

Page 1

Table of Contents
Getting started 10
What you will need . . . . . . . . . . . . . . . . . . . . . . . . . . . . . . . . 10
Components inside the box . . . . . . . . . . . . . . . . . . . . . . . . . 10
Smartphone overview . . . . . . . . . . . . . . . . . . . . . . . . . . . . . . 11
Installing and removing battery . . . . . . . . . . . . . . . . . . . . . . . 13
Charging the battery . . . . . . . . . . . . . . . . . . . . . . . . . . . . . . . 15
SIM card . . . . . . . . . . . . . . . . . . . . . . . . . . . . . . . . . . . . . . . . 17
Installing and removing expansion card . . . . . . . . . . . . . . . . 19
Switching on your Smartphone . . . . . . . . . . . . . . . . . . . . . . 21
Switching on your Smartphone . . . . . . . . . . . . . . . . . . . . 21
Making calls . . . . . . . . . . . . . . . . . . . . . . . . . . . . . . . . . . . . . 22
Getting to know your Smartphone 23
Applications overview . . . . . . . . . . . . . . . . . . . . . . . . . . . . . . 23
Main menu overview . . . . . . . . . . . . . . . . . . . . . . . . . . . . 23
Content
Viewing options in idle screen . . . . . . . . . . . . . . . . . . . . 25
Status bar . . . . . . . . . . . . . . . . . . . . . . . . . . . . . . . . . . . . 26
Keys and navigation . . . . . . . . . . . . . . . . . . . . . . . . . . . . . . . 28
Navigating the screen . . . . . . . . . . . . . . . . . . . . . . . . . . . 29
Locking the keypad . . . . . . . . . . . . . . . . . . . . . . . . . . . . . 30
Sending and receiving data . . . . . . . . . . . . . . . . . . . . . . . . . 31
1
Page 2

Content
Input methods . . . . . . . . . . . . . . . . . . . . . . . . . . . . . . . . . . . .32
Phone 42
Using the phone function . . . . . . . . . . . . . . . . . . . . . . . . . . .42
Sending and receiving data via Bluetooth . . . . . . . . . . . . 31
Entering letters . . . . . . . . . . . . . . . . . . . . . . . . . . . . . . . .32
Selecting input methods . . . . . . . . . . . . . . . . . . . . . . . . . 32
Multitap text input methods . . . . . . . . . . . . . . . . . . . . . . .33
Text input . . . . . . . . . . . . . . . . . . . . . . . . . . . . . . . . . . . . . 35
Chinese input . . . . . . . . . . . . . . . . . . . . . . . . . . . . . . . . .36
Making a call . . . . . . . . . . . . . . . . . . . . . . . . . . . . . . . . . .42
Receiving an incoming call . . . . . . . . . . . . . . . . . . . . . . .45
Sending a picture or other file . . . . . . . . . . . . . . . . . . . . .46
More than one call . . . . . . . . . . . . . . . . . . . . . . . . . . . . . . 47
Conference calls . . . . . . . . . . . . . . . . . . . . . . . . . . . . . . . 47
Call management . . . . . . . . . . . . . . . . . . . . . . . . . . . . . .49
Call log . . . . . . . . . . . . . . . . . . . . . . . . . . . . . . . . . . . . . .53
Emergency call . . . . . . . . . . . . . . . . . . . . . . . . . . . . . . . . 54
Messaging 55
Accessing the Messaging application . . . . . . . . . . . . . . . . . .55
A brief introduction to composing new messages . . . . . . 56
Adding a new mailbox . . . . . . . . . . . . . . . . . . . . . . . . . . .57
Managing information . . . . . . . . . . . . . . . . . . . . . . . . . . . 57
2
Page 3

Composing and sending messages . . . . . . . . . . . . . . . . . . . 58
Composing a new message . . . . . . . . . . . . . . . . . . . . . . 59
Managing recipients . . . . . . . . . . . . . . . . . . . . . . . . . . . . 61
Sending a message . . . . . . . . . . . . . . . . . . . . . . . . . . . . 62
Receiving and reading messages . . . . . . . . . . . . . . . . . 63
Template . . . . . . . . . . . . . . . . . . . . . . . . . . . . . . . . . . . . . 65
Messaging settings . . . . . . . . . . . . . . . . . . . . . . . . . . . . . 65
Email . . . . . . . . . . . . . . . . . . . . . . . . . . . . . . . . . . . . . . . . . . 69
Email settings . . . . . . . . . . . . . . . . . . . . . . . . . . . . . . . . . 69
Composing and sending email messages . . . . . . . . . . . 71
Receiving and reading email messages . . . . . . . . . . . . . 72
Replying and forwarding email messages . . . . . . . . . . . 73
Deleting email messages . . . . . . . . . . . . . . . . . . . . . . . . 73
Web . . . . . . . . . . . . . . . . . . . . . . . . . . . . . . . . . . . . . . . . . . . 74
Accessing the Web application . . . . . . . . . . . . . . . . . . . . 74
Options when browsing . . . . . . . . . . . . . . . . . . . . . . . . . 75
Web settings . . . . . . . . . . . . . . . . . . . . . . . . . . . . . . . . . . 76
Content
PIM 79
Phonebook . . . . . . . . . . . . . . . . . . . . . . . . . . . . . . . . . . . . . . 79
Using the Phonebook application . . . . . . . . . . . . . . . . . . 79
Creating a new entry . . . . . . . . . . . . . . . . . . . . . . . . . . . 80
Creating a new list . . . . . . . . . . . . . . . . . . . . . . . . . . . . . 82
Dialing out from phonebook . . . . . . . . . . . . . . . . . . . . . . 83
3
Page 4

Content
PIM . . . . . . . . . . . . . . . . . . . . . . . . . . . . . . . . . . . . . . . . . . . . 89
Entertainment 99
Camera . . . . . . . . . . . . . . . . . . . . . . . . . . . . . . . . . . . . . . . . .99
Pictures . . . . . . . . . . . . . . . . . . . . . . . . . . . . . . . . . . . . . . . . 105
Sharing contact information . . . . . . . . . . . . . . . . . . . . . . . 84
Deleting contact information . . . . . . . . . . . . . . . . . . . . . . 84
Voice control . . . . . . . . . . . . . . . . . . . . . . . . . . . . . . . . . . 84
SIM Phonebook . . . . . . . . . . . . . . . . . . . . . . . . . . . . . . . .85
Name display settings . . . . . . . . . . . . . . . . . . . . . . . . . . . 88
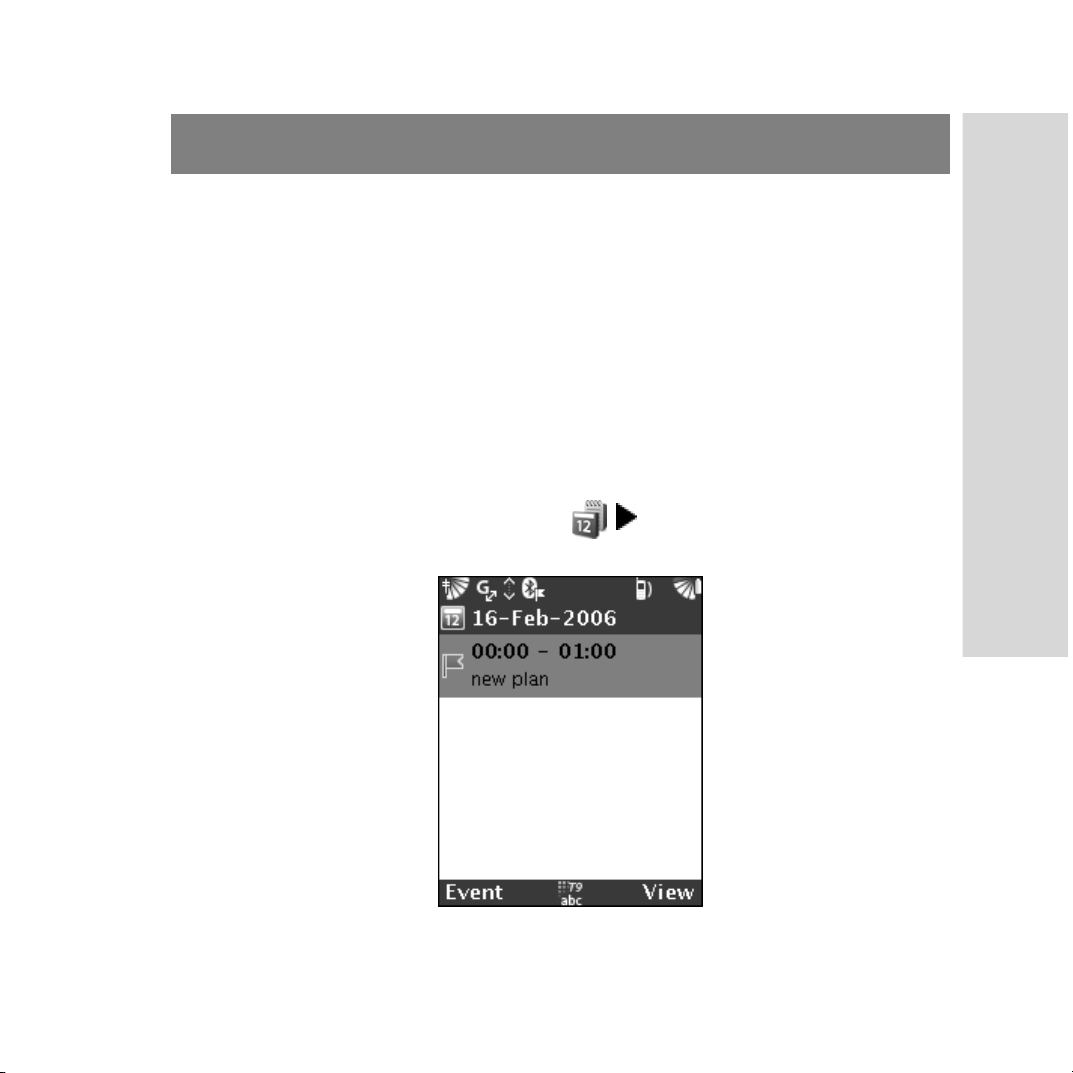
Using the Calendar . . . . . . . . . . . . . . . . . . . . . . . . . . . . .89
Using the Tasks . . . . . . . . . . . . . . . . . . . . . . . . . . . . . . . . 91
Using the Alarm . . . . . . . . . . . . . . . . . . . . . . . . . . . . . . . . 93
Using the Notes . . . . . . . . . . . . . . . . . . . . . . . . . . . . . . . . 96
Using the Calculator . . . . . . . . . . . . . . . . . . . . . . . . . . . . 97
Using the Camera . . . . . . . . . . . . . . . . . . . . . . . . . . . . . .99
Camera options . . . . . . . . . . . . . . . . . . . . . . . . . . . . . . . 101
Using the Pictures . . . . . . . . . . . . . . . . . . . . . . . . . . . . . 105
Options in pictures view . . . . . . . . . . . . . . . . . . . . . . . .106
Managing pictures . . . . . . . . . . . . . . . . . . . . . . . . . . . . . 108
Categories in pictures . . . . . . . . . . . . . . . . . . . . . . . . . .109
Audio player . . . . . . . . . . . . . . . . . . . . . . . . . . . . . . . . . . . . 111
Accessing the Audio player . . . . . . . . . . . . . . . . . . . . . . 111
Playing sound files . . . . . . . . . . . . . . . . . . . . . . . . . . . . 112
4
Page 5

Managing files . . . . . . . . . . . . . . . . . . . . . . . . . . . . . . . 113
Managing playlist . . . . . . . . . . . . . . . . . . . . . . . . . . . . . 115
Video . . . . . . . . . . . . . . . . . . . . . . . . . . . . . . . . . . . . . . . . . 116
Using the Video application . . . . . . . . . . . . . . . . . . . . . 117
Capturing video clips . . . . . . . . . . . . . . . . . . . . . . . . . . 118
Playing video clips . . . . . . . . . . . . . . . . . . . . . . . . . . . . 119
Managing video files . . . . . . . . . . . . . . . . . . . . . . . . . . . 120
Managing playlist . . . . . . . . . . . . . . . . . . . . . . . . . . . . . 121
Media application settings . . . . . . . . . . . . . . . . . . . . . . 123
Connectivity 124
Network selection . . . . . . . . . . . . . . . . . . . . . . . . . . . . . . . . 124
Choosing a network . . . . . . . . . . . . . . . . . . . . . . . . . . . 125
Preferred networks . . . . . . . . . . . . . . . . . . . . . . . . . . . . 125
Network selection . . . . . . . . . . . . . . . . . . . . . . . . . . . . . 126
Bluetooth wireless technology . . . . . . . . . . . . . . . . . . . . . . 126
Turning Bluetooth on . . . . . . . . . . . . . . . . . . . . . . . . . . 127
Content
My devices . . . . . . . . . . . . . . . . . . . . . . . . . . . . . . . . . . 128
My phone . . . . . . . . . . . . . . . . . . . . . . . . . . . . . . . . . . . 128
Sending and receiving . . . . . . . . . . . . . . . . . . . . . . . . . 130
Synchronizing . . . . . . . . . . . . . . . . . . . . . . . . . . . . . . . . . . . 131
Starting synchronization . . . . . . . . . . . . . . . . . . . . . . . . 131
Advanced settings . . . . . . . . . . . . . . . . . . . . . . . . . . . . . . . 132
Activating the advanced settings . . . . . . . . . . . . . . . . . 132
5
Page 6

Content
Customizing 140
Customizing your Smartphone . . . . . . . . . . . . . . . . . . . . . . 140
Others 146
Backup and restore . . . . . . . . . . . . . . . . . . . . . . . . . . . . . . . 146
Application Manager . . . . . . . . . . . . . . . . . . . . . . . . . . . . . .148
Profiles . . . . . . . . . . . . . . . . . . . . . . . . . . . . . . . . . . . . .140
Phone settings . . . . . . . . . . . . . . . . . . . . . . . . . . . . . . . .141
Security settings . . . . . . . . . . . . . . . . . . . . . . . . . . . . . . 144
Clock settings . . . . . . . . . . . . . . . . . . . . . . . . . . . . . . . .145
Back up data . . . . . . . . . . . . . . . . . . . . . . . . . . . . . . . . .146
Restore data . . . . . . . . . . . . . . . . . . . . . . . . . . . . . . . . . 147
Accessing the Application Manager . . . . . . . . . . . . . . . 149
Installing applications . . . . . . . . . . . . . . . . . . . . . . . . . . 149
Uninstalling applications . . . . . . . . . . . . . . . . . . . . . . . . 151
Trouble shooting 152
Mobile PhoneTools 155
Basic introduction . . . . . . . . . . . . . . . . . . . . . . . . . . . . . . . . 155
Installing mobile PhoneTools . . . . . . . . . . . . . . . . . . . . . 156
Mobile device installation and configuration . . . . . . . . . 158
Uninstalling mobile PhoneTools . . . . . . . . . . . . . . . . . .158
6
Online registration . . . . . . . . . . . . . . . . . . . . . . . . . . . . . 159
Page 7

Mobile PhoneTools main window . . . . . . . . . . . . . . . . . 160
Mobile PhoneTools function panel . . . . . . . . . . . . . . . . 161
Starting mobile PhoneTools . . . . . . . . . . . . . . . . . . . . . . . . 163
Setup an Internet connection . . . . . . . . . . . . . . . . . . . . 163
Creating a new email account . . . . . . . . . . . . . . . . . . . 164
Phonebook . . . . . . . . . . . . . . . . . . . . . . . . . . . . . . . . . . 165
Calendar . . . . . . . . . . . . . . . . . . . . . . . . . . . . . . . . . . . . 168
Synchronization . . . . . . . . . . . . . . . . . . . . . . . . . . . . . . 171
Multimedia Studio . . . . . . . . . . . . . . . . . . . . . . . . . . . . . 173
Appendix 180
Safety . . . . . . . . . . . . . . . . . . . . . . . . . . . . . . . . . . . . . . . . . 180
Care and Maintenance . . . . . . . . . . . . . . . . . . . . . . . . . . . . 183
SAR . . . . . . . . . . . . . . . . . . . . . . . . . . . . . . . . . . . . . . . . . . 184
FCC Statement . . . . . . . . . . . . . . . . . . . . . . . . . . . . . . . . . . 184
Content
7
Page 8

Copyright
Copyright
• Copyright © 2006 Group Sense PDA Ltd. All rights reserved.
• Product Specifications and features are for reference only and are subject to
change without prior notice.
Declaration
• This User Guide is published by Group Sense PDA Ltd., without any
warranty. Improvement and changes to this User Guide necessitated by
typographical errors, inaccuracies of current information, or improvements
to programs and/or equipment, may be made by Group Sense PDA Ltd. any
time and without notice. Such changes will, however, be incorporated into
new editions of this User Guide.
• Some of the services in this User Guide are not supported by all networks.
Product features are local network services, local setting and usage
conditions dependent. This also applies to the GSM International
Emergency Number 112.
• Please contact your network operator or service provider if you are in doubt
whether you can use a particular service or not.
SavaJe OS copyright © 1999-2006, SavaJe Technologies, Inc. All rights
reserved. SavaJe® is a registered trademark of SavaJe Technologies, Inc. All
other product and company names are trademarks or registered trademarks of
their respective owners.
TM
Copyright © 2006 Sun Microsystems, Inc. All rights reserved. All Java-based
marks and logos are trademarks or registered trademarks of Sun Microsystems,
Inc. in the United States and other countries.
8
Page 9

Typographical Conventions
Listed below are the typographical conventions used in this User Guide.
• The popup menu options and the items contained in some applications are
listed in bullet and use the bold, italic letters; for example, • All received
calls: Block all incoming calls; • Bookmarks: Selects to choose a website.
• The text enclosed in brackets indicate that it is the name of the menu option
we need to select in the process of operating; for example, select
[Applications] in [Preferences]; select [Share], and then select [Via
Bluetooth].
• The application name is input in capitalization; for example, using the
Phonebook application, access the Phonebook application, access the
Pictures application.
• When the application name is used as a common noun, it is input in
lowercase characters; for example, in the pictures list.
• The menu item uses the capitalization that is used in Smartphone system; for
example, to open the Options menu.
Typographical Conventions
9
Page 10

Getting started
Getting started
What you will need
When you work through the instruction in this User Guide, you will
need all the components that came in the Smartphone box as well as
the following:
• A SIM (Subscriber Identity Module) card
• A location with wireless coverage for your Smartphone
• An electrical outlet
Components inside the box
When you get the Smartphone, you should have all the following
components inside the Smartphone box:
•Handset ·Handsfree earpiece
• Battery ·User Guide
•Travel charger ·Warranty card
10
Page 11
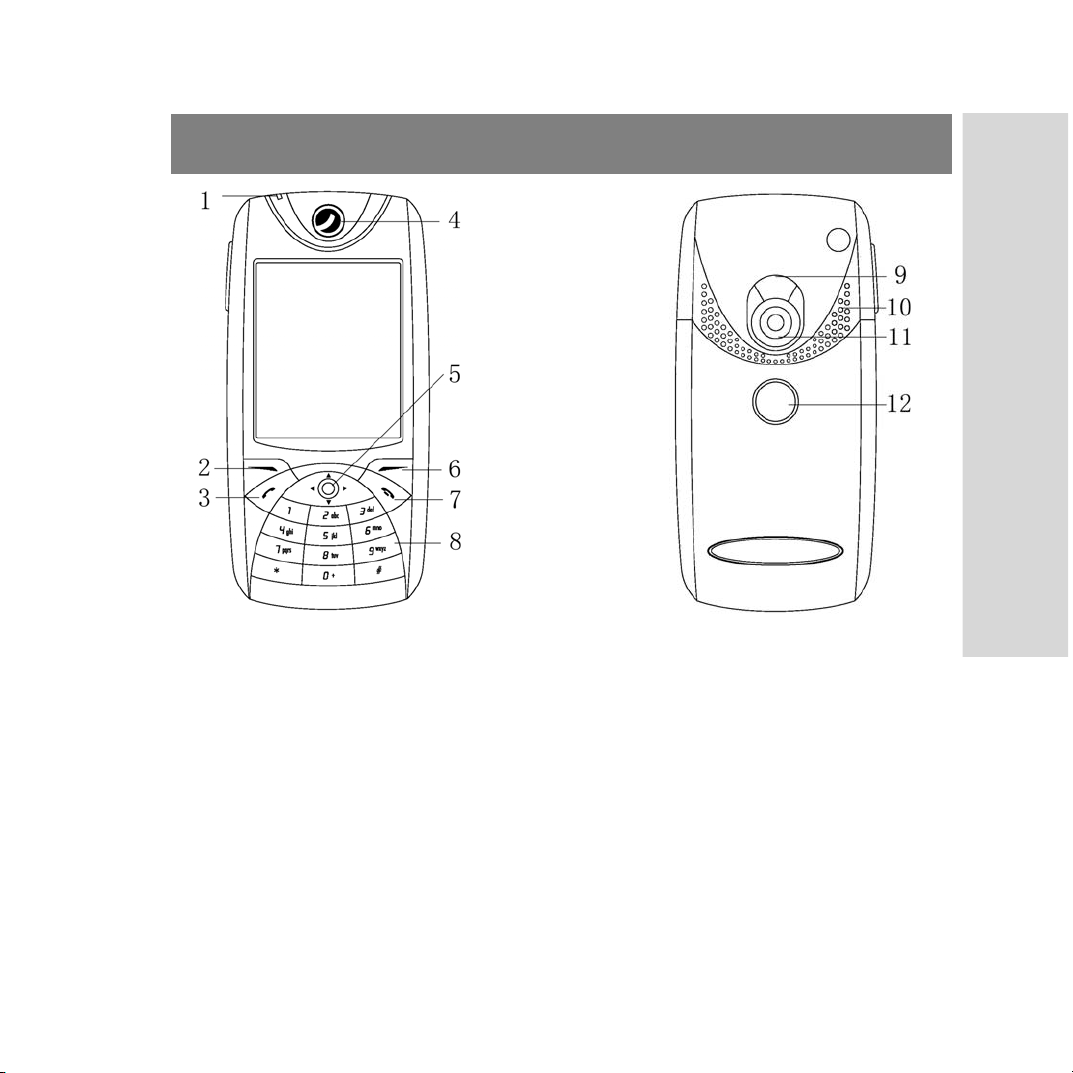
Smartphone overview
1. Status indicator 7. End call key
2. Left function key 8. Numeric keypad
3. Call key 9. Camera flash
Getting started
4. Earpiece 10. Speaker
5. 5-way navigation key 11. Camera
6. Right function key 12. Mirror
11
Page 12
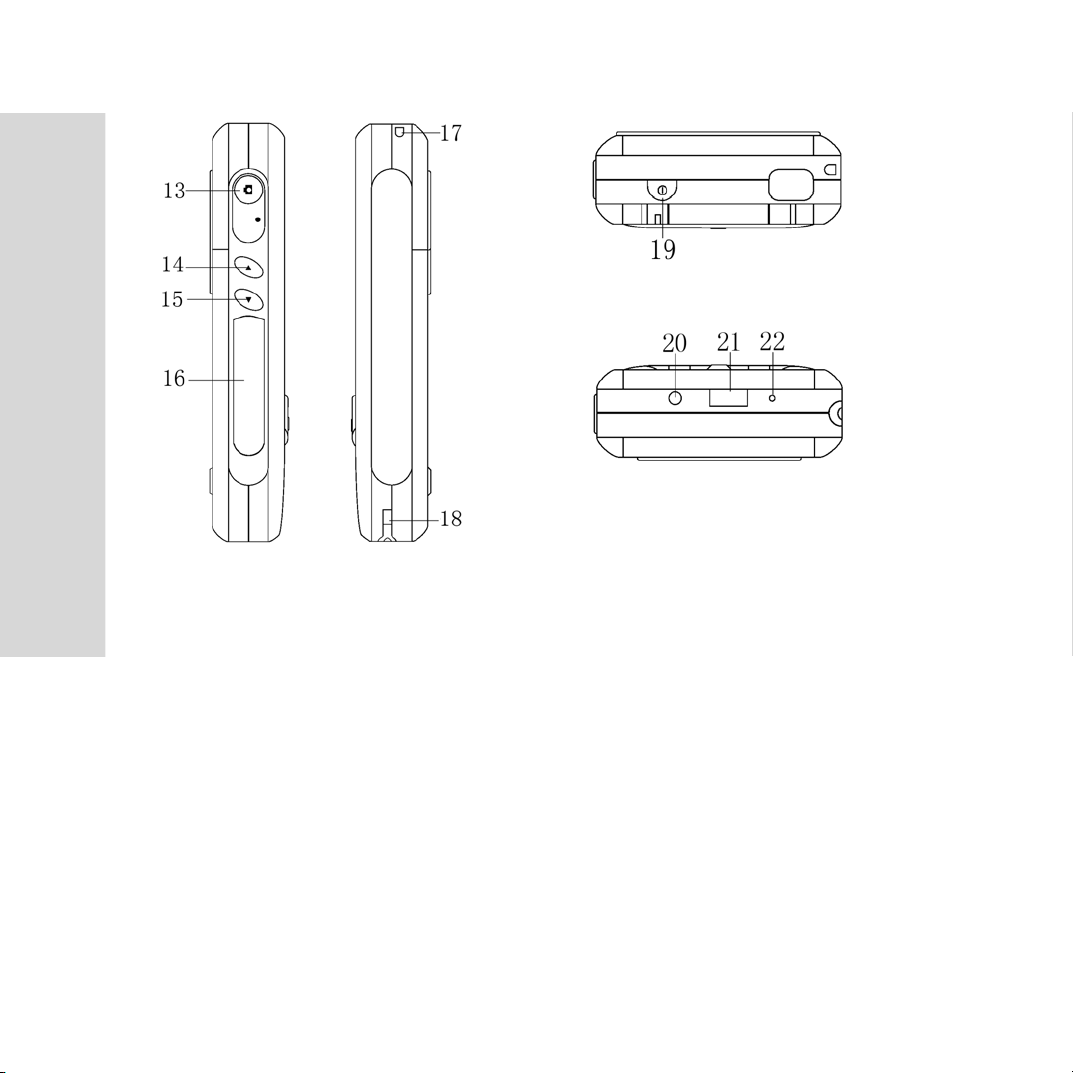
Getting started
Left
13. Camera/Capture button 19. Power on/off button
Right
14/15. Volume button 20. Earphone jack
16. Expansion card slot 21. Universal port
17/18. Strap hole 22. Microphone
12
Page 13
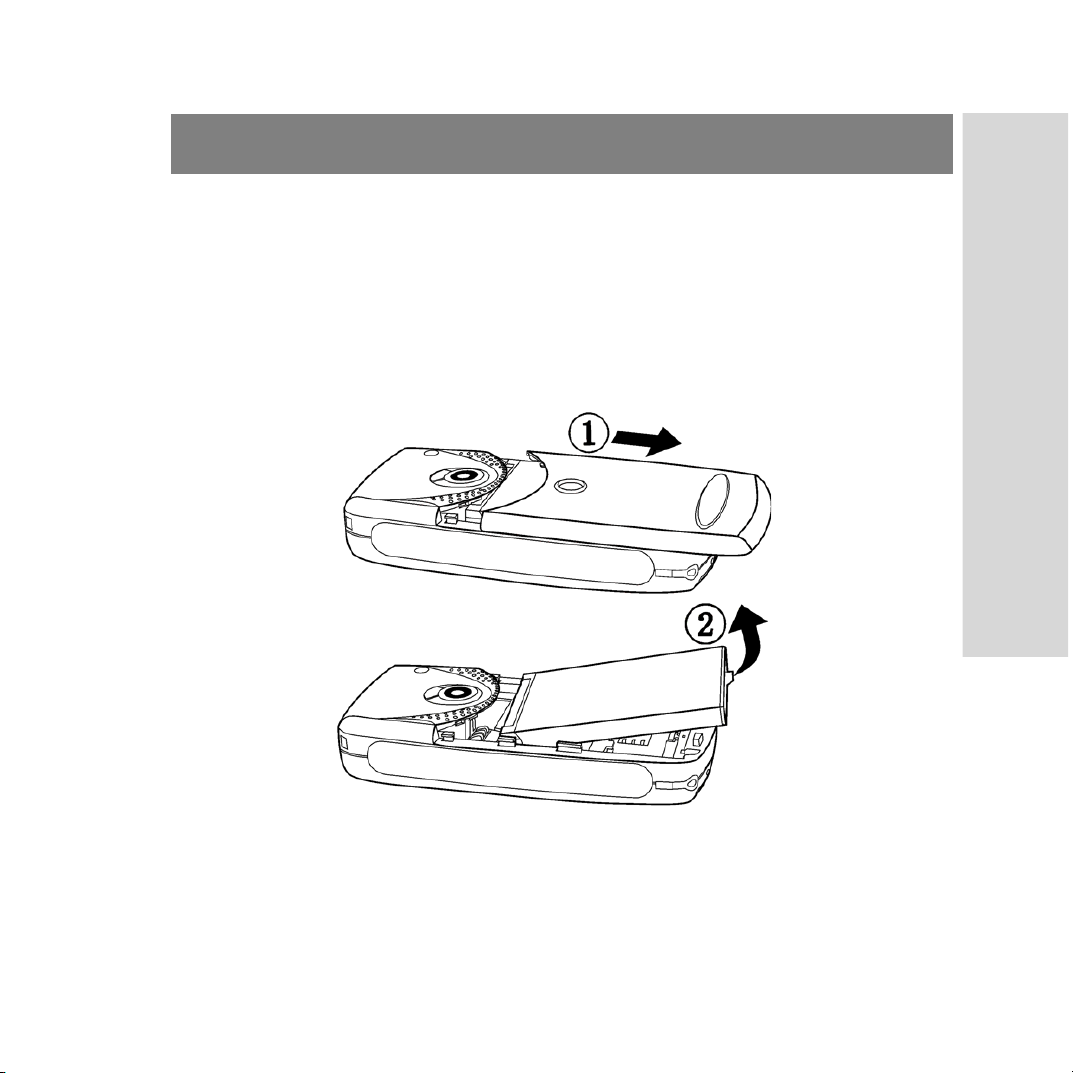
Installing and removing battery
To remove the battery
1. Press and hold the power button to turn off Smartphone. (See
page21 for “Switching on your Smartphone”)
2. Remove the battery cover by sliding it downwards.
3. Gently lift the lower edge of the battery outwards; take out the
battery.
Getting started
13
Page 14
Getting started
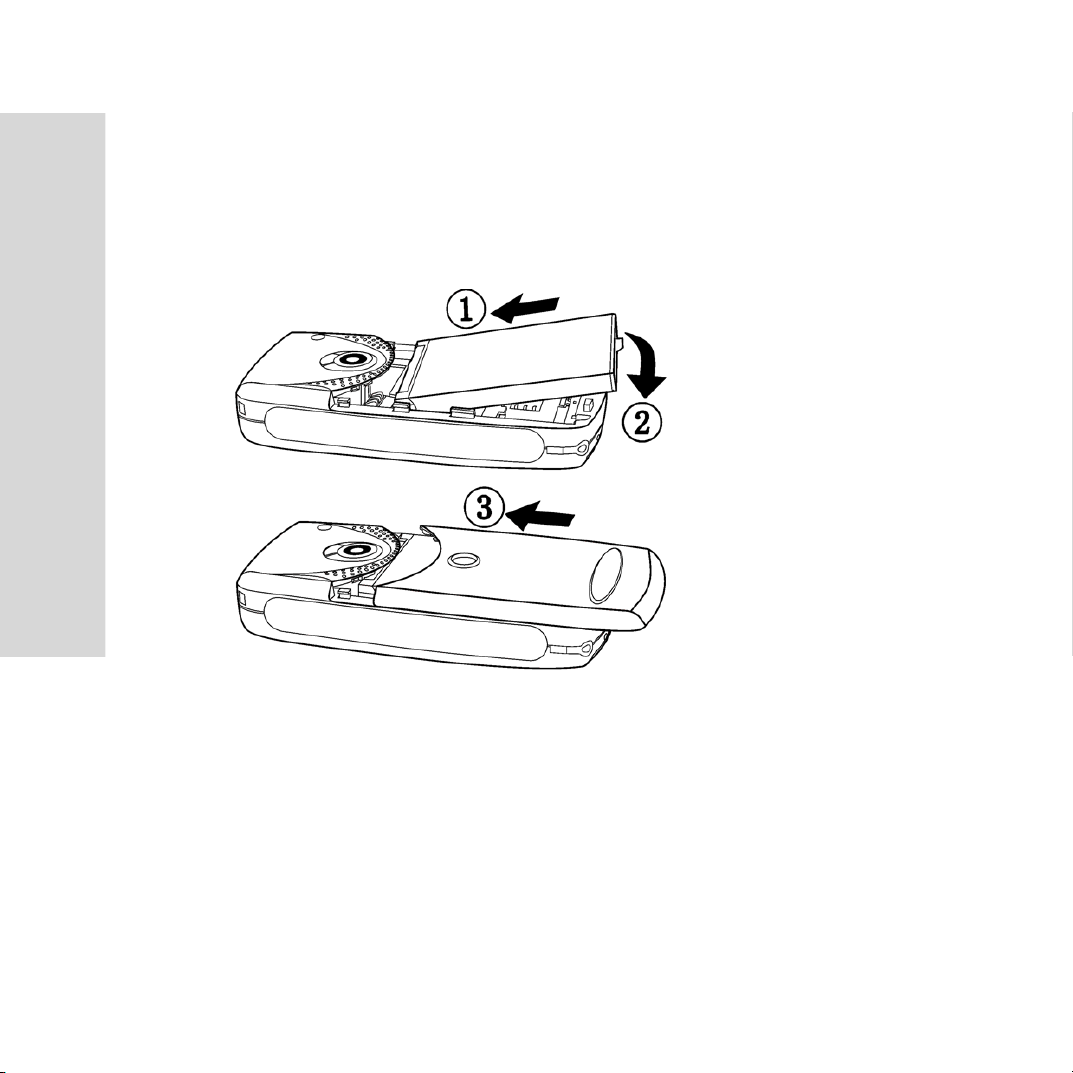
To install the battery
1. Place the battery with the metal contact facing downwards in the
battery compartment, press the battery downwards until it fits
into the battery compartment.
2. Slide the battery cover upwards to close the cover.
14
Page 15
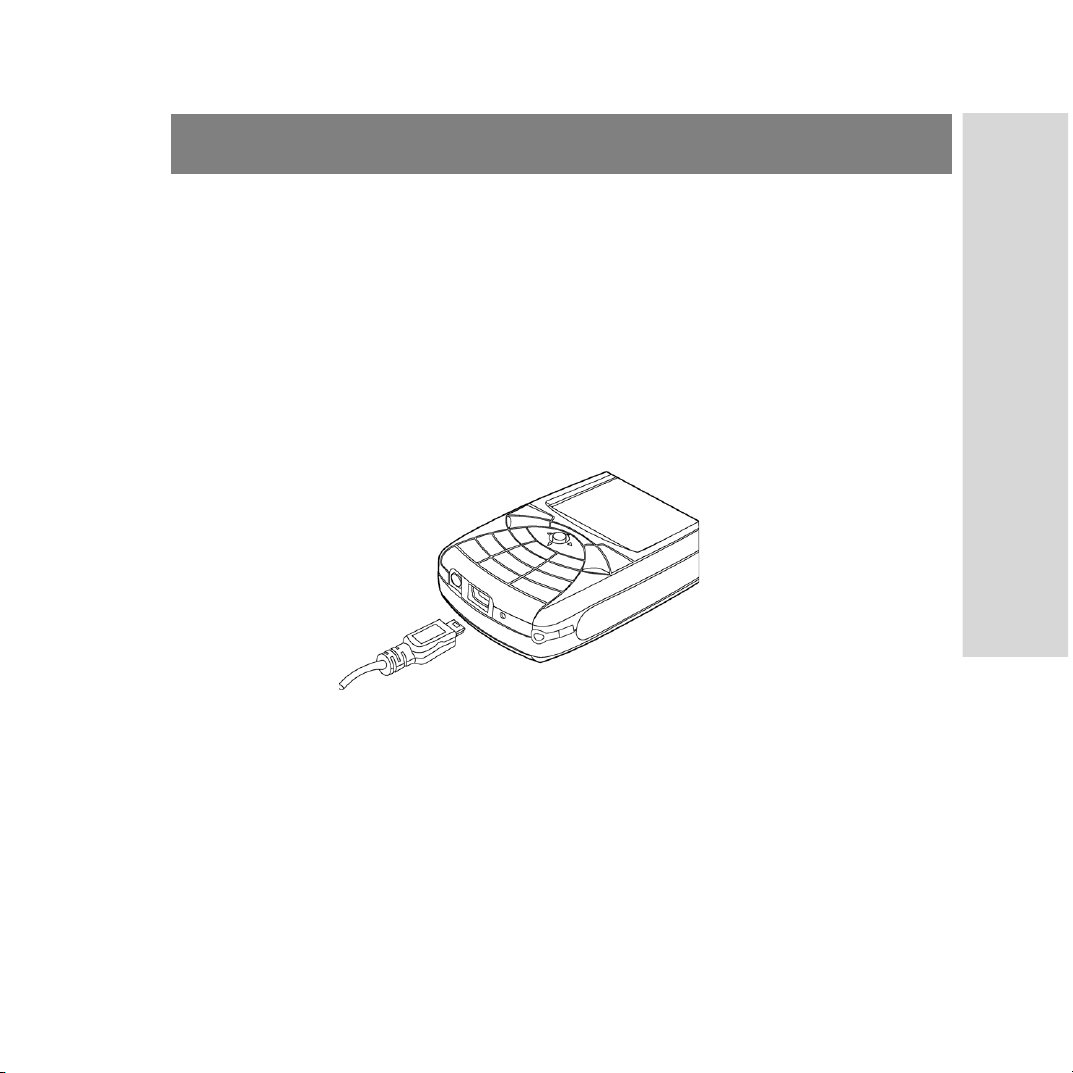
Charging the battery
To charge the battery
1. Connect your charger to the Universal port (as below).
2. Plug the charger to the main electrical outlet.
3. Charge the battery for about 12 hours before first use. The
approximate charging time after the first charge is around 2
hours. (Approximate charging time depends upon battery
usage.)
Battery use and care
A. We recommend that you fully charge the battery before you use
your Smartphone for the first time.
B. A new battery or one which has not been used for a long time
may have reduced capacity for the first few times it is used.
Getting started
15
Page 16

Getting started
C. It is important that you always turn off your Smartphone before
removing the battery. Failure to do so can cause corruption of
data memory.
D. Always detach the charger before inserting or removing the
battery.
E. Warning! Battery may explode if disposed of in fire.
F. Do not expose the battery to liquid.
G. Do not disassemble or modify the battery. Only use the battery
for its intended purpose.
H. Do not let the metal contacts on the battery touch other metal
objects as it could lead to short-circuit and/or damage the battery.
I. Keep the battery out of the reach of children.
J. Do not put the battery into your mouth, the battery electrolytes
may be toxic if swallowed.
K. To maximize the performance of the Smartphone and not void
the warranty, always purchase the accessories that are specially
16
designed for use with the Smartphone. Customer Service cannot
be held liable for any damage due to use with non-authorized
accessories.
L. Talk time and standby time depend on actual transmission
conditions. If the Smartphone is used near a base station, less
power is required. Talk and standby time will therefore be longer.
Page 17
SIM card
When you register as a subscriber with a network service provider,
you will get a SIM (Subscribe Identity Module) card. The SIM card
contains a computer chip that holds your Smartphone number, etc.
Before using mobile networking features, (e.g., making/receiving
calls, sending messages) you need to install a SIM card first.
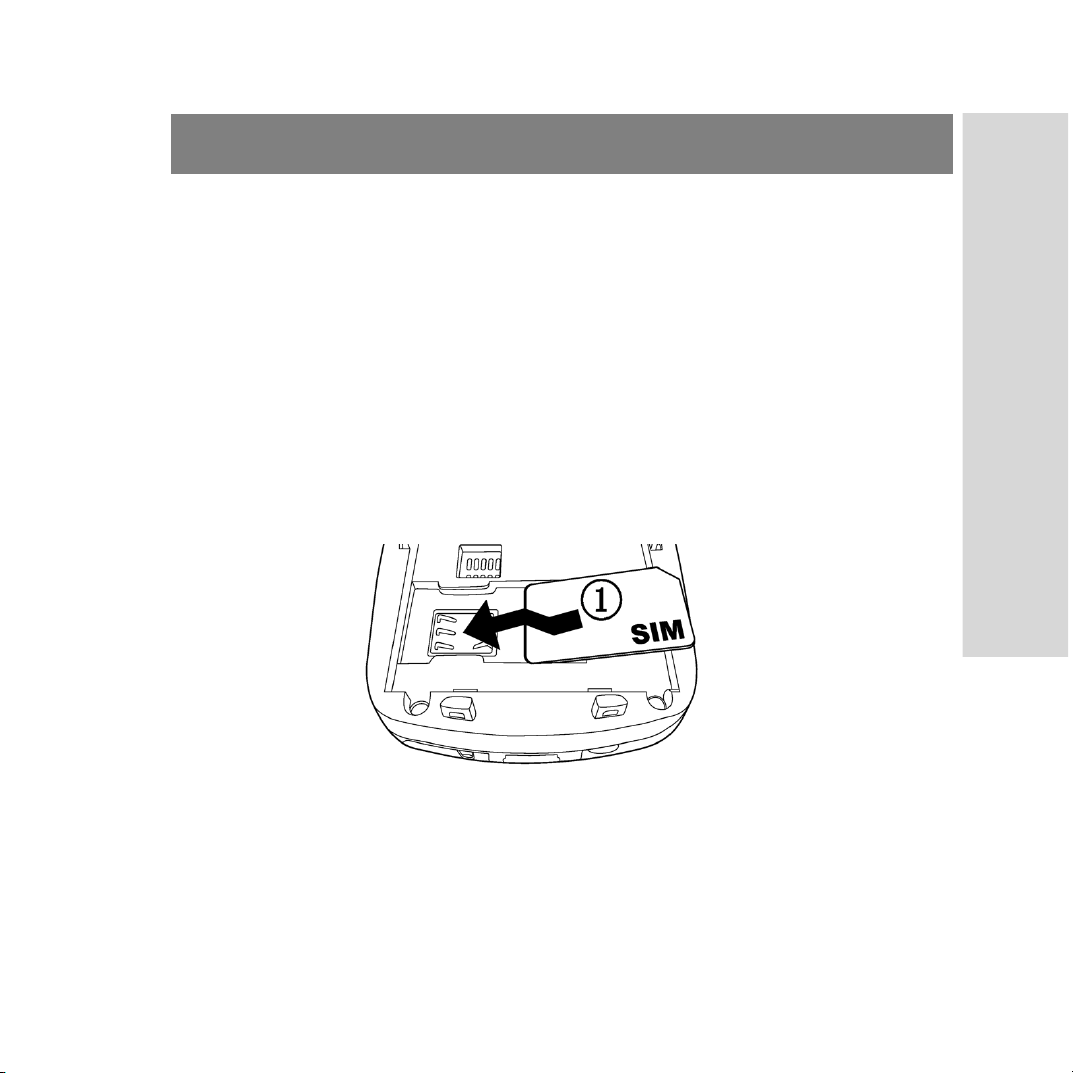
To install SIM card
1. Remove the battery first, insert the SIM card with the golden
connector facing down as illustrated below.
2. Push the SIM card sideways.
Getting started
17
Page 18
Getting started
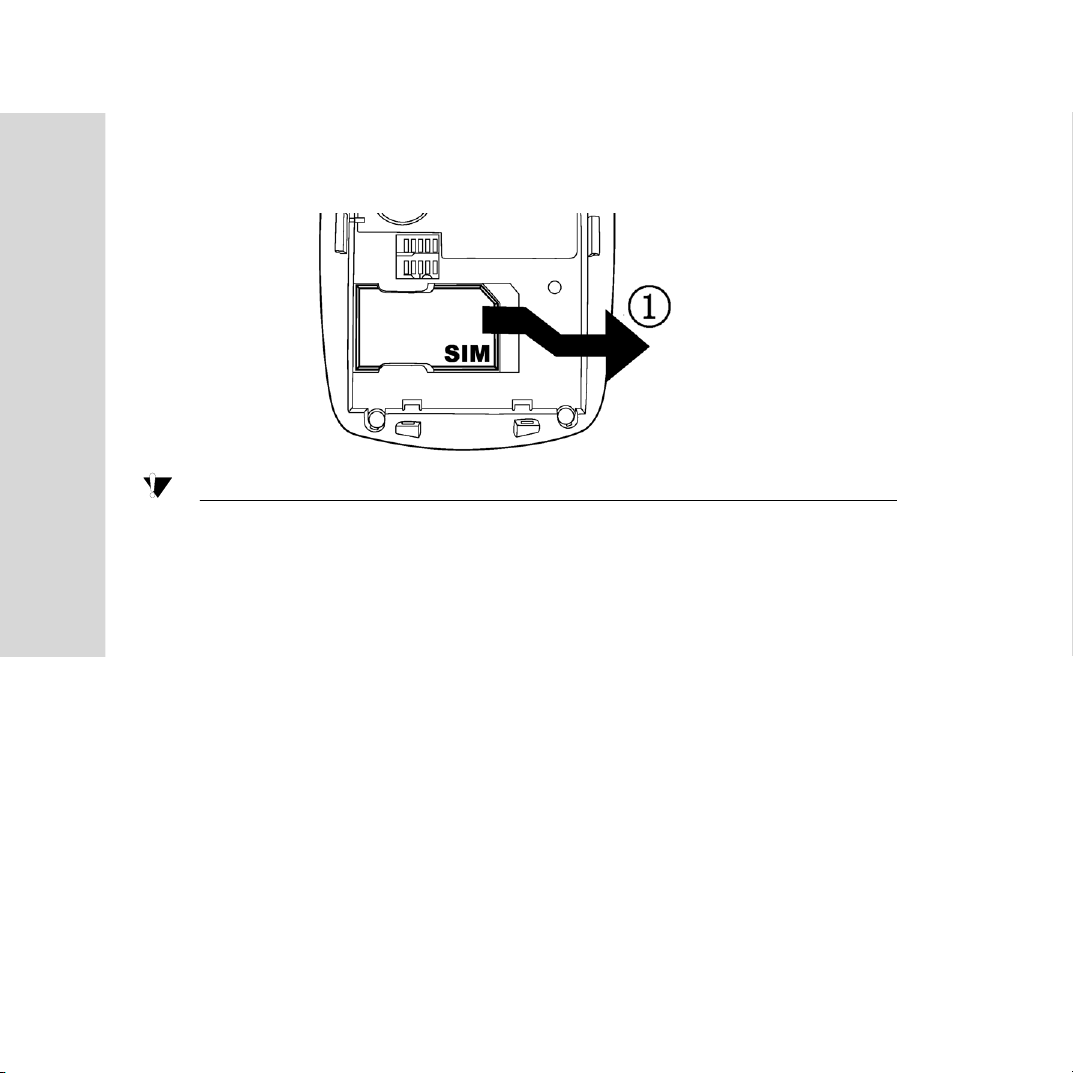
To r e m ove S IM c a rd
1. Push the SIM card sideways to remove the card as illustrated
below:
Note: Please be careful not to bend or scratch the SIM card. Do not
expose the card to liquid or static electricity!
18
Page 19
Installing and removing expansion card
You can use a mini expansion card with more than 1 GB memory in
your Smartphone to expand data storage. You can use the expansion
card to save photos or other files.
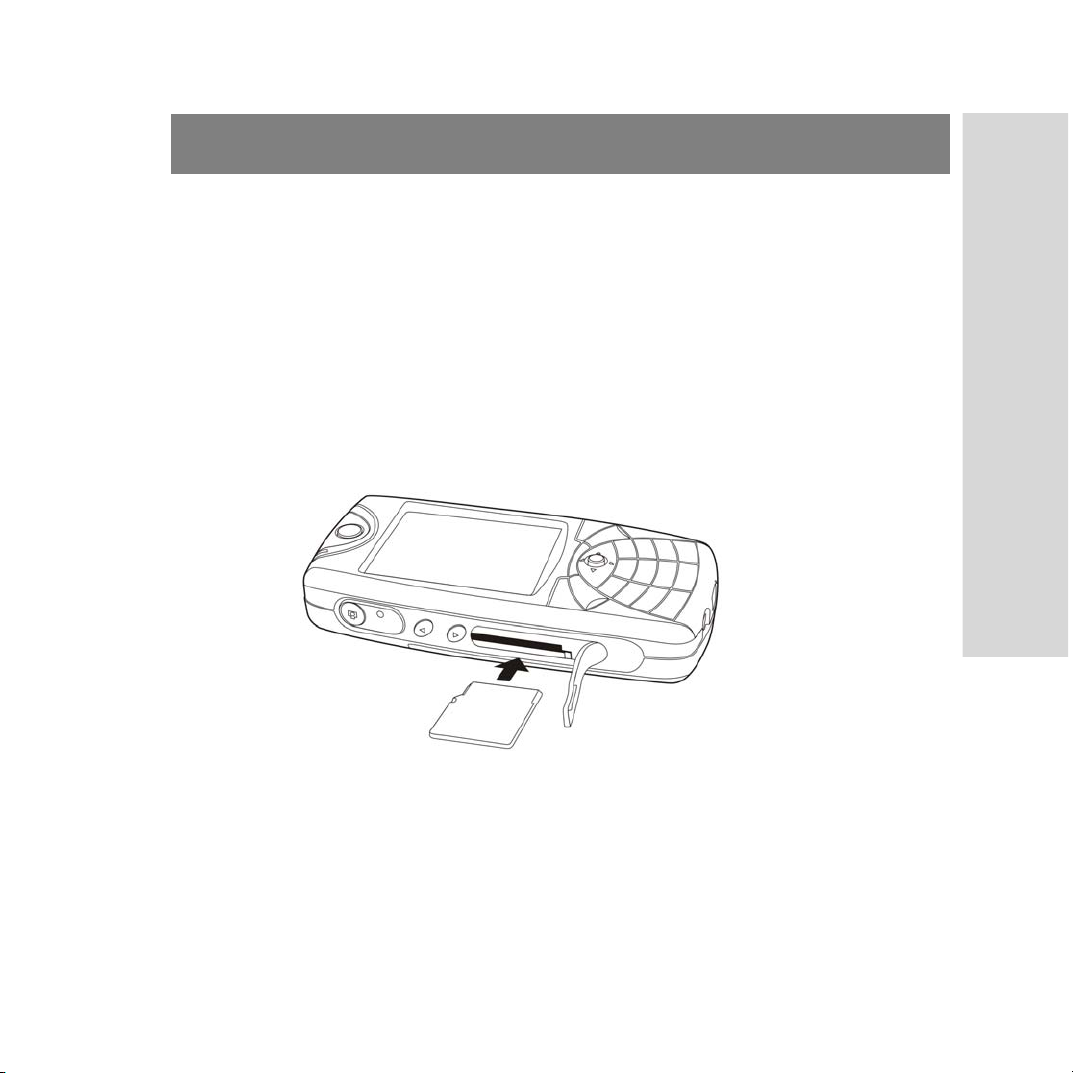
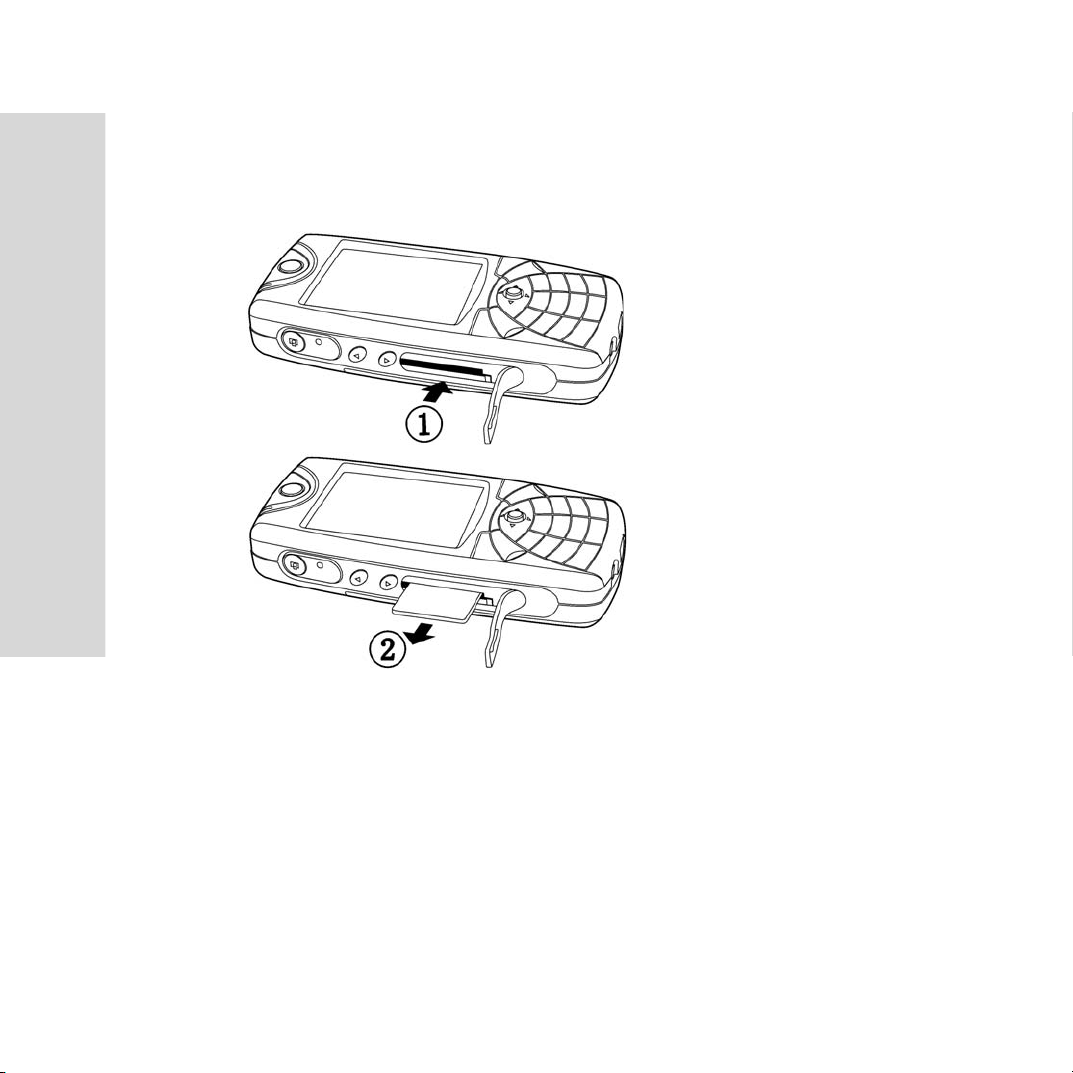
To install expansion card
1. Open the cover on the side of your Smartphone; insert the card
with the metal contact facing upwards into the card slot as
illustrated below.
2. Close the cover.
Getting started
19
Page 20
Getting started
To remove expansion card
1. Open the cover.
2. Press the inserted card to release and then remove card.
20
Page 21
Switching on your Smartphone
Switching on your Smartphone
Your Smartphone is designed to be turned on without a mobile
network connection.
To switch on your Smartphone
1. Press and hold the power button to switch on your
Smartphone.
2. Enter your PIN (Personal Identification Number) if you have
one for your SIM card. Your network operator provides the
PIN.
Note: If you make a mistake while inputting the PIN, press the
button to delete the wrong number. If you enter the wrong PIN
three times, you need to input the PUK (Personal Unblocking
Key) which is also provided by your network service provider.
3. After successfully entering your PIN, your Smartphone will
search for an available GSM network. You can make and
receive calls when the network operator’s name and signal
strength icons appear in the screen. (See page26 for signal
strength icon.)
Getting started
4. Press and hold the power button to turn off Smartphone.
21
Page 22

Getting started
Making calls
Before making a call, make sure you are within range of a mobile
network.
To make a call
1. Switch on your Smartphone.
2. Allow the Smartphone to complete a network search, it may
take a few seconds. Once complete, the signal strength icons
appear on the screen.
3. Input the PIN number if need.
4. Enter the number you wish to call. Press and hold “*” to
enter “+”; “0” to enter “P”.
5. Press to correct any mistakes.
22
6. Press to dial.
7. When your call is complete, press to hang up.
Page 23
Getting to know your Smartphone
Applications overview
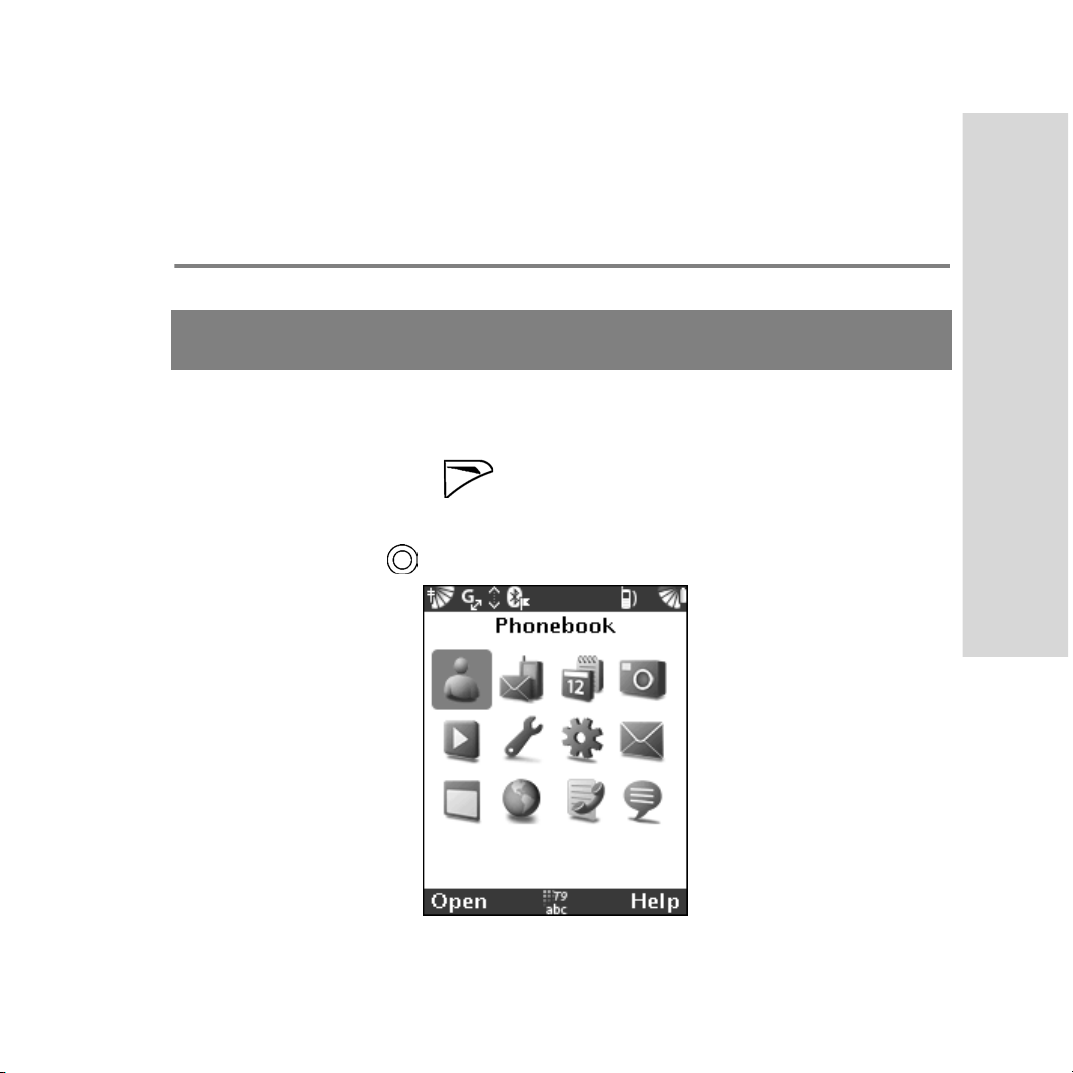
Main menu overview
In the idle screen, press to access main menu.
In the main menu, use the 5-way navigation key to switch between
applications. Press to select the desired application.
Getting to know your Smartphone
23
Page 24

Getting to know your Smartphone
1. Phonebook 2. Messaging*
3. PIM
Calendar Calculator Notes
4. Camera
5. Media
What’s New Music Pictures Video
6. Preferences
Call Forward Profiles Voice Calls*
Networks Phone Settings Security
Set Clock Connectivity Applications
Advanced settings Call Costs (Network Dependent)
7. Utilities
About Application Manager Content Manager
Sync System Manager World Clock
Backup
8. Email*
9. My Applications 10. Web* 11. Call Log
12. Chat*
24
Page 25
Note: All items with “*” need the support of your network service
provider. Please contact your network service provider for
details.
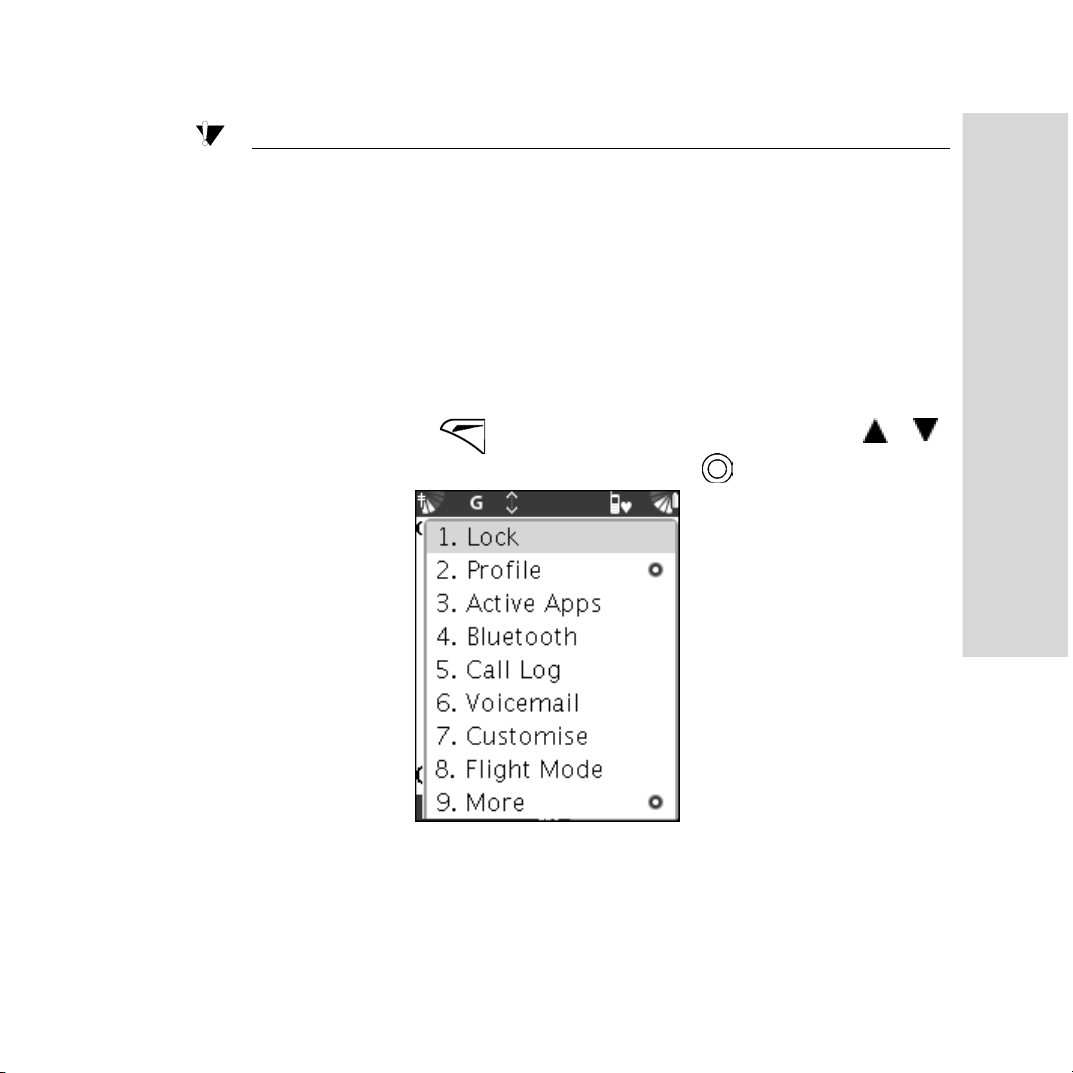
Viewing options in idle screen
In the idle screen, press to open the Options menu, press /
to select the appropriate option, and then press to accept it.
Getting to know your Smartphone
• Lock: Locks the keypad.
• Profile: Provides a submenu containing all profiles available on
the phone. Select one of these options to set the current profile.
25
Page 26
Getting to know your Smartphone
• Active Apps: Checks the applications that are being used.
• Bluetooth: Turns Bluetooth on and off.
• Call Log: Accesses call records list.
• Voicemail: Dials the user’s voicemail.
• Customise: Creates a personal idle screen manually.
• Flight Mode: Selects to turn flight mode on and off.
• More: Provides a submenu with options to set the idle screen or
to display help information.
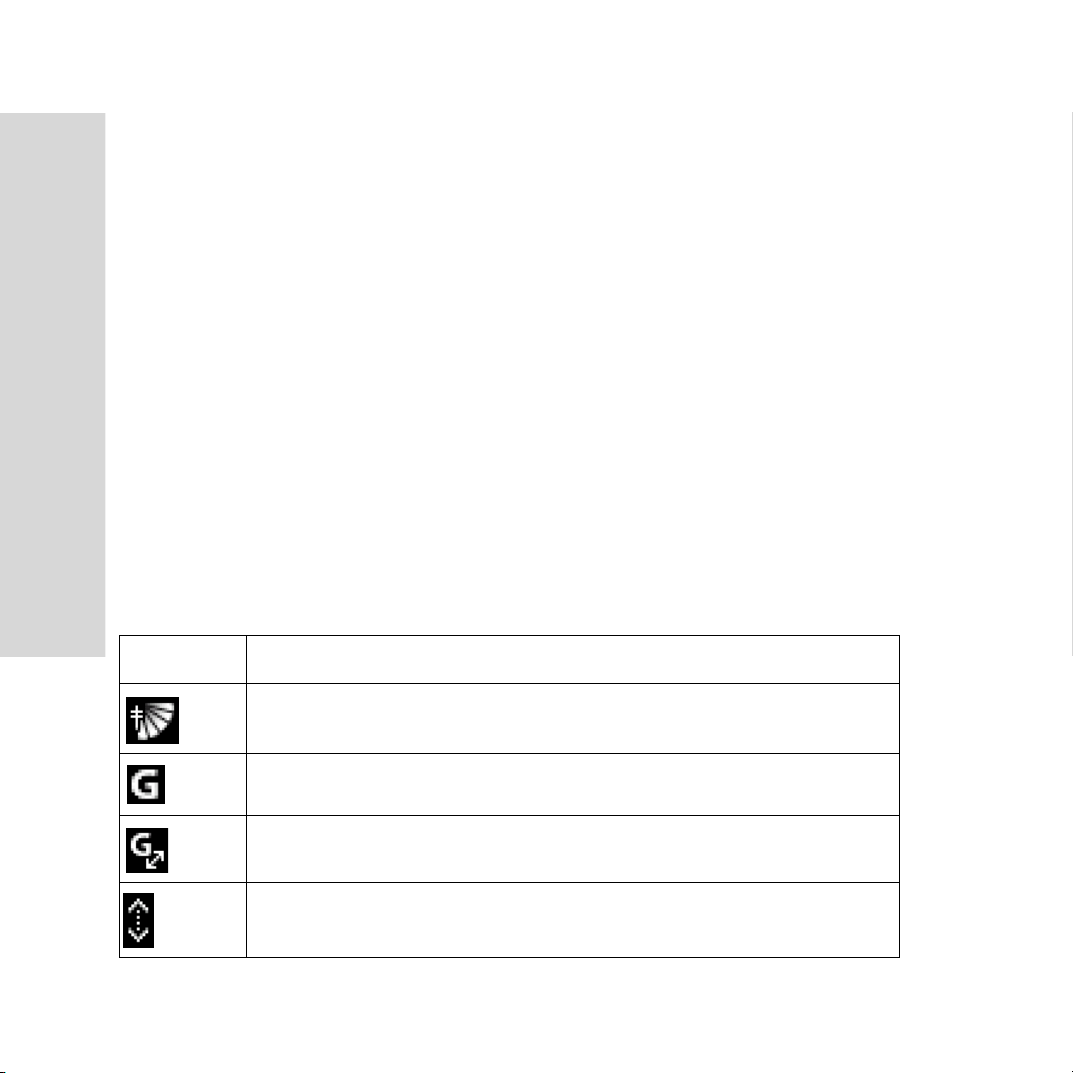
Status bar
The Status Bar is located at the top of the screen, and displays the
following status:
Icon Indicates
26
The strength of mobile network signal
GPRS available
GPRS connected
Network connection active
Page 27
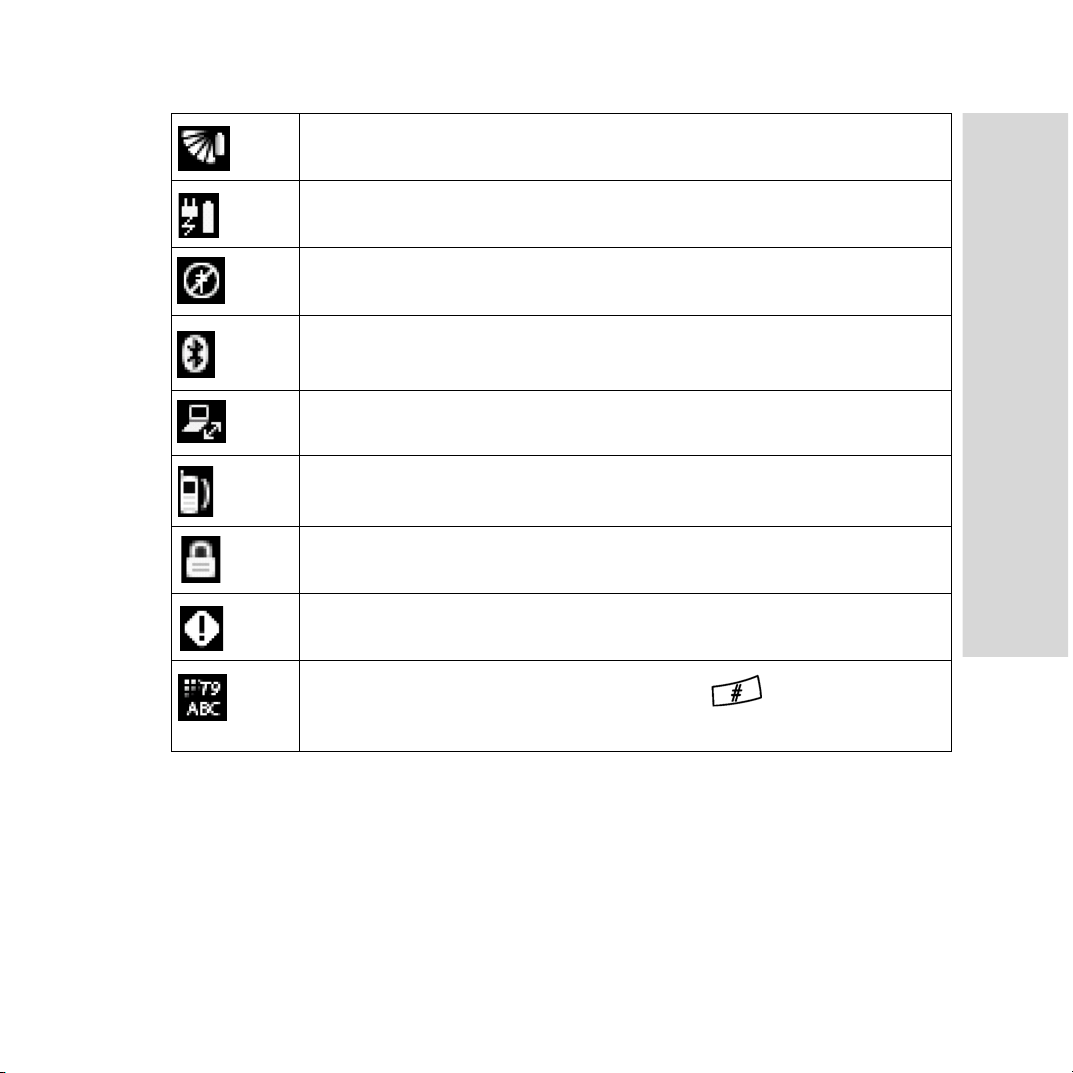
Battery level
Battery charging status
Handset radio turned off
Bluetooth networking on
Phone active as modem
Phone profile
Secure connection active
User notification
Text input modes (Press and hold to switch input
Getting to know your Smartphone
mode)
27
Page 28

Getting to know your Smartphone
Keys and navigation
The idle screen is displayed when you are not using the menu or
making calls. You can see the network operator’s name, the date and
the time.
Keys Instruction:
Key Actions
Accesses the main menu from the Smartphone
idle screen.
Selects the options shown above the key on the
screen.
Selects the options shown above the key on the
screen.
Navigates through the menus and tabs.
28
In the idle screen, press to view call records in call
log; press and hold to make a voice call.
Makes/answers a call.
Returns to idle screen no matter which application
you are in.
Page 29
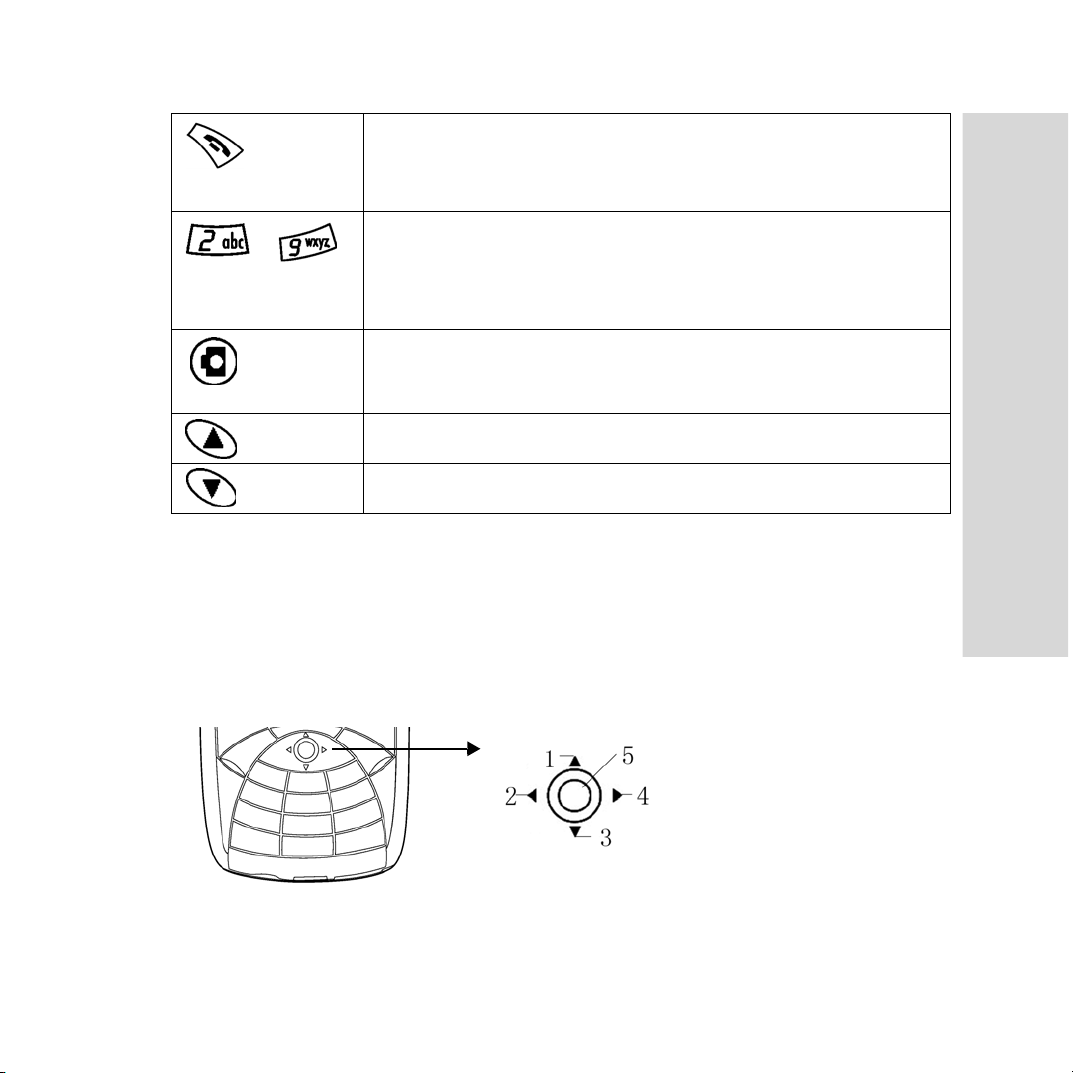
Ends/rejects a call.
Returns to previous page.
- In the idle screen, press and hold any of these keys
to speed dial. (Make sure you have set the speed
dial number.)
Activates the camera, press it again to take a
photo.
Increases volume.
Decreases volume.
Navigating the screen
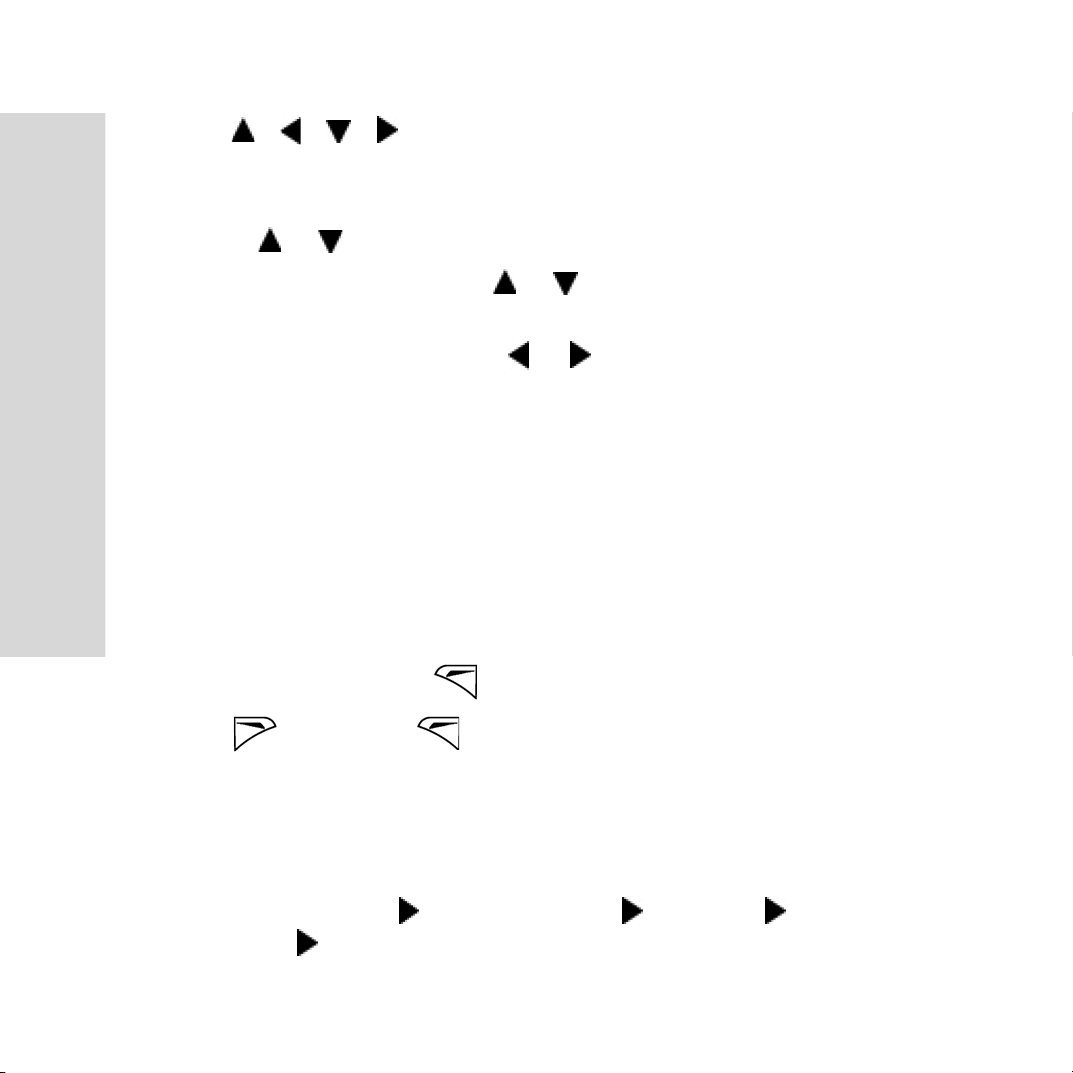
You can navigate the screen using the 5-way navigation key.
1. Up
2. Left
3. Down
4. Right
5. Enter
Getting to know your Smartphone
You can scroll on the Smartphone to move from field to field, page to
page or highlight an item. There are several ways to scroll.
29
Page 30
Getting to know your Smartphone
• Press / / / of the 5-way navigation key to move to the
next field, button or action in that direction.
• When viewing a list screen, (e.g., a message):
– Press or to scroll the screen.
– Press Enter and then press or to scroll between line
items.
• When inside a text field, press or to reselect the character or
word, and edit again.
Locking the keypad
To avoid dialing a number by accident, you can lock the keypad.
To lock the keypad
1. In the idle screen, press and select [Lock] to lock the keypad.
2. Press , then press to unlock the keypad.
To set the automatic keylock
Automatic keylock locks the keypad a short while after you last press
a key.
• Select [Preferences] [Phone Settings] [Display]
30
[Autolock] [On].
Page 31
Sending and receiving data
Sending and receiving data via Bluetooth
Your Smartphone has built-in Bluetooth functionality through which
you can send data.
To send data via Bluetooth
1. First enable Bluetooth. Select [Preferences] [Connectivity]
[Bluetooth] [Turn on].
2. Select the item you want to send, and then select Bluetooth as
transfer method.
3. Once the available receivers are displayed, select the receiver you
want to send the item to.
Note: If the list of available Bluetooth devices is empty, Smartphone
will search for a device automatically.
4. The “Connecting / Sending...” message is displayed on screen.
Getting to know your Smartphone
To receive data via Bluetooth
• A message from the sender is displayed on the receiver’s
Smartphone, press to receive it, press to discard the
received item.
31
Page 32

Getting to know your Smartphone
Input methods
Entering letters
There are several ways for you to enter letters when you add names to
your phonebook, write messages, etc.
• Multitap text input (Abc input methods)
Press each key as many times as needed to show the letter you
want.
TM
• text input
This input method uses a built-in dictionary to recognize the most
frequently used words. You press each key only once, even if the
letter you want is not the first letter on the key.
T9
Selecting input methods
In a text edit field, press and hold to select the input methods.
32
Page 33
Multitap text input methods
To use Multitap text input methods
1. Scroll to Message, write a new message.
2. Press and hold to select the Abc input method.
3. Press to select ABC, Abc or abc.
4. Press each key as many times as needed to show the letter you
want, press to accept the letter and add a space here.
Note: When using Multitap text input methods, press to input
the punctuation.
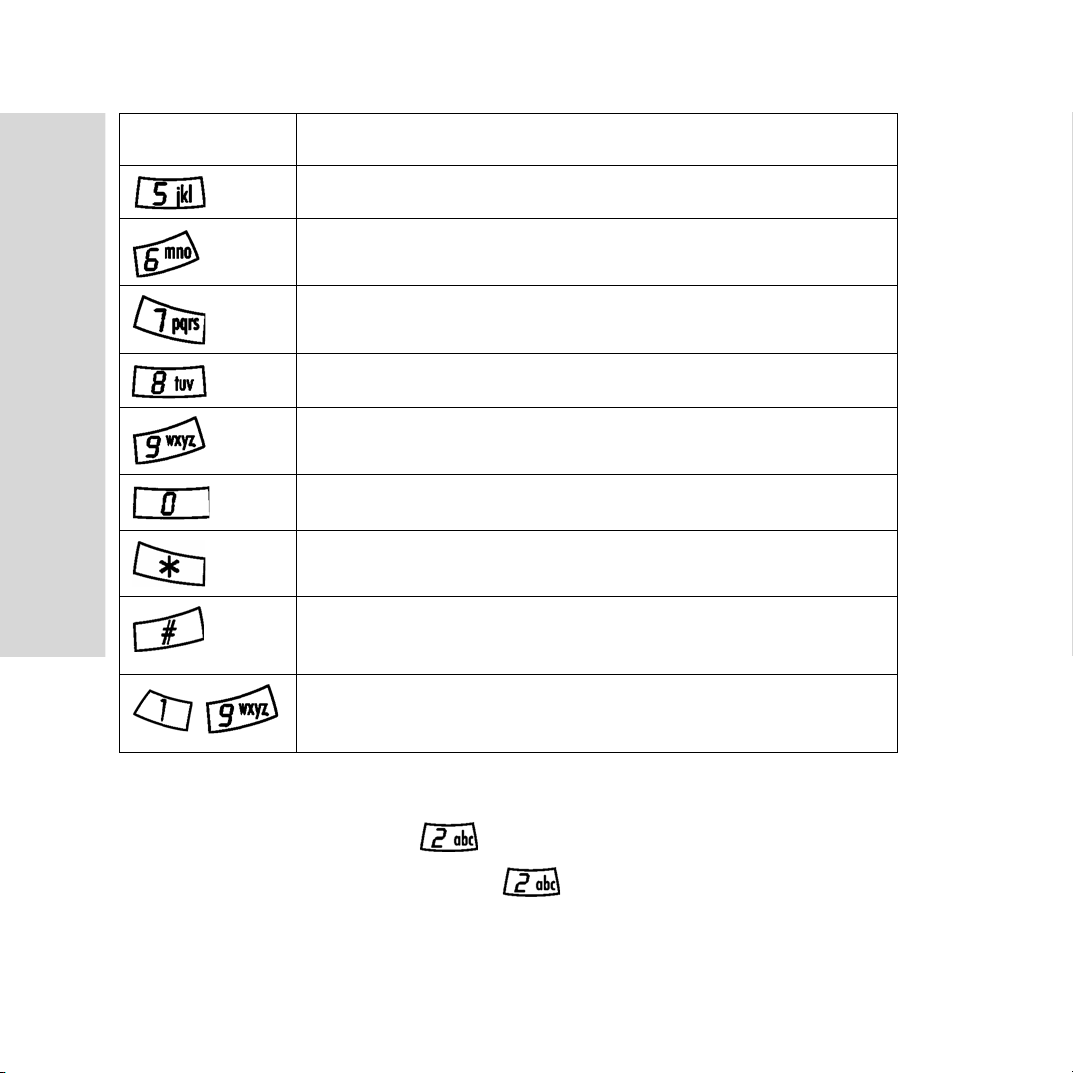
See the table below:
Press to get...
. , - ? ! ’ @ : 1
ABC2
DEF3
GHI4
Getting to know your Smartphone
33
Page 34
Getting to know your Smartphone
Press to get...
JKL5
MNO6
PQRS7
TUV8
WXYZ9
Press to input “0” in Number input mode
Press to input the punctuation
Press and hold to select input method
Press to select ABC, Abc and abc
Example:
34
Press and hold to input number
Press to input English letter
• To enter an “A”, press once.
• To enter a “B”, quickly press twice.
Page 35
TM
T9
To enter letters using text input
Text input
T9
TM
1. Scroll to Message, write a new message.
2. Press and hold to select the Abc input method.
3. Press to select ABC, Abc and abc.
T9
TM
T9
T9
TM
TM
TM
T9
4. For example, if you want to write the word “Thank”, press
“8+4+2+6+5”.
5. If the word shown is the one you want, press to accept the
word; the word is not the one you want, press / to check
the candidate words. If the word you need is not in the
candidate words, press / to edit the word yourself until
no any other words for you to select.
6. Continue writing your message. Press to enter other
punctuation marks, press to accept.
Note: Press and hold to switch the input method; press
to select the punctuation.
Getting to know your Smartphone
35
Page 36
Getting to know your Smartphone
TM
T9
Your Smartphone has two input methods for entering Chinese
characters: Stroke and Pinyin input.
General instructions
Regardless of which input method you choose, your Smartphone can
speed the entry of Chinese characters. When you enter a Stroke or a
Pinyin letter, a candidate row of the frequently used characters
including the Stroke or relating to that letter appears at the bottom of
the input area.
If the character you want is not in the candidate row, press to present
another candidate row, continue pressing until the character you
want is displayed. Alternatively, enter the next Stroke or Pinyin letter,
and a new set of candidate row is displayed. Press to go back to the
previous row, and then press to accept a word.
Chinese input
Stroke input methods
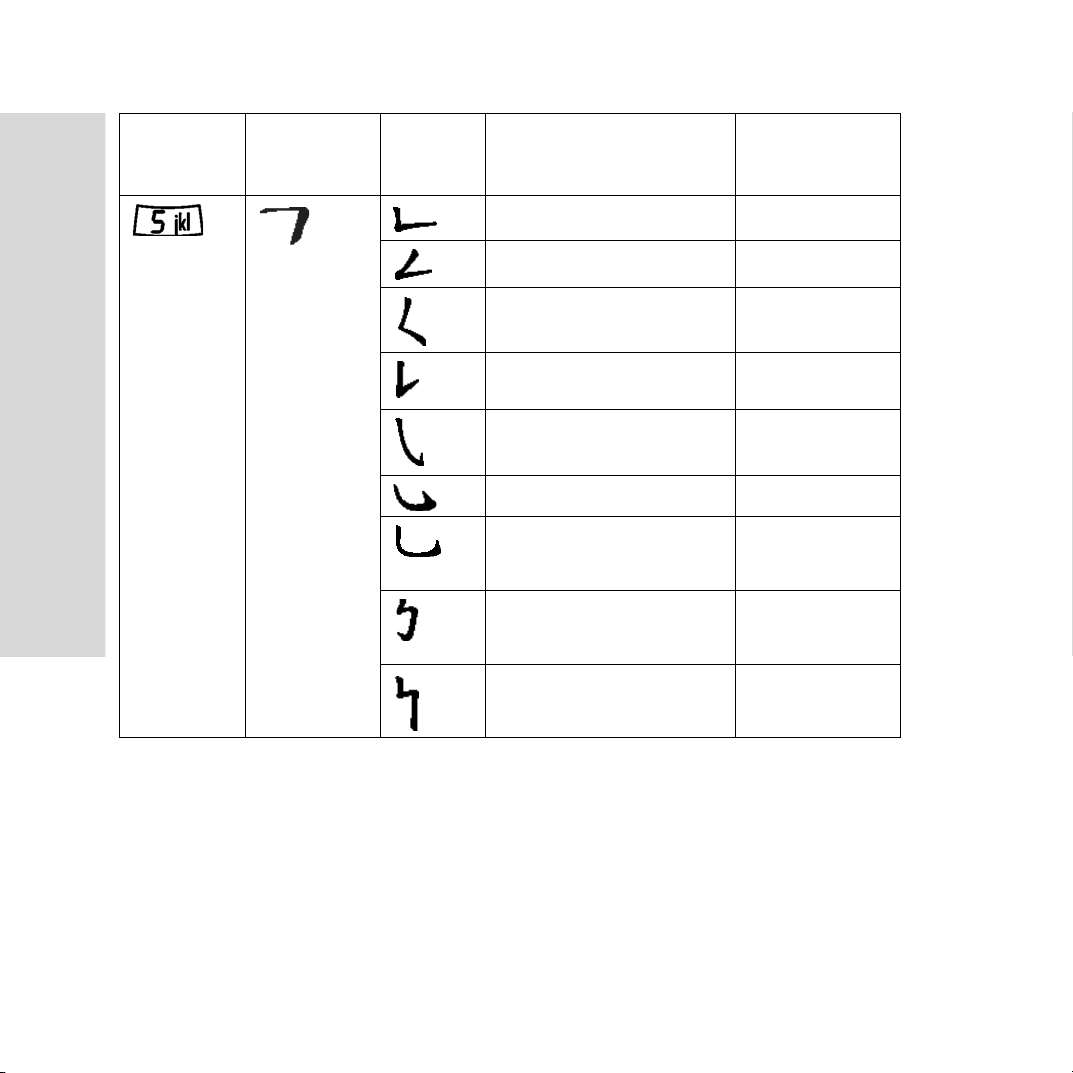
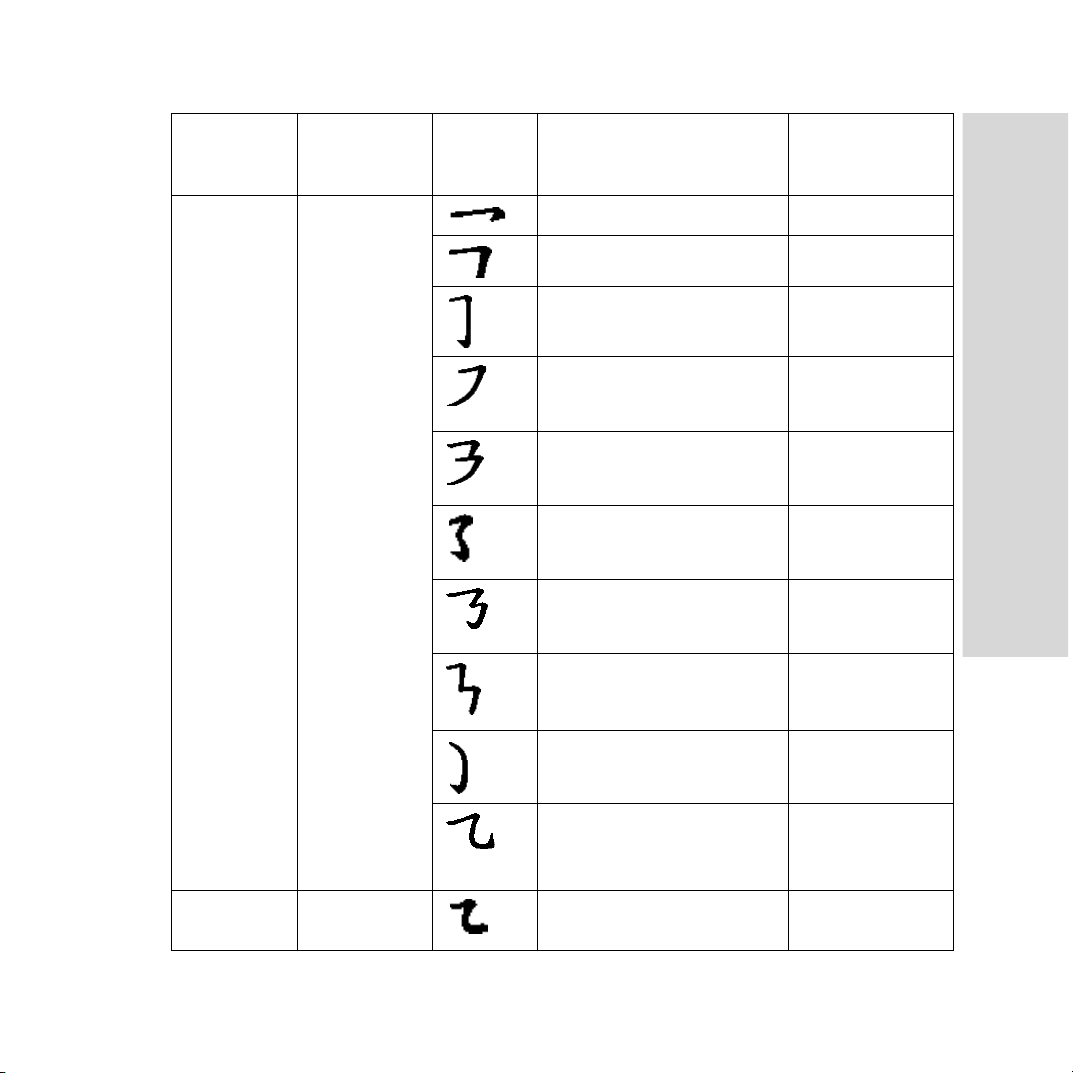
A Chinese character is built up of strokes. There are more than 30
basic strokes that are grouped into 5 stroke categories. Each category
is presented by one of the keys - , the wild key , is used
when you are not sure which stroke to use.
36
Page 37
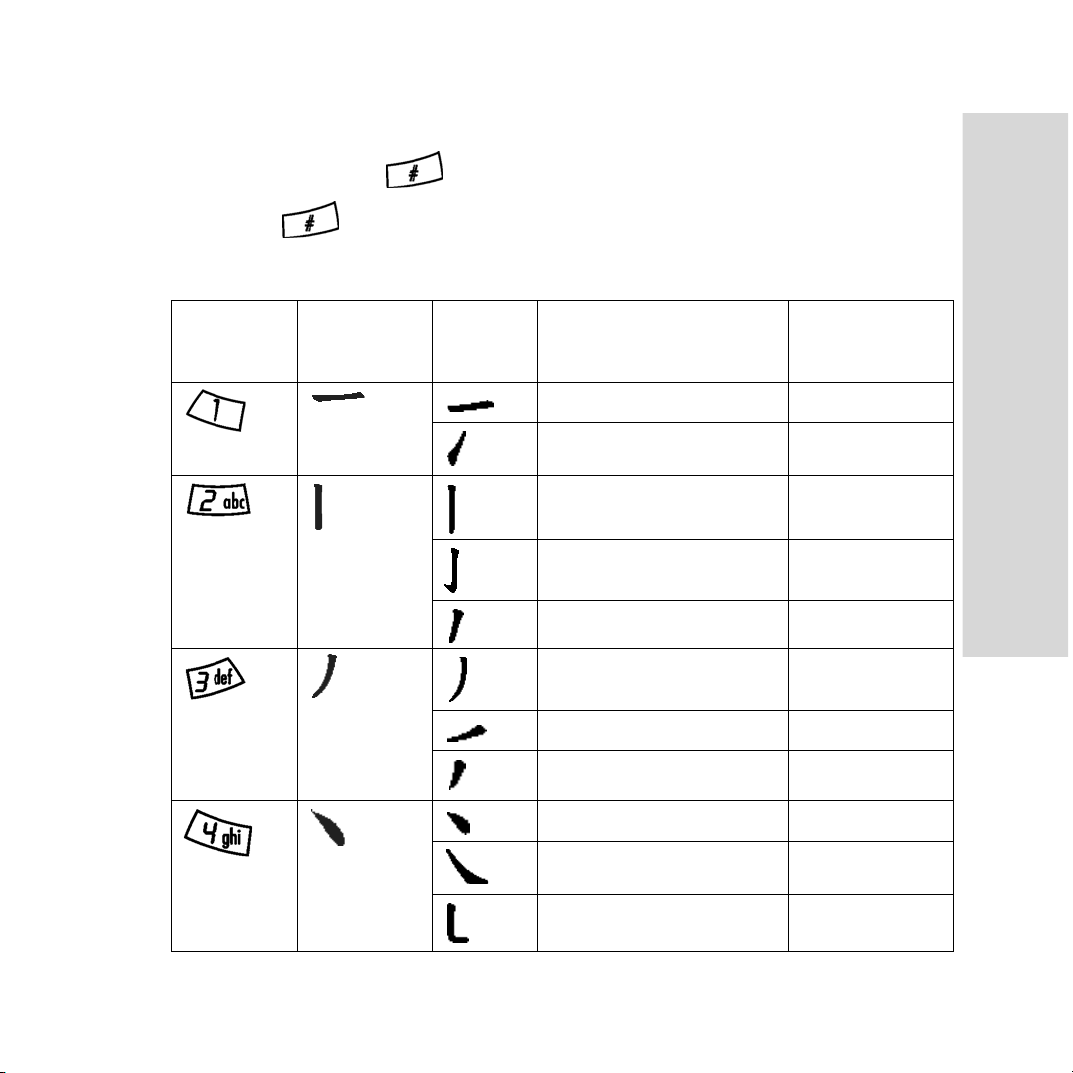
Stroke input
1. Press and hold to select Chinese input.
2. Press to switch to Stroke input.
Stroke categories:
Number
Key
Stroke
Category
Basic
Stroke
Stroke Name Example
Over
Lift
Down
Down-Hook
Short Slope Down
Long Left Slope
Over Slope
Short Left Slope
Dot
Right Slope
王十在七天
海紅牡狀習
中葉上門醜
小水打子承
直真質草
八九丹風片
香千匕後丟
而頁面學殷
六學雷心性
人火又送林
Getting to know your Smartphone
Down-Curved-Over
四西酉酸
37
Page 38
Getting to know your Smartphone
Number
Stroke
Basic
Stroke Name Example
Key
Category
Stroke
Down-Over
Left Slope-Over
Left Slope-Dot
Down-Lift
Right Slope-Hook
Down-Over-Hook
Down-OverCurved-Hook
Down-Over-DownHook
Down-Over-Down
由巨屯母凶
麽去公約能
女要好巡巢
衣以飯收長
我或民成伐
心必思忘
電也毛兄孔
馬與張號費
鼎鼐
38
Page 39
Number
Key
Stroke
Category
Basic
Stroke
Stroke Name Example
Over-Hook
Over-Down
Over-Down-Hook
Over-Left Slope
Over-Down-OverLeft Slope
Over-Left SlopeCurved-Hook
Over-Down-OverHook
Over-Down-OverDown
Curved-Hook
寫字皮通兔
口已戶書骨
力習也同永
又之登多社
及極廷建
阿隊陳那部
乃透鼐雋楊
Getting to know your Smartphone
凸
狗豹家逐狂
Over-DownCurved-Hook
Over-Down-Over
乙九瓦飛風
投沿船凹
39
Page 40
Getting to know your Smartphone
Number
Stroke
Basic
Stroke Name Example
Key
Category
Stroke
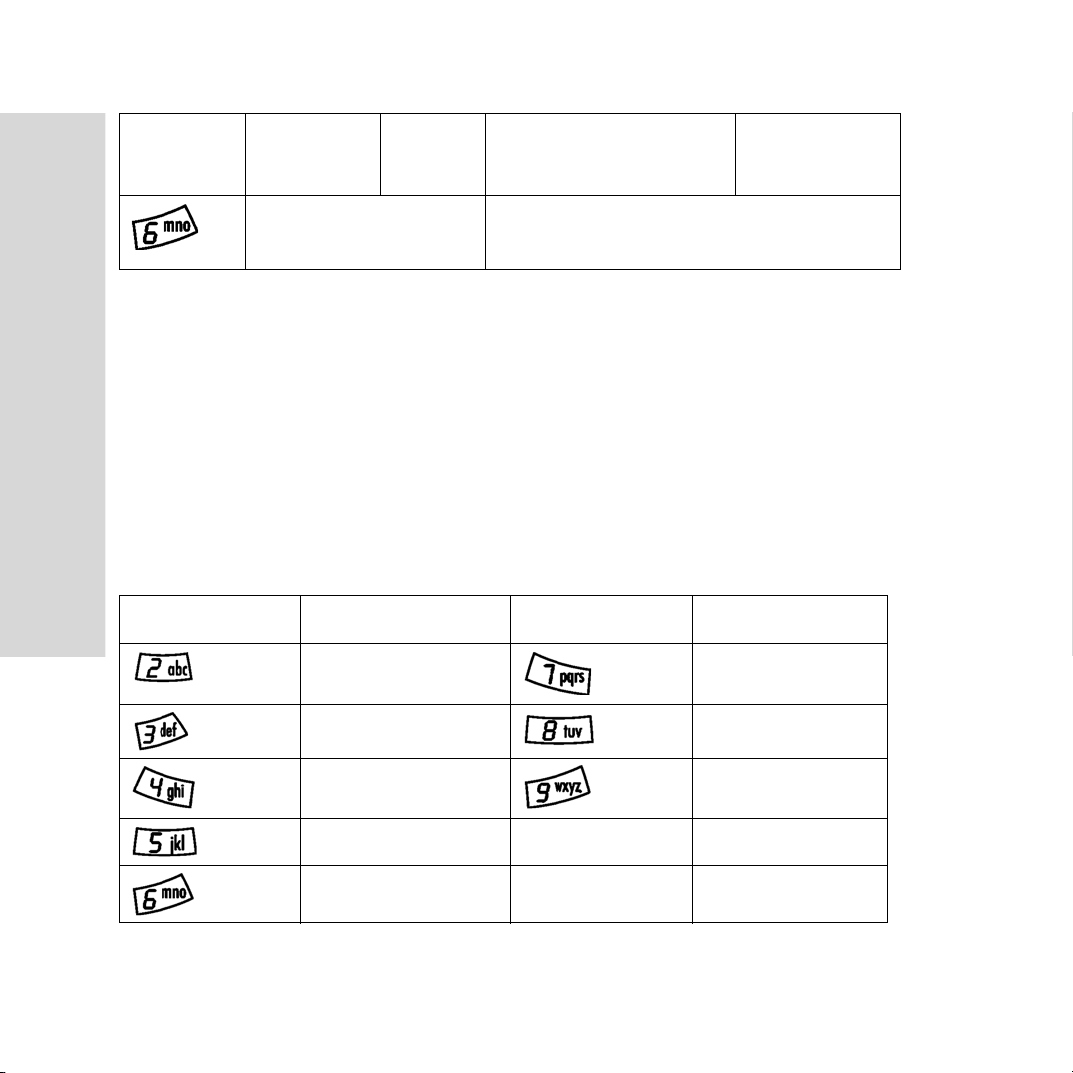
? (Wild card key) It is used when you are not sure
which stroke to use
Pinyin input method
Press the keys containing the required Pinyin letters, and your
Smartphone can make the various proposals on the screen according
to the pronunciation rules of the Mandarin dialect.
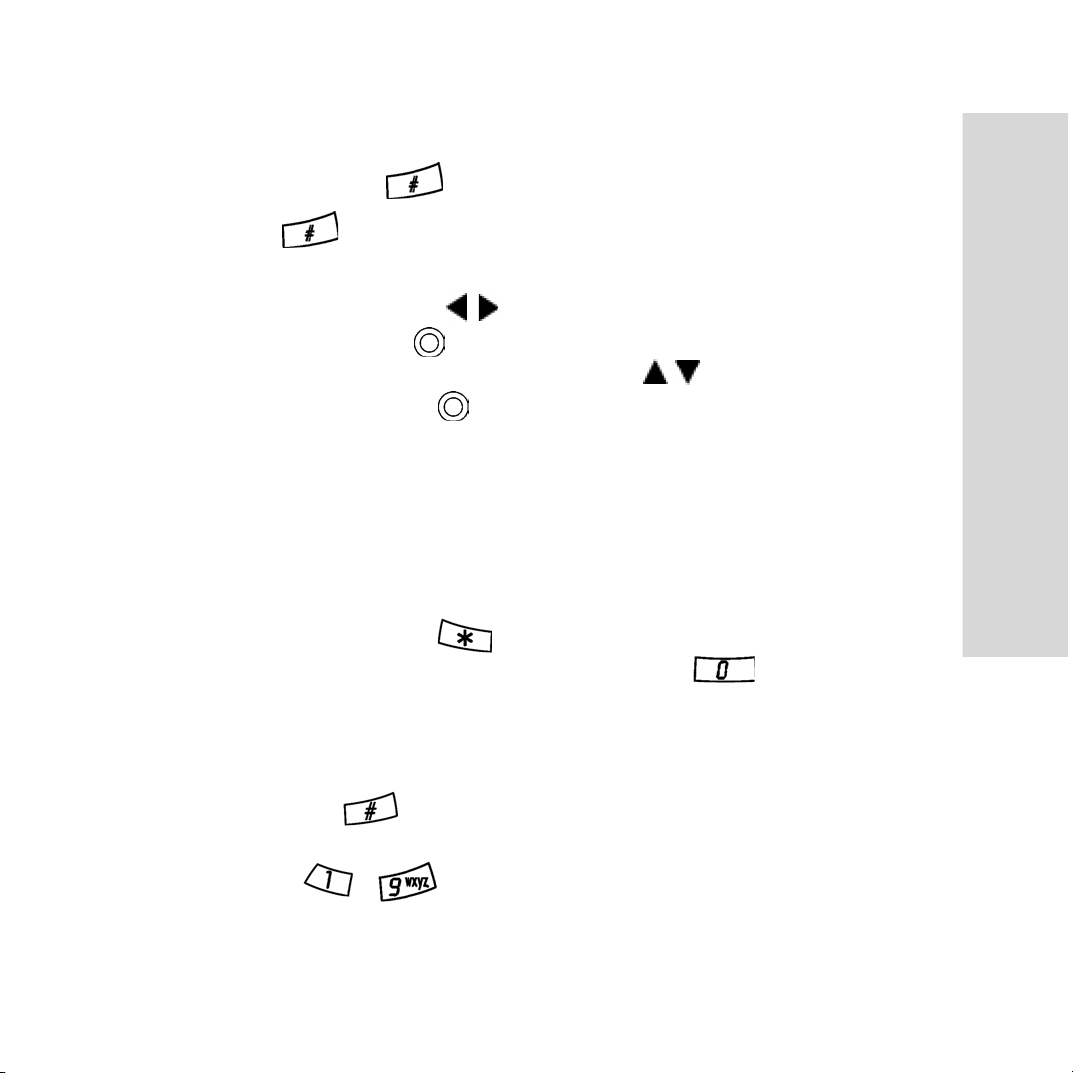
See the Pinyin letters on the keypad:
Number Key Pinyin Letter Number Key Pinyin Letter
abc pqrs
40
def tuv
ghi wxyz
jkl
mno
Page 41
To enter Chinese characters using text input
M
T9
T
1. Press and hold to select Chinese input.
2. Press to switch to Pinyin input.
3. For example, if you want to enter [語言], press “9+8”, when [yu]
is highlighted, press / to check the candidate word and select
[ 語 ], then press to select it. (If you want to enter any other
suggested Pinyin combinations, press / scroll to the desired
combination, press .)
4. Press the navigation key again to select [ 言 ].
Punctuation
In Chinese input, press to display the punctuation list, press the
navigation key to select the desired one, press to add a space.
123 Number input
Press and hold to switch input mode and select Number input.
When in Number input method, you can only input the numbers from
the keypad - .
Getting to know your Smartphone
41
Page 42
Phone
Phone
Using the phone function
Before using the phone function, make sure that you have switched
on your Smartphone and you are within range of a mobile network.
Making a call
When you switch on your Smartphone, it searches for a network
automatically. Once network service is available, you can make or
receive calls.
Note: You can make calls from the idle screen, or you can also make
a call in Speed Dial or Call Log.
To make a call from the idle screen
1. In the idle screen, enter the phone number (with International
country code and area code if necessary).
2. Press to make the call.
42
Page 43
3. Press to end the call.
Options in Dial Number screen
• Press , select [Insert Pause] from the popup menu to insert a
pause displayed as P into the number. Press to delete the
wrong number.
– Add to Person: Open the phonebook edit screen, add the
number to phonebook.
– Send Message: Send message to the current contact.
– Block ID: Block (Unblock) the Caller ID from being sent on
the current call. The block icon is displayed on the screen.
– Dial From: Select to dial from phonebook, SIM phonebook or
call log.
Phone
– Help: Display Help.
43
Page 44

Phone
To make a call in Speed Dial
To add contacts in Speed Dial
1. In the main menu, select [Preferences] [Voice Calls] [Speed
2. Select the position you want to set the speed dial number from 2-
To make a call in Speed Dial
1. In the idle screen, press and hold any key of - to call
2. In the idle screen, press and hold to dial the voice mail
Dials].
9 for the speed dial feature. Press to input the number
directly, or press to select [Browse] in the number input
screen, and select the number from the phonebook.
the contact, or select the number you want to dial out, then press
.
number.
To make a call via Voice Tag
In the idle screen, press and hold , when prompts, say the voice
tag you have recorded. Dial the number when the voice tag is
recognized.
44
Page 45
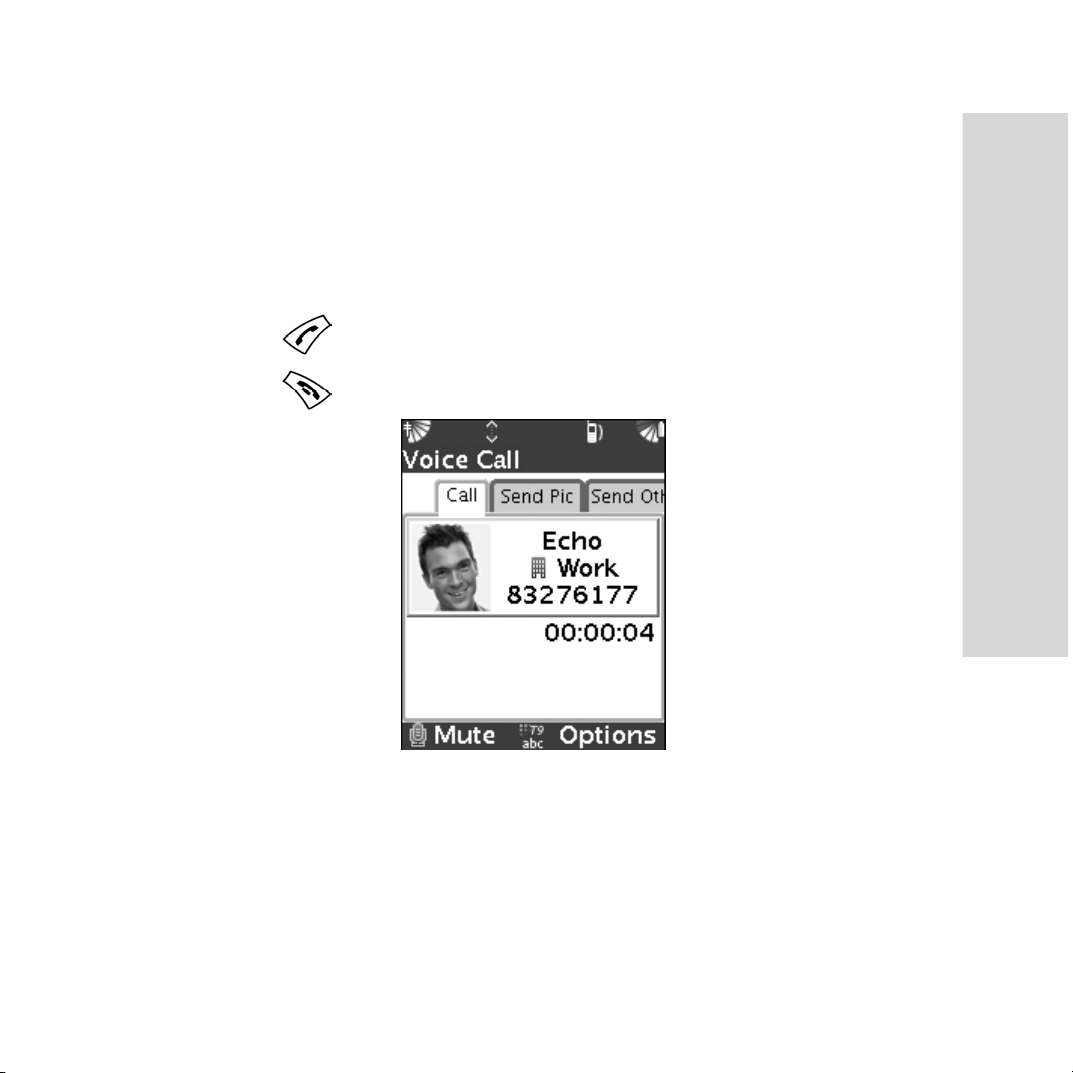
Receiving an incoming call
When you receive a call, the phone rings and the caller’s name and
number are displayed (if they are identified). If the number is in your
phonebook, the name, number, and pictures (if assigned) are
displayed.
• Press to answer the call.
• Press to reject / end the call.
Phone
45
Page 46
Phone
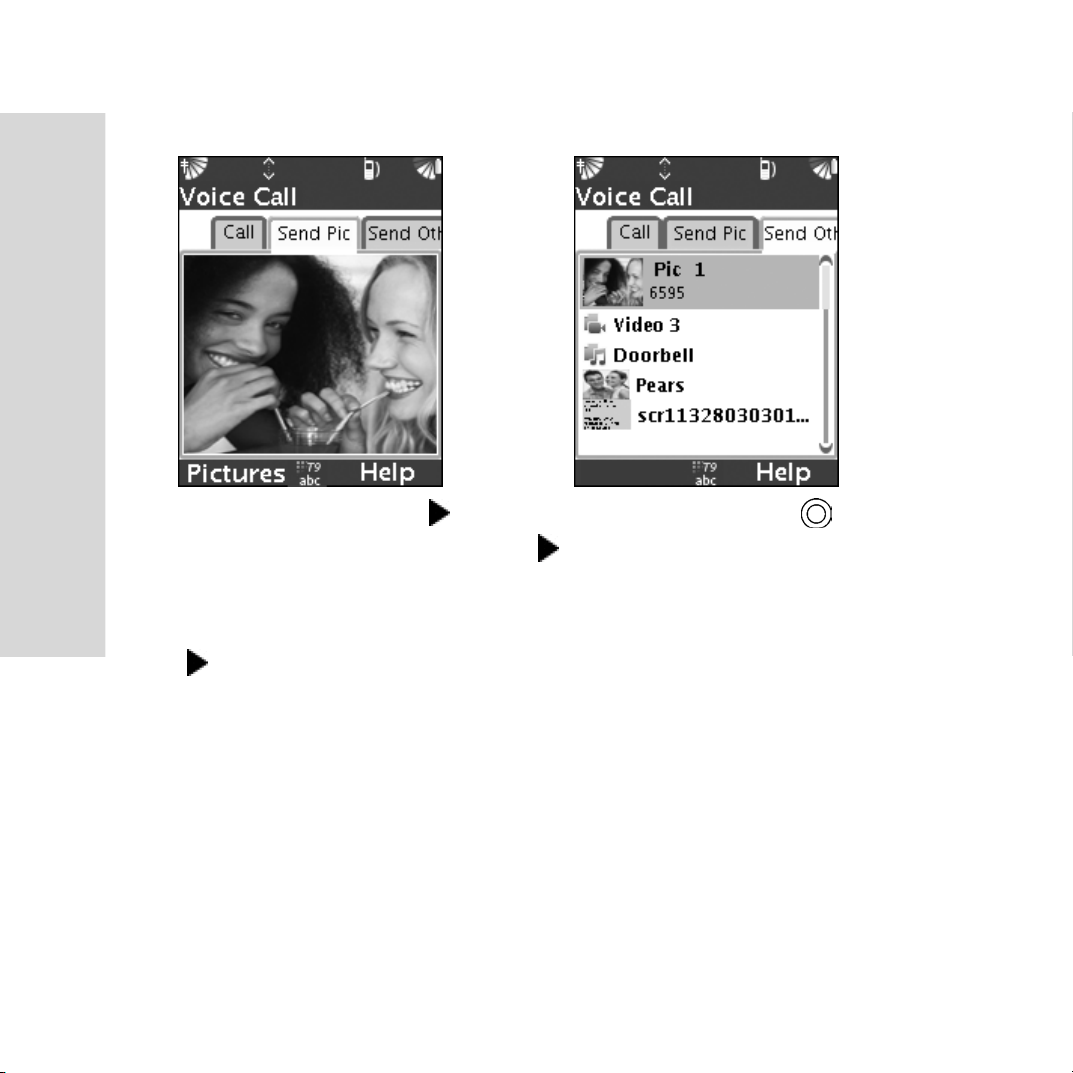
Sending a picture or other file
During conversation, press to select [Send Pic] tab, press to
capture the picture and send it. Press [Pictures] to select the
captured picture, or choose an existing picture from the ones stored
on Smartphone.
Press again to select [Send Other]. Select a file you want to send to
the person you are talking to.
If the person on the other end of the call has no mobile number or
email address, or an incoming call is received without Caller ID, you
can see a Send To screen that tells them the picture cannot be sent to
the default address, and asks for an address.
After hanging up the call, the phone will send out the file that you
have selected during the conversation.
46
Page 47
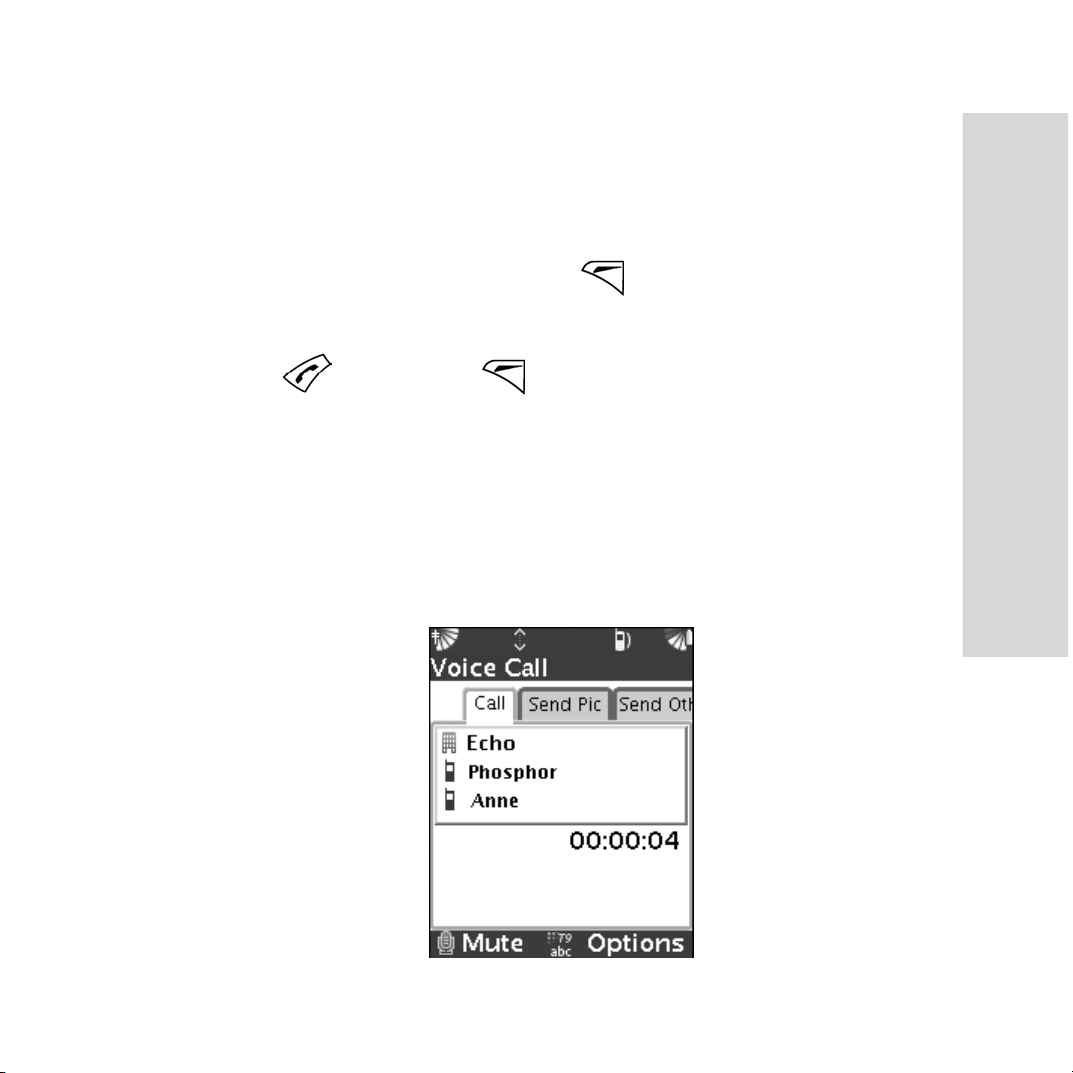
More than one call
You can handle more than one call simultaneously.
To m a k e a s e con d call
1. If you already have a call, press and select [Hold].
2. Enter the number you want to dial.
3. Press to dial, press select [Swap Hold] to switch the
parties.
Conference calls
In a conference call, you can have a conversation with a number of
people. Also, you can hold the conference and make another call.
Phone
47
Page 48

Phone
To add a new participant
1. Press and select [Add Party] in the popup menu.
2. Enter the number to call the next person you want to include in
3. If you have held the call, press and select [Add held to
To remove a participant
To make a private conversation
To view the person details
the conference call.
conference], to add the held party to conference.
• Press and select [Remove] to hang up the selected participant
in the conference call.
• Press and select [Private] to hold the conference call, and
have a private conversation with the selected participant.
• Press and select [View Person], open the phonebook
48
application to view details about the selected person. This
selection is disabled if the selected number is not in the
phonebook.
Page 49

Call management
In phone settings, you can use the following functions: Call forward,
Call waiting, Fixed dialing and Call barring.
Call forward
If you cannot answer incoming calls, you can forward them to
another number here.
Select [Call Forward] in [Preferences] to access the Call Forward.
You can use the following forwarding functions:
• Forward all calls: Forwards all calls to another number or
voicemail.
• Forward if busy: Forwards when you are busy.
• Forward if unanswered: Forwards when you cannot answer the
phone.
• Forward if unreachable: Forwards when your phone is turned
off.
Phone
• Turn off all forwards: Turns off all forward calls.
To activate a call forward
1. In the main menu, select [Call Forward] in [Preferences].
2. Select one of the forwarding options ([Forward all calls],
[Turn on] [Send to Number]) and enter the phone number to
49
Page 50
Phone
To deactivate a call forward
Call waiting
In the main menu, select [Preferences] [Voice Calls] [Call
Waiting] to turn on/off this function. (This function requires the
support of your network service provider.)
Call barring
You can use call barring to restrict outgoing calls and incoming calls,
you need a password that you get from your network service provider.
that you want your calls to be forwarded. You can also select
[Send to Voicemail].
• Scroll the call forward option you want to turn off. Select [Turn
off] to deactivate.
Select [Preferences] [Voice Calls] [Call Barring].
A list of call barring options is displayed:
• All received calls: Block all incoming calls.
• Received abroad: Block all incoming calls while you are abroad.
• All calls out: Block all outgoing calls.
50
Page 51
• International calls out: Block all outgoing international calls.
• International but home: Block all outgoing international calls,
except those to your home country.
Call barring setting
1. Before accessing the call barring, you need enter the call barring
code (Contact your network service provider for more
information).
2. Select one from the above options and press . Press to
activate the selected option, otherwise, press to turn it off.
Fixed dialing
The fixed dialing function allows users to edit the fixed dialing
numbers that are saved on SIM card. Fixed numbers are protected by
PIN2.
Phone
Partial numbers can be saved. For example, saving 978856 allows
dialing all numbers that starts with 978856.
Once you turn on the fixed dialing function, you cannot check any
records saved on SIM card, and cannot dial any numbers that are not
saved in fixed dialing list.
51
Page 52
Phone
Note: You can still make an emergency call, even when the fixed
To activate or deactivate fixed dialing
1. Select [Preferences] [Voice Calls] [Fixed Dialing] [Fixed
2. Enter your PIN2.
To s a v e a f i xed dialing number
1. In the Fixed Dialing Numbers screen, select [Fixed Dialing]
2. Input the phone number, and the name of the contact. Press
To make a call in fixed dialing
dialing function is enabled.
Dialing] [Yes] to activate, or select [No] to deactivate.
[Fixed Dialing Numbers], press to add a new number.
to save it, enter the PIN2.
• In the fixed dialing list, select a number, press to select
52
[Call], or press to dial the number.
Page 53

Call log
There are four call log categories: Dialed calls, Received calls,
Missed calls, and All calls. Numbers of the most recent calls are listed
in call log.
To access the call log
1. In the main menu, select Call Log icon to access. Or press
to access the Call Log in the idle screen.
2. Press to select the log category to view.
To call a number from call log
1. Scroll to the number you want to dial.
2. Press to select [Call] or press to dial out directly.
To add numbers from call log to phonebook
1. Press / to scroll to the number you want to add.
Phone
2. Press , and then select [Add to Person] to create a new entry,
or to select a person to add the number to.
To send a message from call log
1. Press / to scroll to the number you want to send message to.
2. Press , and then select [Send Message], open the message
application with “To” filled with the selected number.
53
Page 54

Phone
Emergency call
Your Smartphone supports emergency call, such as 112. You can
make an emergency call in any region with or without SIM card, if a
GSM network is within range.
54
Page 55
Messaging
Your Smartphone supports various messaging services: SMS (Short
Message Service), MMS (Multimedia Messaging Service), Email and
Cell broadcasting, etc.
Note: All messaging services must be supported by your network
service provider. MMS and Email need special setting service,
please contact your network service provider for details.
Accessing the Messaging application
To open the Messaging application
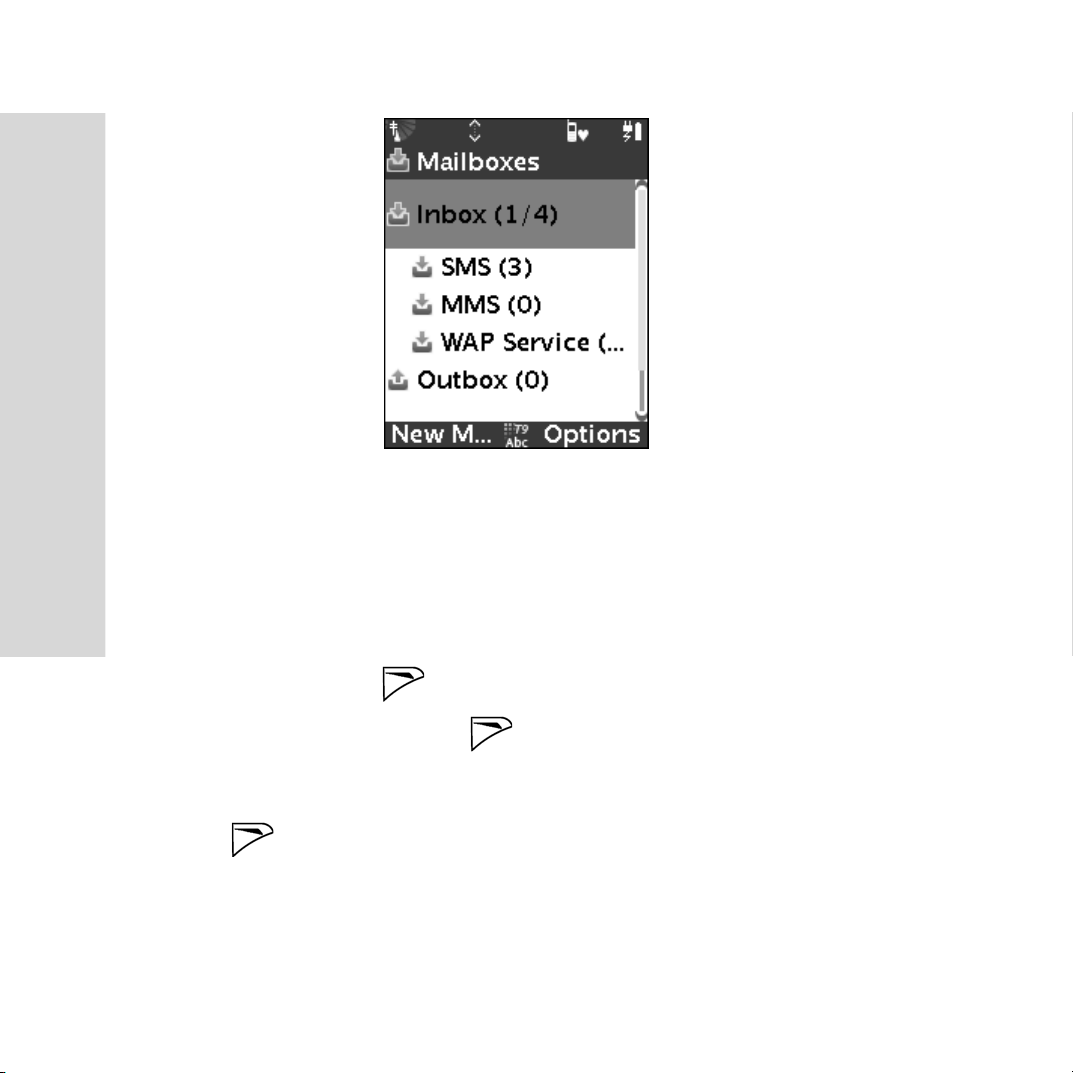
• In the main menu, select Messaging to access all of the
messages you have received.
Messaging
• Press to select [Mailboxes], it contains Inbox (SMS, MMS,
SIM, WAP service), Outbox, Drafts and Sent.
55
Page 56
Messaging
A brief introduction to composing new messages
There are several ways to compose a new message:
• In the Inbox, press to access the composing screen directly.
56
• Or in the Mailboxes, press to access the composing screen
directly.
• Or in the Mailboxes, select the desired application (e.g., SMS),
press to compose a new message.
• You may also compose a new message in the Sent folder.
Page 57
Adding a new mailbox
To manage messages easily, you can create several multiple
mailboxes as you like.
To add a new mailbox
1. In the Mailboxes, press to select [Mailbox] [New].
2. Enter a name for the new mailbox, press to confirm your
entry and return to mailboxes screen. When you go back to the
mailboxes screen, you see the new mailbox that you have created.
(You can delete or edit each mailbox.)
Managing information
To move messages
• In the Inbox, select a message, press to select [Message]
[Move To]/[Move All To], move the selected message or all
messages to Outbox/Drafts.
To mark a selected message as read/unread
Messaging
• In the Inbox, select a message, press to select [Message]
[Mark as Unread], mark the selected message as an unread
message.
57
Page 58
Messaging
To delete messages
• Press to select [Message] [Delete]/[Delete All], press
to delete either a selected message or all messages.
To reply/forward messages
1. Press to select [Compose] [Reply]/[Reply All]/[Forward],
to reply or forward message.
2. In message view mode, press to reply the message.
Composing and sending messages
In the Messaging application, you can compose SMS, MMS
messages.
You can send a message to more than one person, or send to a group
(The contacts saved in phonebook). when composing messages, you
can add picture, music, video or other files and send them to your
contacts.
58
Page 59
Composing a new message
To enter numbers
1. You can access the composing screen in the ways mentioned on
Page57.
2. Enter numbers in the message box. Or press to select
[Phonebook], select a number in the phonebook, and then press
to select [Done], the selected number is shown in [To].
You can send message to more than one person.
3. Press to select [Sub] and input the subject.
4. Select the text field and input the text contents.
(You can input various options in the content).
5. Press to send the message when finish.
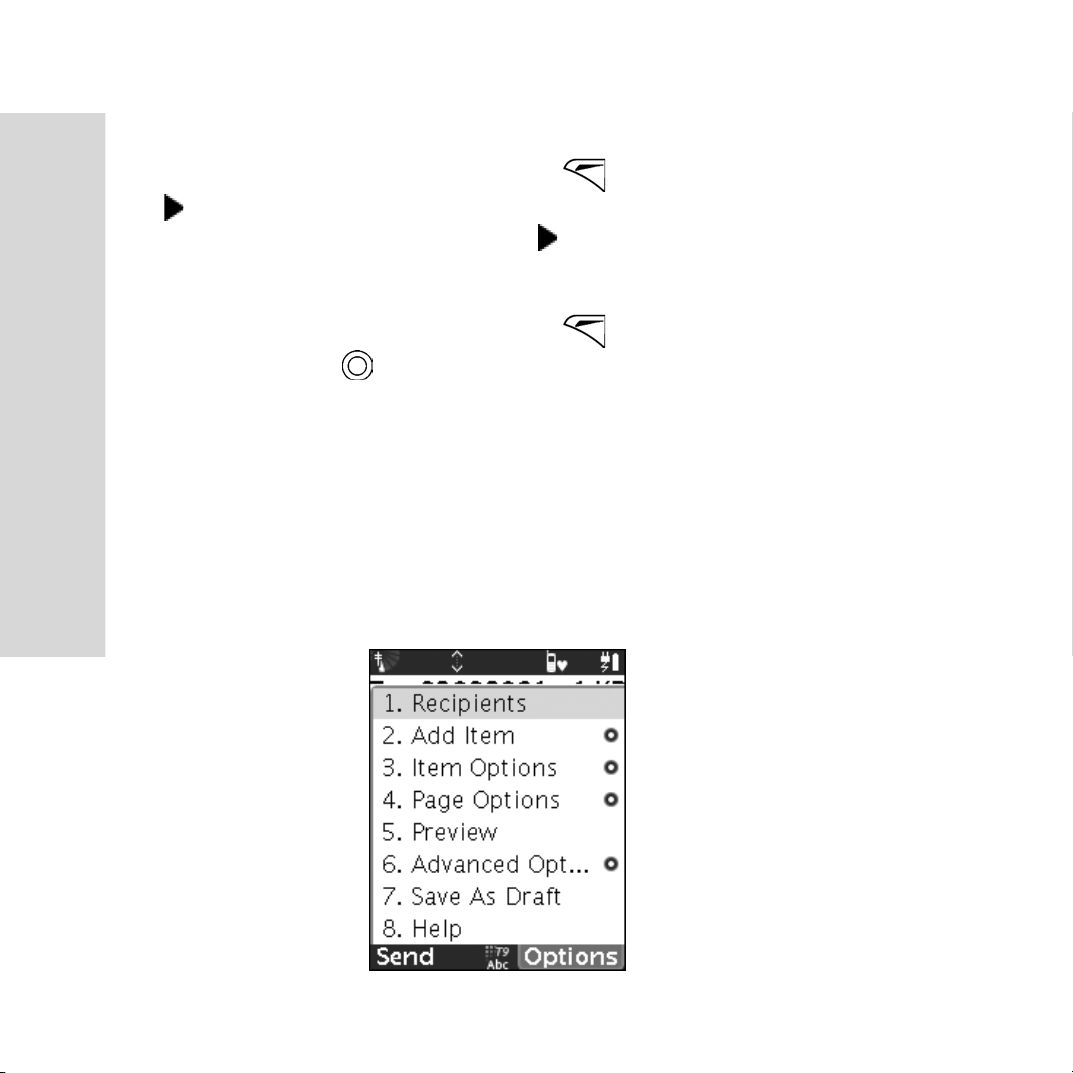
To add a new item
1. Press to select [Add Item].
Messaging
2. Insert picture, video, audio, event or other files into the message.
Items option
• If you have added a new item option, select this item and press
to select [Item Options] [Remove Item], delete the
selected item.
59
Page 60
Messaging
New page
• When composing a message, press to select [Page Options]
[New Page] for adding a blank page. If you want to delete the
new page, select [Page Options] [Delete Page].
Advanced options
1. When composing a message, press to select [Advanced
Options], press to select [Send Anonymously] and send
message anonymously.
2. Select [Set Priority] to set the priority of the message.
3. Select [Background color] to set the color of the message page.
4. Select [Save As Template] to save the message as a template.
To save as draft
• If you do not want to send the message now, select [Save As
Draft] to save the message in the Drafts for sending later.
60
Page 61
Managing recipients
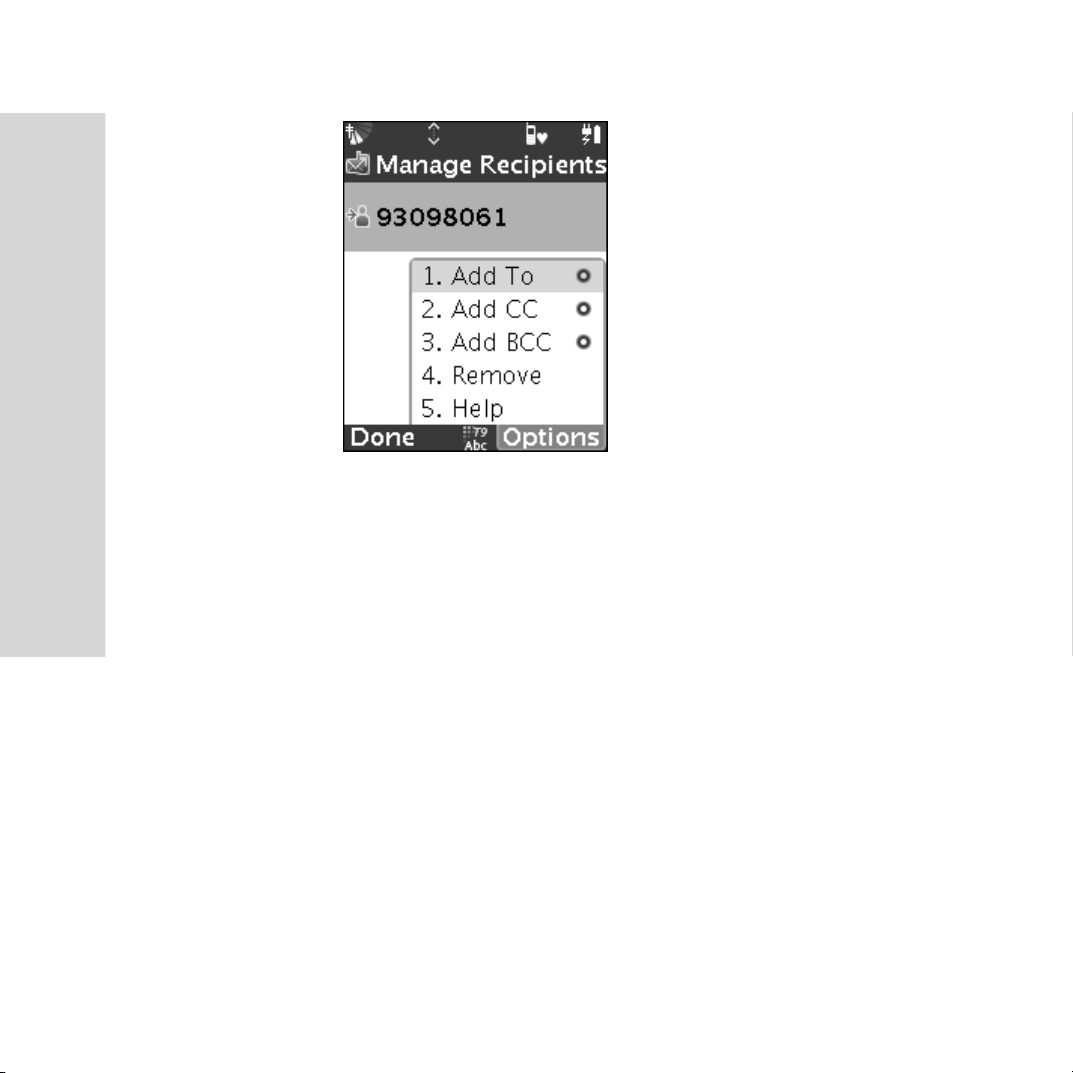
When composing a new message that you want to send to a group of
people or more than one recipient, you can manage this in [Manage
Recipients].
To manage recipients
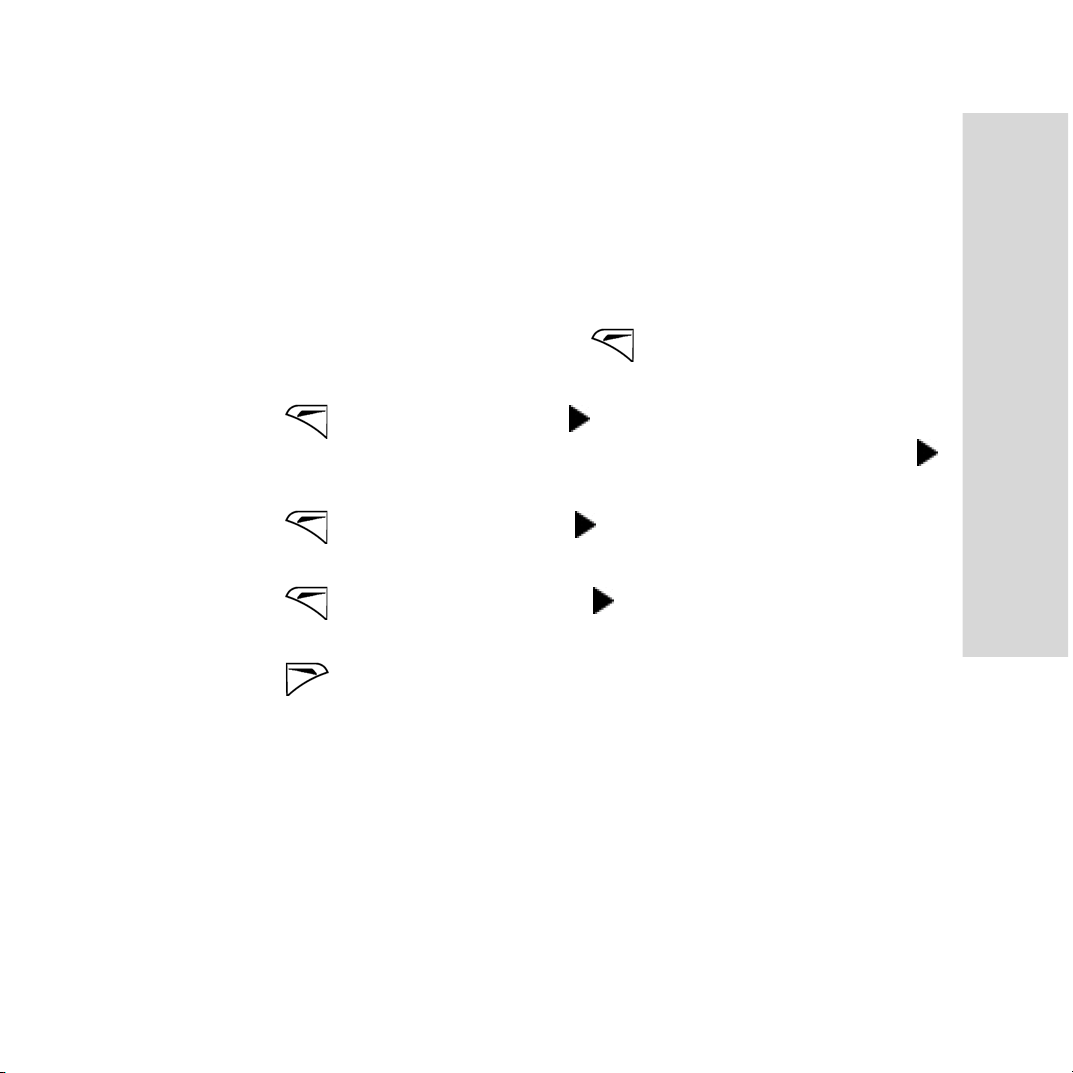
1. In the message edit screen, press and select [Recipients] to
access the Manage Recipients screen.
2. Press and select [Add To] [From Phonebook]; select a
contact and add it to Recipient. Alternatively, select [Add To]
[Other Person] to enter a recipient’s number/address manually.
3. Press and select [Add CC] [From Phonebook]/[Other
Person] to make a copy to another recipient.
4. Press and select [Add BCC] [From Phonebook]/[Other
Person] to make a blind copy to another recipient.
5. Press to continue when finish.
Messaging
61
Page 62
Messaging
Sending a message
The message can be sent as:
• If the message is entirely text, and does not exceed the maximum
length for sending an SMS (less than 100 characters), it should be
sent as an SMS.
62
• If the message contains any non-text content, it should be sent as
an MMS.
• If the recipient address is an email address, even if the message is
entirely text, it should be sent as an MMS.
Page 63
Receiving and reading messages
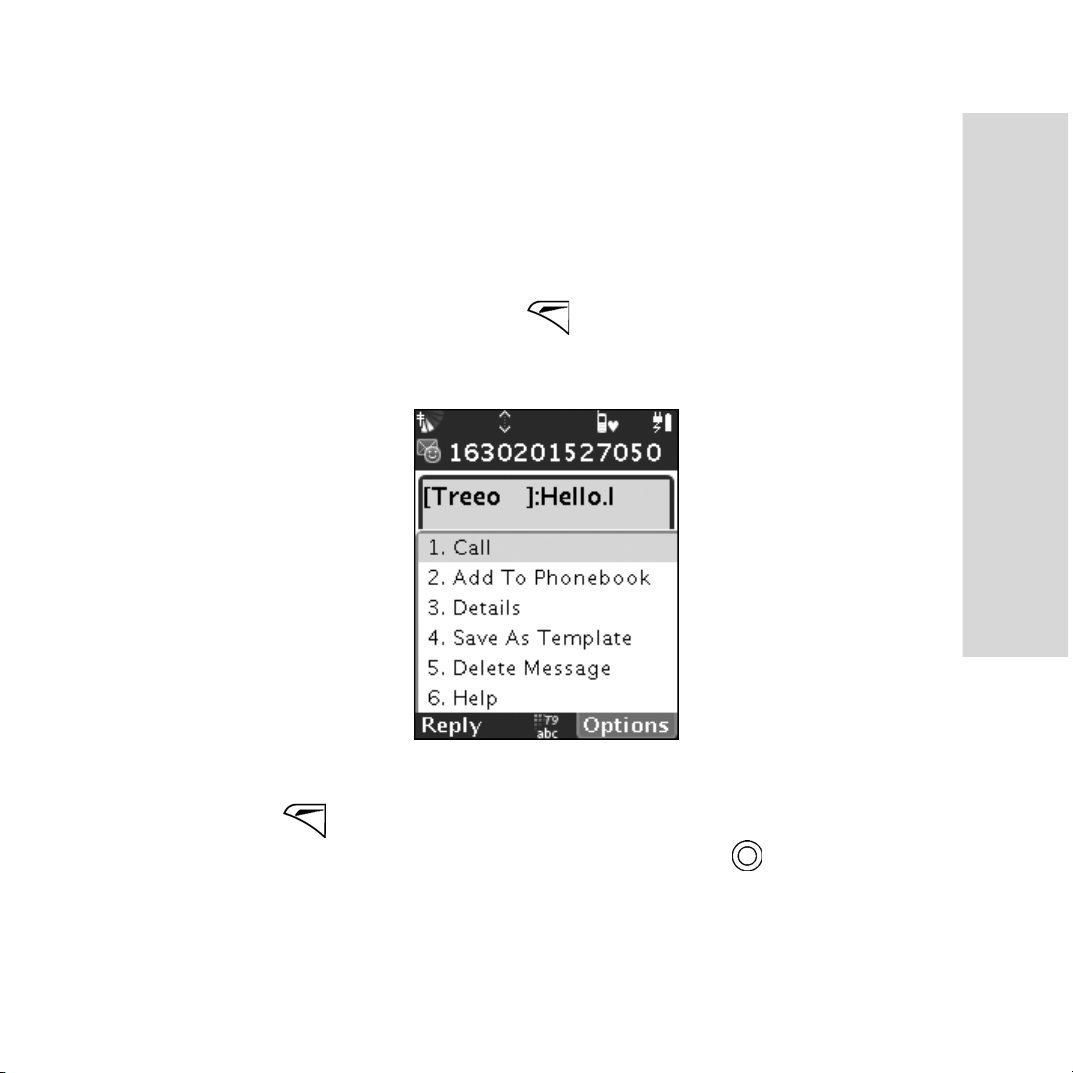
When you receive a message, the system gives prompts to forward or
reply to the message.
When the message is an SMS
• In the prompt screen, press to open the Option menu, select
[More options] to read the message directly.
• Or, select an unread message in the Inbox to read it.
To dial a number
• Press and select [Call]. If the message contains a phone
number, you can select the number and press to dial.
Messaging
63
Page 64

Messaging
To add to phonebook
• If the number you received does not exist in the phonebook, press
To save as template
• You can save the current message as your message template.
To delete a message
• Select [Delete Message] to delete the message you are reading.
To reply a message
• In message view mode, press to reply to the message.
When the message is an MMS
• In the prompt screen, press to read the message or press
to read it later.
to select [Add to Phonebook] and save the number.
• Select an unread message in the Inbox to read it.
If the received message contains an attachment, press in view
mode to select [View Attachments]. Then select the attachment you
need to save, and press to select [Save].
64
Page 65
Template
You can save a message as your MMS template.
To save the received message as a template
• In message view mode, press to select [Save As Template] to
set the message as a message template.
To compose a new message from a template
• In the Inbox, press to select [Compose] [New From
Template] or in the Mailboxes, press to select [New From
Template] to access the message template screen. Then press
to compose a new message.
Messaging settings
You must complete your messaging settings before using Messaging
application.
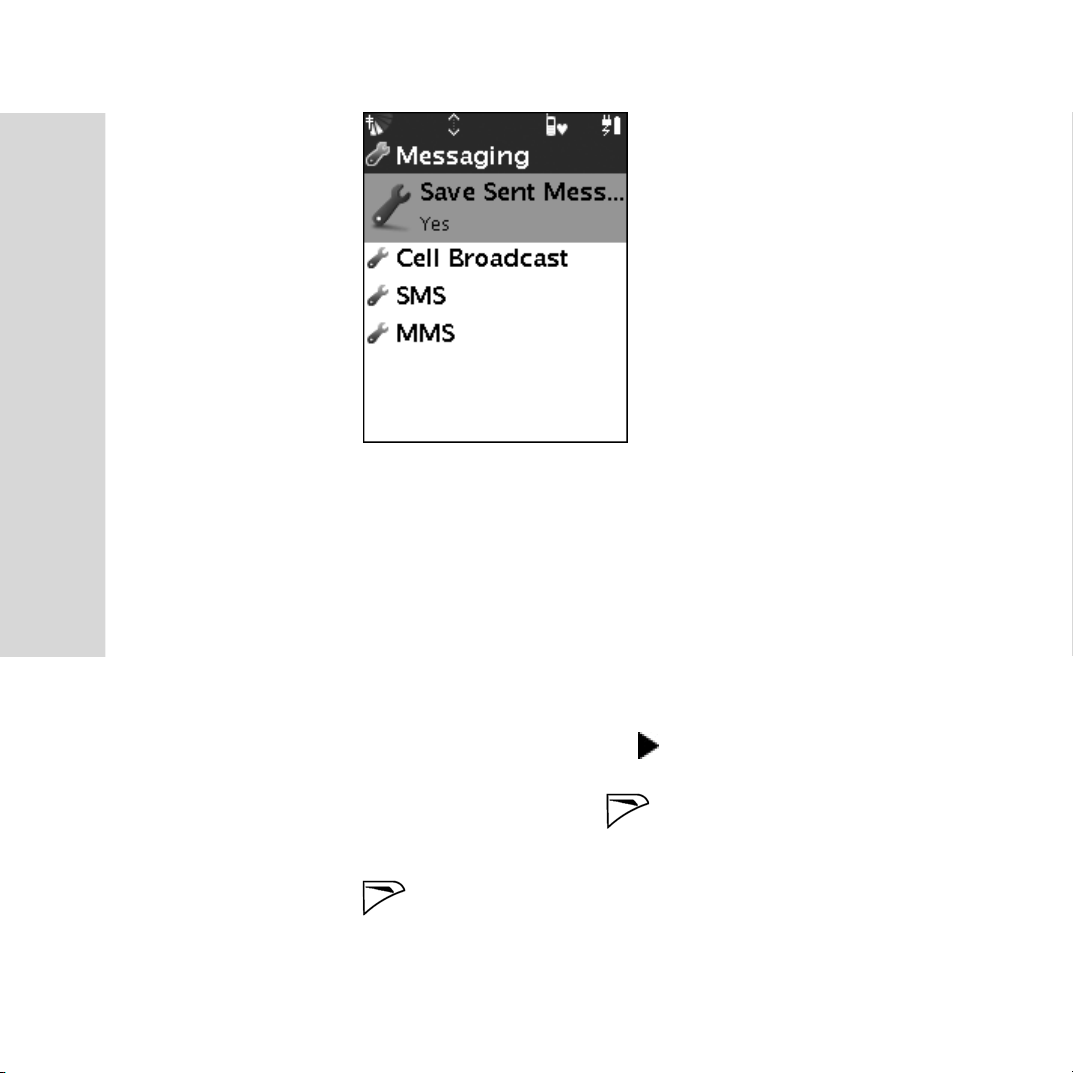
• In the main menu, select [Preferences] [Advanced Settings]
[Messaging] to set the following options:
Messaging
65
Page 66
Messaging
Save Sent Messages
• Turn it on to save the messages that you have sent in mailbox
automatically.
Cell Broadcast
Please contact your network service provider to find out if you can
use this service, and what kind of channel you can use. (Please make
sure that the network is available before using Cell Broadcast. )
In messaging settings, select [Cell Broadcast] [Channels], then
select [All] and check All to register all channels. Alternatively,
follow the instructions on screen and press to set it. (If you turn
off the Reception function, you will not be able to set the channels)
• Area Info: Press to display the area information.
66
• Reception: Turn reception of cell broadcast messages on or off.
Page 67

• Alert: Select to alert when a cell broadcast message arrives.
• Automatic: Select to receive and display cell broadcast messages
automatically.
• Language: Choose which language you want to use for cell
broadcast messages.
SMS
• SMSC: Enter the SMSC (Short Message Service Center) phone
number. and press to set the number. You can get this
information from your network service provider.
• Access Type: Choose the transport method for SMS: GSM or
GPRS.
• Reply path: Press to use the SMSC specified in the message
for the reply path.
• Validity period: Set the validity period for new SMS messages.
MMS
• MMSC List: If there are no records in the list, press to add a
Messaging
new IP address. Press to save the setting. (MMSC:
Multimedia Messaging Service Center)
• Connection: Select the account to use for MMS. If no accounts
are shown, you can create and edit accounts in the GPRS and
GSM dialup connection settings menu.
• Protocol: Choose WAP to use WAP transport for MMS. Choose
Internet to use HTTP transport.
67
Page 68

Messaging
• Defer when Roaming: Choose [Yes] to prevent MMS receipt
while roaming. You can pick up messages when you are in your
home network.
• Request Delivery: Choose [Yes] to receive MMS delivery
confirmation. Choose [No] if you do not want to receive
confirmation requests.
• Request Read Report: Choose [Yes] to receive MMS read
confirmation. Choose [No] if you do not want to receive.
• Validity Period: Select a time to retry sending an MMS message.
Use delivery report if you need to confirm delivery.
• Max Message Size: Enter maximum message size in KB for
sending and receiving MMS.
• Automatic Download: Choose [Yes] to automatically receive
MMS messages when they are available.
• Return Delivery: Choose [Yes] to return delivery report to sender
on request; otherwise, choose [No].
• Return Read Report: Choose [Yes] to return read report to
sender on request; otherwise, choose [No].
68
Page 69
You can use your Smartphone to send and receive email messages.
Attachments on incoming messages can be saved onto your
Smartphone. You can also attach files to outgoing messages. Your
Smartphone supports POP3 and IMAP service.
Note: You need a subscription that support data transmission,
please contact your network service provider for details.
Email settings
Before using this application, you need to set up all email account.
Note: When you purchase the Smartphone, the email settings may
already be entered. If not, you can contact your network ser-
Messaging
vice provider for details. Some network service providers may
provide a special service that you can request the settings in a
message. You can also set up an email account manually.
69
Page 70

Messaging
To set the email account manually
1. In the main menu, select [Email] [Email Settings] [Email
Address] to enter an email address as your “From” address.
2. Select [Outgoing Mail Server] and enter the name of the outgoing
mail server, e.g., smtp.example.com.
3. Select [Server Type] and specify whether your incoming mail
server uses POP3 or IMAP.
4. Select [Incoming Mail Server] and enter the name of the
incoming mail server, e.g., pop.example.com.
5. Select [Leave Mail on Server] and retain a copy of the email so
you can access the mail by another email client.
6. Select [Maximum Incoming mail] and then select the maximum
size for incoming mail.
7. Select [Include Orig Msg] and turn on to include the original
message in your reply.
70
Page 71
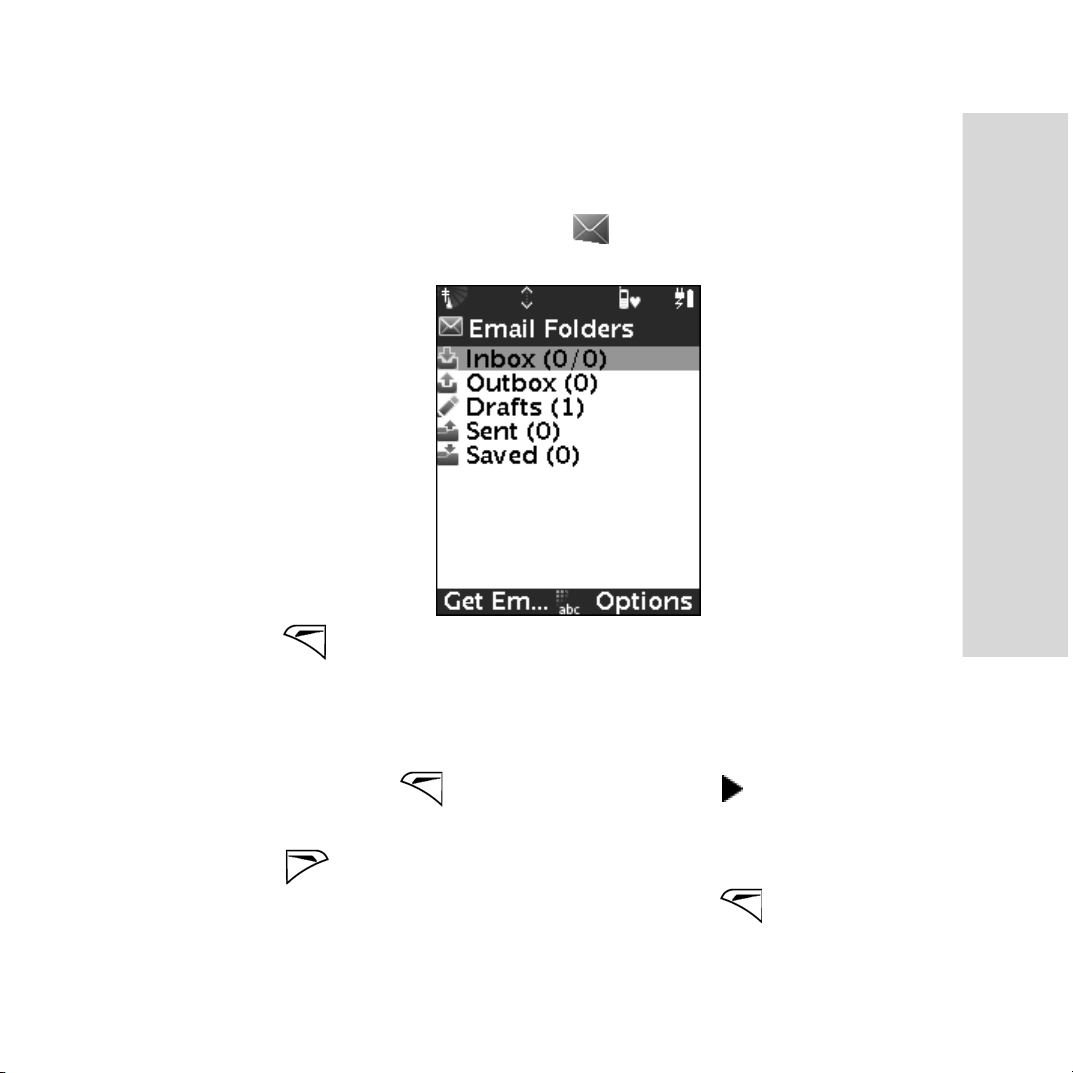
Composing and sending email messages
To compose and send an email message
1. In the main menu, select Email to access the Email
application.
2. Press to select [Compose].
3. Enter the recipient’s address in [To], then select [Sub] to input the
email subject.
Messaging
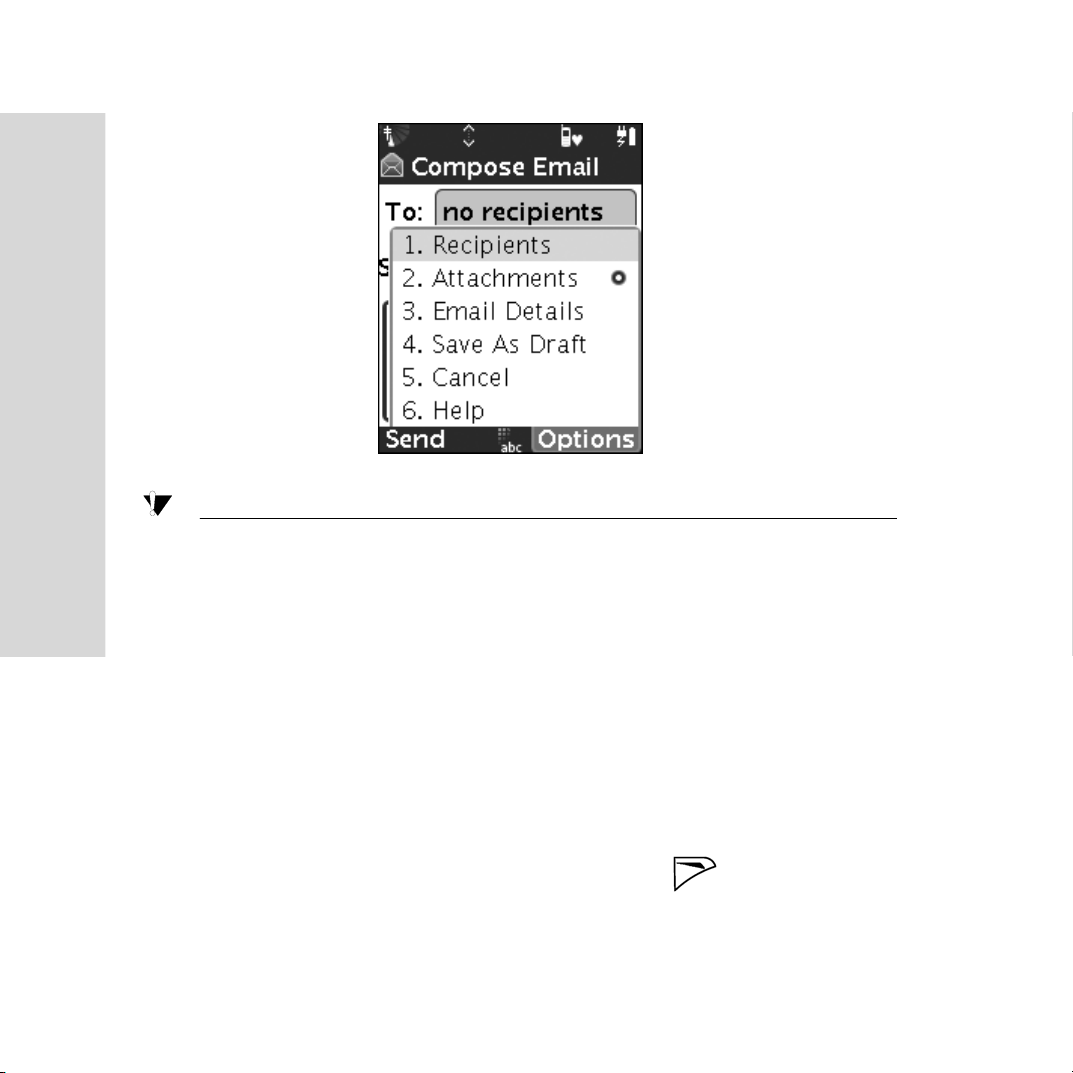
4. Select the text field to input the content. You can attach files in
the email; press to select [Attachments] [Add] and select
the file you need.
5. Press to send the email when you have finished composing.
Or, if you wish to send the email later, press to select [Save
as Draft] and save it in the Drafts.
71
Page 72
Messaging
Note: If you do not set up your email account, you will not be able
to compose email messages. Please contact your network service provider for details.
Receiving and reading email messages
To receive and read an email message
• When accessing the Email application, press to receive new
email messages.
72
• In the Inbox, select an email message to read it.
Page 73

To save an email message
• In the Inbox, press to select [Save Email] and save the email
in the Saved.
To save attachments
• If the email message contains attachment, press to select
[Save] [Attachments] and save the attachments onto your
Smartphone.
Note: The number of the email messages that can be saved depends
on the memory in your Smartphone. All incoming email messages are saved to your Smartphone.
Replying and forwarding email messages
Select an email message in the Inbox, or in message view mode, press
to select [Reply]/[Forward] and access edit mode.
Messaging
Deleting email messages
Select an email message in the Inbox, or in message view mode, press
to select [Delete]/[Delete All] and press to delete the
selected message(s).
73
Page 74
Messaging
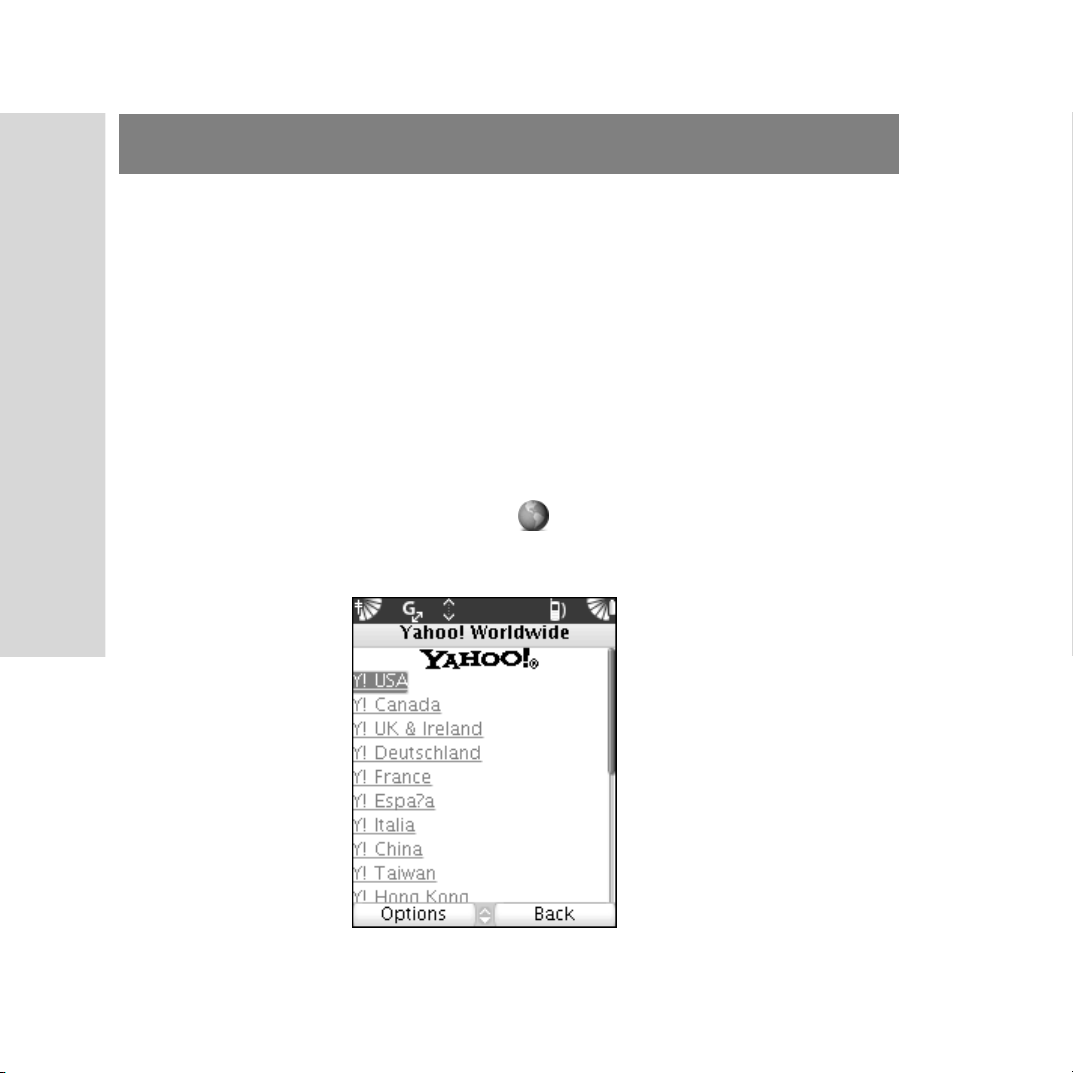
Web
Your Smartphone has a WAP (Wireless Application Protocol)
browser that is designed for Internet browsing on your Smartphone.
This enables you to access various services, such as, news,
entertainment, games, etc. If this is your first time to connect WAP,
you must contact your network service provider for details.
Accessing the Web application
To open the Web application
1. In the main menu, select [Web] to access the Web application.
(If no network is available, please contact your network service
provider for details)
74
Page 75

2. Select a website to browse.
3. Select [Exit] to go back to the Web screen.
Options when browsing
To browse the options in Web
• In the Web screen, press to check the different options:
• Bookmarks: Selects to choose a website.
• Add To Bookmarks: Adds the current website to bookmarks.
• Open Page: Enters the website location.
• Home: Returns to your home page.
• History: Allows you to view a list of the websites you have
visited.
• Save/View Items: Saves the selected items in the website.
Messaging
• Save this Page: Saves the current website to the selected folder.
• More: Displays the advanced settings.
– Search in Page: Enters the characters to search in the website.
–Privacy:
Clear Cache: Selects to clear Cache.
75
Page 76

Messaging
Clear Cookies: Clears Cookies list.
Clear History: Clears the list of websites that you have
browsed.
• Exit: Exits to the main menu.
Web settings
You must set the browser before accessing this Internet. You may
contact your network service provider for details. Please note both
Network setting and browser basic settings need to be set. (Before
using Web, you may need to adjust the Web Internet settings, see
page139)
Web settings
76
1. In Web main screen, press to select [More].
2. Select [Settings] to set the followings:
• Multimedia
– Images: Selects to show images.
– Sounds: Selects to play sounds.
– Objects: Selects to download objects.
Page 77

• Look and feel
– Homepage: To change the homepage, you can navigate to a
site, and choose Set homepage from options menu.
– Font size: Sets the default font size for the browser.
– Text wrap: Allows you to choose to wrap text within a word or
only at the end of a word.
– Text entry: Sets the time delay before advancing to next
character.
– Scroll step: Sets the scroll step between lines or pages.
– Circuit prompt: Sets to prompt for confirmation in opening
circuit switched connections.
– Connection time out: Sets the maximum connection time
allowed for web response. Before the application stops, trying
to connect.
• Security settings
– Secure prompt: Warning before entering non-secure site.
– ID cache: Caching the user ID and password.
– Cookies: Allows Cookies.
– Link referral: Selects to allow current site to view previous
URL.
• Certificates:
Messaging
– When you buy the Smartphone, it may contain the certification
information.
77
Page 78

Messaging
•Advanced
– Title region: Selects to show phone’s title while browsing.
– Content push: Selects to allow content pushes from the
network.
– Mobile identification: Selects to transmit mobile ID on GSM
networks.
78
Page 79

PIM
Phonebook
You can save your phonebook information in your Smartphone. You
can also dial out or send messages in the Phonebook application. The
phonebook database includes several shared system groupware,
through which you can contact your friends using Chat application.
You can also add ringtones and information such as email addresses
and voice tags to your contacts. If you have categorized your
contacts, it is easy for you to check the contact information.
Using the Phonebook application
In the main menu, select [Phonebook] to access the Phonebook
application, and all records are displayed in the contact list.
PIM
79
Page 80
PIM
Creating a new entry
To create a new entry
1. Select [Phonebook] press [New Person].
2. Input the name and phone number.
3. Select [Ringtone] to access the Ringtone and select a sound or
video; press to preview the video (See page116).
4. Select [Picture] to add a picture for your contact. Press to
access camera to capture a new picture (See page99).
Note: If you have added pictures, a ringtone or video for a contact,
the picture or video is displayed when you receive an incoming
call from this contact. (The Caller ID function can only be
used with the support of your registered network service provider.)
5. Press to save the entry when you finish editing.
80
Page 81
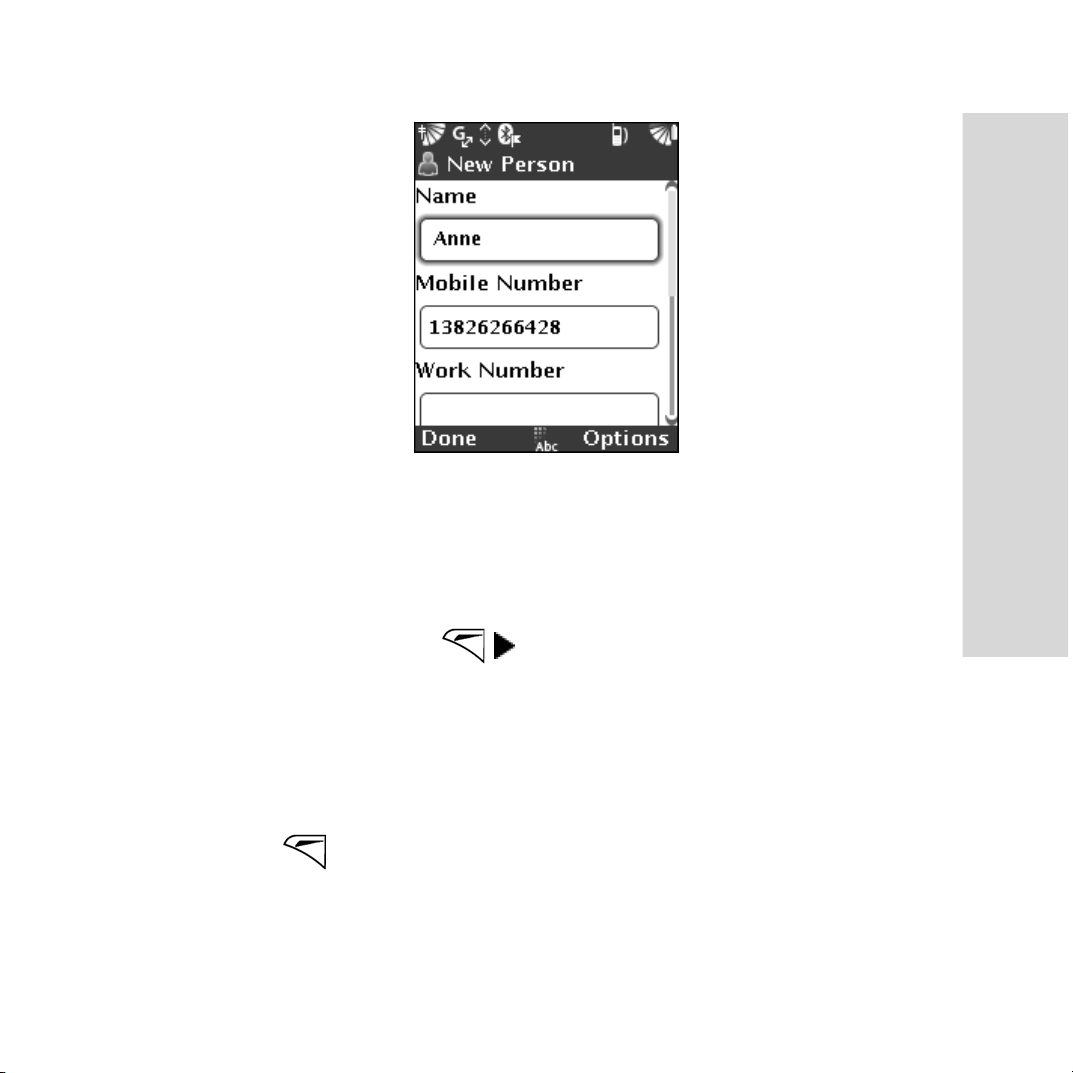
When editing the contact information, you can also add an email
address, fax number, birthday date or categorize the record.
To add a field for a contact
1. In Edit mode, press [Add Field].
2. Select the field you want to add for the contact, (e.g., [Fax]) and
then go back to Edit mode and enter the fax number.
PIM
To d e l ete a fie l d
1. In Edit mode, select the field you want to delete.
2. Press and select [Delete Field].
81
Page 82
PIM
To set a category for a contact
1. In Edit mode, press [Add Field] [Category].
2. Press [New] to create a personal category.
3. Select the category the contact belongs to and press .
To set a phone number as a speed dial number
1. In Edit mode, select a number field and press [Speed
Dial].
2. Select a field in position 1-9 (e.g., “5”); press for the selected
number to be set as a speed dial number (Marked with a tag).
Press and hold to dial out in the phone idle screen.
Creating a new list
You can create a group list of contacts to easily send a message to
several recipients simultaneously.
To create a new list
1. Select [Phonebook], press to select [New List].
2. Enter a name for the new list and press to access the new list.
82
Page 83
3. Press to select [Add Person] , choose contacts in the contact
list and add to the new list.
To send messages via group list
1. In the contact list, select a contact or a group list. Alternatively, in
a new group list, press to select [New Message]/[Send List
Message] to access the message edit screen and the selected
contact appears as the recipient.
2. Edit the message and press to send the message.
(See page58)
To dial from group list
1. In the group list, select a number.
2. Press [Call Person].
PIM
Dialing out from phonebook
You can call number saved in your phonebook by pressing
[Call].
83
Page 84
PIM
Sharing contact information
Using the share function, you can share files with others.
• Select the contact information you want to share with others and
press [Share] [Via Message]/[Via Bluetooth].
Deleting contact information
To delete contact information
1. Select the contact you want to delete.
2. Press and select [Delete] [Delete].
Voice control
You can call others by setting a pre-recorded voice command. You
can save a maximum of 50-recorded words in your Smartphone.
There are three seconds available for voice command. Please ensure
that you are in a quiet environment and use a name that is distinct
from others when recording.
84
Page 85
To record a voice command
1. When editing a contact, press [Add Field] [Voice Tag]
to access the Add Voice Tag screen, or press [Add Voice
Tag] to access the Add Voice Tag screen directly.
2. Press to record the voice command.
To dial a number
In the idle screen, press and hold and say the voice command. If
the command is recognized, the number will dial out.
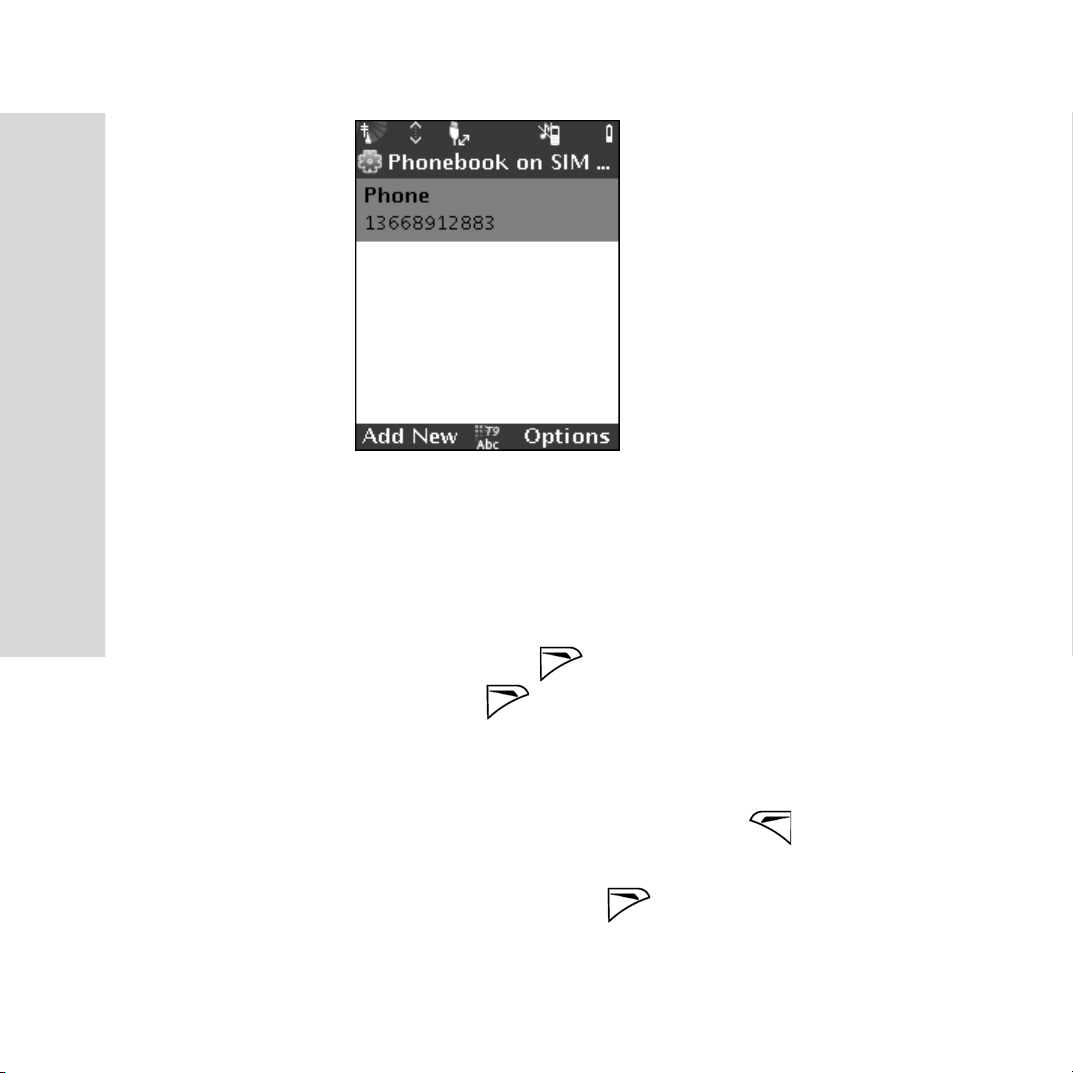
SIM Phonebook
You can save, edit or delete records on your SIM card. You can also
import/export records between the SIM and Phonebook.
PIM
Viewing records on SIM
To view records on SIM
• In the main menu, select [Phonebook], then select [SIM
Phonebook] to access the SIM Phonebook list.
85
Page 86
PIM
Managing records on SIM
New records on SIM
• In the SIM Phonebook list, press to add a new entry. Enter
the name and number, press and select [Save] to save the
new entry.
To edit records on SIM
1. In the SIM Phonebook list, select a record and press to select
[Edit Entry] to edit the selected entry.
2. Enter the new name and number, press and select [Save] to
save the new entry.
86
Page 87
To delete records on SIM
• In the SIM Phonebook list, select a record, press to select
[Delete Entry] and press to delete the selected entry.
Alternatively, select [Delete All] to delete all entries on SIM.
Sending messages from SIM
In the SIM Phonebook list, select a record, press and select [Send
Message] to access the message edit screen. Press to send the
message when finish editing.
Exporting records to SIM
You can export records in your Smartphone to SIM and manage them
on SIM.
• In the SIM Phonebook list, press and select [Phonebook to
SIM] to access the Phonebook on Phone screen. Select the record
you want to export to SIM and press to export the record.
PIM
Importing records to phone
You can import the records on SIM to phone and manage them in
your Smartphone.
87
Page 88
PIM
• In the SIM Phonebook list, press and select [SIM to
Phonebook] to access the Phonebook on SIM card screen. Select
the record you want to import to phone and press to import
the record.
Name display settings
You can set the name display format of the records in the phonebook.
1. Select [Applications] in [Preferences], then select [Phonebook]
[Name Format] to set the contacts to be listed by First or Last
name.
2. Select [Name Sorting] and select Pinyin or Stroke Count sorting
for phonebook names.
88
Page 89
PIM
The PIM includes Calendar, Calculator and Notes features. It allows
you to quickly and easily schedule appointments or any activity
associated with a date or date and time, and also sets an alarm for all
such activities.
Using the Calendar
The Calendar application provides Event, Tasks and Alarms features,
which you can use to schedule appointments in various ways.
• In the main menu, select [PIM] [Calendar] to access the
event list directly.
PIM
89
Page 90
PIM
Creating a new event
1. In the event list, press [New].
2. Enter a brief description of the event and select the date and time.
3. Press to save the event.
Sending an event
You can send an event via Bluetooth or Message.
• In the event list (Day view mode), select an event, press to
select [Share] [Via Message]/[Via Bluetooth] and select either
one to send the event.
Deleting an event
In the event list (Day view mode), select an event, press to select
[Delete] and press to delete the selected event.
Calendar settings
Select [Applications] in [Preferences], select [Calendar]:
• Task Auto-Delete: Sets the length of time before finished tasks
are automatically deleted.
90
Page 91
• Alarm Auto-Delete: Sets the length of time before used and nonrepeat alarms are deleted automatically.
• Default Alarm Sound: Chooses the default alarm sound.
• Snooze Time: Sets the snooze time in minutes.
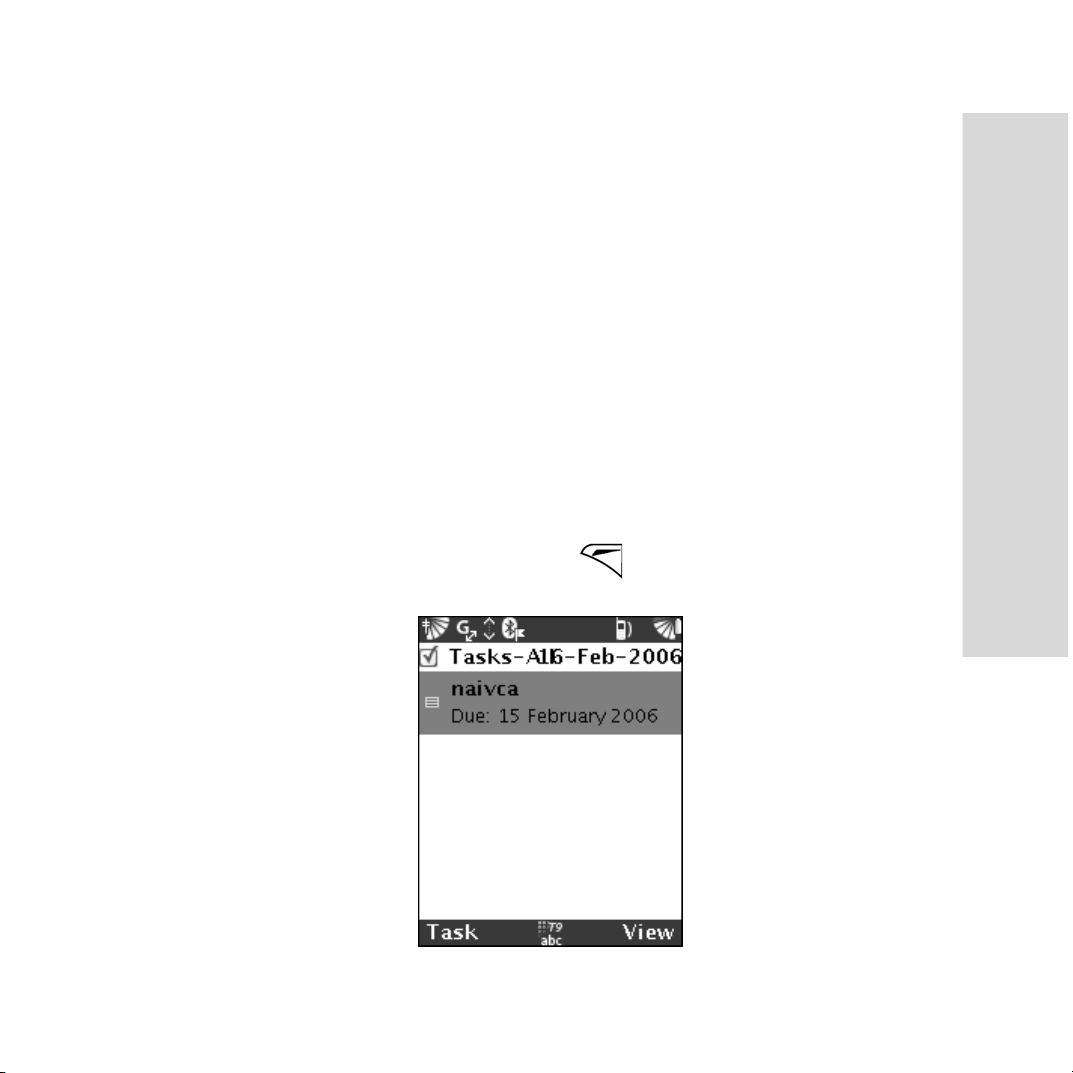
Using the Tasks
You may create tasks to prioritize your daily activities. You can
manage these tasks in category. All tasks can be sent via Bluetooth or
Message.
When accessing the Calendar, press and select [Tasks]. You can
view the brief description of the tasks in the task list.
PIM
91
Page 92

PIM
Managing tasks
To create a new task
1. In the task list, press to select [New] and enter a short
description for the task.
2. Select the Due date, then select the category that the task belongs
to. (See page93 for category settings)
3. Set the priority of the task.
4. Press to save the new task.
To edit a task
1. In the task list, select a record and open it.
2. Edit the task as with the creating steps.
Finished task
• When a task has been completed, press to select [Mark
Finished] and mark as a finished task.
To delete a task
• In the task list, select a record, press to select [Delete] and
press to delete the selected record; press to return to the
task list.
92
Page 93

Task category settings
To create a new category
1. In the task list, press and select [Category].
2. Press and select [New]. Enter a name for the new category
(e.g., Business) and press to save.
To delete a category
• Select the category you want to delete, press and select
[Remove] to delete the selected category.
To rename a category
• Select a category, press and select [Rename] to enter the new
category name.
PIM
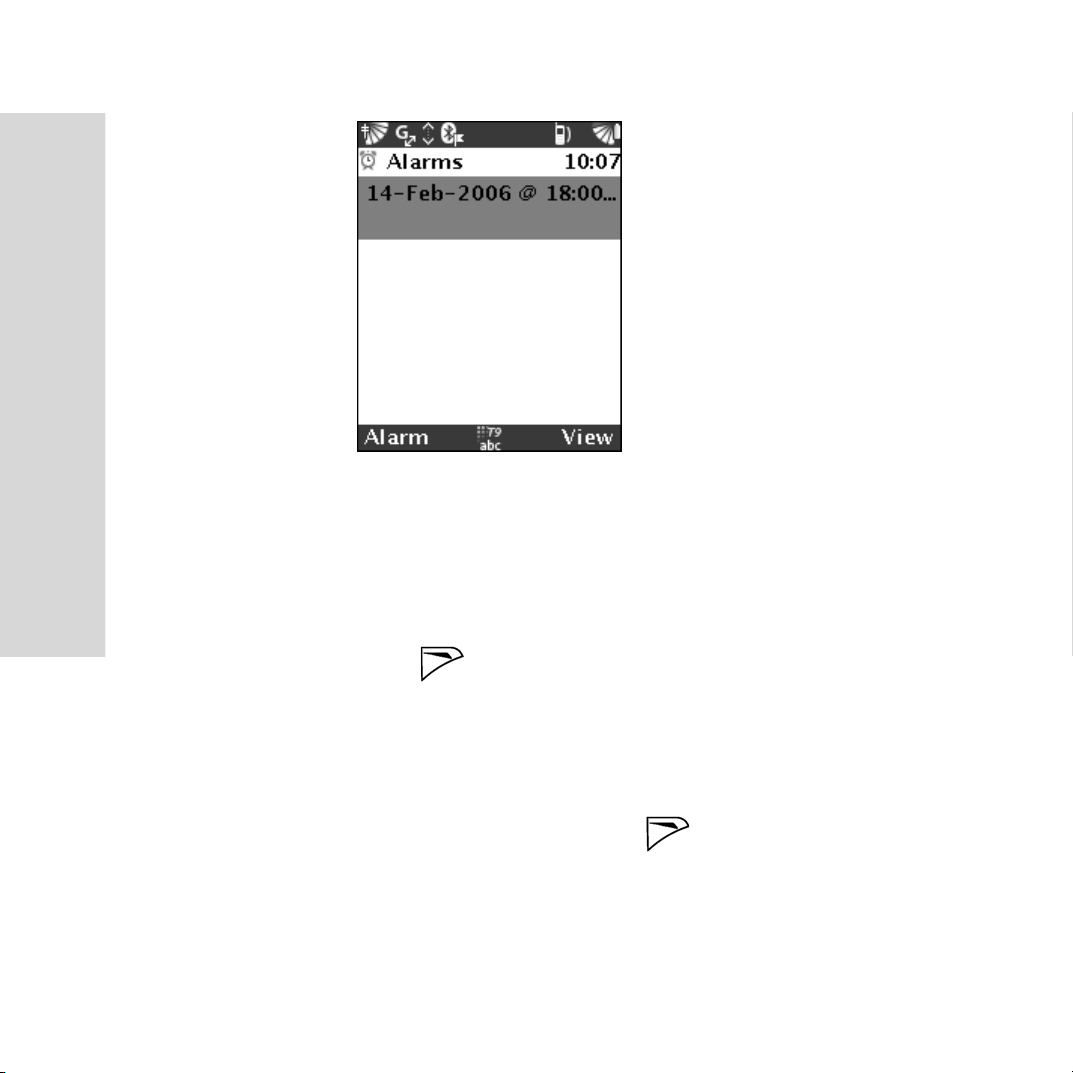
Using the Alarm
The alarm can be set to ring at a specified time within 24 hours. You
can also set a quick alarm to ring at pre-defined time interval within a
shorter time (e.g., in 5 minutes).
In the event list, press and select [Alarms] to activate.
93
Page 94
PIM
Adding a new alarm
To add a new alarm
1. In the alarm list, press and select [New Alarm].
94
2. Select the Alarm to activate a new alarm.
3. Select the date and time.
4. Input the description of the alarm.
5. Select the ringtone for the alarm and press to save.
Page 95
Quick alarm
There are no time and date limits in quick alarm; the alarm can be set
within any time you set.
To add a new quick alarm
1. In the alarm list, press and select [New Quick Alarm].
2. Select the checkbox on the right of Alarm.
3. Select the time and ringtone and press to save.
Deleting an alarm
Select an existing alarm, press to select [Delete] and press to
delete the selected record.
Turning on / off an alarm
PIM
In the alarm list, select an alarm and press to select [On]/[Off] to
turn it on or off.
95
Page 96

PIM
Using the Notes
If you need to make notes, you can achieve this by using the Notes
application.
Select [Notes] in [PIM] to activate.
Adding a new note
To add a new note
1. In the notes list, press to add a new note.
2. Enter the new content and press to save.
Managing notes
To edit a note
• In the notes list, select a record you wish to edit and press .
Alternatively, press to select [Edit], enter the new content,
and then save.
To delete a note
• In the notes list, select a record you want to delete, press to
select [Delete] and press to delete.
96
Page 97
To s e n d a n o te
• Select a note, press and select [Share] to send via Message or
Bluetooth.
To record a new voice note
• Select to record a sound file.
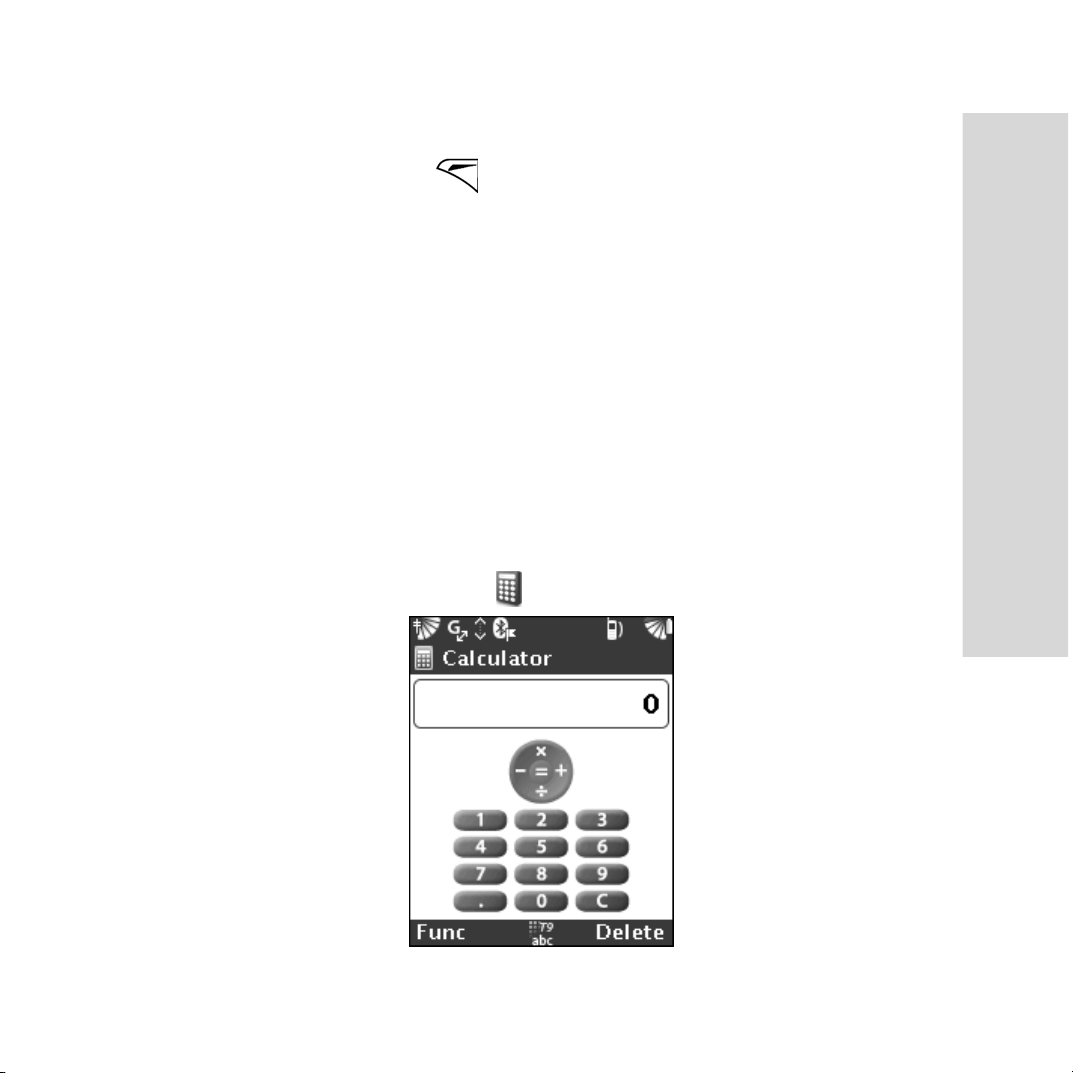
Using the Calculator
Your Smartphone has a standard calculator, you can use to add,
subtract, multiply, divide and calculate percentages.
In [PIM], select [Calculator] to use it.
PIM
97
Page 98
PIM
• Input a number and press / / / / to perform add,
subtract, multiply, divide and equal. Press to delete a wrong
number.
• Press to select the basic function:
– %: Percentage
– +/-: Switch the Positive and Negative number.
– Sqrt: Calculate the square roots.
– 1/x: Select to perform the reciprocal operation.
– M+: Select to store an entered value in the memory.
– M-: Select to subtract the entered value from the value in the
memory.
– Recall: Restore the entered value from memory.
– Store: Store data in memory.
– Clear: Clear all contents in memory.
98
Page 99
Entertainment
Camera
You can take pictures and videos with the built-in camera in your
Smartphone, and send them via MMS to your friends. You can also
send the pictures and videos saved in your Smartphone to computers
via Bluetooth.
Note: To use the MMS service, you need to register first. Please con-
tact your network service provider for details.
Using the Camera
Entertainment
To activate the Camera
1. To activate the camera, either:
• In the main menu, select [Camera] to access the viewfinder
screen; or
• Press the camera button on the side of your Smartphone in the
idle screen.
99
Page 100
Entertainment
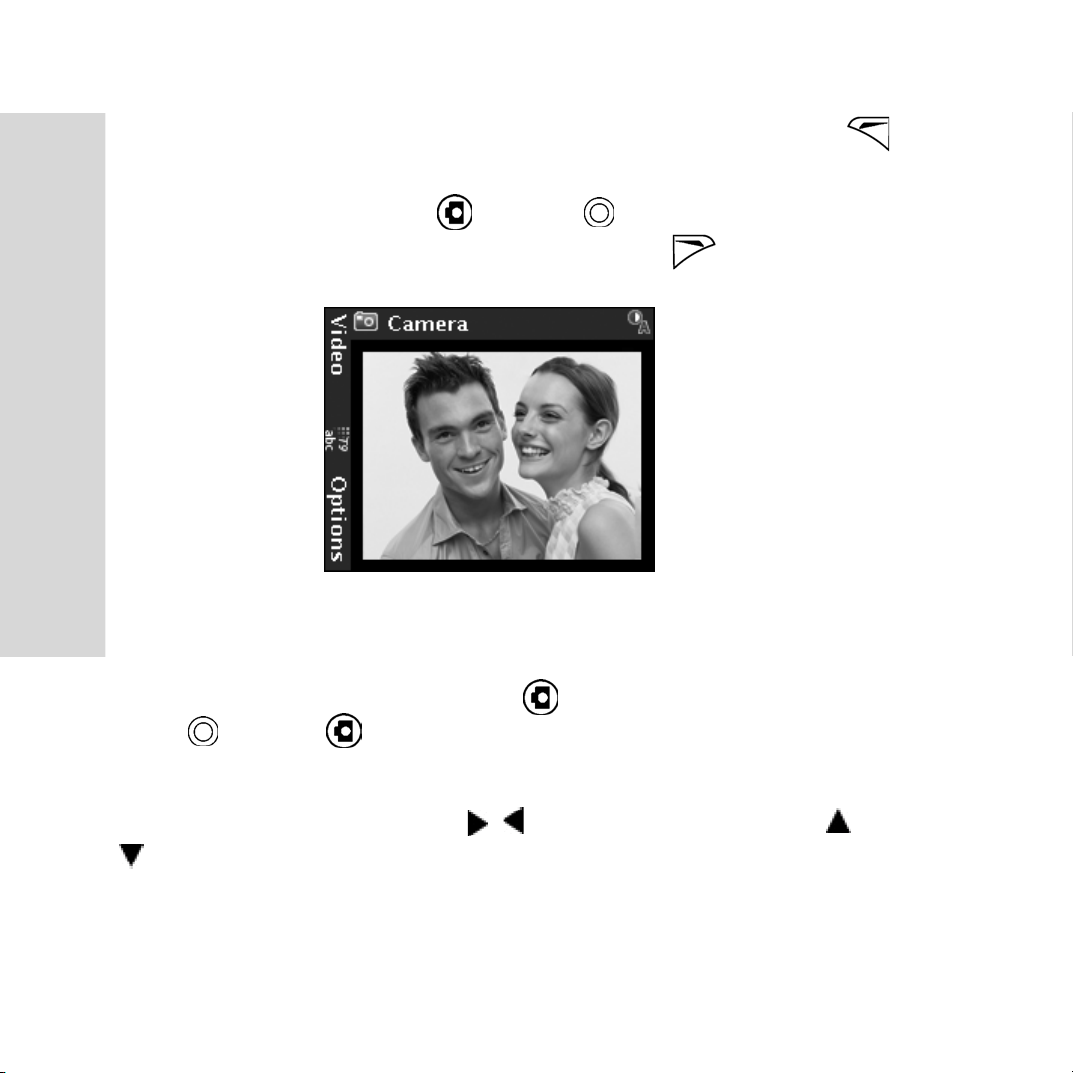
2. Place the phone in a landscape orientation. If required, press
to select the right settings.
3. Press the camera button , or press to capture. You can find
the photos in the Pictures application. (Press to switch to
video mode)
To take a self-portrait
Hold the phone so that you can see your reflection in the mirror next
to the lens, press the camera button to activate the camera, and
press or press again to take photo.
To adjust brightness
In the viewfinder screen, press / to adjust brightness. Press /
to zoom in/out the image.
100
 Loading...