

Page 1
Page 2

Copyright
Copyright © 2004 Group Sense PDA Ltd., All rights reserved.
Palm OS and the Palm Powered logo are registered trademarks and Palm Desktop is a trademark of
the Palm Trademark Holding Company, LLC. HotSync and Graffiti are registered trademarks of
PalmSource, Inc. Other brands names may be trademarks of their respective owners.
THE CHINESE HANDWRITING RECOGNITION SYSTEM IS AUTHORIZED BY HANWANG
TECHNOLOGY CO., LTD.
The manufacturer reserves the right to change the specifications without notice.
Page 3

Contents
Section 1: Introduction to Palm functions 1
1. PC system requirements. . . . . . . . . . . . . . . . . . . 1
2. Understanding G18 interface and controls. . . . . . . . . . . . 2
3. Tapping versus clicking . . . . . . . . . . . . . . . . . . . 4
4. Starting G18 and calibrating its screen . . . . . . . . . . . . . 4
5. Adjusting screen brightness and contrast . . . . . . . . . . . . 5
6. To launch applications . . . . . . . . . . . . . . . . . . . 5
7. Introduction to G18 interface. . . . . . . . . . . . . . . . . 6
8. Setting up the G18 interface . . . . . . . . . . . . . . . . . 9
9. Setting date, time and time zone . . . . . . . . . . . . . . 10
10.Setting Sleep Mode . . . . . . . . . . . . . . . . . . . 11
11.Setting alert sound and volume . . . . . . . . . . . . . . . 11
12.Setting system interface language . . . . . . . . . . . . . . 12
13.Setting up phone to phone IRDA data transfer . . . . . . . . . 14
14.GPRS/communication setting . . . . . . . . . . . . . . . 14
15.Using the onscreen keyboard . . . . . . . . . . . . . . . . 16
Using Graffiti 2 . . . . . . . . . . . . . . . . . . . . . 17
The Graffiti 2 alphabet . . . . . . . . . . . . . . . . . . 18
Writing punctuation marks and other special characters . . . . . 18
Graffiti 2 tips . . . . . . . . . . . . . . . . . . . . . . 19
16.Installing add-on applications . . . . . . . . . . . . . . . 19
17.Removing applications . . . . . . . . . . . . . . . . . . 21
18.HotSync Setting . . . . . . . . . . . . . . . . . . . . . 22
Selecting HotSync setup options . . . . . . . . . . . . . . 23
19.IR HotSync operations . . . . . . . . . . . . . . . . . . 26
Preparing your computer for IRDA communication . . . . . . . 26
Configuring HotSync Manager for IRDA communication . . . . 26
Performing an IR HotSync operation. . . . . . . . . . . . . 27
Using HotSync cable for HotSync operations . . . . . . . . . 27
20.Flash BackupMan . . . . . . . . . . . . . . . . . . . . 28
21.Data transfer from other Palm terminals . . . . . . . . . . . 29
G18 Quick Reference Manual 1
Page 4

Section 2 : Communication and PDA Features 34
1. Using the Phone . . . . . . . . . . . . . . . . . . . . . 34
To launch the Phone application . . . . . . . . . . . . . . 34
Making a call . . . . . . . . . . . . . . . . . . . . . . 36
Receiving a call . . . . . . . . . . . . . . . . . . . . . 37
Call Setting. . . . . . . . . . . . . . . . . . . . . . . 38
Call Time . . . . . . . . . . . . . . . . . . . . . . . 40
Call Records . . . . . . . . . . . . . . . . . . . . . . 40
Speed Dial . . . . . . . . . . . . . . . . . . . . . . . 41
Phone Security Setting . . . . . . . . . . . . . . . . . . 41
Phone ringing Setting . . . . . . . . . . . . . . . . . . . 44
Quick Switch . . . . . . . . . . . . . . . . . . . . . . 46
Testing the Phone Connection . . . . . . . . . . . . . . . 47
2. Using the SMS Short Message . . . . . . . . . . . . . . . 49
To launch the SMS application . . . . . . . . . . . . . . . 49
SMS setting . . . . . . . . . . . . . . . . . . . . . . 49
Writing SMS & Sending SMS . . . . . . . . . . . . . . . 50
Receiving SMS . . . . . . . . . . . . . . . . . . . . . 51
Replying SMS & Forwarding SMS . . . . . . . . . . . . . 52
3. Using the EMailer . . . . . . . . . . . . . . . . . . . . 54
To launch the EMailer application . . . . . . . . . . . . . . 54
Setting. . . . . . . . . . . . . . . . . . . . . . . . . 54
To choose the folder . . . . . . . . . . . . . . . . . . . 57
To create and send an e-mail . . . . . . . . . . . . . . . . 57
To browse an e-mail . . . . . . . . . . . . . . . . . . . 59
To edit an e-mail. . . . . . . . . . . . . . . . . . . . . 59
To delete an e-mail . . . . . . . . . . . . . . . . . . . . 59
To reply an e-mail . . . . . . . . . . . . . . . . . . . . 60
To search. . . . . . . . . . . . . . . . . . . . . . . . 60
4. Using the jBrowser . . . . . . . . . . . . . . . . . . . . 61
To launch the jBrowser application . . . . . . . . . . . . . 61
Surfing Net . . . . . . . . . . . . . . . . . . . . . . . 64
Favorites . . . . . . . . . . . . . . . . . . . . . . . . 64
History . . . . . . . . . . . . . . . . . . . . . . . . 65
Statistics . . . . . . . . . . . . . . . . . . . . . . . . 65
G18 Quick Reference Manual 2
Page 5

5. Using the Camera . . . . . . . . . . . . . . . . . . . . 66
To launch the Camera application . . . . . . . . . . . . . . 66
To set the preferences of a photograph . . . . . . . . . . . . 66
Taking photos . . . . . . . . . . . . . . . . . . . . . . 66
Browsing photos. . . . . . . . . . . . . . . . . . . . . 67
6. Using the Photo Album . . . . . . . . . . . . . . . . . . 68
Album management . . . . . . . . . . . . . . . . . . . 68
To play album. . . . . . . . . . . . . . . . . . . . . . 70
To delete photos . . . . . . . . . . . . . . . . . . . . . 70
To browse photos . . . . . . . . . . . . . . . . . . . . 70
7. Using the Photo Editor . . . . . . . . . . . . . . . . . . 71
To launch the Photo Editor application . . . . . . . . . . . . 71
To edit a picture . . . . . . . . . . . . . . . . . . . . . 72
The definition of the Toolbar icon . . . . . . . . . . . . . . 72
8. Using the Address Book . . . . . . . . . . . . . . . . . . 73
To launch the Address Book application . . . . . . . . . . . 73
9.Using the Date Book . . . . . . . . . . . . . . . . . . . 76
To launch the Date Book application . . . . . . . . . . . . . 76
Scheduling timed events. . . . . . . . . . . . . . . . . . 76
To schedule a timed event for another date . . . . . . . . . . 78
Working in Week view . . . . . . . . . . . . . . . . . . 80
Working in Month view . . . . . . . . . . . . . . . . . . 81
Working in Agenda view . . . . . . . . . . . . . . . . . 81
Appendix I:Safety 82
Appendix II: Install CD 85
Appendix III: Specification 87
Appendix IV: Care and maintenance 88
Appendix V: Reset your G18 89
Appendix VI: FCC Information 91
G18 Quick Reference Manual 3
Page 6

Section 1: Introduction to Palm functions
1. PC system requirements
Section 1: Introduction
to Palm functions
1. PC system requirements
To install and operate Palm Desktop on Windows, your computer system
should meet the following minimum hardware requirements:
• Windows 98/NT/2000/XP
• 16 MB RAM (64MB recommended for Windows 2000 or above)
•20 MB available hard disk space
• VGA monitor or better
• CD-ROM drive (You can also download Palm Desktop software
from the site http://www.palm.com/intl)
• Mouse pointing device
• One available serial port
G18 Quick Reference Manual 1
Page 7
Section 1: Introduction to Palm functions
E
D
L
2. Understanding G18 interface and controls
2. Understanding G18 interface and
controls
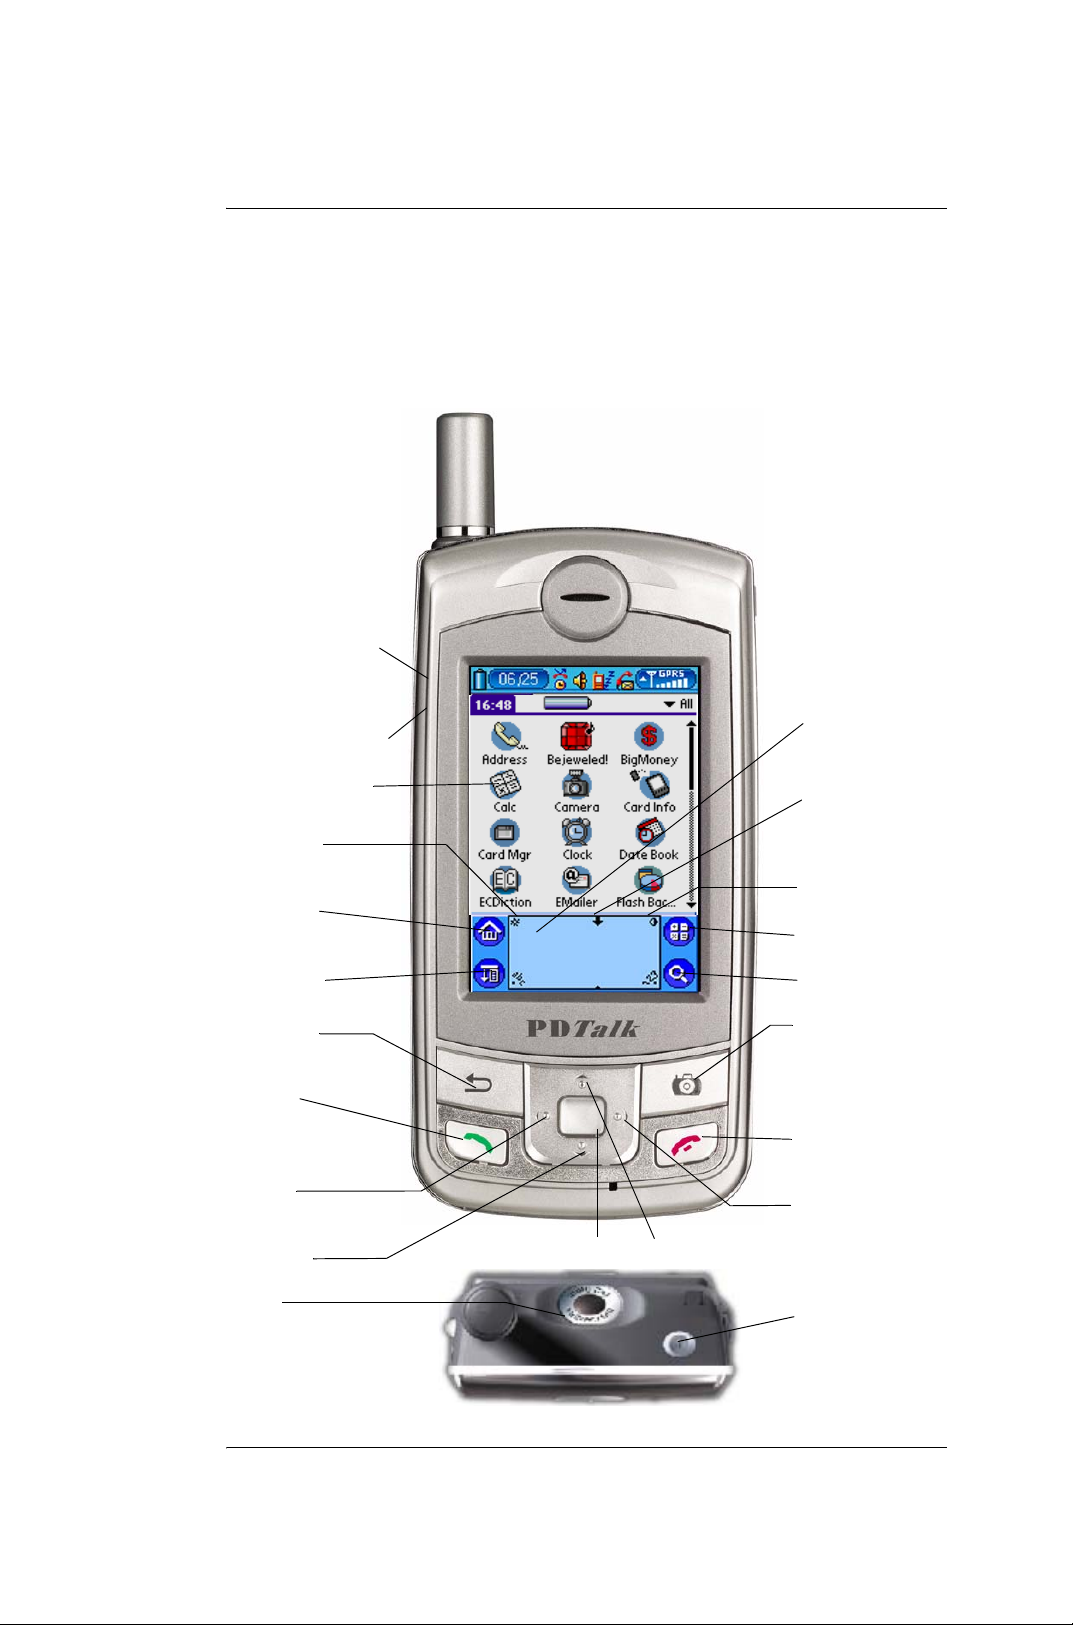
PDTalk G18 components:
ncrease Volume Key
Text
Decrease Volume Key
Sub Menu Icon
Input Area
Hide Text
Input Area
Brightness
Control Icon
Menu/Home
Icon
Function
Menu Icon
scape Key
all Key
Scroll
eft Key
Scroll
own Key
Camera
Enter Key
Scroll Up Key
Contrast
Control Icon
Calculator Icon
Search Icon
Camera Key
End Call Key
Scroll
Right Key
Sleep/Power
Button
G18 Quick Reference Manual 2
Page 8
Section 1: Introduction to Palm functions
2. Understanding G18 interface and controls
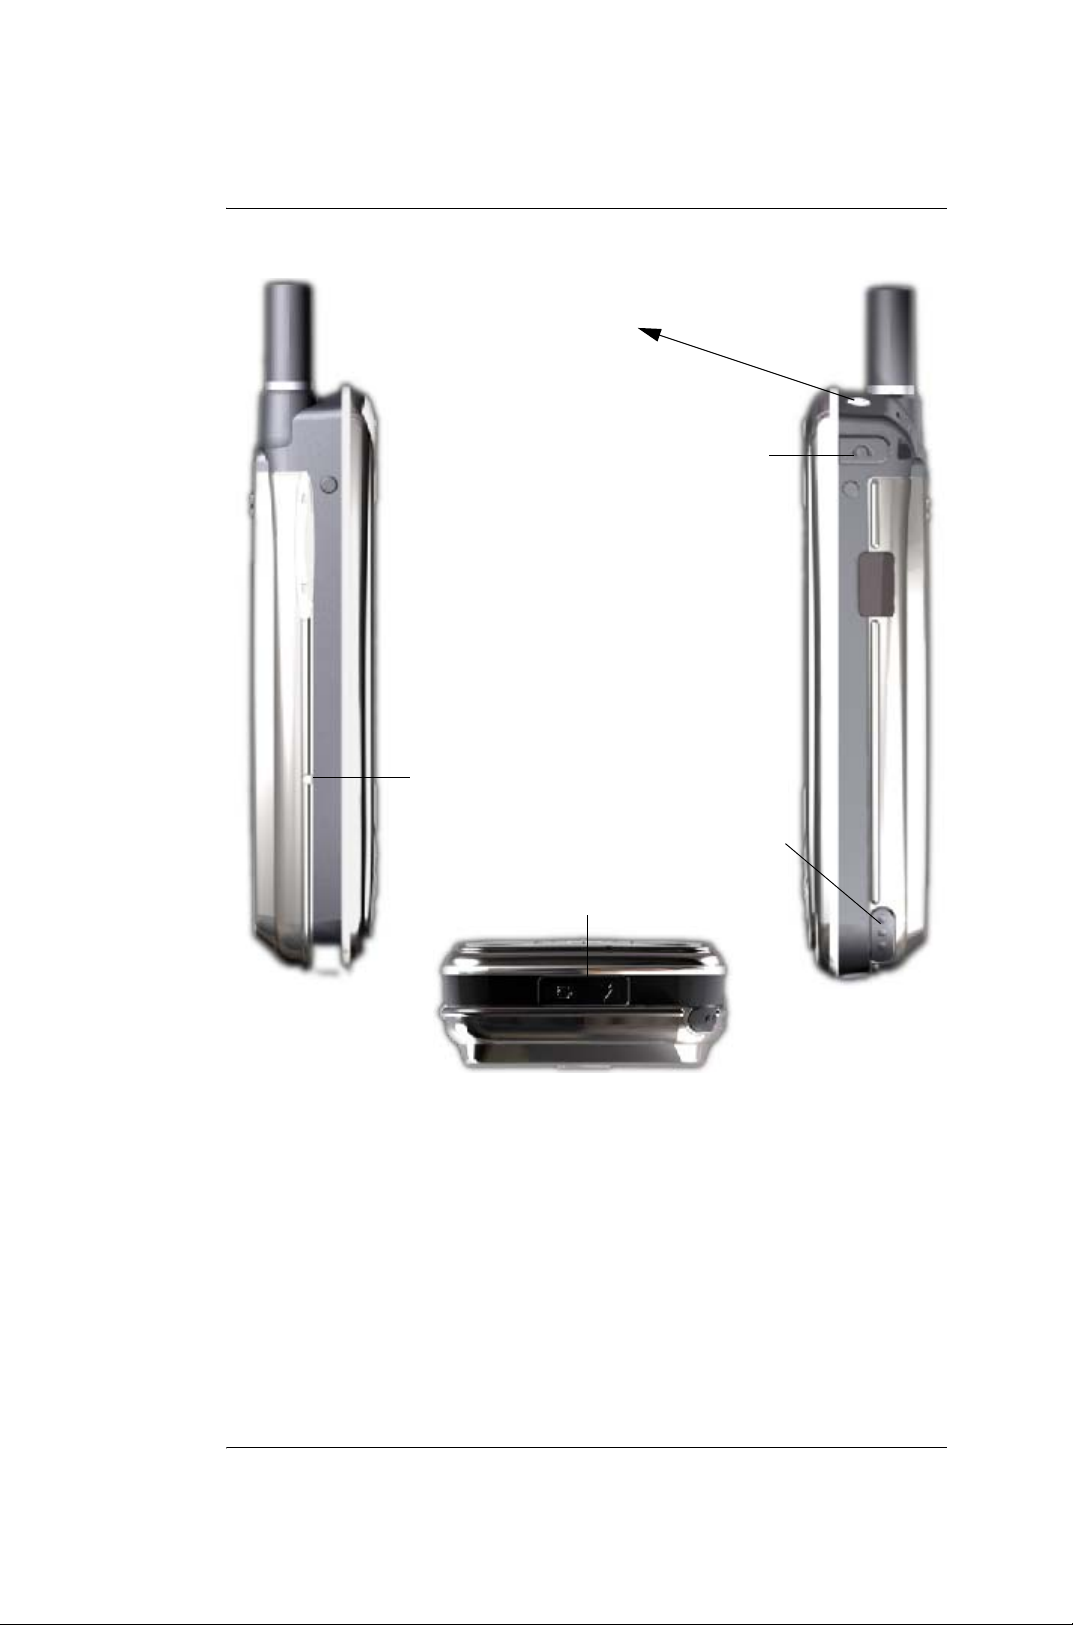
Sleep/Power
Button
Earphone
Jack
Reset
Switch
Stylus
I/O Port
Power Button. Pressing the power button turns the G18 on (if it is off) and
returns to the last screen that was displayed. Press the power button to turn
the G18 off.Use the backlight to illuminate the screen in low-light
conditions.
Text Input Area. Write letters and numbers in this area using the
Graffiti®2 alphabet.
Up/Down Key. Displays text and other information that extends beyond
the area of the G18 screen. Press the lower half of the scroll button to scroll
down and view information below the viewing area. Press the upper half to
view information above the viewing area.
G18 Quick Reference Manual 3
Page 9

Section 1: Introduction to Palm functions
3. Tapping versus clicking
Stylus. The stylus is stored in the lower right corner holder.
InfraRed Port. Used to beam data between your G18 and another G18 or
other Palm OS PDA and perform HotSync operations.
Reset Button. Press to restart your G18
Serial Port Connector. Connects your G18 to PC through HotSync cable.
This allows you to update the information between your G18 and the
computer using HotSync technology.
TIP: When you start the telephone function, the dimension of the keys
will change .You may browse the introduction of telephone function for
particular introduction.
3. Tapping versus clicking
Just as using a mouse pointer to click icons on your computer screen, you
use the stylus to tap on icons on your G18 touch-screen. Tapping is the
basic action used to execute tasks on your G18.
IMPORTANT: Always use the point of the stylus for tapping or
making strokes on the G18 screen. Never use a ballpoint pen, pencil, or
any other sharp object to write on the G18 screen.
4. Starting G18 and calibrating its screen
The first time you start the G18, setup instructions appear onscreen. These
instructions include a calibration screen, or digitizer. Calibration aligns the
internal circuitry of the G18 with its touch-sensitive screen so your G18
can detect the task you want to perform when you tap an element on the
screen.
To calibrate your screen:
1.Tap the Applications icon, and then tap Prefs.
2.In the pick list in the upper right corner of the screen, tap Digitizer.
G18 Quick Reference Manual 4
Page 10
Section 1: Introduction to Palm functions
5. Adjusting screen brightness and contrast
3.Follow the on-screen instructions, tapping the screen where
indicated.
5. Adjusting screen brightness and
contrast
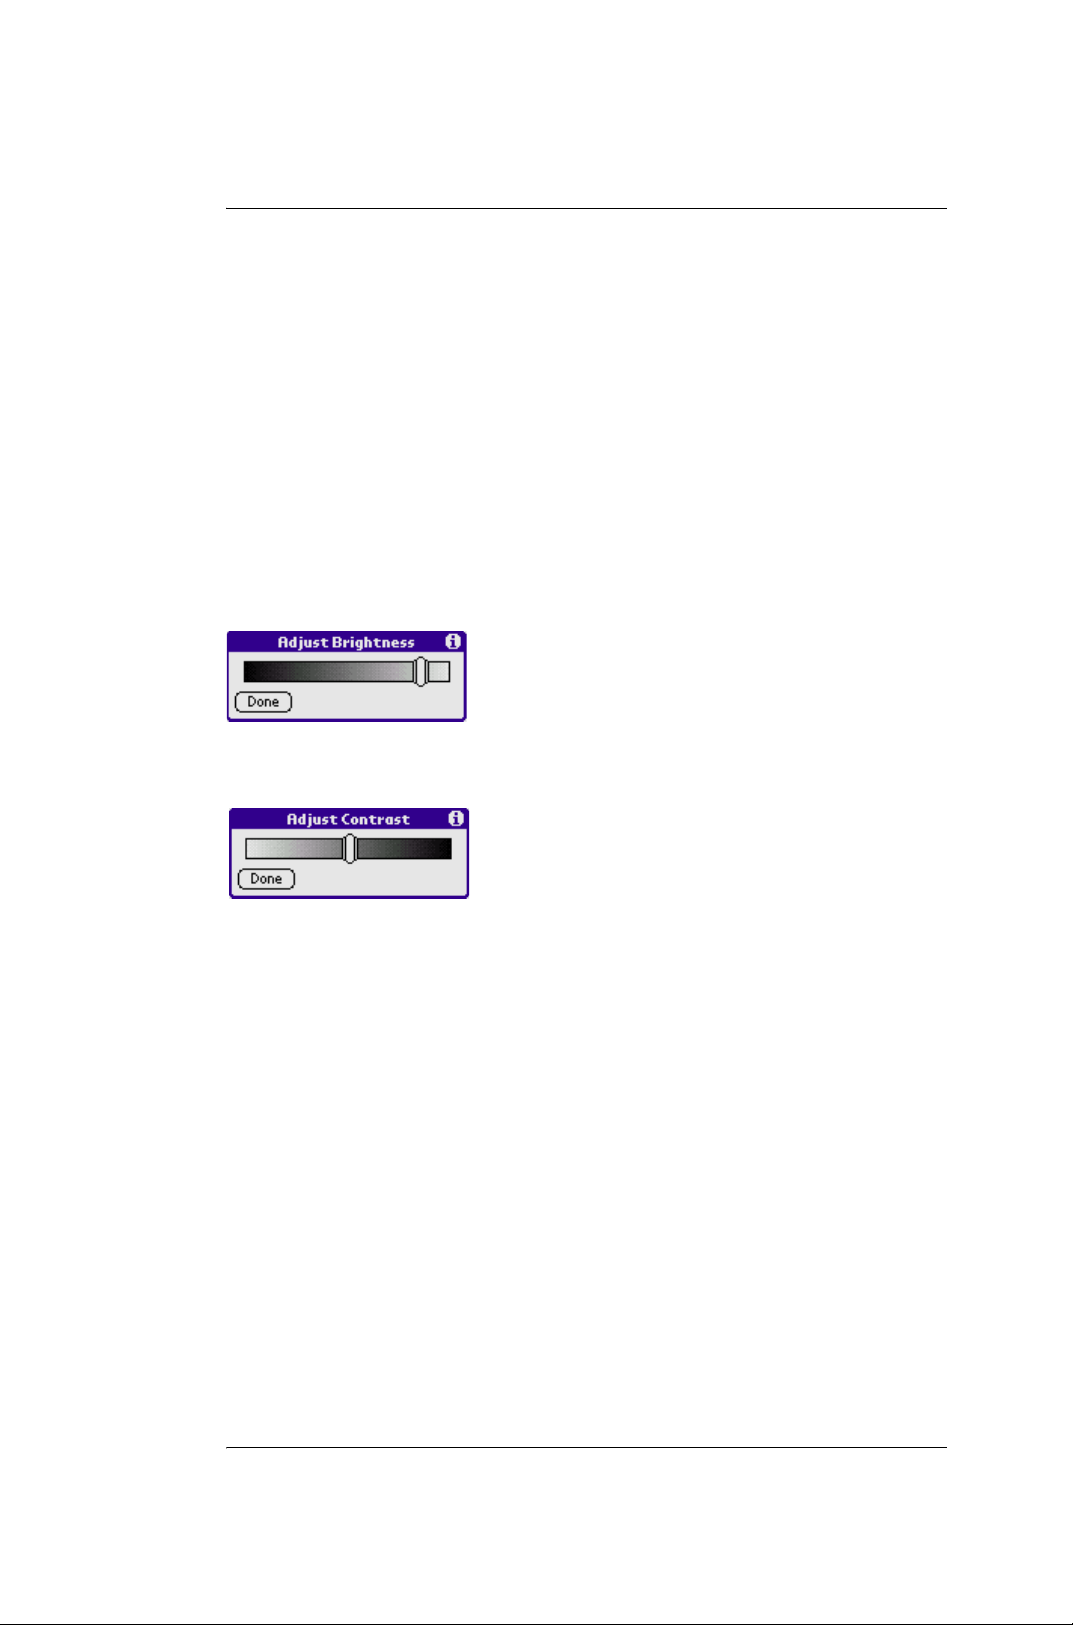
To adjust the brightness of your G18 screen:
1.Turn on your device.
2.Tap the brightness of screen background icon at the screen bottom;
3.Tap the contrast icon at the screen bottom.
6. To launch applications
You can use the Applications Launcher to open any application installed on
your G18. Or you can tap the application button in the front control panel
to shift to another application.
G18 Quick Reference Manual 5
Page 11
Section 1: Introduction to Palm functions
7. Introduction to G18 interface
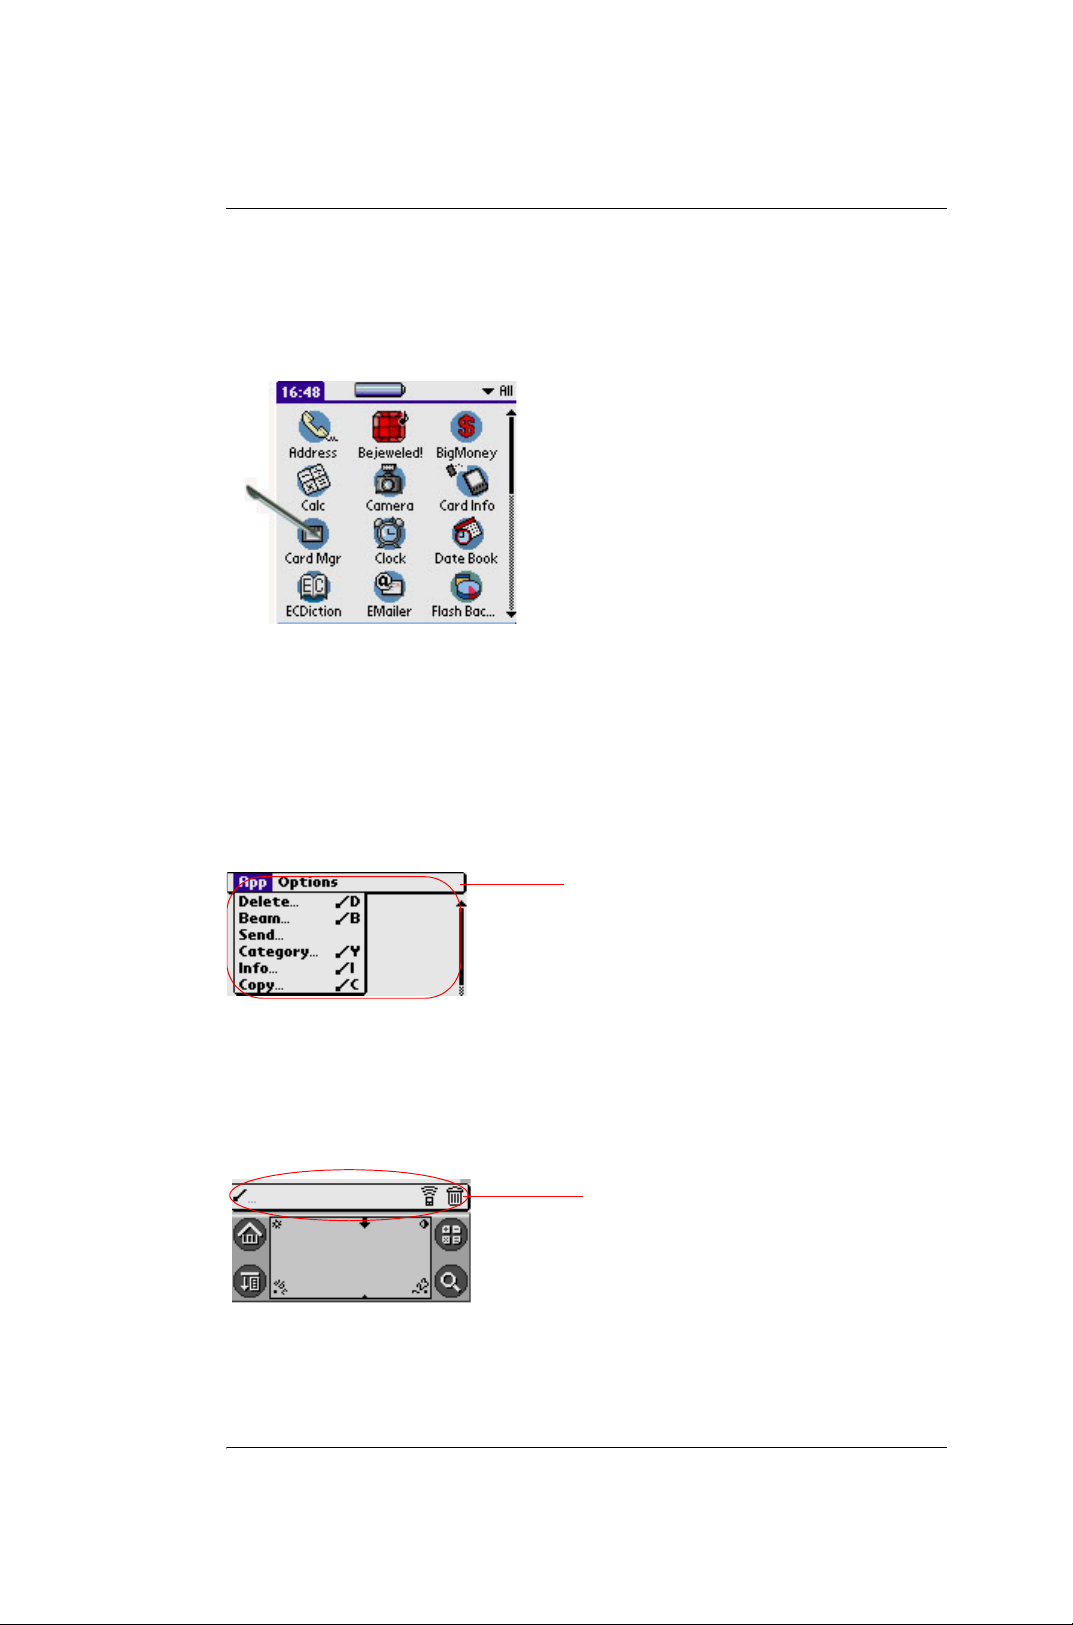
To open an application:
Tap the Application icon.
7. Introduction to G18 interface
Your G18 includes the following interface elements:
• Menu bar.containing a set of menu commands specific to the
application. Not all applications have a menu bar.
menu bar
• Command bar.Let you tap icons or write a ShortCut stroke to
initiate a command instead of tapping a command in the menu bar.
The icons displayed in the Command bar vary within each
application.
command bar
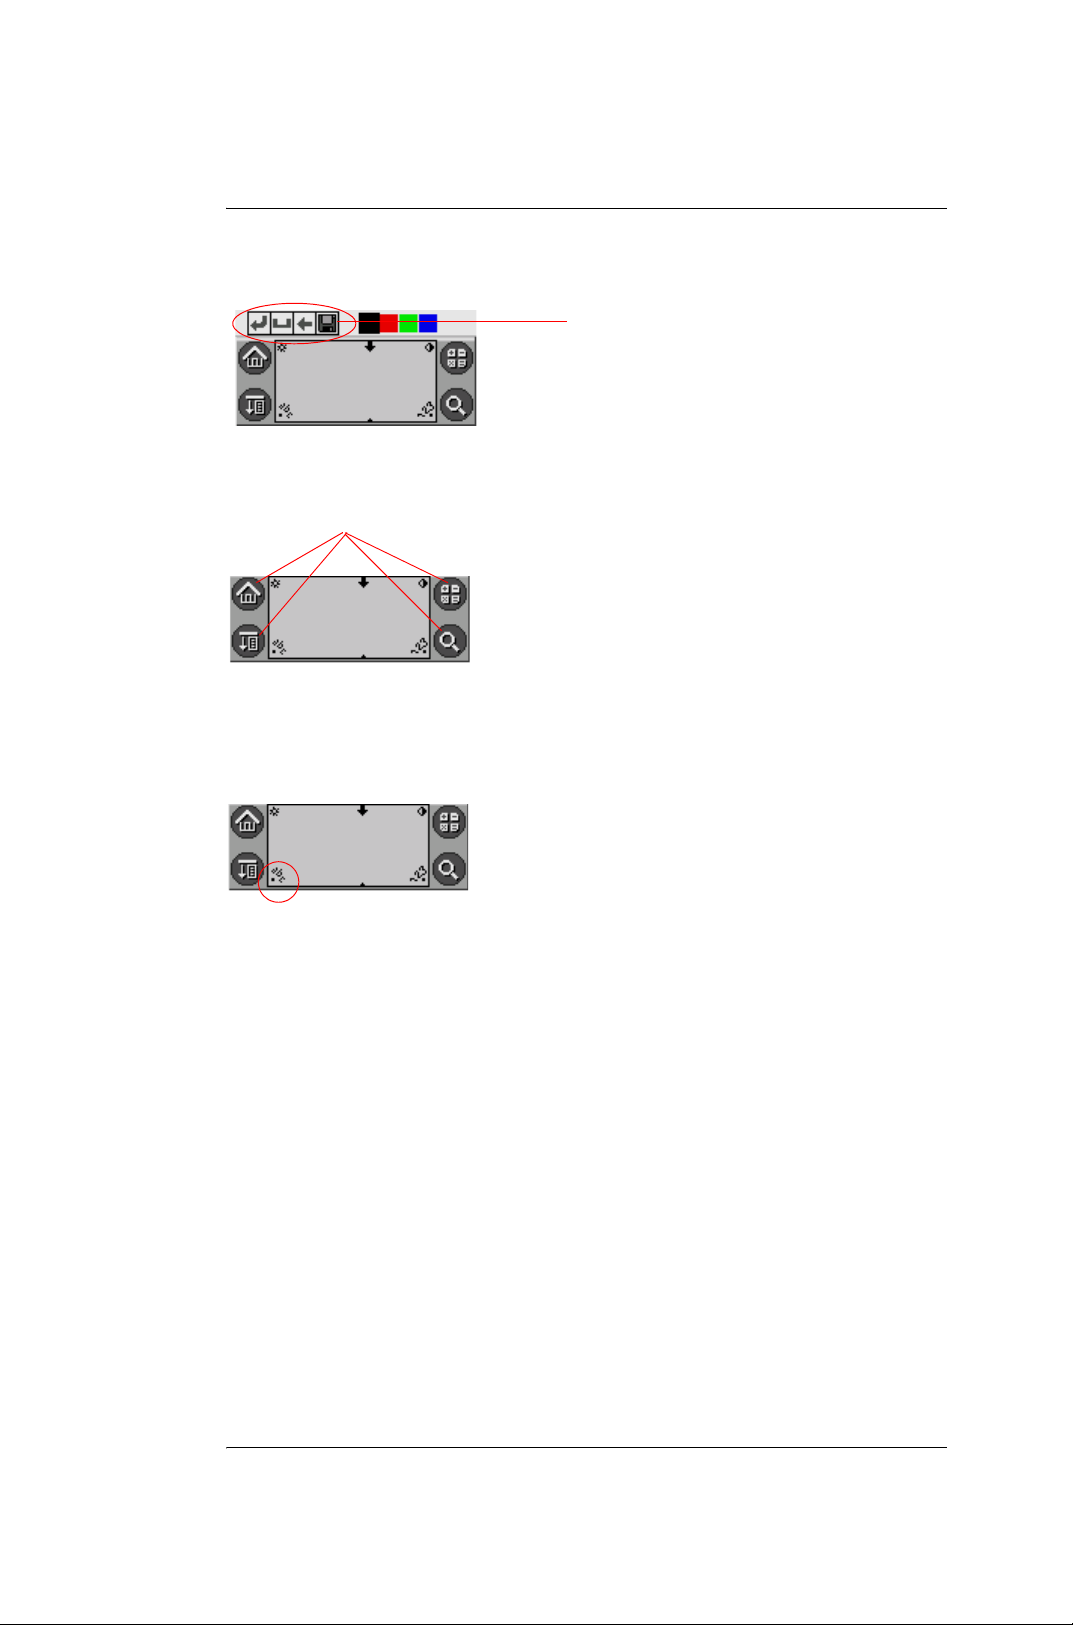
• Command buttons that initiate a command when tapped. Command
buttons appear in dialog boxes and at the bottom of application
screens.
G18 Quick Reference Manual 6
Page 12
Section 1: Introduction to Palm functions
7. Introduction to G18 interface
command button
• Icons that open applications and menus, and find text anywhere in
your data.
icons
•An abc dot in the input area that activates the alphabetic keyboard
when tapped; note that the cursor must be in an input field for this
option to work.
•A 123 dot in the input area that displays the numeric keyboard
when tapped; note that the cursor must be in an input field for this
option to work.
• Exit the input area
G18 Quick Reference Manual 7
Page 13
Section 1: Introduction to Palm functions
7. Introduction to G18 interface
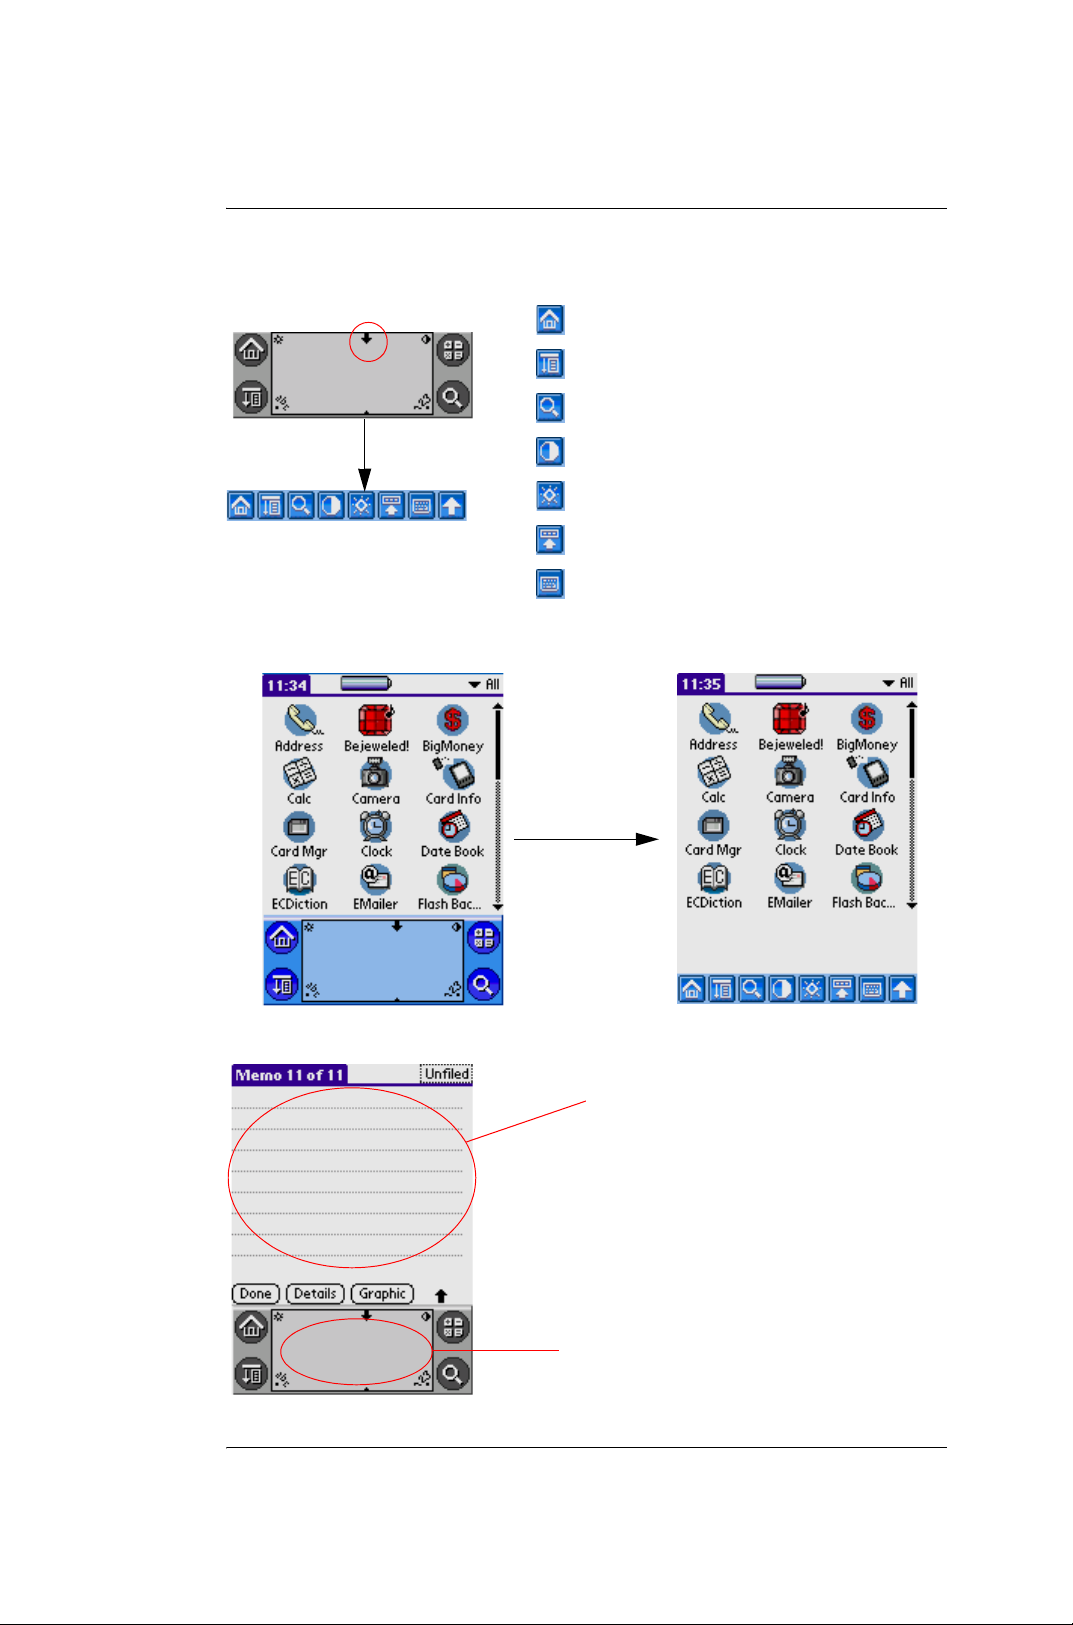
back to the application interface
function menu
search
adjust the contrast
pop up the command
pop up keyboard
pop up input area
tool
• Text areas and screens in which you can enter information.
screen
input area
G18 Quick Reference Manual 8
Page 14
Section 1: Introduction to Palm functions
8. Setting up the G18 interface
8. Setting up the G18 interface
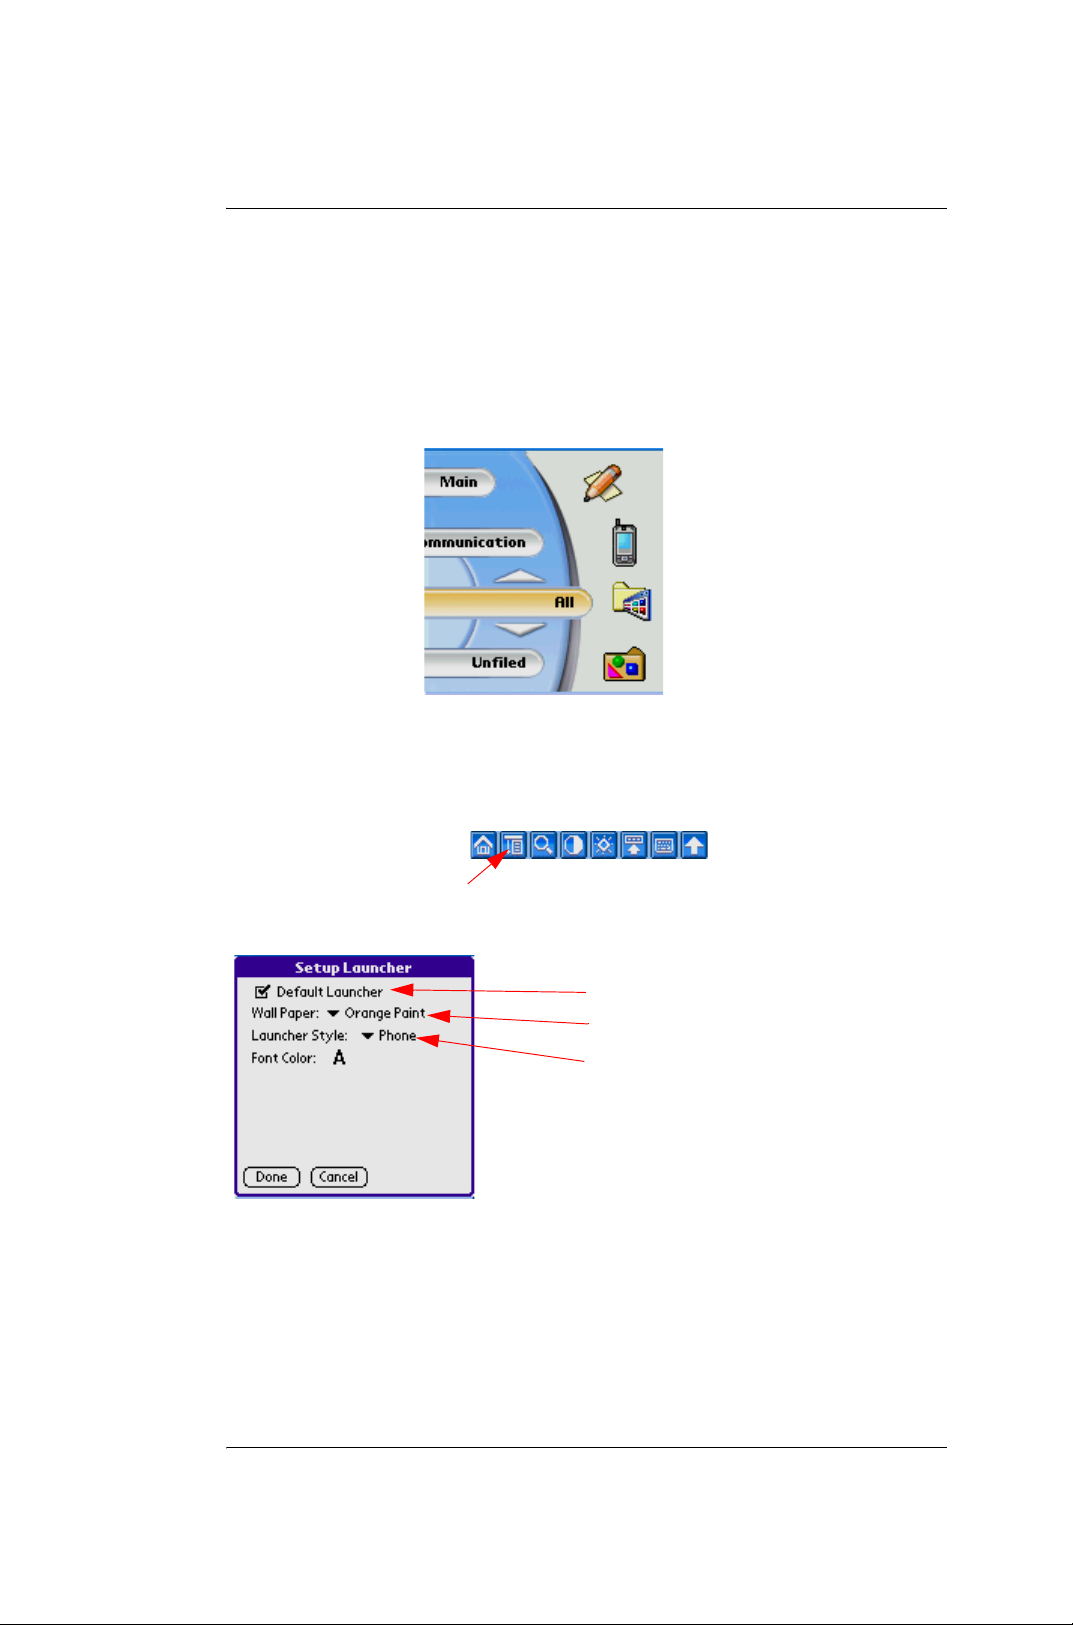
• Interface setting
The G18 provides two user selectable interfaces
1.The GSL interface:
the GSL interface
The GSL interface have two setup launcher(the mobile telephone/ the palm
computer)
• Tap the function menu at the bottom
the function menu
• Tap the setup launcher of the option.
to set the start-up application interface
to get the picture from the album as
wallpaper.
to select the style from the mobile phone
or palm computer
2.The original interface of the palm
Tap the function menu and select the “exit navigation” to start the
application.
G18 Quick Reference Manual 9
Page 15
Section 1: Introduction to Palm functions
9. Setting date, time and time zone
To return to the GSL interface, you can enter the main interface screen and
tap on the GSL launcher icon.
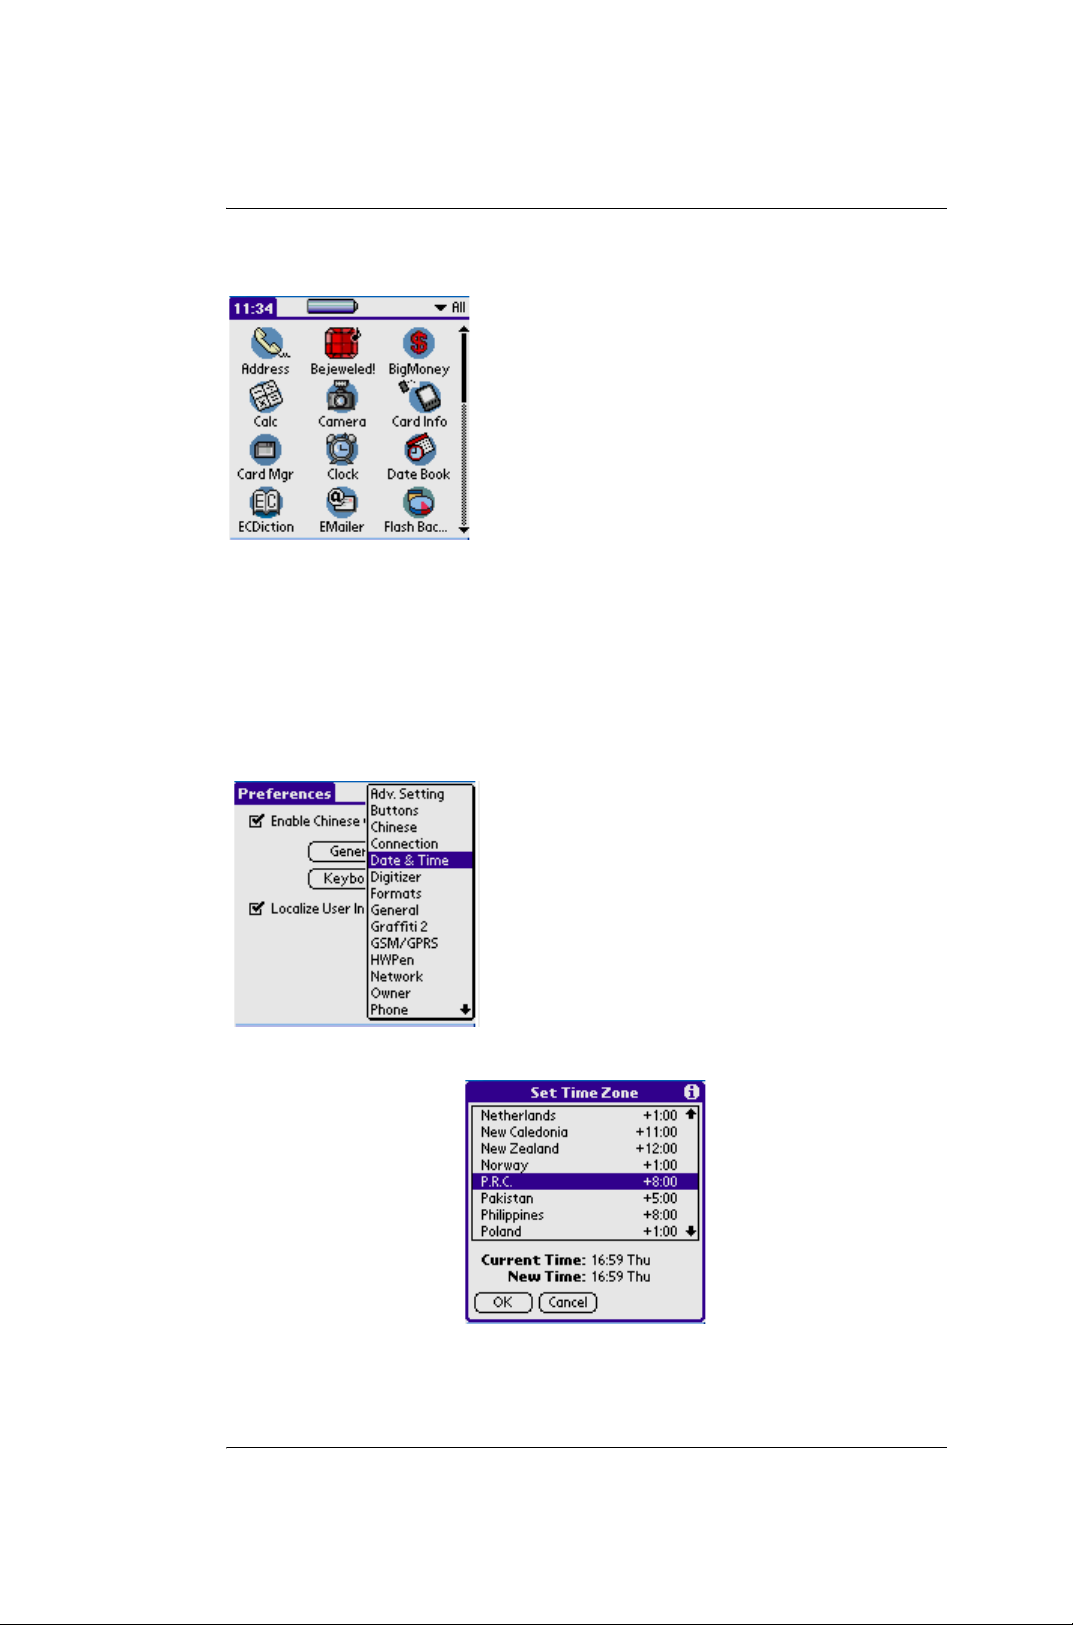
9. Setting date, time and time zone
Enter the “system” screen, tap the “preferences”, then select from the
options available from the drop menu, tap the “date/ time”.
• Note: you need to set the time zone.
G18 Quick Reference Manual 10
Page 16
Section 1: Introduction to Palm functions
10.Setting Sleep Mode
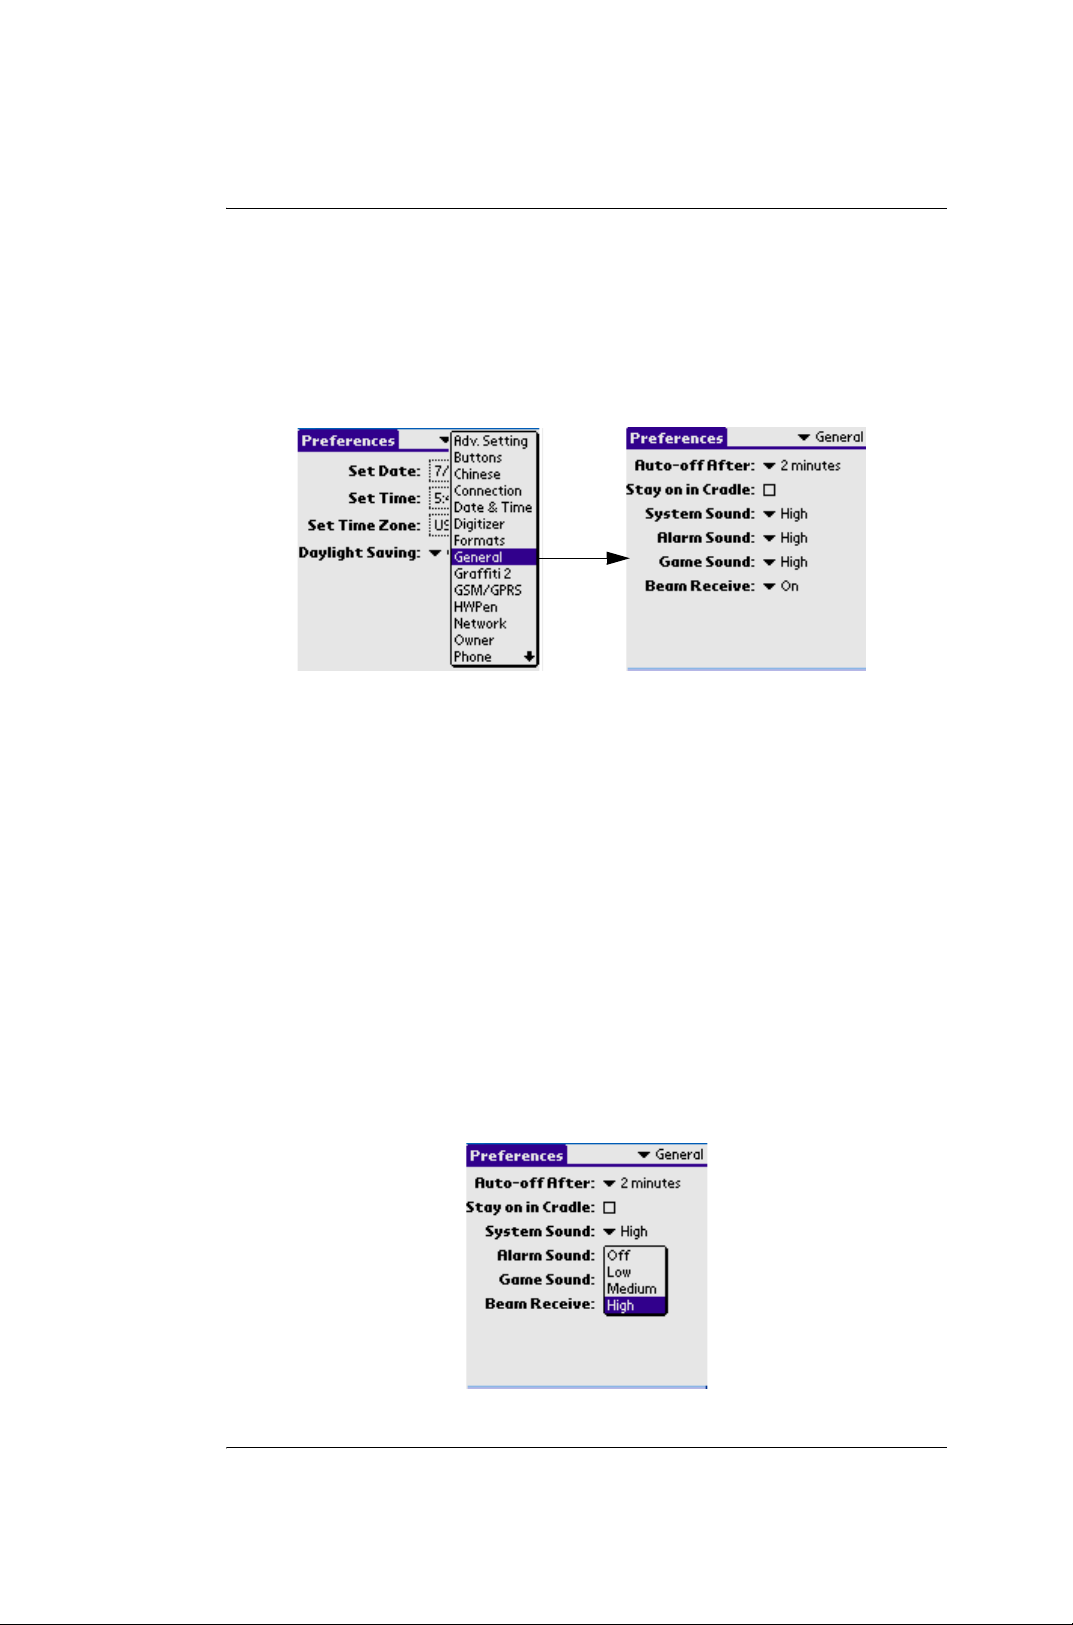
10.Setting Sleep Mode
Go to “preferences setting” screen, from the drop menu, tap the “ general
setting” option.
In the general setting screen, the options available are:
– sleeping state:thirty seconds to three minutes
– system sound
– alarm sound
– game sound
– beam receive
• When you use the mobile phone,you can tap the “sleep mode”
option to start the sleeping state.
11.Setting alert sound and volume
• To set alert sounds and volume, select the “alarm sound” in the
“General” settings option of the “preferences screen”
G18 Quick Reference Manual 11
Page 17
Section 1: Introduction to Palm functions
12.Setting system interface language
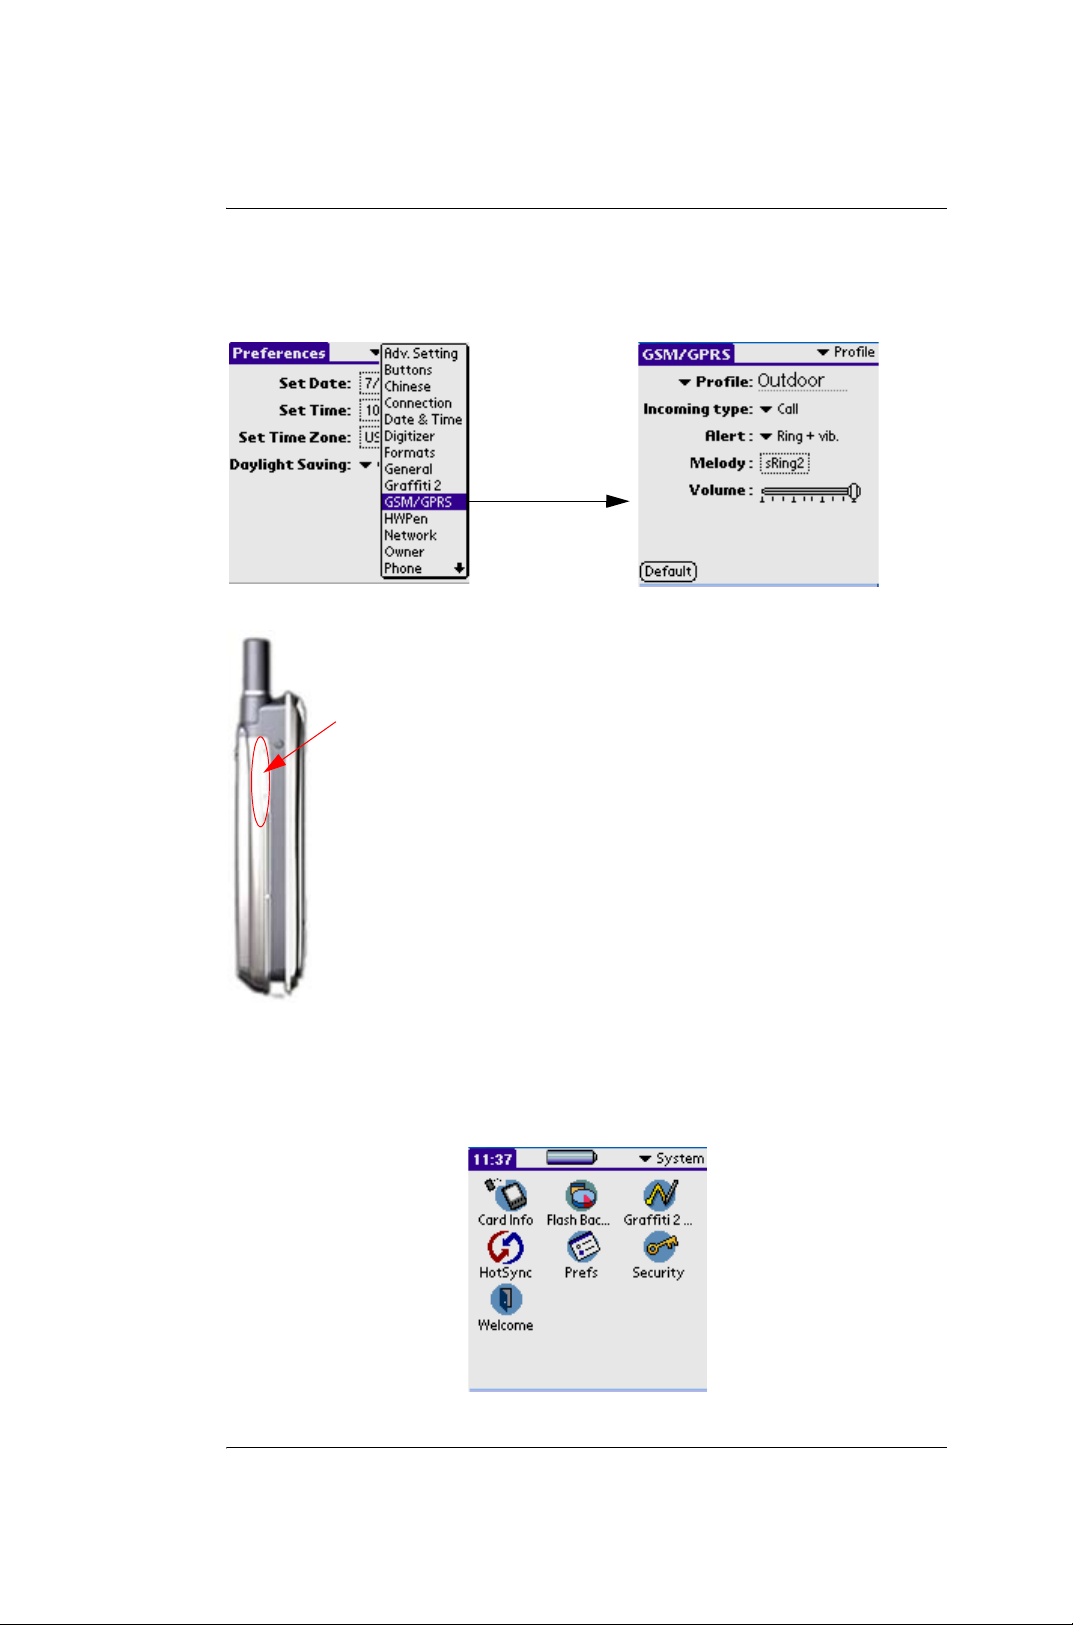
• To personalise your phone ringtone settings, go to “ GSM/GPRS”
option, select “Profile”
adjust the calling volume from the left button
12.Setting system interface language
G18 Quick Reference Manual 12
Page 18
Section 1: Introduction to Palm functions
12.Setting system interface language
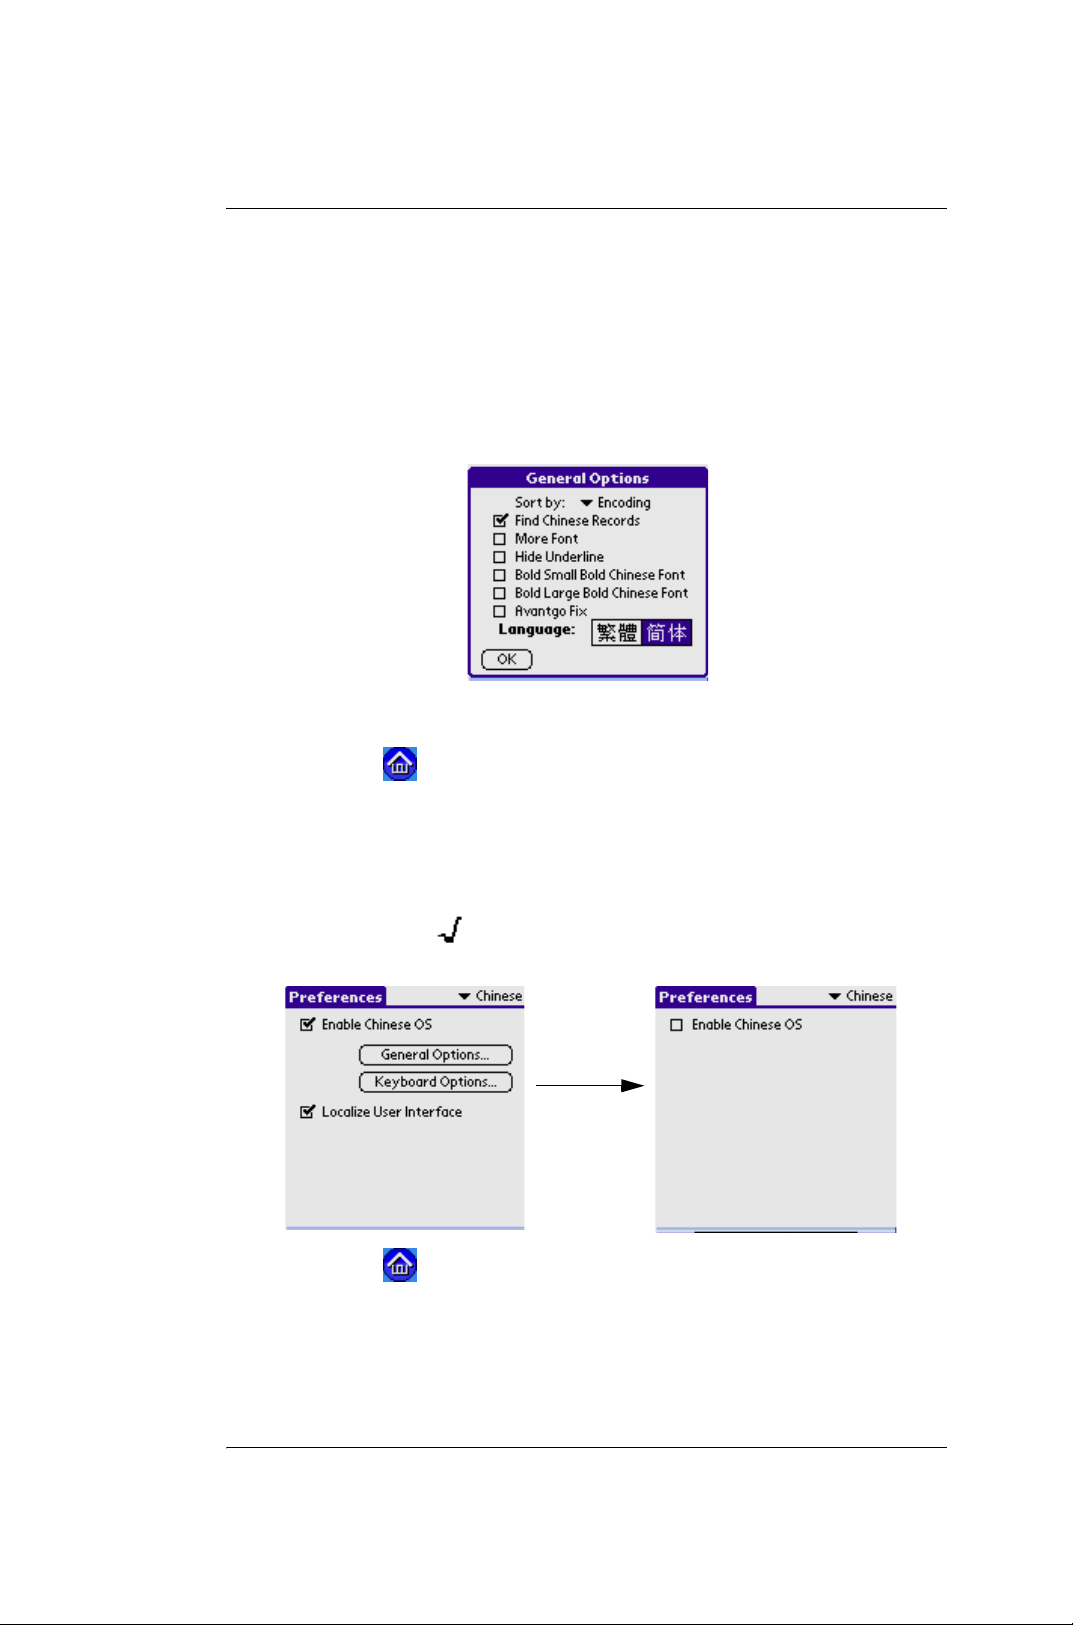
Setting the language from English to Chinese
– Select “Chinese” option from the drop menu.
– Select the “Enable Chinese OS” option.
– Tap the “General” option
– Select the simple Chinese font, and top “OK” option.
– Tap the icon to complete the system language change.
– Note: If the system language is changed to the simple Chinsee
font , it will change the language of the “ input by hand area “
option and browsing the SMS and WAP from English to
Chinese .
– Delete the °× °± flag in the “start the Chinese system”
option.
– Tap the icon .
G18 Quick Reference Manual 13
Page 19
Section 1: Introduction to Palm functions
13.Setting up phone to phone IRDA data transfer
13.Setting up phone to phone IRDA data
transfer
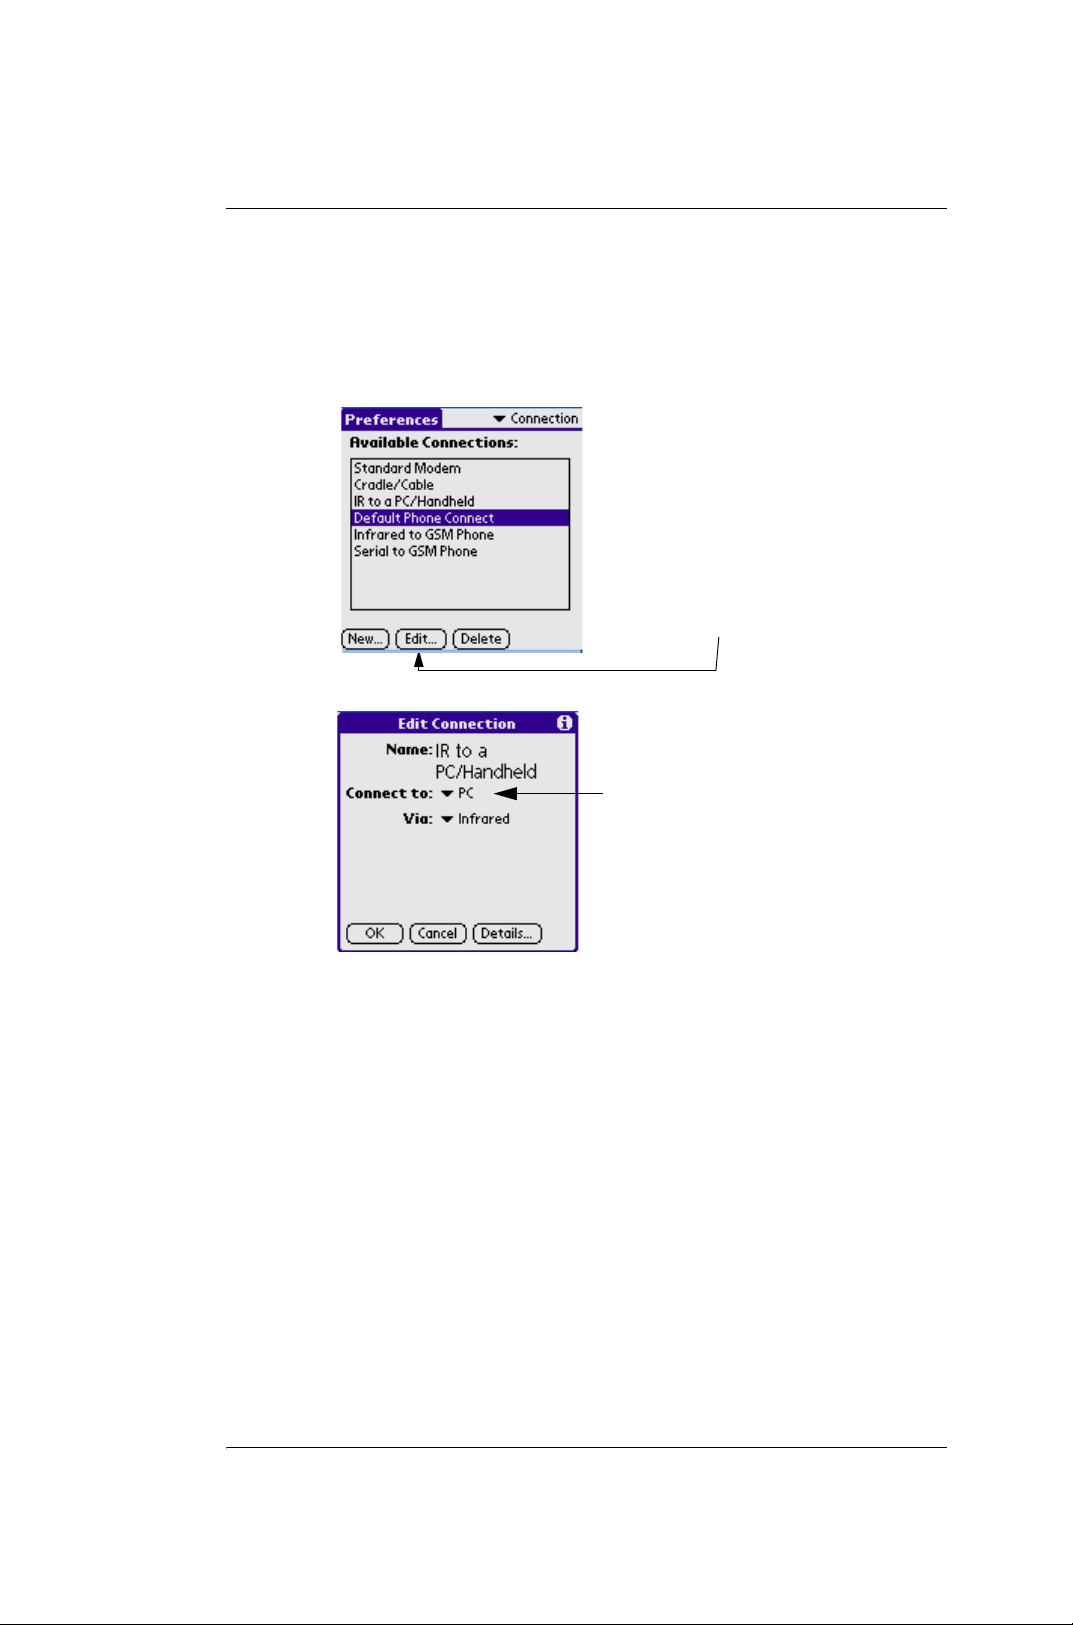
-Select the “connection”.
tap the "Edit..." option
select the transfer object
– For data transfer using "IrDA Beaming". You could first shift to
the"Application Interface", the tap the icon of the "function
menu" at the bottom,select"Beaming".
– Beaming Album with infrared
Shift to "PhotoAlbum" application,select an album which you want to
beam. tap the "function menu" icon,then tap "Beaming the Album..." at the
dropdown menu.
14.GPRS/communication setting
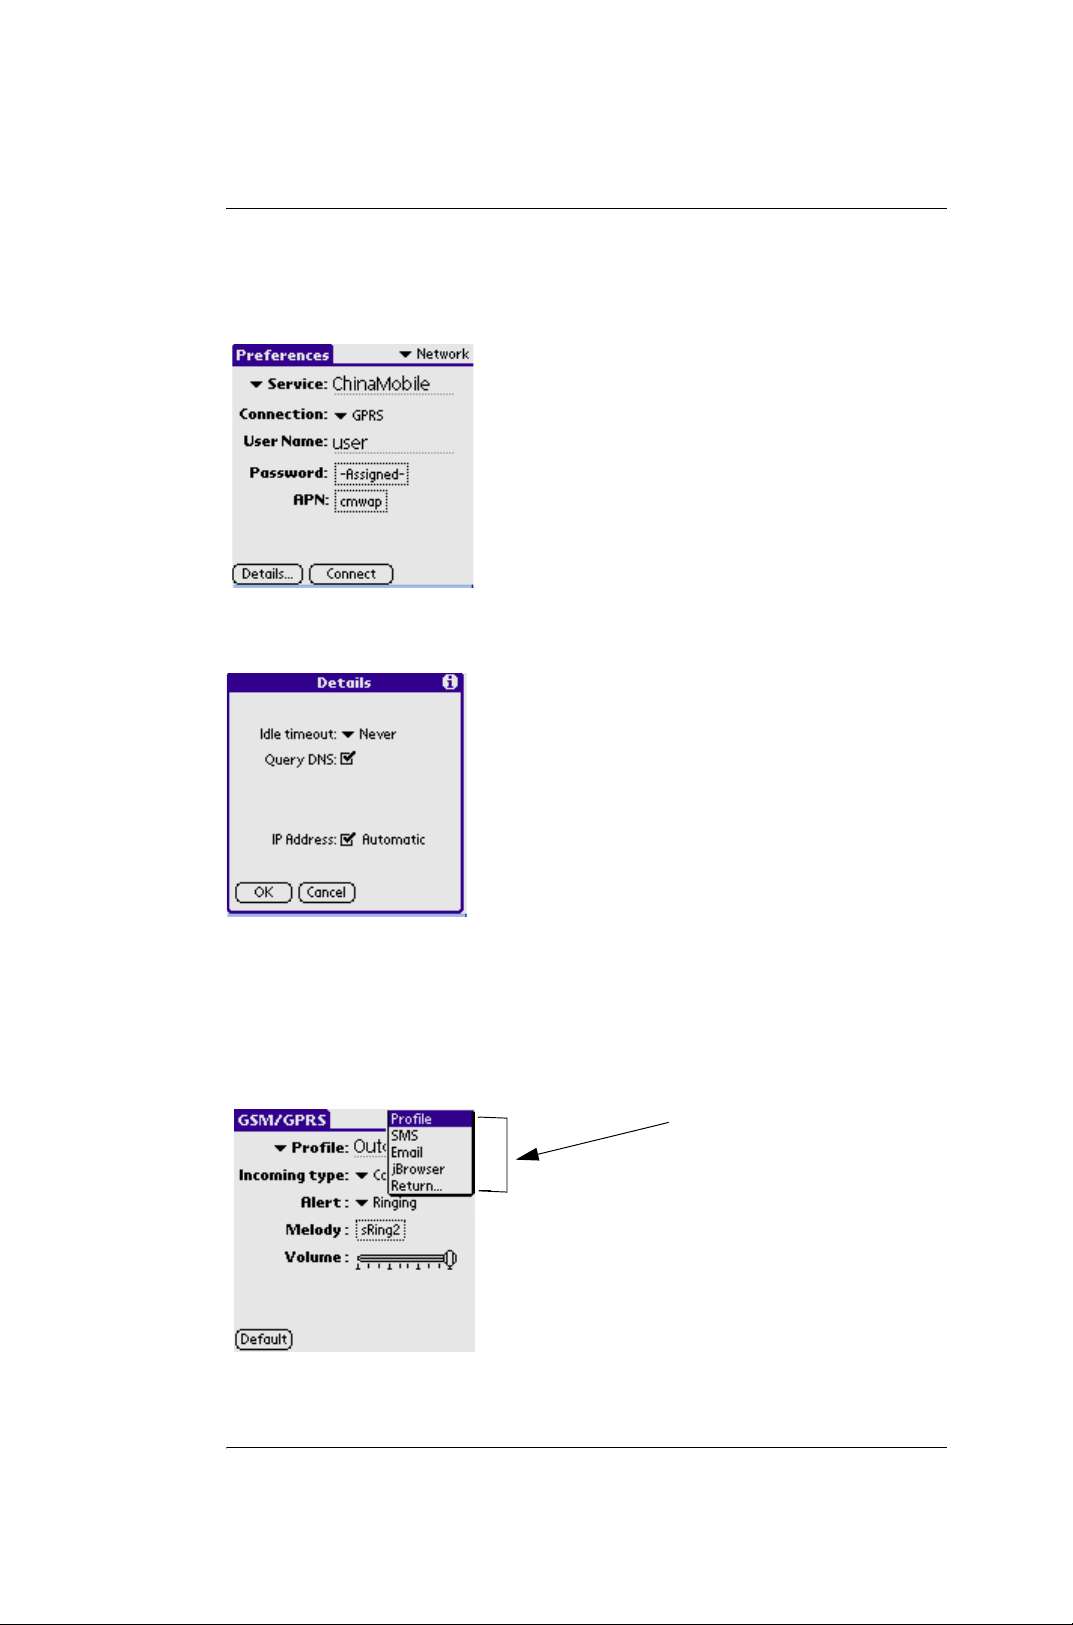
• Enter into the "Prefs",and select "Network"
• select "GPRS" in the "Connection" menu
G18 Quick Reference Manual 14
Page 20
Section 1: Introduction to Palm functions
14.GPRS/communication setting
• Input relational information at the "APN" field ( you can get the
information from the Network master builder )
• Tap on "Details..." to key in required data. Check "Query DNS"
,and check "Automatic" at IP Address.
• Tap the "OK" button to return,then tap the "Connect" button.
• Once GPRS setting is done, window will close. Email setting is
automatically done.
• At the "Preferences" screen, select "Connection" from the drop
menu.
Or select option here
-Email
-SMS
-jBrowser
wait for account information
G18 Quick Reference Manual 15
Page 21
Section 1: Introduction to Palm functions
15.Using the onscreen keyboard
15.Using the onscreen keyboard
You can open the onscreen keyboard anytime you need to enter text or
numbers on your G18.
To use the onscreen keyboard:
• Open any application (such as the Address Book).
• Tap any record, or tap New.
• Choose one of the following to display the alphabetic or numeric
keyboard:
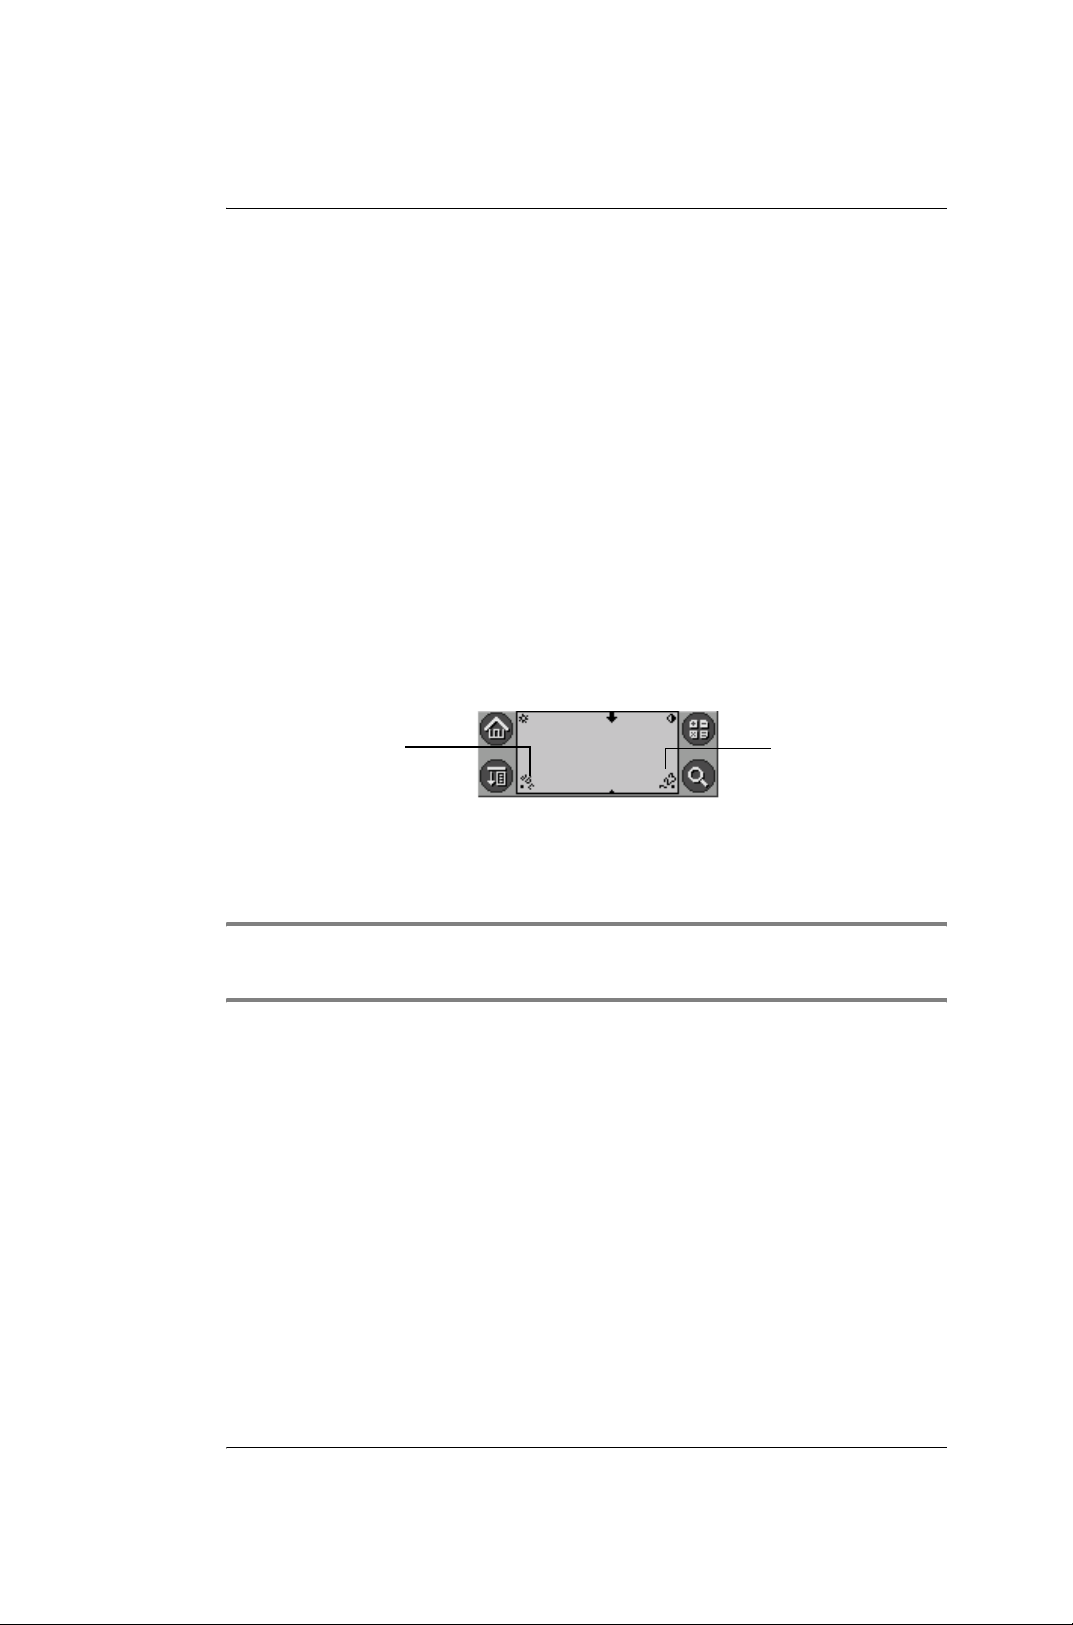
• Tap abc on the front panel of your G18 to display the alphabetic
keyboard.
• Tap 123 on the front panel of your G18 to display the numeric
keyboard.
Tap abc for
alphabet
keyboard.
Tap 123 for numeric keypad.
• To display the international keyboard, tap either abc or 123 on the
front panel of your G18, and then tap Int’l at the bottom of the
keyboard display.
TIP: Some characters have two different stroke shapes.You can select
either as you want.
G18 Quick Reference Manual 16
Page 22
Section 1: Introduction to Palm functions
15.Using the onscreen keyboard
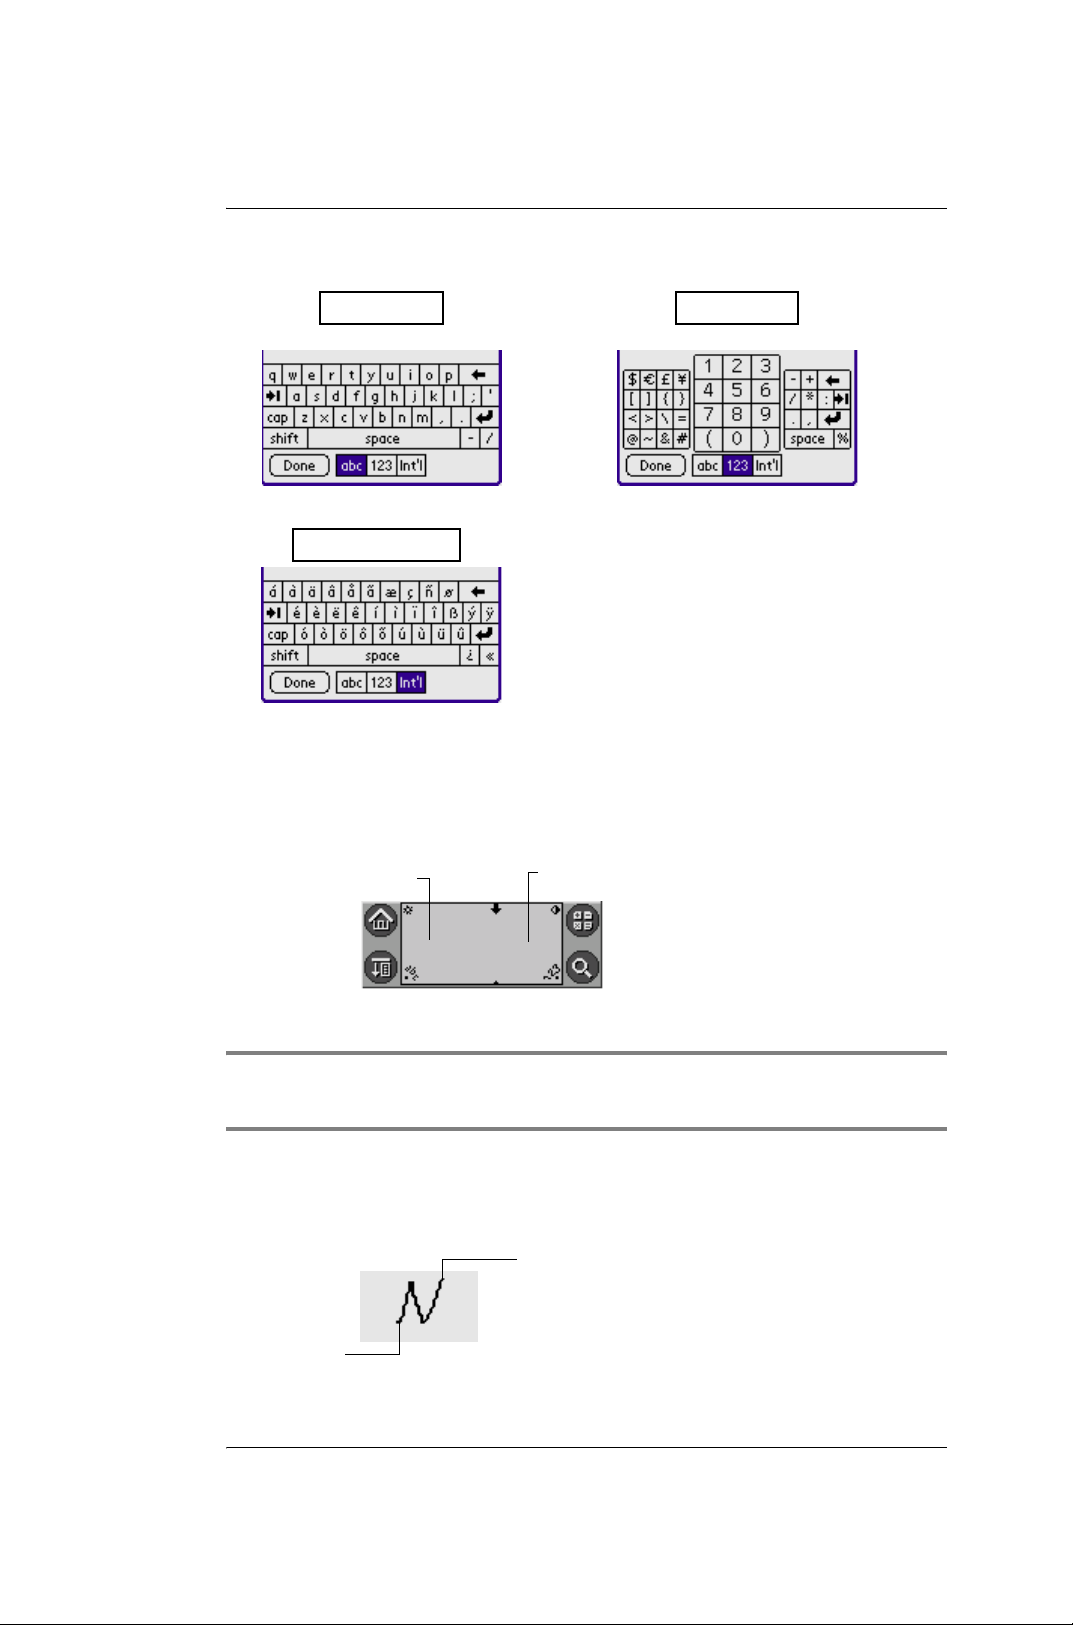
Pinyin Keyboard
Numeric Alpha
• Tap the desired characters or numbers; then tap Done to enter the
text or numbers.
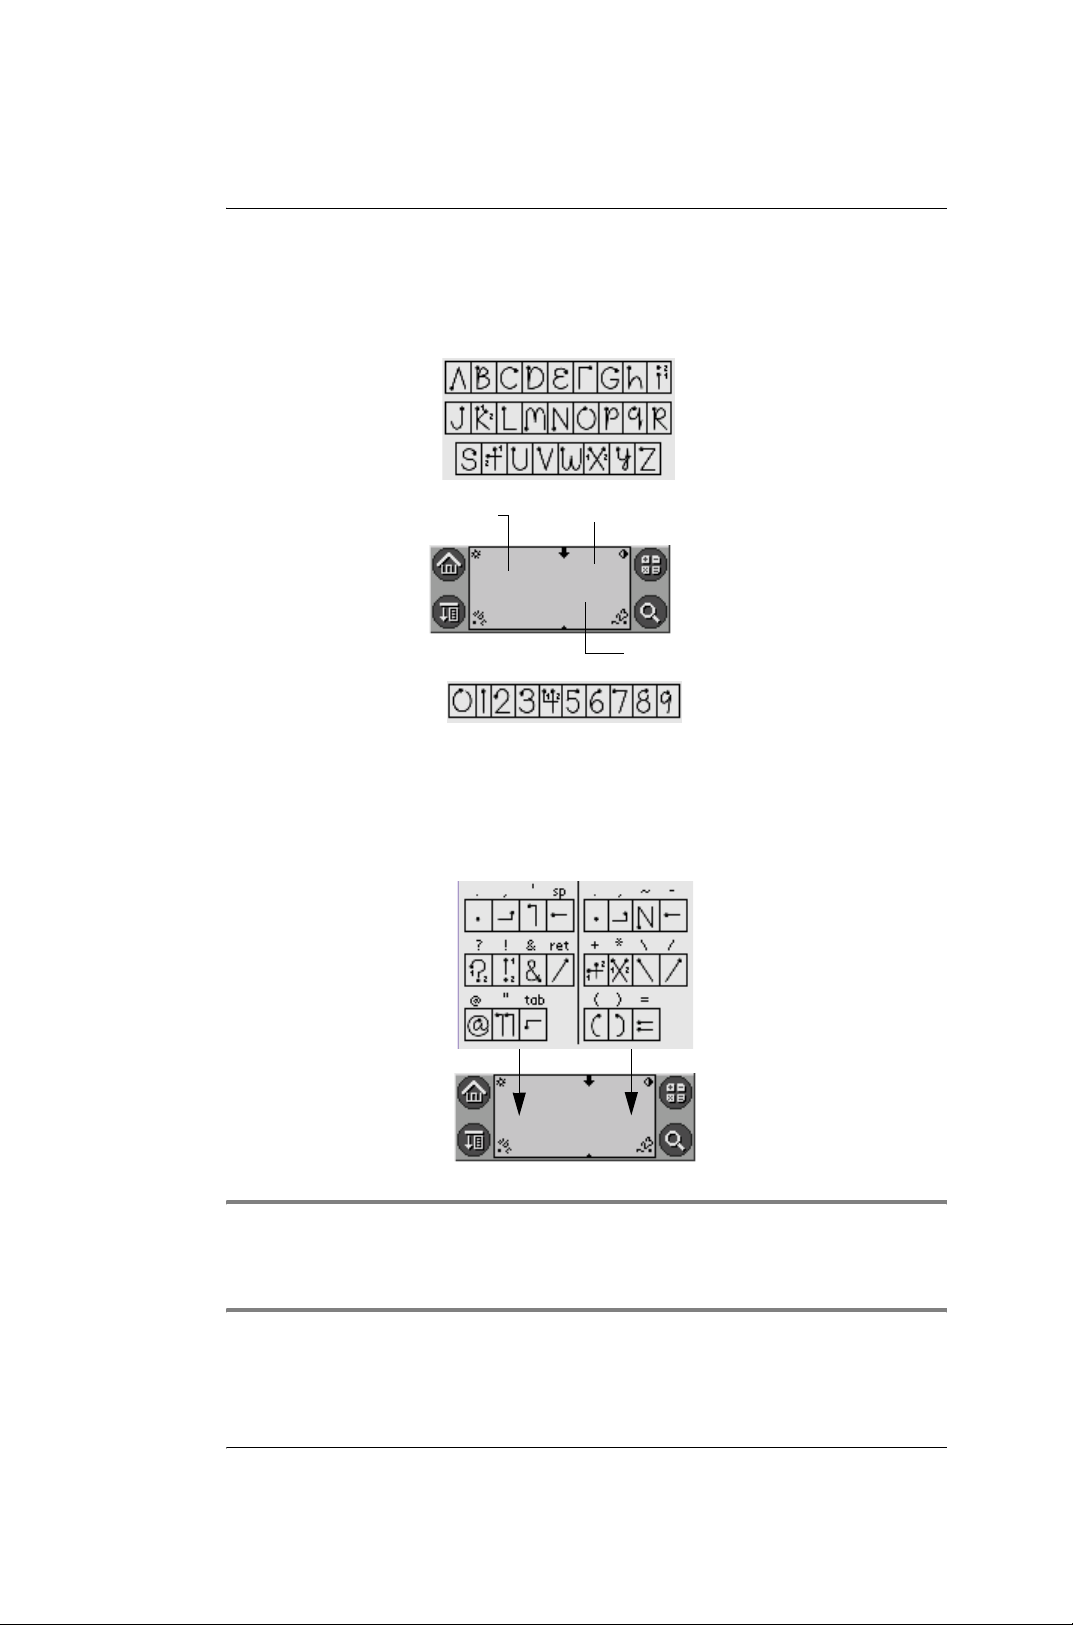
Using Graffiti 2
Write lowercase letters here
Write numbers here
• Tap the screen where you want to write text
TIP: Some characters have two different stroke shapes.You can select
either as you want.
• Use the tables on the following pages to find the stroke shape
for the letter you want to write. For example, the stroke shown
below creates the letter n.
Lift stylus here.
Start stroke at
heavy dot.
G18 Quick Reference Manual 17
Page 23
Section 1: Introduction to Palm functions
15.Using the onscreen keyboard
The Graffiti 2 alphabet
Draw Graffiti 2 letters according to the following alphabet.
Write lowercase letters here
Write uppercase letters across these division marker
Write numbers here
Writing punctuation marks and other special characters
TIP: Using an additional Shift stroke to finish writing the character (as
shown in the demo) is optional, it will make the character appear more
quickly.
G18 Quick Reference Manual 18
Page 24

Section 1: Introduction to Palm functions
16.Installing add-on applications
Graffiti 2 tips
When using Graffiti 2 writing, keep the following tips in mind:
• For greater accuracy, draw letters with large strokes; strokes that
nearly fill the text input area are easily interpreted.
• To delete characters, set the insertion point to the right of the
character you want to delete, and draw the Backspace stroke (a line
from right to left) in the text input area.
• Write at natural speed. Writing too slowly can produce errors.
• Do not write at a slant. Keep vertical strokes parallel to the sides of
the text input area.
• When letters and numbers can be written using two different
strokes, use the one that’s easiest for you.
• Press firmly.
16.Installing add-on applications
Many applications such as Date Book, Address Book,To Do List
and Note Mail are pre-installed for your convenience, you can use them
without extra installation.
You can install other applications into your Palm computer
such as games and other software.
Install Tool makes the installation easy when you are using
Hotsync. Many third-party applications can also be installed in the Palm
OS G18.
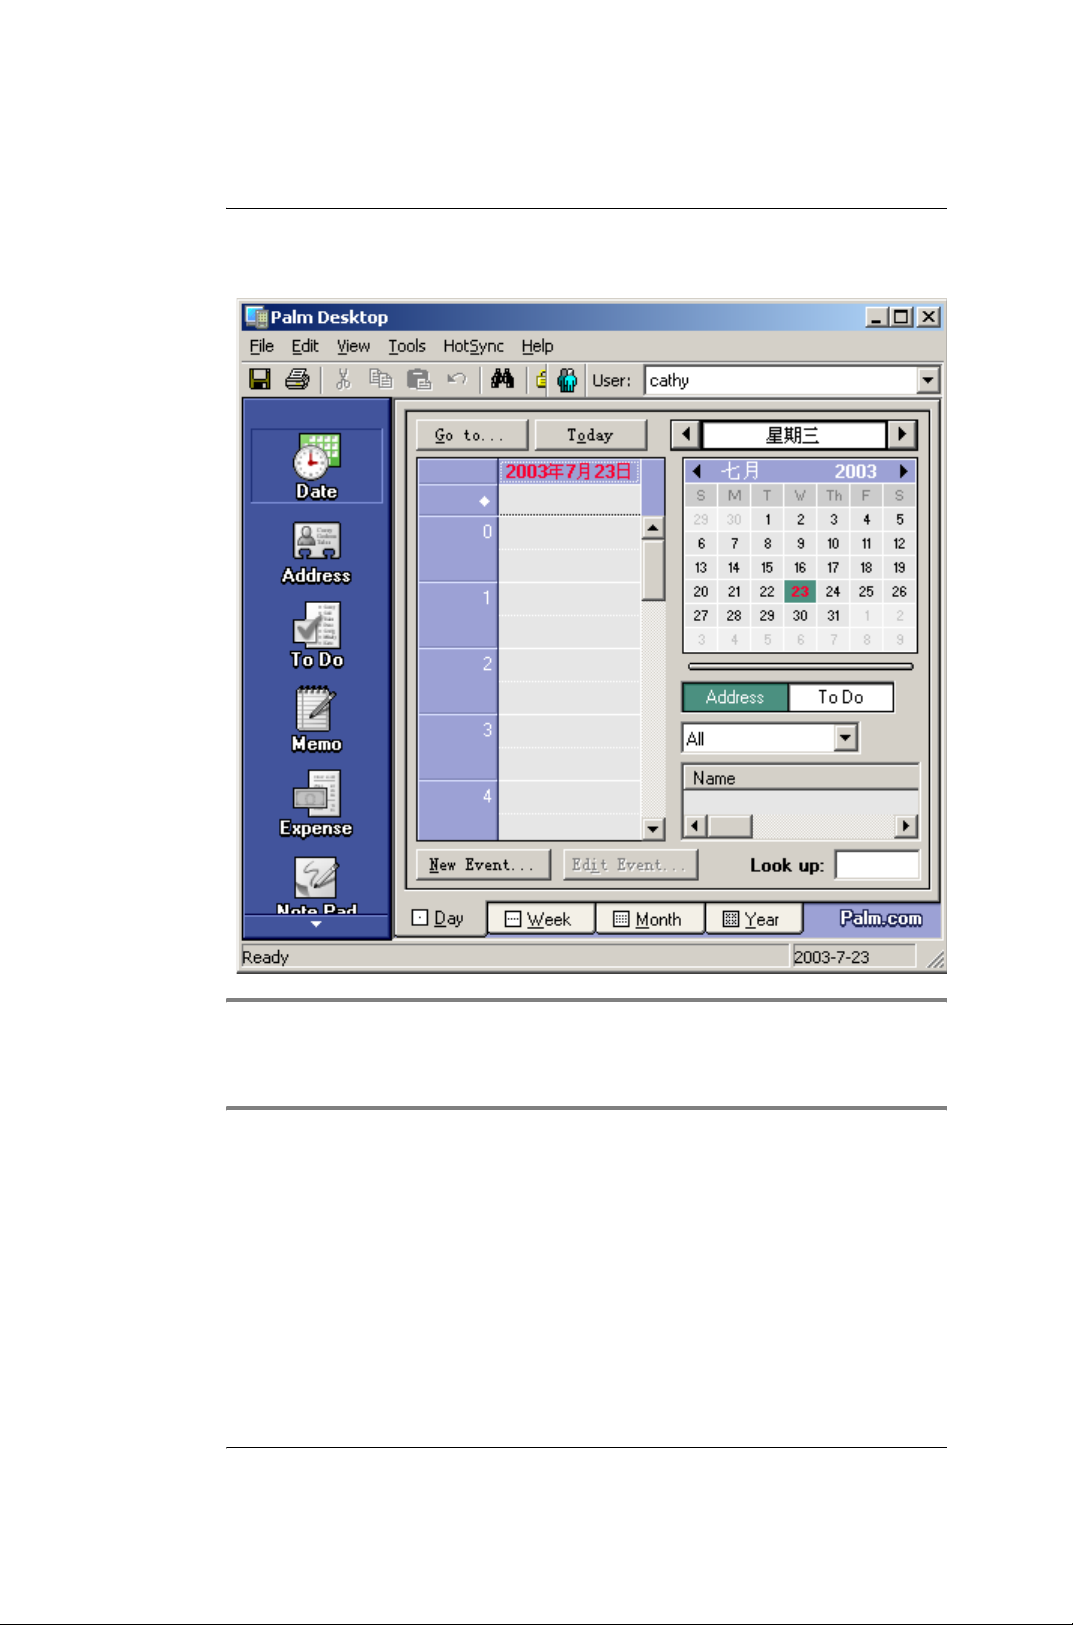
1.From your computer desktop, copy or download the applications
you want to install into the add-on folder in your Palm Desktop
directory.
Note: If the application is compressed, for example, *.zip file,
uncompress the application into the add-on folder before continuing. To
save your application to other directories, browse to that directory before
you finish step 5. Double-click the Palm Desktop icon on your computer
desktop to open it; then click Install.
G18 Quick Reference Manual 19
Page 25
Section 1: Introduction to Palm functions
16.Installing add-on applications
TIP: You can also select the Install Tool dialog box by selecting
Install Tool from the Palm Desktop program group or by doubleclicking any file with a PRC file extension.
G18 Quick Reference Manual 20
Page 26
Section 1: Introduction to Palm functions
17.Removing applications
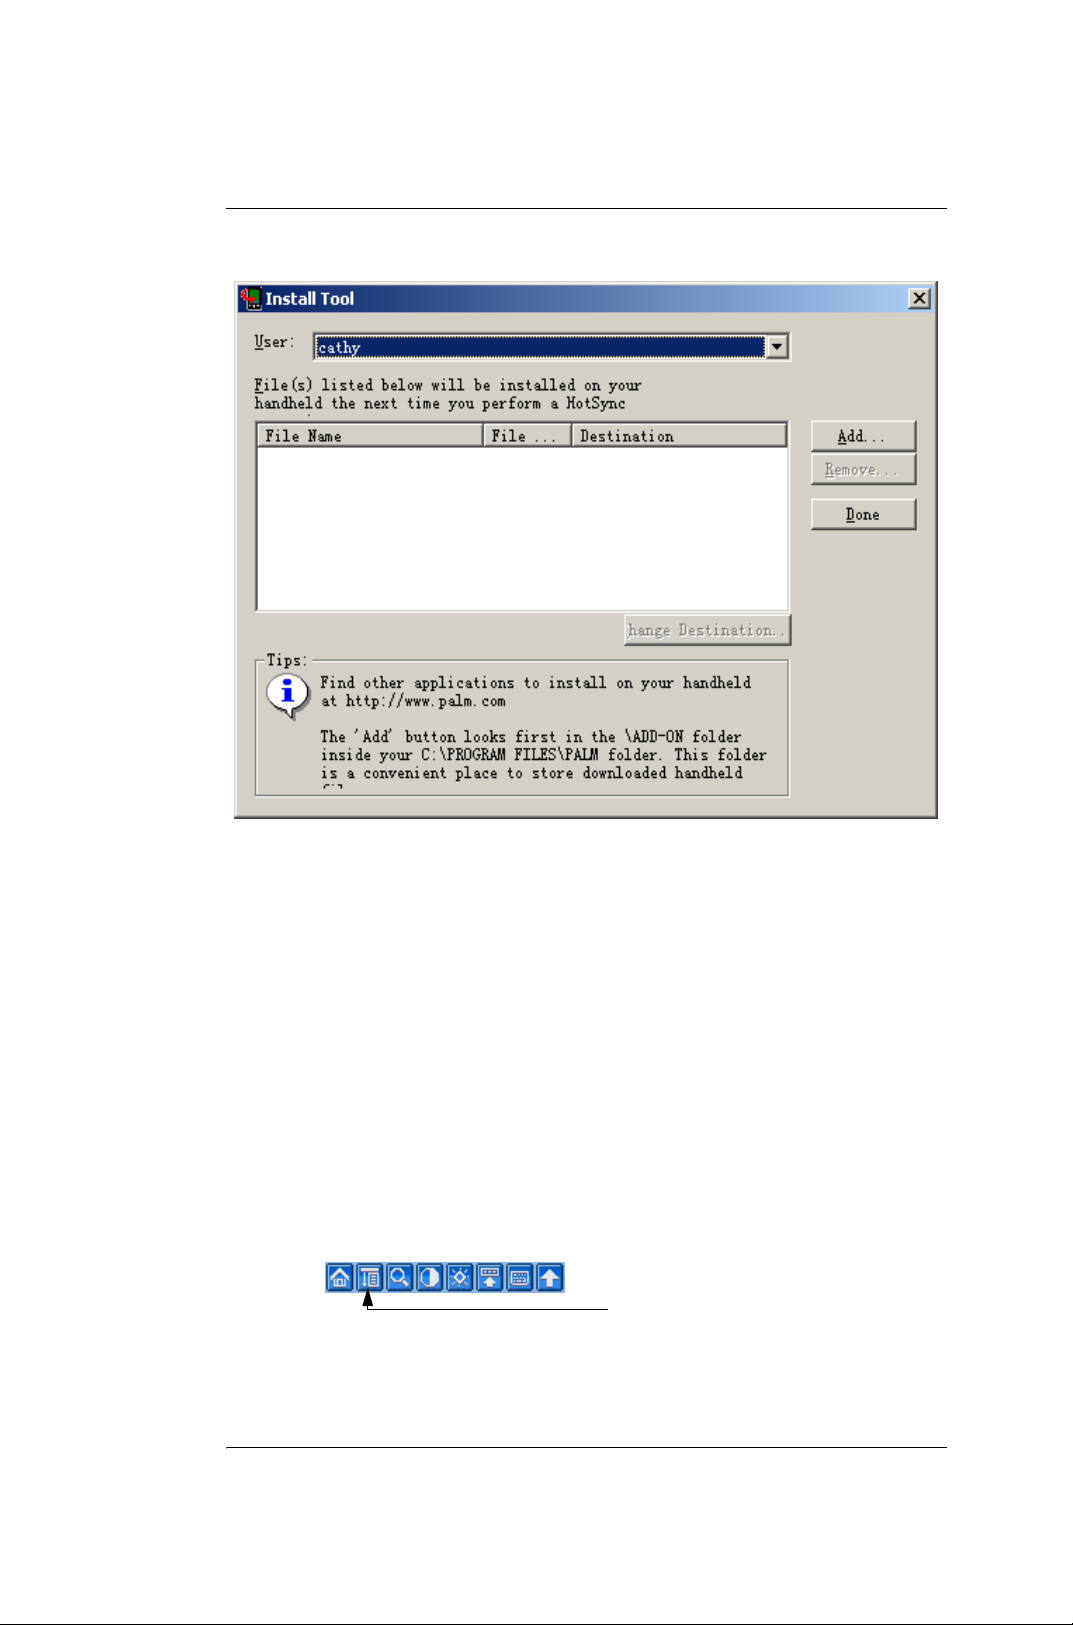
2.In the User drop-menu, select the user name that corresponds to
your G18; then click Add.
3.Select the application that you want to install on your phone; then
click Open.
4.Then return to the Install Tool interface and tap "Done".
17.Removing applications
You can remove add-on applications, patches and extensions from your
G18 if you run out of memory or no longer need them.You cannot remove
the built-in applications that reside in the ROM portion of your device.
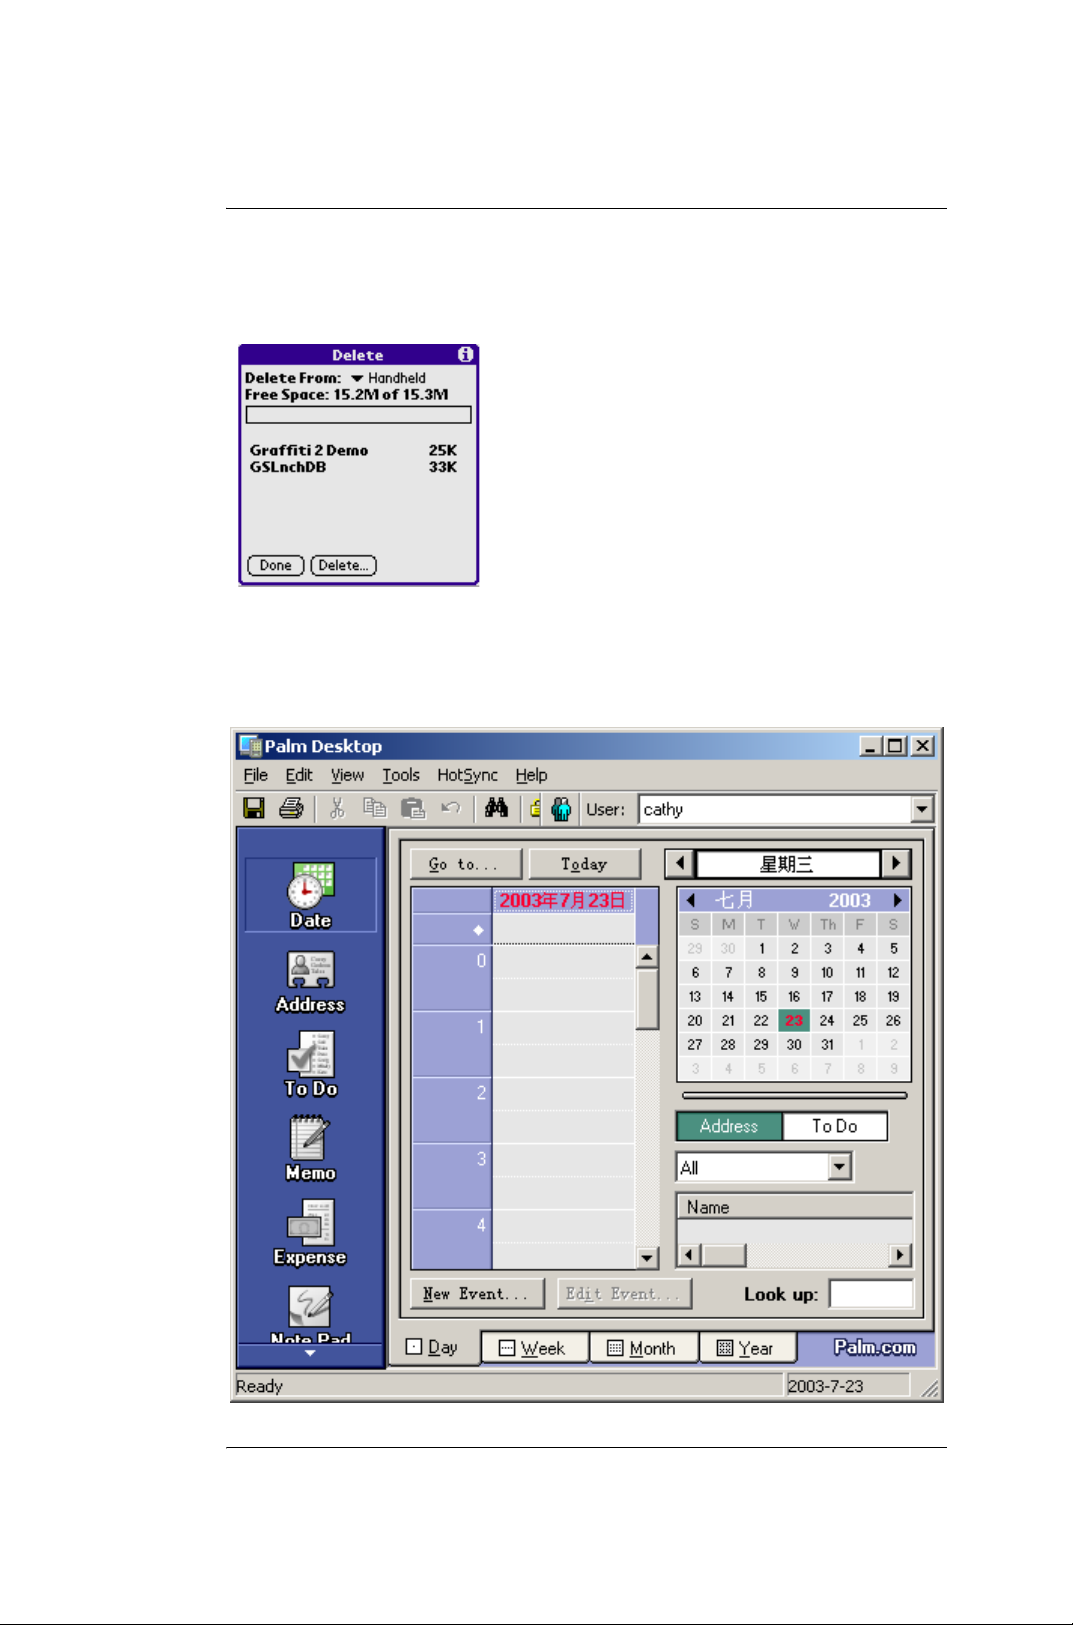
Tap the Applications icon; Tap
Open the
function menu
tap Delete.
G18 Quick Reference Manual 21
Page 27
Section 1: Introduction to Palm functions
18.HotSync Setting
1.tap the application you want to remove,Select the data storage, for
example selecting “Handheld“.
2.Select about App, Tap Delete.
18.HotSync Setting
G18 Quick Reference Manual 22
Page 28

Section 1: Introduction to Palm functions
18.HotSync Setting
To create a user profile:
1.Open Palm Desktop.
2.From the Tools menu, choose Users.
3.Click Profiles.
4.Click New.
5.Enter a unique name for the profile, and click OK.
To use a profile for the HotSync operation first time:
1.Connect your G18 HotSync cable to the computer serial port .
2.Click the HotSync Manager icon in the Windows system tray.
3.Click Profiles.
4.Select the profile that you want to load on the G18, and click OK.
5.Click “Yes” to transfer all the profile data to the G18.
The next time you perform a HotSync operation, Palm Desktop prompts
you to assign a user name to the G18.
Selecting HotSync setup options
You can choose when you want HotSync Manager to run. You can adjust
Hotsync options on the local machine and the modem at the same time.
1.Click the HotSync Manager icon in the Windows system tray.
2.Choose Setup.
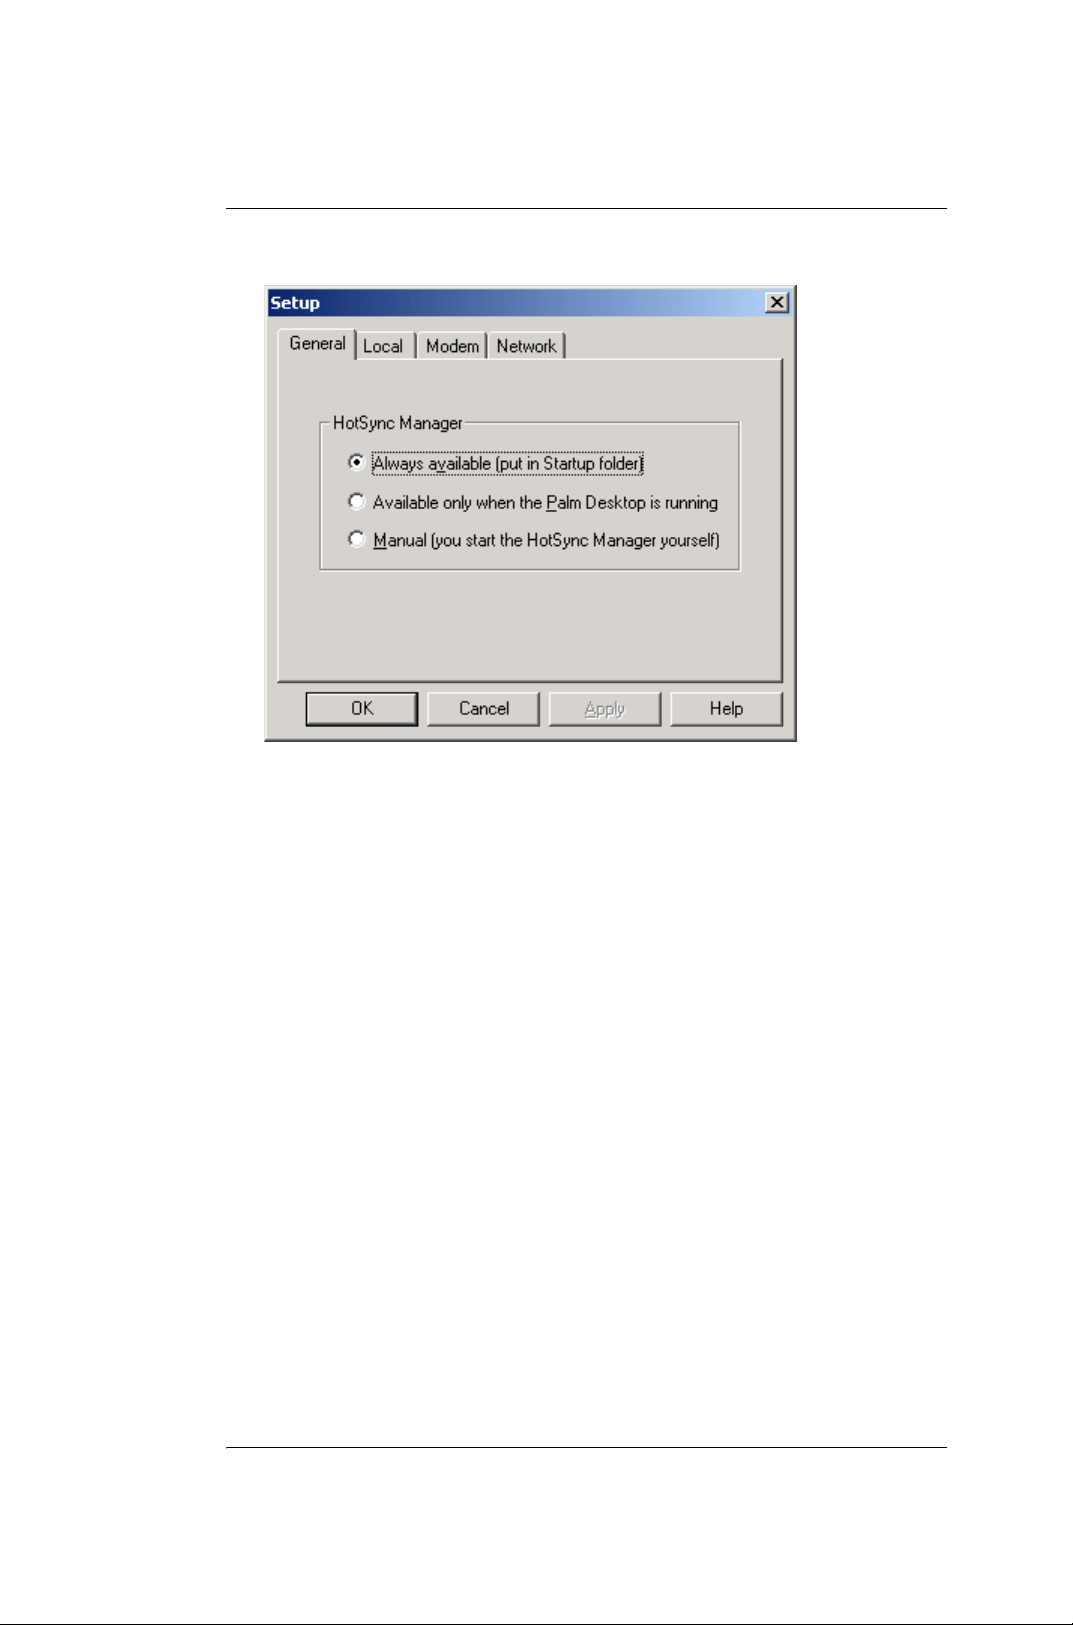
3.Click the General tab, and select one of the following options:
G18 Quick Reference Manual 23
Page 29
Section 1: Introduction to Palm functions
18.HotSync Setting
• “Always Available” adds HotSync Manager to the Startup folder
and constantly monitors the communication port for
synchronization requests from your G18. With this option, the
HotSync Manager synchronizes data even when Palm Desktop is
not running.
• “Available Only When Palm Desktop Is Running” starts HotSync
Manager and monitors requests automatically when you open Palm
Desktop.
• “Manual” monitors requests only when you select HotSync
Manager from the Start menu.
If you are not sure which option to use, keep the default setting,
“Always Available”.
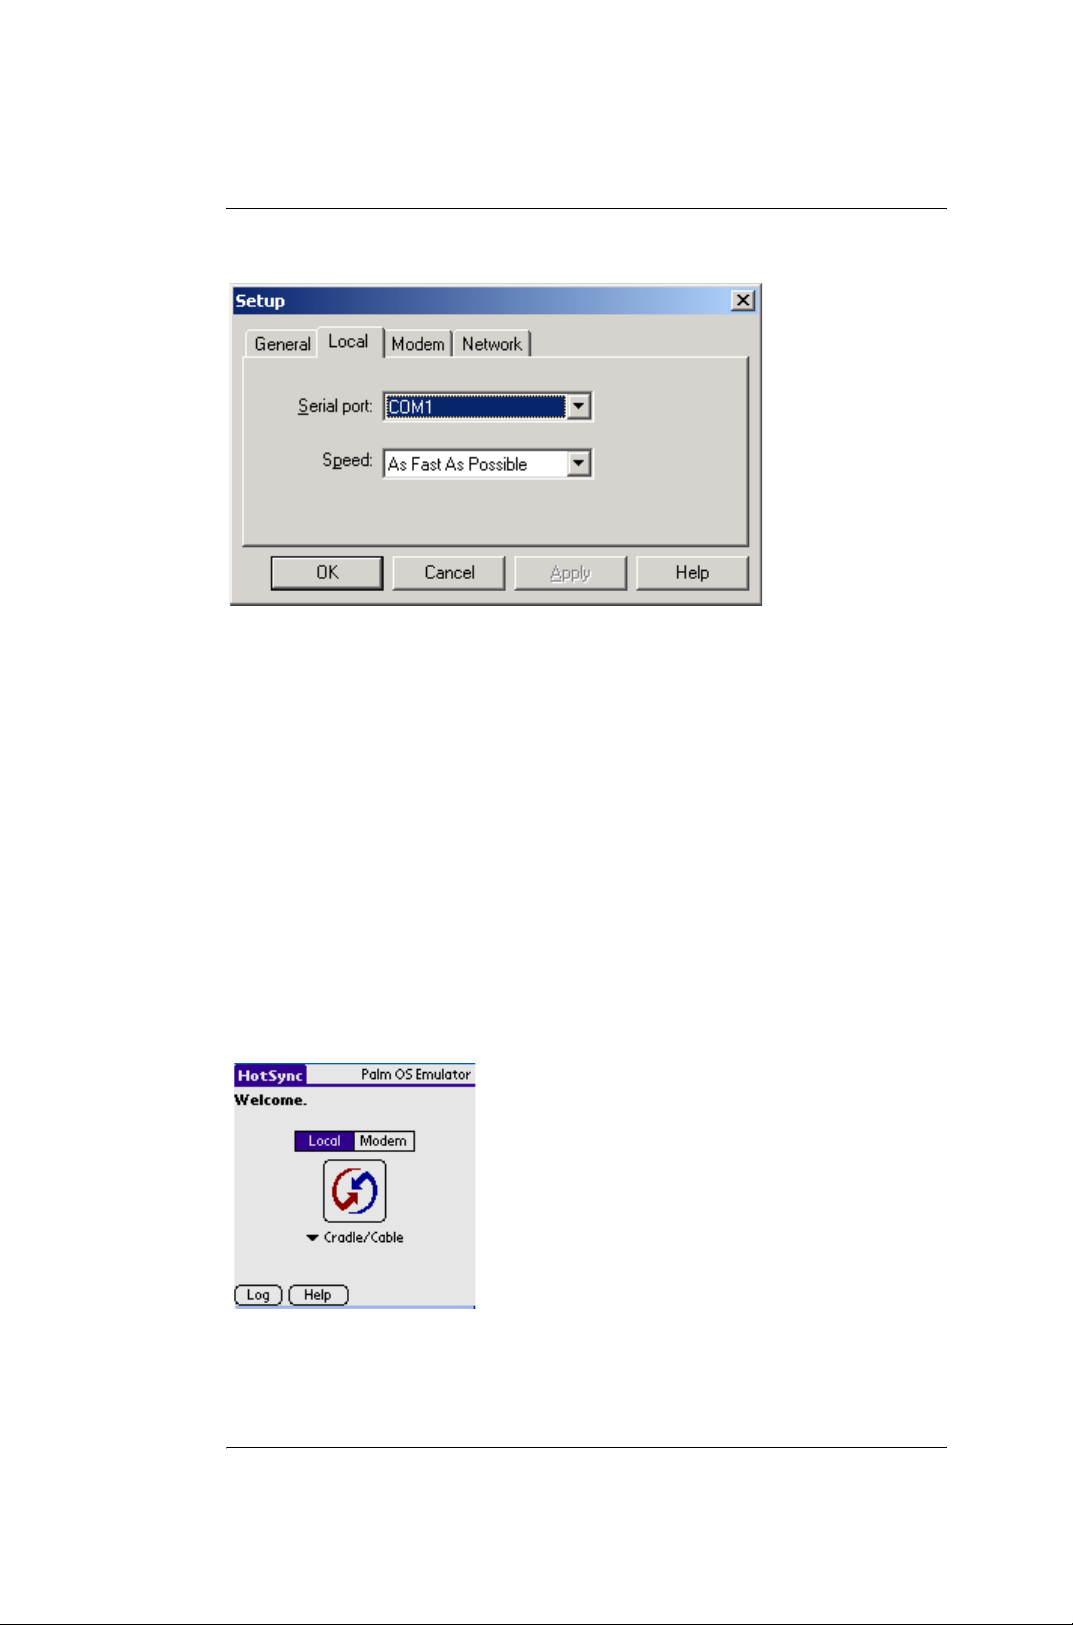
4.When using the serial port, click the Local tab to display the settings
for the connection between your computer and the G18 cradle.You
may adjust the options to suit your requirements.
G18 Quick Reference Manual 24
Page 30
Section 1: Introduction to Palm functions
18.HotSync Setting
• Serial Port. indicates which serial port is connected to the G18 by
HotSync Manager. The Palm Desktop installation software will
detect the serial port automatically.
• Speed. Indicates the transmitting speed between the G18 and the
software of Palm Desktop. Try the "As Fast As Possible rate" first,
and adjust downward if you experience problems. This setting
allows Palm Desktop and your G18 to find and use the fastest
speed.
5.Tap "Modem" tab to display the modem settings, the settings are user
definable.
6.For network connection settings, tap "Network" tab to display the
settings.
7.Tap "OK" after completion of settings.
8.Connect the PC to your G18 with the HotSync cable.
9.Select "HotSync" from "system".
10.Select "Local" or "Cradle/Cable".
G18 Quick Reference Manual 25
Page 31

Section 1: Introduction to Palm functions
19.IR HotSync operations
11.Then tap the "HotSync" icon .
19.IR HotSync operations
Your G18 is equipped with an infrared (IR) port that supports the IrCOMM
implementation of the standards for infrared communication established by
the Infrared Data Association (IrDA). This means that you can beam data
to any other device that supports the IrCOMM implementation of the IrDA
standards. Most importantly, you can use the IR port to perform HotSync
operations. You don’t need a HotSync cable to do this. This is very useful if
you travel with an infrared-enabled laptop. You simply enable infrared
communication on your laptop and G18 and follow the steps in
“Performing an IR HotSync operation” later in this section.
Preparing your computer for IRDA communication
Before you can perform a HotSync operation using the IR port, the
computer you want to synchronize with must meet the following
requirements:
• The computer must support the IrCOMM implementation of the
IrDA standards.
• The computer must have an enabled infrared port built-in, or an
enabled infrared device attached to the computer. Desktop
computers are likely to require an infrared device attached to a
physical COM port. Laptops are likely to have a built-in IR port.
• Your desktop computer will need to have an installed driver for the
external infrared device .For driver installation, please browse the
user manual of the IR device .
Please also check the manual of your computer and determine whether
your computer supports infrared communication.
Configuring HotSync Manager for IRDA communication
The HotSync Manager now needs to be configured and the port specified
for infrared communication.
G18 Quick Reference Manual 26
Page 32

Section 1: Introduction to Palm functions
19.IR HotSync operations
To configure HotSync Manager for infrared communication:
1.Click the HotSync Manager icon in the Windows system tray. Make sure
"Infrared" option is selected.If you can't see "Infrared" option in the
function list of HotSync Manager,please follow the steps as bellow.
2.Make sure "Local Serial" is checked on the menu.
3.Choose “Setup”.
4.Click the “Local” tab.
In the Serial Port drop-menu, select the COM port that was given as
the simulated port in the Options tab of the Infrared Monitor.
Performing an IR HotSync operation
After you complete the steps to prepare for an IR HotSync operation it is
easy to perform the actual operation.
To perform an IR HotSync operation:
1.In the Applications Launcher, tap the HotSync icon.
2.Tap “Local”.
3.Tap the pick list below the HotSync icon and select IR to a PC/Handheld.
4.Position the IR port of your G18 within a couple of inches of the infrared
port of your computer.
5.Tap the HotSync icon to start the IR HotSync operation.
Using HotSync cable for HotSync operations
It’s easy to return to use the HotSync cable for HotSync operations.
To return to HotSync cable synchronization operations:
1.Connect the HotSync cable to a serial (COM) port on your computer.
2.Click the HotSync Manager icon in the Windows system tray.
3.Choose Setup, and then click “Local.”
4.Select the COM port where your HotSync cable is connected.
5.Click “OK”.
G18 Quick Reference Manual 27
Page 33
Section 1: Introduction to Palm functions
20.Flash BackupMan
20.Flash BackupMan
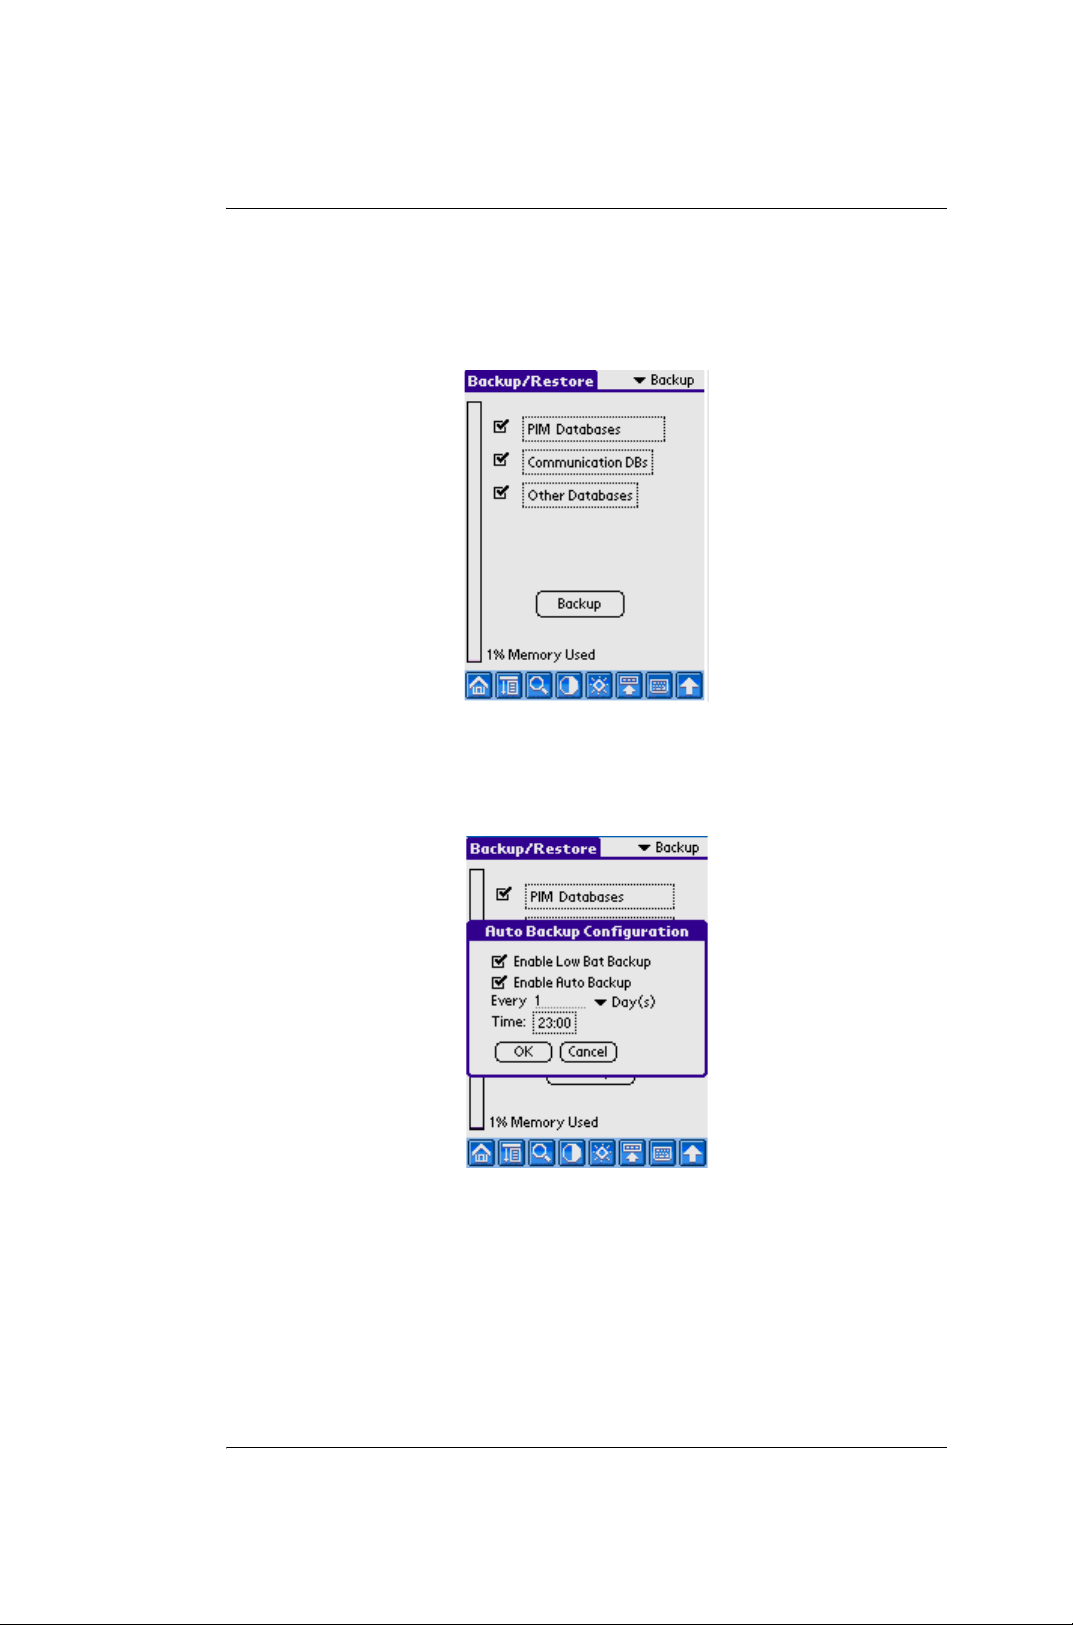
• Enter the "system", tap "Flash BackupMan".
• Tap the function menu, tap "Preferences..." from "Options".
• Check "Enable Low Bat Backup" and "Enable Auto Backup".
• Select the backup time as you require in the "Time" field.
• Tap "OK" button to return the "Backup/Restore" interface, select
the data to backup from "PIM Databases", "Communication DBs"
or "Other Databases".
• When you want to backup data, assure that the item of the right top
metu is "Backup", then tap the "Backup" button at the bottom of the
interface.
G18 Quick Reference Manual 28
Page 34

Section 1: Introduction to Palm functions
21.Data transfer from other Palm terminals
21.Data transfer from other Palm
terminals
After the installation of Desktop ,please pay attention to what is below:
If you are a fresh user, you can skip the following steps; if you are a former
palm OS user and you are using a G18 for the first time, use a new user
name at the Desktop, you can skip the following steps. But if you want the
data to be transferred from the previous database to G18, please follow the
methods and steps as below:
Method 1:
Synchronize using the previous Desktop user name and G18 directly. But
there is a note that the phone can’t be synchronized with the Desktop user
any longer. The detail of the steps is what as below:
1) Backup the user data.
For every Desktop user, the Palm Desktop will create a directory in the
installed directory. The directory, which stores all the user data, is known
as the user directory. For example, if the user name is Jack,and the installed
directory is "C:\Program Files\Palm",then the user data is stored at the
directory "C:\Program Files\Palm\Jack". Please backup all of the data in
the user directory to other directory, any other directory besides the new
user directory.
2)Delete all of the files in the Backup directory which is under the user
directory.
Note: Some documents in the Backup directory may possibly only be
usable by the previous phone, it is relative with the hardware and any
particular system software of the previous phone. Downloading them to
other incompatible phone or G18, may result in abnormal running of the
phone. In this case , please use method 3.
3) Synchronize.
G18 Quick Reference Manual 29
Page 35
Section 1: Introduction to Palm functions
21.Data transfer from other Palm terminals
Method 2(recommended):
If you want to use G18 and the phone at the same time, take following
steps:
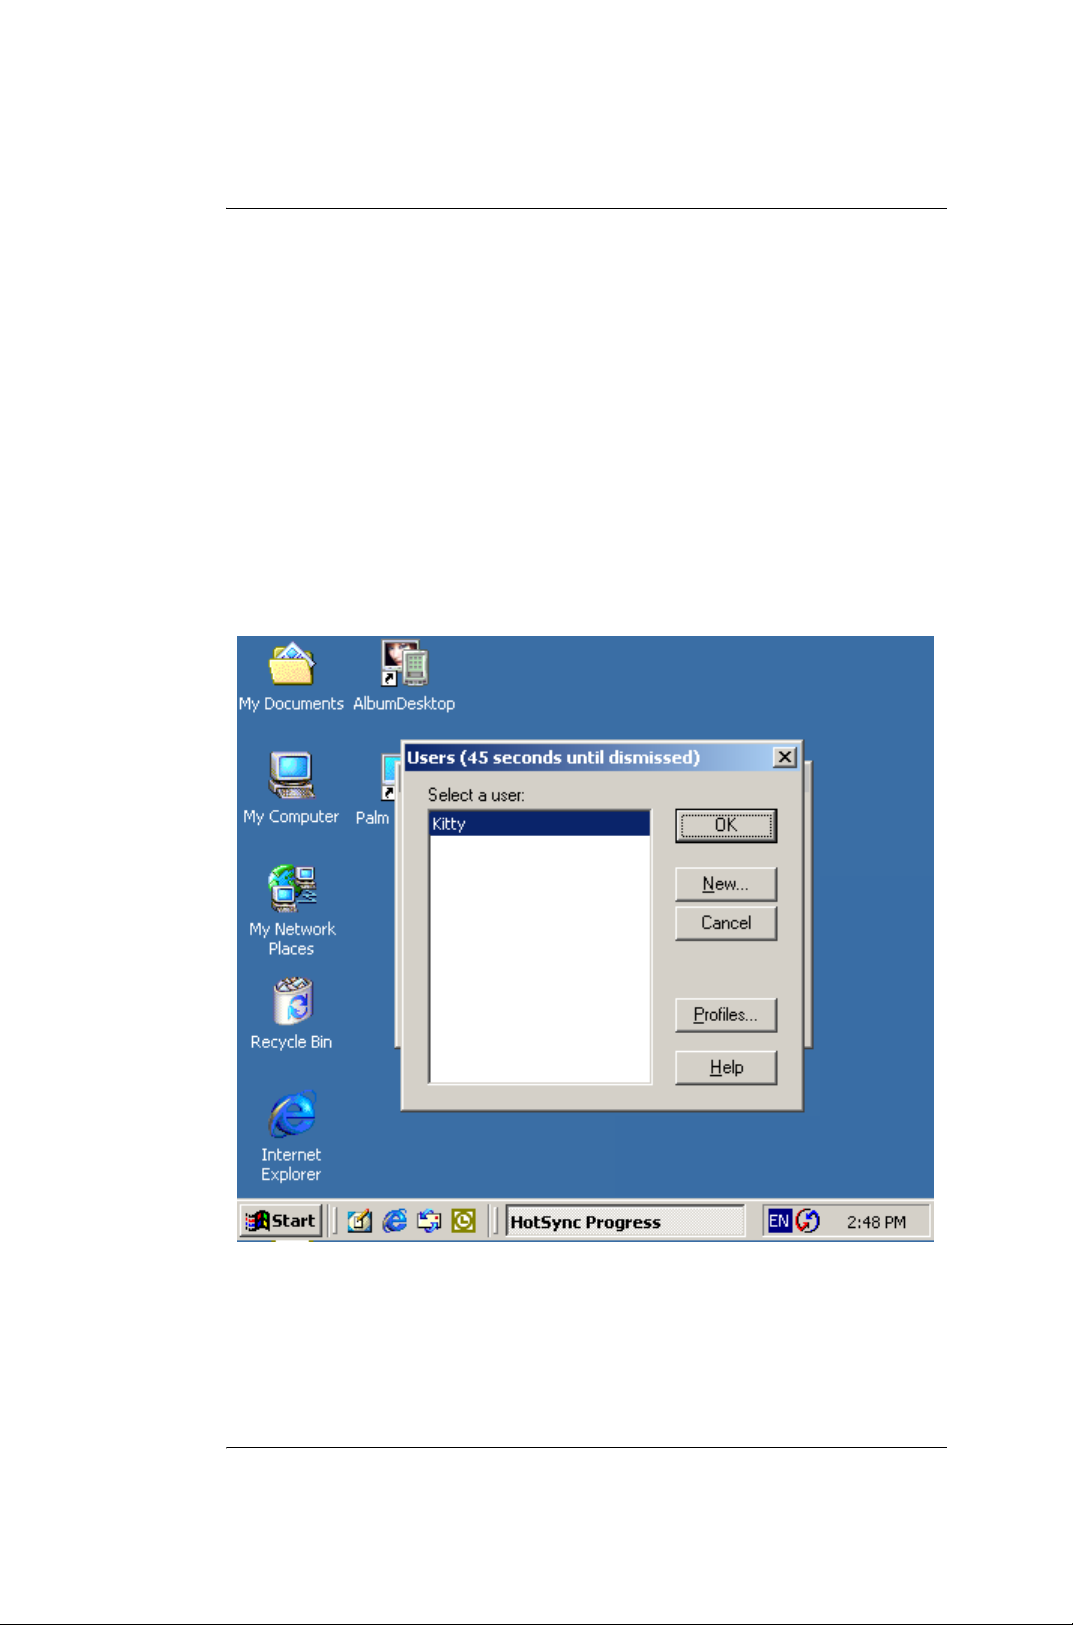
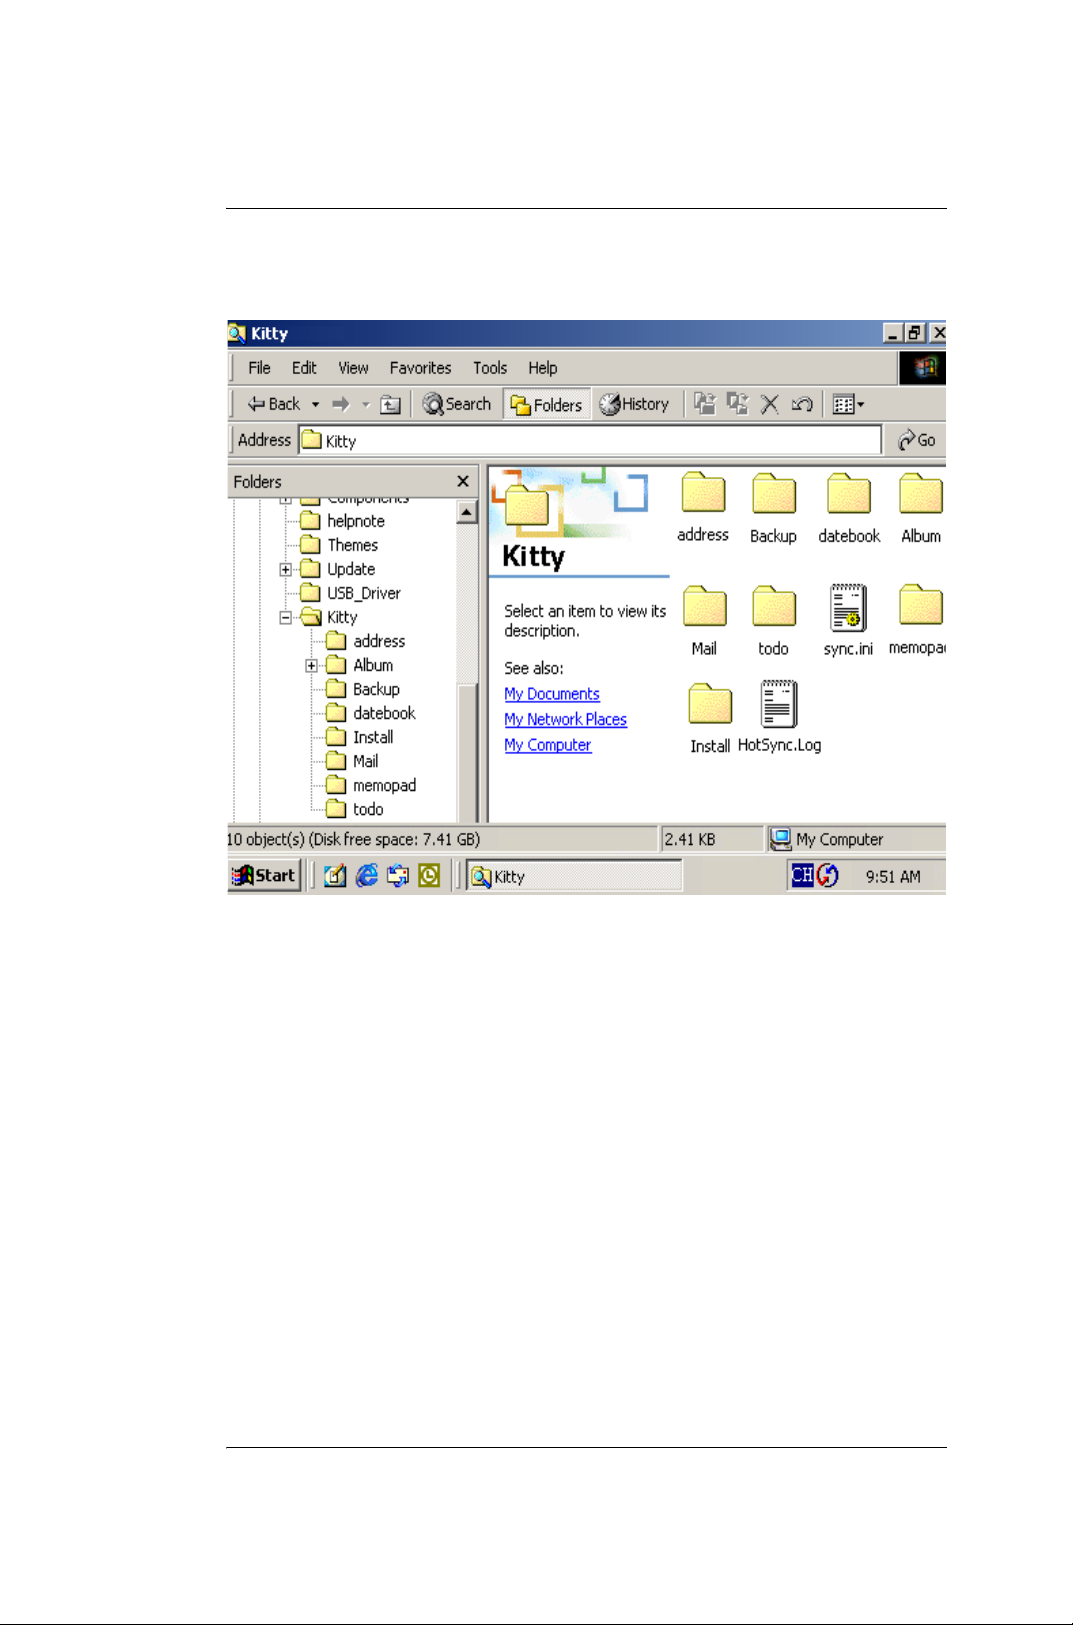
1) Synchronize G18 with the Desktop,and create a new user. At the first
synchronization between G18 and the phone,a dialogue as is shown in
Figure 1 will open, tap the "New..." button, input the new username such as
"user2" in the pop-up dialogue. After the first synchronization,the Desktop
will create a user directory "user2" in the installed directory,and store
information used for synchronization in the user directory,as is shown in
Figure 2.
Figure 1
G18 Quick Reference Manual 30
Page 36
Section 1: Introduction to Palm functions
21.Data transfer from other Palm terminals
Figure 2
2) Copy the required information to the new user directory from the former
user directory.
In the user directory, the address subdirectory is for the address list
information, datebook subdirectory for schedule
information, memopad subdirectory for memoire directory, todo
subdirectory for the to do matter. Expense subdirectory for personal
financing record, Album subdirectory for photos.
3) Set the Synchronize Option of relative documents to "Handheld
overwrites Desktop".
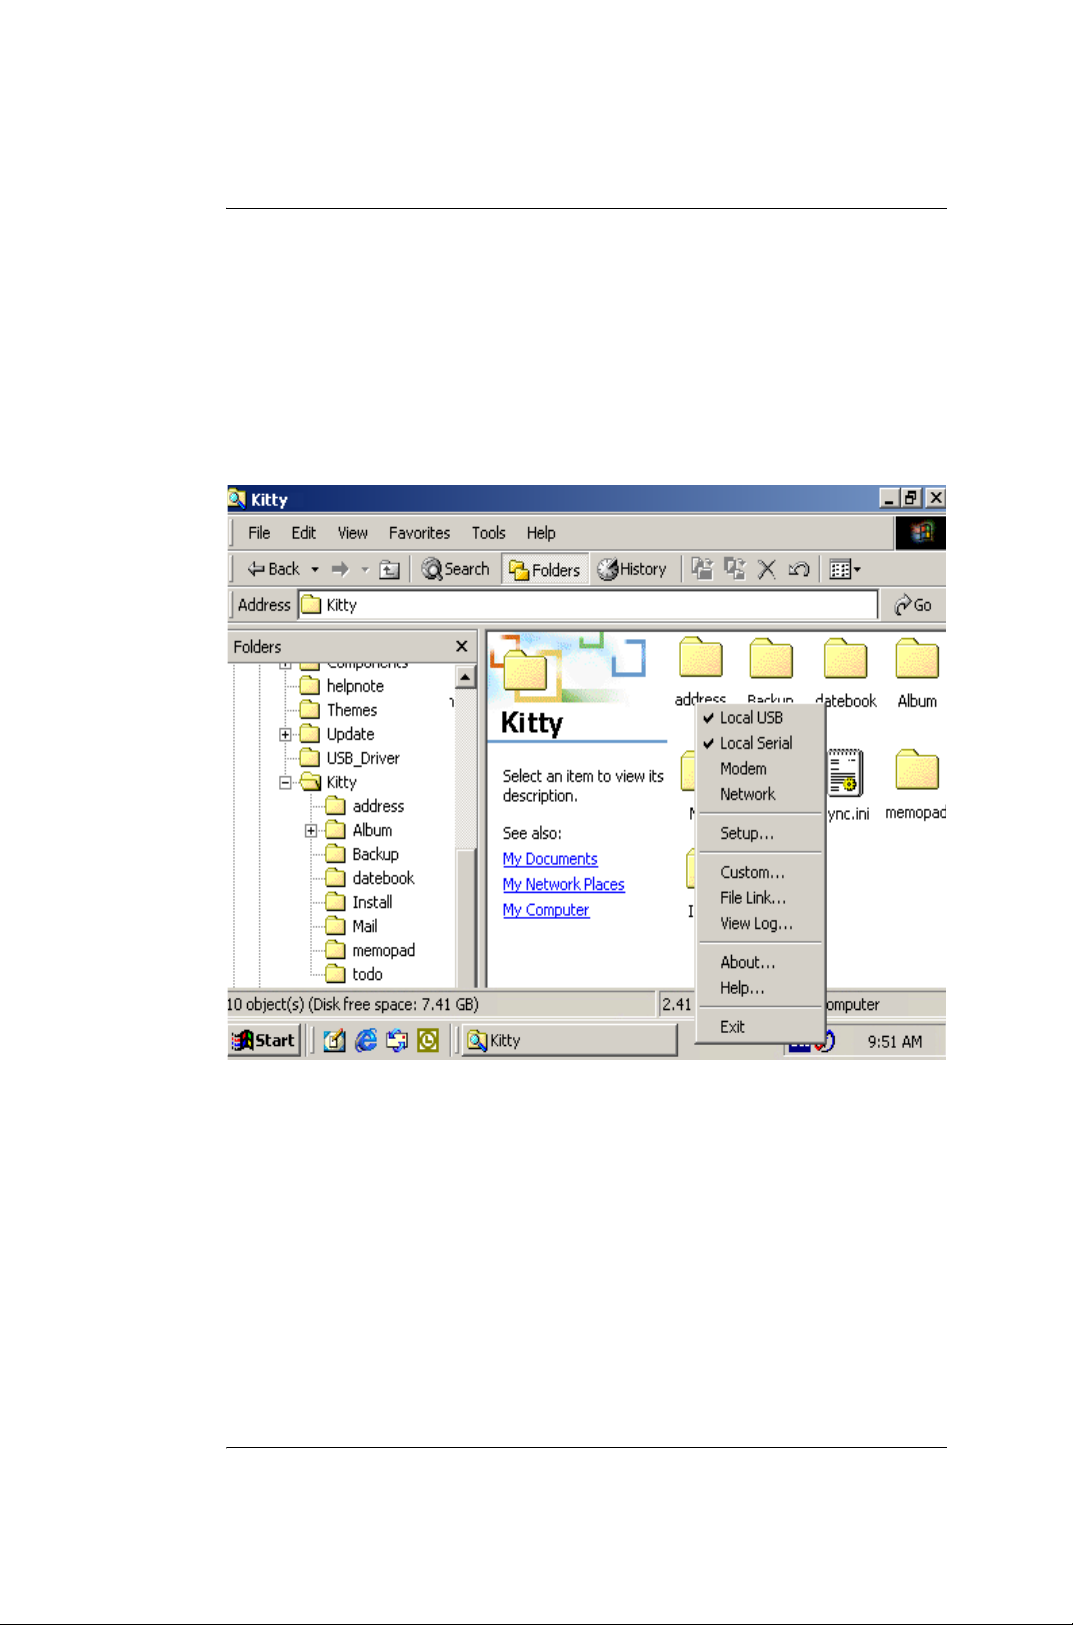
Start Hotsync Manager in your PC.Tap Star->Program
->Palm Desktop->Hotsync Manager,after the start of Hotsync Manager,a
system icon will be seen at the right bottom of the screen. Tap the icon with
the right button of the mouse, select "Custom..." item from the pop-up
G18 Quick Reference Manual 31
Page 37
Section 1: Introduction to Palm functions
21.Data transfer from other Palm terminals
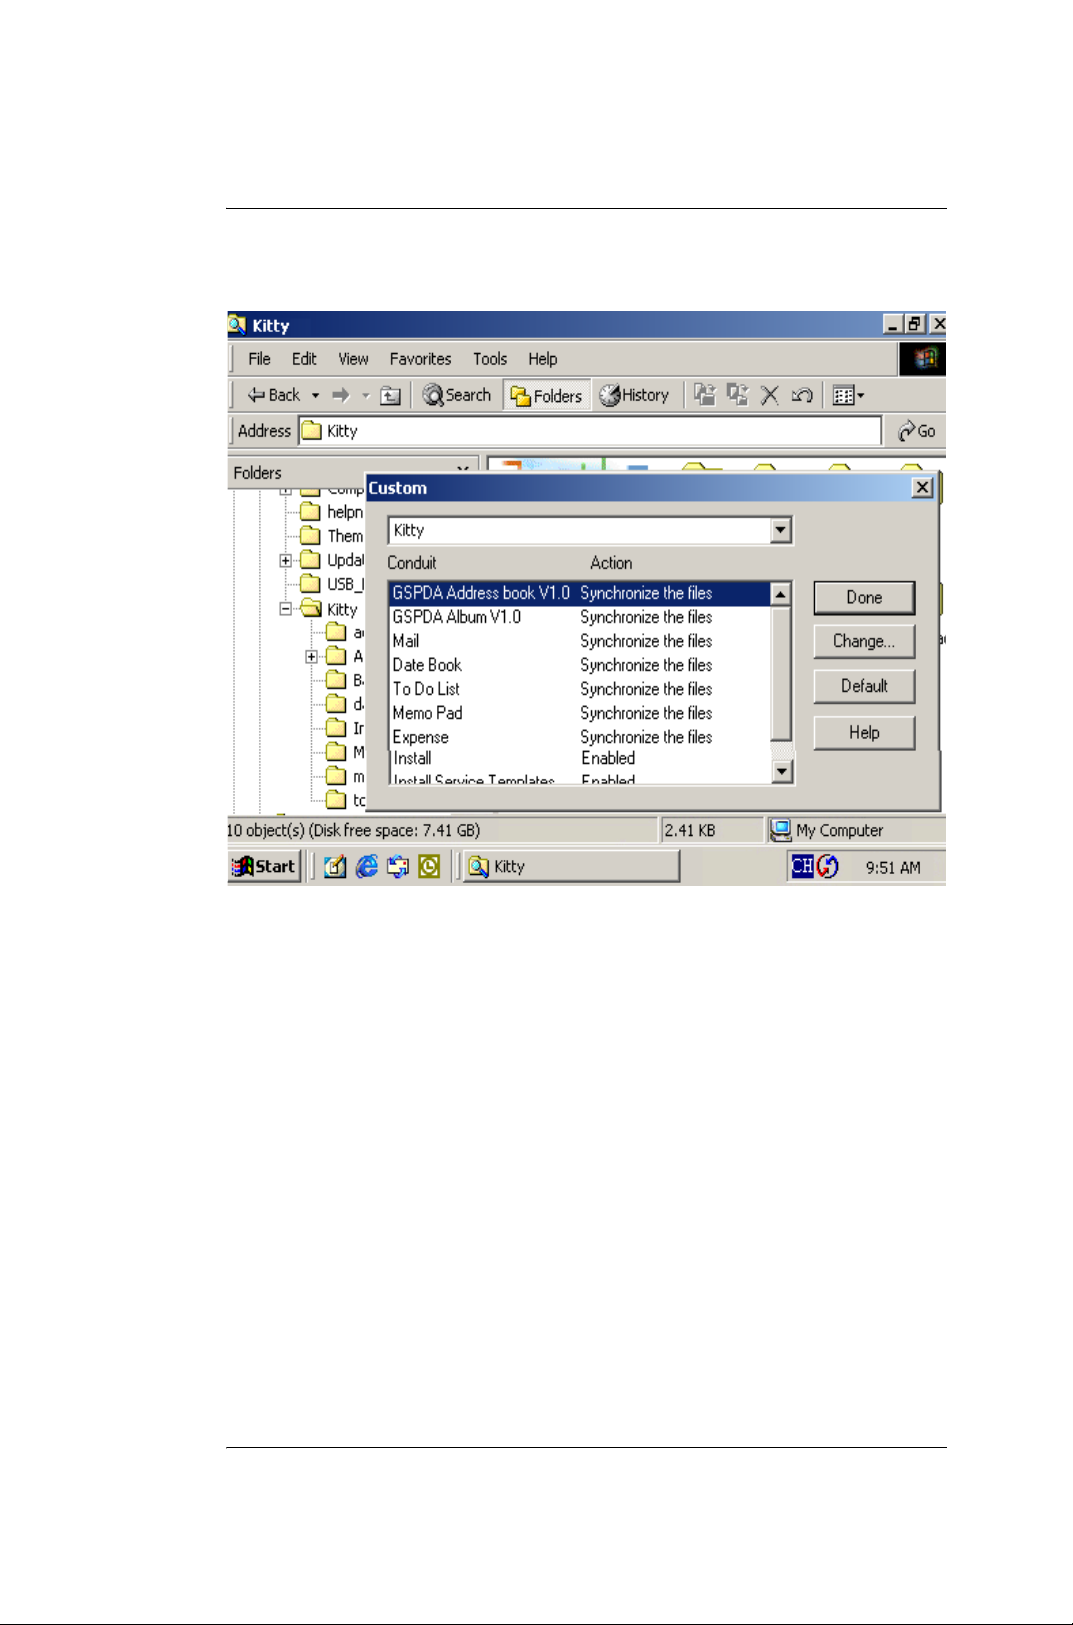
list,as is shown on Figure 3. Thus the "Custom" dialogue box will open,
you can change the synchronize option in this box, as is shown on Figure
4.First tap the drop down list in the top of the box and select the username,
then select the information whose synchronize option need to be changed
from the left list, tap the "Change..." button, finally select the "Handheld
overwrites Desktop" option from the pop-up dialog box and tap "OK" to
change the synchronize option.
Figure 3
G18 Quick Reference Manual 32
Page 38
Section 1: Introduction to Palm functions
21.Data transfer from other Palm terminals
Figure 4
4) Synchronize again.
Method 3:
If you are familiar with the existing phone, please follow the following
steps:
1) Take step 1 as method 1.
2) Delete the files which you think can be deleted and the files which can
only be used in the previous model from the Backup directory.
Note: Some documents in backup directory can only be used in the
previous model of phone and G18. These may be particular to the hardware
and the system software of the phone. Downloading documents
incompatible with the phone or G18, may result in the abnormal running of
the phone.
3)Hotsync.
G18 Quick Reference Manual 33
Page 39
Section 2 : Communication and PDA Features
1. Using the Phone
Section 2 :
Communication and
PDA Features
1. Using the Phone
To launch the Phone application
The telephone function can be activated by
1.Tap the Applications icon .
2.Select Communication from the pick list in the upper right corner;
then tap the Phone icon.
TIP: Alternatively, you can press the Call key to activate the
telephone function.
G18 Quick Reference Manual 34
Page 40
Section 2 : Communication and PDA Features
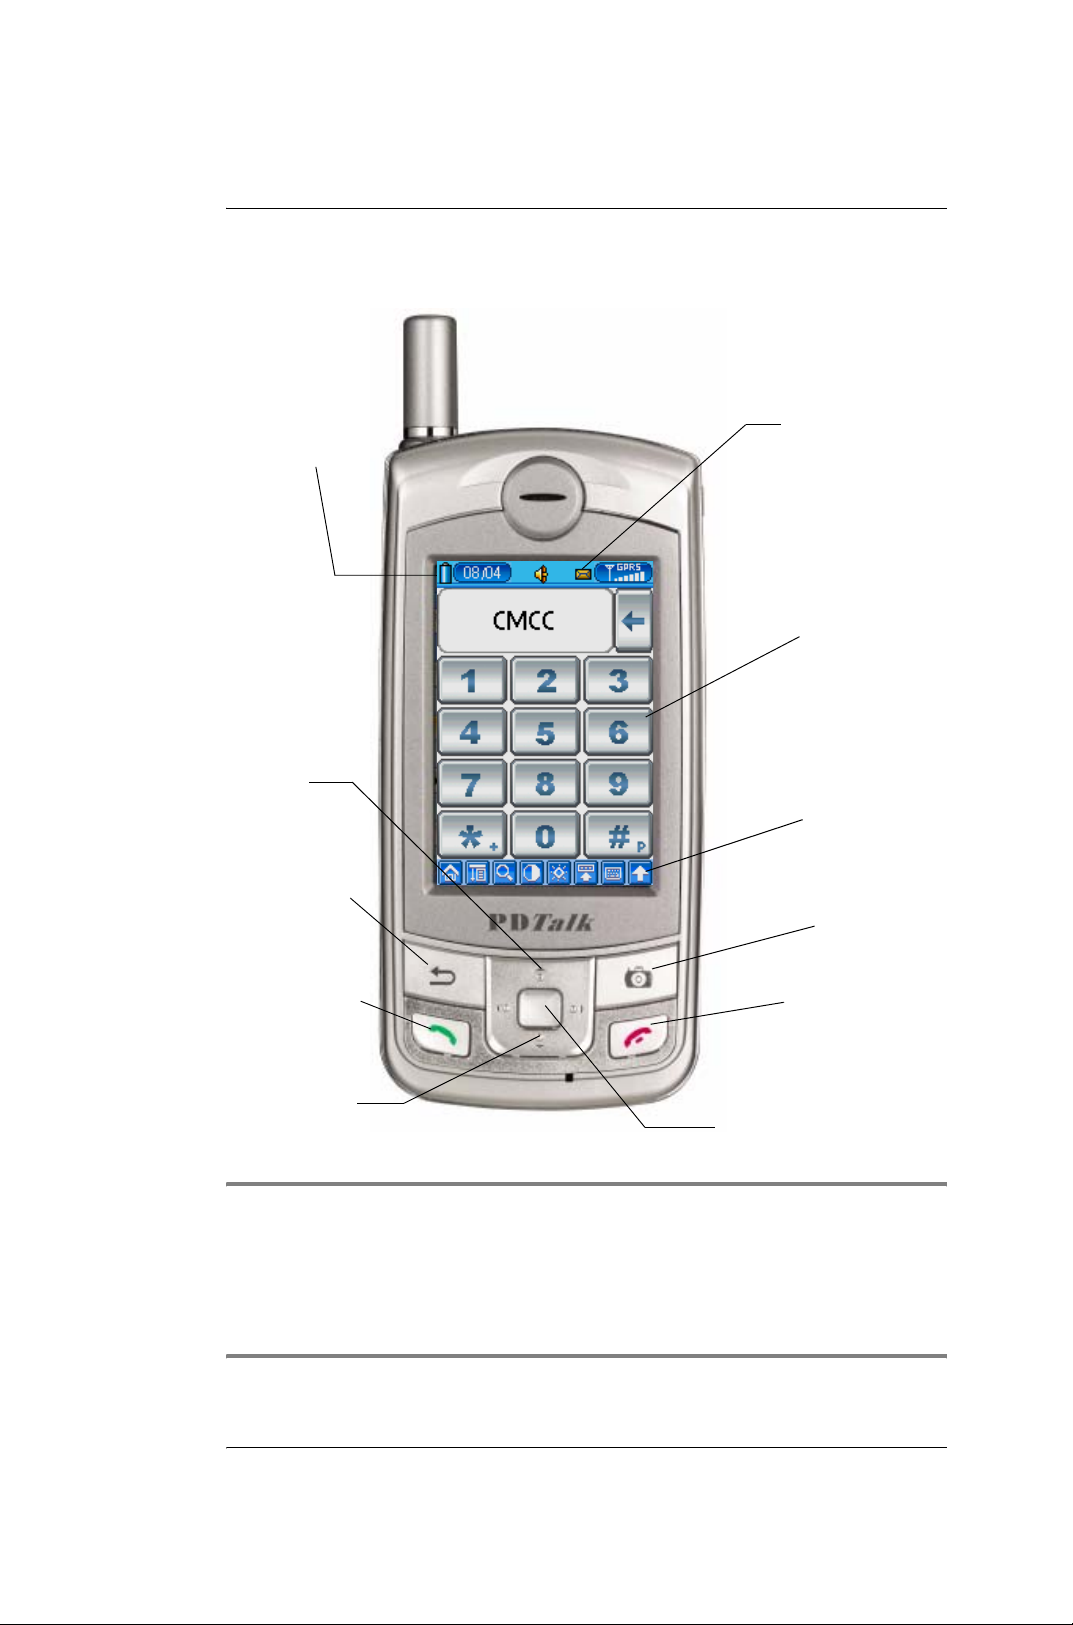
Function Key
1. Using the Phone
battery
capacity
indicatator
Speed
Dial
Escape
Call list/
dial-up
Address list
SMS
Keyboard
PDA function
icon
Camera
Hangup/Clear
the wrong
number
Quick Switch:
- Profiles
- Call divert
- GSM On/Off
- SMS
- Save to address
TIP: If your mobile provider is "CHINA MOBILE",The CMCM
window should display "CHINA MOBILE",and if your mobile provider
is "CHINA UNICOM",The CMCM window should display "CHINA
UNICOM". The network indicator that on the top right corner should
display "GPRS",if you link the "GPRS" service.
G18 Quick Reference Manual 35
Page 41
Section 2 : Communication and PDA Features
Making a call
1. Using the Phone
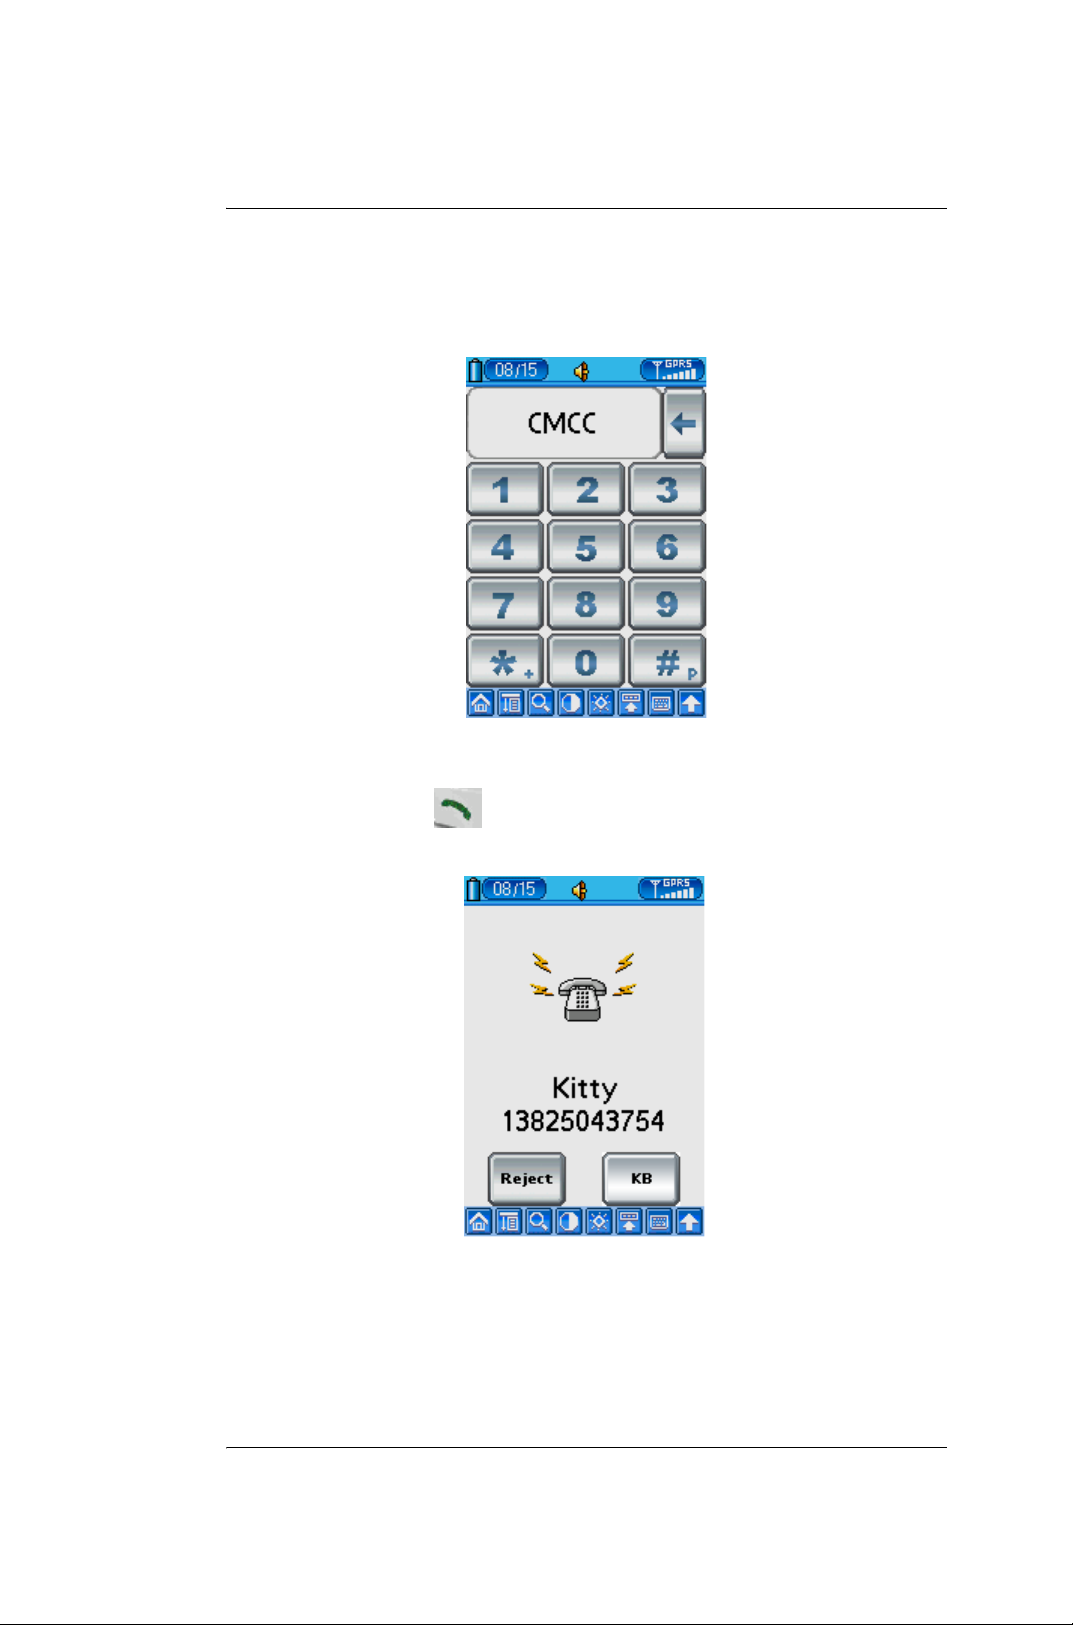
1.Tap Numeric keyboard(0 ~ 9, * and # ) to key in telephone numbers.
2.Press the Call key to dial the numbers.
G18 Quick Reference Manual 36
Page 42
Section 2 : Communication and PDA Features
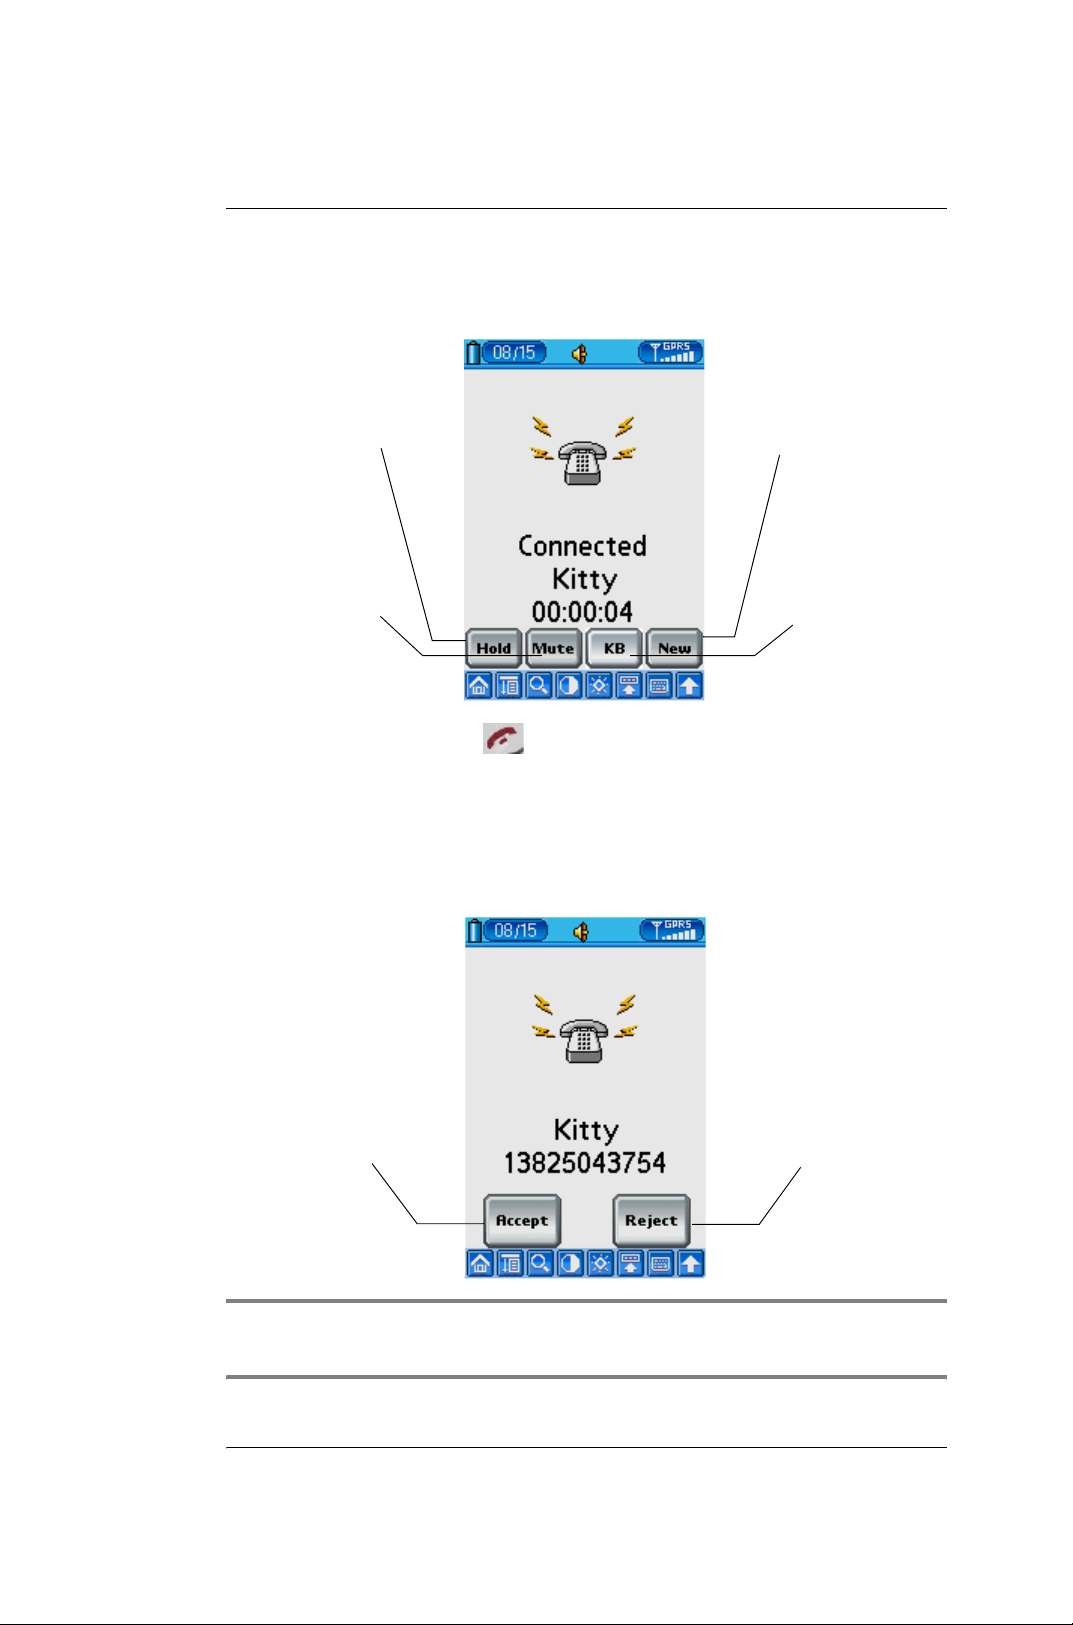
3.After the call is connected:
1. Using the Phone
Tap Hold button to hold
the call.
Tap Mute button to
mute the call.
Tap New button to pause the
calling to call another number.
Tap DTMF button to
input KB.
• Press the End Call Key to end the call.
Receiving a call
1.When receiving a call, you will see the incoming call number on
screen.
Touch the Accept button to
answer the call.
Touch the Reject button to
reject the call.
TIP: Alternatively, the user can press the Call key to accept the call,
while pressing the End Call Key to reject the call.
G18 Quick Reference Manual 37
Page 43
Section 2 : Communication and PDA Features
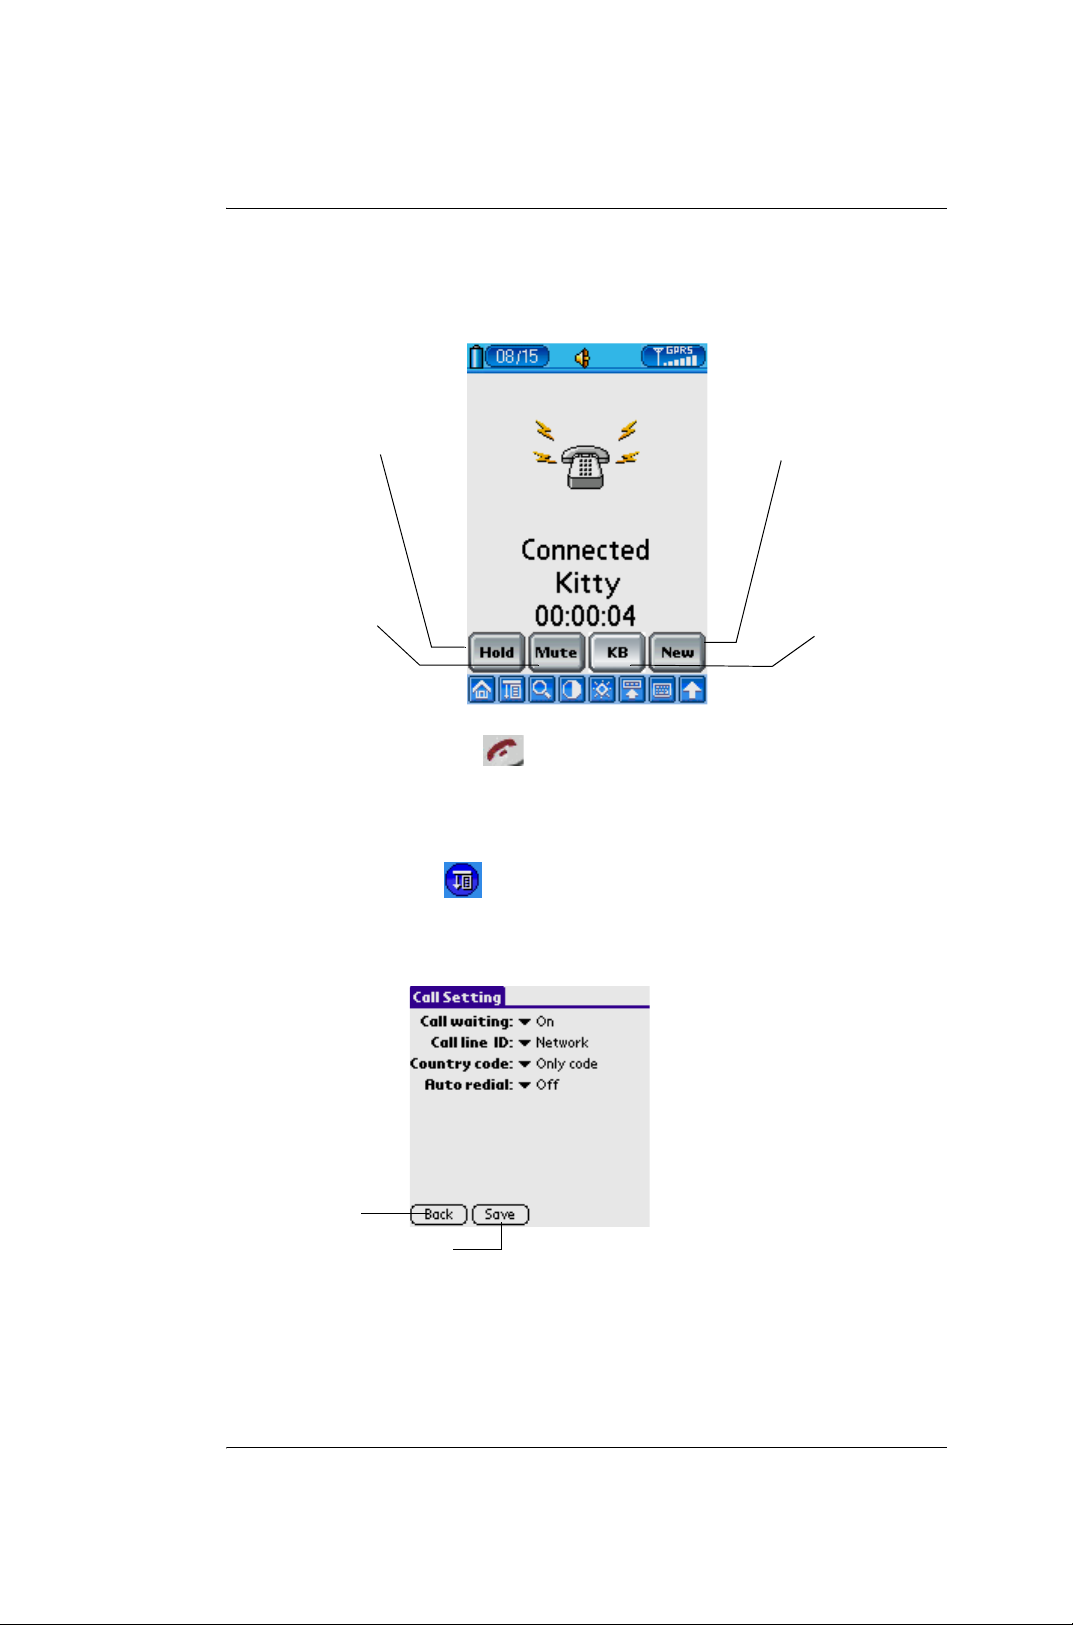
2.When the call is connected :
1. Using the Phone
Tap Hold button to hold
the call.
Tap Mute button to
mute the call.
• Press the End Call Key to end the call.
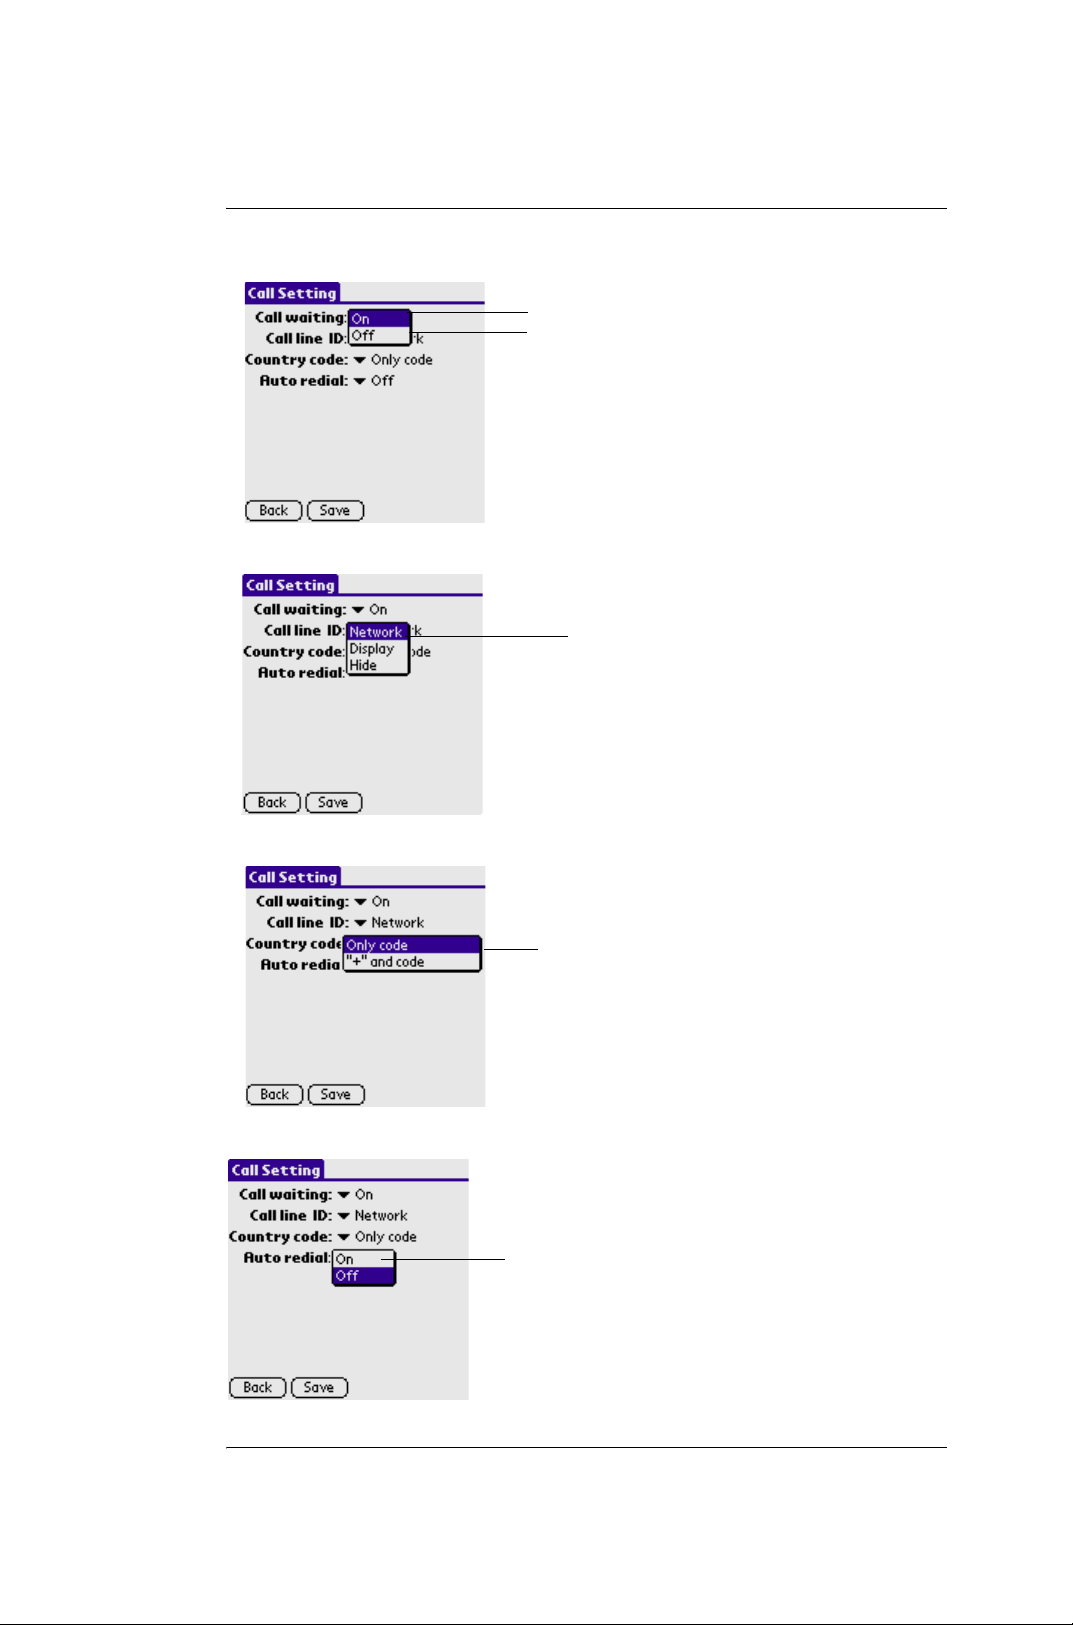
Call Setting
1.Tap the Menu icon .
2.Select Call > Call Setting.
Tap New button to go to Applications Launcher and press
the CALL key to return.
Tap KB button to input KB.
Back
a. Call Waiting
Save
G18 Quick Reference Manual 38
Page 44
Section 2 : Communication and PDA Features
b. Call line ID
1. Using the Phone
• On to enable
• Off to disable
•Network: Determined by GSM
network
• Display: Select to display the Call
line ID
• Hide: Select to hide the Call line ID
c. Country Code Setting
d. Auto redial
• Only code: Add a region code only
• "+” and code: Add a letter ‘+’ before
region code
• On to enable
• Off to disable auto redial function
G18 Quick Reference Manual 39
Page 45
Section 2 : Communication and PDA Features
1. Using the Phone
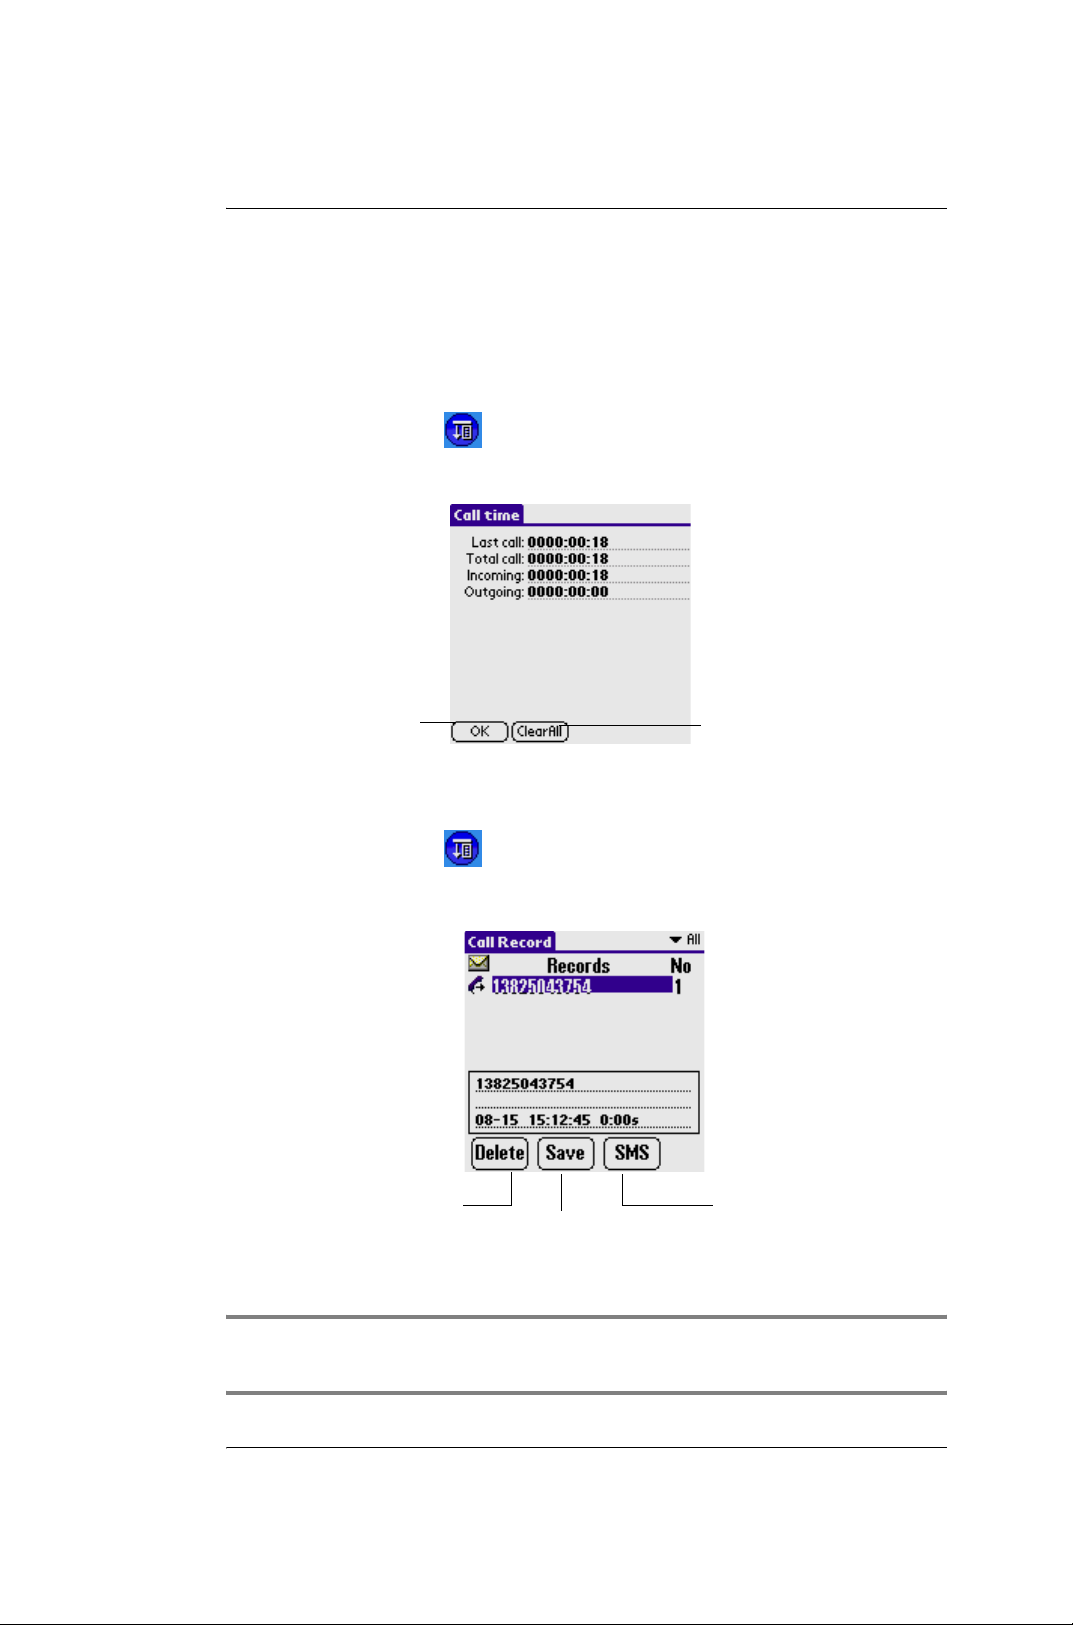
3.When finished setting, Tap Save button to save the setting, then Tap
Left Arrow icon to exit.
Call Time
1.Tap the Menu icon .
2.Select Call > Call Time.
Tap back button
to exit
Tap Delete button to reset timer.
Call Records
1.Tap the Menu icon .
2.Select Call > Call Records.
Tap Delete to delete the detail of the call record (figure
needed)
Tap Save to save the phone
number in the call record (figure needed)
TIP: In the call interface , you can press Call key to enter the call
record interface directly.
Tap SMS to send the short
message to the selected
number
G18 Quick Reference Manual 40
Page 46
Section 2 : Communication and PDA Features
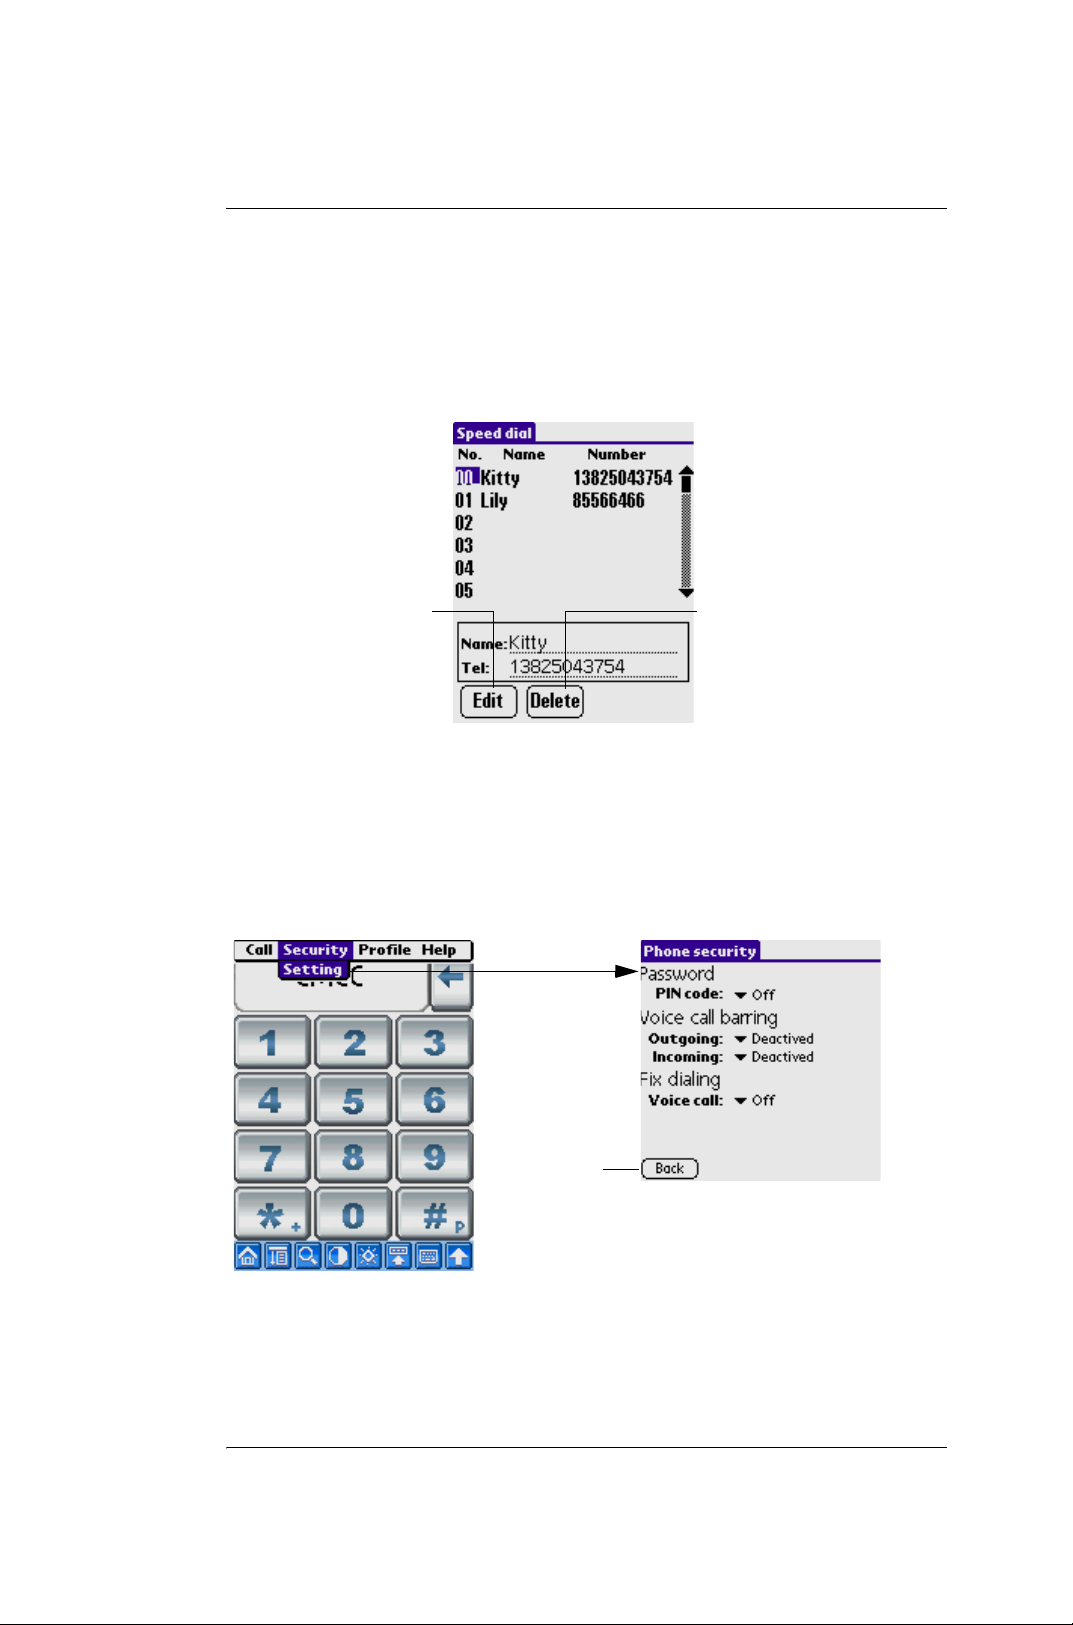
Speed Dial
1.Tap the Menu icon.
2.Select Call > Speed dial.
1. Using the Phone
Tap Edit to edit the phone
number (figure added)
Phone Security Setting
1.Tap the Menu icon.
2.Select Security > Setting.
Tap Setting
Tap back
button to
exit
Tap Delete to delete the detail
of the record (figure added)
a. Changing PIN/PIN2/Barring Code
G18 Quick Reference Manual 41
Page 47
Section 2 : Communication and PDA Features
1. Using the Phone
WARNING! Incorrectly entering your SIM PIN three times causes the
SIM card to be blocked.To unblock your SIM card, you must contact
your service provider and obtain the SIM PIN Unblocking Key (PUK)
code from your service provider.If you unsuccessfully enter the PUK
code ten times, the SIM card is permanently blocked and must be
replaced. If this happens, all data will be lost. You have to purchase a
new SIM card.
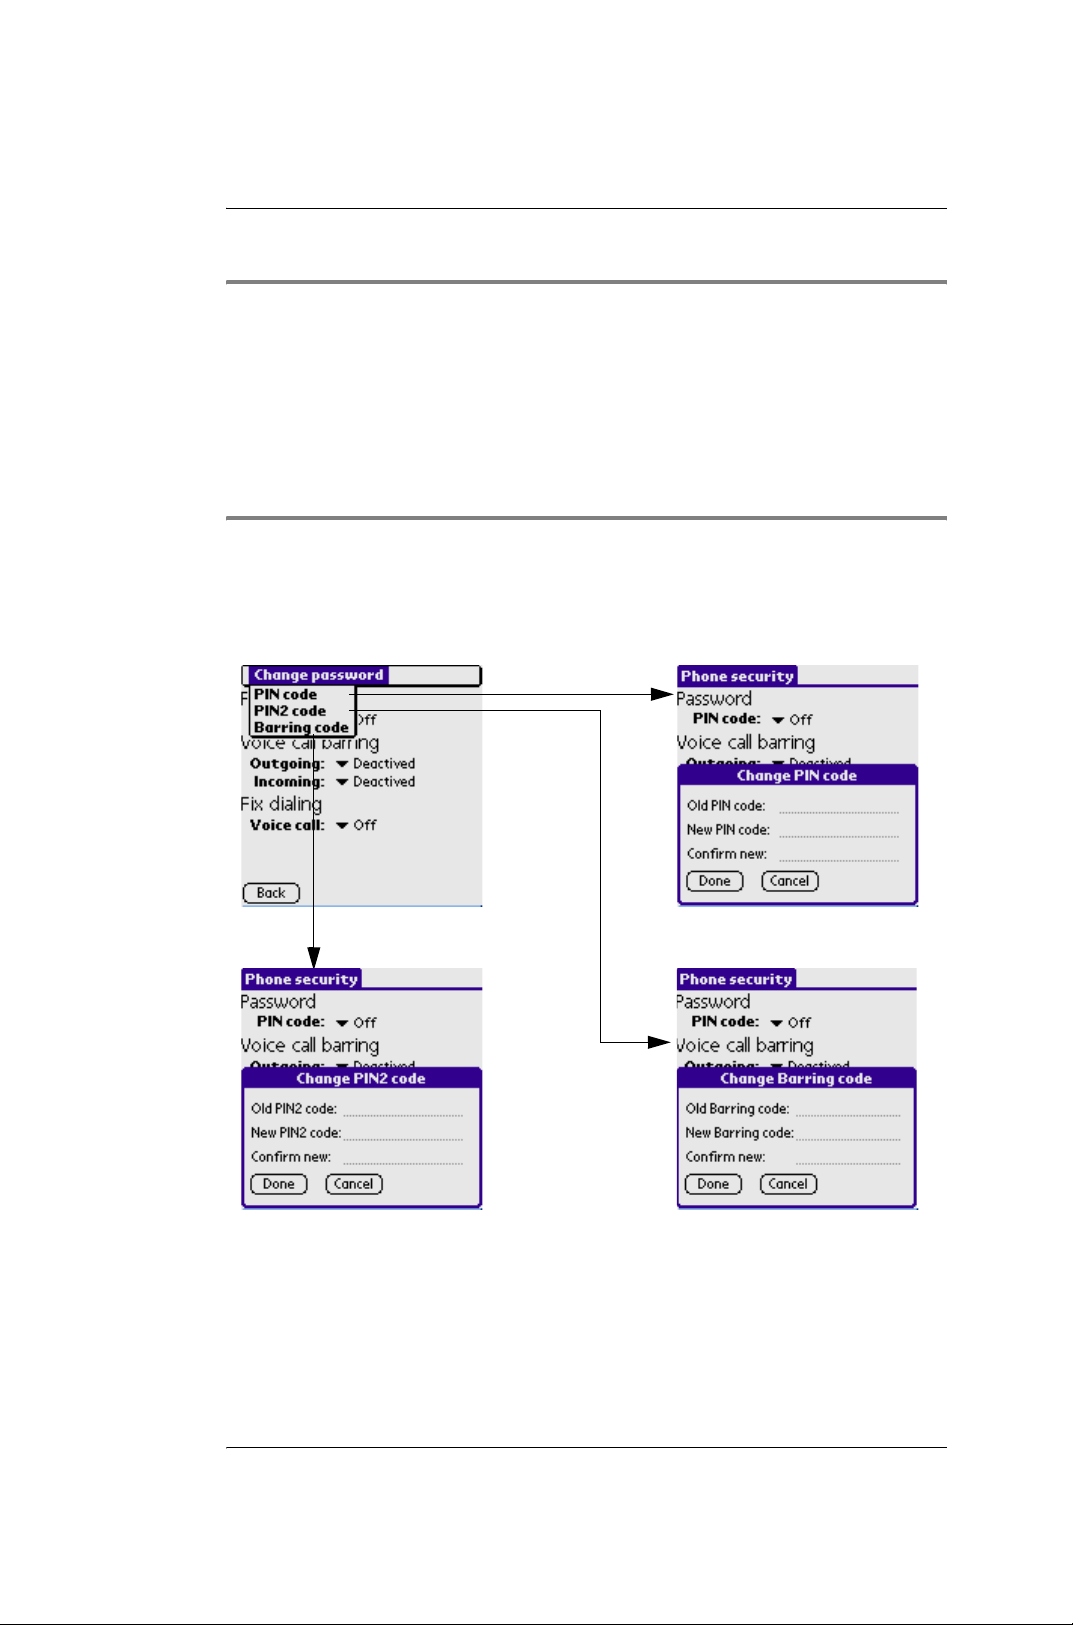
– Tap the Menu icon on front panel of your G18.
– Select Change password > PIN code / PIN2 code / Barring code
to configurate
Tap PIN
b. Setting
Tap PIN2
Tap Barring code
G18 Quick Reference Manual 42
Page 48
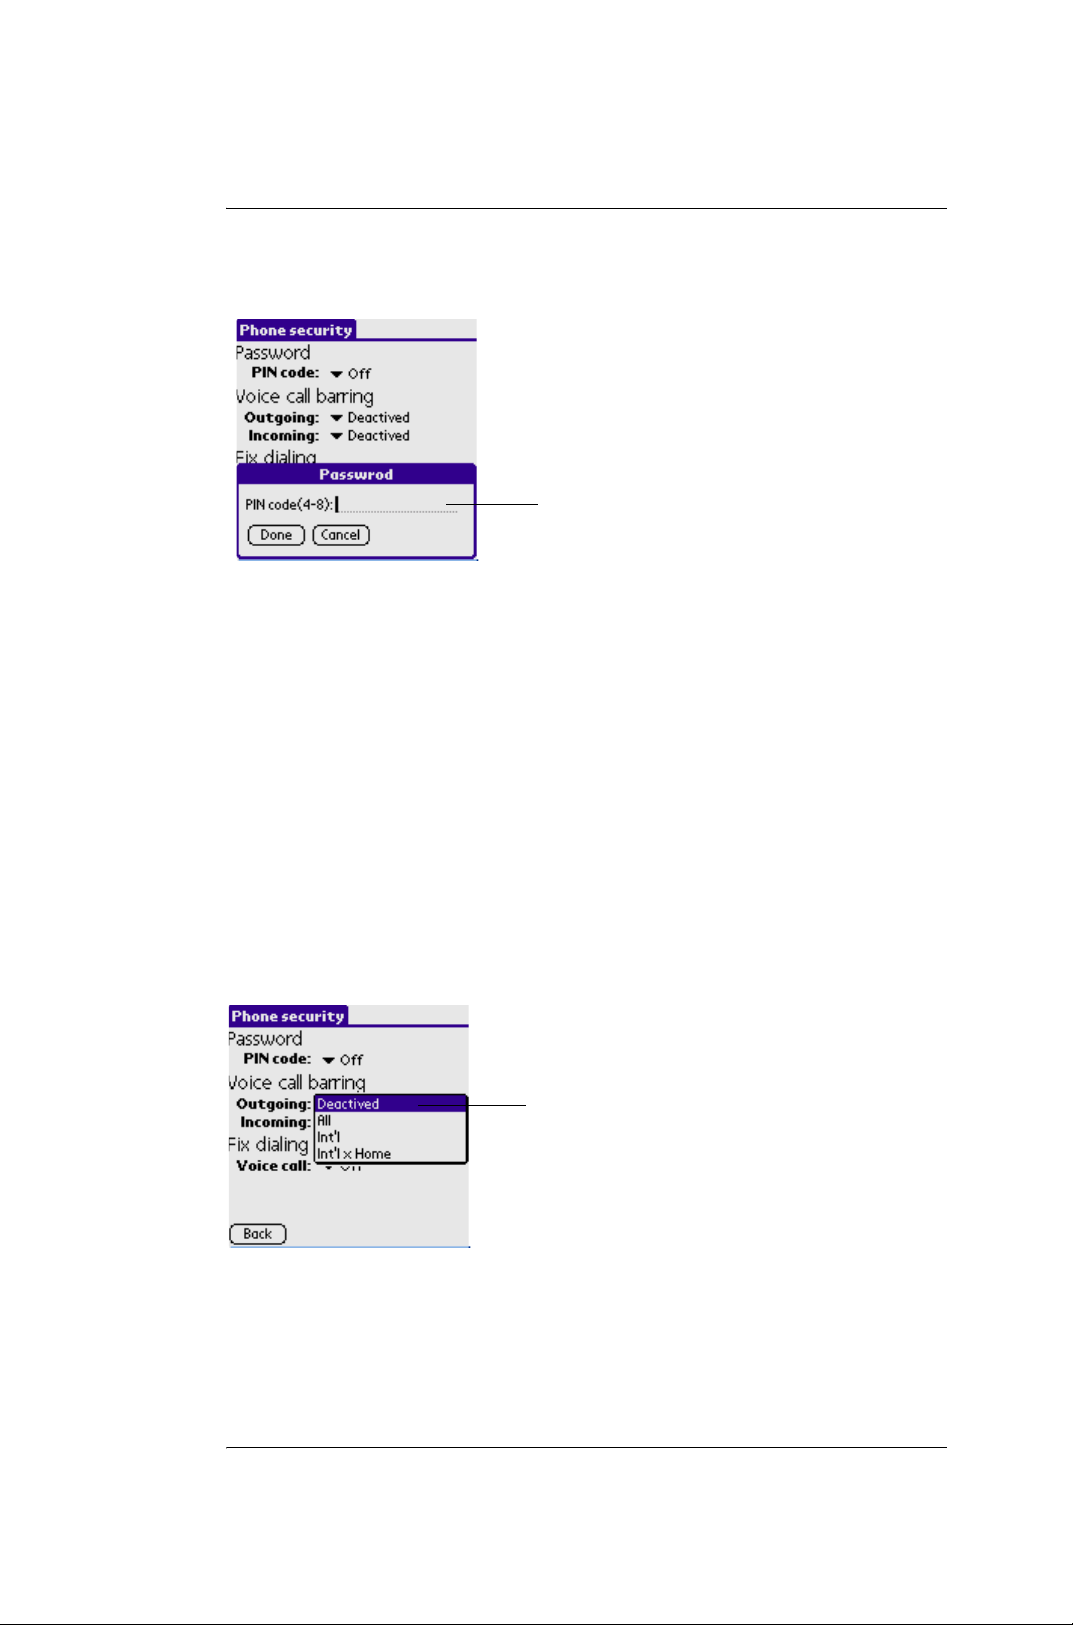
Section 2 : Communication and PDA Features
1. Using the Phone
Enable/PIN Code
Input the PIN
Code
• Tap On from the pick list to enable the PIN Code.
• If the PIN Code has not been set, a dialog box will appear and ask
you to set the PIN Code.
Disable PIN Code
• Tap Off from the pick list to disable the PIN Code.
• If there is an enabled PIN Code, a dialog box will appear and ask
you to input the PIN Code.
• If your input is right, the PIN Code will be disabled.
Voice Call Barring
• Four types of setting are available for Outgoing item.
• Deactivated for "disable call
barring function".
• All for "All calls".
• Int'l for "International call".
• Int'l for x Home for "International
calls except home call".
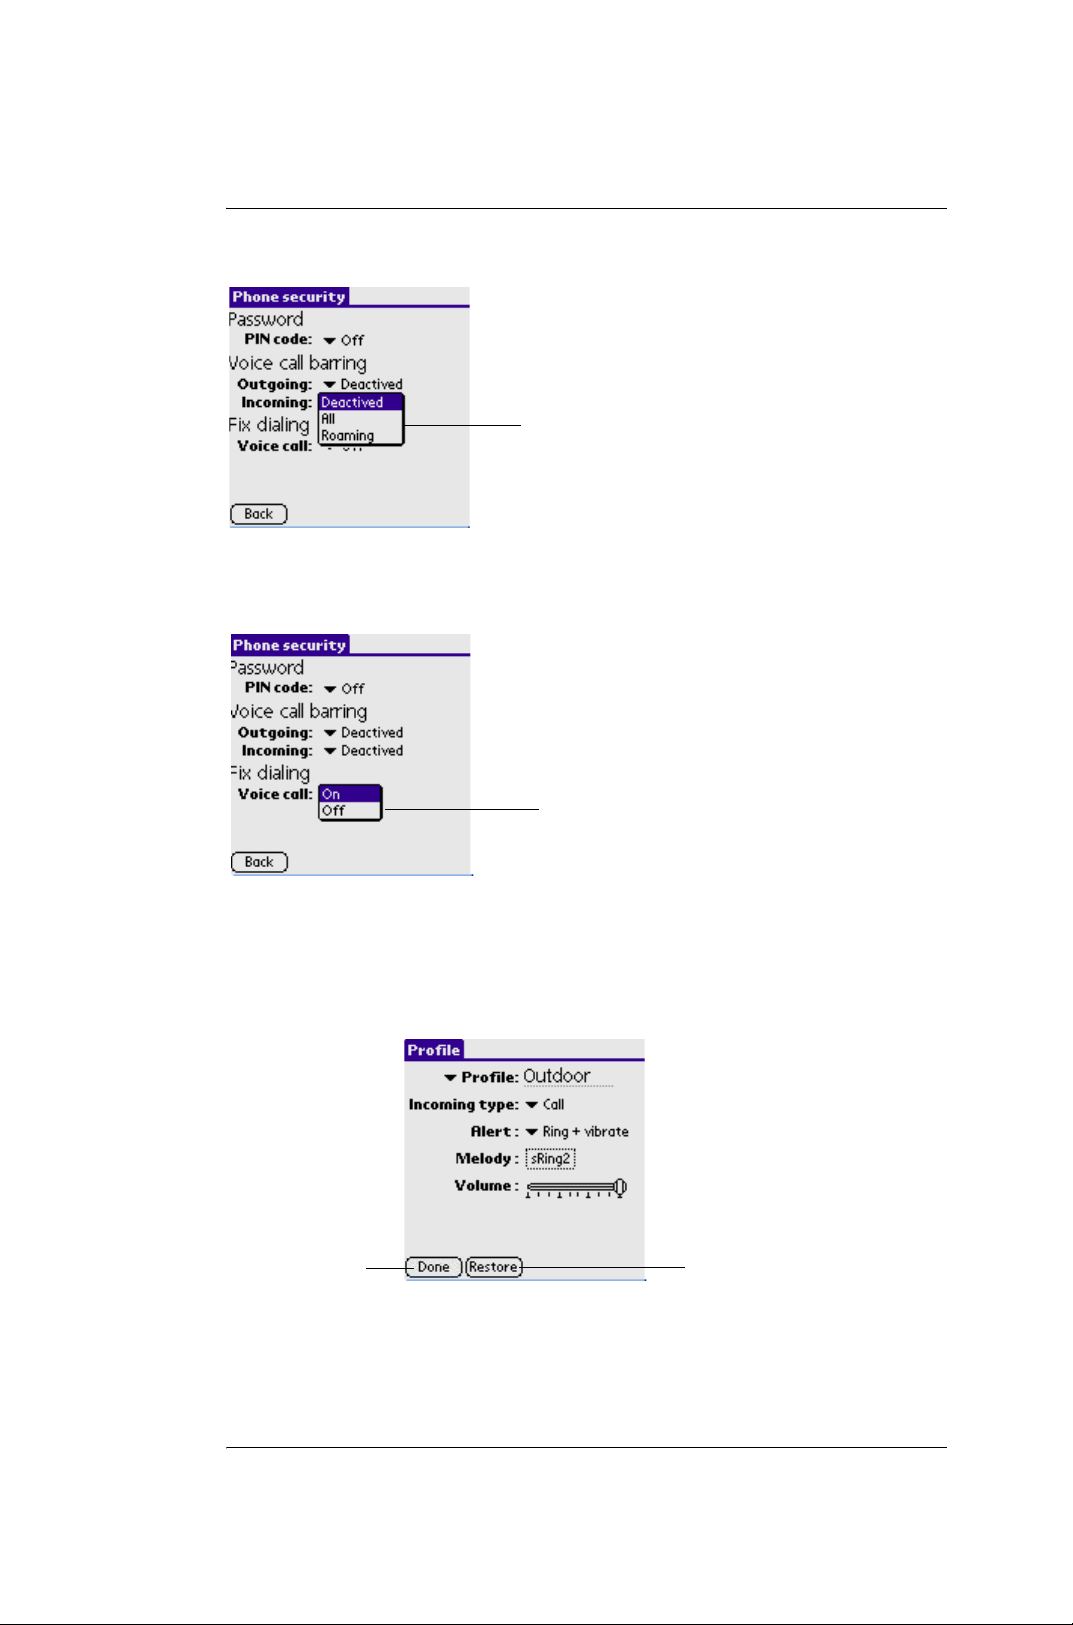
• Three types of setting are available for incoming item.
G18 Quick Reference Manual 43
Page 49
Section 2 : Communication and PDA Features
1. Using the Phone
• Deactivated means that accepting all
incoming calls
• All means that blocking all incoming
calls
• Roaming means that Barring function
will be enabled when roaming
Fix Dialing
Select one of the following options in the Fix Dialing section:
•On for enable.
• Off for disable.
3.Tap the Save button to save the setting.
4.Tap left arrow to exit.
Phone ringing Setting
Tap to reset all
the fields to de-
Back
a. Profile
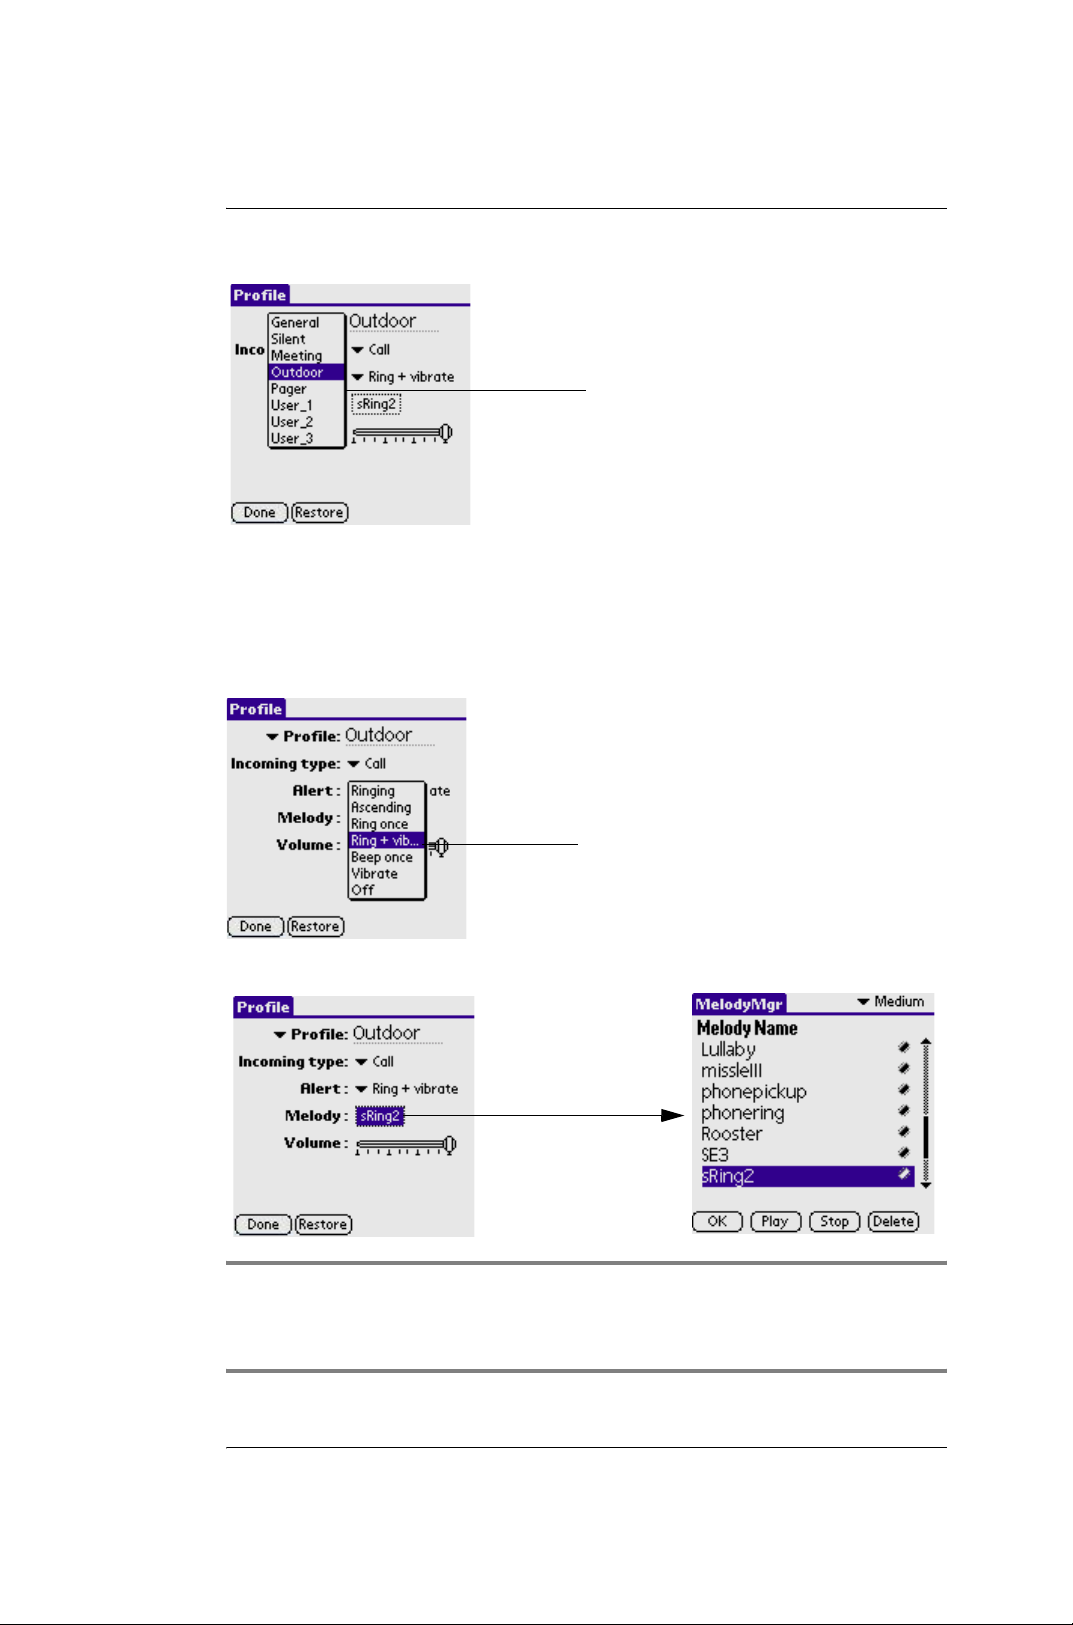
Tap the Profile, you can find the following pre-defined profiles
fault setting
G18 Quick Reference Manual 44
Page 50
Section 2 : Communication and PDA Features
1. Using the Phone
You can edit each profile as you like
by changing any other section in this
page
b. Incoming type
You can specify Call or Message as the incoming type for Alert, Melody,
and Volume setting below
c. Alert
You can select the Alert
style for incoming call
and message
d. Melody
You can specify the melody for your phone, default is None for silence
NOTE: You can pick up one of your favourite melody. For the usage
of Melody, please refer to User Manual in CD, Chapter 7 - Using the
Melody Manager for details.
G18 Quick Reference Manual 45
Page 51
Section 2 : Communication and PDA Features
1. Using the Phone
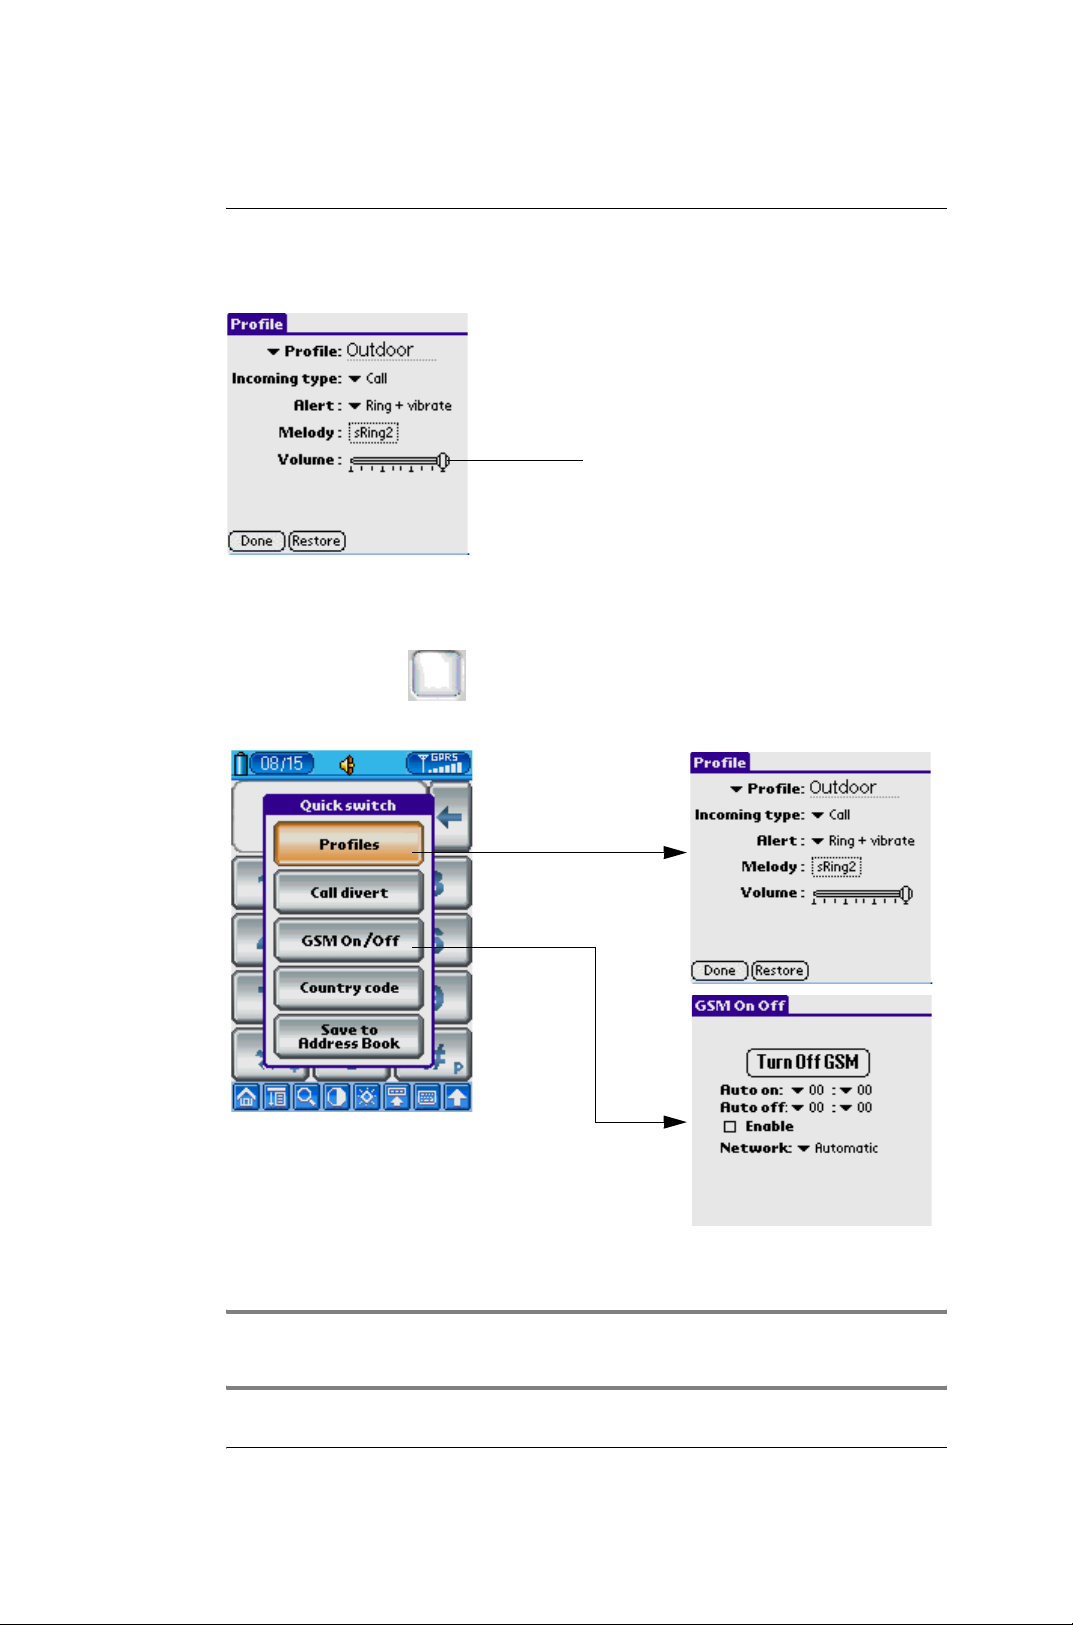
e. Volume
Tap on the volume bar to adjust the volume of the melody for your phone
Quick Switch
Tap the Enter Key in front panel of your G18, you can enter the
Quick switch dialog.Than tap "GSM On/Off".
• Tap Address book button to enter Address application, you can pick
up the phone number from the address book.
NOTE: For the usage of address book, please refer to Chapter 9 Using the Address Book in this section for details.
G18 Quick Reference Manual 46
Page 52
Section 2 : Communication and PDA Features
1. Using the Phone
• Tap Call record button to view the call record history list.
Reference to the part of Call Record in this chapter.
• Tap Speed Dial button to pick up one phone number from Speed
dial list. Reference to the part of Call Record in this chapter.
• Tap Return to quit to main view.
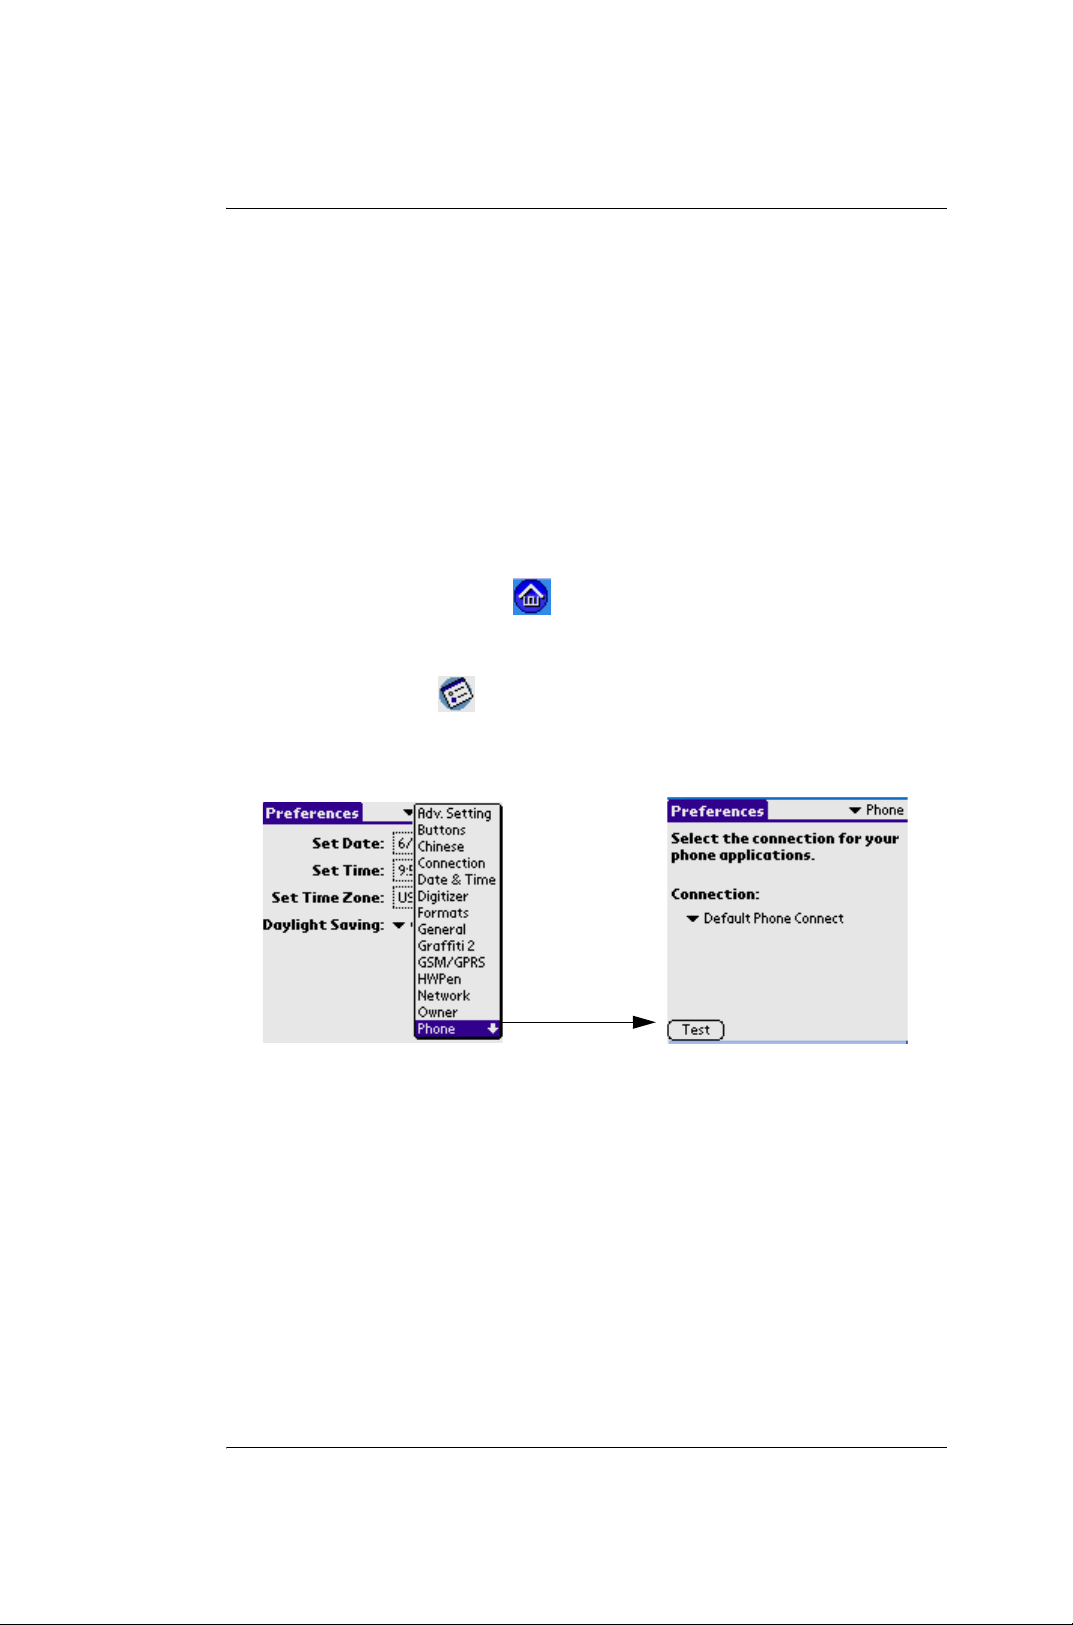
Testing the Phone Connection
For the first time to use the telephone function, you may need to check and
test the phone connection.
1.Tap the Applications icon .
2.Select System from the pick list in the upper right corner.
3.Tap the Prefs icon ; then select Phone from the pick list in the
upper right corner.
4.For Connection, select Default Phone Connect.
Tap "Phone"
5.Tap the Test button to launch the phone connection test.
6.Wait for a while, there will appear a dialog box to show wether it's
ok or anything fails.
7.If the test is ok, you could try to launch the Phone application to call
someone.
8.If the test fails, you might need to check whether the SIM or the
other things go wrong.
G18 Quick Reference Manual 47
Page 53
Section 2 : Communication and PDA Features
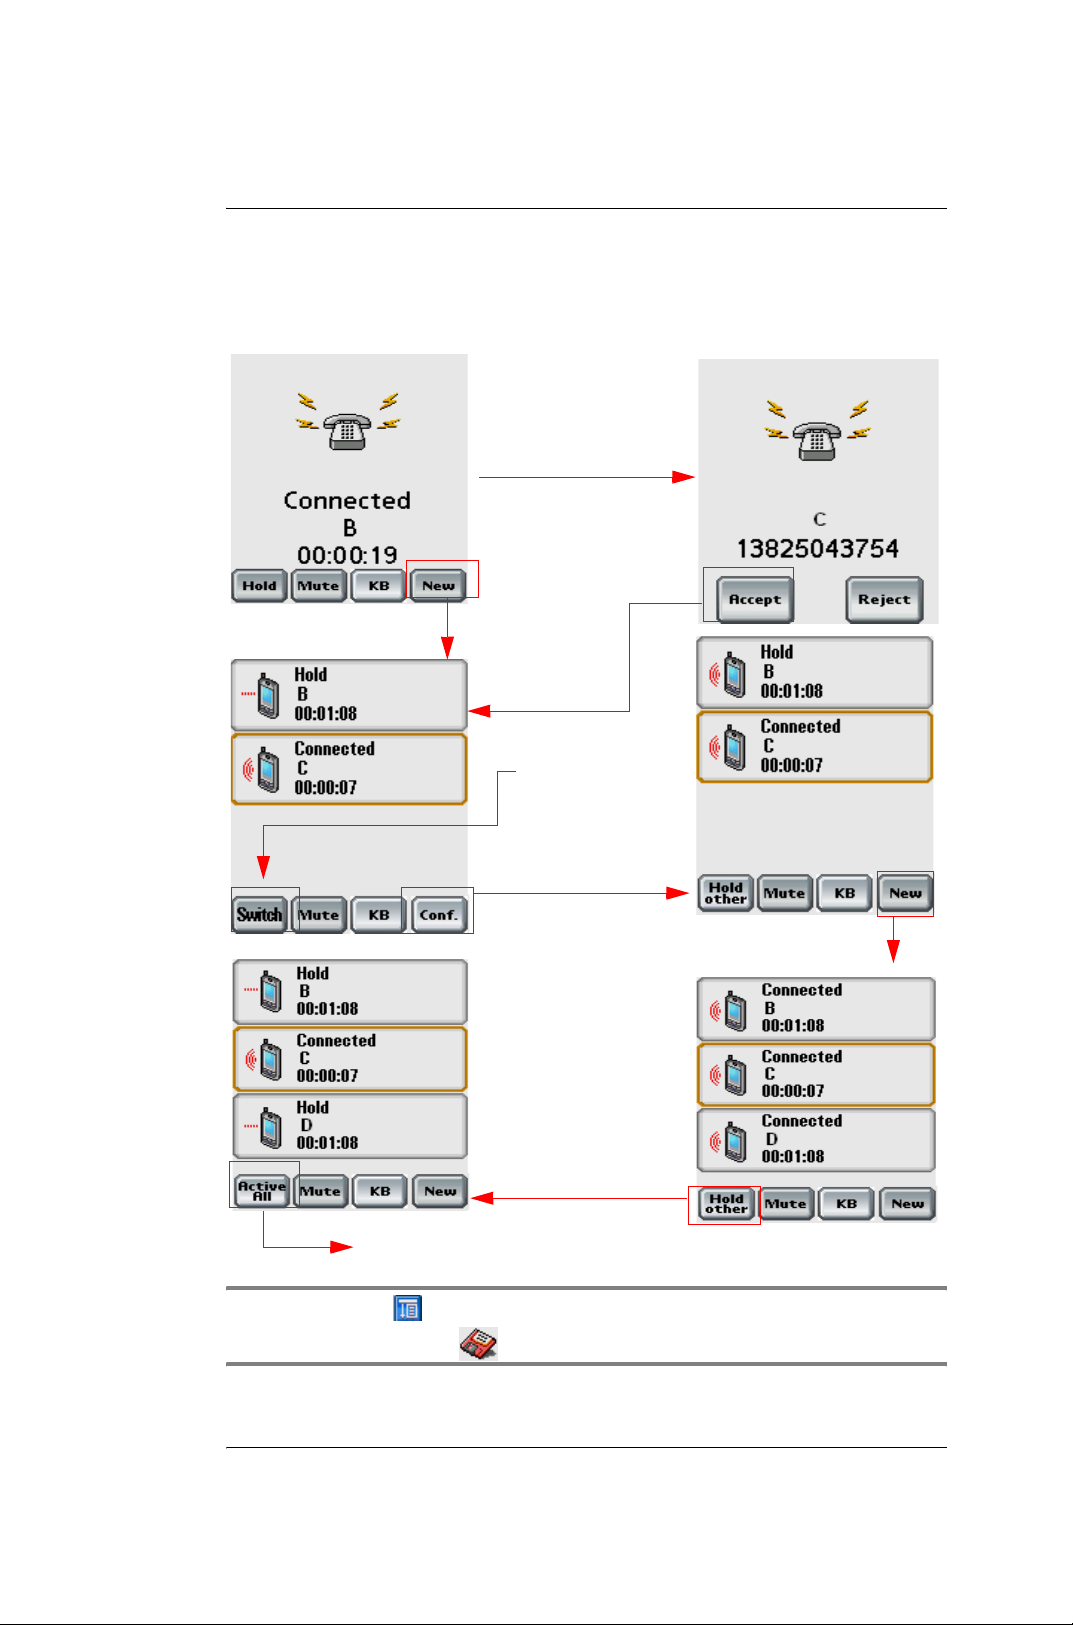
Conference call/ Call Divert
A calls B, after connected£½
C calls A
A calls C, after connected
Switch the call
with B or C by using Call Devert
function
1. Using the Phone
Invite B and C to
the confrence call
A calls D to
enter the conference call
Interuppt the
conference call
and talk to only
one person
Tap to restart the conference call
Note: Tap the ,tap Call>Call Setting, select "On" in the "Call
divert" option, then tap to save your setting.
G18 Quick Reference Manual 48
Page 54
Section 2 : Communication and PDA Features
2
. Using the SMS Short Message
2. Using the SMS Short Message
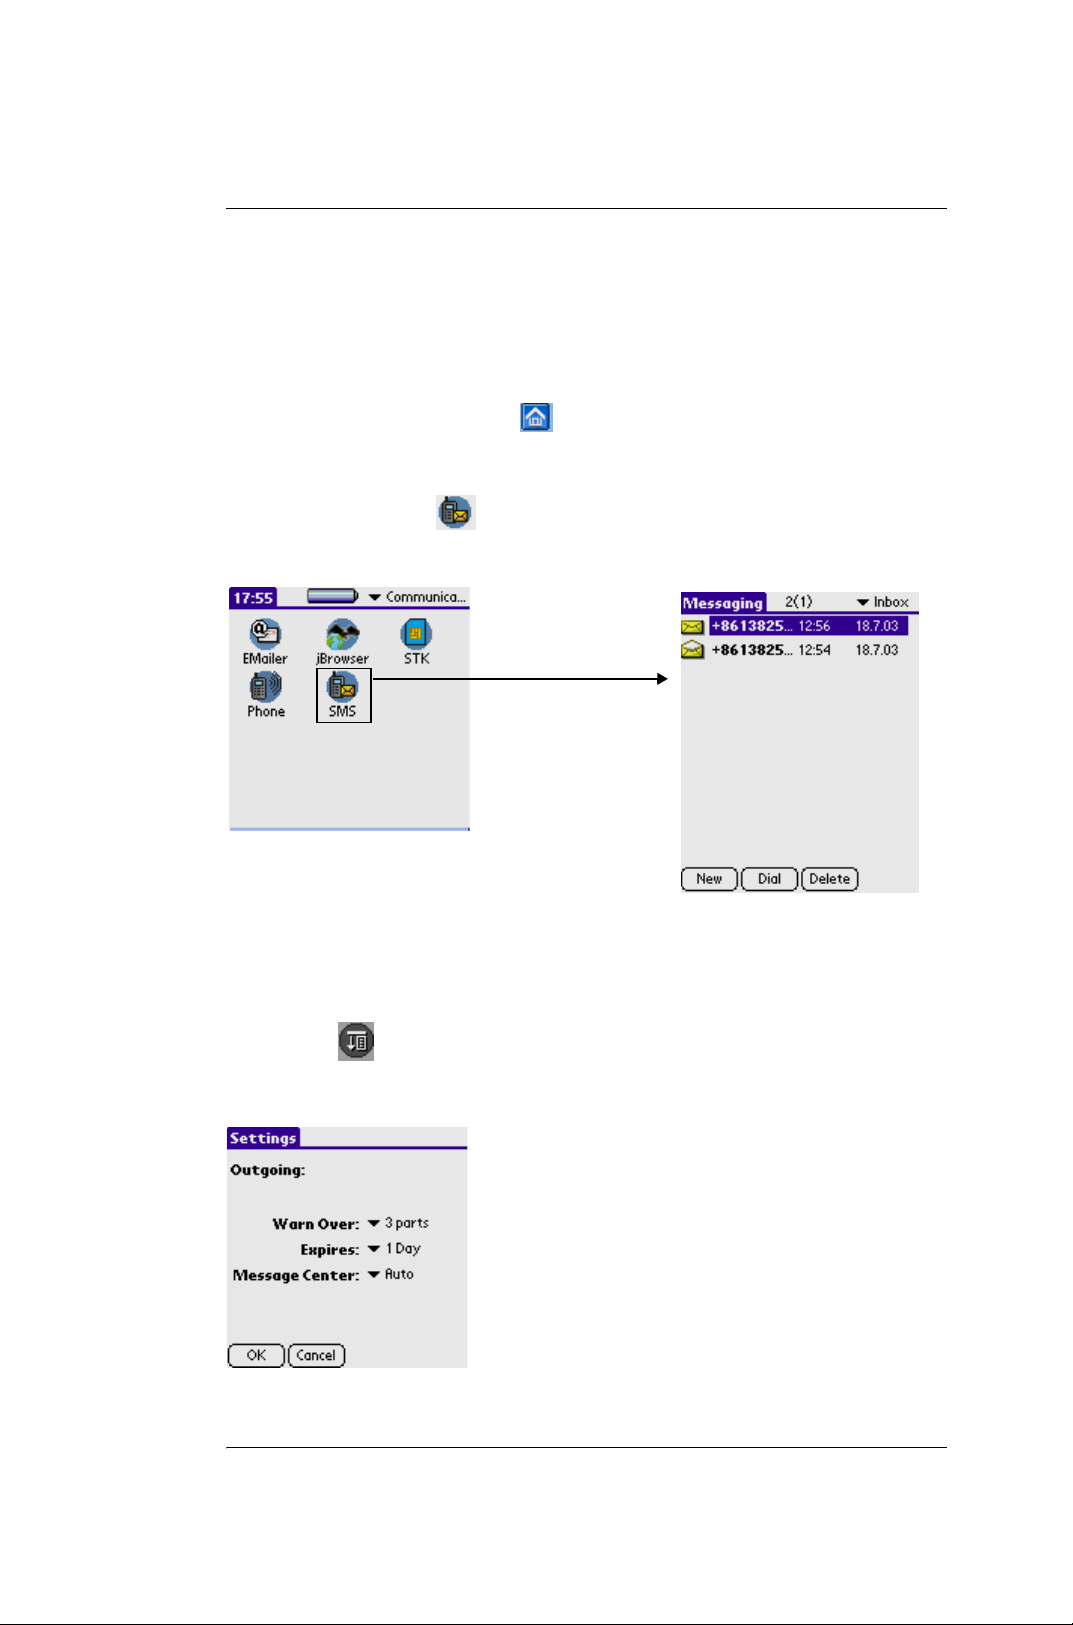
To launch the SMS application
1.Tap the Applications icon .
2.Select Communication from the pick list in the upper right corner.
3.Tap the SMS icon .
Tap SMS icon to enter
the inbox interface
SMS setting
In the main screen, which lists out Inbox messages by default, tap the
Menu icon on the front panel of your PDA phone, choose Tools >
Setting to enter the setting interface.
G18 Quick Reference Manual 49
Page 55
Section 2 : Communication and PDA Features
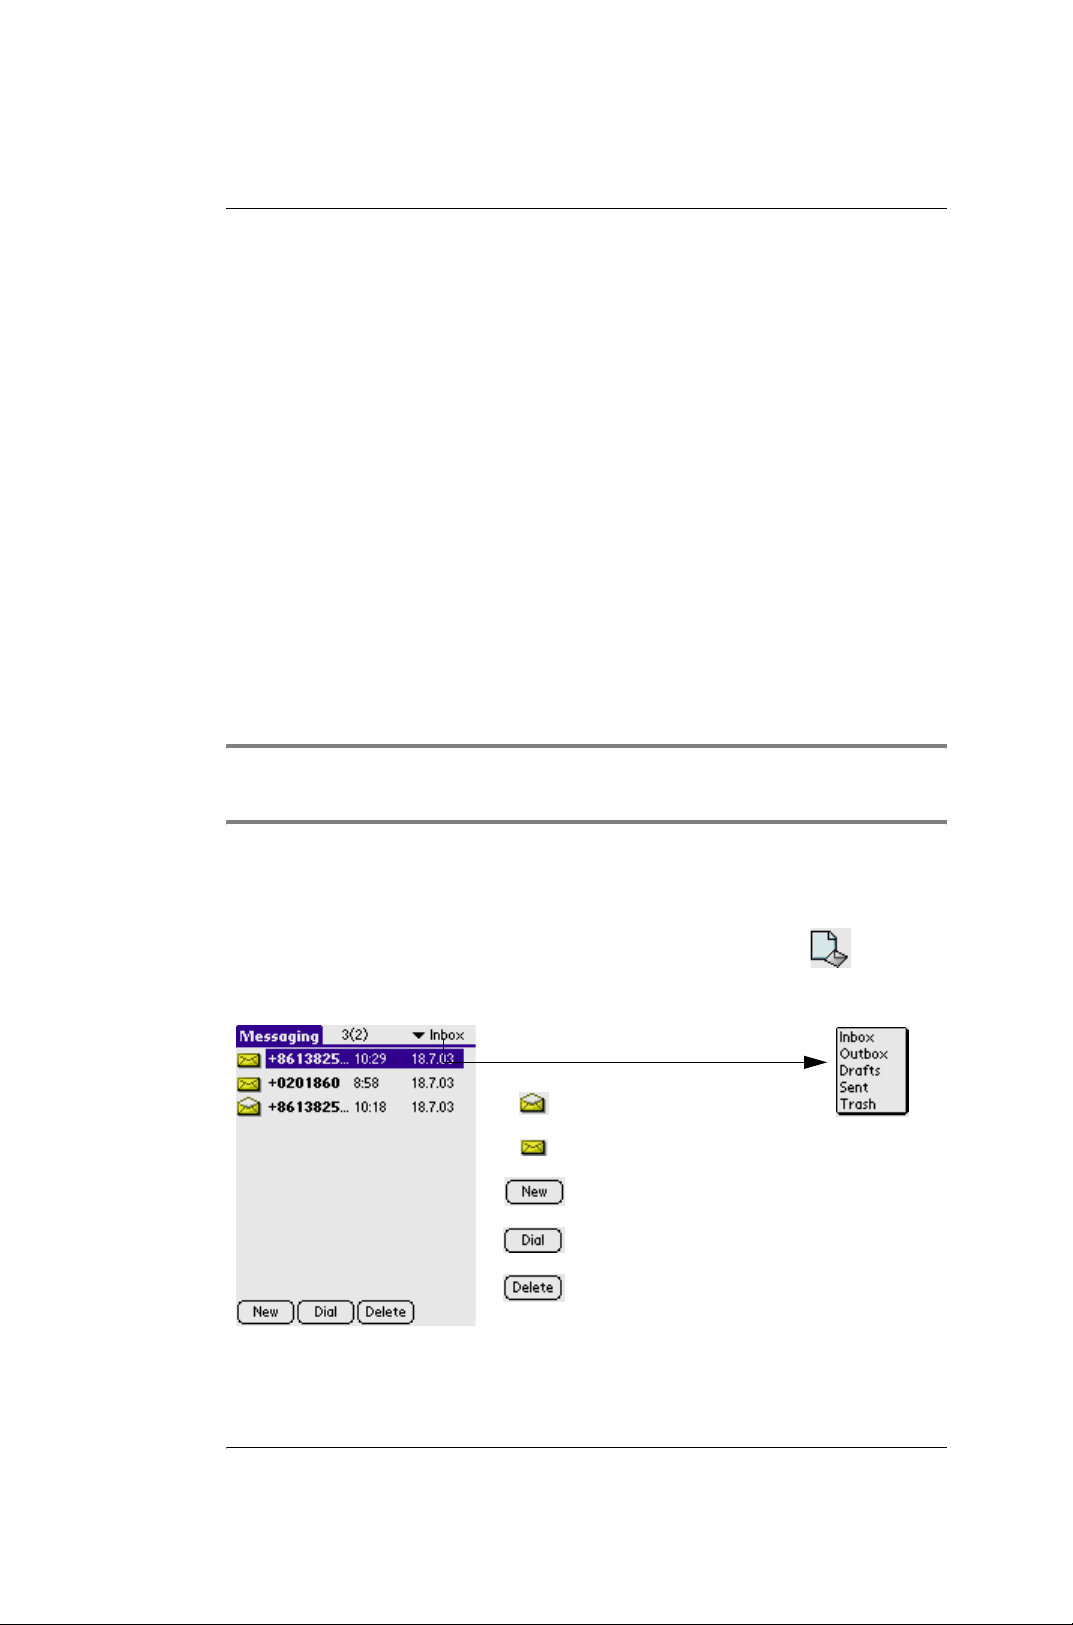
Outgoing:
• Return Receipt:
Return a receipt when recipient got the message.
• Warn Over
You will get a warning when the SMS size is over the limitation.
• Expires
Set a period of time for which the message can be retained in the
message center before you send it out.
• Message Center
Before sending any short message, you must input the short
message service center number, which you can get from your
service provider. The number can be recognized once the SIM card
was inserted.
2
. Using the SMS Short Message
NOTE: If you change your SIM card, SIM only displays the short
messages in the current SIM card.
Writing SMS & Sending SMS
1.In the list view ( in SMS interface), tap the New button to enter
the editing interface.
Tap to show the list
have been read
still havn't been read
Create an SMS
Make a call
After being tapped, a dialog box
will appear to ask for confirmation
of deletion
G18 Quick Reference Manual 50
Page 56
Section 2 : Communication and PDA Features
2
. Using the SMS Short Message
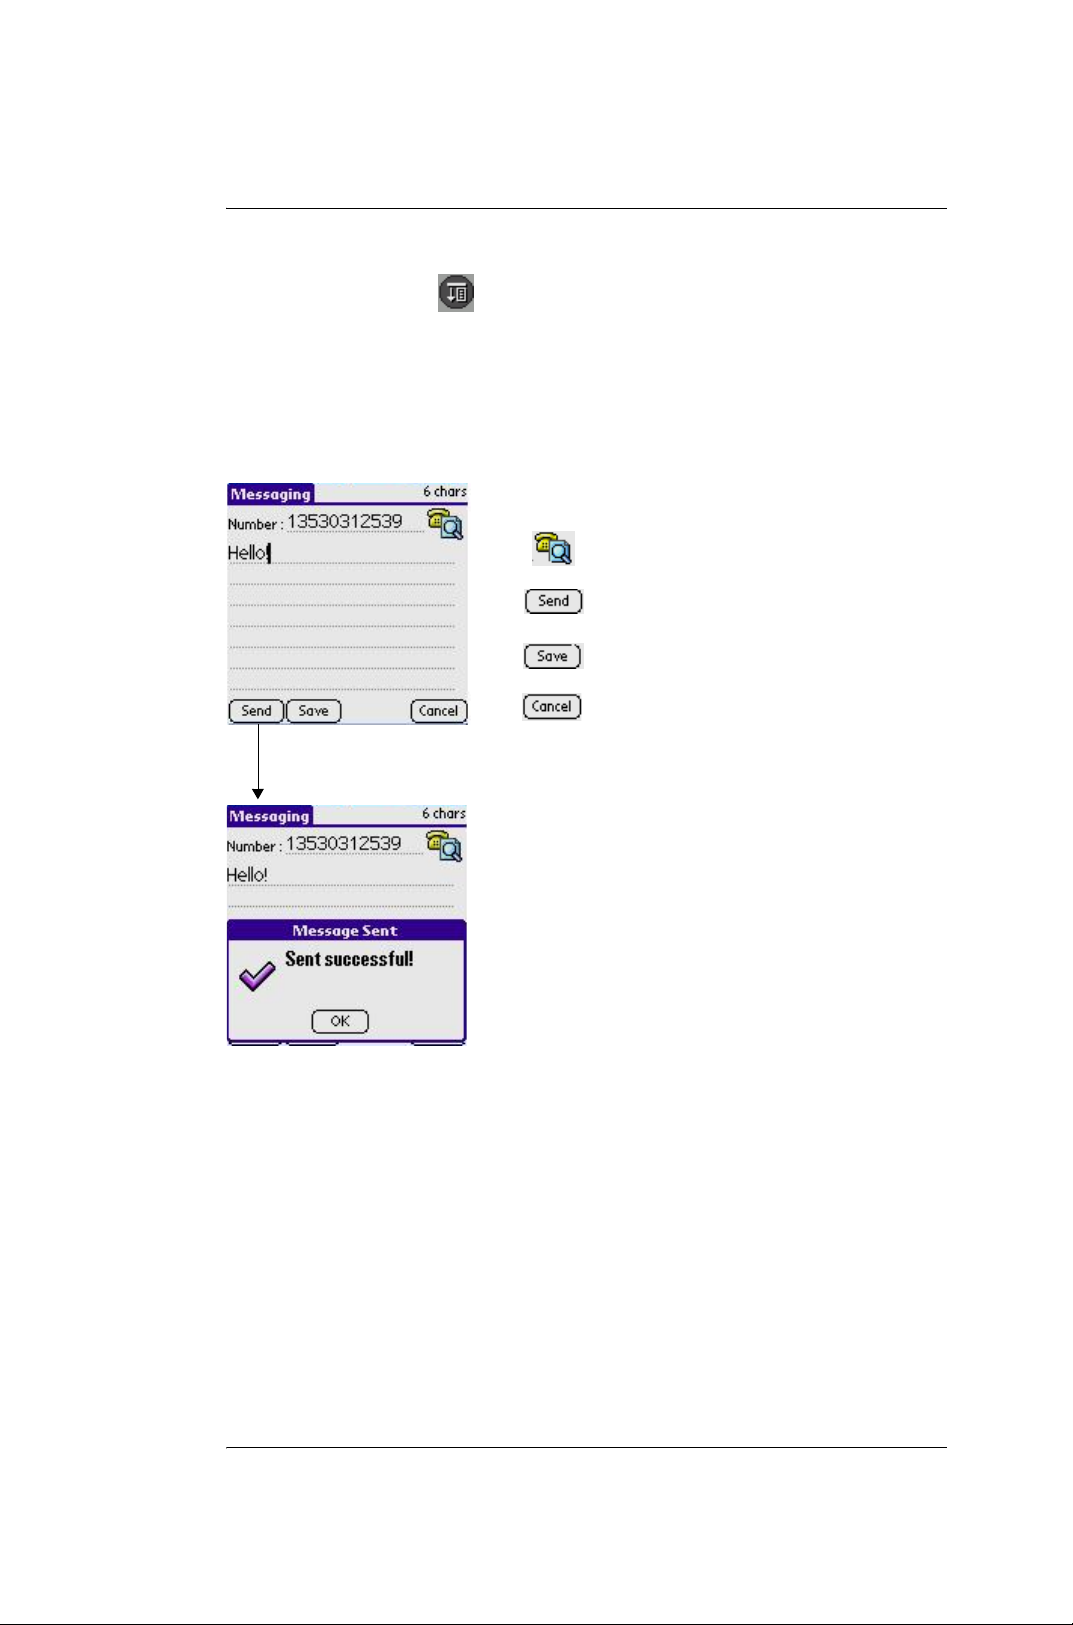
2.Tap the Menu icon on the front panel of your PDA phone, choose
Edit > Keyboard to switch to keyboard entry. Now you can input
number and the content of message. Once finished, tap Done button on
keyboard and return to the message edited interface.
3.Tap the different icons to conduct respective functions, for example,
tap Send icon to send the message.
Enter Address Book to select phone
number
Send SMS, whatever success or not
you will get a return message
Save to draft box
Return to previous interface
Tap "Send"
4.You can also set the font. Tap the function title. After the menu pops
up, tap Font, and then select Set Font to complete the operation.
Receiving SMS
If you receive a short message, it will automatically show a dialog box(it
will appear a envelop icon). You can easily view its content. The short
message may be stored in Inbox or SIM according to the preferred storage
setting.
G18 Quick Reference Manual 51
Page 57
Section 2 : Communication and PDA Features
2
. Using the SMS Short Message
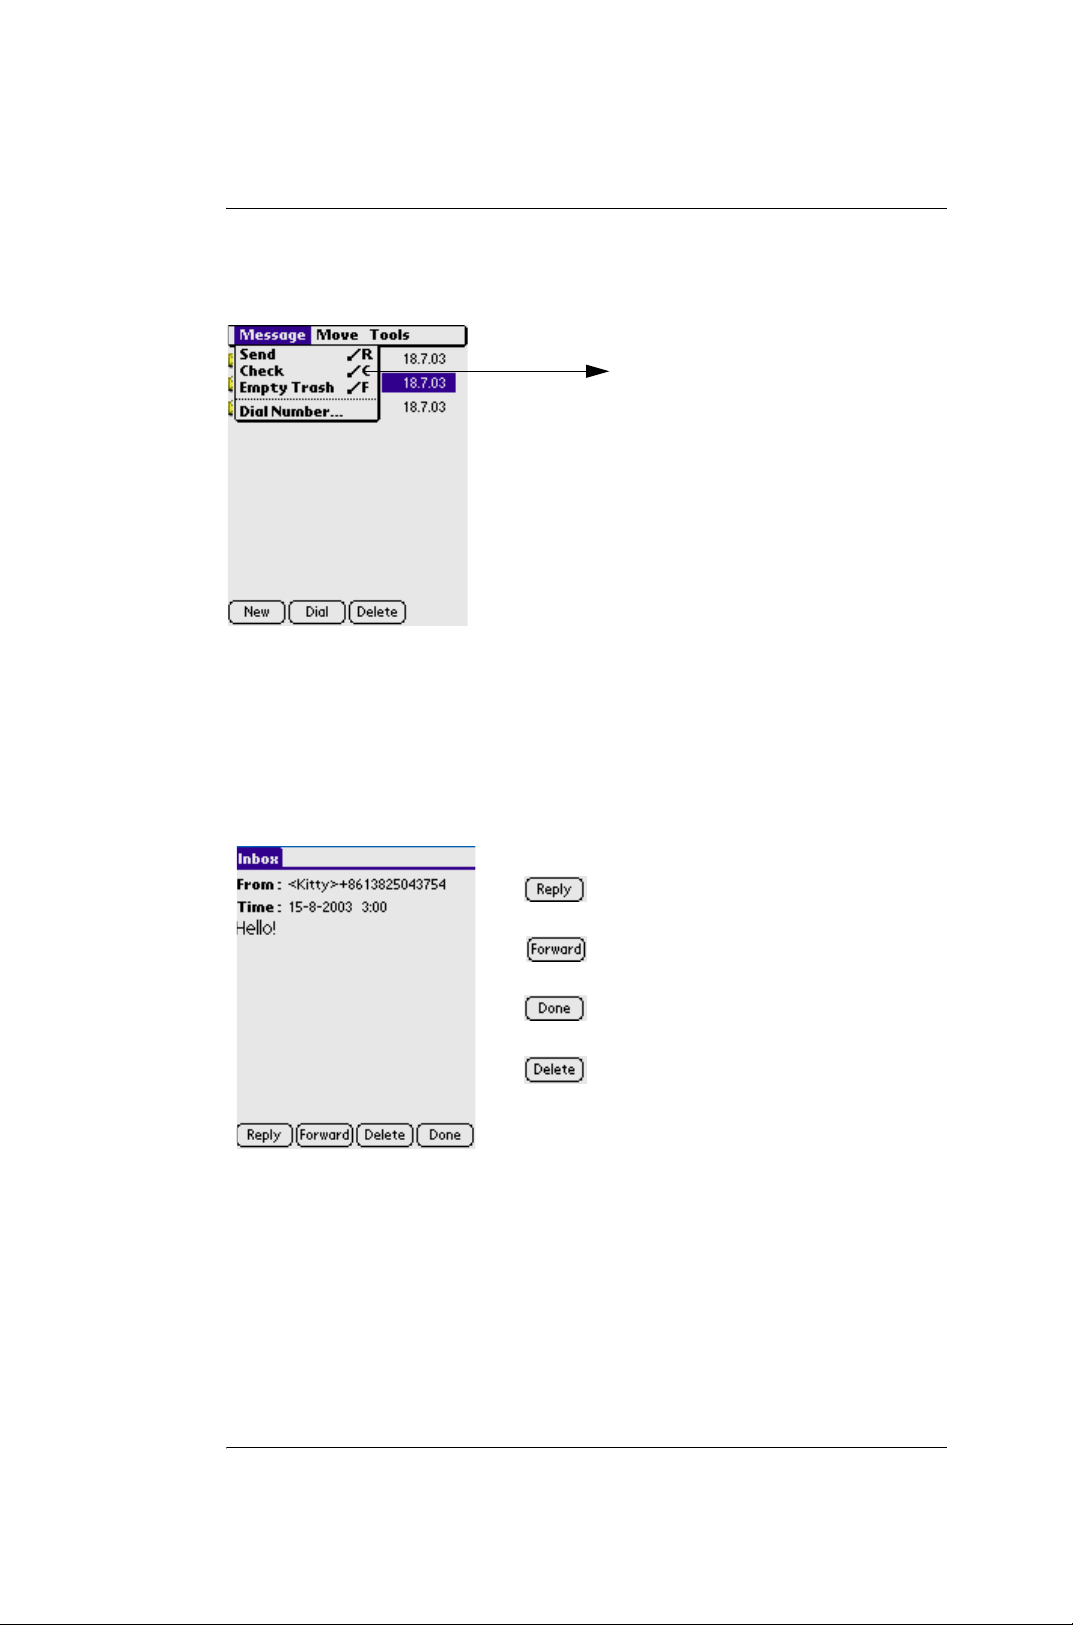
Tap [Check]
Replying SMS & Forwarding SMS
1.In the list view, select proper records in the relative box.
2.Tap one record to enter SMS short message interface. You can do
relative operation according to the prompt of icons.
answer the addresser
forward the current SMS
return to the previous direction
After being tapped, a dialog
box will appear to ask for
confirmation of deletion
Deleting SMS
Delete the short mssage to dustbin.
Select any of the message you want to delete.
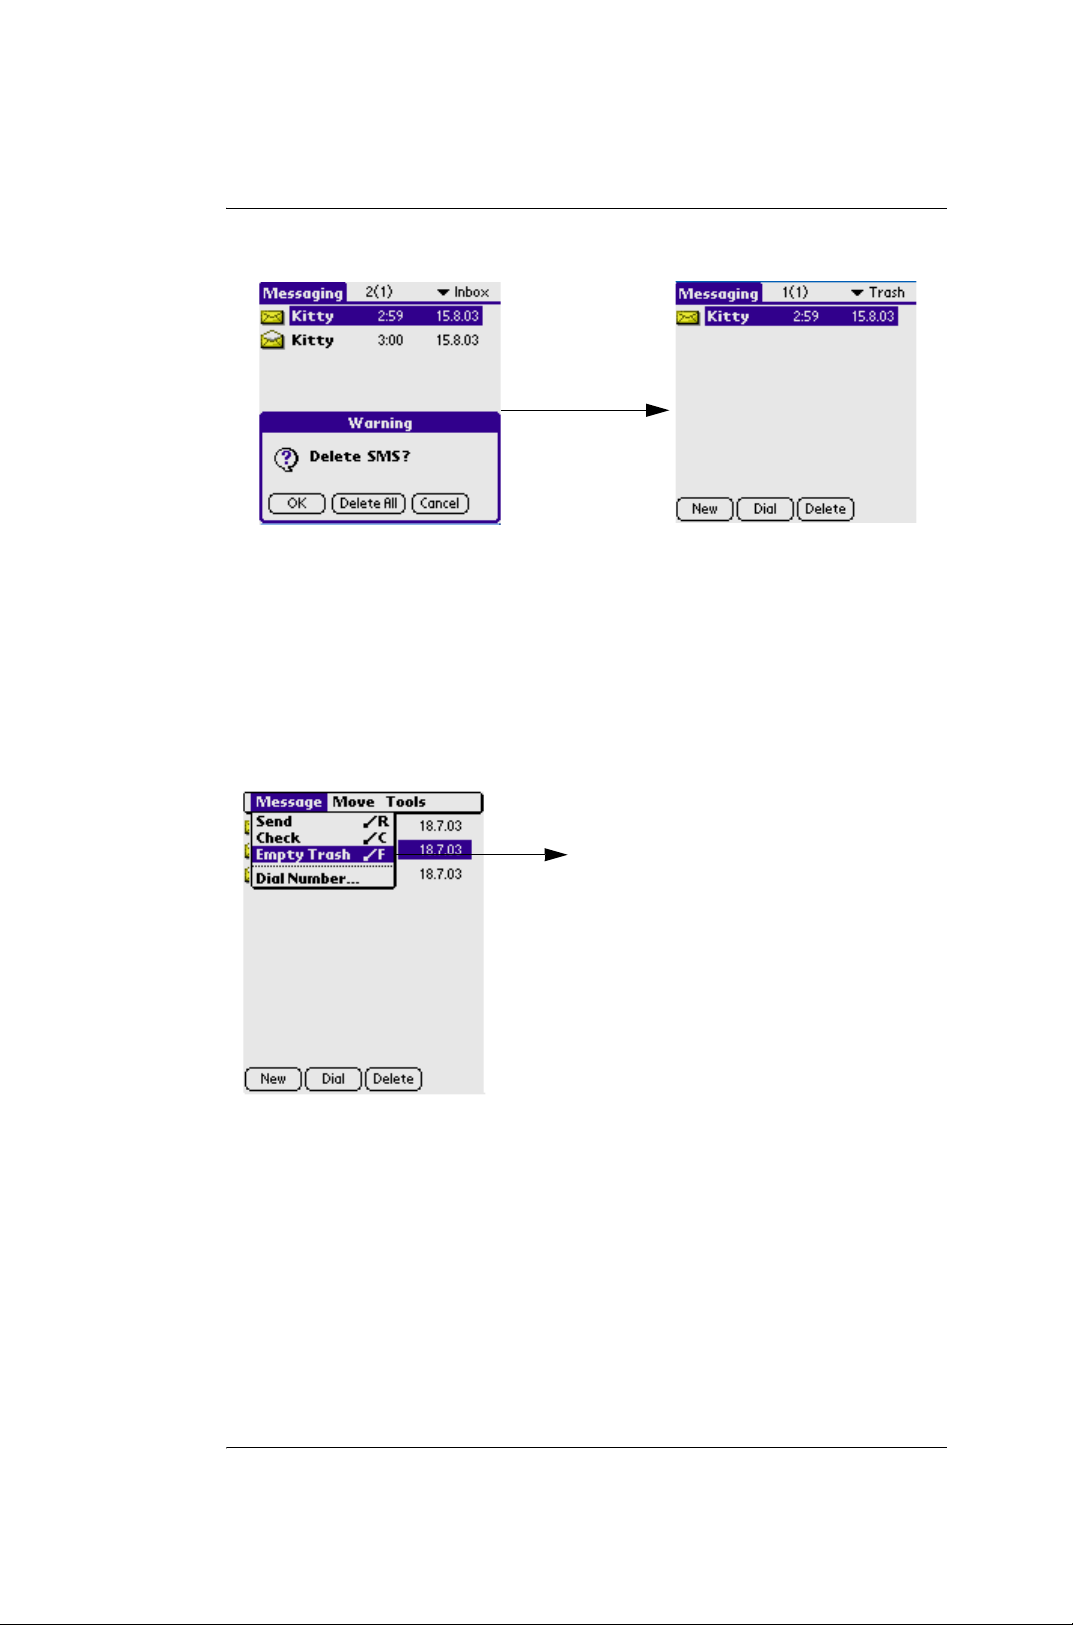
Tap the DELETE button ,then appears a dialog box.
G18 Quick Reference Manual 52
Page 58
Section 2 : Communication and PDA Features
2
. Using the SMS Short Message
after deleting,it will be
placed in the
dustbin
In the dialog box, tap the OK button, then delete the message; tap the
Delete All button, then the all message in the directory will be deleted, tap
the Cancel button, then canel the operation.
Delete forever:
Tap the MENU icon, then a pick list will appear.
In the list , select the Empty Trash , then delete all the message saved in
the dustbin.
tap "Empty Trash"
G18 Quick Reference Manual 53
Page 59
Section 2 : Communication and PDA Features
3. Using the EMailer
3. Using the EMailer
To launch the EMailer application
1.Tap the Applications icon .
2.Select Communication from the pick list in the upper right corner.
3.Tap the EMailer icon .
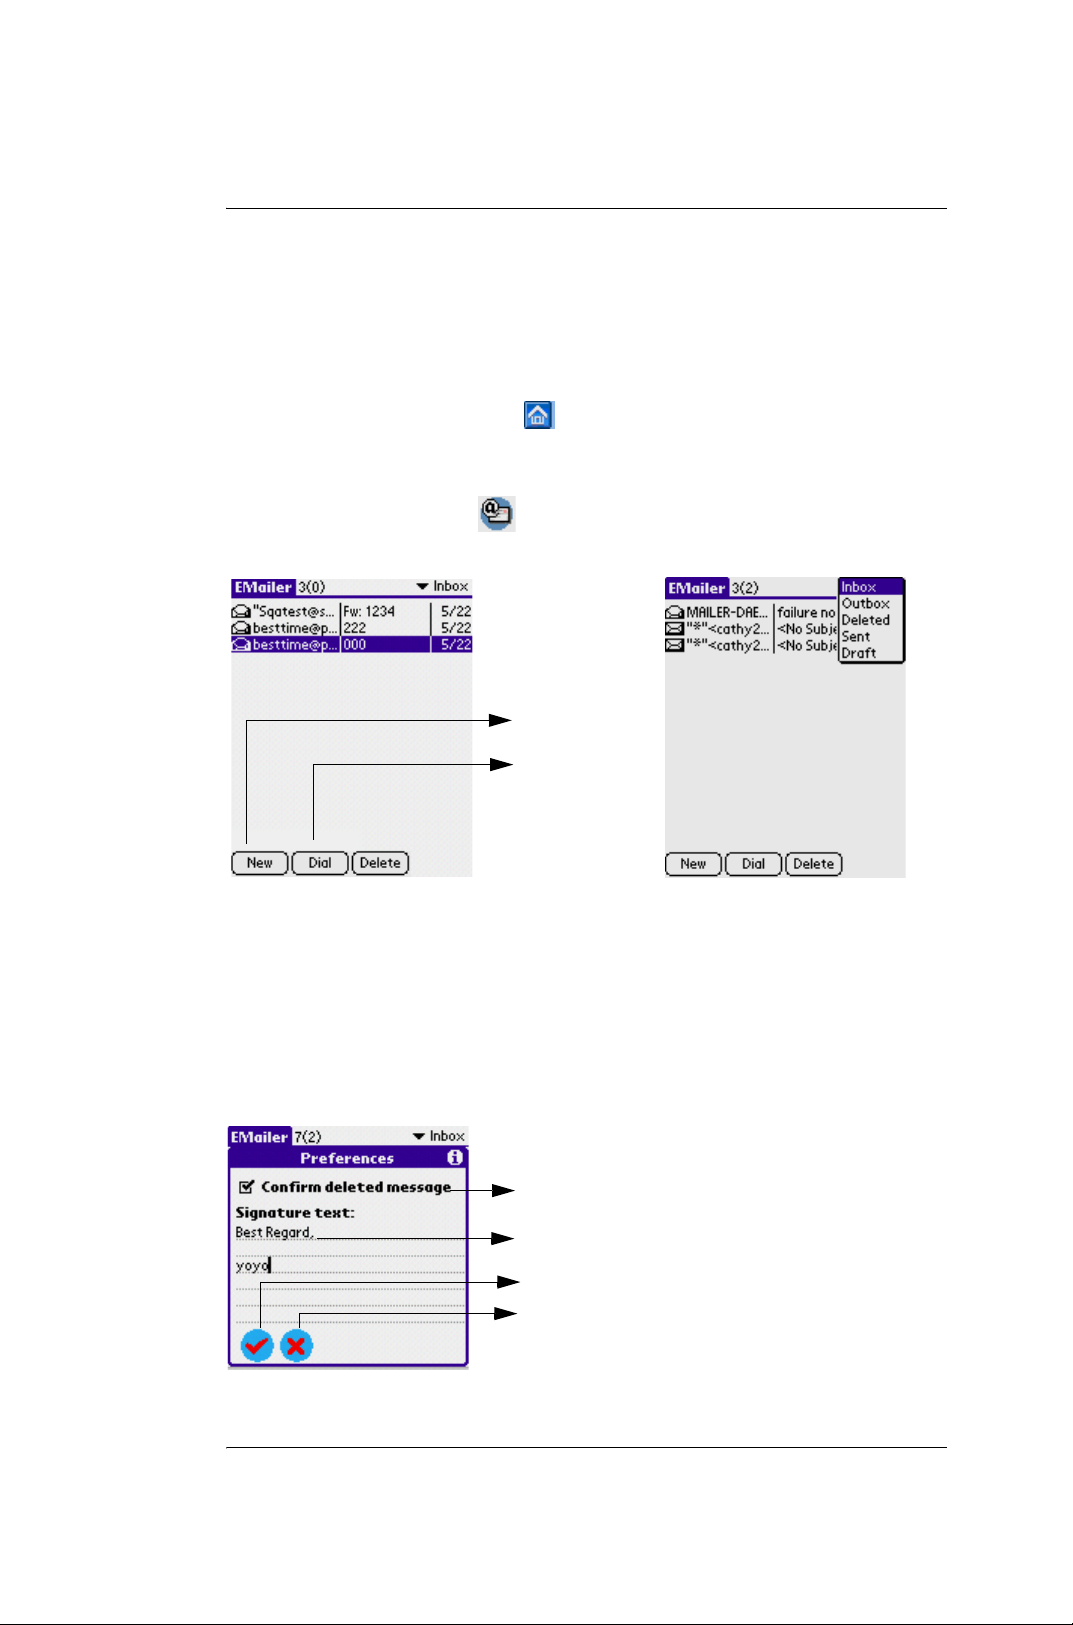
New button
Dial button
Setting
On the main screen of Emailer(default is the index interface of the inbox),
tap the Menu icon on the front panel of your G18, pop up the menu
model(showing as the following).
1) Choose Options > Preferences to set whether to give the
confirmation, whether deleting the dialog box or signing your name.
Tap checkbox to show confirmation
before deletion
Input signature
OK button
Cancel button
G18 Quick Reference Manual 54
Page 60
Section 2 : Communication and PDA Features
3. Using the EMailer
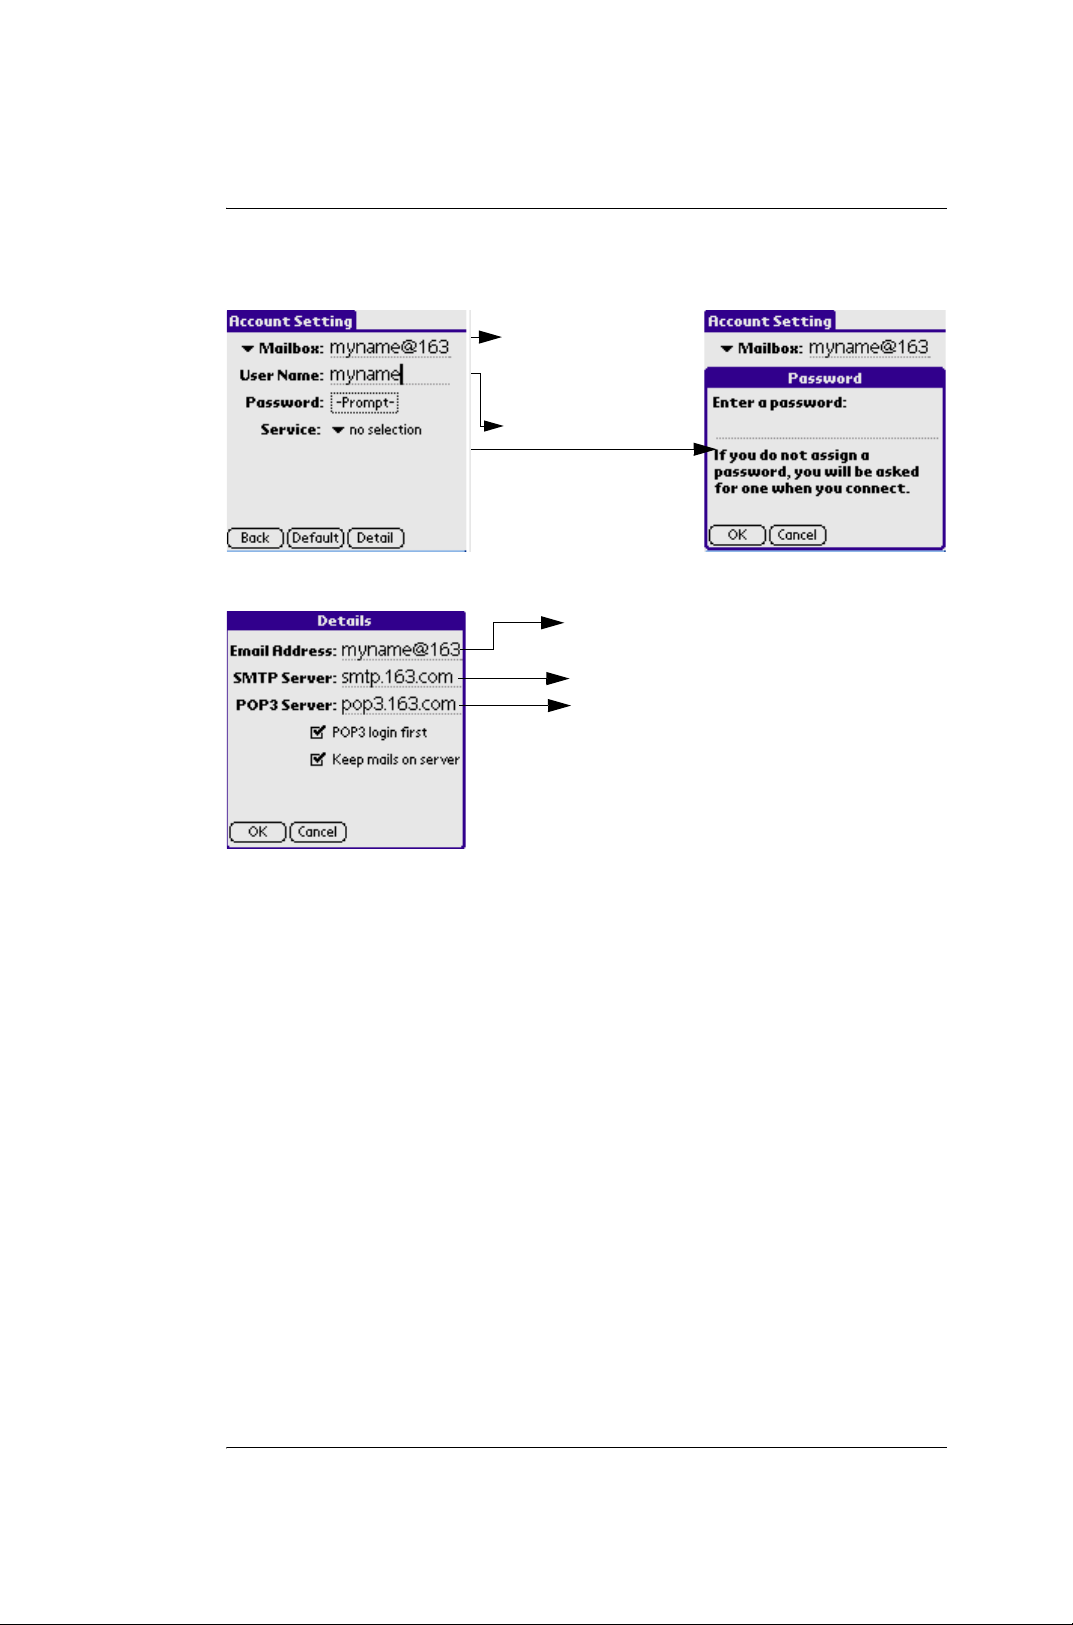
2) Tap Options > Accounts Setting to set your account’s information.
You can select an email account from
the poplist or just
input directly
Input username
Tap here
Set your e-mail account
Set SMTP server
Set POP3 server
G18 Quick Reference Manual 55
Page 61
Section 2 : Communication and PDA Features
3. Using the EMailer
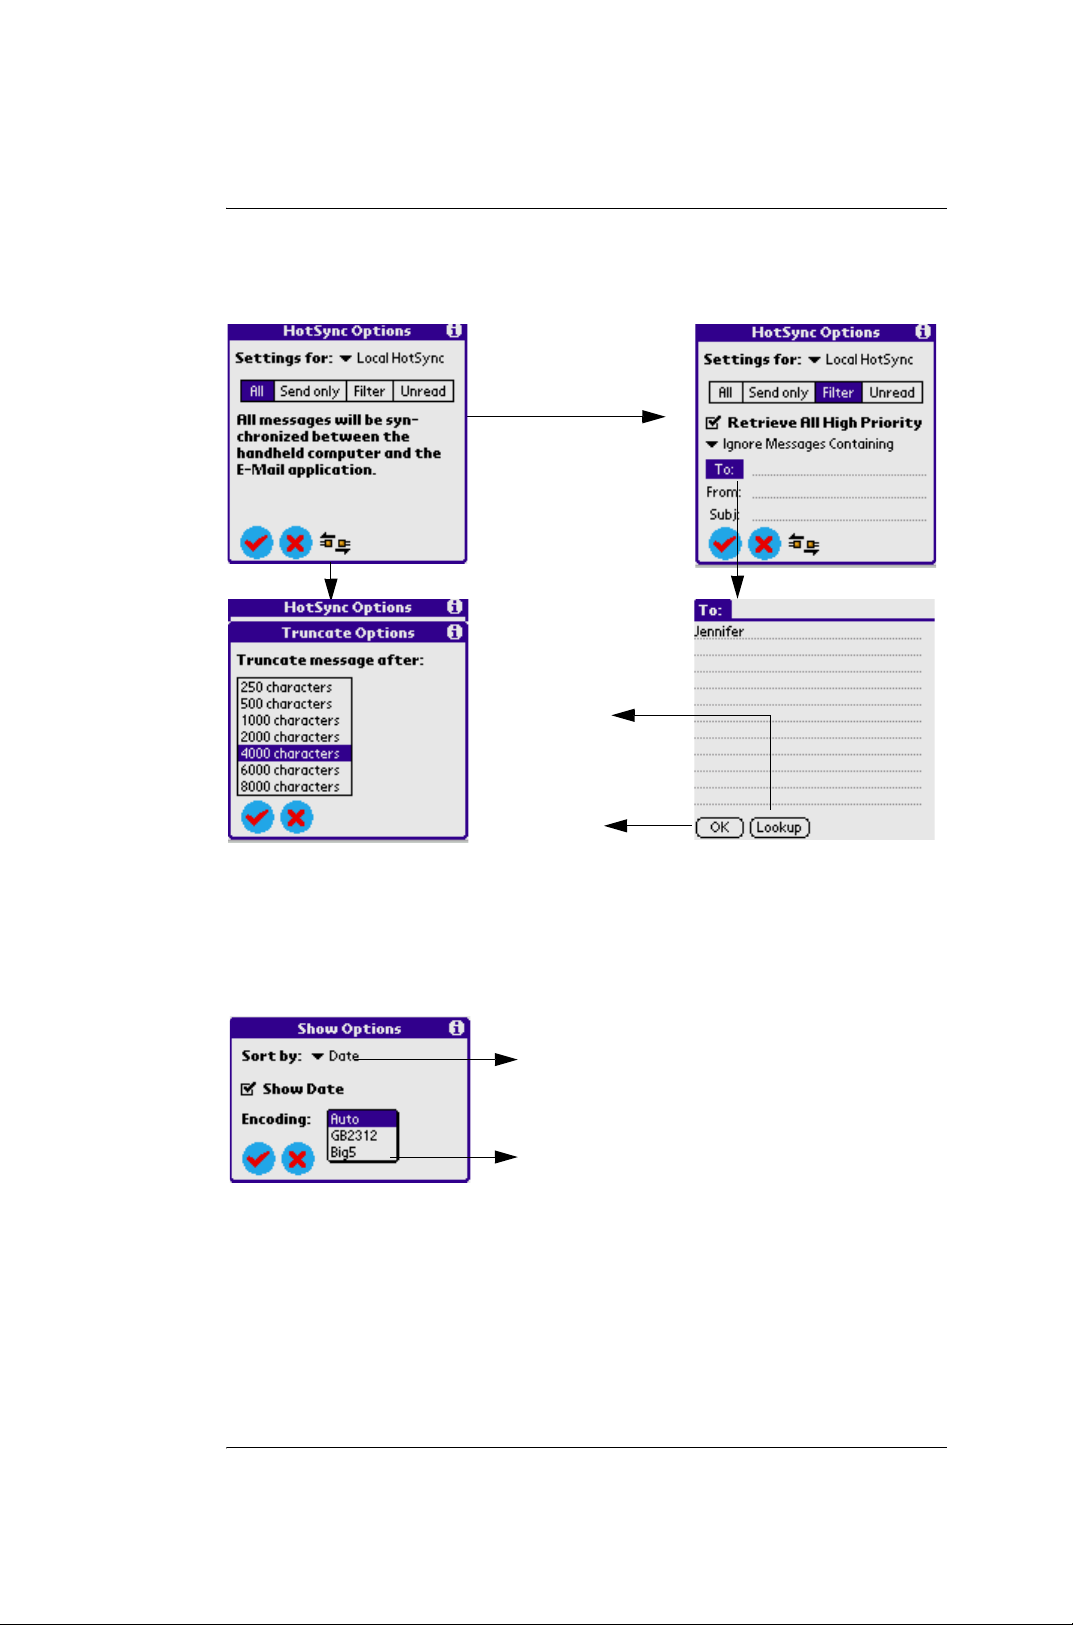
3) Choose Options > HotSync Options to set local synchronization or
remote synchronization.
Lookup button
OK button
4) Tap the Option icon in the function menu to enter the show option
dailog to set the way to arrange list, there are three ways: Date,
Sender, and Subject. And you can also set the character code, there are
three choices: Auto, GB2312, and Big5.
Select sorting method
Select character code
G18 Quick Reference Manual 56
Page 62
Section 2 : Communication and PDA Features
3. Using the EMailer
To choose the folder
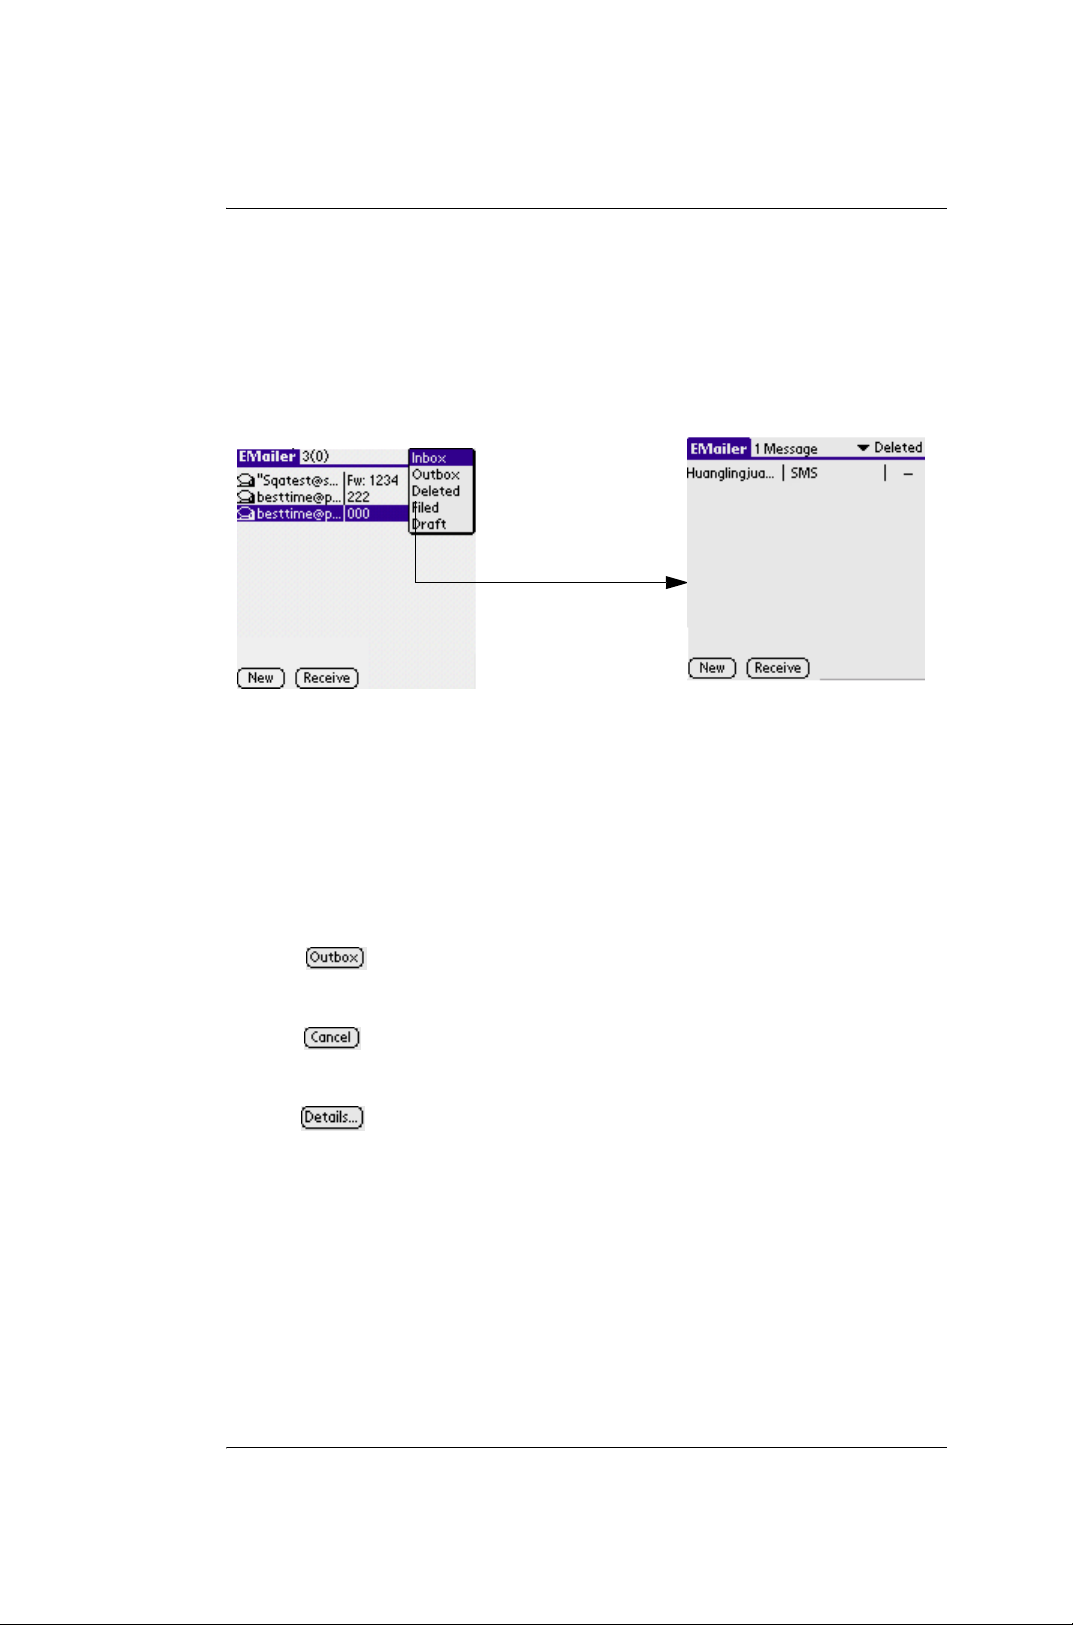
Tap the pick list in the upper right corner, there are five folders: Inbox,
Outbox, Deleted, Filed, and Draft. Tap any folder to enter the
corresponding folder interface. e.g. Deleted.
Select Deleted box
To create and send an e-mail
1.Tap the New button at the bottom of the main screen to enter the
editing interface.
2.After inputting respective information on To, Cc, Bcc, Subject,
Content, tap a icon as following:
– Save the mail to outbox and return to the previous
interface.
– Cancel the current operation and return to the previous
interface.
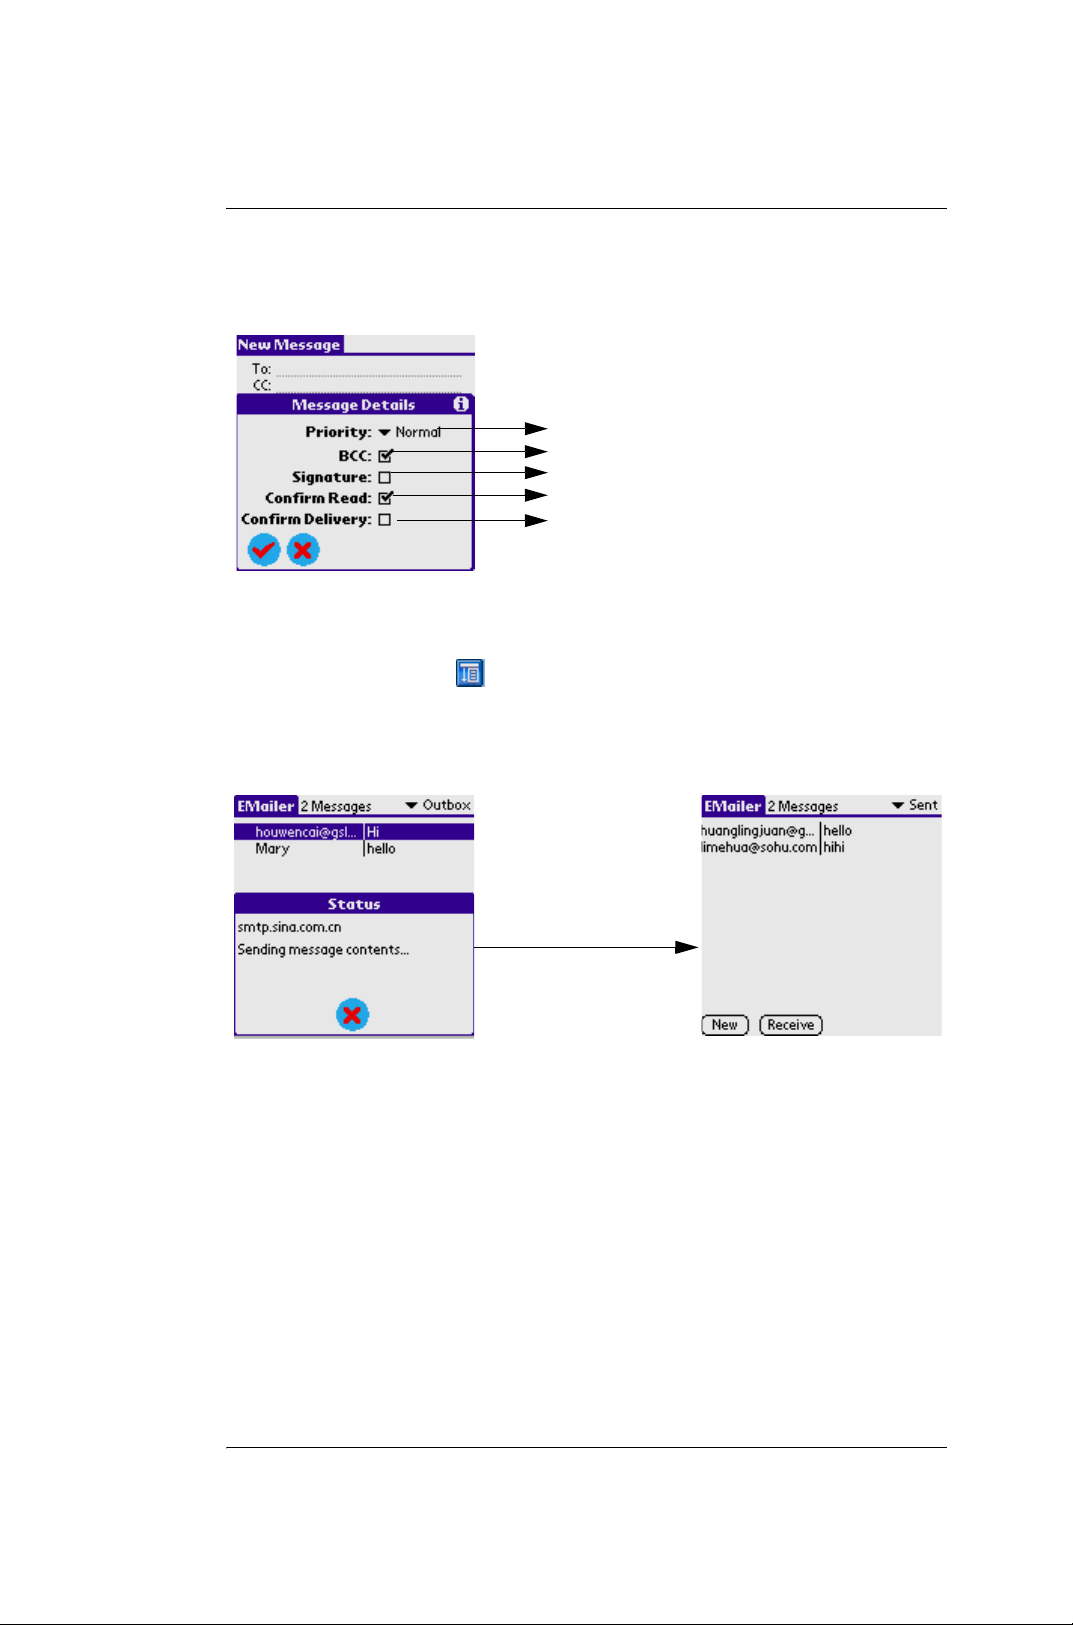
– Show the message details(See Pic).
G18 Quick Reference Manual 57
Page 63
Section 2 : Communication and PDA Features
3. Using the EMailer
Set e-mail priority
send hidedly
use anonymity
read only
confirm send
3.Select Outbox from the pick list in the upper right corner .
4.Tap the Menu icon on the front panel of your G18, choose
Message > Receive or Message > Send all.
Sent mails
G18 Quick Reference Manual 58
Page 64
Section 2 : Communication and PDA Features
3. Using the EMailer
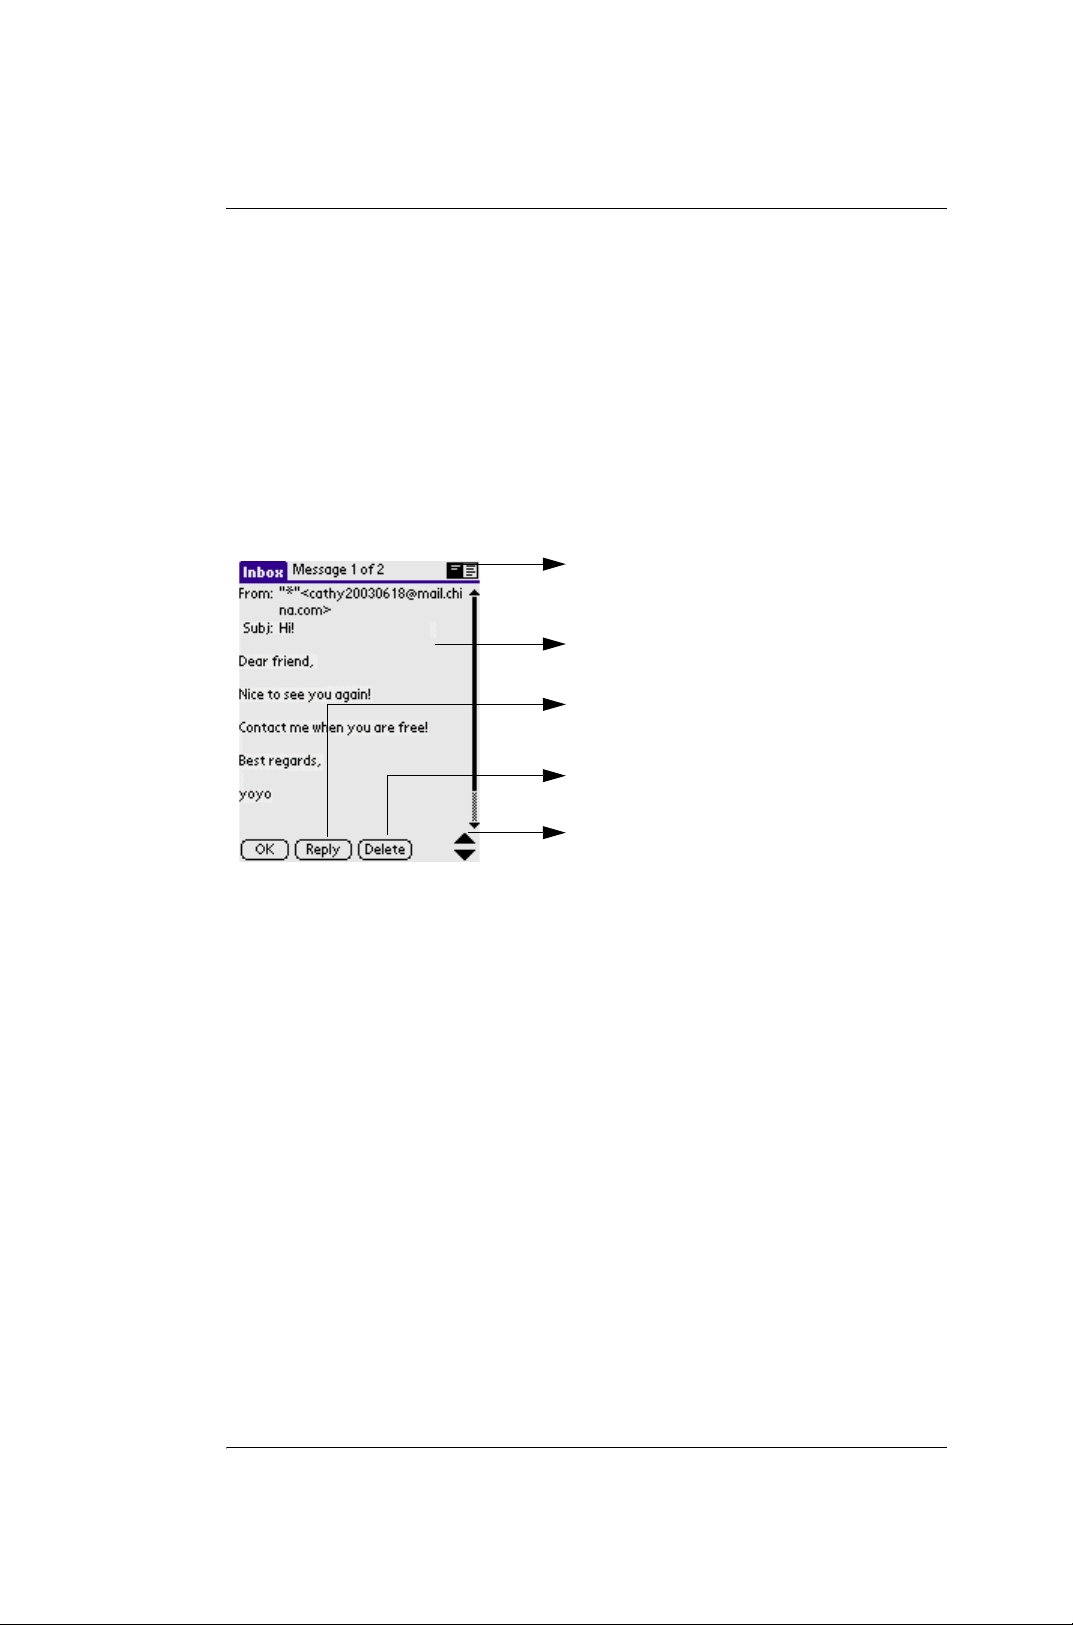
To browse an e-mail
You can browse the relevant records by choosing the folder in the pick list
in the upper right corner in the main screen. Select an e-mail to browse the
content, and tap the scroll bar to view all the content.
Tap two icons in the upper right corner to change the list pattern.
Tap the Previous or Next button in the lower right corner to view the
previous or next e-mail.
Tap to change
list mode
View the e-mail
Reply button
Delete current e-mail
the Previous, Next
button
To edit an e-mail
1.On the list screen of a folder, choose the e-mail you want to edit and
enter its browse interface, and tap the Edit button to enter the e-mail
editing interface.
2.Tap the Menu icon on the front panel of your G18, choose Options,
you can save the e-mail to the draft folder, empty the trash box and
perform other operations such as undo, cut, copy, and paste, selete all.
3.After changing, tap Outbox to complete the editing and return to the
previous interface.
To delete an e-mail
You can delete the e-mails on browse interfaces.
1.In the browse interface of the relevent folder, and select the e-mail
you want to delete.
G18 Quick Reference Manual 59
Page 65
Section 2 : Communication and PDA Features
3. Using the EMailer
2.Enter the browse interface of the e-mail content , and tap the Delete
button at the screen bottom.
3.Tap Yes to confirm your deletion or tap No to cancel your deletion.
4.In the browse interface of the relevent folder, tap the funtion menu
icon at left bottom of the keyboard, and then pop up the menu model
and select the empty the crash box .
NOTE: The e-mails you deleted from Inbox, Outbox, Filed and Draft
will be moved to Deleted folder. But the e-mails that have been deleted
in Deleted folder will be deleted permanently.
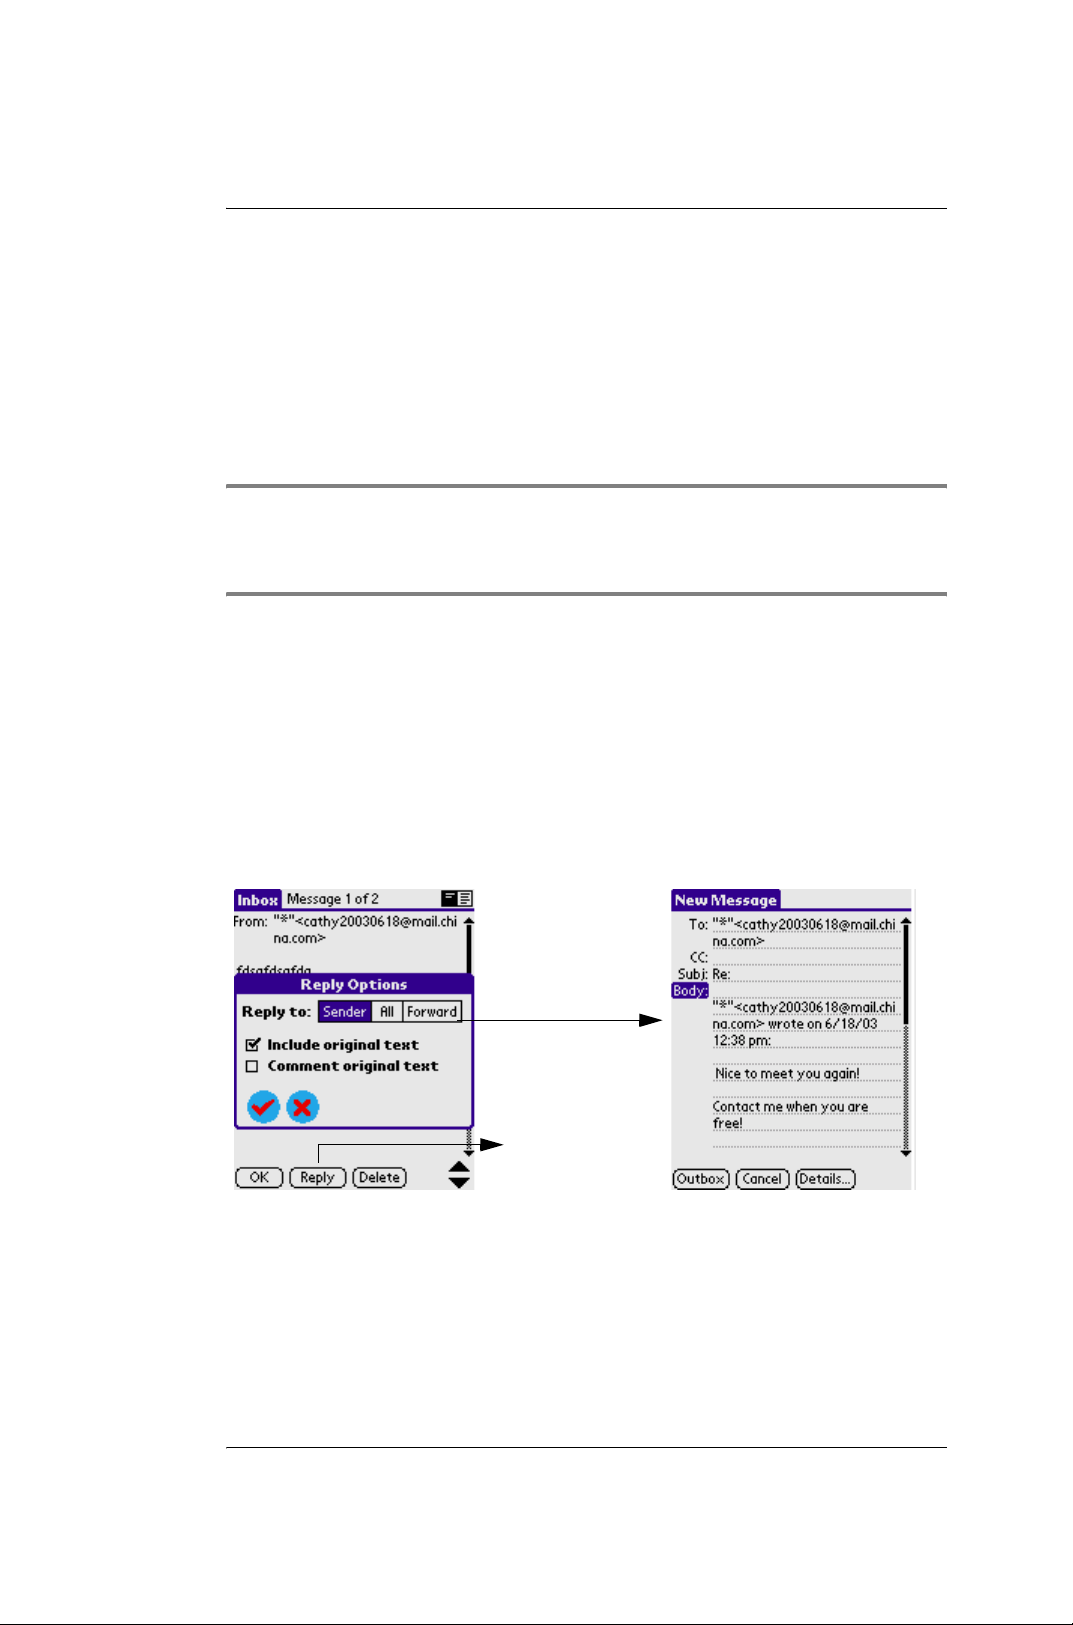
To reply an e-mail
You can reply the e-mails on the browse interface of the e-mail content.
1.Tap the e-mail you want to reply and enter its browse interface.
2.Tap the Reply button on the bottom of the screen, and select the
Reply, Reply all or transmit in the Reply option.
3.You can input the content you want , and then send this e-mail.
Reply button
To search
1.On the interface of creating an e-mail, tap the Receiver.
2.Input contents in input field, and you can search for the e-mail(See
the end Picture of Pic).
G18 Quick Reference Manual 60
Page 66
Section 2 : Communication and PDA Features
4. Using the jBrowser
4. Using the jBrowser
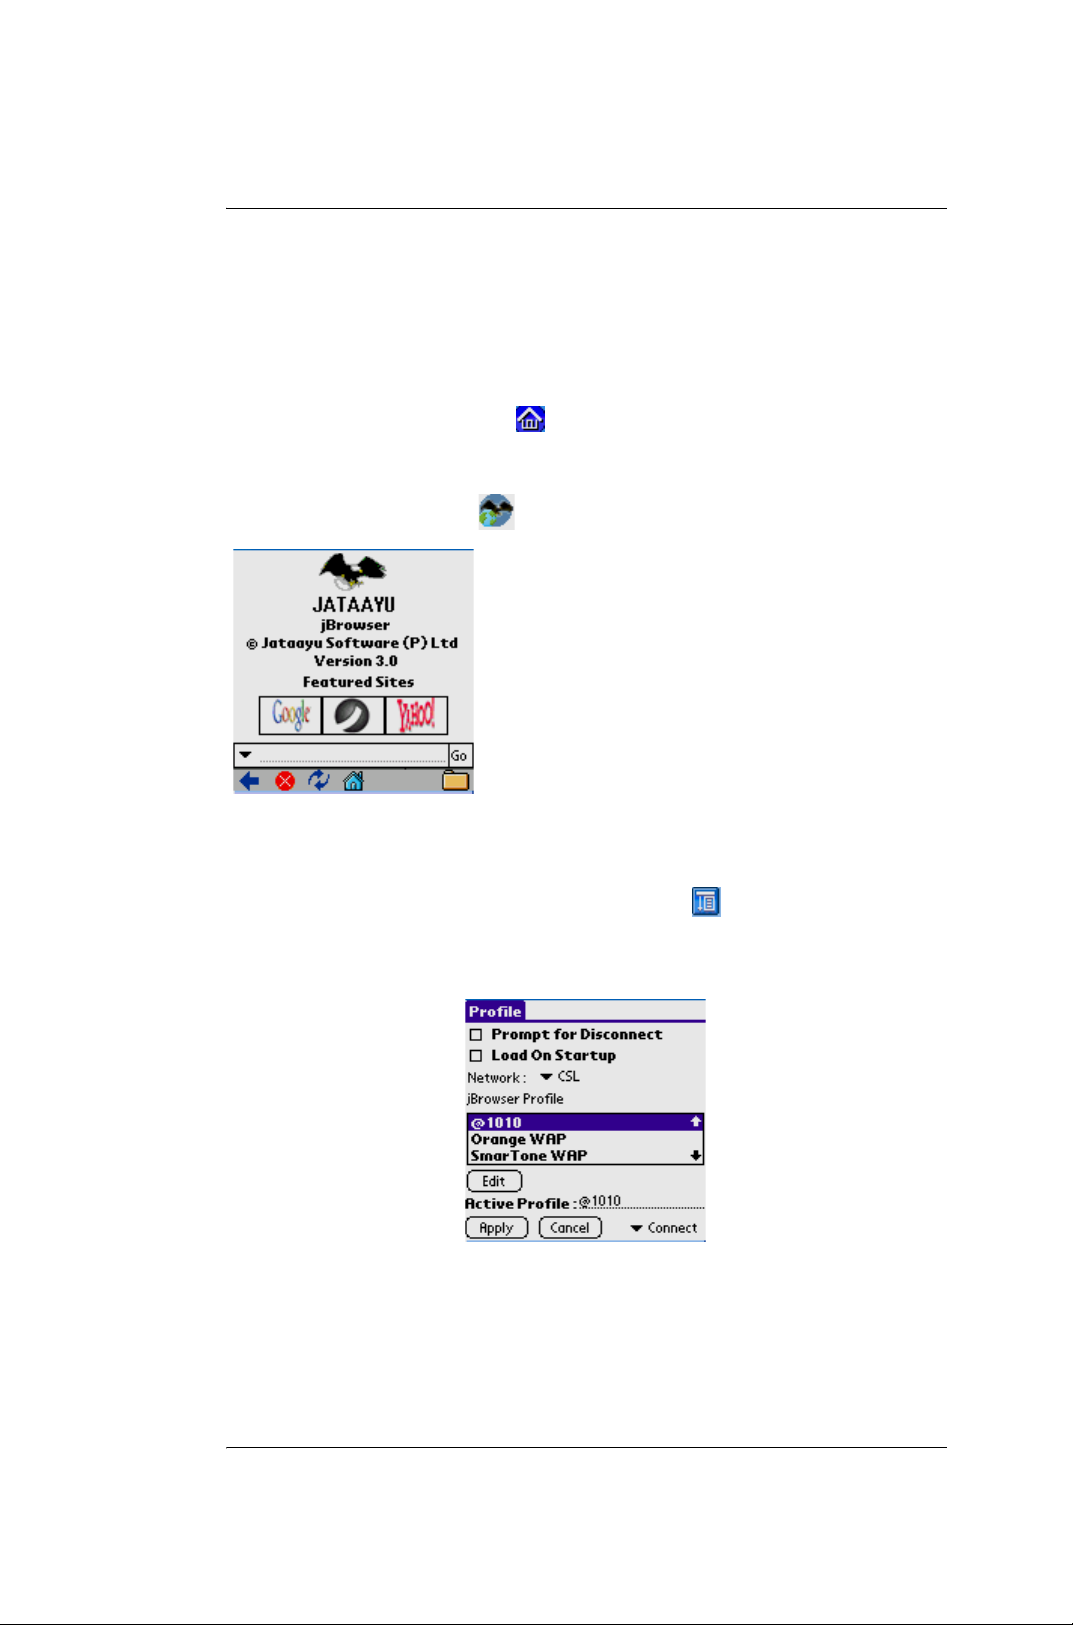
To launch the jBrowser application
1.Tap the Applications icon .
2.Select Communication from the pick list in the upper right corner.
3.Tap the jBrowser icon .
Setting
To View the current settings, tap the Menu icon on the front panel of
your PDA phone, select Tools > Settings.
Connections
•In the Settings tab, the Profile box has a list of all the configured
profiles. The WAP Browser comes preconfigured with Jataayu
G18 Quick Reference Manual 61
Page 67
Section 2 : Communication and PDA Features
4. Using the jBrowser
WAP 2.0 Gateway, Jataayu 1.X Gateway profiles and a direct
connection.
• The Active Profile box displays the currently active profile. To set
a profile as active or change the active profile, select a profile from
the Profile list, and click on the Select button. By default the
Jataayu WAP 1.0 Gateway is selected.
• Check the Browse Offline box for offline browsing. To disable
offline browsing, uncheck the Browse Offline box. By default the
Browse Offline option is disabled.
• Check Load home page on startup to load your home page on
starting the application. By default the Load home page on startup
is disabled.
•Click Apply to enable the connection settings. Click Cancel to
close the dialog box.
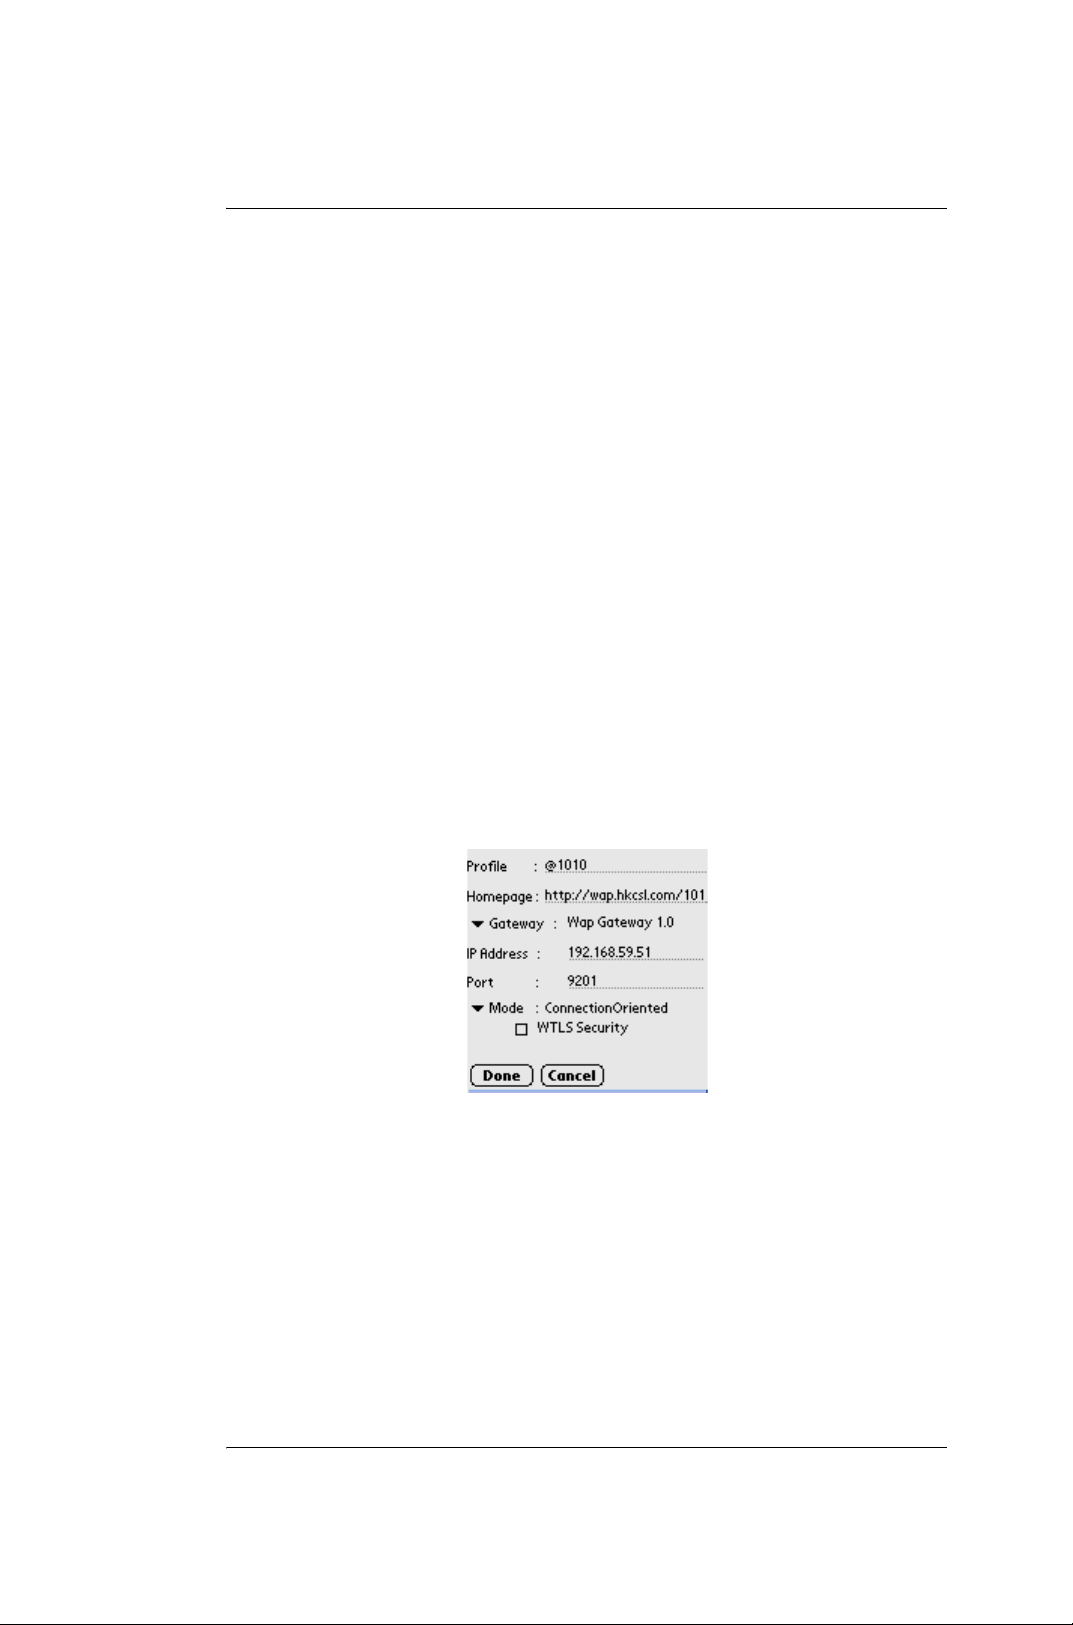
• To edit a profile, select it from the Profile list and click on the Edit
button. Details such as the name of the profile, the URL of the
homepage and the Gateway to connect through, address and port
number can be edited.
• Enter the user name and password if the selected Gateway needs it.
• If the Gateway is a WAP 1.0 Gateway, the connection type is to be
specified as Connection Less or Connection Oriented, and the
username and password are not required.
•Click Done to save the settings or Cancel to exit.
Cache
Browsed pages can be cached for future viewing. Fetching pages from the
cache loads the page faster.
G18 Quick Reference Manual 62
Page 68
Section 2 : Communication and PDA Features
4. Using the jBrowser
Enabling Cache
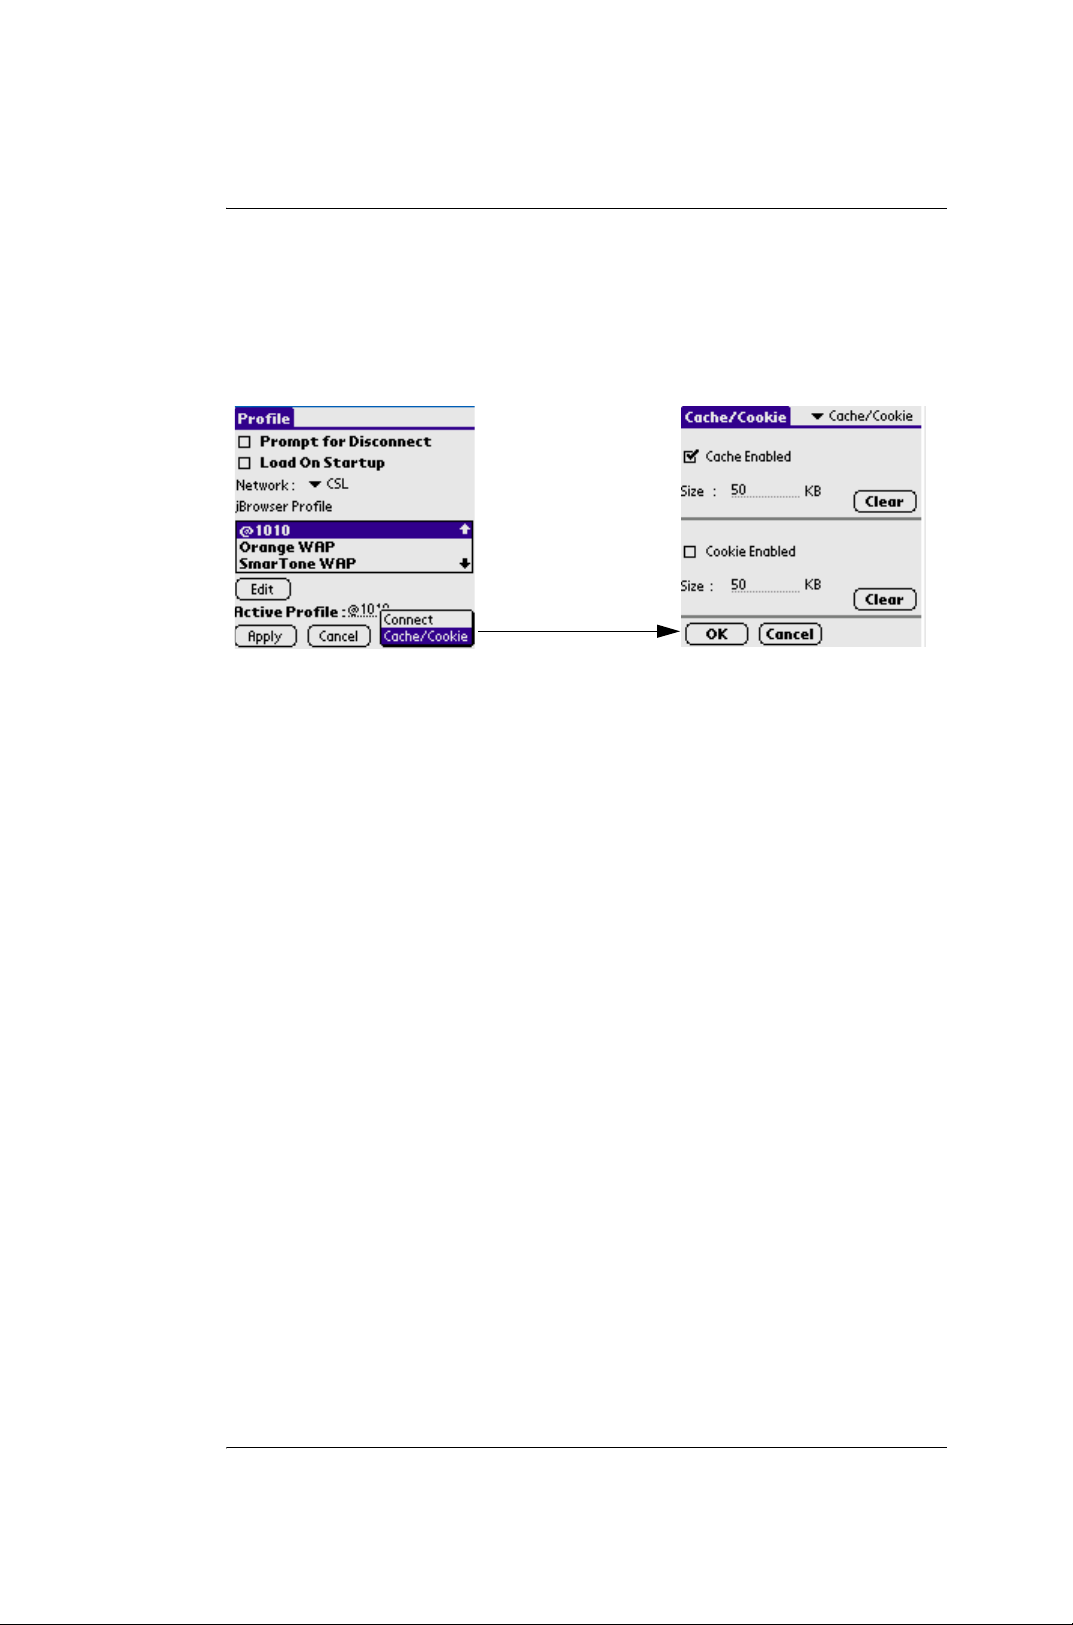
• To access the cache screen, select the Settings option from the
Tools menu and click on Cache/Cookie in the popup list on the top
right hand corner of the screen.
• To enable cache, check Enabled in the Cache group. Specify the
size (in kilobytes) of cache in the Size box.
•Click Ok to save the settings.
• By default the cache is enabled and the cache size is 50 KB.
Clearing Cache
In the Options dialog box, under the Cache/Cookie tab, click the Clear
button in the Cache group or go to Tools->Clear Cache from the menu.
Cookie
Information related to a session can be stored as a cookie. Persistent cookies
are also supported.
Enabling Cookies
• To enable the cookie, select Set Options from the Tools menu and
click on Cache/ Cookie in the popup list on the bottom right hand
corner of the screen.
•Click Ok to save your settings.
• By default, the Cookie is enabled and the Cookie size is 50 KB.
Clearing Cookies
• To clear the cookie information, click on Cache/Cookie in the
popup list on the bottom right hand corner of the screen.
• Click the Clear button in the Cookie group.
G18 Quick Reference Manual 63
Page 69
Section 2 : Communication and PDA Features
4. Using the jBrowser
Surfing Net
• Surfing through web sites, from the browser.
• To open a site, click Go->Open.
• Enter the URL of the site to open.
• You can choose shortcuts from the URL wizard displayed.
• To enter the shortcuts just click on the shortcut and characters .
•Click Undo to remove the last entered shortcut.
•Click Clear All to clear the URL editbox.
•Click Go to open the site.
• You can also enter the URL of the site to open in the address bar
and click Go.
• You can open the URL wizard by clicking More from the Popup
list displayed to the left of the address bar.
• See also:Address Bar
Favorites
• Your favorite sites!
• To view or organise your favorites, click on Go->Favorites from
the menu.
• The favorites under various categories are displayed.
• Select a favorite URL and click Go to open that site.
• To delete a favorite, select it and click Delete.
• To add a new URL to favorite list, click Go->Edit Favorites....
• The current URL is shown, which can be edited.
• Give a name for the favorite.
• Enter the category and click Add.
G18 Quick Reference Manual 64
Page 70
Section 2 : Communication and PDA Features
4. Using the jBrowser
• To add a category, click New Category
• Give the name of new category and click Add.
• To delete a category, click Delete Category. Categories with the
number of links are displayed. Select the one you want to delete and
click Delete.
NOTE: Clicking on the toolbar also opens the favorite list.
History
• Recently visited Sites
• Keep track of the web sites visited by you! URLs of the sites
visited by you are stored in History.
• To see the URLs stored in History, click on Go->History.
• History entries can be viewed by Page Title or by Page URL.
Select your option from the list provided.
• To visit a site from history, just select that site and click Go.
• To delete the history entries, click Clear.
Statistics
• Statistics
• To view the statistical information for a connection, click View -
> Statistics
• Select the connection from the popup list.
• Information of the pages viewed, object fetched, number of
bytes sent and received and the average page size for the selected
connection are displayed.
• To view the total information, select Total from the popup list.
•Click Reset to reset the values to default values.
G18 Quick Reference Manual 65
Page 71
Section 2 : Communication and PDA Features
5. Using the Camera
5. Using the Camera
To launch the Camera application
• Tap the Applications icon .
• Select “Studio” from the pick list in the upper right corner.
• Tap the Camera icon or press the Camera key.
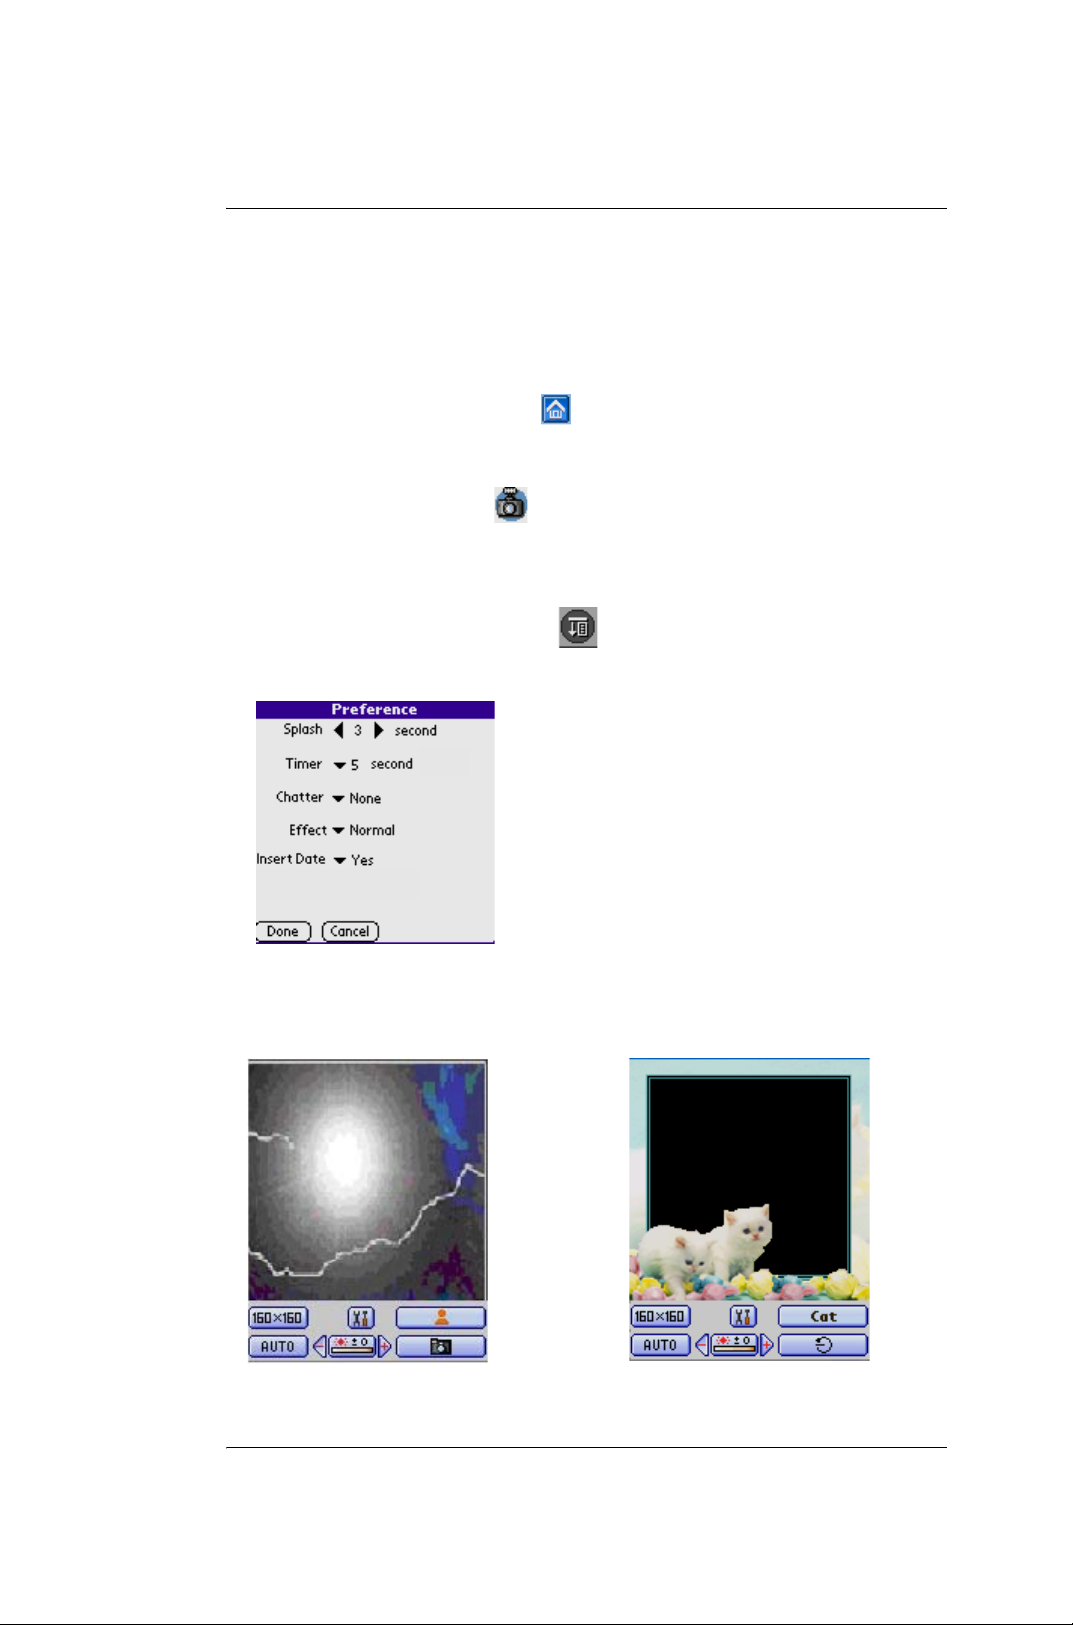
To set the preferences of a photograph
• Tap the function Menu icon on the Camera interface.
• Select Options-> Preferences.
Taking photos
G18 Quick Reference Manual 66
Page 72
Section 2 : Communication and PDA Features
5. Using the Camera
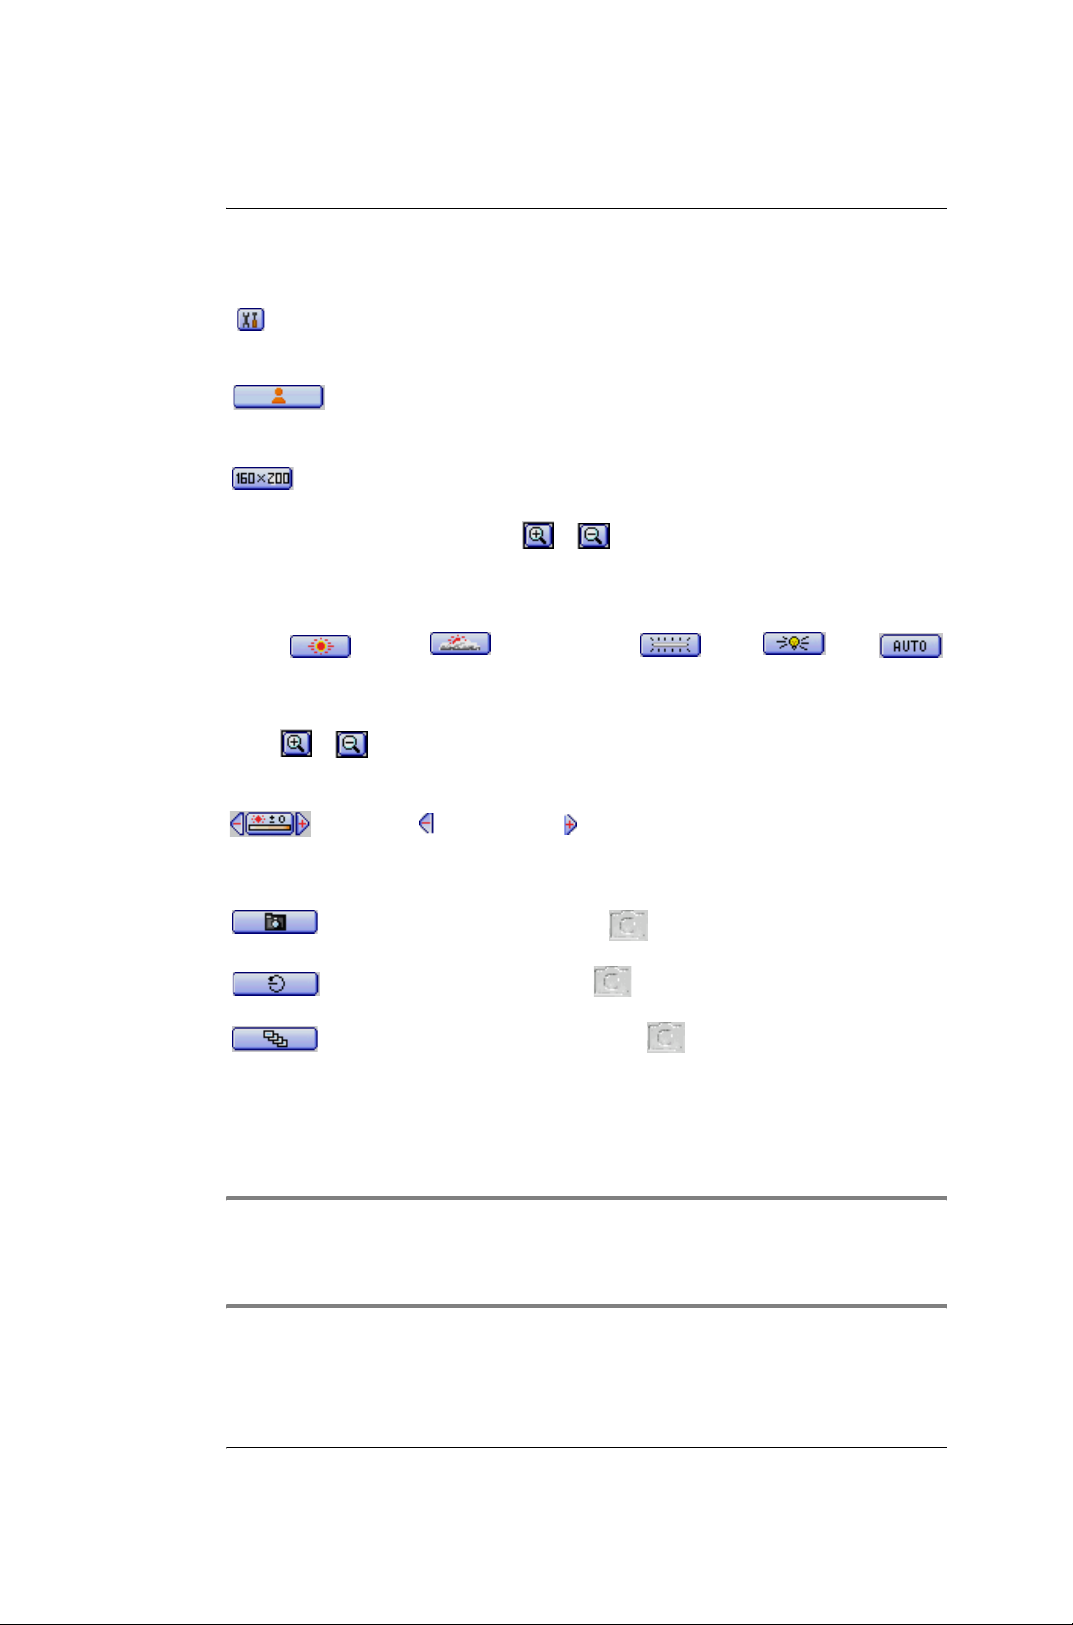
Description of buttons:
: Setting Icon.
: Select different types of photo frame.
: Select the pixer size of picture (including 160*160, 160*200,
320*240)£¨when you change to 320*240,a Zoom in and Zoom out buttons
will be added to the interface( / ).
Five modes of White-balance:
sunny ,cloudy ,daylight lamp ,bulb ,auto
Zooming:
Tap( / ) to zoom in or zoom out the photo.
focusing:
: Zoom in , Zoom out
Three modes of taking photos:
: Normal mode (press button after setting)
: Delay mode (press button after setting)
: Continuous mode (press button after setting)
Browsing photos
Browsing the photos by pressing the Left/Right key on the front panel of
your G18.
NOTE: The photos taken are saved in the PhotoAlbum. Refer to
Chapter 7 - Using the Photo Album in this section for more
information.
G18 Quick Reference Manual 67
Page 73
Section 2 : Communication and PDA Features
6. Using the Photo Album
6. Using the Photo Album
This application has to work together with “Camera” application and
“PhotoEditor” application. Its function is to manage photos taken by users
or pictures downloaded from PC.
NOTE: Please Synchronize your G18 with the PC frequently, G18
will lose the photo after 3 minutes of without power.
To launch the Photo Album application
• Tap the Applications icon .
• Select Studio from the pick list in the upper right corner.
• Tap the PhotoAlbum icon
Album management
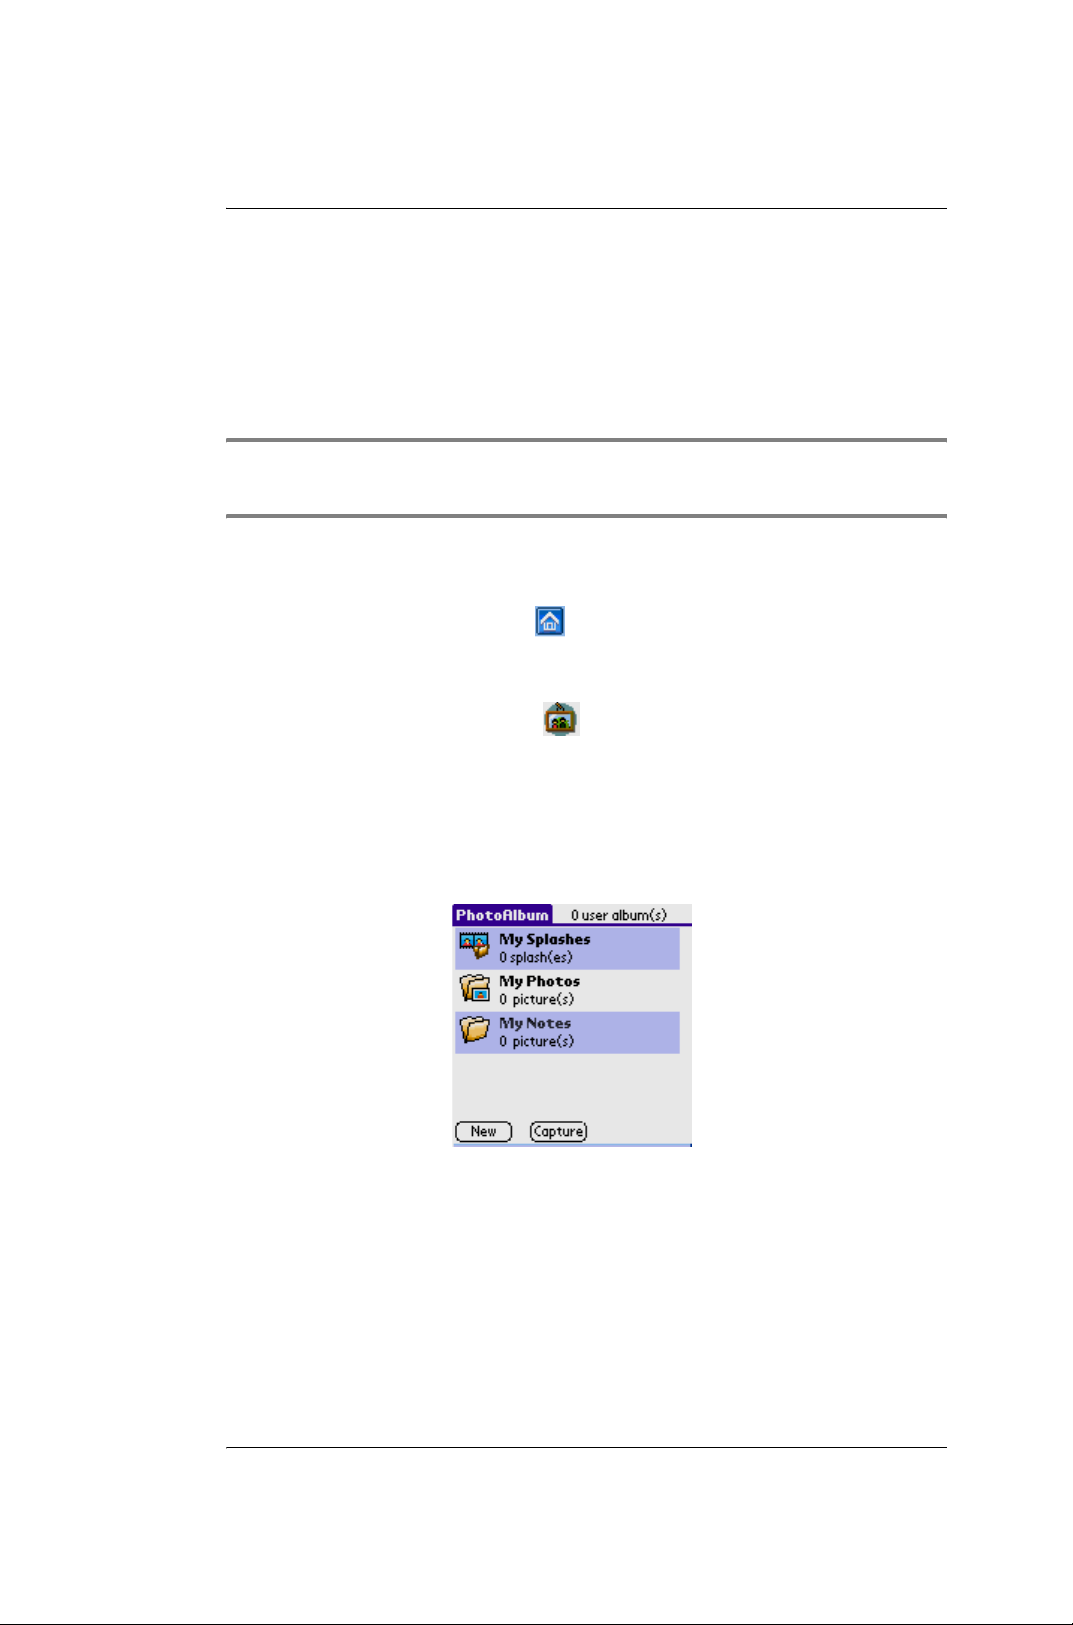
•Album list
Album list interface will appear when tap the “PhotoAlbum” icon.
• Default Photo Album
This application provides four default albums.
MySplashes: this is a special album to store snapshots taken by users.
MyPhotos: this album is used to store photos taken by users recently and
those pictures downloaded from PC. These pictures can be moved to other
album.
G18 Quick Reference Manual 68
Page 74
Section 2 : Communication and PDA Features
6. Using the Photo Album
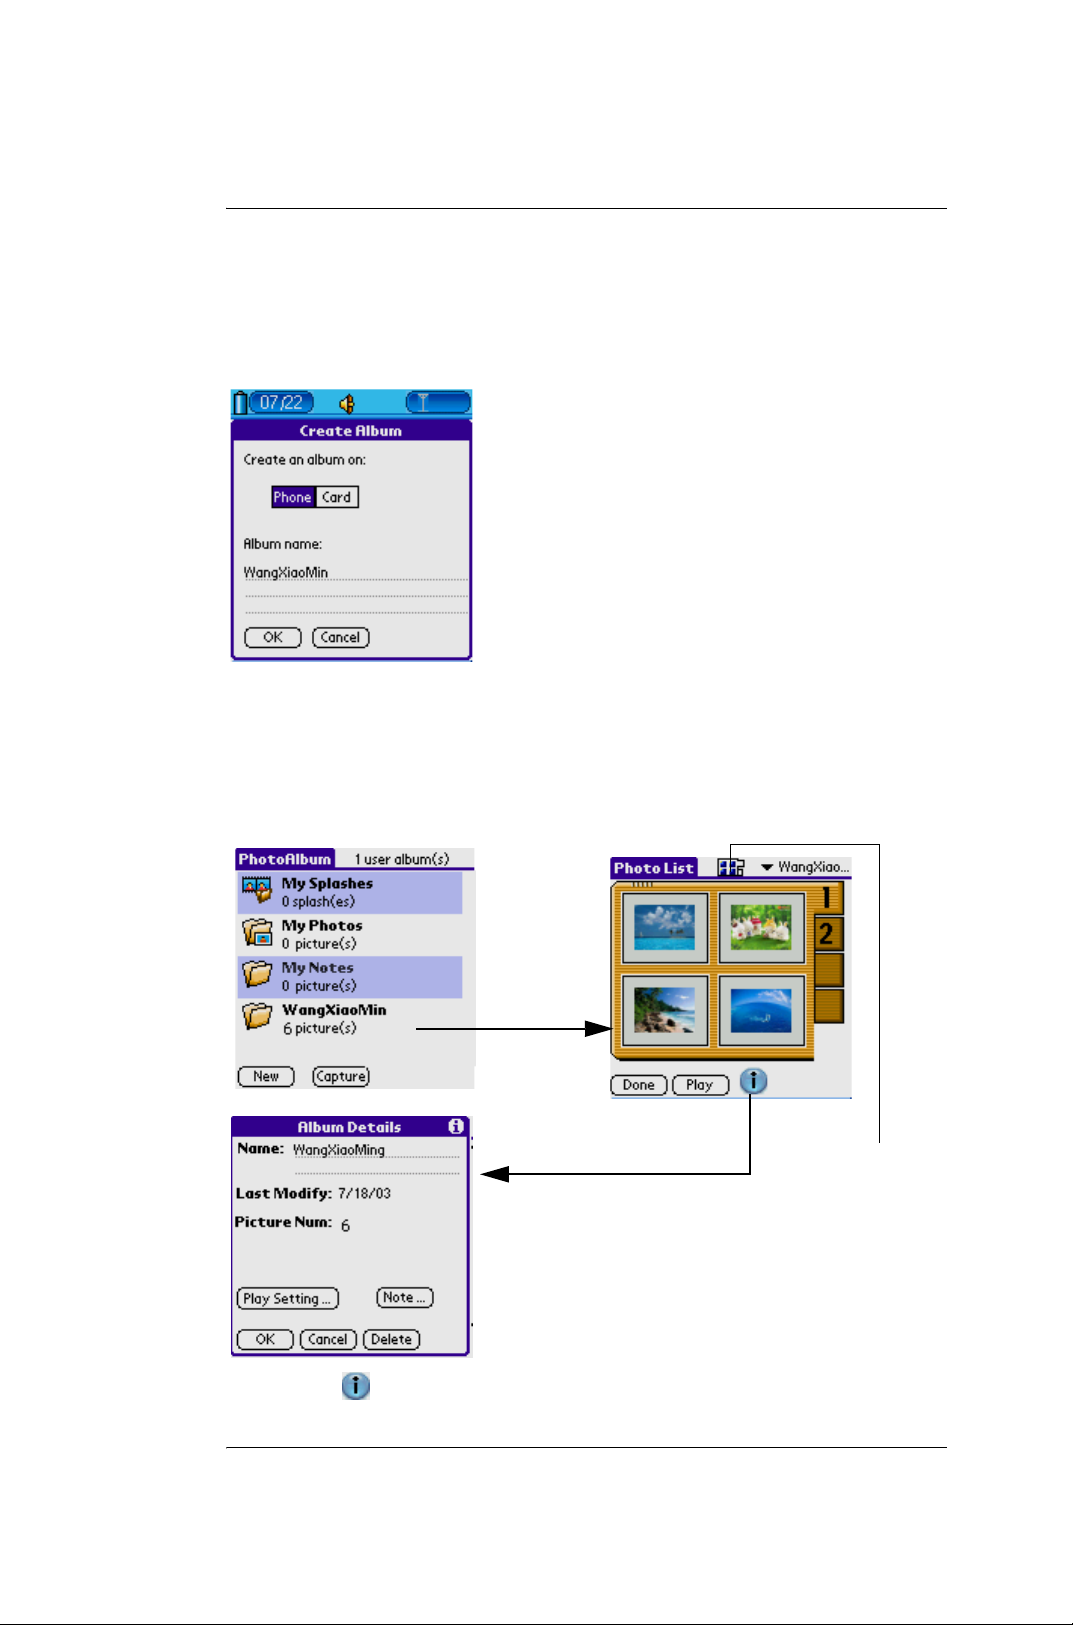
My Notes: Store pictures and edit by Photo Editor.
• To create an album
– Tap New, a dialog box of creating new album appears.
– Enter the name of the album and select where is the album
going to be stored.
– Tap OK to finish.
• Deleting Album
– Tap the album which you want to delete.
tap to enter
the album
Tap the icon to show details
Display Style
-List
-Tile
-Directory
– Tap icon.
G18 Quick Reference Manual 69
Page 75
Section 2 : Communication and PDA Features
6. Using the Photo Album
– Tap Delete button.
– Tap OK to finish.
To play album
• Enter a album, tap the Play button to start playing the pictures in the
album according to the preset mode.
• You can use the Left/Right key on the front panel of your G18 to
enlarge/reduce pictures. You can also use the up or down hard
button to browse the previous or next picture.
• Tap the screen again to return to the previous page.
To delete photos
• Enter a album, tap the photo you want to delete.
• Tap icon to delete the photo.
• Tap “Yes” to confirm.
To browse photos
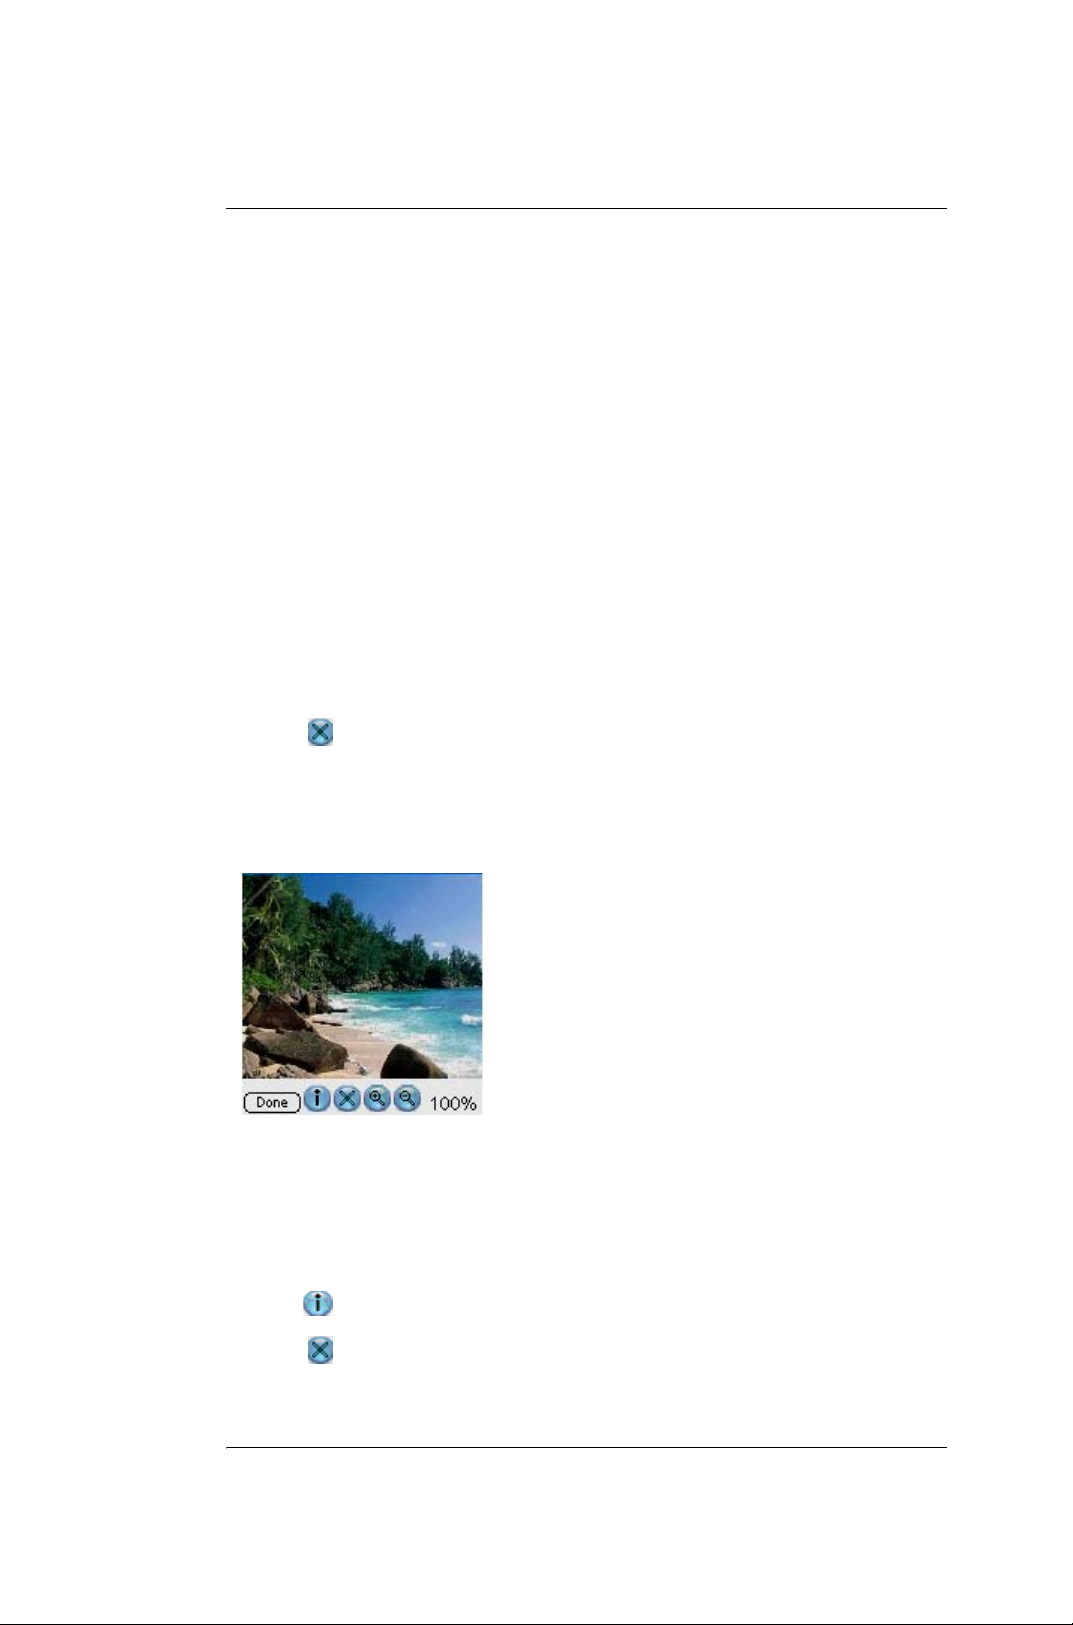
1.In pictures list interface, tap any picture to enter the picture browsing
view.
2.Tap Done to exit browsing.
3.Functions of Icons :
• Tap icon to enter Photo Details.
• Tap icon to delete.
G18 Quick Reference Manual 70
Page 76
Section 2 : Communication and PDA Features
7. Using the Photo Editor
• Tap icon to zoom in.
• Tap icon to zoom out.
NOTE: If a picture is larger than the visible area, you can view
different area of the picture by dragging the picture with your stylus.
Export photo from PC to G18
Start up Palm Desktop in your PC, select "Album", then select “New” at
the left top of the interface, you can select the photo in your PC, then return
to Desktop interface to complete the Hotsync job. The photo selected will
be exported automatically to the PhotoAlbum of your G18.
7. Using the Photo Editor
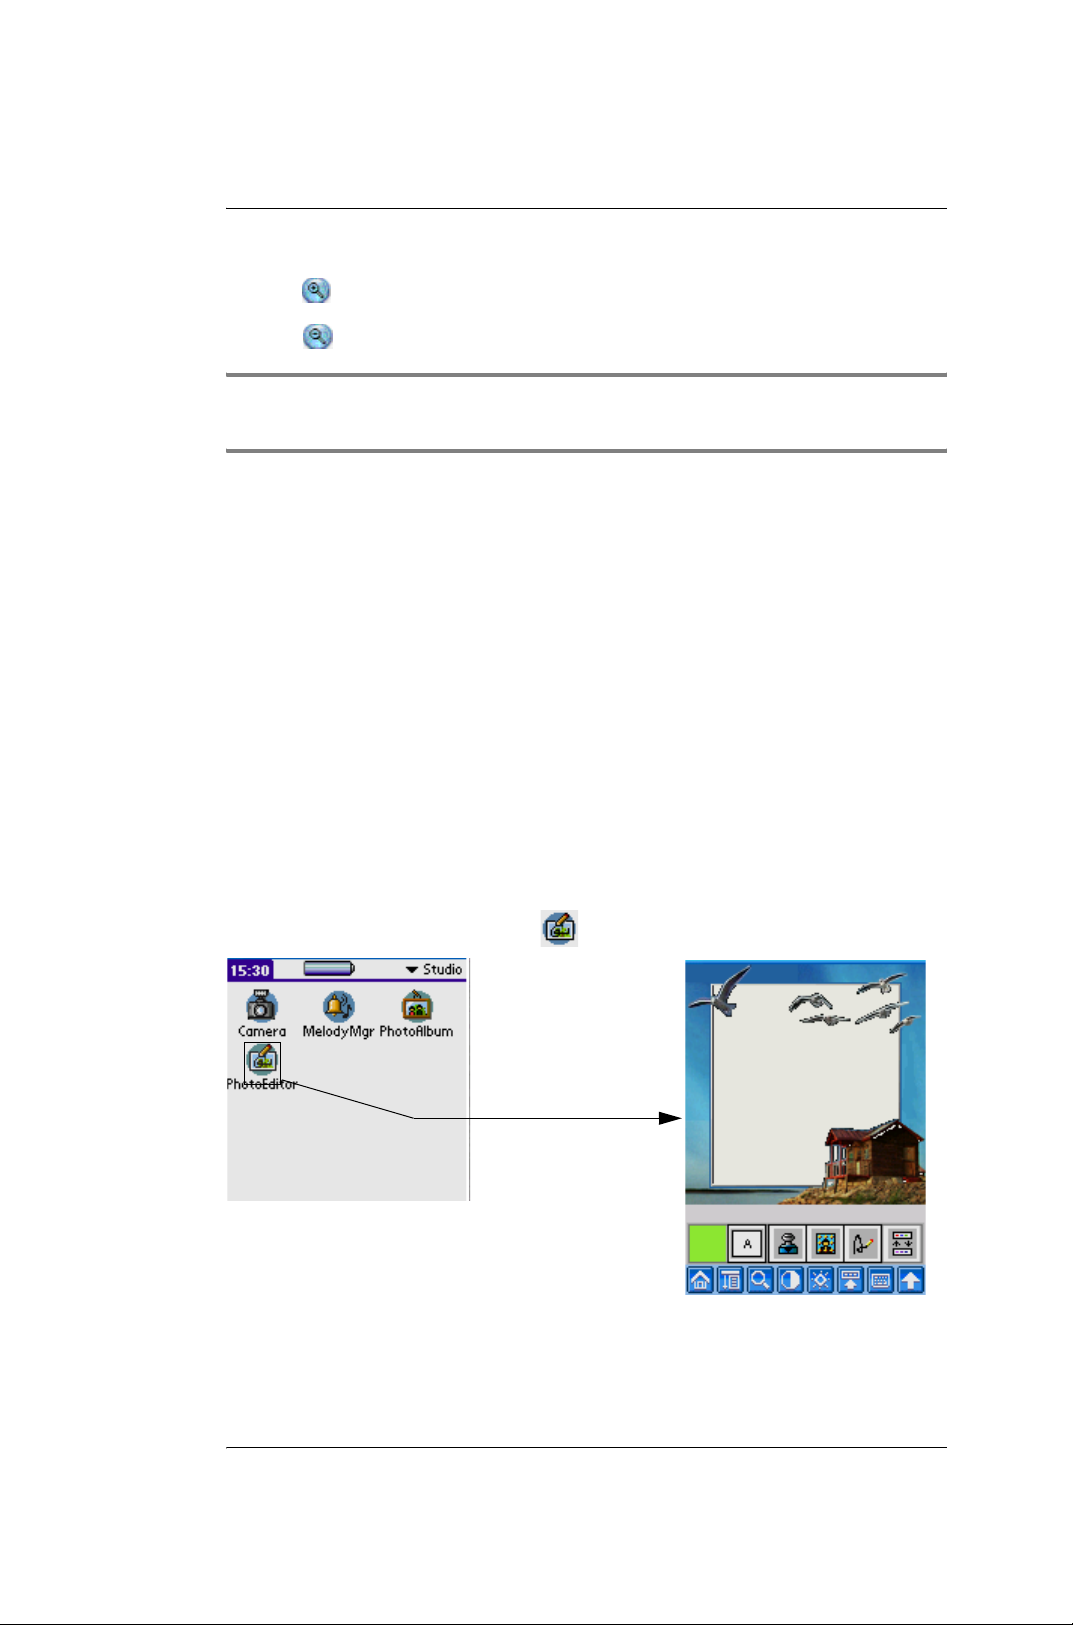
To launch the Photo Editor application
• Select Studio from the pick list in the upper right corner.
• Tap the Photo Editor icon .
Tap the icon
to launch
application
G18 Quick Reference Manual 71
Page 77
Section 2 : Communication and PDA Features
7. Using the Photo Editor
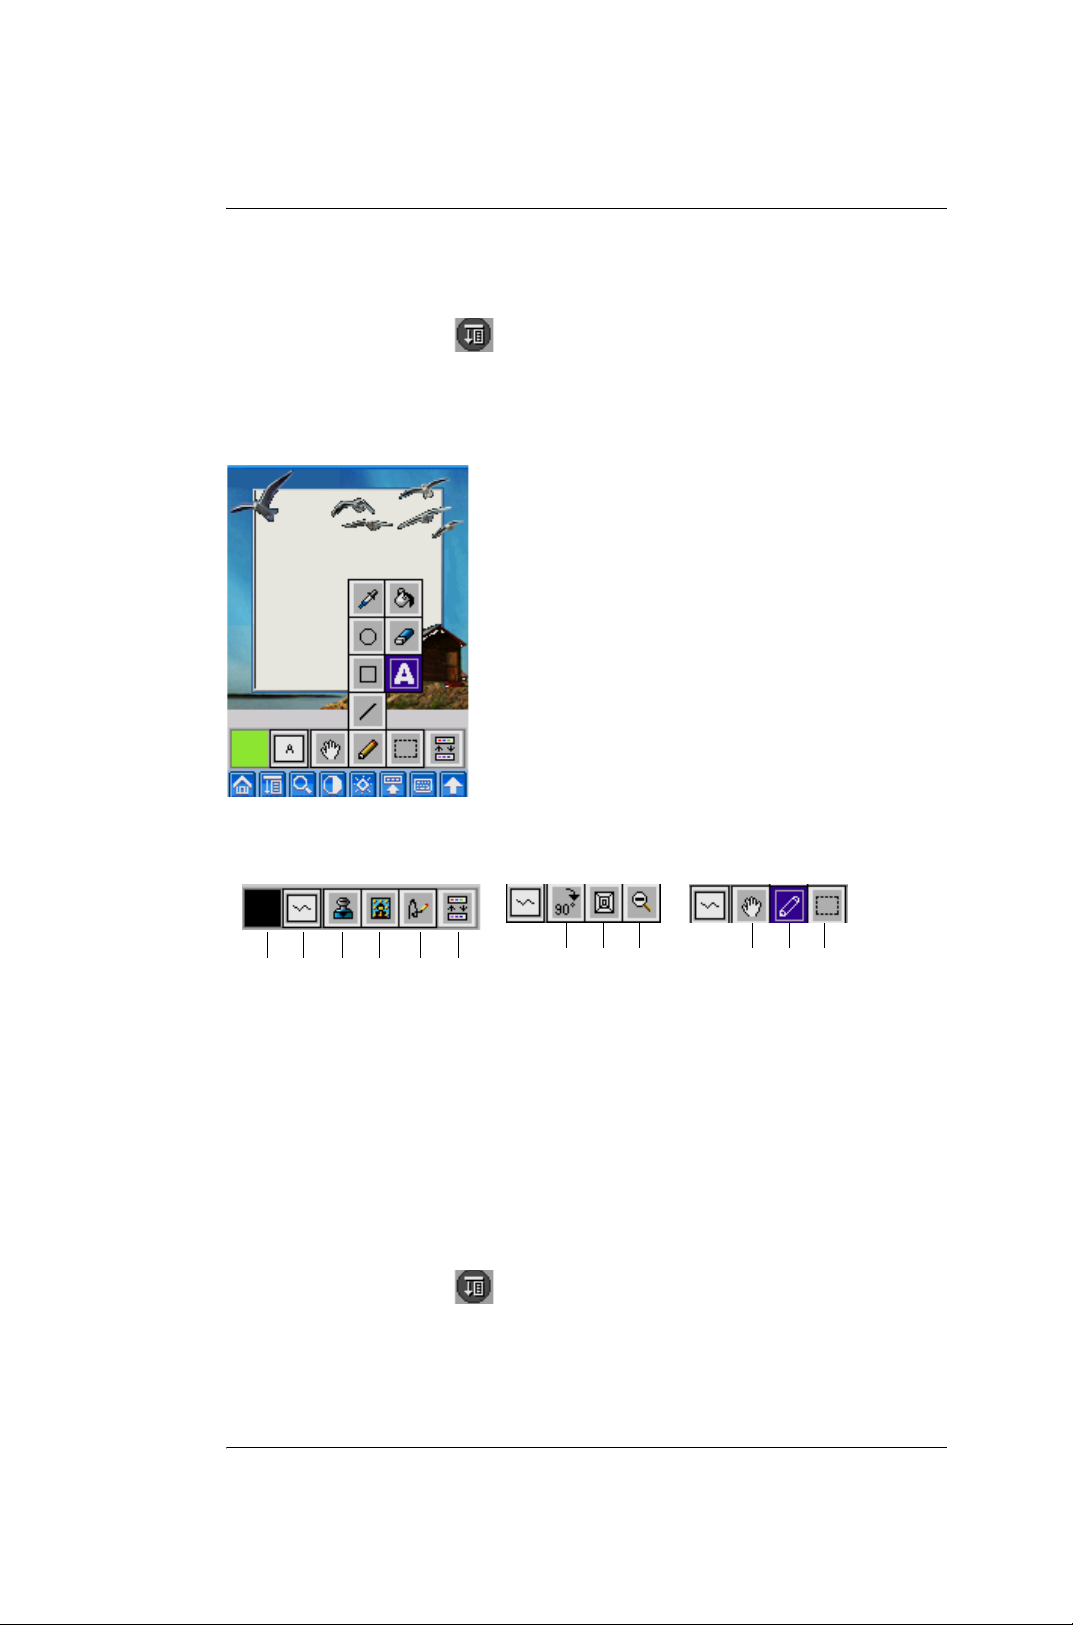
To edit a picture
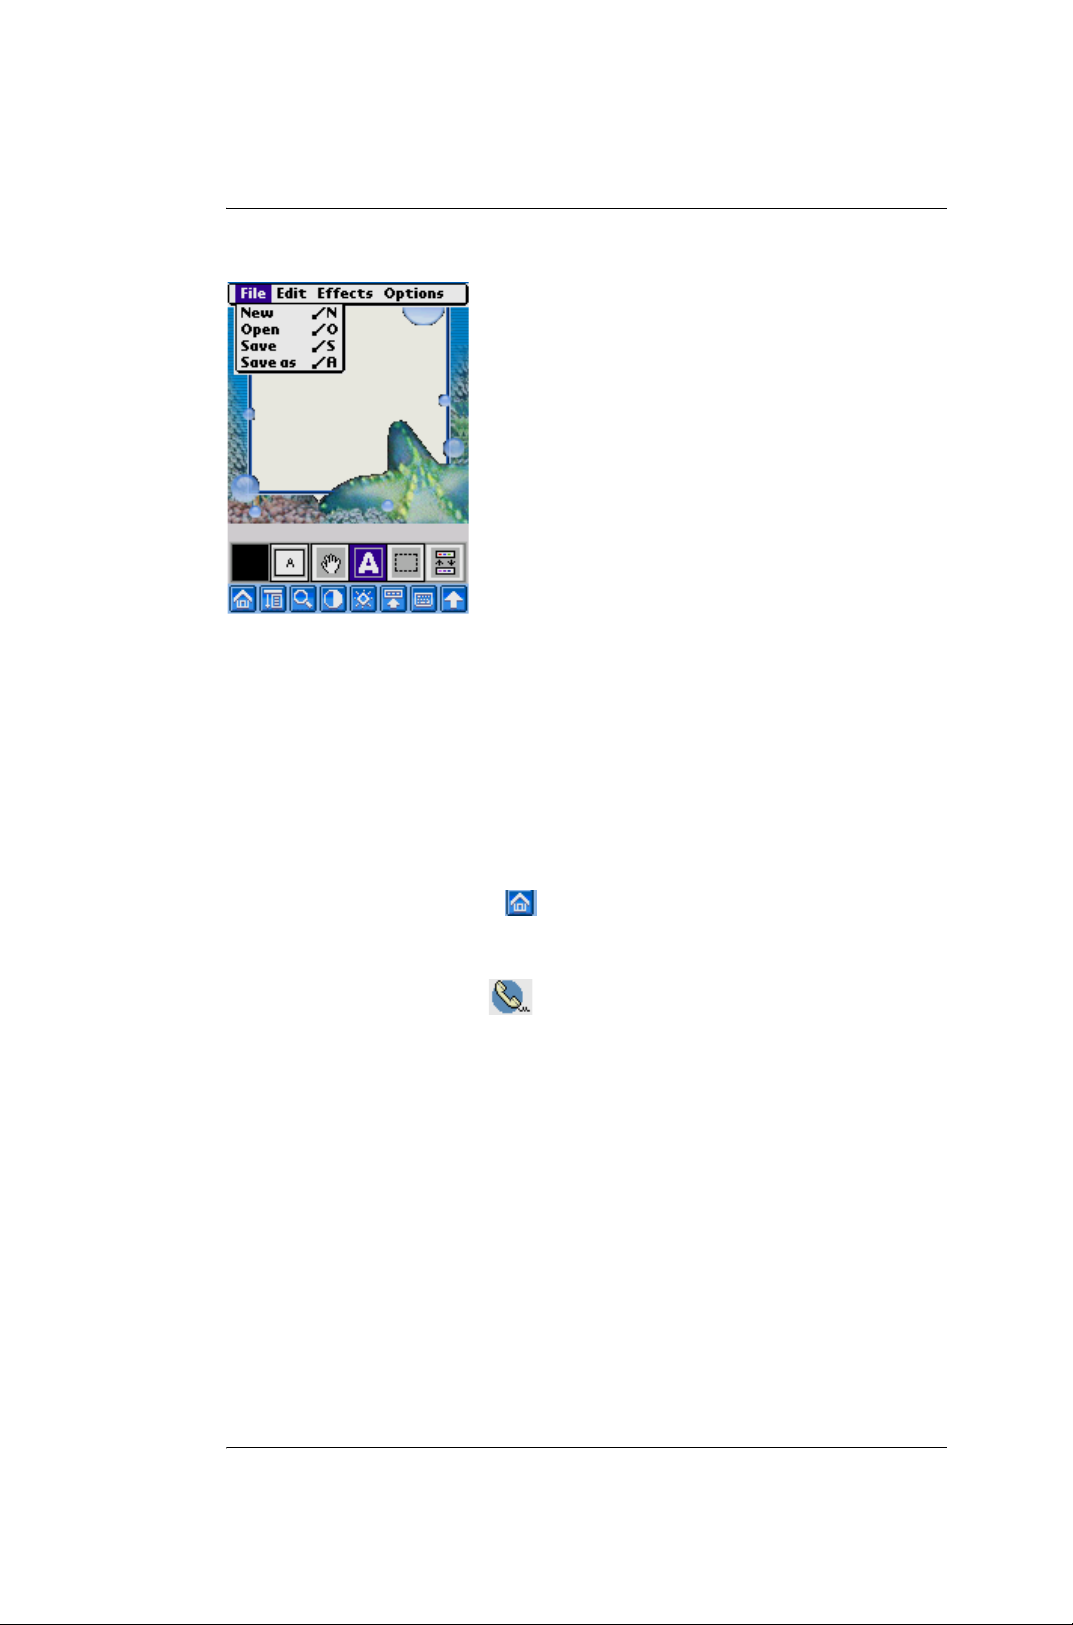
• Tap the Menu icon on the front panel of your G18.
• Select File > Open, the picture list will be shown.
• Tap the pick list in the upper right corner, you can select any picture
to edit.
Album list
The definition of the Toolbar icon
(1) (2) (3) (4) (5) (6)
(1)Select Color
(2)Line
(3)Select Seal
(4)Frame
(5)Add smart record
(6)Icon Exchange
(7) (8) (9) (10)(11)(12)
(7)Angle
(8)Size of Album
(9)Zoom
(10)Move
(11)Stroke Pen
(12)Select Portion and Save As...
To save pictures
• Tap the Menu icon on the front panel of your G18.
• Choose File -> Save to save pictures.
G18 Quick Reference Manual 72
Page 78
Section 2 : Communication and PDA Features
8. Using the Address Book
8. Using the Address Book
To launch the Address Book application
• Tap Applications icon .
• Select Main from the pick list in the upper right corner.
• Tap the Address icon .
G18 Quick Reference Manual 73
Page 79
Section 2 : Communication and PDA Features
8. Using the Address Book
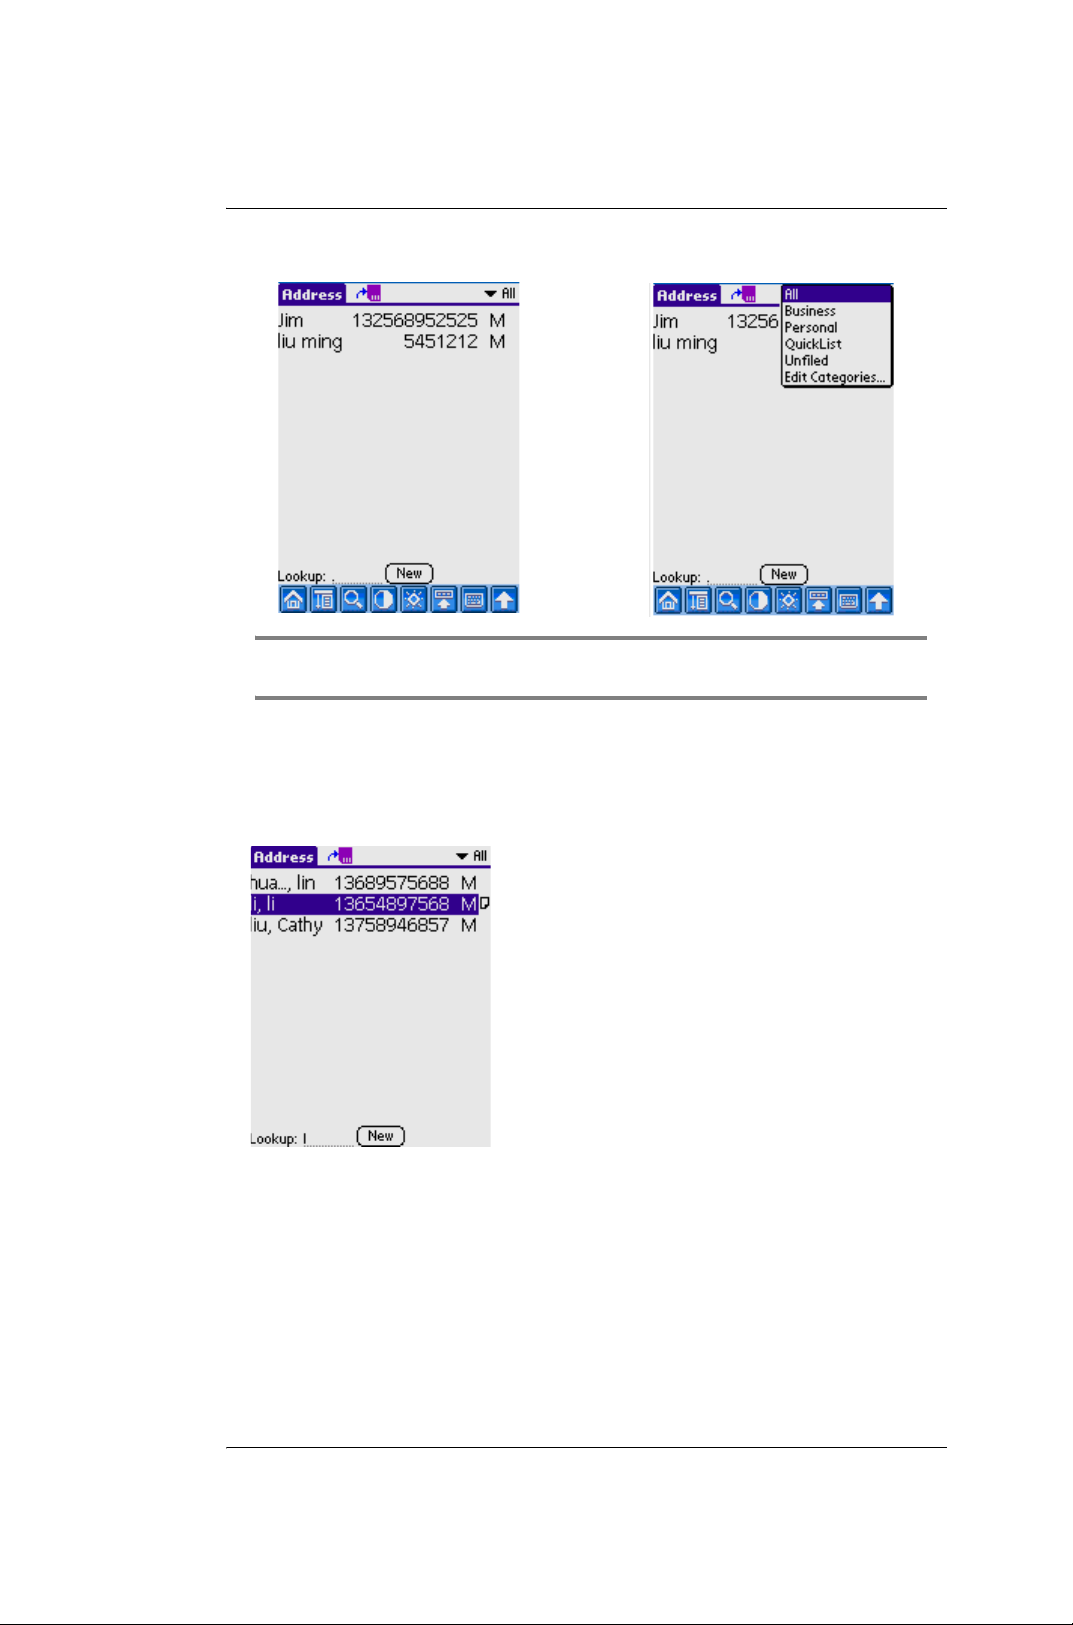
NOTE: If you want to know about the pigeonhole function, please refer to [Edit
Categories].
Lookup
The list will be sorted in phonetic order. You just need to input the first
letter of the name, then the screen will display the relative contacts.
G18 Quick Reference Manual 74
Page 80
Section 2 : Communication and PDA Features
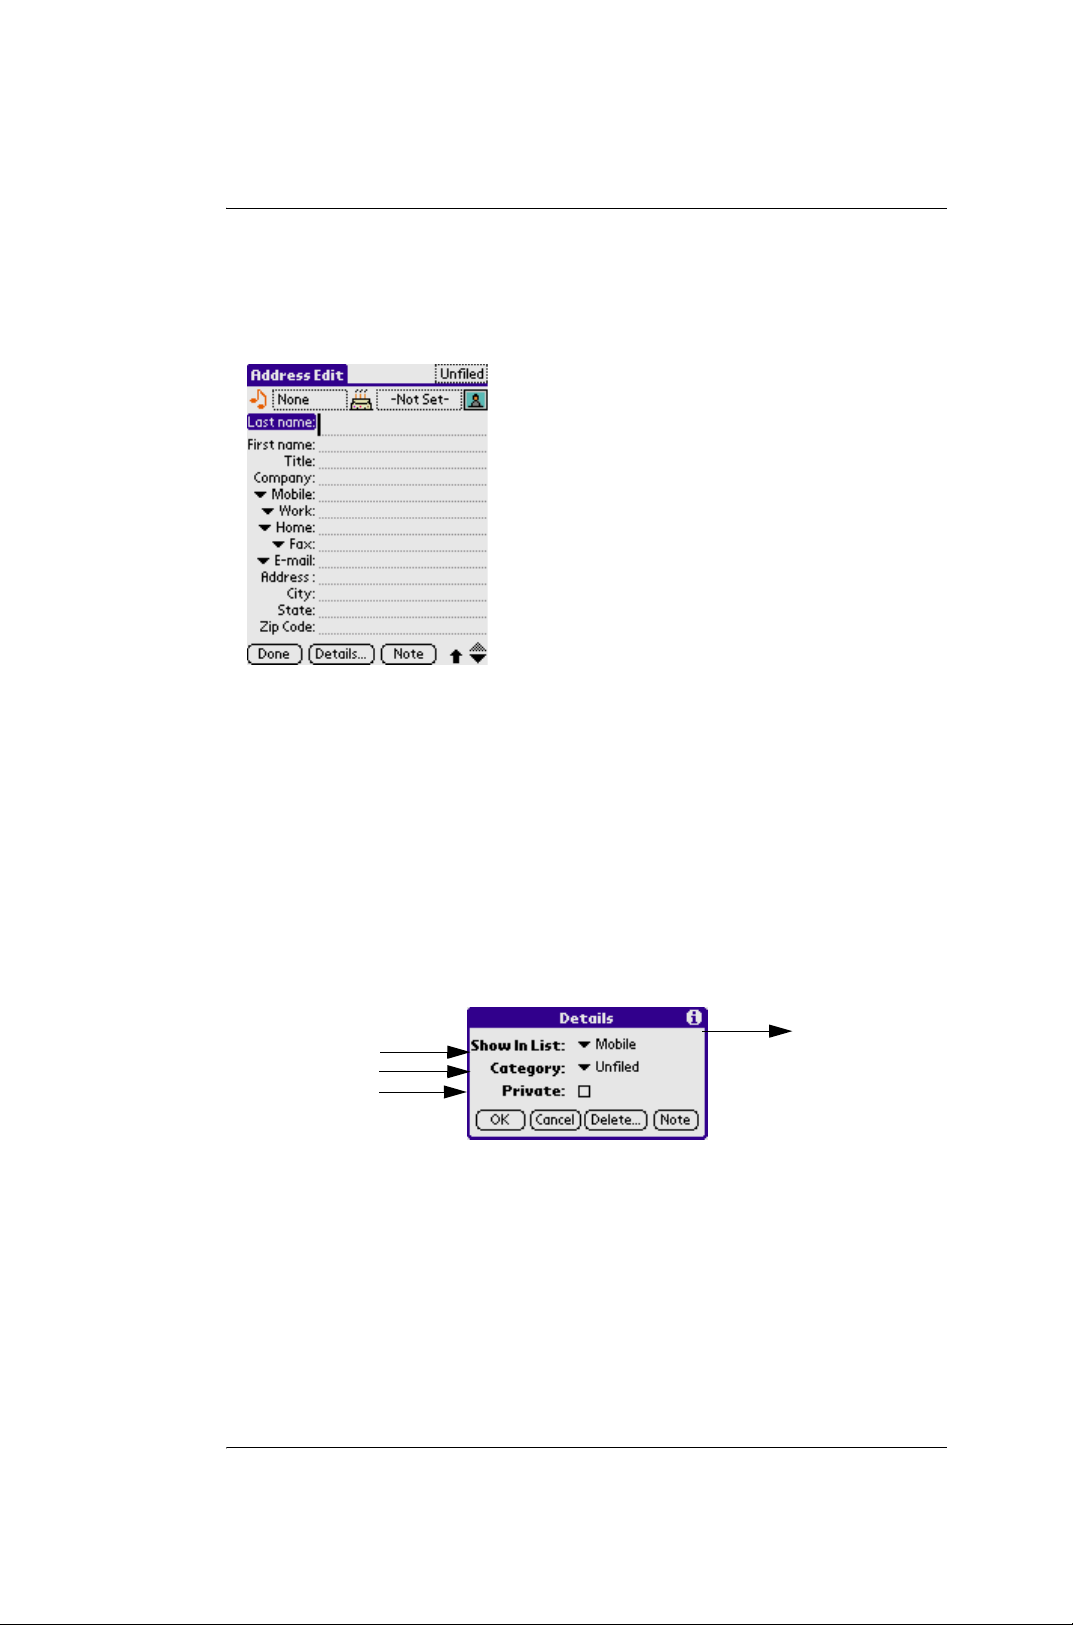
8. Using the Address Book
New/Edit the record
Tap New button on the screen to add a new record.
•Done
Tap this button to return to personal information screen.
• Details...
Tap this button to show a dialog box. In the dialog box, you can set
the current record, delete or add notes to current record.
• Note
Tap this button to enter edit interface.
Dialog Box
Show in list
Category
Private
• OK
Tap this button to save the settings and close the dialog box.
• Cancel
Tap this button to close this dialog box without saving the changes.
Details
G18 Quick Reference Manual 75
Page 81
Section 2 : Communication and PDA Features
9.Using the Date Book
• Delete...
Tap this button to prompt whether to delete the selected entry. Tap
OK to delete all the information, tap Cancel to cancel deletion.
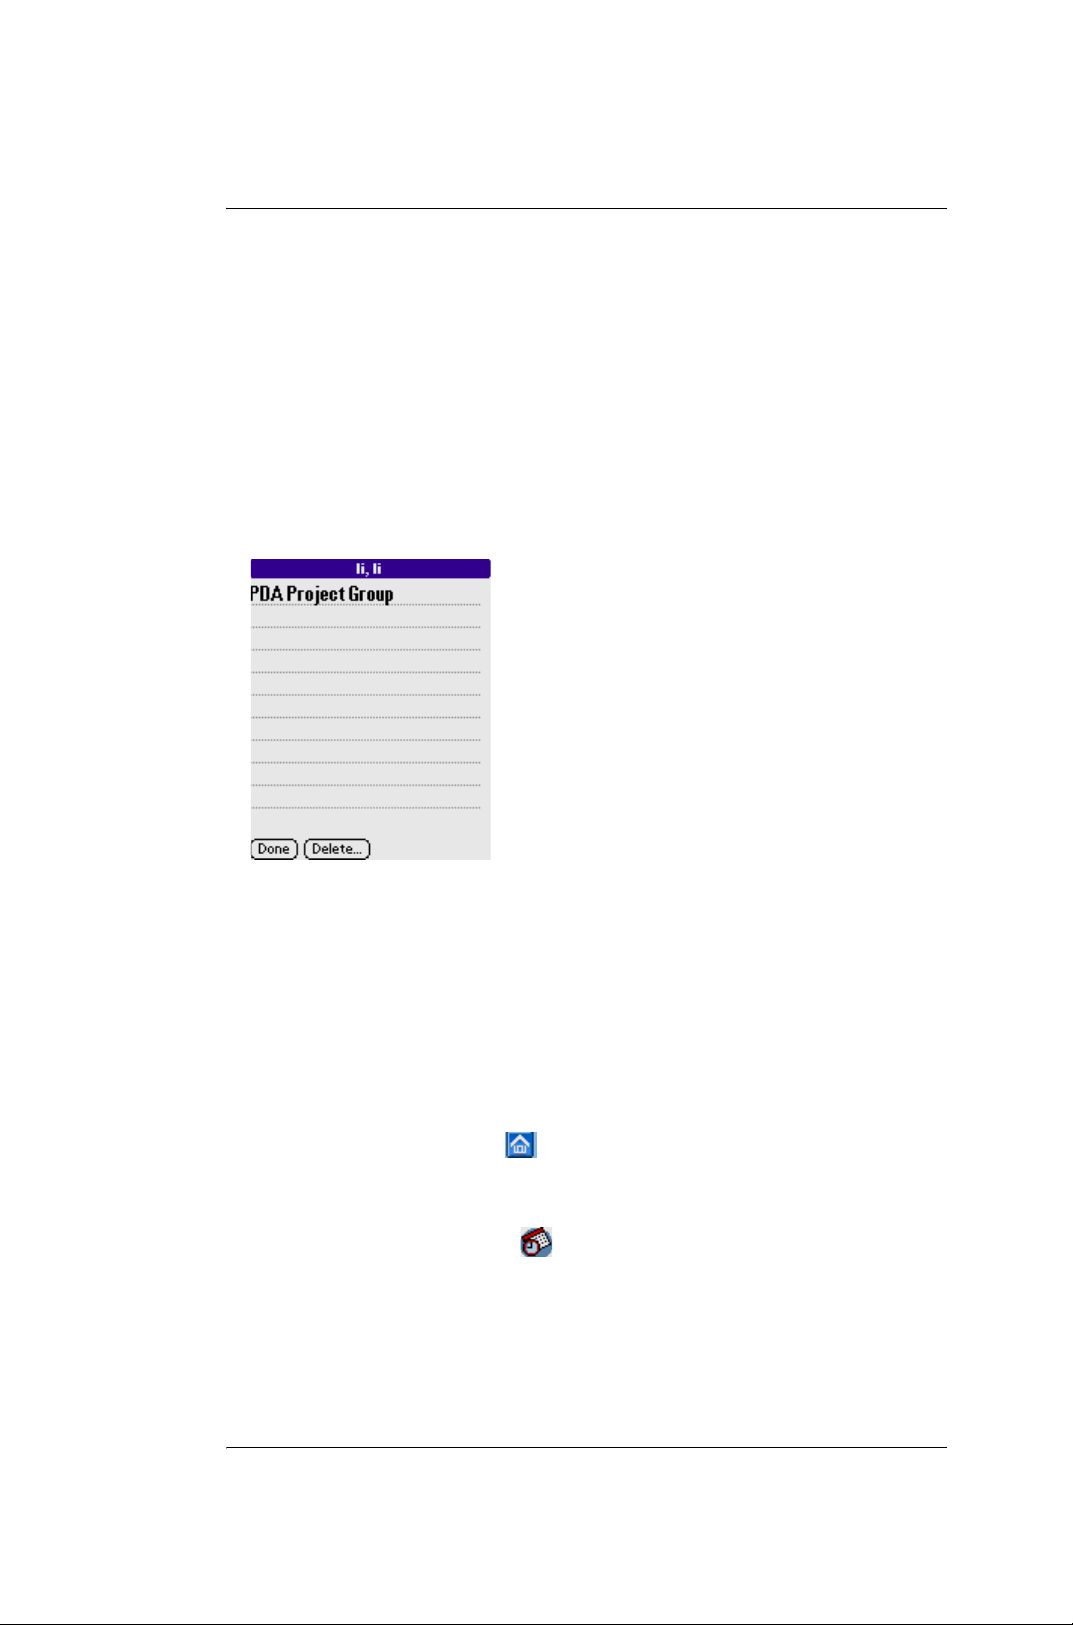
•Note
Tap this button to attach a note to current entry.
Note editing interface
• Done: Finish editing, and return to previous interface.
• Delete: Delete current note.
9.Using the Date Book
To launch the Date Book application
• Tap Applications icon .
• Select Main from the pick list in the upper right corner.
• Tap the Date Book icon.
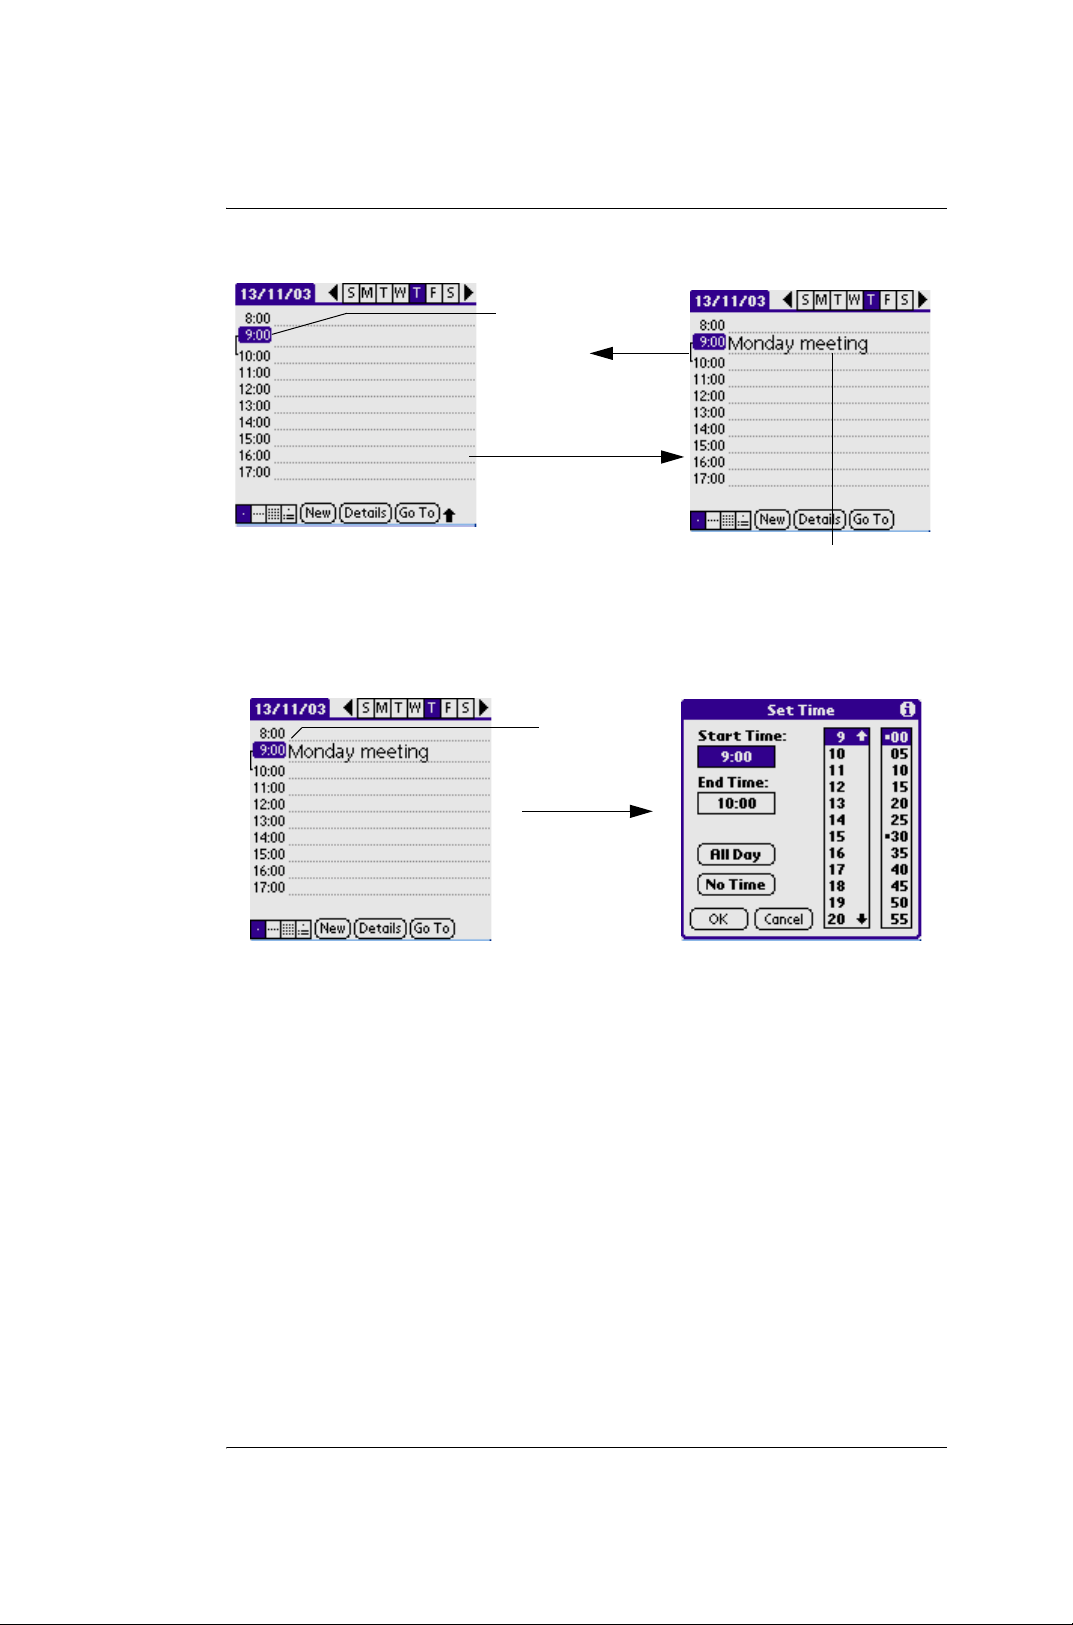
Scheduling timed events
• Tap to select the beginning time of the event.
G18 Quick Reference Manual 76
Page 82
Section 2 : Communication and PDA Features
9.Using the Date Book
Tap to Select the
time
the beginning time
Input the event
• If the event is longer or shorter than an hour, tap directly on the
time to open the Set Time dialog box.You can change time of the
event here.
Tap the time to
display the Set
Time dialog
box.
• Set the duration of the event in either of the following ways:
– Tap the time columns in the Set Time dialog box to set the Start
Time; Tap End Time; then tap the time columns to set the End
Time.
– Tap All Day if the event lasts all day. The default hours of a
standard business day are set by the user, and may be changed
using the Preferences command in the Date Book application.
See the section “Changing the displayed Start and End
Times” later in this chapter.
• Tap OK.
• Tap the blank region,a vertical line will be shown besides the time
to show the duration of the event.
G18 Quick Reference Manual 77
Page 83
Section 2 : Communication and PDA Features
9.Using the Date Book
NOTE: If the Start Time is equal to the End Time, the time will be
shown only once.
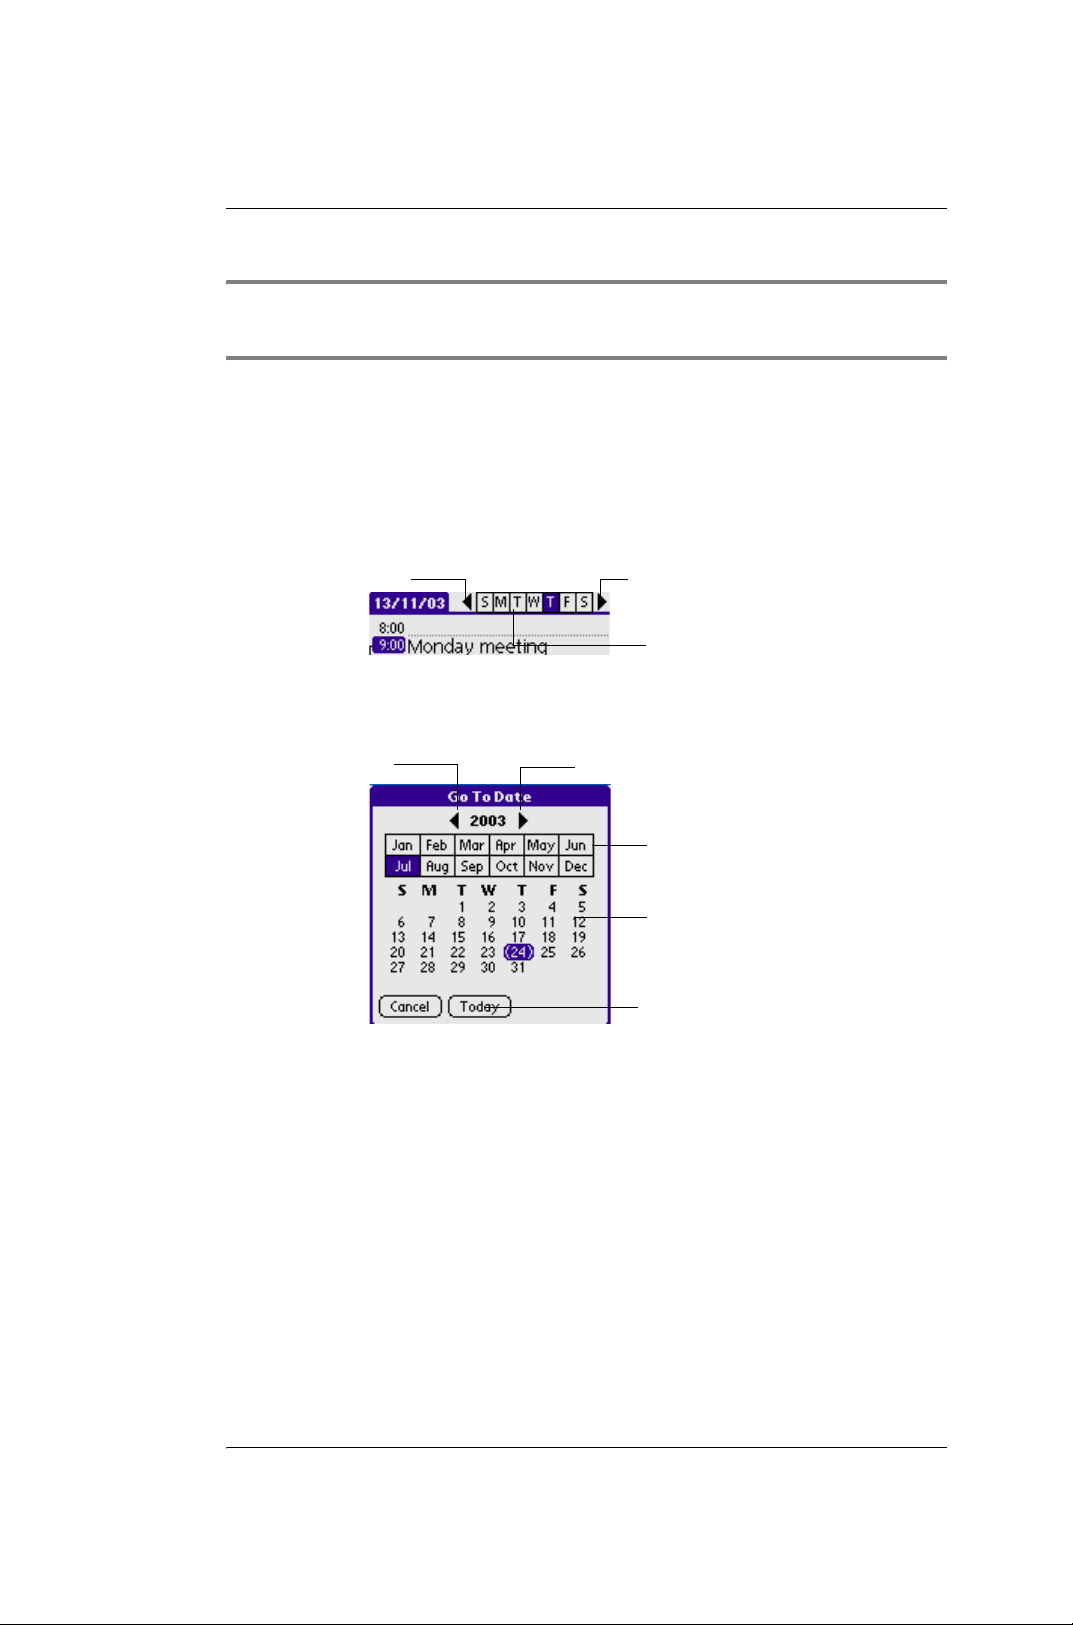
To schedule a timed event for another date
• Select the date in one of the following ways:
Tap the date you want to set a event from the list of date at the top.Tap
“Last week” or “Next Week” to scroll.
Last week Next week
tap to select
a day in the week
Tap “Go To” at the bottom to open the “Go To Date” dialogue box.Tap to
select a day in the calendar.
Last year
Next year
Tap to select the month
Tap to select a day
Tap to select today
Follow the steps as Scheduling timed events to continue.
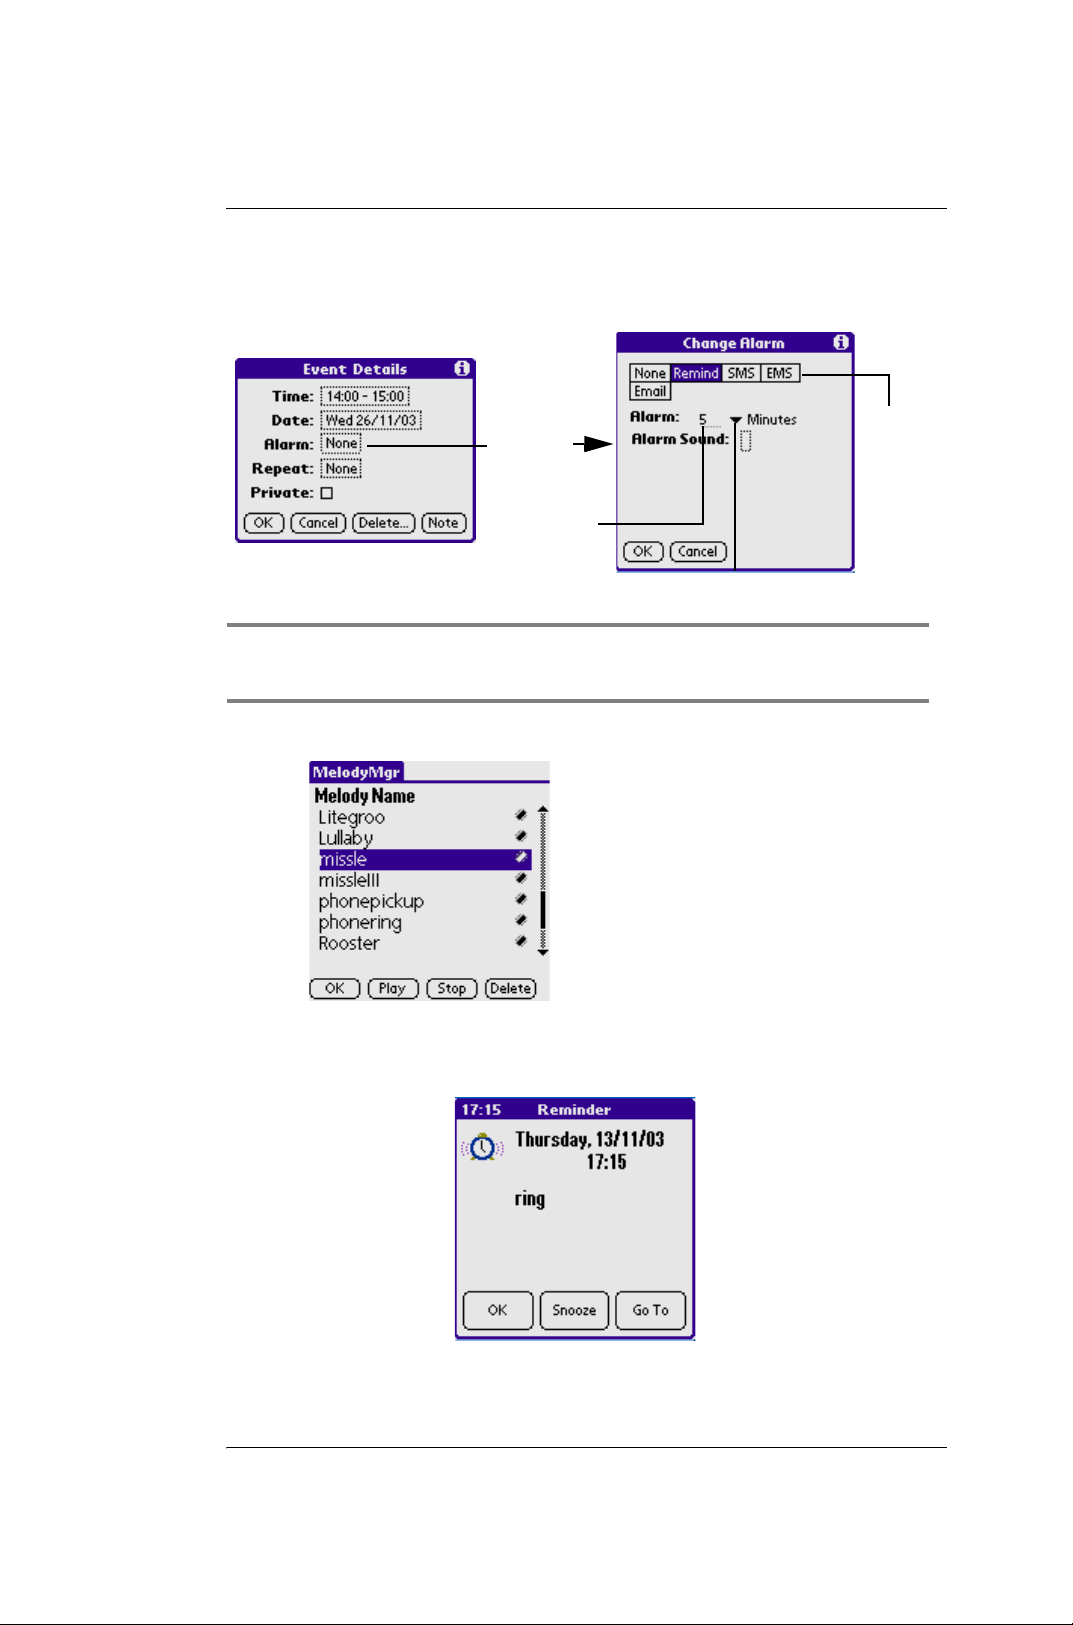
To set an alarm for an event:
• Tap the event to which you want to assign an alarm.
•Tap Details.
• Tap the Alarm check box to select it. Tap None to show Change
Alarm dialog box.
• Set an alarm to sound minutes, hours, or days before a scheduled
appointment.
G18 Quick Reference Manual 78
Page 84
Section 2 : Communication and PDA Features
9.Using the Date Book
• Select the 5 next to poplist and enter any number from 0 to 99
(inclusive) as the number of time units.
Tips
Tap Here
Tap None
Enter number
of time units
here.
Tap here to
select unit of time.
to select
the type
of alarm
NOTE: You can also set the option in the tab of “SMS”to alert
you by sending message to you.
• Tap the field at the right of “Alarm Sound” to select a melody.
button instruction:
• OK - confirm the
seclection.
• Play - play the music
• Stop - stop playing music
• Delete - delete the music
• Tap OK.
• When the alarm sounds, follow one of the steps as below:
Tap “OK”, to stop the alarm and return.
G18 Quick Reference Manual 79
Page 85
Section 2 : Communication and PDA Features
9.Using the Date Book
When the alarm dialog box appears, tap Snooze to delay the alarm
for a preset five-minute period. Each time you tap Snooze, the
alarm is dismissed for an additional 5-minute period.
Tap “Go To” to launch Date Book to browse the attached event.
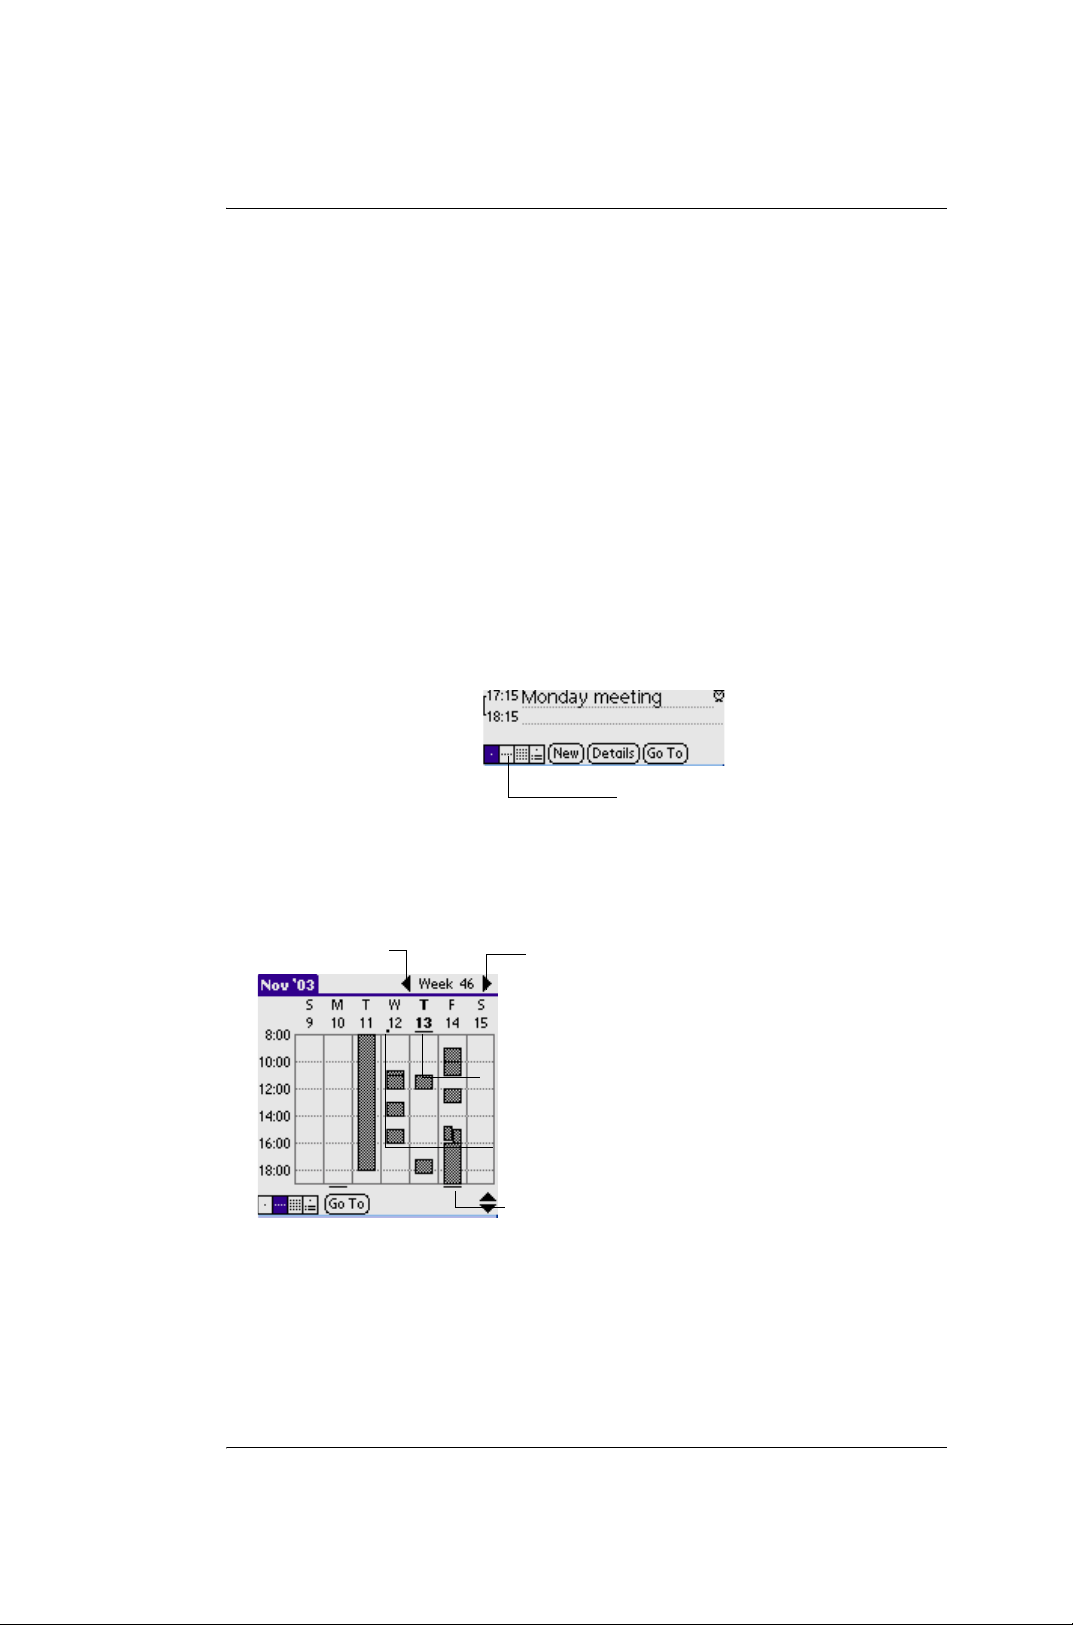
Working in Week view
Week view displays a calendar of your events for an entire week. This view
lets you quickly review your appointments and available time slots. In
addition, the graphical display helps you spot overlaps and conflicts in your
schedule.
To display the Week view:
• Tap the Week view button.
Week view
• Tap the up and down navigation controls to move forward or
backward a week at a time, or tap on a specific day to display the
details of an event.
Theprevious week
week
The next
week
Bar indicates earlier event.
Dot indicates untimed event.
Bar indicates later event.
• Tap an event to display the description.
G18 Quick Reference Manual 80
Page 86
Section 2 : Communication and PDA Features
9.Using the Date Book
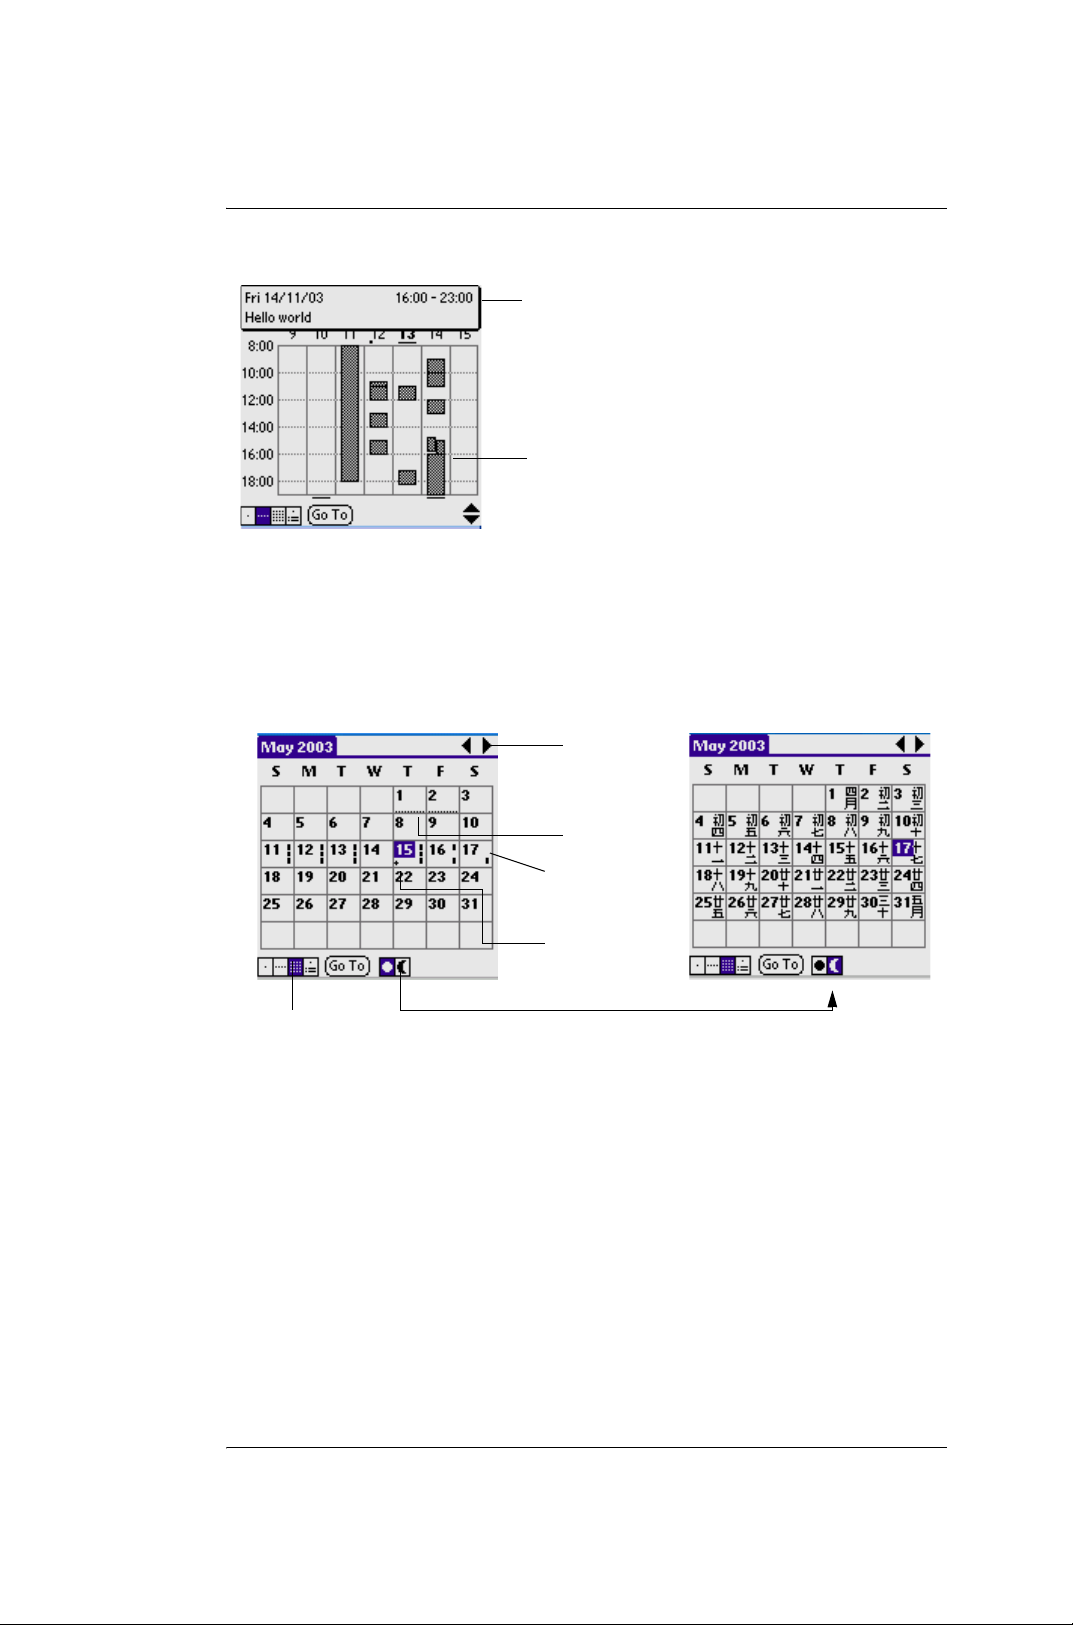
Event details
Tap to show event details.
Working in Month view
The Month View screen shows which days have events scheduled. Dots
and lines in the Month view indicate events, periodical events, and untimed
events.
Last month/
Next month
dashed indicates coher-
ent events
short line
indicates an
event
Cross indicate
untimed event
month viewing
Tap the moon icon to show lunar calendar
Working in Agenda view
The Agenda view lets you view appointments, untimed events, and To Do
List items in a single screen. When you tap an appointment or an untimed
event, it will switch to Day view,make you able to view the detail of the
event.You can also check a to do item to sign this item finished.When you
tap a To Do item, it will switch to do item list.
G18 Quick Reference Manual 81
Page 87

Appendix I:Safety
Appendix I:Safety
Traffic safety
Please check the laws and regulations on the use of mobile phones in the
areas where you are driving. Always obey them. Please use the hands-free
kit while driving.
Pull off the road and park before making or answering a call if driving
conditions so require.
Always secure the phone in its holder. Do not place the phone on the
passenger seat or where it can break loose in a collision or sudden stop.
Phone operating
Remember to follow any special regulations in force in any area and
always switch off your phone whenever it is forbidden to use it, or when it
may cause interference or danger.
When connecting, read the Owner's Guide for detailed safety instructions.
Do not connect it to incompatible products.
Electronic devices
Most modern electronic equipment is shielded from radio frequency (RF)
signals.However, certain electronic equipment may not be shielded against
the RF signals from your wireless phone.
• Persons with pacemaker
– Should always keep the phone more than 20cm (6 inches) from
their pacemaker when the phone is switched on.
– Should not carry the phone in a breast pocket.
– Should use the ear opposite the pacemaker to minimize the
potential for interference.
– If you have any reason to suspect that interference is taking
place, switch OFF your hand-held phone immediately.
G18 Quick Reference Manual 82
Page 88

Appendix I:Safety
• Hearing aids
Some digital wireless phones may interfere with some hearing aids. In
the event of such interference, you may want to consult your operator
or service provider.
• Other medical devices
Operation of any radio transmitting equipment, including wireless
phones, may interfere with the functionality of inadequately protected
medical devices. Consult a physician or the manufacturer of the
medical device to determine if they are adequately shielded from
external RF signal or if you have any questions.
Switch off your phone in health care facilities when any regulation
posted in these areas instruct you to do so. Hospitals or health care
facilities may be using equipment that could be sensitive to external RF
signal.
Vehicles
RF signals may affect improperly installed or inadequately shielded
electronic systems in motor vehicles. Check with the manufacturer or its
representative regarding your vehicle. You should also consult the
manufacturer of any equipment that has been added to your vehicle.
Do not carry it with any combustible, explosive object. In such
environment, it could cause an explosion or fire resulting in injury or even
death.
An air bag inflates with great force. Do not place objects, including both
installed or portable wireless equipment, in the area over the air bag or in
the air bag deployment area. If in-vehicle wireless equipment is improperly
installed and the air bag inflates, serious injury could result.
Posted facilities
Turn your phone OFF in any facility where posted notices require you to do
so.
G18 Quick Reference Manual 83
Page 89

Appendix I:Safety
Potentially explosive environment
Turn your phone OFF and do not remove the battery when in any area with
potentially explosive environment and obey all signs and instructions.
Sparks, from your battery, in such areas could cause an explosion or fire
resulting in injury or even death.
Areas with a potentially explosive environment are often, but not always
clearly marked. They include fueling areas such as gasoline stations; lower
deck of boats; fuel or chemical transfer or storage facilities; areas where
fuel odors are present, i.e.
if a gas/propane leak occurs in a car or home; areas where the air contains
chemicals or particles, such as grain, dust, or metal powders; and any other
area where you would normally be advised to turn off your vehicle engine.
Aircraft
FCC regulations prohibit the use of your phone while in the air. Switch
OFF your phone before boarding an aircraft.
Turn your phone OFF before boarding a plane. To avoid interfering with
the aircraft instrument, do not use the phone on the plane.
Persons who disregard the regulations could have their wireless device
being confiscated, or being charged in court; OR both.
G18 Quick Reference Manual 84
Page 90
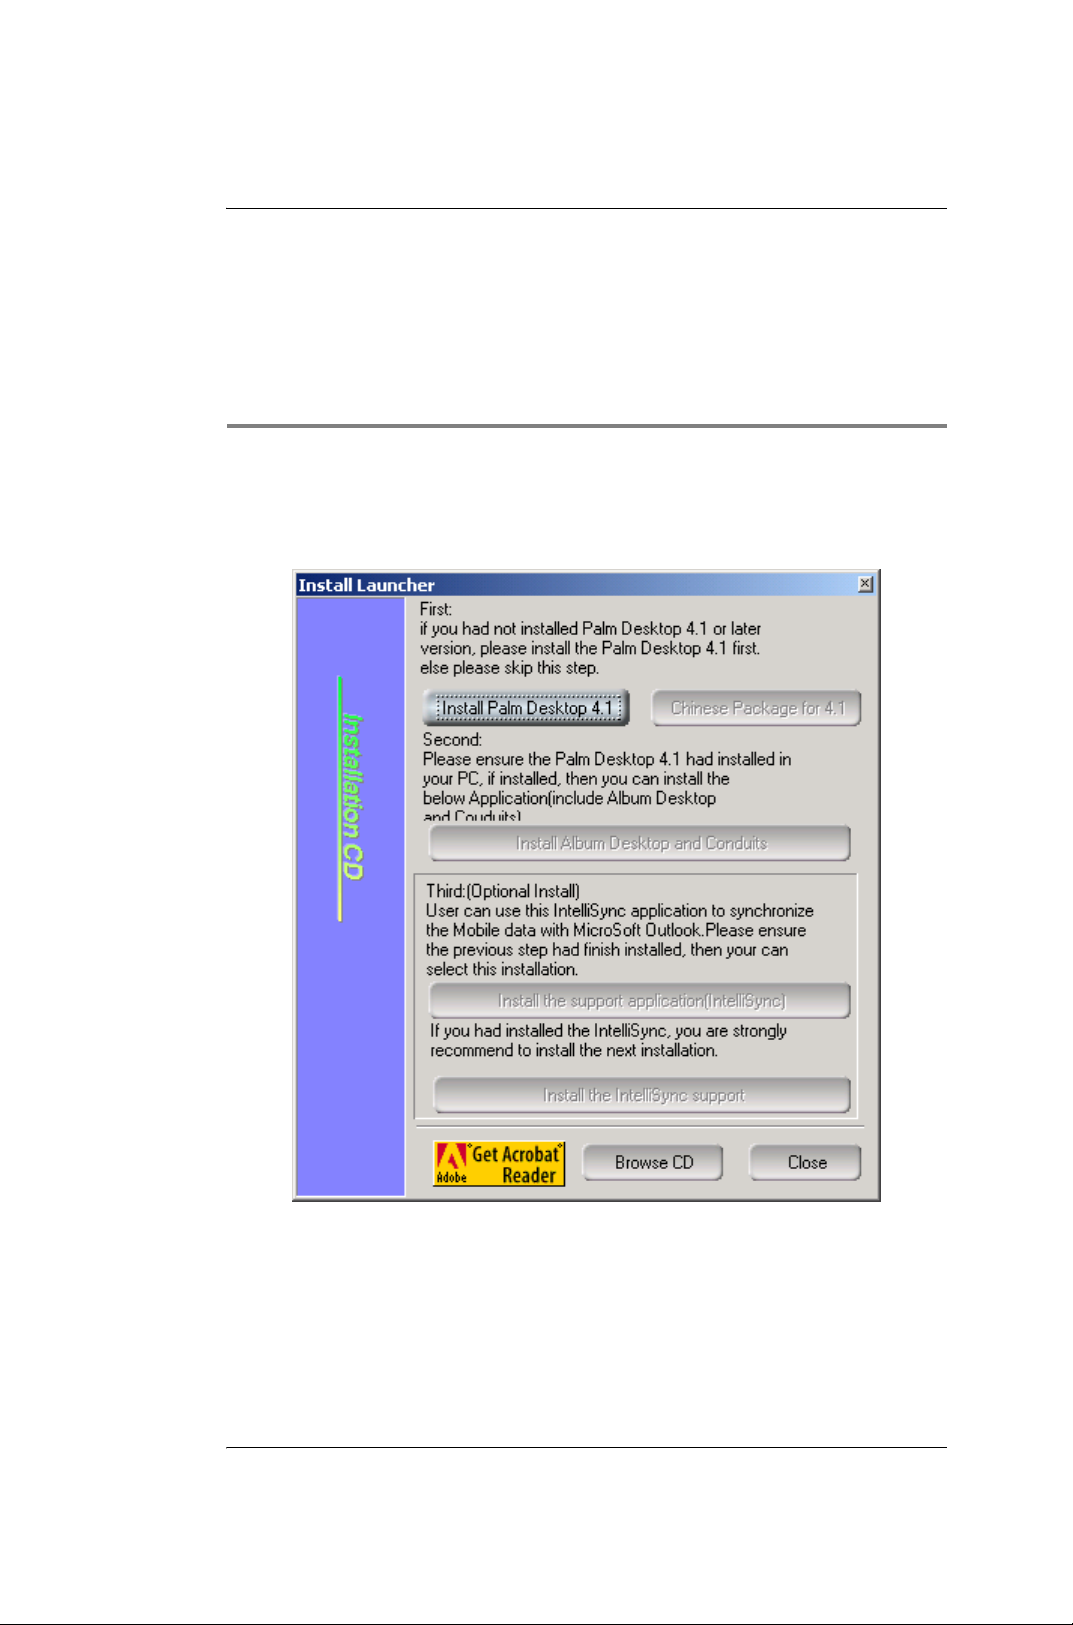
Appendix II: Install CD
Appendix II: Install
CD
• Put the CD in the driver, the install application will start
automatism, if it doesn't work, please select “Install" in the CD.
• You must finish the first part "Install Palm Desktop 4.1 " and the
second part" Install Album Desktop and Conduits", or your G18
will not synchronize the software ,information and photos with
your computer.
• If you want to synchronize information with the "Microsoft
Outlook" of your computer in your G18, please continue installing
G18 Quick Reference Manual 85
Page 91

Appendix II: Install CD
the third part "Install the 3rd support application" and the fourth
part " Install the third-party additional application".
• Finish installing, you can use you computer to synchronize your
PDA with a data line at the first time.
• You can also select the following software to install:
– Frame Converter.
– Melody Converter.
• Otherwise, you can also select some useful software to install in the
following folders.
– bbbox: Including some useful information, such as: common
sense of the file and so on.
– Toolbox: Including some useful software, such as: Ebook,
exchange rate and soon.
– Game: Including some interesting games: Mummy,pharaoh and
so on.
• User manual: Including English and Chinese user manual.
G18 Quick Reference Manual 86
Page 92

Appendix III: Specification
Appendix III:
Specification
Dual-band: GSM 850/1900
OS: Palm 4.1.2
Size: 100mm X 48mm X 21mm
Weight: 105 g
LCD SIZE: 260K 160 X 240 dots
GSM standby time (Phone): 100 hours *
Estimated talk time: 3 hours *
Ringing tone: 32 chords
Accessories:
Travel Charger
CD ROM
Lithium-Ion Battery
Earpiece
Lanyard
PC-Syn Cable
Leather Case
* Operation time will vary depending on SIM card/network settings and
usage.
G18 Quick Reference Manual 87
Page 93

Appendix IV: Care and maintenance
Appendix IV: Care
and maintenance
This unit is a product of superior design and craftsmanship and should be
treated with care. Please read the suggestions below carefully, which will
help you enjoy the functions of the product and its accessories longer.
• Do not dispose of batteries in a fire!
• Keep it and all its parts and accessories out of children's reach.
• Keep it dry. Precipitation, humidity and liquids that contain
minerals will corrode electronic circuits.
• Do not use or store it in dusty, dirty places, which may reduce the
performance of the product and cause damage.
• Do not place it in hot places. High temperatures can shorten the life
of electronic devices, damage batteries and warp or melt certain
plastic parts.
• Do not attempt to open it. Non-professional handling of the device
may cause damage to it or even invalidate the warranty.
• Do not drop, knock or shake it. Rough handling can reduce the
lifetime of the unit or cause damage.
• Do not use strong detergents, chemicals or alcohol to clean it, or
use dry cloth to wipe the screen. Please wipe it with soft and
slightly dampened cloth or anti-static cloth.
• If the unit, battery, charger or any accessory is not working
properly, take them to your nearest authorized and qualified service
center. Non-professional handling may cause great damage and
invalidate the warranty.
G18 Quick Reference Manual 88
Page 94

Appendix V: Reset your G18
Appendix V: Reset
your G18
Under normal circumstances, you will not have to use the reset button.
Since Palm OS is an open platform, the download software and files may
not be compatible with G18 completely. Sometimes, G18 may be out of
order. In this case, you need to perform a reset your G18.
Soft reset
A soft reset tells your G18 to stop what it’s doing and start over again. All
records and entries in your G18 are retained with a soft reset. After a soft
reset, the Welcome screen appears, followed by the Date and Time
Preferences screen (to set date and time).
To perform a soft reset:
Use the reset tip tool, or the tip of an unfolded paper clip (or similar object
without a sharp tip), to gently press the reset button inside the hole on the
left side of your G18.
Hard reset
With a hard reset, all records and entries in your G18 are erased. Never
perform a hard reset unless a soft reset does not solve the problem.
Note: You can restore any data previously synchronized with your
computer during the next HotSync operation. So please use the HotSync
frequently, or use the function “Data backup” of your G18.
To perform a hard reset:
1. Use the reset tip tool, or the tip of an unfolded paper clip (or similar
object without a sharp tip) to gently press and release the reset
button.
2. Hold down the power button on the front panel of your G18. Wait
for the “Palm Powered” logo to appear; then release the power
button.
G18 Quick Reference Manual 89
Page 95

Appendix V: Reset your G18
3. When a message “Erase all data?” appears on the screen warning
that you are about to erase all the data in your G18.
4. Press the upper half of the scroll button on the front panel of your
G18 to complete the hard reset and display the Digitizer screen.
Note: With a hard reset, the current date and time are retained.
Formats Preferences and other settings are restored to their factory
default settings.
G18 Quick Reference Manual 90
Page 96

Appendix VI: FCC Information
Appendix VI: FCC
Information
For body worn operation, this phone has been tested and meets FCC RF
exposure guidelines when used with an accessory that contains no metal
and that positions the handset a minimum of 1.5 cm from the body. Use of
other accessories may not ensure compliance with FCC RF exposure
guidelines.
G18 Quick Reference Manual 91
Page 97

 Loading...