

Page 1

Copyright
• Copyright © 2007 Group Sense Mobile-Tech Limited. All
rights reserved.
• Product specifications and features are for reference
only and are subject to change without prior notice.
Declaration
• This User Guide is published by Group Sense MobileTech Limited., without any warranty. Improvement and
changes to this User Guide necessitated by typographical errors, inaccuracies of current information, or
improvements to programs and/or equipment, may be
made by Group Sense Mobile-Tech Limited. any time
and without notice. Such changes will, however, be
incorporated into new editions of this User Guide.
FCC Statement
This device complies with Part 15 of the FCC Rules. Operation
is subject to the following two conditions: (1) this device may not
cause harmful interference, and (2) this device must accept any
interference received, including interference that may cause
undesired operation.
Changes or modifications not expressly approved by the party
responsible for compliance could void the user's authority to
operate the equipment.
Copyright
1
Page 2

Typographical conventions
Typographical conventions
It is important to understand the terms and typographical conventions used in this User Guide.
Format
The following format used in this User Guide:
Conventions Information
Bold The components or terms displayed on
screen
Terms
Terms Descriptions
Press Press and release a button quickly
Select Select an item in a list or a component from
menu
Tap Press and release an item quickly displayed
on screen
Tap and hold Tap and hold an item displayed on screen for
2 or 3 seconds
2
Page 3

Important safety information
PLEASE READ THIS CAREFULLY BEFORE USING HATCHBACK IN YOUR VEHICLE!
• It is your responsibility to place the Hatchback securely
on your vehicle.
• Mount the Hatchback in a position that is secure, does
not obstruct the driver’s view and will not obstruct you
from leaving your vehicle in the event of an accident.
• Do not operate the Hatchback while driving.
• You’d better familiarize yourself with your device and its
operation before using it.
• Keep the Hatchback cool. Out of direct sunlight.
AC adapter safety information
• Use the AC adapter supplied by Group Sense PDA Ltd.
as an accessory to charge your Hatchback; use other
adapter may result in serious damage.
• Never use the adapter if the plug is damaged.
• Never touch the adapter if your hands/feet are wet.
Important safety information
• Do not expose the adapter to water, it may cause electrical fires.
• Allow sufficient ventilation around the adapter when
using it to operate your Hatchback or charge the internal
battery.
• Do not repair the adapter yourself for your safety.
3
Page 4

Important safety information
Internal battery safety information
• The internal battery is a non-replaceable internal lithiumion polymer battery. It may explode if mishandled. To
reduce the risk of fire or burns, do not disassemble,
crush or puncture the battery.
• Recycle or dispose of the battery safely and properly
according to local laws and regulations. Do not dispose
of the battery in fire or water.
• Only use the correct AC adapter (sold separately) or invehicle adapter supplied by Hatchback to charge the
internal battery.
4
Page 5

Table of Contents
Welcome 8
Getting to know your Hatchback . . . . . . . . . . . . . . . . . . . . . . 9
Front components . . . . . . . . . . . . . . . . . . . . . . . . . . . . . . 9
Back components . . . . . . . . . . . . . . . . . . . . . . . . . . . . . . 10
Up components . . . . . . . . . . . . . . . . . . . . . . . . . . . . . . . 11
Bottom component . . . . . . . . . . . . . . . . . . . . . . . . . . . . . 11
Side components . . . . . . . . . . . . . . . . . . . . . . . . . . . . . . 12
Internal battery . . . . . . . . . . . . . . . . . . . . . . . . . . . . . . . . 13
Inserting/removing external card . . . . . . . . . . . . . . . . . . 13
Input methods . . . . . . . . . . . . . . . . . . . . . . . . . . . . . . . . . . . 15
Using input methods . . . . . . . . . . . . . . . . . . . . . . . . . . . . 15
Input methods options . . . . . . . . . . . . . . . . . . . . . . . . . . 16
TURBODOG navigation system 17
Quick reference . . . . . . . . . . . . . . . . . . . . . . . . . . . . . . . . . 17
Getting started . . . . . . . . . . . . . . . . . . . . . . . . . . . . . . . . . . 18
Icon description on main menu . . . . . . . . . . . . . . . . . . . . . . 19
Icon description on navigation . . . . . . . . . . . . . . . . . . . . . . 21
Start navigation - where do you want to go? 23
Setup a destination . . . . . . . . . . . . . . . . . . . . . . . . . . . . . . . 24
Setup destination by address . . . . . . . . . . . . . . . . . . . . . 24
Setup destination by intersection . . . . . . . . . . . . . . . . . . 29
Setup destination by POI . . . . . . . . . . . . . . . . . . . . . . . . 32
Setup destination by road of POI . . . . . . . . . . . . . . . . . . 34
Setup destination by Favorites . . . . . . . . . . . . . . . . . . . . 37
Search by nearest POI . . . . . . . . . . . . . . . . . . . . . . . . . . 38
Setup destination by recent destinations . . . . . . . . . . . . 40
Table of Contents
5
Page 6

Table of Contents
Setup destination in Map view mode . . . . . . . . . . . . . . . 41
Start navigation . . . . . . . . . . . . . . . . . . . . . . . . . . . . . . . . . 42
Turbodog main menu 44
Go home . . . . . . . . . . . . . . . . . . . . . . . . . . . . . . . . . . . . . . . 45
Set up my home . . . . . . . . . . . . . . . . . . . . . . . . . . . . . . . 45
Edit recent destinations . . . . . . . . . . . . . . . . . . . . . . . . . . . 46
Map view . . . . . . . . . . . . . . . . . . . . . . . . . . . . . . . . . . . . . . 49
Edit favorites . . . . . . . . . . . . . . . . . . . . . . . . . . . . . . . . . . . . 54
Manage navigation 58
Navigation and route plan . . . . . . . . . . . . . . . . . . . . . . . . . 59
Specify route parameters . . . . . . . . . . . . . . . . . . . . . . . . . . 62
Manage destination . . . . . . . . . . . . . . . . . . . . . . . . . . . . . . 64
Navigation 66
Auto-routing . . . . . . . . . . . . . . . . . . . . . . . . . . . . . . . . . . . . 69
Entire route view . . . . . . . . . . . . . . . . . . . . . . . . . . . . . . . . . 71
RDS-TMC traffice and travel information system 72
TMC turn on/off . . . . . . . . . . . . . . . . . . . . . . . . . . . . . . . . . 72
TMC messages . . . . . . . . . . . . . . . . . . . . . . . . . . . . . . . . . 74
TMC rerouting . . . . . . . . . . . . . . . . . . . . . . . . . . . . . . . . . . 75
Change preference 77
Navi setting . . . . . . . . . . . . . . . . . . . . . . . . . . . . . . . . . . . . . 77
Language . . . . . . . . . . . . . . . . . . . . . . . . . . . . . . . . . . . . . . 80
Trave record . . . . . . . . . . . . . . . . . . . . . . . . . . . . . . . . . . . . 81
GPS status . . . . . . . . . . . . . . . . . . . . . . . . . . . . . . . . . . . . . 82
Appendix 84
Categories of POI . . . . . . . . . . . . . . . . . . . . . . . . . . . . . . . . 84
Glossary . . . . . . . . . . . . . . . . . . . . . . . . . . . . . . . . . . . . . . . 85
Attention . . . . . . . . . . . . . . . . . . . . . . . . . . . . . . . . . . . . . . . 86
Map icons . . . . . . . . . . . . . . . . . . . . . . . . . . . . . . . . . . . . . . 89
6
Page 7

TMC message icons . . . . . . . . . . . . . . . . . . . . . . . . . . . . . . 90
Camera 92
Activating camera . . . . . . . . . . . . . . . . . . . . . . . . . . . . . . . . 92
Customizing camera preferences . . . . . . . . . . . . . . . . . . 93
Taking a photo . . . . . . . . . . . . . . . . . . . . . . . . . . . . . . . . 95
Managing photos . . . . . . . . . . . . . . . . . . . . . . . . . . . . . . 95
Photo Viewer 96
Accessing Photo Viewer . . . . . . . . . . . . . . . . . . . . . . . . . . . 96
Photo management . . . . . . . . . . . . . . . . . . . . . . . . . . . . 97
Mp3 Player 101
Activating Mp3 Player . . . . . . . . . . . . . . . . . . . . . . . . . . . . 101
Playing a song . . . . . . . . . . . . . . . . . . . . . . . . . . . . . . . 102
Deleting a song . . . . . . . . . . . . . . . . . . . . . . . . . . . . . . 104
Playlist management . . . . . . . . . . . . . . . . . . . . . . . . . . . . 105
Creating a new playlist . . . . . . . . . . . . . . . . . . . . . . . . . 105
Deleting a playlist . . . . . . . . . . . . . . . . . . . . . . . . . . . . . 106
Mp3 Player settings . . . . . . . . . . . . . . . . . . . . . . . . . . . 107
Hatchback configuration 108
Customizing Hatchback . . . . . . . . . . . . . . . . . . . . . . . . . . 108
Changing the time/date settings . . . . . . . . . . . . . . . . . . 108
Changing the language settings . . . . . . . . . . . . . . . . . . 109
Changing the display settings . . . . . . . . . . . . . . . . . . . 109
Others 110
Using World Clock . . . . . . . . . . . . . . . . . . . . . . . . . . . . . . 110
Accessing World Clock . . . . . . . . . . . . . . . . . . . . . . . . . 110
Time zone area settings . . . . . . . . . . . . . . . . . . . . . . . . 111
Using the Calculator . . . . . . . . . . . . . . . . . . . . . . . . . . . . . 112
Activating Calculator . . . . . . . . . . . . . . . . . . . . . . . . . . . 112
Table of Contents
7
Page 8

Welcome
Welcome
Thank you for using Hatchback navigation system, a global navigation system for vehicles. It utilizes the GPS (Global Position
System) technology. This software will bring you with a pleasant
driving experience more convenient, more comfortable.
This User Guide will guide you throughout the operation of your
Hatchback step by step. Please read this User Guide carefully
before using your Hatchback for the first time, and keep this
Guide for future reference.
8
Page 9
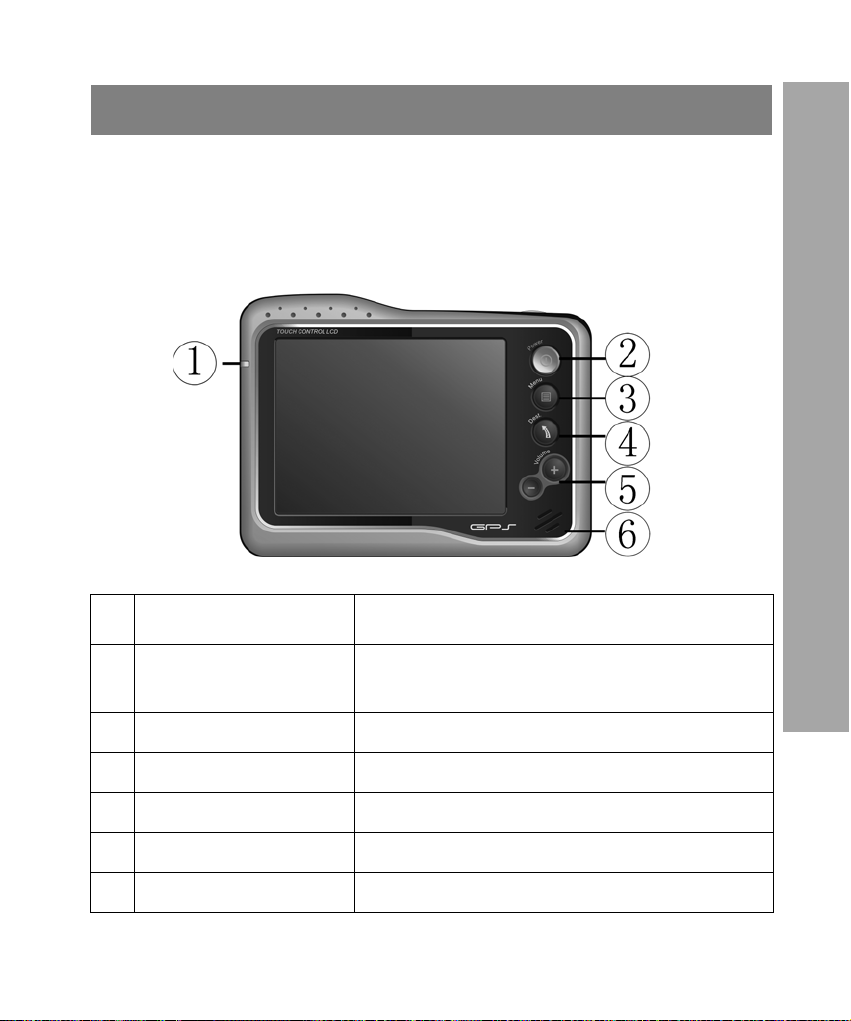
Getting to know your Hatchback
We strongly recommend that you familiarize yourself with the
Hatchback.
Front components
Component Description
Welcome
1 Battery indicator Indicate the level of Internal battery
charge
2 Power button Press to turn Hatchback on/off
3 Menu button Press to access the main menu
4 Destination button Press to access the Maps application
5 Volume button Press to set the volume level
6 Speaker
9
Page 10
Welcome
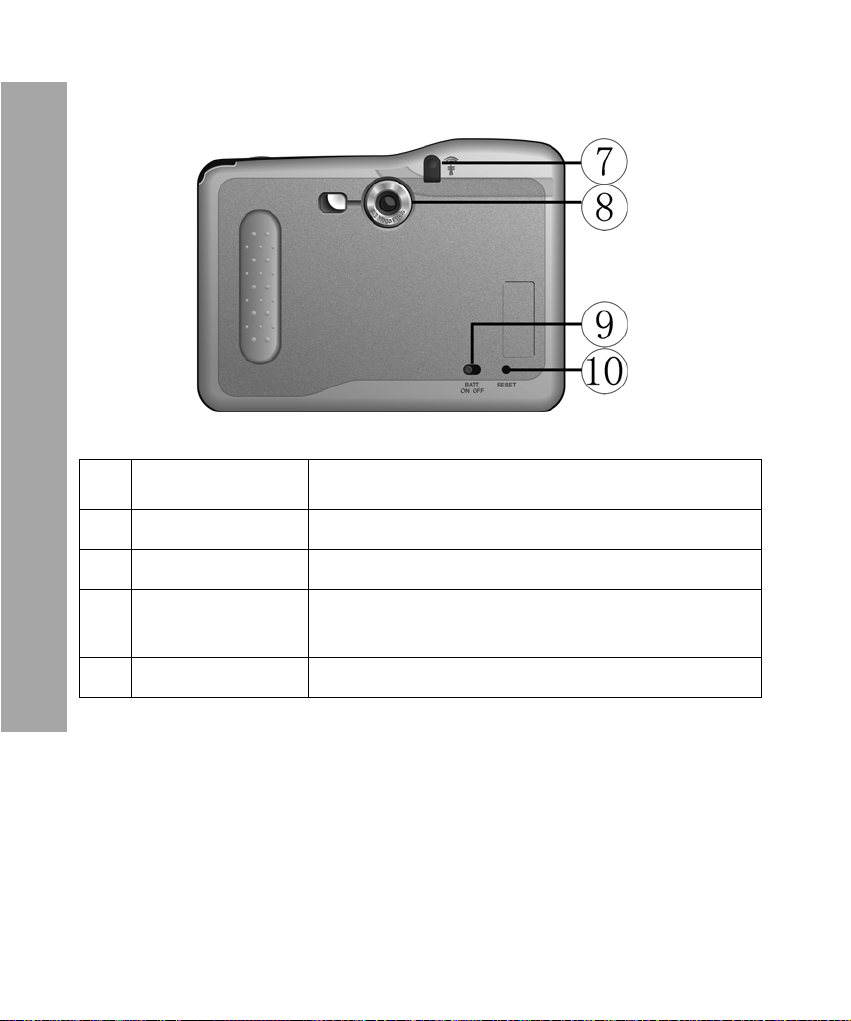
Back components
Component Description
7 GPS receiver Receive signals from GPS satellites
8 Camera Camera lens
9 Battery lock Set it on for normal use; switch to off to
cut internal battery connection
10 Reset hole Use stylus to reset the Hatchback
10
Page 11
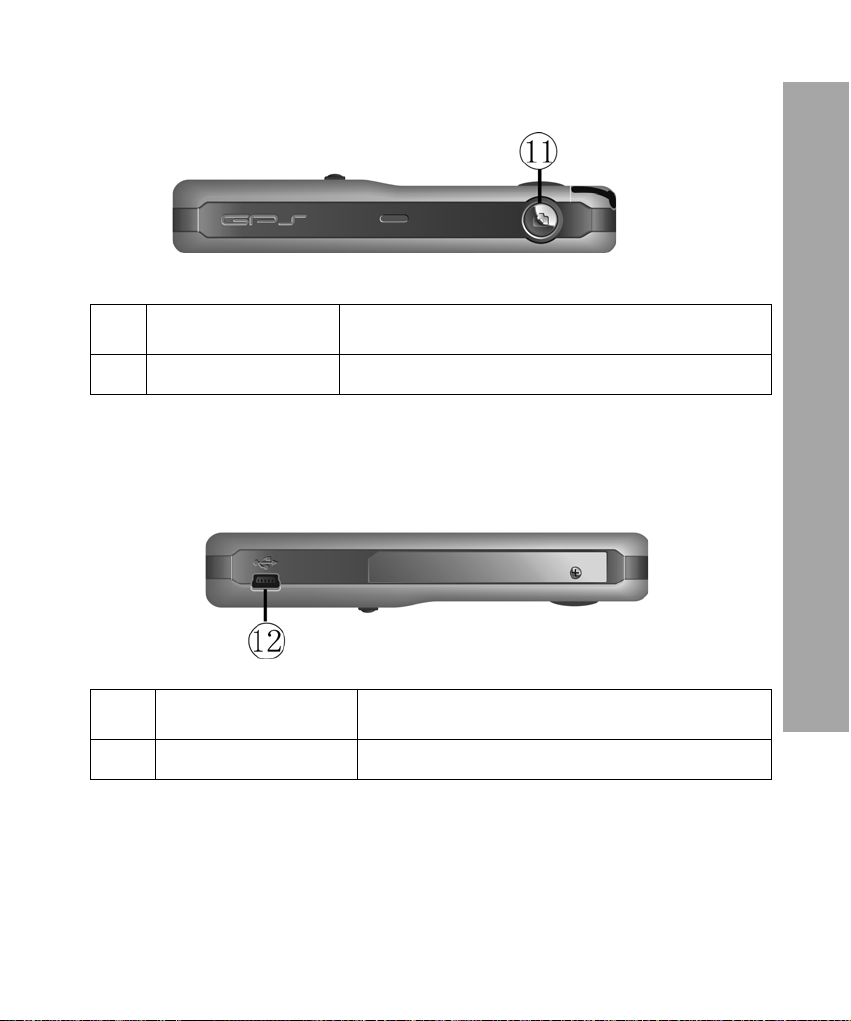
Up components
Component Description
11 Camera button Turn camera on; press to take a photo
Bottom component
Welcome
Component Description
12 Charging socket Connection socket for AC power
11
Page 12
Welcome
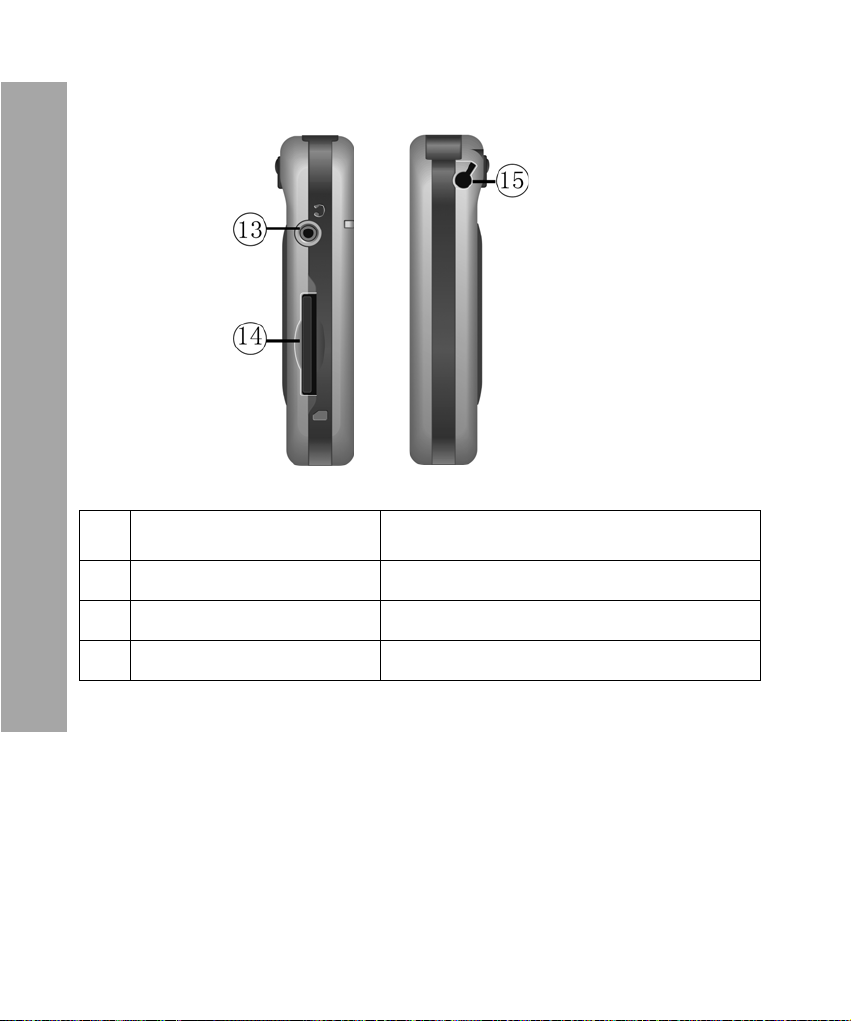
Side components
Component Description
13 Earphone Connection socket for earphone
14 External card slot Slot for memory card
15 Stylus slot Slot for stylus
12
Page 13

Internal battery
The Hatchback has an internal battery, the battery indicator
lights on the front of the Hatchback indicates the level of internal
battery charge:
• Green - Battery full
• Red - Battery low
• Orange- Battery charging
Charging battery
• To charge the Hatchback using an electrical wall outlet,
plug the AC power cable into the charging socket on the
bottom of the Hatchback and the AC power pack into the
wall outlet.
• To charge the Hatchback in a vehicle, plug the vehicle
power adapter into the charging socket on the bottom of
the Hatchback and the end into the vehicle power
socket.
Welcome
Inserting/removing external card
You can copy photos and songs saved in your computer to the
external card.
13
Page 14
Welcome
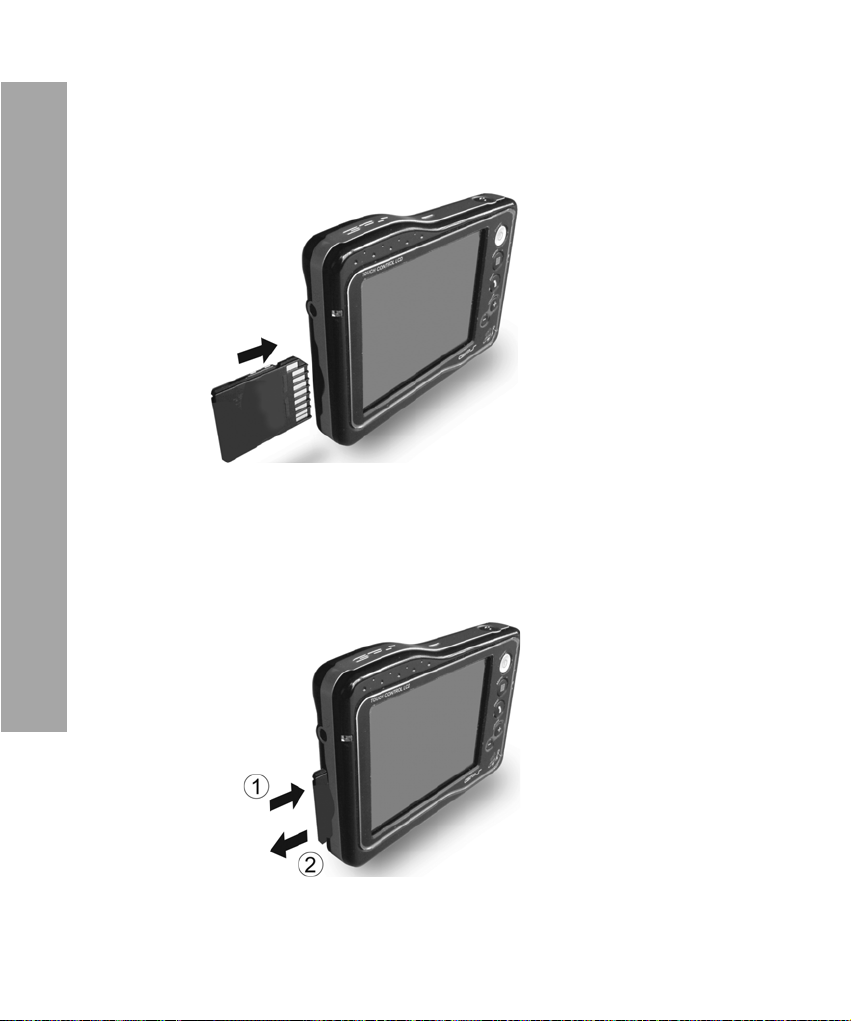
Inserting external card
• Insert the card with the metal contact facing upwards
into the card slot as illustrated below.
Removing external card
• Press the inserted card to release and then remove
card.
14
Page 15
Input methods
This chapter will guide you to the basic operation of input methods.
Using input methods
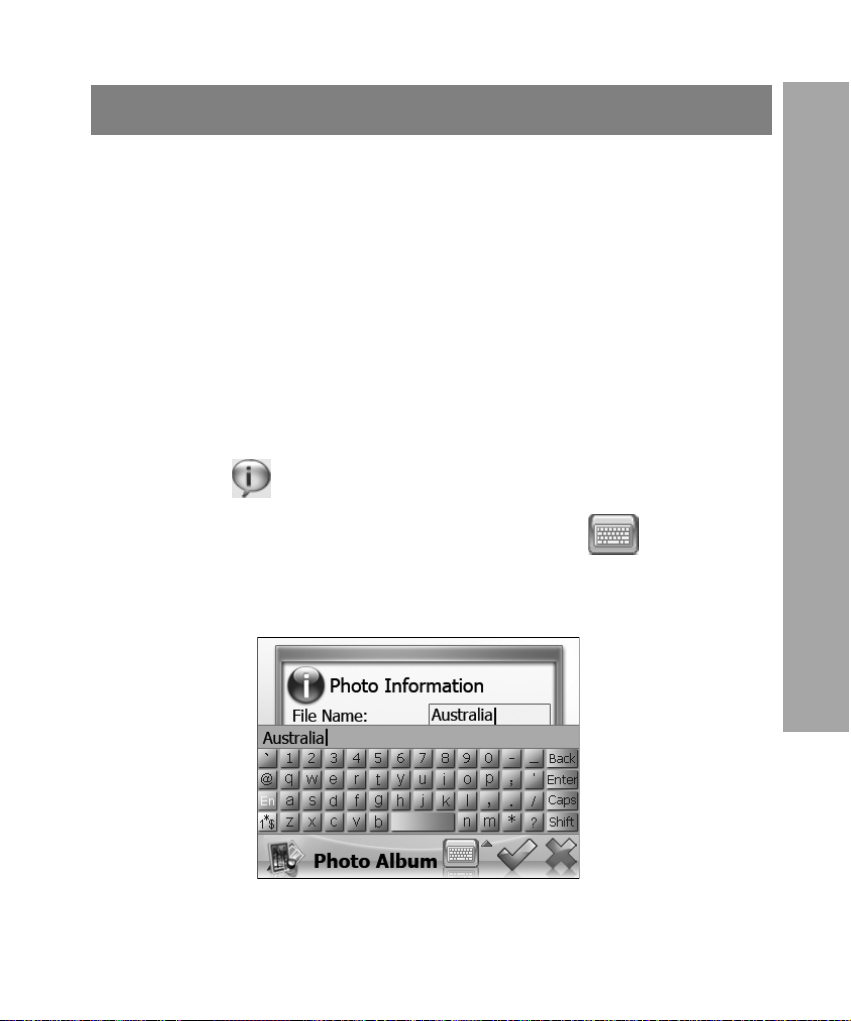
To activate an application that information needed (e.g., Photo
Viewer)
1. Select a photo in the thumbnail view of Photo Viewer
to the full view screen.
2. Tap to view the information of the selected photo.
3. In the Photo Information screen, tap to show the
input panel; tap it again to hide the input panel.
4. Enter characters.
Welcome
15
Page 16
Welcome
Input methods options
There are several input methods for you to enter letters when
you edit photo information.
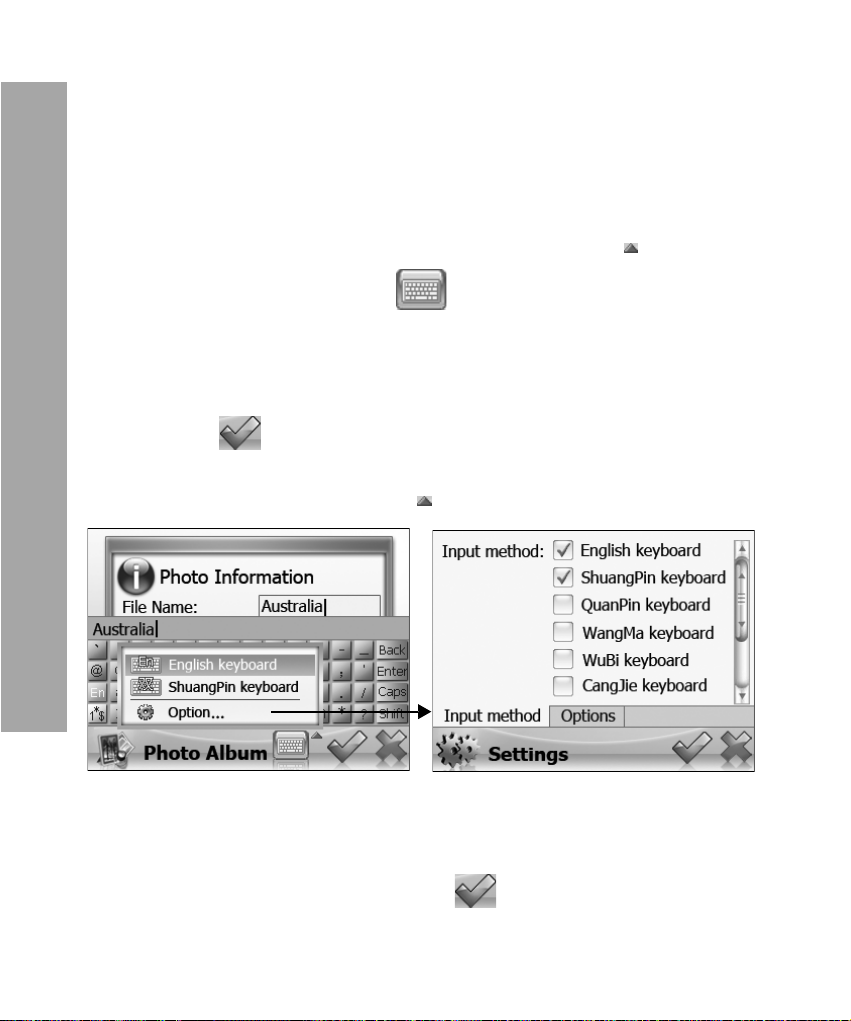
Selecting input methods
1. In the Photo Information edit screen, tap on the
upper right corner of to select Option.
2. Select the input method you need from the list. (Atten-
tion: The input method can not be left blank, you
must select one at least.)
3. Tap to save.
4. The selected input method will be displayed in the
popup menu when tap .
Options selection
1. In the Settings screen, select Options.
2. Set the related option, tap to save.
16
Page 17

TURBODOG navigation system
Quick reference
This chapter gives you a brief introduction how to navigate using
TURBODOG while you drive. Before we explore all detailed
functionalities provided by this application, you have to make
sure that:
• Your TURBODOG is firmly mounted on your car.
• TURBODOG searches for positioning information from
three satellites and your position is oriented when the
application starts.
Cold start & Warm start
When you use GPS receiver for the first time, it may take up 215 minutes to secure satellite information and orientate accurate
position (Cold start). Your position fix is stored in the memory.
For subsequent use of GPS receiver, it only takes up 1-3 minutes to locate your position (Warm start). Once your position is
fixed by GPS receiver, the system starts navigation immediately
without any extra operation when you start the appliation.
TURBODOG navigation system
17
Page 18
TURBODOG navigation system
Getting started
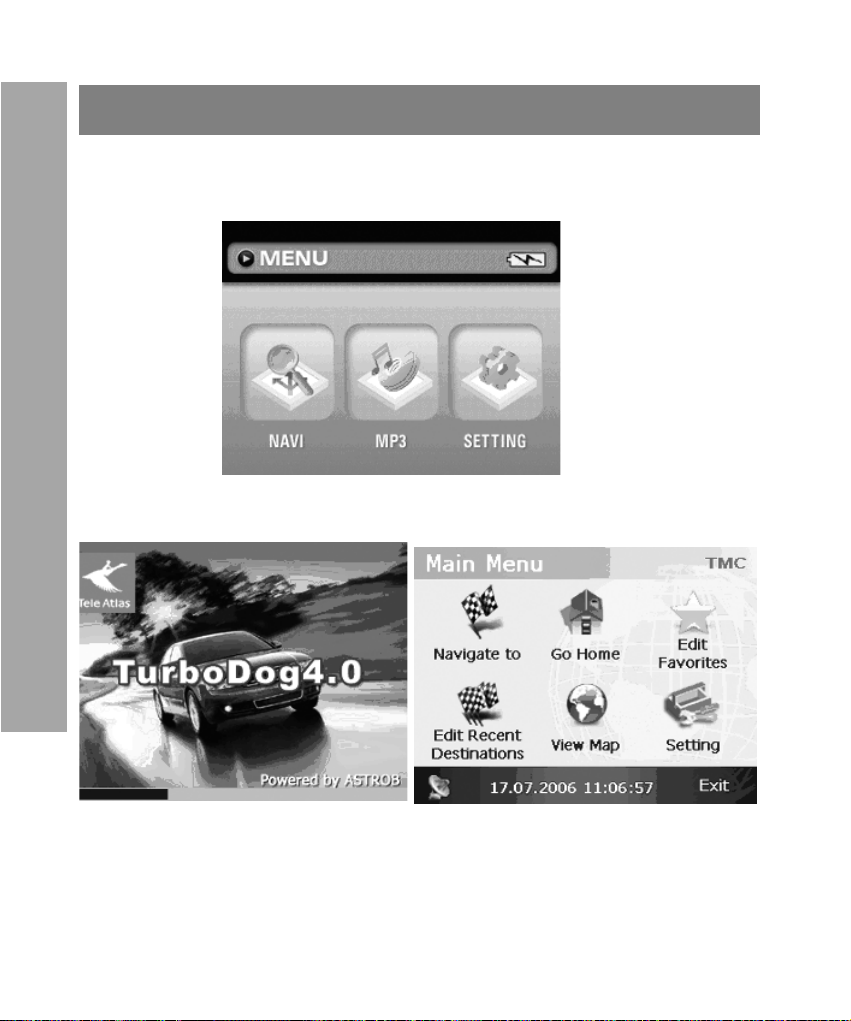
1. Turn on TURBODOG.
2. To tap on Maps icon to start TURBODOG navigator.
3. To enter Greeting page and main menu page.
18
Page 19
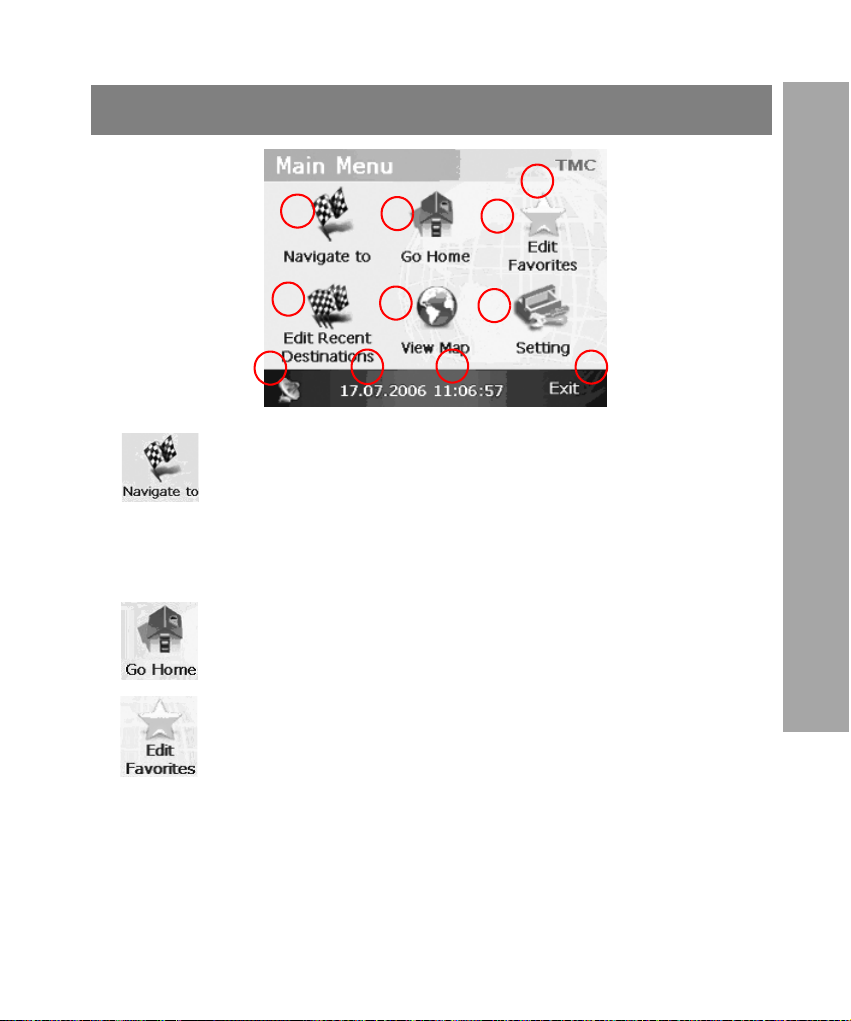
Icon description on main menu
11
1
2
3
TURBODOG navigation system
4
7
1. : to enter Destination Search menu to select a desti-
nation. The application starts navigation once a destination is specified (for detail, please refer to
Chap.3)
2. : to navigate you home
3. : to add new POIs or to edit the existing POIs, e.g.
modify/delete address, telephone number, etc (refer
to Chap.4.4 for detail)
5
8
6
9
10
19
Page 20

TURBODOG navigation system
4. : to edit a list of destinations currently defined, e.g.
delete or search for a destination specified previously (refer to Chap.4.2 for detail)
5. : to view property information of various geographic
location on the map and carry out operations on
these locations, e.g. zoomin/out, shift map, day/night
display mode switch, 2D/3D view mode switch. There
are three different way of viewing the map:
(1) To view the property of each geographic location on the
map shown on screen.
(2) To view property of every geographic location within a
radius of 2 km of the map center.
(3) To enter OPTION function to view the map display mode of
every geographic location (refer to Chap.4.3 for detail)
6. : to enter System Settings menu (refer to Chap.7 for
detail)
7. Satellite signal indicator: to show the status of satellite and the
number of satellites from where satellite signal is received
(green represents GPS is positioned).
8. current date: to display current date.
9. current time: to display current time.
10.to end navigation and exit the application.
20
Page 21
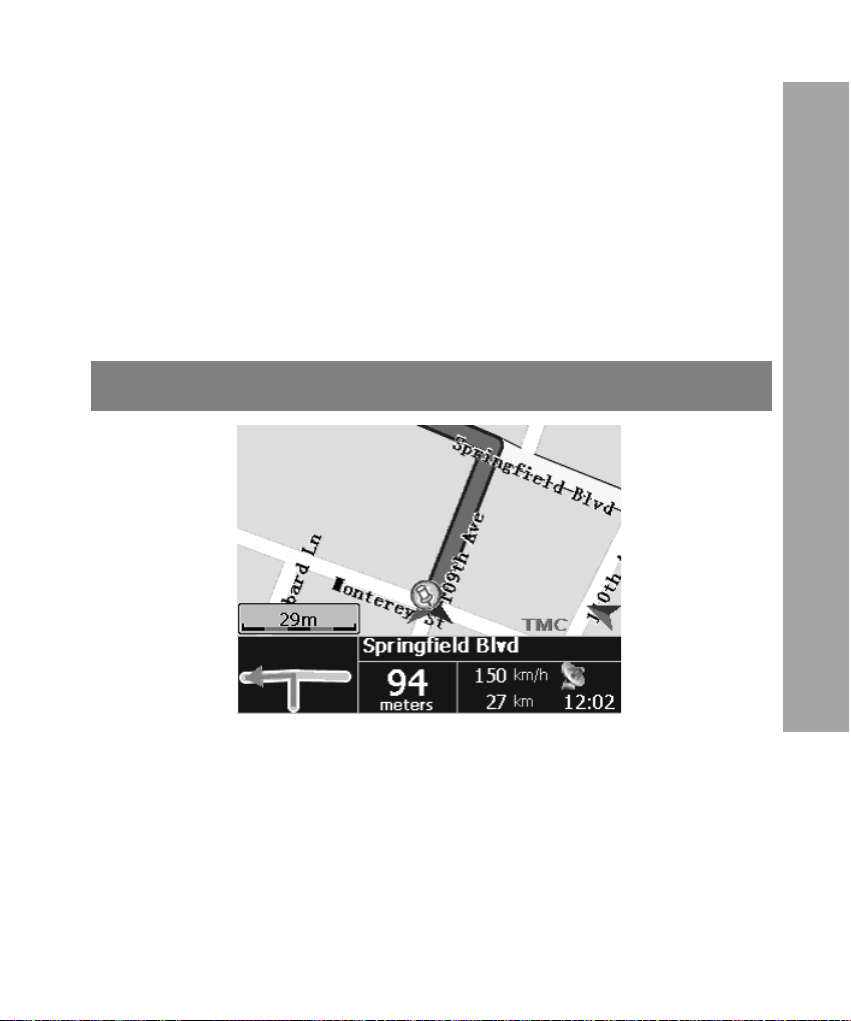
11. The indictor of TMC reception:
Grey indicates RDS-TMC disconnected;
Red indicates there is no TMC message;
Red-green flash indicates there is a new TMC message.
Icon description on navigation
TURBODOG navigation system
1. Orientation indicator: to show current position and driving
direction of the vehicle (floating point)
2. Proposed driving route: to show a proposed driving route
3. Turn guide: to show the diagram of next turn
4. Street info zone: to display the name of the street you are
entering
21
Page 22

TURBODOG navigation system
5. Distance to the next turn: to display the distance between
your current position to the next turn
6. Driving speed: to display current driving speed
7. Journey info zone: to display total distance to the destination
8. Satellite signal status bar: to display the status of satellite
and the number of satellites from where satellite signal is
recevied
9. Arrival time: to display the estimated time of arrival destination
10. The indictor of TMC reception: Grey indicates RDS-TMC
disconnected; Red indicates there is no TMC message; Redgreen flash indicates there is a new TMC message.
22
Page 23
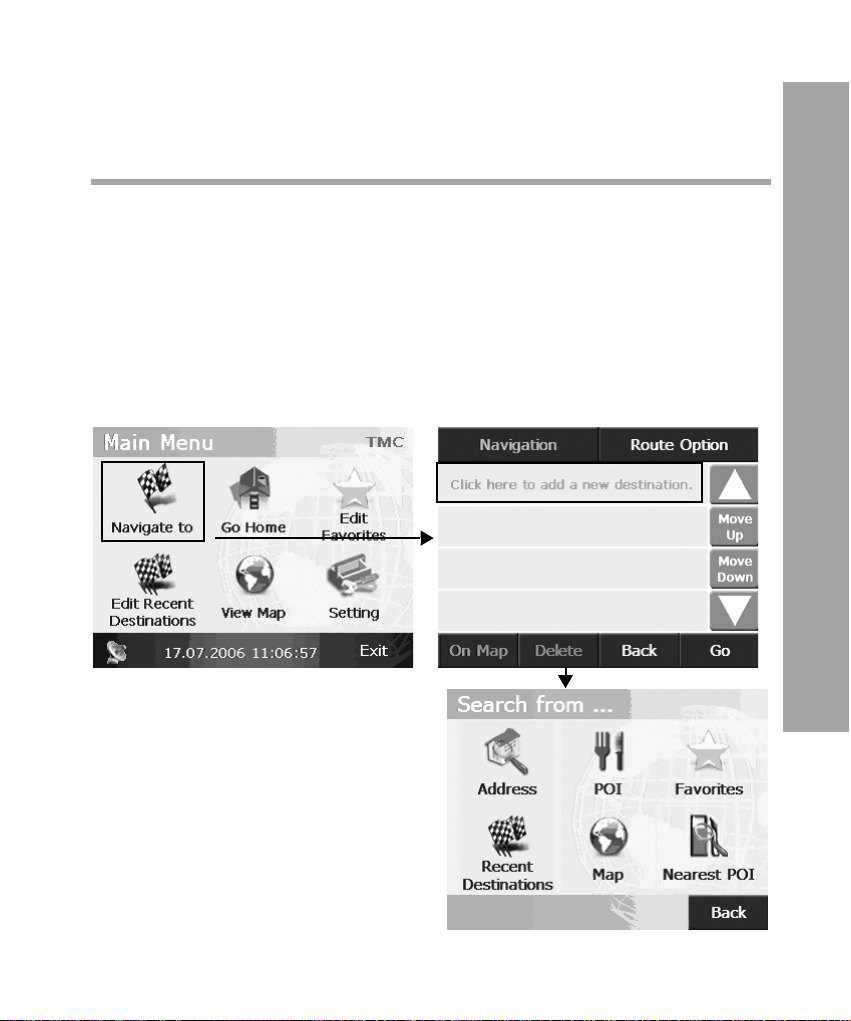
Start navigation - where do you want to go?
In this chapter, you will learn how to setup a destination, calculate a proposed route and start navigation after TURBODOG is
activated.
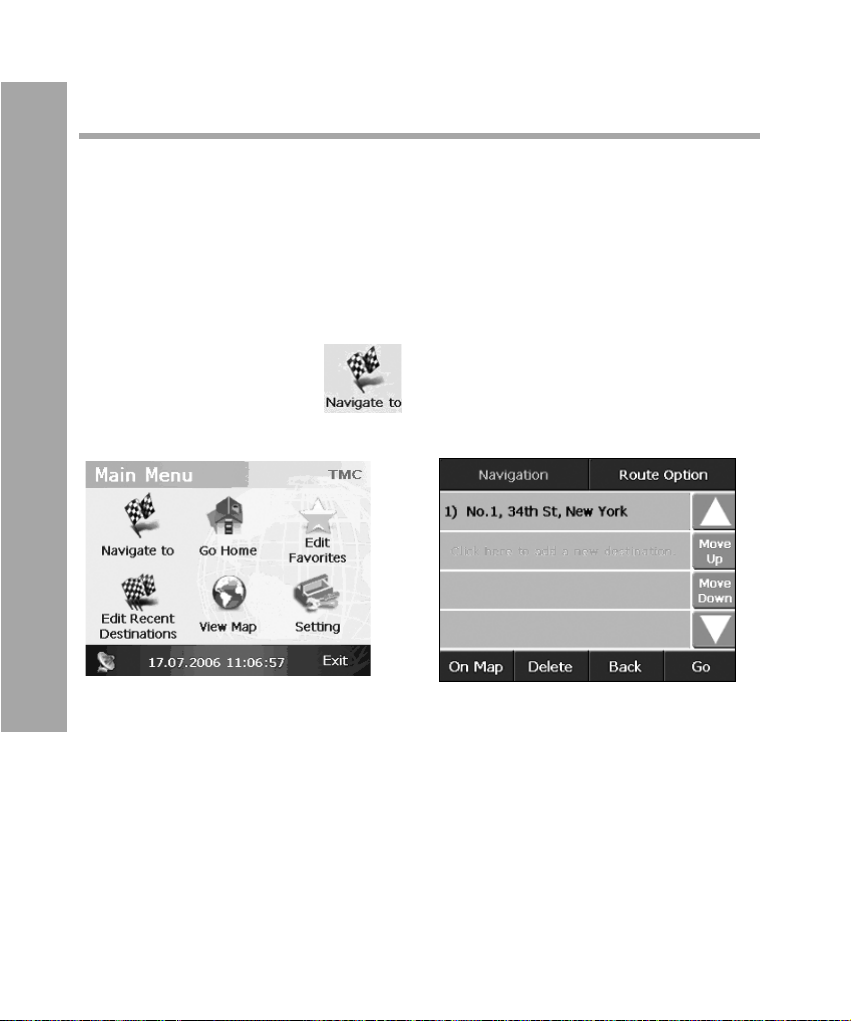
From Start Menu to launch TURBODOG and enter Main Menu,
click on “Navigate to” to enter “Managing navigation” page. tick
on “add a new destination” (Squred in red as shown in picture
3.2) to enter “Destination Search“ page shown in picture 3.3.
Start navigation - where do you want to go?
23
Page 24
Start navigation - where do you want to go?
Setup a destination
TURBODOG provides six searching methods to setup a destination by taking different types of destinations into account.
Setup destination by address
For example: NO. 1, 34 St, New York
th
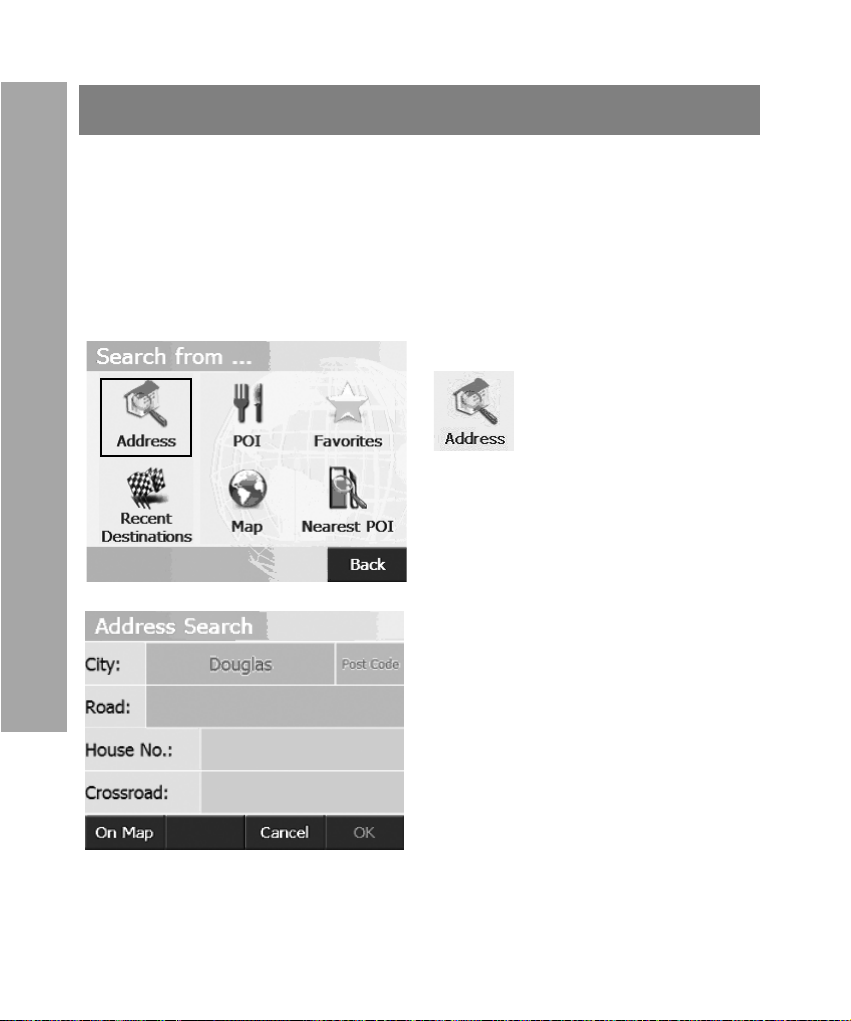
1. In “Search from“, select
” ” to enter “Address
Search” page shown in picture
3.5.
2. Click on “city” in “Address
Search“ page to enter “country
and city selection“ page as
shown in picture 3.6 to select a
country or city.
24
Page 25
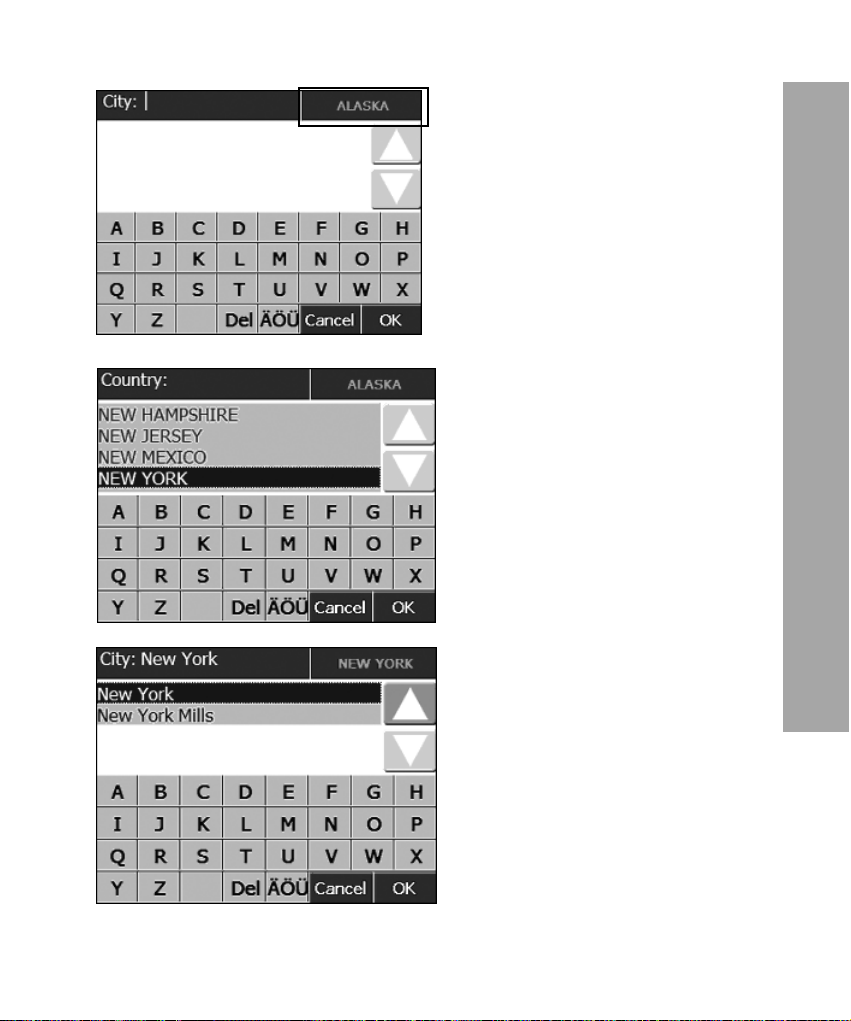
3. In picture 3.6, the current
country sleected is Osterreich.
To change a different country,
e.g. from “Alaska“ to “New
York“, you can click on “New
York“ squred in red as shown in
picture 3.6 to enter another
page as shown in picture 3.7.
4. in picture 3.7, Turbodog
shows a list of available countries for selection. In our case,
we select “New York“;
5. after selected the country,
click on “OK“ to return to “city
selection“ page shown in picture 3.8
6. Once country is selected,
you can specify a city to
search. Enter the name of (or
part of) of the city in City text
box, Turbodog automatically
lists all cities matching your criteria for your selection. Highlight the name of the city you
are searching forand click
Start navigation - where do you want to go?
7. click on “OK“ to return to
“Address search“ page.
25
Page 26
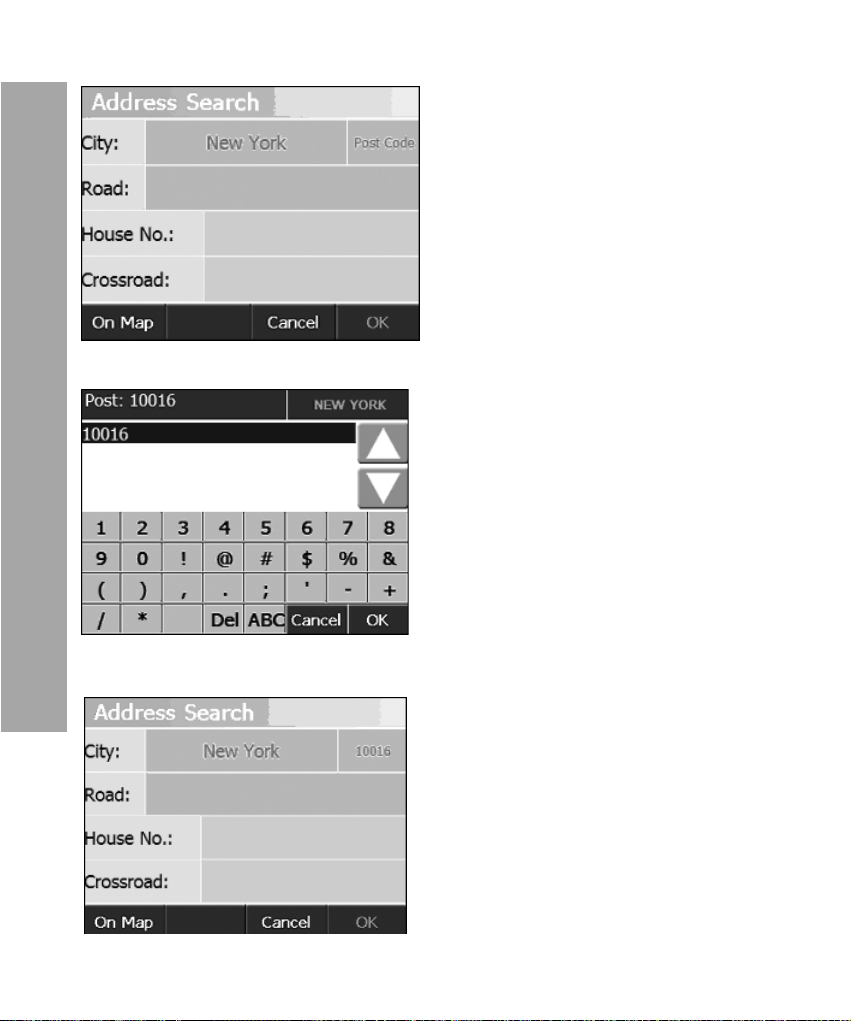
Start navigation - where do you want to go?
8. in picture 3.9, click on
“POSTCODE“ (squred in red)
to enter “postcode search“
page shown in picture 3.10.
9. specify the postcode you
want to search for, Turbodog
automatically lists all postcodes matching your criteria.
Locate the one you are
searching for and click on it.
10. and then click on “OK to
return to “Address Search“
page. The postcode selected is
shown in postcode field next to
city name.
* if the postcode entered mismatch the city you are searching for, the system will show
the city corresponding to the
postcode you specofied.
26
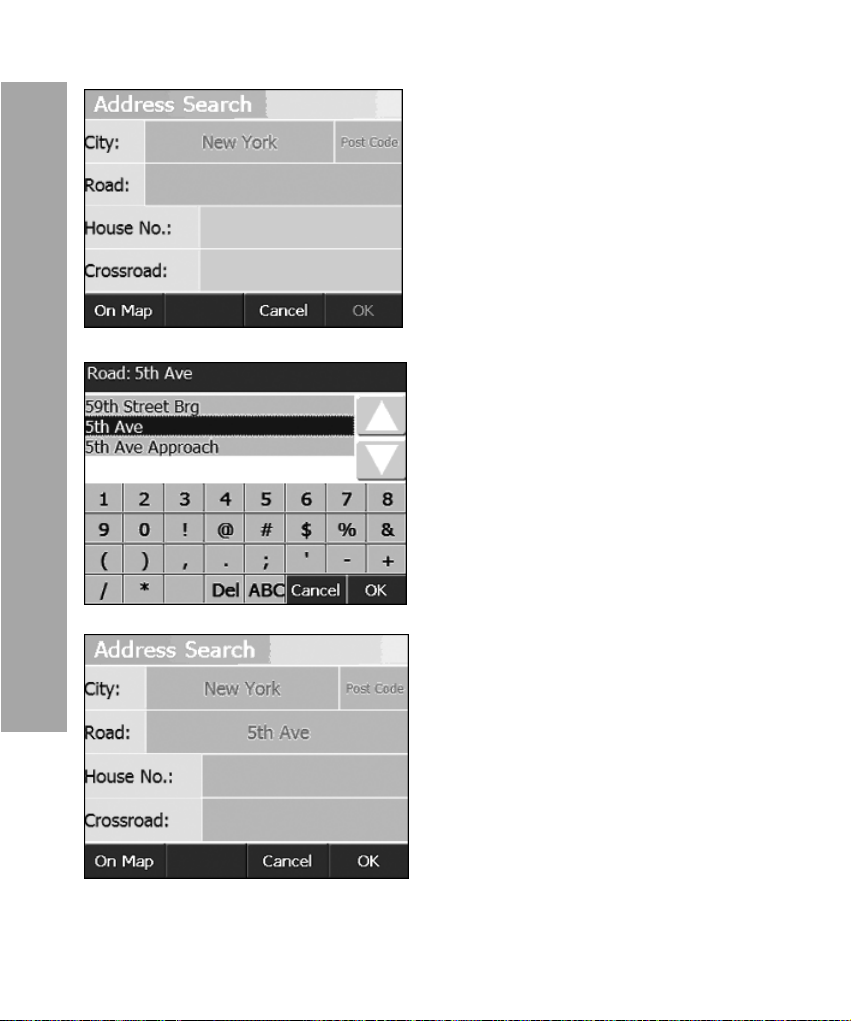
11. click on “road search“ to
enter “road search“ page.
Page 27
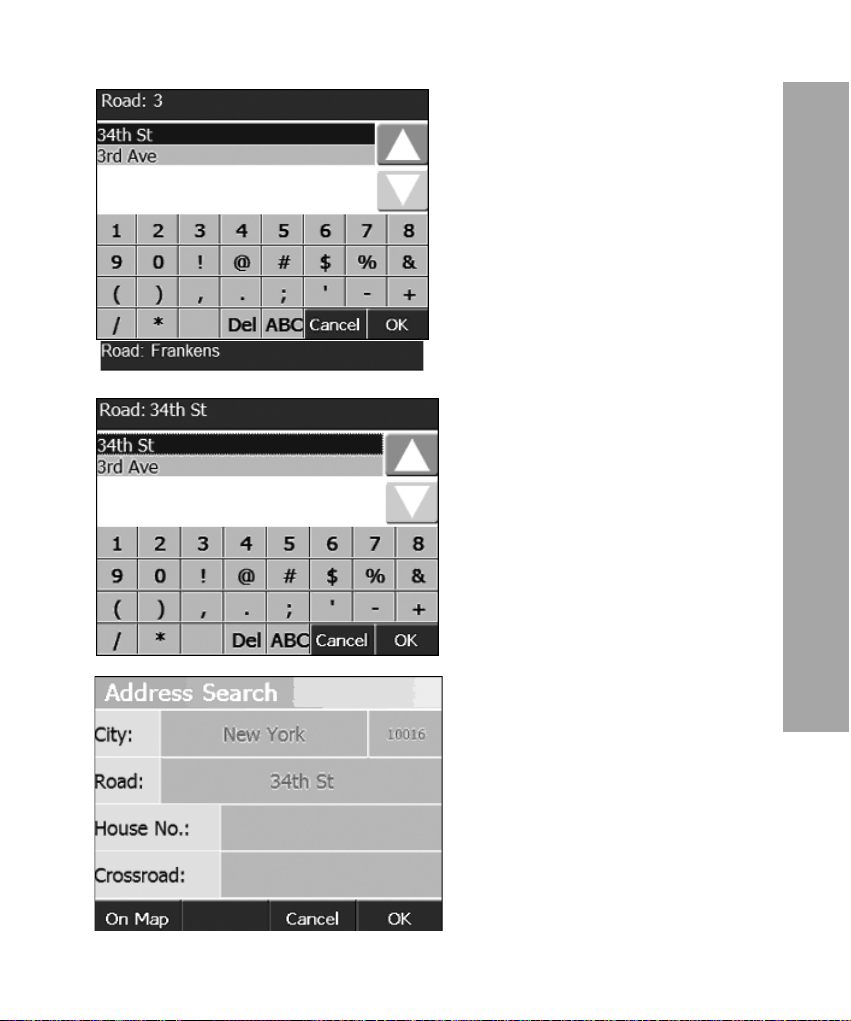
12. Enter the name of (or part
of) the road, Turbodog automatically lists all roads matching the searching criteria.
13. Highlight and click on the
name of the road and lick on
“OK“ to return to “ Address
Search“ page.
Start navigation - where do you want to go?
14. After specifying the name
of the road, click on street
number field, Turbodog enters
“street number search“ page.
27
Page 28
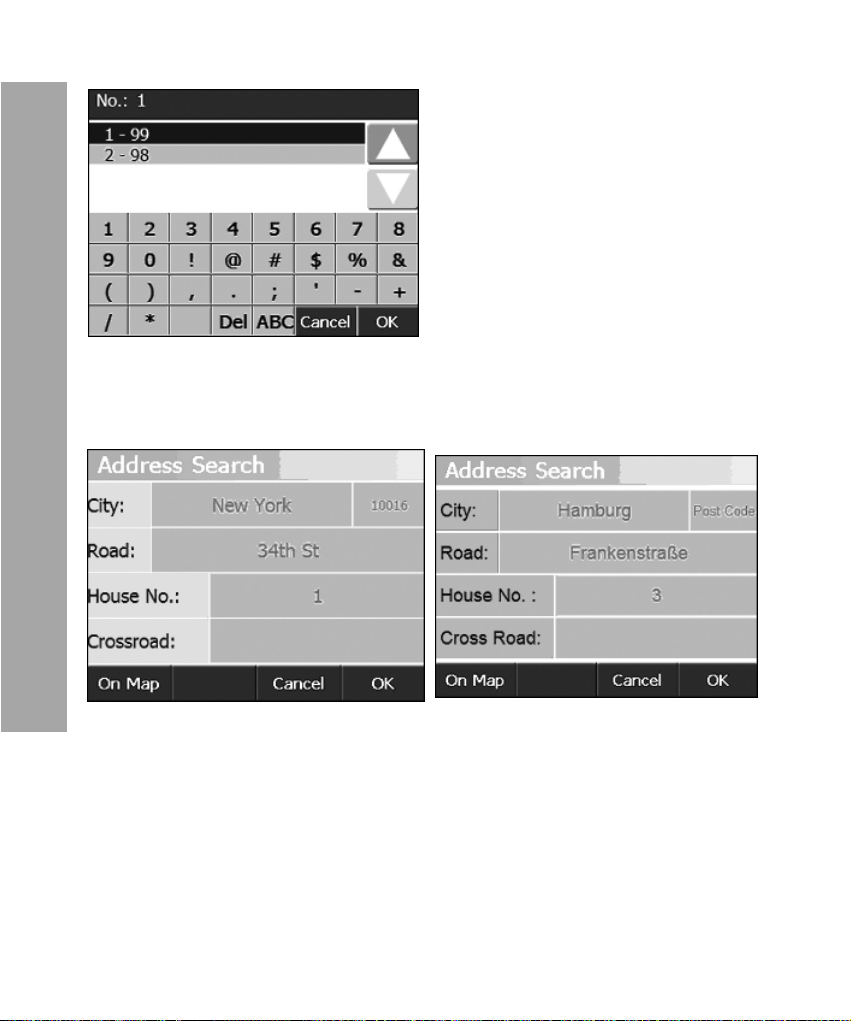
Start navigation - where do you want to go?
15. Enter the streed number,
Turbodog automatically
shows the location of this
address and enter “Address
Search“ page.
8. Click on “OK“, Turbodog returns to “managing navigation“
page.
9. Once a destination is setup successfully, TURBODOG auto-
matically returns to “Managing Navigation“ page and displays
the address in destination list.
In “Managing Navigation“ page, you can click:
• Go: to start navigation
• On map: to verify the address as your destination
28
Page 29
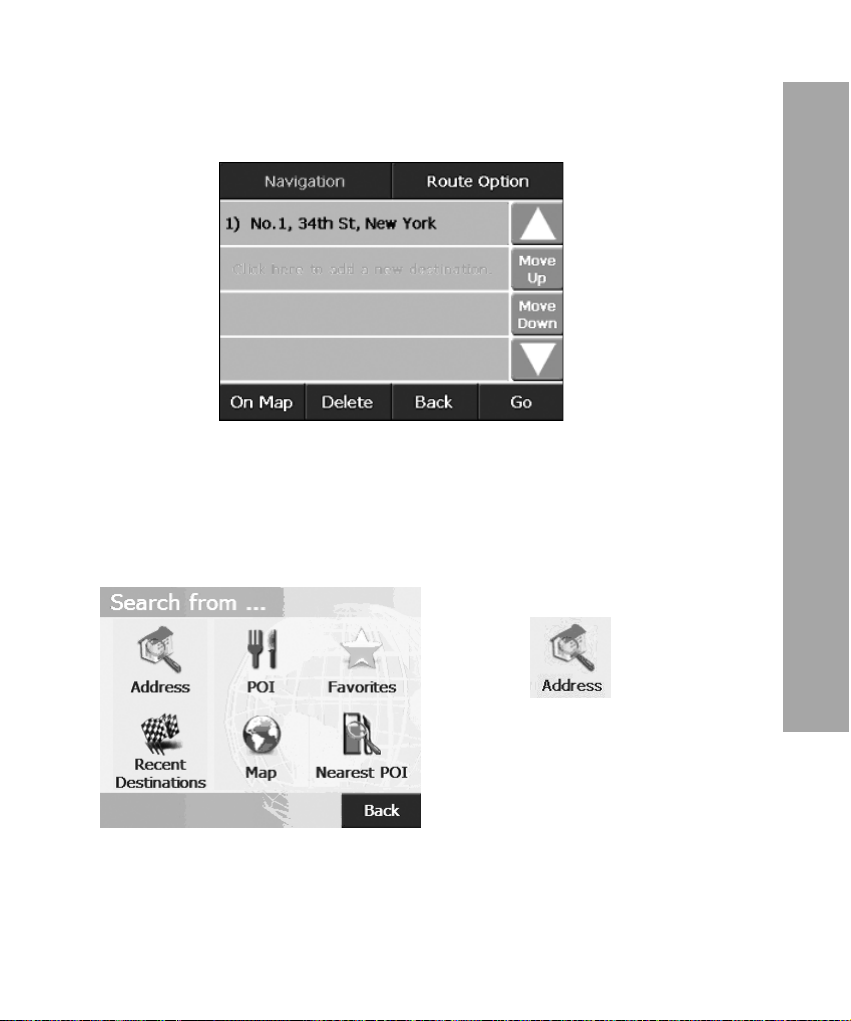
• Delete: to delete the destination
• Back: to return to main menu
Setup destination by intersection
1. in “destination search“ page,
click on “ “ to enter 3.10
Start navigation - where do you want to go?
29
Page 30
Start navigation - where do you want to go?
2. Click on text input box of
Road to enter “road search“
page.
3. enter the name of (or part of
the name of) the road in text
box on the top, Turbodog automatically lists all names of the
roads matching your searching
criteria.
4. Click on “intersection“ text
box to enter intersection
search page. Turbodog automatically lists all roads which
intersects with the road your
specified.
30
Page 31
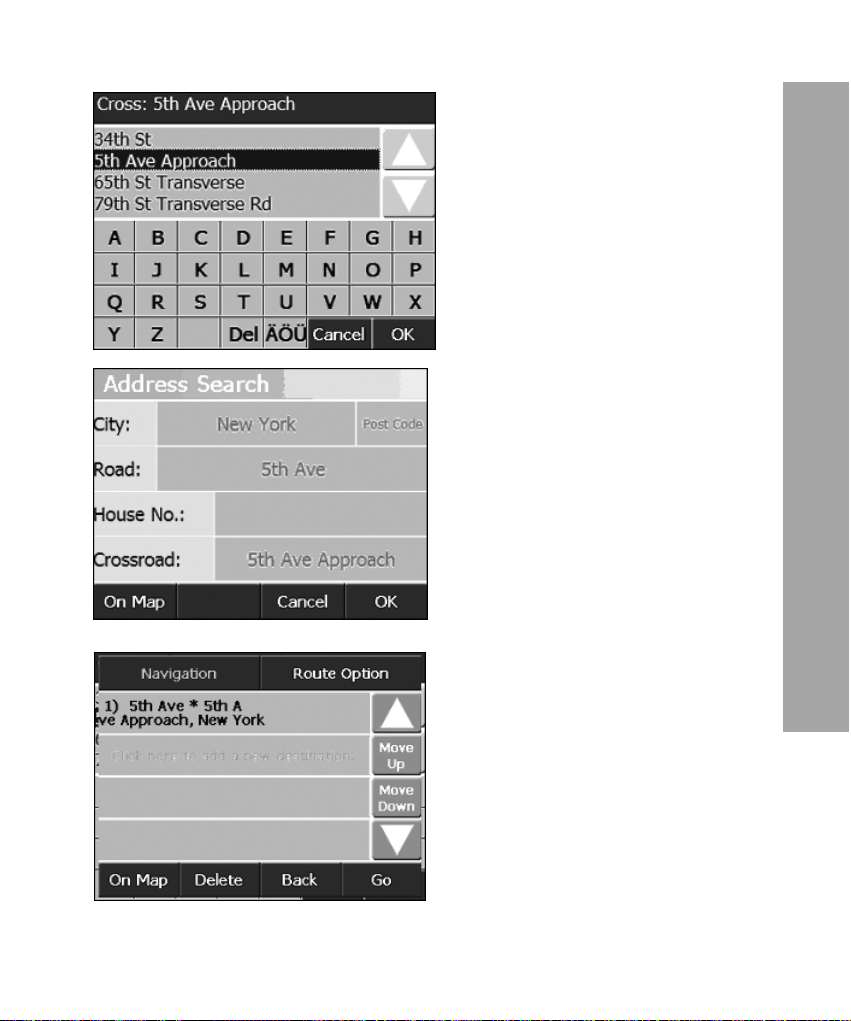
5. Select the road in the list
and then press “OK“ to return
to “Address Search“ page. The
road you selected is displayed
in “intersection“ field.
6. When destination is setup
successfully, TURBODOG
automatically returns to “managing navigation“ page and
displays the destination in the
destination list.
7. Click on Go to start navigation.
Start navigation - where do you want to go?
31
Page 32
Start navigation - where do you want to go?
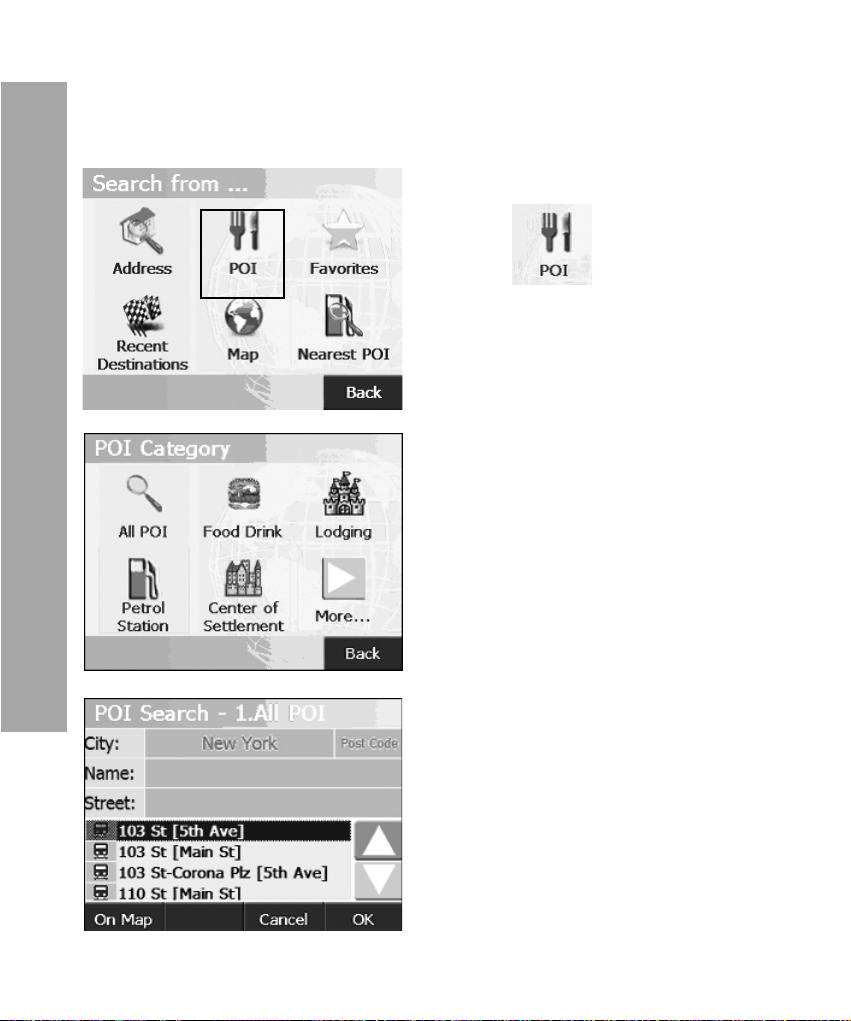
Setup destination by POI
For example: Ansonia Station
1 In “destination search“ page,
click on “ “ to enter “POI
category“ page as shown in picture 3.26.
2. Click on “All POI“ to select
the type of POIs. Turbodog
automatically enters “POI
search‘ page.
32
3. In “POI search“ page, click
on “Name“ text box to enter
“POI input“ page.
Page 33
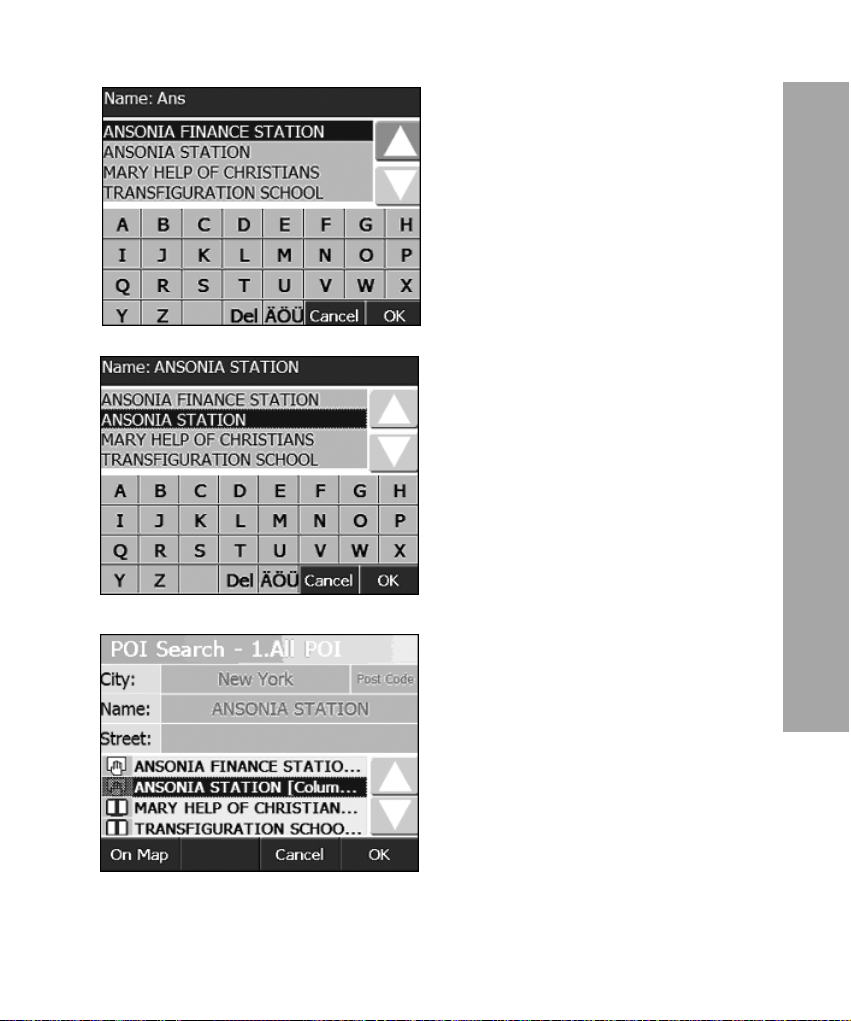
4. Enter the name of (or part of
the name of) the POI in “Name“
field on the top, Turbodog automatically lists all POIs matching your criteria.
5. Select the POI of your interest
6. Then click on “OK“, Turbodog returns to “POI search“
page.
7. Click on “OK“ to end POI
search.
Start navigation - where do you want to go?
33
Page 34
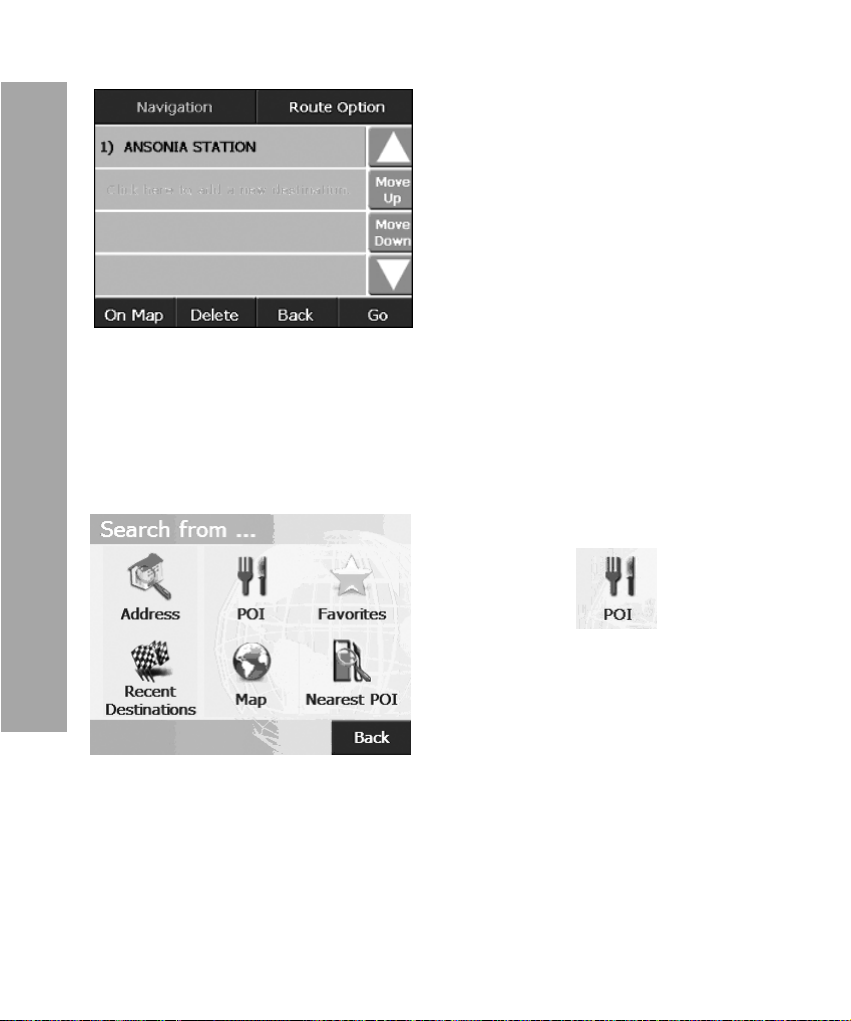
Start navigation - where do you want to go?
Setup destination by road of POI
8. When successful Turbodog automatically returns
to “managing navigation“
page. The destination you
selected is listed in destination list.
9. Click on Go to start navigation
1. In “Destination Search“
page, select “ “ to
enter “POI category“ page as
shown in picture 3.33.
34
Page 35
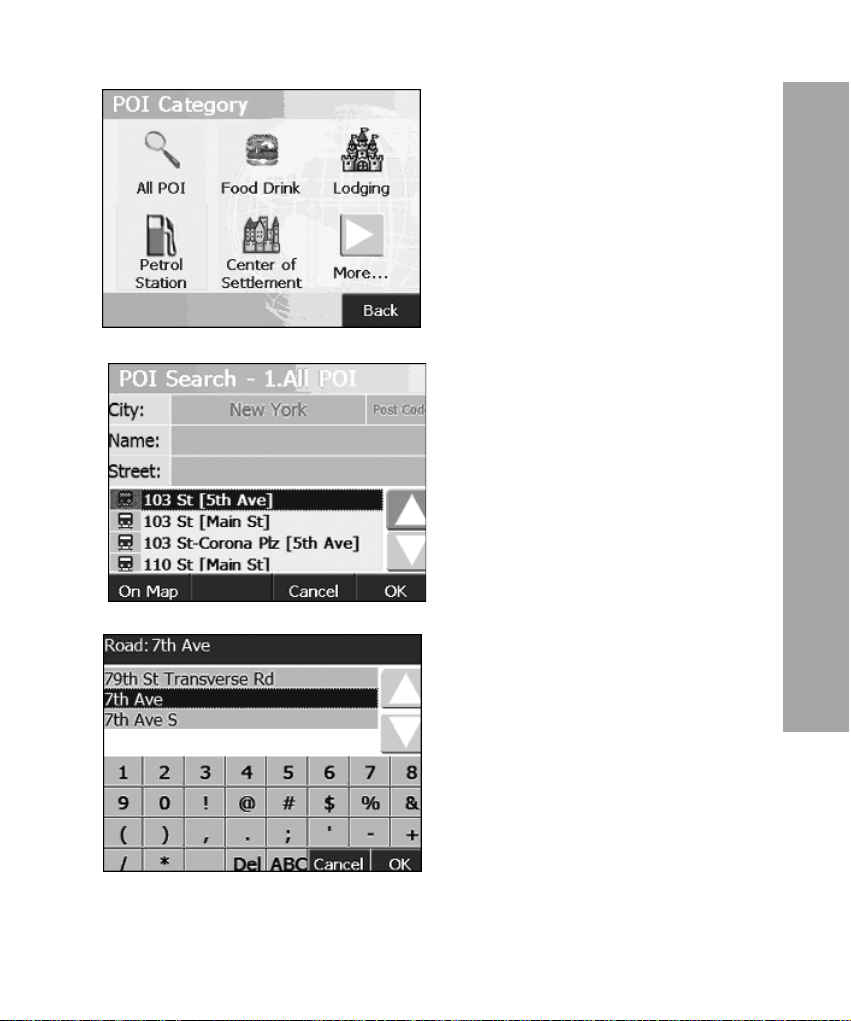
2. Click on “All POI“ to select
the category of POI. Turbodog enters “POI search“
page.
3. Click on “Street“ to enter
“Road Search“ page.
4. Enter the name of the road,
Turbodog lists all roads
matching your criteria.
Start navigation - where do you want to go?
5. Select the one you wish to
search and lick on “OK“; the
system returns to “POI
search“ page and the road
you selected is displayed in
Street field. All POIs along
this road are displayed in POI
35
Page 36
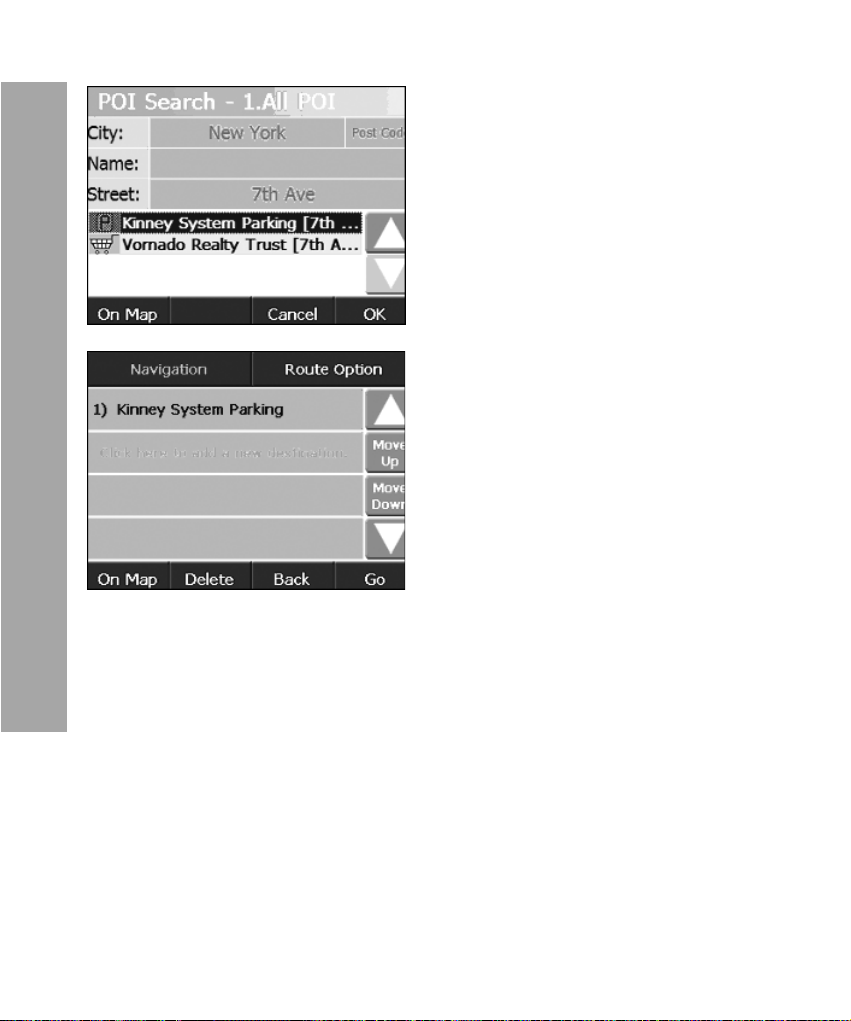
Start navigation - where do you want to go?
6. When successful, Turbodog automatically returns
to “Managing Navigation“
page and the road you
selected is displayed in destination list as the destination.
7. Click on Go to start navigation.
36
Page 37
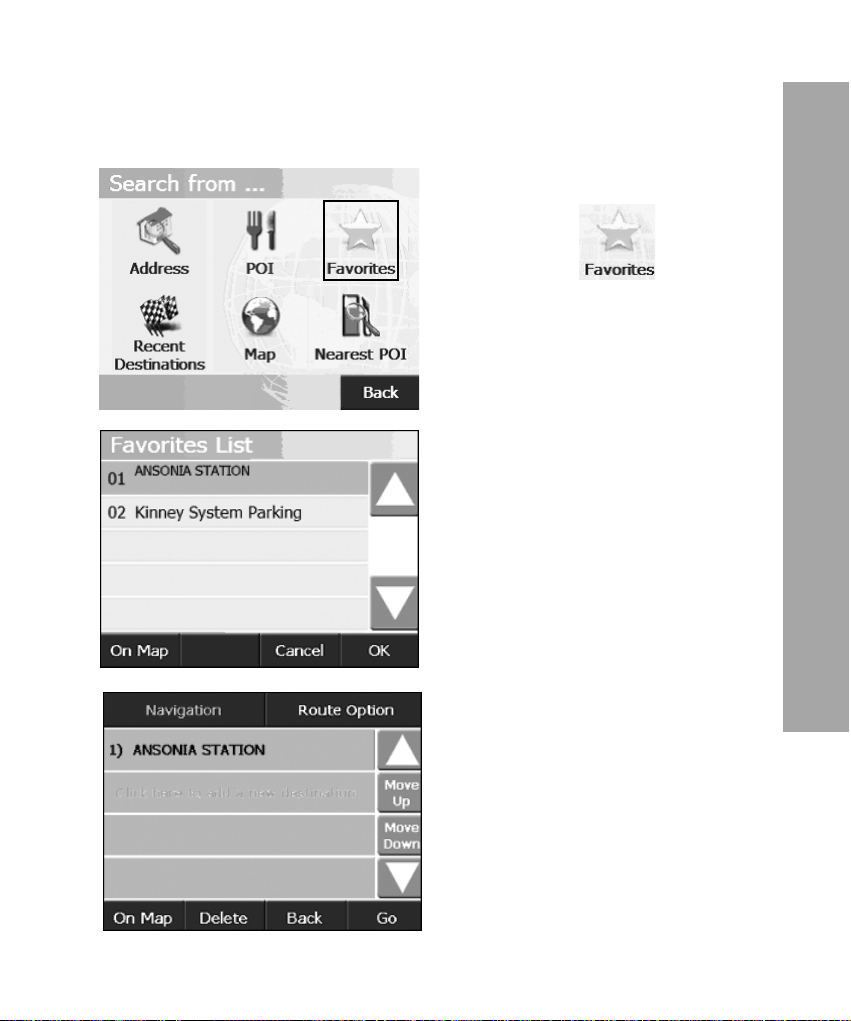
Setup destination by Favorites
For example: Ansona Station
1. In “Destination Search“
page, select “ “ to enter
“Favorites Search“ page as
shown in picture 3.39.
2. Select the one you want to
set as destination in the list.
3. Then click on “OK“ to end
destination setup.
Start navigation - where do you want to go?
4. When successful. Turbodog
automatically returns to “Managing navigation“ page and display the destination in the
destination list.
5. Click on Go to start navigation.
37
Page 38
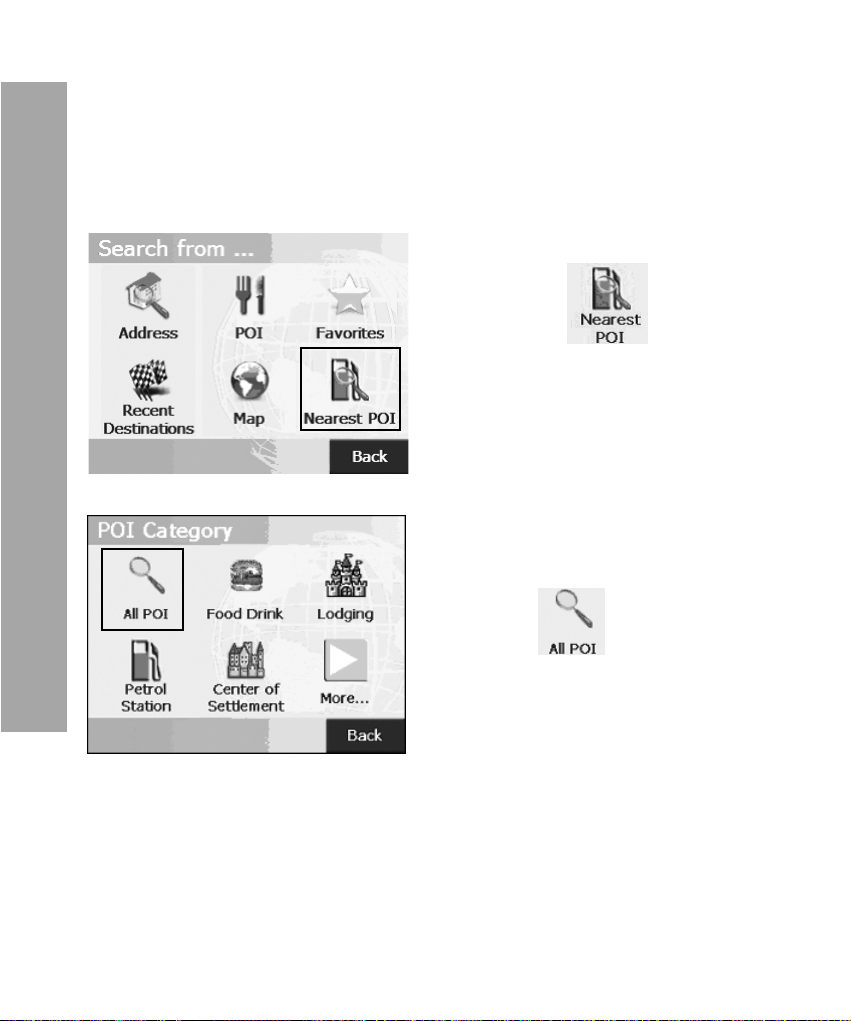
Start navigation - where do you want to go?
Search by nearest POI
(Within a radius of 2 km of the map center or GPS position
fix)
For example: the nearest petrol station
1. In “Destination Search“
page, select “ “ to enter
“POI search“ page as shown in
picture 3.42.
2. Select the one you want to
set as destination in the page.
3. Select “ “ to enter
38
“Nearest POI search“ page as
shown in picture 3.43.
Page 39
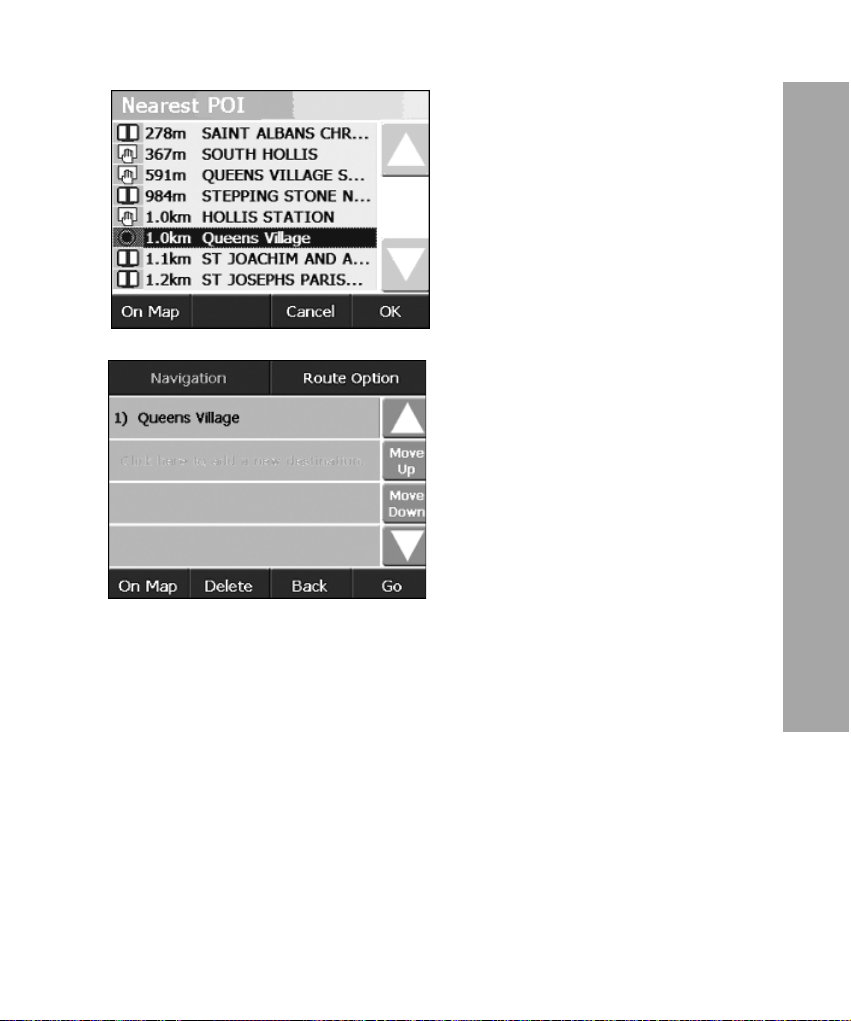
4. Select your destination in
the list
5. Then click on OK to confirm destination selection.
6. When successful. Turbodog automatically returns
to “Managing navigation“
page and display the destination selected in destination
list.
7. Click on Go to start navigation.
Start navigation - where do you want to go?
39
Page 40
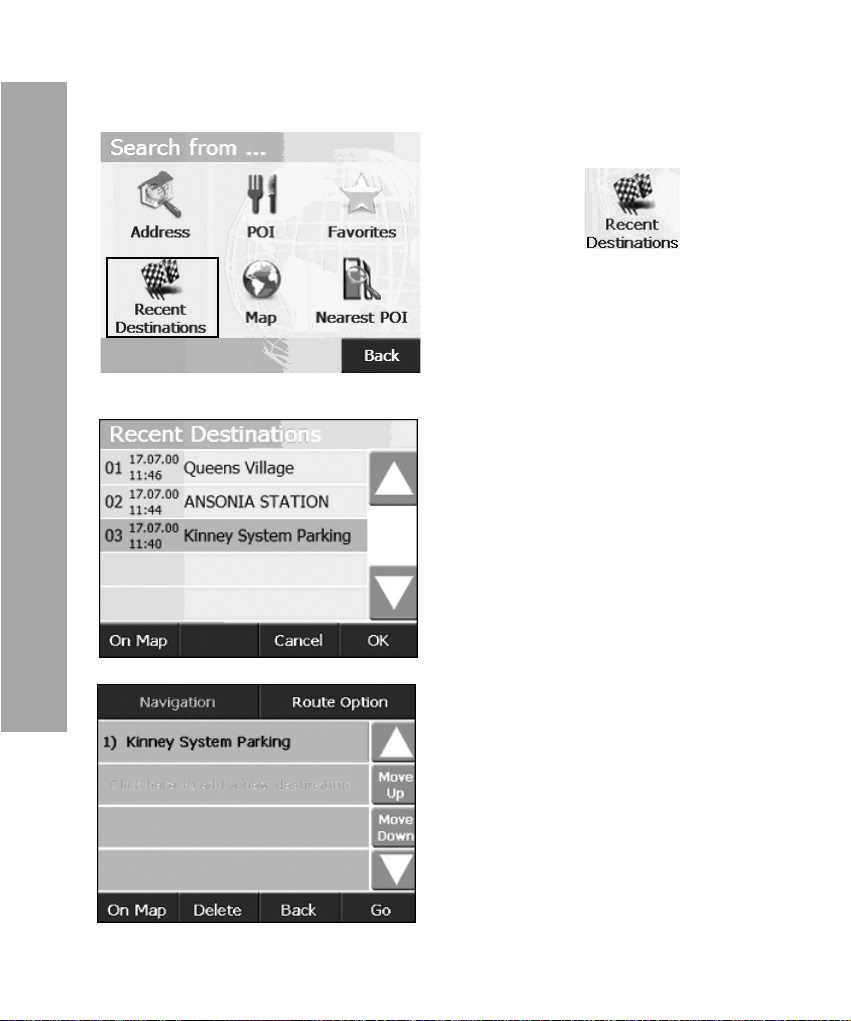
Start navigation - where do you want to go?
Setup destination by recent destinations
1. In “Destination Search“
page, select “ “ to
enter “Recent Destinations
search“ page as shown in picture 3.45.
2. Select your desired destination in the list.
3. Then click on OK to end
the destination setup.
40
4. When successful. Turbodog automatically returns
to “Managing navigation“
page and list the destination
selected in the destination
list.
5. Click on Go to start navigation.
Page 41
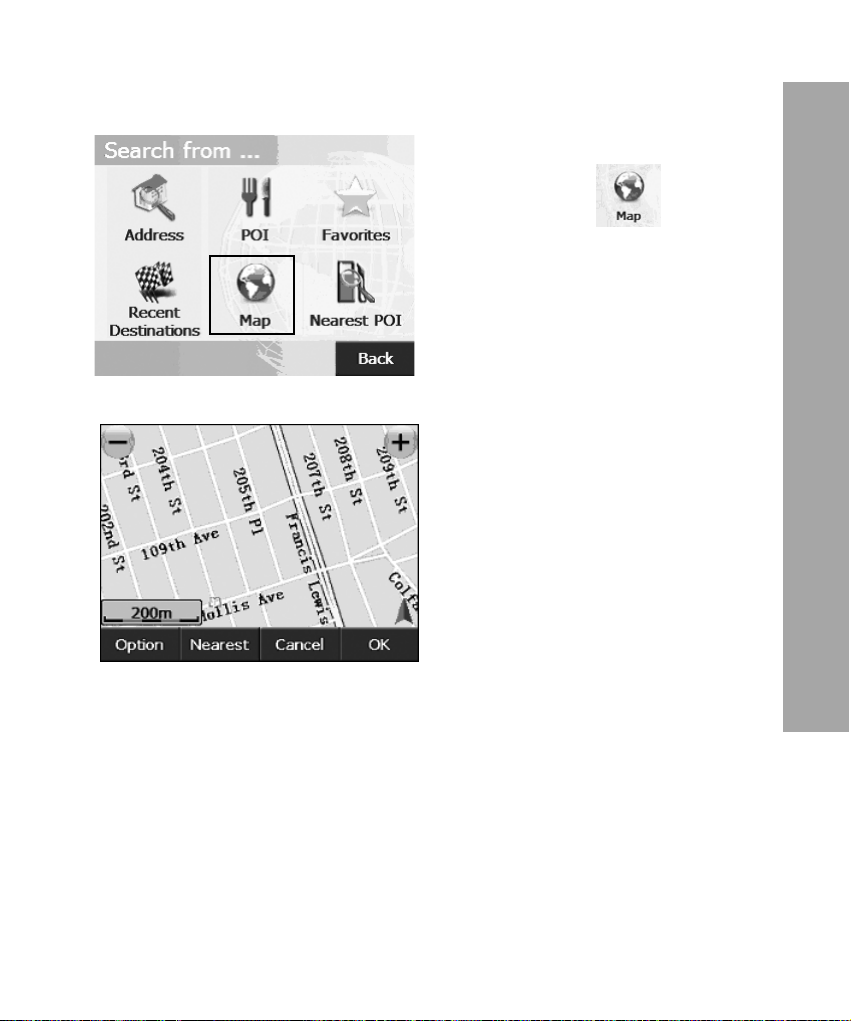
Setup destination in Map view mode
1. In “Destination Search“
page, select “ “ to enter
“Map view“ page as shown in
picture 3.48.
2. Click on screen to shift the
map to the location where you
want to setup as destination.
3. Set up destination directly
on the map by clicking on the
location of your desired destination and then press “OK“.
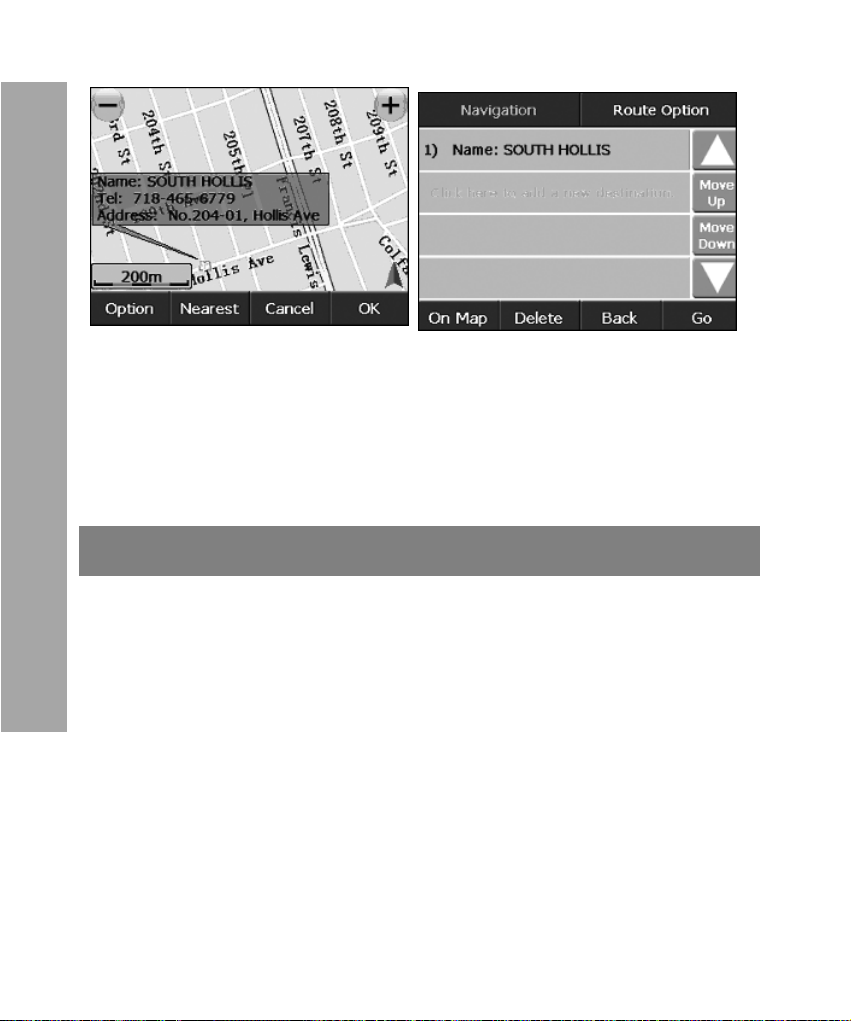
4. When successful. Turbodog
automatically returns to “Managing navigation“ page and list
the destination selected in the
destination list.
Start navigation - where do you want to go?
5. Click on Go to start navigation.
41
Page 42
Start navigation - where do you want to go?
Start navigation
Turbodog enables you setup 10 midway-point at the same time.
The system calculates a proposed route according to the
sequence of midway-point you specified and leads to the final
destination. When you finish the operations of setting up a destination as described in Chap. 3.1, you can click on “Go“ in “Managing navigation“ page to enter “Map view“ page. Once GPS
signal is received and oriented, the system auto-calculates the
route and start navigation.
42
Page 43
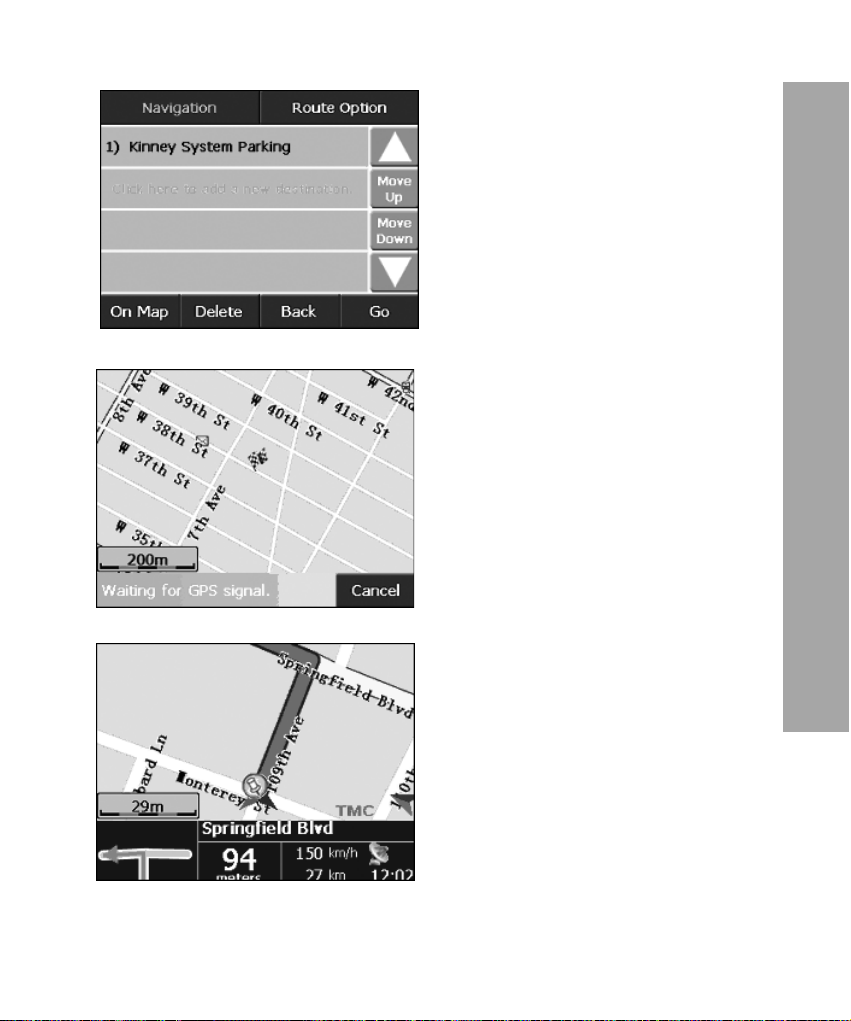
1. After setting up destination
and click on “Go“, Turbodog
automatically enters “Map view“
page and waits for GPS signal
as shown in picture 3.52.
* When you click on Go without
setting up a destination, Turbodog automatically enters
free-navigation mode
2. After GPS orientation, Turbodog automatically starts route
calculation and navigates.
* You can press Cancel at any
time before route calculation
stops.
3. Start navigation.
Start navigation - where do you want to go?
43
Page 44
Turbodog main menu
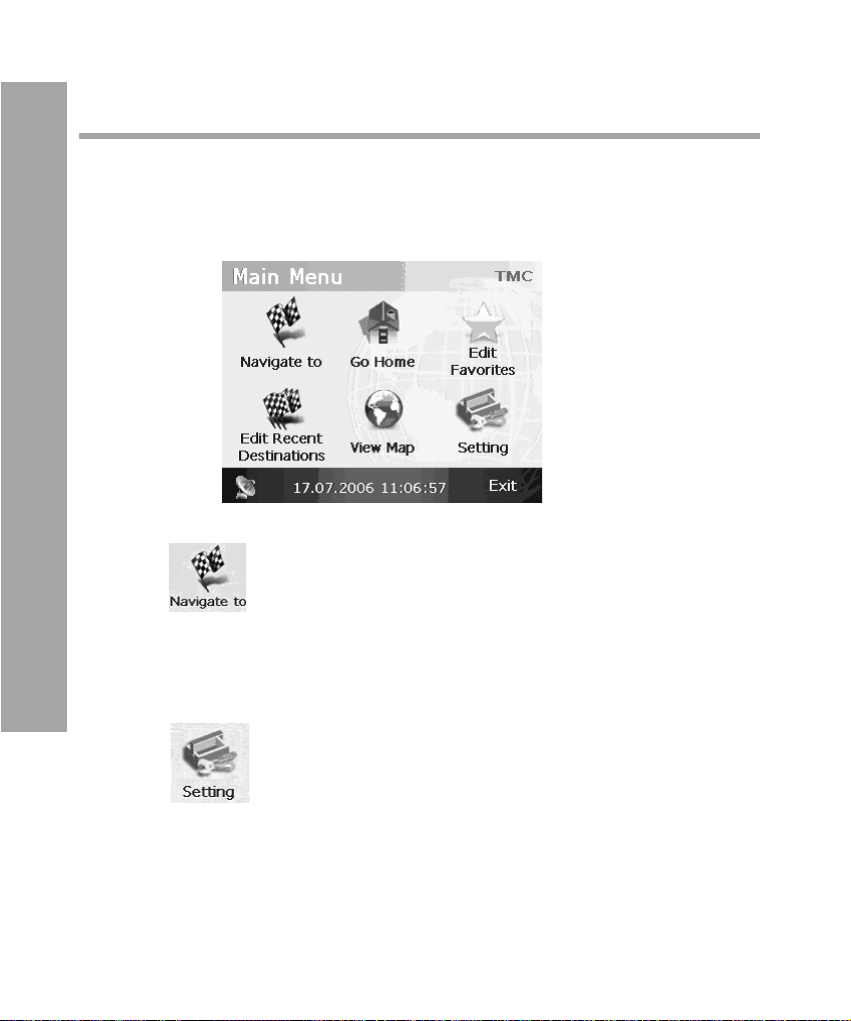
Turbodog main menu
After launching Turbodog, it enters “Main Menu“. It provides six
major functions. This chapter describes those functions in
details.
• In Chap. 3, we have already described how to
setup destination.
44
• TMC in Chap. 7, details on functions of TMC will be
described.
• in Chap. 8, details on how to configure system
settings will be described.
Page 45
Go home
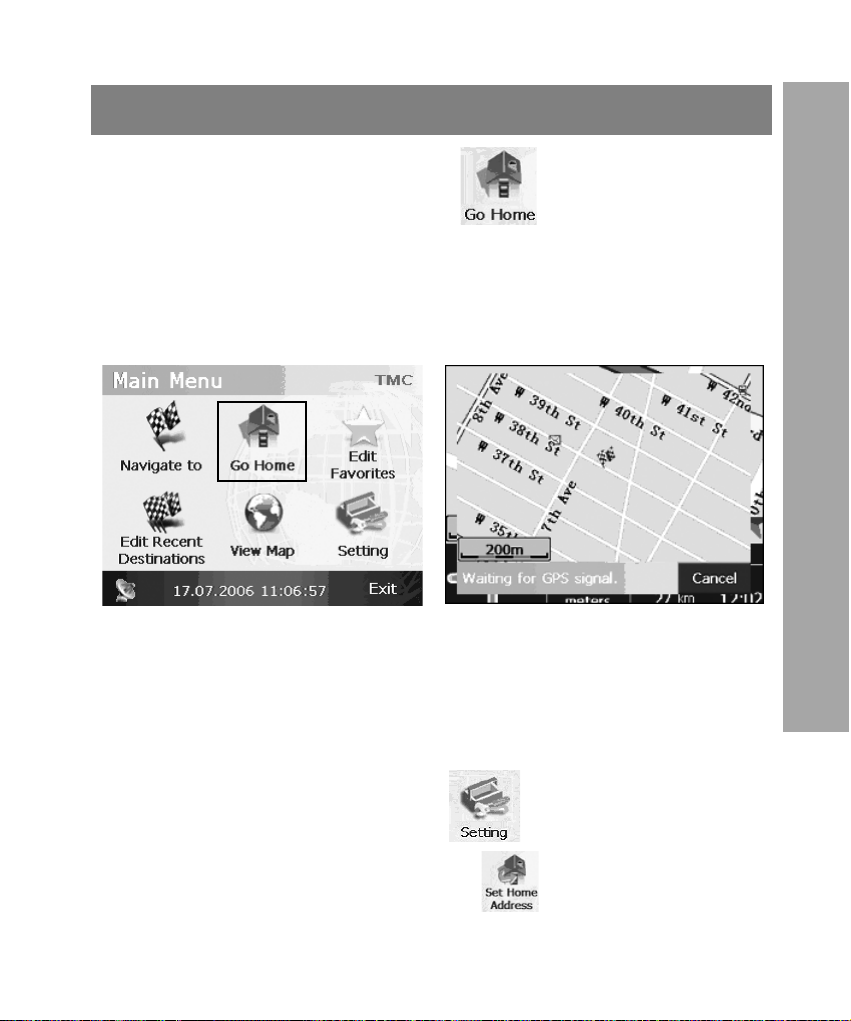
In Turbodog’s main menu, click on Turbodog will start
receiving GPS signals and enter navigation mode starting navigation.
* Before using “Go home“ function, please specify the position of My Home.
Turbodog main menu
Set up my home
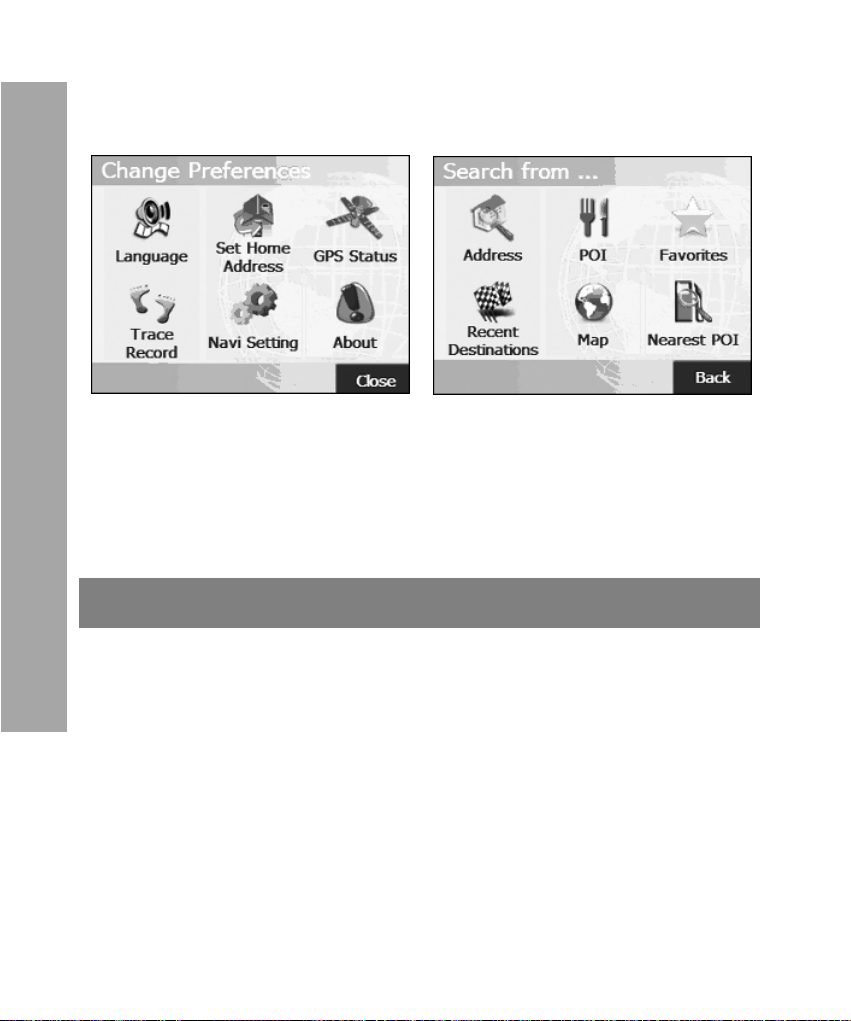
In Turbodog’ main menu, click on to enter “System Pref-
erence” page. On this page, click on icon as shown in pic-
45
Page 46
Turbodog main menu
ture 4.5 to enter “Set home“ page, Turbodog provides six
searching methods to setup home address.
Edit recent destinations
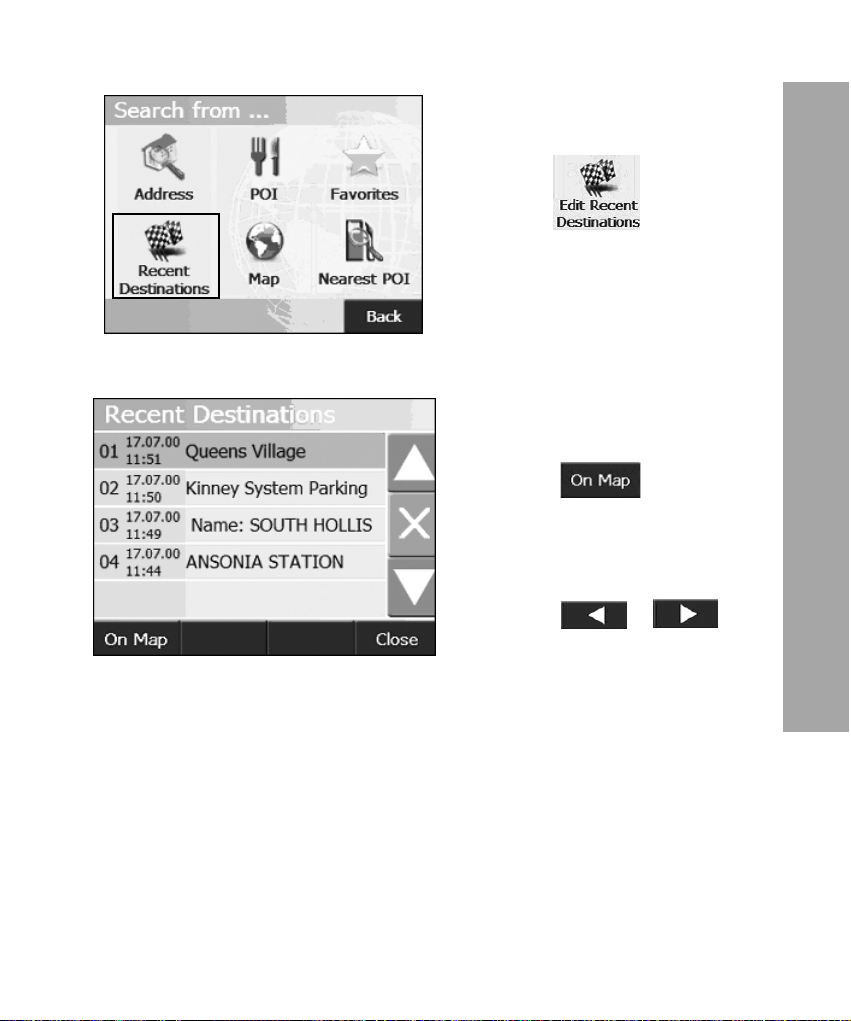
Turbodog allows you to edit up to 100 recently destinations
through the function of Edit Recent Destination. This function
lets you to view and delete any of recently destinations. Below,
we will go through the steps on how to operate:
46
Page 47
(1) View the position of recent
destinations:
1. Click on to enter
“Recent Destinations“ page.
2. Select one of the destination from the list.
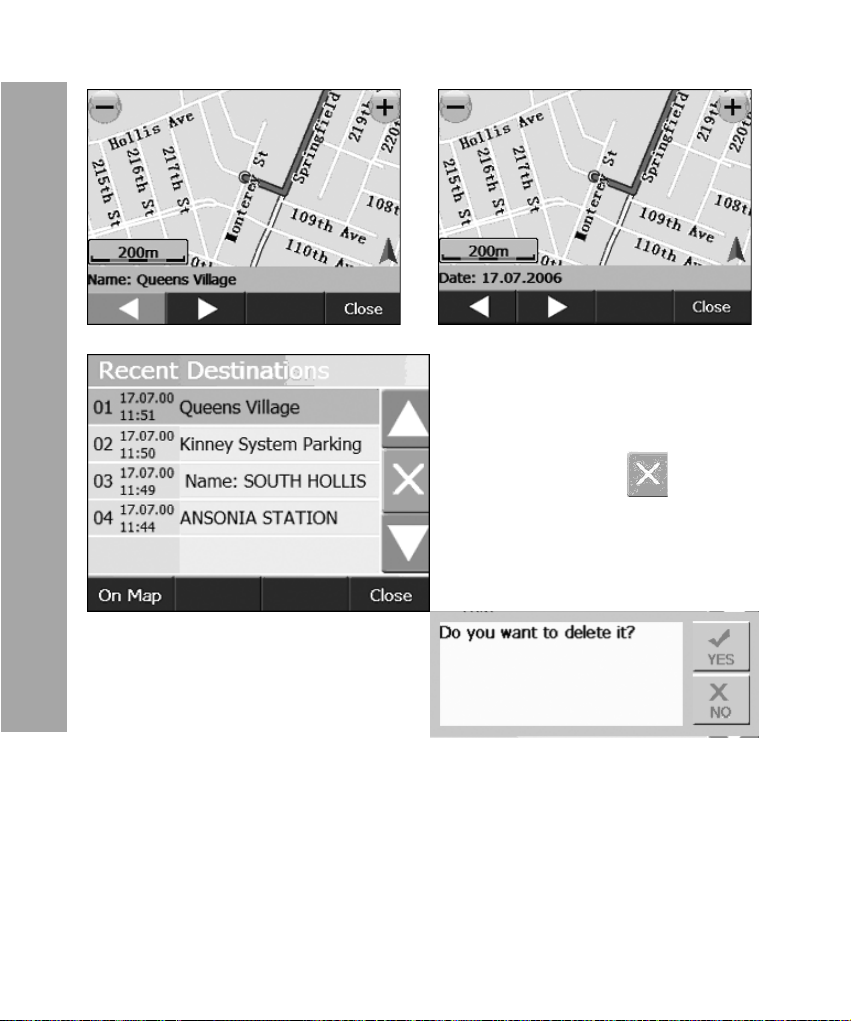
3. Click on , the destination you have selected is
displayed on map as shown in
picture 4.8.
4. Click on or to
view more inormation of all
recent destinations.
Turbodog main menu
47
Page 48
Turbodog main menu
n
,
a
(2) Delete a recent destinatio
In “Recent Destinations“ page
select the one you want to
delete and press button,
dialog box pops up as shown
below to let you confirm if you
are sure to delete it.
48
Page 49
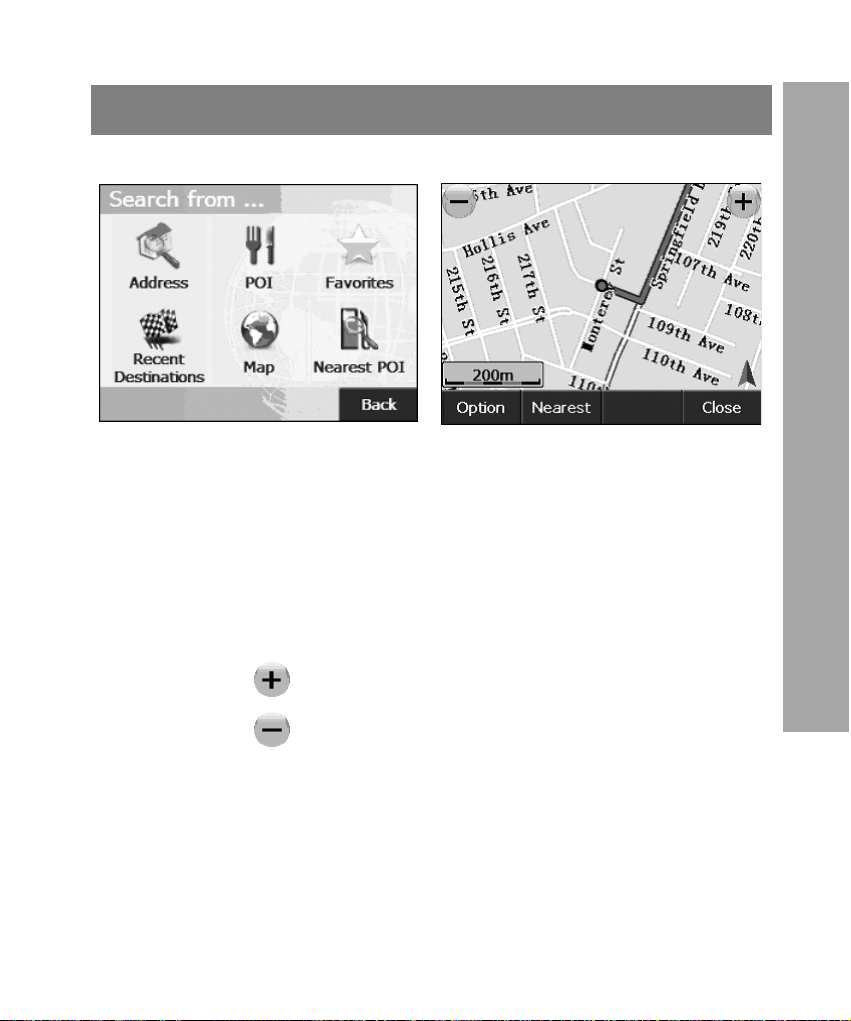
Map view
The Map view provides following function:
If GPS signal is available, it will show your current position.
If GPS signal is not available, it will show last position.
(1) Shift map:
Click on screen to shift map on the screen.
(2) Zoom in/out map:
Click on “Zoom“ button on the screen to zoom in/out map:
Turbodog main menu
Click on to zoom in the map
Click on to zoom out the map
(3) View objects on the map
49
Page 50
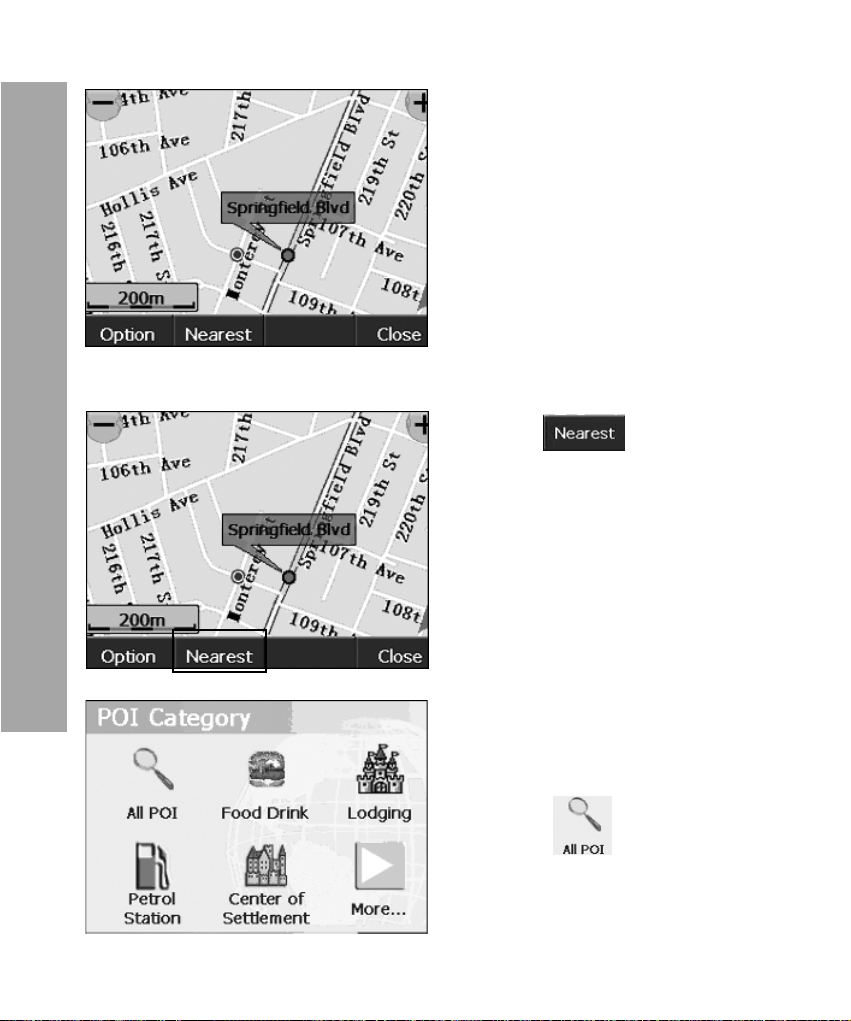
Turbodog main menu
1. Sel
(4) Search for facilities nearby:
Click on any of objectson the
map, the name of this object
is displayed (See picture
4.12).
Click on “ “ key, it
enters “Nearest POI” page.
Turbodog will automatically
list all POIs within a radius of
50 km of the map center.
50
ect the one you want to
set as destination in the
page.
2. Select “ “ to enter
“Nearest POI search“ page
as shown in picture 4.15.
Page 51
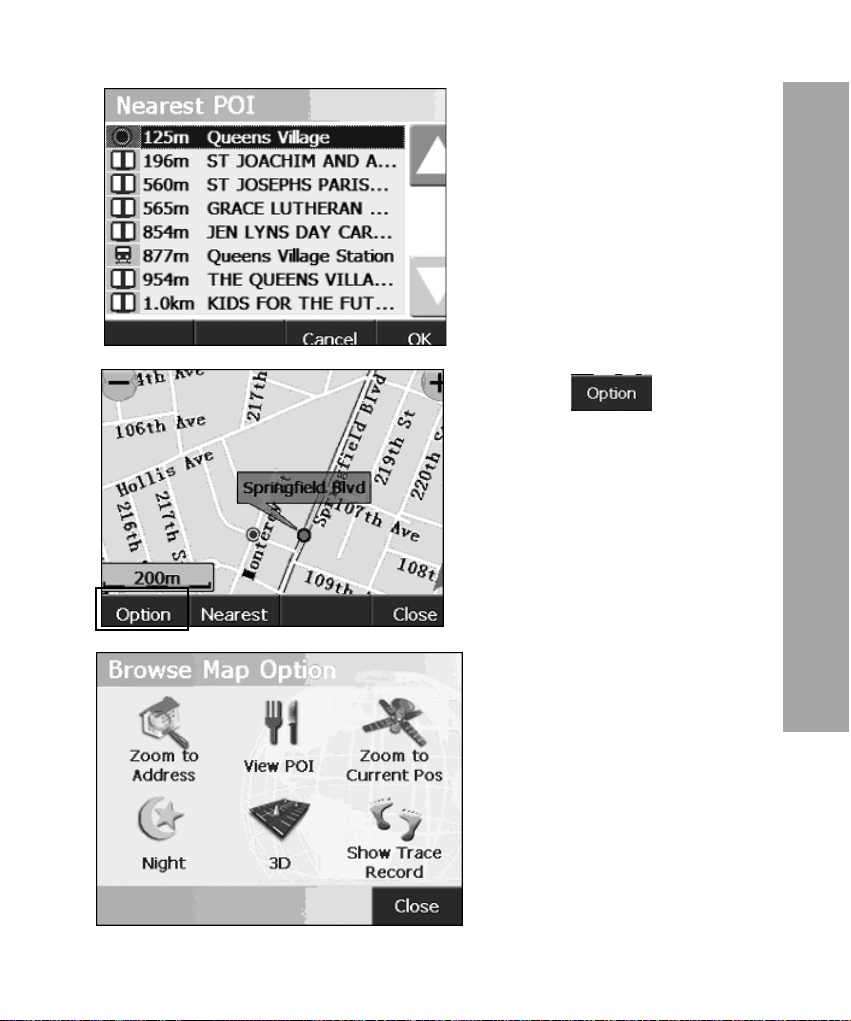
3. Click on key, Turbodog will let you to specify
more options.
Turbodog main menu
51
Page 52
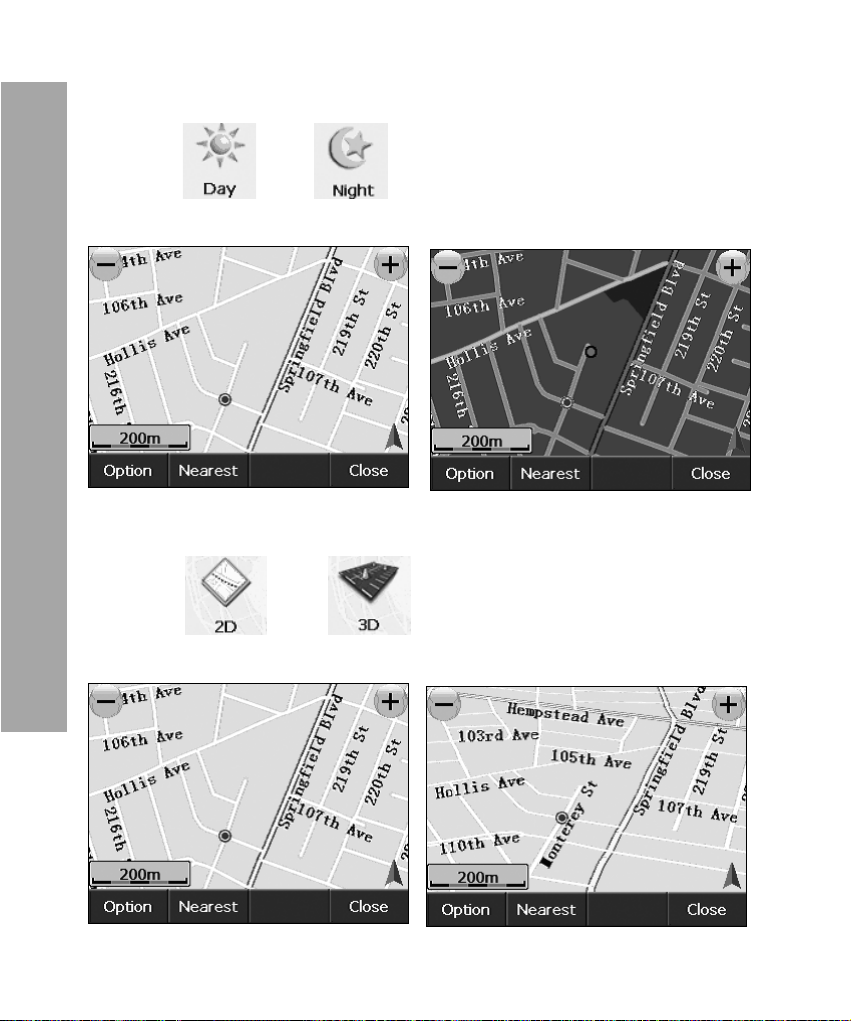
Turbodog main menu
(5) Day/Night mode:
Click on “ “ or “ “ key, you can switch display mode
between Day mode a nd Night mode.
(6) 2D, 3D mode:
Click on “ “ or “ “ key, you can switch display
mode between 2D and 3D mode.
52
Page 53
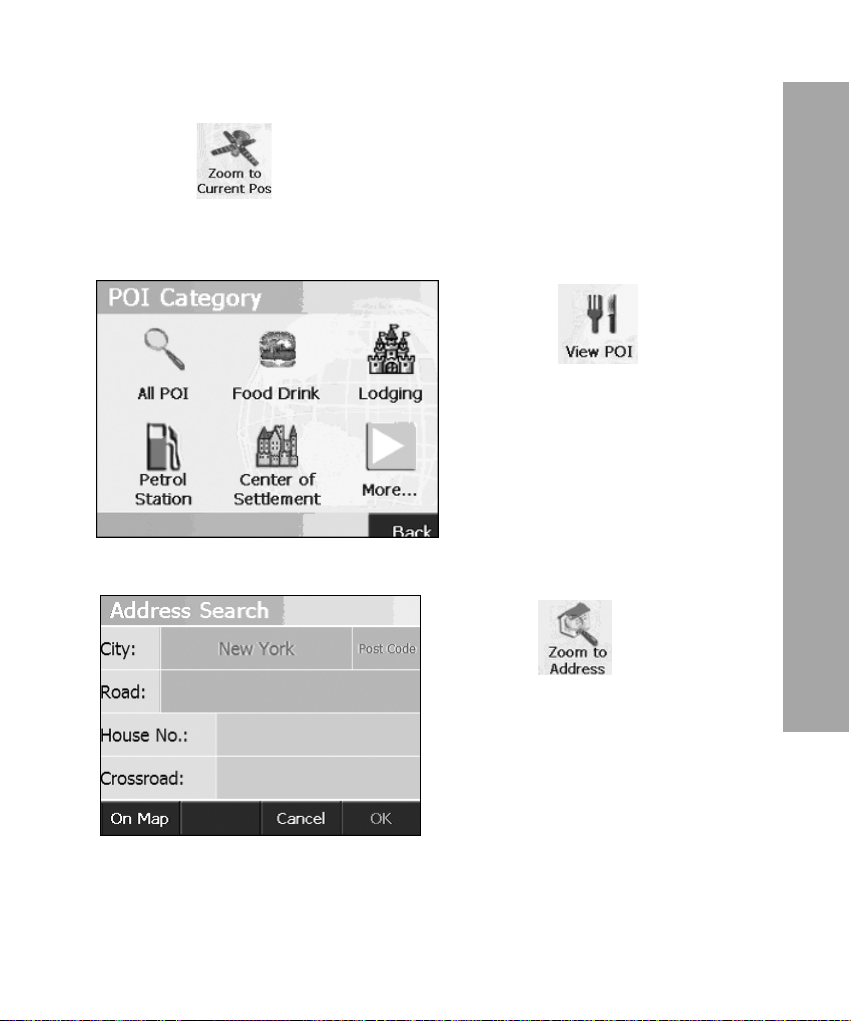
(7) Display current position:
Click on “ “ key, Trubodog will zoom to current GPS posi-
tion.
(8) POI search:
Click on “ “ key to
search for a POI.
(9) Address search:
Click on “ “ key to
Turbodog main menu
search for an address according to the information you
specified.
53
Page 54
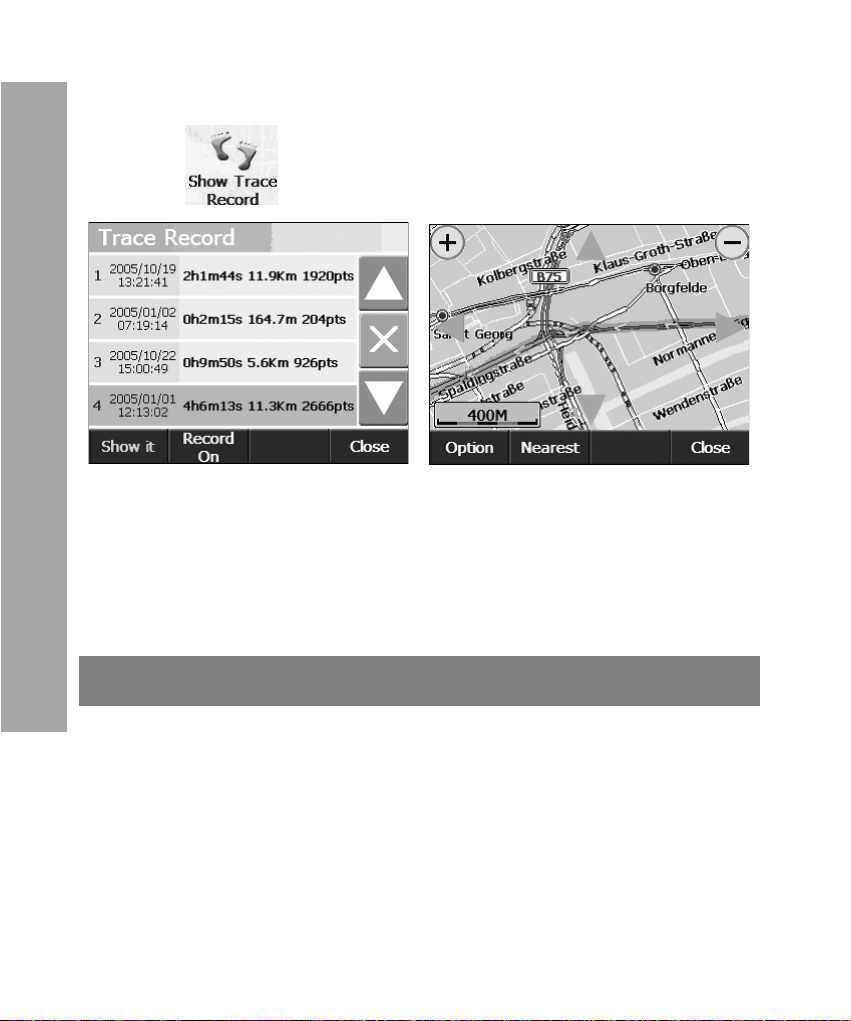
Turbodog main menu
(10) Show trace record:
Click on “ “ key to show trace records.
Edit favorites
Turbodog allows you to bookmark your favorites. These frequently used favorites can be configured as start point or destination of a journey. Below we describe the steps how to operate:
(1) Add new favorites:
54
Page 55
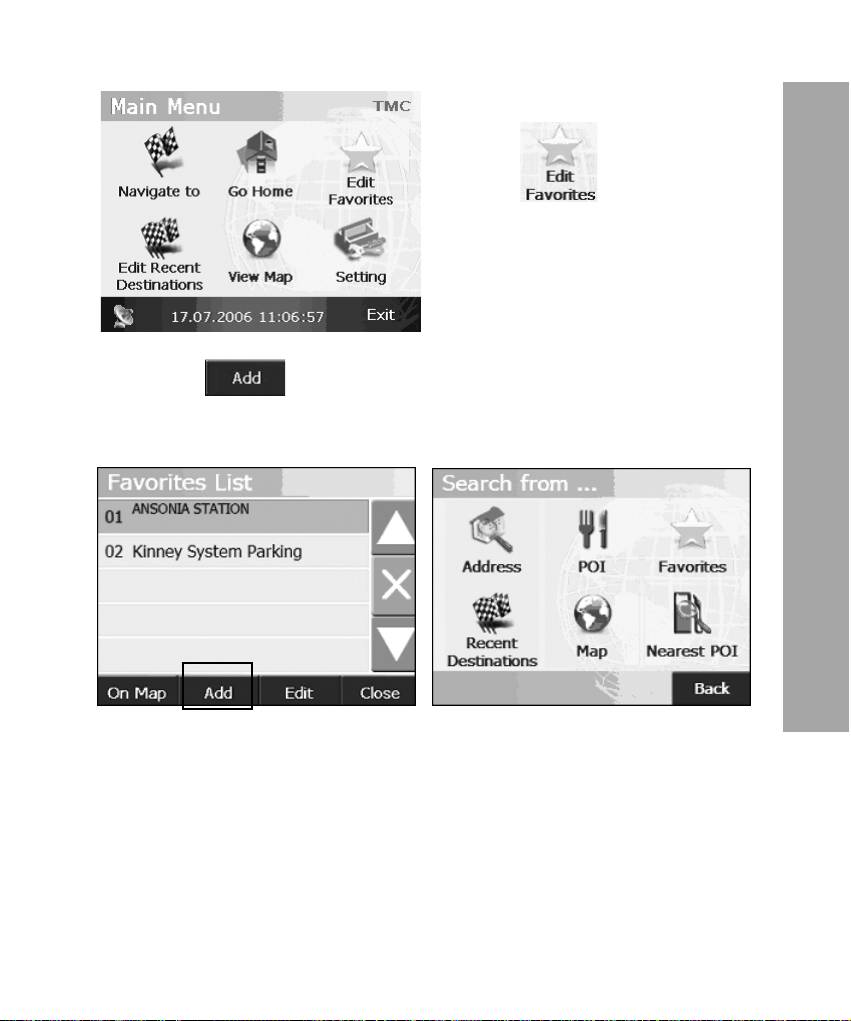
1. In Turbodog’s main menu,
click on key to enter
“Favorite list“ page as shown in
picture 4.25
2. Click on key in this page to enter the page as shown in
picture 4.26. There are six way of adding a new favorite. Please
refer to Chap. 4.1 and Chap. 4.2 for details.
Turbodog main menu
(2) Delete My Favorite:
55
Page 56
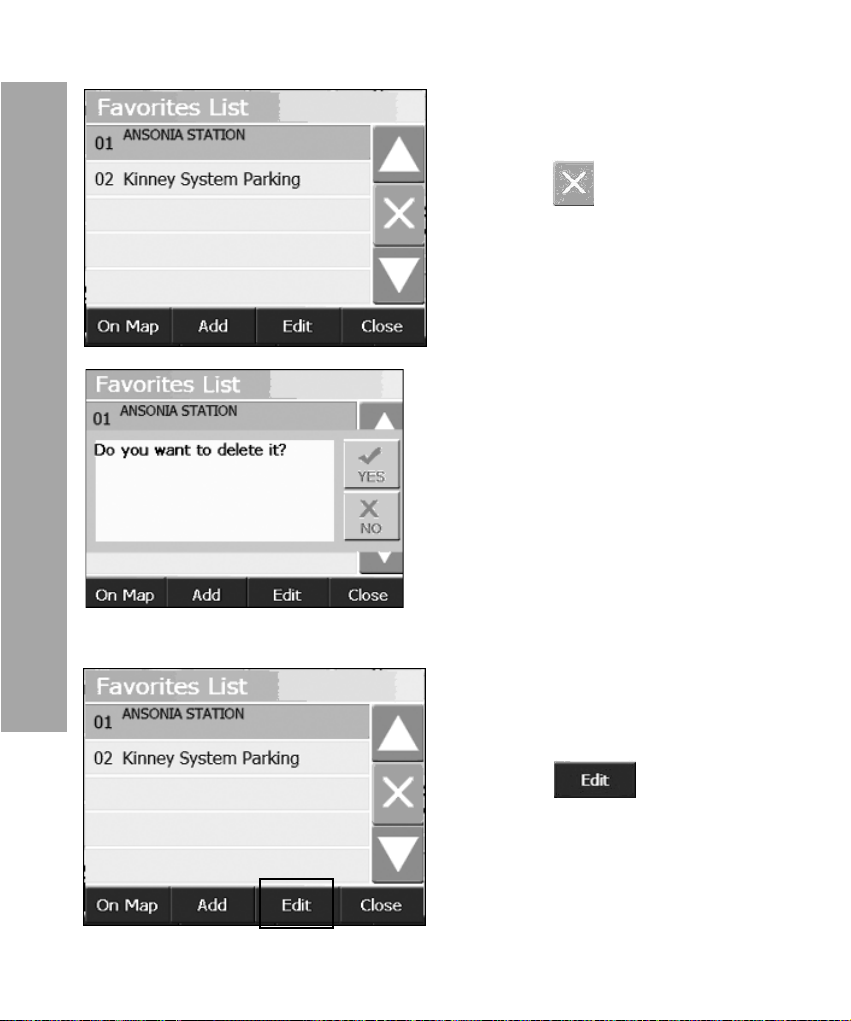
Turbodog main menu
(3) Edit My Favorite:
1. In Favorite list page, select
the one you wish to delete.
2. Click on key, a dialog
box pops up to let you confirm if you are sure to delete it
(See picture 4.28).
3. If you select “Yes“, the
favorite is deleted. If not, the
operation is cancelled and
returns to “Favorite list“ page.
56
1. In “Favorite list“ page,
select the one you wish to
edit.
2. Click on key to
enter “Favorite edit“ page as
shown in picture 4.30.
Page 57
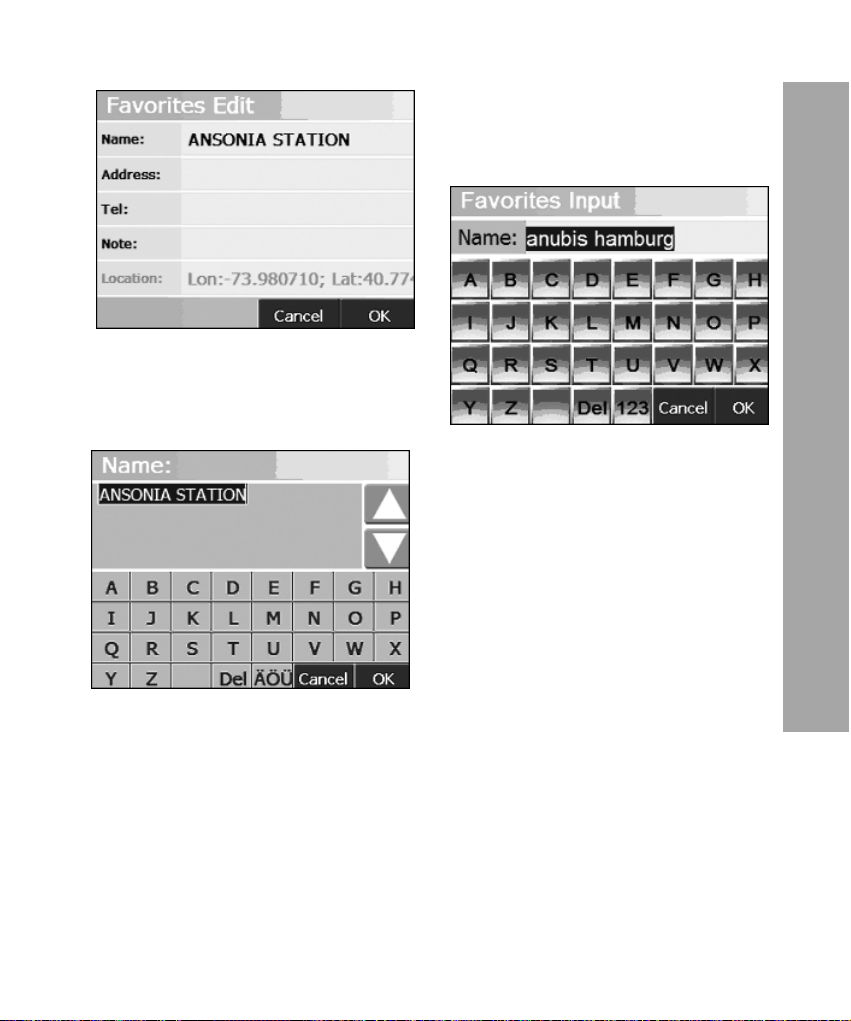
3. Click on the field you wish
to edit to activate virtual key
board as shown in 4.31.
Turbodog main menu
57
Page 58
Manage navigation
Manage navigation
Turbodog allows you to select configurable tools which enables
you to start free navigation (without specifying any destination)
to 10 destinations, specify 4 driving methods and set 2 routing
parameters. Also it provides you with 2 features of navigation
and route view. This lets you use the system any where any
time. Below we describe the detailed operations:
In main menu, click on icon to enter “Managing Naviga-
tion“ page as shown in picture 5.2.
58
Page 59
Navigation and route plan
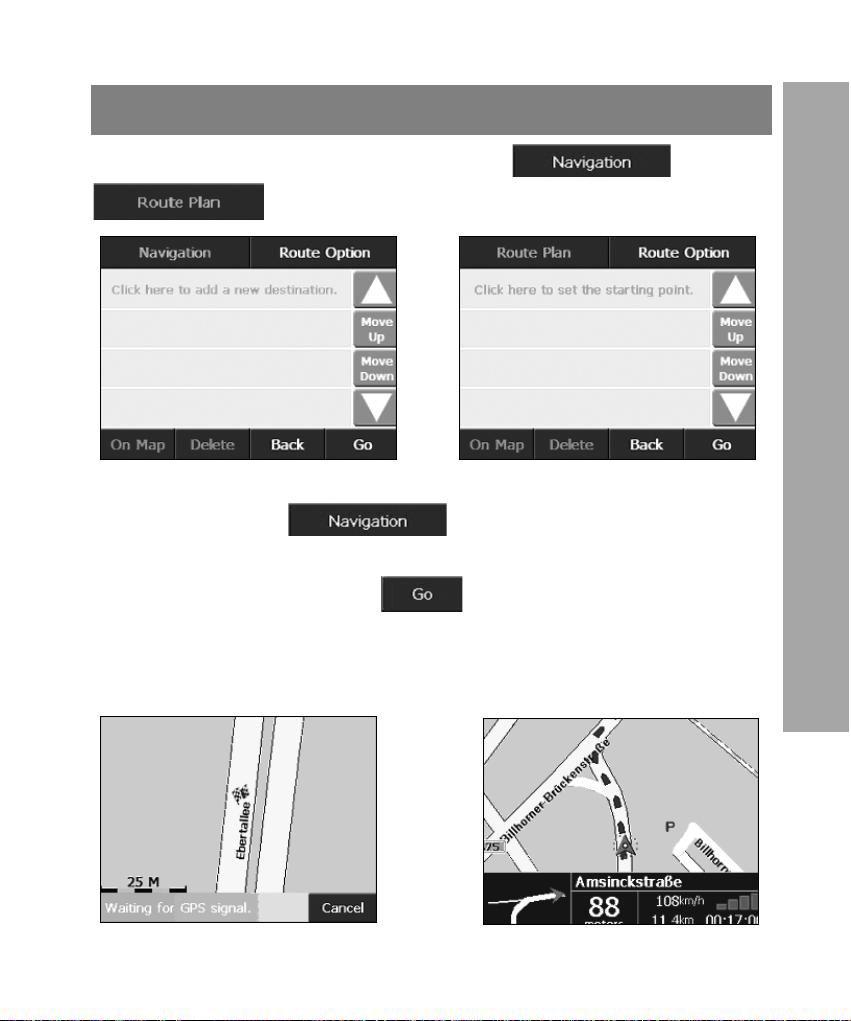
In “Managing Navigation“ page, click on button or
button to switch between 2 modes.
Navigation mode :
Turbodog allows you to specify up to 10 destinations. After spec-
ifying a destination, click on button, Turbodog will wait for
GPS to finish positioning. Once position is fixed, it will calculate
a route and start navigation. When clicking on Go without specifying destination, you can also start free navigation.
Manage navigation
59
Page 60
Manage navigation
Route plan mode :
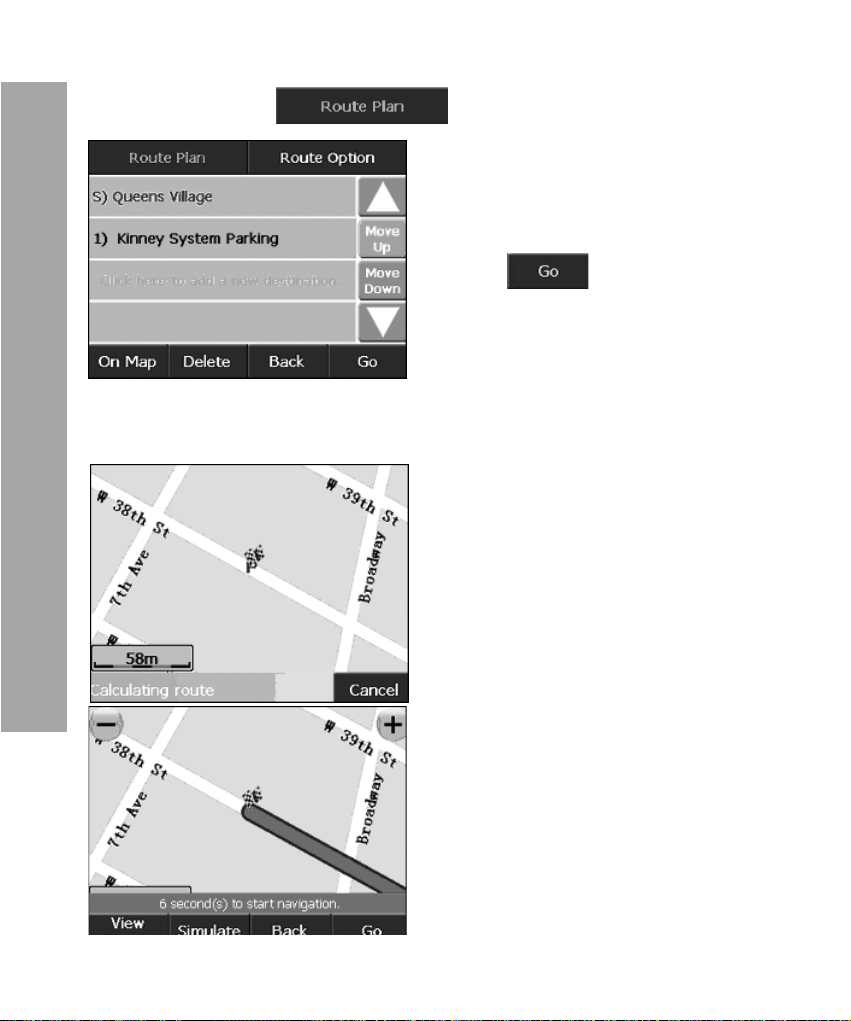
1. Turbodog allows you specify
9 destinations at most and 1
start point. After setting up
start point and destinations,
click on button, Turbodog will enter “Routing“
page as shown in picture 5.7
to start routing.
* Note: In route plan mode, when you move to any candidate
destination, this destination will become start point of route.
2. After routing, it enters to
“View Route“ page as shown in
picture 5.9 to allow you to view
entire route. You can operate
on map to view proposed
route, navigation simulation
and start navigation. Turbodog
will start navigation after 10
seconds if there is no action
detected.
60
Page 61
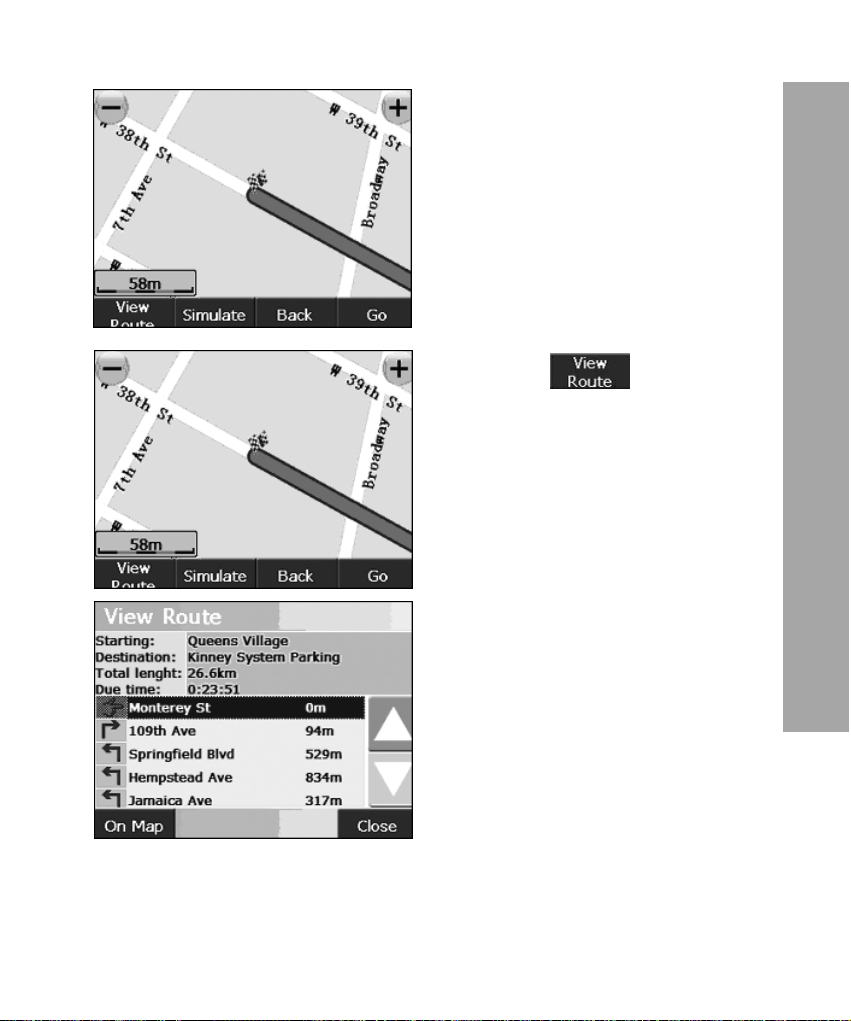
(1) Click on map to enter map
shift mode. This enables you to
view proposed route.
(2) Click on button to
enter entire route view.
Manage navigation
61
Page 62
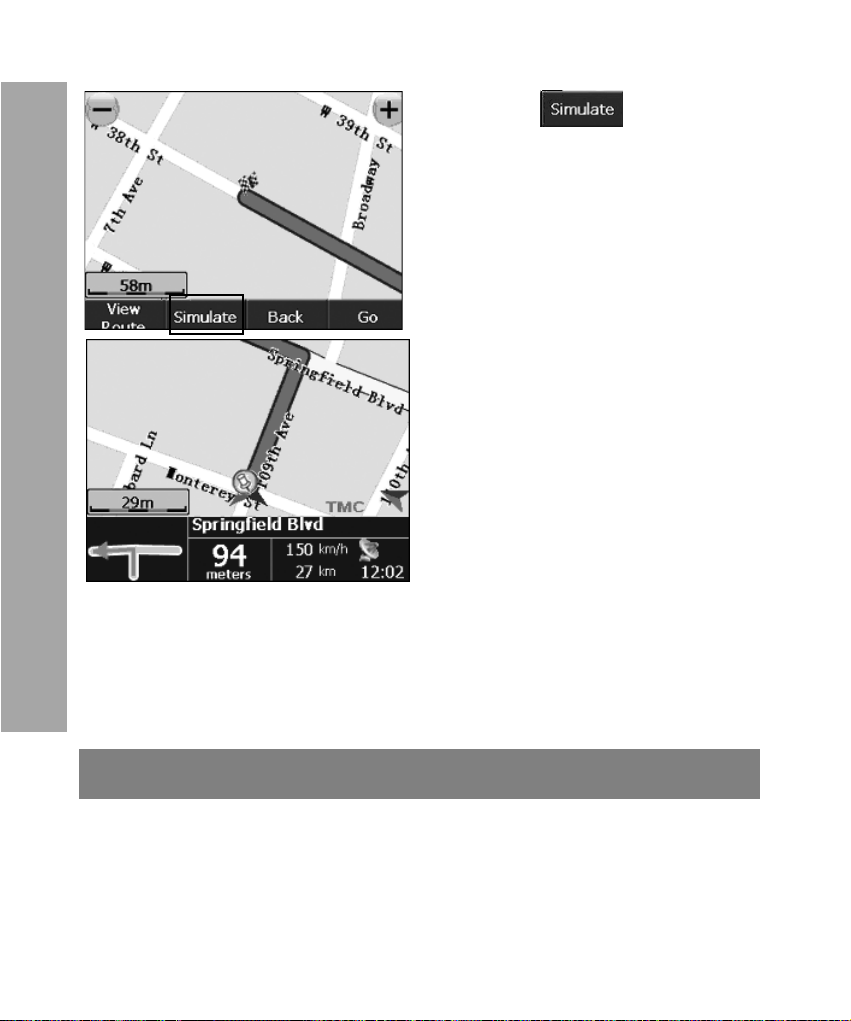
Manage navigation
(3) Click on button to
start simulation as shown in pic-
ture 5.14.
Specify route parameters
Turbodog’s tool provides 4 driving methods and 2 types of routing parameters to satisfy different navigation needs.
62
Page 63
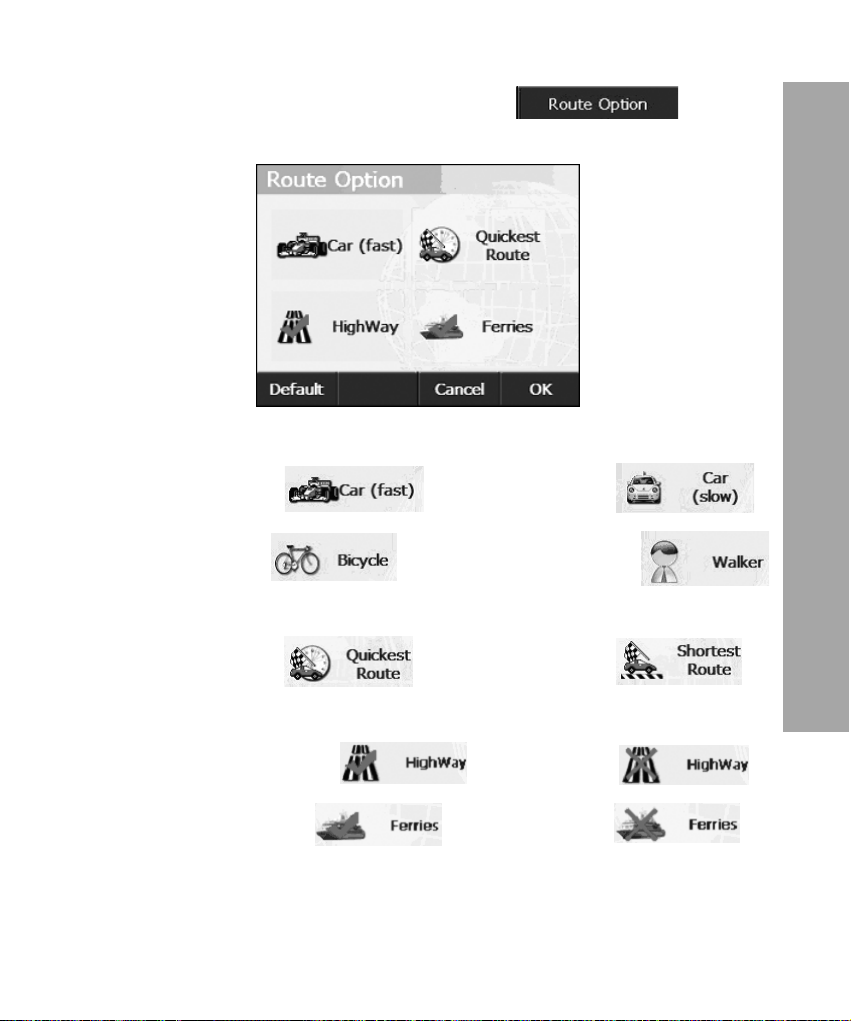
In “Managing Navigation” page. click on key to
enter “Route Option“ page as shown in picture 5.15.
(1) Driving method
Fast car mode Slow car mode
Bicycle mode Pedestrian mode
(2) Routing mode
Manage navigation
Quickest route Shortest route
(3) Routing parameter
HIgh way: preferred not preferred
Ferries: preferred not preferred
63
Page 64
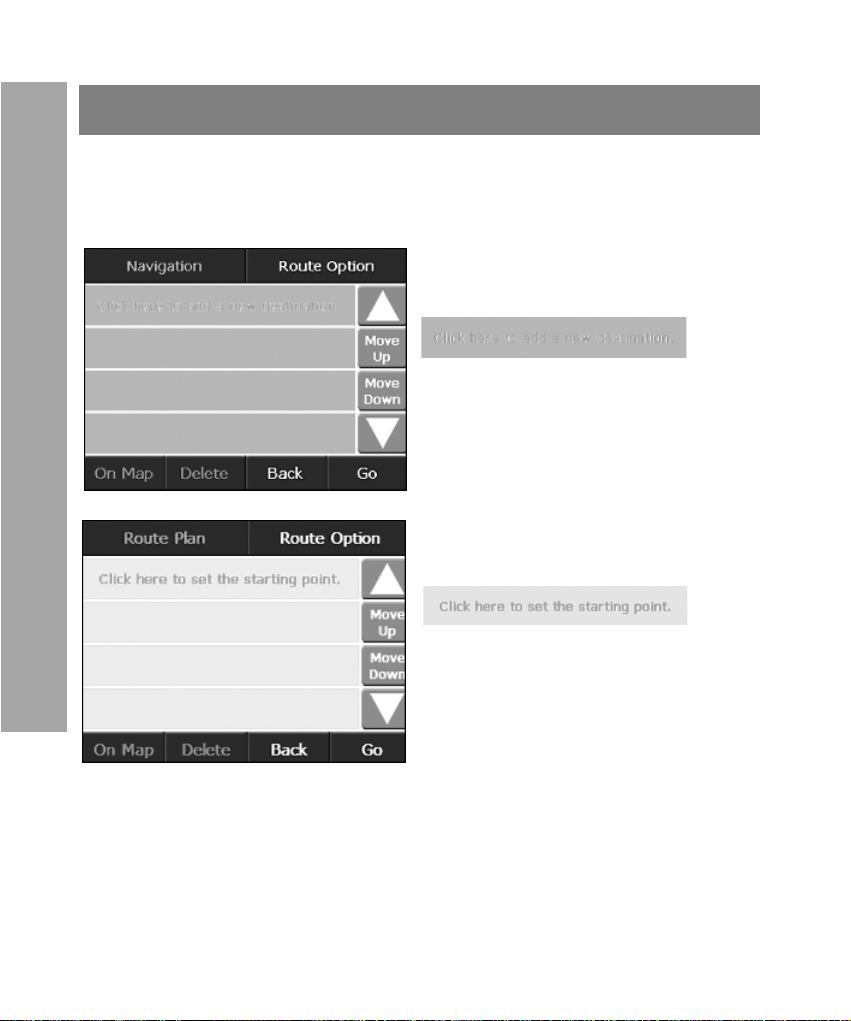
Manage navigation
Manage destination
Turbodog allows you to specify up to 10 destinations and 1 start
point.
(1) Add new destination/start point
Navigation mode:
Click on
enter “Destination Search“ page
to specify destination.
Route plan mode:
Click on
enter “Destination Search“ page
to specify start point.
to
to
64
Page 65
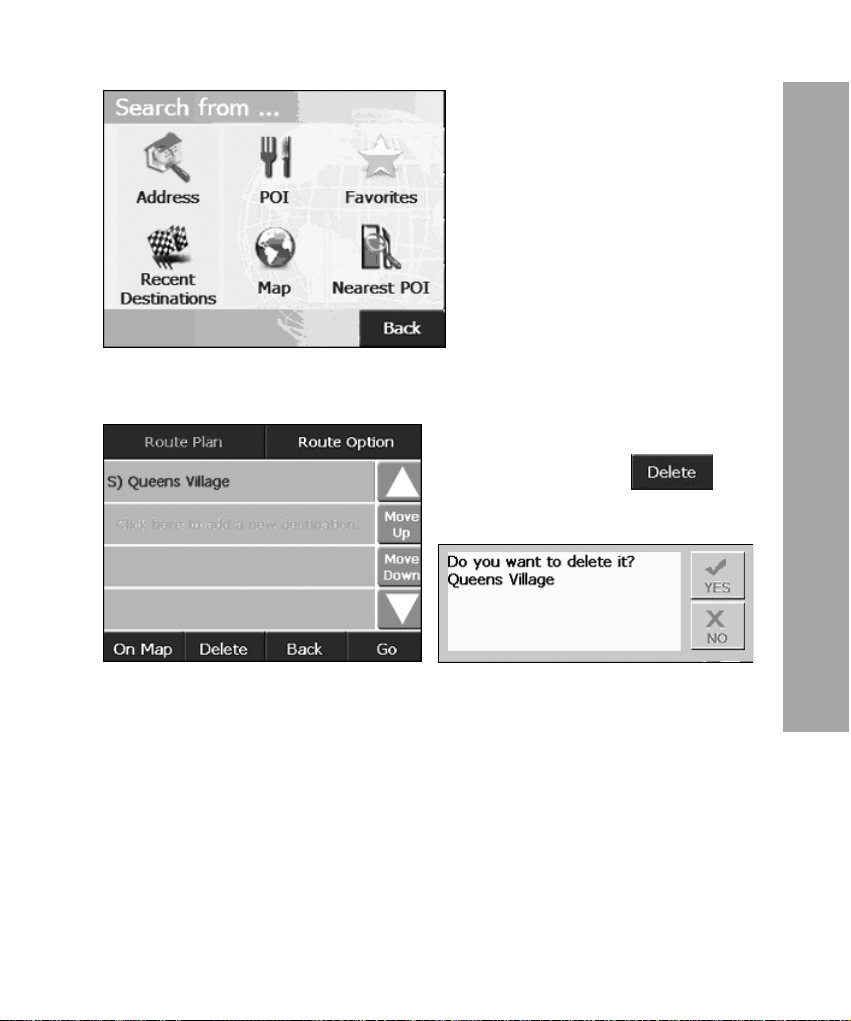
(2) Delete destination
Manage navigation
Click onthe one you wish to
delete, and press key.
A confirmation box pops up.
65
Page 66
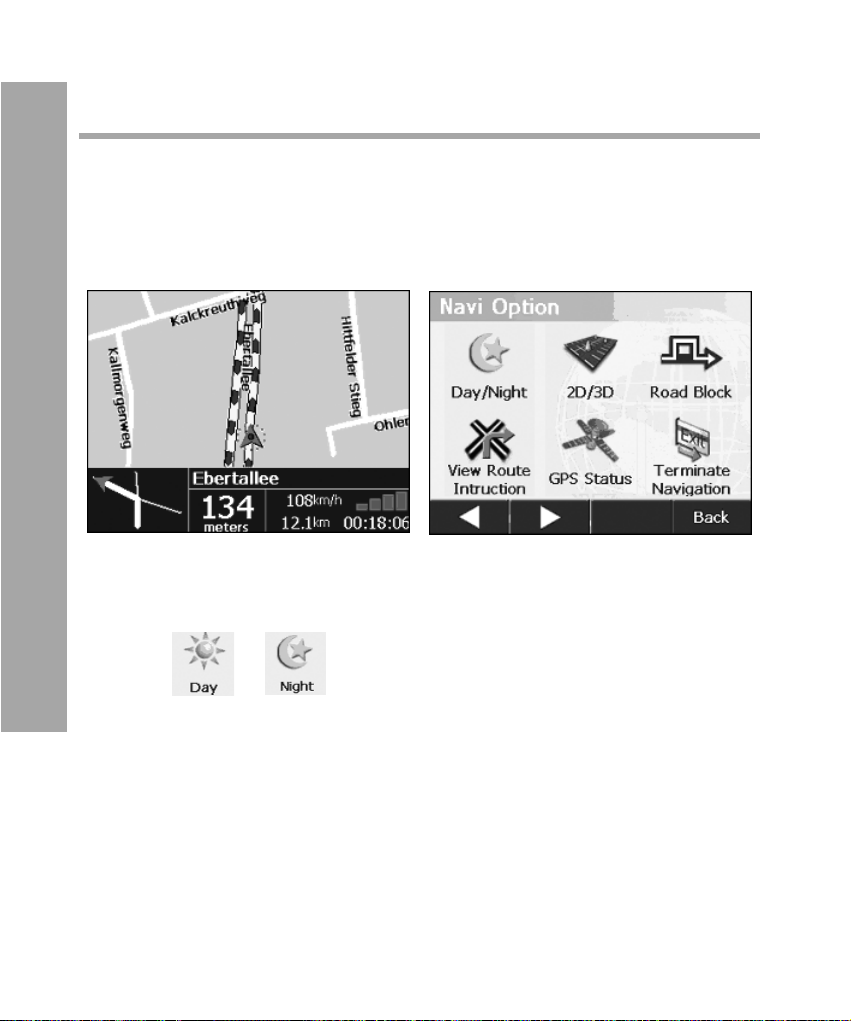
Navigation
Navigation
Turbodog provides six functions in navigation or Simulation
mode. Click on screen to enter “Navi Option“ page as shown in
picture 6.2. If there is no action detected for 5 seconds, the system returns to navigation page.
In Navi Option page, it provides following functions:
(1) Day/Night mode switch
Click on or key, it switches display mode between
Day and Night mode.
66
Page 67
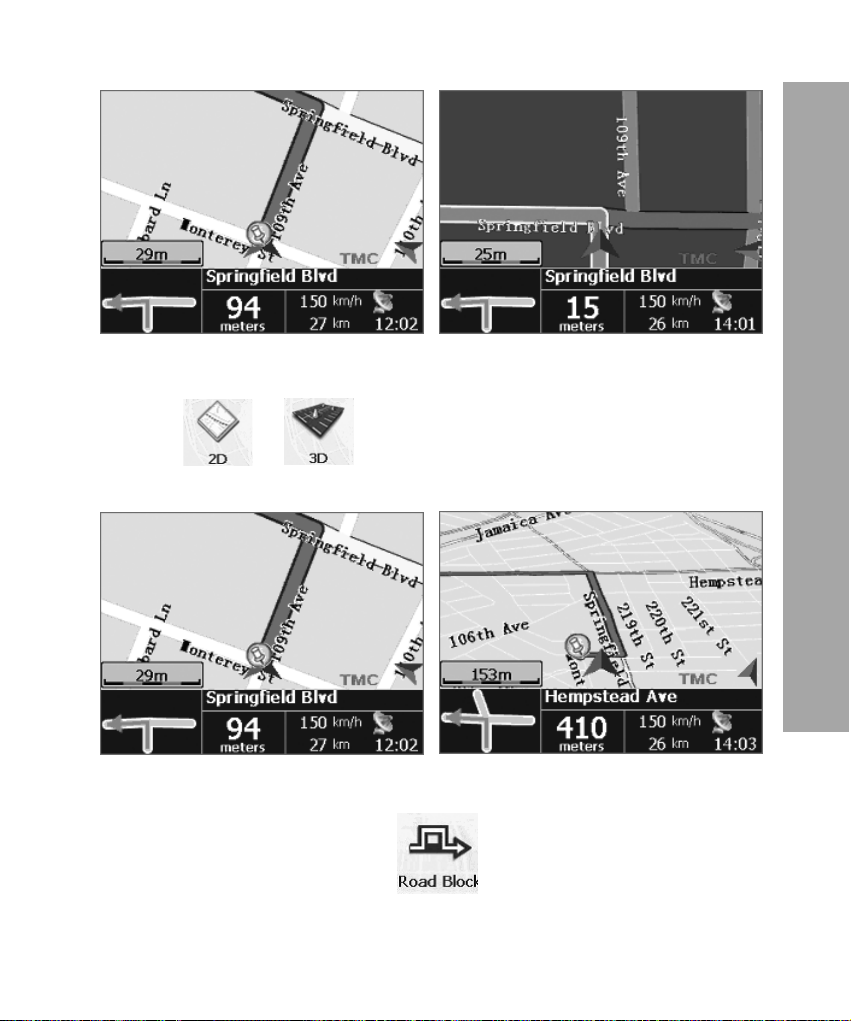
(2) 2D/3D mode switch
Click on or key, it switches display mode between
2D and 3D mode.
Navigation
(3) Detour
In Navi option page, click on icon to display “Detour
option“ page as shown in picture 6.7.
67
Page 68
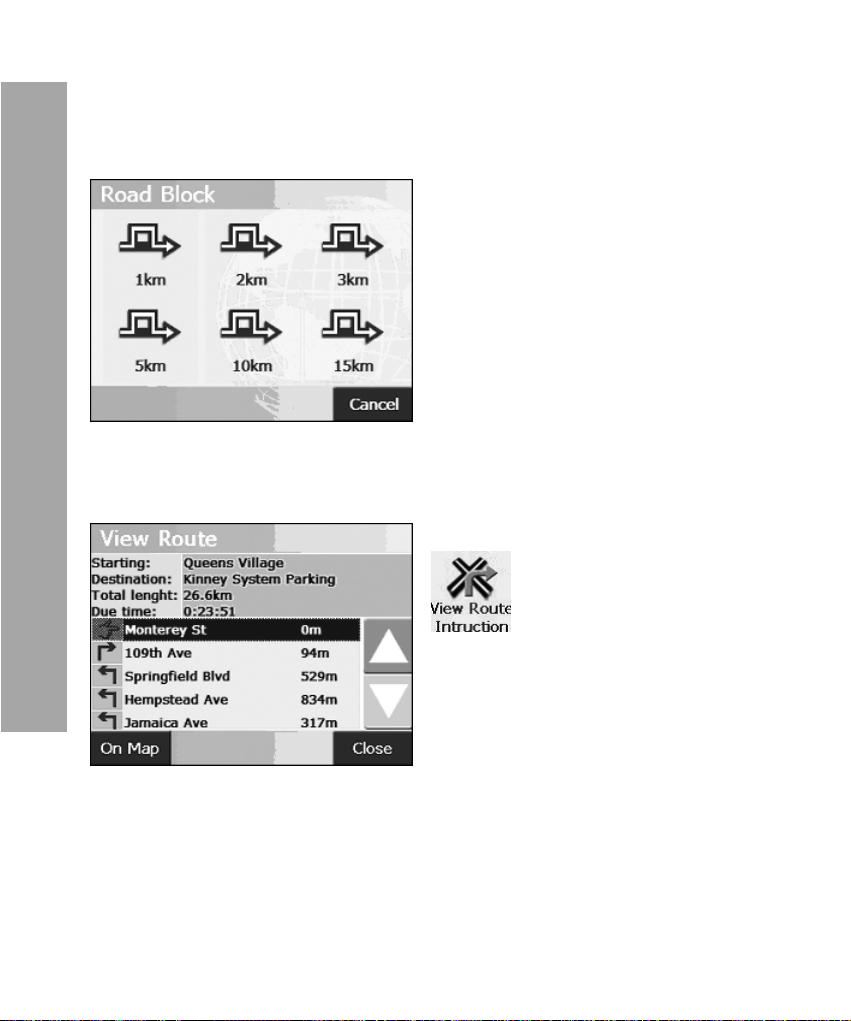
Navigation
When traffic jam, you can estimate the distance to the blocking
point and select an appropriate option, Turbodog will calculate a
detouring route.
(4) View entrire route
In Vavi option page, click on
key to display entire
route in map view mode as
shown in picture 6.8.
(5) GPS status
68
Page 69
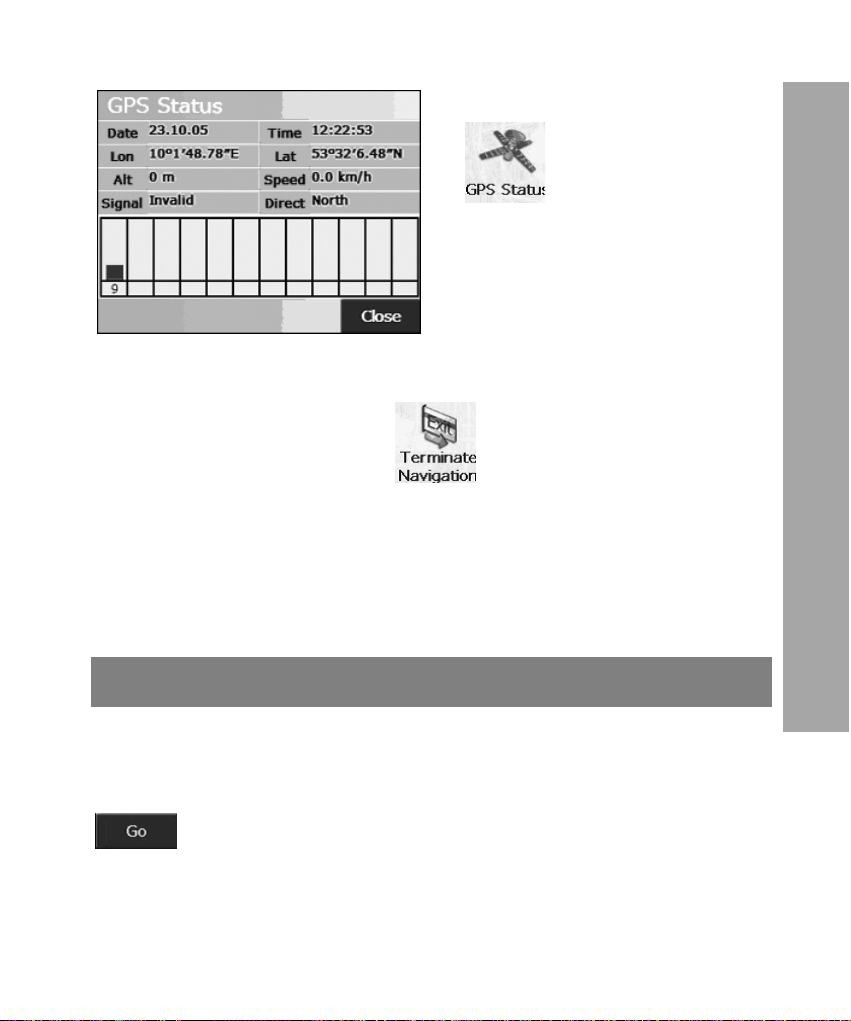
In navi option page, click
on icon to display GPS
status page as shown in picture
6.9.
(6) Teminate nabigation
In Navi option page, click on icon to teminate navigation
and return to main menu page.
Navigation
Auto-routing
With consideration of driving safety, Turbodog provides autorouting function. This feature executes under two circumstances:
Auto starting navigation: after setting up destination, click on
icon in “Managing navigation“ page, Turbodog will auto-
matically start navigation. Below we describe the procedure:
69
Page 70

Navigation
1. Proceed to the next step if GPS receiver has received
signals from all of three GPS satellites and finished
position orientation. Otherwise, keep waiting for GPS
signals;
2. Set current GPS position as start point and the destination you have set as the destination of the journey, use
“Uptimal route“ as default parameter of route calculation and start navigation after routing.
Auto re-routing: if you have accidentally missed a proposed
turning point about 100 meters, Turbodog will activate re-routing
module to calculate a new route. It takes about 10 seconds to recalculate a new route depending on the distance between your
current position to destination. The far, the longer time needed to
re-calculate. This guaranties you will never lost.
70
Page 71
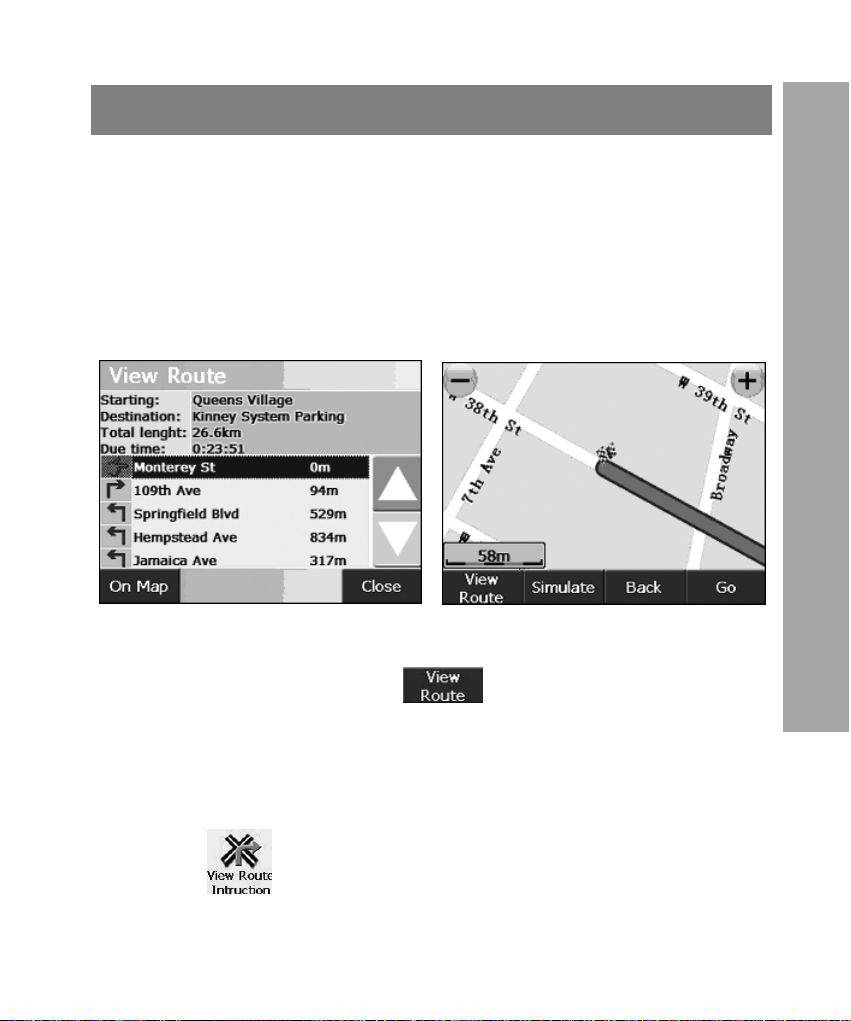
Entire route view
This feature enables you to view entire route after route calculation in the course of navigation.
Route description: each description contains 4 elements
including street name you are on, driving distance, turn method
and street name you are entering. For example: drive along
“Ang Mo Kio Avenue“ for 257.5 meters and make a right turn to
“Marymount Road“.
There are two methods to view entire route:
Navigation
• After routing, click on button as shown in picture
6.12 to enter “Entire route view“ as shown in picture
6.11.
• During navigation or simulation, click on anywhere on
the screen to enter “Navi option“ page. In that page, click
on icon to enter “Entire route view“ as shown in
picture 6.11.
71
Page 72
RDS-TMC traffice and travel information system
RDS-TMC traffice and travel
information system
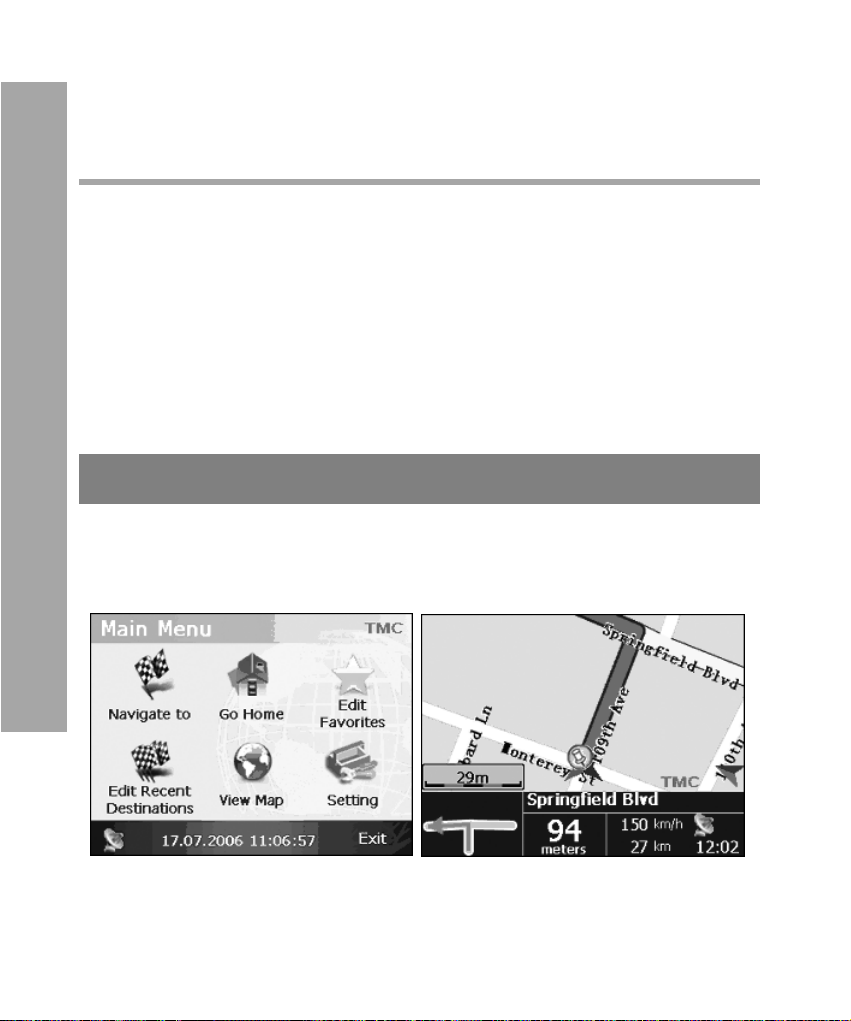
Turbodog is equipped with the function of RDS-TMC. This function enables to receive real-time traffic condition nearby and to
show on the map. When there is an emergency on the route calculated, the system will prompts to recalculate a detour to avoid
the traffice jam.
TMC turn on/off
After Turbodog started, the system will automatically connect to
RDS-TMC device to receive TMC message. To turn off TMC
message, please follow the instructions below:
72
Page 73
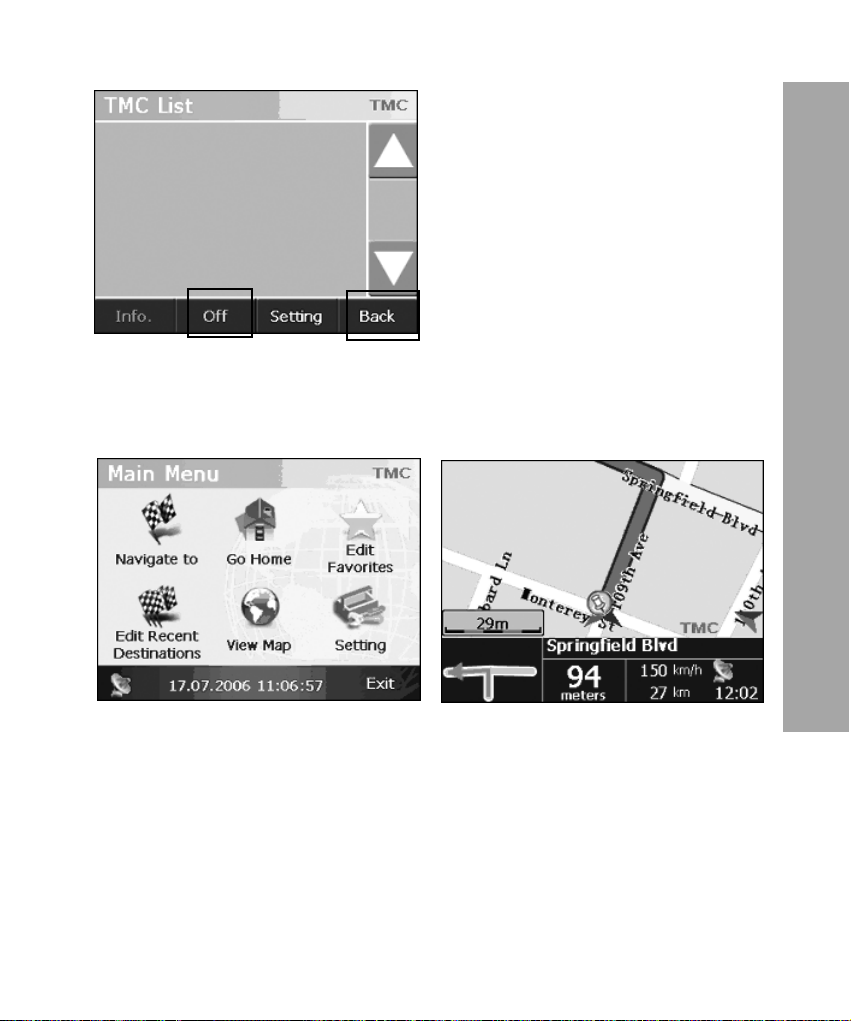
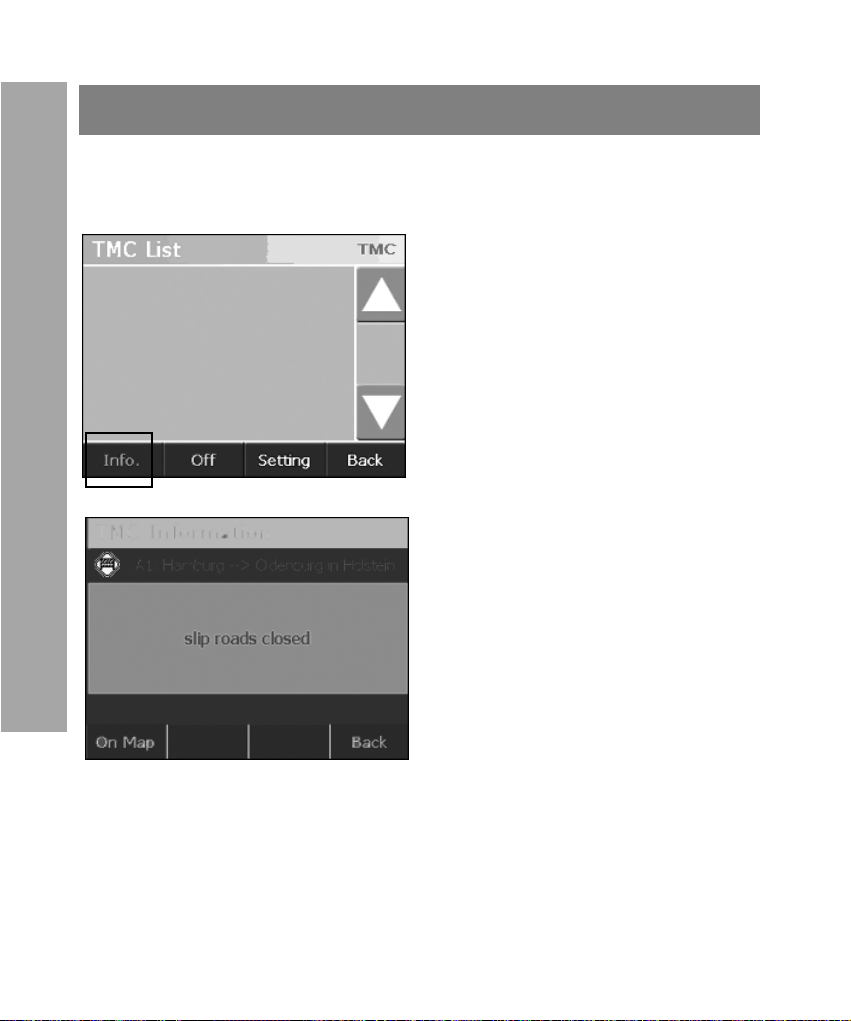
1. In main menu or Navigation
screen, click on “TMC“ to enter
the window shown in picture
7.3.
2. Click on “TMC off“ to turn off
TMC message as shown in
picture 7.4.
3. Click on Back, it returns to main menu or Navigation screen.
The TMC status is in grey which indicates that TMC receiving is
disabled.
RDS-TMC traffice and travel information system
73
Page 74
RDS-TMC traffice and travel information system
3. Click
TMC messages
Once Turbodog received TMC message, it will be displayed literally and marked on the map. Follow the instructions below to
view the TMC message:
1. Click on TMC in main menu
or Navigation screen to enter as
shown in picture 7.7.
2. Select the TMC message
header and then click on Info to
view the detailed message as
shown in picture 7.8.
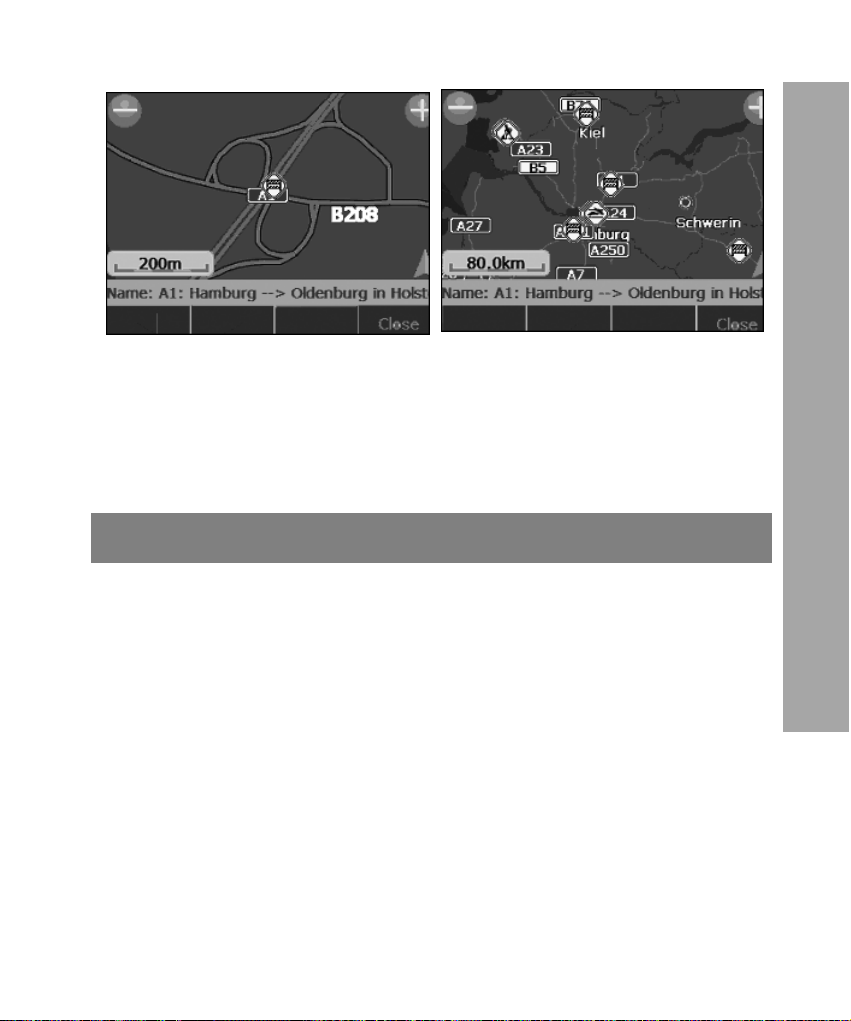
on On Map, it enters
Map view window to show the
location of a TMC message
presented by an icon (For
details, please refer to chapter
9.5) as shown in picture 7.9.
74
Page 75
TMC rerouting
During navigation, Turbodog will re-calculate a detour to avoid
the traffic jam if the traffic event is on the route of a previous
route calculation.
RDS-TMC traffice and travel information system
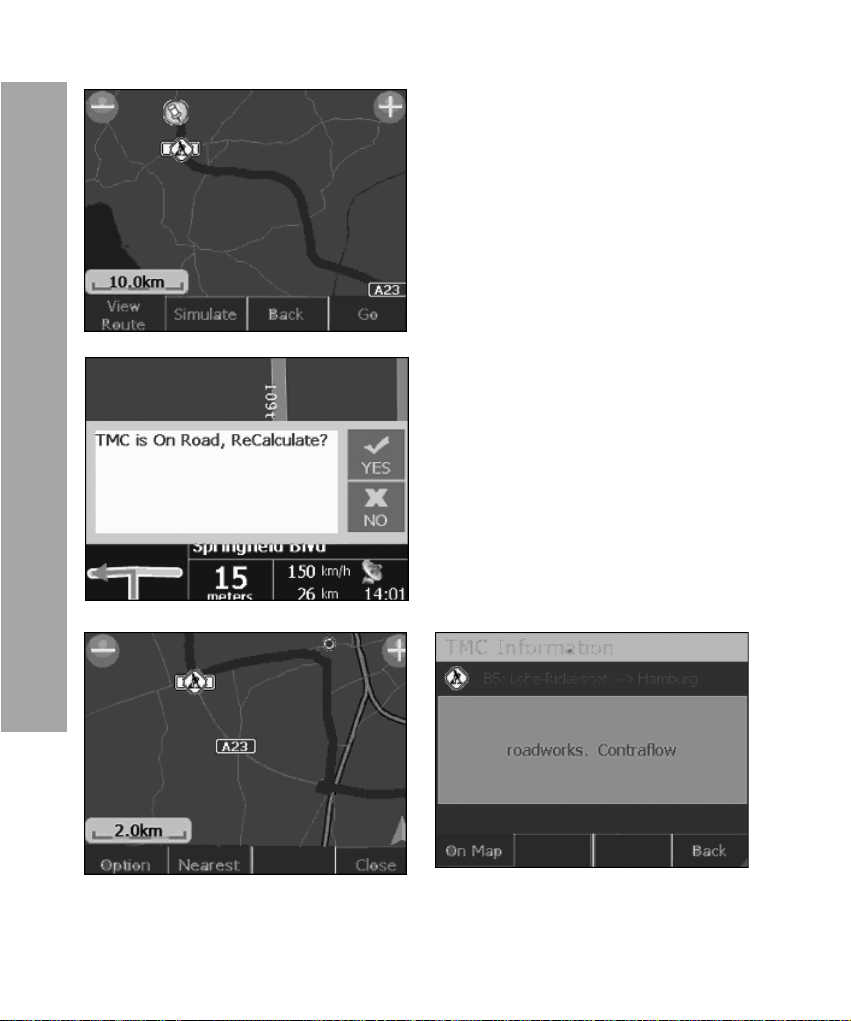
1. Picture 7.11 indicates that you have completed a routing and
destination setting, press Go to start.
2. During the navigation, Turbodog receives a TMC message
indicating there is a traffic condition change on the route. As
shown in picture 7.12, the system will prompt you if a detour calculation is preferred. Turbodog will calculate a detour and this
prompt will not show if you selected Auto Detour calculation
option in Navi Setup.
75
Page 76
RDS-TMC traffice and travel information system
3. Picture 7.13 shows the result
of a detour calculation. PIcture
7.14 is the TMC message.
76
Page 77
Change preference
Navi setting
Turbodog provides a various styles in navigation mode. You can
setup to use different styles in System Configuration window.
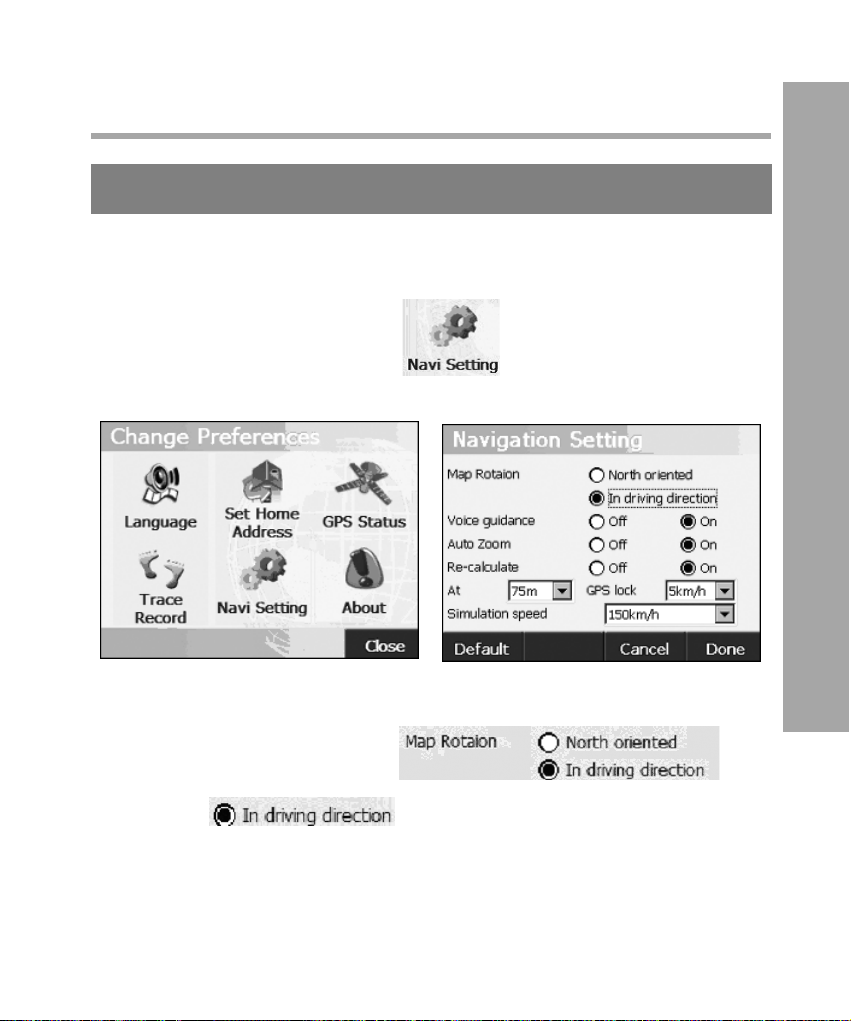
1. Press “Navi setting“ button in Turbodog main
menu to enter “Navigation Setting“ window.
Change preference
2. “Navi Setting“ as described below:
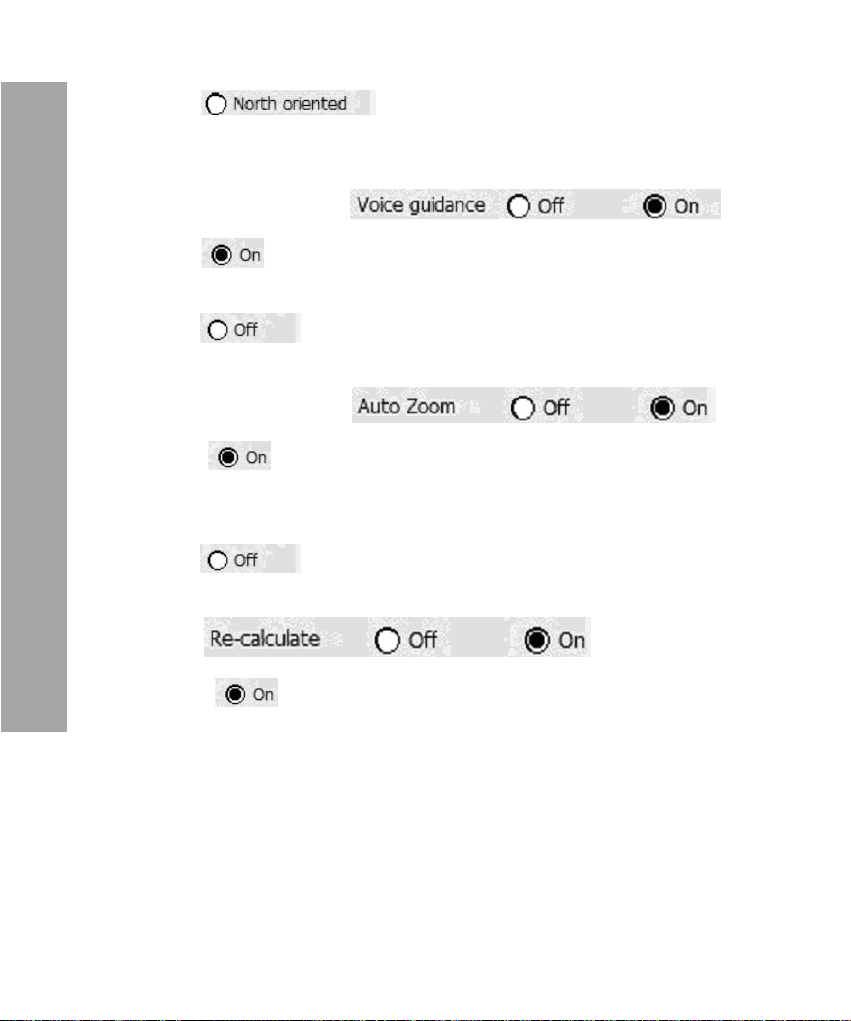
i. Auto-map rotation :
Turbodog will rotate map according
to the direction of movement
77
Page 78
Change preference
This allows you to view driving con-
ditions ahead and makes you always driving to the
north.
ii. Voice prompt :
Turbodog will instruct you at each curving
intersection with the provision of voice prompts.
Turbodog will not instruct you at each curv-
ing intersection with the provision of voice prompts.
iii. Auto-zoom in :
Turbodog automatically adjusts the ao scale
according to driving speed to provide you with better
view of the map.
Manually adjust mao scale.
iv. Diversion range of performing an auto-rerouting
:
78
When you divert from your track and the
diversion exceeds the range you defined, Tibo will
re-compute a route according to your current location and the destination. The larger range, the longer
time is needed to perform a re-routing. However, you
may encounter a more severe interference from
GPS positioning signal with a smaller diversion
range. The default value is 100m.
Page 79
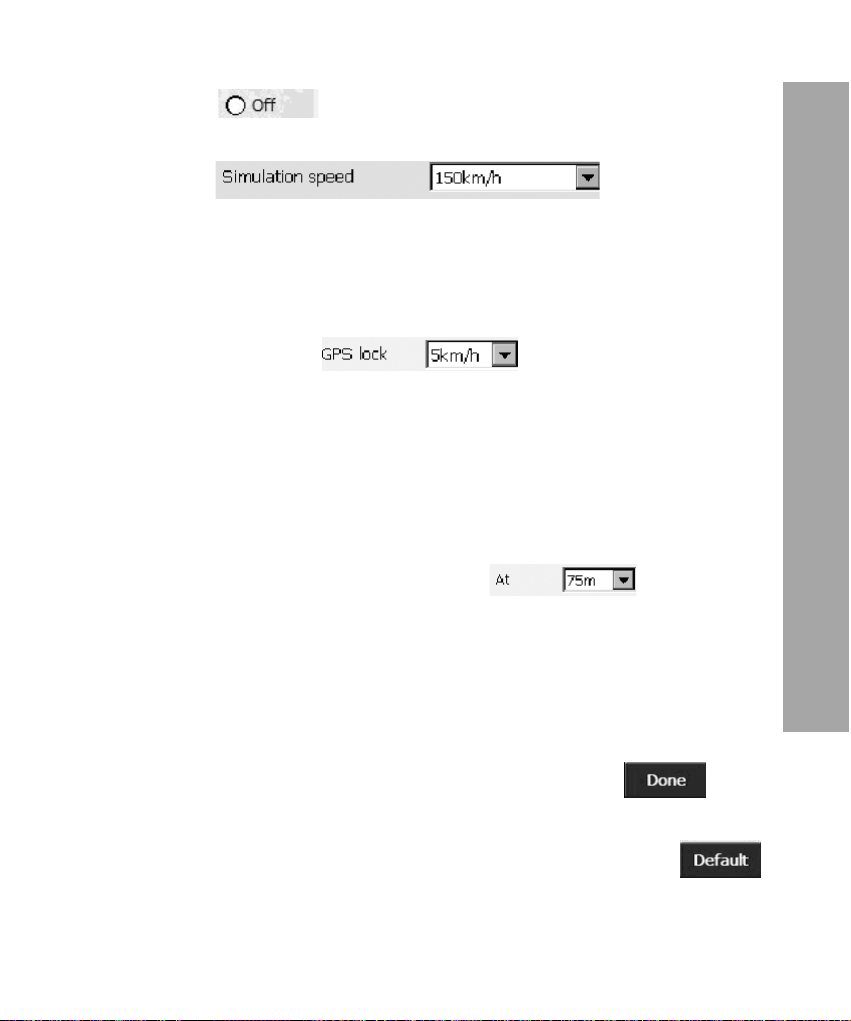
Turn off “Re-calculate“ function.
v. Simulated speed
:
This allows you to set a driving speed during a simu-
lated trip. The ranges of simulated speed are 36KM/
Hr, 72KM/Hr, 108KM/Hr, 144KM/Hr and 180KM/Hr,
etc.
vi. GPS lock :
When your car is stopped or you drive the car very
slowly, the cursor of GPS signal will folat on the
screen. With this function, you can stop having
“moving“ or “floating“ map when you drive at a speed
which is slower than a pre-set value. The default
value is 10KM/Hr.
vii. Deviation distance range :
When your car drive on the road, the GPS position-
ing signal and your car will be deviations, you can
choose the deviation distance range. The default
value is 50m. The ordinary users don’t need to
change it.
Change preference
3. After you configure the settings and press , Tibo
will save the settings and return to main menu.
4. To restore a factory default value, press button .
79
Page 80
Change preference
Language
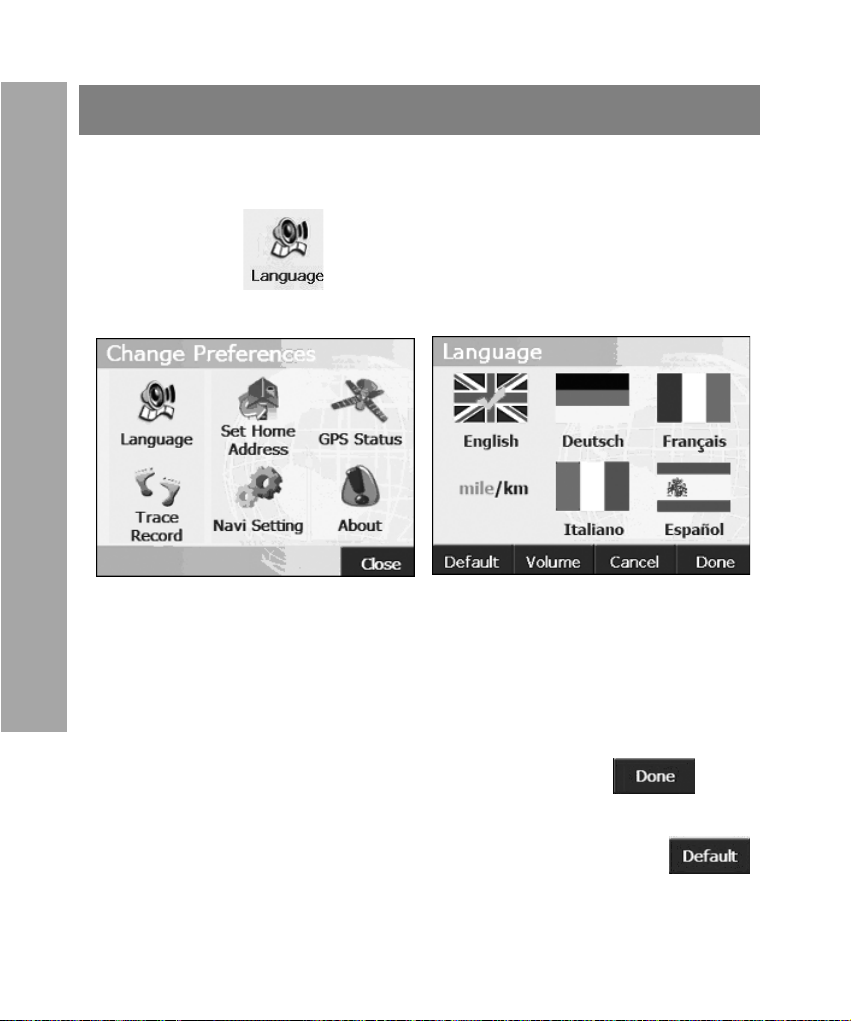
Menu for general system parameter settings allow you to set up
language used for audio prompt, diver side and distance format.
1. Press button in Turbodog main menu to enter
“Language“ window.
2. “Language“ page as described below:
i. Language: defines the laguage used for audio
prompt.
80
ii. Distance Unites: defines measurement system, Met-
ric or U.S.
3. After you configure the settings and press , Tibo
will save the settings and return to main menu.
4. To restore a factory default value, press button .
Page 81
Trave record
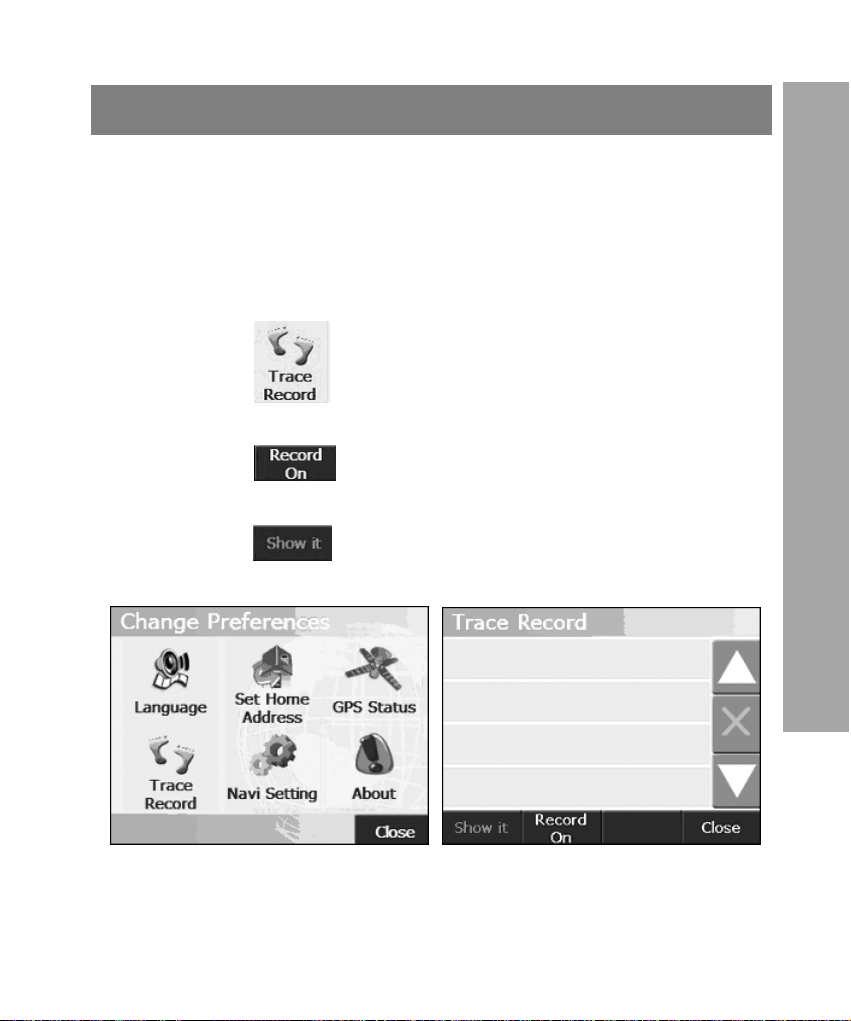
MyGuid logs all positioning information received from GPS
receiver during navigation. It draws a trail of the track on map.
This enables you to review the historic track information when
you re-launch Tibo application at the next time. This function is
very useful when you drive in rural areas such as desert or for-
est.
1. Press button in Turbodog main menu to enter
“Trace Record‘ window.
2. Press button to turn on/off track logging while
navigation.
3. Press button to toggle the display of a selected
track log file.
Change preference
81
Page 82
Change preference
GPS status
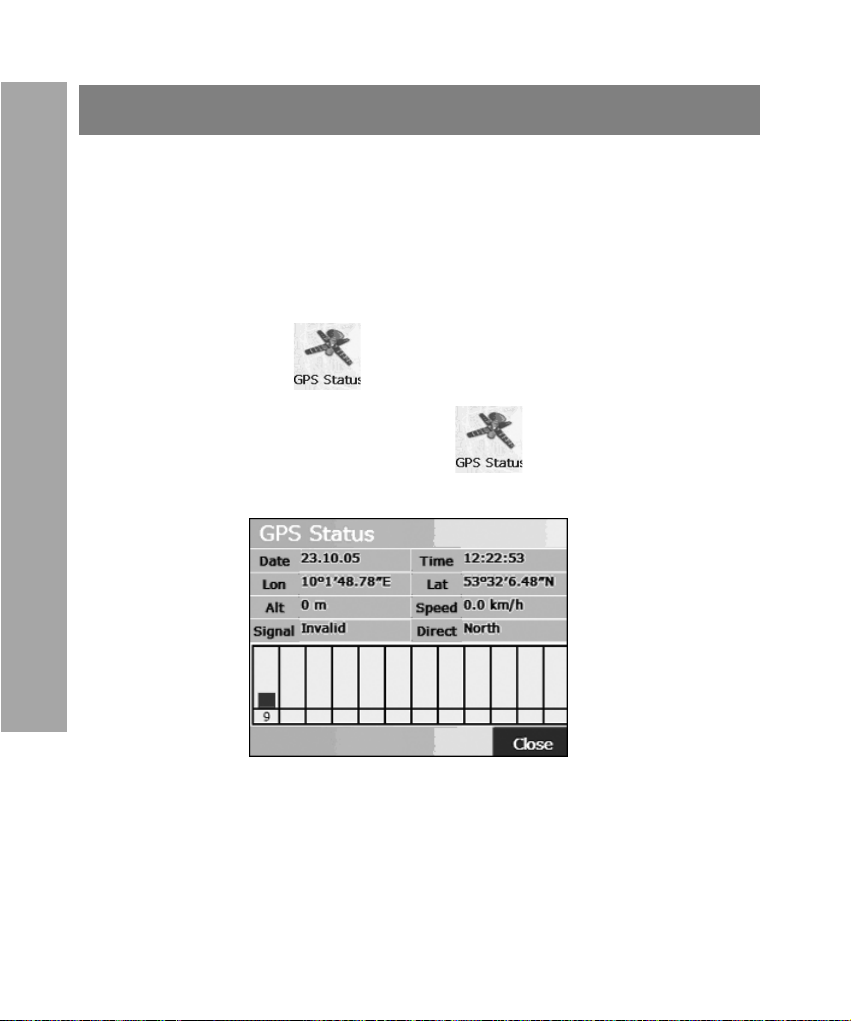
Turbodog will check the status of GPS receiver and display the
positioning information on the screen of your PDA. This feature
of Tibo allows you to view the current usage of satellites, the
number of satellites, the position of satellites and the signal
strength of satellites, etc.
1. In navigation, click on screen enter “Navi option“ page,
then press button to enter “GPS Status“ page.
2. Or in system menu, press button to enter “GPS
Status“ page.
82
3. In GPS Info. window, you are able to view the information of:
i. The positon of satellites: the relative orientaion of
satellites to current position fix.
Page 83

ii. The signal strength of satellites: the signal
strength of satellites from which the signals are
received.
iii. Positioning infromation:
A. Date: the date of which a GPS position fix is
received, e.g. 2004/08/30;
B. Time: the time of which a GPS position fix is
received, e.g. 01:01:27;
C. Longitude: the longitude of GPS position fix, e.g.
E 121/24/34.456;
D. Latitude: the latitude of GPS postion fix, e.g. N
31/24/34.456;
E. Altitude: the altitude of GPS position fix, e.g.
17m;
F. Driving speed: the speed of a GPS position fix,
e.g. 35.9kn/h.
Change preference
83
Page 84
Appendix
Appendix
Categories of POI
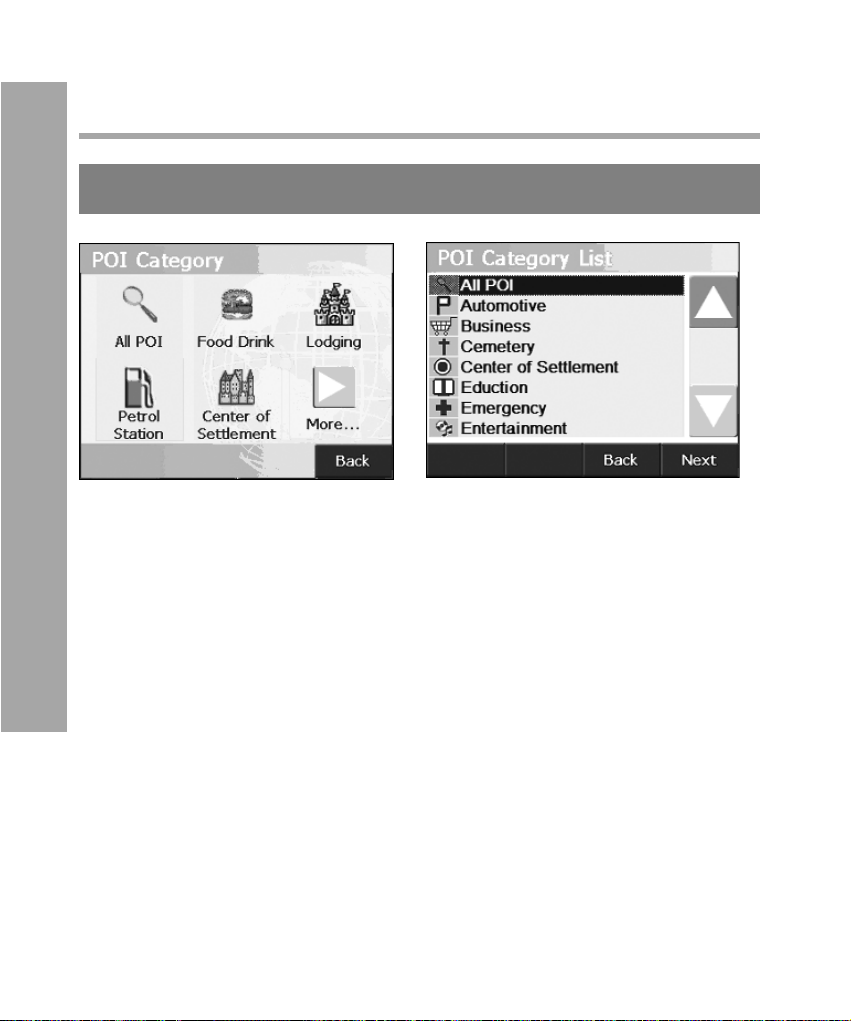
Turbodog include 19 categories of POI
A. All POI B. Automotive C. Business
D. Cemetery E. Center of Settlement
F. Eduction G. Emergency H. Entertainment
I. Food & Drink J. Government office
K. Lodging L. Parking M. Petrol Station
N. Recreation O. Services P. Shoppping
Q. Sights R. Traffic related S, Transport
84
Page 85

Glossary
Item Description
GPS Global Position System
ActiveSync A software application which synchronizes
the communication between a PocketPC
and a desktop PC
Map view mode One of the main function of Tibo which
provides map view and map operation
Navigation mode One of the main function of Tibo, providing
a map view while navigation
Menu operation One of the main function of Tibo, providing
information query, function set up adn system configuraion
Routing Routing calculation between a start point
(current position fix) and destination
Appendix
Proposed route The result of routing, displayed in a line
type on map, or prompted by turn-by-turn
method
Re-routing The ability to re-compute a route when off
the track
Floating point A cursor indicates the current GPS posi-
tion fix on map and direction of the movement
85
Page 86

Appendix
Attention
* It is not a system failure under circumstances listed
below:
Problems caused by the characteristics of GPS positioning:
• Sometimes, when you are driving on the highway/via-
duct, the floating point swings, vice versa.
• When you are driving along a Y shaped road, the float-
ing point may brach to the side road.
• When you are driving on a road of grid shaped, some-
times you will find that the floating point is at the side
road bearby.
• When you are driving on a very steep road.
• When you are driving on spiral road, you will find that the
floating point swings, It is nothing to do with the radius of
the road and the driving speed of your vehicle. It is due
to the real road condition may differ from the informaion
of electronic map.
86
• When you make a right/left turn to enter a road, which
has parallel roads nearby (the distance between them is
less than 50m) in parallel, from the road you have been
driving for a long time, you will find that the floating point
may go to another road.
• When you are driving on a wide road in a snaky line, you
will find that the floating point may swing due to the mismatch of real distance.
Page 87

• Before returning to a ground road after you have been
driving in an underground car park or a spiral path of the
multi-level car park, you will find that the floating point
may swing. When your car is in a rotary elevator, the
arrow of the floating point may not point to the right
direction.
• Providing voice prompt at a branching path ahead even
the car is already off the proposed route.
• Guiding distance may deviate.
When any of those situations occurs, the GPS satellite will automatically adjust the current position fix if you keep driving.
Problems caused by map files:
• When you return from a road which is newly constructed
to a road recorded in map file, you may find floating point
swings due to the map file may not reflect the real road
conditions. After you keep driving for while, the system
will adjust it to the right position using GPS signal information.
Appendix
• No through-way due to road closure or pedestrian path.
• Open of a new road and closure of old road.
• Guide to a no-through way.
• Route re-computed again without changing the proposed route.
• Guide to a normal road instead of a viaduct, or vice
versa.
87
Page 88

Appendix
• If there is only small lanes without a normal road near
destination, the system will only guide you to a place
near to your destination.
• Instruct you to make a U-turn,
• No indication at a branching road.
• Turning instruction mismatch the real road condition.
• No indication of direction or voice prompt about
entrance/exit while guiding on highway/express way.
• Schematic map may mismatch real road conditions.
* Places having difficulties to receive GPS signals
• In the tunnels;
• Between high buildings;
• Under viaducts;
• In trees/forests;
When using external GPS antenna, we recommed to place it on
the roof of the car. If there is rack on the roof of car, please make
sure to separate the rack and the antenna.
GPS is managed by the department of defense of USA. It may
purposely reduce the accuracy of the GPS signals so that the
car may swing.
* Use Notice
• The floating point may swing before GPS signal is
received when turning on power.
88
Page 89
• The floating point may swing when you use the system
at the first time after installation.
• The floating point may swing when you are changing the
tyre, specially using a spare tyre.
• The system will automatically adjust its position and
direction using GPS signals when the floating point mismatches real condition.
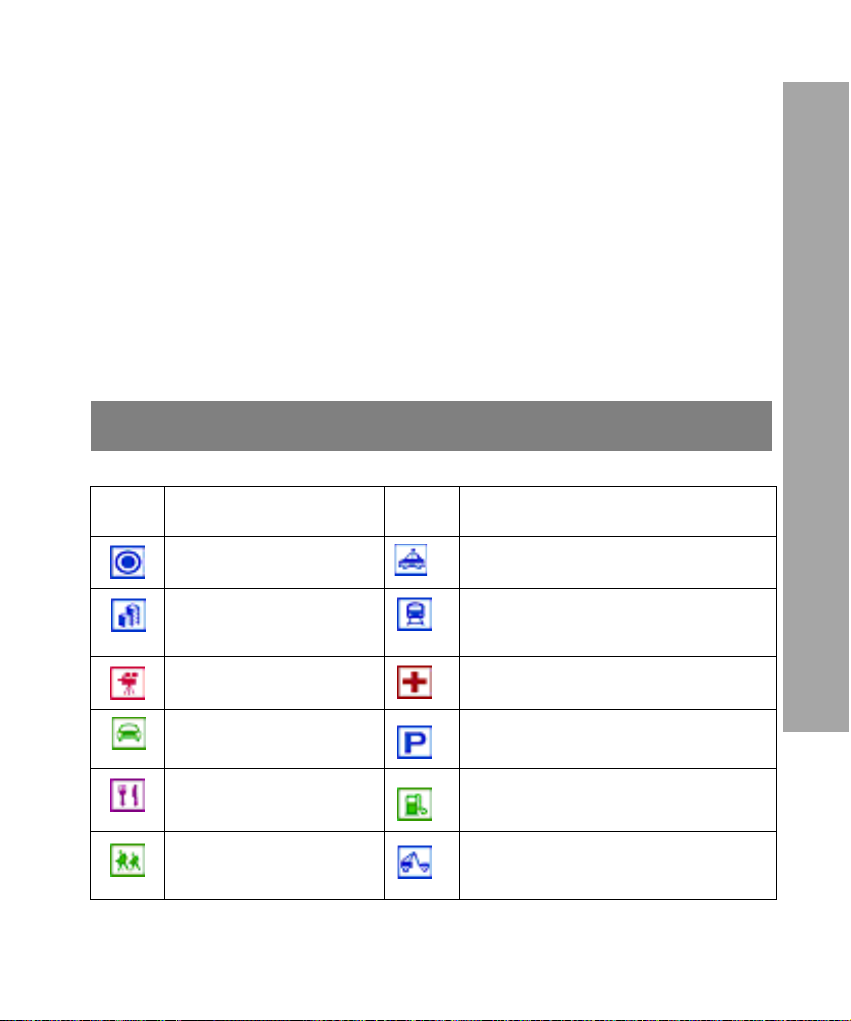
Map icons
Icon Name Icon Name
District/Estate Police station/NPP
Appendix
Building./Shopping Centres
Cinema/Library Hospital/Polyclinic
Car Rental Car parks
Restaurant Petrol kiosk
Tourist Att. Automobile repair and ser-
MRT/LRT
vice
89
Page 90
Appendix
Icon Name Icon Name
School/Education
centre
Sports Embassy/Town council
Cinema/Libary Religion
Golf Exhibition/Company
Airport
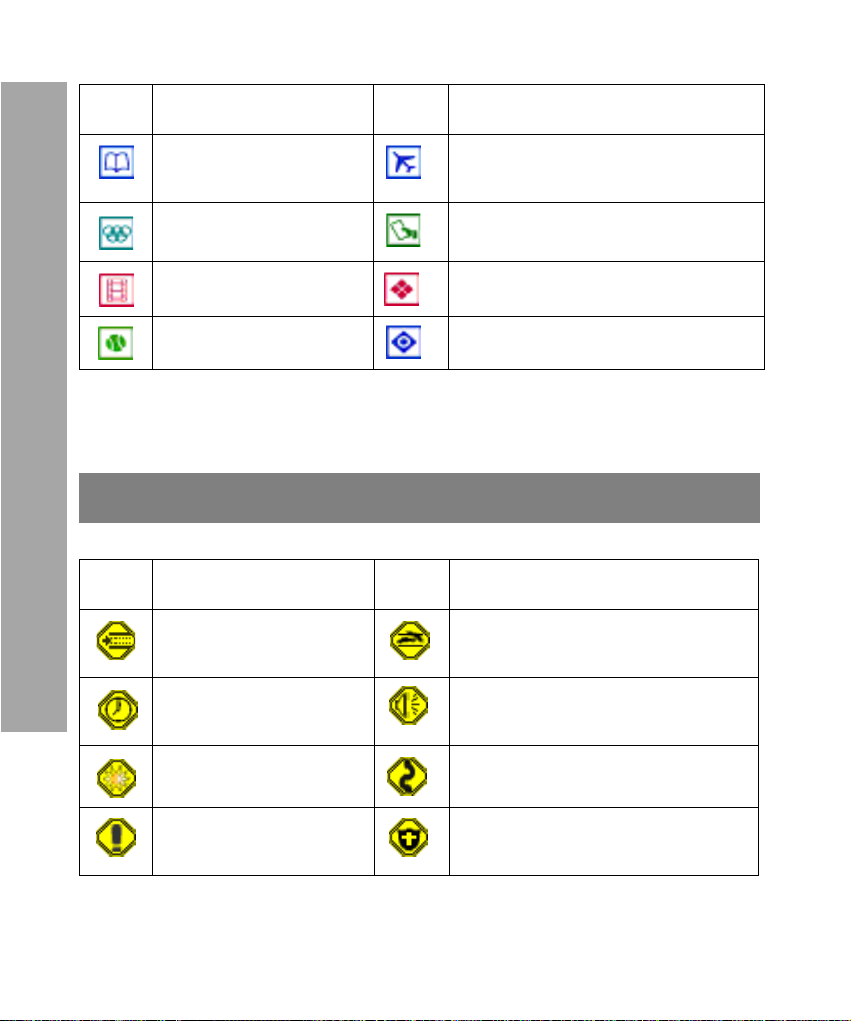
TMC message icons
Icon Name Icon Name
queuing traffic
expected
accident.
Delays(Q)
(Q) accident(s). Stationary
traffic for 3km
this service provides major
road information
90
heavy snowfall stationary traffic for 3km
cyclists on roadway. Danger
major event. Traffic building up
Page 91
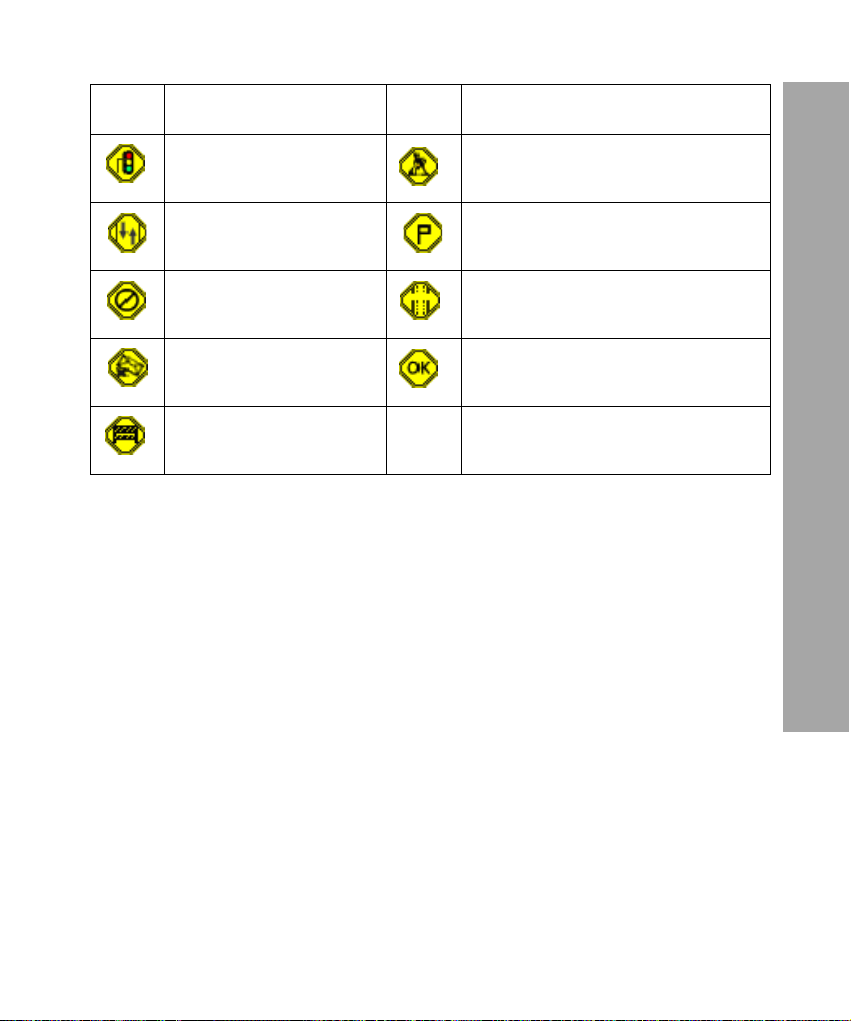
Icon Name Icon Name
Appendix
allow emergency
vehicles to pass
contraflow. Queuing traffic
no motor vehicles carriageway reduced (from
message cancelled
(Q) lanes closed.
Slow traffic
(Q sets of) roadworks.
Slow traffic
less than 10 parking
spaces available
Q lanes) to one lane
incident cleared
91
Page 92
Camera
Camera
Your Hatchback has an inbuilt camera, which allows you to take
photos and save as a geographical location. Photos can be
saved in the Photo Viewer on Hatchback or a memory card and
viewed in full screen.
Activating camera
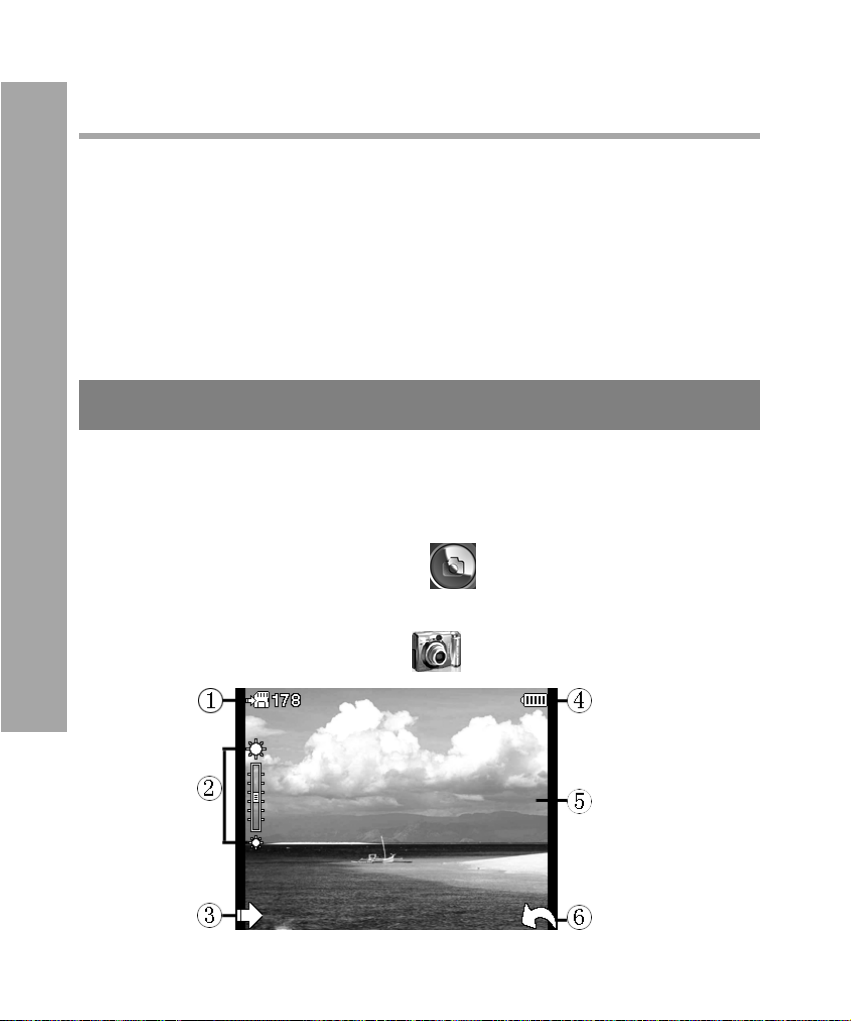
You can take photos with this inbuilt camera and access the
camera preference.
Do one of the following to view the camera screen:
• Press the camera button on the top of the Hatch-
back.
• Or tap the camera icon in the main menu.
92
Page 93
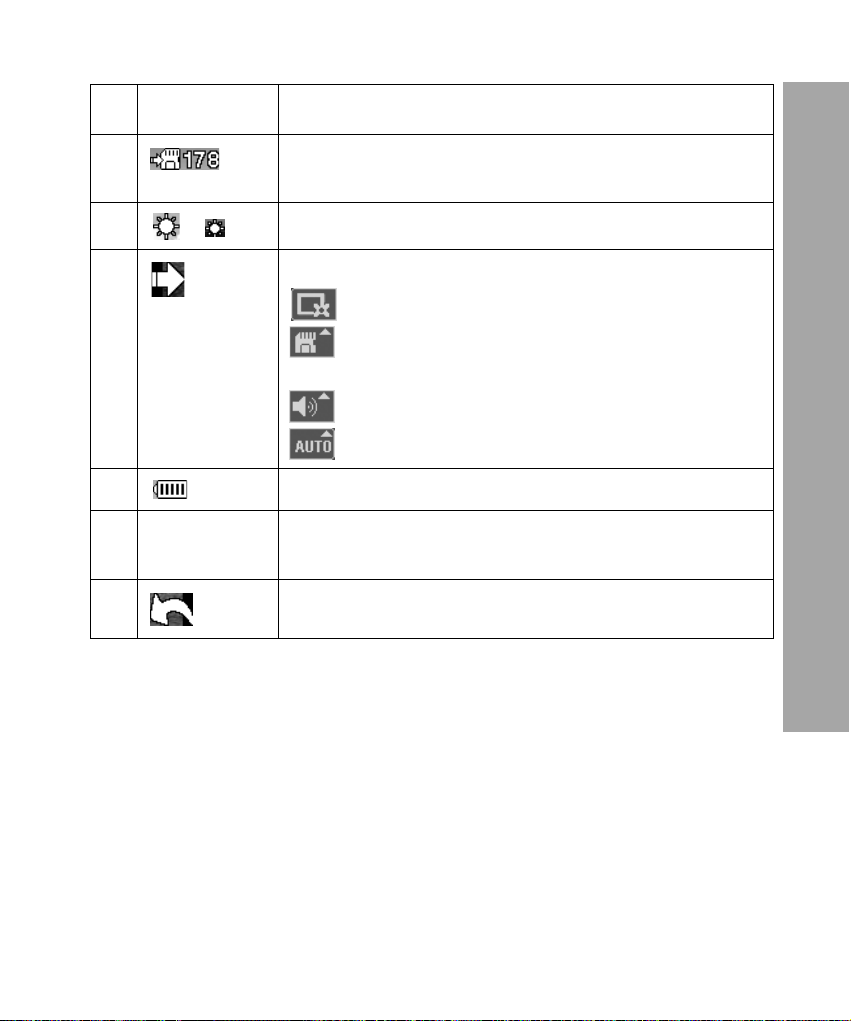
Element Description
1 Display the save location and the number of
photos that are still can be taken
Camera
2
3 Press to get the sub menu:
4 Battery indicator
5 Viewfinder Allows you to take photo within the view-
6 Return to main menu
/
Tap to adjust the lighting and brightness
- Tap it to access the Photo Viewer
- Tap to select the save location: Internal
memory/External memory card
- Tap to turn shutter on/off
- Tap to adjust the white balance status
finder
Customizing camera preferences
You’d better customize the camera preferences before using
camera to take a photo. The inbuilt camera has save location,
lighting and brightness settings, etc.
93
Page 94

Camera
Lighting and brightness options
To adjust the lighting and brightness as the following steps:
1. When the camera is open, tap / to adjust the
lighting and brightness.
2. Stop until the lighting is your preferred one.
Save location options
The photo can be saved on Hatchback or memory card. To set
the save location as the following:
1. When the camera is open, tap to get the sub menu.
2. Tap to select Save to internal memory or Save to
external memory card in the popup menu. Your selection will be saved.
Shutter options
1. When the camera is open, tap to get the sub menu.
2. Tap to select On or Off in the popup menu. Your
selection will be saved.
White balance options
You can switch different white balance in the inbuilt camera:
1. When the camera is open, tap to get the sub menu.
2. Tap to select the your preferred white balance
option in the popup menu. Your selection will be saved.
94
Page 95
Taking a photo
Before you take a photo you can customize the lighting and
brightness settings. For more information, see “Customizing
camera preferences“.
1. When the camera is open, an image the camera is
focused on will display in the viewfinder.
2. When you are satisfied with the image displayed in the
viewfinder, press the camera button to take the
photo.
3. The captured photo will be automatically saved in the
Photo Viewer on Hatchback or memory card.
Managing photos
You can manage the captured photos in Photo Viewer.
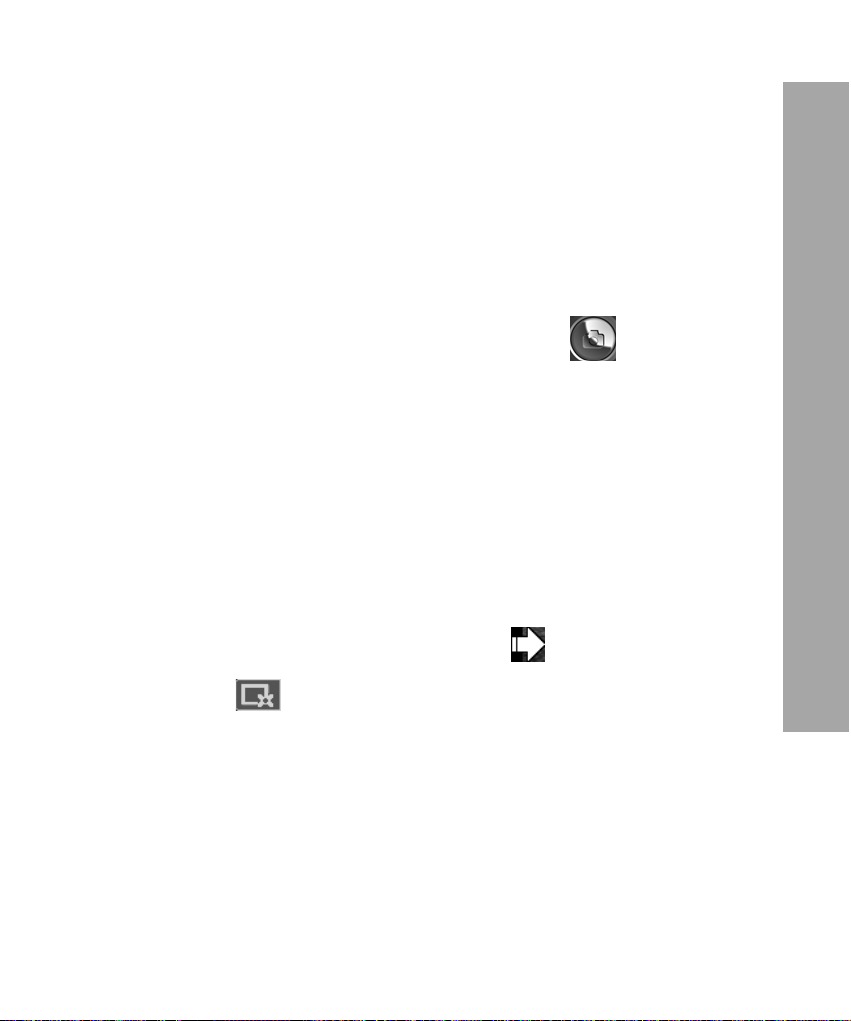
1. When the camera is open, tap to get the sub menu.
Camera
2. Tap to access the Photo Viewer. (See page
xxxxx.)
95
Page 96
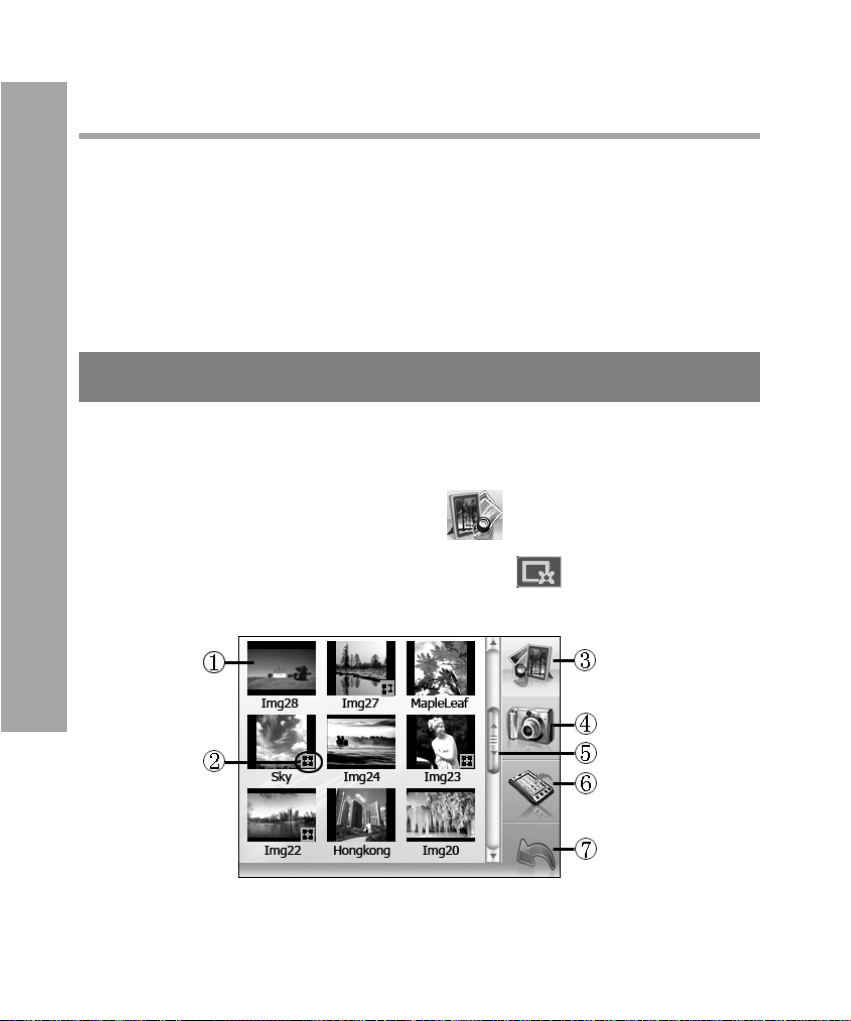
Photo Viewer
Photo Viewer
The Photo Viewer stores all your photos and displays them as
thumbnails. You can store photos in the Photo Viewer on
Hatchback or memory card.
Accessing Photo Viewer
You can manage only the photos saved in DCIM/HatchBack.
Do one of the following to activate Photo Viewer:
• Tap the Photo Viewer icon in the main menu.
• Or when the camera is open, tap to access Photo
Viewer.
96
Page 97
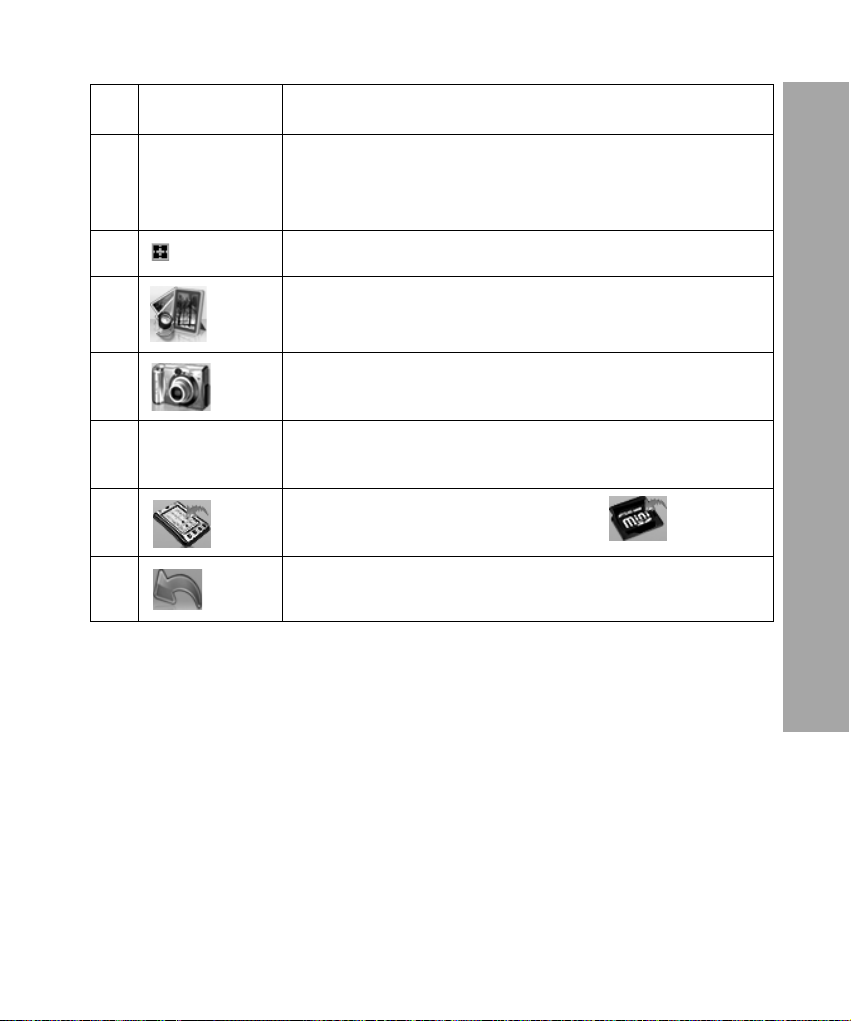
Element Description
1 Photo Display photos in the Photo Viewer on
Hatchback or memory card. Tap to display in
full screen.
2 Display if GPS is associated with a photo
3 You are in the Photo Viewer
4 Tap to activate camera
5 Scroll bar Allows you to scroll through thumbnail view
of photos
Photo Viewer
6
7 Return to main menu
Tap to switch to memory card
Photo management
To manage a photo, you need to tap the thumbnail of the photo.
The photo will display in full screen.
97
Page 98
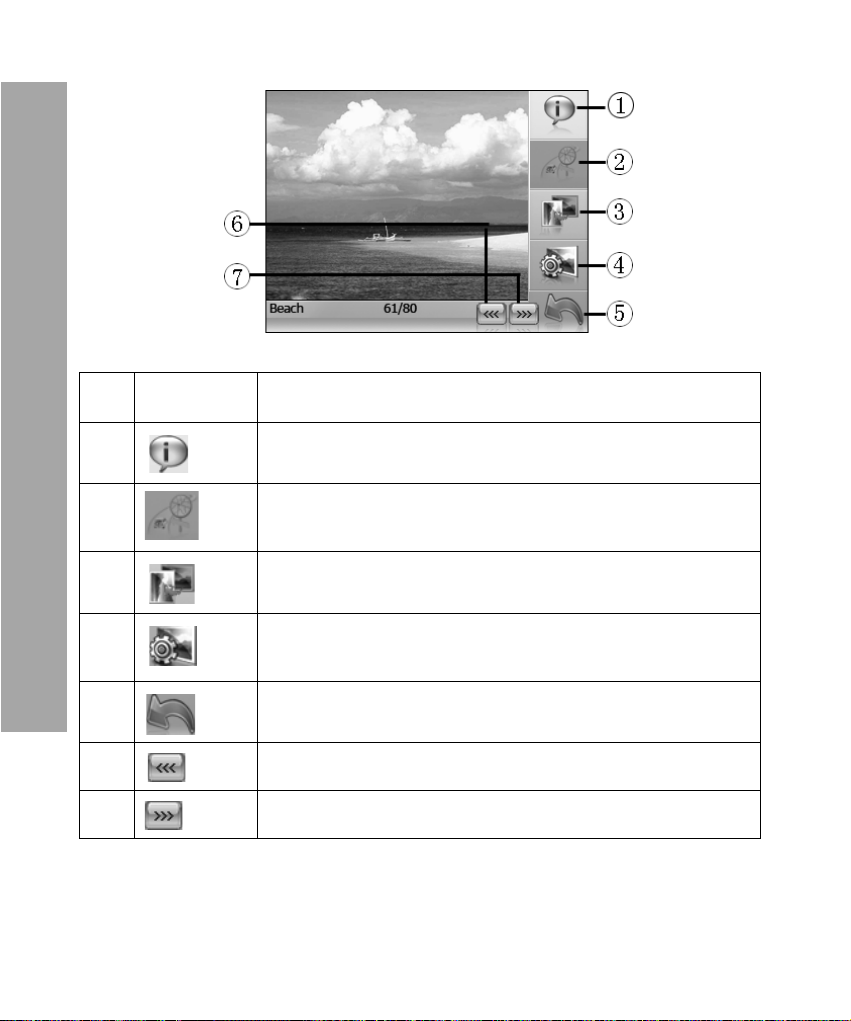
Photo Viewer
Element Description
1 Tap to view the photo’s information
2 If GPS is associated with the photo, tap it to
activate GPS application
3 Tap to rotate the photo
4 Tap it to select related options (See the fol-
lowing instruction)
98
5 Return to main menu
6 Tap to view the previous photo
7 Tap to view the next photo
Page 99
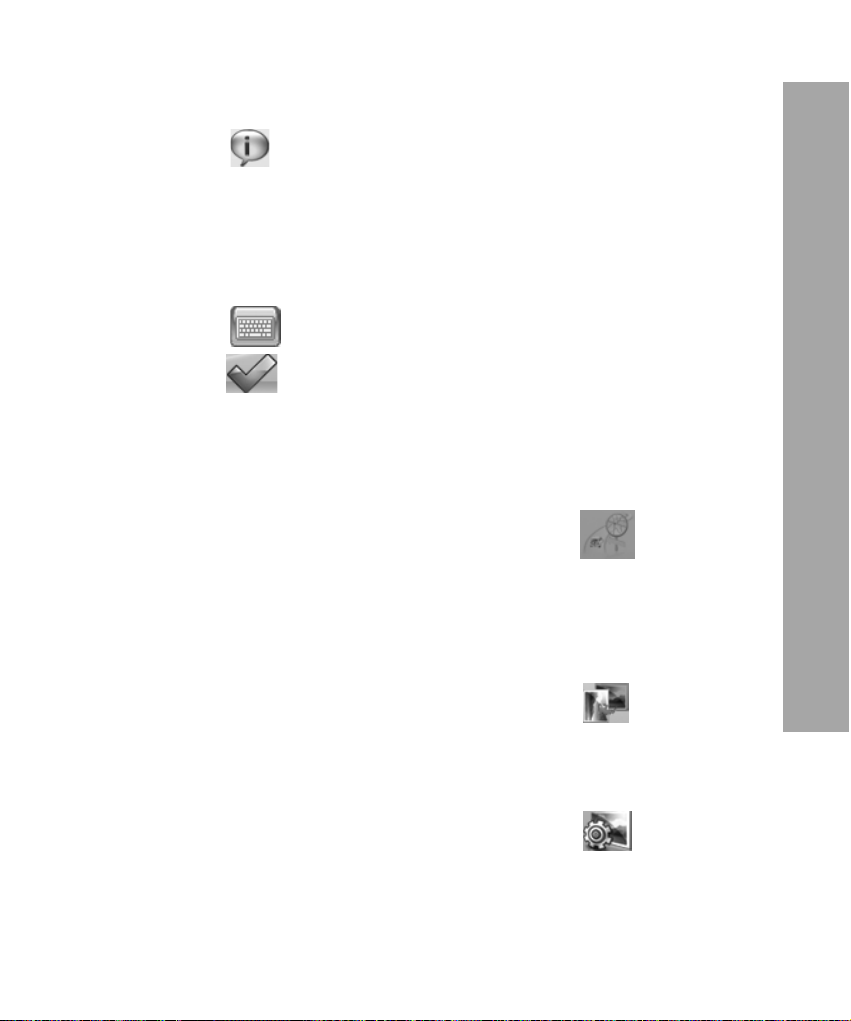
To view a photo’s information
1. Tap to access the Photo Information screen.
2. You can see the file name, photo description, taken
date, and size. If the GPS is associated with the photo,
the longitude and latitude will be displayed at the bottom of the Photo Information screen.
3. Tap to edit the file name and photo description;
tap to save.
To go to navigation
This function is only available when the GPS is associated with
this photo.
1. In the full view screen of a photo, tap to activate
GPS application.
2. Select the destination to go to navigation.
To rotate a photo
Photo Viewer
1. In the full view screen of a photo, tap to rotate the
photo.
To copy/move a photo
1. In the full view screen of a photo, tap to select
Move to external memory card/Copy to external
memory card.
99
Page 100
Photo Viewer
2. If the photo is saved in memory card, tap to select
Move to internal memory/Copy to internal memory.
Note: When copy/move photos to Hatchback, all photos
will be saved in the following folder: DCIM/HatchBack.
To delete a photo
1. In the full view screen of a photo, tap to select
Delete.
2. Tap to delete the current photo.
100
 Loading...