

Page 1

Table of Contents
Getting to know your VoIP Phone 6
Package contents . . . . . . . . . . . . . . . . . . . . . . . . . 7
VoIP Phone overview . . . . . . . . . . . . . . . . . . . . . . 8
Menu overview . . . . . . . . . . . . . . . . . . . . . . . . . . .11
Display indicators . . . . . . . . . . . . . . . . . . . . . . . . 12
Removing and inserting battery . . . . . . . . . . . . . . 15
Charging battery . . . . . . . . . . . . . . . . . . . . . . . . . 17
Input method . . . . . . . . . . . . . . . . . . . . . . . . . . . . 19
Switch input method . . . . . . . . . . . . . . . . . . . . . 19
Getting started 22
Switching the phone on/off . . . . . . . . . . . . . . . . . 22
Making a call . . . . . . . . . . . . . . . . . . . . . . . . . . . . 23
Answering and rejecting an incoming call . . . . . . 25
During a call . . . . . . . . . . . . . . . . . . . . . . . . . . . 26
Call features . . . . . . . . . . . . . . . . . . . . . . . . . . . . 27
Contents
1
Page 2

Contents
Call history . . . . . . . . . . . . . . . . . . . . . . . . . . . . . . 31
Phone Book 35
Accessing the Phone Book . . . . . . . . . . . . . . . . . 35
Phone configuration 39
Customizing your phone . . . . . . . . . . . . . . . . . . . 39
Using speed dial . . . . . . . . . . . . . . . . . . . . . . . 27
Call waiting . . . . . . . . . . . . . . . . . . . . . . . . . . . . 29
Call forward . . . . . . . . . . . . . . . . . . . . . . . . . . . 29
Direct IP . . . . . . . . . . . . . . . . . . . . . . . . . . . . . . 31
Adding an entry . . . . . . . . . . . . . . . . . . . . . . . . 36
Editing an entry . . . . . . . . . . . . . . . . . . . . . . . . 37
Deleting entries . . . . . . . . . . . . . . . . . . . . . . . . 38
Making a call in Phone Book . . . . . . . . . . . . . . 38
Accessing phone configuration . . . . . . . . . . . . 39
Audio . . . . . . . . . . . . . . . . . . . . . . . . . . . . . . . . 40
Ringer . . . . . . . . . . . . . . . . . . . . . . . . . . . . . . . 41
Date/Time settings . . . . . . . . . . . . . . . . . . . . . . 42
2
Page 3

Theme settings . . . . . . . . . . . . . . . . . . . . . . . . 43
Language selection . . . . . . . . . . . . . . . . . . . . . 44
Admin configuration 45
Accessing admin configuration . . . . . . . . . . . . . . 45
WLAN conf . . . . . . . . . . . . . . . . . . . . . . . . . . . . 46
User conf . . . . . . . . . . . . . . . . . . . . . . . . . . . . . 51
Stun conf (Simple Traversal of UDP over NAT) 52
Others . . . . . . . . . . . . . . . . . . . . . . . . . . . . . . . 53
Trouble shooting 55
Contents
3
Page 4

Copyright
Copyright
* Copyright © 2007 Group Sense Mobile-Tech Limited. All rights
reserved.
* Product specifications and features are for reference only and are
subject to change without prior notice.
Declaration
* This User Guide is published by Group Sense Mobile-Tech Lim-
ited, without any warranty. Improvement and changes to this
User Guide necessitated by typographical errors, inaccuracies of
current information, or improvements to programs and/or equipment, may be made by Group Sense Mobile-Tech Limited any
time and without notice. Such changes will, however, be incorporated into new editions of this User Guide.
FCC Statement
This device complies with Part 15 of the FCC Rules. Operation is subject to the following two conditions: (1) this device may not cause
harmful interference, and (2) this device must accept any interference
received, including interference that may cause undesired operation.
Changes or modifications not expressly approved by the party responsible for compliance could void the user's authority to operate the
equipment.
4
Page 5

Conventions used in this User Guide
Listed below are the typographical conventions used in this User
Guide.
* In this User Guide, “press the key” means to release the key after
you press it; “press and hold the key” means to press the key for
over seconds before releasing it.
* The text displayed on the screen is indicated in bold in this User
Guide, for example Phone Book.
Typographical Conventions
5
Page 6

Getting to know your VoIP Phone
Getting to know
your VoIP Phone
Congratulations on purchasing the VoIP Phone!
The VoIP Phone is a practical and highly manageable Voice
over Internet Protocol (VoIP) phone that looks similar to a
regular phone and uses the Internet for voice communication. The VoIP Phone is capable of communicating with regular telephones at very low costs. It can also be a highly
stable, cost-effective communication tool with a traditional
feel. This Guide will instruct you on quickly and easily connecting and using the VoIP Phone.
This chapter will introduce you to know about the VoIP
6
Phone.
Page 7

Package contents
When you get the VoIP Phone, you should have all the following components inside the package. If you find anything
missing or if the documentation set is incomplete, contact
your local phone dealer immediately.
* VoIP Phone handset
* User Guide
* Charger
Getting to know your VoIP Phone
7
Page 8
Getting to know your VoIP Phone
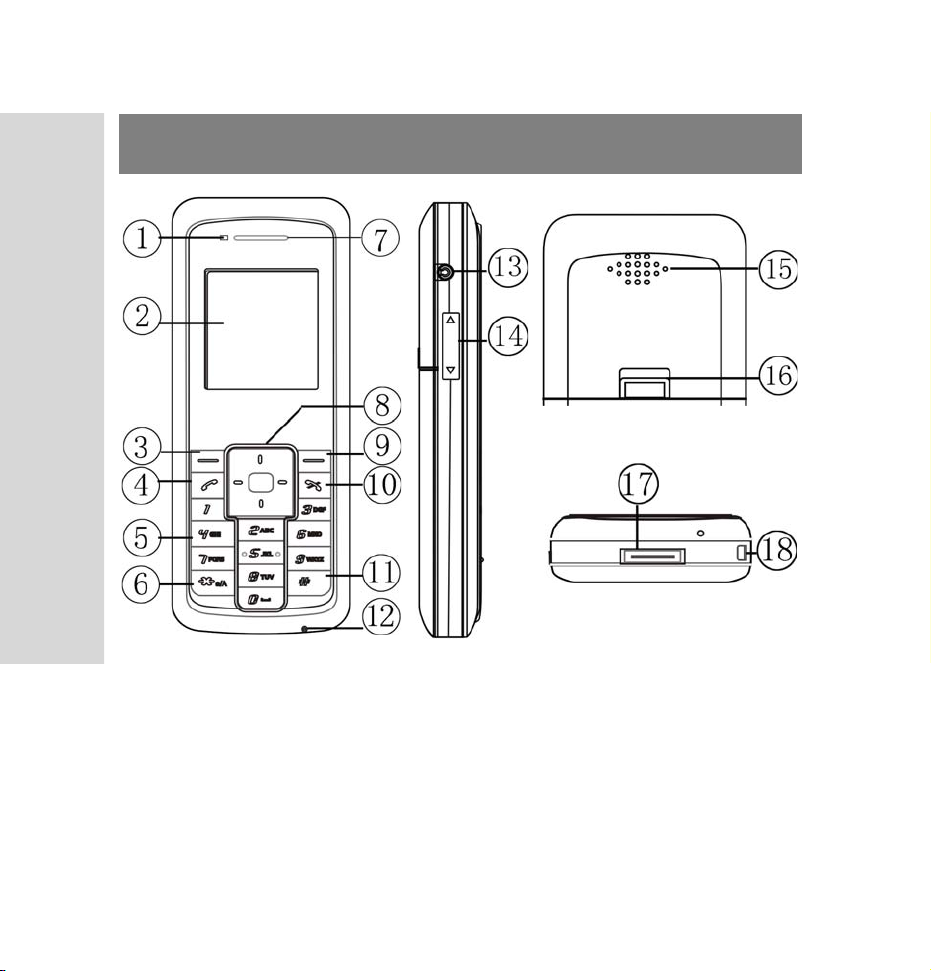
VoIP Phone overview
1. LED
2. LCD screen
3. Left function key
This key is used to perform the function indicated on
the screen above it.
8
Page 9

4. Call key
This key is used to make or receive a call. It can also
be used to access dialed call logs in the idle screen.
5. Numeric keypad
These keys are used to enter number and characters.
6. key
This key is used to enter “*” and switch the input
method.
7. Earpiece
8. Navigation key
This key is used to scroll up and down through out the
menu lists. Press to enter.
9. Right function key
This key is used to perform the function indicated on
the screen above it.
10. Power key
This key is used to switch the phone on and off, to end/
reject a call, or to return to the previous screen.
11. key
Getting to know your VoIP Phone
9
Page 10

Getting to know your VoIP Phone
This key is used to enter “#” and punctuations.
12. Microphone
13. Earphone socket
14. Volume button
15. Speaker
16. Battery release button
17. Charging socket
18. Strap hole
10
Page 11
Menu overview
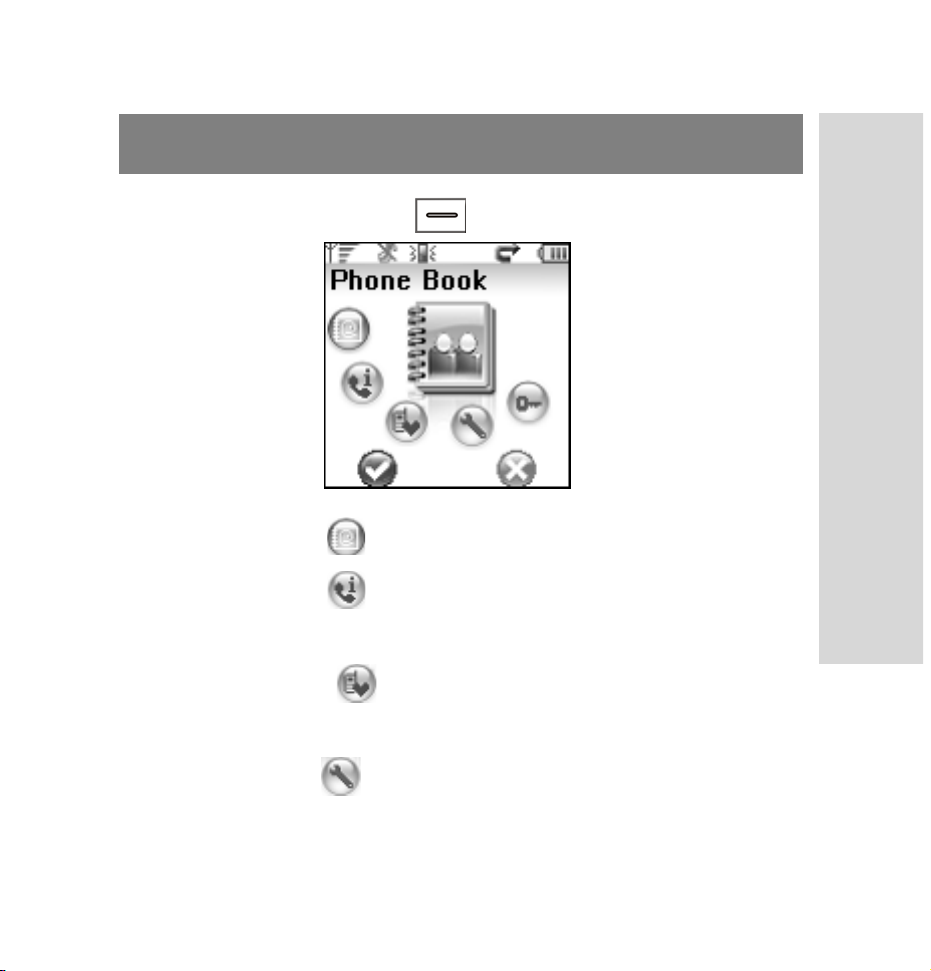
Press the left function key to access the main menu.
1. Phone Book
2. Call History
Missed Calls Received Calls Dialed Calls
3. Call Features
Call Forward Speed Dial Call Waiting Direct IP
4. Phone Conf
Audio Ringer Date/Time Theme Language
Getting to know your VoIP Phone
11
Page 12
Getting to know your VoIP Phone
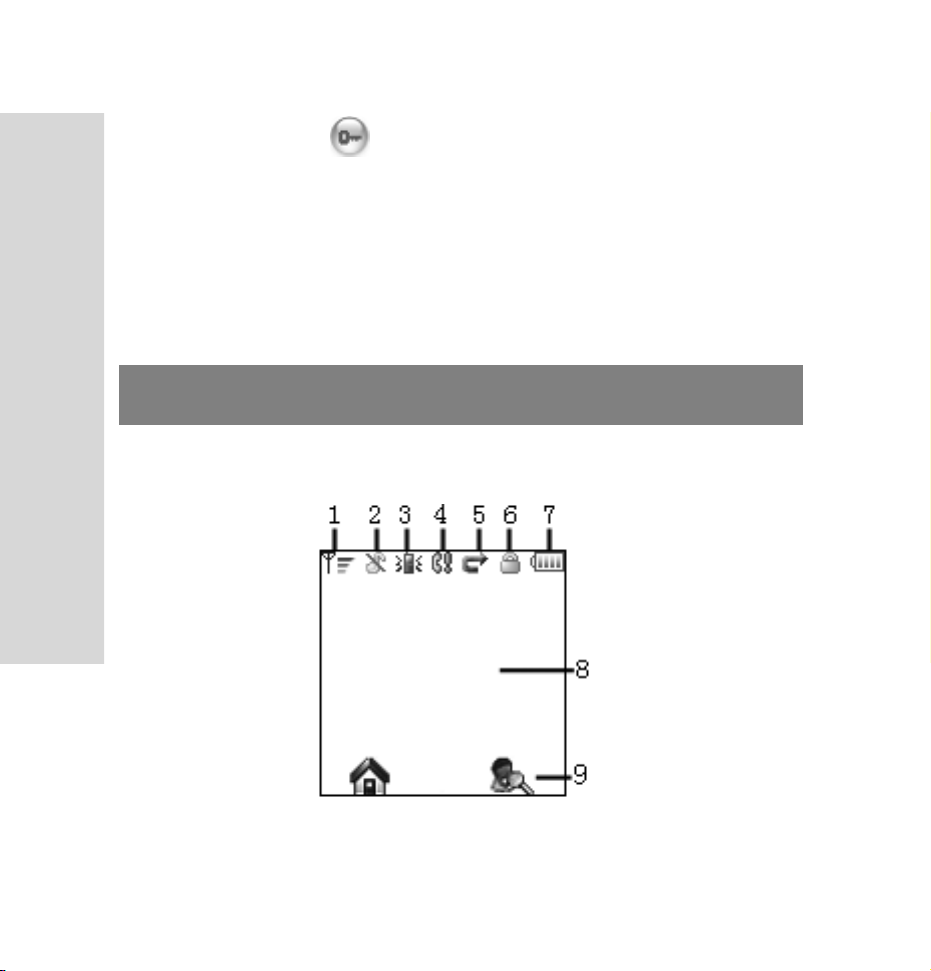
5. Admin Conf
WLAN Conf User Conf STUN Conf Others
Ve rs io n
Display indicators
Icons on the status bar
12
Page 13
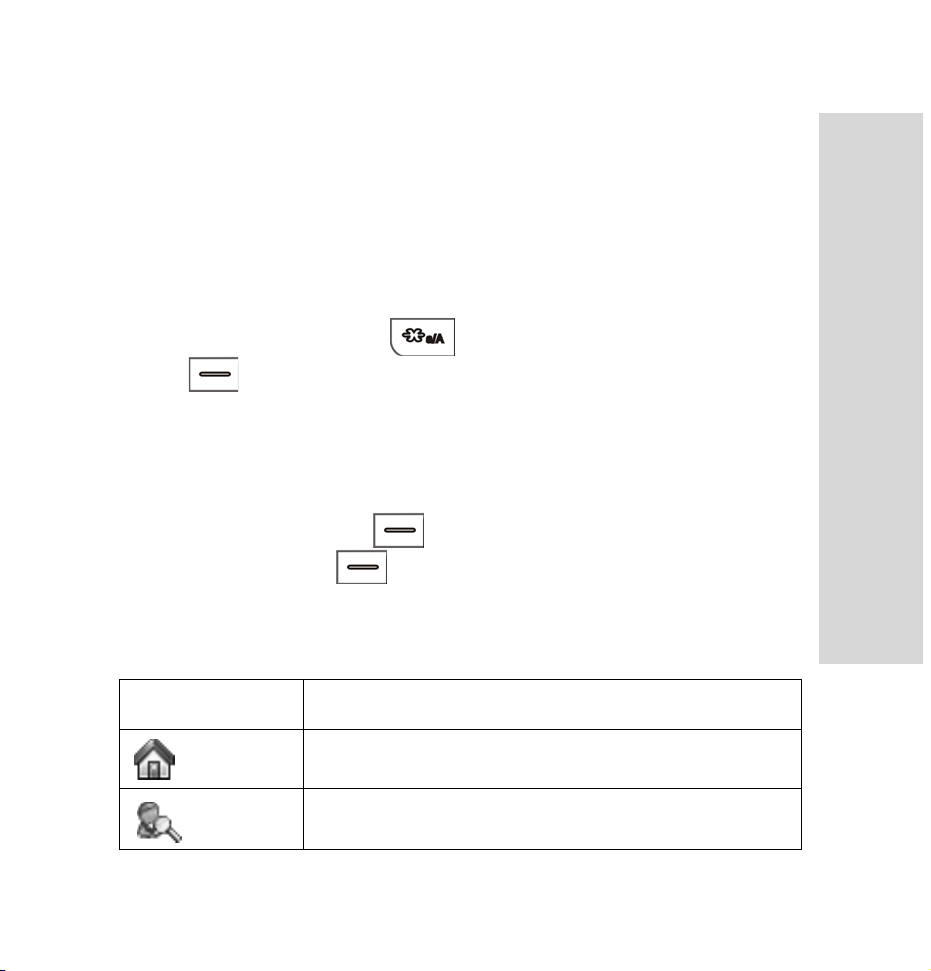
1. Show the current signal strength
2. Ringer volume is set to mute
3. Ring mode is set to vibration
4. Missed call
5. Call forward
6. Key locked (Press and the left function key
to lock/unlock the keyboard)
7. Battery indicator
8. Content display area: Shows the time and date
9. Function key display area: Shows the functions of the
left function key (access main menu) and right
function key (access Phone Book)
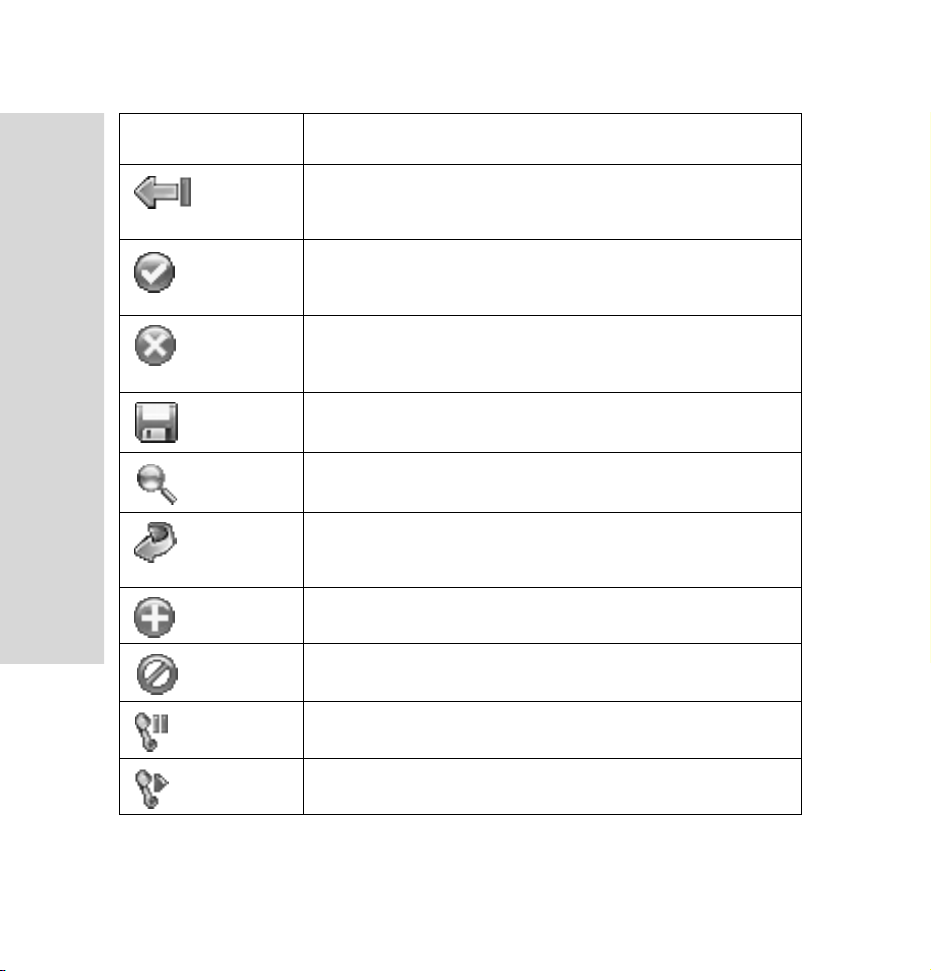
Function key description
Function key Descriptions...
Getting to know your VoIP Phone
Go to menu
Go to Phone Book
13
Page 14
Getting to know your VoIP Phone
Function key Descriptions...
Clear one character where the cursor
located
Perform the functions of selecting, confirming, OK, etc
Back one level of the menu, or exit the
message box, No
Save the settings in the edit mode
More
End the established call, and connect to
the incoming call
Add contacts
Abort
14
Hold the current call
Unhold the current call
Page 15
Removing and inserting battery
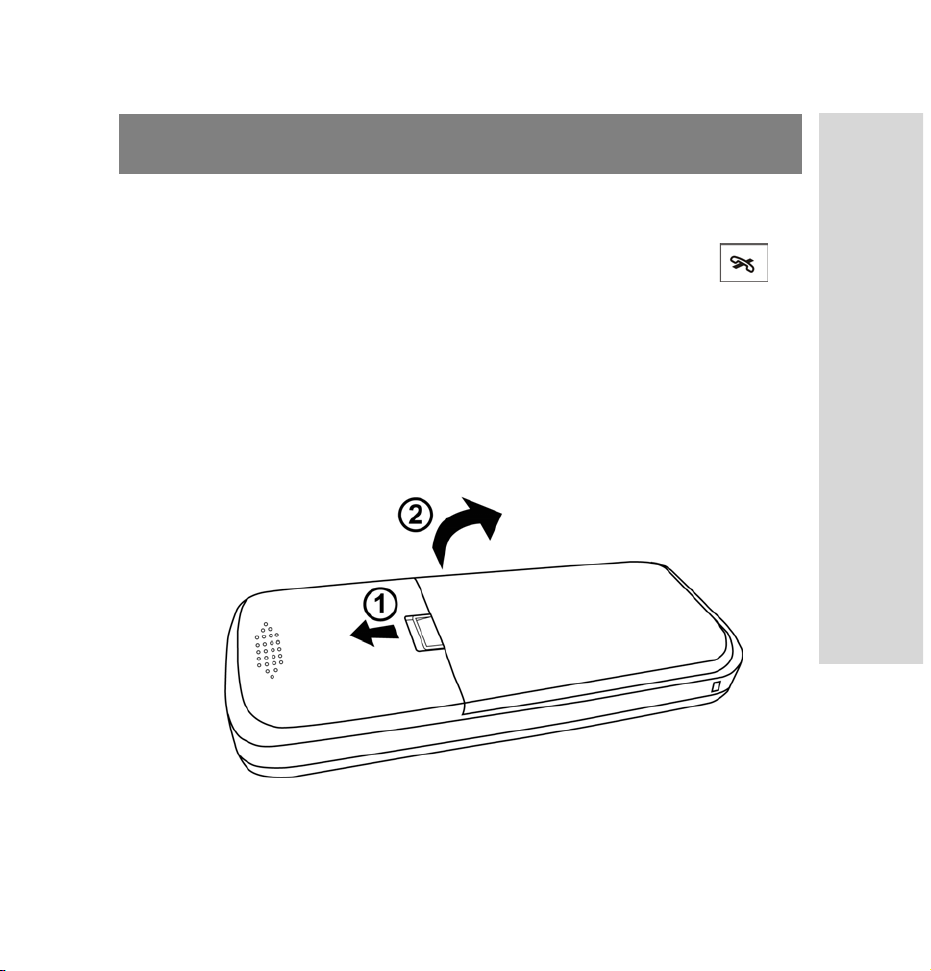
To remove the battery
1. In the idle screen, press and hold the power key to
switch the phone off. (Otherwise, some user settings
may be lost.)
2. Remove the battery.
With the back of the phone facing you, slide the battery
release button upwards and lift the battery off in the
direction of the arrow.
Getting to know your VoIP Phone
15
Page 16

Getting to know your VoIP Phone
To insert the battery
1. Slide the battery release button upwards.
2. Place the battery with the metal contact facing downwards in the battery compartment.
3. Press the battery downwards until it fits into the battery
compartment, then release the battery release button.
16
Page 17
Charging battery
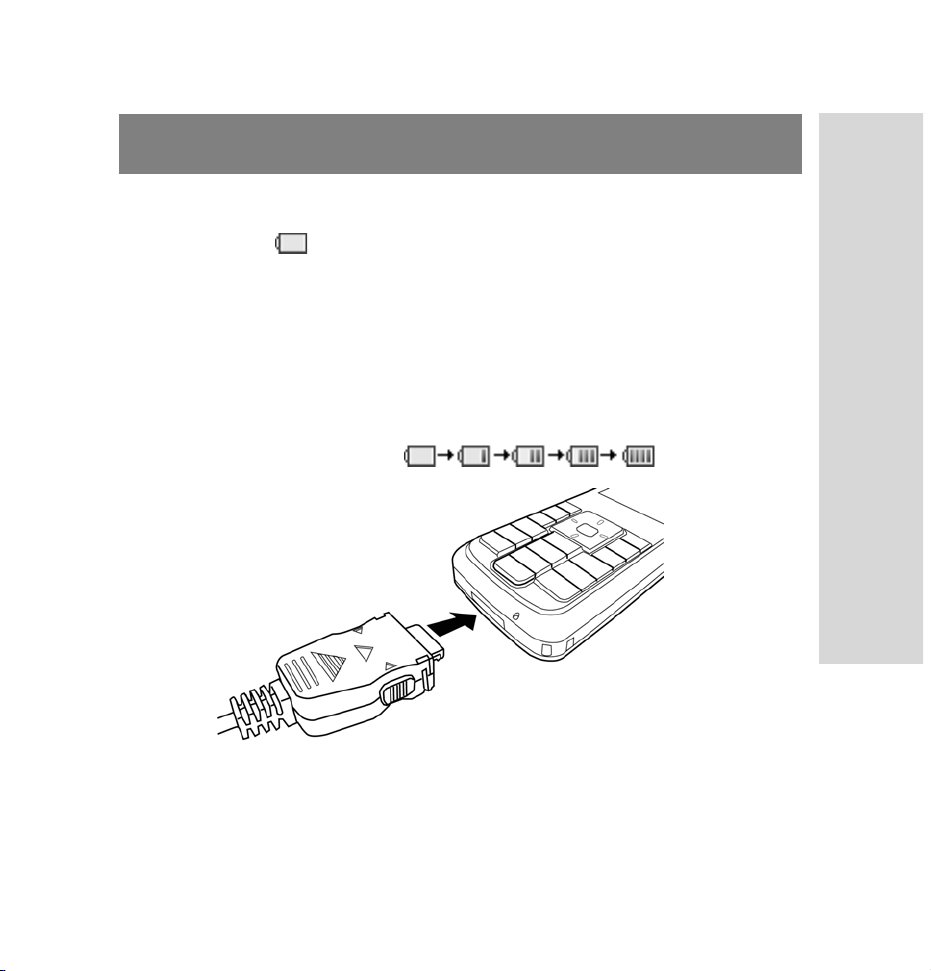
When the battery power is low and needs recharging, the battery indicator will flash continuously, the phone will be
switched off automatically. To charge the battery, please follow the steps below:
1. Plug the charger to an AC wall outlet.
2. Connect the lead to the charging socket of the phone.
And the LED light turns orange, the battery indicator
bar starts to scroll ( ).
Getting to know your VoIP Phone
3. When charging is complete, the battery indicator bar
stops scrolling and the LED light turns green.
17
Page 18

Getting to know your VoIP Phone
4. It is normal that your charger and phone become warm
to touch when the battery is being charged.
5. If the phone is turned on while charging, you can still
make and receive calls as usual.
Battery use and care
A. We recommend that you fully charge the battery before
you use your phone for the first time.
B. A new battery or one which has not been used for a
long time may have reduced capacity for the first few
times it is used.
C. It is important that you always turn off your phone
before removing the battery. Failure to do so can cause
corruption of data in memory.
D. Always detach the charger before installing or
removing the battery.
E. Warning! Battery may explode if disposed of in fire.
Do not expose the battery to liquid.
F. Do not disassemble or modify the battery. Only use the
battery for its intended purpose.
18
Page 19
Input method
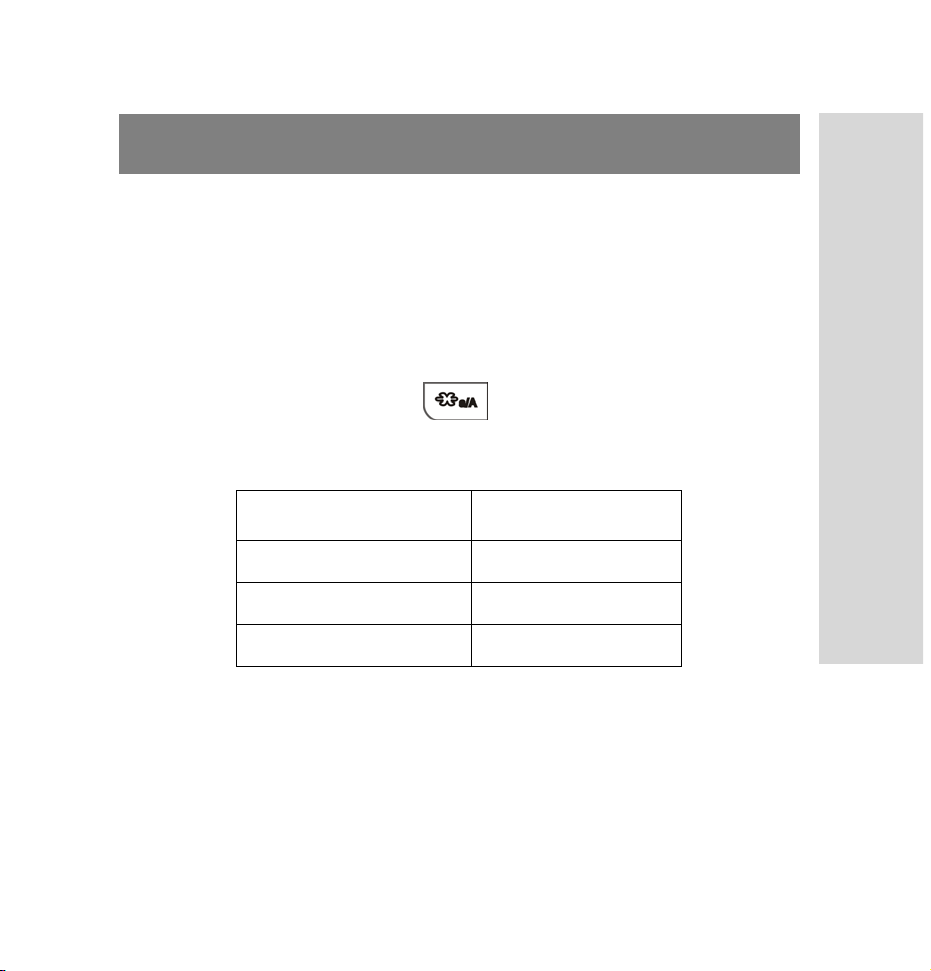
This phone supports English letter (Uppercase letter and
Lowercase letter) and Digit input methods.
Switch input method
In text-editing mode, press to switch between these
input methods. The current input method indicator will be
displayed at the upper right corner of the screen:
Input method Indicator
Uppercase letter A
Lowercase letter a
Digit 1
Letters
Switch to Uppercase letter input method; “A” will be displayed at the upper right corner of the screen.
Getting to know your VoIP Phone
19
Page 20
Getting to know your VoIP Phone
1. To enter a letter, press the corresponding key repeatedly until the letter you need appears.
For example: if you press repeatedly, the following letters appear in turn: ( )
2. After you have entered the intended letter, press any
other key on the keypad to enter the next letter. If the
next letter you will enter and the current letter share the
same key, simply wait for one second to enter again.
3. Press the right function key to delete the character
to the left of the cursor; press and hold the right func-
tion key to delete all characters; press to
switch input methods.
The step to enter lowercase letter is quite same as the uppercase letter input method.
Digit
Switch to Digit input method; “1” will be displayed at the
upper right corner of the screen.
To enter digits, press the corresponding number keys.
20
Page 21
Note: When entering letters or digit, you can press -
repeatedly to enter punctuations; press to
switch input methods; press twice to enter a
space.
Getting to know your VoIP Phone
21
Page 22
Getting started
Getting started
Switching the phone on/off
To switch on your phone
1. Press and hold the power key , the phone will display the power-on animation as the following screen.
2. A few seconds later, the idle screen displays, you can
use your phone.
22
Page 23

To switch off your phone
1. Press and hold the power key .
2. “Saving Config! Please Wait ...!” will be shown on the
screen, then your phone will be switched off automatically.
Making a call
When you switch on your phone, it searches for a network
automatically. Once network service is available, you can
make or receive calls.
To make a call
Getting started
1. Enter the phone number.
To delete the character or digit to the left of the cursor,
press the right function key , To move the cursor,
23
Page 24
Getting started
press the navigation key . To delete all the numbers
or characters, press and hold the right function key
.
2. Press the call key to dial out.
3. To end the call, press the power key (end call key)
.
Note: Prior to making or receiving calls, the phone must
be connected to a wireless Access Point (AP) and
registered with the service network. See “Admin configuration” on page 45 for detailed instructions.
24
Page 25

Answering and rejecting an incoming call
When you receive a call, the phone rings.
To answer an incoming call
1. When there is an incoming call, you may press the call
key .
2. To end an incoming call, press the power key (end call
key) .
To reject an incoming call
* When there is an incoming call, press the power key
(end call key) to reject the incoming call.
Getting started
25
Page 26
Getting started
During a call
While on a call, you can perform the following operations:
To mute the microphone
* To resume the volume, press the left function key
and select Mute/Unmute.
To hold/unhold a call
1. During a call, press the right function key (an icon
displayed on screen ) to hold the current call.
2. To take the call off hold, press the right function key
(an icon displayed on screen ) to unhold the
call.
3. To end the held call, press the power key .
To make a new call
1. While on a call, if you need to connect to a third party,
press the left function key .
2. Press the navigation key to select Make a new
26
call.
Page 27

3. Enter the third party’s phone number, and then press
the call key .
4. When the connection succeeds, you can start the call
with the third party. The original call will be placed on
hold.
Call features
Your phone also supply the following functions: Call forward, Speed dial, Call waiting and Direct IP.
Getting started
Using speed dial
Select this option to assign a phone number to one of speed
dial keys - for greater convenience when dialing.
27
Page 28
Getting started
To assign a phone number in speed dial
1. Select Speed Dial in Call Features.
2. Select the position you want to set the speed dial number from - for the speed dial feature.
3. Press the left function key , enter the speed dial
number.
4. Press the left function key to save.
To make a call in speed dial
If you have assigned a phone number to one of the speed dial
keys - , you can quickly call that phone number.
* In the idle screen, press and hold the corresponding
speed dial key to automatically dial out the number.
28
Page 29

Call waiting
This option enables you to set the Call Waiting function.
To enable call waiting function
1. Press the left function key to select Call Waiting
in Call Features.
2. Select Enable to activate Call Waiting function.
To set the call waiting duration
1. Select Duration in Call Waiting.
2. Select the waiting duration in the list.
Call forward
If the Call Forward function is activated, you can forward a
call to another phone number.
You can use the following forwarding functions:
* All calls: Forwards all calls to another number.
Getting started
29
Page 30

Getting started
* On Busy: Forwards when you are busy.
* On No-Answer: Forwards when you cannot answer
the phone.
To set a call forward number
1. Press the left function key to select Call Forward.
2. Select one of the forwarding options (e.g., All Calls),
then select Forward Add.
3. Enter the phone number to that you want your calls to
be forwarded.
To enable a call forward
1. Press the left function key to select Call Forward.
2. Select one of the forwarding options (e.g., All Calls),
then select Enable. Press the navigation key to
30
highlight Ye s to enable the call forward function.
Page 31
Direct IP
Select Direct IP in Call Features, enter the IP address you
need to dial, and press the call key to dial out. (Press the
key to enter “.”; and the address will be blank when
you access next time.)
Call history
Your phone records missed, received and dialed calls.
In the idle screen, press the left function key to access
the main menu, then press the navigation key to select
Getting started
Call History .
In the idle screen, you can press the call key to quickly
access Dialed Calls.
31
Page 32

Getting started
Missed calls
After you access this option, the phone will display the information of the most recent missed call: the caller’s phone
number or name (if the number is stored in the Phone
Book).
When viewing a call history, you can dial the caller’s phone
number by pressing the call key .
Select Missed Calls in Call History, the caller’s phone num-
ber will be displayed. You can save, remove or view the
details of the number.
To s av e as ne w
1. Press the navigation key to highlight the number
you will save it as a new record.
2. Press the left function key to select Save as new in
Missed Calls.
3. Select the phone number type, press the left function
key to access Add Contact mode.
32
Page 33

4. Edit the number and press the left function key to
save.
To add to contact
1. Press the navigation key to highlight the number
you will add to Phone Book.
2. Press the left function key to select Add to con-
tact in Missed Calls.
3. Select the contact existed in Phone Book, select the
phone number type and press the left function key
to access Edit contact mode.
4. Edit the number and press the left function key to
save.
To view details
1. Press the navigation key to highlight the number
you will view the details.
2. Press the left function key to select View Details
in Missed Calls.
Getting started
33
Page 34

Getting started
3. The name, address, date, time and call duration will be
displayed in View Details.
To remove a call
1. Press the navigation key to highlight the number
you want to delete.
2. Press the left function key to select Remove.
3. Press the left function key to delete the entry;
press the right function key to cancel.
You also can view the received and dialed calls. They have
quite the same function with missed calls, please refer to
Missed calls for details.
34
Page 35

Phone Book
You can store frequently used phone numbers and names in
the Phone Book. Each entry may contain a name and two
phone numbers.
Accessing the Phone Book
You can access the Phone Book in either of the following
ways:
* In the idle screen, press the right function key .
* In the idle screen, press the left function key to
access the main menu, scroll to Phone Book and press
the left function key .
Phone Book
35
Page 36
Phone Book
* Or in the idle screen, press the enter key , then press
it again or left function key .
Adding an entry
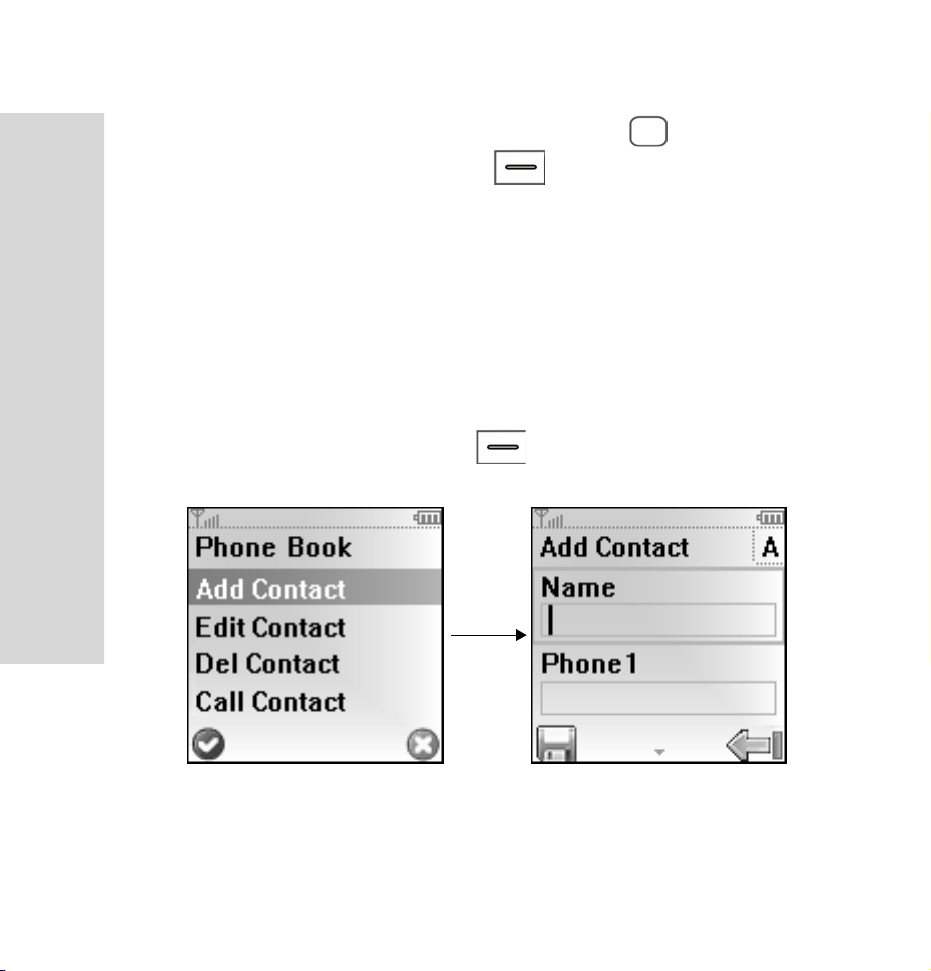
All entries in Phone Book will be displayed in the contact
list. To add a new entry in the following steps:
1. Press the left function key , select Add Contact to
the entry edit screen.
2. Enter the name.
36
Page 37

The name cannot be left blank; otherwise “Please enter
a name.” will be displayed.
3. Use the navigation key , scroll to the number location and enter the number.
The phone number cannot be left blank; otherwise you
will be alarmed “Please enter at lease one number.”.
4. Press the left function key to save the entry when
finish editing.
Editing an entry
Change names or numbers by doing the following steps:
1. Select an entry in the contact list.
2. Press the left function key , select Edit Contact to
access the entry edit mode.
3. Change the name or number, press the left function key
to save.
Phone Book
37
Page 38

Phone Book
Deleting entries
You can delete entries saved in Phone Book.
1. Select an entry in the contact list.
2. Press the left function key to select Del Contact/
Delete All.
3. When get the prompt “The contact will be deleted. Are
you sure?”, press the left function key to delete the
entry; press the right function key to cancel your
selection.
Making a call in Phone Book
You can enter numbers directly in the idle screen to make
calls. Also, you can make calls in Phone Book.
1. In the contact list, select an entry and press the left
function key .
2. Select Call Contact. Select the number you will dial
and press the call key .
38
Page 39
Phone configuration
Customizing your phone
There are a number of ways for you to change the phone’s
settings to suit your requirements.
Accessing phone configuration
To customize your VoIP Phone, access the Phone Conf first:
1. In the idle screen, press the left function key or
enter key to access the main menu.
2. Scroll to Phone Conf and select.
Phone configuration
39
Page 40
Phone configuration
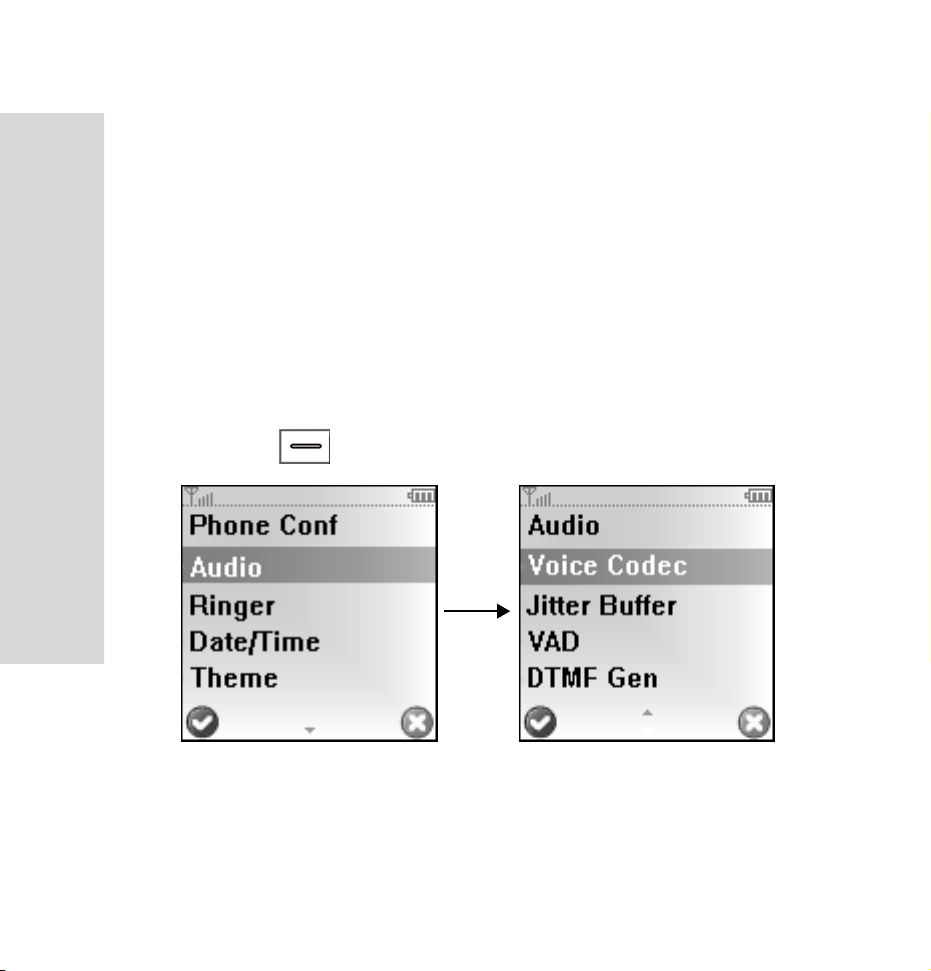
Audio
This item enables you to customize the phone alert settings
to suit a variety of environments.
When you access this menu, the audio list will be displayed.
You can customize each one and activate the one that suits
your environment.
1. In the Phone Conf screen, select Audio.
2. Select the audio you will activate, press the left function key to confirm your selection.
40
Page 41

Ringer
This option enables you to select a special ring tone for the
incoming calls.
Ringtone
1. In the Phone Conf screen, select Ringer.
2. Select Ringtone, scroll through the ringtones, listen to
each and highlight the desired one, press the left func-
tion key to confirm your selection.
Vol ume
Select this option in Ringer to adjust the ring volume level
for incoming calls.
There are 10 volume levels, press the left or right navigation
key to decrease or increase the ring volume level. When the
volume level is set to 0, you can see on the status bar.
Vibration
Phone configuration
This function enables you to define how the phone will
notify you of the incoming call.
1. Select Vibration in Ringer.
41
Page 42
Phone configuration
2. Select On to enable vibration; select Off to disable.
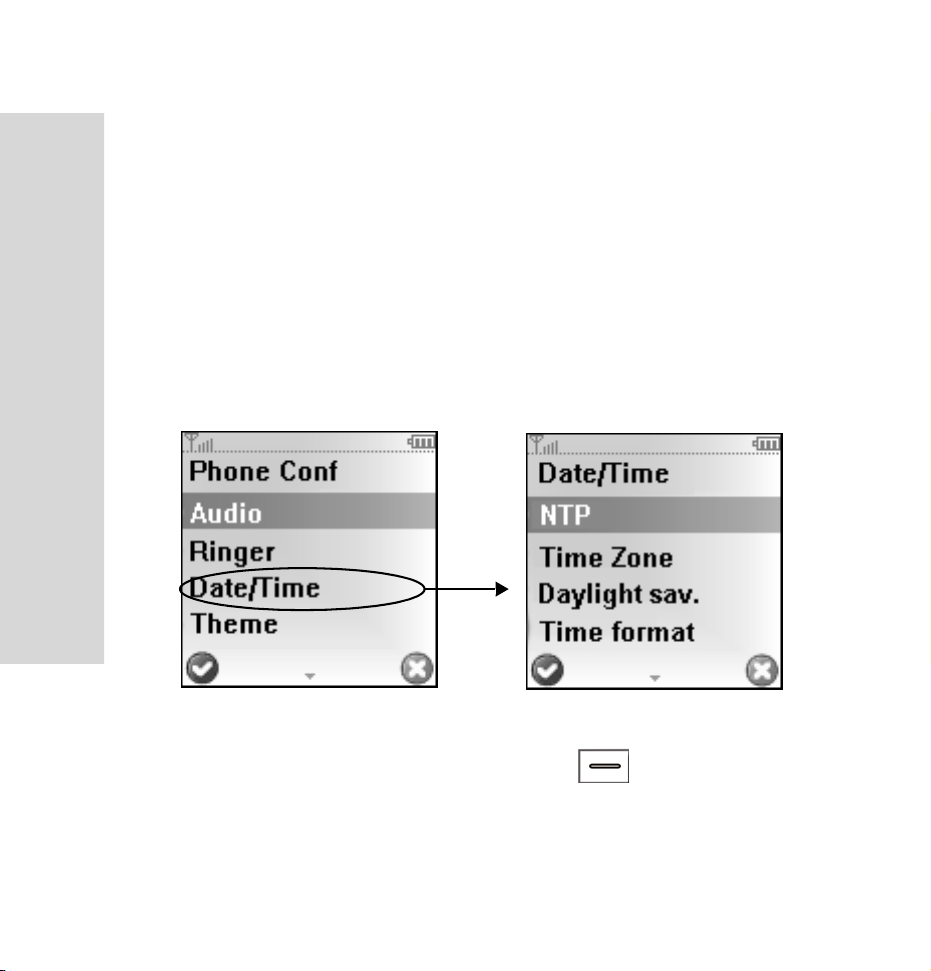
Date/Time settings
This function enables you to set the phone’s date, time, time
format, etc.
1. Select Date/Time in Phone Conf.
2. Select NTP, select NTP Svr Add to enter the IP
address. Press the left function key to save. Then
scroll to Enable, select Ye s to enable NTP.
42
Page 43

3. Select Time Zone, some cities (time zones) will be displayed. Scroll to the desired one and press the left
function key to set it as the current time zone. The
phone’s time will change accordingly.
4. Select Daylight sav., select Standard time to set the
time as the standard time; or select Daylight sav..
5. Scroll to Time format, select 12 Hours or 24 Hours;
scroll to Date format, select the date format, press the
left function key to save.
Theme settings
This function enables you to change the screen color.
1. Select Theme in Phone Conf.
2. Scroll to the desired theme, press the left function key
Phone configuration
to confirm your selection.
43
Page 44

Phone configuration
Language selection
This function enables you to select the language of the
phone’s text display.
1. Select Language in Phone Conf.
2. Scroll to the desired language, press the left function
key to confirm your selection.
44
Page 45
Admin configuration
Accessing admin configuration
From this function, you can perform the following settings.
In the idle screen, press the left function key to access
the main menu. Press the navigation key to highlight
Admin Conf to activate it.
Note: When accessing Admin Conf, you need enter the
default key “1111”.
Admin configuration
45
Page 46
Admin configuration
WLAN conf
WLAN is the abbreviation of Wireless Local Area Network.
This option enables you to set up to five AP (Access Point)
profiles. Each time you switch on your phone, the phone will
try to connect to one of five APs according to their respective profile settings.
Select WLAN Conf in Admin Conf, press the navigation
key to highlight the desired AP profile (1-5), and then
press the left function key to select Edit. The following
options will be available:
SSID (Service Set Identifier)
This option enables you to save an AP’s SSID. After accessing this option, enter the SSID (32 alphanumeric characters
maximum), and then press the left function key to save.
46
Page 47

Mode
This option enables you to set the mode for the AP profile.
After accessing this option, select Infra or AdHoc.
* Infra: Infrastructure mode wireless networking joins a
wireless network to a wired Ethernet network. It also
supports central connection points for WLAN clients.
* AdHoc: On wireless computer networks, ad-hoc mode
is a method for wireless devices to directly communicate with each other. Operating in ad-hoc mode allows
all wireless devices within range of each other to discover and communicate in peer-to-peer fashion without involving central access points (including those
built in to broadband wireless routers).
Encryption
This option enables you to set the security mode for the AP
profile.
Admin configuration
47
Page 48

Admin configuration
After accessing this option, select Mode, WEP Keys or
WPA Personal:
* If Mode is selected, select the security mode for the
AP.
* If WEP Keys is selected, the options of WEP keys
will be displayed.
* If WPA Personal is selected, the options of WPA Per-
sonal will be displayed.
WEP Keys
If the AP profile’s security mode is set to WEP Keys, select
this option to set the WEP keys. After accessing this option,
observe the following operations:
* WEP Bits: Select 64bit or 128 bit according to the
WEP keys settings, press the left function key to
save.
* Select WEP Key 1 - WEP Key 4 to set the key num-
ber. Then select Def. Key ID to access the key index.
48
Page 49

Press the navigation key to highlight the desired one
and press the left function key to save.
WPA Personal
If the AP profile’s security mode is set to WPA Personal,
select this option to set the passphrase.
* After accessing this option, select Passphrase and
enter the WPA Personal key. Press the left function
key to complete the operation.
TCP/IP
This option enables you to set the network parameters.
DHCP (Dynamic Host Configuration Protocol)
If the DHCP function is active, the phone will obtain an IP
address from the DHCP server automatically.
* After accessing this option, select Enable or Disable to
enable or disable DHCP.
Admin configuration
49
Page 50
Admin configuration
Static IP
This option enables you to perform IP settings.
Note: Only when DHCP is disabled, can the Static IP
option be available.
* IP Address: Select this option to set the phone’s IP
address. Press the left function key to save.
* Subnet Mask: Select this option to set the subnet
mask. Press the left function key to save.
* DNS Server: Select this option to set the IP address of
the local DNS server. Press the left function key
to save.
* Def. Gateway: Select this option to set the gateway IP
address. Press the left function key to save.
When finished the WLAN config settings, you can select
Current Conf in WLAN Conf to access config index and
select the desired one.
50
Page 51

User conf
From this option to configure the phone’s user settings.
* Profile name: Enter the profile name, press the left
function key to save.
* Username: Enter phone’s user name, press the left
function key to save.
* Password: Enter the security code, press the left func-
tion key to save.
* Display Name: Enter the display name, press the left
function key to save.
* Domain: Set the server domain address, press the left
function key to save.
* Registrar: Set the server registrar address, press the
Admin configuration
left function key to save.
* Registrar Port: Set the server port, press the left func-
tion key to save.
51
Page 52

Admin configuration
* Outbound Proxy: Set the user outbound proxy, press
the left function key to save.
* Ob. Proxy Port: Set the user outbound proxy port,
press the left function key to save.
Stun conf (Simple Traversal of UDP over NAT)
This option enables you to set the STUN protocol.
* Enable: Select Yes or None to activate or deactivate
the Stun function.
* Stun Server: Set the Stun server address, press the left
function key to save.
* Stun Svr Port: Set the Stun server port, press the left
function key to save.
52
Page 53

* Refresh Int.: Select to set the time interval that device
talks to STUN server, press the left function key to
save.
Others
Site survey
This option enables you to search the available AP profile.
Select Others in Admin Conf, press the navigation key
to select Site Survey, the phone will search available
AP automatically. When available AP profile is found, the
information will be displayed.
Admin configuration
53
Page 54

Admin configuration
Factory Reset
This option enables you to reset your phone.
Select Factory Reset in Others, you need enter the password (system default value 2468) to perform factory reset.
Press the left function key to reset your phone; press the
right function key to cancel.
MAC Address
Select MAC Address in Others. MAC Address is a hardware address that uniquely identifies each node of a network.
54
Page 55

Trouble shooting
This chapter lists some problems you might encounter while
you use your phone. Some problems require you to call your
network service provider, but most of the problems you can
easily correct yourself.
If you need to hand in your phone to repair, you might lose
the data you save in your phone. So, we strongly recommend
that you make a copy of this information before you hand in
your phone for repair.
The phone cannot be switched on
* Press and hold the power key for more than 2 sec-
onds.
* Is the battery low? Charge the battery.
Trouble shooting
55
Page 56

Trouble shooting
Cannot make calls
* Ensure the phone’s Wi-Fi settings are correct.
* Move closer to the AP for better signal strength.
The battery cannot be charged
* Connect the charger and phone correctly.
WLAN search didn't find my AP
* Enable your AP’s SSID broadcasting.
* Make sure your phone is within range of your AP.
If the malfunction symptoms are not listed in the above, or
the corresponding solution is invalid, please contact your
local service provider.
56
Page 57

Glossary
* AC wall outlet: Alternating Current wall outlet
* AP: Access Point
* DHCP: Dynamic Host Configuration Protocol
* DNS: Domain Name Server
* LCD: Liquid Crystal Display
* NAT: Network Address Translation
* SSID: System Set Identifier
* STUN: Simple Traversal of UDP over NAT
* UDP: User Datagram Protocol
* VoI P: Voice over Internet Protocol
* WEP: Wired Equivalent Privacy
* WLAN: Wireless Local Area Network
* WPA: Wi-Fi Protected Access
* TCP/IP: Transmission Control Protocol and Internet
Protocol
Glossary
VoIP User Manual EN V1
57
 Loading...