

Page 1

MODEL G0964
1-1/2 HP PORTABLE FUME
EXTRACTOR w/PRECISION ARM
OWNER'S MANUAL
(For models manufactured since 09/24)
COPYRIGHT © MAY, 2023 BY GRIZZLY INDUSTRIAL, INC., REVISED AUGUST, 2024 (CS)
WARNING: NO PORTION OF THIS MANUAL MAY BE REPRODUCED IN ANY SHAPE
OR FORM WITHOUT THE WRITTEN APPROVAL OF GRIZZLY INDUSTRIAL, INC.
#CS22625 PRINTED IN TAIWAN
***Keep for Future Reference***
V2.08.24
Page 2
This manual provides critical safety instructions on the proper setup,
operation, maintenance, and service of this machine/tool. Save this
document, refer to it often, and use it to instruct other operators.
Failure to read, understand and follow the instructions in this manual
may result in fire or serious personal injury—including amputation,
electrocution, or death.
The owner of this machine/tool is solely responsible for its safe use.
This responsibility includes but is not limited to proper installation in
a safe environment, personnel training and usage authorization,
proper inspection and maintenance, manual availability and comprehension, application of safety devices, cutting/sanding/grinding tool
integrity, and the usage of personal protective equipment.
The manufacturer will not be held liable for injury or property damage
from negligence, improper training, machine modifications or misuse.
Some dust created by power sanding, sawing, grinding, drilling, and
other construction activities contains chemicals known to the State
of California to cause cancer, birth defects or other reproductive
harm. Some examples of these chemicals are:
• Lead from lead-based paints.
• Crystalline silica from bricks, cement and other masonry products.
• Arsenic and chromium from chemically-treated lumber.
Your risk from these exposures varies, depending on how often you
do this type of work. To reduce your exposure to these chemicals:
Work in a well ventilated area, and work with approved safety equipment, such as those dust masks that are specially designed to filter
out microscopic particles.
Page 3

Table of Contents
INTRODUCTION ............................................................................................................................... 2
Contact Info
Manual Accuracy
Identification
Controls & Components
Machine Data Sheet
.................................................................................................................................2
.........................................................................................................................2
................................................................................................................................3
..............................................................................................................4
....................................................................................................................5
SECTION 1: SAFETY
Safety Instructions for Machinery
Additional Safety for Fume Extractors
Meeting Welding Fume Extraction Codes & Standards
SECTION 2: POWER SUPPLY
Converting Voltage to 240V
SECTION 3: SETUP
Needed for Setup
Unpacking
Inventory
Site Considerations
Assembly
Test Run
SECTION 4: OPERATIONS
Operation
SECTION 5: ACCESSORIES
SECTION 6: MAINTENANCE
Schedule
Cleaning
Lubrication
Emptying Dust Drawer
Cleaning/Replacing Filters
Machine Storage
.................................................................................................................................15
....................................................................................................................................16
...................................................................................................................................18
....................................................................................................................................19
...................................................................................................................................20
...................................................................................................................................24
....................................................................................................................................24
.................................................................................................................................25
....................................................................................................................... 7
................................................................................................7
........................................................................................9
.......................................................................................................11
......................................................................................................13
....................................................................................................................... 15
......................................................................................................................15
...................................................................................................................17
............................................................................................................ 20
......................................................................................................... 21
........................................................................................................ 24
..............................................................................................................25
........................................................................................................26
.......................................................................................................................29
............................................................10
SECTION 7: SERVICE
Troubleshooting
SECTION 8: WIRING
Wiring Safety Instructions
Wiring Diagram 120V
Wiring Diagram 240V
SECTION 9: PARTS
...........................................................................................................................................35
Main
Precision Arm
Labels & Cosmetics (Front)
Labels & Cosmetics (Rear)
WARRANTY & RETURNS
................................................................................................................... 30
.........................................................................................................................30
...................................................................................................................... 32
....................................................................................................................... 35
............................................................................................................................37
.........................................................................................................32
................................................................................................................33
................................................................................................................34
......................................................................................................39
.......................................................................................................40
.............................................................................................................. 41
Page 4
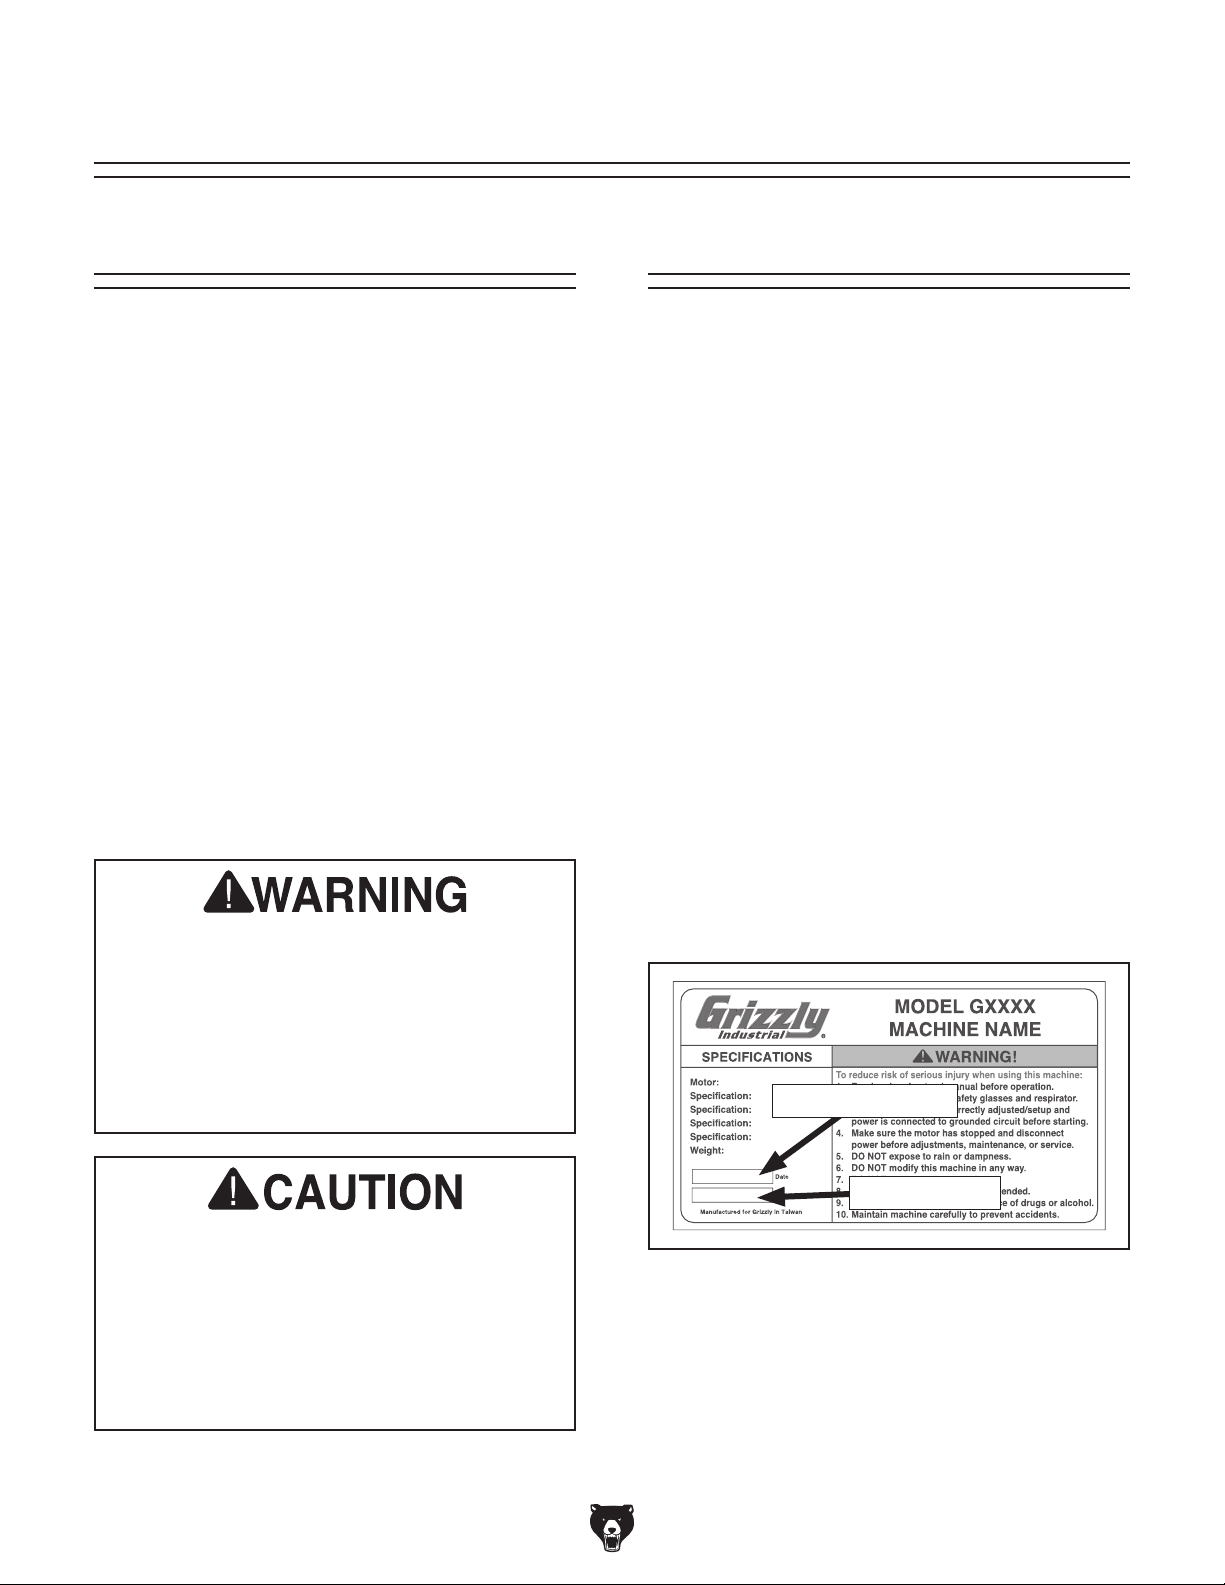
We stand behind our machines! If you have questions or need help, contact us with the information
below. Before contacting, make sure you get the
serial number
from the
machine ID label. This will help us help you faster.
We want your feedback on this manual. What did
you like about it? Where could it be improved?
Please take a few minutes to give us feedback.
Email: [email protected]
We are proud to provide a high-quality owner’s
manual with your new machine!
We
instructions, specifications, drawings, and photographs
in this manual. Sometimes we make mistakes, but
our policy of continuous improvement also means
that
you receive is
slightly different than shown in the manual
If you find this to be the case, and the difference
between the manual and machine leaves you
confused or unsure about something
check our
website for an updated version. W
current
manuals and
on our web-
site at
Alternatively, you can call our Technical Support
for help. Before calling, make sure you write
down the
serial number
from the machine ID label (see below). This
information is required for us to provide proper
tech support, and it helps us determine if updated
documentation is available for your machine.
INTRODUCTION
Contact Info
and manufacture date
Grizzly Technical Support
1815 W. Battlefield
Springfield, MO 65807
Phone: (570) 546-9663
Email: [email protected]
Grizzly Documentation Manager
P.O. Box 2069
Bellingham, WA 98227-2069
Manual Accuracy
made every effort to be exact with the
sometimes the machine
.
,
e post
manual updates for free
www.grizzly.com.
manufacture date and
Like all machinery there is potential danger
when operating this machine. Accidents
are frequently caused by lack of familiarity
or failure to pay attention. Use this machine
with respect and caution to decrease the
risk of operator injury. If normal safety precautions are overlooked or ignored, serious personal injury may occur.
No list of safety guidelines can be complete. Every shop environment is different.
Always consider safety first, as it applies
to your individual working conditions. Use
this and other machinery with caution and
respect. Failure to do so could result in
serious personal injury, damage to equipment, or poor work results.
Manufacture Date
Serial Number
-2-
Model G0964 (Mfd. Since 09/24)
Page 5
To reduce your risk of
serious injury, read this
entire manual BEFORE
Identification
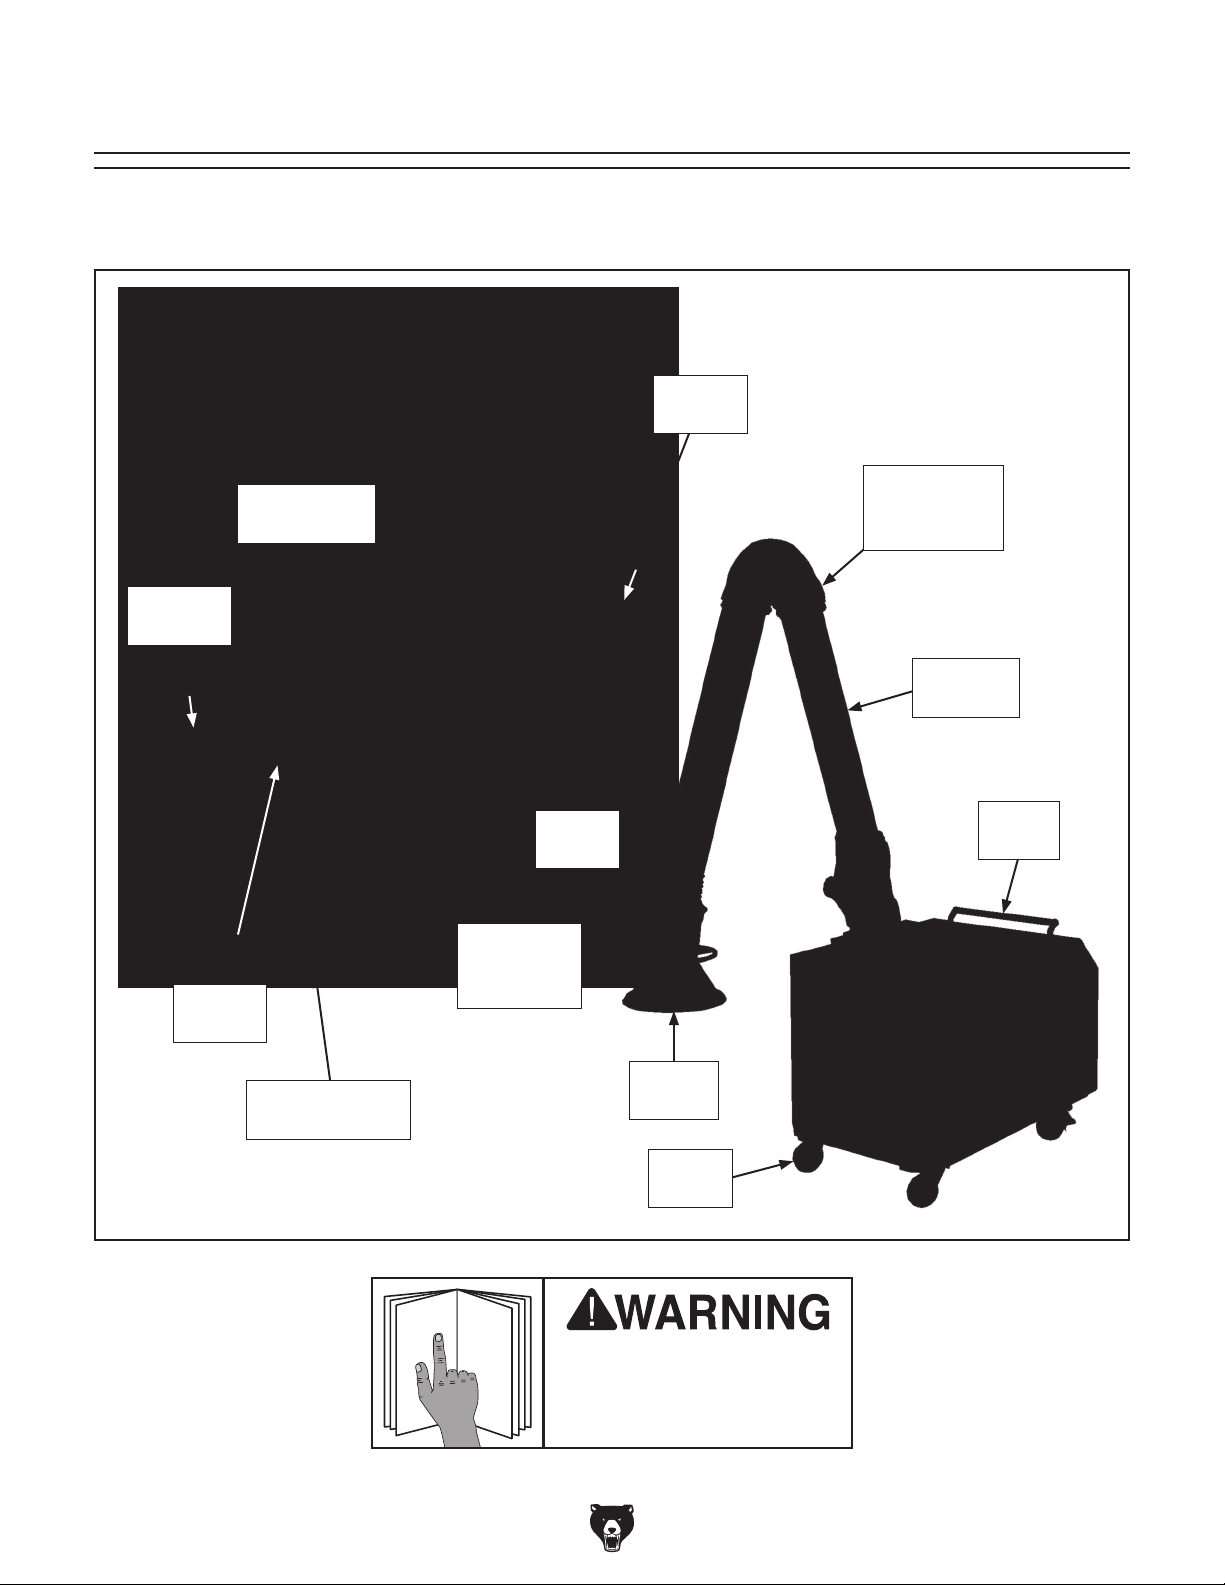
Become familiar with the names and locations of the controls and features shown below to better understand
the instructions in this manual.
Damper
Handle
Pressure
Gauge
Power
Controls
Door Handle
(1 of 2)
Dust
Drawer
Hood
Positioning
Handle
Arm Support
Joint
(1 of 4)
Precision
Arm
Base
Handle
Locking Caster
(1 of 2)
Model G0964 (Mfd. Since 09/24)
Suction
Hood
Caster
(1 of 2)
using machine.
-3-
Page 6
Controls &
To reduce your risk of
serious injury, read this
entire manual BEFORE
Precision Arm
Components
using machine.
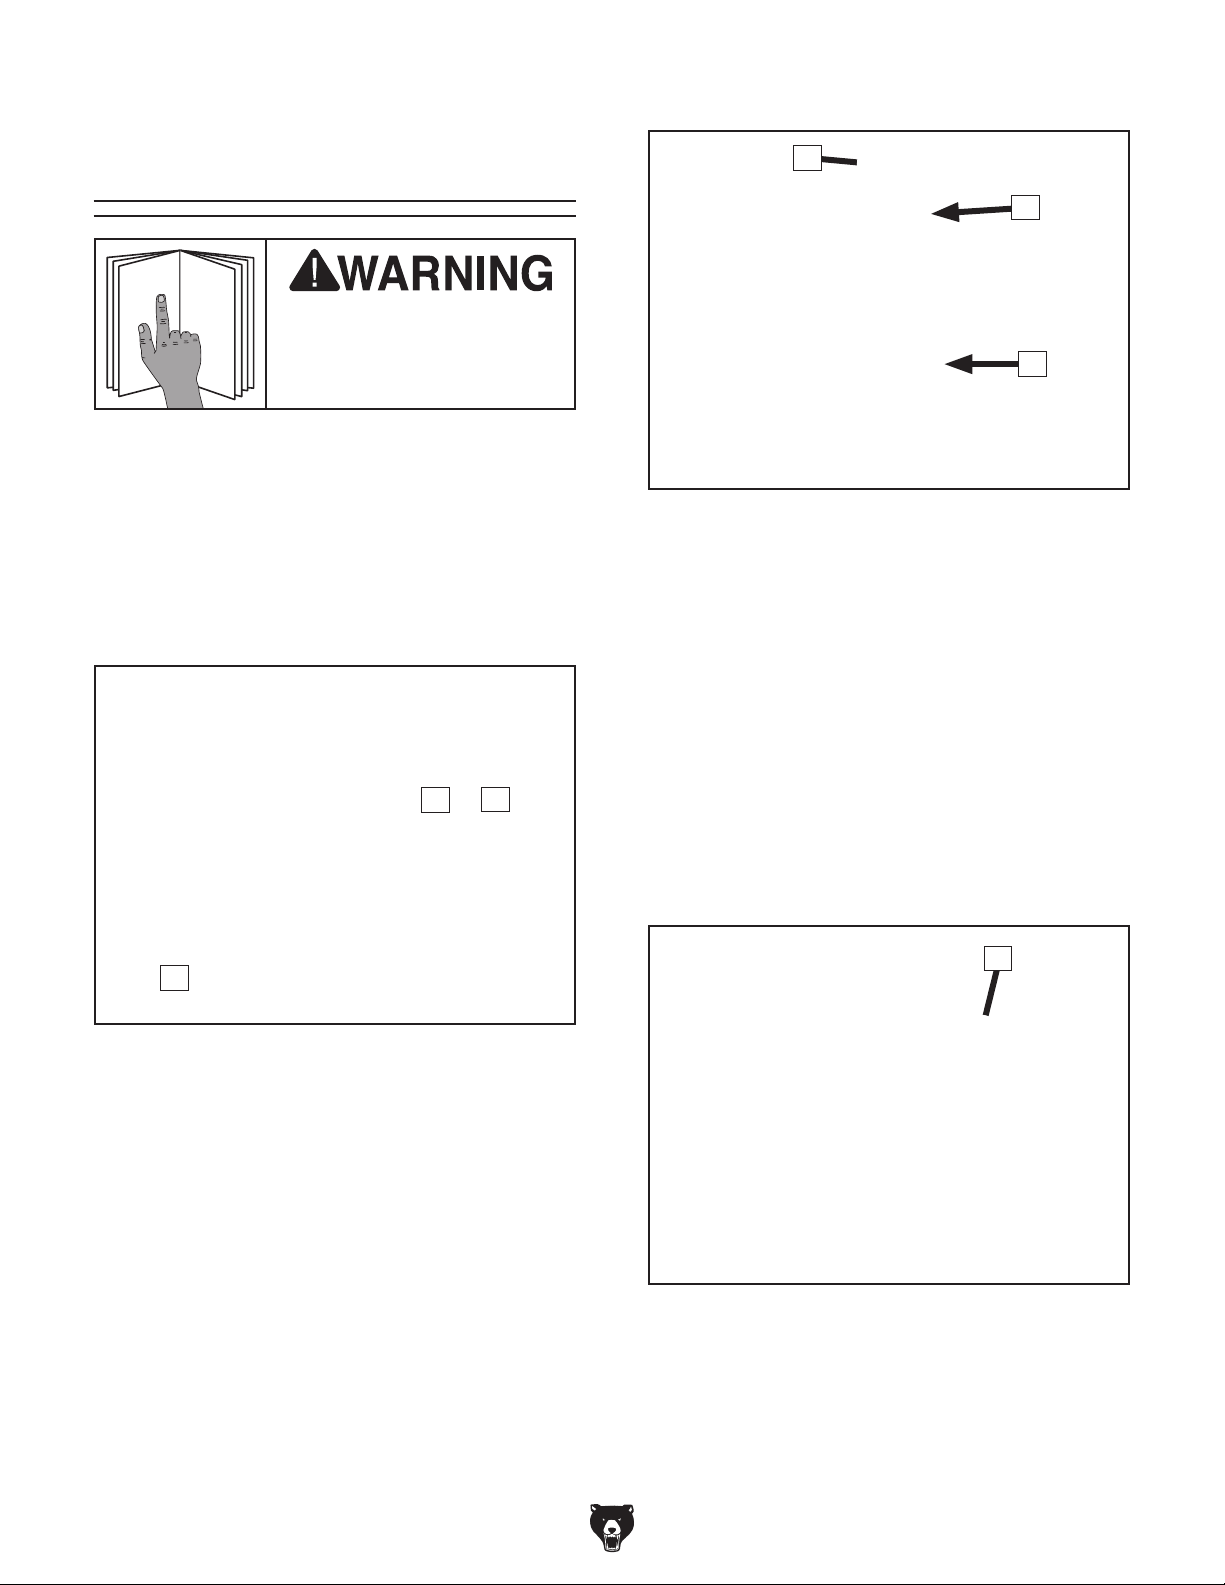
Refer to the following figures and descriptions to
become familiar with the basic controls and components of this machine. Understanding these
items and how they work will help you understand
the rest of the manual and minimize your risk of
injury when operating this machine.
Control Panel
D
E
F
Figure 2. Precision arm adjustment components.
D. Damper Handle: Turn clockwise to open
damper and increase airflow; turn counterclockwise to close damper and decrease
airflow.
E. Precision Arm Handle: Manipulates arm
height, position, and rotation for best operation configuration.
B
A
Figure 1. Pressure gauge and magnetic switch
power controls.
A. Pressure Gauge: Displays vacuum pres-
sure, indicating soil level of filters. Remove
and clean pre-filter when operating pressure
exceeds 6 inches of water (inAq). Replace
filters when cleaning does not improve
performance.
B. OFF Button: Turns power to motor OFF.
C. ON Button: Turns power to motor ON.
C
F. Hood Positioning Handle: Swivels and piv-
ots suction hood to desired position for fume
extraction.
Filter Housing
G
Figure 3. Filter housing.
G. Filter Housing: Secures pre-filter and HEPA
filter behind a stainless steel mesh. Remove
for maintenance and to access aluminum
mesh spark arrestor filter.
-4-
Model G0964 (Mfd. Since 09/24)
Page 7

Machine Data Sheet
Customer Service #: (570) 546-9663 · To Order Call: (800) 523-4777 · Fax #: (800) 438-5901
MODEL G0964
1-1/2 HP PORTABLE FUME EXTRACTOR W/PRECISION ARM
Product Dimensions:
Weight ..............................................................................................................................................................492 lbs.
Width (side-to-side) x Depth (front-to-back) x Height ............................................................. 29-1/2 x 88-1/2 x 84 in.
Footprint (Length x Width) ..............................................................................................................48-1/2 x 29-1/2 in.
Shipping Dimensions:
Carton#1
Type ................................................................................................................................................. Wood Crate
Content ..................................................................................................................................................Machine
Weight ....................................................................................................................................................512 lbs.
Length x Width x Height .............................................................................................................53 x 35 x 43 in.
Must Ship Upright ..........................................................................................................................................Ye s
Carton#2
Type ............................................................................................................................................ Cardboard Box
Content .........................................................................................................................................Precision Arm
Weight ......................................................................................................................................................89 lbs.
Length x Width x Height .............................................................................................................70 x 16 x 28 in.
Must Ship Upright ..........................................................................................................................................Ye s
Electrical:
Power Requirement .............................................................................................120V or 240V, Single-Phase, 60 Hz
Prewired Voltage .................................................................................................................................................. 120V
Full-Load Current Rating ....................................................................................................... 18A at 120V, 9A at 240V
Minimum Circuit Size .......................................................................................................... 20A at 120V, 15A at 240V
Connection Type .......................................................................................................................................Cord & Plug
Power Cord Included ..............................................................................................................................................Yes
Power Cord Length ............................................................................................................................................118 in.
Power Cord Gauge ......................................................................................................................................... 14 AWG
Plug Included ..........................................................................................................................................................Yes
Included Plug Type................................................................................................................................. 5-20 for 120V
Recommended Plug Type ...................................................................................................................... 6-15 for 240V
Switch Type ....................................................................................................Magnetic Switch w/Overload Protection
Motors:
Main
Horsepower .......................................................................................................................................... 1-1/2 HP
Phase ............................................................................................................................................ Single-Phase
Amps .......................................................................................................................................................18A/9A
Speed ................................................................................................................................................ 3450 RPM
Type .................................................................................................................. TEFC Capacitor-Start Induction
Power Transfer .......................................................................................................................................... Direct
Bearings .....................................................................................................Shielded & Permanently Lubricated
Centrifugal Switch/Contacts Type .......................................................................................................... Internal
Model G0964 (Mfd. Since 09/24)
-5-
Page 8

Main Specifications:
Operation Information
Max. Airflow Performance (6-in. Inlet) .......................................................................... 850 CFM @ 1.72 in. SP
Max. Static Pressure (at 0 CFM) ............................................................................................................7.02 in.
Main Inlet Size..............................................................................................................................................6 in.
Max. Precision Arm Length ........................................................................................................................ 10 ft.
Precision Arm Diameter ...............................................................................................................................6 in.
Precision Arm Rotation......................................................................................................................... 350 deg.
Hood Diameter ...........................................................................................................................................13 in.
Machine Collection Capacity at One Time ....................................................................................................... 1
Filter Information
Number of Filters .............................................................................................................................................. 4
Total Filter Surface Area .................................................................................................................. 177.6 sq. ft.
First-Stage Filter Type ............................................................................. Spark Arrestor Aluminum Mesh Filter
First-Stage Filter Size ........................................................................................................... 440 x 540 x 22mm
Second-Stage Filter Type .......................................................................... Large Particle Stainless Steel Mesh
Second-Stage Filter Size ..................................................................................................... 595 x 595 x 22mm
Third-Stage Filter Type ........................................................................................................... Pleated Pre-Filter
Third-Stage Filter Rating ................................................................................................ 2 - 10 Microns @ 35%
Third-Stage Filter Size ......................................................................................................... 595 x 595 x 45mm
Fourth-Stage Filter Type ....................................................................................................... V-Cell HEPA Filter
Fourth-Stage Filter Rating ..............................................................................................0.3 Microns @ 99.97%
Fourth-Stage Filter Size ..................................................................................................... 595 x 595 x 292mm
Impeller Information
Impeller Type ...................................................................................................................................... Radial Fin
Impeller Size ...........................................................................................................................................12.1 in.
Impeller Blade Thickness ............................................................................................................................4mm
Construction
Body ........................................................................................................................................................... Steel
Casters ....................................................................................................................................................Rubber
Impeller ............................................................................................................................................... Aluminum
Hood ................................................................................................................................................... Aluminum
Pipes .......................................................................................................................................Galvanized Steel
Flex Hoses .................................................................................................................................................. PVC
Paint Type/Finish ........................................................................................................................Powder Coated
Other Specifications:
Country of Origin ............................................................................................................................................... Taiwan
Warranty ............................................................................................................................................................. 1 Year
Approximate Assembly & Setup Time .........................................................................................................30 Minutes
Serial Number Location...................................................................................................................................ID Label
ISO 9001 Factory ....................................................................................................................................................Yes
Features:
Filters Provide a Combined Surface Area of 177.6 Sq. Ft.
V-Cell MERV-17 HEPA Filter Collects 99.97% of Particles at 0.3 Microns
6" Diameter Adjustable Precision Arm w/13" Hood
Vacuum Pressure Gauge Indicates When to Clean/Replace Filters
Steel Body w/Two Locking Caster Wheels
Built-In Damper on Precision Arm for Adjusting Air Flow
Removable Dust Drawer
-6-
Model G0964 (Mfd. Since 09/24)
Page 9
SECTION 1: SAFETY
For Your Own Safety, Read Instruction
Manual Before Operating This Machine
The purpose of safety symbols is to attract your attention to possible hazardous conditions.
This manual uses a series of symbols and signal words intended to convey the level of importance of the safety messages. The progression of symbols is described below. Remember that
safety messages by themselves do not eliminate danger and are not a substitute for proper
accident prevention measures. Always use common sense and good judgment.
Indicates an imminently hazardous situation which, if not avoided,
WILL result in death or serious injury.
Indicates a potentially hazardous situation which, if not avoided,
COULD result in death or serious injury.
Indicates a potentially hazardous situation which, if not avoided,
MAY result in minor or moderate injury. It may also be used to alert
against unsafe practices.
Alerts the user to useful information about proper operation of the
NOTICE
machine to avoid machine damage.
Safety Instructions for Machinery
OWNER’S MANUAL. Read and understand this
owner’smanualBEFOREusingmachine.
TRAINED OPERATORS ONLY. Untrained operators have a higher risk of being hurt or killed.
Only allow trained/supervised people to use this
machine. When machine is not being used, disconnect power, remove switch keys, or lock-out
machine to prevent unauthorized use—especially
around children. Make your workshop kid proof!
DANGEROUS ENVIRONMENTS. Do not use
machinery in areas that are wet, cluttered, or have
poor lighting. Operating machinery in these areas
greatly increases the risk of accidents and injury.
MENTAL ALERTNESS REQUIRED. Full mental
alertness is required for safe operation of machinery. Never operate under the influence of drugs or
alcohol, when tired, or when distracted.
ELECTRICAL EQUIPMENT INJURY RISKS.
You can be shocked, burned, or killed by touching
live electrical components or improperly grounded
machinery. To reduce this risk, only allow qualified
service personnel to do electrical installation or
repair work, and always disconnect power before
accessing or exposing electrical equipment.
DISCONNECT POWER FIRST.
nect machine from power supply BEFORE making adjustments, changing tooling, or servicing
machine. This prevents an injury risk from unintended startup or contact with live electrical components.
EYE PROTECTION. Always wear ANSI-approved
safety glasses or a face shield when operating
or observing machinery to reduce the risk of eye
injury or blindness from flying particles. Everyday
eyeglasses are NOT approved safety glasses.
Always discon-
Model G0964 (Mfd. Since 09/24)
-7-
Page 10

may damage the wires inside. Do not handle
WEARING PROPER APPAREL. Do not wear
loose clothing, gloves, neckties, or jewelry that
can become entangled in moving parts. Always tie
back or cover long hair. Wear non-slip footwear to
reduce risk of slipping and losing control or accidentally contacting cutting tool or moving parts.
HAZARDOUS DUST. Dust created by machinery
operations may cause cancer, birth defects, or
long-term respiratory damage. Be aware of dust
hazards associated with each workpiece material. Always wear a NIOSH-approved respirator to
reduce your risk.
HEARING PROTECTION. Always wear hearing protection when operating or observing loud
machinery. Extended exposure to this noise without hearing protection can cause permanent
hearing loss.
REMOVE ADJUSTING TOOLS. Tools left on
machinery can become dangerous projectiles
upon startup. Never leave chuck keys, wrenches,
or any other tools on machine. Always verify
removal before starting!
USE CORRECT TOOL FOR THE JOB. Only use
this tool for its intended purpose—do not force
it or an attachment to do a job for which it was
not designed. Never make unapproved modifications—modifying tool or using it differently than
intended may result in malfunction or mechanical
failure that can lead to personal injury or death!
AWKWARD POSITIONS. Keep proper footing
and balance at all times when operating machine.
Do not overreach! Avoid awkward hand positions
that make workpiece control difficult or increase
the risk of accidental injury.
CHILDREN & BYSTANDERS. Keep children and
bystanders at a safe distance from the work area.
Stop using machine if they become a distraction.
GUARDS & COVERS. Guards and covers reduce
accidental contact with moving parts or flying
debris. Make sure they are properly installed,
undamaged, and working correctly BEFORE
operating machine.
FORCING MACHINERY. Do not force machine.
It will do the job safer and better at the rate for
which it was designed.
NEVER STAND ON MACHINE. Serious injury
may occur if machine is tipped or if the cutting
tool is unintentionally contacted.
STABLE MACHINE. Unexpected movement during operation greatly increases risk of injury or
loss of control. Before starting, verify machine is
stable and mobile base (if used) is locked.
USE RECOMMENDED ACCESSORIES. Consult
thisowner’smanualorthemanufacturerforrec-
ommended accessories. Using improper accessories will increase the risk of serious injury.
UNATTENDED OPERATION. To reduce the
risk of accidental injury, turn machine OFF and
ensure all moving parts completely stop before
walking away. Never leave machine running
while unattended.
MAINTAIN WITH CARE. Follow all maintenance
instructions and lubrication schedules to keep
machine in good working condition. A machine
that is improperly maintained could malfunction,
leading to serious personal injury or death.
DAMAGED PARTS. Regularly inspect machine
for damaged, loose, or mis-adjusted parts—or
any condition that could affect safe operation.
Immediately repair/replace BEFORE operating
machine. For your own safety, DO NOT operate
machine with damaged parts!
MAINTAIN POWER CORDS. When disconnecting cord-connected machines from power, grab
and pull the plug—NOT the cord. Pulling the cord
cord/plug with wet hands. Avoid cord damage by
keeping it away from heated surfaces, high traffic
areas, harsh chemicals, and wet/damp locations.
EXPERIENCING DIFFICULTIES. If at any time
you experience difficulties performing the intended operation, stop using the machine! Contact our
Technical Support at (570) 546-9663.
-8-
Model G0964 (Mfd. Since 09/24)
Page 11

Additional Safety for Fume Extractors
Welding fumes can cause suffocation or poisoning if operating in an enclosed space without
adequate ventilation and fume extraction. All users must be properly trained on the potential
hazards, manufacturer’s operating procedures, use of personal protective equipment (PPE),
emergency procedures, and safety precautions for welding operations. To reduce these risks,
operator and bystanders MUST completely heed the warnings below.
TOXIC FUMES. Welding produces hazardous
fumes that can suffocate or poison without warning. Reduce this risk by researching consumables
needed for operation, atmospheric contaminants,
materials, and material coatings, and take necessary precautions for fumes that will be produced.
Use ANSI-approved respirator for applicable type
of operation and protect others from fumes.
Position hood near workpiece to extract fumes
before they spread throughout and contaminate
work area. If extractor malfunctions, immediately
stop and correct the issue.
FLAMMABLE MATERIALS. Keep flammable
materials and vapors away from fume extractor
and welding operation. Sparks from welding operation and heat from fumes present a fire hazard.
WELDING SAFETY. Welding without approved
personal protective equipment can cause severe
damage to eyes and body. Read and understand
all safety warnings provided by manufacturer for
any welder you plan to use with fume extractor
and take proper precautions.
ADEQUATE VENTILATION. Do not use fume
extractor in confined space without adequate
ventilation. Fume extractors do not replace oxygen that is consumed by welding operations.
Suffocation or explosion can occur if this warning
is ignored. Open covers, doors, and windows to
sustain fresh air ventilation or use an additional
form of mechanical ventilation to ventilate space.
Those inside work area should wear air-line respirators. Have personnel monitor operator from out-
side operating area in case of equipment failure.
INSPECTIONS/MAINTENANCE. Always inspect
equipment and all seals/gaskets prior to operations. Repair or replace defective components
before starting. Stop welding operation if fume
extractor is leaking or malfunctions.
FUME EXTRACTION. NEVER modify machine or
bypass safety features. Machine is not designed
to collect wood, glass, asbestos, lead paint dust,
silica, animal parts, biohazards, burning materials/ashes, combustible dust, flammable liquids or
gases, sprayed paint, burning slag, molten metal,
or fumes from laser engravers/cutters. Always
position hood to only collect smoke and fumes,
and operate machine with all filters and covers in
place. If any filter is missing or replaced with non-
specification filter, fume extractor will not properly
filter contaminated air and will be unsafe to use.
FILTER CLEANING/DISPOSAL. Filters and dust
drawer must be changed regularly according to
the frequency of use, or as specified by manufacturer. When servicing filters, make sure operator
and any bystanders are wearing personal protective equipment. When cleaning filters and cabinet, do not use compressed air. Only use a shop
vacuum that is equipped with a HEPA filter, or
dangerous particulates may be spread throughout
the area and contaminate the air. Wrap all waste
filters in air-tight plastic bags, then mark and dispose of according to current laws and regulations.
MOVING. Use base handle, not arm, to move
machine. Moving machine by arm could damage
it and reduce air flow efficiency and machine's
ability to extract dangerous fumes. Lock casters
prior to adjusting arm to avoid dragging machine
and putting unnecessary stress on arm.
EXPERIENCING DIFFICULTIES. Keep in mind
that welding hazards are intensified in a confined
space. If you are experiencing difficulties performing the intended operation, stop using the equipment, and contact the Occupational Safety and
Health Administration (OSHA) at (800) 321-6742,
or online at www.osha.gov
design and maintain the best overall welding fume
extraction system for your needs.
to find out how to
Model G0964 (Mfd. Since 09/24)
-9-
Page 12

Meeting Welding Fume Extraction
Codes & Standards
Welding metals can give off poisonous fumes containing zinc, lead, beryllium, cadmium, mercury,
fluorine, hexavalent chromium, and others. These fumes typically originate from fluxes, anticorrosion coatings, pigments, metal fillers, and residual chemicals on the workpiece. This machine
is designed to help meet the welding shop clean air requirements mandated by OSHA beginning in
2006. The Model G0964 Portable Fume Extractor is designed to be a part of an overall fume control
system. It is NOT designed to serve as a "single-solution" for keeping workers safe from all welding
fumes. You must contact OSHA to find out how to design and maintain the best overall welding fume
control system for your work station or shop. Often, depending on the workspace size, volume of
work, type of material to be welded, or other special circumstances, you must use additional safety
equipment such as personal air line respirators, hoods, masks, and complete body protection.
Contact the organizations below to help you meet welding fume extraction requirements:
Occupational Safety and Health Administration (OSHA).
— Code of Federal Regulations, Title 29 Labor, Parts 1910.1 to 1910.1450, available from the U.S.
Government Printing Office, Superintendent of Documents, P.O. Box 371954, Pittsburgh, PA 152507954 (telephone: 800-321-6742; web site: www.osha.gov).
American Welding Society (AWS), 8669 NW 36 Street, #130, Miami, FL 33166-6672 (telephone:
800-443-9353; web site: www.aws.org).
Safety & Health Fact Sheets
—
American National Standards Institute (ANSI), 25 West 43rd Street, 4th Floor, New York, NY 10036
(telephone: 212-642-4900; web site: www.ansi.org).
ANSI Z49.1, Safety in Welding, Cutting, and Allied Processes
—
National Institute for Occupational Safety and Health (NIOSH).
Safety and Health in Arc Welding and Gas Welding and Cutting, NIOSH Publication No. 78-138.
—
Cincinnati, OH (telephone: 800-356-4674; web site: http://www.cdc.gov/niosh).
International Agency For Research On Cancer (IARC).
Monographs on the Evaluation of Carcinogenic Risks to Humans, Chromium, Nickel, and Welding,
—
Vol. 49 (1990), Oxford University Press, 198 Madison Avenue, New York, NY 10016 (telephone:
212-726-6000; web site: www.oup-usa.org).
National Fire Protection Association (NFPA), P. O. Box 9101, 1 Batterymarch Park, Quincy, MA
02269-9101 (telephone: 617-770-3000; website: www.nfpa.org).
NFPA Standard 70, National Electrical Code
—
NFPA Standard 51, Standard for the Design and Installation of Oxygen-Fuel Gas Systems for
—
Welding, Cutting, and Allied Processes
NFPA Standard 51B, Standard for Fire Prevention During Welding, Cutting, and Other Hot Work
—
American Conference of Governmental Industrial Hygienists (ACGIH).
Documentation of the Threshold Limit Values and Biological Exposure Indices, available from ACGIH,
—
3640 Park 42 Drive, Cincinnati, OH 45241 (telephone: 513-742-2020; web site: www.acgih.org).
-10-
Model G0964 (Mfd. Since 09/24)
Page 13
SECTION 2: POWER SUPPLY
Before installing the machine, consider the availability and proximity of the required power supply
circuit. If an existing circuit does not meet the
requirements for this machine, a new circuit must
be installed. To minimize the risk of electrocution,
fire, or equipment damage, installation work and
electrical wiring must be done by an electrician or
qualified service personnel in accordance with all
applicable codes and standards.
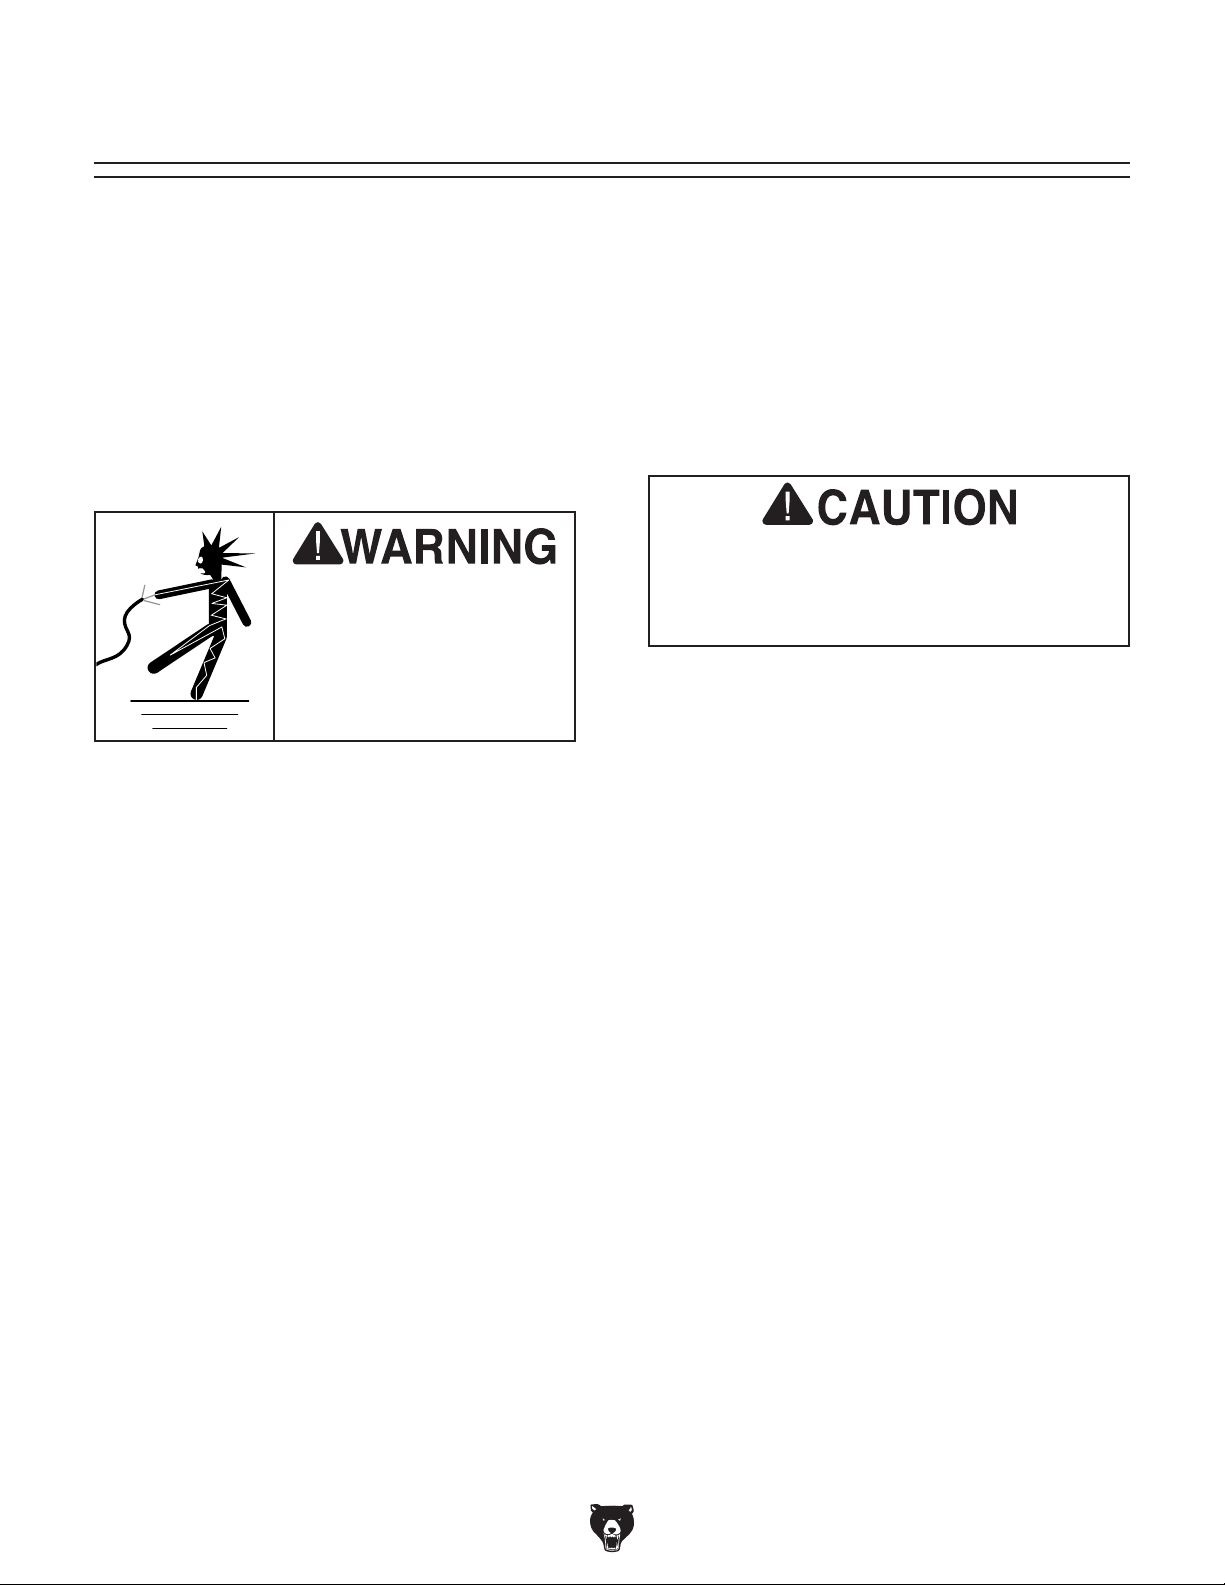
or equipment damage
may occur if machine is
not properly grounded
and connected to power
The full-load current rating is the amperage a
machine draws at 100% of the rated output power.
On machines with multiple motors, this is the
amperage drawn by the largest motor or sum of all
motors and electrical devices that might operate
at one time during normal operations.
The full-load current is not the maximum amount
of amps that the machine will draw. If the machine
is overloaded, it will draw additional amps beyond
the full-load rating.
If the machine is overloaded for a sufficient length
of time, damage, overheating, or fire may result—
especially if connected to an undersized circuit.
To reduce the risk of these hazards, avoid overloading the machine during operation and make
sure it is connected to a power supply circuit that
meets the specified circuit requirements.
For your own safety and protection of
Note: Circuit requirements in this manual apply to
a dedicated circuit—where only one machine will
be running on the circuit at a time. If machine will
be connected to a shared circuit where multiple
machines may be running at the same time, consult an electrician or qualified service personnel to
ensure circuit is properly sized for safe operation.
A power supply circuit includes all electrical
equipment between the breaker box or fuse panel
in the building and the machine. The power supply circuit used for this machine must be sized to
safely handle the full-load current drawn from the
machine for an extended period of time. (If this
machine is connected to a circuit protected by
fuses, use a time delay fuse marked D.)
This machine can be converted to operate on a
power supply circuit that has a verified ground
and meets the requirements listed below. (Refer
to Voltage Conversion instructions for details.)
This machine is prewired to operate on a power
supply circuit that has a verified ground and meets
the following requirements:
Availability
Electrocution, fire, shock,
supply.
Full-Load Current Rating
Circuit Information
property, consult an electrician if you are
unsure about wiring practices or electrical
codes in your area.
Full-Load Current Rating at 120V ..... 18 Amps
Full-Load Current Rating at 240V
Model G0964 (Mfd. Since 09/24)
....... 9 Amps
Circuit Requirements for 120V
Nominal Voltage .................... 110V, 115V, 120V
..........................................................60 Hz
Cycle
Phase
Power Supply Circuit
Plug/Receptacle
........................................... Single-Phase
......................... 20 Amps
............................. NEMA 5-20
Circuit Requirements for 240V
Nominal Voltage .........208V, 22 0V, 230V, 24 0V
..........................................................60 Hz
Cycle
Phase
Power Supply Circuit
Plug/Receptacle
........................................... Single-Phase
......................... 15 Amps
............................. NEMA 6-15
-11-
Page 14
Improper connection of the equipment-grounding
wire can result in a risk of electric shock. The
wire with green insulation (with or without yellow
stripes) is the equipment-grounding wire. If repair
or replacement of the power cord or plug is necessary, do not connect the equipment-grounding
wire to a live (current carrying) terminal.
Check with a qualified electrician or service personnel if you do not understand these grounding
requirements, or if you are in doubt about whether
the tool is properly grounded. If you ever notice
that a cord or plug is damaged or worn, disconnect it from power, and immediately replace it with
We do not recommend using an extension cord
with this machine. If you must use an extension
cord, only use it if absolutely necessary and only
on a temporary basis.
Extension cords cause voltage drop, which can
damage electrical components and shorten motor
life. Voltage drop increases as the extension cord
size gets longer and the gauge size gets smaller
(higher gauge numbers indicate smaller sizes).
Any extension cord used with this machine must
be in good condition and contain a ground wire
and matching plug/receptacle. Additionally, it must
meet the following size requirements:
Grounding Requirements
This machine MUST be grounded. In the event
of certain malfunctions or breakdowns, grounding
reduces the risk of electric shock by providing a
path of least resistance for electric current.
Two-prong outlets do not meet the
grounding requirements for this machine.
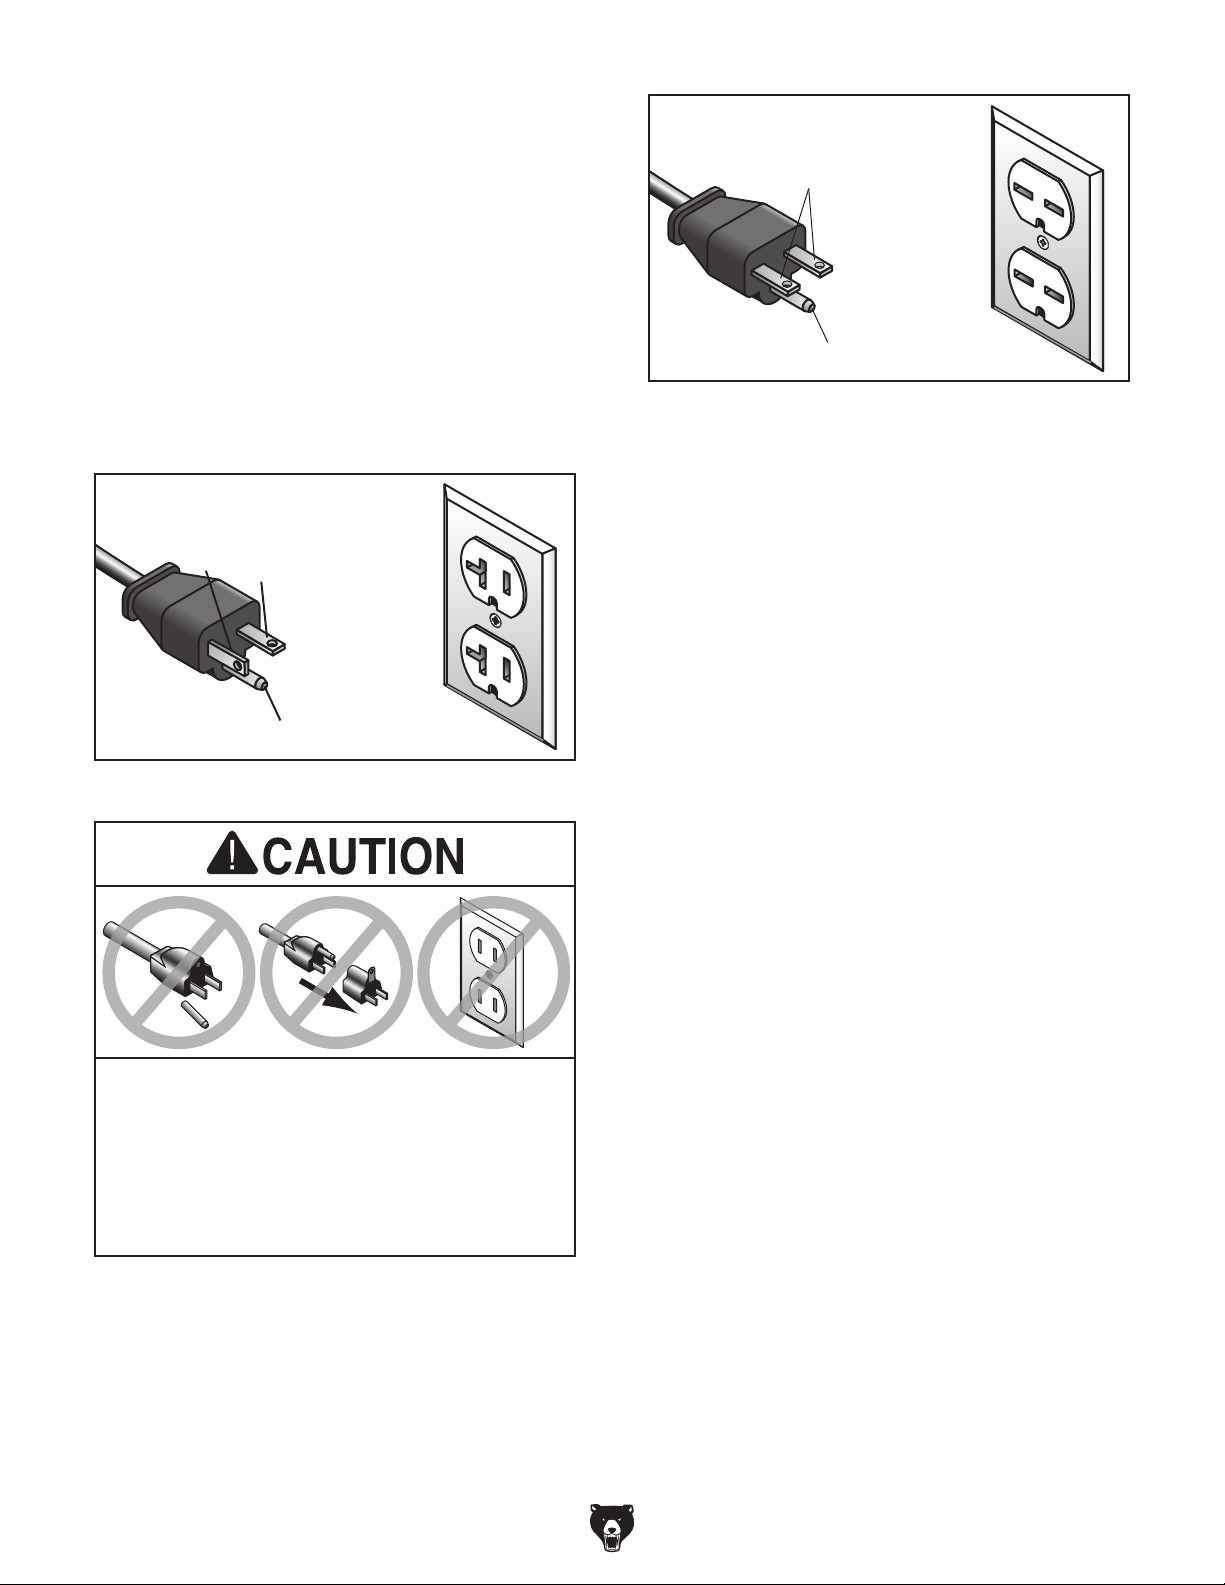
For 120V operation: This machine is equipped
with a power cord that has an equipment-grounding wire and a grounding plug (see following figure). The plug must only be inserted into a matching receptacle (outlet) that is properly installed
and grounded in accordance with all local codes
and ordinances.
GROUNDED
5-20 RECEPTACLE
Hot
Neutral
5-20 PLUG
GROUNDED
6-15 RECEPTACLE
Current Carrying Prongs
6-15 PLUG
Grounding Pin
Figure 5. Typical 6-15 plug and receptacle.
Grounding Pin
Figure 4. Typical 5-20 plug and receptacle.
SHOCK HAZARD!
Do not modify or use an adapter on the plug
provided—if it will not fit the outlet, have a
qualified electrician install the proper outlet
with a verified ground.
For 240V operation: The plug specified under
“Circuit Requirements for 240V” on the previous page has a grounding prong that must be
attached to the equipment-grounding wire on
the included power cord. The plug must only be
inserted into a matching receptacle (see following
figure) that is properly installed and grounded in
accordance with all local codes and ordinances.
-12-
Extension Cords
Minimum Gauge Size (120V) ...............12 AWG
Maximum Length (Shorter is Better)
Model G0964 (Mfd. Since 09/24)
.......50 ft.
Page 15
Converting Voltage
to 240V
The voltage conversion MUST be performed by
an electrician or qualified personnel.
To perform the voltage conversion, rewire the
motor, replace the magnetic switch, and install the
correct plug.
IMPORTANT: If the diagram included on the
motor conflicts with the one in this manual, the
motor may have changed since the manual was
printed. Use the diagram provided on the motor.
4.
Remove screw shown in Figure 7 to remove
motor junction box cover.
Motor Junction Box Cover
Items Needed Qty
Wire Cutters/Strippers ....................................... 1
Wrench or Socket 12mm
Open-End Wrenches 24mm
Phillips Head Screwdriver #2
Wire Nut (14#AWG)
Electrical Tape
................................... As Needed
Magnetic Switch 240V (#P0964016X)
NEMA Plug 6-15
................................................ 1
................................... 1
.............................. 2
............................ 1
........................................... 1
............... 1
To convert machine to 240V operation:
1.
DISCONNECT MACHINE FROM POWER!
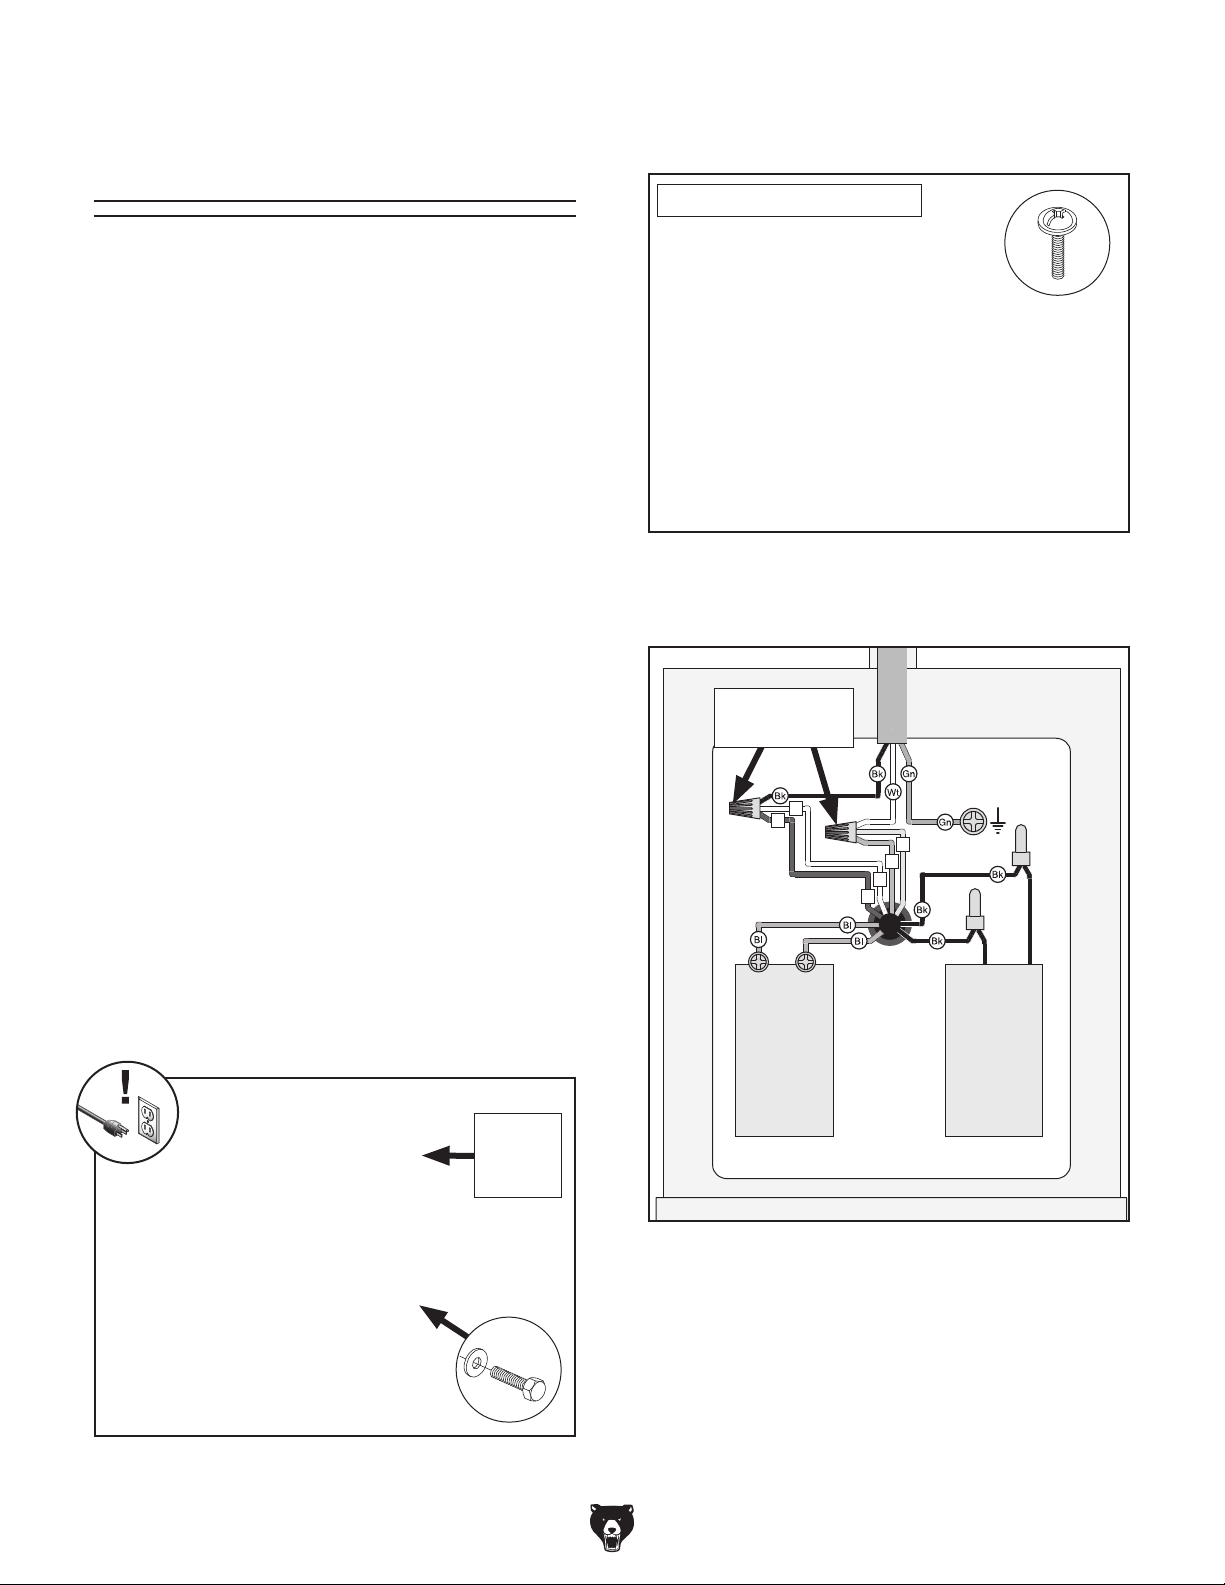
2. Cut off included 5-20 plug.
3. Remove (14) hex bolts and flat washers
shown in Figure 6 to remove motor access
cove r.
Figure 7. Motor junction box cover and screw.
5. Remove (2) wire nuts indicated in Figure 8.
Wire Nuts to
Remove
1
3
Start
Capacitor
300MFD
125VAC
1
3
Ground
4
2
Run
Capacitor
40uF
250VAC
Motor
Access
Cover
Figure 6. Motor access cover and fasteners.
Model G0964 (Mfd. Since 09/24)
Prewired 120V
Figure 8. Motor prewired for 120V.
x 14
-13-
Page 16
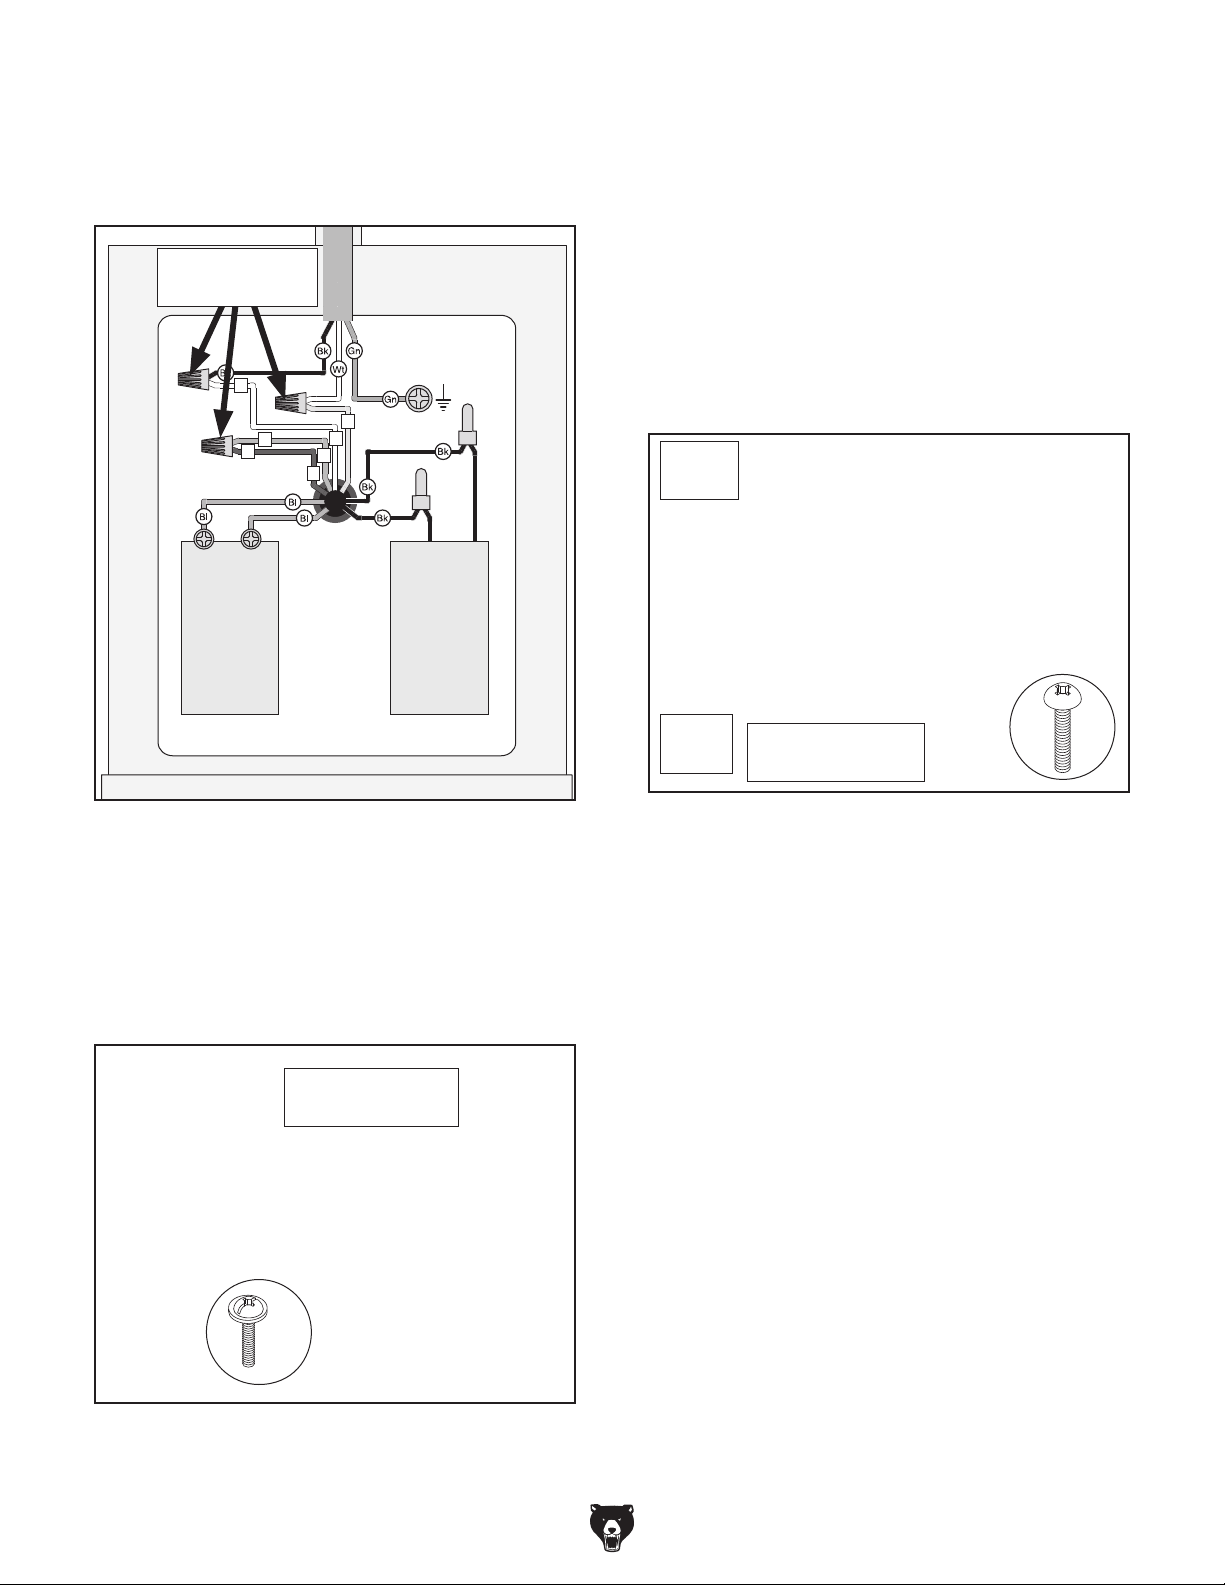
6. Use wire nuts to connect wires as indicated in
Figure 9. Twist wire nuts onto their respective
wires and wrap them with electrical tape so
they will not come loose during operation.
Connect Wires
w/Nuts Here
1
2
3
2
3
Ground
4
1
Disconnect power cord and motor cord wires
10.
from contactor, overload relay, and ground
terminals inside 120V magnetic switch box
(see Figure 11).
Loosen (2) strain relief nuts shown in Figure
11.
11 to remove motor and power cords from
strain relief holes.
Remove (2) screws shown in Figure 11
12.
to remove 120V magnetic switch box from
machine.
Power
Cord
Start
Capacitor
300MFD
125VAC
Run
Capacitor
40uF
250VAC
Rewired 240V
Figure 9. Motor rewired for 240V.
7.
Close and secure motor junction box cover.
8. Install motor access cover.
9. Fully loosen (2) screws shown in Figure 10 to
remove magnetic switch cover.
Magnetic Switch
Cover
Motor
Cord
Strain Relief Nut
(1 of 2)
Figure 11. Location of magnetic switch box
components.
13.
Remove cover on 240V magnetic switch
box, and install box on machine with screws
removed in Step 12.
Insert motor and power cords removed in
14.
Step 11 through 240V magnetic switch box
strain relief holes, then attach wires to terminals according to wiring diagram on Page 34.
Install 240V magnetic switch cover and tight-
15.
en strain relief nuts.
x 2
x 2
Figure 10. Magnetic switch cover and screws.
-14-
Install 6-15 plug on end of power cord,
16.
according to instructions and wiring diagrams
provided by plug manufacturer.
— If plug manufacturer did not include instruc-
tions, wiring of generic NEMA 6-15 plug is
illustrated on Page 34.
Model G0964 (Mfd. Since 09/24)
Page 17
SECTION 3: SETUP
The following items are needed, but not included,
for the setup/assembly of this machine.
This machine was carefully packaged for safe
transport. When unpacking, separate all enclosed
items from packaging materials and inspect them
for shipping damage.
,
please
IMPORTANT: Save all packaging materials until
you are completely satisfied with the machine and
have resolved any issues between Grizzly or the
shipping agent. You MUST have the original pack-
aging to file a freight claim. It is also extremely
helpful if you need to return your machine later.
Needed for Setup
This machine presents
serious injury hazards
to untrained users. Read
through this entire manual to become familiar with
the controls and operations before starting the
machine!
Description Qty
• Safety Glasses (for each person) ............... 1
• Another Person .......................................... 1
• Wrench or Socket 10mm ............................ 1
Wear safety glasses during
the entire setup process!
HEAVY LIF T!
Straining or crushing injury
may occur from improperly
lifting machine or some of
its parts. To reduce this risk,
get help from other people
and use a forklift (or other
lifting equipment) rated for
weight of this machine.
Unpacking
If items are damaged
call us immediately at (570) 546-9663.
Model G0964 (Mfd. Since 09/24)
-15-
Page 18
Inventory
The following is a list of items shipped with your
machine. Before beginning setup, lay these items
out and inventory them.
If any non-proprietary parts are missing (e.g. a
nut or a washer), we will gladly replace them; or
for the sake of expediency, replacements can be
obtained at your local hardware store.
NOTICE
If you cannot find an item on this list, carefully check around/inside the machine and
packaging materials. Often, these items get
lost in packaging materials while unpacking or they are pre-installed at the factory.
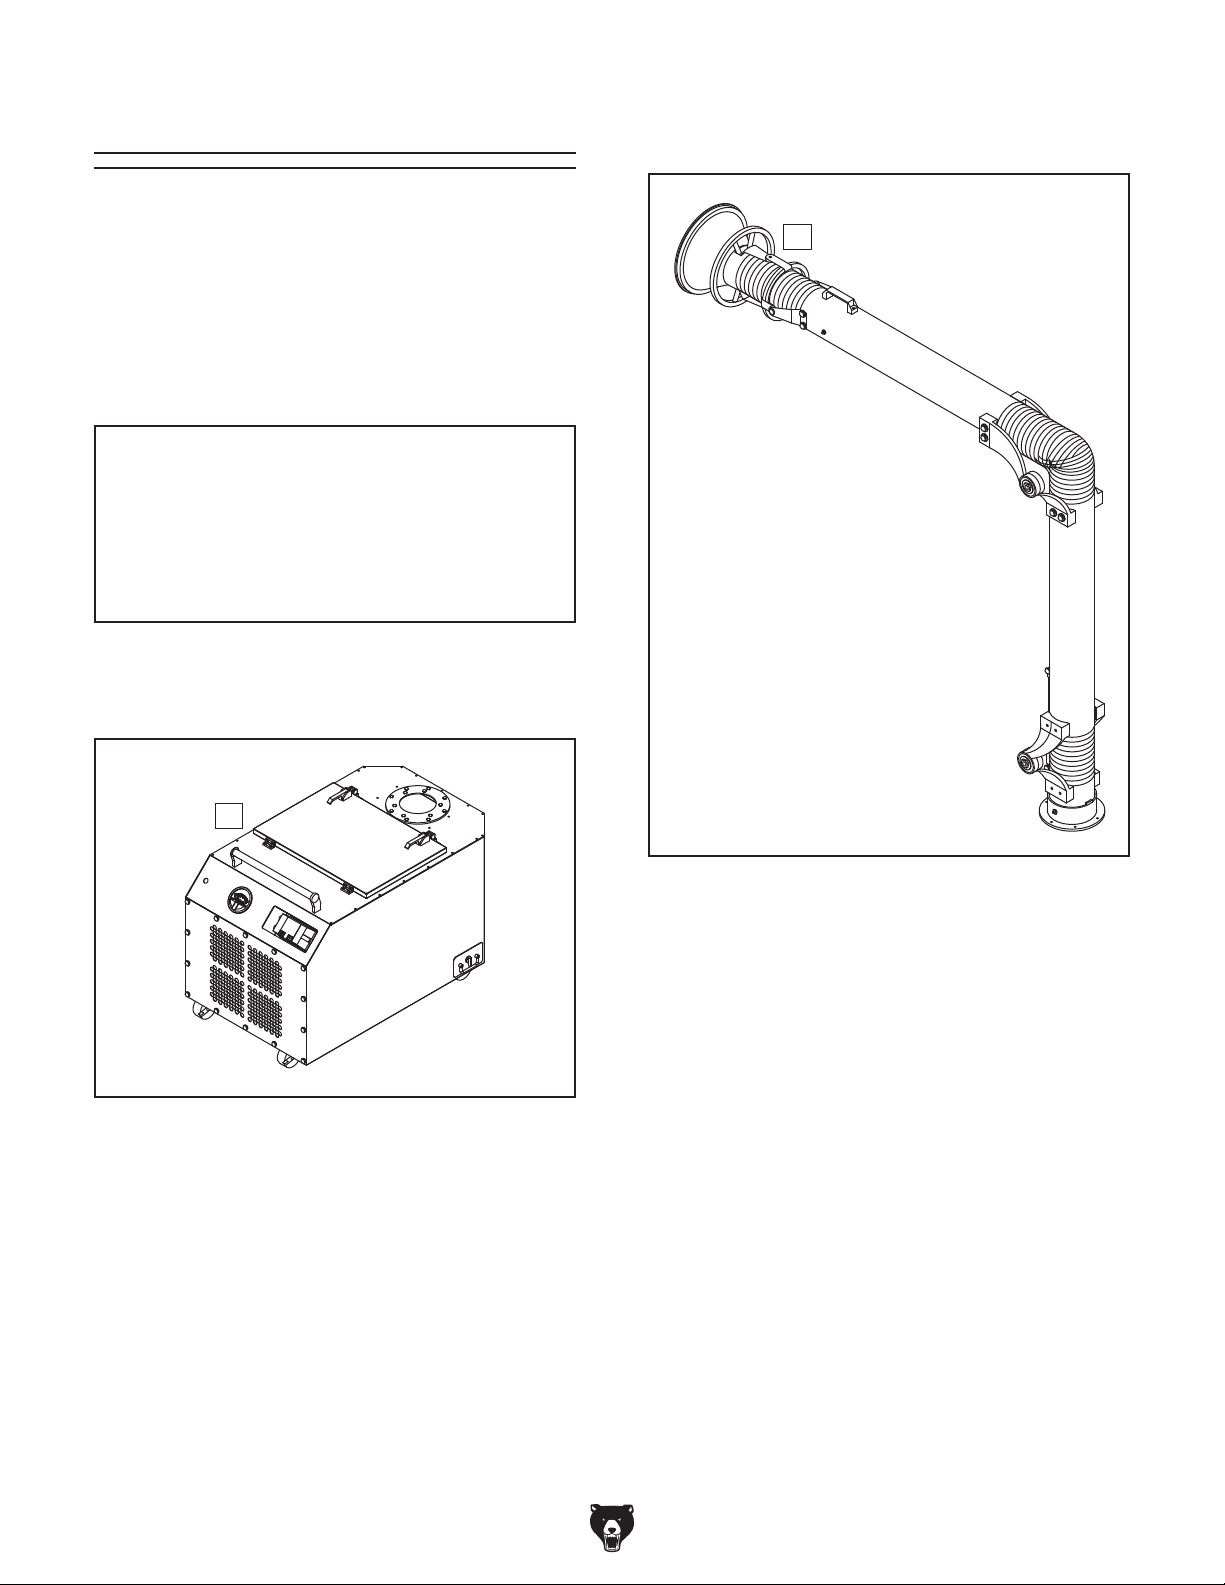
Box 1 (Figure 12) Qty
A. Machine Base............................................. 1
Box 2 (Figure 13) Qty
B. Precision Arm ............................................. 1
B
A
Figure 12. Box 1 inventory.
Figure 13. Box 2 inventory.
-16-
Model G0964 (Mfd. Since 09/24)
Page 19
Site Considerations
Weight Load
Refer to the
of your machine. Make sure that the surface upon
which the machine is placed will bear the weight
of the machine, additional equipment that may be
installed on the machine, and the heaviest workpiece that will be used. Additionally, consider the
weight of the operator and any dynamic loading
that may occur when operating the machine.
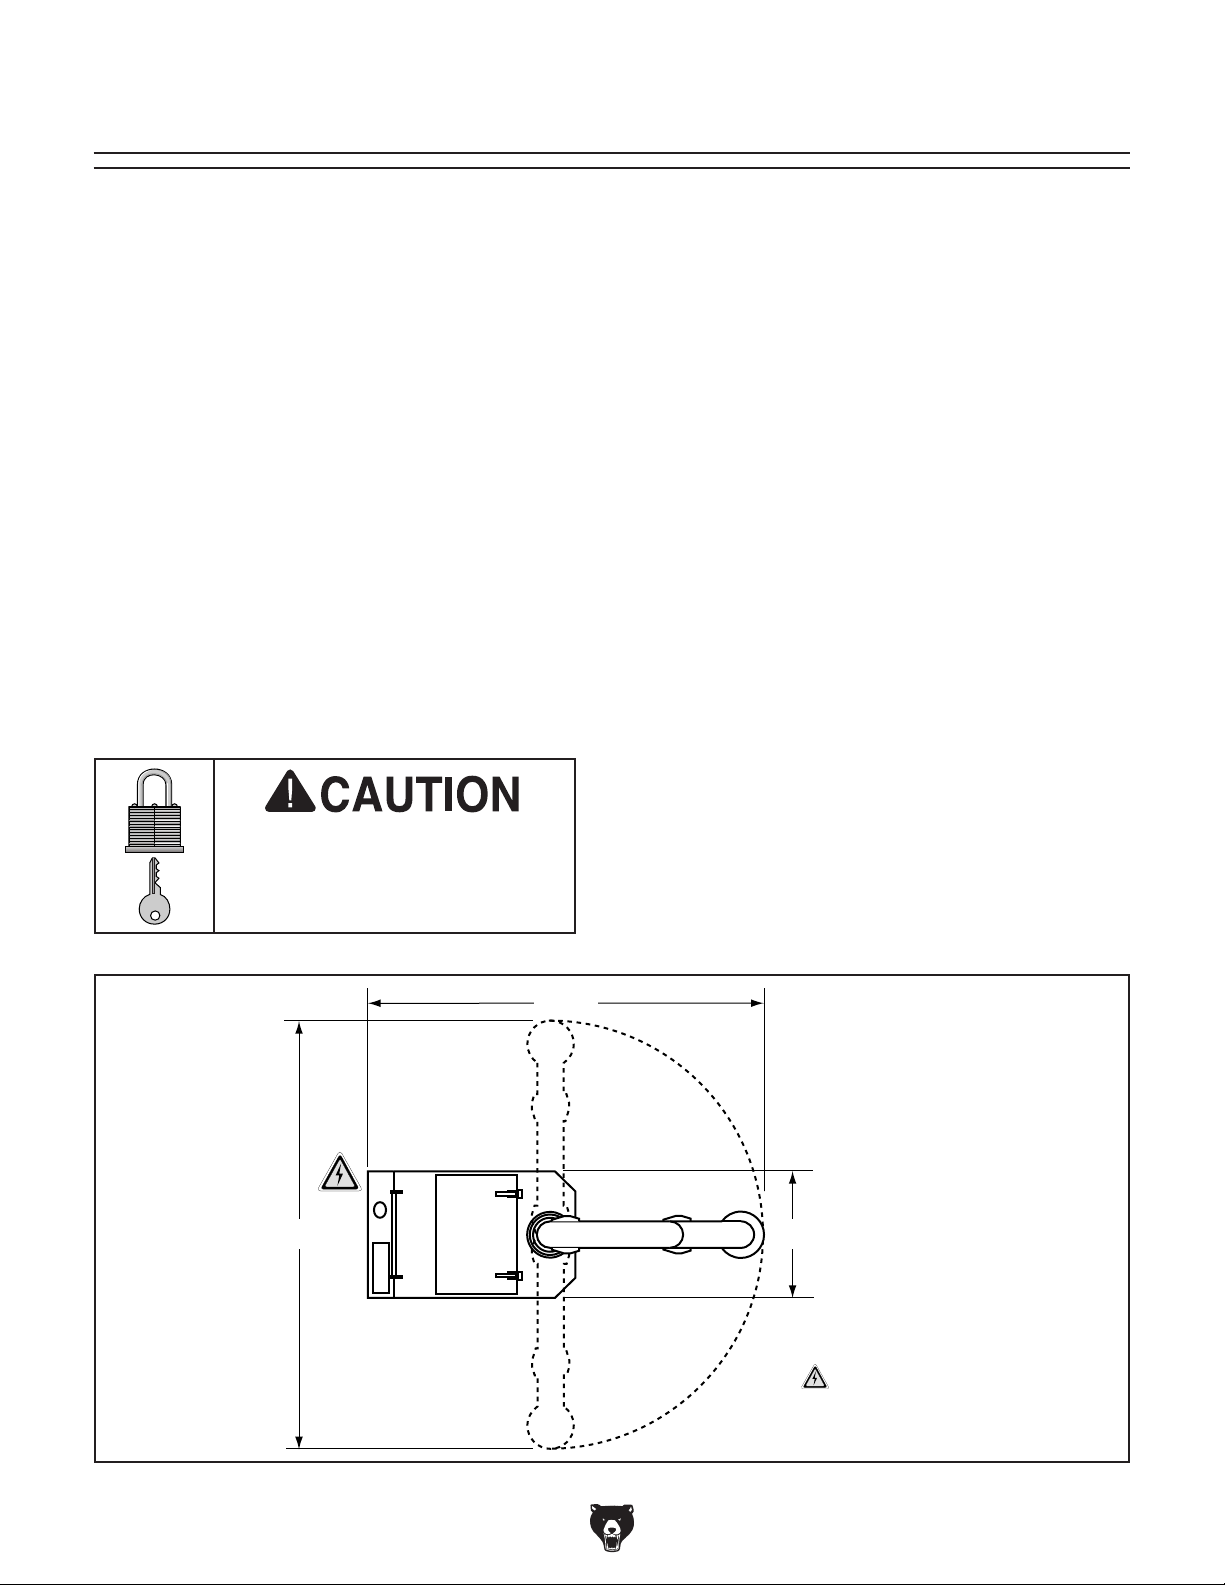
Space Allocation
Consider the largest size of workpiece that will
be processed through this machine and provide
enough space around the machine for adequate
operator material handling or the installation of
auxiliary equipment. With permanent installations,
leave enough space around the machine to open
or remove doors/covers as required by the maintenance and service described in this manual.
See below for required space allocation.
Physical Environment
The physical environment where the machine is
operated is important for safe operation and longevity of machine components. For best results,
operate this machine in a dry environment that is
free from excessive moisture, hazardous chemicals, airborne abrasives, or extreme conditions.
Extreme conditions for this type of machinery are
generally those where the ambient temperature
range exceeds 41°–104°F; the relative humidity
range exceeds 20%–95% (non-condensing); or
the environment is subject to vibration, shocks,
Place this machine near an existing power source.
Make sure all power cords are protected from
traffic, material handling, moisture, chemicals, or
other hazards. Make sure to leave enough space
around machine to disconnect power supply or
Lighting around the machine must be adequate
enough that operations can be performed safely.
Shadows, glare, or strobe effects that may distract
or impede the operator must be eliminated.
Machine Data Sheet for the weight
or bumps.
Electrical Installation
Children or untrained people
may be seriously injured by
this machine. Only install in an
access restricted location.
109½"
apply a lockout/tagout device, if required.
Lighting
88½"
29½"
Electrical
=
Connection
Model G0964 (Mfd. Since 09/24)
Figure 14. Minimum working clearances.
-17-
Page 20
Assembly
The machine must be fully assembled before it
can be operated. Before beginning the assembly
process, refer to
and gather
all
To ensure the assembly process
goes smoothly, first clean any
ered or coated in heavy-duty rust preventative (if
applicable).
listed items.
Needed for Setup
parts that are cov-
HEAVY LIF T!
Straining or crushing injury
may occur from improperly
lifting machine or some of
its parts. To reduce this risk,
get help from other people
and use a forklift (or other
lifting equipment) rated for
weight of this machine.
6. With help of assistant, attach precision arm
to machine base, as shown in Figure 16, with
hex bolts and flat washers removed in Step 5.
Note: Flange tab shown in Figure 16 must
face machine base power controls.
Precision
Arm
Flange
Tab
To assemble machine:
Remove top and sides of shipping crate.
1.
2. Unlock (2) locking casters on machine base.
3. With an assistant to help balance machine,
move machine base off of pallet.
Lock locking casters.
4.
5. Remove (6) 1⁄4"-20 x 3⁄4" hex bolts and 1⁄4"
fender washers shown in Figure 15.
x 6
Figure 16. Precision arm attached to machine
base.
7.
Use precision arm handle to rotate arm
through its full range of motion (see Figure
17) to confirm it has been installed correctly.
Arm should rotate all the way around flange
without binding until it contacts flange tab
shown in Figure 16.
Figure 15. Location of precision arm fasteners.
-18-
Figure 17. Rotating arm through its full range of
motion.
Model G0964 (Mfd. Since 09/24)
Page 21
Test Run
Once assembly is complete, test run the machine
to ensure it is properly connected to power and
safety components are functioning correctly.
If you find an unusual problem during the test run,
immediately stop the machine, disconnect it from
power, and fix the problem BEFORE operating the
machine again. The
table in the
SERVICE section of this manual can help.
DO NOT start machine until all preceding
setup instructions have been performed.
Operating an improperly set up machine
ed results that can lead to serious injury,
Serious injury or death can result from
Troubleshooting
The Test Run consists of verifying the following: 1)
The motor powers up and runs correctly.
using this machine BEFORE understanding
its controls and related safety information.
DO NOT operate, or allow others to operate,
machine until the information is understood.
To test run machine:
1. Clear all setup tools away from machine.
2. Lock locking casters on base.
3. Connect machine to power supply.
4. Press green ON button to turn machine ON
(see Figure 18). Verify motor runs smoothly
and without unusual problems or noises.
Press red OFF button to turn machine OFF
5.
(see Figure 18).
OFF Button ON Button
may result in malfunction or unexpect-
death, or machine/property damage.
Model G0964 (Mfd. Since 09/24)
Figure 18. Location of power controls.
Congratulations! Test Run is complete.
-19-
Page 22
SECTION 4: OPERATIONS
Operation
This fume extractor is designed exclusively to
extract and filter fumes and particulate generated
during welding. DO NOT use this fume extractor to collect wood dust or metal chips due to
potential fire risk. This machine is not designed
to collect the slag and molten metal produced by
cutting torches and plasma cutters.
This machine does not substitute the need for a
respirator or proper workpiece preparation. Make
sure that you are familiar with the materials to be
welded, know what types of fumes will be created,
and take the necessary precautions. Many metal
coatings will produce poisonous fumes when
heated. Strip coatings off at least four inches
away from the area of heat application before
welding. It is always better to follow good welding
practices and remove coatings that may smoke
and possibly contaminate the weld.
Never operate machine with damaged or
worn parts. Never operate machine with filters removed, or filter door open.
To complete a typical operation, the operator
does the following:
1. Positions machine close to welding opera-
tion, locks casters, then directs suction hood
within 6"–18" of workpiece.
Note: Hood should be as close to workpiece
as possible without interfering with operation
by obstructing workpiece view or disturbing
shielding gases.
Connects machine to power and turns it ON.
2.
Adjusts damper for welding operation.
3.
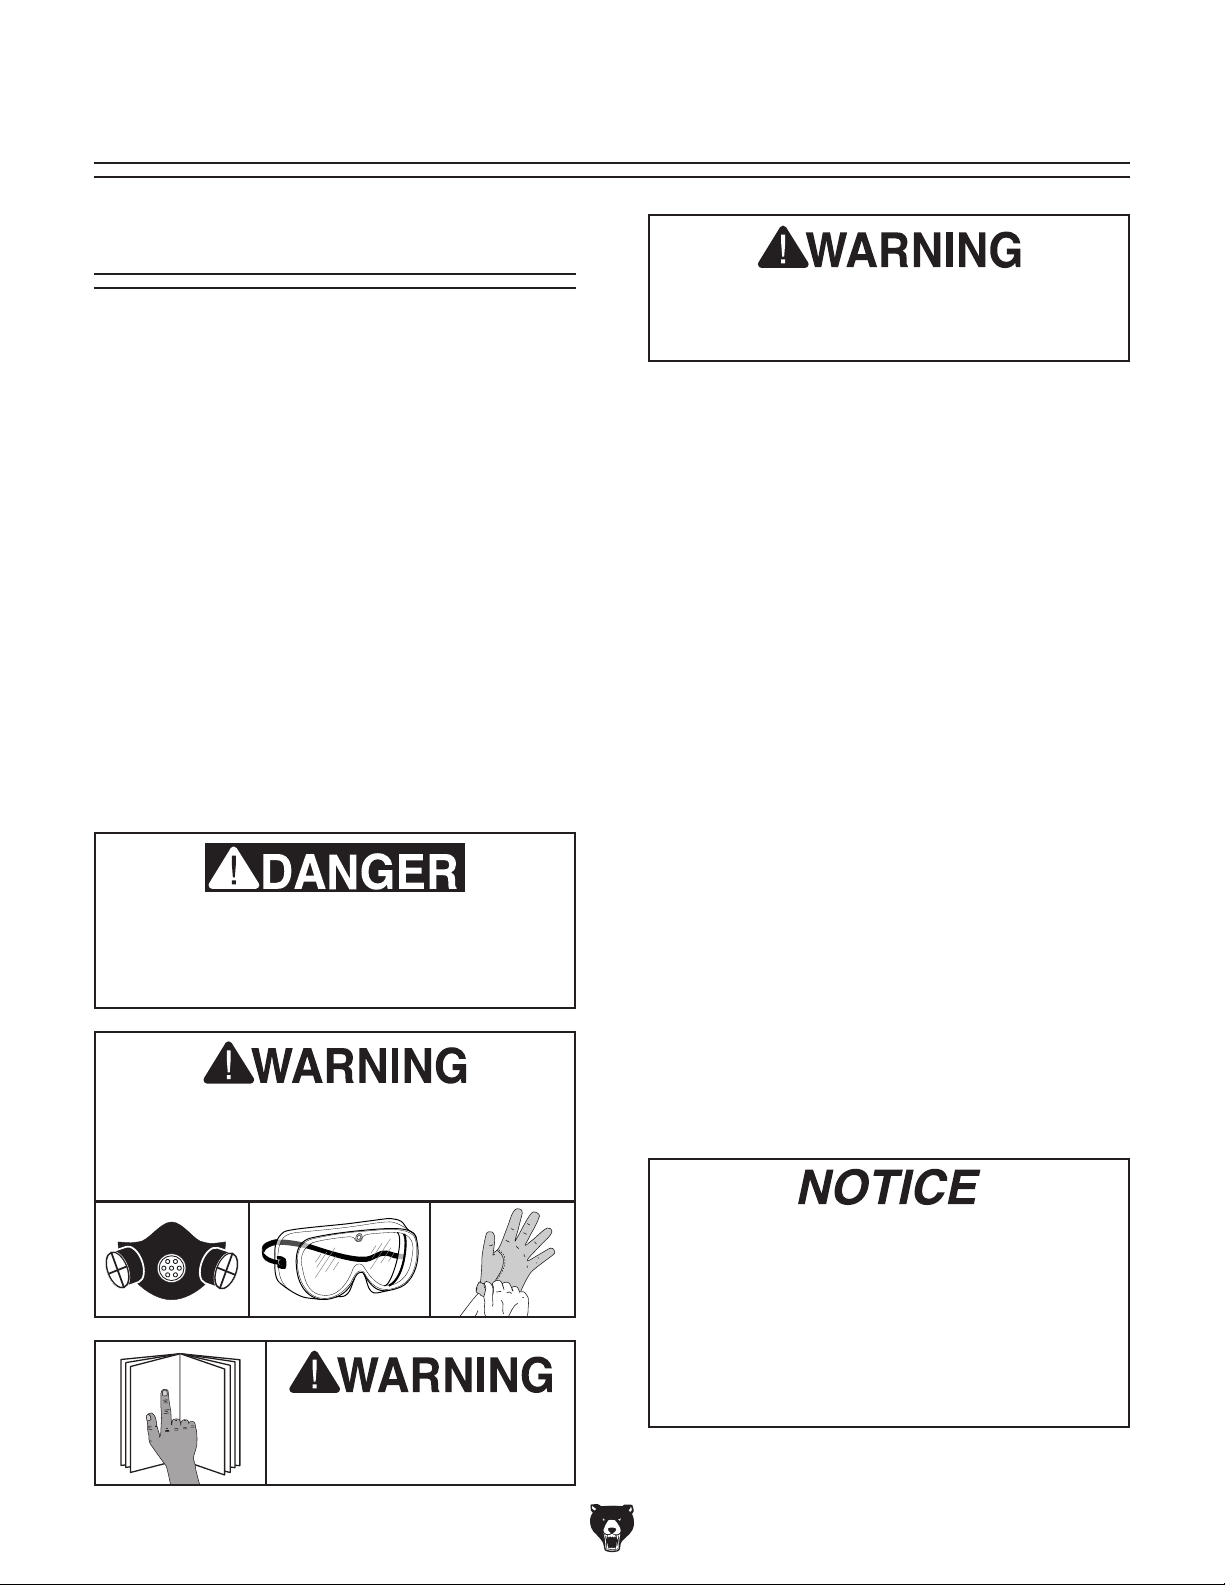
Always wear welding personal protective
equipment, including hood, respirator,
gloves, boots, and long sleeves when
welding.
Wear approved respirator, safety goggles,
and protective gloves whenever cleaning
machine or handling filters to reduce risk of
eye, face, and lung injuries
To reduce risk of serious
injury, read entire manual
BEFORE using machine.
4. Puts on personal protective equipment
required by welding operation.
Performs welding operation, then turns OFF
5.
welder.
Allows machine to remove any residual fumes
6.
from environment, then turns machine OFF
and disconnects it from power.
Empties dust drawer while wearing safety
7.
goggles, protective gloves, and respirator.
If you are not experienced with this type
of machine, WE STRONGLY RECOMMEND
that you seek additional training outside of
this manual. Read books/magazines or get
formal training before beginning any projects. Regardless of the content in this section, Grizzly Industrial will not be held liable
for accidents caused by lack of training.
-20-
Model G0964 (Mfd. Since 09/24)
Page 23
ACCESSORIES
Installing unapproved accessories may
order online at www.grizzly.com or call 1-800-523-4777
SECTION 5: ACCESSORIES
cause machine to malfunction, resulting in
serious personal injury or machine damage.
To reduce this risk, only install accessories
recommended for this machine by Grizzly.
NOTICE
Refer to our website or latest catalog for
additional recommended accessories.
Model G0964 Replacement Filters
T33832—Aluminum Mesh Filter for G0964
This mesh filter arrests sparks and stops slag
from entering the other filters. 440 x 540 x 22mm.
T33833—Pleated Pre-Filter for G0964
The T33833 pleated pre-filter captures 35% of
particles from 2–10 microns in size and has a 9.7
square foot surface area. Removing these particles helps the unit maintain airflow and increase
filtration efficiency. This is especially vital to
extending the life of the HEPA filter. 595 x 595 x
45mm.
Figure 19. T33832 Aluminum Mesh Filter.
Figure 20. T33833 Pleated Pre-Filter.
T33834—V-Cell HEPA Filter for G0964
This MERV-17 HEPA filter captures 99.97% of
particles 0.3 microns in size and has a 167.9
square foot surface area. 595 x 595 x 292mm.
Figure 21. T33834 V-Cell HEPA Filter.
Model G0964 (Mfd. Since 09/24)
-21-
Page 24
order online at www.grizzly.com or call 1-800-523-4777
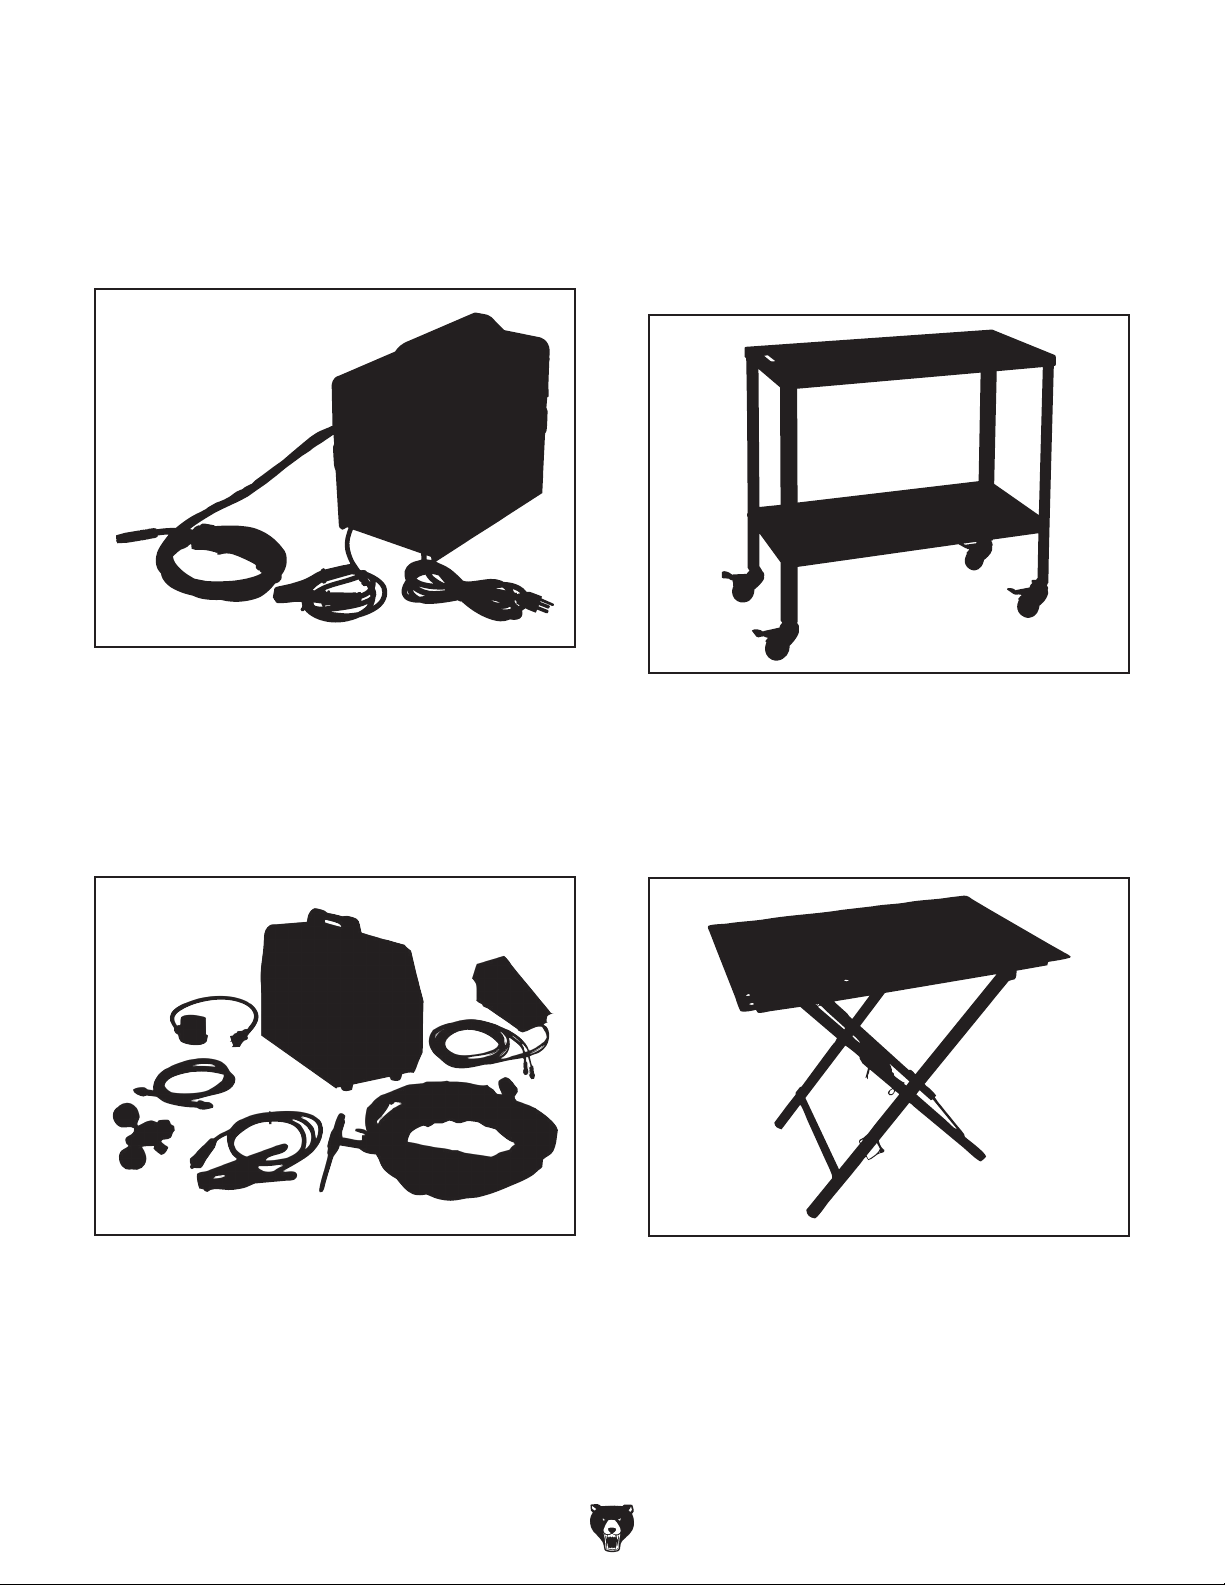
G0879—Flux-Cored Wire Feed Welder
Operating the G0879 is as easy as carrying the
lightweight, 36-pound welder to the job site, plugging it in attaching the ground clamp, and you're
ready to weld! Flux-core welders can produce
cleaner welds than stick welding and offer superior weld puddle control, even on thinner metals.
Figure 22. G0879 Flux-Cored Wire Feed Welder.
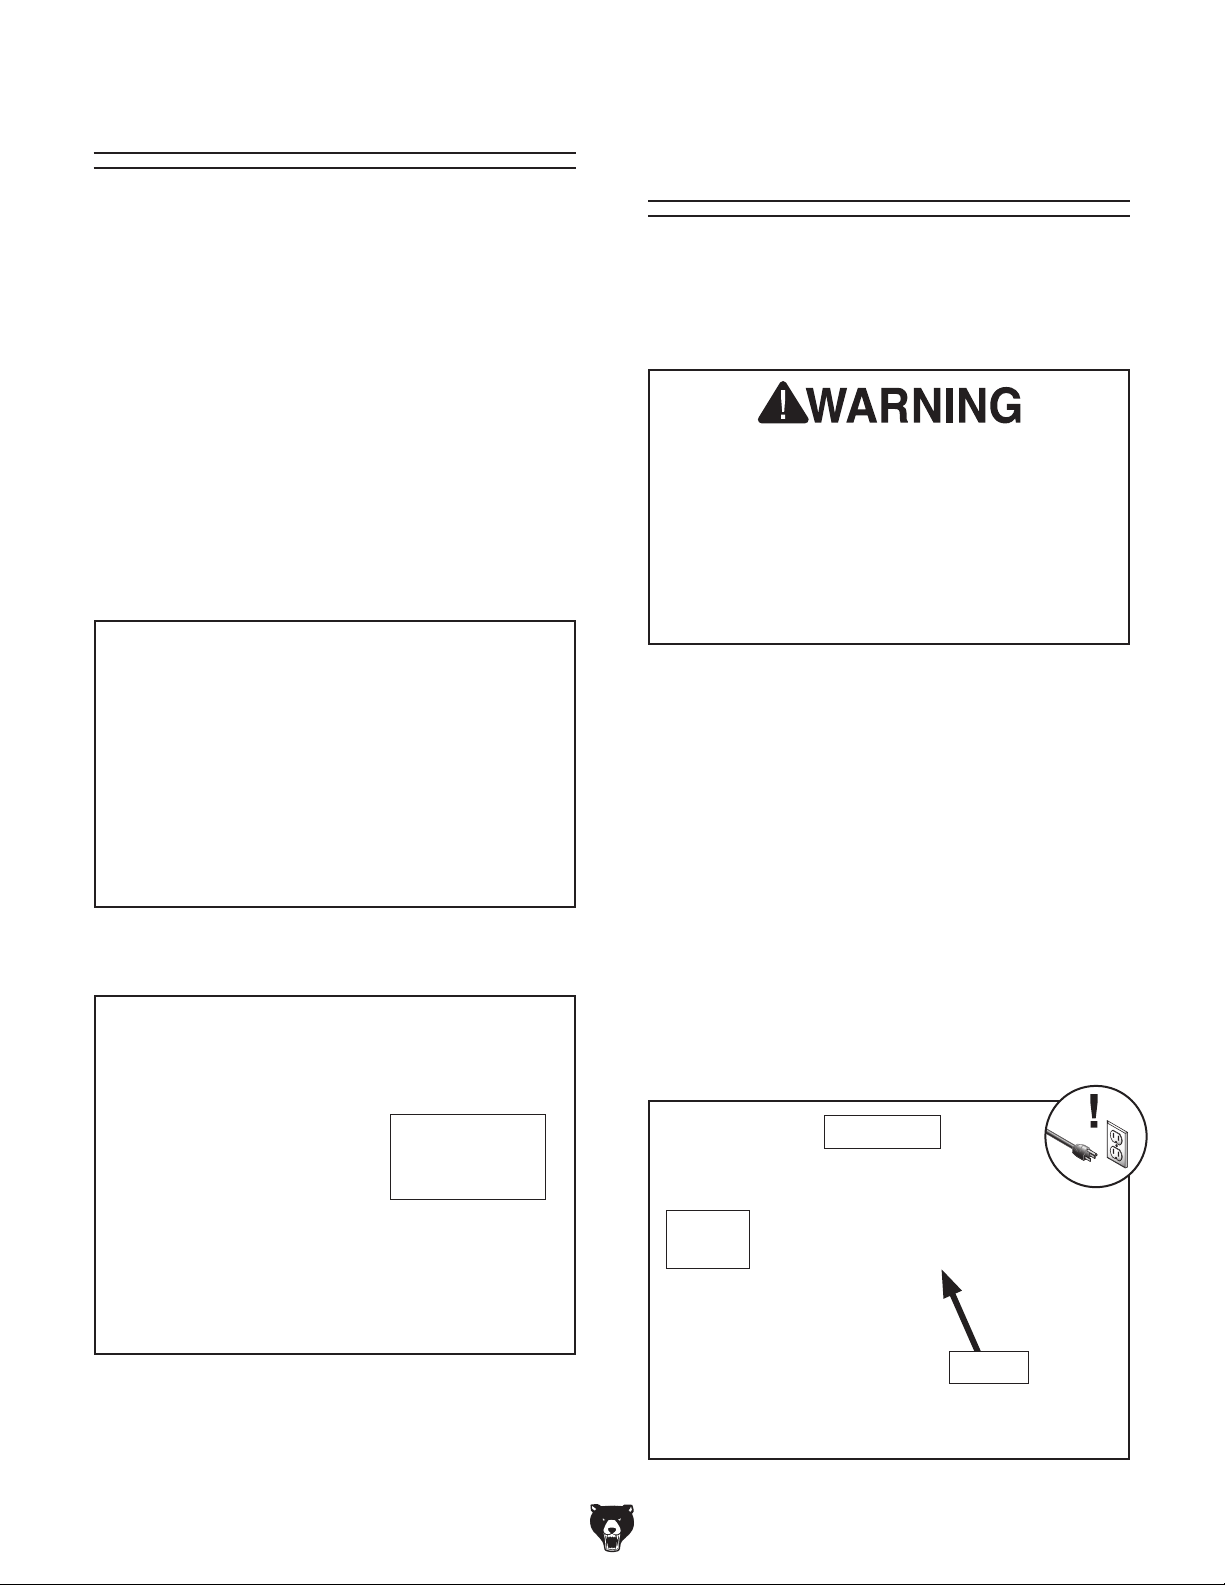
G0883—160A AC/DC TIG Welder
This welder is perfect for those ultra-clean, "stack
of dimes" weld beads you expect from a traditional
TIG unit, while offering the functionality of switching arc control from foot pedal control to fingeractivated.
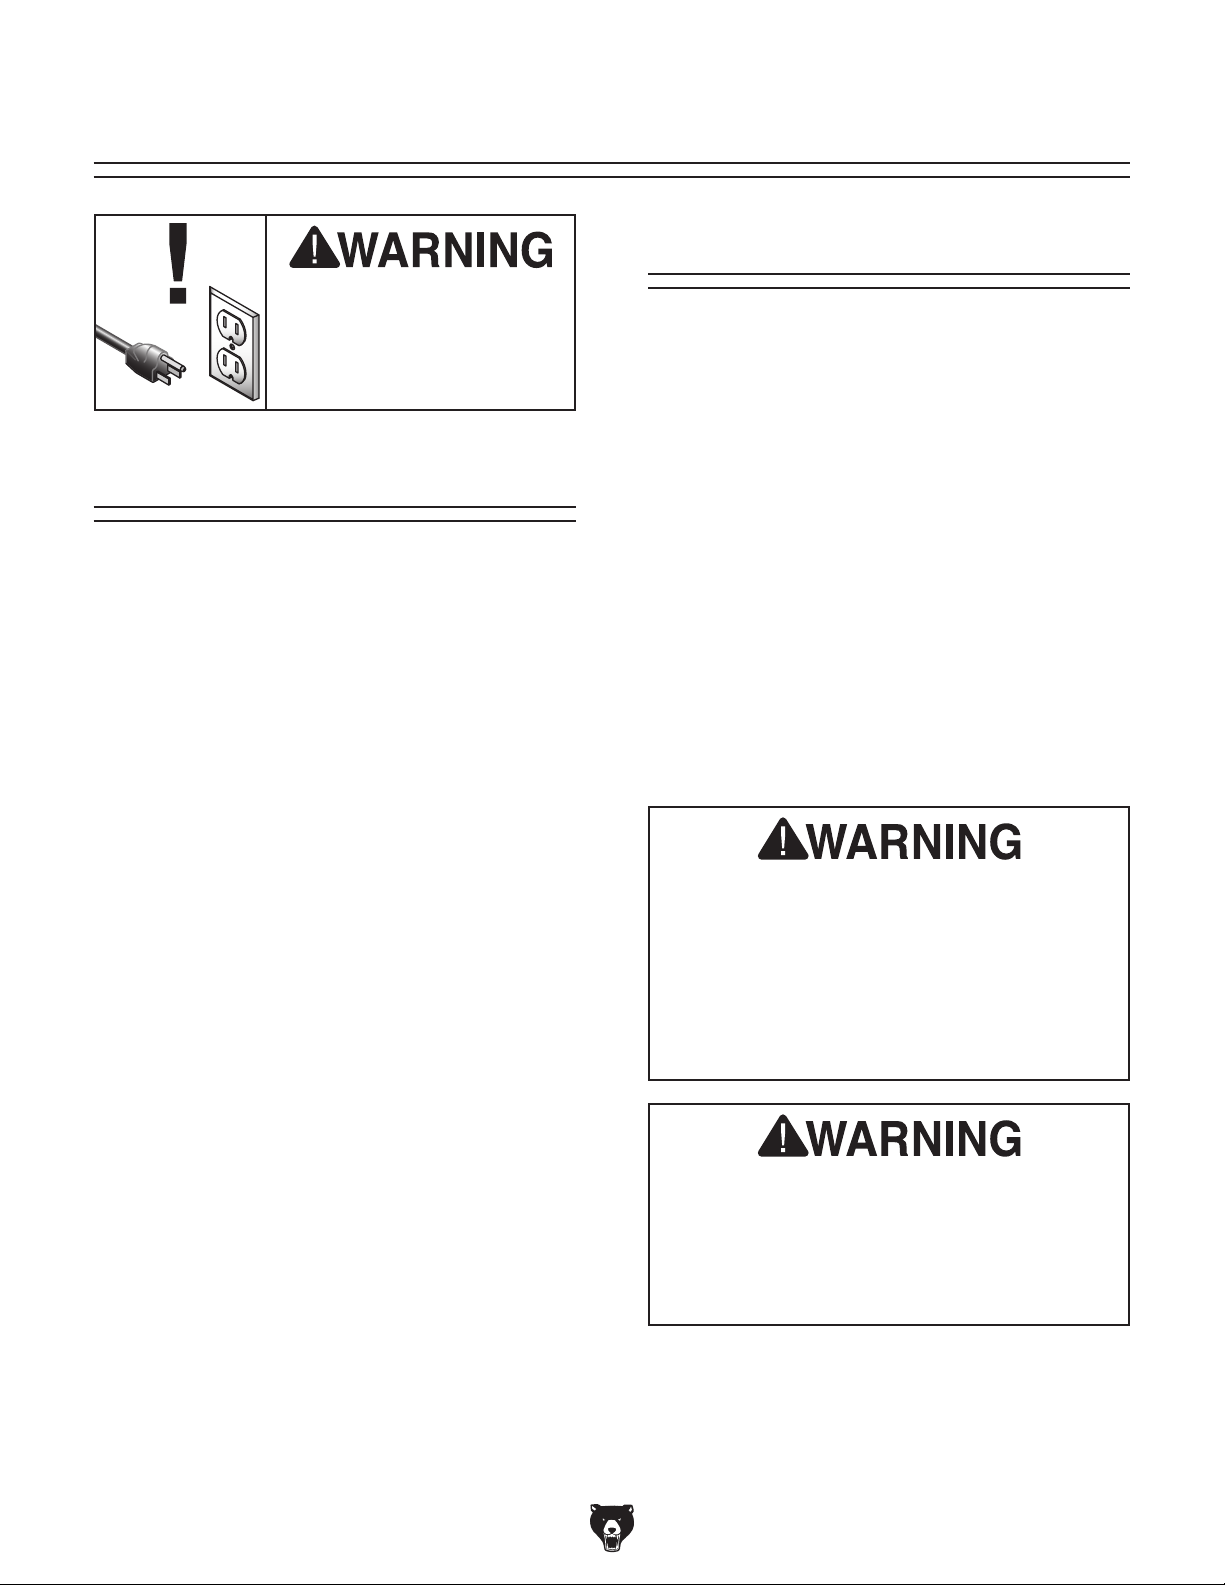
T31771—Mobile Welding Table
Designed for mobility, simply roll the T31771
Mobile Welding Table in place and lock the four
casters down. When you are done with your job
and need the floor space, unlock the casters and
move the table away! The table top is 18" x 36",
5
made of 12-gauge steel with
⁄8" holes on 21⁄2 "
centers.
Figure 24. T31771 Mobile Welding Table.
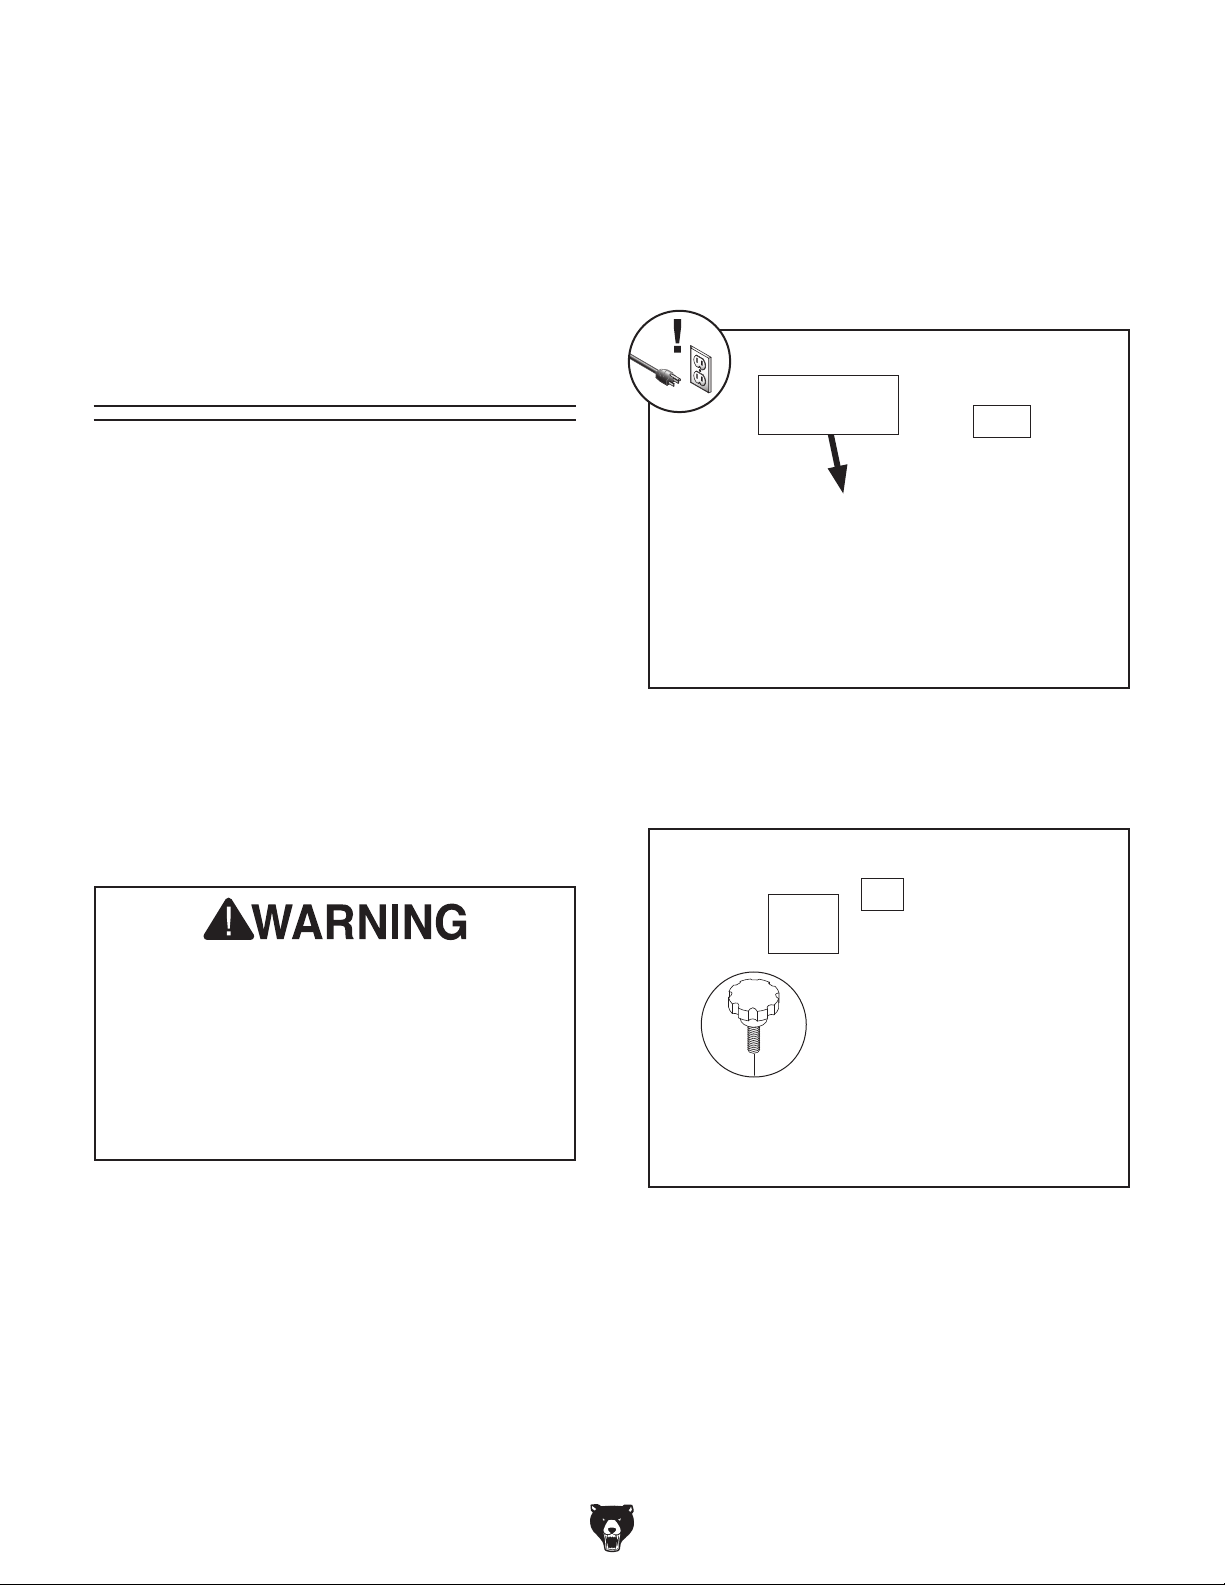
T32859—24" x 36" Folding Welding Table
This folding welding table has a 350-pound load
capacity and collapses for storage when not in
5
use. It has a 9-gauge table with
⁄8" diameter holes
spaced every 2".
Figure 23. G0883 160A AC/DC TIG Welder.
Figure 25. T32859 24" x 36" Folding Welding
Table.
-22-
Model G0964 (Mfd. Since 09/24)
Page 25

T28996—Vertical Swing Clamp
order online at www.grizzly.com or call 1-800-523-4777
The T28996 makes securing welding workpieces
fast and simple. This clamp pairs perfectly with
your worktable and angle fixtures to help apply
pressure where it's needed most.
T28999—Universal 90 Degree Fixture
This fixture has one bored and one oblong hole
that can be used as a large stop. It has machined
scale markings and integrated 28mm fixture holes
for use with clamping bolts.
Figure 28. T28999 Universal 90 Degree Fixture.
Figure 26. T28996 Vertical Swing Clamp.
T28986—Right-Hand Corner Fixture
With nearly endless accessory attachment
options, the T28986 Right-Hand Corner Fixture
angle block offers the support you need. This
clamping and locating fixture reveals a multitude of clamping possibilities due to its three
dimensionality and allows for the use of heavy
parts. Use it as a limit stop and table extension.
1
Measures 10
⁄4" x 113⁄4".
T28990—Corner Clamping Attachment
The T28990 Corner Clamping Attachment provides more working space as a result of diagonally extending the table at a 45° angle. Precisionmachined, high-tensile strength welded steel adds
incredible rigidity for the best 90° angle alignment.
Figure 29. T28990 Corner Clamping Attachment.
Figure 27. T28986 Right-Hand Corner Fixture.
Model G0964 (Mfd. Since 09/24)
-23-
Page 26
SECTION 6: MAINTENANCE
To reduce risk of shock or
accidental startup, always
disconnect machine from
Cleaning
Cleaning the Model G0964 is relatively easy.
power before adjustments,
maintenance, or service.
Always put on ANSI-approved safety goggles, a
NIOSH-approved respirator, and protective gloves
before cleaning machine to protect against any
airborne particles disturbed by cleaning.
Schedule
For optimum performance from this machine, this
maintenance schedule must be strictly followed.
Ongoing
To minimize your risk of injury and maintain proper
machine operation, shut down the machine immediately if you ever observe any of the items below,
and fix the problem before continuing operations:
• Fire hazards or smoldering combustibles.
• Loose mounting bolts.
• Damaged filters or gaskets/seals.
Worn or damaged wires.
•
Any other unsafe condition.
•
Daily Maintenance
• Check operating pressure. If operating pres-
sure exceeds 6 inches of water (inAq), refer
to Cleaning/Replacing Filters on Page 26.
• Empty dust drawer.
Once a week, use a vacuum equipped with a
HEPA filter to remove dust and fume buildup
from the outside of the machine. Once a month,
remove the access cover and filters and vacuum
inside of the machine. Wipe up any remaining
dust with a disposable cloth that has been wet
with water.
IMPORTANT: DO NOT use compressed air to
clean the machine—especially if indoors—as it
will likely cause unnecessary dust to become airborne and can damage the filters.
Wear ANSI-approved safety goggles, NIOSHapproved respirator, and protective gloves
when removing, cleaning, and replacing
filters. Carefully minimize amount of dust
allowed to become airborne, and prevent
spread of dust onto hands or clothing.
Dispose of all waste properly according to
local regulations for material type.
Weekly Maintenance
• Clean/vacuum dust buildup from outside of
machine and precision arm.
• Lubricate precision arm flange.
Monthly Check
• Clean/vacuum dust buildup from inside
machine base and off motor.
-24-
DO NOT clean or degrease fume extractor
with any form of chlorinated hydrocarbons.
When introduced to arc welding operations,
chlorinated hydrocarbons produce phosgene gas which can result in serious injury
and even death.
Model G0964 (Mfd. Since 09/24)
Page 27
Lubrication
Once a week, apply a pump of NLGI#2 grease
like the one shown in Figure 30 below to the precision arm flange using the grease fitting shown
in Figure 31. The grease gun dispensing tip style
must be compatible with a conical head (sometimes called "standard" or "DIN 71412") grease
fitting.
T26419—NLGI#2 Syn-O-Gen Synthetic Grease
Formulated with 100% pure synthesized hydrocarbon basestocks that are compounded with special
thickeners and additives to make Syn-O-Gen
non-melt, tacky, and water resistant. Extremely
low pour point, extremely high temperature oxidation, and thermal stability produce a grease that is
unmatched in performance.
Emptying
Dust Drawer
Empty the dust drawer at the end of the day's
use. If you allow dust and debris to accumulate,
airflow efficiency can drop and machine may be
damaged.
Wear ANSI-approved safety goggles, NIOSHapproved respirator, and protective gloves
when removing, cleaning, and replacing
filters. Carefully minimize amount of dust
allowed to become airborne, and prevent
spread of dust onto hands or clothing.
Dispose of all waste properly according to
local regulations for material type.
Items Needed Qty
ANSI-Approved Safety Goggles ................... 1 Pr.
NIOSH-Approved Respirator
Protective Gloves
Vacuum Cleaner w/HEPA Filter
.........................................1 Pr.
............................. 1
......................... 1
Figure 30. T26419 Syn-O-Gen Synthetic
Grease.
Precision Arm
Flange
Grease Fitting
Figure 31. Location of precision arm flange
grease fitting.
To empty dust drawer:
1.
DISCONNECT MACHINE FROM POWER!
2. Put on personal protective equipment.
3. Turn dust drawer cam latch 90° counterclock-
wise to unlock, then use handle to pull drawer
from machine base (see Figure 32).
Cam Latch
Dust
Drawer
Handle
Model G0964 (Mfd. Since 09/24)
Figure 32. Dust drawer components.
-25-
Page 28
4. Vacuum accumulated dust from dust drawer,
install drawer, then turn cam latch clockwise
to secure.
To clean/replace filters:
DISCONNECT MACHINE FROM POWER!
1.
Dispose of collected dust according to local
5.
regulations.
Cleaning/Replacing
Filters
Clean the aluminum mesh and pre-filter filters
when the operating pressure on the pressure
gauge exceeds 6 inches of water (inAq). Replace
the filters when cleaning does not improve the
machine performance.
Always clean the filters outdoors when possible!
However, take special care to avoid contaminating
the environment. When cleaning or replacing the
filters, always inspect for damage and replace the
filters if ANY damage or tears are found.
IMPORTANT: DO NOT use compressed air to
clean the filters—especially if indoors—as it will
likely cause a large amount of dust to become
airborne and could damage the filters.
2. Put on personal protective equipment.
3. Lift (2) door handles to open door (see
Figure 33).
Door Handle
(1 of 2)
Figure 33. Location of door handles.
4. Loosen knob shown in Figure 34, then slide
latch plate away from pin.
Door
Wear ANSI-approved safety goggles, NIOSHapproved respirator, and protective gloves
when removing, cleaning, and replacing
filters. Carefully minimize amount of dust
allowed to become airborne, and prevent
spread of dust onto hands or clothing.
Dispose of all waste properly according to
local regulations for material type.
Items Needed Qty
ANSI-Approved Safety Goggles ................... 1 Pr.
NIOSH-Approved Respirator
Protective Gloves
Wrench or Socket 12mm
Soft Bristle Brush
Vacuum Cleaner w/HEPA Filter
Wire Brush
Replacement Filters........................... As Needed
......................................................... 1
.........................................1 Pr.
.............................................. 1
............................. 1
................................... 1
......................... 1
Latch
Pin
Plate
Figure 34. Location of filter housing retaining
knob, latch plate, and pin.
-26-
Model G0964 (Mfd. Since 09/24)
Page 29
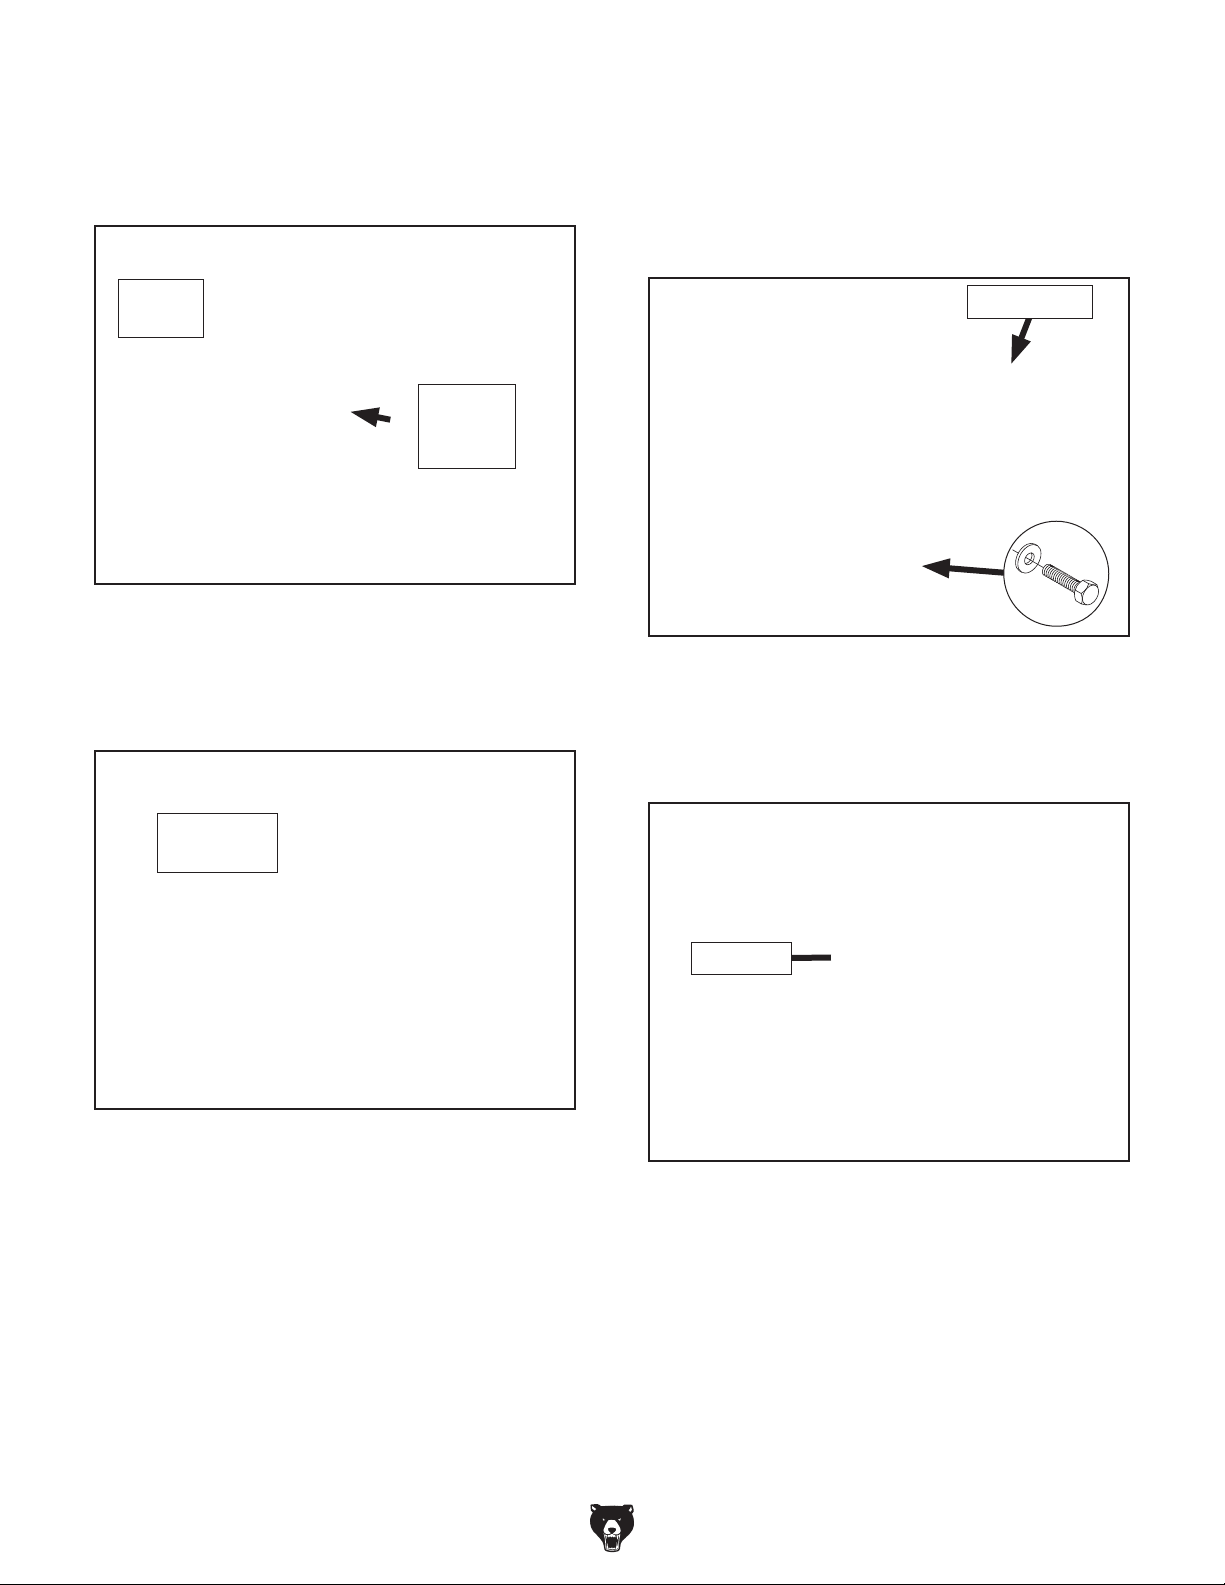
5. Move pivot frames toward pressure gauge to
release filter housing (see Figure 35), then
lift filter housing out of machine base with
handle.
9. Remove HEPA filter from filter housing (see
Figure 37) and set aside for now.
Note: HEPA filter cannot be cleaned without
being damaged. Do not get it wet during the
following steps.
Pivot
Frames
Filter
Housing
Handle
Figure 35. Pivot frames moved to release filter
housing and location of filter housing handle.
6. Move aluminum mesh filter up in order to
remove it from machine base (see Figure 36).
Aluminum
Mesh Filter
HEPA Filter
x 2
Figure 37. Location of filter retaining fasteners
and HEPA filter.
Remove pre-filter from filter housing (see
10.
Figure 38).
Figure 36. Location of aluminum mesh filter.
Flush aluminum mesh filter with water in
7.
enclosed container and allow filter to air dry.
— If mesh filter is worn, damaged, or too
clogged to clean, replace filter (part
#P0964029).
Remove (2) hex bolts and flat washers shown
8.
in Figure 37 to release filters from housing.
Model G0964 (Mfd. Since 09/24)
Pre-Filter
Figure 38. Location of pre-filter.
11. Clean pre-filter with soft bristle brush, and
vacuum with shop vacuum equipped with
HEPA filter.
— If you have already cleaned pre-filter and
operating pressure has not improved,
replace pre-filter (part #P0964037).
-27-
Page 30
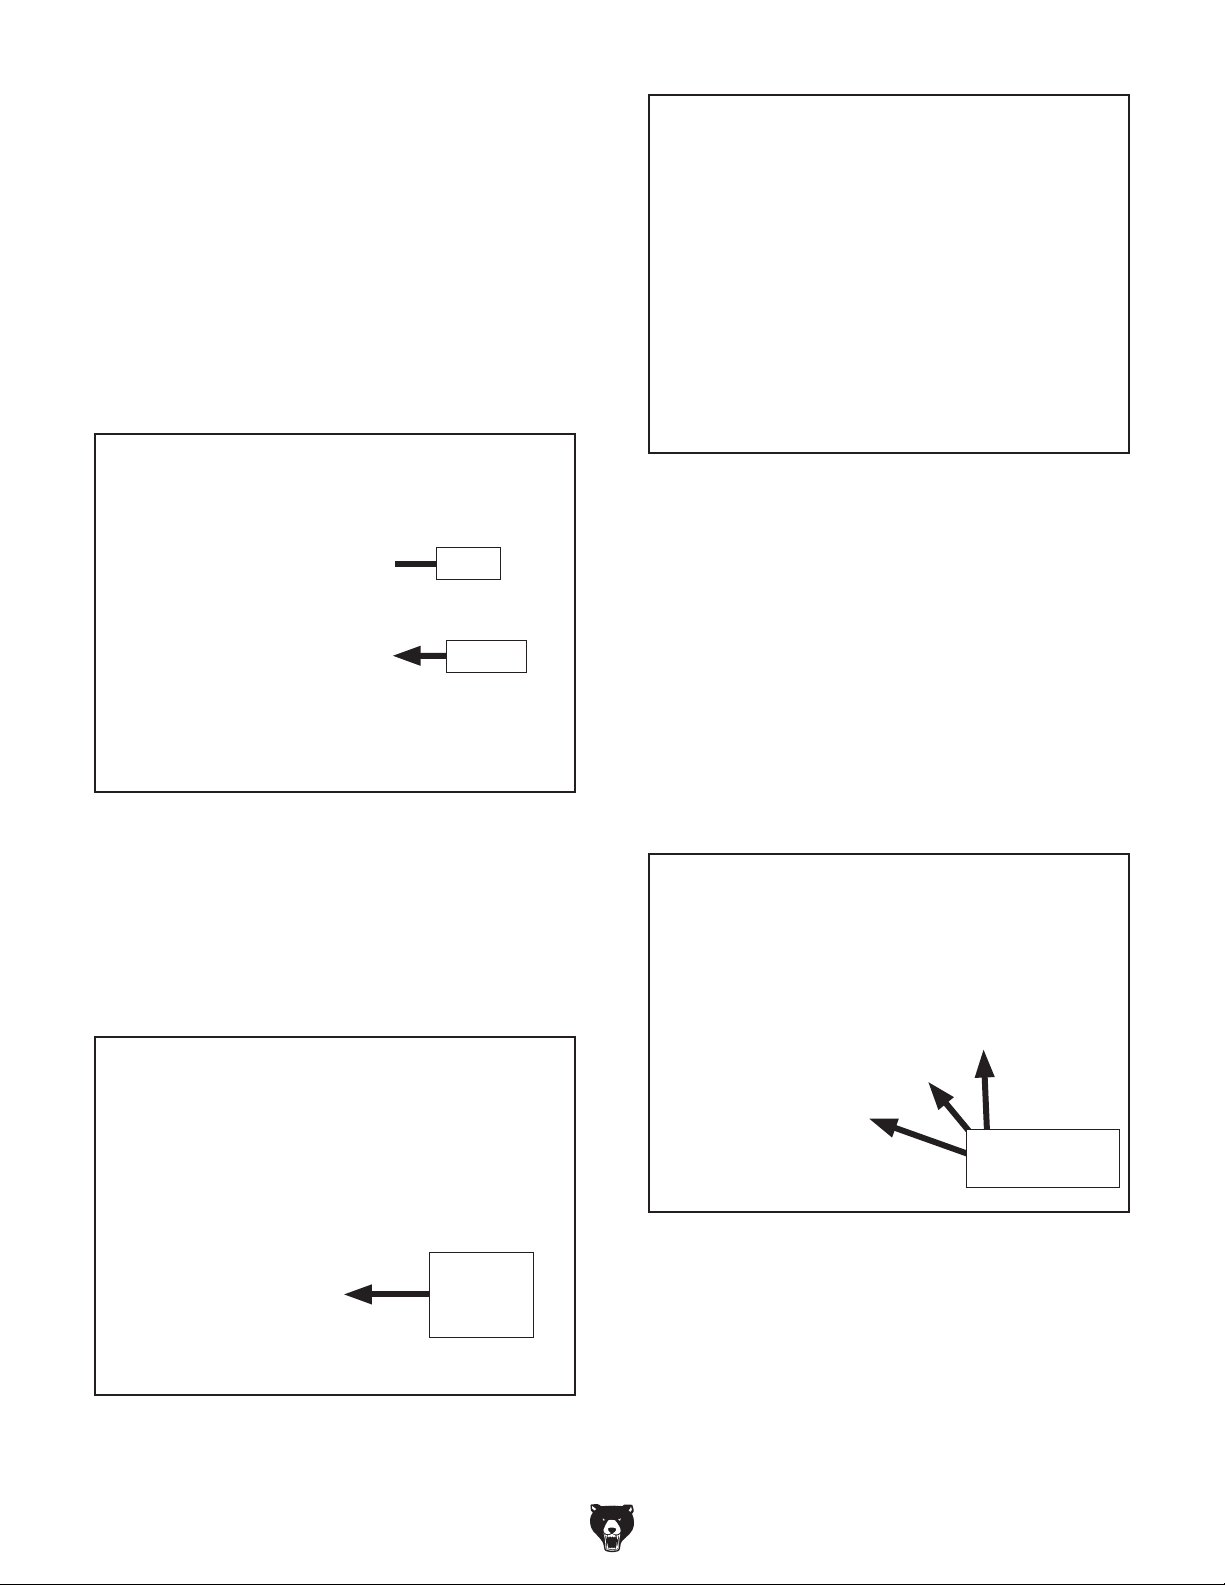
Tap stainless steel mesh on filter housing
12.
(see Figure 39) and carefully use wire brush
to brush away built up dust and slag. If a
piece of solder or slag has welded itself to
screen, do not pry it off or you may put hole
in screen.
Examine filter housing gasket and stainless
13.
steel mesh (see Figure 39).
— If gasket or mesh is damaged, replace
filter housing (part #P0964036).
Mesh
Gasket
Figure 41. Direction of machine air flow.
15. Align HEPA filter with filter housing hooks, as
shown in Figure 42, then place HEPA filter in
filter housing. HEPA filter must be installed so
filter air flow direction arrow points in direction of machine air flow when filter housing is
installed (see Figure 41).
Figure 39. Location of filter housing gasket and
stainless steel mesh.
Place pre-filter in filter housing. Pre-filter must
14.
be installed so filter air flow direction arrow
(see Figure 40) points in direction of machine
air flow when filter housing is installed (see
Figure 41).
Air Flow
Direction
Arrow
— If gasket on HEPA filter is damaged or
pre-filter has already been cleaned and
replaced and operating pressure has
not improved, replace HEPA filter (part
#P0964038).
Filter Housing
Hooks
Figure 42. HEPA filter aligned with filter housing
hooks.
Install hex bolts and flat washers removed in
16.
Step 8 to secure filters in housing.
Figure 40. Location of pre-filter air flow direction
arrow.
-28-
Model G0964 (Mfd. Since 09/24)
Page 31
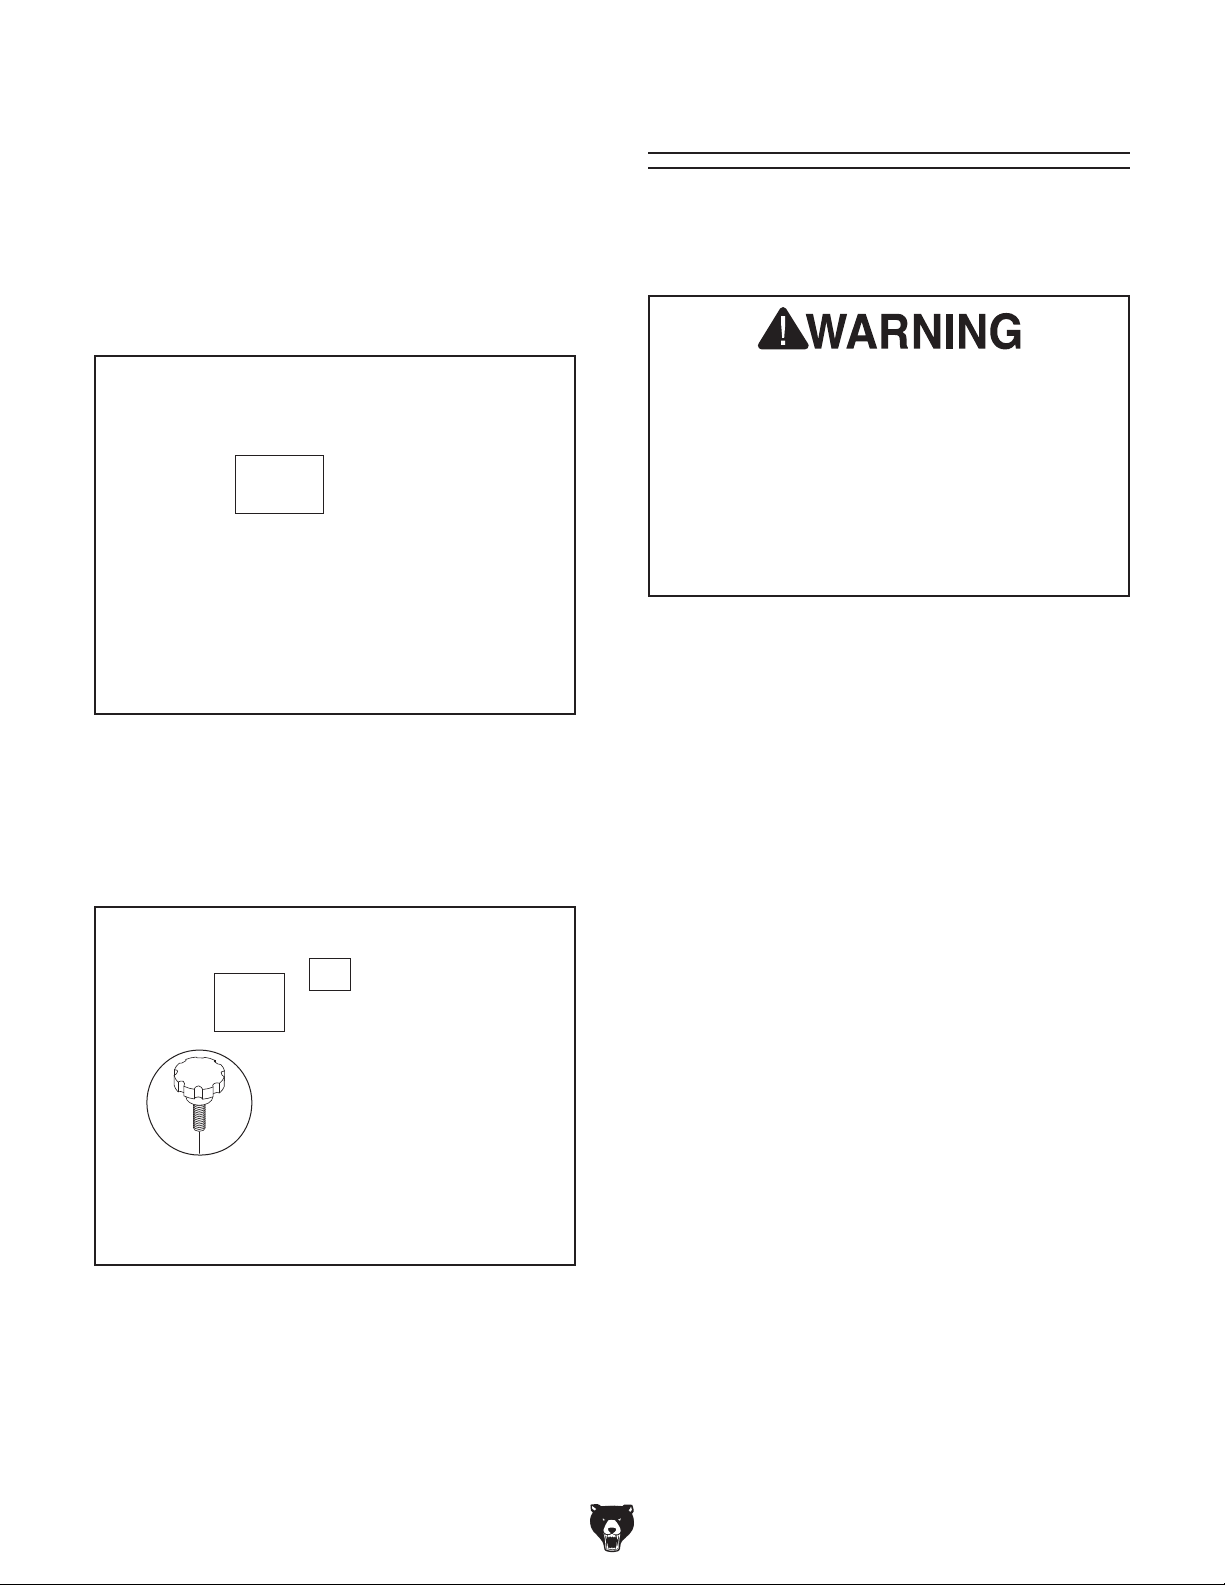
17.
Install aluminum mesh filter in machine base.
Aluminum mesh filter must be installed so
filter air flow direction arrow points in direction of machine air flow (see Figure 41 on
Page 28).
Place filter housing in machine base, then
18.
move pivot frames over filter housing (see
Figure 43).
Pivot
Frames
Figure 43. Filter housing placed in machine
base with pivot frames moved over it.
19. Slide latch plate until it engages pin, then
tighten knob shown in Figure 44 to secure
filter housing in machine base.
Machine Storage
If this machine needs to be stored for a long period of time, use the steps in this section to ensure
that it remains in good condition.
Wear ANSI-approved safety goggles,
NIOSH-approved respirator, and protective
gloves when removing, cleaning, and
replacing filters and dust drawer. Carefully
minimize amount of dust allowed to become
airborne, and prevent spread of dust onto
hands or clothing. Dispose of all waste
properly according to local regulations for
material type.
Items Needed Qty
ANSI-Approved Safety Goggles ................... 1 Pr.
NIOSH-Approved Respirator
Protective Gloves
Wrench or Socket 12mm
Soft Bristle Brush
Vacuum Cleaner w/HEPA Filter
Wire Brush
Replacement Filters........................... As Needed
Desiccant Packs
Tarp/Plastic Sheet
......................................................... 1
.........................................1 Pr.
.............................................. 1
................................ As Needed
............................................. 1
............................. 1
................................... 1
......................... 1
Latch
Plate
Figure 44. Filter housing secured in base.
20.
Close door and secure with door handles.
21. Dispose of any old filters, water used to clean
aluminum mesh filter, and any waste collected in vacuum according to local regulations.
Model G0964 (Mfd. Since 09/24)
Pin
To prepare machine for storage:
1.
DISCONNECT MACHINE FROM POWER
and lockout/tagout controls.
Empty dust drawer.
2.
3. Remove filters and motor access cover to
clean inside of machine.
Clean/replace filters, then install.
4.
5. Place a few moisture-absorbing desiccant
packs inside of filter and motor housings.
Completely cover machine with tarp or plastic
6.
sheet that will keep out dust and resist liquid
or moisture. If machine will be stored in/near
direct sunlight, use cover that will block sun
rays.
-29-
Page 32
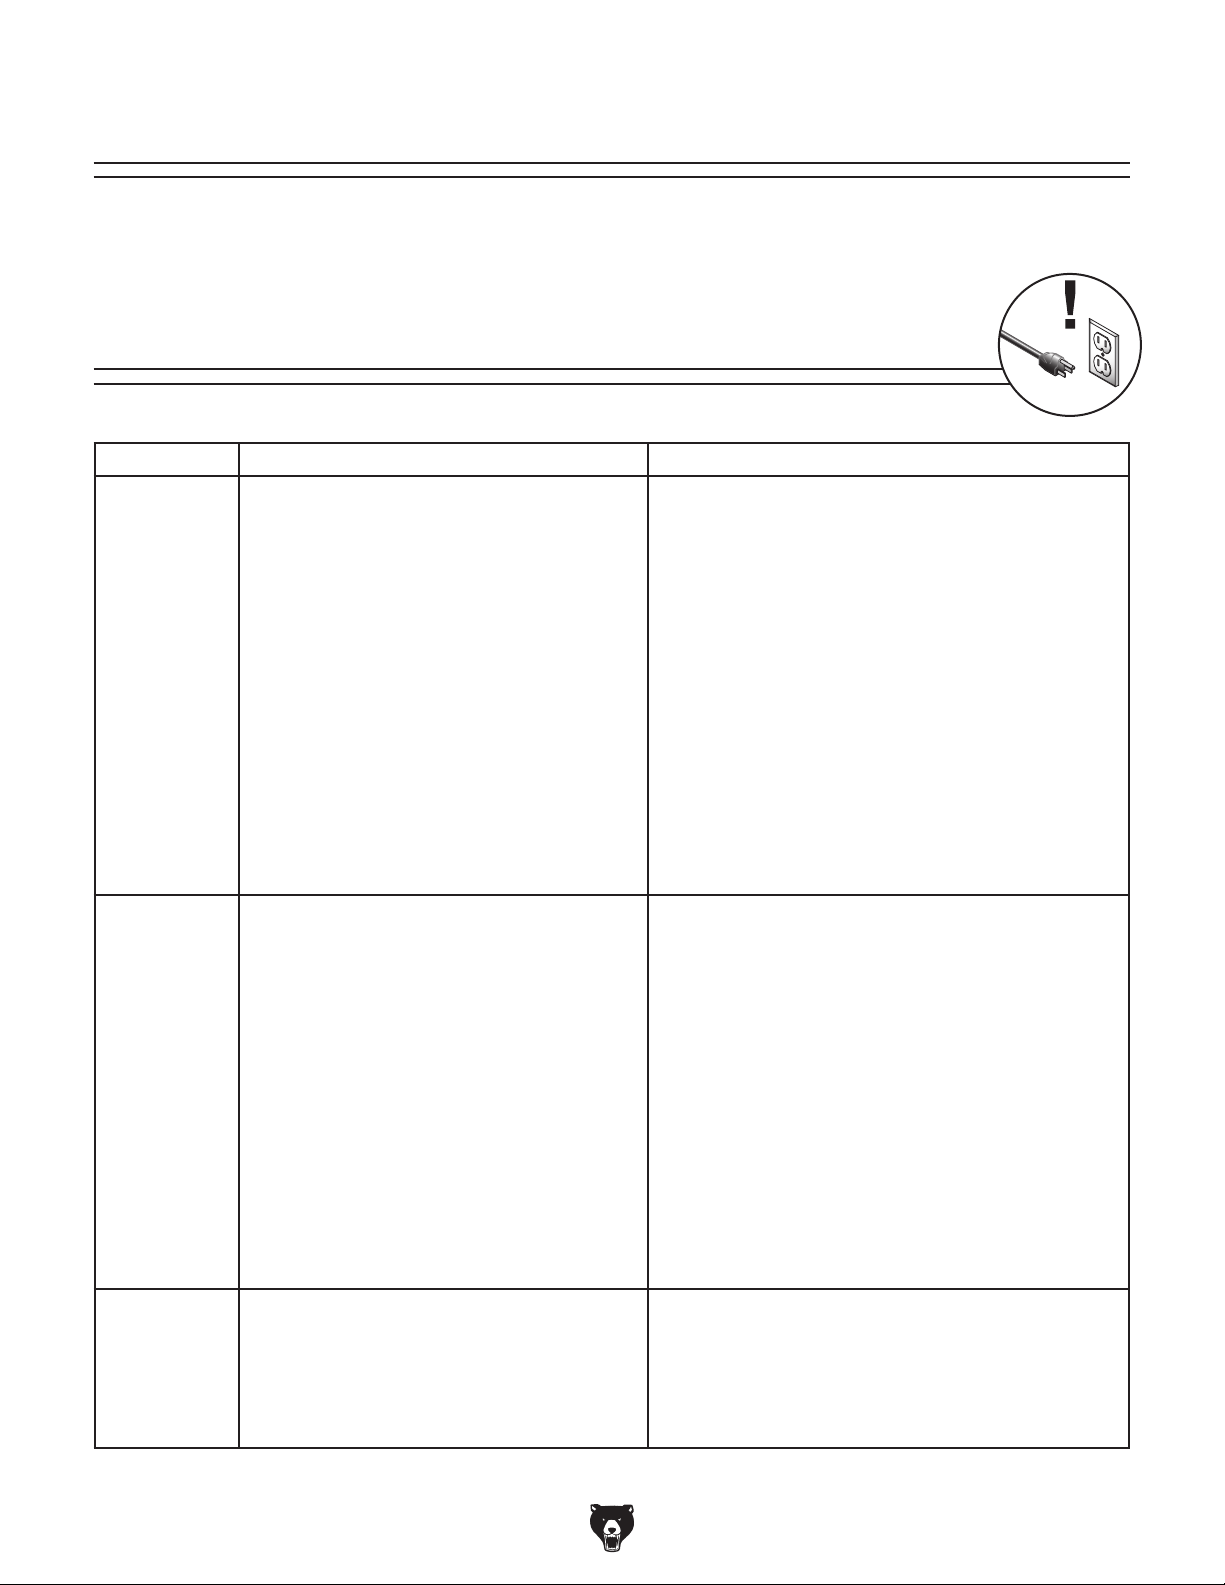
Review the troubleshooting procedures in this section if a problem develops with your machine. If you need
replacement parts or additional help with a procedure, call our Technical Support.
the
serial number and manufacture date of your machine before calling.
SECTION 7: SERVICE
Troubleshooting
Motor & Electrical
Symptom Possible Cause Possible Solution
Machine does
not start, or
power supply
breaker
immediately
trips after
startup.
Machine
stalls or is
underpowered.
Machine has
vibration or
noisy operation.
1. Incorrect power supply voltage or circuit size.
2. Plug/receptacle at fault/wired incorrectly.
3. Power supply circuit breaker tripped or fuse
blown.
4. Motor wires connected incorrectly.
5. Thermal overload relay has tripped/at fault.
6. Start capacitor at fault.
7. Centrifugal switch adjustment/contact points
at fault.
8. Contactor not energized/at fault.
9. Wiring broken, disconnected, or corroded.
10. ON button loose/misadjusted/at fault.
11. Auxiliary contactor at fault.
12. Motor or motor bearings at fault.
1. Damper closed.
2. Airowisblockedorconnectionsareleaking.
3. Filter(s) clogged/at fault.
4. Motor wires connected incorrectly.
5. Plug/receptacle at fault/wired incorrectly.
6. Fume extractor undersized.
7. Motor overheated.
8. Run capacitor at fault.
9. Extension cord too long.
10. Contactor not energized/at fault.
11. Centrifugal switch/contact points at fault.
12. Motor or motor bearings at fault.
1. Motor loose.
2. Motor fan rubbing on fan cover.
3. Centrifugal switch needs adjustment/at fault.
4. Motor bearings at fault.
1. Ensure correct power supply voltage and circuit size
(Page 11).
2. Test for good contacts; correct wiring.
3. Ensure circuit is free of shorts. Reset circuit breaker or
replace fuse.
4. Correct motor wiring connections (Page 32).
5. Reset. Adjust or replace if at fault.
6. Test/replace if at fault.
7. Adjust centrifugal switch/clean contact points. Replace
either if at fault.
8. Test all legs for power; replace if necessary.
9. Fix broken wires or disconnected/corroded
connections (Page 32).
10. Tighten/adjust/replace button.
11. Replace auxiliary contactor.
12. Replace motor.
1. Open damper.
2. Clear blockages, seal leaks.
3. Clean/replacelter(s)(Page 26).
4. Correct motor wiring connections (Page 32).
5. Test for good contacts; correct wiring.
6. Move suction hood closer to welding operation/use
larger fume extractor.
7. Clean motor, let cool, and reduce workload.
8. Test/repair/replace.
9. Move machine closer to power supply; use shorter
extension cord (Page 12).
10. Test all legs for power; repair/replace if at fault.
11. Adjust centrifugal switch/clean contact points. Replace
either if at fault.
12. Replace motor.
1. Replace damaged or missing bolts/nuts or tighten if
loose.
2. Fix/replace fan cover; replace loose/damaged fan.
3. Adjust/replace if at fault.
4. Test by rotating shaft; rotational grinding/loose shaft
requires bearing replacement.
Note: Please gather
-30-
Model G0964 (Mfd. Since 09/24)
Page 33

Operation
Symptom Possible Cause Possible Solution
Fume extractor
does not
adequately
collect
fumes; poor
performance.
Loud,
repetitious
noise, or
excessive
vibration
coming from
fume extractor
(non-motor
related).
Precision
arm does
not maintain
position.
Precision arm
does not adjust
easily.
1. Damper closed.
2. Motor access cover is blocked.
3. Suction hood too far away from welding
operation.
4. Dust drawer is full.
5. Filter(s) clogged/at fault.
6. Leak in connections.
7. Airowblocked/restricted.
8. Gasketonlterhousingisdamaged.
9. Fume extractor is undersized.
1. Fumeextractornotonatsurfaceand
wobbles; casters not locked or not properly
adjusted.
2. Component loose.
3. Suction hood vibrating against workpiece.
4. Impeller damaged and unbalanced.
5. Impeller loose on motor shaft.
1. Support joints need adjustment; damaged.
2. Gas strut loose or worn.
1. Precisionarmangeneedslubrication.
2. Precision arm support joint fasteners are too
tight.
1. Open damper.
2. Unblock motor access cover.
3. Position suction hood closer to better collect fumes
produced by operation.
4. Empty dust drawer (Page 25).
5. Clean/replacelter(s)(Page 26).
6. Seal leak.
7. Unblock restriction.
8. Replacelterhousing.
9. Install a larger fume extractor.
1. Stabilize fume extractor; lock/adjust casters.
2. Replace damaged or missing bolts/nuts or tighten if
loose.
3. Position suction hood so it will not contact workpiece.
4. Inspect impeller for cracks or damage; replace impeller
if damaged.
5. Secure impeller; replace motor and impeller as a set if
motor shaft and impeller hub are damaged.
1. Adjust support joints; replace if damaged.
2. Tighten fasteners on gas strut; replace if worn.
1. Applygreasetoangegreasetting(Page 25).
2. Loosen fasteners.
Model G0964 (Mfd. Since 09/24)
-31-
Page 34
These pages are current at the time of printing. However, in the spirit of improvement, we may make changes to the electrical systems of future machines. Compare the manufacture date of your machine to the one
stated in this manual, and study this section carefully.
If there are differences between your machine and what is shown in this section, call Technical Support at
(570) 546-9663 for assistance BEFORE making any changes to the wiring on your machine. An updated
wiring diagram may be available.
number and manufacture date of your
machine before calling. This information can be found on the main machine label.
machine
SECTION 8: WIRING
Note: Please gather the serial
Wiring Safety Instructions
SHOCK HAZARD. Working on wiring that is con-
nected to a power source is extremely dangerous.
Touching electrified parts will result in personal
injury including but not limited to severe burns,
electrocution, or death. Disconnect the power
from the machine before servicing electrical components!
MODIFICATIONS. Modifying the wiring beyond
what is shown in the diagram may lead to unpredictable results, including serious injury or fire.
This includes the installation of unapproved aftermarket parts.
WIRE CONNECTIONS. All connections must
be tight to prevent wires from loosening during
machine operation. Double-check all wires disconnected or connected during any wiring task to
ensure tight connections.
CIRCUIT REQUIREMENTS. You MUST follow
the requirements at the beginning of this manual
when connecting your machine to a power source.
WIRE/COMPONENT DAMAGE. Damaged wires
or components increase the risk of serious personal injury, fire, or machine damage. If you notice
that any wires or components are damaged while
performing a wiring task, replace those wires or
components.
MOTOR WIRING. The motor wiring shown in
these diagrams is current at the time of printing
but may not match your machine. If you find this
to be the case, use the wiring diagram inside the
motor junction box.
CAPACITORS/INVERTERS. Some capacitors
and power inverters store an electrical charge for
up to 10 minutes after being disconnected from
the power source. To reduce the risk of being
shocked, wait at least this long before working on
capacitors.
EXPERIENCING DIFFICULTIES. If you are experiencing difficulties understanding the information
included in this section, contact our Technical
Support at (570) 546-9663.
The photos and diagrams
included in this section are
best viewed in color. You
can view these pages in
color at www.grizzly.com.
-32-
Model G0964 (Mfd. Since 09/24)
Page 35
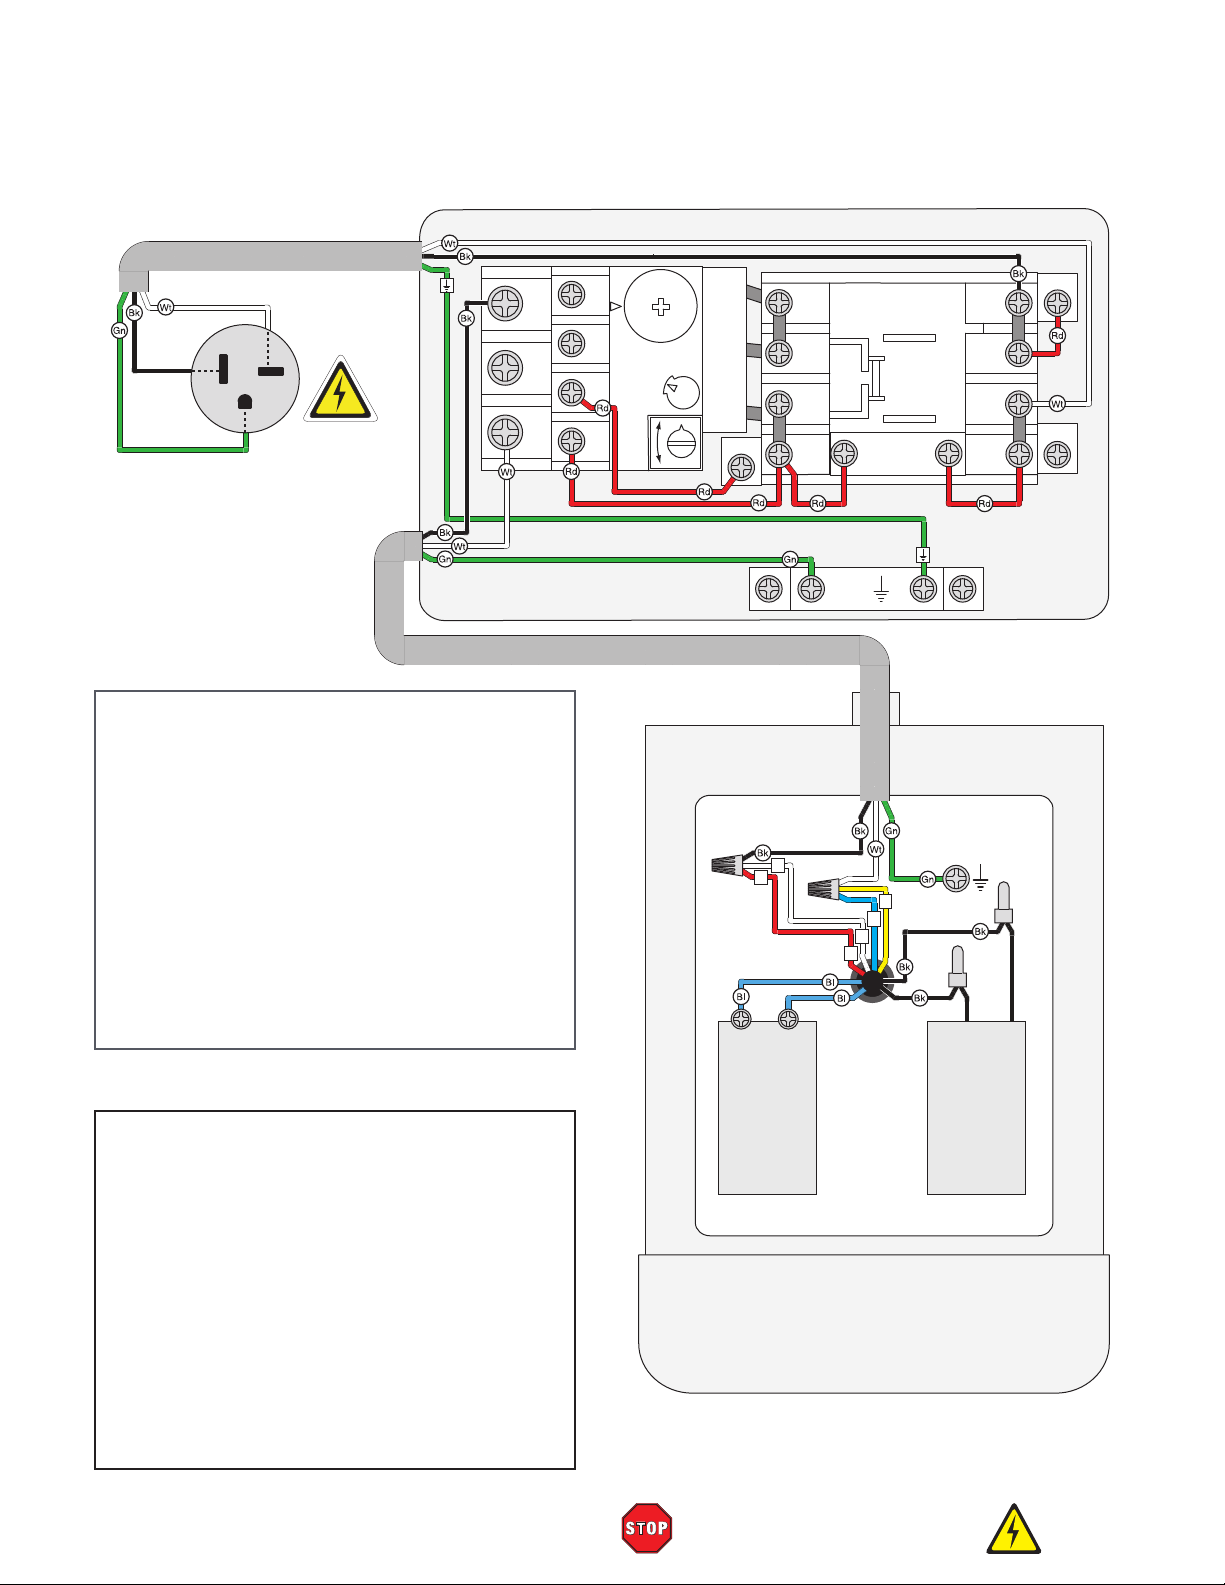
MAG SWITCH 120V
Wiring Diagram 120V
NHD MS1-18D2E7N212PBVO
Neutral
Hot
Ground
5-20 Plug
120 VAC
17
2T1
4T2
6T3
98
18
21
20
97
96
95
NTH-21
OL Relay
NHD
2PE
O R
A2
2T1
4T2
6T3
14NO
1
3
Contactor
120V
NHD
18
GND
4
2
1
3
NHD
C18D10E7
17
1PS
Ground
1L1
3L2
5L3
13NO
A1
A2
Figure 45. Magnetic switch wiring (120V).
Figure 46. Motor junction box wiring (120V).
Model G0964 (Mfd. Since 09/24)
Start
Capacitor
300MFD
125VAC
Run
Capacitor
40uF
250VAC
Prewired 120V
MOTOR 120V/240V
READ ELECTRICAL SAFETY
ON PAGE 32!
-33-
Page 36
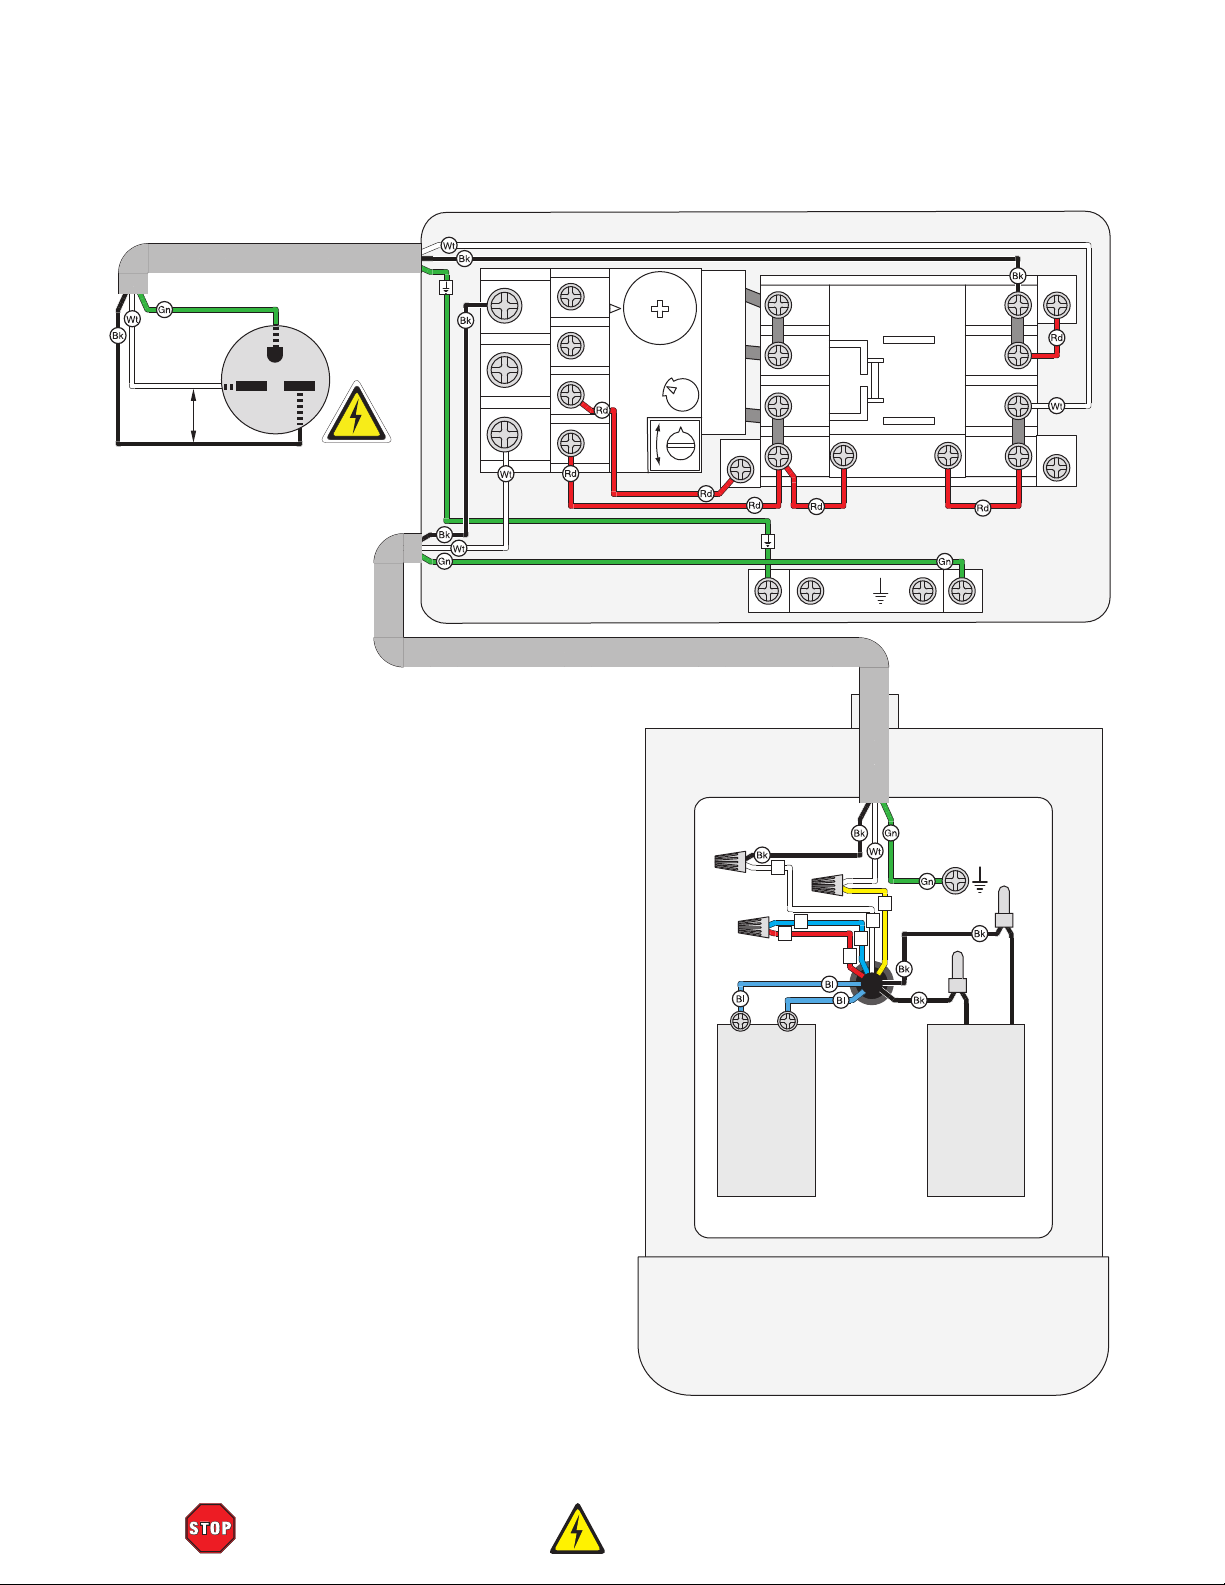
MAG SWITCH 240V
Wiring Diagram 240V
NHD MS1-09D2I7N112PBVO
Hot
240
VAC
Hot
Ground
G
6-15 Plug
(As Recommended)
2T1
4T2
6T3
98
97
96
95
8
9
10
OL Relay
NHD
NTH-11
2PE
O R
11
A2
Contactor
2T1
4T2
6T3
14NO
1
GND
18
240V
NHD
C09D10I7
NHD
1PS
17
Ground
1L1
3L2
5L3
13NO
A1
A2
4
2
3
1
2
3
Start
Capacitor
300MFD
125VAC
Rewired 240V
MOTOR 120V/240V
Run
Capacitor
40uF
250VAC
-34-
READ ELECTRICAL SAFETY
ON PAGE 32!
Model G0964 (Mfd. Since 09/24)
Page 37
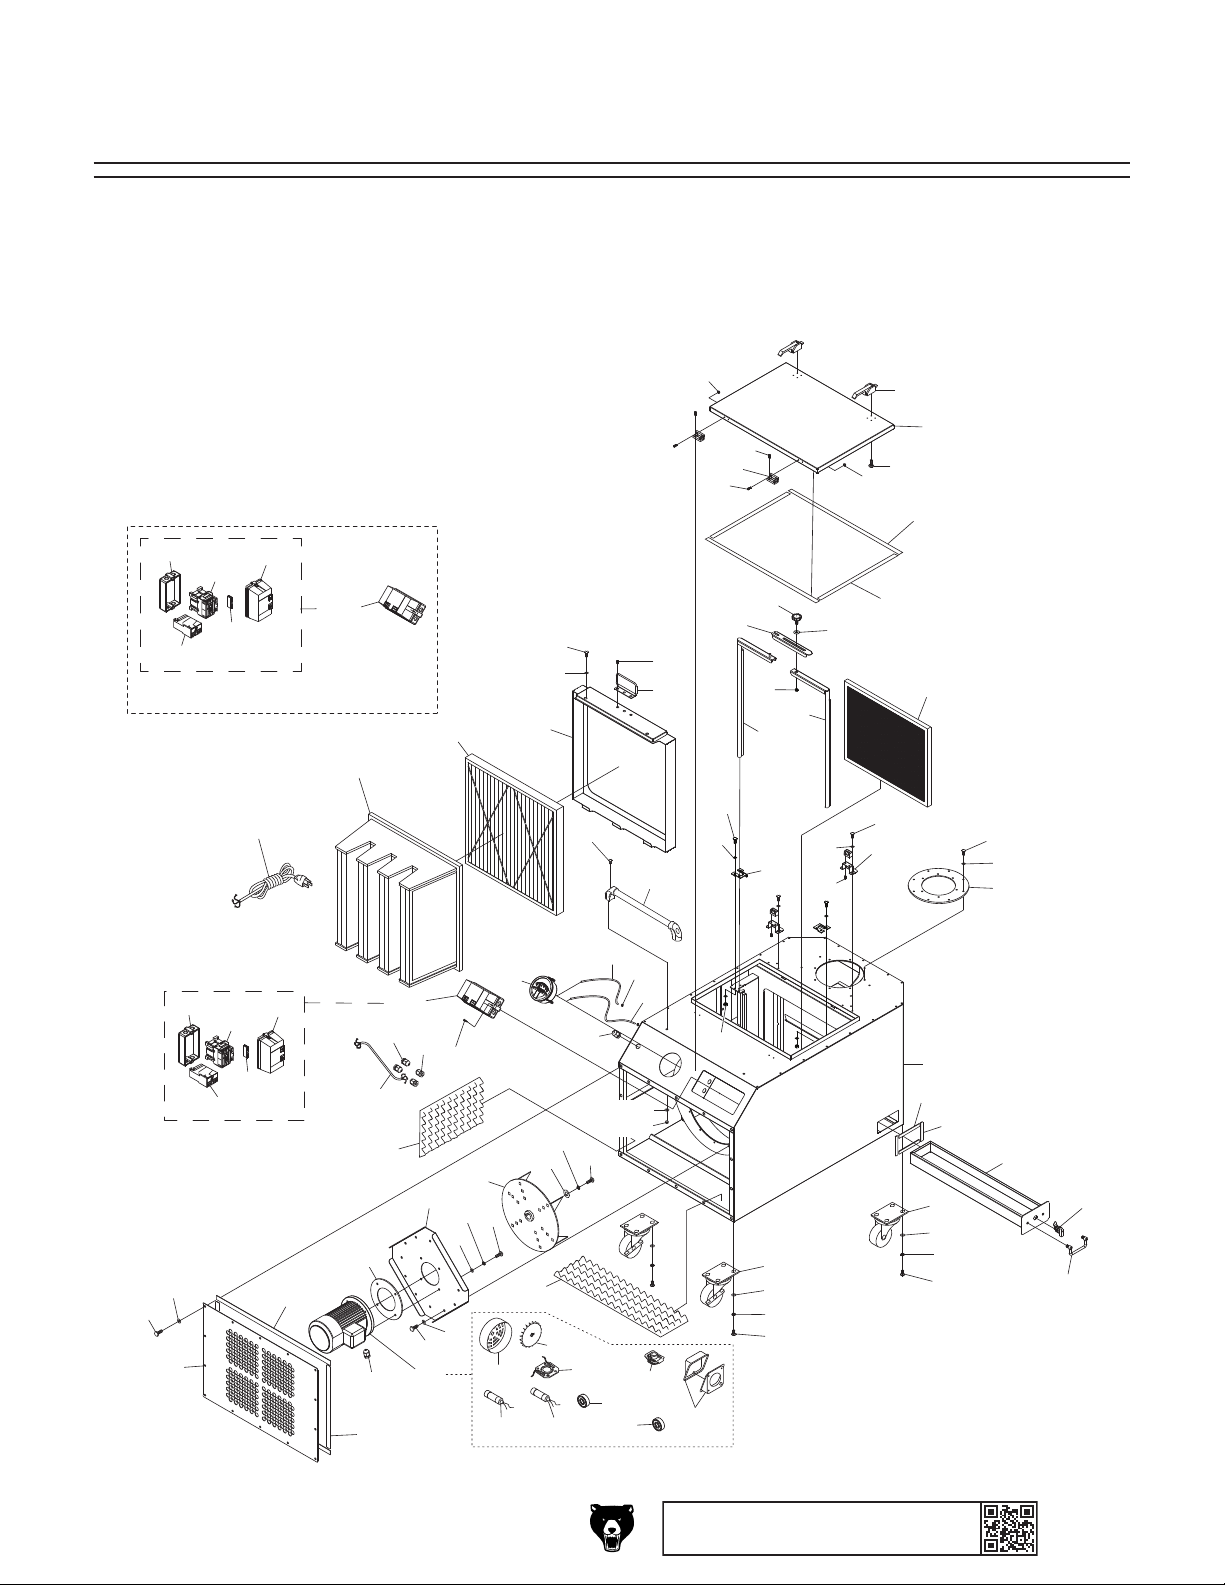
SECTION 9: PARTS
We do our best to stock replacement parts when possible, but we cannot guarantee that all parts shown
are available for purchase. Call (800) 523-4777 or visit www.grizzly.com/parts to check for availability.
Main
16X-1
16X-5
16X-3
16X-2
16X-4
(For 240V Conversion)
18
16X
38
37
36
35
64
59
17
34
22V2
41
25
27
28
40
31
25
30
58
32
56
33
27
25
14
41
28
26
42
39
43
46
55
29
65
64
45
21
48
15
10-3
10-8
52
23V2
24V2
10-4
10-7
21
57
2
60
61
62
10-9
BUY PARTS ONLI NE AT GRIZZLY.COM!
Scan QR code to visit our Parts Store.
1
50
51
7
3
60
61
62
20
11
19
48
49
53
48
16
48
10
12
65
17
64
64
66
13
15
10-1
10-5
66
14
54
10-2
10-6
65
16-1
64
44
16-2
16-5
16-3
16-4
47
Model G0964 (Mfd. Since 09/24)
8
9
-35-
Page 38

24V2 P0964024V2 HEX NUT M10-1.5 V2.09.24 66 P0964066 LOCK WASHER 5/16
Main Parts List
REF P ART # DES CRIP TI ON REF PART # DES CRIP TI ON
1 P0964001 MACHINE B ODY 25 P0964025 CAP SCREW M5-. 8 X 12
2 P0964002 CASTER, 5" LOCKING SWI VEL 26 P0964026 LATCH BASE
3 P0964003 CASTER, 5" SWIVEL 27 P0964027 FENDER WAS HER 1/ 4
7 P0964007 DUST DRAWER 28 P0964028 HEX BOLT 1/4-20 X 3/4
8 P0964008 CAM LATCH 29 P0964029 ALUMI NUM MESH FI LTER
9 P0964009 PULL HANDLE 30 P0964030 KNOB BOLT 5/16-18 X 1, 6-LOBE, D1/8
10 P0964010 MOTOR 1.5 HP 120/240V 1-PH 31 P0964031 LATCH PLATE
10-1 P0964010-1 MOTOR FAN COV ER 32 P0964032 PIVOT FRAME (LEFT)
10-2 P0964010-2 MOTOR FAN 33 P0964033 PI VOT FRAME ( RI G HT)
10-3 P0964010-3 CONTACT PLATE 19 X 70 I NT 34 P0964034 FIL TER FRAME PULL HANDL E
10-4 P0964010-4 CENTRIFUGAL SWI TCH 9/16 3450 35 P0964035 HEX BOLT 5/16-18 X 2-1/ 2
10-5 P0964010-5 S CAPACITOR 300M 125V 1-3/8" X 2-3/4" 36 P0964036 FIL TER HOUS I NG
10-6 P0964010-6 R CAPACITOR 40M 250V 1-9/16" X 2-7/16" 37 P0964037 PRE-FILTER PLEATED
10-7 P0964010-7 BALL BEARING 6205ZZ (FRONT) 38 P0964038 HEPA FILTER V-CELL
10-8 P0964010-8 BALL BEARING 6202ZZ (REAR) 39 P0964039 DOOR
10-9 P0964010-9 J UNCTI ON BOX 40 P0964040 HING E
11 P0964011 MOTOR MOUNT GASKET 137 X 195 X 66MM 41 P0964041 FLANG E NUT M5- . 8
12 P0964012 IMPELLER COVER 42 P0964042 COMPRESSION LATCH
13 P0964013 IMPELLER 12-1/8" 43 P0964043 FLAT HD CA P SCR M5 -.8 X 12
14 P0964014 FENDE R WASHER 5/16 44 P0964044 ACCESS COVER
15 P0964015 HEX BOLT 5/ 16-18 X 1 45 P0964045 PRECISI ON ARM FLANGE
16 P0964016 MAGNETIC SWITCH NHD MS1-18D2E7N212PBVO 46 P0964046 DOOR SEAL 25.6"
16-1 P0964016-1 MAGNETI C SWI TCH BOX 47 P0964047 PANEL SEAL 29. 5"
16-2 P0964016-2 CONTACTOR NHD C18D10E7 120V 48 P0964048 STRAIN RELIEF TYPE-3 PG13.5
16-3 P0964016-3 MAGNETI C SWI TCH COVE R 49 P0964049 PANEL SEAL 20. 5"
16-4 P0964016-4 AUX CONTACTOR NHD 1PS 1A 600V 50 P0964050 DRAWER SEAL 6.7"
16-5 P0964016-5 OL RELAY NHD NTH-21 2PE 17-21A 51 P0964051 DRAWER SEAL 5.5"
16X P0964016X MAGNETIC SWITCH NHD MS1-09D2I 7N112PBVO 52 P0964052 GROMMET 8 X 13 X 11MM
16X-1 P0964016X-1 MAGNETI C SWI TCH B OX 53 P0964053 SOUND INSULATION FOAM 26" X 15-3/4"
16X-2 P0964016X-2 CONTACTOR NHD C- 09D1 0I7 2 40V 54 P0964054 SOUND INSULATION FOAM 29-1/8" X 15-3/4"
16X-3 P0964016X-3 MAGNETI C SWI TCH CO VER 55 P0964055 DOOR SEAL 16-7/8"
16X-4 P0964016X-4 AUX CONTACTOR NHD 1PS 1A 600V 56 P0964056 PIVOT FRAME FIXI NG PLATE
16X-5 P0964016X-5 OL RELAY NHD NTH-11 2PE 8-11A 57 P0964057 HEX NUT 1/4-20
17 P0964017 PHLP HD SCR 10-24 X 1/2 58 P0964058 ACORN NUT 5 / 16- 18
18 P0964018 POWER CORD 14G 3W 118" 5-20P 59 P0964059 HEX BOLT M10-1.5 X 45
19 P0964019 MOTOR CORD 14G 3W 40" 60 P0964060 FLAT WASHER 3/8
20 P0964020 PRESSURE GAUGE 61 P0964061 LOCK WASHER 3/8
21 P0964021 CLEAR TUBE 5 X 8 X 1189MM 62 P0964062 HEX BOLT 3/8-16 X 3/ 4
22V2 P0964022V2 HANDLE V2.09. 24 64 P0964064 FLAT WASHER 5/16
23V2 P0964023V2 FLAT WASHER 10 X 15 X 2MM V2.09.24 65 P0964065 HEX BOLT 5/16-18 X 3/ 4
-36-
BUY PARTS ONLI NE AT GRIZZLY.COM!
Scan QR code to visit our Parts Store.
Model G0964 (Mfd. Since 09/24)
Page 39
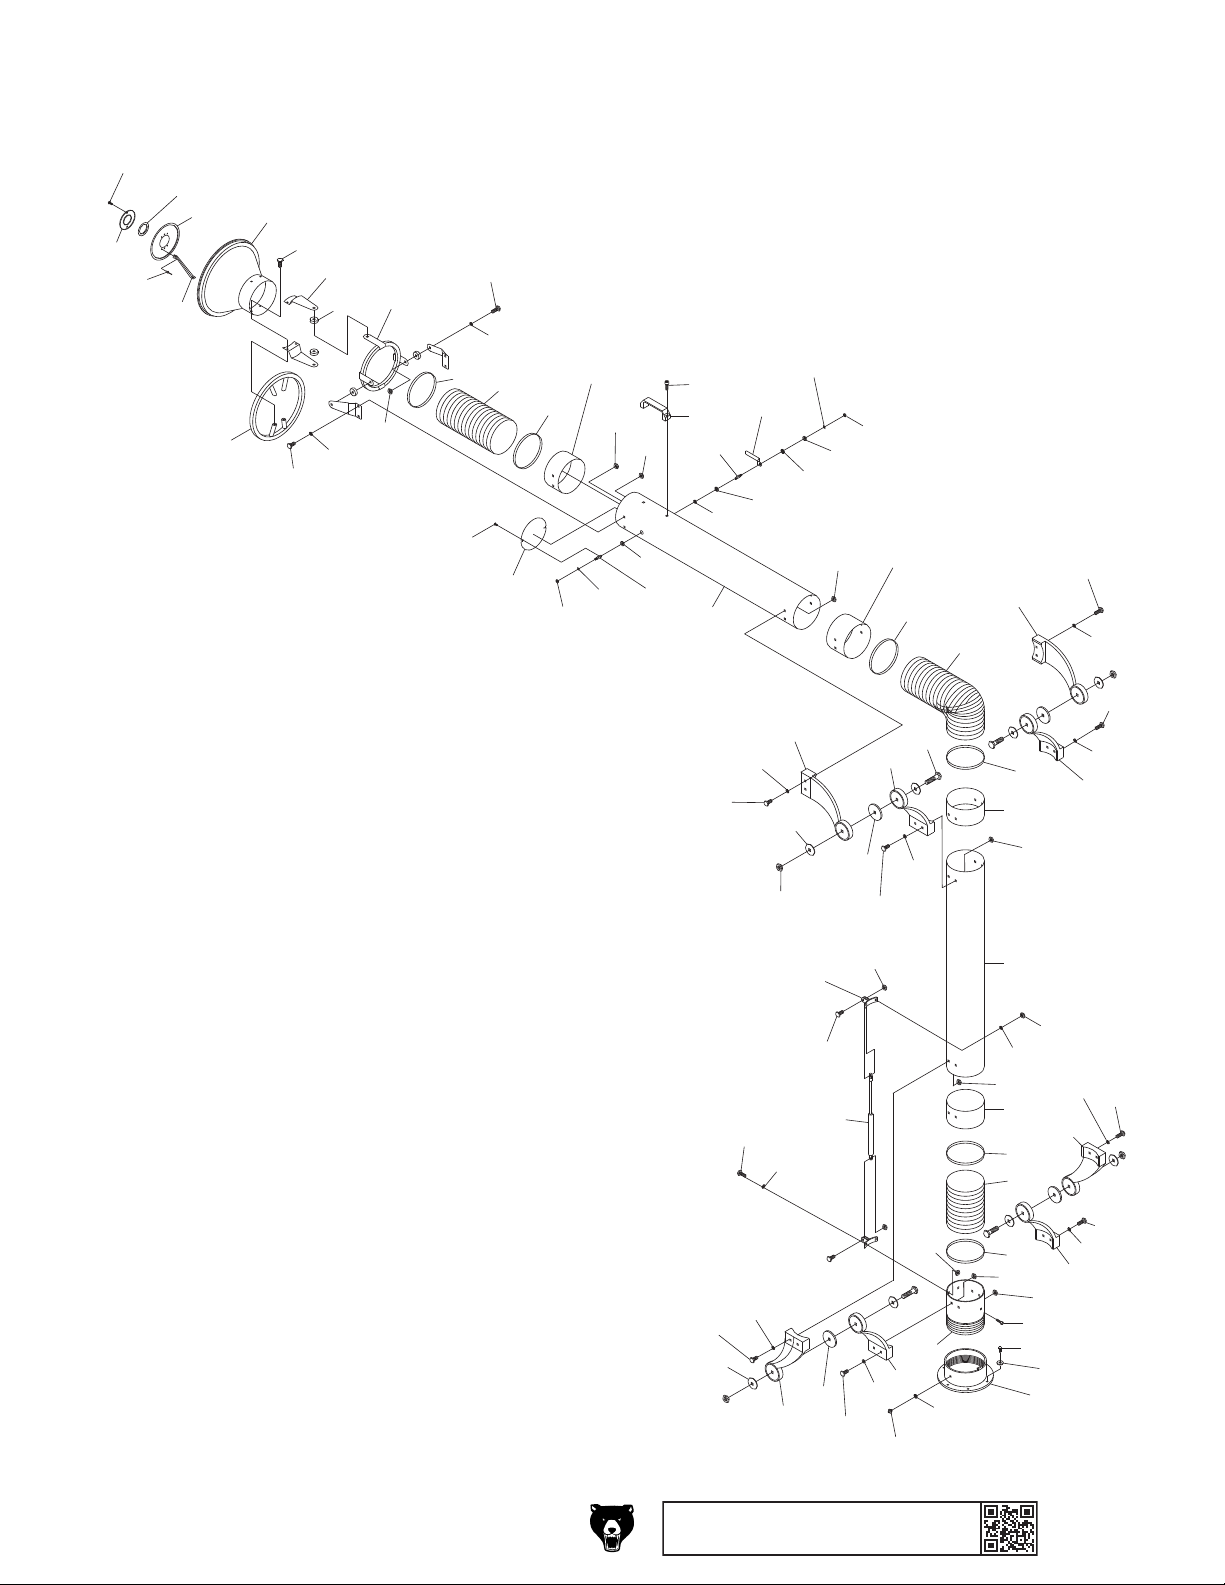
101
137
102
106
103
105
104
108
107
117
109
110
111
116
115
112
Precision Arm
113
114
119
135
122
134
126
125
128
127
124
123
130
129
136
114
137
119
121
118
120
131
128
140
139
138
134
132
133
115
F
141
135
142
137
122
119
143
114
137
145
144
114
E
137
G
114
119
H
147
146
115
Model G0964 (Mfd. Since 09/24)
160
149
165
117
150
159
126
114
137
D
161
156
114
163
137
153
B
155
154
162
BUY PARTS ONLI NE AT GRIZZLY.COM!
Scan QR code to visit our Parts Store.
148
116
115
151
119
152
119
115
125
124
166
164
126
126
114
157
C
167
A
137
114
158
-37-
Page 40
REF PART # DES CRIPTIO N REF PART # DES CRIPTIO N
Precision Arm Parts List
101 P0964101 PHLP HD SCR 10-24 X 5/8 135 P0964135 LOCK NUT M6-1
102 P0964102 SLAG GUARD SEAT 136 P0964136 PIPE 6" X 39-1/2" STEEL
103 P0964103 SLAG GUARD COVER 137 P0964137 HEX BOLT 5/16-18 X 1-1/2
104 P0964104 SLAG GUARD 138 P0964138 LOCK NUT M1 4-2
105 P0964105 SLAG GUARD MOUNTING BRACKET 139 P0964139 TAPER WASHER 14. 2 X 50
106 P0964106 RIVET 4.2 X 10MM BLIND 140 P0964140 J OI NT F
107 P0964107 SUCTI ON HOOD 141 P0964141 SPACER 14.2 X 60 X 6MM
108 P0964108 HANDLE HOOD POSITIONING 142 P0964142 JOINT H
109 P0964109 HEX BOLT M6-1 X 16 143 P0964143 HEX BOLT M14-2 X 55
110 P0964110 PI VOT RI NG MOUNT 144 P0964144 HOSE 6" X 20-1/ 2" NYLON
111 P0964111 SPACER 8 X 32 X 6MM 145 P0964145 J OI NT E
112 P0964112 PI VOT RI NG 146 P0964146 J O I NT G
113 P0964113 HEX BOLT 5/16-18 X 1 147 P0964147 PIPE REINFORCEMENT RING 6" X 1-9/16"
114 P0964114 FLAT WASHER 5/16 148 P0964148 PIPE 6" X 39" STEEL
115 P0964115 LOCK NUT 5/16-18 149 P0964149 LOCK NUT 1/4-20
116 P0964116 FLAT WASHER 1/4 150 P0964150 GAS STRUT W/ROD ENDS 600N
117 P0964117 HEX BOLT 1/4-20 X 3/4 151 P0964151 PIPE REINFORCEMENT RING 6" X 3-7/ 8"
118 P0964118 HOSE 6" X 8. 7" NYLON 152 P0964152 HOSE 6" X 12-9/16" NYLON
119 P0964119 HOSE CLAMP 6" 153 P0964153 TAPER WASHER 14.2 X 60MM
120 P0964120 DAMPER 154 P0964154 JOINT B
121 P0964121 PHLP HD SCR M4-.7 X 8 155 P0964155 SPACER 14.2 X 70 X 6MM
122 P0964122 PIPE REINFORCEMENT RING 6" X 1-9/ 16" 156 P0964156 J OI NT D
123 P0964123 ARM HANDLE 157 P0964157 JOINT A
124 P0964124 CAP SCREW 5/16-18 X 3/4 158 P0964158 J OI NT C
125 P0964125 HEX NUT 5/16-18 159 P0964159 LOCK WASHER 1/4
126 P0964126 HEX NUT 1/4-20 160 P0964160 STRUT MO UNT
127 P0964127 DAMPER ROTATION AXLE 161 P0964161 ARM SWI VEL BASE
128 P0964128 GROMMET 9.5 X 19 X 5MM 162 P0964162 GREASE FITTI NG M8-1 STRAIGHT
129 P0964129 FLAT WASHER 3/8 163 P0964163 LOCK WASHER 8MM
130 P0964130 DAMPER FIXED AXLE 164 P0964164 ARM FLANG E
131 P0964131 DAMPER HA NDLE 165 P0964165 HEX BOLT 1/4-20 X 1
132 P0964132 EXT TOOTH WASHER 10MM 166 P0964166 HEX BOLT 1/4-20 X 3/4
133 P0964133 FLAT WAS HER 8MM 167 P0964167 FE NDER WAS HER 1/ 4
134 P0964134 FENDER WAS HER 6MM
-38-
BUY PARTS ONLI NE AT GRIZZLY.COM!
Scan QR code to visit our Parts Store.
Model G0964 (Mfd. Since 09/24)
Page 41
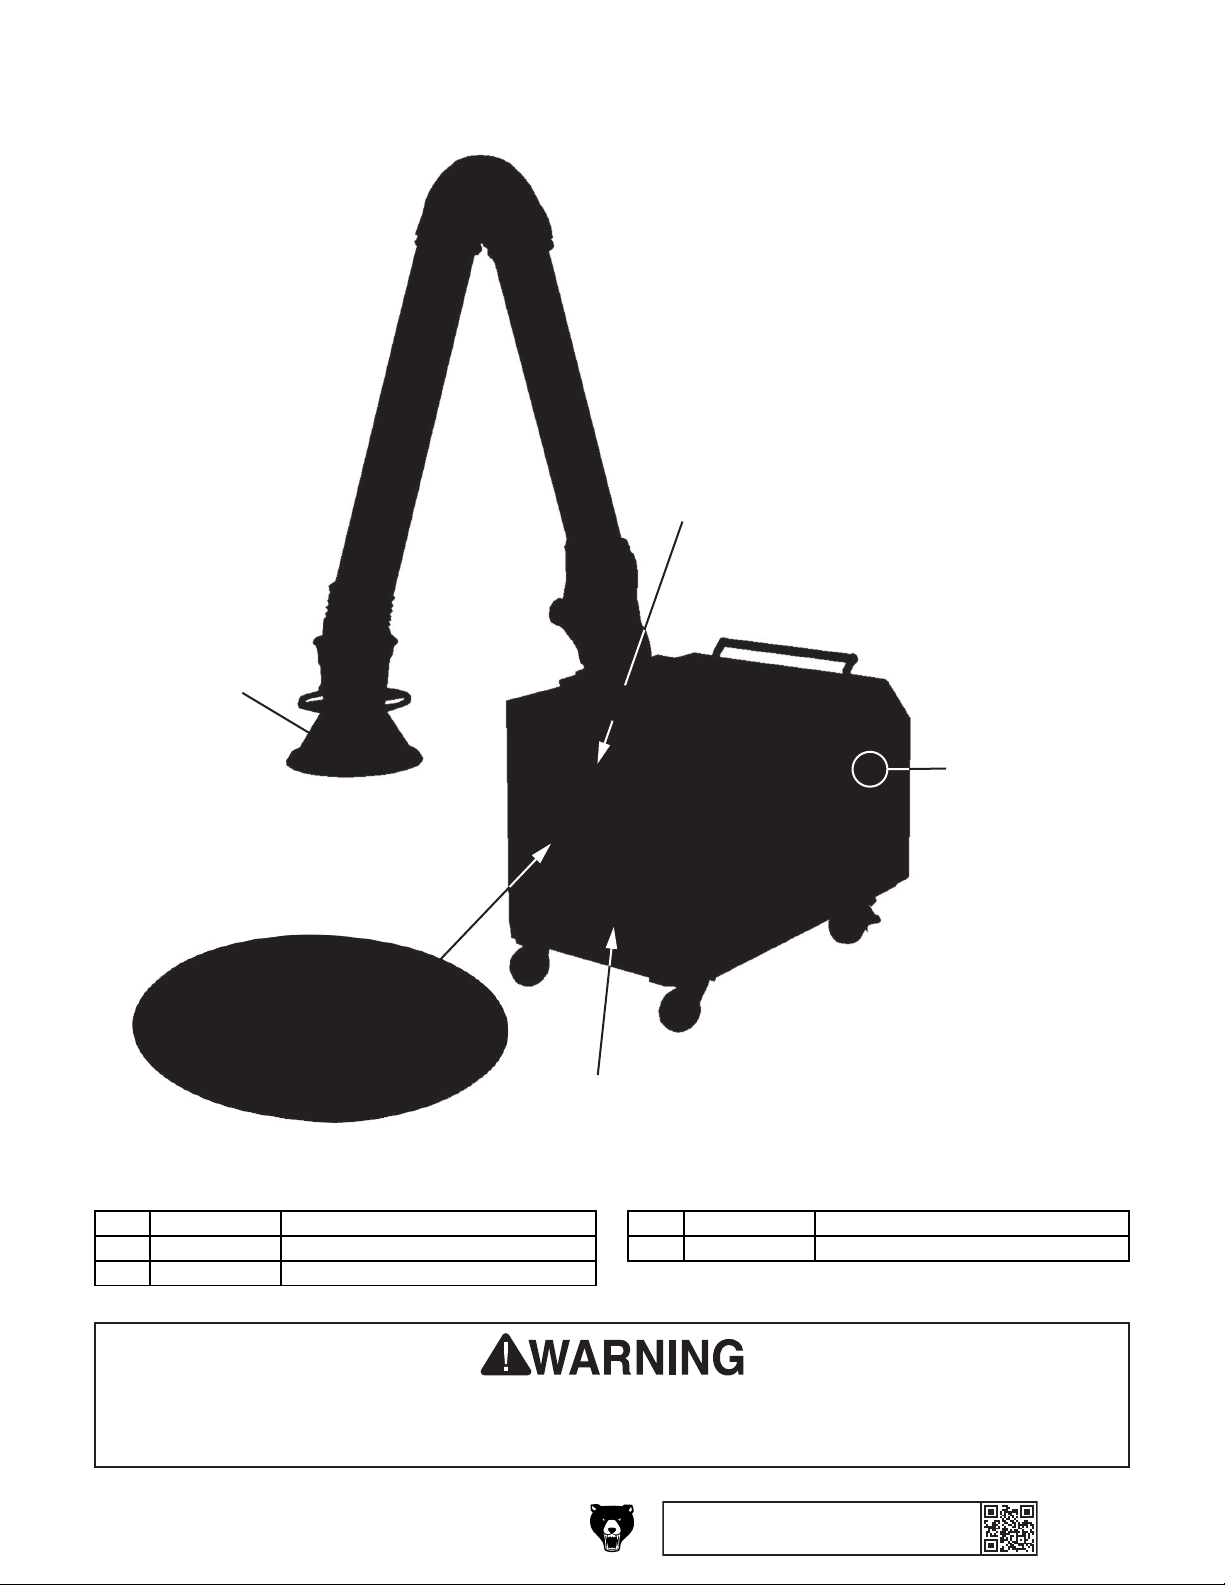
203
204
205
REF PART # DES CRIPTIO N REF P ART # DESCRI PTION
Labels & Cosmetics (Front)
201
G0964
202
grizzly.com
201 P0964201 MODEL NUMBER LABEL 204 P0964204 GRIZZLY NAMEPLATE, LARGE
202 P0964202 TOUCH-UP PA I NT, GRI ZZLY GREE N 205 P0964205 TOUCH--UP P AI NT, GRI ZZLY BE I GE
203 P0964203 GRIZZLY.COM LABEL
Safety labels help reduce the risk of serious injury caused by machine hazards. If any label comes
off or becomes unreadable, the owner of this machine MUST replace it in the original location
before resuming operations. For replacements, contact (800) 523-4777 or www.grizzly.com.
Model G0964 (Mfd. Since 09/24)
BUY PARTS ONLI NE AT GRIZZLY.COM!
Scan QR code to visit our Parts Store.
-39-
Page 42
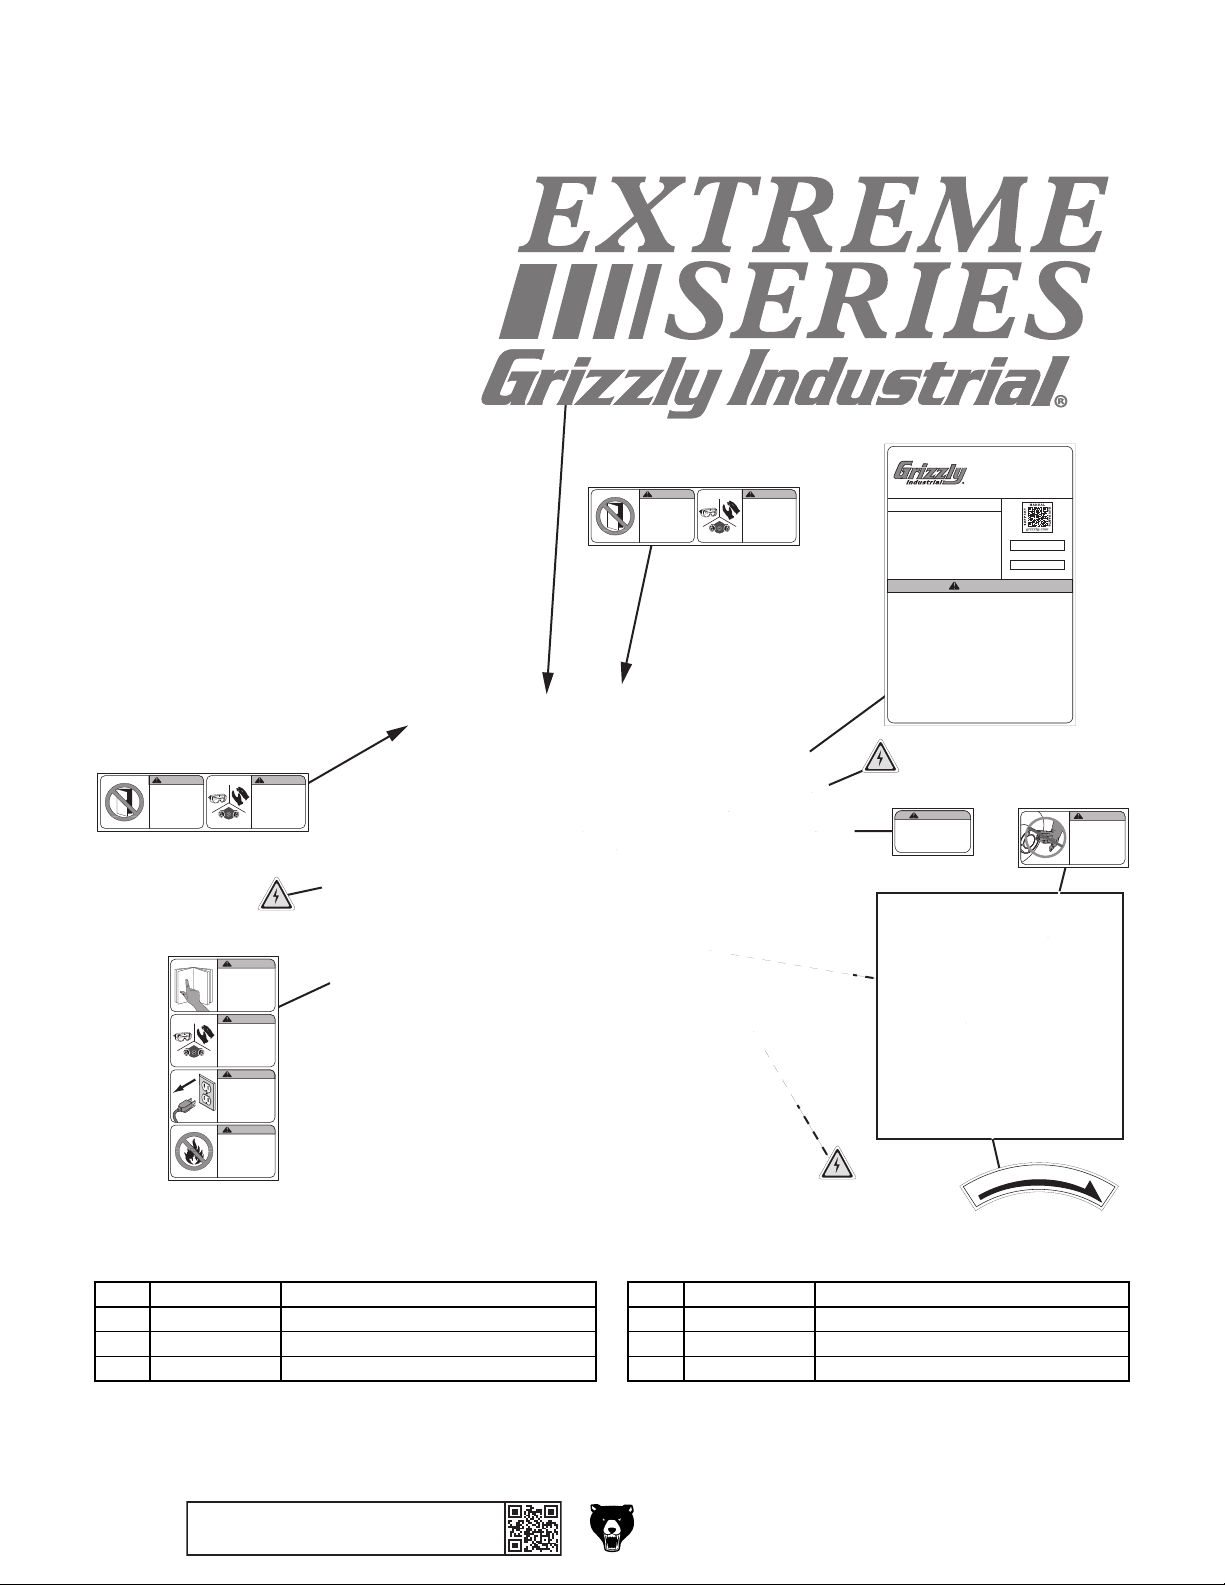
206
213
Labels & Cosmetics (Rear)
207
WARNING!
INJURY HAZARD!
Do not open door
while machine is
connected to power
or impeller is in
motion.
WARNING!
POISON HAZARD!
Wear safety goggles,
chemical-resistant
gloves, and respirator
when cleaning or
replacing filters.
Motor: 1-1/2 HP, 120V/240V, 1-Ph, 60 Hz
Prewired Voltage: 120V
Full-Load Current Rating: 18A at 120V, 9A at 240V
Inlet Diameter: 6"
Airflow: 6" Inlet, 850 CFM @ 1.72" SP
Maximum Static Pressure: 7.02"
Filter 1: Spark Arrestor, Aluminum Mesh
Filter 2: Large Particle Screen, Stainless Steel Mesh
Filter 3: 2–10 Microns @ 35%, Pleated Pre-Filter
Filter 4: 0.3 Microns @ 99.97%, V-Cell HEPA Filter
Filter Replacements: T33832, T33833, T33834
Weight: 492 lbs.
To reduce risk of serious personal injury when using this machine:
1. Read and understand owner’s manual before operating.
2. Always wear approved eye protection, chemical-resistant gloves, and respirator
3. Only plug power cord into a grounded outlet.
4. Monitor pressure gauge, and replace filters when gauge exceeds 6".
5. Handle used filters carefully, and follow EPA guidelines for disposal.
6. Only use this machine to filter smoke and fumes—never use to filter wood, glass,
7. Do not operate machine near flammable materials, such as paint or varnish.
8. Always disconnect power before servicing or cleaning.
9. DO NOT expose to rain or use in wet locations.
10. Keep hands, long hair, and loose clothing away from inlet.
11. Never leave machine unattended during operation.
12. Do not use if cord, plug, or any other electrical equipment becomes
13. Do not use without filters in place.
14. Do not connect cord to power supply with wet hands.
15. Grasp and pull the plug, not the cord, when unplugging.
16. Do not modify machine in any way.
17. DO NOT operate under influence of drugs or alcohol, or if tired.
18. Prevent unauthorized use by children or untrained users.
208
MODEL G0964
1-1/2 HP PORTABLE
FUME EXTRACTOR
W/PRECISION ARM
Specifications
Date
S/N
Mfd. for Grizzly in Taiwan
WARNING!
while operating or when cleaning/replacing filters. Always wear proper protection
when welding.
asbestos, lead paint dust, silica, animal parts, biohazards, burning
materials/ashes, combustible dust, flammable liquids or gases, or sprayed paint.
damaged—promptly repair!
207
WARNING!
INJURY HAZARD!
Do not open door
while machine is
connected to power
or impeller is in
motion.
WARNING!
POISON HAZARD!
Wear safety goggles,
chemical-resistant
gloves, and respirator
when cleaning or
replacing filters.
210
WARNING!
No machine can capture 100% of
welding fumes produced.
DO NOT use where unprotected
bystanders, knowingly or otherwise, may be exposed to fumes.
211
212
DO NOT place
hands near inlet
during operation!
WARNING!
AMPUTATION
HAZARD!
210
WARNING!
To reduce risk of death
or serious injury, read
manual BEFORE using
machine.
To get a new manual, call
(800) 523-4777 or go to
www.grizzly.com.
WARNING!
EYE/LUNG/SKIN
INJURY HAZARD!
Wear safety goggles,
chemical-resistant
gloves, and respirator
when using/servicing
machine.
WARNING!
INJURY/SHOCK
HAZARD!
Disconnect power
before adjustments,
maintenance, or
service.
WARNING!
EXPLOSION HAZARD!
Do not use machine
to collect flammable
materials or expose
machine to flammable
materials or fumes.
214
210
T
I
A
O
T
N
O
R
REF PART # DES CRIPTIO N REF P ART # DESCRI PTION
206 P0964206 EXTREME SERIES LABEL 211 P0964211 BYSTANDERS WARNING LABEL
207 P0964207 COMBO WARNING LABEL DOOR 212 P0964212 INLET WARNING LABEL
208 P0964208 MACHINE ID LABEL 213 P0964213 ROTATION LABEL
210 P0964210 ELECTRICITY LABEL 214 P0964214 COMBO WARNING LABEL MACHINE
-40-
BUY PARTS ONLI NE AT GRIZZLY.COM!
Scan QR code to visit our Parts Store.
Model G0964 (Mfd. Since 09/24)
Page 43

WARRANTY & RETURNS
Grizzly Industrial, Inc. warrants every product it sells for a period of 1 year to the original purchaser from
the date of purchase. This warranty does not apply to defects due directly or indirectly to misuse, abuse,
negligence,accidents,repairsoralterationsorlackofmaintenance.ThisisGrizzly’ssolewrittenwarranty
and any and all warranties that may be implied by law, including any merchantability or fitness, for any particular purpose, are hereby limited to the duration of this written warranty. We do not warrant or represent
that the merchandise complies with the provisions of any law or acts unless the manufacturer so warrants.
InnoeventshallGrizzly’sliabilityunderthiswarrantyexceedthepurchasepricepaidfortheproductand
any legal actions brought against Grizzly shall be tried in the State of Washington, County of Whatcom.
We shall in no event be liable for death, injuries to persons or property or for incidental, contingent, special,
or consequential damages arising from the use of our products.
The manufacturers reserve the right to change specifications at any time because they constantly strive to
achieve better quality equipment. We make every effort to ensure that our products meet high quality and
durability standards and we hope you never need to use this warranty.
In the event you need to use this warranty, contact us by mail or phone and give us all the details. We will
thenissue youa“ReturnNumber,’’which mustbe clearlyposted onthe outsideas wellas theinside of
the carton. We will not accept any item back without this number. Proof of purchase must accompany the
merchandise.
Please feel free to write or call us if you have any questions about the machine or the manual.
Thank you again for your business and continued support. We hope to serve you again soon.
For further information about the
scan the QR
code below
to be automatically directed to our warranty page.
warranty, visit https://www.grizzly.com/forms/warranty or
WARRANTY
Page 44

 Loading...