

Page 1
1
GrimmSpeed 3 Port Boost Control Solenoid
Installation Instructions
MazdaSpeed3/MazdaSpeed6
***Picture above is MS6 BCS***
All GrimmSpeed products are intended for Off-Road use only.
Park your vehicle on a level surface. Fully engage the parking brake and put wheel stops on
the front and rear wheels to keep the vehicle from rolling.
Warning (read before installing):
Before moving forward with the setups outlined below, insure that you have the experience
and confidence to properly tune your car. If not, please consult a tuning professional.
Without a proper tune you can overboost and damage your engine.
Under no circumstances is the GrimmSpeed Solenoid to be used in any applications where
failure of the valve to operate as intended could jeopardize the safety of the operator or any
other person or property.
Note! You must tune for this hardware in 3 port mode! Using stock or off-the-shelf EM with a
3-port solenoid installed in interrupt mode will result in overboosting!
Items Included:
MS6 MS3
(1) GrimmSpeed BCS (1) GrimmSpeed BCS
(1) Rubber Grommet (2) M6 Bolts
(1) Rubber Washer (2) M6 Lock Nuts
(2) M6 Lock Nuts (1) Hose Connector
(1) Hose Connector (1) Rubber Cap
(1) Rubber Cap
Grimmspeed
Page 2

2
A. Purpose
The benefits of this upgrade are faster spool, ability to hold higher boost, and better control
over boost. A side benefit of the improved boost control is the ability to reach higher target
boost levels in the low (1st and 2nd) gears.
B. Technical Background
A BCS is a binary device – i.e. it is either on (energized), or off. In the context of the
MazdaSpeed device, when the BCS is energized, air is allowed to pass through the device,
while it is off, the air flow is cut.
There are two modes of boost controller operation, at least in this context: “bleed” 2 port
mode, which is the mode that the stock BCS operates in, and “interrupt” mode, which is the
mode that a 3-port BCS can operate in. Note that a 3-port BCS can also operate in “bleed”
mode, depending on how it is connected.
Despite being digital in nature, these devices perform a very analog-like task, which is to
control the boost level. In order to do so, the ECU opens and closes the solenoid at varying
speeds, from 0 Hz (closed) to (effectively) ∞ Hz (open).
C. 2-Port Operation (Stock) Review
The stock solenoid is part of the stock bleed-based boost control system. When the solenoid is
off (closed), pressurized air from the compressor is fed straight into the wastegate control.
Any increase in compressor pressure beyond the rated pressure of the wastegate control
results in the wastegate being opened, preventing buildup of boost.
When energized (opened), air is allowed to bleed off the compressor-to-wastegate line by way
of the dual waste gate hose fittings (in stock vehicles, this air is vented back into the intake
post-MAF). This prevents the wastegate from seeing the full compressor pressure, allowing
boost to build.
While the stock system operates adequately, it can lead to problems at higher-than-stock
boost levels. Since the bleed system is sized for the stock turbo at stock boost levels, it is
typically incapable of correctly metering air at higher boost, allowing the wastegate to see
pressure and open before intended. Additionally, since the wastegate is never completely cut
off from seeing compressor pressure, it can open at low boost levels and inhibit boost buildup.
Ideally, the wastegate should remain entirely closed for fastest boost buildup (as all exhaust
is then forced through the turbine).
Installing the GrimmSpeed BCS in 2 port mode does not require tuning.
Grimmspeed
Page 3
3
D. 2-Port Installation
Installation for MazdaSpeed3:
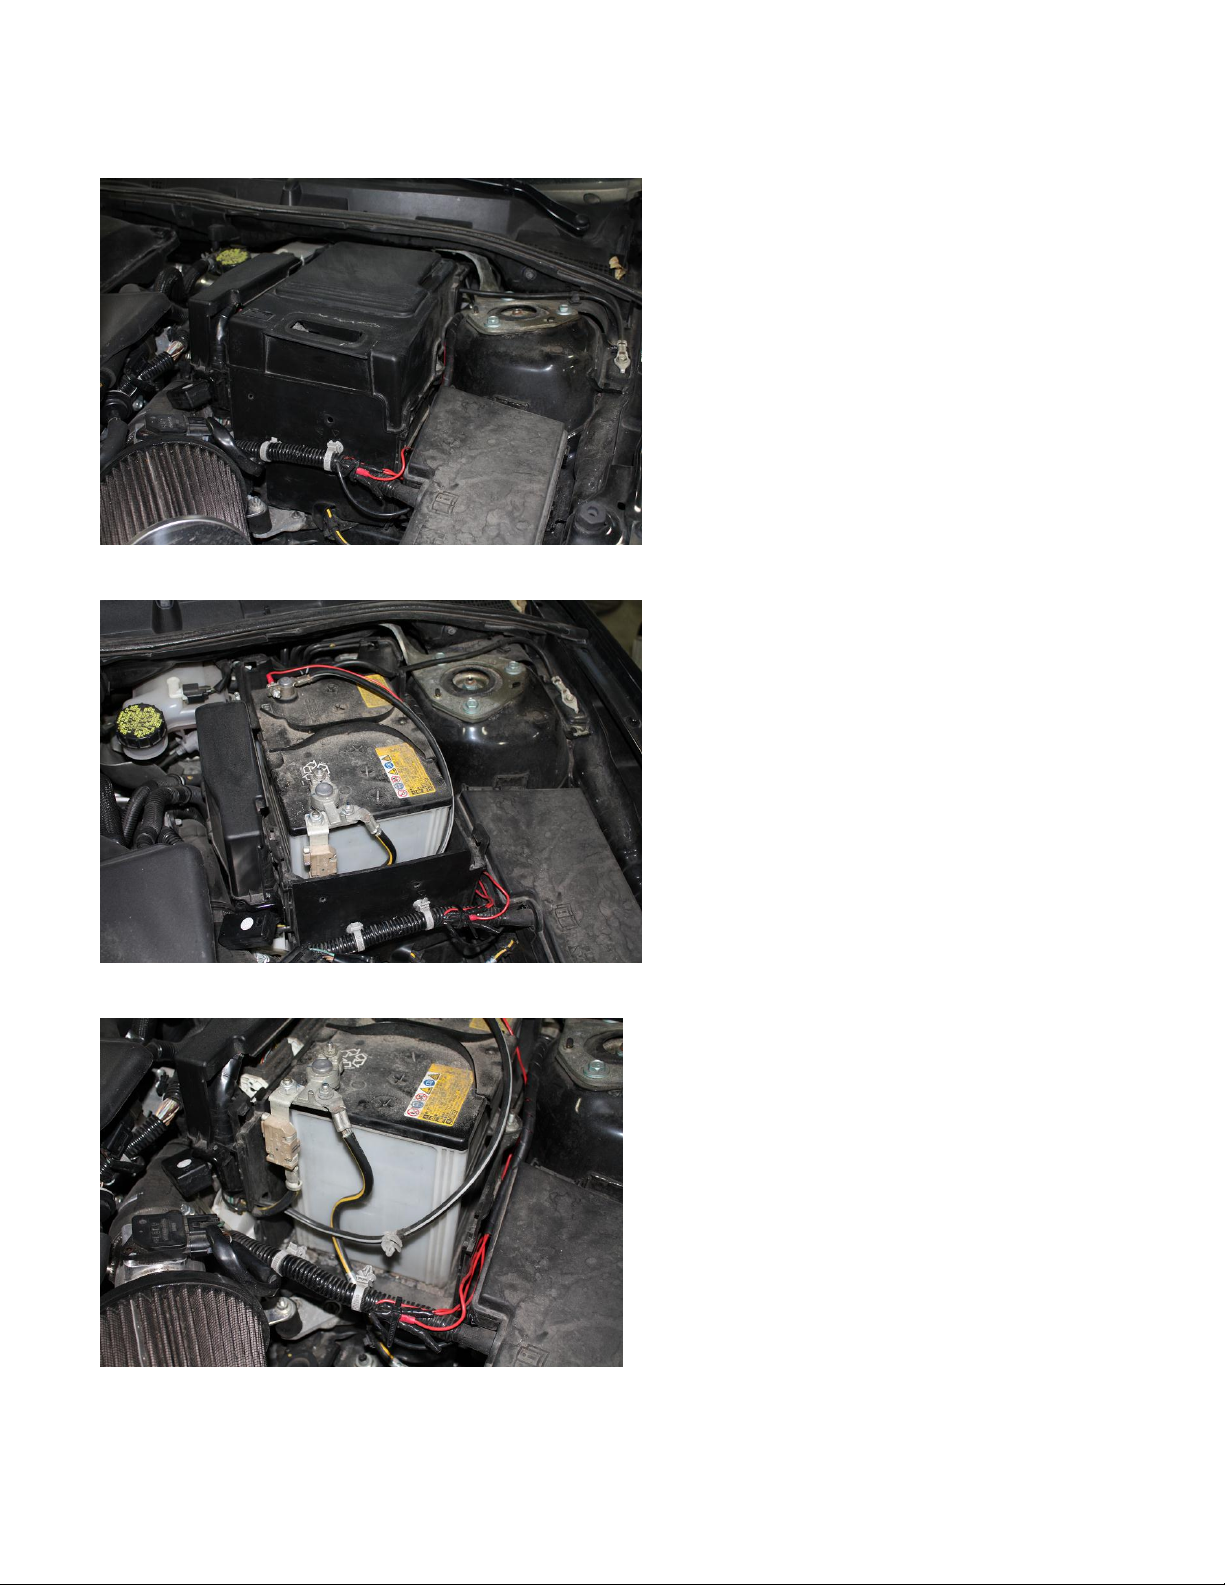
1. Remove air box top.
2. Remove top battery cover.
3. Remove front battery cover.
Grimmspeed
Page 4
4
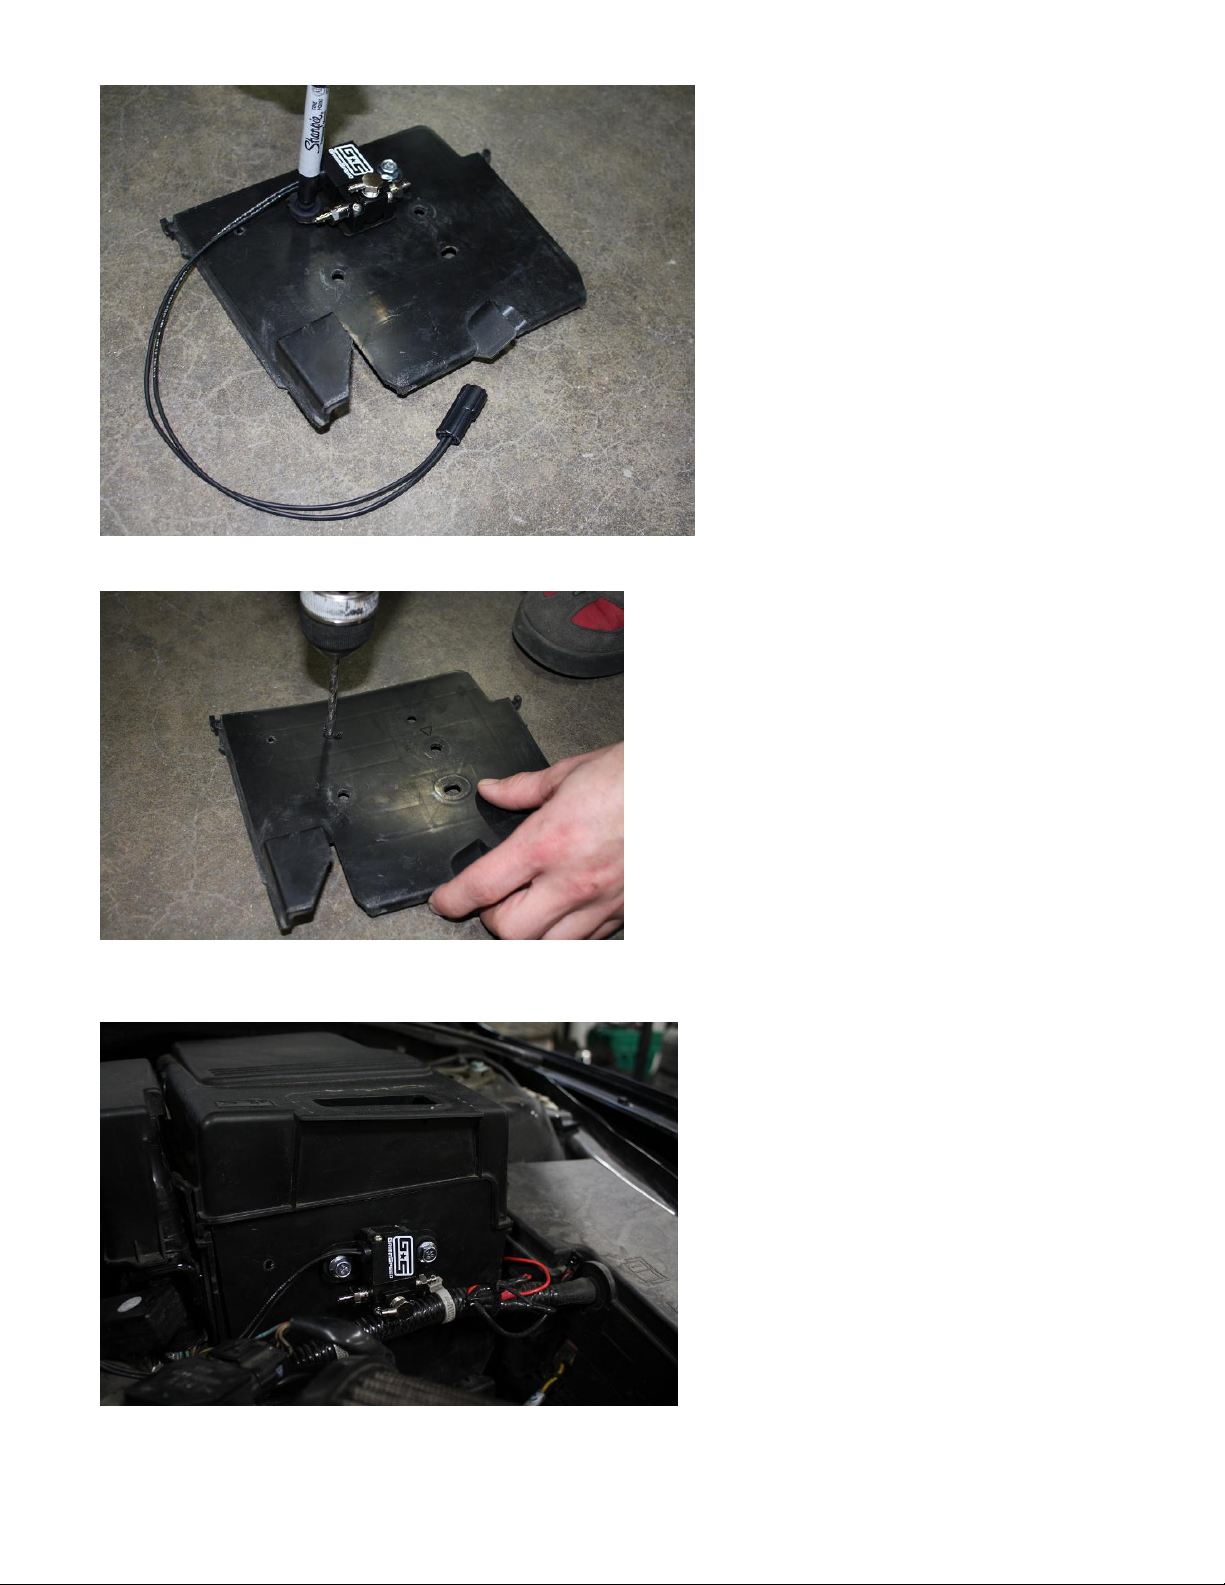
4. Line up the left grommet hole with the existing front battery cover hole near the top of
the cover. The bracket grommets should be parallel with the top of the front battery cover.
5. Drill the left side mounting hole using a 1/4" drill bit.
6. Using provided Grimmspeed bolts and nuts, mount the solenoid on the battery cover.
Reinstall battery front cover and top cover.
Grimmspeed
Page 5

5
7. Disconnect brake booster vacuum line for easy access to solenoid.
8. Locate the factory boost control solenoid that is bolted to the turbo. Disconnect wiring
that goes to it. You may choose to remove the factory solenoid or leave it installed. Unplug
the vacuum lines that go to it.
9. Plug in GrimmSpeed boost control solenoid wiring connector into factory wiring harness.
Prevent wiring from contacting anything sharp and do not allow wiring to be pinched.
Grimmspeed
Page 6

6
10. Hook up vacuum lines. Port 1 on the GrimmSpeed BCS will connect to a high pressure
boost source. Connect the 4mm (smaller) vacuum line from the wastegate to Port 1 of the
BCS.
11. Port 2 on the BCS connects to the turbo inlet. If you prefer, use the included vacuum line
to run a new 4mm line from the inlet to Port 2 on the BCS. It is recommended that a plastic
zip tie is used to secure vacuum lines.
Grimmspeed
Page 7

7
Figure: Installation diagram for 2-port bleed mode setup.
12. In bleed mode, you will only be utilizing two of the three ports on the BCS. Port 3 should
be capped to prevent un-filtered, un-metered air from entering your inlet when you’re not in
boost. To do this, use the included fitting, cap and a small piece of vacuum hose.
Alternatively, you may source a smaller cap for the fitting.
Installation for MazdaSpeed6:
1. You will be installing the GrimmSpeed solenoid on the firewall above the turbo. You will
be using the existing two factory studs. Place the provided rubber washer on the left stud
and the rubber grommet on the right. Install solenoid on studs. Using the provided nylon
locking nuts, tighten bracket.
2. Follow MazdaSpeed 3 instructions starting at Step 8.
E. 3-Port Operation and Installation
Grimmspeed
Page 8

8
A 3-port solenoid does away with the bleed-based system, explicitly shunting air from the
compressor to the wastegate, or compressor to vent (or back into the intake, OEM-style).
Drawbacks of the bleed-based system are thus eliminated, with the wastegate seeing literally
no pressure when the solenoid is energized, to seeing all of the compressor pressure when the
solenoid is de-energized.
Now able to explicitly control the opening and closing of the wastegate, the ECU is able to
control boost with greater precision and reduced response time. Note! You must tune for this
hardware in 3 port mode! Using stock or off-the-shelf EM with a 3-port solenoid installed in
interrupt mode will result in overboosting!
Figure 1: Pneumatic schematic for the GrimmSpeed
Boost Control Solenoid in 3-port operation
Installation for MazdaSpeed3:
1. Follow 2-port installation instruction 1-9 starting on page 3.
2. Hook up vacuum lines. Port 3 connects to a high pressure boost source. Remove bottom
6mm vacuum line on wastegate. Cap bottom wastegate fitting with 6mm cap. On the
unplugged 6mm vacuum line, push in 6mm to 4mm connector. Connect 4mm vacuum line
from this connector to Port 3 on the BCS.
Grimmspeed
Page 9

9
11. Port 2 connects to the internal wastegate actuator vacuum nipple. Remove oem hose on
top of actuator and replace with 4mm hose and bring 4mm hose to Port 2 on the BCS.
12. Port 1 should be routed back to the intake or left to vent to atmosphere. It is
recommended that a plastic zip tie is used to secure vacuum lines.
13. Tuning: WGDC controls the actuator / turbo. Tuning to the WGDC is required. Start at a
WGDC value of 15 and go up from there.
Installation for MazdaSpeed6:
Grimmspeed
Page 10

10
1. You will be installing the GrimmSpeed solenoid on the firewall above the turbo. You will
be using the existing two factory studs. Place the provided rubber washer on the left stud
and the rubber grommet on the right. Install solenoid on studs. Using the provided nylon
locking nuts, tighten bracket.
2. Follow MazdaSpeed 3 instructions starting at Step 8.
F. External Wastegate(EWG) Installation
Hook up vacuum lines. See Figure 3. Port 3 connects to a high-pressure boost source (there is
a vacuum nipple on the turbo compressor outlet). Port 2 connects to the bottom port on the
external wastegate. The factory restrictor pill should be removed for operation. It is
recommended that a plastic zip tie is used to secure vacuum lines. The electrical is plug and
play with the supplied connector.
Grimmspeed
Page 11

11
Please contact us if you have any questions during installation. 612.379.0000 or
sales@grimmspeed.com.
Thank you for your purchase!
Grimmspeed
 Loading...