

Page 1
Gridstore AdministrAtor’s Guide
Page 2

Page 3

Table of Contents
Welcome to the Gridstore Online Administrator's Guide ............................................................. 5
Before You Start ............................................................................................................................. 5
Reviewing Gridstore Terminology .............................................................................................. 5
Checking Operating Systems Supported .................................................................................. 5
Checking Network and Other Requirements............................................................................ 6
Checking Box Contents .............................................................................................................. 6
Setting Up the Grid ......................................................................................................................... 7
Step 1: Set Up Gridstore Storage Nodes .................................................................................. 7
Step 2: Install Gridstore Software ............................................................................................. 8
Step 3: Configure Gridstore Storage Nodes ........................................................................... 10
Next Steps ................................................................................................................................ 13
Creating and Managing vPools ................................................................................................... 14
Creating a vPool ....................................................................................................................... 14
Adding Gridstore Storage Nodes to a vPool ........................................................................... 16
Renaming a vPool .................................................................................................................... 17
Removing a vPool ..................................................................................................................... 17
Moving a Gridstore Storage Node to Another vPool or to the Unallocated Area ................. 18
Managing Gridstore Storage Nodes in a vPool ...................................................................... 18
Viewing vPool Information ....................................................................................................... 18
Viewing a List of vPools in the Grid ..................................................................................... 18
Viewing a List of Standby Nodes ......................................................................................... 19
Viewing Detailed Information for a Specific vPool ............................................................. 21
Creating and Managing vStores .................................................................................................. 23
Creating a vStore...................................................................................................................... 23
Restoring a vStore .................................................................................................................... 29
Stopping I/O to a vStore .......................................................................................................... 29
Starting I/O to a vStore ............................................................................................................ 30
Renaming a vStore .................................................................................................................. 31
Modifying vStore Properties .................................................................................................... 32
Moving a vStore to Another vPool ........................................................................................... 34
Expanding or Shrinking a vStore ............................................................................................. 34
Removing a vStore ................................................................................................................... 37
Managing Gridstore Storage Nodes in a vStore .................................................................... 39
Stopping a Gridstore Storage Node in a vStore ................................................................. 39
Starting a Gridstore Storage Node in a vStore ................................................................... 39
Swapping or Replacing a Gridstore Storage Node in a vStore ......................................... 40
Viewing vStore Information ..................................................................................................... 42
Viewing Information on All vStores in a vPool .................................................................... 42
Viewing Detailed Information for a Specific vStore ........................................................... 43
2
Page 4

Managing Access to vStores ....................................................................................................... 46
Mapping Workgroups to a vStore ........................................................................................... 46
Connecting the Local Computer as the Client ................................................................... 46
Adding Clients to a vStore ................................................................................................... 48
Viewing All Clients Mapped to a vStore .............................................................................. 50
Mapping Active Directory Objects to a vStore ........................................................................ 51
Viewing All Active Directory Object Mappings to a vStore ..................................................... 55
Removing Mappings from a vStore......................................................................................... 56
Disconnecting the Local Computer as the Client ............................................................... 56
Removing Client Access to a vStore ................................................................................... 56
Removing Active Directory Object Mappings from a vStore .............................................. 58
Changing the Drive Map Letter to a vStore ............................................................................ 58
Installing Gridstore Software ....................................................................................................... 60
Installing Software via Group Policy........................................................................................ 60
Installing Software Locally ....................................................................................................... 60
Installing Software Remotely ................................................................................................... 63
Managing Clients ......................................................................................................................... 64
Adding Clients to the Grid ........................................................................................................ 64
Removing Clients from the Grid .............................................................................................. 68
Repairing Software on a Client ............................................................................................... 69
Uninstalling Software from a Client ........................................................................................ 70
Upgrading vController Software for a Client ........................................................................... 72
Selecting a Network Adapter for a Client ............................................................................... 72
Stopping Communication between a vStore and a Client..................................................... 74
Re-establishing Communication between a vStore and a Client .......................................... 74
Restarting the Core Service on a Client .................................................................................. 75
Viewing Client Information....................................................................................................... 76
Viewing a List of Clients on the Grid ................................................................................... 76
Viewing All Clients Mapped to a vStore .............................................................................. 77
Checking Client Membership Status in the Grid ................................................................ 78
Managing Gridstore Storage Nodes ........................................................................................... 80
Configuring Gridstore Storage Nodes ..................................................................................... 80
Modifying Properties of a Gridstore Storage Node ................................................................ 83
Viewing General Properties of a Gridstore Storage Node ................................................. 83
Modifying the Name of a Gridstore Storage Node ............................................................. 85
Modifying IP Addresses for a Gridstore Storage Node ...................................................... 86
Modifying IP Addresses for All Gridstore Storage Nodes in the Grid ................................ 89
Modifying Remote Settings ................................................................................................. 90
Modifying Firewall Settings.................................................................................................. 91
Turning Beacon On or Off for a Gridstore Storage Node ....................................................... 93
Turning Beacon On or Off for All Gridstore Storage Nodes in a vPool .................................. 94
Restarting a Gridstore Storage Node...................................................................................... 94
Shutting Down a Gridstore Storage Node .............................................................................. 95
Waking Up a Gridstore Storage Node that Is Offline ............................................................. 97
Repairing Software on a Gridstore Storage Node .................................................................. 98
Uninstalling Software from a Gridstore Storage Node .......................................................... 99
GRIDSTORE ADMINISTRATOR’S GUIDE 3
Page 5

Removing a Gridstore Storage Node from the Grid ............................................................ 100
Managing Gridstore Storage Nodes in a vStore ................................................................. 102
Checking the LED Lights on a Gridstore Storage Node ...................................................... 102
Power Light ........................................................................................................................ 102
Alert Light ........................................................................................................................... 102
HDD Light ........................................................................................................................... 102
Viewing Status Information on All Gridstore Storage Nodes in the Grid ........................... 103
Managing the Grid .................................................................................................................... 105
Adding Gridstore Storage Nodes to an Existing Grid .......................................................... 105
Setting Up Gridstore Storage Nodes in Your Datacenter ............................................... 105
Configuring Gridstore Storage Nodes .............................................................................. 106
Modifying IP Addresses for All Gridstore Storage Nodes in the Grid ................................. 109
Shutting Down the Grid ........................................................................................................ 110
Starting Up the Grid .............................................................................................................. 111
Upgrading Software for the Grid .......................................................................................... 112
Removing Software from the Grid........................................................................................ 113
Restarting the Management Service ................................................................................... 116
Checking Status Information for the Entire Grid ................................................................. 116
Navigating the Grid Dashboard ........................................................................................ 116
Health Status Icons ........................................................................................................... 120
Statistics ............................................................................................................................ 120
Additional Features ................................................................................................................... 122
Modifying Alerting Details ..................................................................................................... 122
Running System Reports ...................................................................................................... 123
Viewing Performance Information ....................................................................................... 124
Viewing Performance Information for Gridstore Storage Nodes in the vPool ............... 125
Viewing Performance Information for Gridstore Storage Nodes in the vStore ............. 126
Viewing Performance Information for Clients mapped to a vStore ............................... 128
Troubleshooting Features ..................................................................................................... 130
Modifying DNS Settings for SRV Records ........................................................................ 130
Features for Technical Support ........................................................................................ 132
Glossary ..................................................................................................................................... 133
Index .......................................................................................................................................... 135
Copyright, Safety and Warranty Information ........................................................................... 137
4
Page 6

Welcome to the Gridstore Online Administrator's Guide
Congratulations on your new Grid! This Online Administrator's Guide will help you get your Grid set up
and running in just three easy steps. It will also guide you through managing and maintaining your
Grid.
Before You Start
Before you start, it’s a good idea to check system, network and other important requirements.
This section covers the following topics:
Reviewing Gridstore Terminology
Checking Operating Systems Supported
Checking Network and Other Requirements
Checking Box Contents
Reviewing Gridstore Terminology
Terms used in this Administrator's Guide include the following.
• Gridstore Storage Node – a 1U, rack-mountable storage appliance that is used as a simple
building block of storage. Combined with the vController software, Gridstore Storage Nodes
create a powerful storage solution called the Grid.
• The Grid™ – a new model of storage called software-defined storage, which virtualizes the
entire storage stack and distributes it across a powerful grid architecture.
• vController™ – a small footprint driver that loads on any supported Microsoft Windows host
and provides the intelligence of how to find and access data on the Grid.
• GridControl™ – a Microsoft Management Console (MMC) snap-in used to configure and
manage the Grid.
• vPool™ – a logical container for Gridstore Storage Nodes and vStores.
• vStore™ – a logical container of allocated capacity, across Gridstore Storage Nodes, within a
vPool.
Checking Operating Systems Supported
Operating systems supported for the vController include the following.
Windows 2008 R1, 7, Vista, 2003 R1 and R2, XP for 32-bit
•
•
Windows 2008 R1 and R2, 7, Vista for 64-bit
Note: All Windows clients must have Windows .NET framework 3.5 service pack 1.
GRIDSTORE ADMINISTRATOR’S GUIDE 5
Page 7

Checking Network and Other Requirements
Network and other requirements for the Grid include the following.
All Gridstore Storage Nodes participating in a vStore must be connected to the same physical
•
Ethernet switch and within the same VLAN. If you are using modular or blade switches, all
Gridstore Storage Nodes participating in a vStore should be connected to the same module
or card.
•
The switch should be configured to allow multicast at least within the same segment of the
network where the Gridstore Storage Nodes are connected.
DHCP is not required but highly recommended in the network segment. Without DHCP
•
enabled, an administrator would have to connect a laptop to the same network segment for
initial configuration unless multicasts are allowed to cross the segments.
There should be no firewall between the Gridstore Storage Nodes and the clients. If there is,
•
please ensure that ports 11000-11002 and 231-331 are open. The Grid will add exceptions
for Gridstore services on Windows firewall.
Switch enhancement features, such as rate limiting, traffic shaping or policies and Storm
•
Control, should be turned off.
Turning on IEEE 802.3X Flow Control on your switch is highly recommended.
•
•
Standardized features, such as QoS, IEEE 802.1p, 802.1Q, class based queuing and traffic
shaping, are fully supported.
Clients are recommended to be physically connected (aka “wired”) to the LAN as opposed to
•
wireless.
Checking Box Contents
Check the box of your Gridstore Storage Node to ensure it contains all components in the list below.
A GS-1000-2 Gridstore Storage Node, which includes a built-in 2TB drive and comes ready to
•
rack mount
Alternative rack mount ears and parts
•
7 ft. Ethernet cable
•
7 ft. power cord
•
Getting Started Guide
•
6
Page 8
Setting Up the Grid
In this section, you will set up a Grid—which consists of at least three Gridstore Storage Nodes—in
just three easy steps.
This section covers the following topics:
Step 1: Set Up Gridstore Storage Nodes
Step 2: Install Gridstore Software
Step 3: Configure Gridstore Storage Nodes
Next Steps
Note: If you are adding Gridstore Storage Nodes to an existing Grid, see Adding Gridstore Storage
Nodes to an Existing Grid on pg. 105 instead.
Step 1: Set Up Gridstore Storage Nodes
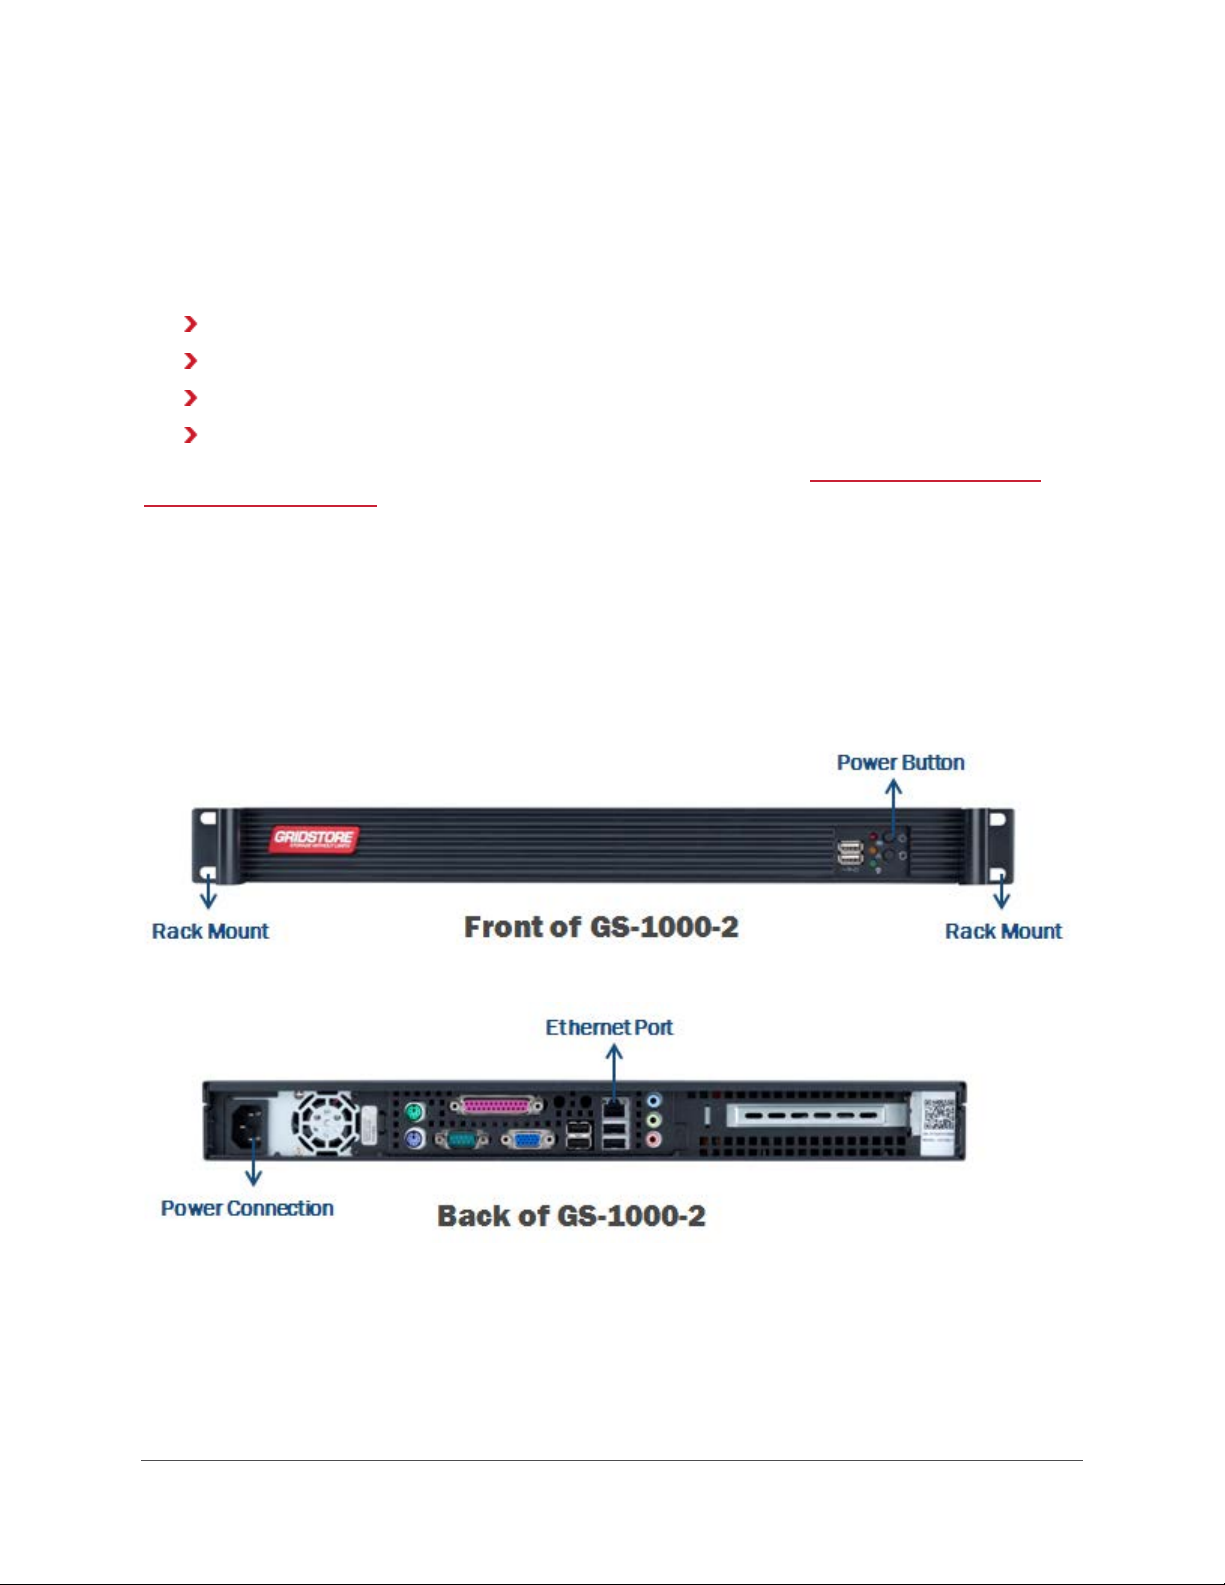
In this first step, you will rack mount, connect and power on the Gridstore Storage Nodes for your
Grid. Note that each Gridstore Storage Node comes ready to rack mount.
Note: You need at least three Gridstore Storage Nodes in a Grid.
As you follow the steps, refer to the images below.
GRIDSTORE ADMINISTRATOR’S GUIDE 7
Page 9

1. Rack mount the Gridstore Storage Nodes in the appropriate location in your datacenter.
2. For each Gridstore Storage Node, connect one end of the supplied Ethernet cable into the
back of the unit, and the other end of the Ethernet cable into a switch.
3. For each Gridstore Storage Node, connect the appropriate end of the power cord into the
power connection at the back of the Gridstore Storage Node, and connect the other end into
a power source.
4. Press the power button
on the front of each Gridstore Storage Node to power it on.
All Gridstore Storage Nodes display a solid green light. You are now ready to install the
Gridstore software, which will enable you to configure, manage and connect to the Grid.
Step 2: Install Gridstore Software
With three or more Gridstore Storage Nodes connected to the network and powered on, you are
ready to install Gridstore software. The installation file (.MSI file) for this software includes the
vController software, which enables any supported host to access storage on the Grid, and
GridControl, which is an MMC snap-in used to configure and manage the Grid.
Notes:
— The vController automatically self-installs on the Gridstore Storage Nodes to the latest version
installed on the host in a network.
— GridControl uses the default view of the MMC.
1. Obtain the installation file (.MSI) by doing the following:
Send an email to [email protected].
•
In the subject line, enter vController Software Request.
•
In the body of the email, enter the serial number(s) for your Gridstore Storage Node(s).
•
Warning! Do not rename the Gridstore installation file (.msi file). If you rename this file, it will
fail to install.
2. After you receive the installation file, double-click on it to install it on an administrative
workstation.
8
Page 10
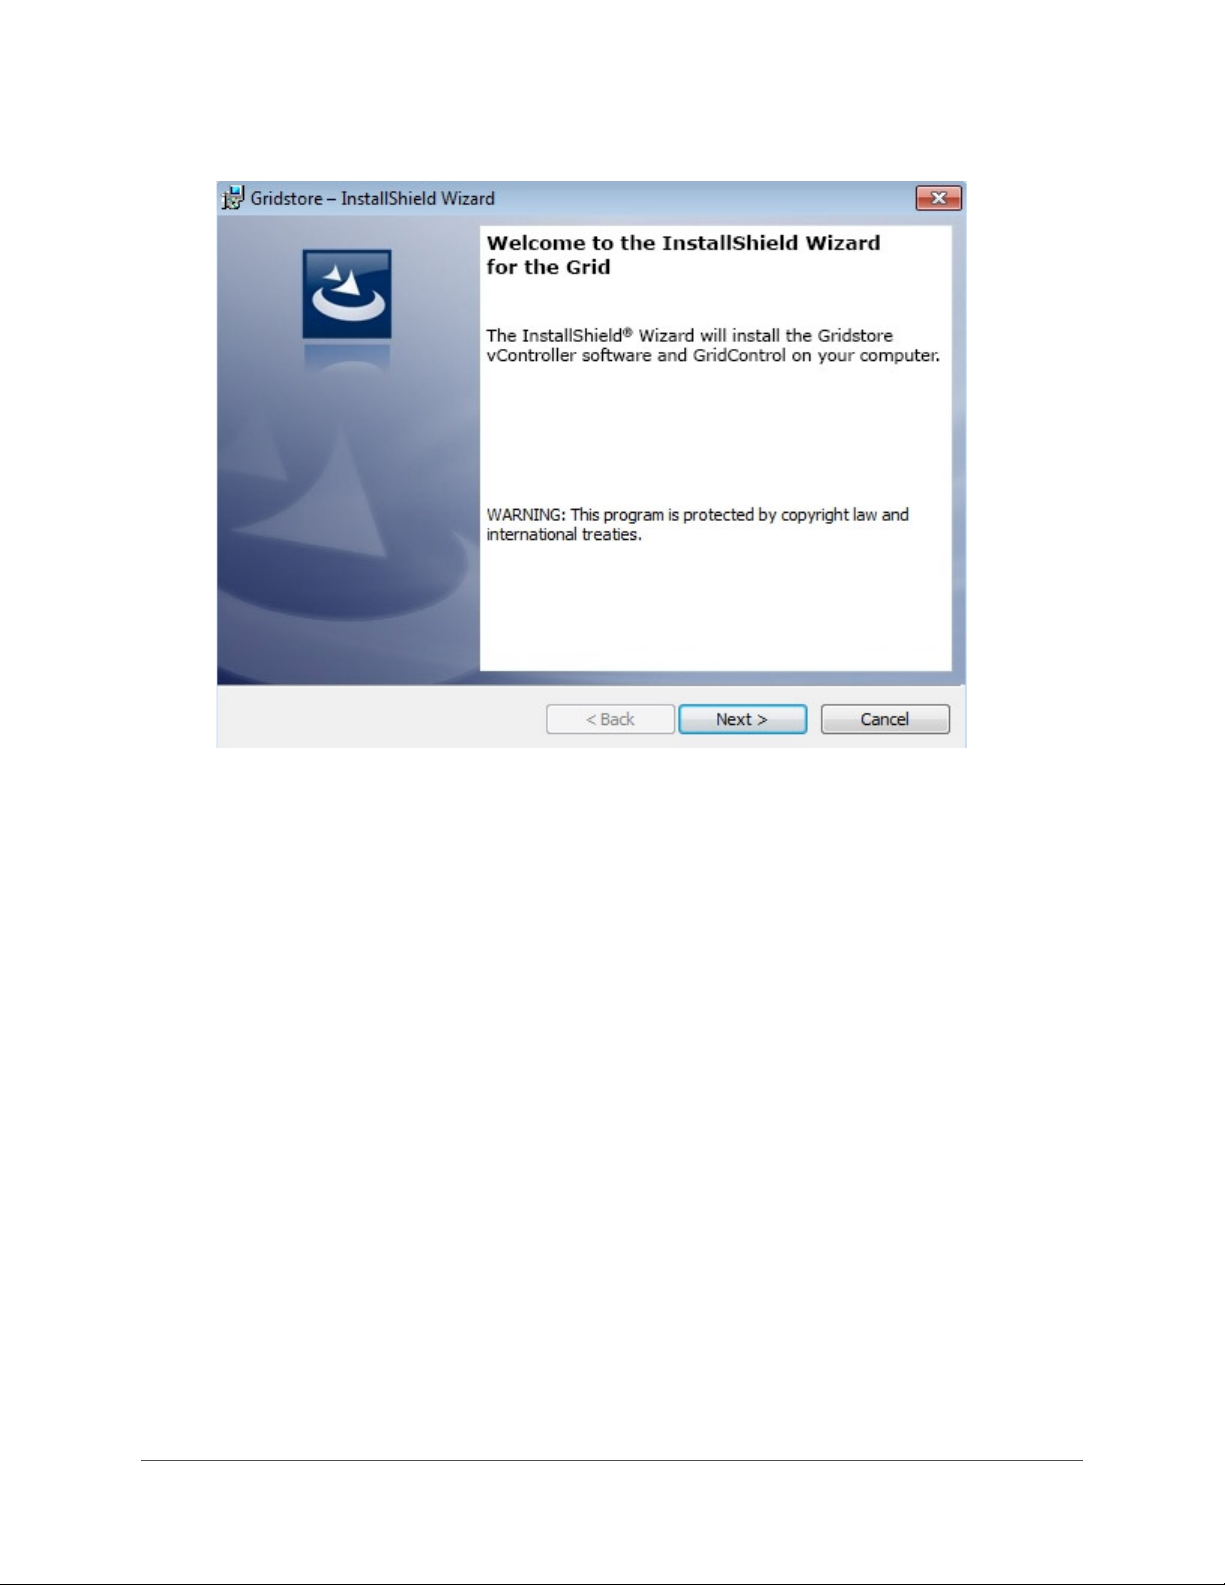
The InstallShield Wizard opens.
3. Click the Next button and follow the installation instructions, clicking the Next button after
each window until you reach the
This window displays options for a complete or custom installation.
4. Select the Complete option.
Note: This option installs both the vController and GridControl MMC snap-in, which you need
to configure and manage the Grid.
5. Click the Next button until you reach the Ready to Install window, and then click the Install
button.
Upon completion, you are ready to configure the Grid.
Install Setup Type window.
GRIDSTORE ADMINISTRATOR’S GUIDE 9
Page 11
Step 3: Configure Gridstore Storage Nodes
After setting up the Gridstore Storage Nodes and installing the Gridstore software, you are now ready
to configure the Gridstore Storage Nodes.
This step includes configuring network settings and specifying details for receiving alerts from the
Grid. Alerts notify you by email for important or critical events, such as when a Gridstore Storage
Node has stopped, failed or run out of capacity.
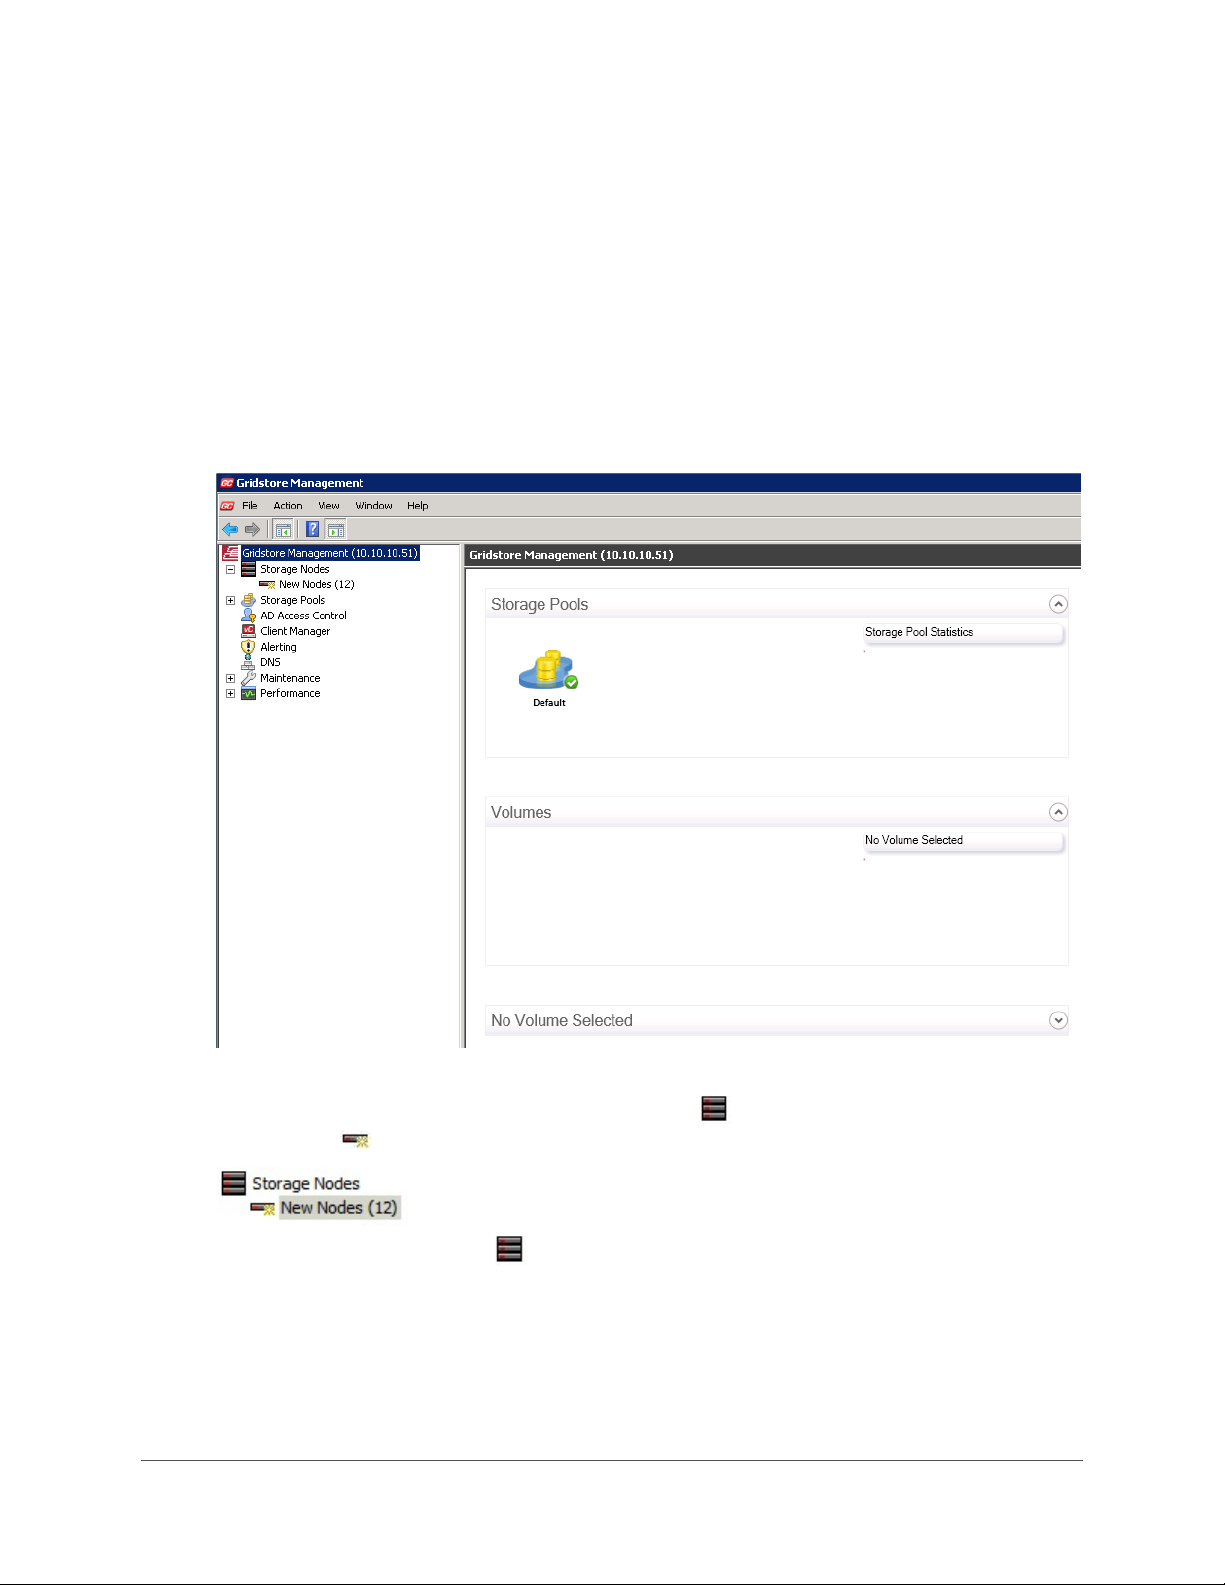
1. Launch the Gridstore software by double-clicking the GridControl icon on your desktop.
Tip: You can also access GridControl through the Administrative Tool menu of the MMC.
The software launches, displaying the GridControl window.
2. In the left navigation tree, click the plus sign next to
then click on
Tip: You can also double-click Storage Nodes to expand it.
New Nodes.
10
Storage Nodes to expand it, and
Page 12

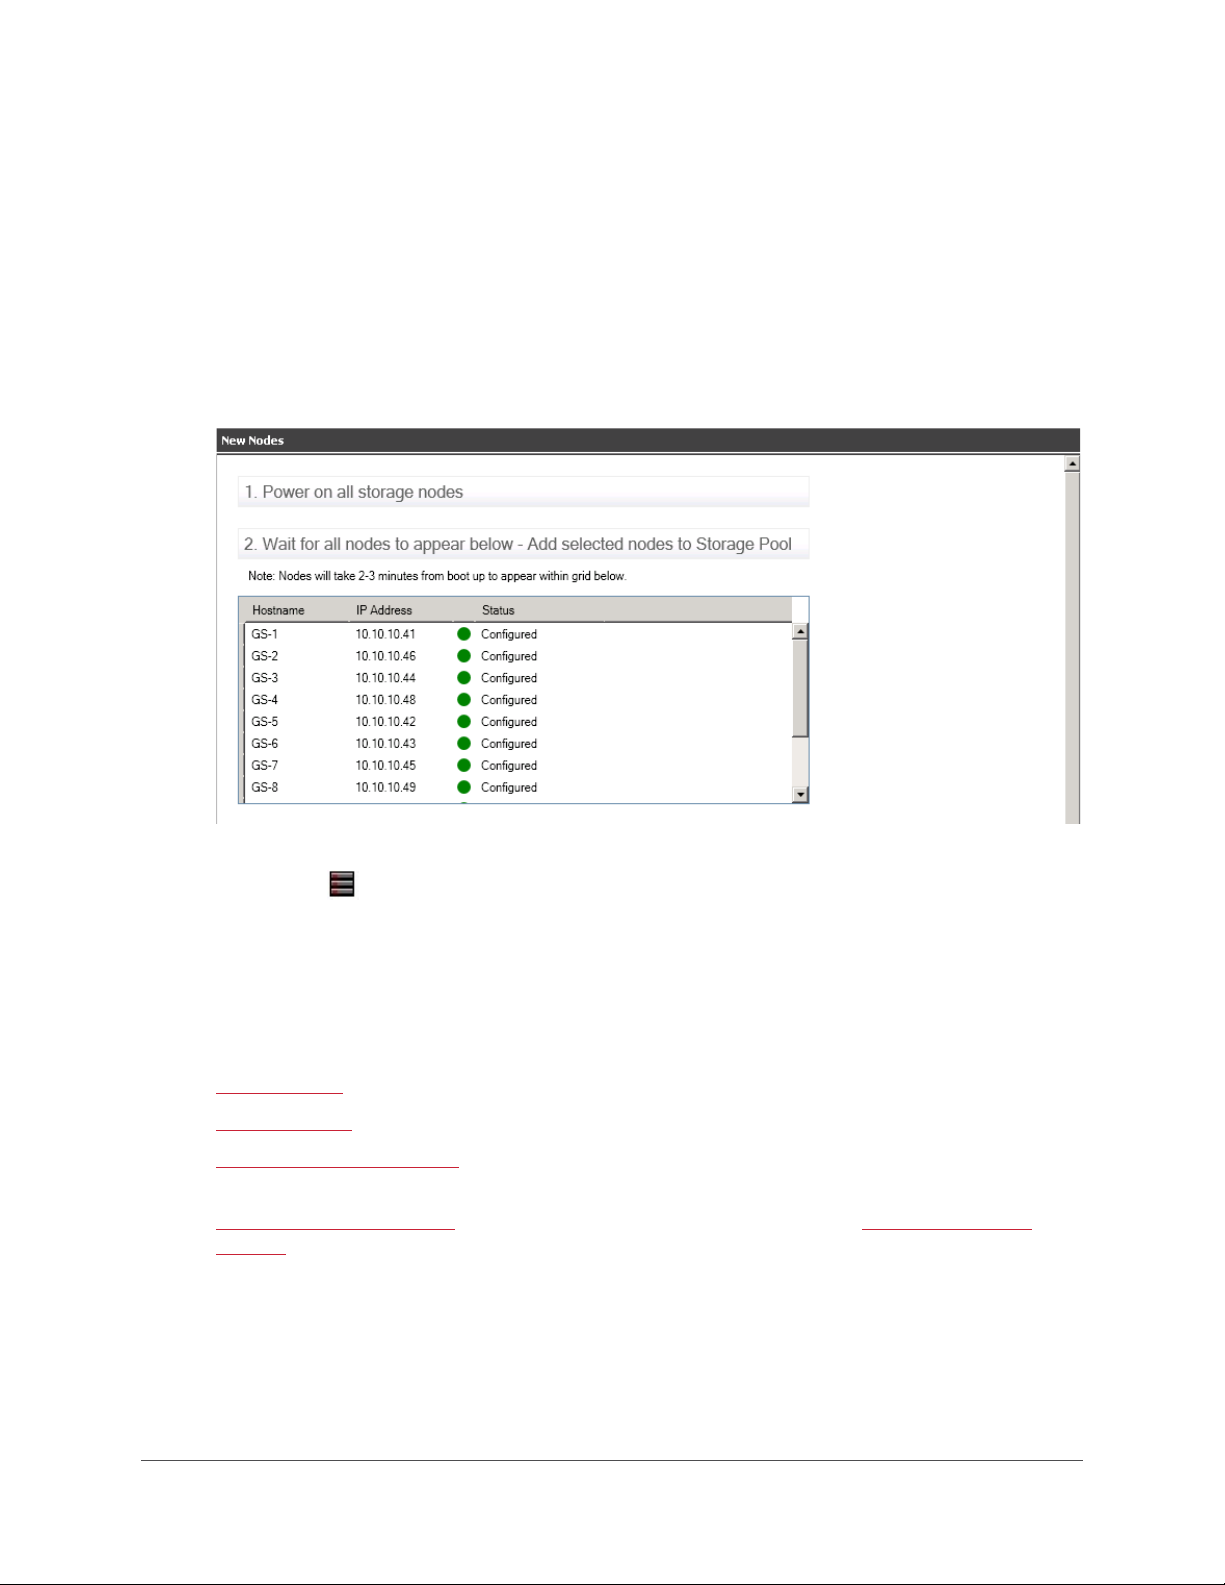
The New Nodes window opens in the center pane. After a few moments, the new Gridstore
Storage Nodes display in this window with a status of “Running,” as seen below.
3. In the Network Details area of the New Nodes window, enter network settings as follows.
(Also, refer to the image below.)
• In the Start IP Address text box, you can use the IP Address that was auto-detected, or
you can enter a new one.
• Click the Apply Range button to apply IP addresses in a series to the other new Gridstore
Storage Nodes.
GRIDSTORE ADMINISTRATOR’S GUIDE 11
Page 13

• Enter the other applicable network settings, such as the Default Gateway, Subnet Mask,
Domain Name, and Preferred and Alternate DNS Server.
Note: If the computer is on the domain, the Create SRV Records check box also displays.
Select it to create SRV Records. (For communication to be established over different subnets
between the vController and the Gridstore Storage Nodes in the Grid, the DNS must contain
an SRV record for each Gridstore Storage Node.)
4. In the Alerting Details area of the New Nodes window, enter alerting details as follows. (Also,
refer to the image below.)
• Select the Disable Alerting check box if you do not wish to receive alerts, and then skip to
the next step.
Note: You can enable alerting at a later time in GridControl. See Modifying Alerting
Details on pg. 122.
• In the SMTP Server text box, enter the IP address for the SMTP server you would like the
email alerts to be sent from.
Note that the SMTP server will need to accept SMTP
relays from the IP addresses of all Gridstore Storage Nodes within the Grid.
• In the Email Address text box, enter the email address where you would like alerts to be
sent.
Note: Use a semi-colon (;) to separate multiple email addresses.
• Enter an SMTP Username and SMTP Password, and select the Use Credentials check box
if the SMTP server requires them to be used.
12
Page 14
5. When finished entering both network and alerting details, click the Apply button just below
the
Alerting Details area.
The settings are applied and each Gridstore Storage Node is rebooted.
Tip: You can scroll to the bottom of the New Nodes window to watch the status of these
actions.
Note: You will receive a confirmation email from the alerting system that reads, “Your email
account is now registered to receive Gridstore alerts.”
After this process is complete, the Gridstore Storage Nodes appear in the New Nodes window
with a status of “Configured.”
Congratulations! You are now ready to use your Grid!
Tip: When you click Storage Nodes in the left navigation tree of GridControl, you will see the newly
configured Gridstore Storage Nodes there.
Next Steps
After setting up your Gridstore Storage Nodes and configuring them for the first time, you are ready
to use your Grid! The next steps are as follows:
1.
Create vPools and assign Gridstore Storage Nodes to them.
Create vStores and set properties for them.
2.
Manage access to vStores by setting permissions in the Active Directory Object Control,
3.
and/or
4.
Install software on Clients, manually add Clients to the Grid, and then set permissions to
vStores for those Clients.
5. Manage your vPools, vStores, Gridstore Storage Nodes, Clients, and the entire Grid.
Note: See other topics in this Gridstore Online Administrator's Guide for more information on
managing the Grid. (To do so, click on folders on the
of this online guide.)
Contents page in the left window pane
GRIDSTORE ADMINISTRATOR’S GUIDE 13
Page 15
Creating and Managing vPools
After you have set up your Grid, you are ready to create vPools. A vPool is a logical container of
Gridstore Storage Nodes within your Grid. After you create a vPool, you can view and manage it and
all the Gridstore Storage Nodes within it.
Note: Once you have created a vPool, you can create vStores within the vPool. For more information,
see
Creating and Managing vStores on pg. 23.
This section covers the following topics:
Creating a vPool
Adding Gridstore Storage Nodes to a vPool
Renaming a vPool
Removing a vPool
Moving a Gridstore Storage Node to Another vPool or to the Unallocated Area
Managing Gridstore Storage Nodes in a vPool
Viewing vPool Information
Creating a vPool
When you create a vPool, you designate Gridstore Storage Nodes within your Grid to be part of that
vPool.
Note: A default vPool is created when the Grid is first set up. You can rename or remove this vPool.
For steps for either, see pg. 17.
1. In the left navigation tree of GridControl, right-click on
from the short-cut menu.
vPools, and select Create vPool
14
Page 16
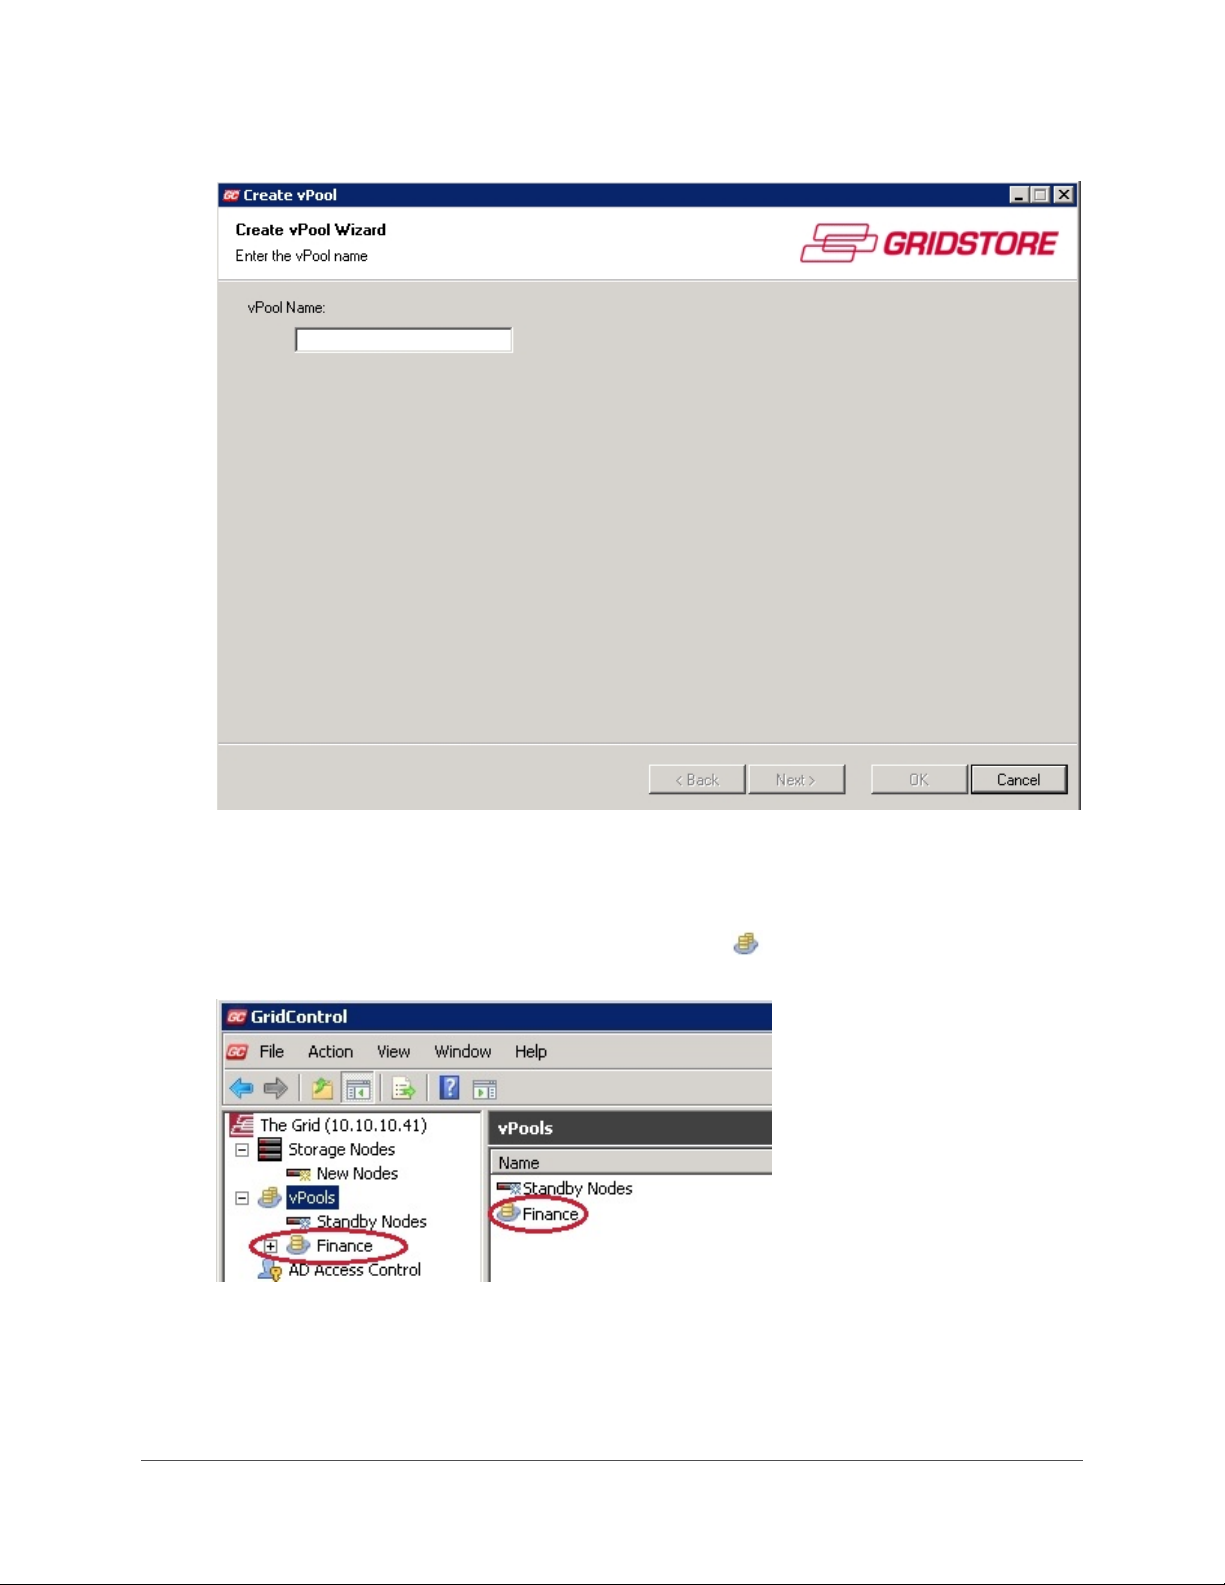
The Create vPool Wizard opens.
2. In the vPool Name text box, enter a name for the vPool, and then click the Next button.
The vPool is created using the Create vPool Wizard.
3. When finished, click the OK button.
The new vPool displays in the left navigation tree in the vPools area, as well as in the
vPools window to the right.
4. Repeat steps 1 to 3 to create additional vPools, as needed.
When finished, you are ready to add Gridstore Storage Nodes to your new vPools.
GRIDSTORE ADMINISTRATOR’S GUIDE 15
Page 17
Adding Gridstore Storage Nodes to a vPool
You can add Gridstore Storage Nodes to a vPool after they have been added to the Grid and
configured, and have not yet been assigned to another vPool.
1. In the left navigation tree of GridControl, click the plus sign next to
and then click
Tip: You can also double-click the vPools icon to expand it.
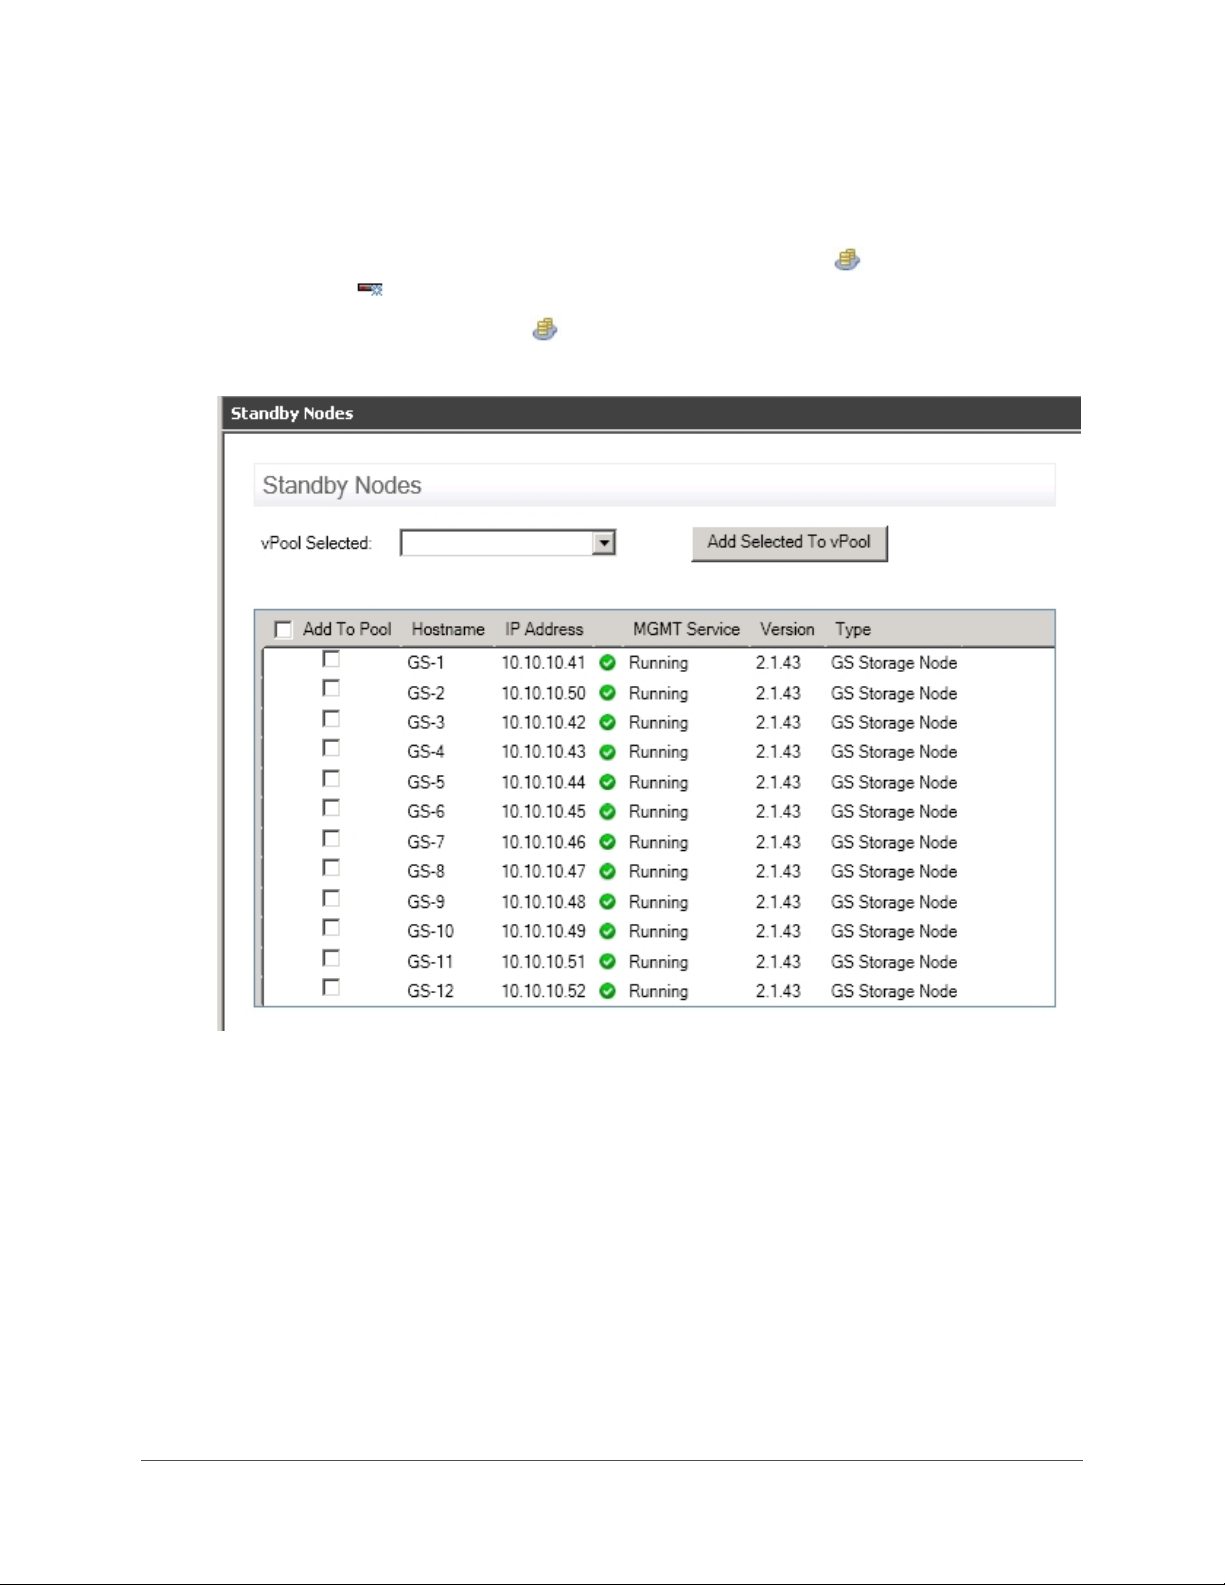
The Standby Nodes window opens, displaying configured Gridstore Storage Nodes.
Standby Nodes.
vPools to expand it,
2. From the vPool Selected drop-down list, select the vPool to which you would like to add
Gridstore Storage Nodes.
3. From the list of Gridstore Storage Nodes, select the check box to the left of the ones that you
would like to have in the selected vPool.
Tips:
— Select the Add to Pool check box to select all the Gridstore Storage Nodes in the list.
— You can click on a heading in the table to sort the Gridstore Storage Nodes by that
heading item.
4. Click the Add Selected To vPool button.
A message box opens, confirming the action.
5. Click the OK button.
16
Page 18

6. Repeat steps 2 to 5 to add Gridstore Storage Nodes to other vPools, as needed.
When finished, you can click on a vPool in the vPools area of the left navigation tree to
view the Gridstore Storage Nodes you added to that vPool, along with other information
about the vPool.
See Also
Moving Gridstore Storage Nodes to Another vPool on pg. 18
Renaming a vPool
You can rename a vPool at any time.
1. In the left navigation tree of GridControl, click the plus sign next to
2. Right-click on the vPool that you would like to rename, and select Rename vPool from the
short-cut menu.
The Rename vPool Wizard opens.
3. In the Enter vPool Name text box, enter a new name for the vPool, and click the Next button.
The name is changed within the Rename vPool Wizard.
4. When finished, click the OK button.
The vPool displays in the vPools area of the left navigation tree with its new name.
vPools to expand it.
Removing a vPool
You can remove a vPool from the Grid that you no longer plan to use. The vPool must be empty; that
is, it must not contain any vStores or Gridstore Storage Nodes. If it is not empty, you can
vStores to another vPool (see pg. 34), remove vStores (see pg. 37), and/or move Gridstore Storage
Nodes to another vPool or to the Unallocated Area (see pg. 18).
1. In the left navigation tree of GridControl, click the plus sign next to
2. Right-click the vPool that you would like to remove, and select Remove vPool from the short-
cut menu.
The Remove vPool Wizard opens.
vPools to expand it.
move
3. Click the Next button.
Tip: If the Next button is not active, it may be that the vPool is not empty. To empty the vPool,
see the options listed above.
After clicking the Next button, the vPool is removed within the Remove vPool Wizard.
4. Click the OK button.
The vPool no longer displays in the vPools area of the left navigation tree.
GRIDSTORE ADMINISTRATOR’S GUIDE 17
Page 19

Moving a Gridstore Storage Node to Another vPool or to the Unallocated Area
You can move a Gridstore Storage Node from one vPool to another. You can also move it to the
unallocated area, where it then displays in a list of Standby Nodes, waiting to be allocated to a vPool.
Note: You cannot move a Gridstore Storage Node that has already been allocated to a vStore to
another vPool. You would first need to
34.) You also cannot move a Gridstore Storage Node that is currently offline (meaning that you
cannot access it from the network) to another vPool.
remove the Gridstore Storage Node from the vStore (see pg.
1. In the left navigation tree of GridControl, click the plus sign next to
2. Click the vPool from which you would like to move Gridstore Storage Nodes.
3. In the table, right-click the appropriate Gridstore Storage Node, select Move from the short-
cut menu, and then select another vPool or
The Gridstore Storage Node is moved to the designated vPool or to the Standby Nodes
area.
Unallocated.
vPools to expand it.
Managing Gridstore Storage Nodes in a vPool
You can manage the Gridstore Storage Nodes in a vPool. This includes modifying properties, such as
IP addresses; uninstalling software; shutting down a Gridstore Storage Node; and more. These
options are available by right-clicking on a Gridstore Storage Node within a vPool.
For more information and steps, see
Managing Gridstore Storage Nodes on pg. 80.
Viewing vPool Information
You can view all the vPools you have in the Grid, as well as the list of Gridstore Storage Nodes
waiting to be assigned to vPools (called Standby Nodes). For each vPool, you can also see available
capacity and its status. You can also view a list of all the Gridstore Storage Nodes in a vPool and
display detailed information on each Gridstore Storage Node.
This sub-section covers the following topics:
Viewing a List of vPools in the Grid
Viewing a List of Standby Nodes
Viewing Detailed Information for a Specific vPool
Viewing a List of vPools in the Grid
You can view a list of all your vPools in the Grid.
In the left navigation tree of GridControl, click vPools to select it.
•
18
Page 20
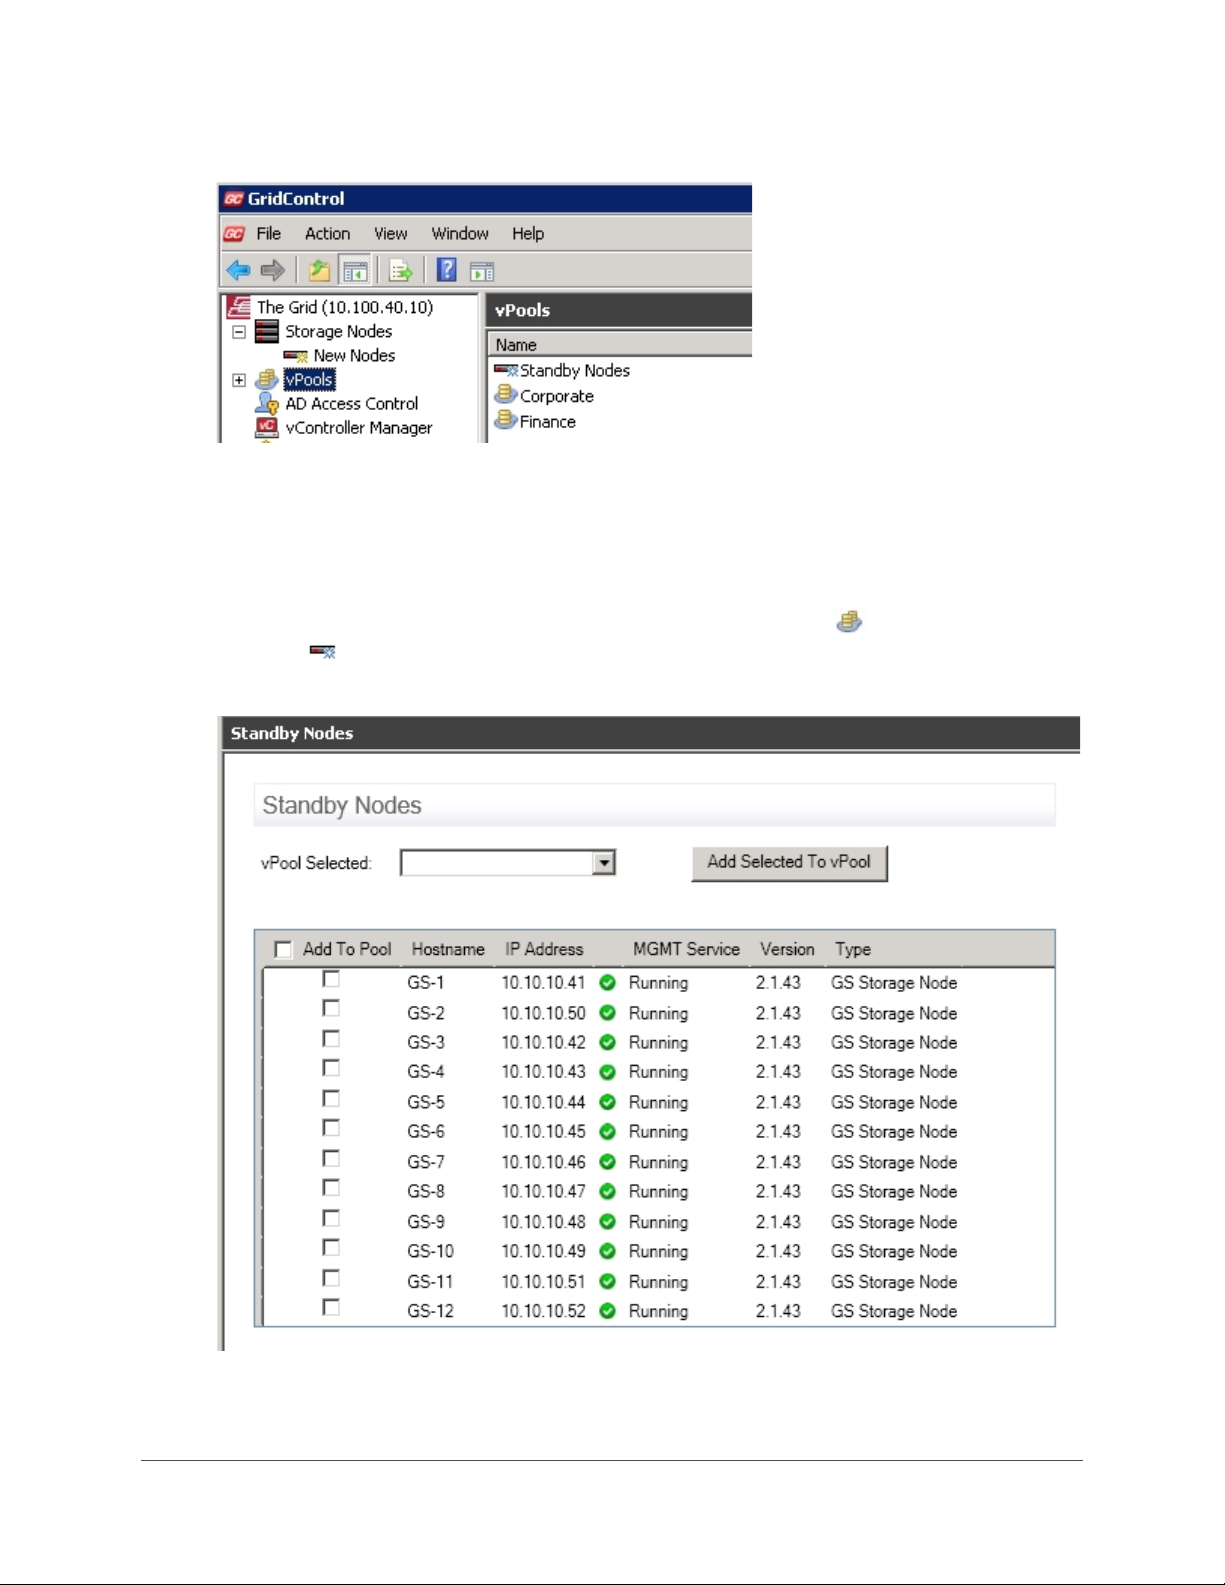
The vPools window opens to the right, displaying a list of your vPools.
Viewing a List of Standby Nodes
You can view a list of configured Gridstore Storage Nodes that are waiting to be assigned to vPools
(called Standby Nodes). You can also view status information for these Gridstore Storage Nodes.
•
In the left navigation tree of GridControl, click the plus sign next to vPools to expand it,
and click
Standby Nodes.
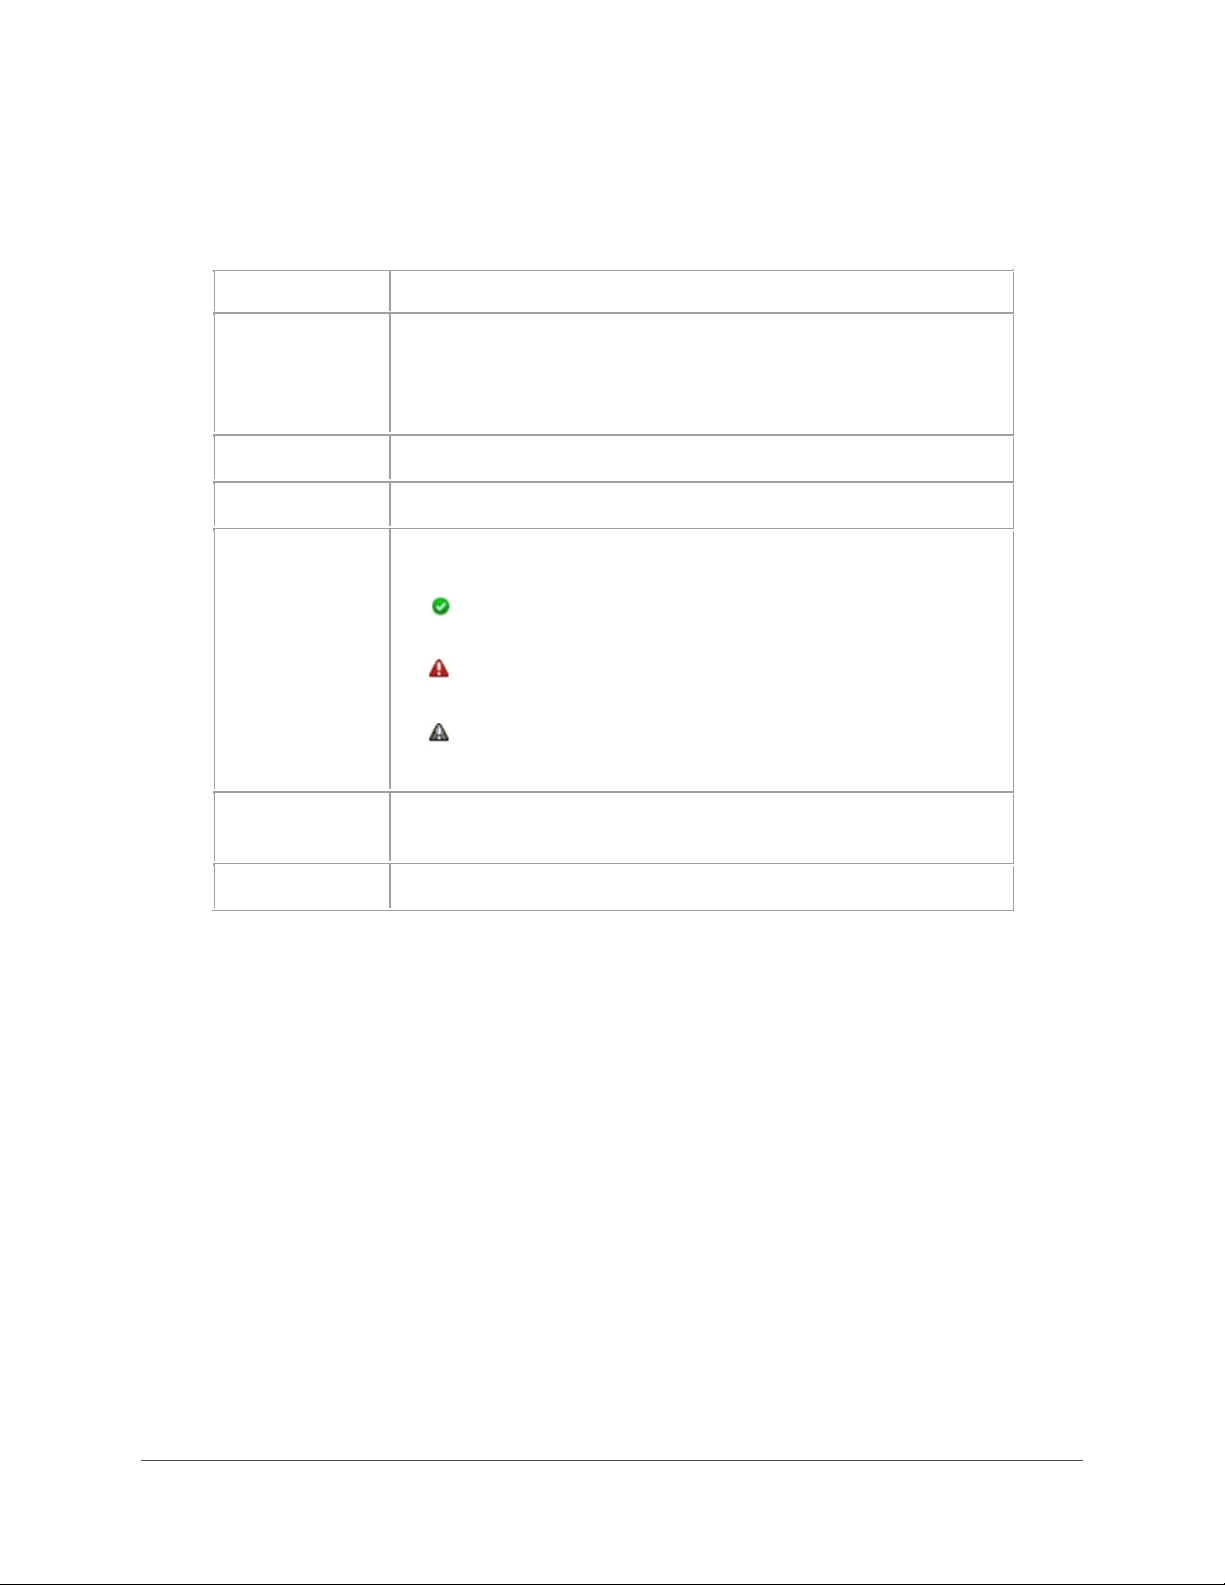
The Standby Nodes window opens, displaying configured Gridstore Storage Nodes.
GRIDSTORE ADMINISTRATOR’S GUIDE 19
Page 21
Field/Item
Description
vPool Selected
Running
Fault
Offline
The table of configured Gridstore Storage Nodes includes the following information.
Tip: You can click on a heading in the table to sort the Gridstore Storage Nodes by that
heading item.
Add To Pool Used to add Gridstore Storage Nodes to a vPool. Select the
check box next to a Gridstore Storage Node that you want to
include in the selected vPool (see the
list.
Hostname The name of the Gridstore Storage Node.
IP Address The IP address for the Gridstore Storage Node.
MGMT Service The current Gridstore Management Service status. Main options
include:
is up and running.
- communication with the Gridstore Storage Node
drop-down
- communication to the Gridstore Storage Node has
stopped.
Version The version of vController currently installed on the Gridstore
Storage Node.
Type The type of node, which are Gridstore Storage Nodes.
- the Gridstore Storage Node is not accessible from
the network.
20
Page 22
Viewing Detailed Information for a Specific vPool
For a specific vPool, you can check its total capacity as well as the amount of available free space
remaining. You can also view the status of the vPool and detailed information about the Gridstore
Storage Nodes it contains.
•
In the left navigation tree of GridControl, click the plus sign next to vPools to expand it,
and click the vPool whose status information you would like to view.
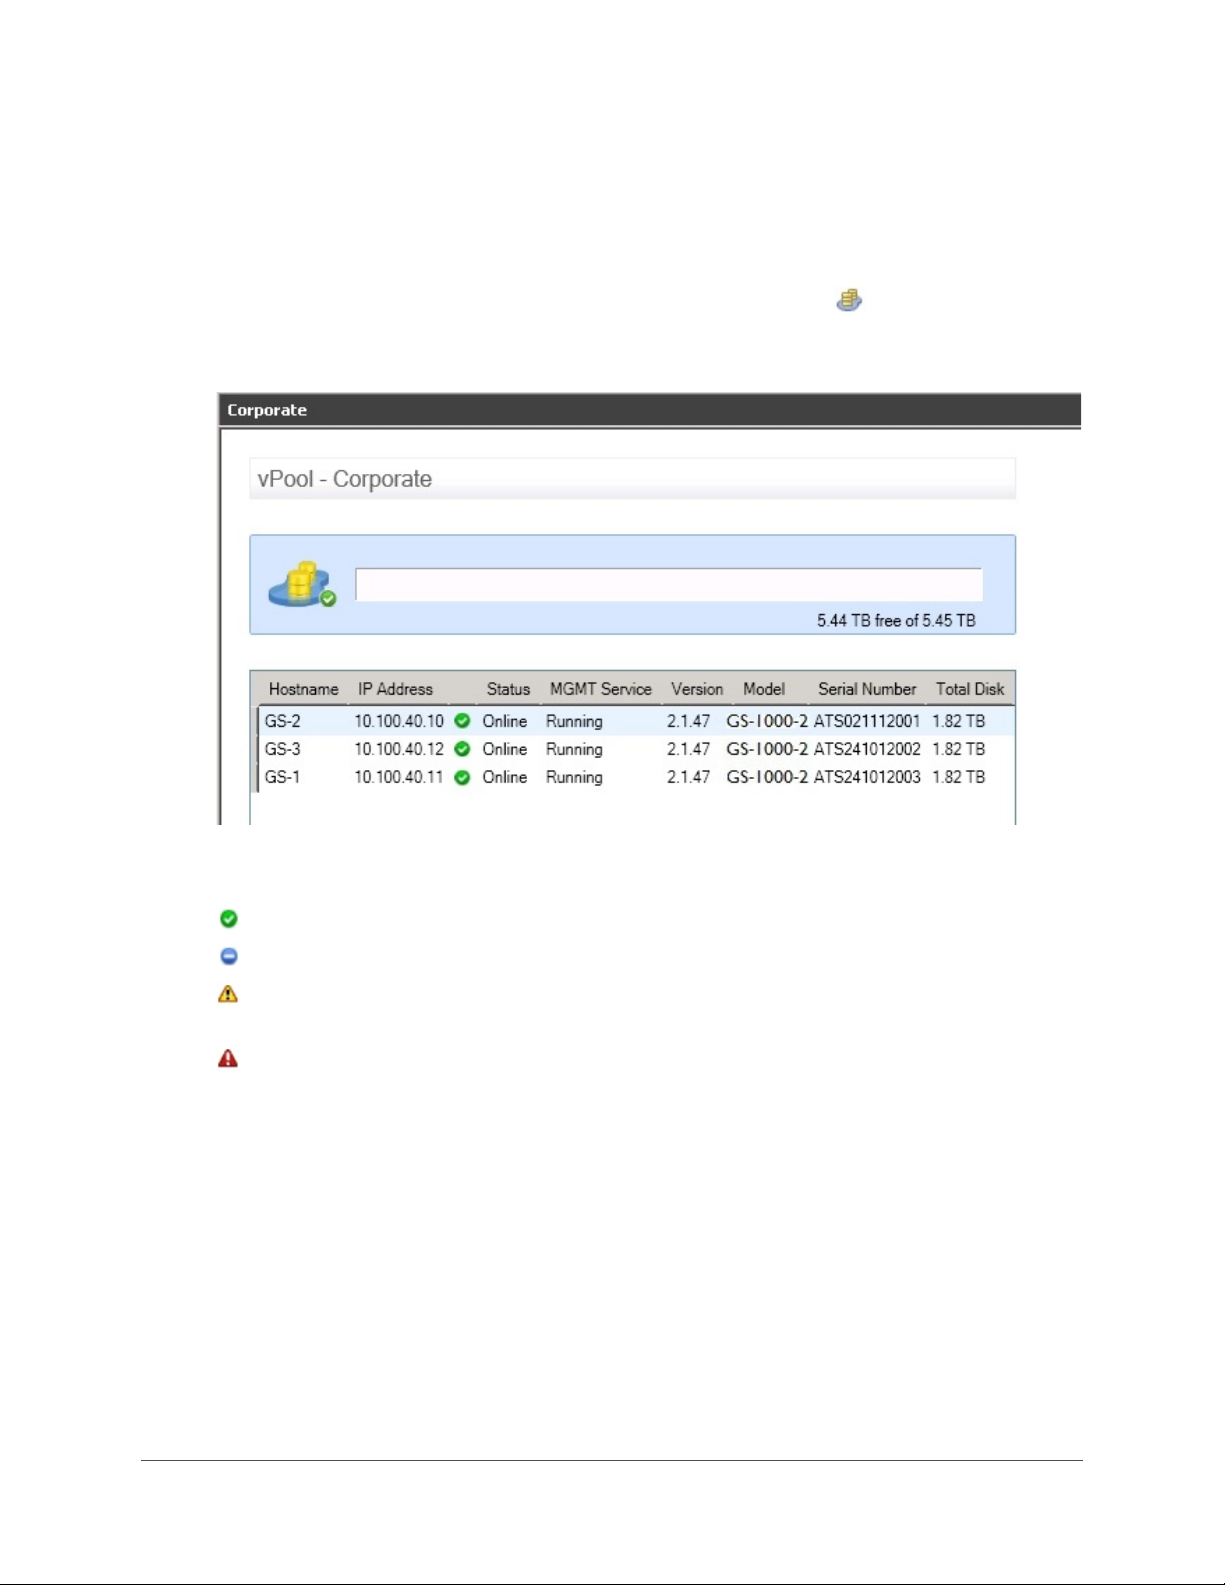
The window for the selected vPool opens to the right.
At the top you can view the status of the vPool. Options include:
Healthy - the vPool is healthy and running.
Stopped - the vPool has been manually stopped using GridControl.
Warning - the vPool is in a state that requires attention, such as when its Gridstore
Storage Nodes are reaching capacity.
Fault - the vPool is in a compromised state that requires immediate attention, such as
when one of its Gridstore Storage Nodes has failed.
GRIDSTORE ADMINISTRATOR’S GUIDE 21
Page 23
Field/Item
Description
Online
Offline
Stopped
Fault
Start Queue
Recovery in Progress
Running
Fault
Offline
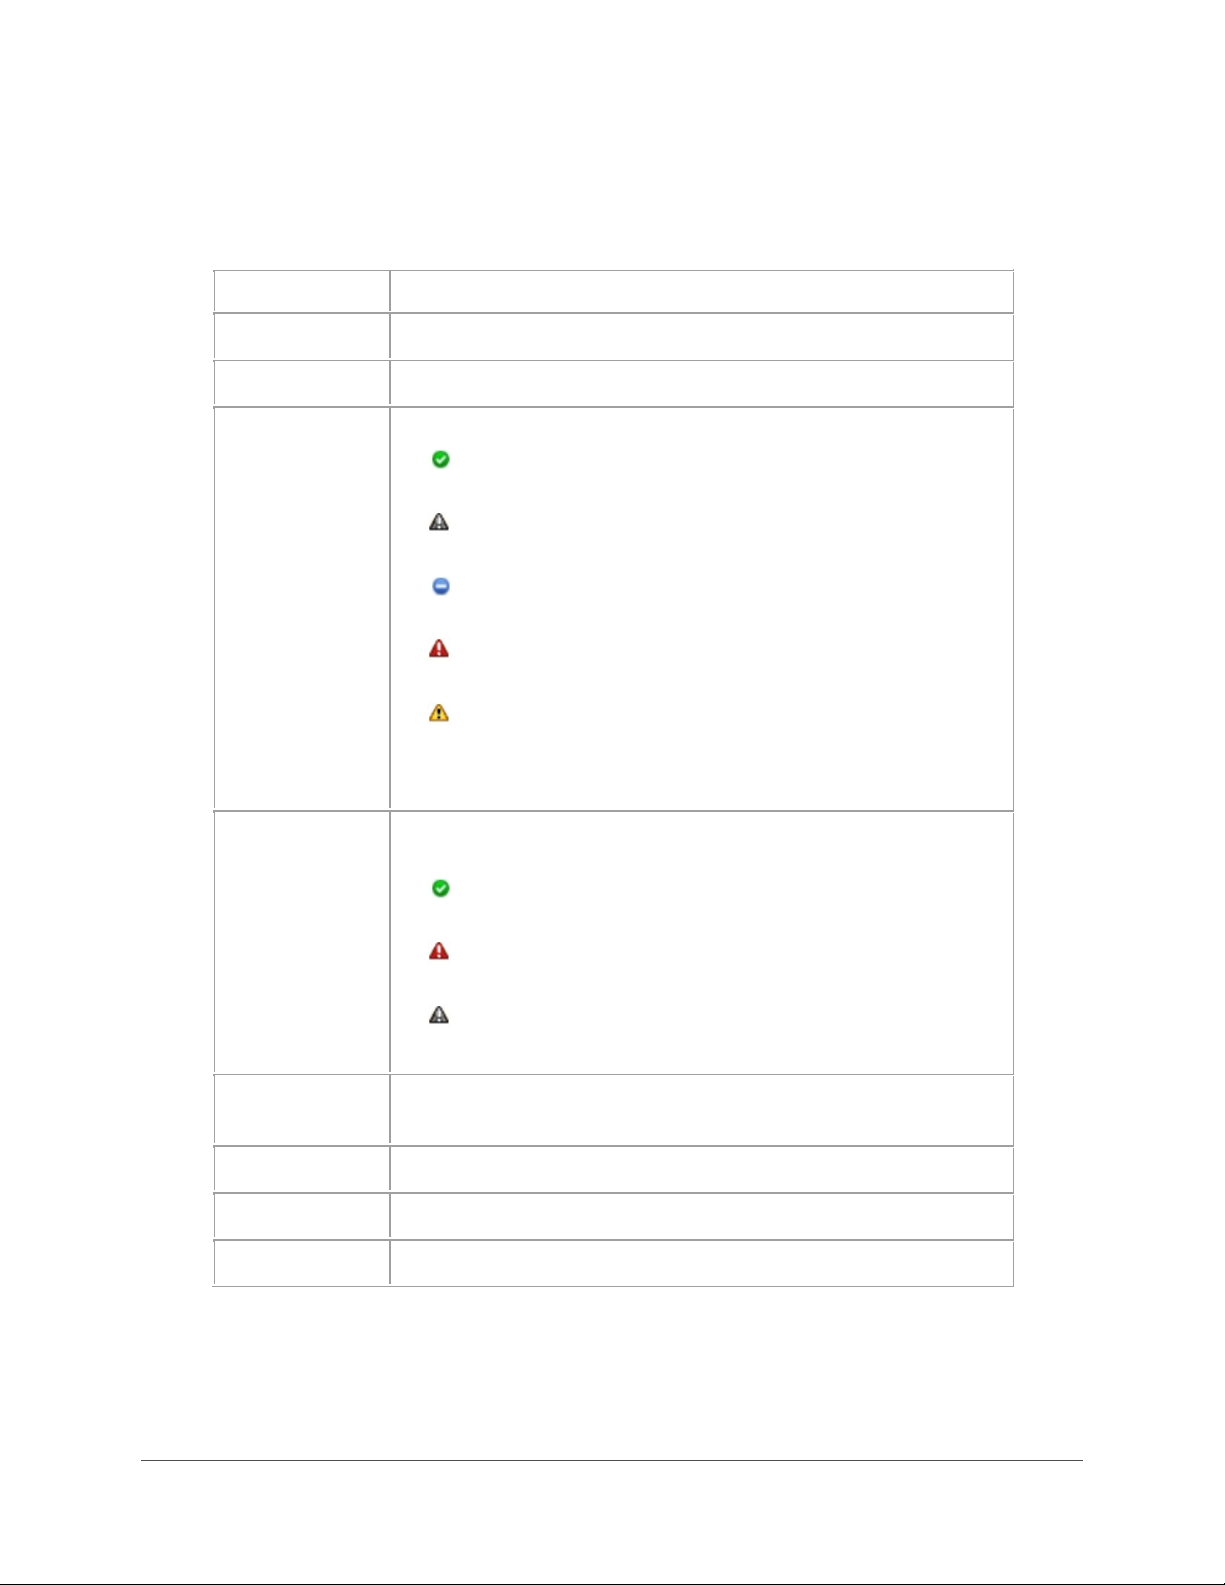
The table of Gridstore Storage Nodes contained in the vPool includes the following
information.
Tip: You can click on a heading in the table to sort the Gridstore Storage Nodes by that
heading item.
Hostname The name of the Gridstore Storage Node.
IP Address The IP address for the Gridstore Storage Node.
Status The status of the Gridstore Storage Node. Main options include:
network.
- the Gridstore Storage Node is accessible from the
•
MGMT Service The current Gridstore Management Service status. Main options
include:
Version The version of vController currently installed on the Gridstore
Storage Node.
- the Gridstore Storage Node is not accessible from
the network.
- the Gridstore Storage Node has been manually
stopped using GridControl.
- the Gridstore Storage Node is in a compromised
state that requires immediate attention.
- the queue is starting.
- recovery of the Gridstore Storage
Node is in progress.
- communication with the Gridstore Storage Node
is up and running.
- communication to the Gridstore Storage Node has
stopped.
- the Gridstore Storage Node is not accessible from
the network.
Model The model of the Gridstore Storage Node product.
Serial Number The serial number for the Gridstore Storage Node product.
Total Disk The total capacity of the Gridstore Storage Node.
22
Page 24
Creating and Managing vStores
A vStore is a logical container of allocated space, across Gridstore Storage Nodes, within a vPool.
This section covers the following topics:
Creating a vStore
Restoring a vStore
Stopping I/O to a vStore
Starting I/O to a vStore
Renaming a vStore
Modifying vStore Properties
Moving a vStore to Another vPool
Expanding or Shrinking a vStore
Removing a vStore
Managing Gridstore Storage Nodes in a vStore
Viewing vStore Information
Creating a vStore
You can create one or more vStores within a vPool. When creating a vStore, you can select the
Gridstore Storage Nodes that make up the vStore.
You also set a quota and GridProtect level for the vStore. The quota is the maximum amount of drive
space you allow for the vStore, and the GridProtect level is the number of Gridstore Storage Nodes
that can withstand failure while still allowing the vStore's data to be protected and accessible. Both
are vStore properties.
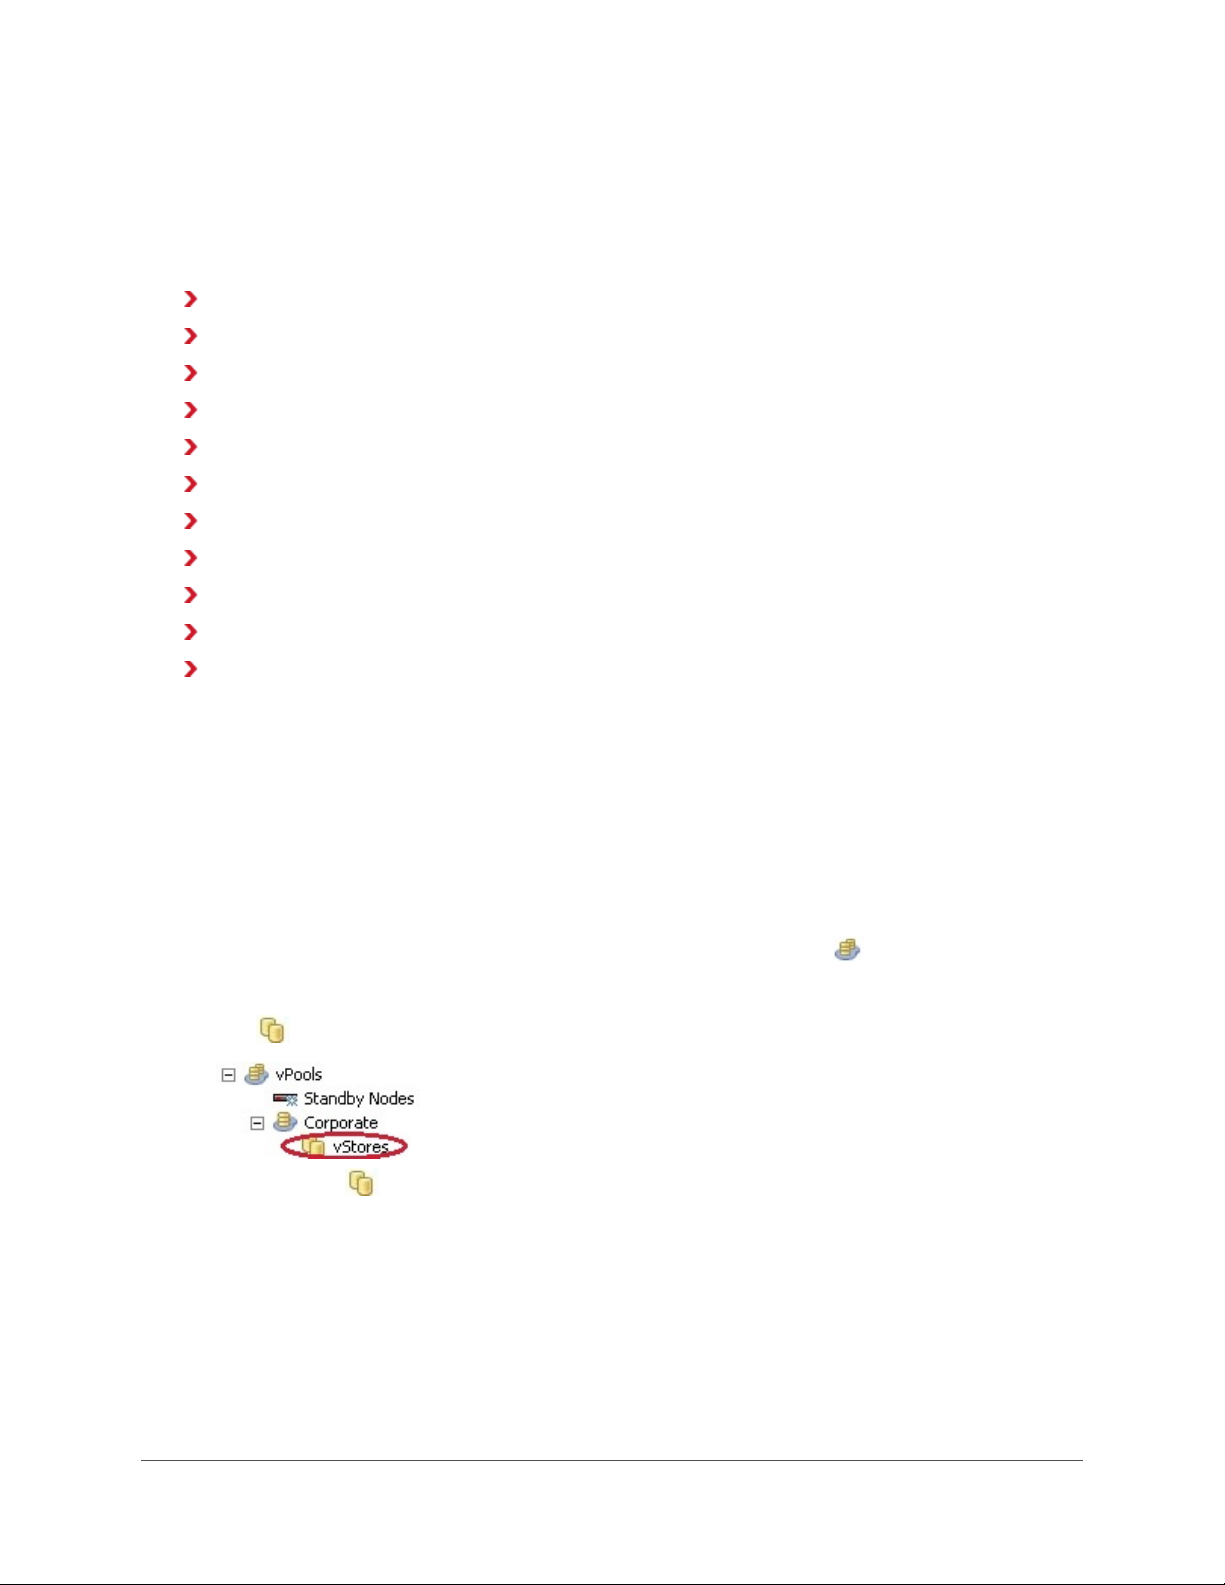
1. In the left navigation tree of GridControl, click the plus sign next to
2. Click the plus sign next to a specific vPool to expand it.
The
3. Right-click on
The Create vStore Wizard opens.
vStores icon displays below the expanded vPool.
vStores, and select Create vStore from the short-cut menu.
vPools to expand it.
GRIDSTORE ADMINISTRATOR’S GUIDE 23
Page 25
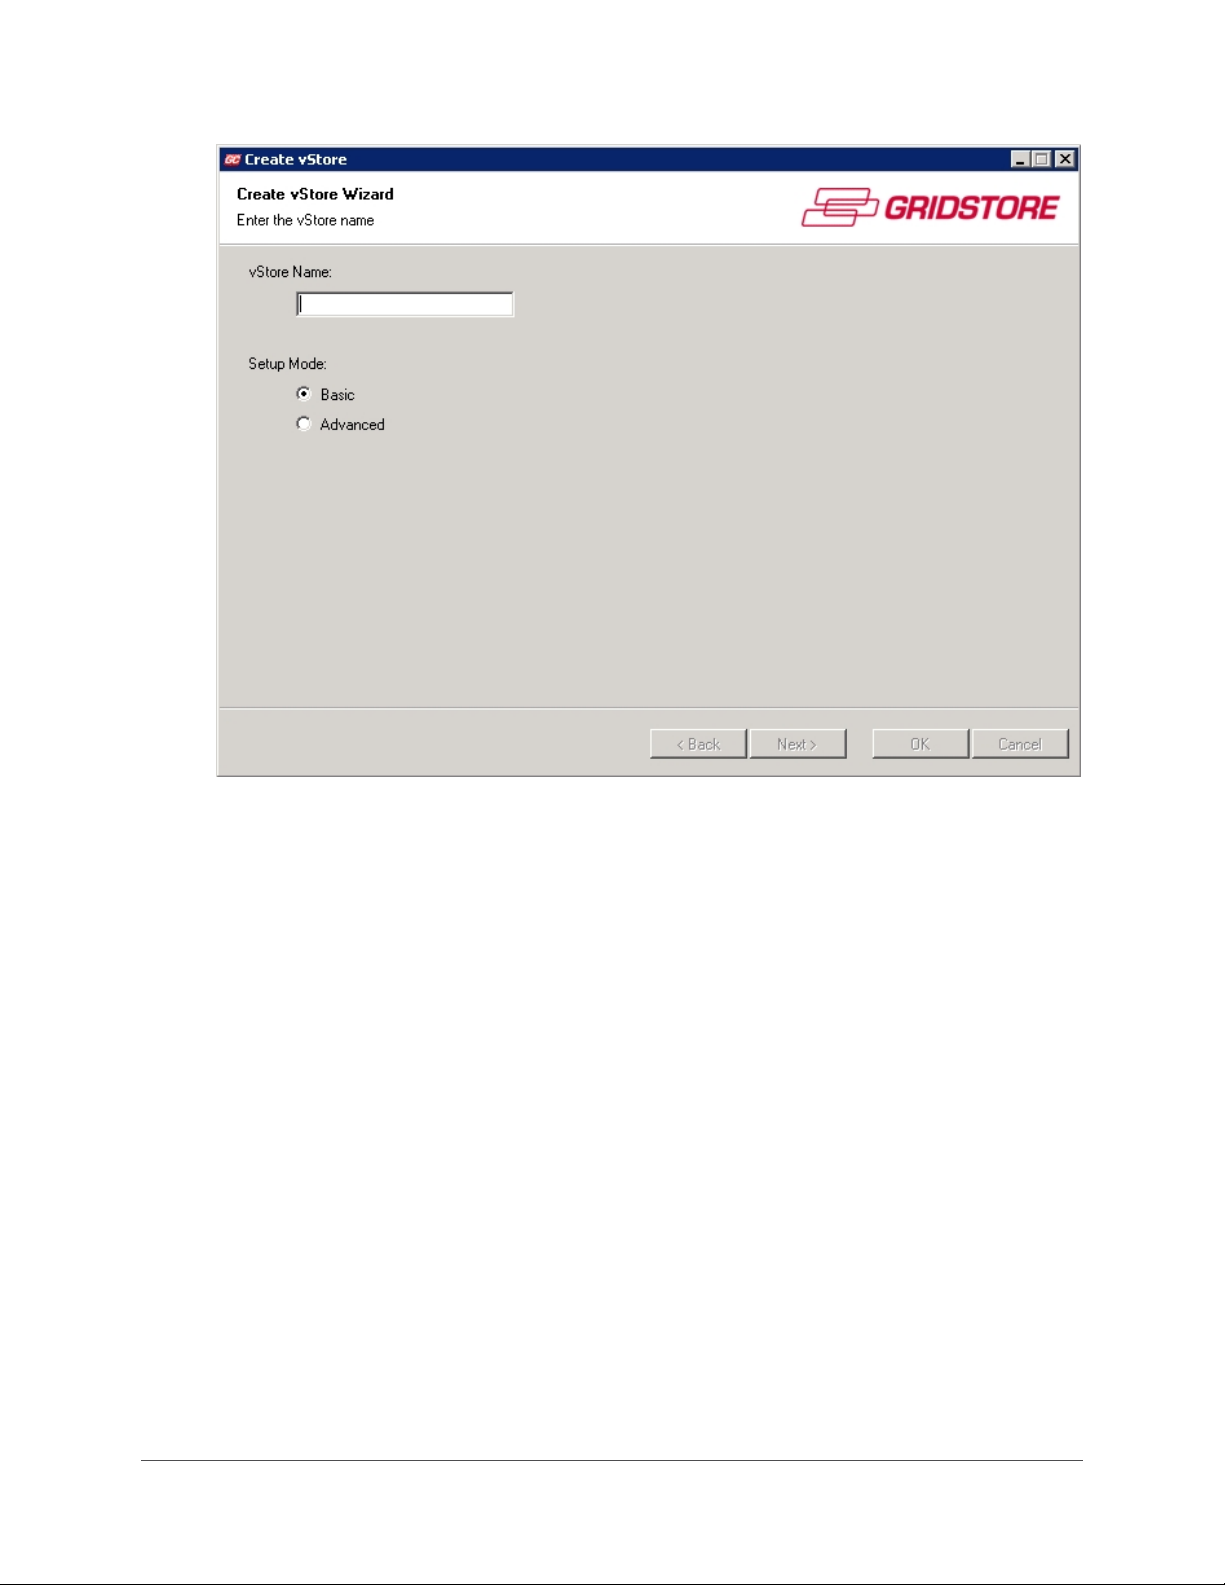
4. In the vStore Name text box, enter a name for the vStore.
5. In the Setup Mode area, select one of the following options.
• Basic - to create a vStore using all the Gridstore Storage Nodes in the vPool.
• Advanced - to select which Gridstore Storage Nodes from the vPool you would like to
include in the vStore.
6. Click the Next button.
One of the following happens:
• If you selected the Basic option, the Set vStore quota and GridProtect level page opens,
and you can skip to step
8.
24
Page 26
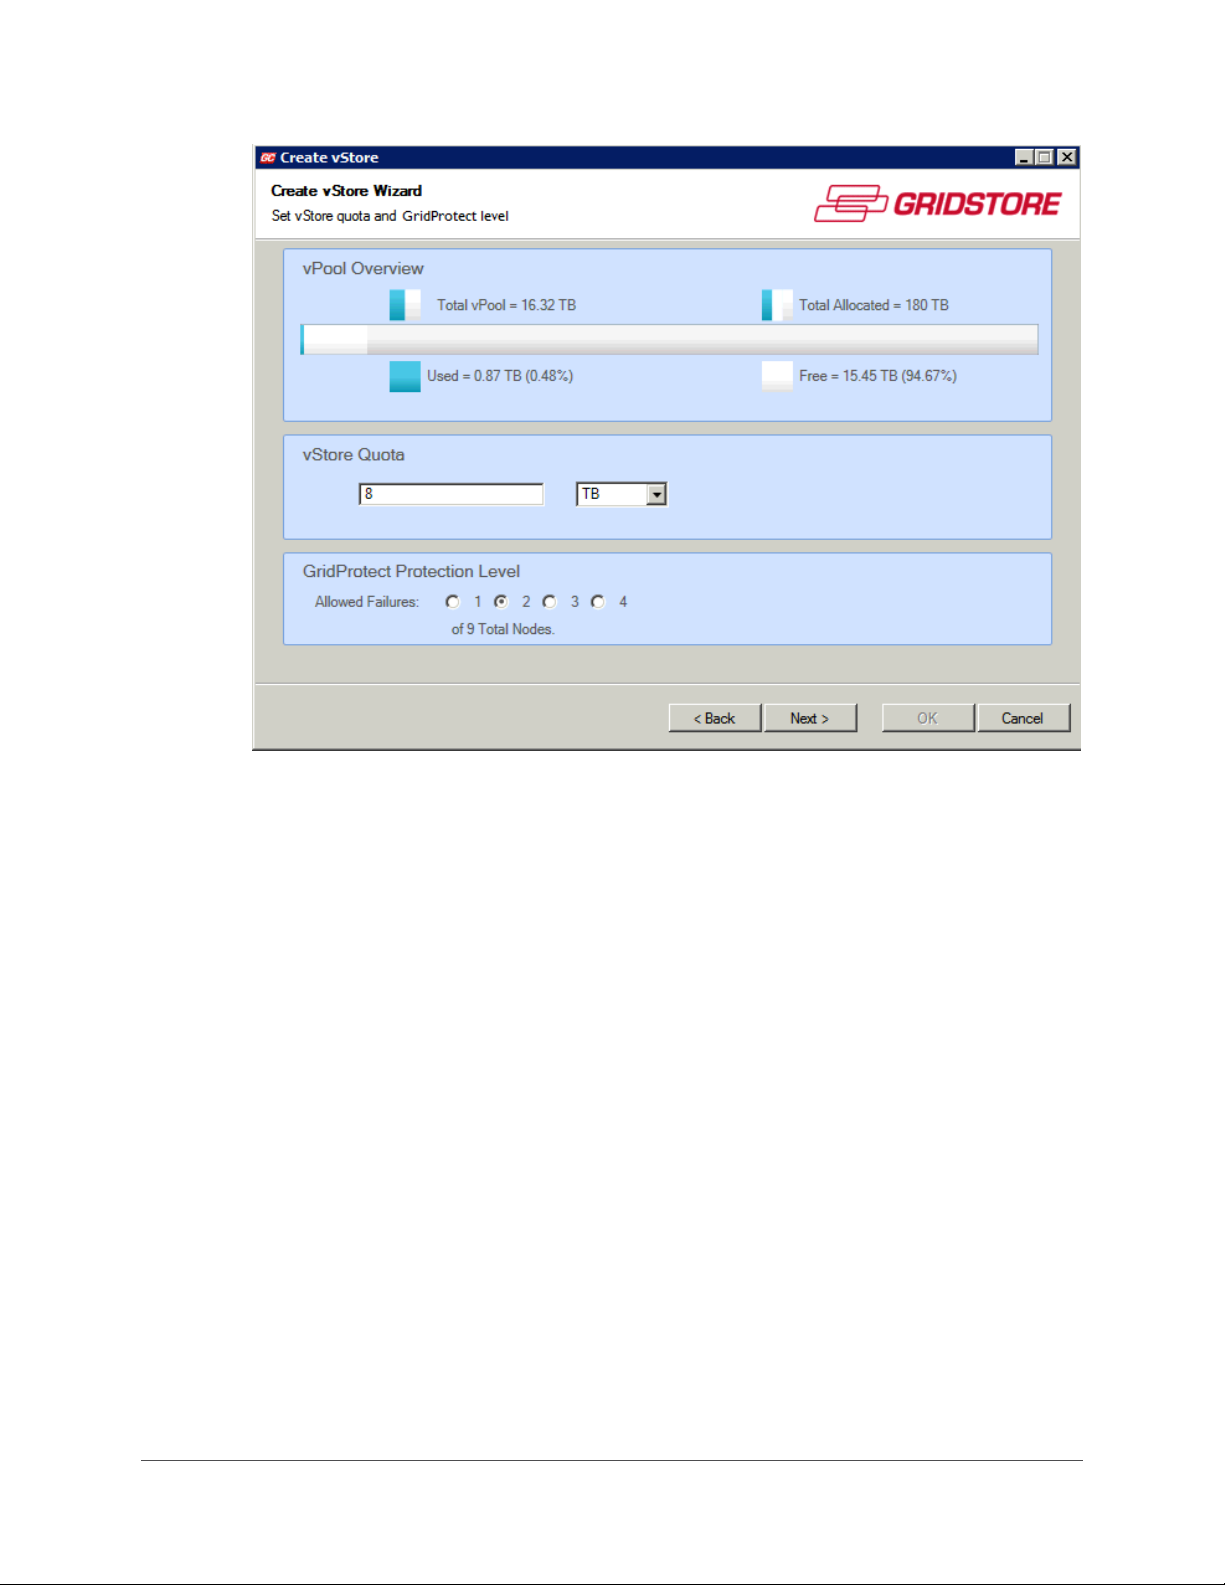
The vPool Overview area displays the following information about capacity:
— Total vPool - total physical capacity available from all of the Gridstore Storage Nodes
in the vPool.
— Total Allocated - total physical capacity that has already been allocated to other
vStores in this vPool.
— Used - the amount of physical capacity in the vPool that is being used out of the
total capacity in the vPool.
— Free - the amount of physical capacity that is available out of the total capacity in
the vPool.
GRIDSTORE ADMINISTRATOR’S GUIDE 25
Page 27
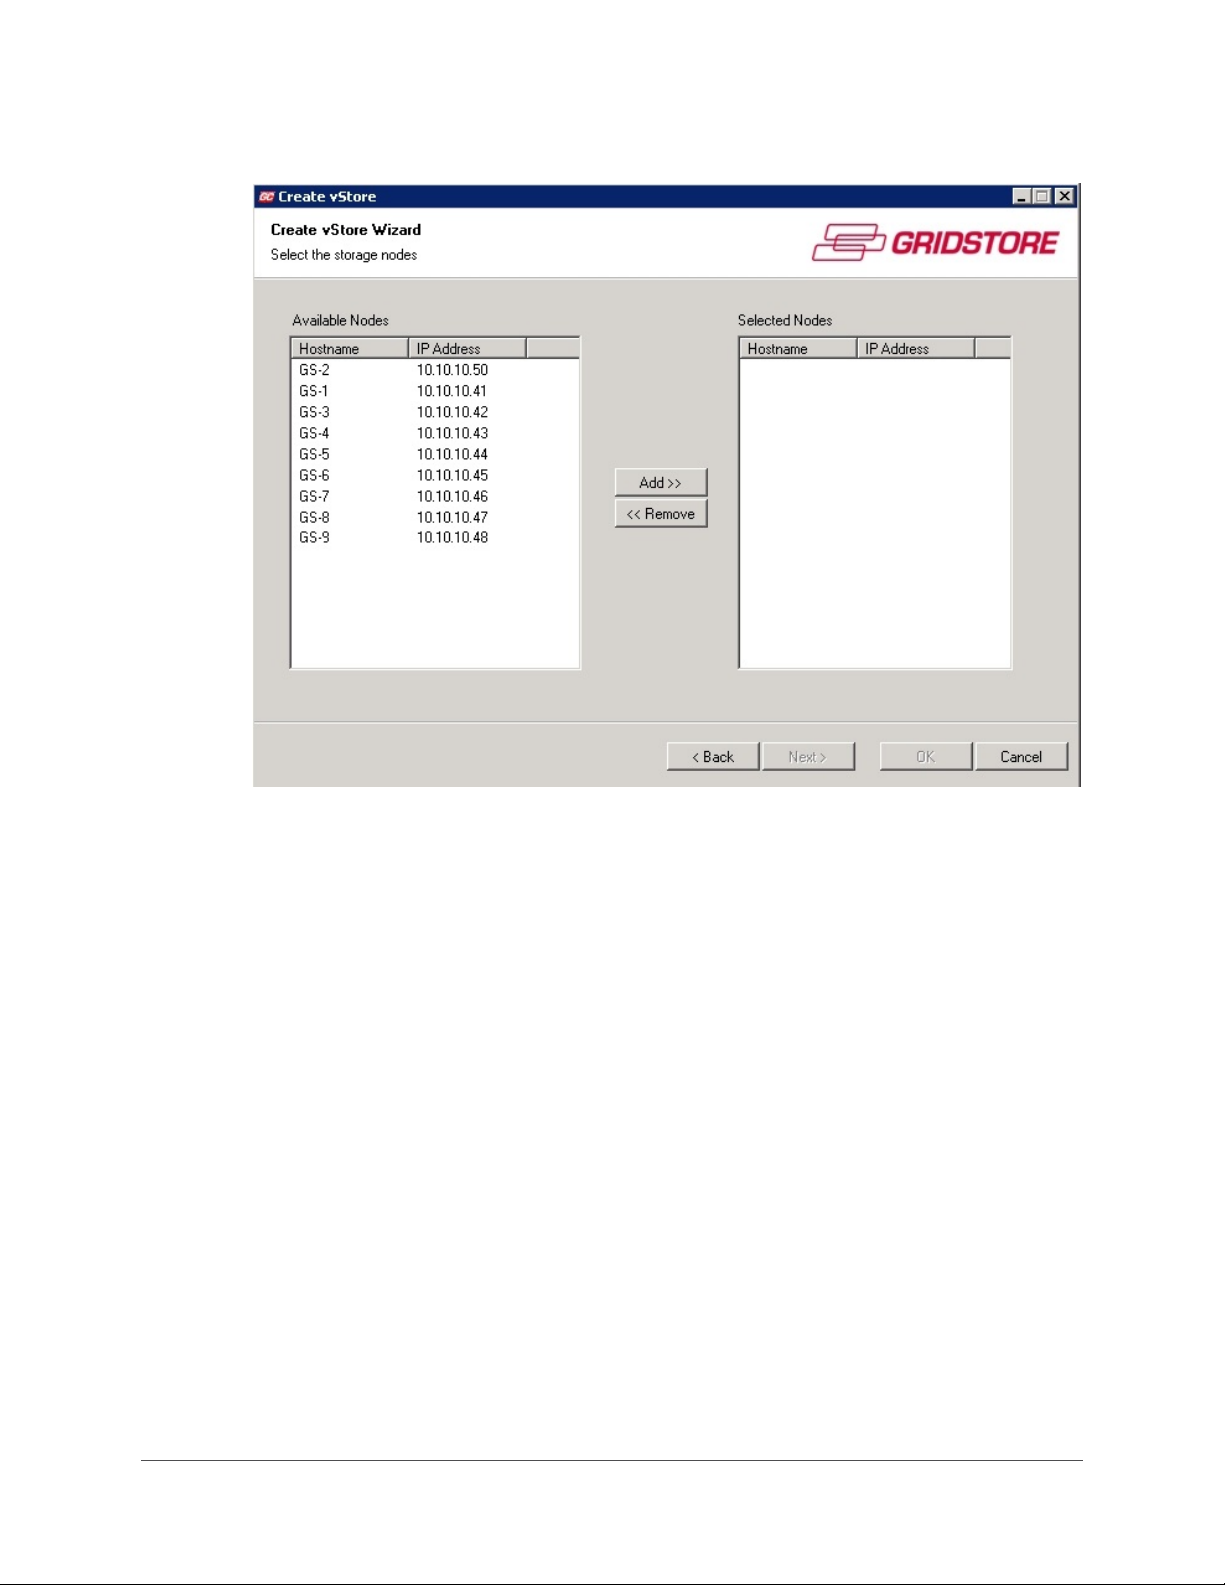
• If you selected the Advanced option, the Select the storage nodes page opens.
7. If you selected the Advanced option, use the Add and Remove buttons to select the Gridstore
Storage Nodes you would like to have participate in the vStore, and click the
Next button.
26
Page 28
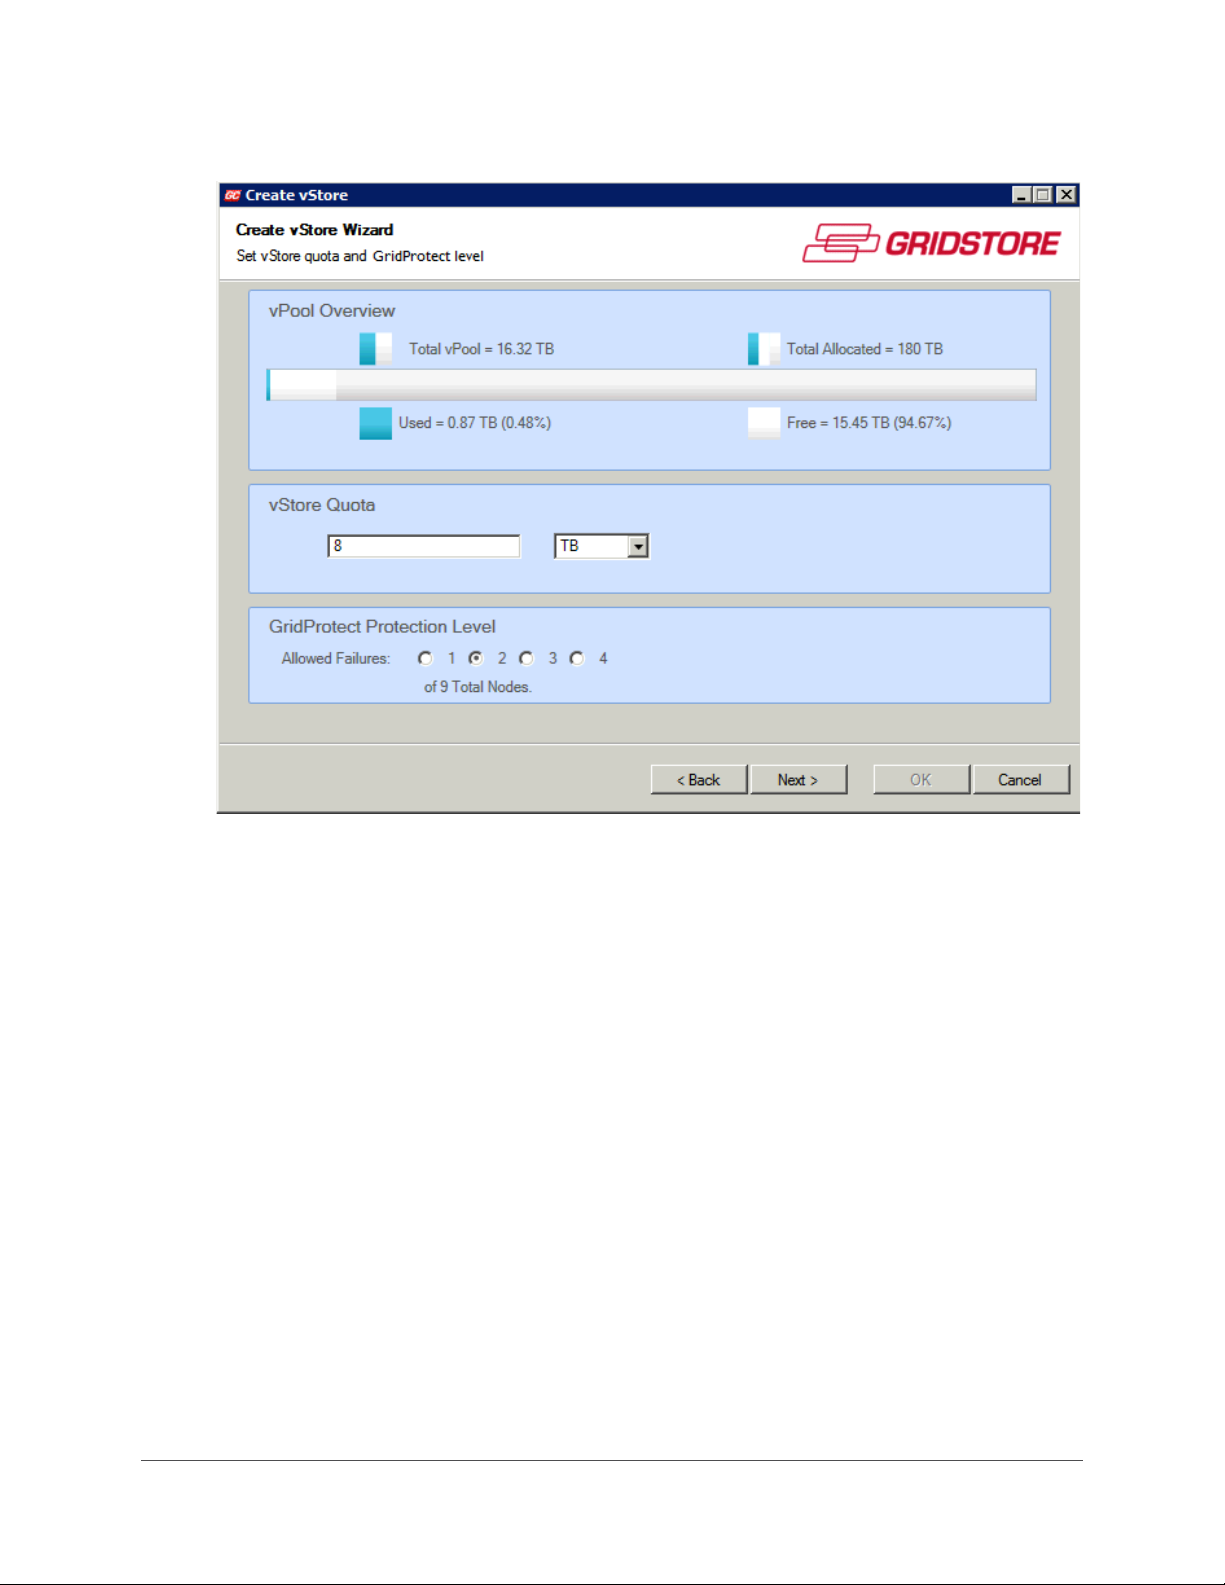
The Set vStore quota and GridProtect level page opens.
The vPool Overview area displays the following information about capacity:
• Total vPool - total physical capacity available from all of the Gridstore Storage Nodes in
the vPool.
• Total Allocated - total physical capacity that has already been allocated to other vStores
in this vPool.
• Used - the amount of physical capacity in the vPool that is being used out of the total
capacity in the vPool.
• Free - the amount of physical capacity that is available out of the total capacity in the
vPool.
8. On the Set vStore quota and GridProtect level page, in the vStore Quota area, enter the
maximum amount of space you would like to allocate to the vStore.
Note: You can enter an amount larger than the available capacity. Doing so enables you to
easily add additional Gridstore Storage Nodes to the vStore in the future without having to
change this setting.
Tip: If you are using alerts, the Grid will notify you when storage space reaches 50%, 75% and
90% of your set quota.
GRIDSTORE ADMINISTRATOR’S GUIDE 27
Page 29
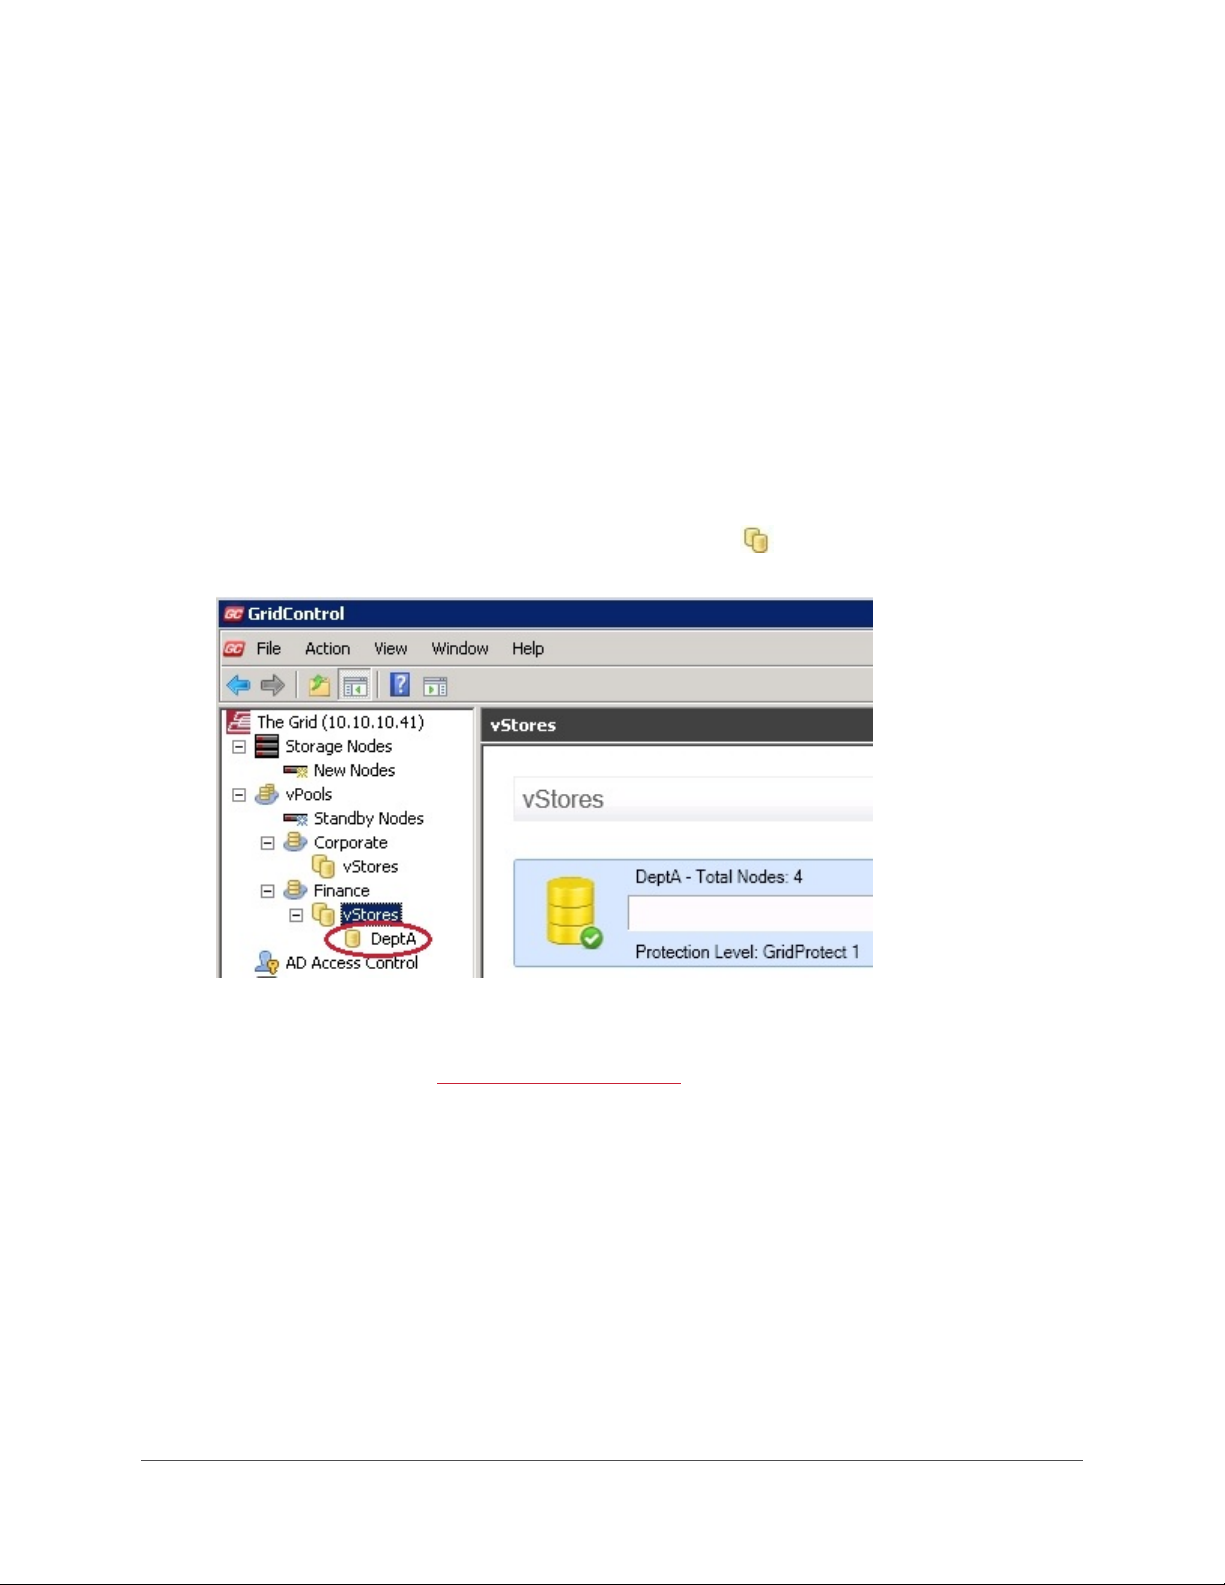
9. In the GridProtect Protection Level area, select the number of Gridstore Storage Nodes that
can fail without data loss or disruption to the vStore.
Note: The GridProtect level will vary depending on the total number of Gridstore Storage
Nodes and total capacity, in the vStore. The maximum number of Gridstore Storage Nodes is
one less than half of the total number of Gridstore Storage Nodes participating in the vStore.
The greater number you choose, the greater the protection, but the less available capacity
you will have.
10. Click the Next button.
The vStore Confirmation page opens.
11. Verify that the settings are correct and click the Next button.
The vStore is created.
12. When finished, click the OK button.
The new vStore displays in the left navigation tree in the vStores area, as well as in the
vStores window to the right.
13. Repeat steps 3 to 12 to create additional vStores.
When finished, you can manage access to vStores (see pg. 46).
28
Page 30
Restoring a vStore
You can restore a vStore that you earlier "preserved." You may preserve a vStore when you are
moving your Grid, for example. You would
preserve the data so that you can restore it elsewhere.
remove software from the Grid (see pg. 113), but elect to
Preserving and restoring vStores should only be done with the guidance of
Gridstore Technical
Support.
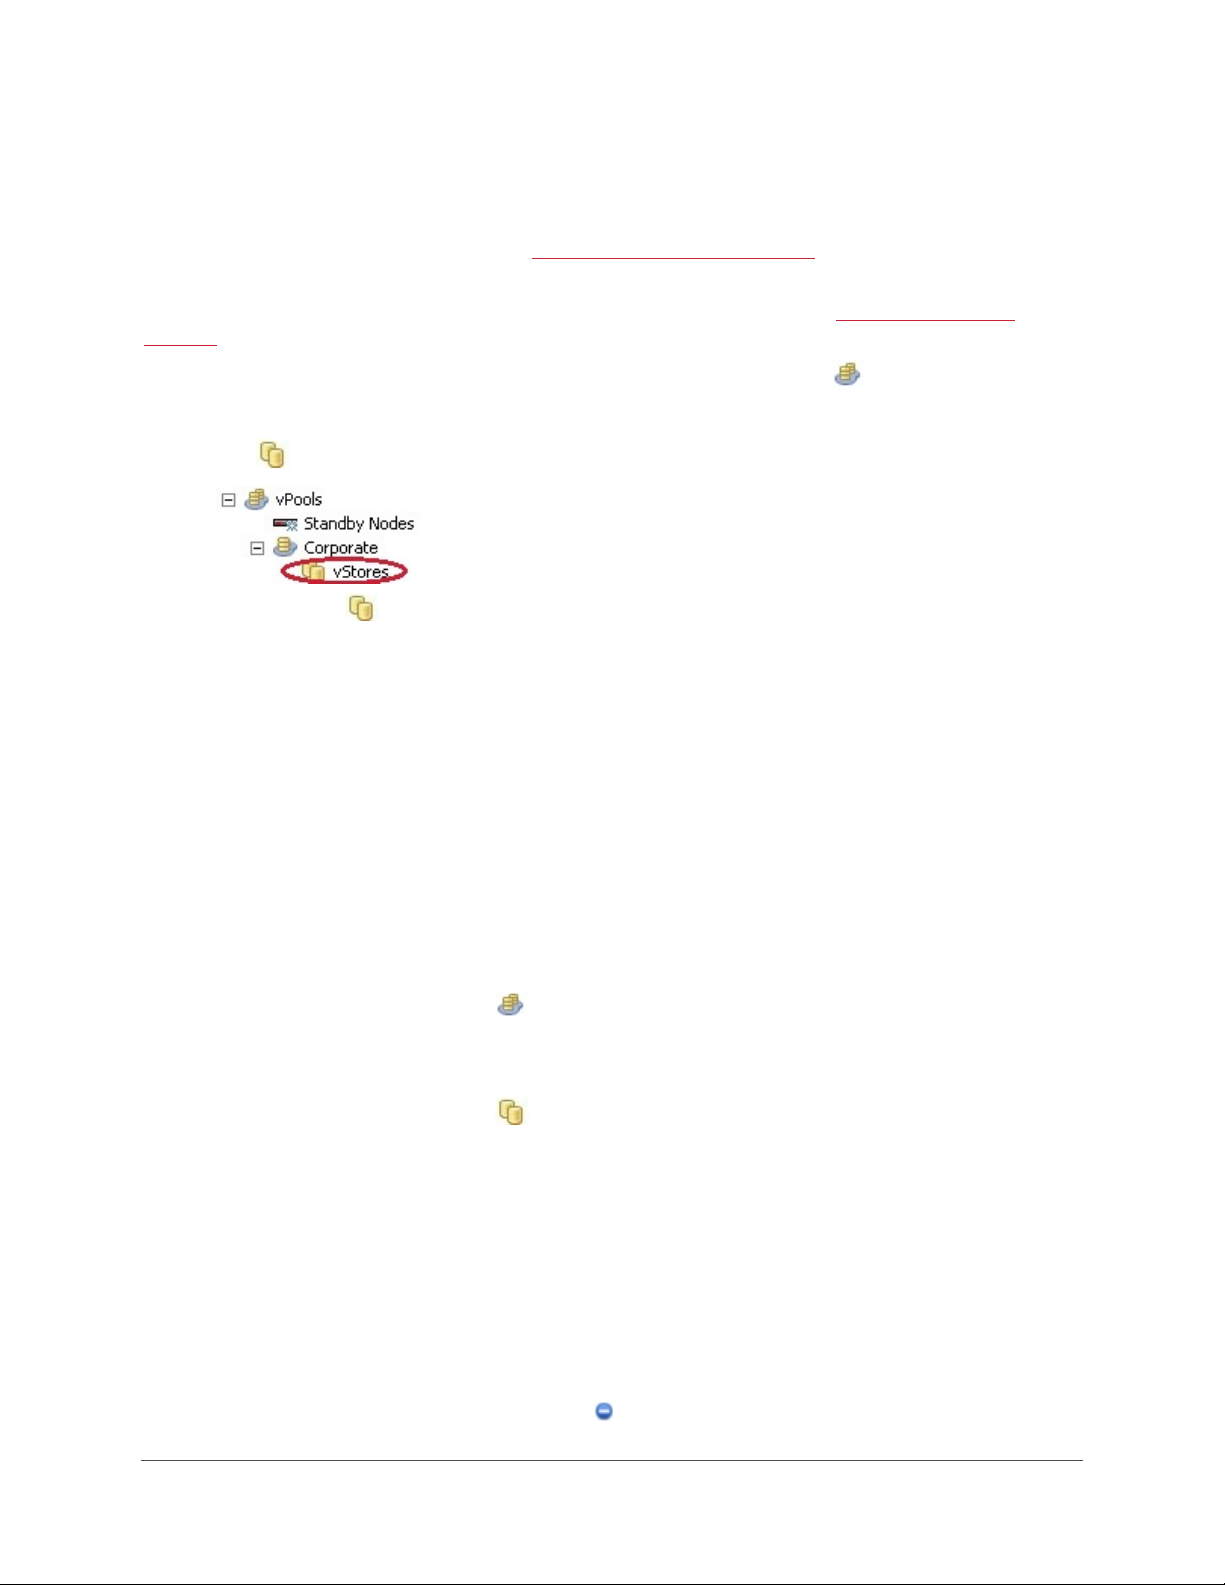
1. In the left navigation tree of GridControl, click the plus sign next to
vPools to expand it.
2. Click the plus sign next to a specific vPool to expand it.
The
vStores icon displays below the expanded vPool.
3. Right-click on
vStores, and select Restore vStore from the short-cut menu.
The Restore vStore Wizard opens.
4. Follow the instructions in the Wizard to restore your vStore.
Stopping I/O to a vStore
Before you can perform certain actions, such as expand a vStore or upgrade the software on the
Grid, you must stop all I/O (Input/Output) to the affected vStore(s). Stopping a vStore stops all I/O
communications to the Gridstore Storage Nodes in the vStore.
Note: Stopping a vStore does not affect defined mappings to the vStore, which are restored when the
vStore starts again. This action also does not power down the affected Gridstore Storage Nodes, or
remove them from the network.
1. In the left navigation tree of GridControl, navigate to the appropriate vStore. To do so:
Click the plus sign next to vPools to expand it.
•
• Click the plus sign next to the vPool that contains the appropriate vStore, to expand that
vPool.
Click the plus sign next to vStores to expand it.
•
2. Click on the appropriate vStore in the left navigation tree so that you can view the vStore and
the Gridstore Storage Nodes it contains.
The vStore you would like to stop displays in the vStore window to the right.
3. Right-click on this vStore in the left navigation tree, and select Stop vStore from the short-cut
menu.
The Stopping vStore dialog box opens, displaying the progress of this action.
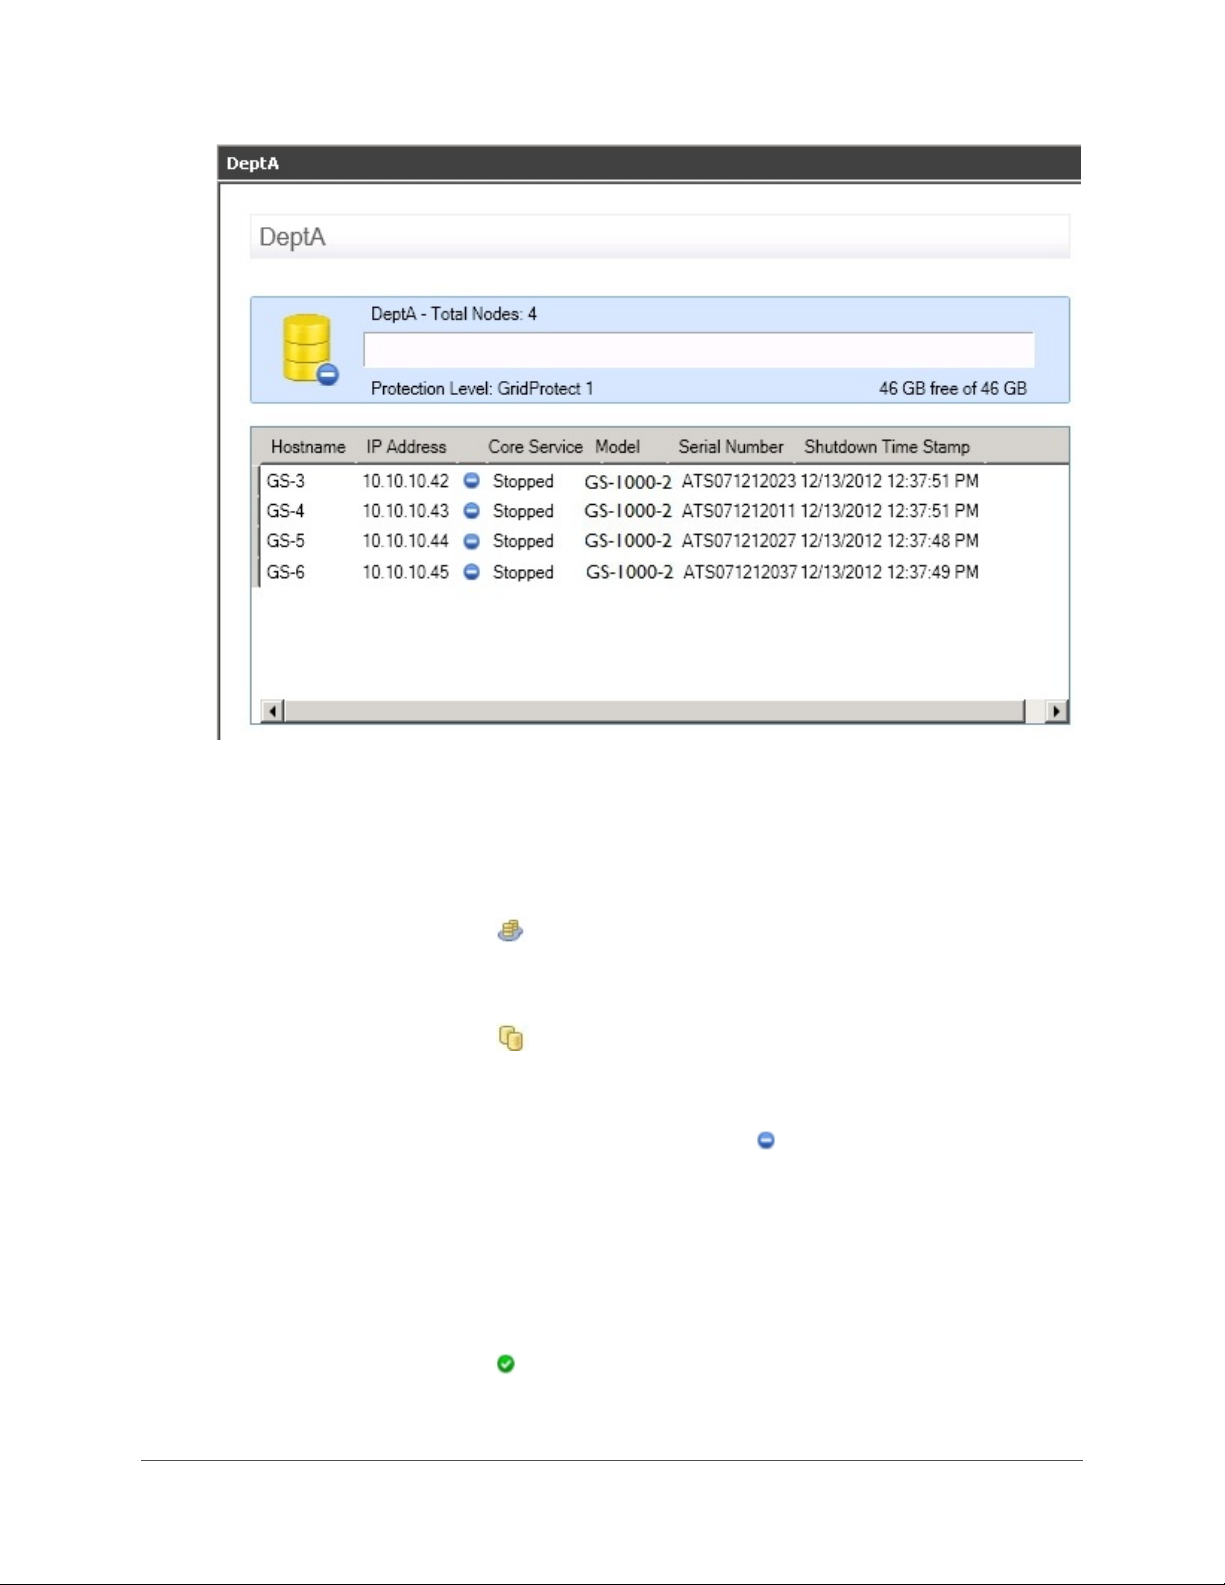
4. Once finished, click the OK button.
All Gridstore Storage Nodes in the vStore are stopped, and both the vStore and the Gridstore
Storage Nodes display with the
Stopped status icon in the vStore window.
GRIDSTORE ADMINISTRATOR’S GUIDE 29
Page 31
Starting I/O to a vStore
Starting a vStore that has been stopped starts all the Gridstore Storage Nodes in the vStore and
restores all access to the vStore.
1. In the left navigation tree of GridControl, navigate to the appropriate vStore. To do so:
•
Click the plus sign next to vPools to expand it.
• Click the plus sign next to the vPool that contains the appropriate vStore, to expand that
vPool.
Click the plus sign next to vStores to expand it.
•
2. Click on the appropriate vStore in the left navigation tree so that you can view the vStore and
the Gridstore Storage Nodes it contains.
The vStore you would like to start displays with a Stopped status icon next to it in the
vStore window.
3. Right-click on this vStore in the left navigation tree, and select Start vStore from the short-cut
menu.
The Starting vStore dialog box opens, displaying the progress of this action.
4. Once finished, click the OK button.
30
After a few moments, all Gridstore Storage Nodes in the vStore are started. Once finished,
they display with the
Running status icon.
Page 32
Renaming a vStore
You can rename a vStore at any time. Note that any UNC (Universal Naming Convention) paths will
be renamed, and any mappings to the vStore will need to be re-established after the rename occurs.
Tip: Because the vStore will need to be stopped during this process, it is best to rename a vStore
during non-business critical times.
1. In the left navigation tree of GridControl, navigate to the appropriate vStore. To do so:
Click the plus sign next to vPools to expand it.
•
• Click the plus sign next to the vPool that contains the appropriate vStore, to expand that
vPool.
Click the plus sign next to vStores to expand it.
•
2. Right-click on the appropriate vStore, and select Rename vStore from the short-cut menu.
The Rename vStore Wizard opens.
3. In the vStore Name text box, enter a new name for the vStore, and click the Next button.
The vStore is renamed within the Rename vStore Wizard.
4. Click the OK button.
The vStore appears with its new name in the left navigation tree in the vStores area.
Tip: It is a good idea to check that all mappings to the vStore have been re-established.
GRIDSTORE ADMINISTRATOR’S GUIDE 31
Page 33
Modifying vStore Properties
You can modify the quota property of a vStore. The quota is the maximum amount of drive space you
allow for the vStore.
Note: The GridProtect level property cannot be edited after the vStore has been created. (The
GridProtect level is the number of Gridstore Storage Nodes that can withstand failure while still
allowing the vStore's data to be protected and accessible.)
1. In the left navigation tree of GridControl, navigate to the appropriate vStore. To do so:
Click the plus sign next to vPools to expand it.
•
• Click the plus sign next to the vPool that contains the appropriate vStore, to expand that
vPool.
•
Click the plus sign next to vStores to expand it.
2. Click the vStore whose quota you would like to change.
The vStore window for the selected vStore opens to the right.
3. In the left navigation tree, right-click on the appropriate vStore, and select Change Quota
from the short-cut menu.
32
Page 34
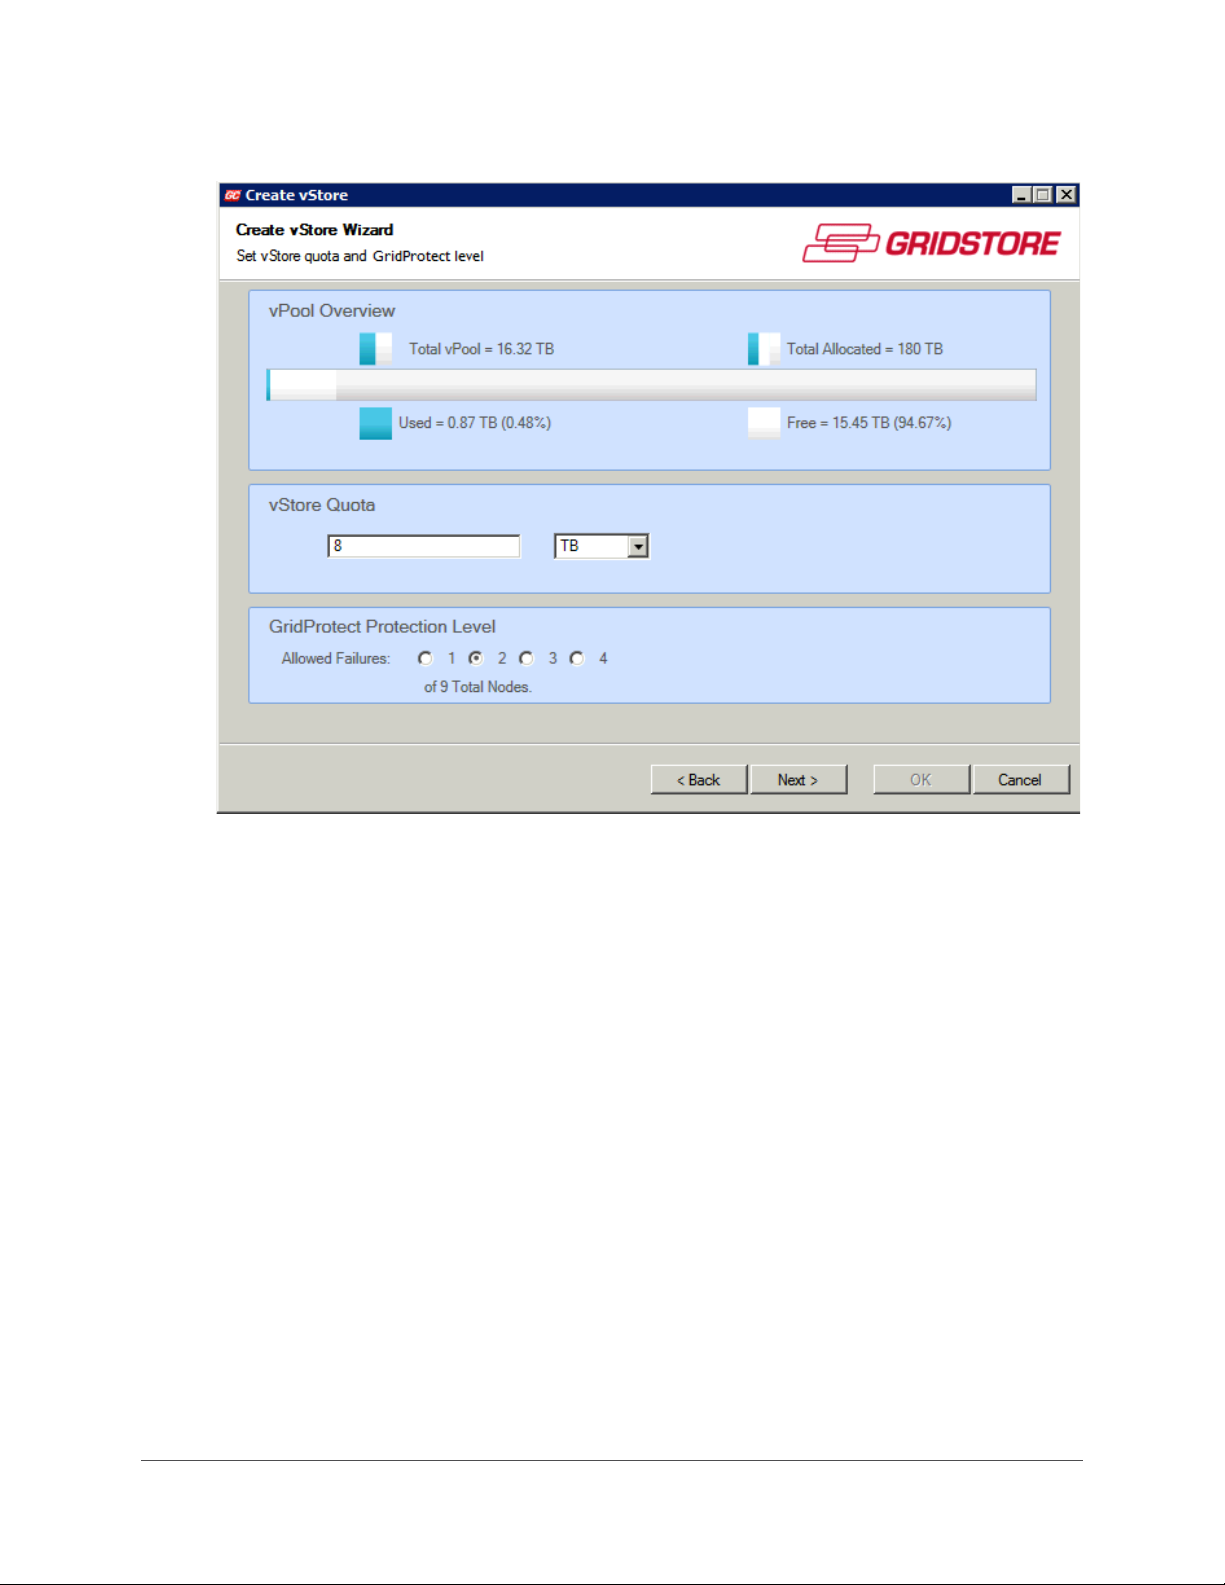
The Set vStore quota and GridProtect level page of the Create vStore Wizard opens.
The vPool Overview area displays the following information about capacity:
• Total vPool - total physical capacity available from all of the Gridstore Storage Nodes in
the vPool.
• Total Allocated - total physical capacity that has already been allocated to other vStores
in this vPool.
• Used - the amount of physical capacity in the vPool that is being used out of the total
capacity in the vPool.
• Free - the amount of physical capacity that is available out of the total capacity in the
vPool.
4. In the vStore Quota area, enter the maximum amount of space you would like to allocate to
the vStore.
Note: You can enter an amount larger than the available capacity. Doing so enables you to
easily add additional Gridstore Storage Nodes to the vStore in the future without having to
change this setting.
Tip: If you are using alerts, the Grid will notify you when storage space reaches 50%, 75% and
90% of your set quota.
5. Click the OK button.
A message box opens, confirming the action.
GRIDSTORE ADMINISTRATOR’S GUIDE 33
Page 35

6. Click the OK button.
The vStore window displays with the new properties.
Moving a vStore to Another vPool
You can move a vStore to another vPool. When you move the vStore, the Gridstore Storage Nodes
assigned to that vStore also move to the other vPool.
Note: You cannot move a vStore if it contains one or more Gridstore Storage Nodes that are
participating in another vStore. The option will not be available.
1. In the left navigation tree of GridControl, navigate to the appropriate vStore. To do so:
Click the plus sign next to vPools to expand it.
•
• Click the plus sign next to the vPool that contains the appropriate vStore, to expand that
vPool.
•
Click the plus sign next to vStores to expand it.
2. Right-click on the appropriate vStore, select Move To from the short-cut menu, and then
select the appropriate vPool.
The vStore now appears under the destination vPool in the left navigation tree.
Expanding or Shrinking a vStore
You can add more Gridstore Storage Nodes from the vPool to the vStore to expand it. You can also
remove Gridstore Storage Nodes from the vStore to shrink it.
Note: When removing Gridstore Storage Nodes from a vStore, keep in mind that a vStore must have
a minimum of three Gridstore Storage Nodes.
1. In the left navigation tree of GridControl, navigate to the appropriate vStore. To do so:
Click the plus sign next to vPools to expand it.
•
• Click the plus sign next to the vPool that contains the appropriate vStore, to expand that
vPool.
Click the plus sign next to vStores to expand it.
•
2. Right-click on the appropriate vStore, and select Expand vStore from the short-cut menu.
34
Page 36
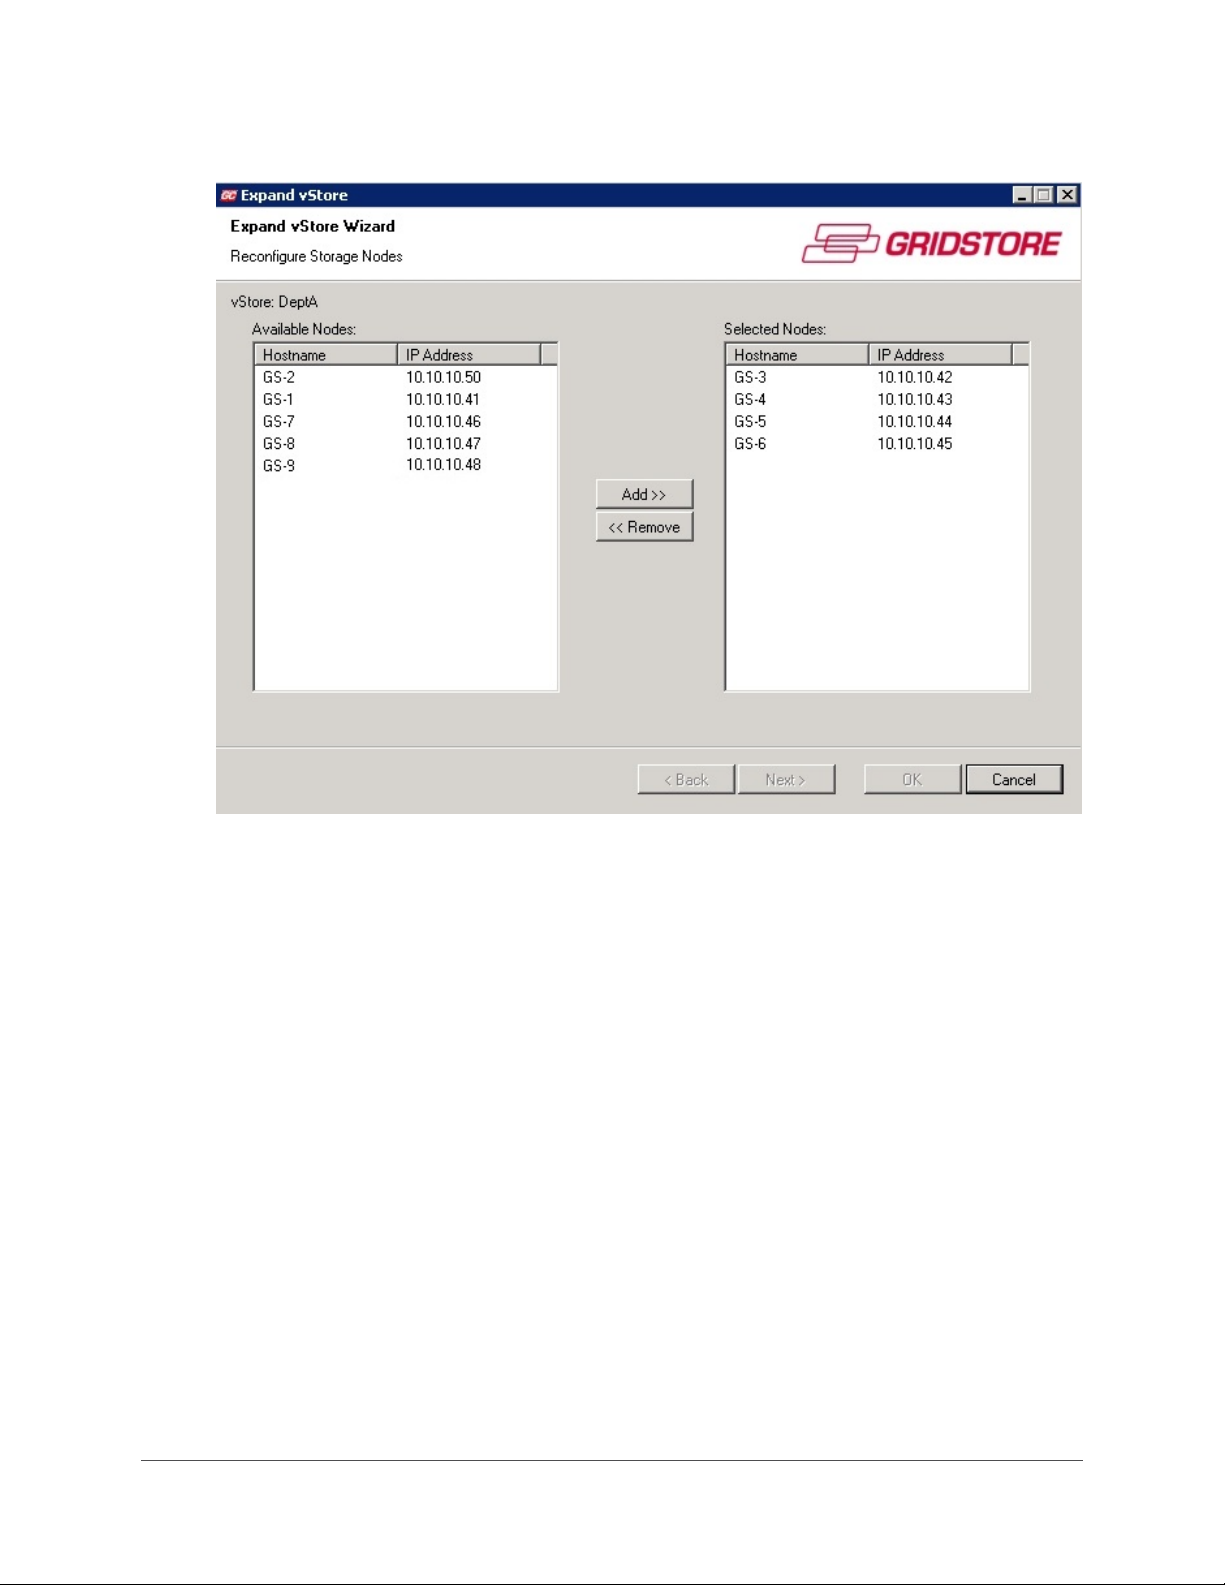
The Expand vStore Wizard opens.
3. Use the Add and Remove buttons to select the Gridstore Storage Nodes you would like to add
to or remove from the vStore, and click the
Next button.
GRIDSTORE ADMINISTRATOR’S GUIDE 35
Page 37
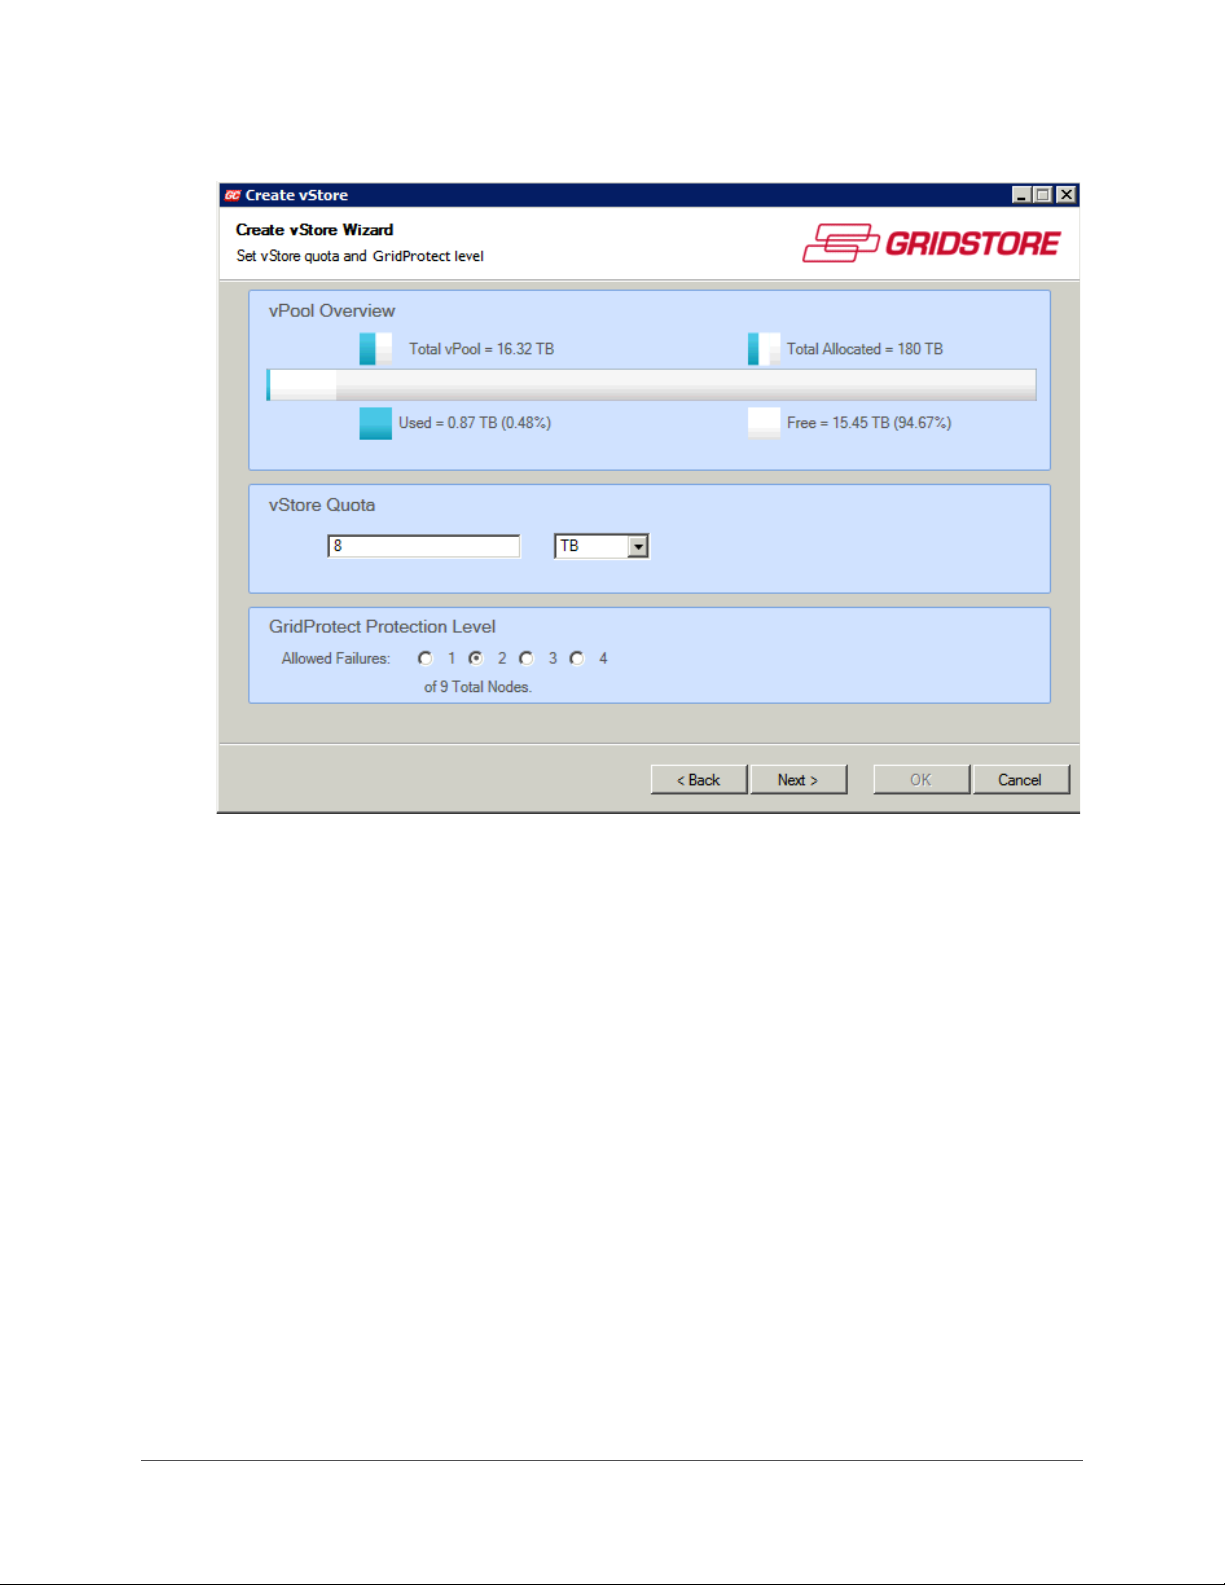
The Set vStore quota and GridProtect level page opens.
The vPool Overview area displays the following information about capacity:
— Total vPool - total physical capacity available from all of the Gridstore Storage Nodes in
the vPool.
— Total Allocated - total physical capacity that has already been allocated to other vStores
in this vPool.
— Used - the amount of physical capacity in the vPool that is being used out of the total
capacity in the vPool.
— Free - the amount of physical capacity that is available out of the total capacity in the
vPool.
4. In the vStore Quota area, enter the maximum amount of space you plan to allow for the
vStore.
Note: You can enter an amount larger than the available capacity. Doing so enables you to
easily add additional Gridstore Storage Nodes to the vStore in the future without having to
change this setting.
Tip: If you are using alerts, the Grid will notify you when storage space reaches 50%, 75% and
90% of your set quota.
36
Page 38

5. In the GridProtect Protection Level area, select the number of Gridstore Storage Nodes that
can fail without data loss or disruption to the vStore.
Note: The GridProtect level will vary depending on the total number of Gridstore Storage
Nodes and total capacity in the vStore. The maximum number of Gridstore Storage Nodes is
one less than half of the total number of Gridstore Storage Nodes participating in the vStore.
The greater number you choose, the greater the protection, but the less available capacity
you will have.
6. Click the Next button.
The Confirmation page opens.
7. Verify that the settings are correct and click the Next button.
The vStore is re-created with the selected Gridstore Storage Nodes.
8. When finished, click the OK button.
The modified vStore displays in the left navigation tree in the vStores area, as well as in
the
vStores window to the right.
Removing a vStore
Before you can remove a vStore from the vPool, you need to stop all I/O communications to the
vStore (see pg. 29). You can do this first, or do this within the Remove vStore Wizard as part of the
steps below.
1. In the left navigation tree of GridControl, navigate to the appropriate vStore. To do so:
Click the plus sign next to vPools to expand it.
•
• Click the plus sign next to the vPool that contains the appropriate vStore, to expand that
vPool.
Click the plus sign next to vStores to expand it.
•
2. Right-click on the appropriate vStore, and select Remove vStore from the short-cut menu.
GRIDSTORE ADMINISTRATOR’S GUIDE 37
Page 39
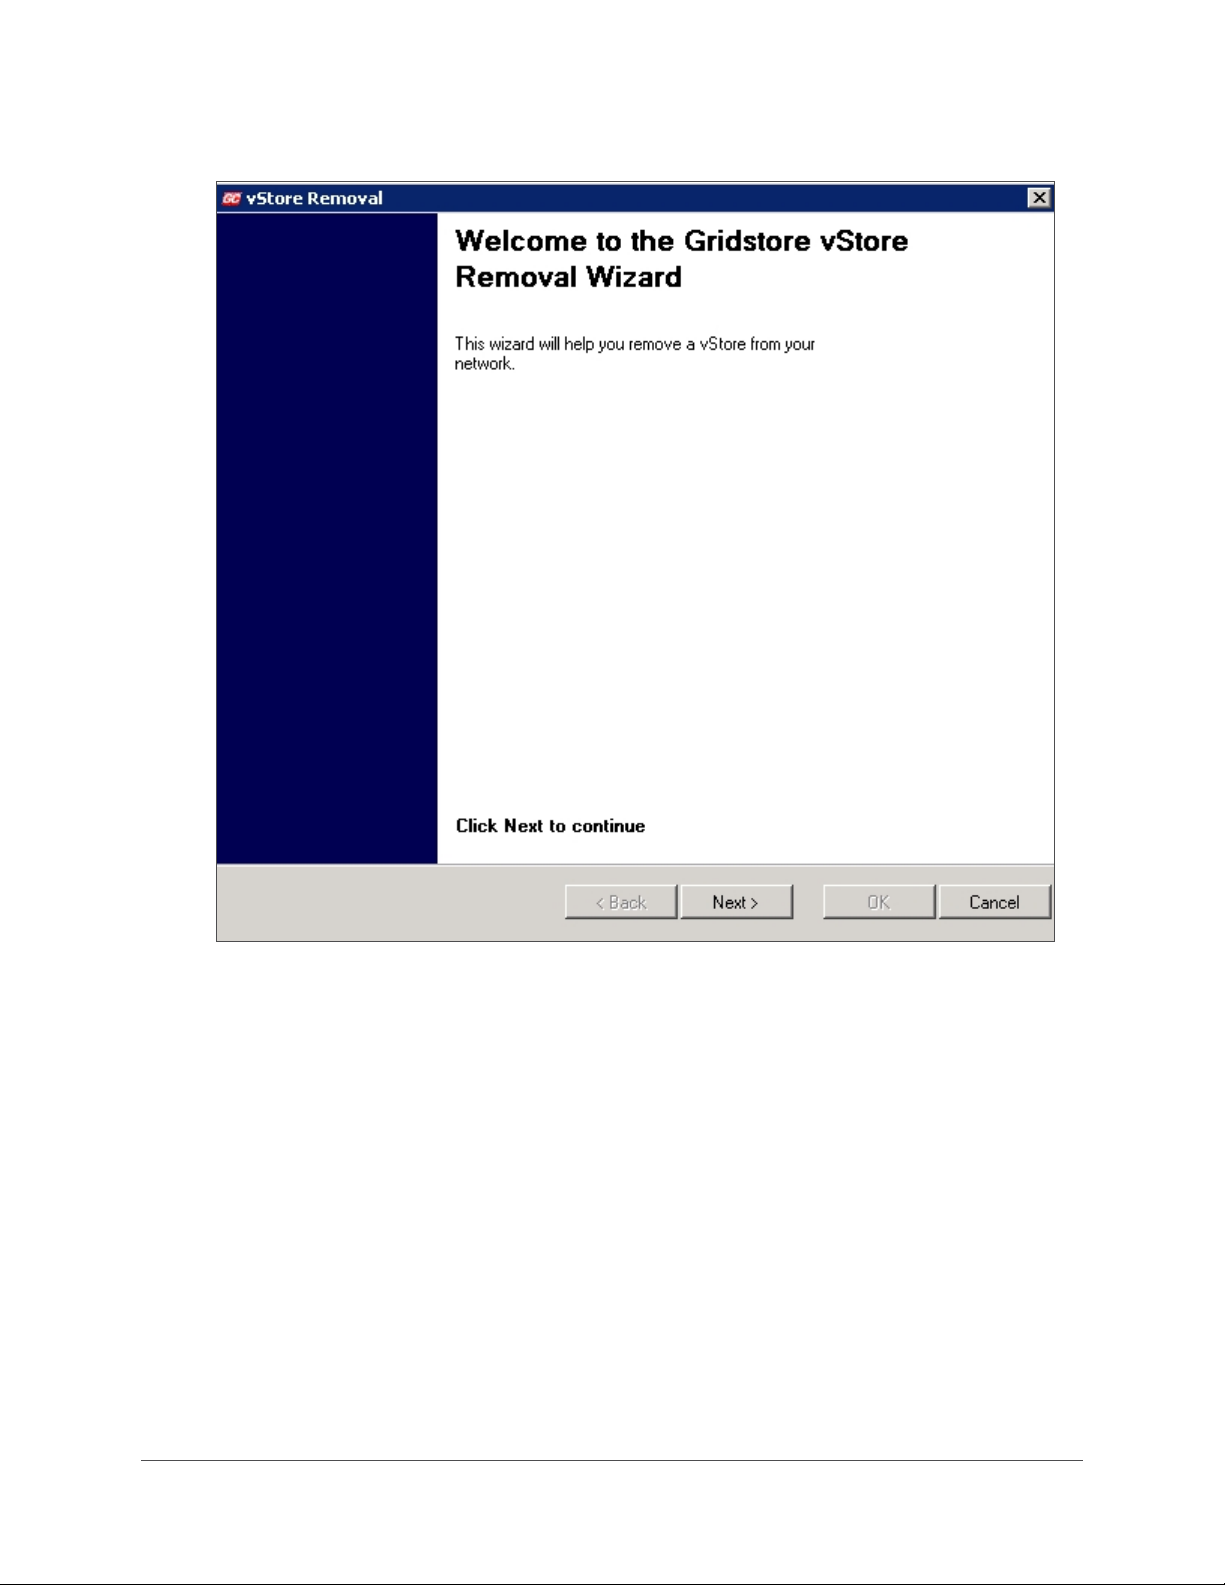
The Remove vStore Wizard opens.
3. Click the Next button.
The Stop vStore page opens.
4. If you have not yet stopped all I/O communications to the vStore, click the Stop button.
The vStore is stopped.
5. When finished, click the Next button.
The vStore is removed from the vPool within the Remove vStore Wizard.
6. When finished, click the OK button.
The vStore no longer displays in the left navigation tree.
38
Page 40
Managing Gridstore Storage Nodes in a vStore
You can stop all I/O communications to a specific Gridstore Storage Node in a vStore, and also start
it up again. If a Gridstore Storage Node is faulty, you also have the option to swap and replace it.
This sub-section covers the following topics:
Stopping a Gridstore Storage Node in a vStore
Starting a Gridstore Storage Node in a vStore
Swapping or Replacing a Gridstore Storage Node in a vStore
Stopping a Gridstore Storage Node in a vStore
You may need to stop all I/O communications to a Gridstore Storage Node in a vStore. You would do
this if you wanted to move or remove the Gridstore Storage Node, for example. This action does not
power down the Gridstore Storage Node, or remove it from the network.
1. In the left navigation tree of GridControl, navigate to the appropriate vStore. To do so:
•
Click the plus sign next to vPools to expand it.
• Click the plus sign next to the vPool that contains the appropriate vStore, to expand that
vPool.
•
Click the plus sign next to vStores to expand it.
2. Select the appropriate vStore so that you can view the vStore and the Gridstore Storage
Nodes it contains.
3. In the vStore window to the right, right-click on the Gridstore Storage Node in the table that
you would like to stop, and select
Stop from the short-cut menu.
The selected Gridstore Storage Node stops and displays with a Stopped status icon.
Starting a Gridstore Storage Node in a vStore
You can start a Gridstore Storage Node in a vStore that was stopped. This starts the Gridstore
Management Services for the Gridstore Storage Node.
1. In the left navigation tree of GridControl, navigate to the appropriate vStore. To do so:
•
Click the plus sign next to vPools to expand it.
• Click the plus sign next to the vPool that contains the appropriate vStore, to expand that
vPool.
Click the plus sign next to vStores to expand it.
•
2. Select the appropriate vStore so that you can view the vStore and the Gridstore Storage
Nodes it contains.
3. In the vStore window on the right, right-click on the Gridstore Storage Node in the list that you
would like to start, and select
Start from the short-cut menu.
The selected Gridstore Storage Node starts up. When finished, it displays with a
Running status icon.
GRIDSTORE ADMINISTRATOR’S GUIDE 39
Page 41
Swapping or Replacing a Gridstore Storage Node in a vStore
When a Gridstore Storage Node in a vStore has had a hardware failure, you can swap it out and
replace it with another. The new one will need to be configured, but will take on the role of the
Gridstore Storage Node it replaced.
Depending on the issue, the Gridstore Storage Node with the hardware failure displays in the vStore
with a
these two states to access the Swap/Replace function.
Core Service status of Offline or Fault. The Gridstore Storage Node must be in one of
1. First, add the replacement Gridstore Storage Node to your Grid by setting it up in your
datacenter and then configuring it. For steps, see
Adding Gridstore Storage Nodes to an
Existing Grid on pg. 16.
Tip: If you do not want to stop your vStore when swapping or replacing a storage node, be
sure to assign an IP address that is in the same subnet as the Gridstore Storage Node you
are replacing when you configure the new Gridstore Storage Node.
2. In the left navigation tree of GridControl, navigate to the vStore that contains the Gridstore
Storage Node that you would like to replace. To do so:
•
Click the plus sign next to vPools to expand it.
• Click the plus sign next to the vPool that contains the appropriate vStore, to expand that
vPool.
•
Click the plus sign next to vStores to expand it.
3. Select the appropriate vStore so that you can view the vStore and the Gridstore Storage
Nodes it contains.
4. In the vStore window to the right, right-click on the Gridstore Storage Node in the list that you
would like to replace, and select
Swap or Replace from the short-cut menu.
Note: The Gridstore Storage Node must have a Core Service status of Offline or Fault.
40
Page 42
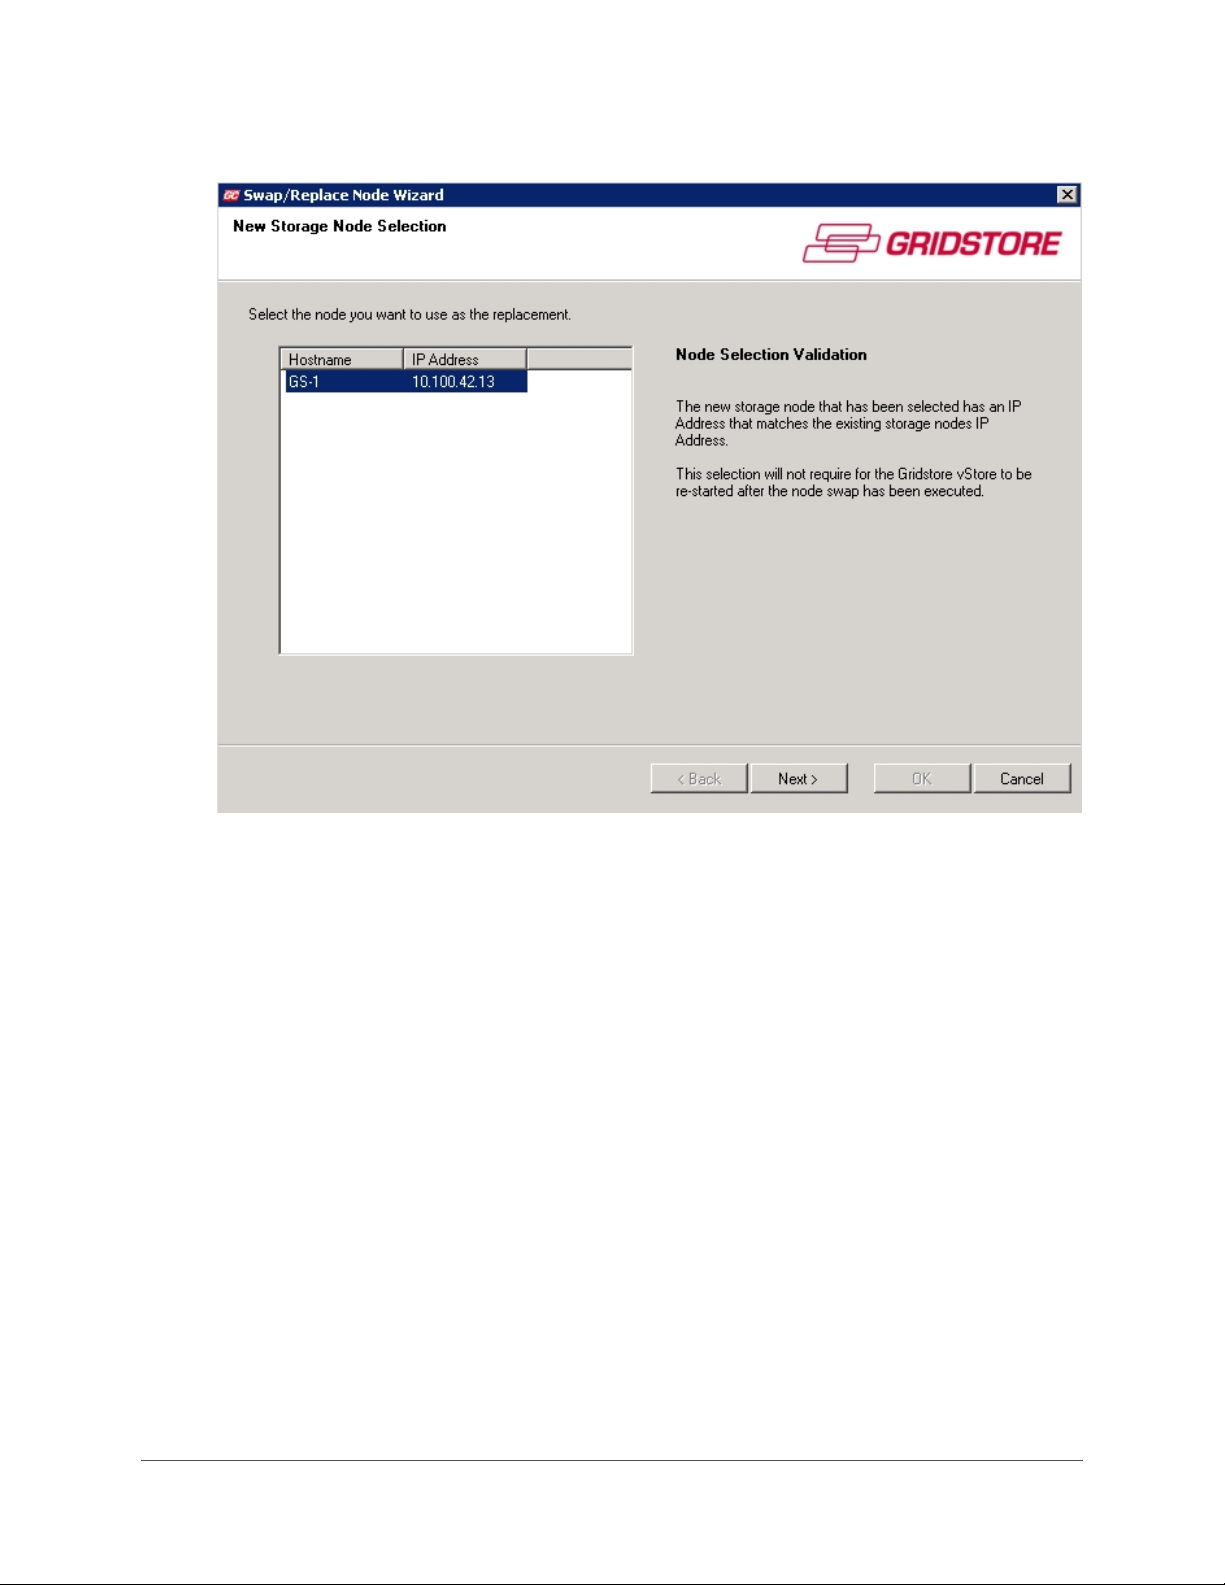
The Swap/Replace Node Wizard opens.
5. Select the Gridstore Storage Node you would like to use to replace the faulty one, and click
the
Next button.
The Confirmation page of the Swap/Replace Node Wizard opens.
6. Click the Next button.
The Summary page opens.
GRIDSTORE ADMINISTRATOR’S GUIDE 41
Page 43
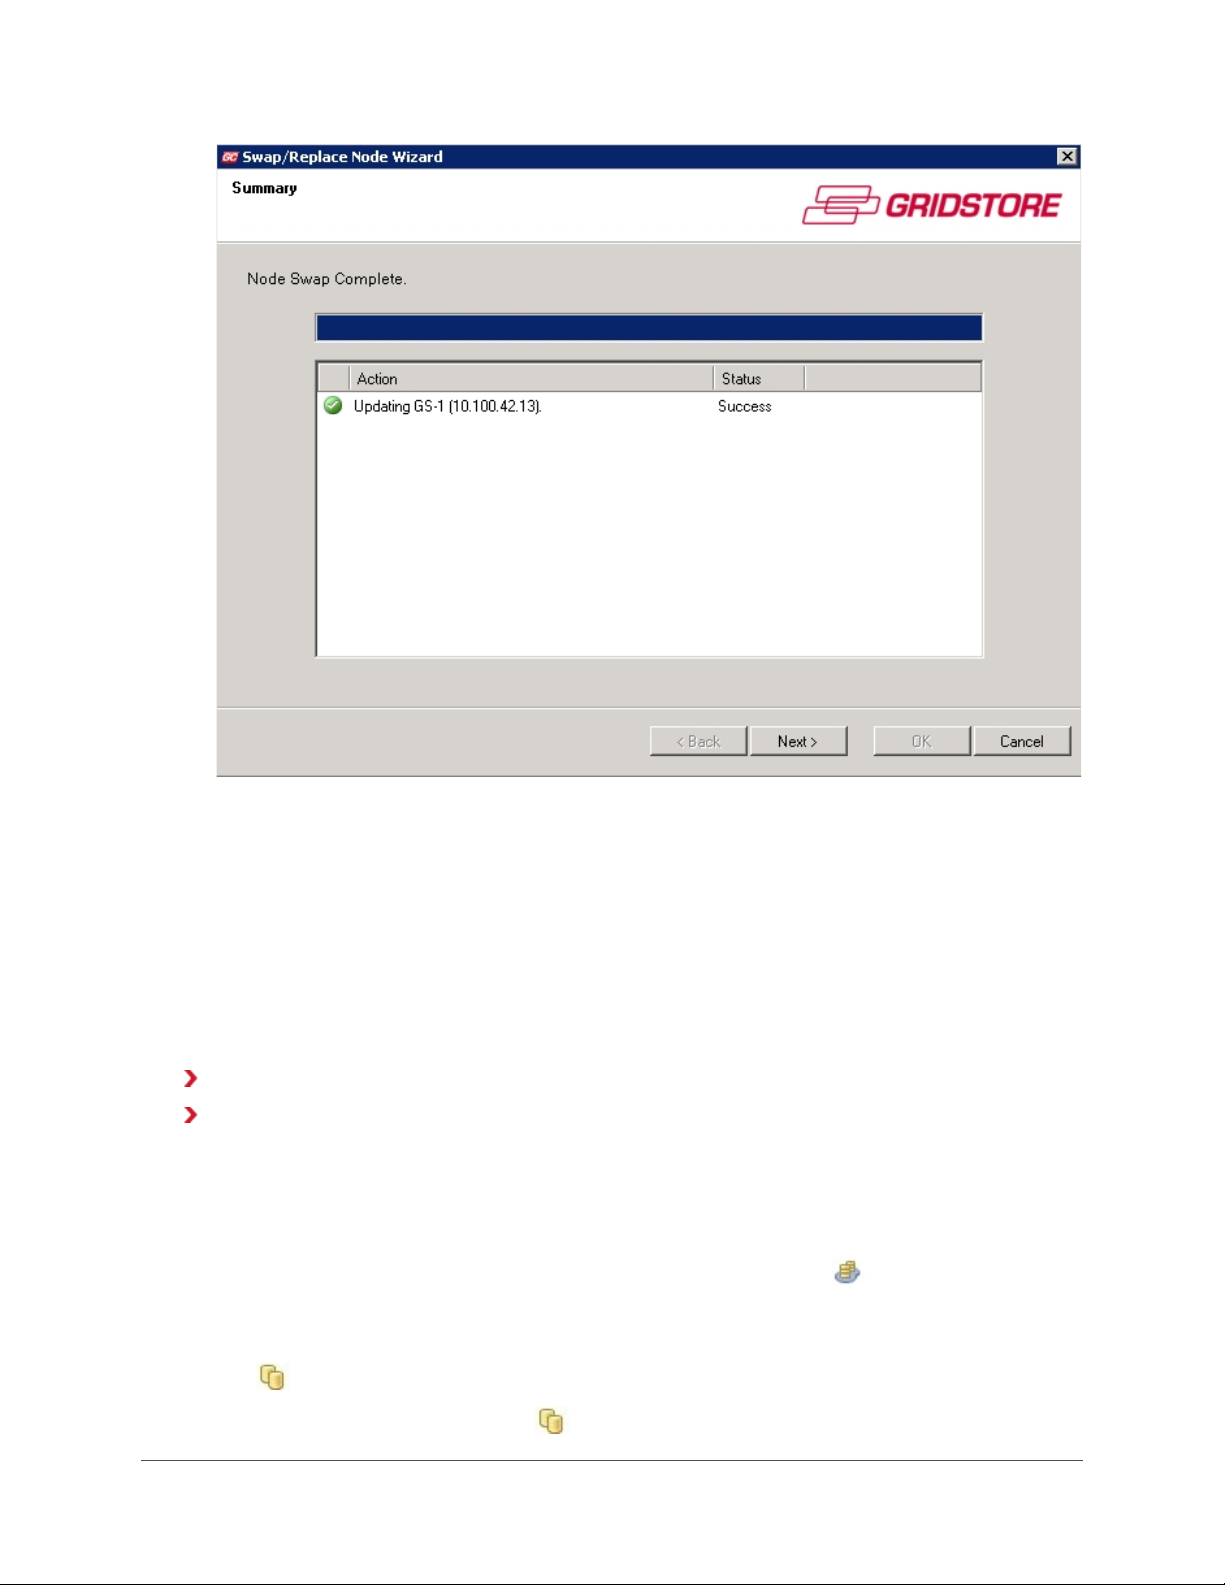
7. When the swap is complete, click the Next button and then the OK button.
The new Gridstore Storage Node displays in the vStore in place of the old, faulty one.
Viewing vStore Information
You can view all the vStores you have in a vPool; the amount of available and total capacity for each;
and detailed information about the Gridstore Storage Nodes that make up each vStore.
This sub-section covers the following topics:
Viewing Information on All vStores in a vPool
Viewing Detailed Information for a Specific vStore
Viewing Information on All vStores in a vPool
You can view all the vStores you have in a vPool, along with the amount of available and total
capacity for each, and other information.
1. In the left navigation tree of GridControl, click the plus sign next to
2. Click the plus sign next to the vPool that contains the vStores whose information you would
like to view, to expand that vPool.
vPools to expand it.
The
3. In the left navigation tree, click on vStores.
vStores icon displays below the expanded vPool.
42
Page 44
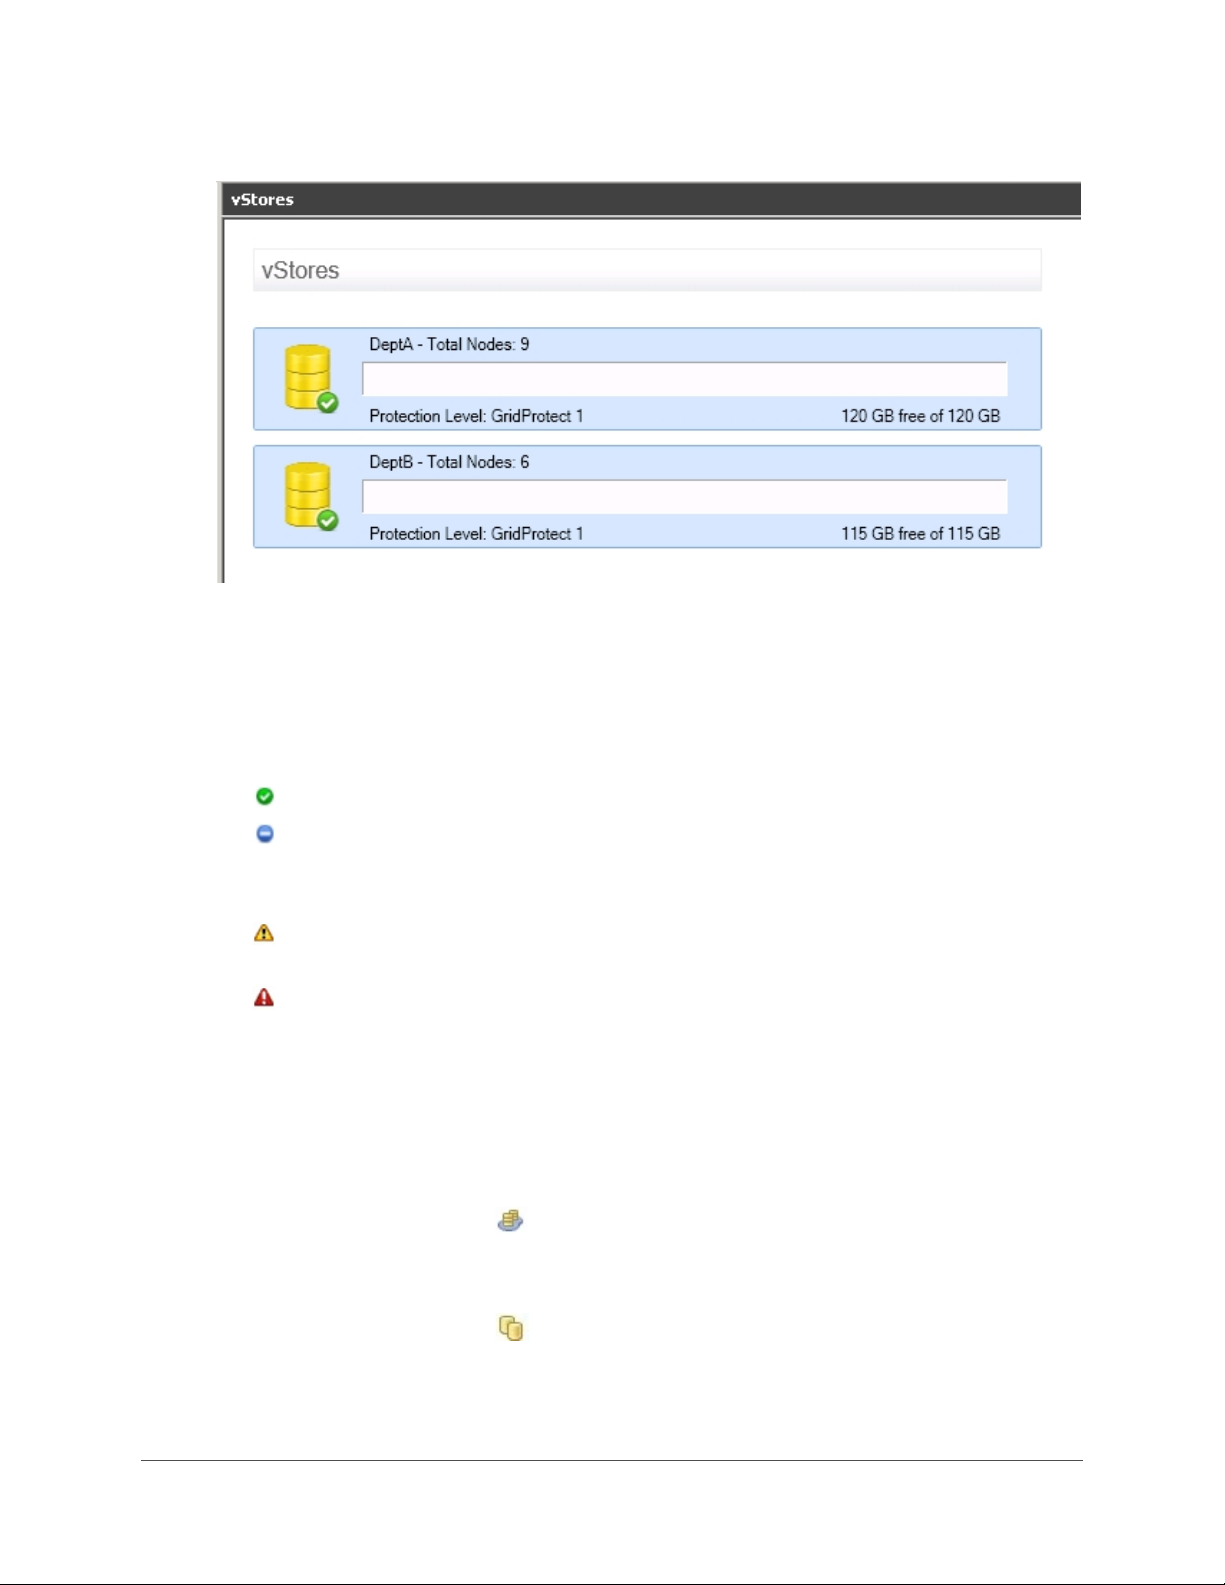
All vStores in the selected vPool display in the vStores window to the right.
For each vStore, the following information displays.
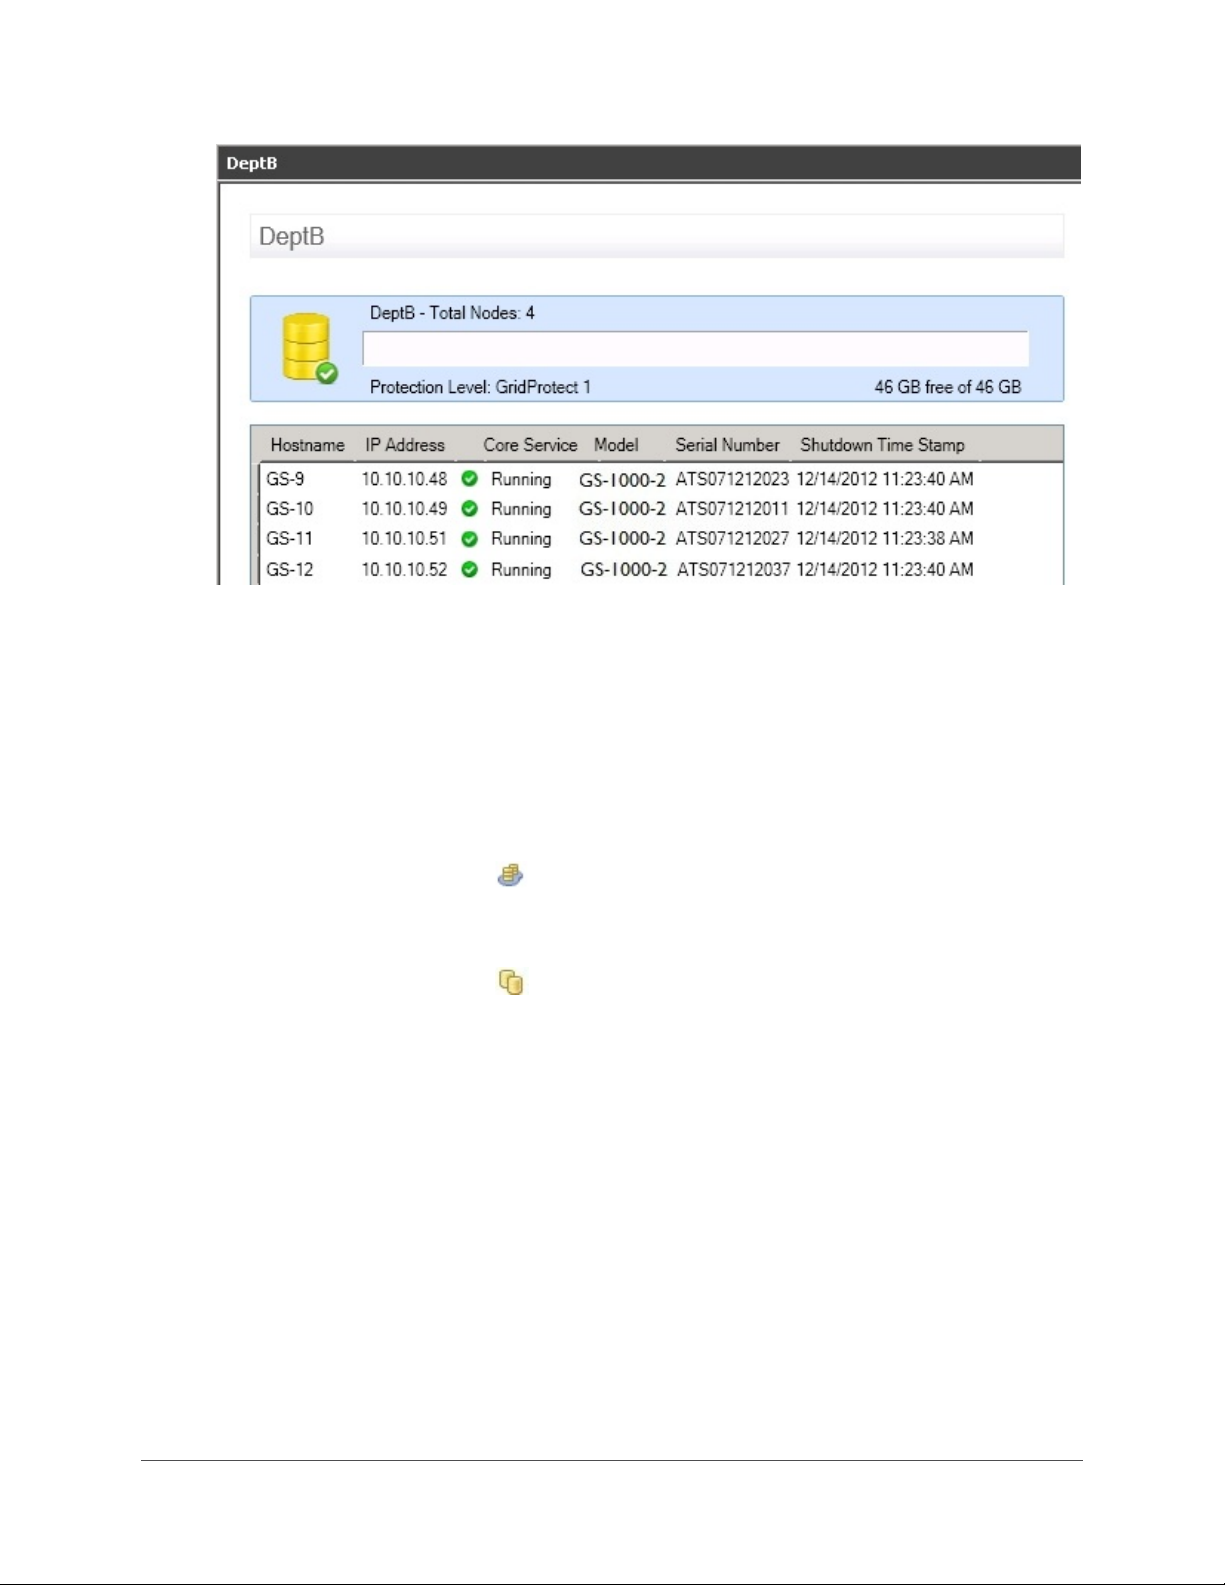
• Total Nodes - the number of Gridstore Storage Nodes in the vStore.
• Protection Level - the number of Gridstore Storage Nodes used for protection.
• Total capacity and the amount of available free space remaining.
Status of the vStore. Options include the following:
•
Healthy - the vStore is healthy and running.
Stopped - the vStore has been manually stopped using GridControl.
Tip: To start the vStore again, you can right-click the vStore in the left navigation tree
and select
Start from the short-cut menu.
Warning - the vStore is in a state that requires attention, such as when its Gridstore
Storage Nodes are reaching capacity.
Fault - the vStore is in a compromised state that requires immediate attention, such
as when there are an insufficient number of Gridstore Storage Nodes in the vStore, or
one of them has failed.
Viewing Detailed Information for a Specific vStore
You can view detailed information about a selected vStore and its Gridstore Storage Nodes.
1. In the left navigation tree of GridControl, navigate to the appropriate vStore. To do so:
•
Click the plus sign next to vPools to expand it.
• Click the plus sign next to the vPool that contains the appropriate vStore, to expand that
vPool.
Click the plus sign next to vStores to expand it.
•
2. In the left navigation tree, click on the vStore for which you would like detailed information.
GRIDSTORE ADMINISTRATOR’S GUIDE 43
Page 45
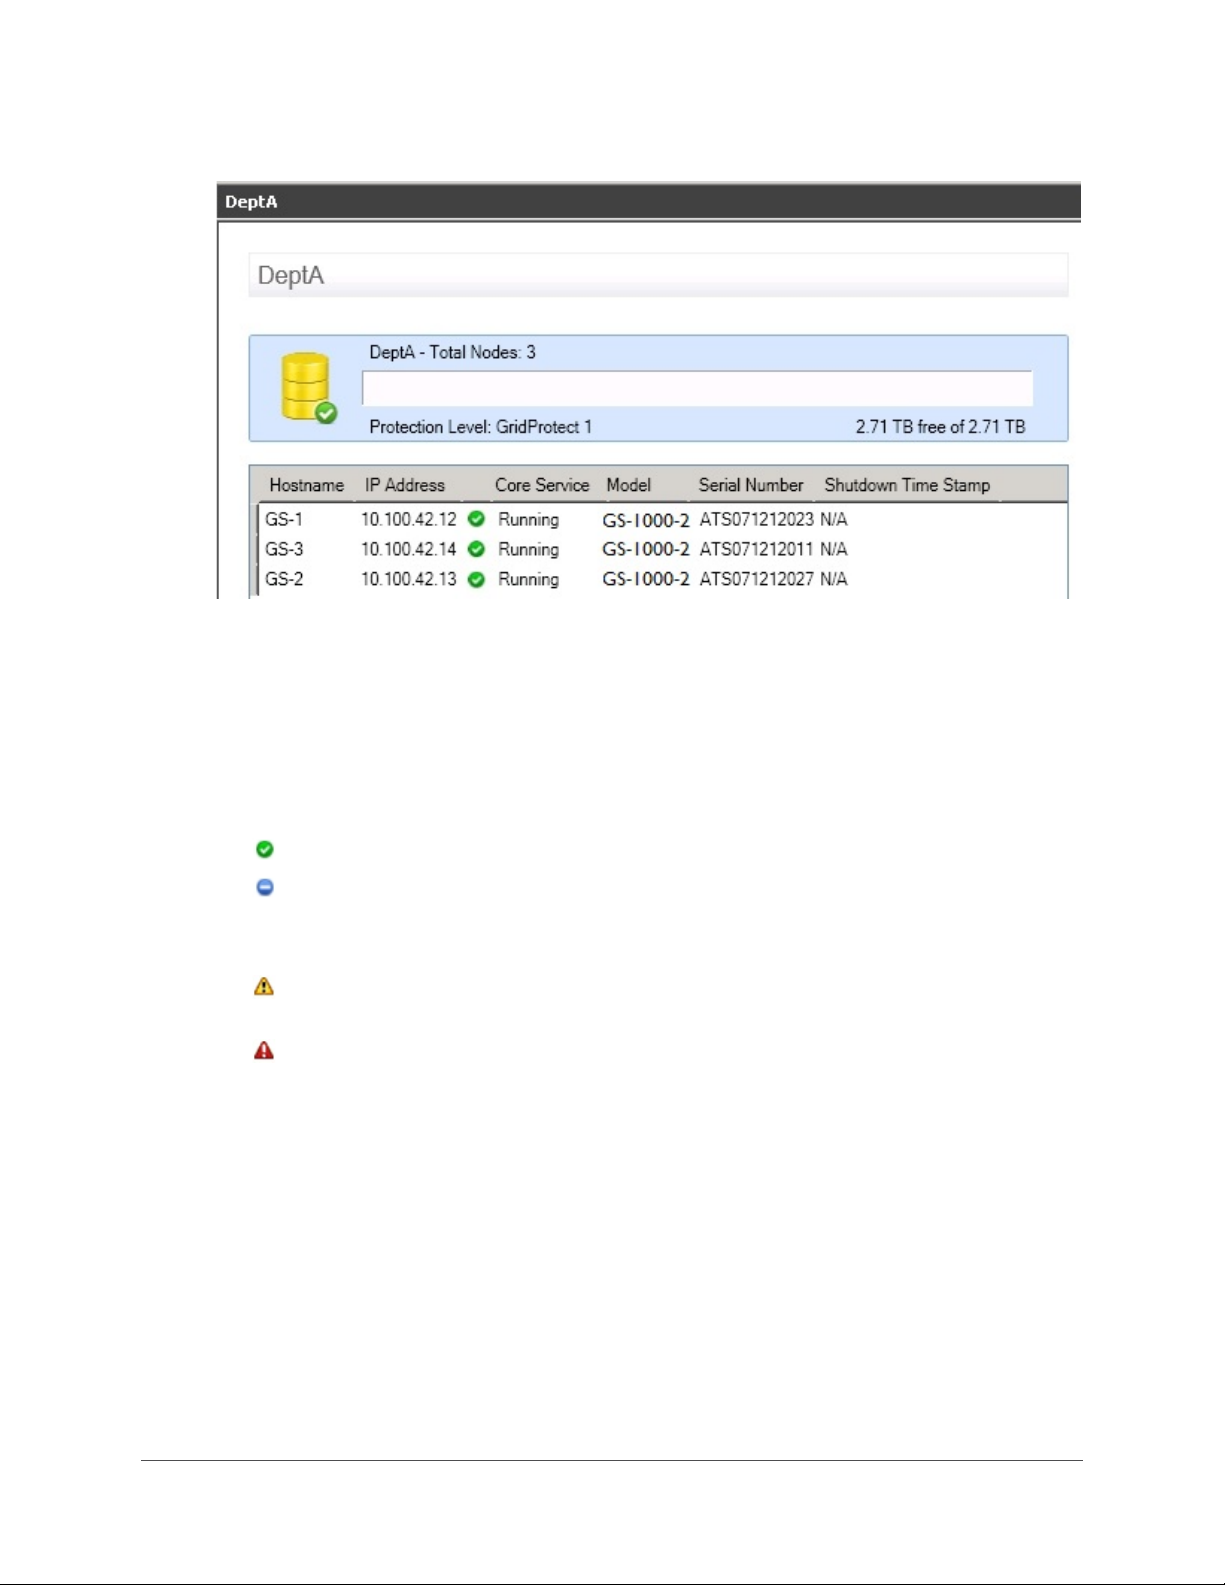
The window for the selected vStore opens to the right.
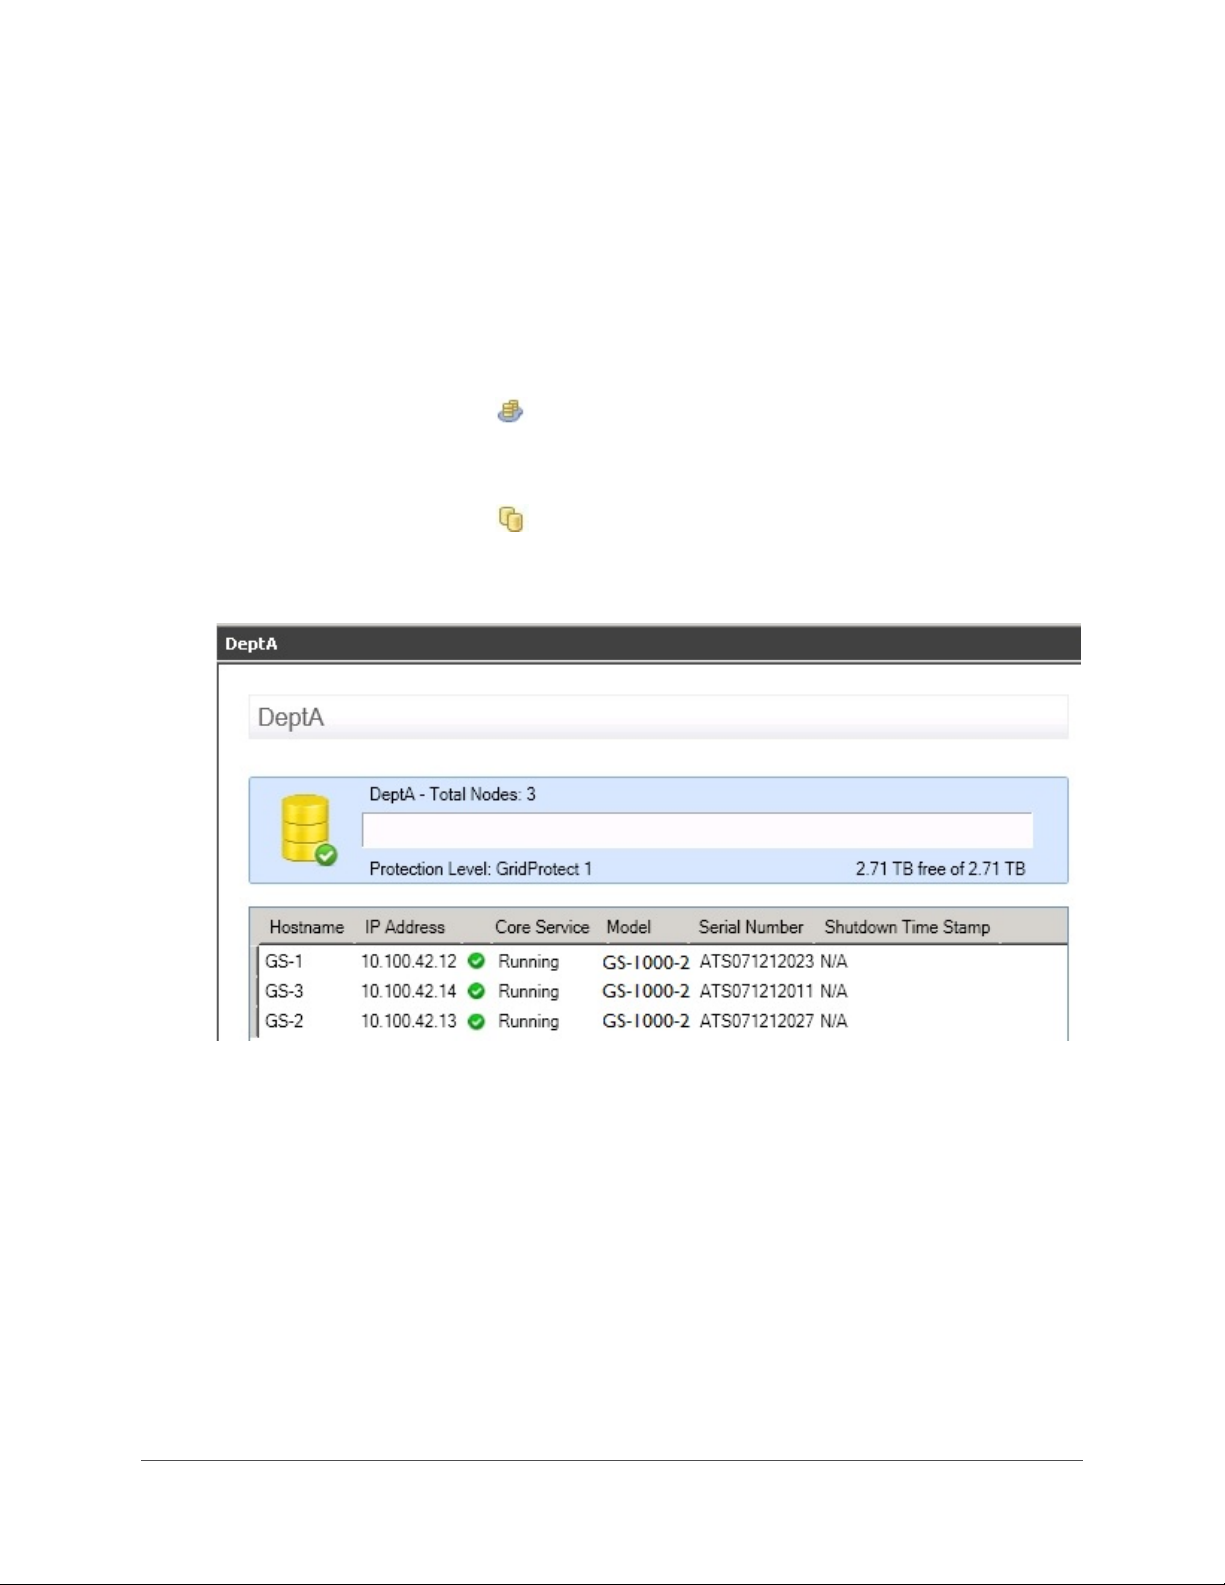
For the vStore, the following information displays.
• Total Nodes - the number of Gridstore Storage Nodes in the vStore.
• Protection Level - the number of Gridstore Storage Nodes used for protection.
• Total capacity and the amount of available free space remaining.
Status of the vStore. Options include the following:
•
Healthy - the vStore is healthy and running.
Stopped - the vStore has been manually stopped using GridControl.
Tip: To start the vStore again, you can right-click the vStore in the left navigation tree
and select
Start from the short-cut menu.
Warning - the vStore is in a state that requires attention, such as when Gridstore
Storage Nodes are reaching capacity.
Fault - the vStore is in a compromised state that requires immediate attention, such
as when one of its Gridstore Storage Nodes has failed.
44
Page 46
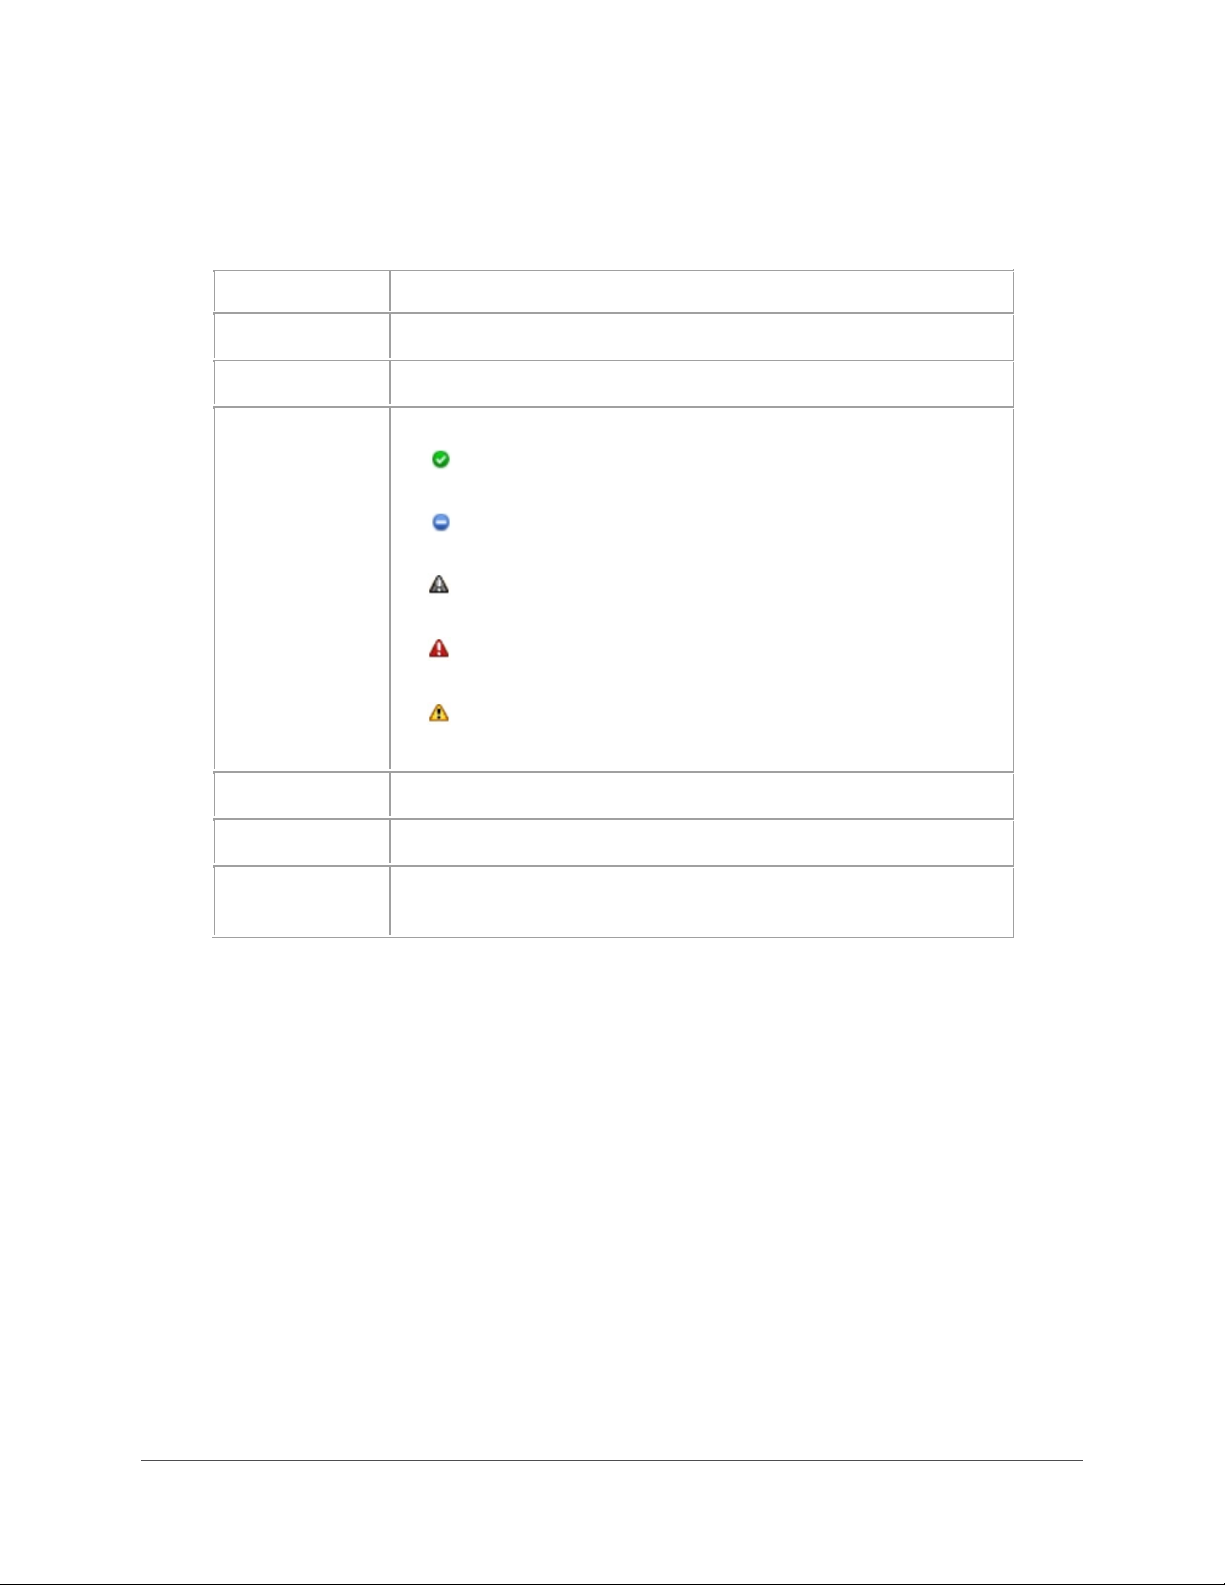
The table of Gridstore Storage Nodes contained in the vStore includes the following
Field/Item
Description
Running
Stopped
Offline
Fault
Start Queue
added to
information.
Tip: You can click on a heading in the table to sort the Gridstore Storage Nodes by that
heading item.
Hostname The name of the Gridstore Storage Node.
IP Address The IP address for the Gridstore Storage Node.
Core Service The status of the Gridstore Storage Node. Main options include:
running.
- the Gridstore Storage Node is healthy and
stopped using GridControl.
the network.
state that requires immediate attention.
the Grid.
Model The model of the Gridstore Storage Node product.
Serial Number The serial number for the Gridstore Storage Node product.
Shutdown
Timestamp
The last time that the Gridstore Storage Node was stopped.
- the Gridstore Storage Node has been manually
- the Gridstore Storage Node is not accessible from
- the Gridstore Storage Node is in a compromised
- the Gridstore Storage Node is being
GRIDSTORE ADMINISTRATOR’S GUIDE 45
Page 47

Managing Access to vStores
After you create vStores, you will want to manage access to those vStores. There are two ways to do
this:
•
Enable workgroup access to a vStore
Map Active Directory Objects (Users, Groups, Organizational Units and Computers) to a
•
vStore
You can also remove a mapping from a vStore, and in the case of workgroup mappings, you can
change a Client's drive map letter to a vStore.
This section covers the following topics:
Mapping Workgroups to a vStore
Mapping Active Directory Objects to a vStore
Viewing All Active Directory Object Mappings to a vStore
Removing Mappings from a vStore
Changing the Drive Map Letter to a vStore
Mapping Workgroups to a vStore
When you map a workgroup to a vStore, you are mapping a computer directly to a vStore, and all
users who log on to that computer have access to the vStore.
There are two ways you can map a workgroup (computer) to a vStore: connect the current, local
computer as a Client to the vStore, or add connected Clients on the network to the vStore.
Important: Before you can map a workgroup to a vStore, you first need to ensure the vController
software is installed on Client computers. See
and steps.
This sub-section covers the following topics:
Connecting the Local Computer as the Client
Adding Clients to a vStore
Viewing All Clients Mapped to a vStore
Connecting the Local Computer as the Client
You can map the local, host computer to a vStore. This enables the local computer to have direct
access to the vStore.
1. From the desired local computer, navigate to the appropriate vStore from the left navigation
tree of GridControl. To do so:
Installing Gridstore Software on pg. 60 for information
46
Click the plus sign next to vPools to expand it.
•
• Click the plus sign next to the vPool that contains the appropriate vStore, to expand that
vPool.
Click the plus sign next to vStores to expand it.
•
Page 48
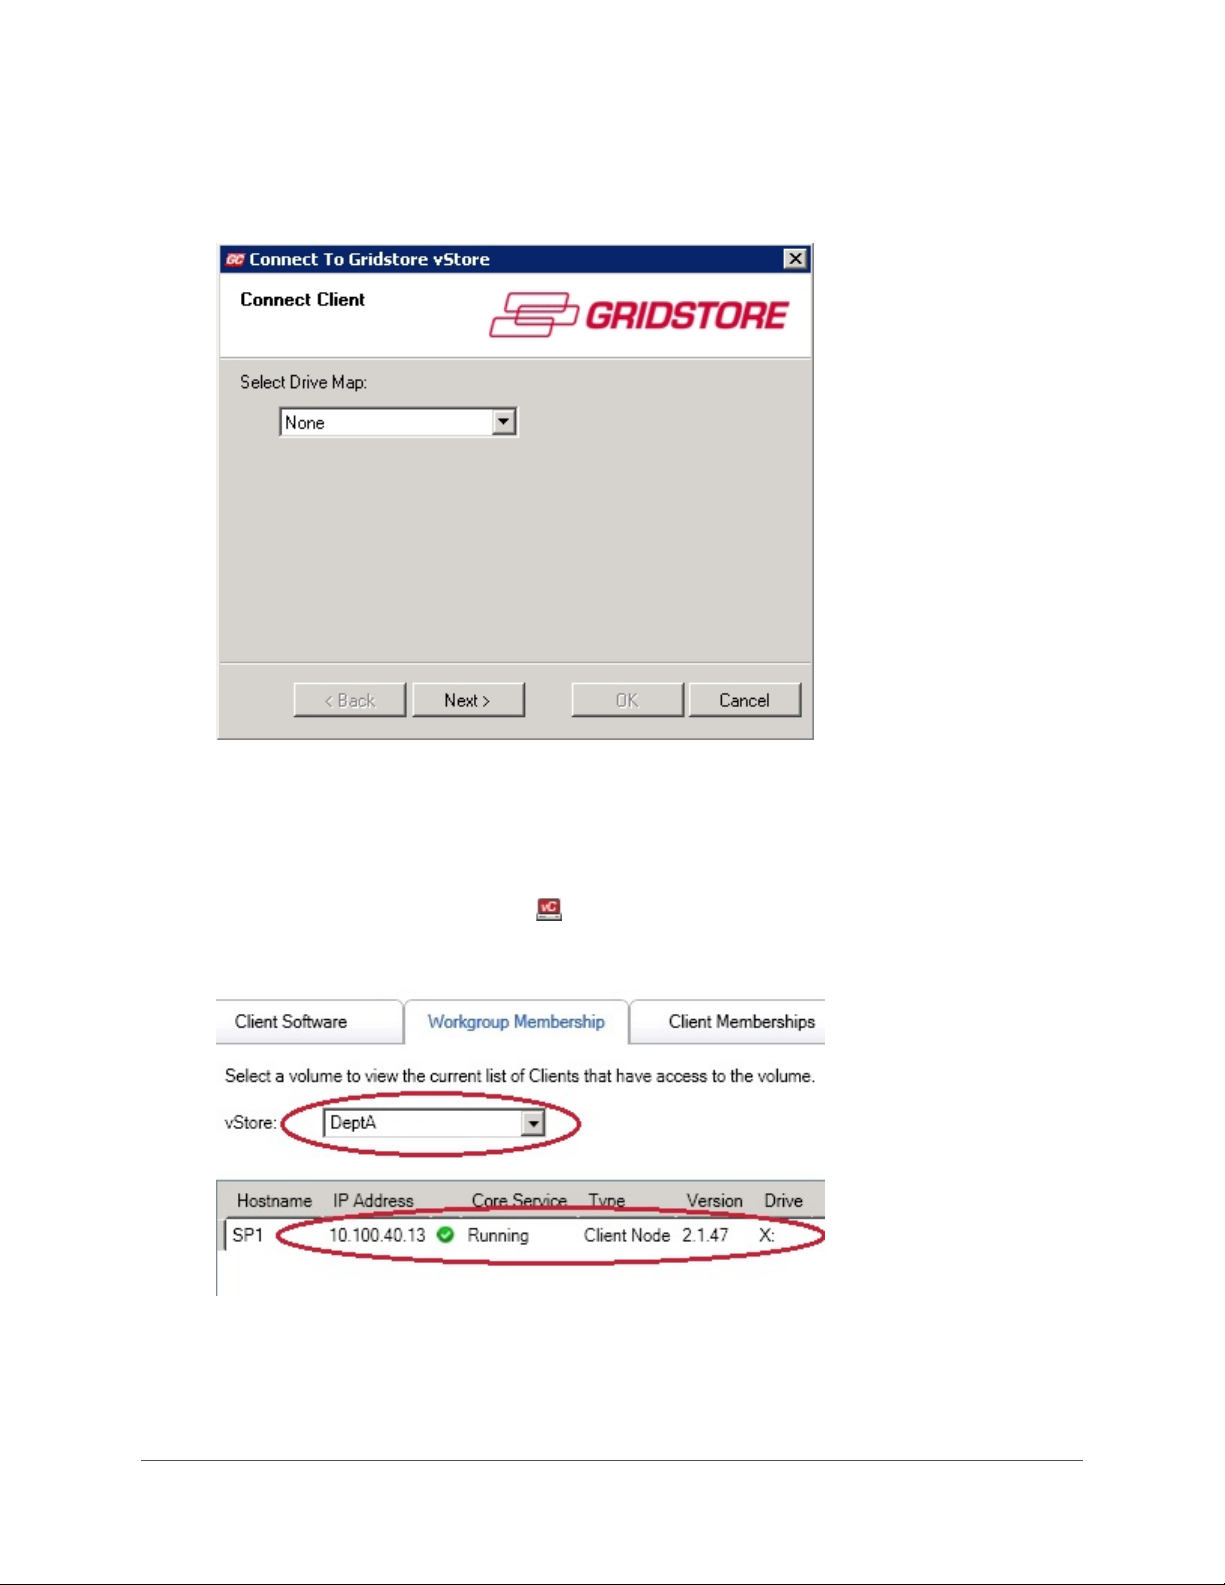
2. In the left navigation tree, right-click on the appropriate vStore, and select Connect as Client
from the short-cut menu.
The Connect to Gridstore vStore Wizard opens.
3. Select a drive map letter from the Select Drive Map drop-down list, and click the Next button.
The Client is connected to the vStore within the Connect to Gridstore vStore Wizard.
4. When finished, click the OK button.
The local computer is now connected to the vStore as a Client.
Tip: To verify this, you can click on vController Manager in the left navigation tree, and in
the
vController Manager window to the right, click the Workgroup Membership tab. Select the
appropriate vStore from the drop-down list and note that the Client is in the list below.
GRIDSTORE ADMINISTRATOR’S GUIDE 47
Page 49
Adding Clients to a vStore
When you add Clients to a vStore, you map Client computers on the network to a vStore. This allows
all users who log on to the Client computers to have access to the vStore.
Note: In order to do this, Clients must have the vController software installed on them. For
information and steps, see
1. In the left navigation tree of GridControl, navigate to the appropriate vStore. To do so:
Click the plus sign next to vPools to expand it.
•
• Click the plus sign next to the vPool that contains the appropriate vStore, to expand that
vPool.
•
Click the plus sign next to vStores to expand it.
2. In the left navigation tree, right-click on the appropriate vStore, and select Add Client(s) to
vStore from the short-cut menu.
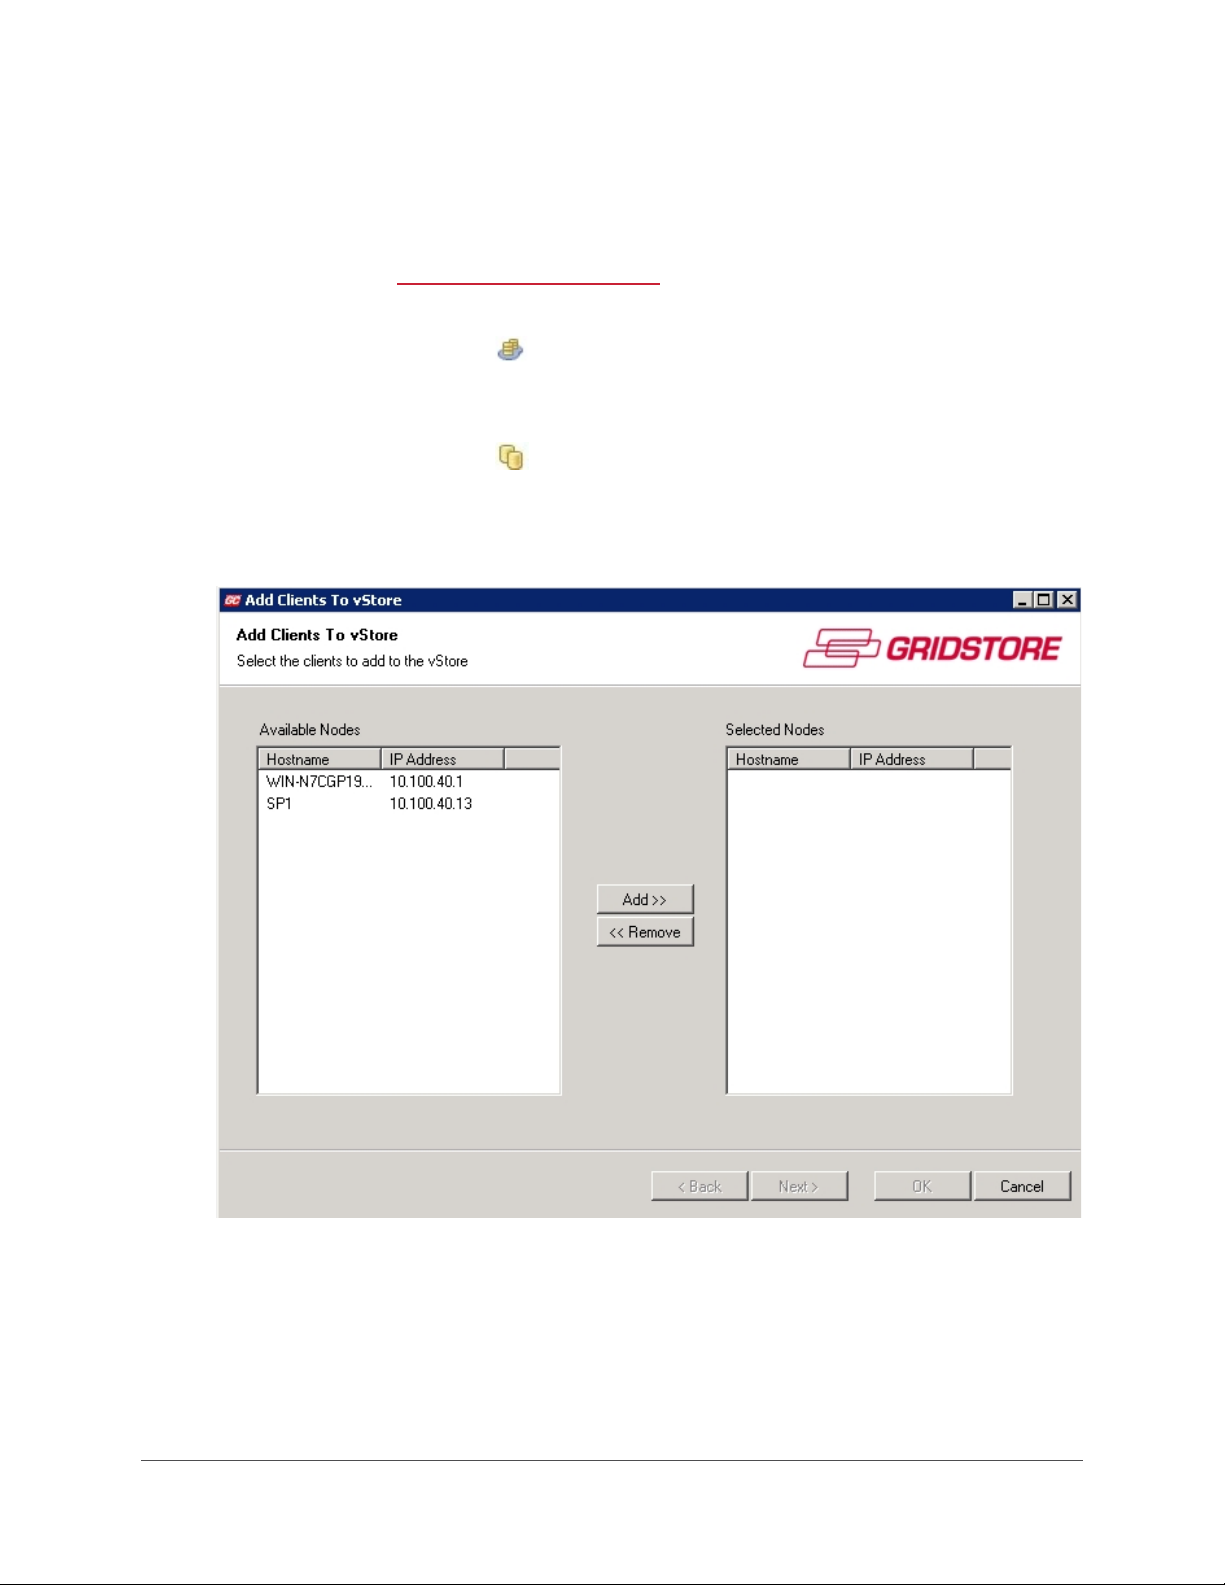
The Add Client(s) to vStore Wizard opens.
Installing Gridstore Software on pg. 60.
3. Use the Add and Remove buttons to select the Clients you would like to add to the vStore,
and click the
Next button.
48
Page 50
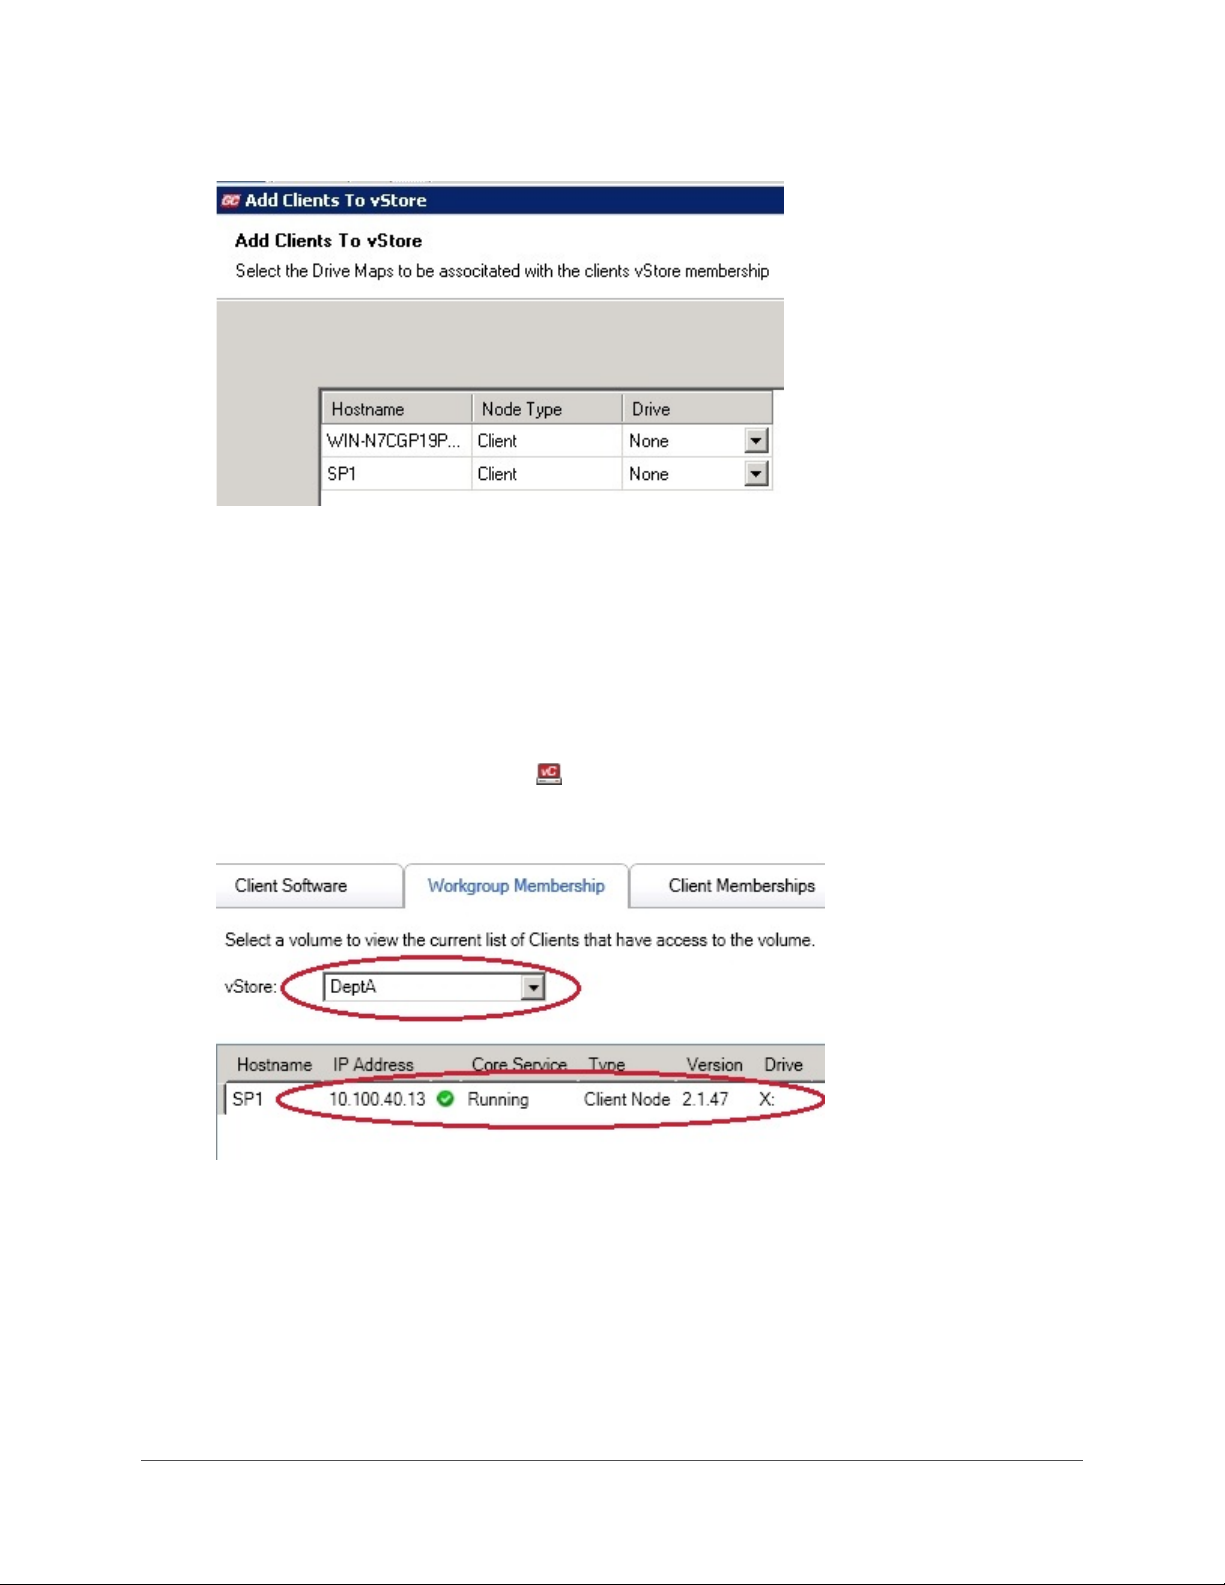
The Select the Drive Maps page opens.
4. For each Client, select a drive map letter from the Drive drop-down list, and click the Next
button.
The confirmation page of the Wizard opens.
5. Ensure the information is correct, and click the Next button.
The vStore memberships for the Clients are created within the Wizard.
6. When finished, click the OK button.
The Clients are now mapped to the vStore.
Tip: To verify this, you can click on vController Manager in the left navigation tree, and in
the
vController Manager window, click the Workgroup Membership tab. Select the
appropriate vStore from the drop-down list and note that the Clients are in the list below.
GRIDSTORE ADMINISTRATOR’S GUIDE 49
Page 51
Viewing All Clients Mapped to a vStore
You can view a list of all Clients that are mapped to a particular vStore. These are the result of
workgroup mappings, which means that all users who log on to the workgroup computers that are
mapped to a vStore have access to that vStore. To see all Active Directory Objects mapped to a
vStore, see
Viewing All Active Directory Object Mappings to a vStore on pg. 55.
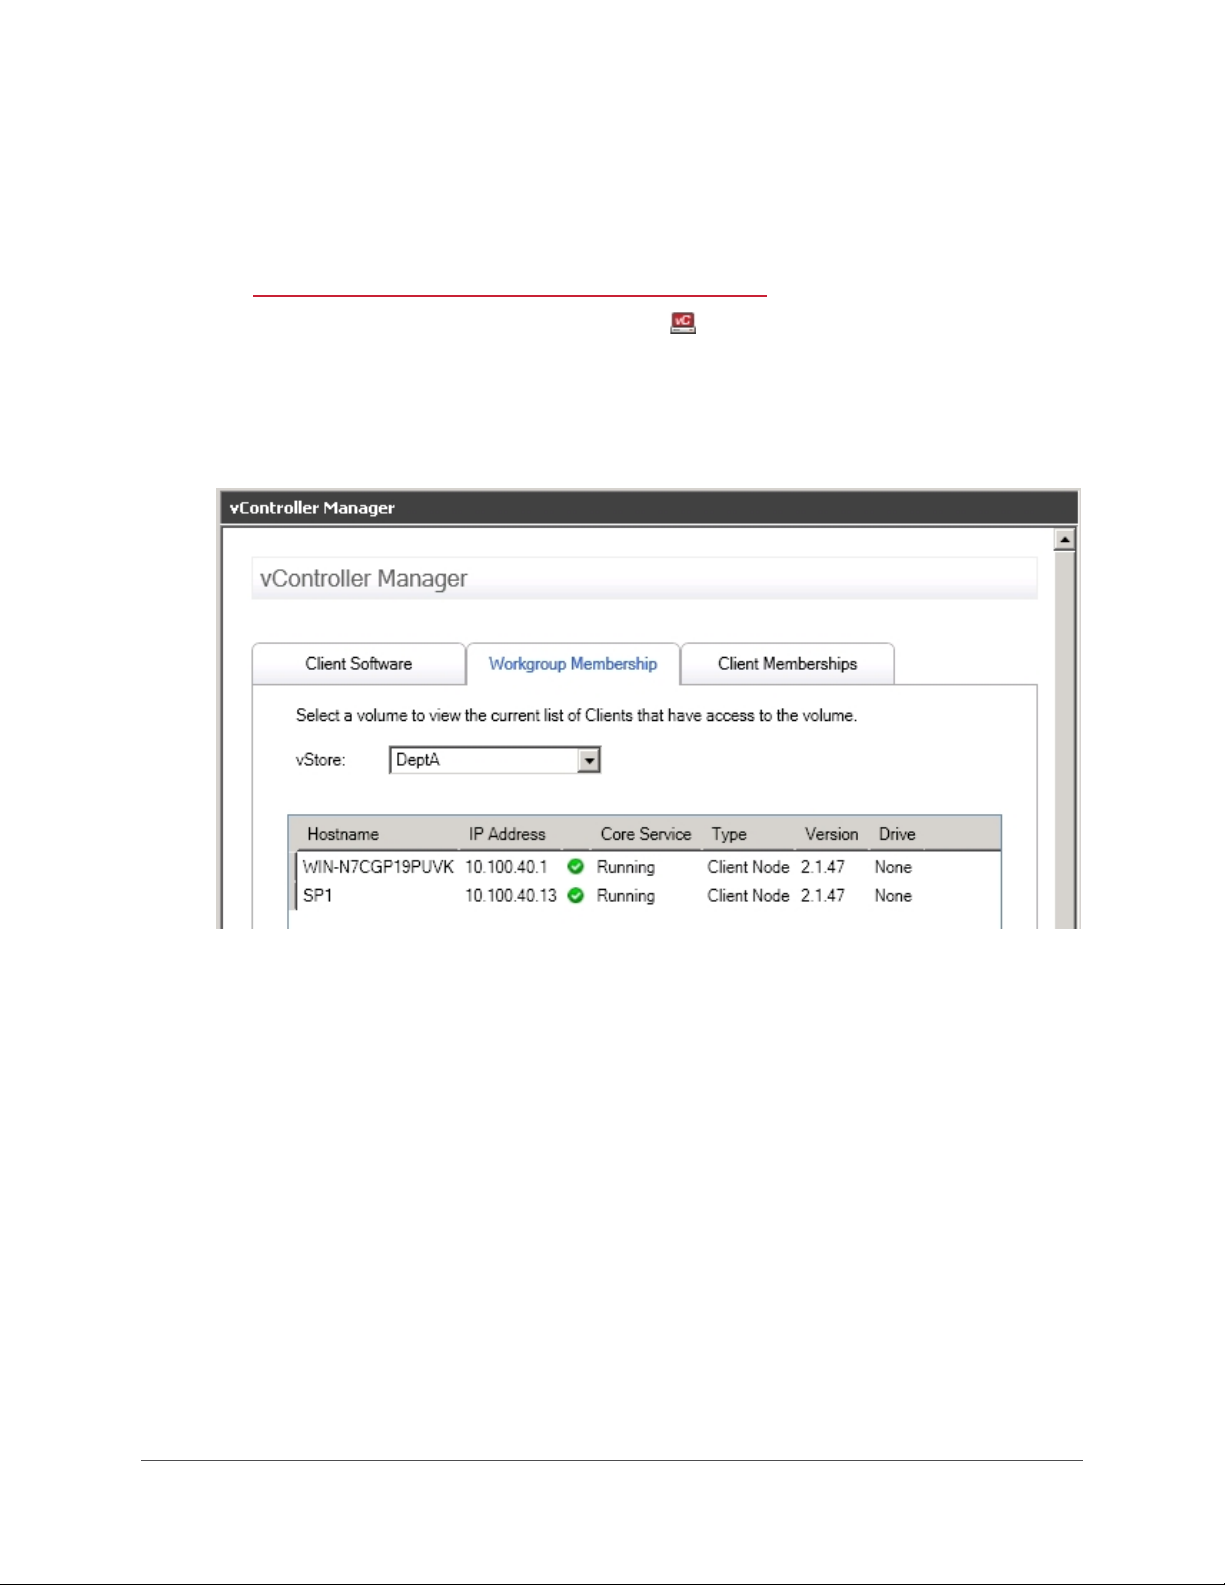
1. In the left navigation tree of GridControl, click on
The vController Manager window opens to the right.
2. Click the Workgroup Membership tab, and select the appropriate vStore from the vStore
drop-down list.
A table of Clients that have access to that vStore displays.
vController Manager.
50
Page 52
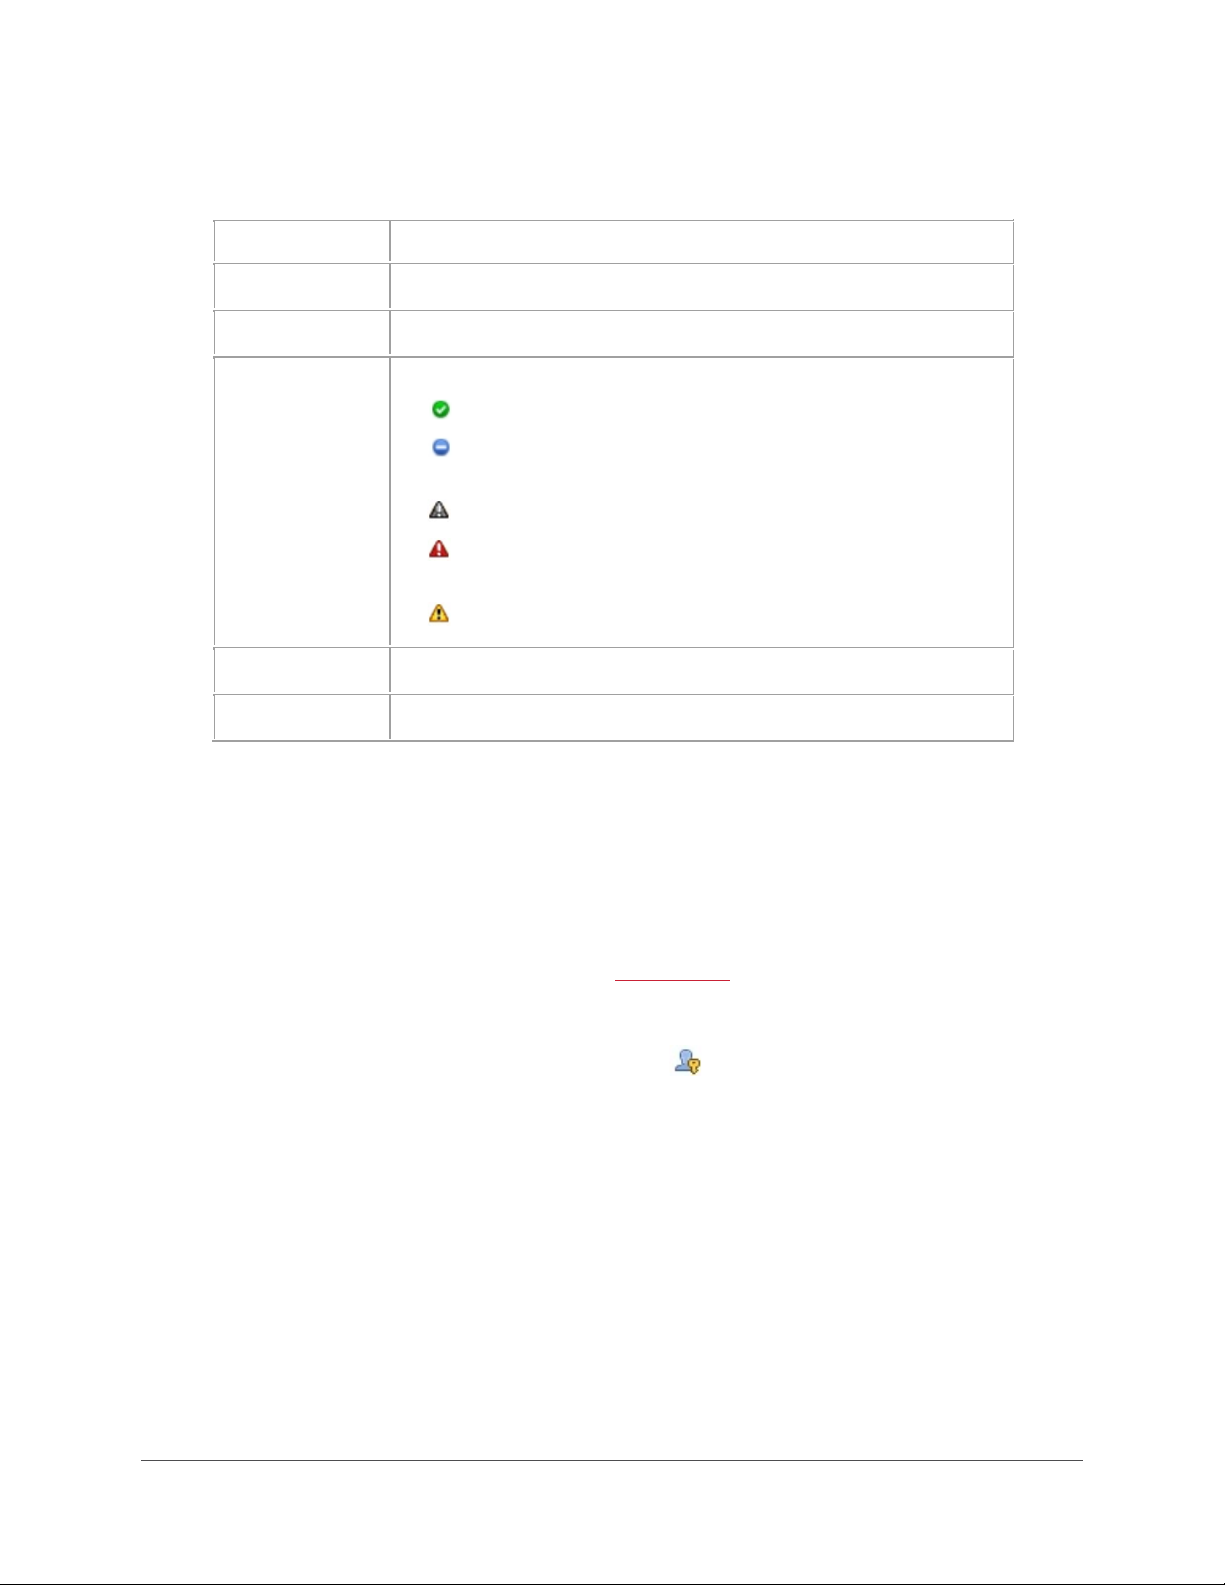
Information for each Client listed in the table includes the following.
Field/Item
Description
Running
Stopped
Offline
Fault
Start Queue
Tip: You can click on a heading in the table to sort the Clients by that heading item.
Hostname The name of the Client.
IP Address The IP address for the Client.
Core Service The status of the Client. Main options include:
- the Client is healthy and running.
GridControl.
immediate attention.
Type The type of node, which is a Client Node.
Version The version of vController currently installed on the Client.
- the Client has been manually stopped using
- the Client is not accessible from the network.
- the Client is in a compromised state that requires
- the Client is being added to the Grid.
Mapping Active Directory Objects to a vStore
Active Directory Objects include Users, Groups, Organizational Units and Computers. When an Active
Directory Object is mapped to a vStore, any user who is a member of that Active Directory Object has
access to the vStore at the time he or she logs on. For Computer object mappings only, the vStore is
mapped when the computer first boots up and is accessible to all users who log on to that computer.
Note: With Active Directory Object mappings, if the Group Policy (see pg. 60) for a user has been set
to have vController installed, then you do not need to have it already installed on Client computers
ahead of time, as a silent install occurs automatically when the user logs on.
1. In the left navigation tree of GridControl, click on
GRIDSTORE ADMINISTRATOR’S GUIDE 51
AD Access Control.
Page 53
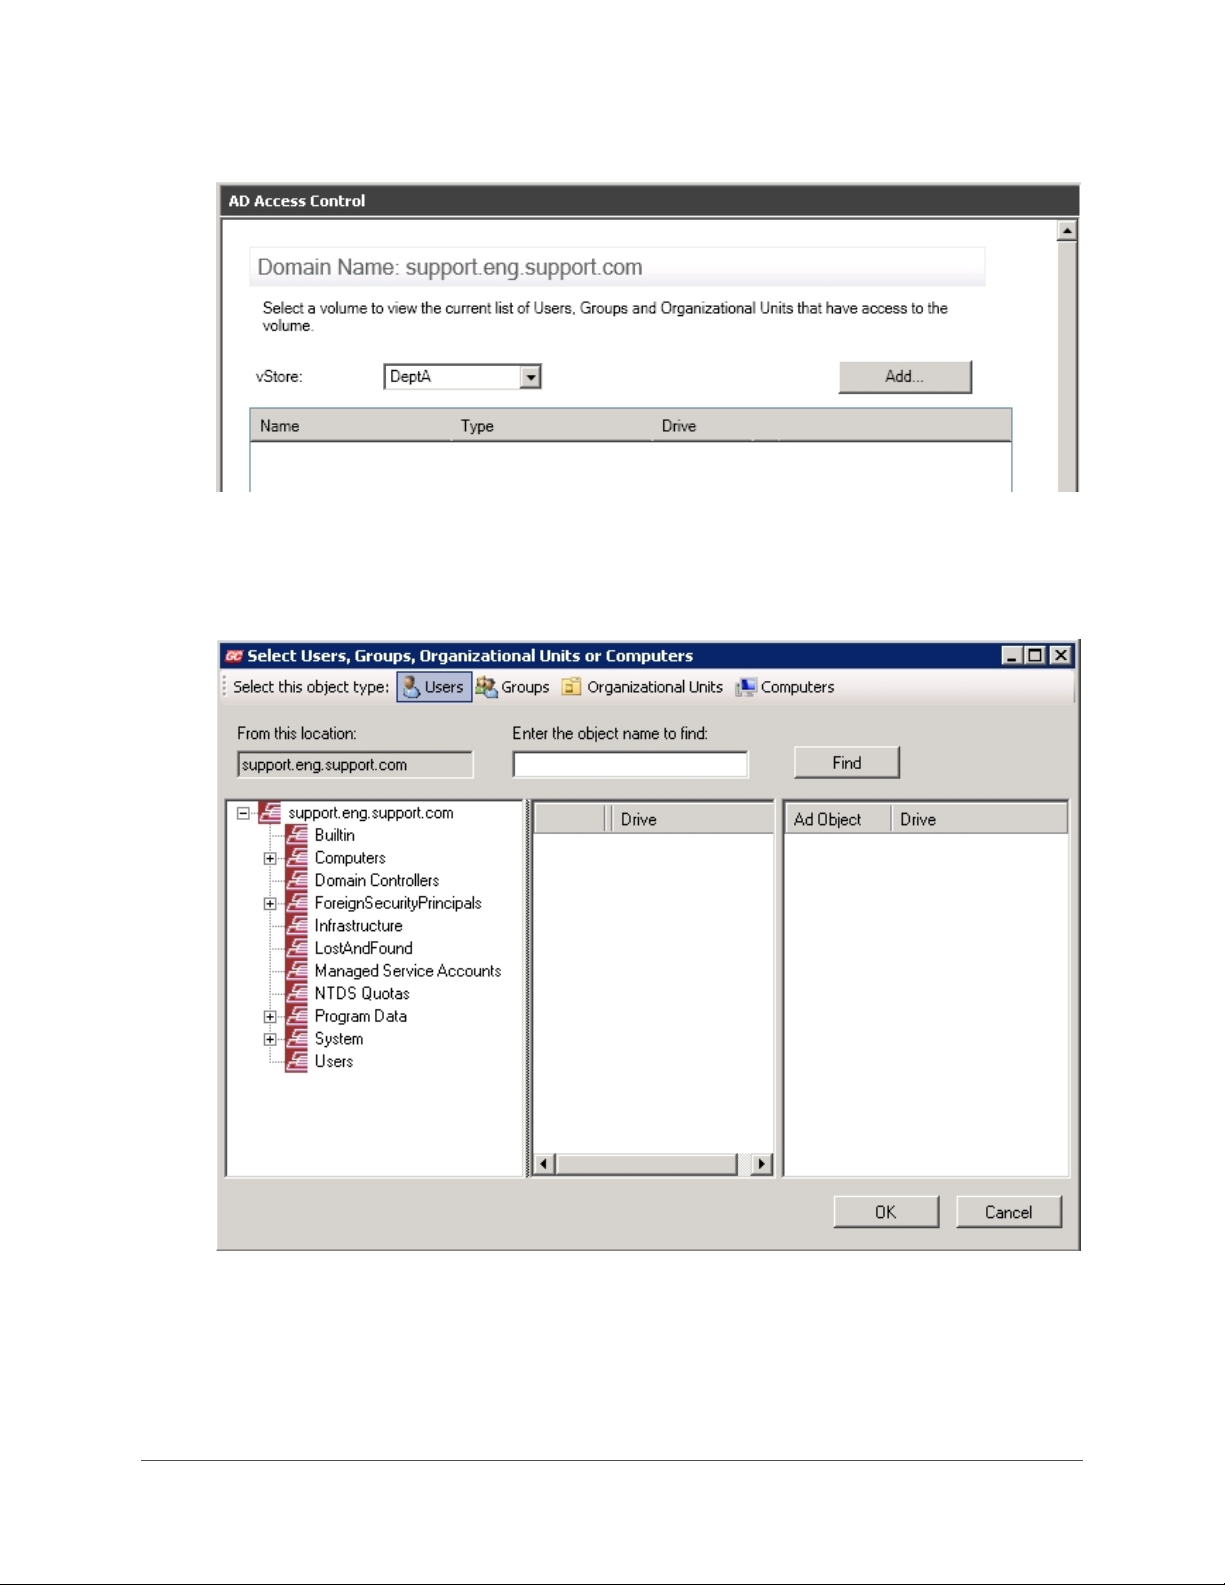
The AD Access Control window opens to the right.
2. In the vStore drop-down list, select the vStore to which you would like to assign access, and
click the
The Select Users, Groups, Organizational Units or Computers dialog box opens.
Add button.
Note: It is assumed the Users, Groups, Organizational Units and Computers have already
been created outside of GridControl.
3. In the Select this object type area at the top, click on the button for the object type to which
you are assigning access to the vStore. Options include:
• Users
52
Page 54
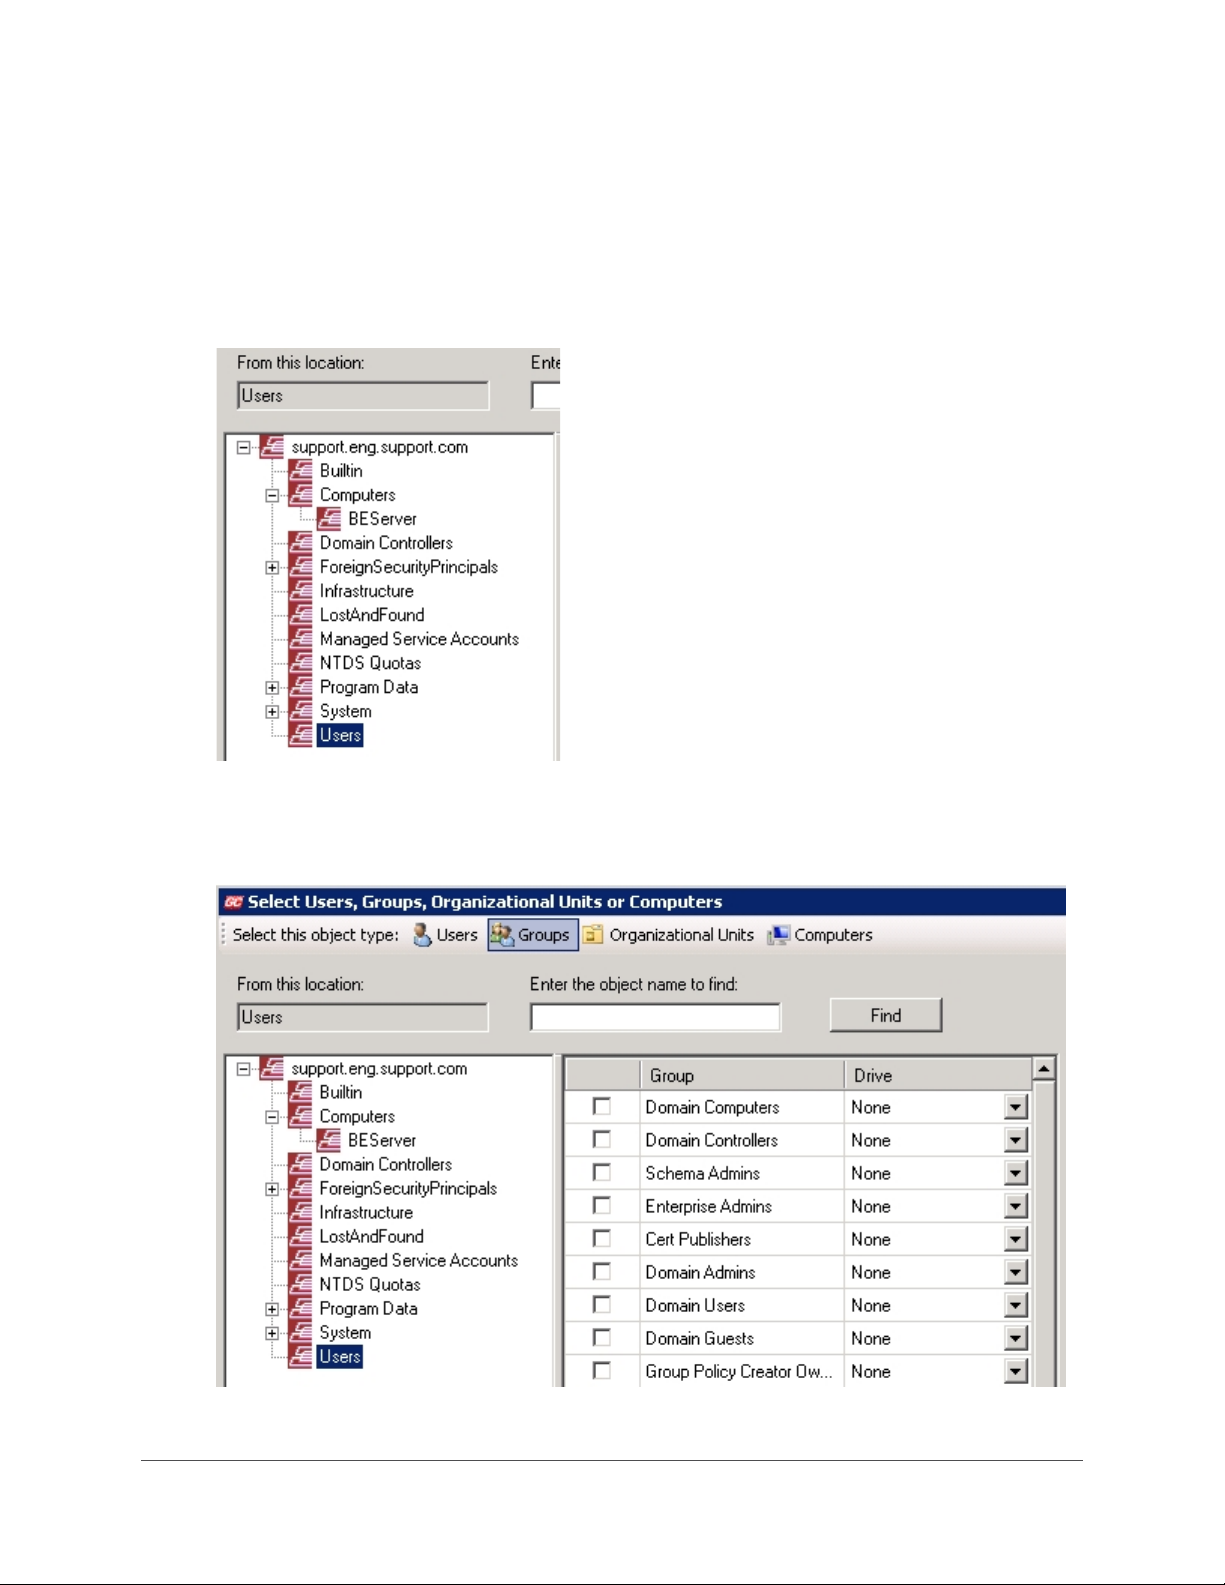
• Groups
Organizational Units
•
Computers
•
4. In the first window pane on the left, navigate to and select the organizational object that
contains the Users, Groups, Organizational Units or Computers to which you would like to
assign access to the vStore.
A list of Users, Groups, Organizational Units or Computers -- depending on the object type you
selected in step
3 -- that exist within the selected organizational object displays in the second
window pane in the middle. Refer to the image below, which displays a list of Groups that
exist for the selected object.
GRIDSTORE ADMINISTRATOR’S GUIDE 53
Page 55
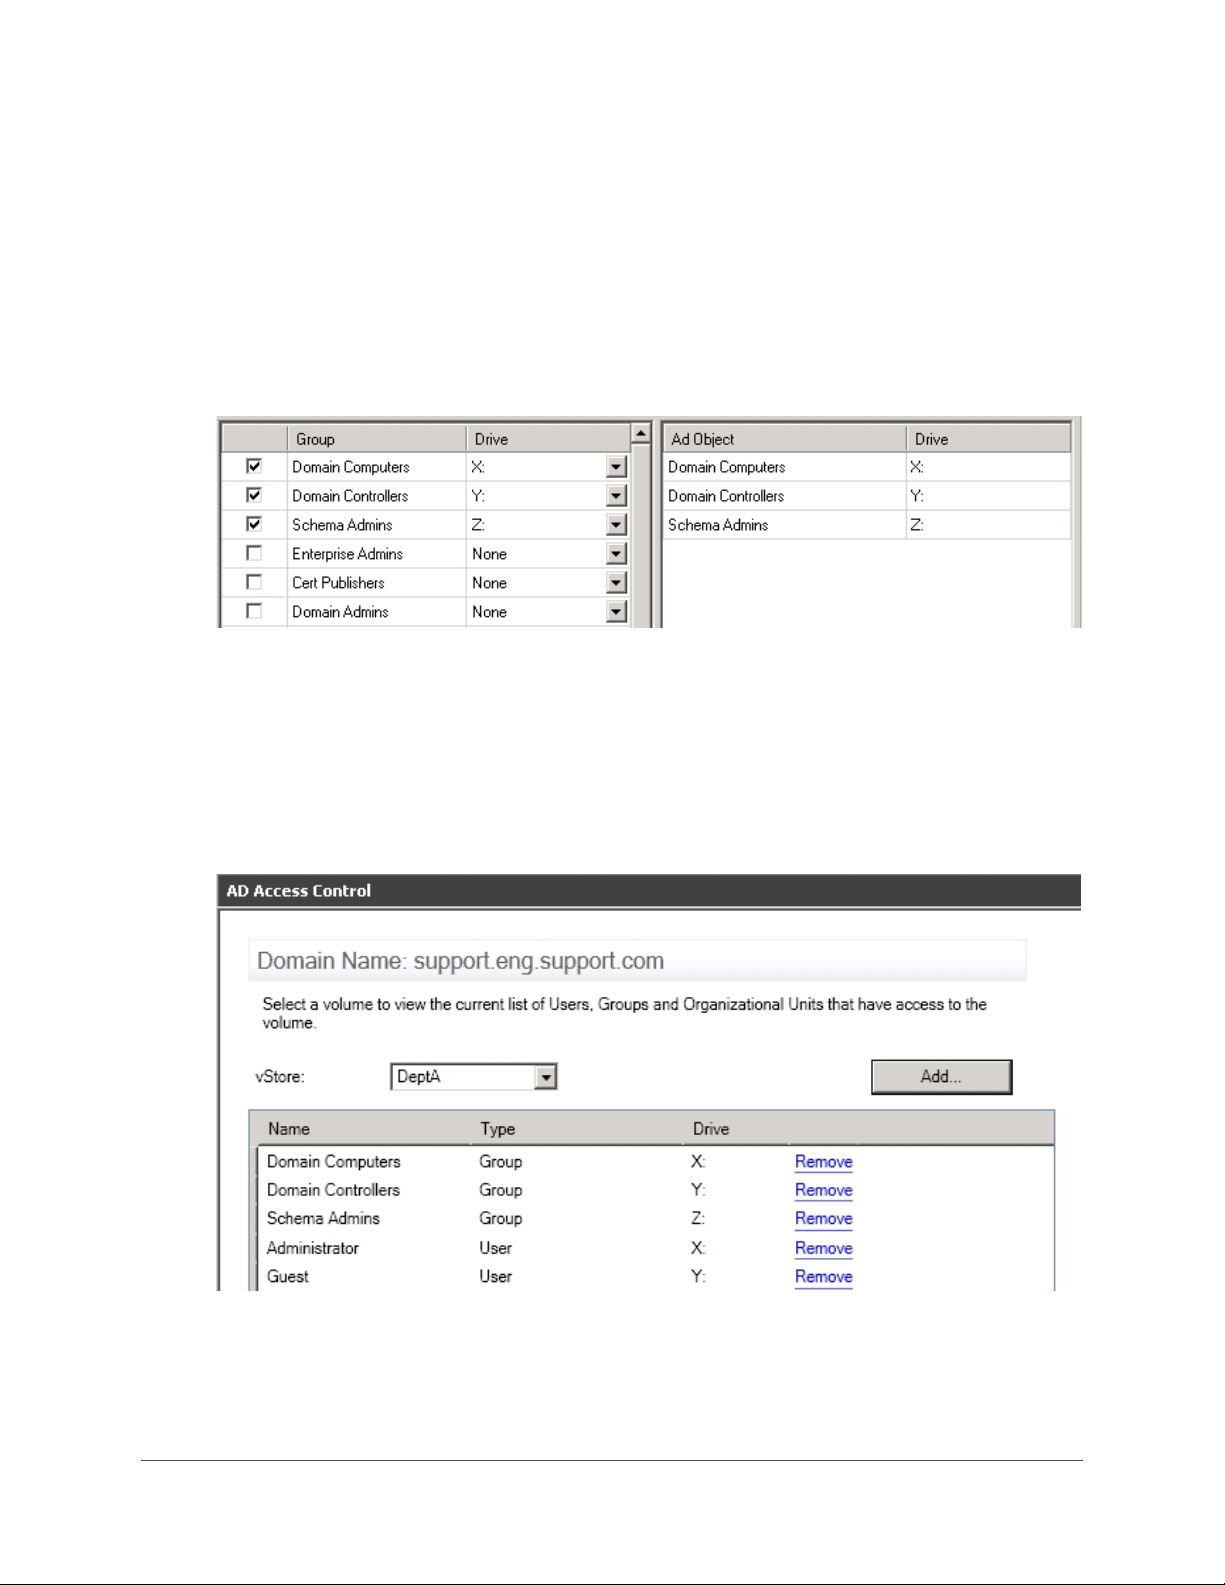
Tip: If you are looking for a specific User, Group, Organizational Unit or Computer within the
selected organizational object, you can enter its name in the
text box and click the
5. In the second window pane in the middle, select the check boxes next to the specific Users,
Groups, Organizational Units or Computers to which you would like to map to the vStore.
6. Also select a drive map letter from the Drive drop-down list for each specific User, Group,
Organizational Unit or Computer.
The mapped objects display in the AD Object window pane, which is the third window pane to
the right. It displays all mapped AD objects, cumulatively. Refer to the image below.
7. Repeat steps 3 to 6 for all AD Object mappings you would like to create for the selected
vStore.
Find button.
Enter the object name to find
8. Click the OK button.
A message box opens, confirming the action.
9. Click the OK button.
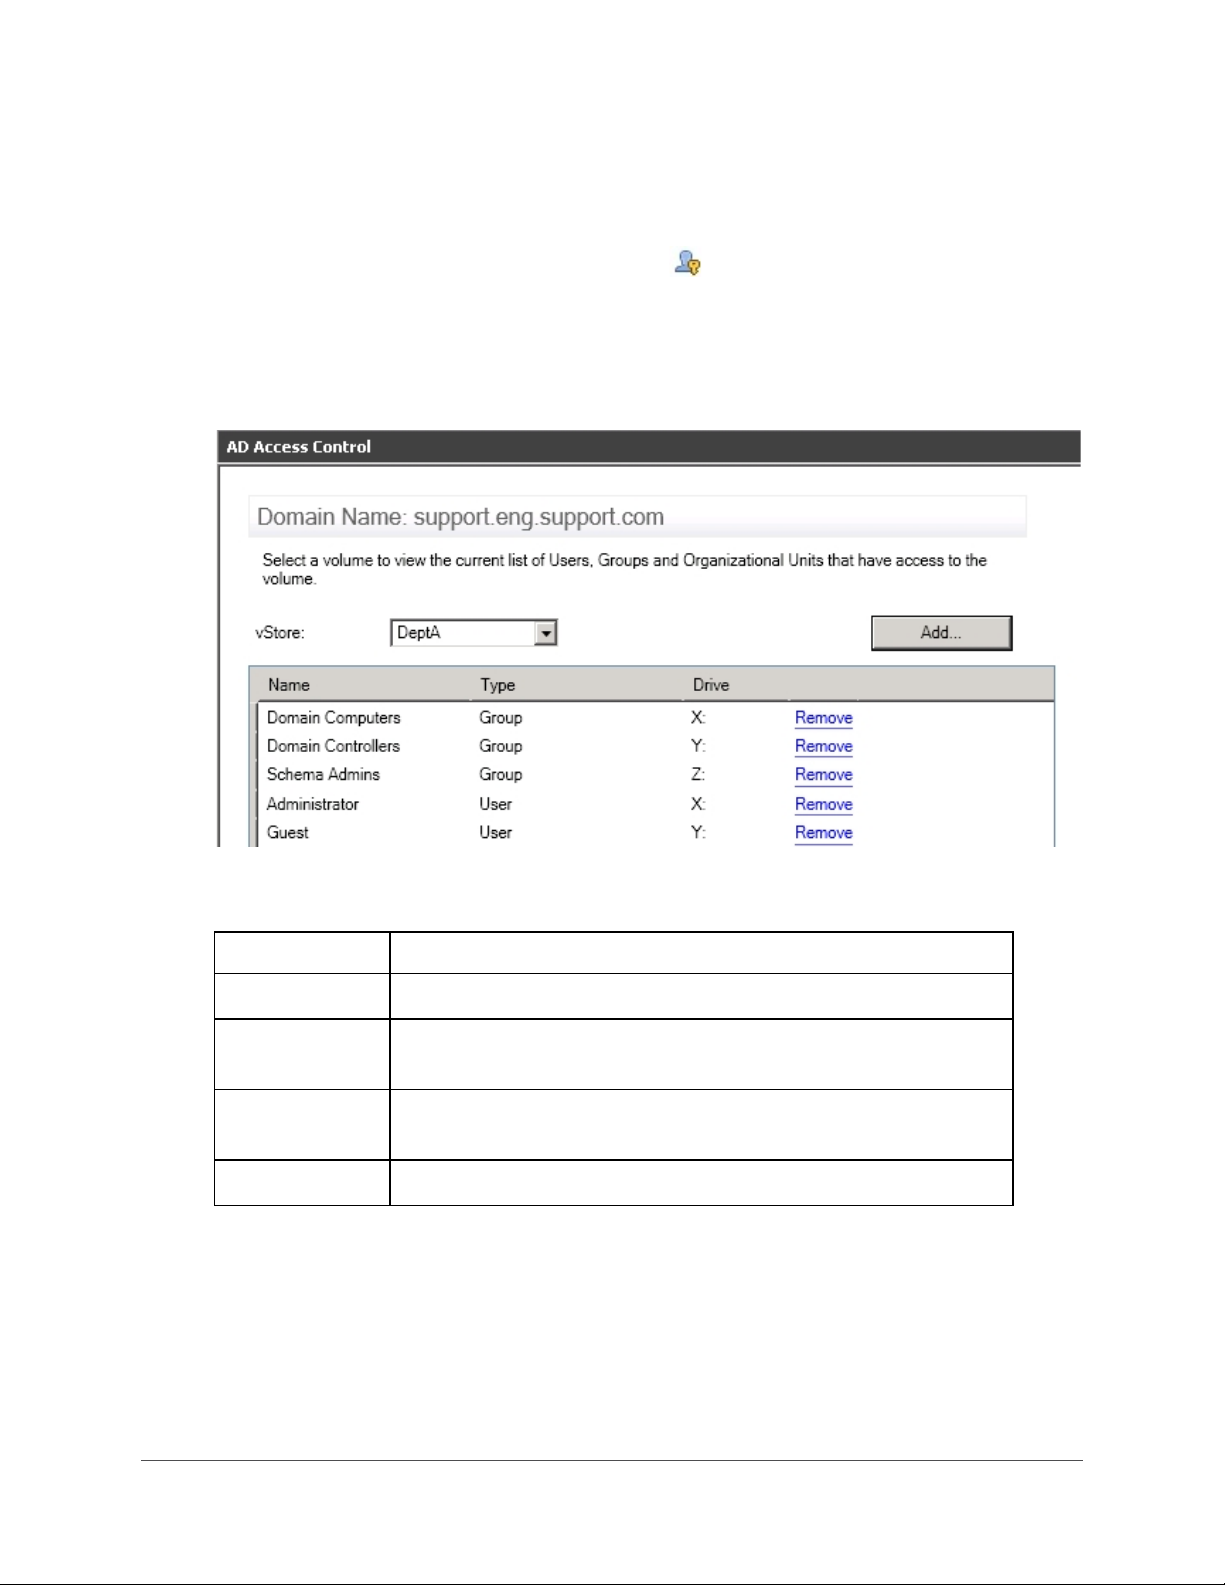
The AD Access Control window opens in GridControl, displaying the Active Directory Object
mappings for the selected vStore.
54
Note: You cannot change the drive map after it has been set. If you would like to do so, you
would need to remove the mapping and re-create it.
Page 56
Viewing All Active Directory Object Mappings to a vStore
Field/Item
Description
Remove
You can view a list of all Active Directory Object Mappings to a particular vStore. From there, you can
choose to add more mappings or remove them.
1. In the left navigation tree of GridControl, click on AD Access Control.
The AD Access Control window opens to the right.
2. In the vStore drop-down list, select the appropriate vStore.
The AD Access Control window displays the Active Directory Object mappings for the selected
vStore.
Information for each Active Directory Object mapping includes the following.
Name The name of the Active Directory Object.
Type The type of Active Directory Object. Options include: User, Group,
Organizational Unit and Computer.
Drive The drive letter to which the Active Directory Object has been
mapped.
link Click this link to remove the mapping to the vStore.
GRIDSTORE ADMINISTRATOR’S GUIDE 55
Page 57
Removing Mappings from a vStore
You can remove access to a vStore at any time.
This sub-section covers the following topics:
Disconnecting the Local Computer as the Client
Removing Client Access to a vStore
Removing Active Directory Object Mappings from a vStore
Disconnecting the Local Computer as the Client
You can remove the local, host computer's access to the vStore.
1. From the desired host computer, navigate to the appropriate vStore from the left navigation
tree of GridControl. To do so:
•
Click the plus sign next to vPools to expand it.
• Click the plus sign next to the vPool that contains the appropriate vStore, to expand that
vPool.
Click the plus sign next to vStores to expand it.
•
2. Right-click on the appropriate vStore, and select Disconnect as Client from the short-cut
menu.
The Remove from vStore dialog box opens.
3. Click the OK button.
The local computer no longer has access to the vStore.
Tip: To verify this, you can click on vController Manager in the left navigation tree, and in
the
vController Manager window, click the Workgroup Membership tab. Select the
appropriate vStore from the drop-down list and note that the Client is no longer in the list
below.
Removing Client Access to a vStore
You can remove one or more Clients' access to a vStore.
1. In the left navigation tree of GridControl, click on
vController Manager.
The vController Manager window opens to the right.
2. Click the Workgroup Membership tab, and select the appropriate vStore from the vStore
drop-down list.
56
Page 58
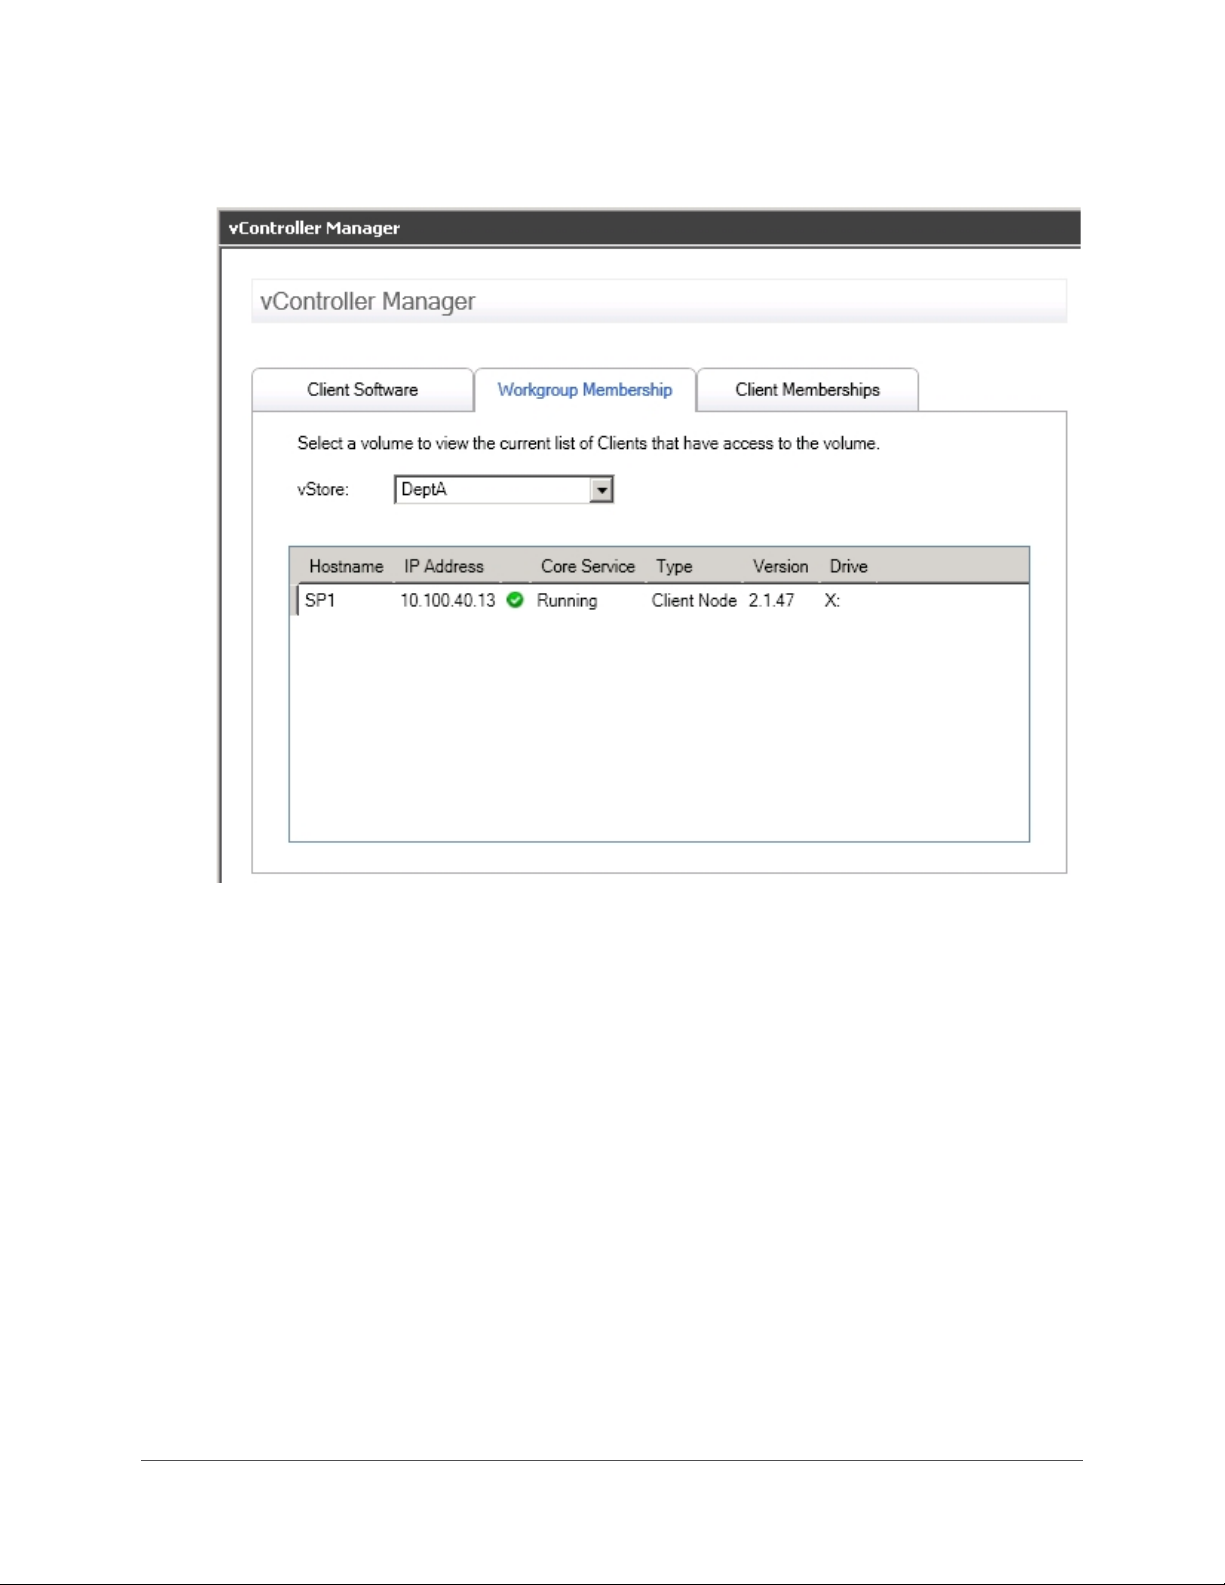
All Clients with a workgroup mapping to the selected vStore display in a table on the
Workgroup Membership tab of the vController Manager.
3. Right-click on the Client whose access to the vStore you would like to remove, and select
Remove From vStore from the short-cut menu.
The Remove From vStore dialog box opens, displaying the status of the removal.
4. When finished, click the OK button.
The Client no longer displays in the table on the Workgroup Membership tab for the selected
vStore.
GRIDSTORE ADMINISTRATOR’S GUIDE 57
Page 59
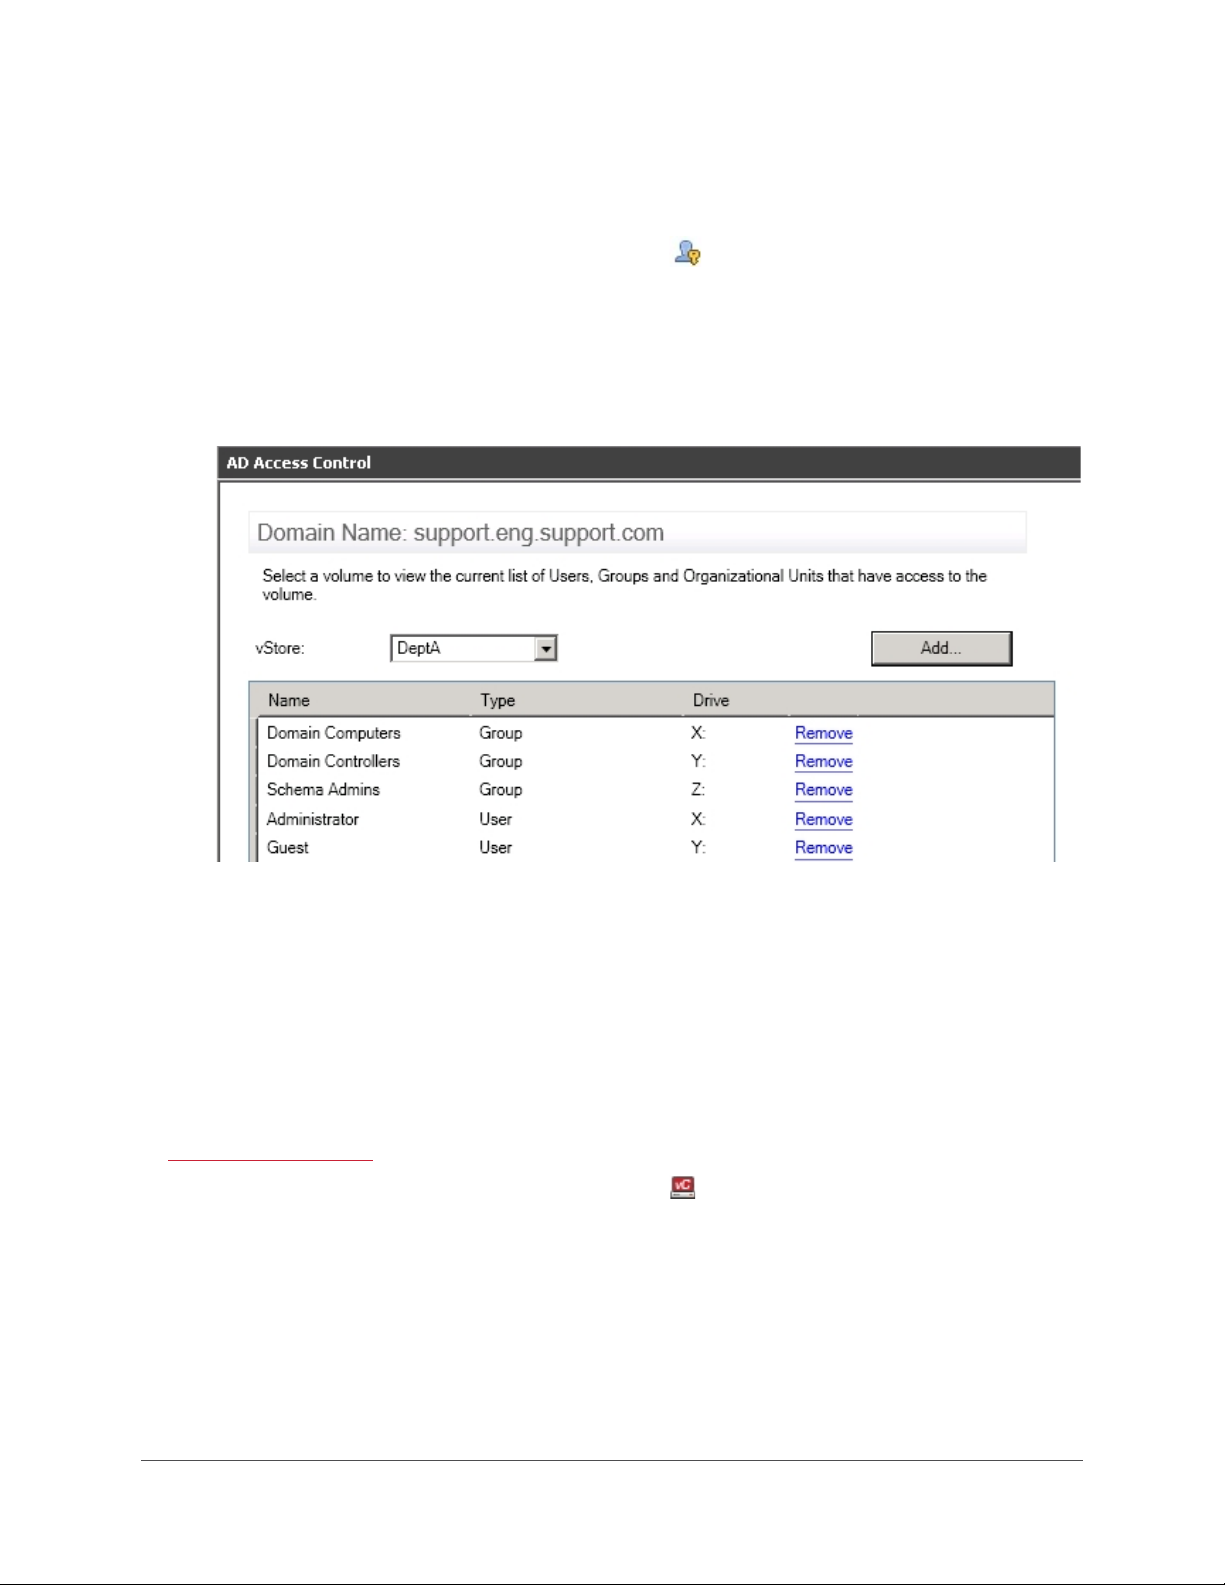
Removing Active Directory Object Mappings from a vStore
You can remove Active Directory Object mappings to a vStore.
1. In the left navigation tree of GridControl, click on
The AD Access Control window opens to the right.
2. In the vStore drop-down list, select the vStore to which you would like to remove AD Object
mappings.
The AD Access Control window displays the Active Directory Object mappings for the selected
vStore.
AD Access Control.
3. Click the Remove link in the table next to the AD Object mapping that you would like to
remove.
The AD Object mapping is removed and no longer displays in the list.
Changing the Drive Map Letter to a vStore
For workgroup mappings to a vStore, you can change the drive map letter for a Client.
Note: For AD Object mappings, you cannot change the drive map letter. To change it, you would need
to
re-create the mapping (see pg. 51).
1. In the left navigation tree of GridControl, click on
The vController Manager window opens to the right.
2. Click the Workgroup Membership tab.
3. Select the appropriate vStore from the vStore drop-down list.
A table of Clients with workgroup mappings for the selected vStore displays.
4. Right-click on the appropriate Client, and select Change Drive Map from the short-cut menu.
vController Manager.
58
Page 60
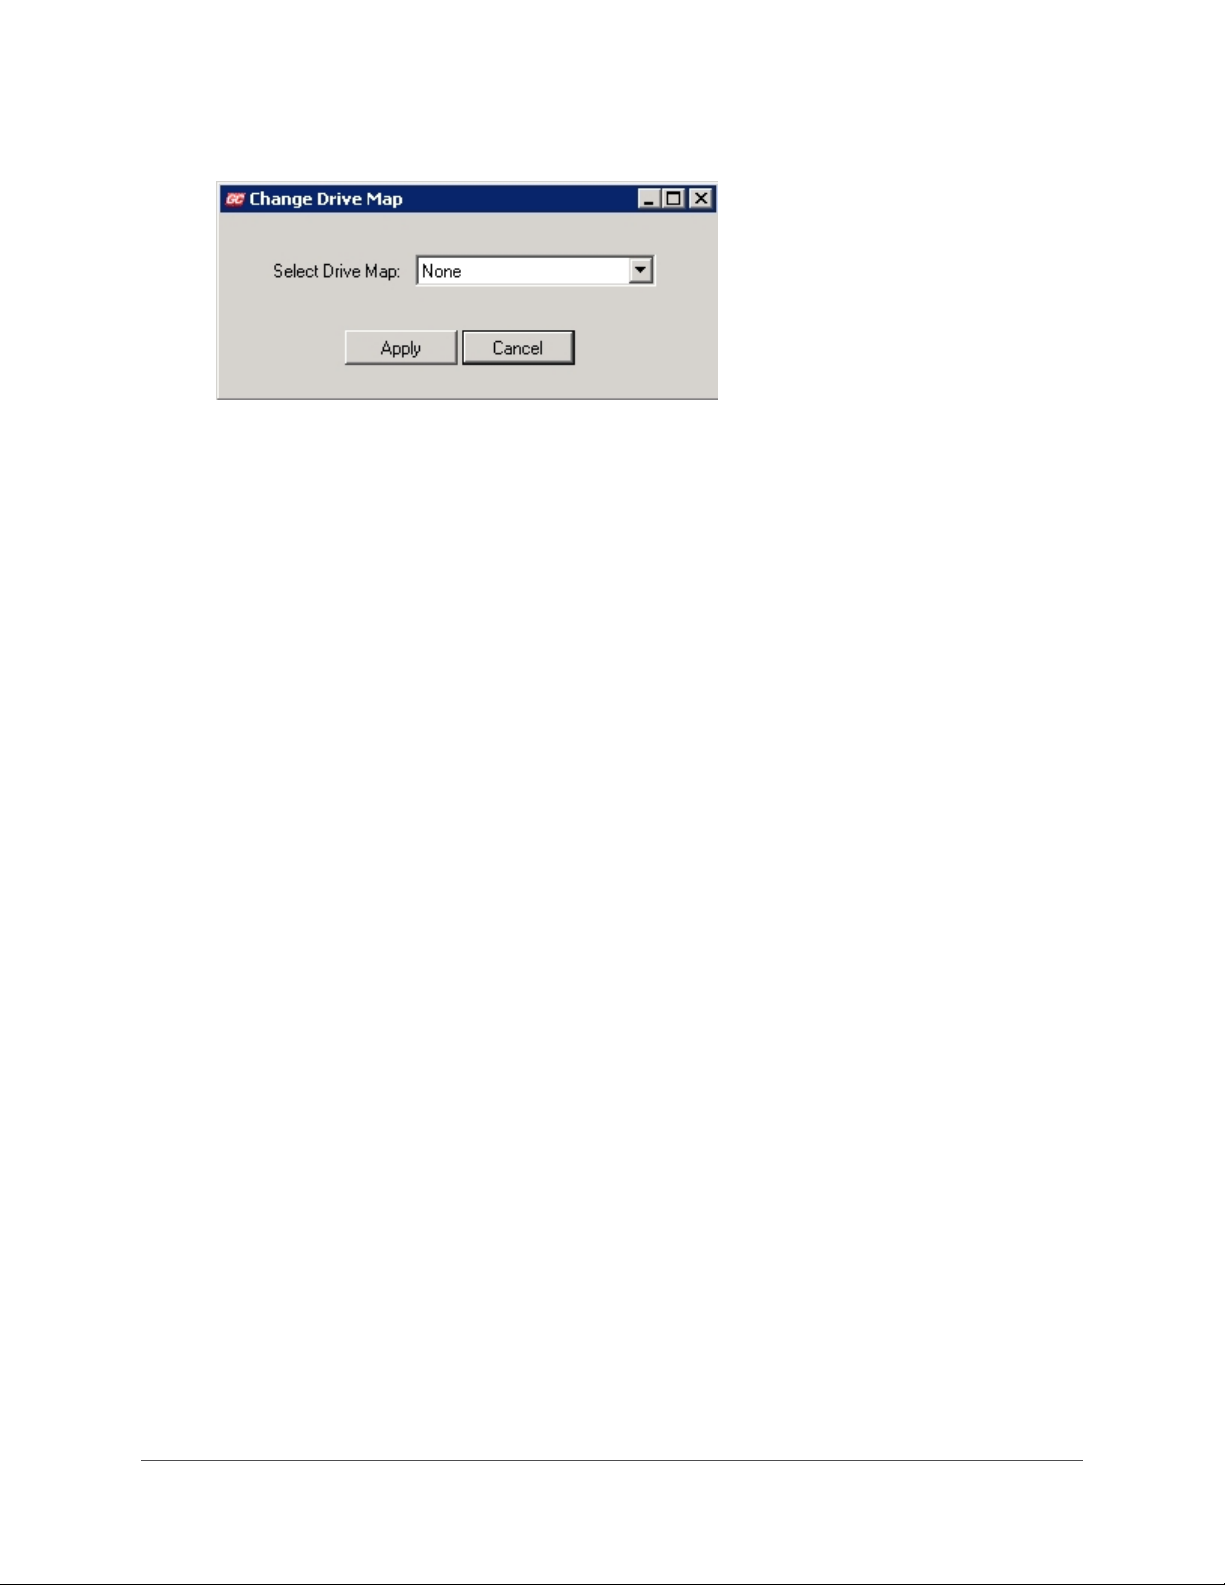
The Change Drive Map dialog box opens.
5. In the Select Drive Map drop-down list, select another drive map letter, and click the Apply
button.
The change is made and is reflected for the Client on the Workgroup Membership tab of the
vController Manager.
GRIDSTORE ADMINISTRATOR’S GUIDE 59
Page 61

Installing Gridstore Software
Before any Client or host computer can access storage on the Grid, it must have the vController
software installed on it. As an option, you can also install GridControl, which is an MMC (Microsoft
Management Control) snap-in used to configure and manage the Grid.
Notes:
— If you are setting up your Grid and installing the vController on a host computer for the first time,
see
Setting Up the Grid on pg. 7 instead.
— When you create Active Directory Object mappings to a vStore (which include Users, Groups,
Organizational Units and Computers being mapped to a vStore), if the
for a user has been set to have vController installed, then you do not need to have it already
installed on Client computers ahead of time, as a silent install occurs automatically when the
user logs on.
There are different ways to install Gridstore software and deploy it on Client computers.
This section covers the following topics:
Installing Software via Group Policy
Installing Software Locally
Group Policy (see below)
Installing Software Remotely
Installing Software via Group Policy
The recommended technique for deploying the vController to Client computers within an enterprise
environment is to use Group Policy. For information and steps on doing this, please see this
knowledge base article on Microsoft's website (http://support.microsoft.com/kb/816102).
Note: For Group Policy deployments, the Gridstore software installs at the computer level as opposed
to user level.
Installing Software Locally
You can install the vController on each Client (or host computer) locally. The installation file (.MSI file)
includes the vController software as well as GridControl, which is an MMC snap-in used to configure
and manage the Grid.
1. Obtain the installation file (.MSI) by doing the following:
•
Send an email to [email protected].
In the subject line, enter vController Software Request.
•
In the body of the email, enter the serial number(s) for your Gridstore Storage Node(s).
•
2. After you receive the installation file, double-click on it to install it.
60
Page 62
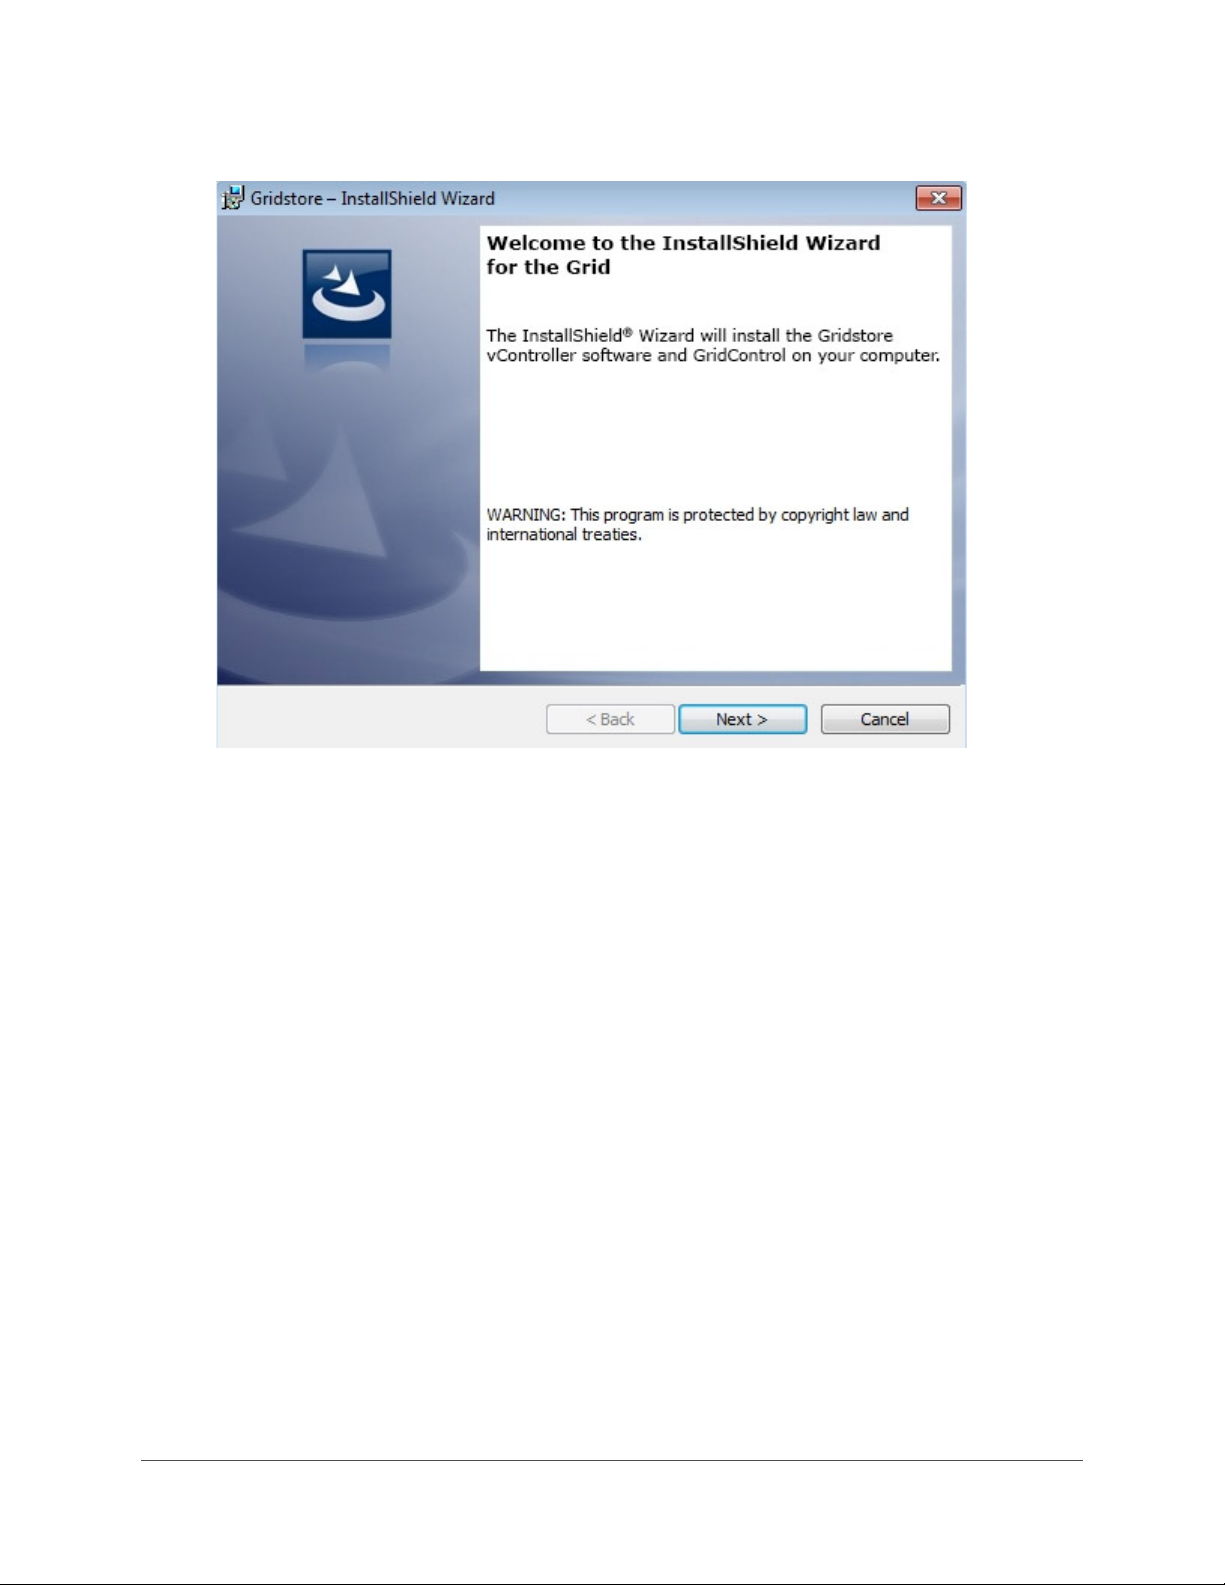
The InstallShield Wizard opens.
3. Click the Next button and follow the installation instructions, clicking the Next button after
each page of the Wizard until you reach the
Install Setup Type page.
GRIDSTORE ADMINISTRATOR’S GUIDE 61
Page 63
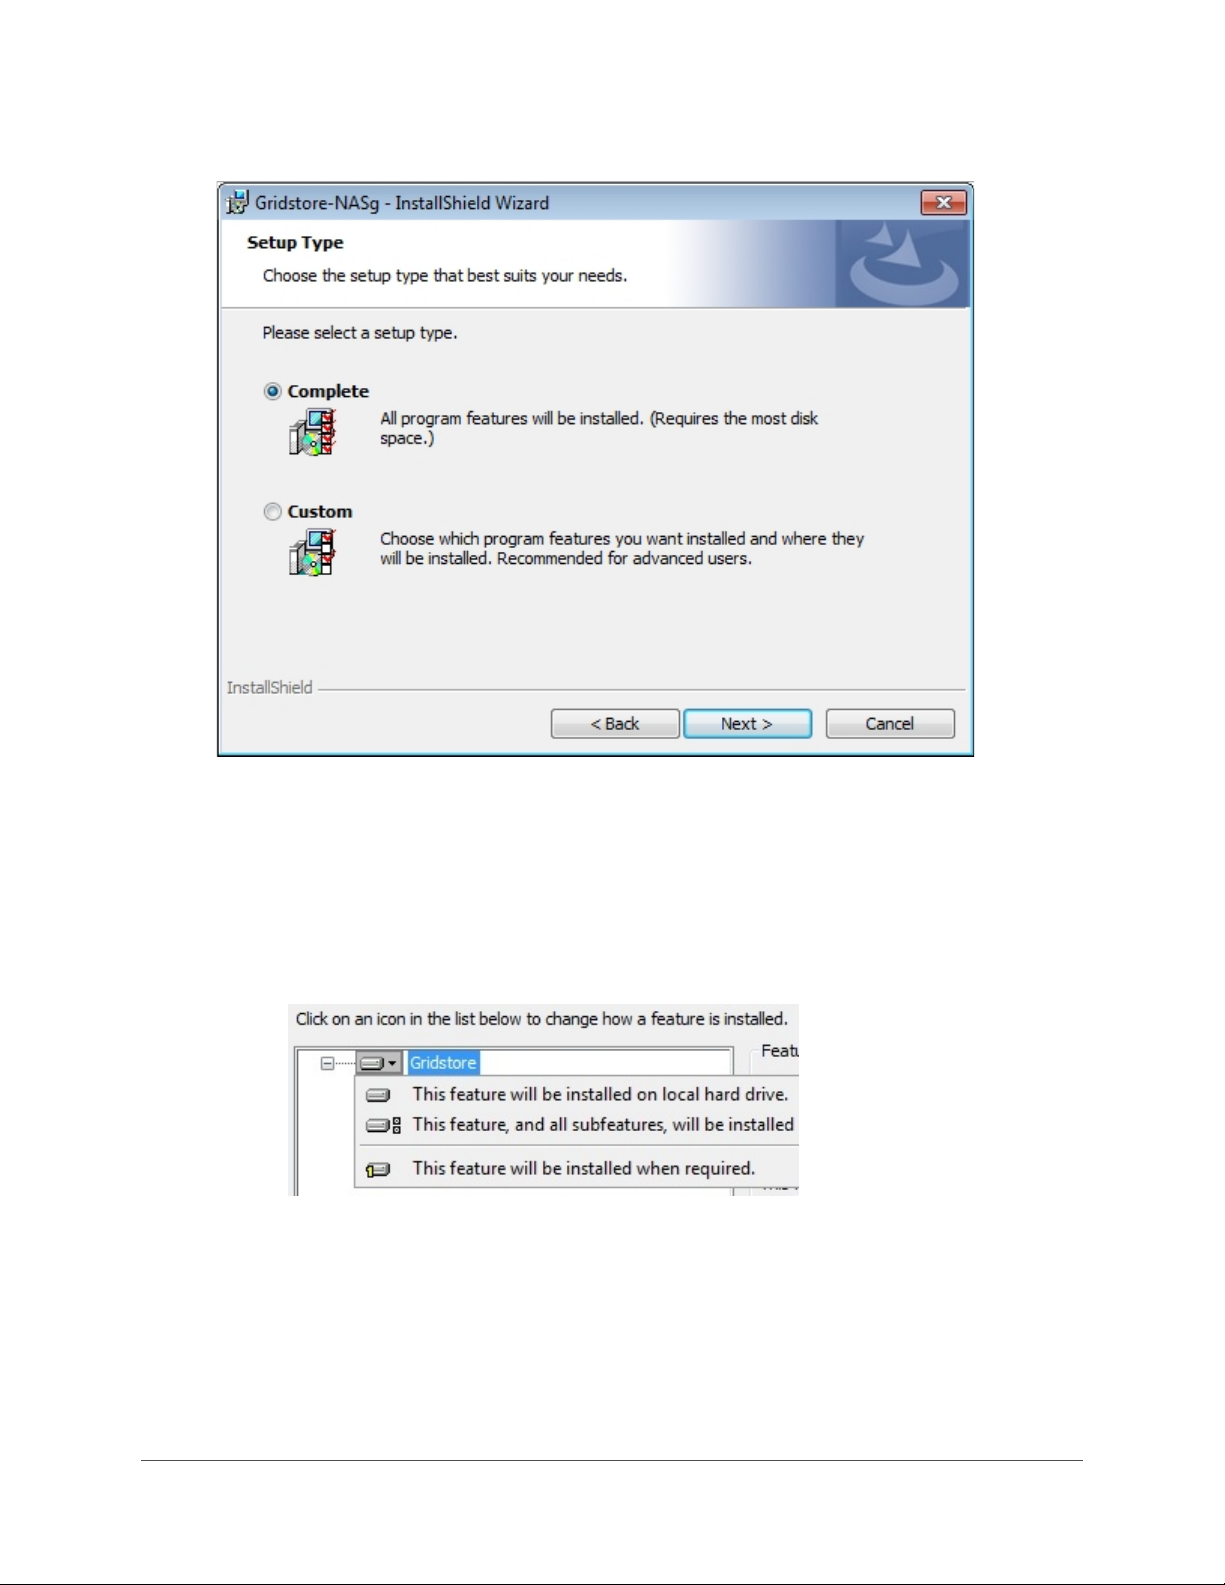
This page displays options for a complete or custom installation.
4. Do one of the following.
• To install the vController software only, select the Custom option, and do the following.
(Recommended for Client computers.)
— Click the Next button.
— In the Custom Setup window, click on the down arrow on the Gridstore icon and
ensure
This feature will be installed on local hard drive is selected.
62
Page 64
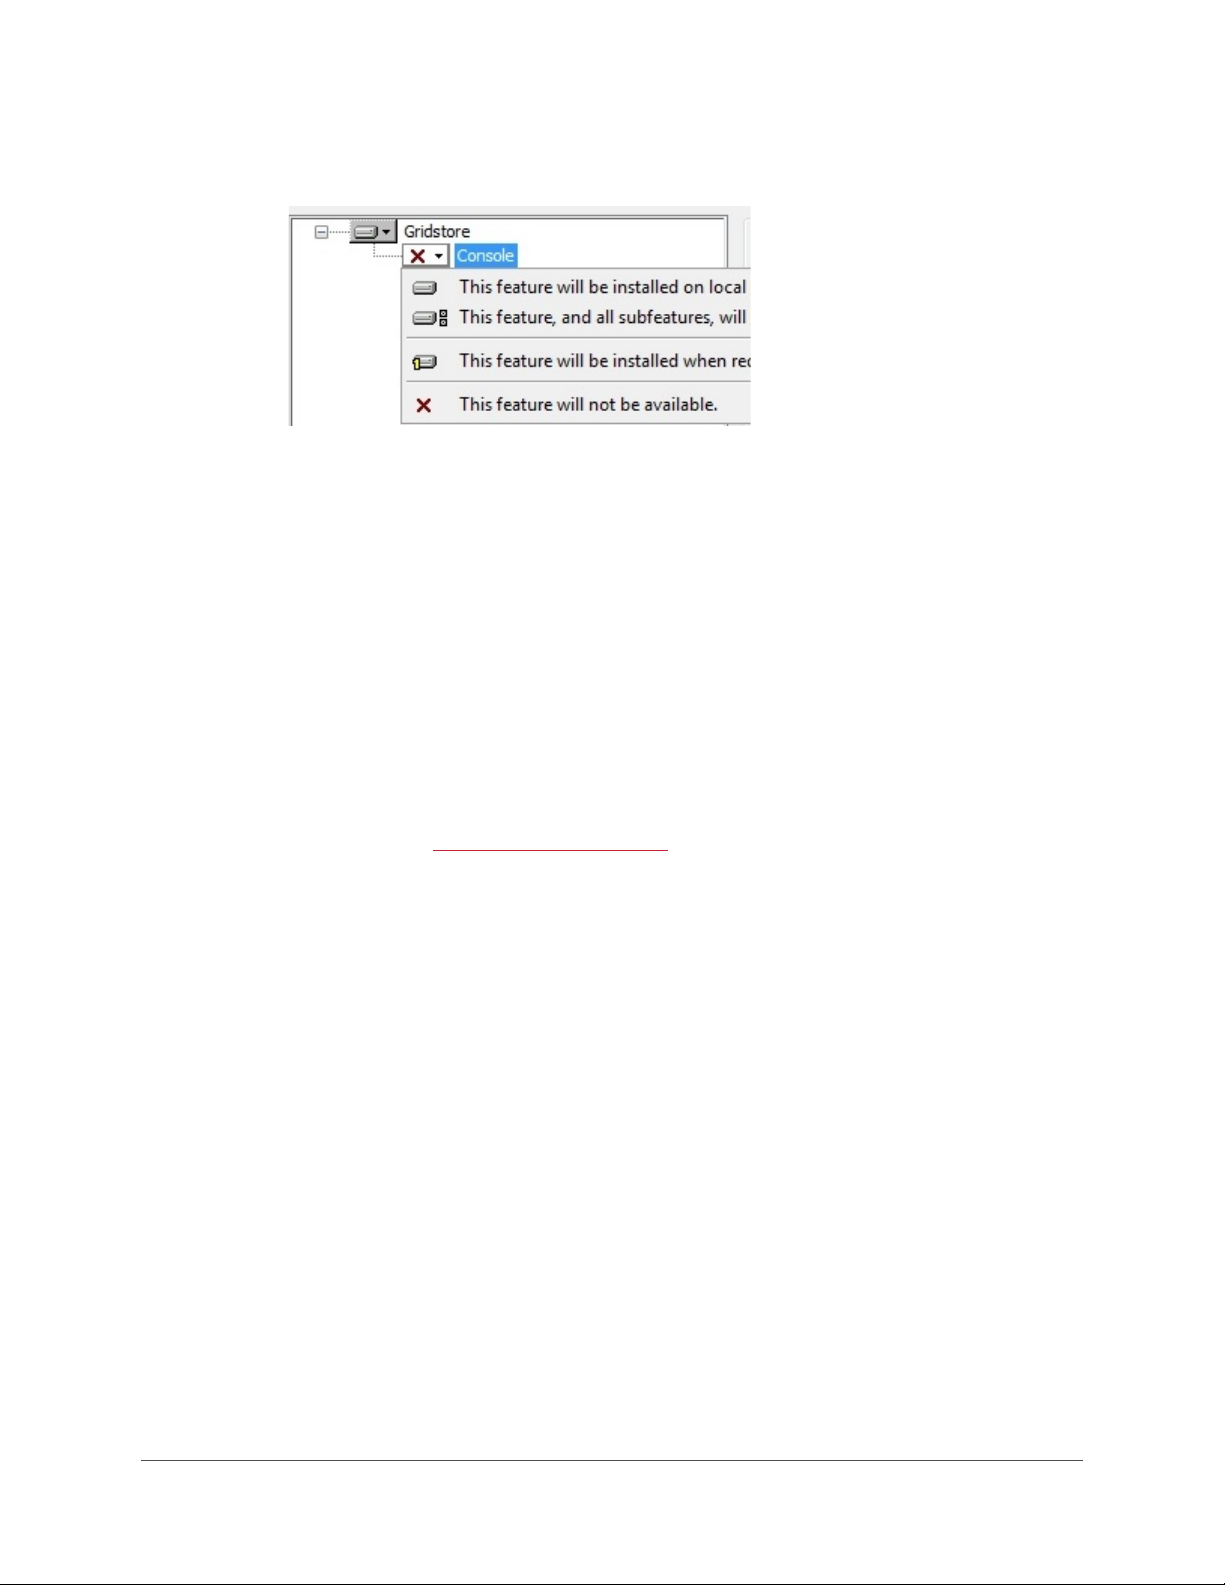
— Click the plus sign next to the Gridstore icon, click on the down arrow on the Console
icon, and ensure
• To include GridControl with the vController, select the Complete option. (Recommended
for the Grid Administrator’s management machine.)
Note: GridControl uses the default view of the MMC.
5. Click the Next button until you reach the Ready to Install window, and then click the Install
button.
Upon completion, the local computer is ready to access the Grid.
This feature will not be available is selected.
Installing Software Remotely
After installing Gridstore software on a host computer, you can install the vController software on
multiple Client computers at once, remotely, from within GridControl. By installing vController on
Client computers, you are adding those Clients to the Grid.
For steps and information, see
Adding Clients to the Grid on pg. 64.
GRIDSTORE ADMINISTRATOR’S GUIDE 63
Page 65
Managing Clients
You can manage the Clients that are in the Grid. This includes upgrading their vController software,
restarting Clients mapped to a particular vStore and more.
This section covers the following topics:
Adding Clients to the Grid
Removing Clients from the Grid
Repairing Software on a Client
Uninstalling Software from a Client
Upgrading vController Software for a Client
Selecting a Network Adapter for a Client
Stopping Communication between a vStore and a Client
Re-establishing Communication between a vStore and a Client
Restarting the Core Service on a Client
Viewing Client Information
Adding Clients to the Grid
When you add Clients to the Grid, you are remotely installing the vController software on Client
computers that are on the same network as the Grid. Once Clients have been added to the Grid, you
can give them access to vStores and manage them.
For this remote installation, Clients must meet the following requirements.
•
Clients must be physically connected (aka “wired”) to the LAN.
.NET Framework 3.5 SP1 must be installed.
•
The domain Administrator account must have administrative access to Clients.
•
Administrative shares must be enabled, and the firewall must allow access to these shares.
•
Share/user level security requirements must be met. This means that either a Windows
•
domain or user logon equivalency must be active. You can, however, manually enter
credentials for each deployment.
1. In the left navigation tree of GridControl, click on
Client(s) to the Grid from the short-cut menu.
vController Manager, and select Add
64
Page 66
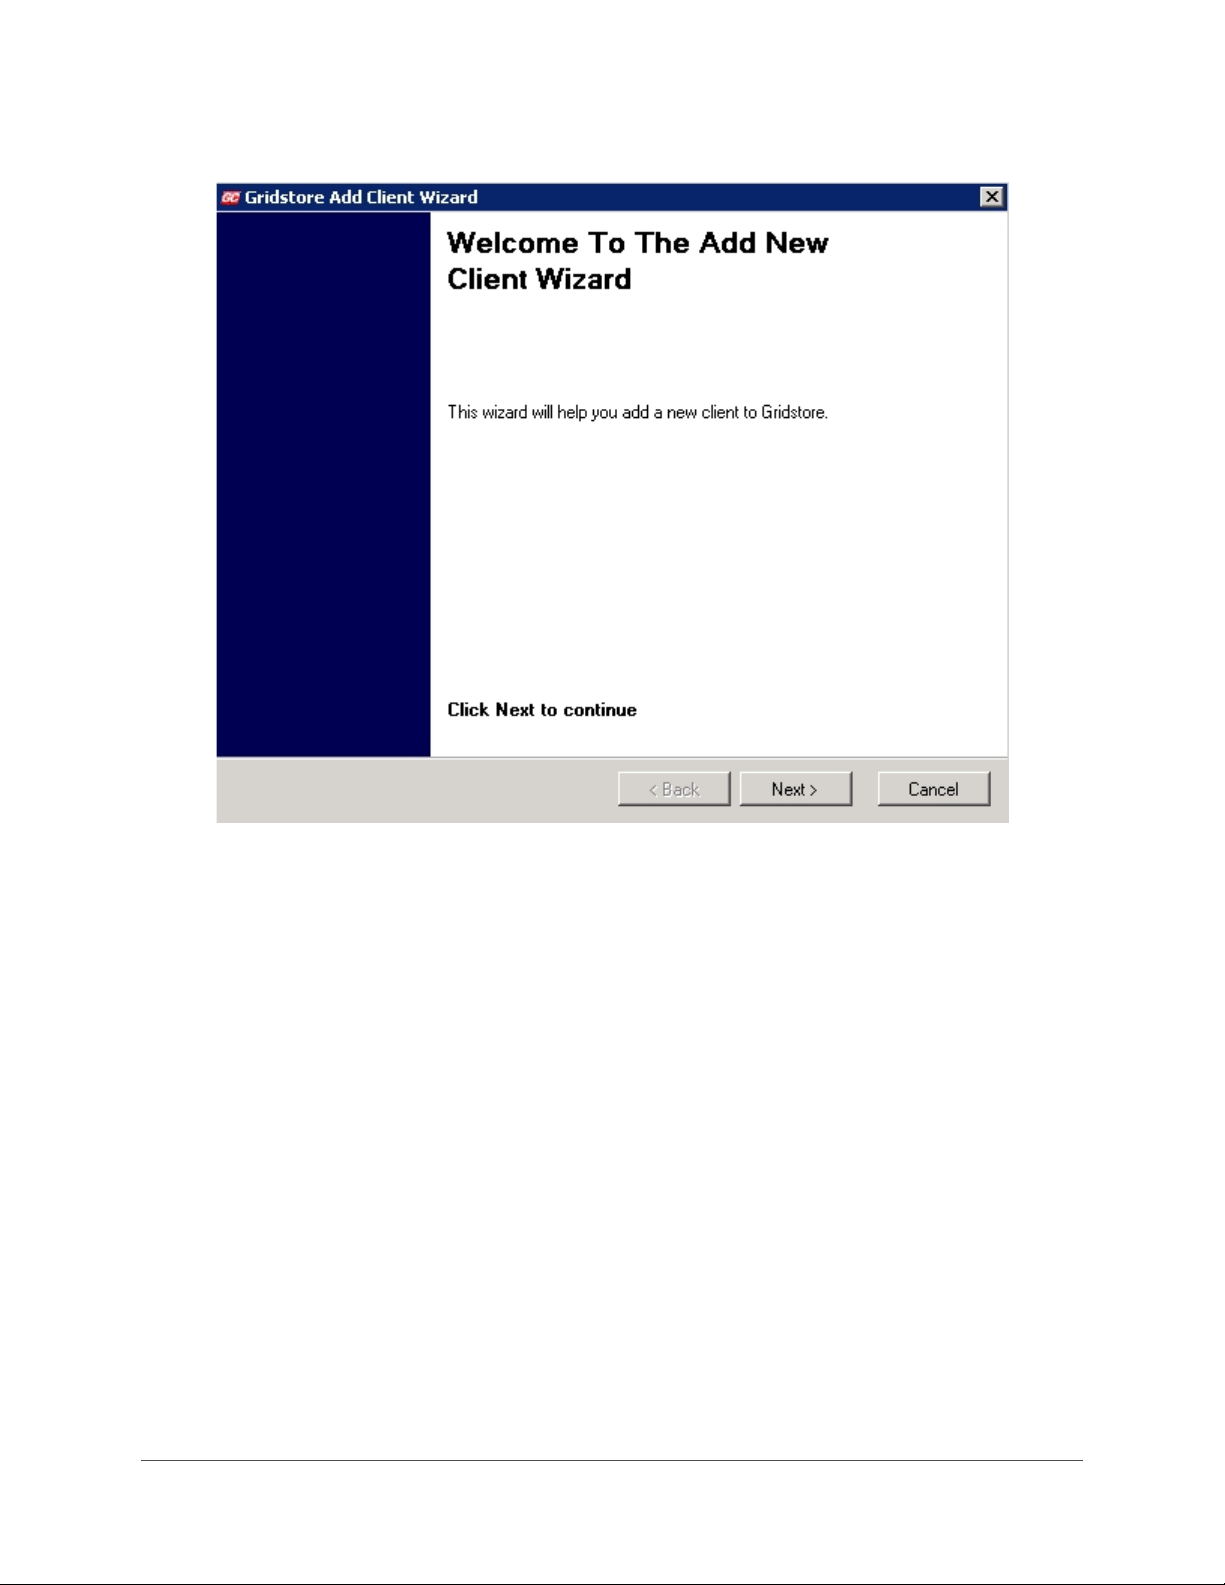
The Add Clients Wizard opens.
2. Click the Next button.
GRIDSTORE ADMINISTRATOR’S GUIDE 65
Page 67
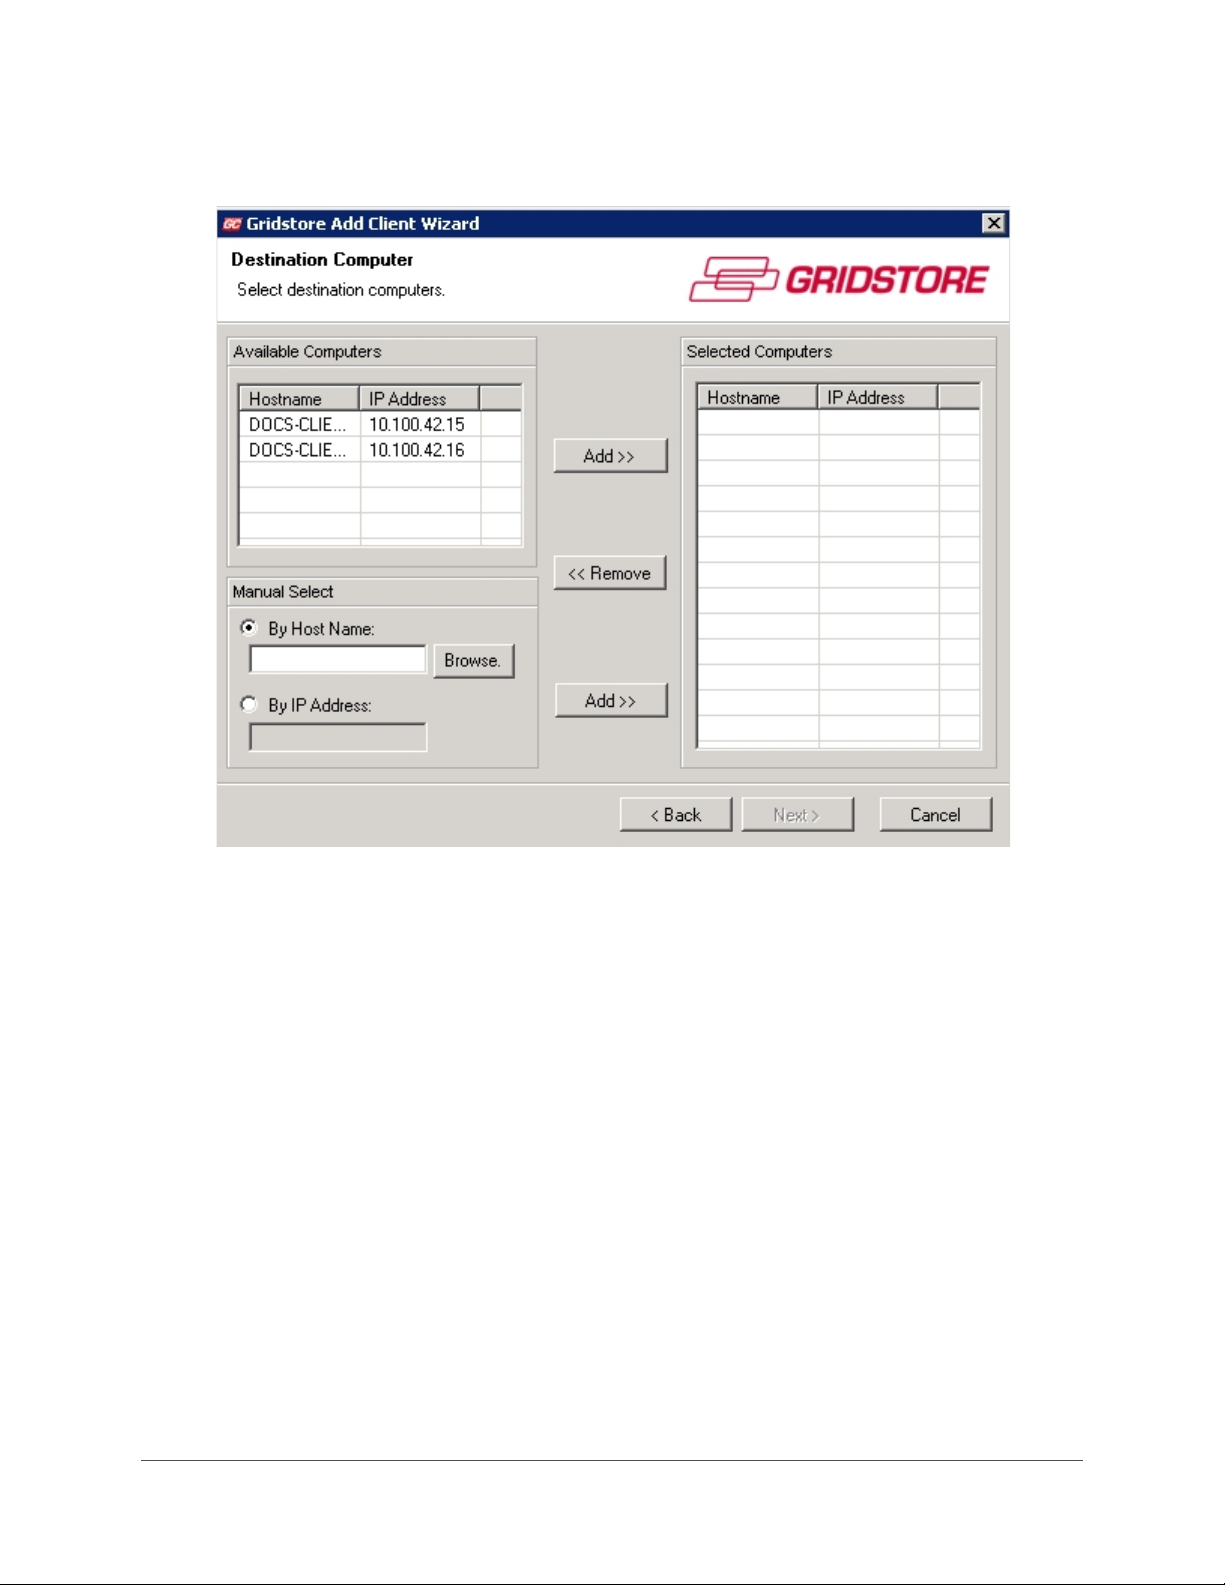
The Destination Computer page of the Wizard opens and loads the available Clients on the
network into the list.
3. Use the Add and Remove buttons to select the Clients you want to add to the Grid.
Tip: You can also add an available Client by host name or IP Address by selecting one of
those options from the
and then clicking the
4. When finished, click the Next button.
The Remote Deployment Pre-Flight Check page of the Wizard opens.
5. When finished, click the Next button.
The Complete the Wizard page opens.
6. Click the Finish button.
Manual Select area (and clicking the Browse button, if applicable),
Add button.
66
Page 68
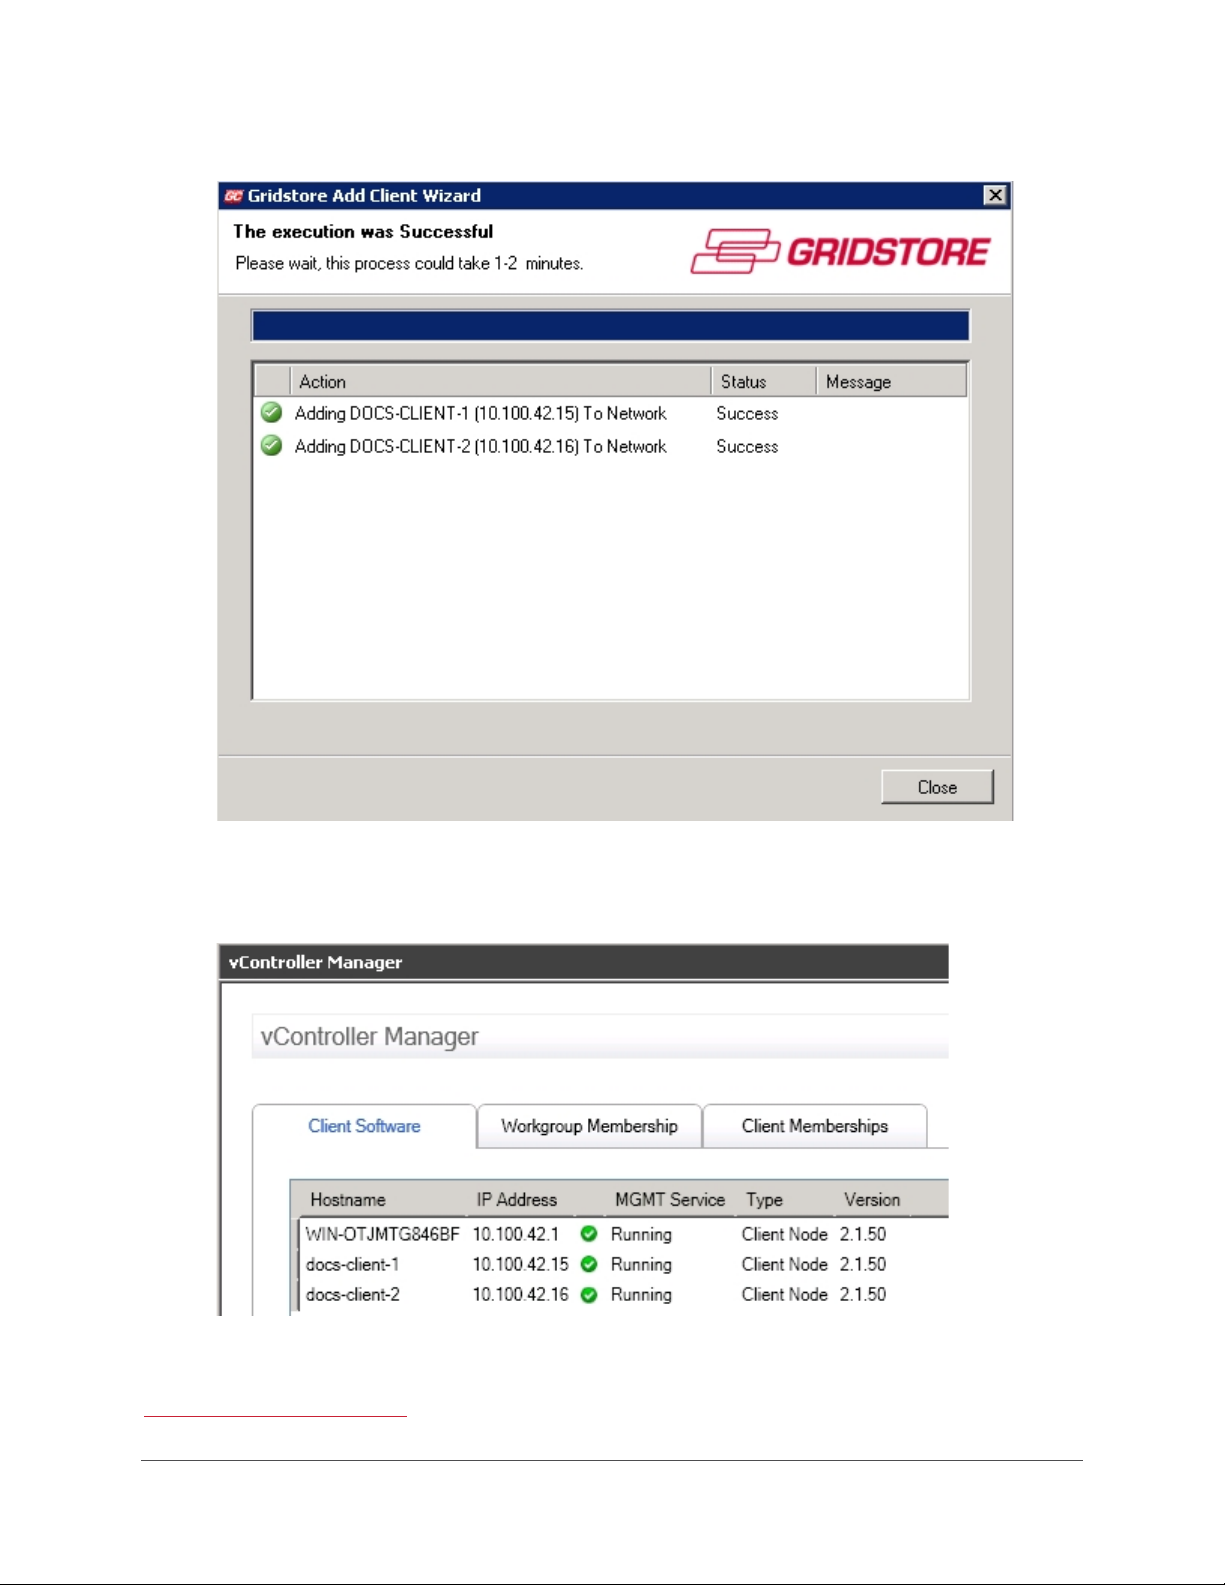
The confirmation page of the Wizard opens.
7. Click the Close button.
The Clients now display on the Client Software tab of the vController Manager.
See Also
Installing Gridstore Software
GRIDSTORE ADMINISTRATOR’S GUIDE 67
Page 69
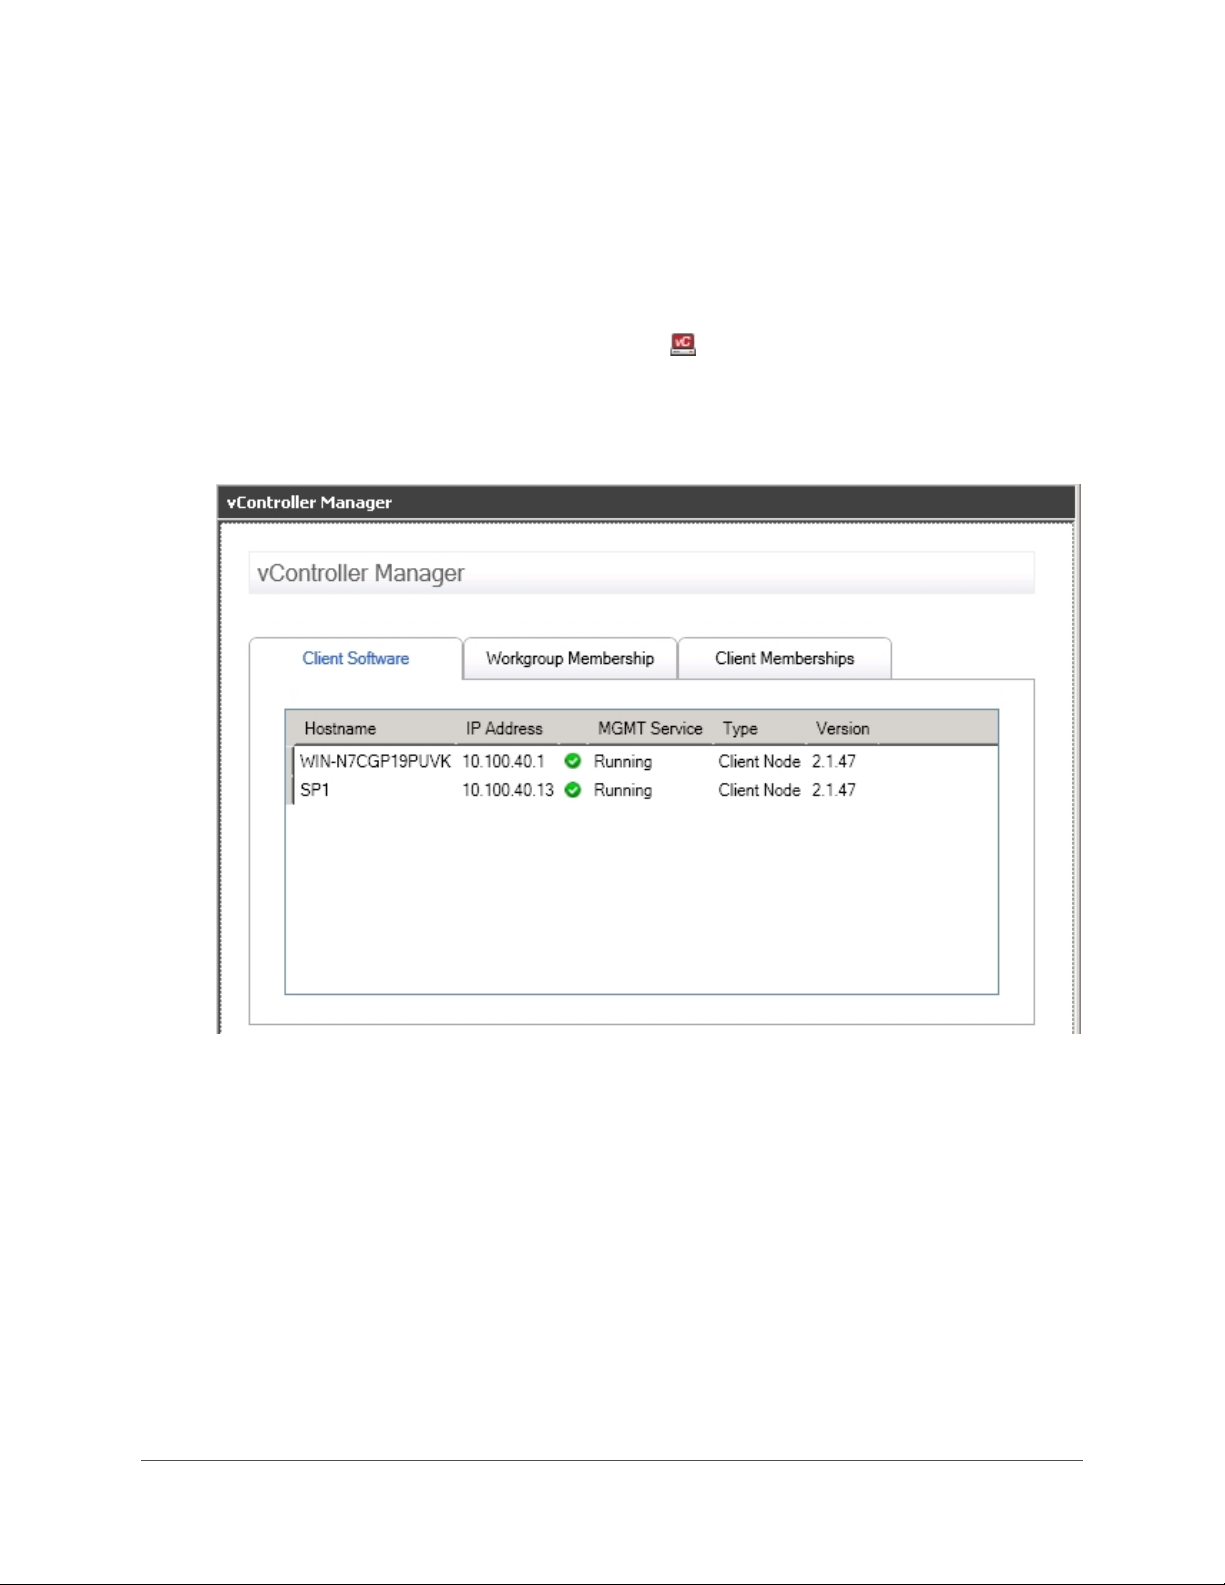
Removing Clients from the Grid
When you remove a Client from the Grid, the Client's configuration is removed from the Gridstore
Management Service (the back-end support service) and it no longer displays in the vController
Manager. Mappings from the Client to vStores are also removed.
When you remove a Client from the Grid you first need to uninstall its vController software. Steps for
doing so are included in the procedure below.
1. In the left navigation tree of GridControl, click on
The vController Manager window opens to the right.
2. Click the Client Software tab.
A table of Clients on the Grid displays.
vController Manager.
3. If you have not done so already, right-click on the appropriate Client, and select Uninstall
from the short-cut menu to uninstall the vController.
A message box opens, warning about the action.
4. Click the OK button.
A message box opens, informing you that the uninstall has started.
5. Click the OK button.
The Client's vController is uninstalled and displays on the Client Software tab with a status of
Stopped.
68
Page 70
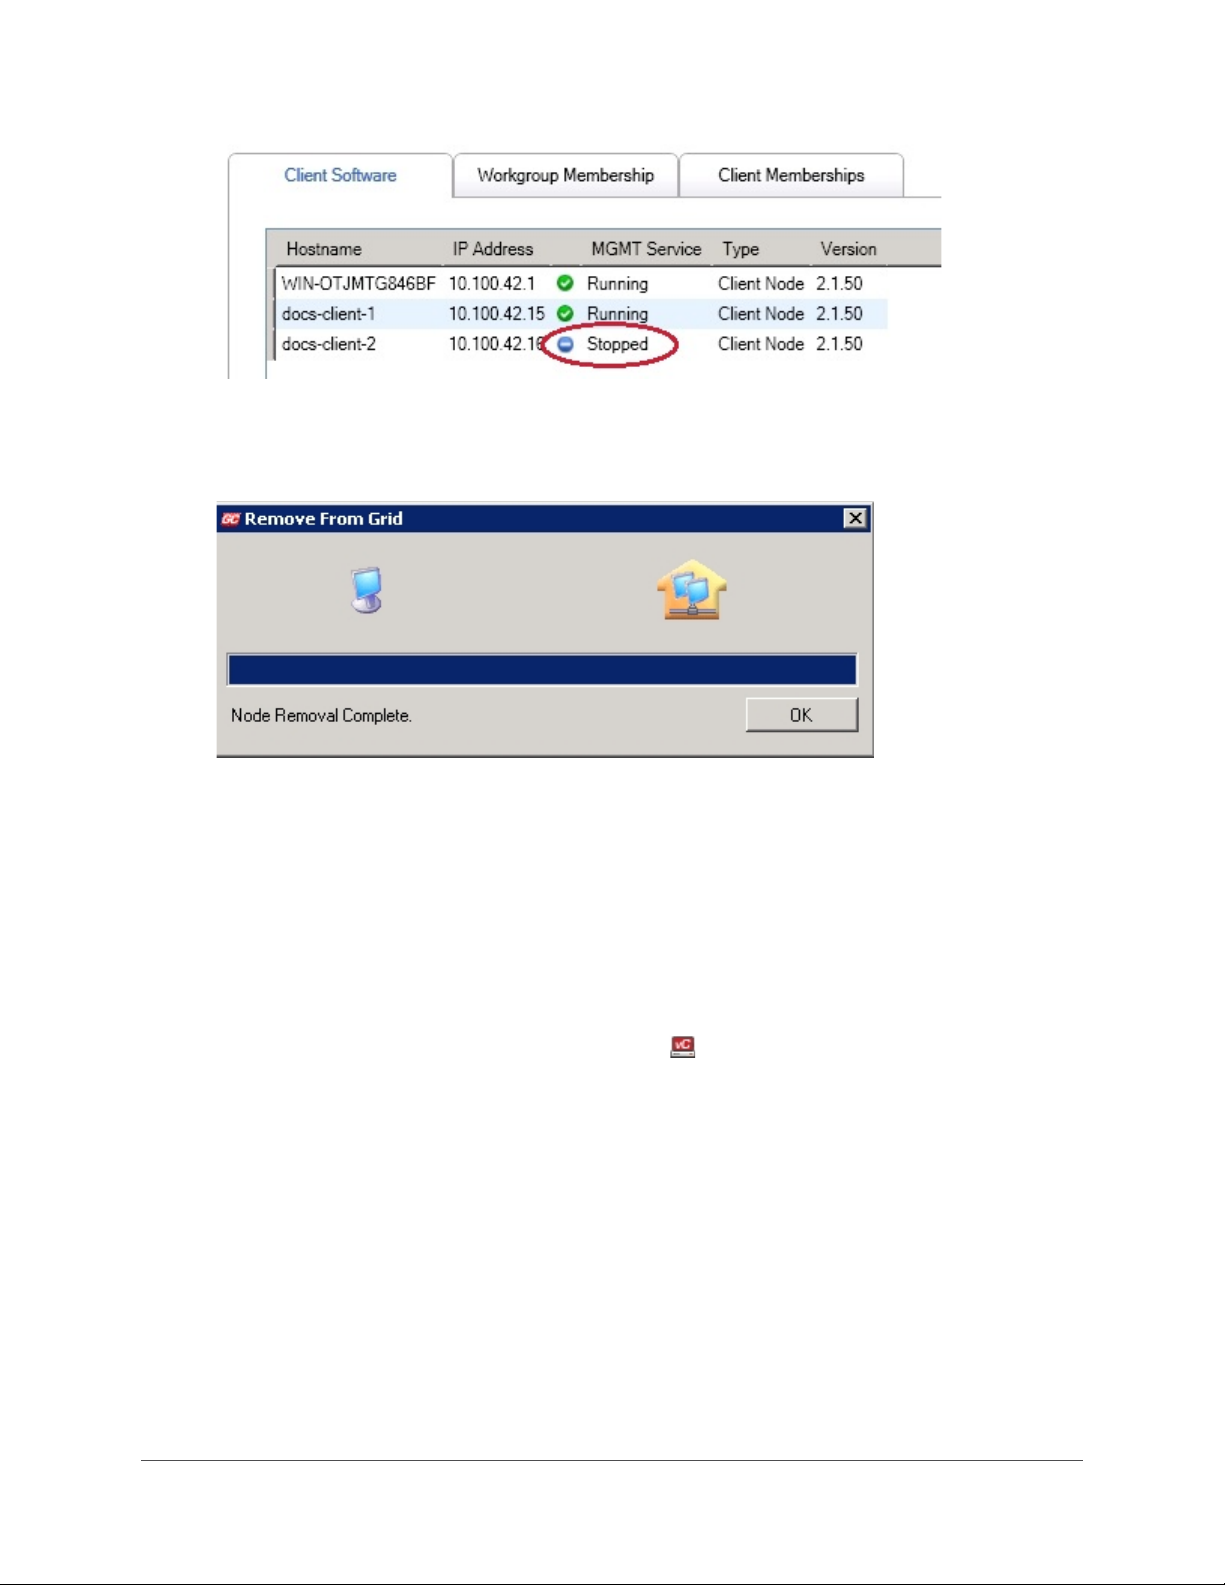
6. Right-click on the stopped Client, and select Remove from Grid from the short-cut menu.
The Remove From Grid dialog box opens, displaying the removal progress.
7. When finished, click the OK button.
The Client no longer displays on the Client Software tab of the vController Manager.
Repairing Software on a Client
You can repair the vController that is on a Client computer. This reinstalls the software in a way that
ensures its integrity.
Tip: You can perform this action from the Client Software tab in the vController Manager for Clients
on the Grid, or from the
1. In the left navigation tree of GridControl, click on vController Manager.
The vController Manager window opens to the right.
2. Click the Client Software tab.
Workgroup Membership tab for Clients connected to a particular vStore.
GRIDSTORE ADMINISTRATOR’S GUIDE 69
Page 71
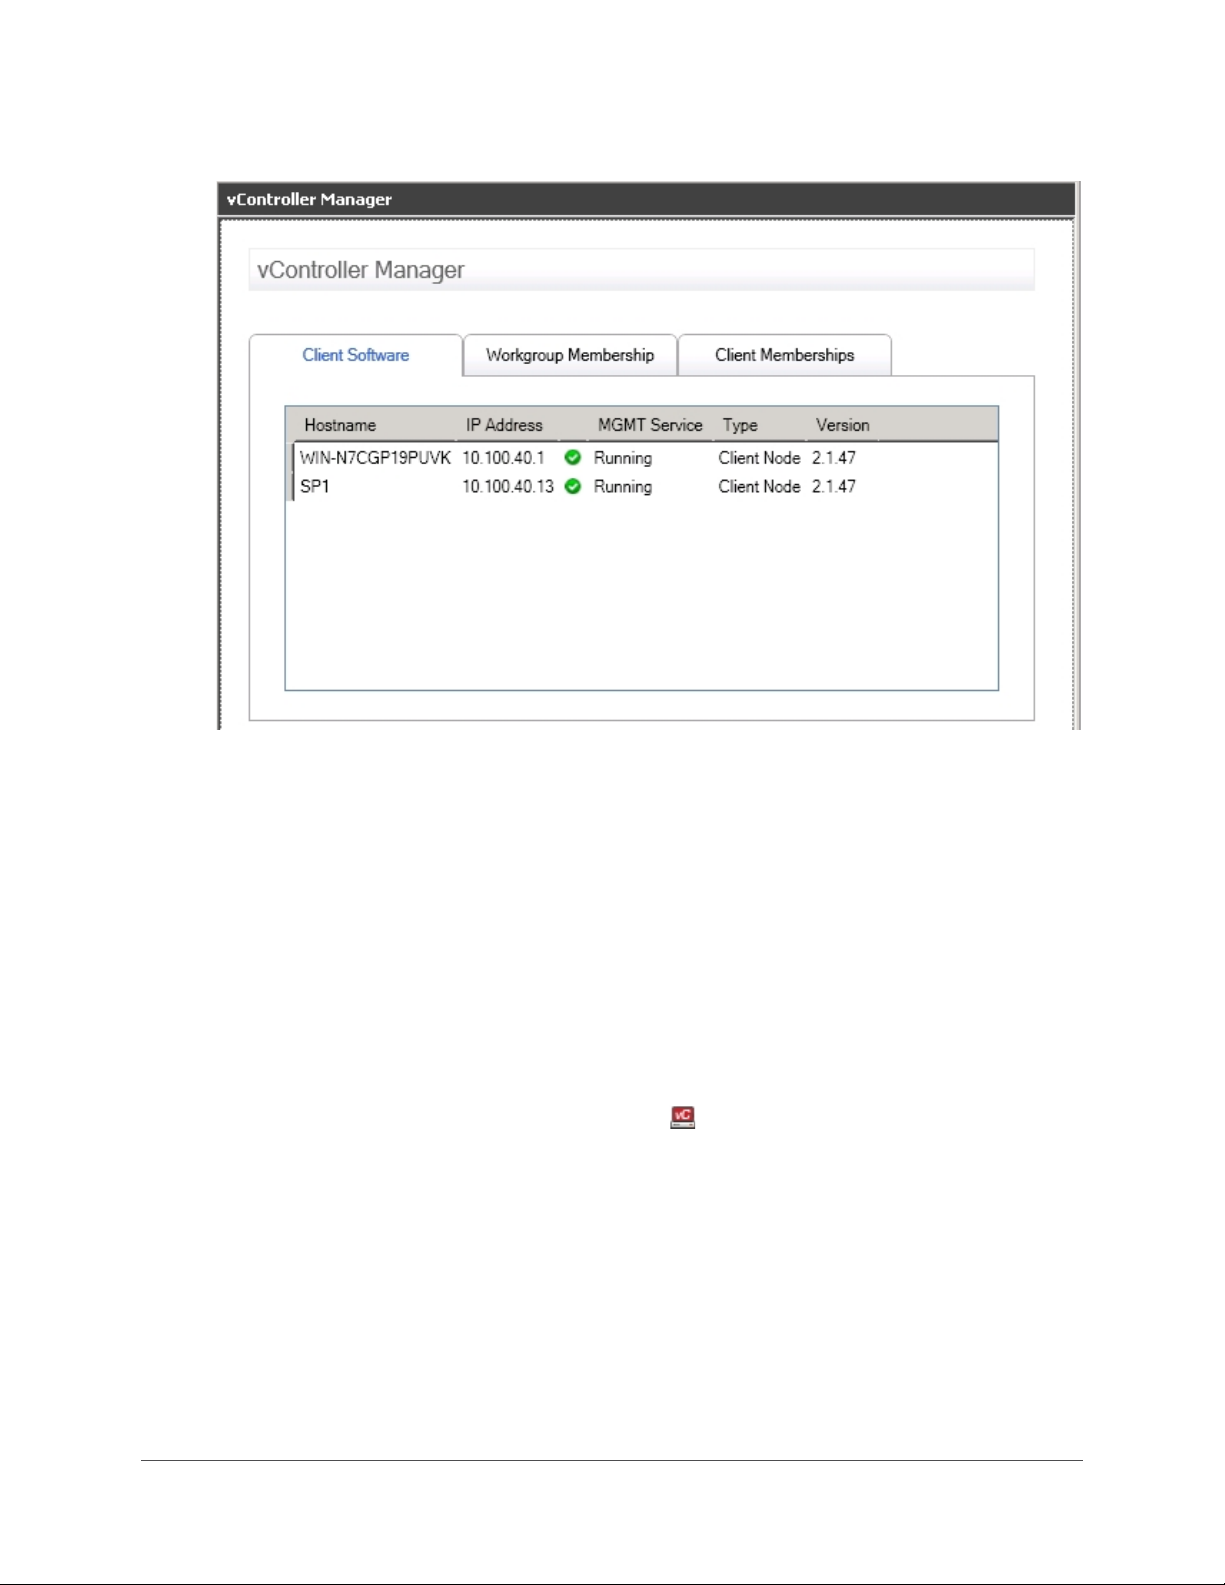
A table of Clients on the Grid displays.
3. Right-click on the Client whose vController software you need to repair, and select Repair
from the short-cut menu.
A message box opens, informing you that the repair has started.
4. Click the OK button.
The vController is repaired for the selected Client.
Uninstalling Software from a Client
You can remove the vController software from a Client computer. Doing so is part of the process of
removing a Client from the Grid.
Tip: You can perform this action from the Client Software tab in the vController Manager for Clients
on the Grid, or from the
1. In the left navigation tree of GridControl, click on vController Manager.
The vController Manager window opens to the right.
2. Click the Client Software tab.
A table of Clients on the Grid displays.
Workgroup Membership tab for Clients connected to a particular vStore.
70
Page 72
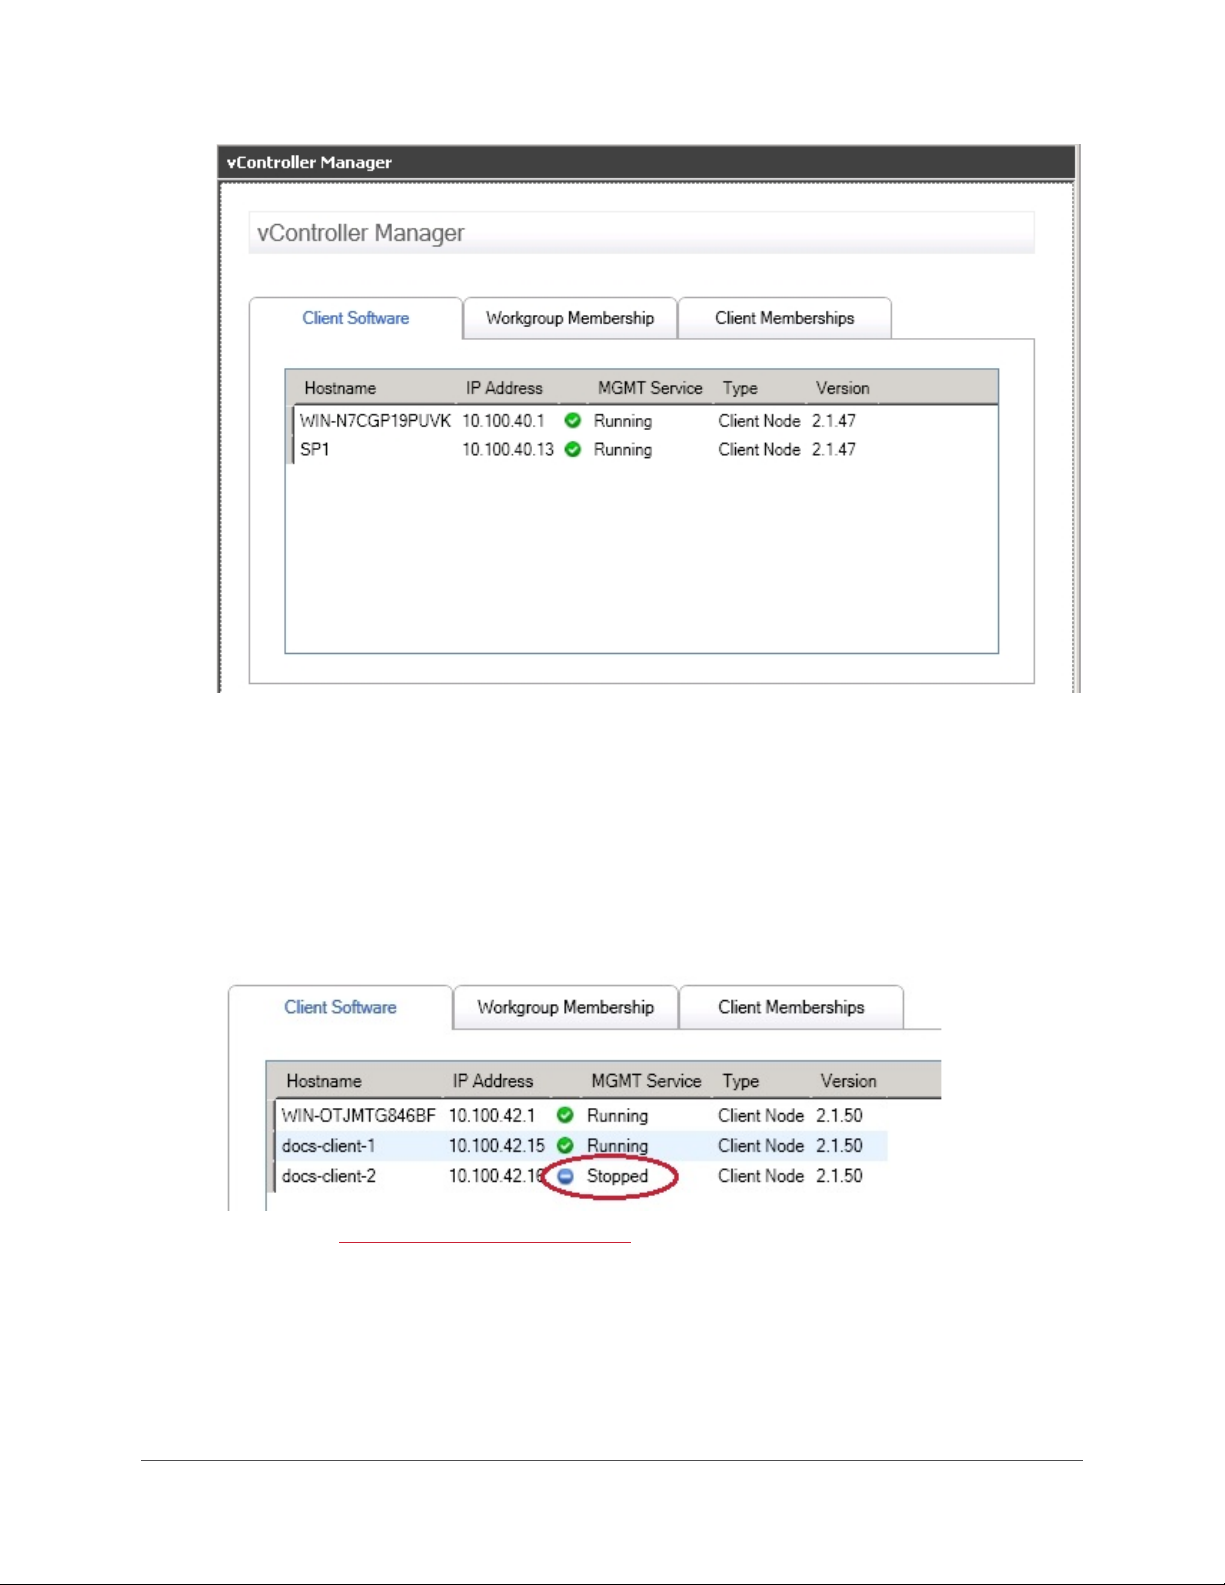
3. Right-click on the appropriate Client, and select Uninstall from the short-cut menu to uninstall
the vController.
A message box opens, warning about the action.
4. Click the OK button.
A message box opens, informing you that the uninstall has started.
5. Click the OK button.
The Client's vController is uninstalled and displays on the Client Software tab with a status of
Stopped.
You can now
remove the Client from the Grid (see pg. 68).
GRIDSTORE ADMINISTRATOR’S GUIDE 71
Page 73
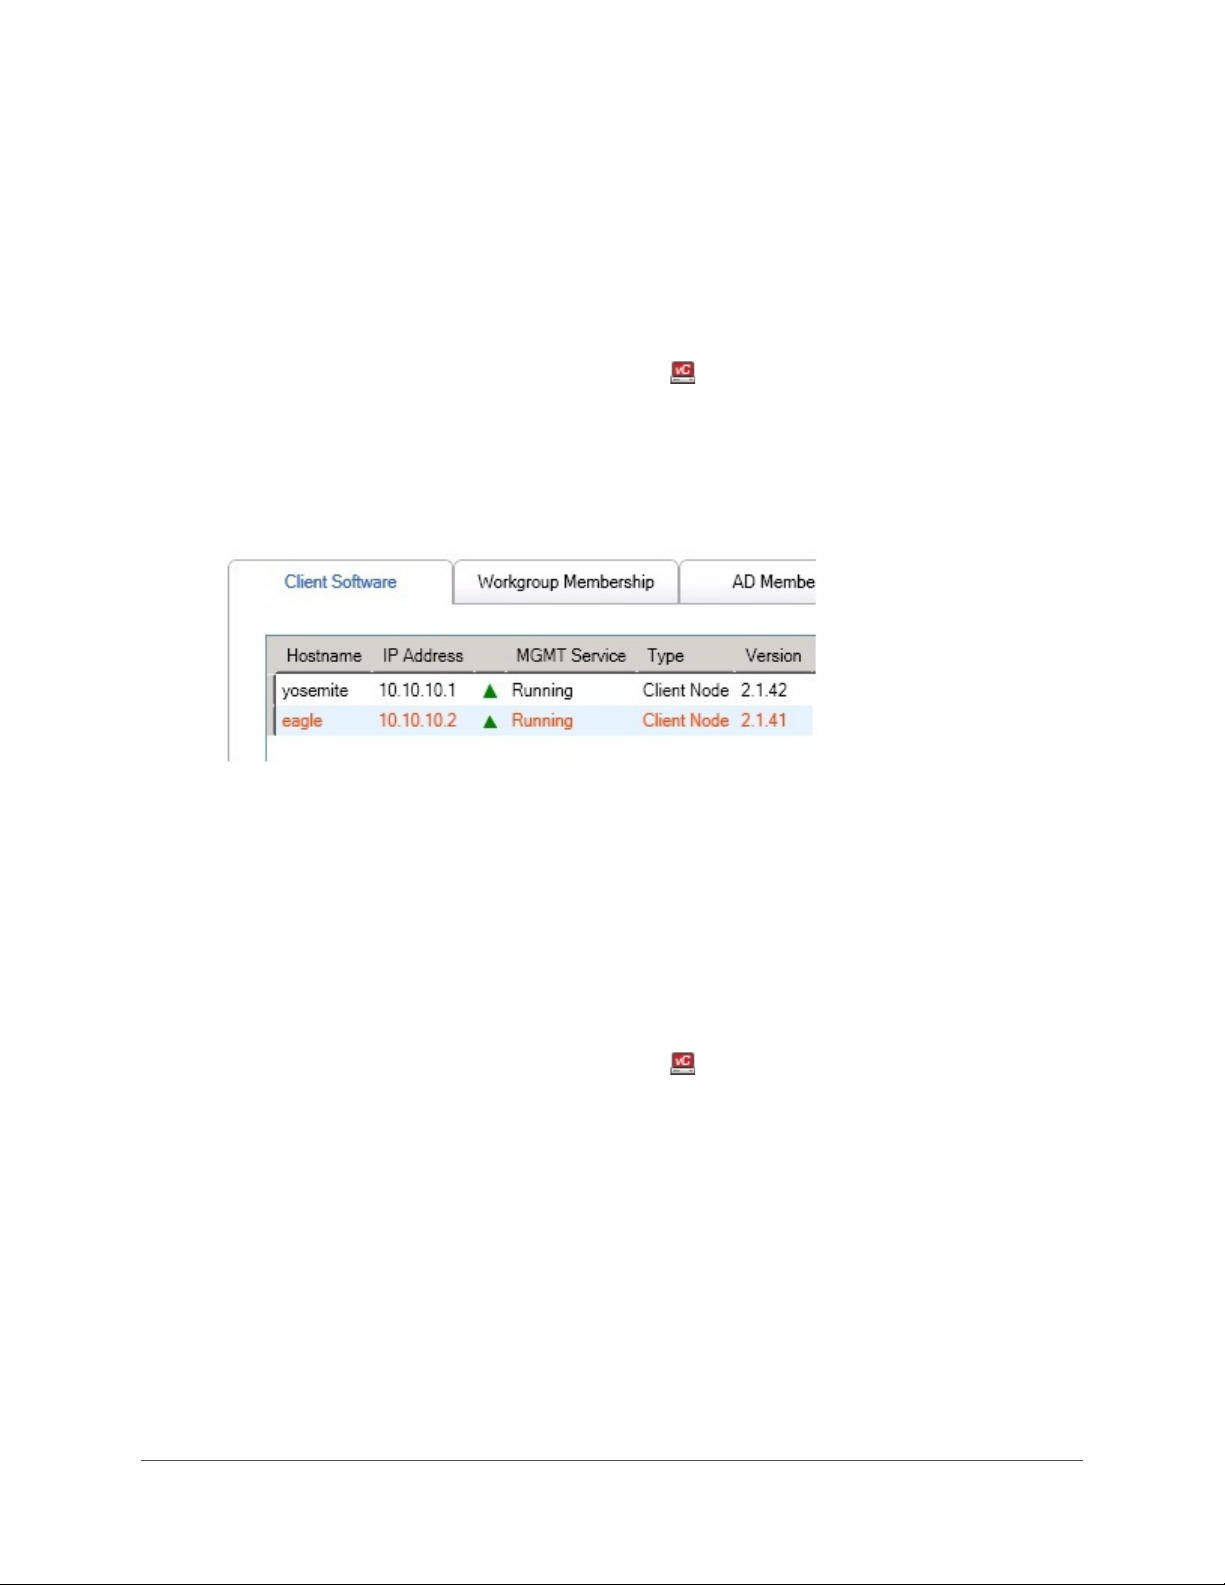
Upgrading vController Software for a Client
You may need to upgrade the vController on just one or more Clients on the Grid. This can happen if,
for example, the Client was shut down when software for the entire Grid was upgraded, or you added
a Client to the Grid at a later time.
When a Client needs to be upgraded it displays in red on the Client Software tab of the vController
Manager.
1. In the left navigation tree of GridControl, click on vController Manager.
The vController Manager window opens to the right.
2. Click the Client Software tab.
A table of Clients on the Grid displays. Note that Clients whose software needs to be
upgraded display in red.
3. Right-click on the Client whose vController you need to upgrade (in red), and select Upgrade
from the short-cut menu.
A message box opens, informing you that the upgrade has started.
4. When finished, click the OK button.
The Client no longer displays in red in the table.
Selecting a Network Adapter for a Client
In some cases, you can select a different network adapter for the Client connection.
1. In the left navigation tree of GridControl, click on
The vController Manager window opens to the right.
2. Click the Client Software tab.
vController Manager.
72
Page 74
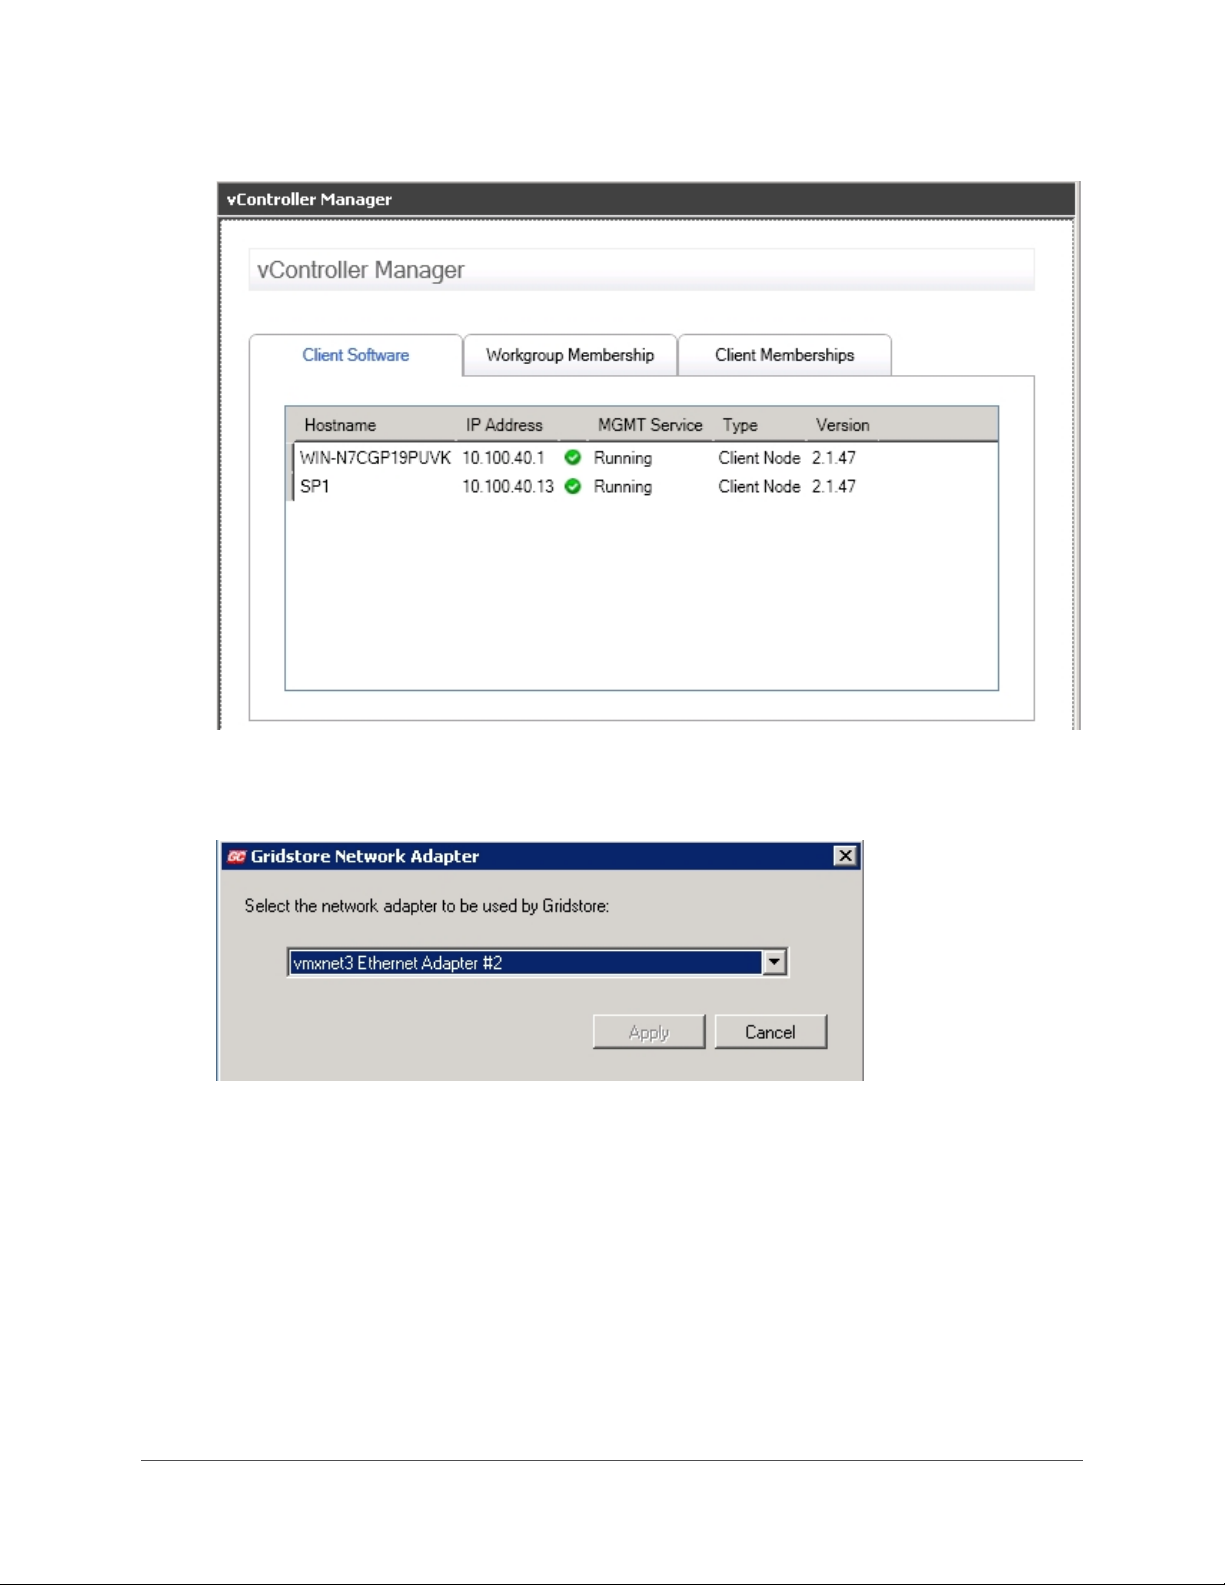
A table of Clients on the Grid displays.
3. Right-click on the Client whose Network Adapter you would like to view or change, and select
Network Adapter from the short-cut menu.
The Gridstore Network Adapter dialog box opens.
4. If applicable, select a network adapter from the drop-down list, and click the Apply button.
The selected network adapter is now used for the connection.
GRIDSTORE ADMINISTRATOR’S GUIDE 73
Page 75
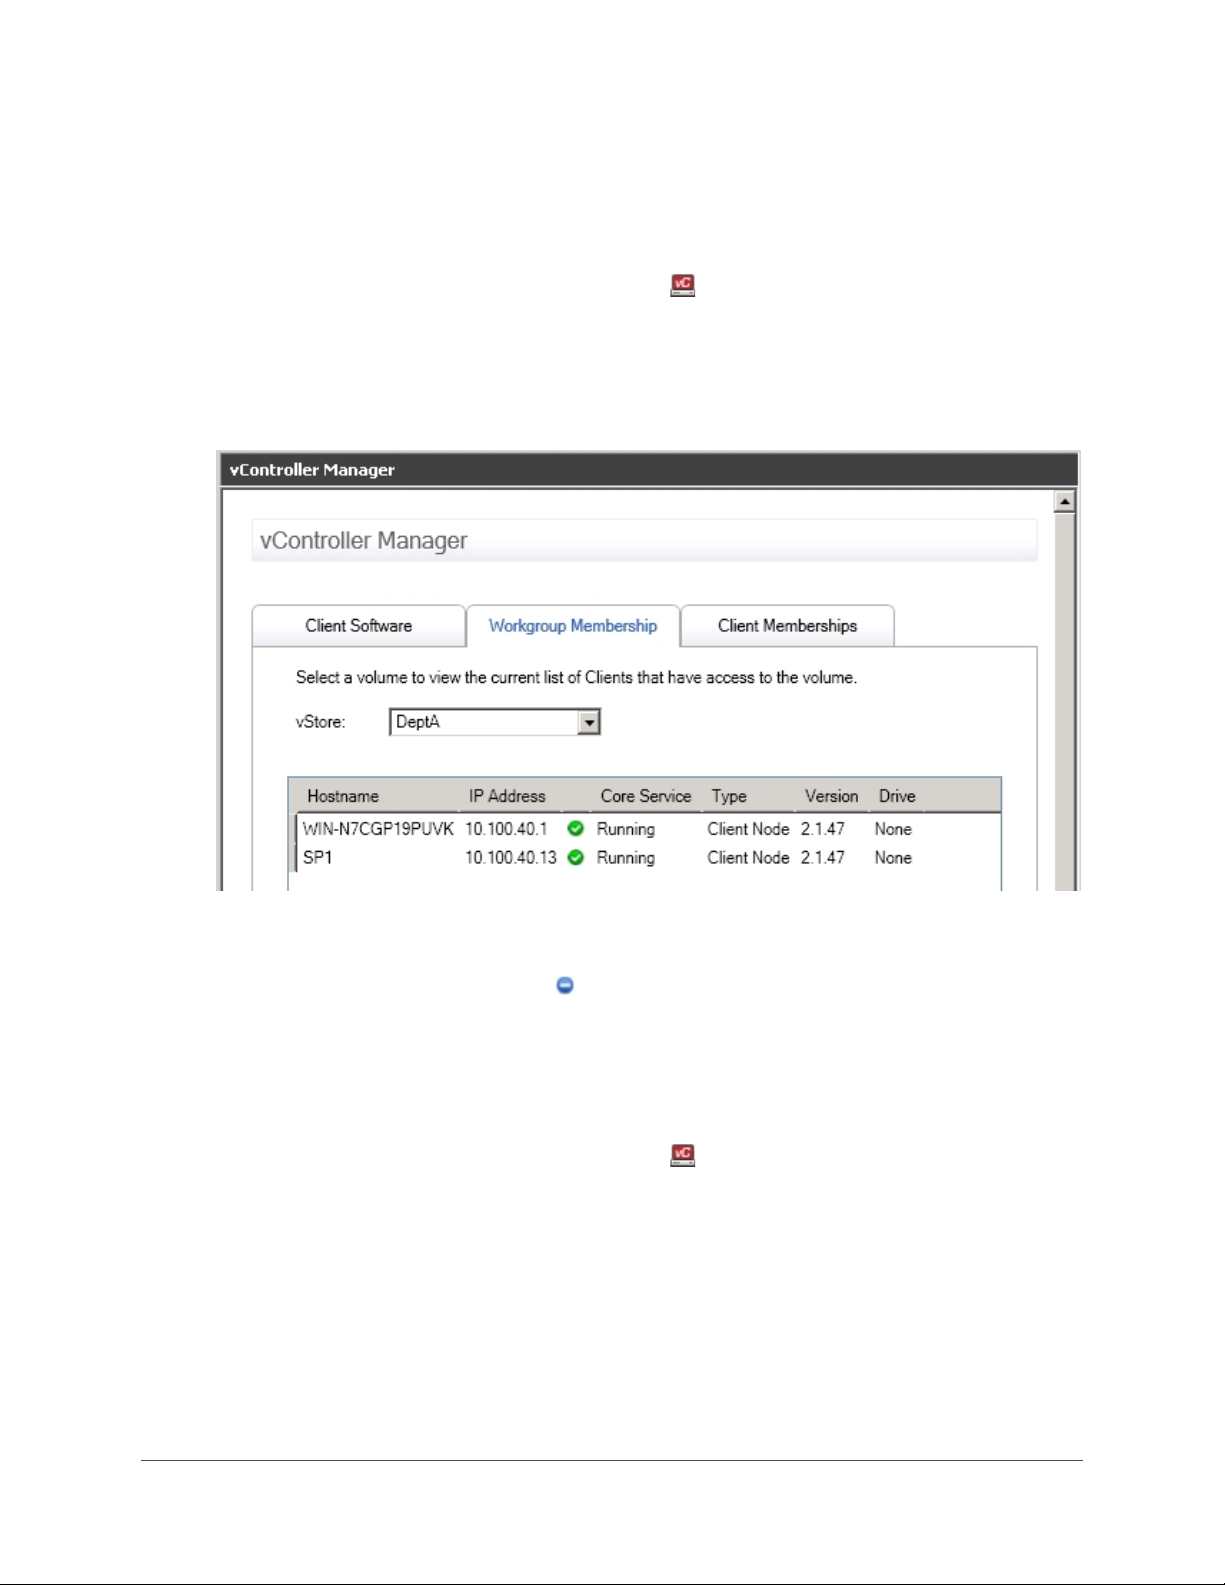
Stopping Communication between a vStore and a Client
You can stop all I/O to a Client that is mapped to a particular vStore. Client mappings to the vStore
are preserved.
1. In the left navigation tree of GridControl, click on
The vController Manager window opens to the right.
2. Click the Workgroup Membership tab, and select the appropriate vStore from the vStore
drop-down list.
A table of Clients that have access to that vStore displays.
vController Manager.
3. Right-click on the Client you would like to stop, and select Stop from the short-cut menu.
The Client stops and displays with a Stopped status icon.
Re-establishing Communication between a vStore and a Client
You can re-establish communication to a Client that is mapped to a particular vStore after you
previously stopped it. The Client's access to the vStore will be restored.
1. In the left navigation tree of GridControl, click on
The vController Manager window opens to the right.
2. Click the Workgroup Membership tab, and select the appropriate vStore from the vStore
drop-down list.
vController Manager.
74
Page 76
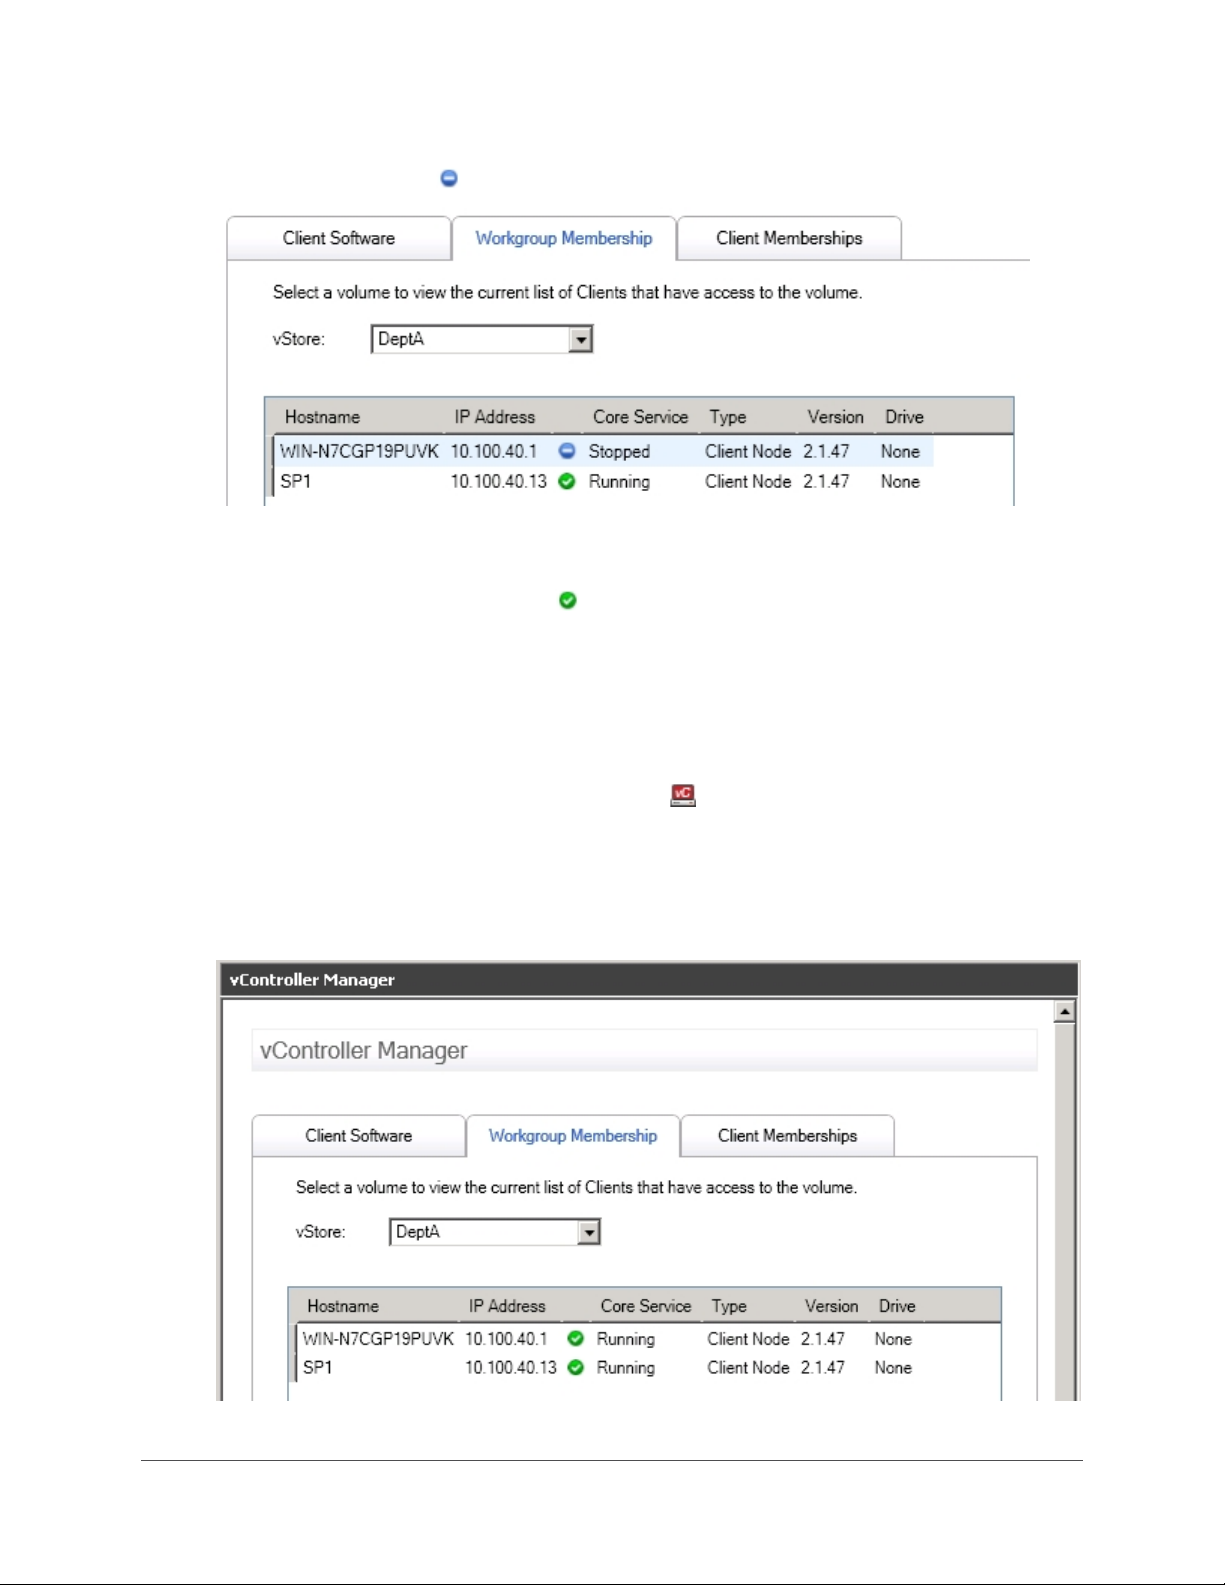
A table of Clients that have access to that vStore displays. Clients that have been stopped
display with a
3. Right-click on the stopped Client, and select Start from the short-cut menu.
The Client starts and displays with a Running status icon.
Stopped status icon.
Restarting the Core Service on a Client
You can restart the core service on a Client that is mapped to a particular vStore. Doing so stops all
I/O between the vStore and that Client, and then restarts it again. During this process, user access
to the vStore is suspended.
1. In the left navigation tree of GridControl, click on
The vController Manager window opens to the right.
2. Click the Workgroup Membership tab, and select the appropriate vStore from the vStore
drop-down list.
A table of Clients that have access to that vStore displays.
vController Manager.
GRIDSTORE ADMINISTRATOR’S GUIDE 75
Page 77
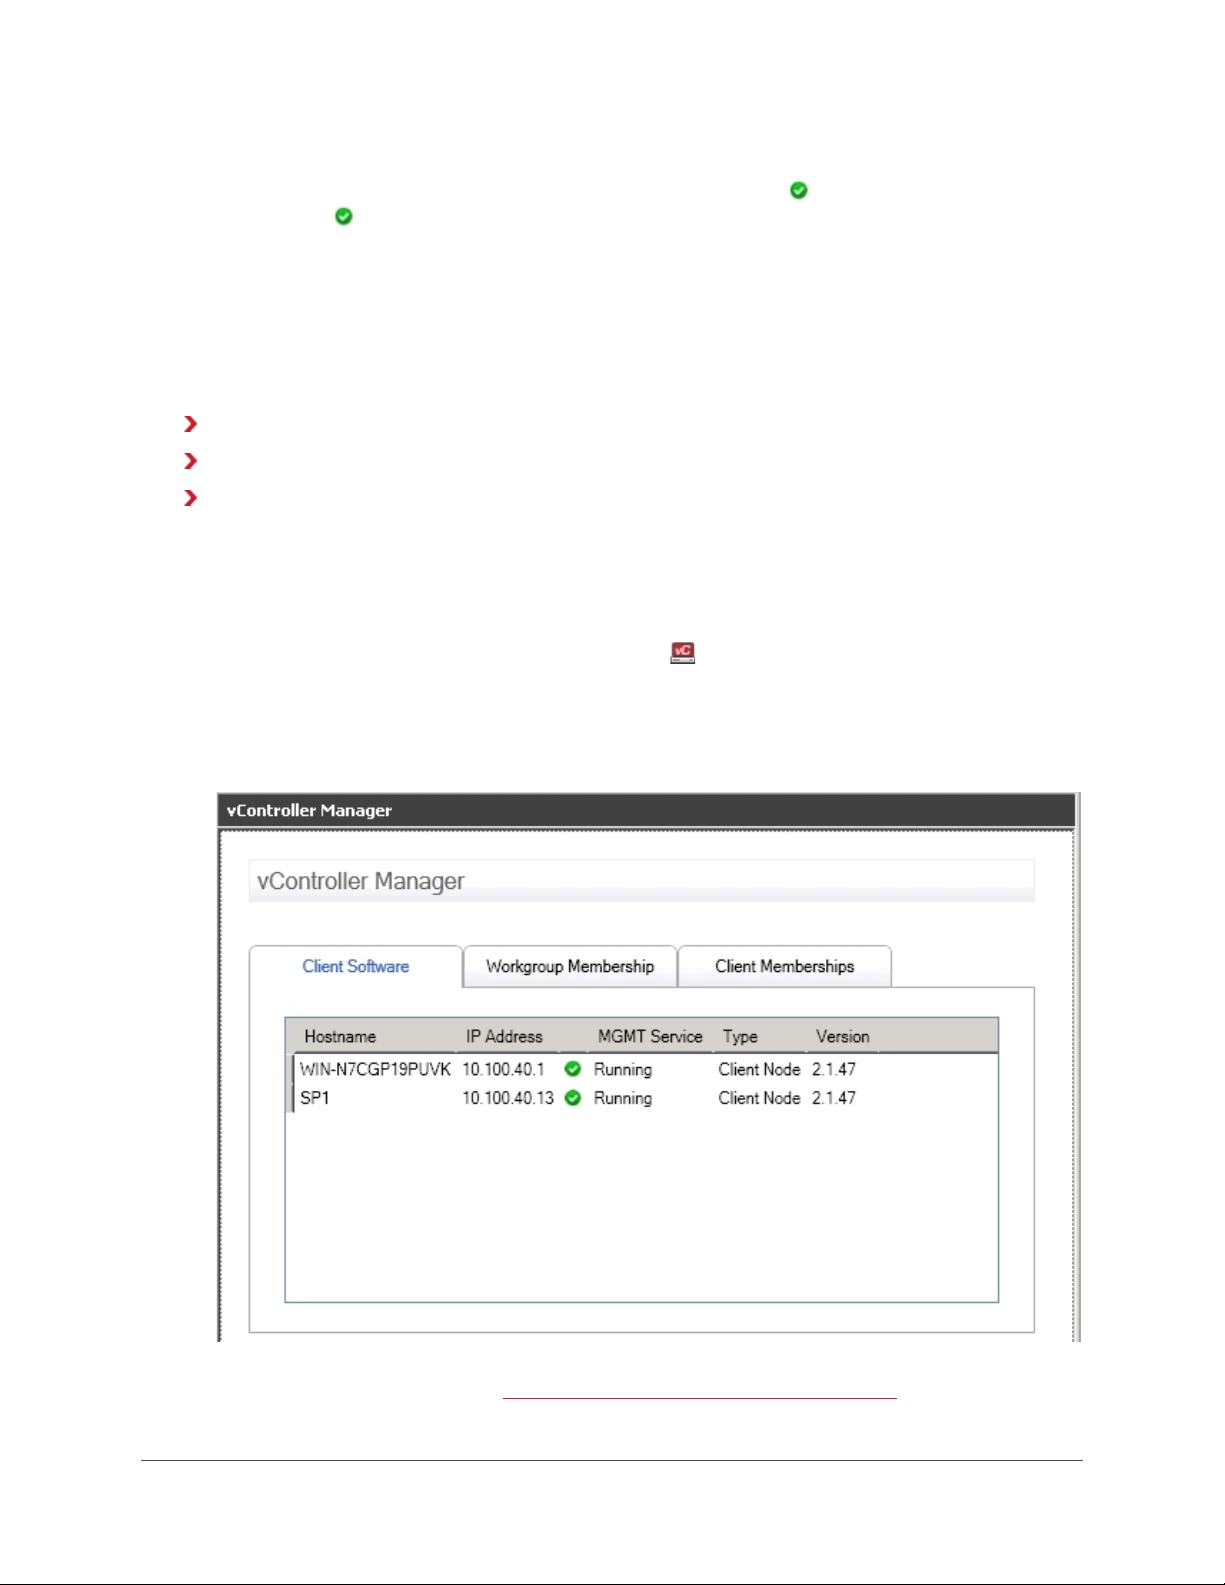
3. Right-click on the Client you would like to restart, and select Restart from the short-cut menu.
After a moment, the Core Service for the Client changes from Running to Start Pending,
and back to
Running again.
Viewing Client Information
You can view information about the Client computers on the Grid, such as the vStores to which they
are mapped.
This sub-section covers the following topics:
Viewing a List of Clients on the Grid
Viewing All Clients Mapped to a vStore
Checking Client Membership Status in the Grid
Viewing a List of Clients on the Grid
You can view a list of all Clients on the Grid and check to ensure they are running well and that their
software is up to date.
1. In the left navigation tree of GridControl, click on
The vController Manager window opens to the right.
2. Click the Client Software tab.
A table of Clients on the Grid displays.
vController Manager.
76
Note: When a Client's software needs to be upgraded it displays in red on the Client Software
tab. For more information, see
Information for each Client listed in the table includes the following.
Upgrading vController Software for a Client on pg. 72.
Page 78
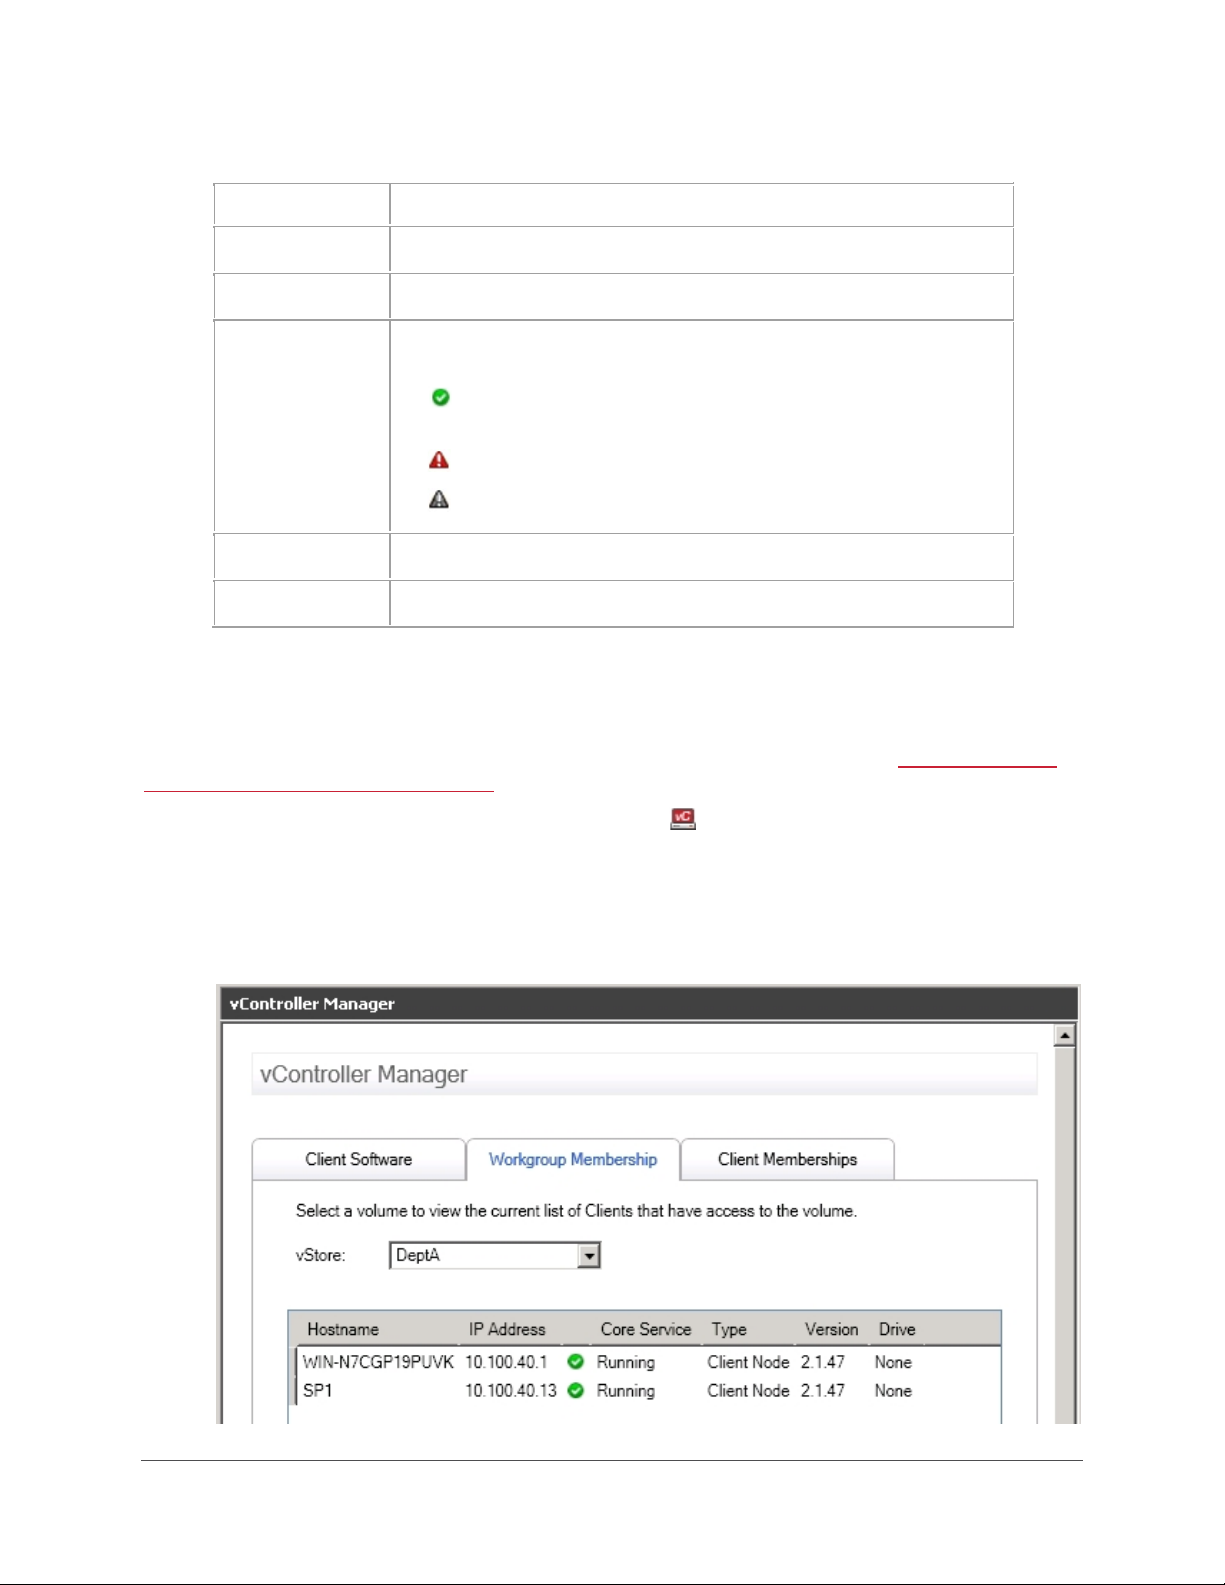
Tip: You can click on a heading in the table to sort the Clients by that heading item.
Field/Item
Description
Running
Fault
Offline
Hostname The name of the Client.
IP Address The IP address for the Client.
MGMT Service The current Gridstore Management Service status. Main options
include:
running.
- communication with the Client is up and
- communication to the Client has stopped.
Type The type of node, a Gridstore Storage Node or Client Node.
Version The version of vController currently installed on the Client.
Viewing All Clients Mapped to a vStore
You can view a list of all Clients that are mapped to a particular vStore. These are the result of
workgroup mappings. To see all Active Directory Objects mapped to a vStore, see
Directory Object Mappings to a vStore on pg. 55.
1. In the left navigation tree of GridControl, click on
The vController Manager window opens to the right.
2. Click the Workgroup Membership tab, and select the appropriate vStore from the vStore
drop-down list.
A table of Clients that have access to that vStore displays.
- the Client is not accessible from the network.
Viewing All Active
vController Manager.
GRIDSTORE ADMINISTRATOR’S GUIDE 77
Page 79
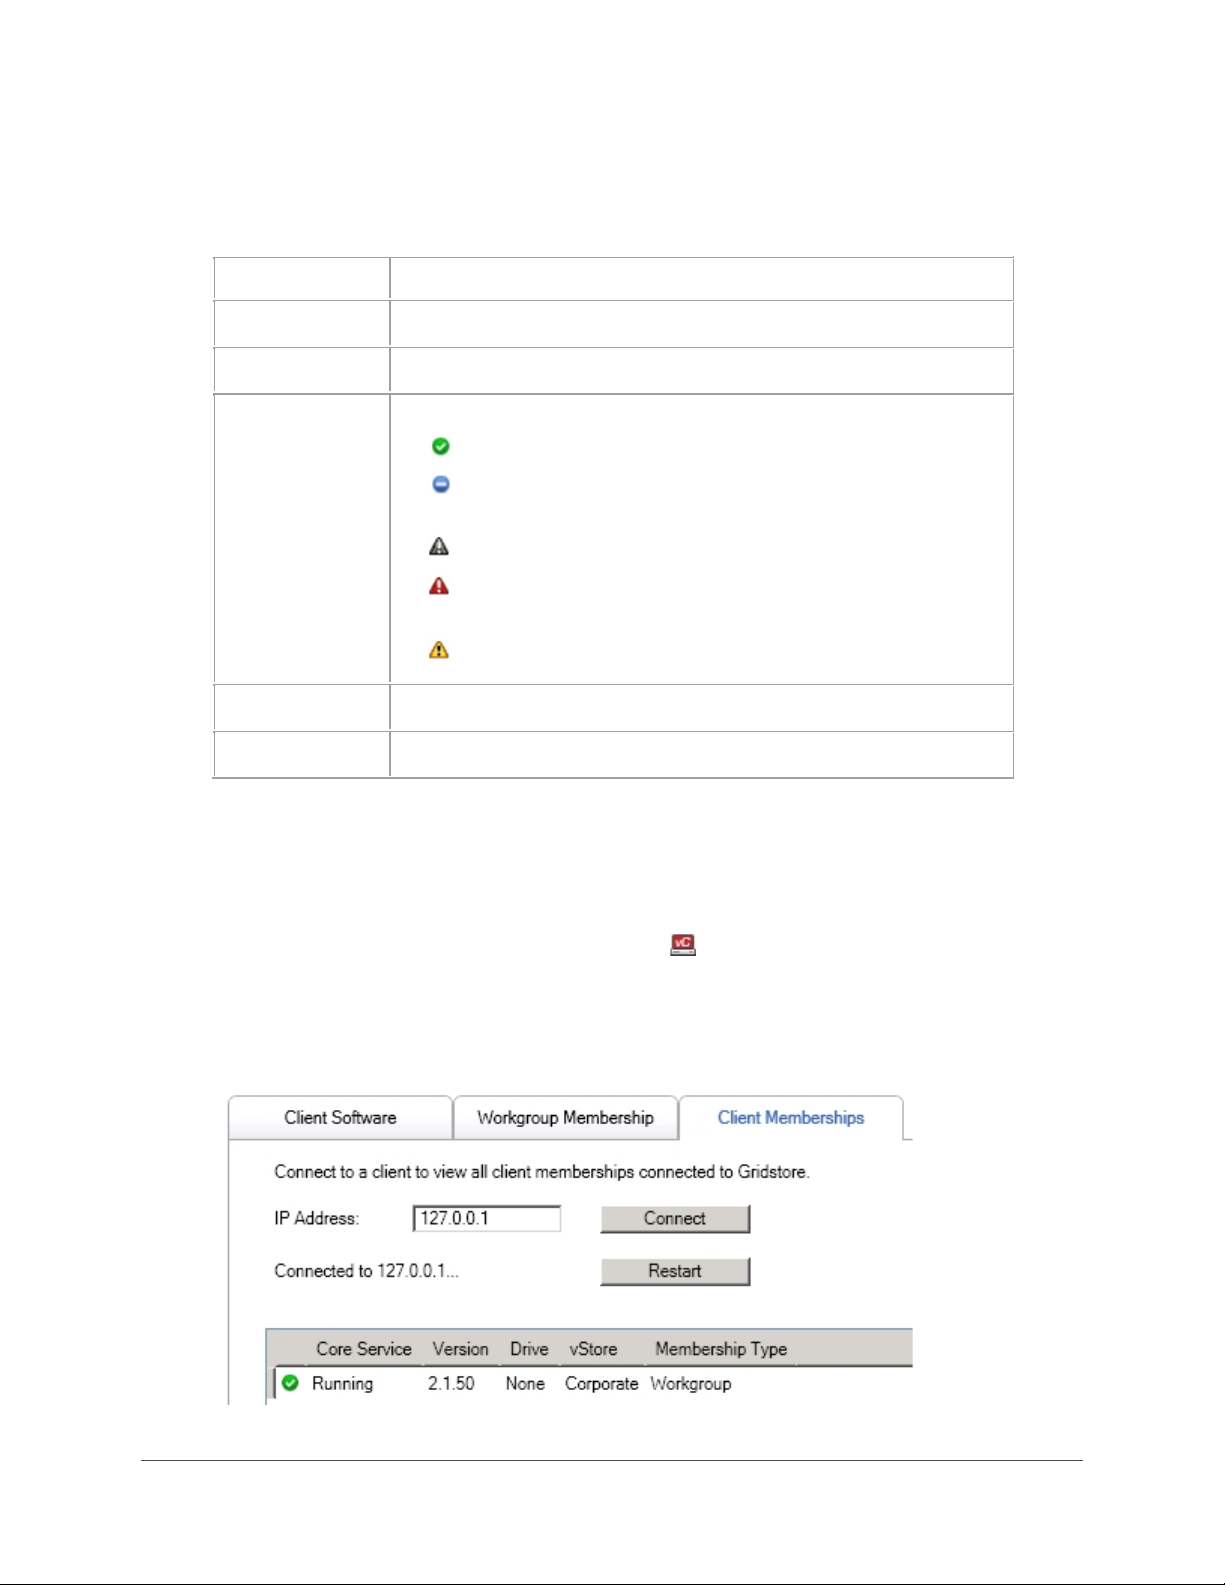
Field/Item
Description
Running
Stopped
Offline
Fault
Start Queue
Information for each Client listed in the table includes the following.
Tip: You can click on a heading in the table to sort the Clients by that heading item.
Hostname The name of the Client.
IP Address The IP address for the Client.
Core Service The status of the Client. Main options include:
- the Client is healthy and running.
GridControl.
immediate attention.
Type The type of node, which is a Client Node.
Version The version of vController currently installed on the Client.
Checking Client Membership Status in the Grid
For any Client, you can check which vStores it is mapped to and the type of mappings they are. You
identify the Client by its IP address.
1. In the left navigation tree of GridControl, click on
The vController Manager window opens to the right.
2. Click the Client Memberships tab.
The Client Membership tab opens.
- the Client has been manually stopped using
- the Client is not accessible from the network.
- the Client is in a compromised state that requires
- the Client is being added to the Grid.
vController Manager.
78
Page 80
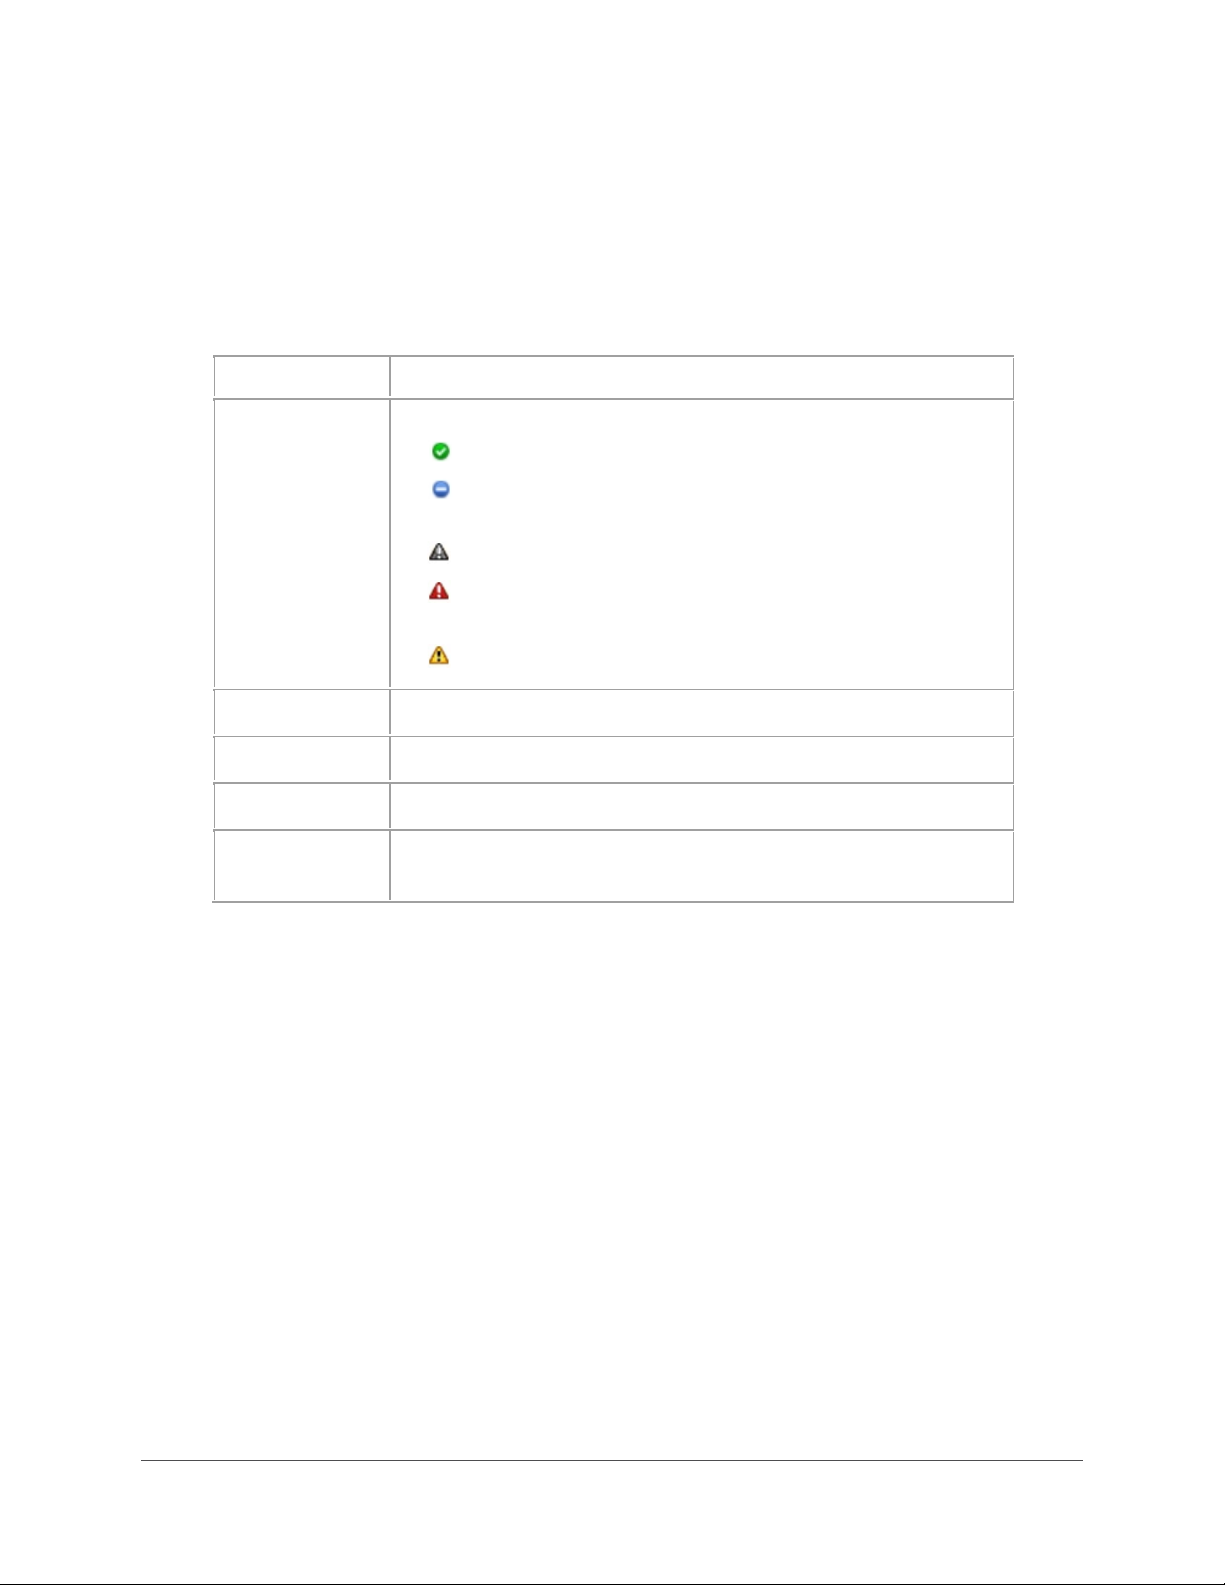
Field/Item
Description
Running
Stopped
Offline
Fault
Start Queue
3. In the IP Address text box, enter the IP address for the Client for which you would like
information, and click the
Note: You can click the Restart button to restart the Client if needed.
Information for the selected Client displays in a table below and includes the following.
Tip: You can click on a heading in the table to sort the Clients by that heading item.
Core Service The status of the Client. Main options include:
Connect button.
- the Client is healthy and running.
GridControl.
immediate attention.
Version The version of vController currently installed on the Client.
Drive The drive letter to which the Client is mapped.
vStore The vStore to which the Client is mapped.
Membership
Type
Options include Workgroup or AD Object.
- the Client has been manually stopped using
- the Client is not accessible from the network.
- the Client is in a compromised state that requires
- the Client is being added to the Grid.
GRIDSTORE ADMINISTRATOR’S GUIDE 79
Page 81
Managing Gridstore Storage Nodes
You can manage the Gridstore Storage Nodes that are in the Grid. This includes configuring Gridstore
Storage Nodes, modifying their properties, repairing their software and shutting them down.
Note: Some options are not available for Gridstore Storage Nodes that have been assigned to a
vStore.
This section covers the following topics:
Configuring Gridstore Storage Nodes
Modifying Properties of a Gridstore Storage Node
Turning Beacon On or Off for a Gridstore Storage Node
Turning Beacon On or Off for All Gridstore Storage Nodes in a vPool
Restarting a Gridstore Storage Node
Shutting Down a Gridstore Storage Node
Waking Up a Gridstore Storage Node that Is Offline
Repairing Software on a Gridstore Storage Node
Uninstalling Software from a Gridstore Storage Node
Removing a Gridstore Storage Node from the Grid
Selecting a Network Adapter for the Gridstore Storage Node
Managing Gridstore Storage Nodes in a vStore
Checking the LED Lights on a Gridstore Storage Node
Viewing Status Information on All Gridstore Storage Nodes in the Grid
Configuring Gridstore Storage Nodes
After adding new Gridstore Storage Nodes to an existing Grid (by rack-mounting them and connecting
them to the network), you need to configure them.
Note: If you are setting up your Grid for the first time, see Setting Up the Grid on pg. 7 instead.
When you configure Gridstore Storage Nodes, you specify network settings, such as IP addresses.
1. In the left navigation tree of GridControl, click the plus sign next to
expand it, and then click New Nodes. (You can also double-click Storage Nodes to
expand it.)
The New Nodes window displays at the right. New Gridstore Storage Nodes display in this
window with a status of “Running,” as seen below.
Storage Nodes to
80
Note: A Gridstore Storage Node may also have a status of Uninstalled, indicating that its
vController software had been previously uninstalled.
Page 82
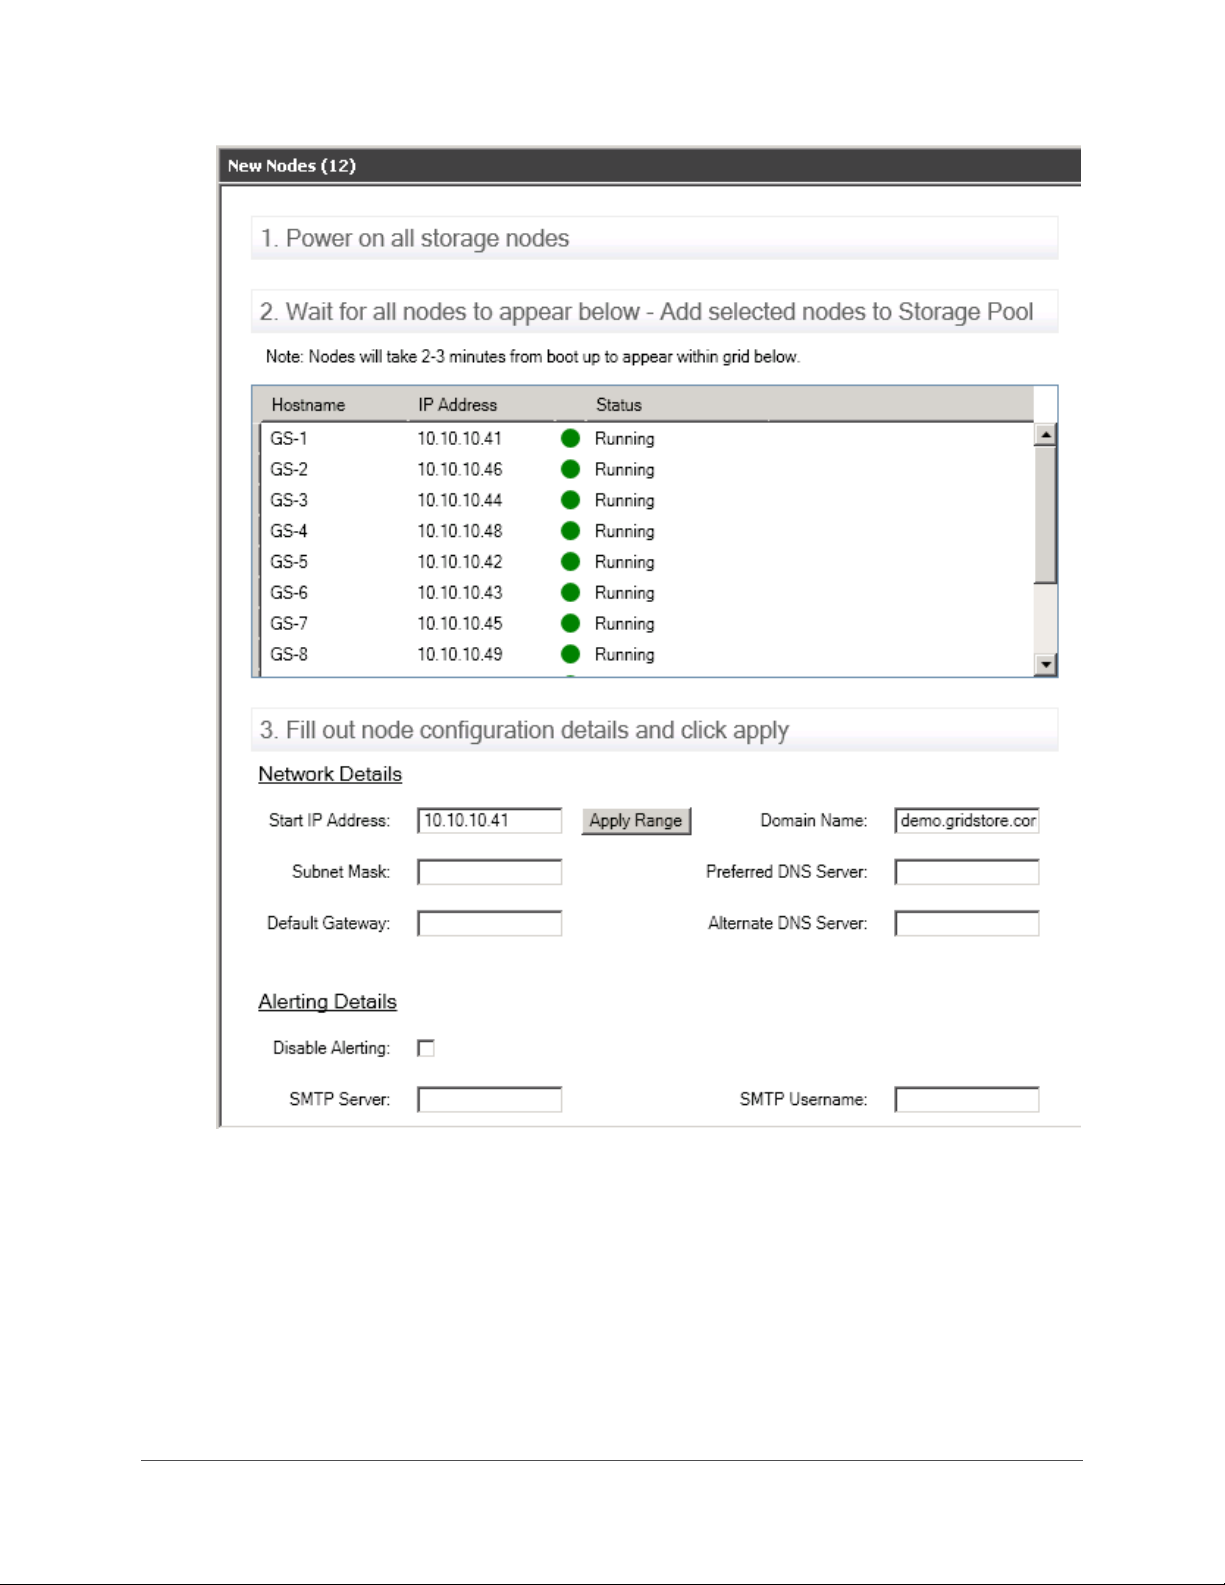
3. In the Network Details area of the New Nodes window, enter network settings as follows.
• In the Start IP Address text box, you can use the IP Address that was auto-detected, or
you can enter a new one.
• Click the Apply Range button to apply the IP address for the first Gridstore Storage Node
listed, and also to apply additional IP addresses in a series to the other new Gridstore
Storage Nodes, if applicable.
• Enter the other applicable network settings, such as the Default Gateway, Subnet Mask,
Domain Name, and Preferred and Alternate DNS Server.
GRIDSTORE ADMINISTRATOR’S GUIDE 81
Page 83
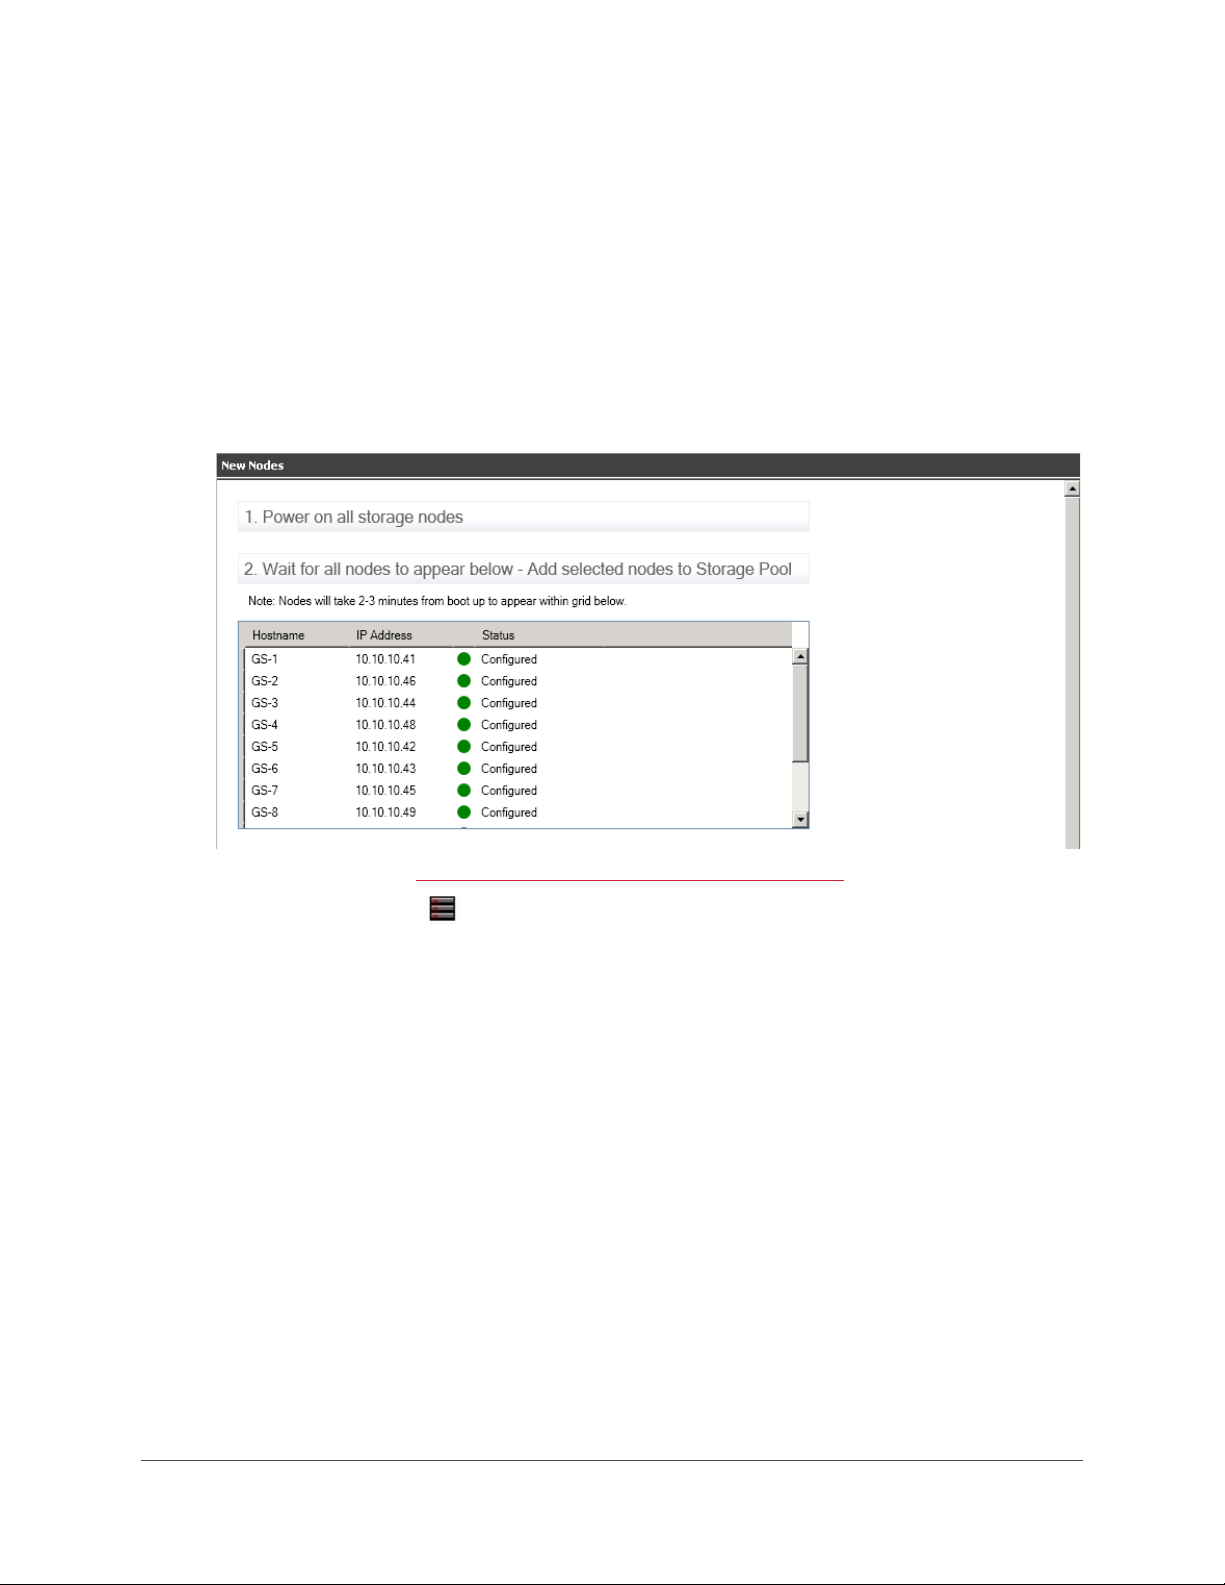
Note: If the computer is on the domain, the Create SRV Records check box also displays.
Select it to create SRV Records. (For communication to be established over different subnets
between the vController and the Gridstore Storage Nodes in the Grid, the DNS must contain
an SRV record for each Gridstore Storage Node.)
4. When finished entering network details, click the Apply button.
The settings are applied and each Gridstore Storage Node is rebooted.
Tip: You can scroll to the bottom of the New Nodes window to watch the status of these
actions.
After this process is complete, the Gridstore Storage Nodes appear in the New Nodes window
with a status of “Configured.”
You are now ready to
Tip: When you click on Storage Nodes in the left navigation tree of GridControl, you will
see the newly configured Gridstore Storage Nodes there.
add these Gridstore Storage Nodes to a vPool (see pg. 16).
82
Page 84
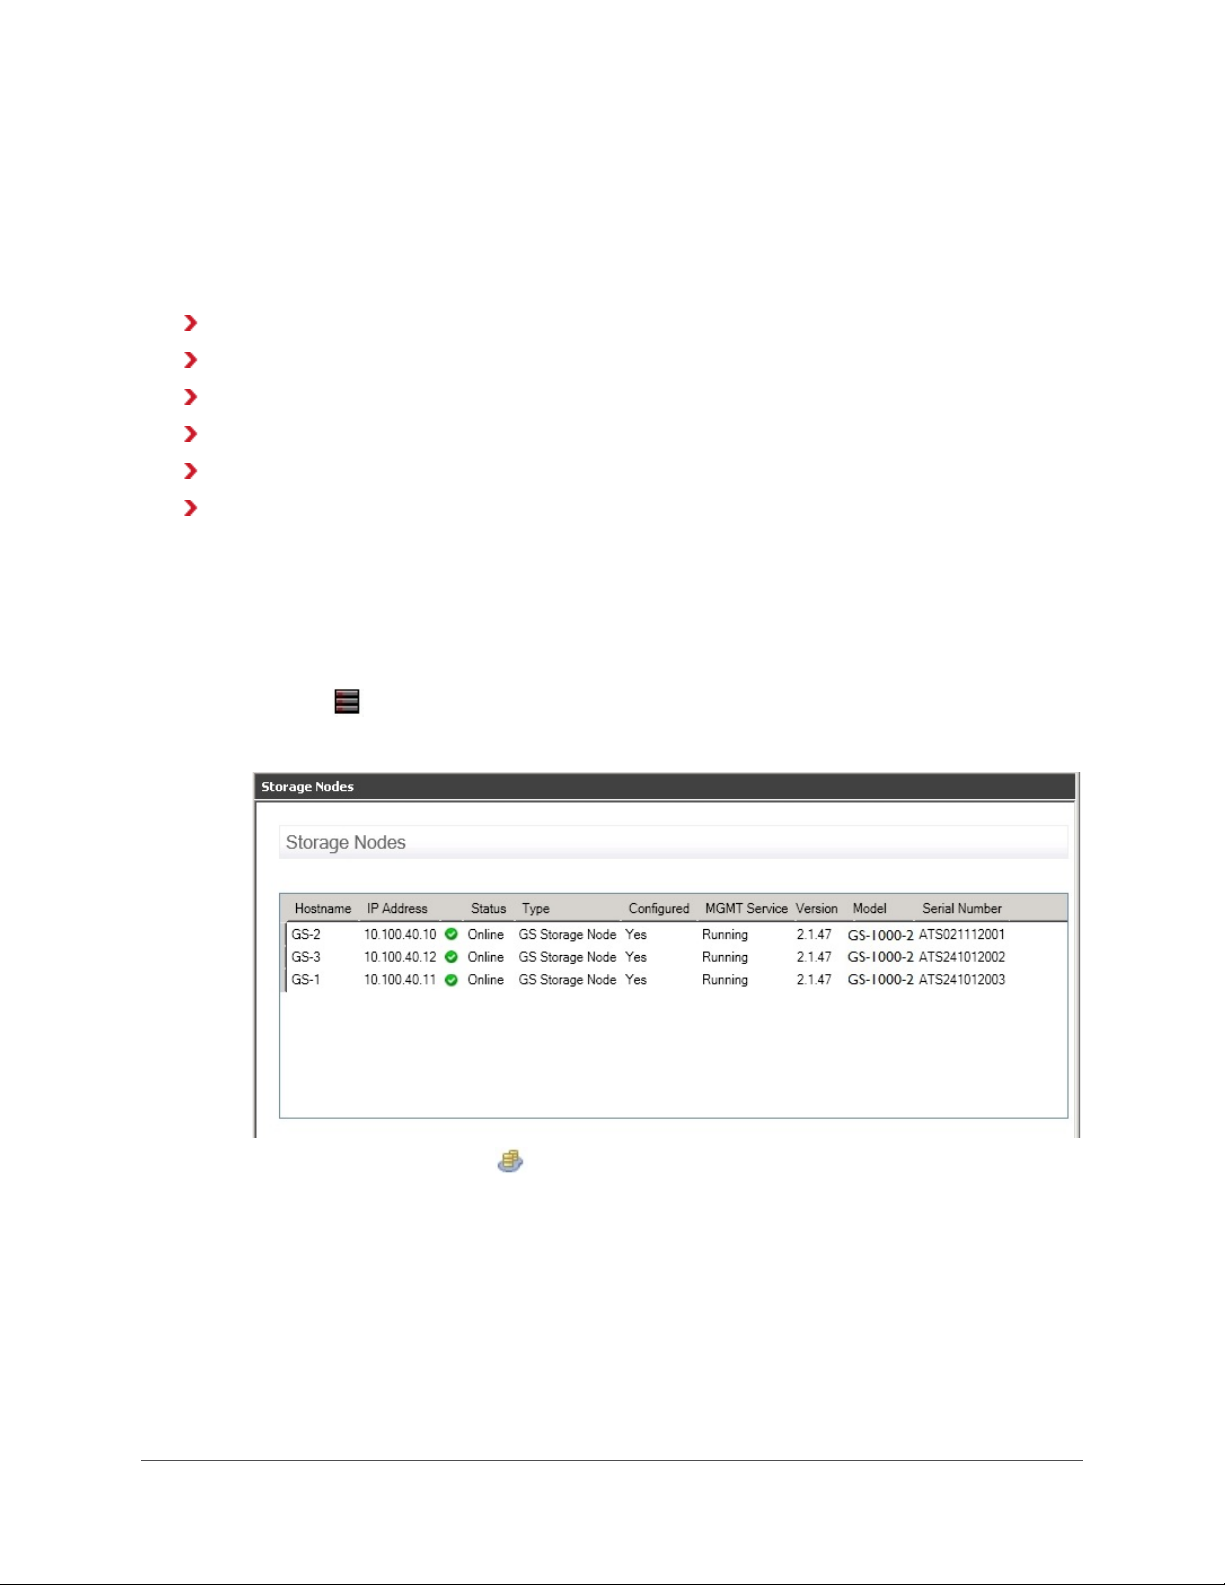
Modifying Properties of a Gridstore Storage Node
You can modify various properties of a Gridstore Storage Node, such as network IP addresses and
more.
This sub-section covers the following topics:
Viewing General Properties of a Gridstore Storage Node
Modifying the Name of a Gridstore Storage Node
Modifying IP Addresses for a Gridstore Storage Node
Modifying IP Addresses for All Gridstore Storage Nodes in the Grid
Modifying Remote Settings for a Gridstore Storage Node
Modifying Firewall Settings for a Gridstore Storage Node
Viewing General Properties of a Gridstore Storage Node
General properties for the selected Gridstore Storage Node include the manufacturer, model,
processor, installed memory and current operating system.
1. In the left navigation tree of GridControl, do one of the following:
•
Click on Storage Nodes.
The Storage Nodes window opens to the right.
Click the plus sign next to vPools to expand it, and then click the vPool that contains
•
the appropriate Gridstore Storage Node.
GRIDSTORE ADMINISTRATOR’S GUIDE 83
Page 85
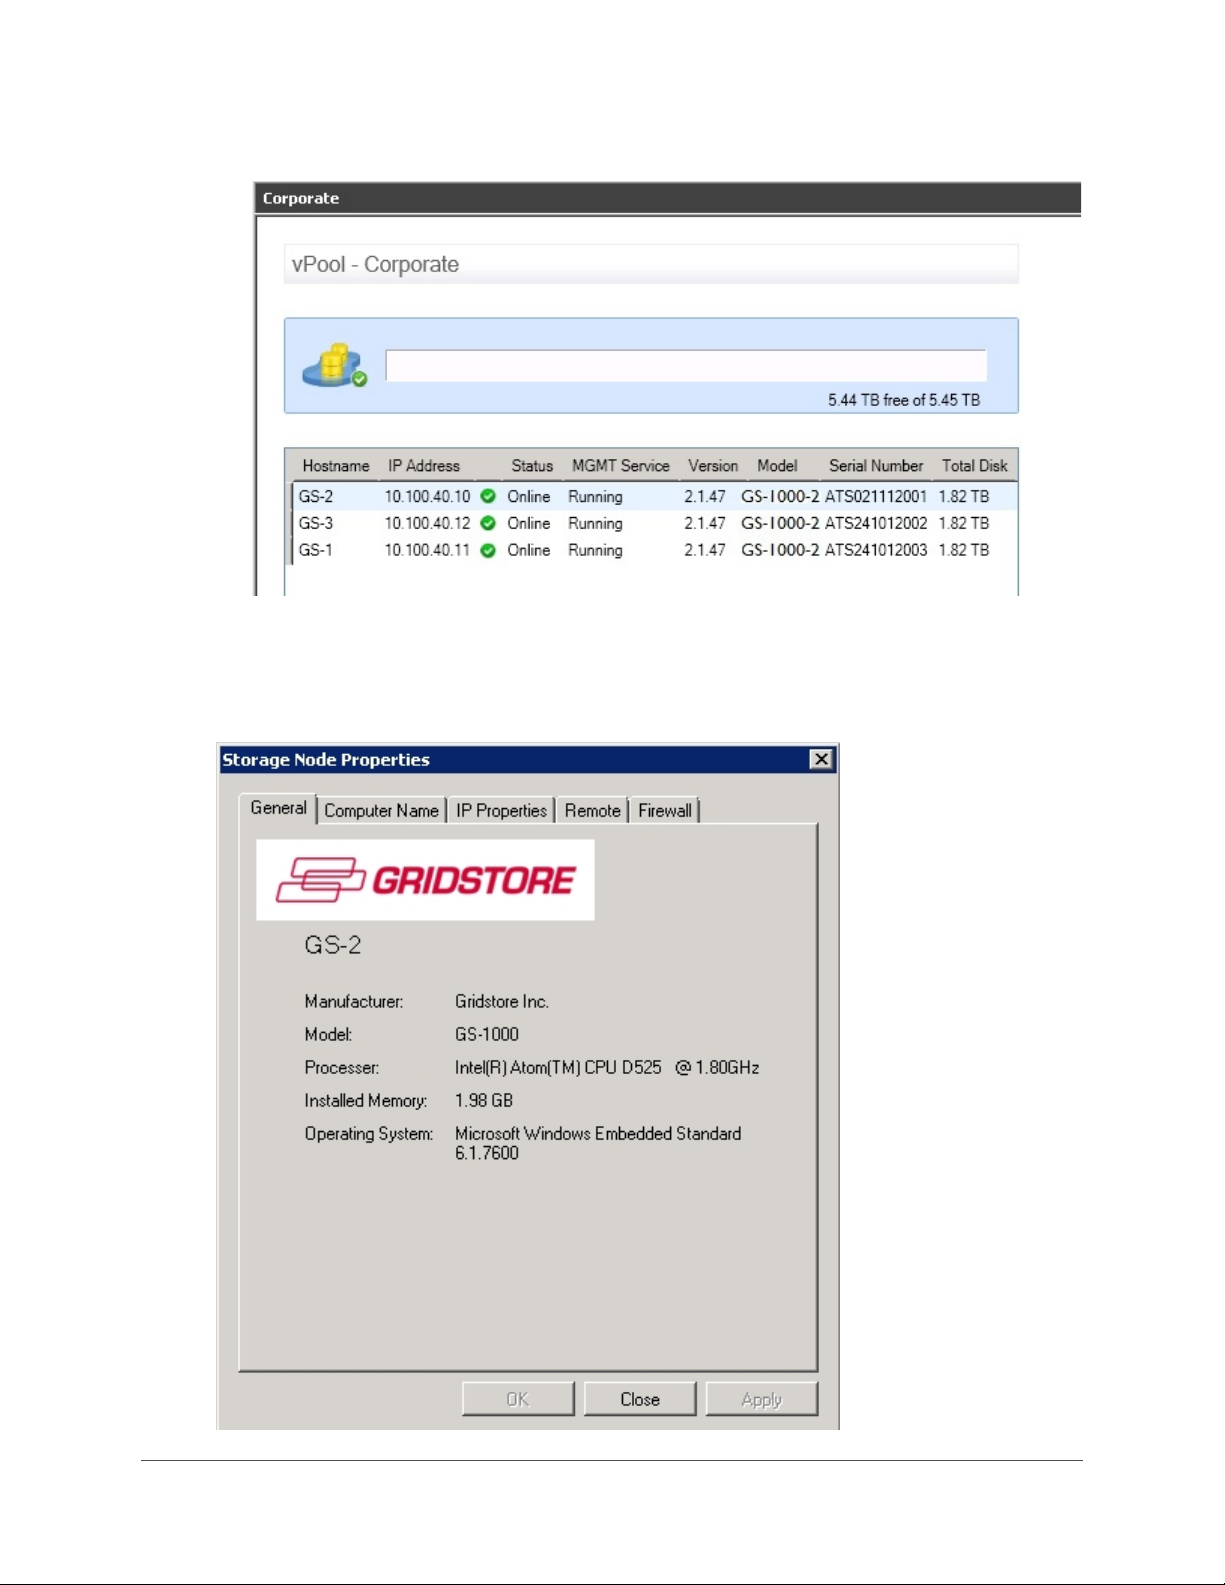
The vPools window for the selected vPool opens.
2. In the window on the right, right-click on the appropriate Gridstore Storage Node in the table,
and select
Properties from the short-cut menu.
The Storage Node Properties dialog box opens.
84
Page 86
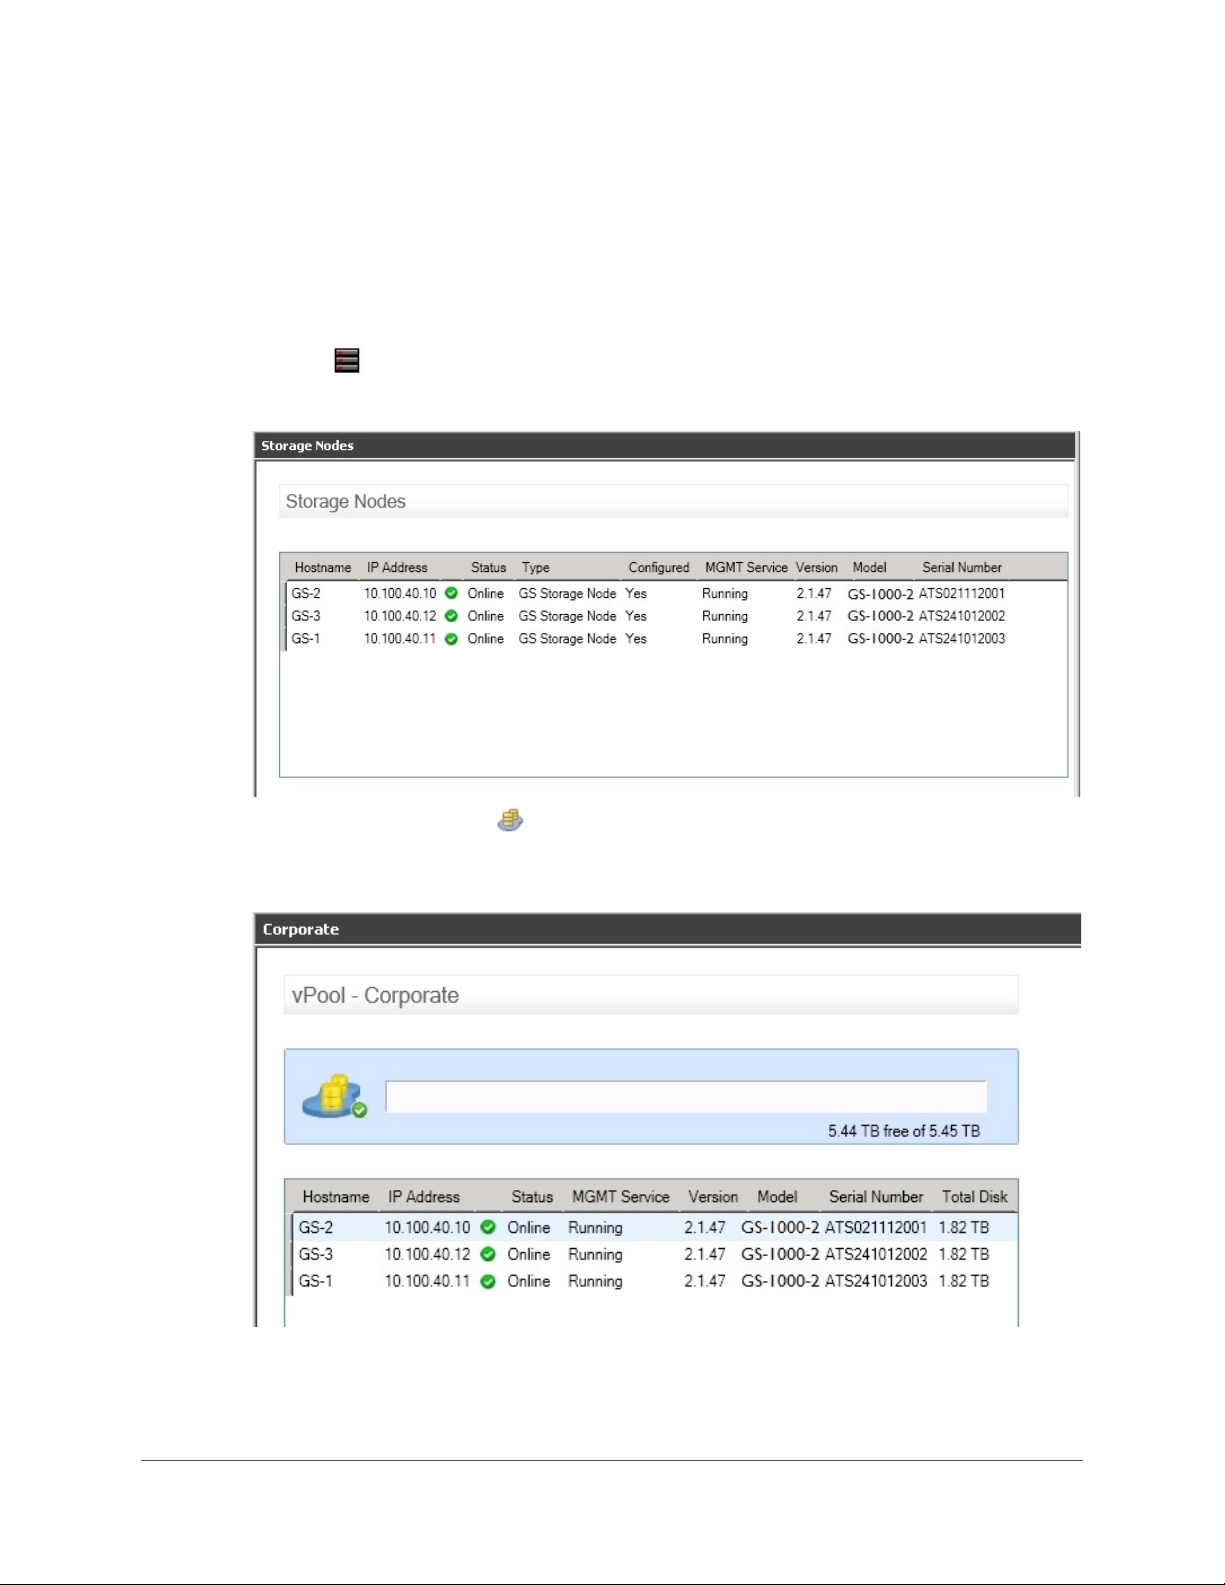
3. Ensure the General tab is selected to view general properties for the Gridstore Storage Node.
4. When finished, click the Close button.
Modifying the Name of a Gridstore Storage Node
You can modify the default name of a Gridstore Storage Node.
1. In the left navigation tree of GridControl, do one of the following:
•
Click on Storage Nodes.
The Storage Nodes window opens to the right.
Click the plus sign next to vPools to expand it, and then click the vPool that contains
•
the appropriate Gridstore Storage Node.
The vPools window for the selected vPool opens.
2. In the window on the right, right-click on the appropriate Gridstore Storage Node in the table,
and select
Properties from the short-cut menu.
The Storage Node Properties dialog box opens.
GRIDSTORE ADMINISTRATOR’S GUIDE 85
Page 87
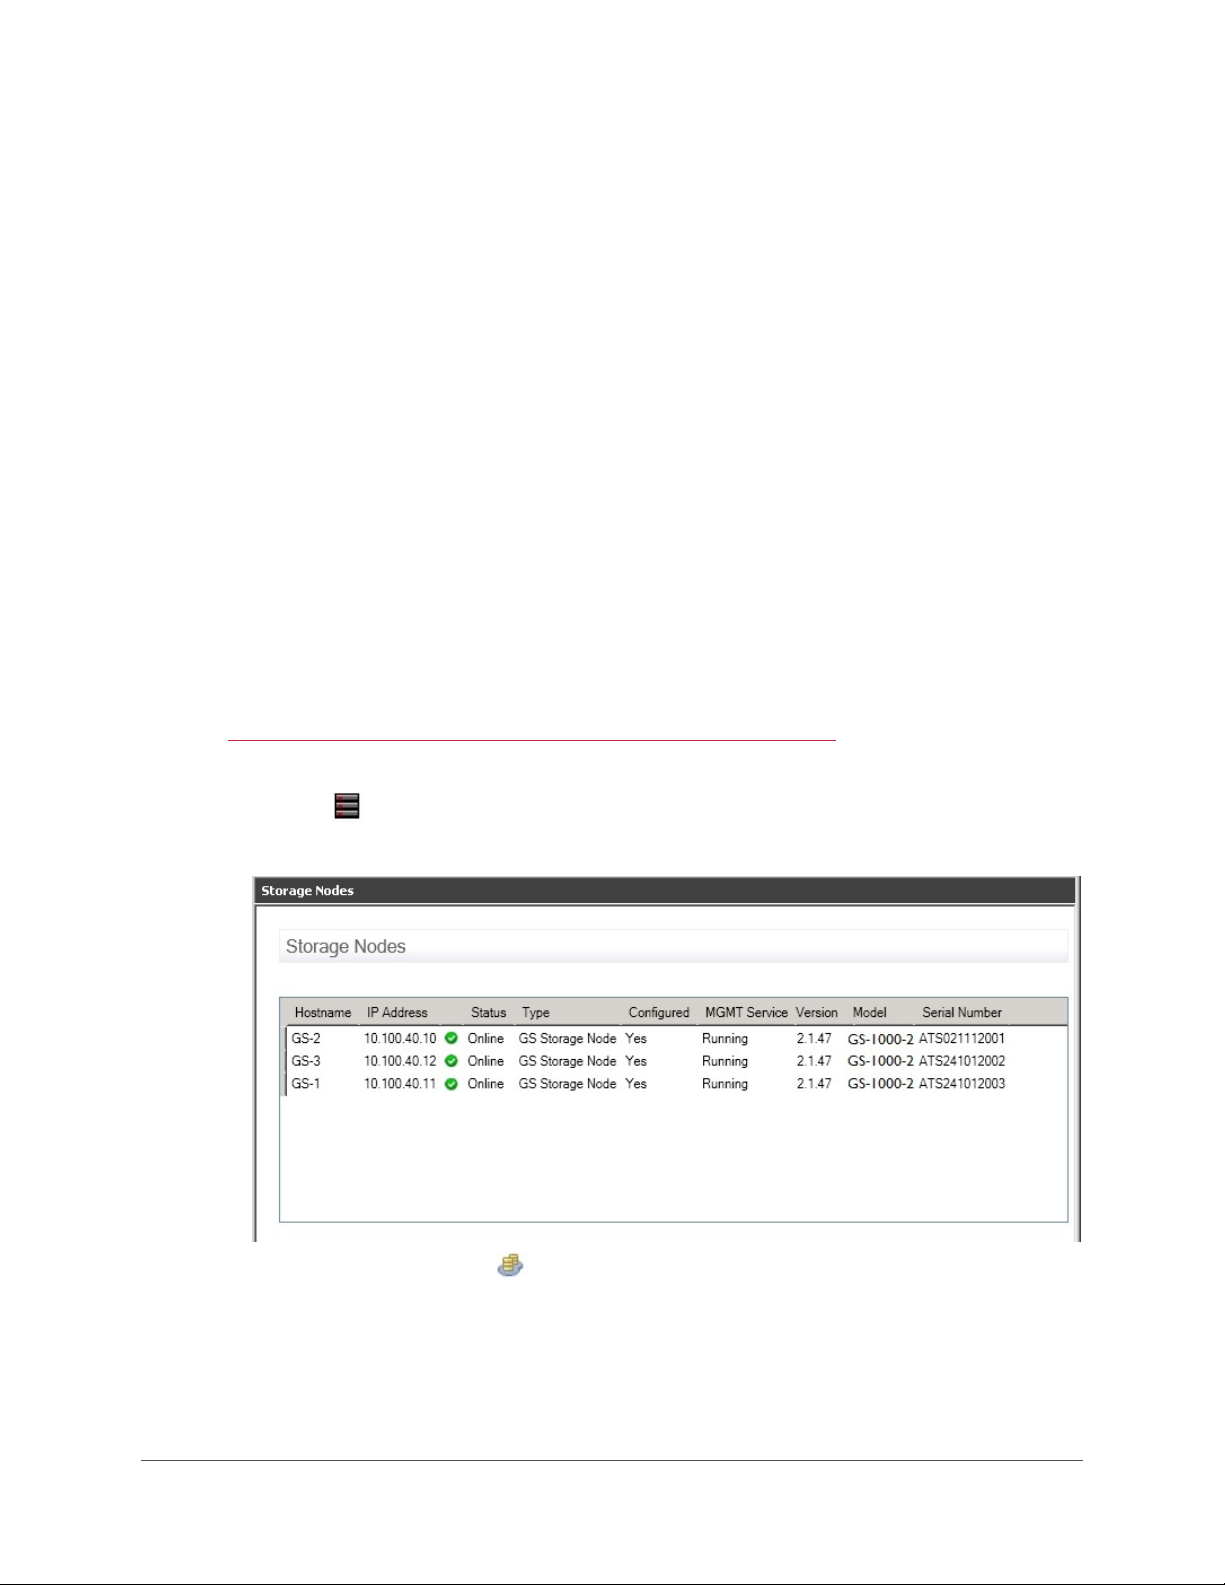
3. Click the Computer Name tab, and then click the Change button.
The Edit Computer Name Change dialog box opens.
4. In the Computer Name text box, modify the name of the Gridstore Storage Node.
5. Click the OK button.
A message box opens, asking you to restart the Gridstore Storage Node for the change to
take effect.
6. Click the Yes button.
A message box opens, confirming that the change has been applied.
7. Click the OK button.
8. In the Storage Node Properties dialog box, click the Close button.
Modifying IP Addresses for a Gridstore Storage Node
You can modify the network settings for a Gridstore Storage Node after you have already configured
it. These settings include the IP address, subnet mask, default gateway and DNS server addresses
for a selected Gridstore Storage Node.
Note: You cannot modify the IP address for a Gridstore Storage Node that belongs to a vStore,
although you can modify all its other settings. You can, however, modify IP addresses and the subnet
mask for all Gridstore Storage Nodes, whether or not they belong to vStores, at the Grid level. To do
this, see
Modifying IP Addresses for all Gridstore Storage Nodes in the Grid on page 109.
1. In the left navigation tree of GridControl, do one of the following:
•
Click on Storage Nodes.
The Storage Nodes window opens to the right.
Click the plus sign next to vPools to expand it, and then click the vPool that contains
•
the appropriate Gridstore Storage Node.
86
Page 88
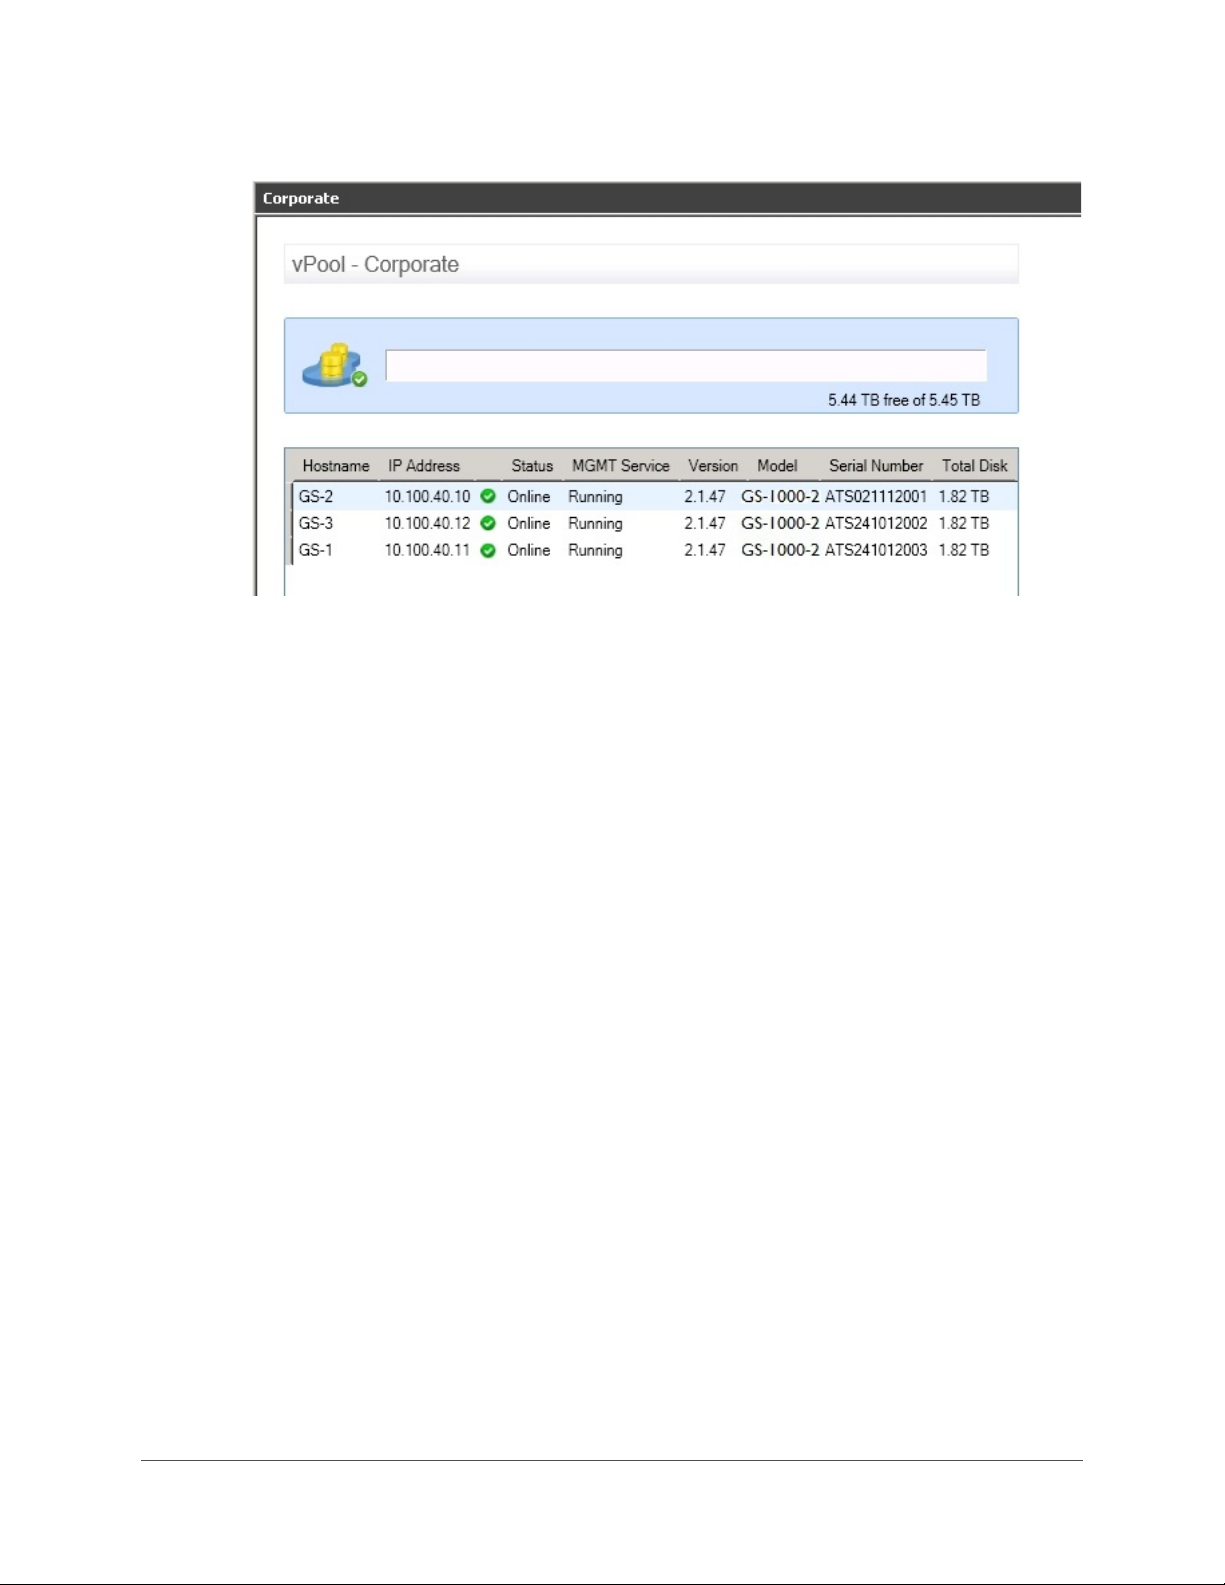
The vPools window for the selected vPool opens.
2. In the window on the right, right-click on the appropriate Gridstore Storage Node in the table,
and select
Properties from the short-cut menu.
The Storage Node Properties dialog box opens.
3. Click the IP Properties tab.
GRIDSTORE ADMINISTRATOR’S GUIDE 87
Page 89
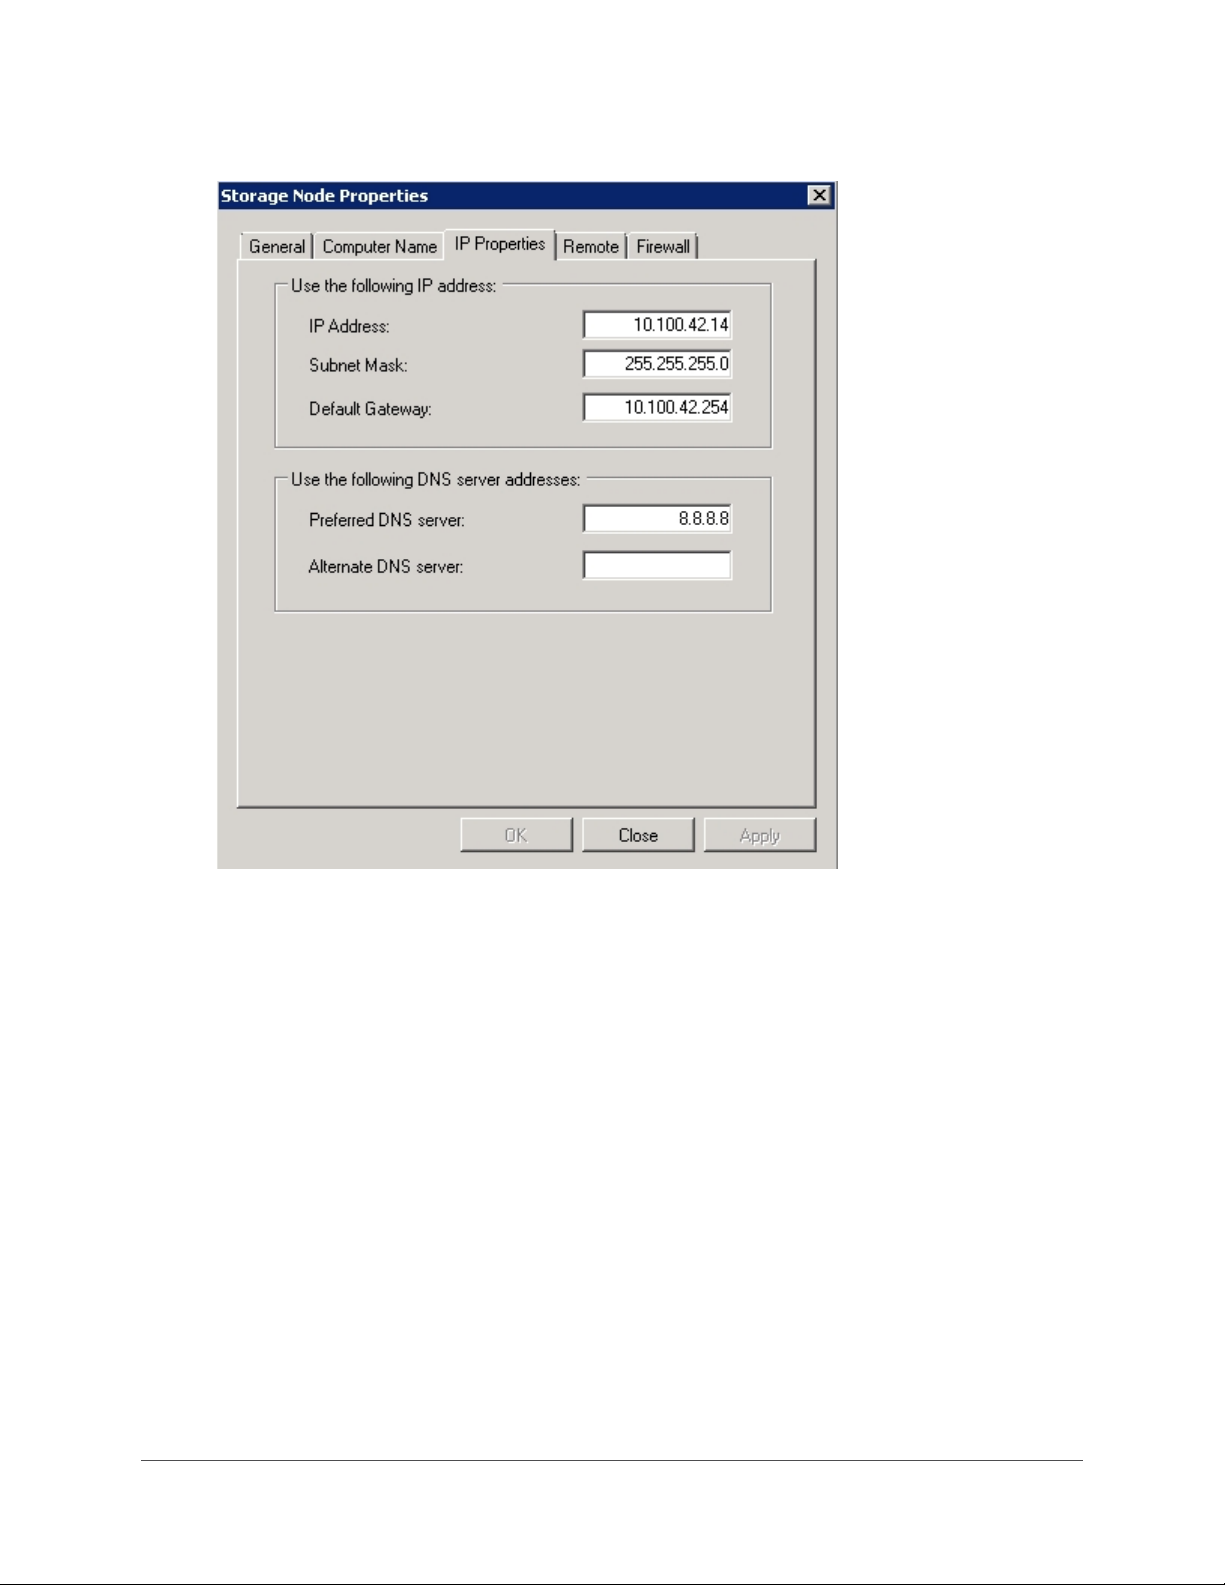
The IP Properties page of the dialog box opens.
4. In the Use the following IP address area, modify the IP address for the Gridstore Storage
Node, and the subnet mask and default gateway addresses, as needed.
5. In the Use the following DNS server addresses area, modify the preferred and alternate DNS
server information, as needed.
6. When finished click the OK button.
A message box opens, asking you to restart the Gridstore Storage Node.
7. Click the Yes button.
A message box opens, confirming that new settings have been applied.
8. Click the OK button.
9. In the Storage Node Properties dialog box, click the Close button.
88
Page 90
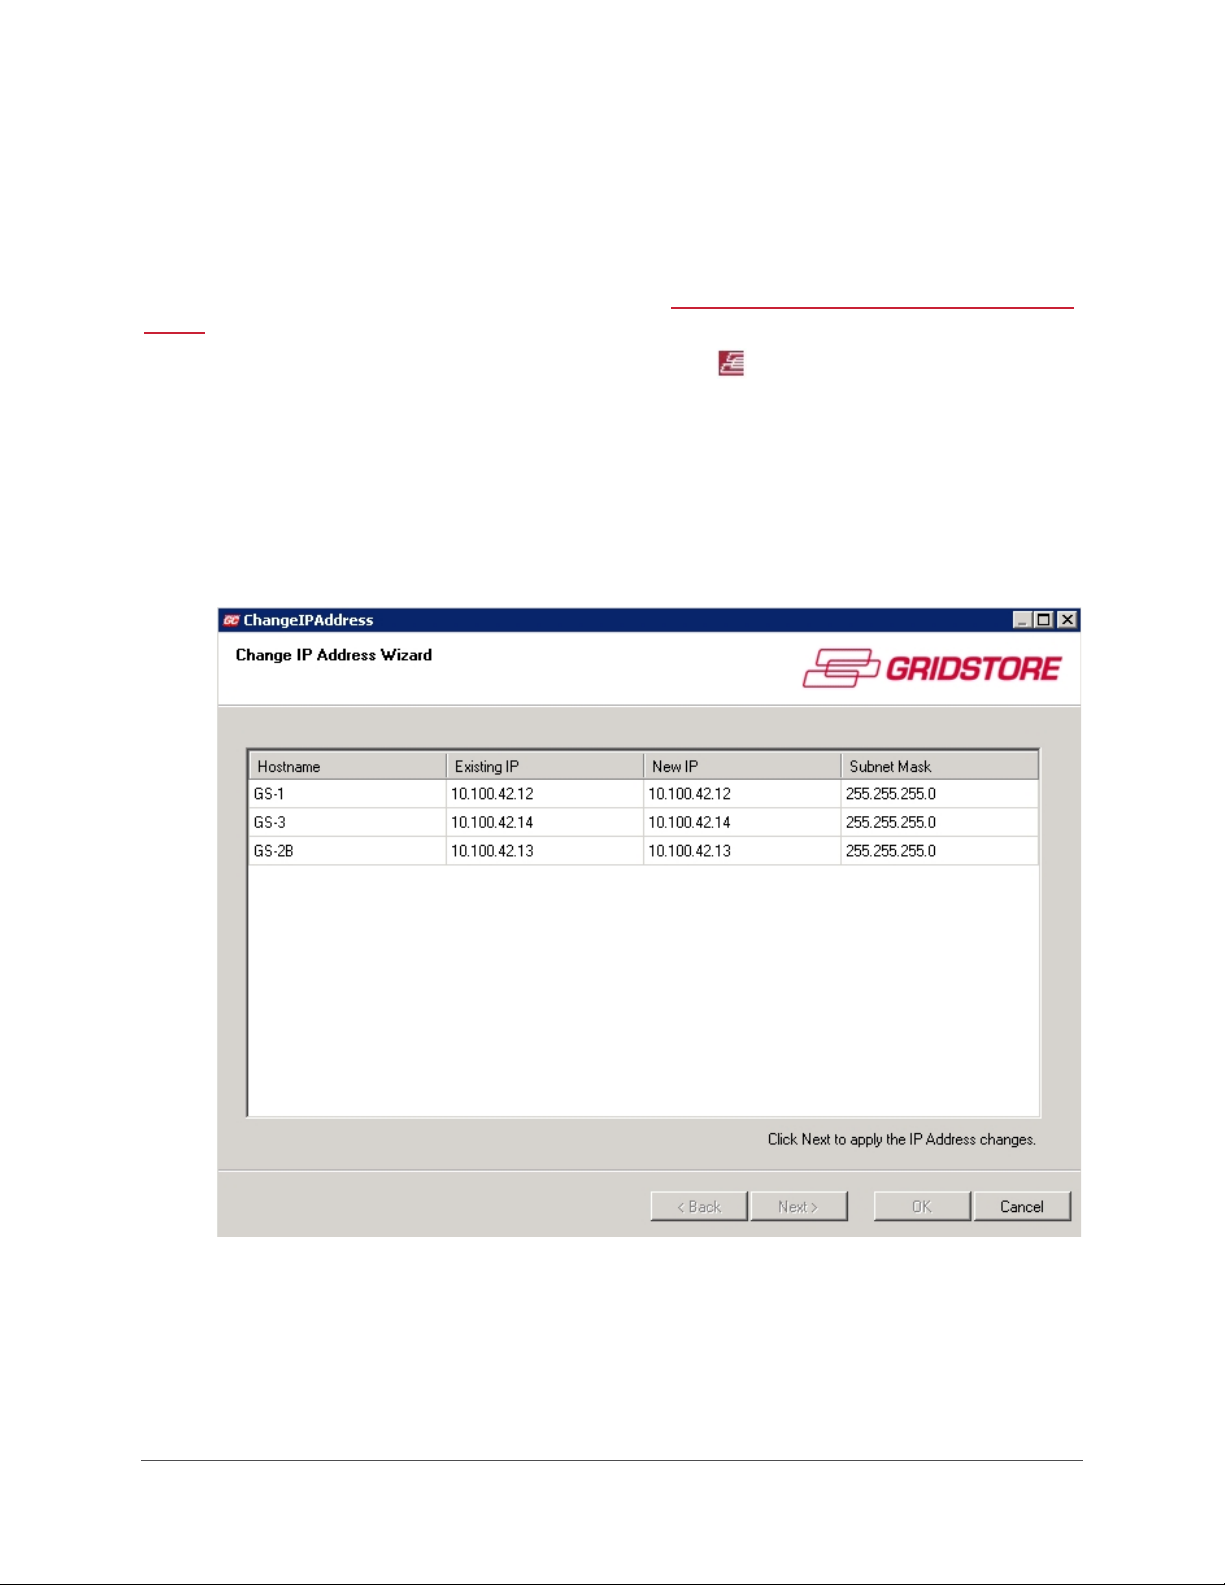
Modifying IP Addresses for All Gridstore Storage Nodes in the Grid
You can modify the IP addresses and the subnet mask for all Gridstore Storage Nodes in the Grid at
the same time. As part of the process, vStores are stopped before you modify IP addresses.
Note: All Gridstore Storage Nodes in a vStore must be online in order to use this feature. For one
method of bringing a Gridstore Storage Node online, see
Offline on pg. 97.
Waking Up a Gridstore Storage Node that Is
1. In the left navigation tree of GridControl, right-click on
Address from the short-cut menu.
The Change IP Address Wizard opens.
2. Click the Next button to stop all vStores in the Grid.
All vStores are stopped within the Change IP Address Wizard.
3. When finished, click the Next button.
The Change IP Address page of the Wizard opens.
The Grid, and select Change IP
4. In the New IP column, modify the IP address for each Gridstore Storage Node, as needed.
5. If needed, also modify the Subnet Mask for each Gridstore Storage Node.
6. Click the Next button.
The IP addresses are changed within the Change IP Address Wizard.
GRIDSTORE ADMINISTRATOR’S GUIDE 89
Page 91
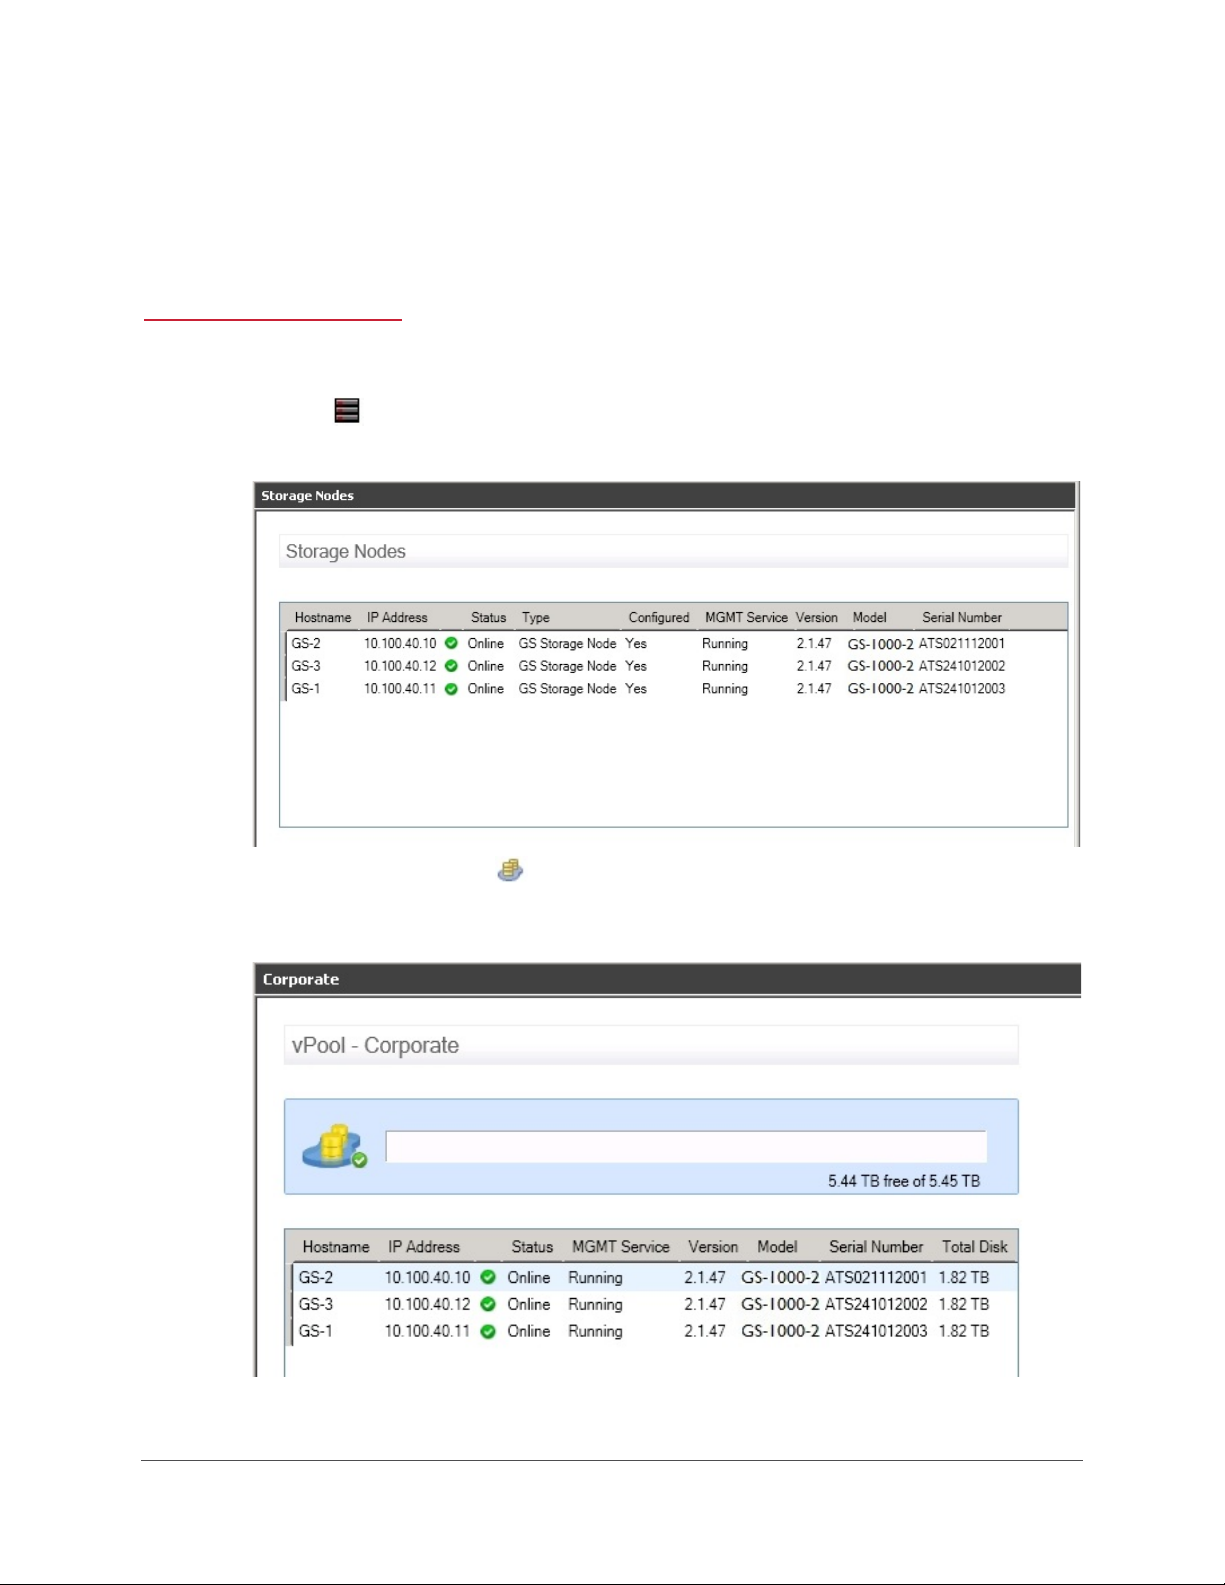
7. When finished, click the OK button.
All Gridstore Storage Nodes restart to complete the IP address change and all vStores are
started again. You are returned to GridControl.
Modifying Remote Settings
Gridstore Technical Support may need to temporarily enable remote connections during
troubleshooting.
1. In the left navigation tree of GridControl, do one of the following:
•
Click on Storage Nodes.
The Storage Nodes window opens to the right.
Click the plus sign next to vPools to expand it, and then click the vPool that contains
•
the appropriate Gridstore Storage Node.
The vPools window for the selected vPool opens.
90
Page 92
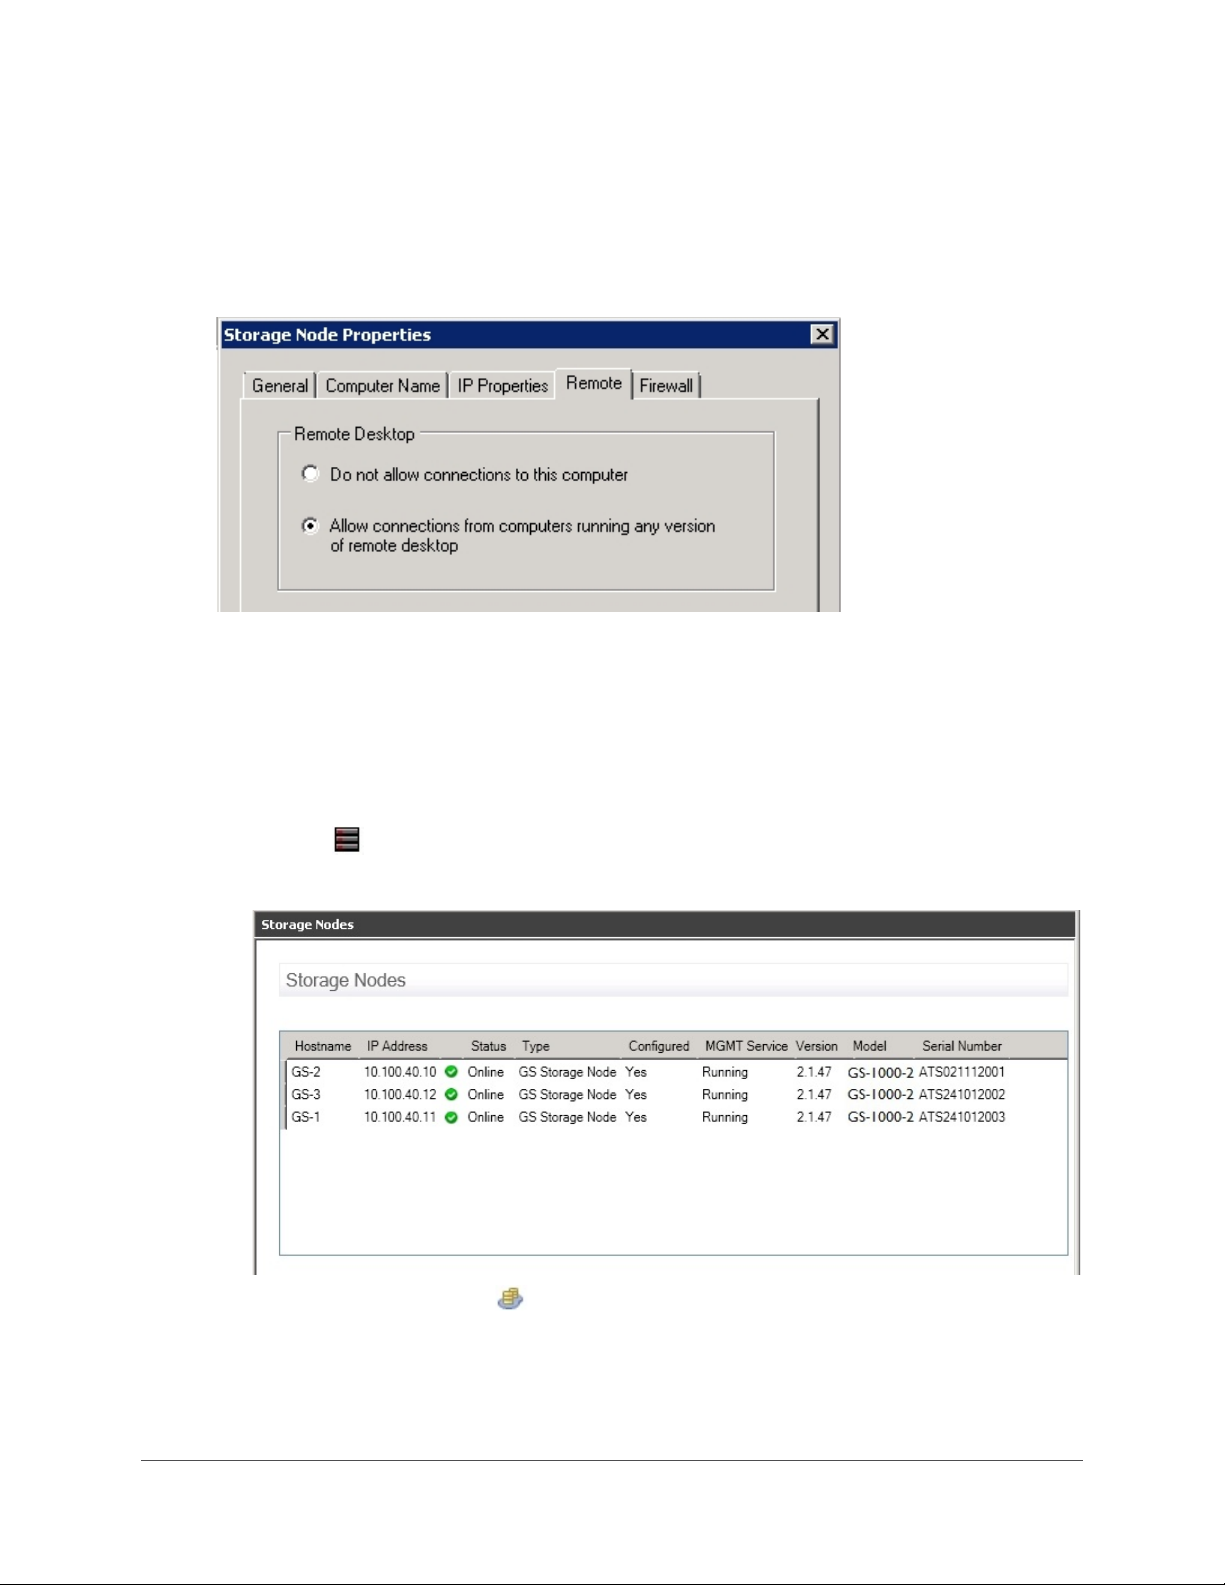
2. In the window on the right, right-click on the appropriate Gridstore Storage Node in the table,
and select
Properties from the short-cut menu.
The Storage Node Properties dialog box opens.
3. Click the Remote tab.
The Remote page of the dialog box opens.
4. In the Remote Desktop area, select one of two options, and then click the OK button.
5. In the Storage Node Properties dialog box, click the Close button.
Modifying Firewall Settings
You can modify the Windows firewall settings for the selected Gridstore Storage Node.
1. In the left navigation tree of GridControl, do one of the following:
•
Click on Storage Nodes.
The Storage Nodes window opens to the right.
Click the plus sign next to vPools to expand it, and then click the vPool that contains
•
the appropriate Gridstore Storage Node.
GRIDSTORE ADMINISTRATOR’S GUIDE 91
Page 93
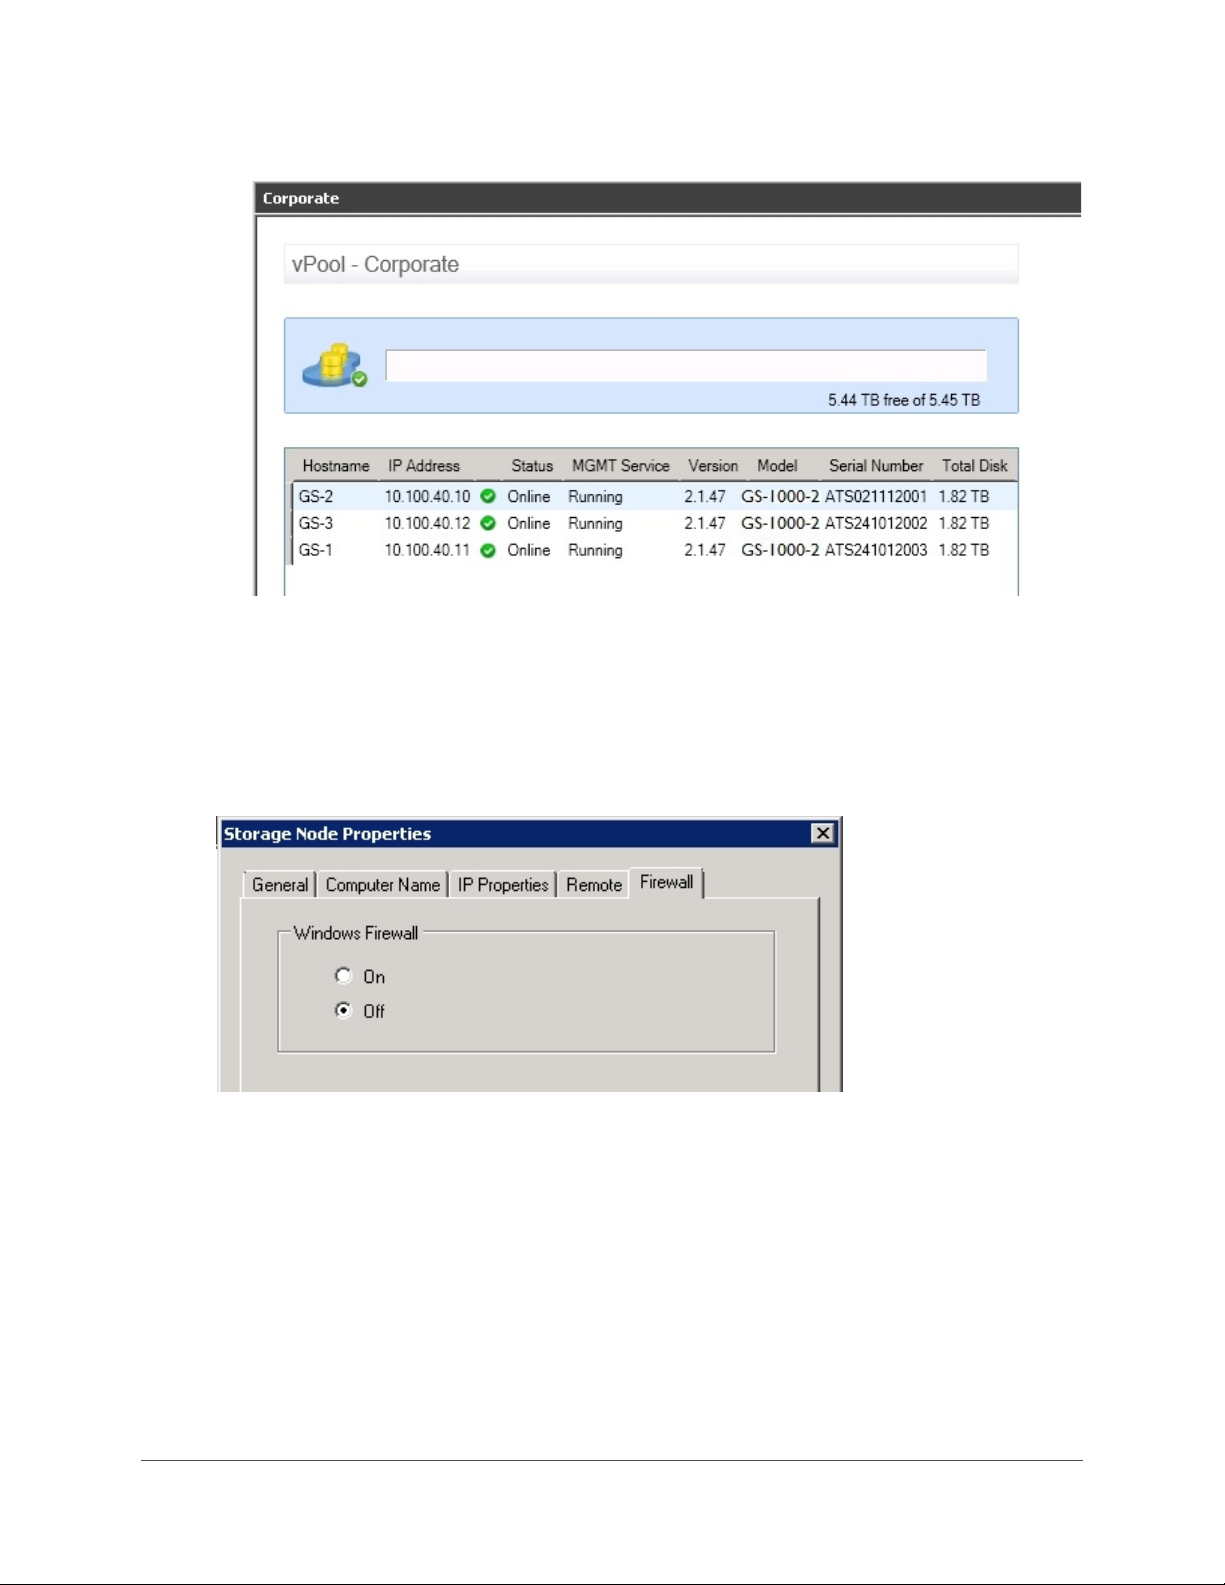
The vPools window for the selected vPool opens.
2. In the window on the right, right-click on the appropriate Gridstore Storage Node in the table,
and select
Properties from the short-cut menu.
The Storage Node Properties dialog box opens.
3. Click the Firewall tab.
The Firewall page of the dialog box opens.
4. In the Windows Firewall area, select one of two options, and then click the OK button.
5. In the Storage Node Properties dialog box, click the Close button.
92
Page 94
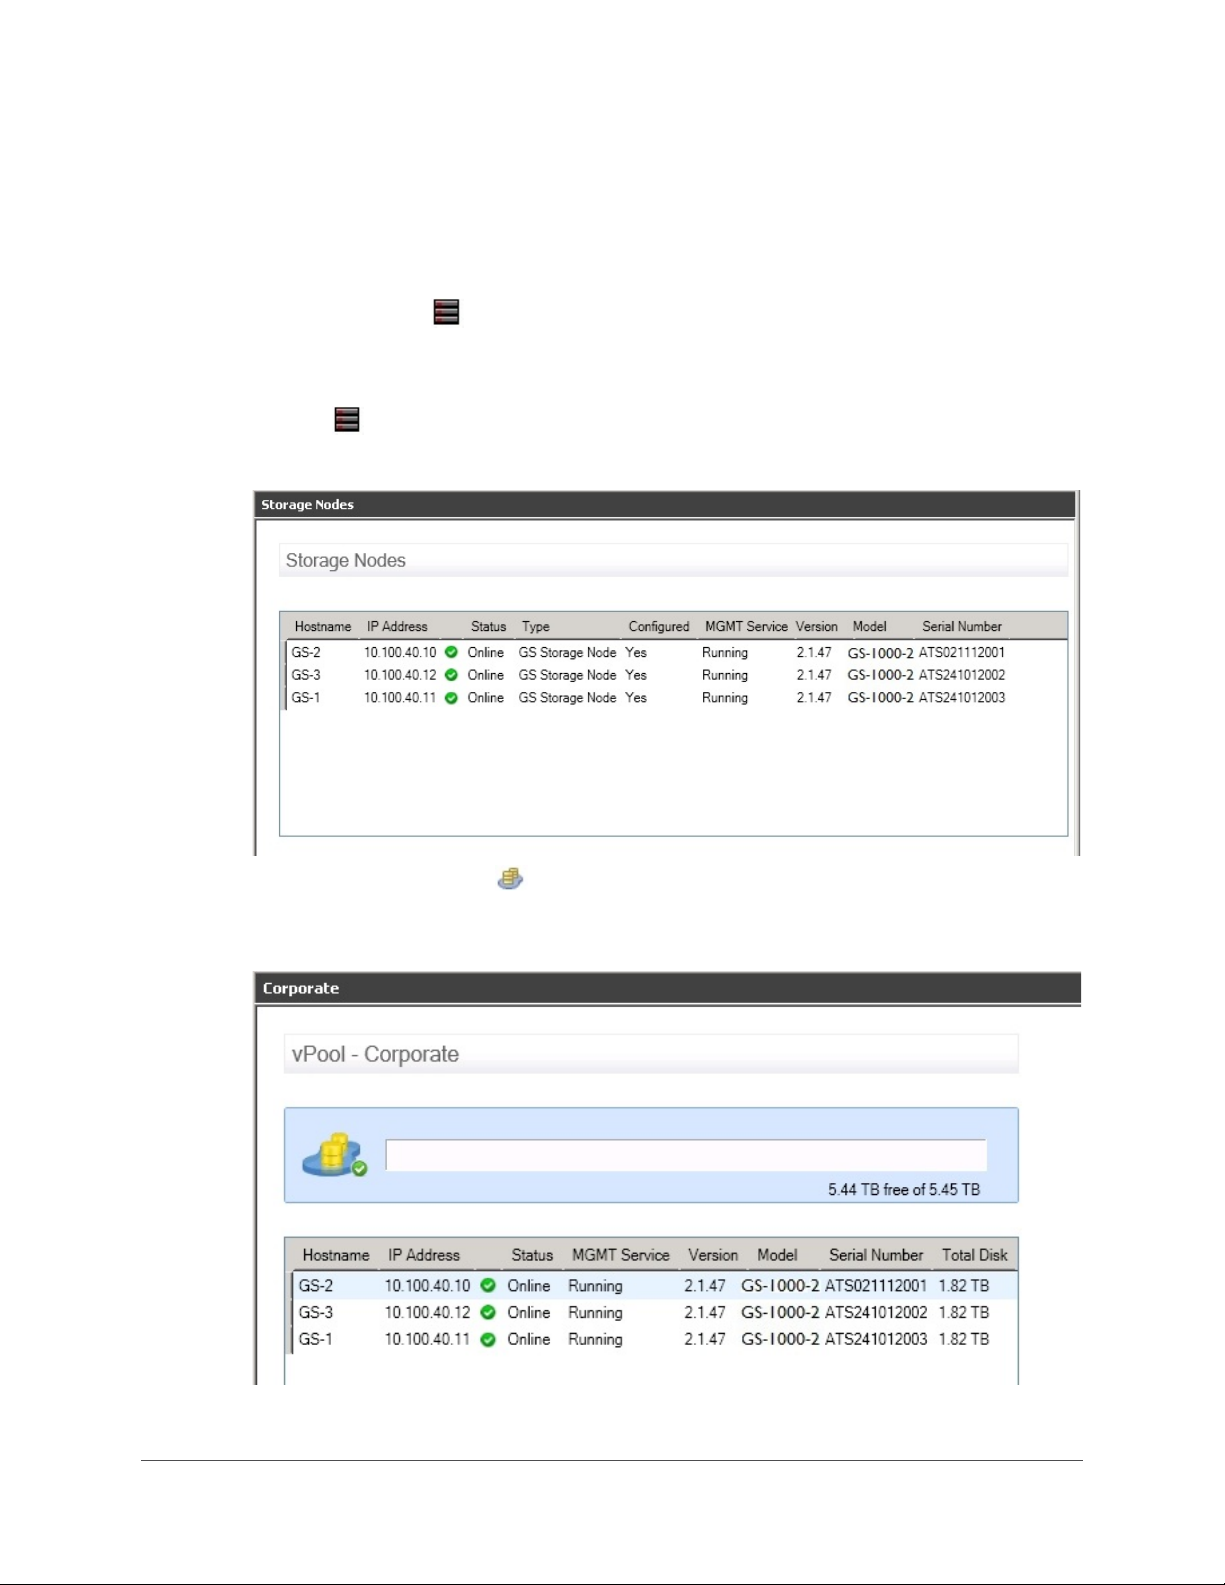
Turning Beacon On or Off for a Gridstore Storage Node
You can test the communication to a Gridstore Storage Node by blinking an LED light that is located
on the front of the Gridstore Storage Node. This feature can also be used to locate a particular
Gridstore Storage Node that is installed in a rack with multiple Gridstore Storage Nodes.
Note: You can do this from the Storage Nodes area or from within the vPool that includes the
Gridstore Storage Node you are attempting to identify.
1. In the left navigation tree of GridControl, do one of the following:
•
Click on Storage Nodes.
The Storage Nodes window opens to the right.
Click the plus sign next to vPools to expand it, and then click the vPool that contains
•
the appropriate Gridstore Storage Node.
The vPools window for the selected vPool opens.
GRIDSTORE ADMINISTRATOR’S GUIDE 93
Page 95
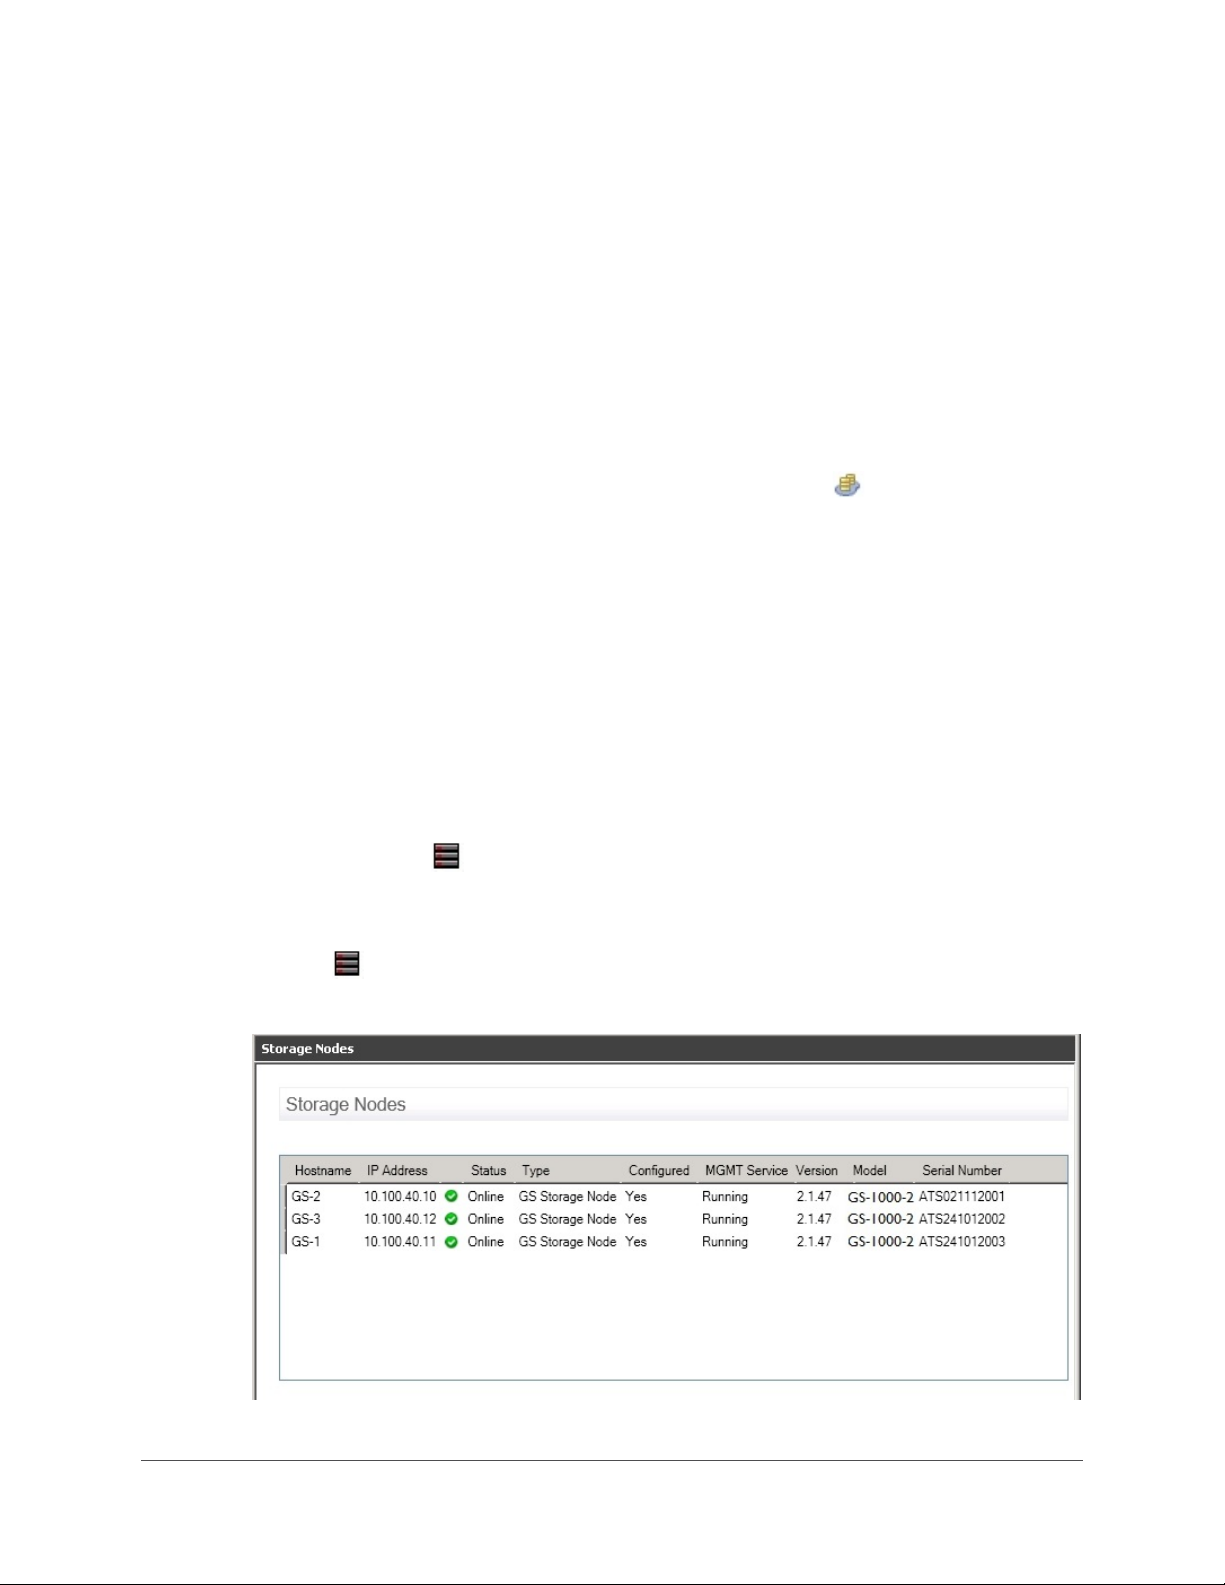
2. In the window on the right, right-click on the appropriate Gridstore Storage Node in the table,
select
The Gridstore Storage Node's beacon light blinks on and off.
3. To turn the beacon off, right-click on the same Gridstore Storage Node, and select Turn
Beacon Off from the short-cut menu.
The beacon light stops blinking on and off.
Manage Node from the short-cut menu, and then Turn Beacon On.
Turning Beacon On or Off for All Gridstore Storage Nodes in a vPool
You can test the communication to all the Gridstore Storage Nodes in a vPool by blinking an LED light
that is located on the front of each Gridstore Node.
1. In the left navigation tree of GridControl, click the plus sign next to
2. In the left navigation tree, right-click the vPool whose beacon lights you would like to turn on,
and select
The beacon lights for all the Gridstore Storage Nodes in the vPool blink on and off.
3. To turn the beacon lights off, right-click on the same vPool, and select Turn Beacon Off from
the short-cut menu.
The beacon lights stop blinking on and off.
Turn Beacon On from the short-cut menu.
vPools to expand it.
Restarting a Gridstore Storage Node
You can restart a Gridstore Storage Node. This action stops all I/O communications to the Gridstore
Storage Node, and then restarts it.
Note: You can do this from the Storage Nodes area or from within the vPool that includes the
Gridstore Storage Node you are restarting.
1. In the left navigation tree of GridControl, do one of the following:
•
Click on Storage Nodes.
The Storage Nodes window opens to the right.
94
Page 96
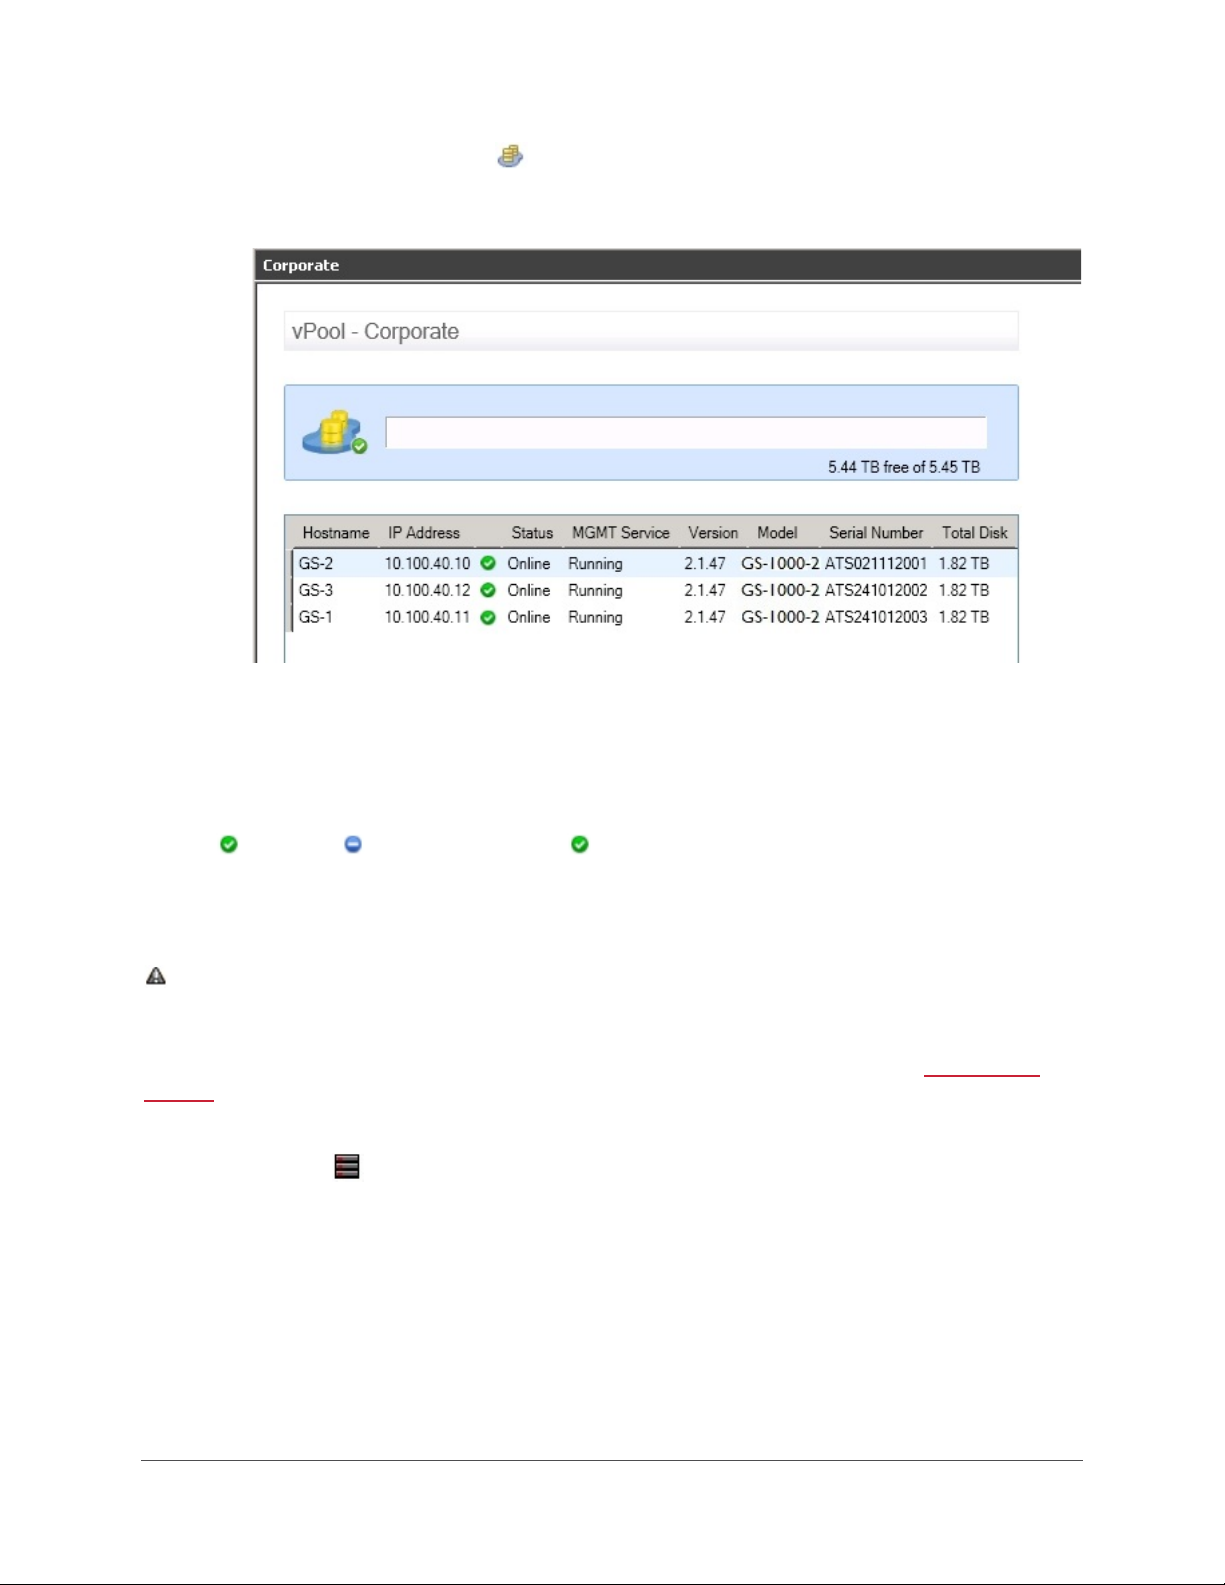
• Click the plus sign next to vPools to expand it, and then click the vPool that contains
the appropriate Gridstore Storage Node.
The vPools window for the selected vPool opens.
2. In the window to the right, right-click on the appropriate Gridstore Storage Node in the table,
select
Manage Node from the short-cut menu, and then Restart.
A message box opens, confirming the action.
3. Click the OK button.
The Gridstore Storage Node shuts down and then restarts. The status changes from
Online to Stopped and back to Online again.
Shutting Down a Gridstore Storage Node
Shutting down a Gridstore Storage Node turns its power off and changes its status in GridControl to
Offline. You may shut down a Gridstore Storage Node if you want to move it physically, or if it is
faulty and you would like to remove it. Note that removing a Gridstore Storage Node that is part of a
vStore will affect the redundancy level of that vStore.
Note: If the Gridstore Storage Node belongs to one or more vStores, we recommend stopping the
vStores (see pg. 29) first.
1. In the left navigation tree of GridControl, do one of the following:
•
Click on Storage Nodes.
GRIDSTORE ADMINISTRATOR’S GUIDE 95
Page 97
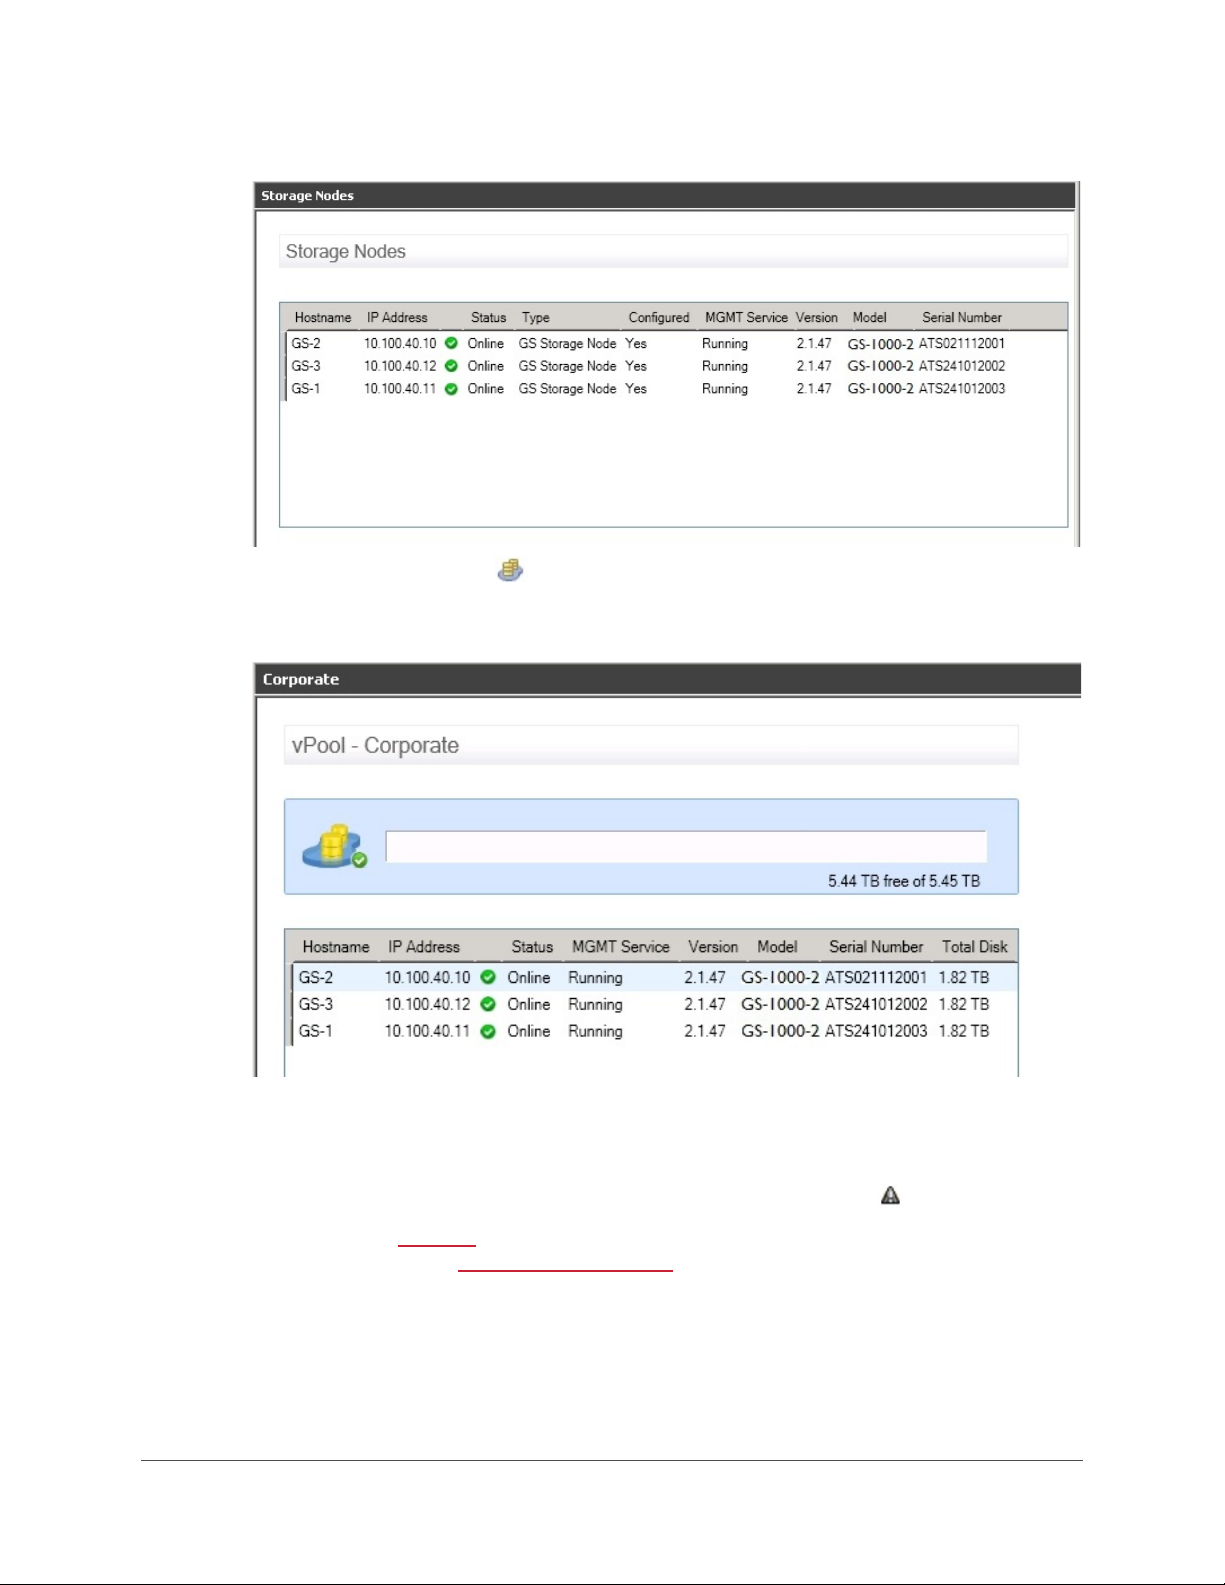
The Storage Nodes window opens to the right.
Click the plus sign next to vPools to expand it, and then click the vPool that contains
•
the Gridstore Storage Node you would like to shut down.
The vPools window for the selected vPool opens.
2. In the window on the right, right-click on the appropriate Gridstore Storage Node in the table,
select
Manage Node from the short-cut menu, and then Shutdown.
The Gridstore Storage Node is powered down and its status changes to Offline.
You can now either wake up the Gridstore Storage Node again (see pg. 97), which powers it
on and brings it online, or
remove it from the Grid (see pg. 100).
96
Page 98
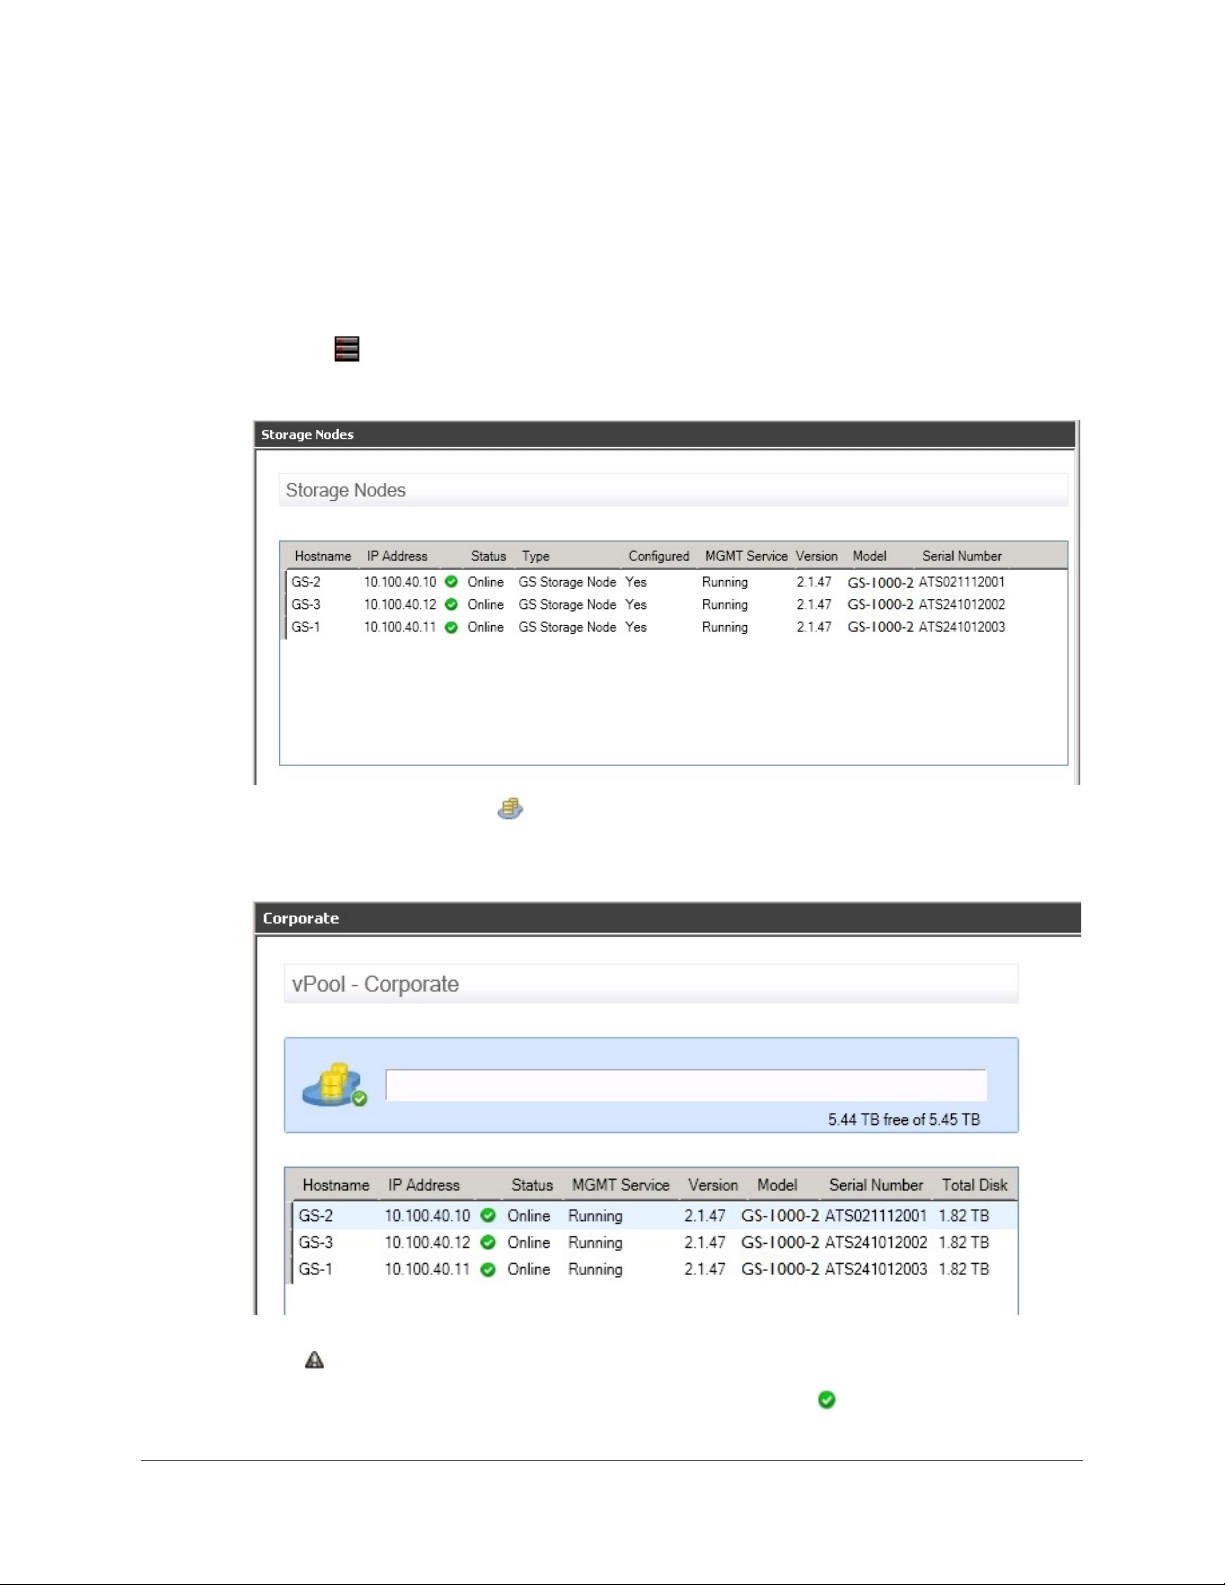
Waking Up a Gridstore Storage Node that Is Offline
You can wake up a Gridstore Storage Node that is offline. When the Gridstore Storage Node is
offline, it is powered off, but still connected to the network and thereby able to respond to a "Wake
On LAN" command.
1. In the left navigation tree of GridControl, do one of the following:
•
Click on Storage Nodes.
The Storage Nodes window opens to the right.
Click the plus sign next to vPools to expand it, and then click the vPool that contains
•
the Gridstore Storage Node you would like to wake up.
The vPools window for the selected vPool opens.
2. In the window at the right, right-click on the Gridstore Storage Node in the table that has a
status of
Offline, select Wake Up from the short-cut menu.
The Gridstore Storage Node is powered on and displays with the Online status.
GRIDSTORE ADMINISTRATOR’S GUIDE 97
Page 99
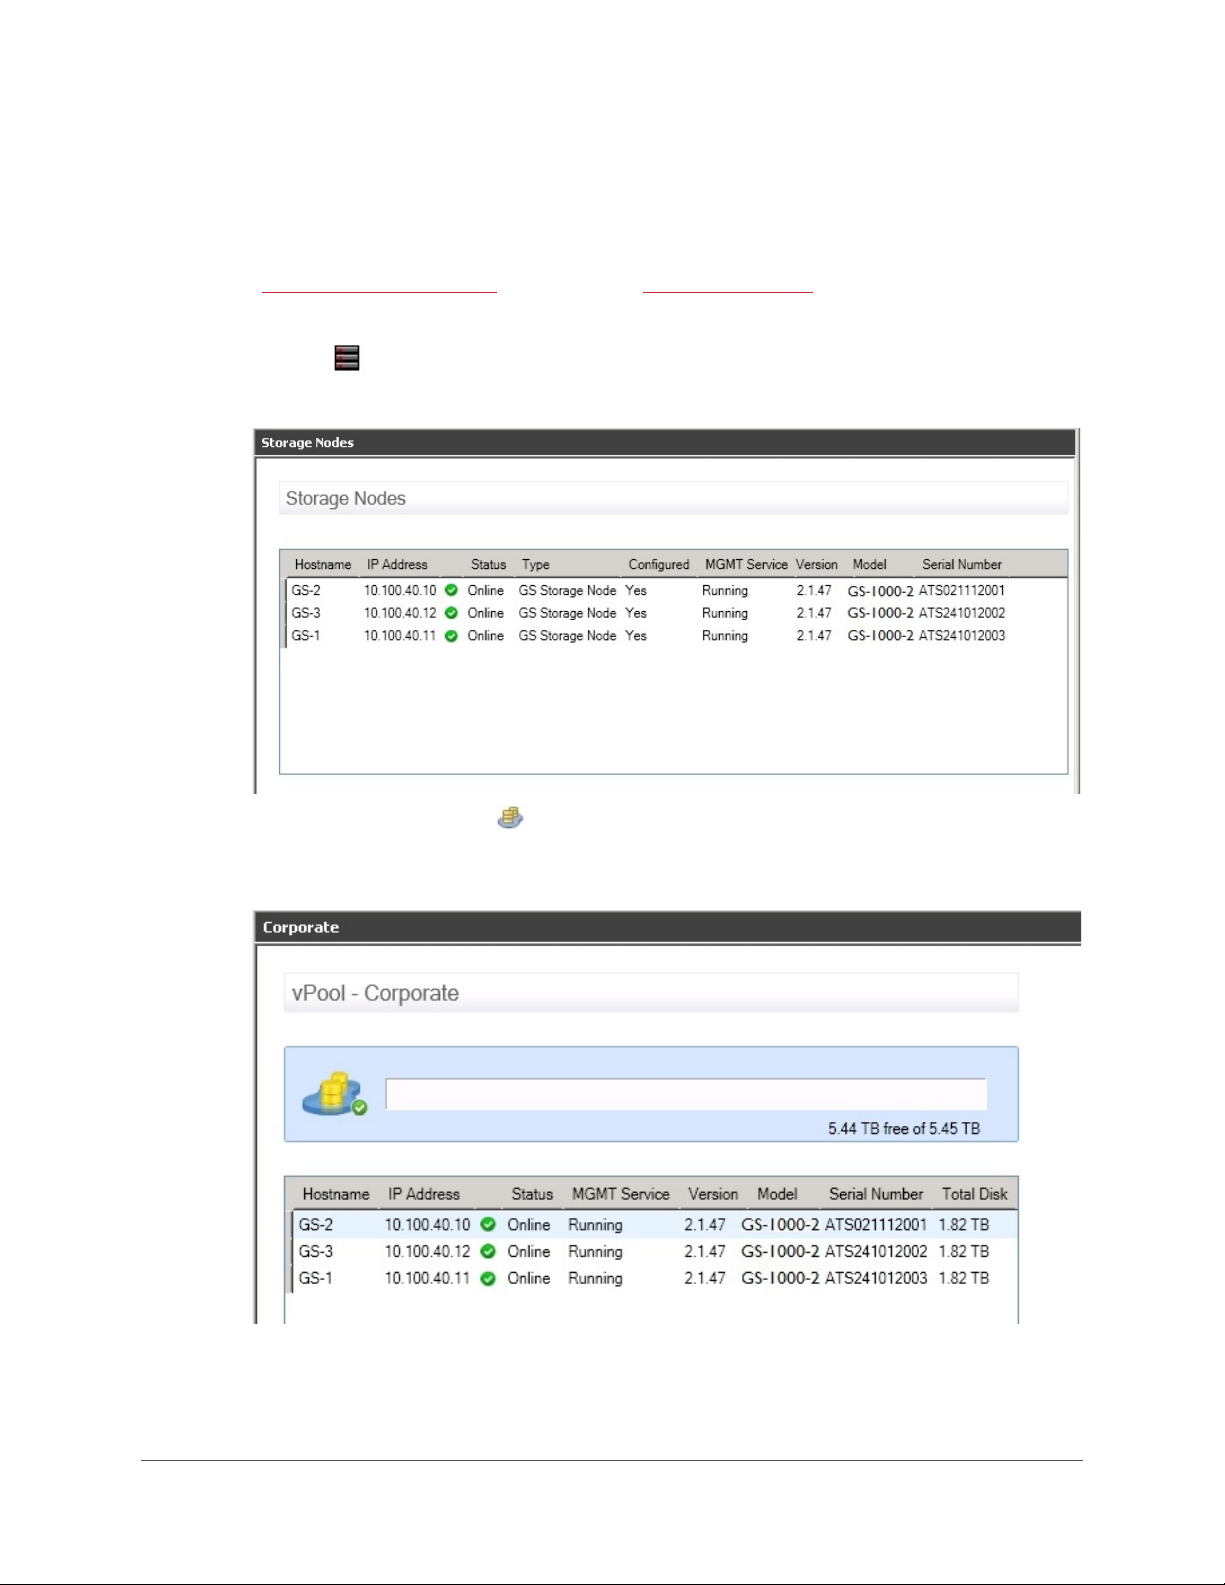
Repairing Software on a Gridstore Storage Node
You can repair the vController software installed on a Gridstore Storage Node. This reinstalls the
software and ensures its integrity.
Note: You cannot repair a Gridstore Storage Node that has been allocated to a vStore. You would
first need to
1. In the left navigation tree of GridControl, do one of the following:
remove it from the vStore (see pg. 34) or remove the vStore (see pg. 37).
•
Click on Storage Nodes.
The Storage Nodes window opens to the right.
Click the plus sign next to vPools to expand it, and then click the vPool that contains
•
the Gridstore Storage Node you would like to repair.
The vPools window for the selected vPool opens.
2. In the window on the right, right-click on the Gridstore Storage Node in the table, and select
Repair from the short-cut menu.
98
A message box opens, confirming the action.
Page 100
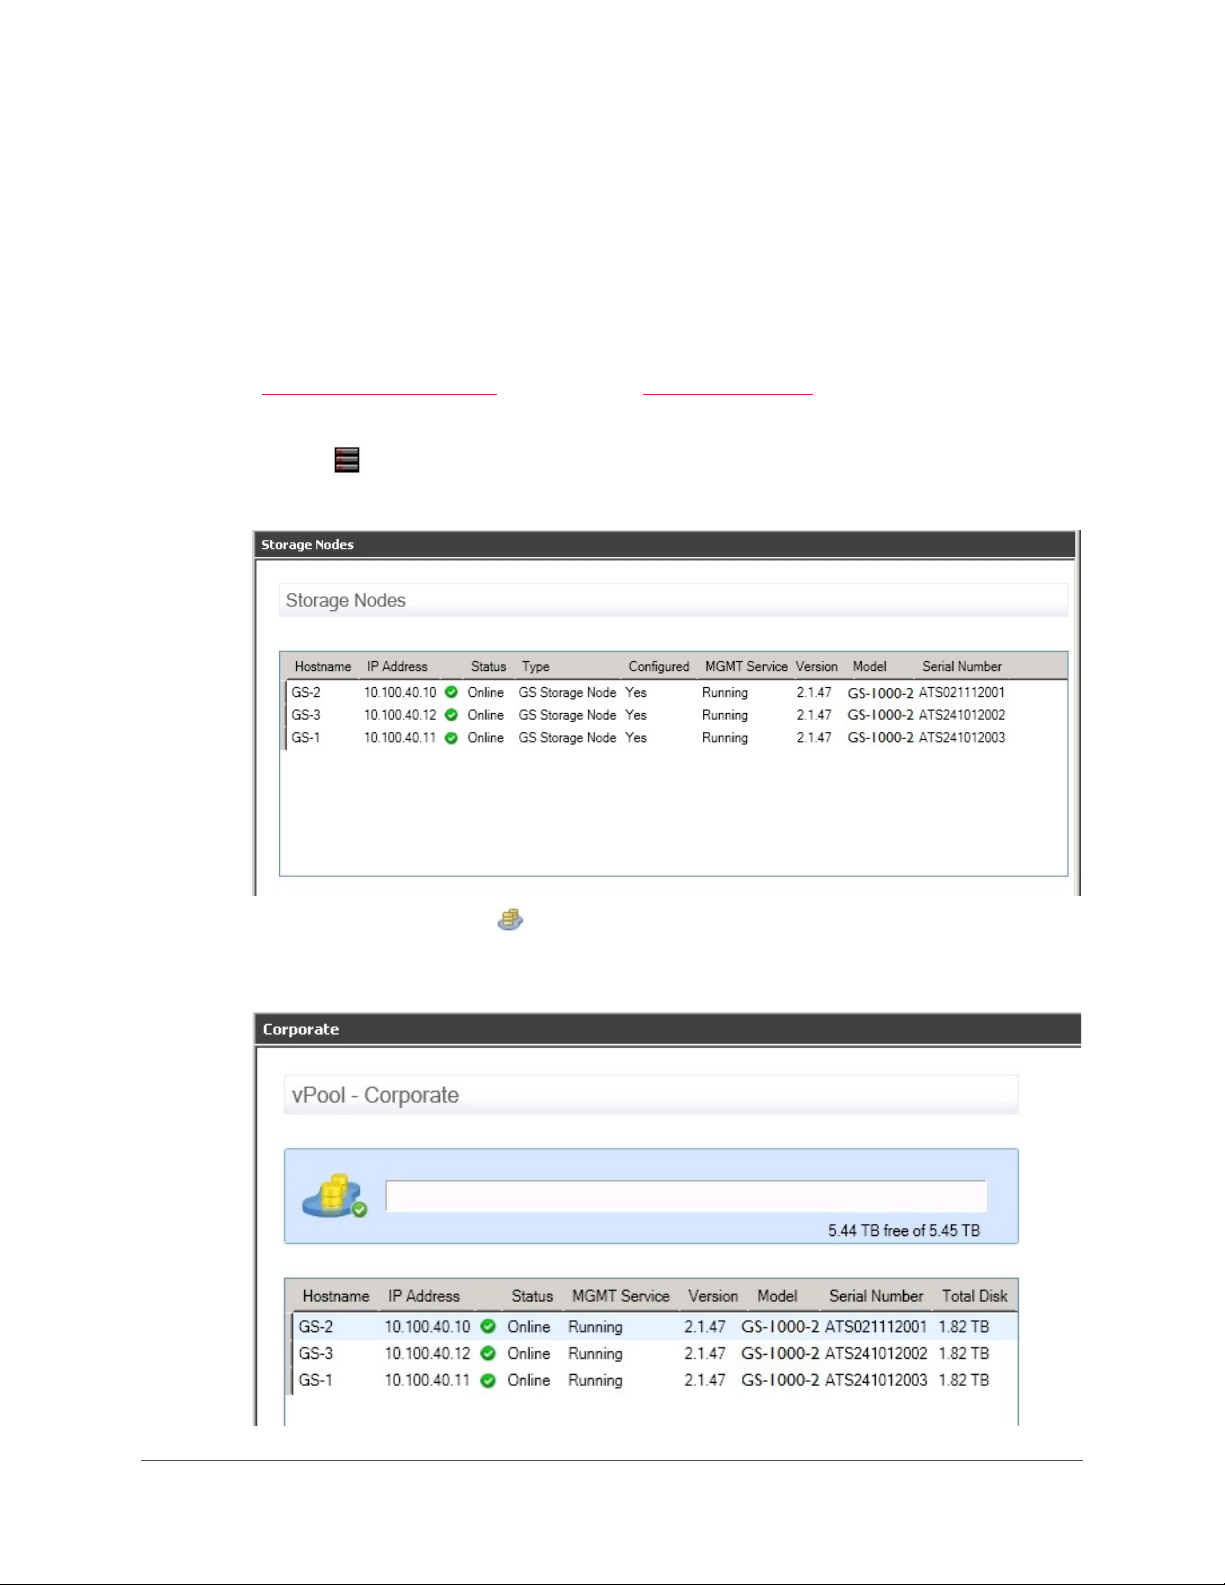
3. Click the OK button.
The Gridstore Storage Node vController software is repaired.
Uninstalling Software from a Gridstore Storage Node
You can uninstall the software on the Gridstore Storage Node. Doing so removes the Gridstore
Storage Node from the Grid.
Note: You cannot uninstall a Gridstore Storage Node that has been allocated to a vStore. You would
first need to
1. In the left navigation tree of GridControl, do one of the following:
remove it from the vStore (see pg. 34) or remove the vStore (see pg. 37).
•
Click on Storage Nodes.
The Storage Nodes window opens to the right.
Click the plus sign next to vPools to expand it, and then click the vPool that contains
•
the Gridstore Storage Node you would like to uninstall.
The vPools window for the selected vPool opens.
GRIDSTORE ADMINISTRATOR’S GUIDE 99
 Loading...