

Page 1

MF-230 Troubleshooting & Web UI Configuration Guide v1.0
1
Table of Contents
1) P1 4G Portable WiFi Router (MF-230) ............................................................................ 2
2) P1 4G Portable WiFi Router (MF-230) Troubleshooting Guide ...................................... 4
a) Router Setup ............................................................................................................... 4
b) WiFi Connection Setup ............................................................................................... 6
c) Computer/Laptop Setup Information ......................................................................... 8
e) Laptop’s Power Saving Schemes when running on Battery ..................................... 14
f) Connectivity Issues .................................................................................................... 16
3) MF-230 Web Based Configuration Troubleshooting Guide ......................................... 19
a) Login settings ............................................................................................................ 19
b) Status Guides ............................................................................................................ 20
c) Personalization for Account & Date .......................................................................... 23
d) Networking ............................................................................................................... 24
e) Management ............................................................................................................. 38
Page 2
MF-230 Troubleshooting & Web UI Configuration Guide v1.0
2
1) P1 4G Portable WiFi Router (MF-230)
A) Box Contents
B) Router Overview
Page 3
MF-230 Troubleshooting & Web UI Configuration Guide v1.0
3
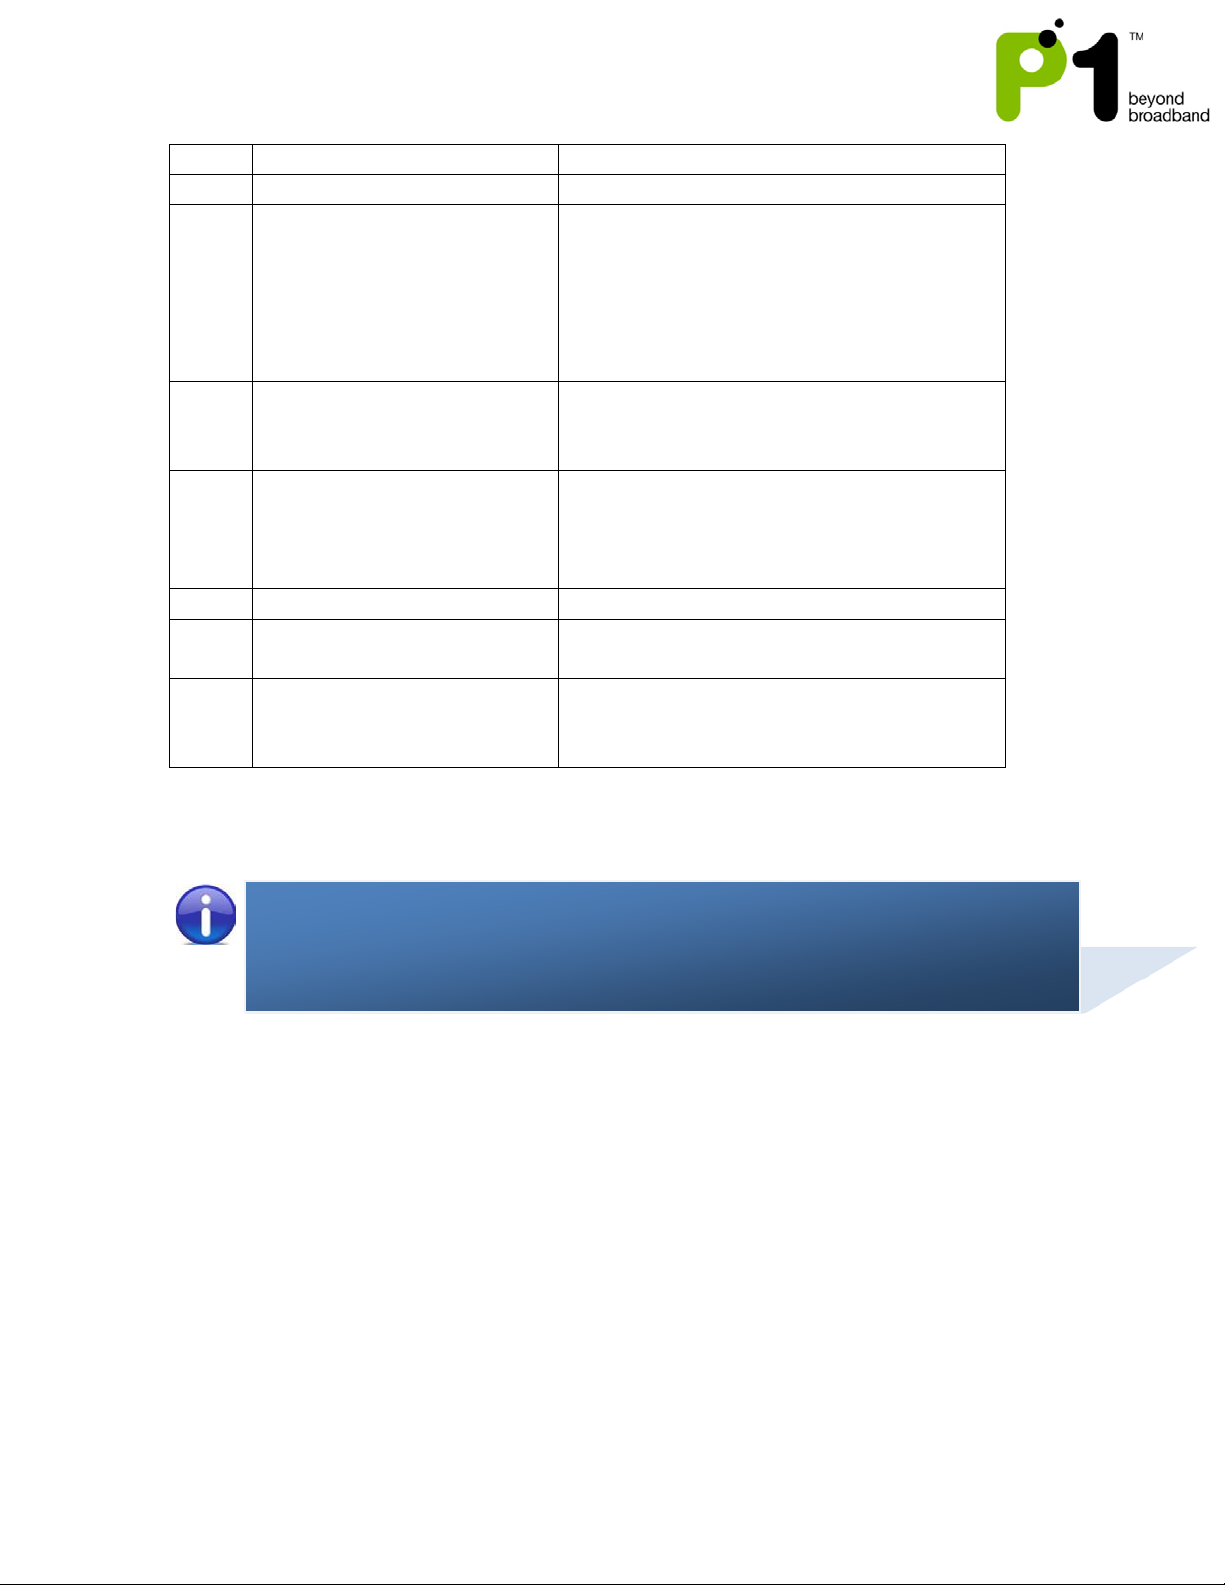
No.
Device Component
Description
1
Strap holder
To insert strap.
2
WiMAX LED
This light turns on when WiMAX signal is
Red: Weak Reception
3
WiFi LED
Green/Static: WiFi enabled
Green /off: WiFi disabled
4
Power/Charging LED
Red/on: Charging
Blue/Blinking Battery Capacity < 25%
5
Power Button
Press for 5 seconds to turn device on/off
6
Reset Button
Resets the device to factory default
settings.
7
USB/ charging connector
Fix the accompanying USB cable to this
PC.
Operating System : Windows XP, Vista, 7, MAC
available. The following light colors indicate
different levels of signal strength:
Green : Excellent Reception
Orange: Good Reception
Green /Blinking: data transmission
Red/Blinking: Low Battery
Blue/Static Battery Capacity > 25%
device and PC to charge or connect to the
C) Router Minimum System Requirements
Hardware : Computer with at least one USB port.
Software : IE, Mozilla, opera or any web browser.
Device : USB Cable, P1 4G Portable WiMAX WiFi Router
D) Router Specifications
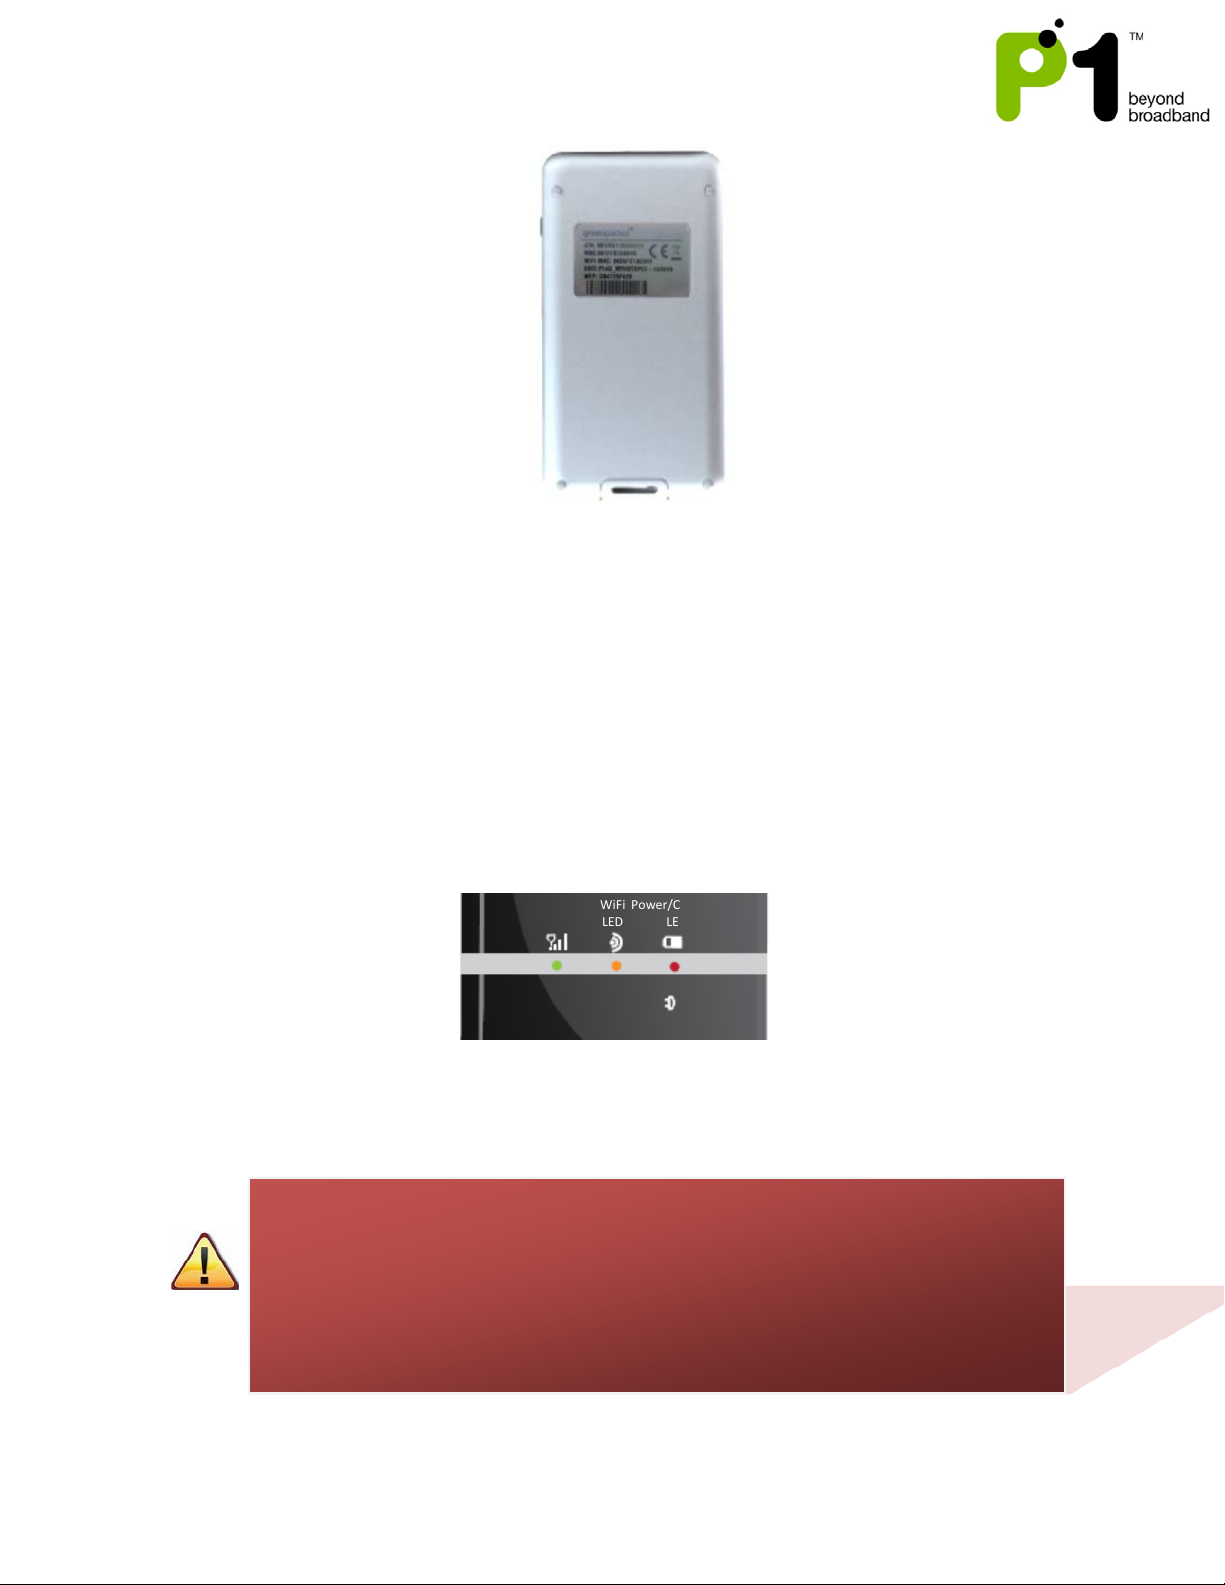
This information can be found at the bottom of your P1 4G Router (MF-230). The default
WiFi network name SSID and password WEP key are also printed there.
Page 4
MF-230 Troubleshooting & Web UI Configuration Guide v1.0
4
If All the LED lights do not light up, these are the possible problems and solutions:
Power/Charging
WiFi
WiMAX
2) P1 4G Portable WiFi Router (MF-230) Troubleshooting Guide
a) Router Setup
I. Switch on the power by pressing and holding the Power Button for 5 seconds. All
LED lights will light up for 3 seconds and go off. The Power/Charging LED will
then light up first followed by WiFi LED light and then WiMAX LED light.
LED
LED
LED
1) The battery is flat. Connect MF-230 with micro USB cable to the USB port of
your computer.
2) The battery is flat and the micro USB cable is faulty, replace your micro USB
cable.
Should the problem persist, please contact P1 Care Line at 1 300 03 1300 for assistance.
Page 5
MF-230 Troubleshooting & Web UI Configuration Guide v1.0
5
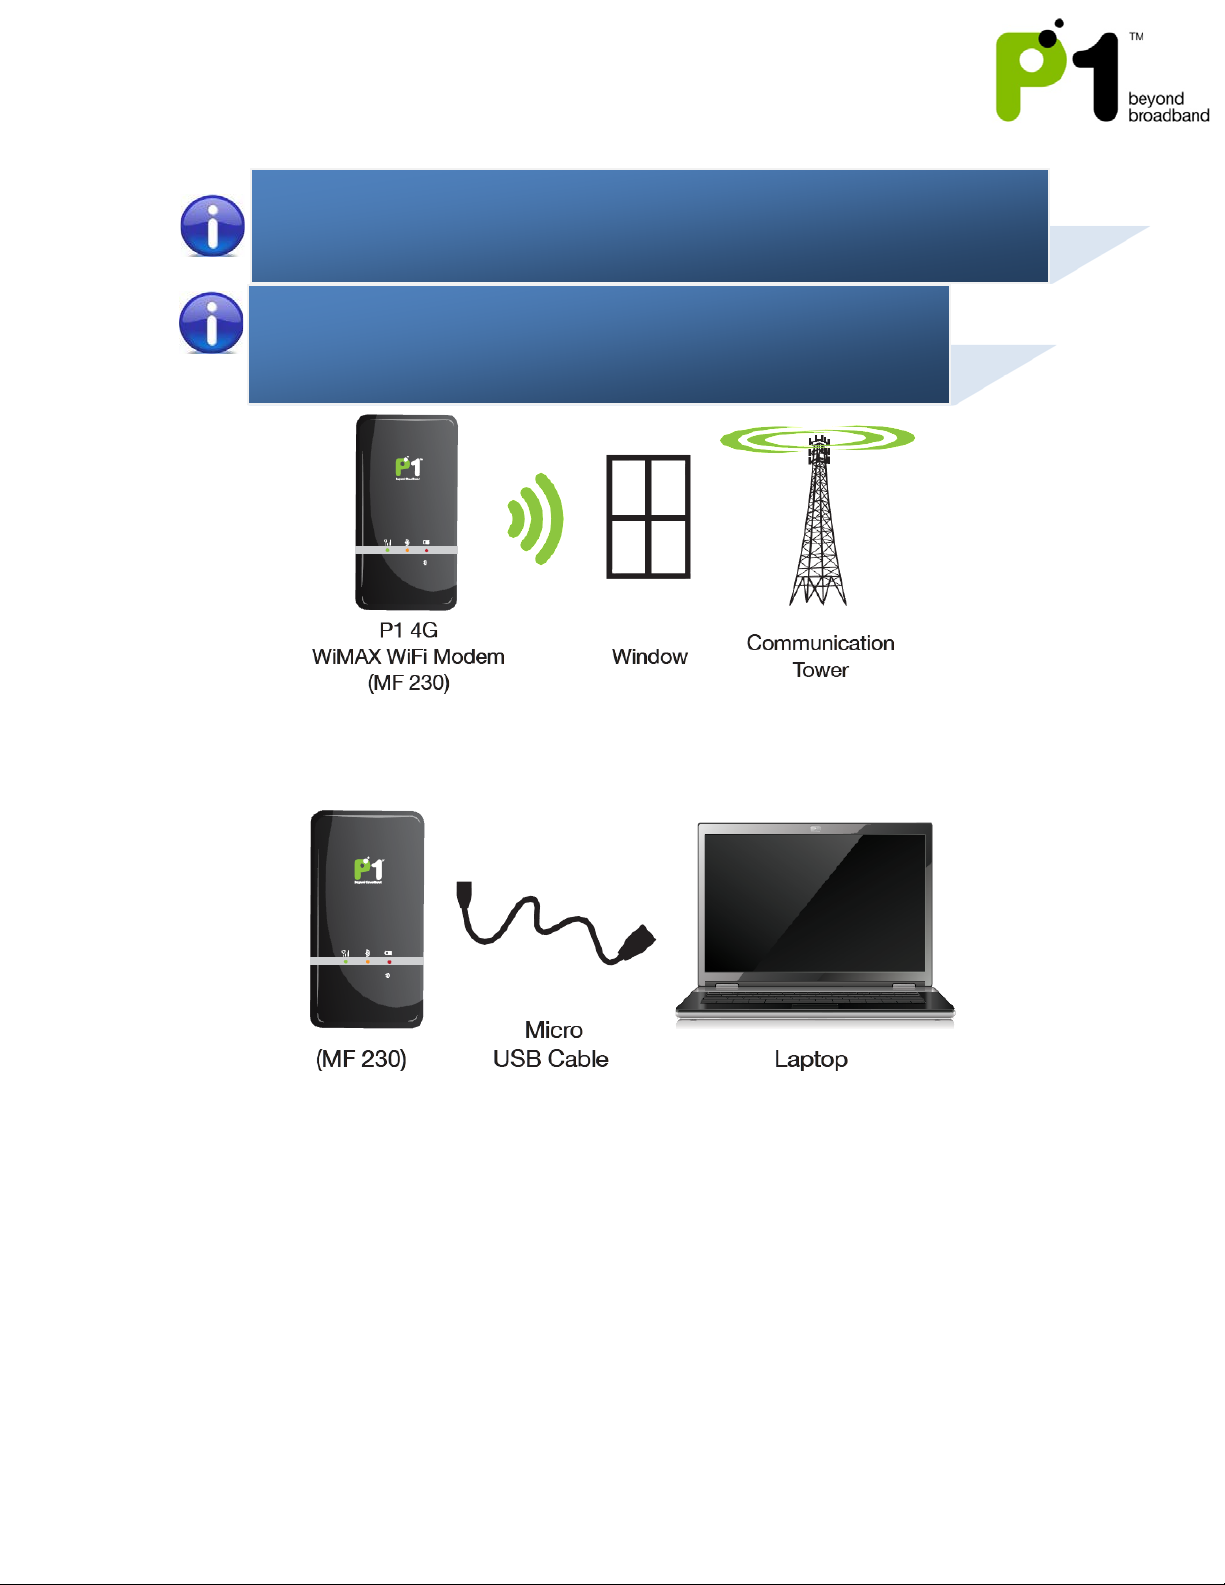
If the WiMAX LED does not light up, please reposition your router near a window.
Router position guide:
Houses: Router must be on top floor, near window
If problem still persist, please contact P1 Care Line.
Condominiums/Apartments: Router must be near window
II. Plug micro connector of the USB cable into MF-230 and the other end to the USB
port of your computer.
III. To enter the hibernate mode, press the power button for 1 second, user will see
blue LED blinking. User will not be able to surf the internet while the router is in
hibernate mode. To return to operation mode, press the power button for 1
second. At the GUI, user can set the timer for the router to enter hibernate
mode automatically after a certain period of time.
Page 6
MF-230 Troubleshooting & Web UI Configuration Guide v1.0
6
Select the name of your
b) WiFi Connection Setup
1. The WiFi function in P1 4G router (MF-230) is enabled by default when you
power it up.
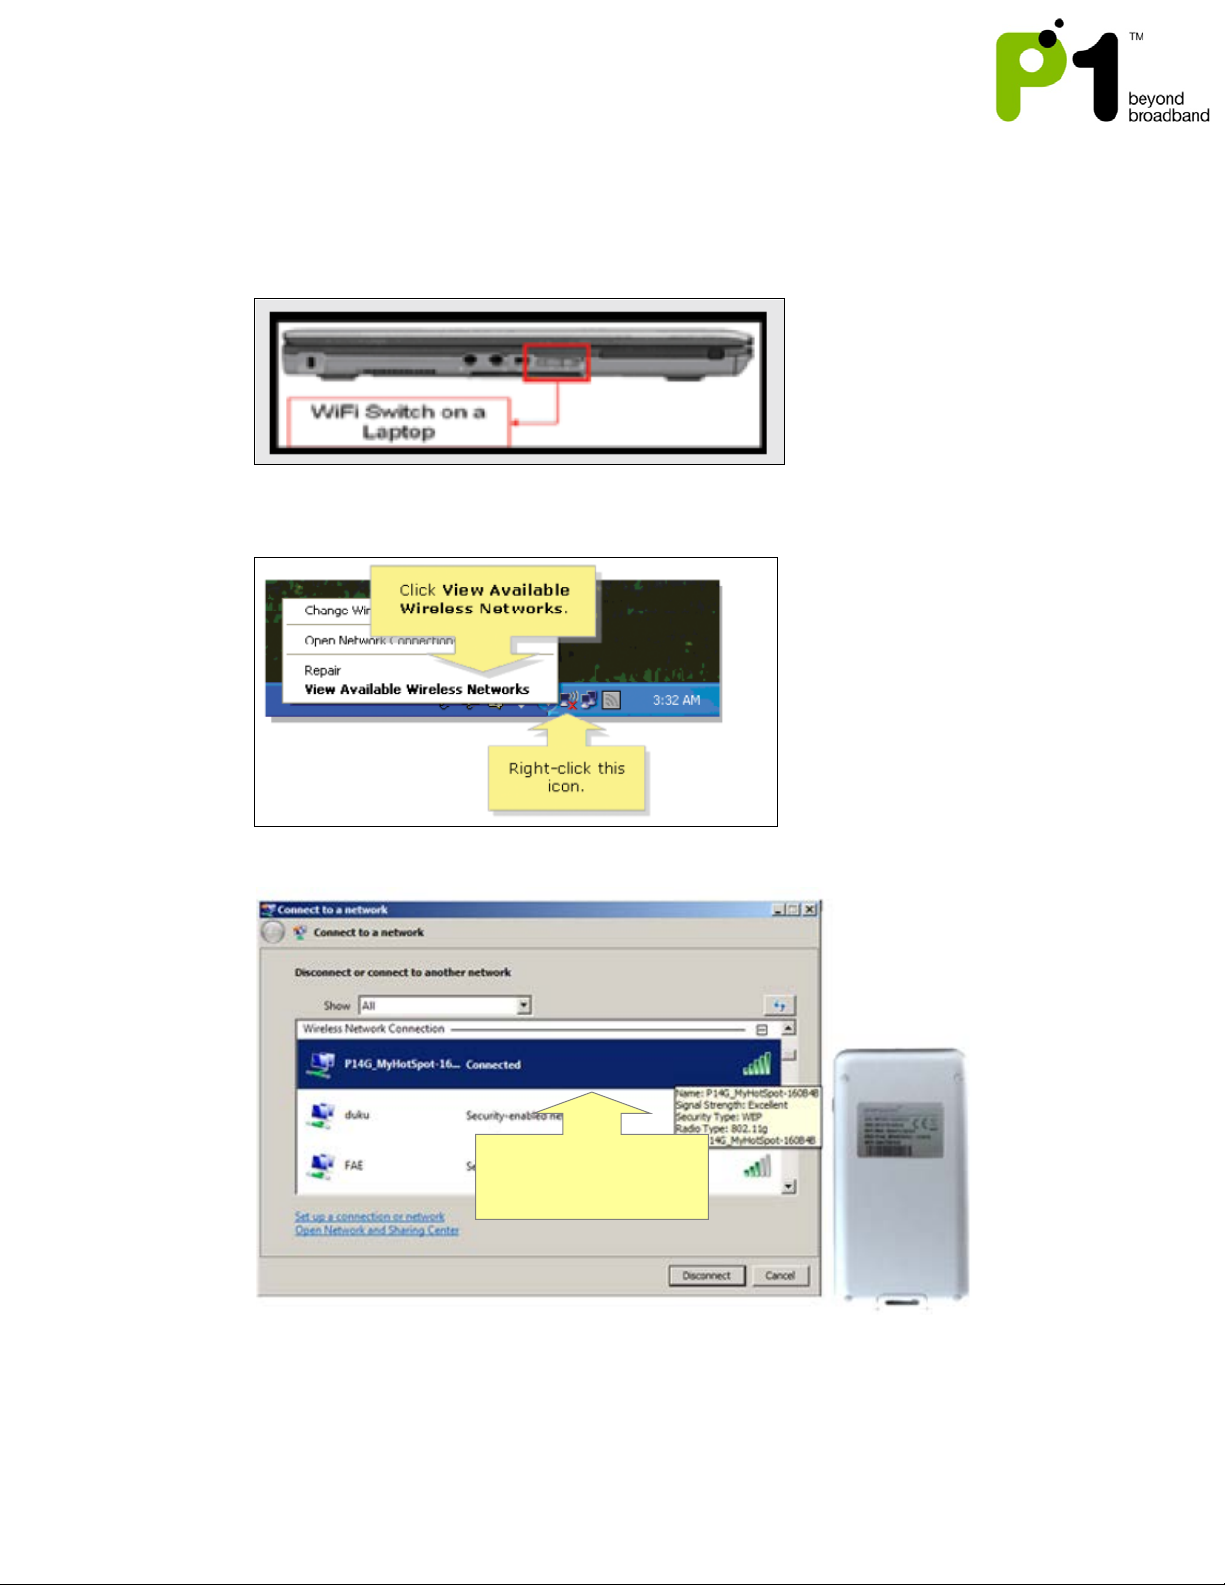
2. Switch on the WiFi adapter on your laptop.
3. Right-click the Wireless Network Connection icon at the bottom-right of the
screen and select View Available Wireless Networks.
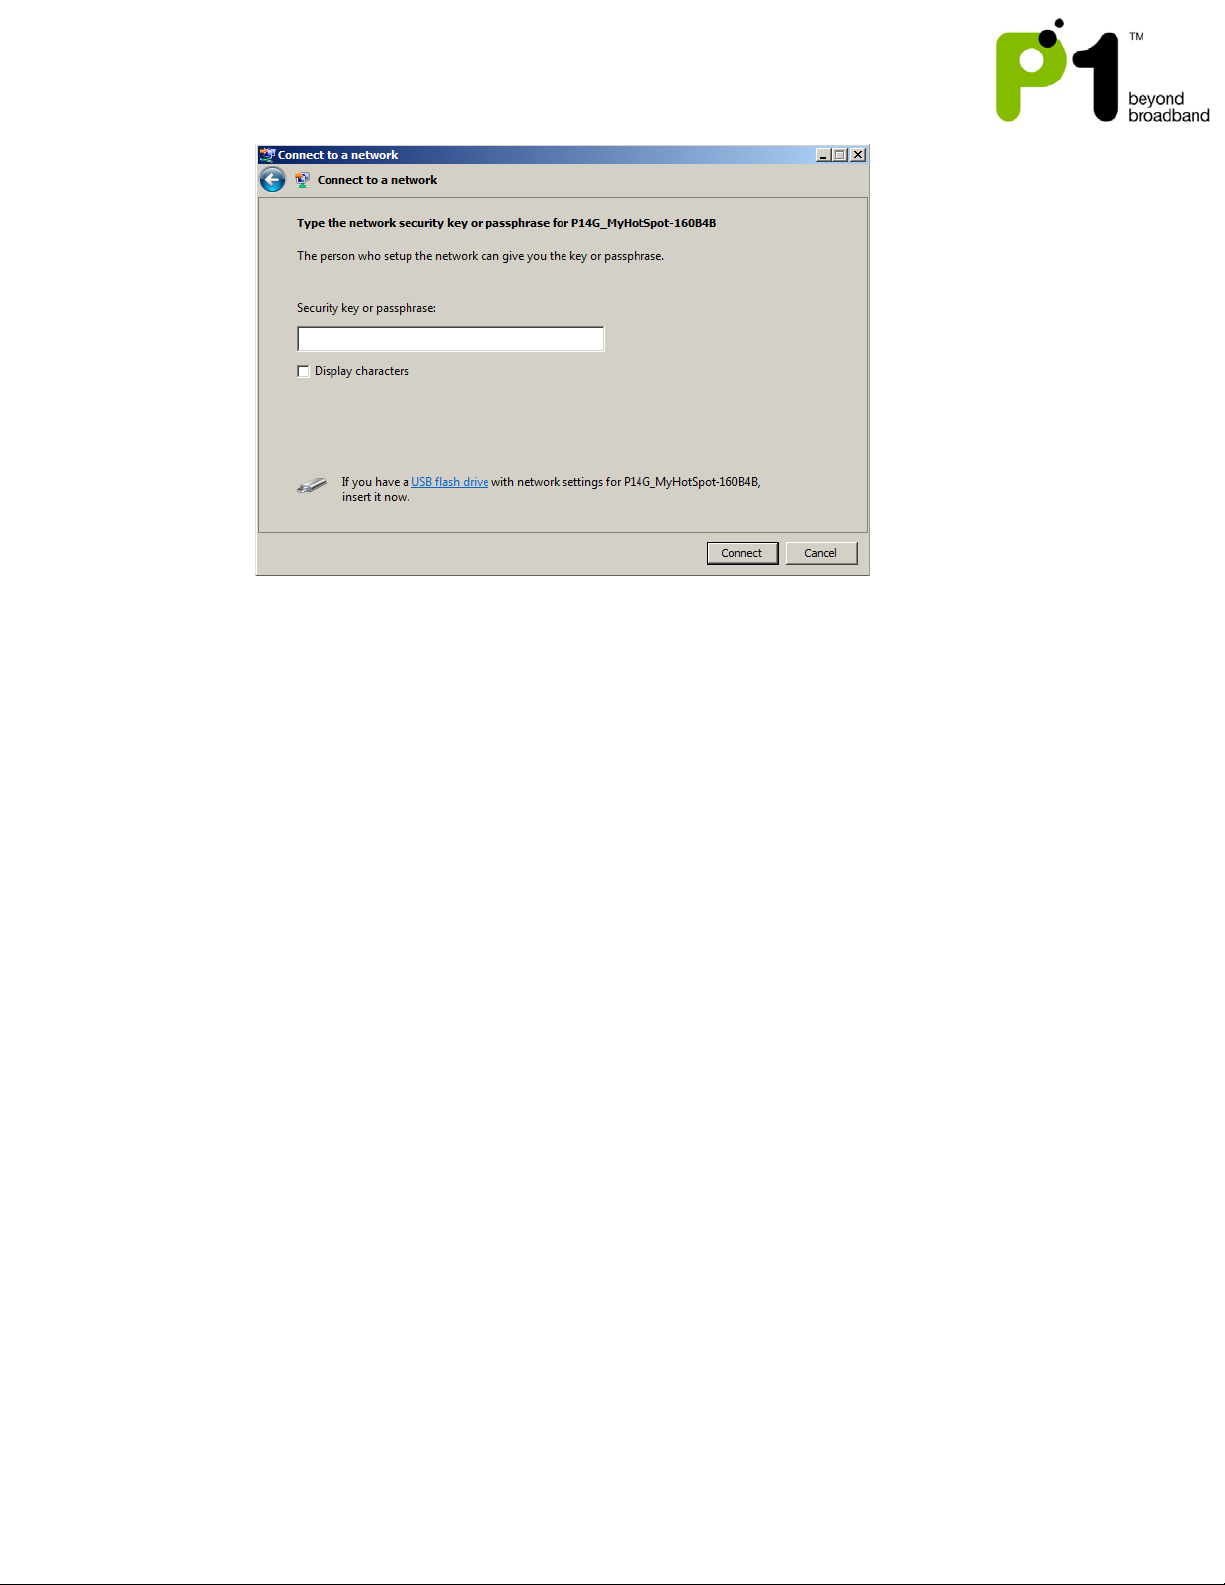
4. Select the “SSID” that is printed under your MF-230. Click Connect.
wireless network or SSID
and click Connect.
5. You will be prompted to key in the WEP security key or passphrase. The WEP
security key or passphrase is printed under your MF-230.
Page 7
MF-230 Troubleshooting & Web UI Configuration Guide v1.0
7
Page 8
MF-230 Troubleshooting & Web UI Configuration Guide v1.0
8
By default, all Operating Systems (Windows/Linux/Mac) will set the DHCP option
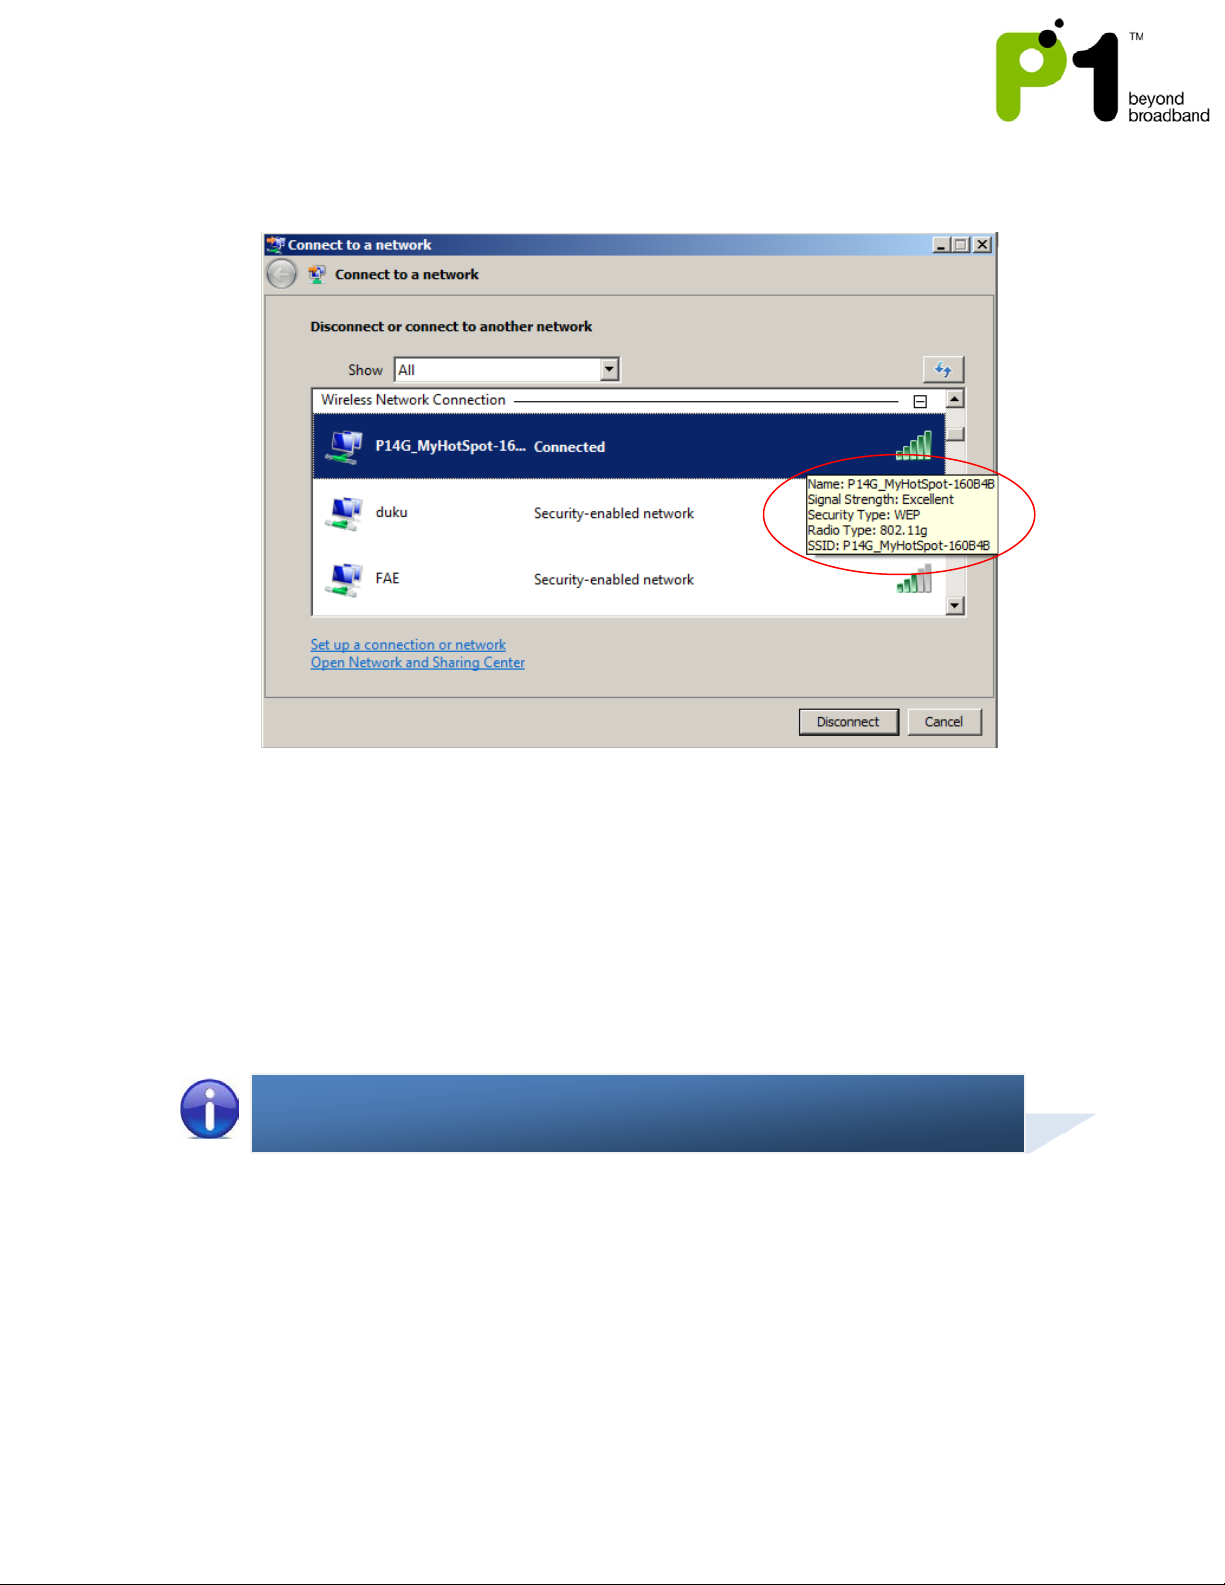
6. Once connected, ensure that your laptop has obtained the correct DHCP IP and
SSID. Check for signal quality and readjust the position of your router accordingly.
7. Note: This step is optional. If you want to change the default SSID or WEP key,
open any Internet browser and type in the URL address for Customer Web
GUIDE at http://10.1.1.254
Username: admin
Password: admin123
c) Computer/Laptop Setup Information
to Obtain an IP address automatically.
Page 9
MF-230 Troubleshooting & Web UI Configuration Guide v1.0
9
WINDOWS XP
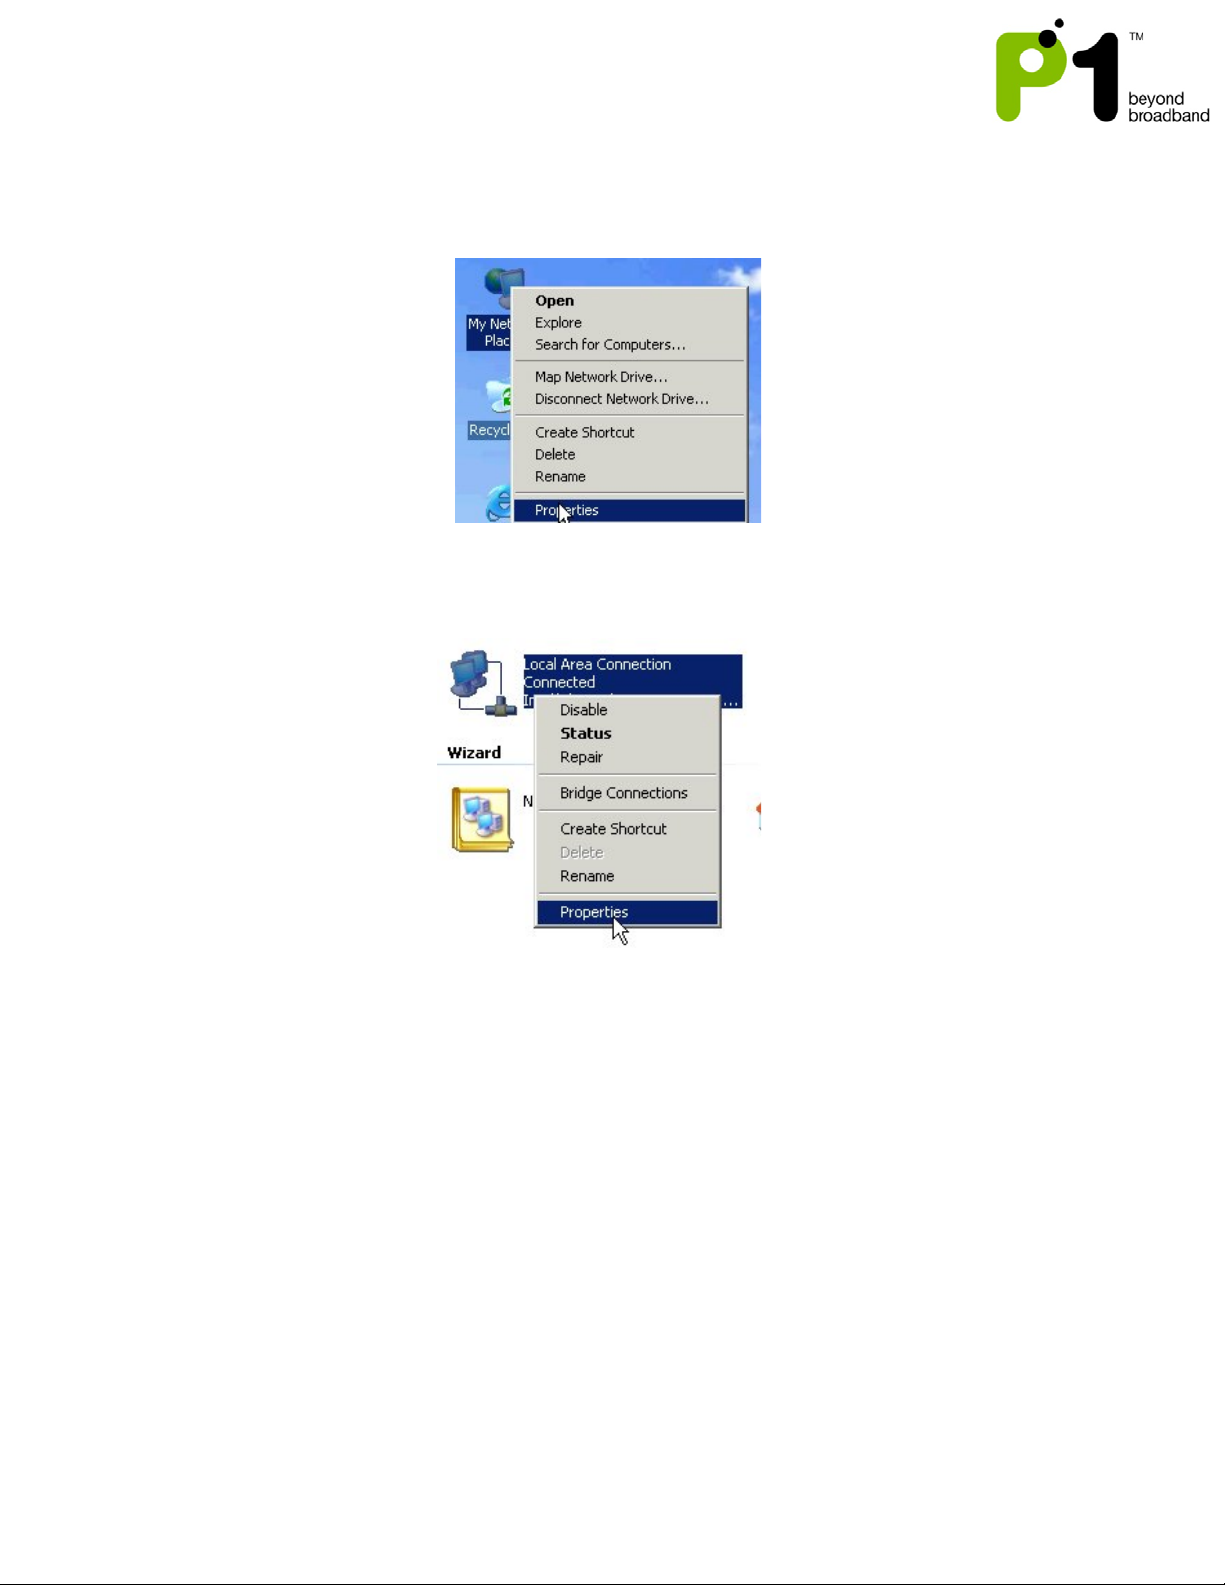
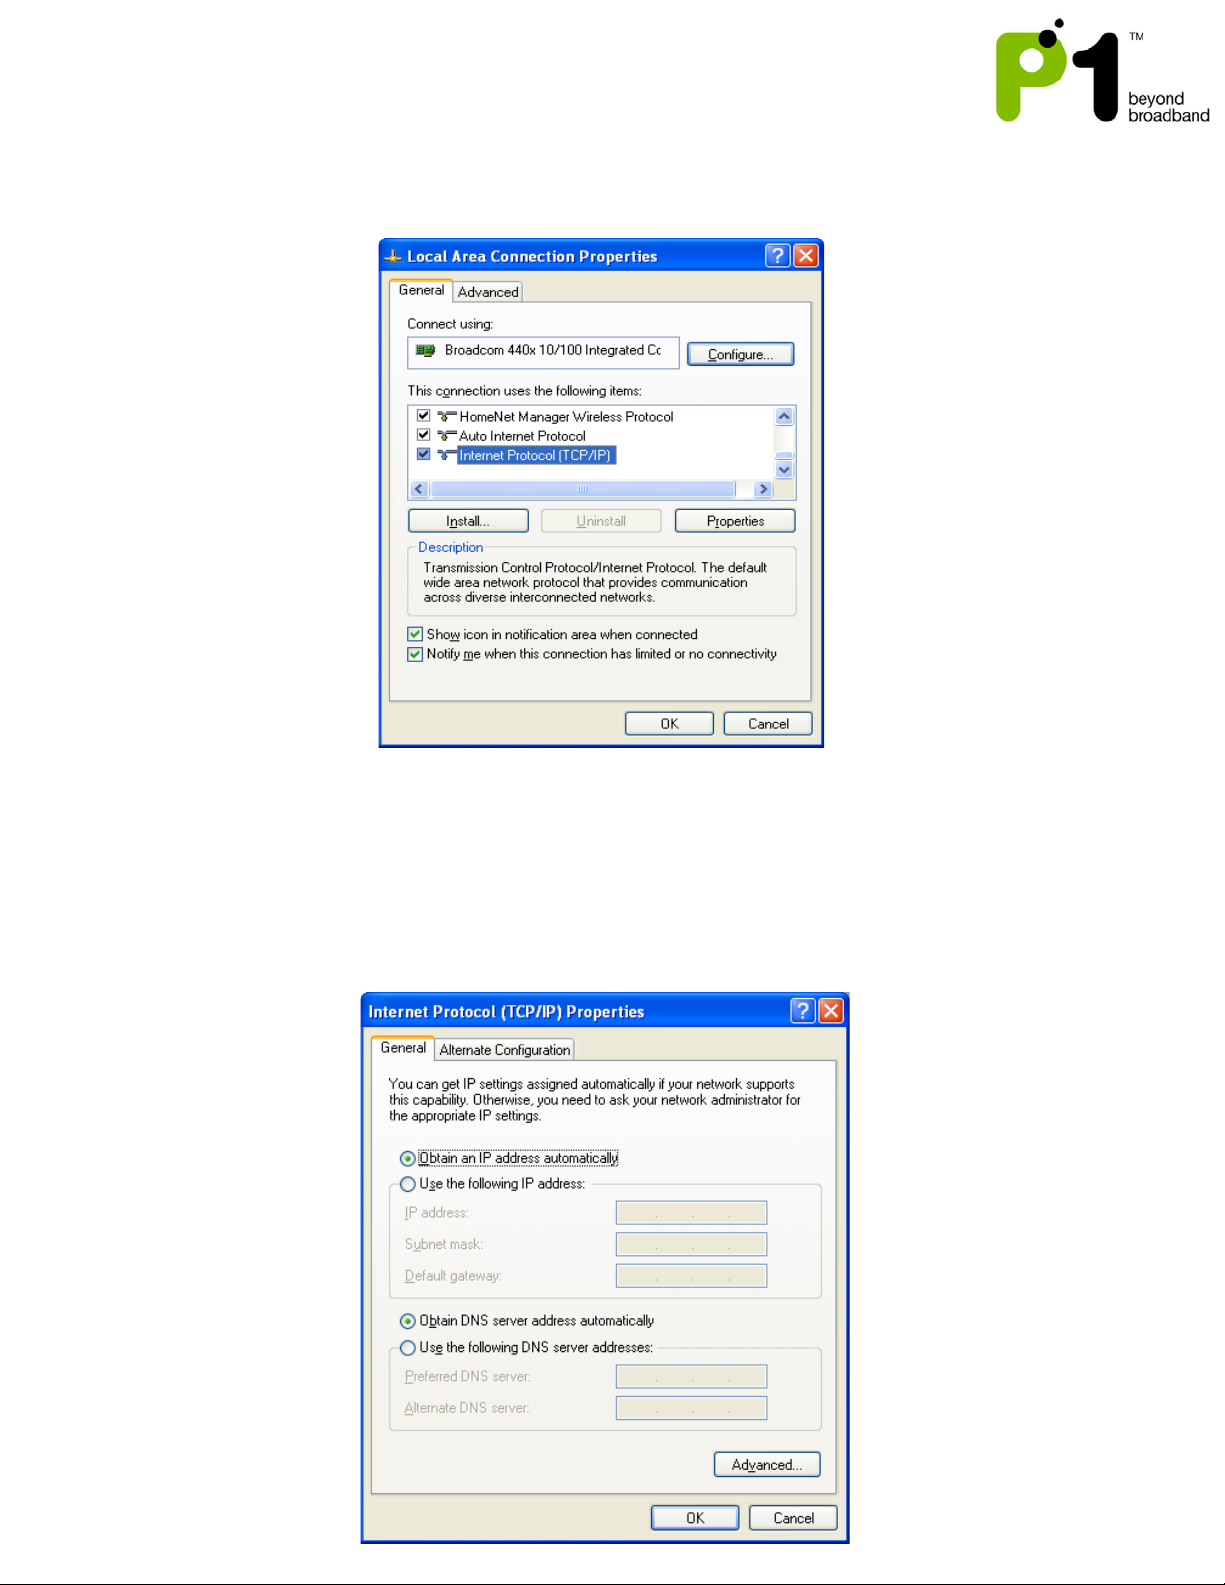
1. Right-click on the My Network Places icon on your desktop and select
“Properties” from the menu that appears.
2. In the window that appears, (labeled Network and Dial-up Connections) right-
click on the icon titled Local Area Connection and select the item Properties from
the menu that appears.
Page 10
MF-230 Troubleshooting & Web UI Configuration Guide v1.0
10
A window titled Local Area Connection Properties will now appear. In the list below,
select the item called Internet Protocol (TCP/IP) and click on the button labeled
Properties.
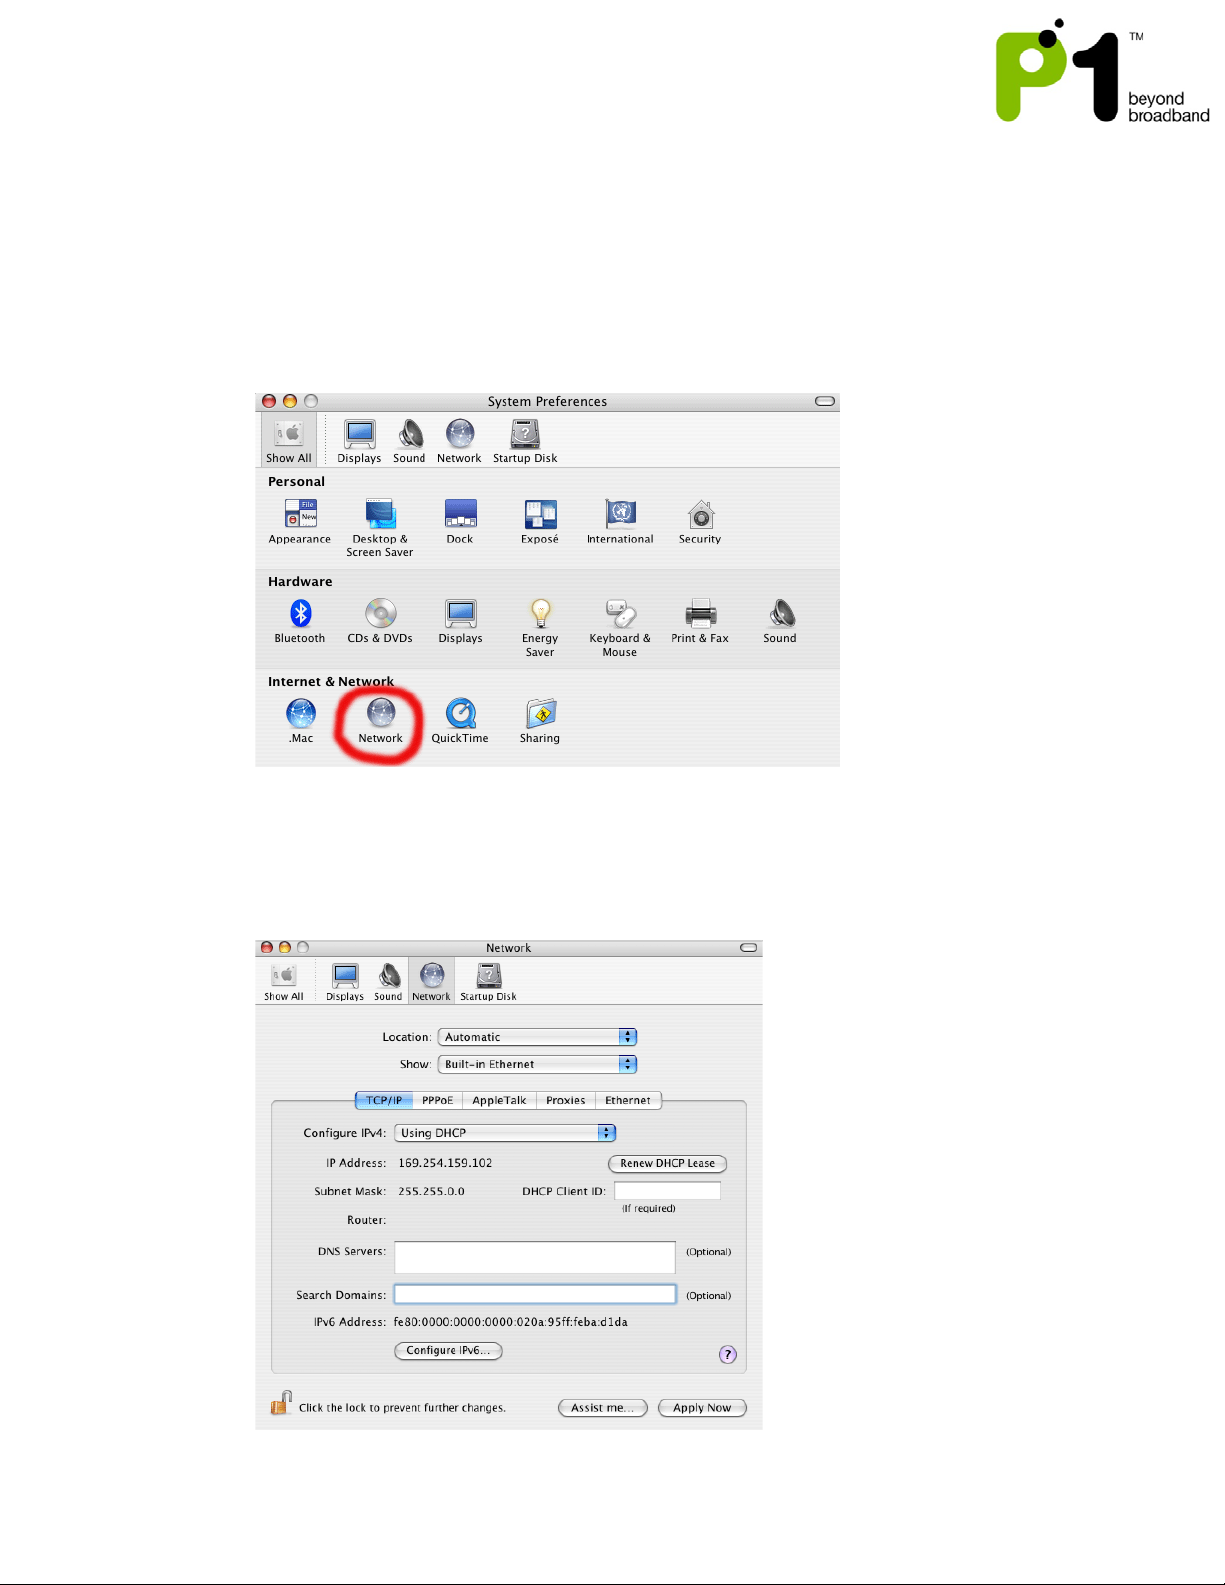
3. A window titled Internet Protocol (TCP/IP) Properties will now appear. In this
window, click on the radio button to the left of Obtain an IP address
automatically.
4. In the same window near the bottom, make sure the radio button to the left of
Obtain DNS server address automatically is filled.
Page 11
MF-230 Troubleshooting & Web UI Configuration Guide v1.0
11
Mac OS X
This guide assumes that your computer has the network adapter and TCP/IP already
installed. All Mac computers certified by Apple to run Mac OS X will have built-in
Ethernet adapter hardware and the necessary networking software as part of OS X's
default installation.
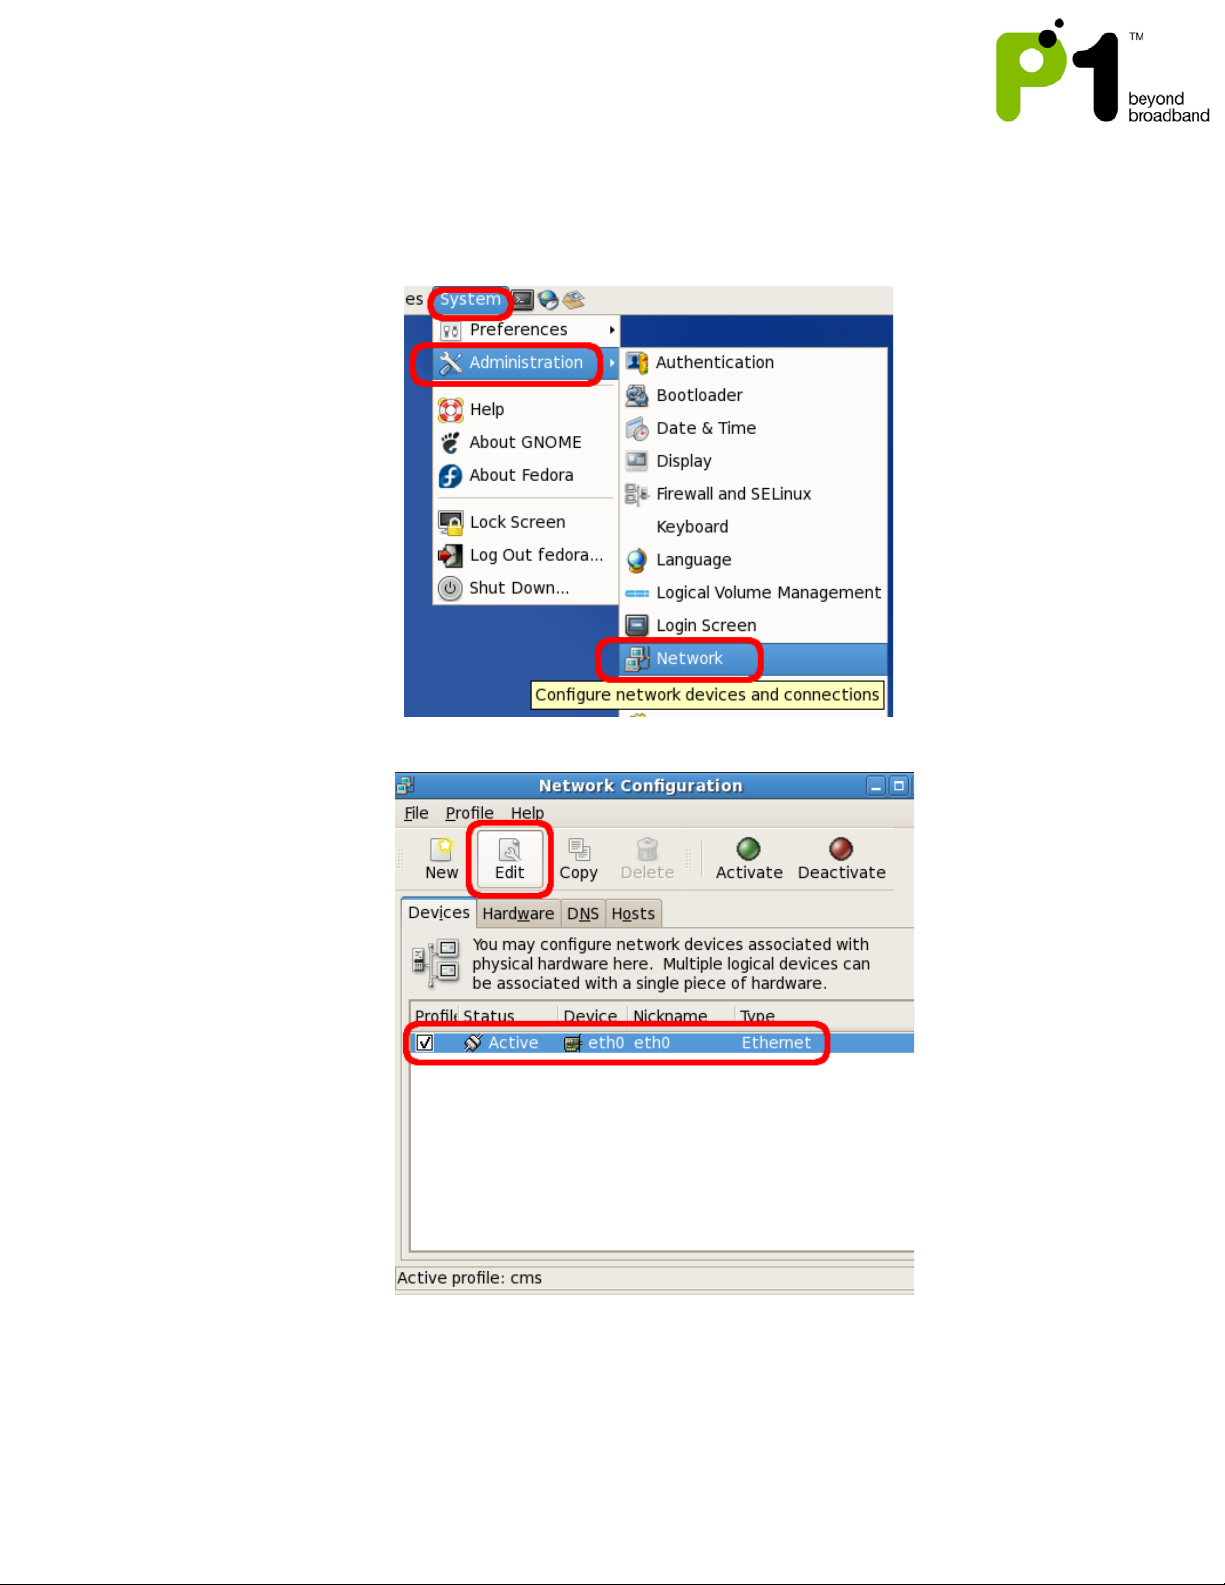
1. Click on the Apple Menu Icon in the upper left corner of your screen.
2. Select System Preferences
3. Click on the Network icon.
4. Select the TCP/IP tab.
5. From the Configure IPv4 menu, select Using DHCP.
6. Click the Apply Now or Save button.
Page 12
MF-230 Troubleshooting & Web UI Configuration Guide v1.0
12
Linux (Fedora)
1. Go to the System Administration and select the Network menu item. This will
launch the Network Config tool, which will prompt Configure Network Devices
and Connections.
2. Select the appropriate network interface and click on Edit.
Page 13
MF-230 Troubleshooting & Web UI Configuration Guide v1.0
13
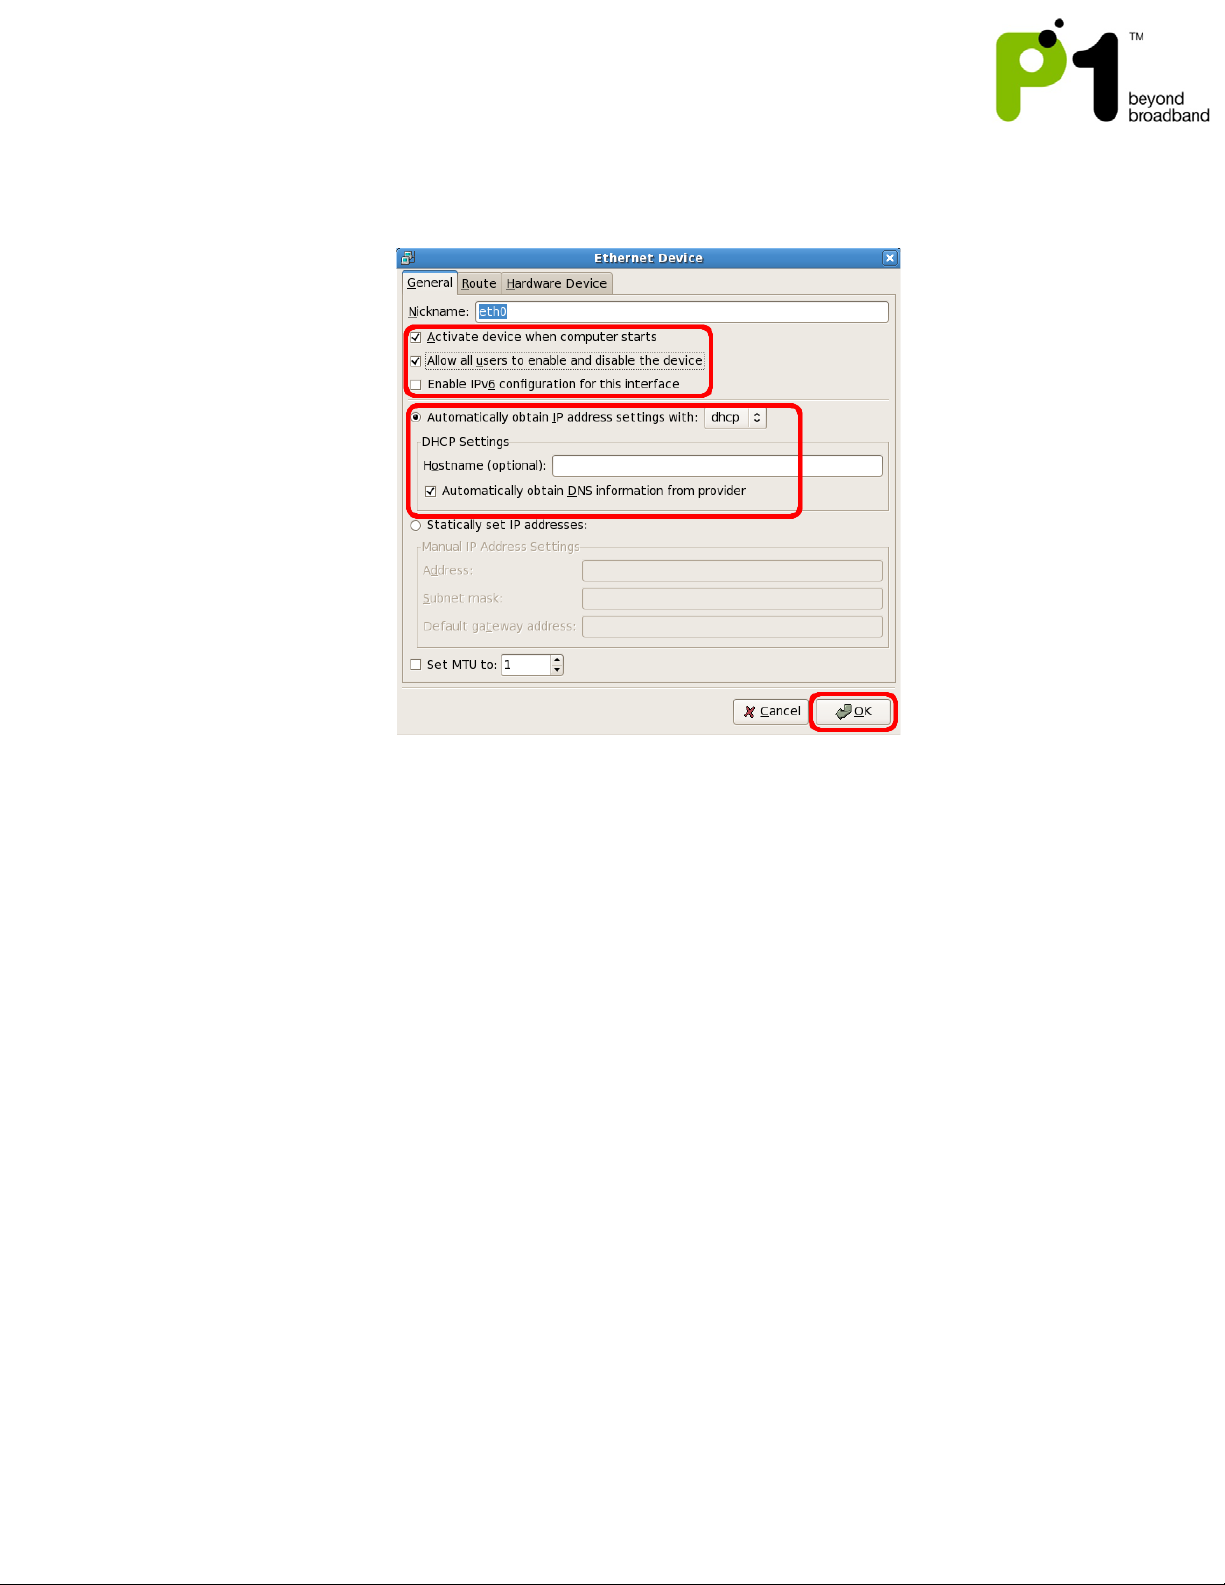
3. Check on the “Activate device when computer starts” and “Allow all users to
enable and disable the device”. Check the “Automatically obtain IP address
settings and choose DHCP (these are default settings)”. Click on the OK button.
Page 14
MF-230 Troubleshooting & Web UI Configuration Guide v1.0
14
e) Laptop’s Power Saving Schemes when running on Battery
Background:
Laptops tend to have those power saving schemes so that the laptop can last longer
when running on battery only. The laptop will dim down the brightness of the laptop
display screen, lower down the laptop’s WiFi transmitting power and shutting down or
lowering down power of other functions.
Troubleshooting steps:
1) In order to isolate the issue that it’s not our MF-230 product issue or WiMAX
issue, it is advisable to ask the customer when experiencing slow, intermittent or
bad internet browsing experience, are they using a laptop and if yes, are they
running on battery.
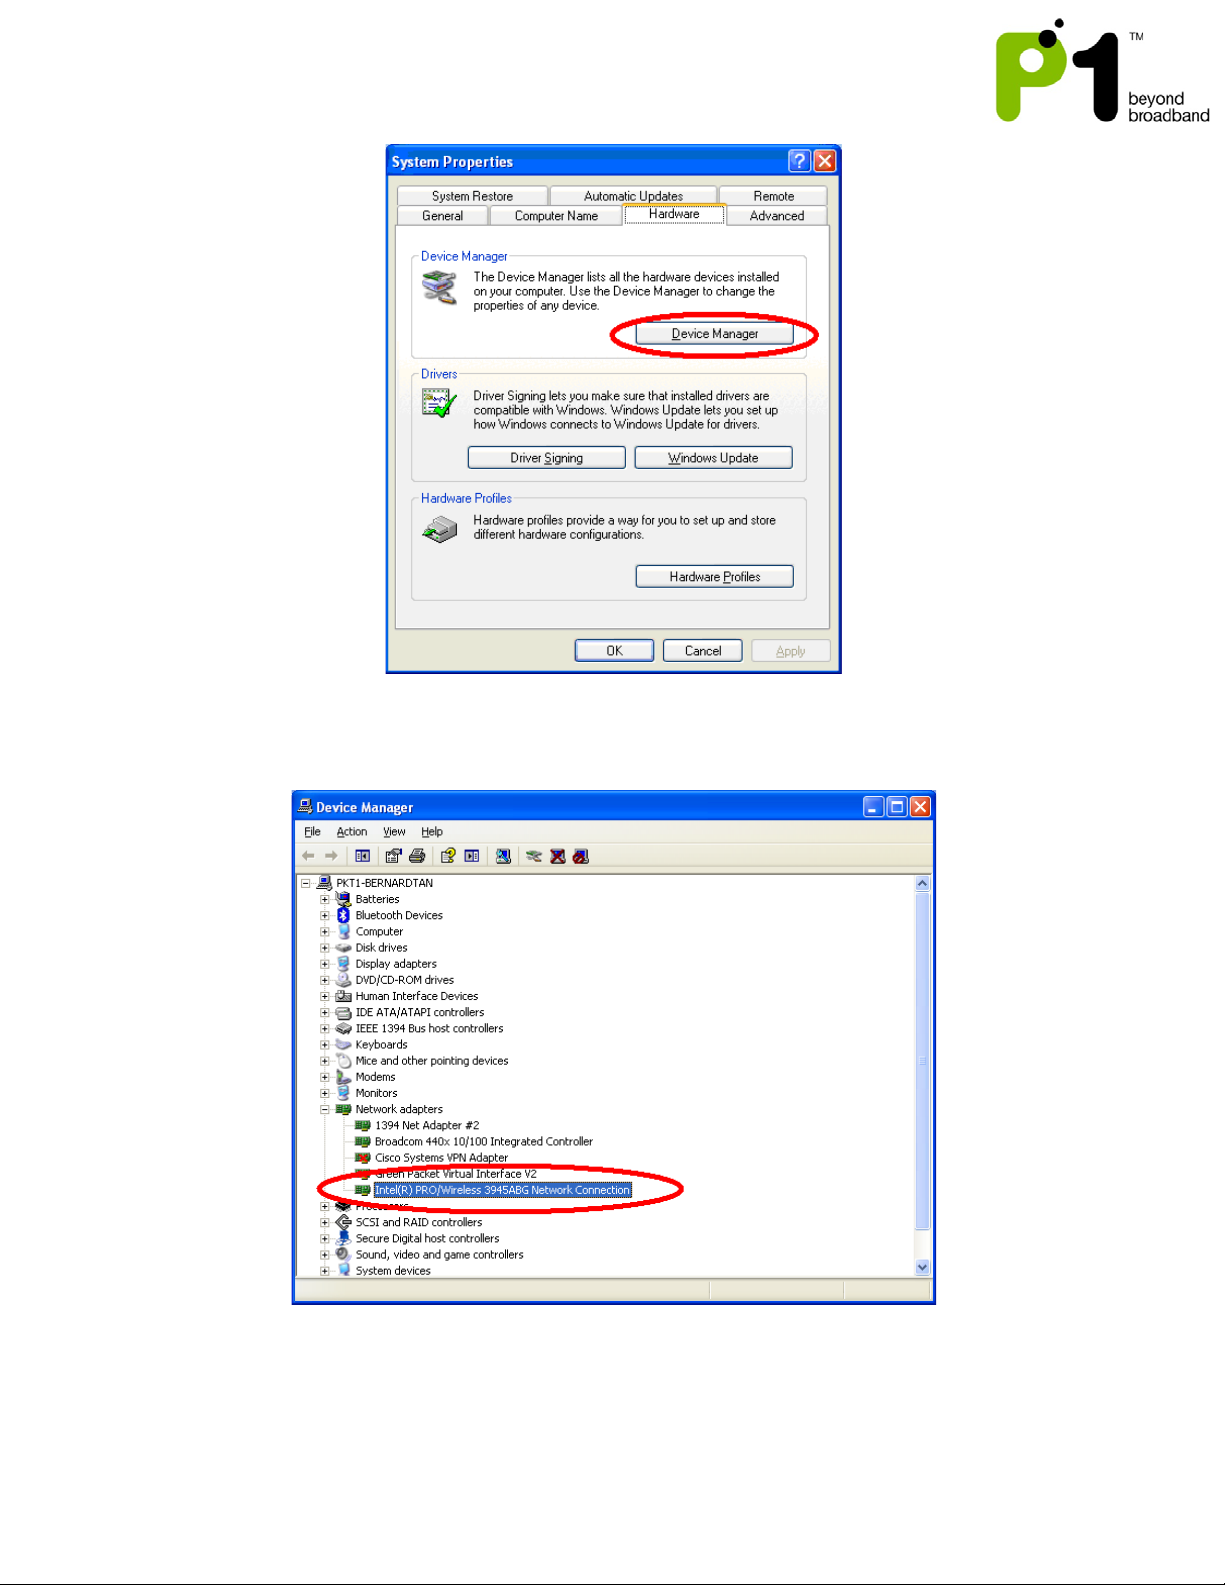
2) If the above are all yes, ask the customer to go to “Start -> Control Panel ->
System -> Hardware” Click “Device Manager”
Page 15
MF-230 Troubleshooting & Web UI Configuration Guide v1.0
15
3) Go to “Network Adapters” and look for the laptop’s WiFi driver and double click
on it.
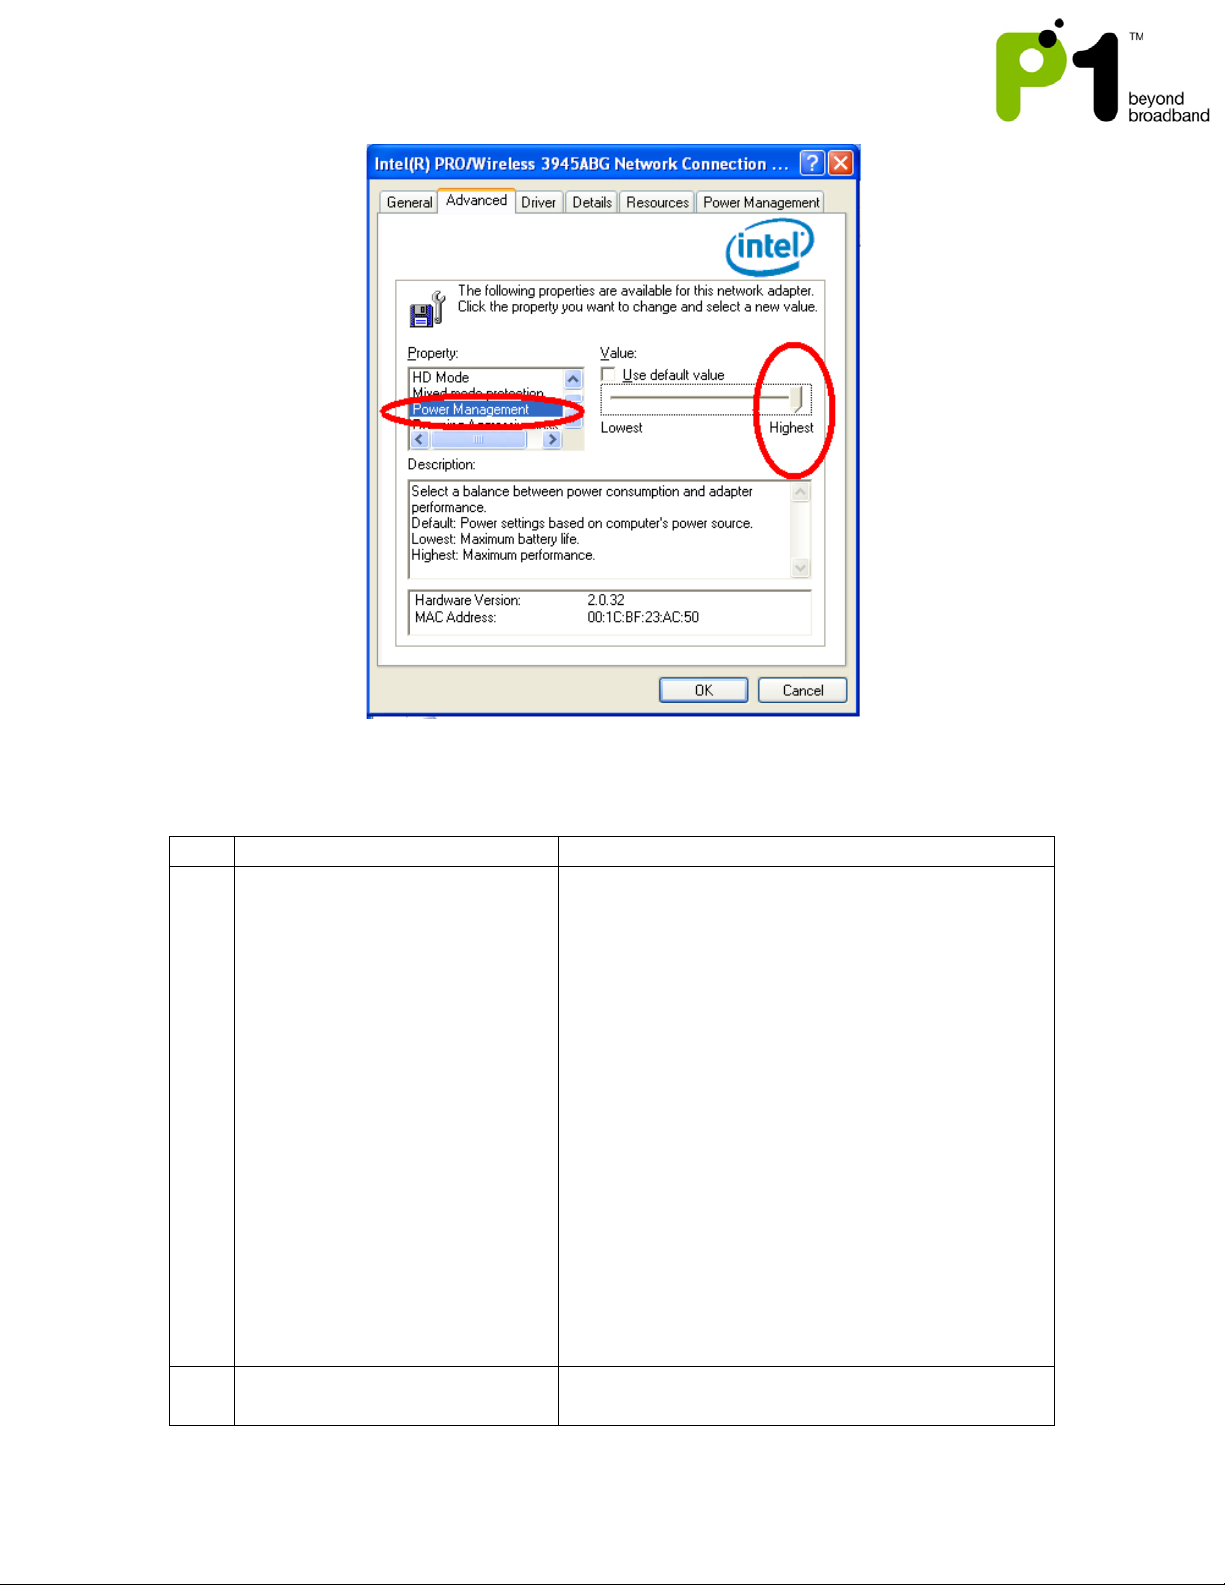
4) Go to “Advanced” and scroll down to look for “power management” and set it to the
“highest” setting.
Page 16
MF-230 Troubleshooting & Web UI Configuration Guide v1.0
16
No
Description
Suggested Solution
1.
Your laptop/desktop cannot
I. Ensure that the router is switched on and
2.
Your laptop/desktop can
detect the router’s WiFi signal
I. Ensure that you are connected to the
correct SSID.
f) Connectivity Issues
detect the router’s WiFi
Signal/SSID.
in operation mode.
II. Make sure that user “start” the WiFi at
“networking -> WiFi” at Web GUI. In
addition, Disable the Hide SSID option.
III. Check that your laptop/desktop has its
WiFi function turned on. Ensure that it can
detect WiFi 11 frequencies and is able to
support B, G and B/G mix mode.
IV. To ensure that it is not an issue of weak
service signals, position your
laptop/desktop near to the router.
V. Make sure that the SSID you are searching
for through the WiFi search network menu
matches the SSID that has been set in MF-
230.
Page 17

MF-230 Troubleshooting & Web UI Configuration Guide v1.0
17
and SSID but unable to
II. Check your WiFi Security Mode as some
(MF-230) WiFi tab on the web GUI.
3.
You are connected to the
I. Check that you have keyed in the correct
(MF-230) WiFi tab on the web GUI.
4.
You are connected to the
I. Set your laptop’s/desktop’s Network
(MF-230) WiFi tab on the web GUI.
5.
You experience irregular or
I. Check whether you can ping to the router.
your router.
connect to it.
router’s WiFi SSID but unable
to get an IP or have limited
connection.
router’s WiFi SSID and can
obtain IP but cannot browse
the Internet.
security modes may require Radius Server
Authentication.
III. Ensure you key in the correct and
matching security key/mode in the
laptop/desktop and router.
IV. Disable Access Control at the P1 4G router
and matching security key mode in the
laptop/desktop and router
II. Check that the router’s DHCP server is
enabled at Networking -> DHCP Server.
Ensure that the DHCP IP range is bigger
than the amount of desktop/laptop
connected to it via wired or wireless to
MF-230.
III. Disable Access Control at the P1 4G router
Wireless Connection to Obtain IP
automatically and Obtain DNS server
address automatically.
II. Ensure that your router is in operation
mode by checking your router’s LED lights.
III. Ensure that your router is connected to
W1MAX service by checking your router’s
LED lights.
IV. Check for proxy settings that disables your
connection in your Web browser.
V. User may have to click Repair on their WiFi
Network Connection for Windows OS or a
similar function for other operating
systems.
VI. Check whether you can ping to the router.
The gateway for your laptop/desktop
should have the same IP as the LAN IP for
your router.
VII. Disable Access Control at the P1 4G router
slow browsing when
connected through WiFi.
The gateway for your laptop/desktop
should have the same IP as the LAN IP for
Page 18

MF-230 Troubleshooting & Web UI Configuration Guide v1.0
18
II. To ensure that it is not an issue of weak
network congestion issue.
service signals, position your
laptop/desktop near to the router.
III. Try changing the WiFi Channel to a
different channel as it may be due to WiFi
Interference.
IV. Do a ping and speed test check via wired
to the router to determine if it is a WiMAX
Page 19
MF-230 Troubleshooting & Web UI Configuration Guide v1.0
19
3) MF-230 Web Based Configuration Troubleshooting Guide
a) Login settings
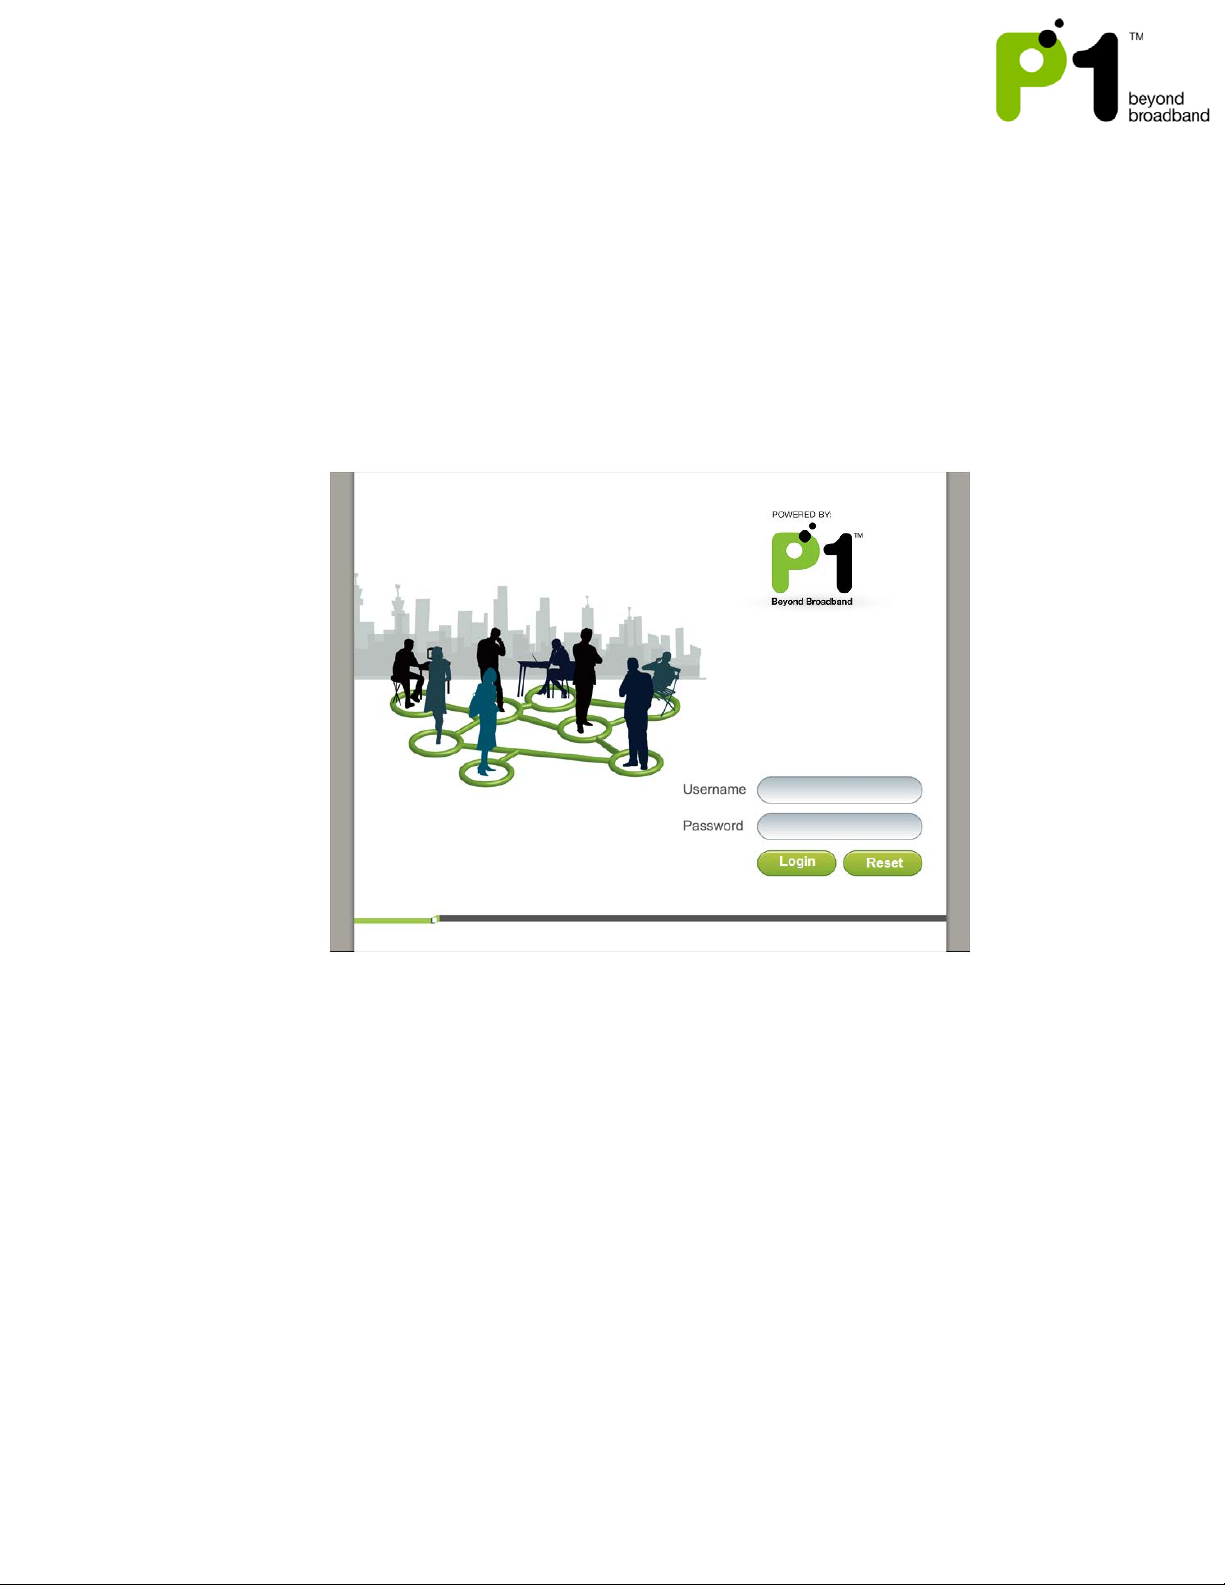
After getting a DHCP IP address from your P1 4G Router MF-230, open any Internet
browser and type in the URL address: http://10.1.1.254
Username : admin
Password : admin123
Troubleshooting:
You cannot access the Customer Web GUI page
• Ensure you receive a DHCP IP from your router in the range of 10.1.1.x (excluding
10.1.1.254), subnet mask 255.255.255.0
• Check if you are able to ping to 10.1.1.254
• Go to START > RUN (Type: cmd) > COMMAND PROMPT (Type: ping 10.1.1.254)
• Check if your web browser has blocked the URL http://10.1.1.254 or if this URL is
under the Restricted List.
Page 20
MF-230 Troubleshooting & Web UI Configuration Guide v1.0
20
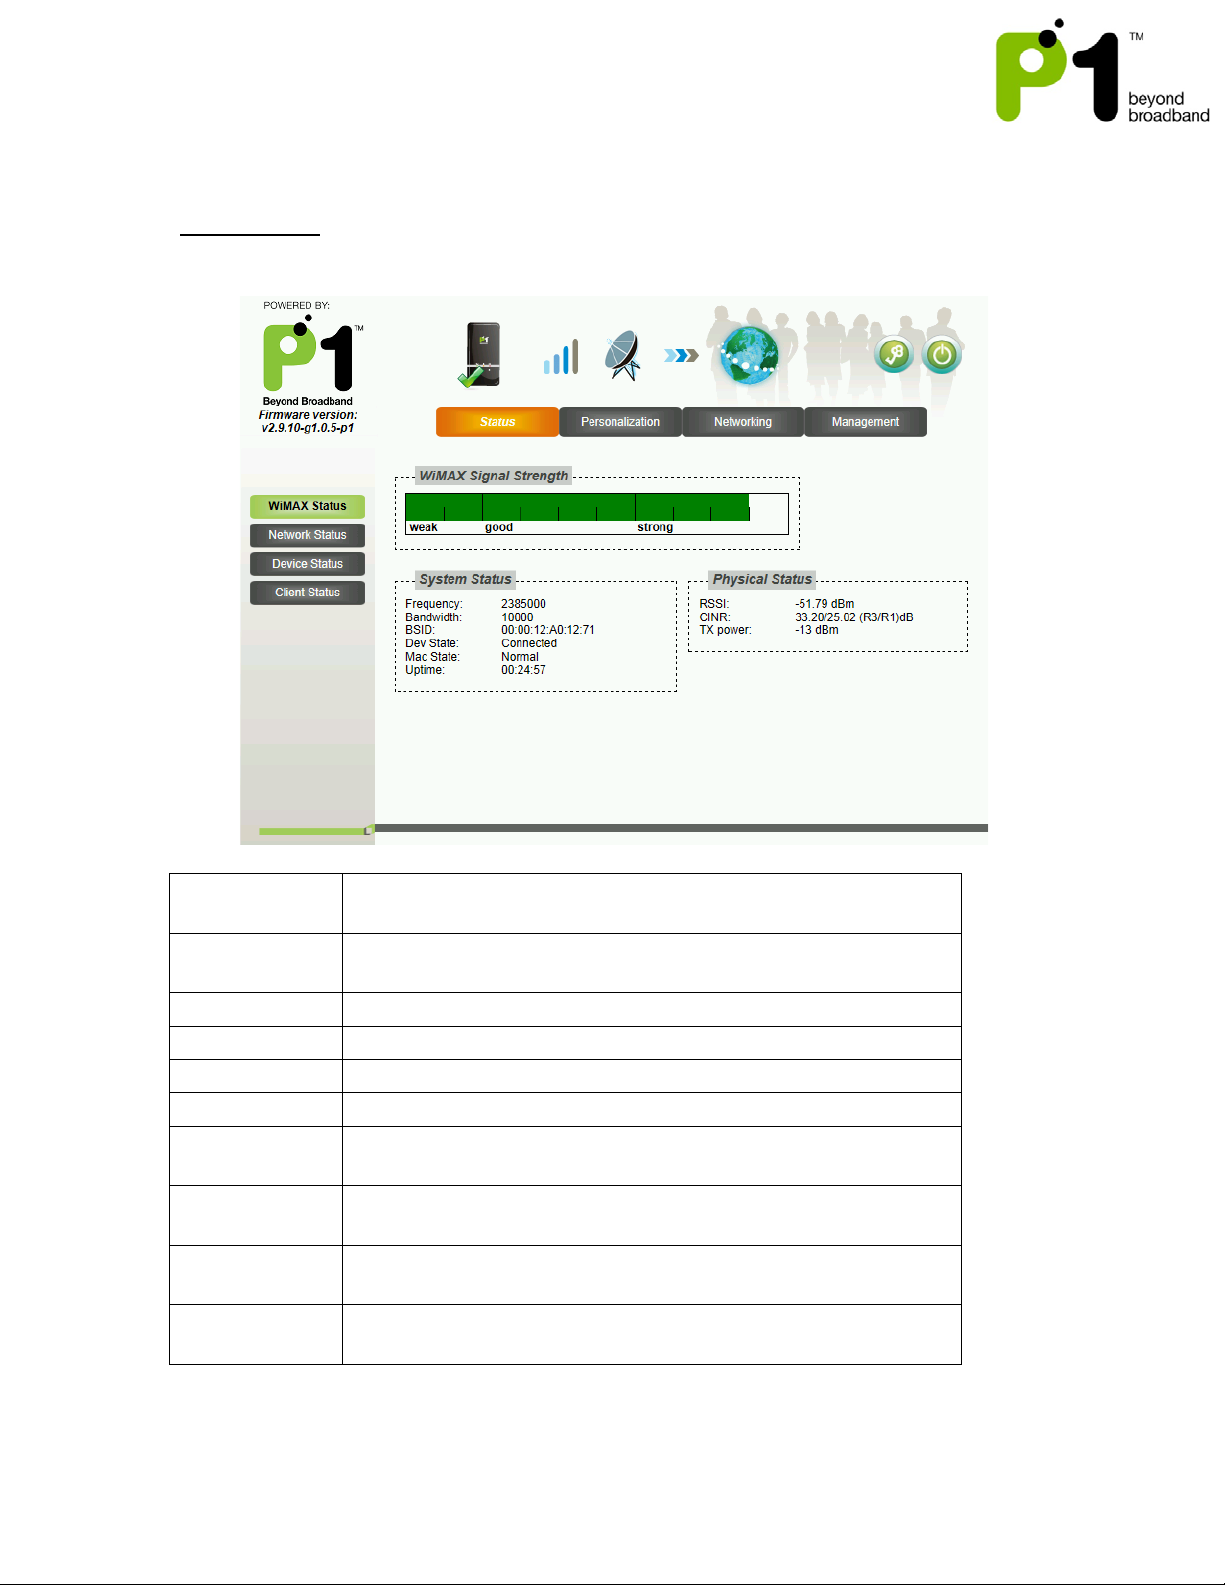
WiMAX Signal
Strength
Signal strength Bar of WiMAX Signal in relation to RSSI and
CINR
Frequency
The WiMAX Radio Frequency channel that the router is
connected to.
Bandwidth
The width of the WiMAX Radio Frequency channel.
BSID
The WiMAX Base station ID that the router is connected to.
Dev State
Status of the router.
Mac State
Status of Wimax
Uptime
The length of time that the router is powered up, starting
when the power is turned ON.
RSSI
The signal strength of the WiMAX Radio Frequency channel
that the router is connected to.
CINR
The signal quality of the WiMAX Radio Frequency channel
that the router is connected to.
TX Power
The WiMAX Radio Frequency power that is transmitted from
the router to the Base station.
b) Status Guides
WiMAX Status
The following is the meaning of each status in the WiMAX Status Page:
Page 21
MF-230 Troubleshooting & Web UI Configuration Guide v1.0
21
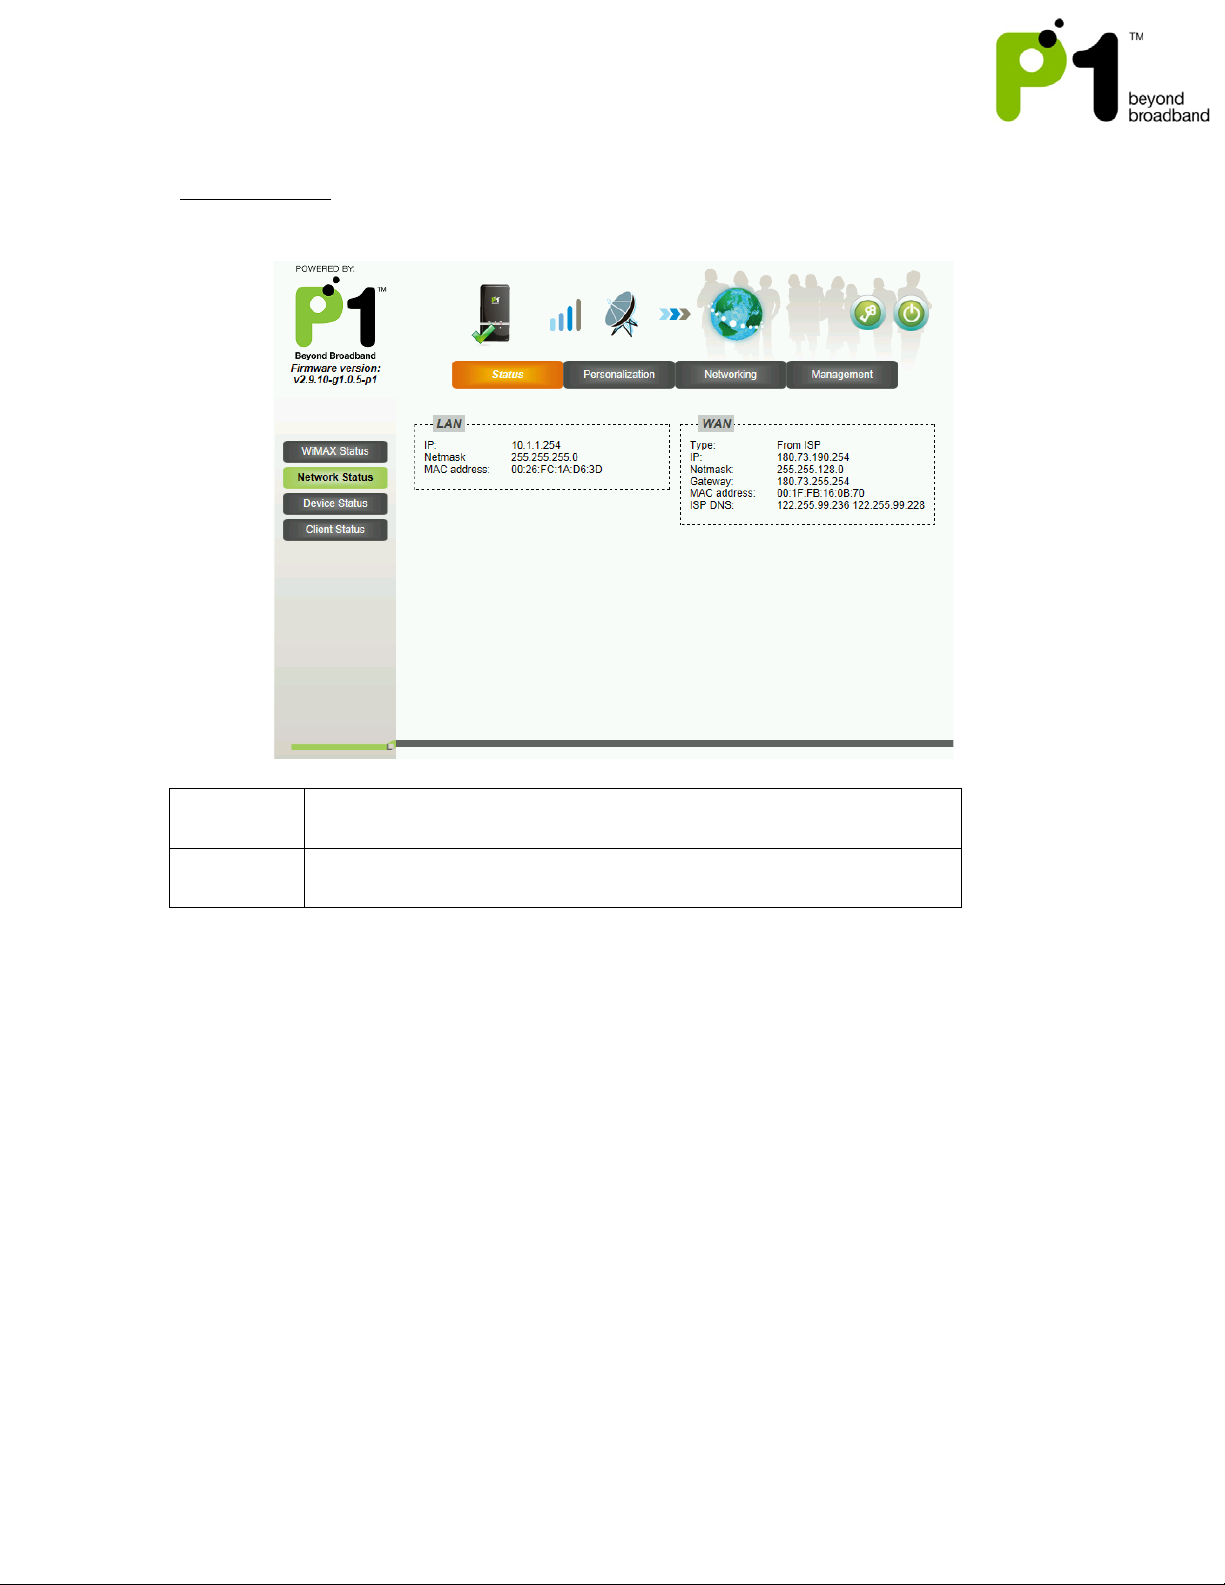
LAN Box
Network information on the router’s LAN side (connected from
USB Port to user’s PC/Laptop).
WAN Box
ISP Network information on the router’s WiMAX side. The IP is a
Public IP.
Network Status
The following is the meaning of each status in the Network Status Page:
Page 22
MF-230 Troubleshooting & Web UI Configuration Guide v1.0
22
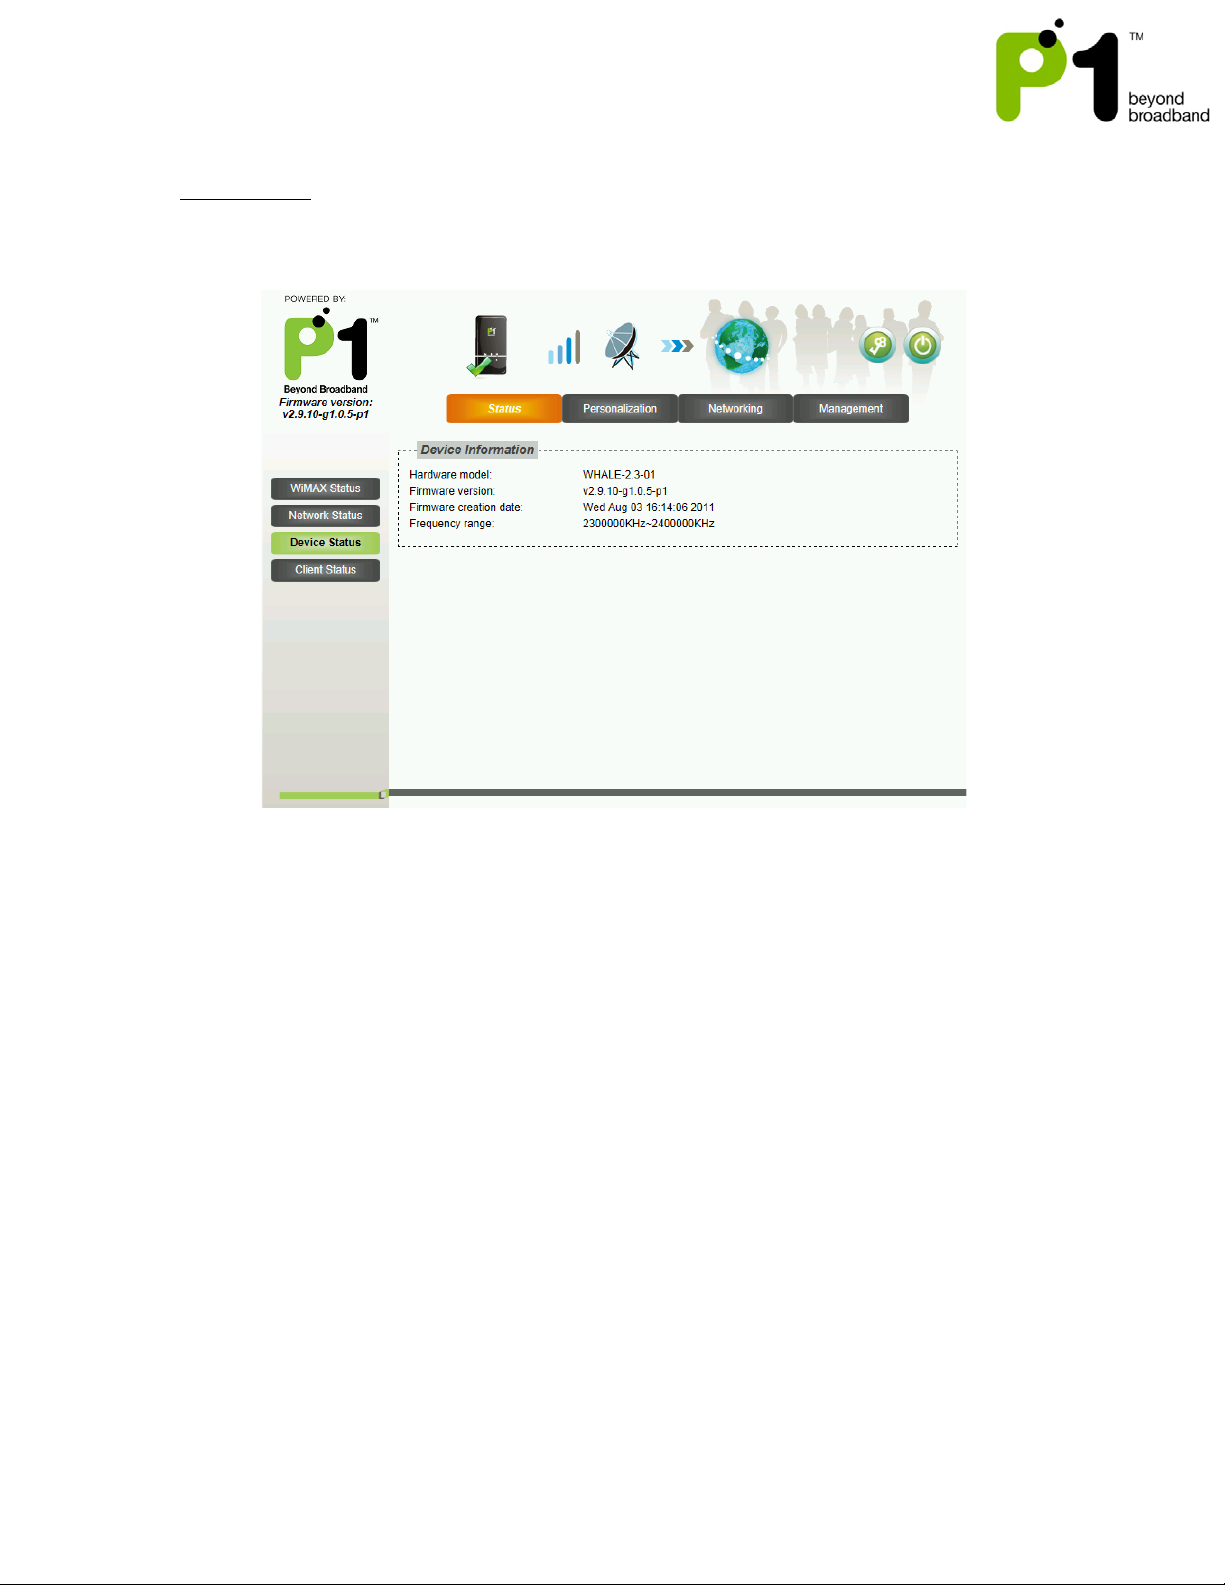
Device Status
The Device Status shows the Firmware Version, Hardware Model and WiMAX Frequency
Range of the router.
Page 23
MF-230 Troubleshooting & Web UI Configuration Guide v1.0
23
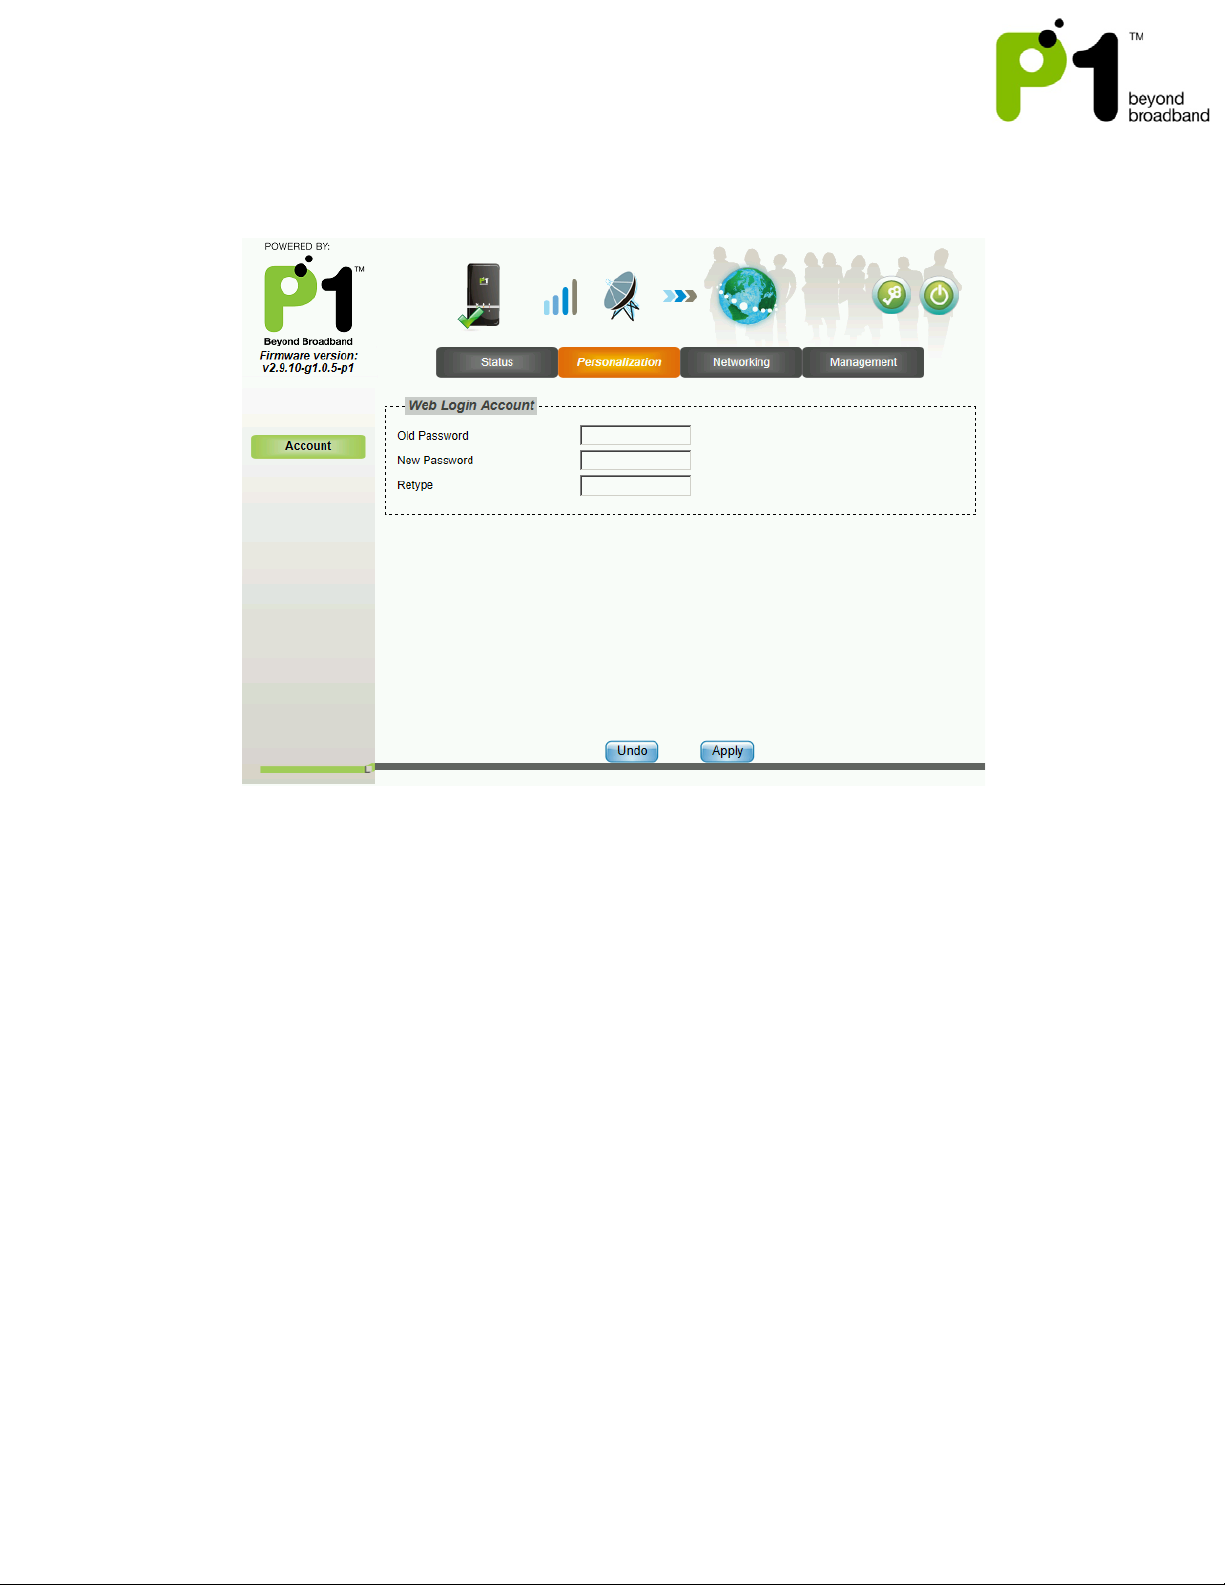
c) Personalization for Account & Date
In the Account section, you can change their Password for their Web Login.
Page 24
MF-230 Troubleshooting & Web UI Configuration Guide v1.0
24
d) Networking
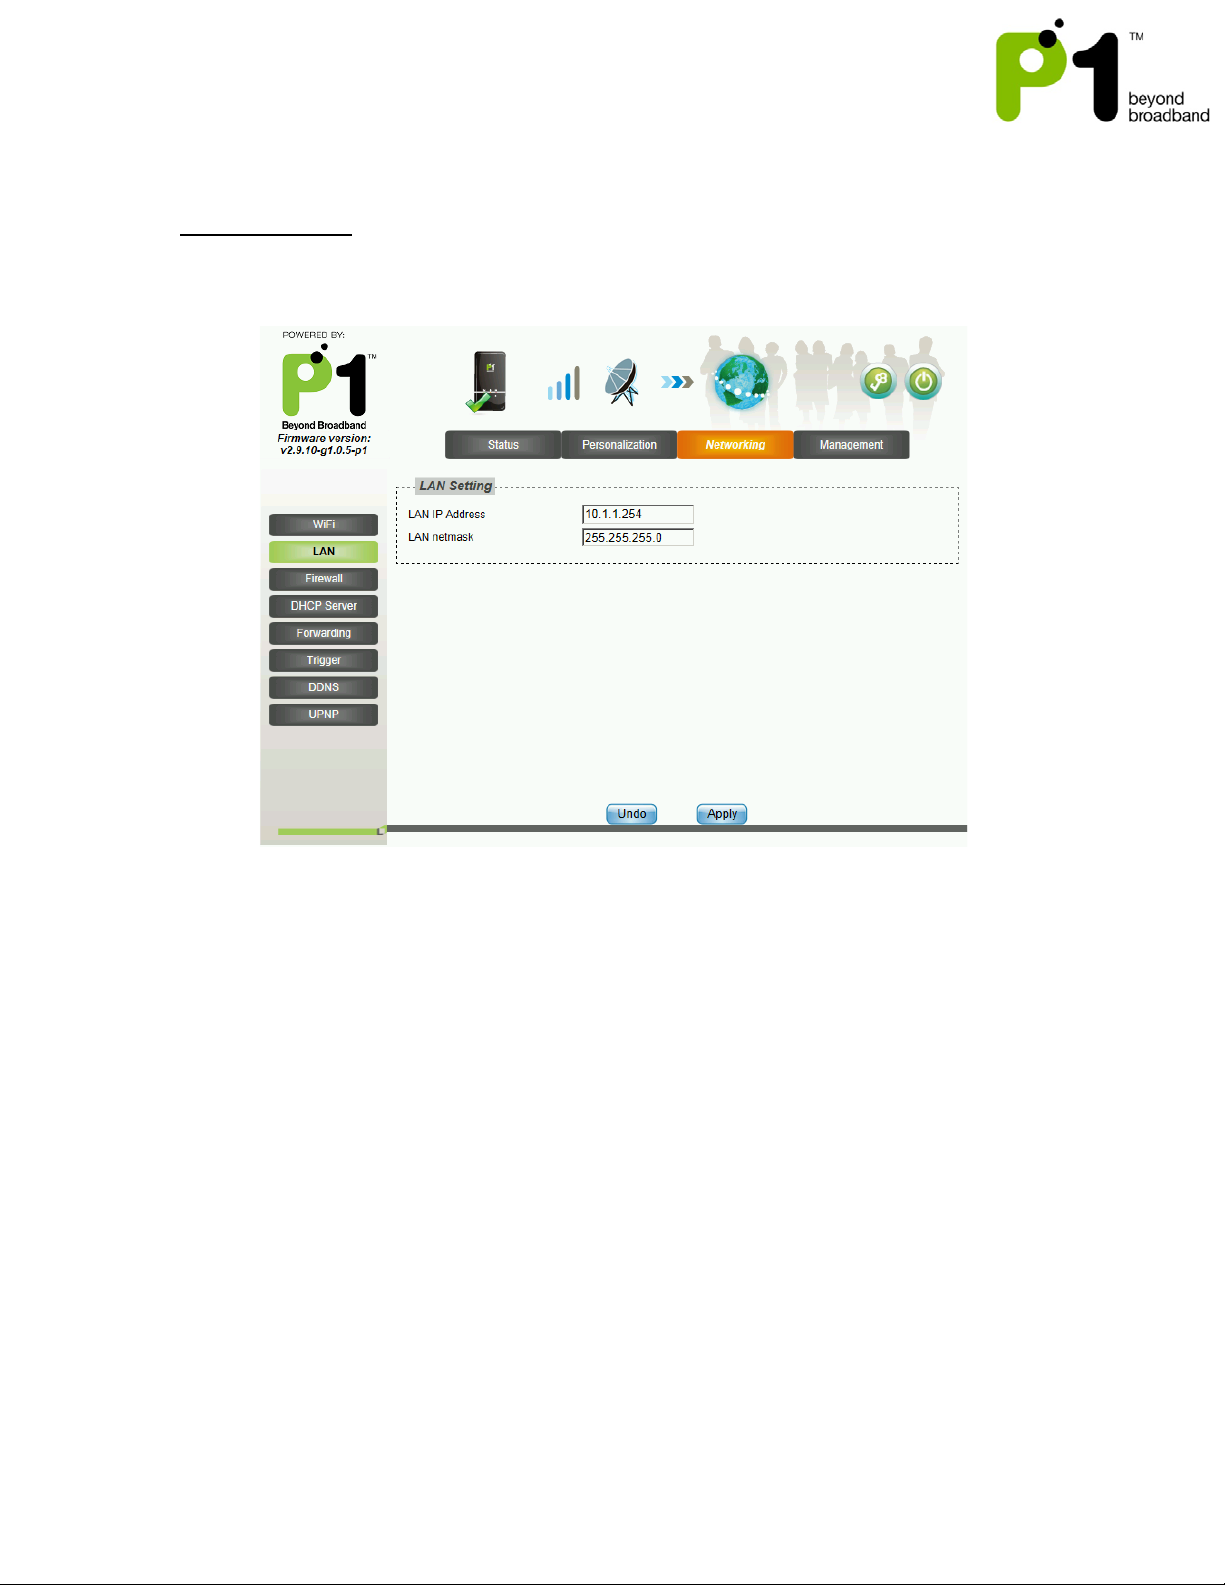
Networking - LAN
On this page, you can change the settings of the router’s LAN IP Address and Subnet
Mask according to the requirements of each individual user.
Page 25
MF-230 Troubleshooting & Web UI Configuration Guide v1.0
25
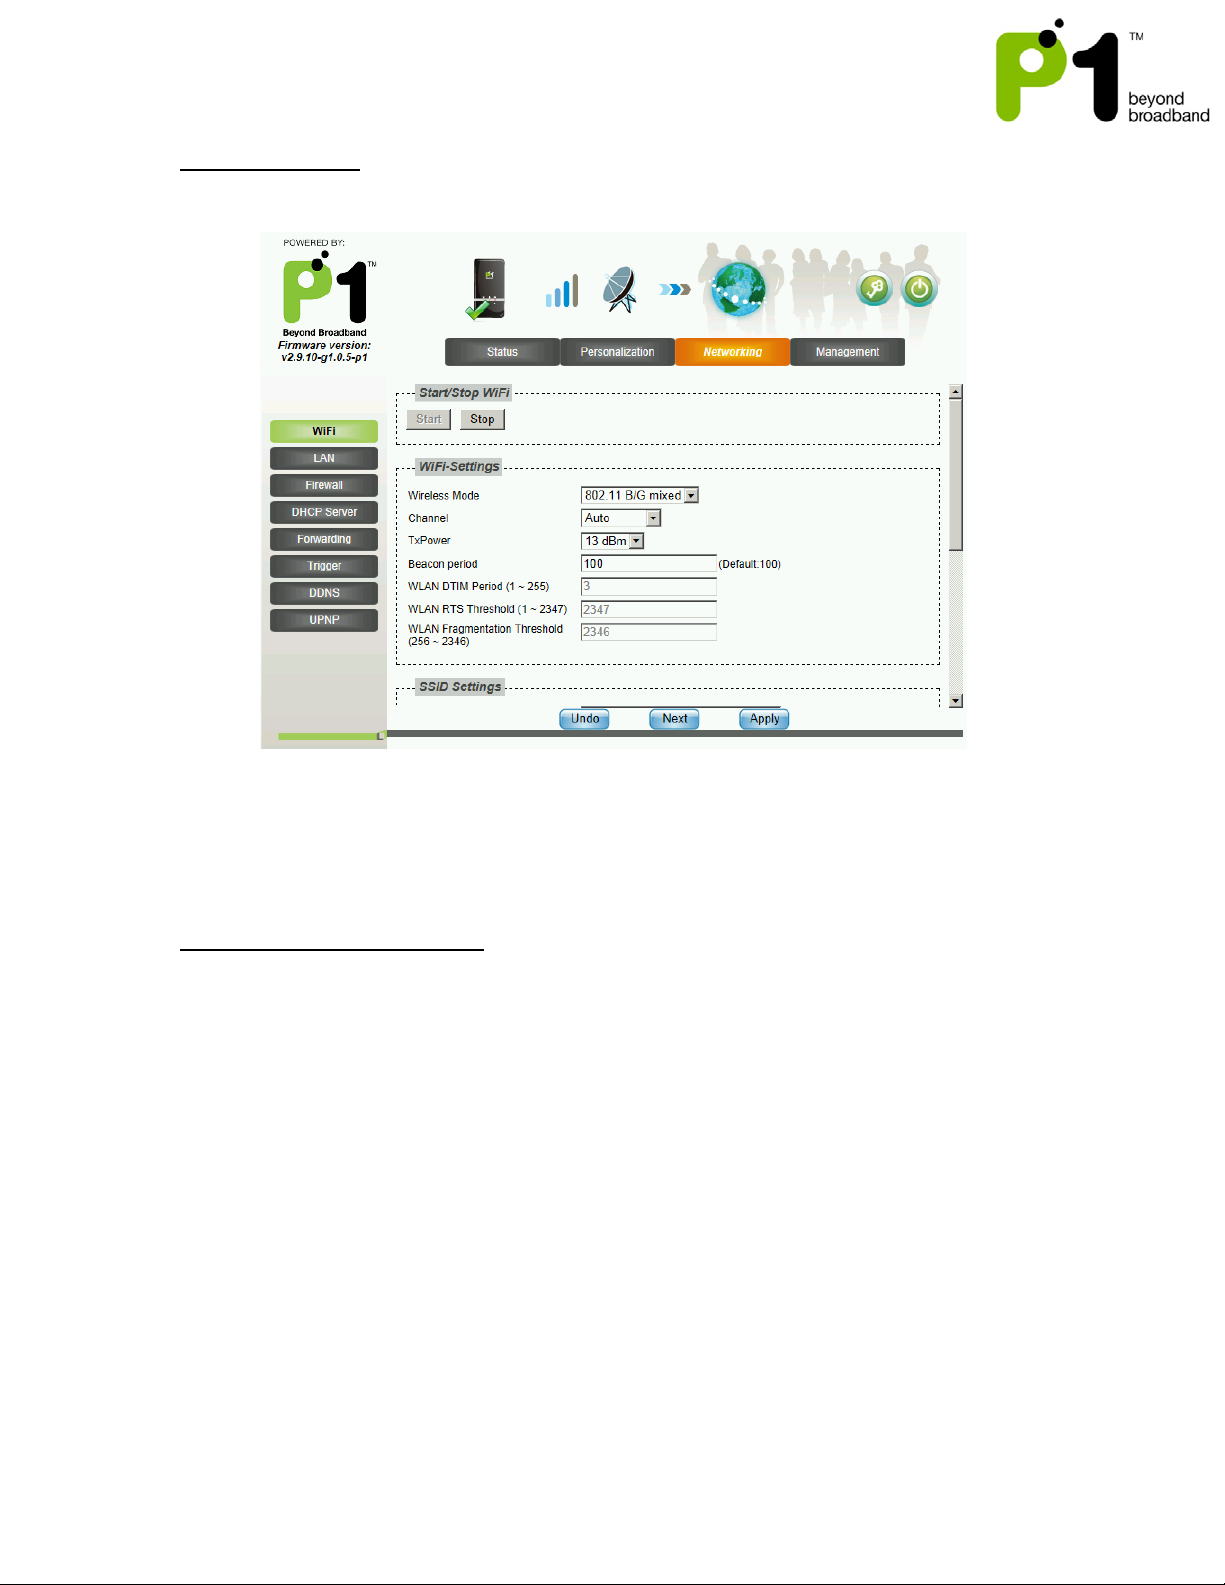
Networking – WiFi
This page allows some basic configuration such as start/stop WiFi and WiFi settings.
This page allows customized security settings to prevent unauthorized access to your
WiFi connectivity. Example: Change his/her SSID and WEP Key. After all configurations
are completed, press Apply.
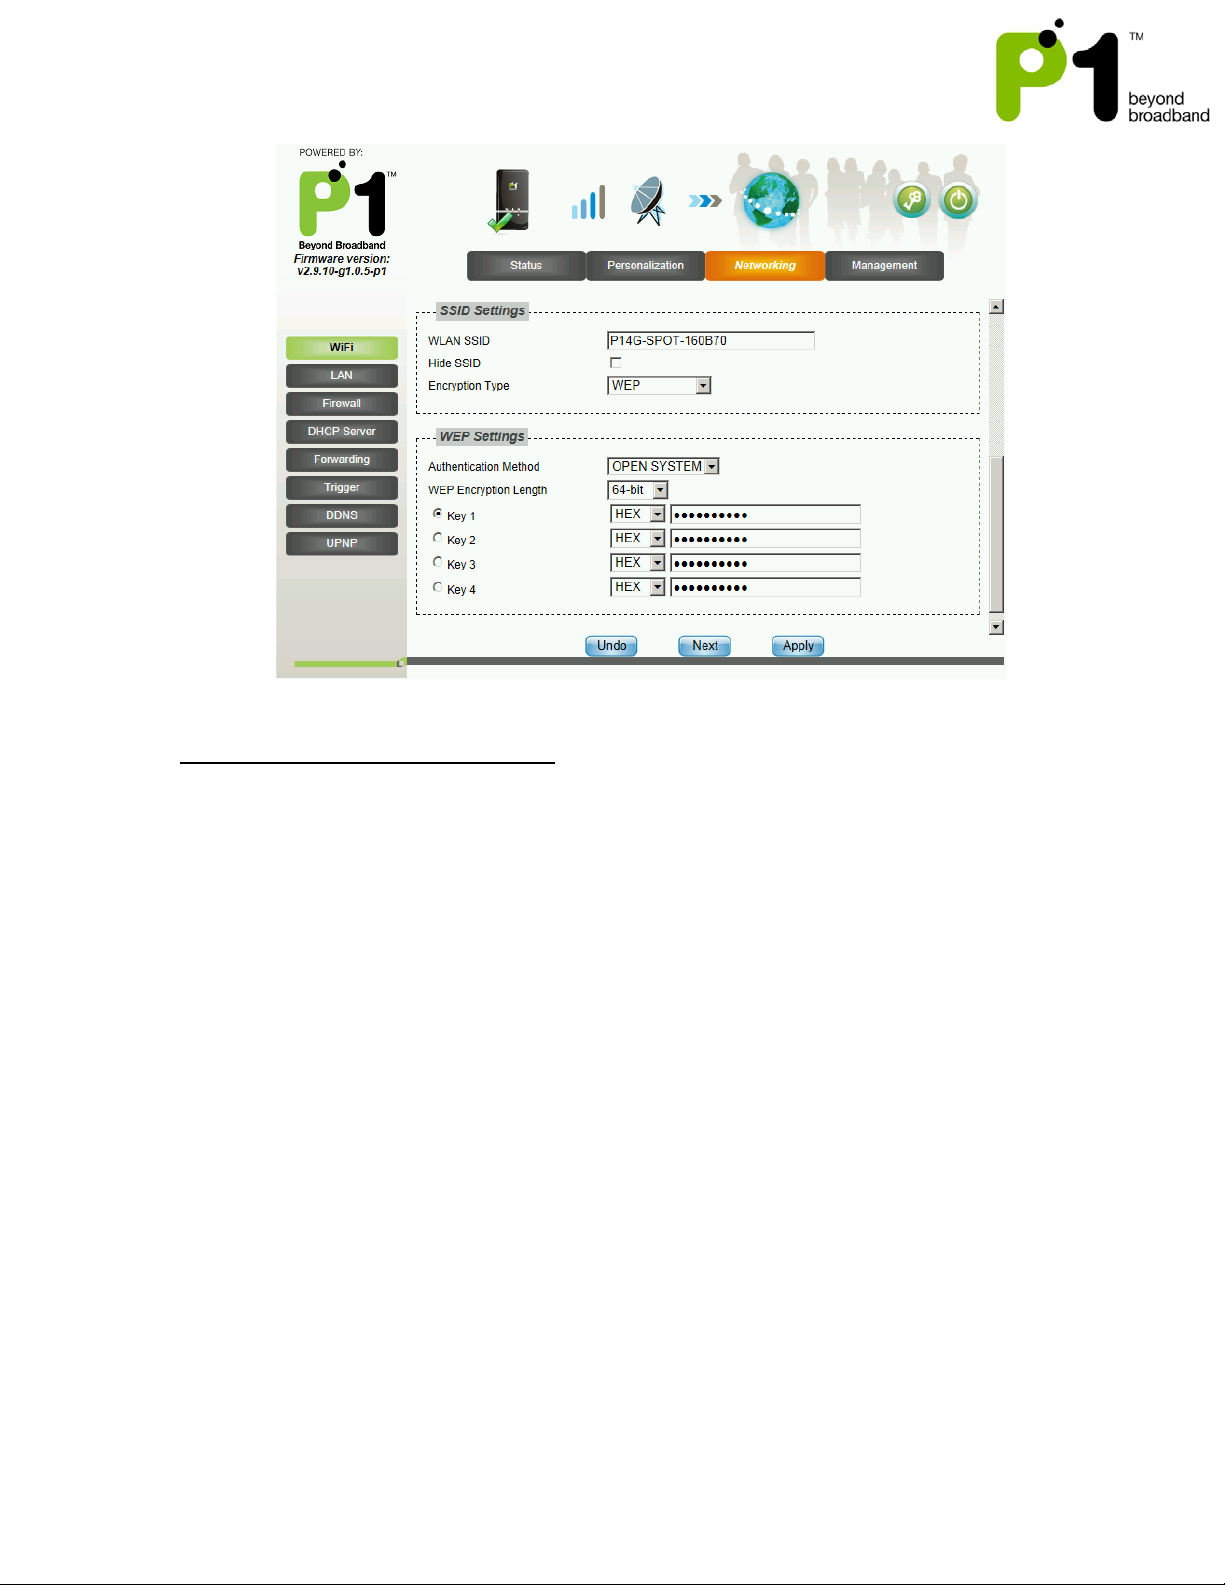
WiFi WEP security type setting:
I. Access the WiFi security page by clicking at Networking, followed by WiFi.
II. Key in SSID in the WLAN SSID field if users would like to change it.
III. Select WEP in Encryption Type drop down list in SSID Settings palette.
IV. In the WEP Settings palette, key in your password in the Key 1 text box. It can
be 8-63 characters or 64 Hexadecimal values long.
V. After all configurations are completed, press Apply.
Page 26
MF-230 Troubleshooting & Web UI Configuration Guide v1.0
26
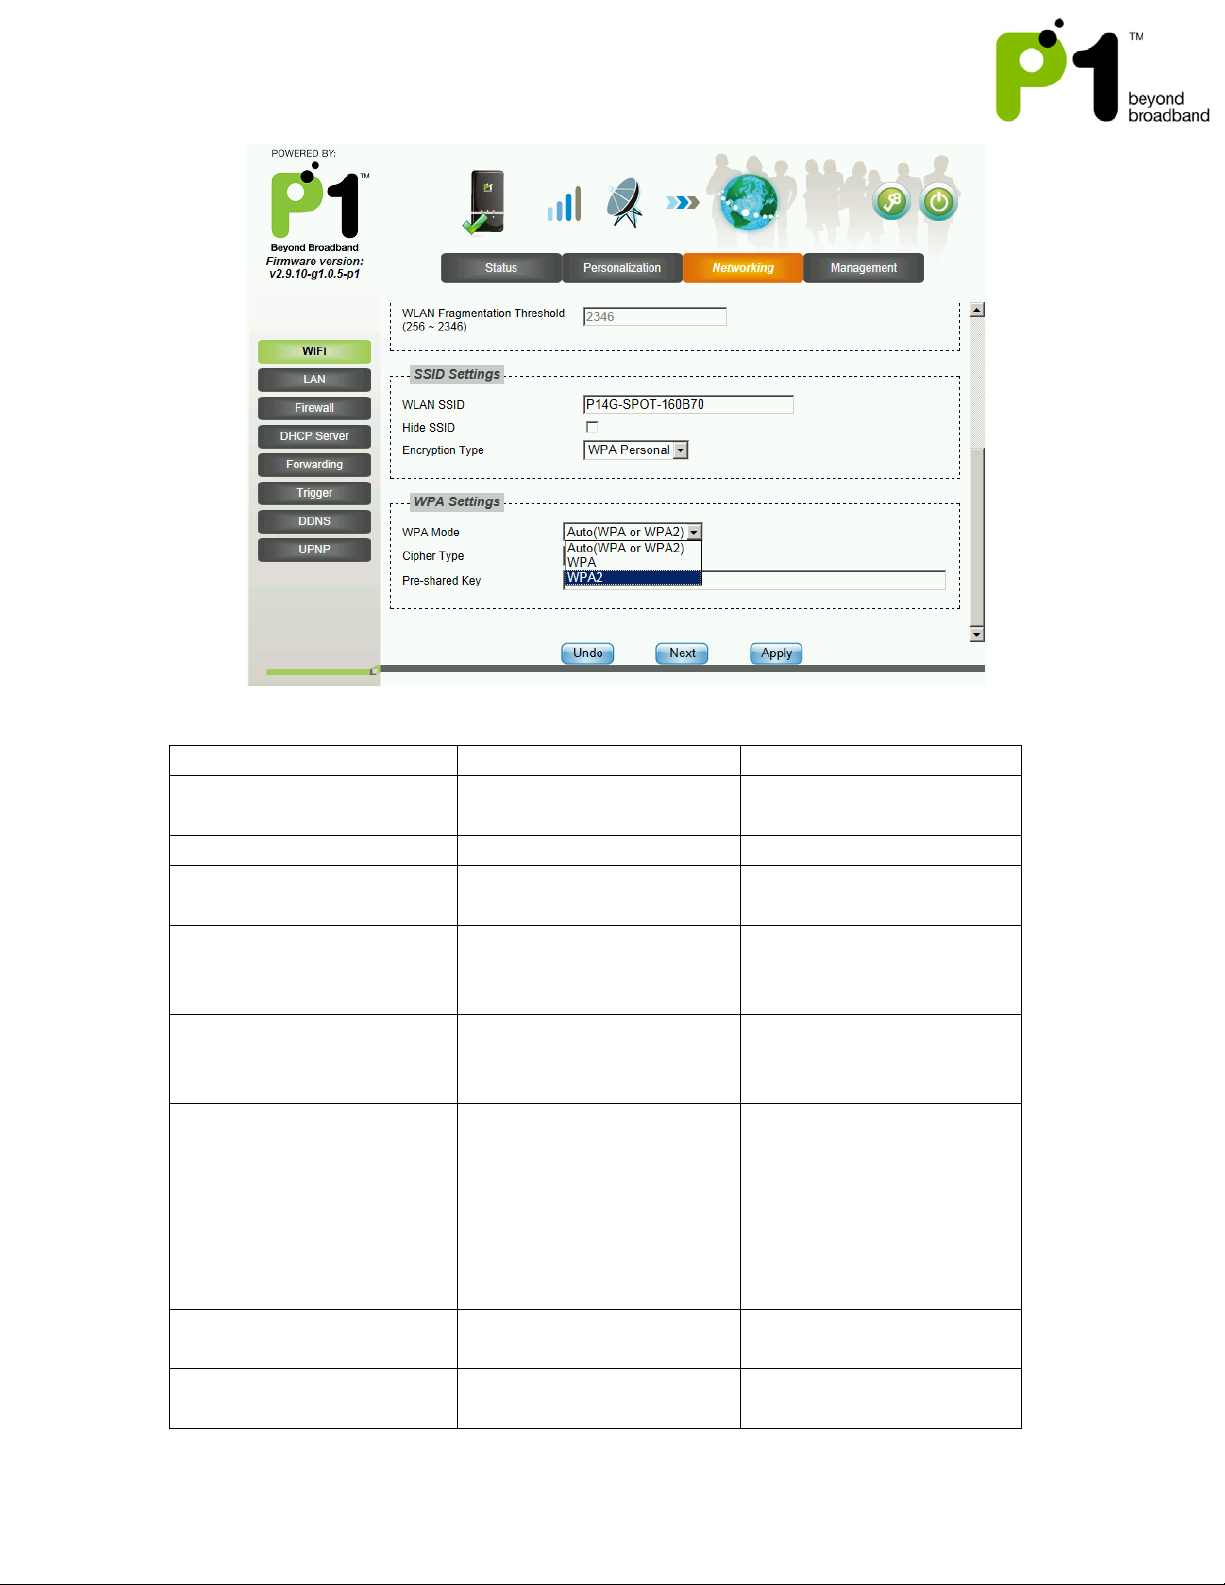
WiFi WPA/WPA2 security type setting:
I. Access the WiFi security page by clicking at Networking, followed by WiFi.
II. Key in SSID in the WLAN SSID field if users would like to change it.
III. Select WPA Personal in Encryption Type drop down list in SSID Settings palette.
IV. In the WPA Settings palette, select WPA-PSK from WPA Mode drop down list.
V. For Cipher Type, choose either one of the three list offered in the drop down
box, which is TKIP, AES or TKIP and AES.
VI. Next, key in your password in the Pre-shared key text box. It can be 8-63
characters or 64 Hexadecimal values long.
VII. After all configurations are completed, press Apply.
Page 27
MF-230 Troubleshooting & Web UI Configuration Guide v1.0
27
Field
Objective
Remark
Start/Stop WiFi
Enable and disable WiFi
Connectivity
Default value is enable
Wireless Mode
Allows B,G or B/G mixed
Default value is B/G mixed
Channel
Channel 9, 10, 11 and
Auto
Default value is Auto
Tx Power
Transmitted power from
Select 100% for maximum
weak
Beacon Period
Defines how often DX230
beacon
Default value is 100
SSID
Insert SSID name
Accepts a maximum of 29
causes error are #, &, “)
Hide SSID
Hide/Unhide broadcast of
SSID name
Encryption Type
Enable security to prevent
unauthorized access
3 modes – None, WEP and
WPA Personal
WiFi in percentage value
will send out wireless
transmit power if WiFi is
alphanumeric characters.
(Symbols may cause error
when trying to connect or
doing settings to the SSID.
Confirmed symbols that
Page 28

MF-230 Troubleshooting & Web UI Configuration Guide v1.0
28
WEP
Enter key string in
64 bit
WPA/WPA2
Uses external Radius
authentication
8-63 ASCII Characters (Can
mixture of 0-9 & A-F only)
Authentication Mode
OPEN SYSTEM or SHARED
KEY for WEP
Encryption Type
TKIP, AES, TKIPAES for
WPA mode
Access control
Prevent user from
MAC address
hexadecimal or ASCII
format
Server in conjunction with
TKIP and AES for
-5 ASCII characters (A-Z or
a mixture of A-Z and 0-9)
-10 Hexadecimal
characters (0-9, A-F or
mixture of both 0-9 & A-F
only)
128 bit
-13 ASCII characters (A-Z
or a mixture of A-Z and 0-
9)
-26 Hexadecimal
characters (0-9,A-F or
mixture of both 0-9 & A-F
only)
be mixture of A-Z & 0-9)
8-64 Hexadecimal (Can be
accessing WiFi by filtering
Page 29
MF-230 Troubleshooting & Web UI Configuration Guide v1.0
29
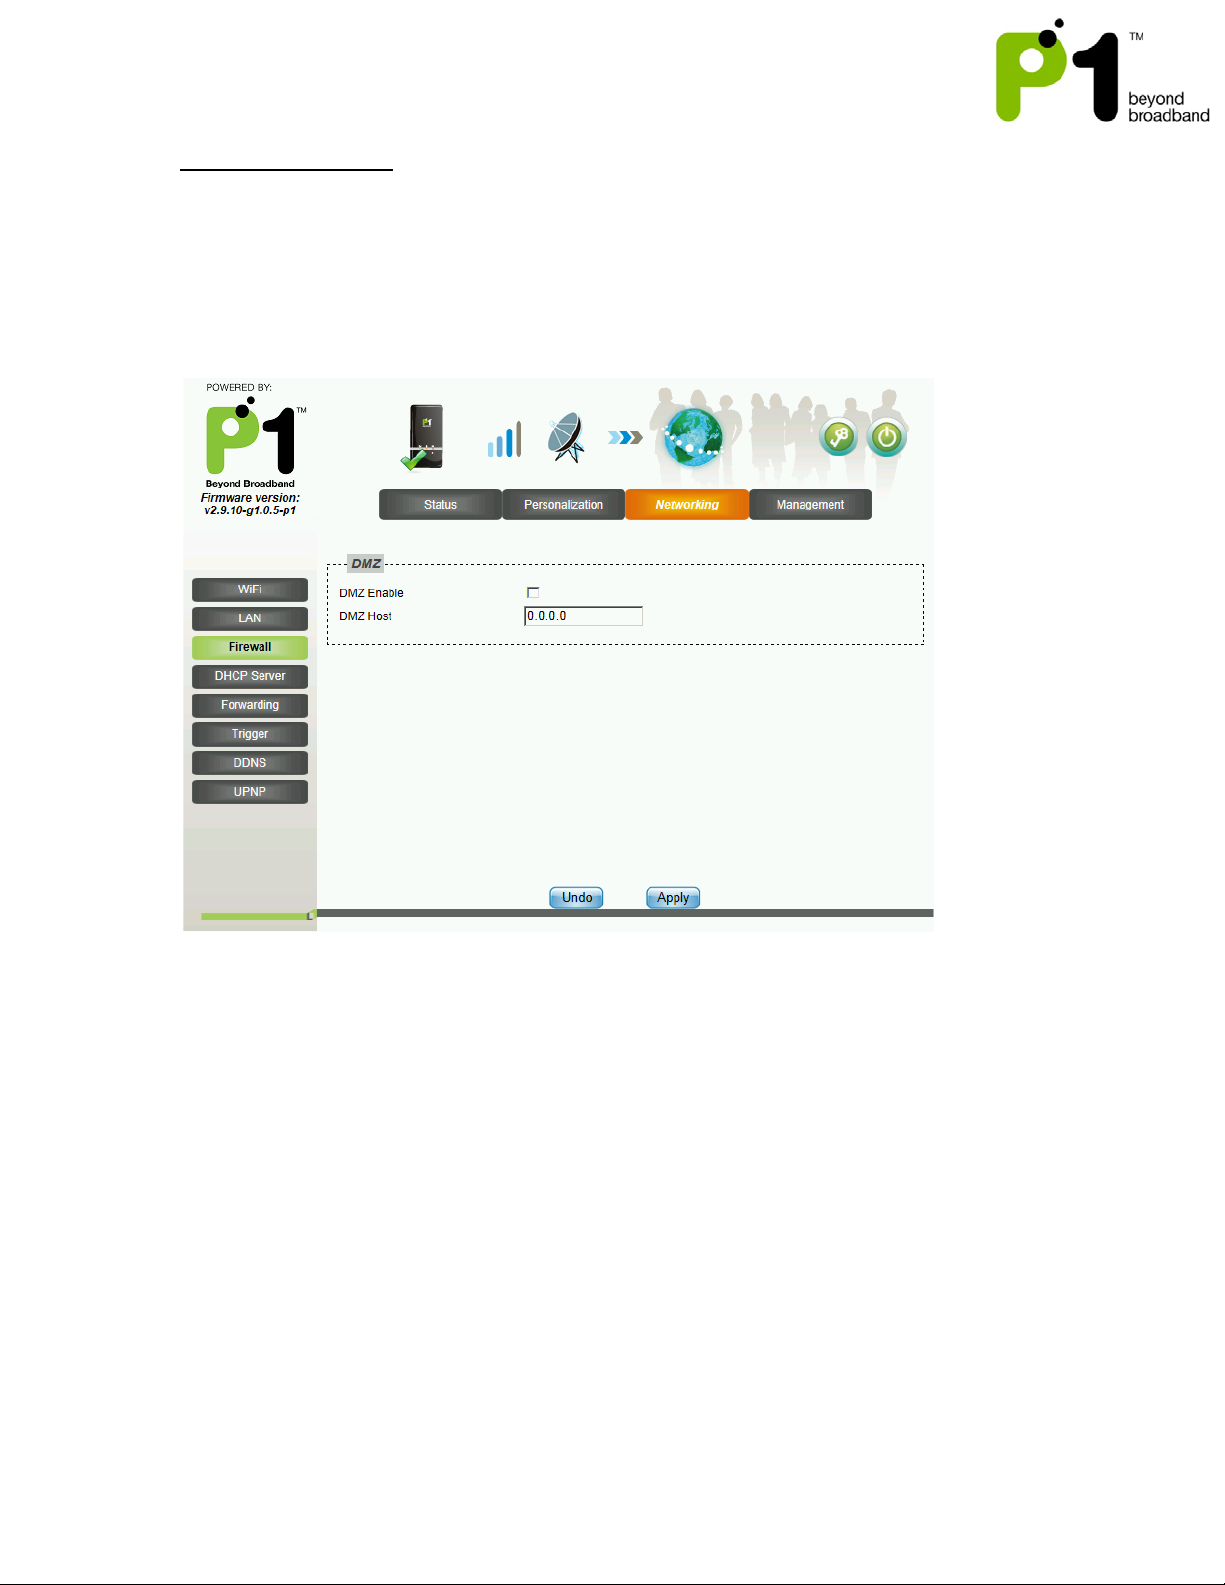
Networking – Firewall
Enabling DMZ on a host (in the range of 10.1.1.x as the default LAN IP subnet), will
enable that host direct access to the internet without having to go through NAT, firewall
and port forwarding. By enabling DMZ, you’re exposing your host to security attacks,
hacking, viruses, Trojans etc. Please ensure that you and the customer know what you
are doing.
Page 30
MF-230 Troubleshooting & Web UI Configuration Guide v1.0
30
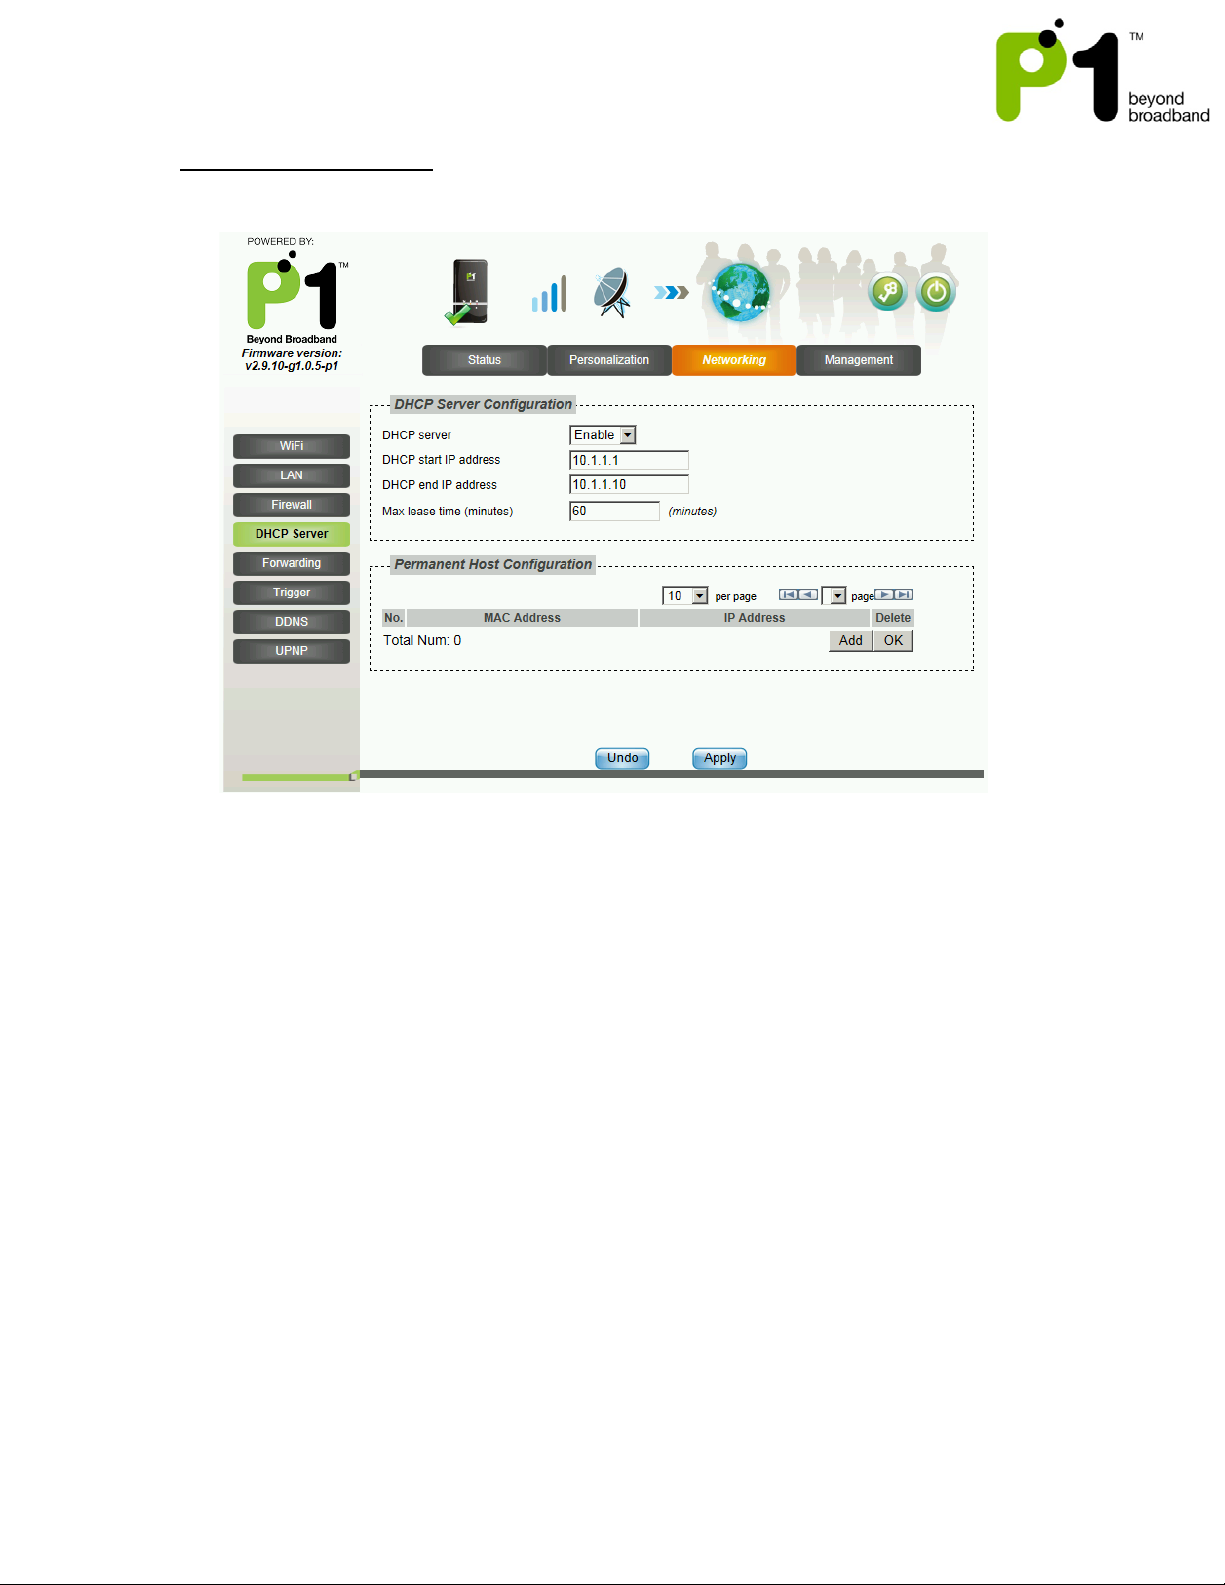
Networking - DHCP server
In this section, you can set the router’s LAN DHCP Server settings.
The settings for the DHCP Server are as below:
• By default the DHCP Server settings are enabled and the default DHCP IP range is
from 10.1.1.1 to 10.1.1.5.
• You can either Enable or Disable the router’s DHCP Server.
• You can also change the DHCP Start IP address, DHCP End IP address and Max
lease time.
• To allow more WiFi-enabled devices to connect to MF-230, user should change
the DHCHP end IP address to a value for example, 10.1.1.10.
• Users can also have a permanent DHCP IP bind to a PC/Laptop Network Interface
Card MAC address under Permanent Host Configuration.
• User will have to key in the Physical/MAC Address of the LAN or WiFi NIC. You
can check it by typing “ipconfig/all” at Windows command prompt.
• The format should be XX:XX:XX:XX:XX:XX
• After keying the settings, you have to click Apply and reboot for the new settings
to take effect.
Troubleshooting:
• If your PC/Laptop cannot get an IP from the router, please check whether
the router’s DHCP Server has been Enabled.
• If you cannot bind the PC/Laptop NIC MAC, check whether it is bind to
Page 31
MF-230 Troubleshooting & Web UI Configuration Guide v1.0
31
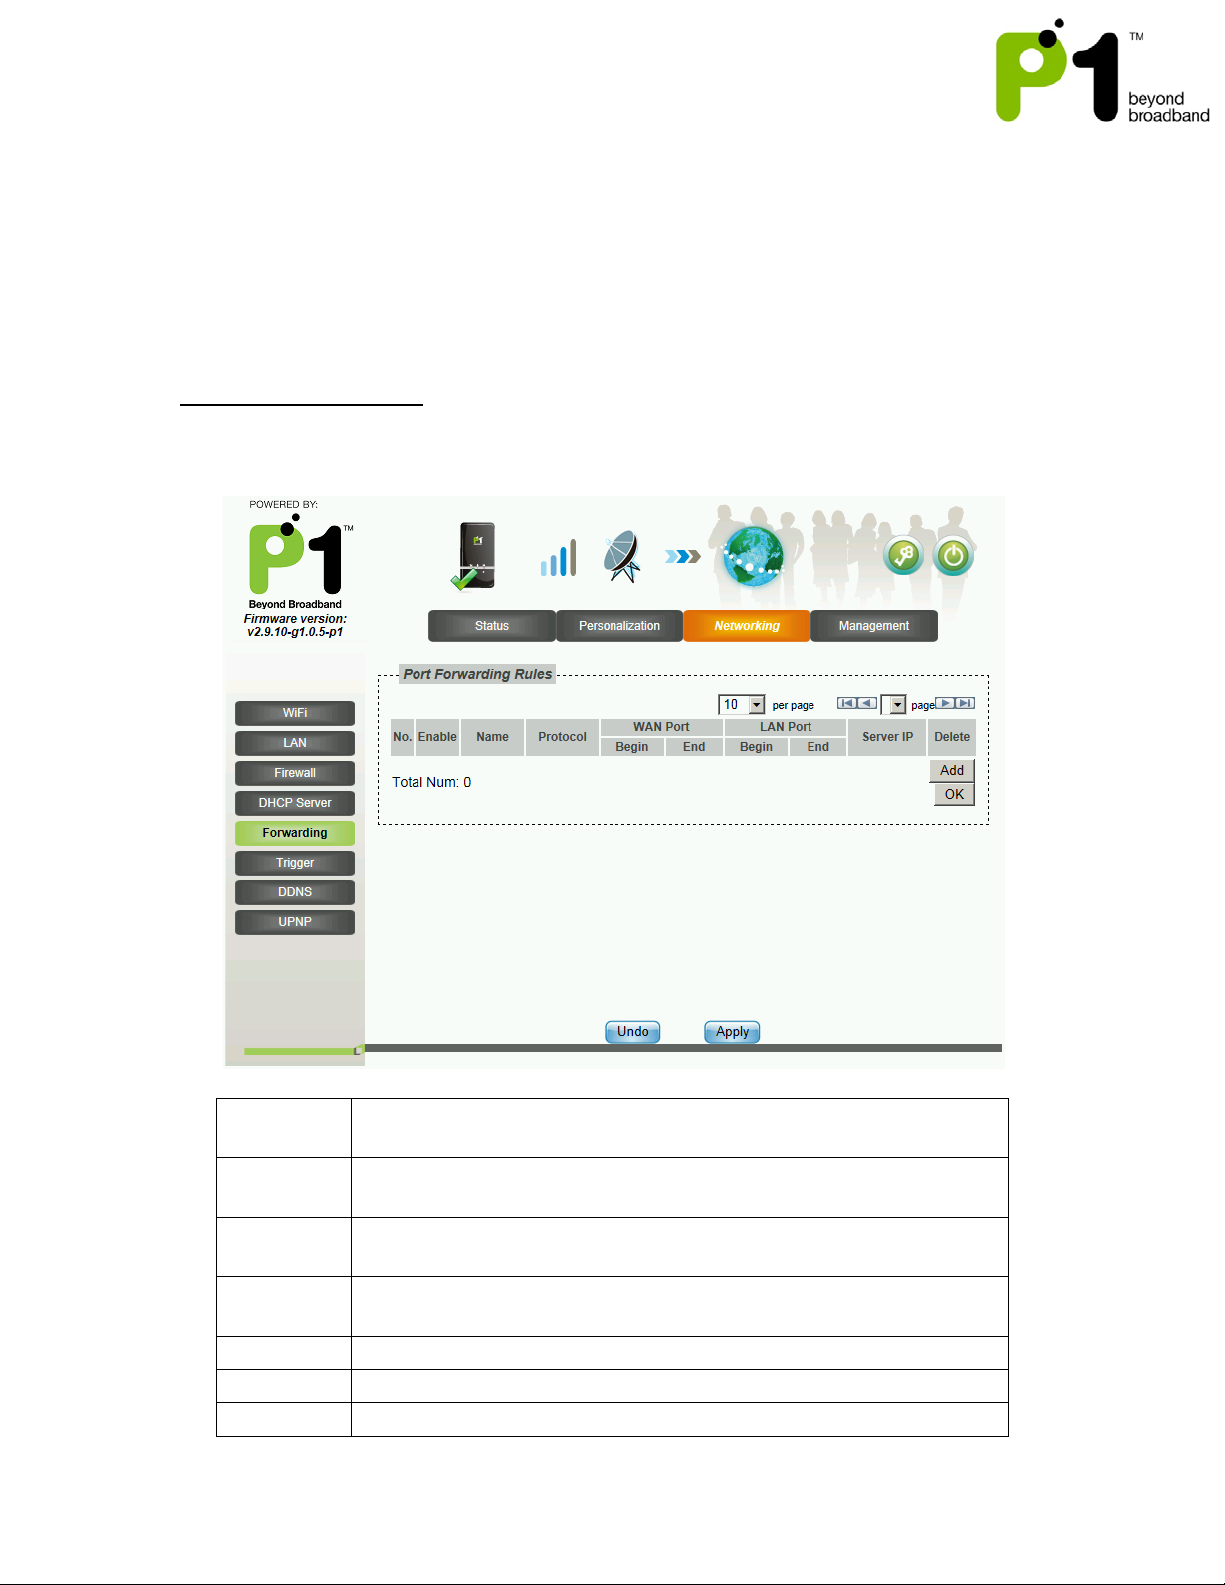
WAN Port
It shows the range of Ports for incoming data from the router’s
Public IP; should it be Open for the Port Forwarding rule.
Server IP
It shows which computer is connected to the router’s Server IP
Address for Port Forwarding.
LAN Port
This is the range of Ports that the incoming data should be
forwarded to on the LAN Side.
Protocol
The Internet Protocol that is allowed to be Port Forwarded in the
Incoming data of the WAN Side.
Enable
Tick this if you want to Enable this Port Forwarding Rule
Delete
Click on this if you want to Delete this Port Forwarding Rule
Insert
Insert another row of Port Forwarding Rules
the correct MAC Address by typing ipconfig/all in the Command Prompt
for Windows OS. The MAC Address should be in the format of
00:11:22:33:44:55
Note: If you change the range of the Default LAN IP from 10.1.1.254 to 192.168.1.254,
the DHCP Server will change the DHCP Start IP address to 192.168.1.1 and DHCP End IP
address to 192.168.1.5 accordingly.
Networking - Forwarding
Port Forwarding helps you to open up a Port in the MF-230 so that support certain
Online Games, Host a Web Server or FTP Server, and etc.
Page 32

MF-230 Troubleshooting & Web UI Configuration Guide v1.0
32
Apply
To Save the Port Forwarding Rule or to Save the changes that
has been done. After this, you will need to reboot the router.
Troubleshooting:
If you are not able to set Port Forwarding or make it works:
• Make sure the Port Forwarding range in both “WAN” and “LAN” is not more or
equal to 900. For example the range must be 30000 to 30899, and not 30000 to
30900.
• Make sure the intended computer IP for the Port Forwarding on the LAN Side is
the same IP as you set in the Web GUI Server IP Address
• Make sure that the intended computer has turned off any Firewall programs and
allow the Ports that have been set in the router Port Forwarding rule.
• A Port can only be used by ONE program at a time. This means that you can only
use Port 500 on ONE computer on the router at a time. Using Port 500 on two
computers at the same time would violate the ONE program rule, and your data
would get messed up.
• Make sure you know and set the correct Ports for “WAN” and “LAN” in your Port
Forwarding rules as this is always the common mistake.
Page 33
MF-230 Troubleshooting & Web UI Configuration Guide v1.0
33
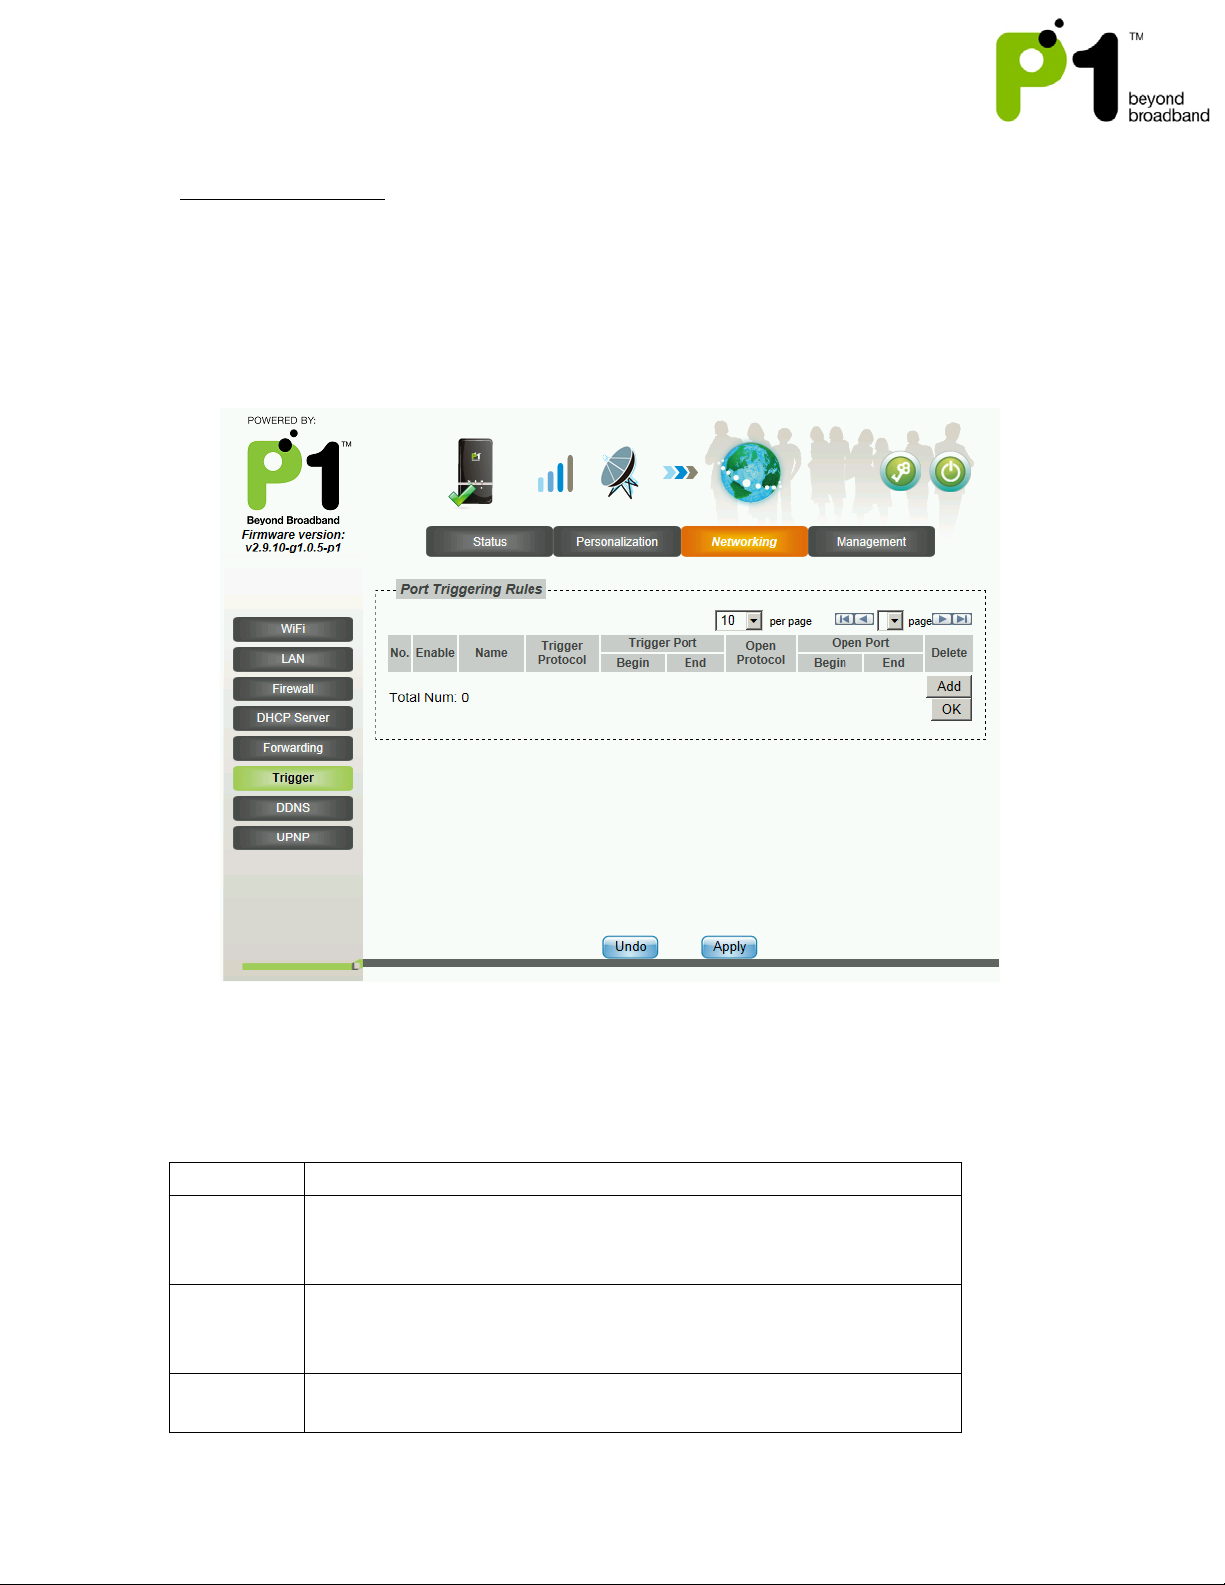
Name
It is an Identifier of the Port Triggering rule.
Trigger
It is the range of Ports that will be triggered ON/OFF when there
Public IP side.
Open Port
It is the range of Ports that incoming data will be forwarded to
router.
Trigger
Protocol
It is the Internet Protocol that is allowed to be Port Forwarded in
the Incoming data of the WAN Side.
Networking – Trigger
Port Triggering is Port Forwarding with an ON/OFF switch for the Ports that have been
forwarded. This ON/OFF switch is turned ON or OFF by data flowing out of a Trigger Port.
Port Triggering is a little more secured than Port Forwarding because the incoming Ports
are not open all the time. They are only open when a program is actively using the
Trigger Port.
Note: Most Port Triggering setups DO NOT require you to enter a LAN IP Address
to forward the incoming Ports to. This means that any computer on the network
can use your Port Triggering setup. If two computers try to use the Port
Triggering setup at the same time you will run into problems.
Port
is outgoing data that uses that range of Ports from your router’s
when outgoing data triggers the Port Triggering rule in the
Page 34

MF-230 Troubleshooting & Web UI Configuration Guide v1.0
34
Open
Protocol
It is the Internet Protocol that is allowed to be Port Forwarded in
the Incoming data of the LAN Side.
Enable
Tick this if you want to Enable this Port Forwarding Rule
Delete
Click on this if you want to Delete this Port Forwarding Rule
Insert
Insert another row of Port Forwarding Rules
Apply
To Save the Port Forwarding Rule or to Save the changes that
has been done. After this, you will need to reboot your router.
Troubleshooting:
• Make sure that the intended computer has turned OFF any Firewall programs
and allow the Ports that have been set in the router’s Port Triggering rule.
• A Port can only be used by one program at a time. This means that you can only
use Port 500 on one computer with the router at a time. Using Port 500 on two
computers at the same time would violate the one program rule, and your data
would get messed up.
• Make sure you know and set the correct Ports for “Triggering Port” and
“Forwarding Port” in your Port Triggering rule as this is always the common
mistake.
• The Port that you set for Port Triggering is constantly sending data out to WAN.
The length of time that the router keeps those Ports open needs to be taken into
account. If the router times out between the gaps of outgoing data to WAN, the
Port Forwarding connection will be severed.
EXAMPLE: What happens when you are trying to download a very large file? The router
that you have set up with Port Triggering may not keep sending data out of the trigger
Port. When that happens, the router closes the incoming Ports, and your download is
interrupted.
Page 35
MF-230 Troubleshooting & Web UI Configuration Guide v1.0
35
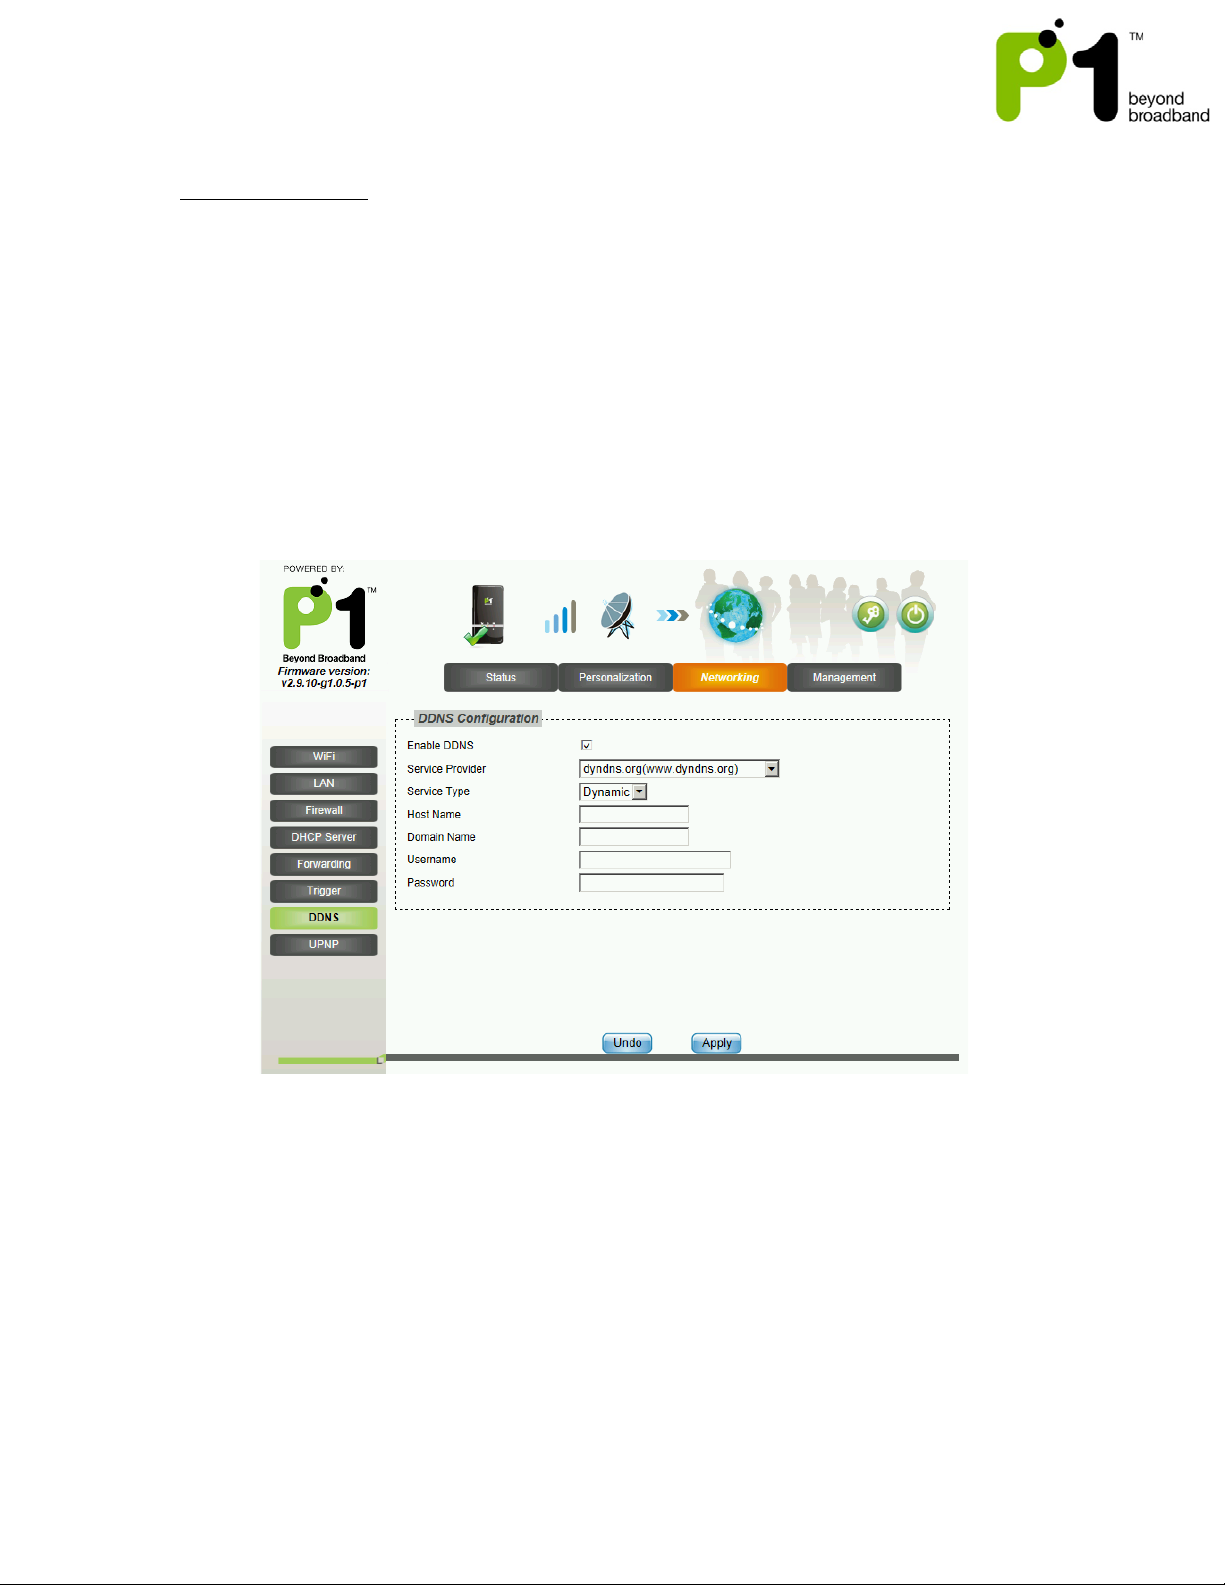
Networking - DDNS
Dynamic Domain Name Server (DDNS) allows you to create a host name that points to
your Dynamic Public IP or Static Public IP address or URL.
Settings:
• Tick on the “Enable DDNS” to enable this feature.
• On the “Service Provider” column, select the DDNS Service Provider Name that
you sign up for in this service.
• Create an account with any service provider from the drop down list.
• Create and customize your own host name and select the domain name of your
choice from the service provider.
• The correct setting at MF-230 is as the screenshot below
• Host Name setting should be the customize name like “testing” or “johnnie” or
“June”. It should be followed by a “.” (dot) like “webhop” or “dyndns” or
“homelinux” that have to be chosen from the service providers.
• Domain Name setting is the end of chosen domain from the website like “com”
or “net” or “org” or “cc”
• You will also have to key in the username and password of your account on the
service provider at the MF-230 username and password field.
• Click “Apply” and reboot your router to save the changes.
Page 36
MF-230 Troubleshooting & Web UI Configuration Guide v1.0
36
• Once everything is complete, MF-230 will update the IP of your created
hostname every time the MF-230 is connected to the internet or the MF-230
obtains a new public IP.
Troubleshooting:
• Make sure that your Username, Password & Host Name is correct and is the
same as the account that you have created with the DDNS Service Provider.
• Certain DDNS Service Providers do not instantly link the Host Name that you
have created in the router, it would take between 5 minutes to 30 minutes for
the DDNS Service Provider to update.
• The router will automatically update the DDNS Service Provider when the DDNS
configurations have been set, on every Reboot, when you connect to the
Internet or if there is a change of Public IP assigned to it.
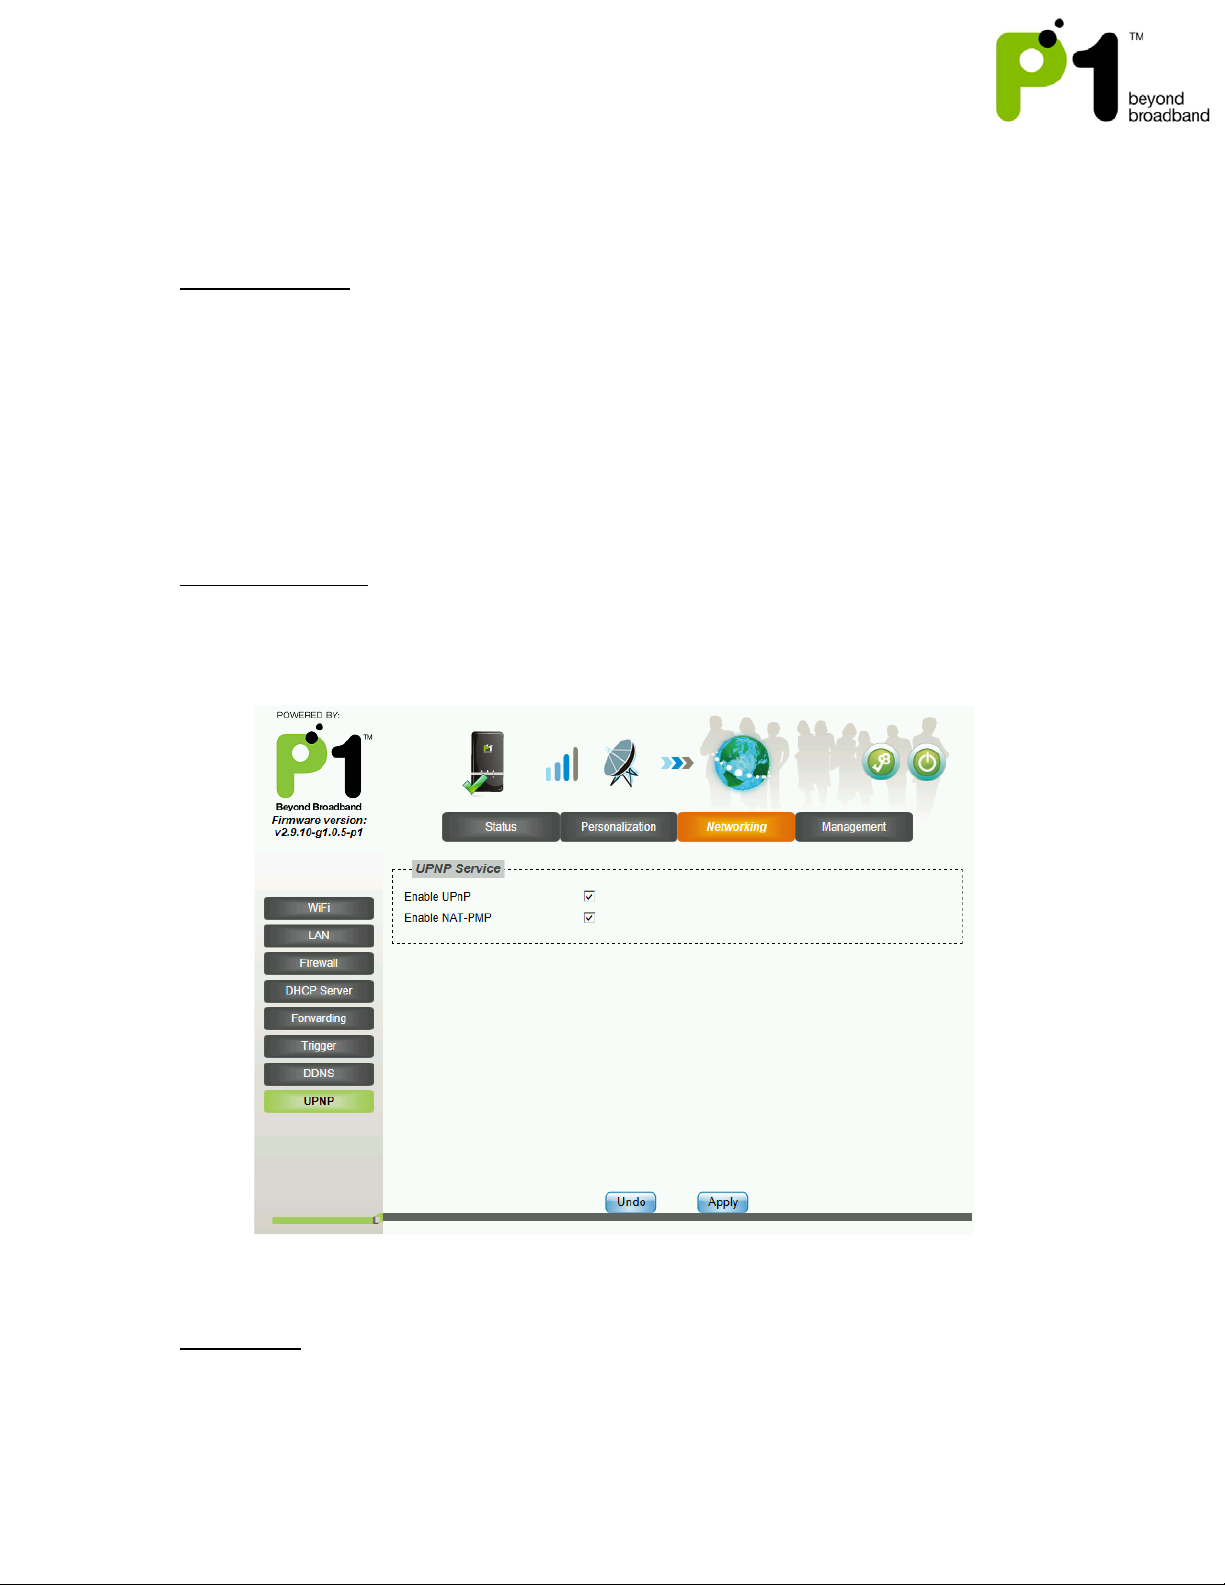
Networking - UPNP
There are 2 options that are enabled by default under this setting tab which are UPNP
and NAT-PMP.
UPNP
Explanation:
Universal Plug and Play (UPnP) is a set of networking protocols promulgated by the
UPnP Forum. The goals of UPnP are to allow devices to connect seamlessly and to
Page 37

MF-230 Troubleshooting & Web UI Configuration Guide v1.0
37
simplify the implementation of networks in the home (data sharing, communications,
and entertainment) and in corporate environments for simplified installation of
computer components. UPnP supports zero-configuration networking.
How it works:
UPnP devices are "plug-and-play" in that when connected to a network they
automatically join a network, obtain an IP address, announcing their network address
and supported device and services types, enabling clients that recognize those types to
immediately begin using the device. Devices can leave the network automatically
without leaving any unwanted state information behind.
Usage:
Just tick the box under “Enable UPnP” to enable it. Devices which support UPnP are
printers, scanners, WLAN access points, media servers and many more.
NAT-PMP
Explanation:
NAT Port Mapping Protocol (NAT-PMP) is introduced by Apple Computer in June 2005.
NAT-PMP allows a computer in a private network (behind a NAT router) to automatically
configure the router to allow parties outside the private network to contact itself. NATPMP runs over UDP. It essentially automates the process of port forwarding.
How it works:
In NAT-PMP is a method for retrieving the public IP address of a NAT gateway, thus
allowing a client to make this public IP address and port number known to peers that
may wish to communicate with it.
Usage:
Just tick the box under “Enable NAT-PMP” to enable it. Products that support this
protocol include Mac OS X, Limewire, uTorrent, Nicecast and many more.
Page 38
MF-230 Troubleshooting & Web UI Configuration Guide v1.0
38
e) Management
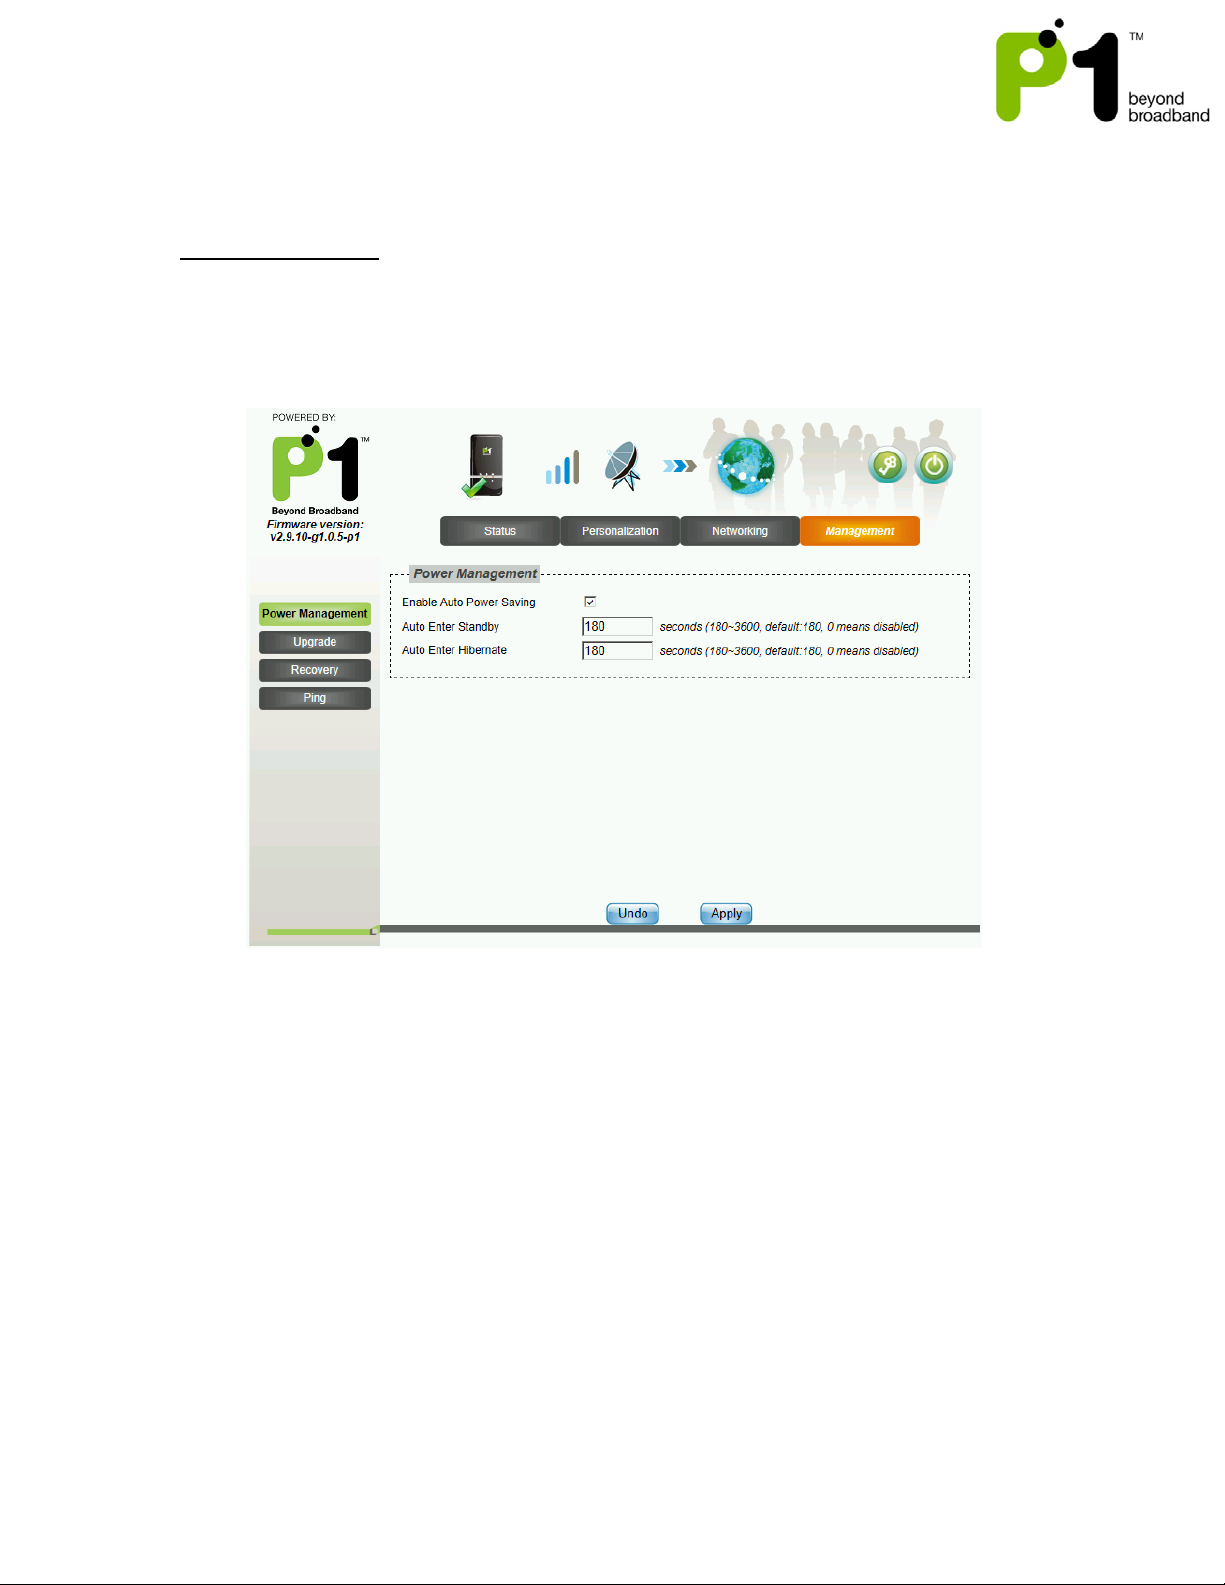
Power Management
This is the page to enable/disable the auto power saving on MF-230. It is enabled by
default and both the default value for Auto Enter Standby and Auto Enter Hibernate is
180 seconds.
Page 39
MF-230 Troubleshooting & Web UI Configuration Guide v1.0
39
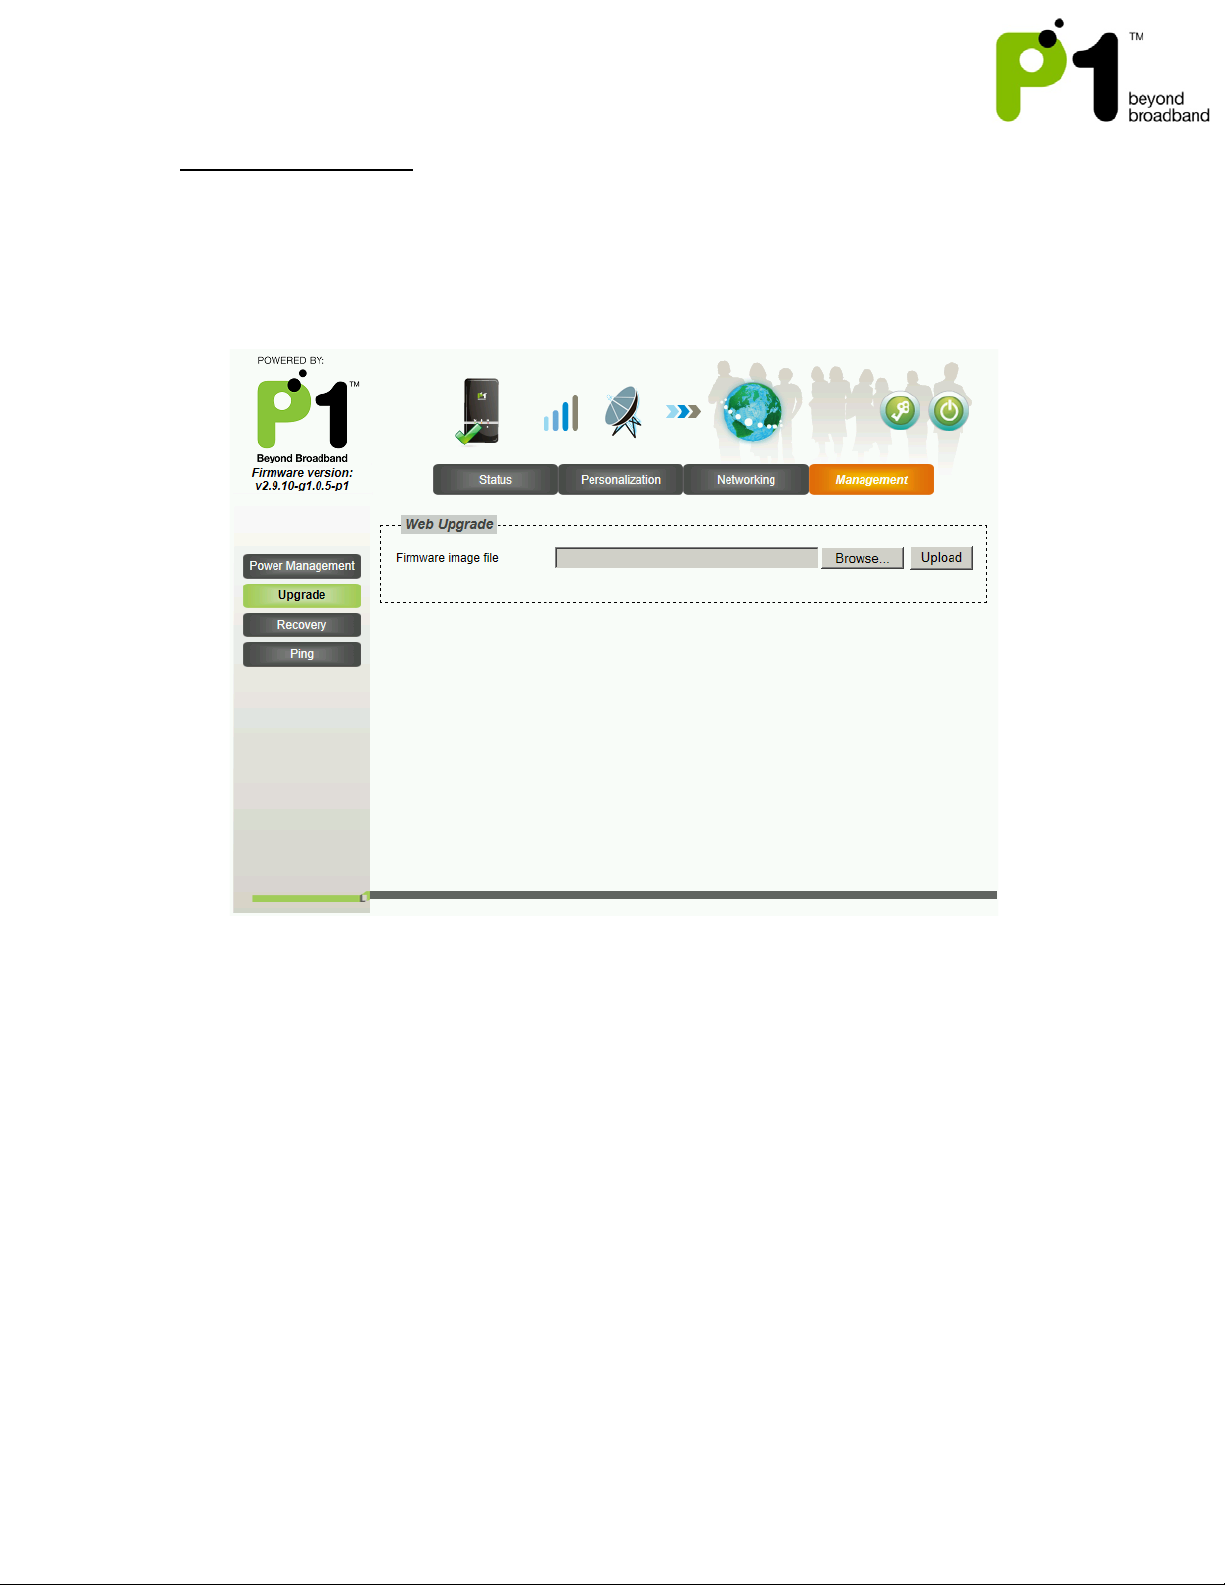
Management - Upgrade
This is the page to manually upgrade the firmware of the MF-230. Select the file and
click “Upload”. After the file is uploaded into the MF-230, a pop up window will prompt
you to “apply”. Click “apply” and wait for 2-3 minutes for the upgrading process. It will
reboot the MF-230 when the upgrade process finishes.
Page 40
MF-230 Troubleshooting & Web UI Configuration Guide v1.0
40
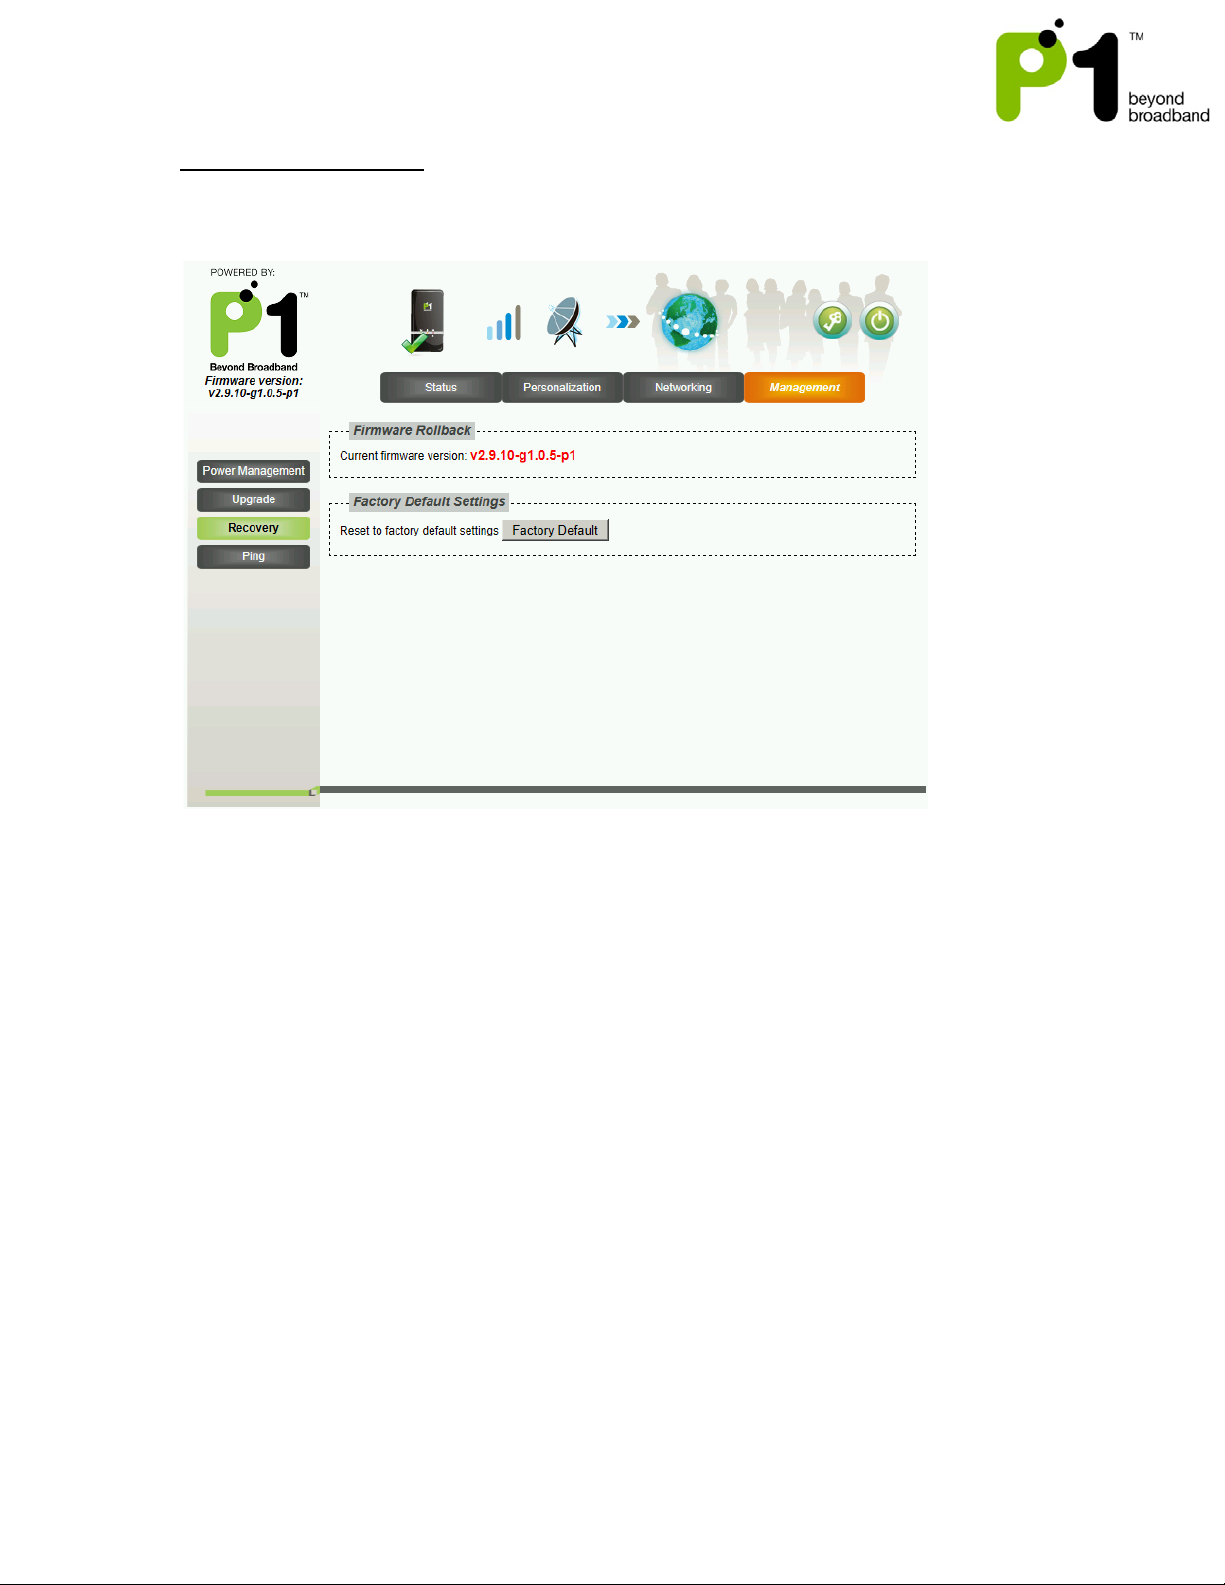
Management – Recovery
This is the web interface to manually factory default the settings of the MF-230.
Page 41
MF-230 Troubleshooting & Web UI Configuration Guide v1.0
41
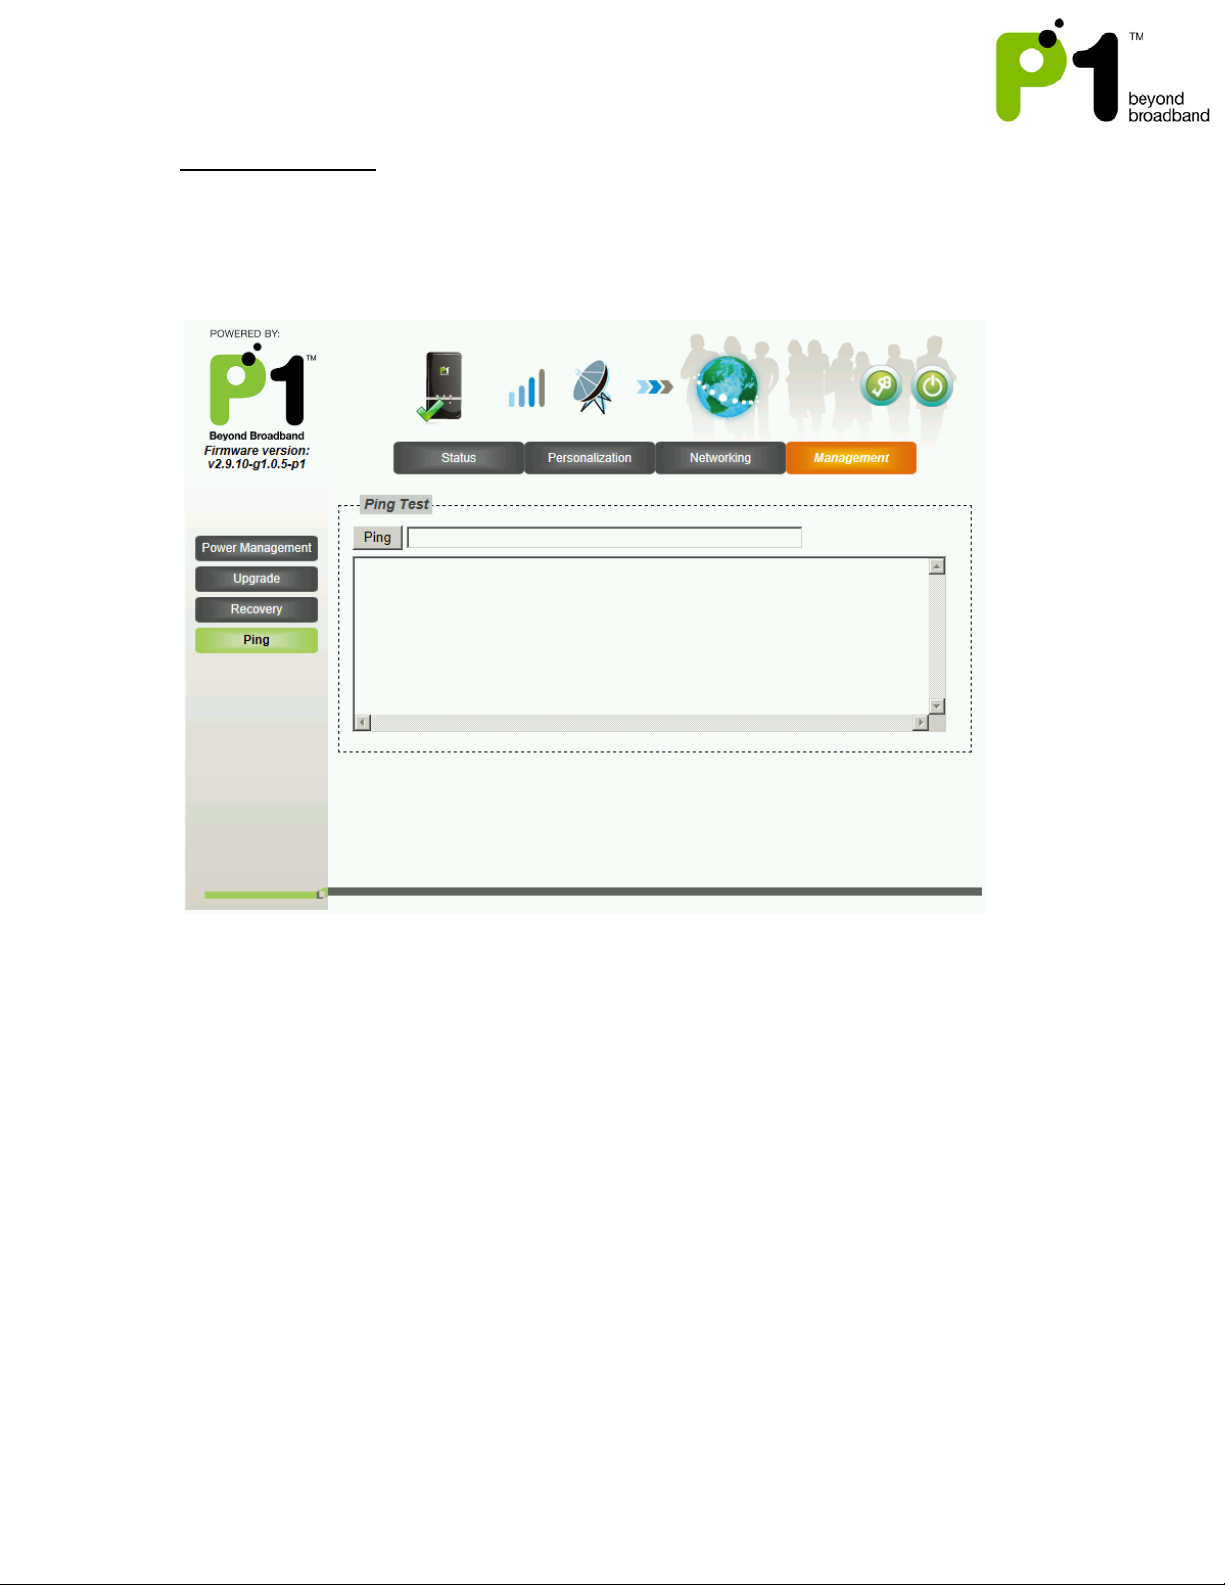
Management – Ping
User can ping to the internet via the WAN interface if users suspect the network issue is
due to the LAN or computer. By Pinging on this interface, there is NAT or Firewall
involve.
- End -
 Loading...