

Page 1

Part Number 474118
®
Energy Recovery Laboratory Exhaust
Installation, Operation and Maintenance Manual
Please read and save these instructions. Read carefully before attempting to assemble, install, operate or maintain the
product described. Protect yourself and others by observing all safety information. Failure to comply with instructions
could result in personal injury and/or property damage! Retain instructions for future reference.
Vektor ERS-MD
Greenheck model VKERS is a pre-engineered energy
recovery system designed to connect directly to a
Vektor-MD high plume dilution blower with bypass air
plenum. This installation manual covers procedures
for receiving, installing and maintaining the energy
recovery coil section.
For additional instruction and maintenance
information on the Vektor-MD high plume dilution
blowers, visit www.greenheck.com and download the
VK-MD instruction manual, part number 464652.
by
General Safety Information
Only qualified personnel should install this fan system.
Personnel should have a clear understanding of these
instructions and should be aware of general safety
precautions. Improper installation can result in electric
shock, possible injury due to coming in contact with
moving parts, as well as other potential hazards.
Other considerations may be required if high winds
or seismic activity are present. If more information
is needed, contact a licensed professional engineer
before moving forward.
DANGER
Always disconnect power before working on or near
a fan. Lock and tag the disconnect switch or breaker
to prevent accidental power up.
CAUTION
When servicing the fan, motor may be hot enough
to cause pain or injury. Allow motor to cool before
servicing.
CAUTION
Precaution should be taken in explosive
atmospheres.
1. Follow all local electrical and safety codes, as well
as the National Electrical Code (NEC), the National
Fire Protection Agency (NFPA), where applicable.
Follow the Canadian Electric Code (CEC) in
Canada.
2. The rotation of the wheel is critical. It must be free
to rotate without striking or rubbing any stationary
objects.
3. Motor must be securely and adequately grounded.
4. Do not spin fan wheel faster than maximum
cataloged fan rpm. Adjustments to fan speed
significantly effects motor load. If the fan RPM is
changed, the motor current should be checked to
make sure it is not exceeding the motor nameplate
amps.
5. Do not allow the power cable to kink or come in
contact with oil, grease, hot surfaces or chemicals.
Replace cord immediately if damaged.
6. Verify that the power source is compatible with the
equipment.
7. Never open access doors to a duct while the fan is
running.
Vektor-ERS Energy Recovery Plenum Laboratory Exhaust
1
Page 2

Receiving
Upon receiving the product, check to make sure
all items are accounted for by referencing the bill
of lading to ensure all items were received. Inspect
each crate for shipping damage before accepting
delivery. Notify the carrier if any damage is noticed.
The carrier will make notification on the delivery
receipt acknowledging any damage to the product.
All damage should be noted on all the copies of the
bill of lading which is countersigned by the delivering
carrier. A Carrier Inspection Report should be filled out
by the carrier upon arrival and the Traffic Department.
If damaged upon arrival, file claim with carrier. Any
physical damage to the unit after acceptance is not
the responsibility of Greenheck Fan Corporation.
Unpacking
Verify that all required parts and the correct quantity
of each item have been received, including accessory
kit containing flex connector, gasketing, etc. If any
items are missing, report shortages to your local
representative to arrange for obtaining missing
parts. Sometimes it is not possible that all items
for the unit be shipped together due to availability
of transportation and truck space. Confirmation of
shipment(s) must be limited to only items on the bill of
lading.
Handling
Fans are to be rigged and moved by the lifting
brackets provided or by the skid when a forklift is
used. Location of brackets varies by model and
size. Handle each piece in such a manner as to keep
from scratching or chipping the coating. Damaged
finish may reduce ability of fan to resist corrosion.
See coating repair section of this manual for details
involving touch-up of damaged surfaces.
Fans should never be lifted by the shaft, fan housing,
motor, belt guard, weatherhood, windband or other
accessories.
Storage
Fans are protected against damage during shipment. If
the unit cannot be installed and operated immediately,
precautions need to be taken to prevent deterioration
of the unit during storage. The user assumes
responsibility of the fan and accessories while in
storage. The manufacturer will not be responsible
for damage during storage. These suggestions are
provided solely as a convenience to the user.
INDOOR
The ideal environment for the storage of fans and
accessories is indoors, above grade, in a low humidity
atmosphere which is sealed to prevent the entry of
blowing dust, rain, or snow. Temperatures should
be evenly maintained between 30°F (-1°C) and
110°F (43°C) (wide temperature swings may cause
condensation and “sweating” of metal parts). All
accessories must be stored indoors in a clean, dry
atmosphere.
Vektor ERS-MD Energy Recovery Plenum Laboratory Exhaust
2
Remove any accumulations of dirt, water, ice or snow
and wipe dry before moving to indoor storage. To
avoid “sweating” of metal parts allow cold parts to
reach room temperature. To dry parts and packages
use a portable electric heater to get rid of any
moisture build up. Leave coverings loose to permit air
circulation and to allow for periodic inspection.
The unit should be stored at least 3½ in. (89 mm) off
the floor on wooden blocks covered with moisture
proof paper or polyethylene sheathing. Aisles between
parts and along all walls should be provided to permit
air circulation and space for inspection.
OUTDOOR
Fans designed for outdoor applications may be stored
outdoors, if absolutely necessary. Roads or aisles for
portable cranes and hauling equipment are needed.
The fan should be placed on a level surface to prevent
water from leaking into the fan. The fan should be
elevated on an adequate number of wooden blocks so
that it is above water and snow levels and has enough
blocking to prevent it from settling into soft ground.
Locate parts far enough apart to permit air circulation,
sunlight, and space for periodic inspection. To
minimize water accumulation, place all fan parts on
blocking supports so that rain water will run off.
Do not cover parts with plastic film or tarps as these
cause condensation of moisture from the air passing
through heating and cooling cycles.
Fan wheels should be blocked to prevent spinning
caused by strong winds.
Inspection and Maintenance during
Storage
While in storage, inspect fans once per month. Keep a
record of inspection and maintenance performed; see
page 12.
If moisture or dirt accumulations are found on parts,
the source should be located and eliminated. At each
inspection, rotate the wheel by hand ten to fifteen
revolutions to distribute lubricant on motor and
bearings. If paint deterioration begins, consideration
should be given to touch-up or repainting. Fans with
special coatings may require special techniques for
touch-up or repair.
Machined parts coated with rust preventive should
be restored to good condition promptly if signs of
rust occur. Immediately remove the original rust
preventive coating with petroleum solvent and clean
with lint-free cloths. Polish any remaining rust from
surface with crocus cloth or fine emery paper and oil.
Do not destroy the continuity of the surfaces. Wipe
clean thoroughly with Tectyl® 506 (Ashland Inc.) or
the equivalent. For hard to reach internal surfaces or
for occasional use, consider using Tectyl® 511M Rust
Preventive or WD-40® or the equivalent.
Page 3
Removing from Storage
As fans are removed from storage to be installed
in their final location, they should be protected and
maintained in a similar fashion, until the fan equipment
goes into operation.
Prior to assembly and installation of the Vektor fan
and system components, inspect the fan assembly to
make sure it is in working order.
1. Check all fasteners, set screws on the fan, wheel,
bearings, drive, motor base and accessories for
tightness.
2. Rotate the fan wheel(s) by hand and assure
no parts are rubbing. Access to the wheel is
obtained through a bolted panel located on the
side of the fan housing.
Table of Contents
Receiving, Handling, Storage ..................2
Unit Identification ...........................3
Installation
Plenum Cabinet ............................4
Unit Weights ..............................4
Plenum Service Clearances and Access ........5
Assembly and Installation
Roof Curb and Plenum Cabinet ............. 5-6
Duct Connections
Plenum Inlet ...............................7
Duct Connections ..........................7
Drain Trap ..................................8
Coils
Water Coil .............................. 8-9
Coil Checklist .............................9
Filter Replacement ..........................9
Coating Touch-Up Procedure ................10
Optional Accessories
Dirty Filter Sensor (Magnehelic Gauge) ........10
Vapor Tight Lights .........................10
Routine Maintenance
Coils ....................................11
Filters ...................................11
Drain Pan ................................11
Service
Coil Replacement .........................12
Reference
Maintenance Log .........................12
Warranty ................................12
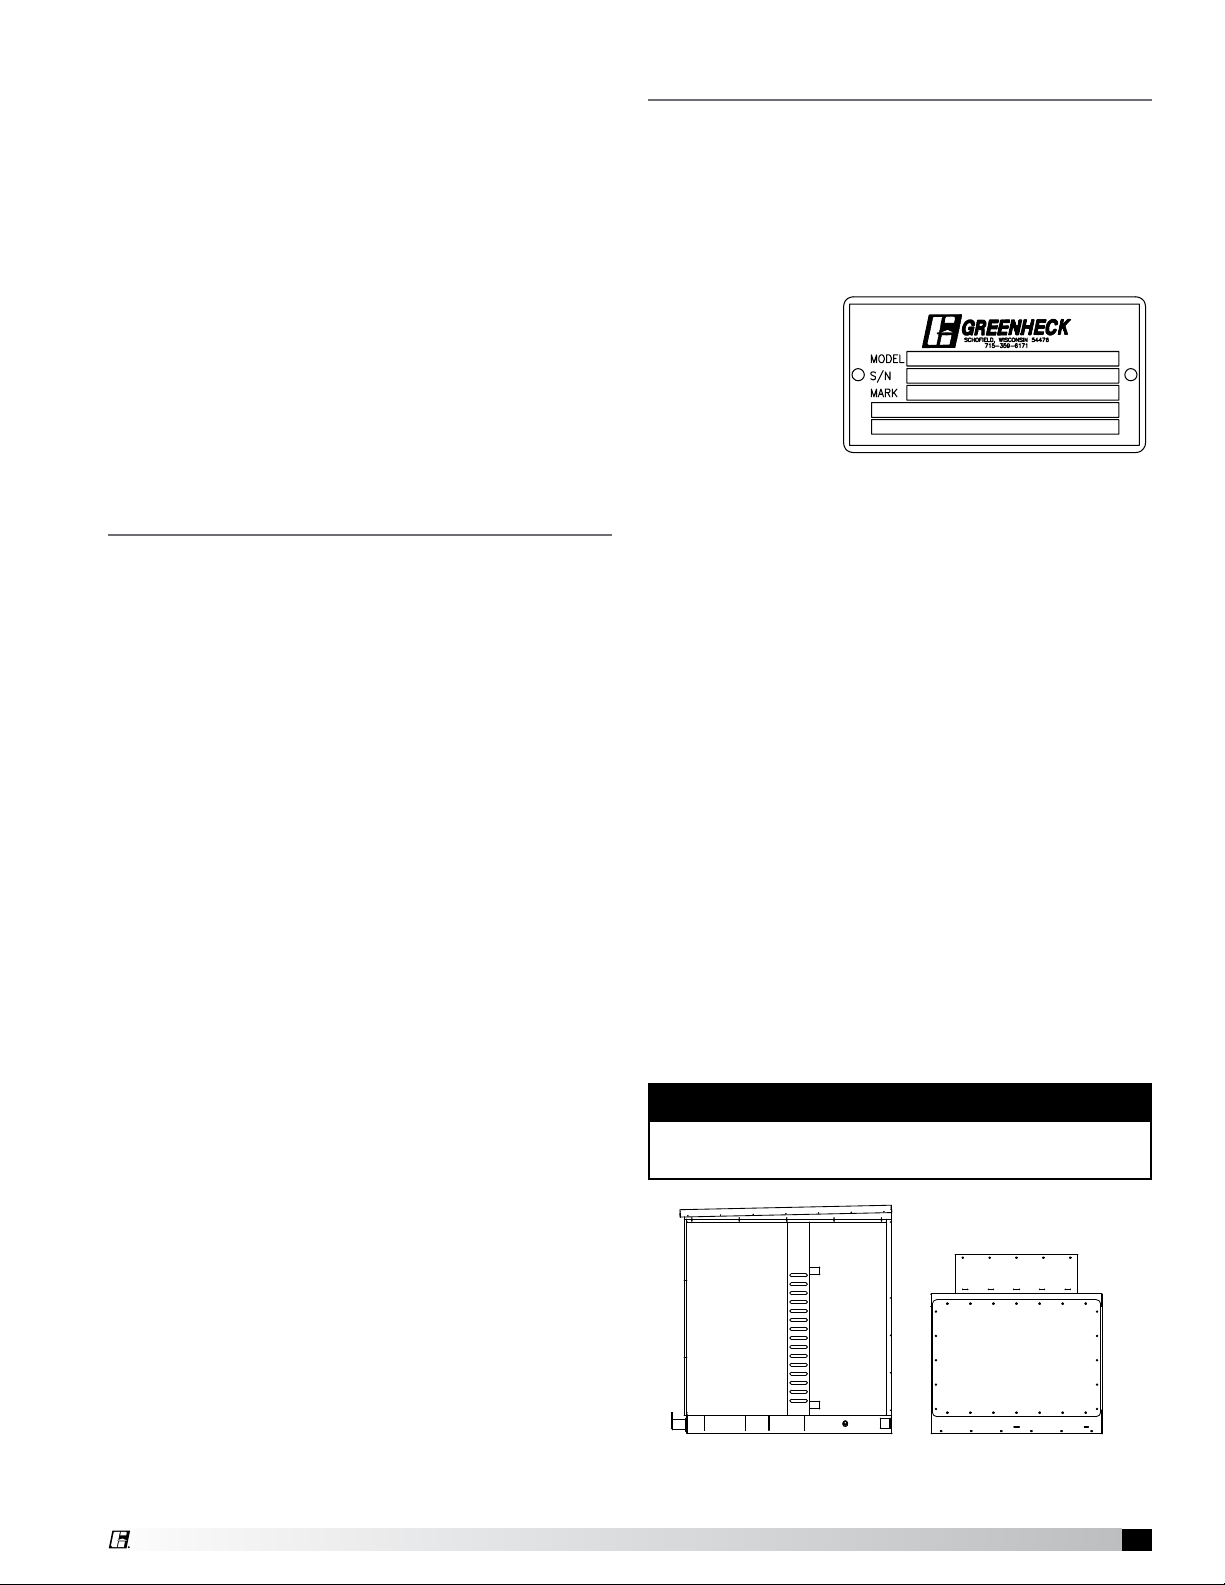
Unit Identification
System Identification Tags
The tag shown is an example of an identification
label on the fan. The information provides general
details about the fan, as well as containing specific
information unique to the unit. When contacting
your Greenheck representative with future needs or
questions, please have the information on this label
available. Tags
are mounted in
an area which is
clearly visible,
usually on the
side of the fan
cabinet.
ERS and Vektor fan systems may arrive in component
pieces due to shipping restrictions. Individual
components of a system have matching identification
tags which should be used to identify and assemble
the complete system. Assembling systems with
different identification tags can cause reductions in
the fan(s) performance.
General Information
To ensure a successful installation, the instructions in
this manual should be read and adhered to. Failure to
comply with proper installation procedures may void
the warranty.
Pre-Installation Checks
Prior to fully assembling and installing the ERS plenum
cabinet and Vektor fan bypass plenum components,
inspect plenums, coils, and fan assembly to make
sure they are in working order.
Storage
When an ERS plenum cabinet is not going to be
in service for an extended period of time, certain
procedures should be followed to keep the plenum
and coils in proper operating condition. Cover unit
with tarp to protect from dirt and moisture.
NOTE
Do not use a black tarp as this will promote
condensation.
ERS
Plenum
Cabinet
Fan Bypass
Air Plenum
(BAP)
Fan System Components
Vektor ERS-MD Energy Recovery Plenum Laboratory Exhaust
3
Page 4
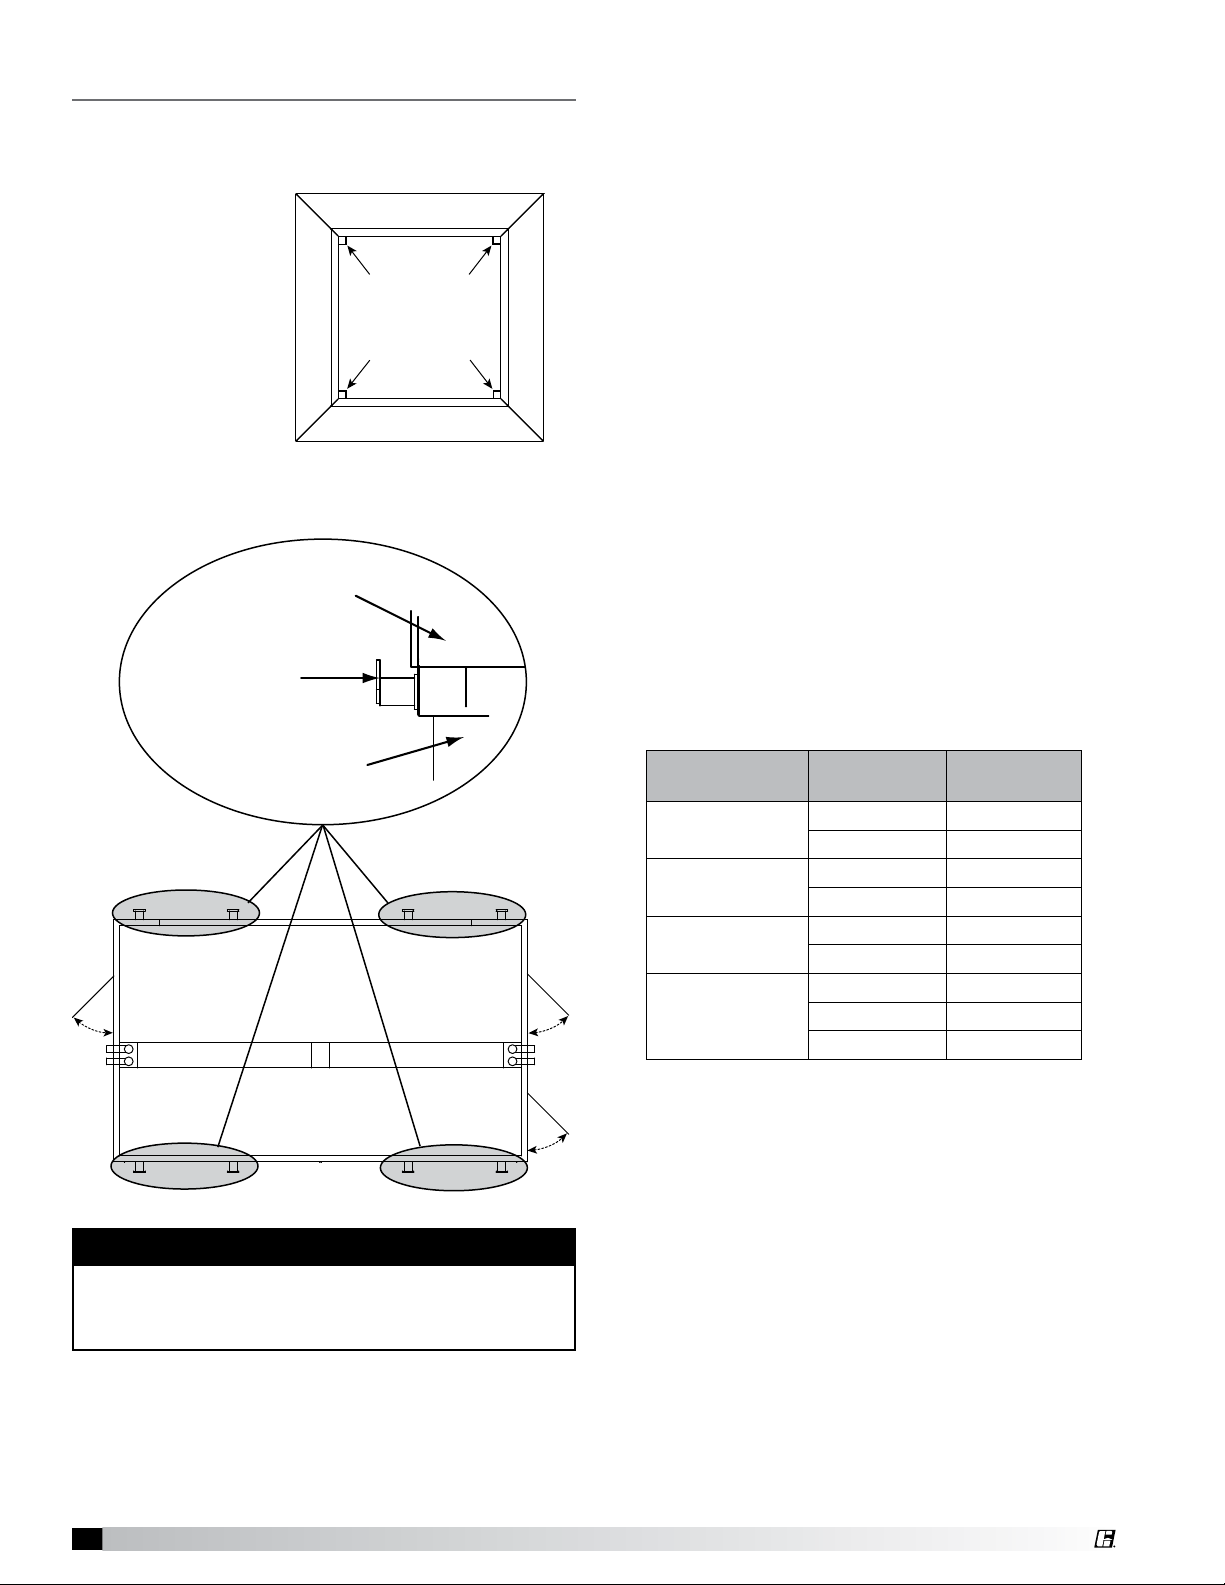
Installation
Lifting Bracket
(removable after
installation)
ERS Plenum Housing
Roof Curb
ERS plenum cabinets and fan bypass air plenums
are to be rigged and moved by the lifting brackets
provided. Handle
in such a manner
as to keep from
scratching or
chipping the
coating. Damaged
finish may reduce
ability of cabinet
to resist corrosion.
See coating repair
section of this
manual for details
involving touchup of damaged
surfaces.
Fan Bypass
Air Plenum
Lift Points
Top view of
Bypass Air Plenum
Check local codes to ensure compliance for all
protective devices.
ERS plenum cabinet with coil section should be lifted/
hoisted by lifting brackets provided. These brackets
are located around the lower perimeter of the plenum
cabinet.
1. Before lifting, be sure that all shipping material
has been removed from unit.
2. To assist in determining rigging requirements,
weights are shown below.
3. Unit must be lifted by the lifting brackets
provided on base structure.
4. Rigger to use suitable mating hardware to attach
to unit lifting brackets.
5. Two spreader bars must span the unit to prevent
damage to the cabinet by the lift cables.
6. Always test-lift the unit to check for proper
balance and rigging before hoisting to desired
location.
7. Never lift units in windy conditions.
8. Preparation of curb and roof openings should be
completed prior to lifting unit to the roof. Verify
the curb has the gasket seal on the top surface.
9. Do not use fork lifts for handling unit.
TOP VIEW
of
Service
Door
Service
Door
Service
Door
PLENUM SECTION
CAUTION
When installing an ERS plenum cabinet, ensure
the proper protective devices are used to protect
personnel from moving parts and other hazards.
Unit Weights (ERS Plenum Section Only)
Cabinet
Size
020
030
040
060
* Weights shown are for largest coil and filter
options per cabinet size. Based on dry
weight. Weights for custom designed units
may vary.
Cabinet
Height
075 3700
090 4500
075 4300
090 4900
075 5400
090 6100
075 6900
090 7800
110 8300
Weight
(lbs)*
Vektor ERS-MD Energy Recovery Plenum Laboratory Exhaust
4
Page 5

8 ROW COIL
EXTERNAL
PIPING BY OTHERS
SERVICE DOOR
155"
INTAKE OPENING
.75" DRAIN
LIFT LUG
(QTY. 8)
S
S
S
S
ISOLATION DAMPER
Coil
Single and Dual Coil Removal Clearances
Clearance
Clearance
Plenum Service Clearances and
Access Locations
ERS plenum cabinet and Vektor fan bypass air plenum
(BAP) require minimum clearances for access on three
sides for routine maintenance. Filter replacement,
drain pan inspection and cleaning, coil inspection,
damper actuator adjustments and inspection, fan
bearing lubrication and belt adjustment (belt drive
units), are examples of routine maintenance that must
be performed. Coil and filter sections are always
provided with a service door or panel for proper
component access. Clearances for component
removal may be greater than the service clearances.
Refer to page 12 for coil clearances.
Side or Bottom Intake Opening
Lift
Bracket
Optional
External
Piping
(by others)
Optional
Internal
Piping
(by others)
under
Vektor fans
Coil Coil
Assembly of Roof Curbs and ERS Plenum
Cabinet to the Bypass Air Plenum (BAP)
Rooftop units require curbs to be mounted first. The
duct connections must be located so they will be clear
of structural members of the building.
1. Assemble factory supplied roof curbs
Roof curbs are Model VK-ERS, which are shipped
knocked down and require field assembly (by
others). Assembly instructions are included with
the roof curb.
Curb section
for ERS plenum
cabinet
Filters
Service Doors
Internal Pipe
Chase
Bypass
Weatherhood(s)
Vektor bypass
air plenum
optional mounting
locations shown
Gasketing material
(supplied) to be
attached to top edge
of all curb sections
NOTE
Gasketing material (shipped with Vektor fan) should
be placed on the top edge of secured roof curb
prior to placing the ERS plenum cabinet and Vektor
bypass air plenum on the curb.
NOTE
If fan bypass air plenum (BAP) is in sections, these
should be assembled first, prior to connection to
ERS plenum cabinet. Refer to Vektor Fan IOM (part
number 464652) on how to assemble the fan BAP.
Determine the placement of the plenum sections
relative to each other. Please refer to the submittal
drawing for the orientation of any bypass air plenum
(BAP) dampers or air inlet locations.
2. Cut roof opening and locate curb
Layout the unit roof openings such that exhaust
inlet of the unit will line up with the corresponding
ductwork (refer to Recommended Roof Openings
on page 7). Do not make opening larger than
necessary. Be sure to allow for the recommended
service clearances.
3. Install roof curbs
Locate curb over roof opening. Check that the
diagonal dimensions are within ±1⁄8 inch of each
other and adjust as necessary. Shim as required
to level. Secure curb to roof deck. Attach
supplied gasketing to top of curb.
4. Set the ERS plenum cabinet
Lift ERS plenum cabinet to a point directly above
the curb and duct openings. While lowering,
guide cabinet to align with duct opening. Roof
curbs fit inside the unit base. Set ERS plenum
cabinet into place on assembled VK-ERS roof
curb. Allow gasketing on curb to compress before
setting the fan bypass air plenum. Make sure the
unit is properly seated on the curb and is level.
ERS
Plenum
Cabinet
Pre-installed
gasket material
Curb section
for Vektor fan
bypass air
plenum
Anchor curb to roof deck structure in accordance
with project construction documents.
Roof Curb
ERS Plenum Cabinet
Installed on Roof Curb
Vektor ERS-MD Energy Recovery Plenum Laboratory Exhaust
5
Page 6

ERS
Plenum
Cabinet
Fan Bypass
Air Plenum
(BAP)
1/2 x 1/2 inch tape
around entire opening
1/2 x 1/2 inch tape
around entire opening
1/2 x 2 inch tape along
outside edge of holes
Gasketing
DETAIL A
DETAIL B
VK-ERS
MARRIAGE WALL
1/2 x 1/2 inch tape
around entire opening
1/2 x 1/2 inch tape
around entire opening
1/2 x 2 inch tape along
outside edge of holes
Gasketing
5. Set the Vektor fan bypass air plenum
Before moving the Vektor fan BAP into position,
gasketing must be installed to seal the plenum
sections against leakage.
Gasketing
This
gasketing is
attached to the
ERS plenum cabinet
prior to shipment. Verify
that it is in place and not
damaged or missing prior to joining
the two plenums together.
The assembly
hardware (stainless
steel bolts) required
to join the sections is
located in the Vektor
fan bypass air plenum
accessory kit.
Lift and set the Vektor fan BAP on the curb
against the ERS plenum. Follow rigging and
Assembly Hardware Kit
5/16 - 18 UNC x 2-1/2 lag bolts
5/16 inch flat washers
1/2 inch flat washers
3/4 inch flat washers
Quantities in hardware kit will vary
by unit size and configuration.
lifting instructions in the Vektor-MD installation
instruction (part number 464652). Push fan bypass
air plenum tight against ERS plenum, making sure
to line up bolt holes. Be certain to compress foam
gasket to form an airtight seal.
Push
Plenum
ERS
Plenum
Cabinet
Roof Curb
Fan Bypass
Air Plenum
(BAP)
ERS and Vektor Fan Bypass Plenum
Assembly Installed on Roof Curb
Inside the ERS plenum are slots along the
marrying sections
which accept the
bolt and washer
assemblies. Using
the hardware kit,
Slots
around perimeter on
each side of plenum
attach the unit
sections by bolting
together frame
extrusion from the
inside.
Slot Detail
Tighten the bolt-washer assemblies to the top
and both sides of the joining sections. Start on
the lower sides and work towards the top. As
the bolts are tightened, the plenum sections
will draw together. Use anti-seize gel to prevent
galling / welding of all stainless steel fasteners.
If necessary, pull the units together with a
mechanical come-along device at the structural
base of the unit or at lifting lugs.
External brackets, one for each side, transition
and connect lower section of the bypass air
plenum to the ERS cabinet. These brackets ship
with the BAP and also complete the connection
between the BAP and roof curb.
Attach to fan bypass air
plenum section
Attach to ERS plenum
section
Skirt Bracket
After the ERS plenum and Vektor fan BAP are
joined and secured, the Vektor fans can be set
on the BAP. Refer to Vektor Fan installation
instruction (part number 464652) on this
procedure.
Installation
Installations with inlet configurations that deviate from
this standard may result in reduced fan performance.
Restricted or unstable flow at the fan inlet can cause
pre-rotation of incoming air or uneven loading of the
fan wheel yielding large system losses and increased
sound levels.
Vektor Riser Installation
Check curb or structural supports for levelness. Both
must be level to ensure proper drainage from plenum
and fan(s).
Vektor ERS-MD Energy Recovery Plenum Laboratory Exhaust
6
Page 7

Duct Connections
Length
Height
Energy Recovery Cabinet
Roof Deck
Curb
RECOMMENDED DUCT INSTALLATION FOR VEKTOR ENERGY RECOVERY VERTICAL INLETS
Contr actor
Installed
Ductwork
Plenum Bottom Inlet Opening
Length
Service
Door
Service
Door
Service
Door
Width
Duct Connections
Installation of all ducts should be done in accordance
with SMACNA and AMCA guidelines.
Connect primary exhaust air ducts to unit using
flanged connections. Screw ducts directly to unit
using stainless steel self-tapping sheet metal screws.
Contractor is responsible for providing transitions
to accommodate difference in sizing between unit
and building ducts. Duct connections to collar-type
openings can be made with S-cleats or overlapping
joints. Apply caulking around the duct connection.
Failure to ensure a tight fit and properly seal duct
connections can cause air leakage and system
performance problems from the contaminated
airstream.
Bottom Inlet
Cabinet
Size
Length
(inches)
Width
(inches)
020 86 25
030 120 25
040 172 25
060 236 25
Plenum Side Inlet Duct Dimension
Length
Cabinet
Size
020 86 30
030 120 30
040 172 30
060 236 30
Length
(inches)
Height
(inches)
Height
Energy Recovery Cabinet
Contractor
Installed
Energy Recovery Cabinet
Ductwork
Contr actor
Installed
Ductwork
Plenum Side Inlet
Contractor
Installed
Ductwork
Curb
Roof Deck
Curb
Roof Deck
Gasket or Sealant
(by others)
Screws
(by others)
Vektor ERS-MD Energy Recovery Plenum Laboratory Exhaust
Gasket or Sealant
(by others)
7
Page 8

Drain Trap
(TRAP BY OTHERS)
NEGATIVE PRESSURE TRAP
ENERGY RECOVERY
PLENUM
SUBFLOOR
1.25 NPT
.75 NPT
*BASED ON STANDARD
VEKTOR ERS CURB HEIGHTS
*
*
ROOF
CURB
Note: A conservative method
of trap design is to add
1¼ inch minimum to total static
pressure
14.750
14.000
NOTE: INSULATION OR OTHER MEANS
OF FREEZE PROTECTION MAY BE
REQUIRED IN CERTAIN CLIMATES
Coils
Coils are provided with a stainless steel drain pan
with 1 1/4-inch male NPT drain connection. A drain
trap must be connected to the drain connection to
allow excess water to flow out of the drain pan. More
importantly though, due to the negative internal static
pressure of the coil compartment, installing the drain
trap prevents outdoor air from being pulled into the
drain pan and consequently forcing water out of the
pan and into the unit.
To ensure the drain trap works properly, the trap
height must account for the difference in static
pressure between ambient conditions outside the
unit and the internal negative pressure of the coil
compartment.
Refer to local codes to determine drainage
requirements. If draining onto roof, place a drip pan
below drain to protect roof. If draining onto roof is
not acceptable, a drain line must be attached to the
trap. The drain line must be pitched away from the
unit at least 1/8-in. per foot. On longer runs, an air
break should be used to ensure proper drainage.
Local codes may require drainage into a waste water
system.
Drainage problems not only occur from improper drain
trap design, but also from lack of maintenance of
the cooling coil compartment. Algae can form in the
drain pan and trap
and cause reduced
water flow, which can
result in backup into
the system. Regular
1¼ inch minimum
TSP
maintenance will
prevent this from
occurring. If the
drains have a clean-
H/2
out opening, be sure
to close the opening
after cleaning.
TSP = Total Static Pressure
H = TSP + 1¼ inch minimum
NOTE
A conservative method of trap design is to add
1-1/4inches minimum to total static pressure.
Installation of Water Coil Piping
Guidelines for the installation of the coil have been
provided to ensure proper performance of the coils
and their longevity. These are general guidelines
that may have to be tailored to meet the specific
requirements of any one job. As always, a qualified
party or individual should perform the installation and
maintenance of the coil. Protective equipment such
as safety glasses, steel toe boots and gloves are
recommended during the installation and maintenance
of the coil.
All field piping must be self-supporting. System piping
should be flexible enough to allow for the thermal
expansion and contraction of the coil.
Water Coil Installation Recommendations
1. Piping should be in accordance with accepted
industry standards. Always use a back up wrench
on the coil connections when attaching the piping
to the coil if pipe thread connections are utilized.
2. Connect the water supply to the bottom
connection on the air leaving side and the water
return to the top connection on the air entering
side.
3. The air vent at the uppermost point should be
temporarily opened during system start-up to
release all of the air from the coil. To maintain
heat transfer capacity, periodically vent any air in
the coil.
4. Water coils are not normally recommended for
use with entering air temperatures below 40°F.
Glycol solutions or brines are the only freeze-safe
media for operation of water coils for low entering
air conditions.
5. Two position control valves, modulating valves,
three way valves or a combination of these
controls can accomplish control of water coils.
Follow the recommendations of the control
manufacturer regarding types, sizing and
locations. Face and bypass dampers may also
be used, but do not close off tightly. Air leakage
in cooling applications has no appreciable
affect. In heating applications, however, the air
temperature may rise several degrees and should
be considered in system design. Low leakage
dampers may be required.
Vektor ERS-MD Energy Recovery Plenum Laboratory Exhaust
8
Page 9

Filter Replacement
TEXT COLOR: BLUE
LABEL COLOR: WHITE
NOTE:
QTY
DESCRIPTION
MAT'L
PART NO.
PAINT
462708
VINYL
CW4R,6R,8R COIL RIGHT OUTLET
1
OLUND_T
11/20/2002
1/1
IAN7664
MSCF-15,20,25
30,45,50,65,85
P/N 462708
The original drawing. Dan Jore asked me to edit 8/10/2010.
Remove the border and the two cap drawings.
PURCHASED
COILCONNECTION
LABELCW-RIGHT
P/N 462682
LABEL COLOR: WHITE
TEXT COLOR: BLUE
NOTE:
QTY
DESCRIPTION
MAT'L
PART NO.
PAINT
462682
VINYL
CW4R,6R,8R COIL LEFT OUTLET
1
OLUND_T
11/20/2002
1/1
IAN7664
MSCF-15,20,25
30,45,50,65,85
The original drawing. Dan Jore asked me to edit 8/10/2010.
PURCHASED
COILCONNECTION
LABELSCW-LEFT
RETURN
Airflow
SUPPLY
External Pipe
Connection
Internal
Pipe
Chase
RETURN
Airflow
SUPPLY
External Pipe
Connection
Internal
Pipe
Chase
Filters are located only in the coil plenum section.
Access is needed from both sides of the plenum to
change all the filters. Unit may have either 2 inch
MERV 8 filters or 4 inch MERV 11 filters depending on
the application requirements. Use equivalent MERV
rating filters when replacing.
Change the filters regularly. Pressure drop readings
can be used to determine when a filter should be
replaced. Prefilters should be replaced at filter
manufacturers recommended pressure drop change
out or as required by system design.
All filter sections have access provided by a door.
Filters used in Greenheck ERS plenums can be
changed in most cases by sliding them out and
replacing. In some cases, filters are secured to frames
using a clip.
6. Pipe sizes for the system must be selected on the
basis of the head [pressure] available from the
circulating pump.
7. Internal coil plumbing. Under each fan there is
a raised, insulated cover panel to be used when
internal pipe connections are desired. Either
remove this panel to run plumbing or punch
appropriately sized holes in the panel to allow
piping to pass without rubbing and space for
piping insulation, sealant and grommets (by
others).
NOTE
Vent and drain connections are provided on
Greenheck water coils unless otherwise specified.
This allows the coils to be drained. Keep in mind
that when draining the coils, all water may not drain
from the coil. In order to completely drain the coil
to prevent the possibility of freezing during cold
ambient temperatures, air or nitrogen pressure must
be utilized to blow any remaining water from the
coil.
Coil Installation Checklist
Use the following checklist to verify that all necessary
installation procedures have been completed.
1. Coils are installed with airflow in same direction
as indicated on the coil nameplate or casing.
2. Condensate drain pans and piping is installed
with a trap in the condensate line and piping is
insulated and heated if installed in applications
that are below freezing.
3. Clean filters are installed upstream.
Vektor ERS-MD Energy Recovery Plenum Laboratory Exhaust
9
Page 10

Vektor Field Coating Touch-up Procedure
for Scratched Areas
Standard coating and color for the Vektor laboratory
exhaust system is Greenheck’s LabCoat™ – Industrial
Gray (041).
The procedure below details the correct method for
repairing minor scratches in the coating.
Repair Kit Contents
1 pint Kem Kromik primer with MSDS
1 pint Industrial Gray (041) enamel with
Material Data Safety Sheet
4 disposable foam brushes
1 sheet of sandpaper
2 technical data sheets for the two pints
1 repair procedure
1. Scuff affected area to be repaired using medium
sandpaper (provided) or medium Scotch Brite™
pad. Feather the edges.
2. Clean affected area to be touched up using an
alkaline based cleaner and rinse.
3. Apply Kem Kromik primer using 1 inch foam
brush (provided). Follow technical data sheet
instructions.
4. Allow primer to dry a minimum of 2 1/2 hours
before top coating.
5. Topcoat with Industrial enamel using 1 inch foam
brush (provided). Follow technical data sheets
instructions. Allow painted units to air-dry and
cure before putting into service. See Technical
Data sheets for detailed drying and cure
schedules at different temperatures.
To order coating repair kits, please reference
Greenheck’s part number HAZ2037 HI-PRO GRAY
FIELD DAMAGE REPAIR KIT. Please contact factory
with your fan’s serial number for colors other than our
standard Industrial Gray (041).
Optional Accessories
Dirty Filter Sensor (Magnehelic Gauge)
Dirty filter sensor monitors pressure drop across the
exhaust air filters. Visual gauge on the side of the
plenum cabinet indicates the pressure across the filter
section. Periodic inspection is necessary to determine
whether filters need to be replaced.
Vapor Tight Lights
Vapor tight lights provide light to each of the
compartments in the energy recovery plenum. The
lights are wired to a junction box mounted on the
outside of the unit. The switch requires a separate
power source to allow for power to the lights when the
unit main disconnect is off for servicing.
Electrical Package
The electrical package consists of a switch and GFCI
receptor mounted in a two gang, “in use” NEMA3R rated box with cover plate. This box would be
mounted at the factory near the ERS plenum access
doors.
The GFCI is rated for 15A, 125VAC and is provided
with SafeLock™ Protection. This feature denies
power if the GFCI is incorrectly wired or if the GFCI
is damaged and protection is lost. The GFCI is also
equipped with a trip indicator light to easily identify
tripped condition. Receptor uses a NEMA 5-15 R
configuration.
Supplied switch is industrial extra heavy duty grade
with back and side wiring. The switch has a rating of
20A, 120/277VAC and single pole. The switch comes
from the factory pre-wired to lights within ERS plenum
section.
Electrical wiring for power to the electrical panel is to
be installed by a licensed electrician in compliance
with all local and national codes.
Vektor ERS-MD Energy Recovery Plenum Laboratory Exhaust
10
Page 11

Routine Maintenance
CAUTION
Use caution when removing access panels or other
unit components, especially while standing on a
ladder or other potentially unsteady base. Access
panels and unit components can be heavy and
serious injury may occur.
Once the unit has been put into operation, a routine
maintenance program should be set up to preserve
reliability and performance. Items to be included in
this program are:
• InternalFilter
Check for cleanliness. Replace if required.
• DoorSeal
Check if intact and pliable.
• CoilMaintenance
Check for cleanliness (coil and drain pan).
• WinterizingCoils
Drain. Fill with antifreeze. Drain.
Coil Maintenance:
Cleaning
Coils should be kept clean to maintain maximum
performance. For operation at its highest efficiency,
the coil should be cleaned often during periods
of high cooling demand or when dirty conditions
prevail. Power should be disconnected and locked
out and motors should be covered to insure that no
moisture penetrates into the windings causing motor
failure if applicable. Remove large debris from the
coils and straighten fins before cleaning. Clean coils
with cold water and detergent or with one of the
commercially available chemical coil cleaners. Rinse
coils thoroughly after cleaning. For coils with fragile
fins or high fin density, foaming chemical sprays and
washes air available. Many coil cleaners contain
harsh chemicals, so they must be used with caution
by qualified personnel only. Care must be taken not
to damage the coils. FINS ARE SHARP! Use caution
when working with coils.
Fin Straightening
Coil fins may have been bent during shipping or
servicing, and should be straightened to maintain
maximum heat transfer. Reduction of the effective
coil surface will correspondingly reduce coil capacity.
Always check fin appearance after any handling of the
coil and after any servicing is done near the coils. Fin
combs are sized according to number of fins per inch
of the coil. For relatively small bends that require only
minor repair, other tools may be used to evenly space
the fins. Be careful not to damage the coils.
Winterizing Coils
During any extended down time, all water should
be drained from the coil. The coil should then be
thoroughly flushed with a glycol solution to prevent
freeze damage.
Filters
Filters upstream of the coil should be checked
regularly for dirtiness and clogging. If the filters are
dirty, they should be replaced. It is important that the
coils stay clean to maintain maximum heat transfer
capability.
Drain Pan
Drain pans may contain moisture; therefore, algae and
other organisms will grow due to airborne spores and
bacteria. Scheduled cleaning is necessary to prevent
build-up from clogging the drain. Drain pans should
also be kept clean to prevent growth of bacteria and
the spread of disease.
WARNING
Biological Hazard! All drain pans and coils should
be cleaned on a regular schedule by qualified
personnel to prevent the growth of bacteria.
CAUTION
Do not use acidic chemical coil cleaners. Do not use
alkaline chemical coil cleaners that, after mixing,
have a ph value greater than 8.5 without also using
an aluminum corrosion inhibitor in the cleaning
solution. Failure to follow these guidelines or the
manufacturer’s instructions for use of cleaning
chemicals could result in damage to the unit.
Vektor ERS-MD Energy Recovery Plenum Laboratory Exhaust
11
Page 12

8 ROW COIL
EXTERNAL
PIPING BY OTHERS
INTAKE OPENING
.75" DRAIN
LIFT LUG
(QTY. 8)
S
S
ISOLATION DAMPER
Coil Coil
Optional
External
Piping
(by others)
Service Doors
Internal Pipe
Chase
Side or Bottom Intake Opening
Lift
Bracket
Optional
Internal
Piping
(by others)
under
Vektor fans
Bypass
Weatherhood(s)
Vektor bypass
air plenum
optional mounting
locations shown
Filters
Coil
Single and Dual Coil Removal Clearances
Clearance
Clearance
Service
Maintenance Log
Coil Change Out Procedure
Coils can only be pulled out through the side of the
plenum cabinet. Side panels which are nearest to the
coil can be removed if the coil needs to be replaced.
Size 020 ERS plenums only have a single coil and do
not require coil removal clearances on both sides. If
necessary, both coils can be removed through the
same side of the plenum housing. This process would
require the removal of an additional spacer panel that
separates the two coils within the unit.
Warranty
Cabinet
Size
020 114
030 74 (each side)
040 100 (each side)
060 132 (each side)
Service Doors
Coil Service
Clearance
Greenheck warrants this equipment to be free from defects in material and workmanship for a period of one year from
the shipment date. Any units or parts which prove defective during the warranty period will be replaced at our option
when returned to our factory, transportation prepaid. Motors are warranted by the motor manufacturer for a period of
one year. Should motors furnished by Greenheck prove defective during this period, they should be returned to the
nearest authorized motor service station. Greenheck will not be responsible for any removal or installation costs.
Minimum Clearance
Coil Coil
(inches)
Coil Service
Clearance
Date __________________ Time _____________ AM/PM
Notes:___________________________________________
_________________________________________________
_________________________________________________
_________________________________________________
_________________________________________________
Date __________________ Time _____________ AM/PM
Notes:___________________________________________
_________________________________________________
_________________________________________________
_________________________________________________
_________________________________________________
Date __________________ Time _____________ AM/PM
Notes:___________________________________________
_________________________________________________
_________________________________________________
_________________________________________________
_________________________________________________
Date __________________ Time _____________ AM/PM
Notes:___________________________________________
_________________________________________________
_________________________________________________
_________________________________________________
_________________________________________________
As a result of our commitment to continuous improvement, Greenheck reserves the right to change specifications
without notice.
Greenheck Catalog Vektor ERS-MD provides additional
information describing the equipment, fan performance,
available accessories, and specification data.
AMCA Publication 410-96, Safety Practices for Users and
Installers of Industrial and Commercial Fans, provides
additional safety information. This publication can be
obtained from AMCA International, Inc. at: www.amca.org.
®
Phone: (715) 359-6171 • Fax: (715) 355-2399 • E-mail: gfcinfo@greenheck.com • Website: www.greenheck.com
474118 •ModelVKERS-MDIOM,Rev.1,April2011 Copyright 2011 © Greenheck Fan Corp.
12
 Loading...