

Page 1
®
PN 463563
Model Hooded Propeller Roof Fans
Exhaust and Supply Hood, Shipped in Halves
Assembly Instructions
Please read and save these instructions for future reference. Read carefully before attempting
to assemble, install, operate or maintain the product described. Protect yourself and others by
observing all safety information. Failure to comply with instructions could result in personal injury
and/or property damage!
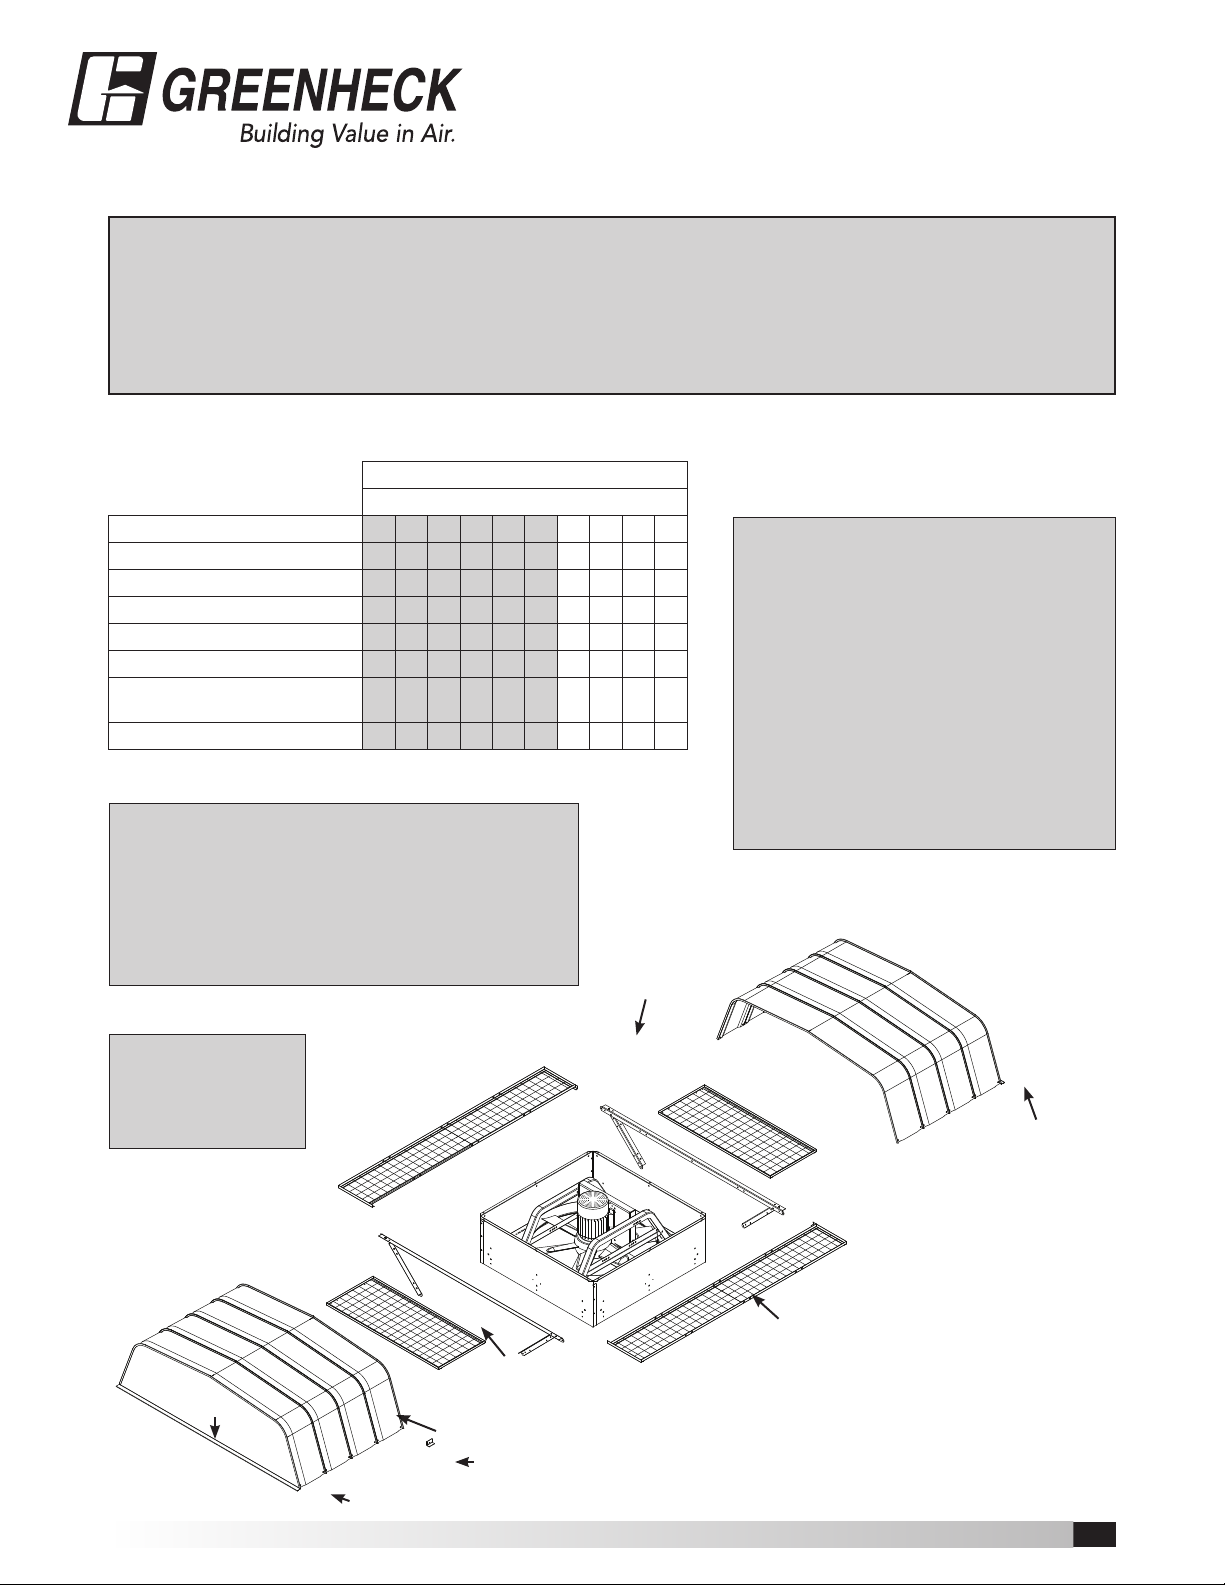
Step 1: Unpack and Inspect Parts
Parts List
Parts Description 18 20 24 30 36 42 48 54 60 72
Fan / Base Assembly 1 1 1 1 1 1 1 1 1 1
Hood Support Rail Assembly 2 2 2 2 2 2 2 2 2 2
Side Birdscreens (Long Screens) 2 2 2 2 2 2 2 2 2 2
Side Birdscreens (Short Screens) 2 2 2 2 2 2 2 2 2 2
Hood Rails 2 2 2 2 2 2 2 2 2 2
Hood Panels including 1 Male &
1 Female hood enclosure panel
Hood Clips for sizes 54 - 72 – – – – – – – 2 2 2
Shaded sizes will always ship fully assembled unless otherwise specied.
Fan Size / Quantity of Parts per Fan Size
4 4 5 6 7 8 9 9 10 11
Tools required to assemble fans:
• Battery Drill, Electric or Pneumatic preferred.
• 3/8”, 7/16”, 1/2”, and 9/16” Wrenches and Sockets.
• 5/16” Nut Runner Bit for Drill.
• Rubber Mallet.
• Awl - for Hole Alignment.
Exhaust / Supply Fans
Each fan that is shipped knocked down
has the following hardware package
containing:
Part # 827384 - Hardware Package
Part # 816526 - Hood Support Fasteners
(16) 3/8” - 16 x 3/4” Spinlock Bolts
(12) 3/8” - 16 Spinlock Nuts
Part # 827383 - Hood Fasteners
(8) 3/8” - 16 x 1/2” Spinlock Bolts
(8) 3/8” - 16 Spinlock Nuts
(2) Hood Clips
(4) #12 x 5/8” Screws
Part # 816528 - Birdscreen / Filter Fasteners
(26) 5/16” - 18 x 3/4” Weld Stud Bolts
(26) 5/16” - 18 Spinlock Nuts
(4) #12 x 3/4” Self-Drilling Screws w/ Washer
Note: Hardware package is designed for the filtered
72” fan. When used on smaller sizes, there will
be some fasteners left over.
Hood
Support
Rail
IMPORTANT!
It is recommended
that a two man crew
minimum be used for
fan/hood assembly.
Label
Short Birdscreen
Section
Hood Panels
Hood Clips (Sizes 54 - 72)
Hood Enclosure Panel (Male)
Hooded Propeller Roof Fans • Exhaust and Supply Hood Shipped in Halves
Hood Enclosure
Panel (Female)
Long Birdscreen
Section
1
Page 2
®
Fan Panel
Fan Drive
Frame
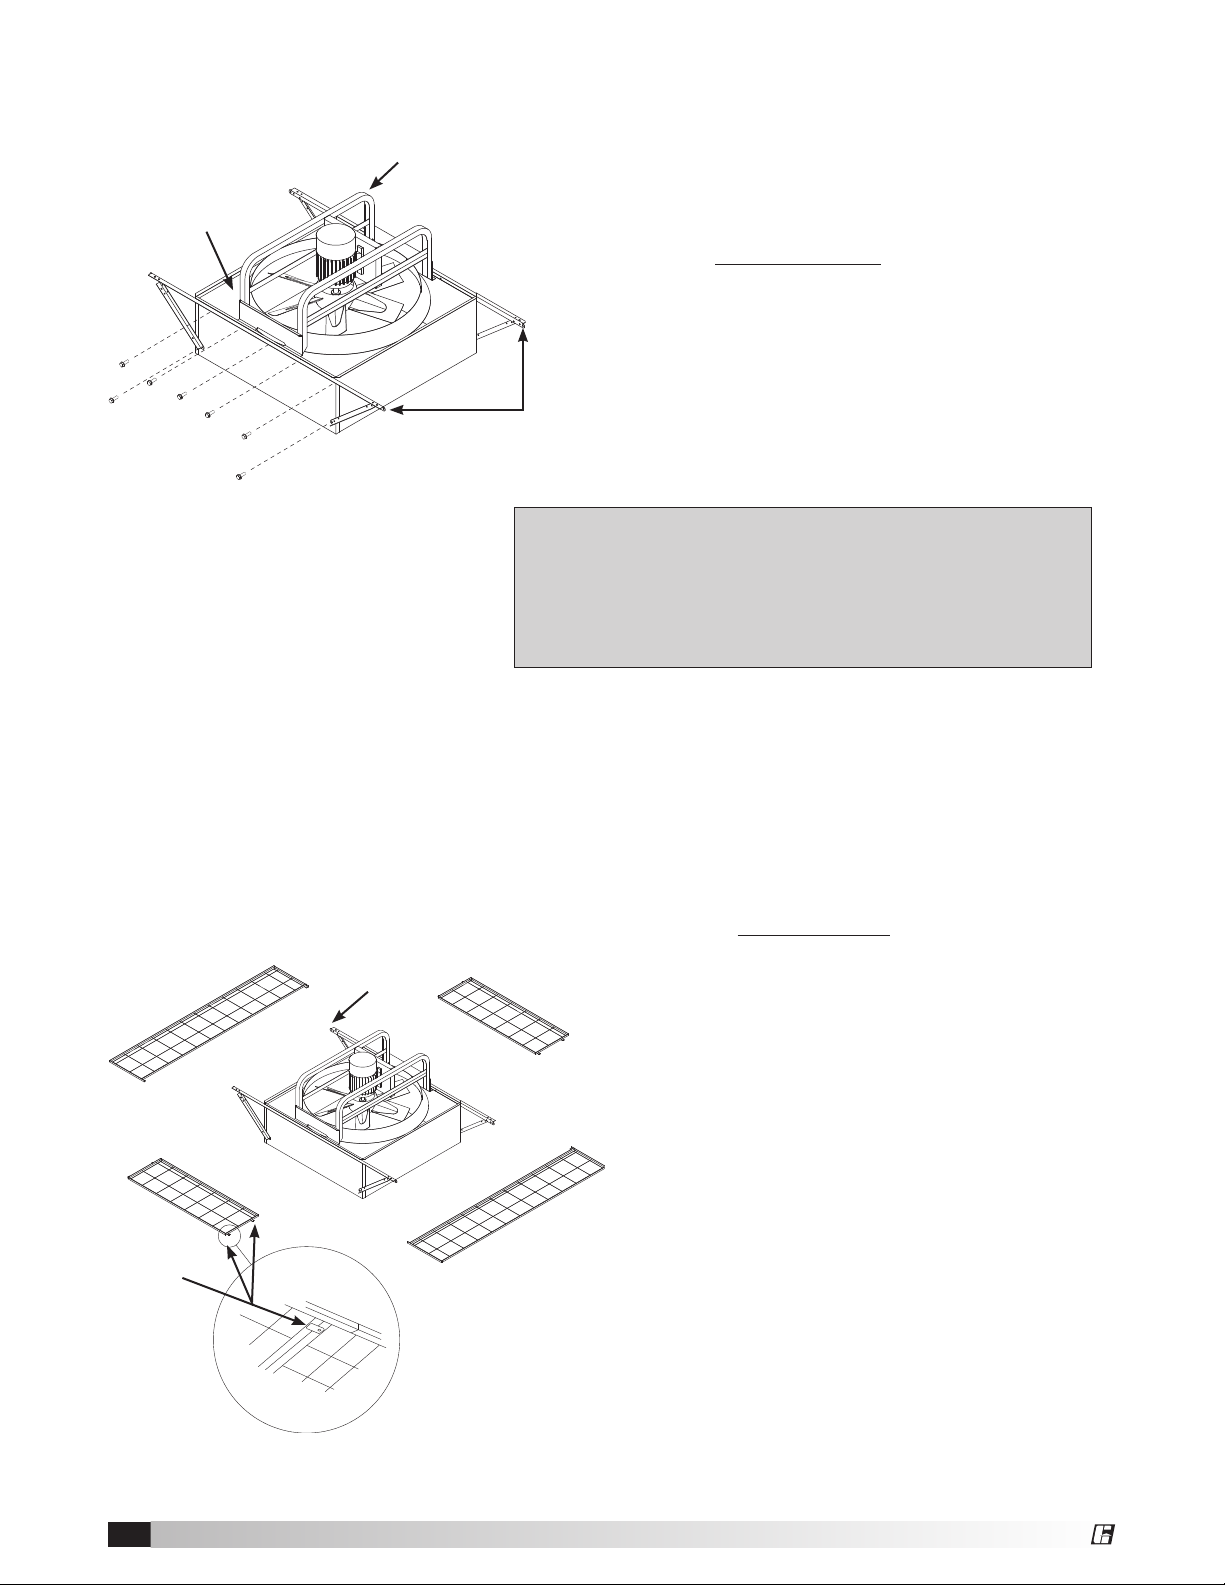
Step 2: Fasten Hood Support Rails
Hardware Required: Hardware Package #816526
3/8” - 16 x 3/4” Hex Head Spinlock Bolts & Nuts
Quantity: Up to (8) fasteners per side for 72” fans,
less required for smaller sizes.
Instructions: WRENCH TIGHTEN the hood support rails
perpendicular to fan drive frame as shown.
Mounting holes in fan base will line up with
holes in hood support rails.
Hood support rails
perpendicular to fan
drive frame
IMPORTANT!
Supply Fans (Models RBS, RBCS, RS2, RCS3)
The fan panel bolts are also used for the hood support
rails. Remove fan panel bolts (one side at a time) and
reinstall through the hood support rails.
Quick Release
Fastener
Fastener
Location
Step 3: Install Birdscreen Sections
Hardware Required: Hardware Package #816528
5/16” - 18 x 3/4” Weld Studs and Spinlock Nuts
Quantity: Only 10 sets required of the 26 sets
provided.
Instructions: A) FINGER TIGHTEN the long birdscreen
sections to the hood support rails at the
locations indicated using the 10 sets of
fasteners.
B) Lay the short birdscreen sections in place
and rotate the quick release fasteners on the
underside of the birdscreen to secure. (See
detail 3 at left).
Detail 3
(viewed from below)
2
Hooded Propeller Roof Fans • Exhaust and Supply Hood Shipped in Halves
Page 3

®
Detail 4A
Hood
Enclosure
Panel (Female)
Step 4: Assemble Hood Panel Sections
Hardware Required: Hardware Package #827383
3/8” - 16 x 3/4” Spinlock Bolts and Nuts
#12 x 5/8” Screw with Washer Hood Clips
Quantity: 4 sets of Nuts and Bolts
Female
Rib
Male
Rib
2 Clips and 2 Screws
Instructions: A) Locate a 5 panel assembly with splices and
a 4 panel assembly. Assemble hood halves on
the ground. The open female rib of the 4 panel
assembly will go over the open male rib of the
5 panel assembly (see detail 4A). Use (4) 3/8 -
16 x 3/4 bolts and (4) 3/8” - 16 nuts to secure
the hood sections together at the hood rail
splice.
B) Install the 2 hood clips (see detail 4B) only
on sizes 54 and larger.
#12 x 3/8” Sheet Metal Screw
with Sealing Washer
Detail 4B
Hood Clip
(Fan Sizes 54 and Larger)
Two on each interlocking rib
Step 5: Place Assembled Hood on the
Hood Support Rails
Instructions: Use (4) 3/8” - 16 x 3/4 bolts and
(4) 3/8” - 16 nuts to secure the hood
to the hood support rails.
Hooded Propeller Roof Fans • Exhaust and Supply Hood Shipped in Halves
3
Page 4

®
Detail 6
Step 6: Secure Hood and Birdscreen
(sizes 54-72 only)
Hardware Required: Hardware Package #816528
#12 x 3/4” Self-drilling Screws with Washers
Quantity: 4 pieces, (2) required per hood and (2) extras
Instructions: A) With birdscreen and hood installed, locate
the birdscreen clips (5 per hood end panel).
Loosen the fasteners and rotate them 90° so
that they support the birdscreen. Retighten
fasteners.
B) Locate the center birdscreen clip on each
hood end panel. Push hood end panel against
#12 x 3/4”
birdscreen. Install the #12 x 3/4” self-drilling
Self-drilling
screw with washer (1 per end panel) thru
Screw
birdscreen clip into birdscreen frame.
(see detail 6).
Hood Clip
(5) Per End Panel
(Sizes 54 x 72)
Warranty
Greenheck warrants this equipment to be free from defects in material and workmanship for a period
of one year from the purchase date. Any units or parts which prove defective during the warranty
period will be replaced at our option when returned to our factory, transportation prepaid. Motors are
warranted by the motor manufacturer for a period of one year. Should motors furnished by Greenheck
prove defective during this period, they should be returned to the nearest authorized motor service
station. Greenheck will not be responsible for any removal or installation costs.
As a result of our commitment to continuous improvement, Greenheck reserves the right to change
specifications without notice.
Greenheck Catalog Hooded Propeller Roof Fans provides additional
information describing the equipment, fan performance, available
accessories, and specication data.
Phone: (715) 359-6171 • Fax: (715) 355-2399 • E-mail: gfcinfo@greenheck.com • Website: www.greenheck.com
4 463563 • Exhaust and Supply Hood Shipped in Halves, Rev. 2, September 2008 Copyright 2008 © Greenheck Fan Corp
AMCA Publication 410-96, Safety Practices for Users and
Installers of Industrial and Commercial Fans, provides additional
safety information. This publication can be obtained from AMCA
International, Inc. at: www.amca.org.
 Loading...