

Page 1
Installation / Operating
instructions for
Digital Thermostat
Model No: TH1-C
You have acquired the latest microprocessor controlled
thermostat to reduce your heating bill. It is made to be user
friendly and easy to use.
SAFETY INSTRUCTIONS
Please read these instructions fully before
attempting installation.
This unit should be installed by a competent person in
accordance with the current IEE Wiring Regulations.
If in doubt consult a qualified electrician
GENERAL
The TH1-C digital thermostat is battery operated and it can
therefore replace any mechanical standard 2 wire thermostat.
Please however note that the maximum resistive load is 5A.
INSTALLATION
Note that if you connect the thermostat to a 230VAC system,
please make sure the power is switched off and if in doubt
consult a qualified electrician.
If you have a mechanical thermostat connected with 2 wires just
remove the old thermostat and replace it with the TH series.
Connect the 2 wires to the terminals as Fig 1 shows, then put
the batteries in and close the thermostat. See below.
Remove the front housing from the base. (see Fig 2.1)
Fig 2.1
3. Unscrew the screw in the protective cover and remove the
protective cover (See Fig 2.2)
Fig 2.2
4. Mount the base on the wall and make sure the hole on the
wall is covered by the base with the wires coming in
through the protective cover hole. (See Fig 2.3)
Loosen the screws of the terminal block and install the
wires into the terminals. (see Fig 1)
If this is a thermostat for a new system you must install a 2 wire
cable to heating system (see Fig 1).
Fig 1
To heating
system
TH1-C
THERMOSTAT
1. You should place the thermostat as following:
a. About 160cm up from the floor.
b.Only on inside walls (not on an outside wall).
c. Do not expose to direct sun light.
d.Do not position close to a heater, ventilation outlet or
close to an outside door.
2. Remove the front cover.
Unscrew the screw in the battery compartment.
Fig 2.3
5. Replace the protective cover on to the base and lock the
cover with the screw.
6. Put the front housing back to the base and lock the front
housing with the screw.
7. Install 2 AA size batteries into the battery compartment.
8. Press the RESET key once and make sure the display shows
room temperature and set temperature.
9. When the thermostat is first filled with batteries or after a
battery change press RESET button.
The LCD shows set temperature 20
o
C and actual room
temperatures.
Page 2
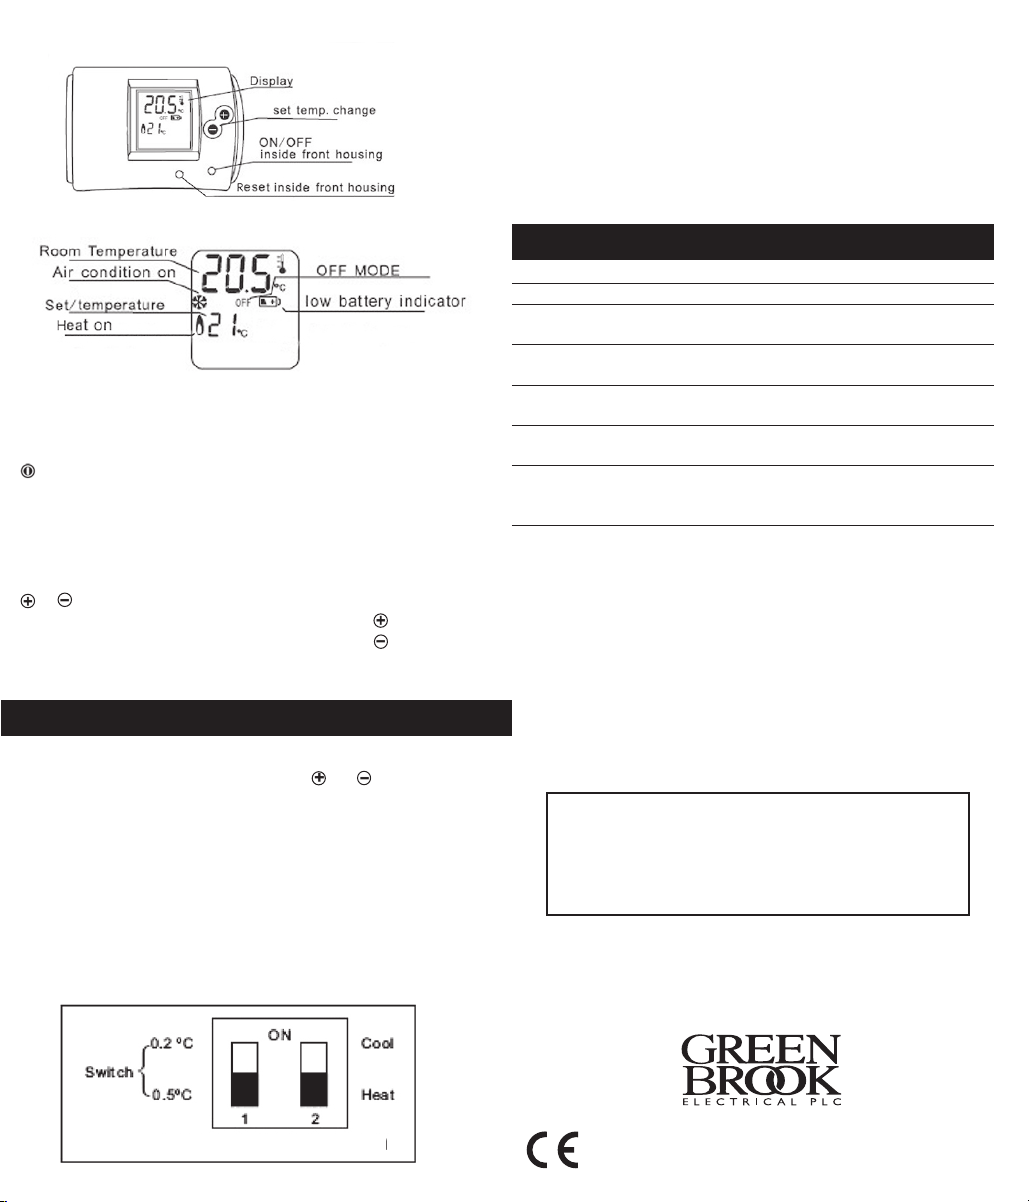
Fig 3.1
Fig 3.2
Keys
The thermostat has the following keys and display, see
(Fig. 3.1, 3.2).
Key ON/OFF (inside front housing) with this key you can
turn off the thermostat or turn it on to Normal mode.
When the thermostat is turned off, “off” will show in the display
and you will see the room temperature. If the thermostat is in
Normal mode you will see the set temp and the room temp in
the display.
or keys
If you want to increase the set temp just press
If you want to decrease the set temp just press
You can see this on the display.
*Reset, after battery change.
DIP SWITCH 2 - HEAT OR COOL SYSTEM SETTING
ON = COOL
OFF = HEAT
FACTORY SETTING: SWING CYCLE - OFF = 0.5OC
SYSTEM OFF = HEAT
TECHNICAL INFORMATION
Temperature range: 5-30oC
Differential: +/- 0.5oC from set temperature
Batteries: 2 x AA (1.5VDC) size batteries
(Alkaline Recommended)
Rated switching power: 230V, 5A resistive load
and 2A Inductive load
Minimum on time in
heating mode: 1 minute
Minimum off time in
cool mode: 3 minutes
Battery Low: Thermostat will turn off and low
battery indication will show on
display
OPERATION
As soon as the batteries are installed the thermostat will keep
the room temperature at 20
or decrease the temperature.
User Optional Selection:
On the back of the front housing, there is a DIP SWITCH on the
PCB where the user can selection following option:
DIP SWITCH 1 - SWING CYCLE - ON = 0.2oC
TH SERIES SWITCH OPTION
o
C. Use the
or
OFF = 0.5
keys to increase
o
C
GUARANTEE
Your KingShield Digital Thermostat is guaranteed
for 12 months.
Each unit is individually tested
before leaving the factory.
PLEASE KEEP THESE INSTRUCTIONS SAFE
FOR FUTURE REFERENCE
WEST ROAD . HARLOW
ESSEX . CM20 2BG . UK
sa les@ gree nbro ok.c o.u k
W W W. G R EE N B R O OK . C O . UK
Issue no: 703757
 Loading...