

Page 1

Installation & Operating Instructions
For Porch Lantern - 6 sided
Models: PL6W & PL6B
Thank you for purchasing a quality KingShield Porch Lantern. Please read these instructions
fully prior to initial use.
Every effort has been made to ensure that the guidance information on this sheet will enable
the installation of the Lantern to be carried out safely and correctly.
IMPORTANT
This product should be installed by a competent person and
in accordance with the current IEE Wiring Regulations.
If in doubt, consult a qualified electrician.
SAFETY INFORMATION
Always switch off mains supply before servicing, fitting or replacing lamps. Always check the
lamp is correct for the application, including its voltage and wattage. Never exceed the
maximum wattage. Ensure the lamp is correctly located in the lampholder.
INSTALLATION INSTRUCTIONS
1. Unscrew capping nuts (2 off) on front of fitting then remove terminal housing cover at
back, and unplug the connector.
2. Hold the terminal housing cover up to the wall in the desired fixing position, mark hole
positions. This fitting should not be fitted to wet or damp surfaces such as freshly
plastered or painted walls.
3. Cut hole in rubber grommet in terminal housing cover and feed mains cable through.
4. Drill holes on the points marked on the wall in step 2. use an ø8mm drill bit and insert
rawl plugs prior to screwing into position.
5. Connect the live and neutral cables to the 3-way terminal block and then relocate the
connector into the terminal housing, see fig.2 for details. NOTE: Earth terminal is
provided for convenience, as this is a class II product.
6. Re-connect the connector removed in (1).
7. Position the fitting onto the terminal housing that was secured to the wall in steps 2, 3, 4
and then secure using the capping nuts that were removed in step 1.
8. Remove lid by unfastening the fixings and screw lamp into lampholder, re-secure lid into
position.
9. Turn on mains supply to test the fitting.
Page 2
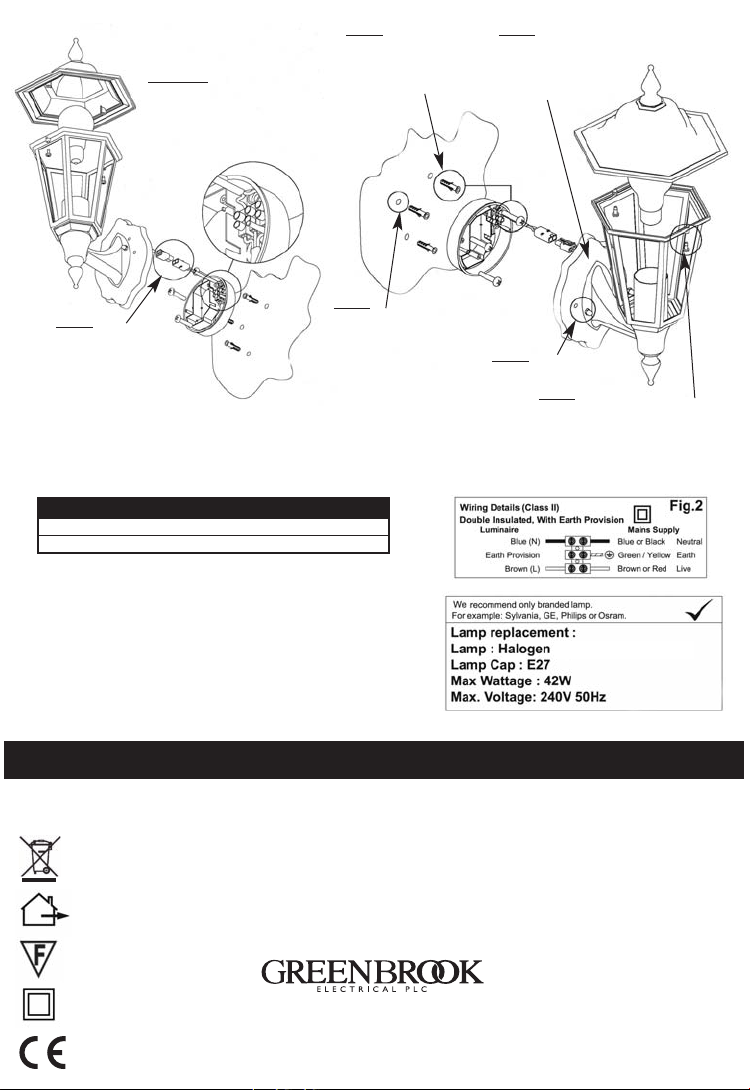
3 & 5
Step
Cut hole in Rubber
Grommet, feed mains
cable through & connect
to Terminal Block.
See Fig.2 for details.
Step 6
Secure Connectors.
TECHNICAL INFORMATION
Supply: 240VAC, 50Hz
IP Rated: IP44
4
Step
Drill holes on the points
marked in Step 2, insert
Rawl plugs & screw into
position, typ. 3 pos’ns.
2
Step
Mark hole positions
through fixing holes in
Terminal Housing, typ. 3
pos’ns.
Step 7
Locate main body
of the fitting to the
Terminal Housing
& resource Capping
Nuts.
1
Step
Unscrew Capping Nuts.
8
Step
Unscrew Lid fixings, remove Lid,
screw lamp into position and
resecure Lid.
42W or CFL 14W
ES
GUARANTEE
Your KingShield Porch Lantern is guaranteed for 12 months
from the date of purchase. This is in addition to your statutory rights.
PLEASE KEEP THESE INSTRUCTIONS
SAFE FOR FUTURE REFERENCE
WEST ROAD . HARLOW
ESSEX . CM20 2BG . UK
sa l es @ gr e e n b r o o k . c o . u k
W W W . G R E E N B R O O K . C O . U K
Issue no: 703427
 Loading...