

Page 1
Installation Instructions
or the Athena Range
f
LED Linkable Striplights
-
art Numbers:
P
EDSLW1N-C / LEDSLW2N-C / LEDSLW3N-C
L
LEDSLC1N-C / LEDSLC2N-C / LEDSLC3N-C
SAFETY
Please read these instructions fully
before attempting installation.
IMPORTANT
This unit should be installed to current
IET wiring regulations, if in doubt
consult a qualified electrician.
1. Before installation maintenance or
lamp replacement, ensure that the
mains supply to the luminaire is
switched off, the circuit supply
fuses are removed or the circuit
breaker is turned off.
2. Check that the total load on the
circuit, including when this
luminaire is installed, does not
exceed the rating of the circuit
cable, fuse or circuit breaker.
INSTALLATION
1. Fixing holes must be clear of any
obstructions (e.g. cables) within
the mounting surface.
2. Position the fitting so that the
minimum distance between the
lamp and any adjacent
flammable surface is greater than
10mm.
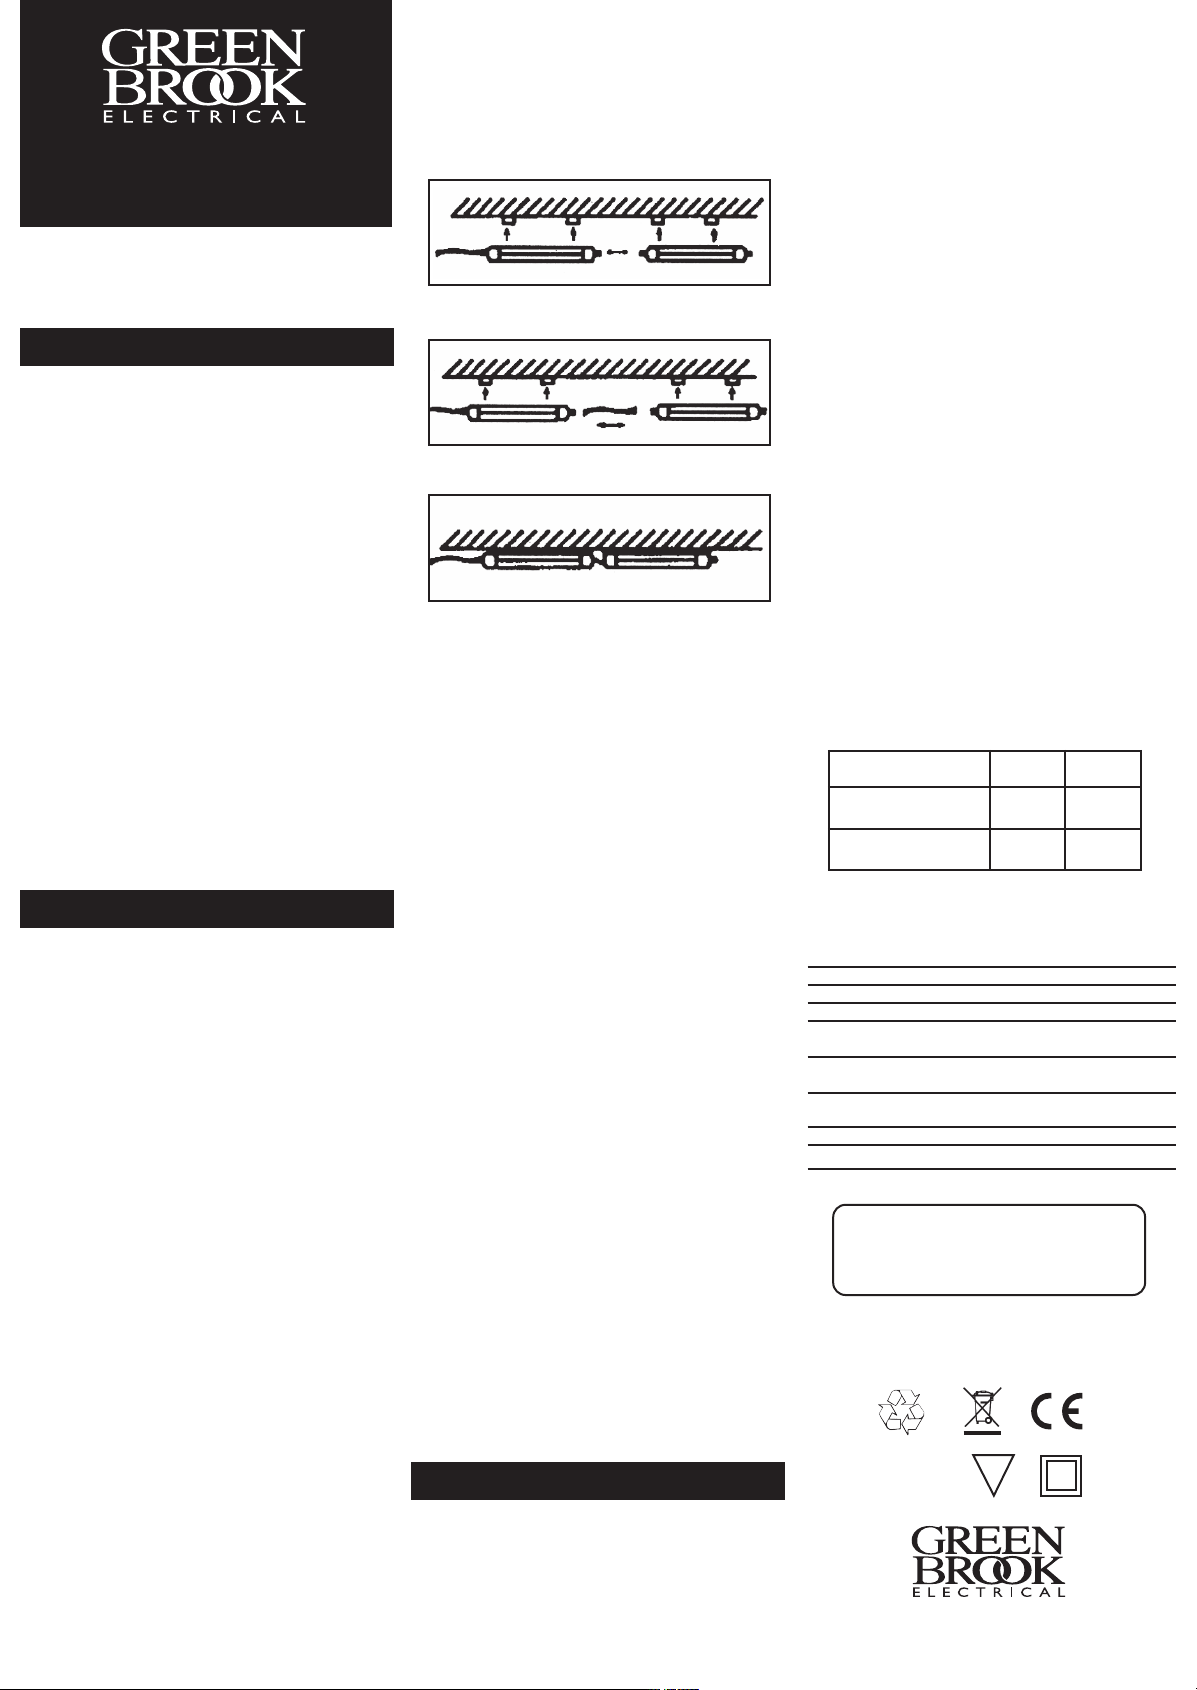
7. Up to six 35cm fittings or two
35cm fittings and two 60cm fittings
can be inter-connected.
Figure 1.
Figure 2.
Figure 3.
8. Installed fittings may be moved
lengthways in their brackets,
allowing linking at any stage of the
installation. If linking by butt
connection, ensure all brackets
are fixed along a straight line.
9. If this fitting is to be connected
directly to an existing fitting, care
should be taken that the male and
female sockets on each fitting are
facing each other.
10.These fittings are designed to be
powered ONLY by the LED driver
included in the starter kits which
are LEDSLW1N-C & LEDSLC1N-C.
They must not be connected
directly to the mains. The LED driver
is class 2 construction and must not
be earthed.
this light fitting. When your light
fitting comes to the end of its life or
you choose to replace it, please do
not dispose of it with your normal
ousehold waste. Please recycle
h
where facilities exist.
A selection of accessories are
available such as dimmers and
hotocells. Please see our website for
p
details.
A higher current driver is also available
(LED250D) which can run 10pcs of
5cm or 5pcs of 60cm LED striplights.
3
The Maximum number of fittings in one run:-
DRIVERS 35cm 60cm
LED125D
(Supplied with starter kit)
LED250D
Sold separately)
(
TECHNICAL INFORMATION
Driver Input Voltage: 230V/240V ~ 50Hz
Driver Power: 12V/1.25A (LED125D)
Cable Length: Input - 1.2m/Output - 2.1m
Connects: Up to 6 units of 35cm max
Colour: Cool White 4,000K
Lumens Output: 150 lumens per 35cm strip
Power Consumption: 2.8W per 35cm strip
Life Span: 25,000 hours
Conforms To: BS EN 60950-1
63
10 6
Warm White 3,000K
300 lumens per 60cm strip
4.5W per 60cm strip
3. Use the fitting as a template to
determine the desired spacing
between brackets.
4. Screw the fixing brackets to the
mounting surface.
5. Clip the fitting into the brackets.
6. Fittings may be linked by butt
connection (Fig. 3) or by link lead
(Fig. 1 & 2) with the link lead
that’s included in the box. Crimps
are also supplied so custom
length link leads can be made up
using twin core 300V, 22AWG
multi stand wire. These should
not exceed 2 meters in length.
11.The mains input lead must be
supplied via a fused spur unit or
fitted with a 13A plug. In both
cases they should be fitted with a
3A fuse. The cores in the mains
lead are coloured in accordance
with the following code.
LIVE = BROWN
NEUTRAL = BLUE
LAMP REPLACEMENT
If one or more of the LEDs do not light,
you will need to replace your light
fitting, there are no user serviceable
parts inside.
Eventually you may want to replace
Your GreenBrook LED Striplight is
guaranteed for 3 years from the
This is in addition to your statutory rights.
PLEASE KEEP THESE INSTRUCTIONS
SAFE FOR FUTURE REFERENCE
EMC
GUARANTEE
date of purchase.
F
WEST ROAD . HARLOW
ESSEX . CM20 2BG . UK
www.greenbrook.co.uk
Issue no: 704539
 Loading...