

Gree GPC08AI-K3NNC6A, GPC10AI-K3NNC6A Owner's Manual
Change for Life
Portable Air Conditioner
Owner's Manual
Residential Air Conditioners
MODEL: GPC08AI-K3NNC6A
GPC10AI-K3NNC6A
Thank you for choosing Residential
manual carefully before operation and retain it for future reference.
Air Conditioners, please read this owner’s

CONTENTS
1 PRECAUTIONS 1
2
LOCATION 3
3
INCLUDE
STRUCTURE 5
4
5
INSTALLATION OF THE POWER CORD HOOK
6
INSTALLATION OF DRAINAGE HOSE
DRAINAGE METHOD
7
8
ACCESSORIES AND INSTALLATION OF HEAT EXHAUST HOSE
9
CONTROL PANEL DISPLAY & OPERATING INSTRUCTIONS 11
10
HOW TO USE THE REMOTE CONTROL 12
11
OPERATION OF WIRELESS REMOTE CONTROL
12
MAINTENANCE
MALFUNCTION ANALYSIS
13
14
SAFE NOTE AND NOTICE
AFTER SALES SERVICE
15
4
6
7
8
9
13
17
18
19
20

PRECAUTIONS
WARNINGS FOR USE
• Install the air conditioner in accordance with the installation instructions in the latter section of this
manual.
• Do not modify any part of this product.
• Do not insert anything into any part of the unit.
• Ensure the power supply used has an appropriate voltage rating.
Use of a power supply with an improper voltage rating can result in damage to the
unit and possibly fire.
•
In the event of any abnormality with the air conditioner (ex. a burning smell), turn it off immediately
and disconnect the power supply.
1
- -

PRECAUTIONS
USAGE CAUTIONS
• Ventilate the room periodically during use, especially if using gas appliances.
Be sure to turn the unit off and disconnect the power supply cord before performing any maintenance
•
or cleaning.
• Do not splash or pour water directly onto the unit.
Water can cause electrical shock or equipment damage.
• Drainage should be performed whenever moving the air conditioner.
If any water remains in the tank, it may spill out while being moved.
• Remove the window panel in the event of particularly adverse weather.
Extremely adverse weather may cause water to leak in through the openings.
•
To ensure proper drainage, the drainage hose must have no kinks or be on a different level.
The drained water may spill out into the room.
• The temperature around the drainage hose must not be below freezing point when used.
Drained water may freeze inside the hose, causing water inside the unit to over flow into the room.
• Do not block the exhaust air outlet with obstacles.
Cooling performance may be reduced or stop completely.
NOTES ON OPERATION
• Allow 3 minutes for the compressor to restart cooling.
If you turn the air conditioner off and immediately restart it, allow three minutes for the compressor to restart
cooling. There is an electronic device in the unit that keeps the compressor turned off for three minutes for
safety.
•
In the event of a power failure during use, allow 3 minutes before restarting the unit.
After power is reinstated, restart the air conditioner. If the power was off for less than three minutes, be sure
to wait at least three minutes before restarting the unit. If you restart the air conditioner within three minutes,
a protective device in the unit may cause the compressor to shut off. This protective device will prevent cooling
for about 5 minutes. Any previous settings will be canceled and the unit will return to its initial settings.
Low temperature operation: Is your unit freezing up?
•
Freezing may occur when the unit is set close to 16°F in low ambient temperature conditions, especially at
night.
In these conditions, a further temperature drop may cause the unit to freeze.
Setting the unit to a higher temperature will prevent it from freezing.
•
Dry mode increases room temperature.
The unit generates heat during dry mode and the room temperature will rise. Warm air will be
blown out from the Exhaust air outlet, but this is normal and does not indicate a problem with the unit.
•
This air conditioner blows the warm air generated by the unit outside the room via the exhaust hose
while in cool mode.
Accordingly, the same amount of air as that blown out will enter the room from outside through any
openings into the room.
When cooling operation is performed at high humidity conditions, water tank inside the unit may
•
frequently become full.
When water tank inside the unit is full, the unit stops operating, Buzzer will sound 8 times, LED window
show error code "H8".
In this case, perform drainage to drain out water within the unit.
-2-
PRECAUTIONS
S
OPERATING CONDITIONS
• The air conditi oner must be operated with in the temperature range indicated below.
MODE Room temperature
Cool 16°C ~ 35°C
• A built-in safety device may cut off operation if the temperature exceeds these limits.
ENERGY EFFICIENCY TIPS
• Avoid direct sunlight.
Close blinds, drapes or shades to keep out direct sunlight while in cooling mode.
• Keep the fi lter clean.
Keeping the fi lter clean greatly aids effi cient operation.
A dirty fi lter blocks the fl ow of air, making your air conditioner work harder and less effi -
ciently.
• Turn off unnecessary lights.
Your air conditioner must remove the heat produced by your lights or other heat-produc-
ing appliances. Turn off any lights or appliances that are not in use.
• Turn off the air conditioner when no one is home.
Use only when necessary. The less time the air conditioner is used, the lower the running
costs.
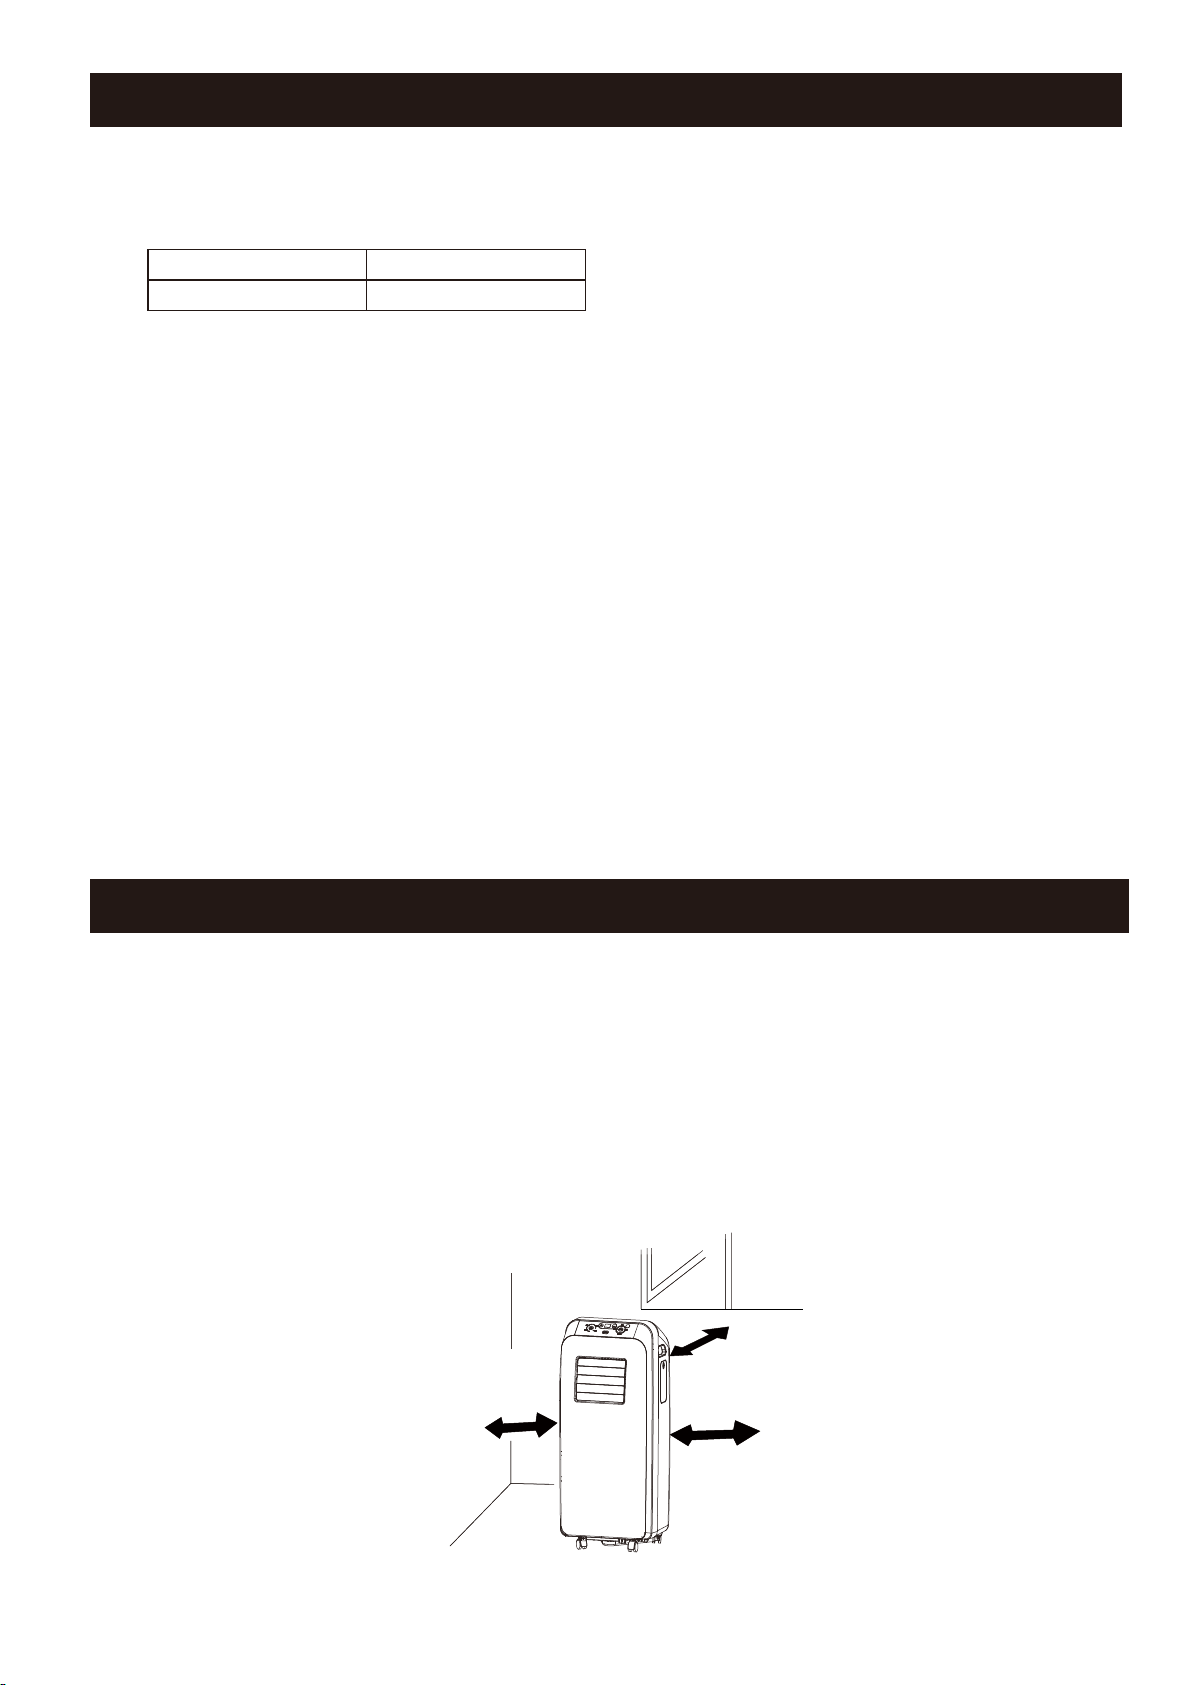
LOCATION
The air conditioner should be placed on a firm foundation to minimize noise and vibration.
•
For safe and secure positioning, place the unit on a smooth, level floor strong enough to
support the unit.
•
The unit has casters to aid placement, but it should only be rolled on smooth, flat surfaces.
Use caution when rolling on carpet surfaces. Do not attempt to roll the unit over
objects.
•
The unit must be placed within reach of a properly rated grounded socket.
•
Never place any obstacles around the air inlet or outlet of the unit.
•
Allow at least 12" (30cm) of space from the wall for efficient air-conditioning.
30cm
30cm
30cm
- 3-
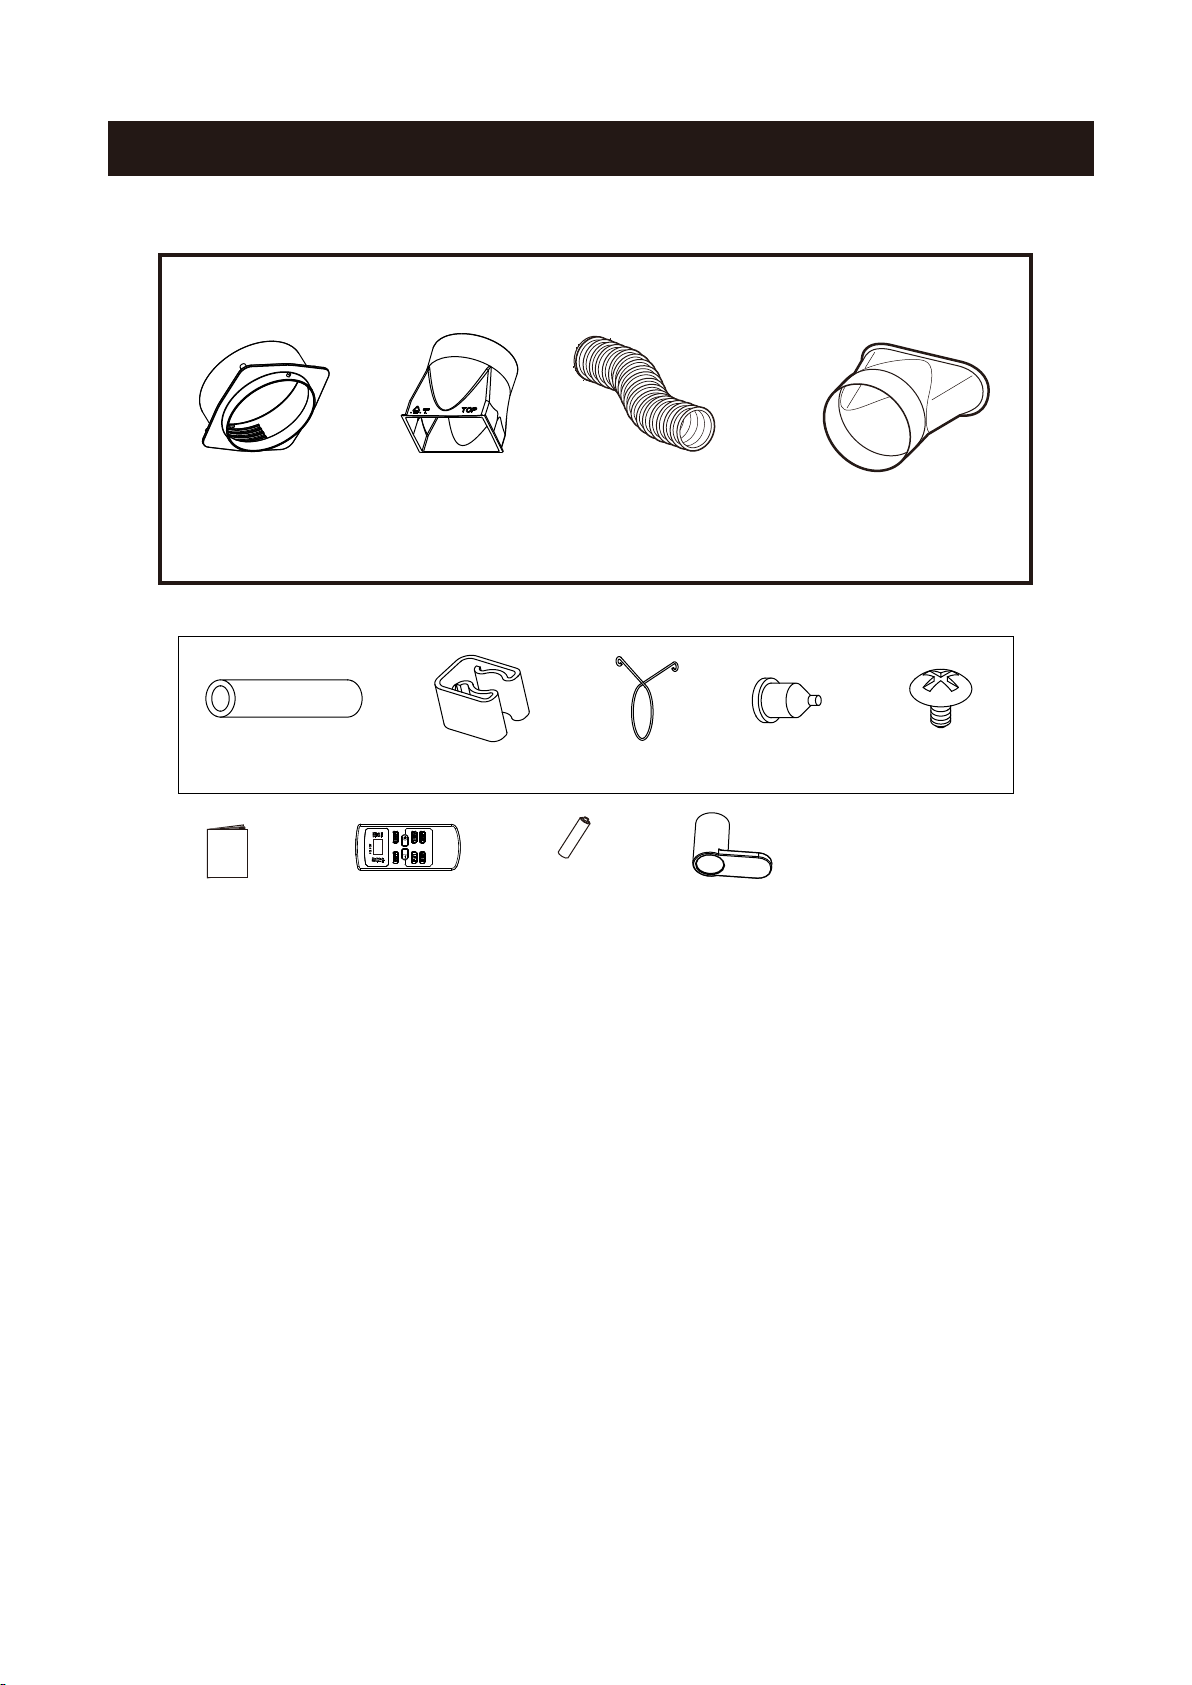
INCLUDE
PARTS INCLUDED
Adapter A
Drainage pipe
Manual
Adapter B
Remote control
Clamp
Flexible Exhaust Hose
Pipe hoop
Battery(2)
(AAA.1.5V)
Clamp(2)
Window Exhaust Adapter
Rubber plug
Screw
-4-
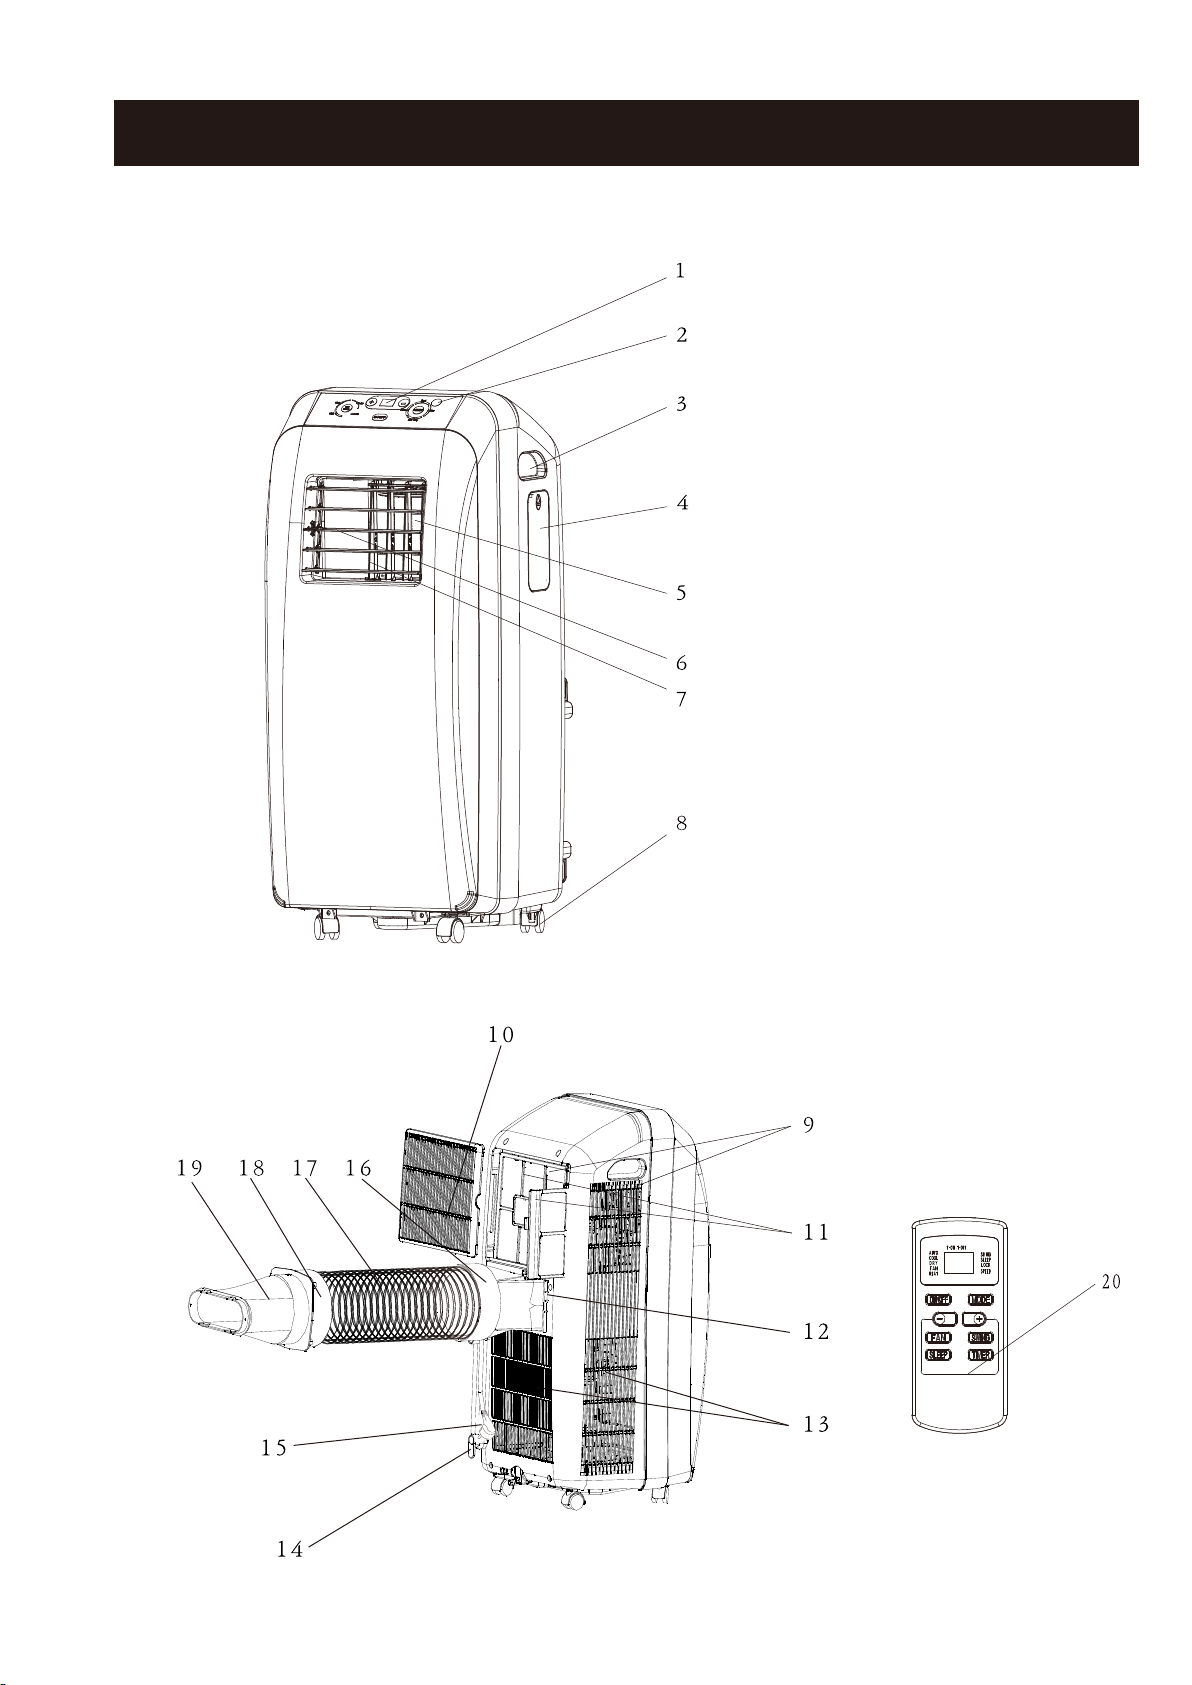
STRUCTURE
Front
1, Control panel and display lamp
2, Remote control signal receiver window
3, Handel
4, Remote controller box
5, Air outlet
6, Vertical louvers
7, Horizontal louvers
8, Wheel
9, Air inlet
10, Grille
11, Air filter
12, Air outlet
13, Air inlet
14, Power cord clamp
15, Power cord
16, Adapter B
17, Flexible Exhaust Hose
18, Adapter A
19, Window Exhaust Adapter
20, Remote control
Rear
-5-
 Loading...