

Page 1

C
™
RT
INSTRUCTION MANUAL SUPPLEMENT
BEFORE YOU PROCEED WITH THE INSTRUCTION MANUAL
This Ready-to-Cover (RTC) version of the Great Planes Viper 500 is supplied to you without the pre-applied fi berglass of the
ARF version. Fiberglassing the fuse and wing is necessary for safety so it must be done, but in this RTC version we allow
you the choice of how and where you want to glass. You can also, of course, glass and paint the whole airplane, but this is
not necessary.
Fiberglassing takes a certain amount of skill, so if you’ve never done it before we recommend that you seek the help of an
experienced modeler. When you’re done glassing and covering, please proceed with the included ARF instruction manual.
Please note that when cutting dry fi berglass cloth, the best tool to use is a rotary cutter with a cutting mat. These can be
found at most fabric supply and art/craft stores.
ITEMS REQUIRED FOR COMPLETION
3/4oz [21g] Fiberglass Cloth (HCAR5000)
8oz [236cc] Coverite™ Balsarite™, fi lm (COVR2515)
4oz [118cc] Top Flite® Trim Solvent (TOPR6020)
9oz [255cc] Great Planes® Finishing Resin (GPMR6049)
Epoxy brushes (GPMR8060)
Mixing sticks (GPMR8055)
Mixing cups (GPMR8056)
Vaseline® petroleum jelly
Great Planes Easy-Touch™ hand sander 5.5" (GPMR6169)
220-grit Easy-Touch Sand Paper (GPMR6185)
400-grit sand paper
Tack cloth
Masking tape (TOPR8018)
Pi ece of 1/16" [1.6mm] scrap balsa sheet or an old credit
card for use as a squeegee
Plan Protector (GPMR6167) or waxed paper
Acetone (for clean-up)
Sharp scissors
Olfa® Rotary Cutter
Self-Healing Cutting Mat (HCAR0454)
HobbyLite™ White-Colored Balsa Filler (HCAR3400)
Page 2
Fiberglass the Forward Fuselage
17" [432mm]
Cut the edges
like this.
3-1/2" [89mm]
9" [229mm]
FUSE BOTTOM PIECE
(OUTER)
Mark the center line
of the cloth. You will
center this on the firewall.
20" [508mm]
FIREWALL & FUSE SIDES PIECE (OUTER)
6-1/2" [165mm]
Fwd
8" [203mm]
FUEL TANK
COMPARTMENT
PIECE
Fwd
Up
3-1/2"
[89mm]
2" [51mm]
2" [51mm]
FIREWALL PIECE
(FUEL TANK
COMPARTMENT,
INSIDE)
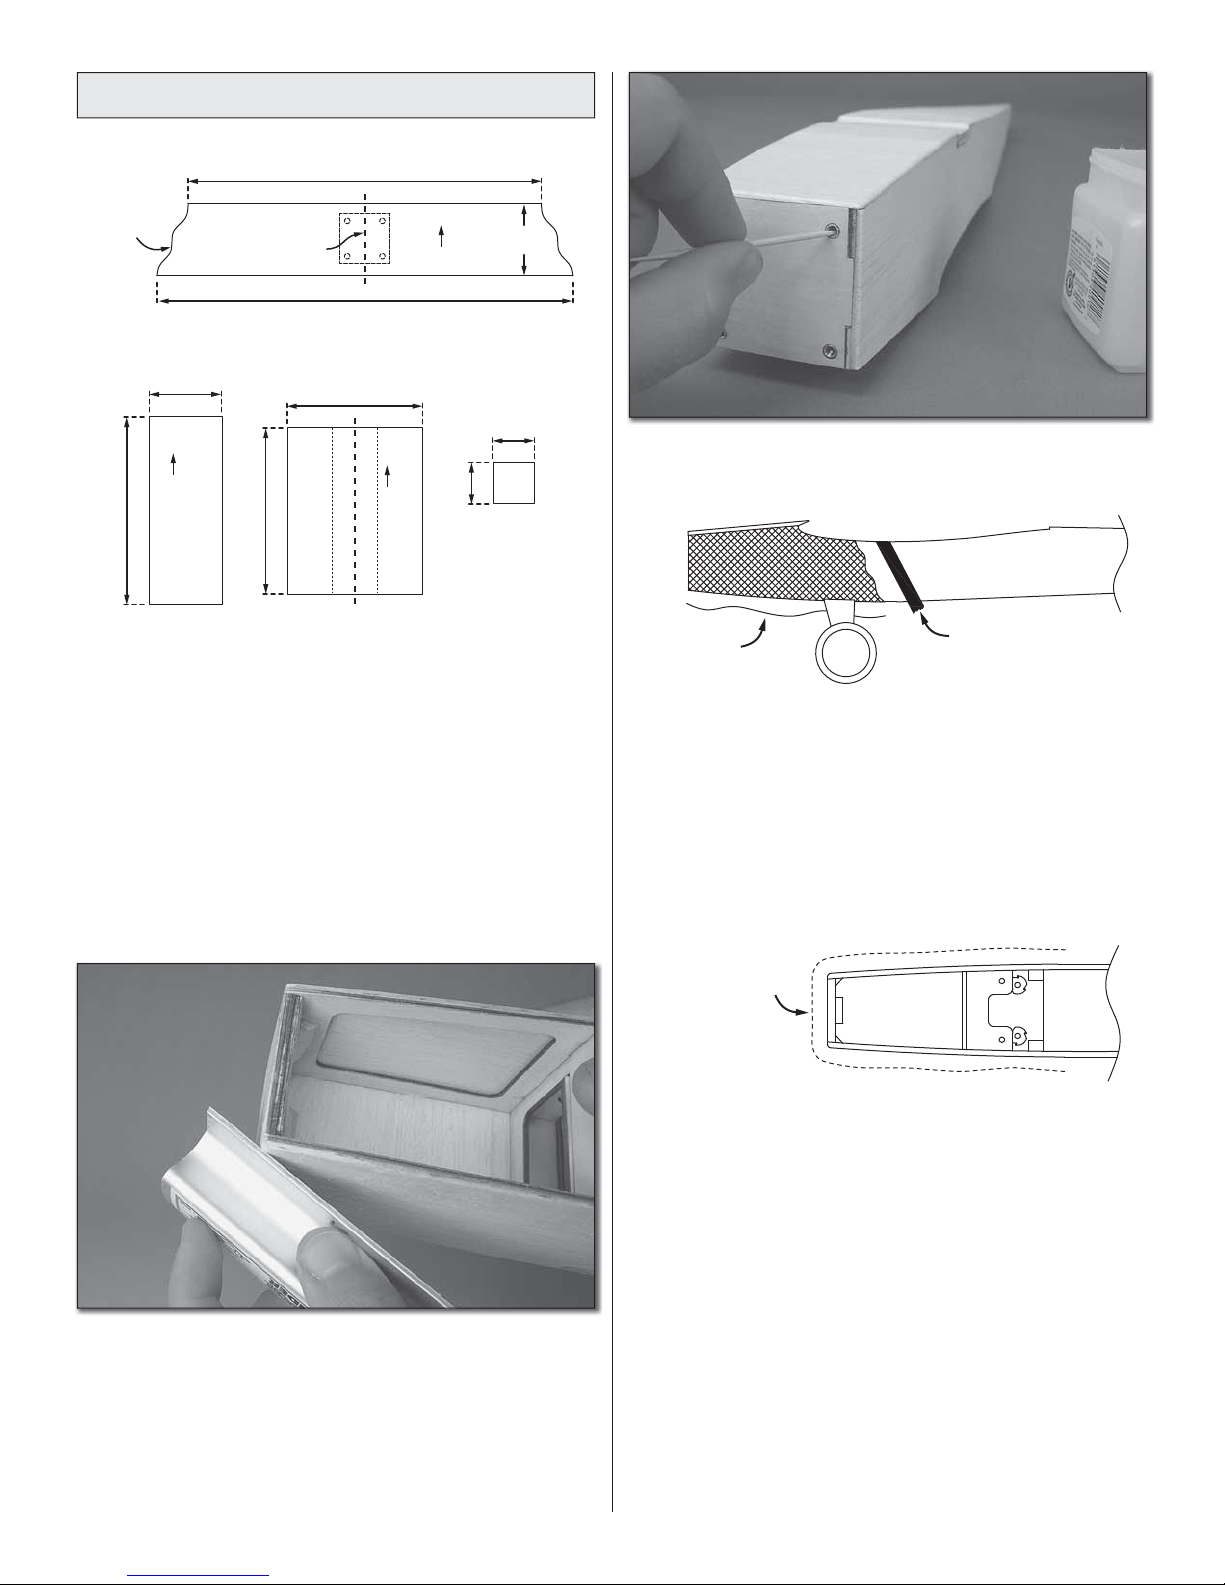
❏ 1. Cut out the following pieces for the fuselage from 3/4oz
[21g] fi berglass cloth:
A. One 3-1/2" x 20" [89 x 508mm] strip and trim the sides
as shown
B. One 3-1/2" x 9" [89 x 229mm] rectangular piece (for
the fwd fuse bottom)
C. One 6-1/2" x 8" [165 x 203mm] rectangular piece (for
the fuel tank compartment sides and bottom)
D. One 2" x 2" [51 x 51mm] square (for the back side of
the fi rewall)
❏ 4. Fill the threads of the blind nuts with petroleum jelly
using a toothpick.
MASKING TAPE HERE
APPLY THE 9" [229mm]
BOTTOM PIECE FIRST
❏ 5. Mix up about 3/4oz [22cc] of fi nishing resin. Brush on
a thin coat of resin to the bottom of the forward fuse. Apply
the 3-1/2" x 9" [89 x 229mm] rectangular piece of fi berglass
to the bottom of the forward fuse. Align the forward edge of
the glass with the edge of the fi rewall. Stipple the glass cloth
down to the fuse. Squeegee any excess resin out of the glass
so that the surface is smooth. Allow the resin to cure. Sand
the fi berglass smooth feathering the glass into the balsa.
❏ 2. Lightly sand the forward part of the fuselage where you
will apply the fi berglass. Round the edges of the fuse sides
slightly. Use compressed air or a tack cloth to clean any dust
from the fuse before you begin glassing.
❏ 3. Apply masking tape to the fuselage sides and bottom
about 1" [25.4mm] back from where you will be applying
fi berglass. See the sketches for more details.
CENTER THE GLASS
ON THE FIREWALL.
FIREWALL/FUSE SIDES PIECE WILL
WRAP AROUND THE FIREWALL LIKE THIS.
❏ 6. Mix up another batch of fi nishing resin and brush a
thin coat onto the fi rewall and forward fuse sides. Center
the 3-1/2" x 20" [89 x 508mm] piece of glass cloth on the
fi rewall and wrap it around to cover the fuse sides. Stipple
and squeegee the glass cloth smooth. Allow the resin to cure
and sand the fi berglass smooth.
❏ 7. Fiberglass the inside of the fuel tank compartment using
the 6-1/2" x 8" [165 x 203mm] rectangular piece for the fuse
bottom and sides, and the 2" x 2" [51 x 51mm] square piece
for the back side of the fi rewall. Allow the resin to cure. Use
your hobby knife to open up the front and back sides of the
blind nuts on the fi rewall. Clean out any remaining petroleum
jelly from the threads of the nuts.
Page 3

Fiberglass the Wing Center Section
4-1/2" [114mm] 11-1/2" [292mm]
Fold the cloth at
the LE of the wing
along this line.
INNER
LAYER
10"
[254mm]
9" [228mm]
16" [406mm]
OUTER
LAYER
❏ 1. Cut out the following pieces for the wing from 3/4oz
[21g] fi berglass cloth:
A. One 9" x 20" [229 x 508mm] piece (center wing,
inner layer)
B. One 16" x 20" [406 x 508mm] piece (center wing,
outer layer)
10"
[254mm]
❏ 2. Study the sketch below. Notice that the smaller piece
of glass cloth (inner layer) is applied fi rst. Lightly sand the
center section of the wing and dust it off. Apply masking
tape where shown. Mix up enough fi nishing resin to wet out
the inner layer shown in the sketch. If you are confi dent with
the working time of the resin, you may mix up enough to
laminate both the inner and outer layers simultaneously. If
not, apply only the inner layer now. Center the cloth on the
wing along the leading edge of the wing and fold it over so
that it covers the top and bottom surfaces of the wing. Stipple
and squeegee out the excess resin and allow the resin to
cure. Trim the excess fi berglass from the trailing edge of the
wing and sand the surface and edges of the glass smooth.
If you applied the inner layer only, go ahead and apply the
outer layer now.
❏ 3. Trim the wing bolt holes open. Sand the surface smooth
feathering the edges of the glass into the balsa sheeting. Use
HobbyLite™ balsa fi ller (HCAR3400) to fi ll in any imperfections.
Finish-sand the model using 400-grit sandpaper.
❏ 4. Apply one or two coats of Coverite Balsarite (COVR2515)
per the manufacturer’s instructions.
❏ 5. Apply your choice of fi lm covering to each part per the
manufacturer’s instructions.
16" [406mm]
OUTER LAYER
9" [228mm]
INNER LAYER
Masking tape here Masking tape here
4-1/2" [114mm]
INNER LAYER
Page 4

Copyright © 2009 GPMA1267INSTR v1.0
 Loading...