

Page 1
B
ENCHTOPPER
Workbench Organizer
Thank you for purchasing the Great Planes®BenchTopper
workbench organizer.In our busy workshop at Great Planes
we find it necessary to keep our bench tops well organized
and our tools readily accessible. Once we thought of the
idea for the BenchTopper and made the first prototype,
everybody in the shop wanted one! Now you can keep your
work area neat and organized too – you may even find that
you build your models a little f aster since it’ll be easier to find
all of your tools!
We’ve provided assembly instructions for the BenchTopper
and left the finishing up to you. You can build your
BenchTopper with no protective finish or go all out and paint
your BenchTopper your favorite color. If you choose to build
your BenchTopper without a finish and leave it bare wood,
then all you have to do is follow the instructions provided. If
you choose to add a finish to your BenchTopper , y ou'll hav e to
do a little planning ahead and think about parts that might be
easier to sand and/or paint before they are glued together. In
any case, we recommend sanding all the pieces before you
do any gluing. If you choose to paint your BenchTopper, at
least one coat of primer is recommended to fill the wood grain.
Pactra®Prep or a similar brush-on primer yields good results.
Any kind of glue that works on wood will work for your
BenchTopper.We built our prototypes with thin CA and CA
accelerator by first “priming”the glue joint with CA accelerator, then applying a few drops of thin CA to the “pre-primed”
joint. The CA will cure immediately before it has had a
chance to soak too far into the wood away from the glue
joint. Should you choose to use medium or thick CA, refrain
from making large fillets that are unnecessary and will
detract from the overall appearance of your BenchTopper.
Refer to the die-cut parts layout on page 4 to familiarize
yourself with what each part looks like. As you separate the
pieces from the sheets, lightly sand the edges. This will
improve glue adhesion.
Please inspect all parts carefully before starting to build! If
any parts are missing, broken or defective, or if you have
any questions about building this workbench organizer,
please call us at (217) 398-8970. If you are calling for
replacement parts, please reference the part numbers (see
the back cover) and the kit identification number (stamped
on the end of the carton) and have them ready when calling.
❏We recommend Great Planes Pro
™
Thin CA
(GPMR6002) and Accelerator (GPMR6035).
❏ Sanding block and assorted sandpaper.
❏ Razor saw.
❏ Hobby knife.
❏Wood filler.
❏ Paint.
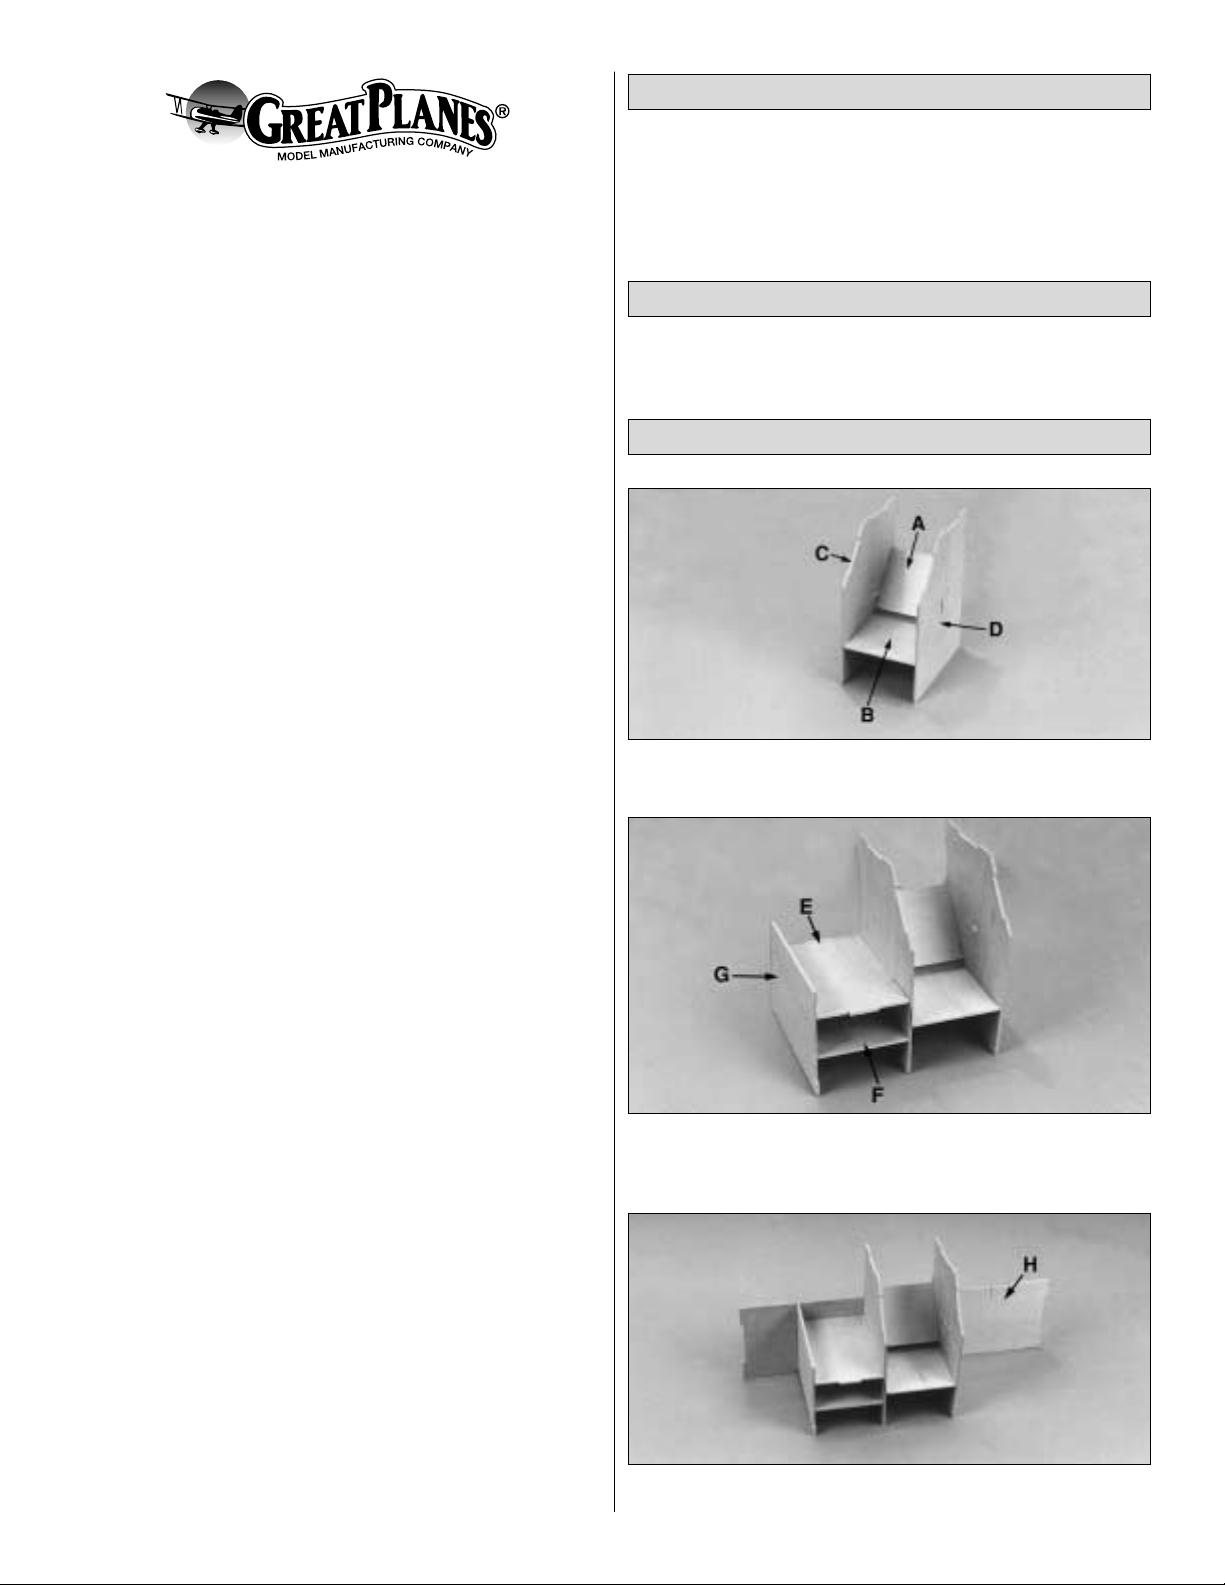
❏ Join A and B to C, then add D. Glue together.
❏Fit E and F to G, then join to C.Note: The notch in Fgoes
toward the rear. Glue the assembly together.
❏ Fit, then glue the back H to the assembly.
Main Assembly
Optional Supplies
Tools & Supplies
™
Page 2

❏ Fit the front I to the assembly. Glue I only to G at this time.
❏Fit J and K together, then install but do not glue them to
the assembly. Glue the left side L
(see the following photo),
to J, H and I and then the right side M to H and I.
❏ Fit the 3/16" bottom to the assembly, then glue it only to
H, I, L and M (back, front and sides).
❏ Adjust D so it is centered on the edge of the opening for
the large drawer. Glue D to I in this position. Glue all other
joints not previously glued.
Note: Some modelers have the need for additional storage
for tools like hex wrenches, screwdrivers, etc. Glue 2 or
more of the circular pop-outs of the epoxy storage area in
place. Then drill 1/8" or larger holes through part “N” to
allow the tools to be inserted.
❏Test fit, then glue N in position. Accurately cut the paper
tubes in half.Fit but do not glue the paper tubes through the
holes in O so the “square end” (the end cut by the factory),
will be at the bottom and contact A. Adjust the paper tubes
so they are perpendicular to O and A and are parallel to
each other.Glue the paper tubes to O and A and then Glue
O into position.
❏ Glue P, then Q in position.
Page 3

❏ Glue the sides R and back S to the bottom T. Test fit the
partially assembled drawer in the BenchTopper. Make
adjustments, if necessary, so the drawer will easily slide in
and out. Caution: The tabs on R are offset and will fit T
properly only one way.
❏ Glue the drawer front U to the front edges of R and T
while the drawer is in the BenchTopper. Hint: Place a
piece of 1/16" scrap balsa or similar behind the drawer
so you do not inadvertently glue the drawer front to the
BenchTopper.
❏Make two drawers from the sides V, back W, and bottom
X. Glue all of the pieces together. Glue the front Y to one
drawer and the front Z to the other drawer. The drawer with
the front Y is the top drawer and the drawer with the front Z
is the bottom drawer. Test fit the drawers and make any
adjustments if necessary. Caution: The tabs on V are offset
and will fit X properly only one way
❏ Sand the fronts of the drawers so they are flat and
smooth. Cut the 1/4" x 1/4" x 6" basswood stick into three 2"
pieces, then glue one “handle”to the front of each dr awer.
❏ Use a sanding block and 220-grit sandpaper to sand the
fronts of the paper tubes and any protruding tabs and edges
so all the corners are flush.
❏ Sand all outside surfaces with 320-grit sandpaper. If you
plan to add a finish to your BenchTopper, use compressed
air, a v acuum, or a tac k cloth to remove all of the dust before
painting.
❏
(This step is optional):
Glue the pin cushion support AA
in position. After finishing, glue the foam pin cushion to the
support with spray adhesive or rubber cement.
Finishing
Build the Drawers
Page 4

❏Use your f a v orite paint and finishing techniques to put the
finishing touches on your BenchTopper. Fill your
BenchTopper with the tools you most often use.
Here's what we keep on hand in our BenchTopper:
❏ Denatured alcohol for wiping away uncured epoxy.
❏Thin, medium and thick CA.
❏ CA debonder.
❏ Drafting triangle.
❏ Hobby knives, ballpoint pen, pin vise.
❏ Paper towel scraps for wiping away epoxy or CA.
❏ 30-minute and 6-minute epoxy.
❏ #11 blades.
❏Three sizes of T-pins (make optional partitions from scrap
plywood).
❏ Single edge razor blades.
❏ Screwdrivers.
❏ Pliers.
❏ Short r uler.
❏ Razor saw.
❏ Epoxy brushes and mixing sticks.
❏ Epoxy mixing cups.
Suggested Tools & Supplies
Part # Qty Description
BTOPD01 1 Decal
BTOPB01 1 3/16" Ply Base
BTOPF01 1 Foam Pin Cushion
BTOPH01 1 1/4" x 1/4" x 6" Drawer Handle
PTUBE001 3 Paper Tube
BTOPDC01 1 1/8" Die-Cut Ply A, K, J, S, AA
Part # Qty Description
BTOPDC02 1 1/8" Die-Cut Ply B, E Q, P
BTOPDC03 1 1/8" Die-Cut Ply L, F
BTOPDC04 1 1/8" Die-Cut Ply D, C, T
BTOPDC05 1 1/8" Die-Cut Ply N, M, G, Y, Z
BTOPDC06 1 1/8" Die-Cut Ply H
BTOPDC07 1 1/8" Die-Cut Ply U, I
BTOPDC08 1 1/8" Die-Cut Ply W, R, V, X
Entire Contents © Copyright 2002 v1.1 – GPMR8500 Printed in USA
Parts List
DIE-CUT DRAWINGS
 Loading...