

Page 1
P.O.Box 788 Urbana, IL 61801
(217) 398-8970
www.greatplanes.com
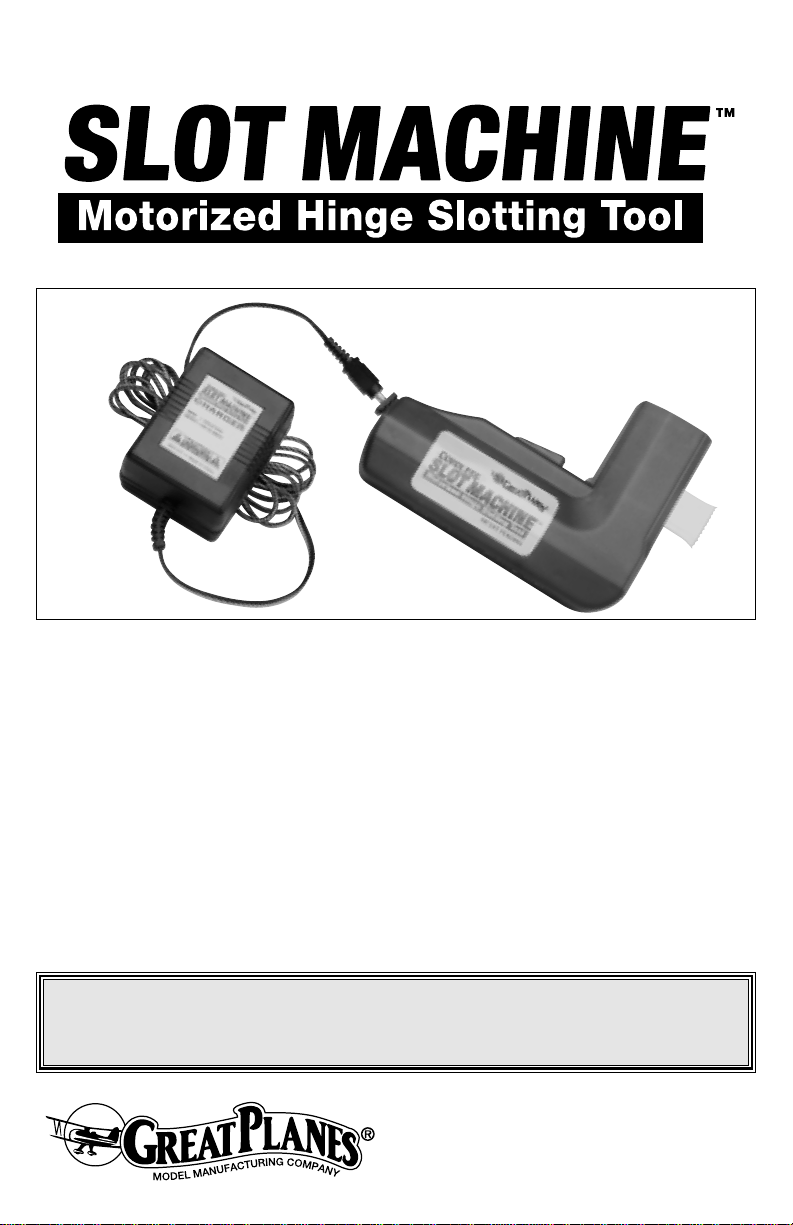
Congratulations on your purchase of the CORDLESS version of the Great Planes SLOT
MACHINE™, the first truly easy way to cut hinge slots in your model airplanes.
The Slot Machine you have purchased is equipped with standard BLADES FOR CA
HINGES, each having a thickness of .008”[0.2mm], which cut slots that are ideal for today’s
“CA hinges.” If you need to cut thicker slots for pinned hinges or tailgear brackets, etc., you
may want to purchase the BLADES FOR NYLON HINGES, which are .012”[0.3mm] thick,
and which have larger teeth and more “set” in the teeth, which produce an ideal slot for a
.040” [1mm] hinge. Or you can purchase the BLADES FOR H.D. HINGES, which are the
same as the blades for Nylon hinges, but cut deeper to accommodate heavy-duty hinges.
You will find the instr uctions for blade replacement in this pamphlet. If you are one of the
fortunate modelers to have both the corded and cordless models, we suggest using the
cordless version with the standard blades for CA hinges, and the corded version with the
thicker replacement blades.
Please read all the instructions and safety precautions before cutting
your first slot, and be sure to practice on balsa scraps to learn good
technique before cutting slots in your model airplane.
INSTRUCTION MANUAL
Cordless
Page 2

SAFETY PRECAUTIONS
KEEP OUT OF REACH OF CHILDREN.The exposed blades can inflict severe injury, so
keep this tool out of the reach of children, and never allow the blades to contact any body
part except when changing blades.
DO NOT DISASSEMBLE.No part of the Slot Machine should be disassemb led, except for
servicing the blades through the blade access hatch only.
FOR HOBBY USE ONLY. The slot machine is made for normal, intermittent personal
hobby use.It is not designed for continuous use, such as in a manufacturing operation.Do
not press hard. When operating the slot machine, apply just enough force to keep the
blades cutting at a steady rate.
USE SAFETY GLASSES AND OTHER SAFETY EQUIPMENT. Use safety goggles or
safety glasses with side shields, complying with applicable safety standards and, when
needed, a face shield. This applies to all persons in the work area. Do not wear loose
clothing or jewelry. They can be caught in moving parts. Wear protective hair covering to
contain long hair.
SECURE THE WORK. Use clamps to hold your work. It’s safer than using your hands and
it frees both hands to operate the tool.
AVOID UNINTENTIONAL STARTING.When positioning the unit, do not hold your finger
over the switch.Because the batteries have some charge in them from the f actory, pressing
the switch may activate the blades even before you charge the unit the first time.
CAUTION: If the Slot Machine is dropped, the saw blades may be bent.Remove the b lades
from the unit and insure the blades lie flat against a flat surface. If the blades are bent
replace them. Even one bent blade may cause the unit to bind or cause the blades to
wander from the intended cut area. NEVER STRAIGHTEN BENT BLADES.
DANGER: KEEP FINGERS AWAY FROM CUTTING AREA. Keep fingers away from
blades.Never hold the part being cut around the area the blades are cutting the slot.
USE ONLY GENUINE GPM BLADES
Never substitute any b lades f or the GPM saw b lades.Nev er use def ective or incorrect b lade
mounting screws. Follow the suggested blade changing procedures. Select the proper
blade for the Hinge you intend to install.Improper blades will cause the slot to be either too
tight or too loose.
IF BLADES BIND OR MOTOR STALLS, RELEASE SWITCH IMMEDIATELY
SPECIFICATIONS
4.8 volts DC
Rechargeable nickel-cadmium batteries, 270-300mAh.
3-hour charger, 120 volt AC.
1-800-822-8837
Page 3
CHARGE THE BATTERY FIRST
Do not attempt to operate the Cordless Slot Machine before charging the battery.
Plug the charger into a 110-120 volt AC wall outlet, and insert the charger plug all the way into
the charge jack on the Slot Machine until you feel the plug “click” into place. Charge for 3 to 4
hours the first time, and whenever the batteries have been run way down or have not been
charged for sev eral weeks .The battery will be fully charged in 3 to 4 hours, b ut the charger may
be left plugged in for longer periods of time, up to sev eral da ys.Unplug the charger from the Slot
Machine and from the wall outlet during long periods (weeks or months) of inactivity .T o maintain
a high level of charge, providing maximum slotting power, it is recommended to leave the
charger plugged into the Slot Machine between slotting sessions.
Starting with a run-down battery...
NOTE: Fast charging with any charger other than the one provided with the Cordless Slot
Machine is not recommended.
OPERATION
The Slot Machine produces hinge slots in balsa wood by means of two thin saw b lades that
reciprocate in opposite directions, similar to an electric carving knife.The force caused by
one blade is offset by the other blade, so the effect is a straight-in cut with minimal effort.
If this is your first time using the Slot Machine, practice cutting slots in scraps of 3/8”or 1/4”
balsa sheet until you are able to make consistently good slots that are in correct alignment
on the hinge line. The tool may seem a bit awkward at first, because you’ve never used
anything like it; but with a little practice you’ll soon be wondering how you ever got along
without it.If you have a lot of difficulty making good slots, read the “Troubleshooting” section
and look for problems in technique or blade alignment that may be causing the problem.
You may also want to try the optional
Great Planes Slot Machine Cutting Guide
(GPMR4013)
, which helps get your slots precisely started every time.
Note: The Slot Machine is designed to cut hinge slots in balsa wood. Using it in “soft
hardwood” such as basswood may be successful if care is used. Do not attempt to use it
in very hard wood such as birch, maple or oak.
Mark accurate hinge lines on your control surfaces and the structures to which they will be
attached. Using the
Great Planes Precision Hinge Marking Tool™(GPMR4005)
is recommended.
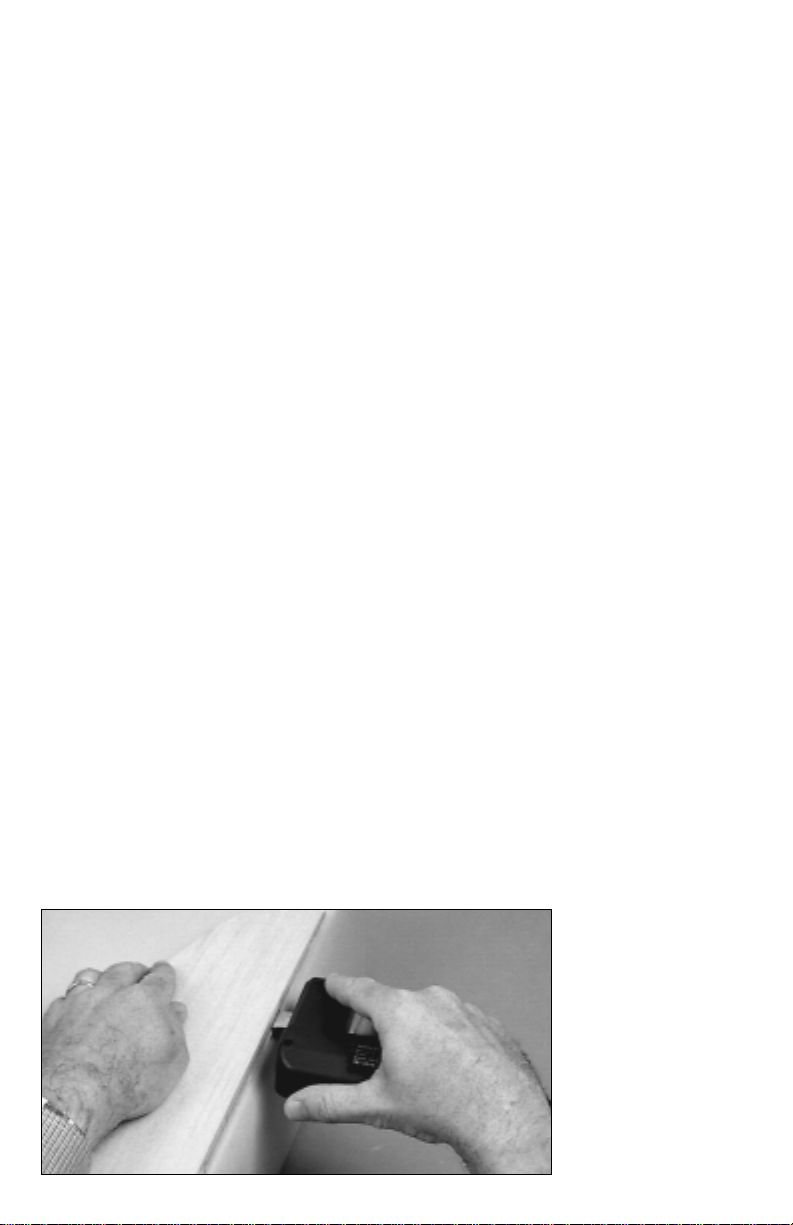
This photo shows
the proper grip to
use when
operating the
Slot Machine.
Notice the position
of the index finger
and thumb.
The switch is
operated by the
middle finger.
A 1 hour charge provides 60% capacity.
A 2 hour charge provides 90% capacity.
A 3 hour charge provides 95% capacity.
A 4 hour charge provides 100% capacity.
Page 4

Before pressing the switch, carefully align the Slot Machine blades on the hinge line and
apply slight pressure to start the teeth into the wood.When first pressing the switch,
the start-up torque of the electric motor will cause a slight sideways movement of the
blades, and this will result in misalignment unless the teeth are partially embedded into the
wood when pressing the button.Holding the unit as shown in the above photo , will minimize
this movement.
Continue pressing the button and applying slight pressure to keep the blades cutting at a
constant rate until the housing bottoms out against the balsa.It is important that you do not
apply an up-down or sideways force, as this will bend the blades and result in a slot that
does not go straight in; but you may find it helpful when cutting slots in very hard balsa to
rock the unit slightly forward and back in the direction of the hinge line. Remove the blades
from the slot and test fit the hinge.Components of The Slot Machine could be damaged by
continuous use under strenuous cutting conditions. If you have just cut a particularly
difficult slot in hard balsa, it’s a good idea to give your Slot Machine 30 seconds to cool
down before starting the next slot.
The number of slots you will be able to cut on a single charge will vary depending on the
type of cutting being done.You may be able to cut up to 50 slots (25 hinges) in soft balsa
with the standard blades for CA hinges.But using the blades for Nylon hinges to cut slots
in medium or hard balsa will result in fewer cuts per charge.Be sure to read the section on
battery charging.
MAINTENANCE
The motor and electronics are not user serviceable. Opening the unit other than at the
blade access hatch may result in operational problems if not properly reassembled.
After cutting approximately 200 hinge slots, it is advised to blow compressed air into the
unit (through the louvers and the blade access opening) to dislodge sawdust from the
electric motor.
Wipe the outside of the unit clean with a soft dry cloth. Do not use water or any solvents or
cleaning sprays.
HOW TO CHANGE BLADES
It may be necessary to access the blades periodically, to change or replace them, or if the
blade attachment screws loosen.Use the following sequence:
Tip:The blades for nylon hinges and the blades for H.D.hinges are special blades in which
every other tooth is set outward in one direction only. The alternate teeth have no set.This
allows the two blades to press against each other without locking up.The 45-degree corner
at the top of the blade ensures that the blades can only be installed in the correct
orientation.The teeth with set must point away from each other.
Page 5

6. Pivot one of the blade holders up and out
of the way, exposing the blade attachment
screws.
If you see a dried, colored residue
around the heads of the screws, that is
thread locking compound used during
assembly. You may need to touch a hot
soldering iron to the head of the screw for 5
seconds to soften the compound, making it
easier to loosen the screws.
5. Slide the blade holder guide off of the
blade holders.
4. Pivot the blades and blade holders down
and out of the housing.
3. Remove the rear Phillips head screw
(above and slightly to the rear of
the blades). If this screw won’t back out
enough to pull it out, try pulling back on the
blades slightly while unscrewing it.
2. Remove the blade access hatch by
sliding it forward and down.
1. Remove the front Phillips head screw on
the end of the housing.
Page 6

13. Reinstall the front Phillips head screw
(smaller diameter). This screw must
engage the dog on the top of the blade
holder guide. Tighten securely, but do not
over tighten.
12. Insert the blades through the slot in
the blade access hatch and snap the
hatch into place.
11. Pivot the blade assembly up into the
housing, and wiggle the blade holder into
position so the screws can be installed.
Reinstall the rear Phillips head screw
(larger diameter) through the housing and
through the dog on the top of the rear
blade holder guide.Tighten snugly, but do
not over tighten.
10. Press the blade holders together and
slide the guide back over the blade holders.
9. Repeat steps 8 - 11 to replace the
other blade.
8.Insert a new blade into the blade holder with
the 45-degree angled corner matching that of
the pocket in the blade holder. Install the
screws tightly.
7. Remove the blade attachment screws
and slide the blade out of its pocket in the
blade holder.Notice that one corner of the
blade has a 45-degree angle, and note the
direction of that angled corner.
Page 7

Problem: The slot is too small for the hinge.
Reason:
You may be using the wrong blades.
Action: If using .040” [1mm] thick pinned hinges, it will be necessary to purchase and install the
optional
BLADES FOR NYLON HINGES orBLADES FOR H.D.HINGES.
See “Replacement Blades”.
Problem: When attempting to cut a slot, the unit jumps and shakes, but does not cut unless excessive
pressure is applied.
Reason #1:
One or both of the blades may be loose.
Action: Inspect the blades to determine if either of them are loose. If so, following the steps of How to
Change Blades, access and tighten the blade attachment screws.Use a thread locking compound on
the screw threads.
Reason #2:
The blades may be out of alignment with each other.
Action: Attempt to realign the blades by loosening and retightening the blade
attachment screws.
Note: Experiment with slightly different methods of starting the cut until you find
one that works well for you.We like to press the teeth firmly into the wood before starting the cut, and
then back off the inward pressure until the blades are cutting smoothly and evenly.
Problem: Slots do not go straight in.
Reason:
If sideways pressure is applied while cutting, the b lades will bend and go in at an angle.
Action: Practice on scraps of 1/4” balsa sheet, cutting the slots open afterward to inspect the slot
angle. A slot that angles upward may be the result of a downward force being applied while cutting.
Practice makes perfect! Skilled users can cut slots in 1/16”balsa!
Problem: Cutting is slow and difficult.
Reason #1:
The batteries are run down.
Action: Charge the batteries.
Reason #2:
One or both of the blades may be loose.
Action: Inspect the blades to determine if either of them are loose. If so, following the steps of How to
Change Blades, access and tighten the blade attachment screws.Use a thread locking compound on
the screw threads.
Reason #3:
The blade teeth may be getting dull.The blades are made of hard steel and the teeth should
remain sharp for many cuts, but they will eventually become dull, especially if used in hardwood.
Action: Purchase and install new blades.
Reason #4:
Wood is very hard and blades for nylon or H.D.hinges are being used.
Action: Cutting slots in hard wood with these blades can be difficult. Try going in slowly, rocking the
unit forward and backward in the direction of the hinge line.Try removing the blades from the slot and
blowing out the sawdust before continuing the cut. We’ve had success in difficult situations like this by
first cutting the slot with the standard (thin) blades, and then following up with the replacement blades.
Problem: A thin tab of balsa remains in the hinge slot.
Reason:
This is the result of the blades wandering apart as the cut is being made.
Action: This can be caused by applying too much force, rather than letting the teeth do the cutting. It
may also be an indication that the teeth are becoming dull.Try relaxing the pressure early in the cut.
Inspect the blade alignment and realign if needed. If these don’t solve the problem, purchase and
install new blades.
Problem: The unit gives off the odor of wood smoke.
Reason:
There may be an excessive amount of sawdust inside the motor, and this may be smoldering.
Action: This is a potential fire hazard! Take the unit outdoors immediately.Stay outside with the unit until
there is no more odor.Remove the blade access hatch and use compressed air to blow out all sawdust.
Problem: The unit gives off an odor of burning electrical components.
Reason:
Electrical wires may be shorted, causing insulation or plastic to be getting hot inside the case.
Action: This is a potential fire hazard! If this happens while charging, unplug the charger from the wall
outlet first, then unplug the charger from the Slot Machine. Take the Slot Machine and the charger
outdoors immediately. Stay outside with the unit until there is no more odor. Call Hobby Services to
arrange for repairs.(217) 398-8970
TROUBLESHOOTING GUIDE
Page 8

Problem: The motor runs, but the blades do not cut when pressed into balsa.
Reason #1:
One or both of the blades may be loose.
Action: Inspect the blades to determine if either of them are loose. If so, following the steps of How to
Change Blades, access and tighten the blade attachment screws. (Optional) Use a thread locking
compound on the screw threads.
Reason #2:
This may be an internal problem that is not user serviceable.
Action: Call Hobby Services to arrange for repairs. (217) 398-8970
Problem: The unit has insufficient power to cut hinge slots in medium-density balsa wood.
Reason:
There may be a problem with the motor, battery or charger.
Action: If the unit is new and you have fully charged the battery, try cutting slots in scrap balsa until
the battery is nearly discharged, then charge again. Cycling the battery in this way will often improve
performance of a new NiCd battery. This technique also often works to rejuvenate batteries that have
not been used for a long time. If this technique does not produce the desired results, Call Hobby
Services to arrange for repairs or battery replacement. (217) 398-8970
1-YEAR LIMITED WARRANTY - *U.S.A and Canada Only
Great Planes warrants this product to be free from defects in materials and workmanship for a period of one (1) year
from the date of purchase.During that period, Great Planes will, at its option, repair or replace without service charge
any product deemed defective due to those causes. You will be required to provide proof of purchase (invoice or
receipt). This warranty does not cover damage caused by abuse, misuse, alteration or accident. If there is damage
stemming from these causes within the stated warranty period, Great Planes will, at its option, repair or replace it for
a service charge not greater than 50% of its then current retail list price. Be sure to include your daytime telephone
number in case we need to contact you about your repair.This warranty gives you specific rights.You may also have
other rights, which vary from state to state.
*For warranty and service information if purchased outside the USA or Canada, see the additional warranty information
insert (if applicable) or ask your retailer for more information.
HIGH QUALITY SLOT MACHINE ACCESSORIES AVAILABLE FROM YOUR
HOBBY RETAILER:
REPLACEMENT BLADES
GPMR4015 Slot Machine Blades for CA Hinges (standard blades)
GPMR4016 Slot Machine Blades for Medium Nylon Hinges
GPMR4017 Slot Machine Blades for Heavy Duty Nylon Hinges
ACCESSORIES TO MAKE SLOTTING EASIER
GPMR4005 Precision Hinge Marking Tool
GPMR4013 Slot Machine Cutting Guide
CONTACTING GREAT PLANES
If you have any questions regarding the Great Planes SLOT MACHINE, please call us at
(217) 398-8970 or e-mail us at productsupport@greatplanes.com and we’ll be glad to help.
Entire Contents © Copyright 1999 GPMZ0248
 Loading...