

Great Plains YP1630F-1670 User Manual

Table of Contents Appendix
Manufacturing, Inc.
www.greatplainsmfg.com
Seed, Fertilizer and Treatment Rate
Charts for
Model YP1630F Planters
The following pages are to assist in the proper setting of seeding and
fertilizer rates for the planter.
To assure the most accurate application rates it is recommended that the planter be calibrated for the
desired materials at the time of planting.
ORIGINAL INSTRUCTIONS
© Copyright 2012 Printed 2012-12-04 401-832B
EN

Great Plains Manufacturing, Inc. Cover Appendix ii
Table of Contents
Introduction ..................................................................1
Models Covered .............................................................1
Setting Material Rates ....................................................1
Seed Rate ......................................................................2
About Finger Meter Charts .............................................2
Reading a Finger Meter Chart....................................3
About Brush Meter Charts..............................................4
Reading a Brush Meter Chart.....................................4
Seed Drive Setup ...........................................................5
Sprocket Storage........................................................5
Range Setup ..............................................................5
Transmission Setup....................................................6
Checking Planting Rate..................................................6
Checking Singulated Rates ........................................7
Seed Rate Charts...........................................................8
12 Finger Meter ..........................................................8
70 cm, Low Range..................................................8
70 cm, High Range.................................................9
30 inch, Low Range..............................................10
30 inch, High Range .............................................11
76.2 cm, Low Range.............................................12
76.2 cm, High Range............................................13
Brush Meter..............................................................14
70 cm....................................................................14
30 inch ..................................................................15
76.2 cm.................................................................16
Fertilizer Rate..............................................................17
Reading a Fertilizer Rate Chart................................17
Fertilizer Range Gears .............................................18
Setting Variable Rate Gearbox.................................18
Fertilizer Meter Calibration .......................................19
Density Adjustment ..............................................19
Fertilizer Rate Charts ................................................... 22
Fertilizer Low Range, 70 cm ....................................22
Fertilizer High Range, 70 cm....................................23
Fertilizer Low Range, 30 inch...................................24
Fertilizer High Range, 30 inch..................................25
Treatment Rate (Option)............................................26
Treatment Compatibility .......................................27
Reading a Treatment Rate Chart.................................27
Treatment Rate Calibration..........................................28
Treatment Rate Calibration Steps............................28
Collect A Treatment Sample ................................29
Calculate the Treatment Rate ..............................29
Treatment Rate Charts ................................................30
Herbicide, Clay Granules ......................................... 30
70 cm ...................................................................30
30 inch.................................................................. 31
76.2 cm (30 inch) .................................................32
Insecticide, Clay Granules .......................................33
70 cm ...................................................................33
30 inch.................................................................. 34
76.2 cm (30 inch) .................................................35
Sand Granules ......................................................... 36
70 cm ...................................................................36
30 inch.................................................................. 37
76.2 cm (30 inch) .................................................38
Appendix..................................................................... 39
Finger Meter Brush Adjustment ...................................39
© Copyright 2012 All rights Reserved
Great Plains Manufacturing, Inc. provides this publication “as is” without warranty of any kind, either expressed or implied. While every precaution has been
taken in the preparation of this manual, Great Plains Manufacturing, Inc. assumes no responsibility for errors or omissions. Neither is any liability assumed for
damages resulting from the use of the information contained herein. Great Plains Manufacturing, Inc. reserves the right to revise and improve its products as
it sees fit. This publication describes the state of this product at the time of its publication, and may not reflect the product in the future.
2012-12-04 Cover Appendix 401-832B
Trademarks of Great Plains Manufacturing, Inc. include: Singulator Plus, Swath Command, Terra-Tine.
Registered Trademarks of Great Plains Manufacturing, Inc. include:
Air-Pro, Clear-Shot, Discovator, Great Plains, Land Pride, MeterCone, Nutri-Pro, Seed-Lok, Solid Stand,
Terra-Guard, Turbo-Chisel, Turbo-Chopper, Turbo Max, Turbo-Till, Ultra-Till, Verti-Till, Whirlfilter, Yield-Pro.
Brand and Product Names that appear and are owned by others are trademarks of their respective owners.
Printed in the United States of America
Great Plains Manufacturing, Inc. Contents Appendix 1
Introduction
This manual is your guide to planter adjustments for
achieving specific seed population, fertilizer density and
treatment density targets.
Although some setup/adjustment material herein is
repeated from the planter Operator Manuals, you need to
be thoroughly familiar with planter operations and
adjustments before applying rate data from this manual.
Models Covered
5
This manual covers the following Great Plains 16-row
planter models. Not all models are available in all locales.
YP1630F-1630ND 30 inch, Narrow, Single row hopper
YP1630F-1630NS 30 inch, Narrow, Single row hopper
YP1630F-1630WD30 inch, Wide, Dual row hopper
YP1630F-1630WS 30 inch, Wide, Single row hopper
YP1630F-1670ND 70 cm, Narrow, Dual row hopper
YP1630F-1670NS 70 cm, Narrow, Single row hopper
YP1630F-1670WD70 cm, Wide, Dual row hopper
YP1630F-1670WS 70 cm, Wide, Single row hopper
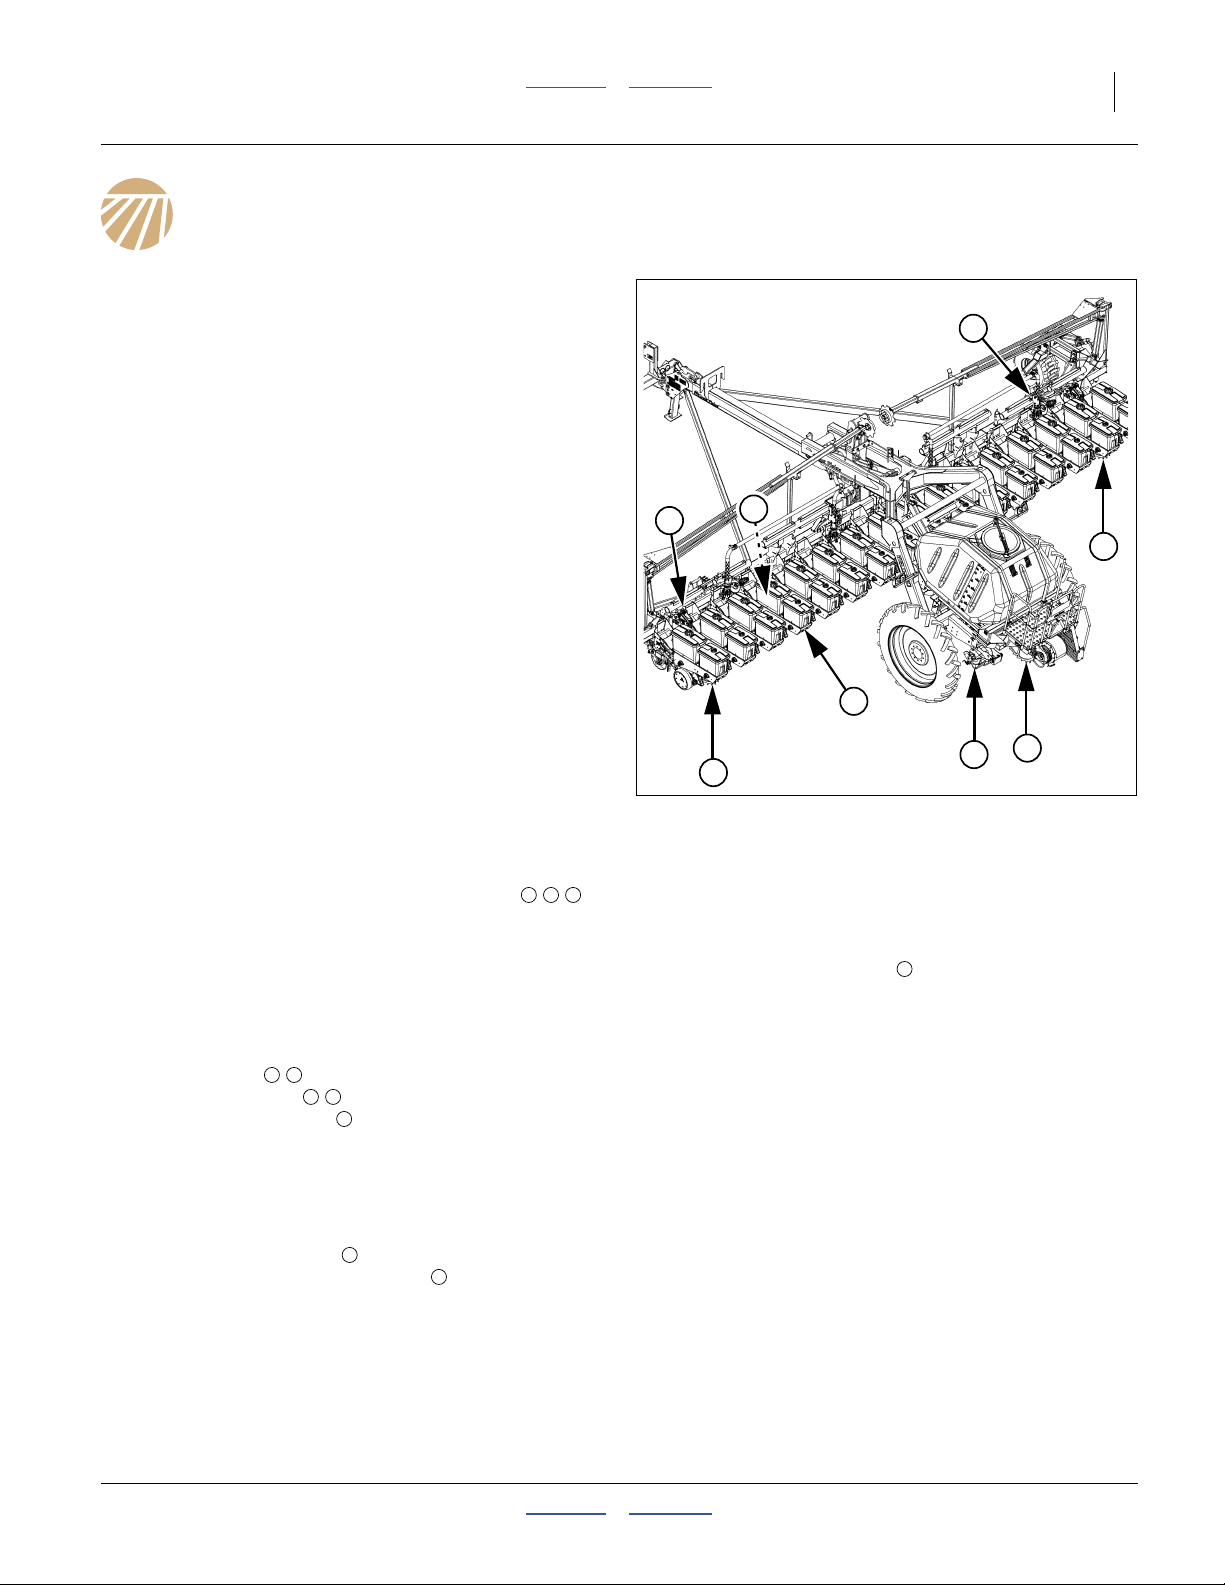
Setting Material Rates
Refer to Figure 1
The YP1630F has three ground drive systems ( , , )
and three metering systems. Two of the metering
systems share a drive system. Details for rate settings,
and rate charts, are found in this manual. This page
provides an overview of the systems.
Planting (Seed) Rate (page 2)
Seed rate is controlled by Range and Transmission
sprocket pairings ( , ) on each of two separate wing
ground drive systems ( , ) and by seed meter
configuration at each row ( , hidden by hopper). The
seed monitor console reports field rates for most seed
types.
4 5
1 2
6
Fertilizer Rate (page 17)
Dry fertilizer rate, from the central hopper, is controlled
by a variable rate gear box under the left side of the
hopper. The associated ground drive , under the right
side, has no adjustments. Fertilizer is delivered by the air
system, with blockage detection at the rows. The air
system must be adjusted to optimal pressure, but does
not adjust rate.
7
3
1 2 3
4
6
2
8
3
7
1
Figure 1
Planter Drive Systems
Treatment Rate (page 26, Option)
Planters with the optional second row hopper can deliver
a variety of granular materials with this system. Rate is
controlled by a knob and dial at each row. The
treatment meters have an agitator roller which shares the
seed drive system, but changes in seed rate sprockets
have only a minor effect on treatment rate.
About the Charts
The rate charts are independent of planter width and row
spacing. All charts except treatment are relatively
insensitive to ground speed.
Note: Units of Measure:
This manual provides most values in dual units of
measure (metric and U.S. customary).
8
34461
2012-12-04 Contents Appendix 401-832B
2 Great Plains Manufacturing, Inc. Contents Appendix YP1630F
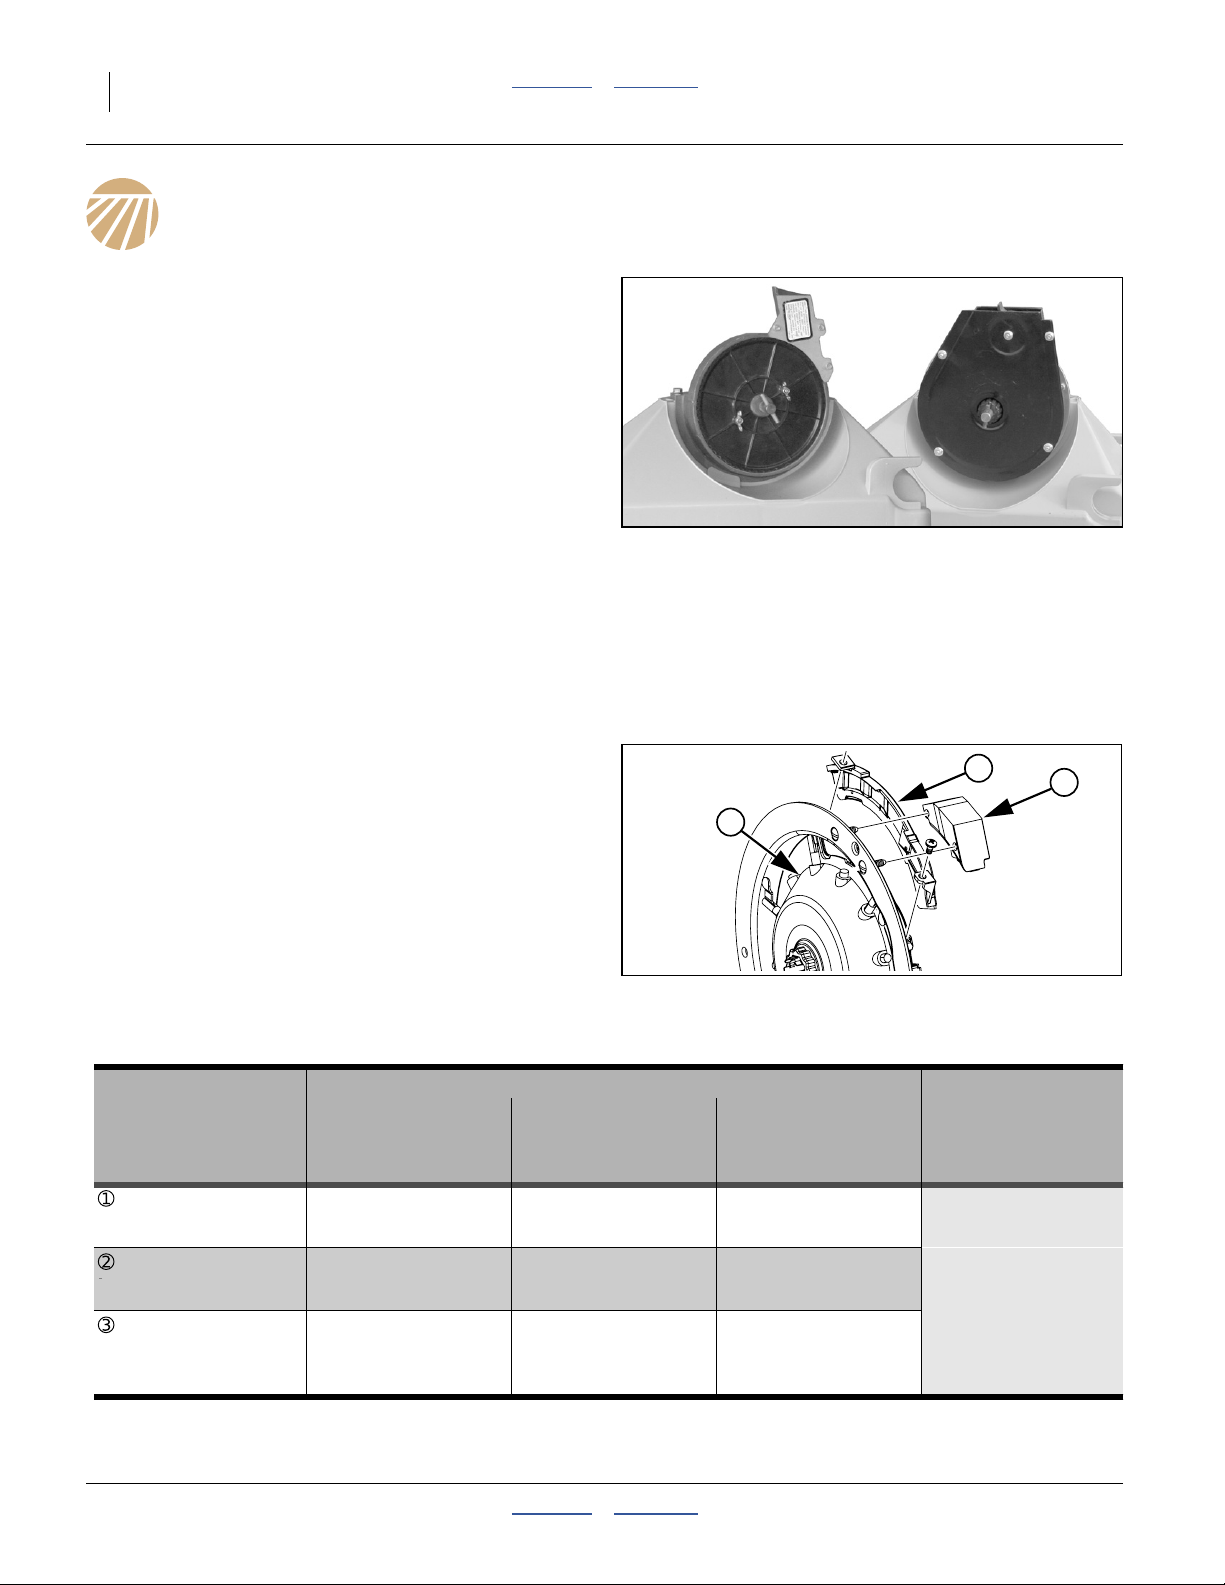
Seed Rate
Rates are set separately for seed, fertilizer (page 17) and
treatments (Option, page 26).
Seed rate is determined by:
1. consulting the seed rate charts,
2. installing the correct meter (in the case of finger
meters, the appropriate finger sets, inserts and
brushes, and in the case of the brush meter, the
appropriate seed plates),
3. setting the Range and Transmission driving/driven
sprocket combinations on each wing, and
4. checking the rate.
There are separate charts for brush and finger pickup
meters. If you are unfamiliar with the charts, see
“Reading a Brush Meter Chart” below or “Reading a
Brush Meter Chart” on page 4.
To change meters, see “Exchanging Meters” in the
Operator manual.
Figure 2
Brush and Finger Pickup Meters
28133
About Finger Meter Charts
The charts are for meters with 12-fingers, and apply to
both Corn and Sunflower configurations.
1
2
3
Some sizes of sunflower seeds meter more reliably with
the corn finger set, insert and brush. See the table below.
See the Operator manual (401-832M) for meter
reconfiguration instructions.
Figure 3
22908
Finger Pickup Components
Finger Pickup: Sunflower Configurations
Oil Seed Size Confection Seed
#4 #3 #2
Meter Component
Finger Set
~16500 seeds/kg
(~7500 seeds/pound)
343067
s
~14300 seeds/kg
(~6500 seeds/pound)
343067
s
~12100 seeds/kg
(~5500 seeds/pound)
343029
c
(12-finger sunflower) (12-finger sunflower) (12-finger corn)
Backing Plate
342108
s
342108
s
342110
c
(Insert C) (Insert C) (Insert A)
Brush Block
343091
(brushless
s
343091
(brushless
block)
c. These components are included in the standard 890-856C Corn meter. 34573
s. These components are included in the standard 890-912C Sunflower meter, and the 403-659A Conversion Kit.
block)
s
343052
c
(adjustable
brush block)
(long, narrow, XL)
~6600 seeds/kg
(~3000 seeds/pound)
Not
recommended
for XL
confection
seed
401-832B Contents Appendix 2012-12-04
Great Plains Manufacturing, Inc. Contents Appendix Seed Rate 3
.
M
20 G
d
For Round Corn optimum meter speed is 45 to 75 RPM
0
M
(
30
h
r
)
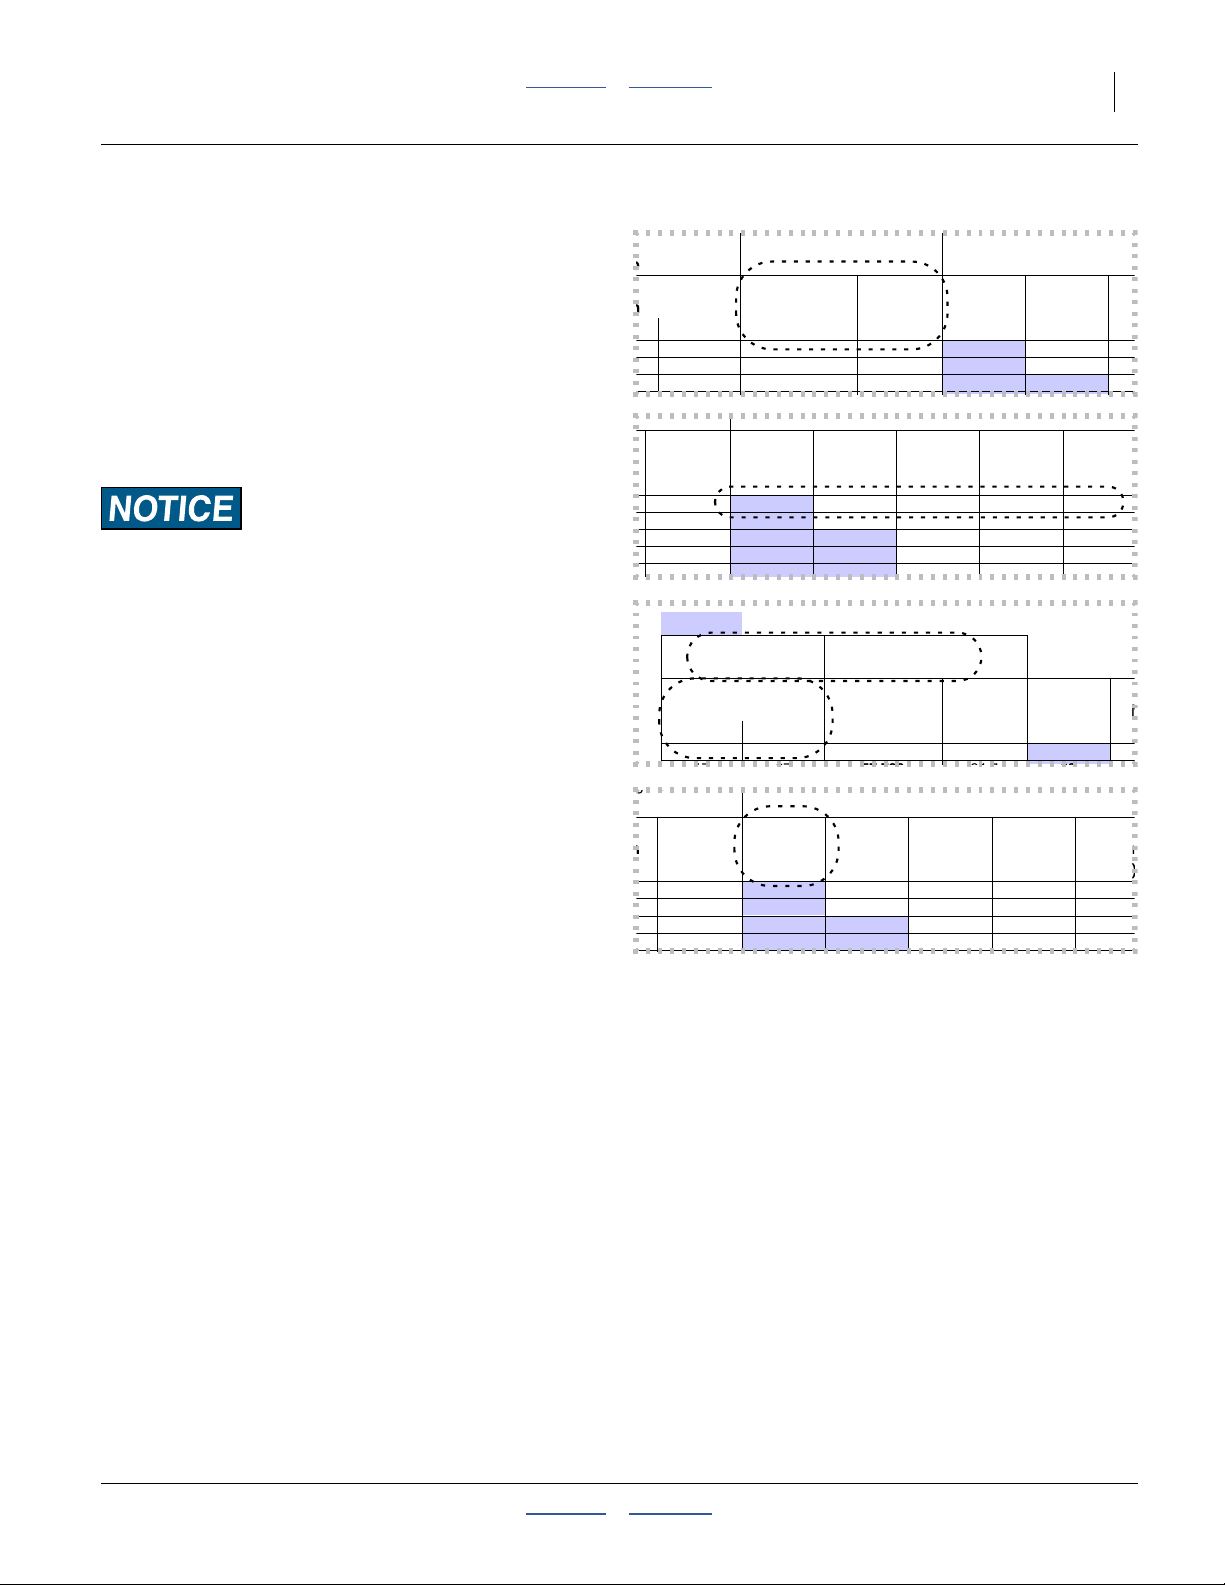
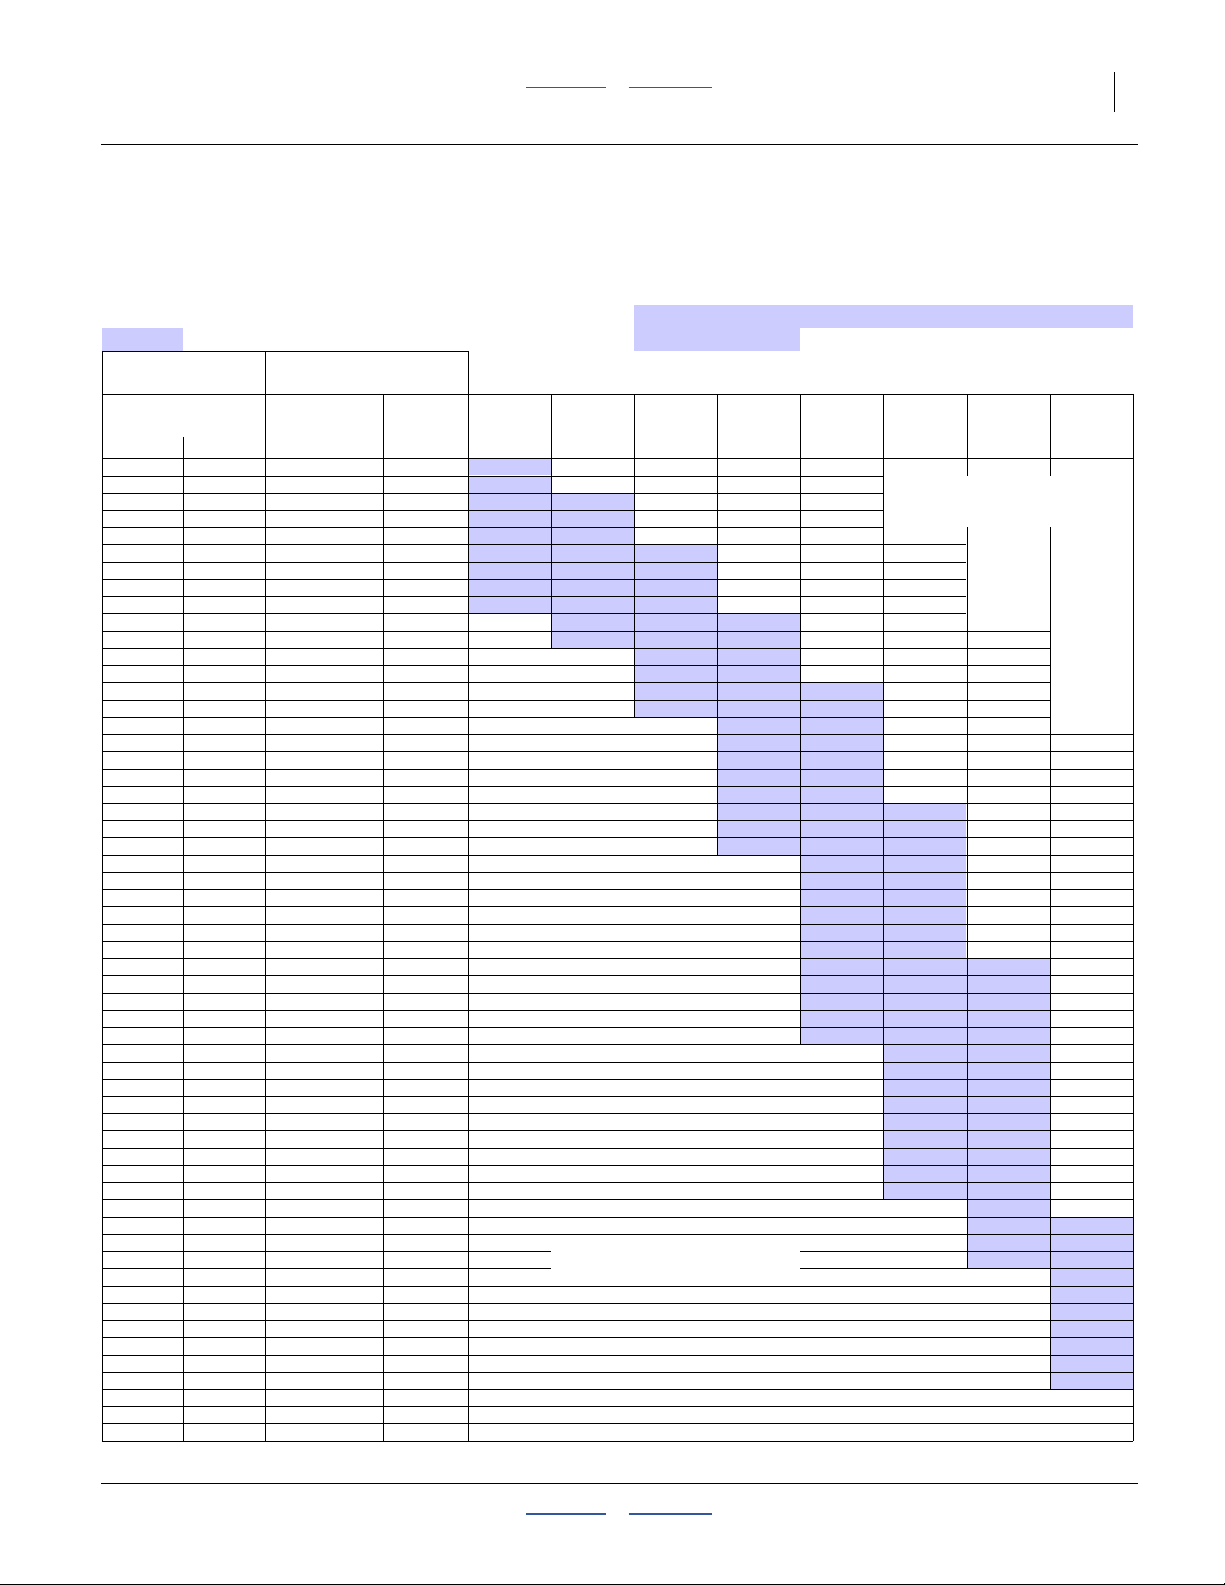
Reading a Finger Meter Chart
Note: Actual charts begin on page 8.
Images at right are excerpts.
Seed Rate: Population
1. Find the chart (Low or High range) which covers your
population.
2. Find the desired seed population or seed spacing.
Seed Rate: Meter rpms
3. Note the range of meter rpms suitable for that
population.
Inconsistent Population Risk:
The shaded rpms are the recommended rpms for most
consistent results. Use the recommended driving speed if
possible. The unshaded rpms are acceptable. Blank cells are
outside the range of reliable meter operation.
Seed Rate: Sprocket Combinations
4. Configure the Range and Transmission sprockets.
The numbers in the Driving/Driven columns are the
number of teeth (T) stamped on the sprockets
required.
Seed Rate: Planting Ground Speed
5. Observe the recommended planting speed. Speed
directly controls meter rpm.
ange Driving =30
rockets
smission
binations Population Spacing
Driven (seeds/ha) (cm)
28
27
26
=
Seed
Spacing
(cm)
25.6
24.7
23.8
22.9
Driven =
20
Seed Seed
55 735
57 799
60 022
11.3 kph 10.5 kph 9.7 kph 8.9 kph 8 kph
Meter Meter Meter Meter Meter
(rpm) (rpm) (rpm) (rpm) (rpm)
61 57 52 48
63 59 54 50 45
66 61 56 52 47
68 63 58 54 49
25.6
24.7
23.8
11.3 kph 10.5 kph 9
Meter Meter
(rpm) (rpm) (
61 57
63 59
66 61
round Spee
( Shaded & Non-shaded areas )
Range Driving =30
Sprockets
Transmission
Combinations Population Spacing
Driving Driven (seeds/ha) (cm)
17 28
=
20 Ground Speed
Seed
Spacing
(cm)
25.6
24.7
23.8
22.9
11.3 kph 10.5 kph 9.7 kph 8.9 kph 8 kp
Meter Meter Meter Meter Mete
(rpm) (rpm) (rpm) (rpm) (rpm
61 57 52 48
63 59 54 50 45
66 61 56 52 47
68 63 58 54 49
Driven =
20
Seed Seed
55 735
25.6
11.3 kph 1
Meter
(rpm)
61
2012-12-04 Contents Appendix 401-832B
4 Great Plains Manufacturing, Inc. Contents Appendix YP1630F
o
s
gg
o
s
P
34523
60 Cell
P
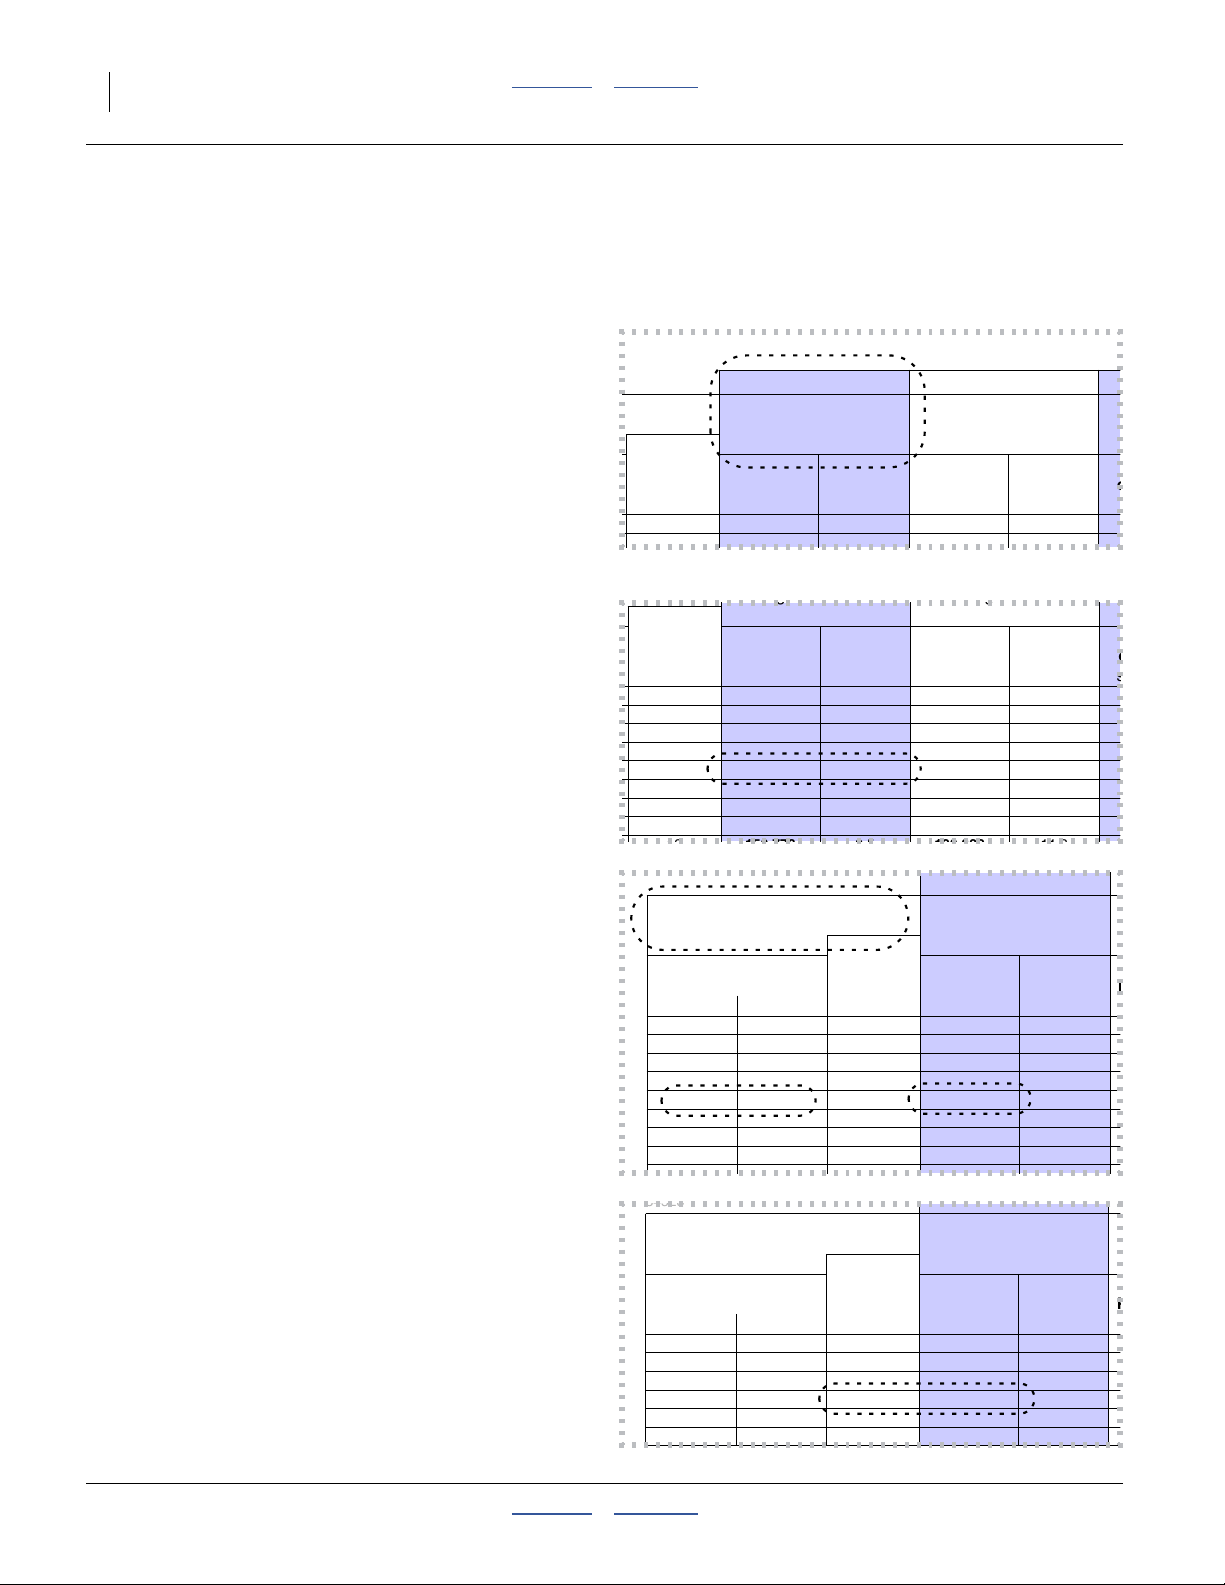
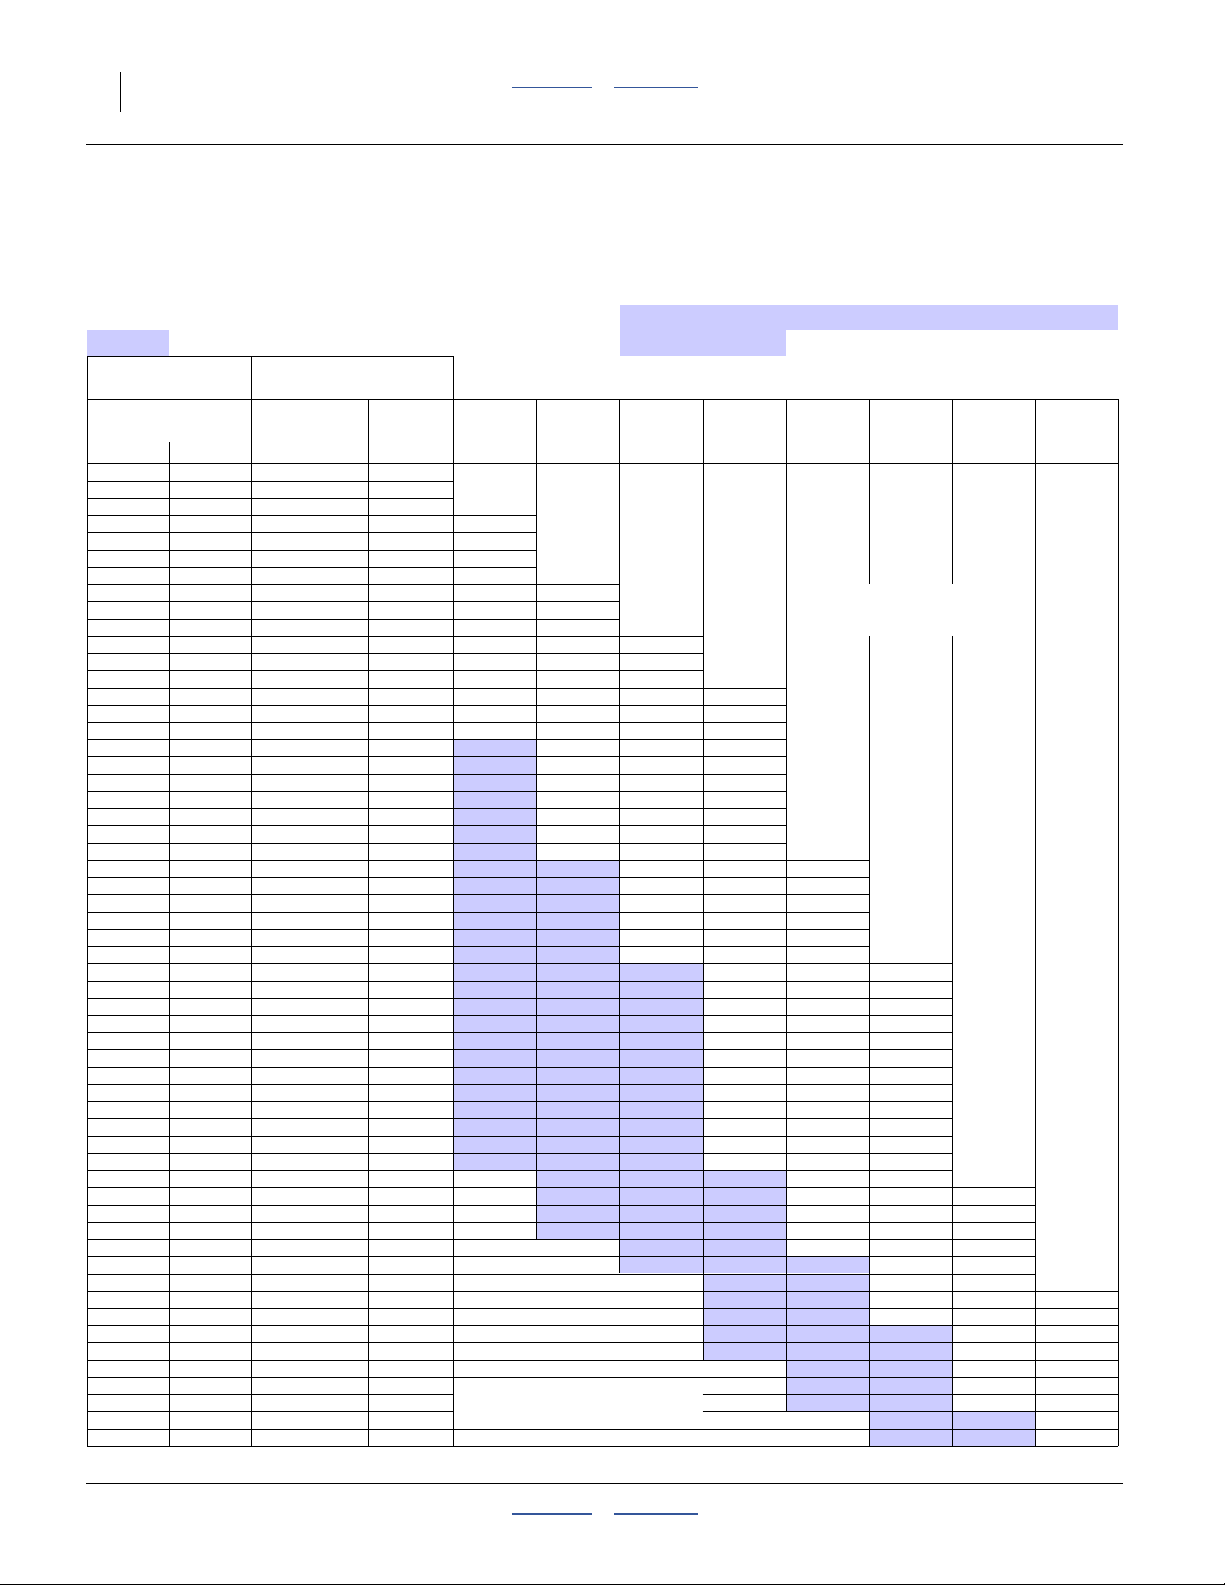
About Brush Meter Charts
The charts are for plates by cell count, and apply to any
seed compatible with the plate.
Reading a Brush Meter Chart
For brush meters, the chart has separate columns based
on the cell count of the seed plate installed. For plate
selection see “Seed Plates” in the Options section of the
Operator manual. To change plates, see “Installing
Brush Meter Plates” in the Operator manual.
Note: Actual charts begin on page 14.
Images at right are excerpts.
Seed Rate: Cell Count
1. Use the chart columns for your seed plate, based on
the cell count.
60 Cell 48 Cell
:20
:30 High Rate Milo/ High Rate
Maximum Grain Sorghum Acid-delinted Cotton
Planting Seed Seed Seed Seed
Speed Population Spacing Population Spacing P
(kph)
13
Soybean or Specialty Soybean or
(seeds/ha) (cm) (seeds/ha) (cm) (
123 853
70 cm Rows
11.5
99 083
14.4
Seed Rate: Population
2. Find the desired seed population or seed spacing.
Seed Rate: Sprocket Combinations
3. Configure the Transmission sprockets.
The numbers in the Driving/Driven columns are the
number of teeth (T) stamped on the sprockets
required.
Note: Brush meter charts use a single Range sprocket
setup: (20T Driving, 30T Driven)
Maximum Grain Sorghum Acid-delinted Cotton
Planting Seed Seed Seed Seed
Speed Population Spacing Population Spacing P
(kph)
13
13
13
13
13
13
13
13
34523
Range
(seeds/ha) (cm) (seeds/ha) (cm) (
123 853
128 441
133 381
138 424
138 716
143 551
144 496
149 072
11.5
11.1
10.7
10.3
10.3
10.0
9.9
9.6
99 083
102 752
106 704
110 739
110 973
114 841
115 596
119 258
14.4
13.9
13.4
12.9
12.9
12.4
12.4
12.0
60 Cell
Driving: 20
Soybean or
Sprockets Driven: 30 High Rate Milo/
(All Cell Counts)
Maximum Grain Sorghum
Transmission Planting Seed Seed
Combinations Speed Population Spacing
Driving Driven (kph)
17 28 13
17 27 13
17 26 13
19 28 13
17 25 13
19 27 13
17 24 13
19 26 13
(seeds/ha) (cm)
123 853
128 441
133 381
138 424
138 716
143 551
144 496
149 072
11.5
11.1
10.7
10.3
10.3
10.0
9.9
9.6
Seed Rate: Planting Ground Speed
4. Observe the range of recommended planting
speeds.
Range
Driving: 20
Soybean or
Sprockets Driven: 30 High Rate Milo/
(All Cell Counts)
Maximum Grain Sorghum
Transmission Planting Seed Seed
Combinations Speed Population Spacing
401-832B Contents Appendix 2012-12-04
Driving Driven (kph)
17 28 13
17 27 13
17 26 13
19 28 13
17 25 13
19 27 13
(seeds/ha) (cm)
123 853
128 441
133 381
138 424
138 716
143 551
11.5
11.1
10.7
10.3
10.3
10.0
Great Plains Manufacturing, Inc. Contents Appendix Seed Rate 5
Seed Drive Setup
With the meters set up, the rate is adjusted by separate
Range and Transmission sprocket pairing at a ground
drive on each wing.
Sprocket Storage
Refer to Figure 4
Each wing has a pair of trees containing both Range
and Transmission sprockets for that wing.
Note: The planter includes a standard set of sprockets
common to several implement models. Some
sprockets may not be used in presently offered
YP1630F configurations.
1
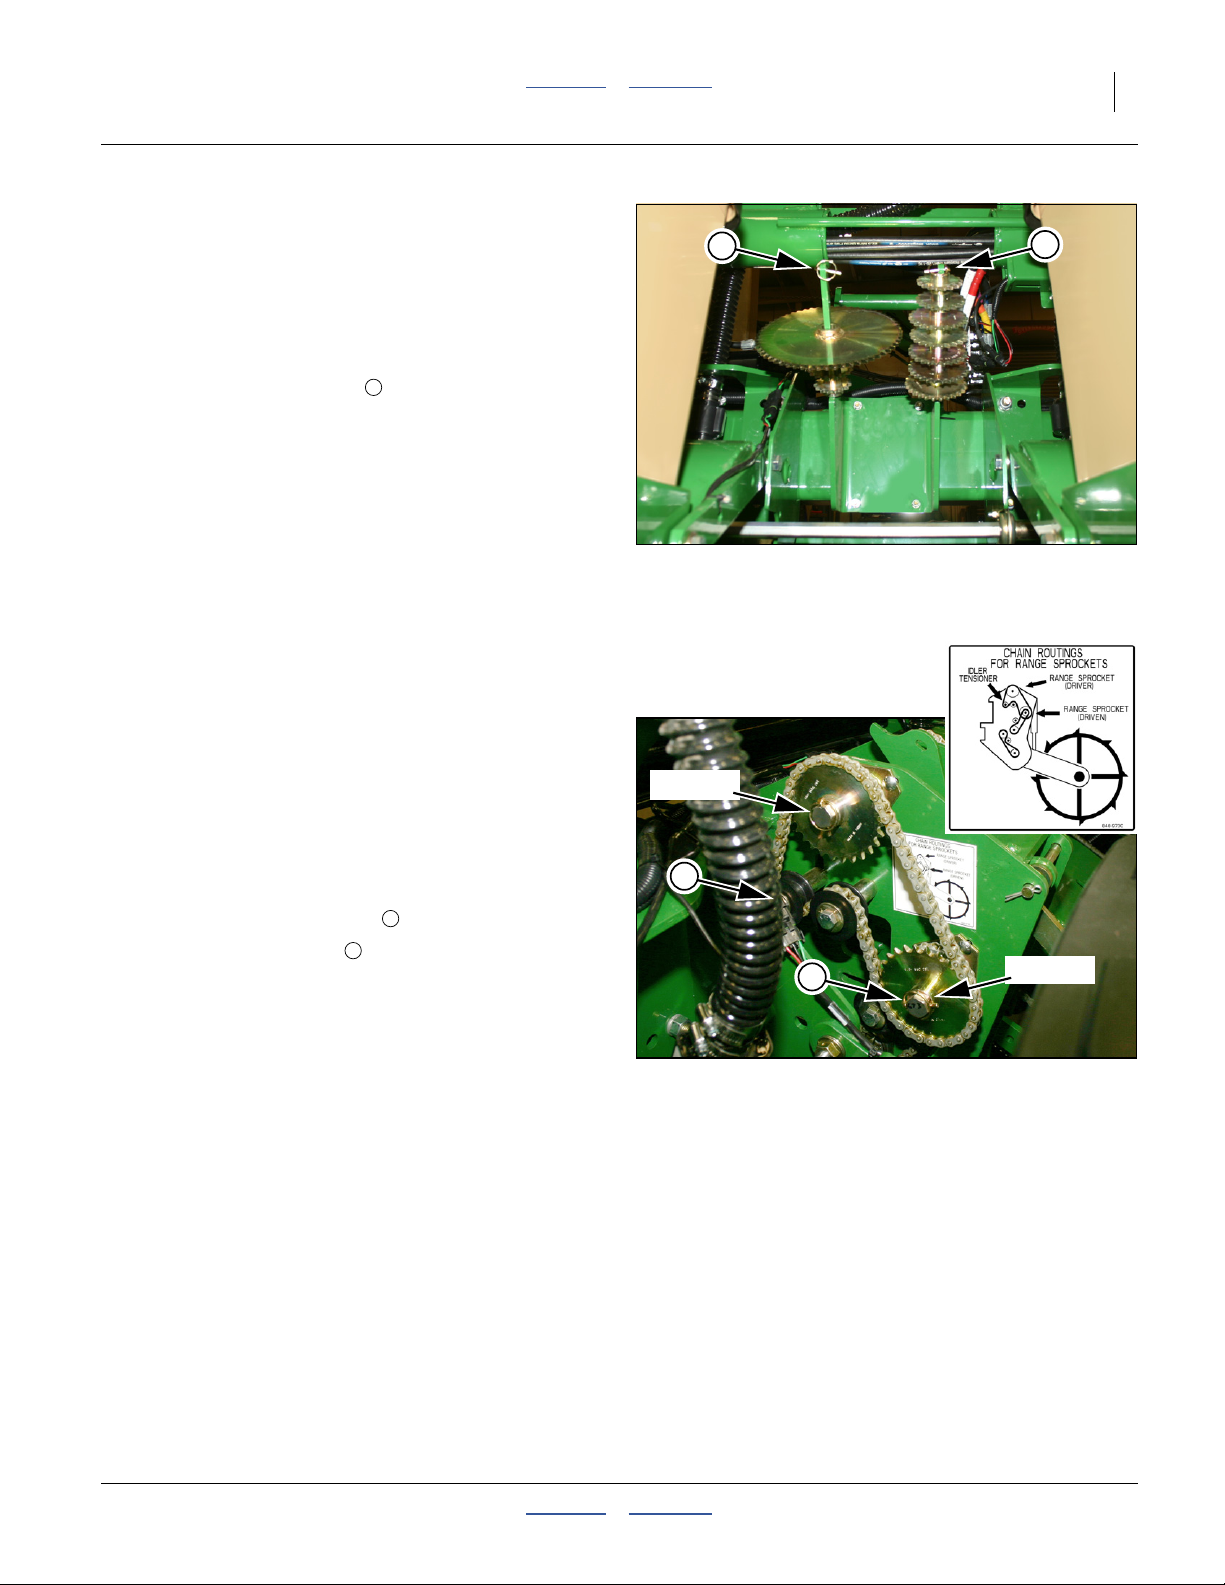
Range Setup
Refer to Figure 5
Range provides coarse seed rate control, and uses only
Driving:Driven sprocket combinations:
30T:20T or 30T:30T.
To change Range drive:
1. Consult the seed rate chart for your crop, meter, and
finger or cell count.
2. For your desired seed population, find the Range
sprocket pairing at the top of the chart.
3. Loosen the tensioning idler to obtain chain slack.
4. Remove the lynch pins at each Range sprocket
that needs to be changed.
5. Exchange sprockets with those required from the
storage trees. Re-install pins.
6. Engage the idler for 6 to 7 mm (1⁄4inch) of chain
slack at longest chain span.
7. Repeat for other wing.
2
3
1
DRIVING
2
Figure 4
Sprocket Storage
3
Figure 5
Range Drive
1
34496
DRIVEN
34497
2012-12-04 Contents Appendix 401-832B
6 Great Plains Manufacturing, Inc. Contents Appendix YP1630F
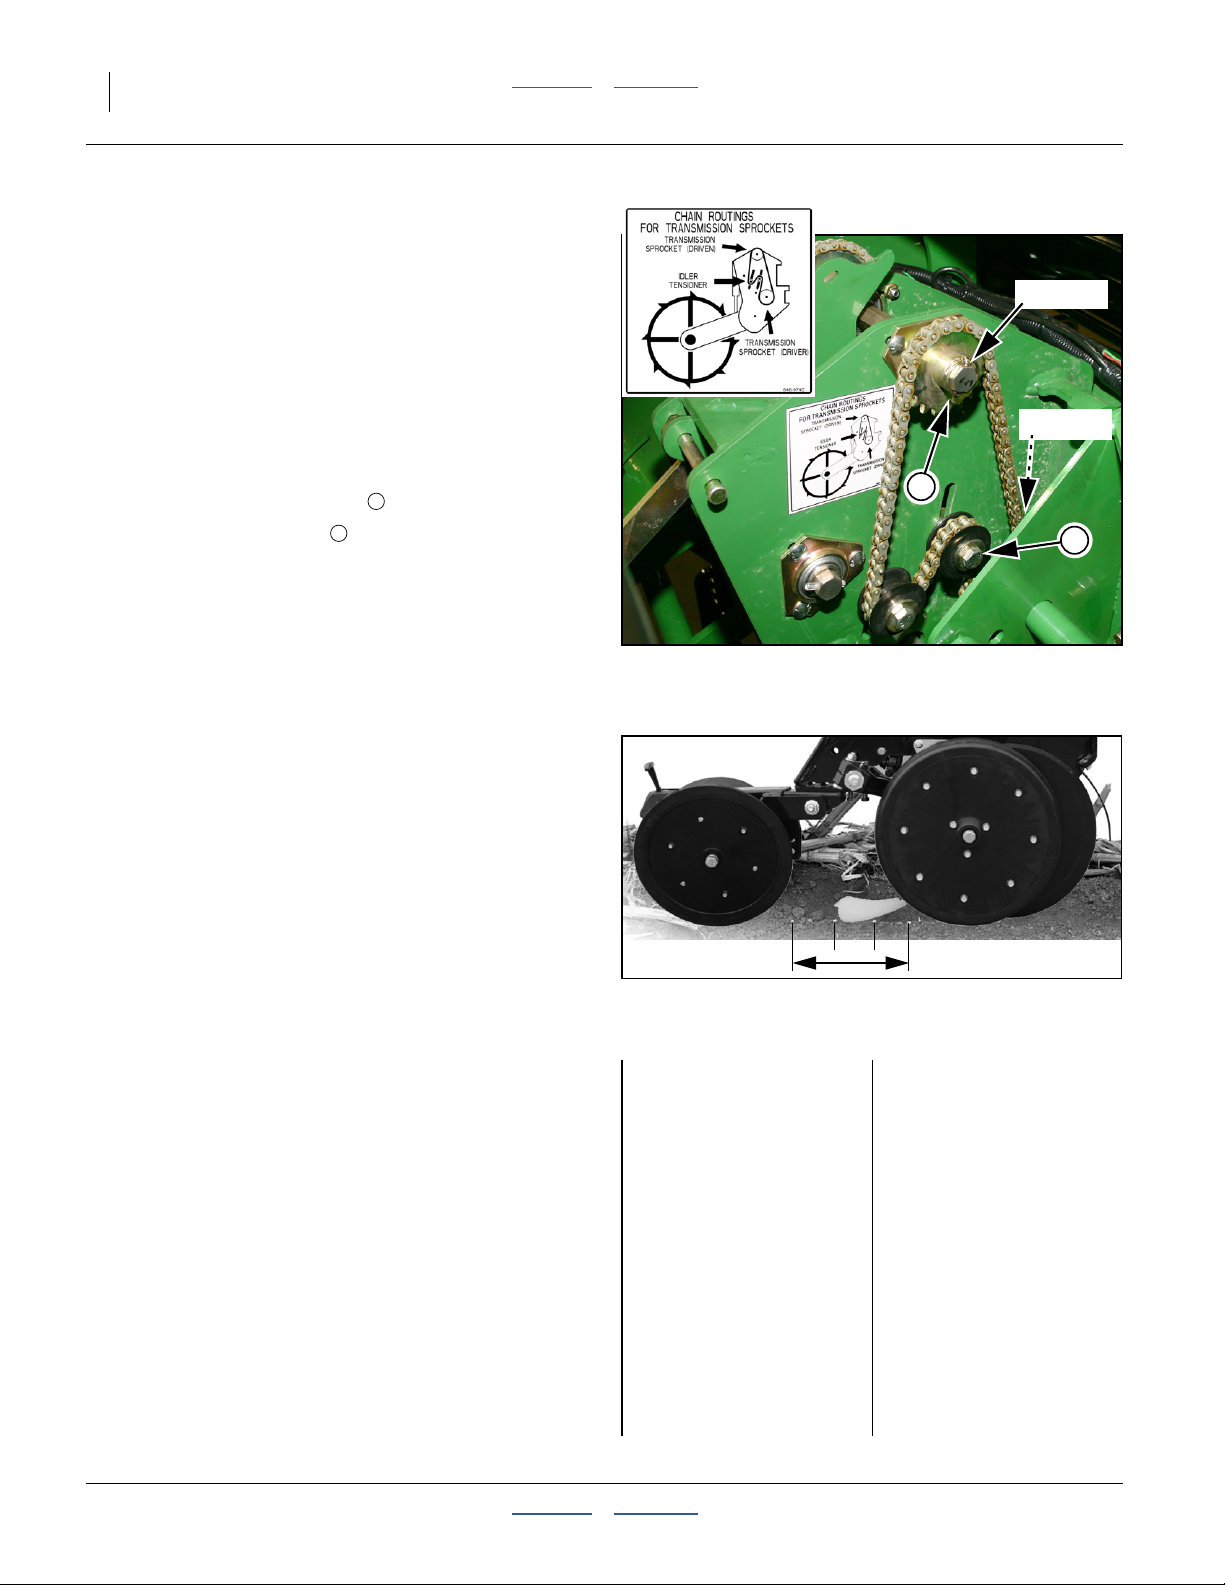
Transmission Setup
Refer to Figure 6
Range provides fine seed rate control, and uses only
pairings from Sprocket sizes:
17T, 19T, 23T, 24T, 25T, 26T, 27T, 28T
Pairings are always unequal except for 23T:23T
To change Range drive:
1. Consult the seed rate chart for your crop, meter, and
finger or cell count.
2. For your desired seed population, find the Range
sprocket pairing at the top of the chart.
3. Loosen the tensioning idler to obtain chain slack.
4. Remove the lynch pins at each Range sprocket
that needs to be changed.
5. Exchange sprockets with those required from the
storage trees. Re-install pins.
6. Engage the idler for 13 mm (
at longest chain span.
7. Repeat for other wing.
2
3
1
⁄2inch) of chain slack
3
Figure 6
Transmission Drive
DRIVEN
DRIVING
2
34498
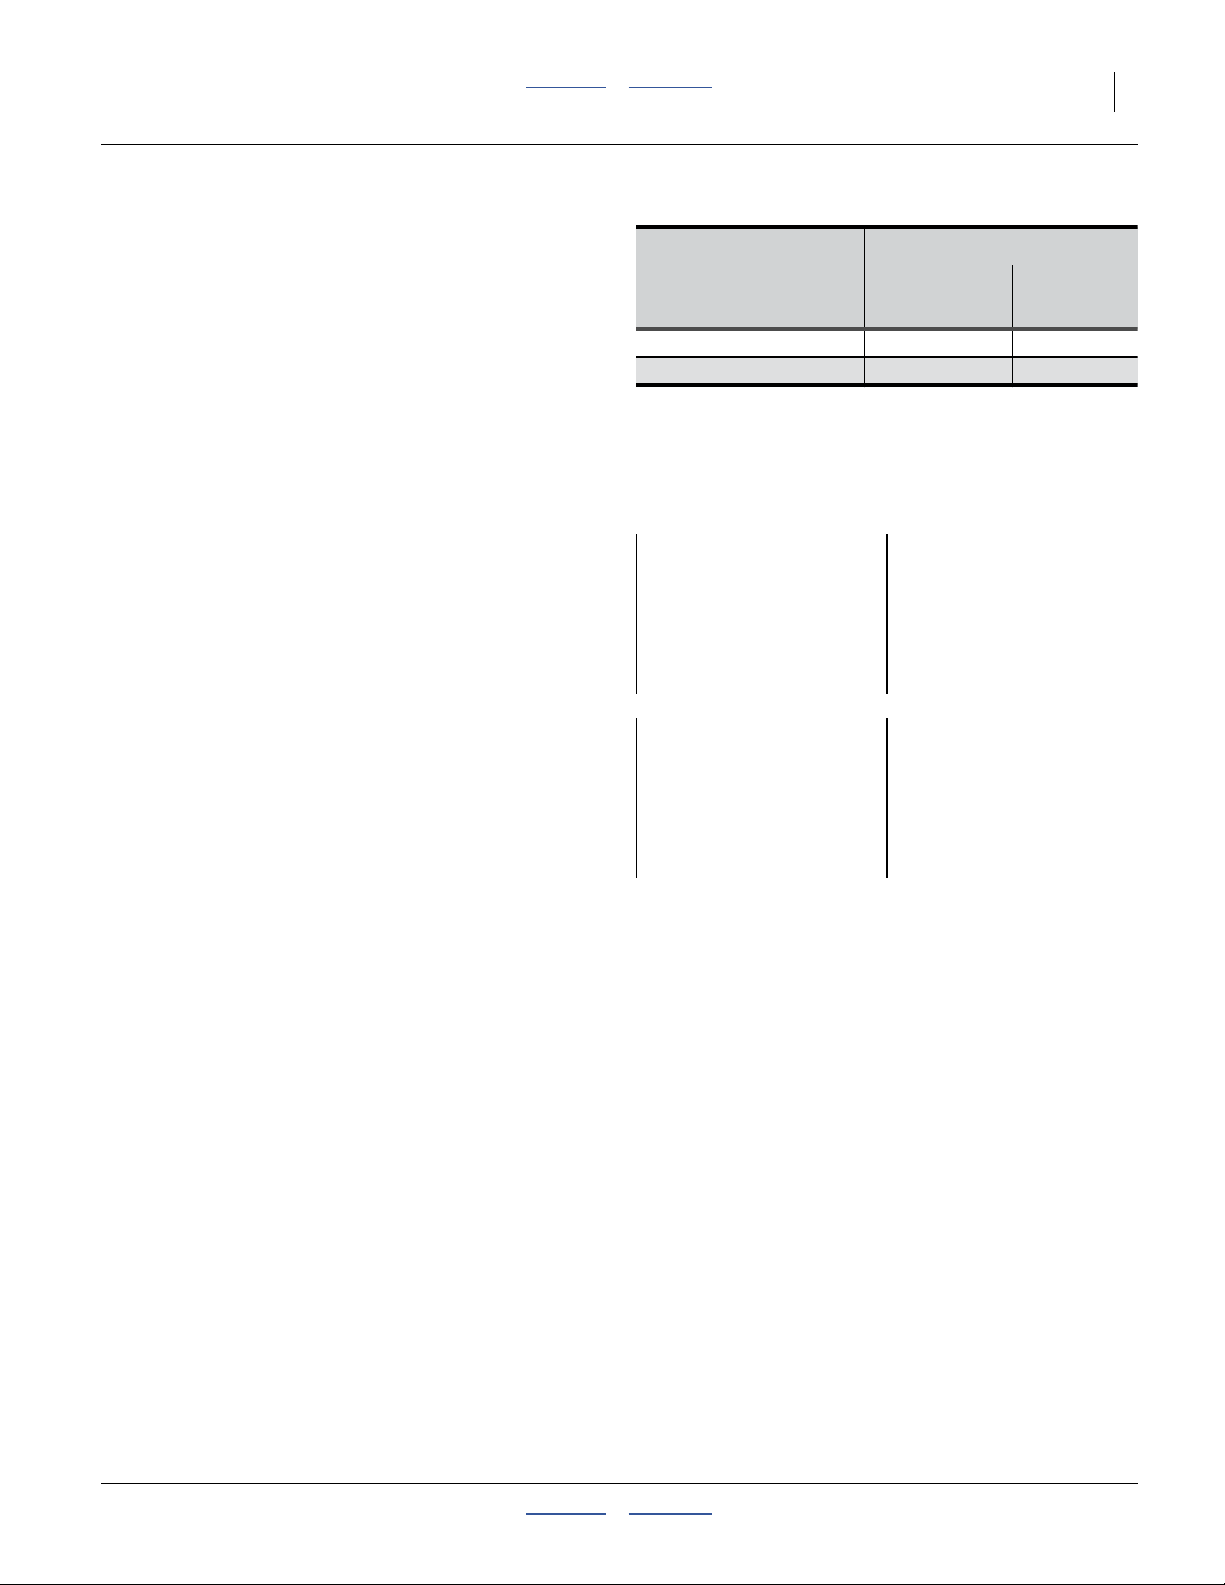
Checking Planting Rate
Singulated seed charts are based on cleaned and sized
seed singulated with the recommended meter and wheel
or finger count. Extreme seed size variations, foreign
material and solid conditions can affect the planting rate.
Any material difference between chart and field rates
implies a mechanical malfunction, a planter setup error,
unsuitable planting conditions (such as excessive wheel
slippage) or extremely worn planter components.
You can verify your setup and planter performance by
measuring seed placement and spacing over a relatively
short distance.
The columns to the right provide example data for a rate
check, in metric units and similar example in U.S.
customary units.
Furrow Check
Metric Example:
Planter: YP1630F-1670
Crop: Corn
Meter: 12 finger pickup
Target Population:
81 200 seeds/hectare
Range Sprockets:
DRIVING: 30
DRIVEN: 20
Transmission Sprockets:
DRIVING: 23
DRIVEN: 26
Planting Speed:
8 kph
Chart Seed Spacing:
17.6 cm
Figure 7
USc Example:
Planter: YP1630F-1630
Crop: Corn
Meter: 12 finger pickup
Target Population:
30,200 seeds/acre
Range Sprockets:
DRIVING: 30
DRIVEN: 20
Transmission Sprockets:
DRIVING: 23
DRIVEN: 26
Maximum Planting Speed:
5 mph
Chart Seed Spacing:
6.9 inches
29247
401-832B Contents Appendix 2012-12-04
Great Plains Manufacturing, Inc. Contents Appendix Seed Rate 7
Checking Singulated Rates
1. Determine the sample distance to check. Find your
row spacing in the table at right.
2. Note the number of rows to sample. Adjust the
planting depth to a shallow setting on one or two
outside rows (per table). Tie up the press wheel
arms with wire or bungee to prevent furrow closure.
3. Decide whether to use 1/1000th or 1/200th of a
hectare or acre as the sample size. 1/200th provides
a more accurate sample.
4. Configure the planter for the chart rate, either using
the chart settings for sprockets, or, with hydraulic
drive, selecting the rate on the seed monitor.
5. Plant at the desired planting speed for slightly more
than the computed sample run length.
6. Measure off the sample distance, balanced in
between where seeding started and stopped.
7. Count the number of seeds over the distance
measured. Also note the consistency of the seed
spacing.
8. Compute the rate for a full acre or hectare.
For a 1/1000th sample, multiply the counted seeds
by 1000.
For a 1/200th sample, multiply the counted seeds by
200.
9. If the field and chart rates vary by more than a few
percent, re-check planter setup, including meter
wheel or finger count, air system, tire size, tire
pressures, sprocket or hydraulic drive setup, chain
slack, etc. If seed spacing is irregular, this suggests
a seed delivery problem, and not a rate setup
problem.
10. While planting, pay attention to the seed monitor. In
addition to confirming the single-row furrow check, it
will also provide field rate data on all the other rows,
and alert you to any irregularities or stoppages.
Rows to Sample Length of Sample Run
Row
Spacing
70 cm 1 ha: 14.29 m 71.45 m
30 inches 1 ac: 17 ft. 5 in. 87 ft. 1 in.
Metric Example:
Sample size:
1/1000th ha
Plant for approximately:
20 meters
Measure the central:
14.29 meters (1429 cm)
Metric Example:
Seeds counted:
82
Computed for full hectare:
82 x 1000 = 82 000
This differs from chart by
less than 1%
Rows
to Count
1/1000th 1/200th
USc Example:
Sample size:
1/1000th ac
Plant for approximately:
25 feet
Measure the central:
17 feet 5 inches
USc Example:
Seeds counted:
31
Computed for full acre:
31 x 1000 = 31,000
This differs from chart by
less than 1%
2012-12-04 Contents Appendix 401-832B
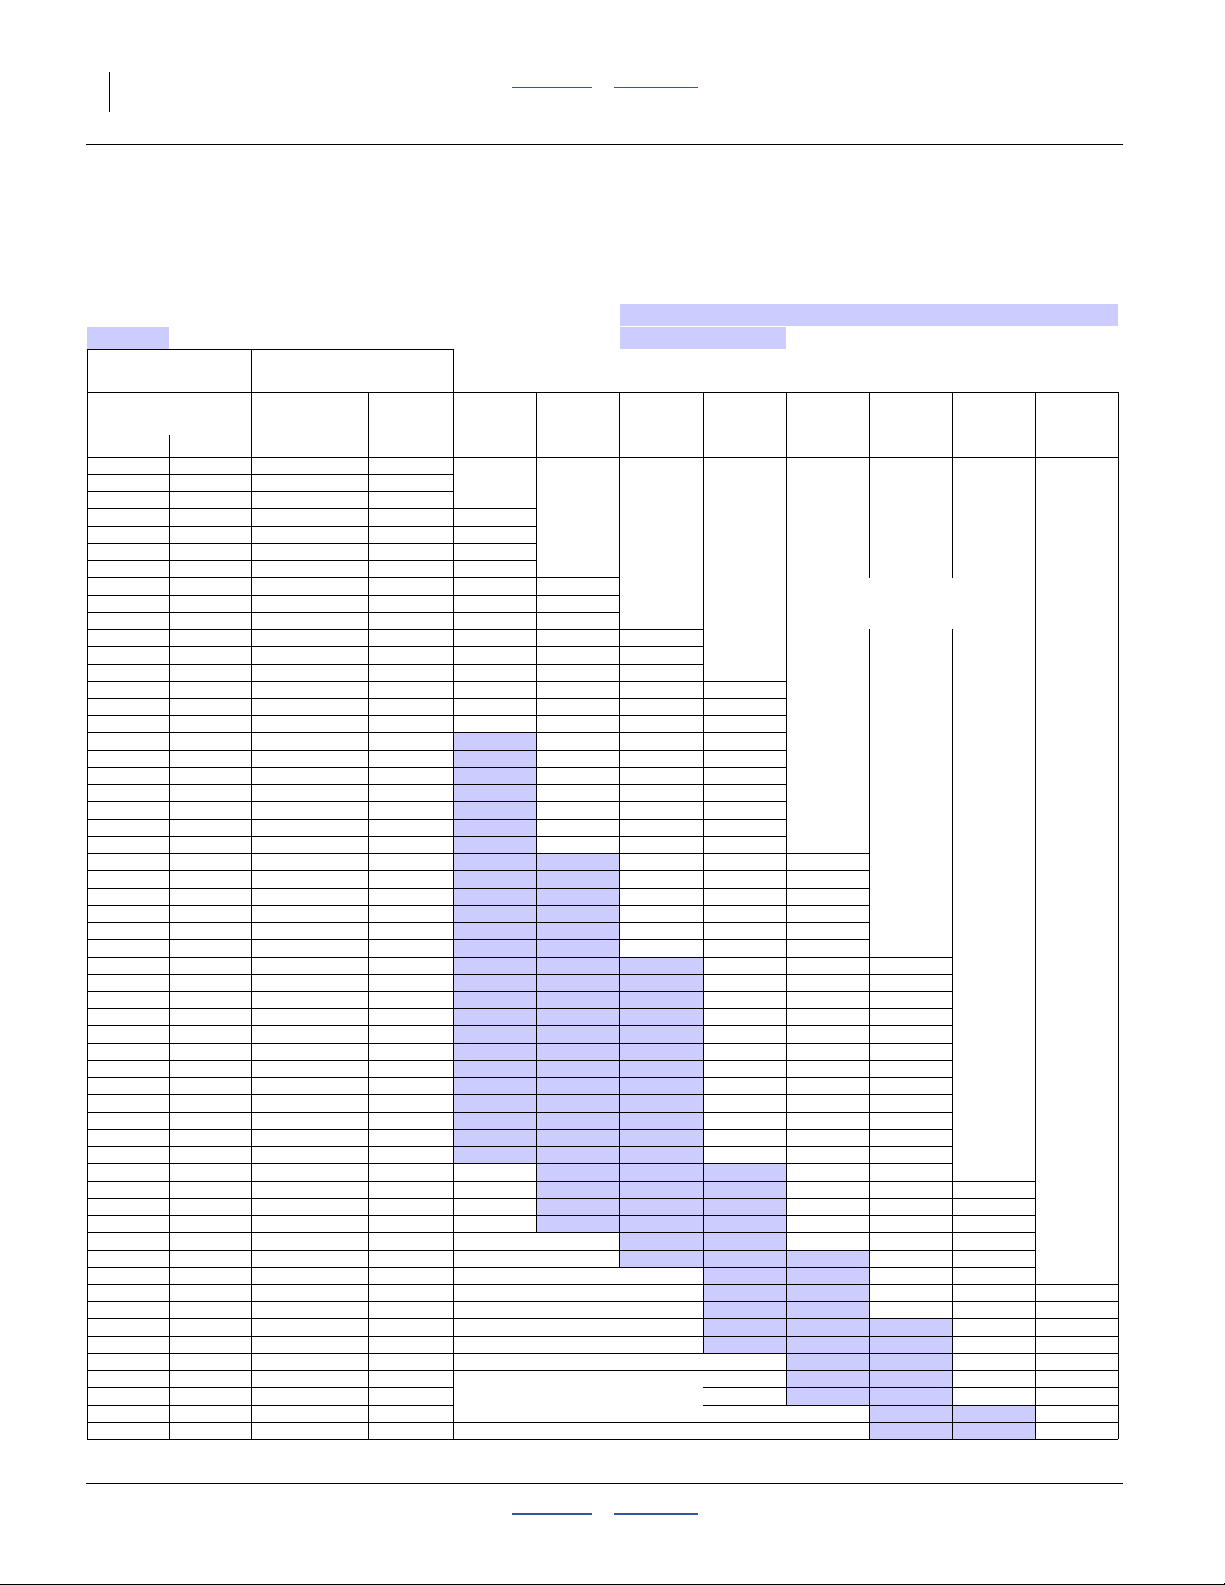
8 Great Plains Manufacturing, Inc. Contents Appendix YP1630F
YP1630F 70cm Rows Low Range
12 Finger Meter
ATTENTION ! ! !
Great Plains always recommends test stand calibration of the finger meter to the population and ground speed desired .
For Round Corn optimum meter speed is 45 to 75 RPM For Flat Corn optimum meter speed is 60 to 75 RPM
( Shaded & Non-shaded areas ) (Shaded area)
Range Driving =30
Sprockets
Transmission
Combinations Population Spacing
Driving Driven (seeds/ha) (cm)
17 28
17 27
17 26
19 28
17 25
19 27
17 24
19 26
17 23
19 25
19 24
23 28
19 23
23 27
24 28
23 26
24 27
25 28
17 19
23 25
24 26
25 27
26 28
23 24
24 25
25 26
26 27
27 28
23 23
28 27
27 26
26 25
25 24
24 23
28 26
27 25
26 24
25 23
19 17
28 25
27 24
26 23
28 24
27 23
23 19
28 23
24 19
25 19
23 17
26 19
24 17
27 19
25 17
28 19
26 17
27 17
28 17
(For all seed corn types)
Driven =
30 Ground Speed
Seed Seed
37 157
38 533
40 015
41 528
41 615
43 066
43 349
44 722
45 234
46 511
48 449
50 271
50 556
52 132
52 456
54 138
54 399
54 642
54 757
56 303
56 491
56 666
56 828
58 649
58 751
58 845
58 932
59 013
61 199
63 466
63 553
63 647
63 749
63 860
65 907
66 095
66 299
66 521
68 399
68 543
68 849
69 181
71 399
71 842
74 083
74 503
77 304
80 525
82 799
83 746
86 399
86 967
89 998
90 188
93 598
97 198
100 798
38.4
37.1
35.7
34.4
34.3
33.2
33.0
31.9
31.6
30.7
29.5
28.4
28.3
27.4
27.2
26.4
26.3
26.1
26.1
25.4
25.3
25.2
25.1
24.4
24.3
24.3
24.
24.2
23.3
22.5
22.5
22.4
22.4
22.4
21.7
21.6
21.5
21.5
20.9
20.8
20.7
20.6
20.0
19.9
19.3
19.2
18.5
17.7
17.3
17.1
16.5
16.
15.9
15.8
15.3
14.7
14.2
11.3 kph 10.5 kph 9.7 kph 8.9 kph 8 kph 7.2 kph 6.4 kph 5.6 kph
Meter Meter Meter Meter Meter Meter Meter Meter
(rpm) (rpm) (rpm) (rpm) (rpm) (rpm) (rpm) (rpm)
45
46
47
47
49 45
50 46 Not Recommended
51 47
53 49 45
55 51 47
55 51 47
57 53 49 45
57 53 49 45
59 55 51 47
60 55 51 47
60 56 51 47
60 56 51 47
62 57 53 48
62 57 53 49
62 58 53 49
62 58 53 49
64 60 55 50 46
64 60 55 51 46
2
4
64 60 55 51 46
65 60 55 51 46
65 60 55 51 46
67 62 57 53 48
70 65 60 55 50 45
70 65 60 55 50 45
70 65 60 55 50 45
70 65 60 55 50 45
70 65 60 55 50 45
72 67 62 57 52 46
72 67 62 57 52 47
73 67 62 57 52 47
73 68 62 57 52 47
75 70 64 59 54 48
75 70 64 59 54 48
75 70 65 59 54 48
70 65 60 54 49
73 67 61 56 50 45
73 67 62 56 51 45
75 70 64 58 52 46
70 64 58 52 47
73 67 60 54 48
69 63 57 50
71 65 58 52 45
72 66 59 52 46
74 68 61 54 47
75 68 61 54 48
70 63 56 49
71 64 56 49
Not Recommended 73665951
68 61 53
71 63 55
34518
401-832B Contents Appendix 2012-12-04
Great Plains Manufacturing, Inc. Contents Appendix Seed Rate 9
YP1630F 70cm Rows High Range
12 Finger Meter
ATTENTION ! ! !
Great Plains always recommends test stand calibration of the finger meter to the population and ground speed desired .
For Round Corn optimum meter speed is 45 to 75 RPM For Flat Corn optimum meter speed is 60 to 75 RPM
( Shaded & Non-shaded areas ) (Shaded area)
Range Driving =30
Sprockets
Transmission
Combinations Population Spacing
Driving Driven (seeds/ha) (cm)
17 28
17 27
17 26
19 28
17 25
19 27
17 24
19 26
17 23
19 25
19 24
23 28
19 23
23 27
24 28
23 26
24 27
25 28
17 19
23 25
24 26
25 27
26 28
23 24
24 25
25 26
26 27
27 28
23 23
28 27
27 26
26 25
25 24
24 23
28 26
27 25
26 24
25 23
19 17
28 25
27 24
26 23
28 24
27 23
23 19
28 23
24 19
25 19
23 17
26 19
24 17
27
25 17
28 19
26 17
27 17
28 17
(For all seed corn types)
Driven =
Seed Seed
55 735
57 799
60 022
62 292
62 423
64 599
65 024
67 083
67 851
69 767
72 674
75 406
75 834
78 199
78 684
81 206
81 599
81 963
82 135
84 455
84 737
84 999
85 241
87 974
88 127
88 268
88 399
88 520
91 798
95 198
95 329
95 470
95 623
95 790
98 860
99 142
99 448
99 781
102 598
102 814
103 273
103 772
107 098
107 763
111 124
111 755
115 956
120 787
124 198
125 619
19
129 598
130 450
134 998
135 282
140 398
145 798
151 197
20 Ground Speed
11.3 kph 10.5 kph 9.7 kph 8.9 kph 8 kph 7.2 kph 6.4 kph 5.6 kph
Meter Meter Meter Meter Meter Meter Meter Meter
(rpm) (rpm) (rpm) (rpm) (rpm) (rpm) (rpm) (rpm)
25.6
24.7
23.8
22.9
22.9
22.1
22.0
21.3
21.1
20.5
19.7
18.9
18.8
18.3
18.2
17.6
17.5
17.4
17.4
16.9
16.9
16.8
16.8
16.2
16.2
16.
16.2
16.1
15.6
15.0
15.0
15.0
14.9
14.9
14.5
14.4
14.4
14.3
13.9
13.9
13.8
13.8
13.3
13.3
12.9
12.8
12.3
11.8
11.5
11.4
11.0
11.0
10.6
10.6
10.2
9.8
9.4
2
61 57 52 48
63 59 54 50 45
66 61 56 52 47 Not Recommended
68 63 58 54 49
68 63 59 54 49
71 66 61 56 51 45
71 66 61 56 51 46
73 68 63 58 52 47
74 69 64 58 53 48
71 65 60 55 49
74 68 63 57 51 45
71 65 59 53 47
71 65 59 53 47
73 67 61 55 49
74 68 62 55 49
70 64 57 51
70 64 57 51 45
71 64 58 51 45
71 64 58 51 45
73 66 59 53 46
73 66 60 53 46
73 66 60 53 47
73 67 60 53 47
Not Recommended 73 64
69 62 55 48
69 62 55 48
69 62 55 48
69 62 55 48
69 62 55 48
72 65 57 50
74 67 60 52
75 67 60 52
75 67 60 52
75 67 60 52
75 67 60 52
70 62 54
70 62 54
70 62 54
70 62 55
72 64 56
72 64 56
73 65 57
73 65 57
75 67 59
67 59
70 61
70 61
34519
66
68
69
71
71
74
74
2012-12-04 Contents Appendix 401-832B
10 Great Plains Manufacturing, Inc. Contents Appendix YP1630F
YP1630F 30in Rows Low Range
12 Finger Meter
ATTENTION ! ! !
Great Plains always recommends test stand calibration of the finger meter to the population and ground speed desired.
For Round Corn optimum meter speed is 45 to 75 RPM For Flat Corn optimum meter speed is 60 to 75 RPM
( Shaded & Non-shaded areas ) (Shaded area)
Range Driving =30
Sprockets
Transmission
Combinations Population Spacing
Driving Driven (seeds/acre) (inches)
17 28
17 27
17 26
19 28
17 25
19 27
17 24
19 26
17 23
19 25
19 24
23 28
19 23
23 27
24 28
23 26
24 27
25 28
17 19
23 25
24 26
25 27
26 28
23 24
24 25
25 26
26 27
27 28
23 23
28 27
27 26
26 25
25 24
24 23
28 26
27 25
26 24
25 23
19 17
28 25
27 24
26 23
28 24
27 23
23 19
28 23
24 19
25 19
23 17
26 19
24 17
27 19
25 17
28 19
26 17
27 17
28 17
(For all seed corn types)
Driven =
30 Ground Speed
Seed Seed
13 814
14 325
14 876
15 439
15 471
16 010
16 116
16 626
16 816
17 291
18 012
18 689
18 795
19 381
19 501
20 126
20 224
20 314
20 357
20 932
21 002
21 066
21 127
21 804
21 842
21 877
21 909
21 939
22 752
23 594
23 627
23 662
23 700
23 741
24 502
24 572
24 648
24 730
25 428
25 482
25 596
25 719
26 544
26 709
27 542
27 698
28 739
29 936
30 782
31 134
32 120
32 331
33 458
33 529
34 797
36 135
37 473
15.1
14.6
14.1
13.5
13.5
13.1
13.0
12.6
12.4
12.1
11.6
11.2
11.1
10.8
10.7
10.4
10.3
10.3
10.3
10.0
10.0
9.9
9.9
9.6
9.6
9.6
9.
9.5
9.2
8.9
8.8
8.8
8.8
8.8
8.5
8.5
8.5
8.5
8.2
8.2
8.2
8.1
7.9
7.8
7.6
7.5
7.3
7.0
6.8
6.7
6.5
6.
6.2
6.2
6.0
5.8
5.6
7 mph 6.5 mph 6 mph 5.5 mph 5 mph 4.5 mph 4 mph 3.5 mph
Meter Meter Meter Meter Meter Meter Meter Meter
(rpm) (rpm) (rpm) (rpm) (rpm) (rpm) (rpm) (rpm)
45
46
47
47
49 45
50 46 Not Recommended
51 47
53 49 45
55 51 47
55 51 47
57 53 49 45
57 53 49 45
59 55 51 47
60 55 51 47
60 56 51 47
60 56 51 47
62 57 53 48
62 57 53 49
62 58 53 49
62 58 53 49
64 60 55 50 46
64 60 55 51 46
5
5
64 60 55 51 46
65 60 55 51 46
65 60 55 51 46
67 62 57 53 48
70 65 60 55 50 45
70 65 60 55 50 45
70 65 60 55 50 45
70 65 60 55 50 45
70 65 60 55 50 45
72 67 62 57 52 46
72 67 62 57 52 47
73 67 62 57 52 47
73 68 62 57 52 47
75 70 64 59 54 48
75 70 64 59 54 48
75 70 65 59 54 48
70 65 60 54 49
73 67 61 56 50 45
73 67 62 56 51 45
75 70 64 58 52 46
70 64 58 52 47
73 67 60 54 48
69 63 57 50
71 65 58 52 45
72 66 59 52 46
74 68 61 54 47
75 68 61 54 48
70 63 56 49
71 64 56 49
Not Recommended 73665951
68 61 53
71 63 55
34516
401-832B Contents Appendix 2012-12-04

Great Plains Manufacturing, Inc. Contents Appendix Seed Rate 11
YP1630F 30in Rows High Range
12 Finger Meter
ATTENTION ! ! !
Great Plains always recommends test stand calibration of the finger meter to the population and ground speed desired .
For Round Corn optimum meter speed is 45 to 75 RPM For Flat Corn optimum meter speed is 60 to 75 RPM
( Shaded & Non-shaded areas ) (Shaded area)
Range Driving =30
Sprockets
Transmission
Combinations Population Spacing
Driving Driven (seeds/acre) (inches)
17 28
17 27
17 26
19 28
17 25
19 27
17 24
19 26
17 23
19 25
19 24
23 28
19 23
23 27
24 28
23 26
24 27
25 28
17 19
23 25
24 26
25 27
26 28
23 24
24 25
25 26
26 27
27 28
23 23
28 27
27 26
26 25
25 24
24 23
28 26
27 25
26 24
25 23
19 17
28 25
27 24
26 23
28 24
27 23
23 19
28 23
24 19
25 19
23 17
26 19
24 17
27
25 17
28 19
26 17
27 17
28 17
(For all seed corn types)
Driven =
Seed Seed
20 720
21 488
22 314
23 158
23 207
24 016
24 174
24 939
25 225
25 937
27 018
28 033
28 192
29 072
29 252
30 190
30 336
30 471
30 535
31 397
31 502
31 600
31 690
32 706
32 762
32 815
32 864
32 909
34 128
35 392
35 440
35 493
35 550
35 611
36 753
36 858
36 971
37 095
38 143
38 223
38 393
38 579
39 815
40 063
41 312
41 547
43 108
44 905
46 173
46 701
19
48 180
48 497
50 188
50 293
52 195
54 203
56 210
20 Ground Speed
7 mph 6.5 mph 6 mph 5.5 mph 5 mph 4.5 mph 4 mph 3.5 mph
Meter Meter Meter Meter Meter Meter Meter Meter
(rpm) (rpm) (rpm) (rpm) (rpm) (rpm) (rpm) (rpm)
10.1
9.7
9.4
9.0
9.0
8.7
8.6
8.4
8.3
8.1
7.7
7.5
7.4
7.2
7.1
6.9
6.9
6.9
6.8
6.7
6.6
6.6
6.6
6.4
6.4
6.
6.4
6.4
6.1
5.9
5.9
5.9
5.9
5.9
5.7
5.7
5.7
5.6
5.5
5.5
5.4
5.4
5.3
5.2
5.1
5.0
4.9
4.7
4.5
4.5
4.3
4.3
4.2
4.2
4.0
3.9
3.7
4
61 57 52 48
63 59 54 50 45
66 61 56 52 47 Not Recommended
68 63 58 54 49
68 63 59 54 49
71 66 61 56 51 45
71 66 61 56 51 46
73 68 63 58 52 47
74 69 64 58 53 48
71 65 60 55 49
74 68 63 57 51 45
71 65 59 53 47
71 65 59 53 47
73 67 61 55 49
74 68 62 55 49
70 64 57 51
70 64 57 51 45
71 64 58 51 45
71 64 58 51 45
73 66 59 53 46
73 66 60 53 46
73 66 60 53 47
73 67 60 53 47
Not Recommended 73 64
69 62 55 48
69 62 55 48
69 62 55 48
69 62 55 48
69 62 55 48
72 65 57 50
74 67 60 52
75 67 60 52
75 67 60 52
75 67 60 52
75 67 60 52
70 62 54
70 62 54
70 62 54
70 62 55
72 64 56
72 64 56
73 65 57
73 65 57
75 67 59
67 59
70 61
70 61
34517
66
68
69
71
71
74
74
2012-12-04 Contents Appendix 401-832B
 Loading...