

Quick Setup Guide for IntelliAg Model YP1225 20” Air Pro
The Quick Setup Guide assumes the Virtual Terminal, Master Switch, Working Set Master Module,
Working Set Member Module, and all sensors have been connected and properly installed. Reference Operator’s manual for installation instructions. NOTE: The master switch is only required for
hydraulic control systems. Reference the manual for instructions to assign a master switch
STEP 1: Pre-Programming Preparation:
Power on vehicle via ignition switch to activate Virtual Terminal (VT). Main menu will display pre-programmed default settings.
1.
If errors are detected (e.g., failed sensors, incorrect confi guration) an alarm and code displays. Alarms are silenced by pressing the Alarm Cancel button . Refer to Operator’s
2.
manual for troubleshooting assistance.
The system has three user levels. The system loads in User Level 1 (operator level) at every power cycle. Access to User Level 2 and 3 screens to setup constants (system confi gura-
3.
tion) requires a password.
STEP 2: Change User Level to Dealer Level
To change the user level, a 6-digit password is required. Password includes the fi ve-digit
serial number found on the label of the Working Set Master or Information screen.
On the IntelliAg Main Work screen, press the Diagnostics button .
1.
At the Diagnostics screen, press the Information button .
2.
At the Information screen, record serial number of WSMT.
3.
Press the Password button .
4.
On the Password screen, enter the 6 digit password as follows: enter the fi rst digit as 2 for
5.
User Level 2. For the next fi ve digits, enter the Working Set Master serial number taken
from the WSMT or Information screen.
Press the OK button . “Dealer screens on” appears at the bottom of screen confi rm-
6.
ing the password and dealer screens are activated.
Press the Work Screen button to return to the Main Work screen.
7.
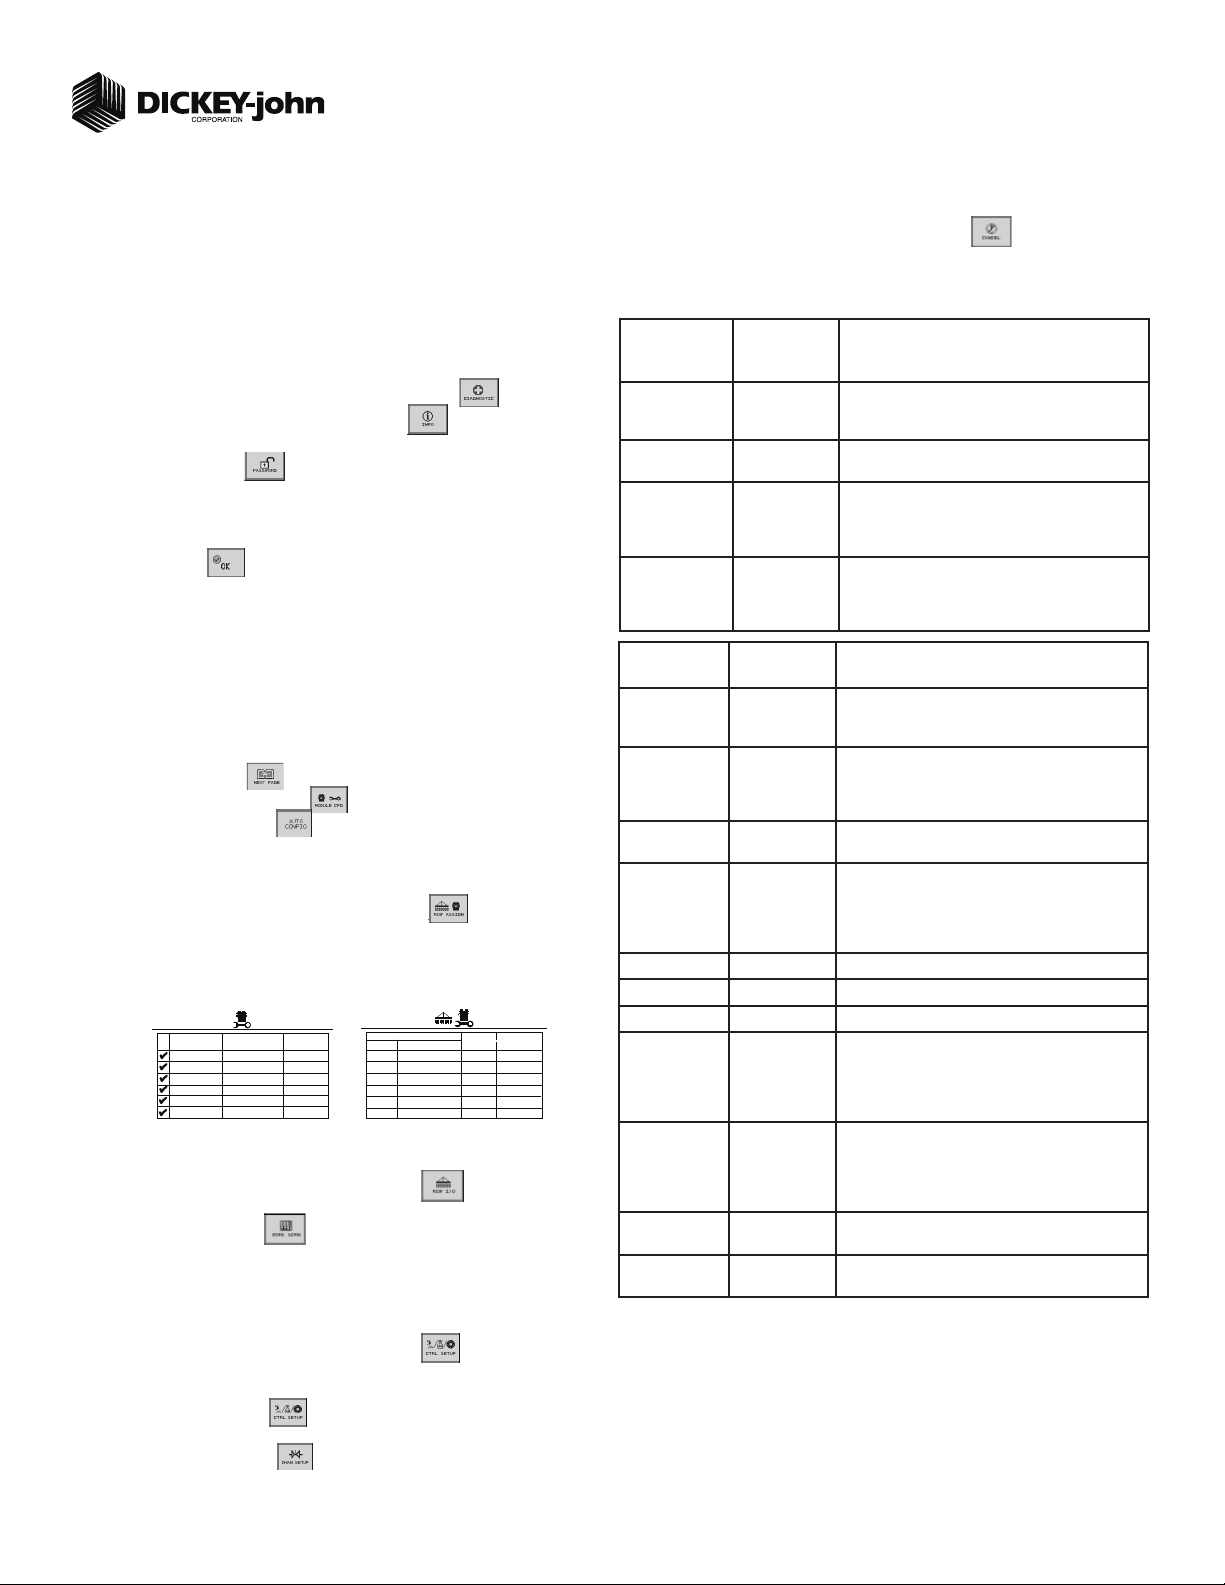
STEP 3: Auto Confi guration (Identifi es sensors connected to each module)
Auto confi g is performed at the factory, but may need to be done in the fi eld as changes
are made to the system or if options are added to the base planter.
Verify Auto Confi g results are correct. Check that the correct number of rows are assigned
1.
to the correct module and number of hopper sensors are assigned accurately.
To Run Auto Confi g:
Press the Next Page button until the Module Confi guration button appears.
1.
Press the Module Confi guration button .
2.
Press the AUTO CONFIG button .
3.
Hour glass will indicate system is being confi gured detecting the presence of seed or hopper
4.
sensors connected to each module and will be automatically assigned to the appropriate
module.
When Auto Confi g completes, press the Row Assign button to display the Row
5.
Assignment screen to verify correct Row # is assigned to the correct module based on serial
number.
Enter # of rows assigned to each module.
6.
Module Configuration Screen Seed Sensor Configuration Screen
(Optional)
SERIAL
NUMBER
10001
10002
10001
10001
10002
10001
MODULE
TYPE
WSMB-POM
WSMB-POM
WSMB-18R
WSMT-GP
WSMB-18R
WSMB-CFM
MODULE
ADDR.
1
2
3
4
5
6
STEP 4: Row Status/Row Width Setup
At the Row Assignment screen, press the Row I/O button .
1.
Begin entering desired values using Table A as reference.
2.
Press the Work Screen button
3.
when Row Status/Row Width confi gurations are
complete to return to the Main Work screen.
STEP 5A: Material Confi guration Setup (Controlled Hydraulic Drive)
15 different materials can be confi gured for use as planter controls. Reference the System
Confi guration section in the Operator’s manual for additional information.
At the Main Menu screen, press the Control Setup button .
1.
Select and press one of the Material buttons (Material 1-15).
2.
Enter desired values from Table B1.
3.
Press the Control Setup button to return to the Control Setup screen.
4.
Repeat steps 2-4 for additional materials.
5.
Press the Channel Setup button to proceed to channel setup screen.
6.
11001-1591-201108
©2011 DICKEY-john Corporation
Specifi cations subject to change without notice.
as an auxiliary input.
ADDR.
1
2
MODULE
WSMB-18R
WSMB-18R
TYPE
# OF
ROWS
9
9
ROW
10-18
TABLE A: Row
Status/Row
Width Setup
Default Value
or Value to
Enter
Instructions/Defi nitions
Row Width 20” Enter row width distance in inches to calculate seed rate
correctly. NOTE: Using 15” planter in 30” mode should
change On/Off Pattern to Every 2nd Row Off.
Auto Update Width Enabled When enabled, implement width will automatically calcu-
late. If disabled, manually enter implement width.
On/Off Pattern Every Row On On/Off Pattern indicates specifi c row patterns to be on
or off. Select pre-defi ned planter All Row On pattern.
For other pre-defi ned planter patterns or individual row
settings, reference Operator’s manual.
Pop/Block Pattern Every Row
Population
Determines which sensors are used to calculate population and those used only for blockage detection. Select
pre-defi ned Every Row Population. For other pre-defi ned
patterns, reference Operator’s manual.
TABLE B1:
Material Setup
Default Value/
Value to Enter
Controlled Hydraulic Drive
Instructions/Defi nitions
Matrl Label Matrl 1 Material Name can be customized to accurately defi ne
the material’s type. Creating a name allows for quick
identifi cation at the Control Setup screen.
Type Planter Control Desired type of application control channel being used
for a specifi c material. The Material Type must correctly
match the Control Type to be able to select Material from
the Material Summary screen and operate properly.
Units Ks/Ac
S/Sec
Automatically changes with the type of material application selected. Changes units for target application.
Preset Method Enable Enabled Preset Method allows 10 user-defi ned target
rates to be adjusted from the Main Work screen using Inc
or Dec buttons. A Disabled Preset Method increases/decreases the target rate based on the % values set at the
Material Setup screen.
Seeds per Rev See Manual Set to number of seeds per 1 disc revolution.
Disc Low Limit 5 Set to desired min seed disc RPM.
Disc High Limit 37 Set to desired max seed disc RPM.
#’s
1-9
High Pop Alarm 15% This is the percentage above the target population of
the planter channel if rows are assigned to the planter
channel. If rows are not assigned to a planter, this is
the percentage above average planter population for all
unassigned rows.
Low Pop Alarm 15% This is the percentage below the target population of the
planter channel if rows are assigned to the planter channel. If rows are not assigned to a planter channel, this is
the percentage below average planter population for all
unassigned rows.
Product Level
Alarm
Row Fail Rate 2/1 (2 seeds
every 1 second)
Sets the level to trigger an alarm alerting of low product
levels. Entered value is an estimate in volume.
Set to desired number of seeds per second to trigger
seed sensor failure alarm.
1

Quick Setup Guide for IntelliAg Model YP1225 20” Air Pro
STEP 5B: Material Confi guration Setup (Ground Drive Metering)
For Ground Drive Metering, control channels 1, 3, and 4 MUST be disabled
and the Monitor Only feature selected at the Control Setup screen. NOTE: A
Material Name must also be selected at the Row Monitor screen to activate
high and low population alarms.
At the Main Work screen, press the Next Page button
1.
Press the Control Setup button .
2.
Select and press one of the Material buttons (Material 1-16).
3.
Enter desired values from Table B2.
4.
Press the Control Setup button to return to the Control Setup screen.
5.
Repeat steps 3-5 for additional materials.
6.
Press the Channel Setup button to proceed to the Channel Setup
7.
one time.
screen and disable any active channels (Step 6B).
STEP 6A: Planter Control Channel Setup
(Controlled Hydraulic Drive)
Select Channel 1 and verify that the channel is set to Planter Control.
1.
Enter desired values using Table C1 as reference.
2.
After planter control setup, calibrate hydraulic valve by pressing the Valve Cal
3.
button .
Ensure implement is raised. With brakes locked and transmission in PARK
4.
position, start engine.
Engage hydraulics and run engine at normal speed until hydraulic fl uid is at
5.
operating temperature.
Verify point row clutches are turned ON.
6.
Do NOT perform this step unless meters are installed in all locations
7.
across planter row units or drive damage will occur.
Press the START button . Turn the master switch to the ON position.
The valve calibration will immediately start. Keep the hydraulics engaged until
the calibration completes.
When the screen indicates calibration is complete, press the Channel Setup
9.
button to return to Channel 1 home screen.
Turn the master switch OFF.
10.
To set up additional control channels (planter or fertilizer control), press the
11.
Next Channel button .
Press the Work Screen button when channel confi gurations are com-
12.
plete to return to the Main Work screen.
Once a control channel has been established as Planter Control, any new materials established as Planter Control on the Material Setup screen will automatically
be added as optional materials for Planter Control channels on the Control Setup
screen.
STEP 6B: Planter Control Channel Setup
(Ground Driven Metering)
NOTE: When using a ground drive/nonhydraulic application to monitor
population, control channels 1, 3, and 4 must be disabled and Material Setup
confi gured for Monitor Only. A material name must also be selected on the
Row Monitor screen.
Press the Channel Setup button .
1.
Select Channel 1 and verify that the channel is set to Disabled.
2.
Press the Next Channel button to change control channels 3 and 4 to
3.
Disabled.
TABLE B2:
Material Setup
Type Monitor Only Desired type of application control channel being used for a specifi c
Units Ks/Ac
Target Population 32.0 1000s of seeds per acre or hectare (32,000 seeds per acre)
High Pop Alarm Warns of a high population problem. Values are % based.
Low Pop Alarm Warns of a low population problem. Values are % based.
On/Off Pattern Rows can be automatically turned ON or OFF according to the
Row Fail Rate 2/1 (2 seeds
Default Value/
Value to Enter
S/Sec
every 1 second)
Ground Driven Metering
Instructions/Defi nitions
material.
Automatically changes with the type of material application selected.
Changes units for target application.
pattern.
Set to desired number of seeds per second to trigger seed sensor
failure alarm.
TABLE C1:
Planter Control
Setup
Type Planter Control Set desired Channel Type as Planter Control.
Material Name Displays only materials that have been confi gured for the channel
Control Mode AUTO Auto is used in normal operating conditions calculating the rate of how
Drive Type PWM A hydraulic valve varies the oil fl ow to the motor proportioned to the
Drive Frequency 100 Hz If not using a DICKEY-john supplied valve, see the manufacturer’s
Input Filter 50 Feedback frequency fi lter for the control channel. DO NOT CHANGE.
Gear Ratio 1.900 Specifys the actual ratio from the feedback sensor to the seed meter
Sensor Constant 360 Sensor Constant establishes the number of pulses for one revolution
# of Seed Rows 18 Entry of a specifi c number of seed rows for the control channel.
Channel Width
Precharge Time + 0.0 Typically used during startup conditions in the fi eld, a Precharge
Delay Time - 0.0 Length of time before the control channel will start after the master
Default Value/
Value to Enter Instructions/Defi nitions
type.
the system is running. Manual mode acts as an override if application
rate sensors are inoperable allowing the use of increase/decrease
buttons to set the fl ow rate for the control. Refer to System Confi gura-
tion section of Operator’s manual for additional information.
electric current supplied.
specifi cations for drive frequency.
shaft RPM. Number of revolutions the feedback sensor turns in relation to one revolution the seed meter turns.
of the feedback sensor. If a DICKEY-john application rate sensor is
used, the value should be set to 360.0.
Row assignment is given a priority based on the channel and will be
assigned sequentially thereafter. Channel 1 is always assigned to the
fi rst set of rows, Channel 2 next set of rows, and so on.
360 Manual entry of the channel width for rows assigned to a specifi c
channel. Width calculation can be determined by # of planter rows
assigned to the channel multipled by the row spacing.
time is a specifi ed length of time a control channel will operate at the
defi ned Precharge Ground Speed. Must be entered as a positive (+)
number.
switch has been turned ON and the implement switch is in a lowered
position. Must be entered as a negative (-) number.
11001-1591-201108
©2011 DICKEY-john Corporation
Specifi cations subject to change without notice.
2

Quick Setup Guide for IntelliAg Model YP1225 20” Air Pro
STEP 7A: Material Confi guration Setup (Split Air Regulation)
It is recommended that when setting a control channel for split air, the
material name be created as “Air” to eliminate confusion between the actual
material and the control used.
At the Main Work screen, press the Control Setup button
1.
Press Material button 16 for Split Air Control.
2.
Create Material Name as “Air”.
3.
Enter desired values from Table D1.
4.
Press the Channel Setup button to proceed to the Channel Setup
5.
.
screen.
STEP 7B: Planter Control Channel Setup
(Split Air Regulation)
NOTE: Split Air Regulation must be confi gured as Control Channel 2 only.
At the Channel Setup screen, press the Next Channel button .
1.
At Channel 2 screen, select Split Air Regulation as the Type.
2.
Enter desired values from Table D2.
3.
Press the Work Screen button to return to the Main Work screen.
4.
STEP 8: Row Monitor Setup
At the Main Work screen, press the Row Monitor button .
1.
Enter desired values using Table E as reference.
2.
Press the Work Screen button to return to the Main Work screen.
3.
TABLE D1:
Material Setup
Type Split Air Reg Desired type of application control channel being used for a specifi c
Units In H20
Preset Method Disabled User-defi ned target rates can be confi gured and when enabled can be
Target Rate 2.00 Establishes the desired rate of application in inches of H20.
Max Rate 5.00 Maximum application rate in inches of H20.
Min Rate 1.00 Minimum application rate in inches of H20.
Inc/Dec % 5% Percentage of change of the entered target rate applied each time the
TABLE D2:
Planter Control
Setup
Type Split Air
Material Name Air Create Material Name as “Air”.
Control Mode Auto Control channel feedback based on air pressure sensor.
Drive Type Air Reg 2 Automatically selects Air Reg 2 as drive type.
Input Filter 79% Amount of fi ltering applied to the control channel feedback frequency.
Pressure Drop 0 Difference in pressure sensor mounting location to the seed disk in
Pressure Slope 447.2269 The change in pressure sensor voltage to a frequency readable by
Pressure Offset 800 Takes a zero point reading that provides a frequency when the fan is
Planter Selection YP12 Select Planter Selection of YP12 to automatically adjust to the ap-
Sensitivity Adjust 0 Increases or decreases the calibration parameters in the ranges of -10
Default Value/
Value to Enter
2
Oz in
Default Value
or Value to
Enter
Regulation
Split Air Regulation
Instructions/Defi nitions
material. CREATE MATERIAL NAME AS “AIR”.
Automatically changes with the type of material application selected.
Changes units for target application.
adjusted from the Main Work screen using the Increment/Decrement
buttons.
Increment/Decrement button is pressed on the Main Work screen.
Split Air Regulation
Instructions/Defi nitions
Confi gure Control Channel 2 as Split Air Regulation.
inches of H20.
the IntelliAg system and measured in inches of H20. Should only be
adjusted by qualifi ed personnel.
off. Press the Zero Pressure button to calculate frequency.
propriate calibration settings.
to +10. Increasing response time makes the system respond quicker.
11001-1591-201108
©2011 DICKEY-john Corporation
Specifi cations subject to change without notice.
TABLE E:
Row Monitor
Setup
Material Name See Instructions Material Name only appears on the Row Monitor Setup screen when
High Alarm Delay 5 Desired number of seconds that high population can be above high
Low Alarm Delay 5 Desired number of seconds that low population can be below low
Population Adjust 100 Enter a % to allow for seed sensor population inaccuracies to achieve
Population Filter 50 Set fi lter value to stabilize the monitored population display. Number
Row Fail Rate 2/1 (2 seeds
Default Value
or Value to
Enter Instructions/Defi nitions
all control channels are disabled and material is set for Monitor Only.
This is only used for ground drive/nonhydraulic applications to monitor
population with high and low alarms. A material must be confi gured
and selected to activate alarms.
alarm point before alarm will sound.
alarm point before alarm will sound.
the desired population display. 100% represents true calculation.
can be set to 0% for no fi ltering and 99% for high level fi ltering.
every 1 second)
Set to desired number of seeds per second to trigger seed sensor
failure alarm.
3

Quick Setup Guide for IntelliAg Model YP1225 20” Air Pro
STEP 9: Speed Set Calibration Setup
At the Main Work screen, press the Speed Set button .
1.
Enter desired values using Table F as reference.
2.
Press the Work Screen button
3.
when ground speed calibration confi gu-
rations are complete to return to the Main Work screen.
STEP 10: Accessory Sensor Setup
Hopper Assignment
At the Main Work screen, press the Next Page button .
1.
Press the Module Confi guration button to display the Module Confi gura-
2.
tion screen.
At the Module Confi guration screen, press the Hopper Assign button .
3.
Press Hopper Set button .
4.
Enter desired values using Table G as reference.
5.
RPM Assignment
At the Module Confi guration screen, press the Acc Assign button .
1.
Press the RPM Setup button .
2.
Enter # of RPMs, if required. NOTE: There must be at least 1 RPM sensor
3.
confi gured before the RPM Setup button appears on the screen.
Enter desired RPM values using Table G as reference.
4.
TABLE F:
Speed
Set
Source Digital Frequency Select CAN Ground if radar is connected to ISO tractor cab harness.
Gspd Constant 2546 Input based on pulse count produced by the ground speed sensor
Shutoff Speed 0.5 mph Set desired minimum ground speed allowed before the system shuts
Minimum
Override
Master Sw
Timeout
Gspd Fail Alarm
Delay
Precharge Ground
Speed
Implement Lift Enabled Implement lift switch, when enabled, displays an implement lift indica-
Default Value/
Value to Enter Instructions/Defi nitions
Select Digital Frequency if radar or hall-effect is connected to WSMT
actuator harness.
over 400’ distance. See Operator’s manual for calibration instructions.
off.
2.0 mph Set to operate when actual ground speed falls below the designated
value. Control will operate at this speed until actual ground speed
rises above minimum override speed or actual speed drops below
shutoff.
10 Set to desired number of seconds system shuts off if the master
switch is turned on and there is no ground speed. Toggle master
switch to restart the system and turn off alarm.
5 Set to desired number of seconds alarm sounds after the ground
speed is zero and seed fl ow continues. (Monitor only)
0 Set to the desired speed the system will use when a precharge time
has been enabled for a control channel. Refer to Table C1: Planter
Control Setup for Precharge Time. This setting will only display when
a Precharge Time has been entered.
tor on the Main Work screen indicating implement lift position as up
or down. Control channels can be turned on and off without using the
master switch.
TABLE G:
Accessory
Setup
Hopper Setup
# of Hoppers 1 (base unit)
Logic Level Active Lo Sets the active state to low signifying that an alarm is generated if
Alarm Delay 5 sec Controls the delay time between the detection of a high/low hopper
Channel Assigns hopper sensor to channel.
RPM Setup
High Alarm
(fan speed)
Low Alarm
(fan speed)
High Alarm Delay 10 sec Establishes the delay between the detection of a high RPM alarm con-
Low Alarm Delay 10 sec Establishes the delay between the detection of a low RPM alarm con-
RPM Constant 3 pulses/rev Number of pulses per sensor revolution.
RPM Filter 0 Filters the signal out of the RPM sensor.
Disable Control
on Low Alarm
Default Value/
Value to Enter Instructions/Defi nitions
1 more (optional)
3000 rpm Sets the RPM value at which a high RPM warning error is generated.
1800 rpm Sets the RPM value at which a low RPM warning error is generated.
Disabled Allows for disabling of all control channels if the RPM value of the
# of hopper sensors connected to each module (4 sensors maximum).
# of hopper data items for each listed module and the Hopp #’s value
will automatically populate if Auto Confi g is used to confi gure installed
sensors.
the sensor’s output is in a low state. Use this setting if the connected
sensor outputs a low condition when empty similar to the DICKEY-john
hopper sensor.
alarm condition and the generation of the resulting alarm. The value is
entered in seconds.
dition and the resulting alarm display. The value is entered in seconds.
dition and the resulting alarm display. The value is entered in seconds.
selected sensor falls below the low alarm level setting.
11001-1591-201108
©2011 DICKEY-john Corporation
Specifi cations subject to change without notice.
4

Quick Setup Guide for IntelliAg Model YP1225 20” Air Pro
STEP 11: Clutch Folding Module (CFM) Setup
The CFM is installed in the cab to control row clutches, marker, fold, fertilizer on/off, lift
and hitch.
At the Main Work screen, press the Clutch CFG button to access the Clutch Confi gu-
1.
ration screen and verify that the correct # of clutches are confi gured for the system.
The Clutch CFG button
2.
only appears as a top level button when a planter
output module and clutch folding module are installed.
STEP 12: Clutch Folding Module Operation
The planter section controls turn the left and right clutch controls on and off.
1.
The master switch must be in the ON position to activate any planter section. When a
2.
clutch control is ON, a green light will illuminate.
Marker/Fold Switch should be in the UP (Marker) position during planting. In the
3.
DOWN (Fold) position, the switch controls the fold of the main frame.
The fertilizer pump switch is turned ON when in the UP position. Press the switch in
4.
the DOWN position to turn OFF.
Lift/Hitch switch should be in the UP (Lift) position during normal operation. In the hitch
5.
position, the switch should be in the DOWN (Hitch) position to unlock and extend the
telescoping tongue in preparation of folding the implement for transport.
Lift/Hitch switch MUST be in the hitch position and hydraulic circuit in FLOAT when
6.
transporting planter equipped with hydraulic-operated tongue hitch. NOTE: Lift/Hitch
switch has no function if planter has standard 3-point hitch operated tongue hitch.
STEP 13: 5 Revolution Test
Press the Control Setup button .
1.
Press the Channel Setup button .
2.
Press the Next Page button .
3.
Ensure implement is raised before starting 5 Rev Test.
4.
With brakes locked and transmission in PARK position, start tractor engine.
5.
Engage hydraulics and run engine at normal speed until hydraulic fl uid is at operating
6.
temperature.
Press the 5 Rev button .
7.
Test Ground Speed and Row data must be entered to perform test.
8.
Press and hold remote test button to initiate 5 Rev Test.
9.
# of Clutches
OUTPUT
LEFT
RIGHT
# OF
ROWS
9
9
2
ROW
#’s
1-9
10-18
STEP 14: Summary Screen
The Summary screen provides an overview of setup constants for active control channels.
At the Main Work screen, press the Next Page button .
1.
Press the Summary button
2.
To view specifi c control channel confi gurations, press the respective control channel
3.
box 1-4.
Press inside a yellow highlighted box to open a specifi c screen for editing.
4.
Press the Work Screen button to return to the Main Work screen.
5.
11001-1591-201108
©2011 DICKEY-john Corporation
Specifi cations subject to change without notice.
5

Quick Setup Guide for IntelliAg Model YP1225 20” Air Pro
Hydraulic
Tongue
Connect to
Harness 467980134
Option
467982000S1
Planter
Output
Module
Output 2 Hitch B1
Output 2 Hitch B2
Output 1 Lift
467983502
Connect to
467980144
Extension
464820517
Row 1
Row 2
Left Section
Row 3
Row 4
Row 5
Row 6
Row 7
Row 8
Row 9
Note: Connect the WSMT
Actuator harness and the
Dj Planter Harness to the
mating connectors of the
WSMT Module harness
Row 10
Right Section
Row 11
Row 12
Row 13
Row 14
Row 15
Row 16
Row 17
Row 18
WSMB
Module
Seed Monitor
467981100S1
WSMT
467980815S1
Hopper Level
Sensor
466820720S3
Standard Dj SE Style
Planter Harness
Connect to
Actuator
467980160
467980410
Harness
WSMB
Module
Seed Monitor
467981100S1
Standard Dj SE Style
Planter Harness
Harness
11001-1591-201108
©2011 DICKEY-john Corporation
Specifi cations subject to change without notice.
Implement CAN
Breakaway Harness
467980134
Connect to Optional
Hydraulic Tongue Harness
or to Extension
Clutch
WSMB
Module
Harness
467981201A
Terminator
Control
464820517S1
467982000S1
Can
Output 2 Fold
Planter
Output
Module
467980847
Extension
Harness 20’
WSMB
Module
Harness
467981201A
467980143
Extension
Harness 25’
WSMT
Module
Harness
467980851
467980143
Extension
Harness 25’
2 Solenoid Driver
464820511S1
Output 1 Marker
2 Solenoid Driver
464820518S1
Right
Clutch
Output 1
466820832S1
Extension 5’
Output 1
Left Clutch
Output 2
Not used
Not used
Output 2
20’ Extension
467980471
467983504
Tractor Harness
CFM Harness
467980330
Chassis
Ground
CAN
Terminator
467980126
RS232
GPS
(467980451 Harness)
Master
Switch
Radar Speed Sensor
467833000S1
Mounting Kit
467830760
(Radar connected to either
tractor harness
or WSMT as shown below)
Virtual
Ter mi n al
Tractor Cab Harness
467980455
Connect Cab
Harness to
Implement CAN
Battery
-
Harness
+
467980452
(5” Terminal) or
467980451A
(10” Terminal)
Tractor ECU
Controller
(467980451)
Task Controller
(467980452)
(10” VT ONLY)
must be connected to
CFM
467984261S1
Harness
Harness
or
Ignition
Connect to switched
+12VDC
NOTE: This wire
switched +12VDC
ACTUATOR HARNESS
467980160
Application
Rate Sensor
(Channel 1-4 Feedback)
Labeled FB1-FB4
Actuator
467096050
Hopper
Level Sensor
466820720S3
Implement
Lift Extension
Harness
466820713
Implement Lift Sensor
464820520S1
If no implement lift
sensor is used, connect
the IMP LIFT leads
together
PWM Solenoid Valves
466820832S1
Hopper Extension
Harness
466820714
Fan/Shaft
RPM Sensor
466970014S1
10’ Harness
457901815
5’ Harness
457901826
Fan
Extension
Harness
459680922
System Component Installation
Locate and install system components as shown in the diagram. Note
1.
how the modules are identifi ed and which modules are located on
which sections in this system.
Connect WSMB module harnesses together with included extensions.
2.
Modules connect to the WSMT harness connection. Plug all unused
connectors with included dust plugs.
Secure any excess wires with tie-wraps.
3.
See Operator’s Manual for additional installation information.
4.
Power on monitor and program with correct constants as described on
5.
this Quick Start Guide.
Adapter
467980172
Accessory Sensors
connection to WSMT
Actuator Harness
467980160
Servo Valves
(Labeled Servo 1 and Servo 2)
Test Switch
Hall Effect
Sensor
466970016S1
Pressure
Sensor
467980496
6
 Loading...