

Page 1

Great Plains Mfg., Inc.
Native Grass Cup Enhancement Kit
Native Grass Drills
Used with:
• Pre-2007 605NT, 3P605NT Native Grass
• Pre-2007 705, 706, 1005, 1006 Native Grass
• Pre-2007 3PNG12, 3PNG15, 2SNG24, 2SNG30, NG12 Grass Seeder
General Information
Installation Instructions 1
These instructions explain how to install the Native Grass
Cup Enhancement Kit. This kit enhances your Great
Plains Native Grass Drill to a hi-rate native grass seed
sprocket. This kit fits most Great Plains Native Grass
Drills. If your drill is not listed above, have your dealer
contact the factory, as a kit may be available.
If your drill is a Series II, you already have this enhancement.
These instructions apply to:
202-597A Native Grass Cup Enhancement Kit
(order one kit per row)
For a complete Series II enhancement, separately order
one of the agitator kits below, and two decals:
202-600A 6’ NG SERIES II AGITATOR KIT
202-601A 706-7 1/2” NG SERIES II AGT.
202-602A 1006-7 1/2” NG SERIES II AGT.
202-603A NG-12 SERIES II AGITATOR
202-604A 12’ 7 1/2” NG SERIES II AGT.
202-605A 12’ 10” NG SERIES II AGT.
202-606A 15’ 7 1/2” NG SERIES II AGT.
202-607A 15’ 10” NG SERIES II AGT.
838-986C DECAL NATIVE GRASS SERIES II
If installing a complete upgrade to Series II, install this kit
(the cup enhancement) before installing the agitators.
Before You Start
Each kit converts one row. You need a kit for each row of
your machine. Count rows and kits.
For each kit, inventory the contents per the “Parts List” on
page 3.
Determine whether your machine is an older model without a removable tray at the bottom of the seed box. The
instructions vary depending on machine type.
If necessary, move the drill to a dry well-lighted location
suitable for disassembly.
Park and secure the drill. Secure the tractor if left connected.
Disconnect any hydraulic and electrical power to the drill.
Have the following tools at hand:
• Parts Manual, or Operator/Part Manual for your drill.
if you do not have one, a copy can be obtained from
your dealer, or, in most cases, on-line in the Support
section of the Great Plains web site:
www.greatplainsmfg.com
•3⁄16in hex driver with a reach of at least 6in through a
13⁄4in access hole (the hose port of the cup)
• Basic hand tools
©Copyright 2006 Printed 10/24/2006 202-598M
Page 2
2 Native Grass Cup Enhancement Kit
Installation
Instructions for All Models
1. Clean out any seed in box.
2. Disconnect seed hoses from the meter cups.
3. Remove final drive sprockets at the Native Grass
(NG) seed box and remove drive chains at the box.
4. Access to the tray and feeder cups may require additional removal of walkboards and small seed boxes.
Great Plains Mfg., Inc.
Fixed-Tray Drill Disassembly
On these models, the upgrade is easiest if the entire
Native Grass seed box is removed.
5. Remove the Native Grass seed box.
Instructions for All Models
Remove existing feeder cups and sprockets.
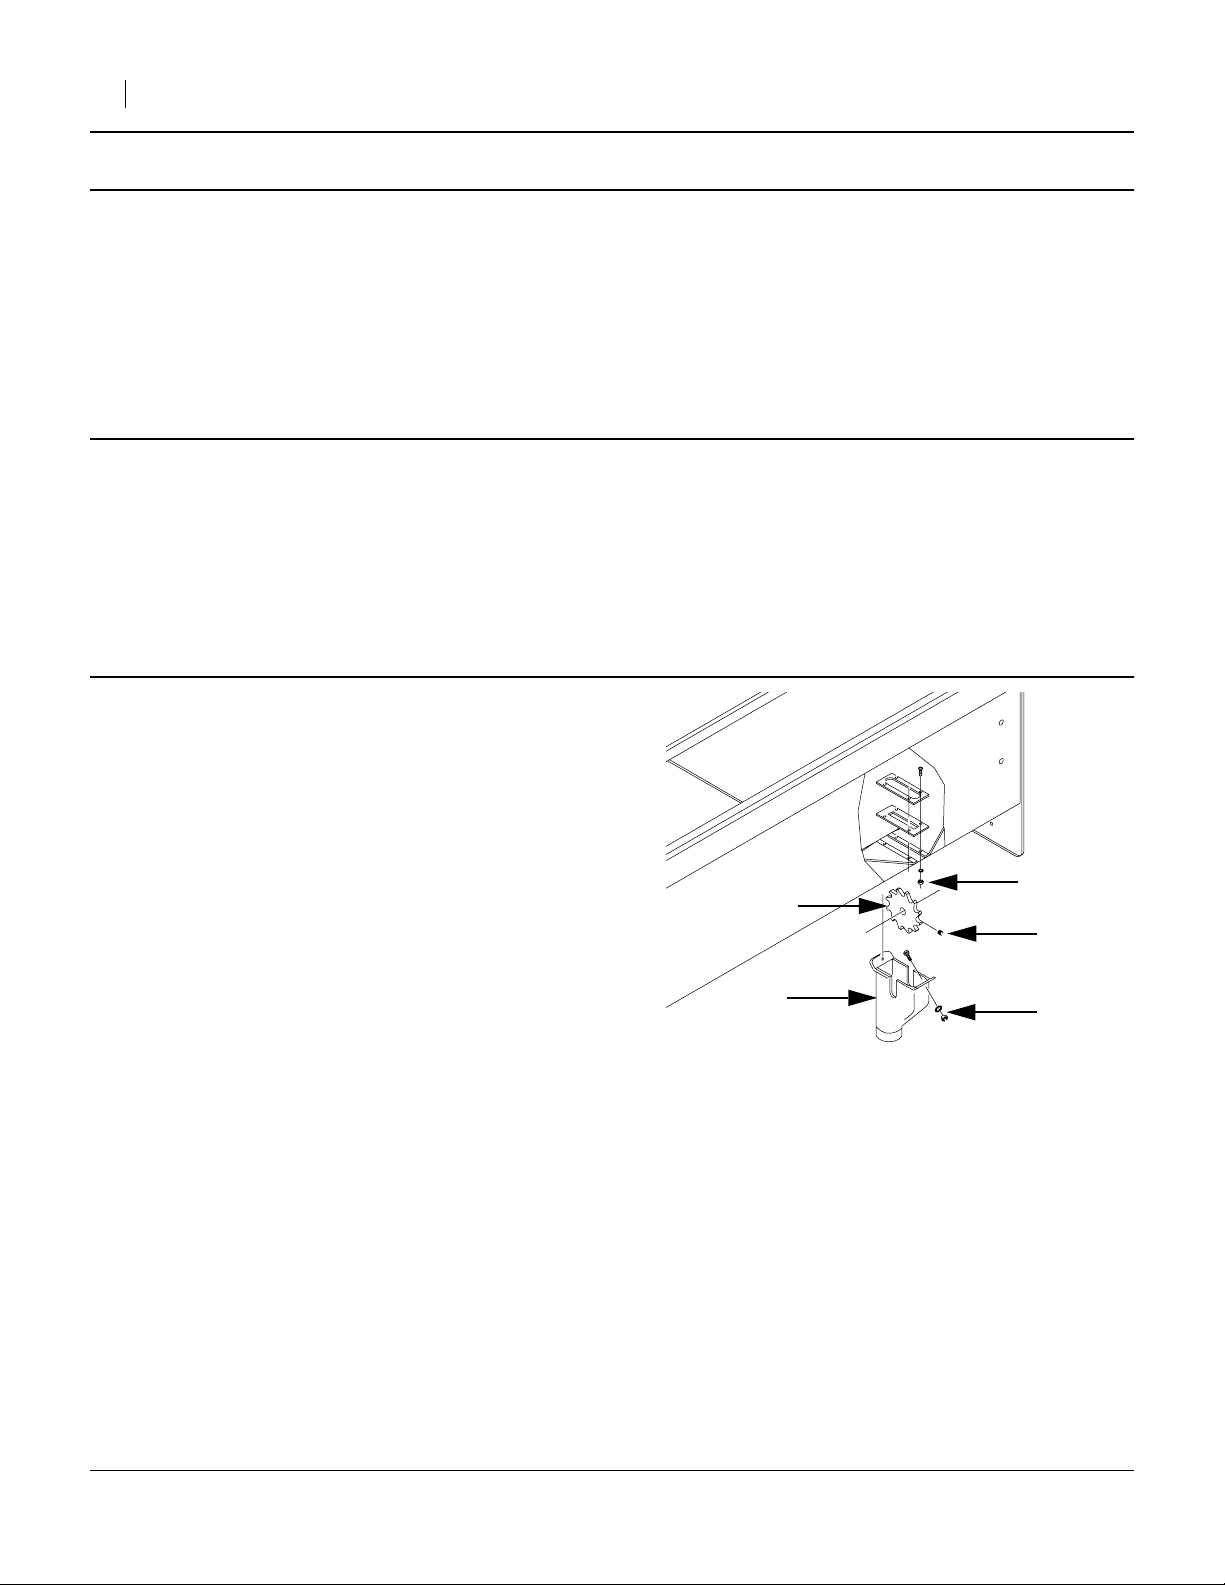
Refer to Figure 1 (which depicts a fixed-tray seed box, but the disassembly process is identical for removable-tray)
6. Remove the1⁄4-20 screws, nuts and washers ➂ that
attach the NG feeder cups ➀ to the tray.
Save the screws, washers and nuts.
Save the NG feeder cups.
7. At each NG feeder cup sprocket ➃, insert the 6in
hex wrench, and loosen the sprocket set screw ➁
two full turns.
8. Remove the 10-24 screws, nuts and washers ➄
that attach the existing wheel covers tray.
Save the screws, washers and nuts.
Save the wheel cover plates.
The existing gasket is not re-used.
9. Remove the set screw from each feeder sprocket.
Save the set screw.
10. Orient the box or tray so that the existing sprockets
➃ will fall away safely, and slide the drive shaft out
of the far end bearing, then each feeder cup
sprocket. The sprockets are not re-used.
Removable-Tray Drill Disassembly
On these models, the upgrade is easiest if just the seed
tray is removed.
5. On the end of the Native Grass feeder cup shaft with
the drive sprocket, remove the screws from the cast
bearing housing, drop that end of the shaft out of its
slot, and pull the assembly out of the hole at the far
end of the shaft, removing the tray from the seed box.
➄
➃
➁
➀
Figure 1
Cup Disassembly
➂
25122
202-598M 10/24/2006
Page 3
Great Plains Mfg., Inc.
Install new sprockets and feeder cups
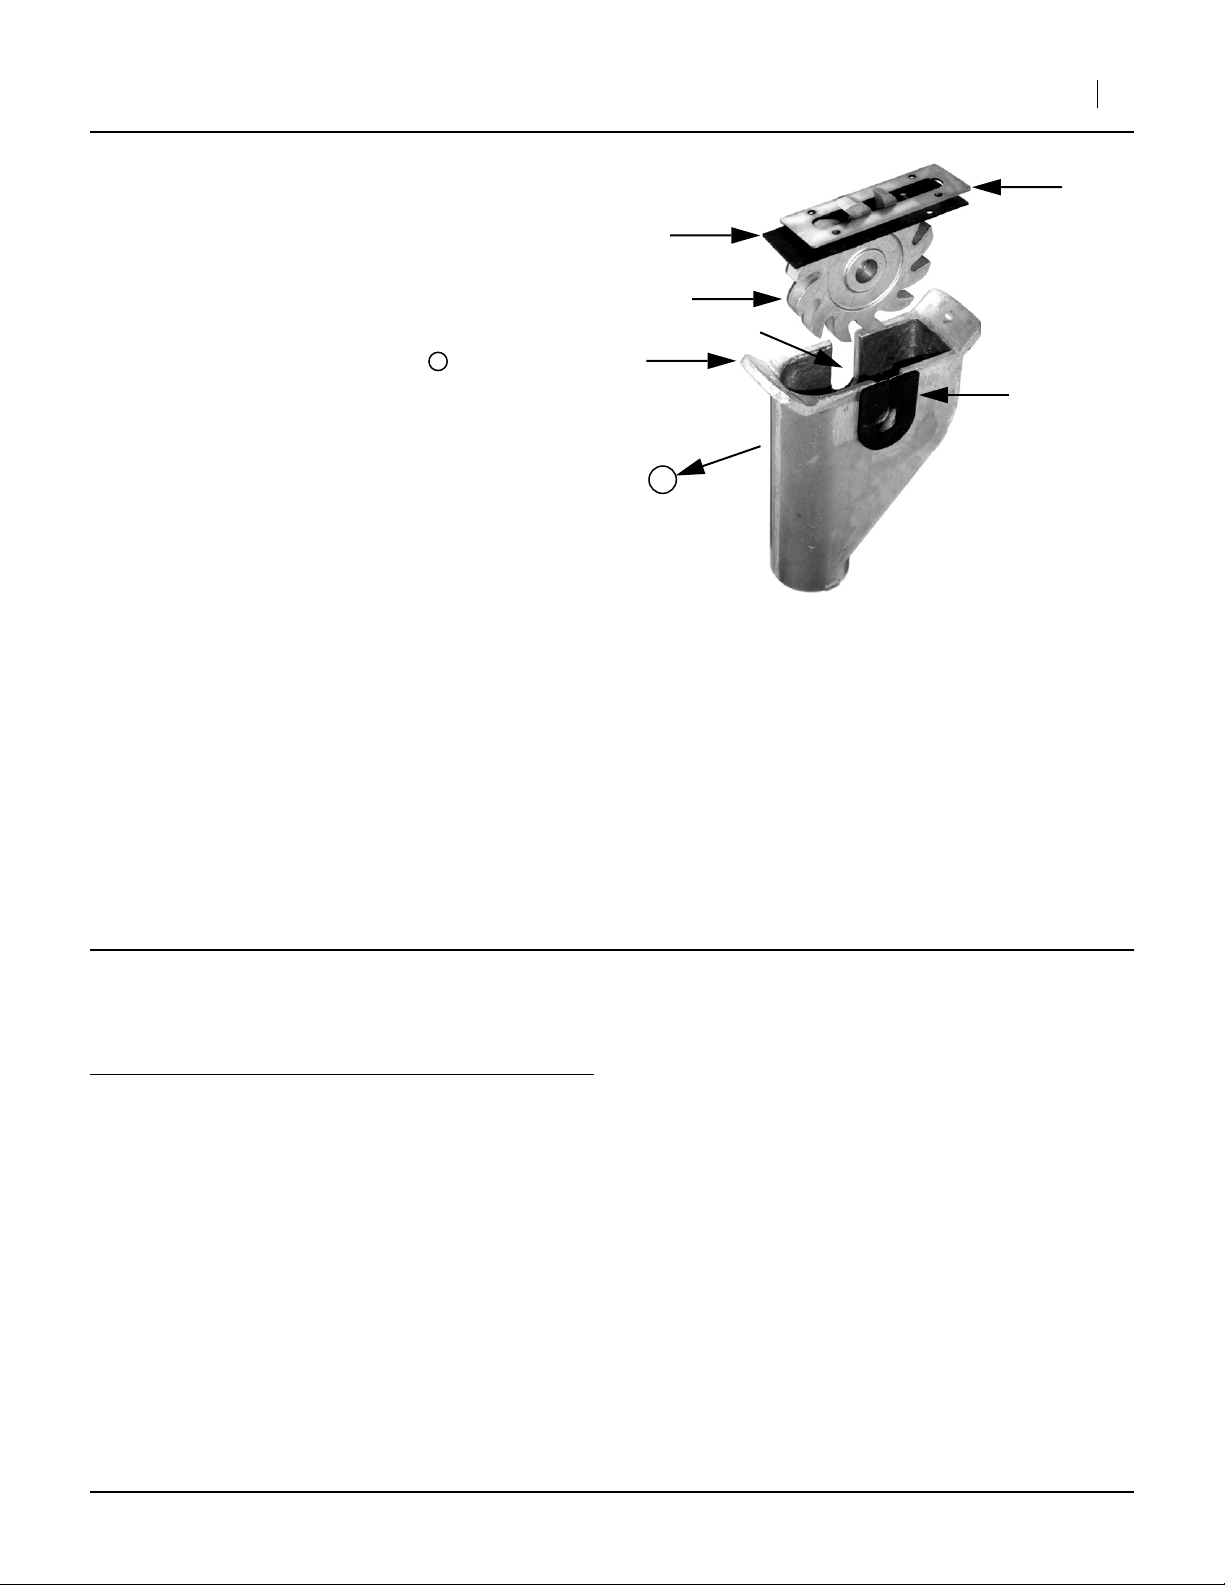
Refer to Figure 2 (for general arrangement only)
11. Re-install the old wheel cover plates ➀ with the new
gaskets ➁, using the old screws, washers and nuts.
Align the inside edges of plate and gasket to be parallel with the tray slot (not shown). Tighten screws.
12. Slide the new sprockets ➂ onto the drive shaft with
the teeth facing down on the front side of the
seed box or tray.
13. Insert each set screw saved from the old sprockets.
Adjust each set screw so that it is 2 full turns back
off from tight.
14. Re-mount the drive shaft (not shown), sliding each
feeder cup sprocket ➂ so that it occupies a tray slot.
Do not tighten set screws at this time. Double-check
that each sprocket is correctly oriented.
F
Installation Instructions 3
➀
➁
➂
➅
➃
➄
F
15. Clean each feeder cup ➃ in the area around the
drive slot. This to assure solid adhesion of the side
gaskets ➄. Do not install the gaskets yet.
16. Re-mount the existing feeder cups ➃, using the
existing1⁄4-20 screws, nuts and washers. Use any
play in the positioning to align the cup so that the
drive shaft is centered in the cup’s drive slots ➅.
Tighten screws.
17. Rotate each new feeder sprocket ➂ so its set screw
is facing down. Center it in the wheel cover slot ➀
and tighten the set screw.
Parts List
202-597A Native Grass Cup Enhancement Kit
Your kit includes:
Qty. Part No. Part Description
1 202-598M This manual
1 812-346C NG CUP HI RATE SPROCKET
1 816-539C NG METER GASKET WIDE
2 816-540C NATIVE GRASS CUP GASKET
Figure 2
Cup Assembly
18. Peel the release paper off each side gasket ➄, and
apply it so the hole is centered on the drive shaft, and
slot gaps are completely covered. Apply two gaskets
to each cup (one per side). You may want to practice
positioning with a gasket that still has the release
paper attached.
19. Re-install the seed box or tray. Reinstall the drive
train, and any drill components removed earlier. Reconnect seed hoses.
25123
10/24/2006 202-598M
Page 4

4 Native Grass Cup Enhancement Kit
Seed Rate Charts
Upgrading the Native Grass feeder sprocket substantially
increases the seed rate for a given prior setting. After
installing this kit, cease using the Native Grass rate
charts previously provided for or with your drill. Use the
new charts in this document.
Series II 605NT Native Grass Box (cup revolutions per acre)
Great Plains Mfg., Inc.
Driven
Sprockets
1
2
3
4
Drive Type
14 15 16 17 18 19 20 21 22 23
137.18 128.04 120.03 112.97 106.70 101.08 96.03 91.45 87.30 83.50
281.98 263.19 246.74 232.22 219.32 207.78 197.39 187.99 179.44 171.64
422.98 394.78 370.14 348.33 328.98 311.67 296.08 281.98 269.17 257.46
690.01 644.01 603.76 568.24 536.67 508.43 483.01 460.01 439.10 420.01
Table 1
Series II 3P605NT Native Grass Box (cup revolutions per acre)
Driven
Sprockets
1
2
3
4
Drive Type
14 15 16 17 18 19 20 21 22 23
133.99 125.06 117.24 110.35 104.22 98.73 93.80 89.33 85.27 81.56
275.43 257.07 385.60 226.83 214.22 202.95 192.80 183.62 175.27 167.65
413.15 385.60 361.50 340.24 321.34 304.42 289.20 275.43 262.91 251.48
673.97 629.04 340.24 555.04 524.20 496.61 471.78 449.32 428.89 410.24
Table 2
Series II 605NT/3P605NT Brome Grass (pounds per acre)
Driven Sprockets 23 22 21 20 19 18 17 16 15 14
12.6 13.2 13.8 14.5 15.2 16.1 17.0 18.1 19.3 20.7
1
1
7
/
in
2
Spacing
Drive Type
25.9 27.1 28.3 29.8 31.3 33.1 35.0 37.2 39.7 42.5
2
38.8 40.6 42.5 44.6 47.0 49.6 52.5 55.8 59.5 63.8
3
63.3 66.2 69.3 72.8 76.6 80.9 85.6 91.0 97.0 104.0
4
Table 3
202-598M 10/24/2006
Page 5

Great Plains Mfg., Inc.
Series II 706 - 7 1/2in Native Grass Box (cup revolutions per acre)
Installation Instructions 5
Driven
Sprockets
1
2
3
Drive Type
4
15 16 17 18 19 20 21 22 23 24
115.03 107.84 101.49 95.86 90.81 86.27 82.16 78.43 75.02 71.89
236.44 221.67 208.63 197.04 186.67 177.33 168.89 161.21 154.20 147.78
354.67 332.50 312.94 295.56 280.00 266.00 253.33 241.82 231.30 221.67
578.58 542.41 510.51 482.15 456.77 433.93 413.27 394.48 377.33 361.61
Table 4
Series II 1006 - 7 1/2in Native Grass Box (cup revolutions per acre)
Driven
Sprockets
1
2
3
Drive Type
4
15 16 17 18 19 20 21 22 23 24
80.04 75.03 70.62 66.70 63.19 60.03 57.17 54.57 52.20 50.02
164.52 154.24 145.16 137.10 129.88 123.39 117.51 112.17 107.29 102.82
246.78 231.35 217.74 205.65 194.82 185.08 176.27 168.26 160.94 154.24
402.57 377.41 355.21 335.48 317.82 301.93 287.55 274.48 262.55 251.61
Table 5
Series II 1006 - Brome Grass (pounds per acre)
Driven Sprockets 15 16 17 18 19 20 21 22 23 24
9.2 8.6 8.1 7.7 7.3 6.9 6.6 6.3 6.0 5.8
18.9 17.7 16.7 15.8 14.9 14.2 13.5 12.9 12.3 11.8
28.4 26.6 25.0 23.6 22.4 21.3 20.3 19.3 18.5 17.7
46.3 43.4 40.8 38.5 36.5 34.7 33.0 .1.5 30.2 28.9
8.6 8.1 7.6 7.2 6.8 6.4 6.1 5.9 5.6 5.4
17.7 16.5 15.6 14.7 13.9 13.2 12.6 12.0 11.5 11.0
26.5 24.8 23.4 22.1 20.9 19.9 18.9 18.1 17.3 16.5
43.2 40.5 38.1 36.0 34.1 32.4 30.8 29.4 28.2 27.0
8.1 7.5 7.1 6.7 6.4 6.0 5.8 5.5 5.3 5.0
16.5 15.5 14.6 13.8 13.1 12.4 11.8 11.3 10.8 10.3
24.8 23.3 21.9 20.7 19.6 18.6 17.7 16.9 16.2 15.5
40.5 37.9 35.7 33.7 32.0 30.4 28.9 27.6 26.4 25.3
7”
Spacing
7.5”
Spacing
8”
Spacing
Drive Type
Drive Type
Drive Type
1
2
3
4
1
2
3
4
1
2
3
4
Table 6
10/24/2006 202-598M
Page 6

6 Native Grass Cup Enhancement Kit
Series II 2SNG24 7-1/2in
Driver 15 15 15 19 19 35 30 30
Driven 30 24 19 19 15 24 19 15
Drive Type
Great Plains Mfg., Inc.
Native Grass Box Sprocket Configuration
Seed Cup Revolutions per Acre
1
1A
2
2A
Series II 2SNG30 7-1/2in
Driver 15 15 15 19 19 35 30 30
Driven 30 24 19 19 15 24 19 15
Drive Type
1
1A
2
2A
75.72 94.65 119.56 151.44 191.83 119.89 239.12 302.88
155.43 194.28 245.41 310.86 393.75 453.33 490.82 621.71
24.73 30.91 39.04 49.45 62.64 72.12 78.08 98.90
50.75 63.44 80.13 101.50 128.57 148.03 160.27 203.01
Table 7
Native Grass Box Sprocket Configuration
Seed Cup Revolutions per Acre
61.25 76.56 96.71 122.50 155.17 96.98 193.42 245.00
125.72 157.15 198.51 251.45 318.50 366.69 397.02 502.89
20.00 25.00 31.58 40.00 50.67 58.33 63.16 80.00
41.05 51.32 64.82 82.11 104.00 119.74 129.64 164.21
Table 8
Series II 3PNG12 7-1/2in
Native Grass Box Sprocket Configuration
Driver 15 15 15 19 19 35 30 30
Driven 30 24 19 19 15 24 19 15
Drive Type
1
1A
2
2A
202-598M 10/24/2006
151.44 189.30 239.12 302.88 383.65 239.78 478.24 605.77
310.86 388.57 490.82 621.71 787.50 906.66 981.65 1243.42
49.45 61.81 78.08 98.90 125.27 144.23 156.16 197.80
101.50 126.88 160.27 203.01 257.14 296.05 320.54 406.02
Seed Cup Revolutions per Acre
Table 9
Page 7

Great Plains Mfg., Inc.
Series II 3PNG15 7-1/2in
Driver 15 15 15 19 19 35 30 30
Driven 30 24 19 19 15 24 19 15
Drive Type
Installation Instructions 7
Native Grass Box Sprocket Configuration
Seed Cup Revolutions per Acre
1
1A
2
2A
122.50 153.13 193.42 245.00 310.33 193.96 386.84 490.00
251.45 314.31 397.02 502.89 637.00 733.39 794.04 1005.79
40.00 50.00 63.16 80.00 101.33 116.67 126.32 160.00
82.11 102.63 129.64 164.21 208.00 239.47 259.28 328.42
Table 10
Series II NG12
Data was not available at first printing of this manual.
Check the Great Plains web site for an updated edition.
Great Plains Manufacturing, Inc.
Corporate Office: PO Box 5060
Salina, KS 67402-5060 USA
10/24/2006 202-598M
 Loading...