

Page 1

Predelivery Instructions
CF50 and CF60
Hydraulic Cross-Fold Boom
Manufacturing, Inc.
P.O. Box 5060 ● Salina, Kansas 67402-5060
Read this manual entirely . When y ou see this symbol, the subsequent instructions and
!
warnings are serious - follow without exception. Your life and the lives of others depend
on it!
YELLOW
© Copyright 1998 Printed
3/10/98
12300
Cover illustration may show optional equipment not supplied with standard unit.
500-015Q
Page 2

Table of Contents
Table of Contents
Great Plains Mfg., Inc.
Important Safety Information . . . . . . . . . . . . . . . . . 1
Safety Notations . . . . . . . . . . . . . . . . . . . . . . . . . 1
Safety Rules . . . . . . . . . . . . . . . . . . . . . . . . . . . . 1
Introduction . . . . . . . . . . . . . . . . . . . . . . . . . . . . . . . 2
Description of Unit. . . . . . . . . . . . . . . . . . . . . . . . 2
Intended Usage. . . . . . . . . . . . . . . . . . . . . . . 2
Using This Manual. . . . . . . . . . . . . . . . . . . . . . . . 2
Definitions . . . . . . . . . . . . . . . . . . . . . . . . . . . 2
Assembly and Setup Assistance. . . . . . . . . . . . . 2
Section 1 Assembly. . . . . . . . . . . . . . . . . . . . . . . . . 3
Tools Required. . . . . . . . . . . . . . . . . . . . . . . . . . . 3
Pre-Assembly Checklist. . . . . . . . . . . . . . . . . . . . 3
Main Boom Assembly. . . . . . . . . . . . . . . . . . . . . . 3
Sprayer to Boom Instructions. . . . . . . . . . . . . 3
Boom to Three-Point Instructions . . . . . . . . . 6
Swing Arm Shock Kit . . . . . . . . . . . . . . . . . . . . . . 8
Boom Latch Assembly . . . . . . . . . . . . . . . . . . . . . 9
Cable Assembly and Adjustment . . . . . . . . . . . . . 9
Section 2 Setup. . . . . . . . . . . . . . . . . . . . . . . . . . . . 10
Plumb Boom. . . . . . . . . . . . . . . . . . . . . . . . . . . . 10
Appendix . . . . . . . . . . . . . . . . . . . . . . . . . . . . . . . . . 12
Tire Inflation Chart . . . . . . . . . . . . . . . . . . . . . . . 12
Torque Values Chart for Common Bolt Sizes. . . 12
© Copyright 1998 All rights Reserved
Great Plains Manufacturing, Inc. provides this publication “as is” without warr anty of any kind, either expressed or implied. W hile ev ery precaution has been taken in the preparation
of this manual, Great Plains Manufacturing, Inc. assumes no responsibility for errors or omissions . Neither is any liability assumed for damages resulting from the use of the inf ormation contained herein. Great Plains Manufacturing, Inc. reserves the right to revise and improve its products as it sees fit. This publication describes the state of this product at the
time of its publication, and may not reflect the product in the future.
The following are trademarks of Great Plains Mfg., Inc.: Application Systems, A usherman, Land Pride, Great Plains
All other brands and product names are trademarks or registered trademarks of their respective holders.
CF50 and CF60 Hydraulic Cross-Fold Boom 500-015Q 4/8/04
Great Plains Manufacturing, Incorporated Trademarks
Printed in the United States of America.
Page 3

Great Plains Mfg., Inc.
Important Safety Information
Important Safety Information
For your safety, thoroughly read “Important Safety Information” and “Operating Instructions” in the operator’s manual
before proceeding.
Safety Notations
The SAFETY ALERT SYMBOL indicates that there is a potential hazard to personal safety involved and extra safety precautions must be taken. When you see this symbol, be alert and
carefully read the message that follows it. In addition to design
and configuration of equipment, hazard control and accident
prevention are dependent upon the awareness, concern, prudence and proper training of personnel involved in the operation, transport, maintenance and storage of equipment.
Watch for the following safety notations throughout your operator’s manual.
!
DANGER!
Indicates an imminently hazardous situation which, if not
avoided, will result in death or serious injury. This signal word
is limited to the most extreme situations.
!
!
WARNING!
Indicates a potentially hazardous situation which, if not avoided, could result in death or serious injury.
!
CAUTION!
Indicates a potentially hazardous situation which, if not avoided, may result in minor or moder ate injury. It may also be used
to alert against unsafe practices.
Safety Rules
Most accidents are the result of negligence, carelessness or
failure to follow safety precautions. Though your implement is
designed with many built-in safety features, safety precautions
are mandatory to prevent accidents.
4/8/04
CF50 and CF60 Hydraulic Cross-Fold Boom 500-015Q
1
Page 4

Introduction
Introduction
Great Plains Mfg., Inc.
Great Plains Manufacturing wants y ou to be satisfied with
any new machine delivered b y the Great Plains Trucking
network. To ease the assembly task and produce a prop
erly working machine, read this entire manual before assembling or setting up new equipment.
Description of Unit
The CF50 and CF60 is a non-turf type, cross-folding
sprayer boom. The boom folds hydraulically to an operat
ing width of 50 or 60 feet. The boom can be mounted on an
Application Systems sprayer or a three-point hitch.
Intended Usage
Use this boom as part of a pressurized sprayer system to
apply liquid pesticides, herbicides or fertilizers to agricul
tural production crops only. Mount the boom on an Application Systems trailer spray er, three-point sprayer or
three-point hitch only. Do not modify the boom or use the
boom with any tillage attachments.
Using This Manual
This manual was written to help you assemble and prepare the new machine for the customer. The manual includes instructions for assembly and setup . Read this
manual and follow the recommendations f or safe, efficient
and proper assembly and setup.
An operator’s man ual is also pro vided with the ne w machine. Read and understand “Important Safety Informa-
tion” and “Operating Instructions” in the operator’ s
manual before assembling the machine . As a reference,
keep the operator’ s man ual on hand while assembling.
The information in this manual is current at printing. Some
parts may change to assure top performance.
-
Definitions
Right and left as used in this manual are determined by
facing the direction the machine will trav el while in use un
less otherwise stated.
-
-
IMPORTANT: A crucial point of information about the
preceding topic. For safe and correct oper ation, read
and follow the directions provided before continuing.
NOTE: Useful inf ormation about the preceding topic.
Assembly and Setup Assistance
T o order additional copies of dealer assemb ly instructions
or operator’s and parts manuals, write to the follo wing ad
dress. Include model numbers in all correspondence.
If you do not understand any part of this manual or have
other assembly or setup questions, assistance is av ail
able. Contact
Product Support
Great Plains Mfg. Inc., Service Department
P.O. Box 5060
Salina, KS 67402-5060
-
-
-
CF50 and CF60 Hydraulic Cross-Fold Boom 500-015Q 4/8/04
2
Page 5
Great Plains Mfg., Inc.
Section 1 Assembly
Section 1 Assembly
The following headings are step-by-step instructions for
assembling the boom. Begin with Tools Required and Pre-
Assembly Checklist to make sure y ou ha ve all necessary
parts and equipment. Then proceed with
sembly. Follow each step to make the job as quick and
safe as possible and produce a properly working machine.
The boom is shipped via flat bed truck. It is the dealer’s responsibility to unload the new machine. Unload all equipment before beginning assembly. Do not attempt any
assembly work while the boom is on the truck.
Main Boom As-
Tools Required
• Forklift or overhead crane
• General hand tools
Pre-Assembly Checklist
1. Read and understand “Important Safety Information” on page 1 before assemb ling.
2. Have at least two people on hand while assemb ling.
3. Make sure the assembly area is le vel and free of obstructions (preferably an open concrete area).
4. Check that all working parts are moving freely, bolts
are tight, and cotter pins are spread.
5. Check that all safety labels and reflectors are correctly
located and legible. Replace if improperly located or
damaged. Refer to Safety Labels , “Important Safety
Information” in the operator’ s man ual.
Main Boom Assembly
Sprayer to Boom Instructions
If mounting the boom on a sprayer, follow these instructions.
1. Position tractor and spr ayer in a clear, level area with
jack placed in the park position. Adjust jack so spray er
tank is level and ele vator mast is straight up and down.
Keep tractor hook ed to sprayer.
!
WARNING!
F ailur e to k eep tr actor hooked to spr ayer may cause sprayer to
tip backwards during initial boom installation.
Refer to Figure 1-1.
2. Bolt elevator in the lo w position if sprayer frame is in
the high position. If sprayer fr ame is going to be used
in low position, keep elev ator in high position and refer
to the single axle sprayer man ual to adjust frame . Ad
just the hydraulic ele v ator until the ele vator slide is toward the bottom of the elev ator mast.
3. If boom is mounted on a single-axle sprayer , install the
boom carrier (1) with the eight 1/2-by-3-inch bolts and
nuts (2) provided.
-
4/8/04
Figure 1-1
Carrier Assembly for Single-Axle Sprayers
CF50 and CF60 Hydraulic Cross-Fold Boom 500-015Q
14136
3
Page 6

Section 1 Assembly
Great Plains Mfg., Inc.
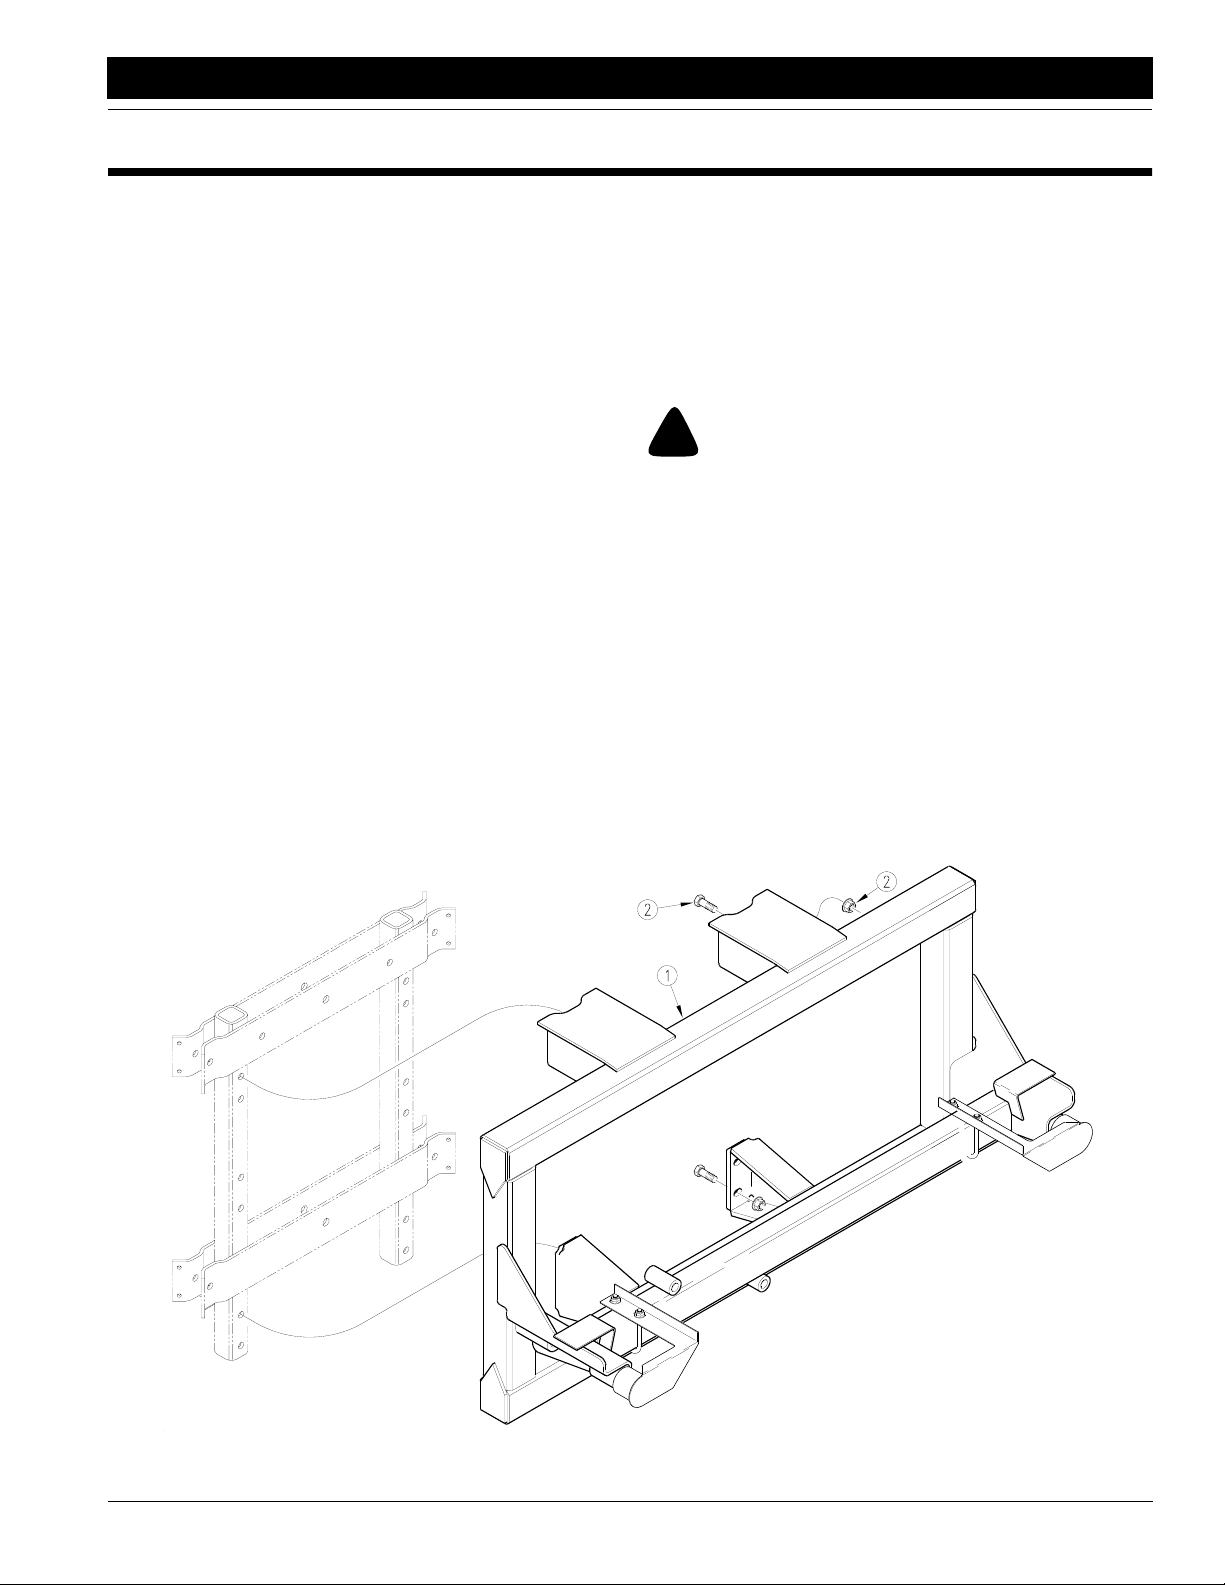
Refer to Figure 1-2.
4. If boom is mounted on a trailer spray er install the carrier (1) with four 1/2-by-1 3/4-inch bolts (2) and backup
plate (3) to secure the top supports as illustrated. As
semble the four 1/2-b y-1 1/4-inch bolts (4) in the bottom supports. Assemble bolts in the orientation
shown.
5. Remove the center A-frame weldment (5). Remo ve
both spring holder pins (6) and the two spring holders
(7).
6. Install center section of the boom (8) by attaching the
swing arms (9) with pivot pins (10) and spring pins
(11) provided. Insert the level-float lock pin (12) into
-
the lock position and fasten retaining pin (13).
7. Re-assemble center A-frame weldment (5). Install the
two spring holders (7) with the two adjoining spring
holder pins (6) and secure pins with the spring pins
(14) in the box of parts. Torque bolts and nuts that se
cure A-frame weldment to the proper torque specifications. Refer to “Torque V alues Chart f or Common
Bolt Sizes” on page 12.
-
Figure 1-2
Sprayer Boom Assembly
CF50 and CF60 Hydraulic Cross-Fold Boom 500-015Q 4/8/04
4
13861
Page 7

Great Plains Mfg., Inc.
Section 1 Assembly
8. Using a forklift or overhead crane , carefully position
the hinge point of left boom wing (15) near the hinge
point of center section (8) of boom.
NOTE: If the boom nozzles are mounted on wings, use the
wing with nozzles mounted on the front and back as the
left wing. Use the wing with nozzles on the back only as
the right wing.
9. Slightly loosen adjustment plate nuts (16) and assemble boom hinge pin (17) to attach boom wing to center
section. Secure hinge pin with snap ring (18).
10. Remove all support of inside boom arm and allow the
hinge to carry the weight. Position the adjustment
plate (19) so there are no gaps between the ball joints
and the hinge tubing on boom wing. This will prevent
boom from sliding to the front and rear. Secure the ad
justment plate by tightening nuts (16) to 85 footpounds.
11. Lev el inside boom arm with center section (8) by positioning the shims (20) on hinge rest until the boom is
level. The bottom tube of inside boom arm should be
parallel to the frame of center section (8). Tighten
shim bolts when finished by supporting inside boom
arm with a forklift.
!
CAUTION!
Be careful not to pinch fingers in hinge. Make sure boom is securely supported before adjusting shims.
12. With inside boom arm supporting its own weight, position the outside boom arm with a sawhorse so adjustment bolt (21) is touching the stop point and the
boom is level and unf olded. Attach outside boom arm
with 5/8-inch pivot pin (22). Secure pivot pin with a
spring pin (23).
13. Lev el outside boom arm by adding or removing a
washer (24) on the adjustment bolt (21) so outer boom
section is level with inside boom arm. Tighten jam nuts
when finished.
14. Position spring nut (25) so nut is flush with end of the
spring rod (26) for maximum spring adjustment. At
tach the cable (27) with the 1/2-by-1 3/4-inch bolt and
nut assembled through the hole on the spring rod (26).
Attach other end of cable to outside boom arm with
the 1/2-by-2 1/4-inch bolt and 1/2-inch nut.
15. Release support under outside boom arm and allow
boom to carry its own weight.
16. Tighten the spring nut (25) until spring is compressed
to a length of 10 inches as shown in
with second nut.
17. Disconnect the elbow (28) attaching the two h ydraulic
hoses together on the hydraulic cylinder . Attach other
loose elbow in the box (29) to the hose (30) and attach
the feed-line hoses (31) to the elbow ends. Route hy
draulic hoses next to ele vator hydraulic hoses through
center of boom. Use cable ties (32) to secure the hos
es after all hydraulic hoses have been routed.
Figure 1-3. Lock
-
Figure 1-3
Spring Adjustment
-
!
WARNING!
Escaping fluid under pressure can penetrate the skin causing
serious injury. Avoid the hazard by relieving pressure before
disconnecting hydraulic lines. Use a piece of paper or card
board, NOT BODY PARTS, to check for suspected leaks. Wear
protective gloves and safety glasses or goggles when working
with hydraulic systems. If an accident occurs, see a doctor im
mediately. Any fluid injected into the skin must be surgically removed within a few hours or gangrene may result.
18. Prime the hydraulic cylinder (33) bef ore attaching to
boom wing. Using tractor hydraulics, fully extend cyl
inder. Then re verse hydraulic flow and retract the cylinders. Make sure the cylinder bottoms out under full
hydraulic pressure. Extend the cylinder once again
and fasten it to boom wing with the pin provided.
!
WARNING!
Bleed hydraulic hoses before trying to fold or unfold boom.
Failure to do so could cause boom to crash causing damage to
boom and potential injury to persons near boom.
19. Repeat steps 8 through 18 for right wing.
20. Reposition Slow Moving V ehicle brac ket (34) in center
of boom and fasten with u-bolt.
21. Position a remote nozzle tube (35) and br acket (36) on
each wing. (Mount bracket on front of boom on left
wing and on the rear of boom on the right wing). Use
the 5/16-inch u-bolts and nuts to attach the bracket.
Position brac ket but do not tighten nuts.
-
-
11937
-
-
-
4/8/04
CF50 and CF60 Hydraulic Cross-Fold Boom 500-015Q
5
Page 8

Section 1 Assembly
Great Plains Mfg., Inc.
22. Assemble the nozzle check v alve and brac ket onto remote nozzle bracket installed in step 21. P osition nozzle for correct spacing (15, 20 or 30 inches) and
tighten the nuts on the bracket. Attach hose to nozzle
check valv e with hose clamps pro vided. Install feed-
line hose correctly so hose will not droop or kink when
folded.
23. If boom is 60 feet wide and equipped with a 15-inch or
30-inch nozzle spacing, move the skid wheels out so
the outer wheel bracket u-bolt is 5 inches from end of
boom tube. This will prev ent the wheel from interfering
with spray pattern.
24. Slowly fold the boom. W atch that boom folds to correct
resting position. You may need to loosen the adjust
ment plate nuts only slightly and position the boom
wing to fold correctly. Slowly maneuver the boom to
move to the f olded position. With the boom in the cor
rect folded position, tighten down the adjustment plate
nuts (16) to 85 foot pounds. Mak e sure the adjustment
plate is adjusted so there are no gaps in between the
hinge ball joints and the hinge tubing on the boom
wing.
Boom to Three-Point Instructions
If mounting the boom on a three-point carrier, follo w these
instructions.
1. Mount three-point carrier to a tractor with correct pin
mountings determined from
Figure 1-4. Level the
three-point carrier to prevent the boom from hitting the
tractor cab when folding or raising the boom.
-
Figure 1-4
Pin and Spacer Configuration
NOTE: The category 4 narrow hitch (CAT IV-N) spacers
are not standard parts supplied with the three-point boom.
2. Follow step 5 through step 24 under Spra yer to Boom
Instructions starting on page 3 to complete boom assembly.
CF50 and CF60 Hydraulic Cross-Fold Boom 500-015Q 4/8/04
6
11939
Page 9

Great Plains Mfg., Inc.
Section 1 Assembly
Refer to Figure 1-5.
3. Mount cam-lock connectors (2) onto three-point carrier with the six 5/16-by-3/4-inch bolts, nuts and mounting brackets as shown.
4. After the nozzles and hoses are mounted on the
boom, attach boom line hoses from three separate
boom sections to cam-lock fluid connectors (3) with
hose clamps provided. (Refer to
10, for instructions on mounting nozzles and hoses.)
Route hose from tractor to male cam-lock fluid connectors (3) which fasten into stationary female fluid
connectors mounted on three-point carrier.
5. Route boom hoses to the tractor to ensure there is no
kinking, drooping below the tractor , or rubbing on the
tractor frame when in operation. Use the cable ties to
fasten and protect the hose.
6. Check to see that all nuts are tightened. See the
Torque Values Chart in
“Appendix” on page 12.
Check to see that all hose clamps are tight.
Plumb Boom, page
4/8/04
Figure 1-5
Three-Point Carrier
CF50 and CF60 Hydraulic Cross-Fold Boom 500-015Q
11938
7
Page 10

Section 1 Assembly
Great Plains Mfg., Inc.
Swing Arm Shock Kit
Refer to Figure 1-6.
The boom must be mounted to the spray er or tractor be fore swing arm shock kit is assemb led.
1. Center the shock mount weldment (1) on boom carrier
frame as shown and bolt in place using the 3/8-inch ubolts (2) and the 3/8-inch flange nuts (3).
2. Compress shock absorbers (4) to a length of 14 inches from center to center of mounting holes. Wire the
shocks from base end to rod end to maintain this
length during assembly.
3. Bolt the rod end of the shock to the swing arm channel
(6) using the 5/8-by-4 3/4-inch bolts (5), spacers (10)
and 5/8-inch flange lock nuts (7). Rotate the shock un
til it lines up with the mounting hole in the center shock
mount weldment and cut the wire to let the shock ex
tend into the channel. Align the shock mounting hole
and bolt in place using the 5/8-by-2 3/4-inch bolt (8)
and 5/8-inch flange lock nut (9).
-
-
Figure 1-6
Swing Arm Shock Kit
CF50 and CF60 Hydraulic Cross-Fold Boom 500-015Q 4/8/04
8
14998
Page 11

Great Plains Mfg., Inc.
Section 1 Assembly
Boom Latch Assembly
Refer to Figure 1-7.
The boom must be mounted to the spray er or tractor be fore the boom latch is assembled.
Center latch assembly (1) on the front tube of the center
section. Center latch bracket (2) around tube as shown.
Cable Assembly and Adjustment
Refer to Figure 1-7.
1. Attach the clevis (3) on the cable to one of the le ver
arms (4) as shown.
2. Route cable through cable rollers at the center of the
boom as illustrated in the front view.
3. Thread cable through the gripple (5) in the direction of
the arrow on the unit.
4. Thread the cable through the hole on the other lev er
arm (6) and back through the gripple in the direction of
the arrow , leaving two inches of exposed wire.
5. Tighten by pulling on cable in the direction of the arrow.
6. Unfold both boom wings and adjust tension in the cable until there is about 1/8-inch between the top of the
latch pin and the bottom of the latch pin plate. Use
gripple for coarse cable adjustment and fine tune ca
ble tension with clevis.
-
4/8/04
15735
Figure 1-7
Boom Latch Assembly
CF50 and CF60 Hydraulic Cross-Fold Boom 500-015Q
9
Page 12

Section 2 Setup
Section 2 Setup
Great Plains Mfg., Inc.
Plumb Boom
If boom nozzles are pre-assembled on your boom, proceed to step 4.
1. Using a felt-tip marker, mark nozzle locations on the
boom to help identify hose locations. For 15- and 30inch spacings, start with a nozzle in the center of the
sprayer. For 20-inch spacing, start with a nozzle 10
inches to the left and right of center.
17013
Figure 2-1
Mark Tube for Nozzle Spacing
2. Using mounting clamps (1), mount nozzles (2) on
boom at marked locations. Refer to
2-4 and Figure 2-5 for correct placement of end nozzles and tee-nozzles. When mounting nozzles on the
left-hand, inside boom arm, mount nozzles on the in
side of the arm. Mount all other nozzles to the rear.
Figure 2-3, Figure
17077
3. Plumb nozzles. From the roll of 3/4-inch hose , cut
lengths to connect the nozzles. Use worm clamps to
secure hoses to nozzles. Refer to
2-4 and Figure 2-5 for correct placement of tee-fittings
(1) and feed lines. Use zip ties (2) and hose holders
(3) to secure the hoses.
4. Route boom hoses through center of A frame on
boom and on the front left of boom carrier. Make a
loop in the hose so that when the elevator is fully
raised, there is enough slack in the hose.
5. Tie hoses to the horizontal and left vertical tube of
boom carrier. Zip ties hoses tight so they can not slide
in and out of the tie. When routing the hoses from the
elevator to the ball v alves, be sure there will be no
kinking, drooping, or rubbing when sprayer is in oper
ation. Use cable ties where needed to secure the hose
on sprayer.
6. Attach boom hoses to the three boom valves. Make
sure left boom feed-line hose is connected to the front
valve (front being tow ard the hitch). The left hose and
valve are marked with a red tape . Attach center boom
feed-line hose to the middle valv e which is mark ed
with yellow tape. The right boom feed-line hose should
be connected to the rear valve which is marked with
green tape.
7. Fold and unfold the boom wings to check an y pinch
points where the hose may become damaged. Unfold
-
the boom, remove the boom le v el-float loc k pin and
rock the boom to check any pinch points around the
swing-arms. Use zip ties to fasten hoses to pre v ent
hose damage.
8. Check to see all nuts are tightened. See the Torque
V alues Chart,
that all hose clamps are tight.
9. Fill sprayer tank 1/4 full of w ater. Hook up the pump to
a tractor and operate the pump with control box boom
switches off and agitation wide open. If unit is
equipped with boom throttling valves, open throttling
valves full open. With pump running turn on all boom
switches and flush out boom lines before assembling
nozzles. Allow water to flow out of all nozzles at least
ten seconds to ensure all foreign material is removed
from the plumbing.
“Appendix” on page 12. Chec k to see
Figure 2-3, Figure
-
Figure 2-2
Mount Nozzles
CF50 and CF60 Hydraulic Cross-Fold Boom 500-015Q 4/8/04
10
Page 13

Great Plains Mfg., Inc.
17078
Figure 2-3
Plumb Nozzles, Center Section
17079
17078
Figure 2-4
Plumb Nozzles, Inner Wing
Figure 2-5
Plumb Nozzles, Outer Wing
4/8/04
CF50 and CF60 Hydraulic Cross-Fold Boom 500-015Q
11
Page 14

Appendix
Appendix
Torque Values Chart for Common Bolt Sizes
Great Plains Mfg., Inc.
Bolt Head Identification
Bolt Size
(Inches)
1
in-tpi
1/4" - 20 7.4 5.6 11 8 16 12 M 5 X 0.8 4 3 6 5 9 7
1/4" - 28 8.5 6 13 10 18 14 M 6 X 1 7 5 11 8 15 11
5/16 - 18 15 11 24 17 33 25 M 8 X 1.25 17 12 26 19 36 27
5/16" - 24 17 13 26 19 37 27 M 8 X 1 18 13 28 21 39 29
3/8" - 16 27 20 42 31 59 44 M10 X 1.5 33 24 52 39 72 53
3/8" - 24 31 22 47 35 67 49 M10 X 0.75 39 29 61 45 85 62
7/16" - 14 43 32 67 49 95 70 M12 X 1.75 58 42 91 67 125 93
7/16" - 20 49 36 75 55 105 78 M12 X 1.5 60 44 95 70 130 97
1/2" - 13 66 49 105 76 145 105 M12 X 1 90 66 105 77 145 105
1/2" - 20 75 55 115 85 165 120 M14 X 2 92 68 145 105 200 150
9/16" - 12 95 70 150 110 210 155 M14 X 1.5 99 73 155 115 215 160
9/16" - 18 105 79 165 120 235 170 M16 X 2 145 105 225 165 315 230
5/8" - 11 130 97 205 150 285 210 M16 X 1.5 155 115 240 180 335 245
5/8" - 18 150 110 230 170 325 240 M18 X 2.5 195 145 310 230 405 300
3/4" - 10 235 170 360 265 510 375 M18 X 1.5 220 165 350 260 485 355
3/4" - 16 260 190 405 295 570 420 M20 X 2.5 280 205 440 325 610 450
7/8" - 9 225 165 585 430 820 605 M20 X 1.5 310 230 650 480 900 665
7/8" - 14 250 185 640 475 905 670 M24 X 3 480 355 760 560 1050 780
1" - 8 340 250 875 645 1230 910 M24 X 2 525 390 830 610 1150 845
1" - 12 370 275 955 705 1350 995 M30 X 3.5 960 705 1510 1120 2100 1550
1-1/8" - 7 480 355 1080 795 1750 1290 M30 X 2 1060 785 1680 1240 2320 1710
1 1/8" - 12 540 395 1210 890 1960 1440 M36 X 3.5 1730 1270 2650 1950 3660 2700
1 1/4" - 7 680 500 1520 1120 2460 1820 M36 X 2 1880 1380 2960 2190 4100 3220
1 1/4" - 12 750 555 1680 1240 2730 2010
1 3/8" - 6 890 655 1990 1470 3230 2380
1 3/8" - 12 1010 745 2270 1670 3680 2710
1 1/2" - 6 1180 870 2640 1950 4290 3160
1 1/2" - 12 1330 980 2970 2190 4820 3560
Torque tolerance + 0%, -15% of torquing values. Unless otherwise specified use torque values listed above.
Grade 2 Grade 5
N · m2ft-lb3N · m ft-lb N · m ft-lb mm x pitch
Grade 8
Bolt Size
(Metric)
4
N · m ft-lb N · m ft-lb N · m ft-lb
1
in-tpi = nominal thread dia.in inches-threads per inch
2
N· m = newton-meters
3
ft-lb= foot pounds
4
mm x pitch = nominal thread dia. in millimeters x thread pitch
Bolt Head Identification
5.8 8.8 10.9
Class 5.8 Class 8.8 Class 10.9
Tire Inflation Chart
Tire Size Inflation PSI Tire Size Inflation PSI
7.50 x 20" 4-Ply Drill Rib 28 11L x 15" 6-Ply Rib Implement 28
9.0 x 22.5 10-Ply Highway Service 70 70 11L x 15" 12-Ply Rib Implement 52
9.0 x 24" 8-Ply Rib Implement 40 12.5L x 15" 8-Ply Rib Implement 36
9.5L x 15" 6-Ply Rib Implement 32 12.5L x 15" 10-Ply Rib Implement 44
9.5L x 15" 8-Ply Rib Implement 44 16.5L x 16.1" 10-Ply Rib Implement 36
9.5L x 15" 12-Ply Rib Implement 60 21.5 x 16.1” SC 10-Ply Rib Implement 28
CF50 and CF60 Hydraulic Cross-Fold Boom 500-015Q 4/8/04
12
Page 15

Great Plains Manufacturing, Inc.
Corporate Office: PO. Box 5060
Salina, Kansas 67402-5060 USA
 Loading...