

Great Dane GDSZ52-16BV, GDSZ52-22KHE, GDSZ48-14KA, GDSZ61-22KHE, GDSZ52-18BV User Manual
...Page 1

GREAT DANE POWER EQUIPMENT, INC.
JEFFERSONVILLE, INDIANA 47130 U.S.A.
GDSZ48-14KA
GDSZ48-16BV
GDSZ52-16BV
GDSZ52-18BV
GDSZ52-22KHE
GDSZ61-22KHE
PATENTS PENDING JAN 1997
FORM D01002-97
Page 2

A
PAGE
TABLE OF CONTENTS
Safety Guidelines
Common Accidents you must avoid Safety
Interlock System
Hydraulic Safety
ssembly of Machine
Initial Adjustments
Initial run-in
Operating Instructions
Field Servicing & Adjustments
Tire Pressure
Height of Cut
Belt Tension
Free Wheeling
Hydro Air Bleeding
Spindle Disassembly Battery Servicing
2
3
3
3
4
Recommended Maintenance
5
Check List
Initial Break-in
Page 3

SAFETY GUIDELINES
COMMON ACCIDENTS YOU MUST AVOID
.CONTACT WITH ROTATING BLADES .THROWN OBJECTS
.OPERATING WITHOUT GUARDS IN PLACE
.RUNNING OVER SOMEBODY
.OVERTURNING ON STEEP SLOPES
Memorize the above and do yourself a favor; read, remember
and follow these safety instructions.
Before Operating
.Do not let children or youngsters operate this machine.
.Do not let others run the machine before they carefully read
these instructions.
.Do not carry excess baggage including passengers.
.Police the work area and pick up and remove debris such as
wires, sticks, glass, rocks and scrap materials.
.Wear safety goggles, sturdy work shoes, and close fitting
clothes. Never operate machine in
r'bare feet, sandals or sneakers.
-Keep all safety devices, guards and shields in good condition
and in place.
.The discharge chute must be installed and
spring loaded down, except when grass catcher is in place.
.Do not touch engine muffler. It may be
extremely hot and cause severe burns. .Although the Great
Dane Surfer has a built-in
safety system, it is recommended to disengage power to the
cutter blades and engage the parking brake before leaving
the platform for a brief time.
.When leaving the machine out of sight, disengage power to
cutter blades, shut off engine, apply parking brakes and take
the starting key with you.
.Watch out for traffic when crossing or near roadways.
.Never direct discharge chute toward bystanders, windows,
buildings or cars.
During Operation
.Using the machine demands attention.
To prevent loss of control:
* Mow only in daylight or when there is
good lighting
* Watch for pot holes, rocks, and any
hidden hazard
* Keep away from drop-offs, ditches, creeks, ponds and
other hazards.
* Reduce speed when making sharp turns
and especially on hillsides.
* Always be sure of your footing. Keep a firm hold on the
stationary handle at all times.
* Do not operate in slippery conditions.
* Lean forward when mowing uphill.
.Before crossing gravel drives, sidewalks or
roads, disengage the cutter blades and wait for them to stop.
.Do not run engine indoors.
.Keep engine free of accumulated grass, leaves and excessive
lubricants to avoid fires.
.Don't smoke around the mower at any time. This has caused
serious injury.Keep all nuts and bolts tight to be sure of safe working
conditions.
.Machine should be stopped and inspected for damage after
striking a foreign object. Repair any damage before restarting.Before leaving the operator's position or leaving mower
unattended, disengage cutter blades, stop engine and remove
starting key.
.Always park the machine on level surface and apply parking
brake. Block the wheels when parking on sloping surface.Before any servicing, disengage cutter blades, stop engine,
remove starting key and spark plug wires.
.This machine is not meant for highway or street use. It is not a
recreational vehicle. Don't try to show off.
.In other words. always be careful.
Precautions when Handling Gasoline
.Use an approved gasoline container
Never remove fuel cap or add gasoline to a running or hot
engine. Allow engine to cool for several minutes before
refueling tank.
.Never refuel indoors.
.Avoid spilling gasoline anywhere.
.Wipe up any spilled gasoline
.Do not smoke while handling gasoline
SAFETY INTERLOCK SYSTEM
The Great Dane Surfer has been designed to be
inherently safe. In addition, there are these safety systems:
.Before starting engine, you must turn "OFF" the cutter blade
clutch switch.
.An operator must be standing on the platform to engage the
cutter blades (machines with pull start, you must cycle blade
clutch switch "OFF" then "ON").
.Completely letting go of control levers will brake machine to
instant stop.
Page 4

HYDRAULIC SAFETY
.All hydraulic system servicing should be done by a qualified
technician.
.Relieve all pressure in the system before disconnecting any
hoses.
.Keep body and hands away from pin holes that may eject
hydraulic fluid under high pressure.
.Make sure all hydraulic connections are tight and hos es in
good condition.
High pressure hydraulic fluid may have sufficient force to
penetrate skin and cause serious injury. Seek med ica l attent i on
immediately. Treatment must be done a doctor.
.If wheels do not stop rotating when controls are.~ in neutral, adjust
the NEUTRAL stop wing bolts at the rear of the power unit,
between the two hydro pumps.
.Engage cutter blade clutch. Be sure area is clear
of debris. Run blades for several minutes.
.Shut off engine and remove jack stands.
Remove start key.
.Check all belts for proper tension.
.Test run the machine in a level area. If machine
drifts to the right or left when both control levers
are full forward, adjust swivel nuts at the top of
control rods to change length of control rod so
that machine travels in a straight line. Please remember, the
neutral adjustment and straight
drive adjustments will need to be repeated after several hours of
ASSEMBLY OF MACHINE
operation.
Please note the Great Dane Surfer is shipped completely
assembled and has been tested at the factory.
After you have removed all crating and packaging materials,
.Test function of the three safety interlock Systems.
carefully follow these steps:
.Remove battery from machine, if one is installed and servic e
observing precautions in Section on Battery Servicing.
.Check hydraulic fluid level. Should be about 5 inches below
the top of the oil filler pipe. Use 10W-30 engine oil during
initial operating period.
.Check engine oil for proper level.
.Check rear wheel tire pressure. Use high pressures up to 24
.Adjust safe maximum drive speed by unlocking
and adjusting the stationary bar to limit amount
of forward movement of the control levers.
Secure the stationary bar firmly by tightening the ~ lever on the left
side of bar.
OPERATING INSTRUCTIONS
psi for mowing on rough ground, and down to 14 psi for fairly
smooth terrain. Note, front caster wheel tires must be foam
filled and thus never require air servicing.
Read and understand the Safety Guidelines before attempting to
operate.
.Remove belt cover and check all belt tension. .Lubricate all
moving parts (see Maintenance
Check List).
.Locate rear drive wheel mounting bracket for general height of
cut in your region.
.Fill fuel tank with regular, 80 octane gasoline. .Open shut-off
valve under gas tank.
You are now ready for initial running of the machine.
.Check fuel tank
.Check engine oil level
.Open fuel valve
.Adjust stationary bar half way back and tighten left side lever
for moderate mowing speed
.Travel control levers must be in neutral
.Electric blade clutch switch m ust be OFF
.Stand on platform
.Set throttle and choke as required
.Turn key switch ON and pull start or electric start .Wide open
throttle
.Engage cutter blade switch
INITIAL ADJUSTMENTS
.Set the rear of the machine on jack stands or blocks to raise
rear wheels off of ground and block caster wheels.
.Start engine. Let run for several minutes to warm hydraulic
fluid.
.Observe that wheels rotate in the correct direction when
control levers are moved back and forth.
.Grasp stationary bar with both hands
.Push both levers forward smoothly and evenly to go straight
ahead
.To make turns, pull same side control lever back .To stop,
return both levers to neutral
.To reverse, pull both levers back
.Apply parking brake when leaving machine. Do not park on
slopes
.To hand push the machine, open dump valve levers about one
full turn.
Page 5

SERVICING & ADJUSTMENTS
TIRE PRESSURE
.When mowing on relatively smooth ground, keep rear wheel
tire pressure low, such as 14 to 16 psi. When mowing on
rough ground, increase
tire pressure to 20 to 24 psi. This will produce a nicer level of
cut.
.Note that the front caster wheels are foam filled and never
need air .
.When oil starts to flow in a steady stream from disconnected
open port on the pump, reconnect hose to pump.
.Secure machine in a safe area, away from bystanders and
facing a wall. Raise drive wheels off the ground and block
caster wheels
Run full forward speed for about a minute and
then reverse speed for another minute. Continue
to cycle until cavitations sound quiets down and full power is
restored.
HEIGHT OF CUT
.Rear wheels may be located in three or four positions. Use
midpoint position for average cut from 2 to 4 inches. Highest
hole position to cut from 3 to 5 inches. Lowest hole position
to cut from 1 to 3 inches.
.Adjust caster wheel spacers to keep cutter deck tilted slightly
down at the front.
.Vary number of spacers between cutter blade
and spindle for higher height of cut.
BELT TENSION ADJUSTMENT
The belt drive from the engine to the hydro -'pumps is self
adjusting, normally requi ring no
maintenance.
.The belt from the engine to the cutter deck and the right hand
spindle drive belt should be tightened only so that you can
deflect the belt about 1/2 inch when pulling about 10 Ibs. If
the belt is too tight, you may damage the engine or the
spindle bearings. Too loose, and the belt will wear
prematurely.
FREE WHEELING
.To move machine without having the engine running, rotate
the dump valve levers of the left hand side of the hydro
pump about one turn counterclockwise. Levers must be
returned to original closed position to drive the machine.
SPINDLE DISASSEMBLY
To replace ball bearings in the spindle assembly, there is no
need to remove assembly from cutter deck
.Carefully clean all debris around the spindle assembly
.Remove the blade, bolt and flanged nut
.Slide off pulley and spacer washer. If pulley is seized on spline
shaft, soak with solvent. Do not use hammer or wheel puller
.Remove wire clip ring at top of bearing around the shaft. Use
sharp tool to extract
.Lower the entire shaft from the bottom of the spindle with
lower bearing and spacer sleeve
.Discard old bearings at this time.
.Clean entire assembly
.Reinstall in reverse order. Place new bearing on shaft lower
flange, slide on the spacer sleeve
.Slide the shaft assembly up into the spi ndle housing keeping
shaft carefully centered. The lower bearing can easily bind
since clearance is only .002 inch. Do not hammer into
position. If the bearing seizes, take apart again and caref ully
reposition until the assembly slides easily and smoothly into
housing
.Carefully center and install top bearing
.Insert wire clip, any spacers and pulley
BATTERY SERVICING
HYDRO AIR BLEED PROCEDURE
When any of the hydro components or hoses are
disconnected or removed and when the hydro oil is changed
entrapped air must be bled from the system.
Disconnect small hose line from each pump going to the oil
filter
.When oil starts to flow in a steady stream from end of hose,
plug the hose
.Carefully fill each cell to the proper level with electrolyte,
observing great caution when handling acid. Severe chemical
burns may
result.
.Charge battery in open, well ventilated area and use proper
procedure specified with the charging system.
.After neutralizing any acid spills, install battery and securely
tighten wires.
Page 6

RECOMMENDED MAINTENANCE CHECK LIST
DAILY
1. Check engine oil level
2. Remove and clean engine air filter
3. Blow clean engine blower screen and fins
4. Clean out debris under belt cover
5. Inspect all belts for damage
6. Sharpen and balance cutter blades
WEEKLY (or every 40 hours}
1 .Change engine oil
2. Grease caster wheel bearings (2 places)
3. Grease caster wheel pivot bearings (2 places)
4. Scrape clean underside of cutter deck
5. Check belt tension
6. Check tire pressure
7. Check battery acid level
8. Clean engine air filter
MONTHLY {or every 160 hours}
1. Clean spark plugs
2. Replace engine oil filter
3. Check hydro reservoir oil level
Lubricate the following with WD 40 or LPS-2:
1. Idler pulley pivots (3 places)
2. Hydro pump control arms (6 places)
3. Platform OPC push rod
4. Platform hinges (2 places)
5. Traction control lever pivot shaft (4 places)
6. Throttle control cable
7. Choke control cable
ANNUALLY
1. Remove and replace all spindle bearings
2. Remove and replace main cutter deck idler pulley
2. Remove caster wheel roller bearings, clean and relube
3. Remove and replace caster pivot bearing bushings
4. Replace three belts. Run-in and adjust tension for new belt
5. Thoroughly clean top and underside of power unit
6. Replace hydro oil filter with original Great Dane service part
7. Check all bolts and nuts for tightness
8. Remove and clean battery box
9. Replace spark plug.
VERY IMPORTANT NO TE: FOLLOWIN G I TEMS REQUIRED TO VALI DATE
(Dealer service invoice accepted)
INITIAL BREAK-IN PERIOD
1. Change engine oil and replace engine filter at 8 hours
2. Dump hydro oil and replace with synthetic Aeroshell W or Mobil 1, 15-W50 (about 4 qts) at 40 hours
3. Replace hydro oil filter at 40 hours
4. Adjust new belt tension at 4 hours, 8 hours and again at 24 hours
Page 7

Page 8

Page 9

Page 10

Page 11

Page 12
Page 13
Page 14

Page 15

Page 16

Page 17
Page 18
Page 19

Page 20

Page 21

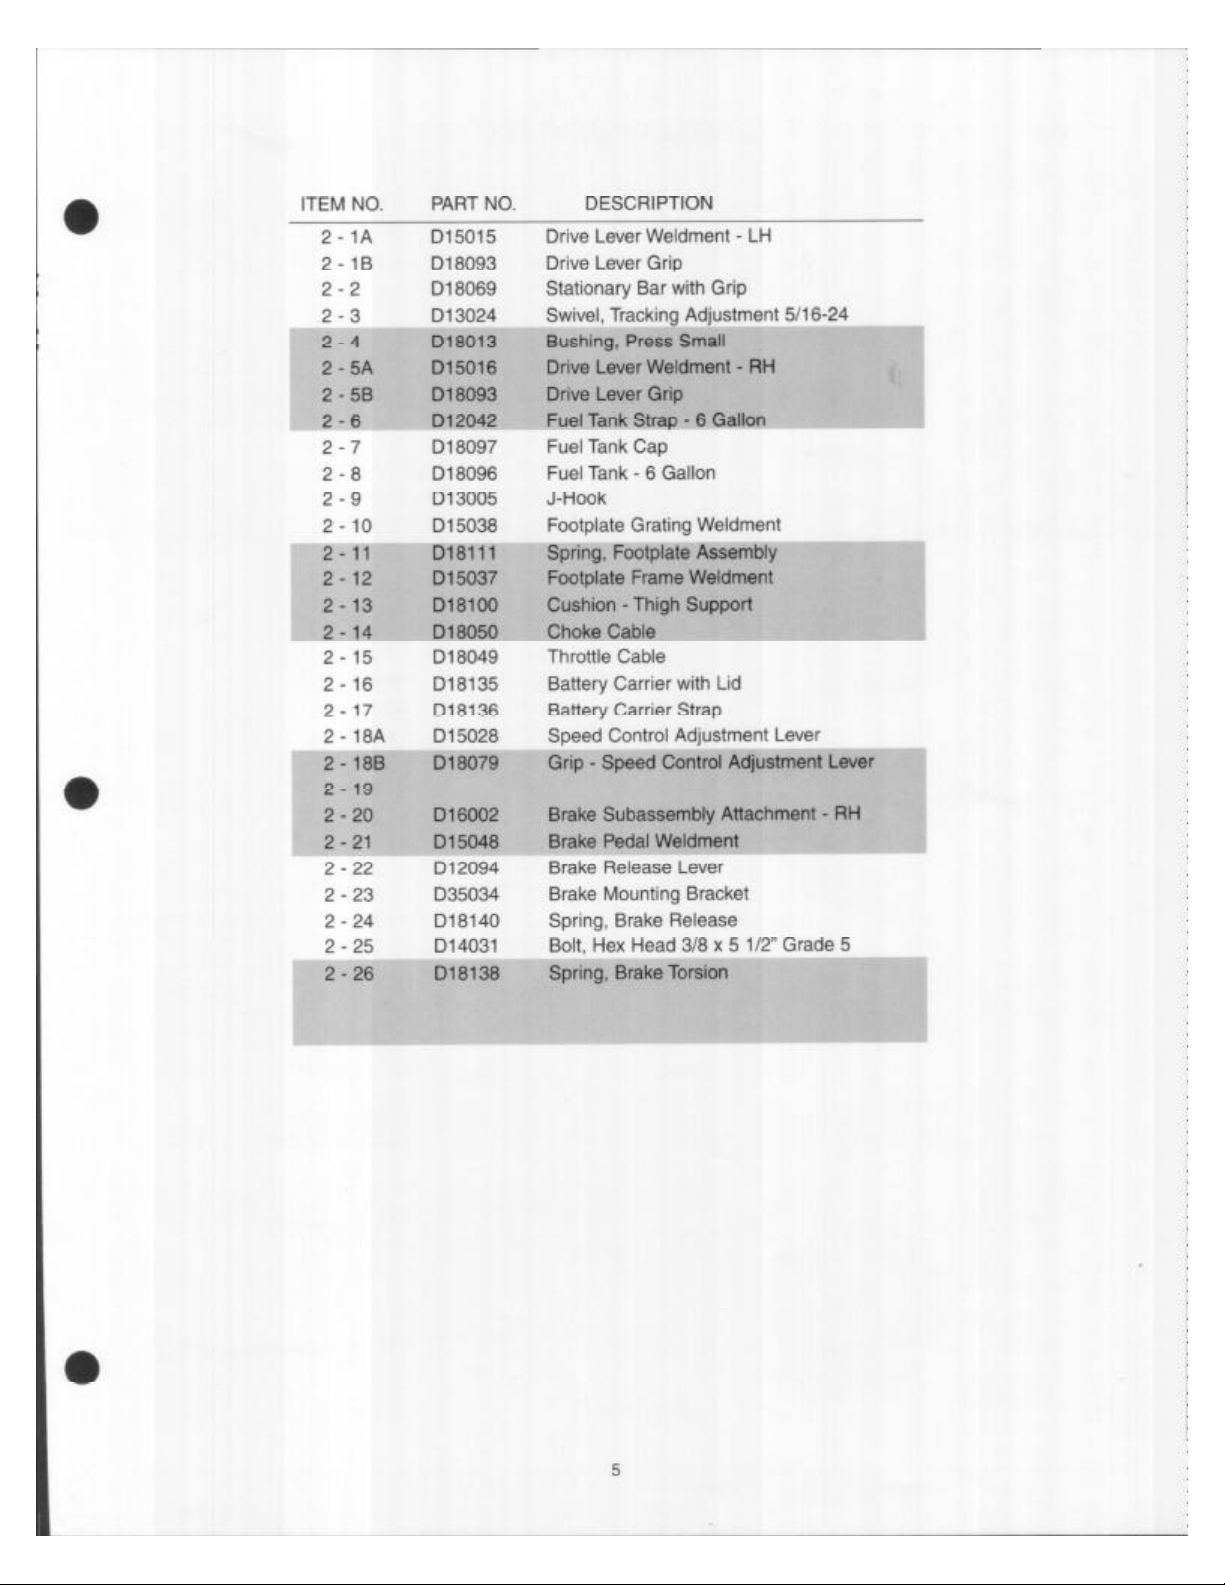
Illustrated Parts Book Addendum: Surfer
Parts not shown in manual
Part no. Description Page no. Figure #
D12051 Replaced By D22215 2 1
D12052 Battery Tray Support 2 1
D12066 Bracket, Wheel Motor Mount 2 1
D14215 Lug Stud, Drive Wheel 2 1
D15025 Side Support LH 2 1
D15026 Side Support RH 2 1
D15031 Engine Deck Weldment 2 1
D18110 Rear Wheel Hub (for the 18 x 8.50) 2 1
D18134 Rubber Gromments 2 1
D18192 Tire, 18x8.50-8 2 1
D18193 Tire, 18x7.50-8 2 1
D18195 Rim, 18x8.50-8 2 1
D18198 Rim, 18x7.50-8 2 1
D12002 Console, Old style w/ toggle PTO switch 4 2
D12098 Console, Current style 4 2
D12106 Retainer Tab, PTO Switch 4 2
D13011 Rod, Pivot 4 2
D13022 Slip Swivel, Platform J-hook 4 2
D13036 Brake Bushing 4 2
D13039 Brake Latch Bushing 4 2
D15022 Thigh Plate Weldment 4 2
D15023 Handle Mount Weldment 4 2
D15047 Brake Pedal Weldment LH 4 2
D16000 Spring Platform Update 4 2
D16001 LH Parking brake kit 4 2
D35033 LH Brake Bracket Weldment 4 2
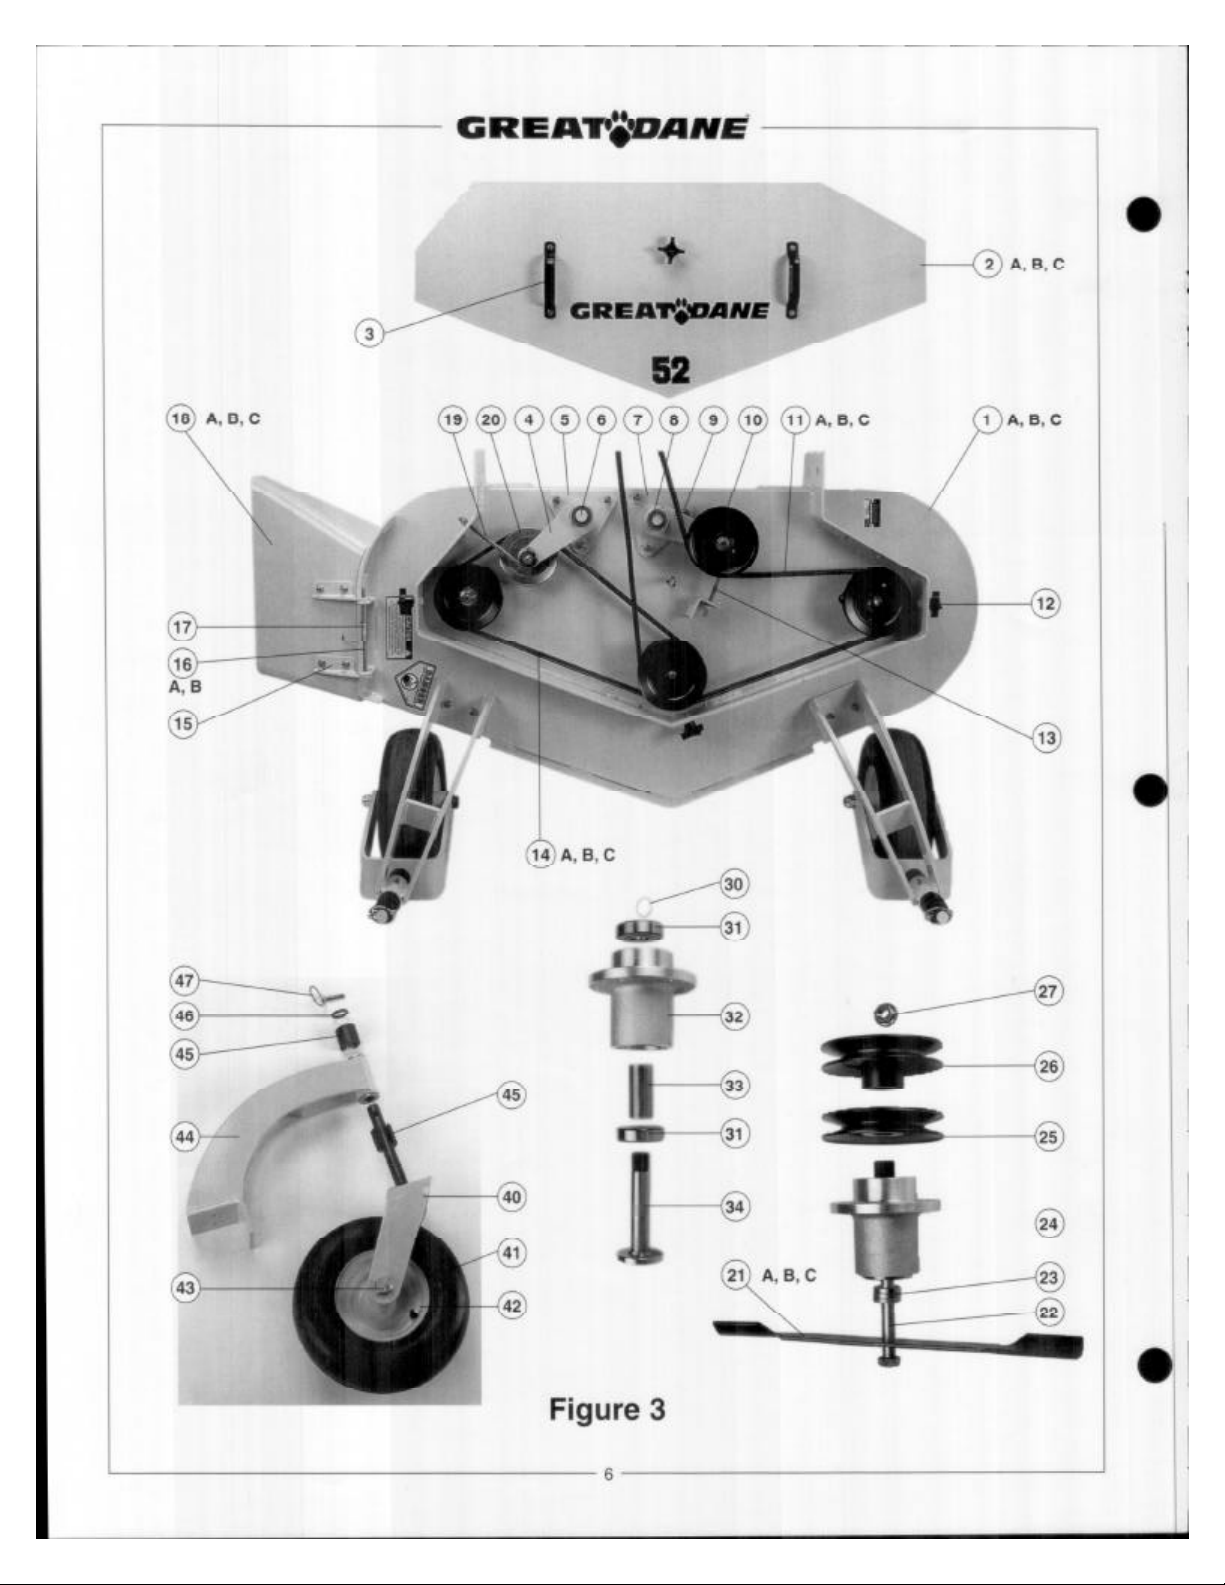
D13003 Caster Wheel Bearing Sleeve 6 3
D13023 Spacer, J-Hook Flat Idler 6 3
D13024 Spindle - Top Pulley Spacer 6 3
D15151 Pin, 48" Chute Pin 6 3
D18003 Idler Arm - Bearing Bushing 6 3
D18076 Caster Support Bushing 6 3
D33007 Spacer, 13" Caster Wheel 6 3
D38035 Tapered Roller Bearings w/ race - 13" Caster Wheel 6 3
D38065 13" Caster Wheel Seal 6 3
D38066 13" Caster Tire 6 3
D38067 13" Caster Spacer Tube 6 3
D38068 13" Caster Stop Tube 6 3
D12027 Bracket, Clutch Mount 8 4
D12064 Rear Cover for Hydro Pulley 8 4
D13010 Spacer - Engine Crankshaft 8 4
D14160 Washer, 1/4" Heavy Washer 8 4
Page 22

D14204 3/8 Washer, 1/4" Thick - Platform Bolt 8 4
D14213 Bolt, m6x14 for Pump Pulley 8 4
D15009 O.P.C. Weldment 8 4
D15036 Plunger, OPC Actuator 8 4
D18003 Idler Arm - Bearing Bushing 8 4
D18067 Key, M5xM28 Hydro Pump Pulley 8 4
D18145 Key Sq. 1/4" Taper, Engine Pulley 8 4
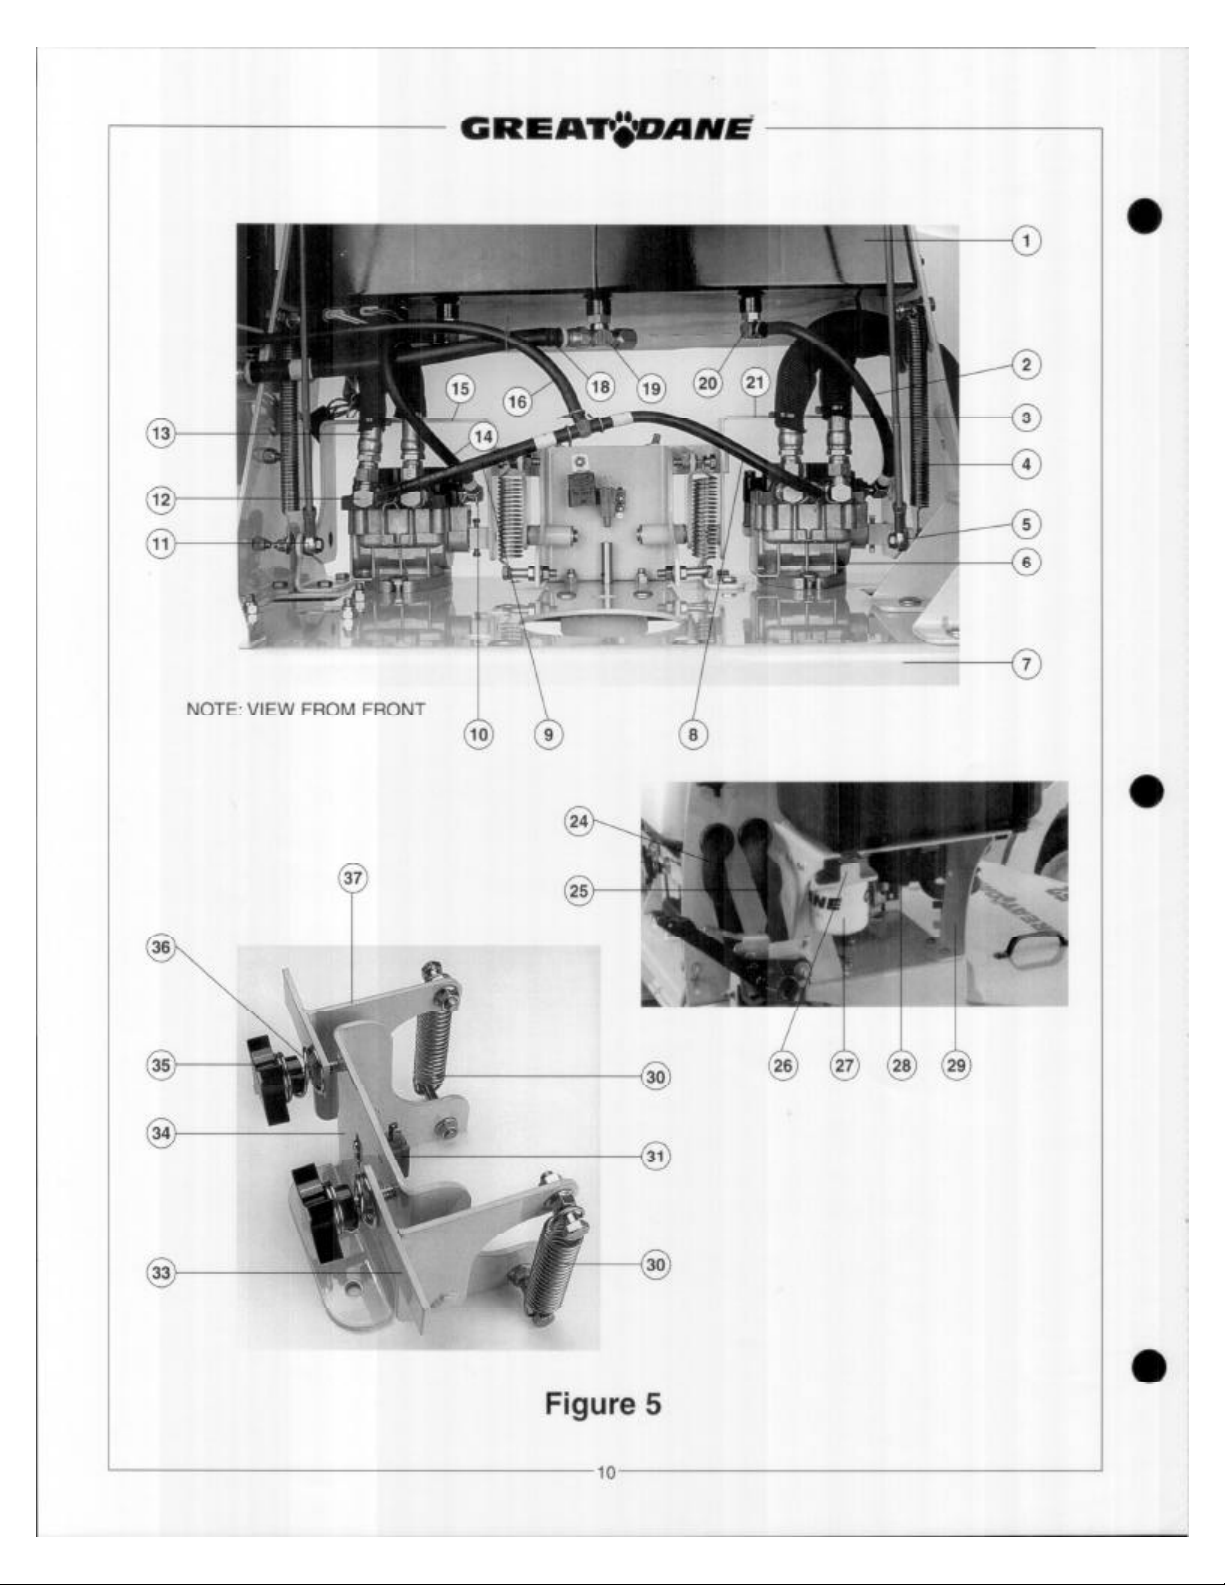
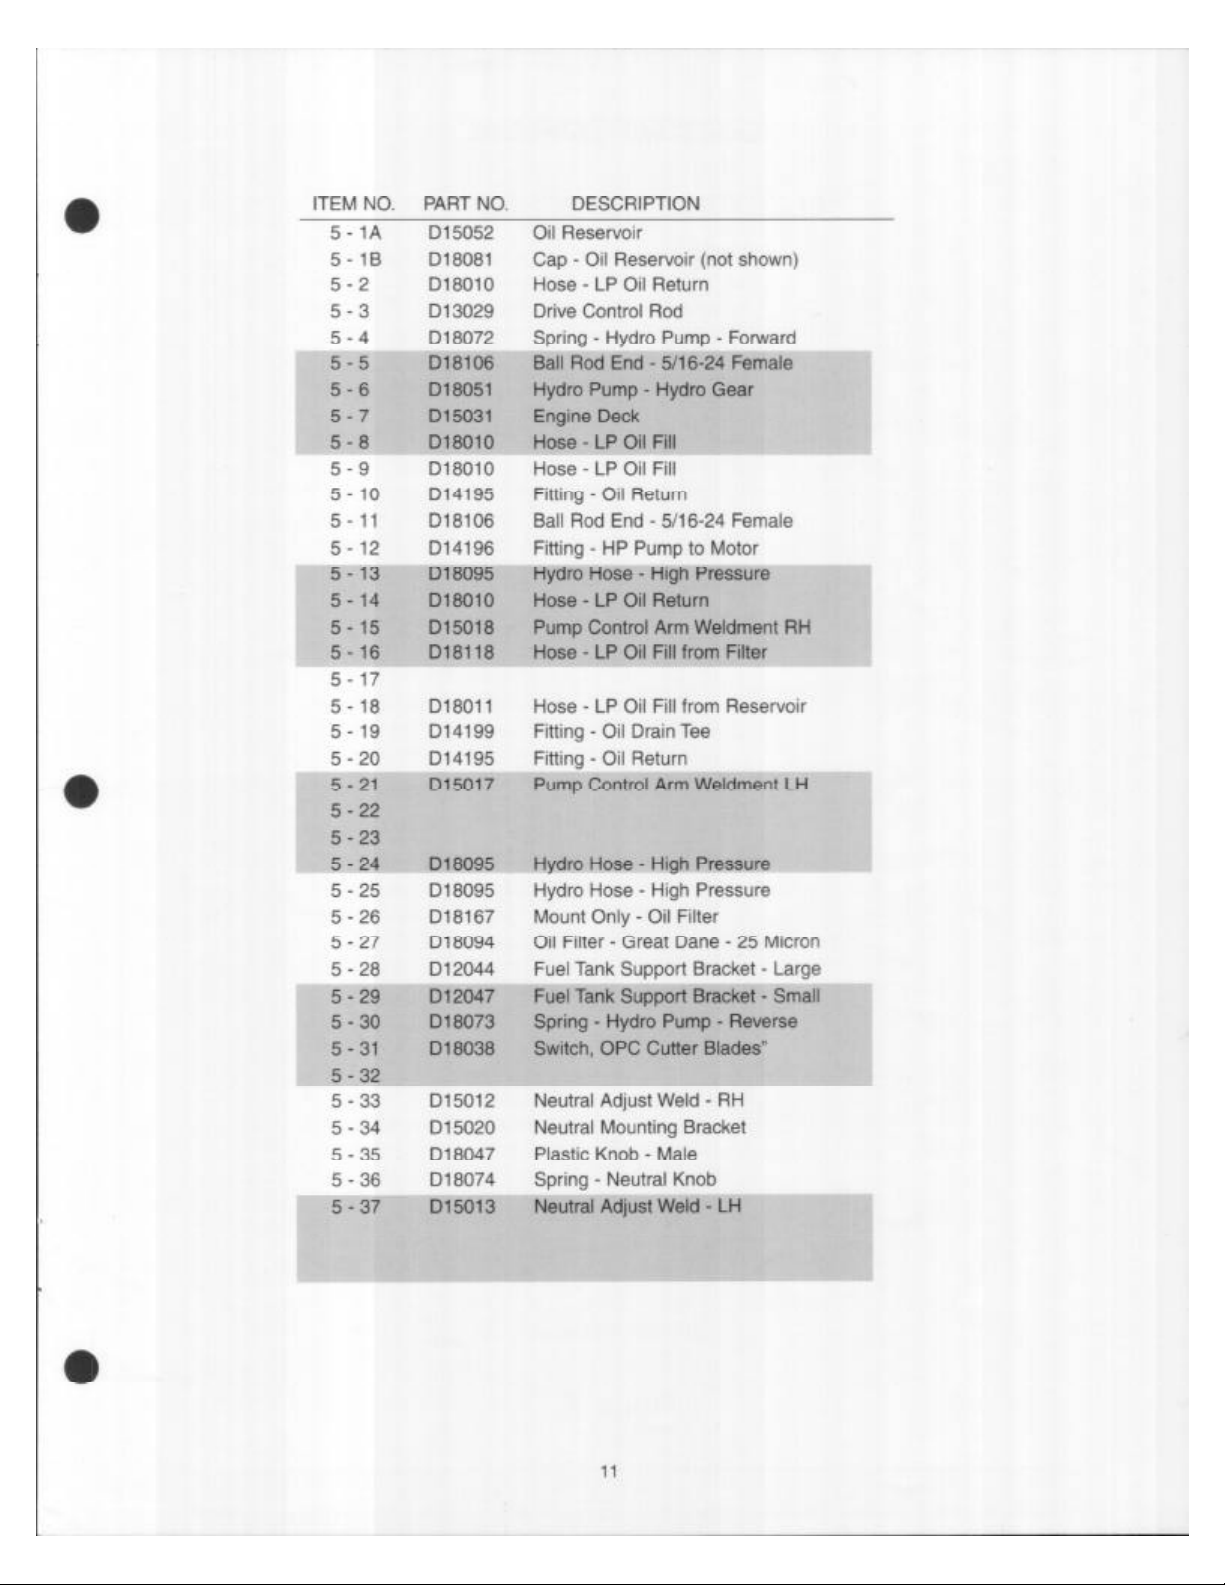
D14043 Internal Flare Fitting 10 5
D14197 Fitting, Straight 10 5
D14198 Fitting - Tee - Oil Fill To Pumps 10 5
D14212 Lever - Pump Release 10 5
D15010 Rotational Support 10 5
D18009 Hose, LP Tank to Pump 10 5
D18010 Hose, Pump to Tee 10 5
D18059 Square Head Set Screw w/Patch 1/4-20 x 1/2 10 5
D18098 Fuel Tank - Shut Off Valve 10 5
D18144 Grommet, Fuel Tank Valve 10 5
D18174 Cap - Oil Drain Tee 10 5
D32070 Capacitor Mount (Not shown, Kawasaki units only) 10 5
D32071 Module Mount (Not shown, Kawasaki units only) 10 5
D18017 Wiring Pigtail, Kohler 12 6
D18184 Wiring Harness, Kawasaki Manual Start 12 6
D38182 Wiring Harness, Kawasaki Electric Start 12 6
D38027 Kawasaki Wiring Pigtail 12 6
 Loading...