

Graymills QC User Manual

795-91382
02-10
Graymills
QC Series Pumps
In order to ensure the safe operation, never operate pump without motor installed snugly against the
flange. Read all warnings and cautions in OMI #795-08260 before any service work.
For proper pump cleaning and maximum bearing life, both motor and bearing cartridge should be
removed from housing.
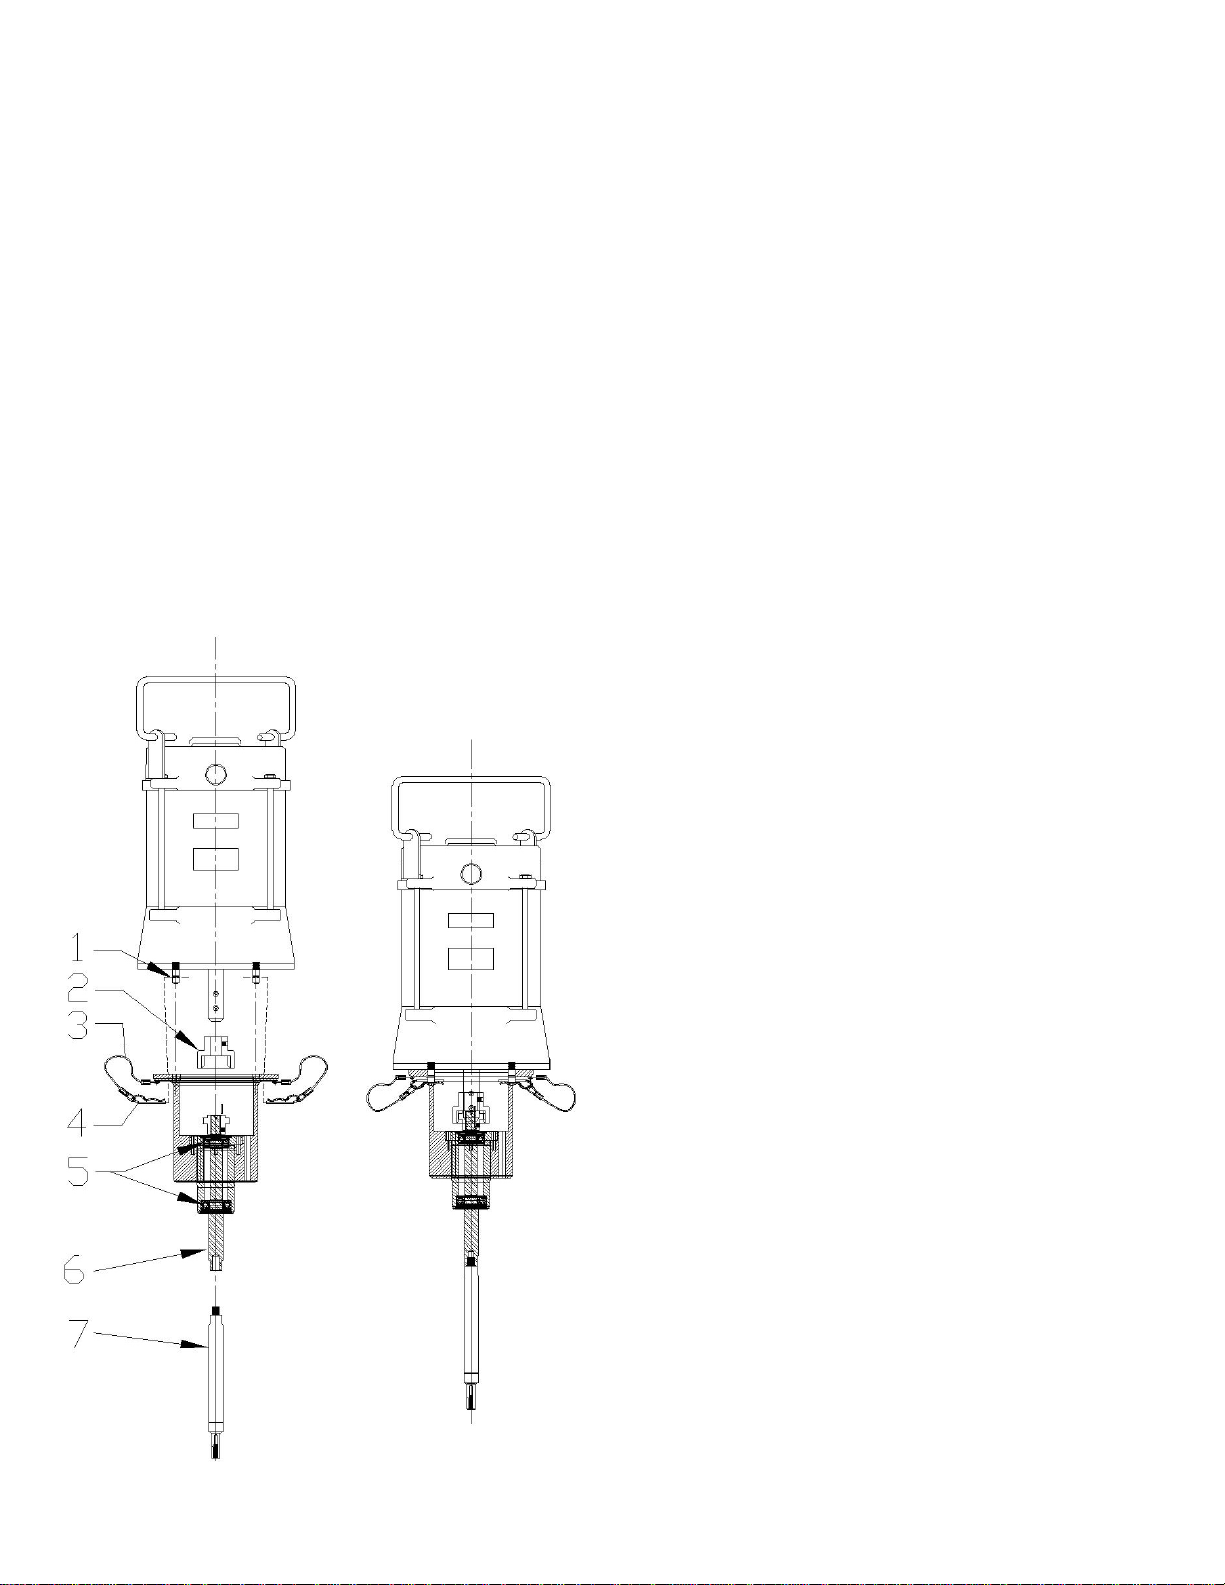
Removing/Installing Motor
To remove: Make sure motor is cool.
a. QC Models- Remove pin clips from retaining screws below mating flange of bearing housing.
b. QCE Models- Remove pin clip from the retaining screw above mating flange of bearing
housing.
c. Using handle, lift motor away from mating flange. DO NOT USE ELECTRICAL
CONNECTIONS FOR LIFTING.
To install motor:
1. QC Models- If installing motor on bearing housing for first time, install threaded retaining
screws to proper depth. Place the motor on top of bearing housing so retaining screws
protrude below bearing housing flange. Adjust retaining screws so hole in screw protrudes just
below housing flange.
2. QCE Models- If installing motor on bearing housing for the first time, thread retaining screws
into bearing housing flange. Place motor on top of the bearing housing so retaining screws
protrude above motor flange. Adjust retaining screws until hole in screw just protrudes above
motor flange.
3. Both Models- Insert pin clip into the retaining screw. Twist clip in a ratcheting motion, tighten
retaining screw down until flanges on motor and bearing housing are mated tightly.
Removing Bearing Cartridge from Housing- QC and QCE Series
To obtain ultimate bearing life, bearing cartridge should be removed before cleaning pump
body.
Tools Required: 4mm hex key and two 5/8” open-end wrenches
1. Remove Motor as described above.
2. Remove (2) 4mm screws located inside bearing housing with hex key. This will allow shaft to
“float” and makes bearing cartridge removal easier.
3. Place (2) 5/8” open end wrenches on straddle-milled slots on the upper and lower sections of
the pump shaft. NOTE: Shafts are threaded with a left-hand thread, thus loosening
requires turning clockwise
Graymills Corporation – 3705 N. Lincoln Ave. – Chicago, IL USA – www.graymills.com
795-91382
02-10
4. Holding lower section stationary, rotate upper shaft clockwise to unlock sections and then
continue to loosen by hand. Once loose, you can also rotate bearing cartridge to separate the
upper and lower sections of the shaft.
5. Remove bearing cartridge and upper shaft by pushing up from shaft end. The upper shaft is
retained in bearing cartridge.
Installing Bearing Cartridge- QC and QCE versions
1. Place bearing cartridge containing upper section of shaft into bearing housing
2. Holding upper shaft stationary using one 5/8” open end wrench on the straddle-milled slot,
tighten the lower section using second open end wrench on its straddle-milled slot. NOTE:
Shafts are threaded with a left-hand thread, thus tightening requires turning counterclockwise.
3. Install (2) 4mm screws inside bearing housing and tighten with hex key.
NOTE: A 3-phase motor can be wired to run in reverse; however, this will cause the shaft to
loosen during operation, due to the left-hand thread of the shaft. Flow will also be reduced by
90%
QC and QCE Versions
Part Numbers
1. Retaining Pin 568-38859-88
2. Coupling Set
QC Models C-37717
QCE Models C-37718
3. Lanyard 765-91349-13
4. Hair Pin Clip 756-91348
5. Bearing Service Kit
QC Models C-38983
QCE Models C-38984
6. Upper Pump Shaft
QC Models 560-38821-86
QCE Models 560-38814-86
7. Lower Pump Shaft
QCM3 (before 5/1/06) 560-38820-86
QCM3 (after 5/1/06) 560-39534-86
QC4000 560-38954-86
QC3 560-39174-86
QCME3 (before 5/1/06) 560-38820-86
QCME3 (after 5/1/06) 560-39534-86
QCE4000 560-39534-86
QCE3 560-39174-86
QCWE2 560-41020-86
QCGE2 560-41020-86
Graymills Corporation – 3705 N. Lincoln Ave. – Chicago, IL USA – www.graymills.com
 Loading...