

Page 1
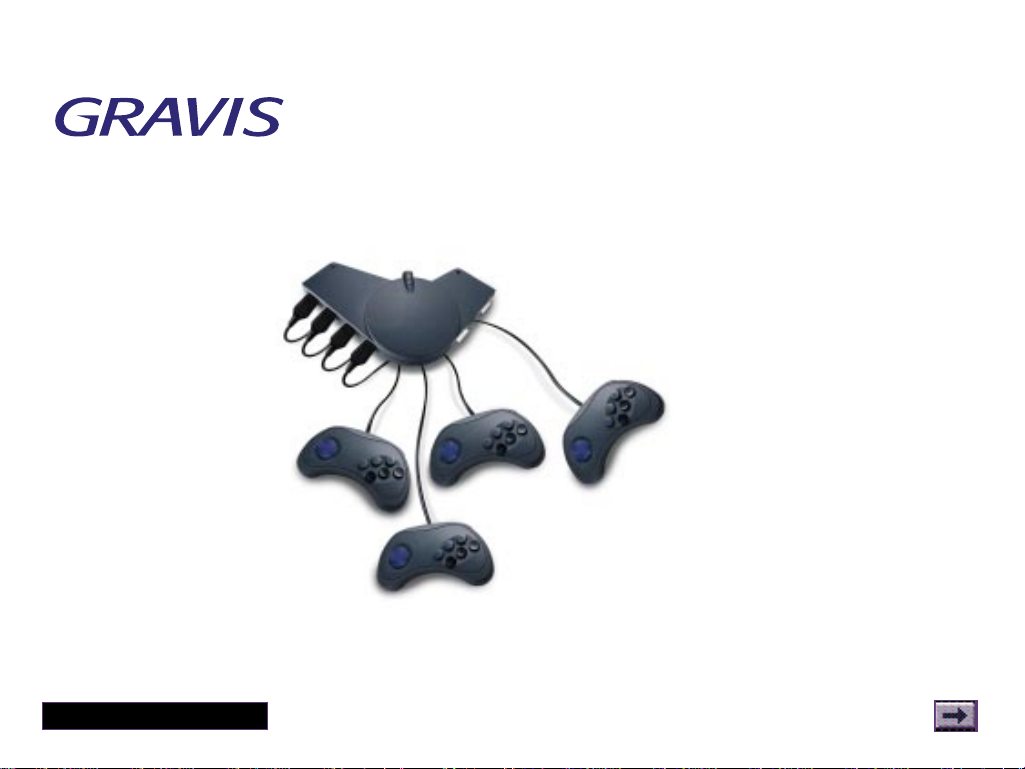
GrIP Game System
How to Use this GuideHow to Use this Guide
User’s Guide
Page 2
Book Topics
Chapter Topics
Click on a Topic or click on
the arrow at the bottom of
the page to continue reading
through the book.
Throughout this book, you
can click on green-highlighted text to jump to a
related topic.
To return, click the Back
button in the tool bar.
Book Topics
Introduction
Connections
GrIP MultiPort’s Control Modes
The GrIP-Pad
GrIP Software
Troubleshooting
Technical Support
GrIP User’s Guide
Page 3
Book Topics
Chapter Topics
Click on a Topic or click on
the arrow at the bottom of
the page to continue reading
through the book.
Introduction
Introduction
Registration
What You’ll Need
GrIP User’s Guide
Page 4
Book Topics
Chapter Topics
Introduction
Chapter 1 – Introduction
Click on green-highlighted
text to jump to a related
topic in the book
To return, click the Back
button in the tool bar at the
top of the page..
GrIP User’s Guide
Thank you for choosing to upgrade your computer gaming environment with Gravis GrIP™. Your new MultiPort™ and GrIP-Pad™ controllers are based on the patent-pending Gravis Interface Protocol
(GrIP). GrIP technology allows game controllers to communicate bidirectionally, at high speed, through a standard PC game port.
The PC game port has changed little since its introduction over 15
years ago. It supports a maximum of two controllers, X and Y axes for
each, and two buttons for each controller; and the task of reading a
single analog joystick uses 12 to 14% of CPU cycle time, slowing the
performance of your games. As the developers of today‘s complex
games try to add more players, dimensions, and special functions to
their games, the limitations of the standard game port get in the way.
Gravis GrIP opens the door to radical game development. GrIP technology imposes no practical limit on the number of controllers, buttons,
and axes that can be connected to a single PC game port. The
MultiPort allows you to connect four GrIP controllers or two traditional
joysticks. And the MultiPort supports all eight independent buttons on
each connected GrIP-Pad.
Page 5

Book Topics
Chapter Topics
...Introduction, cont’d.
Chapter 1 – Introduction
Speed Compensation Note
If you are using a speedcompensating game port, set the
speed compensation level as
usual for Pass-Thru Mode.
When you are running the
MultiPort in GrIP Mode, however,
either turn off the speed
compensation, or make sure that
your game port is set to a
medium compensation level. (For
the game port on the Gravis
MULTIPORT cards, use an UltraJoy
setting between 8–31.) The need
for speed compensation is
eliminated with GrIP, but the
MultiPort may not work well with
a game port set to a low (fast)
compensation level.
GrIP User’s Guide
Reading four GrIP controllers through the MultiPort uses less than 1%
of the CPU cycle time, allowing your games to operate at full speed.
The MultiPort also eliminates the most common game port headaches:
• GrIP eliminates the need for speed compensation.
• The MultiPort is tolerant of half-game port systems (substandard
game ports that support only two axes or two buttons).
• GrIP provides auto calibration, so no software calibration is necessary for games that support Gravis GrIP technology.
The GrIP-Pad’s 8 buttons operate independently in GrIP games, and
can be used in two predefined modes or programmed with keystrokes
for games that do not include direct GrIP support.
Page 6

Book Topics
Chapter Topics
Registration
Chapter 1 – Introduction
Complete the registration card in your GrIP package and mail or fax it
back right away. We supply our registered customers with full warranty and technical support. If you have Internet Web access, register
on-line at www.gravis.com. Leave us your e-mail address, and we’ll
send you information on product upgrades, new products, and special
offers.
GrIP User’s Guide
Page 7

Book Topics
Chapter Topics
What You’ll Need
Chapter 1 – Introduction
• IBM PC or compatible 486DX-66 or better recommended
• DOS 5.0 or greater
• IBM PC-compatible game port
• Double-speed or better CD-ROM drive recommended
(required for initial installation)
• Hard drive
• Windows® 95 required to create custom GrIPKey keysets
GrIP User’s Guide
Page 8
Book Topics
Chapter 2
Chapter Topics
Click on a Topic or click on
the arrow at the bottom of
the page to continue reading
through the book.
Throughout this book, you
can click on green-highlighted text to jump to a
related topic.
To return, click the Back
button in the tool bar.
Connections
Connecting the MultiPort
Connecting GrIP Game Controllers
Connecting Standard 15-Pin Game Controllers
GrIP User’s Guide
Page 9

Book Topics
Chapter Topics
Connecting the MultiPort
1. If your computer is running, turn it off to avoid possible electrical
damage to your MultiPort or computer.
2. Plug the MultiPort‘s 15-pin connector into your computer‘s joystick
port. If your game adapter has two joystick ports, use Port A.
Chapter 2 – Connections
GrIP User’s Guide
Page 10
Book Topics
Chapter Topics
Connecting GrIP Game Controllers
Chapter 2 – Connections
GrIP User’s Guide
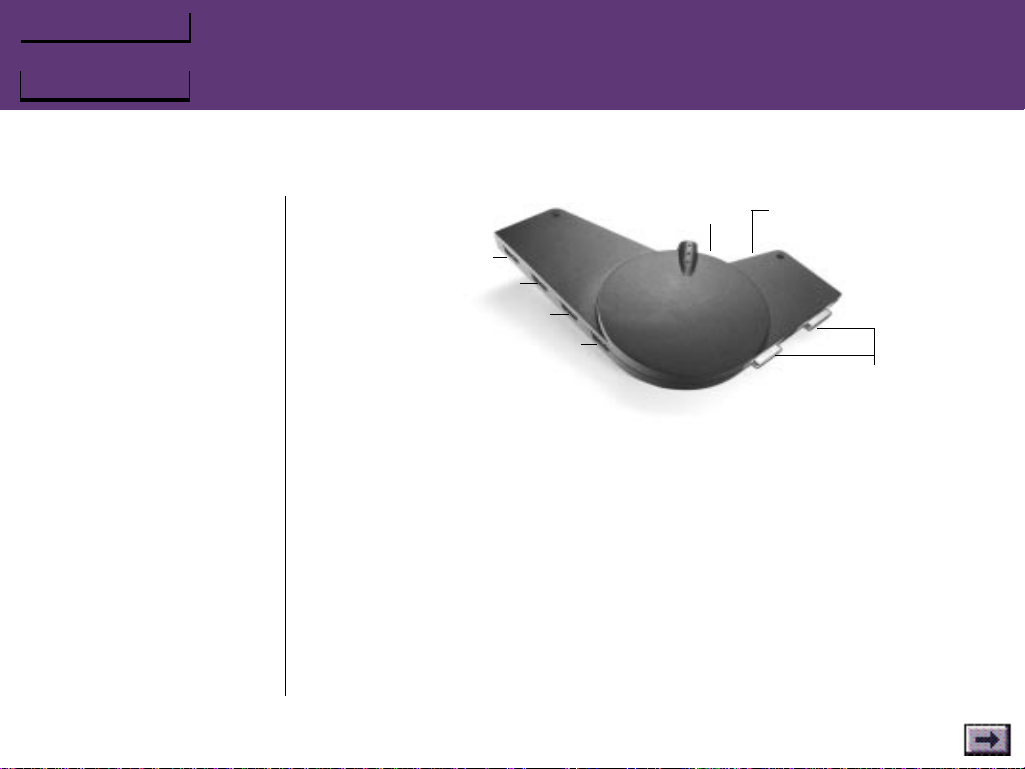
Mode Selector
Switch
15-pin standard joystick
“Pass-Thru” sockets
9-pin GrIP
sockets:
Reset Switch
Port 1
Port 2
Port 3
Port 4
1. With your computer running, move the Mode selector slide switch
towards the two 15-pin joystick ”Pass-Thru“ connectors until the
green LED on the Pass-Thru wing lights up.
This switches the MultiPort into Pass-Thru (standard game port) Mode
and cuts off power to the four GrIP sockets so you can safely connect
GrIP controllers.
The ”GrIP wing“ on the MultiPort has four sockets, labeled Ports 1–4.
2. Attach each GrIP-Pad or other GrIP controller to one of these
sockets.
Page 11

Book Topics
Chapter Topics
...Connecting GrIP Game Controllers, cont’d.
Chapter 2 – Connections
Connecting Controllers for
GamePad Emulation
Control
GamePad Emulation
supports only two controllers. If
you’re going to play a game in
GamePad Emulation:
• Connect a single controller
to Port 1 or Port 3; or,
• Connect two controllers to
Ports 1 & 2 or Ports 3 & 4.
GrIP User’s Guide
3. Move the MultiPort’s Mode Selector switch back towards the GrIP
sockets to put the MultiPort into GrIP Mode.
This deactivates any attached 15-pin controllers. If you are in DOS,
the bi-color LED switch on the MultiPort’s GrIP wing lights up red
to signal that the MultiPort is in its default setting (GamePad
Emulation). If you are running Windows 95, the GrIP LED lights up
green to signal GrIP mode. Any time you run a game with GrIP
support, the GrIP LED lights up green.
The MultiPort allows you to connect and use GrIP devices of different
types. As analog-style GrIP controllers become available, you will be
able to use these alongside your GrIP-Pads.
Page 12

Book Topics
Chapter Topics
Connecting Standard 15-Pin Controllers
1. Plug each game controller‘s 15-pin connector into one of the
MultiPort‘s 15-pin joystick sockets. If you are using only one joystick, attach it to the MultiPort‘s Port A. You can connect and
disconnect 15-pin controllers without shutting down your computer, but do not connect or disconnect controllers while a game is
running.
2. Move the MultiPort‘s Mode Selector switch towards the two 15-pin
sockets until the green LED on the Pass-Thru wing lights up to put
the MultiPort into Pass-Thru Mode.
This activates any attached 15-pin controllers and deactivates the
GrIP connectors. The green LED on the MultiPort‘s Pass-Thru wing
indicates that the MultiPort is in Pass-Thru Mode.
✳ You cannot use 15-pin controllers and GrIP controllers at the same time.
Chapter 2 – Connections
GrIP User’s Guide
Page 13
Book Topics
Chapter 3
Chapter Topics
Click on a Topic or click on
the arrow at the bottom of
the page to continue reading
through the book.
Throughout this book, you
can click on green-highlighted text to jump to a
related topic.
To return, click the Back
button in the tool bar.
GrIP MultiPort’s Control Modes
Overview
GrIP Mode
Keyboard Emulation
GamePad Emulation
Pass-Thru Mode
GrIP User’s Guide
Page 14
Book Topics
Chapter Topics
Overview
Chapter 3 – MultiPort Control Modes
The MultiPort can operate in a variety of control modes to suit different games and situations:
Games that support Gravis GrIP switch the MultiPort and controllers
automatically into GrIP Mode. The game software determines the
functions of each button and control on your GrIP controller. Look in
the game‘s manual or Setup for its GrIP controls.
Keyboard Emulation allows you to assign a game‘s keyboard com-
mands to the GrIP controller‘s buttons using the GrIPKey or GKLOAD
software. Keyboard Emulation works in Windows® 95 or DOS, but is
not available in Pass-Thru Mode.
GamePad Emulation allows the GrIP-Pad to emulate a standard PC
GamePad‘s controls, with a few enhancements. If your game does not
support Gravis GrIP, the MultiPort defaults to GamePad Emulation.
Pass-Thru Mode allows you to connect one or two standard 15-pin
joysticks to the MultiPort. This mode ”passes through“ the capabilities
of the standard PC game port. To use standard joysticks, the
MultiPort‘s Mode Selector Switch must be set to Pass-Thru Mode.
GrIP User’s Guide
Page 15

Book Topics
Chapter Topics
GrIP Mode
Chapter 3 – MultiPort Control Modes
GrIP Support
Many major software developers
are adding GrIP support to their
new releases, and GrIP support is
built into Windows® 95.
GrIP User’s Guide
Windows 95 and games that support Gravis GrIP require the MultiPort
to be in GrIP Mode. When you are running Windows 95, and any time
you want to play a game with GrIP support, you must put the Mode
Selector Switch in GrIP Mode.
When you start a game with GrIP support, or start Windows 95, the bicolor LED on the MultiPort‘s GrIP connector wing turns green. This tells
you that the MultiPort is in GrIP Mode.
In GrIP Mode, the game software determines the functions of each
button and control on your GrIP controller (unless you have used
GrIPKey to program the buttons). Look in the game‘s manual or Setup
for a description of its GrIP controls.
GrIP Mode allows the game software to use all of each GrIP
controller‘s buttons and axes. For the Gravis GrIP-Pad, this means that
all eight buttons on each GrIP-Pad can control independent game
functions, even if more than one GrIP-Pad is connected. (Some games,
however, do not support 8 buttons.)
In DOS, when the MultiPort‘s Mode Selector Switch is set to GrIP
Mode, but your game software does not support GrIP directly, the
GrIP-Pads default to GamePad Emulation.
Page 16

Book Topics
Chapter Topics
Keyboard Emulation
Chapter 3 – MultiPort Control Modes
To turn off Keyboard Emulation
before you begin playing a game
with GrIP support, you can run
GrIPKey and deselect Keyboard
Emulation, or you can double-click
on the GCC task bar icon and
select Keyboard Emulation Off.
When Keyboard Emulation is on,
DOS-based games will not
recognize the GrIP-Pads as
joysticks; therefore, you must
select Keyboard Control in the
game’s setup and make sure that
the GrIPKey set you are using has
keystrokes assigned to the
directional pad.
GrIP User’s Guide
Your GrIP controllers‘ buttons are programmable!
The GrIPKey software allows you to assign keyboard commands to the
GrIP controller‘s buttons. You can save button definitions for up to 4
GrIP controllers in a control file called a set, or keyset, for each of your
games.
To use Keyboard Emulation, you must assign keys to your GrIP-Pads‘
buttons using the GrIPKey software or load an existing GrIPKey keyset
from the DOS prompt using GKLOAD.
Directional Control
When you play games in Windows 95, the directional pad will provide
directional control, or you can assign keystrokes to the directional pad
as well as the buttons in GrIPKey.
If you are playing a game from a DOS box, select ”Keyboard“ in the
game‘s Setup. Directional control will be available only through
keyboard directional commands (e.g., arrow keys) that you assign to
the directional pad using GrIPKey.
See the GrIPKey Software and GKLOAD sections for detailed instructions.
Page 17

Book Topics
Chapter Topics
GamePad Emulation
Game Port
Restrictions
If your game port is substandard,
and supports only one controller
and two buttons, GamePad
Emulation support will be limited
by the capabilities of the game
port.
Chapter 3 – MultiPort Control Modes
In DOS, the MultiPort defaults to GamePad Emulation.
GamePad Emulation allows you to use your GrIP-Pad or other GrIP
controllers with games that have no built-in support for Gravis GrIP.
When the MultiPort is set for GamePad Emulation, the bi-color LED
on its GrIP connector wing lights up red. (Software that supports
Gravis GrIP automatically switches the MultiPort into GrIP Mode;
when this happens, the GrIP LED lights up green.)
GamePad Emulation is restricted to four button functions on one
controller or two button functions on two controllers. Even in
GamePad Emulation, however, your GrIP-Pad offers a variety of
control options. See the next chapter, The GrIP-Pad, for the exact
button function mapping for your GrIP-Pad in GamePad Emulation. If
you have another type of GrIP controller, see its manual to determine
its button functions in GamePad Emulation.
GrIP User’s Guide
Page 18

Book Topics
Chapter Topics
Pass-Thru Mode
Chapter 3 – MultiPort Control Modes
Move the MultiPort‘s Mode Selector Switch towards the two 15-pin
Pass-Thru connectors to put the MultiPort in Pass-Thru Mode. Make
sure the switch is moved all the way (the green LED on the Pass-Thru
wing should light up).
The MultiPort‘s Pass-Thru Mode allows you to use the standard 15-pin
joysticks and controllers you already own. In Pass-Thru Mode, the
MultiPort operates exactly as a PC game adapter Y-cable. If you have a
standard IBM PC-compatible game port, this Mode allows support for:
• 4 independent buttons and 4 axes (e.g., 2 joystick axes plus throttle
and rudder control) on a single controller; or,
• 2 buttons and 2 axes (the joystick ’X‘ and ’Y‘ axes) on each of 2
attached controllers.
If your game port is substandard, and supports only one controller and
two buttons without the MultiPort, Pass-Thru Mode support will be
limited by the capabilities of the game port.
GrIP User’s Guide
Page 19
Book Topics
Chapter 4
Chapter Topics
Click on a Topic or click on
the arrow at the bottom of
the page to continue reading
through the book.
Throughout this book, you
can click on green-highlighted text to jump to a
related topic.
To return, click the Back
button in the tool bar.
The GrIP-Pad
Features
GrIP Mode Button Functions
Keyboard Emulation Button Functions
GamePad Emulation Button Functions
GrIP User’s Guide
Page 20
Book Topics
Chapter Topics
GrIP-Pad Features
Chapter 4 – The GrIP-Pad
The GrIP-Pad features a thumb-controlled directional pad, two indexfinger ”flipper“ buttons, and six additional independent buttons.
In GrIP Mode, the GrIP-Pad‘s buttons can control eight independent
game commands; the game software determines the button settings.
In Keyboard Emulation, the directional control and all eight buttons
are programmable: you can assign a game‘s keyboard commands to
the GrIP-Pad‘s buttons.
In GamePad Emulation, the GrIP-Pad offers a variety of preset control
options; these work the same in every game.
In GrIP Mode, the MultiPort lets you connect and use up to four GrIPPads or other GrIP controllers at once for multi-player games, with all
button functions available for each controller.
GrIP User’s Guide
Page 21
Book Topics
Chapter Topics
Button Functions
Chapter 4 – The GrIP-Pad
...In GrIP Mode
In GrIP Mode, the game software determines the GrIP-Pad button
functions. Look in the game‘s manual or setup for its GrIP controls.
Most GrIP-supporting games let you select your own button settings.
In GrIP Mode, the game can use each of the GrIP-Pad‘s eight buttons
for a different game command.
...In Keyboard Emulation
In Keyboard Emulation, the GrIP-Pad‘s directional pad and buttons will
perform the keystrokes assigned to them in the GrIPKey control set.
...In GamePad Emulation
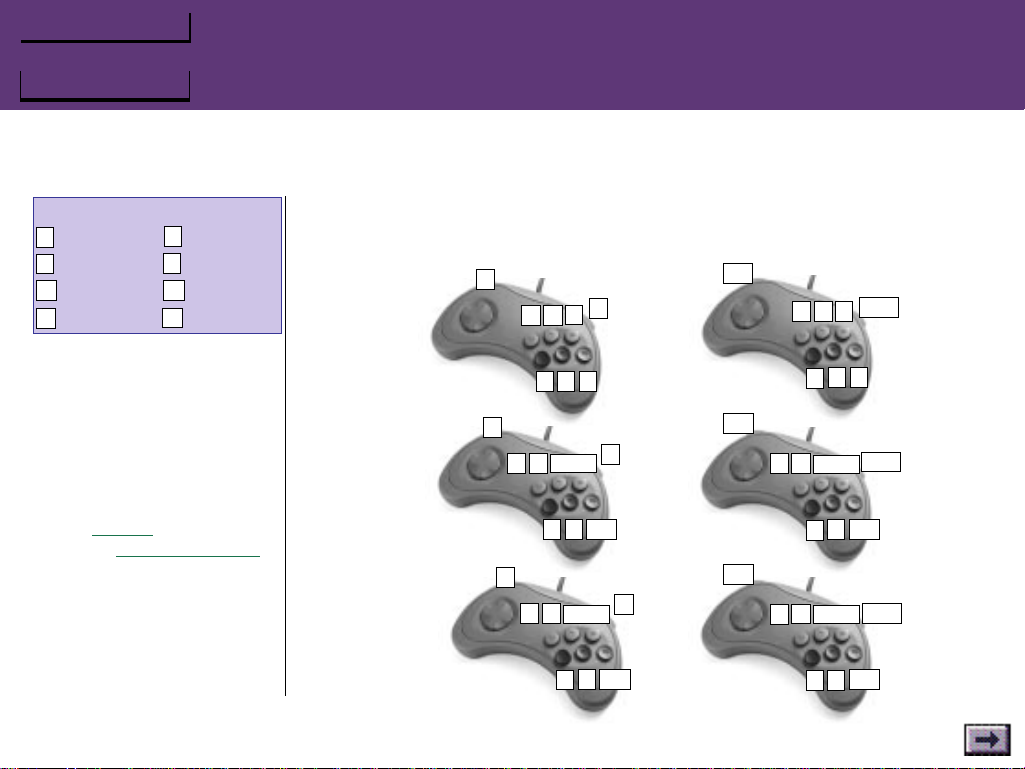
In GamePad Emulation, the GrIP-Pad‘s buttons will function much like
a Gravis PC GamePad, but with a variety of control options:
• For ”standard“ GamePad control, connect your GrIP-Pads to GrIP
Ports 1 & 2.
• For ”steering“ control (great for driving games or any game where
side-to-side movement is important), connect your GrIP-Pads to
GrIP Ports 3 & 4.
GrIP User’s Guide
The buttons will function as in the illustrations on the next page.
Page 22
Book Topics
Chapter Topics
...Button Functions, cont’d.
Chapter 4 – The GrIP-Pad
Joystick A:
A Button A
B Button B
Joystick B:
C Button A
D Button B
AT A-Turbo CT A-Turbo
BT B-Turbo DT B-Turbo
These settings are for
GamePad Emulation only.
If your game supports GrIP, the
buttons may function differently. See
your game’s manual or Setup for a
description of its GrIP functions.
If you have configured your GrIP-Pad
with the
GrIPKey software, you are
operating in
and your buttons will function
differently.
If your game port is substandard,
and supports only one controller and
two buttons, GamePad Emulation
support will be limited by the
capabilities of the game port.
GrIP User’s Guide
Keyboard Emulation,
“STANDARD” GAMEPAD EMULATION
Recommended for arcade-style, adventure, and fighting
games.
1 GamePad
in
Port 1
B
AT BT D
A
A B C
2 GamePads
in
Ports 1 & 2
Pad A
B
AT BT AT&BT
A B
A
A&B
D
Pad B
CT DT
CT&DT
C
C
D
C&D
GrIP-Pad Button Settings for GamePad Emulation
“STEERING” GAMEPAD EMULATION
Recommended for driving games and any game where
left-and-right movement control is important.
Left
Left
BT D
AT
A B
ATBTAT&BT
1 GamePad
Right
Port 3
C
2 GamePads
Right
Ports 3 & 4
Pad A
A&B
A B
Left
Pad B
CTDTCT&DT
Right
C D C&D
in
in
Page 23
Book Topics
Chapter 5 – GrIP Software
Chapter 5
Chapter Topics
Click on a Topic or click on
the arrow at the bottom of
the page to continue reading
through the book.
Throughout this book, you
can click on green-highlighted text to jump to a
related topic.
To return, click the Back
button in the tool bar.
GrIP Software
Introduction
Drivers
GrIP Control Center (GCC)
GrIPKey - Keyboard Emulation Software
GKLOAD
GravUtil
Gravis Joystick Applet
GrIP User’s Guide
Page 24
Book Topics
Chapter Topics
Introduction
Chapter 5 – GrIP Software
These software applications are included with the GrIP Game System,
and are explained in this chapter:
DOS and Windows 95 drivers. These driver programs are required
for GrIP mode. If you are not running Windows 95, only the DOS driver
will be installed on your computer.
GCC – The GrIP Control Center. GCC is a Windows 95 task bar utility
that allows you to check the status of your GrIP MultiPort and enable
or disable keyboard emulation.
GrIPKey. GrIPKey is a Windows 95 application that allows you to
program GrIP controllers to emulate keyboard commands in your
games. You can use GrIPKey “keysets” with any keyboard-controlled
Windows 95 or DOS game.
GKLOAD. GKLOAD is a DOS-based command-line utility that allows
you to load GrIPKey keysets into your GrIP controllers and use them
with DOS games.
GrIP User’s Guide
GravUtil. GravUtil is a game port and joystick testing utility.
Page 25

Book Topics
Chapter Topics
Drivers
Chapter 5 – GrIP Software
GRIP.GLL
All DOS-based games that support Gravis GrIP require the GRIP.GLL file.
It is installed into your GrIP software folder. The SET GRIP= line that
the GrIP installation program adds to your AUTOEXEC.BAT file tells
games where to find the file (e.g. SET GRIP=C:\GRAVIS\GRIP).
Windows 95 GrIP Driver
If Windows 95 is installed on your computer, a Windows 95 driver is
installed automatically into your Windows directory during the GrIP
software installation.
GrIP User’s Guide
Page 26
Book Topics
Chapter Topics
GrIP Control Center
Chapter 5 – GrIP Software
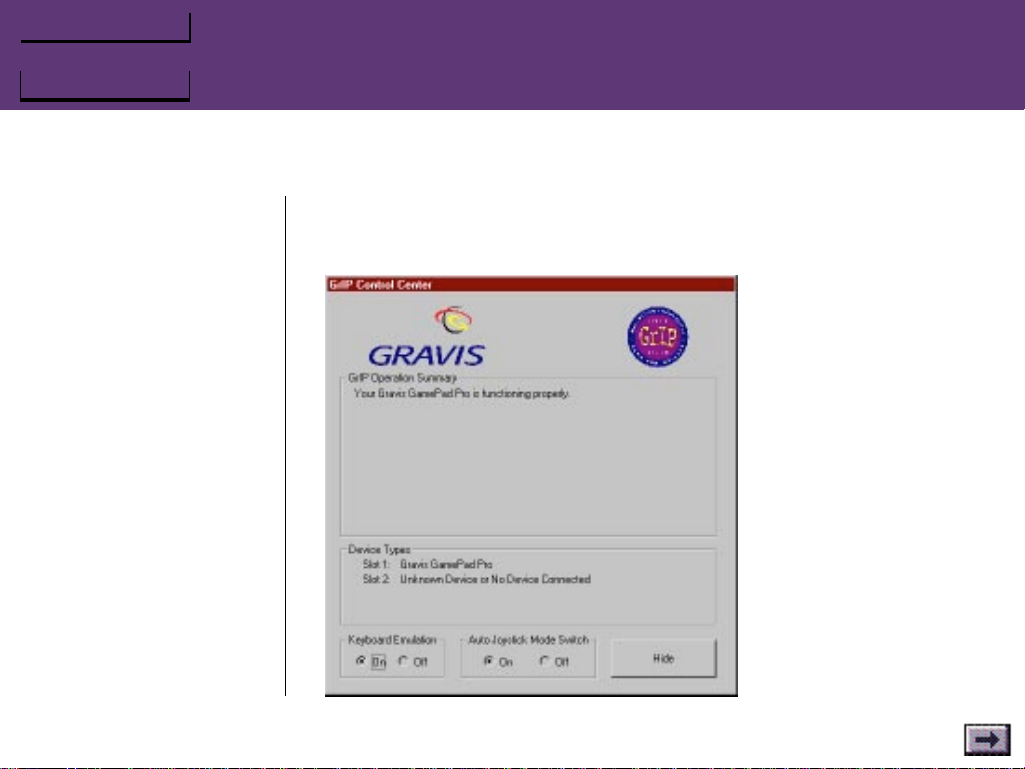
The GrIP Control Center (GCC) is a Windows 95 task bar utility that
allows you to check the status of your connected controllers and turn
Keyboard Emulation on and off.
GrIP User’s Guide
Page 27
Book Topics
Chapter Topics
...GrIP Control Center (GCC), Cont’d.
To start GCC:
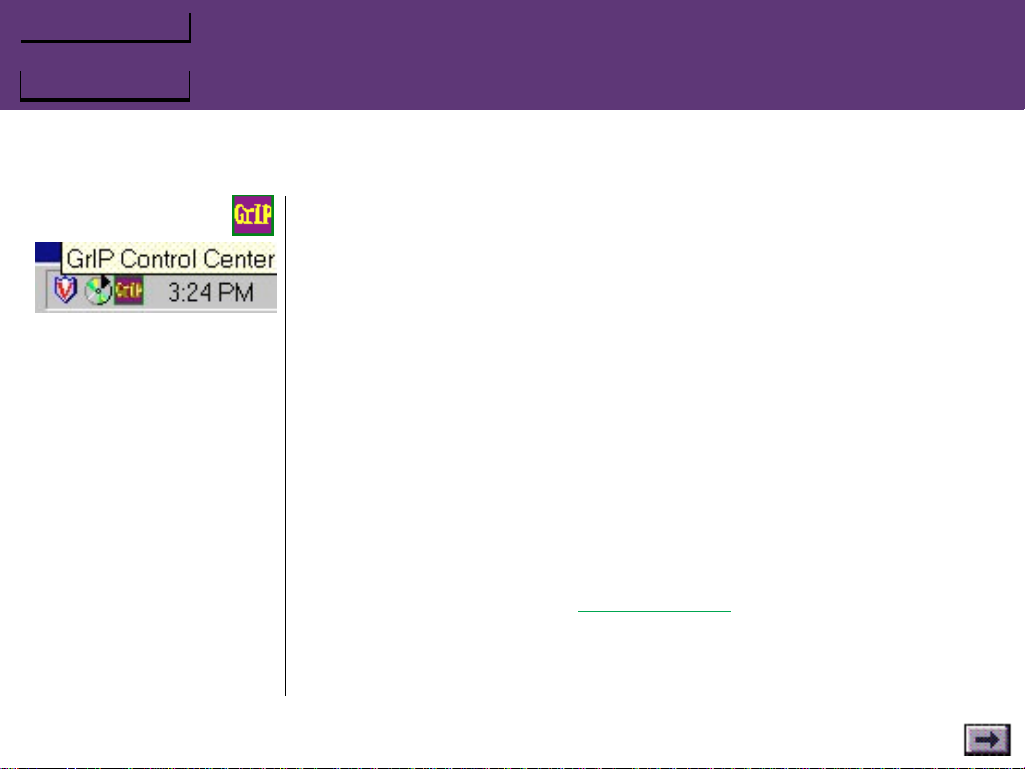
GCC is run automatically every time Windows 95 starts up. A small GCC
icon appears on the task bar. To start the program, click on the task
bar icon.
The GrIP Control Center window opens. The status window should
display a message, letting you know what devices it finds attached to
your game ports or MultiPort ports. If there is a problem with your
mode selection, GCC will tell you, and the icon on the task bar will
flash.
Keyboard Emulation
The Keyboard Emulation on/off checkboxes allow you to disable and
re-enable Keyboard Emulation from the task bar—without starting the
GrIPKey software.
If you have not configured your GrIP controller with a GrIPKey set
(which you do by choosing Configure GrIP from GrIPKey’s File menu
or by running GKLOAD from the DOS prompt), these options will be
unavailable.
Chapter 5 – GrIP Software
GrIP User’s Guide
Page 28

Book Topics
Chapter Topics
...GrIP Control Center (GCC), Cont’d.
Auto Joystick Mode Switching
This option is selected by default, and in most cases, you should leave
it selected. When this option is enabled (selected), the GrIP driver will
automatically put the GrIP MultiPort (if there is one attached) into
GamePad Emulation mode when a game tries to access the joystick
port directly. If a GamePad Pro is attached and this situation occurs,
GCC will pop up a message, instructing you to switch the pad’s mode
switch into GamePad Mode.
This option can occasionally cause problems when you are using a
GrIPKey set to play a game in keyboard emulation. If GCC tells you to
switch to GamePad Mode while your GamePad Pro is configured with
a GrIPKey set, or if your MultiPort switches into Emulation Mode while
you are using a GrIPKey set, you should disable the Auto Joystick Mode
Switching option.
Chapter 5 – GrIP Software
GrIP User’s Guide
Page 29
Book Topics
Chapter Topics
GrIPKey Keyboard Emulation Software
Chapter 5 – GrIP Software
GrIPKey is designed to work
with the standard GrIP-Pad
and the GamePad Pro.
GrIP User’s Guide
GrIPKey makes games with lots of keyboard commands easier and
more fun to play with your GrIP-Pads or other GrIP controllers.
The GrIPKey software allows you to assign keyboard commands to
buttons on any GrIP-compatible game controller. You can save button
definitions for up to 4 GrIP controllers in a control file called a keyset
(or set) for each of your games.
While the GrIPKey software requires Windows® 95, you can use the
completed GrIPKey sets (including all the included preconfigured sets)
with DOS games as well.
To start GrIPKey:
Double-click the GrIPKey icon.
To program a GrIP controller‘s buttons:
1. Look in your game‘s setup or manual for the keyboard commands
used in the game.
2. Click the New button, or choose File–New to open a new Keyset
window, where you can create and store a list of game commands.
Page 30
Book Topics
Chapter Topics
...GrIPKey Keyboard Emulation Software, Cont’d.
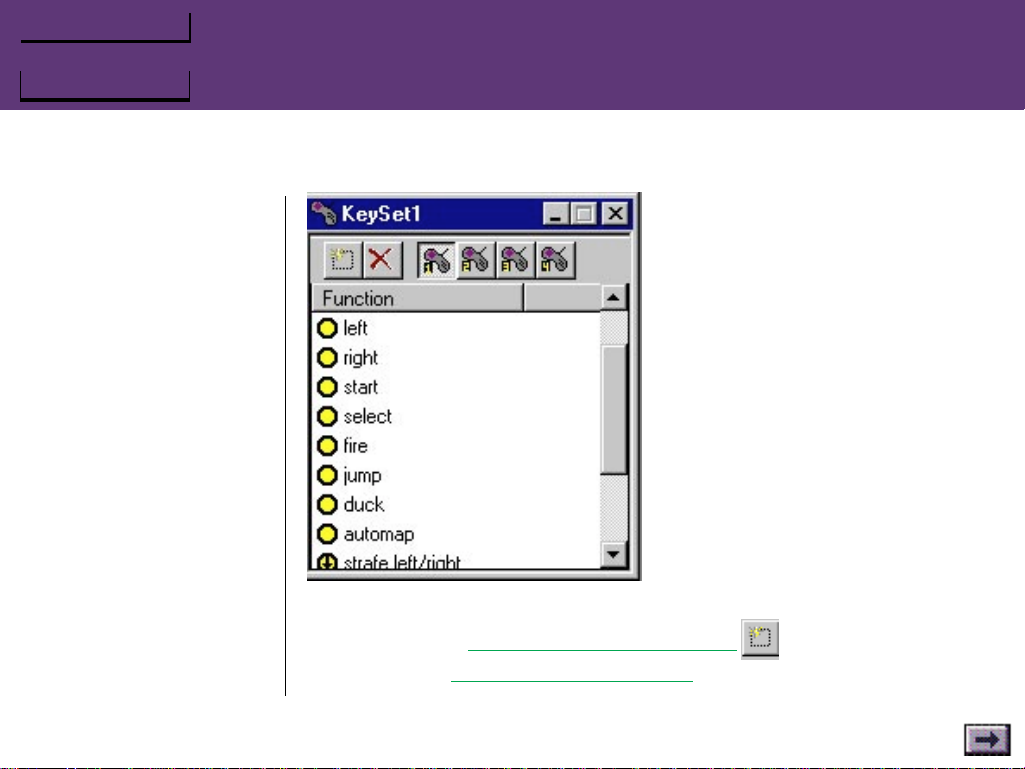
Sample functions
(a new KeySet will be blank)
3. To enter the game‘s keyboard commands:
Chapter 5 – GrIP Software
GrIP User’s Guide
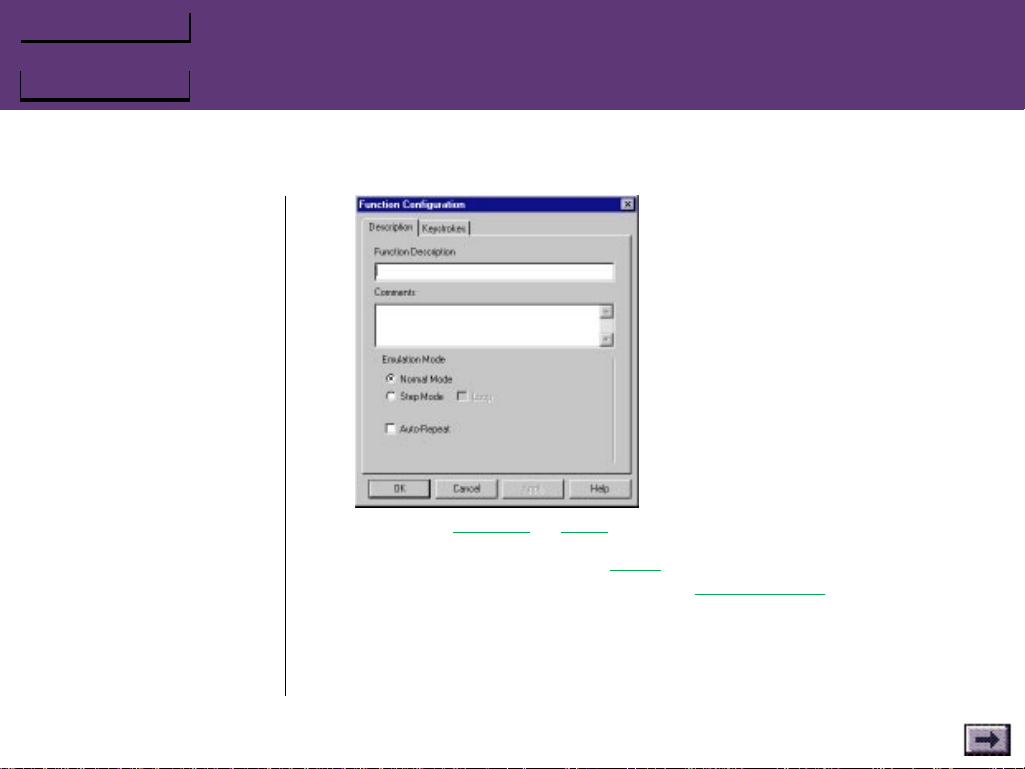
a. Click the Add New Function button in the Keyset window. The Function Configuration window opens.
b. Type a description in the Function Description field.
Page 31
Book Topics
Chapter Topics
...GrIPKey Keyboard Emulation Software, Cont’d.
Examples
If you assign the keys A, B, and
C to a Step mode button, here
is what will happen when you
play the game:
Step Mode with Loop:
Button press Key
1A
2B
3C
4A
5 B...
Step Mode
Button press Key
1A
2B
3C
4C
5 C...
GrIP User’s Guide
and so on
without Loop:
and so on
c. Choose Normal or Step mode.
If you selected Step, select Loop if you wish the keystroke string to
repeat. (See example at left.) Select Auto Repeat if you wish a
Normal keystroke string to repeat (for a turbo-fire effect).
d. Select the Keystroke tab.
For a Normal mode entry, enter a key or series of keys in the Press
String field. If you wish, you can enter a second key or series of
Chapter 5 – GrIP Software
Page 32
Book Topics
Chapter Topics
...GrIPKey Keyboard Emulation Software, Cont’d.
keys in the Release String field to be performed when you release
the button.
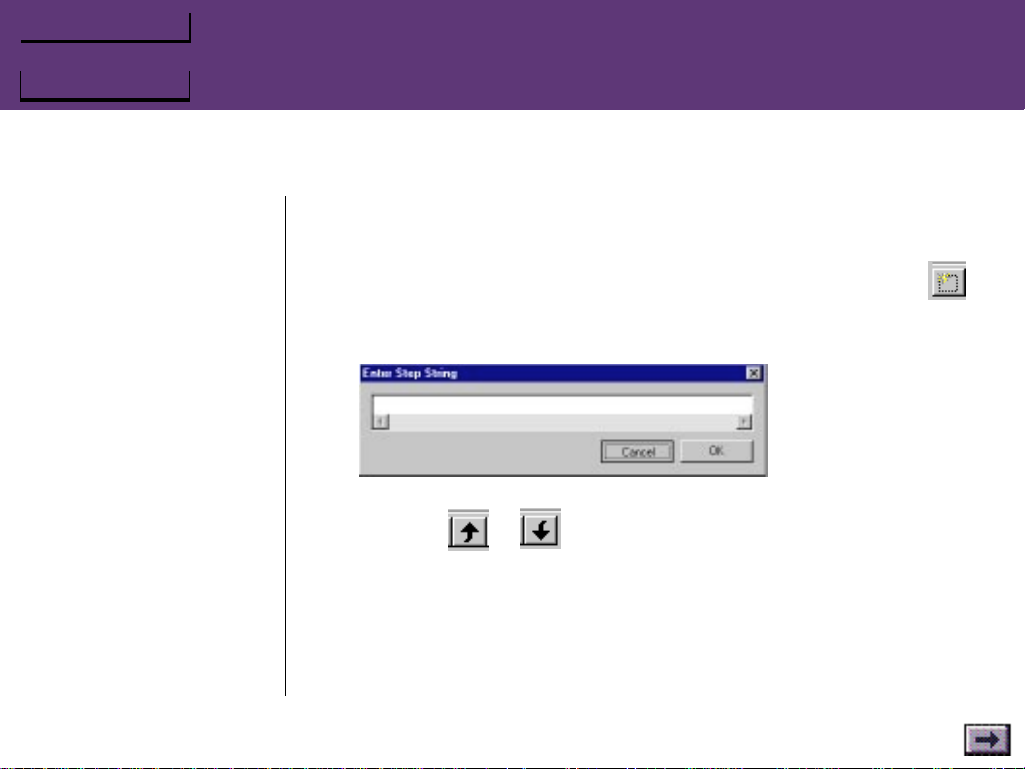
For a Step mode entry, click the Add New Step String button
and enter a key or series of keys in the Enter Step String dialog.
Repeat these steps for each game command in the Step series.
To move a line up or down in the Step dialog, select the line and
press the or button.
4. Click OK, then repeat step 3 for each game command that you
want to assign to a button on your GrIP controller.
Chapter 5 – GrIP Software
GrIP User’s Guide
5. When all the game‘s commands are entered in the Keyset window,
you can assign them to buttons on your GrIP controller:
Page 33
Book Topics
Chapter Topics
...GrIPKey Keyboard Emulation Software, Cont’d.
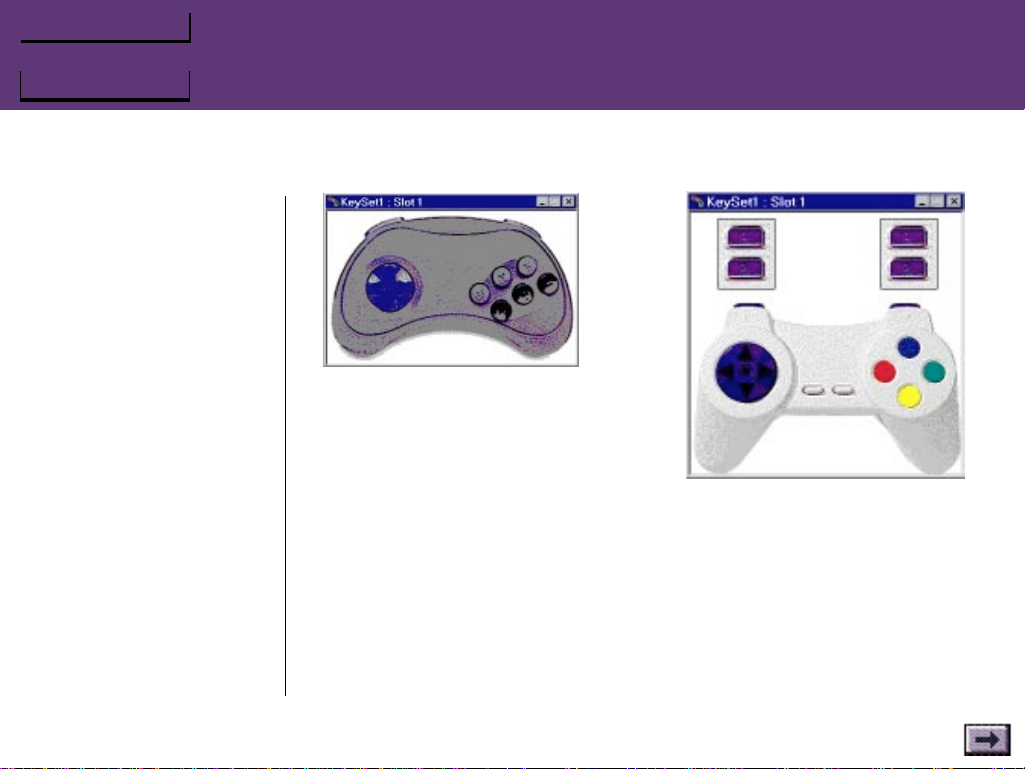
GrIPKey displays the type of controller that it
detects when it polls the game port (or MultiPort)
at startup—unless the set was created for another
controller. To display a different device, right-click
in an empty area of this window and choose from
the popup window.
a. Click the numbered Show Controller button for the port where a
GrIP controller is connected (or choose View–Pad#). This opens a
new window with an image of the controller.
b. Select a function from the Keyset window, and drag it over top
of a button on the controller image.
Chapter 5 – GrIP Software
GrIP User’s Guide
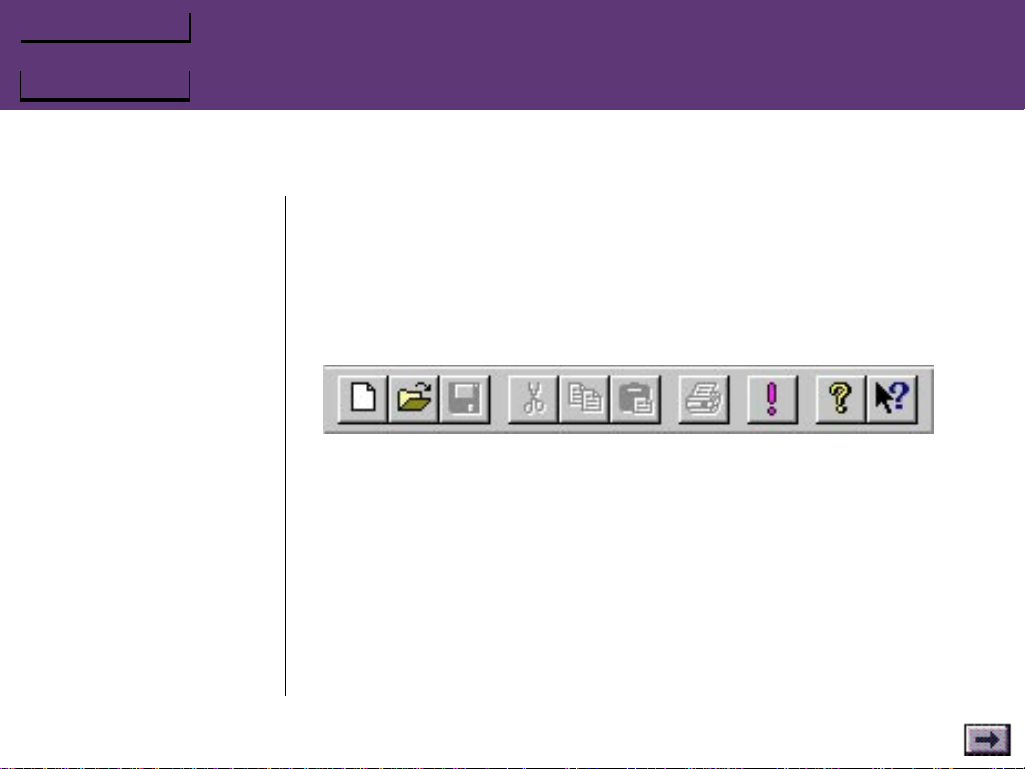
To edit a button, double-click on it to change the Function Configuration, or drag a new function from the Keyset window or from another
button.
Page 34
Book Topics
Chapter Topics
...GrIPKey Keyboard Emulation Software, Cont’d.
✳ You can assign different button definitions to each GrIP controller.
6. Select File/Configure GrIP to load the settings into your attached
GrIP controllers.
Note: If you skip this step, keyboard emulation will not work.
The Main Toolbar
Chapter 5 – GrIP Software
GrIP User’s Guide
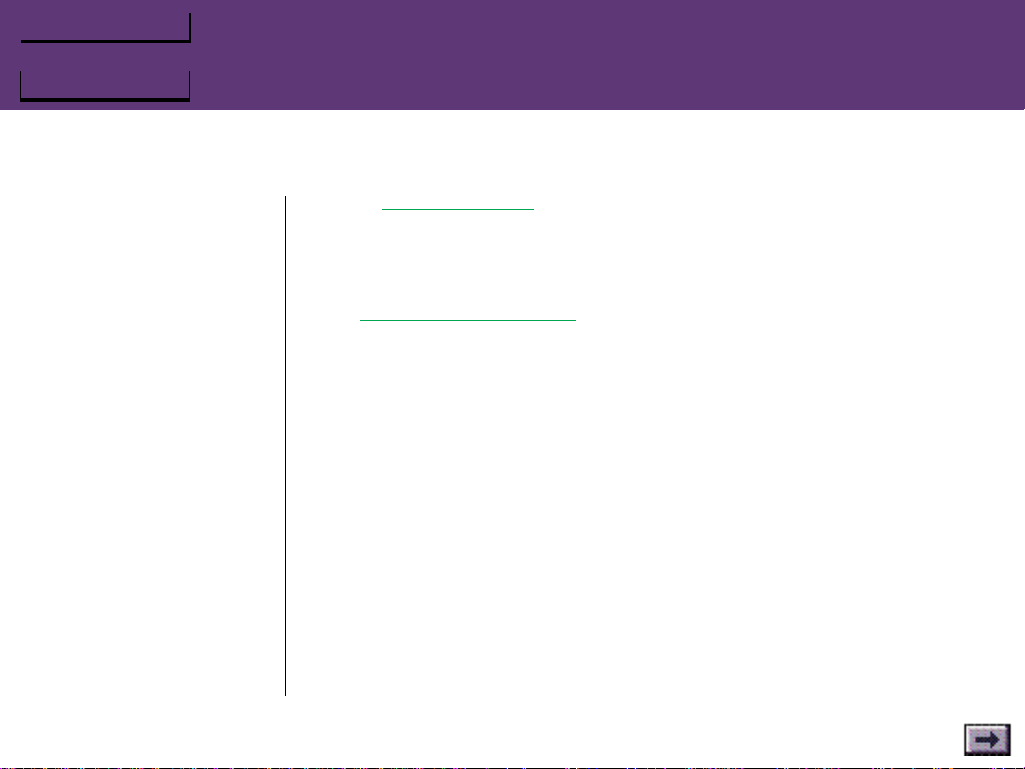
New Open Save Cut Copy Paste Print Keyboard Help
Emulation On/Off
New
Click on the New tool to open a new, untitled GrIP control Keyset
window.
Open
Click on the Open tool to open an existing Keyset window.
Save
Click on the Save tool to save the active set.
Page 35

Book Topics
Chapter Topics
...GrIPKey Keyboard Emulation Software, Cont’d.
Cut
Allows you to move a function from one Keyset window to another.
Select a function in the active Keyset window, then click on the Cut
tool to copy the function to the Clipboard and remove it from the
Keyset window. Use this command in conjunction with Paste.
Copy
Allows you to copy a function from one Keyset window to another.
Select a function in the active Keyset window, then click on the Copy
tool to copy the function to the Clipboard. Use this command in
conjunction with Paste.
Paste
Click in the destination Keyset window, then click on the Paste tool to
paste the function from the Clipboard.
Print
Click on the Print tool to print a reference chart of your button configurations.
Chapter 5 – GrIP Software
GrIP User’s Guide
Keyboard Emulation On/Off
Click on this tool to turn keyboard emulation on and off. When you
Page 36
Book Topics
Chapter Topics
...GrIPKey Keyboard Emulation Software, Cont’d.
select Configure GrIP from the File menu, Keyboard Emulation goes
on automatically. To disable it, click this tool; to turn keyboard emulation back on again, click this tool again.
If you prefer, you can also turn keyboard emulation on and off using
the GrIP Control Console task bar utility.
About
Click on the About icon to check the version number of your GrIPKey
software.
Help
Click on the Help tool to start GrIPKey Help.
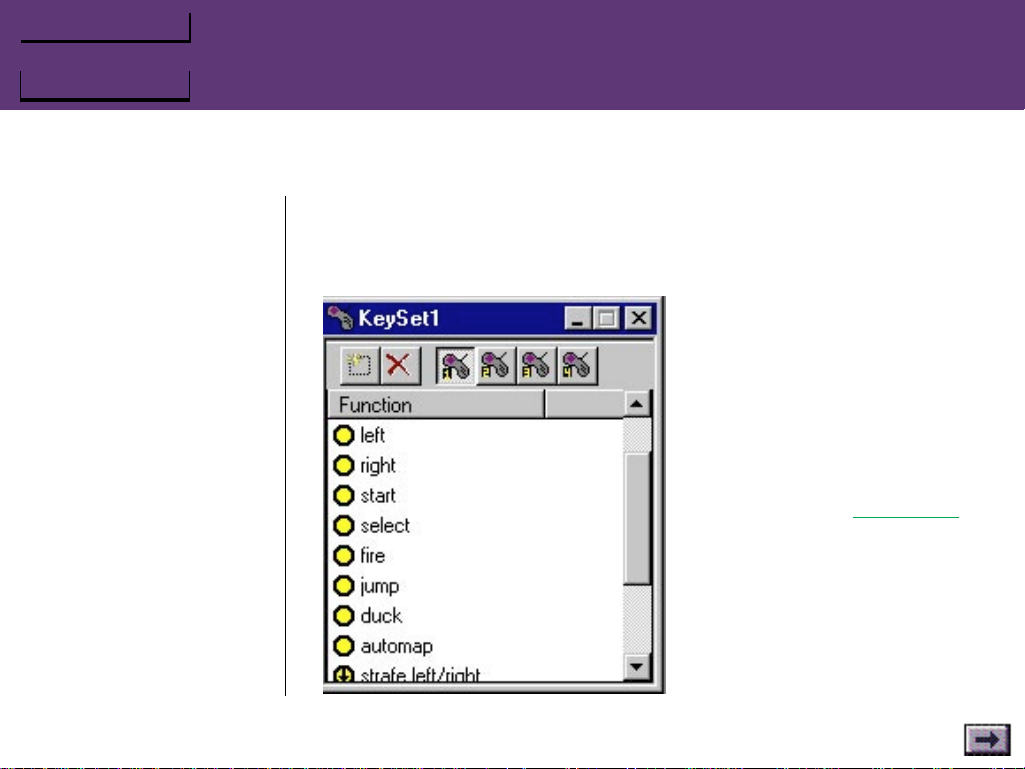
The Keyset Window
The Keyset window allows you to develop a list of game functions and
assign them to buttons on your GrIP controller.
Chapter 5 – GrIP Software
GrIP User’s Guide
You can create or open as many Keysets as you like. You may wish to
create separate Keysets with different commands for each controller.
Page 37
Book Topics
Chapter Topics
...GrIPKey Keyboard Emulation Software, Cont’d.
The Function Configuration Window
You will do all your button programming in the Function Configuration window.
To open the Function Configuration window, choose Edit/Add
Function..., or click on the Add
New Function button in the
active Keyset window. You can
also open a Function Configuration window for a specific
button by double-clicking on
the button in the Controller
window or by right-clicking on
the button selecting Properties.
Chapter 5 – GrIP Software
GrIP User’s Guide
Page 38
Book Topics
Chapter Topics
...GrIPKey Keyboard Emulation Software, Cont’d.
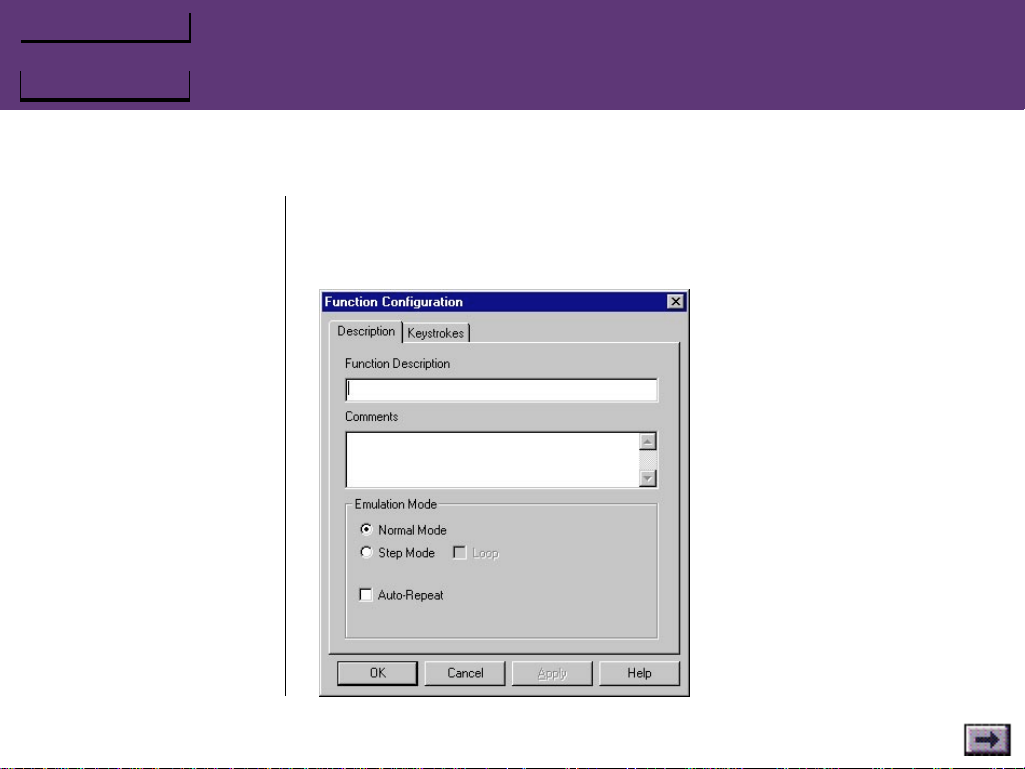
The Description Tab (Function Configuration Window)
Function Description
Enter a descriptive label for the game command function in this field.
Comments
If you like, you can use this
field to enter more descriptive comments about the
game command in this field.
Emulation Mode
Select a mode for the function:
Normal Mode
Pressing a button configured
with this function in Normal
mode will have exactly the
same effect in the game as
pressing the keys on the
keyboard.
Chapter 5 – GrIP Software
GrIP User’s Guide
Page 39

Book Topics
Chapter Topics
...GrIPKey Keyboard Emulation Software, Cont’d.
Step Mode
Step mode allows you to program a single button with a series of
game commands (keystroke “Step strings”) that are always executed in the same order—or reverse order (for instance, cycling
Step Functions:
When you define a Step mode
function, two functions are
actually added to the keyset:
one for ascending order
(designated by an “up”
arrow) and one for descending/reverse order (designated
by a “down” arrow).
through a collection of weapons).
Loop. The Loop option lets you cycle, or “loop” through a series of
keystroke steps. This example demonstrates the difference between the results of pressing a button configured in Step mode
with and without Loop:
Function Configuration: Step string #1: A
Step string #2: B
Step string #3: C
Step string #4: D
Button Functions: Step with Loop: Step without Loop:
Chapter 5 – GrIP Software
Step Mode Example
GrIP User’s Guide
1st button press A A
2nd button press B B
3rd button press C C
Page 40
Book Topics
Chapter Topics
...GrIPKey Keyboard Emulation Software, Cont’d.
Chapter 5 – GrIP Software
...Step Mode Example,
GrIP User’s Guide
cont’d.
4th button press D D
5th button press A D
6th button press B D
...and so on.
Auto-Repeat. Auto-Repeat is a “turbo-fire” option that lets you
set a keystroke string to repeat rapidly and continuously for as
long as you continue to press the button. Auto-Repeat is not
available with Step mode.
The Keystrokes Tab (Function Configuration Window)
Normal Mode Entries:
Press String
In this field, you can enter a separate keystroke or keystrokes to be
sent to the game when you press a button on the GrIP controller.
Release String
In this field, you can enter a separate keystroke or keystrokes to be
sent to the game when you release a button.
Page 41
Book Topics
Chapter Topics
...GrIPKey Keyboard Emulation Software, Cont’d.
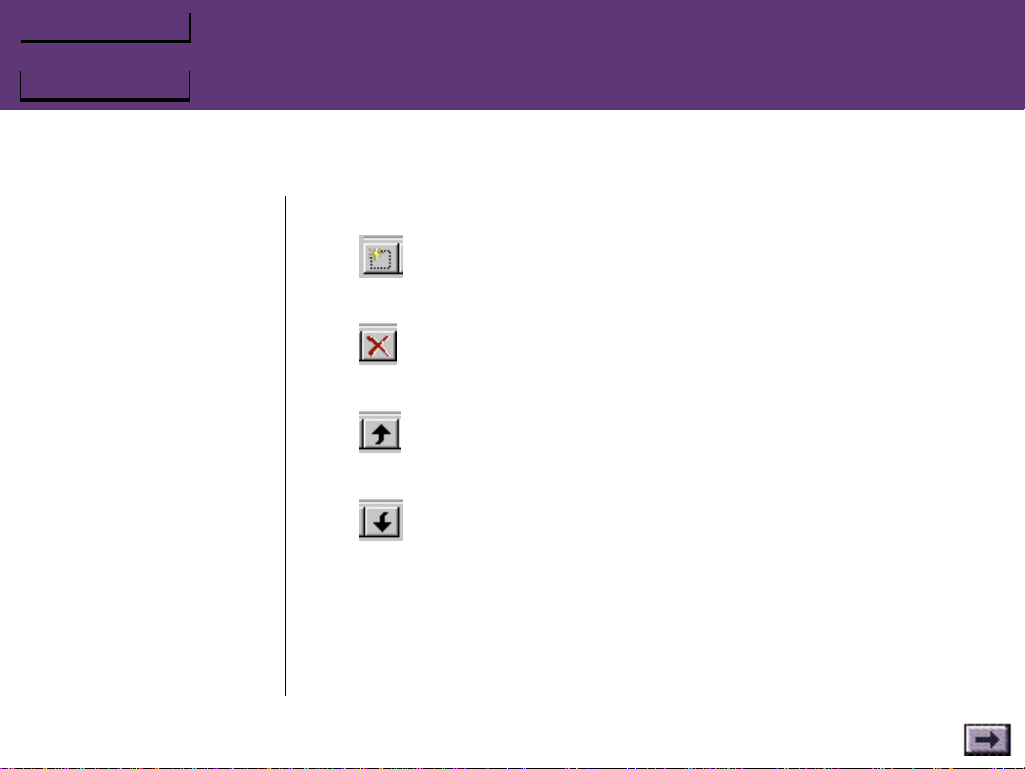
Step Mode Entries:
Add New String
Click on this to open a New Step String window.
Delete String
Click on this to delete the currently selected Step string.
Move Selected Step Up
Moves the selected Step string up in the list.
Move Selected Step Down
Moves the selected Step string down in the list.
Chapter 5 – GrIP Software
GrIP User’s Guide
Editing a Step String
Double-click on the step string to open the editing window. Select the
keystrokes that you want to change, then press Delete to delete
them—or type new keys to replace them.
Page 42

Book Topics
Chapter Topics
...GrIPKey Keyboard Emulation Software, Cont’d.
Controller Window
The Controller windows (labeled Keyset # – Slot #) correspond to the
GrIP controllers attached to Ports 1 and 2 of a standard PC game port
or to Ports 1–4 of a GrIP MultiPort.
You can assign the functions in the Keyset window to the buttons and
direction controls on your GrIP controller by dragging them from the
Keyset window to this Controller window.
There are two ways to open a Controller window:
• Click the Controller# buttons in the Keyset window to display a
programming window for the controller attached to that port.
• Choose a Pad# from the View menu.
To Edit a Button Configuration
Double-click on a button in the Controller window (or right-click on it
and select Properties) to open its Function Configuration window.
Chapter 5 – GrIP Software
GrIP User’s Guide
Page 43
Book Topics
Chapter Topics
...GrIPKey Keyboard Emulation Software, Cont’d.
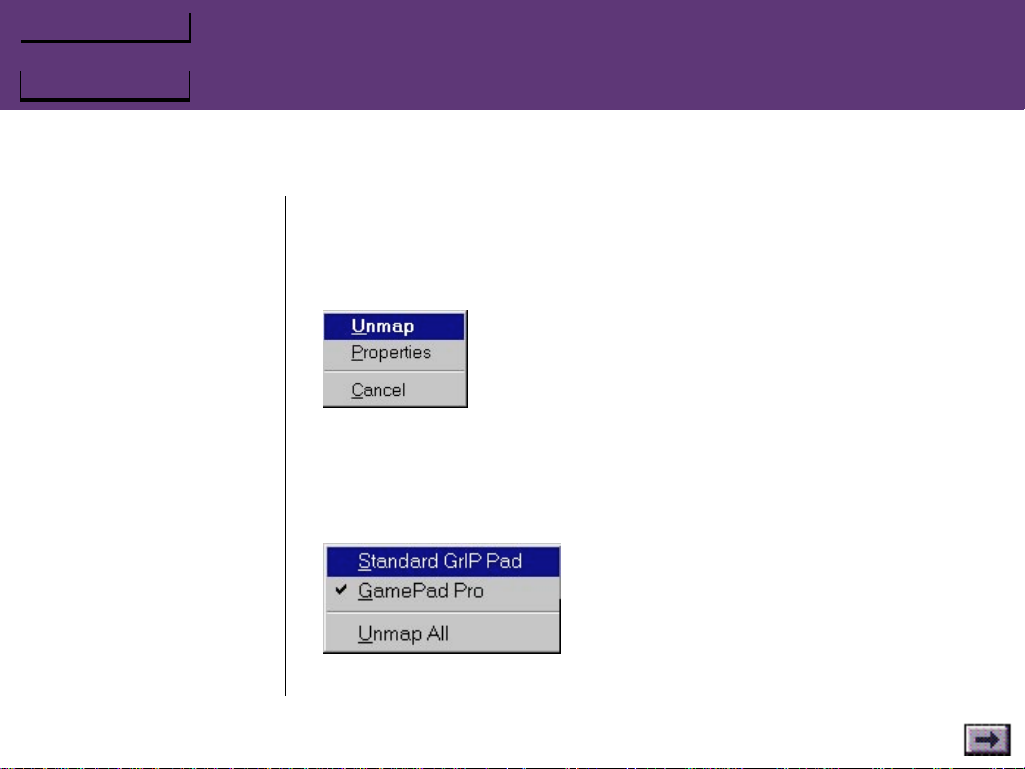
To Unmap a Button
Right-click on a button and select Unmap to unmap the function
currently assigned to it. (This unmaps the function from the button but
leaves the function definition intact in the KeySet window.)
To Unmap all Buttons:
Right-click in an empty portion of the Controller window, then select
Unmap All from the pop-up window to unmap all the functions from
the buttons and direction controls in the active Controller window.
Chapter 5 – GrIP Software
GrIP User’s Guide
Page 44
Book Topics
Chapter Topics
...GrIPKey Keyboard Emulation Software, Cont’d.
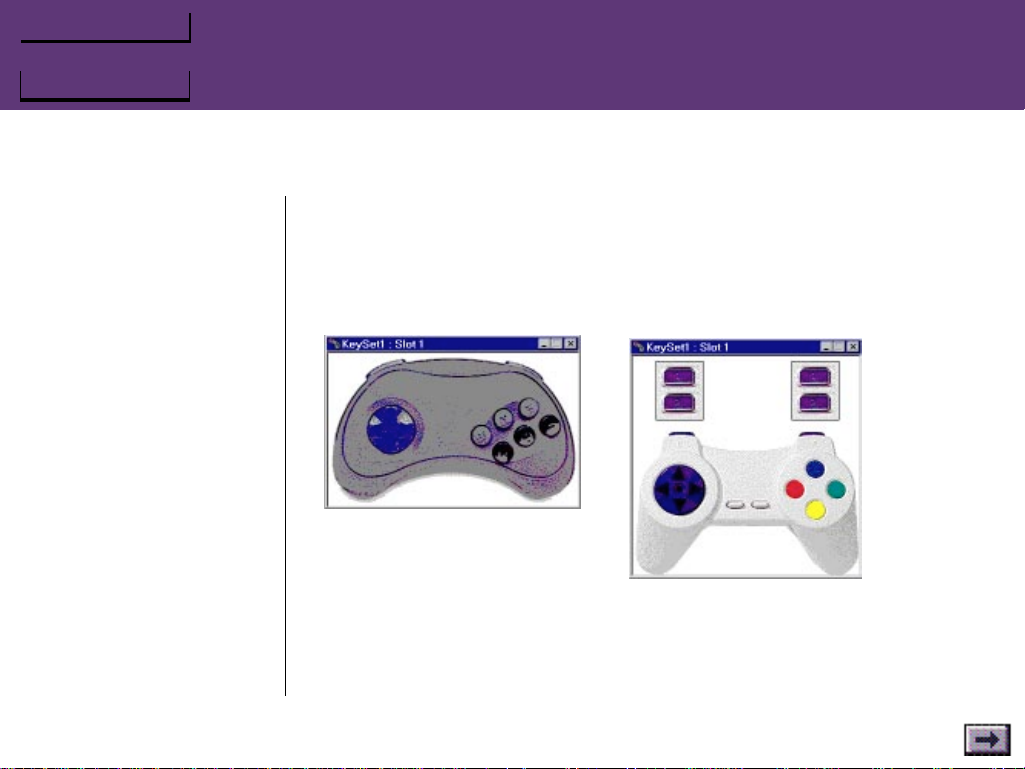
To Change Controller Types
When you first open the Controller window, the software polls your
game port or MultiPort to determine which type of controller you
have connected. If you wish to change controller types, right-click in
the Controller window, and select the controller type you prefer.
When you click on a Controller#
tool or choose View/Pad#,
GrIPKey displays the type of
device that it found attached
when it polled the game port
(or MultiPort) at startup. If no
pad was attached when
GrIPKey started, it displays the
pad type selected in the
Options/Preferences.
To change the type of device displayed,
right-click in an empty area of this
window and choose from the popup box.
Chapter 5 – GrIP Software
GrIP User’s Guide
Page 45
Book Topics
Chapter Topics
...GrIPKey Keyboard Emulation Software, Cont’d.
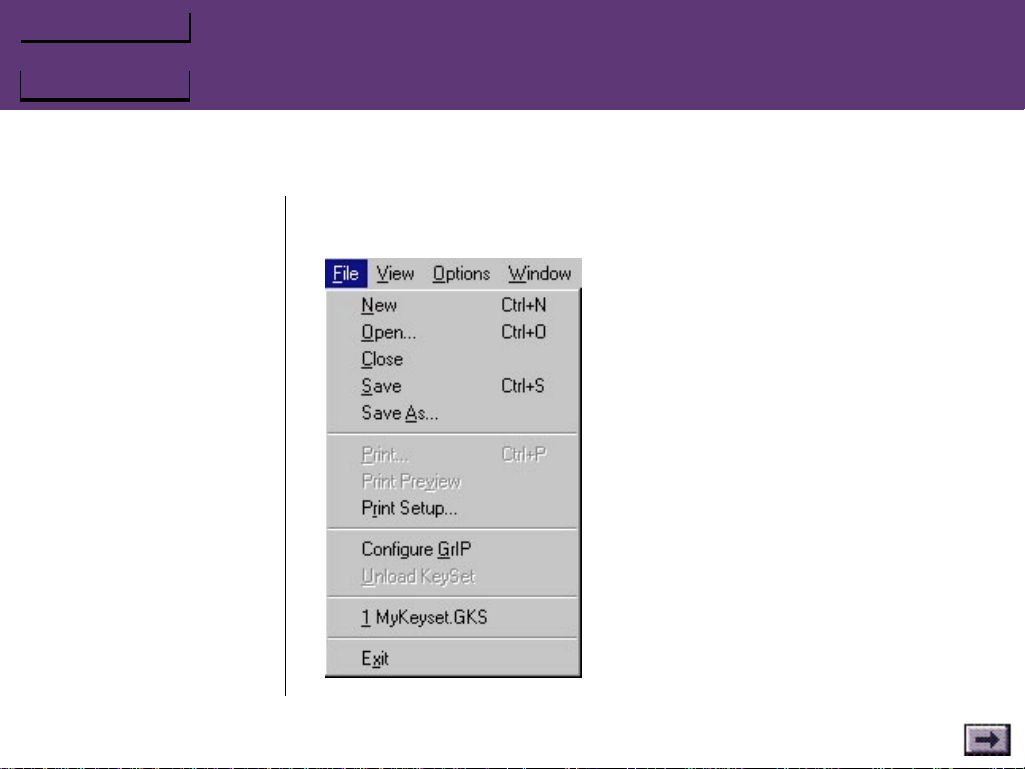
The Menus
File Menu
Chapter 5 – GrIP Software
GrIP User’s Guide
Page 46

Book Topics
Chapter Topics
...GrIPKey Keyboard Emulation Software, Cont’d.
New
Opens a new, untitled GrIP control set.
Open
Opens an existing set. Select a set file from the file dialog box.
Close
Closes the active set.
Save
Saves the active set.
Save As...
Saves a copy of the active set with a new name that you specify.
Print...
Prints a reference chart of your button configuration.
Print Preview
Allows you to view a preview of the reference chart on screen before
you print.
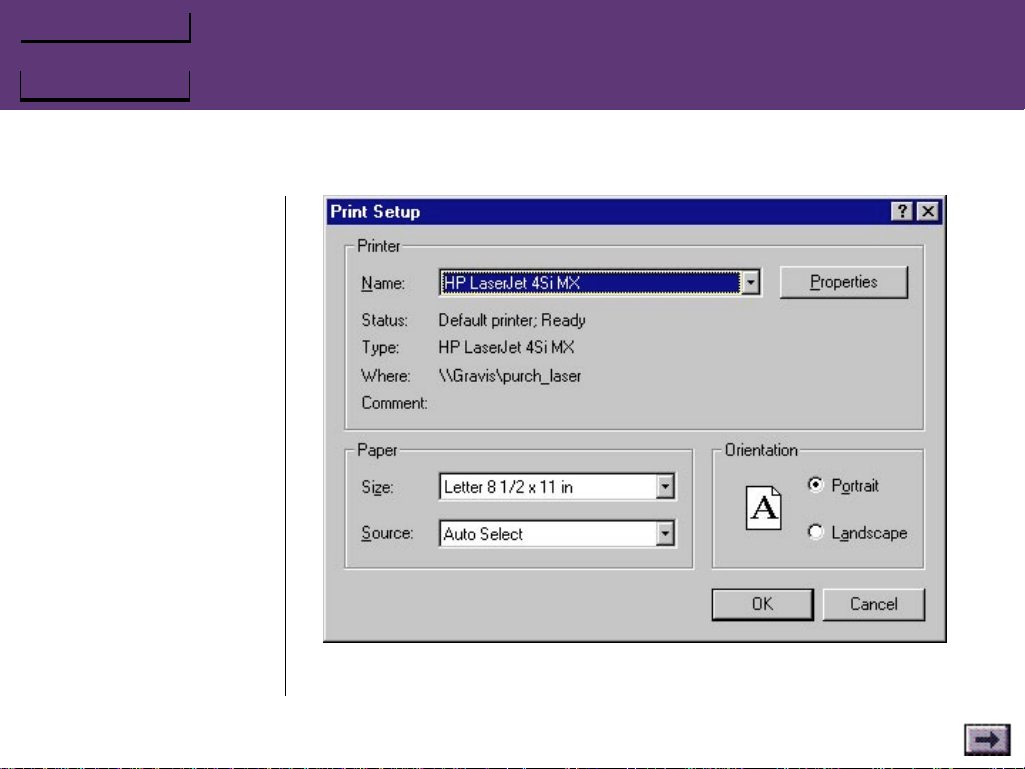
Print Setup
Allows you to select print options.
Chapter 5 – GrIP Software
GrIP User’s Guide
Page 47
Book Topics
Chapter Topics
...GrIPKey Keyboard Emulation Software, Cont’d.
Chapter 5 – GrIP Software
GrIP User’s Guide
The Properties button brings up a screen where you can select additional paper and printer options.
Page 48
Book Topics
Chapter Topics
...GrIPKey Keyboard Emulation Software, Cont’d.
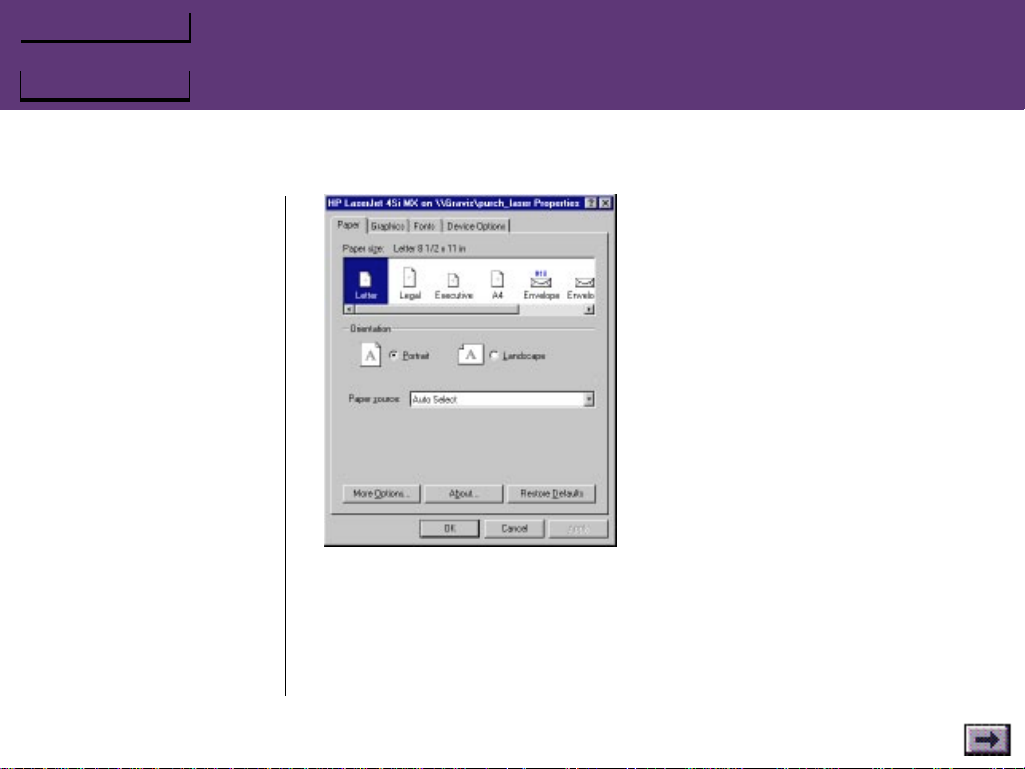
Printer Properties
For image type selections, click the More Options... button.
Chapter 5 – GrIP Software
GrIP User’s Guide
For the fastest printing, and for printers with limited graphics support,
a Line Art option is available. For a more realistic image, select one of
the Dithering options.
Page 49

Book Topics
Chapter Topics
...GrIPKey Keyboard Emulation Software, Cont’d.
If you like, you can also control the intensity/brightness of the printed
image using the Intensity Control slider.
Select Letter- or Draft-quality output from the Printer Quality
dropdown box.
Configure GrIP
Loads the settings in the active GrIPKey set into the GrIP driver. Once
you have selected this option, the GrIP controllers‘ buttons will function according to the GrIPKey set.
Unload Keyset
Clears the configuration of the GrIP controller.
Exit
Quits the program.
Chapter 5 – GrIP Software
GrIP User’s Guide
Page 50
Book Topics
Chapter Topics
...GrIPKey Keyboard Emulation Software, Cont’d.
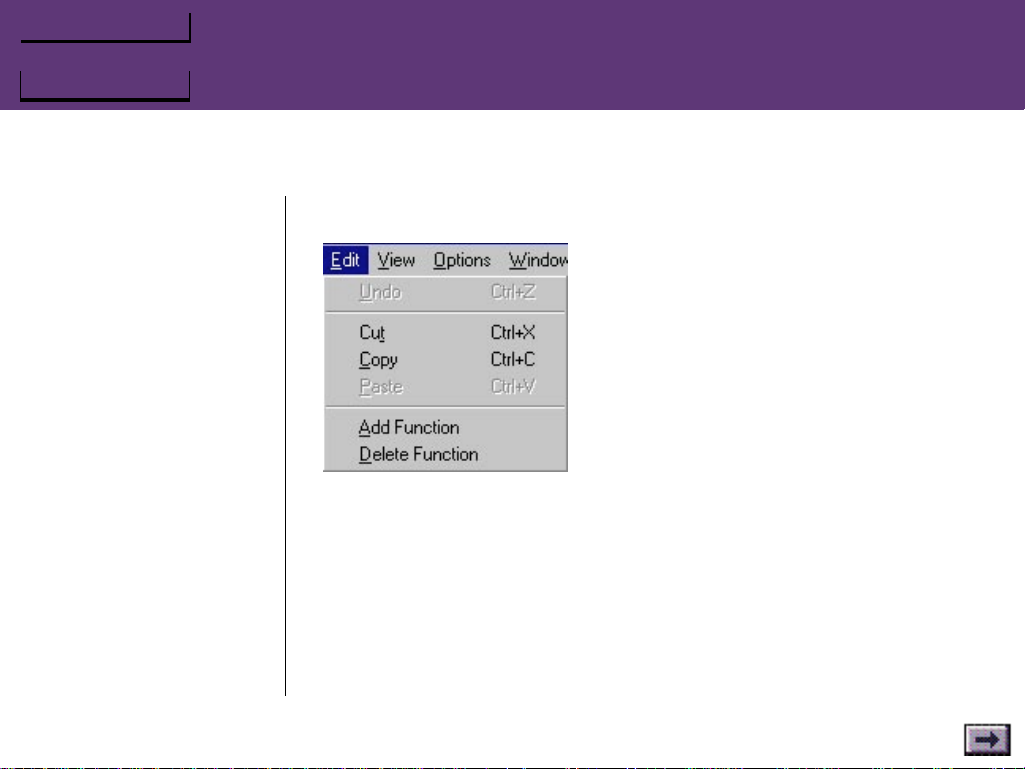
Edit Menu
Undo
Undoes the last action.
Cut
Allows you to move a function from one Keyset window to another.
Select a function in the active Keyset window, then select Cut to copy
the function to the Clipboard and remove it from the Keyset window.
Use this command in conjunction with Paste.
Chapter 5 – GrIP Software
GrIP User’s Guide
Page 51

Book Topics
Chapter Topics
...GrIPKey Keyboard Emulation Software, Cont’d.
Copy
Allows you to copy a function from one Keyset window to another.
Select a function in the active Keyset window, then select Copy to copy
the function to the Clipboard. Use this command in conjunction with
Paste.
Paste
Click in the destination Keyset window, then select Paste to paste the
function from the Clipboard.
Add Function
Opens a Function Configuration window that is not tied to a specific
button.
Delete Function
Deletes the selected function from the Keyset window.
Chapter 5 – GrIP Software
GrIP User’s Guide
Page 52
Book Topics
Chapter Topics
...GrIPKey Keyboard Emulation Software, Cont’d.
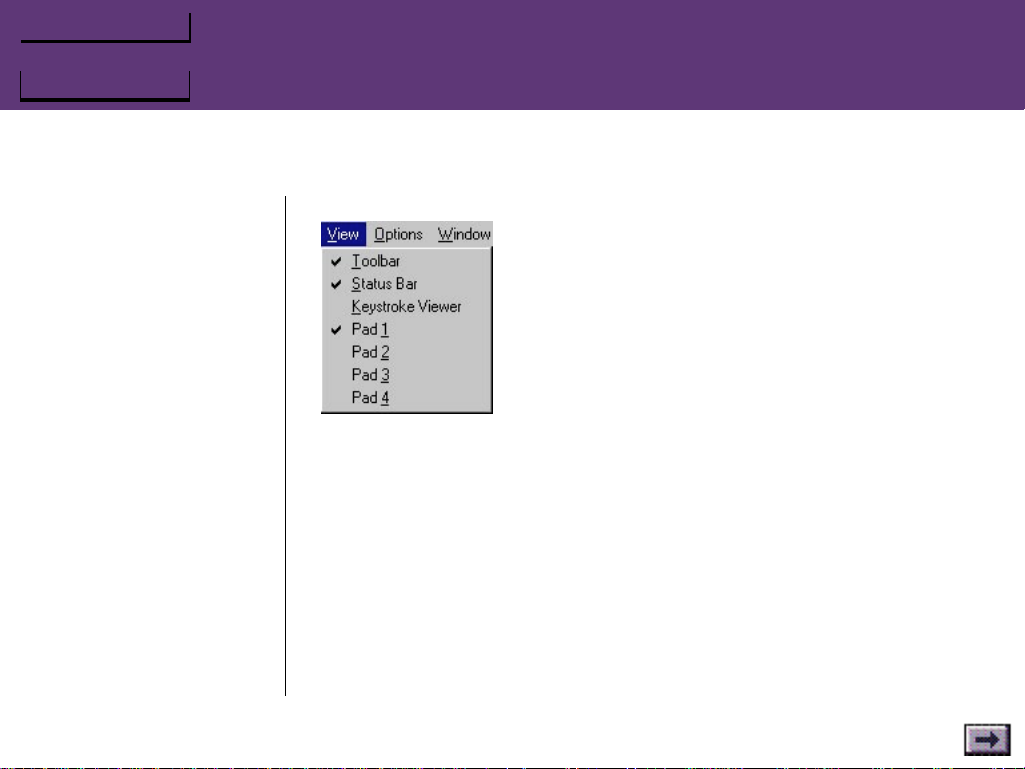
View Menu
Toolbar
Select this option to display the main toolbar on screen.
Status Bar
Select this option to display the Status Bar at the bottom of the screen.
By default, this is selected.
Keystroke Viewer
Select this option to open the Keystroke Viewer window to test your
controller’s configuration. Then pick up your GrIP controller and press
a button; you should see the keystrokes configured to that button in
the Viewer window.
Chapter 5 – GrIP Software
GrIP User’s Guide
Page 53
Book Topics
Chapter Topics
...GrIPKey Keyboard Emulation Software, Cont’d.
Pads #1–4
Select these options to display programming windows for each of the
connected controllers.
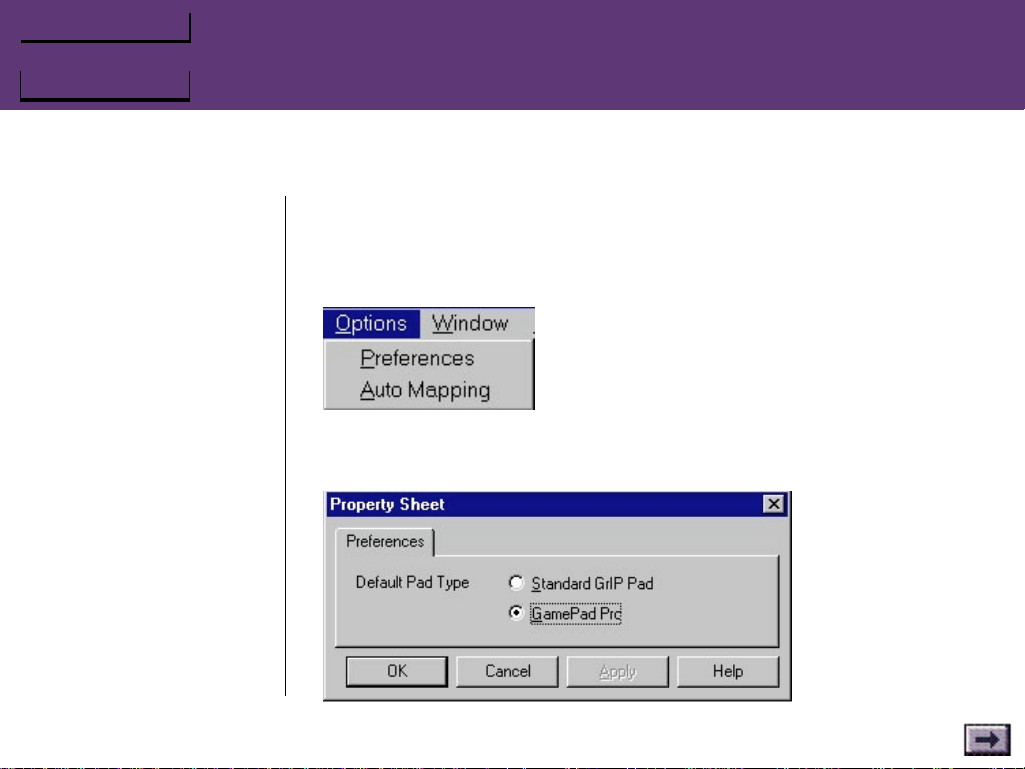
Options Menu
Preferences
Select Preferences to change the default controller type.
Chapter 5 – GrIP Software
GrIP User’s Guide
Page 54

Book Topics
Chapter Topics
...GrIPKey Keyboard Emulation Software, Cont’d.
Auto Mapping
Auto-mapping saves you the “mouse-work” of dragging functions
from the Keyset window to the Controller window. To use it:
1. Select Options/Auto Mapping.
2. Select the first function in the Keyset list.
3. Pick up your GrIP controller, and press the button where you would
like that function.
4. GrIPKey automatically selects the next function in the list. Press the
button where you would like the second function, and continue
through the end of the Keyset list.
Window Menu
Use the options in the Window menu to select the window you want
to be active and to arrange the open windows on your screen.
Chapter 5 – GrIP Software
GrIP User’s Guide
Page 55
Book Topics
Chapter Topics
...GrIPKey Keyboard Emulation Software, Cont’d.
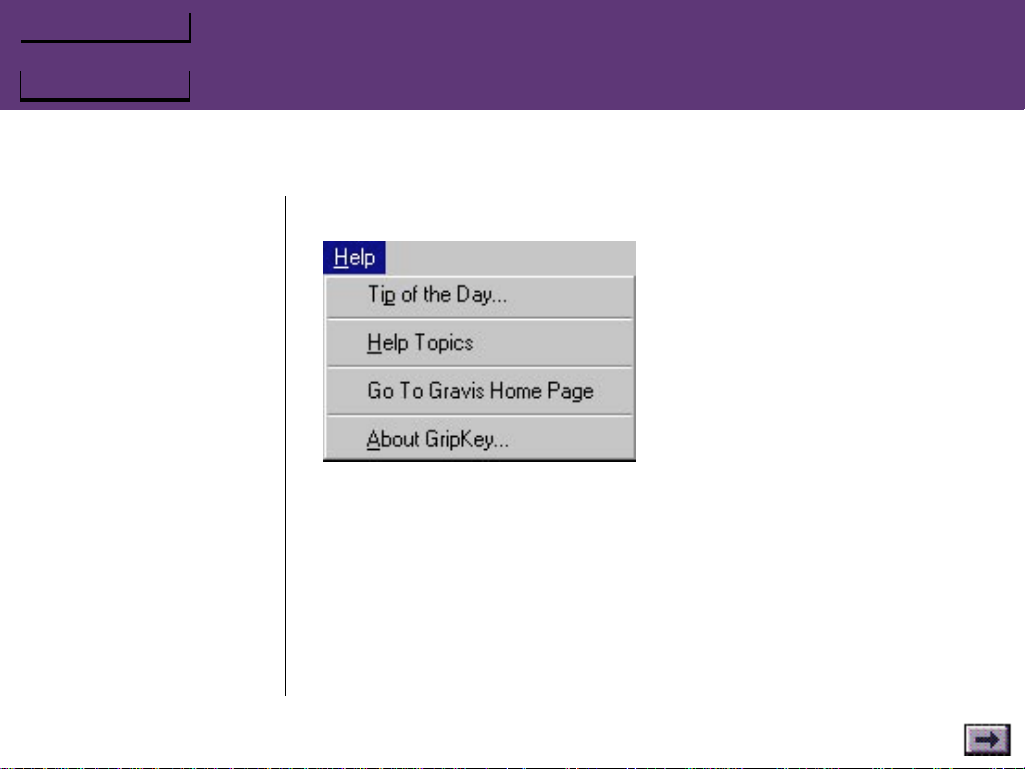
Help Menu
Tip of the Day...
Displays a tip.
Help Topics
Chapter 5 – GrIP Software
GrIP User’s Guide
Opens the GrIPKey Help file. Select a topic from the Contents list.
Go To Gravis Home Page
If you are connected to the Internet, selecting this option will open
Page 56

Book Topics
Chapter Topics
...GrIPKey Keyboard Emulation Software, Cont’d.
your Internet browser application and take you directly to the Advanced Gravis Home Page (www.gravis.com).
About GrIPKey...
If you ever need to contact Gravis for technical support, first select this
option to check the version number of your GrIPKey software.
Chapter 5 – GrIP Software
GrIP User’s Guide
Page 57

Book Topics
Chapter Topics
GKLOAD
Chapter 5 – GrIP Software
Important! Any time you
use keyboard emulation
(whether you enable it from
GrIPKey, GKLOAD, or GCC) in
order to use the your GrIP
controller’s directional pad (Dpad), you must use a GrIPKey
set that has the game’s
keyboard commands for
direction control mapped to
the D-pad, and you must
select “Keyboard only”
control in the game.
GrIP User’s Guide
GKLOAD is a DOS command-line utility for loading GrIPKey sets. While
the GrIPKey software requires Windows 95, the GKLOAD utility allows
you to configure your GrIP controller with a GrIPKey set from a DOS
command prompt. That means that you can use your GrIP controller to
play any keyboard-controlled DOS game.
To load a GrIPKey set into your GrIP controller using
GKLOAD:
1. In DOS, change to your \GRAVIS\GRIP directory.
2. Type: GKLOAD [setname] <Enter>
(where “setname” is the name of a GrIPKey set)
If you return to Windows 95 after using GKLOAD, you must disable
keyboard emulation using GCC or GrIPKey.
Page 58

Book Topics
Chapter Topics
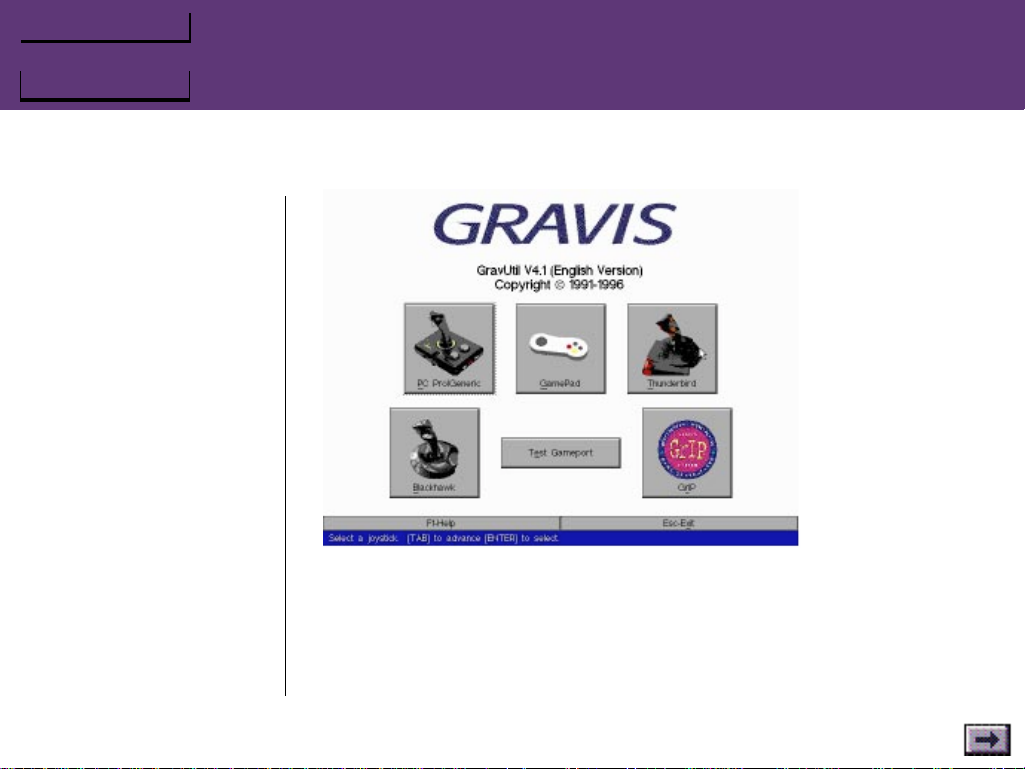
GravUtil Testing Software
GravUtil is a useful program for testing your GrIP controllers and game
port. Your GrIP controllers do not require GravUtil. If they are working
properly, you don’t need GravUtil.
To run GravUtil:
Double-click the GravUtil icon in your Gravis program group. To run
the program from DOS, change to your \GRAVIS\GRAVUTIL directory,
and type: GRAVUTIL <Enter>.
To Test the GrIP Controller:
Select the GrIP button on GravUtil’s main screen.
Chapter 5 – GrIP Software
GrIP User’s Guide
Page 59
Book Topics
Chapter Topics
...GravUtil Testing Software, Cont’d.
1. Click on the appropriate controller button on GravUtil’s main
screen.
Chapter 5 – GrIP Software
GrIP User’s Guide
2. Follow the instructions on-screen to test the pad. For detailed
instructions, press F1 or click on the Help button.
Page 60

Book Topics
Chapter Topics
...GravUtil Testing Software, Cont’d.
Chapter 5 – GrIP Software
Note: If your MultiPort or GrIP
controllers are in GrIP mode,
the Gameport Test will fail. The
Gameport Test must be run
with the unit in GamePad
Pass-Through Mode.
GrIP User’s Guide
The Speed Compensation option applies only if you are using the
game port on a Gravis UltraSound card. For more information, press F1
to access GravUtil’s Help.
If your controller and game port test OK in GravUtil, but you are
having problems with the controller in a game, the problem is with
either:
• the game’s joystick setup or calibration; or
• your Windows 95 joystick setup (if it’s a Windows 95 game).
To Test Your Game Port:
Click on the Test Gameport button on GravUtil’s main screen and read
the reports on your screen as GravUtil runs three tests on your game
port.
If your game port fails any portion of the test, press F1 for help, and
read the following section on game port conflicts.
Game Port Conflicts
Erratic joystick behavior is often caused by conflicting game ports in a
Page 61

Book Topics
Chapter Topics
...GravUtil Testing Software, Cont’d.
system. All game ports use the same address (201 hex), and a joystick
will not work properly if more than one device in your system is using
that address. This address cannot be shared. A computer that has two
game port circuits will cause a dilemma when a game requests information from the game port because two devices will “talk” at the
same time. With two active devices on the same address, you will
experience a conflict between the two circuits.
If your games are behaving erratically, you may have a conflicting or
malfunctioning game port. Some cards - multi-I/O cards for example have game card circuits but no external joystick connector. It is the
interface circuit that causes problems, so you may have a conflict
without actually having another visible joystick connector.
To correct a conflict, remove or disable the conflicting device, or
change its base address. See the manuals for the other cards in your
computer (e.g. game, scanner, tape backup, or multi-I/O cards) for
information on disabling a game port or changing its base address
from 201 Hex.
Chapter 5 – GrIP Software
GrIP User’s Guide
Press F1 at any time if you need help.
Page 62

Book Topics
Chapter Topics
The Gravis Joystick Applet
During the GrIP software installation, an enhanced Joystick Properties
sheet (the Gravis Joystick Applet) replaced the standard one in your
Control Panel.
If, for some reason, you prefer to use the standard Windows Joystick
Properties sheet, you will find it saved as joy.bak in your system directory. To use it, rename the file as joy.cpl.
Current Joystick & Joystick Selections
With Joystick 1 selected, choose a controller from the dropdown list.
For the GrIP MultiPort, choose Gravis GrIP.
The list includes all the standard Windows 95 controllers as well. When
you select Gravis GrIP as Joystick 1, Joysticks 2–4 are configured for
Gravis GrIP at the same time. This is a requirement of the GrIP driver.
Click Recall Last if you wish to go back to the previous joystick selection.
Chapter 5 – GrIP Software
GrIP User’s Guide
Calibration Information
This section of the Properties sheet allows you to calibrate and test a
joystick or game pad. To use it:
Page 63
Book Topics
Chapter Topics
...Gravis Joystick Applet, cont’d.
1. Click Apply to apply your new joystick selections (if you have
changed the Current joystick & Joystick Selections).
2. If you are setting up a non-GrIP device, click Calibrate and follow
the instructions on screen to calibrate the joystick. With the
“Gravis GrIP” setting, this option in unavailable, since the GrIP
MultiPort and all GrIP devices self-calibrate.
3. Click on the Test button. Then press each button on the joystick or
pad; watch the corresponding blocks on the Joystick Properties
sheet light up as you press each button. Click OK when finished.
Note: If you experience any problems with the calibration or
button test, click on the GravUtil button to run a more extensive
testing program.
4. When you are finished, click OK to save your changes and close the
properties sheet (or Cancel to close the sheet without saving
changes). Or click on one of the buttons at the bottom of the sheet
(Gravis Special Gameport/Joystick Utilities) to start a related
program:
Chapter 5 – GrIP Software
GrIP User’s Guide
Page 64
Book Topics
Chapter Topics
...Gravis Joystick Applet, cont’d.
GravUtil is a game port and joystick test utility for Gravis products.
If you experience problems with the simple calibration and button
tests on this Joystick Properties sheet, run GravUtil to test your
game port and MultiPort further.
Note: This option will not be available if you have not installed
GravUtil from the Gravis software CD.
GrIPKey is the graphical keyboard emulation software for the
MultiPort and other GrIP devices.
FCC (Firebird Control Console) is the keyboard emulation software
for the Gravis Firebird 2 joystick; if you do not have the Firebird 2
software installed on your computer, this option will be unavailable.
Chapter 5 – GrIP Software
GrIP User’s Guide
Page 65
Book Topics
Chapter 6
Chapter Topics
Click on a Topic or click on
the arrow at the bottom of
the page to continue reading
through the book.
Throughout this book, you
can click on green-highlighted text to jump to a
related topic.
To return, click the Back
button in the tool bar.
Troubleshooting
Keyboard Emulation Won't Work in a Game
GrIP Support Won’t Work in a Game
15-Pin Joystick Won’t Work with MultiPort
MultiPort Stuck in GrIP Mode
GrIP User’s Guide
Page 66
Book Topics
Chapter Topics
Keyboard Emulation Won’t Work in a Game
Is the MultiPort in GrIP mode?
Keyboard emulation works only when the MultiPort is in GrIP mode.
Did you turn off Keyboard Emulation and forget to turn it back on?
You can enable or disable Keyboard Emulation using the radio
buttons in GCC or by clicking on the exclamation mark button in
GrIPKey.
Have you configured the MultiPort with a GrIPKey set?
You configure the MultiPort by selecting Configure GrIP from
GrIPKey’s File menu or by loading a set from the DOS prompt using
GKLOAD.
Did you select Keyboard Only control in the game?
GrIPKey emulates standard keyboard controls. If you turn on Keyboard
Emulation and configure the MultiPort with a GrIPKey set, DOS-based
games will not recognize the GrIP controller as a joystick; you MUST
select Keyboard control in the game’s setup.
Chapter 6 – Troubleshooting
GrIP User’s Guide
Page 67

Book Topics
Chapter Topics
GrIP Support Won’t Work in a Game
My game says it supports Gravis GrIP. I’ve selected GrIP in the game‘s Setup,
and I‘ve switched the MultiPort into GrIP Mode, but when I start the game, the
MultiPort stays in GamePad Emulation. Why?
If you are running a game from Windows 95, check to make sure that
the GrIP driver is listed in the Drivers section of your Control Panel. If
it‘s not there, click Add New Hardware... and install the driver from
your the MultiPort CD. See your Windows manual for help installing
drivers.
If you are running a DOS-based game from a Win 95 DOS box or in
MS-DOS Mode:
Sometimes DOS-based games that support GrIP expect to find the
MultiPort in the DOS default ‘GamePad Emulation’ (with the GrIP LED
red). In Windows 95, however, the default is GrIP mode (LED green).
Before you open a Windows 95 DOS box or drop to MS-DOS mode,
press the MultiPort’s Reset button to turn the LED red. Then open a
DOS box or drop to MS-DOS mode and start the game.
Chapter 6 – Troubleshooting
GrIP User’s Guide
If you are running a DOS-based game, you may have altered or moved
the GRIP.GLL file or the SET GRIP= line in your AUTOEXEC.BAT that
helps DOS programs locate this file. All DOS-based games require this
Page 68

Book Topics
Chapter Topics
...GrIP Support Won’t Work in a Game, cont’d.
file for GrIP support.
Reinstalling the GrIP software should restore this.
As I start my game, the GrIP LED switches to green, but there‘s no GrIP support
once I start playing.
Your game port cable may be plugged in only partially. Make sure it is
plugged in securely.
GrIP User’s Guide
Page 69

Book Topics
Chapter Topics
15-Pin Joystick Won’t Work with MultiPort
I plugged my old joystick into one of the MultiPort’s 15-pin connectors, but it’s
not working. Why not?
You probably forgot to switch the MultiPort‘s Mode Selector switch
into Pass-Thru Mode. Make sure the Mode Selector is switched towards
the two 15-pin Pass-Thru connectors to allow your 15-pin controllers to
work through the MultiPort. Make sure that the green LED on the
Pass-Thru wing is lit.
Also, make sure that you have selected the correct joystick description
in your game‘s Setup. Choose ”Joystick“ or a more specific description
of your joystick—not ”Gravis GrIP“—if you are using the MultiPort
with a standard controller in Pass-Thru Mode.
GrIP User’s Guide
Page 70

Book Topics
Chapter Topics
MultiPort Stuck in GrIP Mode
My MultiPort is stuck in GrIP Mode; the bi-color LED stays green, and I can‘t
play games in GamePad Emulation.
When you exit a GrIP-compatible game, the game software should
switch the MultiPort back into GamePad Emulation automatically. If
your computer crashes in the middle of a game, or if this instruction in
the game has been altered or omitted, your MultiPort may ”stick“ in
GrIP Mode.
You can switch back to GamePad Emulation manually using the
MultiPort‘s reset switch.
GrIP User’s Guide
Page 71
Book Topics
Chapter 7
Chapter Topics
Click on a Topic or click on
the arrow at the bottom of
the page to continue reading
through the book.
Throughout this book, you
can click on green-highlighted text to jump to a
related topic.
To return, click the Back
button in the tool bar.
Technical Support
Technical Support Instructions
Support by Telephone
Support by Electronic Mail
Warranty
Garantie de Advanced Gravis (Français)
Garantie von Advanced Gravis (Deutsch)
Garantia de Advanced Gravis (Español)
GrIP User’s Guide
Page 72

Book Topics
Chapter Topics
Technical Support Instructions
Technical support is available to all registered owners of Gravis products. Before you call, please read the README file on the Gravis CD or
floppy disk and, if you can, please read the Frequently Asked Questions (FAQ) on the Gravis Web site (www.gravis.com). There is no
charge for technical support, except possible long distance charges.
Technical Support Tips
• If only certain programs are affected, read their manuals for
information relating to joysticks and game cards.
• Call from a phone near your computer so you can test suggestions
and provide any additional information that may be required.
• Please be prepared to provide the following information:
Name, address and telephone number
The name of the Gravis product
Make and Model of your computer
Your system software and version
The MultiPort software version number
Names and versions of all affected software programs
Symptoms of the problem, and what led to them
Chapter 7 – Technical Support
GrIP User’s Guide
Page 73
Book Topics
Chapter Topics
Support By Telephone
Chapter 7 – Technical Support
Technical support is
available weekdays by
phone, fax, or e-mail. To
save yourself long distance
charges, send questions by
fax or e-mail if you can.
Troubleshooting information and Frequently Asked
Question responses are
available 24 hours a day on
Gravis Web site and
the
from the automated 24hour faxback service.
GrIP User’s Guide
Technical support is available by telephone 8:00 AM–4:30 PM Pacific
Coast Time Monday–Thursday, 8:00 AM–3:30 PM Friday.
24-Hour Automated Faxback Service: (604) 431-9179
Fax responses will be sent directly to you, so please call directly from a
fax machine or set your fax-modem to Manual Receive.
In the United States, Canada, and Mexico, please call:
Phone: (604) 431-1807Fax: (604) 431-9358
In Europe, please call one of these numbers:
Austria 0660-5791 Luxembourg 0800-2778
Belgium 0800-16778 Netherlands 31-36-536 4443
Denmark 800-17838 Norway 800-11335
Finland 9800-13228 Portugal 05-05313318
France 05-906053 Spain 900-993129
Germany 0130-810654 Sweden 020-795845
Hungary 00800-11727 Switzerland 155-8605
Ireland 1800-553168 UK 0800-894383
If your country is not listed, please call either (604) 431-1807 (Canada)
or +31-36-536-4443 (Netherlands).
Page 74

Book Topics
Chapter Topics
Support By Electronic Mail
Contact Advanced Gravis at the following addresses:
Chapter 7 – Technical Support
This Web site is the hub of Gravis‘
online support network. For the
most current and detailed
information and files, look here.
GrIP User’s Guide
[email protected] (Europe)
Internet File Server: ftp.gravis.com
CompuServe: Go PCVENB area #14
Advanced Gravis BBS: (604) 431-5927 V32bis N81
Advanced Gravis Europe BBS: +31-36-536-0379 V32bis N81
America On-Line: email Gravistec
go keyword: Gravis
Page 75

Book Topics
Chapter Topics
Warranty Information
Advanced Gravis Computer Technology Ltd. (hereinafter referred to as
GRAVIS) warrants to the original purchaser of the Gravis MultiPort and
GrIP-Pad (hereinafter referred to as MULTIPORT) manufactured by
GRAVIS that it will be free of defects in materials and workmanship for
a period of 1 year from the original date of purchase.
Information on obtaining warranty services is provided in the ”Warranty Claim Instructions“ section. Proof of purchase must be provided
when requesting work be done during the warranty period. All warranty claims must be sent to GRAVIS—do not return your MULTIPORT to
the place of purchase.
In no event will GRAVIS be responsible for any indirect, special, incremental, consequential or similar damages or lost data or profits to you
or any other person or entity regardless of the legal theory, even if we
have been advised of the possibility of such damage. Some states do not
allow the exclusion or limitation of consequential damages, so the
above limitation or exclusion may not apply to you. Our liability for any
damage to you or any third party in the event that any of the above
limitations are held unenforceable shall not exceed three times the fee
you paid for the MULTIPORT regardless of the form of any claim.
Chapter 7 – Technical Support
GrIP User’s Guide
Page 76

Book Topics
Chapter Topics
...Warranty, cont’d.
Chapter 7 – Technical Support
During the warranty period, GRAVIS will repair, (or at its option
replace with a reconditioned MULTIPORT) at no extra charge, components that prove to be defective, provided the MULTIPORT is returned
with proof of purchase and shipped prepaid to Advanced Gravis:
Canadian and International Customers
101-3750 North Fraser Way
Burnaby, B.C. V5J 5E9
Canada
U.S. Customers
3140 Mercer Avenue, Suite H
Bellingham, WA 98225-8446
USA
Warranty Claim Instructions
Carefully read the warranty section and provide a detailed description
of the problem including the make and Model of your computer
system and the name, version and publisher of the software you are
using.
GrIP User’s Guide
The means of product shipment to GRAVIS is at your cost and discretion. We suggest that you insure your Gravis MULTIPORT in case of
Page 77

Book Topics
Chapter Topics
...Warranty, cont’d.
Chapter 7 – Technical Support
damage during shipment. GRAVIS is not responsible for product lost or
damaged in shipment.
We regret that warranty claims originating in the U.S. that are shipped to the
Canadian address must be refused due to customs and importation requirements. To avoid customs charges for warranty claims originating outside the
U.S. or Canada, please state on the customs documents that the joystick is
being returned for warranty repair.
Include the following information:
• Your name and address
• Home and business numbers
• Fax number (if applicable)
• A copy of your original sales bill
• A description of the problem
GrIP User’s Guide
Page 78

Book Topics
Chapter Topics
Garantie de Advanced Gravis
Advanced Gravis Computer Technology Ltd. (ci-après désigné sous le
nom GRAVIS) garantit à l’acheteur original de la Gravis GrIP Game
System (ci-après désigné sous le nom MULTIPORT) fabriqué par
GRAVIS, qu’elle ne présente aucun défaut de matériau ou de fabrication, et cela pour une période d’un an à compter de la date d’achat.
Pour toute demande de réparation pendant la période de garantie,
vous devez fournir une preuve d’achat. Toutes les réclamations doivent
être adressées à GRAVIS : ne rapportez pas votre MULTIPORTau
revendeur.
En aucun cas GRAVIS ne saurait être tenu responsable des dommages
indirects, spéciaux, marginaux, consécutifs, ou similaires, ou de la perte
de données ou de bénéfices à votre compte ou celui d’un tiers, quelle
que soit la théorie juridique pouvant s’appliquer et même si nous
avons été avertis de la possibilité d’un tel dommage. Certains États
n’autorisant pas l’exclusion ou la limite des dommages indirects, les
limites ou l’exclusion décrites ci-dessus peuvent ne pas vous concerner.
Dans le cas où elles ne sont pas applicables, et en cas de dommages,
notre responsabilité vis-à-vis de vous ou d’un tiers ne dépassera pas
trois fois le prix d’achat de la MULTIPORT, quelle que soit la forme de
la réclamation.
GrIP User’s Guide
Page 79

Book Topics
Chapter Topics
...Garantie de Advanced Gravis
Pendant la période de garantie, GRAVIS s’engage à réparer les
composants défectueux (ou, àson choix, remplacer sans supplément la
MULTIPORT par une autre MULTIPORT remise àneuf), sous réserve que
la MULTIPORT, accompagnée d’une preuve d’achat, soit expédiée en
port pré-payé à : Advanced Gravis Computer Technology.
Clients canadiens et étrangers
101-3750 North Fraser Way
Burnaby, B.C. V5J 5E9
Canada
Clients des États-Unis
3140 Mercer Avenue, Suite H
Bellingham, WA 98225-8446
États-Unis
Instructions pour faire valoir une rèclamation sous
garantie
GrIP User’s Guide
Veuillez lire attentivement la section sur la garantie et fournir une
description détaillée du problème, en indiquant la marque et le
modèle de votre ordinateur, ainsi que le nom, la version et l’éditeur du
logiciel utilisé.
Page 80

Book Topics
Chapter Topics
...Garantie de Advanced Gravis
Les frais d’expédition d’un produit à GRAVIS sont à votre charge et le
choix du mode de transport vous appartient. Nous vous suggérons
d’assurer votre MULTIPORT contre la perte ou les dommages subis
pendant le transport. GRAVIS n’est pas responsable de la perte du
produit ou des dommages subis par celui-ci au cours du transport.
Les réclamations de garantie expédiées à l’adresse canadienne à partir
des États-Unis seront renvoyées à l’expéditeur en raison des
réglementations d’importation et de taxes douanières. Pour les
réclamations faites en dehors des États-Unis ou du Canada, veuillez
préciser sur les formulaires des douanes que vous retournez pour
réparation un produit sous garantie. Vous éviterez ainsi des frais de
douane.
Veuillez fournir les informations suivantes :
- Vos nom et adresse.
- Vos numéros de téléphone (domicile et lieu de travail).
- Votre numéro de télécopieur (le cas échéant).
- Une photocopie de la facture originale.
- Une description du problème.
GrIP User’s Guide
Page 81

Book Topics
Chapter Topics
Garantie von Advanced Gravis
Advanced Gravis Computer Technology Ltd. (im folgenden Gravis
genannt) garantiert dem Erstbesitzer des von GRAVIS hergestellten
Gravis GrIP Game System (im folgenden MULTIPORT genannt) für die
Dauer für ein Jahr ab Kaufdatum, daß das Produkt frei von Materialund Verarbeitungsfehlern ist. Alle Garantieansprüche müssen direkt
über GRAVIS abgewickelt werden, geben Sie daher den MULTIPORT
nicht an Ihren Händler zurück.
GRAVIS haftet nicht für alle mittelbaren, speziellen, zufälligen oder
Folgeschäden bzw. ähnlichen Schäden, einschließlich Daten- oder
Vermögensverluste, die Ihnen oder einer anderen Person oder
juristischen Person entstehen, unabhängig von der gültigen
Rechtsauffassung, selbst dann, wenn GRAVIS von der Möglichkeit
solcher Schäden in Kenntnis gesetzt wurde. In einigen Ländern ist eine
Haftungsbeschränkung oder der Ausschluß von Folgeschäden nicht
erlaubt. Daher ist es möglich, daß der oben beschriebene
Haftungsausschluß bzw. die Haftungsbeschränkung nicht auf Sie
zutreffen. In keinem Fall kann Ihr Schadensersatzanspruch oder der
eines Dritten gegenüber GRAVIS den dreifachen Betrag, den Sie für
den MULTIPORT bezahlt haben, überschreiten.
GrIP User’s Guide
Während der Garantiezeit repariert GRAVIS fehlerhafte Komponenten
Page 82

Book Topics
Chapter Topics
...Garantie von Advanced Gravis
auf eigene Kosten, vorausgesetzt, der MULTIPORT wurde zusammen
mit einem Kaufnachweis an eine der genannten Adressen von Advanced Gravis Computer Technology Ltd. geschickt. Dabei bleibt es
Gravis überlassen, das defekte Gerät zu reparieren oder durch ein
generalüberholtes auszutauschen.
Kanadische und internationale Kunden
101-3750 North Fraser Way
Burnaby, B.C. V5J 5E9
Kanada
Nordamerikanische Kunden (USA)
3140 Mercer Avenue, Suite H
Bellingham, WA 98225-8446
USA
Hinweise Zur Garantieabwicklung
Lesen Sie den Abschnitt mit den Garantiebestimmungen sorgfältig
durch, und legen Sie beim Einreichen des Garantieanspruchs eine
genaue Problembeschreibung bei. Geben Sie dabei Marke und Modell
Ihres Computers sowie Namen, Version und Hersteller der von Ihnen
verwendeten Software an.
GrIP User’s Guide
Page 83

Book Topics
Chapter Topics
...Garantie von Advanced Gravis
Die Versandkosten tragen Sie, und es bleibt Ihnen überlassen, auf
welche Art Sie das Produkt an GRAVIS zurückschicken. Wir empfehlen
Ihnen, den Joystick gegen Verlust und Transportschäden zu versichern.
GRAVIS lehnt jede Haftung für Produkte ab, die während des Versands
beschädigt werden oder verlorengehen.
Garantieansprüche aus den USA, die an die kanadische Adresse
geschickt werden, werden aus Zollgründen abgewiesen und an den
Absender zurückgeschickt. Wenn Sie einen Garantieanspruch aus dem
Ausland schicken, geben Sie bitte auf dem Zollformular an, daß Sie ein
in Kanada hergestelltes Produkt aus Reparaturgründen im Rahmen der
Gewährleistung an den Hersteller zurückschicken.
Geben Sie ferner folgende Informationen an:
• Ihren Namen und Ihre Adresse.
• Telefonnummern, unter denen Sie privat und geschäftlich zu
erreichen sind.
• Faxnummer (falls vorhanden).
• Eine Kopie Ihres Kaufnachweises.
• Eine genaue Fehlerbeschreibung.
GrIP User’s Guide
Page 84

Book Topics
Chapter Topics
Garantia de Advanced Gravis
Advanced Gravis Computer Technology Ltd. (denominada en adelante
GRAVIS) garantiza al comprador original del bastón de mando Gravis
GrIP Game System (denominado en adelante MULTIPORT), fabricado
por GRAVIS, que el producto estará libre de defectos de material y
mano de obra por un período de 1 año desde la fecha de adquisición
original. Cuando solicite reparaciones durante el período de garantía,
el usuario deberá suministrar un comprobante de compra. Todos los
reclamos de garantía deben enviarse a GRAVIS. No devuelva su
MULTIPORT al lugar de adquisición.
GRAVIS no se responsabiliza por ningún daño o perjuicio indirecto,
especial, incremental, consecuente o similares o por la pérdida de
datos o ganancias sufridas por el usuario o por cualquier otra persona
o entidad, independientemente de la teoría legal, aun si GRAVIS
hubiera recibido aviso sobre la posibilidad de tales daños y perjuicios.
Algunos estados de los Estados Unidos no permiten la exclusión o
limitación de los daños y perjuicios consecuentes, por lo que la
limitación precedente puede no ser aplicable en todos los casos. La
responsabilidad de GRAVIS por cualquier daño o perjuicio al usuario o
a terceros, en caso de que alguna de las limitaciones precedentes no
fuera legalmente aplicable, no excederá el triple del monto que el
GrIP User’s Guide
Page 85

Book Topics
Chapter Topics
...Garantia de Advanced Gravis
usuario pagó por el MULTIPORT, independientemente de la forma del
reclamo.
Durante el período de garantía, GRAVIS reparará los componentes
defectuosos (o a opción de GRAVIS los reemplazará por un MULTIPORT
reacondicionado sin costo adicional), siempre que el usuario devuelva
el MULTIPORT, con comprobante de adquisición y lo envíe con flete
prepago a: Advanced Gravis Computer Technology Ltd.
Clientes internacionales y canadienses
101–3750 North Fraser Way
Burnaby, BC V5J 5E9
Canadá
Clientes de los Estados Unidos
3140 Mercer Avenue, Suite H
Bellingham, WA 98225-8446
EE.UU.
GrIP User’s Guide
Instrucciones para reclamos de garantia
Lea cuidadosamente la sección de la garantía y proporcione una
descripción detallada del problema, incluidos la marca y modelo de su
Page 86

Book Topics
Chapter Topics
...Garantia de Advanced Gravis
sistema de computadora y el nombre, versión y editor del software
que utiliza.
El costo del medio de transporte del producto a GRAVIS estará a cargo
y discreción del cliente. Sugerimos asegurar el MULTIPORT contra
pérdida o daños durante el transporte. GRAVIS no acepta
responsabilidad por la pérdida o daños de los productos durante el
transporte.
Los artículos enviados a la dirección canadiense desde los Estados
Unidos se devolverán al remitente debido a las regulaciones de
importación aduaneras e impositivas. Para evitar recargos aduaneros,
cuando el reclamo de garantía se origina fuera de los Estados Unidos o
Canadá, sírvase declarar en los documentos de aduana que el producto
se devuelve para reparaciones bajo garantía.
Incluya la siguiente información:
* Nombre y dirección.
* Números de teléfono particular y comercial.
* Número de fax (si corresponde).
* Una copia de la boleta de venta original.
* Una descripción del problema.
GrIP User’s Guide
Page 87
Book Topics
Chapter Topics
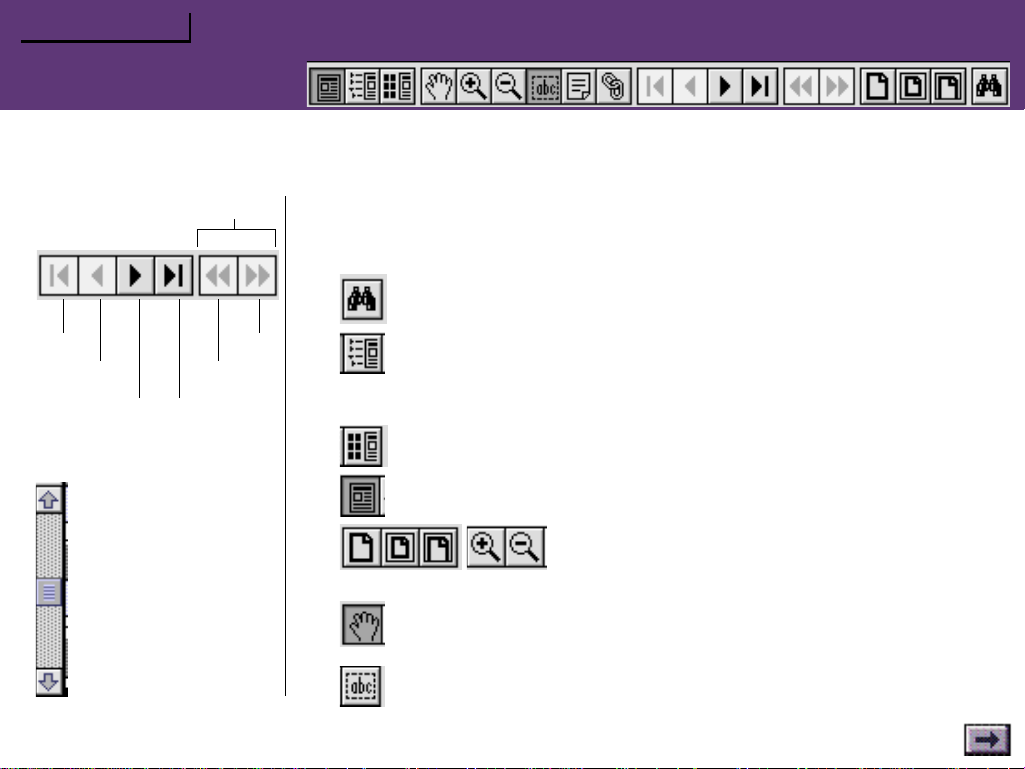
Navigating Buttons
To retrace your steps:
How to Use this Guide
This guide is designed to make information easy to find. Read it “cover to
cover” like a book if you like. Use the navigating buttons or the scroll bar to
page through the guide.
Click the Find button to search for a specific topic.
to page 1
back 1 page
forward 1 page
Scroll Bar
Click the up arrow or
drag the slider up to
Click the down arrow
or drag the slider down
to move forward.
GrIP User’s Guide
go back
skip to last page
move back.
forward
Click the Bookmarks button to view the complete Contents list.
In the Contents (“Bookmarks”) list, click the triangles to view subtopics, and double-click a topic to skip to that page in the guide.
Click the Thumbnails button to view small previews of each page.
Click the Page View button to return to the default view.
Click the Resize or Zoom buttons to change the
page view size.
Use the Hand tool to move a document page on-screen when it does
not fit within the window. Drag the hand tool in the direction you
want to move the page.
Use the Text tool to select text to copy.
 Loading...