

'w
NOAIC H9EtrSVl)f
ng
'clIl
svlsulAo
/.l]AVUD
,,(il,,
aflfloxt
'd'Ir
z/tz
eql
roJ
-IVNNVN
NOtrcnursNt
o
N v
ts
l'f
sruvd
*
ATflAVIn$
eqr
I
slql
'lJel
oql
uo
loJluoJ
arr,r
pesolcuo
pu€
ra^ol
elllorrll
IIuLus
oql
qlr^A
olpu€q eql
'ourqcuru
eql
Jo
1q3u
eql uo
pellg
sr ro^ol qclnlc
eSrBI
eql
qll^\
olpu€q
oql
t€ql
polou
eq
plnoqs
1I
'reqruorussorc
oql puqoq
lsni
olpueq
qcse
ur oloq
€
q8noJgl poss€d
sl
qcg^,/' poJ
oll or{l
Jo
su€otu
,(q
pernces
pue
reqrueussoJc
pooa
eql uo reqleSol palqtuosse
eq uoql plnoqs
selpuur{
oqJ
.JolBArllnJ
er{l
Jo
soprs oql
ol ul esolc
punoJ
eq
llll\
sesodrnd e8e>1ced roJ
LlcrLI,r\
.s>1ur1
1o11urud
oql
Jo
spue
eql ol
pelloq
aq
plnoqs
oseql
'sle>lc€rg
rror{l gtr^\
elelduoc
elPrc
eql
Jo
ruolloq
eql ur
punoJ
eq
llr,r
sleeq,^, 1(olloJ
er.uu{lool
oqJ
'erue4lool
pue
slorluoc
'selpuuq
eql
elquess€-eJ
01
Jolluru ,(see
ue sl
1r
palBJc
pore^rlep
sr Jole^rllllJ
orll
JJ
.AUSAITIIC
DNIXVI
SNOf,f,Cn!IilS'Nf
)
'eurqcetu
go
lq8rr
uo fel1nd JolJBls
ruor3
Surluredo derls
Euryelg
'eur8ue
Surddols
ro3 oleu8eur
Jo
eprs uo
uollnq
lno trnJ
uorlru8y
'JollarnqJuc
ol peqcelte
3ur1re1s ploc
JoJ
e{oqJ
'q'd'ru
€
ol
I
ruo{
Jo
peeds
e 3ur^,13
'elpueq
Uo[
uo el11oJql
peleredo
puul1
'qclec
{col
IerlrlJu
qlr^\
'elpueq
lq8lr
uo re^el
qclnlc
peleredo
pueH-S1OUJNOJ
'u!
19
.UI
TE
'ut
+vt
'ul
sz
solpuei{ Surpnlcur q€ue1
(
,.
(.
.i
)
rlfue_I
(
" " '<
)
qlpttrr
(selpueq
8urpn1:rur
1ou)
lq8reg
SNOISNIII^II(]
'e,rup
ree8
11y
'l
:
Ig
Ieeq^\
puel
ol eurEuo tuo{
uotlcnpeJ
xoqreorJ
'xoqrce8
pue
aurEue uae,rloq qclnlr
pellorluoo
puBH-NOISSI6ISNVII
'Z-L
VZ
ad[1 qyuaT
,ro11ernqre3
y'y
ed.{1 ocl71\'o1eu8e141
'{uel
1ro
eleredes
o} uorlelncJrc
durnd
reEunld ql1,r'qse1ds,(q
uorlecrrqnl
'd'H1Z
lo^\od pelel{
.ur
i
olorts
'ur
f7
arog
'Joloru
e>loJls :nog
'pelooc
rru
'.repurlfc
e13urs
,{1e,rerD-ENI51NE
N0r'Ll'Cr,.ilrc[Nds

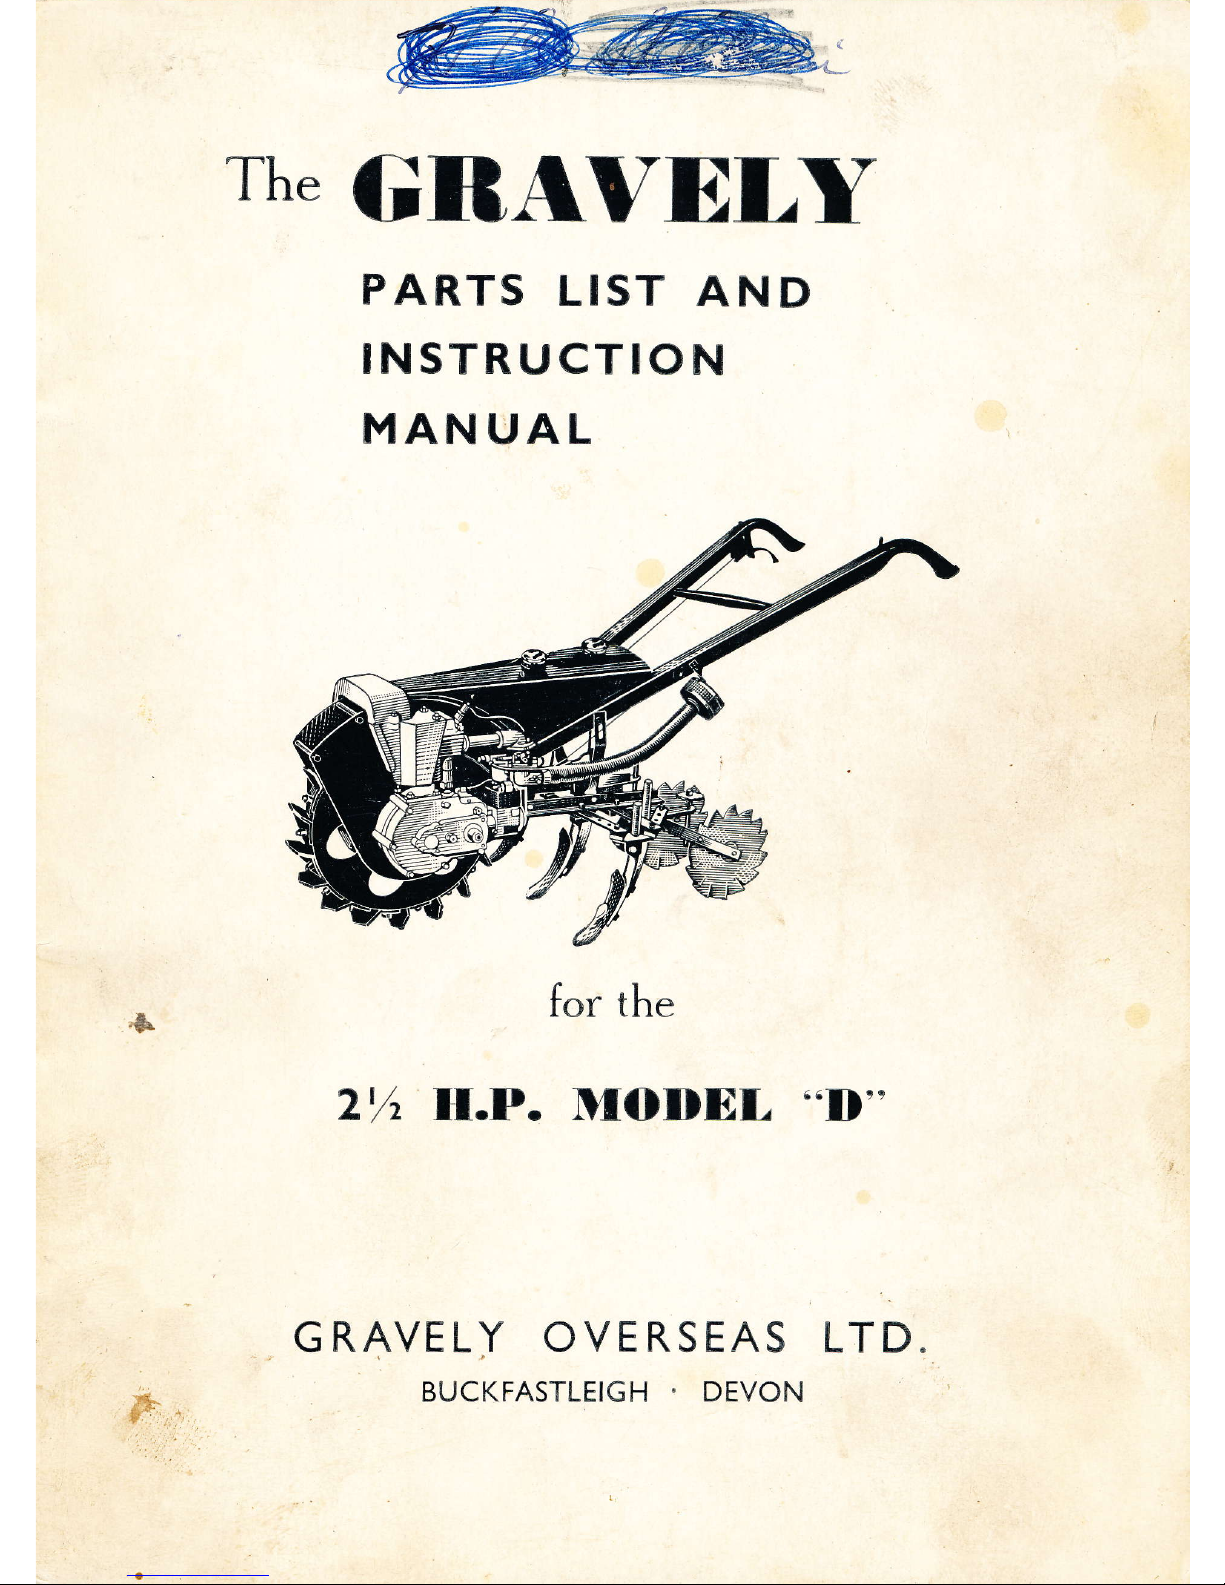
assembly
should then
be mounted
on the cultivator
by means
of
two
cross
bolts,
the ends
of which
protrude
from either side
of the tank shield.
The throttle and
clutch controls
may
next be attached
and adjusted.
The
end of the throttle
wire
should
be
entered
into the
eye clamp
on the
carburettor
lever
and the
pinch
screw
tightened.
Make certain the
handle
lever
can operate
the whole
carburettor
lever movement.
To secure
the clutch
control
firsl
remove the
outer
nut
which
is loosely
screwed to
the clutch
rod
on
the riglit
of the
machine.
The right angled
bracket at the
end of the
handle
control
rod
should then
be
pushed
along the clutch
rod
until it butts with
the
inner
nut.
It should
then
be locked in this
position
by
tightenirrg the
outer
nut
against
it.
BEFORE
STARTING.
It is e,ssential
before
starting the
new Gravely
Cultivator to
plenish
the
engine and
gearbox
with
lubricating
oil.
First
remove the
forward tank cap
and two-thirds
fill with
engine
oil.
We
recommend
Triple Shell oil, and
about four
pints
will
be required to
filI
the
tank
to this
level. The
rear
tank
should
be filled with
petrol.
Next
remove the
gearbox
oil filler
plug.
This is
on
the
right side
of
the
machine
towards
the top
of
the
countershaft
gear
housing. The
gearbox
should
be supplied
at this
point
with one-third
of a
pint
of Shell Spirax
c6
C
"
gear
oil.
Overseas
customers
will find the
appropriate
engine and
gearbox oil
recommendations
printed
on their tractor
name
plate.
A small
level check
plug
is
fitted at the front
and near the
bottom of the
gearcase
inside
the
right hand frame
plate.
Do
not overfill beyond
this
point,
and
it should
be
noted that
cold
gear
oil will take
a long time to
flow to the
bottom
of the
gearcasc,
so that
although enough
oil is supplied
it will not show
for some
time
at the level
plug.
An
excess of lubricant
in this
gearbox
will
cause
bad clutch
slip.
If this
machine is
in daily use we
recommend that the
oil levels
be regularly
checked,
the
engine
oil darly, and
the
gearbox
at least
weekly.
Finally
the air
cleaner should
be
removed,
dipped
in clean engine
oil,
drained
and
re-fixed
on the handle.
STARTING.
The:machine,
if it
has been supplied with
lubricants as detaileri
in
the
previous
paragraph, may now be started.
First
switch on the
oil and
petrol
supply by turning
down the tank taps
into
the
vertical
position,'
Both these taps
will be found under the
petrol
and
oil tanks.
The clutch
lever should then
be
fully withdrawn,
and held
in
that
position
by
rotating the
catch lever,
whrch is
just
in front of the clutch
lever, backwards
until it engages
with the
notch cut in the clutch
lever. This ensures that the
machine
is locked
in neutral and will not run
away directly the engine
is
started.
With
a cold
engine the choke should
be closed for starting. To do this
the
small
Ioop
attached to the
lower
qarburettor
lever
should
be
hooked
over
e
'l€]uoztJoq
qloq oJe
.{aq1
Ylun
sre,rel
cltl eql
Sulurnl
.(q serlddns
IIo
pu€
1or1ed
qloq
Jo
urnl
.
11eutg
'oleu8eu
erll
Jo
epls
otJl uo uollnq
lno lnc
eql
Sutsserd
,(q
peddols
eq
ueql
,{eru
eu€ue
eq;
'se1pr
eur8ue
orll
Irlun
ellloJql
oq]
esolJ
'Je^_ol
qcl€c
oql
qll^\
uorlrsod
l"ql
ur
ll
)col
pue Jalel
qclnlc eql esrel
'eurqcuur
eql
dols
o1
'1srr4
u€rs
or sr
1r
se .{lrcerroc
eurqceur
eql dors
or
rue}rocfurr
se
lsnl
{t1Ttt""
.CNIddOIS
'ln€qJolo
Sutrtnber
ero.;eq
re8uol
leep
leet?
e
lsel
llr,ll.
ur unJ ,(11n3eruc
sr
qclq.l.l eulqceu
V
'e8uer
s1t uI{l1^A
llo,t\
lser^Beq
eql
ollce1
lltlvr
]I
ltlun
pesseJcul fllunper8
eq ,{eur
puol ogl
t{clq,l.r
lege
'Suruun;.srnoq
0l
lsrg
s1l Surrnp
ryo,rl.
1q3r1
roJ posn eq
eulqceu
eql
leql
osllpe
plno,r
ol[
'ur
Suruunr
sortnber
1g]s
'.{rotrcug
eql
18
pelse1 ,(lq8noroql
ueeq
seq
lr
q8noqlle
'eutqceru
srq
1Bq1
roluredo
oql
puruoJ
plno,tr e,\\
oleH
'JeAeI
ellloJql
eqlJo esn
,(q
pelsnlpe eq
feru
peeds
pue
'pre'trJoJ
3ur,toru
ilels
llrl*
eurqceur
oql
pespelsr ,{1lenper8
sI JeAo[
qc]nlc
oq] sY
']uorueLoru
re^el r{rlnlc er{} J€elc o}
pr€,^AJoJ
pe1o.^td oq,^Aou,{eul
qcq,tt:e,'le1
qclsc
er{}
uo p€ol oql o^oIIeJ ol
repro uI JeAeI
qclnlc
pueq-lq8tr
eq1
11n4
'uorlolu
ur
les
oq ,{eu
eurqceru eqt ,tlqloorus
Suruunr
eutSue
eql
qlla.
'suorlrpuoc
I€col
llns
o1
luerulsnlpe
peou .(eru sSutlles
rollelnqr€c
1sql
poolsJepun
oq
plnoqs
lr
elururlcJo
sed.{1 reqlo ur
posn
sI eulqcetu
eq}
eleql(
pue'ul€llrg
1E0r[)
ur suorlrpuoc crlerurlc Jopun elqectldde
ert suollcnllsul
Sutgels
eseq;
'ernlxrru
e
qcrr
ool
ol€clpur
lltm
Buug ueloun
pu€
lsn€qxo
1ce1q
,(,teeq
y
'eurSue
oql
eloqc flqeqord
pu€
ernlxnu el{l
Jo
ssougctJ
relo esn€c
plno,{\ slql
sB
eloqc oql esolc
01
peeu ou oq
plnoqs
ereql
eur8ue UIJE,^A
e Sutgels
ueq16
',,(1uele
unr
01
q8noue ruJ€. A sr out8ue oql
llun
'peqlrrsep
,(1snot,re;d
s€
'e{oqc
eql
Jo
osn ,(q 3ur11e1s uror3
1de4
eq . eur
qcrq,tt
'eurEue
eql
il€ls
,r,r.ou
plnoqs s11nd
,!\eJ
V
'uedo
gleq
lnoq€
ol elllolql
eql
e^oIU
osl€
pu€
o{oqc
eql uedo
'du.t1s
eql qlr^\
s11nd eerqtr Jo o,^al
JeU€ uo unr
lou
lnq
oJU eurEua
eql
pFoqs
'uedo
,(11n9 o{oqc eql
qlr,tt
.{1q1oours sunr eutSue eqtr
lr}un
leeder
pue
'o,tt1
Jo
puoces
€ JoJ e{oqc eql esolr
'fyprder
fl€ls
o]
puel ourqc€u eql
pFoqs
'o{oqc
egl
esEeIeJ'Suruurrl
spuoces
,4aeJ € JoIJV
'u€ls
,uou
plnoqs eur8ue eqa
'dn
1nd
dreqs e dpJls eql e,,u8
pue
eru€Ulool eql uo
loog
e Sutculd
.{q eutqceut
eql
ipuelg
'pre,ttroJ
oc€J
pu€
selpuuq ?r{1
Jo
eprs eql
l€
eurqo€u
eq1
go
lq8tr
eql
ol pupls
'uorlcerrp esr,t\-{colc e ur ,{e11nd eq}
punor€
derls
eq1
du.t16
,(e11nd regels oql
ur utd eql
re.to
d€rls eql
Jo
pue
eq1 ur eloq eql xU
pue
'der1s
Surgels eql
e1e1 fleutg
'e1pu€q
oql uo o>loJls Je^el eq1
go pue
do1
oql
tuo4
lueruelotu
sll
Jo
t/l
o1
g/1 peuedo
oq uoql
pFoqs
eluorqt eqJ
'JOIC0UUOJ
JeuteJc
JI€ Jogqnr
aIIl ol
lelcos
JecnpeJ unrururnlu eql
ruou
Eurlcelord
urd egl
RUNNING
ADJUSTMENTS.
When the machine is working one
of the most important
items to maintain
in correct
adjustment is the clutch.
If, when
the clutch
lever
is fully withdrawn,
the
machine
tries
to move
forward on starting
the engine, this
will be due to
insufficient withdrawal of
the
clutch
members from each
other. To remedy
this
the
nuts clamping the
right-angled
connector
bracket to
the
clutch
rod will need adjustment. lJnscrew
the
inner nut a few
turns towards the clutch, then
tighten the othet
nut
down
to
it.
Repeat this
if necessary until the machine
no longer tries to
move
forward
when the
engine is running with the clutch
lever withdrawn.
The other
adjustment to the
clutch is that
required if clutch slip occurs
when
the
machine
is working. This fault is symptomised
by the machine
remaining
stationary
or moving only very slowly
u'hen the clutch lever
is
released, even
though the
engine is set at
full
throttle
and revolves at
high
speed.
This slippage
will
be due to either one or
more of the following three causes.
Firstly
the clutch
may be held slightly
withdrawn, even when the
clutch lever
is fully
released.
To cure this,
the outer nut on the clutch
rod should
be unscrewed a
few
turns
away
from the clutch
and
the
inner nut then tightened
against
it. Repeat
this
until
no slip occurs
when
the
engine
is driving the cultivator.
After
making this
adjustment
withdraw the clutch
lever and observe
if
there
is any
tendency
for the
machine to
inch
forward.
If this occurs the
clutch has
been
slightly
over adjusted
and the
nuts on
the
clutch
rod should be moved
back a
turn
or two to
cure this.
Secondly
the clutch
lining may have worn sufficiently
to
require adjustment
of
the control.
This should
be carried out as
described
for
the
first fault.
Lastly the
friction faces
in the clutch may
have become
oily due to an
excess
of oil from the
gearbox
having seeped
between the clutch
members'
To cure
this,
first drain any excess
of oil from
the
gearbox.
Next remove
the
fan,
which
is also the
female clutch cone,
and clean
off both working
faces
of the clutch
with clean
petrol.
The fan
removal
is
achieved
by
first removing
the
fan
cover,
which
is
held in
position
on the
right of the
machine by
six cheese
headed screws
into
the
geaicase
and
one hexagon
head screw
into the air
manifold.
Next the
starter
pulley
may
be removed
by removing the
two screws
securing
it to the
fan.
Finally the
central
nut
securing
the
fan should
be removed
and the
fan
carefully
prised
from
its
taper
seating. Care
should
be taken
not to
lose the
key fitted
in the taper on
the fan shaft.
In addition to this,
several adjustments
should
be made
at
regular intervals
of not
less than
one month if thd
best
performance
is to
be obtained
from the
cultivator
engine.
First the sparking
plug
should
be removed
and thoroughly
cleaned.
The
plug
gap
should
be checked and
set at
.015-.018
in. by use
of a feeler
gauge.
(As
the cultivator
may
be left stationary
for considerable
periods
in
the
open,
it is advisable
to keep a spare
plug
available.)
Next remove the cover
over the end
of the
magneto,
and clean
off the
contact
breaker assembly.
Rotate the
engine
until the
points
are fully open
and
check
the
gap
between them.
This should
be set to
.015 in'
I
lol
slqi
'req
Lturuol
pexg
e
qlpA ,4aorcs e
fq
pollotluoc
luotutsnlpe
elpeau
€ seq
pue
'pre.nr.rog
Surce;
rollernqr€c
eql
Jo
Luolloq oql
1€
sI
1ei
utuur eq1
',uercs
Surlsnlpe
Suruunr
,{d.ols er{l
Jo
Surlles
JeqilnJ
ertnber
,{eru slueurlsnlpe eseql
Jo
Jeqllg
'ol11ll
B
ur ,reJcs sql
les
pesolc
sr elilorql eql
uol{.44
lno
slnc
Jo ,{1.aa,o1s
ootr selpl
eutSue
eql
3t
,{lesteluo3
'Je^el
el}lorql eql o^oq€
spJ€.,l\)ceq
Surce;
peeq uo8exeq
eql
qll.ll
euo
oql sr ,tAeJcs sIqJ
'elllll
e
IcBq
les
eq
plnoqs
,nrercs dols
ollloJl{l eql
peeds e
1eer3
ool
ls
selpl
eut8ue eq}
;1
'lols
.re^rJp,4Aercs
€
qll4A pBeq pelrnu{ € sBrl
pu€
'pre,trro3
Eulcug
rollernq.l€c
eql;o do1
eql
18
slAercs sIuJ
'r{1qloours
Sutlpt
sr eurSue
oql
Illun
'eutt1
e
1B
ulnl
e
31eq
'lno
,ro ur
pelsnlp€
eq
plnoqs ,4\ercs
luerulsnlpe
Suruunr
lAols oql ueql
'uoleun
st 8ut1pt
luenbesqns
oq1
lnq
'pesolc
sr
ollloJqtr eql
wJBlY\
sr eulSue eql
uerl,^A
JI
'11
ol
{cn}s
euocoq
,{eut
qcq,r,t
seleel
ro sser8
'1rrp
IIB
Jo
u€slc
,(1ru1n8e1
'u€olc
rollernqrec eql deey
'uotldrunsuoc
1en;
,ir.eeq
pue esuodser
eur8ue
rood o1
peel
,{eu
lrroq}
qll4a JI?ITIru€J
1ou
uosred e
fq
luerulsnlpu
su
'f,resseceu.{1e1n1osqe
ssalun
qllll pereduel eq
lou
plnoqs pue
'frolce;
eql se^eel
eurqc?u
qc€e eJoJeq eutSue
eql
llns
o1
pelsnlpe sI
luelunJlsul
sIqJ
'rolloJnqrec
oqtr sr rep.ro
3ur4ro./'r
lceJJoc
ur
1de>1
eq
01 urell
]u€lrodrul
lsour
V
',{poq
re11g arlt
olur
Jet]€l
oql ouroq
.n.rercs ,(1tq3p
pu€
eJoc aql
uo sJeqs€1vr
eql olquoss€-eU
'oroJ
pue ,{poq Jollg
qloq ruoq
rel}€tu u8rerog
IIs
e^oluer
pue
1o;1ed
u€elc
uI sreqsu,t\
lleJ
oql
Jo
qs€l11
'pe^orueJ
eq uec
'sreqsu.lrt
rellg
lloJ
oq]
qlLA eleldruoc
'eJoc
eql
Irlun
oslld{colc-Ilu€
peurn}
puu peddt:8 oq
plnoqs
eroc
rellg
eql
;o
e8pe
pelJnDI eql
'{u€1
IIo
eq}
ql€euJepun
pol€nlls
sI
re}lg
Ilo
oql
'erer{p€
IIL4A
lsnp
go
selcrped
qcq,^
01 eceJrns
f1ct1s e
proJe
IIr,t
Io
Jo
rulu eqJ
'elpu€q
eql
uo
peceyder ueql
'poulerp
pue
po^ouer
'1to
eutSue
ueelc ur
peddrp eq ueql
plnoqs
1I
'ulp
Jo
selcrlred
II€
e^oruer
o1 ugered
ro
1or1ed
ueolc uI
lno
poqsu,tl.
pue pelotuor oq
plnogs
leu€olc
JIE eql
'uolluslls
eAIecoJ
plnoqs
SJollU
IIo
pu? JIe eql sqluotu
eerql ro o,tt1 .{re.tg
'uor1e:edo
.;o
en8rleg eql
ecnpel
.{1leer8
pu? oulqceru oql
Jo
eJ}l eql
eseorcul
IILI
slulod
osel{}
Jo
uoll€clJqn'I
'c1e
'se8e>1ull
pue
slurol
por
lorluoJ
pue por qc1n1c
's11oq
durelc
's,tre:cs
Su4snlpe
gldep
'sqnq
Ieel{1vr
,4aolloJ epnlcul
esoql
'polo
pu€
peseer8 sl.red
8ur4ro.r,r
pesodxe
IIp
pue
pou€elc
,{1;e1n3et
oq
ppoqs
eulqcetu
orll uolllppu
uI
1nq
'eurqceru
;no,,(
go Sutuunr
luelcge
eql 01
I31IA
eJE sJuetulsnipe
eseql
'eloels
oAI€A
lelul
re,trol erll ecelder
pu€
'uI
900'
01 oAlB^
]elul
oql
repun de8 eql
lsnlpv
'eprnE
pue re8unld o^lu^
]alul
eql ecelder
1xe51
'O^eels
eAIeA
lsnBqxe
Je,{\oI
oql ecelder
ueql
<pesl?J
sI
oAI€A
}sn€qxe
eql
Illun
eur8ue
eql ollo^er
'peleldruoc
ueeq seq
slql ueqi[
'uI
900'
o1
reSunld
eqt
go do1 eq1 ur
lnu>lcol
pu€
./v\eJcs erll
Jo
luolulsnlpu
.{q
les
eq
plnoqs sql
'e3ne3
reloeJ e
qll{\ e^le^
or{1 Jepun ecueJeolc
eql
lceqc
pue
pesolc
sI oAIEA
lsneqxe
eql
lllun
eurSue
eql
eAIoAeU
'pe,taoJcsun
eq
^\ou
.{eu
e.t1e,r.
lsnsqxe
eql relo eleols Je,^Aol erlJ
:e8unld qlr.u elelduoc
lI
elotueJ
pue eprn8 re8unld e^l?^
lelur
eql .^c.oJcsun
'lnqs
sr
e^l€^
lolul
oql
IDun
eut8ue
eql eAloAoU
'eleels
e.t1e.r
reddn eql Je^o
dn
1r
eprls
pu€
e^l€A
lelul
eql reto
o^eels Je,4dol eql ,^aercsun
lsJrd
'pelcagJ
eq
ueql
pForIS
sSutlles
1edde1
eq1
may become
blocked, by
any dirt
in
the
petrol,
and
cause the engine
to stall.
In this case
remove
the
jet
needle with its
body by
unscrewing
the narrow
hexagon on
the
body.
Ihis
will expose the
main
jet
which
may be removed
with
a screwdriver.
After
cleaning both the
jet
and
needlc replace
them in the
carburettor.
The needle will then
require adjustment.
Screw
the needle right
horne by
turning the tommy
bar clockwise as far
as
it
will
go.
Then unscrew
the needle
l]
full
turns.
This wiil be near the correct
setting which
may then be finely
adjusted
by trying the
machine
with the needle
set a little either
side of this
position.
MAINTENANCE.
At
regular intervals, of about six
months,
but depending on
the amount
of
work the
machine has done,
certain overhaul
tasks should be
performed.
First the
engine should be decarbonised and the valves reground
on
tl.reir
seats.
This is best carried out
by completely removing
the cylinder
head.
To do this the
air manifold
and cylinder cover should be detached.
Disconnect
the sparking
plug
lead and remove the cylinder head, being
careful
not
to
damage
the
gasket
between the head and cylinder. Tap off the
exhaust
pipe.
Unscrew
the
lower valve covers and
lemove both
plungers
and
plunger
guides.
The
cylinder
holding down nuts
may now be released
and
the
cylinder removed,
taking care
not to
damage
the
joint
washer under the cylinder.
The valve
gear
should then
be removed
from
the cyiinder
and
all
carbon
removed
from
in
the
ports
and also
from the cylinder head,
piston
crown and the
valves.
Care
should bc taken
not to allow any dirt
or carbon to enter
the
crankcase
whilst
the cylinder
is removed.
The
valves should
be re-ground
on their seats
and then all
parts
washed
off
u'ith
clean
petrol
or
paraffin.
On
re-assembly
care should
be
taken
with the
gasket
and
joint
washers
to
ensure
that
no oil or
gas
leaks occur, also the tappets and
sparking
plug
should
be adjusted
to their correct
settings.
The clutch
should
also receive
attention at this time. It
should be removed,
cleaned
and inspected
for wear.
A new lining is 3116 in.
thick, and this may
be used
as a
basis for
judging
wear.
Replace
the clutch after
this overhaul
and adjust
the
operating
rod.
Before
replacing
the
fan
cover
clean out the air
passage
to the cylinder.
Inspect
the whole
machine
and tighten up any
screws or
bolts
which
may
have worked
loose.
Drain
thc
lubricating
oil tank and clean out with
petrol
to
remove
any
dirt or
metal
which
may have found
its
way
into
the tank. Refill
with fresh
lubricating
oil.
Wash
off all
painted
surfaces,
and
touch
up
with
paint
where required.
Finally
when
the
paint
rs dry rub a clean
oily rag over
the machine.
A machine
serviced
in this manner will
have
a very
much longer
life than
one
that
is neglected
and allowed to
rust
away.
When
it becomes
necessary through wear to
replace
or
repair
any
part
of
the
engine
or
gearbox,
we would
advise the
owner, unless
he has skilled labour

'JolnqrJlsrp
Jno,{
llnsuoc
uaql
asrJe,,(uur
qcrq.tl
elqnoJl
,(ue a1ecol
louuec
no,(
31
'll
eer; ol ua{e1
lou
s€,r uorlce
el€rpourur
3r
eut8ue ,neu e
,{11en1rr,,r.
ueetu
pFoA\
l€ql
ue^e
1nq
'edrd
Iro
po{colq
€ ueq} eJour
ou
eq
lqSnu i1
'o,r,tsuedxa
,(raa.
sr repro redord ur
lou
eurqc€u
u
{Jol\
oI
'esn€c
slr
peurelJecse
ea.eq no.{
11lun
pJ€q
1l
{Jot\
Jo
our8ue oql ecJoJ re,rou
'elnzres
Jo
osrou elrssecxo
'ecueur.ro;red
p€q
Jo
suSrs
,(ue
s,roqs eun{c€ur
Jo eur8ue eql orurl ,
ue
1e
31
.9
',,(1;eln8er
sluerulsnfpe
uorssrursueJl
pue
aur8ue eql ur€lurpJ
J
'g
'c1e
'spue:q1
rtercs
's1eeq,r
Jo
arnzres
yuanbesuoc
pue
lsnJ
lue,lerd
ol
pelro
ro
peszerS
areqdsoule
eql ol
pesodxe
eJ€
1€ql
slrud 8ur4ro..tr
11e
cieey
'y
ecuo
ls€ol
rB rno
perr'e"
,q
plnoqi
s*{} uoqr
{np fr"
"
Hri;H,f
sr eurqceur
eql
3r
lsle.lrelul
reln8er
1u
1ro
Suqecrrqnl
aql eiiuuq3
'u€olc
sr ourqc?u
eql ol
parlddirs
1o.t1ed
puu
lro
ll€
leql
eJns aluru
pu€
slto Eu4ecuqnl go seper8
lcaJJoc
oql
esn
'u€olc
ourgc€ur eq1 dee;
ere
slurod
Bu*,o11og
oqr
Jr
runururu
e eq
III^\ IIrq
ecu€uel"r; :i:tto"
'pa:mber
4ro,r
rreder
Jo
lutlour€
oql
ol s€ rurq esr
p€
IIr.^A.
oq^\
'peseqcrnd
sE.{\
ourqc€u eql ruoq,r
ruou JolnqrJlsrp
oq}
qceotdde
o1
'e1qe1re,te
'c
,z
.I

n"+ inlcr"Lc,ngeob
le.
crri
lL Drneriooyr
Il)oohrne
It-*er*hot,
g
e
obl.--
-rf
l,
D-.
-+caa
f)Oo.hcn.,
In{.'oln'o',
9.o
(l-
f.r
#-E
h./'o}ff6,$lr
es
Pgorocn,qpH
Prnr No. NuMBER NavB
No.
prn
MacntNn
I
I
I
1
1
1
I
1
2
1
I
1
1
I
I
6
4
4
4
2
I
I
1
2
4
1
4
4
4
1101
1102
I108
I
I
08a.
2101
1309
13r0
1
s08
25
l8
701
P
1
507
1812
1814
2518
t] t1
t29
S
1 208
211 N
304 W
1301
1302
I 303
I 501
503
K
1304
1 308
151
1
121
S
301 W
(
I
{
I
J
I
2
38
-)
-l
36
30
34
35
31
29
32
34
31
28
39
40
43
4t
24
42
49
Inner Crankcase
\
ourer crankcase I
Not obtainable
I
sepa ra tely.
Sleeve
I
Ontv
as Assembly
Dowel
for
Sleeve
J
Actuating Stud
for Sleeve
Drive Shaft
bush-Inner
Crankcase
Bush for Sleeve
lnner Camshaft
Bush
Oil
Connection
Elbow-Inner
Crankcase
Oilway
Plug-Inner
Crankcase
Outer
Camshaft
Bush
Drain
Plug-Outer
Crankcase
Drain
Plug Washer
. .
Breather
Outlet
Elbow-Outer
Crankcase
Breather
Pipe
Crankcase
Bolts
Cylinder
Base Stud
. .
Nut
for Stud
Washer
Flywheel
Drive
Shaft
Crank
Pin
Crank Pinion
Key
for
Shaft
and
Pinion
Nut
Ballrace
for
Pinion
Locking
Washer
Lock
Screw
Spring
Washers

w.m.ffi
ffi
ff*%
-,p
ffi
M
W"
s
o6-
-r-
b4*=_
ffi@%
LN

U:
,6
F>
rd
Ycn
z2
&
Z-)
-e
(,li
E8
1l
l5
Panr No,
I 1312t
L,,,
|.
,r,,o
r
l4}t
I
toorn
I
]
1402n
|
1403n
L
1404
[
1610
|
1611
I2ilN
I
'u,,
I
L 16l2
I
ts02
|
150e
{
1516
lr,r*
Lro,*
r
1506
|
,roo
1,,0,
lrot*
I
|
1sr0
L
15ll
r
ll03
.l
t
too
Ltrrs
I
1701
1
)
norl
I
rzo:
Psorocnaps
NuvrEn
47
45
48
t6
I7
18
85
86
87
88
59
60
6t
62
63
64
66
68
67
4
8
NalrB
Connecting Rod
Big
End Bush
Little End Bush
Piston . .
Piston
Ring-Compression
Piston
Ring-Scraper
Gudgeon Pin . .
Circlip
Rocker
Lever
Rocker
Shaft
Nut
for Shaft
Long Spacer ..
Short
Spacer
Idler Wheel
Bush for Wheel
Bearing Stud for
Idler
Nut
for Stud
Spring Washer
Camshaft
Camshaft Mitre Cear
Camshaft
Drive Gear
Key for Gears
Nut for
Camshaft
Lockwasher
Timing Cover
Gasket for Cover
Retain Screw
for Cover
Magneto
Backplate
for
Gasket
No.
pen
MacrlNn
1
I
7
I
I
I
*
F
rll.
<4
a=
d,z
Hli
x8
6<
&.
<1
ii ca
z
tiU)
t](,
a<
F>
EI
ai
za
4A
U<
AU
za
zo
FU
Y"r
zz
33
z<
Magneto

qFffi,rtr
ffi']',
HH
*%
-W
-%
-$
s%
x&s
***
\
{w
h.)
L) oo
rO
r\
(,
\J
S*@
s
(,
(n
3lH=
ffi
.w
r*:
l@X
o@J
-w
ow
rffi _m
s
(,
rc
$
s
Oo
ffi
qf
$
Ot
.m
t$f
'W
r}
\.1
A
qCI
-€=+
{pffi
#
ootfi

I
Eli
I
43<
:eI
ei
I
t
PuorocupH
Panr No.
Nuvnnn
N.qvr
Retain
Screw
Magneto
Gear
Sleeve
for Gear
Sparking Plug
Magneto Lead
Cylinder Barrel
Valve Guide . .
Valve
Upper Valve
Spring
Sleeve . .
Valve
Spring
. .
Valve
Spring Collar
. .
Pin for
Collar
Lower Valve Spring Sleeve . .
Cylinder Head Stud-long .
.
Cylinder Head Stud short
Nut for Studs
Cylinder Base
Washer
Valve Pluhger
Cuide
Washer
lor
Guide
Valve
Plunger
Plunger Adjusting Screw
Locking
Nut
Cylinder
Head
Gasket for Head
Cylinder
Cover
121
S
1 505n
1 70le
1109
1709t
1201r
1605r
1601
1614
1602
1603 i
I
rc041
l6l 5
1205
1206
211 N
1207
1607
l8l4
1606
1 608
1609
1202t
Y
229
1204
2715
1112
Z
1128
126 S
t22 S
t4
25
10
9
76
75
84
17
78
83
26
27
No.
prn
MacnrNr
4
1
I
I
I
I
2
)
Fl
!
z
ri
tA
a
.,4
.i:' A
rd
ir
,.-..a
f.-
,,,,.
Z
".'
<
Fl
ti
&
p
g
d
rc
H
z
H
F.l
U
2
2
.2
2
2
2
4
6
I
2
2
2
2
2
I
I
I
I
1
I
I
I
13
82
32
81
19
80
2
5
t41
6
l2
l9
20
21
Exhaust Pipe . .
Carburettor
Intake
Elbow
Carburettor Retaining
Screw-long
Carburettor Retaining
Screw-short
Fia
rll
Et !.1
I
clcat
s>i
F/lr] I
aonl
&al
<<t
12

€l
.gqp
SW
Sffi
$o
{urm
So
$W
x&'xffi
s,,,*,,@
.
:...r.,....
I
,..1
:.':'..,.
'
,
Or.'.,r:,.'
l',:.,,1.
i
lt...
:,t
:,
,
.
.
:
1-
l-'l
':'
.''''i',''r,g
*
s@,,,,sm
E.
s
*ffi
-ffi
'..'ttl
,i,'
$ffi
=ffi-ffi
se.sffi
oS&
ow
.,w&T@
ryYT@
o\o
d X
d
s,l
ffq*
ryppffi

PHorocnnPn
Panr
No.
NuMern
22
23
24
178
165
50
54
53
52
58
57
55
56
65
51
No.
pnn
MncHrNr
2
1
1
2
L 807e
11
13
2006
1729t
l',l29
1 801
1811
1 804
I 805
1809
1810
18064
4025
1815
1 802
t22
S
2401
2305
2301
128 S
2205
2206
131
S
305 W
2208
z
^H
JZ
FiIr
r ta
h(,
^4
2a
!
Fl
m
ti
a
rc
a
a
g
!
z
p
H
Fl
6
: .-^
rd
=
z
<!i
p-
_ i-4
H--
-.t
h
j
j
i3
a
ti
a
a
Fl
H
ti
H
*
7
td
-
*
!
Nlur
Joint
Washer
lnduction
Pipe
Lock
Nut
for
Pipe
Choke
Wire
Air
Hose
Connection
Oil
Pump
Housing
Oil
Pump
Piston
Upper
Cylinder
Lower
Cylinder
Ball
Valve
Spring
for
Ball
Retaining
Plug
Gasket
for
Plug
Crank
Brass
. .
Gasket
for
Housing
.
.
Retaining
Screw
for
Housing
L.H.
Frame
Plate
Hub Dust
Washer
Retainer
Hub
Dust
Washer
Retaining
Screw
Main
Drive
Wheel
Cleat
Bolt
Spring
Washer
Bearing
for
Main
Wheel
Adjusting
Nut
l.ock
Washer
Drive
Gear
Housing
Hub
Dust
Washer
I
I
2
2
2
2
I
I
4
1
I
2
5
I
18
18
18
2
133
156
t49
t44
r55
2209
2210
2301
2307
, 107
I
I
tos
110
111
141
t49
'i,
<1
t4

9I
s%
ffiffi
W ffi
.qffi
(ow
()
s%
il*
-ff
sm
m
(tl
ry&s
s
sffi
s#
psffi'
tr_w_ffi
s
sffieffig$-.e
E(o
-m
F
re
l;
O
N)
s
t{
!0
a
ffi-&
ililx
v
:-_=@

Puorocupn
P,rnl No. Nunaepn
Naur
Drain
and Level
Plug
Inner Ballrace
No.
prn
MactrrNr
130
Fl
FA
a
r!
a
a
.i
rc,o
tc
\J.
ri
Fl
a
ri
a
a
rd
Fi
r.l
A
F]
z
tr
*
;
35
105
109
r06
t03
104
145
134
148
113
t46
138
139
34
Outer
Ballrace
Nut for Countershaft
Countershaft
I-ock Washer
Drive
Gear
Joint Washer
Key
for Drive Gear
R.H. Frame
Plate
Ballrace
Retainer
Retainir-rg
Screw
to
Spring
Washer
Gear
Housing
Stud
Nut
for Stud
. .
Countershaft
Gear'
Key
for
Gear
Drive
Cear
Housing
1
10
10
2202
504
K
2302
c
291
102
P
2518
1111
125 S
2
Countershaft
Gear
Housing
Joint
Washer . .
Oil
Filler
Plug
Elbow
for
Breather
. .
Breather
Pipe
Retaining
Housing
Screw-Countershaft
Gear
l0
I
I
I
I
I
1
I
I 109
2104
1110
2001
503
K
2004
2002
101
r02
fi2
135
44
136
Spindle
Nut
Actuating
Sleeve
Seal
Washer
Lock
Washer
for
Spindle
Nut
Fan
and
Clutch
Cone
*-J
-H
<.n
?a
C,)<
dl
El
z4
<!
E;J
I
t
Key
for
Fan
Nut for
Fan
Starter
Pulley
l6

E*,1
,e
'w
z?r
m

!lu
0r>
-l
&6
r!t
-4
1o
;{cn
j
H
z
F]
a
a
Q
?
F
F]
(J
z=
|2
<;
2a
3<
<z
49
a2
-<
FIU
UH
2
j
H>
[ns
a
€hl
a
VA
z<
F
PgotocnAPn
P,q.nr No.
NUMBER
(
2003
l
[
130
s
90
89
r03
r04
97
98
100
99
94
96
Nrur
Pin for Pulley
Retaining
Bolt for
Pulley
Inner Clutch Cone
Clutch
Lining
Rivets
for Lining
Nut for
Cone
Lock Washer
Key
for Cone
Clutch
Pinion
Clutch Spring
Thrust Collar
Clutch
Pressure
Spring
Clutch Pinion Thrust Collar
Clutch Actuating
Sleeve
Actuating
Sleeve Bearing
Clutch Actuating
Collar
Clamp Screw
for Collar
Clutch
Actuating Spring
Rod
Split
Pin for Rod
Washer
Actuating
Spring
Adjusting
Nut
Guide Stud
for Rod
Nut
for
Stud
..
'
Spring Washer
No.
pnn
MlcHrtE
2005
2008
2009
2006
502 K
2201
2101
I
I
22t1
l
I
2
I
I
9
1
1
1
1
1
I
I
I
I
1
1
I
2
1
I
2
I
1
I
I
1
I
1
1
2
pairs
I
2106
I
L
210s
|
210)
2t03
2108
132 S
2ttt
602 C
401
w
2110
210 N
2113
211 N
Isoo*
|
250t
2502
2503
2509
2526
2504
r50
152
l5l
Tank Shield
Oil Tank
Petrol Tank
Gasket between
Oil
Tank and Shield
Gasket
between
Petrol
Tank and Shieid
..
Filler Cap Neck
18
i
I
I
t
142

6I
'W
rsr
ffi
fsr
w
st,t
r.''*--
l*
"q
.d
"*t****
q
i $"nu\ h
",.
r\,
*f $
'-
"h4*!#"
.i"
.|j',
s
t\or*-****sd
slt

rl
H
z^
a-t
aa
<9
z
F
tl
lrl
a
a
F
FI
trr
Fl
a
3
rl
€
a
rc
U
a
ri
a
tu
a
€F
ti
0r
Dr1
zg
:/<
PHo.rocuPH
P,tnr
No.
Nutrlnrn
,'l
t\4
153
122
123
r19
121
154
115
34
128
126
129
r32
127
125
131
143
Filler
Cap
I 2s0s
|
,rro
i
2520
L
,rroo
r
1901
I
tno,
I
'nno
I
,no,
]
'nnt
i
I
reo2
I
rsos
I rnou
I
L
2518
f
1601r,
|
,ooo
J ryz
|
,0,,
Lon,
J
^'o
I
zsrt
L,,u
l,
,roro
lrott
Ioort
Ir',
n
( 2s19
.]
,ttt
I
rt'u
I
2406
i1
,+os
Collar
with
Lock
Nut
Petrol
and Oil
Taps
. .
Fibre
Washer
for
Taps
Oil
Filter
Case
Connecting
Nipple
Nut
for
Nipple
Oil
Return
Sight
Tube
Gasket
for
Nipple
Oil
Filter
Core
Gasket
for
Core
Frame Spacer
Tube
Tank
Spacer
Tube-short
Tank
Spacer
Tube-long
Handle
Clamp
Washer
Spacing
Washer
for
Hitch
Bolt
Spring
Washer
for
Hitch
Bolt
Washer
for Spacer
Bolts
'
.
Nut
fdr Spacer
Bolt
. .
Petrol
Pipe
Oil
Pipe-Feed
Oil
Pipe-Return
Wooden
Handles.
L.H.
and
R.H.
Wooden
Crossmember
.
N,lN,re
No.
psn
MAcHINE
2
pairs
2
2
I
1
1
1
I
1
I
4
2
1
2
2
2
t0
l4
1
I
1
I
pair
I
Felt
Filter
Washer
4
Elbow
Connector
to Case
1
Hitch
Brace
Spacer
Bolt
2
Frame
Plate Spacer
Bolt
3
Tank Spacer
Bolt
I
Handle
Spacer
Bolt
.
.
I
118
116
117
172
\a

lz
Wq
ss%
rsl
4
m
ffi r8t
%.a-
\
\
W
".|ffi
ffi
8/l
e
€9t ffi
(;
qLr
ffi
s8t
lq
a/
69t
K
sEt
ffi
H
6Er

Psorocnnpn
P.lnr No. NuMsEn
No.
prn
MacurNr
I
2
2
1
1
4
I
1
1
J
J
1
1
I
l0
2
1
3
I
I
I
I
I
I
2
2
2
2
2
2
2409
210
N
410 w
2612
2607
1601
r.
2601
2603
401 W
134
S
210
N
2604
2604n
2605
26tl
21
t]
t] t]
I
718
l1 t6
132 S
210
N
302 W
1729
2411
2702
2103
2102
135
S
213 N
305
W
116
Tie Rod
183
a
ri
Fl
z
z
tc
z
!
Fl
a
trl
a
a
a
a
FN
F
179
t82
180
181
184
177
Nut for
Tie Rod
Washer
Catch
Lever'
Clutch
Lever .
Pivot Spacer
for
Levers
Throttle
Lever
Friction Washer
Washer
Bolt lor
Levers
Nut for Bolt
. .
Clutch
Rod
Throttle
Inner
Cable
complete with Swivel
Tl-rrottle Outer Cable
Retaining Staple
for Throttle
Control Wire
Guide
Bracket and
Clutch Rod Bracket . .
Air
Cleaner Bracket
. .
Wood
Screw
. .
Air Cleaner
Bolt
to
Retain
Cleaner
Nut
Washer
Air Hose
Folding
Stand
Rear Hitch
Brace
Front Hitch
Brace
Tool Holder Strut
Bolt
Strut to
Hitch Brace
. .
Nut for Bolt
.
Spring
Washer'
t64
188
169
163
162
rd
a-
-=i
l)a
F

tz
t*1
ffi@
Ior{'*$
v6t go(.
#
w
sreso('"I
q
fl
e8t
--roM

PHorocupil
Penr
No. NuMeen
No.
pnn
MncnrNn
2
8
14
3
J
J
-)
2
2
2
2
2
2
2
2
2
2
8
2
2
2
I
4
I
4
1
I
1
I
1
2
204
244
. ,_. f 2107
2Q1
ztos
-rr
I
t30
S
E
(
2710
z-A
EE
2902
aQ1
,:)
i ztzo
9*ieozc
F
|
2709
I
i )qo)
I i
-'"-
H I 2726
d 602c
a)
2
1
ztzo
a \
)721
!
I
z:tx
2 i )i)7
|
''-"
d lztrc
rct
E I )tt6
> I-','.-
+ I 2717
*t
* i
2tt8
n
i
2lt9
I
L
2r3
2112
21 12r.
2344l.
23C4s
250ir
280 I
2802
t33 S
210 N
401 w
111
166
186
151
N,q.N4p
Parallel Clamp Bar
Parallel
Bar
Screw for
Toolframe
Tool Shank
Holder
168
161
Depth
Wheel
Bracket
Clamp Bolt
Clamp
Nut
Split
Pin
Clamp Bolt
Clamp Nut
Split Pin
Depth
Adjusting Screw
Depth Adjusting Knob
Lock Nut
for Knob .
.
Depth Adjusting
Spring
Depth Wheel Pressing
Depth Wheel Hub
Rivet
for Wheel
Depth Wheel Link
Link Spacer
Depth Adjusting Nut
Tool Shank-l Hole
Tool Shank-2 Hole
Name Flate
Retaining
Screws
Transfer
Starting Strap
Handle
for
Strap
Bolt
Nut
Washer
24

 Loading...