

Gravely 996122, 996124, 996143, 996144 Owner's/operator's Manual
Treker
ENGLISH
Owner/Operator Manual
Models
996122 – 2 x 4 Red
996124 – 2 x 4 Red Turf Tires
996143 – 4 x 4 Red
996144 – 4 x 4 Camouflage
09650600 2/10
Printed in USA
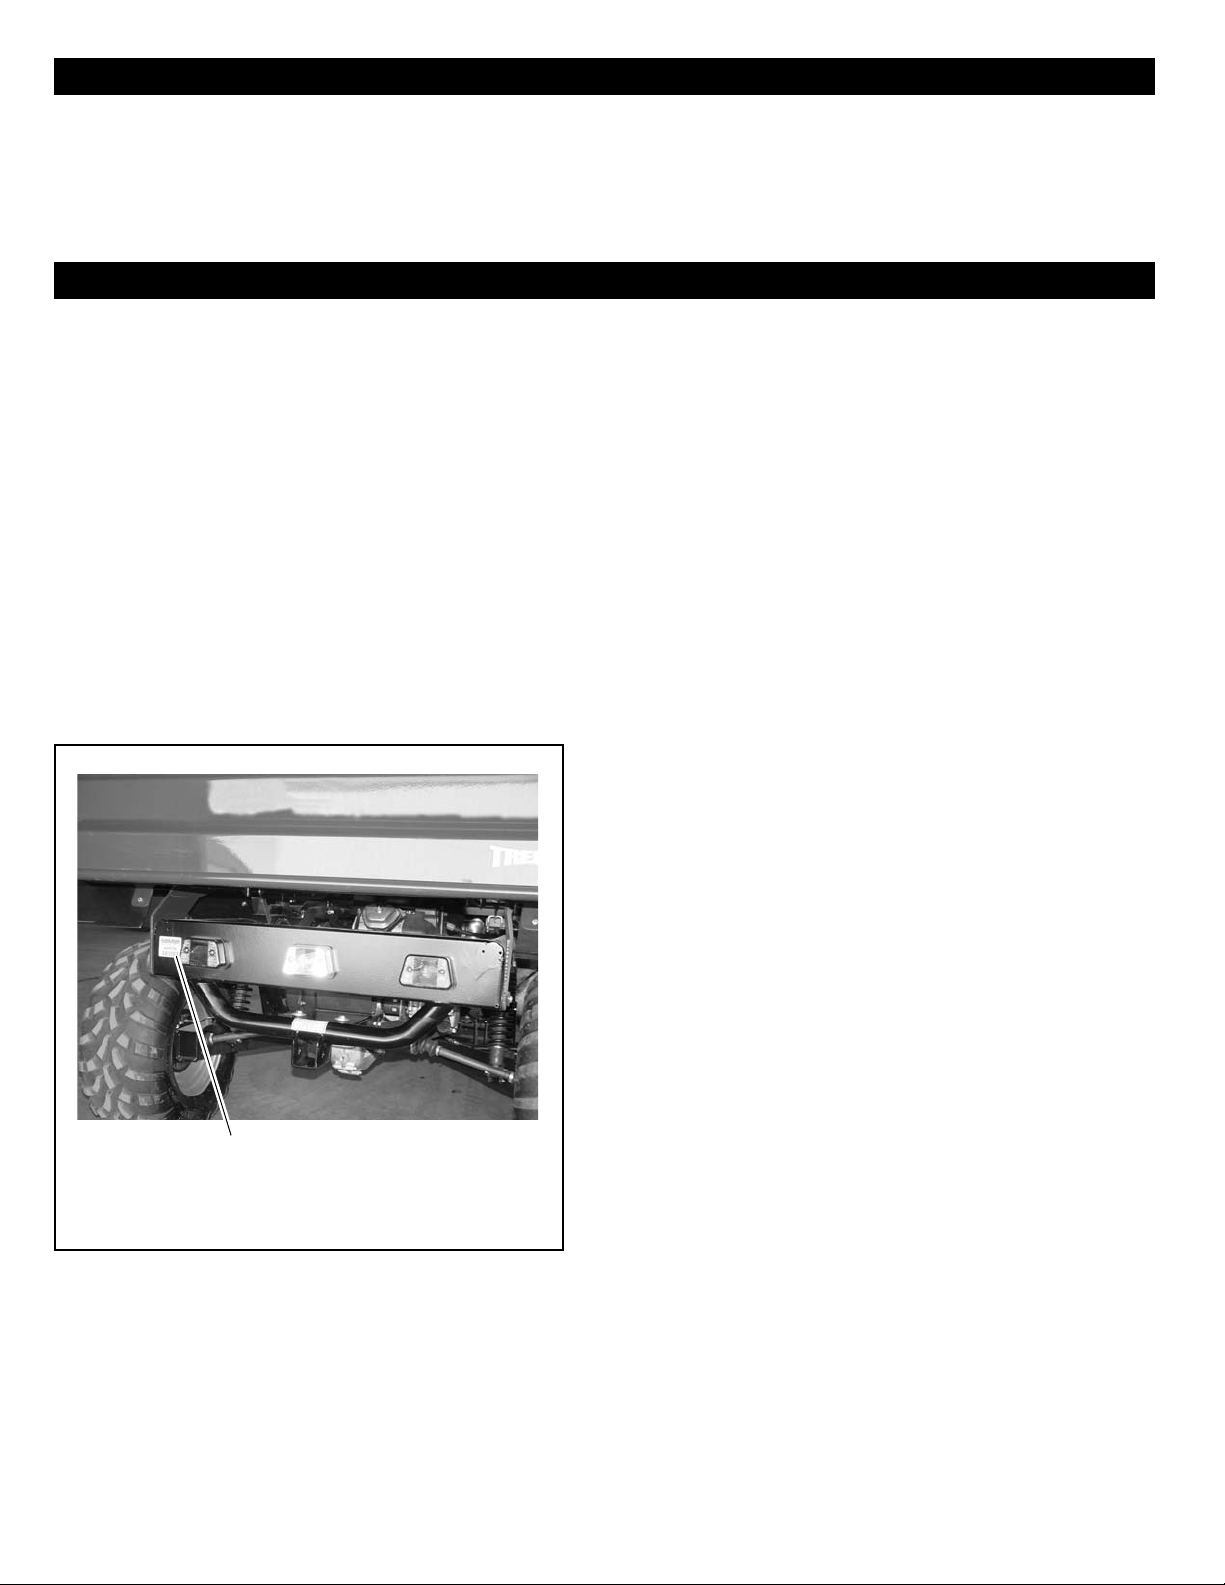
TABLE OF CONTENTS
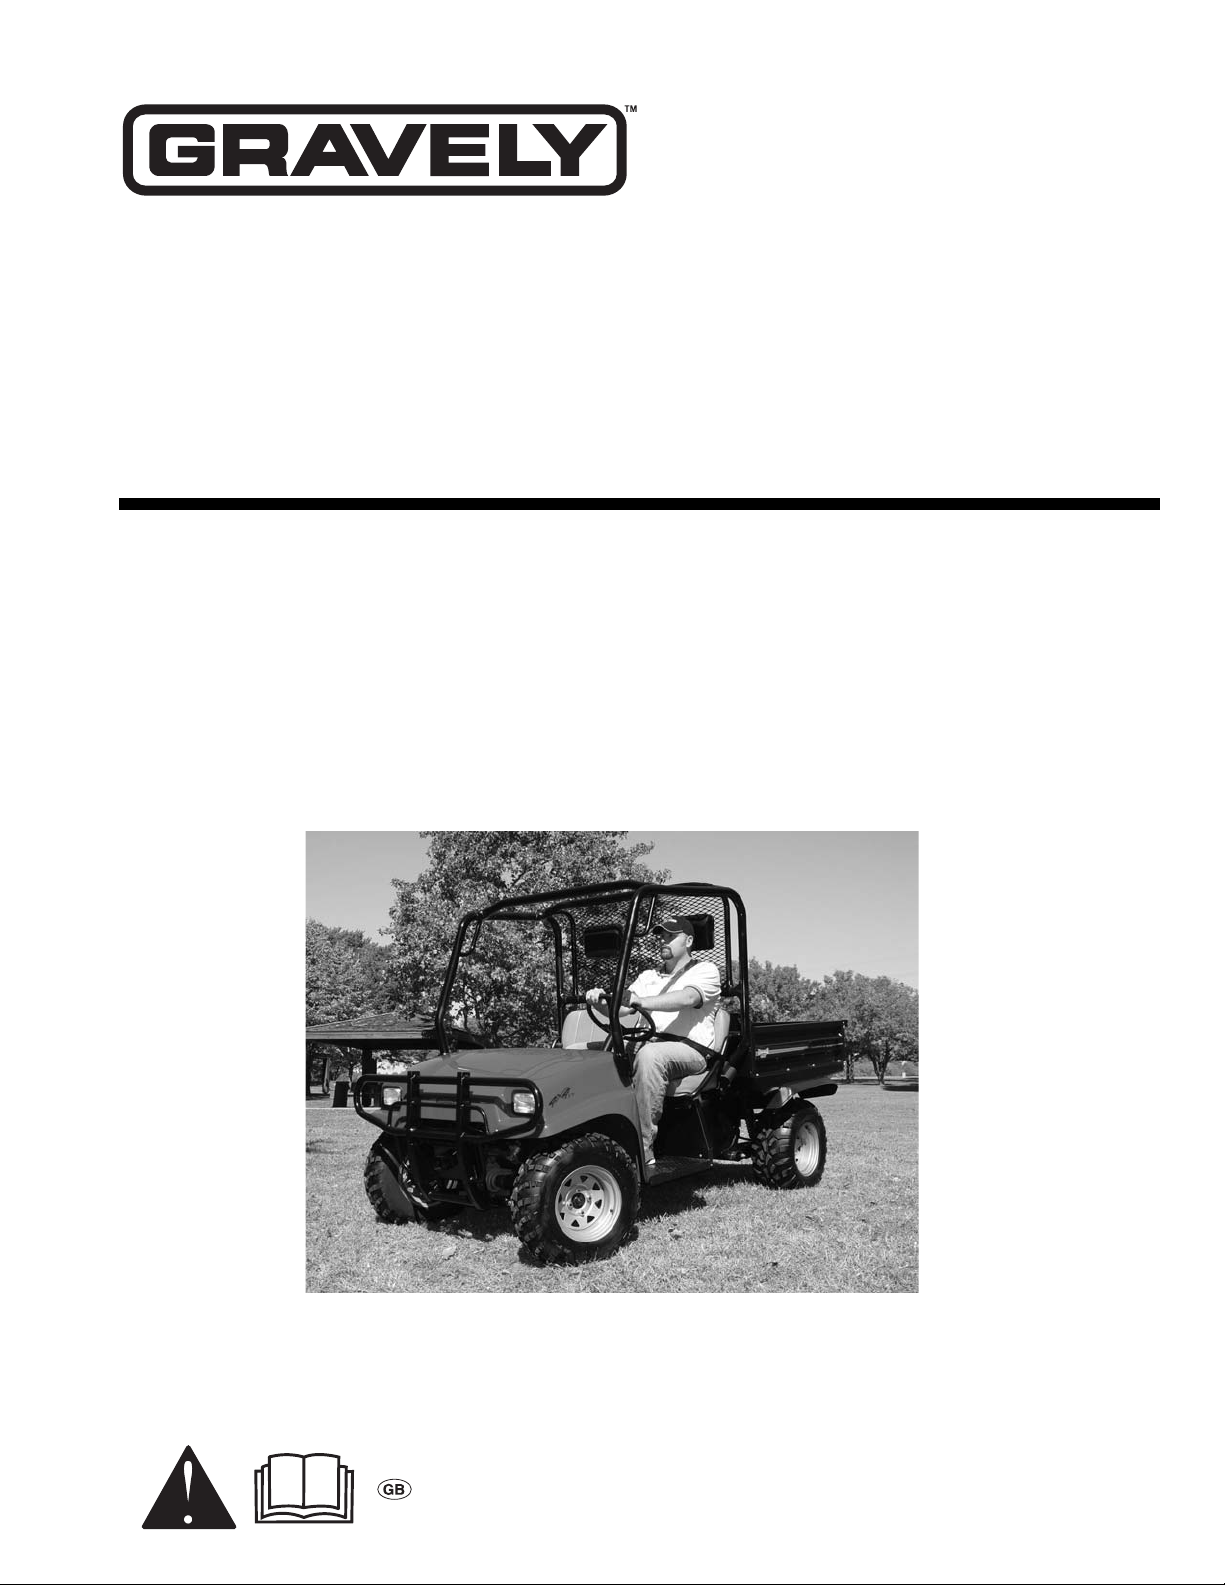
Serial Number Label
Figure 1
OG1400
Safety . . . . . . . . . . . . . . . . . . . . . . . . . . . . . . . . . . . . . . 3
Controls and Features. . . . . . . . . . . . . . . . . . . . . . . . 13
Operation . . . . . . . . . . . . . . . . . . . . . . . . . . . . . . . . . . 14
Maintenance . . . . . . . . . . . . . . . . . . . . . . . . . . . . . . . 23
Maintenance Schedule . . . . . . . . . . . . . . . . . . . . . . . 23
INTRODUCTION
THE MANUAL
Before operation of unit, carefully and completely read your
manuals. The contents will provide you with an
understanding of safety instructions and controls during
normal operation and maintenance.
All reference to left, right, front, or rear are given from
operator standing in operation position and facing the
direction of forward travel.
MODEL AND SERIAL NUMBERS
When ordering replacement parts or making service
inquiries, know the Model and Serial numbers of your unit
and engine.
Numbers are located on the product registration form in the
unit literature package. They are printed on a serial number
label, located on the frame of your unit.
Storage. . . . . . . . . . . . . . . . . . . . . . . . . . . . . . . . . . . . 39
Troubleshooting . . . . . . . . . . . . . . . . . . . . . . . . . . . . 40
Specifications . . . . . . . . . . . . . . . . . . . . . . . . . . . . . . 44
Warranty. . . . . . . . . . . . . . . . . . . . . . . . . . . . . . . . . . . 47
PRODUCT REGISTRATION
The Gravely dealer must register the product at the time of
purchase. Registering the product will help the company
process warranty claims or contact you with the latest
service information. All claims meeting requirements during
the limited warranty period will be honored, whether or not
the product registration card is returned. Keep a proof of
purchase if you do not register your unit.
Customer Note: If the Dealer does not register your
product, please fill out, sign and return the product
registration card to Gravely or go to www.gravely.com on the
internet.
UNAUTHORIZED REPLACEMENT PARTS
Use only Gravely replacement parts. The replacement of
any part on this vehicle with anything other than a Gravely
authorized replacement part may adversely affect the
performance, durability, or safety of this unit and may void
the warranty. Gravely disclaims liability for any claims or
damages, whether warranty, property damage, personal
injury or death arising out of the use of unauthorized
replacement parts. To locate your nearest Gravely Dealer,
go to www.gravely.com on the internet.
Vehicle Information
Model No. _________________
Date _________________
Serial No. _________________
Engine Serial No. _________________
DISCLAIMER
Gravely reserves the right to discontinue, make changes to,
and add improvements upon its products at any time without
public notice or obligation.The descriptions and
specifications contained in this manual were in effect at
printing. Equipment described within this manual may be
optional. Some illustrations may not be applicable to your
unit.
DEALER DELIVERY
Dealer should:
1. Check all controls for proper function.
2. Fill out Original Purchaser Registration Card and
return the card to Gravel y.
3. Explain Limited Warranty Policy.
4. Explain recommended lubrication and maintenance.
Advise customer on adjustments.
5. Instruct customer on controls and operation of unit.
Discuss and emphasize the Safety Precautions. Give
customer Owner/Operator, Parts, and Engine
Manuals. Advise customer to thoroughly read and
understand them.
GB-2
© Copyright 2010 Ariens Company

SAFETY
838-303C
Danger: Battery
SAFETY ALERTS
Look for these symbols to point out important
safety precautions. They mean:
Attention!
Personal Safety Is Involved!
Become Alert!
Obey The Message!
The safety alert symbols above and signal words below are
used on decals and in this manual.
Read and understand all safety messages.
DANGER: IMMINENTLY HAZARDOUS
SITUATION! If not avoided, WILL RESULT
in death or serious injury.
WARNING: POTENTIALLY HAZARDOUS
SITUATION! If not avoided, COULD
RESULT in death or serious injury.
CAUTION: POTENTIALLY HAZARDOUS
SITUATION! If not avoided, MAY RESUL T in
minor or moderate injury. It may also be
used to alert against unsafe practices.
NOTATIONS
NOTE: General reference information for proper operation
and maintenance practices.
IMPORTANT: S pecific procedures or information required to
prevent damage to unit or attachment.
PRACTICES AND LAWS
Practice usual and customary safe working precautions, for
the benefit of yourself and others. Understand and follow all
safety messages. Be alert to unsafe conditions and the
possibility of minor, moderate, or serious injury or death.
Learn applicable rules and laws in your area, including those
that may restrict the age of the operator.
REQUIRED OPERATOR TRAINING
Original purchaser of this unit was instructed by the seller on
safe and proper operation. If unit is to be used by someone
other than original purchaser; loaned, rented or sold,
ALWAYS provide this manual and any needed safety
training before operation.
SAFETY DECALS AND LOCATIONS
ALWAYS replace missing or damaged Safety Decals. Refer
to figures below for Safety Decal locations.
1. Keep all safety decals clean and legible.
2. Replace all damaged or missing decals. Order new
safety decals through your Gravely dealer.
3. Some new equipment installed during repair requires
safety labels to be affixed to the replaced component
as specified by Gravely. When ordering new parts or
components, also request corresponding safety
decals.
4. Refer to this section for proper label placement. Install
new decals a s follows
• Clean area on which decal is to be placed.
• Spray soapy water on the surface where decal is to be
placed.
• Peel backing from decal. Press firmly on surface, being
careful not to cause air bubbles under decal.
• Squeeze out air bubbles with edge of a credit card.
GB - 3
24691
818-543C
Danger: Guard Missing
838-629C
Warning: Pinch Point or Crushing Hazard
24697
838-532C
Warning: Cab Rollover Protection
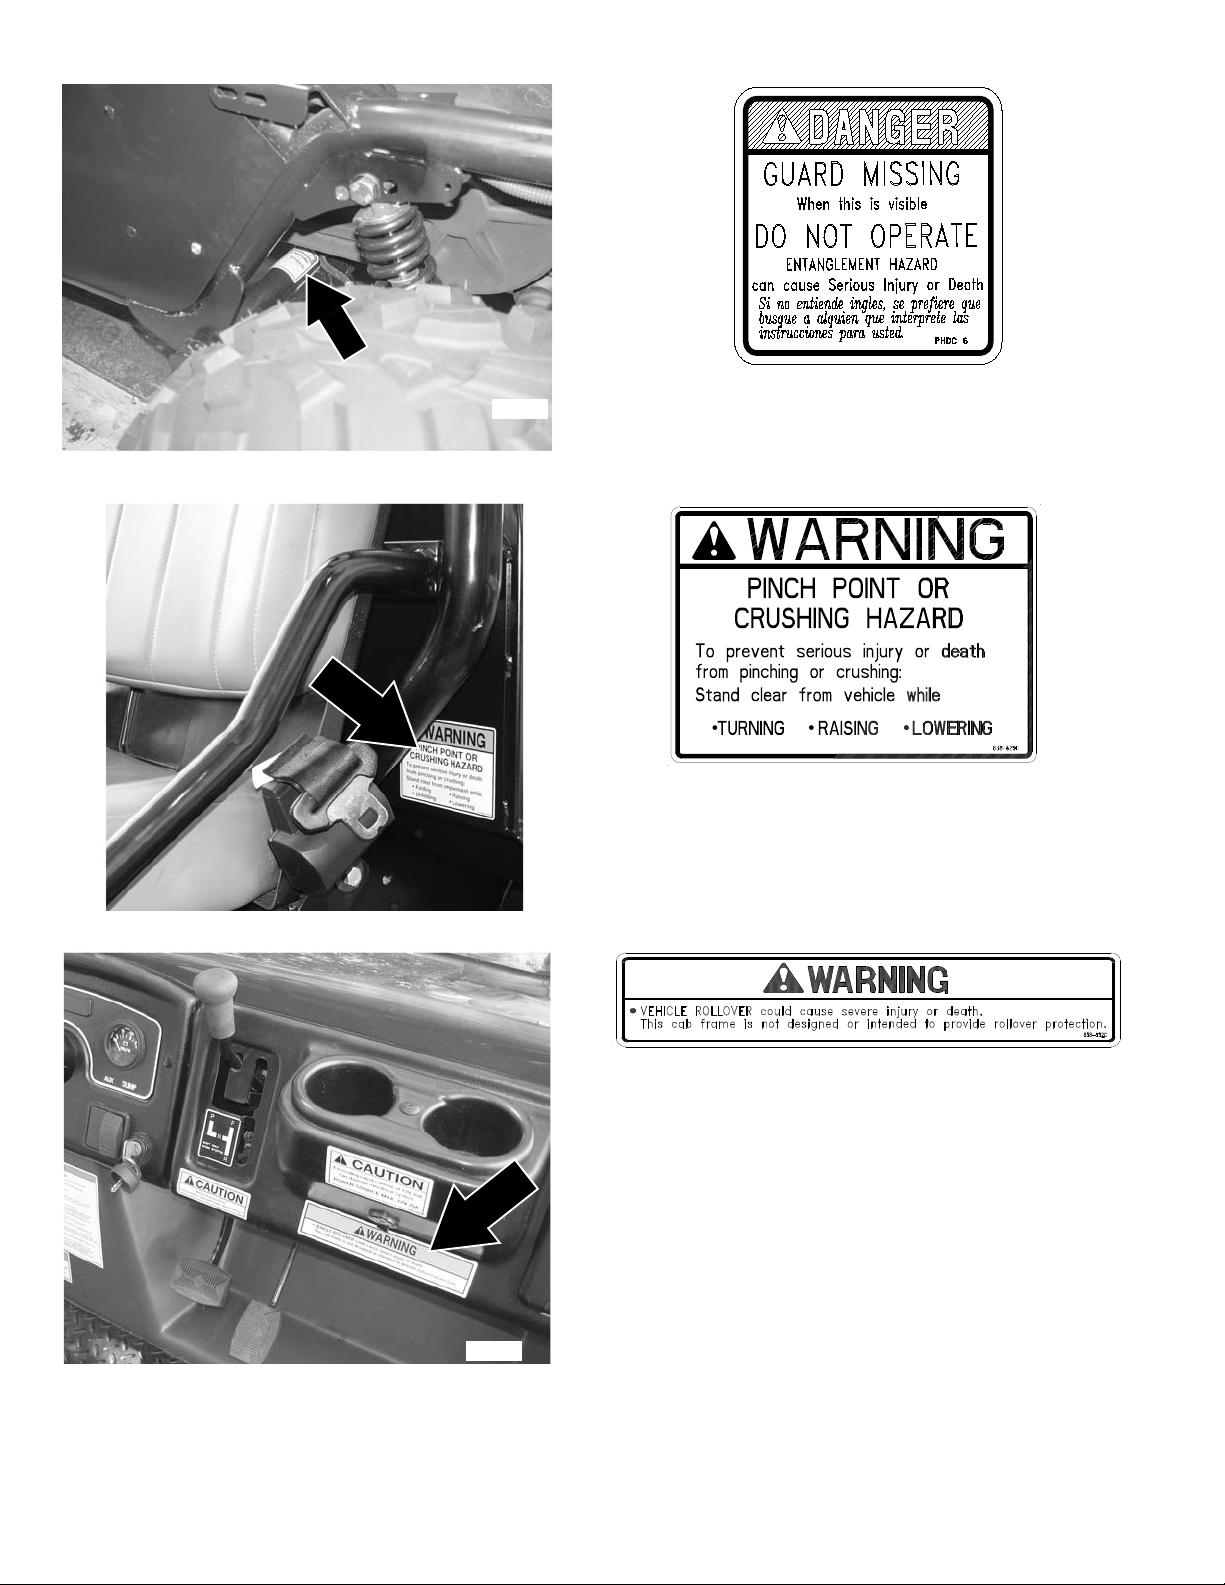
GB-4
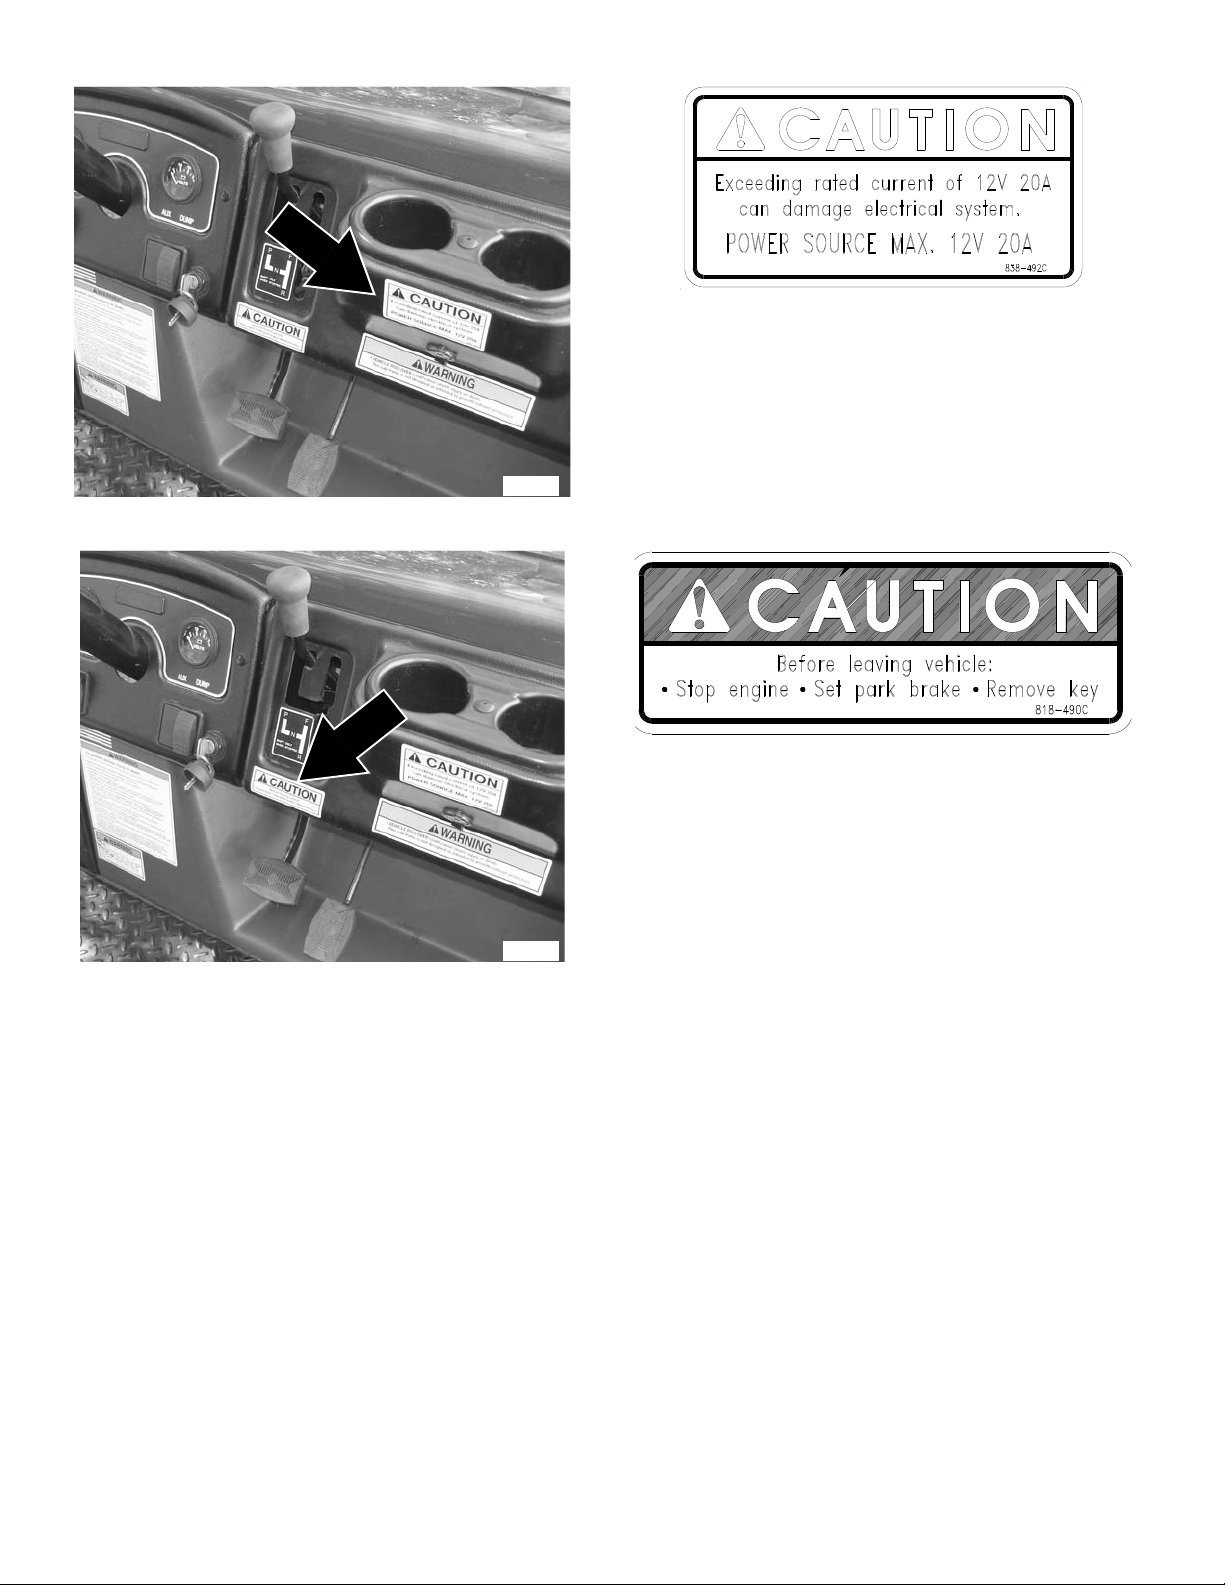
24697
838-492C
Caution: Maximum Power Source
24697
838-490C
Caution: Stop Engine
GB - 5
24694
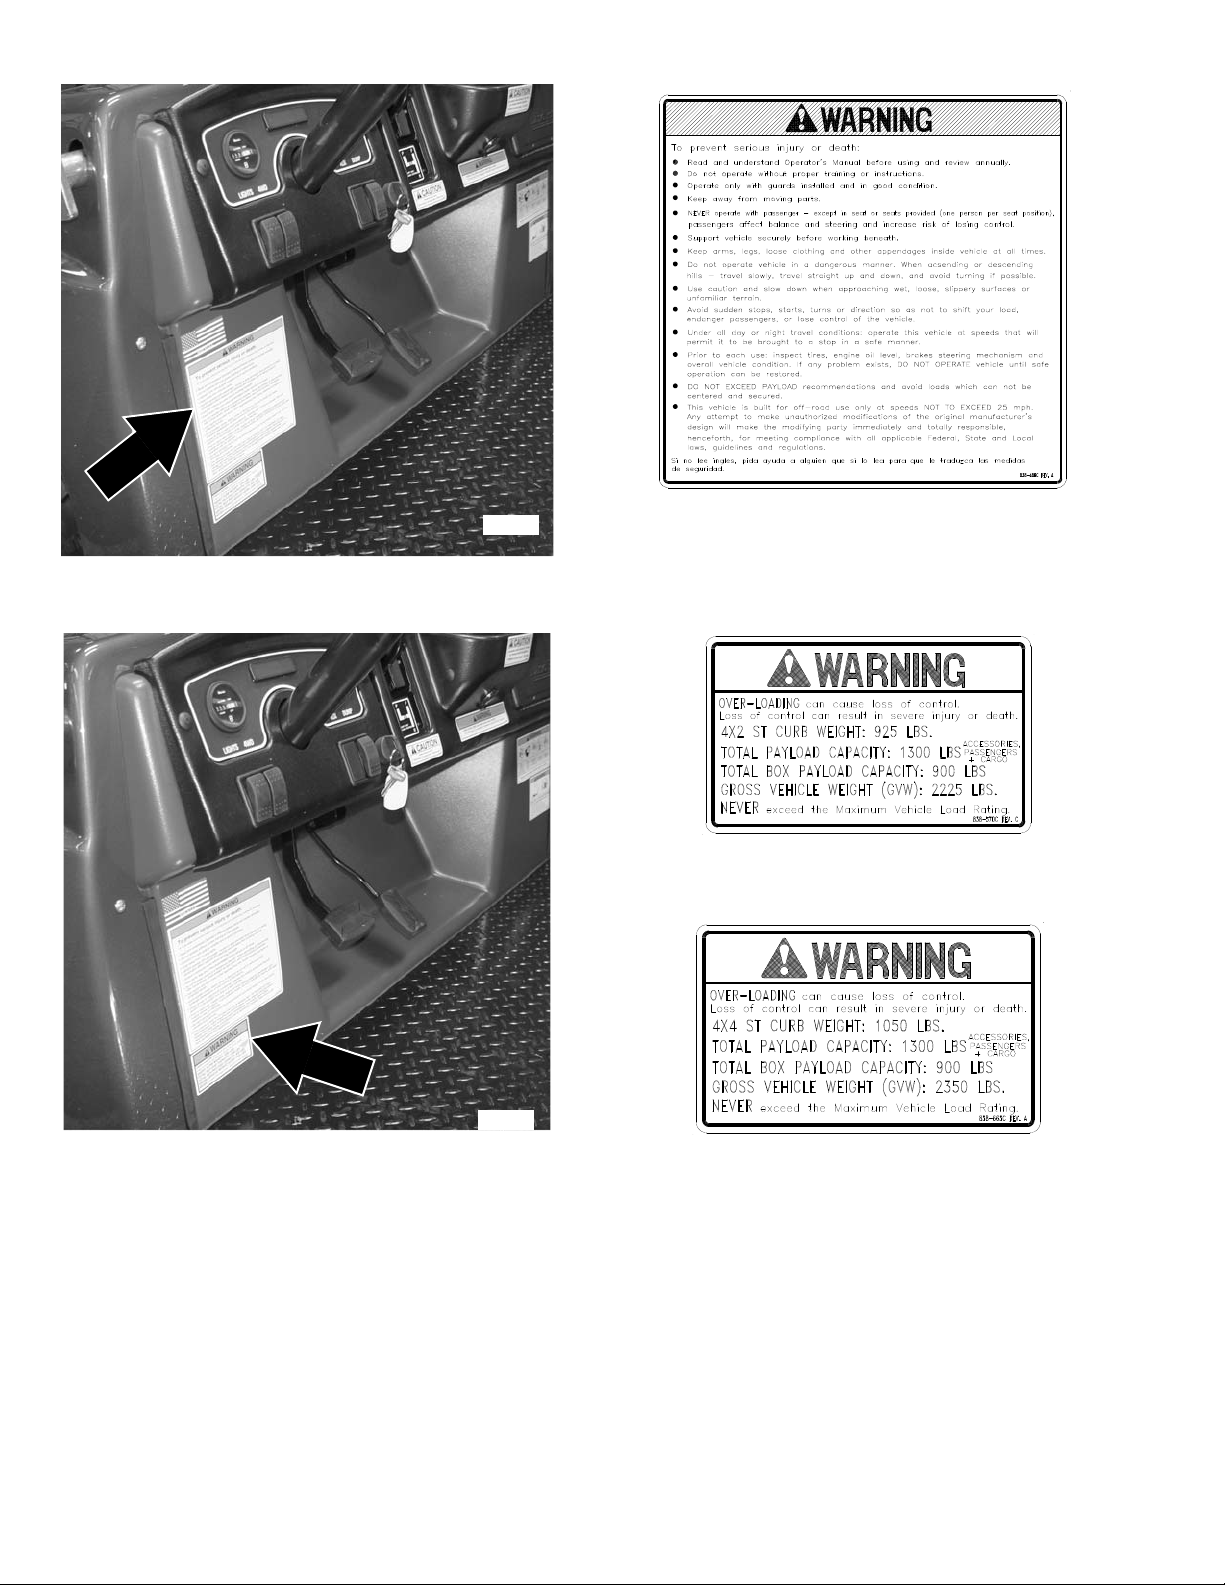
838-486C
Warning: General Utility Vehicle
24694
838-570C
Vehicle Loading Capacities, 4 x 2 Series
838-663C
Vehicle Loading Capacities, 4 x 4 Series
GB-6
21147
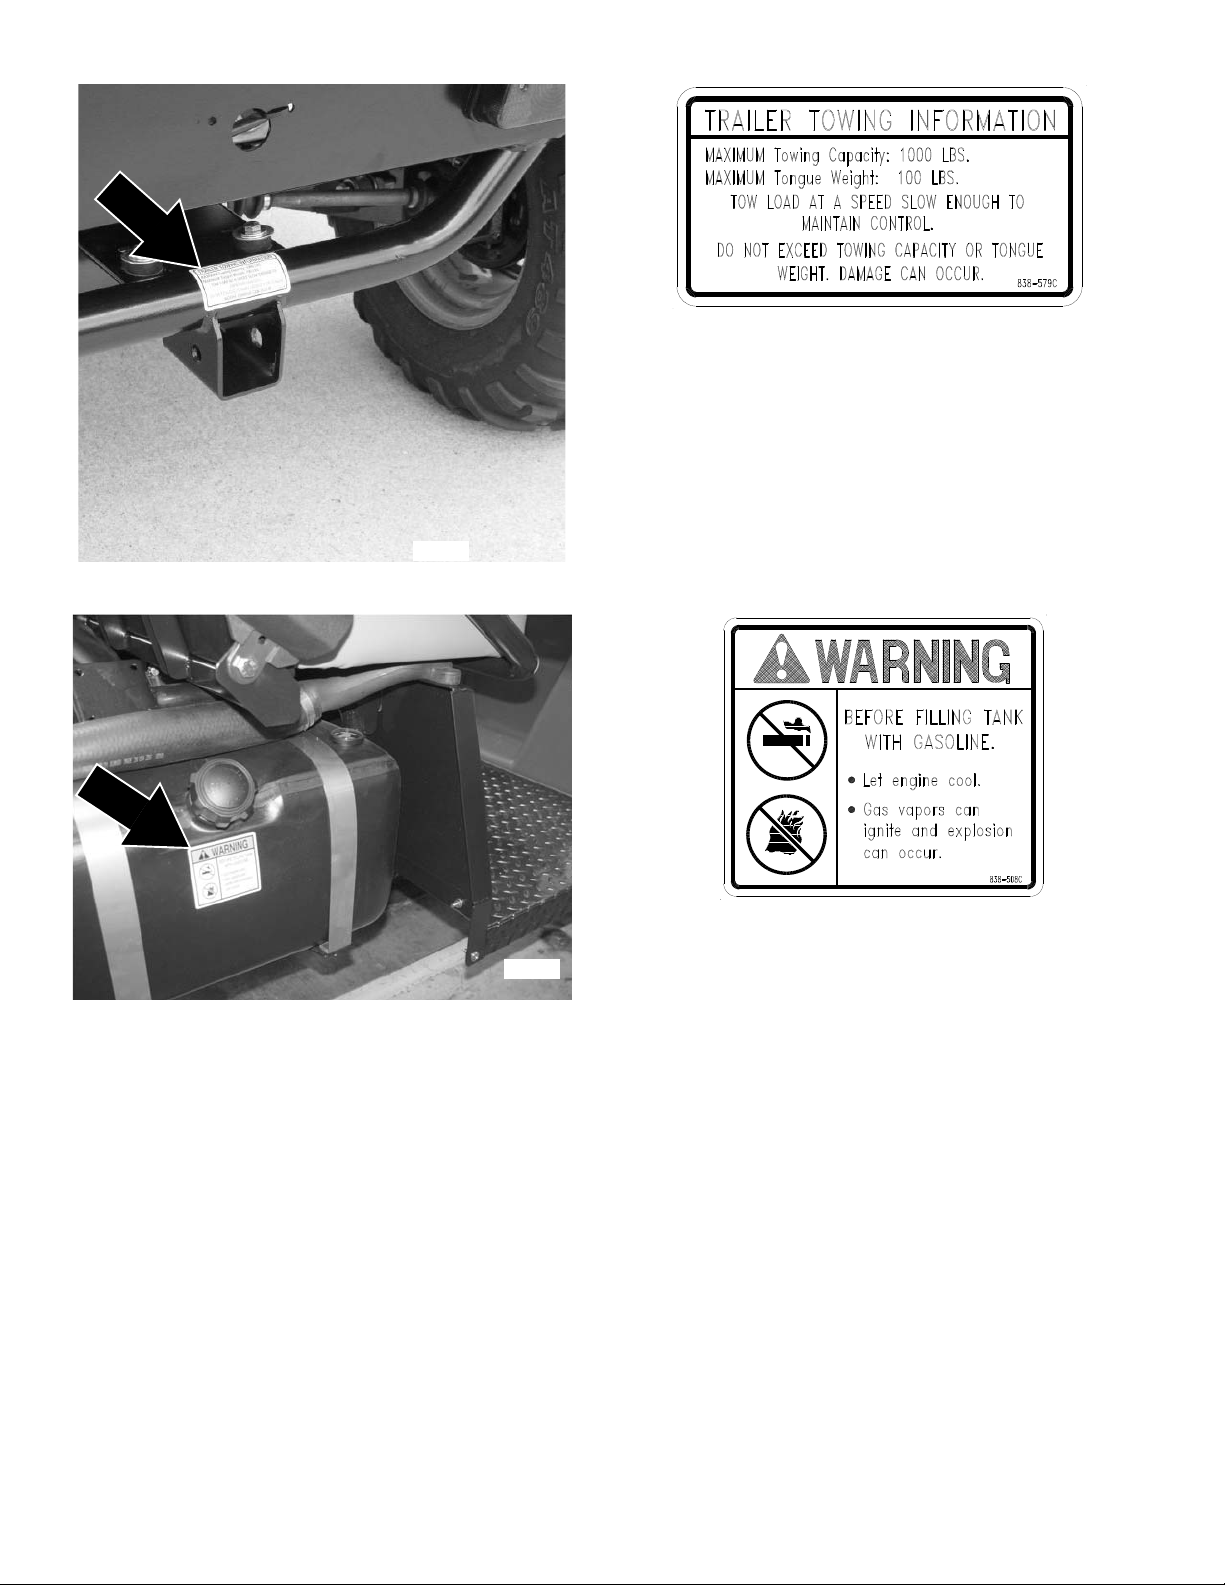
838-579C
Trailer Towing Information
24735
838-508C
Warning: Before Filling Tank with Gasoline
GB - 7

23535
838-491C
Warning: Improper Use
23535
838-489C
Warning: Rollover Hazard
GB-8
General Safety
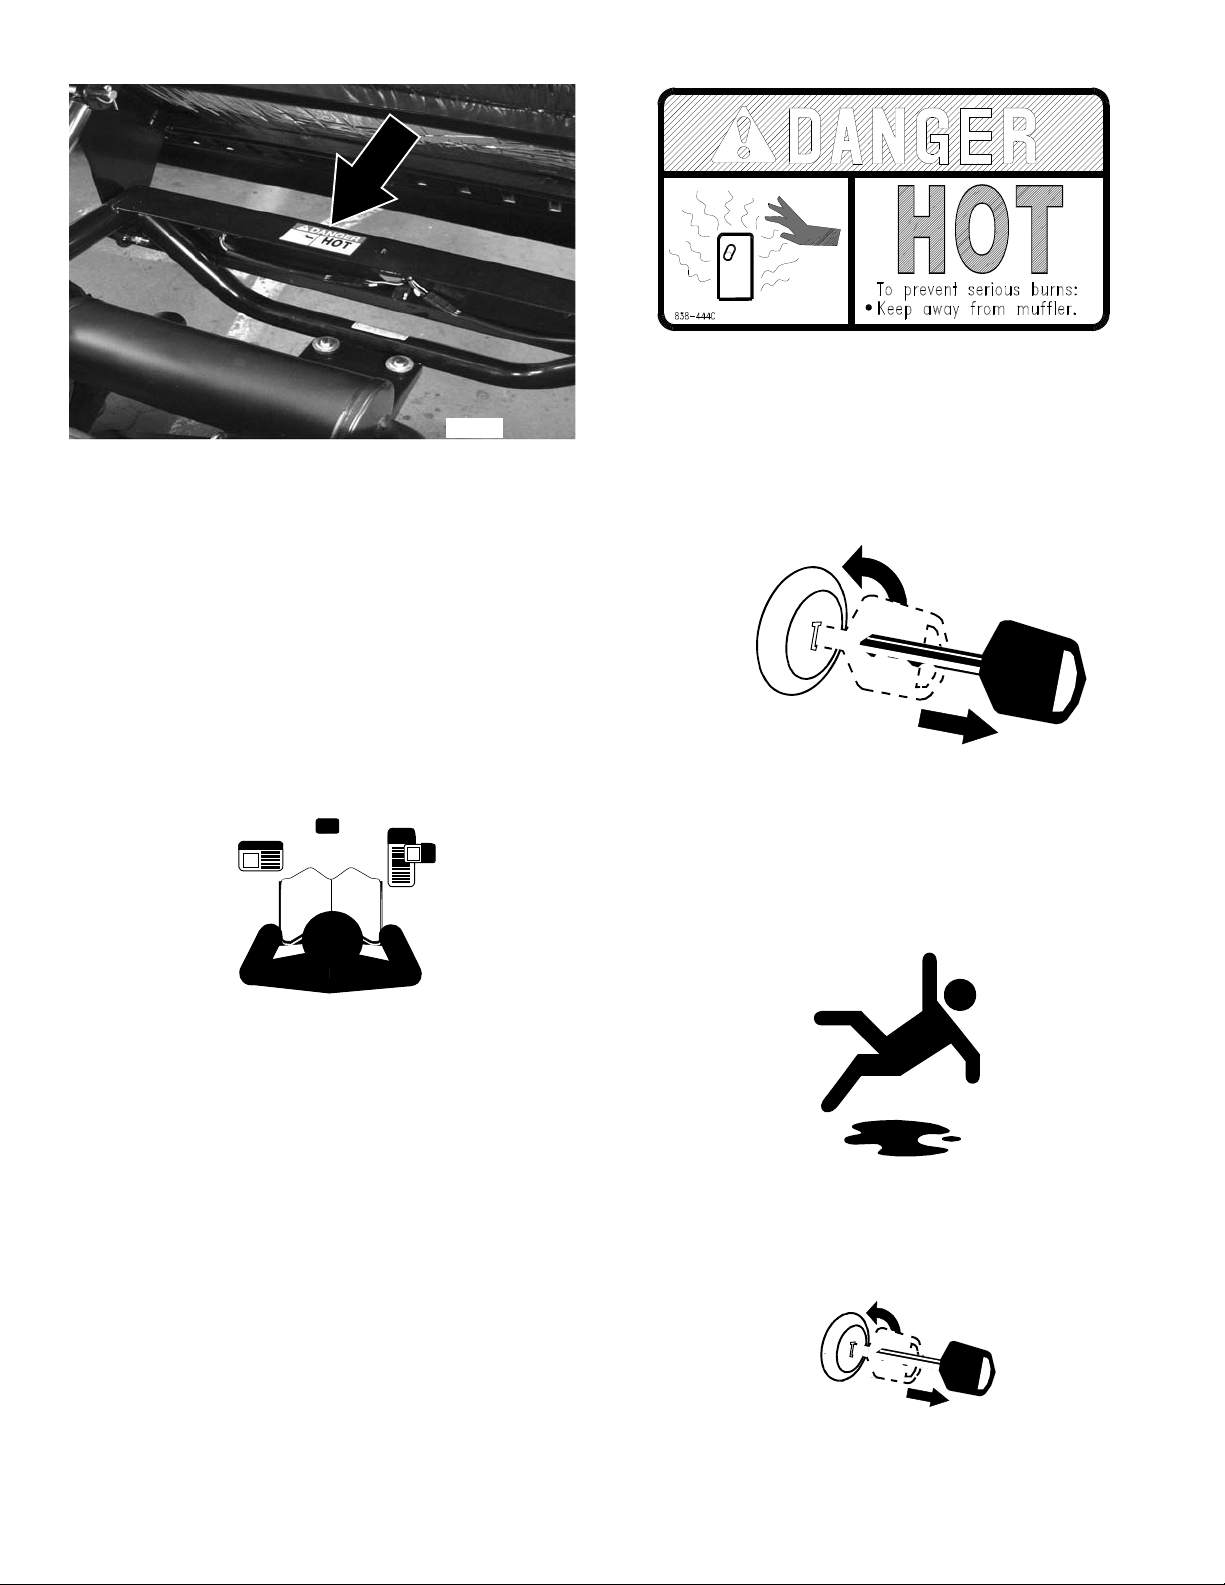
24695
838-444C
Danger: Muffler hot
OFF
OFF
For Your Protection
• Thoroughly read and understand the instructions given
in this manual before operation. Refer to the “Safety
Label” section, read all instructions noted on the
decals.
• Do not allow anyone to operate this equipment who
has not fully read and comprehended this manual and
who has not been properly trained in the safe
operation of the equipment.
Before Operating
• This Treker Light Utility Vehicle is not to be driven on
public roads.
• Do not operate this vehicle under the influence of
alcohol or drugs.
• Always inspect the vehicle before operating it. See
"Pre-Start Check List" on page 14.
• Do not operate this machine unless all safety shields
are in place and all badly worn, broken or missing parts
have been properly replaced.
• Wear appropriate protective gear and clothing such as
safety helmet, goggles, gloves, coveralls, etc., when
conditions warrant.
• No driver under age of 16.
Practice Safe Maintenance
• Understand procedure before doing work. Use proper
tools and equipment. Refer to this manual for
additional information.
• Work in a clean, dry area.
• Place the vehicle in neutral, set parking brake, turn off
engine and remove key before performing
maintenance. Chock wheels if you must perform
maintenance on a slope.
GB - 9
• Make sure all moving parts have stopped and all
911
system pressure is relieved.
• Allow the engine to cool completely.
• Disconnect battery ground cable (-) before servicing or
adjusting electrical systems or before welding.
• Inspect all parts. Make sure parts are in good condition
and installed properly.
• Remove build-up of grease, oil or debris.
• Remove all tools and unused parts from the Treker
before operation.
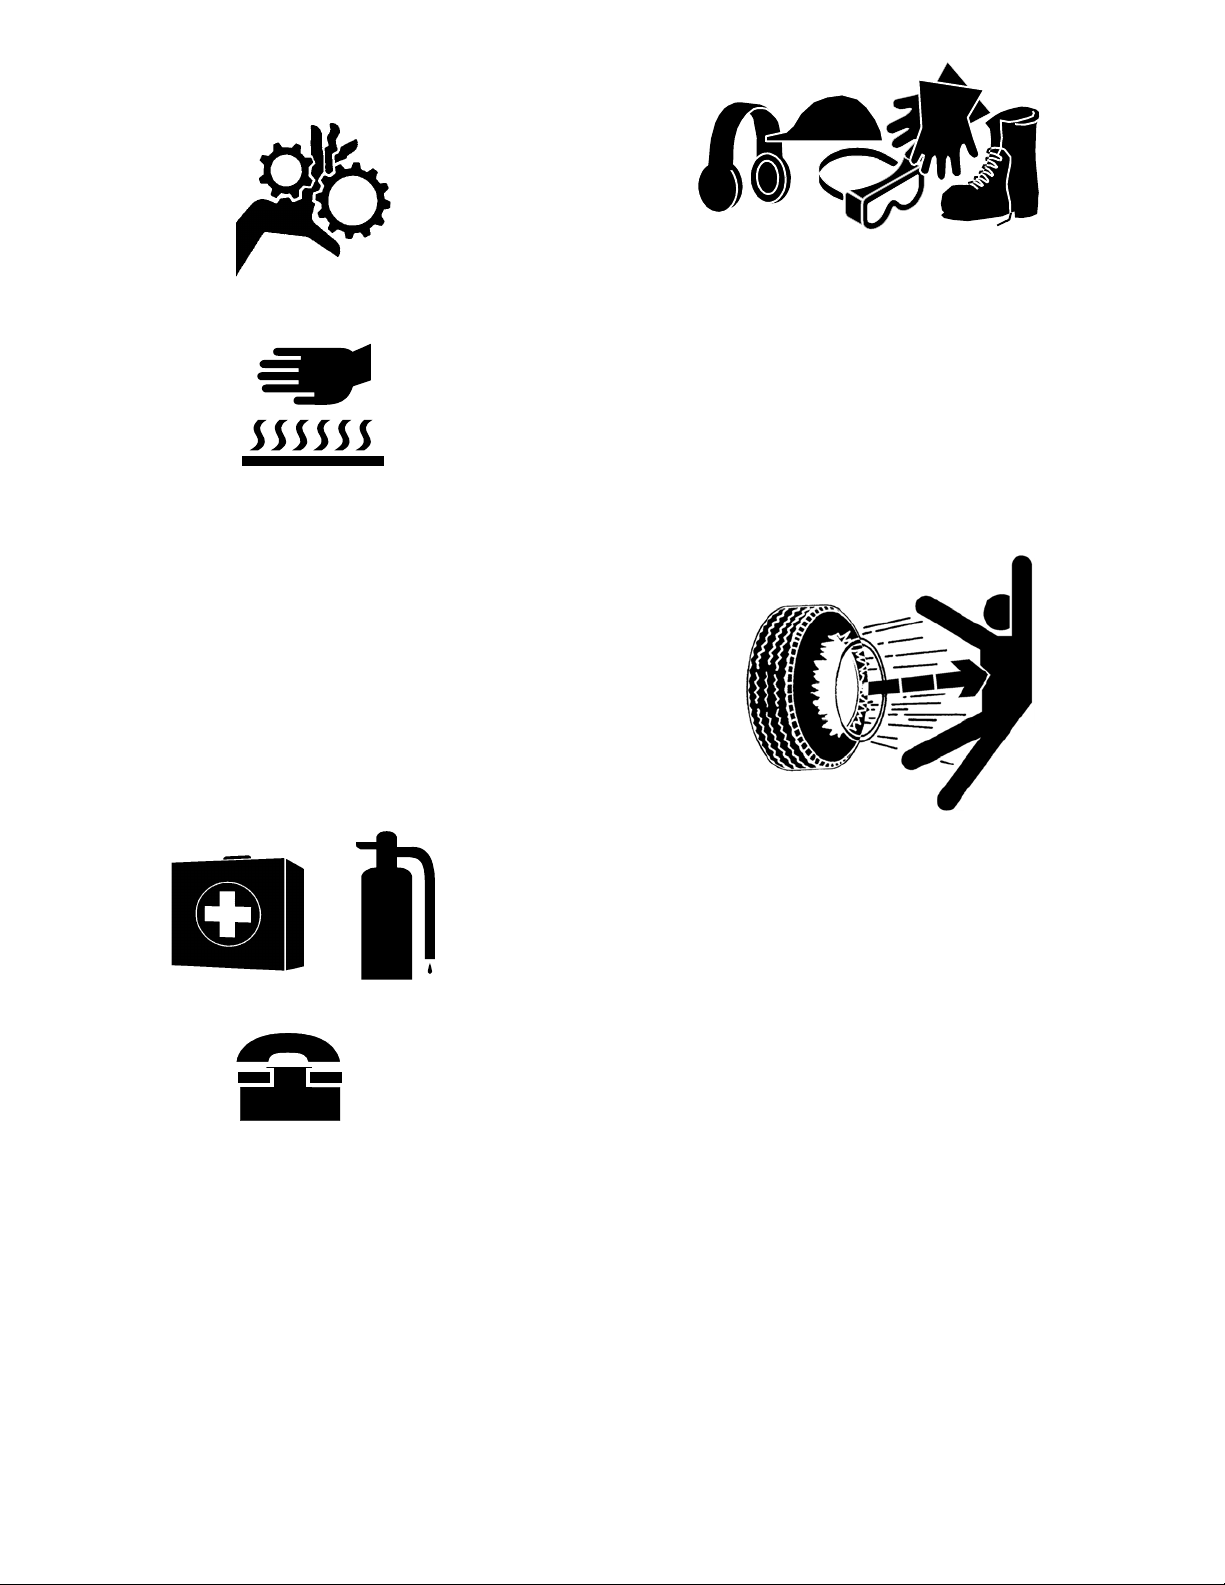
Tire Safety
Tire changing can be dangerous and should be performed
by trained personnel using correct tools and equipment.
• When inflating tires, use a clip-on chuck and extension
hose long enough for you to stand to one side–not in
front of or over tire assembly. Use a safety cage if
available.
• When removing and installing wheels, use
wheel-handling equipment adequate for weight
involved.
Prepare for Emergencies
• Be prepared if a fire starts.
• Keep a first aid kit and fire extinguisher handy.
• Keep emergency numbers for doctor, ambulance,
hospital and fire department near phone.
Wear Protective Equipment
• Wear protective clothing and equipment.
• Wear clothing and equipment appropriate for the job.
Avoid loose-fitting clothing.
• Because prolonged exposure to loud noise can cause
hearing impairment or hearing loss, it is best to wear
suitable hearing protection such as earmuffs or
earplugs.
• Because operating equipment safely requires your full
attention, avoid wearing radio headphones while
operating machinery.
• It is the discretion of the operator and passenger to
wear Seat Belts when available.
Safe Operating Procedures
The safe operation of any machinery is an important
concern to all consumers. Your Treker has been designed
with many built-in safety features. However, no one should
operate this vehicle before carefully reading this Operator’s
Manual. Also read all instructions noted on the safety
decals.
Personal Safety
• Be familiar with all functions of this vehicle.
• Do not allow anyone to operate this vehicle who has
not fully read and comprehended this manual and who
has not been properly trained in the safe operation of
this vehicle.
• Do not operate vehicle while drinking or under the
influence of alcohol or drugs.
• Do not allow anyone under 16 years of age to operate
this vehicle even under adult supervision.
• Do not run engine indoors except when starting engine
and transporting attachment in or out of a building.
Carbon monoxide gas is colorless, odorless and
deadly.
• Operator must always use both hands on the steering
wheel.
GB-10

• Keep all bystanders away from this vehicle during
operation. Keep children out of the operating area and
under the watchful eye of another responsible adult.
• Riders may, without knowing it, place their foot on the
accelerator pedal while bracing themselves against a
rough ride. This makes it impossible to slow down the
vehicle until the passenger removes his foot from the
pedal. Inform passenger to keep his foot off the
accelerator and always slow down before the ride gets
rough.
• Operator and passenger are responsible for deciding if
their situation warrants using seat belts if so equipped.
• No riders are allowed except in factory designed and
supplied seating and no more than one person in a
bucket seat and three people in a bench seat. Do not
use cargo bed for carrying people. Maximum vehicle
occupancy including driver is one person per seat
position.
• Operate vehicle from driver’s seat only.
• Do not leave vehicle unattended with engine running.
• Do not dismount a moving vehicle as serious injury or
death could occur.
• Wear snug-fitting clothing to avoid entanglement with
moving parts.
• Keep hands, feet, long hair, clothing and jewelry away
from moving parts and obvious pinch points to avoid
getting caught.
• Keep hands, arms, feet and all bodily appendages
safely inside the confines of the vehicle. Always be
aware of and avoid tree limbs and brush that have a
potential of hitting and/or poking individuals riding the
vehicle. Serious body harm could result.
• Some conditions may warrant extra safety gear to be
worn such as safety helmets and/or goggles.
• Do not touch engine, engine exhaust pipe and/or
muffler while they are hot.
• Avoid pinch point hazards. Cargo bed and seat
platform hinge creating pinch points.
• Battery fumes are explosive. A spark will ignite battery
fumes. Wear a face shield when charging or jumping a
battery. Follow all battery safety rules outlined in this
manual.
• Avoid battery acid spills. Do not get battery acid on
eyes, face, or other body parts. Flush eyes and other
body parts immediately with water for at least 15
minutes if battery acid has gotten on them.
• When refueling use a UL approved nonmetallic
container that has no screen or filter. Set container on
the ground before fueling to eliminate static discharge
and do not use Methanol fuel.
• Do not smoke or use electrical devices including cell
phones while refueling.
• Support this vehicle securely before working beneath.
Chock wheels to prevent vehicle from rolling.
Mechanical Safety
• Do not operate a vehicle with damaged or worn parts.
Repair all damages and worn parts before putting
vehicle back in t o service.
• Never attempt to make any adjustments while engine
is running or hot. Keep clear of all rotating parts.
• Make sure engine surface, cooling fins and fan screen
are clean of all debris including dirt, trash and oil.
• Always operate vehicle with drive belt enclosure
installed. Do not leave pulleys and belts exposed.
• Never modify any parts on the vehicle without
authorization. Unauthorized modifications will void
warranty to all parts directly and indirectly affected by
the modification.
• Do not use cargo tail gate as a seat.
• Do not use cargo bed as a working platform.
• The power lift is designed to dump cargo only. Do not
use it to lift other objects.
• Never attempt “wheelies”, jumps, or other stunts.
Never drive recklessly. Always operate your vehicle at
a safe speed that will allow you to maintain control.
• Do not use vehicle as an anchor device.
• Do not mount a receiver hitch type carrier platform to
the vehicle.
• Front bumper, brush guards and cargo box are not
designed as pusher bars. Do not attempt to push other
vehicles or implements or damage may resul t.
• Always maintain proper tire inflation. See Tire
Maintenance on page 25.
• Always disconnect negative battery terminal before
making adjustments to vehicle electrical system or
welding on this vehicle.
• Always check wheel lug nut torque values two hours
after initial operation and two hours after each tire
repair or replacement. Routinely check lug nut torque
every 100 hours of operation. See Wheel Lug Nuts on
page 24.
• Do not shift trans-axle unless this vehicle is fully
stopped and engine is at idle or damage may occur.
• Keep safety decals clean of dirt and grime.
• Replace all missing, illegible, or damaged safety
decals. See list of safety decals in this manual.
Transpor ting Safety
Most accidents with off road vehicles occur when traveling
up, down, or across the face of a slope. Refer to operation
instructions and safety video for proper operation
procedures.
• Use extreme caution when driv in g throu gh dry gra ss ,
brush and other fire hazard materials. Never stop or
park over combustible materials. Keep grass and
brush from collecting on and around engine and
muffler parts.
GB - 11

• Be aware of cargo shifting when stopping or moving.
Make sure all cargo is properly secured and tied down.
Injury could result from loos e ca rg o.
• Avoid sudden stops, starts and turns.
• Always make sure vehicle pathway is clear of all
objects when backing up. Know location of persons
around vehicle and especiall y locati on of sma ll
children. Take extra precautions when rear view is
hindered by cargo.
• Do not attach an implement, trailer or other device to
the hitch that will produce negative tongue weight.
• Reduce speed and payload on hilly, rough, wet, slick or
unstable ground.
• Reduce speed when loaded with cargo. Heavy cargo
load takes longer to stop.
• Always make tu rns at a s peed that will ma inta in contr ol
of vehicle. Never make turns at full speed. Reduce
speed when turning empty and reduce speed even
more when turning loaded. The heavier the cargo load,
the slower the turn should be.
• The 4-post accessory bar is not a certified ROPS (Roll
Over Protection System). Always avoid roll-overs.
• Do not load 4-post accessory bar with heavy
equipment. Rollover could result from such loading.
• Always park on level ground, stop engine, set park
brake (See Shift Selector and Park Brake on page 16)
and remove ignition key before leaving vehicle. Chock
tires if condition warrants.
• Use extreme caution when cresting hills, approaching
blind corners, shrubs, trees or other obstructions that
might limit visibility. Proceed slowly until you are sure
trail conditions immediately ahead are safe. Use extra
care when approaching obstructions that might hide
children.
• Be especially observant of operating area and terrain.
Watch for holes, rocks, or other hidden hazards. Do
not operate vehicle near the edge of drop-offs or
banks.
• Keep front wheels straight when cresting hills or going
over bumps.
• Do not stop, start suddenly or over accelerate on hills.
Loss of control and rollover could result.
• Use extreme caution when descending hills, running
on loose slippery surfaces, or when towing at
maximum capacity. Towing, braking and tractive
capabilities are greatly diminished.
• Avoid changing direction or making sharp steering
corrections on slopes or rollover may occur.
• If this vehicle begins to tip when crossing a slope, turn
front wheels downhill to regain stability and control.
• Do not operate vehicle on slopes over 15
o
.
• When crossing a slope on soft terrain, turn front
wheels slightly uphill and maintain a constant speed to
maintain a straight line of travel.
• When descending hills or slopes apply steady
pressure to the foot brake to avoid potential of
freewheeling or runaway.
• Never allow vehicle to coast or free wheel in neutral or
loss of control ma y result.
• If your vehicle loses power and stops on a hill,
immediately engage foot brake and back slowly down
the hill maintaining a straight downhill line of travel. Do
not attempt to turn vehicle sideways on the hill or a
rollover could result.
• Never operate vehicle without good visibility and
lighting. When traveling at night always use your
headlights and reduce speed according to visibility, trail
and terrain conditions.
• Do not operate this vehicle on highways, public roads,
or where it may be a hazard to faster moving traffic.
• Exercise extreme caution when operating on or
crossing a gravel drive, walks, or roads. Stay alert for
hidden hazards or traffic.
• Avoid water crossings when possible and never cross
a body of water where depth is unknown. Loss of
power will occur if drive belt becomes submerged or
wet. Unnecessary crossing of streams and waterways
erodes shore line and damages water-born habitat. If
you must cross, do it at a point where banks are not
steep and proceed at a slow and steady speed. Do not
travel in water that is higher than the bottom wheel lug
nuts. Water higher than the bottom wheel lug nut can
damage the brake system and get the drive belt wet
stalling the vehicle. However, intermittent stream
crossings where depth of water briefly comes into
contact with bottom of floorboards is acceptable. See
Going Out on the Trail on page 21.
• Never use vehicle for racing and never modify engine
to exceed 25 MPH vehicle speed.
Towing Safety
• Follow all towing instructions in this manual when
towing the Treker behind another vehicle. Do not tow
the vehicle faster than 25 MPH. See Towing Safety on
page 12.
• Beware, tow ropes, cables and chains can break when
pulling another vehicle or object causing serious injury
or death to anyone in line with the whipping action
created when they break. Never jerk when pulling,
always ease into a pull gently. Always stay clear of tow
line. Never be in line with tow line.
Safe Load Capacities
See Vehicle Specifications on page 44.
• Do not exceed total payload capacity of this vehicle.
• Do not pull a trailer or implement exceeding maximum
towing capacity and/or maximum tongue weight.
Loss of control may result.
• Do not exceed front cargo rack carrying capacity.
• Do not exceed rear cargo box payload capacity.
GB-12

CONTROLS AND FEATURES
4 x 2 & 4 x 4 Series
Features Benefits
Subaru OHV V-Twin Engine For Proven Powe r & Dep en dabil it y.
25 MPH Top Speed Able to go from job site to job site at a reasonable speed.
4-Wheeled Independent Suspension For Soft Ride & Excellent Stability.
Rack & Pinion
Automotiv e Type Steering
4- Post Accessory Bar Offers Accessory Mounting Capabi lities & Added Protection from Limbs &
9 1/2" Minimum Ground Clearance For Traversing Rough Terrain.
1,300 lb. Total Payload For Maximum Carg o and Gear Haul ing Ca pabilit ie s.
4-Wheeled Auto mo tiv e Styl e Br akin g For Maximum Stopping Power & Con trol .
Constantly Variable Transmission For Rapid Respons e & Easy Shi ftin g.
Large Open Operator’s Platform For Maximum Operator & Passenger Comfort.
8-Gallon Fuel Tank For Extended Operating Range.
58” Overall Width at Rear Tires For Maximum Stability.
Cargo Box with Power Lift For added convenien ce an d maxi mum pro duc tivit y.
Full Bench Seat More Spacious Seating.
Wide Range Of Accessories To Meet Individual Cu stome r Need s.
Enclosed CVT For enhanced stream crossing capability.
Auto-Lock Differential For maximum traction capability.
Overrunning Clutch For environmental fr ie ndl y trac ti on an d ea sy ha ndl in g.
Seat Belts For extra measure of saf et y.
Heavy Duty Brush Guard For added body protection.
Front Receiver
(With Heavy Duty Brush Guard)
High Mounted Air Intake For enhanced stream crossing capability.
Dash Mounted Cup Holders For added conveni ence.
Locking Deep Well Glove Box For added security an d co nve nie nce.
Dash Mounted Shifter
with Integral Park Brake
Removable Cargo Box Sides For added versatil it y.
Warranty One year against manuf actur in g de fects.
For Easy Handling & Quick Response.
Branches.
For added versatil it y.
For added conveni ence.
Two years manufacturer’s engine warranty.
GB - 13

OPERATION
WARNING: AVOID INJURY. Read and
understand the entire Safety section before
proceeding.
SAFETY FIRST
Gravely is fully aware of the need for safe operating
procedures around all of our equipment. We hope you will
make a sincere effort to put safety above all other priorities.
The Treker utility vehicles are designed and built for work,
recreation and enjoyment; however, improper and
irresponsible operation could result in serious injury or
death. Since this is an off-road vehicle, operators will seldom
see road safety and warning signs they are accustomed to
seeing on highways and public streets. This places
additional responsibility on the driver to operate this vehicle
well within safe operational limits and capabilities of the unit.
This manual has been prepared to instruct you in the safe
and responsible operation of your Treker. Please read and
abide by all safety alert information about this vehicle. If you
do not understand any part of this manual, contact your local
dealer for additional information and clarification. As the
operator of this piece of equipment, you are in complete
control. Only you can prevent an accident from happening!
Operator Responsibilities
WARNING: It is the operator’s responsibility to
have read this manual thoroughly and to know
how to operate this vehicle safely in all
situations. See General Safety on page 9.
• Step on foot brake to make sure there is plenty of
pedal and that brakes hold pressure and do not bleed
off. Add brake fluid as indicated in Brake Fluid on
page 37 and bleed brakes if required.
• Check park brake to make sure it will engage, hold and
release.
• Check steering by executing a full lock to lock turn in
each direction.
• Check to make sure neutral start feature is working by
trying to start unit with the shift selector located in
forward and reverse positions. (Unit should not start.)
• Check engine oil level at the dipstick. Add oil as
indicated in Engine Oil on page 34 if oil is at or below
the add mark on the dipstick. Do not overfill or plug
fouling will occur.
• Check differential oil level at the differential oil plug.
Add gear lube as indicated in Case Oil on page 35.
• Check fuel level to make sure there is at least 1/8 of a
tank of gas prior to performing initial starting
operations.
• Check air intake filtering system. Clean or replace
filtering system per instructions for Engine Air Filter
Maintenance on page 30 and CVT Snorkel Filter
Maintenance on page 32.
• Make sure low engine idle speed is set between 1250
and 1350 rpm and that maximum engine static speed
does not exceed 3800 rpm. Modifying or adjusting
carburetor to increase vehicle speed above factory
set specification is a safety violation and could
void the wa rranty.
Pre-Start Check List
• Lubricate vehicle as indicated in LUBRICATION on
page 34.
• Make sure engine cooling fan screen is clean of all
debris including dirt, trash and oil. Also, make sure
engine surface and cooling fins are clean. See Engine
Maintenance on page 29.
• Make sure exhaust system is clean of all dirt, trash and
oil. Check spark arrester every 100 hours to make sure
it is clean and in good working condition. See Exhaust
System on page 32.
• Check tire pressure as indicated in the See Tire
Inflation Chart on page 25.
• Make sure wheel lug bolts/nuts are tightened to
73 ft-lbs (99 N•m).
• All nuts, bolts, screws and fasteners should be
checked. See Torque Values Chart on page 45.
• Turn on headlights to make sure battery has a charge
and electrical lighting circui t is working.
• Check tail lights and brake lights.
General Operation
DANGER: Avoid injury or death from
entanglement in the rotating drive belt. All
shields must be in place and secure when
operating. Keep all persons aw ay from rotatin g
drive line.
To start the Treker, follow the starting procedures displayed
at the gearshift lever and as noted below.
IMPORTANT: The brake pedal needs to be pressed to start
the Treker engine. The unit can start in any gear position,
but the brake pedal needs to be pressed. Whenever
possible, start the engine with the shift lever in Park or
Neutral to prevent unintended vehicle motion.
1. Press the brake pedal.
2. Pull choke fully out and hold when engine is cold.
3. Turn ignition key fully clockwise and hold until engine
starts.
4. Release ignition key to run position and choke to
normal operating position immediately after engine
starts.
GB-14
5. Turn ignition key counterclockwise to stop engine.
1 2
6
24696
3
54
3
2
4
1
24693
Operating a Treker is as easy as operating a car with an
automatic transmission. A simple forward and reverse shifter
provides direction control. A manual choke control under the
seat assists in quick cold weather starting. The infinitely
variable torque converter drive system means there is no
clutching. Shift into either forward or reverse when the
vehicle is stopped and step on the throttle pedal to go at
speeds up to 25 mph. Never shift while vehicle is moving.
The brake pedal needs to be pressed to start the engine.
Braking is accomplished by simply pressing the brake pedal
located on the floorboard. This activates the rear hydraulic
drum brakes and front hydraulic disc brakes. The park brake
is incorporated in the shift selector. A dash mounted park
brake indicator light will remain on until park brake is
disengaged.
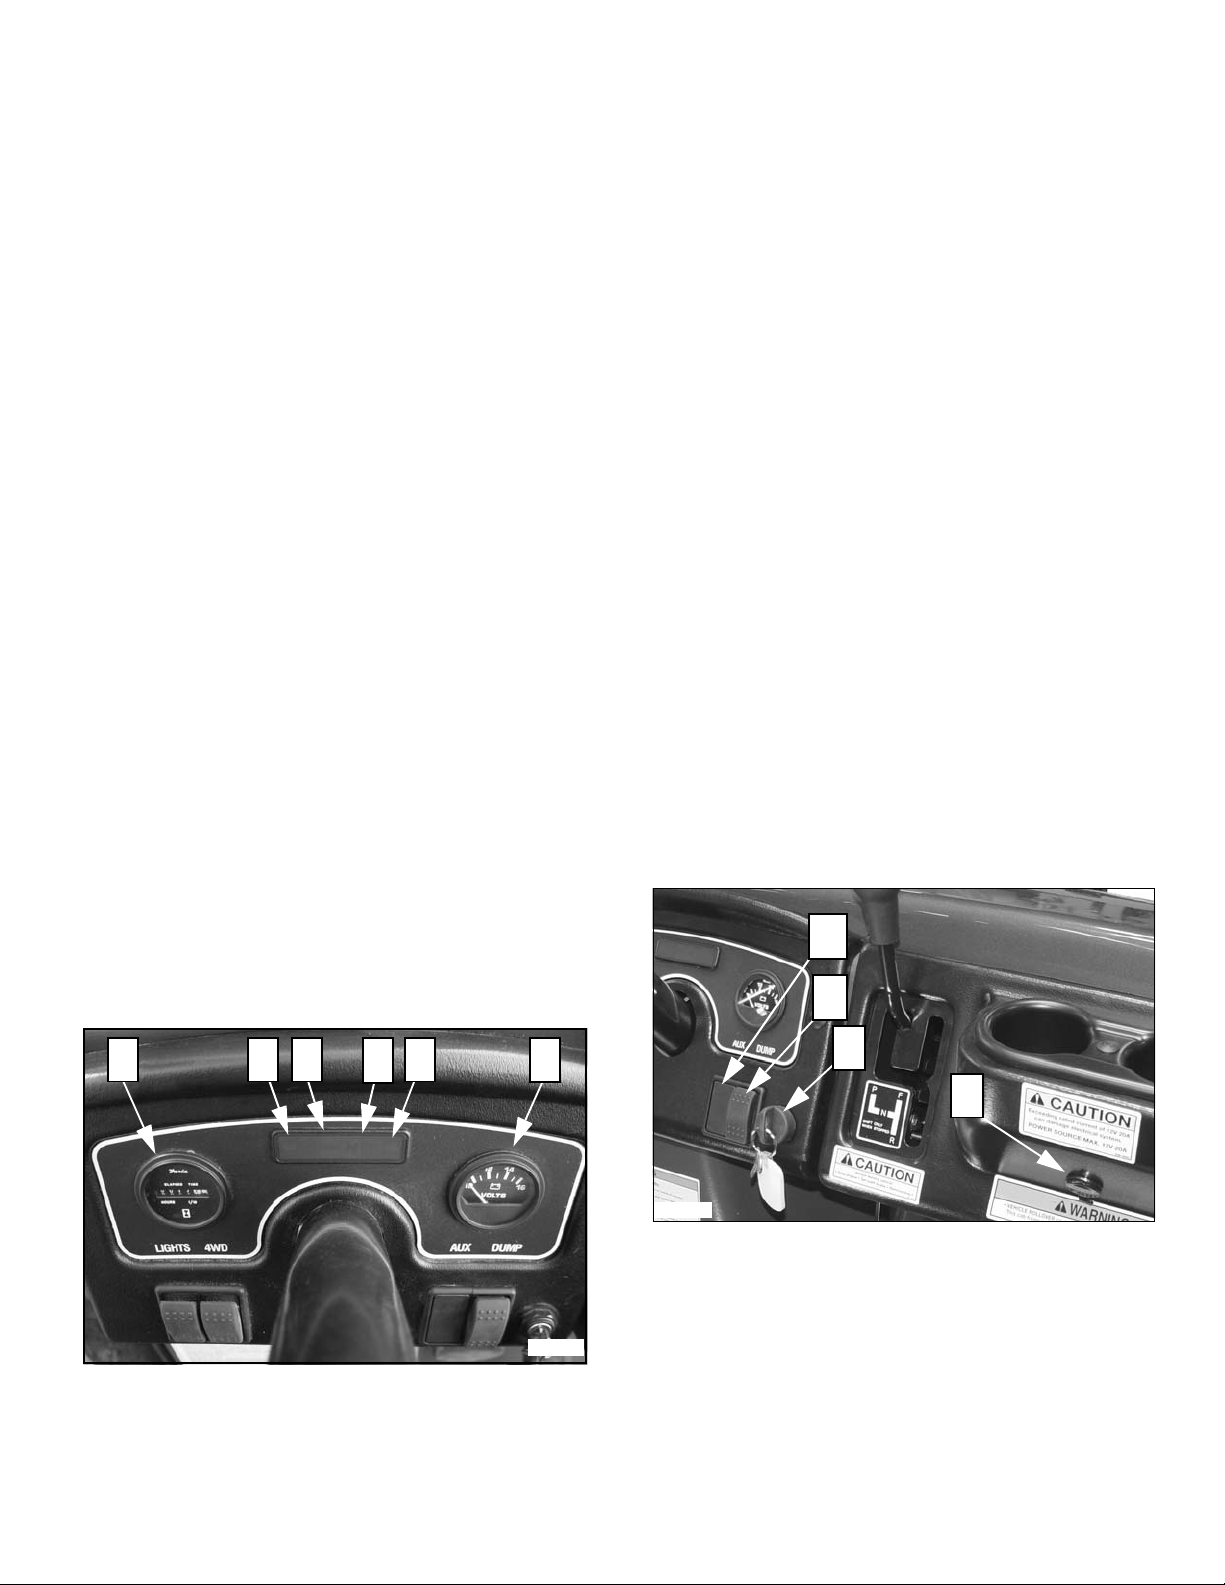
Indicating Lights and Gauges
Refer to Figure 2:
1. Hour Meter: Indicates number of hours, to the nearest
1/10 of an hour, the vehicle has run.
2. Park Brake Light: Indicates park brake is on when
illuminated. Do not move vehicle with park brake light
on. See note below.
3. 4-Wheel Drive Light: Indicates 4-wheel drive is
activated when illuminated.
4. Neutral Light: Indicates shift selector is in neutral
when illuminated.
5. Oil Light: Indicates low oil pressure when illuminated.
Stop engine immediately. Check oil level and add if
low. See your authorized Gravely dealer if oil light
stays on and engine is full of oil. It is normal for the oil
light to come on whenever the ignition switch is turned
on and will stay on until engine is running.
6. Volt Meter: Indicates battery is charging. Check
battery if volt meter registers a charge that is lower
than normal. See your authorized Gravely dealer if
battery is good and volt meter still registers low charge.
Switches
Refer to Figure 3 and Figure 4:
1. Power Plug Outlet: Located on the dash is a power
plug outlet for connecting 12 volt accessories such as
a cell phone or light.
2. Ignition Switch: Starts and stops engine. Vertical
position is off. Turn switch key clockwise to start
engine. See General Operation on page 14 for correct
vehicle starting procedures.
3. Dump Switch: An electric cylinder raises and lowers
the cargo box. Press top of switch and hold to raise
cargo box. Press bottom of switch and hold to lower
cargo box. Release switch at any position to stop
cargo box. Release switch immediately if Power Bed
Lift Cylinder makes a ratchet noise.
IMPORTANT: The Power Bed Lift is protected by an internal
clutch in both directions and will make a loud “ratchet” noise
indicating end of travel has been reached or Power Bed Lift
is overloaded. Release switch immediately when this noise
is heard.
4. Auxiliary Switch Slot: 12 volt on/off accessory with
switch may be installed at this location.
5. Light Switch: Turns on head and tail lights. Press top
of switch to turn on lights and bottom of switch to turn
off lights.
6. 4-Wheel Drive Switch: Engages the 4-wheel drive
system. Press top of switch to engage 4-wheel drive
and bottom of switch to disengage 4-wheel drive. The
4-wheel drive system should be used only when
required to get through a difficult situation.
NOTE: 4x4 drive should not be engaged at transport speed
or on hard surface roads.
Figure 3
Figure 2
GB - 15
 Loading...