

Gravely 810, 812, 818T, 816S, 816T Owner's Manual
®
GRAVELY
READ THIS MANUAL BEFORE ATTEMPTING
TO
OPERATE THE EQUIPMENT.
OWNER'S MANUAL
OPERATOR'S INSTRUCTION
800
SERIES
Form No. 22454 (9-77)
Printed in USA.
BrentChalmers.com

BrentChalmers.com
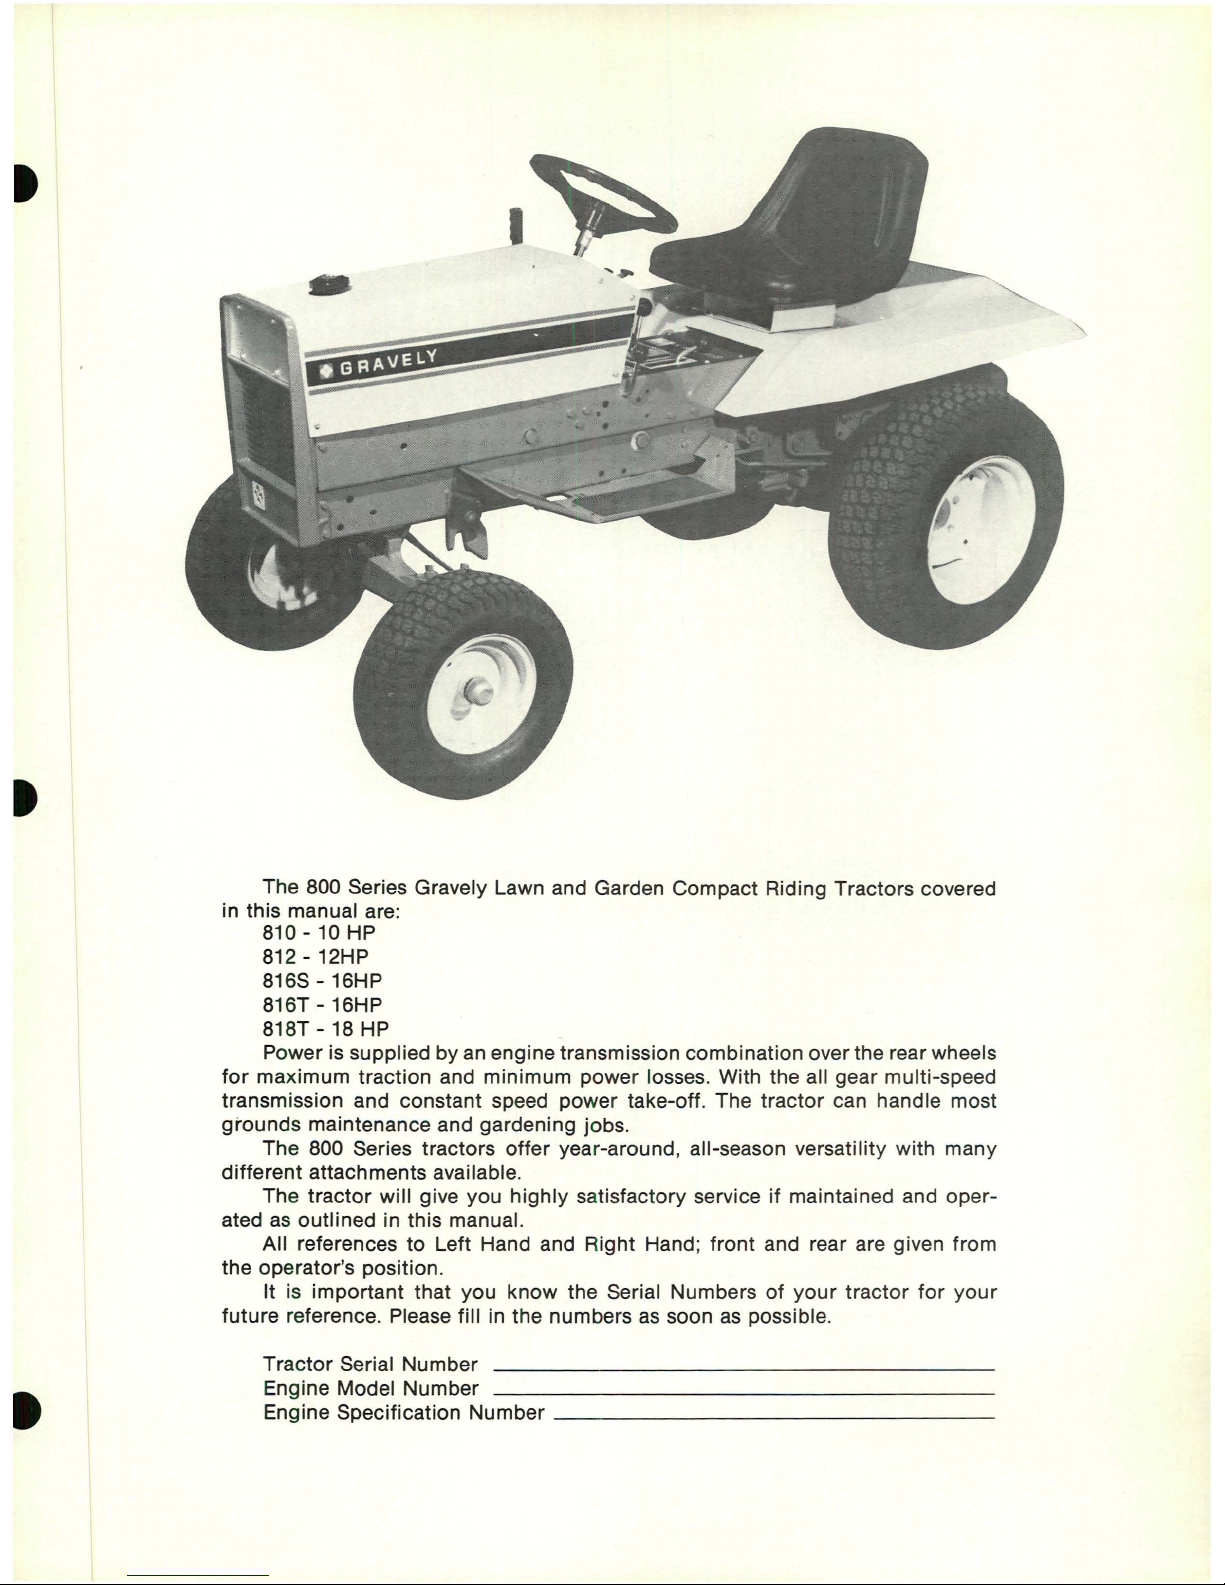
The 800 Series Gravely Lawn and Garden
Compact
Riding Tractors covered
in this manual are:
810 - 10 HP
812-12HP
816S - 16HP
816T - 16HP
818T - 18 HP
Power is supplied
by
an enginetransmission combination over the rear wheels
for
maximum
traction and
minimum
power losses. With the all gear multi-speed
transmission and constant speed
power
take-off. The
tractor
can handle most
grounds
maintenance and gardening jobs.
The 800 Series tractors
offer
year-around, all-season versatility with many
different
attachments available.
The
tractor
will
give you
highly
satisfactory service if maintained and
oper-
atedasoutlined
in this manual.
All references
to
Left Hand and Right Hand;
front
and rear are given
from
the operator's position.
It is
important
that you
know
the Serial Numbersofyour
tractor
for
your
future
reference. Please fill in the numbersassoon as possible.
Tractor
Serial
Number
Engine Model
Number
Engine Specification
Number
_
BrentChalmers.com
KNOW THE GRAVELY
Read this manual carefully and understand howtooperate and maintain
The
Tractor
before attempting
to
use it. The Tractor has been designed and
built
to
traditionally
high standards for which it is famous. With proper operation and
maintenance The
Tractor
will
perform
for
many years to come.
Before actually using The
Tractor
with
an
implement (after reading
and
un-
derstanding
this
manual)
spend some time with ittoget the feel and confidence
of
what The
Tractor
can do. Practice starting, turning, backing, changing direc-
tions, gear changes, stopping, etc. Knowing how
to
use The
Tractoristhe largest
partofgetting the
job
done.
It is very important that the SAFETY PRECAUTIONS be read, understood
and adhered to. Remeber, Safety First!
ABOUT THE WARflANTY
The Gravelyisdesigned and
built
for longevity. To maintain warranty, it is
the owners responsibilitytohave it operated and maintainedasoutlined in this
manual. A failure duetolackofmaintenanceorimproper useisnot covered
by
warranty.
Itisthe natureofmachines to "wear out". A failure duetoa defect usual-
ly
shows up early in the lifeofa machine. When The Tractor is in the warranty
period, the manufacturerormanufacturer's authorized representative will decide
whether a partisdefectiveorworn-out.
(The warranty statement appears in the back of this manual)
CONTENTS
INTRODUCTION 2
SAFETY OPERATING PRACTICES 3
CONTROLS 5
OPERATION 8
SERVICE INTERVALS 9
MAINTENANCE
&ADJUSTMENTS
10
STORAGE
17
TROUBLE SHOOTING · 17
SPECIFICATIONS
18
EQUIPMENT CHARTS
·.··
19
2
BrentChalmers.com
SAFETY OPERATING PRACTICES
I
Since the
tractor
is seldom used
without
powering
some
typeofequipment, these precautions are also
directed towards the operation
of
that
equipment.
Improper
use
of
the
tractor
and its attachments
may result in damage
to
the machinery
and/or
injury
to the operator. Practice these safety precautions
and pay attention
to
the
job
being done.
TRAINING
1.
Read this manual and the attachment manuals.
Be
thoroughly
familiar with the controls and
proper use
of
the equipment. Know
howtostop
the
unit
and disengage the controls quickly.
2.
Never
allow
childrentooperate the equipment.
Never
allow
adultstooperate equipment
without
proper
instructions.
3.
Keep area
of
operation clear of all persons,
especially small children and pets. Never direct
the attachment discharge toward bystanders
or
allow
anyone in
frontofthe unit.
PREPARATION
1.
Thoroughly
inspect the
work
area where the
equipment is
to
be used and remove all stones,
glass, metal, bones, sticks, wires and any
other
foreign objects. Stay alert
for
holes and
other
hidden hazards.
2.
Before attempting
to
start the engine, the
PTa
must be in the
OUT
position and the Direction
Control lever in Neutral
to
engage the interlock
switches.
3.
Do
not
put
handsorfeet nearorunder rotating
parts.
4.
Never operate the machine
without
good
visibil-
ity and light.
5.
Do
not
wear loose
fitting
clothingoraccessories
that
might
get
caught
in moving partsoron the
controls. Keep hands, feet, hair, clothing, etc.,
away from moving parts. Wear eye protection.
6.
Never attempt
to
make any adjustments while
engine
is
running (except where specifically rec-
ommended
by
the manufacturer).
7.
Handle fuel with care, it is
highly
flammable.
(A) Do
not
smoke while handling fuel.
(B) Use approved fuel container.
(C) Never add fuel
to
a running engine
or
hot
engine.
3
(D) Fill fuel tank
outdoors
with extreme care.
Never fill fuel tank indoors.
(E) Replace gasoline cap securely and wipe
spilled fuel from equipment.
OPERATION
1.
Operate the
tractor
only
from the operator's pos-
ition. Keep the feet on the
foot
rests.
2.
Before making any repairsoradjustments, STOP
the engine and put the
PTa
in the
OUT
position,
and set parking brake.
3.
When connected power equipment is
not
in use
or
is being transported, put the
PTa
in the
OUT
position.
4.
After striking a foreign object, STOP the engine
and put the
PTa
in the
OUT
position, and set
parking brake, before inspecting
for
damage.
Any
damage must be repaired before restarting
the equipment.
5.
Exercise caution, especially when operating in
reverse.
6.
Use care when pulling loads
or
using heavy
equipment.
(A) Use
only
the hitch connection pointsasde-
scribed in the manual.
(B) Limit loads
to
those that can
be
safely
con-
trolled.
(C) Do
not
make sharp turns especially when
backing
to
avoid jackknifing.
(D) Use auxiliary weight when suggested in the
attachment manual.
7.
Do
not
operate equipment except
from
proper
operator's position.
8.
Keep safety devices and shields in at all times.
9.
Do
not
allow
passengers
to
accompany
the
operator at any time.
10.
Disengage
PTa
before crossing a gravel drive,
walks
or
roads. Stay alert
for
hidden hazards
or
traffic.
11.
Use extreme caution when operating on slopes.
Reduce speed on all slopes and sharp turns
to
prevent
tipping
overorlossofcontrol.
12.
Before cleaning, repairing,
or
inspecting, make
certain all moving parts have stopped. Remove
the key and disconnect the spark plug wire
to
prevent accidental starting.
BrentChalmers.com
13.
If the unit should start
to
vibrate abnormally,
stop the engine, disengage the
PTa,
and check
for
the cause. Abnormal vibration is generally a
warning
of
trouble. If unabletolocate cause, call
your
service dealer.
14.
Never makeanattachment adjustment while engine is runningifthe operator must dismount to
do so.
15.
Take all possible precautions when parking
or
leaving the equipment unattended: STOP the
engine, remove the key, put the direction control
in neutral, and lower equipment.
16.
Do
not
run engine indoors, except when starting
engine and
for
transporting equipmentinor
out
of
building. Open outside
doorasexhaust fumes
are dangerous.
17. Never operate machine at high transport speeds
on slippery surfaces.
18.
Disengage the
tractor
PTa
when transporting
or
not
in use.
19.
Do
not
overload machine capacitybyattempting
to
operate equipment at
too
fast a rate.
20.
Use
only
attachments and accessories approved
by manufacturerofthe equipment. Unapproved
attachments can result in damagetothe equip-
mentorin personal injury.
21.
Be alert
for
traffic when nearorcrossing road-
ways.
22.
Do not startorstop suddenly when going up
or
down slopes. When mowing,
go
up and down
the face
of
slopes, never across. DO
NOT
mow
excessively steep slopes.
23.
When using the
tractor
with powered equipment,
never direct the discharge so astoendanger life
or
property
such
as
people, pets, structures,
cars, etc.
24.
Stay alert
for
holes in the terrain and
other
hid-
den hazards.
25.
Keep the equipment in good operating
condi-
tion, and keep safety devices in place.
26.
Do
not
change the engine governor settings
or
overspeed the engine.
4
MAINTENANCE AND STORAGE
1.
Keep all bolts, nuts, screws
tight
to
be sure
equipment is in safe working condition.
2.
Never store equipment with gasoline in the tank, t
inside a building where open flames
or
sparks
are present.
Allow
the engine
to
cool before
storing in any enclosure.
3.
Keep engine free of grass, leaves,ordebris,orexcessive grease to prevent overheating and possible fire hazard.
4.
Do not touch the mufflerorexhaust pipes until
they have had sufficient time to cool.
5.
Do not change the engine governor beyond
specified setting. (3600 RPM)
6.
Prevent accidental starting by removing the
spark plug wire from the spark plug. Remove the
key, and set parking brake when servicing the
tractor.
BrentChalmers.com
CONTROLS
DIRECTION CONTROL LEVER
• The Direction
Control
Lever operates the unique,
• instant Forward and Reverse clutches that give, you
instant forward
to
reverse
controlofthe tractor. DO
NOT
continuously
slip the clutch. MOVE THE
CON-
TROL
LEVER TO A FULLY ENGAGED POSITION AS
SOON AS POSSIBLE AFTER GETTING UNDERWAY.
The Directional
Control
lever is located on the
right
sideofthe tractor. See fig.
1.
PROCEDURE
1.
Push the lever forward (away from operator)
to
go
forward.
2.
Pull the lever back (toward the operator)
for
re-
verse.
3.
Neutral is a straight up and down (vertical) posi-
tion.
4.
The Direction
Control
must be in the Neutral
po,
sition before engine will start due to the ignition
interlock switch.
5.
The operationofthe service brake will return the
Control
to
Neutral. (See Brake) The Control
t requires routine maintenance lubrication.
BRAKE-SERVICE AND PARKING
The Brake pedal operates master brake on the
transmission. Brake requires adjustmenttomaintain
effective braking. Brake must be adjusted to return
Direction
Control
to
Neutral before braking action
begins. (See Maintenance)
SERVICE BRAKE
Figure 1
GEAR SELECTOR
Figure 2
I
Pushing on pedal will stop the tractor. Pedal dis-
engages and returns Direction Control to Neutral.
PARKING BRAKE
Stop-rod: Depress pedal and move stop-rod lever
back (toward operator). To release, depress pedal
and move stop-rod lever forward. See fig. 1
GEAR AND RANGE SELECTORS
The
controls
are used in combinationtogive you
eight
ground
speedstoselect from. Experiment
by
varying
ground
speedstofind the
optimum
speed
for
the
equipment
used. CAUTION: DO
NOT
ATTEMPT
TO SHIFT GEARS WHEN MOVING. DAMAGE WILL
RESULT. Always come
to
a complete stoptochange
range
and/or
gear. See fig
2.
5
RANGE SELECTOR
The
HI-LO
Range hasnodetented neutral position.
The
control
is either in HI
or
LO range. The Range
Selector
significantly
affects the
ground
speed
with-
out
affecting the PTO speedofthe power driven at-
tachment. See ground speed chart on page
18.
GEAR SELECTOR
The Gear Selector has
four
gearstochoose from.
The
"NEUTRAL"
position is the middleofthe
"H"
pattern.
PTO CONTROL
The PTO Control (power take-off) engages and
disengages the PTO clutch inside the transmission.
Follow all SAFETY PRECAUTIONS concerning the
PTO. See fig
2.
BrentChalmers.com
PROCEDURE
1.
PTO can be engaged at any engine speed.
(A)
Slowly
move control forwardtoengage.
"IN"
(B) Do
not
operate equipment until PTO is
fully
engaged and engine is at full throttle.
2.
Move
control
back toward
operatortodisengage
PTO.
3.
Control must be in
OUT
position before engine
will start due
to
ignition interlock.
4.
Control
requires maintenance
for
free-travel.
(See MAINTENANCE)
EQUIPMENT LIFT
The equipment
lift
provides a meansofraising
or
lowering front, center
or
rear mounted equipment.
Both HYDRAULIC and
MANUAL
LIFTS are located on
left side
of
tractor.
MANUAL
LIFT
1.
To
raise equipment, pull the lever towards
operator
untilitlocks. (Will
notgoback down).
2.
To lower equipment, pull back
slightly
and de-
press the button on top of lever, and push
for-
ward (away from operator). See fig
3.
MANUAL
LIFT POSITION LOCK
The Position Lock limits downward travel
of
lever
and can be adjusted
without
leaving operator's posi-
tion. See fig
3.
(A)
To
limit
downward travel, put the
Lift
Lever
in the raised position.
Liftupon the Position
Lock and at the same time,
pullout
towards
the operator.
II
Figure
3
(B)
To
put the equipment in the float position,
(follow ground contour) put the
Lift
Lever in
the raised position,
lift
up on the Position
Lock and at the same time push in.
HYDRAULIC LIFT
Basically the system is either on
or
off.
Only
use
enough pressure on the control
to
activate the sys-
tem. Increasing pressure on the control does
not
increase the speedorpowerofthe system. Laboring
on the
control
will
only
damage the linkage. Run the
engine at full throttle when using the hydraulic lift.
Equipmentcan be lowered
without
theenginerunning.
See
fig
4.
PROCEDURE
1.
To
raise, move control back until the equipment is
up. Release control
to
neutral.
2.
To lower, move control forward until equipment
lowers
to
the desired position. Release control to
neutral.
3.
To
"Float", push control
through
the
"lower"
position down
to
the "Float position. Control
will lock in "Float."
Figure 4
THROTTLE
Engine speed is controlled by the internal governor
at
any
throttle setting. Engine performance is best
at
full throtle. DO
NOT
exceed 3600 RPM.
A.
Full throttle: Push throttle control
up
and
away from operator.
B.
Slow
or
Stop: Pull throttle control down and
toward operator.
I
The throttle controlislocated on right sideofthe
Instrument Panel.
6
BrentChalmers.com
 Loading...