

Page 1

Best.-Nr. 6437
Order-No.6437
Rèf. No. 6437
BEDIENUNGSANLEITUNG
OPERATING MANUAL
INSTRUCTIONS D´UTILISATION
Li-Po charger 4
Mikroprozessorgesteuertes Hochleistungsladegerät für bis zu 4 Lithium-Polymer
Zellen und einem maximalen Ladestrom von 3 A
Micro-processor controlled high-performance charger for up to
four Lithium-Polymer cells, maximum charge current 3 A
Chargeur piloté par micro-processeur pour la charge de jusqu’à 4 éléments
au Lithium-Polymer avec un courant de charge maximum de 3 A
Seite 2
page 6
page 10
G R A U P N E R GmbH & Co. KG D - 7 3 2 3 0 K I R C H H E I M / T E C K G E R M A N Y
Keine Haftung für Druckfehler! Änderungen vorbehalten!
08/04
Page 2

Allgemeine Sicherheitshinweise
Allgemeines
Um alle Eigenschaften Ihres neuen Ladegerätes
voll nutzen zu können, lesen Sie vor Inbetrieb
nahme, die nachfolgende Beschreibung vollständig und sorgfältig durch. Beachten Sie vor allem
die Warn- und Sicherheitshinweise. Diese Anlei
tung ist an einem sicheren Ort aufzubewahren
und einem nachfolgenden Benutzer des Ladege
räts unbedingt mit auszuhändigen.
Mit dem Li-Po charger 4 haben Sie ein ausge
reiftes Produkt mit überragenden Eigenschaf
ten erworben. Durch den Einsatz modernster
Halbleitertechnologie, gesteuert durch einen
leistungsfähigen RISC-Microprozessor werden
überragende Ladeeigenschaften, einfache Bedi
enbarkeit und optimale Zuverlässigkeit, erreicht
die normalerweise nur in deutlich teureren Gerä
ten zu finden sind.
Mit dem Li-Po charger 4 lassen sich bis zu vier
Lithium-Polymer Zellen laden.
Das Ladegerät erkennt automatisch, ob 1-3 Zel
len angeschlossen wird und errechnet die dazu
benötigten Ladeparameter selbst.
Sollten Sie 4 Lithium-Polymer Zellen laden, müssen Sie dies manuel einstellen, da die Vollauto
matik nur bis 3 Zellen möglich ist.
Hinweis
Es sind stets die Ladehinweise der Akkuhersteller zu beachten, sowie die Ladeströme und
Ladezeiten einzuhalten. Es dürfen nur Akkus
schnellgeladen werden, welche ausdrücklich für
diesen hohen Ladestrom geeignet sind!
Lithium-Polymer Zellen sind sehr empfindlich.
Daher dürfen diese nur unter Aufsicht während
des gesamten Ladevorgangs geladen werden.
Warn- und Sicherheitshinweise
• Das Ladegerät vor Staub, Feuchtigkeit,
Regen, Hitze (z. B. direkte Sonneneinstrah
lung) und Vibration schützen. Nur zur Verwen dung im Trockenen!
• Die Schlitze im Gehäuse dienen der Kühlung
des Geräts und dürfen nicht abgedeckt oder
verschlossen werden. Das Gerät muss zum
Laden frei aufgestellt sein, damit die Luft
ungehindert zirkulieren kann.
• Das Ladegerät ist für den Anschluss an
einer 12V Autobatterie oder an ein von
Graupner empfohlenes Netzteil geeignet.
Es dürfen keinerlei Veränderungen am Lade gerät durchgeführt werden.
• Das Ladegerät und die zu ladende Batterie
muss während des Betriebs auf einer nicht
brennbaren, hitzebeständigen und elektrisch
nicht leitenden Unterlage stehen! Niemals
direkt auf den Autositzen, Teppiche o. ä.
abstellen! Auch sind brennbare oder leicht
entzündliche Gegenstände von der Lade
anordnung fernzuhalten. Auf gute Belüftung
achten.
• Verbinden Sie das Ladegerät nur direkt
mit den Original-Anschlussleitungen und
den Anschlussklemmen direkt mit der Auto batterie. Der Motor des Kfz’s muss, solange
der Li-Po charger 4 mit dem Kfz in Verbin dung steht, abgestellt sein! Die Autobatterie
darf nicht gleichzeitig von einem anderen
Ladegerät aufgeladen werden!
• Die Ladeausgänge und die Anschlusskabel
bedürfen nicht verändert oder untereinander
in irgendeiner Weise verbunden werden
Zwischen den Ladeausgängen und der
Fahrzeug-Karosserie besteht beim Betrieb an
der Autobatterie Kurzschlussgefahr! Lade-
und Anschlusskabel dürfen während des
Betriebs nicht aufgewickelt sein! Vermeiden
Sie Kurzschlüsse mit dem Ladeausgang
bzw. dem Akku und der Autokarosserie auch
wenn der Li-Po charger 4 dagegen geschützt
ist. Stellen Sie deshalb das Gerät niemals
direkt auf die Fahrzeugkarosserie.
• Lassen Sie das Ladegerät niemals unbeauf
sichtigt an der Stromversorgung angeschlos
sen.
• Es darf nur ein zu ladender Akku an den
Ladeanschluss angeschlossen werden.
• Es dürfen nur Lithium-Polymer Zellen mit bis
zu 4 Zellen angeschlossen werden.
• Um Kurzschlüsse an den Krokodilklemmen
des Ladekabels zu vermeiden, verbinden
Sie bitte immer zuerst das Ladekabel mit dem
Ladegerät und dann erst mit dem Akku!
2 Sicherheitshinweise
Page 3

Vor dem Laden prüfen: Sind alle Verbindungen
einwandfrei, gibt es Wackelkontakte?
Bitte bedenken Sie, dass das Schnellladen
von Batterien gefährlich sein kann. Eine, wenn
auch nur kurze Unterbrechung aufgrund eines
Wackelkontakts führt unweigerlich zu Fehlfunktionen, kann einen erneuten Ladestart oder
zu einer falschen Zellenzahlerkennung führen
auslösen und den angeschlossenen Akku total
überladen.
Laden von Akkus
Beim Laden wird dem Akku eine bestimmte
Strommenge zugeführt, welche der Li-Po charger 4 automatisch zu dem angeschlossenem
Akku errechnet und während des gesamten
Ladevorgangs an den Akku anpasst.
Der maximale Ladestrom des Li-Po charger 4
ist 3 Ampere.
• Akkus dürfen nur unter Aufsicht geladen
werden!
• Akkus
NUR auf einem feuerfestem Unter
grund laden!
• Defekte oder aufgeblähte Lithium Zellen
dürfen auf keinen Fall erneut geladen werden!
• Der zu ladende Akku wird über den originalen
Stecker für GRAUPNER Lithium-Polymer
Zellen angeschlossen
• Achten Sie auf sicheren und guten Kontakt
aller Steck- und Klemmverbindungen. Eine
auch nur kurzzeitige Unterbrechung aufgrund
eines Wackelkontakts kann einen erneuten
Ladestart auslösen und den angeschlossenen
Akku u. U. total überladen.
Lithium-Polymer Zellen
Der Li-Po charger 4 ist nur zum Laden von Lithi
um-Polymer-Akkus mit einer Zellen Nennspannung von 3,7 V/Zelle geeignet.
Lithium-Akkus zeichnen sich vor allem durch
ihre, im Vergleich zu anderen Akkutypen,
wesentlich höhere Kapazität aus.
Dieser wesentliche Vorteil auf der einen Seite
erfordert jedoch andere Behandlungsmethoden
in Bezug auf die Ladung / Entladung sowie für
einen gefahrlosen Betrieb.
Betriebshinweise 3
Haftungsausschluss
Die Einhaltung der Betriebsanleitung sowie die
Bedingungen und Methoden bei Installation, Be
trieb, Verwendung und Wartung des Ladegerätes
können von der Fa. GRAUPNER nicht überwacht
werden. Daher übernimmt die Fa. GRAUPNER
keinerlei Haftung für Verluste, Schäden oder
Kosten, die sich aus fehlerhafter Verwendung
und Betrieb ergeben oder in irgendeiner Weise
damit zusammenhängen.
Die hier grundlegenden Vorschriften müssen
auf alle Fälle beachtet werden. Weitere entspre
chende Angaben und Sicherheitshinweise ent
nehmen sie bitte den technischen Angaben des
Akkuherstellers.
Prinzipiell können Akkus auf Lithiumbasis NUR
mit speziellen Ladegeräten geladen werden, die
auf den jeweiligen Akkutyp (Ladeschlussspannung, Kapazität) eingestellt sind.
Die Aufladung erfolgt anders als bei NiCd- oder
NiMH-Akkus durch eine sog. Konstantstrom/
Konstantspannungs-Methode. Der für die La
dung erforderliche Ladestrom ergibt sich aus
der Akkukapazität und wird vom Ladegerät
automatisch eingestellt. Lithiumakkus werden
gewöhnlich mit 1-2 C Ladestrom aufgeladen (1
C Ladestrom = Kapazitäts-Ladestrom. Beispiel:
bei einer Kapazität von z. B.: 1500 mAh ist der
entsprechende 1 C Ladestrom = 1500 mA =
1,5A). Der Li-Po charger 4 errechnet vollauto
matisch den zum jeweiligen Akkutyp passenden
Ladestrom bis maximal 3 Ampere, sodass eine
Einstellung überflüssig ist und bei diesem Lader
bewusst weggelassen wurde. Wird die zum jeweiligen Akkutyp gehörende, spezifische Ladeschlussspannung erreicht, wird der Ladestrom
automatisch reduziert, um ein Überschreiten der
Ladeschlussspannung zu verhindern.
Allgemeine Betriebshinweise
Page 4
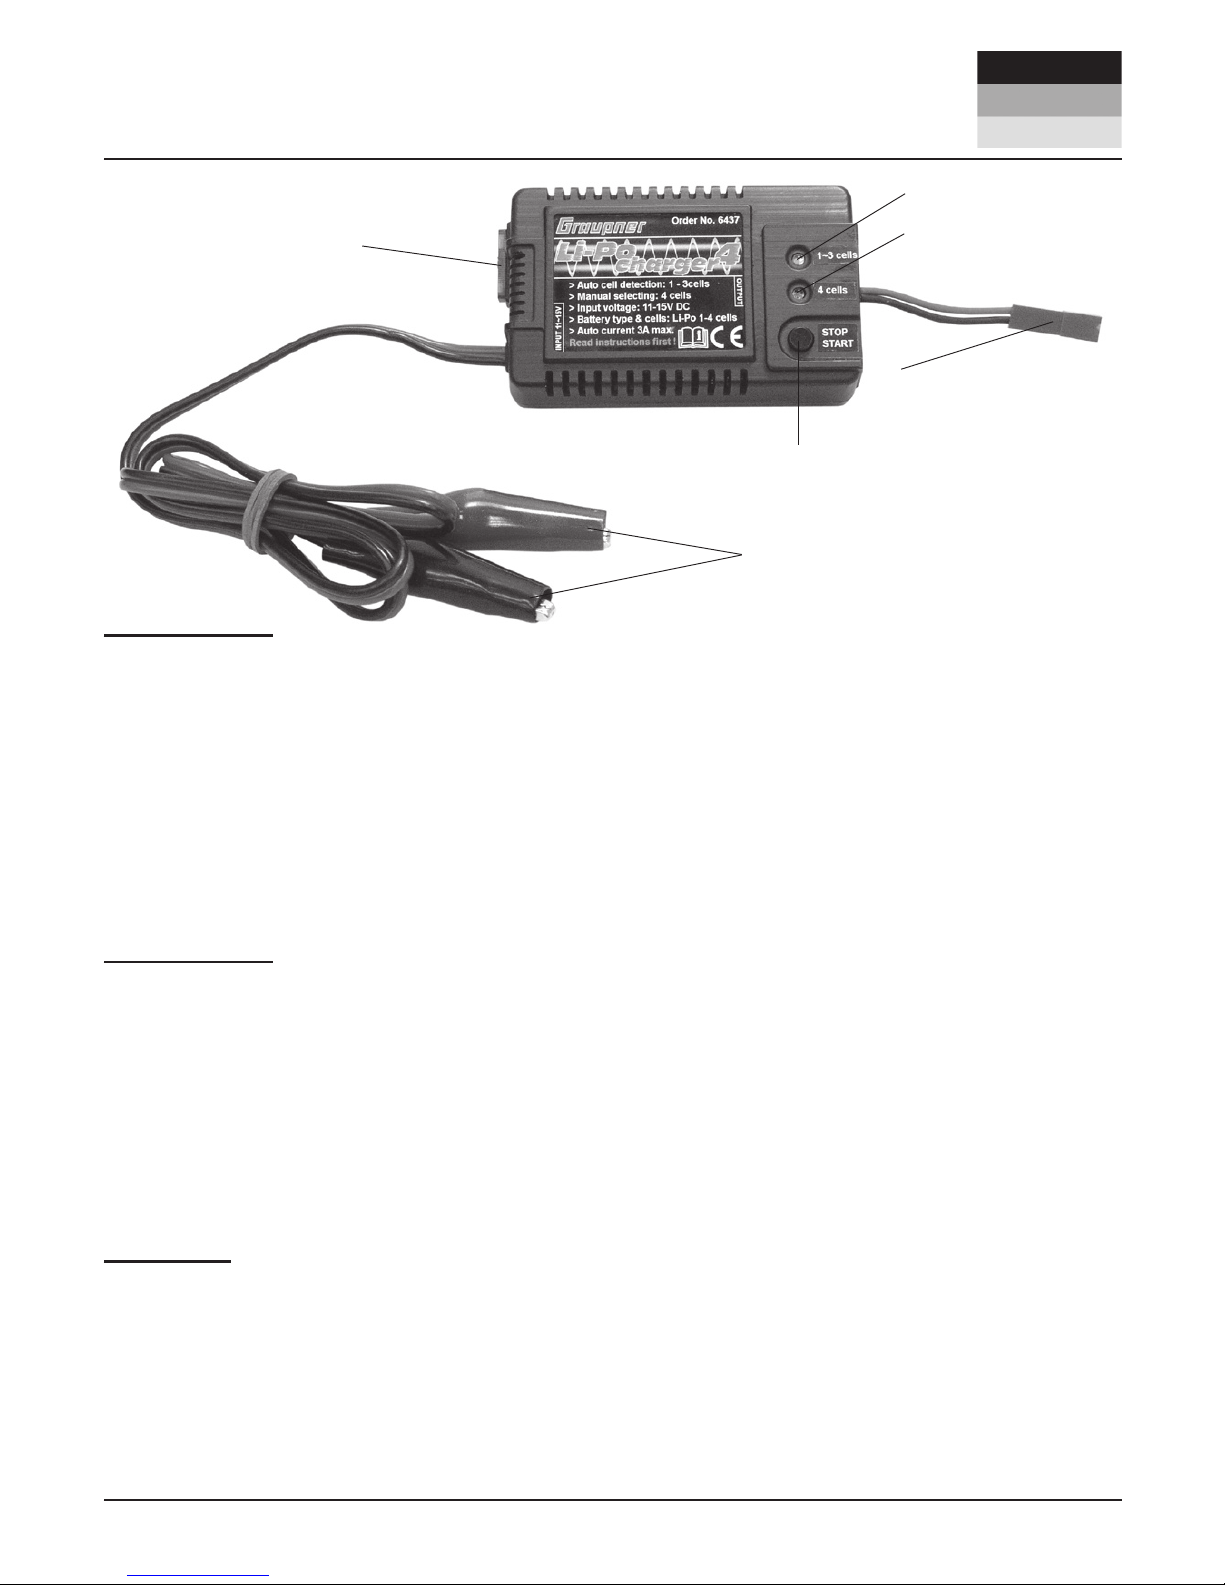
Sicherung
7,5 A / 32V
LED blau
LED rot
START/STOP Taste
EINGANG 11-15V DC
AUSGANG
1-4 Zellen
4 Inbetriebnahme
Inbetriebnahme
Inbetriebnahme
Schließen Sie Ihren Li-Po charger 4 an eine 12V
Stromquelle mit ausreichender Leistung an.
Achten Sie dabei auf die richtige Polarität!
Dafür bestens geeignet ist eine 12V Autobatterie
bzw. eine geeignete Bleibatterie. (Best. Nr. 2593
12V/24Ah)
Alternativ kann auch ein Stabilisiertes Netzgerät
mit 12 ... 14V und mindestens 5 A.(Best. Nr. 644
5
13,8V/7A oder Best. Nr. 94450 13,8V/5-7 A) verwendet werden.
Standby Modus
Sobald der Li-Po charger 4 mit einer
Stromquelle
verbunden ist, beginnt die blaue LED in einem
3sek. Intervall zu blinken.
Achtung: Sobald Sie die START/STOP Taste
drücken, während sich das Gerät im Lade-, Akku
geladen-, oder Fehlermodus befindet, kehrt der
Li-Po charger 4 wieder in den Standby Mo
dus
zurück.
Lademodus
Schließen Sie nun einen geeigneten original
GRAUPNER Lithium-Polymer Akkupack bis maximal 4 Zellen an den Ausgang des Li-Po charger
4 an.
Um einen 1-3 zelligen Lithium-Polymer Akkupack
zu laden, drücken Sie kurz die START/STOP
Taste, nachdem Sie den Akku angeschlossen
Der Tastendruck wird mit einem lauten Signalton
bestätigt und die blaue LED für 1-3 Zellen leuch
tet während dem Ladevorgang.
Wenn Sie einen Lithium-Polymer Akkupack mit
4 Zellen laden möchten, so drücken Sie die
START/STOP Taste für ca. 2 sek., nachdem Sie
den Akku angeschlossen haben.
Dieser Tastendruck wird mit zwei kurzen Signaltönen bestätigt. Außerdem leuchtet die rote LED
für 4 Zellen während des Ladevorgangs.
Durch drücken der START/STOP Taste können
Sie den Ladev
organg abbrechen. Der Li-Po
charger 4 wechselt dann sofort in den Standby
Modus.
Der Li-Po charger 4 wurde entwickelt, um die
empfindlichen Lithium-Polymer Zellen so einfach
und sicher wie möglich zu laden.
Das spezielle Lithium Ladeprogramm errechnet
während des gesamten Ladevorgangs den für
die Akkuphase passenden Ladestrom der maximal 3 Ampere beträgt.
Das bedeutet, das der Li-Po charger 4 mit einem niedrigeren Ladestrom beginnt und der
Akkupack erst komplett vermessen wird, bevor
das Ladegerät den Ladestrom vollautomatisch
erhöht. Nähert sich der Akkupack der maximalen
Ladekapazität, regelt das Gerät ebenso vollautomatisch den Ladestrom herunter.
Durch dieses Ladeverfahren wird der Akku zu
100% voll geladen und dabei geschont.
Page 5

Inbetriebnahme 5
„Akku geladen“ Modus
Sobald der Akku seine Ladekapazität zu 100%
erreicht hat, schaltet das Gerät automatisch ab.
Dies wird durch blinken der blauen LED (bei 1-3
Zellen) im Sekundentakt bzw. durch blinken der
roten LED (bei 4 Zellen) im Sekundentakt ange
zeigt. Außerdem ertönt für ca. 15 Sekunden ein
Signalton im Sekundentakt.
Es ist völlig normal, dass sich der Akkupack nach
dem Ladevorgang nur kaum oder überhaupt
nicht erwärmt, da der Li-Po charger 4 automa
tisch gegen Ladeende den Ladestrom reduziert.
Stecken Sie nun den geladenen Akkupack ab
und drücken die START/STOP Taste, sodass der
Li-Po charger 4 wieder in den Standby Modus
wechselt.Die blaue LED signalisiert den Standby
Modus durch blinken im drei Sekundentakt.
Fehler Modus
Der Li-Po charger 4 besitzt verschiedene hoch
moderne Sicherheitsfunktionen, die den Akku
pack sowie das Ladegerät schützen.
Beispielweise ist das Gerät gegen Verpolung am
Eingang sowie am Ausgang geschützt.
Sollten Sie das Gerät ausversehen verpolt haben, kann es sein, dass die 7,5A/32V Sicherung
fliegt, so dass diese ersetzt werden muss.
Ersatzsicherungen erhalten Sie in jedem guten
Elektrofachhandel.
Sobald einer der folgenden Fehler auftritt, wech
selt der Li-Po charger 4 in den Fehler Modus.
Dieser Modus wird durch blinken der beiden
LEDs (blau und rot) signalisiert. Außerdem ertönt
gleichzeitig ein Signalton im Sekundentakt.
Welcher der folgenden Fehler aufgetreten ist,
können Sie an der Anzahl des blinkens der beiden LEDs, bevor eine kurze Pause erfolgt, in der
weiterhin der Singalton ertönt.
LED Fehler
1x Eingangsspannung liegt unter 10,5V
bzw. über 15V
2x Akku am Ladeausgang verpolt
3x Kein Akku am Ladeausgang ange schlossen
4x Falsche Zellenzahl eingestellt
5x Nicht Ladefähiger Akkupack ange schlossen (z.B. Ni-Cd/Ni-MH)
6x Problem mit der Schaltung
(Senden Sie das Gerät an eine Service stelle ein)
Prüfen Sie unbedingt die Sicherung (7,5A/32V)
falls das Gerät nicht mehr reagiert und keine
akustische sowei optische Anzeige abgibt, so
bald es korrekt mit einer dafür geeigneten Stromquelle verbunden ist.
Sollte dies Sicherung defekt sein, tauschen Sie
diese gegen eine identische aus.
Technische Daten
Eingangsspannung: 11~15V
Akkutyp: Lithium-Polymer
(nur 3,7V Typ)
Zellenzahl: 1-4
Ladestrom: Automatik max. 3A
Anzeige: LED blau und rot
Sicherheitsfunktionen: Verpolungsschutz
(Ein- Ausgang)
Falsche Zellenzahl
Spannungsfehler
Kreislauf (Sicherung)
Eingang: Krokodilklemmen
Ausgang: Graupner BEC
Stecker
Abmessungen (L/B/H): ca. 88x55x23mm
Gewicht: ca. 112 g.
Inbetriebnahme
Page 6

6 Safety Notes
General Safety Notes
Introduction
Please be sure to read right through these operating instructions attentively before you attempt
to use your new charger, as this will ensure that
you can make full use of all of its facilities. Take
particular note of the warnings and safety notes.
These instructions should be kept in a safe
place; if you ever dispose of the charger be sure
to pass them on to the new owner.
The Li-Po Charger 4 is a sophisticated product
offering superb facilities and features. The
use of the latest semi-conductor technology,
controlled by a high-performance RISC microprocessor, provides outstanding charging performance, simplicity of operation and optimum
reliability - features which are usually only to be
found in much more expensive units.
The Li-Po Charger 4 is capable of charging
batteries consisting of up to four Lithium-Poly
mer cells.
If the battery consists of one to three cells, the
unit automatically detects the cell count and
calculates the required charge parameters
automatically.
If you wish to charge four Lithium-Polymer cells,
you must set the cell count manually, as fully
automatic operation is only possible with up to
three cells.
Note
Always read and observe the charging instructions supplied by the battery manufacturer, and
keep to the charge currents and charge times
stated in them. It is not safe to fast-charge Lithium batteries unless they are expressly stated to
be suitable for high charge currents.
Lithium-Polymer cells are very sensitive.
For this reason they should only ever be
charged in conditions when the entire charging
process can be supervised constantly.
Warnings and safety notes
• Protect the charger from dust, damp, rain,
heat (e.g. direct sunshine) and vibration. It
should only be operated in dry indoor conditi
ons. Provide good ventilation.
• The case slots serve to cool the charger, and
must not be covered or enclosed; set up the
charger with space all around it, so that
cooling air can circulate unhindered.
• The charger is designed to be powered by
a 12 V car battery or a mains PSU recom
mended by Graupner. Do not make any
modifications of any kind to the unit.
• The charger and the battery to be charged
should be set up on a heat-resistant, non inflammable and non-conductive surface
before use. Never place the charger directly
on a car seat, carpet or similar surface. Keep
all inflammable and volatile materials well
away from the charging area. Provide good
ventilation.
• Connect the charger directly to the car battery
using the original cables and connectors
supplied. The car’s engine must be stopped
all the time the Li-Po Charger 4 is connected
to it.
• The charge output sockets and connecting
leads must not be modified, and must not
be inter-connected in any way. There is a
danger of short-circuit between the charge
outputs and the vehicle’s bodywork when the
charger is connected to the car battery. The
charge leads and connecting leads must not
be coiled up when the charger is in use. Avoid
short-circuiting the charge output or the model
battery with the car bodywork, even though
the Li-Po Charger 4 is protected against such
errors. For this reason the charger must never
be placed directly on the vehicle’s bodywork.
• Never leave the charger running or connected
to the car battery unsupervised.
• Only one battery may be connected to the
charger for charging at any one time.
• The charger is only suitable for charging
Lithium-Polymer batteries consisting of up to
four cells.
• To avoid short-circuits between the banana
plugs fitted to the charge lead, please always
connect the charge lead to the charger first,
and only then to the battery to be charged.
Page 7

Operating Information 7
General Operating Information
Check before using the charger: are all connections firm, or is there an intermittent contact
at any point in the circuit?
Please bear in mind that it can be dangerous to
fast-charge batteries. For example, if there is a
brief interruption due to an intermittent contact,
the result is inevitably a malfunction such as a
restart of the charge process or an incorrect cell
count detection, which would result in the pack
being massively overcharged.
Charging batteries
During the charge process a particular quantity
of energy is fed into the battery; the Li-Po
Charger 4 automatically calculates the correct
quantity to suit the battery connected to it, and
adjusts the charge rate during the entire charge
process to suit the battery’s condition.
The maximum charge current of the Li-Po
Charger 4 is 3 Amps.
• Batteries must be supervised when on char
ge.
• Batteries must ALWAYS be placed on a fire proof surface for charging.
• Faulty or swollen Lithium cells must never be
recharged.
• The battery to be charged must be connec
ted using the original connector supplied with
GRAUPNER Lithium-Polymer cells.
• Ensure that there are no intermittent contacts
at any point in the charge circuit. If there
is a brief interruption due to an intermittent
contact, the result could be a restart of the
charge process, which would result in the
pack being massively overcharged.
Lithium-Polymer cells
The Li-Po Charger 4 is designed solely for char
ging Lithium-Polymer batteries with a nominal
cell voltage of 3.7 V per cell.
The outstanding feature of Lithium batteries
compared to other battery types is their much
higher capacity.
However, this important advantage is balanced
by increased risks, and it is necessary to adopt
different charging and discharging methods in
order to reduce the risk to a minimum.
It is essential to observe the basic instructions
provided here at all times. Please be sure
also to read the information and safety notes
provided by the battery manufacturer, and keep
within the stated technical limits.
The basic rule is that Lithium-based batteries
can ONLY be charged using special battery
chargers designed and adjusted to suit the
specific battery type (final charge voltage and
capacity).
In contrast to NiCd and NiMH batteries, Lithium
batteries have to be charged using what is
known as a constant current / constant voltage
method. The charge current required is determined by the battery capacity, and the charger
detects and sets this automatically. Lithium
batteries are usually charged at a charge
current of 1 - 2 C, where a charge current of 1 C
corresponds to the cell capacity. For example, if
a battery has a capacity of 1500 mAh, a charge
current of 1 C is 1500 mA, or 1.5 A. The Li-Po
Charger 4 automatically calculates the optimum
charge current to suit the battery connected
to it, up to a maximum of 3 amps. This makes
it unnecessary to set the charge rate, and the
charger therefore features no such means
of adjustment. Once the specific final charge
voltage for the particular battery type is reached,
the charger automatically reduces the current in
order to prevent the final charge voltage exceeding the permissible maximum value.
Liability Exclusion
As manufacturers, we at GRAUPNER are not in
a position to ensure that you observe the correct
methods of operation when installing, using and
maintaining this charger. For this reason we are
obliged to deny all liability for loss, damage or
costs which are incurred due to the incompetent
or incorrect use and operation of our products,
or which are connected with such operation in
any way.
Page 8

8 Using the charger for the first time
Using the charger for the first time
Fuse, 7.5 A / 32 V
Blue LED
Red LED
START/STOP button
INPUT 11-15V DC
OUTPUT 1-4 cells
Using the charger for the first time
Connect your Li-Po Charger 4 to a 12 V power
source of adequate capacity.
Check polarity carefully!
The ideal power source is a 12 V car battery or
other suitable lead-acid battery (Order No. 2593:
12 V / 24 Ah).
Alternatively a stabilised mains PSU with a rated
output of 12 - 14 V and at least 5 A can be used,
e.g. Order No. 6445 (13.8 V / 7 A) or Order No.
94450 (13.8 V / 5-7 A).
Stand-by mode
When you connect the Li-Po Charger 4 to the
power source, the blue LED starts flashing at
three-second intervals.
Caution: if you press the START/STOP button
while the charger is in charge mode, battery
charged mode or error mode, the Li-Po Charger
4 reverts to Stand-by mode.
Charge mode
Now connect a suitable genuine GRAUPNER
Lithium-Polymer battery pack to the output of
the Li-Po Charger 4. The pack must consist of
no more than four cells
If you are charging a Lithium-Polymer pack
consisting of one to three cells, press the
START/STOP button briefly after connecting the
battery to the charger.
You will hear a loud audible signal to confirm
that the button was pressed, and the blue LED
(for 1 - 3 cells) lights up; it continues to glow
during the charge process.
If you are charging a Lithium-Polymer pack
consisting of four cells, hold the START/STOP
button pressed in for about two seconds after
connecting the battery to the charger.
You will hear two short audible signals to confirm this. The red LED (for 4 cells) lights up; it
continues to glow during the charge process.
You can interrupt the charge process at any
time by pressing the START/STOP button. The
Li-Po Charger 4 then reverts immediately to
Stand-by mode.
The Li-Po Charger 4 has been developed to
provide as simple and safe a means of charging
sensitive Lithium-Polymer cells as possible.
During the entire charge process the special
Lithium charge program calculates the optimum
current for each phase of charging, with a
maximum current of 3 Amps.
The effect of this is that the Li-Po Charger
4 starts with a relatively low charge current,
then analyses the battery completely before
increasing the charge current fully automatically. When the pack is approaching maximum
capacity, the charger reduces the charge current
again, also completely automatically.
Page 9

Using the charger for the first time 9
This method of operation charges the pack to
100% of full capacity, at the same time avoiding
battery damage and overloading.
“Battery charged” mode
As soon as the battery has reached 100% of
charged capacity, the charger automatically
switches off the process. This is indicated by
the blue LED (1 - 3 cells) flashing at one-second
intervals, or by the red LED (4 cells) flashing at
one-second intervals. You will also hear an au
dible signal at one-second intervals; this signal
continues for about 15 seconds.
Do not be surprised if the battery is cool or
just barely warm after a full charge. This is
completely normal, as the Li-Po Charger 4
automatically reduces the current towards the
end of the charge process.
Disconnect the charged battery and press the
START/STOP button; the Li-Po Charger 4 now
reverts to Stand-by mode.
The blue LED flashes at three-second intervals
to indicate Stand-by mode.
Error mode
The Li-Po Charger 4 includes a range of sophisticated safety functions designed to protect the
battery and the charger.
For example, the device is protected against
reversed polarity at the input and output.
If you accidentally connect the charger with
reversed polarity, the 7.5 A / 32 V fuse may
blow, in which case you will have to fit a replace
ment fuse.
Spare fuses are available from any good electrical goods supplier.
If one of the following errors occurs, the Li-Po
Charger 4 switches to Error mode.
This mode is indicated by both LEDs (blue and
red) flashing. At the same time the unit emits an
audible warning signal at one-second intervals.
You can identify the type of error by counting the
number of flashes from the two LEDs before a
short pause occurs, during which you will again
hear the audible warning signal.
Using the charger for the first time
LED Error
1x Input voltage below 10.5 V or above
15 V
2x Battery connected to charge output with
reversed polarity
3x No battery connected to charge output
4x Incorrect cell count selected
5x Incorrect battery type connected
(eg. Ni-Cd / Ni-MH)
6x Problem with charger circuit
(send charger to Graupner Service
Centre)
If the charger does not work at all when connected correctly to a suitable power source, and
fails to produce any audible or visual indicators,
remember to check the fuse (7.5 A / 32 V).
If the fuse has blown, remove it and fit an identical replacement fuse.
Specification
Input voltage: 11~15V
Battery type: Lithium-Polymer
(3.7 V type only)
Cell count: 1-4
Charge current: Automatic, max. 3 A
Indicators: Blue and red LEDs
Safety functions: Reversed polarity
protection
(input / output)
Incorrect cell count
Voltage error
Circuit break (fuse)
Input: Crocodile clips
Output: Graupner BEC
plug
Dimensions (L / W / H): app. 88 x 55 x 23 mm
Weight: approx. 112 g
Page 10

10 Généralités
Généralités
Avant la mise en service de votre nouveau chargeur, veuillez lire attentivement et entièrement
les descriptions qui vont suivre pour connaître
toutes ses particularités. Observez surtout les
avertissements et les conseils de sécurité.
Conservez soigneusement ces instructions afin
de pouvoir les remettre à un éventuel utilisateur
suivant.
Avec le chargeur Li-Po 4, vous avez fait
l’acquisition d’un produit aux remarquables propriétés. Grâce à l’utilisation d’une technologie
moderne avec un puissant micro-processeur
RISC, de remarquables capacités de charge,
une utilisation simple et une fiabilité optimale ont
été obtenues.
Jusqu’à 4 éléments au Lithium-Polymer
pourront être chargés avec le chargeur Li-Po
4. Ce chargeur détecte automatiquement le
nombre d’éléments connectés (1-3 éléments) et
détermine lui-même les paramètres de charge
nécessaires.
Si l’on désire charger 4 éléments au LithiumPolymer, le réglage devra être effectué manuellement, car la détection automatique n’est
possible que jusqu’à 3 éléments seulement.
Note :
Les conseils de charge donnés par le fabricant
des accus devront être observés, ainsi que le
courant et le temps de charge prescrits. Seuls
les accus à charge rapide adaptés pour ces
forts courants de charge devront être connectés
sur ce chargeur.
Les éléments au Lithium-Polymer sont très sen
sibles et ils devront ainsi être surveillés durant la
totalité du processus de charge.
Avertissements et conseils de sécurité
• Protéger le chargeur de la poussière, de
l’humidité, de la pluie, de la chaleur (Par ex.
du rayonnement solaire direct) et des vibra tions ; il doit être utilisé uniquement dans un
endroit sec !
• Les ouies percées dans le boîtier servent
au refroidissement de l’appareil et ne devront
en aucun cas être obturées. Durant la charge
des accus, placer l’appareil à un endroit
dégagé afin de lui assurer une circulation
d’air.
• Ce chargeur est adapté pour une alimentation
par une batterie de 12 V ou par un transfor mateur de courant secteur Graupner; aucu nes modifications ne devront être effectuées
sur l’appareil.
• Durant le processus de charge, le chargeur et
la batterie à charger devront être placés sur
une surface non inflammable, résistance à la
chaleur et non conductrice de l’électricité! Ne
jamais les poser sur les sièges de la voiture,
les tapis, etc… Eloigner également les objets
facilement inflammables de l’installation de
charge et veiller à assurer une bonne aérati on.
• Relier le chargeur directement sur le cou rant secteur avec le cordon original ou
directement sur la batterie de voiture avec les
pinces crocodile. Tant que le chargeur est
relié à la batterie de la voiture, le moteur de
celle-ci doit être arrêté ! La batterie de la
voiture ne devra jamais être chargée en
même temps par un autre chargeur !
• La sortie de charge et les cordons de
raccordement ne devront par être modifiés
ni reliés entre-eux d’une façon quelconque.
Durant le processus de charge, il existe
un danger de court-circuit entre la sortie
de charge et la carrosserie de la voiture!
Les cordons de raccordement et de charge
ne devront pas être enroulés entre-eux durant
l’utilisation ! Eviter les court-circuits entre
la sortie de charge ou l’accu et la carrosserie
de la voiture, même si le chargeur Li-Po 4
est protégé contre cela ; pour cette raison,
ne jamais poser l’appareil directement sur la
carrosserie de la voiture.
• Ne jamais laisser l’appareil sans surveillance
lorsqu’il est relié à l’alimentation en courant.
• Un seul pack d’accus à charger devra être
connecté sur la sortie de charge.
• Jusqu’à seulement 4 éléments au Lithium-Po lymer pourront être connectés sur le chargeur.
• Pour éviter un cour-circuits entre les pinces
crocodile, relier toujours d’abord le cordon de
charge au chargeur et ensuite à l’accu.
Page 11

Généralités 11
Généralités
Avant la charge, s’assurer que toutes les
liaisons sont impeccables et qu’il n’y a pas de
contact intermittent.
Noter que la charge rapide des batteries peut
être dangereuse, car même une courte interruption en raison d’un contact intermittent conduit
inévitablement à un mauvais fonctionnement
provoquant un nouveau départ de la charge, ou
une détection erronée du nombre d’éléments en
entraînant une surcharge de l’accu connecté !
Charge des accus
Une intensité de courant déterminée, calculée
automatiquement par que le chargeur Li-Po 4,
est adaptée durant le processus de charge à
l’accu connecté. Le courant de charge maximal
du chargeur Li-Po 4 est de 3 A.
• Les accus devront être chargés uniquement
sous surveillance !
• Charger les accus uniquement sur une base
non inflammable !
• Les éléments au Lithium-Polymer défectueux
ou usagés ne devront en aucun cas être
rechargés !
• Les accus à charger devront être reliés uni
quement avec les connecteurs originaux pour
les éléments au Lithium-Polymer GRAUP NER.
• Veiller à la sécurité de contact de toutes
les connexions, car même une courte inter ruption en raison d’un contact intermittent
peut déclencher un nouveau départ de char ge et surcharger totalement l’accu connecté.
Eléments au Lithium-Polymer
Le chargeur Li-Po 4 est uniquement adapté
pour la charge d’accus au Lithium-Polymer
d’une tension nominale de 3/7 V/Elément.
Les accus au Lithium se distinguent par leur
capacité beaucoup plus élevée par comparaison
aux autre types d’accus. Ce gros avantage
exige cependant un traitement différent en ce
qui concerne la charge et la décharge, ainsi que
pour une utilisation sans danger. Les prescrip
tions exposées ici devront être observées dans
tous les cas. Les autres indications correspondantes et les conseils de sécurité sont à relever
dans les données techniques du fabricant des
accus.
Par principe, les accus à base de Lithium
devront être chargés UNIQUEMENT avec les
chargeurs spéciaux qui sont réglés sur chaque
type d’accu (Tension de fin de charge, capacité).
La charge se fait différemment qu’avec les
accus NiCd ou NiMH par une méthode dite
courant constant/tension constante. Le courant
nécessaire pour la charge s’obtient par la
capacité de l’accu et sera automatiquement
réglé par le chargeur. Les accus au Lithium
seront habituellement chargés par un courant
de charge de 1-2 C (Courant de charge de 1 C
= Capacité-courant de charge. Exemple : avec
une capacité de par ex. 1500 mAh, le courant
de charge correspondant 1 C est de = 1500 mA
– 1,5 A). Le chargeur Li-Po 4 calcule totalement
automatiquement le courant de charge adapté
pour chaque type d’accu jusqu’à un maximum
de 3 A, de sorte qu’un réglage superflu n’a
pas été prévu avec ce chargeur. A l’atteinte
de la tension de fin de charge spécifique pour
chaque type d’accu, le courant de charge sera
automatiquement réduit pour éviter qu’elle soit
dépassée.
Exclusion de responsabilité
Le respect des instructions d’utilisation ainsi que
les conditions et les méthodes d’installation,
d’utilisation et d’entretien du chargeur ne peuvent pas être surveillées par la Firme GRAUPNER. C’est pourquoi celle-ci décline toute
responsabilité et sa participation d’une façon
quelconque pour les pertes, les détériorations
ou les coûts résultant d’une mauvaise utilisation
de ce chargeur.
Page 12

12 Mise en service
Fusible
7,5 A/32 V
LED bleu
LED rouge
Touche START/STOP
ENTRÉE 11-15 V
Continu
SORTIE 1-4 éléments
Mise en service
Relier le chargeur Li-Po 4 à une source de
courant en 12 V d’une puissance suffisante en
veillant au respect des polarités !
Le mieux adapté pour cela est une batterie de
voiture de 12 V ou une batterie au plomb (Réf.
N°2593, 12 V/24 A).
Alternativement, un transformateur de courant
secteur en 12…14 V d’au moins 5 A pourra
être utilisé (Réf. N°6445, 13,8 V/7 A ou Réf.
N°94450, 13,8 V/5-7 A).
Mode Standby
Dès que le chargeur LiPo 4 est relié à une
source de courant, le LED bleu commence à
clignoter par intervalles de 3 sec.
Attention : Dès que la touche START/STOP
est pressée, l’appareil charge l’accu ou s’il se
trouve dans le Mode erreur, il revient dans le
Mode Standby
Mode charge
Connecter un pack d’accus au Lithium Polymer
adapté d’origine GRAUPNER avec 4 éléments
au maximum sur la sortie du chargeur Li-Po 4.
Pour charger un pack d’accus au Lithium
Polymer de 1-3 éléments, presser brièvement la
touche START/STOP, après l’avoir connecté. La
pression de la touche est confirmée par un
signal sonore et le LED bleu pour 1-3 éléments
s’allume durant le processus de charge.
Si l’on veut charger un pack d’accus au Lithium
Polymer avec 4 éléments, presser la touche
START/STOP durant env. 2 sec. après l’avoir
connecté.
Cette pression de touche est confirmée par
deux courts signaux sonores et le LED rouge
pour 4 éléments s’allume durant le processus
de charge.
Le processus de charge pourra être interrompu
en pressant la touche START/STOP ; le chargeur LI-Po 4 revient alors dans le Mode Standby
Le chargeur Li-Po 4 a été développé pour le
sensibilité des éléments au Lithium Polymer afin
de pouvoir les charger d’une façon aussi simple
et sûre que possible.
Le programme de charge spécial Lithium
calcule le courant de charge adapté pour
l’accu durant la totalité du processus de charge
jusqu’à un maximum de 3 A. Cela signifie que
le chargeur Li-Po 4 commence à charger avec
un faible courant et que le pack d’accus sera
d’abord complètement mesuré avant que le cou
rant de charge soit automatiquement augmenté.
Lorsque le pack d’accus a atteint sa capacité de
charge maximale, l’appareil abaisse de même
automatiquement le courant de charge.
Grâce à ce procédé de charge, l’accu sera
chargé à 100% et raisonnablement.
Mise en service
Page 13

Mise en service 13
Mode ‘’Accu chargé’’
Dès que l’accu atteint sa capacité de charge
à 100%, l’appareil coupe automatiquement la
charge. Ceci est indiqué par le clignotement
du LED bleu (avec 1-3 éléments) ou par le
clignotement du LED rouge (avec 4 éléments)
en cadence par secondes. En outre, un signal
sonore se fait entendre durant env. 15 sec. en
cadence par secondes.
Il est tout à fait normal que le pack d’accus soit
à peine échauffé après le processus de charge,
car le chargeur Li-Po 4 a automatiquement
réduit le courant vers la fin de la charge.
Déconnecter alors le pack d’accus chargé et
presser la touche START/STOP de façon à ce
que le chargeur revienne dans le Mode Standby
Le LED bleu signale le retour en Mode Standby
en clignotant en cadence de 3 secondes.
Mode Erreur
Le chargeur Li-Po 4 comprend différentes
fonctions modernes de sécurité qui protègent le
pack d’accus ainsi que l’appareil.
A titre d’exemple, l’appareil est protégé contre
les inversions de polarités à l’entrée ainsi qu’à la
sortie. L’appareil est aussi pourvu d’un fusible de
sécurité 7,5 A/32 V remplaçable que l’on peut
se procurer dans tout bon magasin d’électricité.
Dès que l’une des erreurs suivantes se produit,
le chargeur Li-Po 4 passe dans le Mode Erreur.
Ce Mode est signalé par le clignotement des
deux LED (bleu et rouge). En outre, un signal
sonore intervient en même temps en cadence
par secondes. Le nombre de clignotements
des deux LED, avant une courte pause et
l’intervention du signal sonore, permet de
savoir laquelle des erreurs suivantes s’est
produite :
LED Erreur
1x Tension d’entrée en-dessous de 11,5 V
ou au-dessus de 15 V
2x Inversion de polarité de l’accu sur la
sortie de charge
3x Pas d’accu connecté sur la sortie de
charge.
4x Faux nombre d’éléments réglés.
5x Pack d’accus non rechargeable
connecté (par ex. NiCd /NiMH).
6x Problème avec le circuit (Retourner
alors l’appareil au S.A.V. concerné)
Vérifier absolument le fusible (7,5 A/32 V) si
l’appareil ne réagit plus et ne donne aucune
indication acoustique ni optique, dès qu’il est
relié à une source de courant adaptée.
Si le fusible est défectueux, le remplacer par un
autre identique.
Caractéristiques techniques
Tension d’entrée: 11~15V
Type d’accu: Lithium-Polymer
(seulement du type
3.7 V )
Nombre d’éléments: 1-4
Courant de charge: Automatique, max.3A
Indication: LED bleu et rouge
Fonctions de sécurité: Protection contre les
inversions de polari
tés (Entrée et sortie)
Faux nombre
d’éléments
Erreur de tension
Circuit (Fusible)
Entrée: Pinces crocodile
Sortie: BEC Graupner
Dimensions (Lxlxh): env. 88 x 55 x 23 mm
Poids: env. 112 g
Mise en service
Page 14

14
Notizen
notices / Notififications
Page 15

15
Notizen
notices / Notififications
Page 16

Die Fa. Graupner GmbH & Co. KG, Henriettenstraße 94-96. 73230 Kirchheim/Teck gewährt ab
dem Kaufdatum auf dieses Produkt eine Garan
tie von 24 Monaten.
Die Garantie gilt nur für die bereits beim Kauf des
Produktes vorhandenen Material- oder Funkti
onsmängel. Schäden die auf Abnützung, Über
lastung, falsches Zubehör oder unsachgemäße
Behandlung zurückzuführen sind, sind von der
Garantie ausgeschlossen.
Die gesetzlichen Rechte und Gewährleistungs
ansprüche des Verbrauchers werden durch die
se Garantie nicht berührt.
Bitte überprüfen Sie vor einer Reklamation oder
Rücksendung das Produkt genau auf Mängel, da
wir Ihnen bei Mängelfreiheit die entstandenen
Unkosten in Rechnung stellen müssen.
Graupner GmbH & Co. KG, Henriettenstraße 9496, 73230 Kirchheim/Teck, Germany guarantees
this product for a period of 24 months from date
of purchase.
The guarantee applies only to such material or
operational defects witch are present at the time
of purchase of the product.
Damage due to wear, overloading, incompetent
handling or the use of incorrect accessories is
not covered by the guarantee.
The user´s legal rights and claims under garantee are not affected by this guarantee.
Please check the product carefully for defects
before you are make a claim or send the item to
us, since we are obliged to make a charge for our
cost if the product is found to be free of faults.
La société Graupner GmbH & Co. KG, Henriet
tenstraße 94-96, 73230 Kirchheim/Teck, Allemagne, accorde sur ce produit une garantie de 24
mois à partir de la date d´achat.
La garantie prend effet uniquement sur les vices
de fonctionnement et de matériel du produit
acheté. Les dommages dûs à de l´usure, à de la
surcharge, à de mauvais accessoires ou à d´une
application inadaptée, sont exclus de la garantie.
Cette garantie ne remet pas en cause les droits
et prétentions légaux du consommateur.
Avant toute réclamation et tout retour du prouit,
veuillez s.v.p. cotrôler et noter exactement les
défauts ou vices du produit, car tout autre frais
relatif au produit vous sera facturé.
Wir gewähren auf dieses Erzeugnis eine / This product is / Sur ce produit nous accordons
Garantie von
warrantied for
garantie de
2 4
Monaten
month
mois
Servicestellen / Service / Service après-vente
Graupner-Zentralservice
Graupner GmbH & Co. KG
Postfach 1242
D-73220 Kirchheim
Servicehotline
(+49)(01805) 472876
Montag - Freitag 9:30 -11:30
und 13:00 -15:00 Uhr
Espana
FA - Sol S.A.
C. Avinyo 4
E 8240 Maneresa
(+34) 93 87 34 23 4
France
Graupner France
Gérard Altmayer
86, rue ST. Antoine
F 57601 Forbach-Oeting
(+33) 3 87 85 62 12
Italia
GiMax
Via Manzoni, no. 8
I 25064 Gussago
(+39) 3 0 25 22 73 2
Sverige
Baltechno Electronics
Box 5307
S 40227 Göteborg
(+46) 31 70 73 00 0
Schweiz
Graupner Service
Postfach 92
CH 8423 Embrach-Embraport
(+41) 43 26 66 58 3
UK
GLIDERS
Brunel Drive
Newark, Nottinghamshire
NG24 2EG
(+44) 16 36 61 05 39
Ceská Republika/Slovenská
Republika
RC Service Z. Hnizdil
Letecka 666/22
CZ-16100 Praha 6 - Ruzyne
(+42) 2 33 31 30 95
Luxembourg
Kit Flammang
129, route d’Arlon
8009 Strassen
(+35) 23 12 23 2
Garantie-Urkunde
Warranty certificate / Certificat de garantie
Li-Po charger 4, Best.-Nr. 6437
Belgie/Nederland
Jan van Mouwerik
Slot de Houvelaan 30
NL 3155 Maasland VT
(+31)10 59 13 59 4
Übergabedatum, Date of purchase/delivery, Date de remise
Name des Käufers, Owner´s name, Nom de l´acheteur
Strasse, Wohnort, Complete adress, Domicie et rue
Firmenstempel und Unterschrift des Einzelhändlers, Stamp and signature of dealer,
Cachet de la firme et signature du detailant
 Loading...