

Page 1

Xplorer
Asset Management Tool
User Manual
M852-0400-480
w w w . m i r a n d a . c o m
Page 2

Page 3
Xplorer
Asset Management Tool
User Manual
Vertigo Suite v.4.8
Page 4

Copyright Notice
© 2012 Miranda Technologies Inc. All rights reserved.
Third Party Trademarks
All other brand names, product names or trademarks belong to their respective holders.
Usage Agreement
Please read the following terms and conditions carefully. By using the Xplorer User Manual,
you agree to the following terms and conditions:
Miranda Technologies Inc. hereby grants permission and license to owners of Xplorer and
the Vertigo Suite to use their product manuals for their own internal business use. Manuals
for Miranda Technologies Inc. products may not be reproduced or transmitted in any form
or by any means, electronic or mechanical, including photocopying and recording, for any
purpose unless specifically authorized in writing by Miranda Technologies Inc.
Miranda Technologies Inc. makes no warranty, either expressed or implied, including but
not limited to any implied warranties of merchantability or fitness for a particular purpose,
regarding these materials and makes such materials available solely on an “As-Is” basis.
In no event shall Miranda Technologies Inc. be liable to anyone for special, collateral,
incidental, or consequential damages in connection with or arising out of purchase or use
of these materials. The sole and exclusive liability to Miranda Technologies Inc., regardless
of the form of action, shall not exceed the purchase price of the materials described herein.
Miranda Technologies Inc. reserves the right to revise and improve its products at any time
and without notice. This publication describes the state of this product at the time of its
publication, and may not reflect the product at all times in the future. Thus, different versions
of a manual may exist for any given product. Care should be taken to ensure that one
obtains the proper manual version for a specific product serial number.
Information in this document is subject to change without notice and does not represent a
commitment on the part of Miranda Technologies Inc.
Government Use
The Software {and Documentation} is provided with RESTRICTED RIGHTS. Use,
duplication or disclosure by the United States Government or any agency, department or
instrumentality thereof is subject to the restrictions set forth in the Commercial Computer
Software -- Restricted Rights clause at FAR 52.227-19 or the Commercial Computer
Software -- Licensing clause at NASA FAR Supplement 1852.227-86.
Printed in Canada
Document Identification
• Title: Xplorer User Manual
• Part number: M852-0400-480
• Software version: Vertigo Suite v.4.8
• Last revised: June 21, 2012
Page 5

Document Revision History
After the original release date, this user manual may be updated with edits and then rereleased. The following table tracks the versions of this document.
Publication date Description
June 21, 2012 Original release of this user manual for Vertigo Suite v.4.8
Page 6

Page 7

TABLE OF CONTENTS
Introducing Xplorer.............................................................................................................. 1-1
Getting started with Xplorer................................................................................................ 2-1
Installation and licensing information................................................................................................. 2-2
Starting Xplorer and connecting to the Xmedia Server...................................................................... 2-3
Overview of Xplorer’s interface.......................................................................................................... 2-5
Configuring Xplorer’s settings............................................................................................................ 2-7
Adding devices to Xplorer’s Device Viewer .......................................................................................2-8
Connecting a device to Xplorer ....................................................................................................... 2-12
Launching a device’s Dashboard from Xplorer................................................................................ 2-13
Browsing and managing media on the Xmedia Server and other devices .................... 3-1
Displaying the media contents of the XMS or a device ..................................................................... 3-2
Browsing the contents of the XMS or a device.................................................................................. 3-3
Searching for assets stored on the Xmedia Server ........................................................................... 3-5
Categorizing within the Xmedia Server.............................................................................................. 3-6
Removing an asset from an XMS category or a device..................................................................... 3-7
Removing an asset from a category on the Xmedia Server ......................................................... 3-7
Removing assets from devices, but not the Xmedia Server ......................................................... 3-8
Deleting assets from the Xmedia Server or a device......................................................................... 3-9
Renaming an asset.......................................................................................................................... 3-10
Viewing and editing an asset’s properties .......................................................................................3-11
Monitoring and managing a device’s disk space ............................................................................. 3-14
Moving assets to/from the Xmedia Server and other devices......................................... 4-1
Managed versus unmanaged assets.................................................................................................4-2
Ingesting third-party content files....................................................................................................... 4-4
Ingesting image or audio files ....................................................................................................... 4-4
Ingesting image sequences .......................................................................................................... 4-7
Ingesting video files .................................................................................................................... 4-11
Importing content files that are native to the Vertigo Suite system.................................................. 4-13
Publishing assets from the Xmedia Server to a device ................................................................... 4-15
Automatically publishing assets to devices................................................................................. 4-15
Manually publishing assets from the Xmedia Server to devices................................................. 4-16
Monitoring and managing a device’s publish queue ................................................................... 4-17
Publishing the entire contents of one device to another device....................................................... 4-21
Propagating assets from the Xmedia Server to another server....................................................... 4-22
Exporting Vertigo asset files to another Xmedia Server .................................................................. 4-23
Saving a local copy of an asset as a file.......................................................................................... 4-26
Previewing assets in Xplorer .............................................................................................. 5-1
Previewing audio and video clips....................................................................................................... 5-2
Previewing cel animations ................................................................................................................. 5-3
Previewing and editing image assets ................................................................................................ 5-4
Xplorer User Manual TOC-1
Page 8

Table of Contents
Opening the Image Editor..............................................................................................................5-5
Zooming in/out and repositioning the image ..................................................................................5-5
Cropping an image ........................................................................................................................5-7
Making color adjustments ..............................................................................................................5-9
Adjusting the sharpness of an image...........................................................................................5-10
Using the Image Modification buttons to flip an image ................................................................5-10
Appendix A - Quick reference to Xplorer’s commands and settings ............................. 6-1
Xplorer’s menu commands.................................................................................................................6-2
File menu .......................................................................................................................................6-2
View menu .....................................................................................................................................6-3
Tools menu ....................................................................................................................................6-4
Help menu .....................................................................................................................................6-4
Xplorer’s toolbar buttons.....................................................................................................................6-5
Xplorer’s settings ................................................................................................................................6-7
XMS settings..................................................................................................................................6-8
Work Order settings.......................................................................................................................6-9
Layout settings.............................................................................................................................6-10
Publish Monitoring settings..........................................................................................................6-11
General settings...........................................................................................................................6-12
Logging settings...........................................................................................................................6-13
Appendix B - Searching for assets stored on the XMS.................................................... 7-1
Opening the Search Tool....................................................................................................................7-2
Using the search tool’s interface ........................................................................................................7-3
Standard search criteria fields and controls...................................................................................7-4
Advanced search criteria fields, controls, and summary ...............................................................7-9
Message area: Search status and asset information...................................................................7-18
Results area.................................................................................................................................7-19
Performing a standard search ..........................................................................................................7-21
Performing an advanced search.......................................................................................................7-22
Creating a query that uses a single property ...............................................................................7-22
Creating a query that combines multiple properties ....................................................................7-23
Editing a search criteria’s property conditions .............................................................................7-24
Saving and loading a search criteria............................................................................................7-25
Removing search criteria .............................................................................................................7-25
Appendix C - Creating and using work orders ................................................................. 8-1
Creating a new work order .................................................................................................................8-2
Viewing existing work orders and/or jobs ...........................................................................................8-4
Adding a job to an existing work order ...............................................................................................8-6
Removing a work order or job from the XMS .....................................................................................8-8
TOC-2 Xplorer User Manual
Page 9

1 INTRODUCING XPLORER
Xplorer is a media management application that allows you to browse and manage the
media content stored on the Xmedia Server (XMS) and other devices.
More specifically, Xplorer allows you to:
• Quickly identify and monitor the status of the Xmedia Server and other devices that are
configured and/or connected to your system.
• Browse and manage the media content stored on the Xmedia Server and/or other
devices.
• Move content to and from the Xmedia Server and other devices, including ingesting
content from external storage devices and converting the imported files into Vertigo
compatible assets.
• Preview the playout of various asset types that are stored on the Xmedia Server or
devices.
• Create and manage work order requests for graphics elements that are required but do
not exist on the system.
The following sections provide information and instructions for using Xplorer:
• “Getting started with Xplorer” on page 2-1
• “Browsing and managing media on the Xmedia Server and other devices” on page 3-1
• “Moving assets to/from the Xmedia Server and other devices” on page 4-1
• “Previewing assets in Xplorer” on page 5-1
• “Appendix A - Quick reference to Xplorer’s commands and settings” on page 6-1
• “Appendix B - Searching for assets stored on the XMS” on page 7-1
• “Appendix C - Creating and using work orders” on page 8-1
Xplorer User Manual 1-1
Page 10

Introducing Xplorer
1-2 Xplorer User Manual
Page 11

2 GETTING STARTED WITH XPLORER
To help get you started using Xplorer, this chapter provides you with information about
installing and licensing the Xplorer software. Once installed, you must configure Xplorer to
recognize and actively connect with the Xmedia Server and the other devices.
Information and instructions to help you set-up and familiarize yourself with Xplorer are
provided in the following sections:
• “Installation and licensing information” on page 2-2
• “Starting Xplorer and connecting to the Xmedia Server” on page 2-3
• “Overview of Xplorer’s interface” on page 2-5
• “Configuring Xplorer’s settings” on page 2-7
• “Adding devices to Xplorer’s Device Viewer” on page 2-8
• “Connecting a device to Xplorer” on page 2-12
Xplorer User Manual 2-1
Page 12

Getting started with Xplorer
NOTE
Installation and licensing information
Xplorer is packaged with the Vertigo Suite software installation wizard. It can be installed as
part of the full installation or as an individual (standalone) component. In both cases, you
simply need to run the installation wizard on a workstation that is on the same network as
the Xmedia Server.
Information regarding the Vertigo Suite’s hardware and network requirements, as well as
instructions for installing and/or upgrading Xplorer, are available in the Vertigo Suite’s
Release Notes, which can be downloaded from the Miranda Technical Support Services
web site (http://www.miranda.com/support/product.php?name=Vertigo).
Xplorer requires that a software application license be installed and validated on the Xmedia
Server. Therefore, once Xplorer is installed, you must contact the Miranda Technical
Support team (support@miranda.com
apply and validate the license using the Vertigo Suite’s License Manager, which stores the
license on the Xmedia Server. Instructions for acquiring and validating an Xplorer
application license are provided in the Vertigo Suite’s Release Notes.
Xplorer will not operate properly unless its connection to the Xmedia Server is active and a
valid license is present. See page 2-3 for more information about resolving connection and
license errors.
) to request a license key for Xplorer. Then you must
2-2 Xplorer User Manual
Page 13
Getting started with Xplorer
NOTE
Xplorer is actively
connected to the
Xmedia Server
Xplorer has been
disconnected from
the Xmedia Server
Starting Xplorer and connecting to the Xmedia Server
As a client application, Xplorer must always be connected to the Xmedia Server, which is
the centralized asset management server and license manager for Vertigo applications and
devices.
Each time Xplorer is opened, it verifies the connection to the Xmedia Server and the
availability of the Xplorer license. If both conditions are successful, then Xplorer opens and
is ready to be used. However, if either of these conditions is unsuccessful, an error message
appears and prompts you to remedy the situation (see below).
While using Xplorer, the connection to the Xmedia Server must always be maintained
(active). As such, Xplorer continuously verifies and reports the connection status using the
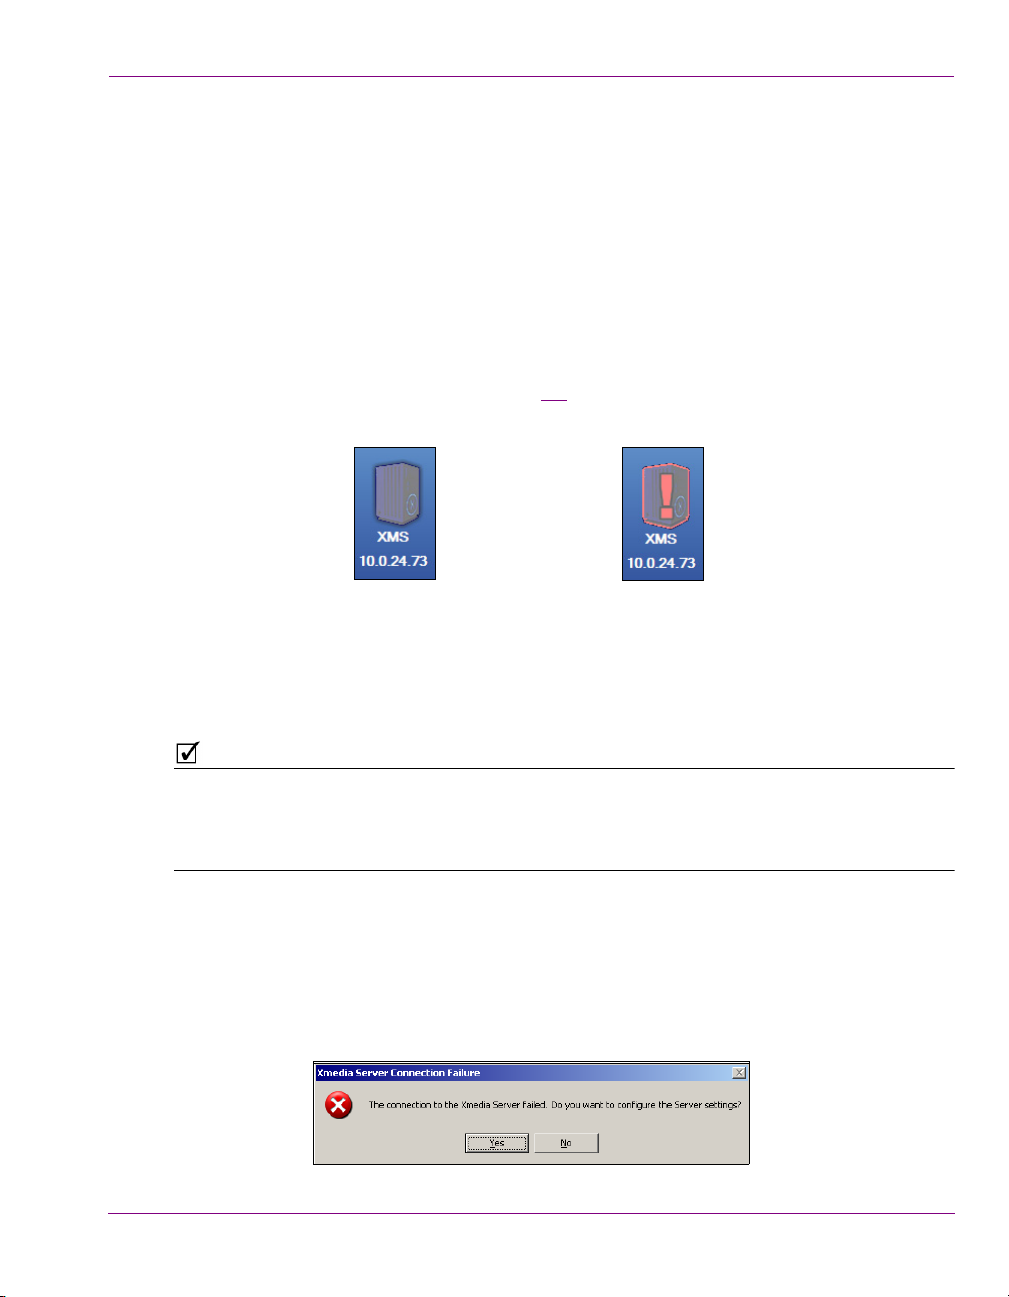
XMS icon in the Xmedia Server Viewer. Figure 2-1
icon’s connectivity status.
demonstrates the two states of the XMS
Xplorer User Manual 2-3
Figure 2-1. Xplorer’s Xmedia Server connection status
If for any reason the connection to the Xmedia Server fails (disconnected), you must reestablish the connection before continuing to use Xplorer.
Common reasons for losing the connection are that the Xmedia Server or the machine
hosting Xplorer has lost its network connection (network is down, IP address has changed
or network cable disconnected), the Xmedia Server service has been stopped, or the
Xmedia Server machine has been shutdown or has crashed.
The following sections describe how to resolve situations in which Xplorer cannot connect
to the Xmedia Server or find a valid license on startup.
Resolving an Xmedia Server connection failure when opening Xplorer:
1. Open Xplorer by clicking VERTIGOXMEDIA>XPLORER from the Windows Start menu.
If Xplorer cannot successfully connect to the Xmedia Server, the following error
message appears.
Page 14
Getting started with Xplorer
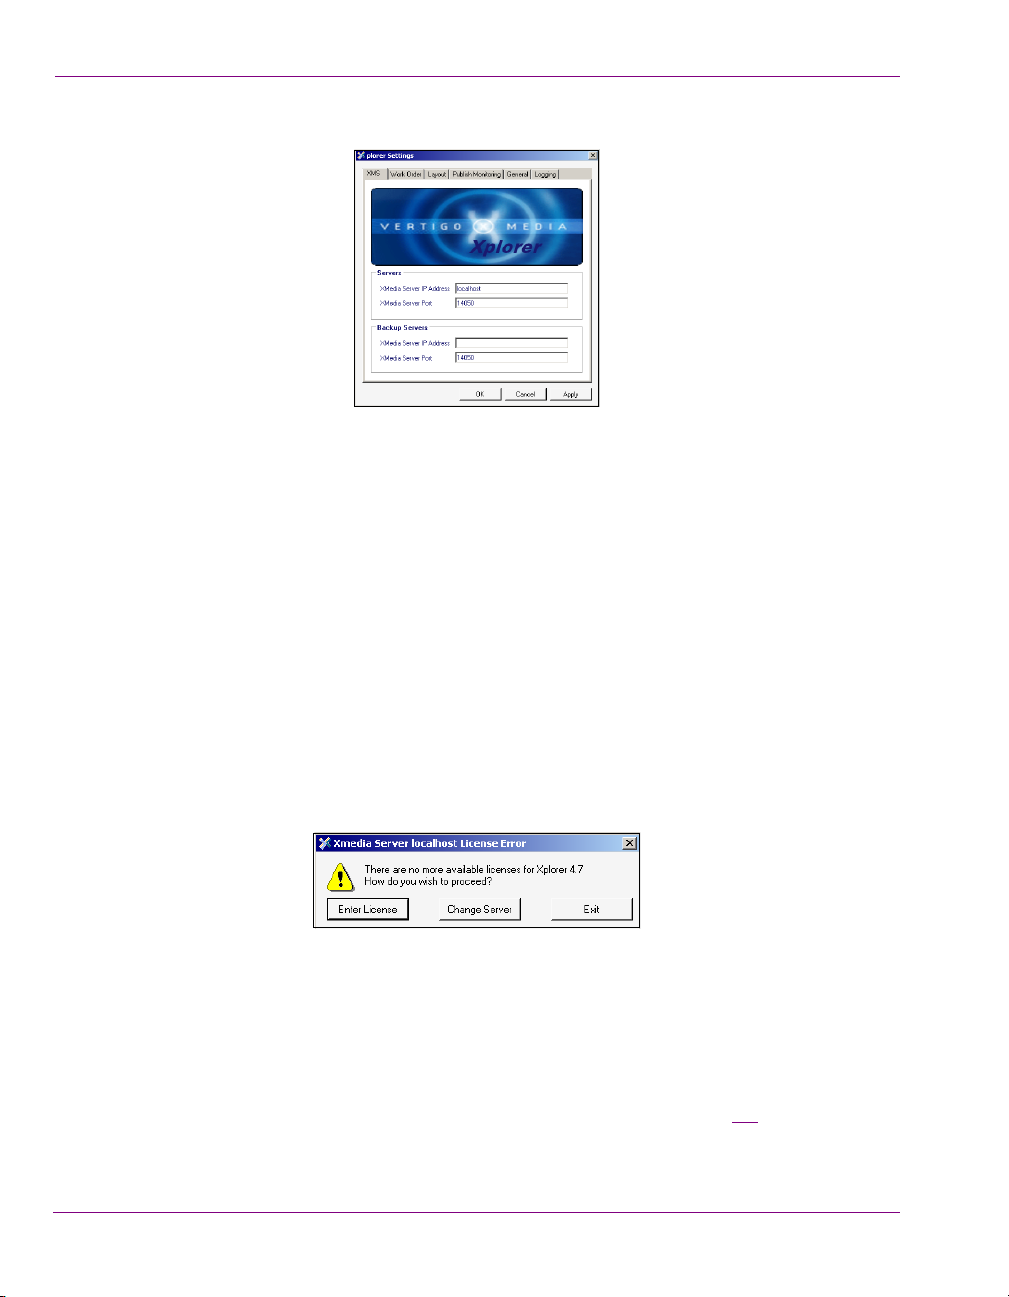
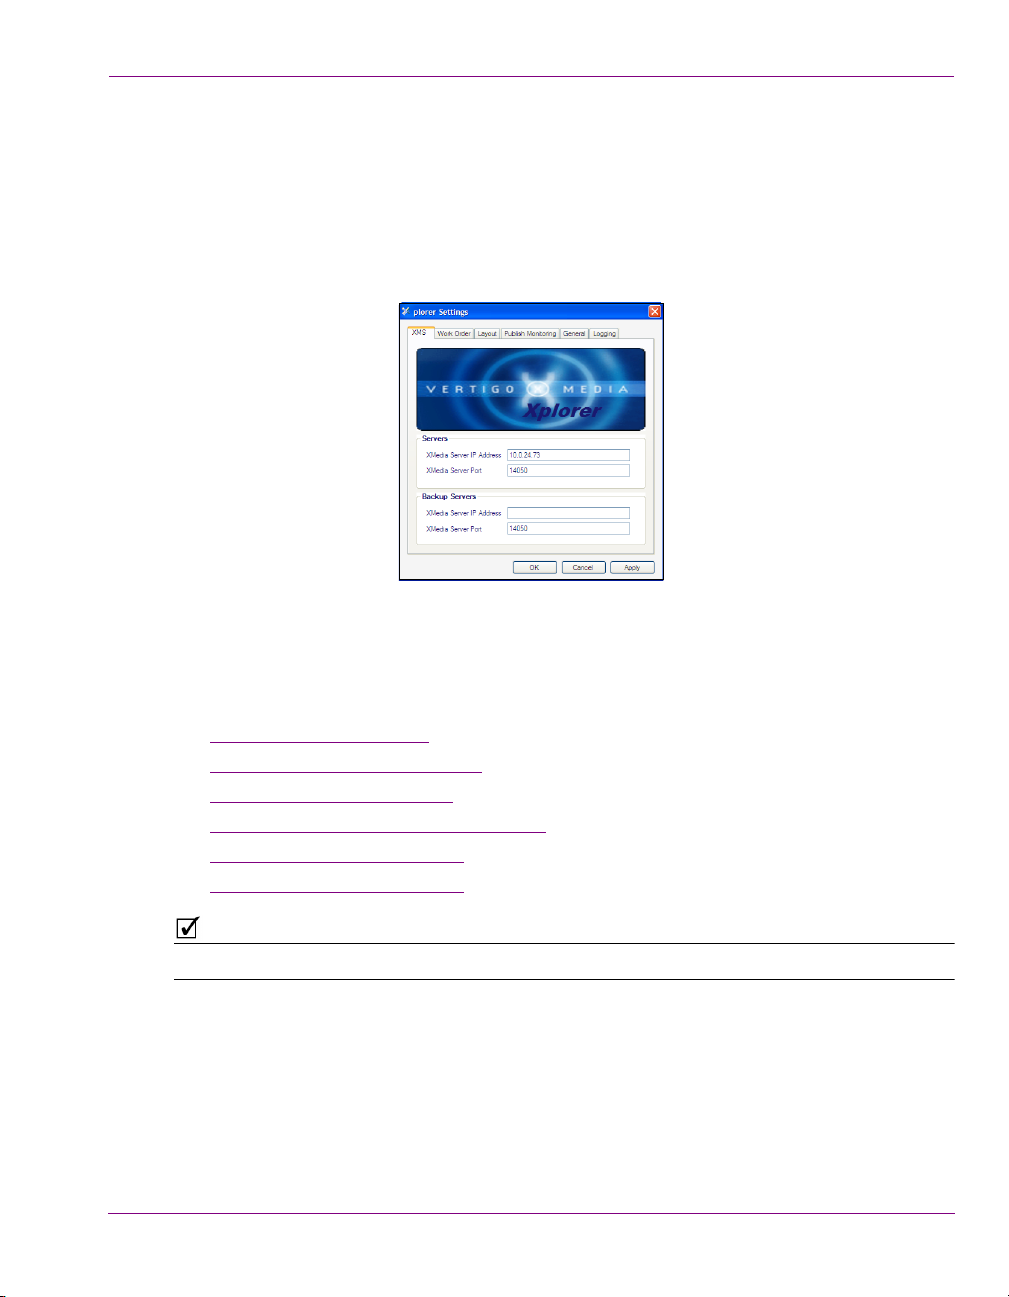
2. Click Yes and Xplorer’s SETTINGS window opens and displays the XMS page.
3. In the X
MEDIA SERVER IP ADDRESS field, type the IP address of the machine hosting the
Xmedia Server.
4. Unless the port number was changed when the Xmedia Server was installed, the default
in the X
MEDIASERVER PORT field will be correct. If it was changed, enter the new number.
5. Click OK.
Xplorer should now open. If Xplorer still cannot connect to the Xmedia Server, consult
your system administrator. The problem could be due to one of the following:
• The IP address or port was entered incorrectly.
• The machine hosting the Xmedia Server is down.
• The Xmedia Server is not running on the host machine.
• The machine is not connected to the network.
Figure 2-2. Xplorer’s Settings window
Resolving a license failure when opening Xplorer:
1. Open Xplorer by clicking VERTIGOXMEDIA>XPLORER from the Windows Start menu.
If Xplorer cannot successfully locate a valid Xplorer license on the Xmedia Server, the
following error message appears.
2. Evaluate and act according to the following:
• If you suspect that the cause of the license error is that the Xplorer license has not yet been
installed and validated on the Xmedia Server, click Enter License. The License Manager
opens and you can follow the instructions in the Release Notes for acquiring and installing
a software license.
• If you suspect that the cause of the license error is that Xplorer is connected to the wrong
Xmedia Server (the license resides on another Xmedia Server), click Change Server.
Xplorer’s S
S
ERVER IP ADDRESS field, type the IP address of the Xmedia Server that holds a valid
ETTINGS window opens and displays the XMS page (figure 2-2). In the XMEDIA
Xplorer license. Click OK.
2-4 Xplorer User Manual
Page 15
Overview of Xplorer’s interface
1
3
5
2
4
6
While further chapters provide full procedural instructions for using Xplorer, this section lists
Xplorer's main interface components and provides brief functional descriptions of each.
Getting started with Xplorer
Figure 2-3. Xplorer’s user interface components
1. Menu commands - The menu commands provide access to Xplorer's settings and
administrative functions. See “Xplorer’s menu commands” on page 6-2
of each command.
2. Toolbar buttons - The toolbar buttons offer easy access to the features and functions that
are most commonly needed when using Xplorer. Functional descriptions for each of these
buttons is described within the procedures for using Xplorer, as well as “Xplorer’s toolbar
buttons” on page 6-5.
Xplorer User Manual 2-5
3. Asset Browser - Located along the left-side of the interface, the Asset Browser is a
collapsible panel that provides a hierarchical view of the root categories and sub-categories
in which assets are stored on either the Xmedia Server or the device that is currently
selected in the Device Viewer. Upon selecting a category, the assets are displayed in the
Asset Gallery.
4. Asset Gallery - Identifies the assets that are stored within the asset category selected
in the Asset Browser. When the Proxy View button is enabled in Xplorer’s toolbar,
the assets are displayed as labelled-thumbnail images. When the Detail View button
is enabled, the assets are displayed in a list that identifies the asset’s name along
with some of its current properties.
for a full description
Page 16
Getting started with Xplorer
5. Xmedia Server Viewer - Identifies the Xmedia Server (hostname or IP address) and its
current connection status to Xplorer (see page 2-3). When you select the XMS icon, the
contents of the Xmedia Server are displayed in the Asset Browser and Asset Gallery.
6. Device Viewer - Displays an icon for each of the devices that are managed by the
Xmedia Server, as well as their current connection status to Xplorer (see page 2-12
When the View>Show Device Details menu command is enabled, some of the
devices’ statistics are displayed (i.e. the percentage of free space on their disk, as well
as the number of items left in the publish queue.) See page 4-17
When you select a device’s icon, the contents of that device are displayed in the Asset
Browser and Asset Gallery.
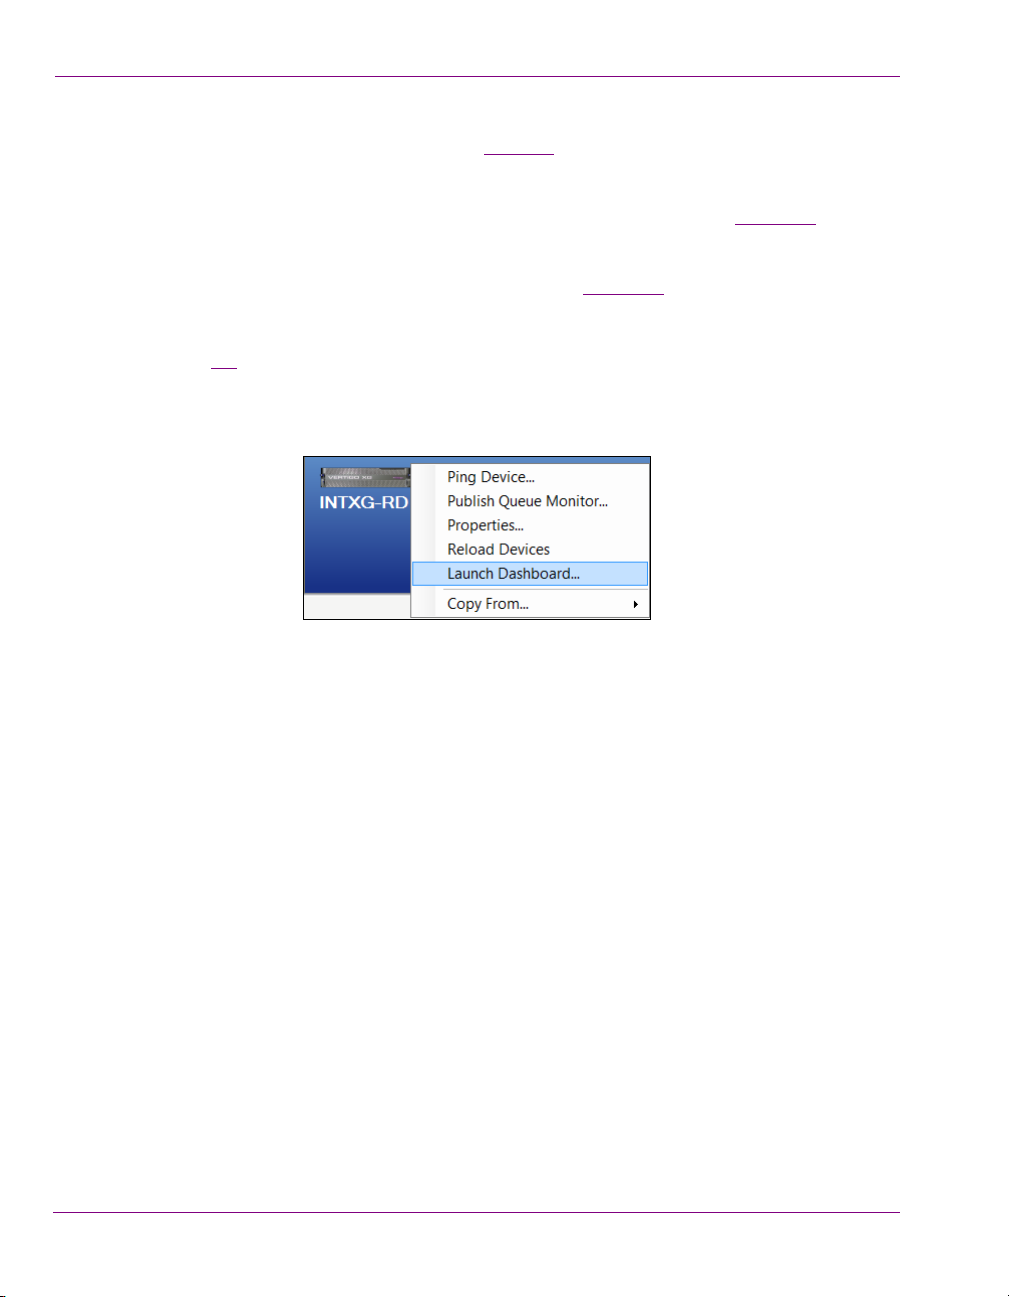
Figure 2-4
that you can use to launch various functions associated with the device (e.g. ping the
device, launch the device’s Publish Queue Monitor, launch the device’s Dashboard or
display the device’s properties).
demonstrates that right-clicking on the device’s icon exposes commands
).
for more information.
Figure 2-4. Right-clicking on the device exposes commands associated with the device
2-6 Xplorer User Manual
Page 17
Configuring Xplorer’s settings
NOTE
While Xplorer’s default settings are appropriate for most operating circumstances, you may
want to customize the look and behavior of the application using Xplorer’s settings. Note
that modifying the settings is entirely optional.
Changes to Xplorer’s settings are made in the S
by selecting the T
OOLS>SETTINGS menu command.
Figure 2-5. Xplorer’s Settings window
Getting started with Xplorer
ETTINGS window, which can be accessed
ETTINGS window has six thematic tabs, which contain properties and settings that
The S
apply to Xplorer. A functional description of each setting is provided in a quick reference
format in the following sections of the appendix chapter:
• “XMS settings” on page 6-8
• “Work Order settings” on page 6-9
• “Layout settings” on page 6-10
• “Publish Monitoring settings” on page 6-11
• “General settings” on page 6-12
• “Logging settings” on page 6-13
Some settings will require you to restart Xplorer for the changes to be applied.
Xplorer User Manual 2-7
Page 18
Getting started with Xplorer
Xplorer’s Device Viewer
displays all of the devices
from the Xmedia Server.
Adding devices to Xplorer’s Device Viewer
Xplorer uses the Vertigo Suite’s Device Manager to identify the output devices that are
available and associated with the Xmedia Server. The Device Manager contains the userdefined device configuration profiles that allow Vertigo Suite applications (i.e. Xplorer,
Xstudio, Xplay...etc.) to connect to and communicate with specific output devices on the
network.
Since several applications in the Vertigo Suite are capable of defining devices on the
Xmedia Server, it is possible that the device configuration profiles of some of the devices
on your network are already present in the Device Manager. As such, when you open
Xplorer and it is connected to the Xmedia Server, the devices that already exist in the
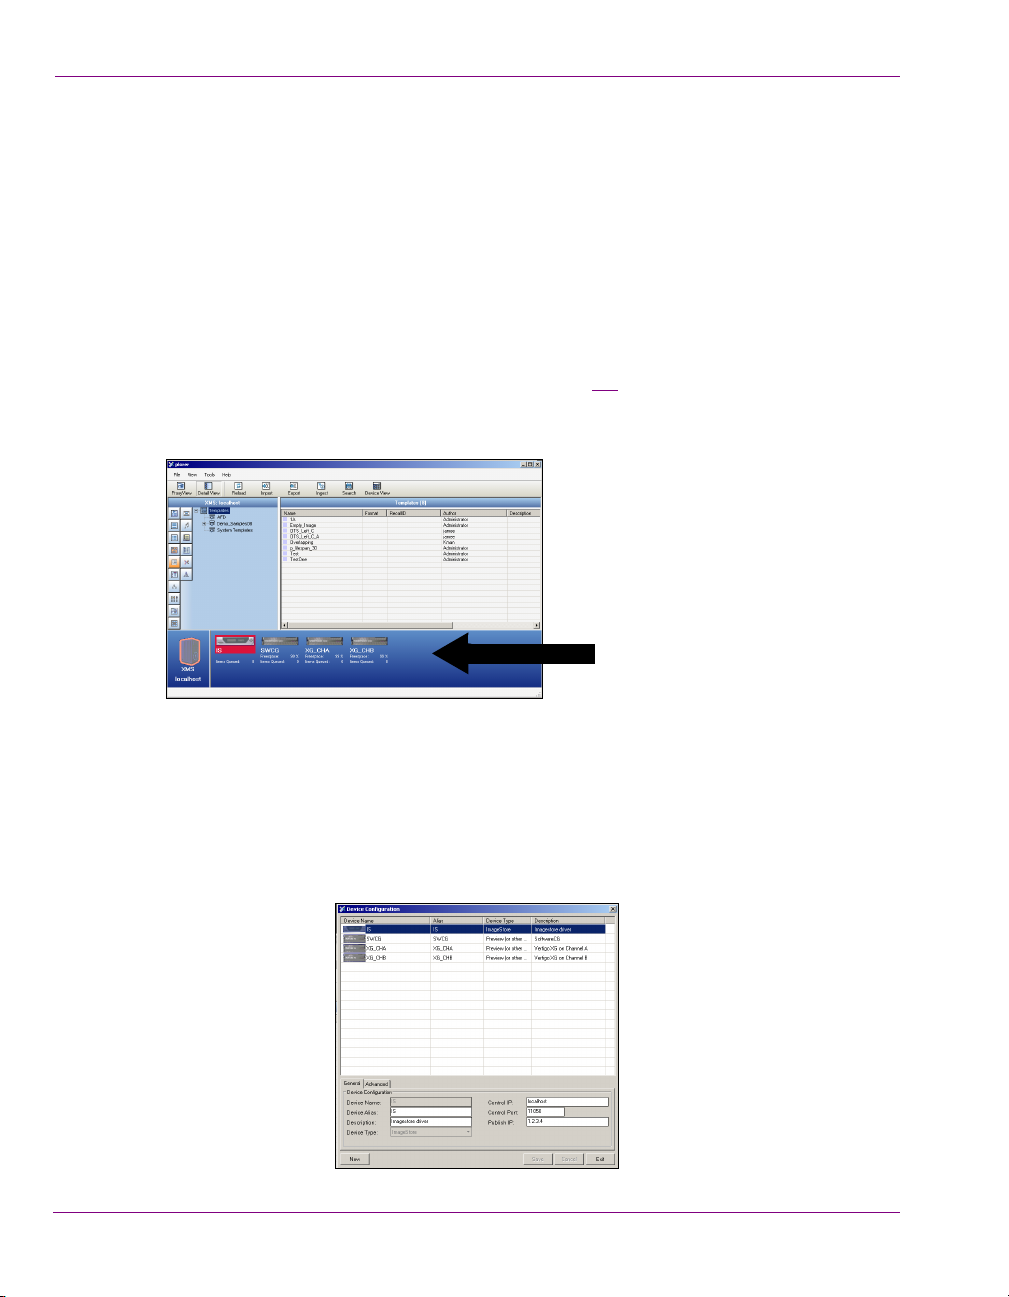
Xmedia Server will appear in Xplorer’s Device Viewer (figure 2-6
not contain an output device that you need, you must add the device’s configuration profile
to the Device Manager.
). If the Device Viewer does
Figure 2-6. Xplorer’s Device Viewer is populated with the devices from the Xmedia Server
To add a device to Xplorer’s Device Viewer:
1. Select the T
The DEVICE MANAGER window (Device Configuration) opens.
Note that the Device Manager will display the device profiles that were previously
added to the Xmedia Server.
2-8 Xplorer User Manual
OOLS>CONFIGURE DEVICES menu command.
Page 19
Getting started with Xplorer
2. Select the NEW button in the lower-left corner.
The Device Configuration section (lower portion) immediately changes to become the
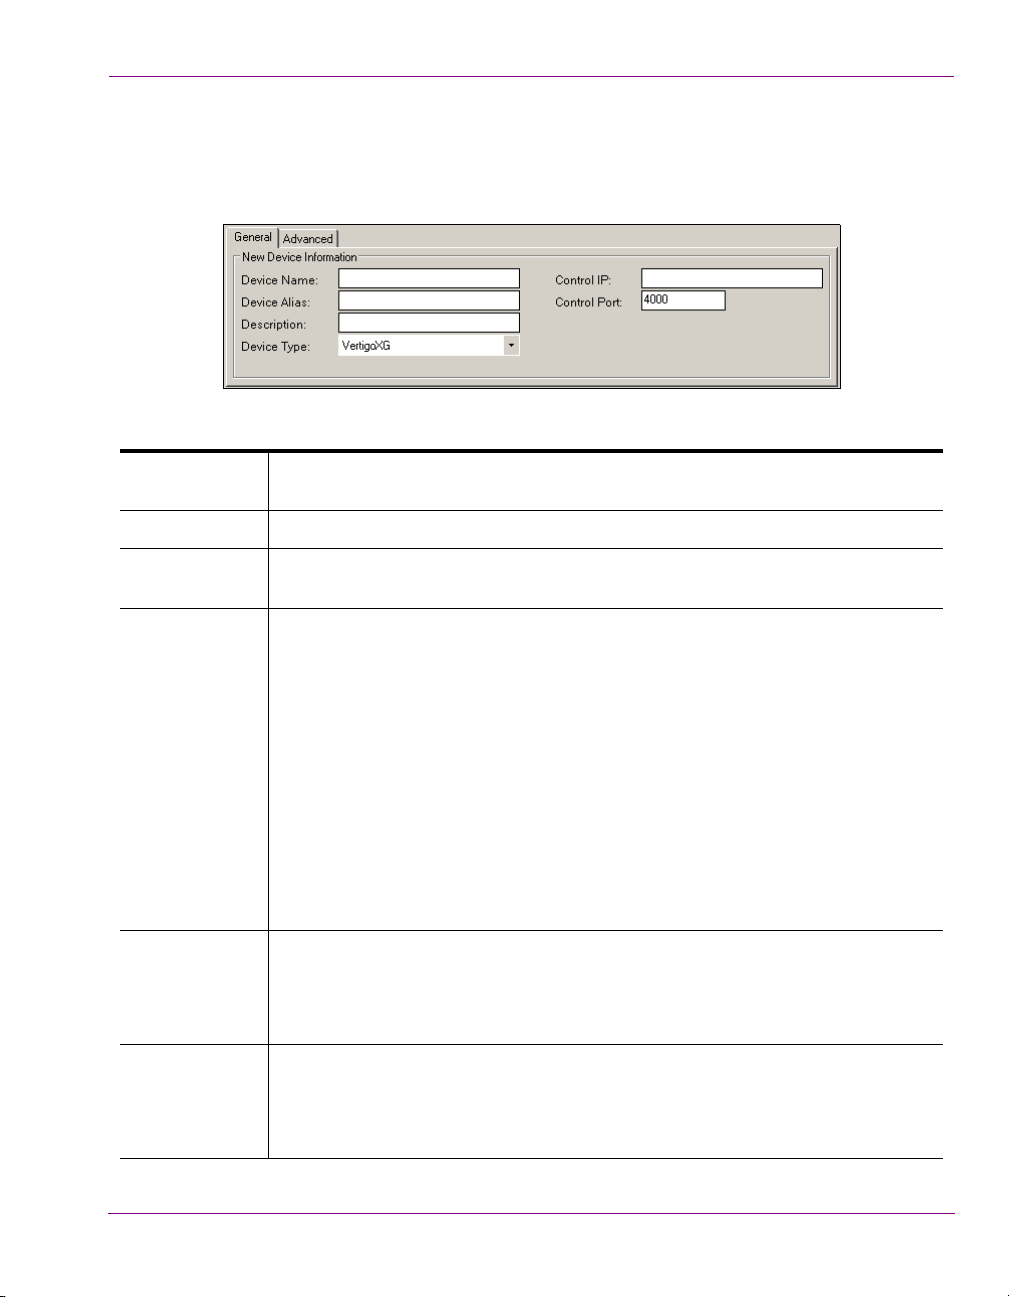
New Device Information section, which features two tabs (G
ENERAL and ADVANCED) upon
which are a series of empty fields for specifying the new device’s configuration details.
3. Specify the appropriate General Device Configuration settings:
Device name The name of the device. Note that the name cannot be modified after the device
configuration profile has been added to the Device Manager.
Device alias An optional field that provides an alternative name for the device on your network.
Description An optional field that lets you identify the device using a meaningful label. This is
helpful for distinguishing similar devices at your facility.
Device Type Identifies the type of device that these settings apply to.
Choose from:
•V
ERTIGOXG
•INTUITIONXG
•PREVIEW (OR OTHER DEVICE)
MAGESTORE
•I
•INTUITION
•HMP
•FTP
•LGK
•DSK
THER
•O
NOTE: Always select PREVIEW (OR OTHER DEVICE) for Software CG devices.
Control IP The network location (IP address) or hostname of the selected device. The host
must be available on the network.
N
OTE: The Control IP setting is not displayed when HMP is selected as the device
type.
Control Port The networking port that serves as a channel for sending commands to and from
the device.
N
OTE: The Control Port setting is not displayed when HMP is selected as the device
type.
Xplorer User Manual 2-9
Page 20

Getting started with Xplorer
Publish IP The network location (IP address) or hostname of the of the machine to which
assets are published when publishing to the selected device. This is usually set to
the same address as the Control IP. Note that the host must be available on the
network.
OTE: The Publish IP setting is not displayed when VERTIGO XG, INTUITION XG or
N
NTUITION are selected as the device type.
I
Publish Port The networking port that serves as a channel for publishing assets. Typically, this
value is set to 15000.
N
OTES:
• The Control Port setting is only displayed when P
REVIEW, FTP, HMP or OTHER
are selected as the device type.
• This value must correspond with the port used by the XpublishAgent on the
output device.
Publish as
Export
The Publish as Export setting is only displayed if FTP is the selected device type.
This setting publishes the asset in the Vertigo Export (.vex) zip file format. The
VEX format is used by the File Ingest Service to import assets into the Xmedia
Server.
4. Specify the appropriate Advanced Device Configuration settings:
Clip Template To take a clip to air in Xplay, the clip must be hosted in a template that contains a
clip object. This setting specifies the template that is used to host clips.
This is an optional field when using Xplorer. If this device profile is used by another
Vertigo Suite application in the future, you can always return to the Device Manager
and edit to profile to include this setting.
Cel Template
&
Image
Tem pla te
To take a Cel animation or image to air in Xplay, the asset must be hosted in a
template that contains a cel animation or image object. This setting specifies the
template that is used to host cel animation or image.
This is an optional field when using Xplorer. If this device profile is used by another
Vertigo Suite application in the future, you can always return to the Device Manager
and edit to profile to include this setting.
External Keyer Allows you to associate another device with the current device. This setting is used
when the CG output is keyed over the output of an ImageStore device. This allows
specific commands to be sent to the external keyer through the CG.
OTE: The External Keyer setting is not displayed when FTP and HMP are selected
N
as the device type.
2-10 Xplorer User Manual
Page 21

Getting started with Xplorer
Publish
Master
When a publish master device is specified, all items that are published to the
publish master are forwarded to the current device. This is a deprecated feature
that has been kept for backward compatibility.
OTE: The Publish Master setting is only displayed when PREVIEW and OTHER are
N
selected as the device type.
5. Click SAVE and the device configuration profile is added to the Xmedia Server and
displayed in the Device Manager.
6. Click Exit and the device is immediately added to Xplorer’s Device Viewer.
In most cases, the device is automatically connected to Xplorer and is ready for use. If it is
not connected (red box around the device), see “Connecting a device to Xplorer” on page
2-12 for instructions on how to establish the connection.
Xplorer User Manual 2-11
Page 22
Getting started with Xplorer
The red box around the device
indicates that Xplorer is not
currently connected to the device.
Connecting a device to Xplorer
In addition to being present in the Device Viewer, devices must also be actively connected
to Xplorer to ensure proper communication between the two. In most cases, a device’s
connection to Xplorer is automatic and maintained if the device is properly configured and
running on an active network.
If for any reason, the connection between Xplorer and the device fails or is dropped, the
Device Viewer alerts you of the failed connection by displaying a red box around the device.
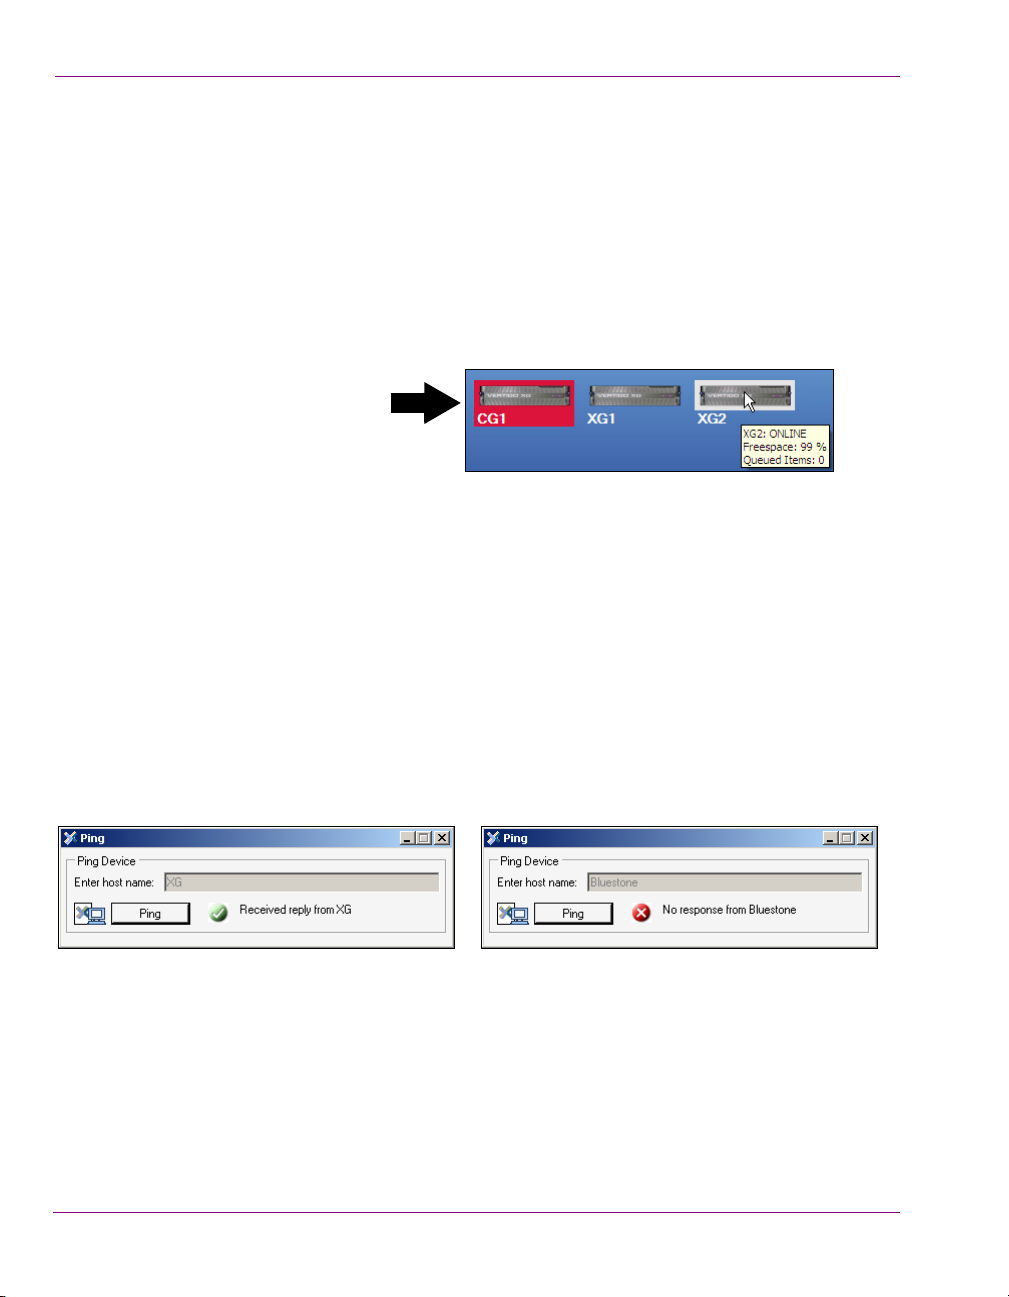
You can also see the connection status by hovering your cursor over the device (O
O
FFLINE).
Common reasons for losing the connection are that the output device or the machine
hosting Xplorer has lost its network connection (network is down, IP address has changed
or network cable disconnected) or the output device has been shutdown or has stopped.
To help you troubleshoot the connection failure, the Device Viewer contains the PING
EVICE menu command, which allows you to ping the device to verify the communication
D
path between the device and Xplorer.
NLINE or
To ping a device:
1. Right-click the device in Xplorer’s Device Viewer.
2. Select the PING DEVICE command.
ING window appears.
The P
3. Click the PING button.
Xplorer attempts to ping the device and then displays its results.
If pinging the device results in a failure, open the D
EVICE MANAGER window and verify the
device’s configuration settings. If the settings are correct, then continue troubleshooting by
verifying that the device is operating and that its cabling connections are proper.
Once the connection is re-established, Xplorer will automatically update the Device Viewer,
or you can right-click on a device and select the R
2-12 Xplorer User Manual
ELOAD DEVICES command.
Page 23
Getting started with Xplorer
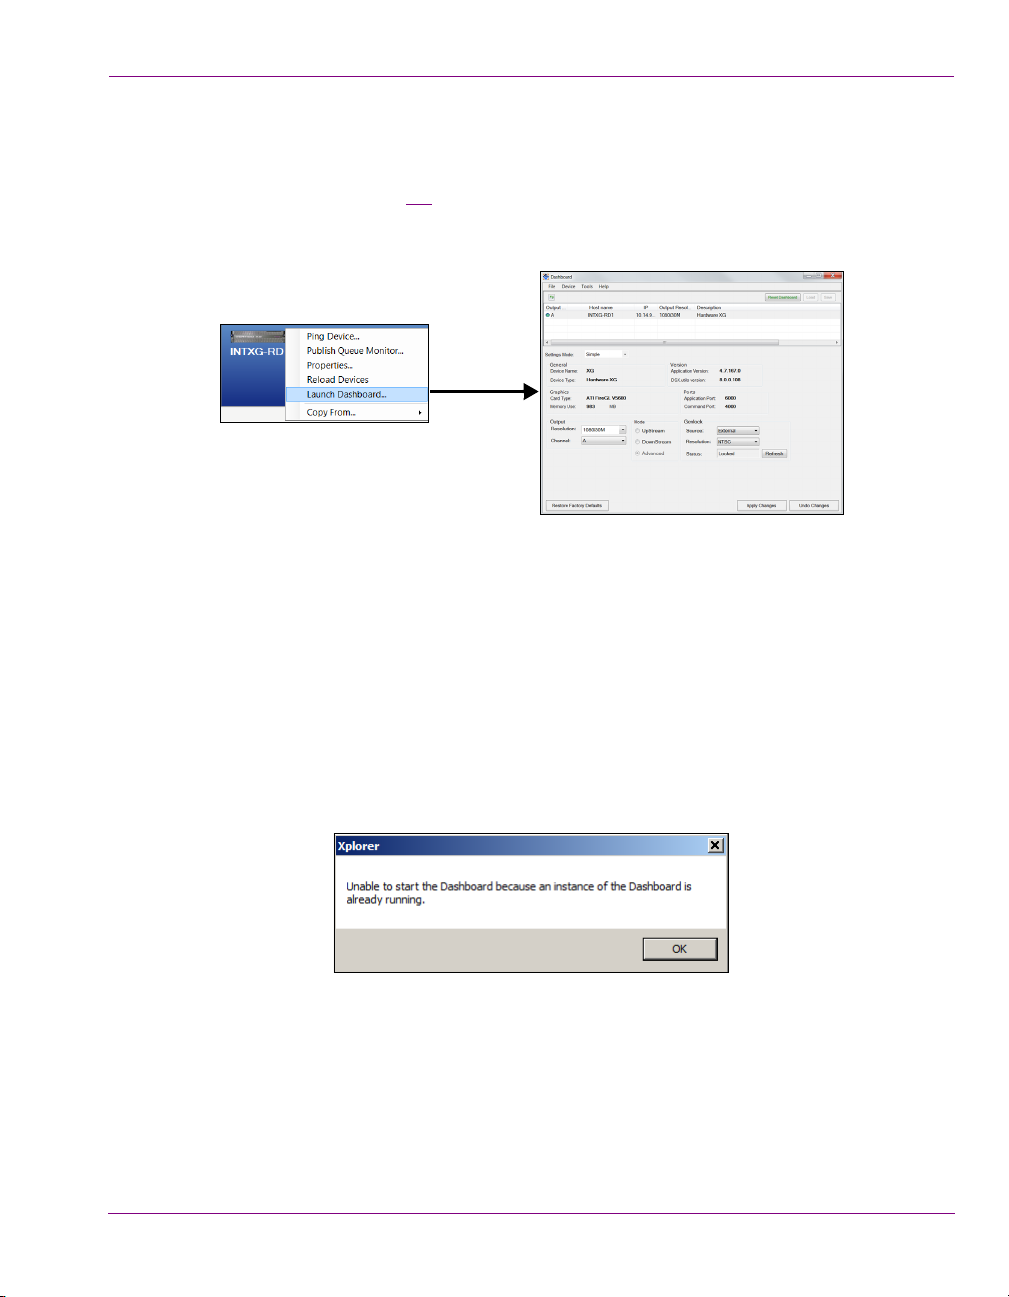
Launching a device’s Dashboard from Xplorer
Xplorer allows you to launch a device’s Dashboard, which contains the device’s
configuration settings. Figure 2-7
or Preview (Software CG) device in Xplorer’s Device view displays the L
command.
Figure 2-7. Launching a device’s Dashboard from Xplorer
demonstrates that right-clicking a Vertigo XG, Intuition XG
AUNCH DASHBOARD
When the L
and searches for the device on the specified machine and port. If the device is found, then
it is shown in the Dashboard’s device list and its properties are displayed for editing. In the
case of Intuition XG devices, the port specified in the device definition is the automation port
on Xplay rather than the port belonging to an XG instance. Because of this, all ports are
scanned on Intuition XG devices. If multiple XG instances are running they will all be shown
in the device list.
Only one instance of the XG Dashboard may be running at a time. If you attempt to open
an XG Dashboard when another instance is already running, Xplorer will display the
following error message.
A Dashboard launched from Xplorer only targets a specific machine and the port behaves
slightly differently from a dashboard launched from the XG control panel. The Device
Discovery settings are ignored and an automatic scan is performed on the requested
device. The device list is not saved on exit regardless of the value of the Auto-Save Device
List on Exit setting. The Load Device List and S
also disabled.
AUNCH DASHBOARD command is selected, the device’s XG Dashboard opens
AVE DEVICE LIST commands/buttons are
Xplorer User Manual 2-13
Page 24

Getting started with Xplorer
2-14 Xplorer User Manual
Page 25

3 BROWSING AND MANAGING MEDIA ON
THE XMEDIA SERVER AND OTHER DEVICES
As a media management application, Xplorer allows you to browse and manage the media
content (assets) stored on the Xmedia Server, as well as the assets that have been
published to and reside on other output devices.
The following sections describe how to use Xplorer to access and browse the content of the
Xmedia Server and other devices. Also described are some of the administrative tasks that
you can perform to help organize and maintain the media set on the Xmedia Server and/or
devices.
• “Displaying the media contents of the XMS or a device” on page 3-2
• “Browsing the contents of the XMS or a device” on page 3-3
• “Searching for assets stored on the Xmedia Server” on page 3-5
• “Categorizing within the Xmedia Server” on page 3-6
• “Removing an asset from an XMS category or a device” on page 3-7
• “Deleting assets from the Xmedia Server or a device” on page 3-9
• “Renaming an asset” on page 3-10
• “Viewing and editing an asset’s properties” on page 3-11
• “Monitoring and managing a device’s disk space” on page 3-14
Xplorer User Manual 3-1
Page 26
Browsing and managing media on the Xmedia Server and other devices
NOTE
Displaying the media contents of the XMS or a device
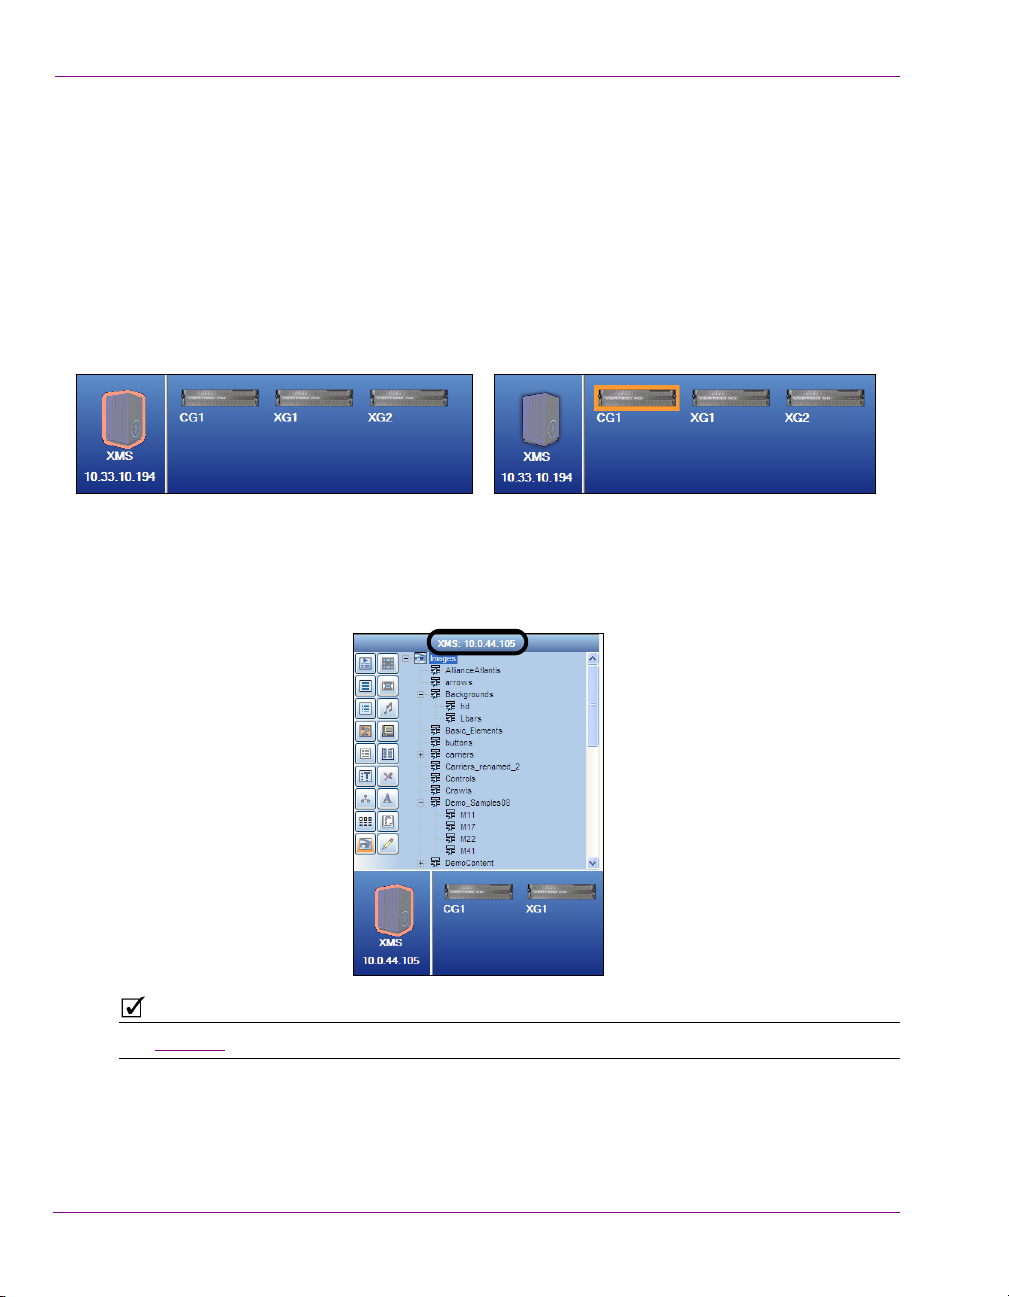
Despite being configured and connected to the Xmedia Server and several devices, Xplorer
can only display the media content and work from the perspective of the Xmedia Server or
one device at a time. As such, when you are working with Xplorer either the Xmedia Server
(XMS) is selected or the selected device becomes Xplorer's active device.
The XMS icon and device icons in Xplorer’s Viewers act as buttons that you can click to
determine whether to display and browse the contents of the Xmedia Server or a specific
device. Once selected, an orange outline appears around the icon to identify that its content
is currently being displayed in Xplorer.
When you select the XMS icon or a device’s icon, the Asset Browser immediately refreshes
the categories and the assets are displayed in Xplorer’s Asset Browser and Asset Gallery.
In addition to outlining the icon in the Viewers, the Asset Browser’s title bar also identifies
the XMS or device.
See page 3-3 for information and instructions on how to browse the content of the XMS and devices.
3-2 Xplorer User Manual
Page 27
Browsing and managing media on the Xmedia Server and other devices
NOTE
Proxy View
Detail View
Browsing the contents of the XMS or a device
When you select the XMS icon or a device’s icon in Xplorer’s Viewers, the categories and
the assets displayed in Xplorer’s Asset Browser and Asset Gallery are immediately
refreshed (see page 3-2). You can now browse the content by navigating through the
hierarchical structure of root categories, subcategories and files.
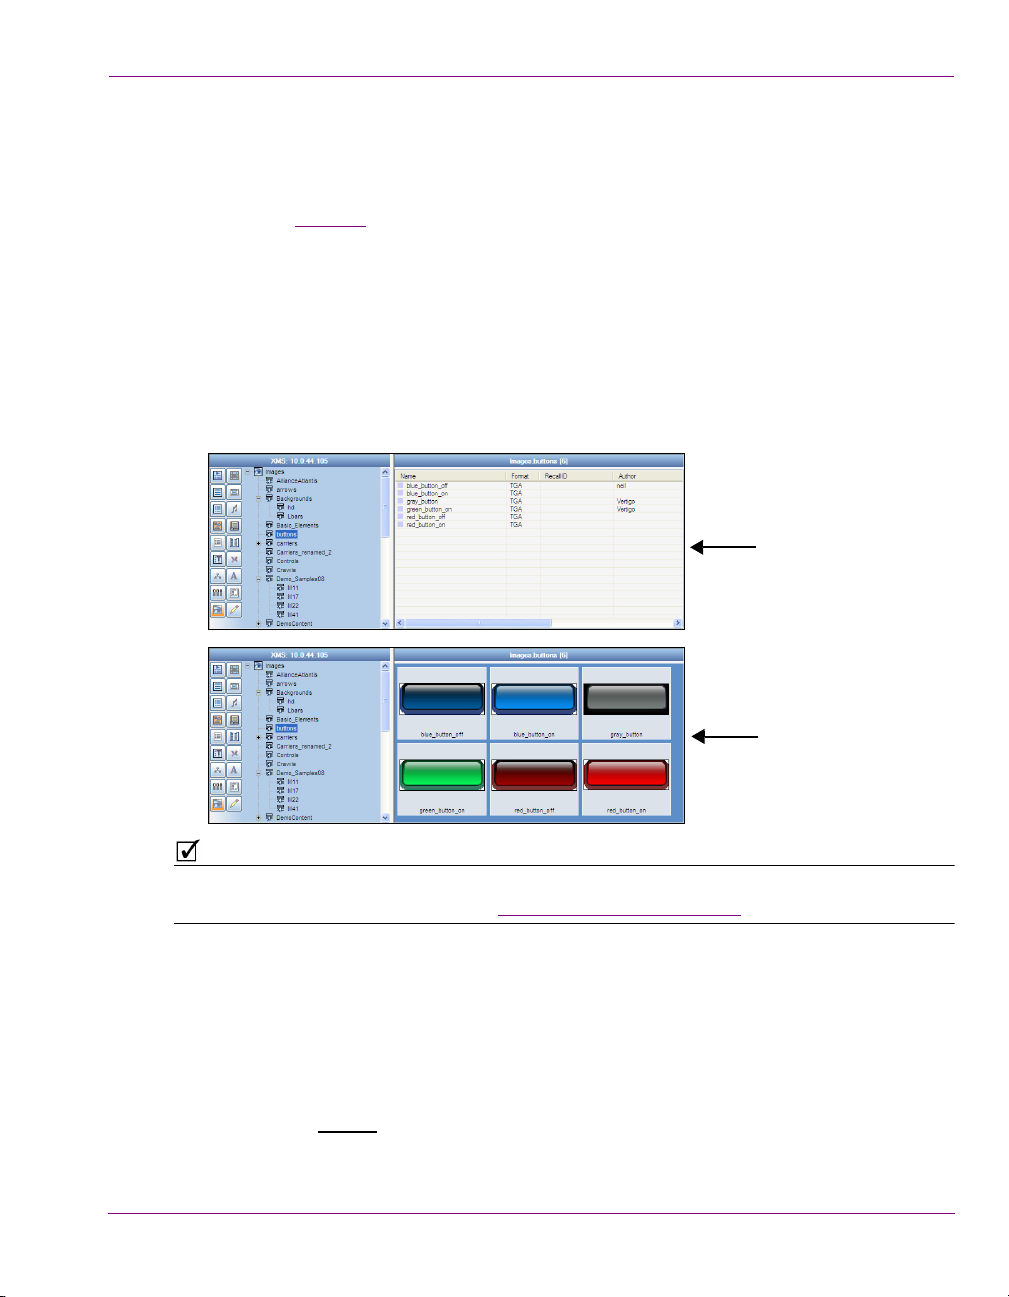
Most asset types can be displayed in the Asset Gallery either as thumbnail images using
ROXY VIEW, or as detailed lists using DETAIL VIEW.
P
ETAIL VIEW lists the contents of the selected category/subcategory and provides
• D
detailed information about your assets, including name, format, author, description,
and date modified.
ROXY VIEW displays the contents of the selected category/subcategory as thumbnail
• P
images so you can quickly identify the individual assets.
The size at which the thumbnail images are displayed can be edited using the THUMBNAIL SIZE
setting (TOOLS>SETTINGS>LAYOUT). See “Layout settings” on page 6-10 for more information.
Not all assets can be viewed in proxy mode. Since proxy view displays the assets using
thumbnail images to preview the asset, the asset must have an image or visual component
associated to it.
Asset types that can be viewed as Proxies include:
Audio, Fonts, Scenes, Templates, Pages, Images, Cel Animations, Clips, Panels, Generic
and Xmedia Objects
Asset types that cannot
Jobs, Work Orders, Playlists, Rundowns, Segments, Scripts and Lookup Tables
Xplorer User Manual 3-3
be viewed as Proxies include:
Page 28

Browsing and managing media on the Xmedia Server and other devices
NOTE
NOTE
To display the contents of the XMS or a device:
1. Select the Xmedia Server or device by clicking the XMS icon or device’s icon in the
Viewers.
Upon selecting the icon, the Asset Browser refreshes and displays the Asset
categories for the XMS or the device.
If the desired device is not listed in the Device Viewer, or if the device is disconnected, see page
2-8 and page 2-12 for instructions on how to add, configure and connect a device to Xplorer.
2. Select the desired asset category icon and navigate through the subcategory folders
by selecting the + symbol to expand the category, or select a subcategory.
The contents of the category are immediately displayed in the Asset Gallery.
3. Select either the P
toolbar to select the view format of the Asset Gallery.
4. Repeat step 2 to browse through the contents of various asset types and categories.
5. To browse the contents of another device, repeat steps 1 to 4.
If you are not able to locate a particular asset or set of assets on the Xmedia Server by
simply browsing through the Asset Browser and Asset Gallery, you can use Xplorer’s
Search tool to find it. See “Appendix B - Searching for assets stored on the XMS” on page
7-1 for more information.
ROXY VIEW or the DETAIL VIEW buttons from Xplorer’s
3-4 Xplorer User Manual
Page 29
Browsing and managing media on the Xmedia Server and other devices
NOTE
Searching for assets stored on the Xmedia Server
While Xplorer’s Asset Browser and Asset Gallery provide you with convenient access to the
assets on your Xmedia Server, you may also want to find or sort assets based on common
themes or characteristics. For this reason, Xplorer offers a Search tool, which allows you to
quickly search and find assets on the Xmedia Server by specifying search criteria based on
asset properties and meta data. When a query is performed, the Search tool returns a listing
of the assets that match the search criteria.
To open Xplorer’s Search Tool, simply click the S
Figure 3-1. Xplorer’s Search Tool
See “Appendix B - Searching for assets stored on the XMS” on page 7-1 for a full description
and instructions for using Xplorer’s Search Tool.
EARCH icon in the Xplorer toolbar.
Xplorer User Manual 3-5
Page 30
Browsing and managing media on the Xmedia Server and other devices
NOTE
NOTE
Categorizing within the Xmedia Server
An asset may be placed in one or more categories in the Xmedia Server. You can change
the set of categories where the asset resides using the C
While assets can be recategorized within the Xmedia Server, you cannot use Xplorer to
recategorize assets directly from within the device.
To move or add an asset to another category within the same Xmedia Server device:
1. Select the XMS device from the Device Viewer.
2. Select the root category in the Asset Browser and navigate to the asset that is to be
moved or added to another category.
3. Right-click on the asset in the Asset Gallery and select the C
The RECATEGORIZE window appears, which displays the current location(s) of the
asset, as well as all of the possible categories where the asset can reside.
ATEGORIZE command.
ATEGORIZE command.
4. Select the category, or multiple categories, where you want the asset to be located.
Note that you can remove the asset from its current category by deselecting the
category (see note below).
You are not permitted to deselect all categories before committing to this change otherwise
the asset might be orphaned it would not have an assigned category to reside in and
therefore be invisible to the Asset Browser.
5. Click OK and the asset is immediately moved to the specified categories.
3-6 Xplorer User Manual
Page 31

Browsing and managing media on the Xmedia Server and other devices
NOTE
Removing an asset from an XMS category or a device
Managing the assets on the Xmedia Server and associated devices often involves
eliminating redundant instances of a asset. However, you probably do not want to delete
the asset completely from the system. As such, the following sections describe how to
remove duplicate assets from Xmedia Server categories, as well as how to remove
published assets from associated devices, without deleting the asset from the Xmedia
Server.
• “Removing an asset from a category on the Xmedia Server” on page 3-7
• “Removing assets from devices, but not the Xmedia Server” on page 3-8
Use the DELETE command to delete the asset completely from the Xmedia Server or the
device. See page 3-9 for more information.
Removing an asset from a category on the Xmedia Server
When an asset is stored in more than one category on the Xmedia Server, the REMOVE
ROM CATEGORY command becomes available in the Asset Gallery’s context menu. This
F
command allows you to remove the selected asset from the category on the Xmedia Server,
as well as other devices, without deleting the asset entirely from the Xmedia Server or from
the other categories.
To remove an asset from a category on the Xmedia Server (and other devices):
1. Select the XMS in the Device Viewer.
2. Select the asset category’s icon in the Asset Browser and navigate to the subcategory
that contains the asset.
3. In the Asset Gallery, right-click on the asset that is to be removed and select the
EMOVE FROM CATEGORY command.
R
4. The R
5. Click OK and the asset is immediately removed from the category on the Xmedia
Xplorer User Manual 3-7
EMOVE ASSET window appears and asks you to confirm your intention to remove
the asset.
Server and all other devices that held this asset in that category.
Page 32

Browsing and managing media on the Xmedia Server and other devices
NOTE
Removing assets from devices, but not the Xmedia Server
When published assets are no longer required on a device, you may want to remove them
from the device, but leave a copy of the assets on the Xmedia Server as an archive. In such
a case, the R
of assets, or selected assets, from specified devices.
To remove assets from specific devices, without removing them from the Xmedia
Server or deleting the asset:
1. Select the device from the Device Viewer that contains the asset that you want to remove.
2. Select the Asset Category icon in the Asset Browser and navigate to the subcategory
that contains the asset.
3. In the Asset Gallery, select the asset, or multiple assets, that are to be removed from
the device.
4. To select multiple assets, press the SHIFT key as you click on each asset for consecutive
selections, or press the CTRL key to select a grouping of non-consecutive files.
5. Right-click on one of the selected assets and select the R
6. Click OK when prompted to confirm the removal of the assets.
The assets are immediately removed from the category on the device, but they remain
untouched on the Xmedia Server and other devices.
EMOVE FROM DEVICE command allows you to either remove an entire category
EMOVE FROM DEVICE command.
You can also remove assets or an asset category from a single or all associated devices by
selecting the XMS icon and navigating to the category or assets. Select the category or
assets to be removed and then right-click on the category/assets. Select the Remove From
command. Select either the single device or A
Remove window appears and the assets are immediately removed from the category on
the device, but they remain untouched on the Xmedia Server.
LL ASSOCIATED DEVICES. The Publish
3-8 Xplorer User Manual
Page 33

Browsing and managing media on the Xmedia Server and other devices
Deleting assets from the Xmedia Server or a device
Deleting an asset refers to permanently removing the asset from the system with no means
for retrieving the asset afterwards. You would most likely want to delete assets that are
unnecessary or outdated and will not be used in the future.
The following instructions describe how to properly remove assets from the Xmedia Server
or another device.
To delete assets from the Xmedia Server or a device:
1. Select the XMS icon or a device icon from the Viewers.
2. Select the root category in the Asset Browser and navigate through the categories until
the assets that are to be deleted from the system appear in the Asset Gallery.
3. Select a single asset or select multiple files by press the SHIFT key as you click on
each asset for consecutive selections, or press the CTRL key to select a grouping of
non-consecutive files.
4. Right-click on one of the selected assets and select the D
The DELETE ASSET window appears (figure 3-2) and asks you to confirm that you
intentionally want to delete the selected assets. Note that when deleting a single asset,
ELETE ASSET window specifies the file’s name and the device’s name, while the
the D
DELETE ASSET window that appears for multiple assets is not asset-specific.
ELETE command.
Figure 3-2. The Delete Asset window asks for confirmation before deleting the asset(s)
5. Click OK to permanently delete the asset(s), or C
unchanged in the system.
Xplorer User Manual 3-9
ANCEL to leave the asset(s)
Page 34

Browsing and managing media on the Xmedia Server and other devices
Renaming an asset
Xplorer allows you to rename assets. Changes to the asset’s name are applied to all
instances of the asset, whether the asset is renamed from the Xmedia Server or from a
device.
To rename an asset:
1. Right-click on the asset in the Asset Gallery and select the Rename command.
The RENAME ASSET window appears.
2. Type the asset’s new name in the text box and click OK. The asset’s name is
immediately changed on the Xmedia Server and the devices where the asset has been
published. There is no need to republish the asset.
3-10 Xplorer User Manual
Page 35

Browsing and managing media on the Xmedia Server and other devices
NOTE
Asset’s thumbnail
Sorting buttons
Asset’s properties
Selected property description
Preview, Advanced, Save, & Cancel buttons
Viewing and editing an asset’s properties
The Asset Gallery’s PROPERTIES command allows you to display an asset’s complete
properties in the A
When Xplorer is in DETAIL VIEW mode, some of the assets’ properties are conveniently
displayed in the Asset Gallery. See page 3-3 for more information.
To display an asset’s properties:
1. Open the Asset Properties window for the asset.
With the asset displayed in the Asset Gallery, right-click on the asset and select the
ROPERTIES command.
P
SSET PROPERTIES window appears (figure 3-3).
The A
SSET PROPERTIES window (figure 3-3).
Xplorer User Manual 3-11
Figure 3-3. The Asset Properties window
Page 36

Browsing and managing media on the Xmedia Server and other devices
NOTE
2. Verify the identity of the asset by:
• If the asset has a proxy image, it will be displayed in the thumbnail display on the Asset
Properties window. If the asset does not have a proxy image, then a generic P
A
VAILABLE icon is displayed.
• Verify the N
• Click the P
AME property’s setting in the Properties list.
REVIEW button. If the asset is able to be previewed it will be displayed in a
separate window (see “Previewing assets in Xplorer” on page 5-1
3. View and edit the asset’s property settings:
• All of the asset’s properties and its current settings are listed on the Asset Properties
window. Selecting a property’s heading (left column) displays a short description of that
property below the property list.
• Not all property settings can be edited. In fact, most are read-only. Only those settings that
are bold and some empty fields can be edited by clicking in the field and typing the new
setting value.
Selecting the K
EYWORDS property’s setting box produces a button. When selected,
this button opens a KEYWORD EDITOR window for entering keywords.
Similarly, selecting the Expiry Date property’s setting box also produces a button.
When selected, this button opens a E
XPIRY DATE EDITOR window for setting the expiry
date using a calendar tool.
• The asset’s properties can be listed in two different formats using the sorting buttons.
Select the C
ATEGORIZED button to view the properties listed in thematic groupings, or
the ALPHABETICAL button to list the properties alphabetically.
ROXY NOT
for more information).
Click the ADVANCED button to view the advanced properties for image assets. See
“Displaying an image asset’s advanced properties” on page 3-13 for more information.
4. Save or close the Asset Properties window. If you have made any edits to the
property settings, you must click SAVE for the changes to become permanent. If you
want to close the window without saving any edits or changes, click CANCEL and the
window closes immediately.
3-12 Xplorer User Manual
Page 37

Browsing and managing media on the Xmedia Server and other devices
Displaying an image asset’s advanced properties
In addition to the standard properties that are displayed in the Asset Properties window,
image assets can also contain meta data property settings, which can be viewed and set
using the I
MAGE PROPERTIES window (figure 3-4).
Figure 3-4. Advanced Image Properties window
To open the I
lower-left corner of the A
MAGE PROPERTIES window, select the ADVANCED button that is located in the
SSET PROPERTIES window (see figure 3-3 on page 3-11).
The Image Properties window contains seven (7) thematic tabs, each features properties
and settings that apply to the image asset. These properties and their settings are often
used when the Vertigo Suite’s Search Tool is used to perform an advanced search for image
assets (see “Performing an advanced search” on page 7-22
).
Once you have edited the settings, click OK to save and apply the new settings. Otherwise,
click CANCEL to apply no chances and close the window.
Xplorer User Manual 3-13
Page 38

Browsing and managing media on the Xmedia Server and other devices
NOTE
Monitoring and managing a device’s disk space
As a media management application, Xplorer provides several features and techniques for
monitoring and managing the available disk space on the Xmedia Server and other devices.
It is important to monitor how much free disk space is left on a device to allow you to free
up space if needed.
When the VIEW>SHOW DEVICE DETAILS menu command is enable, Device Details are
displayed below the icons in the Device Viewer. The Freespace property displays the
percentage of disk space that is still available on the device. Alternatively, you can hover
the cursor over the device’s icon to display updated device details.
When Xplorer’s Device View toolbar button is enabled, the Device Viewer expands to full
screen and the Device Details information is automatically enabled below each device’s icon.
A device’s precise disk space levels can be viewed by right-clicking the device’s icon in the
Device Viewer and selecting the P
appears and provides the exact amount of F
device’s C drive.
To avoid running low on disk space, it is important that you manage the contents of the
Xmedia Server and devices by removing unnecessary, duplicate, or outdated content files.
Manual techniques for removing and deleting assets from the Xmedia Server and/or
devices are described in the following sections:
• “Removing an asset from an XMS category or a device” on page 3-7
• “Deleting assets from the Xmedia Server or a device” on page 3-9
3-14 Xplorer User Manual
ROPERTIES command. The Device Properties window
REE DISK SPACE and USED DISK SPACE for the
Page 39

Browsing and managing media on the Xmedia Server and other devices
Expiry Date
Publish Lifespan
Another method for eliminating unnecessary assets is to set the asset’s EXPIRY DATE and/or
PUBLISH LIFESPAN properties.
You can access an asset’s properties by right-clicking on the asset in the Asset Gallery and
select the P
ROPERTIES command.
Determines when the asset is automatically deleted from the
Xmedia Server and devices.
When set to N
ONE, the asset will remain on the Xmedia Server and
publish devices until it is manually removed or deleted.
Expiry Date
You can also select this property and click the button, which
opens the E
XPIRY DATE EDITOR window. Use this window to set the
date upon which the asset will automatically be deleted from the
Xmedia Server and devices.
Click Save in the Properties window to apply any changes.
Publish Lifespan
When the publish lifespan expires, the asset is removed from the
device but remains in the Xmedia Server.
Xplorer User Manual 3-15
Page 40

Browsing and managing media on the Xmedia Server and other devices
3-16 Xplorer User Manual
Page 41

4 MOVING ASSETS TO/FROM THE XMEDIA
NOTE
ERVER AND OTHER DEVICES
S
As a media management application, Xplorer offers you different ways of moving assets to,
from, and within the Xmedia Server and other devices. Which method you use for moving
assets around depends upon the type or source of the asset and its destination.
The following sections describe and provide instructions for moving and managing the
assets on the Xmedia Server (XMS) and other configured devices:
• “Managed versus unmanaged assets” on page 4-2
• “Ingesting third-party content files” on page 4-4
• “Importing content files that are native to the Vertigo Suite system” on page 4-13
• “Publishing assets from the Xmedia Server to a device” on page 4-15
• “Publishing the entire contents of one device to another device” on page 4-21
• “Propagating assets from the Xmedia Server to another server” on page 4-22
• “Exporting Vertigo asset files to another Xmedia Server” on page 4-23
• “Saving a local copy of an asset as a file” on page 4-26
Information and instructions for managing assets within the Xmedia Server (i.e. recategorizing,
deleting and renaming assets) are provided in sections starting on page 4-1.
Xplorer User Manual 4-1
Page 42

Moving assets to/from the Xmedia Server and other devices
NOTE
Managed asset (light blue) Unmanaged asset (dark blue)
Managed versus unmanaged assets
At the center of the Vertigo Suite’s architecture is the Xmedia Server (XMS), which acts as
a central archive of the assets available on your system. Xplorer is the application that not
only allows you to manage the assets on the Xmedia Server, but also helps you to publish
assets to and access assets that reside on other processors like a Vertigo XG, Intuition XG,
ImageStore, or Intuition.
When discussing asset management involving the Xmedia Server and other devices, we
must distinguish between managed assets and unmanaged assets. A
asset which has been ingested into the Xmedia Server. The Xmedia Server manages the
asset and it is responsible for the various tasks that are performed on or with the asset like,
publishing, deleting, renaming... etc.
UNMANAGED ASSET is an asset which resides on a device, which has not been ingested into
An
the XMS and therefore the XMS does not know about it. For example, the first time you browse
an Intuition or Imagestore using Xplorer, the Xmedia Server retrieves a list of all the assets on
the device using the device’s publish history. If an asset resides on the Intuition or Imagestore,
but was not published there by the Xmedia Server (i.e. not in the publish history), it is considered
unmanaged. In such a case, the asset was not ingested into Xmedia Server, but it was published
to the Intuition or Imagestore by some other means. Similarly, unmanaged assets can also exist
on a VertigoXG if they were ingested directly into the EXMS.
MANAGED ASSET is an
An unmanaged asset can be made into a managed asset by dragging the asset from the
Asset Gallery onto the XMS icon in Xplorer’s Device Viewer.
Identifying managed and unmanaged assets
A device can contain both managed and unmanaged assets. Identifying whether an asset
is managed or unmanaged in Xplorer is easy. In Detail view, the colored square beside the
asset name is light blue if the asset is managed and dark blue if the asset is unmanaged.
ROXY VIEW, managed assets are identified by the asset’s light blue tile
In P
background/border color, while an unmanaged asset displays a dark blue tile color.
Figure 4-1. Identify a managed versus unmanaged asset by its tile’s background/border color
4-2 Xplorer User Manual
Page 43

Moving assets to/from the Xmedia Server and other devices
NOTE
A valid technique for adding an individual asset or the entire contents of a category is by
dragging it from one device’s Asset Browser/Gallery and dropping it on a device in the
Device Viewer. If the asset is managed, it will be published immediately to the recipient
device. If, however, the asset is unmanaged and it is dragged to an Imagestore or Intuition
device, the file will be copied over. While dragging an unmanaged asset onto a Vertigo XG
or Intuition XG device launches the C
categories in which the asset will reside.
ATEGORIZE window allowing you to select the
Xplorer User Manual 4-3
Page 44

Moving assets to/from the Xmedia Server and other devices
NOTE
Ingesting third-party content files
Individual content files (i.e. images, cel animations, video clips, and audio clips) that make
up broadcast graphics are normally produced by third-party applications outside of the
Vertigo Suite. Therefore, you must ingest them into the Xmedia Server before they can be
used by the Vertigo applications as assets. Ingesting a file basically means converting the
file into a Vertigo asset and saving it on the Xmedia Server according to its asset type.
While the procedure for ingesting image, video, and audio files is for the most part the same,
ingesting cel animations requires a different procedure. The following sections provide
information and instructions for ingesting files into the system.
• “Ingesting image or audio files” on page 4-4
• “Ingesting image sequences” on page 4-7
• “Ingesting video files” on page 4-11
Ingesting image or audio files
Images and audio clips that were created using third-party applications must be ingested into
the Xmedia Server before they can be used by the Vertigo Suite applications.
If you are ingesting multiple image files that have a sequential naming convention and/or
ingesting image files for purposes of creating a cel animation or video clip, please refer to
“Ingesting image sequences” on page 4-7.
To ingest an image or audio file:
1. Click the I
The INGEST FILES window appears.
4-4 Xplorer User Manual
NGEST button in Xplorer’s toolbar or select the FILE>INGEST menu command.
Page 45
Moving assets to/from the Xmedia Server and other devices
NOTE
Displaying the proxy of the image file
Media Player for previewing the audio file
2. Navigate through the categories in the INGEST FILES window and select the file(s) that
are to be ingested into the Xmedia Server.
You can ingest multiple files by pressing the SHIFT key as you click on each file for
consecutive selections, or pressing the CTRL key to select a grouping of nonconsecutive files.
3. Click O
PEN.
EW MEDIA window appears, which allows you to specify and save details about the
The N
ingested asset file.
If the first three letters in the name of the selected image file are identical to other files in the
same directory (i.e. Bug001, Bug002, Bug003...), the I
NGESTING A CEL ANIMATION message box
appears and asks if your intention is to ingest the single image file or to create cel animation.
- Select N
O to ingest a single image file using the NEW MEDIA window.
- Select YES to create a cel animation from the set of identically named image files using the
MULTI-IMAGE INGEST window. See page 4-7 for instructions on how to proceed in such a case.
4. Selecting a file’s name in the NEW MEDIA LIST displays the file’s information and all of
the categories within the appropriate root category. When an image file is being
ingested, a proxy of the image is displayed in the center pane of the Ingest window. If
an audio file is being ingested, then the Ingest window features the Windows Media
Player allowing you to preview the playout of the audio clip before ingesting it.
5. Select the first file name in the N
Repeat this step for each file listed in the N
a. In the NAME field, assign a name to the asset to be called. By default, the file’s
name is used.
Note: If you are ingesting an edited version of a file that already exists on the
Xmedia Server, saving it under the same name in the same category overwrites
the previous version of the asset. To avoid overwriting the asset, rename it or save
it to another category.
b. Optional - Enter your name in the A
c. Optional - Enter a short description in the D
Xplorer User Manual 4-5
EW MEDIA LIST panel and complete the following tasks.
EW MEDIA LIST panel.
UTHOR field.
ESCRIPTION field.
Page 46

Moving assets to/from the Xmedia Server and other devices
d. Optional - Enable and set a EXPIRY DATE and PUBLISH LIFESPAN fields. The EXPIRY
DATE specifies a date when the asset will be automatically deleted from the main
XMS, spoke XMSs (hub & spoke model), as well as removing the asset from the
devices that it was published to.
UBLISH LIFESPAN is used by the Xmedia Server to determine how long (in days)
The P
the asset remains on a device that it has been published to before it is removed.
e. The M
ANAGE ASSET FROM ITS CURRENT LOCATION check box will only be enabled if
the asset that is to be ingested is currently stored on an external device which is
accessible by the Xmedia Server.
Selecting this option can save space on the Xmedia Server by managing the asset
from its current location instead of making a copy. In most cases, this parameter
should not be enabled.
f. Assign the asset to one or more categories by selecting check boxes in the
ATEGORIES box. To create a new category, right-click in the CATEGORIES box and
C
select ADD CATEGORY from the pop-up menu.
g. Optional - Assign the file one or more keywords by selecting check boxes in the
EYWORDS box. (Keywords are used by Xplorer’s Search tool for searching and
K
retrieving assets.) To create a new keyword, right-click in the K
select ADD KEYWORD from the pop-up menu.
6. Click OK to save and exit the Ingest window.
Or,
Click CANCEL to discard the new information entered in the window, exit and return to Xplorer.
EYWORDS box and
4-6 Xplorer User Manual
Page 47

Ingesting image sequences
NOTE
As explained on page 4-4, you can use Xplorer to ingest a single image file. Additionally,
you can use Xplorer’s Multi-image Ingest window to ingest multiple image files or create
a cel animation or clip from a series of sequentially named images files.
To ingest multiple images or convert the image files into a cel animation or a clip
animation:
1. Click the I
The I
2. Navigate through the categories in the I
are to be ingested. Then click OPEN.
NGEST button in Xplorer’s toolbar or select the FILE>INGEST menu command.
NGEST FILES window appears.
Moving assets to/from the Xmedia Server and other devices
NGEST FILES window and select the image file(s) that
You select multiple files by pressing the SHIFT key as you click on each file for consecutive
selections, or pressing the CTRL key to select a grouping of non-consecutive files.
Xplorer User Manual 4-7
Page 48

Moving assets to/from the Xmedia Server and other devices
If you selected a single image file and the first three letters in the name of the file are
identical to other files in the same directory (i.e. Bug001, Bug002, Bug003...), the
NGESTING A CEL ANIMATION message box appears and asks if your intention is to
I
ingest the single image file or to create cel animation.
•Select N
O to ingest the single image file using the INGEST window. See page 4-4
for instructions on how to proceed in such a case.
•Select Y
files using the M
If however, you selected multiple image files, the M
ES to create a cel animation or clip from the set of identically named image
ULTI-IMAGE INGEST window.
ULTI-IMAGE INGEST window
automatically appears and offers you several options to either ingest the individual
image files, or to create a cel animation or clip asset from these image files.
3. When the M
ULTI-IMAGE INGEST window appears, it offers you six (6) options for how you
can proceed to ingest the set of image files. Each option is described in the table below.
Note that Xplorer takes into consideration what is trying to be ingested and makes a
preliminary suggestion as to which option to use by pre-selecting an option for you. You
may use the pre-selected option or select another.
VAF The VAF option ingests the selected image files and converts their
sequential playout into a video clip asset. The resulting video clip asset
is saved using the Vertigo Animation Format (.vaf) and it is stored in
the Xmedia Server’s Clips category.
This option is recommended for large animations.
Note that this option does not preserve the original format and it offers a
reduced set of looping options.
OXI +VAF Select the OXI +VAF option when ingesting large animations.
When this option is chosen a cel animation asset is created by
converting the images into both the oxi and vaf formats. The asset uses
oxi as its master format and vaf as the alternate format. The Xmedia
Server determines whether to publish the oxi or the vaf based on the
target device type. Such a cel animation can be played on both XG and
Intuition/Imagestore devices.
OXI The OXI option ingests the multiple images and creates a cel animation
by converting the images into oxi format. The resulting .oxi file will be
saved as a cel animation asset in the Cel Animation category.
The OXI option is recommended when ingesting smaller animations.
Unlike the OXI +VAF option, the OXI option provides additional looping
options. The recommended file sizes for this option are < 250 MB when
the target device is a Vertigo XG and < 4 GB when the target device is
an Intuition.
4-8 Xplorer User Manual
Page 49

Moving assets to/from the Xmedia Server and other devices
VAF, OXI + VAF, OXI with embedded VAFOXI J2K + OXI
OXI with embedded VAF The OXI with embedded VAF option is intended to be used with
external management systems that require a single file.
When this option is chosen a cel animation asset is created by
converting the images into both the oxi and vaf formats and embedding
the vaf within the oxi.
Embedding the VAF in the OXI allows the same file to be used on both
the Intuition (Classic), as well as the Vertigo XG. Note that this option
provides reduced looping options and that file sizes should be < 3.6 GB.
J2K+OXI The J2K+OXI option is used with HMP devices. In such a case, the J2K
is the master, while the OXI is the alternate format.
Ingest multiple images The Ingest multiple images option ingests several images and saves
them as individual image assets in the Xmedia Server’s Image category.
4. If creating a cel animation, select from the FORMAT drop-down list the target video
format of the cel animation. This information indicates the desired full screen size and
frame rate and is used when the cel animation is cropped. Valid settings are: PAL,
NTSC, 720p60, 720p60M, 720p50, 1080i30, 1080i30M, and 1080i25.
5. Enable or disable the I
NTERLACED property.
Enable this setting if the images that make up the sequence being ingested contain
fields, rather than frames. Disable this setting if the images that make up the sequence
contain frames.
6. Enable or disable the U
SE ORIGINAL SIZE property.
Enable this setting if the width and height of the cel animation will be equal to the width
and height of the images from which it was created. When this setting is disabled, the
cel animation will be cropped to the smallest size possible by removing completely
transparent regions.
7. Enable or disable the R
EVERSE property.
The reverse parameter determines whether the files that make up the sequence should
be played in reverse order. T
RUE or FALSE (default)
8. Set the Looping properties.
Figure 4-2
shows the looping properties that are available when different ingest options
are selected.
Figure 4-2. The Loop parameter formats for multi-image ingest options
Xplorer User Manual 4-9
Page 50

Moving assets to/from the Xmedia Server and other devices
NOTE
• LOOP - While the check box can be enabled or disabled, the LOOP drop-down list has
three (3) possible settings:
RUE: Enables looping. When this setting is used the animation will loop until
• T
an action is sent to stop it.
ALSE: Disables looping.
• F
NSPECIFIED: Takes the looping setting that is already established by the scene object.
• U
When looping is enabled, the Start Loop and End Loop settings specify the range of frames
over which looping occurs. In general, the animation plays all frames up to and including the
frame specified by the End Loop frame, then jumps back to the Start Loop frame and plays
again up to the End Loop frame repeatedly until looping is disabled. At this point the
animation plays the frame after the End Loop frame.
OOP setting is used in conjunction with Start Loop and End Loop settings. If Start Loop
The L
and End Loop are set to -1, then the entire cel animation loops continuously. If either Start
Loop or End Loop is not -1, then the cel animation does a four point loop (in-loop-out). If Loop
is disabled, the cel animation plays once from beginning to end. However, if loop is disabled
and Start Loop and End Loop are both set to the same value (other than -1), then the cel
animation displays the frame specified by Start Loop and End Loop and the cel animation can
be controlled by automation. Note that if Ping Pong is enabled, and both Start Loop and End
Loop are set to -1, then Loop is ignored.
ING PONG - If enabled, and both Start Loop and End Loop settings are set to -1, then
• P
the cel animation plays in ping-pong mode. That is, it plays from beginning to end and
then back to the beginning.
TART FRAME - Specify the frame at which the cel animation starts playout.
• S
A value of -1 means start at the beginning.
ND FRAME - Specify the frame at which the cel animation ends playout.
• E
A value of -1 means play until the end.
TART LOOP - Specify the frame at which looping starts.
• S
A value of -1 means loop from the beginning of the cel animation.
ND LOOP - Specify the frame where the cel animation loop ends.
• E
A value of -1 means loop until the end of the cel animation.
All frames are specified starting from 0 for the first frame in the cel animation.
9. Click OK and the I
NGEST window appears.
10. Optional - You can preview the cel animation or clip by dragging the slider or using the
arrow buttons along the bottom of the preview display in the middle panel. When you
are ingesting multiple images, you can preview an image file by selecting its file name
in the N
EW MEDIA LIST.
11. Choose the proxy by selecting a frame in the preview window.
12. Assign a name to the asset in the N
AME field. By default, the file’s name is used.
Note: If you are ingesting an edited version of a file that already exists on the selected
device, saving it under the same name in the same category overwrites the previous version
of the asset. To avoid overwriting the asset, rename it or save it to another category.
4-10 Xplorer User Manual
Page 51

Moving assets to/from the Xmedia Server and other devices
13. Optional - Enter your name in the AUTHOR field.
14. Optional - Enter a short description in the D
15. Optional - Enable and set a E
ATE specifies a date when the asset will be automatically deleted from the main XMS,
D
XPIRY DATE and PUBLISH LIFESPAN fields. The EXPIRY
ESCRIPTION field.
spoke XMSs (hub & spoke model), as well as removing the asset from the devices that
it was published to.
UBLISH LIFESPAN is used by the Xmedia Server to determine how long (in days)
The P
the asset remains on a device that it has been published to before it is removed.
16. The M
ANAGE ASSET FROM ITS CURRENT LOCATION check box will only be enabled if the asset
that is to be ingested is currently stored on an external device and if the permission permit
access. If this criteria is met, the parameter is available and you can save space on your
local/central XMS by managing the asset from its current location. In most cases, this
parameter should not be enabled.
17. Assign the asset to one or more categories by selecting check boxes in the C
ATEGORIES
box. To create a new category, right-click in the CATEGORIES box and select ADD CATEGORY
from the pop-up menu.
18. Optional - Assign the file one or more keywords by selecting check boxes in the K
box. (Keywords are used by the Search tool for searching and retrieving assets.) To create
a new keyword, right-click in the K
EYWORDS box and select ADD KEYWORD from the pop-up
menu.
19. Click OK to save and exit the Ingest window.
Or,
Click CANCEL to discard the new information entered in the window and return to Xplorer.
EYWORDS
Ingesting video files
Video clips that are created using third-party applications must be ingested into the Xmedia
Server before they can be used by the Vertigo Suite applications.
To ingest a video clip:
1. Click the I
The I
2. Navigate through the categories in the I
are to be ingested. Then click OPEN.
To select multiple files, press the SHIFT key as you click on each asset for consecutive
selections, or press the CTRL key to select a grouping of non-consecutive files.
3. When the I
panel and complete the following tasks. Repeat this step for each file listed in the NEW
EDIA LIST panel.
M
a. Optional - Preview the clip in the Windows Media Player in the middle panel to
b. Optional - Select a proxy by moving the slider in the Windows Media Player to the
Xplorer User Manual 4-11
NGEST button in Xplorer’s toolbar or select the FILE>INGEST menu command.
NGEST FILES window appears.
NGEST FILES window and select the file(s) that
NGEST window appears, select the first file name in the NEW MEDIA LIST
confirm that this is the correct video file to be ingested.
desired frame. Optionally, you can use the Proxy Mode button to choose a jpg file.
Page 52

Moving assets to/from the Xmedia Server and other devices
c. In the NAME field, assign a name to the asset. By default, the file’s name is used.
Note: If you are ingesting an edited version of a file that already exists on the
selected device, saving it under the same name in the same category overwrites
the previous version of the asset. To avoid overwriting the asset, rename it or save
it to another category.
d. Enter your name in the A
UTHOR field.
e. Optional - Enter a short description in the D
f. Optional - Enable and set a EXPIRY DATE and PUBLISH LIFESPAN fields. The EXPIRY
ATE specifies a date when the asset will be automatically deleted from the main XMS,
D
spoke XMSs (hub & spoke model), as well as removing the asset from the devices that
it was published to.
UBLISH LIFESPAN is used by the Xmedia Server to determine how long (in days)
The P
the asset remains on a device that it has been published to before it is removed.
g. The M
ANAGE ASSET FROM ITS CURRENT LOCATION check box will only be enabled if
the asset that is to be ingested is currently stored on an external device and if the
permission permit access. If this criteria is met, the parameter is available and you
can save space on your local/central XMS by managing the asset from its current
location. In most cases, this parameter should not be enabled.
h. Assign the asset to one or more categories by selecting check boxes in the
ATEGORIES box. To create a new category, right-click in the CATEGORIES box and
C
select ADD CATEGORY from the pop-up menu.
i. Optional - Assign the file one or more keywords by selecting check boxes in the
EYWORDS box. (Keywords are used by Xplorer’s Search tool for searching and
K
retrieving assets.) To create a new keyword, right-click in the K
select ADD KEYWORD from the pop-up menu.
4. Click OK to save and exit the Ingest window.
Or,
Click CANCEL to discard the new information entered and return to Xplorer.
ESCRIPTION field.
EYWORDS box and
4-12 Xplorer User Manual
Page 53

Moving assets to/from the Xmedia Server and other devices
NOTE
Importing content files that are native to the Vertigo Suite system
If you would like to add and use Vertigo assets that were created on a separate Vertigo Suite
installation (e.g. stored on a different Xmedia Server), the assets must first be exported from
the original system (see page 4-23
along with a Vertigo Export file (.exp).
You can then use Xplorer (or Xstudio) to import the .exp file into your Xmedia Server. Unlike
ingesting files, which loads and converts files from third-party formats into Vertigo assets
(see page 4-4
require no conversion. The assets are also automatically assigned to their rightful place on
the Xmedia Server according to their asset type and previous categorization.
There are two things to worth noting regarding importing asset files:
• Links to data will not be maintained. The same data sources need to be set up on
your server and the links re-established.
• Existing assets may be overwritten. This only occurs under a very specific set of
circumstances. For example, if you import a file in a category that has the same name
as a file in an identically named category, the imported file will overwrite the other one.
Also, if you import a file from the root category and an identically named file is in the
root category of the installation you are importing to, the imported file will overwrite the
other one. You can prevent files from being overwritten by assigning them to different
categories, since an imported file will only overwrite another file if both have the same
name and belong to the root category or to an identically named category.
), imported assets are already in the appropriate Vertigo formats and therefore
), which creates a folder containing the exported assets
If the assets that you are importing contain data schemas, then your data schema
connection settings will likely need to be changed. Do this before using any templates,
scenes, or pages.
To import assets:
1. Select the I
The S
2. Navigate to the export folder that contains the asset(s) that you want to import
(i.e. VxM_Export_21082008_125200).
3. Double-click the folder to display its contents.
4. Select the .
5. The Import window appears and identifies all of the assets that will be imported from
the export file to the target XMS. An icon in front of the asset’s name indicates whether
the asset is being added or is being updated .
Xplorer User Manual 4-13
MPORT button from Xplorer’s toolbar.
ELECT VERTIGOXMEDIA ASSET EXPORT FILE window appears.
EXP FILE and then click the OPEN button.
Page 54

Moving assets to/from the Xmedia Server and other devices
NOTE
The assets are displayed in a tree-structure that represents the assets’ destination among
the target server’s categories. Newly created categories are indicated the icon.
Figure 4-3. The Import window provides a verification step before the import operation is performed
Figure 4-3
also demonstrates that the Import window can also contain a list of error or
warning messages to alert users of problems that may occur if the import is performed.
For example, some categories may have to be renamed and some assets will not be
able to be categorized because of name conflicts. Clicking on an asset that shows
either an error or warning icon highlights the associated messages. Similarly, clicking
on a message will select the corresponding asset or category in the tree.
6. After inspecting the import contents, select the I
MPORT button to proceed with the
import or select CANCEL to abort the import.
The Import window remains open after I
MPORT is clicked so that it can be referenced when
looking for newly imported assets. Select the CLOSE button to close the IMPORT window.
7. Optional: Verify that the asset was properly imported by opening the Asset Browser
and navigating to the category where you expected the asset to be stored.
Transferring assets by exporting assets from one XMS and then importing them into
another XMS manually is ideal for low volume and infrequent transfers. However, if you are
frequently transferring assets between servers, we recommend using propagation to
transfer assets. See “Propagating assets from the Xmedia Server to another server” on
page 4-22 for more information.
4-14 Xplorer User Manual
Page 55

Moving assets to/from the Xmedia Server and other devices
NOTE
Publishing assets from the Xmedia Server to a device
In the Vertigo workflow, assets are centrally stored on the Xmedia Server. Before an asset can
be used on an output device, a copy of the asset must be transferred from the Xmedia Server
and stored locally on the device. This transfer process is referred to as publishing the asset.
When you publish assets to a device, the Publish Progress window keeps track of which
assets have been recently published and the status of the publishing process. You can also use
the Publish Queue Monitor to monitor and manage a device’s publish queue (see page 4-17
There are two (2) ways in which assets can be published to a device:
• “Automatically publishing assets to devices” on page 4-15
• “Manually publishing assets from the Xmedia Server to devices” on page 4-16
Automatically publishing assets to devices
You can set up Xplorer so that when you ingest or import an asset into the Xmedia Server,
the asset is automatically published to preselected devices.
To set up Xplorer for automatic publishing assets to devices:
1. Prior to ingesting or importing the asset(s) into the Xmedia Server, open Xplorer and verify
that the XMS and the devices are present and actively connected in the Device Viewer. If
not, see page 2-8
2. Select the XMS icon in the Xmedia Server Viewer.
3. Select the Asset Category’s icon in the Asset Browser and navigate to the category
where the asset(s) will be ingested or imported into.
4. Right-click on the category and select the P
The PUBLISH DEVICES window appears.
5. Select the devices that you want to publish the asset to when it is received by the XMS.
6. Click OK.
From this point on, every time an asset is added to the specific category on the Xmedia
Server, the asset will be automatically published to the selected devices.
To deactivate the automatic publishing of a category:
1. Select the XMS icon in the Xmedia Server Viewer.
2. Right-click on the category and select the R
device(s) from which they are to be removed.
UBLISH REMOVE window appears and lists the assets that are being deleted from
The P
the device. Once finished close the Publish Remove window.
3. Right-click on the category once again and select the P
context menu. The C
4. Disable the check boxes next to the devices that you no longer want to automatically
publish to.
5. Click OK.
and page 2-12 for instructions on how to add and/or connect devices.
ROPERTIES command.
EMOVE FROM command, as well as the
ROPERTIES command from the
ATEGORY PROPERTIES dialog box appears.
).
Re-enabling autopublish does not trigger a publish. To force a publish, you must manually
publish using the PUBLISH TO command (see page 4-16).
Xplorer User Manual 4-15
Page 56

Moving assets to/from the Xmedia Server and other devices
Manually publishing assets from the Xmedia Server to devices
Using Xplorer, you can manually publish assets from the Xmedia Server to specific devices
in preparation for playout on those devices.
The quickest way to publish an asset from the Xmedia Server to a device is to drag the
asset or its category from the Xplorer’s Asset Gallery and drop it onto the device in the
Device Viewer (figure 4-4
Figure 4-4. A quick way to publish an asset to a device is to drag & drop from the Asset Gallery
The following instructions describe an alternative way of manually publishing asset using
the Publish commands.
To publish manually assets from the Xmedia Server to one or several devices:
1. Launch Xplorer and verify that the Xmedia Server and the devices are present and
actively connected in the Xplorer Viewers. If not, see page 2-8
instructions on how to add and/or connect devices.
2. Select the V
IEW>PUBLISH PROGRESS command to open the PUBLISH PROGRESS
window. The Publish Progress window allows you to track all of the assets that have
been published during the current Xplorer session.
3. Select the XMS icon in the Xmedia Server Viewer.
The contents of the Xmedia Server appears in the Asset Browser and Asset Gallery.
4. Select the appropriate asset category icon and navigate to the category folder that
contains the asset(s) that are to be published.
5. Determine if you want to publish the asset(s) to one or more devices. If you want to
publish to just one device, then continue to the next step.
If you want to publish the asset(s) to more than one device:
a. Right-click on the category and select the P
UBLISH DEVICES window appears.
The P
b. Enable the devices that will receive the published asset(s).
c. Click OK.
6. In the Asset Gallery, select the asset(s) you want to publish:
• If you want to publish all of the assets contained in a category, right-click on the
category in the Asset Browser and a context menu appears.
• If you want to publish just one of the assets in a category, right-click on the asset in
the Asset Gallery, and a context menu appears.
• If you want to publish several assets displayed in the Asset Gallery, hold down the
C
TRL key and select the desired assets. Release the CTRL key and right-click on one
of the selected assets in the Asset Gallery. A context menu appears.
).
and page 2-12 for
ROPERTIES command.
4-16 Xplorer User Manual
Page 57

Moving assets to/from the Xmedia Server and other devices
NOTE
NOTE
7. Select either the PUBLISH TO command or the FORCE PUBLISH TO command.
The Publish command is the most efficient choice, since it only publishes assets which
have not previously been published or have changed since last being published. The
Force Publish command always publishes all specified assets without performing any
checking.
8. Select the device to which the asset(s) will be published, or select the A
EVICES command to publish the asset to the devices that where specified in the
D
Publish Devices window in step 5.
The assets are immediately published to the device and its status appears in the
Publish Progress window.
Although the PUBLISH PROGRESS window tracks and displays the status of the publishing of
assets, Xplorer also allows you to view a Publish Transfer log file that documents in greater
detail the publish process. After publishing, select the V
to open the Publish Transfer log file in Notepad.
IEW>PUBLISH TRANSFER LOG command
LL ASSOCIATED
Monitoring and managing a device’s publish queue
When you are publishing a significant volume of assets to a single or multiple devices, we
recommend using Xplorer’s Publish Queue Monitor window to monitor and manage a
device’s publish queue.
The following sections provide information and instructions for monitoring and managing
the publish queue for individual devices:
• “Using Device Details to monitor a device’s publish queue” on page 4-17
• “Using the Publish Queue Monitor to manage publishing” on page 4-18
Using Device Details to monitor a device’s publish queue
One way to monitor a device’s publish queue is to display the Device Details in the Device Viewer.
When the V
information is listed below the device’s icon:
• Freespace: Percentage of disk space still available on the device.
• Items Queued: The number of items currently in the device’s publish queue.
• Q. Status: The status of the queue during publishing. Normal indicates that everything
• Throughput: The data transfer speed/rate (Kb/s) at which publishing is operating.
When Xplorer’s Device View toolbar button is enabled, the Device Viewer expands
to full screen and the Device Details information is automatically enabled below each
device’s icon.
Xplorer User Manual 4-17
IEW>SHOW DEVICE DETAILS menu command is enabled, the following
is working as expected, while Blocked indicates that the throughput is too low to publish.
Page 58

Moving assets to/from the Xmedia Server and other devices
Queue tabs
Items to be
Number of items
left in the queue
published
The Device Details’ refresh rate is determined by the PUBLISH STATISTICS UPDATE INTERVAL
setting in Xplorer’s Publish Monitoring settings (see page 6-11). Another convenient way
to view the most recent device details is to hover the cursor over the device’s icon.
Using the Publish Queue Monitor to manage publishing
Xplorer’s Publish Queue Monitor allows you to monitor and manage the publish queue for
a specific device. More specifically, the Publish Queue Monitor displays the current status
of all of the publish queues for a particular publish location (device). In addition, the Publish
Queue Monitor allows you to manage the device’s publish queue by reordering the items in
the queue and also moving items from one queue to another so that they may be published
concurrently.
Figure 4-5. Publish Queue Monitor window
The following sections provide information and instructions for using the Publish Queue Monitor:
• “Opening the Publish Queue Monitor window” on page 4-19
• “Monitoring the contents and progress of the device’s publish queue” on page 4-19
• “Prioritizing items that are in the queue” on page 4-19
• “Publishing items concurrently in different queues” on page 4-20
4-18 Xplorer User Manual
Page 59

Moving assets to/from the Xmedia Server and other devices
NOTE
Opening the Publish Queue Monitor window
To open the Publish Queue Monitor window, right-click on a device in the Device Viewer and
select the Publish Queue Monitor command.
If items are currently being published to the device when the Publish Queue Monitor window
is opened, the publish item list will be populated. Otherwise, the publish item list will be
empty until a publish request is executed to that publish location.
Monitoring the contents and progress of the device’s publish queue
When a publish request is executed to the device’s publish location, the items to be
published will populate the publish queue list within the Queue 1 tab (default).
The publish requests are executed sequentially in the queue. This means that the items at
the top of the queue are currently being processed, followed by those that are next to be
processed.
Items in the queue that have been or are currently being processed are disabled (light gray)
and cannot be selected. If the item is red, this indicates that several attempts to publish the
item have failed.
Each column displays a property of the publish item in the queue, including its current status
and completion progress.
The rate at which the queue’s information is updated in the Publish Queue Monitor window is
regulated by the Refresh Rate setting located in the toolbar. By default, the queue is
automatically updated every 1 second, however, you may change the setting by clicking the
button and selecting a specific frequency rate (1, 2, 5 or 10 seconds) or M
Selecting Manual allows you to control the updating of the queue by clicking R
ANUAL.
EFRESH button
in the toolbar.
Once an item is successfully published to the device, you can remove them from the queue
by clicking the CLEAR COMPLETE button in the toolbar
You may cancel items that are currently in the publish queue by selecting the items and then
clicking the CANCEL SELECTED button in the toolbar. The status of the cancelled items
will indicate that the item’s publishing was cancelled and the item will be disabled (gray) so
that it cannot be reordered or reprioritized. We recommend removing cancelled items from
the publish queue.
Prioritizing items that are in the queue
Publish requests are executed sequentially, so that the items at the top of the queue list are
processed first. The Publish Queue Monitor allows you manage the order in which items
are published by moving items to a higher position so that they are published sooner, or
delay publishing a queued item by moving it lower in the queue.
You cannot move an item to the very last row of the queue - only to the second last item.
Xplorer User Manual 4-19
Page 60

Moving assets to/from the Xmedia Server and other devices
NOTE
To reorder items in the publish queue, select the item, then drag and drop the item onto its
new location in the queue. An orange bar appears while dragging to show exactly where
the item will be placed when dropped.
Items that are currently being processed in the queue cannot be reordered.
Publishing items concurrently in different queues
The Publish Queue Monitor allows you to publish concurrently in five (5) queues. This is
useful if you have a large item publishing (that is taking a long time) and you do not want to
wait before publishing other items.
When a series of publish requests are executed, by default the items are placed in the first
queue (Queue 1 tab). By selecting and dragging items from the first queue to another queue
tab, you will place the items in a separate publish queue that will start publishing
simultaneously with the other queue. This avoids having to wait for the other items to finish.
4-20 Xplorer User Manual
Page 61

Moving assets to/from the Xmedia Server and other devices
Publishing the entire contents of one device to another device
Xplorer provides a quick and easy way to duplicate the complete asset contents of one
device to another device.
To duplicate the contents of one device on another device:
1. Right-click on the recipient device and select the Copy from command.
2. Select the source device that contains the desired assets.
The following warning message appears.
3. Click Yes to proceed.
The entire asset contents of the source device are immediately entered into the
destination device’s publish queue, which can be monitored using the Publish
Progress window or the destination device’s Publish Queue Monitor window.
Xplorer User Manual 4-21
Page 62

Moving assets to/from the Xmedia Server and other devices
NOTE
Propagating assets from the Xmedia Server to another server
Propagation allows you to automatically or manually transfer and save assets stored on one
server (i.e. XMS-1) onto another server (i.e. XMS-2) even though both of these servers are
otherwise independent. This is accomplished by configuring the servers specifically for
propagation, in which one server is the propagation server (master) and the others are
propagation nodes (slaves). This configuration is perfomed in the XMS Panel on each of
the servers, and is therefore described in the XMS P
User Manual.
While propagation does require some initial setup, once it is properly configured it makes
transferring assets quick and effortless. It is therefore ideal for situations where the transfer
of assets between servers is frequently performed. If this is not the case, then it may be
more beneficial to can transfer assets by exporting assets from one XMS and then importing
them into another XMS manually (see page 4-23 and page 4-13).
Once the propagation configuration is properly setup on the servers’ XMS Panel, no further
setup is required in Xplorer. The automatic propagation will transfer, update, and save
assets to the propagation nodes automatically when you do any of the following to an asset
category that is associated to a propagation node:
• create a new asset
• edit an asset or the asset’s properties
• rename, recategorize, or delete an asset
• change or delete the asset’s proxy/thumbnail
If while working in Xplorer, you want to force the propagation of an asset or asset category,
you can use the P
ROPAGATE TO command to execute a manual propagation.
ANEL documentation, not in this Xplorer
To manually propagate assets from one server to another:
1. Open Xplorer on the propagation server (master).
2. Select the asset category or the asset that you want to propagate to a node server from
the Asset Browser or Asset Gallery.
To select multiple assets to propagate, press the SHIFT key as you click on each asset
for consecutive selections, or press the CTRL key to select a grouping of nonconsecutive files.
3. Right-click on the selection and select the P
menu. The menu extends to display a list of the associated node servers (that were
setup on the XMS Panel).
4. Select the recipient of the assets and the assets are immediately transferred to the
selected node server.
4-22 Xplorer User Manual
ROPAGATE TO command from the context
Page 63

Moving assets to/from the Xmedia Server and other devices
Exporting Vertigo asset files to another Xmedia Server
Exporting consists of saving Vertigo assets to files. Exporting is most commonly used for
copying objects and assets from one server to another. For example, a broadcaster with
several stations can replicate their look and feel at each station by exporting assets from
one and importing them to the others.
Xplorer offers maximum flexibility by letting you export anything -- from an individual asset
(e.g. an image file) to the entire contents of an asset type’s root category (e.g. Panels).
Moreover, anything you export will automatically be accompanied by the assets used to
build it, any proxy images, etc. For example, if exporting a control panel, all assets that were
used to create it will be exported at the same time (e.g. Xmedia objects, image files, clip
files, etc.).
To export one or more assets or asset categories:
1. Launch Xplorer and verify that the XMS icon appears in the Viewer.
If it does not, then see “Starting Xplorer and connecting to the Xmedia Server” on page
2-3 for instructions on how to configure the XMS for Xplorer.
2. Select the XMS icon.
The contents of the Xmedia Server appears in the Asset Browser and Asset Gallery.
3. Select the appropriate asset category icon and navigate to the subcategory folder that
contains the asset(s) that are to be exported.
4. Select the E
The E
XPORT button in the Xplorer toolbar.
XPORT ASSETS window appears (figure 4-6).
Figure 4-6. The Export Assets window
Xplorer User Manual 4-23
Page 64

Moving assets to/from the Xmedia Server and other devices
NOTE
5. Drag and drop the assets, or the subcategory (if you want to export all of the assets in
a subcategory), from the Asset Gallery to the Export Assets window (figure 4-7).
Figure 4-7. Export Assets window with assets selected for export
Selecting an item for export more than once will not create multiple copies.
6. Check the Export Linked Assets check box.
7. When done, click OK. This displays the CREATE EXPORT DESTINATION DIRECTORY window.
Figure 4-8. Create Export Destination Directory window
4-24 Xplorer User Manual
Page 65

Moving assets to/from the Xmedia Server and other devices
NOTE
8. Note that the FILE NAME field will contain a default name for the export which can be
edited if desired. Browse to the folder where you wish to save the export and click
AVE. This creates a new folder containing a set of files which comprise the export.
S
Figure 4-9. Export folder
Transferring assets by exporting assets from one Xmedia Server and then importing them
into another Xmedia Server manually is ideal for low volume and infrequent transfers.
However, if you are frequently transferring assets between servers, we recommend using
propagation to transfer assets. See “Propagating assets from the Xmedia Server to another
server” on page 4-22 for more information.
Xplorer User Manual 4-25
Page 66

Moving assets to/from the Xmedia Server and other devices
NOTE
Saving a local copy of an asset as a file
Xplorer allows you to save a copy of selected assets locally to your machine as a file.
When saving the following asset types, A
ENERIC, Xplorer identifies the main file format that the asset can be saved as, as well as
G
any alternative file formats (if applicable).
Although SCENES and TEMPLATES assets can also be saved locally, they must be saved as
.xml files.
The following asset types cannot be saved locally: PANELS, PLAYLIST, SEGMENTS,
UNDOWNS, SCRIPTS, PAGES, LOOKUP TABLES, WORK ORDERS and JOBS.
R
To save a single asset on your local drive:
1. Right-click on the asset in the Asset Gallery and select the S
The command expands and asks you to choose the file format that you would like to
save the asset as.
•The Master format is the asset’s original file format.
•The Alternate formats are additional formats that the asset may be saved as.
UDIO, IMAGES, CEL ANIMATIONS, CLIPS, and
AVE LOCAL COPY command.
2. Select the file format that the asset will be saved as.
AVE LOCAL COPY window appears.
The S
3. Navigate to the folder on your system where you want to save the files and click S
AVE.
To save multiple assets on your local drive:
1. In the Asset Gallery, select the desired files by pressing the SHIFT key as you click on
each asset for consecutive selections, or press the CTRL key to select a grouping of
non-consecutive files.
2. Right-click on one of the selected assets and select the S
AVE LOCAL COPY command.
The BROWSE FOR FOLDER window appears.
3. Navigate to the folder on your system where you want to save the file and click OK.
Or,
Select a directory location and create a new folder in that location by pressing the M
AKE
NEW FOLDER button. Name the folder and then click OK.
When saving multiple assets, the assets can only be saved as their current file format.
Saving assets in alternate file formats must be done individually as described above.
4-26 Xplorer User Manual
Page 67

5 PREVIEWING ASSETS IN XPLORER
To help identify and manage the asset contents of the Xmedia Server and other devices,
Xplorer allows you to preview the playout of audio clips, images, cel animations, and video
clips. Although other asset types cannot be previewed, their proxy images are displayed in
the Asset Gallery.
Xplorer also provides access to the Image Editor, which allows you to perform some basic
image editing tasks on image assets like, adjusting the image’s color and sharpness,
cropping the image, among others. Note that no other type of assets can be modified using
Xplorer.
The following sections provide information and instructions for previewing assets and
modifying images:
• “Previewing audio and video clips” on page 5-2
• “Previewing cel animations” on page 5-3
• “Previewing and editing image assets” on page 5-4
Xplorer User Manual 5-1
Page 68

Previewing assets in Xplorer
NOTE
NOTE
Previewing audio and video clips
Previewing an audio or video clip asset in Xplorer opens a Windows Media Player window
(figure 5-1
controlling the playout of the clip. Use the slider to display the playout of a particular frame, or
to select the starting point at which the clip (audio or video) will begin when you select the P
button. Pressing the spacebar during playout pauses and restarts the playout of the clip.
You cannot edit any aspect of the audio or video asset using the preview window or command.
), which features typical transport controls (play, pause, stop, volume...etc.) for
LAY
Figure 5-1. Audio / video clips are previewed in a media player type window
To preview an audio or video clip asset:
1. Select the XMS or a connected device from the Device Viewer.
2. Navigate through the Asset Browser until the desired asset is displayed in the Asset
Gallery.
3. Either double-click the asset in the Asset Gallery, or right-click on the asset’s name and
select the P
The asset immediately starts loading and then playing out in a separate media viewer window.
If for any reason the asset cannot be previewed, the P
When clips and OXA/OXI cel animations are previewed in Xplorer, they are actually being
played out from the Xmedia Server by opening a UNC path to the Xmedia Server. As such,
should a clip ever fail to play in Xplorer, we suggest that you troubleshoot the problem by
ensuring that the user logged into the machine running Xplorer has permission to access
the Xmedia Server machine. In other words, the user of Xplorer must be able to successfully
open a UNC path to the Xmedia Server by specifying the Xmedia Server by hostname
(rather than IP address) in Windows Explorer.
5-2 Xplorer User Manual
REVIEW command.
ROXY NOT AVAILABLE icon appears.
Page 69

Previewing cel animations
NOTE
Previewing a cel animation asset in Xplorer opens an independent preview window
(figure 5-2
as well as viewing the contents of a particular frame.
The preview window’s title bar identifies the name of the cel animation and the length of the
cel animation (total number of frames). When you move the slider, the title bar identifies the
exact frame location that is being displayed.
), which features a slider that allows you to manually playout the cel animation,
Previewing assets in Xplorer
Figure 5-2. The Cel Animation preview window allows you to view the animation frame-by-frame
If the cel animation is an OXA or and OXI, you can preview the cel animation’s alpha channel by
clicking the V
To preview a cel animation asset:
1. Select the XMS or a connected device from the Device Viewer.
2. Navigate through the Asset Browser until the desired asset is displayed in the Asset
Gallery.
3. Either double-click the asset in the Asset Gallery, or right-click on the asset’s name and
select the P
The asset immediately starts loading in a separate media viewer window. Once
completely loaded, you can use the slider to preview the cel animation.
If for any reason the asset cannot be previewed, the P
You cannot edit any aspect of the cel animation asset using the cel animation preview
window or command.
Xplorer User Manual 5-3
IEW ALPHA CHANNEL button in the bottom-left corner.
REVIEW command.
ROXY NOT AVAILABLE icon appears.
Page 70

Previewing assets in Xplorer
Previewing and editing image assets
Previewing an image asset in Xplorer opens an independent preview window, which allows
you to see the image in its full size (figure 5-3
Figure 5-3. The image preview window allows you to view the image
To preview an image asset:
1. Select the XMS or a connected device from the Device Viewer.
2. Navigate through the Asset Browser until the desired asset is displayed in the Asset Gallery.
3. Either double-click the asset in the Asset Gallery, or right-click on the asset’s name and
select the P
The asset immediately appears in the preview window.
If for any reason the asset cannot be previewed, the P
The image preview window does not allow you to make any edits to the image asset,
However, Xplorer does provides you access to the Vertigo Suite’s Image Editor tool, which
allows you to perform some basic image editing tasks on image assets like, adjusting the
image’s color and sharpness, cropping the image, among others.
REVIEW command.
).
ROXY NOT AVAILABLE icon appears.
Figure 5-4. The Image Editor allows you to perform some basic image editing tasks on image assets
5-4 Xplorer User Manual
Page 71

The following sections provide functional descriptions and instructions for how to use the
Original image displayed (centered) Zoom in on the Image, but the upper
portion is now is not visible
Panned up to view the whole
statue, while still zoomed in.
Image Editor to edit image asset:
• Opening the Image Editor
• Zooming in/out and repositioning the image
• Cropping an image
• Making color adjustments
• Adjusting the sharpness of an image
• Using the Image Modification buttons to flip an image
Opening the Image Editor
To open the Image Editor from within Xplorer:
1. Select the XMS or a connected device from the Device Viewer.
2. Navigate through the Asset Browser until the desired asset is displayed in the Asset Gallery.
3. Right-click on the image asset in the Asset Gallery and select the M
The Image Editor window immediately opens and displays the image.
Zooming in/out and repositioning the image
Previewing assets in Xplorer
ODIFY IMAGE command.
When editing an image, it is often necessary to view the image, or a portion of the image,
in greater detail. It is for this reason that the Image Editor allows you to magnify, or zoom in
on the image, as well as zoom out to get an expanded or distanced view of the image.
As figure 5-5
directly in the center of Editor’s canvas. However, when you zoom in on the image, you may
not see certain areas of the image. To reposition the image within the display, while
maintaining the zoom scale, you can pan across the image to the area that is otherwise
outside of the window’s display.
Instructions for zooming in/out and panning across the image are provided below.
• Zooming in/out
• Reposition the image by panning
Xplorer User Manual 5-5
demonstrates, when an image is opened in the Image Editor it is placed
Figure 5-5. Zooming in and panning across the canvas
Page 72

Previewing assets in Xplorer
Zooming in/out
There are two (2) methods that you can use to zoom in on an image:
1. The Image Editor’s ZOOM tool allows you to zoom in on a particular area on the image.
• Click the Z
Your pointer transforms into a magnifying glass.
• Click the part of the image that you want to zoom in on.
The Image Editor zooms in on the image in increments.
2. You can zoom in on the image using your mouse or keyboard. Note, however, that this
type of zoom operation zooms in on the center of the portion of the image that is
currently displayed. As a result, you may need to pan across the image to view a
particular area of interest (see figure 5-5
• Roll the mouse wheel forward.
Or,
• Press the + (plus) key on your keyboard’s number pad.
To zoom out of the image:
You can zoom out of the image using your mouse or keyboard. Note, however, that this
type of zoom operation zooms out on the center of the portion of the image that is
currently displayed.
• Roll the mouse wheel backward.
Or,
• Press the - (minus) key on your keyboard’s number pad.
Or,
• Press the S
original scale (1:1).
OOM button on the Image Editor’s toolbar.
).
PACE BAR on your keyboard and the zoom is reset to the images
Reposition the image by panning
There are three (3) methods that you can use to reposition an image by panning:
Panning is only required, and therefore only available, when a portion of the zoomed image
is not visible in the Image Editor’s canvas. In such a case, the canvas’ horizontal and/or
vertical scroll bars become active.
1. The Image Editor’s P
drag the image around the Editor’s canvas.
• Click the P
Your pointer transforms into a hand.
• Drag the image in the direction (up/down, and/or right/left) required to
reposition and display the desired portion of the image in the Editor’s canvas.
2. You can reposition an image using the Editor’s canvas scroll bars. When an upper or
lower portion of the image is not visible in the Editor’s canvas, the canvas’ vertical scroll
5-6 Xplorer User Manual
AN tool allows you to reposition an image using your mouse to
AN button on the Image Editor’s toolbar.
Page 73

bar appear. Similarly, when the right or left portion of the image is not visible in the
NOTE
Crop the image if you want to focus on
Use the crop and zoom features to resize
and reposition the bounding outline around
the portion of the image to be preserved.
The cropped image can be saved
using a new, or the same, name.
only a portion of the original image.
Editor’s canvas, the canvas’ horizontal scroll bar appear.
• Drag the scroll box up/down and/or back/forth to reposition the image on the
Editor’s canvas.
3. You can also use the keyboard’s direction keys (up, down, left, right, page up, and page
down) to reposition the image in small increments.
Cropping an image
The Image Editor’s cropping function allows you to conserve a selected portion of the image,
while removing the remaining portions surrounding the selected area (see figure 5-6
Cropping is a popular image processing technique that is commonly used to focus the image
on a particular subject or area on the image.
Previewing assets in Xplorer
).
Since cropping permanently alters the image, the Image Editor allows you to save a copy
of the changed image before the cropping is actually performed. As a result you can
preserve the original state of the image asset.
A bounding outline surrounds the image when it is opened in the Image Editor (figure 5-6).
The bounding outline is a frame that is used for defining the area of interest when using the
cropping feature. In other words, the content inside of the bounding outline will be
preserved, while whatever is outside the bounding outline will be permanently removed.
When the Image Editor is in crop mode, dragging the bounding outline’s corner handles
(squares) allow you use to resize the bounding outline around the area of interest on the
image. If the “U
bounding outline can only be resized to dimensions that maintain the aspect ratio of the
image’s placeholder on the scene, template, or control panel. Clearing this check box allows
you to resize the bounding outline freely without any aspect ratio restrictions.
Xplorer User Manual 5-7
Figure 5-6. Cropping the contents of an image asset using the Image Editor
SE AREA OF INTEREST ASPECT RATIO” check box is selected, then the
Page 74

Previewing assets in Xplorer
When resizing or repositioning the bounding outline, its dimensions and location is display
in the lower right corner of the Image Editor window (figure 5-7). The first set of number
displays the X/Y dimensions of the bounding outline in pixels, while the second set
represents the location coordinates of the bounding outline’s upper left corner.
Figure 5-7. The dimensions and location of the bounding outline
To crop an image:
1. Open the original image in the Image Editor (see page 5-5).
2. With the image completely visible in the Image Editor, click the C
3. Resize and/or reposition the bounding area to include only the content to be preserved.
a. Select the U
bounding outline, but still maintain the aspect ratio of the image’s placeholder on
the scene, template, or control panel. Clear the check box is you want to freely
resize the bounding area.
b. Drag the bounding outline’s sizing handles to resize the bounding outline around
the area of interest.
c. If necessary, you can reposition the bounding outline within the image by clicking
inside the bounding outline and dragging it over the area of interest in the image.
4. Once the bounding outline contains only the area of interest, click OK.
AME NEW IMAGE window appears.
The N
ROP button .
SE AREA OF INTEREST ASPECT RATIO check box if you want to resize the
Figure 5-8. The N
AME NEW IMAGE window.
5. Save the cropped image:
• Select the S
TRETCH IMAGE TO FILL PLACEHOLDER check box if you want the Image Editor
to enforce scaling so that the resulting image is the exact size of the placeholder.
• Leave the S
TRETCH IMAGE TO FILL PLACEHOLDER check box clear (unchecked) you want
to defer any scaling between the cropped image and its final space until playout time.
• If you want to preserve the original image asset, you can save the cropped image as a
new image by typing in the name of the new image asset in the text box and then clicking
OK on the N
AME NEW IMAGE window.
• To replace the original image with the cropped image, leave the original image’s name in
the text box and click OK.
5-8 Xplorer User Manual
Page 75

Previewing assets in Xplorer
Making color adjustments
The Image Editor allows you to adjust the color properties of an image asset. Color
adjustments are applied immediately to the entire image, not just a specific area of interest.
You can experiment with different color settings, however there is no way to undo your
changes except to click the R
they were in when the image was last saved, or by clicking C
Editor and the image asset remains unchanged.
Figure 5-9 and the following table demonstrate that you adjust the image’s color properties
by moving the property’s slider to the right or left.
Figure 5-9. The Image Editor’s color adjustment sliders
Contrast The difference in the luminance of the brightest and the darkest areas of an image.
A high contrast will display an obvious difference (i.e. black versus white) in the
luminance between two areas, while a low contrast makes the difference less
obvious or more gradual (i.e. shades of grey).
• Move the slider to the right to increase the image’s contrast ratio.
• Move the slider to the left to decrease the image’s contrast ratio.
ESET ALL button, which returns the color settings to the state
ANCEL, which closes the Image
Brightness Generally, the brightness setting determines how light or dark a the colors of the
image are based on how close the colors are to white. The more white a color has,
the brighter it is.
• Move the slider to the right to increase the image’s brightness (until all white)
• Move the slider to the left to decrease the image’s brightness (until all black)
Saturation Saturation refers to the intensity of a specific hue. It is based on the color's purity; a
highly saturated hue has a vivid, intense color, while a less saturated hue appears
more muted and grey. With no saturation at all, the hue becomes a shade of grey.
• Move the slider to the right to increase the image’s saturation.
• Move the slider to the left to decrease the image’s saturation.
Gamma Alters the contrast of the mid-tone colors with little effect on pure white or black, which
is the function of the Contrast property above. Increasing the gamma ratio increases
the image’s highlight to shadow contrast in terms of mid-tone colors’ density values.
Decreasing the gamma setting intensifies the shadows amongst the mid-tone colors.
• Move the slider to the right to increase the image’s gamma setting.
• Move the slider to the left to decrease the image’s gamma setting.
Xplorer User Manual 5-9
Page 76

Previewing assets in Xplorer
Adjusting the sharpness of an image
The Image Editor allows you to adjust the sharpness setting of an image asset. The
sharpness adjustment is applied immediately to the entire image, not just a specific area of
interest. You can experiment with different settings, however there is no way to undo your
changes except to click R
when the image was last saved, or by clicking C
the image asset remains unchanged.
Figure 5-10 demonstrates that you adjust the image’s sharpness property by moving the
property’s slider to the right to increase the focus and to the left to blur the image.
Figure 5-10. The Image Editor’s sharpness adjustment slider
ESET, which returns the sharpness setting to the state it was in
ANCEL, which closes the Image Editor and
Using the Image Modification buttons to flip an image
The Image Editor allows you to quickly change the orientation of an image by flipping it
horizontally or vertically. Figure 5-11 demonstrates that the IMAGE MODIFICATION section of
the Image Editor’s interface features two buttons: F
Click these buttons to immediately flip the image, and click the button again to return to the
original orientation.
Figure 5-11. The Image Editor’s Image Modification buttons allow you to quickly flip image assets
5-10 Xplorer User Manual
LIP HORIZONTAL and FLIP VERTICAL.
Page 77

6 APPENDIX A - QUICK REFERENCE TO
PLORER’S COMMANDS AND SETTINGS
X
Although many of Xplorer’s commands and settings are described within the context and/or
procedures to which they apply, the following sections provide a quick reference to their
functional descriptions:
• “Xplorer’s menu commands” on page 6-2
• “Xplorer’s toolbar buttons” on page 6-5
• “Xplorer’s settings” on page 6-7
Xplorer User Manual 6-1
Page 78

Appendix A - Quick reference to Xplorer’s commands and settings
Xplorer’s menu commands
Many of Xplorer’s key features are thematically organized within the menu bar command
structure at the top of the main interface window.
The following sections provide functional definitions of the Xplorer menu commands
• “File menu” on page 6-2
• “View menu” on page 6-3
• “Tools menu” on page 6-4
• “Help menu” on page 6-4
File menu
The FILE menu contains two (2) commands that are related to ingesting files into the system
and closing the Xplorer application.
INGEST Opens the INGEST FILES window, which allows you to create assets from
files that are not native to the Vertigo Suite applications, e.g. image and
audio files. These files are made into assets, so that they can be used
within the Vertigo Suite.
See “Ingesting third-party content files” on page 4-4 for instructions on
using this command.
XIT Allows you to close the Xplorer application.
E
6-2 Xplorer User Manual
Page 79

Appendix A - Quick reference to Xplorer’s commands and settings
View menu
The VIEW menu contains commands that are related to how and what will be displayed in
the Xplorer interface.
HUMBNAILS Displays the contents of the Asset Gallery as individual thumbnail images,
T
which makes it easy to visually recognize and differentiate individual assets.
The alternative to the Thumbnails display format is DETAILS.
Alternative access:
ROXYVIEW toolbar button:
• P
ETAILS Displays the contents of the Asset Gallery in a list, which provides property
D
details about each of the individual assets (i.e. Name, Format. The
alternative to the Details display format is T
Alternative access:
• DETAIL VIEW toolbar button:
S
HOW DEVICE DETAILS When enabled, Xplorer displays the following information under each
device in the Device Viewer:
• Freespace: The amount of free disk space available (percentage) on
the device.
• Items Queued: The number of items that are currently in the device’s
publish queue.
• Q. Status: The status of the queue during publishing. Normal indicates
that everything is working as expected, while Blocked indicates that
the throughput is too low to publish.
• Throughput: The data transfer speed/rate (Kb/s) at which publishing is
operating.
See “Using Device Details to monitor a device’s publish queue” on page
4-17 for more information.
HUMBNAILS.
OG FILE When selected, this command opens the current log file in Notepad. The log
L
file stores the processes and errors that occurred during your Xplorer
session and is useful when debugging.
P
UBLISH TRANSFER LOG Displays the PUBLISH TRANSFER LOG FILE, which reports the processes and
errors that occur for each asset that is published during the Xplorer session.
See Publishing assets from the Xmedia Server to a device for more
information on publishing assets.
P
UBLISH PROGRESS Displays or hides the PUBLISH PROGRESS window, which allows you to see
a list of all of the assets that have been published during the current Xplorer
session. Note that closing this window clears the list.
See Publishing assets from the Xmedia Server to a device
for more
information on publishing assets
Xplorer User Manual 6-3
Page 80

Appendix A - Quick reference to Xplorer’s commands and settings
Tools menu
The TOOLS menu contains commands that allow you to specify some of settings that affect
the aesthetic and behavioral properties of Xplorer. It also allows you to configure Xplorer to
interact with other storage devices.
ETTINGS Opens the SETTINGS window, which is used to establish the aesthetic
S
and behavior of many of the Xplorer features. See “Configuring Xplorer
settings” on page 2-9 for a functional description of each setting.
ONFIGURE DEVICES Opens the DEVICE CONFIGURATION window, which allows you to define
C
a new device to be added to the Device Viewer. See “Configuring
devices” on page 2-13 for more information.
S
TATION MANAGER The Station Manager allows you to add and configure devices to the
Xmedia Server. These devices can then be grouped together into
channels which are used by panel’s created in the Xpanel application.
Help menu
The HELP menu contains commands that provide Xplorer product information, like licensing
and software version identification
ABOUT Displays information about the version of Xplorer that you are using.
ICENSE Opens the LICENSE MANAGER window, which allows you to copy the customer
L
ID and send it to Miranda. Once you receive your license key, paste it into the
License Key box. See page 2-2
6-4 Xplorer User Manual
and page 2-4 for more information.
Page 81

Appendix A - Quick reference to Xplorer’s commands and settings
Xplorer’s toolbar buttons
The toolbar along the top-left side of the Xplorer interface contains a series of buttons that
allow you to set the display format of the Asset Gallery and perform other actions with
respect to moving, finding, and publishing assets.
The following table provides a functional description of each button on the Xplorer toolbar:
ROXYVIEW
P
Displays the contents of the Asset Gallery as individual thumbnail images, which
makes it easy to visually recognize and differentiate individual assets. The
alternative to the Thumbnails display format is DETAIL VIEW.
Alternative access:
• Menu command: V
IEW>THUMBNAILS
DETAIL VIEW
Displays the contents of the Asset Gallery in a list, which provides property details
about each of the individual assets (i.e. Name, Format. The alternative to the
Details display format is P
Alternative access:
• Menu command: VIEW>DETAILS
ROXYVIEW.
ELOAD
R
Refreshes the selected category to ensure that it contains the most updated
version of the assets.
MPORT
I
Opens the SELECT VERTIGOXMEDIA ASSET EXPORT FILE window, which allows you
to navigate to the VxM Export file (*.exp) that is native to the Vertigo products
and import it into the central XMS. See Importing content files that are native to
the Vertigo Suite system for more information.
XPORT
E
Allows you to select assets from the central XMS’s Asset Gallery to be exported
and saved in a VxM Asset Export Directory on your system. See Exporting Vertigo
asset files to another Xmedia Server for more information.
NGEST
I
Allows you to create assets from files that are not native to the Vertigo Suite, e.g.
image and audio files. See Ingesting third-party content files
for more information.
Xplorer User Manual 6-5
Page 82

Appendix A - Quick reference to Xplorer’s commands and settings
EARCH
S
Opens the SEARCH window, which allows you to quickly locate assets stored on
the Xmedia Server using basic search parameters, like name, keywords, and
type, or using advanced search parameters like meta data. See Appendix B -
Searching for assets stored on the XMS for more information.
ORK ORDER
W
Opens the WORK ORDER window, which allows you to create a new work order.
The work order system requires users to login using a user name and password.
User names and passwords are registered and stored on the Xmedia Server
using the Xmedia Server’s properties panel. See “Appendix C - Creating and
using work orders” on page 8-1 for more information.
EVICE VIEW
D
When enabled, the devices section of the Device Viewer becomes full screen and
each device’s details are automatically displayed.
This view is useful when you need to monitor and manage a large number of
devices.
6-6 Xplorer User Manual
Page 83

Xplorer’s settings
NOTE
To better suit your preferences or operating circumstances, Xplorer allows you to configure
some settings. Note that since the default settings are appropriate for most operating
circumstances, modifying these settings are entirely optional.
Xplorer’s settings are edited in the S
1. Select T
This displays the S
2. After making changes, click OK to register the information and close the window.
Or,
Click A
Or,
Click CANCEL to ensure that no changes made since the last time you clicked OK.
The S
to Xplorer. A functional description of each setting is provided in the following sections:
• “XMS settings” on page 6-8
• “Work Order settings” on page 6-9
• “Layout settings” on page 6-10
• “Publish Monitoring settings” on page 6-11
• “General settings” on page 6-12
• “Logging settings” on page 6-13
OOLS>SETTINGS from the Xplorer menu commands.
ETTINGS window.
PPLY to register the information and keep the window open.
ETTINGS window has six thematic tabs, which contain properties and settings that apply
Appendix A - Quick reference to Xplorer’s commands and settings
ETTINGS window, which can be accessed by:
Some settings will require you to restart Xplorer for the changes to be applied.
Xplorer User Manual 6-7
Page 84

Appendix A - Quick reference to Xplorer’s commands and settings
XMS settings
The XMS settings specify the locations of the main Xmedia Server, as well as the backup
XMS (if applicable), which contains all of the assets, i.e. all building blocks used in the
creation of broadcast graphics. The Xmedia Server is also where playlists, templates,
images, etc., are stored.
The following settings are displayed on the XMS settings tab (figure 6-1
• Servers > XMedia Server IP Address - Specifies the IP address of the machine
running the XmediaServer.
• Servers > XMedia Server Port - Specifies the port on which the Xmedia Server is
listening.
• Backup Servers > XMedia Server IP Address - Specifies the backup server’s IP
address used in case of failure of the primary Xmedia Server.
• Backup Servers > XMedia Server Port - Specifies the backup server’s port used in
case of failure of the primary Xmedia Server.
):
Figure 6-1. Xplorer’s Xmedia Server settings
6-8 Xplorer User Manual
Page 85

Work Order settings
If your system does not contain a particular image, clip, or cel animation, you can create
and track a work order, which submits a request from the graphics department. See
“Appendix C - Creating and using work orders” on page 8-1
The following settings are displayed on the W
ORK ORDER PRINTER - Specifies the printer device that is used as the default when
• W
RINT command is used on the Work Order window.
the P
OWS IN WO JOB LIST - This setting determines the number of rows are always visible
• R
in the job list portion of the Work Order window. Since most work orders contain a small
number of jobs, the default value of 3 is reasonable. If there are more than three jobs
in the work order, you can always scroll down through the list to view the additional
jobs. If you routinely add numerous jobs to a work order, this setting can be set to a
larger number so that you can see all the jobs without having to scroll. Note that the
minimum permitted value is 3 and the maximum permitted value is 10.
NABLE WORK ORDERS - When enabled (check), this setting enables the Work Orders
• E
feature and displays the Work Orders button in the Xplorer toolbar. When disable
(unchecked), the Work Orders functionality is hidden.
IGHLIGHT OVERDUE WO - Highlights work orders that are past their due date in red.
• H
• WO
DUE DATE TOLERANCE (DAYS:HOURS) - Sets the tolerance for identifying an
approaching completion deadline for a work order. When the H
setting is enabled, a work order whose due date falls within the tolerance setting is
highlighted in red. The format of the this setting value is DAY:HOURS and the higher the
tolerance value is, the more advance warning is provided. For example, a tolerance
value of 1:18 means that the work order will remain highlighted in red one day and
eighteen hours prior to being overdue.
Appendix A - Quick reference to Xplorer’s commands and settings
for procedural information.
ORK ORDER SETTINGS tab (figure 6-2):
IGHLIGHT OVERDUE WO
Figure 6-2. Xplorer’ Work Orders settings
Xplorer User Manual 6-9
Page 86

Appendix A - Quick reference to Xplorer’s commands and settings
Layout settings
The LAYOUT settings tab allows you to set specific parameters that affect the aesthetic or
visual look of the Xplorer interface.
The following settings are displayed on the LAYOUT settings tab (figure 6-3):
HUMBNAIL SIZE > TILE WIDTH - Specifies the width of the thumbnail image that will be
• T
displayed when Xplorer is set to P
button to the right of this setting, returns the thumbnails to their default size of 160.
EVICE VIEWER > # OF ROWS - Specifies the layout (number of rows) of how the devices will
• D
be listed and displayed in the Device Viewer pane of the Xplorer interface (see page 2-5
ROXY VIEW (see page 3-3). Selecting the RESET
).
Figure 6-3. Xplorer’ Layout settings
6-10 Xplorer User Manual
Page 87

Appendix A - Quick reference to Xplorer’s commands and settings
Publish Monitoring settings
The PUBLISH MONITORING settings tab allows you to set specific parameters related to the
updating of a device’s publish statistics and logging. See “Monitoring and managing a
device’s publish queue” on page 4-17 for related information.
The following settings are displayed on the P
UBLISH STATISTIC S UPDA TE INTERVAL- Specifies the frequency at which the Device
• P
Details (related to publishing) in the Device Viewer are updated. The default value is 1
minute.
EVICE PUBLISH STATISTICS LOGGING - Turns on logging of the updating of device
• D
information (Freespace, ItemsQueued) that occurs when the Show Device Details
command is enabled.
UBLISH MONITOR LOGGING - Turns on logging in the Publish Queue Monitor window
• P
opened.
UBLISH MONITORING tab (figure 6-4):
Figure 6-4. Xplorer’s Publish Monitoring settings
Xplorer User Manual 6-11
Page 88

Appendix A - Quick reference to Xplorer’s commands and settings
General settings
The GENERAL settings tab allows you to set the DEFAULT TV FORMAT setting, which
determines the default values to set in the M
sequence is ingested (figure 6-5
sequence is ingested, the default value in the Multi-Image Ingest window for cel animations
will show NTSC as the format of the cel animation.
). For example, if the default format is NTSC, when a Targa
ULTI-IMAGE INGEST window when a new Targa
Figure 6-5. Xplorer’s General settings
6-12 Xplorer User Manual
Page 89

Logging settings
Xplorer’s Logging settings allow you to specify the categories of events that you want to
be recorded in the Xplorer log files, as well as the maximum number and size of Xplorer log
files that will be archived.
As Xplorer operates, events are recorded to a log text file, which is stored under the Windows
system directory for application specific data.
Since the log files thoroughly track and record Xplorer’s events during operation, they are
a great tool to use for diagnosing error conditions or unexpected behaviors. In fact,
Miranda’s Technical Support team will often ask its customers to send them the Xplorer log
file to help them troubleshoot any unexpected behavior that you may be experiencing.
Appendix A - Quick reference to Xplorer’s commands and settings
Figure 6-6. Xplorer’s Logging settings
• L
OG LEVEL - This sets the default log level used by all logging categories except those
that have been checked in the Debug Categories list. The choices are:
• Error - Only log errors and essential operations.
• Warn - Log unsuccessful operations that may indicate a problem (in addition
to all messages logged at the Error level).
• Info - (Default) Log important events that occur during normal conditions (in
addition to all messages logged at the Warn level).
It is recommended to set the Log Level to Info in order to provide enough information
in the logs to diagnose common problems without affecting performance.
ILE SIZE - Sets the maximum memory size for each log file created per run. The default
• F
value is 6 MB.
ILE COUNT - Specifies the maximum number of Xplorer*.log files that will be
• F
stored. A large enough number should be chosen to store over a day's worth of logs.
This way if a problem happens the relevant log files will be available. Once the
Xplorer User Manual 6-13
Page 90

Appendix A - Quick reference to Xplorer’s commands and settings
maximum number of files is reached, the oldest log file will be replaced by a new one.
The default value is 5.
EBUG CATEGORY LIST - Select the types of debug logging (categories) that you would
• D
like to record in the Xplorer log file:
• General - General logging that does not fit under any other category.
• VxmsApi - Logs client-side calls to the Xmedia Server.
• VxmsTcp - Logs client-side socket communication with the Xmedia Server
using the principal Xmedia Server connection.
• VxmsCache - Logs client-side activity in the Xmedia Server cache.
• VxmsTcpLayer - Logs client-side socket communication with the Xmedia
Server used by the cache and publishing.
6-14 Xplorer User Manual
Page 91

7 APPENDIX B - SEARCHING FOR
ASSETS STORED ON THE XMS
Xplorer offers a Search tool, which allows you to quickly search and find assets on the
Xmedia Server by specifying search criteria based on asset properties and meta data.
When a query is performed, the Search tool returns a listing of the assets that match the
search criteria.
Figure 7-1. Xplorer’s Search Tool
The Search tool allows you to perform two types of searches: a standard search and an
advanced search. The standard search allows you create a search criteria using the basic
properties associated with assets like, the type of asset, keywords, date of creation, among
others. While the advanced search allows you to create a search criteria based on the
asset’s meta data information.
The following sections provide more information about the Search tool, as well as how to
perform a standard or advanced search for assets:
• “Opening the Search Tool” on page 7-2
• “Using the search tool’s interface” on page 7-3
• “Performing a standard search” on page 7-21
• “Performing an advanced search” on page 7-22
Xplorer User Manual 7-1
Page 92

Appendix B - Searching for assets stored on the XMS
Opening the Search Tool
To access the search tool and select the search mode:
1. Select the XMS icon in the Xmedia Server Viewer.
2. Click the S
The XMS S
EARCH icon in the Xplorer toolbar.
EARCH window (Search Tool) appears (figure 7-2).
3. Select a search mode:
• Select the S
TANDARD tab to perform a standard search using the asset’s basic
properties.
Or,
• Select the A
DVANCED tab to perform an advanced search using the asset’s
meta data properties.
Figure 7-2. The XMS Search window
7-2 Xplorer User Manual
Page 93

Appendix B - Searching for assets stored on the XMS
Search Mode tab
Search criteria fields
and controls
Message area and
view buttons for the
Results area
Results area
in Proxy view
Search Mode tab
Search criteria fields
and controls
Message area and
view buttons for the
Results area
Results area
in Proxy view
Using the search tool’s interface
While the Standard search mode allows you to search for assets using basic asset
properties, the advanced search mode bases its search criteria on the asset’s metadata
information. As such, the Search tool’s interface has some components that are common
to both modes, while others are exclusive to the function and purpose of the specific mode
(see figures 7-3
The following sections provide functional descriptions of each part of the search tool’s
interface components.
• “Standard search criteria fields and controls” on page 7-4
• “Advanced search criteria fields, controls, and summary” on page 7-9
• “Message area: Search status and asset information” on page 7-18
• “Results area” on page 7-19
and 7-4).
Xplorer User Manual 7-3
Figure 7-3. The Search tool’s Standard Search interface components
Figure 7-4. The Search tool’s Advanced Search interface components
Page 94

Appendix B - Searching for assets stored on the XMS
Standard search criteria fields and controls
A standard search bases its query on the criteria that you build using the asset properties
specified on the interface.
Once you have specified your search criteria, select the S
Immediately after launching the query, the Search tool looks for matches based on your
criteria and displays the results in the Results area. The message area also displays the
status of the search and summarizes the results of the Search tool’s findings.
If your search criteria is too general, then the Search tool could retrieve more results than
are necessary, which could take time and be ineffective. At any time during the search, you
can click the S
to that point will be displayed in the Results area.
It is recommended that you be strategic when creating your search criteria. When searching
for a particular asset, be as precise as possible in the type of information that you provide
and use as many identifiers as possible to focus the search and limit the amount of
matching results. If, however, you want the search tool to return all of the assets that match
a certain criteria (i.e. all assets containing images of cars), then keep your search criteria
flexible by setting minimal restrictions and using generic identifiers.
The following topics represent the asset property fields on the standard search interface
that can be used to build a search criteria. Each topic below provides advice for how to use
the field to expand or limit your search.
• Name
• Type
• Keywords
• Description
• Author
• Recall ID
• Date
TOP button to immediately stop the search. The results that were retrieved up
EARCH button to start the search.
Name
The NAME field allows you to search for assets that contain specific text in their name.
Therefore, you type either the asset’s exact name, or part of the asset’s name and the
search tool returns all of the assets who’s name contains the text.
There are certain rules that you should be aware of that affect the search tool’s match
criteria for this property:
• Whenever possible type the asset’s exact name (including any underscores).
• The search tool is not case-sensitive, so using upper or lower case does not affect the
search results.
• If the asset’s name contains multiple words separated by spaces (i.e. Red Sports
Cars), then your name query text must contain the exact wording and it must be in the
exact order. For example, “Sports Cars Red” or “Red Sport Car” will not find this asset.
7-4 Xplorer User Manual
Page 95

Appendix B - Searching for assets stored on the XMS
• If the asset’s name contains multiple words separated by spaces (i.e. Red Sports
Cars), then your name query text can contain a only part of the name, but this results
in a less focused search resulting in more results than desired. For example: red, red
sports, sports cars, sports, or cars will find the asset, but potentially others as well. Note
that when using partial names, the words still must be in the same order (i.e. sports
cars, not cars sports).
• If the asset’s name contains multiple words separated by underscores (i.e. Red_Sports
Cars), then the underscore attaches the two words and they become one string.
Therefore, to find this asset you will could search for Red_sports cars, or red_sports,
but “red sports car” will not find this asset.
• You can use the asterisk (*) operator before or after a word as a wild card to represent
one or more
missing characters. This allows you to broaden your search or
compensate for miss information. For example, *Sports Cars will find the asset
Red_Sports Cars. Similarly, Red_sports* will also find the asset.
• You can use the question mark (?) operator before or after a word as a wild card to
represent one
missing character. This allows you to broaden your search or
compensate for miss information. For example, if you had twenty assets each named
in incrementing order (i.e. image1, image2... image19, image20), you can find the first
nine (image1 to image9) by searching for “image?”.
Type
The TYPE field allows you to search for assets that belong to a specific asset type, like
images, cel animations, Xmedia objects, among others. When combined with other fields,
the TYPE field is very helpful in limiting the search’s results to only particular types of asset.
For example, if you need image or cel animation assets that contain a car, these fields
would return results that are precisely limited to that criteria and you wouldn’t have to sort
through all of the other types of assets that contain cars.
By default, the T
YPES field is set to ALL TYPES, meaning that no restrictions will be placed
on what type of assets will be returned. To limit your search to only one particular type, or
certain types of assets only, you use either the field’s drop-down list, or the S
TO SEARCH window (figure 7-5).
ELECT TYPES
Figure 7-5. You can restrict search results to only certain types of assets
Xplorer User Manual 7-5
Page 96

Appendix B - Searching for assets stored on the XMS
To restrict or limit your search to finding assets of only one specific type:
• Click in the T
YPE field’s text box, or by clicking the drop-down list button , and then
select the asset type’s name from the list.
Or,
1. Click the button to the right of the Type field to open the S
window.
ELECT TYPES TO SEARCH window appears.
The S
2. Select the check box of the asset type that you want to restrict results to. Be sure that
all of the other check boxes are deselected.
3. Clock OK.
To find assets of multiple types:
1. Open the S
ELECT TYPES TO SEARCH window:
• Click in the TYPE field’s text box, or by clicking the drop-down list button ,
and then select the M
ULTIPLE TYPES from the list.
Or,
• Click the button to the right of the Type field to open the S
SEARCH window.
2. Select the check boxes of the asset types that you want to restrict results to. Be sure
that all of the other check boxes are deselected.
3. Click OK.
ELECT TYPES TO SEARCH
ELECT TYPES TO
To verify or change your multiple types selections:
When more than one asset type has been selected as the Type search criteria, the TYPE
field will display M
ULTIPLE TYPES label. If you want to verify, or change, which asset types
have been selected, open the SELECT TYPES TO SEARCH window by clicking the button
to the right of the TYPE field. Selected check boxes represent the asset types included in the
search, while deselected check boxes represent asset types that are not included in the
search.
7-6 Xplorer User Manual
Page 97

Appendix B - Searching for assets stored on the XMS
Keywords
When an asset is created or ingested into the Xmedia Server, the user is asked to provide
keywords that are appropriate for identifying or recalling the asset. The keywords become
a part of the asset’s Keywords property and can be viewed and changed at any time using
the Properties Browser. The search tool can use these keywords as searchable identifiers
for retrieving assets.
To specify which keywords to use in a standard search:
1. Clicking the button to the right of the K
EYWORDS text box on the standard search
interface.
• If there are assets in your system who have keywords associated to them, then
EYWORD window appears listing the available/searchable keywords.
a K
• If no assets in your system have keywords associated to them, then the N
K
EYWORDS EXISTS window will appear stating: “There are currently no
O
keywords to display”. This means that you cannot use the Keywords search
field, so click OK and base your search criteria on other asset properties
2. Select the keywords that you want to use in your search from the K
EYWORD window
and click OK.
The chosen keywords now appear in the Keywords field’s text box on the standard
search interface.
Description
When an asset in created or ingested into the Xmedia Server, the user is asked to provide
a brief description of the asset for identification and/or instructional purposes. This
description becomes a part of the asset’s properties and can be viewed and changed at any
time using the Properties Browser.
ESCRIPTION field allows you to search for assets whose Description property contains
The D
specific text. You can type either the asset’s exact description, or part of the asset’s
description in this field. The search tool returns all of the assets whose Description property
contains the text.
See page 7-4
regarding the rules that affect the search tool’s match criteria.
Author
When an asset in created or ingested into the Xmedia Server, the user is asked to provide
the name of the person who created the asset. The name becomes a part of the asset’s
properties and can be viewed and changed at any time using the Properties Browser.
UTHOR field allows you to search for assets based on name of the author/person who
The A
created the asset. You can type either the exact name in the text box, or part of the author’s
name and the search tool returns all of the assets whose Author property contains the text.
Xplorer User Manual 7-7
Page 98

Appendix B - Searching for assets stored on the XMS
Recall ID
A Recall ID is usually a unique numeric identifier that is given by the user to panel, template,
and/or page assets so that they can be quickly retrieved in production. The Recall ID of a
panel, template, or page asset becomes one of its properties and it can be viewed or
changed at any time using the Properties Browser.
The RECALL ID field allows you to search for assets whose Recall ID number matches the
number typed in this field’s text box. You can type either the exact number in the text box,
or part of the recall ID’s number. The search tool returns all of the assets whose Recall ID
property contains the numbers specified.
Remember that zero (0) is not a valid Recall ID number, that Recall ID numbers can be a
maximum of eight (8) characters, and no two assets can have the same Recall ID.
Date
The DATE field on the standard search interface features arrow buttons that display or
hide the date options (figure 7-6) used in to limit the search results according to the
dates that the asset was either created or modified.
Figure 7-6. The standard search interface’s Date options
When displayed, the D
ATE field offers the following three (3) options:
No specific date When activated, this option applies no date restrictions to the retrieval of
asset results. In other words, all assets, irrespective of their creation or
modification date, will be included in the search. As such, this is the default
state of this field.
Modified Date When activated, this option restricts the search results to only assets that
were modified and saved between the dates specified in the From and To
date fields to the right of this option.
Creation Date When activated, this option restricts the search results to only assets that
were created and saved between the dates specified in the From and To
date fields to the right of this option.
When you select either the M
ROM and TO date fields that represent the dates between the search tool will limit its
the F
ODIFIED DATE or CREATION DATE options, you must also set
results to. You can either type the dates directly into the text box, or select the pull-down
button on the right-side of the text box, which opens a calendar user interface. You can then
navigate and select the exact date desired. You must specify a valid date for both the F
and the T
O fields.
ROM
7-8 Xplorer User Manual
Page 99

Appendix B - Searching for assets stored on the XMS
A query is based on the set of search
criteria listed in the Criteria panel.
Properties can have one or many conditions.
(i.e. the AgencyName property has 2 conditions: Reuters and Associated Press)
Each search criteria contains
one metadata property
(i.e. CreationDate / AgencyName)
Advanced search criteria fields, controls, and summary
The advanced search interface retrieves assets by performing a query using the search
criteria that you build using searchable metadata properties. As figure 7-7
query can contain one or many search criteria, which are listed in the Criteria panel.
However, a search criteria can only contain one property.
demonstrates, a
Figure 7-7. An advanced search query is based on the search criteria’s metadata properties
You build a search criteria using the A
accessed by clicking the A
DD button on the advanced search interface. A search criteria
DD A NEW CRITERIA window (figure 7-7), which is
must only contain one metadata property, which you select from the P
list. You can then set conditions to qualify the property (i.e. E
REATER THAN...etc.) and specify a specific search string (i.e. text, date, digits...etc.). A
G
functional description of each of the available metadata properties is provided in “Advanced
Search Properties” on page 7-11.
A search criteria’s property can contain one or many conditions. When using multiple
conditions for a property you have to specify in the CONDITIONS panel how you want the
conditions to interact. Using the A
DD setting combines the conditions, which generally
makes the search more restrictive. Again using figure 7-7 as an example, using the ADD
conditions setting for the AgencyName property would find assets that were limited to those
distributed by Reuters and
the Associated Press. Meanwhile, using the OR setting provides
Xplorer User Manual 7-9
ROPERTIES drop-down
QUAL TO, BEFORE, CONTAINS,
Page 100

Appendix B - Searching for assets stored on the XMS
NOTE
a complementary condition, which generally broadens the search. For example, using the
OR conditions setting for the AgencyName property widens the search results to assets that
were distributed by Reuters or
Once you build the search criteria in the A
the Associated Press.
DD A NEW CRITERIA window and click OK, it
becomes listed in the Search tool’s Criteria panel as a search criteria statement.
It is recommended that you verify the logic of your search criteria and query by reviewing
the summary statements displayed in the Criteria panel and the Query summary below the
Criteria panel (figure 7-8). If these statements are accurate, then you can click the SEARCH
button to launch the search. If the statements are not exactly what you want, you can edit
the search criteria by selecting the criteria statement in the Criteria panel and then clicking
DIT button. The EDIT AN EXISTING CRITERIA window appears and allows you to change
the E
the property’s conditions in the same way that you created the criteria.
Figure 7-8. The search criteria and query is summarized on the Advanced search tool’s interface
If your search criteria is too general, then the Search tool could retrieve more results than
are necessary, which could take time and be ineffective. At any time during the search, you
can click the S
TOP button which will immediately stop the search at whatever point its at.
The results that were retrieved to that point will be displayed in the Results area.
Rather than recreating the same search criteria every time you start a new session, you can
save the search criteria to disk using the S
using the L
OAD button. See “Saving and loading a search criteria” on page 7-25 for more
AVE button and then open the search criteria later
information.
See “Performing an advanced search” on page 7-22 for precise instructions on how to use
the advanced search interface to find assets.
7-10 Xplorer User Manual
 Loading...