

Page 1

User Manual
Xplay
Media Event Sequencer
M852-0800-500
Page 2

Copyright & Trademark Notice
Copyright © 2015, Grass Valley USA, LLC. All rights reserved.
Belden, Belden Sending All The Right Signals, and the Belden logo are trademarks or
registered trademarks of Belden Inc. or its affiliated companies in the United States and
other jurisdictions. Grass Valley USA, LLC, Miranda, Vertigo Suite, Vertigo XG and Xmedia
Server are trademarks or registered trademarks of Grass Valley USA, LLC. Belden Inc.,
Grass Valley USA, LLC, and other parties may also have trademark rights in other terms
used herein.
Terms and Conditions
Please read the following terms and conditions carefully. By using the Xplay documentation,
you agree to the following terms and conditions.
Grass Valley hereby grants permission and license to owners of the Vertigo Suite to use
their product manuals for their own internal business use. Manuals for Grass Valley, A
Belden Brand products may not be reproduced or transmitted in any form or by any means,
electronic or mechanical, including photocopying and recording, for any purpose unless
specifically authorized in writing by Grass Valley.
A Grass Valley manual may have been revised to reflect changes made to the product
during its manufacturing life. Thus, different versions of a manual may exist for any given
product. Care should be taken to ensure that one obtains the proper manual version for a
specific product serial number.
Information in this document is subject to change without notice and does not represent a
commitment on the part of Grass Valley.
Warranty Policies
Warranty information is available in the Support section of the Grass Valley Web site
(www.grassvalley.com).
Document Identification
Title Xplay User Manual
Part number M852-0800-500
SW version Vertigo Suite v5.0
Page 3
Revision History
After the original release date, the Xplay User Manual may be updated with edits and then
re-released. The following table tracks the versions of this document.
Revision date Description
November 28, 2014 Original release
March 02, 2015 Vertigo Suite v5.0 SP1 release
Page 4

TABLE OF CONTENTS
Introducing Xplay................................................................................................................. 1-1
Getting started with Xplay................................................................................................... 2-1
Installation and licensing information................................................................................................. 2-2
Starting Xplay and connecting to the Xmedia Server ........................................................................ 2-3
Overview of the Xplay interface ......................................................................................................... 2-4
Configuring Xplay’s settings .............................................................................................................. 2-7
Adding and connecting Xplay to playout devices .............................................................................. 2-8
Adding output devices to Xplay’s Device Manager....................................................................... 2-9
Configuring Xplay for single or multi-device playout control ....................................................... 2-12
Connecting output devices to Xplay ........................................................................................... 2-16
Creating and editing playlists in Xplay .............................................................................. 3-1
Setting the Playlist Editor’s Playlist View........................................................................................... 3-3
Creating a new playlist ...................................................................................................................... 3-5
Loading an existing playlist................................................................................................................ 3-6
Playlist element verification........................................................................................................... 3-8
Navigating and selecting elements within the playlist........................................................................ 3-9
Adding playlist elements to a playlist............................................................................................... 3-10
Using the Asset Browser to add pages, templates and clips to a playlist ................................... 3-10
Using Quick Recall to add templates, clips and pages to a playlist ............................................ 3-12
Using Search XMS to find and add pages, template or clips to a playlist................................... 3-15
Inserting or appending a playlist to a loaded playlist .................................................................. 3-16
Adding shared segment assets to a playlist................................................................................ 3-18
Grouping elements into playlist segments....................................................................................... 3-19
Adding and populating playlist segments ................................................................................... 3-20
Repositioning playlist segments and their elements ................................................................... 3-22
Deleting playlist segments from a playlist................................................................................... 3-23
Adding comment rows to the playlist ............................................................................................... 3-25
Repositioning playlist elements within the playlist ........................................................................... 3-27
Repositioning primary playlist elements (clips, pages or comments) ......................................... 3-27
Adding secondary elements to a clip in the playlist .................................................................... 3-28
Configuring and editing the playlist columns ................................................................................... 3-29
Configuring the Playlist Editor’s column layout ........................................................................... 3-29
Editing a playlist element’s properties.........................................................................................3-33
Deleting playlist elements................................................................................................................ 3-36
Reloading the playlist ...................................................................................................................... 3-37
Saving the playlist............................................................................................................................ 3-38
Operator controlled preview and playout techniques...................................................... 4-1
Preview and playout on a single device............................................................................................. 4-2
Preparing to preview and playout on a single device.................................................................... 4-3
Previewing and taking playlist elements to air on a single device ................................................ 4-4
Preview and playout on multiple devices, channels or layers............................................................ 4-7
Xplay User Manual TOC-1
Page 5

Table of Contents
Preparing to preview and playout using the Multi-Device layout ...................................................4-8
Previewing and taking playlist elements to air on multiple devices .............................................4-10
Additional operator controlled tasks .................................................................................................4-16
Editing playlist elements that are displayed in a Device View .....................................................4-16
Using a panel to control an additional keyer level on a device ....................................................4-20
Reloading and refreshing playlist elements .................................................................................4-21
Marking / Unmarking playlist elements as Aired..........................................................................4-23
Controlling Xplay devices using automation protocols .................................................. 5-1
Specifying Automation settings in Xplay.............................................................................................5-3
Configuring Xplay to use the Evertz protocol over Serial ...................................................................5-5
Configuring Xplay to use the Oxtel protocol over Serial .....................................................................5-9
Configuring Xplay to use Xprotocol over TCP/IP..............................................................................5-13
Configuring Xplay to use the Oxtel serial protocol over TCP/IP .......................................................5-15
Device forwarding of automation commands ...................................................................................5-19
Appendix A - Quick reference to Xplay’s menus and settings........................................ 6-1
Xplay’s menu commands ...................................................................................................................6-2
File menu .......................................................................................................................................6-2
View menu .....................................................................................................................................6-4
Actions menu .................................................................................................................................6-5
Tools menu ..................................................................................................................................6-11
Help menu ...................................................................................................................................6-12
Xplay’s settings.................................................................................................................................6-13
General settings...........................................................................................................................6-14
Layout settings.............................................................................................................................6-16
Playout settings ...........................................................................................................................6-17
AFD settings ................................................................................................................................6-20
Display settings............................................................................................................................6-21
Template Favorites settings.........................................................................................................6-23
Panel Events settings ..................................................................................................................6-24
Automation settings .....................................................................................................................6-25
As Run Logging settings ..............................................................................................................6-27
Logging settings...........................................................................................................................6-30
Plugins settings............................................................................................................................6-32
Servers settings ...........................................................................................................................6-34
Playlist > Basic settings ...............................................................................................................6-35
Playlist > Status settings..............................................................................................................6-36
Playlist > Highlight settings..........................................................................................................6-37
Appendix B - Creating and editing pages in Xplay........................................................... 7-1
Embedded versus Shared pages .......................................................................................................7-2
Creating and adding embedded pages to a playlist ...........................................................................7-3
Creating and adding a single embedded page ..............................................................................7-3
Creating and adding multiple embedded pages ............................................................................7-5
Using Template Favorites to create and add embedded pages ....................................................7-7
Creating and adding shared page assets to a playlist........................................................................7-9
Creating and adding new shared pages ........................................................................................7-9
TOC-2 Xplay User Manual
Page 6

Table of Contents
Using the Asset Browser to add shared pages to a playlist........................................................ 7-12
Editing pages in Xplay ..................................................................................................................... 7-13
Editing a page within a playlist using the Edit Page command................................................... 7-13
Editing a page when it is cued on a device................................................................................. 7-14
Appendix C - Using Xplay to support the Emergency Alert System (EAS).................... 8-1
Configuring Xplay’s EAS settings ...................................................................................................... 8-2
Communication Settings............................................................................................................... 8-3
Target Device Settings ................................................................................................................. 8-3
Protocol Settings........................................................................................................................... 8-4
Device Forwarding........................................................................................................................ 8-4
EAS status bar in the Xplay interface ................................................................................................ 8-6
Appendix D - Configuring GPI inputs ................................................................................ 9-1
Configuring and controlling the GPI Server .................................................................................. 9-1
Specifying the Video Bypass settings for the GPI inputs .............................................................. 9-3
Starting, stopping, and refreshing the GPI Server ........................................................................ 9-4
Opening the GPI Configuration window in Xplay .......................................................................... 9-5
Adding states for each GPI input .................................................................................................. 9-5
Adding a rule to a GPI input state................................................................................................. 9-6
GPI input actions .......................................................................................................................... 9-8
Enabling and disabling GPI in Xplay.............................................................................................9-9
Xplay User Manual TOC-3
Page 7

Table of Contents
TOC-4 Xplay User Manual
Page 8
1 INTRODUCING XPLAY
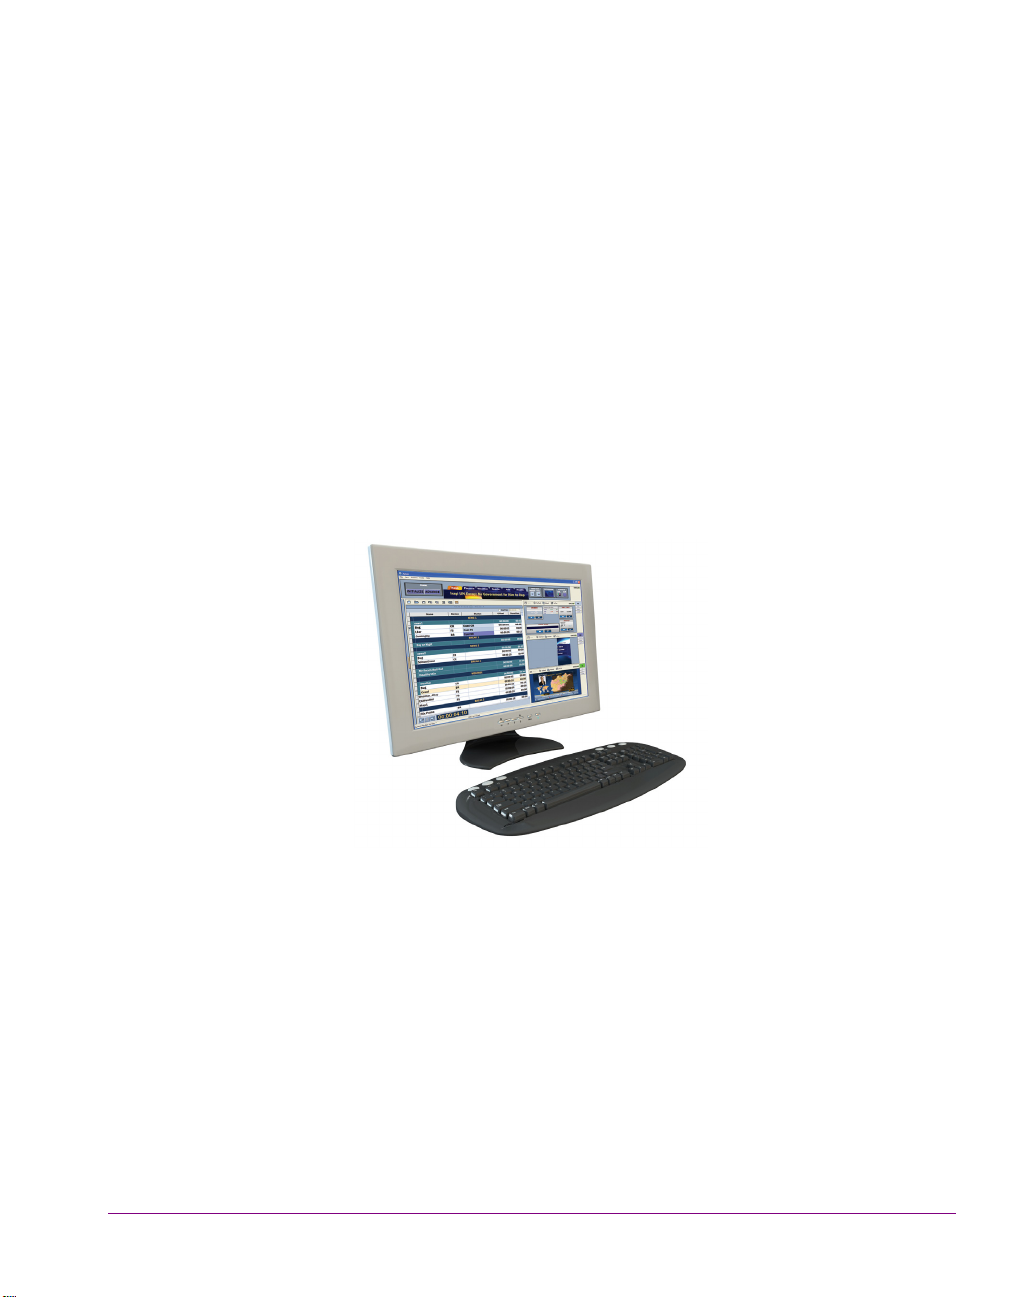
Xplay is the Vertigo Suite’s application for controlling and previewing the playout of media
and graphics. The management and playout of the playlist can be either operator-controlled
using the Xplay user interface or through a external automation system. Xplay’s versatility
also allows you to control playout on multiple devices, multiple channels, and/or multiple
layers on a channel all from a single interface.
Figure 1-1. Xplay allows you to preview and control the playout of playlist elements
In situations where operator-control over the playlist is appropriate, Xplay allows you to:
• Create new playlists that contain pages, clips and/or templates
• Create new pages and add them to a playlist
• Edit existing playlists and pages either prior to playout, or on the fly during the
broadcast
• Send completed playlists to air on one or more playout devices in real-time using
manual control techniques, or with the assistance of customizable run-time control
panels
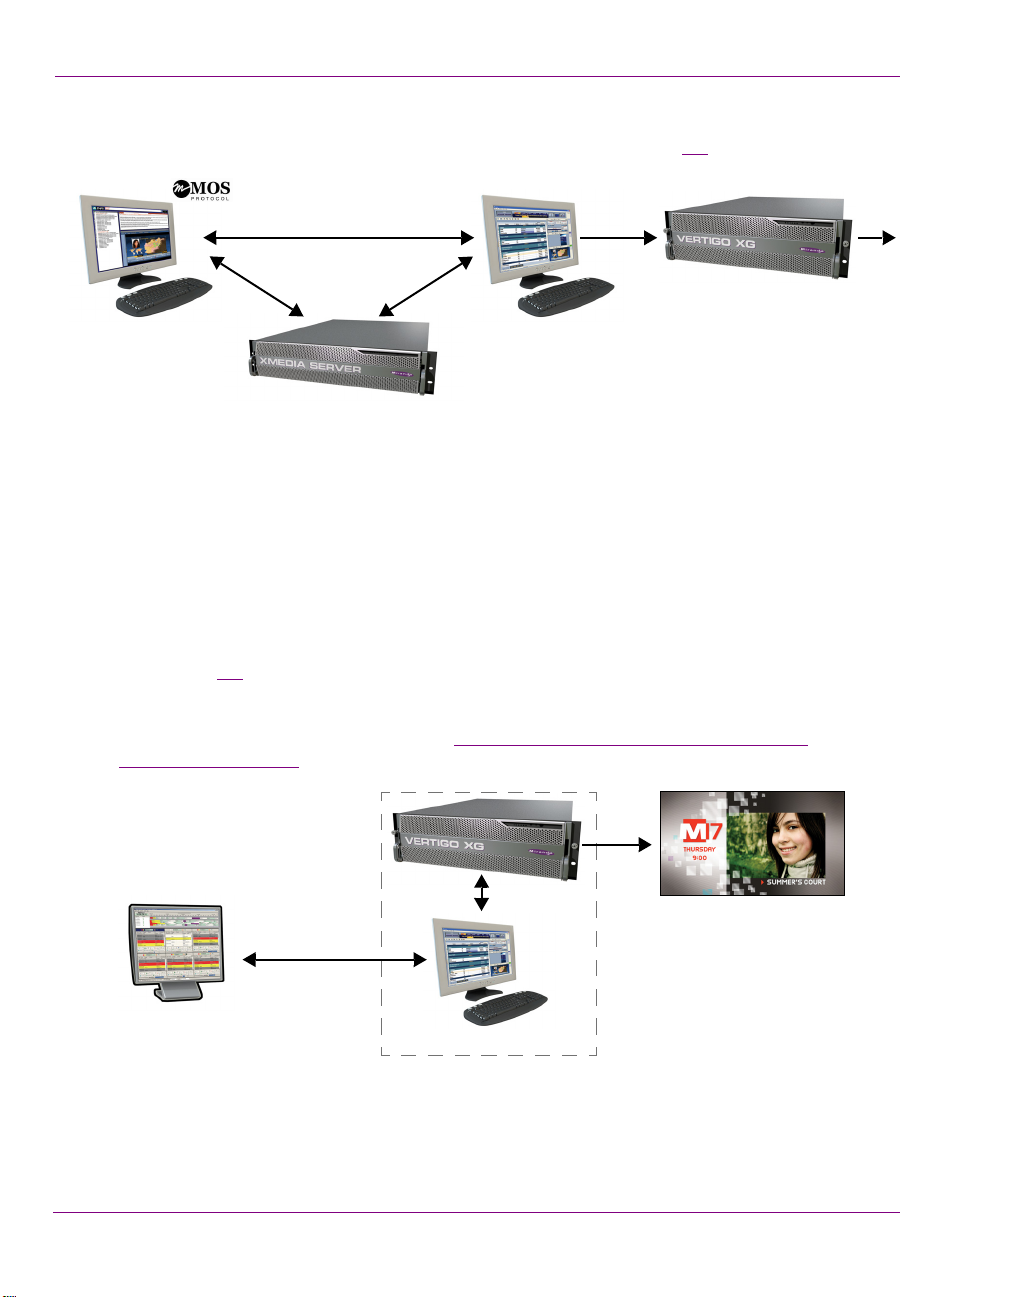
In newsroom environments, Xplay is the media event sequencer which controls the playout
of rundowns in a similar way that it controls the playout of traditional playlists. Using the
Xplay User Manual 1-1
Page 9
Introducing Xplay
NRCS & Xnews plugin
Asset management
Xplay
Playout device
Station automation
Automation
protocol
Xplay
(Serial or TCP/IP)
MOS protocol, the newsroom computer system (NRCS) sends the rundown information to
Xplay, which previews and plays out on Vertigo playout devices (figure 1-2).
Figure 1-2. Xplay also acts as the media event sequencer in newsroom environments
Upon receipt of the rundown, Xplay recalls the graphics pages from the Xmedia Server and
then plays out the dynamic news sequences with live data mapped to the appropriate
graphic template fields. Customized control panels at the top of the Xplay interface can be
used for manual operation. Since Xplay’s device views show a preview of the device’s
playout, you can also make last minute changes to the graphics. The Xnews User Manual
provides more information about the Vertigo news graphics workflow.
Xplay can also be used to allow third-party automation systems, like Pharos, Pebble Beach,
Harris (ADC), and Florical, to control Vertigo playout devices (i.e. Vertigo XG and Intuition
XG). Figure 1-3
automation controls protocols for graphics playback either through a serial or TCP/IP
connection. Xplay receives these commands from automation to control the device and the
device sends back status messages. See “
protocols” on page 5-1 for more information.
demonstrates that automation commands are sent using standard
Controlling Xplay devices using automation
Figure 1-3. Xplay allows third-party automation systems to control Vertigo playout devices
1-2 Xplay User Manual
Page 10

2 GETTING STARTED WITH XPLAY
Xplay can be used to preview and control the playout of media and graphics on a single or
multiple devices and this can be done either manually or through automation. As such, the
procedures for installing and configuring Xplay are depend upon its intended use.
The following sections provide information and instructions for how to install, configure and
become familiar with Xplay’s user interface:
Installation and licensing information” on page 2-2
• “
• “Starting Xplay and connecting to the Xmedia Server” on page 2-3
• “Overview of the Xplay interface” on page 2-4
• “Configuring Xplay’s settings” on page 2-7
• “Adding and connecting Xplay to playout devices” on page 2-8
Xplay User Manual 2-1
Page 11
Getting started with Xplay
NOTE
Installation and licensing information
When playout is to be controlled manually by an operator, Xplay is typically installed and
configured on a client computer that is connected via a local-area network to the playout
devices. However, when the playout is to be controlled by an external automation system,
Xplay is installed and configured directly on the Vertigo playout device (i.e. Vertigo XG or
Intuition XG).
Regardless of where it is installed, Xplay is packaged with the Vertigo Suite software
installation wizard. It can be installed as part of the full installation or as an individual
(standalone) component. In both cases, you simply need to run the installation wizard on a
workstation that is on the same network as the Xmedia Server.
Information regarding the Vertigo Suite’s hardware and network requirements, as well as
instructions for installing and/or upgrading Xplay, are available in the Vertigo Suite’s
Release Notes, which can be downloaded from the Support Portal web site.
Unlike most other Vertigo Suite applications, Xplay does not require a software application
license.
2-2 Xplay User Manual
Page 12
Getting started with Xplay
Starting Xplay and connecting to the Xmedia Server
When you initially launch Xplay, a dialog box appears and asks you to configure the server
location. As a client application, Xplay must be connected to the Xmedia Server, which is
the centralized asset management server for Vertigo applications and devices.
Since you have only just installed Xplay, the first task that you must do is to connect Xplay
to the Xmedia Server.
To start Xplay and connect to the Xmedia Server:
1. Click S
2. When the message asking you to configure the server location, click the Y
TART>PROGRAMS>VERTIGOXMEDIA>XPLAY.
ES button.
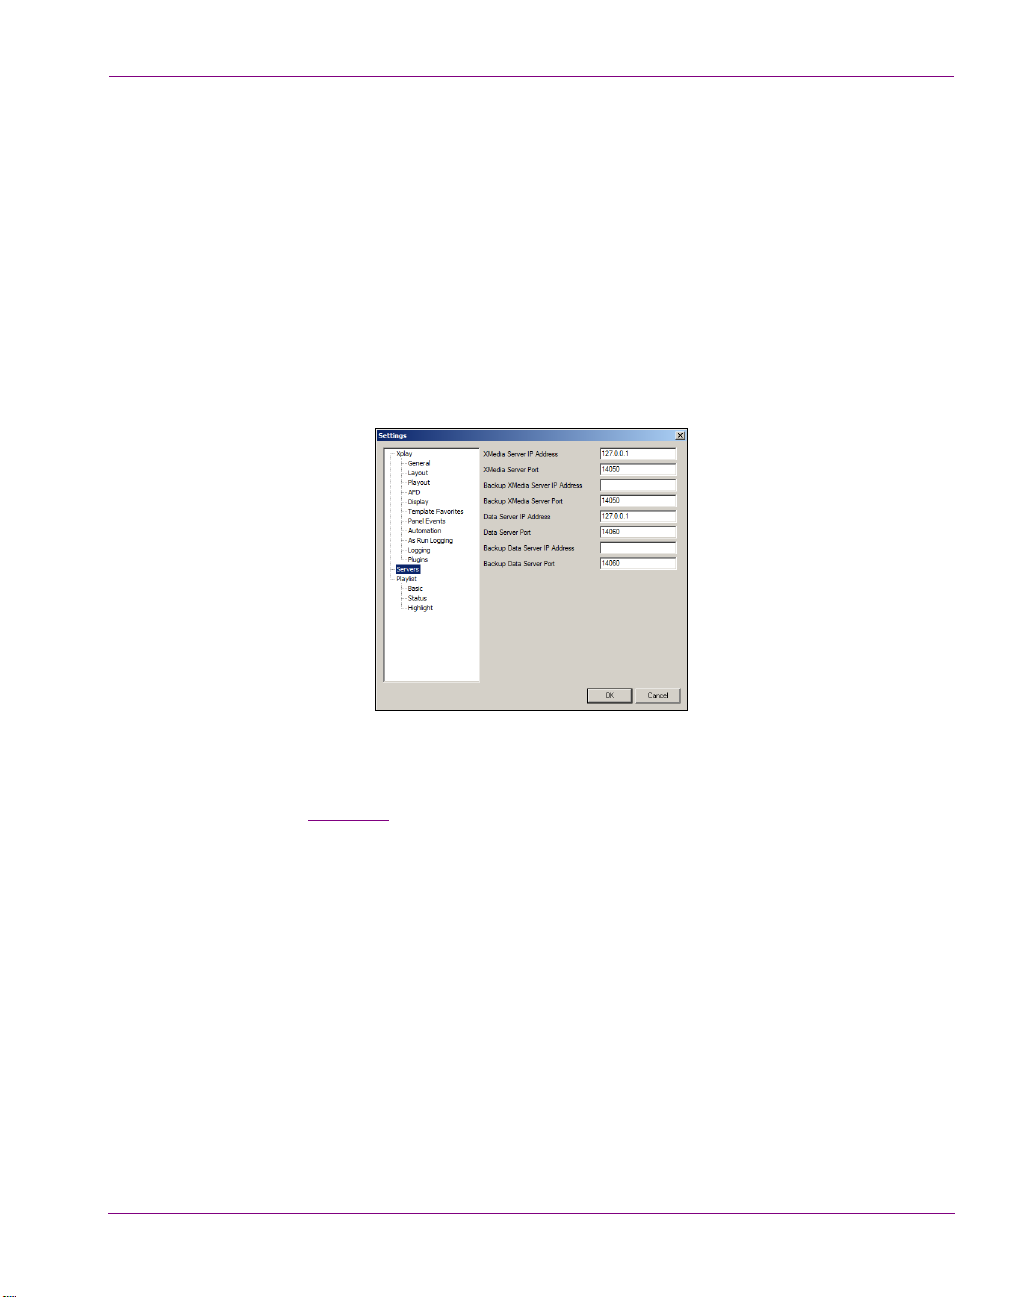
The SETTINGS dialog box appears.
Figure 2-1. Settings dialog box
3. Click S
4. In the X
ERVERS in the tree view at left. This displays the settings related to the Xmedia
Server (see page 6-34
MEDIASERVER IP ADDRESS field, replace <server IP> with the IP address of
for more information about Xplay’s Server settings).
the machine hosting the Xmedia Server.
5. Unless the port number was changed when the Xmedia Server was installed, the
default in the X
MEDIASERVER PORT field will be correct. If it was changed, enter the new
number.
6. Click OK.
Xplay launches. If the program does not launch, consult your system administrator. The
problem could be due to one of the following:
• The IP address or port was entered incorrectly.
• The machine hosting the Xmedia Server is down.
• The Xmedia Server is not running on the host machine.
• The machine is not connected to the network.
Xplay User Manual 2-3
Page 13

Getting started with Xplay
1
2
7 8
6
3
4
5
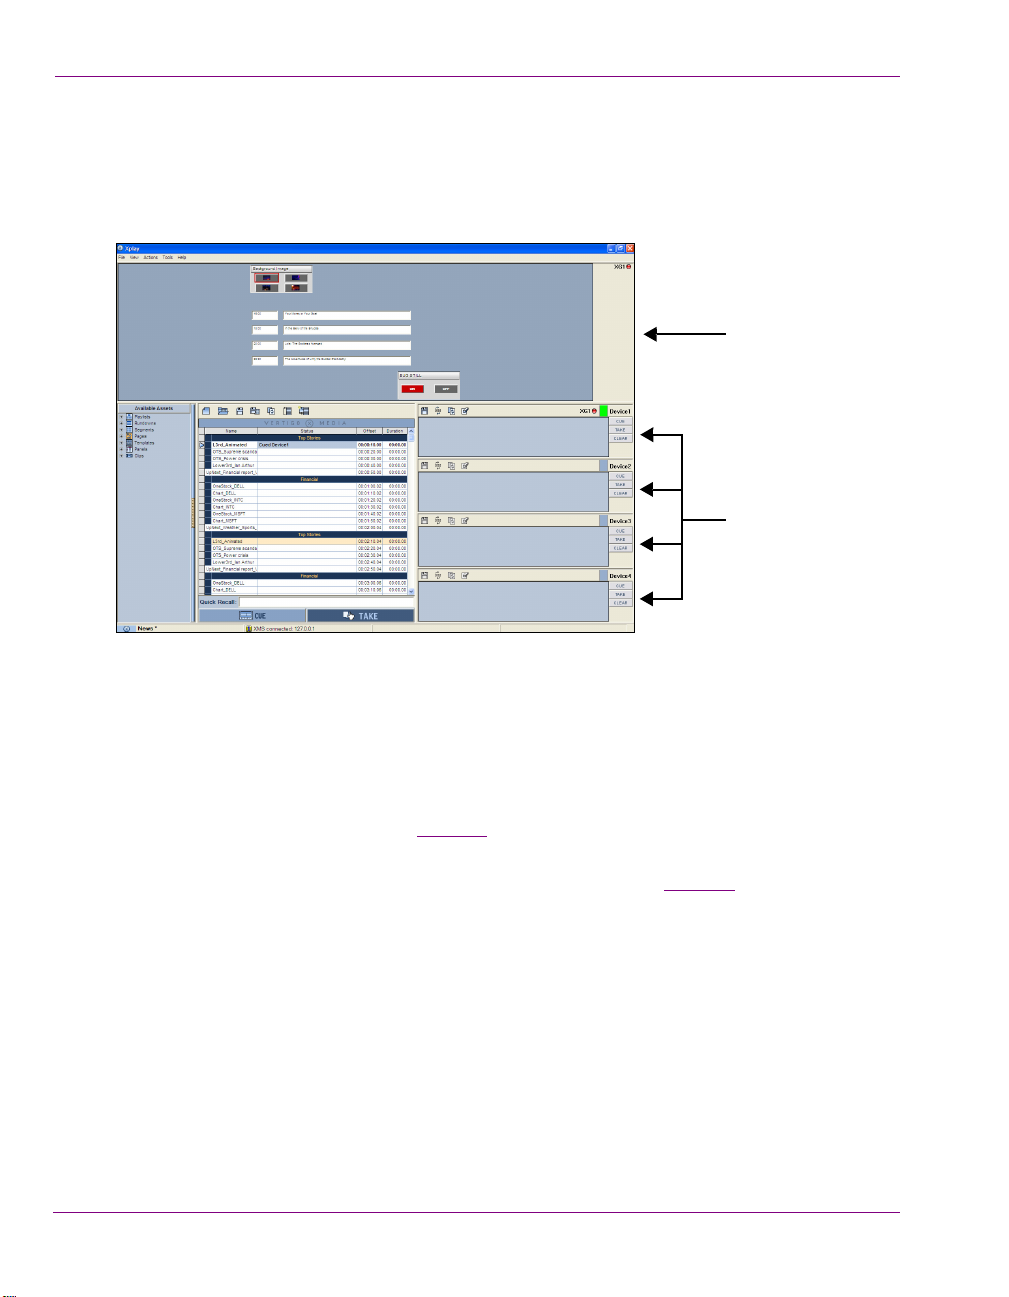
Overview of the Xplay interface
While some of the Xplay interface components remain constant, others are customizable
using Xplay’s settings. Figures 2-2
interface components and provide a brief functional description of each.
and the following descriptions identify the Xplay’s main
Figure 2-2. Xplay set to Manual playout mode and On-Air Preview layout mode
1. Main menus: Located along the top of the interface, these menu commands provide
access to most of Xplay’s settings and administrative functions. See “Xplay’s menu
commands” on page 6-2 for more information.
2. Asset Browser: The Asset Browser, which is located within a collapsible panel, provides
a tree view of assets stored on the Xmedia Server. You can use the Asset Browser to
locate and load a rundown into Xplay, as well as to add pages, clips, templates and/or
scenes to an open playlist.
3. Playlist Editor: The Playlist Editor is the workspace where an opened playlist is displayed.
Playlist elements (segment headings, pages, clips, comments...etc.) are organized in a
2-4 Xplay User Manual
sequential list.
• The buttons along the top of the window are used for loading and managing playlists.
These buttons allow you to open a new playlist, as well as save, reload, loop... the
playlist and its elements.
•The Q
• The Playlist Editor’s global C
UICK RECALL field, which can be hidden/exposed using the VIEW>QUICK RECALL
command, allows you to quickly locate and insert a page, clip, template and/or scene
into the playlist using the asset’s Recall ID property.
the playlist elements appear on air.
UE and TAKE buttons allow you to control the timing of when
Page 14

Getting started with Xplay
4. Message Log: Xplay’s Message Log window alerts you to possible errors or operational
events that may impede or adversely affect your playout. For example, the Message Log
will alert you if Xplay’s connection to the Xmedia Server (XMS) or to an output device is
disconnected or re-connected.
The Message Log window is conveniently displayed as a floating window upon start up
and each time a new message is added to the Message Log.
You can hide the Message Log window by clicking the window’s C
reopen the Message Log window at anytime, select the V
command or press C
TRL + M.
IEW>OPEN MESSAGE LOG
LOSE button . To
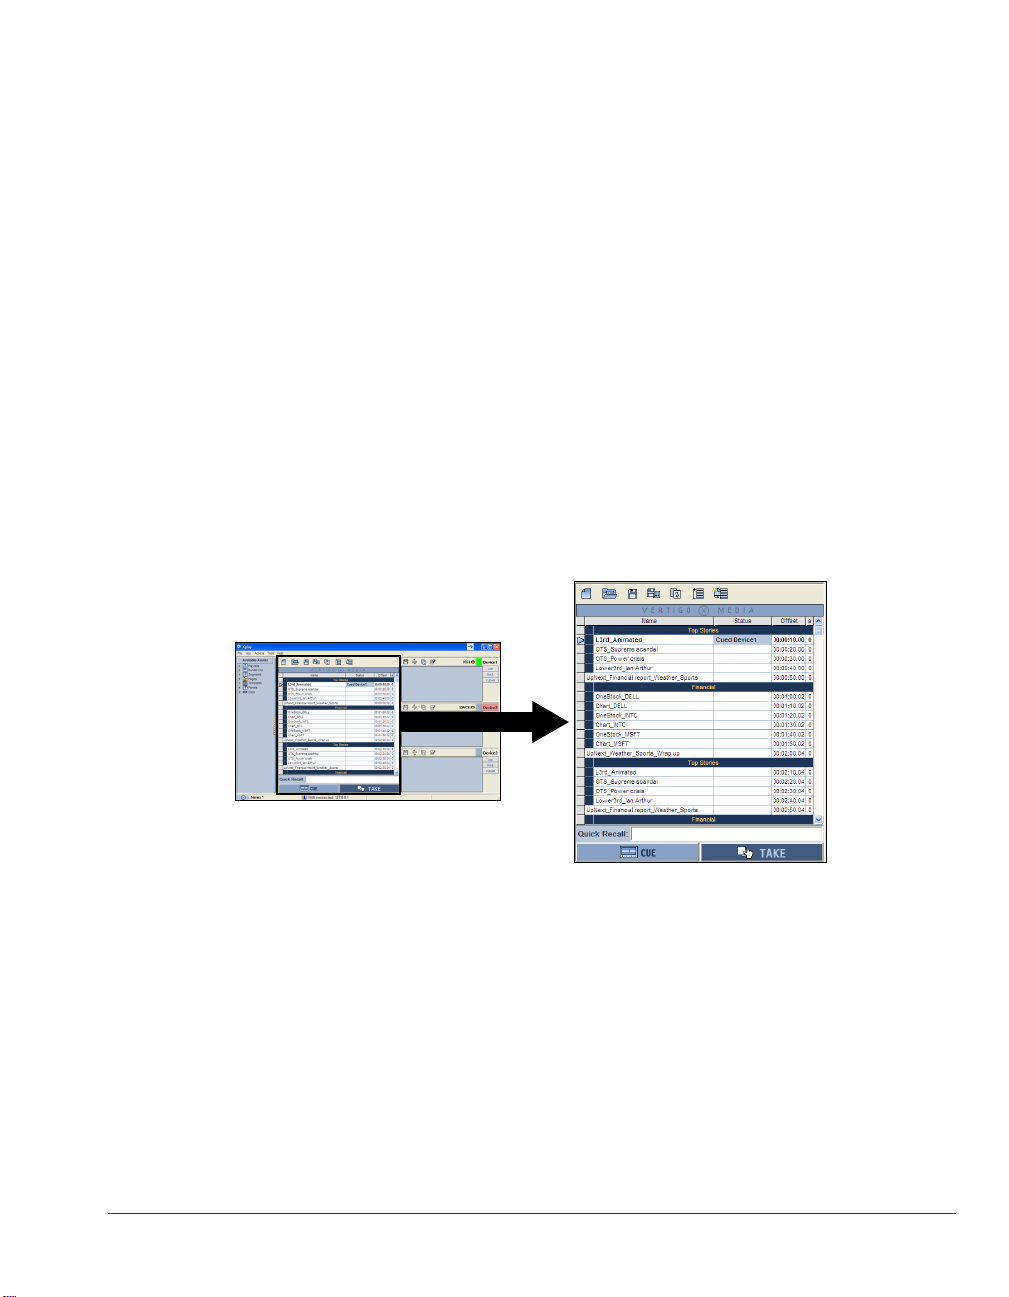
Rather than a floating window, the Message Log window can be set as an embedded
window in the Xplay interface (figure 2-3
). To embed the Message Log window, set the
Tools>Settings>Layout>Show embedded message window setting.
Figure 2-3. Xplay’s Message Log window can be floating or embedded
5. EAS Status bar: When Xplay is configured to support the Emergency Alert System
(EAS), the EAS Status bar provides operators with a quick visual of the EAS receiver’s
status and any current event messages. See “
Appendix C - Using Xplay to support the
Emergency Alert System (EAS)” on page 8-1 for more information.
6. Xplay’s Status bar: Xplay’s status bar identifies the name and status of the currently
loaded playlist, as well as Xplay’s connection status to the Xmedia Server.
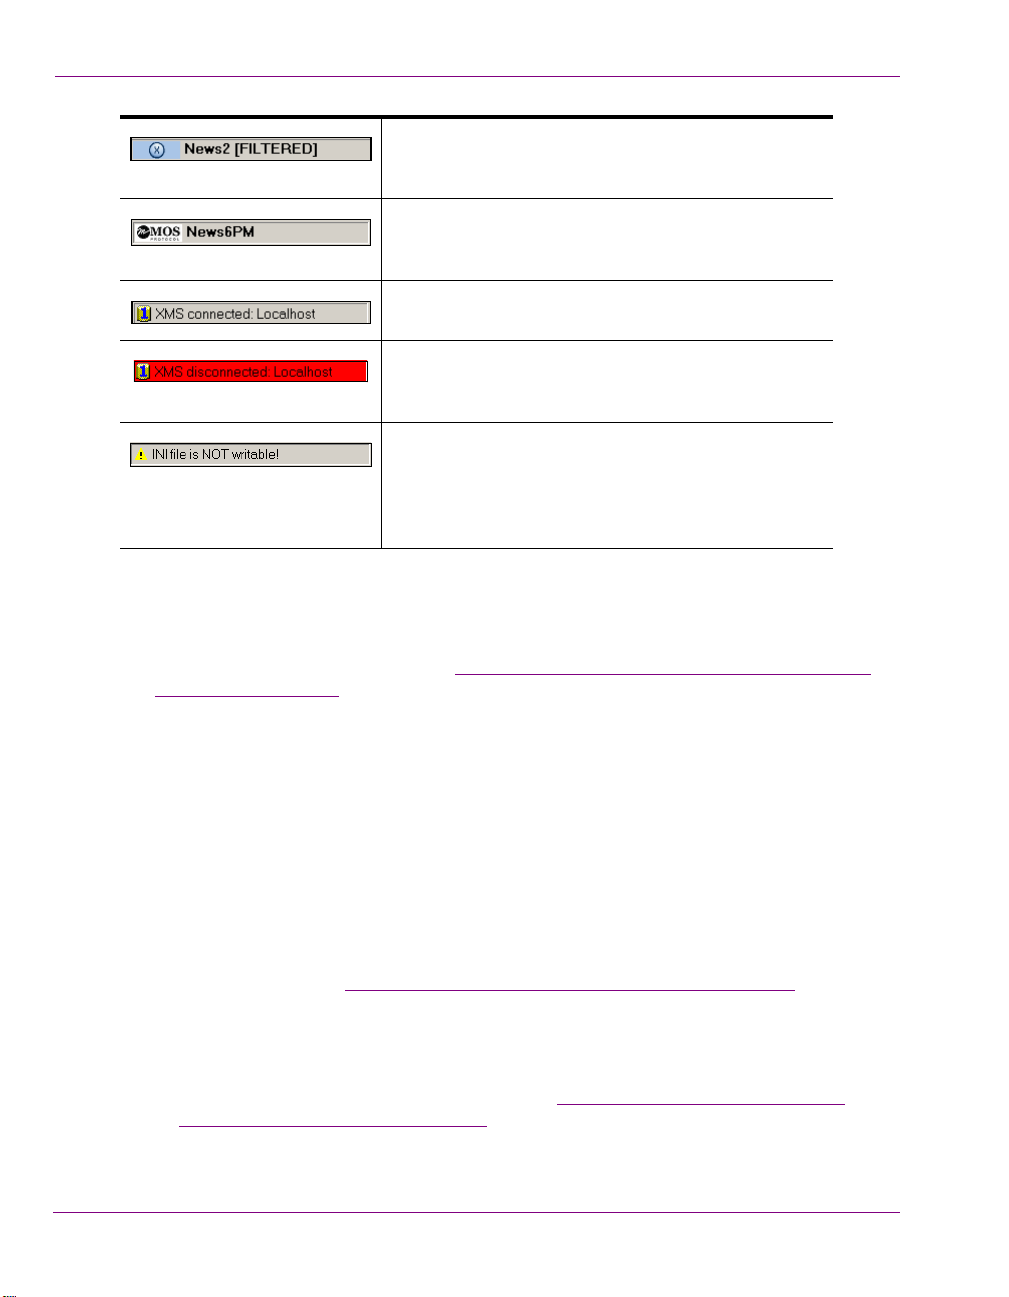
The following table describes the possible status information that is displayed in each
of the categories:
The X logo indicates that a basic Vertigo Suite playlist
is loaded in the Playlist Editor. The logo is followed by
the playlist’s name.
The asterisks beside the playlist’s name indicates that
unsaved edits have been made to the playlist.
Xplay User Manual 2-5
Page 15
Getting started with Xplay
Xplay’s F
ILTER PAGES BY DEVICE setting is enabled and
some playlist elements were removed because they
were not assigned to a device.
The MOS logo indicates a rundown (playlist) is
currently loaded in Xplay. Rundowns are a type of
playlist normally used for MOS news broadcasts.
Xplay is properly connected to the Xmedia Server
whose name or IP address is indicated.
When this section of the Status bar turns red, Xplay is
has lost its connection to the Xmedia Server whose
name or IP address is indicated.
Alerts or warns you that the Xplay.ini file, which is
located in C:\Program Files\VertigoXmedia\Apps, is
currently in an unwritable state. This means that Xplay
is currently not able to save any of the Xplay settings
upon shutdown.
7. Toolbar Panel: Any panel opened for use with the playlist will be displayed in a panel
directly under Xplay’s menu bar. When a panel is open, you can display or hide the entire
control panel area by selecting or deselecting V
IEW>TOOLBAR PANEL. The panel area can
be resized by dragging from its bottom borders downwards. You can also zoom in/out of the
panel by using the mouse wheel. See “
Using a panel to control an additional keyer level on
a device” on page 4-20 for more information.
8. Device Views: Xplay’s G
ENERAL settings (TOOLS>SETTINGS) allow you to set the LAYOUT
setting to either MULTI-DEVICE or ONAIR-PREVIEW, which affects the appearance of Xplay’s
Device Views. The Device Views allow you to see a visual representation of the playlist
element that is either being cued or currently being played out on a device.
ULTI-DEVICE: When Xplay is configured to playout to multiple devices or on different
• M
keyers of the same device, a display pane appears according to the number of devices
specified in the N
UMBER OF DEVICES setting. Each device’s display view has indicators
that informs of the device’s connection status, as well as override buttons for controlling
the playout of the playlist elements on that device (e.g. C
UE, TAKE CLEAR). The override
buttons allow you to take selected playlist elements to air on the channel of your choice.
The layout of the device’s display views can also be customized using the
AYOUT>MULTIDEVICE LAYOUT setting, which can be set to ONAIR, PREVIEW, or
L
REVIEWONAIR. See “Configuring Xplay for multi-device playout” on page 2-14 for more
P
information.
NAIR-PREVIEW: This mode is used when Xplay is connected to only a single playout
• O
device (1 keyer channel) and an optional preview device (i.e. Software CG). One display
pane shows the playlist element that is currently on air, while the pane previews the
element that has been cued as next-to-air. See “
Configuring Xplay for single device
playout (OnAir-Preview)” on page 2-12 for more information.
2-6 Xplay User Manual
Page 16
Configuring Xplay’s settings
NOTE
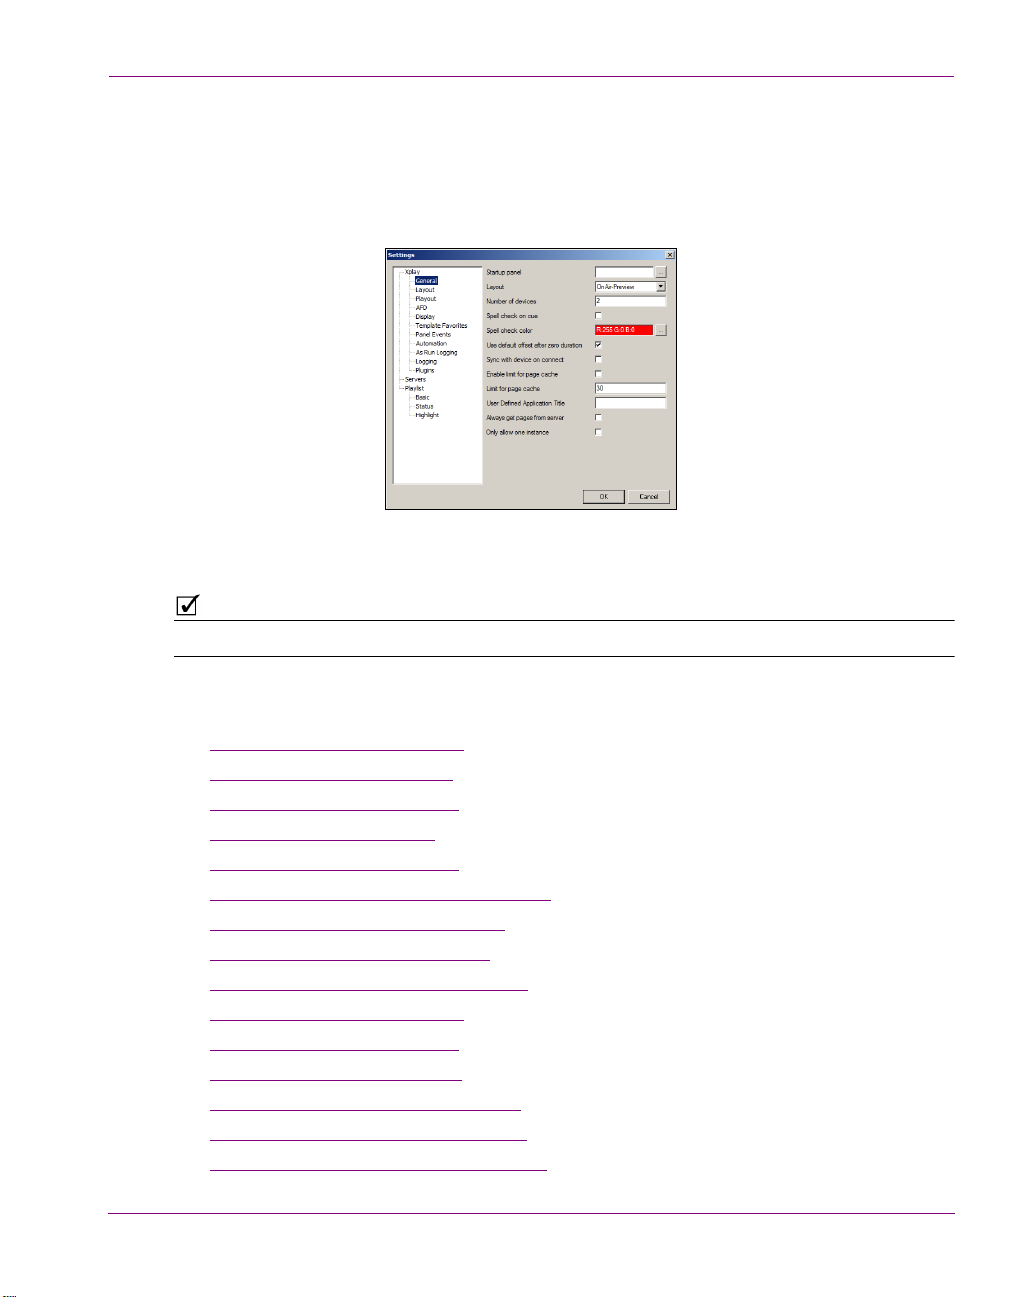
While Xplay’s default settings are appropriate for most operating circumstances, you may
want to customize the look and behavior of the application using Xplay’s settings. Note that
modifying these settings is entirely optional.
Getting started with Xplay
Changes to Xplay’s settings are made within the S
accessed by selecting the T
Some settings will require you to restart Xplay for the changes to be applied.
This SETTINGS dialog box contains a tree-structure of thematic settings. Each of the settings
is defined in the following sections:
General settings” on page 6-14
• “
• “Layout settings” on page 6-16
• “Playout settings” on page 6-17
• “AFD settings” on page 6-20
• “Display settings” on page 6-21
• “Template Favorites settings” on page 6-23
• “Panel Events settings” on page 6-24
• “Automation settings” on page 6-25
• “As Run Logging settings” on page 6-27
• “Logging settings” on page 6-30
• “Plugins settings” on page 6-32
• “Servers settings” on page 6-34
• “Playlist > Basic settings” on page 6-35
• “Playlist > Status settings” on page 6-36
• “Playlist > Highlight settings” on page 6-37
OOLS>SETTINGS menu command.
ETTINGS dialog box, which can be
Xplay User Manual 2-7
Page 17
Getting started with Xplay
NOTE
Xplay’s Device Views
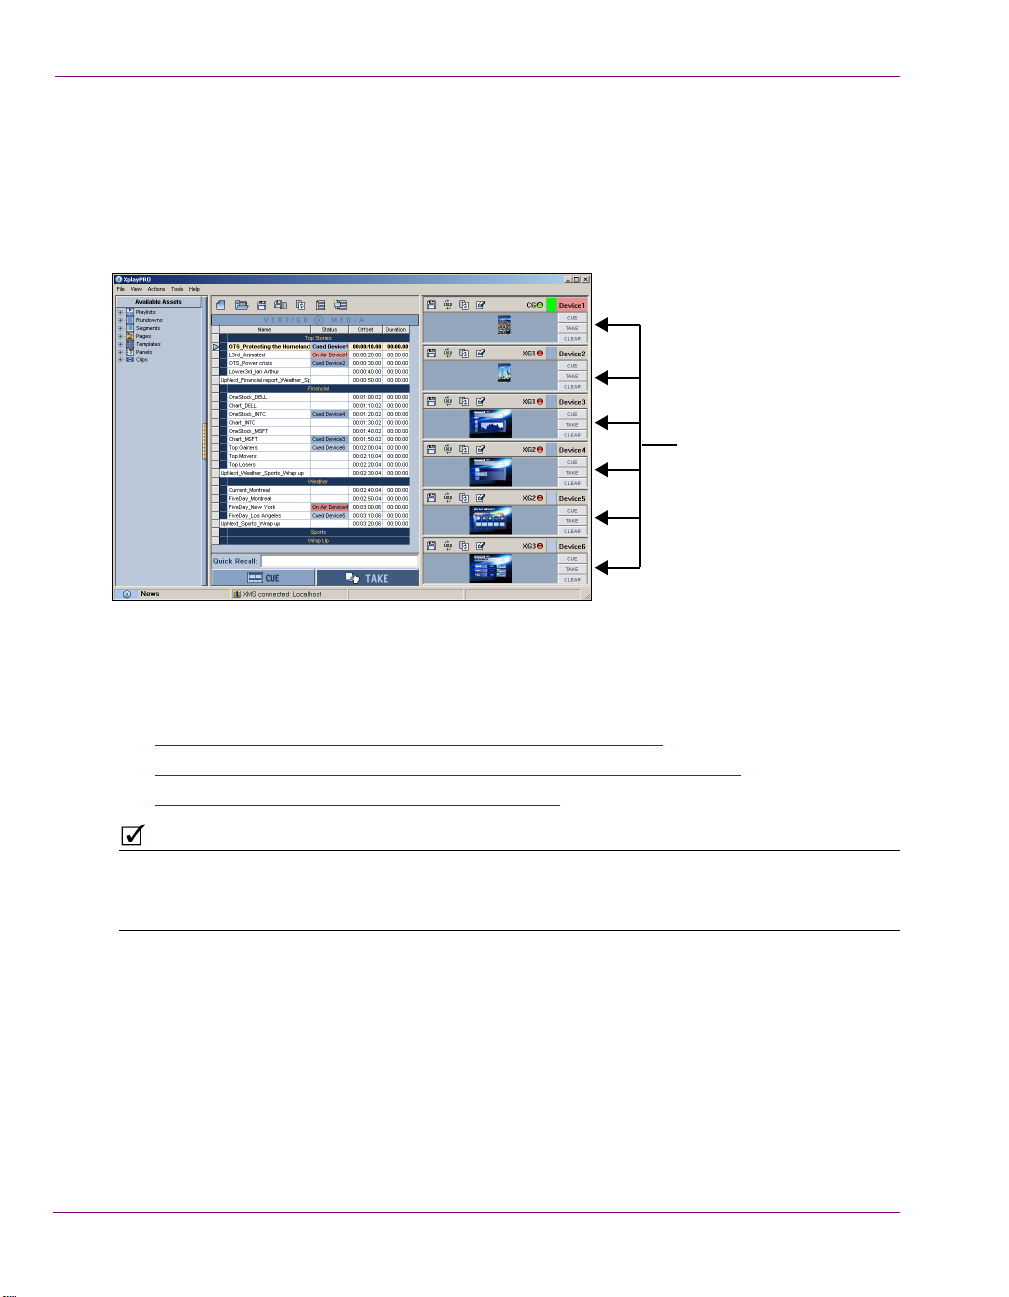
Adding and connecting Xplay to playout devices
Xplay allows you to preview and control the playout of media and graphics on various types of
rendering and playout devices (e.g. Software CG, Vertigo XG or Intuition XG). Xplay can be
configured to preview and control playout on a single device, or to managed the playout on
multiple devices, multiple channels, and/or multiple layers on a channel all from a single interface.
Figure 2-4. Xplay’s Device Views allow you to control the playout on specific devices, channels and/or keyers
The following sections describe how to configure Xplay’s Device Manager and Device
Views to connect to your output device(s):
Adding output devices to Xplay’s Device Manager” on page 2-9
1. “
2. “Configuring Xplay for single or multi-device playout control” on page 2-12
3. “Connecting output devices to Xplay” on page 2-16
Xplay supports playout on several different device types, including the Software CG, Vertigo XG,
Intuition XG, as well as other Grass Valley and 3rd party devices. Please refer to the latest Vertigo
Suite Release Notes for the complete list of supported devices.
2-8 Xplay User Manual
Page 18
Getting started with Xplay
Adding output devices to Xplay’s Device Manager
Before Xplay can connect and playout media and graphics content to an output device,
each instance of the output device must be defined in Xplay’s Device Manager.
The Device Manager maintains a list of output device profiles that have been configured to
work with Xplay. You can add several devices to the Device Manager, as well as add a
separate device for each channel of the same device (i.e. XG1 for channel A and XG2 for
channel B of a dual-channel Vertigo XG device).
Note that adding a device to the Device Manager does not automatically associate the
device with an Xplay Device View (keyer) nor does it automatically connect the device to
Xplay (these tasks are performed in a separate step described on page 2-12
Adding devices to the Device Manager simply means that these devices are already
configured and available to Xplay whenever they may be needed.
To add an output device to Xplay’s Device Manager:
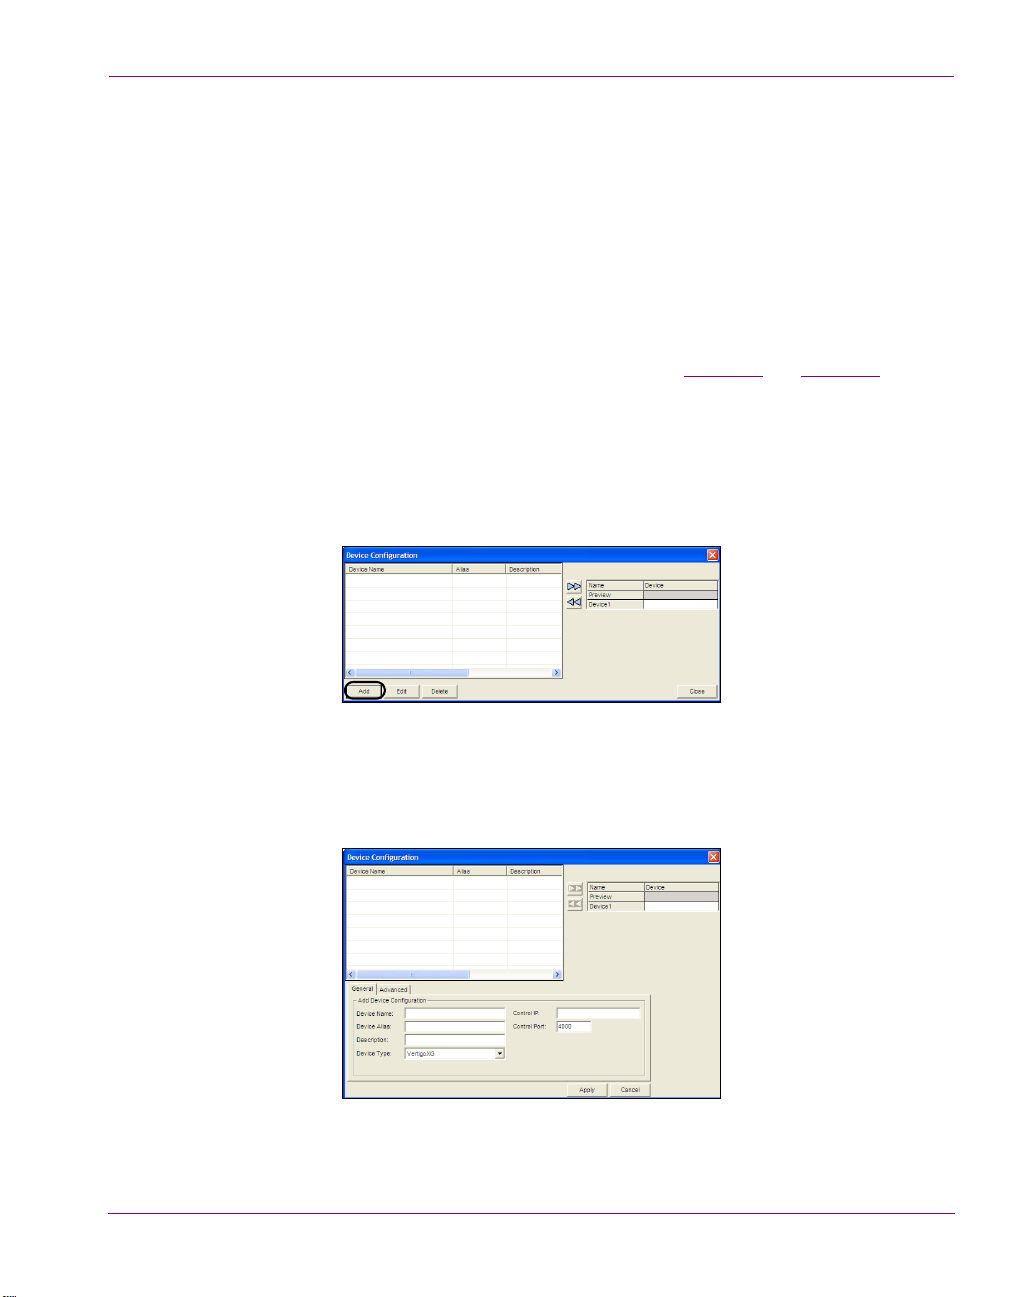
1. Open the Device Configuration window by selecting TOOLS>DEVICE MANAGER.
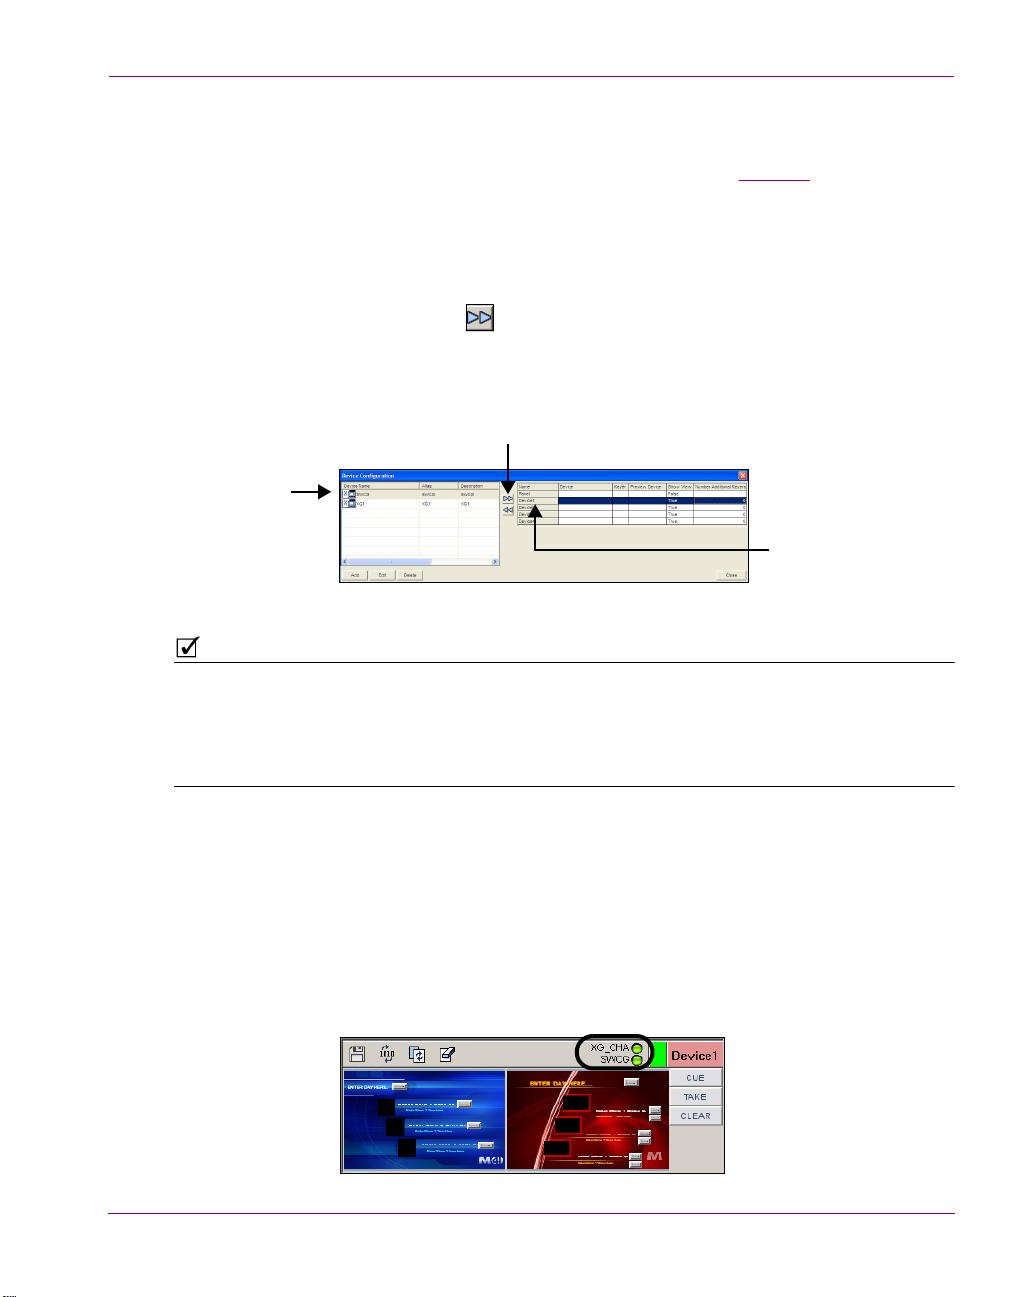
2. In the D
EVICE CONFIGURATION window, select the ADD button:
and page 2-16.
Figure 2-5. Device Configuration dialog box
3. The DEVICE CONFIGURATION windows expands to reveal two tabs (GENERAL and ADVANCED)
with settings for identifying the device’s configuration.
Figure 2-6. Add Device Configuration section
Xplay User Manual 2-9
Page 19

Getting started with Xplay
4. Specify the appropriate General Device Configuration settings:
Device name The name of the selected device. This can only be modified when adding a device.
Device alias An alternative name for the selected device on your network.
Description An optional field that lets you label the device to distinguish it from other similar
devices at your facility (for example).
Device Type Identifies the type of device that these settings apply to.
Choose from:
•V
ERTIGOXG
NTUITIONXG
•I
•P
REVIEW (OR OTHER DEVICE)
MAGESTORE
•I
•INTUITION
•FTP
•LGK
•DSK
•HMP
THER
•O
NOTE: Always select PREVIEW (or other device) for Software CG devices.
Control IP The network location (IP address) or hostname of the selected device. The host
must be available on the network.
N
OTE: The Control IP setting is not displayed when HMP is selected as the device
type.
Control Port The networking port that serves as a channel for sending commands to and from
the device.
N
OTE: The Control Port setting is not displayed when HMP is selected as the device
type.
Publish IP The network location (IP address) or hostname of the selected device. The host
must be available on the network.
N
OTE: The Publish IP setting is not displayed when VERTIGO XG, INTUITION XG or
INTUITION are selected as the device type.
Publish Port The networking port that serves as a channel for publishing assets. Typically, this
value is set to 15000.
N
OTES:
• The Control Port setting is only displayed when PREVIEW, FTP, HMP or OTHER
are selected as the device type.
• This value must correspond with the port used by the XpublishAgent on the
output device.
2-10 Xplay User Manual
Page 20
Getting started with Xplay
NOTE
Publish as
Export
The Publish as Export setting is only displayed if FTP is the selected device type.
This setting publishes the asset in the Vertigo Export (.vex) zip file format. The
VEX format is used by the File Ingest Service to import assets into the Xmedia
Server and/or device.
5. Specify the appropriate Advanced Device Configuration settings:
Clip Template When a “stand-alone” clip asset played out (either from the playlist or from an
automation command), Xplay will use this system template to determine the clip’s
playout format, position and behavior.
Click the button to navigate to and select a Clip template.
Valid clip templates for various scene formats are included with the Vertigo Suite’s
system templates. Once imported into the Xmedia Server, the templates are stored
in the T
EMPLATES>SYSTEM TEMPLATES category.
If you choose to create your own clip template, remember that the clip template’s
control-side must have a texture linked to a scene-side clip object.
Cel Template
&
Image
Tem pla te
The name of the template that is used to play “stand-alone” cel animations or
images when they are taken to air using an automation command.
Click the button to navigate to and select a cel template or image template.
Valid templates for various scene formats are included with the Vertigo Suite’s
system templates. Once imported into the Xmedia Server, the templates are stored
in the T
EMPLATES>SYSTEM TEMPLATES category.
If you choose to create your own template, remember that the template’s controlside must have a texture linked to a scene-side cel animation or image object.
External Keyer Allows you to associate another device with the current device. This setting is
specifically used when the Software CG output is keyed over the ImageStore
output. In this way, specific commands can be sent to the ImageStore (the External
keyer) when specific things are done on the Software CG.
OTE: The External Keyer setting is not displayed when FTP and HMP are selected
N
as the device type.
Publish
Master
Lets you select a master device.
N
OTE: The Publish Master setting is only displayed when PREVIEW and OTHER are
selected as the device type.
6. Click A
PPLY.
After a device has been added to the Device Manager, you can edit a device’s configuration
settings (except for the Device Name) or delete the device from the Device Manager. However,
the device must not be actively assigned to a Device View in Xplay.
Xplay User Manual 2-11
Page 21
Getting started with Xplay
Toolbar Panel
On Air
Preview
Device View
Device View
Configuring Xplay for single or multi-device playout control
The Device Views along the right-side of the Xplay interface allow you to view and control
the playlist items that are either being cued or currently being played out on a device.
Taking into consideration your intended use and output device configurations, you must set
Xplay’s Layout setting (T
ULTI-DEVICE, which determines the appearance of Xplay’s device views. You must also
M
associate Xplay’s Device Views with the device channels and keyers that the playlist items
will be played out on. Both of these tasks are explained in the following sections:
Configuring Xplay for single device playout (OnAir-Preview)” on page 2-12
• “
• “Configuring Xplay for multi-device playout” on page 2-14
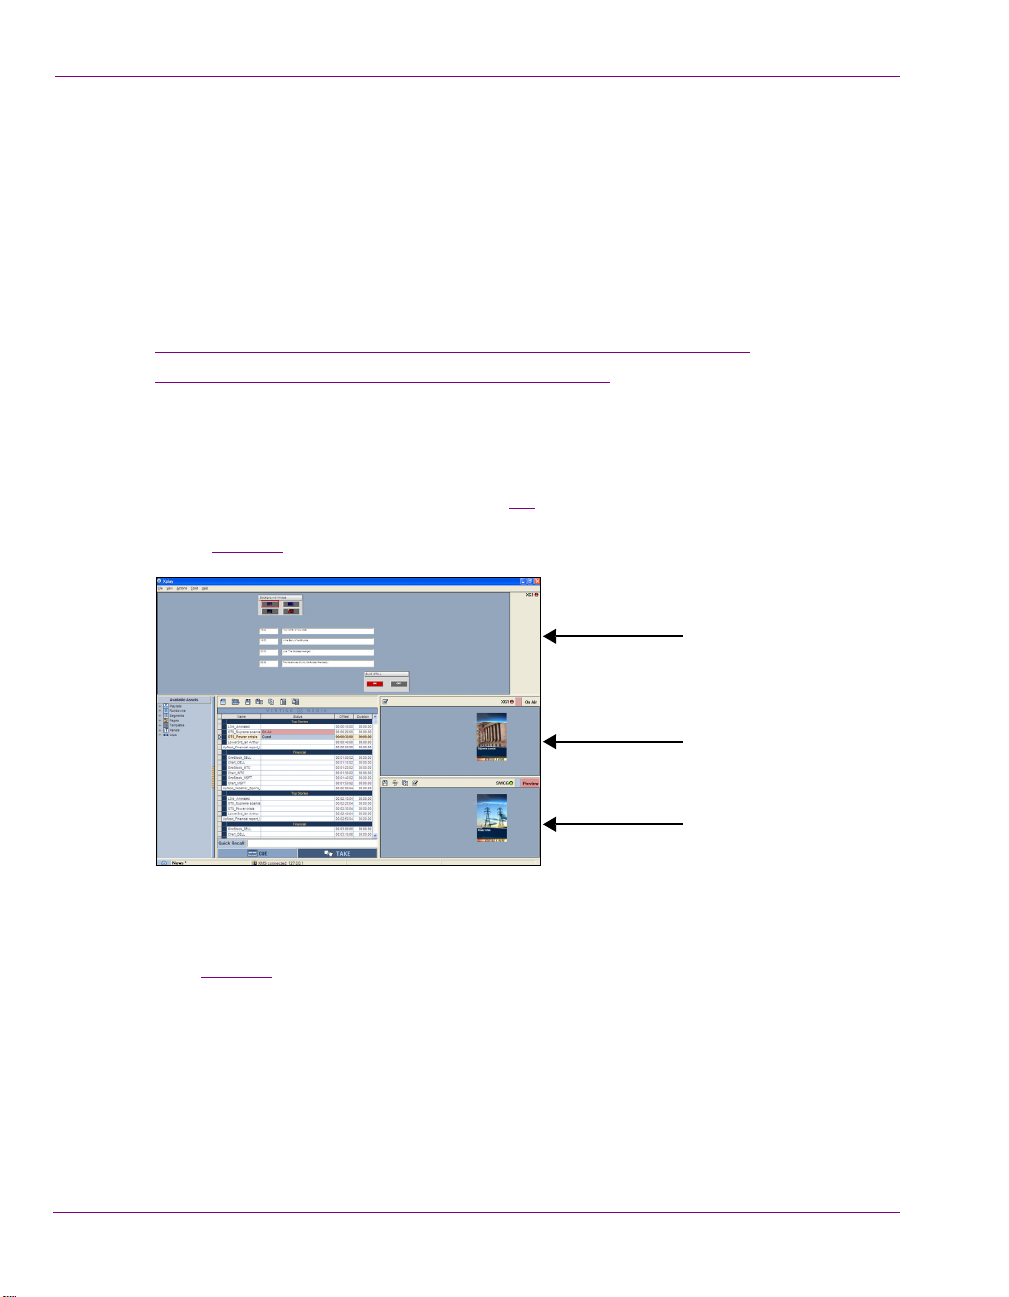
Configuring Xplay for single device playout (OnAir-Preview)
When Xplay is to be connected to only a single playout device, we recommend that you set
Xplay’s Layout setting to ONAIR-PREVIEW. Figure 2-7 demonstrates that the OnAir-Preview
layout provides you with two Device View windows (On Air and Preview) and the Toolbar
Panel. See page 4-2
OOLS>SETTINGS>GENERAL>LAYOUT) to either ONAIR-PREVIEW or
for a detailed description of the OnAir-Preview layout.
Figure 2-7. On Air - Preview layout’s device views and Toolbar Panel
Once a playout device and a preview device (optional) have been added to Xplay’s Device
Manager (page 2-9
) and the layout is set to ONAIR-PREVIEW, you can assign a device
(channel and/or keyer) to each of the On Air and Preview Device Views using the Active
Device table in the Device Manager.
To configure Xplay for single device playout using the OnAir-Preview layout:
1. Select TOOLS>SETTINGS>GENERAL and set the LAYOUT setting to ONAIR-PREVIEW and
click OK.
2. Restart Xplay.
2-12 Xplay User Manual
Page 22
Getting started with Xplay
Step B
Steps A & D
Step C
3. Open Xplay’s Device Manager by selecting TOOLS>DEVICE MANAGER.
The D
EVICE CONFIGURATION window appears with the available output devices already
listed in the device table. If the desired device is not listed, refer to page 2-9
instructions on how to add a device to the Device Manager.
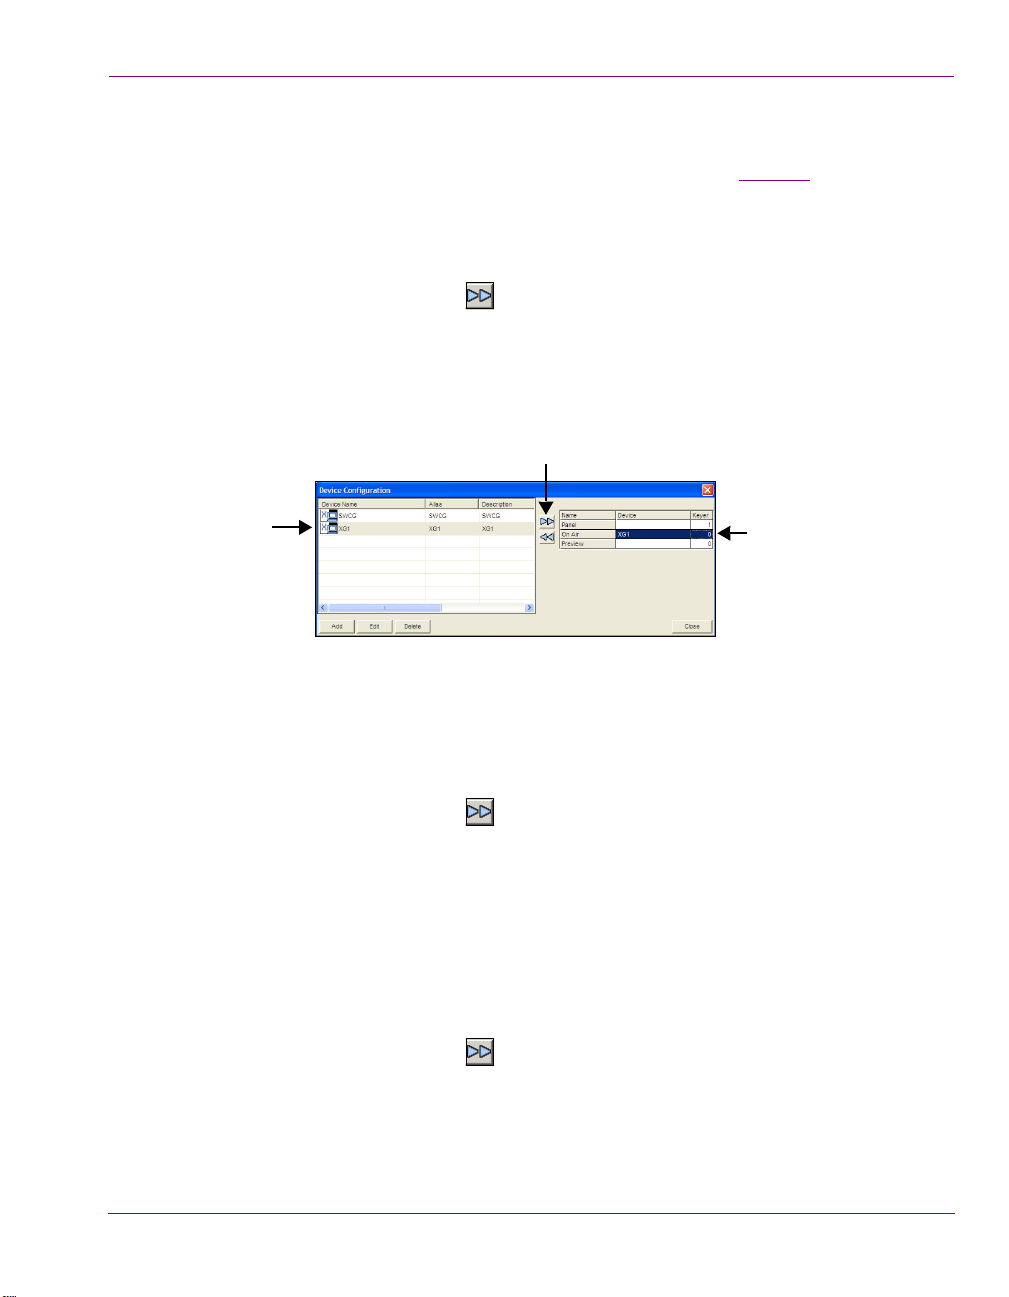
4. To associate the On Air Device View with a playout device and keyer.
a. In the Active Device table, click O
N AIR to select the row.
b. In the Device Configuration table, select the device that you want to playout on.
c. Click the right-arrow button to establish the association.
The device is immediately added to the Active Device table. It is also added to the
On Air Device View on the Xplay interface.
d. Click the device’s K
EYER column and assign a keyer value.
The keyer value tells Xplay on which layer of the output device to playout the
playlist element (0 is the bottom-most level).
for
Figure 2-8. Connecting Xplay to an output device
5. Optional - If you want to preview and/or edit playlist items before they are taken to air,
you can associate the Preview row in the Active Device table with an output device.
a. In the Active Device table, click P
REVIEW to select the row.
b. In the Device Configuration table, select the device that you want to preview the
playout on.
c. Click the right-arrow button to establish the association.
The device is immediately added to the Active Device table. It is also added to the
Preview Device View on the Xplay interface.
d. Click the device’s K
EYER column and assign a keyer value.
0 is the bottom-most level.
6. Optional: To configure Xplay to use a control panel asset to control and playout
graphics on a different device or on a different keyer on the On Air device:
a. In the Active Device table, click P
ANEL to select the row.
b. In the Device Configuration table, select the device that you want to control the
playout on.
c. Click the right-arrow button to establish the association.
The device is immediately added to the Active Device table.
d. Click the device’s K
EYER column and assign a keyer value.
0 is the bottom-most level.
Xplay User Manual 2-13
Page 23
Getting started with Xplay
Toolbar Panel
Device Views
Configuring Xplay for multi-device playout
When you want to use Xplay to control the playout on more than one output device or
control more than one keyer on the same device, we recommend that you set Xplay’s
Layout setting to M
ULTI-DEVICE.
Figure 2-9. Multi-Device layout’s device views and Toolbar Panel
The Multi-Device layout allows you to specify the number of playout devices or keyers to be
controlled and then produces one Device View window in Xplay for each device channel or
keyer. For example, if I intend for Xplay to control and playout on one dual-channel Vertigo
XG with both channels having two keyer levels; I would set the N
UMBER OF DEVICES setting
to 4. Consequently, this produces 4 device view windows in Xplay, which would be assigned
to these device channels/keyers. See page 4-7
for more information about the Multi-Device
layout.
Once playout devices have been added to Xplay’s Device Manager (page 2-9
layout is set to M
ULTI-DEVICE, you can assign a device (channel and/or keyer) to each of the
) and the
On Air and Preview Device Views using the Active Device table in the Device Manager.
To configure Xplay to control and playout on multiple devices and/or keyers:
1. Select TOOLS>SETTINGS>GENERAL and set the LAYOUT setting to MULTI-DEVICE.
2. On the same page, specify the number of devices and/or keyers to be controlled in the
UMBER OF DEVICES setting.
N
3. Select T
P
OOLS>SETTINGS>LAYOUT and set the MULTI-DEVICE LAYOUT setting to
REVIEW, ONAIR or PREVIEWONAIR.
4. Click OK and then restart Xplay.
When Xplay reopens it displays multiple Device View windows along the right-side in
the format specified by the M
ULTI-DEVICE LAYOUT setting.
2-14 Xplay User Manual
Page 24
Getting started with Xplay
NOTE
Step B
Step A
Step C
5. Open Xplay’s Device Manager by selecting TOOLS>DEVICE MANAGER.
The D
EVICE CONFIGURATION window appears with the available output devices already
listed in the device table. If the desired device is not listed, refer to page 2-9
instructions on how to add a device to the Device Manager.
6. To assign an output device with a Device View:
a. In the Active Device table, click the <Device#> in the N
AME column to select the row.
b. In the Device Configuration table, select the device that you want to assign to the
Device View selected in the Active Device table.
c. Click the right-arrow button to establish the association.
The device is immediately added to the Active Device table. It is also added to the
Device View on the Xplay interface.
d. Repeat the above steps for each of the device views in the Active Device table.
Figure 2-10. Associating a device with one of Xplay’s Device Views
for
By default, the device views in Multi-Device layout are named DEVICE1, DEVICE2,
DEVICE3...etc. You are not obligated to keep these default names. To personalize the device
views by assigning them a new name, right-click on the K
EYER STATE button (the device’s
name in the Device View’s toolbar) and select the RENAME command. The Keyer State button
will now display the new name, as does the Active Device table in the Device Manager
7. Once a device is added to the Active Device table, you can complete the remaining
properties associated with each of the Device Views:
EYER: The keyer value tells Xplay on which layer of the output device to playout the
• K
playlist element (0 is the bottom-most level).
• Preview: (Optional) Assigns a device from the Device Configuration table to be a
preview device. This allows you to preview the playout of a playlist item when it is cued
and then playout on the assigned device when it is taken to air. Like an output device,
the preview device’s name and connection status LED are displayed in the Device
View’s toolbar.
Xplay User Manual 2-15
Page 25
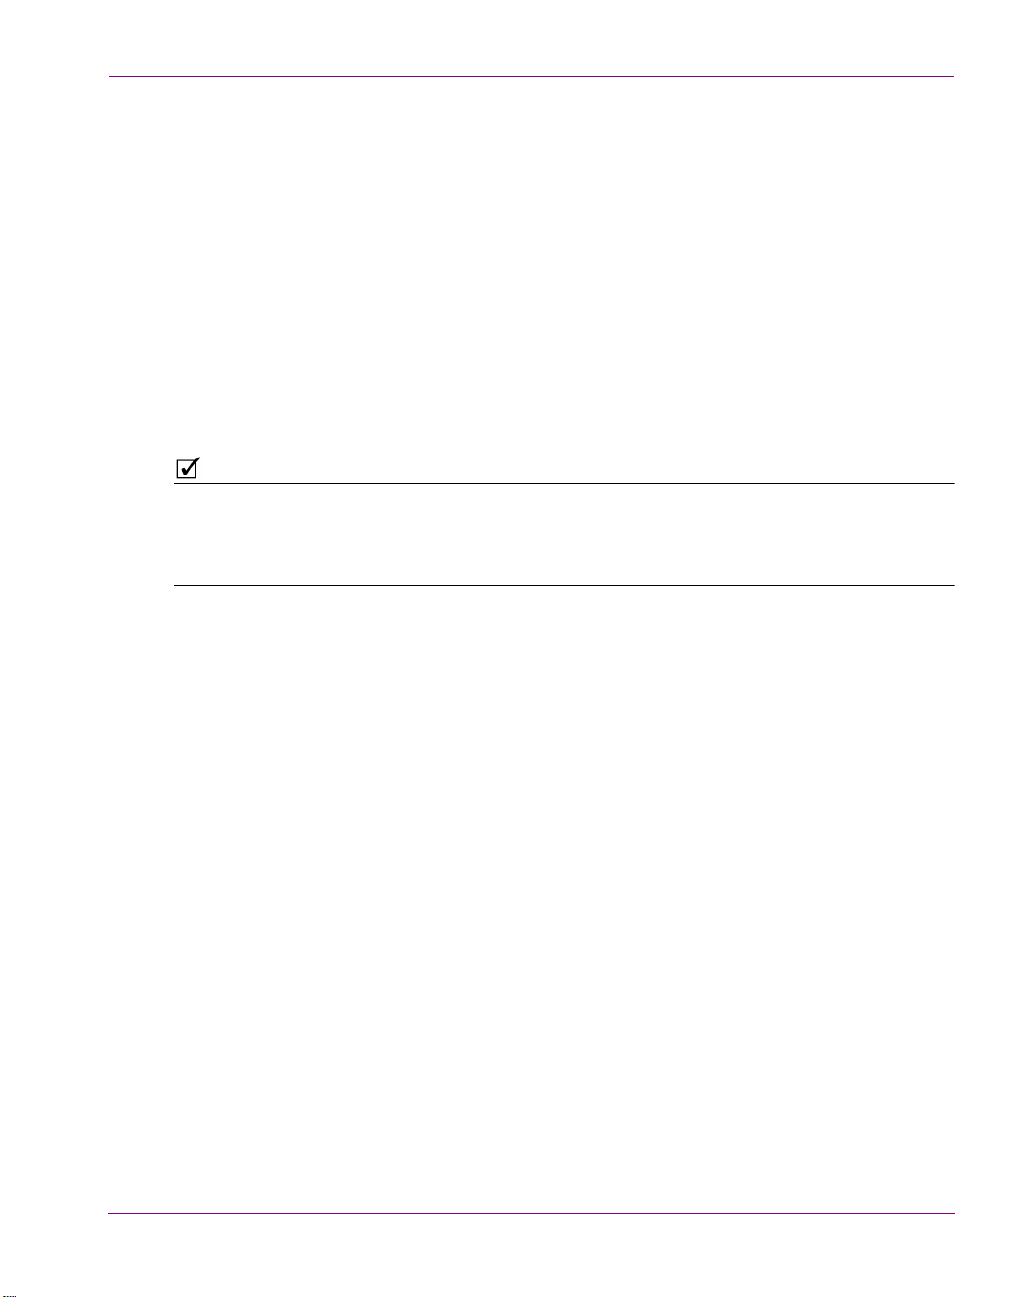
Getting started with Xplay
Output Device
Name
Device View
Name
Connection LED
Green = Connected
Red = Disconnected
• Show View: Determines whether or not the Device View window is appears (TRUE) or
is hidden (FALSE) in the Xplay interface. When an abundance of devices are active,
hiding certain devices from view provides more space on the Xplay interface for those
devices that are of greater interest.
UMBER OF ADDITIONAL KEYERS: You can associate a number of additional keyers with
• N
a particular device. This is useful if Xplay is configured with many devices, for example
20 devices with 16 keyers on each device. Xplay is not capable of displaying this many
views simultaneously. So, you can decide to show only the keyer specified in the
EYER column of each device for control/interaction purposes and the rest will remain
K
hidden, but be controllable by automation. Note that the additional keyers are
accessible to all External Control functions and they can be referred to by name using
the following format:
<BaseKeyerName>#1
<BaseKeyerName>#2
...
<BaseKeyerName>#n
8. Click the C
LOSE button on the DEVICE CONFIGURATION window.
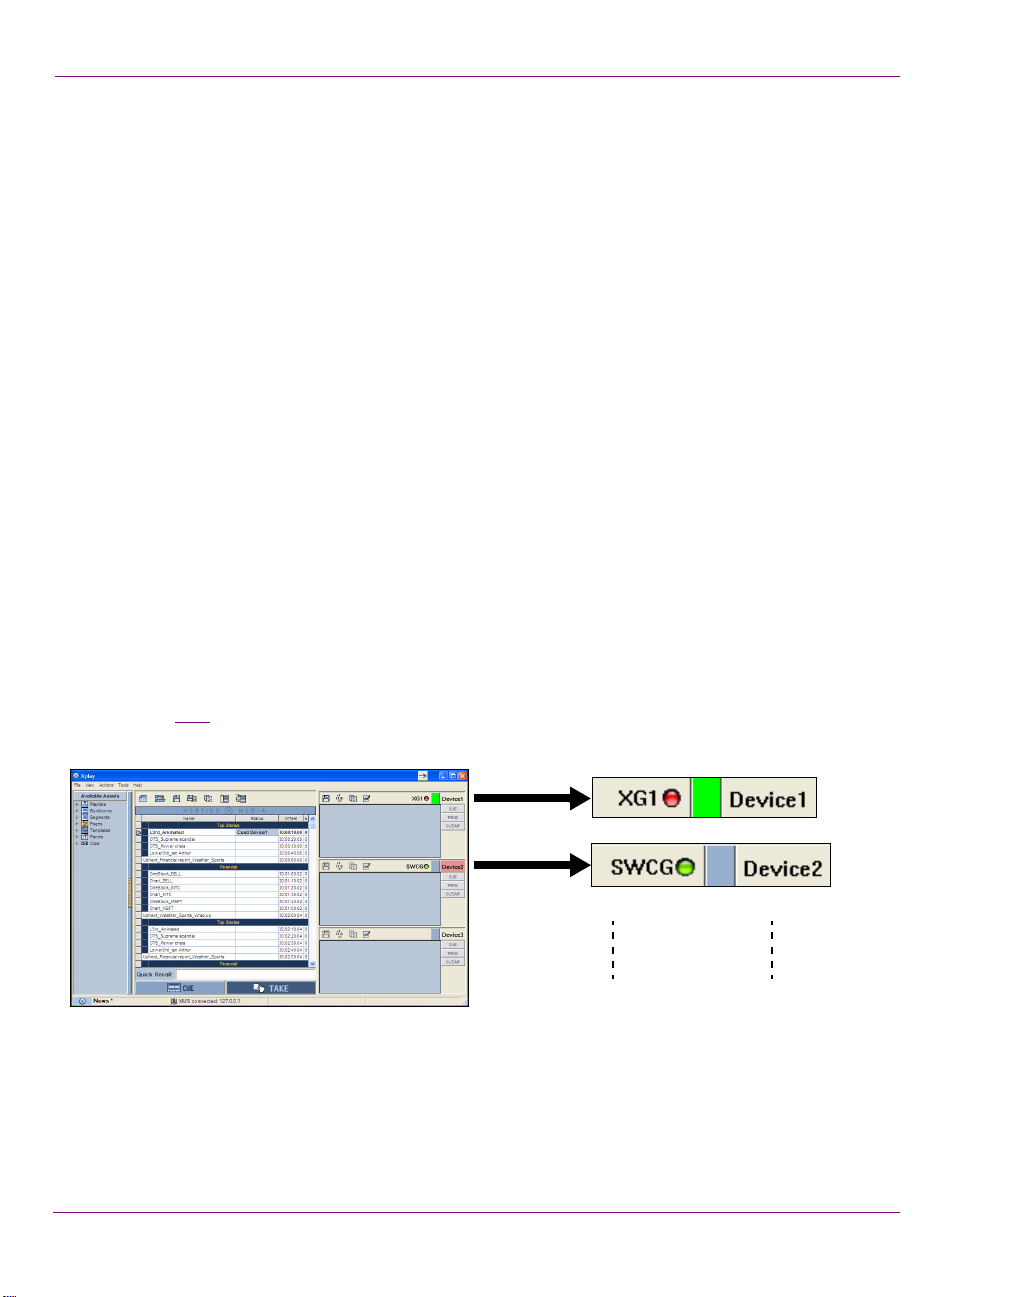
Connecting output devices to Xplay
Although the output devices may be properly configure and associated to the Device Views
in Xplay’s Device Manager, you must also ensure that the Device View is actively connected
to the output device. An active connection means that the output device is up and running
and that Xplay is able to communicate with it.
Figure 2-11
Device View’s toolbar.
Figure 2-11. Whether or not a device is actively connected to a Device View is indicated by the LED
shows that the device’s connection status is reported using an LED on the
2-16 Xplay User Manual
Page 26
Getting started with Xplay
NOTE
To reconnect Xplay to a device:
If Xplay is not connected or disconnects from an output device, the LED next to the device name
turns red. You can reconnect Xplay to the output device without having to access the Device
Manager; simply double-click the red LED. The LED turns green if a connection to the device
is established. If the LED remains red, it means one of the following:
• The information describing the device has been entered incorrectly.
• The desired device is down.
• The network connection has been lost.
To disconnect Xplay from a device:
If desired, you can disconnect from a device and run your playlist in Xplay to ensure that all
page information is correct. You can temporarily disconnect a device from Xplay, without
removing the device from the Device Manager; simply right-click on the device’s LED and
select the D
You can change the default name of the Device View (i.e. Device1) to something more
descriptive by right-clicking on the Device View’s name in the toolbar and selecting the Rename
command. When the name becomes editable, type the new name and press Enter. The name
change will also be automatically be applied to the Device Manager’s Active Device table.
ISCONNECT command (the green LED turns red).
Xplay User Manual 2-17
Page 27

Getting started with Xplay
2-18 Xplay User Manual
Page 28
3 CREATING AND EDITING PLAYLISTS IN
PLAY
X
Xplay’s Playlist Editor allows you to build and edit playlists by adding playlist elements (i.e.
pages, templates and clips) to the tabular list and organizing them into the order in which
they are intended to be taken to air. Playlists built in Xplay are typically designed to be
manually played back sequentially by operator control using Xplay.
Figure 3-1. Xplay’s Playlist Editor in Standard playlist view
Each row in playlist represents a single playlist element, while the columns display
properties associated with the playlist item (some of which can be edited directly in the
Playlist Editor). Since some playlists can get quite long, you can also organize playlist
elements into thematic segments, as well as insert comment rows to provide information or
instructions to the operator controlling the playout of the playlist.
Xplay User Manual 3-1
Page 29

Creating and editing playlists in Xplay
The following sections provide information and instructions for how to create and edit
playlists in Xplay:
Setting the Playlist Editor’s Playlist View” on page 3-3
• “
• “Creating a new playlist” on page 3-5
• “Loading an existing playlist” on page 3-6
• “Navigating and selecting elements within the playlist” on page 3-9
• “Adding playlist elements to a playlist” on page 3-10
• “Grouping elements into playlist segments” on page 3-19
• “Adding comment rows to the playlist” on page 3-25
• “Repositioning playlist elements within the playlist” on page 3-27
• “Configuring and editing the playlist columns” on page 3-29
• “Deleting playlist elements” on page 3-36
• “Reloading the playlist” on page 3-37
• “Saving the playlist” on page 3-38
3-2 Xplay User Manual
Page 30
Creating and editing playlists in Xplay
Playlist elements are
ordered sequentially
Playout controls
Setting the Playlist Editor’s Playlist View
The appearance and functionality of Xplay’s Playlist Editor differs depending upon the
Playlist View setting (T
new playlist or load an existing playlist in the Playlist Editor, we recommend that you first
select an appropriate playlist view.
• None
• Standard
• ByDevice
None
When Xplay’s Playlist view setting is set to NONE, the Playlist Editor is not displayed in the
Xplay window and playlists cannot be manually loaded or displayed. This setting is used
primarily when Xplay is controlled through automation. See page 5-1
about controlling Xplay using automation protocols.
Standard
When Xplay’s PLAYLIST VIEW setting is set to STANDARD, the loaded playlist is displayed in
the Playlist Editor as a single list, showing all of its elements in the order in which they were
saved, positioned, or are intended to be sequentially played out.
The Playlist Editor’s global Cue and Take buttons are available in Standard view and let you
to manually control the timing of when the playlist elements appear on air.
Unlike the ByDevice view, Standard view can be used to control the playout on a single
device, or on multiple devices. See page 4-1
operator controlled playout techniques.
OOLS>SETTINGS>LAYOUT>PLAYLIST VIEW). As such, before create a
for information and instructions on using
for more information
Figure 3-2. The Playlist Editor in Standard playlist view
Xplay User Manual 3-3
Page 31

Creating and editing playlists in Xplay
NOTE
Playlist for Device 1
Playlist for Device 2
Playlist for Device 3
Playlist for Device 4
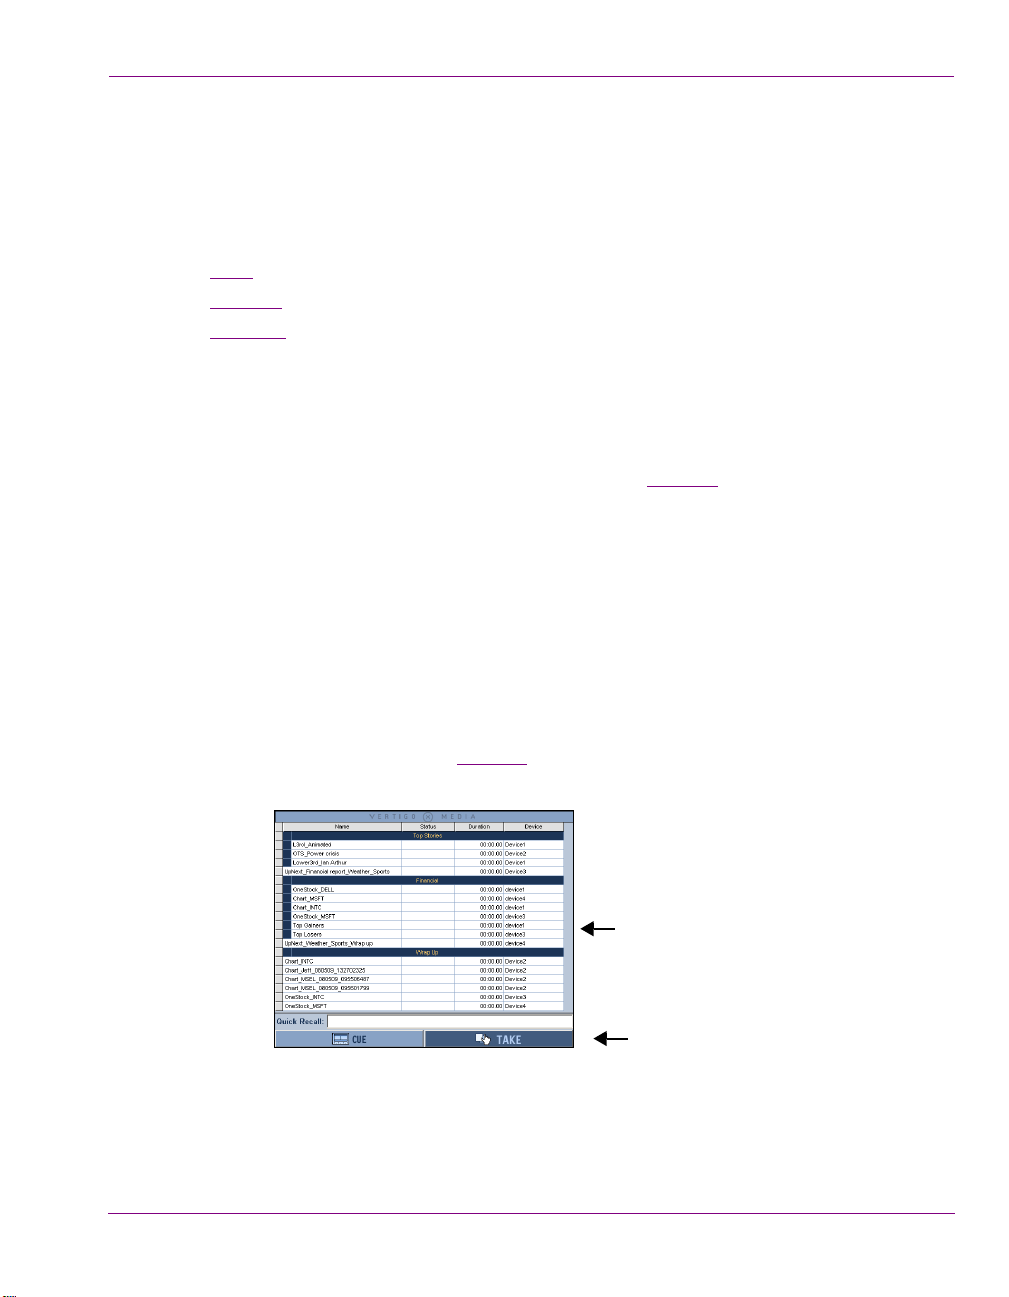
ByDevice
Xplay’s ByDevice playlist view allows the Playlist Editor to display a playlist’s elements by
device groupings rather than one sequential playlist. This makes it easier to identify and
control the playlist elements that will be played out on specific devices.
Figure 3-3. ByDevice playlist view groups playlist elements into device playlists
When a single playlist is loaded into the Playlist Editor in ByDevice playlist view, the
sequential playlist is broken down into multiple playlists, one for each of the devices
associated with Xplay. The playlist elements are then sorted into the device playlists
according to the element’s Target Device property, which is set in Xstudio when the asset’s
template is created. If the template’s T
then the asset is appended to the first device’s playlist. You can then reposition it within its
device view, however, you cannot move it to another device’s playlist (see page 3-27).
As demonstrated by how playlist elements are sorted into device playlists, the Playlist Editor
behaves differently in BYDEVICE view than in STANDARD view. Rather than list the
differences here, they are described in context throughout this user manual within the
context of procedural descriptions.
ARGET DEVICE property was not specified (empty),
In ByDevice view, the device’s playlist is shown opposite the Device View for the
corresponding device (figure 3-4
associated device. When a device is deactivated from the Device Manager’s Active Device
table (see page 2-17
window.
3-4 Xplay User Manual
), both the device’s view and playlist will be removed from the Xplay
). Each list only shows those elements that target the
Page 32

Creating a new playlist
NOTE
New, empty playlist
To create a new playlist, you must first open a new, empty playlist. If the Playlist Editor area
is already occupied by another playlist, performing the C
(described below) immediately clears the Playlist Editor and a blank playlist appears, ready
for use (see figure 3-4
The Playlist Editor’s layout depends upon Xplay’s PLAYLIST VIEW setting, which can be set
to N
ONE, STANDARD, or BYDEVICE. If the Playlist Editor does not appear or it opens in an
unwanted layout, see page 3-25
setting.
To create a new playlist:
•Select F
Or,
• Press the C
Or,
• Press the C
).
for information regarding changing the Playlist View
ILE>NEW PLAYLIST.
REATE NEW PLAYLIST button in the Playlist toolbar.
TRL+N keyboard shortcut
Creating and editing playlists in Xplay
REATE NEW PLAYLIST action
Xplay User Manual 3-5
Figure 3-4. A newly created playlist in ByDevice playlist view
Page 33

Creating and editing playlists in Xplay
Playlist elements organized by target device
ByDevice playlist view
Playlist elements organized into one sequential list
Standard playlist view
Loading an existing playlist
When Xplay is in the Standard playlist view and a playlist is loaded into the Playlist Editor,
the playlist appears as one sequential list of playlist elements. However, when Xplay is in
the ByDevice playlist view and a playlist is loaded, the playlist splits up its elements into
sub-playlists that contain elements that target each of the devices configured in Xplay
(figure 3-5
forced to impose some restrictions, which are described below.
). Note that in order to effectively split the playlist into device playlists, Xplay is
Figure 3-5. Playlists that are loaded in ByDevice playlist view are organized differently than in Standard view
There are two (2) methods for loading an existing playlist into the Playlist Editor:
• Select the P
LAYLISTS root category in the Asset Browser, and navigate to the
appropriate category where the playlist is stored.
• Double-click the desired playlist in the Asset Browser.
Or,
• Right-click on the playlist ‘s name in the Asset Browser and select the O
PEN
command from the context menu.
The playlist opens in the Playlist Editor.
•Select F
The O
ILE>OPEN PLAYLIST, or the CTRL+O keyboard shortcut.
PEN PLAYLIST dialog box appears.
• Navigate through the Playlist categories in the right panel until the desired
playlist is listed in the left panel.
• Double-click the desired playlist listed in the right panel.
Or,
• Select the playlist and then click OK.
The playlist opens in the Playlist Editor.
3-6 Xplay User Manual
Page 34

Creating and editing playlists in Xplay
Segment’s elements
split per device
Device1 elements and
all unassigned elements
Device2 elements only
Device3 elements only
Device4 elements only
The following behaviors pertain to how existing playlists are treated when they are loaded
into the Playlist Editor when it is set to ByDevice playlist view:
• Only the elements that target the device are displayed in the playlist for each device.
Elements whose target device does not match any device name will be played in the
playlist for the first device.
• Secondary elements in clips are removed from the playlist when the playlist is loaded
in the ByDevice layout. The following message in the Message Log window confirms
that the secondary elements were removed.
“The playlist contained secondary elements in clips that were removed on...”
• All empty segments and/or a comment rows are removed from the playlist when the
playlist is loaded.
• When a playlist segment contains elements which target more than one device, the
segment and its elements are displayed in each of the relevant devices.
• Use the Device Manager to show/hide views and their associated playlist.
Xplay User Manual 3-7
Figure 3-6. Playlist elements are organized per assigned device in ByDevice playlist view
Page 35

Creating and editing playlists in Xplay
Playlist element verification
When the VERIFY PLAYLIST setting is enabled, each element in the playlist is verified when
the playlist is loaded into the Playlist Editor to ensure that it is available and ready for use.
Each element in the playlist is verified as follows:
• Checks if the asset used by the playlist element actually exists.
• Checks if the assets that are used by the playlist element require the completion of a
Work Order before they can be used.
• Checks if the assets used by the playlist element are published on a specified device.
If not, then it initiates the publishing of the assets.
The results of the verification are displayed in the S
playlist (figure 3-7
Figure 3-7. When the Verify Playlist setting is enabled, each element’s status is verified upon loading
).
TATUS column for each element in the
3-8 Xplay User Manual
Page 36

Creating and editing playlists in Xplay
NOTE
Selecting non-consecutive playlist elements
Selecting consecutive playlist elements
Navigating and selecting elements within the playlist
When Xplay is in Standard playlist view, a loaded playlist appears in the Playlist Editor as one
sequential list of playlist elements, and you can navigate and select freely within the playlist.
When Xplay is in the ByDevice playlist view, the playlist splits up its elements into sub-playlists
that contain elements that target each of the devices configured in Xplay. As such, you are only
permitted to select within one of the device’s playlists at a time. In other words, if elements are
selected in the playlist for device1 and then you click on an element in device2, the selection is
cleared in the playlist for device1.
Information and instructions regarding repositioning playlist elements within the playlist are
provided on page 3-27.
Navigating within a playlist
While the most common way to select an element and navigate within a playlist is to perform
a left-mouse click on the element, you can also use the following keyboard functions to
navigate within the playlist:
P/DOWN ARROW KEYS: Selects the element above or below the currently selected
• U
element within the playlist.
AGE UP/DOWN KEYS: When in STANDARD view, they select the first or the last element
• P
in the entire playlist. When in BYDEVICE view, they select the first or the last element in
the selected device’s playlist.
OME/END KEYS: When in STANDARD view, they select the first or the last element in the
• H
entire playlist. When in BYDEVICE view, they select the first or the last element in the
selected device’s playlist.
Grouping a selection of playlist elements
You may want to group a selection of playlist item as to drag & drop the grouped elements
to a different location or to delete a grouping of items all at once.
Selecting consecutive playlist elements:
Select the first element that you want to be included in the grouping. While holding down
the SHIFT key, select the last element from the playlist. The first, last, and all elements
between these two become selected forming the group of elements.
Selecting non-consecutive playlist elements:
Select the first element that you want to be included in the grouping. While holding the
CTRL key, click on each individual element that you want to be included in the grouping.
Figure 3-8. Selecting consecutive and non-consecutive playlist elements
Xplay User Manual 3-9
Page 37

Creating and editing playlists in Xplay
NOTE
Adding playlist elements to a playlist
Xplay allows you to create and populate playlists by adding individual graphic pages,
templates and clip assets to a playlist loaded in the Playlist Editor. Xplay also allows you to
append or insert the entire contents of an existing playlist or segment to a loaded playlist.
The following sections provide instructions for the various ways in which you can populate
a playlist in Xplay:
Using the Asset Browser to add pages, templates and clips to a playlist” on page 3-10
• “
• “Using Quick Recall to add templates, clips and pages to a playlist” on page 3-12
• “Using Search XMS to find and add pages, template or clips to a playlist” on page 3-15
• “Inserting or appending a playlist to a loaded playlist” on page 3-16
• “Adding shared segment assets to a playlist” on page 3-18
Additional instructions for creating and adding embedded and shared pages to a playlist are
provided in “Appendix B - Creating and editing pages in Xplay” on page 7-1.
Using the Asset Browser to add pages, templates and clips to a playlist
The PAGES, TEMPLATES, and CLIPS root categories in Xplay’s Asset Browser provide access to
all of the shared pages, templates, and clips that are stored on the Xmedia Server (figure 3-9).
As such, the Asset Browser is a practical tool for finding and adding these assets to the playlist.
Figure 3-9. The Asset Browser provides access to the shared page, templates and clip stored on the XMS
3-10 Xplay User Manual
Page 38

Creating and editing playlists in Xplay
1. Double-click
Or,
2.
Open command
Or,
3.
Drag & Drop
To add a shared page, template or clip asset to a playlist using the Asset Browser:
The most common way to add shared pages, templates, or clips to a playlist using the Asset
Browser is to drag the asset from the Asset Browser and drop it into the playlist.
Regardless of whether Xplay is in the Standard or ByDevice playlist view, when you drag
an asset from the Asset Browser into the playlist, the Insert Line identifies exactly where the
asset will be placed within the playlist. A fully extended Insert Line indicates that the playlist
will be added as a primary event, while a partially extended line indicates that it will be
added as a secondary event (see “
Repositioning primary playlist elements (clips, pages or
comments)” on page 3-27 and “Adding secondary elements to a clip in the playlist” on page
3-28 for more information.
Normally when Xplay is in ByDevice playlist view, it is the asset’s Target Device that
determines in which device playlist the asset will be placed. However, when you drag and
drop an asset into a device’s playlist, the asset’s original Target Device setting is overridden
and it assumes the new device as its target device.
Also note that once the page is dropped into the device’s playlist, you cannot move it to
another device’s playlist.
Additional ways to add shared pages to a playlist using the Asset Browser:
There are two (2) additional ways in which shared pages assets can be added to a playlist
using the Asset Browser:
• Double-click the page’s heading in the Asset Browser category.
Or,
• Right-click on the page’s heading in the Asset Browser category and select the O
PEN
command.
Xplay User Manual 3-11
Figure 3-10. There are three ways to add a shared page to a playlist from the Asset Browser
When Xplay is in the Standard playlist view and you add a shared page by double-clicking or
using the O
PEN command, the page is appended to the end of the playlist loaded in the Playlist
Editor. You can then reposition it within the playlist by following the instructions on page 3-29.
When Xplay is in the ByDevice playlist view and you add a shared page by double-clicking or
using the OPEN command, the new shared page is immediately appended to the device playlist
Page 39

Creating and editing playlists in Xplay
The Quick Recall field when Xplay
is set to ByDevice playlist view
The Quick Recall field when Xplay
is set to Standard playlist view
and Manual playout mode
as assigned by the template’s TARGET DEVICE property, which is set in Xstudio when the
template is created. If the template’s TARGET DEVICE property was not specified (empty), then
the page is appended to the first device’s playlist. You can then reposition it within its device
view, however, you cannot move it to another device’s playlist (see page 3-29
).
Using Quick Recall to add templates, clips and pages to a playlist
Templates, clips and shared pages contain a property called a RECALL ID, which is a unique
alpha-numeric value that is assigned by users to identify the specific asset. The Recall ID
property can be set either when the asset is saved for the first time or by accessing and
editing its properties in Xstudio, Xbuilder, or Xplorer.
The purpose of assigning a Recall ID to a template, clip or shared page asset is to be able
to quickly add the asset to a playlist in Xplay by simply using its Recall ID value, rather than
manually searching and adding it yourself. Additionally, the Recall ID also allows you to
quickly cue and/or take the asset to a device using Xplay.
To use Xplay’s Quick Recall functionality, you must first enable Quick Recall by selecting
IEW>QUICK RECALL command. Then Xplay must either be set to BYDEVICE playlist
the V
view or Standard playlist view with M
to appear in the lower portion of the Xplay interface (figure 3-11).
ANUAL playout mode enabled, for the Quick Recall field
Figure 3-11. Xplay’s Quick Recall field
The following sections describe how you can quickly added a template, clip or shared page
asset to a playlist using Xplay’s Quick Recall field:
• “
Adding a page/template/clip to a playlist in Standard playlist view” on page 3-13
• “Adding a page/template/clip to a playlist in ByDevice playlist view” on page 3-13
• “Adding a page/template/clip to a playlist and cueing it to a device” on page 3-14
3-12 Xplay User Manual
Page 40

Creating and editing playlists in Xplay
Adding a page/template/clip to a playlist in Standard playlist view
To add a template, clip or shared page asset to the playlist when Xplay is set to
TANDARD playlist view:
S
1. Determine where you want to place the asset within the playlist by selecting the playlist
element above the location where you want to insert the asset.
2. Type the asset’s Recall ID in the Quick Recall text box and press the + (plus) keyboard key.
The asset is immediately added below the playlist element that was selected. If no playlist
element was selected in the playlist, the asset is appended to the end of the playlist.
Figure 3-12. The Quick Recall field when Xplay is set to Standard playlist view
Adding a page/template/clip to a playlist in ByDevice playlist view
When Xplay is set to BYDEVICE playlist view, the asset’s Target Device property primarily
determines in which device’s playlist the asset will be added. If no Target Device is
associated with the asset, then the asset is added to the first device’s playlist.
Meanwhile, where within the device’s playlist the asset is added depends upon if a playlist
element is selected, and whether the selection is inside or outside of the Target Device’s
playlist.
To add a template, clip or shared page asset to the playlist when in B
view:
1. Determine where you want to place the asset within the target device’s playlist by
selecting the playlist element above the location where you want to insert the asset.
Note: Since you cannot set the target device on a clip asset, a clip will always default
to the first playlist.
2. Type the asset’s Recall ID in the Quick Recall text box and then press the + (plus)
keyboard key.
The asset is immediately added below the playlist element that was selected in the
target device’s playlist. If no playlist element was selected, the asset is appended to
the end of the target device’s playlist. If the selection was outside of the target device
playlist or the asset does not have an assigned target device, the asset is appended to
the first device’s playlist.
Xplay User Manual 3-13
YDEVICE playlist
Page 41

Creating and editing playlists in Xplay
Adding a page/template/clip to a playlist and cueing it to a device
Xplay’s Quick Recall feature not only offers the ability to add a template, clip or shared page
asset to the playlist loaded in the Playlist Editor, but also to then immediately cues the asset
on a device.
Note that the asset’s T
asset will be cued on, as well as which device’s playlist the asset will be added to when
Xplay is set to B
added depends upon whether or not the target device already has a playlist element cued
on it.
To add a template, clip or shared page asset to a playlist and cue it on a device:
• Type the asset’s Recall ID in the Quick Recall text box and then press E
One of the following occurs:
• If nothing was already cued on the playlist corresponding to the target device, then
the asset is inserted after the last aired element and then cued on the device.
• If an element was already cued on the playlist corresponding to its target device,
then the asset is be inserted before the cued element and cued in its place.
ARGET DEVICE property primarily determines which device view the
YDEVICE playlist view. Meanwhile, where within the playlist the asset is
NTER.
3-14 Xplay User Manual
Page 42

Creating and editing playlists in Xplay
NOTE
NOTE
Using Search XMS to find and add pages, template or clips to a playlist
Xplay’s Search XMS allows you to quickly find and add shared pages, templates, or clips to a
playlist that is currently loaded in Xplay’s Playlist Editor.
Selecting the VIEW > SEARCH menu opens the SEARCH XMS window, which allows you to
quickly search for assets stored on the Xmedia Server. Once a search is launched, assets
that match the name, type, description, author, keywords and/or Recall ID are displayed as
thumbnails in P
The SEARCH XMS window uses Solr, which a web-based solution by the Apache group that
performs fast searches across large amounts of data. The Xmedia Server must maintain a
connection to Solr so that it can create an index of the database. See the Xmedia Server
Configuration Guide for more information.
To search for assets stored on the Xmedia Server:
1. Select VIEW > SEARCH to open SEARCH XMS window.
2. Type a search query in the S
3. Optional: Limit Search XMS results to specific asset types.
By default, all asset types are evaluated by the search query as indicated by the T
drop-down box set to ALL TYPES.
• To limit the search results to one asset type, select an asset type from the
T
• To limit the search results to multiple asset types, click the Browse button
to open the Select Types To Search dialog. Select the asset types that you
want included in the search and uncheck the asset types that you want
excluded from the search results.
4. Click the button to launch the search.
Assets that satisfy the search query are displayed in the results pane of the Search
XMS window.
ROXY VIEW or listed in a table in DETAIL VIEW.
EARCH XMS text box.
YPE
YPE drop-down list.
If an expected asset is not returned in the search results, it may be because user rights
management is enabled on the Xmedia Server and the current user does not have
permission to view the asset. See “User Rights Management” in the Xmedia Server
Configuration Guide for more information.
5. Browse the results and select an asset of interest.
• Right-clicking on an asset exposes menu commands that allow you to rename
or delete the asset.
or,
Xplay User Manual 3-15
Page 43

Creating and editing playlists in Xplay
NOTE
NOTE
• Add a Template, Page or Clip by dragging an asset from the search results
onto a playlist open in Xplay.
Inserting or appending a playlist to a loaded playlist
When Xplay is set to STANDARD playlist view, you can add the entire contents of an existing
playlist (i.e. pages, templates, clips, segments, and comments) to a playlist. This avoids
having to recreate the contents of a playlist that already exists.
As described below, there are four (4) ways to add the contents of an existing playlist assets
to a playlist:
• Drag and drop the playlist asset from the Asset Browser into the Playlist Editor.
•Use the A
•Use the I
• Use the Search Tool to locate the playlist asset and then drag it into the loaded playlist.
The ability to insert and append playlists is only available when Xplay is set to STANDARD
playlist view. When Xplay is set to BYDEVICE playlist view, both the APPEND PLAYLIST and
INSERT PLAYLIST commands are disabled and you cannot drag and drop a playlist asset into
the playlist.
PPEND PLAYLIST command.
NSERT PLAYLIST command.
To add the contents of an existing playlist to a playlist by dragging and dropping the
playlist asset:
1. Be sure that Xplay is set to STANDARD playlist view.
2. Select the P
appropriate category where the playlist asset is stored.
3. Select the desired playlist asset and drag it into the Playlist Editor.
Notice that a highlighted Insert line appears in the Playlist Editor as you drag the pointer
over the various rows in the playlist. This line indicates the location of where the playlist
will be inserted in the playlist.
A fully extended Insert Line indicates that the playlist will be added as a primary event, while a
partially extended line indicates that it will be added as a secondary event (see “
primary playlist elements (clips, pages or comments)” on page 3-27 and “Adding secondary
elements to a clip in the playlist” on page 3-28 for more information.
4. Drop the playlist asset into the playlist by releasing the mouse button.
The entire contents of the playlist asset is added immediately to the playlist, including
all pages, templates, clips, segments, and comments that were contained in the playlist
asset.
3-16 Xplay User Manual
LAYLISTS root category in the Asset Browser, and navigate to the
Repositioning
Page 44

Creating and editing playlists in Xplay
To add the contents of an existing playlist to a playlist using the APPEND PLAYLIST
command:
1. Be sure that Xplay is set to S
TANDARD playlist view.
2. With the playlist that you want to add to open in the Playlist Editor, select the
ILE>APPEND PLAYLIST menu command.
F
PPEND PLAYLIST dialog box appears.
The A
3. Navigate through the APPEND PLAYLIST dialog box and select the playlist asset that you
want to add (append) to the end of current playlist.
4. Click OK, or double-click the playlist’s asset name in the A
PPEND PLAYLIST dialog box.
The entire contents of the playlist asset is added immediately to the bottom portion of
the playlist, including all pages, templates, clips, segments, and comments that were
contained in the playlist asset.
To add the contents of an existing playlist to a playlist using the I
NSERT PLAYLIST
command:
1. Be sure that Xplay is set to S
TANDARD playlist view.
2. With the playlist that you want to add to open in the Playlist Editor, select the playlist
row where you want the contents of the playlist to be inserted (the contents will be
inserted below the selected row).
3. Select the F
The I
4. Navigate through the I
ILE>INSERT PLAYLIST menu command.
NSERT PLAYLIST dialog box appears.
NSERT PLAYLIST dialog box and select the playlist asset that you
want to add (insert in) to the end of current playlist.
5. Click OK, or double-click the playlist’s asset name in the I
NSERT PLAYLIST dialog box.
The entire contents of the playlist asset is added immediately below the selected playlist
row, including all pages, templates, clips, segments, and comments that were contained in
the playlist asset.
To add the contents of an existing playlist to a playlist using the Search Tool:
1. With the playlist loaded in the Playlist Editor, open Xplay’s Search Tool by selecting the
VIEW>SEARCH menu command. The SEARCH window appears.
2. Select P
LAYLIST from the TYPE drop-down list.
3. Create a search profile by setting as many or as few of the search properties (see page
3-57).
4. Click the S
EARCH button.
The playlist assets that meet the search profile are listed/displayed in the Search
Window’s results area.
5. Select the desired asset from the results area and drag it over to the Playlist Editor.
Note that as you drag the mouse’s pointer over the playlist, an Insert Line appears
within the playlist rows to indicate the location of where the asset will be inserted.
Once you have placed the Insert Line is the desired location, release the left mouse
button to drop the asset into the playlist.
Xplay User Manual 3-17
Page 45

Creating and editing playlists in Xplay
NOTE
Adding shared segment assets to a playlist
Adding a shared segment to a playlist in Xplay is a convenient way of adding an existing
grouping of embedded pages, shared pages and/or clips to a playlist.
Shared segments are only permitted to be added to a playlist when Xplay’s Playlist view
setting is S
Xplay’s Playlist view setting is BYDEVICE.
Shared segments are stored on the Xmedia Server and are accessible to Xplay through the
Asset Browser’s SEGMENTS root category (figure 3-13). Despite being created in Xbuilder
and intended to be used in Rundowns, shared segments are essentially a thematic
grouping of embedded pages, shared pages and/or clips. As such, shared segments can
be added to a playlist in Xplay.
TANDARD. Xplay will not allow you to add shared segment asset to a playlist when
Figure 3-13. Segments are groupings of pages and clips
To add a shared segment to a playlist:
1. Be sure that Xplay is set to S
2. Select the S
appropriate category where the segment asset is stored.
3. Select the desired segment asset and drag it into the Playlist Editor.
Notice that a highlighted Insert line appears in the Playlist Editor as you drag the pointer
over the various rows in the playlist. This line indicates the location of where the
segment will be inserted in the playlist.
4. Drop the segment asset into the playlist by releasing the mouse button.
The entire contents of the segment asset is added immediately to the playlist, including
all pages, clips and comments that were contained in the segment asset.
3-18 Xplay User Manual
EGMENTS root category in the Asset Browser, and navigate to the
TANDARD playlist view.
Page 46

Creating and editing playlists in Xplay
NOTE
Grouping elements into playlist segments
When Xplay is in STANDARD playlist view, you can add playlist segments (sometimes called
embedded segments) into your playlists to group together related playlist elements under
common headings (figure 3-14). This allows you to:
• See at a glance how items in a playlist have been organized thematically
(e.g. Headlines, Sports, Business, Entertainment).
• Move the contents of a segment all at once. This is useful if, for example, at the last
minute you decide that the pages organized under Business should be placed before
the Sports segment.
Figure 3-14. Playlist segments allow you to put pages, templates and clips into thematic groupings
Playlist segments are different from the shared segment assets that are listed in the Asset
Browser’s S
Server and made available in the Asset Browser for creating rundowns, while playlist
segments are only available to the playlist in which they are a part of.
When Xplay is in B
to a device’s playlist (the ADD SEGMENT commands are disabled). However, if a playlist is
loaded into the Playlist Editor that contains playlist segments, the following behaviors occur:
• If the playlist segment contains elements that all target the same device, the segment
• If the playlist segment contains elements which target more than one device, the
• All empty playlist segments are removed from the playlist when the playlist is loaded.
• You can only reposition a playlist segment and its elements within its own target device
The following sections provide instructions for adding and managing playlist segments:
• “
• “Repositioning playlist segments and their elements” on page 3-22
• “Deleting playlist segments from a playlist” on page 3-23
Xplay User Manual 3-19
EGMENTS root category. Shared segment assets are stored on the Xmedia
YDEVICE playlist view, you are not permitted to add new playlist segments
and its elements are all displayed within the device’s playlist.
segment and its elements are split up and displayed in each of the relevant devices.
playlist.
Adding and populating playlist segments” on page 3-20
Page 47

Creating and editing playlists in Xplay
Adding and populating playlist segments
When Xplay is in STANDARD playlist view, you can add playlist segments (sometimes called
embedded segments) into your playlists to group together related playlist elements under
common headings.
To add a segment to the playlist:
1. Be sure that Xplay is set to STANDARD playlist view.
2. Load a playlist into the Playlist Editor, or create a new playlist and add the necessary
pages, templates and/or clips.
3. Select the playlist row where you want the segment to be inserted (the segment
heading will be inserted above the selected row).
4. Right-click on the row and select the A
that appears (figure 3-15
The segment heading is added above the selected row with the name open for editing.
).
DD SEGMENT command from the context menu
Figure 3-15. Use the A
5. Enter a name for the segment and press ENTER.
At this point the segment is empty, even if pages, templates, or clips appear to be
beneath it (figure 3-16). You now need to add items to the segment.
Figure 3-16. Segment heading has been added, but it is still empty
3-20 Xplay User Manual
DD SEGMENT command to insert a segment heading into the playlist
Page 48

Creating and editing playlists in Xplay
When the insert line is fully extended, the element will be moved outside of the segment.
When the insert line is not fully extended and the border changes color, the element will be inserted into the segment.
6. Click and drag the selected playlist element into the desired segment. As you drag, a
Insert Line indicates where the element will be placed. Before you drop it, take note of
the following:
• Whether or not the segment heading changes color. If the segment
heading does change color, the element will become part of the segment. If it
does not, then the element will be placed outside of the segment.
• The length of the insert line (red by default). If the insert line runs the entire
width of the playlist, then the element is being moved outside the segment. If
the line shortens, it means that the element is being moved into the segment
(see below).
• Blue box: Once elements have been added to a segment, they are bordered
at left by a blue box (see below).
Xplay User Manual 3-21
Page 49

Creating and editing playlists in Xplay
NOTE
Segment 1
Segment 2
Repositioning playlist segments and their elements
The instructions on page 3-19 explain how to add playlist segments (sometimes called
embedded segments) to your playlists to group together related playlist elements under
common headings (figure 3-17
Figure 3-17. Playlist segments help organize playlist elements into thematic groupings
Not only does grouping playlist elements within segments improve the organization of the
playlist, it also allows you to move or reposition the contents of a segment all at once. This
is useful if, for example, at the last minute you decide that the pages organized under
Business should be placed before the Sports segment.
To reposition a segment row within a playlist:
1. Select the segment’s heading row.
The segment and all of the elements that belong to the segment are highlighted.
2. Click and drag the selected segment to the desired playlist row.
As you drag, an insert line (red line by default) extends across the table, which
indicates where the segment will be placed (figure 3-18
).
).
Figure 3-18. Drag the segment and its elements to a new location within the playlist
3. Release the mouse button to drop the item in its new location.
In BYDEVICE playlist view, you can reposition a segment within its own device playlist, but
3-22 Xplay User Manual
you cannot move it to another device’s playlist. Also, note that repositioning a segment in
one device playlist, also repositions the equivalent segments in the other device playlists.
Page 50

Deleting playlist segments from a playlist
NOTE
When Xplay is in STANDARD playlist view, deleting a playlist segment and its elements from
a playlist is pretty straightforward. However, when Xplay is in B
segment’s elements might be targeting several devices, which changes the deletion
procedure slightly (see below).
Please refer to “Deleting playlist elements” on page 3-36 if you only want to delete a single
element within a playlist segment (i.e. a page, clip or comment).
Creating and editing playlists in Xplay
YDEVICE playlist view, the
When Xplay is in S
1. Select the segment’s heading row. The segment and all of the elements that belong to
the segment are highlighted.
Or,
Select all of the elements within the playlist segment (see page 3-9
2. Right-click on the segment and select the DELETE command (figure 3-19).
Or,
Press the D
3. The CONFIRM DELETE dialog box appears. Select YES to immediately delete the
segment and its elements from the playlist, or select N
TANDARD playlist view and you want to delete a playlist segment:
).
ELETE key on your keyboard.
O to cancel the delete action.
Figure 3-19. Use the Delete command (or the Delete keyboard key) to delete a playlist segment
Xplay User Manual 3-23
Page 51

Creating and editing playlists in Xplay
NOTE
The “Financial” segment’s
Device Playlist 1
Device Playlist 2
Device Playlist 3
Device Playlist 4
elements are distributed
to their target devices
When Xplay is in BYDEVICE playlist view and you want to delete a playlist segment:
As is described on page 3-6, when a playlist is loaded into the Playlist Editor that contains
a playlist segment whose elements target more than one device, the segment and its
elements are displayed in each of the relevant devices (figure 3-20
splitting the segments into different playlists, the segment in each device’s playlist becomes
independent of the others. This means that you can delete a segment in one device playlist
without affecting the segment in another device’s playlist.
). As a consequence of
Figure 3-20. The elements within a segment are distributed to their target device’s playlist
1. Select the segment’s heading row. The segment and all of the elements that belong to
the segment in that device playlist are highlighted.
Or,
Select all of the elements within the playlist segment (see page 3-9
).
2. Right-click on the segment and select the DELETE command.
Or,
Press the D
ELETE key on your keyboard.
3. The CONFIRM DELETE dialog box appears. Select YES to immediately delete the
segment and its elements from the playlist, or select N
To delete the entire segment from each of the device playlists, you must repeat the above
procedure in each of the device playlists.
O to cancel the delete action.
3-24 Xplay User Manual
Page 52

Creating and editing playlists in Xplay
NOTE
Adding comment rows to the playlist
When Xplay is in STANDARD playlist view, you can annotate your playlist by adding comment
rows. Your comments should be concise, yet identify the purpose or behavior of elements
in your playlist.
Comment rows can only be added to a playlist when Xplay is in STANDARD playlist view.
When Xplay is in B
not allowing you to add comment rows to the device playlists. Similarly, when a playlist that
contains comment rows in loaded into Xplay’s B
are not displayed.
To add comments to the playlist:
1. Be sure that Xplay is set to S
2. Load a playlist into the Playlist Editor, or create a new playlist and add the necessary
pages, templates and/or clips.
3. Select the playlist row where you want the comment to be inserted (the comment will
be inserted above the selected row).
4. Right-click on the row and select the A
that appears (figure 3-21).
The comment row is added above the selected row with the text ready for editing.
YDEVICE playlist view, the ADD COMMENT command is disabled thereby
YDEVICE playlist view, the comment rows
TANDARD playlist view.
DD COMMENT command from the context menu
Figure 3-21. Use the A
5. Type the text for the comment and press ENTER.
Xplay User Manual 3-25
DD COMMENT command to insert an annotation into the playlist
Page 53

Creating and editing playlists in Xplay
To edit the text of a comment row that is already inserted into the playlist:
1. Select the comment row who’s text is to be edited.
2. Right-click on the row and select the E
appears (figure 3-22
). The comment row text becomes ready for editing.
DIT CELL command from the context menu that
Figure 3-22. Use the E
DIT CELL command to change the text in a playlist annotation
3. Type the new text for the comment and press ENTER.
3-26 Xplay User Manual
Page 54

Creating and editing playlists in Xplay
NOTE
Repositioning playlist elements within the playlist
Pages and clips are added to playlists as primary scheduled events. Once added to the
Playlist Editor, you can reposition these elements within the playlist by dragging and
dropping them to the desired row location. In STANDARD playlist view, you can move an
elements to any location within the playlist. In B
reposition an element within its own device playlist, but you cannot move it to another
device’s playlist.
When a clip is a primary event in the playlist, you can reposition pages within the playlist to
become secondary events to the clip. Making a page a secondary event to a clip allows you
to set the page’s offset and duration with respect to the clip (primary event), rather than to
the beginning of the playlist.
The following sections provide instructions for repositioning items within the playlist:
Repositioning primary playlist elements (clips, pages or comments)” on page 3-27
• “
• “Adding secondary elements to a clip in the playlist” on page 3-28
Repositioning primary playlist elements (clips, pages or comments)
To reposition a playlist elements:
1. Select the playlist element that you want to move to a new location.
2. Click and drag the selected playlist element into the desired playlist row.
As you drag, an insert line (red line by default) extends across the table, which
indicates where the item will be placed (figure 3-23
3. Release the mouse button to drop the item in its new location.
YDEVICE playlist view however, you can
).
Figure 3-23. Drag and drop the playlist element to the desired row location
In BYDEVICE playlist view, you can reposition an element within its own device playlist, but
you cannot move it to another device’s playlist.
Xplay User Manual 3-27
Page 55

Creating and editing playlists in Xplay
NOTE
NOTE
A fully extended insert line adds the page as a primary object
A partially extended insert line adds the page as a secondary object to the primary object
Adding secondary elements to a clip in the playlist
Making a page a secondary event to a clip allows you to set the page’s offset and duration
with respect to the clip (primary event), rather than to the beginning of the playlist.
Secondary elements can only be added to a playlist and shown in playlists when Xplay’s
Playlist view is set to S
elements are not permitted to be added to a playlist. As well, secondary elements are
removed from the playlist when the playlist is loaded in the BYDEVICE layout and the
following message in the Message Log window confirms that the secondary elements were
removed.
“The playlist contained secondary elements in clips that were removed on...”
To add a secondary event (page) to a primary event (clip):
1. Add a clip to the playlist as a primary event by dragging the clip asset from the Asset
Browser and dropping it into the desired location in the playlist.
2. Add a page to the playlist as a secondary event to the clip by dragging the page asset
from the Asset Browser to the row below the clip’s name in the playlist.
Before you drop it, take note of the following:
• Whether or not the primary event heading changes color. If the primary event
heading changes color, the page will become a secondary event. If it does not, then
the element will be placed below the primary event as an additional primary event.
• The length of the insert line (red by default). If the insert line runs the entire width
of the playlist, then the page is being moved outside the primary event. If the line
shortens, it means that the page will become a secondary event (see below).
• Blue box: Once page has been added to the primary event, it is bordered at left by
a blue box (see below).
TANDARD. When Xplay is in BYDEVICE playlist view, secondary
3. Drop the page into the playlist by releasing the mouse button.
To make a page that already exists as a primary event in the playlist a secondary event of
a clip in that same playlist, simply drag the page from its current location to the row under
the clip in the same way that is described in step 2 and 3 above.
3-28 Xplay User Manual
Page 56

Creating and editing playlists in Xplay
Configuring and editing the playlist columns
Each row in playlist represents a single playlist element, segment heading or comment;
while the columns display properties associated with the playlist item.
Which columns are displayed in the Playlist Editor can be configured using the COLUMN
AYOUT dialog box. As well, you can also edit several of the properties associated with the
L
playlist items from within the Playlist Editor.
Configuring the Playlist Editor’s column layout” on page 3-29
• “
• “Editing a playlist element’s properties” on page 3-33
Configuring the Playlist Editor’s column layout
The COLUMN LAYOUT dialog box (figure 3-24) allows you to configure which columns are
displayed or hidden in the playlist. You can also determine the order in which the columns
appear in the playlist.
Column headings that are currently displayed in the playlist are listed in the SELECTED
COLUMNS text box (on the right), while hidden column headings are listed in the AVAILABLE
OLUMNS text box (on the left). Customizing the playlist column means simply moving the
C
headings from on side to the other (see the instructions below). The COLUMN LAYOUT dialog
box conveniently also offers two (2) standard layouts: BASIC and FULL.
Figure 3-24. Column Layout dialog box
The following sections explain how to customize the playlist’s columns:
Adding columns to a playlist” on page 3-30
• “
• “Removing columns from a playlist” on page 3-30
• “Creating, renaming, and deleting your custom column headings” on page 3-31
• “Reordering the columns in a playlist” on page 3-31
• “Using the standard column layouts: Basic or Full” on page 3-32
Xplay User Manual 3-29
Page 57

Creating and editing playlists in Xplay
Adding columns to a playlist
Complete the following steps to add one or many columns to a playlist:
1. Select TOOLS>CONFIGURE PLAYLIST COLUMNS.
OLUMN LAYOUT dialog box appears. The current playlist columns are listed in the
The C
S
ELECTED COLUMNS text box, while hidden column headings are listed in the
VAILABLE COLUMNS text box.
A
2. Select the desired column heading(s) from the AVAILABLE COLUMNS text box.
The column heading’s name is highlighted in blue when it is selected. To deselect,
simply click the heading again.
3. Click the R
IGHT ARROW button.
The selected column headings immediately move to the S
4. Click APPLY to implement the changes immediately to the playlist, while keeping the
Column Layout dialog box open for further edits to the playlist columns.
Or,
Click OK to implement the changes immediately to the playlist and close the Column
Layout dialog box.
Or,
ANCEL to abort the changes and maintain the playlist as it was.
Click C
Removing columns from a playlist
Complete the following steps to remove one or many columns from a playlist:
1. Select T
The C
SELECTED COLUMNS text box, while hidden column headings are listed in the
AVAILABLE COLUMNS text box.
2. Select the desired column heading(s) from the S
The column heading’s name is highlighted in blue when it is selected. To deselect,
simply click the heading again.
3. Click the L
The selected column headings immediately move to the A
4. Click A
Column Layout dialog box open for further edits to the playlist columns.
Or,
Click OK to implement the changes immediately to the playlist and close the Column
Layout dialog box.
Or,
Click CANCEL to abort the changes and maintain the playlist as it was.
OOLS>CONFIGURE PLAYLIST COLUMNS.
OLUMN LAYOUT dialog box appears. The current playlist columns are listed in the
EFT ARROW button.
PPLY to implement the changes immediately in the playlist, while keeping the
ELECTED COLUMNS text box.
ELECTED COLUMNS text box.
VAILABLE COLUMNS text box.
3-30 Xplay User Manual
Page 58

Creating and editing playlists in Xplay
NOTE
Creating, renaming, and deleting your custom column headings
To better reflect the particular contents of your playlist, the COLUMN LAYOUT dialog box allows
you to create your own (user defined) column headings. Once it has been created, you can also
rename the column heading or delete it from the Column Layout dialog box by right-clicking on
the name and selecting either the R
Only custom column headings can be renamed and deleted from the Column Layout dialog box.
To create a custom playlist column heading:
1. Select T
The C
OOLS>CONFIGURE PLAYLIST COLUMNS.
OLUMN LAYOUT dialog box appears.
2. Click the ADD button.
DD COLUMN dialog box appears.
The A
3. Type the name of the new column in the text box and click OK.
The new column heading’s name immediately appears in the S
box on the C
OLUMN LAYOUT dialog box.
4. Click APPLY to immediately add the new column to the playlist, while keeping the
Column Layout dialog box open for further edits to the playlist columns.
Or,
Click OK to immediately add the new column to the playlist and close the Column
Layout dialog box.
Or,
ANCEL to abort the changes and maintain the playlist as it was.
Click C
ENAME or DELETE command from the context menu.
ELECTED COLUMNS text
Reordering the columns in a playlist
The order in which the column appear in the Playlist Editor is determined by the column
heading’s position in the
Complete the following steps to reorder one or many columns in a playlist:
1. Select T
OOLS>CONFIGURE PLAYLIST COLUMNS.
The COLUMN LAYOUT dialog box appears. The current playlist columns are listed in
order the S
ELECTED COLUMNS text box.
2. Select the column heading(s) that you want to move to another position from the
ELECTED COLUMNS text box.
S
The column heading’s name is highlighted in blue when it is selected. To deselect,
simply click the heading again.
3. Click the U
P ARROW button once for each position that you want to move the
column to the left in the playlist.
Or,
Click the D
OWN ARROW button once for each position that you want to move the
column to the right in the playlist.
Xplay User Manual 3-31
Page 59

Creating and editing playlists in Xplay
4. Click APPLY to implement the changes immediately in the playlist, while keeping the
Column Layout dialog box open for further edits to the playlist columns.
Or,
Click OK to implement the changes immediately to the playlist and close the Column
Layout dialog box.
Or,
ANCEL to abort the changes and maintain the playlist as it was.
Click C
Using the standard column layouts: Basic or Full
The Column Layout dialog box offers two (2) preset standard layouts:
ASIC - Includes only the Name, Device and Status columns.
• B
• FULL - Includes all columns.
These standard layouts are convenient ways of populating or removing columns from the
Playlist Editor.
To select a standard layout playlist format:
1. Select TOOLS>CONFIGURE PLAYLIST COLUMNS.
The COLUMN LAYOUT dialog box appears. The current playlist columns are listed in the
ELECTED COLUMNS text box, while hidden column headings are listed in the
S
AVAILABLE COLUMNS text box.
2. Select either B
3. Click the SELECT button.
ELECTED COLUMNS and AVAILABLE COLUMNS text boxes are immediately
The S
appropriately populated.
4. Click A
PPLY to implement the changes immediately in the playlist, while keeping the
Column Layout dialog box open for further edits to the playlist columns.
Or,
Click OK to implement the changes immediately to the playlist and close the Column
Layout dialog box.
Or,
ANCEL to abort the changes and maintain the playlist as it was.
Click C
ASIC or FULL from the STANDARD LAYOUT drop-down list.
3-32 Xplay User Manual
Page 60

Creating and editing playlists in Xplay
Editing a playlist element’s properties
When a playlist is loaded in the Playlist Editor, you can change certain properties that
belong to playlist elements. The following table defines the property/column and explains
how to edit each playlist column.
Playlist column Definition and how to edit the playlist element’s property
D
ESCRIPTION Displays a user provided text that describes the playlist item. The description text
is originally created by filling in the D
when the item is originally saved as an asset.
• Shared pages & Embedded pages: You can edit a page’s Description
property by right-clicking the element in the playlist and selecting the E
PAGE command. The EDIT PAGE window allowing you to edit the page’s
ESCRIPTION field. Then, you must click the COMMIT AND CLOSE button
D
(embedded page) or the SAVE PAGE, AND CLOSE button (shared page) to
apply the change and close the EDIT PAGE window.
• Tem pla tes : You cannot edit the Description property of a template from
within the playlist.
• Clips: You can change the Description property of a clip in the playlist by
right-clicking the clip’s Description cell and selecting the E
command. Then type the new description directly in the playlist.
ESCRIPTION field on the SAVE dialog box
DIT CELL
DIT
EVICE Identifies the device to which the page, template, scene or clip will be sent.
D
This column is based on the element’s Target Device property, which is set in
Xstudio when the asset’s template is created. If the template’s TARGET DEVICE
property was not specified (empty), then the asset is appended to the first
device’s playlist.
• Standard playlist view: When Xplay is in Standard playlist view, you can
edit the target device for any playlist element type by right-clicking the
element’s Device cell in the playlist and selecting the E
DIT CELL command.
Then, you can type the name of the target device.
• ByDevice playlist view: When Xplay is in ByDevice playlist mode, the
playlist elements are naturally sorted using their Target Device settings. You
are not permitted to edit a playlist elements device setting once the element
is in a device’s playlist nor move it to another device’s playlist.
URATION Identifies the length of time that the page, template, scene or clip stays on air
D
during the playout of the playlist.
• Embedded pages, Shared pages and Templates: You can edit a page’s or
template’s duration value from within the playlist by right-clicking on the
element’s Duration cell and selecting the E
DIT CELL command. Then, type
the new duration value directly in the playlist.
• Clips: You cannot select or edit the Duration property for clips from within the
Playlist Editor.
Xplay User Manual 3-33
Page 61

Creating and editing playlists in Xplay
Playlist column Definition and how to edit the playlist element’s property
MARK IN / MARK
UT
O
Displays the frame location that will be used as a starting and ending points when
the clip asset is played out in the playlist. This property is set using the
ARKIN/OUT EDITOR.
M
• Embedded pages, Shared pages and Templates: You cannot edit the
Mark In or Mark Out values for pages or templates since this property only
applies to clip assets.
• Clips: There are two (2) ways in which you can edit the Mark In or Mark Out
values for a clip from within the Playlist Editor.
• Right-click on the element’s Mark In or Mark Out cell and
select the E
DIT CELL command. Then, type the new value
directly in the playlist.
• Right-click on the element’s Mark In or Mark Out cell and
select the V
ISUAL MARK IN/MARK OUT command. The Mark
In/Out Editor opens, allowing you to set the Mark In and
Mark Out values using the Trim In and Trim Out handles.
When you click Apply on the Mark In/Out Editor, these
values are reported back to the Playlist Editor.
AME Displays the name of the playlist item.
N
• Shared pages & Templates: You cannot rename a shared page or template
since their name is a fundamental property of the asset.
• Embedded pages: Except for when the embedded page is automatically
named, you can edit the name of embedded pages by right-clicking the
element in the playlist and selecting the E
PAGE window allowing you to edit the page’s NAME field. Then, you must
click the COMMIT AND CLOSE button to apply the change and close the EDIT
AGE window.
P
• Clips: You can change the name of a clip in the playlist by right-clicking the
element and selecting the E
DIT CELL command. Then type the new name
directly in the playlist.
DIT PAGE command. The EDIT
O
FFSET Identifies the amount of time delay between the playout of two consecutive
playlist elements.
You can change the offset value of any of the playlist elements from within the
playlist by right-clicking on the element’s Offset cell and selecting the EDIT CELL
command. Then, type the new offset value directly in the playlist.
O
VERFLOW Identifies the difference between the total time of the content in a timeslot and the
time available in the timeslot. When the total time of the content in a timeslot
exceeds the time available, there is an overflow.
A playlist element’s overflow cannot be edited from within the playlist.
3-34 Xplay User Manual
Page 62

Creating and editing playlists in Xplay
Playlist column Definition and how to edit the playlist element’s property
PLAYOUT TYPE Indicates the method by which the playlist item (i.e page, template or clip) be
cued to air. The Playout Type for playlist elements can be changed in the Playlist
Editor by right-clicking on the element’s P
the P
LAYOUT TYPE command. Select one of the following transition types:
EQUENTIAL : The playlist element is played when the previous element
• S
LAYOUT TYPE cell, and then selecting
has completed (possibly with an offset).
ARD START : The playlist element is played at the specified time of day.
• H
If required, the currently playing element will be preempted. When a hard
start element is played the playlist is synchronized with the system clock.
The time of day is specified by entering it into the Offset column.
ANUAL : The playlist element is played when a RESUME command is sent
• M
to the playlist. If this command arrives earlier than expected, the currently
playing element is preempted. If the command arrives later than expected,
the playlist waits before resuming playout. The R
ESUME command can be
sent from the PLAY button in Xplay, or from logic in the Panel.
R
ECALL ID Displays the Recall ID for the page, template or clip, which is used as a shortcut
identifier for calling up pages and templates.
The Recall ID is originally created by filling in the RECALL ID field on the SAVE
dialog box when the page, template or clip is originally saved as an asset.
• Shared pages: You can set or edit the page’s Recall ID property by rightclicking the element in the playlist and selecting the E
DIT PAGE command.
The shared page’s editing window appears, allowing you to type in the Recall
ID field. Click the S
AVE PAGE, AND CLOSE button to apply the new Recall ID
value to the asset.
Note that each Recall ID value must be unique. If the new Recall ID value is
already assigned to another asset, an error message appears giving you the
option of either entering another value or overriding the Recall ID of the other
asset.
• Embedded pages, Templates and Clips: You cannot edit the Recall ID
property for embedded pages, templates, or clips from within the playlist.
TATUS A playlist element’s status cannot be edited from within the playlist. The status
S
changes only when the element is verified, cued, taken to air or cleared.
When the VERIFY PLAYLIST setting is enabled, each element in the playlist is
verified when the playlist is loaded to ensure that it is available and ready for use.
The results of the verification are displayed in the Status column for each
for more information.
DIT CELL
U
SER-DEFINED
COLUMNS
element. See page 3-8
All user-defined columns that have been added to the Playlist Editor can be
edited by right-clicking on the element’s cell and selecting the E
command. Then, type the new value directly in the playlist
Xplay User Manual 3-35
Page 63

Creating and editing playlists in Xplay
NOTE
NOTE
Deleting playlist elements
While building or using the playlist, you may want to delete an element that was previously
added to the playlist (e.g. a page, template, clip, playlist segment, or comment).
If the page, template, or clip that is to be deleted is a saved asset, deleting the item from
the playlist does not remove the asset from the system, only from the playlist. However,
embedded pages, playlist segments, and comments that were added to the playlist, but are
not assets, will be completed deleted from the system.
The following instructions describe how to delete elements from the playlist.
To delete an individual element from the playlist:
1. Select the element that you would like to delete from the playlist.
2. Right-click on the element’s row and select the DELETE command.
Or,
Press the D
3. If Xplay’s C
enabled, the CONFIRM DELETE dialog box appears. Select YES and the element is
immediately deleted from the playlist, or select N
If however Xplay’s CONFIRM PAGE DELETION property (TOOLS>SETTINGS>AUTOMATION)
is disabled, then the element is immediately deleted from the playlist.
ELETE key on your keyboard.
ONFIRM PAGE DELETION property (TOOLS>SETTINGS>AUTOMATION) is
O to cancel the delete action.
To delete multiple elements from the playlist:
1. Select the first element that you would like to delete from the playlist.
2. While holding down the C
delete from the playlist.
3. Right-click on one of the selected elements and select the D
Or,
Press the D
See page 3-23 for instructions on how to delete a playlist segment from a playlist.
3-36 Xplay User Manual
ELETE key on your keyboard.
TRL key, select the various elements that you would like to
ELETE command.
Page 64

Reloading the playlist
If you’ve had a playlist open for a while you may need to reload it to ensure that it’s still upto-date. For example, additional items may have been appended to the playlist by a user at
another workstation while the playlist was also open at your workstation.
How you reload and whether it’s necessary at all depends on how Xplay has been
configured. There are three possible scenarios:
•The P
•The P
• Both the P
Note that the currently airing and cued pages stay on air and cued even if they have been
moved to new locations in the playlist, or have been removed altogether.
LAYLIST UPDATE INTERVAL setting has not been activated. In this case, Xplay will
not be checking for updates. For changes made at remote workstations to take effect,
the playlist must be manually reloaded by clicking the R
Editor’s toolbar.
LAYLIST UPDATE INTERVAL setting has been activated, but not the AUTO RELOAD
PLAYLISTS setting. This means that Xplay will periodically check the Xmedia Server for
updated versions of the playlist but will not automatically reload the new version for
you. Instead, the Reload button will turn orange to indicate that a new version has
been detected. Click the button in the Playlist Editor’s toolbar to reload.
LAYLIST UPDATE INTERVAL and AUTO RELOAD PLAYLISTS settings have been
activated. Xplay will check the Xmedia server for an updated version of the current
playlist and will automatically reload it when it finds a newer version.
Creating and editing playlists in Xplay
ELOAD button in the Playlist
Xplay User Manual 3-37
Page 65

Creating and editing playlists in Xplay
Saving the playlist
For a playlist to be available for future use, or accessible to other Vertigo Suite applications
(i.e. Xbuilder), the playlist must be saved to the Xmedia Server. Newly created playlists are
given a generic name (i.e. Playlist1) until they are saved and you specify a unique name.
As well, any edits that are performed to existing playlists are not permanent until the playlist
has been saved. A playlist with unsaved edits is indicated by an asterisks beside the
playlist’s name in Xplay’s Status bar.
When a playlist is saved to the system, it becomes a playlist asset. Playlist assets are stored
and accessed from within the P
Browser.
To save a newly-created playlist:
1. Select the F
Or,
Press C
Or,
Press the S
The S
ILE>SAVE PLAYLIST command from Xplay’s menu commands.
TRL+S.
AVE CURRENT PLAYLIST button in the Playlist Editor’s toolbar.
AVE PLAYLIST dialog box appears (figure 3-25).
LAYLISTS root category (and sub-categories) in the Asset
Figure 3-25. The Save Playlist dialog box
2. In the N
3. Enter your name in the A
4. Enter a short description for the playlist in the D
AME field enter a new name for the playlist.
UTHOR field (optional).
ESCRIPTION field (optional).
5. Link the playlist to the Playlists root category or to sub-categories by selecting the
check box for each place where you want the playlist to be accessible from.
6. Click OK to save the playlist and exit the dialog box.
Or,
ANCEL to discard all entered information and return to the unsaved playlist.
Click C
3-38 Xplay User Manual
Page 66

Creating and editing playlists in Xplay
NOTE
To save the changes to an existing playlist:
• Select the F
ILE>SAVE PLAYLIST menu command.
Or,
• Press C
TRL+S.
Or,
• Click the S
AVE CURRENT PLAYLIST button in the Playlist Editor’s toolbar.
To save an existing playlist under a different name or into another category:
1. Select the FILE>SAVE PLAYLIST AS menu command.
Or,
Click the S
The S
AVE CURRENT PLAYLIST AS button in the Playlist Editor’s toolbar.
AVE PLAYLIST dialog box appears (figure 3-25).
2. In the NAME field enter a new name for the playlist.
3. Enter your name in the A
4. Enter a short description for the playlist in the D
UTHOR field (optional).
ESCRIPTION field (optional).
5. Link the playlist to the Playlists root category or to sub-categories by selecting the
check box for each place where you want the playlist to be accessible from.
6. Click OK to save the playlist and exit the dialog box.
Or,
ANCEL to discard all entered information and return to the unsaved playlist.
Click C
If you only want to move an existing playlist to another category, you don’t necessarily have
to perform a Save As. Simply drag and drop the playlist from its current category to another
within the Asset Browser.
Xplay User Manual 3-39
Page 67

Creating and editing playlists in Xplay
3-40 Xplay User Manual
Page 68

4 OPERATOR CONTROLLED PREVIEW
AND PLAYOUT TECHNIQUES
Xplay is the Vertigo Suite’s application for previewing and controlling the playout of content
that has been organized into playlists. Operators use Xplay’s Playlist Editor and Device
Views to view and control the playlist elements that are then cued and/or taken to the output
device(s).
To accommodate different control and playout situations, the layout of Xplay’s Playlist Editor
and Device Views can be configured for previewing and controlling the playout on one or
multiple devices.
The following sections instruct operators how to control the preview and playout of playlist
content on a single device, or manage the playout on multiple devices, multiple channels,
and/or multiple layers on a channel. An additional section describes supplemental tasks
that operators can perform to edit the content of playlist elements “on the fly”, as well as
other playout control and management techniques.
Preview and playout on a single device” on page 4-2
• “
• “Preview and playout on multiple devices, channels or layers” on page 4-7
• “Additional operator controlled tasks” on page 4-16
Xplay User Manual 4-1
Page 69

Operator controlled preview and playout techniques
Toolbar Panel
On Air
Preview
Device View
Device View
Preview and playout on a single device
When Xplay is intended to be used to control the playout on only a single playout device, we
recommend that you use Xplay’s O
OnAir-Preview layout provides operators with two Device View windows (On Air and Preview)
and the Toolbar Panel.
• Toolbar panel: While the Toolbar Panel is not specific to the OnAir-Preview layout, it is
optionally used in conjunction with the On Air device. The Toolbar panel allows you to load
a control panel asset, which can then be used to control the content and playout of an
additional keyer level on the same On Air playout device.
N AIR: The On Air Device View is associated with a specific keyer level on a playout device.
• O
When a playlist item is taken to air, the item is displayed in the On Air Device View window.
REVIEW: The Preview Device View is associated with a device is used for previewing the
• P
playout of playlist item that has been cued and is being sent next to air. The preview window
not only lets you see which item is next, but you can also make and save last-minute edits
to the playlist item, just before taking the playlist item to air.
NAIR-PREVIEW layout. Figure 4-1 demonstrates that the
Figure 4-1. On Air - Preview layout’s device views and Toolbar Panel
The following sections provides instructions for how operators can set up and control Xplay
to preview and control the playout of a playlist on a single device:
Preparing to preview and playout on a single device” on page 4-3
• “
• “Previewing and taking playlist elements to air on a single device” on page 4-4
4-2 Xplay User Manual
Page 70

Operator controlled preview and playout techniques
Keyer State: On
Keyer State: Off
Preparing to preview and playout on a single device
Before using Xplay to preview and take a playlist to air on a single device, we suggest that
you perform the following preliminary configuration and verification procedures to ensure
that Xplay is properly configured and setup:
1. Verify that Xplay is currently in the OnAir-Preview layout and that the On Air and
Preview Device Views are assigned to the desired devices.
Figure 4-2. OnAir-Preview layout displays two Device Views: On Air and Preview
If Xplay is not in the OnAir-Preview layout and/or the proper devices are not assigned to
the Device Views, consult “
and follow the configuration procedures for a single device and OnAir-Preview layout.
Adding and connecting Xplay to playout devices” on page 2-8
2. Verify that both the On Air and Preview Device Views have a green LED next to the
device name to indicate that they are actively connected to the devices.
If the LED is red, follow the instructions on page 2-16
3. Ensure that the Keyer State button of the On Air and Preview Device Views are both On.
The Keyer State button allows you to control whether the device’s keyer is on or off. When
the keyer is On, the Keyer State button is pink, which indicates that the loaded element
is actively displayed on the device. When the keyer is Off, the Keyer State button is grey,
which indicates that the loaded element is not being displayed on the device.
To change the Keyer State:
• Double-click the Keyer State button
Or,
• Right-click on the Keyer State button and select the T
Xplay User Manual 4-3
to reconnect Xplay to the device.
URN KEYER ON command.
Page 71

Operator controlled preview and playout techniques
Cue: Loads the next element
in the playlist to the On Air
playout device.
Take: Plays the currently cued
element on the On Air
playout device.
4. Select TOOLS>SETTINGS and verify that the Xplay settings are configured as follows. Once
finished, click OK to close the Settings dialog box.
PLAY>LAYOUT>PLAYLIST VIEW>STANDARD
•X
The playlist is displayed in the Playlist Editor as a single list, showing all elements in
the order in which they were saved or positioned (not separated by device assignment).
The Playlist Editor’s global control buttons, Cue and Ta ke, allow operators to cue and
playout the playlist elements in the order in which they are listed in the Playlist Editor.
•XPLAY>PLAYOUT>AUTO CUE NEXT ITEM>ENABLED
After a manual take, the next playlist element will automatically be cued on the
Preview device.
•XPLAY>PLAYOUT>CUE ON LOAD PLAYLIST>ENABLED
Xplay automatically cues the first element in the playlist when it is loaded. Note that
since the C
UE LOOK AHEAD setting is enabled, the first element on will be cued when
the playlist is loaded.
•X
PLAY>PLAYOUT>INITIAL PLAYOUT MODE>MANUAL
Configures Xplay so that operators have full manual control over what and when
playlist elements are cued and taken to air.
Previewing and taking playlist elements to air on a single device
After completing the preparation procedure on page 4-3, Xplay is in a state where you can create
or load a playlist into the Playlist Editor. Using the Playlist Editor’s global playout buttons (Cue and
Take), you can control the pace of the playlist’s sequential playout by cueing and previewing the
playout of playlist items on the Preview device and then taking them to air on the playout device.
Notice that the control-side of the page or template is displayed in the Device Views. This allows
operators to easily identify the playlist elements, as well as allowing them to make (and save) onthe-fly changes to the asset’s editable fields before they are taken to air. See page 4-16
information.
for more
Figure 4-3. Previewing cued playlist elements and then taking them to air on the playout device
4-4 Xplay User Manual
Page 72

Operator controlled preview and playout techniques
NOTE
NOTE
NOTE
To manually control the sequential preview and playout of a playlist on a single device:
1. Ensure that Xplay is properly configured and setup for previewing and playing out on
a single device (see page 4-3
2. Create a new playlist or load an existing playlist into the Playlist Editor (see page 3-6
Since the C
UE ON LOAD PLAYLIST setting is enabled, when the playlist is loaded, the first
).
).
playlist element is cued onto the Preview Device View and previewed on the connected
preview device.
The first element in the playlist does not have to be the first item played out. You can determine the
starting point for the sequential playout by selecting the element and then clicking the CUE button.
3. Optional: When a playlist element is cued in the Preview Device View, you can make
last minute edits to the element’s editable fields directly in the Device View before
bringing it to air on the playout device (see page 4-16).
4. Click the T
Since the A
AKE button to take the cued playlist element to air on the playout device.
UTO CUE NEXT ITEM setting is enabled, the next element in the playlist that
is assigned will automatically be cued to the Preview device when the currently cued
element moved to on air.
5. Optional: If while the playlist element is playing out on the On Air Device, you notice an
error in the content of one of the editable fields (i.e. a spelling mistake or incorrect
picture), you can make “on-the-fly” edits directly in the Device View (see page 4-16
6. Since the playlist is played out in sequential order, clicking the T
AKE button again brings
).
the next element in the playlist to air and the next element on that device becomes
cued.
Continue clicking the T
AKE button at the pace at which you want to control the playout
of the playlist elements.
As an alternative to clicking the Playlist Editor’s Cue and Take control buttons, you can also use
Xplay’s ACTIONS>CUE (F2) and ACTIONS>TAKE (F1) menu commands and keyboard shortcuts.
7. Optional: If you want to force an element to be cued or taken, but it is not the next in
the playlist (e.g. skip forward or return backwards); simply double-click the element that
you want to be cued as the next element to air. The Playlist Editor’s current position
arrow moves to the new location and the element is cued on the Preview device.
Clicking the T
AKE button resumes the playout of the playlist from this point.
If you have configured Xplay’s Device Manager to allow a panel to control an additional
keyer layer of the On Air playout device, you can load a panel into Xplay’s Toolbar Panel
and use the panel to control the playout on the specified keyer. See “
Using a panel to control
an additional keyer level on a device” on page 4-20 for more information.
Xplay User Manual 4-5
Page 73

Operator controlled preview and playout techniques
8. If the Playlist Editor’s SET PLAYLIST WRAP PROPERTY button is enabled, once you
have reached the last element in the playlist, you can keep looping through the playlist
by clicking the T
AKE button.
However, if the SET PLAYLIST WRAP PROPERTY button is disabled, you can only
continue until all of the elements have gone to air once.
9. Optional: You can remove the cued item from the Preview Device View by clicking the
Uncue button or selecting Xplay’s A
Similarly, you can use the Clear button or Xplay’s A
command to remove the currently playing element from the On Air playout device.
CTIONS>CLEAR PREVIEW menu command.
CTIONS>CLEAR ALL (F4) menu
4-6 Xplay User Manual
Page 74

Operator controlled preview and playout techniques
Preview and playout on multiple devices, channels or layers
Use Xplay’s MULTI-DEVICE layout when Xplay is to be used to control the preview and
playout on multiple devices, multiple channels, and/or multiple layers on a channel.
In Multi-Device layout, each device, channel and/or keyer is represented in Xplay by a
Device View, which allows operators to visualize and independently control the selection
and pace at which playlist elements are cued and played out on the various devices. For
example, figure 4-4
control a dual-channel Vertigo XG with 2 keyer layers for each channel.
shows Xplay with four (4) Device Views since it was configured to
Figure 4-4. Xplay is configured in a Multi-Device layout to control 2 channels, each with 2 keyer layers
When Xplay is set to the Multi-Device layout, the appearance and functionality of the
Playlist Editor and Device Views can be changed to accommodate different operator
preferences and playout situations.
For example:
• Playlist items can be organized in the Playlist Editor in a Standard or By Device view.
• The layout of the Device Views can provide a view of the Preview, On Air or both the
OnAir-Preview devices.
• If the Playlist Editor is in Standard view, operators can control the playlist using the
Playlist Editor’s global controls (Cue and Take) to playout the playlist elements
sequentially on their assigned devices. If the S
is also enabled, operators can also use the Device View’s Manual Playlist buttons to
force the playout of an element on any device, regardless of the device assignment.
The following sections provides instructions for how operators can set up and control Xplay
to preview and control the playout of a playlist on a multiple devices, channels and/or layers:
• “
Preparing to preview and playout using the Multi-Device layout” on page 4-8
• “Previewing and taking playlist elements to air on multiple devices” on page 4-10
Xplay User Manual 4-7
HOW MANUAL PLAYOUT BUTTONS setting
Page 75

Operator controlled preview and playout techniques
Device Manager
Preparing to preview and playout using the Multi-Device layout
Before using Xplay to preview and take a playlist to air on a multiple devices, channel and/or
layers, we suggest that you perform the following preliminary configuration and verification
procedures to ensure that Xplay is properly configured and setup:
1. Verify that Xplay is currently in the Multi-Device layout and that appropriate number of
Device Views are displayed and assigned to the correct devices.
Figure 4-5. Verify the Multi-Device layout, Device Views and device assignments
If Xplay is not in the Multi-Device layout, the proper number of devices are not displayed,
and/or the proper devices are not assigned to the Device Views, consult “
connecting Xplay to playout devices” on page 2-8 and follow the configuration
procedures for a multiple devices and Multi-device layout.
Adding and
2. Verify that all of the devices in the Device Views have a green LED next to the device
name to indicate that they are actively connected to the devices.
If the LED is red, follow the instructions on page 2-16
3. Ensure that the Keyer State button of each of the Device Views are On.
The Keyer State button allows you to control whether the device’s keyer is on or off. When
the keyer is On, the Keyer State button is pink, which indicates that the loaded element is
actively displayed on the device. When the keyer is Off, the Keyer State button is grey,
which indicates that the loaded element is not being displayed on the device.
To change the Keyer State:
• Double-click the Keyer State button
Or,
• Right-click on the Keyer State button and select the T
4-8 Xplay User Manual
to reconnect Xplay to the device.
URN KEYER ON command.
Page 76

Operator controlled preview and playout techniques
Standard Playlist View ByDevice Playlist View
4. Select TOOLS>SETTINGS and verify that the Xplay settings are configured as follows.
Once finished, click OK to close the Settings dialog box.
PLAY>LAYOUT>PLAYLIST VIEW
X
• STANDARD: A single list, showing all of the playlist elements in the order in which they
were positioned. This list does not separate elements by their device assignments.
The Playlist Editor’s global playout controls (Cue and Take) are also displayed and can
be used to control the playlist in sequential order. Note that when using the global
controls, you are restricted by the element’s device assignment. In other words, you
cannot cue and take an element assigned to one device (e.g. device1) on another
device (e.g. Device2). To cue and take on another device, you must enable and use
the Manual Playout buttons in the Device Views.
YDEVICE: The playlist is broken down and displayed as multiple playlists, with one
• B
list for each device configured in Xplay. The device’s playlist is shown opposite the
Device View for the corresponding device. Each list only shows those elements that
target the associated device. To control the playlist, you must enable and use the
manual playout buttons within each individual Device View.
•X
PLAY>LAYOUT>SHOW MANUAL PLAYOUT BUTTONS>ENABLED
Displays the manual playout buttons within each Device View window. The Manual
Playout buttons allow you to override playlist order, default device assignments and
the current position by controlling or forcing the content onto the specific Device View.
Cues the selected playlist element to the Device View’s connected
device. The element then becomes the playlist’s current position.
This button can also be used to cue an element to a device that is not
the element’s default target device.
An element cannot be cued to more than one device at a time.
Takes the playlist element that is cued on the device to the default or
assigned channel. It does not alter the current position in the playlist.
If no element has been cued on the device, it clears the currently airing
element from the default channel.
Clears the element that is currently on air on this device. Clicking this
button does not alter the current position of the playlist.
Xplay User Manual 4-9
Page 77

Operator controlled preview and playout techniques
Preview or OnAir OnAirPreview
•XPLAY>LAYOUT>MULTIDEVICE LAYOUT
•PREVIEW: The Device View consists of only the Preview window, which displays the
element that is currently cued on the device.
NAIR: The Device View consists of only the On Air window, which displays the
•O
element that has been brought to air on the device.
NAIRPREVIEW: The Device View consists of both the Preview and On-Air windows,
•O
therefore displaying the elements that are cued and playing out on the device.
PLAY>PLAYOUT>CUE LOOK AHEAD>ENABLED
•X
Determines if Xplay cues elements on every device when a cue is performed.
Enabling this setting and then performing a general cue allows the element that is
selected for cueing to be cued first. Then a search is made for the next element
targeting each remaining device, starting after the selected element. Each element
that is located is cued, but only if it is not already cued. After a manual take, the next
element on the same device where the take occurred is cued.
If this setting is disabled and a general cue is executed, only the element selected
for cueing is cued. After a manual take, no element is cued on the device.
PLAY>PLAYOUT>CUE ON LOAD PLAYLIST>ENABLED
•X
Xplay automatically cues the first element in the playlist when it is loaded. Note that
since the CUE LOOK AHEAD setting is enabled, the first element on will be cued when
the playlist is loaded.
•XPLAY>PLAYOUT>INITIAL PLAYOUT MODE>MANUAL
Configures Xplay so that operators have full manual control over what and when
playlist elements are cued and taken to air.
Previewing and taking playlist elements to air on multiple devices
After completing the preparation procedure on page 4-8, Xplay is in a state where you can
create or load a playlist into the Playlist Editor and begin to control the preview and playout
of the playlist elements on multiple devices.
Since the Playlist View setting (STANDARD or BYDEVICE) significantly changes Xplay’s
appearance and functionality, the following procedures guide you through an identical
procedure for controlling playout only using difference playlist views.
Controlling playout on multiple devices using Standard playlist view” on page 4-11
• “
• “Controlling playout on multiple devices using ByDevice playlist view” on page 4-14
4-10 Xplay User Manual
Page 78

Operator controlled preview and playout techniques
Controlling playout on multiple devices using Standard playlist view
The following procedure guides you through the steps for controlling a playlist on multiple
devices using the Playlist Editor’s global controls, as well as the Device View’s Manual
playout buttons in Standard Playlist View.
These Xplay settings are used in this example:
PLAY>GENERAL>LAYOUT>MULTI-DEVICE
• X
• XPLAY>GENERAL>NUMBER OF DEVICES>4
PLAY>LAYOUT>PLAYLIST VIEW>STANDARD
• X
• XPLAY>LAYOUT>SHOW MANUAL PLAYOUT BUTTONS>ENABLED
• XPLAY>LAYOUT>MULTIDEVICE LAYOUT>PREVIEWONAIR
• XPLAY>PLAYOUT>CUE LOOK AHEAD>ENABLED
• XPLAY>PLAYOUT>CUE ON LOAD PLAYLIST>ENABLED
To preview and playout a multi-device playlist using the Standard playlist view:
1. Load a playlist into the Playlist Editor (see page 3-6).
Each playlist element’s Device cell displays the particular device that they were
assigned to be played out on.
Since the C
device is cued onto their assigned output device (figure 4-6). The arrow along the
left-side of the playlist, indicates the current position within the playlist. In other words,
the next operation will apply to the element it is pointing to.
Also note that since Device1 and Device 2 are connected to both an output device and
a Preview device, a preview of the cued elements’ playout is run on the Preview device
when the element is cued.
UE ON LOAD PLAYLIST setting is enabled, the first playlist element for each
Figure 4-6. The Cue On Load Playlist setting automatically cues the elements to their assigned devices
Xplay User Manual 4-11
Page 79

Operator controlled preview and playout techniques
Changed from Cued Device1
to On Air Device1
This element is now cued on
Device1 since it will be the next
element to be taken on Device1
On air on Device3
Cued on Device3
2. Optional: You can modify the cued elements’ editable fields in the Device Views before
bringing them to air on the device (see page 7-13).
3. Click the global T
AKE button at the bottom of the Playlist Editor to take the first playlist
element (indicated by the arrow in the playlist) that is cued on the devices to air.
Since the A
UTO CUE NEXT ITEM setting is enabled, the next element in the playlist that
is assigned to the device will automatically be cued to the device when the currently
cued element moved to on air (figure 4-7
). The element will stay on air until the playlist
reaches the cued element in the playlist.
Figure 4-7. When the playlist element is taken to air, the next element for that device is cued on the device
4. Since the global cue and take buttons at the bottom of the playlist run through the
playlist in sequential order, clicking the T
in the playlist to air and the next element on that device becomes cued (figure 4-8
AKE button again brings the next cued element
).
Figure 4-8. The next item is taken to air on its device and the next element is cued on the device
4-12 Xplay User Manual
Page 80

Operator controlled preview and playout techniques
NOTE
5. Continue clicking the TAKE button at the pace at which you want to control the playout of the
playlist elements on their devices. You will also continue to make your way down the playlist.
So the next the next element in the playlist would be taken to air on Device2 and so on.
If the Playlist Editor’s S
ET PLAYLIST WRAP PROPERTY button is enabled, once you
have reached the last element in the playlist, you can keep looping through the playlist
by clicking the T
However, if the S
AKE button.
ET PLAYLIST WRAP PROPERTY button is disabled, you can only
continue until all of the elements have gone to air once.
During playout, the playlist scrolls and shows the most recently taken element. In a multidevice setup, when many consecutive takes are made on the same device, the cued and
on-air elements on other devices may scroll out of view. To scroll the playlist down to view
the cued and on-air elements on a particular device, right-click the device name on the rightside of Xplay and select the S
CROLL INTO VIEW menu command.
If both the cued and on-air elements cannot be visible at the same time because they are
too widely spaced, then the cued element is made visible. If there is no cued or on-air
element on the chosen device, no scrolling is performed.
6. Optional: You can remove the cued items from the Preview Device View by clicking the
Uncue button in each Device View.
As well, you can use Xplay’s ACTIONS>CLEAR menu commands or each Device View’s
Clear button to remove the currently playing element from the connected playout device.
Forcing a playlist element on air (breaking the playlist order)
If you need a playlist element to immediately playout on its assigned
device:
1. Double-click the desired playlist element.
The playlist element is immediately cued on the assigned device and the playlist’s
current position arrow moves to this element.
2. Click the Playlist Editor’s Take button or the Take button in the element’s assigned
Device View. The element is immediately taken to air and the playlist resumes from this
new location.
If you need a playlist element to immediately playout, but on a device that is different
from
its assigned device:
1. Select the desired playlist element.
2. Click the Cue button in the Device View that is associated with the device that you want
to play the element on.
The playlist element is immediately cued on the new device as indicated by the
element’s status in the playlist.
Note that the element’s device assignment (Device column) remains unchanged.
Xplay User Manual 4-13
Page 81

Operator controlled preview and playout techniques
NOTE
3. Click the Take button in the Device View assigned to the device that it is to be played
out on and the element is immediately taken to air.
The element is immediately taken to air and the playlist resumes from this new location.
Controlling playout on multiple devices using ByDevice playlist view
If you would prefer to focus on managing the playout of a multi-device playlist on the
individual devices, rather than controlling it in sequential order, you may consider setting
Xplay’s Playlist View setting to ByDevice.
When the Playlist Editor is in BYDEVICE VIEW, the multi-device playlist is broken down into
multiple playlists, with one list for each device configured in Xplay. Each playlist only shows
those elements that target the associated device. Each device’s playlist is displayed
opposite to its corresponding Device View (figure 4-9
).
Figure 4-9. Xplay’s Playlist Editor in ByDevice view
Unlike Standard view which allows you to control the whole playlist using global controls or
individual devices using the manual playout buttons, ByDevice view only allows you to
focus on controlling each device separately using the manual playout buttons. Therefore,
for operators to control the playlist, Xplay’s S
be enabled (see page 4-11 for a functional description of these buttons).
When the Playlist Editor is in ByDevice view, you are restricted by the element’s device
assignment. In other words, you cannot cue and take an element assigned to one device (e.g.
device1) on another device (e.g. Device2).
It is possible, however, to cue and take a playlist element on a device that is different from the
assigned target device if the Playlist Editor is in Standard view. See page 4-13
and instructions.
4-14 Xplay User Manual
HOW MANUAL PLAYOUT BUTTONS setting must
for more information
Page 82

Operator controlled preview and playout techniques
The following procedure guides you through the steps for controlling a multi-device playlist
when the Playlist Editor is set to ByDevice view.
These Xplay settings are used in this example:
• X
PLAY>GENERAL>LAYOUT>MULTI-DEVICE
• XPLAY>GENERAL>NUMBER OF DEVICES>4
• X
PLAY>LAYOUT>PLAYLIST VIEW>BYDEVICE
• XPLAY>LAYOUT>SHOW MANUAL PLAYOUT BUTTONS>ENABLED
• XPLAY>LAYOUT>MULTIDEVICE LAYOUT>PREVIEWONAIR
• XPLAY>PLAYOUT>CUE LOOK AHEAD>ENABLED
• XPLAY>PLAYOUT>CUE ON LOAD PLAYLIST>ENABLED
To preview and playout a multi-device playlist using the ByDevice playlist view:
1. Load a playlist into the Playlist Editor (see page 3-6).
The playlist is immediately divided up and each playlist element is placed in a playlist
according to its assigned or target device (figure 4-10
Since the C
UE ON LOAD PLAYLIST setting is enabled, the first playlist element for each
).
device is cued onto their assigned output device.
Also note that since Device1 and Device 2 are connected to both an output device and
a Preview device, a preview of the cued elements’ playout is run on the Preview device
when the element is cued.
Figure 4-10. The Cue On Load Playlist setting automatically cues the elements to their assigned devices
2. Control each device separately using each Device View’s manual playout buttons.
Figure 4-11. Use the manual playout buttons (Cue and Take) to control the playlist elements for the device
Xplay User Manual 4-15
Page 83

Operator controlled preview and playout techniques
Additional operator controlled tasks
In addition to the operator controlled or initiated playout techniques described in the
previous sections, Xplay allows operators to perform a few other control and playout tasks.
The following sections describe how operators can make last minute or on-the-fly changes
to the cued playlist element’s editable fields; use a panel to control an additional keyer on
a playout device; refresh/reload the playlist elements to ensure that the most updated
versions are being used; and track which playlist elements have already been to air.
Editing playlist elements that are displayed in a Device View” on page 4-16
• “
• “Using a panel to control an additional keyer level on a device” on page 4-20.
Reloading and refreshing playlist elements” on page 4-21.
• “
Marking / Unmarking playlist elements as Aired” on page 4-23
• “
Editing playlist elements that are displayed in a Device View
While the Device Views display the playlist elements that are currently cued or on air on a
specific device, they also provide a workspace upon which you can make last minute
changes to the element’s editable content. For example, you can change the text in a text
box, make selections from drop-down lists, replace the existing image or clip...etc.
Preview Device View • Page: You can make changes to the page’s elements, and then either
save the changes and/or take the page to air.
• Template, Scene, and Clip: You can make changes to the template’s
elements or substitute the video clip, and then take the template/clip to
air. You cannot, however, save the changes that were made to the
template or clip.
On-Air Device View • Page: You can make changes to the page’s elements and apply them
immediately to the on-air device’s playout. There is also an indirect way
in which you can save the changes that were made to the page.
• Tem plate and C lip: You can make changes to the template’s elements
or substitute the video clip and apply the changes immediately to the
on-air device’s playout. You cannot, however, save the changes that
were made to the template or clip.
The following topics describe how to edit the playlist elements in the Device Views, as well
as how to save or apply the changes:
Zooming in/out and repositioning in the device view” on page 4-17
• “
• “Editing text and other contents elements in the device view” on page 4-18
• “Changing an image, clip, or cel animation in the device view” on page 4-19
• “Saving changes made to playlist elements in the Device Views” on page 4-20
4-16 Xplay User Manual
Page 84

Operator controlled preview and playout techniques
NOTE
Original Zoom in Zoom in & reposition
Zooming in/out and repositioning in the device view
To view the details of an element displayed in the Device View window, you can zoom in
and out of the element. As a result of zooming in/out, portions of the element may become
hidden outside of the window’s frame. If this happens, you can reposition the element within
the device view window (figure 4-12
Figure 4-12. See the displayed playlist element in greater detail by zooming in and repositioning
Pressing the SPACE BAR or HOME KEY on your keyboard, resets the device view’s zoom to
the original scale (1:1) and repositions the element to the center of the window.
To zoom in or out of a playlist element that is displayed in the device view window:
1. Click within the device view.
2. Use your mouse’s wheel to zoom in or out.
• Roll the mouse wheel forward to zoom in.
Or,
• Roll the mouse wheel backward to zoom out.
).
To reposition the playlist element within the device view window:
1. Click within the device view.
2. While holding the A
the desired position. Or, holding the A
and drag the element to its new position.
Xplay User Manual 4-17
LT key, press the direction arrow keys to move the element toward
LT key you can hold down the left-mouse button
Page 85

Operator controlled preview and playout techniques
NOTE
Drop-down lists
Text boxes
Radio buttons
Check boxes
Images
Text
Editing text and other contents elements in the device view
If the page or template that is displayed in the Device View contains content elements
(primitives) whose A
these elements (figure 4-13
Some of the edits that are possible in the Device View are:
• setting text in text boxes by clicking within the text box and typing the new text
• selecting an item from a drop-down list
• selecting check boxes or a radio button to indicate a choice or enable a setting
• replacing existing images, cel animations, or clips with another of the same type (see
page 4-19
The new settings appear immediately in the device view and the changes are stored in a
cached version of the playlist element. If the changes are being made in the On-Air Device
View, then the changes are immediately viewed in the device’s playout. While you cannot
permanently save the changes made to templates or clips in the Device Views, you can
save the changes to a page’s content elements (see page 4-20).
LLOW EDIT property are set to TRUE, then you can make changes to
).
)
Figure 4-13. You can make changes to the current settings on a page or template in the Device Views
4-18 Xplay User Manual
Page 86

Operator controlled preview and playout techniques
NOTE
Changing an image, clip, or cel animation in the device view
If page or template that is in the Preview or On-air Device View window contains an image,
clip, or cel animation element whose A
substitute the current image, clip, or cel animation for another without having to clear and
reload the Device View.
Figure 4-14. Replacing an image on a page cued in the Device View
Although the following procedure only describes how to replace an image, we suggest that
you use the same instructions for replacing a clip or cel animation in the Device View
window since the procedure is generally the same in all three cases.
To change an image on the page from within the Device View window:
1. Right-click on the image in the device view window.
ELECT AN IMAGE dialog box appears (figure 4-15).
The S
LLOW EDIT property is set to TRUE, then you can
Figure 4-15. Select the replacement image
2. Navigate through the I
VIEW ) or listed (DETAIL VIEW ) in the SELECT AN IMAGE dialog box.
MAGES root folder until the desired image is displayed (PROXY
3. Double-click the desired image, or select the desired file and click OK.
ELECT AN IMAGE dialog box closes and the image is immediately updated in the
The S
device view.
The new image appears immediately in the device view and the changes are stored in a
cached version of the playlist element. If the change was made in the On-Air Device View,
then the change is immediately viewed in the device’s playout. While you cannot
permanently save the changes made to templates or clips in the Device Views, you can
save changes to a page’s content elements (see page 4-20).
Xplay User Manual 4-19
Page 87

Operator controlled preview and playout techniques
NOTE
Control Panel
Saving changes made to playlist elements in the Device Views
Xplay allows you can make changes to the content elements within a page, template, or clip
asset that is currently displayed in the Preview and On-Air Device Views. The changes appear
immediately in the Device Views and they are also temporarily stored in a cached version of
the playlist element. If the changes are being made to a playlist element in the On-Air Device
View and the element has been taken to air on the device, the changes will immediately be
applied to the on-air playout.
As was stated above, these changes are temporarily stored in a cache version of the playlist
element, but they have not yet been permanently saved. You must intentionally save the
changes, otherwise they will be lost when Xplay is closed.
Regardless of whether the edits where made in the Preview or the On-Air Device View
window, edits to a template or clip playlist element cannot be save to the asset. In fact, the
AVE button in the Device View’s toolbar will be disabled when editing a template
the S
or clip asset in the Device Views.
You can save the changes that were made to a page that is loaded in the Preview Device View
by clicking the S
Air Device View, the SAVE button in the Device View’s toolbar is unfortunately disabled to
encourage users to make most long lasting edits in the Preview Device View rather than onair. If however, you really must save changes that were made in the On-Air Device View, you
can use the Xplay’s F
command not only saves the page of interest, but all pages that have unsaved edits.
AVE button in the Device View’s toolbar. If the page was loaded in the On-
ILE>SAVE PAGES command. Be aware however, that the SAVE PAGES
Using a panel to control an additional keyer level on a device
In addition to using manual control techniques to send playlists to air on one or more playout
devices in real-time, Xplay also allows you to use a control panel to playout and control an
additional keyer layer on a specified output device.
Control panel assets are created in Xstudio, and allow operators to interact with content and
control the playout while it is played out on air. Control panels can also contain logic that
executes actions based on events received from the playout. For example, a control panel
can control the appearance of a ticker crawl as well as provide the content from an RSS feed.
Figure 4-16
is opened, the panel appears in the Toolbar Panel section of the Xplay interface.
Figure 4-16. Xplay can use a panel to playout and control graphics on an additional keyer layer
4-20 Xplay User Manual
shows that when Xplay is connected to a Panel device and a control panel asset
Page 88

Operator controlled preview and playout techniques
NOTE
NOTE
To use a panel in Xplay to playout and control an additional keyer layer on a specified
output device:
1. Open Xplay’s Device Manager.
Add and configure a device to the P
2. Load a control panel asset into the Toolbar Panel by navigating through the Asset
Browser’s PANELS root category and double-clicking the desired control panel asset.
The control panel immediately opens in Xplay’s Toolbar Panel.
Xplay can be configured to load a specific control panel into the Toolbar Panel upon startup.
Simply specify panel asset in Xplay’s STARTUP PANEL setting (see page 6-14).
3. To playout of the specified device, Xplay’s Toolbar Panel must be actively connected
to the device. Therefore, ensure that the connection LED in the Toolbar Panel is green.
If the LED is red, see page 2-16
ANEL device in Active Device table (see page 2-8).
for instructions on reconnecting to the device.
4. Depending upon what the panel was designed to do, operators can interact with the
panel’s editable fields and control buttons and/or the panel will receive events during
playout and react according to the programmed logic.
Xplay can be configured to send events to a control panel using keyboard shortcuts. The
keys used to send the events are C
settings” on page 6-24 for more information.
TRL-SHIFT+0 up to CTRL-SHIFT+9. See “Panel Events
Reloading and refreshing playlist elements
If the loaded playlist or one of the playlist elements that is currently cued has been changed
by another user on a different workstation, you can still obtain the latest saved version
quickly and easily at any time by reloading the playlist or element.
When the A
currently loaded playlist has changed, it automatically reloads the playlist. However, if this
setting is disabled and Xplay detects that the currently loaded playlist has changed, the
ELOAD button in the Playlist Editor’s toolbar turns orange and you must click the
R
R
ELOAD button to reload the playlist (see instructions below and “Reloading the playlist” on
page 3-37 for more information).
Xplay User Manual 4-21
UTO RELOAD PLAYLISTS command is enabled and Xplay detects that the
Page 89

Operator controlled preview and playout techniques
Similarly, if a playlist element is linked to a data source, you can refresh the cued element,
which forces objects with data links to read the latest values in the database in order to
display the latest information.
To reload the playlist:
• Click the R
ELOAD PLAYLIST button in the Playlist Editor’s toolbar.
Or,
• Select Xplay’s A
CTIONS>RELOAD PLAYLIST command.
Or,
• Press F5 on your keyboard.
To reload a playlist element that is currently cued on a device:
• Click the R
ELOAD PLAYLIST button in the Device View’s toolbar.
Or,
• Select one of the following commands according to the device that the element is cued on:
• Select Xplay’s A
CTIONS>RELOAD CUED command.
• Select Xplay’s ACTIONS>RELOAD CUED DEVICE 1 command.
• Select Xplay’s A
CTIONS>RELOAD CUED DEVICE 2 command.
To refresh a playlist element that is currently cued on a device:
• Click the REFRESH button in the Device View’s toolbar.
Or,
• Select one of the following commands according to the device that the element is cued on:
• Select Xplay’s A
• Select Xplay’s A
CTIONS>REFRESH CUED command, or press F3 on your keyboard.
CTIONS>REFRESH CUED DEVICE 1 command, or press SHIFT + F3 on
your keyboard.
• Select Xplay’s A
CTIONS>REFRESH CUED DEVICE 2 command, or press CTRL + F3 on
your keyboard.
4-22 Xplay User Manual
Page 90

Operator controlled preview and playout techniques
Mark As Aired
Marking / Unmarking playlist elements as Aired
Xplay contains an optional feature that allows you to visually distinguish between the
playlist elements that have already been played on air and those that have not. As figure 4-
17 demonstrates, you can configure Xplay so that once an element has been taken to air,
TATUS column changes color and reports “AIRED”.
its S
Figure 4-17. The Status of an element reads “Aired” once the element has completely played on air
When Xplay’s P
element has finished playing out on air, the element’s S
LAYLIST>HIGHLIGHT>SHOW AIRED setting is enabled, each time a playlist
TATUS column automatically
changes color and reports “AIRED”. The color that the Status changes to is determined by
the PLAYLIST>HIGHLIGHT>AIRED COLOR setting (figure 4-18).
Figure 4-18. The “Show Aired” setting must be enabled for this feature to be available
• To remove the “A
IRED” Status from a playlist element, select the playlist element in the
Playlist Editor and then select ACTIONS>UNMARKED AS AIRED or press CTRL + U.
• To manually reinstate the element’s Status as “A
Playlist Editor and then select A
CTIONS>MARK AS AIRED or press CTRL + R.
IRED”, select the playlist element in the
Xplay User Manual 4-23
Page 91

Operator controlled preview and playout techniques
4-24 Xplay User Manual
Page 92

5 CONTROLLING XPLAY DEVICES USING
NOTE
Station automation
Automation
protocol
Xplay
(Serial or TCP/IP)
AUTOMATION PROTOCOLS
Vertigo playout devices (Vertigo XG and Intuition XG) can be remotely controlled by
external automation systems using Xplay and an automation protocol. Figure 5-1
demonstrates that automation commands are sent using an automation protocol from the
automation system to the device’s Xplay either through a serial or TCP/IP connection. Xplay
then acts as an interpreter by receiving control commands from automation to control the
device and the device sends back status messages.
Xplay User Manual 5-1
Figure 5-1. Xplay supports the remote control of devices via automation protocols
To facilitate integration, Xplay supports several different protocols. In most cases however,
we recommend using the Oxtel Protocol.
Page 93

Controlling Xplay devices using automation protocols
To use automation for device control, you must first configure Xplay’s AUTOMATION settings
and the device’s Dashboard settings for automation compatibility. Instructions for
accomplishing these tasks are provided in “
Specifying Automation settings in Xplay” on
page 5-3.
Then you must use the X
PLAY AUTOMATION CONFIGURATION window to associate the device
that is to be controlled with an automation protocol. Xplay offers a series of automation
protocol properties that can be edited, as well as a mechanism for forwarding automation
commands to other devices.
The XPLAY AUTOMATION CONFIGURATION window is accessed by selecting the
OOLS>CONFIGURE AUTOMATION command. If Xplay has already been associated with one
T
or more devices, then the X
PLAY AUTOMATION CONFIGURATION window appears (figure 5-2).
Figure 5-2. Xplay’s Automation Configuration window
If Xplay has not been associated with any devices, the following error message appears:
Automation cannot be used without devices attached to Xplay.
Please use the device manager to configure Xplay and try again.
Close the X
Device Manager to associate one or more devices to Xplay (see “
PLAY AUTOMATION CONFIGURATION window’s error message and use Xplay’s
Adding and connecting
Xplay to playout devices” on page 2-8). Then, try again to open the XPLAY AUTOMATION
C
ONFIGURATION window.
Once the X
PLAY AUTOMATION CONFIGURATION window is open and displays the devices,
you can add and configure the protocol settings for each device. The following sections
provide instructions for configuring Xplay’s automation protocol settings:
Configuring Xplay to use the Evertz protocol over Serial” on page 5-5
• “
• “Configuring Xplay to use the Oxtel protocol over Serial” on page 5-9
• “Configuring Xplay to use Xprotocol over TCP/IP” on page 5-13
• “Configuring Xplay to use the Oxtel serial protocol over TCP/IP” on page 5-15
5-2 Xplay User Manual
Page 94

Controlling Xplay devices using automation protocols
NOTE
Specifying Automation settings in Xplay
For automation to control a Vertigo playout device, Xplay must run on the same device that
is to be controlled. To ensure frame accuracy during playout, you must configure both Xplay
and the device’s AUTOMATION settings to be complementary. Note that frame accuracy is
not supported when using playlists.
To configure Xplay’s Automation settings:
1. Open Xplay on the rendering machine that will be controlled by the automation system.
2. Select the T
dialog box.
3. Navigate through X
OOLS>SETTINGS from the Xplay menu commands to open the SETTINGS
PLAY>AUTOMATION to display Xplay’s Automation settings (figure 5-3).
Figure 5-3. Xplay’s Automation settings
4. Enable the AUTOMATION (NO MESSAGE BOXES) setting, which overrides the behavior of
the four (4) settings below it and prevents message boxes from appearing during Xplay
operations.
5. Optional: if you are planning on using the Evertz protocol, then you must specify the
EAD BAND setting (otherwise ignore this setting). The Dead band setting allows you to
D
synchronize the taking and clearing of multiple templates within the Evertz protocol.
6. Select from the TV F
execution of automation commands and page creation. This is used to determine the
number of frames per second and to display timecode values. This TV Format should
match the TV Format of the templates that you build and the Rendering Resolution
setting of your rendering device.
7. Click OK.
See “Automation settings” on page 6-25 for further information regarding Xplay’s AUTOMATION
settings.
Xplay User Manual 5-3
ORMAT setting’s drop-down list the format target TV format for the
Page 95

Controlling Xplay devices using automation protocols
To configure the Vertigo rendering device’s Automation settings:
1. Open the Vertigo rendering device’s Dashboard application by selecting the
OOLS>LAUNCH DASHBOARD command from the device’s Control Panel.
T
2. Select the device from the Device Discovery table. If the device does not appear in the
table, perform a Device Discovery (T
OOLS>SETTINGS>DEVICE DISCOVERY).
3. With the S
ETTINGS MODE still set to SIMPLE, ensure that the OUTPUT RESOLUTION setting
to the same as the TV FORMAT setting in the Xplay Automation settings (page 6-25).
4. Change the S
5. On the G
6. Set the A
ETTINGS MODE by selecting ADVANCED from the drop-down list.
ENERAL page, select the SYSTEM COUNTER option in the AUTOMATION MODE settings.
UTOMATION > PREROLL setting to match that of the automation system.
Automation systems will send and clear events ahead of time; preroll corresponds to
the number of frames used by the automation system.
7. Click the A
PPLY CHANGES button and close the Dashboard application.
5-4 Xplay User Manual
Page 96

Controlling Xplay devices using automation protocols
NOTE
Configuring Xplay to use the Evertz protocol over Serial
Xplay can be configured to support the Evertz protocol as a means of controlling the playout
of graphics content to Vertigo output devices. Thus far, Grass Valley has used Encoda
Automation System running the Evertz protocol (Evertz 9525 DSK-LG) controlling Xplay.
The Evertz protocol is somewhat limited in that there is no real control over layering of
templates on the device. Therefore, in the current implementation there is no guarantee that
a particular template will be loaded onto a particular keyer. If strict layering control is desired
then another protocol, such as Xprotocol, should be considered (see page 5-13).
To configure Xplay to use the Evertz protocol over Serial to control a device:
1. Open Xplay’s DEVICE MANAGER and verify that the devices and device keyers that the
Evertz protocol will control are properly configured and assigned (see “Adding and
connecting Xplay to playout devices” on page 2-8).
2. Verify that Xplay’s AUTOMATION settings and the renderer’s automation settings are
appropriate for automation control (see “
page 5-3).
3. Open Xplay’s A
Evertz protocol for the device that is to be controlled by automation.
a. Select T
The XPLAY AUTOMATION CONFIGURATION window appears (figure 5-4).
UTOMATION CONFIGURATION window and create an instance of the
OOLS>CONFIGURE AUTOMATION.
Specifying Automation settings in Xplay” on
Figure 5-4. The Xplay Automation Configuration window
b. In the D
Xplay User Manual 5-5
EVICE TO PROTOCOL MAPPINGS section, click the ADD PROTOCOL button next
to the device that you want to map the Evertz protocol to.
Page 97

Controlling Xplay devices using automation protocols
c. Select EVERTZ OVER SERIAL from the drop-down list that appears and press ENTER.
The Properties section now displays the C
EVICE FORWARDING settings (figure 5-5).
and D
Figure 5-5. Xplay’s Properties for configuring Evertz protocol over serial
OMMUNICATION, PROTOCOL, LOGGING
4. Set the following C
OMMUNICATION settings:
COM PORT Select the communication port upon which Xplay will interact with the
automation system. The default value is 1.
AUD RATE Select the expected transmission rate between the automation system and
B
Xplay. Consult with the automation system and select the Baud rate that
matches the baud rate used by the system. The default value is 19200.
PARITY The parity setting normally offers the option of error checking during
transmission between the automation system and Xplay. This setting is
disabled since it is provided by the Evertz protocol.
S
TOP BITS The stop bits value represents the last bit in a character in asynchronous
transmission to indicate the ending of the character. This setting is
determined by the protocol and therefore it has been disabled.
ATA BITS The number of bits that make up a character of data that is transmitted. This
D
setting is determined by the protocol and therefore it has been disabled.
LOW CONTROL Select the process for managing the rate of transmission of data between
F
the receiver and Xplay to prevent congestion. Choose from the following
settings/techniques: N
ONE, CTS/RTS, HARDWARE, or SOFTWARE.
5-6 Xplay User Manual
Page 98

Controlling Xplay devices using automation protocols
5. Set the PROTOCOL Settings:
K
EYERS Specify the keyers (layers) of a particular device that the Evertz protocol will
control. These keyers must be configured in advance in Xplay using the
Device Manager (see “
Adding and connecting Xplay to playout devices” on
page 2-8).
Since there is no keyer specified by the Evertz protocol, the Evertz driver in
Xplay will decide where to put the next element and does this by looking for
the first of the configured keyers that has nothing cued nor on air. If every
available keyer has something on air then Xplay will select the first keyer
that does not have any element cued.
Note: If a template is loaded onto a keyer external to the protocol, the Evertz
protocol driver has no knowledge of this and therefore will incorrectly
consider this keyer as an available keyer.
ERIFY MULTIPLE To reduce the number of verification calls made to the Xmedia Server, the
V
Evertz protocol may send a verify request for a particular element multiple
times in rapid succession (once a second, for example). This value sets a
throttle on the number of incoming Evertz requests for an item that result in
a call to the XMS. Xplay will reply with a cached value for that item on every
verify request for the item until the number of repeat request received is
equal to the Verify Multiple value. The recommended value for this setting
is 5.
Note that for playlists, verify only verifies that the playlist exists on the
Xmedia Server – it does not verify that all the playlist content is published
on a device.
LAYLIST ID RANGE Specify an inclusive range if you want to cue and take playlists via the Evertz
P
protocol. The range can be either numeric or alphanumeric, although
currently playlists do not fully support Recall IDs so the lookup of a playlist
will always by name.
When an element is identified to be within the playlist range, a cue
command opens the playlist and puts Xplay in Automatic playout mode. The
playlist is then played out on the Take command and play out ceases when
a Clear command is received.
GNORE PLAYLIST CLEAR This setting is used in conjunction with the PLAYLIST ID RANGE setting that
I
allows you to cue and take playlists via the Evertz protocol.
Since a Clear command from the Evertz protocol stops the playlist from
playing out abruptly, enabling this setting allows Xplay to ignore the Clear
commands, thereby letting the playlist to finish on its own.
Xplay User Manual 5-7
Page 99

Controlling Xplay devices using automation protocols
NOTE
NOTE
6. Optional: Select the ENABLE ADVANCED LOGGING setting to activate the Evertz protocol
logging, which tracks and records the operation and interaction between the Evertz
protocol, Xplay, and the output devices.
A maximum of ten 5 MB Evertz driver logs files is maintained with the oldest ones being
deleted when necessary. The log file can be found in the standard log path:
C:\Documents and Settings\All Users\Application Data\VertigoXmedia\Logs
Evertz driver log files names have the following format:
Evertz-<process_id>-<date>-<time>.log
For example, Evertz-1896-11292007-100834.log
You can also set additional logging to record events from Xplay’s and the device’s
perspectives. Xplay’s L
(page 6-30), while the XGs logging settings are accessed using the Dashboard application
(see the VERTIGO XG CONFIGURATION GUIDE for more information).
OGGING settings are accessed through the TOOLS>SETTINGS command
7. Optional: Set the device forwarding feature (figure 5-6
Evertz protocol to control multiple devices. See “Device forwarding of automation
commands” on page 5-19 for instructions.
Figure 5-6. Device Forwarding table
8. Once you are finished setting the Evertz over Serial properties, click OK and restart
Xplay.
Xplay should be restarted after any changes to the XPLAY AUTOMATION CONFIGURATION
window’s Device to protocol mappings or protocol properties.
9. Verify that the automation configuration has been applied to the Xplay device(s).
Once Xplay has been restarted, the devices that have been configured for automation
should now display the automation icon in the Device View’s toolbar. If there is no
communication between the automation system and Xplay, the automation icon
remains grey. However, when communication between the Evertz protocol and Xplay
is successful, the blue automation icon is displayed in blue.
), which allows you to use the
5-8 Xplay User Manual
Page 100

Controlling Xplay devices using automation protocols
Configuring Xplay to use the Oxtel protocol over Serial
As the Oxtel protocol is Grass Valley’s proprietary protocol, we recommend that you use this
automation protocol to allow an automation system to control Grass Valley playout devices.
The following instructions describe how to configure Xplay to use the Oxtel protocol over a
dedicated serial connection between the automation system and Xplay. Note however, that
Xplay can also be configured for use over a TCP/IP (see “Configuring Xplay to use the Oxtel
serial protocol over TCP/IP” on page 5-15).
To configure Xplay to use the Oxtel protocol over Serial to control Xplay devices:
1. Open Xplay’s D
Oxtel protocol will control are properly configured and assigned (see “
connecting Xplay to playout devices” on page 2-8).
2. Verify that Xplay’s AUTOMATION settings and the renderer’s automation settings are
appropriate for automation control. For XG devices, see “
settings in Xplay” on page 5-3.
3. Open Xplay’s A
protocol for the device(s) that are to be controlled by automation.
a. Select T
The XPLAY AUTOMATION CONFIGURATION window appears (figure 5-7).
EVICE MANAGER and verify that the devices and device keyers that the
Adding and
Specifying Automation
UTOMATION CONFIGURATION window and create an instance of the Oxtel
OOLS>CONFIGURE AUTOMATION.
Figure 5-7. The Xplay Automation Configuration window
b. In the D
EVICE TO PROTOCOL MAPPINGS section, click the ADD PROTOCOL button next
to the device that you want to control using the Oxtel protocol.
Xplay User Manual 5-9
 Loading...