

Page 1

User Manual
Xnews
MOS Compliant NCS Graphics Plug-in
M852-0900-500
Page 2

Copyright & Trademark Notice
Copyright © 2015, Grass Valley USA, LLC. All rights reserved.
Belden, Belden Sending All The Right Signals, and the Belden logo are trademarks or
registered trademarks of Belden Inc. or its affiliated companies in the United States and
other jurisdictions. Grass Valley USA, LLC, Miranda, Vertigo Suite, Vertigo XG and Xmedia
Server are trademarks or registered trademarks of Grass Valley USA, LLC. Belden Inc.,
Grass Valley USA, LLC, and other parties may also have trademark rights in other terms
used herein.
Terms and Conditions
Please read the following terms and conditions carefully. By using the Xnews
documentation, you agree to the following terms and conditions.
Grass Valley hereby grants permission and license to owners of the Vertigo Suite to use
their product manuals for their own internal business use. Manuals for Grass Valley, A
Belden Brand products may not be reproduced or transmitted in any form or by any means,
electronic or mechanical, including photocopying and recording, for any purpose unless
specifically authorized in writing by Grass Valley.
A Grass Valley manual may have been revised to reflect changes made to the product
during its manufacturing life. Thus, different versions of a manual may exist for any given
product. Care should be taken to ensure that one obtains the proper manual version for a
specific product serial number.
Information in this document is subject to change without notice and does not represent a
commitment on the part of Grass Valley.
Warranty Policies
Warranty information is available in the Support section of the Grass Valley Web site
(www.grassvalley.com).
Document Identification
Title Xnews User Manual
Part number M852-0900-500
SW version Vertigo Suite v5.0
Page 3

Revision History
After the original release date, the Xnews User Manual may be updated with edits and then
re-released. The following table tracks the versions of this document.
Revision date Description
November 28, 2014 Original release
March 02, 2015 • Vertigo Suite v5.0 SP1 release
• Added note about the Xmedia Server’s User Rights
Management possibly restricting Search XMS results
(page 3-21
• Added information about the AP Graphics Search’s
Editorial Notes icon to page 7-3
April 15, 2015 • Specified that the NCS ID and MOS ID values in the
MOS settings dialog must be uppercase characters
(page 2-19
and page 3-31).
.
).
Page 4

TABLE OF CONTENTS
Introducing Xnews...............................................................................................................1-1
The newsroom workflow with the Vertigo Suite ................................................................................. 1-3
Installing and integrating Xnews into your NCS System ................................................. 2-1
Integrating Xnews into your newsroom computer system (iNEWS or ENPS) ................................... 2-2
Installing Xnews on a NCS workstation ............................................................................................. 2-3
Configuring the xnews.ini file ............................................................................................................. 2-5
Enabling the Playout Preview setting ........................................................................................... 2-5
Enabling Embedded Pages or Shared Pages mode .................................................................... 2-6
Enabling Privates Pages mode..................................................................................................... 2-7
Editing the MOS version for iNEWS ............................................................................................. 2-9
Starting Xnews for the first time....................................................................................................... 2-10
Xnews licensing............................................................................................................................... 2-11
Configuring the Xnews settings....................................................................................................... 2-12
Servers settings .......................................................................................................................... 2-13
Backup Server settings............................................................................................................... 2-14
Preferences settings ................................................................................................................... 2-15
Defaults settings ......................................................................................................................... 2-17
MOS settings .............................................................................................................................. 2-19
Spell Check settings ................................................................................................................... 2-20
Logging settings.......................................................................................................................... 2-21
Familiarizing yourself with the Xnews Interface ............................................................... 3-1
Opening Xnews in ENPS................................................................................................................... 3-2
Opening Xnews in iNEWS................................................................................................................. 3-3
Overview of the Xnews interface ....................................................................................................... 3-4
Toolbar buttons on the Xnews interface ............................................................................................ 3-6
Using the Asset Browser in Xnews.................................................................................................... 3-8
Opening/hiding the Asset Browser panel...................................................................................... 3-9
Refreshing a category................................................................................................................... 3-9
Adding a new category ............................................................................................................... 3-10
Setting access permissions for an asset category...................................................................... 3-11
Asset Gallery, Home Area and Status bar....................................................................................... 3-14
Changing the view style (Detail or Proxy)................................................................................... 3-15
Opening a template or page in the Home Area .......................................................................... 3-16
Changing the edit and creation settings for shared pages.......................................................... 3-17
Zooming in/out of a template or page on the Home Area ........................................................... 3-18
Displaying a listing of Work Orders or Jobs ................................................................................ 3-19
Using the Drag bar to create embedded pages and clips................................................................ 3-20
Searching for assets on the Xmedia Server .................................................................................... 3-21
Creating and using Work Orders ..................................................................................................... 3-23
Creating a new work order and an initial job request.................................................................. 3-24
Viewing existing work orders and/or jobs.................................................................................... 3-26
Adding a job to an existing work order........................................................................................ 3-28
Xnews User Manual TOC-1
Page 5

Table of Contents
Removing a work order or job from the XMS...............................................................................3-30
Fulfilling jobs using assets stored on the Xmedia Server ............................................................3-30
Fulfilling jobs using images from the AP Graphics Bank .............................................................3-31
Preparing to use Xnews ...................................................................................................... 4-1
Creating templates in Xstudio.............................................................................................................4-2
Choosing between embedded, shared or private pages ....................................................................4-5
Creating a clip template in Xstudio for clip playout .............................................................................4-7
Creating a clip template .................................................................................................................4-7
Specifying the clip template on a device’s configuration ...............................................................4-9
Embedded Pages: Creating, editing and previewing ....................................................... 5-1
Creating a new embedded page from a template ..............................................................................5-2
Opening an existing embedded page.................................................................................................5-3
Changing a template’s editable fields.................................................................................................5-4
Replacing an image, cel animation or a clip on a page ......................................................................5-5
Editing a page’s image using the Image Editor ..................................................................................5-7
Zooming in/out and repositioning the image ..................................................................................5-8
Cropping an image ......................................................................................................................5-10
Making color adjustments ............................................................................................................5-12
Adjusting the sharpness of an image...........................................................................................5-13
Using the Image Modification buttons to flip an image ................................................................5-13
Previewing the on-air look of a page ................................................................................................5-14
Saving and adding embedded pages to a story ...............................................................................5-15
Shared Pages: Creating, editing and previewing ............................................................. 6-1
Creating a new shared page from a template ....................................................................................6-2
Opening an existing shared page.......................................................................................................6-3
Editing and previewing a shared page ...............................................................................................6-4
Saving shared pages to the Xmedia Server .......................................................................................6-5
Adding shared pages to a story..........................................................................................................6-7
Acquiring images from the AP Graphics Bank................................................................. 7-1
Enabling AP Graphics Bank integration in the Xmedia Server...........................................................7-2
Searching the AP Graphics Bank for images .....................................................................................7-3
Adding AP Graphics Bank preview images to a Page........................................................................7-4
Purchasing AP Graphics Bank images...............................................................................................7-5
Clip Assets: Opening and editing the Mark In/Out settings ............................................ 8-1
Locating and opening a clip asset using the Xnews Asset Browser...................................................8-2
Preview and editing the clip’s mark in/out settings .............................................................................8-4
Overview of the standalone Mark In/Out Editor interface in ENPS................................................8-5
Overview of the embedded Mark In/Out Editor interface in iNEWS ..............................................8-7
Setting the Trim In and/or Trim Out points.....................................................................................8-8
Previewing the clip in the standalone Mark In/Out Editor ............................................................8-10
Creating and working with stories and rundowns in ENPS ............................................ 9-1
Creating a new rundown in ENPS ......................................................................................................9-2
TOC-2 Xnews User Manual
Page 6

Table of Contents
Creating a new story within a rundown in ENPS ............................................................................... 9-3
Opening a story and adding graphics pages and/or clips in ENPS ................................................... 9-5
Saving a story to a rundown in ENPS................................................................................................ 9-7
Creating and working with stories in INEWS .................................................................. 10-1
Adding a new story to a rundown in iNEWS.................................................................................... 10-2
Opening a story and adding a page or clip in iNEWS...................................................................... 10-3
Opening a page or clip that belongs to a story in iNEWS................................................................ 10-5
Playing out rundowns using Xplay ...................................................................................11-1
Overview of the Xplay interface ....................................................................................................... 11-2
Opening a rundown in Xplay ........................................................................................................... 11-4
Updating and reloading a rundown in Xplay .................................................................................... 11-5
Configuring Xplay’s update and reload settings.......................................................................... 11-6
Manually reloading a rundown in Xplay ...................................................................................... 11-6
Verifying device connections in Xplay ............................................................................................. 11-7
Playing out a rundown in Xplay ....................................................................................................... 11-8
Automatic playout mode ............................................................................................................. 11-9
Manual playout mode ............................................................................................................... 11-10
Xnews User Manual TOC-3
Page 7

Table of Contents
TOC-4 Xnews User Manual
Page 8
1 INTRODUCING XNEWS
Associated Press ENPS
Avid iNEWS
Xnews is a MOS-compliant Newsroom Computer System (NCS) plug-in that provides news
producers and journalists with immediate access to images, graphic elements and
templates directly from their newsroom desktops. Graphic pages can be created or edited
to produce effective lower-thirds, over-the-shoulder graphics images, and full-screen builds
with animated highlights. Finished graphic pages can then be quickly dragged and dropped
into local news rundowns, which can then be played out using Xplay.
Xnews is available as an ActiveX plug-in or a stand-alone web client. As an ActiveX plug-in
software, Xnews integrates fully into any MOS compliant newsroom system, as well as
broadcast automation systems like:
Newsroom Computer Systems
• Associated Press ENPS
• Avid iNEWS
• Dalet Enterprise Edition
• Octopus NRCS
• VSNnews
• Annova Systems OpenMedia
Broadcast Automation / Production Control Systems
• Thomson – Grass Valley Ignite
• Ross OverDrive
Xnews User Manual 1-1
Page 9

Introducing Xnews
NOTE
In “The newsroom workflow with the Vertigo Suite” on page 1-3, you will find conceptual
information on how Xnews and the Vertigo Suite integrate and operate within typical
newsroom environments.
Meanwhile, further chapters in this user manual provide practical information and
instructions for installing and integrating Xnews into your Newsroom Computer System, as
well as how to use Xnews to create, edit, and playout graphics pages and rundowns.
Installing and integrating Xnews into your NCS System” on page 2-1
• “
• “Familiarizing yourself with the Xnews Interface” on page 3-1
• “Preparing to use Xnews” on page 4-1
• “Embedded Pages: Creating, editing and previewing” on page 5-1
• “Shared Pages: Creating, editing and previewing” on page 6-1
• “Clip Assets: Opening and editing the Mark In/Out settings” on page 8-1
• “Creating and working with stories and rundowns in ENPS” on page 9-1
• “Creating and working with stories in INEWS” on page 10-1
• “Playing out rundowns using Xplay” on page 11-1
Since Xnews is a plug-in that integrates into third-party newsroom computer systems, we
limit our documentation coverage to topics related to the operation and integration of
Xnews. We strongly recommend that you refer to your NCS’s user documentation for
instructions and information relating to using a newsroom computer system.
1-2 Xnews User Manual
Page 10
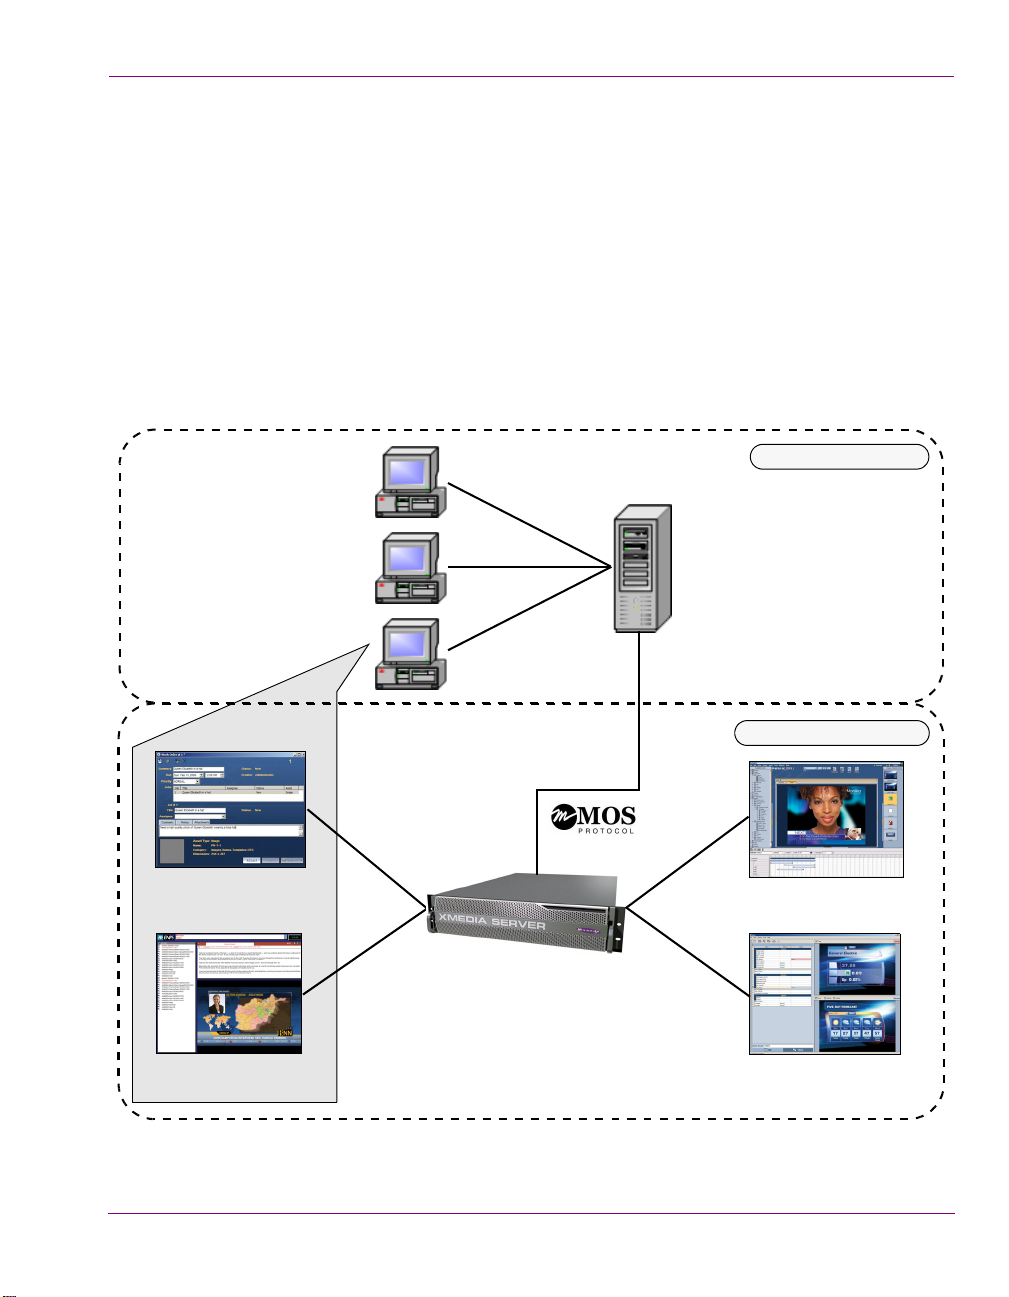
The newsroom workflow with the Vertigo Suite
ENPS / iNews / Dalet
NCS Workstations
ENPS / iNews / Dalet
NCS Server
Xnews
VxWOM
MOS Gateway
MOS Plug-in
Work Order Management
Vertigo Suite environment
Newsroom environment
Xstudio
Template Designer
Xplay
Playout Control Device
Xmedia Server
Graphics Asset Management
Integrating the Vertigo Suite into your existing newsroom environment improves the
efficiency of your entire newsroom workflow. Graphic artists use Xstudio to create templates
for news graphics that are then stored on an Xmedia Server archive. These templates are
accessible to all the networked newsroom computer system (NCS) workstations used by
graphics artists and journalists.
Since Xnews is integrated into the NCS workstation interface as a plug-in application,
journalists can use Xnews to open Vertigo Suite templates and media libraries (i.e. images,
clips... etc.) to create the news graphics pages that they need to support a story. Once
completed, the journalist can simply drag-and-drop the graphics page into stories and
rundowns within the same newsroom system interface.
Introducing Xnews
Figure 1-1. Components of the Vertigo Suite integrate with existing newsroom computer systems
Xnews User Manual 1-3
Page 11

Introducing Xnews
When journalists require a graphic element that does not already exist in the system, they
can use the Vertigo Suite’s Work Order Management system to create a request from the
Art department and insert a placeholder on their page. Once the graphic artist has created
the desired graphic element, the journalist can review/approve/reject it, then automatically
replace the placeholder on the graphics page with the new graphic element.
Using the MOS protocol, the newsroom computer system and the Vertigo Suite (i.e. Xmedia
Server and Xnews) are able to communicate the status of the graphics pages in the
rundowns, report errors, and recall the pages and their graphic elements. For news
Directors, the seamless integration of the Vertigo Suite with existing newsroom systems
facilitates the timing and organization of stories within the rundown, especially last minute
changes to the rundown. This template-based approach also means that graphics can be
created at high speed for breaking news.
With the Vertigo Suite integrated into an existing newsroom system, Xplay can be used to
control the playout of rundowns to output devices. Rundowns are stored on the Xmedia
Server and are easily loaded into Xplay as playlists. The most common way to control a
playlist is to advance through the items in order. Last minute changes to graphics can be
made on the fly, and even if the playlist has been changed by another user on a different
workstation, the latest version can still be quickly and easily accessed at any time.
1-4 Xnews User Manual
Page 12
2 INSTALLING AND INTEGRATING XNEWS
Xnews
INTO YOUR NCS SYSTEM
Xnews integrates into your newsroom computer system as an ActiveX plug-in application.
As such, proper installation and configuration is essential to ensure proper functionality.
The integration of Xnews should only be performed by a qualified network or newsroom
system administrator (see page 2-2). However, journalists may be required to install Xnews
on their NCS workstation and configure the Xnews settings upon the first start-up.
The following topics are covered in this chapter:
Integrating Xnews into your newsroom computer system (iNEWS or ENPS)” on page 2-2
• “
• “Installing Xnews on a NCS workstation” on page 2-3
• “Configuring the xnews.ini file” on page 2-5
• “Starting Xnews for the first time” on page 2-10
• “Xnews licensing” on page 2-11
• “Configuring the Xnews settings” on page 2-12
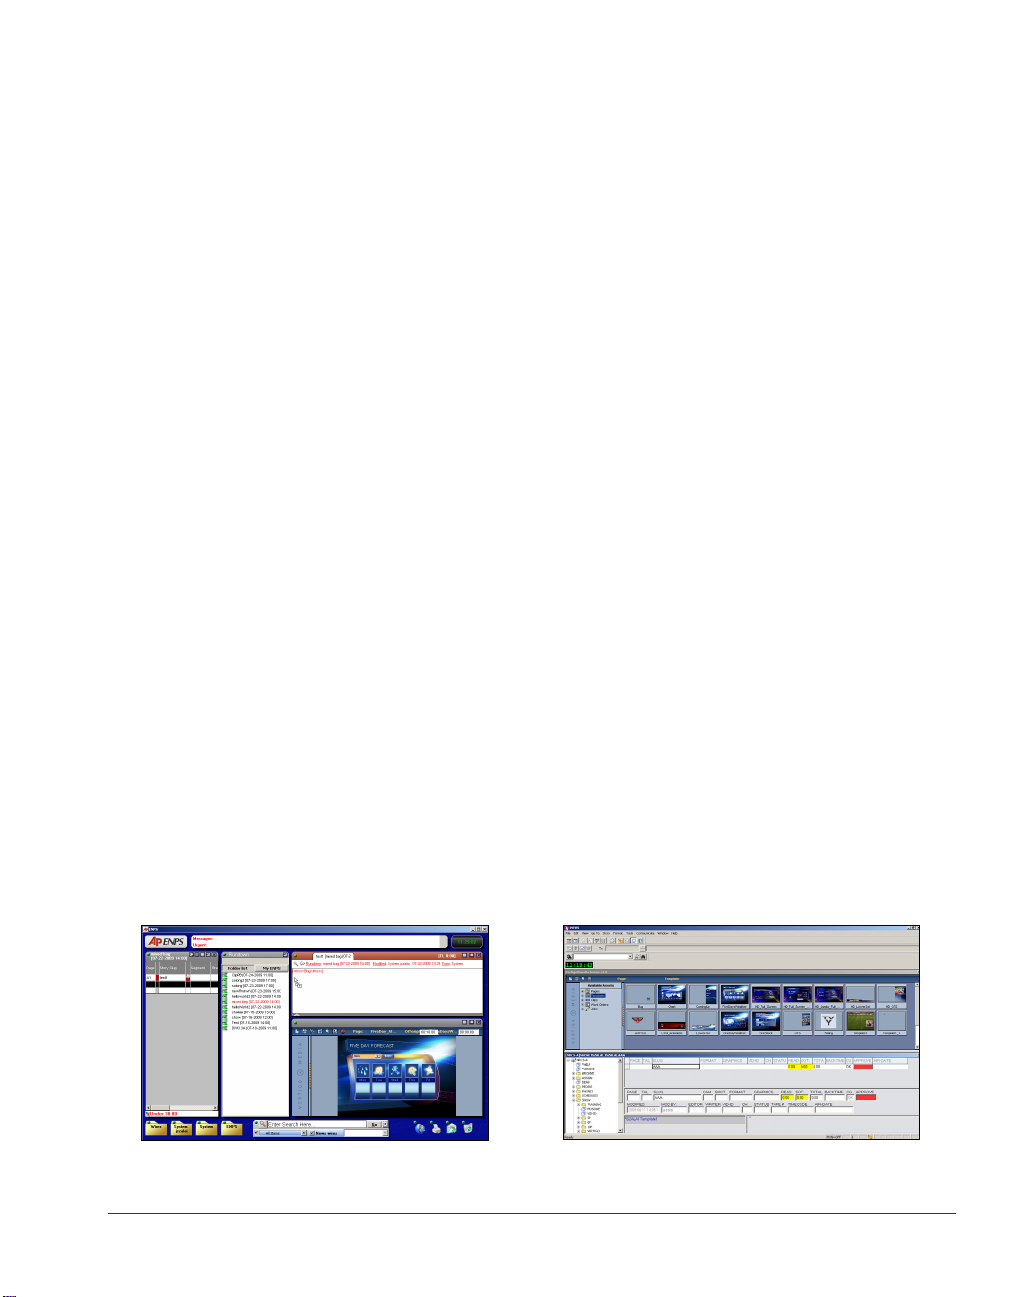
Figure 2-1. Xnews is a plug-in application that integrates easily into the ENPS client workstation
Xnews User Manual 2-1
Page 13

Installing and integrating Xnews into your NCS System
Integrating Xnews into your newsroom computer system (iNEWS or ENPS)
Xnews integrates into your newsroom computer system (NCS) client workstation as an
ActiveX plug-in. This allows journalists to easily create graphics pages from templates and
quickly add them to the stories and rundowns without having to switch between two
applications.
Proper installation and configuration is essential to ensure proper functionality. Therefore,
we strongly recommend that the integration of Xnews into your newsroom computer system
be performed by a qualified network or newsroom system administrator.
Installation and configuration instructions for integrating Xnews into the Associated Press’
ENPS and Avid’s iNEWS newsroom computer systems are available to system
administrators in the Xmedia Server Configuration Guide.
NCS user documentation
If as a journalist or system administrator, you require information regarding your newsroom
that extends beyond the Xnews and Xmedia Server documentation, we suggest that you
consult the following user documentation resources:
Associated Press’ ENPS user documentation
Please consult the Associated Press’ user documentation for precise and detailed
information and instructions for setting up and using the ENPS newsroom computer
system.
• With ENPS open, clicking the F1 key brings up ENPS online help.
• ENPS - Basic User’s Guide by Associated Press Broadcast Technology
Avid’s iNEWS documentation user documentation
Please consult Avid’s iNEWS user documentation for precise and detailed information and
instructions for setting up and using the iNEWS newsroom computer system.
2-2 Xnews User Manual
Page 14

Installing and integrating Xnews into your NCS System
NOTE
Installing Xnews on a NCS workstation
Xnews is an ActiveX plug-in that is installed on a NCS client workstation. To ensure the
proper functioning of the Xnews software, the client workstation must conform to the
following hardware and software requirements:
Recommended platform:
• Intel® Core™ i3, i5 or i7 series or Xeon 1.8 GHz or faster
•4 GB RAM
• 40 GB free hard drive space
• 100/1000 NIC
• 256 MB Nvidia/ATI video card
• Windows XP professional SP3 or Windows 7
• Microsoft Internet Explorer 7.0 or later
Before installing Xnews
1. Ensure that the Xmedia Server is installed and configured (if unsure, consult your
network administrator).
The Xmedia Server runs the Vertigo Suite of products. It determines the directory paths
for the templates and pages. It also coordinates the licenses for the system, controls
the locations to which users working with the client components can publish image
files, and establishes a connection with the Media Object Server.
2. Ensure with your network administrator that sufficient Xnews licenses are available.
This should have been done when setting up the Xmedia Server. If not, your network
administrator must obtain the Machine ID of the Xmedia Server. Then contact our
Technical Support department (support@grassvalley.com
purchase agreement.
3. Find out the IP
SERVER is installed (you will need this information when you first launch Xnews after
installation).
ADDRESS and PORT NUMBER of the computer on which the XMEDIA
) to verify your licensing
The server’s IP ADDRESS and PORT NUMBER are displayed in the status bar of the Xmedia
Server program.
To install Xnews:
1. Log on with administrator privileges (consult your network administrator for details).
2. Insert the Vertigo Suite CD-ROM and then in Windows Explorer browse to the CD drive.
3. Run setup.exe. The E
4. Read the agreement. If you choose to accept it, click I A
ERTIGO SUITE window is displayed, warning that all open applications should be
The V
closed before proceeding.
Xnews User Manual 2-3
ND USER LICENCE AGREEMENT window is displayed.
GREE to begin installation.
Page 15

Installing and integrating Xnews into your NCS System
5. If all applications are closed, click CONTINUE, otherwise click EXIT SETUP to quit the
installation process.
If you clicked C
ONTINUE, another VERTIGO SUITE window is displayed, giving you the
opportunity to select where you would like the program to be installed on your system.
6. To accept the proposed default location, click C
If you would like a location other than the proposed default, click C
and make a new selection. Once you’ve finished, click C
ETUP OPTIONS window is displayed.
The S
7. Under COMPONENTS TO INSTALL, select the Xnews check box, then click CONTINUE.
8. Click F
INISH to start the installation process, or click EXIT SETUP to quit. If a warning
message appears stating that a file being copied is not newer than the current one,
ES to keep the existing file.
click Y
9. You will be prompted once installation has completed successfully.
Click OK to complete the procedure.
You may log off as administrator if desired, although it is not necessary in order to run
the program.
ONTINUE.
HANGE DIRECTORY
ONTINUE.
2-4 Xnews User Manual
Page 16

Installing and integrating Xnews into your NCS System
Configuring the xnews.ini file
Most of the Xnews settings are configured using the SETTINGS window (page 2-12).
However, there are three (3) very important scenarios in which you must configure settings
in the xnews.ini file.
The following topics introduce to you the three scenarios that require you to edit the
xnews.ini file:
Enabling the Playout Preview setting” on page 2-5
• “
• “Enabling Embedded Pages or Shared Pages mode” on page 2-6
• “Enabling Privates Pages mode” on page 2-7
• “Editing the MOS version for iNEWS” on page 2-9
Enabling the Playout Preview setting
While editing or creating of a page, Xnews allows you to preview the on-air playout
appearance and behavior of the page on a designated device (eg. Software CG).
For the preview page functionality to be used, you must enable the PLAYOUT settings in the
Xnews.ini file and the device must be exclusively available for Xnews connectivity.
Once these conditions are met, each time a page or template is opened in the Xnews Home
Area, the PREVIEW PAGE button appears in the toolbar allowing you to preview the page
on the device.
The following procedure provides instructions for enabling the Playout Preview mode in the
xnews.ini file, while “
information for how to use the Preview Page feature.
Previewing the on-air look of a page” on page 5-14 provides you with
To enable the Xnews Preview Page feature:
1. Ensure that Xnews is closed on the NCS workstation.
2. Verify that a playout device is properly configured in the Vertigo Suite’s Device
Manager/Configuration (i.e. Xplorer, Xstudio, Xbuilder, or Xplay).
3. Set the Playout settings in the Xnews.ini file.
a. Open the Xnews.ini file by navigating to and opening the xnews.ini file:
C:\ProgramData\VertigoXmedia\Settings\xnews.ini
b. Type the device’s name after the PreviewDeviceName= setting.
c. Edit the EnablePreview= setting from False to True.
d. Save the edits by selecting the F
e. Close the xnews.ini file.
Xnews User Manual 2-5
ILE>SAVE menu command.
Page 17
Installing and integrating Xnews into your NCS System
NOTE
Enabling Embedded Pages or Shared Pages mode
By default, Xnews is configured to run in EMBEDDED PAGES MODE, which only allows you to
create embedded pages. This configuration is preferred in most cases since pages are
usually created for a specific story or rundown and then they are no longer needed (see
page 4-5
embedded pages, then you do not have to edit the EnableEmbeddedPages setting in the
xnews.ini file.
The Enable Private Pages setting in the xnews.ini file supersedes the Enable Embedded
Pages setting. As such, to create embedded pages you must ensure that the Enable Private
Pages setting is either not present in the xnews.ini file, or that
EnablePrivatePages=false.
If however, you want to save and re-use the same page(s) in several rundowns, then you
must configure Xnews for SHARED PAGES MODE. In Shared Pages mode, pages are created
and then saved on the Xmedia Server as a Page asset. This type of page is often referred
to as a shared page because it can be used by multiple stories and/or rundowns (see page
4-5 for more information about embedded pages).
The following procedures describes how to configure Xnews to run in shared page mode,
as well as how to revert Xnews back to Embedded Pages mode.
for more information about embedded pages). If your intention is to create
To configure Xnews to run in Shared Page mode:
1. Ensure that Xnews is closed on the NCS workstation.
2. Open the Xnews.ini file by navigating to the following folder and opening the
xnews.ini file:
C:\ProgramData\VertigoXmedia\Settings
3. In the [Preferences] section, set EnableEmbeddedPages= to False.
This setting allows you to save the page as a shared page (an asset) on the Xmedia
Server.
4. Set the [Quiet Mode]parameter:
• If you want to specify a name and category for the page, set the
UseQuietMode2= to False. This allows the S
when you attempt to save the page.
Or,
• If you want the shared page’s name and category assignment to be identical
in the Pages category to how it was in the Templates root category, set the
UseQuietMode2= to True.
5. Save and close the xnews.ini file.
To revert Xnews back to embedded mode:
1. Ensure that Xnews is closed on the NCS workstation.
2. Open the Xnews.ini file by navigating to the following folder and opening the
xnews.ini file:
2-6 Xnews User Manual
AVE PAGE window to appear
Page 18

C:\Documents and Settings\All Users\Application Data\VertigoXmedia\Settings
NOTE
3. In the [Preferences] section, set EnableEmbeddedPages= to True.
This setting allows you to save the page as a embedded page in a story.
4. In the [Quiet Mode]section, set the UseQuietMode2= to True. This setting ensures
that the embedded page’s name is automatically assigned when it is inserted into a
story.
5. Save and close the xnews.ini file.
Enabling Privates Pages mode
To create Private pages in Xnews, you must first enable the Private Pages setting in the
xnews.ini file. You must also set the Expiry settings for Private Pages in the MOS options
on the Xmedia Server Properties window.
Once these settings are properly set, dragging a template and inserting it into a story in
Xnews will create a private page.
See “Choosing between embedded, shared or private pages” on page 4-5 for more
information about Private Pages.
To configure Private pages in the xnews.ini file:
1. Ensure that Xnews is closed on the NCS workstation.
2. Open the Xnews.ini file by navigating to the following folder and opening the
xnews.ini file:
C:\Documents and Settings\All Users\Application Data\VertigoXmedia\Settings
3. In the [Preferences] section, set EnablePrivatePages= to True
4. Save and close the xnews.ini file.
Installing and integrating Xnews into your NCS System
To set the Private Page Expiry settings:
1. Open the Xmedia Server Properties window (XMS Panel).
2. Select the MOS tab.
3. In the MOS O
4. In the U
number of days after which an unused private page is to be removed from the Xmedia
Server. The default value is 30 days.
A private page is considered to be no longer in use if it is not referenced by any
rundown in the Xmedia Server. This can occur when a page is deleted from a rundown,
floated or its rundown is made MOS Control Inactive. If the Private page is restored
before the expiry deadline, then it will not be removed from the Xmedia Server.
Each time a private page is edited in Xnews, a new private page is created. If the old
private page is not bound to any other segments when the story is saved to the Xmedia
Server, then the old private page will have its expiry date set to the current time plus
the value of U
Xnews User Manual 2-7
PTIONS, drop-down list, select PRIVATE PAGES.
NREFERENCED PRIVATE PAGE EXPIRY setting, enter a value to represent the
NREFERENCED PRIVATE PAGE EXPIRY.
Page 19

Installing and integrating Xnews into your NCS System
5. In the TEMPORARY PRIVATE PAGE EXPIRY setting, enter a value to represent the number
of days after which an unsaved Private page is to be removed from the Xmedia Server.
The default value is 1 day.
Temporary Private pages refer to Private pages that were created in Xnews, but never
saved to a rundown on the Xmedia Server. For example, if a page is added to a story,
but the story is never added to a rundown, then the contained page is considered
temporary and it will be removed as specified by this setting.
6. Click OK.
2-8 Xnews User Manual
Page 20

Installing and integrating Xnews into your NCS System
Editing the MOS version for iNEWS
If you are using Xnews within a iNEWS system, you must apply the following edits to the
Xnews.ini file’s settings.
[Preferences]
DisableSaveAndClose=True
HideSaveAndInsert=True
[MOS]
MOS_Version=2.6
These changes are necessary since iNEWS uses MOS version 2.6, rather than version 2.8
(default). As a consequence, both the S
button are disabled since they send MOS 2.8 commands.
With these buttons disabled, you can still save a new page by dragging it into the rundown
(see page 10-2
Xnews window, which will insert the page (MOS item) back into the story after having edited
it.
). Or, use the APPLY button that appears in iNEWS itself, just below the
AVE AND INSERT PAGE button and the SAVE
Xnews User Manual 2-9
Page 21
Installing and integrating Xnews into your NCS System
Starting Xnews for the first time
When you initially launch Xnews (see page 3-2 and page 3-3), a red bar will display to
indicate that you are not connected to an Xmedia Server. As a client application, Xnews
must be connected to the Xmedia Server. Since you have only just installed Xnews, you
have not yet had the opportunity to connect it to the server.
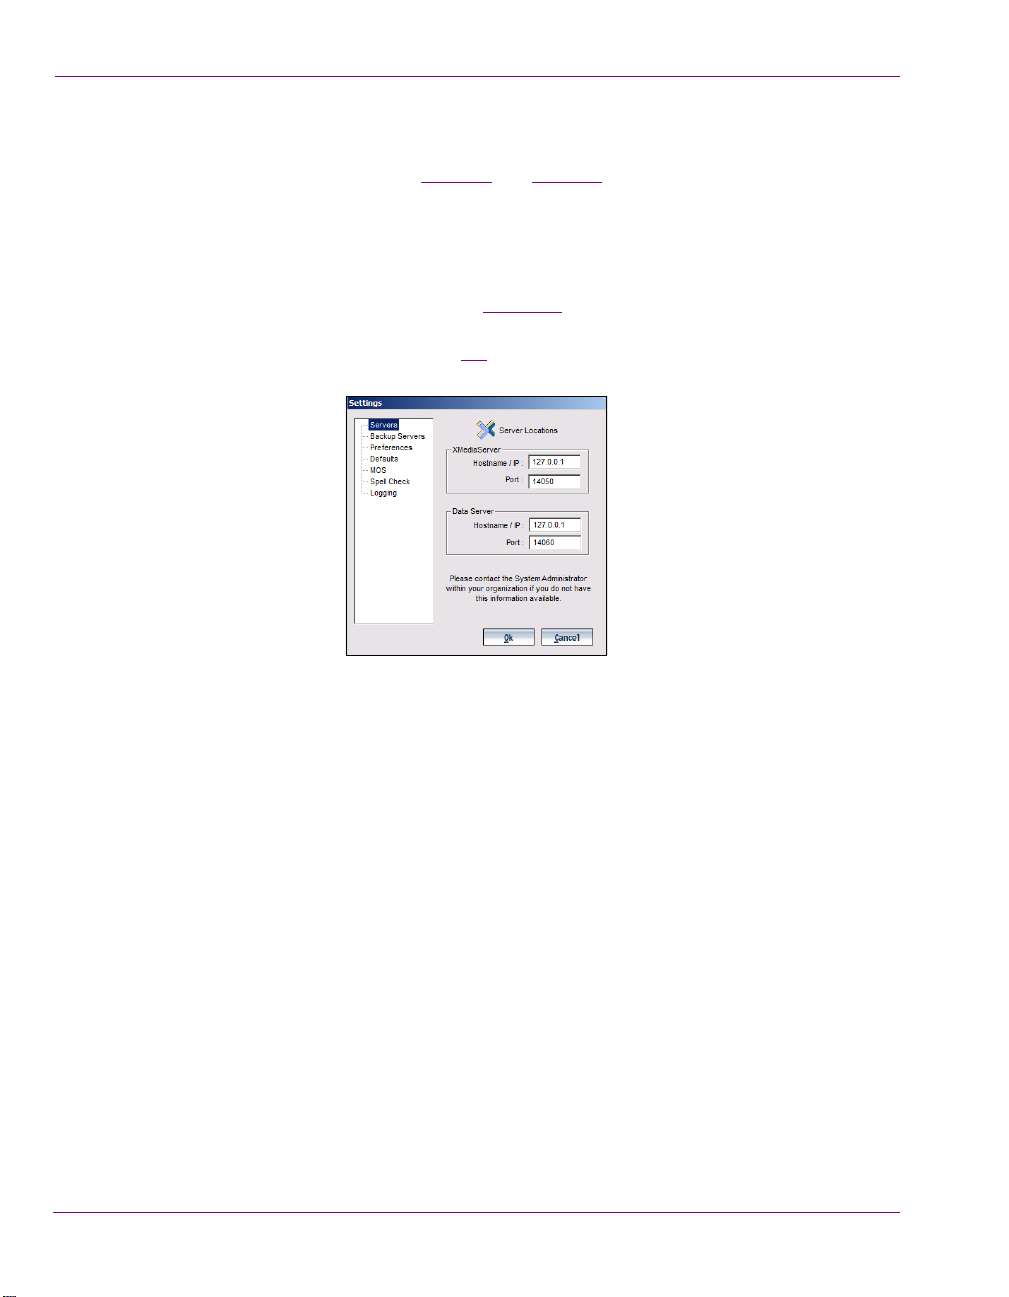
When the message displays:
1. In Xnews, right-click on the Drag bar (see page 3-20
command.
ETTINGS window appears (figure 2-2).
The S
) and select the CHANGE SETTINGS
Figure 2-2. Specify the Xmedia Server’s IP address and Port in the Settings window
2. In the Xmedia Server H
hosting the Xmedia Server.
3. Unless the port number was changed when the Xmedia Server was installed, the
default in the Xmedia Server P
the new number.
4. Click OK. For changes to take effect, close Xnews and then re-launch.
If the connection to the Xmedia Server is not established, consult your system
administrator. The problem could be due to one of the following:
• The IP address or port was entered incorrectly.
• The machine hosting the Xmedia Server is down.
• The Xmedia Server is not running on the host machine.
• The machine is not connected to the network.
2-10 Xnews User Manual
OSTNAME/IP ADDRESS field, enter the IP address of the machine
ORT field will be correct (14050). If it was changed, enter
Page 22
Installing and integrating Xnews into your NCS System
Xnews licensing
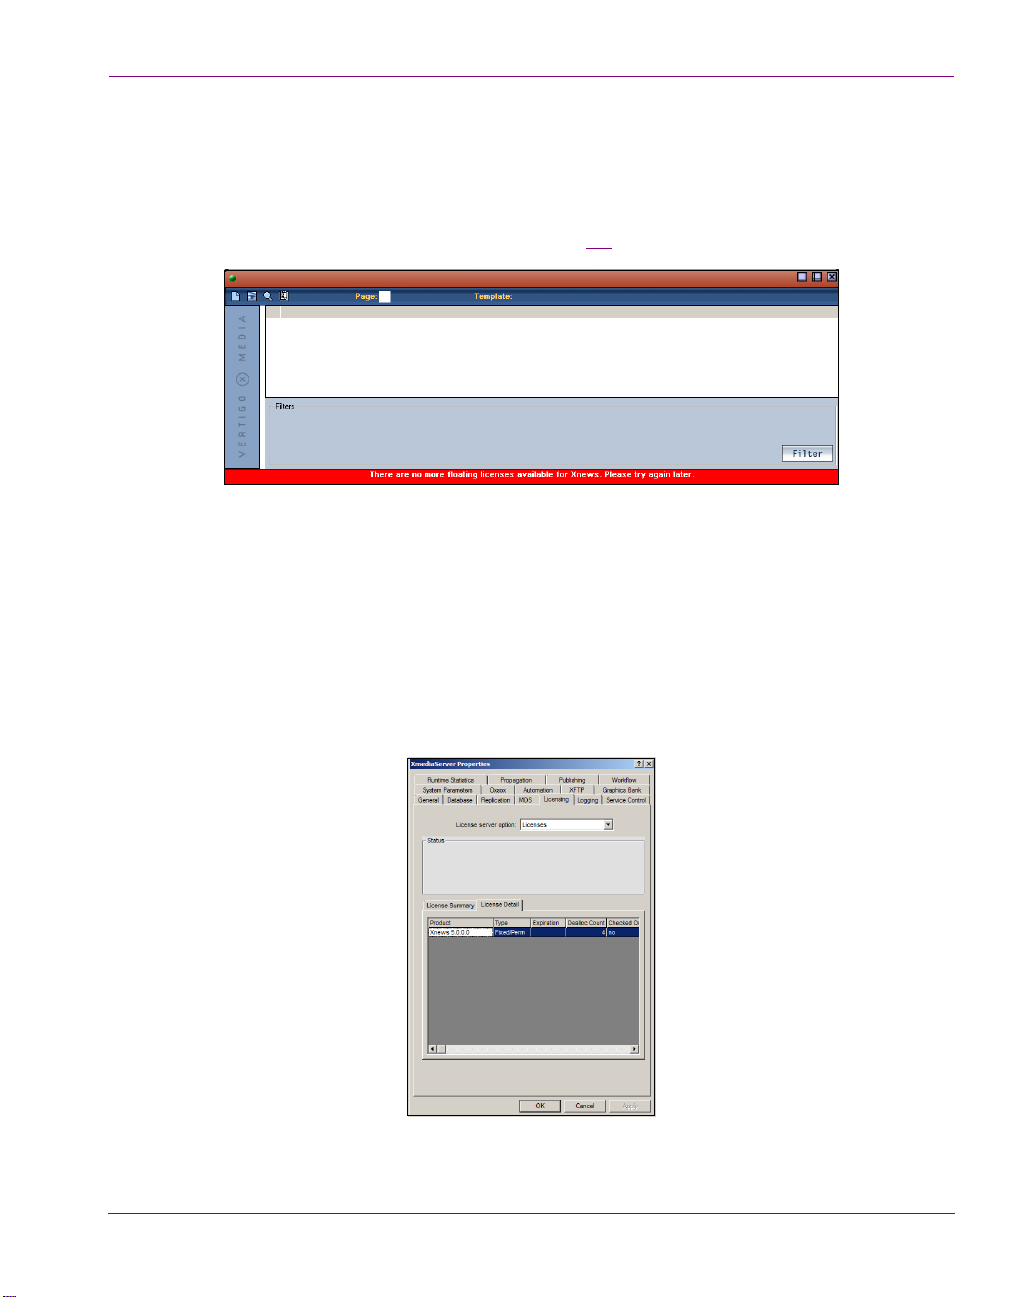
As a licensed software application, Xnews checks the Xmedia Server upon startup for a
valid Xnews license. If a license has been installed and is available, Xnews opens normally
and is ready for use. However, if a license has not been installed or there are none currently
available, Xnews displays an error message (figure 2-3
Figure 2-3. License error: “There are no more floating licenses available for Xnews. Please try again later.”
As the license error message states, it might just be a case that your system has limited
number of floating licenses and that none are currently available. In such a case, you must
wait until one becomes available before you will be able to use Xnews.
If however you suspect that the Xnews license was not installed on the Xmedia Server, or
if you suspect that something is wrong with the license (i.e. expired); we encourage you to
contact your network or newsroom system administrator. The administrator will be able to
open the Vertigo Suite License Manager to add or verify the Xnews license (see “Xmedia
Server Configuration Guide” for more information).
).
Figure 2-4. Xnews license detail in the License Manager on the Xmedia Server
Xnews User Manual 2-11
Page 23
Installing and integrating Xnews into your NCS System
1
2
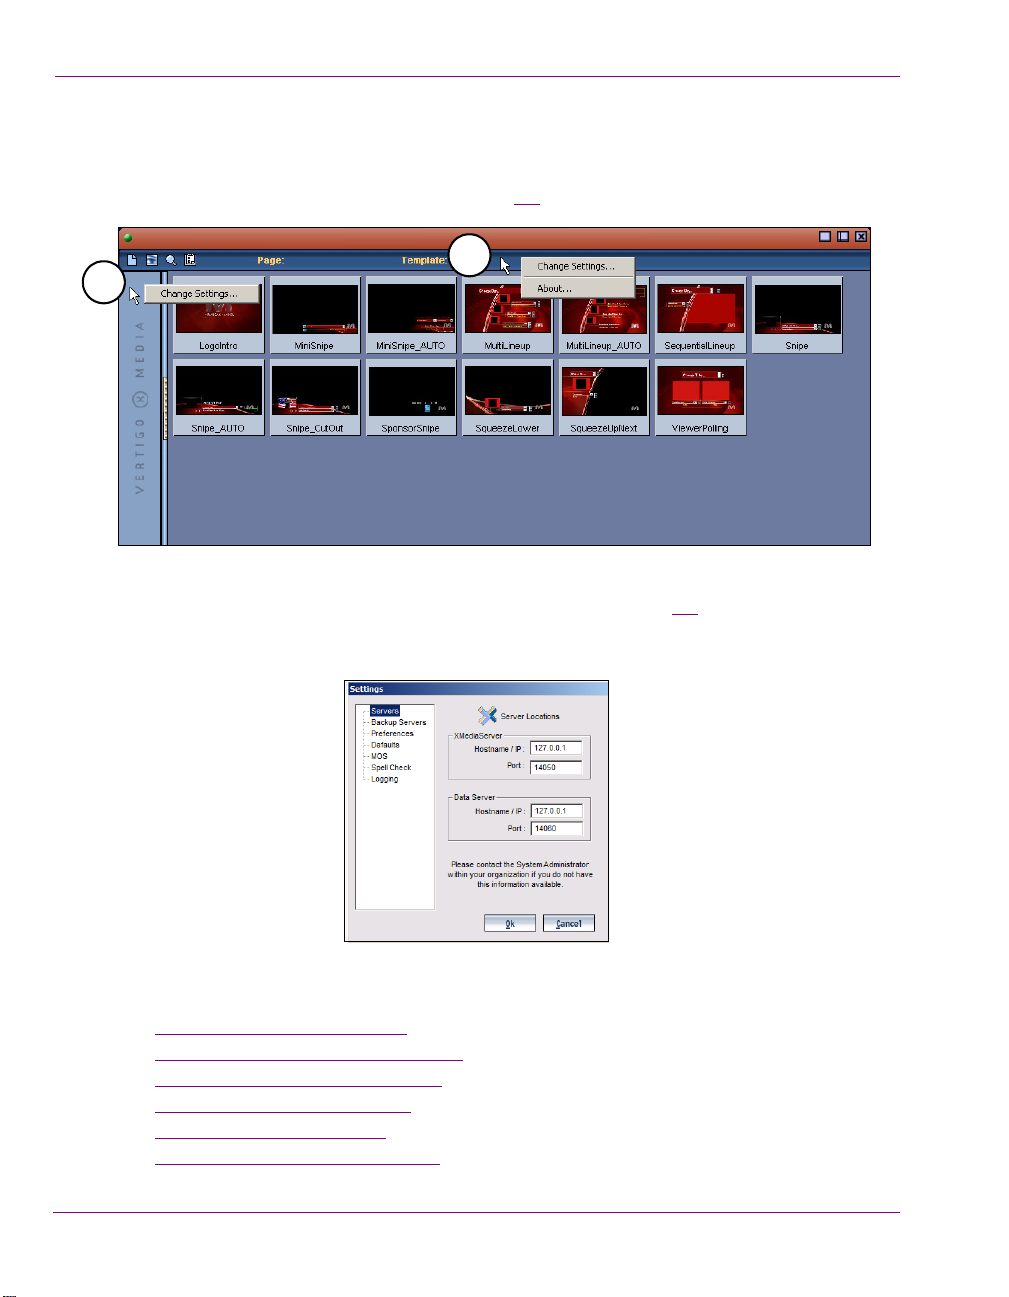
Configuring the Xnews settings
Xnews settings are accessed by right-clicking in the Drag bar (1) or the Status bar (2) and
selecting the C
The C
HANGE SETTINGS command opens the SETTINGS window (figure 2-6). Selecting a
setting category from the list in the left-hand portion of the Settings window displays the
settings for the category.
HANGE SETTINGS command (figure 2-5).
Figure 2-5. There are two ways to access the Change Settings command
Figure 2-6. The Settings window
The following sections provide detailed information about each of the Xnews settings:
Servers settings” on page 2-13
2-12 Xnews User Manual
• “
• “Backup Server settings” on page 2-14
• “Preferences settings” on page 2-15
• “Defaults settings” on page 2-17
• “MOS settings” on page 2-19
• “Spell Check settings” on page 2-20
Page 24
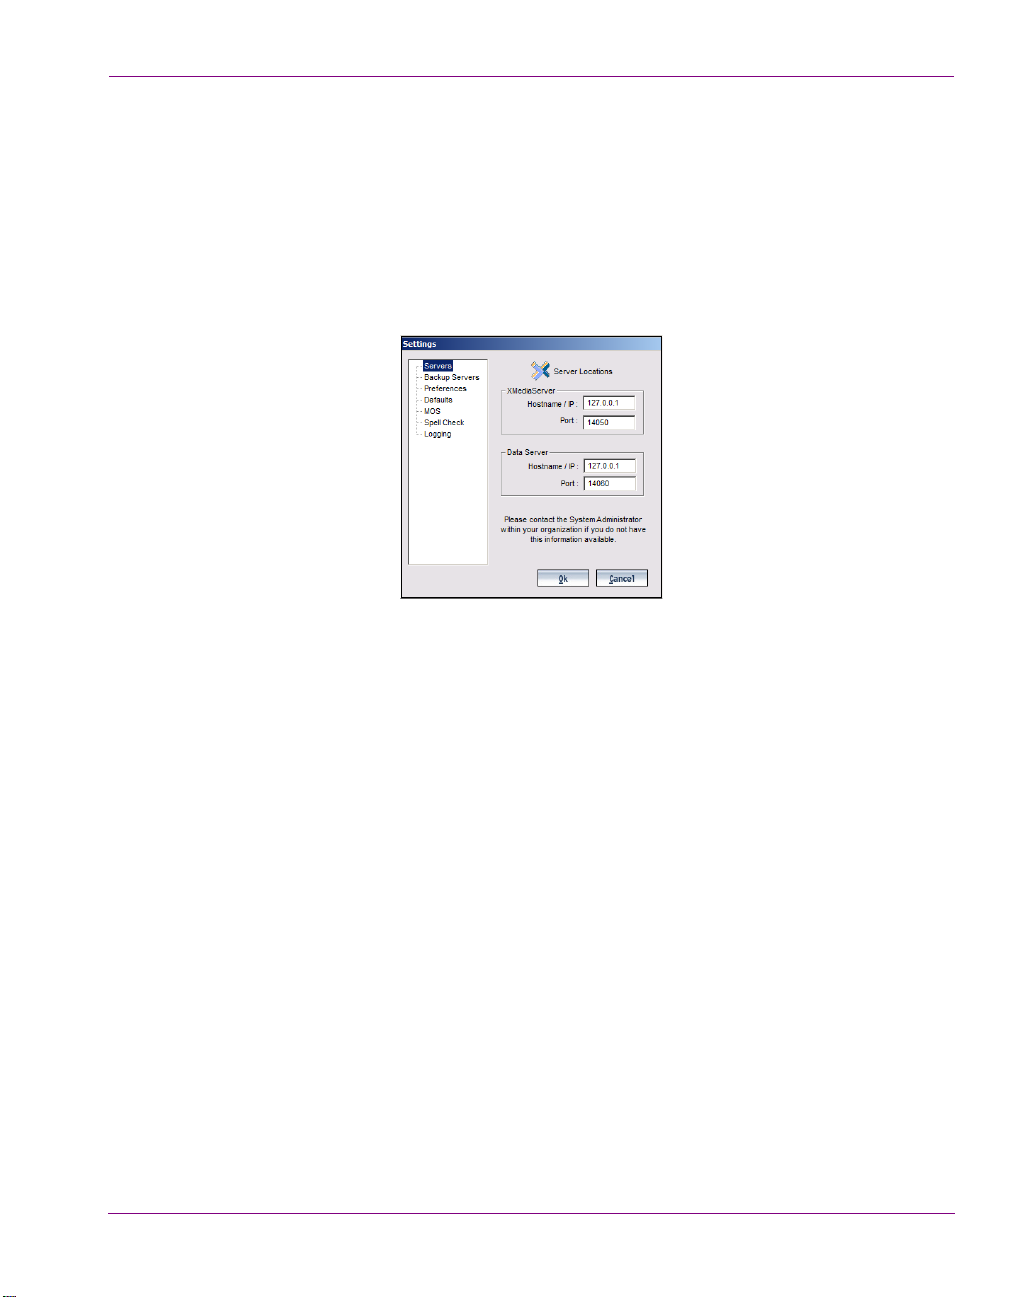
Servers settings
As a client application, Xnews must be connected to the Xmedia Server in order to be able
to access templates and pages stored on the network. It must also be connected to the Data
Server in order to access the data specified by the templates. The information entered in
the Server settings tells Xnews which machines hosts the servers.
When Xnews is initially launched the Server tab is the first one displayed. Xnews cannot run
until key information is provided here.
Installing and integrating Xnews into your NCS System
Figure 2-7. Xnews’ Server settings
The following settings must be specified on the Server settings tab:
XmediaServer
• Hostname / IP - The hostname or IP address of the machine hosting the Xmedia
Server.
• Port - The port number on which the connection to the Xmedia Server is established.
Normally the XMS port value is 14050.
Data Server
• Hostname / IP - The hostname or IP address of the machine hosting the Data Server.
• Port - The port number on which the connection to the Data Server is established.
Normally the DataServer port value is 14060.
Xnews User Manual 2-13
Page 25
Installing and integrating Xnews into your NCS System
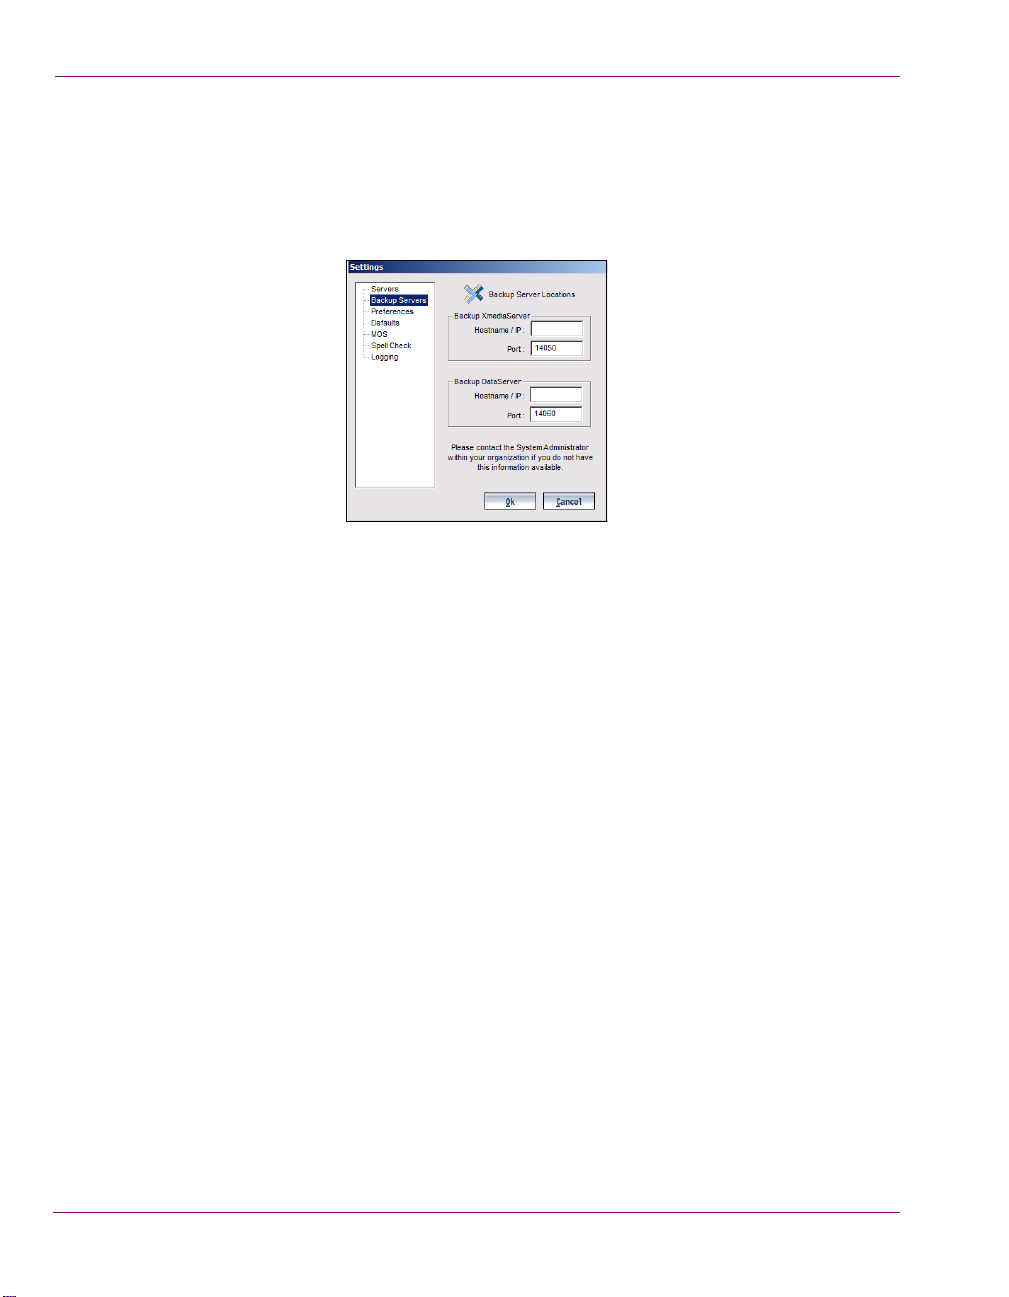
Backup Server settings
By specifying the Backup Server settings, Xnews is able to seemlessly connect to the
secondary server’s XMS service and Data Server in the event that the primary Xmedia
Server unexpectedly goes down.
Figure 2-8. Xnews’ Backup Server settings
The following settings must be specified on the Backup Server settings tab:
Backup XmediaServer
• Hostname / IP Address - Specifies the backup server’s IP address used in case of
failure of the primary Xmedia Server.
• Port - Specifies the backup server’s port used in case of failure of the primary Xmedia
Server.
Backup DataServer
• Backup Data Server Hostname / IP Address - Specifies the backup data server’s IP
address used in case of failure of the primary data server.
• Backup Data Server Port - Specifies the backup data server’s port used in case of
failure of the primary data server.
2-14 Xnews User Manual
Page 26
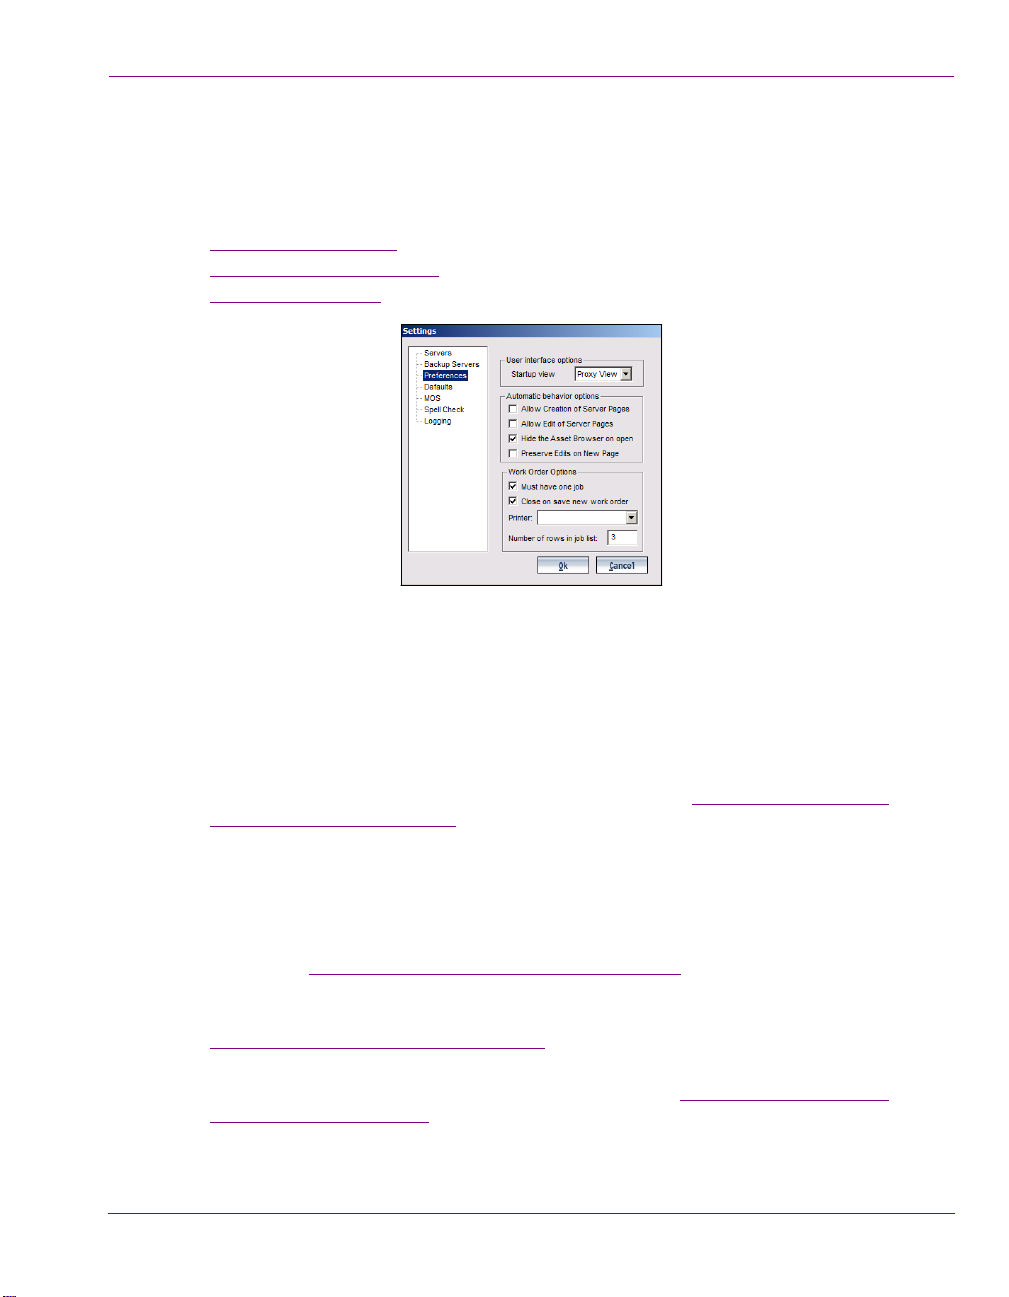
Preferences settings
The PREFERENCES page contains settings that allow you to determine some of the behavior
and appearance defaults for the Asset Gallery, Asset Browser, and Work Order
Management system in Xnews.
User interface options”
• “
• “Automatic behavior options”
• “Work Order Options”
Installing and integrating Xnews into your NCS System
Figure 2-9. Xnews’ Preferences settings
User interface options
• Startup view - This setting allows you to specify the default view for the Xnews Asset
Gallery. When PROXY VIEW is selected, the contents of the Pages and Templates root
categories are displayed in the Asset Gallery as thumbnail images. When DETAIL VIEW
is selected, the contents of the Pages and Templates root categories are displayed in
the Asset Gallery as a list of the assets’ basic properties. See “
(Detail or Proxy)” on page 3-15 for more information.
Changing the view style
Automatic behavior options
• Allow Creation of Server Pages - This setting is a mechanism for granting or
restricting permission for users to create and save new shared pages to the Xmedia
Server. See “
• Allow Edit of Server Pages - This setting is a mechanism for granting or restricting
permission for users to edit shared pages that are stored on the Xmedia Server. See
Allow Edit of Server Pages” on page 3-18 for more information.
“
• Hide the Asset Browser on open - When this setting is enabled, the Asset Browser
will collapse (hide) when a page or template is opened. See “
Browser panel” on page 3-9 for instructions on how to reopen the Asset Browser once
it is hidden. When this setting is disabled, the Asset Browser remains open when a
page or template is opened in the Home Area.
Xnews User Manual 2-15
Allow Creation of Server Pages” on page 3-17 for more information.
Opening/hiding the Asset
Page 27

Installing and integrating Xnews into your NCS System
• Preserve Edits on New Page - Creates a new page based on a page that was just
edited and inserted into a story. Its functionality only applies to new pages created
using the following methods:
• holding down SHIFT and dragging the page into a story
or,
• holding down SHIFT and clicking the SAVE-AND-INSERT button.
Enabling the PRESERVE EDITS ON NEW PAGE setting and using one of the Shift
sequences (listed above), creates a new page that is identical to the page just dragged
out, including all edits that were made to the previous page. The practical use of this
feature is that the new page remains open in Xnews’ Home Area and is available for
editing starting from the previous page rather than the template.
Disabling the PRESERVE EDITS ON NEW PAGE setting and using one of the Shift
sequences (listed above), creates a new page that is identical to the template on which
it is based, discarding all edits that were made in the previous page.
Work Order Options
• Must have one job - When this setting is enabled, the first job is automatically created
when the new work order is requested. Enable this setting, as well as the CLOSE ON
SAVE NEW WORK ORDER setting (see below), when you want to be able to quickly create
work orders containing only one job.
Disable this setting, as well as the C
to use automatic job creation through auto-create-job assets, and create work orders
with multiple jobs.
Note that for changes to this setting to take effect, Xnews must be restarted.
• Close on save new work order - When this setting is enabled, the Work Order window
closes when the work order is saved. When this setting is disabled the Work Order
Window remains open after the work order has been saved.
• Printer - This setting allows you to specify a default printer to which work orders will be
printed when the P
RINT WORK ORDER button is selected from the Work Order
window.
• Number of rows in job list - This setting determines the number of rows that are
always visible in the job list portion of the Work Order window. Since most work orders
contain a small number of jobs, the default value of 3 is reasonable. If there are more
than three jobs in the work order, you can always scroll down through the list to view
the additional jobs. If you routinely add numerous jobs to a work order, this setting can
be set to a larger number so that you can see all the jobs without having to scroll. Note
that the minimum permitted value is 3 and the maximum permitted value is 10.
LOSE ON SAVE NEW WORK ORDER setting, if you want
2-16 Xnews User Manual
Page 28
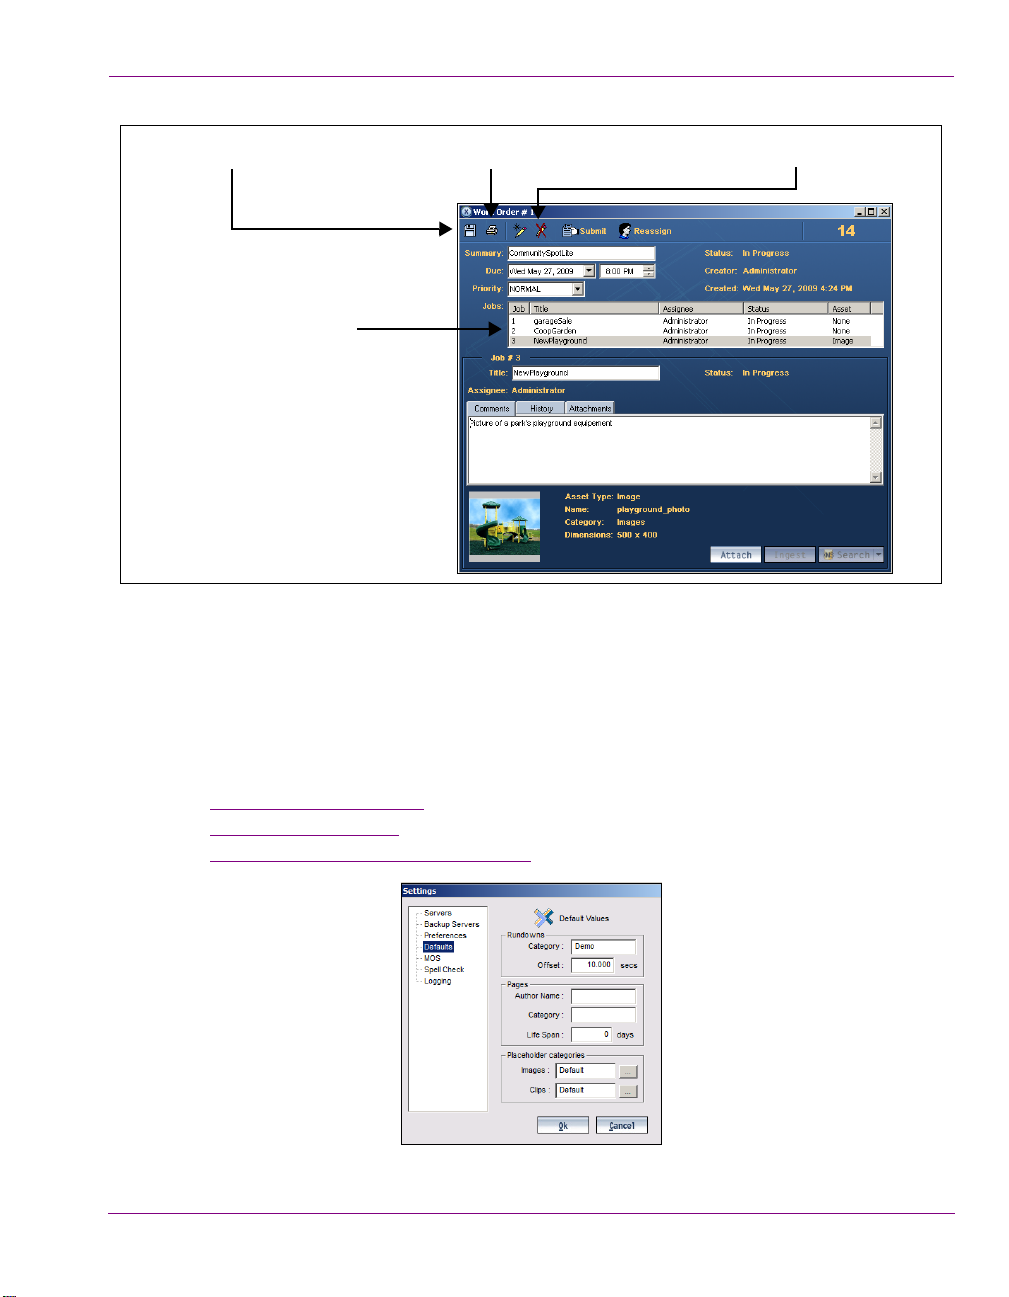
Installing and integrating Xnews into your NCS System
Remove Job Button
Number of rows in job list
Print Work Order buttonSave Work Order Button
Figure 2-10. The Work Order Options settings affect the features/behavior of the Work Order window
Defaults settings
The DEFAULTS page contains settings that allow you to specify some of the properties and
storage locations that will be used as the defaults for the Rundowns, Pages, and Place
Holder created or saved in Xnews.
• “
• “Pages default settings”
• “Placeholder categories default settings”
Xnews User Manual 2-17
Rundown default settings”
Figure 2-11. Xnews’ Default settings
Page 29

Installing and integrating Xnews into your NCS System
Rundown default settings
• Category - Enter the name of the category into which all rundowns will be stored by
default on the Xmedia Server. Note that the MOS C
enabled when the rundown is created.
• Offset - Enter the default amount of time delay (in seconds) between the playout of two
consecutive story elements in the rundown.
Pages default settings
• Author Name - Enter the name that will appear by default as the creator of all new
pages.
• Category - Enter the name of the category into which all shared pages will be stored
by default on the Xmedia Server.
• Life Span - All pages have an expiry date. Once reached, expired pages are deleted
from the system in order to keep the server from becoming clogged with pages that
are no longer relevant. Use this field to enter the number of days before a page
expires. If left at 0, the page never expires. If an existing page is edited, its expiry
date is reset to the number of days specified in this field.
Placeholder categories default settings
• Images - Specifies the category in which new image place holders are saved. If
unspecified, image place holders are saved to in the same category as the image
from which the place holder is created. Click the
SELECT CATEGORY window, which allows you to navigate to the desired category
location. Then click OK to automatically set the selected category as the default.
• Clips - Specifies the category in which new clip place holders are saved. If
unspecified, clip place holders are saved to the same category as the clip from
which the place holder is created. Click the
CATEGORY window, which allows you to navigate to the desired category location.
Then click OK to automatically set the selected category as the default.
ONTROL ACTIVE setting must be
BROWSE button to open the
BROWSE button to open the SELECT
2-18 Xnews User Manual
Page 30
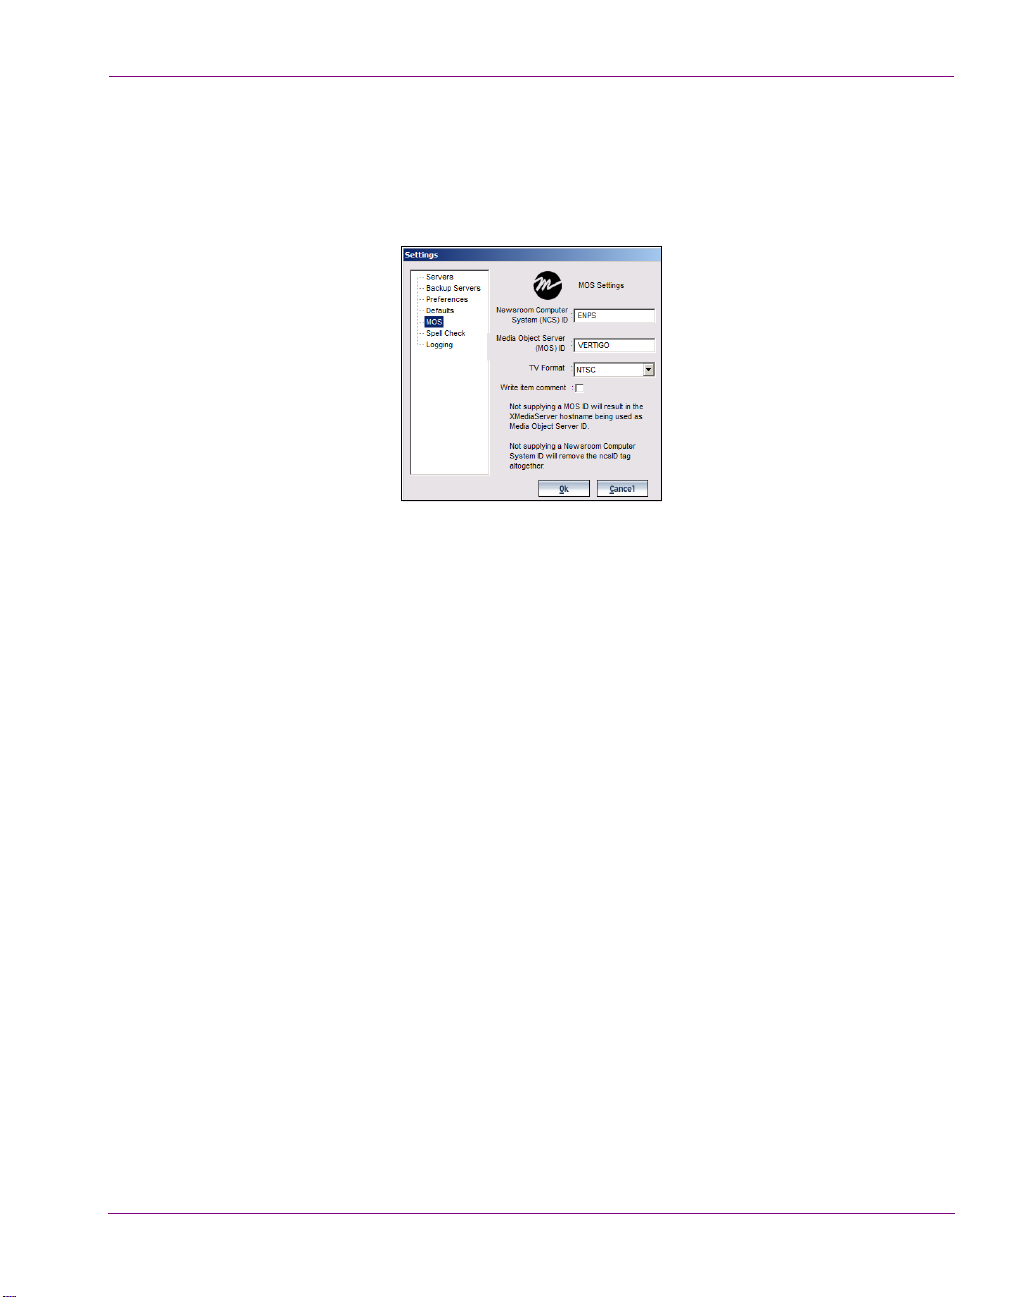
MOS settings
To integrate the Xmedia Server (XMS) into a newsroom environment, the Xmedia Server
must be configured as a MOS Server and then associated with a Newsroom Computer
System, like ENPS or iNews.
The following MOS settings are used for setting up the connection between Xnews and the
Media Object Server. Contact your system administrator for the NCS and MOS IDs.
• Newsroom Computer System ID - Enter the name of the server hosting your
newsroom computer system. This value must be type in all uppercase characters. Not
supplying a Newsroom Computer System ID will remove the ncsID tag altogether.
• For ENPS, the name of the ENPS Server, which can be found at
ENPS>S
• For iNEWS, the name of the iNEWS Server.
• Media Object Server ID - All MOS messages to and from the Xmedia Server will be
identified by the MOS ID assigned by your system administrator (e.g. VERTIGO). This
value must be type in all uppercase characters. Not supplying a MOS ID will result in
the Xmedia Server hostname being used as the Media Object Server ID.
• In ENPS, see ENPS>S
column.
• In iNEWS, this value matches the <mos> value within the configuration file on the
iNEWS MOS Gateway at
See your iNEWS administrator for assistance.
• TV Format - The video format that is being used by the Xmedia Server. Valid values are:
Installing and integrating Xnews into your NCS System
Figure 2-12. Xnews’ MOS settings
YSTEM MAINTENANCE>SERVERS.
YSTEM MAINTENANCE>MOS CONFIGURATION in the ID
C:/Program Files/Avid/MOS Gateway/mosconfig.xml.
• NTSC • HDTV_1080_30M
• PAL • HDTV_1080_25
• HDTV_720_60 • ITV
• HDTV_720_60M • NTSC_16_9
• HDTV_720_50 • PAL_16_9
• HDTV_1080_30
Xnews User Manual 2-19
Page 31

Installing and integrating Xnews into your NCS System
• Write item comment - When enabled and a page is saved, the <itemComment> MOS
tag is written to the MOS XML. The <itemComment> contains the name of the page
and some MOS clients (i.e. iNEWS) display this information in the rundown.
If the setting is disabled (default), the <itemComment> MOS tag is not written to the
MOS XML when a page is saved.
Spell Check settings
Xnews offers an optional spell check utility, which helps you to avoid any typing error or
spelling mistakes by underlining any potentially misspelled words that you have entered into
text boxes on a page.
Figure 2-13. Xnews’ Spell Check settings
• Use spellchecker - When selected, the application helps you to avoid any typing
errors or spelling mistakes by underlining any potentially misspelled words that you
have entered.
• Highlight color - Specifies the RGB color that the
line color to identify potentially misspelled words.
2-20 Xnews User Manual
SPELL CHECK ON setting uses for the
Page 32

Logging settings
Xnews’ Logging settings allow you to specify the categories of events that you want to be
recorded in the Xnews log files, as well as the maximum number and size of Xnews log files
that will be archived.
As Xnews operates, events are recorded to a log text file, which is stored under the Windows
system directory for application specific data.
Since the log files thoroughly track and record Xnews’ events during operation, they are a
great tool to use for diagnosing error conditions or unexpected behaviors. In fact, our
Technical Support team will often ask its customers to send them the Xnews log file to help
them troubleshoot any unexpected behavior that you may be experiencing.
Installing and integrating Xnews into your NCS System
Figure 2-14. Xnews’ Logging settings
• Log Level - This sets the default log level used by all logging categories except those
that have been checked in the Debug Categories list. The choices are:
• Error - Only log errors and essential operations.
• Warn - Log unsuccessful operations that may indicate a problem (in addition
to all messages logged at the Error level).
• Info - (Default) Log important events that occur during normal conditions (in
addition to all messages logged at the Warn level).
It is recommended to set the Log Level to Info in order to provide enough information
in the logs to diagnose common problems without affecting performance.
• Max File Size - Sets the maximum memory size for each log file created per run. The
default value is 6 MB.
• Max File Count - Specifies the maximum number of Xnews*.log files that will be
stored. A large enough number should be chosen to store over a day's worth of logs.
This way if a problem happens the relevant log files will be available. Once the
maximum number of files is reached, the oldest log file will be replaced by a new one.
The default value is 5.
• Debug Categories - Select the types of debug logging (categories) that you would like
to record in the Xnews log file:
Xnews User Manual 2-21
Page 33

Installing and integrating Xnews into your NCS System
• General - General logging that does not fit under any other category.
• Actions - Logs the execution of actions in a panel, template or page.
• Spellcheck - Logs activity in the spell checker.
• DeviceComm - Logs socket communication between the client application
and the CG as well as server-side socket communications in device drivers.
Formerly controlled via the VXLOG_DEVICE environment variable set to ‘1’.
• DeviceComm Verbose - Logs socket communication between the client
application and the CG as well as server-side socket communications in
device drivers. Logging with this category is very verbose, since it includes the
actual bytes that are transmitted. Formerly controlled via the
VXLOG_DEVICE environment variable set to ‘2’.
• DSClient - Logs client-side socket communication with the Data Server.
• VxmsApi - Logs client-side calls to the Xmedia Server.
• VxmsTcp - Logs client-side socket communication with the Xmedia Server
using the principal Xmedia Server connection.
• VxmsCache - Logs client-side activity in the Xmedia Server cache.
• VxmsTcpLayer - Logs client-side socket communication with the Xmedia
Server used by the cache and publishing.
2-22 Xnews User Manual
Page 34

3 FAMILIARIZING YOURSELF WITH THE
Xnews
NEWS INTERFACE
X
The Xnews user interface opens as a panel/workspace in your newsroom computer
system’s (NCS) client workstation interface (figure 3-1). The Xnews user interface contains
its own components and features that you will use in the creation and insertion of pages into
news rundown.
Figure 3-1. Xnews integrates into your NCS client’s workspace (i.e. ENPS or iNEWS)
The following sections provide functional descriptions of the Xnews interface and all of its
components:
Opening Xnews in ENPS” on page 3-2
• “
• “Opening Xnews in iNEWS” on page 3-3
• “Overview of the Xnews interface” on page 3-4
• “Toolbar buttons on the Xnews interface” on page 3-6
• “Using the Asset Browser in Xnews” on page 3-8
• “Asset Gallery, Home Area and Status bar” on page 3-14
• “Using the Drag bar to create embedded pages and clips” on page 3-20
• “Searching for assets on the Xmedia Server” on page 3-21
• “Creating and using Work Orders” on page 3-23
Xnews User Manual 3-1
Page 35

Familiarizing yourself with the Xnews Interface
NOTE
NOTE
Opening Xnews in ENPS
To launch Xnews within the ENPS workspace:
1. Launch ENPS using the ENPS workstation’s S
2. Click the MEDIA CONTROL ROVER and select your MOS ID description name from
the list (figure 3-2
Figure 3-2. Select the MOS ID Description name from the Media Control rover to open Xnews in ENPS
The MOS ID description name was specified when the ENPS MOS configuration settings were
specified. You can verify the MOS ID description name by selecting the ENPS FOLDER ROVER >
SYSTEM MAINTENANCE > MOS CONFIGURATION. The correct DESCRIPTION name is specified for the
IP address of the ENPS workstation.
).
TART menu or desktop shortcut.
3. Xnews immediately starts loading into one of the Editing Windows on the ENPS
interface (figure 3-3).
Figure 3-3. Opening Xnews in the ENPS workspace
If it is the first time that Xnews is opened since it was installed, a red bar will display to
indicate that you are not connected to an Xmedia Server. See “
time” on page 2-10 for instructions on how to set the server connection settings.
3-2 Xnews User Manual
Starting Xnews for the first
Page 36

Opening Xnews in iNEWS
To launch Xnews within the iNEWS workspace:
1. Launch iNEWS using the iNEWS workstation’s S
The INEWS SERVER CONNECTION window appears.
2. Log into the iNEWS workstation.
3. Close the
The iNews workstation window appears (figure 3-4).
INEWS MESSAGES OF THE DAY window.
Figure 3-4. iNews workstation window
Familiarizing yourself with the Xnews Interface
TART menu or desktop shortcut.
4. Launch Xnews by selecting T
menu bar.
Xnews opens in one of the iNEWS workspace’s panels (figure 3-5
Figure 3-5. Xnews opens in a panel in the iNEWS workspace
Xnews User Manual 3-3
OOLS>PLUGINS>VERTIGOXMEDIA XNEWS from the iNEWS
).
Page 37

Familiarizing yourself with the Xnews Interface
1
3
4
2
5
1
2
5
3 4
6
Overview of the Xnews interface
If you are launching Xnews from your newsroom computer system for the first time, you must
configure the server settings before you can access the Xnews interface (see page 2-10
Once you launch Xnews, the Xnews interface appears in a section of your NCS interface.
Figures 3-6, 3-7 and the following descriptions provide a brief overview of Xnews’ main
interface components.
Figure 3-6. Xnews interface with the Asset Browser and Asset Gallery open
).
Figure 3-7. Xnews interface with the a page open in the Home Area
1. Toolbar: Contains buttons for creating a new page, saving, and switching between
DETAIL and PROXY view in the Asset Gallery. When a template or page is open in the
3-4 Xnews User Manual
Home Area, three additional buttons appear in the toolbar allowing you to save the
asset and preview the page. See “
for a functional description of each button in the toolbar.
Toolbar buttons on the Xnews interface” on page 3-6
Page 38

Familiarizing yourself with the Xnews Interface
2. Asset Browser: Provides a tree view of the Xmedia Server root categories that contain
the templates, pages and clips, Work Orders and Jobs. When you click on a folder in
the Asset Browser, its contents are displayed in the Asset Gallery on the right. You can
display or hide the Asset Browser by clicking the orange gripper bar. See “
Using the
Asset Browser in Xnews” on page 3-8 for more detailed instructions for using the Asset
Browser.
3. Asset Gallery / Home Area: When you click a folder in the Asset Browser, its contents
are displayed in the Asset Gallery in either D
ETAIL or PROXY view (to toggle between
views, click in the toolbar). Double-clicking a template or page in the Asset Gallery
opens the template/page in what now becomes the Home Area. You can modify the
template/page’s editable components in the Home Area and then save the page. If
Xnews experienced an error when loading the template or page, a message will appear
in a banner along the bottom of the Home Area. See “
Asset Gallery, Home Area and
Status bar” on page 3-14 for instructions on how to use the Asset Gallery and Home
Area.
4. Status bar: Located next to the toolbar, the Status bar provides the name, source,
offset, and duration values for the template or page that is currently open in the Home
Area. Right-clicking the Status bar also provides access to the C
BOUT commands. See “Asset Gallery, Home Area and Status bar” on page 3-14 for
A
HANGE SETTINGS and
instructions on how to use the Status bar features.
5. Drag bar: The Drag bar, identified by the Vertigo Xmedia logo, allows you to drag and
drop the currently open page into the host news system. Right-clicking the Drag bar
also provides access to the C
HANGE SETTINGS command. See “Using the Drag bar to
create embedded pages and clips” on page 3-20 for instructions on how to use the
Drag bar.
6. Error Message: Whenever Xnews encounters an error, a red bar appears in the lower
portion of the Xnews interface that displays an error message describing the source
and/or consequence of the error. Simply click the error message bar to hide it.
Xnews User Manual 3-5
Page 39

Familiarizing yourself with the Xnews Interface
Toolbar buttons on the Xnews interface
The Xnews toolbar contains iconic buttons that execute various Xnews functions. The
following table provides a brief functional descriptions of each button in the toolbar.
C
REATE NEW
OR
AVE PAGE
S
AVE AND INSERT PAGE
S
CHANGE THE VIEW
EARCH
S
If a page is already open in the Home Area, clicking this button closes the
page. The Home Area is replaced with the Asset Gallery, which displays the
contents of the category that was last selected.
These buttons only appear in the toolbar when a page/template is open in the
Home Area.
When an unsaved page is open in the Home Area, clicking the SAVE PAGE
button allows you to save the page as a shared page by specifying the
page details (i.e. name) and the category location(s).
When a page is open in the Home Area, the S
AVE PAGE button appears in
the toolbar. Clicking this button saves any edits that were made to the page.
This button only appears in the toolbar when a page/template is open in the
Home Area.
Allows you to save the open page by adding it to the open story/rundown.
Pressing this button toggles the Asset Gallery’s display format between
DETAIL and PROXY views. As described on page 3-14, Detail view displays
category contents in a list format, which provides more detail about the page.
While Proxy view displays the pages and templates as thumbnail images for
quick and easy recognition.
Pressing the SEARCH button opens the SEARCH XMS window, which allows
you to create and execute a search for assets on the Xmedia Server. From the
search results, you can replace an existing image, cel animation or clip asset
on a page in Xnews; or open a specific Page, Template, Work Order or Job.
Searching for assets on the Xmedia Server” on page 3-21.
See “
Pressing this button opens the WORK ORDER window, which allows you to
EW WORK ORDER
N
create a work order request for the creation or addition of an asset (i.e. image)
that is needed for a page. Once a work order is created, a placeholder is
placed on the page. See “
Creating and using Work Orders” on page 3-23 for
more information.
These buttons only appear in the toolbar when a page/template is open in the
OR
PREVIEW PAGE
Home Area and the Playout settings are enabled in the xnews.ini file.
Pressing this button publishes the open page to a designated device, which
allows the page’s on-air likeness to be previewed on the playout device. See
Previewing the on-air look of a page” on page 5-14 for more information.
“
If the P
REVIEW PAGE button has an X on it, this indicates that Xnews was
unable to connect to the device.
3-6 Xnews User Manual
Page 40

EARCH AP GRAPHICS
S
B
ANK
URCHASE GRAPHICS
P
ANK IMAGES
B
Familiarizing yourself with the Xnews Interface
This button only appears in the toolbar when the GRAPHICS BANK ENABLED
setting is selected on the Xmedia Server Control Panel’s G
RAPHICS BANK
page.
Opens the AP GRAPHICS BANK SEARCH window, which allows you to search
and preview images from the AP Graphics Bank. See for more information.
This button only appears in the toolbar when the GRAPHICS BANK ENABLED
setting is selected on the Xmedia Server Control Panel’s G
RAPHICS BANK
page.
Clicking this button while a page is open that contains a preview image from
the AP Graphics Bank (it has not yet been purchased), opens the AP
GRAPHICS BANK: PURCHASE IMAGES window. This window lists the images on
the page that have yet to be purchased and provides the ability to purchase
them. See for more information.
Clicking this button while a page is not open or if the page does not contain
unpurchased images results in an error message.
Xnews User Manual 3-7
Page 41

Familiarizing yourself with the Xnews Interface
NOTE
Asset Browser
Using the Asset Browser in Xnews
The Asset Browser (figure 3-8) is a collapsible panel on the left-side of the Xnews interface
that allows you to view and access the pages, templates, and clips that are stored on the
Xmedia Server. As well, the Asset Browser allows you to access the Work Orders and Jobs
that are also stored on the Xmedia Server (see page 3-26
The Asset Browser organizes pages, templates, and clips in a tree structure of root
categories and subcategories, which can be navigated by expanding or collapsing the
category. Note that you can create new subcategories, but the root categories are
permanent and subcategories cannot be deleted in Xnews. When a category is selected,
the pages, templates, or clips of the category are listed/previewed in the Asset Gallery (to
the right of the Asset Browser).
).
Figure 3-8. The Asset Browser in Xnews
In addition to accessing the contents of the Xmedia Server, the Asset Gallery has a context
menu that features a series of commands that are used to perform various tasks using the
selected asset category.
The following sections provide instructions for using the Asset Browser in Xnews to manage
and organize the pages and templates stored on the Xmedia Server:
Opening/hiding the Asset Browser panel” on page 3-9
• “
• “Refreshing a category” on page 3-9
• “Adding a new category” on page 3-10
• “Setting access permissions for an asset category” on page 3-11
Unlike the Asset Browsers in other Vertigo Suite applications, the Asset Browser in Xnews
only contains five (5) root categories: PAGES, TEMPLATES, CLIPS, WORK ORDERS, and JOBS.
3-8 Xnews User Manual
Page 42

Familiarizing yourself with the Xnews Interface
NOTE
Click to open the Asset Browser Click to hide the Asset Browser
Opening/hiding the Asset Browser panel
The Asset Browser is a collapsible browser that is located and anchored to the left side of
the Xnews interface. By collapsible, we mean that you open and hide the browser’s display
by clicking the gripper bar on the left-hand side of the screen (figure 3-9).
Figure 3-9. Click the gripper bar to open or hide the Asset Browser
Another way to reopen the Asset Browser when a page or template is open in the Xnews
Home Area is to click the C
immediately closes in the Home Area and the Asset Browser and Asset Gallery return to
their previous state.
If the HIDE THE ASSET BROWSER on open setting is enabled on the Preferences page in the
Xnews settings, the Asset Browser will automatically collapse when a page or template is
opened in the Home Area. See page 2-15 for more information.
REATE NEW button in the Xnews toolbar. The page/template
Refreshing a category
The benefit of having the Xmedia Server centrally archive all of the assets (i.e. pages,
templates, images...etc.) is that anybody on the network can ingest, create, or access these
assets at anytime. Since the contents of the Xmedia Server may be changing during your
Xnews session (as others add, edit, or remove assets), the Xmedia Server automatically
refreshes the Asset Browser every time a change is saved to an asset or asset category.
This ensures that the Xnews Asset Browser always contains the latest versions of the
assets stored on the Xmedia Server.
Although it isn’t necessary, you can refresh the Asset Browser by right-clicking on a
category in the Asset Browser and selecting the R
Asset Browser immediately reloads the category with the Xmedia Server content.
Figure 3-10. The Refresh command reloads the category with the most recent content from the XMS
Xnews User Manual 3-9
EFRESH command (figure 3-10). The
Page 43

Familiarizing yourself with the Xnews Interface
NOTE
Root Category
Subcategories
Adding a new category
The Asset Browser’s Pages, Templates, and Clips root categories are pre-set within the
system and cannot be moved or deleted, nor can new ones be created. However, you can
create as many subcategories within these root categories as required, as well as edit and
delete them (figure 3-11
Figure 3-11. The Asset Browser organizes assets in a tree-structure of root categories and subcategories
To create a new category or subcategory:
1. Select the desired root category icon, so that its tree structure appears in the Asset
Browser.
2. If you want the new subcategory to be immediately under the root category, right-click
on the root category’ name in the tree. Otherwise, navigate to the subcategory in which
you would like to create a new subcategory and right-click on its heading.
In both cases, the Asset Browser’s context menu appears.
3. Select the N
EW CATEGORY window appears.
The N
4. Type the name of the new subcategory in the text box.
5. Click OK.
The new sub-category is displayed below the category heading.
).
EW CATEGORY command from the context menu.
You cannot add or delete root categories from the Asset Browser in Xnews. You must use Xplorer,
Xstudio, or another Vertigo Suite application to add or delete categories. Xnews however, does
allows you to create as many categories within the root categories as you would like.
3-10 Xnews User Manual
Page 44

Familiarizing yourself with the Xnews Interface
Setting access permissions for an asset category
If the Xmedia Server has been configured to support user rights management, the PERMISSIONS
command will be enabled in the Asset Browser’s category context menu (figure 3-12
Figure 3-12. The Permissions command allows you to restrict access to the category to specific users
If the PERMISSIONS command is disabled in the context menu, this indicates that either the
Authorization Manager is not installed; or that the Xmedia Server does not have its
Authorization Manager Configuration settings enabled or set properly; or the user does not
have access to the Policy Store.
Complete instructions for configuring the Xmedia Server for user rights management and
using the P
the Xmedia Server Configuration Guide.
The following procedure describes how to set the Asset Browser’s category permissions to
restrict access of a selected asset category to only a select group of users.
ERMISSIONS command are available in the “User Rights Management” section of
).
To restrict access of asset category to only a select group of users:
1. Right-click on the asset category from the Asset Browser that you want to restrict
access to.
2. Select the PERMISSIONS command from the context menu (figure 3-13).
ATEGORY SECURITY window appears and states that there are currently no
The C
viewing restrictions set for the selected category. It further explains that the action of
adding a user or a group instantly hides the category from every user except those
users or groups add to this permission.
Figure 3-13. Select the Permissions command to restrict access to the selected asset category
Xnews User Manual 3-11
Page 45

Familiarizing yourself with the Xnews Interface
3. Click the ADD button.
The S
ELECT USERS OR GROUPS window appears (figure 3-14).
Figure 3-14. The Select Users or Groups window
4. The text box provides a space for you to type the names of the user or group that you
want to find.
5. Click the C
HECK NAMES button.
6. If only one match is found, then the name is immediately added to the text box.
However, if multiple names match the search, then the M
window appears (figure 3-15). Select the name of the user(s) that you want to add from
the MULTIPLE NAME FOUND window and click OK.
ULTIPLE NAMES FOUND
Figure 3-15. The Multiple Name Found window
7. The names are now listed in the S
ELECT USERS OR GROUPS window (figure 3-16).
Figure 3-16. The Select Users or Groups window
3-12 Xnews User Manual
Page 46

Familiarizing yourself with the Xnews Interface
8. Click OK and the SELECT USERS OR GROUP window closes.
The C
ATEGORY SECURITY window now lists the users and/or groups that have
permission to view and interact with the assets in this category (figure 3-17
).
Figure 3-17. The Category Security window lists the users and/or groups who have permission
9. Click A
PPLY to complete the procedure.
Related documentation
Please refer to the “User Rights Management” section of the Xmedia Server Configuration
Guide for other procedures using the P
ERMISSIONS command.
Xnews User Manual 3-13
Page 47

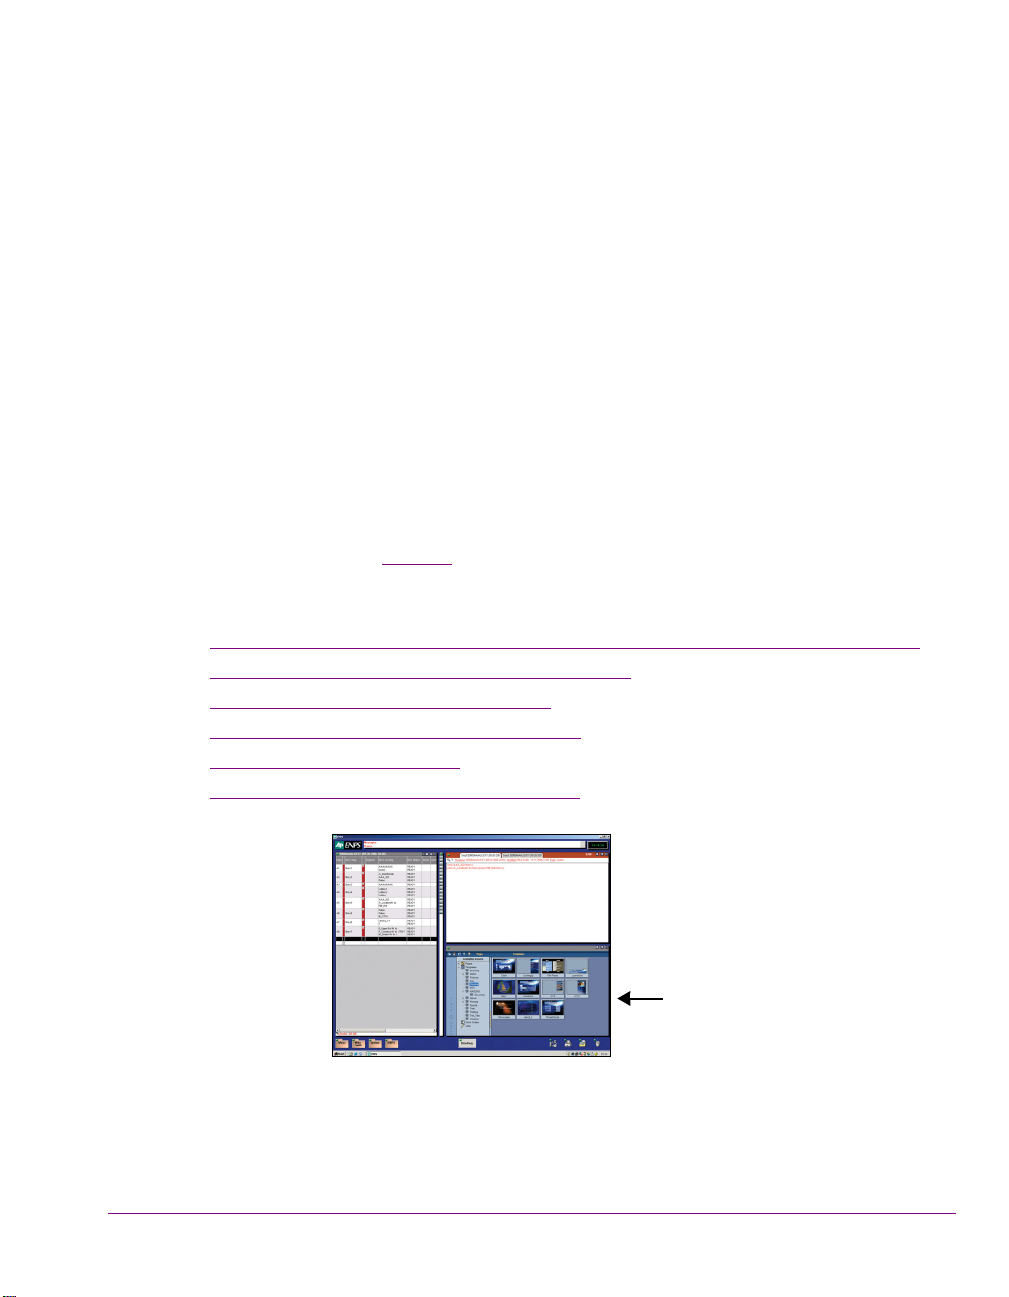
Familiarizing yourself with the Xnews Interface
Asset Gallery in Proxy View mode
Home area displaying a shared page
Asset Gallery, Home Area and Status bar
The pages, templates, work orders, and jobs that are stored on the Xmedia Server and
associated devices are displayed or listed in the Asset Gallery. After selecting a root
category or subcategory in the Asset Browser, the assets are displayed in the Asset Gallery.
Some asset types can be displayed as thumbnail images (P
identification, while others are displayed as lists which provide specific details about the
assets (DETAIL view).
In addition to viewing the contents of the Xmedia Server, the Asset Gallery has a context
menu that features a series of commands that are used to perform various tasks using the
selected asset.
While the following sections describe the Asset Gallery views and commands, further
chapters in this document provide instructions for using these features.
Changing the view style (Detail or Proxy)” on page 3-15
• “
• “Opening a template or page in the Home Area” on page 3-16
• “Changing the edit and creation settings for shared pages” on page 3-17
• “Zooming in/out of a template or page on the Home Area” on page 3-18
• “Displaying a listing of Work Orders or Jobs” on page 3-19
ROXY view) for easy
Figure 3-18. The Home Area replaces the Asset Gallery when a template or page is opened in Xnews
3-14 Xnews User Manual
Page 48

Familiarizing yourself with the Xnews Interface
NOTE
Changing the view style (Detail or Proxy)
When the PAGES or TEMPLATES category or subcategories is selected in the Asset Browser,
its assets are displayed in the Asset Gallery. Depending on the view setting (P
ETAIL) the assets will be displayed in the Asset Gallery in a list/table or as a series of
D
thumbnail graphics.
Figure 3-19 demonstrates that you can change the view style by clicking the CHANGE THE
VIEW button selecting either the DETAIL VIEW or PROXY VIEW commands.
Figure 3-19. Use the Change the View button to toggle between Proxy View and Detail View
ROXY or
The STARTUP VIEW field on the Xnews Preference settings page dictates in which view
mode Xnews uses as its default view. See “Preferences settings” on page 2-15 for more
information.
Xnews User Manual 3-15
Page 49

Familiarizing yourself with the Xnews Interface
Opening a template or page in the Home Area
Since templates and shared pages are stored on the Xmedia Server, they can be accessed
by navigating through the Asset Browser and Asset Gallery. Embedded pages, however,
exist only within a rundown. Therefore to open an embedded page, you must open the
rundown first in your NCS interface and then access the page from there.
The following procedures provide instructions for opening templates, shared pages, and
embedded pages within the Xnews Home Area.
To open a template or shared page in the Xnews Home Area:
1. Open the Asset Browser and navigate through the P
until the desired page/template is listed or displayed in the Asset Gallery.
2. Open the page or template by performing one of the following:
• Double-click the page/template in the Asset Gallery.
Or,
• Right-click on the page/template in the Asset Gallery and select the O
command.
To open an embedded page from a host news system’s story:
1. In the NCS interface (i.e. ENPS or iNews), open the rundown and story that contains
the page that is to be displayed in Xnews.
2. Double-click on the MOS entry for the page that you want to display in Xnews and the
page opens in the Xnews Home Page (figure 3-20
AGES or TEMPLATES categories
).
PEN
Figure 3-20. Opening an embedded page in Xnews
3-16 Xnews User Manual
Page 50

Familiarizing yourself with the Xnews Interface
NOTE
Changing the edit and creation settings for shared pages
Xnews features two (2) settings that determine whether or not users can create and/or edit
shared pages:
• Allow Creation of Server Pages
• Allow Edit of Server Pages
Figure 3-21 shows that these two (2) settings can be access and enabled/disabled on the
Xnews P
REFERENCE settings page (see page 2-12 to learn how to access Xnews settings).
Figure 3-21. Two Preference settings that control the creation and editing of shared pages
Allow Creation of Server Pages
The ALLOW CREATION OF SERVER PAGES setting in the Xnews PREFERENCE settings is a
mechanism for granting or restricting permission for users to create and save new shared
pages to the Xmedia Server.
When this setting is enabled (checked), the SAVE PAGE button in the Xnews toolbar is
enabled (blue), which allows you to save a shared page. However, when the setting is
disabled (empty), the S
does not allow you to save the page to the Xmedia Server.
If your intent is to create a shared page, but an embedded page is created from the template
instead, check to see if the ALLOW CREATION OF SERVER PAGES setting is enabled in the
xnews.ini file. Similarly, if the S
enabled SAVE PAGE button, the UseQuietMode2 parameter in the xnews.ini file might
be enabled. See “
instructions on changing these settings.
Xnews User Manual 3-17
AVE PAGE button in the Xnews toolbar is disabled (grey) and it
AVE PAGE window does not appear when you press the
Enabling Embedded Pages or Shared Pages mode” on page 2-6 for
Page 51

Familiarizing yourself with the Xnews Interface
Shared page can be edited
Shared page cannot be edited
Allow Edit of Server Pages
The ALLOW EDIT OF SERVER PAGES setting in the Xnews PREFERENCE settings is a
mechanism for granting or restricting permission for users to edit shared pages that are
stored on the Xmedia Server.
When this setting is disabled (unchecked), the S
bar displays a small lock, which signifies that no edits can be made to the page. However,
when the setting is enabled (checked), the S
does not display a lock and users can make changes to the page’s editable fields. See
Editing and previewing a shared page” on page 6-4 for instructions on editing shared
“
pages.
HARED PAGE icon in the Xnews Status
HARED PAGE icon in the Xnews Status bar
Figure 3-22. The Shared Page icon indicates whether or not a page can be edited
Zooming in/out of a template or page on the Home Area
When a page is open in the Xnews Home Area, you can use your mouse’s wheel to zoom
in and out of the page (figure 3-23
view to its original size in the Home Area.
You can then move the page up or down in the Home Area by holding down the ALT key
and pressing the U
3-18 Xnews User Manual
P ARROW or DOWN ARROW keys on your keyboard.
Figure 3-23. Use the mouse wheel to zoom in and out of the page
). Pressing your keyboard’s HOME key returns that page’s
Page 52

Familiarizing yourself with the Xnews Interface
Work Orders Jobs
Displaying a listing of Work Orders or Jobs
The Xnews Asset Browser not only displays the root categories for Pages and Templates,
it also displays root categories for Work Orders And Jobs. Upon selecting these root
categories, a listing of all of the Work Orders or Jobs is displayed in the Xnews Home Area
(figure 3-24
Figure 3-24. Access listings of Work Orders and Jobs using the Asset Browser and Asset Gallery
When Work Orders or Jobs are listed in the Asset Gallery, the lower portion of the pane
contains a filtering tool. You can use the filter to limit the number of listings displayed by
specifying a set of restrictions or properties that the results must conform to (e.g. only work
orders that are currently in a Pending state).
Full instructions for using the Work Order management system are provided in “
and using Work Orders” on page 3-23.
).
Creating
Xnews User Manual 3-19
Page 53

Familiarizing yourself with the Xnews Interface
Using the Drag bar to create embedded pages and clips
The Drag bar is located along the left side of the Xnews interface and is easily identified by
ERTIGO X MEDIA logo that is written across it.
the V
The Drag bar provides access to the C
specify settings that affect the functionality of Xnews (figure 3-25
Xnews settings” on page 2-12 for more information.
Figure 3-25. The Drag bar provides access to the Xnews Settings window
The Drag bar allows you to drag and drop the currently open page/clip into the host news
system. Figure 3-26 demonstrates that when you click the Drag bar while holding down the
left mouse key and start moving the mouse across the story panel, the cursor changes to a
drag icon and the drag-and-drop functionality is initiated. Place the cursor in the location
in the story where you want the page to be ordered and release the mouse key. The
page/clip’s MOS entry is added to the story and the page closes in Xnews. See “
adding embedded pages to a story” on page 5-15 for more information.
HANGE SETTINGS command, which allows you to
). See “Configuring the
Saving and
Figure 3-26. Using the Drag bar to add a page to the NCS story
3-20 Xnews User Manual
Page 54

Familiarizing yourself with the Xnews Interface
NOTE
NOTE
Searching for assets on the Xmedia Server
Clicking the SEARCH button on the toolbar opens the SEARCH XMS window, which allows
you to quickly search for assets stored on the Xmedia Server. Once a search is launched,
assets that match the name, type, description, author, keywords and/or Recall ID are
displayed as thumbnails in P
With the search results displayed in the results pane, you can:
• Replace an existing image, clip or cel animation by dragging an asset of the equivalent
type from the search results onto a page open in Xnews.
• Open a specific Page or Template asset in Xnews by double-clicking the asset in the
search results.
• Open a specific Work Order or Job in the Work Order window by double-clicking the
asset in the search results.
The SEARCH XMS window uses Solr, which a web-based solution by the Apache group that
performs fast searches across large amounts of data. The Xmedia Server must maintain a
connection to Solr so that it can create an index of the database. See the Xmedia Server
Configuration Guide for more information.
To search for assets stored on the Xmedia Server:
1. Click the SEARCH button to open SEARCH XMS window.
2. Type a search query in the S
See the Xplorer User Guide for descriptions and examples of the syntax you can use
to build more effective search queries.
3. Optional: Limit Search XMS results to specific asset types.
By default, all asset types are evaluated by the search query as indicated by the T
drop-down box set to A
• To limit the search results to one asset type, select an asset type from the
YPE drop-down list.
T
• To limit the search results to multiple asset types, click the Browse button
to open the Select Types To Search dialog. Select the asset types that you
want included in the search and uncheck the asset types that you want
excluded from the search results.
4. Click the button to launch the search.
Assets that satisfy the search query are displayed in the results pane of the Search
XMS window.
ROXY VIEW or listed in a table in DETAIL VIEW.
EARCH XMS text box.
LL TYPES.
YPE
If an expected asset is not returned in the search results, it may be because user rights
management is enabled on the Xmedia Server and the current user does not have
permission to view the asset. See “User Rights Management” in the Xmedia Server
Configuration Guide for more information.
Xnews User Manual 3-21
Page 55

Familiarizing yourself with the Xnews Interface
5. Browse the results and select an asset of interest. Depending on the asset type,
perform one of the following actions:
• Replace an existing image, clip or cel animation by dragging an asset of the
equivalent type from the search results onto a page open in Xnews.
• Open a specific Page or Template asset in Xnews by double-clicking the asset
in the search results.
• Open a specific Work Order or Job in the Work Order window by double-
clicking the asset in the search results. Note that the Search XMS window
closes automatically.
3-22 Xnews User Manual
Page 56

Familiarizing yourself with the Xnews Interface
NOTE
Creating and using Work Orders
While creating or editing a page, you may realize that the Xmedia Server does not contain
the specific image or video clip asset that you need for your story. In such a case, Xnews
allows you to create a work order, which is a set of requests directed at your graphics
department for the creation and addition of the required asset to the Xmedia Server. Each
request in the work order is known as a job. While creating the job request, you can insert
a placeholder on the page. Once the asset is ingested into the Xmedia Server and the job
is complete, the placeholder is automatically replaced by the new image/video and the page
is ready to go to air.
Xnews also allows you to view all of the work orders and jobs on your system through the
Asset Browser’s Work Orders and Jobs categories.
The following sections describe how to create and use work orders and jobs in the context
of the Xnews application:
Creating a new work order and an initial job request” on page 3-24
• “
• “Viewing existing work orders and/or jobs” on page 3-26
• “Adding a job to an existing work order” on page 3-28
• “Removing a work order or job from the XMS” on page 3-30
• “Fulfilling jobs using assets stored on the Xmedia Server” on page 3-30
• “Fulfilling jobs using images from the AP Graphics Bank” on page 3-31
The Work Order Management System is a feature that must be installed and configured on
the Xmedia Server. For a more detailed description about configuring the Work Order
Management system, please refer to the Xmedia Server Configuration Guide.
Xnews User Manual 3-23
Page 57

Familiarizing yourself with the Xnews Interface
NOTE
NOTE
Creating a new work order and an initial job request
If the Xmedia Server does not contain an image or video clip asset that you require for your
template-based page, you can create a work order and job request. The work order’s job
issues a request to your graphic arts department to create an asset that fulfills your
prescribed specifications and then ingest it into the system.
Before creating a work order or job from Xnews, your Xmedia Server system must first be
configured to contain a work order workflow. You must also have the correct permission
settings in your user profile to allow you to create work orders and jobs. Contact your
system administrator for more information regarding your organization’s work order
workflow configuration.
Before creating a new work order, it is recommended that you verify that the image or clip
that you require does not already exist on the Xmedia Server.
To verify if an image or clip already exists:
1. With the page open in Xnews, right-click the image or clip that is to be replaced.
Either the S
2. Browse through the categories within the window to see if any of the existing images
or clips meet your requirements.
• If so, select the asset and press OK. The image or clip will immediately be
brought into the page.
• If not, then proceed to creating a work order for your story or rundown, and
specify a particular job request for the required image or clip
ELECT AN IMAGE or the SELECT A CLIP window appears.
You can allows use the Search Tool to verify if an image or clip already exists in the system.
See “Searching for assets on the Xmedia Server” on page 3-21 for instructions.
To create a new work order:
1. With the page open in Xnews, select the N
2. Each time you begin a new Xnews session and you attempt to create or access a work
order or a job, the V
you to sign in using a user name and password. If you do not have a user name and
password, contact your IT department and ask them to add you to the Xmedia Server’s
ORKFLOW>USERS properties.
W
3-24 Xnews User Manual
ERTIGOXMEDIA LOGIN window (figure 3-27) appears and prompts
Figure 3-27. VertigoXmedia Login window
EW WORK ORDER button from the toolbar.
Page 58

Familiarizing yourself with the Xnews Interface
NOTE
Once you enter your user name and password, press OK and the Work Order Window
appears (figure 3-28).
Figure 3-28. The Work Order window
The entire login step is avoided if the Windows user name matches the user name in the
XmediaServer Properties’ Workflow options. If this is the case, then the user will
automatically be logged on under the logged in name and the VERTIGOXMEDIA LOGIN
window does not even appear.
3. In the S
UMMARY text box, type a short description of what story or rundown the work
order applies to (i.e. 11PM news).
4. In the D
UE field, specify the date and time by which all of the jobs in the work order are
required to be finalized in the system. You can either type the date directly in the date
text box, or press the drop-down arrow to open and use a calendar to select the date.
Similarly, you can either type the time in the text box, or select use the up and down
arrows.
5. In the P
RIORITY drop-down list, select one of the available priority levels to indicate to
the graphic arts department the urgency of the work order request. The default priority
levels are: L
OW, NORMAL, HIGH, and URGENT. The meaning and use of the priority
levels should be determined within your organization and configured in the Priorities
workflow options on the XMS Panel application.
6. Depending on Xnews’ Work Order Options (page 2-16
) and the workflow defined on
the Xmedia Server, the first job can be automatically created when the work order is
created and the job is already listed in the Jobs table and its properties are ready to be
filled in.
• In the T
ITLE field, type a short title that describes the subject of the image or
clip requested.
• In the A
SSIGNEE field, select from the drop-down list the name of the person
that you want to assign the job to (i.e. the name of the graphic artist).
Xnews User Manual 3-25
Page 59

Familiarizing yourself with the Xnews Interface
7. Add a placeholder to the page by dragging the X-logo onto the page where the image
or clip is located (figure 3-29). The JUST CREATED placeholder is inserted on the page
and the Job’s Asset information (type, name, category, and dimensions) are updated.
Figure 3-29. Adding a job’s placeholder to a page
8. Once the job(s) are created for the work order, you must save the work order by
pressing the S
9. The Work Order dialog automatically closes and the new work order is entered into the
system.
AVE WORK ORDER button in the Work Order toolbar.
Viewing existing work orders and/or jobs
All saved work orders and jobs are stored on the Xmedia Server. You can view and open
existing work orders and jobs using Xnews’ Asset Browser and Asset Gallery.
To view a list of the existing work orders and open a specific work order:
1. Select the W
A list of all of the existing work orders now appears in the Asset Gallery (figure 3-30
3-26 Xnews User Manual
ORK ORDERS root category in the Asset Browser.
).
Figure 3-30. Work Orders listed in the Asset Gallery
Page 60

Familiarizing yourself with the Xnews Interface
2. Optional - If you cannot find the work order that you are looking for, use the Filters tool
in the lower portion of the Asset Gallery to place restrictions on the listing.
3. To open a work order, simply double-click the work order’s row in the Asset Gallery’s
list. The Work Order window opens and displays all of the work order information and
lists the jobs associated with the work order.
Xnews User Manual 3-27
Page 61

Familiarizing yourself with the Xnews Interface
NOTE
To view a list of the existing jobs and open a specific job:
1. Select the J
OBS root category in the Asset Browser.
A list of all of the existing jobs now appears in the Asset Gallery (figure 3-31
Figure 3-31. Jobs listed in the Asset Gallery
2. Optional - If you cannot find the job that you are looking for, use the Filters tool in the
lower portion of the Asset Gallery to place restrictions on the listing.
3. To open a specific job, simply double-click the job’s row in the Asset Gallery’s list.
The Job window opens and displays all of the information associated with the job.
Adding a job to an existing work order
).
Jobs must belong to a work order. Therefore, to create and submit a job request for a new
image or clip, you must first create a work order and then create a job request (see page
3-24), or add a new job to an existing work order.
To add a new job to an existing work order:
1. Open an existing work order. See “Viewing existing work orders and/or jobs” on page
3-26 for instructions.
ORK ORDER window appears and displays all of the work order information and
The W
lists the jobs associated with the work order.
2. To add a new job, select the A
DD JOB button in the Work Order toolbar.
A job is added to the Jobs list.
3. In the T
ITLE field, type a short title that describes the subject of the image or clip
requested.
4. In the A
SSIGNEE field, select from the drop-down list the name of the person that you
want to assign the job to (i.e. the name of the graphic artist).
Depending upon your Work Order Workflow definition, the user names that appear in the
Assignee drop-down list might be limited to only those who are assigned the same role as
the Target Role setting on the Assign Transition’s properties on the XMS Panel application.
Therefore, if the desired user’s name does not appear in the Assignee list, verify that the
user’s role and the Assign transition’s properties match.
3-28 Xnews User Manual
Page 62

Familiarizing yourself with the Xnews Interface
NOTE
5. In the COMMENT tab’s text box, provide instructions and/or specifications to guide the
graphic artist, so that they can provide you with an image or clip that meets your
specific requirements.
6. Add a placeholder to the page by dragging the X-logo onto the page where the image
or clip is located (figure 3-32
and the Job’s Asset information (type, name, category, and dimensions) are updated.
Figure 3-32. Adding a job’s placeholder to a page
). The JUST CREATED placeholder is inserted on the page
You can save a job without a placeholder, then use the Search or Ingest buttons to locate
and attach a placeholder to the job. This placeholder will not exist on any page at this point,
but it can be dragged afterward onto a page, or simply left alone in its category.
Also note, that in the distributed work order case, on the hub the Ingest and Search buttons
are disabled for empty-placeholder jobs because only spokes are allowed to make
placeholders for distributed work orders. See the Xmedia Server Configuration Manual
for more information about the Hub and Spoke model and distributed work orders.
7. Click the S
Xnews User Manual 3-29
AVE WORK ORDER button to save the job and the work order.
Page 63

Familiarizing yourself with the Xnews Interface
NOTE
NOTE
Removing a work order or job from the XMS
Xnews allows you to delete unwanted work orders and jobs from the Xmedia Server.
To delete a work order or job from the Xmedia Server:
1. Select the W
A list of all of the existing work orders or jobs appears in the Asset Gallery.
2. Optional - If you cannot find the work order or job that you are looking for, use the
ILTERS tool in the lower portion of the Asset Gallery to place restrictions on the listing.
F
3. Select the work order or job that you want to remove, or to select multiple work
order/jobs, press the SHIFT key as you click on each one for consecutive selections,
or press the CTRL key to select a grouping of non-consecutive work orders/jobs.
4. Right-click on the selection and select the D
5. The D
delete the work order(s) or job(s).
6. Press OK.
ORK ORDERS root category or the JOBS root category in the Asset Browser.
ELETE command.
ELETE WORKORDER window appears and asks you to confirm your intention to
Fulfilling jobs using assets stored on the Xmedia Server
The XMS SEARCH button on the Work Order and Job windows opens the SEARCH XMS
window, which allows you to quickly search and find assets stored on the Xmedia Server.
Once a search is launched, assets that match the name, type, description, author, keywords
and/or Recall ID are displayed in either a P
relevance to the search criteria. You can then use the assets listed to fulfill the job request.
ROXY VIEW or DETAILED VIEW and ordered by
The SEARCH XMS window uses Solr, which a web-based solution by the Apache group that
performs fast searches across large amounts of data. The Xmedia Server must maintain a
connection to Solr so that it can create an index of the database. See the Xmedia Server
Configuration Guide for more information.
To search for assets stored on the Xmedia Server:
1. Open an unfulfilled job in the Work Order window or Job window.
2. Click the XMS S
When the GRAPHICS BANK ENABLED setting is selected on the Xmedia Server Control
Panel, the Search button in the Work Order and Job windows is shared by two search tools:
XMS Search and AP Search. If the AP S
arrow and select the SEARCH XMEDIASERVER option.
3. Type a search query in the S
See the Xplorer User Guide for descriptions and examples of the syntax you can use
to build more effective search queries.
3-30 Xnews User Manual
EARCH button to open SEARCH XMS window.
EARCH button is currently displayed, click the
EARCH XMS text box.
Page 64

Familiarizing yourself with the Xnews Interface
NOTE
4. Optional: Limit Search XMS results to specific asset types.
By default, all asset types are evaluated by the search query as indicated by the T
drop-down box set to A
LL TYPES. One exception however, is if the job already has a
placeholder associated with a page or template. In this case, the Type is already
restricted based on the asset type of the placeholder.
• To limit the search results to one asset type, select an asset type from the
YPE drop-down list.
T
• To limit the search results to either the Image or Clip asset types, click the
browse button to open the Select Types To Search dialog. Select the
asset types that you want included in the search and uncheck the asset types
that you want excluded from the search results. Click OK.
5. Click the button to launch the search.
Assets that satisfy the search query are displayed in the Results pane of the Search
XMS window.
6. Browse, sort and add an asset to the job.
• When the P
ROXY VIEW button is selected, the assets appear as
thumbnails in order of relevance to the search criteria. Double-clicking the
asset’s thumbnail automatically adds the asset to the job.
• When the D
ETAIL VIEW button is selected, the assets are listed in a table
and sorted by relevance to the search criteria. Clicking the column headings
allows you to sort the results based on that column. Double-clicking the
asset’s row automatically adds the asset to the job.
YPE
If an expected asset is not returned in the search results, it may be because user rights
management is enabled on the Xmedia Server and the current user does not have
permission to view the asset. See “User Rights Management” in the Xmedia Server
Configuration Guide for more information.
Fulfilling jobs using images from the AP Graphics Bank
The Associated Press (AP) Graphics Bank is a breaking news and archive image service
that offers an extensive selection of images for on-air broadcasters.
When the G
Panel, the S
Graphics Bank allowing you to search for suitable images to fulfill the job.
To fulfill an image request job using the AP Graphics Bank:
1. Ensure that the AP Graphics Bank settings are enabled and configured on the Xmedia
Server Control Panel. See page 7-2 and “Enabling AP Graphics Bank components” in
the Xmedia Server Configuration Guide.
2. Open a job in the Work Order window (see page 3-26
Xnews User Manual 3-31
RAPHICS BANK ENABLED check box is selected on the Xmedia Server Control
EARCH button in the Work Order window provides integrated access to the AP
).
Page 65

Familiarizing yourself with the Xnews Interface
The SEARCH button in the Work Order window allows searching in both the Xmedia
Server and in the AP Graphics Bank.
If the XMS S
EARCH button is currently displayed, click the arrow and select the SEARCH
AP GRAPHICS BANK option.
3. Click the AP S
EARCH button.
The AP GRAPHICS BANK: SEARCH window appears.
4. Search for a suitable image by entering a search query (keyword or boolean string) in
the text box and clicking the search button. See page 7-3
for more information
about managing the search results.
5. Once you have found an image that you want to use, select one of the following options
from the drop-down button below the S
P
URCHASE AND
INGEST
Ingest the full resolution version of the selected image and use
this image to replace the placeholder in the current Job.
ORT field:
This operation constitutes a purchase of the image and the AP
GRAPHICS BANK: PURCHASE IMAGES window appears.
P
URCHASE, INGEST
& ATTACH
Ingest the full resolution version of the selected image and use
this image to replace the placeholder in the current Job. In
addition, add the image as an attachment in the Job.
This operation constitutes a purchase of the image and the AP
RAPHICS BANK: PURCHASE IMAGES window appears.
G
The image added as an attachment to the Work Order job can
be saved to disk.
URCHASE AND
P
TTACH
A
Download the full resolution version of the selected image and
add the image as an attachment in the Job.
This operation constitutes a purchase of the image.
The image is added as an attachment to the Work Order job
and can be saved to disk.
Note that the image is not ingested into the Xmedia Server.
NGEST PREVIEW Ingest the low resolution preview version of the selected
I
image and use this image to replace the placeholder in the
current Job.
This operation does not constitute a purchase of the image.
However, to finalize the Job using the preview image, the
image must be purchased.
3-32 Xnews User Manual
Page 66

Familiarizing yourself with the Xnews Interface
NOTE
6. Purchase the selected image and set the image’s properties by following the
instructions on page 7-5.
When a Playlist Verification is performed in Xbuilder or Xplay, if an element in a playlist
contains one or more AP Graphics Bank preview images that have not been purchased, the
status of that element displays as ASSETS AWAITING PURCHASE until the images are
purchased.
Xnews User Manual 3-33
Page 67

Familiarizing yourself with the Xnews Interface
3-34 Xnews User Manual
Page 68

4 PREPARING TO USE XNEWS
A prerequisite to using Xnews to create pages is that the Xmedia Server must contain the
templates upon which the pages will be created. If the templates do not already exist, or if
the templates require edits, you must use Xstudio to create/edit the template before using
Xnews.
Once the templates are available on the Xmedia Server, you must decide whether you will
want to create embedded pages or shared pages. This decision must be made in advance
of creating your page because Xnews must be configured to operate in either embedded
pages mode or shared pages mode.
The information in the following sections will help you to create a template, as well help you
to decide if you want to create embedded pages or shared pages:
Creating templates in Xstudio” on page 4-2
• “
• “Choosing between embedded, shared or private pages” on page 4-5
• “Creating a clip template in Xstudio for clip playout” on page 4-7
Xnews User Manual 4-1
Page 69

Preparing to use Xnews
Creating templates in Xstudio
Templates are built in Xstudio and determine the layout and contents of the on-air graphics.
Meanwhile, pages are instances of a template, which means that the layout is already done
and all you have to do is enter into the template’s variable fields the text, images, or video
clips that are specific to the required broadcast graphic. No matter how many times the
page is edited, the page retains its ties to the template that it was created from. The
advantage of this is that changes to the template are easily propagated to all of the pages
that were built from using that template.
The following procedure provides a high-level overview of how to create a template in
Xstudio. These instructions are only intended to illustrate the template requirements for
creating pages in Xnews. For complete information about creating and using templates in
Xstudio, see the “Xstudio User Manual”.
To create a template in Xstudio:
1. Open Xstudio by selecting S
The CREATE NEW window appears in the Xstudio window upon opening (figure 4-1).
TART>PROGRAMS>VERTIGOXMEDIA>XSTUDIO.
Figure 4-1. Xstudio’s initial screen
2. Select T
An empty template canvas appears and is ready to be populated (figure 4-2
4-2 Xnews User Manual
EMPLATE + SCENE from the CREATE NEW window and then click OK.
).
Figure 4-2. A new, empty template canvas
Page 70

Preparing to use Xnews
3. Build the template by populating the template’s canvas with assets and/or primitives.
• Open the Asset Browser, then drag and drop one or more
CLIP assets onto the template’s canvas.
and/or
IMAGE, CEL ANIMATION,
and/or
• Drag and drop one or more of the following primitives from the Primitives toolbar
to the template’s canvas: T
ADIO BUTTON, ACTIVE X, TIMER.
R
EXT, DROPBOX, BUTTON, TEXTBOX, IMAGE, CHECKBOX,
Figure 4-3. Populating the template with assets and/or primitives
4. Move, resize, align, or layer the objects on the template’s canvas to achieve the desired
layout. See the “Xstudio User Manual” for instructions on how to perform these tasks.
5. Use the P
ROPERTY BROWSER to set the property parameters for each individual object
on the template’s canvas. See “Xstudio User Manual” for descriptions of each of the
properties that can be set.
Of particular relevance to pages for Xnews are the A
LLOW EDITS property and the
properties under the LINKS category (e.g. Lookup table, Data Source...etc.).
• A page’s image, cel animation or clip assets can only be replaced in Xnews if
the asset’s A
LLOW EDITS property is enabled on the template in Xstudio.
Therefore, as the template’s author you can allow users to replace the object
when creating a page by setting the A
LLOW EDITS property to TRUE.
Meanwhile, a FALSE value prevents the asset from being replaced on a page
in Xnews. See “Replacing an image, cel animation or a clip on a page” on
page 5-5 for more information.
• Setting the properties within the LINKS category in the Property Browser
(figure 4-4
) allows you to define when and how the object will be populate with
data (e.g. Data Source or Lookup Table).
Figure 4-4. Set the properties within the Property Browser’s L
INKS category
Xnews User Manual 4-3
Page 71

Preparing to use Xnews
6. Use the ACTION EDITOR to associate the template’s objects with actions that are
executed when a specific event occurs either in Xnews or during playout.
Figure 4-5. Use the Action Editor to associate a template’s object with an action and event
7. Save the template by selecting F
AVE TEMPLATE window appears (figure 4-6) allowing you to specify a name for
The S
ILE>SAVE.
the template and into which category the template will be stored on the Xmedia Server.
Figure 4-6. Save the template asset to the Xmedia Server
4-4 Xnews User Manual
Page 72

Preparing to use Xnews
Choosing between embedded, shared or private pages
Before using Xnews to create graphics pages for broadcast, we recommend that you
determine whether you want to create embedded pages, shared pages or private pages. All
three types of pages provide the same playout performance in a rundown. The main
considerations that should be taken into account is whether the page is intended to be
included in only one or many stories and whether the page asset is required to be stored
and managed on the Xmedia Server.
Embedded pages exist only within a story, and it is the rundown that is saved as a whole
in the Xmedia Server. As a result, the individual page does not exist anywhere else, not
even in the Pages root category of the Asset Browser. An advantage of using embedded
pages is cleanup - once the rundown is deleted, all the pages in it are gone too. Therefore,
the Xmedia Server does not accumulate large quantities of unused/unwanted assets. The
use of embedded pages is commonly preferred in newsroom environments since pages are
usually created for a specific story or rundown and then they are no longer needed. By
default, Xnews is configured to run in E
Pages or Shared Pages mode” on page 2-6).
Shared pages exist in the Xmedia Server (accessed from the Asset Browser) as distinct
assets and can be used in many different stories as a common item. The benefit of using
shared pages is that only one “copy” of that page needs to be updated for the updates to
apply to all of the stories that include that page. The drawback of using shared pages is that
deleting the shared page asset from the Xmedia Server affects all stories that use that page.
By default, Xnews is configured to run in E
create embedded pages.To create shared pages in Xnews, you must disable the
EnableEmbeddedPages setting in the xnews.ini file (see “
or Shared Pages mode” on page 2-6).
Private pages are exclusively meant to replace the use of embedded pages for MOS
workflows in ENPS. In this particular application, embedded pages were previously used
which sometimes resulted in ENPS performance issues. The strategic characteristics of
private pages remedies these issues.
Private pages can only be created in Xnews and like shared pages, they exist as distinct
assets, however unlike shared pages they are not visible from the Asset Browser.
Since private pages exist only in the Xmedia Server, their lifetime must be managed by the
Xmedia Server. When a private page is no longer needed, it must be removed from the
Xmedia Server. The U
Private page is kept in the Xmedia Server after it has been deleted, floated, archived or its
rundown has been made MOS Control Inactive.
Private page names must be valid Xmedia Server asset names and are limited to any
alphanumeric character, space, hyphen and underscore characters. Private pages do not
support recall IDs, so giving a private page a uniquely numeric name does not support the
usual recall id functionality.
To create Private pages, you must enable the EnablePrivatePages setting in the
xnews.ini file (see “
NREFERENCED PRIVATE PAGE EXPIRY setting determines how long a
Enabling Privates Pages mode” on page 2-7).
MBEDDED PAGES MODE (see “Enabling Embedded
MBEDDED PAGES MODE, which only allows you to
Enabling Embedded Pages
Xnews User Manual 4-5
Page 73

Preparing to use Xnews
This icon indicates
Shared pages are stored
on the Xmedia Server
that the open page is a
shared or private page.
If no icon appears,
then the open page
is an embedded page.
While most of the procedures are the same for creating or editing embedded, shared or
private pages, there are some differences in the way in which they are accessed and saved.
Therefore, we recommend that you follow the procedures in the relevant chapters below:
Embedded Pages: Creating, editing and previewing” on page 5-1
• “
• “Shared Pages: Creating, editing and previewing” on page 6-1
Figure 4-7. Identifying whether a page is an embedded page or a shared page
4-6 Xnews User Manual
Page 74

Preparing to use Xnews
Creating a clip template in Xstudio for clip playout
Clip assets can be directly added to a story and played out as part of the rundown. For the
clip to be cued and played out to a device, you must first create and publish a “clip template”
in Xstudio. The clip template must contain a clip texture on both the template and scene
side. The clip texture on the scene side must then be associated to the clip texture on the
template side. By setting the texture on the template side, we are able to display the clip
proxy on the template in Xplay and the linking takes care of setting the clip object on the
scene side.
Once the clip template is saved to the Xmedia Server and published to the device, you must
set the C
Device Manager.
The following topics provide instructions for how to create a clip template and set the device
configuration settings for clip playback:
• “
• “Specifying the clip template on a device’s configuration” on page 4-9
Creating a clip template
To create a clip template in Xstudio:
1. Open Xstudio by selecting S
LIP TEMPLATE and CLIP OBJECT NAME fields on the device’s configuration in the
Creating a clip template” on page 4-7
TART>PROGRAMS>VERTIGOXMEDIA>XSTUDIO.
The CREATE NEW window appears in the Xstudio window upon opening (figure 4-8).
Figure 4-8. Xstudio’s initial screen
Xnews User Manual 4-7
Page 75

Preparing to use Xnews
2. Select TEMPLATE + SCENE from the CREATE NEW window and then click OK.
An empty template canvas appears and is ready to be populated (figure 4-9
3. Place an Image texture on the template’s canvas by selecting the IMAGE PRIMITIVE icon
and dragging the texture onto the canvas (figure 4-10).
).
Figure 4-9. A new, empty template canvas
Figure 4-10. Add an image texture to the template’s canvas
4. Select the S
LIP PRIMITIVE icon and dragging the object onto the canvas (figure 4-11).
C
CENE tab and place a clip object on the scene’s canvas by selecting the
Figure 4-11. Add a clip primitive object to the scene-side’s canvas
4-8 Xnews User Manual
Page 76

Preparing to use Xnews
5. Select the TEMPLATE tab to return to the Template side.
6. Link the template side’s image texture to the scene’s clip object by dragging the clip
object in the scene tree and dropping it onto the image texture (figure 4-12
Be sure to place and size the clip object within the scene’s safe areas.
Figure 4-12. Link the scene’s clip object to the template’s image texture
).
7. Save the template to the Xmedia Server by selecting F
category for the template in the SAVE TEMPLATE window. Then, click OK.
ILE>SAVE. Specify a name and
Specifying the clip template on a device’s configuration
To specify a clip template on a device’s configuration:
1. Open the clip template in Xstudio and take note of its name, category location, and the
name of the texture on the template side.
2. Open the D
The Device Manager (DEVICE CONFIGURATION window) appears (figure 4-13).
3. If the device is connected (appears in the Device box on the right side), click the left
arrow button to disconnect it and make it available for editing.
The device box becomes empty.
EVICE MANAGER window by selecting TOOLS>DEVICES>CONFIGURE DEVICES.
Figure 4-13. The Device Manager
Xnews User Manual 4-9
Page 77

Preparing to use Xnews
4. Select the device name in the table and click the EDIT button.
The Device Manager window expands to reveal the E
settings (figure 4-14
DIT DEVICE CONFIGURATION
).
Figure 4-14. The device’s configuration settings
5. Click the
BROWSE button next to the Clip Template field.
The SELECT CLIP TEMPLATE window appears.
6. Navigate to the Clip Template, select the asset, and then click OK.
ELECT CLIP TEMPLATE window closes and the clip template’s name appears in the
The S
CLIP TEMPLATE field on the Device Configuration window.
7. Type the name of the texture on the template side of the clip template in the C
LIP
OBJECT NAME field.
8. Click A
PPLY.
The EDIT DEVICE CONFIGURATION settings close.
9. Reconnect the device by selecting the device’s name from the table and then clicking
the right arrow button . The device now appears in the Device box on the right
(figure 4-15
).
10. Click the CLOSE button to close the DEVICE CONFIGURATION window.
Figure 4-15. Reconnect the device
4-10 Xnews User Manual
Page 78

5 EMBEDDED PAGES: CREATING,
NOTE
EDITING AND PREVIEWING
By default, Xnews is configured to run in EMBEDDED PAGES MODE, which allows you to
create embedded pages that exist only within a story/rundown, rather than being saved as
an asset on the Xmedia Server (i.e. shared page). The Embedded Page configuration is
preferred in most cases since pages are usually created for a specific story or rundown and
then they are no longer needed (see page 4-5
pages). So rather than storing and deleting all of the individual page assets, embedded
pages are saved within the rundown, and only the rundown is required to be deleted when
it is no longer needed.
The following topics provide practical information and instructions for creating, editing and
previewing embedded pages using Xnews:
Creating a new embedded page from a template” on page 5-2
• “
• “Opening an existing embedded page” on page 5-3
• “Changing a template’s editable fields” on page 5-4
• “Replacing an image, cel animation or a clip on a page” on page 5-5
• “Editing a page’s image using the Image Editor” on page 5-7
• “Previewing the on-air look of a page” on page 5-14
• “Saving and adding embedded pages to a story” on page 5-15
for more information about embedded
Although the default configuration sets Xnews to Embedded Pages mode, the instructions
Enabling Embedded Pages or Shared Pages mode” on page 2-6 will allow you to verify
in “
that your system is indeed configured in Embedded Pages mode.
Also note that to create embedded pages you must ensure that the Enable Private Pages
setting is either not present in the xnews.ini file, or that EnablePrivatePages=false.
Xnews User Manual 5-1
Page 79

Embedded Pages: Creating, editing and previewing
Creating a new embedded page from a template
Since pages are based on templates, you must first open the desired template to create a
page from it. You can then edit the template’s editable fields (i.e. text, images, clips...etc.)
and insert it into a news story as a new embedded page.
To create a new embedded page from a template:
1. Display the available templates in the Asset Gallery by clicking the TEMPLATES category
in the Asset Browser and navigating down until the desired template is displayed in the
Asset Gallery.
If a page is already open, click the C
the open page, and then display the templates in the category that was last selected.
When the new page opens, the Asset Browser disappears. To display it again, click the
orange gripper bar.
2. Double-click the template in the Asset Gallery from which you would like your page
based.
A new page is created based on the template and is opened for editing. The status bar
indicates that the page has not yet been named and saved, and identifies the template
on which it is based.
3. Modify the page’s replaceable fields as required (see “
fields” on page 5-4 and “Replacing an image, cel animation or a clip on a page” on page
5-5).
4. Set the page’s O
“Displaying a listing of Work Orders or Jobs” on page 3-19.
5. Insert the page into the story. See “
page 5-15.
FFSET and DURATION settings that are displayed in the Status bar. See
REATE NEW button in the toolbar. This will close
Changing a template’s editable
Saving and adding embedded pages to a story” on
5-2 Xnews User Manual
Page 80

Embedded Pages: Creating, editing and previewing
The embedded page
opens in Xnews
In the story, double-click
the embedded page’s
MOS entry
The Save Page & Close button
indicates that you are editing
a page that belongs to a rundown
(i.e. embedded page)
Opening an existing embedded page
By definition embedded pages are not saved on the system, rather they are part of the story
that they were inserted into. Therefore, to open an embedded page involves first opening
the story in the NCS workstation. Once the story is open, you can open, edit, and/or save
changes to the page.
To open an existing embedded page:
1. With the NCS workstation interface open, navigate to the rundown and story that
contains the page that you want to open.
2. Open Xnews in the NCS workstation interface.
3. Double-click the MOS entry for the page that you want to open (figure 5-1
The page opens in the Home Area of the Xnews interface.
).
Xnews User Manual 5-3
Figure 5-1. Opening an embedded page in Xnews
Page 81

Embedded Pages: Creating, editing and previewing
NOTE
Changing a template’s editable fields
Templates determine the layout and appearance of graphics pages and they can range in
sophistication from very simple (i.e. an over-the-shoulder image) to multi-asset displays that
use logic to determine the content and behavior of the resulting page.
Regardless of how simple or complex the template is, you can create a unique page from
the template by editing the template’s editable fields. These editable fields may be:
• Text inside text boxes
• Selections from drop-down lists
• A selection from a series of radio buttons
• Single or multiple selections from check boxes
• An image, cel animation, or clip
Making changes to the editable fields follows the typical user interface behavior. For
example, enabling/disabling a radio button or check box by selecting it, or filling in text by
selecting and typing inside a text box. Since changing an image, cel animation or clip is a
little more involved, precise instructions are provided on page 5-5
A quick way of identifying and navigating through the editable fields on a template or page
is to click anywhere on the page and then click the TAB key to go from one editable field to
the next.
.
Figure 5-2. Customize pages by changing the editable fields on the template
Not all fields on a template are designed to be editable. Whether or not a field is to be
editable is determined by the creator of the template in Xstudio by enabling the field’s
(asset’s) A
it most likely has been intentionally protected to enforce editorial standards.
5-4 Xnews User Manual
LLOW EDIT property. Therefore, if you select a field and you are unable to edit it,
Page 82

Embedded Pages: Creating, editing and previewing
Replacing an image, cel animation or a clip on a page
A page’s image, cel animation or clip assets can be replaced in Xnews only if the asset’s
LLOW EDITS property was enabled on the template in Xstudio. When the asset is added to
A
template in Xstudio, the author can specify whether or not the asset can be edited/replaced
by setting the asset’s ALLOW EDITS property (figure 5-3). Assigning a TRUE value to this
setting allows Xnews users to change the asset in Xnews. However, a F
the asset from being replaced on a page in Xnews. This editorial restriction ensures that all
of the pages that are created from the template have a consistent look and feel.
Creating templates in Xstudio” on page 4-2 for more information.
See“
Figure 5-3. The Allow Edits property in Xstudio determines whether the image/clip can be edited in Xnews
To replace a page’s image, cel animation or clip in Xnews:
While the following procedure only makes reference to images, these instructions also
apply to replacing a cel animation or a clip on a page.
1. With the page open in the Home Area, right-click on the existing image that is to be replaced.
• If the template allows the image to be edited, the S
window appears allowing you to view all of the images stored on the Xmedia
Server (figure 5-4).
Note: If the desired image does not currently exist in the browser (i.e. on the
Xmedia Server), you can create a work order request for its creation. See
Creating and using Work Orders” on page 3-23 for more information.
“
• If nothing happens when you right-click, then the image’s properties are most
likely set not allow Xnews users to edit or replace the asset on the page.
ELECT AN IMAGE browser
ALSE value prevents
Figure 5-4. The Image Browser allows you to view and choose an image to use as a replacement
Xnews User Manual 5-5
Page 83

Embedded Pages: Creating, editing and previewing
NOTE
2. Either double-click on the desired image, or select it and then click OK.
The Image Browser window closes and the image is updated on the page in Xnews.
If a page’s image requires editing, you can access and use the Image Editor for performing
minor editing tasks like adjusting the image’s color and sharpness or cropping the image.
See page 5-7 for more information.
5-6 Xnews User Manual
Page 84

Embedded Pages: Creating, editing and previewing
Editing a page’s image using the Image Editor
The Image Editor allows you to perform some basic image editing tasks to the image assets
that appear on the template or page. For example, you can adjust the image’s color and
sharpness or crop the image.
To access the Image Editor from within Xnews:
1. With a page open in the Home Area, right-click on the image.
The SELECT AN IMAGE window appears (figure 5-5).
Figure 5-5. click the Edit button to open the Image Editor
2. Navigate to and select the image that is to be edited.
3. Once the image is selected, click the E
MAGE EDITOR window appears (figure 5-6).
The I
DIT button (figure 5-5).
Figure 5-6. The Image Editor
The following sections provide functional descriptions and instructions for how to use the
Image Editor to edit image asset:
Zooming in/out and repositioning the image” on page 5-8
• “
• “Cropping an image” on page 5-10
• “Making color adjustments” on page 5-12
• “Adjusting the sharpness of an image” on page 5-13
• “Using the Image Modification buttons to flip an image” on page 5-13
Xnews User Manual 5-7
Page 85

Embedded Pages: Creating, editing and previewing
Original image displayed (centered)
Zoom in on the Image, but the upper
portion is now is not visible
Panned up to view the whole
statue, while still zoomed in.
Zooming in/out and repositioning the image
When editing an image, it is often necessary to view the image, or a portion of the image,
in greater detail. It is for this reason that the Image Editor allows you to magnify, or zoom in
on the image, as well as zoom out to get an expanded or distanced view of the image.
As figure 5-7
directly in the center of Editor’s canvas. However, when you zoom in on the image, you may
not see certain areas of the image. To reposition the image within the display, while
maintaining the zoom scale, you can pan across the image to the area that is otherwise
outside of the window’s display.
Instructions for zooming in/out and panning across the image are provided below.
• “
• “Reposition the image by panning” on page 5-9
demonstrates, when an image is opened in the Image Editor it is placed
Zooming in/out” on page 5-8
Figure 5-7. Zooming in and panning across the canvas
Zooming in/out
There are two (2) methods that you can use to zoom in on an image:
1. The Image Editor’s ZOOM tool allows you to zoom in on a particular area on the image.
• Click the Z
Your pointer transforms into a magnifying glass.
• Click the part of the image that you want to zoom in on.
The Image Editor zooms in on the image in increments.
2. You can zoom in on the image using your mouse or keyboard. Note, however, that this
type of zoom operation zooms in on the center of the portion of the image that is
currently displayed. As a result, you may need to pan across the image to view a
particular area of interest (see figure 5-7
• Roll the mouse wheel forward.
Or,
• click the + (plus) key on your keyboard’s number pad.
5-8 Xnews User Manual
OOM button on the Image Editor’s toolbar.
).
Page 86

Embedded Pages: Creating, editing and previewing
To zoom out of the image:
You can zoom out of the image using your mouse or keyboard. Note, however, that this
type of zoom operation zooms out on the center of the portion of the image that is
currently displayed.
• Roll the mouse wheel backward.
Or,
• click the - (minus) key on your keyboard’s number pad.
Or,
• click the S
PACE BAR on your keyboard and the zoom is reset to the images
original scale (1:1).
Reposition the image by panning
There are three (3) methods that you can use to reposition an image by panning:
Panning is only required, and therefore only available, when a portion of the zoomed image
is not visible in the Image Editor’s canvas. In such a case, the canvas’ horizontal and/or
vertical scroll bars become active.
1. The Image Editor’s P
drag the image around the Editor’s canvas.
• Click the P
Your pointer transforms into a hand.
• Drag the image in the direction (up/down, and/or right/left) required to
reposition and display the desired portion of the image in the Editor’s canvas.
2. You can reposition an image using the Editor’s canvas scroll bars. When an upper or
lower portion of the image is not visible in the Editor’s canvas, the canvas’ vertical scroll
bar becomes active. Similarly, when the right or left portion of the image is not visible
in the Editor’s canvas, the canvas’ horizontal scroll bar becomes active.
• Drag the scroll box up/down and/or back/forth to reposition the image on the
Editor’s canvas.
3. You can also use the keyboard’s direction keys (up, down, left, right, page up, and page
down) to reposition the image in small increments.
AN tool allows you to reposition an image using your mouse to
AN button on the Image Editor’s toolbar.
Xnews User Manual 5-9
Page 87

Embedded Pages: Creating, editing and previewing
NOTE
Crop the image if you want to focus on
Use the crop and zoom features to resize
and reposition the bounding outline around
the portion of the image to be preserved.
The cropped image can be saved
using a new, or the same, name.
only a portion of the original image.
Cropping an image
The Image Editor’s cropping function allows you to conserve a selected portion of the image,
while removing the remaining portions surrounding the selected area (see figure 5-8
Cropping is a popular image processing technique that is commonly used to focus the image
on a particular subject or area on the image.
Figure 5-8. Cropping the contents of an image asset using the Image Editor
).
Since cropping permanently alters the image, the Image Editor allows you to save a copy
of the changed image before the cropping is actually performed. As a result you can
preserve the original state of the image asset.
A bounding outline surrounds the image when it is opened in the Image Editor (figure 5-8). The
bounding outline is a frame that is used for defining the area of interest when using the
cropping feature. In other words, the content inside of the bounding outline will be preserved,
while whatever is outside the bounding outline will be permanently removed. When the Image
Editor is in crop mode, dragging the bounding outline’s corner handles (squares) allow you use
to resize the bounding outline around the area of interest on the image. If the “U
INTEREST ASPECT RATIO” check box is selected, then the bounding outline can only be resized
SE AREA OF
to dimensions that maintain the aspect ratio of the image’s placeholder on the scene, template,
or control panel. Clearing this check box allows you to resize the bounding outline freely
without any aspect ratio restrictions.
When resizing or repositioning the bounding outline, its dimensions and location is display
in the lower right corner of the Image Editor window (figure 5-9
). The first set of number
displays the X/Y dimensions of the bounding outline in pixels, while the second set
represents the location coordinates of the bounding outline’s upper left corner.
Figure 5-9. The dimensions and location of the bounding outline
5-10 Xnews User Manual
Page 88

Embedded Pages: Creating, editing and previewing
To crop an image:
1. Open the original image in the Image Editor (see “
Zooming in/out and repositioning the
image” on page 5-8).
2. With the image completely visible in the Image Editor, click the C
ROP button .
3. Resize and/or reposition the bounding area to include only the content to be preserved.
a. Select the U
SE AREA OF INTEREST ASPECT RATIO check box if you want to resize the
bounding outline, but still maintain the aspect ratio of the image’s placeholder on
the scene, template, or control panel. Clear the check box is you want to freely
resize the bounding area.
b. Drag the bounding outline’s sizing handles to resize the bounding outline around
the area of interest.
c. If necessary, you can reposition the bounding outline within the image by clicking
inside the bounding outline and dragging it over the area of interest in the image.
4. Once the bounding outline contains only the area of interest, click OK.
AME NEW IMAGE window appears.
The N
Figure 5-10. The N
AME NEW IMAGE window.
5. Save the cropped image:
• Select the S
TRETCH IMAGE TO FILL PLACEHOLDER check box if you want the
Image Editor to enforce scaling so that the resulting image is the exact size of
the placeholder.
• Leave the S
TRETCH IMAGE TO FILL PLACEHOLDER check box clear (unchecked)
if you want to defer any scaling between the cropped image and its final space
until playout time.
• If you want to preserve the original image asset, you can save the cropped
image as a new image by typing in the name of the new image asset in the
text box and then clicking OK on the N
AME NEW IMAGE window.
• To replace the original image with the cropped image, leave the original
image’s name in the text box and click OK.
The Image Editor closes automatically and the cropped image appears on the page.
Xnews User Manual 5-11
Page 89

Embedded Pages: Creating, editing and previewing
Making color adjustments
The Image Editor allows you to adjust the color properties of an image asset. Color
adjustments are applied immediately to the entire image, not just a specific area of interest.
You can experiment with different color settings, however there is no way to undo your
changes except to click the R
they were in when the image was last saved, or by clicking the C
the Image Editor and the image asset remains unchanged.
Figure 5-11 and the following table demonstrate that you adjust the image’s color properties
by moving the property’s slider to the right or left.
Figure 5-11. The Image Editor’s color adjustment sliders
Contrast The difference in the luminance of the brightest and the darkest areas of an image. A
high contrast will display an obvious difference (i.e. black versus white) in the
luminance between two areas, while a low contrast makes the difference less obvious
or more gradual (i.e. shades of grey).
• Move the slider to the right to increase the image’s contrast ratio.
• Move the slider to the left to decrease the image’s contrast ratio.
ESET ALL button, which returns the color settings to the state
ANCEL button, which closes
Brightness Generally, the brightness setting determines how light or dark a the colors of the image
are based on how close the colors are to white. The more white a color has, the brighter
it is.
• Move the slider to the right to increase the image’s brightness (until all white)
• Move the slider to the left to decrease the image’s brightness (until all black)
Saturation Saturation refers to the intensity of a specific hue. It is based on the color's purity; a
highly saturated hue has a vivid, intense color, while a less saturated hue appears
more muted and grey. With no saturation at all, the hue becomes a shade of grey.
• Move the slider to the right to increase the image’s saturation.
• Move the slider to the left to decrease the image’s saturation.
Gamma Alters the contrast of the mid-tone colors with little effect on pure white or black, which
is the function of the Contrast property above. Increasing the gamma ratio increases
the image’s highlight to shadow contrast in terms of mid-tone colors’ density values.
Decreasing the gamma setting intensifies the shadows amongst the mid-tone colors.
• Move the slider to the right to increase the image’s gamma setting.
• Move the slider to the left to decrease the image’s gamma setting.
5-12 Xnews User Manual
Page 90

Embedded Pages: Creating, editing and previewing
Adjusting the sharpness of an image
The Image Editor allows you to adjust the sharpness setting of an image asset. The
sharpness adjustment is applied immediately to the entire image, not just a specific area of
interest. You can experiment with different settings, however there is no way to undo your
changes except to click the R
it was in when the image was last saved, or by clicking the C
Image Editor and the image asset remains unchanged.
Figure 5-12 demonstrates that you adjust the image’s sharpness property by moving the
property’s slider to the right to increase the focus and to the left to blur the image.
Figure 5-12. The Image Editor’s sharpness adjustment slider
ESET button, which returns the sharpness setting to the state
ANCEL button, which closes the
Using the Image Modification buttons to flip an image
The Image Editor allows you to quickly change the orientation of an image by flipping it
horizontally or vertically. Figure demonstrates that the IMAGE MODIFICATION section of the
Image Editor’s interface features two buttons: F
these buttons to immediately flip the image, and click the button again to return to the
original orientation.
Figure 5-13. The Image Editor’s Image Modification buttons allow you to quickly flip image assets
Xnews User Manual 5-13
LIP HORIZONTAL and FLIP VERTICAL. click
Page 91

Embedded Pages: Creating, editing and previewing
Previewing the on-air look of a page
While editing or creating of a page, Xnews allows you to preview the on-air playout
appearance and behavior of the page on a designated device (e.g. Software CG).
Figure 5-14. The playout of a page can be previewed on a device during creation
For the preview page functionality to be used, you must enable the PLAYOUT settings in the
Xnews.ini file and the device must be exclusively available for Xnews connectivity. See
Enabling the Playout Preview setting” on page 2-5 for instructions on how to enable the
“
Playout preview mode.
Once these conditions are met, each time a page or template is opened in the Xnews Home
Area, the PREVIEW PAGE button appears in the toolbar allowing you to preview the page
on the device.
To preview a page on a device:
With a page/template open in the Xnews Home Area, look to see if the Xnews toolbar
contains the P
If so, click the P
then played out on the device identified in the xnews.ini file.
If the Preview Page button does not appear in the toolbar, the Preview Page functionality
has not been properly enabled. Return to page 2-5 and follow the instructions for enabling
the Preview Page feature.
If the Preview Page icon appears in the toolbar but it has a red X over it , this indicates
that the device is currently disconnected or not available to Xnews. For example, the device
might be closed, or currently be used by or connected to another Vertigo Suite application.
Click the Preview Page button to try to connect to the device. If the connection is reestablished then the Preview Page icon returns to its normal appearance and the page
playouts on the device. If the Preview Page remains with the X over it, you must verify the
availability of the device.
5-14 Xnews User Manual
REVIEW PAGE button.
REVIEW PAGE button and the page is quickly published to the device and
Page 92

Embedded Pages: Creating, editing and previewing
Saving and adding embedded pages to a story
Once you have completed all of your edits to the page, you can save and add the page to
a story in the NCS interface.
To save and add a newly created embedded page to a NCS story:
With a story open in the NCS and the page open in the Xnews Home Area:
• click the S
and is saved to the story.
Or,
• Drag and drop the Drag bar from the Xnews interface into your NCS’s story area (figure
5-15
AVE AND INSERT PAGE button from the Xnews toolbar. The page closes
).
Figure 5-15. Using the Drag bar to add a page to the NCS story
To save any changes to an embedded page to a NCS story:
With the page open in the Xnews Home Area, click the S
Xnews toolbar. The page closes and is saved to the story.
Xnews User Manual 5-15
AVE PAGE button from the
Page 93

Embedded Pages: Creating, editing and previewing
5-16 Xnews User Manual
Page 94

6 SHARED PAGES: CREATING, EDITING
This icon indicates
Shared pages are stored
on the Xmedia Server
that the open page
is a shared page
AND PREVIEWING
Unlike embedded pages, which only exist within a story/rundown, shared pages are distinct
assets that are stored on the Xmedia Server and they can be used in many different playlists
as a common item. See page 4-5 for more information about shared pages.
Creating a new shared page requires that Xnews be configured for Shared Pages mode
(see page 2-6). However, editing and/or adding shared pages to a NCS story can be
performed in either Embedded Pages or Shared Pages mode.
The following topics provide practical information and instructions for creating, editing and
previewing shared pages using Xnews:
Creating a new shared page from a template” on page 6-2
• “
• “Opening an existing shared page” on page 6-3
• “Editing and previewing a shared page” on page 6-4
• “Saving shared pages to the Xmedia Server” on page 6-5
• “Adding shared pages to a story” on page 6-7
Xnews User Manual 6-1
Figure 6-1. Identifying shared pages
Page 95

Shared Pages: Creating, editing and previewing
Creating a new shared page from a template
Since pages are based on templates, you must first open the desired template to create a
page from it. You can then edit the template’s replaceable fields (i.e. text, images,
clips...etc.) and save it as a new shared page.
To create a new page from a template:
1. Display the available templates in the Asset Gallery by clicking the desired TEMPLATES
category in the Asset Browser.
If a page is already open, click the C
the open page, and then display the templates in the category that was last selected.
When the new page opens, the Asset Browser disappears. To display it again, click the
orange gripper bar.
2. Double-click the template in the Asset Gallery from which you would like your page
based.
A new page is created based on the template and is opened for editing. The status bar
indicates that the page has not yet been named and saved, and identifies the template
on which it is based.
3. Modify the page’s replacable fields as required (see “
Server” on page 6-5 and “Replacing an image, cel animation or a clip on a page” on page
5-5).
4. Set the page’s OFFSET and DURATION settings that are displayed in the Status bar. See
Displaying a listing of Work Orders or Jobs” on page 3-19.
“
5. To save the page:
a. Click the S
AVE PAGE button in the toolbar.
The SAVE PAGE window appears, unless QUIETMODE is enabled. If QuietMode is
enabled, then the page is automatically named (see page 2-5
NOTE: If the SAVE PAGE button is disabled in the toolbar, the ALLOW CREATION
OF SERVER PAGES setting has been disabled. See “Preferences settings” on
page 2-15 for information on how to enable this setting and enable the SAVE
PAGE button.
b. Specify the following information on the S
AME - The name that you want to give to the new page.
• N
• RECALL ID - A code (usually numeric) you can assign to the page.
UTHOR - The name of the person who authored the page.
• A
ESCRIPTION - A description of the page.
• D
VAILABLE CATEGORIES - The categories in which you would like to store
• A
and make the page available.
c. Click OK to save, or the C
unsaved page.
REATE NEW button in the toolbar. This will close
Saving shared pages to the Xmedia
).
AVE PAGE window:
ANCEL button to close the window and returned to the
6-2 Xnews User Manual
Page 96

Shared Pages: Creating, editing and previewing
NOTE
NOTE
NOTE
Opening an existing shared page
All of the previously created shared pages are centrally archived on the Xmedia Server.
Using the Asset Browser and Asset Gallery in the Xnews interface, you can navigate to and
open an existing page.
You can also open a shared page that is listed in a NCS story by double-clicking the page’s
MOS entry in the story.
Finding and opening an existing page using the Asset Browser and Asset Gallery:
1. With the Asset Browser open (see page 3-9
by expanding the subcategories until the desired page appears or is listed in the Asset
Gallery (figure 6-2
The Asset Gallery can either list the pages in Detail View or as thumbnail graphics using the
Proxy View. Use the CHANGE THE VIEW button to toggle between the two views.
).
), navigate through the PAGES root category
Figure 6-2. Navigate through the Asset Browser and Asset Gallery to find an existing page
2. Once you have located the exact page that you want to open, either:
• Double-click the page’s proxy or name in the Asset Gallery.
Or,
• Right-click on the page’s proxy or name in the Asset Gallery and select the
PEN command.
O
The Asset Browser and the Asset Gallery both close and the page opens in the Home
Area.
Since the Xmedia Server archives all shared pages, navigating and identifying a specific
page using the Asset Browser might not be the most effective, especially if you are not
familiar with the categorization logic. Another method for finding or sorting pages based on
common themes or characteristics is to use the Search Tool. See “
the Xmedia Server” on page 3-21.
Xnews User Manual 6-3
Searching for assets on
Page 97

Shared Pages: Creating, editing and previewing
NOTE
Editing and previewing a shared page
The procedures for editing and previewing pages are the same whether you are working
with a shared or embedded page. Therefore, we ask that you refer to the following topics
for instructions on how to edit and preview a shared page:
Changing a template’s editable fields” on page 5-4
• “
• “Replacing an image, cel animation or a clip on a page” on page 5-5
• “Editing a page’s image using the Image Editor” on page 5-7
• “Previewing the on-air look of a page” on page 5-14
Figure 6-3. Customize pages by changing the editable fields on the template
Not all fields on a template are designed to be editable. Whether or not a field is to be
editable is determined by the creator of the template in Xstudio by enabling the field’s
(asset’s) A
it most likely has been intentionally protected to enforce editorial standards.
6-4 Xnews User Manual
LLOW EDIT property. Therefore, if you select a field and you are unable to edit it,
Page 98

Shared Pages: Creating, editing and previewing
NOTE
NOTE
Saving shared pages to the Xmedia Server
You must save the page to conserve any changes that were made to the page or to archive
the shared page in a category on the Xmedia Server.
The Xnews toolbar features three (3) buttons that can be used to save the shared page. The
AVE PAGE button is used to simply save the page to a category on the Xmedia Server.
S
The S
AVE AND INSERT PAGE button not only saves the page to the Xmedia Server, it also
inserts it into the story that is currently open in the NCS interface. The S
button indicates that the page being edited is part of, and will be saved to, the rundown.
If the SAVE PAGE button is disabled in the toolbar, the ALLOW CREATION OF SERVER
AGES setting has been disabled. See “Preferences settings” on page 2-15 for information
P
on how to enable this setting and enable the SAVE PAGE button.
To save a shared page:
1. With the page open in the Home Area:
• Click the S
category on the Xmedia Server.
The S
Or,
• Click the SAVE AND INSERT PAGE button in the toolbar to save the page to
a category on the Xmedia Server and insert it into the story that is currently
open in the NCS interface.
The S
Or,
• Click the S
make to the page to the existing rundown and Xmedia Server.
AVE PAGE button in the toolbar to just save the page to a
AVE PAGE window appears (figure 6-4).
AVE PAGE window appears (figure 6-4).
AVE AND CLOSE PAGE button in the toolbar to save any edits
AVE AND CLOSE PAGE
If the SAVE PAGE window does not appear and it appears that the page was saved
automatically, then Xnews might have its Q
UIETMODE2 setting enable. See “Configuring the
xnews.ini file” on page 2-5 for more information.
Figure 6-4. Fill in the fields on the Save Page window to save a shared page to the Xmedia Server
Xnews User Manual 6-5
Page 99

Shared Pages: Creating, editing and previewing
2. Specify the following information on the SAVE PAGE window (figure 6-4):
• N
AME - The name that you want to give to the new page.
ECALL ID - A code (usually numeric) you can assign to the page.
• R
UTHOR - The name of the person who authored the page.
• A
ESCRIPTION - A description of the page.
• D
• AVAILABLE CATEGORIES - The categories in which you would like to store
and make the page available.
3. Click OK to save, or the C
ANCEL button to close the window and return to the unsaved
page.
6-6 Xnews User Manual
Page 100

Shared Pages: Creating, editing and previewing
Adding shared pages to a story
Once you have completed all of your edits to the page, you can save and add the page to
a story in the NCS interface.
To save and add a new or existing shared page to a NCS story:
With the page open in the Xnews Home Area:
• click the S
and is saved to the story.
Or,
• While holding down the S
into your NCS’s story area (figure 6-5
AVE AND INSERT PAGE button from the Xnews toolbar. The page closes
HIFT key, drag and drop the Drag bar from the Xnews interface
).
Figure 6-5. Adding a shared page to a story by dragging it from Xnews
Xnews User Manual 6-7
 Loading...