

Page 1
Xbuilder
Playlist & Template-based Graphics Building
User Manual
M852-0600-480
w w w . m i r a n d a . c o m
Page 2

Page 3
Xbuilder
Playlist and Template-Based Graphics Building
User Manual
Vertigo Suite v.4.8
Page 4

Copyright Notice
© 2012 Miranda Technologies Inc. All rights reserved.
Third Party Trademarks
All other brand names, product names or trademarks belong to their respective holders.
Usage Agreement
Please read the following terms and conditions carefully. By using the Xbuilder User
Manual, you agree to the following terms and conditions:
Miranda Technologies Inc. hereby grants permission and license to owners of Xbuilder and
the Xmedia Suite to use their product manuals for their own internal business use. Manuals
for Miranda Technologies Inc. products may not be reproduced or transmitted in any form
or by any means, electronic or mechanical, including photocopying and recording, for any
purpose unless specifically authorized in writing by Miranda Technologies Inc.
Miranda Technologies Inc. makes no warranty, either expressed or implied, including but
not limited to any implied warranties of merchantability or fitness for a particular purpose,
regarding these materials and makes such materials available solely on an “As-Is” basis.
In no event shall Miranda Technologies Inc. be liable to anyone for special, collateral,
incidental, or consequential damages in connection with or arising out of purchase or use
of these materials. The sole and exclusive liability to Miranda Technologies Inc., regardless
of the form of action, shall not exceed the purchase price of the materials described herein.
Miranda Technologies Inc. reserves the right to revise and improve its products at any time
and without notice. This publication describes the state of this product at the time of its
publication, and may not reflect the product at all times in the future. Thus, different versions
of a manual may exist for any given product. Care should be taken to ensure that one
obtains the proper manual version for a specific product serial number.
Information in this document is subject to change without notice and does not represent a
commitment on the part of Miranda Technologies Inc.
Government Use
The Software {and Documentation} is provided with RESTRICTED RIGHTS. Use,
duplication or disclosure by the United States Government or any agency, department or
instrumentality thereof is subject to the restrictions set forth in the Commercial Computer
Software -- Restricted Rights clause at FAR 52.227-19 or the Commercial Computer
Software -- Licensing clause at NASA FAR Supplement 1852.227-86.
Printed in Canada
Document Identification
• Title: Xbuilder User Manual
• Part number: M852-0600-480
• Software version: Vertigo Suite v.4.8
• Last revised: June 21, 2012
Page 5
Document Revision History
After the original release date, this user manual may be updated with edits and then rereleased. The following table tracks the versions of this document.
Publication date Description
June 21, 2012 Original release of this user manual for Vertigo Suite v.4.8
Page 6

Page 7

TABLE OF CONTENTS
Introducing Xbuilder............................................................................................................1-1
Getting started with Xbuilder.............................................................................................. 2-1
Installation and licensing information................................................................................................. 2-2
Starting Xbuilder and connecting to the Xmedia Server .................................................................... 2-3
Overview of Xbuilder’s user interface ................................................................................................ 2-4
Configuring Xbuilder’s settings .......................................................................................................... 2-6
Adding and configuring a Preview device.......................................................................................... 2-7
Configuring a device for the verification of playlist elements............................................................. 2-9
Creating, editing and previewing pages and/or scenes................................................... 3-1
Creating an individual shared page from a template ......................................................................... 3-3
Creating pages and/or scene using a Merge List .............................................................................. 3-4
Creating Merge List file in Microsoft Excel.................................................................................... 3-5
Creating an XML Merge List file.................................................................................................... 3-6
Approving or rejecting new pages and scenes created from a Merge List ................................... 3-8
Opening an existing page or scene ................................................................................................... 3-9
Editing a page or scene’s content elements .................................................................................... 3-10
Previewing a page or scene on the Preview device ........................................................................ 3-11
Saving a snapshot (image file) of a page or scene’s playout .......................................................... 3-12
Rendering pages and scenes to a clip file ........................................................................ 4-1
Render to VAF for pre-rendered playout....................................................................................... 4-2
Render to MXF for playout on a video server ............................................................................... 4-3
Render to MPEG for preview........................................................................................................ 4-4
Manual rendering pages and/or scenes to a file................................................................................ 4-5
Batch-rendering of pages and/or scenes to a file .............................................................................. 4-7
Performing Quality Control (QC) and Media Check (MC)................................................. 5-1
Setting up the QC and MC workflows................................................................................................ 5-3
Create and set up the Subfolders and Approved Category folders .............................................. 5-3
Specify Xbuilder’s settings for the QC and MC workflows ............................................................ 5-4
Associate channels to devices in Xbuilder’s Device Manager ...................................................... 5-5
Verify that the system templates are installed and publish them to the SWCG............................ 5-6
Verify the presence of the QC license .......................................................................................... 5-8
Creating a Make List / Air List spreadsheet ....................................................................................... 5-9
Using AE Plug-in and the Make List to create and ingest graphics ................................................. 5-11
Quality Control: Previewing and validating graphics in Xbuilder...................................................... 5-12
Media Check: Graphics publish verification ..................................................................................... 5-14
Creating and using playlists ............................................................................................... 6-1
An overview of the Playlist Editor ...................................................................................................... 6-2
Procedural overview for creating a sequential playlist....................................................................... 6-3
Creating a new playlist ...................................................................................................................... 6-4
Opening an existing playlist............................................................................................................... 6-4
Xbuilder User Manual TOC-1
Page 8

Table of Contents
Verifying the contents of a playlist ......................................................................................................6-5
Populating a playlist............................................................................................................................6-6
Creating and adding an embedded page to a playlist ...................................................................6-7
Adding shared pages, scenes and clip assets to a playlist............................................................6-8
Appending or inserting the contents of a playlist to a playlist ........................................................6-9
Configuring the Playlist table columns..............................................................................................6-11
Repositioning playlist items within the playlist ..................................................................................6-17
Adding segments to the playlist........................................................................................................6-19
Adding comments to the playlist.......................................................................................................6-21
Deleting playlist items from the playlist.............................................................................................6-22
Editing the properties associated to the playlist items......................................................................6-24
Saving a playlist................................................................................................................................6-26
Reloading the playlist .......................................................................................................................6-28
Creating and using rundowns and segments................................................................... 7-1
An overview of the Rundown Editor ...................................................................................................7-3
An overview of the Segment Editor & Segment Window....................................................................7-4
Procedural overview for creating rundowns .......................................................................................7-6
Creating a new rundown.....................................................................................................................7-7
Opening an existing rundown .............................................................................................................7-8
Creating and using rundown segments ..............................................................................................7-9
Creating a new rundown segment .................................................................................................7-9
Configuring the segment table columns ......................................................................................7-11
Adding pages to a rundown segment ..........................................................................................7-11
Adding scene assets to a rundown segment ...............................................................................7-13
Adding clip assets to a rundown segment ...................................................................................7-13
Adding a comment row to the rundown segment ........................................................................7-14
Repositioning pages within the rundown segment ......................................................................7-15
Deleting or removing items from a rundown segment .................................................................7-16
Saving a rundown segment .........................................................................................................7-17
Opening an existing rundown segment ............................................................................................7-18
Adding segments to a rundown ........................................................................................................7-19
Repositioning segments within the rundown ....................................................................................7-21
Removing segments from a rundown...............................................................................................7-22
Saving a rundown under a different name or category.....................................................................7-23
Deleting a rundown from the system ................................................................................................7-24
Appendix A - Quick reference to Xbuilder’s menus & toolbars ...................................... 8-1
Xbuilder’s menu commands ...............................................................................................................8-2
File menu .......................................................................................................................................8-2
View menu .....................................................................................................................................8-5
Actions menu .................................................................................................................................8-6
Tools menu ....................................................................................................................................8-7
Timeline menu ...............................................................................................................................8-8
Help menu .....................................................................................................................................8-8
Playlist Editor’s toolbar .......................................................................................................................8-9
TOC-2 Xbuilder User Manual
Page 9

Table of Contents
Template Editor’s toolbar & properties ............................................................................................ 8-11
Segment Editor toolbar.................................................................................................................... 8-17
Appendix B - Quick reference to Xbuilder’s settings....................................................... 9-1
General settings ................................................................................................................................ 9-2
Display settings ................................................................................................................................. 9-4
Template Favorites settings............................................................................................................... 9-6
Automation settings ........................................................................................................................... 9-7
Playlist Ingest settings ....................................................................................................................... 9-8
Place Holders settings....................................................................................................................... 9-9
Merge List settings .......................................................................................................................... 9-10
Logging settings .............................................................................................................................. 9-11
Render To File settings ................................................................................................................... 9-12
Timelines settings............................................................................................................................ 9-13
Work Orders settings....................................................................................................................... 9-14
Servers settings............................................................................................................................... 9-15
Playlist > Basic settings ................................................................................................................... 9-16
Playlist > Highlight settings.............................................................................................................. 9-17
Xbuilder User Manual TOC-3
Page 10

Table of Contents
TOC-4 Xbuilder User Manual
Page 11

1 INTRODUCING XBUILDER
Xbuilder’s primary role in the Vertigo Suite is to quickly and accurately build multiple
instances of template-based or pre-rendered graphics for playout. Xbuilder is also allows
you to prepare the new graphics for playout by verifying quality, previewing playout and
organizing the graphics into playlists.
While the remaining chapters provide instructions for how to use Xbuilder, the following list
provides a brief overview of Xbuilder’s main functions:
• Create and populate graphics pages from a master template
Templates created in Xstudio lock down a graphics’ layout. With no need to recreate
the graphic’s layout, Xbuilder can use templates to quickly create multiple instances of
the graphics where the content is specific to the broadcast. These new graphics called
pages are saved as individual assets whose layout is linked to the template. See page
3-1 for more information.
• Render templates to a clip file for the purposes of previewing or playout
Xbuilder can render the playout of templates into various video clip formats, so that you can
preview the graphics playout, or use the resulting clip file to playout the pre-rendered
graphic on a video server or Vertigo playout device. See page 4-1
• Perform quality control and media check of pre-rendered graphics files
Xbuilder’s Make List feature (QC workflow) allows you to preview and validate
(approve or reject) the pre-rendered graphics that the After Effects Plug-in and the
Make List file created and ingested into the Xmedia Server.
Once the graphics are approved and published to the device(s), Xbuilder’s Air List feature
(MC workflow) allows you to quickly preview and verify that all of the approved graphics
have actually been published to the correct devices. See page 5-1
• Create sequential playlists to be played out in Xplay
Xbuilder allows you to build playlists, which are ordered sequences of program clips
and branding and promotional graphics elements (i.e. pages, scenes or clips). The
resulting playlists can be edited and played back using the Vertigo Suite’s Xplay. See
page 6-1
• Create rundowns and segments for newsroom applications
Similar to sequential playlists, Xbuilder can create rundowns and segments, which are
ordered lists of the pages, scenes and clips that can be brought into newsroom
applications. See page 7-1
for more information.
for more information.
for more information.
for more information.
Xbuilder User Manual 1-1
Page 12

Introducing Xbuilder
1-2 Xbuilder User Manual
Page 13

2 GETTING STARTED WITH XBUILDER
This chapter provides you with information about installing and licensing the Xbuilder
software on a client workstation. Additional information and instructions are provided for
performing a basic setup and configuration of the Xbuilder software.
Once you have completed the installation and quick setup, Xbuilder will be properly
configured to create and save pages, render graphics to clips and create playlists.
This chapter is organized into the following topics:
Installation and licensing information” on page 2-2
• “
• “Starting Xbuilder and connecting to the Xmedia Server” on page 2-3
• “Overview of Xbuilder’s user interface” on page 2-4
• “Configuring Xbuilder’s settings” on page 2-6
• “Adding and configuring a Preview device” on page 2-7
• “Configuring a device for the verification of playlist elements” on page 2-9
Xbuilder User Manual 2-1
Page 14
Getting started with Xbuilder
Installation and licensing information
Xbuilder is packaged with the Vertigo Suite software installation wizard. It can be installed
as part of the full installation or as an individual (standalone) component. In both cases, you
simply need to run the installation wizard on a workstation that is on the same network as
the Xmedia Server.
Information regarding the Vertigo Suite’s hardware and network requirements, as well as
instructions for installing and/or upgrading Xbuilder, are available in the Vertigo Suite’s
Release Notes, which can be downloaded from the Miranda Technical Support Services
web site.
To operate in its full capacities, Xbuilder requires that four (4) software application licenses
(listed below) be installed and validated on the Xmedia Server. Therefore, once Xbuilder is
installed, you must contact the Miranda Technical Support team (support@miranda.com
to request a license key. Then you must apply and validate the licenses using the
XmediaServer Control Panel. Instructions for acquiring and validating licenses are also
provided in the Vertigo Suite’s Release Notes.
License name Description
)
Xbuilder
XGSoftware
XGEncode
XGEncodeforPlayout
QC
The Xbuilder license is required to open and operate the base
features and functionality of the Xbuilder application.
The XG Software license is required to preview graphics using the
VX-Preview (Software CG) application. See page 3-11
information.
The XG Encode license is required to use Xbuilder’s Render to File
feature, which renders and saves the playout of a template, page,
and/or scene to a file in various clip formats. See page 4-1
information.
The XG Encode for Playout license is required to render pages
and/or scenes to playout server compatible formats (XDCAM and
IMX compatible MXF files). See page 4-3
The QC license is required to use Xbuilder’s Quality Control (QC)
workflow (O
preview and validate graphics before they are published to the target
devices and taken to air. See page 5-1
PEN MAKELIST feature). The QC workflow allows you to
for more information.
for more information.
for more
for more
2-2 Xbuilder User Manual
Page 15
Getting started with Xbuilder
Starting Xbuilder and connecting to the Xmedia Server
When you initially launch Xbuilder, a dialog box appears and asks you to configure the
server location. As a client application, Xbuilder must be connected to the Xmedia Server,
which is the centralized asset management server for Vertigo applications and devices.
Since you have only just installed Xbuilder, the first task that you must do is to connect
Xbuilder to the Xmedia Server.
To start Xbuilder and connect to the Xmedia Server:
1. Click S
2. When the message asking you to configure the server location, click the Y
TART>PROGRAMS>VERTIGOXMEDIA>XBUILDER.
ES button.
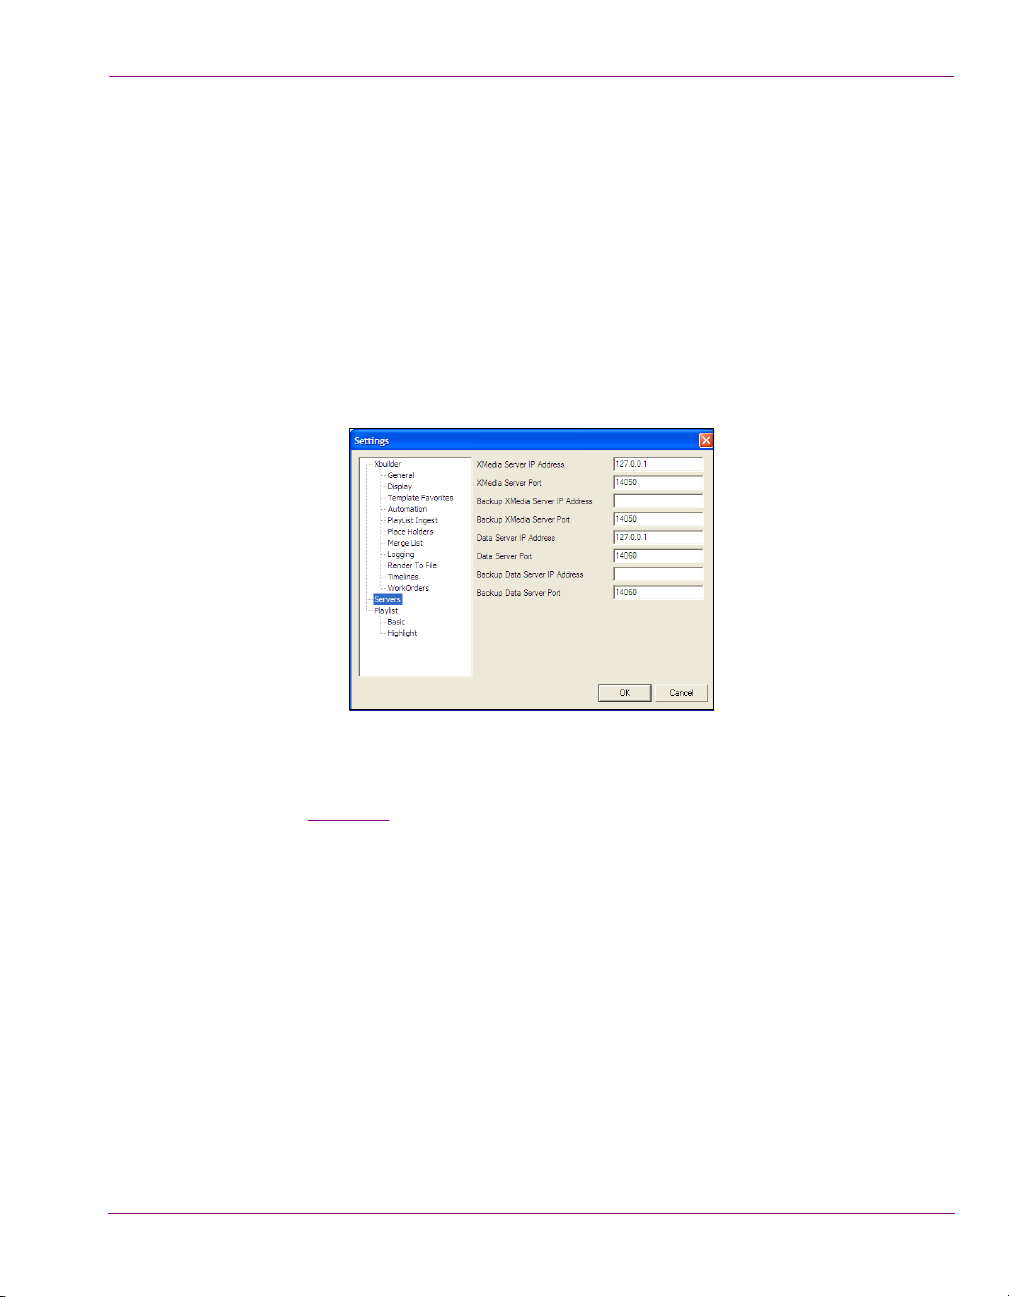
The SETTINGS dialog box appears.
Figure 2-1. Settings dialog box
3. Click SERVERS in the tree view at left. This displays the settings related to the Xmedia
Server (see page 9-15 for more information about Xbuilder’s Server settings).
4. In the X
MEDIASERVER IP ADDRESS field, replace <server IP> with the IP address of
the machine hosting the Xmedia Server.
5. Unless the port number was changed when the Xmedia Server was installed, the
default in the X
MEDIASERVER PORT field will be correct. If it was changed, enter the new
number.
6. Click OK.
Xbuilder launches. If the program does not launch, consult your system administrator.
The problem could be due to one of the following:
• The IP address or port was entered incorrectly.
• The machine hosting the Xmedia Server is down.
• The Xmedia Server is not running on the host machine.
• The machine is not connected to the network.
Xbuilder User Manual 2-3
Page 16
Getting started with Xbuilder
1
2
3
4
5
6
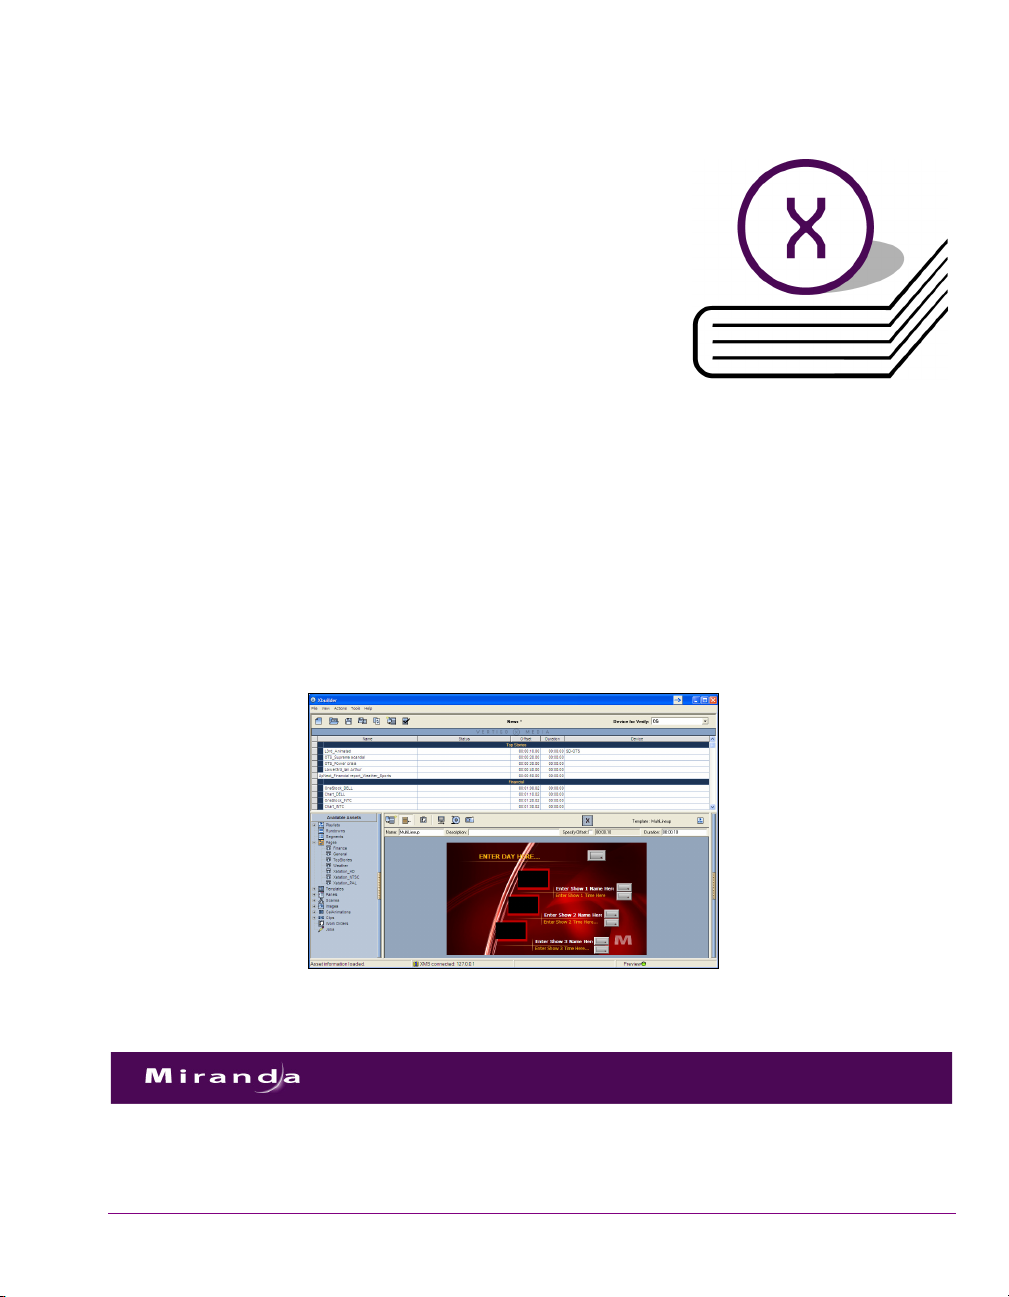
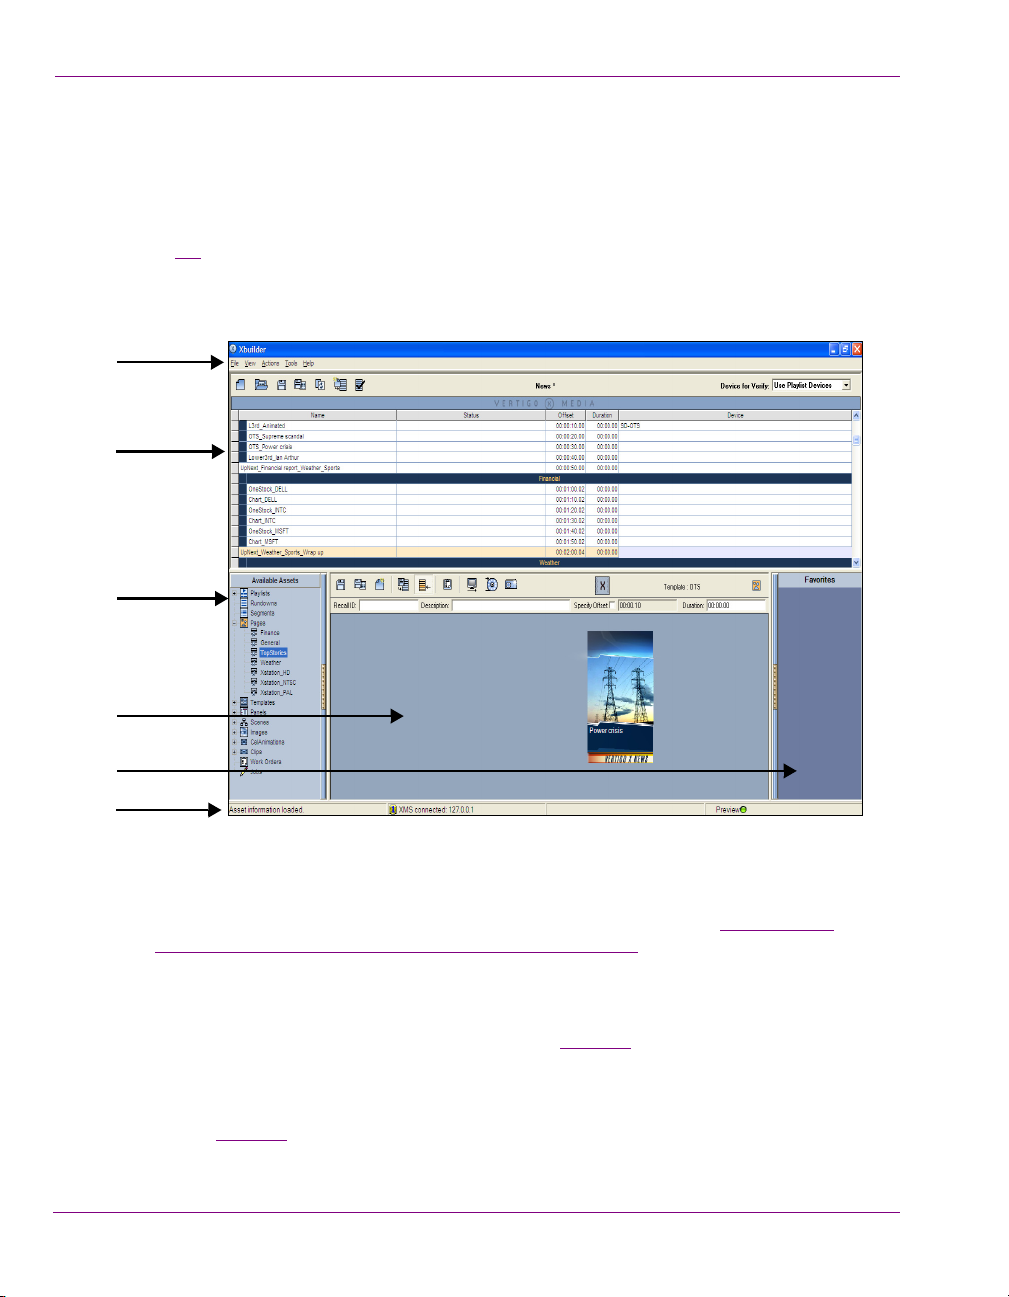
Overview of Xbuilder’s user interface
Xbuilder provides an interface provides you with the tools and features required for
accomplishing various tasks like creating and populating pages, rendering graphics to a file
or building playlists.
Figure 2-2
features and components. Information and instructions for how to use each interface
component are provided in within the applicable tasks in further chapters.
and the following descriptions provide an overview of Xbuilder’s main interface
1. Main menus - Located along the top of the interface, these menu commands provide
access to most of Xbuilder's settings and administrative functions. See “
Quick reference to Xbuilder’s menus & toolbars” on page 8-1 for more information.
2. The upper portion of the Xbuilder interface changes according to what type of project
you are working on: playlist, segment, rundown or timeline.
• Playlist Editor - The workspace where pages, templates, scenes and clips
can be organized into a sequential playlist. See page 6-2
using the Playlist Editor.
• Segment window - Very similar to the Playlist Editor, the Segment window
allows you to build a portion of a sequential playlist to be used in a rundown.
See page 7-4
for full details on using the Segment window.
Figure 2-2. Xbuilder interface
Appendix A -
for full details on
2-4 Xbuilder User Manual
Page 17

Getting started with Xbuilder
• Rundown Editor - The workspace for creating a sequential rundown playlist
using segments, pages, clips, scenes and template assets. See page 7-6 for
full details on using the Rundown Editor.
• Timeline Editor - The Timeline Editor allows you to create and edit
automated promos by assembling and editing episodic clips, graphics, and
audio elements within a timeline interface.
3. Asset Browser - Located in the lower left-hand portion of the interface, the Asset
Browser provides a tree view of the asset categories on the connected Xmedia Server.
When you select a category or sub-category, the assets stored within the category are
displayed in the panel to the right of the Asset Browser (Template Editor). You can
display or hide the Asset Browser by pressing C
TRL+A, or by selecting Asset Browser
from the View menu.
4. Template Editor - Its main function is to provide a canvas for displaying and editing
the variable fields on a open pages, templates and scenes. Its toolbar buttons provide
access to commands and features tat can be applied to the displayed asset.
A secondary function of this interface panel, is to display the contents of the selected
category from the Asset Browser. The assets from a selected category can be viewed
in proxy or list view mode.
5. Favorites Browser - Located in the lower right-hand portion of the interface, the
Favorites Browser provides a quick drag-and-drop area where frequently used
templates, pages, scenes and clips can be stored for easy access.
6. Status bar - Located along the bottom of the Xbuilder window, the status bar provides
process update messages (left), server connection identification (center), and preview
device connection status (right).
Xbuilder User Manual 2-5
Page 18
Getting started with Xbuilder
Configuring Xbuilder’s settings
Although Xbuilder’s default settings are appropriate for most operating circumstances, you
may want to customize the look and behavior of the application using Xbuilder’s settings.
Note that modifying these settings is entirely optional.
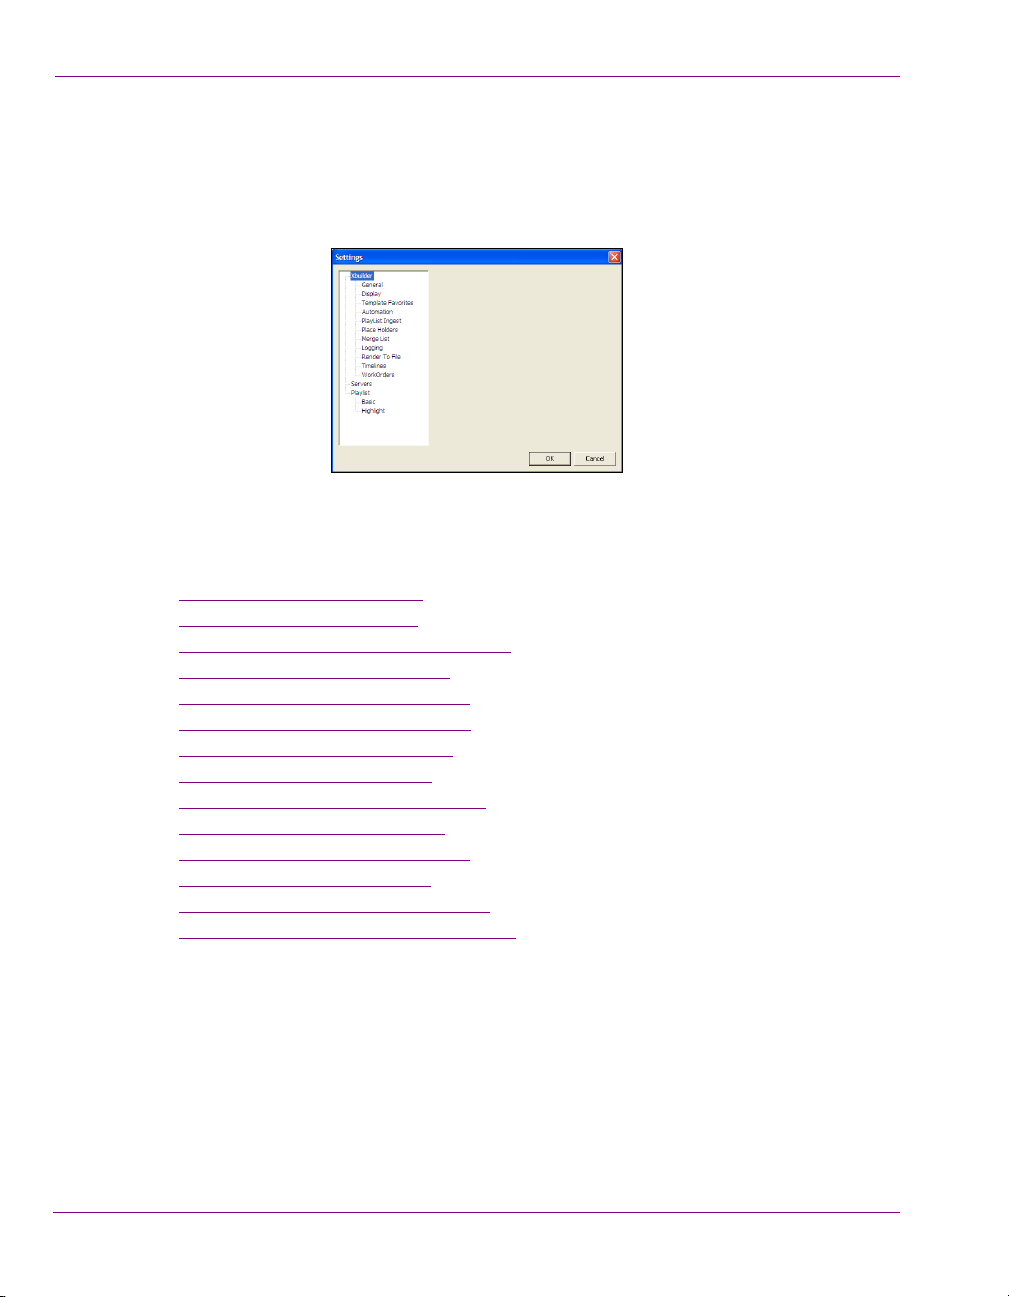
Changes to Xbuilder settings are made within the S
accessed by selecting TOOLS>SETTINGS from the Xbuilder menu commands.
This SETTINGS dialog box contains a tree-structure of thematic settings. Each of the settings
is defined in the following sections:
General settings” on page 9-2
• “
• “Display settings” on page 9-4
• “Template Favorites settings” on page 9-6
• “Automation settings” on page 9-7
• “Playlist Ingest settings” on page 9-8
• “Place Holders settings” on page 9-9
• “Merge List settings” on page 9-10
• “Logging settings” on page 9-11
• “Render To File settings” on page 9-12
• “Timelines settings” on page 9-13
• “Work Orders settings” on page 9-14
• “Servers settings” on page 9-15
• “Playlist > Basic settings” on page 9-16
• “Playlist > Highlight settings” on page 9-17
ETTINGS dialog box, which can be
2-6 Xbuilder User Manual
Page 19
Adding and configuring a Preview device
NOTE
In order to use Xbuilder’s features for previewing the playout (page 3-11) and/or render a
page/scene to file (page 4-1
these tasks. In most cases, a Vertigo Software CG device is used for previewing and
rendering to file in Xbuilder.
The XGSOFTWARE license is required to fully use the preview feature.
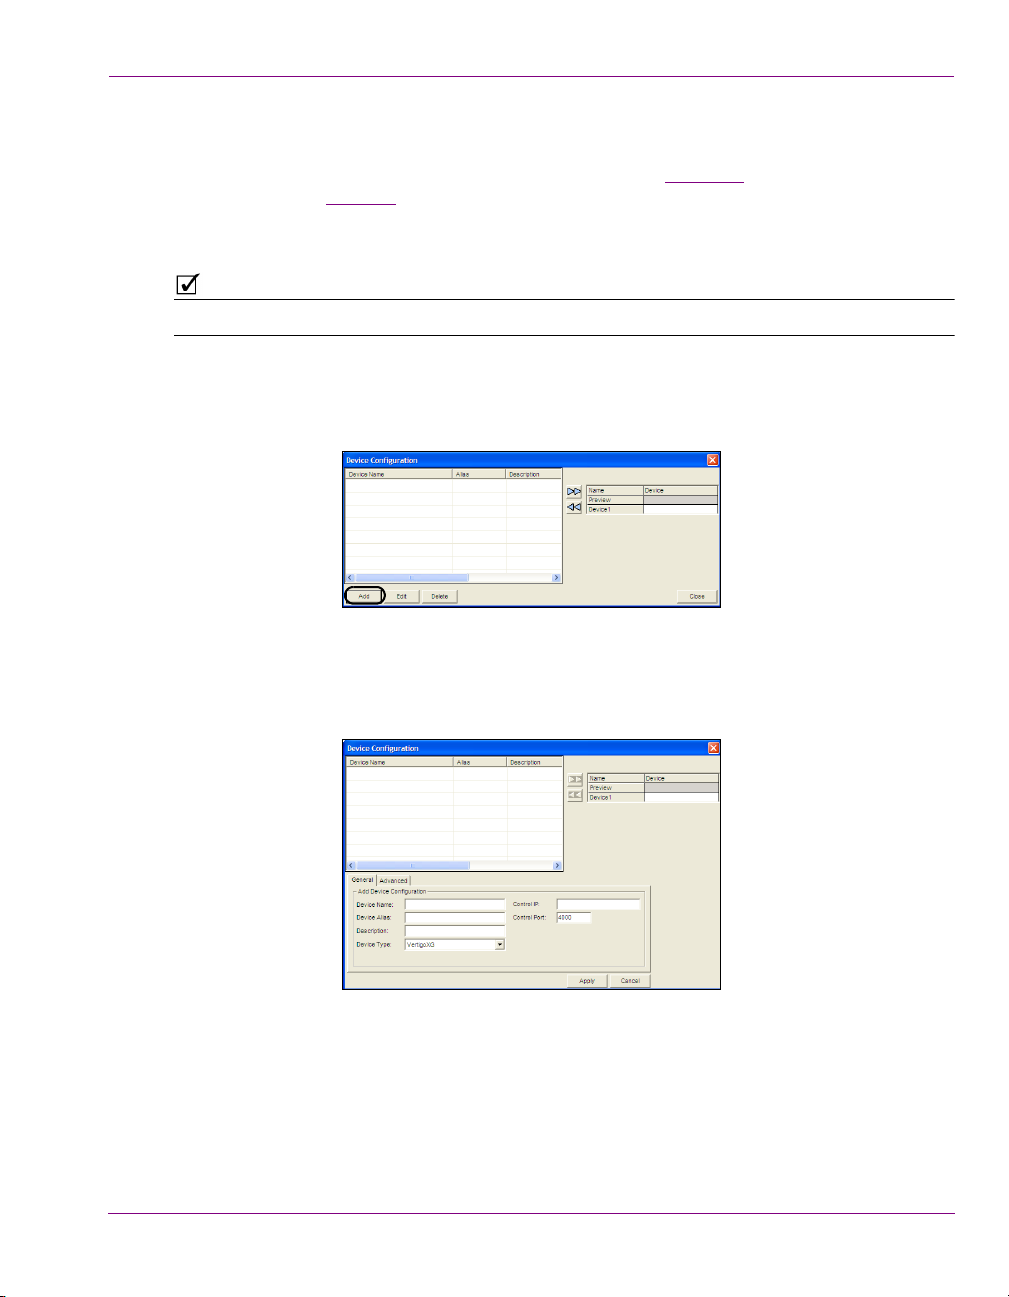
To add and connect Xbuilder to a Preview device:
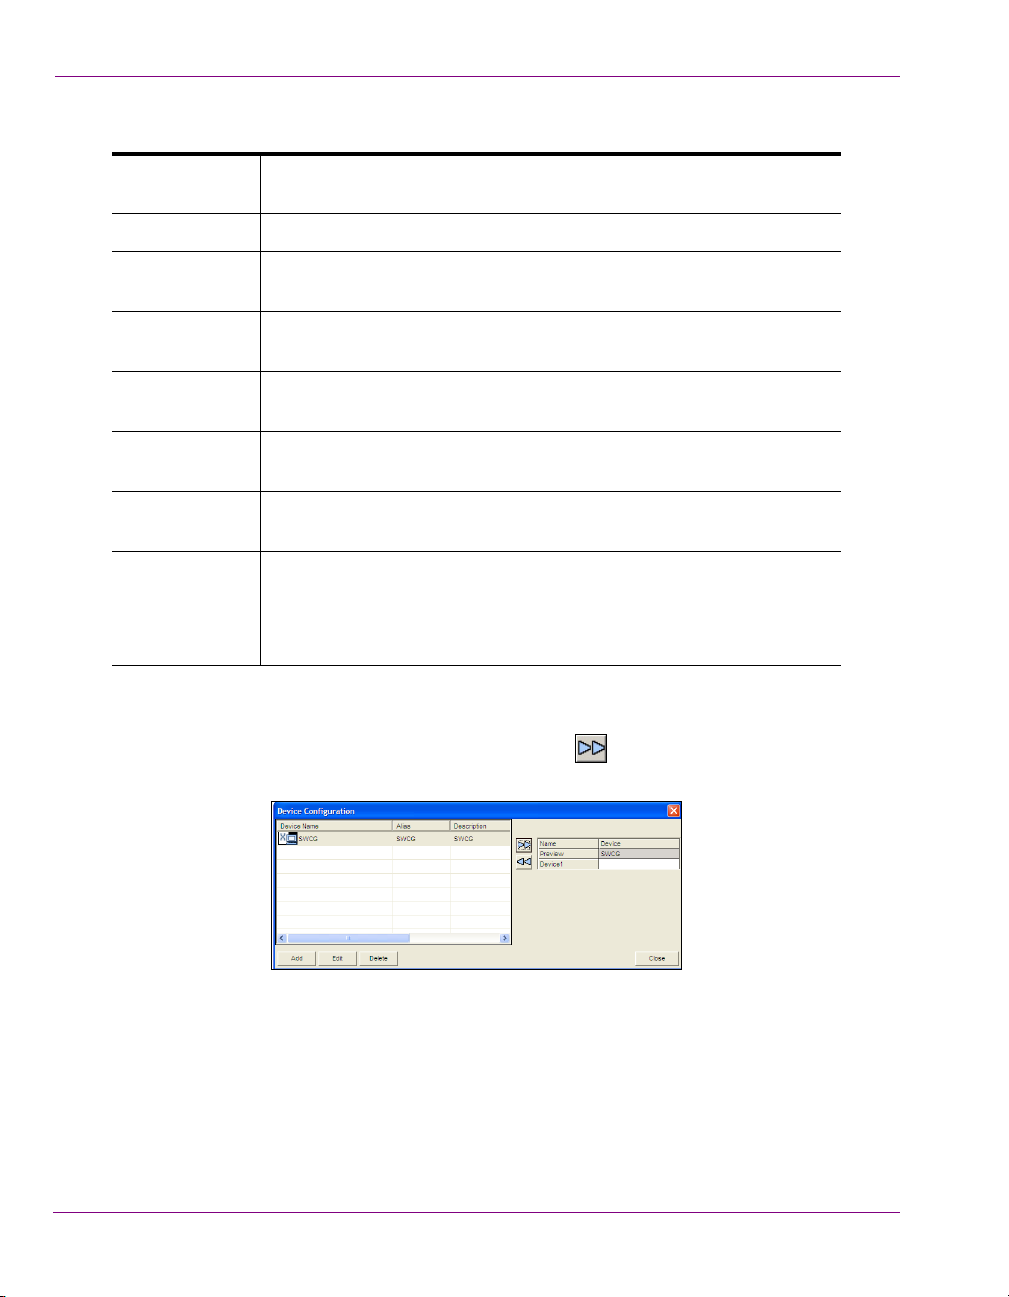
1. Open the Device Configuration window by selecting T
2. In the D
EVICE CONFIGURATION window, select the ADD button:
), you must specify which device Xbuilder will use to perform
OOLS>DEVICE MANAGER.
Figure 2-3. Device Configuration dialog box
Getting started with Xbuilder
3. The D
Xbuilder User Manual 2-7
EVICE CONFIGURATION windows expands to reveal two tabs (GENERAL and ADVANCED)
with settings for identifying the device’s configuration.
Figure 2-4. Add Device Configuration section
Page 20
Getting started with Xbuilder
4. Specify the appropriate General Device Configuration settings:
Device name The name of the selected device. This can only be modified when
Device alias An alternative name for the selected device on your network.
Description An optional field that lets you label the device to distinguish it from other
Device Type Identifies the type of device that these settings apply to. Select
Control IP The network location (IP address) or hostname of the selected device.
Control Port The networking port that serves as a channel for sending commands to
Publish IP The network location (IP address) or hostname of the selected device.
Publish Port The networking port that serves as a channel for publishing assets.
adding a device.
similar devices at your facility (for example).
REVIEW (or other device) for Software CG devices.
P
The host must be available on the network.
and from the device.
The host must be available on the network.
Typically, this value is set to 15000.
N
OTE: This value must correspond with the port used by the
XpublishAgent on the output device.
5. Click A
6. In the D
PPLY.
EVICE CONFIGURATION dialog box, click in the cell to the right of Preview.
7. Select the device from the table at left and then click .
The device now appears next to the P
REVIEW box at right.
8. Click CLOSE.
When Xbuilder successfully connects to the preview device, the LED in the lower right
corner of the Xbuilder window is green and when disconnected, it is red.
2-8 Xbuilder User Manual
Page 21
Getting started with Xbuilder
Configuring a device for the verification of playlist elements
Xbuilder can be configured to manually or automatically verify the elements of a playlist
have been published to specified devices. Elements that have not been published are
identified and highlighted in the playlist so that they can be published. For this verification
step to be accomplished, the target devices that will be checked must first be assigned in
the Device Manager.
To specify a device for the verification of playlist elements:
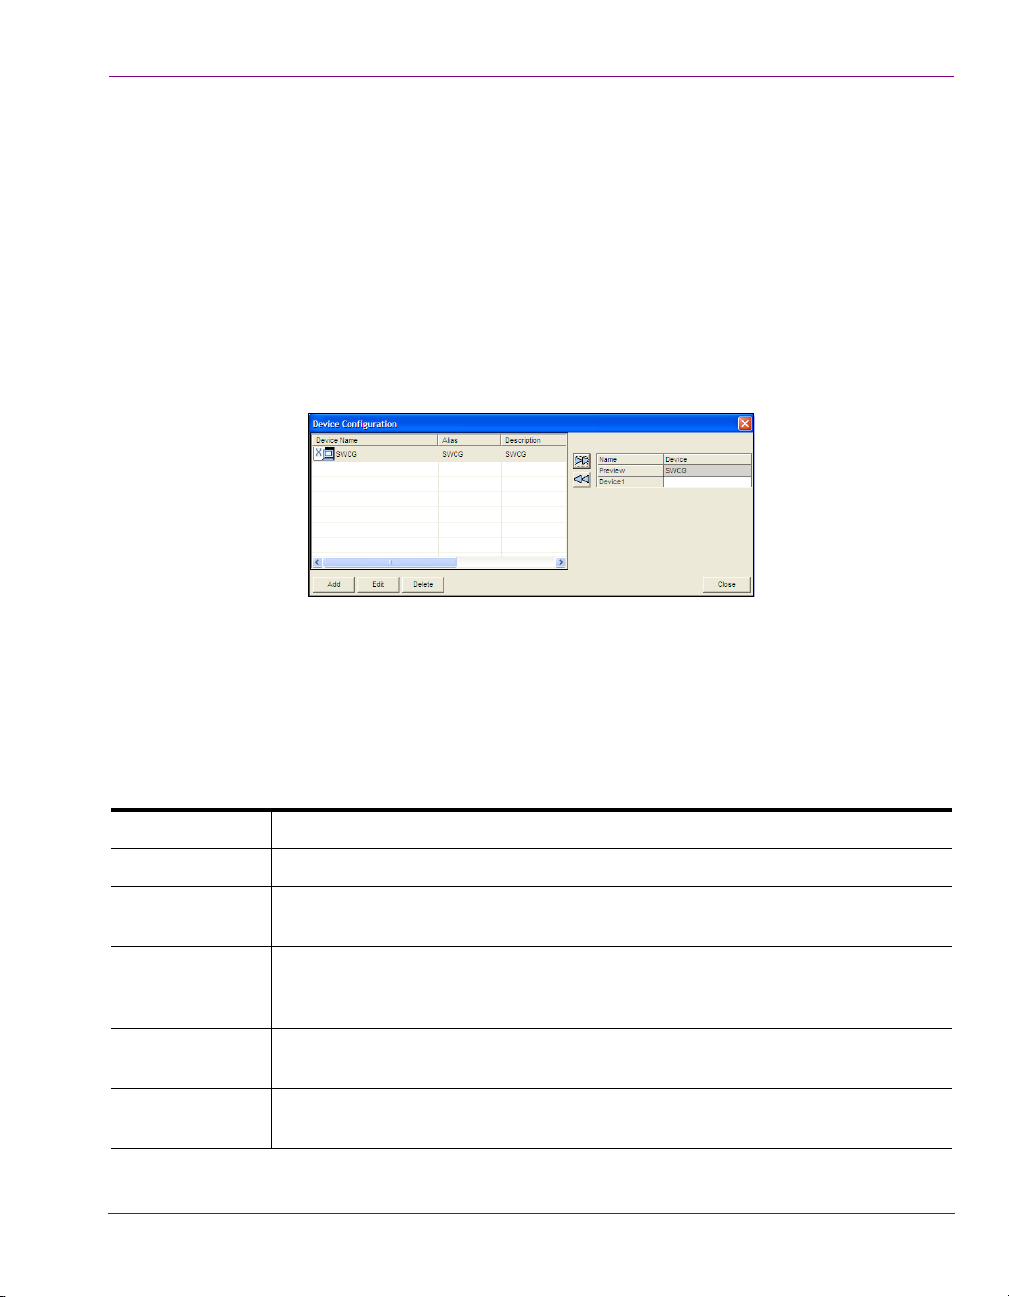
1. Open the Device Manager by selecting T
EVICE CONFIGURATION dialog box appears.
The D
Figure 2-5. Device Configuration dialog box
OOLS>DEVICE MANAGER.
2. Verify that the intended output device is listed in the D
If it is not, then you must add it to the device list.
a. In the D
b. The D
ADVANCED) with settings for identifying the device’s configuration.
c. Specify the appropriate General Device Configuration settings:
Device name The name of the selected device. This can only be modified when adding a device.
Device alias An alternative name for the selected device on your network.
Description An optional field that lets you label the device to distinguish it from other similar
Device Type Identifies the type of device that these settings apply to. Choose from the following:
Control IP The network location (IP address) or hostname of the selected device. The host
Control Port The networking port that serves as a channel for sending commands to and from the
Xbuilder User Manual 2-9
EVICE CONFIGURATION window, select the ADD button.
EVICE CONFIGURATION windows expands to reveal two tabs (GENERAL and
devices at your facility (for example).
V
ERTIGOXG, INTUITIONXG, PREVIEW (OR OTHER DEVICE), IMAGESTORE, INTUITION,
FTP, LGK, DSK, HMP, or O
must be available on the network.
device.
THER.
EVICE CONFIGURATION dialog box.
Page 22
Getting started with Xbuilder
Publish IP The network location (IP address) or hostname of the selected device. The host
must be available on the network.
Publish Port The networking port that serves as a channel for publishing assets. Typically, this
value is set to 15000.
NOTE: This value must correspond with the port used by the XpublishAgent on the
output device.
d. Specify the appropriate Advanced Device Configuration settings:
Clip Template The name of the template that is used to play out clips. The clip template’s control-
side must have a texture linked to a scene-side clip object. Use the button to
navigate to the Clip template.
Note that among the Vertigo Suite’s system templates are valid clip templates for
various scene formats. The system templates are export files that are stored in the
following directory: Program Files\VertigoXmedia\Apps\Support. Once
imported into the Xmedia Server, the templates are stored in the
EMPLATES>SYSTEM TEMPLATES category.
T
The Clip Template field only appears when one of the following device types is
selected: Vertigo XG, Intuition XG, Preview (and other devices), or Other.
Cel Template The name of the template used to play out cel animations. The cel template’s
control-side must have a texture linked to a scene-side clip object. Use the button
to navigate to the Cel template.
Note that among the Vertigo Suite’s system templates are valid Cel templates for
various scene formats. The system templates are export files that are usually stored
in the following directory: Program Files\VertigoXmedia\Apps\Support.
Once imported into the Xmedia Server, the templates are stored in the
TEMPLATES>SYSTEM TEMPLATES category.
The Cel Template field only appears if one of the following device types is selected:
Vertigo XG, Intuition XG, Preview (and other devices), or Other.
Image Template The name of the template used to play out images. The image template’s control-
side must have a texture linked to a scene-side clip object. Use the button to
navigate to the Image template.
Note that among the Vertigo Suite’s system templates are valid image templates for
various scene formats. The system templates are export files that are usually stored
in the following directory: Program Files\VertigoXmedia\Apps\Support.
Once imported into the Xmedia Server, the templates are stored in the
EMPLATES>SYSTEM TEMPLATES category.
T
The Image Template field only appears if one of the following device types is
selected: Vertigo XG, Intuition XG, Preview (and other devices), or Other.
2-10 Xbuilder User Manual
Page 23
Getting started with Xbuilder
External Keyer Allows you to associate another device with the current device. This setting is
specifically used when the CG output is keyed over the ImageStore output. In this
way, specific commands can be sent to the ImageStore (the External keyer) when
specific things are done on the CG.
Publish Master Lets you select a master device.
e. Click APPLY.
The device is added to the Device list in the Device Configuration dialog box.
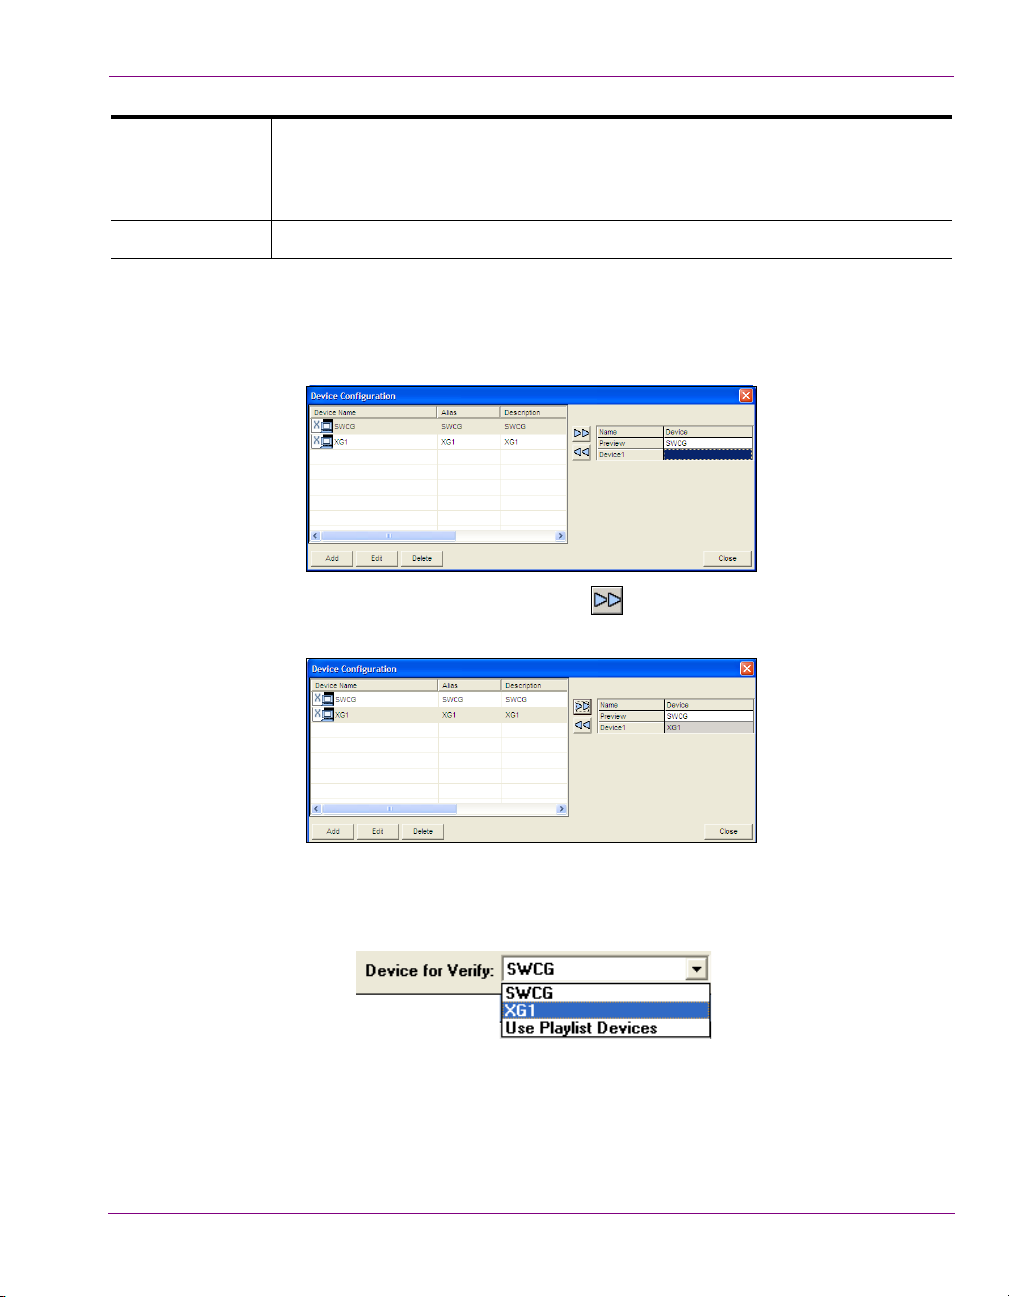
3. In the D
EVICE CONFIGURATION dialog box, select the text box to the right of DEVICE1.
4. Select the device name from the table and click .
The device appears in the box on the right side with its name in the D
5. Click C
LOSE on the Device Configuration dialog box.
6. Restart Xbuilder and ensure that the device was added to the D
down list in the upper-right corner of Xbuilder’s Playlist Editor toolbar.
EVICE1 field.
EVICE FOR VERIFY drop-
Xbuilder User Manual 2-11
Page 24

Getting started with Xbuilder
2-12 Xbuilder User Manual
Page 25
3 CREATING, EDITING AND PREVIEWING
PAGES AND/OR SCENES
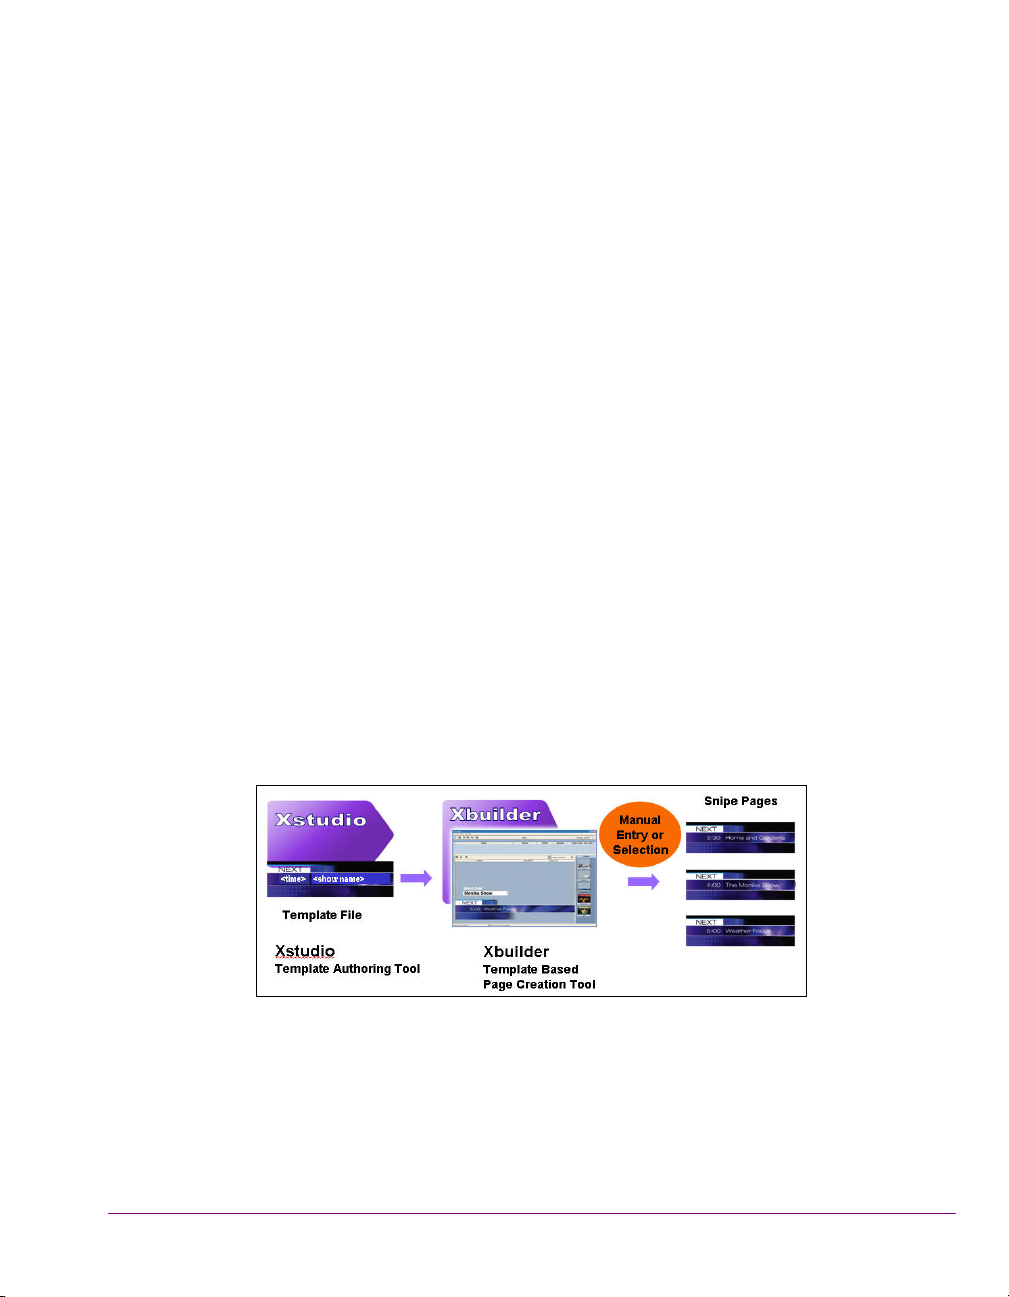
In the Vertigo Suite workflow, Xstudio is used to author scenes, which display graphical
elements (i.e. text, images, video clips, and cel animations) on air. Scenes can be
standalone or they can be associated with a template. A template is an interface that lets
operators control and edit parts of the scene without disturbing the scene’s layout or
formatting.
The benefit of using template-based graphics is that once you have created a scene and
template in Xstudio, rather than recreating the control and layout for similar projects, you
can use the template and scene in Xbuilder to create multiple instances of the graphics
(called pages) by simply changing the content (i.e. enter the new text, images, clips, and/or
animations specific to the broadcast). Also note that no matter how many times the page is
edited, the page retains its ties to the template that it was created from. The advantage of
this is that changes to the template are easily propagated to all of the pages that were built
from using that template.
Figure 3-1. Workflow for populating templates and creating pages
There are actually two types of pages that can be created using Xbuilder: shared or embedded.
Both types of pages provide the same playout performance in a playlist. The main consideration
that should be taken into account is whether the page is intended to be included in only one or
many playlists.
Xbuilder User Manual 3-1
Page 26

Creating, editing and previewing pages and/or scenes
• Shared pages are the preferred type of page as they are created directly from an
existing template and they are saved to the Xmedia Server as distinct assets. Shared
pages can be used in many different playlists as a common item.
• Embedded pages are most often created from another existing page. Unlike shared
pages, embedded pages only exist within a playlist, and it is the playlist that is saved
as a whole to the Xmedia Server. As a result, the individual page does not exist
anywhere else, not even in the P
AGES root category of the Asset Browser. Embedded
page can be reused outside of its playlist if its playlist is inserted or appended to
another playlist, or if the page converted into a shared page using the SAVE AS SHARED
PAGE command. See page 6-7 for instructions on creating and adding embedded
pages to a playlist.
The following sections provide instructions for using Xbuilder to create and populate
graphics pages and scenes, either individually from a template/scene or as a batch using a
Merge List file:
Creating an individual shared page from a template” on page 3-3
• “
• “Creating pages and/or scene using a Merge List” on page 3-4
3-2 Xbuilder User Manual
Page 27
Creating, editing and previewing pages and/or scenes
Creating an individual shared page from a template
Shared pages are graphics created as an instance of an existing template. They are stored
on the Xmedia Server as an distinct assets and can be used in many different playlists as
a common item. Like all pages, the shared page’s formatting is linked to the original
template (changes to the template’s formatting are automatically applied to the page). The
following instructions describe how to create an individual shared page.
To create a new shared page from a template:
1. Open Xbuilder.
2. In the Asset Browser, navigate through the T
desired template listed in the Template Editor.
3. Double-click the template, or right-click on the template listed in the Template Editor
and select the O
PEN command from the context menu.
The template opens in the Template Editor.
4. Set or edit the variable fields in the template as required (see “
content elements” on page 3-10 for assistance).
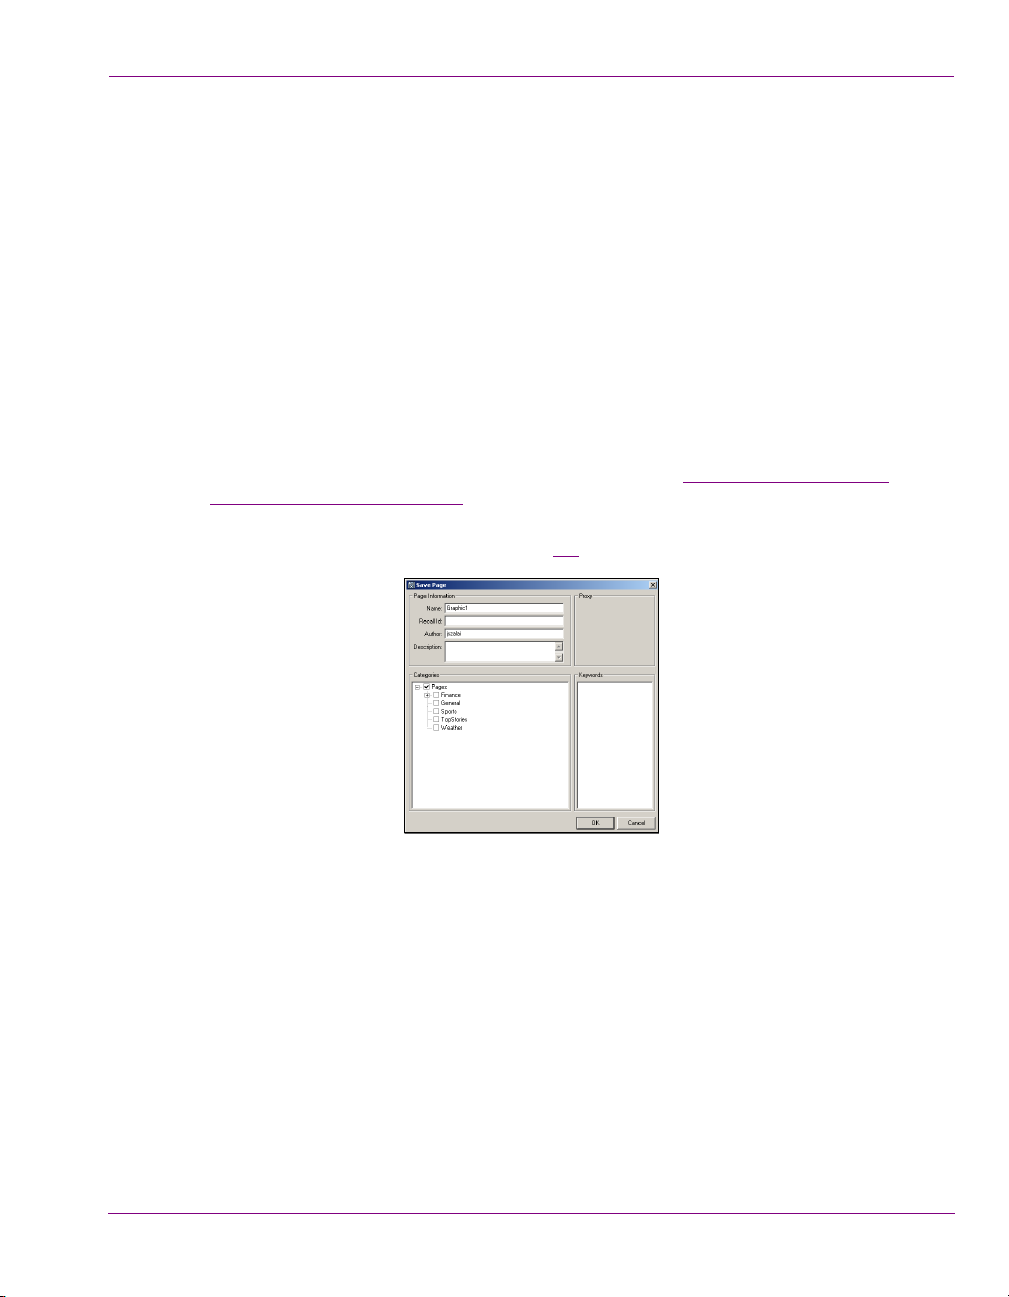
5. Select the F
ILE>SAVE AS A SHARED PAGE command.
The SAVE PAGE dialog box appears (figure 3-2).
EMPLATES root directory until you see the
Editing a page or scene’s
Figure 3-2. The Save As Shared Page command opens the Save Page dialog box
6. In the N
7. In the R
AME field enter a new name for the page.
ECALLID field enter a unique a unique alpha-numeric identifier that can be used
in Vertigo Suite applications (i.e. Xbuilder, Xplay) to quickly call up the specific page.
(optional)
8. Enter your name in the A
9. Enter a short description of the page in the D
UTHOR field (optional).
ESCRIPTION field (optional).
10. Link the page to the Pages root category or to sub-categories by selecting the check
box for each place where you want the page to be accessible from.
11. Click OK to save the page and exit the dialog box.
Xbuilder User Manual 3-3
Page 28
Creating, editing and previewing pages and/or scenes
Creating pages and/or scene using a Merge List
Xbuilder’s Merge List feature (ACTIONS>OPEN MERGE LIST) allows you to create multiple
pages and/or scenes from a single Merge List file (spreadsheet or XML file). Acting as the
data source, the Merge List file provides Xbuilder with the information it needs to create new
instances of pages/scenes from existing template and scene assets.
The following table describes the Merge List workflow for creating new pages and/or scenes:
Step Task Description
1 Configure Xbuilder’s Merge List settings
Specify the default categories in which new pages and scenes will be stored. Since scenes will
only be moved to the default category after they have been approved, you must also specify a
temporary category for new scenes.
1. Open Xbuilder and select T
2. For each of the settings, select the button and select a destination category.
Merge List settings” on page 9-10 for more information.
See “
2 Create the templates and scenes in Xstudio
In Xstudio, create or verify the existence of the templates and scenes that you want to create
the new pages and scene from.
3 Create the Merge List file
Xbuilder generates the new pages and/or scenes based on the data provided in the Merge List
file. The Merge List file can be in XML format or an Excel spreadsheet. The following sections
provide instructions for creating an appropriate Merge List file:
Creating Merge List file in Microsoft Excel” on page 3-5
• “
• “Creating an XML Merge List file” on page 3-6
OOLS>SETTINGS>MERGE LIST.
4 Load the Merge List file in Xbuilder
When a Merge List file is loaded, Xbuilder generates the new pages and/or scenes based on
the data provided in the Merge List file. After being processed, the new pages and/or scenes are
added to a playlist in Xbuilder’s Playlist Editor.
1. Open Xbuilder and select A
2. Use the O
5 Approve or reject the new pages and/or scenes
When new pages are generated by the Merge List, they are added to the playlist as embedded
pages until they have been “approved”. Approved pages become assets (shared pages) and
they are saved in the specified default render path. Rejected pages remain in the playlist as
embedded pages.
When new scenes are generated by the Merge List, they are first placed in the specified
temporary scenes category. Scenes are only moved to their specified render path location after
they have been approved. Rejected scenes remain in the temporary scene folder.
See page 3-8
3-4 Xbuilder User Manual
PEN MERGE LIST FILE window to navigate to and open the Merge List file.
for instructions on how to approve or reject new pages and scenes.
CTIONS>OPEN MERGE LIST.
Page 29
Creating, editing and previewing pages and/or scenes
Step Task Description
6 With the new pages/scenes, you can perform the following tasks:
• Preview the new pages/scenes on a software CG (see page 3-11
• Render all or an individual page/scene to a clip file (see page 4-1
• Create and save a snapshot image of a new page or scene (see page 3-12).
• Perform edits to the content of new pages/scenes (see page 3-10
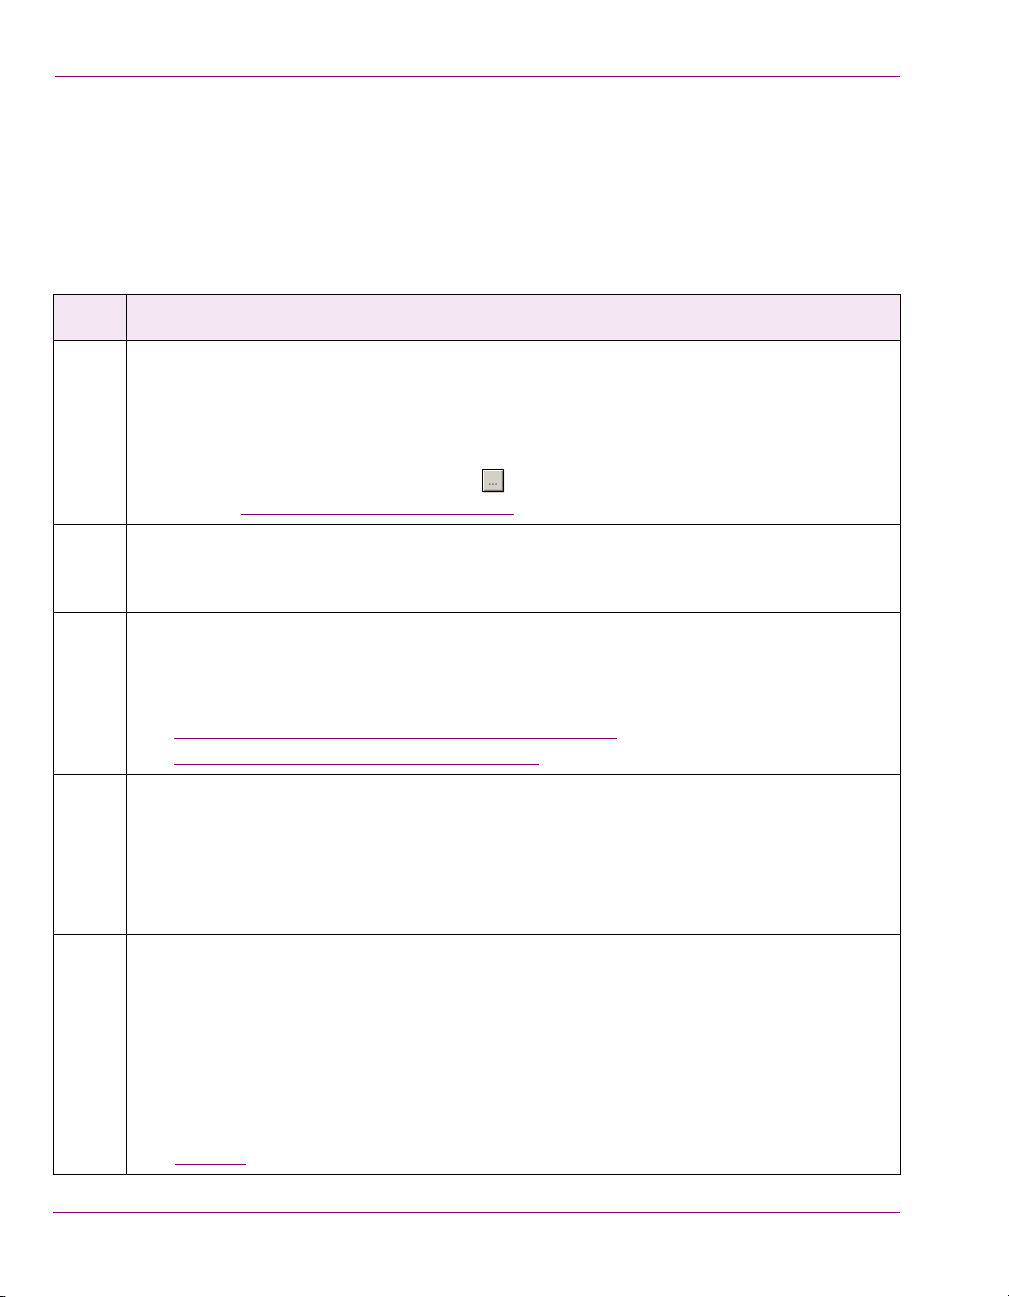
Creating Merge List file in Microsoft Excel
The Merge List file can be in the form of a Microsoft Excel spreadsheet (.xls only), which
contains specific column headers that allows Xbuilder to create new pages and/or scenes
from existing assets (templates/scenes), apply specific attributes, and/or populate the
asset’s fields.
Figure 3-3. Merge List spreadsheet
).
).
).
Figure 3-3
first row in the Merge List spreadsheet contains the mandatory column headers for the data
the Xbuilder needs to create the new pages and/or scenes.
The following list identifies and describes the columns and information are mandatory or
commonly used in a Merge List spreadsheet:
• PageName: The path and asset name of the template that the new page will be created
• OutputName: The path and asset name given to the new page or scene. The
• RecallId: An alpha-numeric identifier given to the new page or scene. (Optional)
• ExpiryDate: The date when the new page or scene is to be deleted from the repository.
• PublishLifespan: The number of days that must elapse since the last time the new
• RenderProfile: The name of the render profile to use when the user wants to render the
• RenderPath: The folder where the user wishes the rendered file will be saved.
provides and example of a Merge List spreadsheet and demonstrates that the
from or the scene from which the new scene will be based.
outputName specified can be fully qualified. If it is not fully qualified the new page will
be saved to a default path specified in the settings. If no default path is specified will
then save to the asset root category.
The format is yyyy-mm-dd. (Optional)
page or scene has been accessed before it is removed from the published device. This
does not remove it from the repository. (Optional)
page to file. The name of the render profile is defined inside of the render profile xml.
Xbuilder User Manual 3-5
Page 30

Creating, editing and previewing pages and/or scenes
NOTE
• Duration: The duration of the page in dropframe timecode. This will be the duration of
the file generated.
• <objectName>: Column 9 (I) and beyond are the name of a target control side object.
The target object can be a text, textbox, image, clip, or cel animation object.
The value for the image, clip, or cel animation override can be a fully qualified asset
name. If the asset name is not fully qualified the asset will be searched for by the
existing object's type. The asset from the first category in which it was found will be
used. If the asset is not fully qualified and there is no existing object in the originating
template then the asset cannot be found.
The object type is not defined in the object name to allow the reuse of the object names
across types. This reduces the number of columns in the spreadsheet.
Be mindful of the following conditions and behaviors when creating or using the Merge List
spreadsheet file:
• Do not enter blank rows between the data as blank rows are interpreted as the end of file.
• If the name and category specified for the new page or scene matches an existing
page/scene and the Merge List is being processed, you will be prompted as to whether
you want to replace it.
• If the specified recalI Id is already being used elsewhere, the new page or scene will
steal the recalI Id.
• The items specified in the Merge List will be converted into embedded pages in a playlist.
Once approved, the embedded pages from the playlist will then be saved as shared pages.
Creating an XML Merge List file
The Merge List file can be in the form of a XML file, which contains specific attributes (tags)
allowing Xbuilder to create new pages and/or scenes from existing assets (templates/scenes),
apply specific attributes, and/or populate the asset’s fields.
The following example and the list below identifies and describes the attributes (XML tags) that
are mandatory or commonly used in a Merge List to create new instance of pages and/or scenes:
<MergeList>
<Page name="Template/scene name" outputName="New page/scene name"
recallId="recall ID" expiryDate="yyyy-mm-dd" publishLifespan="#days"
renderProfile="renderProfile" renderPath="C:\folder"
duration="#seconds">
<Textbox name="Textbox name">value</Textbox>
<Image name="Image name">value</Image>
<Clip name="Clip name">value</Clip>
<CelAnimation name="Cel name">value</CelAnimation>
</Page>
</MergeList>
Each new instance of a page or scene must be specified within a separate Page name node.
3-6 Xbuilder User Manual
Page 31

Creating, editing and previewing pages and/or scenes
NOTE
• Page name - The name of the template or scene to base the new page or scene on.
The name must be fully qualified.
• outputName - The name given to the new page or scene. The outputName specified can be
fully qualified. If it is not fully qualified the new page will be saved to a default path specified in
the settings. If no default path is specified will then save to the asset root category.
• recallId - The recallId given to the new page or scene. This can be alpha-numeric. (Optional)
• expiryDate - The date when the new page or scene is to be deleted from the repository.
The format is yyyy-mm-dd. (Optional)
• publishLifespan - The number of days that must elapse since the last time the new
page or scene has been accessed before it is removed from the published device. This
does not remove it from the repository. (Optional)
• renderProfile - The name of the render profile to use when you want to render the page
or scene to a file. The name of the render profile is defined inside of the render profile xml.
• renderPath - The folder where you want the rendered file will be saved.
• duration - The duration of the page or scene in dropframe timecode. This will be the
duration of the file generated.
• Textbox name - The name of the target textbox. Value is the text to be set on the textbox.
• Image name - The name of the target image object. Value is the name of the image
asset to set on the image object.
• Clip name - The name of the target clip object. Value is the name of the clip asset to
set on the clip object.
• CelAnimation name - The name of the target cel animation object. Value is the name
of the cel animation asset to set on the cel animation object.
The image, clip or celAnimation value specified can be a fully qualified name. If it is not fully
qualified the image, clip, celAnimation from the first category in which it was found will be used.
Xbuilder User Manual 3-7
Page 32

Creating, editing and previewing pages and/or scenes
Approving or rejecting new pages and scenes created from a Merge List
When new pages are generated by the Merge List, they exist only in the playlist as
embedded pages, which means that the pages are not yet assets and that they only belong
to that particular playlist. Therefore unless you save the playlist, you delete the new
embedded pages. To conserve the pages for future use in other playlists, you can save
them as shared page assets by using Xbuilder’s Approve feature.
Unlike pages, when new scenes are generated by the Merge List, they immediately become
assets and are placed in the specified temporary scenes category. The scene assets
remain in the temporary category until they are approved. Upon approval the scene assets
are moved to the specified render path location.
To approve or reject new pages and scenes:
1. Verify that the default category settings in Xbuilder’s Merge List settings
OOLS>SETTINGS>MERGE LIST) are properly configured (page 9-10).
(T
2. If not already done, open the Merge List in Xbuilder (page 3-13
scenes will be generated and displayed in a playlist in Xbuilder’s Playlist Editor.
3. There are two (2) methods for approving new pages and/or scenes:
• Approved All - To quickly approve all of the items (pages & scenes) in the
playlist, click the A
PPROVE ALL ITEMS IN MERGELIST button in the Playlist
Editor’s toolbar. Xbuilder runs through each item in the playlist, moves the
assets to the appropriate categories, and changes the item’s status in the
playlist to A
PPROVED.
• Approve individual - To approve new pages and/or scenes individually,
select the item in the playlist. The selected page/scene opens in Xbuilder’s
Template Editor. Click the A
PPROVE AND NEXT button in the Template
Editor’s toolbar to approve. Xbuilder then creates the shared page asset,
moves the asset to the appropriate category, and changes the item’s status in
the playlist to A
4. To reject the page/scene, click the R
PPROVED.
EJECT AND NEXT button in the Template
Editor’s toolbar. When rejected, scene assets remain in the temporary category, while
pages remain as embedded pages in the playlist. In both cases, Xbuilder changes the
item in the playlist to red and its status to R
EJECTED.
). The new pages and/or
3-8 Xbuilder User Manual
Page 33

Creating, editing and previewing pages and/or scenes
A page open in
the Template Editor
Opening an existing page or scene
There are two (2) ways to open and display an individual page or scene in Xbuilder:
• Navigating through the Asset Browser’s P
page/scene assets are listed or previewed in the panel to the right of the Asset Browser.
Double-click the asset’s name and the page/scene will open in the Template Editor.
Or,
• With a populated playlist open in the Playlist Editor, double-click a page or scene item
in the playlist and it opens in the Template Editor.
AGES or SCENES root category and the
Xbuilder User Manual 3-9
Page 34

Creating, editing and previewing pages and/or scenes
Editing a page or scene’s content elements
When you open a standalone scene in Xbuilder’s Template Editor, you can make and save
changes to the content of editable objects within the scene (i.e. change the image, edit the
text, choose another cel animations...etc.), but you cannot reposition or make any other
changes to the scene’s layout.
Unlike scenes, when you open a page or template in Xbuilder, it is not the scene-side of the
project that is displayed in the Template Editor, but rather the control-side (template). The
control-side contains objects that are pre-programmed to control the content and behavior
of the objects on the scene-side. Therefore, you can make certain modifications to the
associated scene’s variable content fields before sending them to air, including:
• setting text in text boxes by clicking within the text box and typing in text.
• selecting a listed items from drop-down boxes
• selecting check boxes to indicate a choice or enable a setting
• replacing existing images, cel animations, or clips with another of the same type
Replacing an image, cel animation, or clip on a page
The following instructions guide you through how to replace an image on a page/scene,
however, the procedure is identical for replacing cel animations and clips.
To change an image:
1. Open the page so that it is displayed in Xbuilder’s Template Editor.
1. Right-click on the image.
ELECT AN IMAGE dialog box is displayed.
The S
Figure 3-4. The Select an Image dialog box
The tree view at left lists all eligible categories from which a new image can be chosen.
By default, the category containing the image is initially displayed. The selection of a
new image may be restricted to a specific category. In this case the tree view shows
the contents of this category instead of the I
3-10 Xbuilder User Manual
MAGES root category.
Page 35

Creating, editing and previewing pages and/or scenes
Template in the Template Editor
Preview of the page using the Software CG
2. Double-click the folder that contains the required image. Click the PROXY VIEW button
to display the folder’s contents as proxies, or click the LIST VIEW button
display detailed asset information.
3. Double-click the desired image in the right window pane, or select the desired file and
then click the S
ELECT button. The SELECT AN IMAGE dialog box closes and the new
image appears in the page.
Previewing a page or scene on the Preview device
Since only a static version of the control-side of a template or page is displayed in Xbuilder’s
Template Editor, it may not provide you with a true representation of how it will look when
played out on a device. Similarly, standalone scenes open as static displays, meaning that
you are not able to view the playout of any cel animations, clips or animated properties
associated with the scene.
Xbuilder offers the P
a method for viewing the playout of the template, page or scene that you currently have
open in the Template Editor. The PREVIEW PAGE/SCENE renders and plays out the video,
audio, and animation elements of the page/scene on the preview device (Software CG)
specified in Xbuilder’s Manager.
REVIEW PAGE/SCENE command in the Template Editor’s toolbar as
To preview a template, page, or scene on a connected device:
1. Set up the preview device.
In most cases, the device used for previewing the playout will be a Vertigo Software CG.
Therefore, you should verify that the software CG is specified in the SWCG E
OCATION parameter on Xbuilder’s GENERAL setting page (page 2-7) and that the device
L
XECUTABLE
is also properly configured as the Preview device in Xbuilder’s Device Manager (see
Adding and configuring a Preview device” on page 2-7).
“
2. Open the desired template, page, or scene so that it is displayed in Xbuilder’s Template Editor.
3. Select the P
REVIEW PAGE/SCENE command from the Template Editor’s toolbar.
A publishing status bar briefly appears in the right-corner of the Template Editor’s toolbar.
Once the publishing is complete, the scene automatically begins to play in the
software CG’s playout window.
Xbuilder User Manual 3-11
Page 36

Creating, editing and previewing pages and/or scenes
Saving a snapshot (image file) of a page or scene’s playout
The TAKE SNAPSHOT OF PAGE/SCENE command in the Template Editor’s toolbar allows
you to render and save (as an image file) a single frame of the scene’s playout. This is
particularly useful when the template, page or scene contains clips and/or cel animations,
as you can specify the exact frame during playout to capture. The resulting image file can
then be easily distributed (i.e. by email or file transfer) for feedback and/or approval.
To render and save a snapshot of a template, page or scene’s playout:
1. Verify that Xbuilder is properly configured/connected to a preview device (Software CG)
in the Device Manager (page 2-7
XECUTABLE LOCATION parameter on Xbuilder’s GENERAL settings page (page 2-7).
E
2. Verify, or edit, the RENDER PATH location where the image file will be saved to by opening the
Software CG’s Dashboard application and selecting the A
) and that the software CG is specified in the SWCG
DVANCED>GENERAL page (figure 3-5).
Figure 3-5. The Render Paths settings determine the storage location of the frame’s snapshot
3. Open the desired template, page or scene asset so that it is displayed in Xbuilder’s
Template Editor.
4. Select the T
The T
3-12 Xbuilder User Manual
AKE SNAPSHOT OF PAGE/SCENE command from the Template Editor’s toolbar.
AKE SNAPSHOT dialog box appears (figure 3-6).
Figure 3-6. The Take Snapshot dialog box
Page 37

Creating, editing and previewing pages and/or scenes
NOTE
NOTE
5. Type a name for the rendered image file in the TARGET FILENAME field.
The rendered image format of a snapshot is always Targa (.tga). As such, the Render Format
property in the Take Snapshot dialog box cannot be changed.
6. Verify the S
will be extracted.
Since the duration of a snapshot is always one frame, the Duration property in the Take
Snapshot dialog box cannot be changed. Similarly, the Quality level property is fixed at
HIGH and cannot be changed.
7. Click the R
Template Editor’s toolbar. Once the publishing is complete, the scene appears on the
preview device and the frame is automatically converted to an image and saved to an
image file in the specified render folder.
8. Navigate to the directory where the image was saved (R
step 3). Open the saved file and the image will display in your targa (.tga) compatible
media viewer.
TART OFFSET value, which determines the specific frame of the playout that
ENDER button and a publishing status bar appears in the right-corner of the
ENDER PATH setting from
Xbuilder User Manual 3-13
Page 38

Creating, editing and previewing pages and/or scenes
3-14 Xbuilder User Manual
Page 39

4 RENDERING PAGES AND SCENES TO A
CLIP FILE
Xbuilder’s RENDER TO FILE feature allows you to render and save the playout of templates,
pages and scenes as a video clip files. This is particularly useful when a template, page or
scene contains clips and/or cel animations, since the resulting clip file captures and saves
the full video, audio and animation elements of the scene’s playout.
There are three (3) workflows in which Xbuilder’s Render to File feature is intended to be
used:
Render to VAF for pre-rendered playout” on page 4-2
• “
• “Render to MXF for playout on a video server” on page 4-3
• “Render to MPEG for preview” on page 4-4
Regardless of which workflow you choose, Xbuilder provides the following two (2) methods
for rendering pages and/or scenes to a clip file:
Manual rendering pages and/or scenes to a file” on page 4-5
• “
Uses the Template Editor’s RENDER PAGE/SCENE TO FILE button to render and
save the playout of an individual scene to a clip file.
Batch-rendering of pages and/or scenes to a file” on page 4-7
• “
When a Merge List is used to create pages and scenes, all of the resulting pages and
scenes can be rendered and saved as individual video clip files using the Playlist
Editor’s R
ENDER ALL ITEMS IN PLAYLIST button .
Xbuilder User Manual 4-1
Page 40

Rendering pages and scenes to a clip file
Render to VAF for pre-rendered playout
Xbuilder’s Render to File feature uses the Vertigo Software CG’s rendering engine to render
pages and scenes into .vaf (Vertigo Animation Format) files. The rendered VAFs can then
be easily ingested (as-is) into the Xmedia Server by setting up a watch-folder using the
Vertigo File Ingest Service for playout on Vertigo XG devices.
The advantage of pre-rendering pages and/or scenes to VAF is that it minimizes risk during
the playout by eliminating live rendering and data insertion.
Figure 4-1
first created in Xstudio. Once the templates are opened in Xbuilder, pages are created by
populating the templates with instance data (either individually or as a batch using a Merge
List). When Render to File is executed, the new pages are rendered and saved to disk (not
the Xmedia Server) as VAF clip files. You can then import the files into the Xmedia Server
and the VAFs can be played out on Vertigo XG devices.
demonstrates the Render to file (VAF) workflow in which master templates are
Figure 4-1. Render to file (VAF) workflow
NOTES
• Rendering VAF files requires the XG E
• VAF is a heavily compressed format and encoding times can be very long.
The encoder is multi-threaded and will scale to the number of available cores.
• VAF looping points cannot be set in this workflow.
• VAF clips will automatically be cropped based on the scene’s content.
4-2 Xbuilder User Manual
NCODE license.
Page 41

Rendering pages and scenes to a clip file
Render to MXF for playout on a video server
Xbuilder’s Render to File feature uses the Vertigo Software CG’s rendering engine to render
pages and scenes into XDCAM and IMX compatible MXF files that are natively supported
on virtually all modern playout servers.
When you configure the Render to File feature, you select the output format from among
the following render format profiles:
• MXF IMX 25 (PCM audio)
• MXF IMX 30 (PCM audio)
• MXF IMX 40 (PCM audio)
• MXF IMX 50 (PCM audio)
• MXF MPEG2 (PCM audio) HD
• MXF MPEG2 (PCM audio) SD
• MXF XDCAM HD-50 (50 Mbit 4:2:2) (PCM)
Figure 4-2
created in Xstudio. Once the templates are opened in Xbuilder, pages are created by
populating the templates with instance data (either individually or as a batch using a Merge
List). When Render to File is executed, the new pages are rendered and saved to disk (not
the Xmedia Server) as MXF clip files. The MXF files are now ready for eventual playout on a
3rd party video server.
demonstrates the Render to file (MXF) workflow in which master templates are first
Figure 4-2. Render to file (MXF) workflow
NOTES
• Supplied profiles are heavily tuned and are not intended to be modified by the end-user.
• Render to playout server compatible formats requires the XGE
software license. However, MPEG2 encoding only requires the XG E
• Encoding scales to the number of CPU cores on the system running Xbuilder.
• MXF files generated by Xbuilder are not intended to be re-ingested into the Xmedia Server.
• MXF Op1a has been deprecated on Windows 7.
Xbuilder User Manual 4-3
NCODEFORPLAYOUT
NCODE license.
Page 42

Rendering pages and scenes to a clip file
Render to MPEG for preview
Xbuilder’s Render to File feature uses the Vertigo Software CG’s rendering engine to render
pages and scenes into MPEG clip files that can be saved to disk and then viewed on most
media players.
Rendering pages and scenes to MPEG is mainly used in situations where you want to share
and allow others to preview the file’s playout using a portable and common playout format.
The Render to file (MPEG) workflow starts with the creation of master templates in Xstudio.
Once the templates are opened in Xbuilder, pages are created by populating the templates
with instance data (either individually or as a batch using a Merge List). When Render to
File is executed, the new pages are rendered and saved to disk (not the Xmedia Server) as
MPEG clip files. The MPEG files can then be ingested into the Xmedia Server or distributed
for previewing and/or approval.
4-4 Xbuilder User Manual
Page 43

Rendering pages and scenes to a clip file
NOTE
Manual rendering pages and/or scenes to a file
When an individual template, page, or scene is open in Xbuilder’s Template Editor, you can
use the R
and save the asset’s playout to a video clip file.
To render and save a template or page as a video file:
1. Verify that Xbuilder is properly configured/connected to a preview device (i.e. Software CG)
2. Open the Xbuilder Settings window (Tools>Settings) and configure the SWCG
3. Select R
4. Open the template, page or scene so that it is displayed in Xbuilder’s Template Editor.
5. Select the R
ENDER PAGE/SCENE TO FILE button in the Template Editor’s toolbar to capture
in the Device Manager (page 2-7).
XECUTABLE LOCATION parameter on the GENERAL settings page (page 2-7).
E
ENDER TO FILE in the Settings window and configure the default settings (page 9-12).
ENDER PAGE/SCENE TO FILE button from the Template Editor’s toolbar.
ENDER TO FILE dialog box appears (figure 4-3).
The R
Figure 4-3. The Render to File dialog box
6. Type a name for the rendered file in the T
7. Select the desired video format for the rendered file from R
ARGET FILENAME field.
ENDER FORMAT drop-down list.
If you load an HD scene and specified an SD profile (or vice versa), the render fails. The
profile must be consistent with the format of the scene.
Xbuilder User Manual 4-5
Page 44

Rendering pages and scenes to a clip file
NOTE
8. You can edit the DURATION value, if you want it to be different from the value specified
in the Default Duration field in the Render To File settings (step 3).
9. Press the R
Template Editor’s toolbar. Once the publishing is complete, the captured video
automatically starts to playout on the preview device and the video file is saved to the
default render path folder.
The rendered video file is saved to the specified location on your system and it is not saved
as a Clip asset on the Xmedia Server. If at anytime you want to use the render clip file as
an asset within the Vertigo Suite, you must use Xstudio or Xplorer to import/ingest the video
file into the Xmedia Server.
ENDER button and a publishing status bar appears in the right-corner of the
4-6 Xbuilder User Manual
Page 45

Rendering pages and scenes to a clip file
NOTE
NOTE
NOTE
Batch-rendering of pages and/or scenes to a file
When a Merge List is used to create pages and scenes (see page 3-13), all of the resulting
pages and scenes can be rendered and saved as individual video clip files using the Playlist
Editor’s RENDER ALL ITEMS IN PLAYLIST button .
To render and save all of the resulting items from a Merge List:
1. Verify that Xbuilder is properly configured/connected to a preview device (i.e. Software CG)
in the Device Manager (page 2-7
2. Open the Xbuilder Settings window (Tools>Settings) and configure the SWCG
XECUTABLE LOCATION parameter on the GENERAL settings page (page 2-7).
E
3. Select R
Although the settings associated with each item in Merge List file take precedent,
configuring these settings is prudent in case the Render Profile and Duration
attributes are not specified in the Merge List file.
The DEFAULT PROFILE PATH and DEFAULT PROFILE settings only need to be set when using
Xbuilder on Windows7.
4. Create the Merge List file and load it into Xbuilder using the procedure described on
page 3-13.
5. Once the new pages and/or scenes from the Merge List have been created and are
displayed in the playlist, select the R
Playlist Editor’s toolbar.
Xbuilder automatically launches the preview device and starts to publish and render
each of the pages and scenes from the playlist. Once an item is published, the page or
scene’s playout in previewed on the device’s display.
ENDER TO FILE in the Settings window and configure the default settings (page 9-12).
).
ENDER ALL ITEMS IN PLAYLIST button from the
The profile specified must be consistent with the format of the scene. The render will fail if
they are different.
6. Once the process is complete, you can navigate to the directory where the clip file was
saved and open the saved file in an appropriate media viewer.
The rendered video file is saved to the specified location on your system and it is not saved
as a Clip asset on the Xmedia Server. If at anytime you want to use the render clip file as
an asset within the Vertigo Suite, you must use Xstudio or Xplorer to import/ingest the video
file into the Xmedia Server.
Xbuilder User Manual 4-7
Page 46

Rendering pages and scenes to a clip file
4-8 Xbuilder User Manual
Page 47

5 PERFORMING QUALITY CONTROL (QC)
After Effects
Central Xmedia Server
Rejected
Approved
Preview
Make List
EXMS
Ingest
Publish
Status updated to Approved or Rejected
Xbuilder
SW CG
HW Device
SW CG
Validation
Subfolder
Approved
Category
Verification
Xbuilder
Preview
MC Workflow
QC Workflow
1
2
3
Make List
(.xls)
Graphics Creation
Once the graphics have been Approved (QC), the Make List can be used as the Air List for MC workflow
Air List
(.xls)
AE Plug-in
AND MEDIA CHECK (MC)
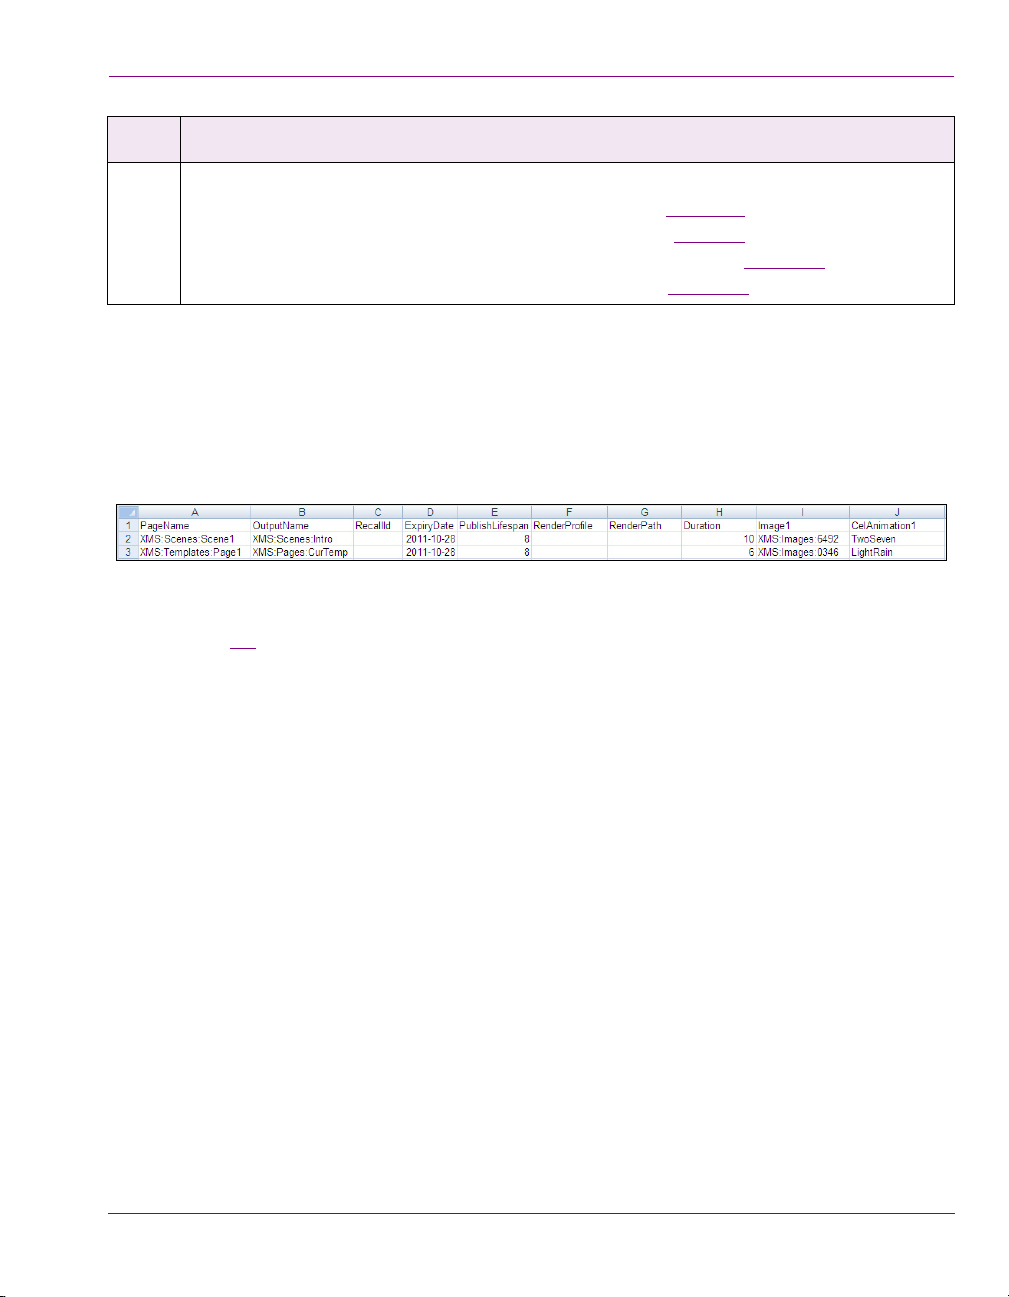
The Vertigo Quality Control (QC) workflow is the process by which graphics can be
previewed and validated before they are published to the target devices and taken to air
(figure 5-1). The QC workflow creates the graphics files from Adobe After Effects Project
compositions and a Make List spreadsheet (1). The resulting graphics are then brought into
Xbuilder as a playlist where they can be previewed on the Software CG and validated
(approved/rejected) individually (2). The status of each asset is updated in the Make List
and the approved graphics are moved to the Approved Category folder on the XMS, which
can be set up to automatically publish to the playout device(s).
Once the graphics are approved and published to the device(s), you can use the Vertigo
Media Check (MC) workflow to quickly preview and verify that all of the approved graphics
have actually been published to the correct devices (3). Opening an Air List in Xbuilder
generates a playlist of approved graphics. The Air List is usually the same spreadsheet as
the Make List, but the status of all of the assets are Approved. You can preview the graphics
and/or launch a verification in which Xbuilder verifies the actual availability of the graphics
assets on the targeted device’s database. The asset’s status is then reported back and
displayed in the playlist.
By using the QC and MC workflows, you can be confident that your graphics are correct
and that they are ready to go to air.
Vertigo Suite v.4.6 Release Notes (GA) 5-1
Figure 5-1. The Vertigo QC & MC Workflow block diagram
Page 48

Performing Quality Control (QC) and Media Check (MC)
The following sections provide instructions and details regarding the configuration and use
of the Vertigo QC and MC workflows:
Setting up the QC and MC workflows” on page 5-3
• “
• “Creating a Make List / Air List spreadsheet” on page 5-9
• “Using AE Plug-in and the Make List to create and ingest graphics” on page 5-11
• “Quality Control: Previewing and validating graphics in Xbuilder” on page 5-12
• “Media Check: Graphics publish verification” on page 5-14
5-2 Vertigo Suite v.4.6 Release Notes (GA)
Page 49

Performing Quality Control (QC) and Media Check (MC)
NOTE
Setting up the QC and MC workflows
Prior to using the Vertigo QC and MC workflows, some of the Vertigo Suite components
(i.e. destination folders, Xbuilder, device manager, licensing) must be configured to ensure
the proper coordination of resources.
The following sections provide instructions for configuring the Vertigo Suite for the QC and
MC workflows:
Create and set up the Subfolders and Approved Category folders” on page 5-3
1. “
2. “Specify Xbuilder’s settings for the QC and MC workflows” on page 5-4
3. “Associate channels to devices in Xbuilder’s Device Manager” on page 5-5
4. “Verify that the system templates are installed and publish them to the SWCG” on page 5-6
5. “Verify the presence of the QC license” on page 5-8
Create and set up the Subfolders and Approved Category folders
We recommend that you create the Subfolders and Approved Category folders in advance
of using the QC workflow’s Make List. The Make List’s SUBFOLDERS column specifies into
which subcategory folders on the central Xmedia Server, new assets will be ingested to.
Meanwhile, the A
be moved once they have been approved. See page 5-9 for more information about
creating and using the Make List file.
A compelling reason to set up the Approved Category folders in advance is that it allows
you to assign publish rules to these folders. That way, when the assets are moved from the
subfolders upon approval, the assets will automatically be published to the appropriate
playout device(s).
PPROVED CATEGORY column identifies the folder into which the assets will
If you choose not to pre-configure the Approved Category folder for auto-publish, you will
have to manually publish the assets before being able to preview them on a device or before
using the MC workflow.
To create and set up the Subfolders and Approved Category folders:
1. Open Xplorer.
2. Create a new subfolder within the Clips and/or CelAnimations root categories for the
ingested asset files.
a. Right-click on the Clips root category and select the N
b. Specify a name for the subfolder in the N
c. Repeat steps a and b for the CelAnimations root category.
3. Create a new folder within the Clips and/or CelAnimations root categories for the
Approved Category.
a. Right-click on the Clips root category and select the N
b. Specify a name for the Approved subfolder in the N
click OK.
c. Repeat steps a and b for the CelAnimations root category.
Vertigo Suite v.4.6 Release Notes (GA) 5-3
EW CATEGORY dialog box and click OK.
EW CATEGORY command.
EW CATEGORY command.
EW CATEGORY dialog box and
Page 50

Performing Quality Control (QC) and Media Check (MC)
4. Assign publish devices to the Approved Category folders.
a. Right-click on the new Approved Category folder in the Clips root category and
select the P
The P
ROPERTIES command.
UBLISH DEVICES dialog box appears.
b. Select the device(s) that you want the assets to be automatically published to and
then click OK.
c. Repeat steps a and b for the Approved Category folder in the CelAnimations root
category.
Specify Xbuilder’s settings for the QC and MC workflows
To accommodate the QC and MC workflows, a few of Xbuilder’s settings must be configured.
To configure Xbuilder’s settings for the QC workflow:
1. Launch Xbuilder.
2. In the D
EVICE FOR VERIFY drop-down list, select USE PLAYLIST DEVICES (figure 5-2).
Figure 5-2. Set Xbuilder’s Device for Verify parameter to “Use Playlist Devices”
3. Open Xbuilder's SETTINGS dialog box (TOOLS>SETTINGS).
Figure 5-3. Xbuilder’s Settings
4. Set the XBUILDER>GENERAL>VERIFY PLAYLIST parameter to MANUAL.
5. Set the X
BUILDER>GENERAL>NUMBER OF VERIFY DEVICES to the number of devices that
you expect to use for verifying assets.
6. Click OK in the S
ETTINGS dialog box to apply the new settings and close the dialog box.
5-4 Vertigo Suite v.4.6 Release Notes (GA)
Page 51

Performing Quality Control (QC) and Media Check (MC)
Associate channels to devices in Xbuilder’s Device Manager
Xbuilder’s Device Manager associates device channel names to actual physical devices
(figure 5-4
of the asset on a device.
When performing quality control tasks (validation), only the PREVIEW device is required to
be assigned to the local software CG in the Device Manager. However, when performing
media checks, the number of devices that can be associated is the Preview device plus the
number of devices identified in the N
The channel names in the Device Manager’s N
enter in the Make List / Air List file’s T
Xbuilder performs a media check, it uses the data (channel names) in the T
column to determine on which devices to look for published assets.
To configure Xbuilder’s Device Manager for QC and MC tasks:
1. Open Xbuilder’s Device Manager (T
2. Set the P
3. Change the default channel names that appear in the N
). Xbuilder uses this association when previewing and performing media check
UMBER OF VERIFY DEVICES setting.
AME column (figure 5-4) are what you will
ARGET CHANNEL column (see page 5-9). When
Figure 5-4. Associate device channels with playout devices in the Device Manager
OOLS>DEVICE MANAGER).
REVIEW device to the local Software CG defined.
AME column by clicking in the
cell and typing a new name (figure 5-5).
ARGET CHANNEL
Figure 5-5. Specify new channel names which will be used in the Make List file’s T
4. Using the D
EVICE LIST and the ADD TO ACTIVE DEVICES button associate each one
ARGET CHANNEL column
of the channels to their respective devices.
Note that the channel names are used by the playlist to identify the target device(s) for
each asset.
5. Click C
LOSE in the DEVICE CONFIGURATION dialog box to apply the changes and close
the dialog box.
Vertigo Suite v.4.6 Release Notes (GA) 5-5
Page 52

Performing Quality Control (QC) and Media Check (MC)
Verify that the system templates are installed and publish them to the SWCG
The QC and MC workflows require that a series of system templates be installed on the
central Xmedia Server and published to all Vertigo preview and playout devices, including
the Software CG. The system templates are general purpose "asset holders" for different
asset types and different TV formats.
Generally, the system templates are automatically added when the Vertigo Suite
software is installed on the Xmedia Server and Vertigo hardware devices. Since the
system templates are vital to the proper functioning of the QC and MC workflows, we
recommend that you verify that all of the system templates are installed on the Xmedia
Server and Vertigo playout devices using Xplorer.
The Vertigo Software CG is used by the QC and MC workflows as the preview device.
Unlike the hardware playout devices, the system templates are not published to the
Software CG during the Vertigo Suite installation. Therefore, you must publish the
system templates to the Software CG device as part of the QC workflow configuration.
To verify that the system templates are installed on the central XMS and hardware
playout devices:
1. Open an instance of Xplorer, which is connected to the central Xmedia Server.
2. Select the Xmedia Server in the Device Viewer.
3. In the Asset Browser, select T
system templates are displayed in the Asset Gallery (figure 5-6).
If the system templates are not present, or if some are missing, please import the
templates from the following directory location:
Files\VertigoXmedia\Apps\Support\SystemTemplates.rar
files to a local directory and import them to the Xmedia Server using Xplorer. If the
templates still do not appear, please contact Miranda’s Technical Support Services.
EMPLATES>SYSTEM TEMPLATES and verify that all of the
C:\Program
. Decompress the
Figure 5-6. System Templates on the central Xmedia Server
5-6 Vertigo Suite v.4.6 Release Notes (GA)
Page 53

Performing Quality Control (QC) and Media Check (MC)
4. For each of the hardware playout devices, select the hardware device and then select
TEMPLATES>SYSTEM TEMPLATES in the Asset Browser. Verify that all of the system
templates are displayed in the Asset Gallery.
If the system templates are not present, or if some are missing, please import the
templates from the directory location identified in step 3 or publish the templates from
the Xmedia Server to the device.
To publish the system templates to the Software CG preview device:
1. Open an instance of Xplorer, which is connected to the central Xmedia Server.
2. Select the Xmedia Server in the Device Viewer.
3. In the Asset Browser, select T
EMPLATES>SYSTEM TEMPLATES.
4. Right-click on the System Templates subcategory in the Asset Browser and select the
UBLISH TO>CG menu command (figure 5-7). The Publish Progress window appears
P
as the assets are published to the Software CG device.
Figure 5-7. Publishing the system templates to the Software CG device
5. Once the publishing is complete, close the Publish Progress window.
6. Select the Software CG device in Xplorer’s Device Viewer.
7. In the Asset Browser, select T
EMPLATES>SYSTEM TEMPLATES and verify that all of the
system templates are displayed in the Asset Gallery.
If the system templates are not present on the Software CG device, or if some are
missing, please contact Miranda’s Technical Support Services for assistance.
Vertigo Suite v.4.6 Release Notes (GA) 5-7
Page 54

Performing Quality Control (QC) and Media Check (MC)
Verify the presence of the QC license
The QC and MC workflows requires that a valid QC license be installed and validated on
the central Xmedia Server. Without a valid QC license, Xbuilder’s Open MakeList and
Open AirList menu commands are disabled.
To verify that a valid QC license is installed and validated on the Xmedia Sever:
1. Open Xbuilder.
2. Select the Actions menu.
If the Open MakeList and Open AirList menu commands are enabled, then the QC
license is properly installed and validated on the Xmedia Server.
If the Open MakeList and Open AirList menu commands are disabled:
a. Open the License Manager (H
b. Click the S
HOW DETAILS button in the License Manager dialog box.
c. Select the LICENSED APPLICATIONS AND DEVICES tab.
d. Verify the QC license is present in the list. If not, please contact Miranda’s
Technical Support team to obtain a valid QC license. If the license is present,
please verify that the Xmedia Server and its services are properly running, or
contact Miranda’s Technical Support for further assistance.
ELP>LICENSE).
5-8 Vertigo Suite v.4.6 Release Notes (GA)
Page 55

Performing Quality Control (QC) and Media Check (MC)
NOTE
Creating a Make List / Air List spreadsheet
Both the QC and MC workflows require you to create a specially formatted Excel
spreadsheet called a Make List (for QC) or Air List (for MC). The same spreadsheet can be
used for both QC and MC tasks since it contains the same mandatory data for creating and
organizing the graphics assets. The main difference between the two files is that the MC
workflow requires that all of the assets in the Air List’s have the S
A
PPROVED.
The Make List is an Excel Spreadsheet (.xls) whose data is used by the Vertigo After Effects
Plug-in to create graphics assets (clips or cel animations) based on an After Effects project.
The resulting asset are then stored automatically on the Xmedia Server. The same Make
List is then used to create a playlist in Xbuilder, which is used during the quality control
(preview and validation) and the media check tasks.
To ensure that the Make List contains all of the required columns, a sample Make List is
available to be used as a template:
http://support.miranda.com/portal/software/Vertigo%20Software/Makelist_sample.xls
TATUS column marked as
Figure 5-8. Make List spreadsheet
Figure 5-8
headers for the data that the After Effects Plug-in and Xbuilder need to create the assets
and playlist. The following list describes the columns and information that must be present
in the Make List spreadsheet:
• P
• O
Vertigo Suite v.4.6 Release Notes (GA) 5-9
demonstrates that the first row in the Make List contains the mandatory column
ROJECT NAME: The path and filename of the After Effects project. This information is
used by the After Effects plug-in to generate the asset. This information is not used by
Xbuilder.
UTPUT FILE NAME: The name of the asset that is generated by the After Effects plug-
in. The name must include the extension, so that Xbuilder can tell what the asset type
is (i.e. Clip versus Cel animation) even though the extension does not appear in the
asset name in Xmedia Server.
Page 56

Performing Quality Control (QC) and Media Check (MC)
Make List / Air List
Playlist
Device Manager
• FORMAT: The format of the asset, which is used by Xbuilder to launch the software CG
in the appropriate format to get the best preview possible. Acceptable values are:
•NTSC
•PAL
• HDTV_720_60
• HDTV_720_60M
• HDTV_720_50
• HDTV_1080_30
• HDTV_1080_30M
• HDTV_1080_25
• NTSC_16_9
• PAL_16_9
• S
TATUS: The status of the asset (Approved, Rejected). The After Effects plug-in only
generate assets for those not marked as A
Make List that was opened.
PPROVED CATEGORY: The category folder into which the assets are moved when they
• A
have been approved. The category should be read as Subfolder 1\Subfolder
2...\Subfolder N. We recommend that you create the Approved Category folder in
advance so that you can assign publish rules to this folder. That way, when the assets
are moved into this folders, they will also be automatically published to the appropriate
playout devices. See page 5-3
UBFOLDER 1, ..., SUBFOLDER N: The category folder into which the After Effects plug-
• S
for instructions.
in puts the asset when it is generated. This is the category folder where unapproved
assets exist and rejected assets are moved to (from the approved category). We
recommend that you create these folders in advance. See page 5-3
ARGET CHANNEL: A comma-delimited list of names of devices to which the asset is
• T
published. The devices specified must be the names of the target device channels,
which are defined in the NAME column in Xbuilder’s Device Manager (see page 5-5).
When Xbuilder generates the playlist, one playlist element will be created for each of
the asset’s targeted device channels (figure 5-9
PPROVED. Xbuilder writes the status into the
for instructions.
).
Figure 5-9. Multiple target channels results in one playlist element for each of the asset’s targeted devices
5-10 Vertigo Suite v.4.6 Release Notes (GA)
Page 57

Performing Quality Control (QC) and Media Check (MC)
NOTE
Using AE Plug-in and the Make List to create and ingest graphics
The QC workflow uses the Vertigo After Effects Plug-in’s MERGE MODE to create and ingest the
graphics files (clips and/or cel animations) into the Xmedia Server. Using the Make List
spreadsheet as an input, Merge Mode creates the graphics files from the specified Adobe After
Effects Project composition(s) and then ingests them to the destination categories on the XMS.
To use the After Effects Plug-in and Make List to create and ingest graphics files:
1. Launch Adobe After Effects and select the F
ODE) menu command.
M
A message appears warning you that the project you currently have open will be closed
without saving. To continue, simply click OK.
XPORT MIRANDA ANIMATION dialog box appears (figure 5-10).
The E
ILE>EXPORT>MIRANDA ANIMATION (MERGE
Figure 5-10. The Export Miranda Animation dialog box
2. Click the button in the I
the Make List spreadsheet (see page 5-9
3. In the Output destination section, enable EXPORT TO XMS SERVER NAME / IP and then
type either the Xmedia Server’s hostname or the IP address of the XMS device where
the output files will be ingested to.
4. Enable O
file that may already exist using the exact same name in the exact same location.
5. Select the O
graphics files will be created, including specifying the looping behavior. See the “AFTER
EFFECTS PLUG-IN USER MANUAL” for more information.
6. Create the graphics files by clicking OK.
The E
box appears to track the graphics files’ creation.
7. Verify that the files were ingested into the Xmedia Server by opening Xbuilder and navigate
through the Asset Browser to the expected destination category and subfolder.
If the subfolders were not previously set to automatically publish the assets to the target
devices (see page 5-3
preview and verify devices before proceeding.
Vertigo Suite v.4.6 Release Notes (GA) 5-11
VERWRITE EXISTING FILES / ASSETS if you wish to automatically replace an existing
PTIONS button to expose advanced options, which specify how the
XPORT MIRANDA ANIMATION dialog box closes and the EXPORT PROGRESS dialog
), you must open Xplorer and manually publish the assets to the
NPUT - DATA SOURCE FILE NAME field to navigate to and select
).
Page 58

Performing Quality Control (QC) and Media Check (MC)
NOTE
Quality Control: Previewing and validating graphics in Xbuilder
The QC workflow allows you to preview and validate (approve or reject) the graphics that
the After Effects Plug-in and the Make List file created and ingested into the Xmedia Server.
When you open the Make List file in Xbuilder, a playlist is created that contains an element
for each of the assets (pages) that were created by the After Effects Plug-in’s export.
Selecting an element in the playlist, opens the page in Xbuilder’s Template Editor.
To preview the page’s playout, select the P
the local Software CG’s Live window. To validate the page, simply select either the A
or R
EJECT buttons. Approved assets are automatically moved to the Approved Category
that was specified in the Make List spreadsheet, while rejected assets are flagged as such
for further revising.
To use Xbuilder to preview and validate graphics created by using a Make List:
1. Launch Xbuilder and select ACTIONS>OPEN MAKELIST... menu command.
PEN MERGE LIST FILE dialog box appears.
The O
The Open MakeList command is only enabled if a valid QC license is found on the Xmedia
Server. Please contact Miranda’s Technical Support team to obtain a valid QC license.
REVIEW PAGE button and the page plays out in
PPROVE
2. Select and open the Make List file.
Xbuilder creates a temporary playlist with one element per asset (figure 5-11
element is selected by default and is displayed in Xbuilder’s Template Editor pane. If
an asset has multiple target devices, it will appear multiple times in the playlist with
different target devices (see page 5-10
If there is any issue parsing the data or finding the asset, a comment is inserted in the playlist.
3. To preview the page (element) selected in the playlist, simply click the P
button in Xbuilder’s Template Editor toolbar.
The page is automatically published and opened in the local Software CG’s Live
window. The Live Window displays the page’s playout in the format associated with the
page’s template (figure 5-11
Figure 5-11. Pages from the Make List’s playlist can be previewed in the local Software CG
5-12 Vertigo Suite v.4.6 Release Notes (GA)
). You can preview the page multiple times.
).
). The first
REVIEW PAGE
Page 59

Performing Quality Control (QC) and Media Check (MC)
NOTE
When previewing a page, the Software CG and its Live window open automatically in the
format associated with the page’s template. Each time you preview another page whose
format is different from the current page, the Live Window closes and reopens in the
appropriate new format. Also note that since these instances of the Software CG are
launched by Xbuilder, the Software CG also closes when Xbuilder is closed.
4. To validate pages, Xbuilder offers three (3) buttons in the Template Editor’s toolbar.
PPROVE
A
Select the Approve button if you are satisfied with the page’s playout
and it is deemed ready to go to air “as-is”. Once Approved, the asset is
moved to the Approved Category that was specified in the Make List
spreadsheet. The element’s status is updated to Approved in the
playlist and the status is written to the opened Make List spreadsheet.
The next item in the playlist is then selected and opened automatically.
Note that approved assets may still be previewed and rejected by
reselecting the element in the playlist.
EJECT
R
Select the Reject button if you are not satisfied with the page’s playout
and you would like it to be flagged for revision.
Once rejected, the asset is moved back to the original category. The
element’s status is updated to Rejected in the playlist and the status is
written to the opened Make List spreadsheet. The next item in the
playlist is then selected and opened automatically.
Note that rejected assets may still be previewed and approved by
reselecting the element in the playlist.
KIP
S
Select the Skip button to move down the playlist to the next element.
5. After validating the pages, you can close the playlist and/or Xbuilder. Before closing,
you are prompted to save the playlist. You can select N
O, since the playlist is meant to
be temporary and each element’s status has already been saved to the Make List file.
If you need to revisit the playlist in the future, you simply have to open the Make List in
Xbuilder as was described in step 1.
Vertigo Suite v.4.6 Release Notes (GA) 5-13
Page 60

Performing Quality Control (QC) and Media Check (MC)
NOTE
Media Check: Graphics publish verification
The Vertigo Media Check (MC) workflow allows Master Control to quickly verify that all of
the assets that were validated (approved) during the QC workflow have been published to
the target playout devices.
A prerequisite for the MC workflow is the QC workflow’s Make List with the Status all of the
assets marked as ACCEPTED. The Make List also must contain a column called TARGET
HANNEL, which lists the devices on which to verify the publish (see page 5-10).
C
When used for MC workflow purposes, the Make List file is referred to as an A
The Air List file is imported into Xbuilder, which creates a temporary playlist that contains an
element for each of the assets (pages). If an asset has multiple target devices, the asset will
appear multiple times in the playlist with different target channels (see page 5-10
You can preview any of the assets on the Software CG selecting the page (element) in the
playlist and clicking the PREVIEW PAGE button in Xbuilder’s Template Editor toolbar.
A media check is executed by clicking the VERIFY PLAYLIST button . The availability of
the asset is verified directly in the target device’s database. A comparison is also performed
between the published graphic file on the device and the graphic file in the central Xmedia
Server. The results of the verification and comparison are displayed in the item’s Status in
the playlist. Possible status messages are:
• Ready - The asset is published and ready to be used.
• Cannot Connect to Device - Xbuilder is unable to connect to the target device’s
database. Either the device is offline or not properly defined in the Device Manager.
• Asset on Device but Not Published - The asset exists as an asset on the device’s
database, but is not found in the publish folder. This occurs if someone deletes the
published file without deleting the asset from the device’s database.
• Asset Not Published Or Is Not Same Version - The asset does not appear to be in
the device’s database. You will also get this message if an asset of the same name
exists on the device, but is not the same as the one on the central Xmedia Server.
• Unknown Device - The asset is targeting a device that is not defined in the Device
Manager.
IR LIST.
).
To use Xbuilder and an Air List to verify that the assets have been published to the
target playout devices:
1. Launch Xbuilder and select A
PEN AIR LIST FILE dialog box appears.
The O
The Open AirList command is only enabled if a valid QC license is found on the Xmedia
Server. Please contact Miranda’s Technical Support team to obtain a valid QC license.
2. Select and open the Air List file.
If there is any issue parsing the data or finding the asset, a comment is inserted in the
playlist.
5-14 Vertigo Suite v.4.6 Release Notes (GA)
CTIONS>OPEN AIRLIST... menu command.
Page 61

Performing Quality Control (QC) and Media Check (MC)
NOTE
3. To preview the page (element) selected in the playlist, simply click the PREVIEW PAGE
button in Xbuilder’s Template Editor toolbar.
The page is automatically published and opened in the local Software CG’s Live window.
When previewing a page, the Software CG and its Live window open automatically in the
format associated with the page’s template. Each time you preview another page whose
format is different from the current page, the Live Window closes and reopens in the
appropriate new format. Also note that since these instances of the Software CG are
launched by Xbuilder, the Software CG also closes when Xbuilder is closed.
4. To verify that the assets in the playlist have been successfully published to the target
device(s), simply click the VERIFY PLAYLIST button .
Xbuilder reports results of the media check query in the playlist’s STATUS column.
Vertigo Suite v.4.6 Release Notes (GA) 5-15
Page 62

Performing Quality Control (QC) and Media Check (MC)
5-16 Vertigo Suite v.4.6 Release Notes (GA)
Page 63

6 CREATING AND USING PLAYLISTS
Xbuilder allows you to build manual or automatic playlists, which are ordered sequences of
program clips and branding and promotional graphics elements (i.e. pages or scenes).
Manual playlists are typically designed to be played back sequentially by operator control
using Xplay, while automatic playlists are typically designed to have specific time and
duration values that are used during playback by Xplay.
The following sections provide instructions for how to create and edit playlists in Xbuilder:
An overview of the Playlist Editor” on page 6-2
• “
• “Procedural overview for creating a sequential playlist” on page 6-3
• “Creating a new playlist” on page 6-4
• “Opening an existing playlist” on page 6-4
• “Populating a playlist” on page 6-6
• “Appending or inserting the contents of a playlist to a playlist” on page 6-9
• “Configuring the Playlist table columns” on page 6-11
• “Repositioning playlist items within the playlist” on page 6-17
• “Adding segments to the playlist” on page 6-19
• “Adding comments to the playlist” on page 6-21
• “Deleting playlist items from the playlist” on page 6-22
• “Editing the properties associated to the playlist items” on page 6-24
• “Saving a playlist” on page 6-26
• “Reloading the playlist” on page 6-28
Xbuilder User Manual 6-1
Page 64

Creating and using playlists
1
2
4
3
An overview of the Playlist Editor
The Playlist Editor allows you to build sequential lists of graphic pages, scenes and clips.
The contents and positioning of the elements in the playlist determine the playout order and
duration of the playlist.
Figure 6-1
features and components.
1. T
2. N
3. D
4. P
and the following descriptions provide an overview of the Playlist Editors’
Figure 6-1. Playlist Editor components
OOLBAR: A series of buttons that allows you to perform actions related to creating,
opening, saving, and populating playlists. See “Playlist Editor’s toolbar” on page 8-9 for a
description of each button on the toolbar.
AME: Displays the name of the playlist that is currently displayed in the Playlist Editor. An
asterisk appears beside the name until the playlist, or edits to the playlist, have been saved.
EVICE FOR VERIFY: Allows you to target a specific device or all of the configured
devices when a playlist verification is executed. See “
verification of playlist elements” on page 2-9 and “Opening an existing playlist” on page
6-4 for more details.
LAYLIST: The Playlist is the area where you create a sequential playlist by adding and
organizing pages, scenes and clips into the intended playout order. Generally, each row in
the playlist represents a page, scene or clip to be played out. To help further organize
playlists, rows of pages, scene and clips can be gathered into playlist segments and
comment rows can also be added.
The playlist’s columns display information about each page included in the playlist. You
can determine which columns are displayed or hidden in the playlist table by using the
OLUMN LAYOUT dialog box. You can also determine the order in which the columns
C
appear in the table. See “Configuring the Playlist table columns” on page 6-11 for
descriptions of each column and instructions for how to display or hide certain Playlist
table columns.
Configuring a device for the
6-2 Xbuilder User Manual
Page 65

Creating and using playlists
Procedural overview for creating a sequential playlist
The procedure below identifies the high-level steps involved in creating playlists for playing
out branding and promotional graphics sequences. Subsequent sections (identified by the
links within the procedure) provide step-by-step instructions for performing each step.
To create a sequential playlist in Xbuilder:
1. Create a new playlist, or open an existing playlist.
Creating a new playlist” on page 6-4
• “
• “Opening an existing playlist” on page 6-4
• “Verifying the contents of a playlist” on page 6-5
2. Populate the playlist with pages, scenes, clips, and/or the contents of other playlists
Creating and adding an embedded page to a playlist” on page 6-7
• “
• “Adding shared pages, scenes and clip assets to a playlist” on page 6-8
• “Appending or inserting the contents of a playlist to a playlist” on page 6-9
3. Determine which property columns you want displayed in the playlist.
Configuring the Playlist table columns” on page 6-11
• “
4. Organize the playlist items
Repositioning playlist items within the playlist” on page 6-17 (optional)
• “
Adding segments to the playlist” on page 6-19 (optional)
• “
• “Adding comments to the playlist” on page 6-21 (optional)
Deleting playlist items from the playlist” on page 6-22 (optional)
• “
5. Edit the playlist items’ properties
Editing the properties associated to the playlist items” on page 6-24
• “
6. Save the playlist
Saving a playlist” on page 6-26
• “
Additional tasks that can be performed using the playlist are:
Reloading the playlist” on page 6-28
• “
Xbuilder User Manual 6-3
Page 66

Creating and using playlists
NOTE
Creating a new playlist
To create a new playlist, you must first open a new, empty Playlist Editor. If the Playlist
Editor area is already occupied by another project (i.e. an existing playlist, rundown editor
or segment window), performing the CREATE NEW PLAYLIST action (described below)
immediately clears the Playlist Editor space and a blank Playlist Editor appears, ready for
use.
To create a new playlist:
•Select FILE>NEW PLAYLIST.
Or,
• Click the C
Xbuilder’s Merge List and Make List / Air List features are alternative ways of creating playlists
containing new pages and/or scenes from an Excel spreadsheet or XML file. See “Creating pages
and/or scene using a Merge List” on page 3-4 and “Performing Quality Control (QC) and Media
Check (MC)” on page 5-1 for more information.
REATE NEW PLAYLIST button in the Playlist toolbar.
Opening an existing playlist
Existing playlists are stored on the Xmedia Server. You can open existing playlists either
from the Asset Browser or from the FILE menu.
To open an existing playlist using the Asset Browser:
1. Select the P
appropriate category where the playlist is stored.
The playlists contained in the Asset Browser category is listed/displayed in the panel
to the right of the Asset Browser.
2. Double-click the name of the desired playlist.
Or,
Right-click on the playlist’s name and select the O
menu.
The playlist opens in the Playlist Editor.
To open an existing playlist from the File menu:
1. Select F
The O
2. Navigate through the Playlist categories in the right panel until the desired playlist is
listed in the left panel.
3. Double-click the desired playlist listed in the right panel.
Or,
Select the playlist and then click OK.
The playlist opens in the Playlist Editor.
6-4 Xbuilder User Manual
LAYLISTS root category in the Asset Browser, and navigate to the
PEN command from the context
ILE>OPEN PLAYLIST.
PEN PLAYLIST dialog box appears.
Page 67

Verifying the contents of a playlist
NOTE
When a playlist is opened in Xbuilder, you can run a verification of all of the items in the
playlist to be certain that they have been published and are available on specific or all
devices configured in Xbuilder’s Device Manager.
When a playlist verification is executed, each element in the playlist is verified as follows:
• Checks if the assets used by the playlist element actually exist.
• Checks if the assets that are used by the playlist element require the completion of a
Work Order before they can be used.
• Checks if the assets used by the playlist element are published on a specified device.
If not, then it initiates the publishing of the assets.
There are two (2) ways in which you can perform a playlist verification: manual or
automatic.
1. Open Xbuilder’s G
value for the V
• Choose AUTOMATIC if you want Xbuilder to automatically run a verification
each time a playlist is opened in Xbuilder’s Playlist Editor.
• Choose M
time they are opened in Xbuilder’s Playlist Editor.
ENERAL settings page (TOOLS>SETTINGS>GENERAL) and choose a
ERIFY PLAYLIST setting:
ANUAL if you do not want playlists to automatically be verified each
Creating and using playlists
Regardless of whether you choose Automatic or Manual, you can manually execute a playlist
verification at any time using the VERIFY PLAYLIST button in the Playlist Editor’s toolbar.
2. In the NUMBER OF VERIFY DEVICES field on the GENERAL settings page, specify the total
number of devices that you would like to set up in the Device Manager for the purposes
of verifying playlist contents.
3. Click OK to close the Settings dialog box.
4. Open Xbuilder’s Device Manager (T
OOLS>DEVICE MANAGER) and following the
instructions on page 2-9 for adding and configuring devices for playlist verification.
5. Select from the D
EVICE FOR VERIFY drop-down list, select the device(s) that you what
to verify when the Verify Playlist task is executed. In the case where the playlist items
already have a device assignment associated with them, you can select the U
LAYLIST DEVICES option, otherwise choose a specific device.
P
6. If Xbuilder’s V
ERIFY PLAYLIST setting was set to AUTOMATIC, opening an existing playlist
SE
in Xbuilder results in an immediately playlist verification.
If Xbuilder’s V
ERIFY PLAYLIST setting was set to MANUAL, the playlist is not verified upon
opening. However, in either case, you can execute a playlist verification at any time by
clicking the VERIFY PLAYLIST button in the Playlist Editor’s toolbar.
The results of the playlist verification are reported directly in the playlist by highlighting
erroneous items in red, as well as reporting problems in the item’s S
TATUS column.
Xbuilder User Manual 6-5
Page 68

Creating and using playlists
NOTE
Populating a playlist
Playlists are a sequentially ordered list of the video clips, scenes and graphic pages of a
show. As described on page 3-1
playlist: embedded pages and shared pages. Since shared pages exist in the Xmedia
Server as distinct assets, they can be used in many different playlists as a common item.
Embedded pages are unique and independent, in that they are not linked to any other
playlists. Any and all edits to an embedded page therefore only affect the playlist that it
belongs to.
The following sections provide instructions for adding embedded and shared pages to a
playlist:
Creating and adding an embedded page to a playlist” on page 6-7
• “
• “Adding shared pages, scenes and clip assets to a playlist” on page 6-8
Templates that are stored in the Asset Browser can be dragged and added to playlists. In
doing so, an instance of that template is automatically converted into an embedded page
unique to that playlist. In other words, it becomes an embedded page based on the template.
After you have create and saved a few playlists, you might have the need to create a playlist
whose contents is very similar to one that already exists. Rather than adding each page,
scene and clip individually again, you may want to append or insert the contents of the
existing playlist (pages and clips) to the new playlist. See “Appending or inserting the
contents of a playlist to a playlist” on page 6-9 for instructions on using this method for
populating a playlist.
, there are two (2) types of pages that can be added to a
Figure 6-2. An example of a playlist that contains graphic pages, clips, segments, and comments
6-6 Xbuilder User Manual
Page 69

Creating and using playlists
Creating and adding an embedded page to a playlist
Creating and adding a new embedded page to the playlist results in the page existing only
in that specific playlist, not as an asset in the Asset Browser to be used in additional
playlists.
The following instructions describe the commonly used method of creating a new
embedded page from a template, followed by some alternative methods.
To create a new page from a template and add it to the playlist as an embedded page:
1. Click the I
The S
2. Navigate to the appropriate template asset within the T
sub-categories.
3. Double-click the template asset listed.
The template opens in the Template Editor.
Or,
Select the template in the Template Editor and click OK.
The template opens in the Template Editor.
4. Set or edit the variable fields in the template as required (see “
content elements” on page 3-10 for assistance).
5. Optional: Preview the playout of the page using the P
the Template Editor’s toolbar (see “Previewing a page or scene on the Preview device”
on page 3-11).
6. Select the row in the playlist where you would like the page to be inserted (the page is
inserted below the selected row).
7. Click the I
toolbar.
The page is immediately added to the playlist below the selected playlist row and the
template closes leaving the Template Editor empty.
NSERT NEW PAGE button in from playlist’s toolbar.
ELECT A TEMPLATE FOR THE NEW GRAPHIC dialog box appears.
EMPLATES root category and
Editing a page or scene’s
REVIEW PAGE command in
NSERT IN PLAYLIST AND CLOSE button from the Template Editor’s
Alternative ways of creating and adding an new embedded page from a template
include:
• Navigate through the Asset Browser’s T
EMPLATES categories until the desired template
is listed in the panel to the right of the Asset Browser. Select the desired template asset
from the Template Editor and drag and drop it into the playlist.
• With a template open in the Template Editor, drag and drop the icon (located in the
upper portion of the Template Editor) into the playlist.
• If you have populated the Favorites Browser with existing templates, you can drag and
drop these templates from the Favorites Browser into the playlist.
• Open a Merge List in Xbuilder and all of the new pages that are created are added to
a new playlist as embedded pages until they are approved (then they become shared
pages). See “
Creating pages and/or scene using a Merge List” on page 3-4 for more
information.
Xbuilder User Manual 6-7
Page 70

Creating and using playlists
NOTE
NOTE
Adding shared pages, scenes and clip assets to a playlist
Shared pages, scenes and clips are three asset types that can be added to different
playlists. Although these assets are stored on the Xmedia Server, they are accessible to
Xbuilder through the Asset Browser.
Since shared pages exist in the Xmedia Server as distinct assets, they can be used in many
different playlists as a common item. A noteworthy drawback of using shared pages in
multiple playlists is that if the shared page is edited or deleted, you will (perhaps
unintentionally) affect all of the playlists that contain that shared page.
The following instructions describe how to add shared pages, scenes and clip asset to a
playlist by dragging the asset from the Asset Browser to the playlist. If however, the shared
page or scene is already open in the Template Editor, a second set of instructions describes
how to add that page or scene to the playlist.
To add a shared page, scene or clip asset to the playlist:
1. Select the P
to the appropriate category where the asset is stored.
The assets contained in the pages, scenes or clips categories are then listed/displayed
in the panel to the right of the Asset Browser.
2. Select the desired asset and drag it into the Playlist Editor.
Notice that a highlighted horizontal line appears in the Playlist Editor as you drag the
pointer over the various rows in the playlist. This line indicates the location of where the
asset will be inserted in the playlist.
AGES, SCENES or CLIPS root category in the Asset Browser, and navigate
A fully extended Insert Line indicates that the asset will be added to the playlist as a primary
event, while a partially extended line indicates that it will be added as a secondary event
(see “Repositioning primary playlist items (clips, scenes, pages, or comments)” on page
6-17 and “Adding a secondary event to a primary event in a playlist” on page 6-18 for more
information.
3. Drop the asset into the playlist by releasing the mouse button.
To add an opened shared page or scene to the playlist:
1. With a shared page or scene open in the Template Editor, select the playlist row where
you want the page to be inserted (the page will be inserted below the selected row).
2. Click the S
toolbar.
Any unsaved changes that were made to the page or scene are immediately saved and
the page/scene is added to the playlist below the selected playlist row.
6-8 Xbuilder User Manual
AVE PAGE, INSERT IN PLAYLIST button located in the Template Editor’s
Page 71

Creating and using playlists
NOTE
NOTE
Appending or inserting the contents of a playlist to a playlist
Rather than adding pages, scenes, templates, and clips individually to a playlist, you can
add the entire contents of an existing playlist (including segments and comments) to a
playlist. This avoids having to recreate the contents of a playlist that already exists.
Adding the contents of a playlist to another playlist is a legitimate way of copying embedded
pages from one playlist to another.
As described below, there are three (3) ways to add the contents of an existing playlist
assets to a playlist:
• Drag and drop the playlist asset from the Asset Browser into the Playlist Editor.
•Use the A
•Use the I
To add the contents of an existing playlist to a playlist by dragging and dropping the
playlist asset:
1. Select the PLAYLISTS root category in the Asset Browser, and navigate to the
appropriate category where the playlist asset is stored.
The assets contained in the Playlists category are then listed/displayed in the panel to
the right of the Asset Browser.
2. Select the desired playlist asset and drag it into the Playlist Editor.
Notice that a highlighted horizontal line appears in the Playlist Editor as you drag the
pointer over the various rows in the playlist. This line indicates the location of where the
playlist will be inserted in the playlist.
PPEND PLAYLIST command.
NSERT PLAYLIST command.
A fully extended Insert Line indicates that the playlist will be added as a primary event, while a
partially extended line indicates that it will be added as a secondary event (see “Repositioning
primary playlist items (clips, scenes, pages, or comments)” on page 6-17 and “Adding a
secondary event to a primary event in a playlist” on page 6-18 for more information.
3. Drop the playlist asset into the playlist by releasing the mouse button.
The entire contents of the playlist asset is added immediately to the playlist, including
all pages, templates, scenes, clips, segments, and comments that were contained in
the playlist asset.
Xbuilder User Manual 6-9
Page 72

Creating and using playlists
To add the contents of an existing playlist to a playlist using the APPEND PLAYLIST
command:
1. Open in the playlist to be added in the Playlist Editor and then select the F
P
LAYLIST menu command.
PPEND PLAYLIST dialog box appears.
The A
2. Navigate through the A
want to add (append) to the end of current playlist.
3. Click OK, or double-click the playlist’s asset name in the A
The entire contents of the playlist asset is added immediately to the bottom portion of
the playlist, including all pages, templates, scenes, clips, segments, and comments
that were contained in the playlist asset.
To add the contents of an existing playlist to a playlist using the I
command:
1. Open in the playlist to be added in the Playlist Editor and then select the playlist row
where you want the contents of the playlist to be inserted (the contents will be inserted
below the selected row).
2. Select the F
The I
ILE>INSERT PLAYLIST command from the Xbuilder menus.
NSERT PLAYLIST dialog box appears.
3. Navigate through the INSERT PLAYLIST dialog box and select the playlist asset that you
want to add (insert in) to the end of current playlist.
4. Click OK, or double-click the playlist’s asset name in the I
The entire contents of the playlist asset is added immediately below the selected playlist
row, including all pages, templates, scenes, clips, segments, and comments that were
contained in the playlist asset.
ILE>APPEND
PPEND PLAYLIST dialog box and select the playlist asset that you
PPEND PLAYLIST dialog box.
NSERT PLAYLIST
NSERT PLAYLIST dialog box.
6-10 Xbuilder User Manual
Page 73

Configuring the Playlist table columns
The playlist table’s columns display information about each page, template, scene, or clip
included in the playlist/segment. Using the C
determine which columns are displayed or hidden in the playlist. You can also determine
the order in which the columns appear in the playlist.
Column headings that are currently displayed in the playlist are listed in the S
OLUMNS text box (on the right), while hidden column headings are listed in the AVAILABLE
C
OLUMNS text box (on the left). Customizing the playlist column means simply moving the
C
headings from on side to the other (see the instructions below). The C
box conveniently also offers two (2) standard layouts: B
OLUMN LAYOUT dialog box (figure 6-3), you can
ASIC and FULL.
Creating and using playlists
ELECTED
OLUMN LAYOUT dialog
Figure 6-3. Column Layout dialog box
The following table lists and describes all of the available column categories that can be
displayed in the Playlist Editor:
ESCRIPTION Displays a user provided text that describes the playlist item.
D
The description text is originally created by filling in the
ESCRIPTION field on the SAVE dialog box when the item is
D
originally saved as an asset.
You can also add/edit the description text of a page, template,
scene or clip asset by editing the Description field in the
Template Editor when the asset is opened. See “
Editing the
properties associated to the playlist items” on page 6-24 for
more information.
EVICE Identifies the device to which the page, template, scene or clip
D
will be sent.
URATION Identifies the length of time that the page, template, scene or
D
clip stays on air during the playout of the playlist.
Xbuilder User Manual 6-11
Page 74

Creating and using playlists
MARK IN Displays the frame location that will be used as a starting point
M
ARK OUT Displays the frame location that will be used as an ending point
AME Displays the name of the playlist item.
N
FFSET Identifies the amount of time delay between the playout of two
O
VERFLOW Identifies the difference between the total time of the content in
O
PLAYOUT TYPE Indicates the method by which the playlist item (i.e page,
when the clip asset is played out in the playlist. As is described
Editing the properties associated to the playlist items” on
in “
page 6-24, this property is set using the MARKIN/OUT EDITOR.
when the clip asset is played out in the playlist. As is described
in “Editing the properties associated to the playlist items” on
page 6-24, this property is set using the MARKIN/OUT EDITOR.
See “Editing the properties associated to the playlist items” on
page 6-24 for information regarding editing the name of
specific playlist items.
consecutive playlist elements.
a timeslot and the time available in the timeslot. When the total
time of the content in a timeslot exceeds the time available,
there is an overflow.
template, scene, clip) be cued to air:
EQUENTIAL : The playlist element is played when the
• S
previous element has completed (possibly with an offset).
ARD START : The playlist element is played at the
• H
specified time of day. If required, the currently playing
element will be preempted. When a hard start element is
played the playlist is synchronized with the system clock.
The time of day is specified by entering it into the Offset
column.
ANUAL : The playlist element is played when a
• M
ESUME command is sent to the playlist. If this command
R
arrives earlier than expected, the currently playing
element is preempted. If the command arrives later than
expected, the playlist waits before resuming playout. The
ESUME command can be sent from the PLAY button in
R
Xplay, or from logic in the Panel.
R
ECALL ID Displays the Recall ID for the page, template, scene or clip,
which is used by other Vertigo Suite applications as a shortcut
identifier for calling up pages and templates.
The Recall ID is originally created by filling in the R
field on the S
AVE dialog box when the page or template is
ECALL ID
originally saved as an asset.
6-12 Xbuilder User Manual
Page 75

Creating and using playlists
NOTE
STATUS When the VERIFY PLAYLIST setting is enabled, each element in
the playlist is verified when the playlist is loaded to ensure that
it is available and ready for use. The results of the verification
are displayed in the Status column for each element. See
Adding and configuring a Preview device” on page 2-7 for
“
more information. The playlist item’s on-air or cued status is
also displayed in this column.
The following sections explain how to customize the playlist table’s columns.
Adding columns to a playlist” on page 6-13
• “
• “Removing columns from a playlist” on page 6-14
• “Creating, renaming, and deleting your custom column headings” on page 6-14
• “Reordering the columns in a playlist” on page 6-15
• “Using the standard column layouts: Basic or Full” on page 6-15
For instructions on modifying column information for playlist items, refer to “Editing the
properties associated to the playlist items” on page 6-24.
Adding columns to a playlist
Complete the following steps to add one or many columns to a playlist:
1. Select T
OOLS>CONFIGURE PLAYLIST COLUMNS.
The COLUMN LAYOUT dialog box appears. The current playlist columns are listed in the
ELECTED COLUMNS text box, while hidden column headings are listed in the
S
AVAILABLE COLUMNS text box.
2. Select the desired column heading(s) from the A
VAILABLE COLUMNS text box.
The column heading’s name is highlighted in blue when it is selected. To deselect,
simply click the heading again.
3. Click the R
The selected column headings immediately move to the S
4. Click A
IGHT ARROW button.
ELECTED COLUMNS text box.
PPLY to implement the changes immediately to the playlist, while keeping the
Column Layout dialog box open for further edits to the playlist columns.
Or,
Click OK to implement the changes immediately to the playlist and close the Column
Layout dialog box.
Or,
ANCEL to abort the changes and maintain the playlist as it was.
Click C
Xbuilder User Manual 6-13
Page 76

Creating and using playlists
NOTE
Removing columns from a playlist
Complete the following steps to remove one or many columns from a playlist:
1. Select T
OOLS>CONFIGURE PLAYLIST COLUMNS.
The COLUMN LAYOUT dialog box appears. The current playlist columns are listed in the
ELECTED COLUMNS text box, while hidden column headings are listed in the
S
VAILABLE COLUMNS text box.
A
2. Select the desired column heading(s) from the S
The column heading’s name is highlighted in blue when it is selected. To deselect,
simply click the heading again.
3. Click the L
EFT ARROW button.
The selected column headings immediately move to the A
4. Click A
PPLY to implement the changes immediately in the playlist, while keeping the
Column Layout dialog box open for further edits to the playlist columns.
Or,
Click OK to implement the changes immediately to the playlist and close the Column
Layout dialog box.
Or,
Click CANCEL to abort the changes and maintain the playlist as it was.
Creating, renaming, and deleting your custom column headings
To better reflect the particular contents of your playlist, the COLUMN LAYOUT dialog box allows
you to create your own (user defined) column headings. Once it has been created, you can also
rename the column heading or delete it from the Column Layout dialog box by right-clicking on
the name and selecting either the R
ELECTED COLUMNS text box.
VAILABLE COLUMNS text box.
ENAME or DELETE command from the context menu.
Only custom column headings can be renamed and deleted from the Column Layout dialog box.
To create a custom playlist column heading:
1. Select T
The C
2. Click the A
OOLS>CONFIGURE PLAYLIST COLUMNS.
OLUMN LAYOUT dialog box appears.
DD button.
The ADD COLUMN dialog box appears.
3. Type the name of the new column in the text box and click OK.
The new column heading’s name immediately appears in the S
box on the C
4. Click A
OLUMN LAYOUT dialog box.
PPLY to immediately add the new column to the playlist, while keeping the
ELECTED COLUMNS text
Column Layout dialog box open for further edits to the playlist columns.
Or,
Click OK to immediately add the new column to the playlist and close the Column
Layout dialog box.
Or,
Click CANCEL to abort the changes and maintain the playlist as it was.
6-14 Xbuilder User Manual
Page 77

Creating and using playlists
Reordering the columns in a playlist
The order in which the column appear in the Playlist Editor is determined by the column
heading’s position in the
Complete the following steps to reorder one or many columns in a playlist:
1. Select T
The COLUMN LAYOUT dialog box appears. The current playlist columns are listed in
order the S
2. Select the column heading(s) that you want to move to another position from the
S
The column heading’s name is highlighted in blue when it is selected. To deselect,
simply click the heading again.
3. Click the U
column to the left in the playlist.
Or,
Click the D
column to the right in the playlist.
4. Click A
Column Layout dialog box open for further edits to the playlist columns.
Or,
Click OK to implement the changes immediately to the playlist and close the Column
Layout dialog box.
Or,
Click C
OOLS>CONFIGURE PLAYLIST COLUMNS.
ELECTED COLUMNS text box.
ELECTED COLUMNS text box.
P ARROW button once for each position that you want to move the
OWN ARROW button once for each position that you want to move the
PPLY to implement the changes immediately in the playlist, while keeping the
ANCEL to abort the changes and maintain the playlist as it was.
Using the standard column layouts: Basic or Full
The Column Layout dialog box offers two (2) preset standard layouts:
ASIC - Includes only the Name, Device and Status columns.
• B
ULL - Includes all columns.
• F
These standard layouts are convenient ways of populating or removing columns from the
Playlist Editor.
To select a standard layout playlist format:
1. Select T
The C
S
A
2. Select either B
3. Click the SELECT button.
The S
appropriately populated.
Xbuilder User Manual 6-15
OOLS>CONFIGURE PLAYLIST COLUMNS.
OLUMN LAYOUT dialog box appears. The current playlist columns are listed in the
ELECTED COLUMNS text box, while hidden column headings are listed in the
VAILABLE COLUMNS text box.
ASIC or FULL from the STANDARD LAYOUT drop-down list.
ELECTED COLUMNS and AVAILABLE COLUMNS text boxes are immediately
Page 78

Creating and using playlists
4. Click APPLY to implement the changes immediately in the playlist, while keeping the
Column Layout dialog box open for further edits to the playlist columns.
Or,
Click OK to implement the changes immediately to the playlist and close the Column
Layout dialog box.
Or,
ANCEL to abort the changes and maintain the playlist as it was.
Click C
6-16 Xbuilder User Manual
Page 79

Creating and using playlists
NOTE
Repositioning playlist items within the playlist
Pages, scenes and clips are added to the playlist as primary scheduled events. Once added
to the playlist, you can reposition the items within the playlist by dragging and dropping them
to the desired row location.
When a clip is a primary event in the playlist, you can reposition pages and scenes within
the playlist to become secondary events to the clip. Making a page or scene a secondary
event to a clip allows you to set the page or scene’s offset and duration with respect to the
clip (primary event), rather than to the beginning of the playlist.
The following sections provide instructions for repositioning items within the playlist:
Repositioning primary playlist items (clips, scenes, pages, or comments)” on page
• “
6-17
• “Adding a secondary event to a primary event in a playlist” on page 6-18
Also see “Adding segments to the playlist” on page 6-19 for instructions for how to move
playlist items into, or out of, playlist segments.
Repositioning primary playlist items (clips, scenes, pages, or
comments)
To reposition a playlist item:
1. Select the playlist item that you want to move to a new location.
2. Click and drag the selected playlist item into the desired playlist row.
As you drag, a insert line (red line by default) extends across the table, which indicates
where the item will be placed (figure 6-4
3. Release the mouse button to drop the item in its new location.
Figure 6-4. Drag and drop the playlist item to the desired row location
Xbuilder User Manual 6-17
).
Page 80

Creating and using playlists
NOTE
A fully extended insert line adds the page/scene as a primary object
A partially extended insert line adds the page/scene as a secondary object to the primary object
Adding a secondary event to a primary event in a playlist
Making a page or scene a secondary event to a clip allows you to set the page or scene’s
offset and duration with respect to the clip (primary event), rather than to the beginning of
the playlist.
To add a secondary event to a primary event:
1. Add a clip to the playlist as a primary event by dragging the clip asset from the Asset
Browser and dropping it into the desired location in the playlist.
2. Add a page or scene to the playlist as a secondary event to the clip by dragging the
asset from the Asset Browser to the row below the clip’s name in the playlist.
Before you drop it, take note of the following:
• Whether or not the primary event heading changes color. If the primary
event heading changes color, the page/scene will become a secondary event.
If it does not, then the item will be placed below the primary event as an
additional primary event.
• The length of the insert line (red by default). If the insert line runs the entire
width of the playlist, then the page/scene is being moved outside the primary
event. If the line shortens, it means that the page will become a secondary
event (see below).
• Blue box: Once page/scene has been added to the primary event, it is
bordered at left by a blue box (see below).
3. Drop the page/scene into the playlist by releasing the mouse button.
To make a page or scene that already exists as a primary event in the playlist a secondary
event of a clip in that same playlist, simply drag the page/scene from its current location to
the row under the clip in the same way that is described in step 2 and 3 above.
6-18 Xbuilder User Manual
Page 81

Creating and using playlists
NOTE
Adding segments to the playlist
You can insert segments into your playlists to group together related playlist items under
common headings (figure 6-5
• See at a glance how items in a playlist have been organized thematically (e.g. Headlines,
Sports, Business, Entertainment).
• Move the contents of a segment at once. This is useful if, for example, at the last minute you
decide that the pages organized under Business should be placed before the Sports segment.
Figure 6-5. Playlist segments allow you to put pages, templates, scenes and clips into thematic groupings
Playlist segments are different from the segment assets that are listed in the Asset
Browser’s SEGMENTS root category. Segment assets are stored on the Xmedia Server and
made available in the Asset Browser for creating rundowns, while playlist segments are
only available to the playlist in which they are a part of.
). This allows you to:
To add a segment to the playlist:
1. Select the playlist row where you want the segment to be inserted (the segment
heading will be inserted above the selected row).
2. Right-click on the row and select the A
that appears (figure 6-6
The segment heading is added above the selected row with the name open for editing.
Figure 6-6. Use the A
Xbuilder User Manual 6-19
).
DD SEGMENT command to insert a segment heading into the playlist
DD SEGMENT command from the context menu
Page 82

Creating and using playlists
When the insert line is fully extended, the item will be moved outside of the segment.
When the insert line is not fully extended and the border turns color, the item will be inserted into the segment.
3. Enter a name for the segment and press ENTER.
At this point the segment is empty, even if pages, scenes, clips or templates appear to
be beneath it. You now need to add items to the segment.
4. Click and drag the selected playlist item into the desired segment. As you drag, a red line
indicates where the item will be placed. Before you drop it, take note of the following:
• Whether or not the segment heading changes color. If the segment heading does
change color, the item will become part of the segment. If it does not, then the item
will be placed outside of the segment.
• The length of the insert line (red by default). If the insert line runs the entire width
of the playlist, then the item is being moved outside the segment. If the line shortens,
it means that the item is being moved into the segment (see below).
• Blue box: Once items have been added to a segment, they are bordered at left by a
blue box (see below).
6-20 Xbuilder User Manual
Page 83

Adding comments to the playlist
Annotating your playlist by adding comments often benefits the person operating the
playlist. Your comments should be concise, yet identify the purpose or behavior of elements
in your playlist.
To add comments to the playlist:
1. Select the playlist row where you want the comment to be inserted (the comment will
be inserted above the selected row).
2. Right-click on the row and select the ADD COMMENT command from the context menu
that appears (figure 6-7
The comment row is added above the selected row with the text ready for editing.
).
Creating and using playlists
Figure 6-7. Use the A
3. Type the text for the comment and press ENTER.
To edit the text of a comment row that is already inserted into the playlist:
1. Select the comment row who’s text is to be edited.
2. Right-click on the row and select the E
appears (figure 6-8
Figure 6-8. Use the E
3. Type the new text for the comment and press ENTER.
DD COMMENT command to insert an annotation into the playlist
DIT CELL command from the context menu that
). The comment row text becomes ready for editing.
DIT CELL command to change the text in a playlist annotation
Xbuilder User Manual 6-21
Page 84

Creating and using playlists
NOTE
Deleting playlist items from the playlist
While building or using the playlist, you may want to remove an item that was previous
added to the playlist (i.e. a page, scene, template, clip, playlist segment, or comment).
If the page, template, scene or clip that is to be deleted is a saved asset, deleting the item
from the playlist does not remove the asset from the system, only from the playlist.
However, embedded pages, playlist segments, and comments that were added to the
playlist, but are not assets, will be completed deleted from the system.
The following instructions describe how to delete items from the playlist, as well as how to
delete all playlist items in one action.
To delete an individual item from the playlist:
1. Select the item that you would like to delete from the playlist.
2. Right-click on the item’s row and select the DELETE command from the context menu.
Or,
Press the D
3. If Xbuilder’s CONFIRM PAGE DELETION property (TOOLS>SETTINGS>AUTOMATION) is
enabled, the C
immediately deleted from the playlist, or select NO to cancel the delete action.
If however Xbuilder’s C
(TOOLS>SETTINGS>AUTOMATION) is disabled, then the item is immediately deleted from
the playlist.
ELETE key on your keyboard.
ONFIRM DELETE dialog box appears. Select YES and the item is
ONFIRM PAGE DELETION property
To delete multiple items from the playlist:
1. Select the first item that you would like to delete from the playlist.
2. While holding down the CTRL key, select the various items that you would like to delete
from the playlist.
3. Right-click on one of the selected items and select the D
context menu.
Or,
Press the D
6-22 Xbuilder User Manual
ELETE key on your keyboard.
ELETE command from the
Page 85

Creating and using playlists
To delete a consecutive grouping of items from the playlist:
1. Select the first item that you would like to delete from the playlist.
2. While holding down the S
HIFT key, select the last item that you would like to delete from
the playlist.
The first, last, and all items between these two become selected forming the group of
items to be deleted from the playlist.
3. Right-click within the grouping and select the D
ELETE command from the context menu.
Or,
Press the D
ELETE key on your keyboard.
4. If Xbuilder’s CONFIRM PAGE DELETION property (TOOLS>SETTINGS>AUTOMATION) is
enabled, the CONFIRM DELETE dialog box appears. Select YES and the items are
immediately deleted from the playlist, or select N
O to cancel the delete action.
If however Xbuilder’s CONFIRM PAGE DELETION property is disabled, then the items are
immediately deleted from the playlist.
To delete the entire contents of the playlist in one action:
1. Select the A
CTIONS>CLEAR PLAYLIST command from Xbuilder’s menu commands.
Or,
Press F8.
2. If Xbuilder’s C
enabled, the C
playlist are immediately deleted and the playlist is left empty. Or, select N
ONFIRM PLAYLIST CLEAR property (TOOLS>SETTINGS>AUTOMATION) is
LEAR PLAYLIST dialog box appears. Select YES and the items in the
O to cancel
the clear playlist action.
If however Xbuilder’s C
ONFIRM PAGE DELETION property is disabled, then the playlist
items are immediately removed from the playlist, leaving an empty playlist.
Xbuilder User Manual 6-23
Page 86

Creating and using playlists
NOTE
Editing the properties associated to the playlist items
Each item that is added to the playlist is arranged as a row in the Playlist Editor. Some of
the properties that are associated with the item are identified in the column cells that run
along the playlist row. You can change certain playlist item properties from within the
playlist. The following table explains how to edit each playlist column.
See “Configuring the Playlist table columns” on page 6-11 for a description the available
playlist column categories, as well as how to display/hide the column categories.
D
ESCRIPTION You cannot change a page, template or scene description from within
the Playlist Editor since it’s a fundamental property of the asset.
However, if you still would like to add/edit the description text, doubleclick the item’s row in the playlist. The item opens in the Template
Editor. Type the text in the Description field in the upper portion of the
Template Editor. If the item was a page, click the S
CLOSE button in the Template Editor. If the item was a template,
click the COMMIT AND CLOSE button in the Template Editor. The
playlist’s Description column now displays the added/edited text.
EVICE The name of the output device to which the playlist item will be sent
D
when it is played out in Xplay.
AVE PAGE, AND
URATION The duration of time a playlist item stays on air can be modified by
D
selecting the row and then clicking once in the Duration column cell.
Type in the amount of time that you would like the item to stay on air for
(i.e. 00:00:01 is one second). Then press E
NTER.
See “Playlist > Basic settings” on page 9-16 for a description of the
SHOW HOURS IN DURATION COLUMN setting, which determines the format
of the Duration value in the playlist column.
ARK IN To edit the value in the Mark In column for clip items in the playlist,
M
select the clip row in the playlist. Right-click on the Mark In column cell
and select the V
ISUAL MARKIN/MARKOUT command from the context
menu. The MarkIn/Out Editor window appears. Use the left handle on
the slider to adjust the Mark In value and then click A
ARK OUT To edit the value in the Mark Out column for clip items in the playlist,
M
PPLY.
select the clip row in the playlist. Right-click on the Mark Out column cell
and select the V
ISUAL MARKIN/MARKOUT command from the context
menu. The MarkIn/Out Editor window appears. Use the right handle on
the slider to adjust the Mark Out value and then click A
PPLY.
6-24 Xbuilder User Manual
Page 87

Creating and using playlists
NAME You cannot rename a page, template, scene or clip from within the
Playlist Editor since it’s a fundamental property of the asset.
However, if you still would like to edit the name of the item in the playlist,
double-click the row in the playlist. The item opens in the Template
Editor. Type the new name in the Name field in the upper portion of the
Template Editor. Click the C
OMMIT AND CLOSE button in the
Template Editor. The playlist’s Name column now displays the edited
name.
To edit the name of a playlist segment, right-click the segment headings
row and select the E
the new text and press E
See “
Adding comments to the playlist” on page 6-21 for instructions on
DIT CELL command from the context menu. Type
NTER.
how to edit the text in a comment row.
O
FFSET The offset time, which represents the amount of time delay between the
playout of two consecutive playlist elements, can be modified by
selecting the row and then clicking once in the Offset column cell. Type
in the amount of time that you would like to be between the playout of
the playlist items (i.e. 00:00:01 is one second). Then, press E
NTER.
See “Display settings” on page 9-4 for a description of the OFFSET
DISPLAY FORMAT setting, which determines the format of the Offset
value in the playlist column.
O
VERFLOW Currently, you cannot edit the overflow column’s value in Xbuilder’s
Playlist Editor.
P
LAYOUT TYPE The Playout Type column’s setting, as indicated by an icon, can be
changed by right-clicking on the playout type’s column’s cell, and then
selecting the P
LAYOUT TYPE command from the context menu. Select
one of the following playout types styles: SEQUENTIAL, HARD START, or
MANUAL. See page 6-12 for more information about the three (3)
playout types.
ECALL ID The Recall ID column’s value cannot be changed from within the
R
Playlist Editor since it’s a fundamental property of the page or template.
However, if you still would like to add/edit the Recall ID for a particular
page, double-click the page’s row in the playlist. The page opens in the
Contents Editor. Type the text in the Recall ID field in the upper portion
of the Template Editor. Click the S
AVE PAGE, AND CLOSE button in
the Template Editor. The playlist’s Recall ID column now displays the
added/edited text.
S
TATUS Displays the results of a verification routine when the playlist is loaded,
as well as the item’s on-air or cued status.
Xbuilder User Manual 6-25
Page 88

Creating and using playlists
Saving a playlist
For a playlist to be available for future use, or accessible to other Vertigo Suite applications
(i.e. Xplay), the playlist must be saved to the Xmedia Server. Newly created playlists are
given a generic name (i.e. Playlist1) until they are saved and you specify a unique name.
As well, any edits that are performed to existing playlist are not permanent until the playlist
has been saved. A playlist with unsaved edits is indicated by an asterisks beside the
playlist’s name in the Playlist Editor.
When a playlist is saved to the system, it becomes a playlist asset. Playlist assets are stored
and accessed from within the P
Browser and listed in the Template Editor.
To save a newly-created playlist:
1. Select the F
Or,
Press C
Or,
Click the S
The S
ILE>SAVE PLAYLIST command from Xbuilder’s menu commands.
TRL+S.
AVE CURRENT PLAYLIST button in the Playlist Editor’s toolbar.
AVE PLAYLIST dialog box appears (figure 6-9).
LAYLISTS root category (and sub-categories) in the Asset
Figure 6-9. The Save Playlist dialog box
2. In the N
3. Enter your name in the A
4. Enter a short description for the playlist in the D
AME field enter a new name for the playlist.
UTHOR field (optional).
ESCRIPTION field (optional).
5. Link the playlist to the Playlists root category or to sub-categories by selecting the
check box for each place where you want the playlist to be accessible from.
6. Click OK to save the playlist and exit the dialog box.
Or,
ANCEL to discard all entered information and return to the unsaved playlist.
Click C
6-26 Xbuilder User Manual
Page 89

Creating and using playlists
NOTE
To save the changes to an existing playlist:
• Select the F
ILE>SAVE PLAYLIST command from Xbuilder’s menu commands.
Or,
• Press C
TRL+S.
Or,
• Click the S
AVE CURRENT PLAYLIST button in the Playlist Editor’s toolbar.
To save an existing playlist under a different name or into another category:
1. Select the FILE>SAVE PLAYLIST AS command from Xbuilder’s menu commands.
Or,
Click the S
The S
AVE CURRENT PLAYLIST AS button in the Playlist Editor’s toolbar.
AVE PLAYLIST dialog box appears (figure 6-9).
2. In the NAME field enter a new name for the playlist.
3. Enter your name in the A
4. Enter a short description for the playlist in the D
UTHOR field (optional).
ESCRIPTION field (optional).
5. Link the playlist to the Playlists root category or to sub-categories by selecting the
check box for each place where you want the playlist to be accessible from.
6. Click OK to save the playlist and exit the dialog box.
Or,
ANCEL to discard all entered information and return to the unsaved playlist.
Click C
If you only want to move an existing playlist to another category, you don’t necessarily have
to perform a Save As. Simply drag and drop the playlist from the Template Editor from its
current category to another within the Asset Browser.
Xbuilder User Manual 6-27
Page 90

Creating and using playlists
Reloading the playlist
If you’ve had a playlist open for a while you may need to reload it to ensure that it’s still upto-date. For example, additional items may have been appended to the playlist by a user at
another workstation while the playlist was also open at your workstation.
To reload the playlist:
• Select the A
Or,
• Press F5.
Or,
• Click the R
CTIONS>RELOAD PLAYLIST command from Xbuilder’s menu commands.
ELOAD PLAYLIST button in the Playlist Editor’s toolbar.
6-28 Xbuilder User Manual
Page 91

7 CREATING AND USING RUNDOWNS AND
NOTE
SEGMENTS
Xbuilder allows you to create rundowns, which are ordered lists of the thematic RUNDOWN
SEGMENTS that make up a program. In turn, the rundown segments are lists of the graphic
pages (shared and embedded), scenes, and/or clips. The order in which the items are listed
in the rundown determines their playout order as well.
There are two types of rundown segments: shared segments and embedded segments.
• Shared segments are segment lists that are created and saved as assets on
the Xmedia Server. These segments are accessed through the Asset
Browser’s S
• Embedded segments are similarly created, but rather than being saved as
independent assets, they are saved as part of the rundown. Embedded
segments therefore, can only be used by the rundown that it belongs to.
EGMENTS root category and they can be added to any rundown.
Although rundown segments appear very similar to playlists, be aware that there are
differences between the two and that you should make assumptions that their functionality
is the same. For example, you cannot add the contents of a playlist to a rundown segment
if the playlist’s pages are organized within playlist segments.
The following sections provide descriptions and instructions for how to create and edit
rundowns and segments in Xbuilder:
An overview of the Rundown Editor” on page 7-3
• “
• “Procedural overview for creating rundowns” on page 7-6
• “Creating a new rundown” on page 7-7
• “Opening an existing rundown” on page 7-8
• “Creating and using rundown segments” on page 7-9
• “Opening an existing rundown segment” on page 7-18
Xbuilder User Manual 7-1
Page 92

Creating and using rundowns and segments
• “Adding segments to a rundown” on page 7-19
• “Repositioning segments within the rundown” on page 7-21
• “Removing segments from a rundown” on page 7-22
• “Saving a rundown under a different name or category” on page 7-23
• “Deleting a rundown from the system” on page 7-24
7-2 Xbuilder User Manual
Page 93

Creating and using rundowns and segments
Rundown name
Rundown segments
Segment open in
Segment Editor
Rundown Editor’s
menu commands
(right-click)
An overview of the Rundown Editor
The Rundown Editor lists the content and playback order for a program. A rundown is
populated and organized using rundown segments that are built and edited in the Segment
Editor or the Segment window. Figure 7-1 demonstrates that the Segment Editor appears
to the right of the Rundown Editor and is used mainly to view and edit the segments
belonging to the rundown.
Xbuilder User Manual 7-3
Figure 7-1. Rundown Editor components
Figure 7-1
and the following table identifies and describes the components of the Rundown Editor:
Rundown name New rundowns are given a temporary default name of Rundown#, which
appears in the first row of the Rundown list. Once you save the rundown,
the default name is replaced with its new name. Rundowns are saved on
the Xmedia Server as assets and are available to Xbuilder through the
Asset Browser’s Rundowns root category.
Rundown segments Each row in the Rundown Editor represents an individual rundown
segment. Rundown segments are built and viewed in the Segment
Editor/Window and can consist of a single page or a series of pages.
When you select a segment in the Rundown Editor, the row’s background
changes color. When the segment is open the Segment Editor, the
segment’s name is highlighted in the Rundown Editor. These color settings
can be changed using Xbuilder’s segment color settings.
Rundown Editor’s
menu commands
The Rundown Editor also features a context menu that allows you to save,
rename or delete the segment that is selected in the Rundown Editor.
Page 94

Creating and using rundowns and segments
1
4
2
53
An overview of the Segment Editor & Segment Window
Xbuilder offers two interfaces for creating and editing rundown segments: the Segment Editor
and the Segment window.
•The S
The S
associated with a specific rundown) that allows you to create and populate new shared
rundown segments with pages, scenes, clips and playlists.
EGMENT EDITOR (figure 7-2) is joined to the Rundown Editor and it allows you to:
• Create and populate new rundown segments with pages and playlists.
• Add the segments to the rundown that is open in the Rundown Editor.
• Save the segment as shared segment (using the S
embedded segment (using the S
AVE button).
AVE AS button) or as an
• View, add, edit, or remove pages, scene or clips belonging to the segment
highlighted in the Rundown window.
Figure 7-2. The Rundown Window and the Segment Editor
EGMENT WINDOW (figure 7-3) is a standalone interface (meaning that it is not
Figure 7-3. The Segment window is a stand-alone interface for creating and editing shared segments
Figure 7-3
1.
and the following list identify and describe the main interface components
TOOLBAR: A series of buttons that allows you to perform actions related to creating,
saving, and populating segments. See “
Segment Editor toolbar” on page 8-17 for a
description of each button on the toolbar.
EGMENT: A list of the pages, scenes and clips that make up the content of the segment.
2. S
Each page, scene, or clip has a dedicated row in the Segment Editor/window, which
determines their intended playout order. See “
Adding pages to a rundown segment” on page
7-11 and “Repositioning pages within the rundown segment” on page 7-15 for more
information.
Like playlists, the columns display information about each item included in the rundown
segment. Xbuilder allows you to determine which columns are displayed or hidden in
the Segment Editor/window by using the C
the Playlist table columns” on page 6-11 for instructions on how to display or hide
certain columns.
OLUMN LAYOUT dialog box. See “Configuring
7-4 Xbuilder User Manual
Page 95

Creating and using rundowns and segments
NOTE
You can annotate the segment by adding comment rows. Comment rows are often
used to insert instructions or identification annotations so that operators are better
informed. See “
Adding a comment row to the rundown segment” on page 7-14 for more
information.
ENU COMMANDS: Right-clicking on a segment row exposes menu commands that
3. M
allows you to set the playout type or delete the selected segment row. When these
commands are opened on a clip row, the VISUAL MARK IN/MARK O UT command can be
used to edit the clip’s starting and ending times. The two other commands allow you to
insert a segment or comment above the currently selected segment.
NAME: Displays the name of the rundown segment that is currently displayed in the Segment
4.
window. An asterisk appears beside the name until the segment, or the edits to the segment,
have been saved. See “Saving a rundown segment” on page 7-17 for more information.
EVICE FOR VERIFY: In the same way that Xbuilder allows you to verify the presence and
5. D
publishing of playlist items on configured devices, Xbuilder can also manually verify the
contents of a segment on specified devices using the V
ERIFY SEGMENT button .
This particular interface component allows you to target a specific device or all of the
configured devices when a segment verification is executed.
Configuring a device for the verification of playlist elements” on page 2-9 and
See “
Verifying the contents of a playlist” on page 6-5 for more details.
“
Xbuilder’s Action menu contains commands for clearing and reloading segments in the
Segment Editor/Window. See “Actions menu” on page 8-6 for more information.
Xbuilder User Manual 7-5
Page 96

Creating and using rundowns and segments
NOTE
Procedural overview for creating rundowns
The procedure below identifies the high-level steps involved in building rundowns for playing
out branding and promotional graphics sequences. Subsequent sections (identified by the
links within the procedure) provide step-by-step instructions for performing each step.
As a preliminary step, verify that the SEGMENTS category is displayed in Xbuilder’s Asset
Browser (without it you will not be able to populate the rundown). If the S
not displayed, then open the xbuilder.ini file (
and set the DisplaySegments setting to True.
To create a rundown in Xbuilder:
1. Create a new rundown, or open an existing rundown.
Creating a new rundown” on page 7-7
• “
• “Opening an existing rundown” on page 7-8
2. Create new rundown segments for the rundown:
Creating a new rundown segment” on page 7-9
• “
• “Adding pages to a rundown segment” on page 7-11
• “Adding scene assets to a rundown segment” on page 7-13
• “Adding clip assets to a rundown segment” on page 7-13
• optional - “Adding a comment row to the rundown segment” on page 7-14
• optional - “Repositioning pages within the rundown segment” on page 7-15
• optional - “Deleting or removing items from a rundown segment” on page 7-16
• “Saving a rundown segment” on page 7-17
3. Add rundown segments to the rundown and edit the rundown:
Adding segments to a rundown” on page 7-19
• “
• optional - “Repositioning segments within the rundown” on page 7-21
• optional - “Removing segments from a rundown” on page 7-22
4. Save the rundown
• “
Saving a rundown under a different name or category” on page 7-23
C:\Program Files\VertigoXmedia\Apps)
EGMENTS category is
7-6 Xbuilder User Manual
Page 97

Creating a new rundown
To create a new rundown, you must execute the CREATE NEW RUNDOWN action (described
below), which immediately replaces whatever is currently in the upper portion of the
Xbuilder window with a new, empty Rundown/Segment Editor (figure 7-5).
To create a new rundown:
1. Select FILE>NEW RUNDOWN or press CTRL+R.
The SAVE RUNDOWN dialog box appears (figure 7-4).
\
Creating and using rundowns and segments
Figure 7-4. The SAVE RUNDOWN dialog box.
2. In the N
3. Enter your name in the A
4. Enter a short description of the rundown in the D
5. Link the rundown to the R
AME field enter a new name for the rundown.
UTHOR field (optional).
ESCRIPTION field (optional).
UNDOWNS root category or to sub-categories by selecting the
check box for each place where you want the rundown to be accessible from.
6. Click OK to save the rundown and exit the dialog box.
The Rundown Editor and Segment Editor appear and are ready to be populated
(figure 7-5
).
Figure 7-5. A newly created rundown with an empty Segment Editor
Xbuilder User Manual 7-7
Page 98

Creating and using rundowns and segments
Opening an existing rundown
Existing rundowns are stored on the Xmedia Server. You can open existing playlists either
from the Asset Browser and Template Editor, or from the F
To open an existing rundown using the Asset Browser and Template Editor:
1. Select the R
appropriate category where the rundown is stored.
The rundowns contained in the Asset Browser category are listed in the Template
Editor.
2. Double-click the desired rundown in the Template Editor.
Or,
Right-click on the rundown in the Template Editor and select the O
the context menu.
The rundown opens in the Rundown Editor and the first segment listed in the rundown
list is displayed in the Segment Editor.
To open an existing playlist from the File menu:
1. Select FILE>OPEN RUNDOWN.
The O
2. Navigate through the Rundown categories in the right panel until the desired rundown
is listed in the left panel.
3. Double-click the desired rundown listed in the right panel.
Or,
Select the rundown and then click OK.
The rundown opens in the Rundown Editor and the first segment listed in the rundown
list is displayed in the Segment Editor.
UNDOWNS root category in the Asset Browser, and navigate to the
PEN RUNDOWN dialog box appears.
ILE menu.
PEN command from
7-8 Xbuilder User Manual
Page 99

Creating and using rundowns and segments
Stand-alone
Segment window
Creating and using rundown segments
Typically, rundown segments are lists of graphic pages (shared and embedded pages),
scenes, clips and shared playlists that make up a section of a program. The order in which
these items are listed in the rundown segment determines their playout order as well.
The following sections provide instructions for creating new rundown segments and
opening existing rundown segments:
Creating a new rundown segment” on page 7-9
• “
• “Configuring the segment table columns” on page 7-11
• “Adding pages to a rundown segment” on page 7-11
• “Adding scene assets to a rundown segment” on page 7-13
• “Adding clip assets to a rundown segment” on page 7-13
• “Adding a comment row to the rundown segment” on page 7-14
• “Repositioning pages within the rundown segment” on page 7-15
• “Deleting or removing items from a rundown segment” on page 7-16
• “Saving a rundown segment” on page 7-17
Creating a new rundown segment
Xbuilder User Manual 7-9
The introduction to rundowns on page 7-1 explains that rundown segments can either be shared
or embedded. While shared segments can be created and edited in both the Segment Editor
and the Segment window, embedded segments can only be created in the Segment Editor.
The following instructions guide you through the process of creating new rundown
segments from either interface.
To create a new shared segment in the Segment window:
1. Select the FILE>NEW SEGMENT command from the Xbuilder toolbar.
The upper portion of the Xbuilder window becomes an empty Segment window (figure 7-6
Figure 7-6. Stand-alone Segment window
).
Page 100

Creating and using rundowns and segments
2. Populate the segment with shared pages and/or embedded pages (templates) from the
Asset Browser and Template Editor (see “Adding pages to a rundown segment” on
page 7-11).
3. Click the SAVE button in the Segment window’s toolbar.
Or,
Select the F
ILE>SAVE SEGMENT or the FILE>SAVE SEGMENT AS command from the
Xbuilder menu commands.
AVE SEGMENT dialog box appears (figure 7-7).
The S
Figure 7-7. Save the shared segment on the Xmedia Server using the Save Segment dialog box
4. In the N
5. Enter your name in the A
6. Enter a short description of the segment in the D
AME field enter a new name for the segment.
UTHOR field (optional).
ESCRIPTION field (optional).
7. Link the segment to the Segments root category or to sub-categories by selecting the
check box for each place where you want the segment to be accessible from.
8. Click OK to save the segment and exit the dialog box.
To create a new segment (shared or embedded) in the Segment Editor:
1. With a rundown open in the Rundown window, click the N
EW SEGMENT button in
the Segment Editor’s toolbar.
A new segment is added to the rundown window below the initial segment listed and
the Segment Editor becomes empty and is ready to be populated.
7-10 Xbuilder User Manual
 Loading...