

Page 1

Visual Status Display
ENCORE/PRELUDE CONTROL SYSTEMS
Instruction Manual
Software Version 2.0
071857502
AUGUST 2010
Page 2

Affiliate with the N.V. KEMA in The Netherlands
CERTIFICATE
Certificate Number: 510040.001
The Quality System of:
Thomson Inc, and its worLdwide Grass Valley division affiliates DBA
GRASS VALLEY
Headquarters
400 Providence Mine Rd
Nevada City, CA 95959
United States
15655 SW Greystone Ct.
Beaverton, OR 97006
United States
10 Presidential Way
Suite 300
Woburn, MA 01801
United States
Kapittelweg 10
4827 HG Breda
The Nederlands
7140 Baymeadows Way
Ste 101
Jacksonville, FL 32256
United States
2300 So. Decker Lake Blvd.
Salt Lake City, UT 84119
United States
Rue du Clos Courtel
CS 31719
35517 Cesson-Sevigné Cedex
France
1 rue de l’Hautil
Z.I. des Boutries BP 150
78702 Conflans-Sainte
Honorine Cedex
France
Technopole Brest-Iroise
Site de la Pointe du Diable
CS 73808
29238 Brest Cedex 3
France
40 Rue de Bray
2 Rue des Landelles
35510 Cesson Sevigné
France
Spinnereistrasse 5
CH-5300 Turgi
Switzerland
Brunnenweg 9
D-64331 Weiterstadt
Germany
Carl-Benz-Strasse 6-8
67105 Schifferstadt
Germany
Including its implementation, meets the requirements of the standard:
ISO 9001:2008
Scope:
The design, manufacture and support of video and audio hardware and software products and
related systems
.
This Certificate is valid until: June 14, 2012
This Certificate is valid as of: June 14, 2009
Certified for the first time: June 14, 2000
H. Pierre Sallé
President
KEMA-Registered Quality
The method of operation for quality certification is defined in the KEMA General Terms
And Conditions For Quality And Environmental Management Systems Certifications.
Integral publication of this certificate is allowed.
KEMA-Registered Quality, Inc.
4377 County Line Road
Chalfont, PA 18914
Ph: (215)997-4519
Fax: (215)997-3809
CRT 001 073004
Accredited By:
ANAB
Page 3
Visual Status Display
ENCORE/PRELUDE CONTROL SYSTEMS
Instruction Manual
Software Version 2.0
071857502
AUGUST 2010
Page 4
Contacting Grass Valley
International
Support Centers
Local Support
Centers
(available
during normal
business hours)
France
24 x 7
Australia and New Zealand: +6
Middle East: +9
Europe
+800 8080 2020 or +33 1 48 25 20 20
Hong Kong, Taiwan, Korea, Macau: +852 2531 3058 Indian Subcontinent: +91 22 24933476
Asia
Southeast Asia/Malaysia: +6
China: +8
Belarus, Russia, Tadzikistan, Ukraine,
S. Europe/Italy-Roma: +3
Benelux/Belgium: +3
Germany, Austria, Eastern Europe: +4
61 0660 159 450 Japan: +81 3 5484 6868
71 4 299 64 40 Near East and Africa: +800 8080 2020 or +33 1 48 25 20 20
Copyright © Grass Valley, Inc. All rights reserved.
This product may be covered by one or more U.S. and foreign patents.
Grass Valley Web Site
The www.grassvalley.com web site offers the following:
Online User Documentation — Current versions of product catalogs, brochures,
data sheets, ordering guides, planning guides, manuals, and release notes
in .pdf format can be downloaded.
FAQ Database — Solutions to problems and troubleshooting efforts can be
found by searching our Frequently Asked Questions (FAQ) database.
Software Downloads — Download software updates, drivers, and patches.
United States/Canada
24 x 7
03 7805 3884 Southeast Asia/Singapore: +65 6379 1313
1 1300 721 495 Central/South America: +55 11 5509 3443
Uzbekistan: +7 095 2580924 225 Switzerland: +41 1 487 80 02
9 06 87 20 35 28 -Milan: +39 02 48 41 46 58 S. Europe/Spain: +34 91 512 03 50
2 (0) 2 334 90 30 Benelux/Netherlands: +31 (0) 35 62 38 42 1 N. Europe: +45 45 96 88 70
9 6150 104 444 UK, Ireland, Israel: +44 118 923 0499
+1 800 547 8949 or +1 530 478 4148
4 Visual Status Display — Instruction Manual
Page 5

Contents
Section 1 — VSD Introduction . . . . . . . . . . . . . . . . . . . . . . . . . . . . . . . . . . . . . . . . . . . 7
Section 2 — VSD Installation . . . . . . . . . . . . . . . . . . . . . . . . . . . . . . . . . . . . . . . . . . . 11
Section 3 — Encore VSD Configuration . . . . . . . . . . . . . . . . . . . . . . . . . . . . . . . . 15
Overview . . . . . . . . . . . . . . . . . . . . . . . . . . . . . . . . . . . . . . . . . . . . . . . . . . . . . . . . . . . . . 7
VSD Features . . . . . . . . . . . . . . . . . . . . . . . . . . . . . . . . . . . . . . . . . . . . . . . . . . . . . . . . . . 8
Views. . . . . . . . . . . . . . . . . . . . . . . . . . . . . . . . . . . . . . . . . . . . . . . . . . . . . . . . . . . . . . . . . 9
Current VSD Limitations . . . . . . . . . . . . . . . . . . . . . . . . . . . . . . . . . . . . . . . . . . . . . . . . 9
Distribution . . . . . . . . . . . . . . . . . . . . . . . . . . . . . . . . . . . . . . . . . . . . . . . . . . . . . . . . . . 11
Requirements. . . . . . . . . . . . . . . . . . . . . . . . . . . . . . . . . . . . . . . . . . . . . . . . . . . . . . . . . 11
Installing Using the VSD Installer . . . . . . . . . . . . . . . . . . . . . . . . . . . . . . . . . . . . . . . 11
Installing with Encore/Prelude Software Installer . . . . . . . . . . . . . . . . . . . . . . . . . 13
Uninstall . . . . . . . . . . . . . . . . . . . . . . . . . . . . . . . . . . . . . . . . . . . . . . . . . . . . . . . . . . . . . 14
Overview . . . . . . . . . . . . . . . . . . . . . . . . . . . . . . . . . . . . . . . . . . . . . . . . . . . . . . . . . . . . 15
Register VSD PC With Encore. . . . . . . . . . . . . . . . . . . . . . . . . . . . . . . . . . . . . . . . . . . 16
Set VSD Related Parameters and Flags . . . . . . . . . . . . . . . . . . . . . . . . . . . . . . . . . . . 21
Section 4 — Prelude VSD Configuration . . . . . . . . . . . . . . . . . . . . . . . . . . . . . . . 23
Overview . . . . . . . . . . . . . . . . . . . . . . . . . . . . . . . . . . . . . . . . . . . . . . . . . . . . . . . . . . . . 23
Prelude NP Client/Server Configuration Procedure . . . . . . . . . . . . . . . . . . . . . . . 23
Section 5 — VSD Operation. . . . . . . . . . . . . . . . . . . . . . . . . . . . . . . . . . . . . . . . . . . . . 25
Connecting VSD to the Routing System . . . . . . . . . . . . . . . . . . . . . . . . . . . . . . . . . . 25
VSD License Key Registration. . . . . . . . . . . . . . . . . . . . . . . . . . . . . . . . . . . . . . . . . . . 25
Toolbar Controls . . . . . . . . . . . . . . . . . . . . . . . . . . . . . . . . . . . . . . . . . . . . . . . . . . . . . . 27
Dropdown Menus . . . . . . . . . . . . . . . . . . . . . . . . . . . . . . . . . . . . . . . . . . . . . . . . . . . 27
View . . . . . . . . . . . . . . . . . . . . . . . . . . . . . . . . . . . . . . . . . . . . . . . . . . . . . . . . . . . . . 27
Edit . . . . . . . . . . . . . . . . . . . . . . . . . . . . . . . . . . . . . . . . . . . . . . . . . . . . . . . . . . . . . . 27
Actions. . . . . . . . . . . . . . . . . . . . . . . . . . . . . . . . . . . . . . . . . . . . . . . . . . . . . . . . . . . 27
Settings . . . . . . . . . . . . . . . . . . . . . . . . . . . . . . . . . . . . . . . . . . . . . . . . . . . . . . . . . . 28
Show. . . . . . . . . . . . . . . . . . . . . . . . . . . . . . . . . . . . . . . . . . . . . . . . . . . . . . . . . . . . . 28
Tools. . . . . . . . . . . . . . . . . . . . . . . . . . . . . . . . . . . . . . . . . . . . . . . . . . . . . . . . . . . . . 29
Event Stacker . . . . . . . . . . . . . . . . . . . . . . . . . . . . . . . . . . . . . . . . . . . . . . . . . . . . . 29
Help . . . . . . . . . . . . . . . . . . . . . . . . . . . . . . . . . . . . . . . . . . . . . . . . . . . . . . . . . . . . . 29
Standard Icon Toolbar . . . . . . . . . . . . . . . . . . . . . . . . . . . . . . . . . . . . . . . . . . . . . . . 29
Preferences Bar. . . . . . . . . . . . . . . . . . . . . . . . . . . . . . . . . . . . . . . . . . . . . . . . . . . . . . 30
Events Log . . . . . . . . . . . . . . . . . . . . . . . . . . . . . . . . . . . . . . . . . . . . . . . . . . . . . . . . . 30
Bottom Status Bar . . . . . . . . . . . . . . . . . . . . . . . . . . . . . . . . . . . . . . . . . . . . . . . . . . . 30
VSD Views . . . . . . . . . . . . . . . . . . . . . . . . . . . . . . . . . . . . . . . . . . . . . . . . . . . . . . . . . . . 31
Views Supported by Encore and Prelude . . . . . . . . . . . . . . . . . . . . . . . . . . . . . . . 31
New Views . . . . . . . . . . . . . . . . . . . . . . . . . . . . . . . . . . . . . . . . . . . . . . . . . . . . . . . . . 31
Visual Status Display — Instruction Manual 5
Page 6

Contents
Level Selection. . . . . . . . . . . . . . . . . . . . . . . . . . . . . . . . . . . . . . . . . . . . . . . . . . . . . . 32
Column Widths. . . . . . . . . . . . . . . . . . . . . . . . . . . . . . . . . . . . . . . . . . . . . . . . . . . . . 33
Names and Aliases . . . . . . . . . . . . . . . . . . . . . . . . . . . . . . . . . . . . . . . . . . . . . . . . . . 33
Arranging and Sorting View Elements . . . . . . . . . . . . . . . . . . . . . . . . . . . . . . . . . 33
Reloading System Views . . . . . . . . . . . . . . . . . . . . . . . . . . . . . . . . . . . . . . . . . . . . . 34
Destination View . . . . . . . . . . . . . . . . . . . . . . . . . . . . . . . . . . . . . . . . . . . . . . . . . . . . . 35
Source View. . . . . . . . . . . . . . . . . . . . . . . . . . . . . . . . . . . . . . . . . . . . . . . . . . . . . . . . . . 36
Active Salvo View (Encore Only). . . . . . . . . . . . . . . . . . . . . . . . . . . . . . . . . . . . . . . . 37
Tally Salvo View (Encore Only) . . . . . . . . . . . . . . . . . . . . . . . . . . . . . . . . . . . . . . . . . 38
Tie Line View (Encore Only) . . . . . . . . . . . . . . . . . . . . . . . . . . . . . . . . . . . . . . . . . . . 39
Rooms View (Encore Only). . . . . . . . . . . . . . . . . . . . . . . . . . . . . . . . . . . . . . . . . . . . . 40
Assignment View (Encore Only) . . . . . . . . . . . . . . . . . . . . . . . . . . . . . . . . . . . . . . . . 41
Monitor View . . . . . . . . . . . . . . . . . . . . . . . . . . . . . . . . . . . . . . . . . . . . . . . . . . . . . . . . 42
Event Stacker. . . . . . . . . . . . . . . . . . . . . . . . . . . . . . . . . . . . . . . . . . . . . . . . . . . . . . . . . 43
Customizing VSD Views. . . . . . . . . . . . . . . . . . . . . . . . . . . . . . . . . . . . . . . . . . . . . . . 45
Application Preferences. . . . . . . . . . . . . . . . . . . . . . . . . . . . . . . . . . . . . . . . . . . . . . 45
View Preferences. . . . . . . . . . . . . . . . . . . . . . . . . . . . . . . . . . . . . . . . . . . . . . . . . . . . 46
Color Settings. . . . . . . . . . . . . . . . . . . . . . . . . . . . . . . . . . . . . . . . . . . . . . . . . . . . . 47
Font Settings . . . . . . . . . . . . . . . . . . . . . . . . . . . . . . . . . . . . . . . . . . . . . . . . . . . . . . . 47
Visual Status Display Instruction Manual . . . . . . . . . . . . . . . . . . . . . . . . . . . . . . . . 47
Index. . . . . . . . . . . . . . . . . . . . . . . . . . . . . . . . . . . . . . . . . . . . . . . . . . . . . . . . . . . . . . . . . . . . . . 49
6 Visual Status Display — Instruction Manual
Page 7

VSD Introduction
Overview
The Visual Status Display (VSD) application shows the current status of the
Source-to-Destination connections of an Encore or Prelude routing system.
VSD information is updated automatically. For example, when a Destina
tion’s routing changes, if that Destination is currently displayed its status
will be updated within five seconds. In addition, on Encore systems the
VSD screen can automatically update if an Encore router configuration is
modified (for example, changes in the names of existing Sources or Desti
nations). On Prelude systems VSD automatically updates Source and Destination names whenever the application connects.
Section 1
-
-
The VSD application runs on Windows operating systems. The PC running
VSD needs to be connected to the router network. With Encore systems,
VSD acts as an RCL client, so the PC running VSD needs to be registered
with the Encore system and have access to the Sharer to be operational. On
Prelude systems VSD acts as a client for an NP Server configured on a
Prelude control panel.
VSD supports fail-over redundancy. On Encore systems redundancy uses a
mirrored Panel Server. If the Master Panel Server fails, VSD establishes a
connection with its Mirrored Panel Server. On Prelude systems redundancy
is accomplished using NP Servers configured on two control panels.
VSD is an option that is registered by entering a license key, obtained from
Grass Valley Customer Service. The license key is valid for only a specific
PC, and only one VSD instance can run on that PC at a time. An unregis
tered VSD operates in trial mode, which limits the maximum number of
elements supported per View to five. Two types of VSD license are avail
able, a basic licence that excludes the Event Stacker, and a full license that
includes Event Stacker.
-
-
Visual Status Display — Instruction Manual 7
Page 8

Section 1 — VSD Introduction
VSD Features
The VSD application has the following capabilities:
• Eight different system views (see View s below).
• Event Stacker, which allows programming and executing time-sched-
• Display of names, or alias names, or both.
• Sorting by names.
• New Destination, Source and Tie Line names can be inserted anywhere
• Cut, Copy and Paste operations are supported where appropriate.
• Multiple columns of Destinations can be displayed (useful in systems
• An optional Comments column is available for each view type.
uled tasks (Takes, Protects, Unprotects, Salvos, Assignments, Deassignments, and Monitor Takes). Encore systems only, and requires a full
license.
in already created view screens.
with many Destinations and few Levels).
• Chop feature status reporting is supported.
• Display font type and size can be configured.
• The VSD can retain its last connection state.
• Fail-over redundancy.
• An Events Log is available, to observe the connected Panel Server’s
operations.
• Dynamic Audio Attribute feature status reporting is supported (Encore
systems only).
8 Visual Status Display — Instruction Manual
Page 9

Views
View s
Large routing systems can have many Destinations and complex paths,
making it impossible to see the status of the entire system on a single
screen. VSD permits grouping subsets of the system into Views. Different
Views can be created to quickly display the current status of various por
tions of the system. The types of Views available include:
• Destination View (Encore and Prelude systems)
• Source View (Encore and Prelude systems)
• Active Salvo View (Encore systems only)
• Tally Salvo View (Encore systems only)
• Tie-Line View (Encore systems only)
• Rooms View (Encore systems only)
• Assignment View (Encore systems only)
• Destination Monitor View (Encore systems only)
-
The VSD limits its view capability automatically based on the type of
control system it is connected to.
Current VSD Limitations
• The Event Stacker does not support scheduling a re-occurrence event.
• The Event Stacker does not tally the result of RCL Server events.
• On Prelude systems, if more than one VSD application is connected,
• Prelude systems require the use of at least one hardware control panel
• Cut, Copy, Paste operations are not available in all Views.
any deleted, modified or newly created Views will not be shared by the
running VSC applications. To synchronize this information a VSD
application must be closed and restarted. On Encore systems, Views are
dynamically shared with other connected VSD applications.
(not Soft Panels) to act as an NP server for VSD operations.
Visual Status Display — Instruction Manual 9
Page 10

Section 1 — VSD Introduction
10 Visual Status Display — Instruction Manual
Page 11

VSD Installation
Distribution
The VSD application is included on the Encore and Compact Router
Control System software CDs, and is available for download from the
Grass Valley Support web site.
Requirements
VSD runs on a customer supplied PC running Windows 2000, Windows XP,
or Windows 7. The PC you use must be a node on the router network, so it
will need to be configured with appropriate IP addresses.
Section 2
Installing Using the VSD Installer
1. If you have not already done so, configure the PC with IP addresses
appropriate for your Encore or Prelude network.
2. Physically connect the PC’s Ethernet port to the router network.
3. Acquire the VSD software. It can be downloaded from the web onto any
convenient media (hard disk, thumb drive, or burned to CD).
4. Quit any applications running on the PC. You may want to reboot the
computer to ensure all processes (including Port Mapper) have quit.
5. Access the VSD directory and run Setup.exe.
Visual Status Display — Instruction Manual 11
Page 12
Section 2 — VSD Installation
6. The VSD install program will launch and a Use with Encore window
appears (Figure 1).
Figure 1. Use With Encore Window
• Select Yes if you plan to use VSD with an Encore system. Later you
will be asked for the IP address of the Sharer network.
• Select
7. A Welcome to VSD window then appears. Click Next, accept the license
agreement, and follow the on-screen instructions (Figure 2). Default
settings are recommended.
Figure 2. VSD Installation Screens
No if you will be using VSD only with a Prelude system.
12 Visual Status Display — Instruction Manual
Page 13
Installing with Encore/Prelude Software Installer
Installing with Encore/Prelude Software Installer
A check box for VSD is available during an Encore or Prelude control
system software installation process. You can choose to install VSD on the
PC along with the control system software if you wish, or you can select
only that checkbox to install just VSD (Figure 3 and Figure 4).
Figure 3. Encore Installer Checkboxes
Note The VSD can be installed along with the Encore software. Installation at a later
time with applications open may result in a Cannot update Port Mapper error
message. If this occurs, use Task Manager to halt only the Port Mapper.exe
application, and then install VSD.
Figure 4. Prelude Installer Checkboxes
When selected, the VSD installer (as described earlier) will launch.
Visual Status Display — Instruction Manual 13
Page 14

Section 2 — VSD Installation
Uninstall
The UnWise.exe file, installed by default into the Program Files/Grass Valley
Group/VSD, folder can be used to uninstall the VSD application from the
PC. User data, including licensing, is not deleted by this uninstall process
and becomes available if the VSD program is re-installed.
14 Visual Status Display — Instruction Manual
Page 15

Encore VSD Configuration
Overview
The Encore system will not recognize the VSD until the IP address of the
PC running the VSD application is registered.
Note If the PC has already been registered with the Encore system you will not
need to do this registration procedure.
The following procedure assumes an Encore OUI has already been
installed onto the PC and the necessary applications have been configured.
If this is not the case, refer to the Encore Release Notes and/or Encore Config
uration Manual for specific instructions.
Section 3
-
Visual Status Display — Instruction Manual 15
Page 16
Section 3 — Encore VSD Configuration
Register VSD PC With Encore
You will need Encore System Administrator privileges to do this registration procedure.
1. Launch the Encore OUI and login as System Administrator. Default is
user SYS with no password. When logged in a screen similar to Figure 5
will be displayed.
Figure 5.
16 Visual Status Display — Instruction Manual
Page 17

Register VSD PC With Encore
2. Click on a blank button on the lower application bar and select a Control
Panel Server
application screen will be displayed (Figure 6).
Figure 6.
from the pop up menu. The Control Panel Server
Visual Status Display — Instruction Manual 17
Page 18

Section 3 — Encore VSD Configuration
3. Click on the RCL Servers button on the lower right to display the next
screen (Figure 7).
Figure 7.
4. In the right Ethernet pane, click on a number to select an item to
configure. An arrow will be displayed next to the number.
5. Click on the first field and enter a name for the PC you wish to register.
18 Visual Status Display — Instruction Manual
Page 19

Register VSD PC With Encore
6. Click on the second IP field and enter the IP address of the PC you will
run VSD on (Figure 8).
Figure 8.
7. The new setting will be saved automatically, with no need to Modify or
Save the change.
Visual Status Display — Instruction Manual 19
Page 20

Section 3 — Encore VSD Configuration
8. If you need to connect multiple clients at the same time from the same
PC, (for example, both VSD and Salvo Editor) click
and click the
enabled, when the other client connects the
dropped.
Figure 9.
Flags and Parameters
Multiple Conn flag so it is green (Figure 9). If this flag is not
existing client will be
Note VSD requires a Protocol Type of either the default Auto Select (recom-
mended) or RCL Prot
9. Click Main and disconnect the Panel Server application.
The VSD application will now be recognize
is launched and connected to the Encore Panel Server. Initially it will
operate in Trial mode (limited to 5 items per View). License registration
enables the VSD application
ocol.
d by the Encore system when it
20 Visual Status Display — Instruction Manual
Page 21

Set VSD Related Parameters and Flags
To obtain statuses for all Encore system entities, ensure none are excluded.
• Make sure the Src Category Set is AllSrcs. VSD reports statuses of
excluded Sources as
• Make sure the Salvo Exclusion Set is AllSvos. VSD will not be able to
select excluded Salvos for status reporting.
If changes are made to the RCL Server Flags and Parameters for a connected VSD, you will need to disconnect and reconnect that VSD instance
to activate the changes.
<Undef>.
Set VSD Related Parameters and Flags
Visual Status Display — Instruction Manual 21
Page 22

Section 3 — Encore VSD Configuration
22 Visual Status Display — Instruction Manual
Page 23

Prelude VSD Configuration
Overview
On a Prelude system the VSD application operates as a client to an NP
server configured on a Prelude control panel. Once configured, VSD con
nects over the network to the control panel to receive Prelude system status
information.
The VSD client/server configuration process for Prelude involves several
steps.
• A VSD client configuration, which includes the IP address of the PC
running VSD, is created and saved on the Prelude system.
• The client configuration is assigned to an NP server of a Prelude control
panel configuration, saved, and sent to that panel.
Section 4
-
• The VSD application connects using the IP address of the Prelude
control panel with the configured server, and so gains access to Prelude
system information.
Note The VSD NP server must be configured on a hardware control panel. Soft
Panels do not support client connections, even if a configuration containing
an NP server is sent to the Soft Panel.
Refer to the separate Prelude Instruction Manual for more detailed information.
Prelude NP Client/Server Configuration Procedure
1. In Prelude, open a configuration file for the control panel you wish to
use as the VSD server. Click on the
a configuration window. Right click on a
columns and select
New to create a new client configuration (Figure 10).
NP Server Configuration button to open
Client Name field in one of the
Visual Status Display — Instruction Manual 23
Page 24

Section 4 — Prelude VSD Configuration
Figure 10. NP Server Configuration Window
2. In the NP Client Configuration window that opens, enter a name for the
VSD client, the IP address of the PC that will be running VSD, and then
Save the client configuration file (Figure 11).
Figure 11. NP Client Configuration Window
3. The NP Server Configuration window will now show that client
configuration assigned to that panel server.
configuration for that panel.
4. Click Send Panel Config to Control Panel, select the control panel you wish to
use as the server, and click
The PC running VSD will now be able to connect to that Prelude control
panel using
the panel’s IP address and gain access to the Prelude system.
Send.
Save the server
24 Visual Status Display — Instruction Manual
Page 25

VSD Operation
Connecting VSD to the Routing System
When the routing system has been configured to support VSD, you will be
able to connect VSD to the system.
Section 5
If the VSD program launches into a disc
Connect button
Encore SCB or Prelude control panel you wish to connect to (Figure 12).
Figure 12. VSD Connect Window
If the program is unable to connect to the primary server, it will attempt to
connect to the backup server (if one was specified). If this second connection attempt also fails, an error message will be displayed and the VSD
lication will not be operational.
app
On successful connection a Level Selection window appears (Figure 19 on
page 32), allowing you to select the Levels
opens a window allowing entry of the IP address of the
onnected state, clicking on the
to be displayed on the screen.
VSD License Key Registration
The VSD will operate in Trial Mode until a valid license key is entered. Trial
Mode is fully functional, but limits to five the maximum number of elements in each View.
Two levels of licensing exist. Both ve
imum, but the Full license is required to
Visual Status Display — Instruction Manual 25
rsions remove the five element max-
activate the Event Stacker feature.
Page 26

Section 5 — VSD Operation
Each license key is valid for an individual PC, and is generated based on
the Device ID of that specific PC. You will need to determine the Device ID
of your PC and provide that exact number to Grass Valley Sales. They will
then generate the key and send it to you. Entering this key into the VSD will
activate full functionality on that PC.
The complete procedure to register your V
1. Click on the VSD desktop icon. If not licensed the following prompt
message appears (Figure 13).
Figure 13.
2. Click OK. A blank VSD screen will be displayed. Click on Help/Enter
License Key
Figure 14.
and note the Device ID displayed (Figure 14).
SD involves the following steps:
3. Contact Grass Valley Sales by email or phone (refer to the back of the
title page of this manual for the current contact methods) and provide
the exact Device ID number. After your purchase has been confirmed,
a License Key will be generated and sent to you.
4. Enter the license key text exactly (including dashes) in the field
displayed and click
the Device ID it will be accepted and the following valid key message
will be displayed (Figure 15).
Figure 15.
26 Visual Status Display — Instruction Manual
Submit. If the key is entered correctly and matches
Page 27

Toolbar Controls
Dropdown Menus
View
Tool b a r Co n t rols
5. Click OK. Your copy of VSD is now fully operational (allows unlimited
elements your Views). If no license key is entered or the license key is
invalid, the VSD application will operate in trial mode.
The dropdown menu items follow Windows OS conventions, with some
additional application specific functions.
New - Presents a sub-menu listing types of Views that can be created.
Selecting a View type creates a new
Noname View of that type.
Open - Presents a sub-menu listing types of Views. Selecting a View type
opens a window of those existing Views. Selecting a View loads it into the
spreadsheet.
Save - Saves the currently loaded active View with its current name.
Save As... - Opens a window that allows saving the active View under the
same or a new name.
Close - Closes the active View.
Close All - Closes all currently loaded Views.
Exit - Exits the VSD application.
Edit
Cut, Copy, Paste - Standard clipboard style editing controls.
Levels - Opens a window allowing selection of the Levels to be displayed in
the active View.
Actions
Connect - Opens a window allowing entry of the IP address of the server
VSD will connect to.
Disconnect - Disconnects VSD from the server.
Reload System Views from Sharer - Loads Views from the Encore Sharer (Encore
systems only).
Visual Status Display — Instruction Manual 27
Page 28

Section 5 — VSD Operation
Settings
Show
Delete - Opens a window allowing the selection of existing Views to be
deleted.
Note On Encore systems, use this control to delete Views. The Encore OUI Filer
should not be used for this purpose, unless you also use the Encore System
Manager OUI to delete the Views from the dustbin. Views in the dustbin
prevent new Views with the same name from being saved to the Sharer. See
the separate Encore Configuration Manual for more information.
Preferences - Provides access to the Application Preferences screen, for changing
application features, and the
View Preferences window allowing changes to
VSD spreadsheet colors and other settings.
Font Settings - Opens a window allowing the selection of the font, font style,
and size to be used in the VSD spreadsheet.
Toolbars
Standard - Shows or hides the standard icon controls at the top of the
screen.
View Preferences - Shows or hides the preferences bar at the top of the
screen.
Status Bar - Shows or hides the bottom status bar.
Full Screen - Enlarges the active window by hiding the toolbars.
Show Area Aliases - Appends the Area Alias names in front of Source and Des-
tination names (Encore systems only).
Auto-Fit Columns - Controls whether columns will automatically resize to fit
the contained text.
Show Names - Displays Destinations and Sources by name (the default set-
ting).
Show Alias - Displays Destinations and Sources by alias, adding extra
columns if
Note If both Show Names and Show Alias are turned off, names will be displayed.
Show Names is also selected.
Destination Columns - In Destination View, allows display of up to eight
columns of Destinations.
Events Log - Enables a resizeable sub-window at the bottom of the screen that
reports router activity (Takes, Protects, etc.).
28 Visual Status Display — Instruction Manual
Page 29

Tools
Zoom in, Zoom Out - Enlarges or reduces the size of the spreadsheet display.
Event Stacker - Enables and/or displays the Event Stacker window.
Event Stacker
When Event Stacker window is active, the following controls are available:
Event - Permits modifying or deleting events.
View - Displays on the screen only events meeting various criteria.
See Event Stacker on page 43 for more information.
Help
Instruction Manual - Provides access to the VSD Instruction Manual, in .pdf
format (Acrobat Reader required).
Tool b a r Co n t rols
About VSD - Opens a window displaying the version of VSD.
Enter License Key - Opens a window that displays the Device ID of the PC
running VSD, and permits entry of a license key.
Standard Icon Toolbar
The standard icon toolbar near the top of the VSD screen (Figure 16)
accesses various functions, which are a
Figure 16. VSD Standard Toolbar and View Preferences
The functions for these icons are, from left to right:
•Create New View
• Open Existing View
lso available via dropdown menus.
•Close View
• Save View
• Cut Selection
• Copy Selection
• Paste Selection
Visual Status Display — Instruction Manual 29
Page 30

Section 5 — VSD Operation
Preferences Bar
Events Log
• Connect to Server
• Disconnect from Server
• Open Preferences Window
• Font Settings
• Zoom Spreadsheet Display Size
• Open Event Stacker
When View Preferences is selected, controls are available for Show Alias,
Show Names, and Destination Columns (Figure 16).
When Events Log is selected, a resizeable window is available to view router
activity (Figure ).
Figure 17. VSD Events Log and Status Bar
A text file of the log activity is saved locally during VSD operation, in the
Event Log folder inside the VSD application folder. Each file is named with
date, in day month year format (i.e. 02-06-2010.txt).
Clicking
file to open into a Notepad window.
Bottom Status Bar
A status bar (if selected in the Show dropdown) is located at the bottom of
the VSD screen (Figure ).
The statuses reported, from left to right, are:
• Current activity status of the VSD app
sages.
View, Open, Event Log opens a window allowing you to select a log
lication, including any error mes-
30 Visual Status Display — Instruction Manual
Page 31

VSD Views
VSD Views
Note Error messages are displayed as they are received, and may not be cleared
by subsequent successfully performed events.
• Server connection status, including IP address of the connected server.
• Sharer availability status (Encore systems only).
Views are status displays of subsets of Encore system crosspoints. Different
Views can be created and saved for reuse. VSD Views can be stored as
System Views in the Sharer (on Encore systems) as well as on the local PC
on which the VSD is running. Tally Salvo Views for system salvo individual
elements are read only and cannot be saved.
Each type of View (Destination View, Source View, etc.) is identified at the
top of the screen, followed by the name of the currently selected View.
Color coded tabs with the name of the View are also displayed at the
bottom of the screen, allowing quick access to any loaded View. The default
View is titled
name with the trailing number.
NoName1. Subsequent newly created Views initially have that
Views Supported by Encore and Prelude
Encore control systems support all VSD Views and the Event Stacker.
Prelude systems support only Destination and Source Views, and do not
support the Event Stacker.
New Views
New Views will appear as a blank spreadsheet. You select which items
(destinations, sources, tielines, etc.) you wish to see status for by double
clicking on an item’s column. A window will appear listing the available
items. Clicking on one or a series of items will load them into the View. You
can restrict the list to show items in an individual Area with the
Area
dropdown list (Figure 18).
Select an
Visual Status Display — Instruction Manual 31
Page 32

Section 5 — VSD Operation
Figure 18. Adding Destinations
Level Selection
You can select which levels will be displayed on the screen, with the Edit /
Levels dropdown menu. A list of the available Levels is displayed
(Figure 19).
Figure 19. Level Selection Window
When the Applicable box is checked (the default setting), each View will
open with only the defined Levels.
32 Visual Status Display — Instruction Manual
Page 33

Column Widths
The width of the columns on the screen can be adjusted by dragging the
cursor on the margin at the top of each column. Column widths can also the
automatically adjusted to the size of the text with the
setting.
Names and Aliases
Items can be listed by name, by alias, or both, using the checkboxes in the
View Preferences toolbar that can appear above the spreadsheet
(Figure 20). If neither box is checked, names will be used (the default). The
selection applies to all Views except T
is not supported by Prelude systems.
Figure 20. Alias and Names Selected
VSD Views
Show / AutoFit Columns
ally Salvo View. Alias name display
Arranging and Sorting View Elements
One or more items can be added to or removed from any location on the
list, which will ripple the lower items. This allows you to group items
together on the list regardless of the item’s name or alias (Figure 21). Saving
a view saves the current item list order.
Visual Status Display — Instruction Manual 33
Page 34

Section 5 — VSD Operation
Figure 21. Non-Contiguous Item Listing
Clicking a left column heading (Destination, Source, etc.) sorts the list into
alphanumeric order. Clicking the heading again reverses the sort order.
(Figure 22)
Figure 22. Items Listed in Descending and Ascending Order
Reloading System Views
On Encore systems, System Views on the Sharer can be reloaded from the
Sharer to the VSD with the
progress bar will be displayed as the Views are downloaded to the VSD.
Actions / Reload System Views from Sharer control. A
On Prelude systems this control is not operational. Prelude System Views
e stored locally on the PC running VSD.
ar
34 Visual Status Display — Instruction Manual
Page 35

Destination View
Destination View shows the status of a group of Destinations, reporting the
Source(s) currently routed to each level, and also shows the protect status
of each Destination in the third column of the View (Figure 23).
Figure 23. VSD Destination View
Destination View
If the state of a destination that is displayed changes, it is highlighted for
five seconds, by default. This duration can be changed by with VSD Preferences (see Enter Highlight Duration
their status changes. on page 45).
- Sets how long items are highlighted when
Visual Status Display — Instruction Manual 35
Page 36

Section 5 — VSD Operation
Source View
Source View reports all of the Destinations to which a specified Source is
currently routed on a level-by-level basis (Figure 24)
Figure 24. VSD Source View
Sources taken to multiple Destinations will report these destinations on the
rows below that source.
36 Visual Status Display — Instruction Manual
Page 37

Active Salvo View (Encore Only)
Salvo related Views (Active Salvo and Tally Salvo) are unavailable unless
Load Salvos on Connect to Encore is checked in the Preferences window (see
page 45).
Active Salvo View (Encore Only)
Active Salvo View reports the status of one or mor
ground indicates all the cross points in a salvo’s
current state of the matrix. A red background indicates at least one source
is not connected to its defined destination (Figure 25).
Figure 25. VSD Active Salvo View
e salvos. A green back-
definition match the
Right clicking on a red colored cell reports the actual Source for that Destination Level.
Double clicking on a salvo cell opens a T
Figure 26 on page 38).
Visual Status Display — Instruction Manual 37
ally Salvo View for that salvo (see
Page 38

Section 5 — VSD Operation
Tally Salvo View (Encore Only)
Tally Salvo View shows the status of all the destinations of a given salvo.
Destinations connected to Sources that do not match their salvo definition
are highlighted in red (Figure 26). Moving the cursor to a red cell displays
the currently connected Source for that Destination.
A Tally Salvo View is opened by double cl
View, or using the
and selecting a Salvo.
Figure 26. VSD Tally Salvo View
View / Open / Tally Salvo View dropdown menu selection
icking on a Salvo in Active Salvo
38 Visual Status Display — Instruction Manual
Page 39
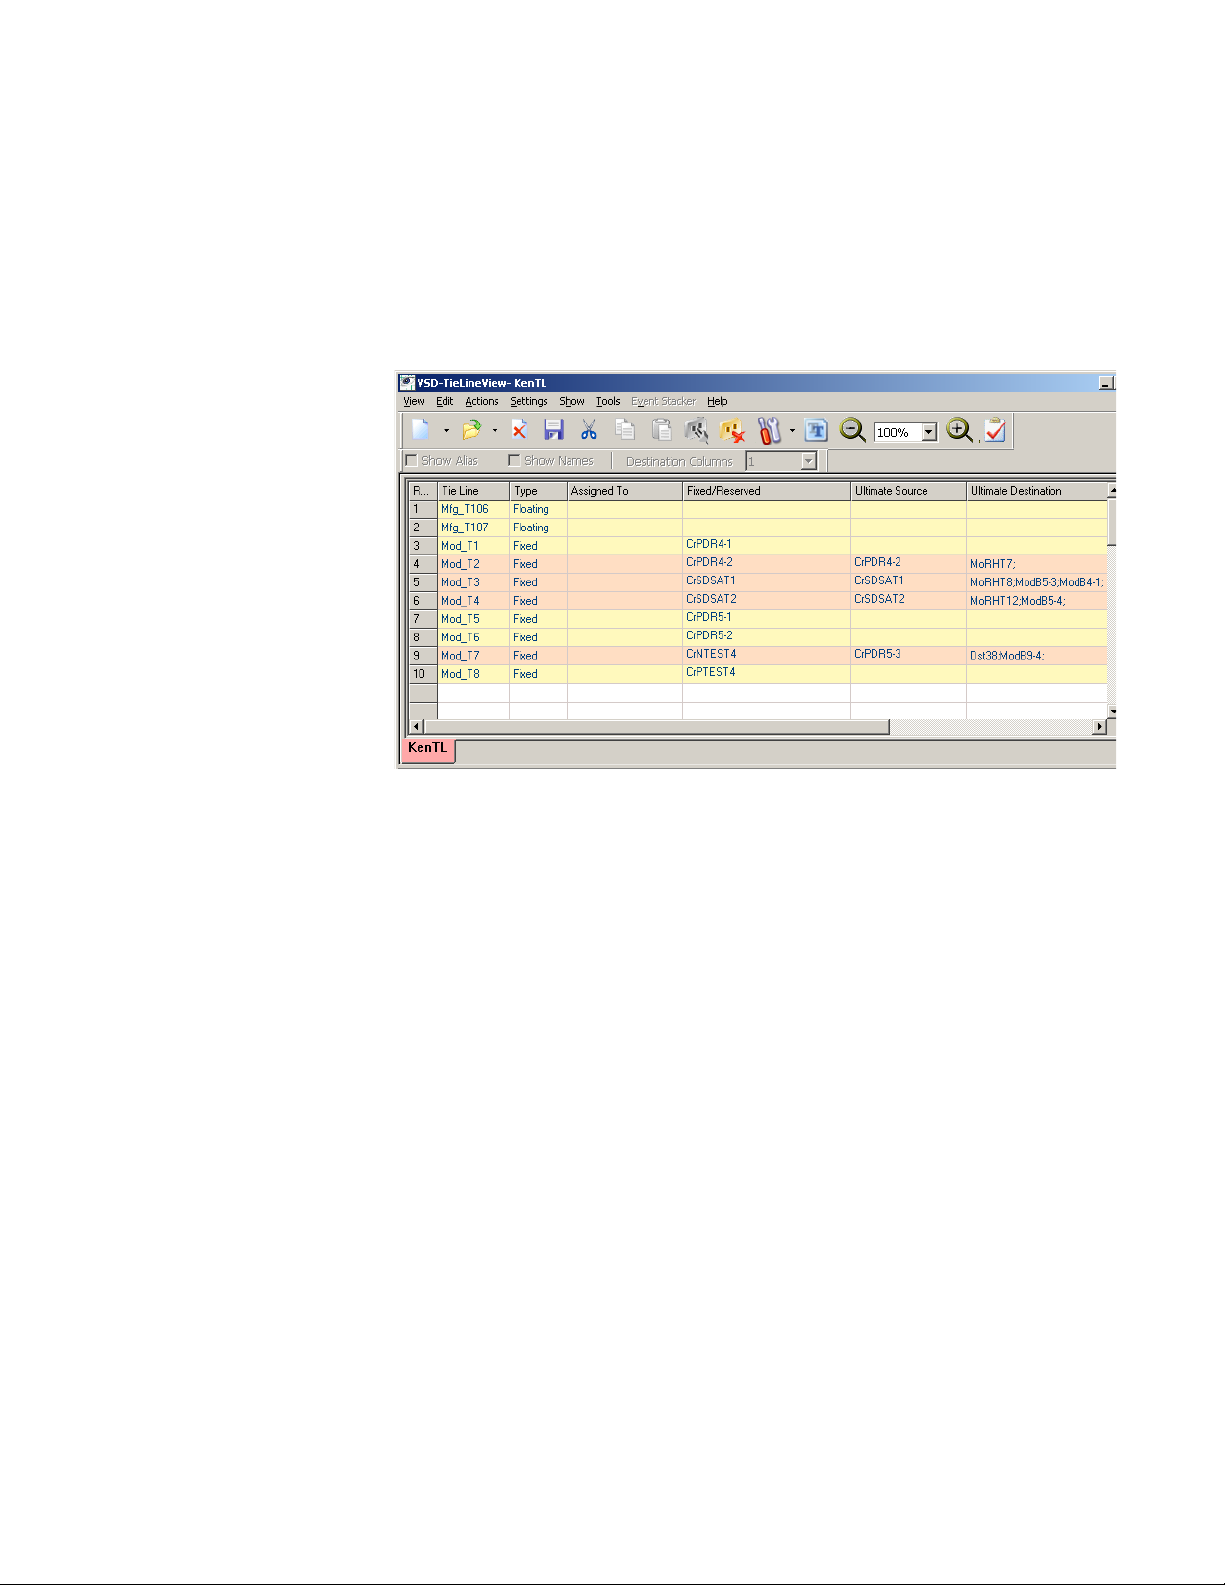
Tie Line View (Encore Only)
Tie Line View reports status information for tie lines. Status includes the
usage of the Tie line, the type of tie line (reserved, floating, etc.), the name
of the room to which it is assigned (if any), its ultimate source, and its ultimate destination (Figure 27).
Figure 27. VSD Tie Line View
Tie Line View (Encore Only)
Visual Status Display — Instruction Manual 39
Page 40

Section 5 — VSD Operation
Rooms View (Encore Only)
Rooms are a special feature not commonly used. It allows dividing an Area
into separate components to restrict access to sources and destinations to
only a room. Rooms View shows the different rooms defined in the system,
the destinations associated with each room, the room type, and any linkages with other rooms (Figure 26).
Figure 28. VSD Rooms View
Placing the mouse cursor over the linkage column text when a link is active
displays additional linked rooms if more than one room is linked.
40 Visual Status Display — Instruction Manual
Page 41

Assignment View (Encore Only)
Assignments are another specialized capability not commonly used. An
assignment is the same as reserving an item, but assignments can be used
by an automation client. Two types of resources can be assigned: Tie Lines
and Machine Control. Assignment View shows the source assignments
made in the system on a destination by destination basis.
Figure 29. VSD Assignment View
Assignment View (Encore Only)
Assignment View also supports assignment and de-assignment operations.
This is the only View in which the VSD can effect control of the system. All
other Views can only report statuses.
Visual Status Display — Instruction Manual 41
Page 42

Section 5 — VSD Operation
Monitor View
Monitor View reports status information for Destination Monitors. The
name of the Destination currently being monitored is displayed for each
Level (Figure 30).
Figure 30. VSD Monitor View
42 Visual Status Display — Instruction Manual
Page 43
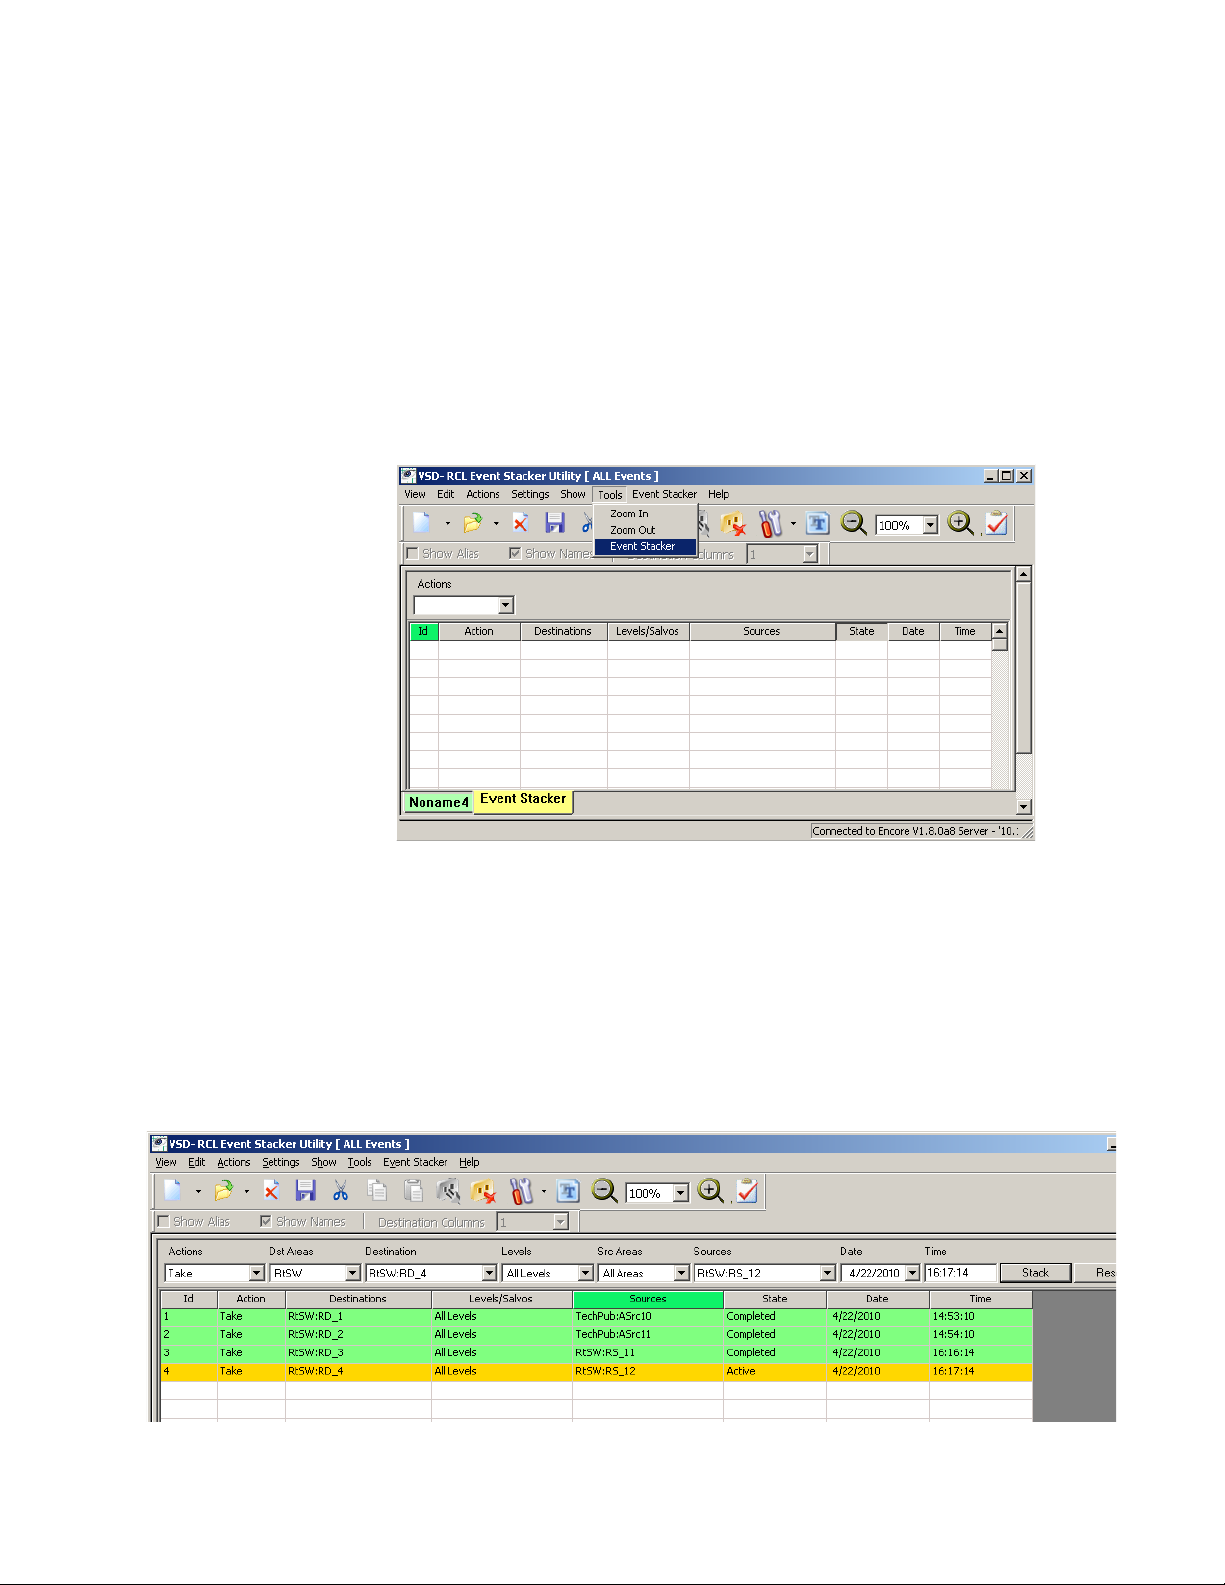
Event Stacker
Event Stacker
The Event Stacker (available with Encore v1.8.0 software) can be used to
schedule actions to be performed at future times. Actions include Takes,
Protects, Unprotects, Salvos, Assignments, Deassignments, and Monitor
Takes. A full license is required, and this feature is only available for Encore
control systems.
To open the Event Stacker window, click on
dropdown item (Figure 31).
Figure 31. Event Stacker Dropdown Selection
The initial Event Stacker window has an Actions dropdown control, used to
select the type of event. Once the event type is selected, additional dropdown controls become available to select the r
(Area, Destination, Source, Date, Time, etc.). When all the information has
been selected click the
example with Take events is shown in Figure 32. The
used to clear all the dropdown data.
Stack button to enter that event into the list. An
Tool s and select the Event Stacker
equired data for that event
Reset button can be
Figure 32. VSD Event Stacker, Take Events
Visual Status Display — Instruction Manual 43
Page 44

Section 5 — VSD Operation
Item colors indicate the following:
• Orange when the event is active (queued for action),
• Green when the event has completed, and
• Blue if the event has been cancelled.
Note Item colors represent the status of the sending the event, and does not indi-
cate whether the action of that event w
Take sent to a Protected Destination will be reported as Completed, even
though the Source for that Protected Destination did not change.
as actually successful. For example, a
These colors are fixed, and are not affected by changes made to the VSD
View preferences.
Clicking on the
the list, opens a dropdown menu with
Figure 33. Event and View Dropdown Menus
Event Stacker menu, or right clicking on one or more items on
Event and View options (Figure 33).
The Event dropdown options apply to the currently selected event.
Cancel - Deactivates an active event, leaving it in the list. This command
does not affect completed events.
Modify - Opens an active event for editing. This command does not affect
completed events.
Delete - Removes the event from the list. This command can be applied
to all events.
View dropdown options control what types of events are shown on the
The
list (Figure 33). The
Take , Protect, or Assignment events.
Note Error messages on the left side of the lower Status Bar are displayed as they
are received, and may not be cleared by subsequent successfully performed
events. An error being reported may have been caused by any preceding
event, not just the one last sent.
By Category submenu permits selecting to display just
44 Visual Status Display — Instruction Manual
Page 45
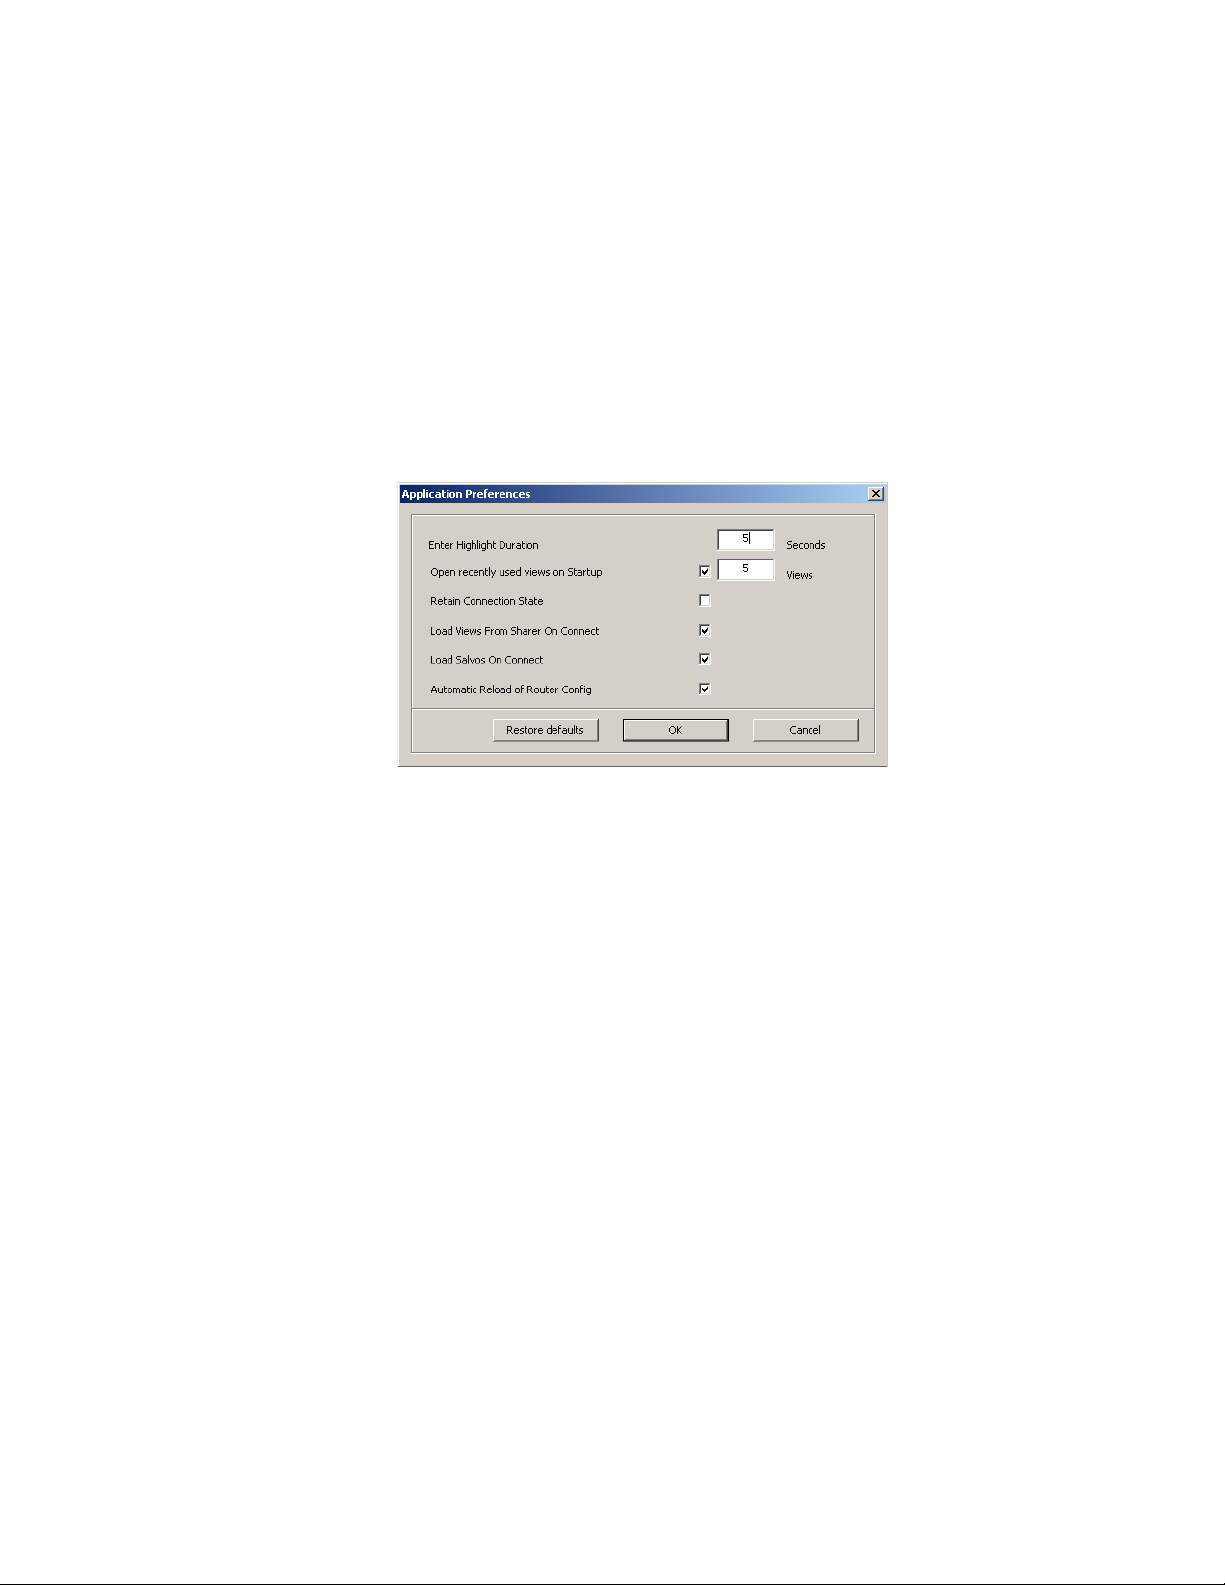
Customizing VSD Views
Selecting Settings / Preferences opens a window that allows you to customize
VSD preferences.
Application Preferences
Selecting Application Preferences opens a window allowing adjustments to
VSD application behaviors (Figure 34).
Figure 34. VSD Application Preferences Window
Customizing VSD Views
Enter Highlight Duration - Sets how long items are highlighted when their
status changes.
Open Recently Used Views On Startup - Determines whether and how many
Views are opened when VSD starts up. The maximum is 10 Views.
Retain Connection State - When On, the VSD application will reconnect when
the application is launched.
Load Views From Sharer On Connect - On Encore systems, check this box to have
VSD load saved Views when the application connects to the Encore Panel
Server (Figure 35). This control does not apply to Prelude systems.
Load Salvos on Connect - For Encore systems, check this box to load Salvos
when the VSD connects to the Panel Server. This control also activates
Active Salvo and Tally Salvo Views, which are grayed out otherwise. This
control does not apply to Prelude systems.
Automatic Reload of Router Config - For Encore systems, when checked
changes to router configurations (for example, modifying the names of
sources or destinations) will be automatically loaded into VSD,
allowing dynamic updates of this information. This control does not
apply to Prelude systems.
Visual Status Display — Instruction Manual 45
Page 46

Section 5 — VSD Operation
View Preferences
Selecting View Preferences opens a window allowing adjustments to the
display colors and other settings used by VSD (Figure 35).
Figure 35. VSD View Preferences Window
Options you can select include:
Show Chop Status - Colors the cells of Chopping destinations.
Include Comments Column - Adds a column for typed in comments.
Autofit Columns - widens and narrows columns to fit the text. This can also
be set using the Show dropdown menu.
Show Alias - This can also be set using the Show dropdown menu or the
View Preferences toolbar.
Show Names - This can also be set using the Show dropdown menu or the
View Preferences toolbar.
Destination Columns - This can also be set using the Show dropdown menu
or the View Preferences toolbar.
46 Visual Status Display — Instruction Manual
Page 47

Color Settings
Clicking on a colored box opens a color definition window, permitting the
selection of a different color for that VSD display element (Figure 36).
Figure 36. VSD Color Definition Window
Visual Status Display Instruction Manual
Font Settings
Selecting Font Settings opens a window allowing you to change the font
type and size used by VSD (Figure 37).
Figure 37. VSD Font Window
Visual Status Display Instruction Manual
This instruction manual in .pdf format is accessible in the Help menu.
Adobe Acrobat Reader must be installed to view this file. The free Acrobat
Reader application is available for download from www.adobe.com.
Visual Status Display — Instruction Manual 47
Page 48

Section 5 — VSD Operation
48 Visual Status Display — Instruction Manual
Page 49

Index
A
About VSD button 29
Actions dropdown control 43
Actions menu controls 27
activating RCL Server changes 21
Active Salvo View 37
activity status 30
Aliases 33
AllSrcs
Src Category Set 21
AllSvoss
Salvo Exclusion Set 21
Applicable checkbox 32
Application Preferences 45
arranging view elements
view elements
arranging 33
assignment operation 41
Assignment View 41
Auto Select protocol 20
AutoFit Columns 33
Autofit Columns 46
Auto-Fit Columns button 28
Automatic Reload of Router Config 45
C
Cannot update Port Mapper error 13
color settings 47
column
AutoFit 33
column width 33
configuration
NP Client 23
NP Server 23
Prelude overview 23
Connect menu 27
connecting to routing system 25
customizing VSD View 45
D
de-assignment operation 41
default View name 31
Delete menu 28
Destination Columns 46
Destination Columns button 28
Destination View 35
device ID 26
Disconnect button 27
documentation online 4
dropdown menu items 27
E
Edit menu controls 27
Encore
deleting Views 28
Views supported 31
Encore OUI 15
Encore Visual Status Display
overview 7
Enter Highlight Duration 45
Enter License Key button 29
Evemt Stacler
Event dropdown 44
Event Stacker
Actions 43
By Category submenu 44
Event 29
general description 43
item colors 44
Reset button 43
View 29
View dropdown 44
Event Stacker button 29
Events Log 30
naming 30
Events Log button 28
Visual Status Display — Instruction Manual 49
Page 50

Index
F
FAQ database 4
features of VSD 7
Font Settings button 28
Font Settings window 47
frequently asked questions 4
Full Screen button 28
G
Grass Valley web site 4
H
Help menu controls 29
I
Include Comments Column 46
installation
with Encore/Prelude installer 13
with VSD installer 11
installation of VSD 11
Instruction Manual 47
N
Names 33
new View 31
NoName1 default name 31
NP Client Configuration window 24
NP Client/Server configuration 23
NP Server Configuration Window 24
O
online documentation 4
Open recently used views on Startup 45
overview
VSD 7
P
Panel Server redundancy 7
PC
requirements 11
Preferences Bar 30
Preferences button 28
Prelude
configuration overview 23
Views supported 31
L
Level selection 32
Applicable box 32
Levels menu 27
license key 7
basic 7
full 7, 25
registration 25
license key registration
Trial Mode 25
limitations of VSD 9
Load Salvos on Connect 37, 45
Load Views From Sharer 45
M
Monitor View 42
Multiple Conn flag 20
R
RCL protocol. 20
RCL Server
activating changes 21
redundancy
Panel Server 7
registration 7
license key 25
VSD PC 16
Reload System Views from Sharer 27
reloading System views 34
Retain Connection State 45
Rooms View 40
routing system connection 25
50 Visual Status Display — Instruction Manual
Page 51

Index
S
Salvo Exclusion Set
AllSvos 21
selecting Levels 32
server connection status 31
Settings menu controls 28
Sharer availability status 31
Show Alias 46
Show Alias button 28
Show Area Aliases button 28
Show Chop Status 46
Show menu controls 28
Show Names 46
Show Names button 28
software download from web 4
sorting view elements
view elements
sorting 33
Source Category Set
AllSrces 21
Source View 36
Stack button 43
Standard toolbar 28
Status Bar 30
Status Bar button 28
system requirements of VSD 11
system View
reloading from Sharer 34
T
Tally Salvo View 38
Tie Line View 39
Tool Bar controls 27
Tool Bar icons
descriptions 29
Toolbar icons 29
Tools menu controls 29
Trial Mode 25
V
View
Active Salvo 37
Assignments 41
deleting on Encore 28
Destination 35
general description 9
Monitor 42
new 31
Rooms 40
Source 36
Tally Salvo 38
Tie Line 39
types 9
View menu controls 27
View Preferences toolbar 28
View Preferences window 46
Views
supported by Encore 31
supported by Prelude 31
Views overview 31
Visual Status Display
features 7
overview 7
VSD
distribution 11
features 7
installation 11
on software CDs 11
overview 7
registration 7
uninstall 14
VSD features 8
VSD limitations 9
VSD PC
registration 16
VSD system requirements 11
VSD View
customizing 45
W
web site documentation 4
U
uninstall VSD 14
Visual Status Display — Instruction Manual 51
web site FAQ database 4
web site Grass Valley 4
web site software download 4
Page 52

Index
width of column 33
Windows OS 7
52 Visual Status Display — Instruction Manual
 Loading...