

Page 1

Vertigo XG & iTX Integration
User Manual
www.miranda.com
M852-9014-233
22 April 2013
Page 2

Copyright Notice
© 2013 Miranda Technologies Partnership. All rights reserved.
Third Party Trademarks
All other brand names, product names or trademarks belong to their respective holders.
Usage Agreement
Please read the following terms and conditions carefully. By using the Vertigo XG & iTX
Integration User Manual, you agree to the following terms and conditions:
Miranda Technologies Partnership hereby grants permission and license to owners of the
Vertigo Suite and iTX software to use their product manuals for their own internal business
use. Manuals for Miranda Technologies Inc. products may not be reproduced or transmitted
in any form or by any means, electronic or mechanical, including photocopying and
recording, for any purpose unless specifically authorized in writing by Miranda Technologies
Partnership.
Miranda Technologies Partnership makes no warranty, either expressed or implied,
including but not limited to any implied warranties of merchantability or fitness for a
particular purpose, regarding these materials and makes such materials available solely on
an “As-Is” basis.
In no event shall Miranda Technologies Partnership be liable to anyone for special,
collateral, incidental, or consequential damages in connection with or arising out of
purchase or use of these materials. The sole and exclusive liability to Miranda Technologies
Partnership, regardless of the form of action, shall not exceed the purchase price of the
materials described herein.
Miranda Technologies Partnership reserves the right to revise and improve its products at
any time and without notice. This publication describes the state of this product at the time
of its publication, and may not reflect the product at all times in the future. Thus, different
versions of a manual may exist for any given product. Care should be taken to ensure that
one obtains the proper manual version for a specific product serial number.
Information in this document is subject to change without notice and does not represent a
commitment on the part of Miranda Technologies Partnership.
Government Use
The Software {and Documentation} is provided with RESTRICTED RIGHTS. Use,
duplication or disclosure by the United States Government or any agency, department or
instrumentality thereof is subject to the restrictions set forth in the Commercial Computer
Software -- Restricted Rights clause at FAR 52.227-19 or the Commercial Computer
Software -- Licensing clause at NASA FAR Supplement 1852.227-86.
Printed in Canada
Document Identification
• Title: Vertigo XG & iTX Integration User Manual
• Part number: M852-9014-233
• Software version: iTX v2.3 SP3
• Last revised: April 22, 2013
Page 3
Document Revision History
After the original release date, this user manual may be updated with edits and then rereleased. The following table tracks the versions of this document.
Publication date Description
October 30, 2012 Original publication of the document.
December 5, 2012 Introduced a new document cover page design.
April 9, 2013 Added a limitation statement to acknowledge the inability to
perform traditional iTX squeeze-backs and PIP (page 1-4
).
April 22, 2013 • Added to the A
page 2-9 that this setting’s value be set to at least 500ms
when the Enable TS Commands setting (Timestamped
Takes) is selected.
• Changed the default value for Xplay’s Number of Devices
setting from 20 to 9 on page 2-3
• Added a note on page 1-1
Vertigo Suite and iTX software that support XG & iTX
integration.
UTOMATION DELAY setting’s description on
.
that identifies the versions of the
Page 4

TABLE OF CONTENTS
Integration of Vertigo XG & iTX .......................................................................................... 1-1
Overview of the XG Inside workflow.................................................................................................. 1-2
Overview of the downstream Vertigo XG workflow............................................................................ 1-5
Configuration Procedures................................................................................................... 2-1
XG Inside configuration procedures .................................................................................................. 2-2
Installing ITXG Xmedia Suite Install on an iTX Output Server...................................................... 2-3
Establishing a connection between TXPlay and Xplay ................................................................. 2-5
Adding an XG Inside device to the Xmedia Server’s Device Manager ......................................... 2-6
Enabling auto-publishing on the Templates, Pages and/or Scenes categories............................ 2-7
Installing and configuring the VertigoXG Desktop plugin.............................................................. 2-8
External Vertigo XG and iTX configuration procedure..................................................................... 2-10
Configuring Xplay’s keyers ......................................................................................................... 2-11
Configuring Xplay to use automation to control the Vertigo XG.................................................. 2-13
Adding the Vertigo XG device to the central XMS’s Device Manager ........................................ 2-15
Configuring the Vertigo XG’s Dashboard settings for automation .............................................. 2-16
Enabling auto-publishing on the Templates, Pages and/or Scenes categories.......................... 2-17
Installing and configuring the VertigoXG Desktop plugin............................................................ 2-19
VertigoXG Plugin: Adding XG Events to a Schedule........................................................ 3-1
Procedural overview for creating an XG event .................................................................................. 3-4
Browsing or searching for templates, pages or scenes on an Xmedia Server .................................. 3-5
Creating a new page from a template................................................................................................ 3-7
Adding a page to the VertigoXG Palette..........................................................................................3-10
Opening and editing an existing page in the VertigoXG Viewer ...................................................... 3-11
Adding an unedited scene to the VertigoXG Palette ....................................................................... 3-13
Updating a scene already listed on the VertigoXG Palette.............................................................. 3-15
Creating a new scene based on an existing scene ......................................................................... 3-16
Adding XG events to an iTX schedule.............................................................................................3-18
Editing the properties or content of a scheduled XG event ............................................................. 3-20
Vertigo XG & iTX Integration User Guide TOC-1
Page 5
1 INTEGRATION OF VERTIGO XG & ITX
NOTE
The branding capabilities of a typical iTX playout channel can be enhanced by integrating
Vertigo graphics events into the iTX playout schedule. Using the VertigoXG plugin,
Vertigo XG events can be added to the iTX Desktop’s schedule as secondary graphics
events and then inserted into the iTX program stream either using:
• the XG Inside as an option that integrates the XG Renderer directly within iTX Output
Servers and iTX Playout Appliances
or,
• an external Miranda Vertigo XG device downstream of the iTX Output Server
This document provides you with an understanding of the two ways in which the Vertigo XG
can be integrated into an iTX system, as well as how to install, configure and use the
VertigoXG plugin. The iTX Desktop’s VertigoXG plugin allows you to create Vertigo graphics
pages and add these pages, as well as Vertigo scenes to an ITX schedule for playout.
Overview of the XG Inside workflow” on page 1-2
• “
• “Overview of the downstream Vertigo XG workflow” on page 1-5
• “XG Inside configuration procedures” on page 2-2
• “External Vertigo XG and iTX configuration procedure” on page 2-10
• “VertigoXG Plugin: Adding XG Events to a Schedule” on page 3-1
The integration of the Vertigo XG and iTX is supported by the following versions of the iTX
and Vertigo Suite software: iTX v2.3 SP3 or higher and Vertigo Suite v.4.8 or higher.
Vertigo XG & iTX Integration User Guide 1-1
Page 6
Integration of Vertigo XG & iTX
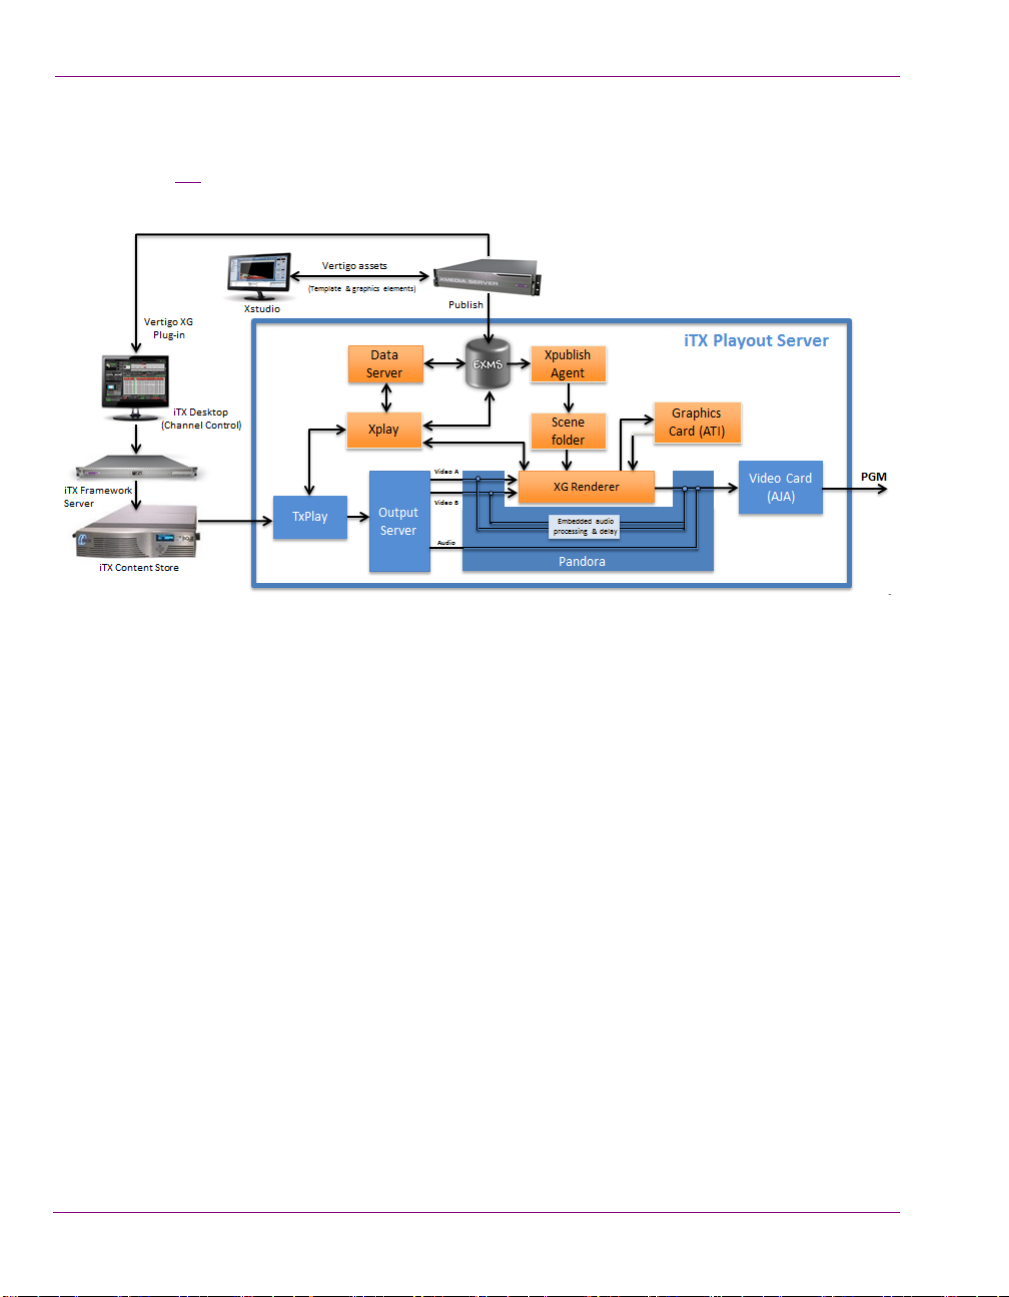
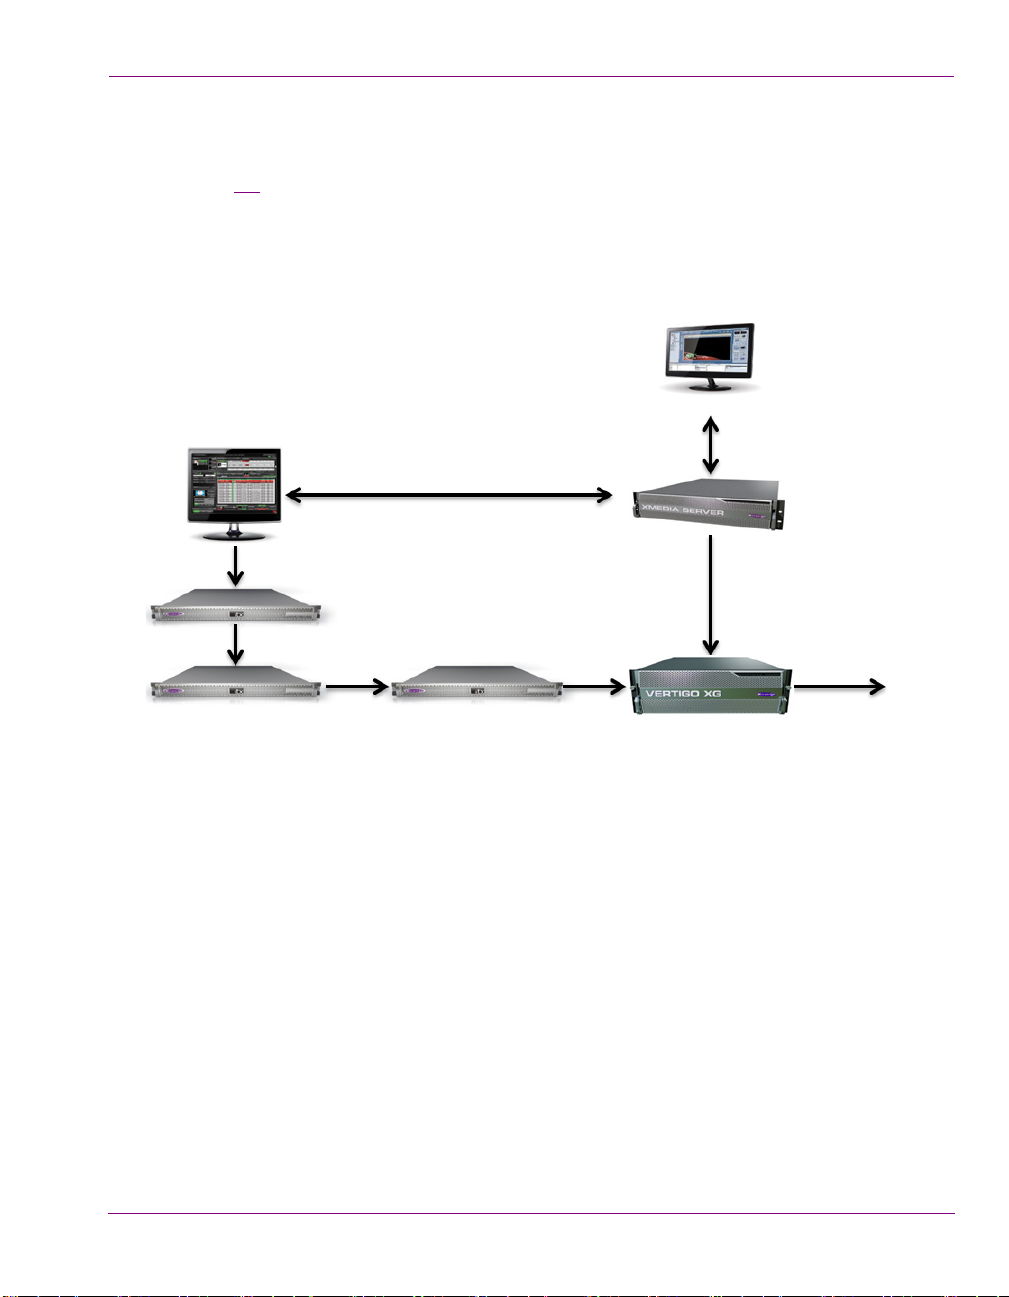
Overview of the XG Inside workflow
Figure 1-1 shows how iTX and the XG Inside components work together on an Output
Server machine.
Figure 1-1. XG Inside signal path and workflow
Graphics preparation
Vertigo templates are created offline using the Vertigo Suite’s Xstudio application. The
templates provide the layout, formatting and optional logic for controlling the graphics
during playout. An advantage of using graphics templates is that unique instances of the
graphics can be quickly created by changing the content elements, without having to
recreate the layout and formatting. See the Xstudio User Manual for more information
about using Xstudio to create Vertigo templates.
Once a template is created, it is saved to a Vertigo Xmedia Server. From there, the template
and its associated graphics files are published to the Embedded Xmedia Server (EXMS) on
the iTX Playout Server, where they become available for playout. The Xpublish Agent puts
the graphics files in the Scene folder.
The VertigoXG plugin associated with the iTX Desktop allows users to browse the
templates and pages stored on the Xmedia Server. Opening the template in the plugin
allows users to edit the content of the template and save it as a graphics page on the
Xmedia Server. The Xmedia Server then publishes the page and its associated graphics
files to the Embedded Xmedia Server (EXMS) on the iTX Playout Server.
In addition to templates and pages, the VertigoXG plugin associated with the iTX Desktop
also allows users to browse for standalone scenes stored on the Xmedia Server. Like the
scene-side of a template, scenes contain the collection of graphic objects that will be
displayed on air during playout. Standalone scenes are appropriate if the scene’s objects
and playout do not require any control logic (static and/or timed playout). However, if the
1-2 Vertigo XG & iTX Integration User Guide
Page 7
Integration of Vertigo XG & iTX
scene’s objects are to be data driven or controlled during playout, the scene should be
associated with a template. See the Xstudio User Manual for more information about using
Xstudio to create standalone scene assets.
Processing and playout of video & graphics
Using the Vertigo XG plugin in the iTX Desktop, the graphics page and scenes can then be
added to the channel’s schedule or timeline as a secondary event.
TXPlay controls schedule playout. It sends commands through the Output Server to the
iTX Player (Pandora) to play out events at specified times. An event can feature one or two
video sources, from which iTX produces an SDI or HD SDI output signal.
When an event includes a Vertigo page or scene, the iTX Player feeds the video streams
to the XG Renderer. It always supplies two streams; if there is only one video source, one
of the streams has blank frames.
Using the Oxtel protocol, TXPlay instructs Vertigo Xplay to cue and take the page or scene.
Xplay processes the page/scene requirements and sends playout commands to the
XG Renderer.
The XG Renderer loads the page or scene and its associated graphics. The XG Renderer
and the GPU renders the graphics with the video streams and passes a single rendered
video stream back to the iTX Player, which combines this with the audio stream(s) for
playout through the AJA video card.
The iTX Player does not pass any audio content to the XG Renderer. It de-embeds the audio
content from the video streams, diverts it around the XG Renderer and then re-embeds it into
the rendered video stream (after a delay to compensate for the render process).
For events that do not feature a Vertigo page or scene (XG Event), the video streams simply
pass through the XG Renderer (figure 1-2
).
Figure 1-2. For all other event types, the video streams pass through the XG Renderer
Vertigo XG & iTX Integration User Guide 1-3
Page 8

Integration of Vertigo XG & iTX
Limitations of the XG Inside
The following limitations currently apply to the integration of the Vertigo XG components in
the iTX Output Server.
• The system can handle one or two video streams from any of the following source
options: one video clip; two video clips; a live feed; a video clip and a live feed.
• The integration is suitable only for a single-channel iTX Output Server.
• Cel animations are only supported if they are in the Miranda VAF format.
Uncompressed TGA sequences are likely to have an adverse affect on the
performance of the Output Server.
• The XG Renderer plays out audio clips embedded in a Vertigo XG template; but it does
not perform any audio mixing with content from the iTX Player, since this contains no
audio stream. This means that Vertigo templates cannot modify the audio properties
(e.g. volume levels) of the clips played out by iTX.
• Audio-level reduction (ducking) and sound effects cannot be controlled from the
XG Renderer.
• The XG Renderer does not modify any AFD code in the video streams.
• The XG Renderer does not include caption or subtitle data in the video stream it returns
to the iTX Player.
• The XG Renderer cannot pass SNMP data to the iTX system.
• Where there is only one video stream and the source is a live feed, only transitions that
do not involve overlapping video streams are possible (e.g. cut-cut; fade out, followed
by fade in).
• Since the XG Renderer is responsible for the compositing of PGM A and PGM B video,
traditional iTX functionality for squeeze-backs and picture-in-picture (PIP) effects do
not work.
1-4 Vertigo XG & iTX Integration User Guide
Page 9
Integration of Vertigo XG & iTX
Xstudio
VertigoXG Plugin
Publish
PGM
iTX Content Store
iTX Output Server
iTX Desktop
(Channel Control)
iTX Framework Server
Vertigo assets
(Templates & graphics elements)
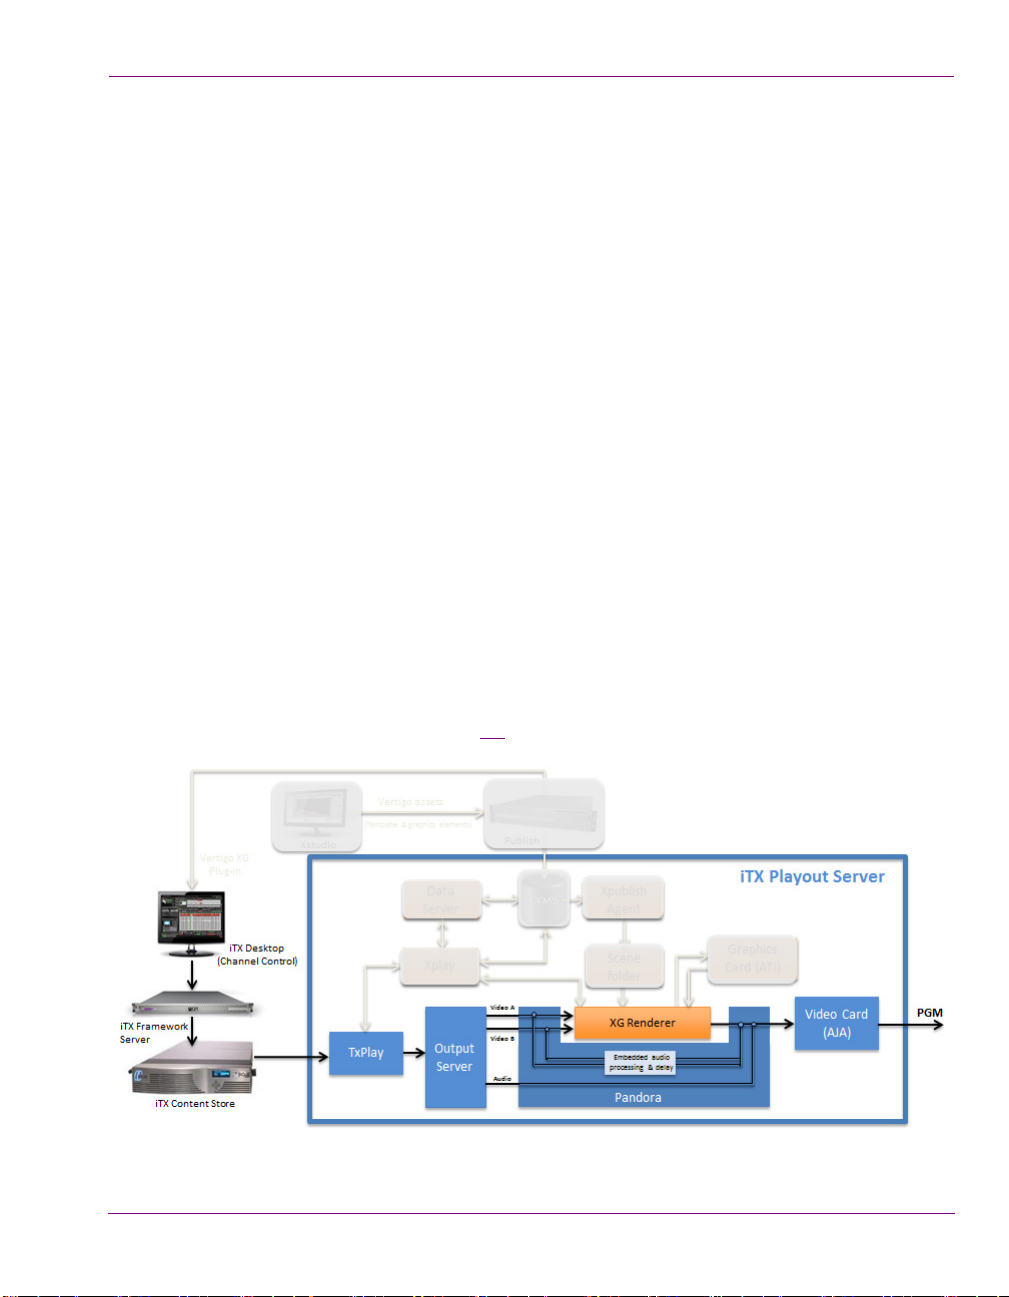
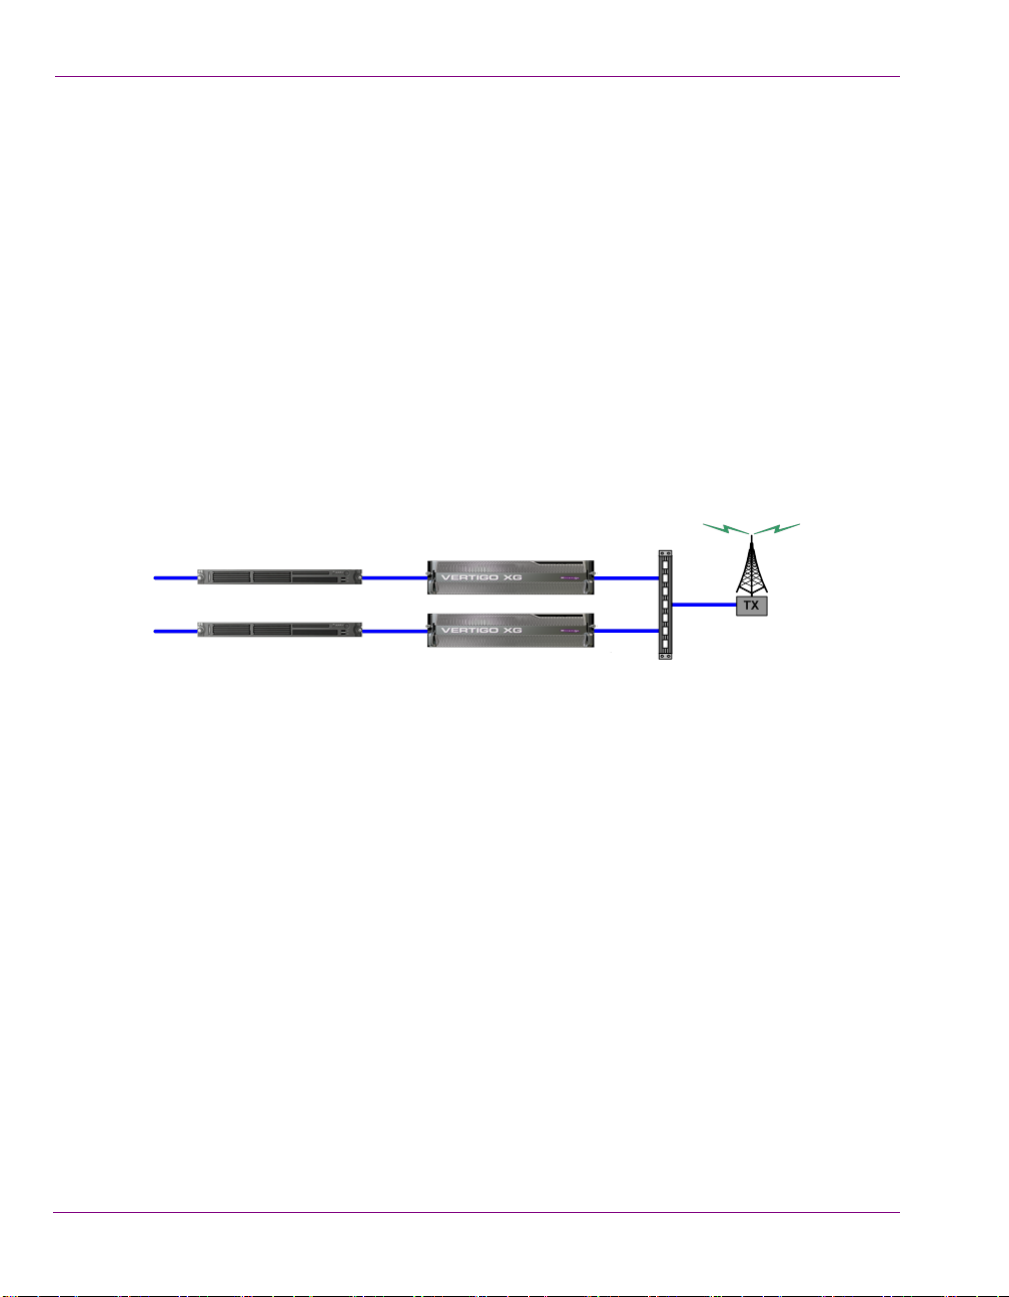
Overview of the downstream Vertigo XG workflow
Figure 1-3 demonstrates that in a downstream branding model, the iTX Output Server acts
as an upstream video server, feeding video and audio content to the external Vertigo XG
device. Meanwhile, graphics content is created and managed using the Vertigo Suite’s
Xstudio and the Xmedia Server. iTX is the automation system that drives the playout
schedule, including controlling the playout of graphics events from the Vertigo XG using
Oxtel automation protocol commands.
Vertigo XG & iTX Integration User Guide 1-5
Figure 1-3. System diagram of an external Vertigo XG device downstream of an iTX system
Graphics preparation
Vertigo templates are created offline using the Vertigo Suite’s Xstudio application. The
templates provide the layout, formatting and optional logic for controlling the graphics
during playout. An advantage of using graphics templates is that unique instances of the
graphics can be quickly created by changing the content elements, without having to
recreate the layout and formatting. See the Xstudio User Manual for more information
about using Xstudio to create Vertigo templates.
Once a template is created, it is saved to a Vertigo Xmedia Server. From there, the template
and its associated graphics files are published to the Embedded Xmedia Server (EXMS) on
the Vertigo XG device, where they become available for playout.
The VertigoXG plugin associated with the iTX Desktop allows users to browse the
templates and pages stored on the Xmedia Server. Opening the template in the plugin
allows users to edit the content of the template and save it as a graphics page on the
Page 10
Integration of Vertigo XG & iTX
iTX Channel1
iTX Channel1 - Backup
Controlled by Main Channel
Controlled by Backup Channel
Router
(controlled by iTX)
Xmedia Server. The Xmedia Server then publishes the page and its associated graphics
files to the Vertigo XG device.
In addition to templates and pages, the VertigoXG plugin associated with the iTX Desktop
also allows users to browse for standalone scenes stored on the Xmedia Server. Like the
scene-side of a template, scenes contain the collection of graphic objects that will be
displayed on air during playout. Standalone scenes are appropriate if the scene’s objects
and playout do not require any control logic (static and/or timed playout). However, if the
scene’s objects are to be data driven or controlled during playout, the scene should be
associated with a template. See the Xstudio User Manual for more information about using
Xstudio to create standalone scene assets.
Processing and playout of video & graphics
For system resilience, we recommend an independent control setup where the backup
channel is configured to use a different Vertigo XG device and commands are always sent
from both the Main and Backup channels regardless of which one is Master.
Using the Vertigo XG plugin in the iTX Desktop, graphics pages are added to the channel’s
schedule or timeline as a secondary event.
TXPlay controls schedule playout. It sends commands through the Playout Server to the
iTX Player (Pandora) to play out events at specified times. An event can feature one or two
video sources, from which iTX produces an SDI or HD SDI output signal. The output signal
is then fed to the Vertigo XG device’s input.
When an XG event (Vertigo page or scene) is encountered in the schedule, TXPlay uses
the Oxtel protocol to instruct the Vertigo XG’s Xplay to cue and take the page or scene.
Xplay processes the page requirements and sends playout commands to the XG Renderer.
The XG Renderer loads the page/scene and its associated graphics. The XG Renderer and
the GPU renders the graphics with the video streams and outputs a single rendered video
stream to air.
For events that do not feature a Vertigo page or scene (XG Event), the video streams simply
pass through the Vertigo XG.
1-6 Vertigo XG & iTX Integration User Guide
Page 11

2 CONFIGURATION PROCEDURES
NOTE
Integrating the Vertigo XG’s branding capabilities with the iTX automation playout system
involves the coordination and configuration of several hardware and software components
to ensure proper communication and operation.
This chapter provides information and instructions for how to add and setup the XG Inside
option on an iTX Output Server or iTX Playout Appliance - Single channel. Similarly,
instructions are also provided for how to configure a system that uses an external
Vertigo XG downstream from an iTX Output Server.
XG Inside configuration procedures” on page 2-2
• “
• “External Vertigo XG and iTX configuration procedure” on page 2-10
The scope of this chapter does not include hardware installation, cabling and other systemlevel installation and configuration information and instructions. We recommend that you
consult the Vertigo XG, Xmedia Server and iTX system installation and configuration
documentation before attempting to configure your system for the integration of XG
branding within an iTX system.
Vertigo XG & iTX Integration User Guide 2-1
Page 12

Configuration Procedures
XG Inside configuration procedures
XG Inside is an option for iTX Output Servers and iTX Playout Appliances that enhances
the branding capabilities of an iTX playout channel by integrating the XG Renderer software
directly within the iTX playout device.
As the system diagram on page 1-2 demonstrates, the integration of XG graphics rendering
into an iTX system requires adding and configuring new software and hardware
components to the system.
The following procedure provides instructions for installing and configuring the software
components required for using the XG Inside option on an iTX Output Server or iTX Playout
Appliance - Single channel:
Step # Ta s k
1 Install the “ITXG Xmedia Suite Install” software component on the iTX
Output Server.
See “
Installing ITXG Xmedia Suite Install on an iTX Output Server” on page
2-3 for complete instructions.
*** This task should only be performed on iTX Output Servers. Proceed to the
next task if you are configuring XG Inside on a iTX Playout Appliance since
the software component is factory-installed on iTX Playout Appliances. ***
2 Establish the connection between TXPlay and Xplay.
See “
Establishing a connection between TXPlay and Xplay” on page 2-5 for
complete instructions.
3 Add the XG Inside device to the Xmedia Server’s Vertigo Device
Manager.
See “
Adding an XG Inside device to the Xmedia Server’s Device Manager”
on page 2-6 for complete instructions.
4 Enable auto-publishing on the Xmedia Server’s Templates, Pages
and/or Scenes asset categories.
See “
Enabling auto-publishing on the Templates, Pages and/or Scenes
categories” on page 2-7 for complete instructions.
5 Install and configure the “Vertigo ITX Desktop plugin” on the client
machine hosting the iTX Desktop application.
See “
Installing and configuring the VertigoXG Desktop plugin” on page 2-8 for
complete instructions.
2-2 Vertigo XG & iTX Integration User Guide
Page 13
Configuration Procedures
NOTE
Installing ITXG Xmedia Suite Install on an iTX Output Server
The Vertigo Suite Installer’s ITXG Xmedia Suite Install software preset contains the
XG Renderer and its associated components, which must be added to the iTX Output
Server or iTX Playout Appliance - Single channel.
The ITXG Xmedia Suite Install software component is factory-installed on all iTX Playout
Appliance - Single channel devices. If you are adding and configuring the XG Inside option
on an iTX Playout Appliance unit, do not
configuration procedure.
To add the ITXG Xmedia Suite Install component to an iTX Output Server:
1. Ensure the iTX Server Controller is not running.
2. Acquire and run the latest version of the Vertigo Suite Installer (v.4.8 or later).
3. When the installation wizard requests you to select components, select the ITXG
MEDIA SUITE INSTALL preset configuration.
X
This preset will automatically install the following components on the Playout Server:
Xplay, Software CG, Vertigo ITXG, XpublishAgent, Dataserver, Clip Playback and
Encoding (codecs) and Xmedia Server (EXMS).
4. Follow the wizard instructions and respond to the prompts to install all dependencies.
The wizard may prompt you to restart the machine to continue the installation (e.g.
when an SQL database is created) and to complete the installation.
5. Restart the iTX Output Server machine when the wizard prompts you to.
The wizard takes a few minutes to complete the installation after the (final) restart.
reinstall it. Proceed to the next task in this
The installer pre-configures most of the XG Inside components with the required settings.
• EXMS & XPA windows: No additional configuration required.
• iTXG Renderer Control Panel & Dashboard: No additional configuration required.
Note that the R
iTX Output Server.
• Software CG Control Panel & Dashboard: No immediate configuration required.
Note however that a valid CG license is required, which is sold separately.
• Xplay Settings are automatically configured for XG inside.
ERVERS>XMEDIA SERVER IP ADDRESS> 127.0.0.1
•S
ENERAL>LAYOUT>MULTI-DEVICE
•G
•GENERAL>NUMBER OF DEVICES>9
•LAYOUT>MULTI-DEVICE>PREVIEWONAIR
•AUTOMATION>AUTOMATION (NO MESSAGE BOXES)>SELECTED
• Xplay Automation Configuration (Tools>Configure Automation) is automatically
configured with the Oxtel over TCP/IP protocol added to the iTXG device.
Vertigo XG & iTX Integration User Guide 2-3
ESOLUTION setting will be determined and automatically passed in by the
Page 14
Configuration Procedures
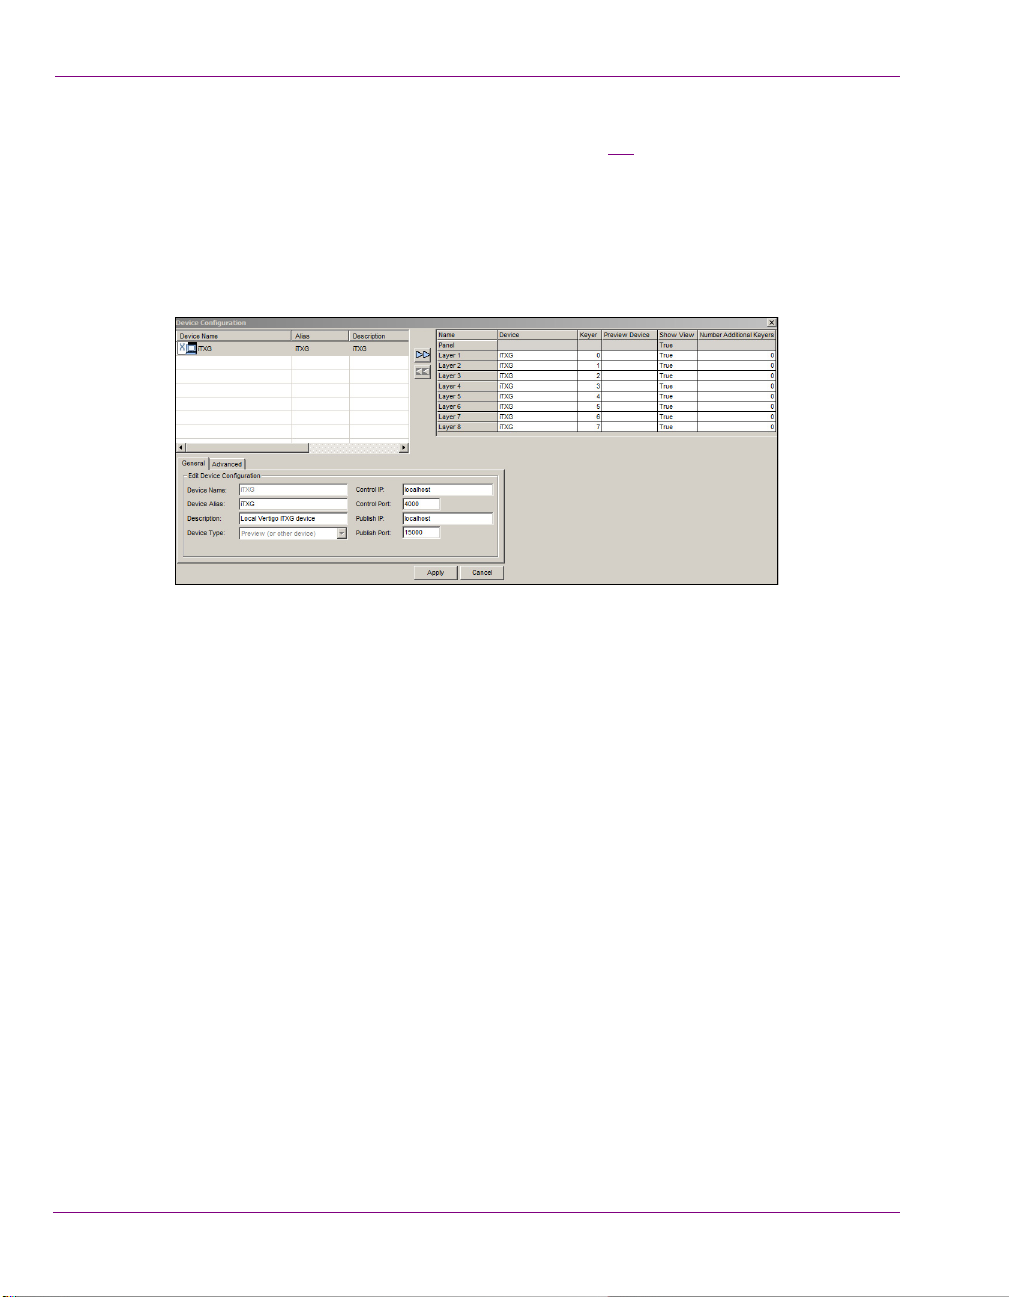
• EXMS Device Manager: An iTXG device is added and pre-configured in the EXMS’s
Device Manager (Xplay>Tools>Device Manager). Figure 2-1 demonstrates that it is
configured as:
EVICE TYPE: PREVIEW (OR OTHER DEVICE)
• D
ONTROL IP: LOCALHOST
• C
UBLISH IP: LOCALHOST
• P
• The ITXG device is also automatically assigned to each of the device layers
in the Device Manager’s Active Device table.
Figure 2-1. The ITXG device is automatically added to the EXMS Device Manager
2-4 Vertigo XG & iTX Integration User Guide
Page 15
Configuration Procedures
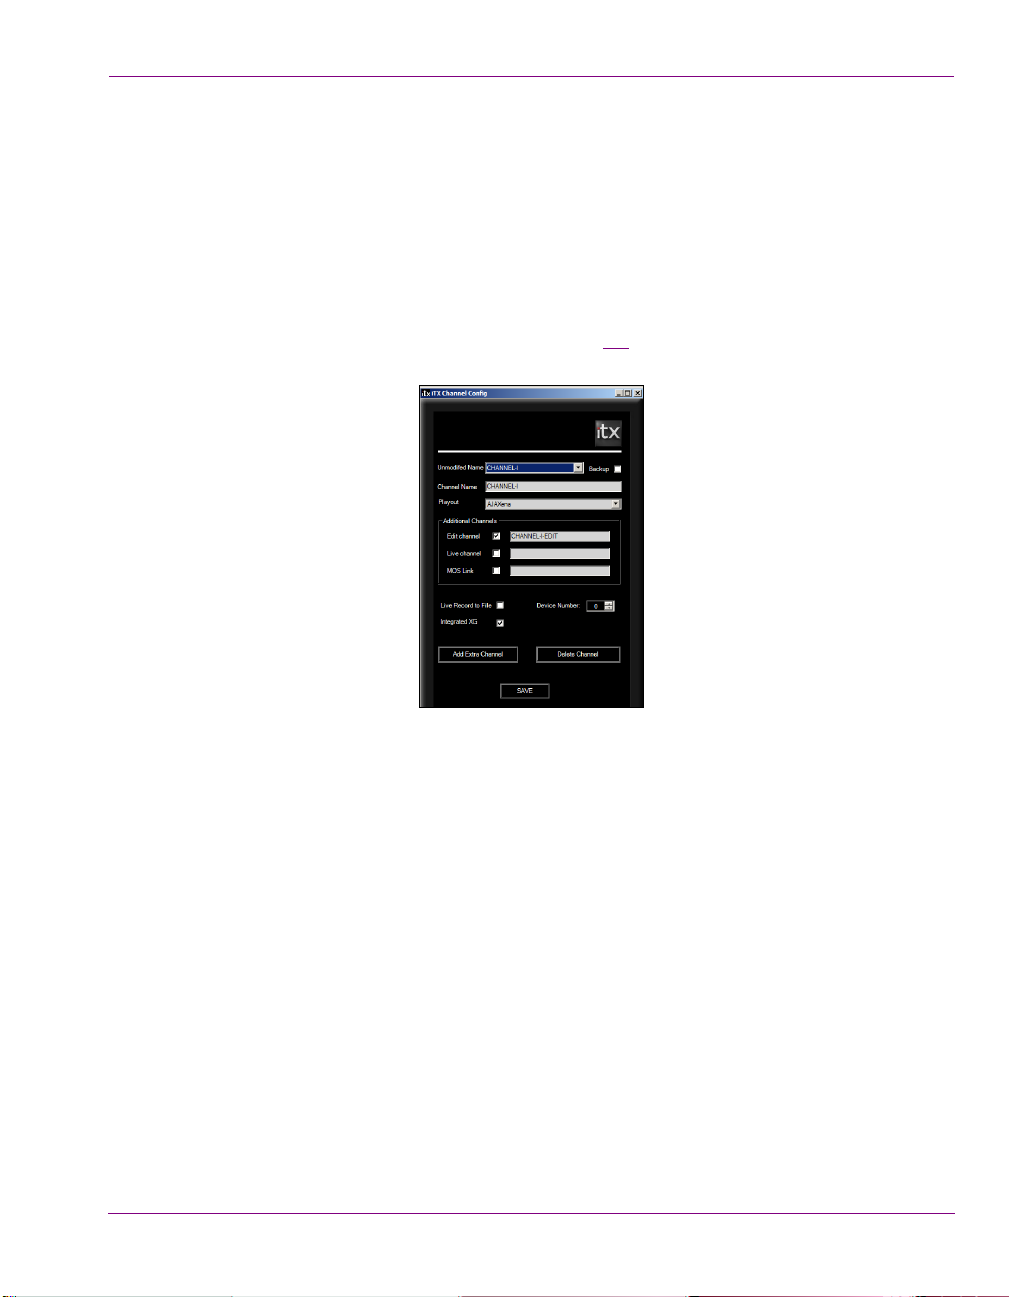
Establishing a connection between TXPlay and Xplay
TXPlay controls the channel’s schedule playout. So when TXPlay encounters an XG event
(graphics event) in the schedule, it communicates with Vertigo’s Xplay using the Oxtel
protocol to instruct Xplay to cue and take the page.
The relationship between TXPlay and Xplay must be configured by enabling the Integrated
XG setting in the iTX Channel Config dialog. This setting adds Vertigo’s Xplay to the
Server Controller Configuration tool, which then creates a relationship between TXPlay
and Xplay.
1. Open the iTX Channel Config dialog box (figure 2-2
Config icon on the Output Server’s desktop.
) by double-clicking the TXPlay
Figure 2-2. Enable the Integrated XG setting
2. Enable the Integrated XG setting.
3. Click Save.
Vertigo XG & iTX Integration User Guide 2-5
Page 16

Configuration Procedures
Adding an XG Inside device to the Xmedia Server’s Device Manager
The Xmedia Server acts as the central storage and management system for Vertigo assets
like templates, pages, scenes and their associated assets (i.e. images, clips, cel
animations...etc).
For the Xmedia Server to publish assets to the Embedded Xmedia Server (EXMS) on the
iTX Output Server, you must add an XG Inside device configuration profile to the Xmedia
Server’s Device Manager.
To add the XG Inside device to the Xmedia Server’s Device Manager:
1. Open Xstudio on a client machine and ensure that it is connected to the Xmedia Server.
2. Select the T
The D
Note that the Device Manager will display all of the device profiles that were previously
added to the Xmedia Server.
3. Select the A
The Device Configuration section (lower portion) immediately changes to become the
Add Device Information section.
4. Fill-in the fields to create a device configuration profile for the XG Inside device.
• Provide a Name, Alias and Description for the device (e.g. XGInside)
•The Device Type must be V
•The Control IP must be set to the IP address of the iTX Output Server hosting
the XG Inside software components.
•The Control Port must be left as 4000.
OOLS>DEVICE MANAGER menu command.
EVICE MANAGER window (Device Configuration) opens.
DD button in the lower-left corner.
ERTIGOXG.
Figure 2-3. Adding an XG Inside device to the Xmedia Server’s Device Manager
5. Click APPLY and then CLOSE.
2-6 Vertigo XG & iTX Integration User Guide
Page 17

Configuration Procedures
NOTE
NOTE
Enabling auto-publishing on the Templates, Pages and/or Scenes categories
To increase workflow efficiency and accuracy, we recommend that you set auto-publishing
on the Xmedia Server’s Templates, Pages and/or Scenes asset categories. This authorizes
the Xmedia Server to automatically publish new or saved templates, pages and/or scenes
from the Xmedia Server to the EXMS on the iTX Output Server.
You do not have to set auto-publishing for other asset types. If a template, page or scene
uses an asset of another type (i.e. images or clips), the asset will be automatically published
as part of the template/page/scene.
To set-up auto-publishing on the Templates, Pages and/or Scenes categories:
1. Open Xstudio on a client computer that is connected to the Xmedia Server.
2. Open the Asset Browser.
3. Right-click the Templates root category and select the P
If you only want to auto-publish the contents of a sub-folder (rather than the root folder),
simply navigate to the subfolder and right-click and select the P
4. Enable the output server(s) in the Category Properties window for which you want to
be the recipients of the published assets (e.g. XGInside). Then click OK.
ROPERTIES command.
ROPERTIES command.
Figure 2-4. The Category Properties window allows you to set auto-publishing for a category
5. Repeat steps 3 and 4 for the P
If your system has multiple output servers and you do not want to publish all of the contents
to all of the devices, create matching subcategories under both the Templates and Pages
root categories, as well as the Scene root category, and then assign the different categories
to different devices.
Vertigo XG & iTX Integration User Guide 2-7
AGES category and/or Scenes category.
Page 18

Configuration Procedures
NOTE
Installing and configuring the VertigoXG Desktop plugin
The VertigoXG plugin is an iTX channel plugin that allows the scheduling of secondary
graphics events that will be inserted into the iTX Programme stream by the XG Inside option
installed on an iTX Playout Server.
This plugin adds the VertigoXG palette to the Content Selector on the Channel Control
layout, which lets you create graphics pages based on Vertigo templates and then add the
pages and/or scenes to the schedule or timeline. See page 3-1
To operate, the VertigoXG plugin requires that an iTX Integrated XG license be installed
on the iTX Framework Server.
The following procedure assumes that you have already set up the channel configurations
in the iTX Desktop.
To install and configure the Vertigo XG plugin on a machine hosting iTX Desktop:
1. Acquire and run the Vertigo Suite installer (version 4.8 SP3 or later) on the computer
hosting the iTX Desktop that is connected to the iTX Playout Server with XG Inside.
2. When prompted by the installation wizard, select to install the Vertigo iTX Desktop
Plugin.
3. Follow the wizard instructions and respond to the prompts to install all dependencies.
4. Restart the computer when the wizard prompts you to.
The wizard takes a few minutes to complete the installation after the (final) restart.
for more information.
To configure the VertigoXG Plugin for XG Inside operation:
Once the VertigoXG plugin software is installed, you must configure the VertigoXG plugin:
1. In the iTX Desktop, select the E
2. Select the channel.
3. Select the P
2-8 Vertigo XG & iTX Integration User Guide
LUGINS>VERTIGOXG tab and configure the following settings (figure 2-5).
Figure 2-5. The VertigoXG plugin’s configuration settings
NGINEERING>CHANNEL CONFIGURATION view.
Page 19

Configuration Procedures
CTIVE Select the Active button to enable (green LED) or disable (grey LED) the
A
VertigoXG plugin.
A
DDRESS Enter the IP address of the playout server on which Xplay is running.
P
ORT 5006 is the port number on which iTX is to communicate with Xplay.
UTOMATION DELAY (MS) iTX uses this value to determine how much earlier than the scheduled time
A
Take and Clear commands are sent.
When ENABLE TS COMMANDS is selected, an automation delay of at least
500ms is recommended.
ELAY (FRAMES) Specifies the number of frames prior to the end of the XG event that the Clear
OFF D
command will be triggered, so as to offer the page’s Default Out animation a
chance to playout.
OUTPUT CHANNEL Currently not used.
NABLE SLAVE DEVICE Enable this setting when a Master-Slave setup is used and the Master and
E
Slave each have their own instance of an XG.
NABLE TS COMMANDS When selected, the Take and Clear commands are sent to the XG as
E
determined by the Automation Delay setting with a timestamp indicating
when the command will execute. This approach compensates for small
delays in communication with the XG and ensures frame accuracy.
4. Click Save and then Close.
Vertigo XG & iTX Integration User Guide 2-9
Page 20

Configuration Procedures
External Vertigo XG and iTX configuration procedure
The following procedure provides instructions for installing and configuring the software
components required to integrate iTX as an automation system driving the downstream
Vertigo XG device. The Vertigo XG device’s components must be configured to receive the
program stream from the iTX Output Server and apply branding graphics as dictated by the
iTX schedule before brought on air.
As the system diagram on page 1-5
setup and configured as they always are for a typical playout channel. As such, we
recommend that you consult the iTX System Administrator Guide and the Vertigo Suite
documentation for system installation and setup procedures.
Step # Task
1 Configure Xplay’s interface for multiple keyers and assign the Vertigo XG’s
localhost device (XG_CHA) to each keyer.
See “
Configuring Xplay’s keyers” on page 2-11 for complete instructions.
2 Configure Xplay’s Automation settings and the automation protocol for the
Vertigo XG device.
See “
Configuring Xplay to use automation to control the Vertigo XG” on page 2-13
for complete instructions.
demonstrates, the iTX system and Vertigo system are
2 Add the Vertigo XG device to the central Xmedia Server’s Device Manager.
See “
Adding the Vertigo XG device to the central XMS’s Device Manager” on page
2-15 for complete instructions.
5 Configure the Vertigo XG’s Dashboard settings for automation.
Configuring the Vertigo XG’s Dashboard settings for automation” on page
See “
2-16 for complete instructions.
6 Enable auto-publishing on the Xmedia Server’s Templates, Pages and/or
Scenes asset categories.
See “
Enabling auto-publishing on the Templates, Pages and/or Scenes
categories” on page 2-17 for complete instructions.
7 Install and configure the “Vertigo ITX Desktop plugin” on the client machine
hosting the iTX Desktop application.
See “
Installing and configuring the VertigoXG Desktop plugin” on page 2-19 for
complete instructions.
2-10 Vertigo XG & iTX Integration User Guide
Page 21

Configuring Xplay’s keyers
Xplay’s multi-device layout
set with 9 keyers
When Vertigo XG units are factory-configured, a local XG_CHA device (XG_CHA &
XG_CHB for dual channel devices) is defined in the Embedded Xmedia Server’s (EXMS)
Device Manager. Sometimes known as the localhost device, the XG_CHA device
represents the actual Vertigo XG output channel.
The following procedures provide instructions for configuring Xplay’s interface so that it can
accommodate the independent control of the multiple keyers required to playout graphics
on different layers on the playout channel. Once the keyers appear in Xplay, you can then
assign the XG_CHA device to each of Xplay’s keyers and put the keyers in a ready state
for playout.
To configure Xplay’s interface for multiple keyers:
1. Open Xplay and select T
ULTI-DEVICE.
M
2. In the NUMBER OF DEVICES setting, specify the number of Vertigo XG keyers to be
controlled by the iTX automation system. For this example, we use 9 keyers.
3. Select T
P
OOLS>SETTINGS>LAYOUT and set the MULTI-DEVICE LAYOUT setting to
REVIEWONAIR.
4. Click OK and then restart Xplay.
When Xplay reopens it displays multiple Keyer windows along the right-side.
OOLS>SETTINGS>GENERAL and set the LAYOUT setting to
Configuration Procedures
Vertigo XG & iTX Integration User Guide 2-11
Page 22

Configuration Procedures
Step 3
Step 2
Step 4
To assign the Vertigo XG’s XG_CHA device to each of Xplay’s keyers and put the
keyers in a ready state:
1. With Xplay open, select the T
EVICE MANAGER window (Device Configuration) opens with the XG_CHA device
The D
already listed in the table on the left-side.
OOLS>DEVICES MANAGER menu command.
2. In the right-side table in the Device Manager, click a <Device#> in the N
AME column to
select the row.
3. Select the XG_CHA device (left table).
4. Click the right-arrow button .
The XG_CHA device is immediately added to the table on the right. It is also added to
the Keyer on the Xplay interface.
5. Repeat the steps 2 - 4 for each of the <Device#> in the table.
6. Click Close. The local device (XG_CHA) device is now associated with each keyer in Xplay.
2-12 Vertigo XG & iTX Integration User Guide
Page 23

Configuration Procedures
7. Ensure that the Vertigo XG device is actively connected to Xplay.
As shown above, when Xplay is connected to the device, the LED is green. If Xplay is
disconnected from the device, then the LED is red.
To reconnect Xplay to the Vertigo XG device, simply double-click the red LED. If the
connection isn’t immediately established, verify that the device is powered up and that
the network is operating normally.
8. All of the keyers should be turned on, which is indicated by the background of the
keyer’s Device name being pink. If the background is grey, then the keyer is turned off.
To turn the keyer on, right-click on the keyer’s Device name and select the Turn Keyer
On command.
Configuring Xplay to use automation to control the Vertigo XG
TXPlay controls the channel’s schedule playout. So when TXPlay encounters an XG event
(graphics event) in the schedule, it communicates with the Vertigo XG device’s Xplay using
the Oxtel automation protocol to instruct Xplay to cue and take the page or scene. To ensure
proper communication between TXPlay and Xplay, you must set Xplay’s Automation
settings and configure Xplay to use the Oxtel protocol over TCP/IP.
To configure Xplay’s Automation settings:
1. Select the T
2. Enable the A
OOLS>SETTINGS>XPLAY>AUTOMATION to display Xplay’s Automation settings.
UTOMATION (NO MESSAGE BOXES) setting, which overrides the behavior of the
four settings below it and prevents message boxes from appearing during Xplay operations.
3. Leave the D
EADBAND setting set to its default value.
Vertigo XG & iTX Integration User Guide 2-13
Page 24

Configuration Procedures
4. Select from the TV FORMAT setting’s drop-down list the format target TV format for the
execution of automation commands and page creation. This is used to determine the
number of frames per second and to display timecode values. This TV Format should
match the TV Format of the templates that you build and the Rendering Resolution
setting of the Vertigo XG device (see “
for automation” on page 2-16.
5. Click OK.
To configure Xplay to communicate with TXPlay using the Oxtel protocol over TCP/IP:
1. Open Xplay’s AUTOMATION CONFIGURATION window and create an instance of the Oxtel
protocol for the Vertigo XG’s local device (XG_CHA) that is to be controlled by TXPlay.
a. Select T
The XPLAY AUTOMATION CONFIGURATION window appears.
Configuring the Vertigo XG’s Dashboard settings
OOLS>CONFIGURE AUTOMATION.
b. In the D
EVICE TO PROTOCOL MAPPINGS section, click the ADD PROTOCOL button next
to the XG_CHA device.
c. Select O
XTEL OVER TCP/IP from the drop-down list that appears and press ENTER.
Leave the Properties settings in their default state.
2. Click OK and restart Xplay.
2-14 Vertigo XG & iTX Integration User Guide
Page 25

Configuration Procedures
3. Verify that the automation configuration has been applied to the Xplay device(s).
Once Xplay has been restarted, the keyers that have been configured for automation
should now display the automation indicator in the keyer’s toolbar. If there is no
communication between the automation system and Xplay, the automation indicator
remains grey. However, when communication between the TXPlay and Xplay is
established, the automation indicator is displayed in blue.
Adding the Vertigo XG device to the central XMS’s Device Manager
The Xmedia Server acts as the central storage and management system for Vertigo assets
like templates, pages, scenes and their associated assets (i.e. images, clips, cel
animations...etc).
For the Xmedia Server to publish assets to the Embedded Xmedia Server on the Vertigo XG
device, the Vertigo XG must be defined in the Device Manager associated with the central
Xmedia Server.
The following procedures instructs you on how to add a device configuration profile,
representing the Vertigo XG, to the central Xmedia Server’s Device Manager.
To add the Vertigo XG device to the Xmedia Server’s Device Manager:
1. Open an application, such as Xplorer or Xstudio, that is connected to the central
Xmedia Server.
2. Select the T
The D
3. Select the ADD button in the lower-left corner.
The Device Configuration section (lower portion) immediately changes to become the
Add Device Information section.
4. Fill-in the fields to create a device configuration profile for the Vertigo XG device.
• Provide a Name, Alias and Description for the device (e.g. VertigoXG)
•The Device Type must be V
•The Control IP must be set to the IP address of the Vertigo XG device.
•The Control Port must be left as 4000.
OOLS>DEVICES>CONFIGURE DEVICES menu command.
EVICE MANAGER window (Device Configuration) opens.
ERTIGOXG.
5. Click Save or Apply and the VertigoXG device is added to the table in the Device
Manager.
Vertigo XG & iTX Integration User Guide 2-15
Page 26

Configuration Procedures
Configuring the Vertigo XG’s Dashboard settings for automation
There are a few settings in the Vertigo XG’s Dashboard that must be configured to
synchronize the Vertigo XG’s rendering services with the video coming from the iTX Output
Server, as well as to allow iTX automation to control the Vertigo XG.
The following procedure instructs you how to set the Vertigo XG’s Automation settings:
To configure the Vertigo XG’s Automation settings:
1. Open the Vertigo XG’s Dashboard application by selecting the TOOLS>LAUNCH
DASHBOARD command from the Vertigo XG’s Control Panel, which should already be
open on the Vertigo XG’s desktop.
2. Select the Vertigo XG device from the Device Discovery table. If the device does not
appear in the table, perform a Device Discovery (TOOLS>SETTINGS>DEVICE DISCOVERY).
3. With the SETTINGS MODE still set to SIMPLE, ensure that the OUTPUT RESOLUTION setting
is the same as the TV FORMAT setting in the Xplay Automation settings (page 2-13).
2-16 Vertigo XG & iTX Integration User Guide
Page 27

Configuration Procedures
NOTE
4. Change the SETTINGS MODE by selecting ADVANCED from the drop-down list.
5. On the H
6. Click the A
ARDWARE>GENLOCK page, set the Genlock settings particular to your iTX system.
PPLY CHANGES button and close the Dashboard application.
Enabling auto-publishing on the Templates, Pages and/or Scenes categories
To increase workflow efficiency and accuracy, we recommend that you set auto-publishing
on the Xmedia Server’s Templat es, Pages and/or Scenes asset categories. This
authorizes the Xmedia Server to automatically publish new or saved templates, pages and
scenes from the Xmedia Server to the Vertigo XG device.
You do not have to set auto-publishing for other asset types. If a template, page or scene
uses an asset of another type (i.e. images or clips), the asset will be automatically published
as part of the template/page/scene.
To set-up auto-publishing on the Templates, Pages and/or Scenes categories:
1. Open Xstudio on a client computer that it is connected to the Xmedia Server.
2. Open the Asset Browser.
3. Right-click the Templates root category and select the P
If you only want to auto-publish the contents of a sub-folder (rather than the root folder),
simply navigate to the subfolder and right-click and select the P
ROPERTIES command.
ROPERTIES command.
Vertigo XG & iTX Integration User Guide 2-17
Page 28

Configuration Procedures
NOTE
4. Enable the output device(s) in the Category Properties window that the assets will be
published to. Then click OK.
5. Repeat steps 3 and 4 for the P
If your system has multiple output servers and you do not want to publish all of the contents
to all of the devices, create matching subcategories under both the Templates and Pages
root categories, as well as the Scene root category, and then assign the different categories
to different devices.
AGES category and/or Scenes category.
2-18 Vertigo XG & iTX Integration User Guide
Page 29

Configuration Procedures
NOTE
Installing and configuring the VertigoXG Desktop plugin
The VertigoXG plugin is a type of iTX channel plugin that allows the scheduling of
secondary graphics events that will be added downstream of the iTX Output Server.
This plugin adds the VertigoXG palette to the Content Selector on the Channel Control
layout, which lets you create graphics pages based on Vertigo templates and then add the
pages and/or scenes to the schedule or timeline. See page 3-1
To operate, the VertigoXG plugin requires that an iTX Integrated XG license be installed
on the iTX Framework Server.
The following procedure assumes that you have already set up the channel configurations
in the iTX Desktop.
To install the VertigoXG plugin on a client computer hosting iTX Desktop:
1. Acquire and run the Vertigo Suite installer (version 4.8 SP3 or later) on the computer
hosting the iTX Desktop that is connected to the iTX Output Server.
2. When prompted by the installation wizard, select to install the Vertigo iTX Desktop
Plugin.
3. Follow the wizard instructions and respond to the prompts to install all dependencies.
4. Restart the computer when the wizard prompts you to.
The wizard takes a few minutes to complete the installation after the (final) restart.
for more information.
To configure the VertigoXG Plugin:
Once the VertigoXG plugin software is installed, you must configure the VertigoXG plugin:
1. In the iTX Desktop, select the E
2. Select the channel.
3. Select the P
Vertigo XG & iTX Integration User Guide 2-19
LUGINS>VERTIGOXG tab and configure the following settings:
NGINEERING>CHANNEL CONFIGURATION view.
Page 30

Configuration Procedures
CTIVE Select the Active button to enable (green LED) or disable (grey LED) the
A
VertigoXG plugin.
A
DDRESS Enter the IP address of the VertigoXG device.
P
ORT 5006 is the port number on which iTX is to communicate with Xplay.
UTOMATION DELAY (MS) iTX uses this value to determine how much earlier than the scheduled time
A
Take and Clear commands are sent in order to compensate for small
communication delays when sending commands.
OFF DELAY (FRAMES) Specifies the number of frames prior to the end of the XG event that the Clear
command will be triggered, so as to offer the page’s Default Out animation a
chance to playout.
O
UTPUT CHANNEL Currently not used.
E
NABLE SLAVE DEVICE Enable this setting when a Master-Slave setup is used and the Master and
Slave each have their own instance of an XG.
E
NABLE TS COMMANDS Not applicable when using a downstream external Vertigo XG.
Ensure that this setting is off.
4. Click Save and then Close.
2-20 Vertigo XG & iTX Integration User Guide
Page 31

3 VERTIGOXG PLUGIN: ADDING XG
NOTE
The Selection pane lists
the Vertigo “pages”
that are available to be added
opens the VertigoXG Viewer
removes the selected “page”
from the selection pane
to the iTX Desktop’s Schedule
which allows you to create
and/or add Vertigo graphics
pages or scenes to the VertigoXG
Palette’s Selection pane.
Grid or Timeline.
The Add Page button
The Remove Page button
Double-clicking a page name
opens the page/scene in the
VertigoXG Viewer’s Edit view.
EVENTS TO A SCHEDULE
The VertigoXG plugin provides operators with access to Vertigo templates, pages and
scenes stored on the Xmedia Server directly from within the iTX Desktop application.
Operators can create a new page based on a template or open an existing page or scene
for editing. The Vertigo graphics pages and scenes can then be added to the iTX channel’s
Schedule Grid or Timeline as secondary graphics events (XG type).
The VertigoXG plugin adds the Vertig oXG palette to the Content Selector on the iTX
Channel Control layout (figure 3-1
REMOVE PAGE) and a selection pane.
The VertigoXG Palette uses the term “Page” for both Vertigo pages and scenes. For example,
the Selection pane lists both pages and scenes, but the column heading is Page Name.
). The palette features two buttons (ADD PAGE and
Vertigo XG & ITX Integration User Guide 3-1
Figure 3-1. The VertigoXG palette in the iTX Desktop’s Content Selector
Page 32

VertigoXG Plugin: Adding XG Events to a Schedule
Browse view Edit view
Clicking the ADD PAGE button on the VertigoXG Palette opens the VertigoXG Viewer
(figure 3-2), which has two views: Browse and Edit.
• Browse view allows you to browse and/or search for templates, pages and/or scenes
that currently exist on a specified Xmedia Server. See “
templates, pages or scenes on an Xmedia Server” on page 3-5 for more information.
• Edit view allows you to create a new page based on a template or open an existing
page or scene for editing. You can then save the page or edited scene to the Xmedia
Server and add the page/scene to the VertigoXG Palette’s selection pane so that it can
be added to the iTX schedule as an XG graphics event.
Browsing or searching for
Figure 3-2. The VertigoXG Viewer has two views: Browse and Edit
Connecting the VertigoXG Viewer to the Xmedia Server
The first time the VertigoXG Viewer is opened, you must set the IP address of the Xmedia
Server in the HOSTNAME/IP field of the Settings window (figure 3-3). This allows the
VertigoXG Viewer to access the templates, pages and scenes of a particular Xmedia Server
device, as well as save new pages and scenes to the Xmedia Server.
Figure 3-3. Specify the IP address or hostname of the Xmedia Server
3-2 Vertigo XG & iTX Integration User Guide
Page 33

VertigoXG Plugin: Adding XG Events to a Schedule
Unable to connect to the Xmedia Server?
Each time the VertigoXG Viewer is opened, it verifies the connection to the Xmedia Server.
An error message appears if the VertigoXG Viewer is unable to connect to the Xmedia
Server. To verify the current server settings, right-click the blue upper menu bar and select
Change Settings. The Settings window appears and displays the current settings. If the
server settings are correct, verify that the Xmedia Server or network are working properly.
If the server settings are incorrect, edit the required fields and click OK. A message informs
you that you must restart the client for the server settings changes to take effect. Close the
VertigoXG Viewer and then reopen it.
Vertigo XG & iTX Integration User Guides 3-3
Page 34

VertigoXG Plugin: Adding XG Events to a Schedule
Open the VertigoXG
Palette in the
Content Selector.
Is the desired
page in the
Selection pane?
Yes No
Will the event
contain a page
or a scene?
ScenePage
Does the page
need to be
edited?
Yes
No
Double-click the page
Open the VertigoXG
Viewer and browse
the Pages category
of the Xmedia Server.
Open the VertigoXG
Viewer and browse
the Scenes category
of the Xmedia Server.
in the Selection pane
to open the page in
the VertigoXG Viewer.
Make any necessary
edits to the page.
Does the
page already
exist on the Xmedia
Server?
Yes No
Open the page and
make any necessary
edits.
Browse the Templates
category and open a
template from which
to create a new page.
Edit the template’s
dynamic fields.
Click the Save Page
button to add the
page or scene to the
Selection pane on
the VertigoXG
palet te.
Do you need
to make edits
to the scene?
Yes
No
Open the scene and
make any necessary
edits.
*
Click the Save Page
button to add the
page to th e
Selection pane on
the VertigoXG
palette.
Drag the page from
the Selection pane to
the Schedule grid or
Timeline .
* When the scene is opened and edited from the
VertigoXG Viewer, it is given a unique name, saved
to the Xmedia Server as a new scene asset and
added to the Selection pane as this new, unique scene.
Procedural overview for creating an XG event
The following flowchart and the remaining sections of this chapter provide you with
instructions for how to use the VertigoXG Palette and VertigoXG Viewer to create Vertigo
graphics pages, edit pages and scenes and then add them to the iTX channel’s Schedule
Grid or Timeline as secondary graphics events.
3-4 Vertigo XG & iTX Integration User Guide
Page 35

VertigoXG Plugin: Adding XG Events to a Schedule
NOTE
NOTE
Asset Browser &
Change the view
the assets belonging
to the selected category
Browsing or searching for templates, pages or scenes on an Xmedia Server
The VertigoXG Viewer’s Browse view allows you to explore and display the template, page
and scene assets currently stored on the specified Xmedia Server.
Use the Asset Browser to navigate through the Xmedia Server’s Templates, Pages and
Scenes categories, as well as their sub-categories. The contents of a selected category are
displayed in the pane to the right of the Asset Browser.
Figure 3-4
types, which is determined by the Change the view setting in the toolbar:
• Detail View: Displays the category’s assets in a detailed list.
• Proxy View: Displays the category’s assets as thumbnail images.
The Startup View setting in the VertigoXG Viewer’s Preferences settings determines
which view is used when the VertigoXG Viewer is initially opened in Browse view.
demonstrates that the selected category’s assets can be displayed two view
Figure 3-4. Template, page and scene assets stored on the XMS can be displayed in Proxy or Detail View
Vertigo XG & iTX Integration User Guides 3-5
Double-clicking the template, page or scene asset opens in the template/page/scene in the
VertigoXG Viewer’s Edit view.
If the VertigoXG Viewer opens in Edit view, you can switch to browse view by clicking the
Create new toolbar button.
Page 36

VertigoXG Plugin: Adding XG Events to a Schedule
NOTE
Search
Another method for exploring and accessing template, page and scene assets stored on
the specified Xmedia Server is to use the Search tool (figure 3-5). The Search tool allows
you build a search query based on asset properties like name, author or a date range. When
a query is performed, the Search tool returns a list of the assets that match the search
conditions. Like the VertigoXG Viewer’s Browse view, the Search tool can display the
results in Proxy View or Detail View.
Double-clicking the template, page or scene asset in the Search tool’s results pane opens
the template/page/scene in the VertigoXG Viewer’s Edit view.
Figure 3-5. Search for template, page or scene assets on the Xmedia Server based on the asset’s properties
Although the Search tool can search and locate all asset types, only template, page and
scene assets can be opened in the VertigoXG Viewer.
3-6 Vertigo XG & iTX Integration User Guide
Page 37

VertigoXG Plugin: Adding XG Events to a Schedule
NOTE
Page’s default duration
Edit the template’s
dynamic elements
Keyer setting
Trigger or Duration
Tem pla t e n a me
(No page name indicates that a template is open rather than a page)
Save Page
Creating a new page from a template
The Vertigo Suite workflow dictates that templates are created in Xstudio. Templates are
designed so that the formatting, layout and some graphical elements are fixed (i.e. cannot
be edited except in Xstudio).
In the XG & iTX integrated workflow, unique instances of the graphics, known as pages, can
quickly and easily be created using the VertigoXG Viewer by changing dynamic content
fields and saving the individual page asset.
While pages already exist on the Xmedia Server, you cannot create a new page from an
existing page. In other words, there is no “Save Page As” functionality in the VertigoXG
Viewer. You can only edit and save existing pages or create new pages from templates.
Figure 3-6
and the following procedure describe how you can use the VertigoXG Viewer to
create a new page based on existing template stored on the Xmedia Server and add it to
the VertigoXG Palette’s Selection pane.
Figure 3-6. Create a new page based on an existing template
Vertigo XG & iTX Integration User Guides 3-7
To create a new page in the VertigoXG Viewer:
1. Open the template in the VertigoXG Viewer’s Edit view.
2. Edit the template’s dynamic fields.
For example, you may be able to edit text fields, make selections from a drop-down list,
or substitute an image, cel animation or clip asset displayed on the template.
Page 38

VertigoXG Plugin: Adding XG Events to a Schedule
NOTE
To substitute an image, cel animation or clip element on a template, right-click on the
element. A browser for that asset type appears and displays the assets on the Xmedia
Server that can be used as substitutes. Select a new asset and click OK to add it to the
template.
3. In the Duration field, specify the page’s default duration
VertigoXG Viewer is a property of the page and is therefore saved to the Xmedia Server
with the page.
When the page is first added to an XG event, the page’s default duration value is used
to set the initial duration for an XG event. The XG event’s duration value can then be
edited independently of the page’s default Duration value. In other words, changing the
Duration value of an XG event does not change the page asset’s default Duration
value, and vice versa.
If the duration is set to 00:00:00, iTX imposes a default duration of 5 seconds when the page
is added to a schedule as an XG event.
4. Set the Trigge r or Duration mode, which represents the default method by which the
graphics page will be cleared when it is part of an XG event.
RIGGER: The XG event will remain on air until another page replaces it or it
• T
is cleared in another manner (e.g. cleared using Xplay).
URATION: The XG event will be cleared when its duration expires.
• D
These modes are a property of the XG event in iTX, not the page asset itself in the
Xmedia Server. As such, their settings are saved to the page element added to the
VertigoXG Palette, but they are not saved as part of the page asset on the Xmedia
Server.
When creating a new page, specify the default setting that will be used as the initial
value when the page is added as an XG event. After the page reference has been
added to the VertigoXG Palette, you can edit the default value by opening and editing
these fields in the VertigoXG Viewer and then clicking the S
page is added to an XG event, the default value is used, but you can change it using
the Event Editor.
5. In the K
EYER setting, specify the default keyer that the page will playout on. This value
is used when the page is added to the VertigoXG Palette, as well as when adding an
XG event in the schedule/timeline.
Note that this field is a property of the XG event, not the page asset itself. As such, the
setting is saved to the page reference added to the VertigoXG Palette, but it is not
saved as part of the page asset on the Xmedia Server.
When creating a new page, specify the default keyer setting that will be used as the
initial value when the page is added as an XG event. After the page has been added
to the VertigoXG Palette, you can edit the default value by opening and editing the page
in the VertigoXG Viewer and then clicking the S
added to an XG event, the default value is used, but you can change it using the Event
Editor.
. The Duration setting in the
AVE PAGE button. When the
AVE PAGE button. When the page is
3-8 Vertigo XG & iTX Integration User Guide
Page 39

VertigoXG Plugin: Adding XG Events to a Schedule
6. Click the SAVE PAGE button. The Save Page button creates the new page, saves the
page to the Xmedia Server and adds a reference to the page element on the VertigoXG
Palette’s Selection pane.
• Page name: The new page is automatically given a unique name, which consists
of the template’s AutoName property (which defaults to the template’s name)
with a timestamp appended. You cannot rename the page using the VertigoXG
Viewer.
• Pages Category: The VertigoXG Viewer looks for a category under the Pages
root category that has the same name as the category under the Templates root
category from which the template originated. If such a category is found, then the
Page is saved there. Otherwise, the page is saved in the Pages root category.
• Selection Pane listing: A reference to the page is added to the VertigoXG
Palette’s Selection pane using the page’s name. The pages are listed in the
Selection pane in alphabetical order. In addition to the page’s name, the page’s
default keyer value is also listed.
Vertigo XG & iTX Integration User Guides 3-9
Page 40

VertigoXG Plugin: Adding XG Events to a Schedule
NOTE
Adding a page to the VertigoXG Palette
When creating a new page from a template, you will finish creating the new page by clicking
the Save Page button. The Save Page button saves the new page to the Xmedia Server
and adds a reference listing of the page (a page element) in the VertigoXG Palette’s
Selection pane.
Figure 3-7 shows that pages added to the Selection pane are listed alphabetically and
consist of the page’s name and its current default keyer value.
In reality, this listing is a reference to the page stored on the Xmedia Server. Therefore any
changes saved to the page on the Xmedia Server are reflected in the page when it is
opened from the Selection pane.
Figure 3-7. Add pages to the VertigoXG Palette’s Selection pane
Pages can only be added to the Vertigo XG Palette’s Selection pane by first opening the
template/page in Edit view and then clicking the Save Page button. Adding a page is not
permitted in the VertigoXG Viewer’s Browse view.
3-10 Vertigo XG & iTX Integration User Guide
Page 41

VertigoXG Plugin: Adding XG Events to a Schedule
NOTE
NOTE
Page’s default duration
Edit the page’s
dynamic elements
Default Keyer setting
Trigger or Duration mode
Tem pla t e n a me
Save Page
Page name
Opening and editing an existing page in the VertigoXG Viewer
You can use the VertigoXG Viewer to edit existing pages that are saved on the Xmedia
Server. Although there are various ways in which you can open the VertigoXG Viewer in Edit
view, we recommend that you first add the page to the VertigoXG Palette’s Selection pane
and then open and edit the page from this state.
While pages already exist on the Xmedia Server, you cannot create a new page from an
existing page. In other words, there is no “Save Page As” functionality in the VertigoXG
Viewer. You can only edit and save existing pages or create new pages from templates.
To open and edit an existing page using the VertigoXG Viewer:
1. Open the page in the VertigoXG Viewer’s Edit view.
Double-click the page’s name listed in the VertigoXG Palette’s Selection pane.
The page opens in the VertigoXG Viewer (figure 3-8
If the page does not open and an error message appears, verify the Server settings, the
operational state of the Xmedia Server and/or whether the page still exists on the Xmedia Server.
).
Vertigo XG & iTX Integration User Guides 3-11
Figure 3-8. Editing an existing page in the VertigoXG Viewer’s Edit view
Page 42

VertigoXG Plugin: Adding XG Events to a Schedule
NOTE
NOTE
NOTE
2. Optional: Edit the page’s dynamic fields.
You may want to edit text fields, make selections from a drop-down list, or substitute
an image, cel animation or clip asset displayed on the page.
To substitute an image, cel animation or clip element on a page, right-click on the element.
A browser for that asset type appears and displays the assets on the Xmedia Server that
can be used as substitutes. Select a new asset and click OK to add it to the page.
Changes to a page’s content will be saved to the Xmedia Server when you click SAVE PAGE.
The page is a shared page, which means that saved changes will be reflected in all XG
events that are already scheduled and associated with the page.
3. Optional: Edit the page’s default Duration value.
Changes to a page’s default Duration value will be saved to the Xmedia Server when
you click SAVE PAGE. As such, these changes will be reflected the next time you add
the page to an XG event. The duration value of XG events that are associated with the
page are not affected by changes to the page’s default Duration value.
4. Optional: Edit the default Keyer value.
Changes to a page’s default Keyer value are automatically reflected in the VertigoXG
Palette’s Selection pane when you click S
Note that the default Keyer value is not saved with the page asset on the Xmedia
Server. However, the page’s reference in the VertigoXG Palette holds the new keyer
value, so that when you open the page from the Selection Pane or add the page to a
new XG event, the new default Keyer value is used.
AVE PAGE.
Changing the default Keyer value does not affect the current Keyer value of XG events
already listed in the ITX schedule.
5. Optional: Edit the default Trigger or Duration mode settings.
Changes to a page’s default Trigger or Duration mode settings are not saved with the
page asset on the Xmedia Server when you click S
Changing the default Trigger or Duration mode settings does not affect the current XG
events already listed in the ITX schedule.
6. Click the Save Page button to commit any changes to the page.
3-12 Vertigo XG & iTX Integration User Guide
AVE PAGE.
Page 43

VertigoXG Plugin: Adding XG Events to a Schedule
NOTE
Scene’s default duration
Do not edit the scene’s
dynamic elements
Default Keyer setting
Trigger or Duration mode
Scene’s name
Save Page
Adding an unedited scene to the VertigoXG Palette
If a scene that is stored on the Xmedia Server is intend to be played out on air “as is” (does
not require any edits), then we recommend using the following procedure to add the scene
to the VertigoXG Palette’s Selection pane.
Making no edits to the scene allows you to add the scene to the Selection pane using the
scene’s original name and content (as saved on the Xmedia Server). However, making edits
and then clicking the Save Page button, creates a new scene asset, which is given a unique
name, saved on the Xmedia Server and added to the Selection pane. See “
scene based on an existing scene” on page 3-16 for more information.
To open and add an existing scene to the VertigoXG Palette’s Selection pane:
1. Click the Add Page button in the VertigoXG Palette to open the VertigoXG Viewer.
2. Browse the Scene category in the VertigoXG Viewer’s Asset Browser.
3. Double-click the scene to open it in the VertigoXG Viewer’s Edit view.
Creating a new
Vertigo XG & iTX Integration User Guides 3-13
Figure 3-9. Opening and adding an unedited scene to the VertigoXG Palette
4. Do not edit the scene’s content (dynamic elements) or the default Duration value.
Editing the content and/or the Duration value results in the creation of a new scene
asset when the Save Page button is clicked, rather than applying the edits to the
original scene.
Page 44

VertigoXG Plugin: Adding XG Events to a Schedule
NOTE
NOTE
NOTE
5. Optional: Edit the default Keyer value.
Changes to a scene’s default Keyer value are automatically reflected in the VertigoXG
Palette’s Selection pane when you click S
Note that the default Keyer value is not saved with the scene asset on the Xmedia
Server. However, the scene’s reference in the VertigoXG Palette holds the new keyer
value, so that when you open the scene from the Selection pane or add the page to a
new XG event, the new default Keyer value is used.
Changing the default Keyer value does not affect the current Keyer value of XG events
already listed in the ITX schedule.
6. Optional: Edit the default Trigger or Duration mode settings.
Changes to a scene’s default Trigger or Duration mode settings are not saved with the
scene asset on the Xmedia Server when you click SAVE PAGE.
Changing the default Trigger or Duration mode settings does not affect the current XG
events already listed in the ITX schedule.
7. Click the Save Page button to commit any changes to the scene. The scene is
automatically added to the VertigoXG Palette’s Selection pane.
AVE PAGE.
After the scene has been added to the Selection pane using the Save Page button, the
scene remains open in the VertigoXG Viewer. Any edits that are made to the scene while
it’s open in the VertigoXG Viewer will apply to the scene that was just added to the Selection
pane. When the Save Page button is clicked, the changes will be saved to the current scene
without creating a new scene.
3-14 Vertigo XG & iTX Integration User Guide
Page 45

VertigoXG Plugin: Adding XG Events to a Schedule
NOTE
NOTE
Updating a scene already listed on the VertigoXG Palette
If you want to update the content elements or properties of an existing scene asset, without
creating a new scene asset, you must open the scene from the VertigoXG Palette’s
Selection pane. Once you have made the necessary edits, clicking the Save Page button
saves the changes to the scene asset on the Xmedia Server and updates the scene’s listing
on the Selection pane.
To open and apply edits to an existing scene:
1. Double-click the scene’s name in the VertigoXG Palette’s Selection pane.
The scene opens in the VertigoXG Viewer’s Edit view.
2. Optional: Make changes to any of the scene’s dynamic content elements (e.g. change
text or substitute image, clip or cel animation elements).
3. Optional: Edit the scene’s default Duration value.
Changes to a scene’s default Duration value will be saved to the Xmedia Server when
you click S
the scene to an XG event. The duration value of XG events that are associated with
the scene are not affected by changes to the scene’s default Duration value.
4. Optional: Edit the default Keyer value.
Changes to a scene’s default Keyer value are automatically reflected in the VertigoXG
Palette’s Selection pane when you click S
Note that the default Keyer value is not saved with the scene asset on the Xmedia
Server. However, the scene’s reference in the VertigoXG Palette holds the new keyer
value, so that when you open the scene from the Selection pane or add the page to a
new XG event, the new default Keyer value is used.
AVE PAGE. As such, these changes will be reflected the next time you add
AVE PAGE.
Changing the default Keyer value does not affect the current Keyer value of XG events
already listed in the ITX schedule.
5. Optional: Edit the default Trigger or Duration mode settings.
Changes to a scene’s default Trigger or Duration mode settings are not saved with the
scene asset on the Xmedia Server when you click SAVE PAGE.
Changing the default Trigger or Duration mode settings does not affect the current XG
events already listed in the ITX schedule.
6. Click the Save Page button to commit any changes to the scene. The edits are saved
on the Xmedia Server and the scene is automatically updated on the VertigoXG
Palette’s Selection pane.
Vertigo XG & iTX Integration User Guides 3-15
Page 46

VertigoXG Plugin: Adding XG Events to a Schedule
Creating a new scene based on an existing scene
The VertigoXG Viewer provides you with a “Save As” type functionality that allows you to
create a new scene asset from an existing scene asset. The new scene is given a unique
name, saved on the Xmedia Server and added to the Selection pane.
Figure 3-10. A new scene asset created from an existing scene asset
To create a new scene asset based on an existing scene:
1. Click the Add Page button in the VertigoXG Palette to open the VertigoXG Viewer.
2. Browse the Scene category in the VertigoXG Viewer’s Asset Browser.
3. Double-click the scene to open it in the VertigoXG Viewer’s Edit view.
4. Make changes to any of the scene’s dynamic content elements (e.g. change text or
substitute image, clip or cel animation elements).
5. Edit the scene’s default Duration setting.
Changes to a scene’s default Duration value will be saved to the Xmedia Server when
you click S
the scene to an XG event. The duration value of XG events that are associated with
the scene are not affected by changes to the scene’s default Duration value.
6. Optional: Edit the default Keyer value.
Changes to a scene’s default Keyer value are automatically reflected in the VertigoXG
Palette’s Selection pane when you click S
Note that the default Keyer value is not saved with the scene asset on the Xmedia
Server. However, the scene’s reference in the VertigoXG Palette holds the new keyer
value, so that when you open the scene from the Selection pane or add the page to a
new XG event, the new default Keyer value is used.
3-16 Vertigo XG & iTX Integration User Guide
AVE PAGE. As such, these changes will be reflected the next time you add
AVE PAGE.
Page 47

VertigoXG Plugin: Adding XG Events to a Schedule
NOTE
NOTE
NOTE
Changing the default Keyer value does not affect the current Keyer value of XG events
already listed in the ITX schedule.
7. Optional: Edit the default Trigger or Duration mode settings.
Changes to a scene’s default Trigger or Duration mode settings are not saved with the
scene asset on the Xmedia Server when you click S
Changing the default Trigger or Duration mode settings does not affect the current XG
events already listed in the ITX schedule.
8. Click the Save Page button.
A new scene asset is created, saved on the Xmedia Server and added to the Selection
pane. The new asset is given a unique name, which consists of the name of the original
scene with the date and time appended. If the original scene already had a date and
time in its name, the date and time will be replaced.
After the new scene has been added to the Selection pane, the scene remains open in the
VertigoXG Viewer. Any edits that are made to the scene while it’s open in the VertigoXG
Viewer will apply to the scene that was just added to the Selection pane. When the Save
Page button is clicked the changes will be saved to the current scene without creating a
new scene.
AVE PAGE.
Vertigo XG & iTX Integration User Guides 3-17
Page 48

VertigoXG Plugin: Adding XG Events to a Schedule
NOTE
Vertigo pages/scenes are added as secondary events of type XG
Adding XG events to an iTX schedule
XG events are secondary events in a schedule that allow Vertigo graphics pages and scenes
to be played out on a specified keyer layer.
You can add XG events to the iTX channel’s schedule by either adding a page or scene to
the Schedule Grid or to the Timeline.
The VertigoXG Palette uses the term “Page” for both Vertigo pages and scenes. For example,
the Selection pane lists both pages and scenes, but the column heading is Page Name.
Adding an XG event to the schedule grid
Figure 3-11 demonstrates that once pages (Vertigo page and/or scene assets) are listed in
the Vertigo XG palette, you can drag a page/scene from the Selection pane directly onto a
primary event on the channel’s Schedule Grid. This adds the page/scene as a secondary
event of type XG. The page/scene’s default duration value and default keyer value are used
for the event’s Duration and Keyer settings, but they can be edited directly in the Schedule
Grid or using the Event Editor (see page 3-20
).
Figure 3-11. Drag the page/scene onto a primary event in the schedule
3-18 Vertigo XG & iTX Integration User Guide
Page 49

VertigoXG Plugin: Adding XG Events to a Schedule
Adding an XG event to the timeline
In order to add a page/scene to the timeline, the timeline grid must be configured to display
the XG keyer tracks. Selecting the Select Tracks button above the iTX Desktop’s timeline
allows you to select and display the XG Keyer tracks in the timeline.
Once the XG Keyer tracks are displayed on the timeline, you drag & drop a page/scene
from the Vertigo XG palette’s Selection pane onto the primary video track on the timeline.
The page/scene is added to the appropriate XG keyer track as determined by the
page/scene’s keyer setting (figure 3-12
).
Figure 3-12. Drag the page/scene from the Selection pane onto the PGM Video track on the timeline
Vertigo XG & iTX Integration User Guides 3-19
Page 50

VertigoXG Plugin: Adding XG Events to a Schedule
NOTE
Editing the properties or content of a scheduled XG event
When a page or scene is added to the iTX channel’s Schedule Grid as an XG event, some of
the event’s properties, like Duration and Keyer, are initially set using the page/scene’s default
values.
You can edit the XG event’s properties by selecting the XG event’s row in the schedule and
then selecting the Event Editor tab. The event’s properties can be edited directly in the Event
Editor and the changes applied by clicking the Store Changes button.
Clicking the Edit Page button opens the page/scene in the VertigoXG Viewer’s Edit view. You
can make content changes to the page that is currently assigned to the XG event. Once you
have clicked the VertigoXG Viewer’s Save Page button, changes to the page/scene are
applied to the page/scene asset on the Xmedia Server, as well as to all XG events that are
associated with that page/scene, even in other channel’s schedules.
Figure 3-13. Edit an XG event’s properties using the Event Editor
When an older schedule is loaded into the iTX Desktop, it may contain XG events that were
authored using an older version of the VertigoXG plugin. If the Edit Page button is clicked
for an older XG event, it will open the Edit page fields dialog, which only allows editing of
text substitutions in a grid.
3-20 Vertigo XG & iTX Integration User Guide
 Loading...