

Page 1

T2
INTELLIGENT DIGITAL DISK RECORDER
Users Manual –SP3/SP4–
www.grassvalley.com
F2431110171
October 2011
Page 2

Copyright Copyright © 2011 Grass Valley K.K. All rights reserved. Portions of software © 2000 – 2011,
Microsoft Corporation. All rights reserved. This document may not be copied in whole or in part,
or otherwise reproduced except as specifically permitted under U.S. copyright law, without the
prior written consent of Grass Valley USA, LLC, P.O. Box 59900, Nevada City, California
95959-7900. This product may be covered by one or more U.S. and foreign patents.
Grass Valley is a trademark of GVBB Holdings S.a.r.l.
Disclaimer Product options and specifications subject to change without notice. The information in this
manual is furnished for informational use only, is subject to change without notice, and should
not be construed as a commitment by Grass Valley USA, LLC. Grass Valley assumes no
responsibility or liability for any errors or inaccuracies that may appear in this publication.
U.S. Government
Restricted Rights
Legend
Trademarks and
Logos
Use, duplication, or disclosure by the United States Government is subject to restrictions as set
forth in subparagraph (c)(1)(ii) of the Rights in Technical Data and Computer Software clause
at DFARS 252.277-7013 or in subparagraph c(1) and (2) of the Commercial Computer
Software Restricted Rights clause at FAR 52.227-19, as applicable.
Grass Valley is a trademark of GVBB Holdings S.a.r.l. Grass Valley USA, LLC products are
covered by U.S. and foreign patents, issued and pending. Additional information regarding
Grass Valley USA, LLC trademarks and other proprietary rights may be found at
www.grassvalley.com.
Other trademarks and logos used in this document are either registered
trademarks or trademarks of the manufacturers or vendors of the associated
products, such as Microsoft
player, Internet Explorer® internet browser, and SQL Server™. QuickTime, the
QuickTime logo and Final Cut Pro are trademarks or registered trademarks of
Apple, Inc., used under license therefrom. Intel, Core 2 Quad are the trademarks
or registered trademarks of Intel Corporation or its subsidiaries in the United States of America
and other countries. Adobe, Adobe logo, Adobe Premiere and Adobe Reader are registered
trademarks of Adobe Systems Incorporated. XDCAM, MPEG HD422 and XDCAM EX are
trademarks or registered trademarks of Sony Corporation. XDCAM EX, SxS, and their logos
are trademarks of Sony Corporation. GF and GFPAK are trademarks of Toshiba Corporation.
®
Windows® operating system, Windows Media
®
Grass Valley Web Site This public Web site contains all the latest manuals and documentation, and additional support
information. Use the following URL.
http://www.grassvalley.com.
Revision Status
Rev Date Description
October 17, 2011 F2431110171
2 T2 Users Manual –SP3/SP4– October 17, 2011
Page 3

Table of Contents
Introduction....................................................................................................... 7
Chapter 1 License Transfer
License transfer....................................................................................................... 10
Chapter 2 T2 XDCAM Option
What is XDCAM? .................................................................................................... 12
What is XDCAM EX?............................................................................................... 12
Validated driver versions ......................................................................................... 12
Supported formats................................................................................................... 12
XDCAM............................................................................................................... 12
XDCAM EX......................................................................................................... 14
Connection between T2 and a device ..................................................................... 15
What are VFAM/FAM and SAM?........................................................................ 15
Connecting your T2 and XDCAM drive (PDW-U1) ............................................. 15
Removing a professional disc............................................................................. 16
Connecting your T2 and SxS memory card USB reader/writer (SBAC-US10)... 17
Removing an SxS memory card......................................................................... 17
Workflow using XDCAM .......................................................................................... 18
Playing sources in an XDCAM drive................................................................... 18
Importing XDCAM sources
(Import in the native format/Convert to Grass Valley HQ AVI for import) ...... 18
Converting XDCAM sources stored in a bin to Grass Valley HQ AVI................. 20
Sending/receiving XDCAM sources to/from your T2 via FTP............................. 20
Exporting a file in the XDCAM format ................................................................. 22
Exporting from EDIUS 6 in the MXF format........................................................ 24
Workflow using XDCAM EX .................................................................................... 26
Playing sources in an SxS memory card............................................................ 26
Importing XDCAM EX sources
(Import in the native format/Convert to Grass Valley HQ AVI for import) ...... 27
Converting XDCAM EX sources stored in a bin to Grass Valley HQ AVI........... 28
Sending/receiving XDCAM EX sources to/from your T2 via FTP....................... 29
Exporting a file in the XDCAM EX format ........................................................... 29
Chapter 3 T2 P2 Option
What is P2? ............................................................................................................. 32
Validated driver versions ......................................................................................... 32
Supported formats................................................................................................... 32
Connection between T2 and a device ..................................................................... 36
Connecting your T2 and P2 drive (AJ-PCD20)................................................... 36
Removing a P2 card ........................................................................................... 37
Workflow using P2................................................................................................... 38
Playing sources in a P2 drive ............................................................................. 38
Importing P2 sources
(Import in the native format/Convert to MXF (OP-1a) for import/
Convert to Grass Valley HQ AVI for import) .................................................. 39
Converting P2 sources stored in a bin to MXF (OP-1a)/Grass Valley HQ AVI
Exporting a file in the P2 format ......................................................................... 41
Exporting an AVC-Intra MXF file from EDIUS 6 ................................................. 43
.... 41
Chapter 4 T2 GF Option
What is GF? ............................................................................................................ 46
Supported formats................................................................................................... 46
Connection between T2 and a device ..................................................................... 47
Connecting your T2 and GFPAK ........................................................................ 47
Removing GFPAK .............................................................................................. 47
Workflow using GF .................................................................................................. 48
Playing sources in GFPAK ................................................................................. 48
October 17, 2011 T2 Users Manual –SP3/SP4– 3
Page 4

Table of Contents
Chapter 5 T2 Alpha Option
Chapter 6 Additional/Updated Functions for SP3 and SP4
Importing GF sources
(Import in the native format/Convert to Grass Valley HQ AVI for import) ..... 49
Converting GF sources stored in a bin to Grass Valley HQ AVI ........................ 50
Sending/receiving GF sources to/from your T2 via FTP .................................... 51
Exporting a file in the GF format......................................................................... 51
Option overview ...................................................................................................... 54
Limitations .......................................................................................................... 55
Supported formats................................................................................................... 56
What is Fill and Key data? ...................................................................................... 56
MXF import and export functions ............................................................................ 59
Supported formats.............................................................................................. 59
Importing Grass Valley HQ MXF sources
(Import in the native format/Convert to Grass Valley HQ AVI for import) ..... 60
Converting Grass Valley HQ MXF sources stored in a bin to Grass Valley HQ AVI
Sending/receiving Grass Valley HQ MXF sources to/from your T2 via FTP ...... 63
Exporting a file in the Grass Valley HQ MXF format .......................................... 63
Exporting a Grass Valley HQ MXF file from EDIUS 6 ........................................ 64
Converting Grass Valley HQ AVI to MXF (XDCAM format) and
exporting the converted file ................................................................................ 67
Loading and editing T2 sources in other editing software .................................. 69
AVCHD import and export functions ....................................................................... 70
Supported formats.............................................................................................. 70
Displaying AVCHD sources in removable media ............................................... 71
Importing AVCHD sources
(Import in the native format/Convert to Grass Valley HQ AVI for import) ..... 72
Converting AVCHD sources stored in a bin to Grass Valley HQ AVI................. 74
Sending/receiving AVCHD sources to/from your T2 via FTP ............................. 74
Exporting a file in the AVCHD format ................................................................. 74
Restoring settings at the next startup...................................................................... 75
Batch capture .......................................................................................................... 78
Batch capture action settings ............................................................................. 78
Importing the batch capture list and executing the batch capture ...................... 79
Setting In and Out points......................................................................................... 82
Additional/updated functions for the playlist view.................................................... 83
Switching event view .......................................................................................... 83
Background color for events............................................................................... 85
Changing the event view style and background color ........................................ 86
Selecting and sorting multiple events ................................................................. 86
Setting a specific timecode to an event in a playlist................................................ 87
Setting an event template ....................................................................................... 88
Converting a playlist to a single clip ........................................................................ 90
Converting a playlist stored in a bin to a single clip............................................ 91
Converting a playlist to a single media file for export ......................................... 91
Importing/exporting playlists and clips .................................................................... 93
Exporting playlists and clips in the T2 format ..................................................... 93
Importing playlists and clips ............................................................................... 94
Transferring media files to other T2 ........................................................................ 95
Configuring the FTP server settings of T2 (destination)..................................... 95
Exporting media files from T2 to T2 ................................................................... 96
Backing up all data to other T2 (Sync backup) ....................................................... 98
Setting T2 on the sync destination (slave) to the slave mode............................ 98
Setting T2 on the sync source (master) to the master mode for data sync........ 99
Local operations in the remote mode ...................................................................... 101
Local operations in the R1-Remote mode .......................................................... 101
... 62
4 T2 Users Manual –SP3/SP4– October 17, 2011
Page 5

Local operations in the P1-Remote mode/P2-Remote mode ............................. 102
Other additional/updated functions.......................................................................... 103
Automatically exporting files while recording...................................................... 103
Automatically loading sources that can be loaded to the P1/P2 channel ........... 104
Automatically adding a sub clip created in R1 to a playlist ................................. 105
Setting the preview update interval .................................................................... 105
Exporting ancillary data during playback at other than single speed.................. 107
Keyboard shortcuts............................................................................................. 107
Starting up your T2 with the Wake On LAN function .......................................... 107
Tally signal output from GPI ............................................................................... 109
Chapter 7 Appendix
Important notes on T2 export .................................................................................. 112
Operations in the front panel mode ......................................................................... 113
Playing sources in media.................................................................................... 113
Importing............................................................................................................. 114
Removing a medium........................................................................................... 115
Converting a clip stored in a bin to a different format ......................................... 116
FTP settings ....................................................................................................... 117
Converting a playlist to a single clip ................................................................... 119
Exporting in the T2 format .................................................................................. 121
Exporting a file in the original format .................................................................. 122
Converting Grass Valley HQ AVI to MXF (XDCAM format) and
exporting the converted file ................................................................................ 122
Backing up all data to other T2 (Sync backup)................................................... 124
Table of Contents
October 17, 2011 T2 Users Manual –SP3/SP4– 5
Page 6

Table of Contents
6 T2 Users Manual –SP3/SP4– October 17, 2011
Page 7

Introduction
This manual contains descriptions of several types of optional products and
descriptions on additional functions introduced by the upgrade from SP2 to SP3 and
SP4. If you have purchased an optional product, see the chapter of the product.
This manual mainly provides procedures in which a user operates T2 in the
workstation mode. The procedures are also the same for operations in the front panel
mode unless otherwise noted. For more information about the operations in the front
panel mode, see Chapter 7.
About this manual
This manual consists of the following:
Chapter 1, License Transfer:
Describes how to transfer the license of an optional product to your T2.
Chapter 2, T2 XDCAM Option:
Describes the workflow to use XDCAM and XDCAM EX.
Chapter 3, T2 P2 Option:
Describes the workflow to use P2.
Chapter 4, T2 GF Option:
Describes the workflow to use GF.
Chapter 5, T2 Alpha Option:
Describes how to handle a file that contains transparency information.
Chapter 6, Additional/Updated Functions for SP3 and SP4:
Describes the additional or updated functions for SP3 or SP4.
Chapter 7, Appendix:
Describes the important notes on exporting or the procedures in the front panel mode.
About the package contents of optional products
Please check that the following items are included in the optional product of your
purchase.
•USB key
• T2 Users Manual –SP3/SP4– (this book)
October 17, 2011 T2 Users Manual –SP3/SP4– 7
Page 8

Introduction
8 T2 Users Manual –SP3/SP4– October 17, 2011
Page 9

Chapter 1
License Transfer
This chapter consists of the following:
• "License transfer" on page 10
October 17, 2011 T2 Users Manual –SP3/SP4– 9
Page 10

Chapter 1 License Transfer
License transfer
You can transfer the licenses of the optional products you purchased to your T2. This
allows you to use the products without connecting the USB key to your T2. (You can
also use each option without transferring the license by connecting the USB key.)
NOTE: Licenses transferred on your T2 will not be overwritten and will remain
available even if the firmware is updated.
1. Start up your system in the maintenance mode.
• For instructions on how to start up your system in the maintenance mode, refer
to the Maintenance Manual of your T2.
2. Click the
3. Click
• Click
• Click
connected to your T2.
4. Select the option you want to transfer the license, and then click >.
Option tab in Maintenance Tools.
Move Licenses.
Check T2 to check the licenses transferred on your T2.
Check USB Key
and then click
Check
to check the licenses in the USB key
5. Click
NOTE: The transferred licenses can also be moved back to the USB key in the
"Move License" screen.
10 T2 Users Manual –SP3/SP4– October 17, 2011
OK.
Page 11

Chapter 2
T2 XDCAM Option
This chapter consists of the following:
• "What is XDCAM?" on page 12
• "What is XDCAM EX?" on page 12
• "Validated driver versions" on page 12
• "Supported formats" on page 12
• "XDCAM" on page 12
• "XDCAM EX" on page 14
• "Connection between T2 and a device" on page 15
• "What are VFAM/FAM and SAM?" on page 15
• "Connecting your T2 and XDCAM drive (PDW-U1)" on page 15
• "Removing a professional disc" on page 16
• "Connecting your T2 and SxS memory card USB reader/writer (SBAC-US10)"
on page 17
• "Removing an SxS memory card" on page 17
• "Workflow using XDCAM" on page 18
• "Playing sources in an XDCAM drive" on page 18
• "Importing XDCAM sources (Import in the native format/Convert to Grass
Valley HQ AVI for import)" on page 18
• "Converting XDCAM sources stored in a bin to Grass Valley HQ AVI" on
page 20
• "Sending/receiving XDCAM sources to/from your T2 via FTP" on page 20
• "Exporting a file in the XDCAM format" on page 22
• "Exporting from EDIUS 6 in the MXF format" on page 24
• "Workflow using XDCAM EX" on page 26
• "Playing sources in an SxS memory card" on page 26
• "Importing XDCAM EX sources (Import in the native format/Convert to Grass
Valley HQ AVI for import)" on page 27
• "Converting XDCAM EX sources stored in a bin to Grass Valley HQ AVI" on
page 28
• "Sending/receiving XDCAM EX sources to/from your T2 via FTP" on page 29
• "Exporting a file in the XDCAM EX format" on page 29
October 17, 2011 T2 Users Manual –SP3/SP4– 11
Page 12

Chapter 2 T2 XDCAM Option
What is XDCAM?
XDCAM is a professional broadcast disc video system developed by Sony
Corporation. This system uses a professional disc as its recordable medium and this
single medium provides operations from collecting materials to editing, exporting,
and archiving.
XDCAM records video files in the MXF file format. Compression formats include the
following four types: MPEG HD422, MPEG HD, MPEG IMX, and DVCAM. T2
XDCAM Option supports these four formats.
Recording video in the file format allows for high speed access that is impossible for
tape media. Each file is saved as a single clip with operations to start and stop a
recording. Each file is also linked to thumbnail data. T2 allows you to access a
professional disc from the Browse tab to list the saved clips as thumbnails and
manipulate them in the same way as clips in a bin.
XDCAM content records additional information such as date, time, or comments and
proxy AV data as metadata in addition to high resolution video and audio data. T2 can
play and edit high resolution data without using any proxy data.
What is XDCAM EX?
XDCAM EX is a professional broadcast video system developed by Sony
Corporation. This system uses SxS memory cards that are compatible with
ExpressCard as its recordable media. XDCAM EX records video files in the MPEG
file format. MPEG HD is incorporated as the compression format. T2 allows you to
access an SxS memory card from the Browse tab to list the saved clips as thumbnails
and manipulate them in the same way as clips in a bin.
Validated driver versions
This product has been validated on the drivers of the following versions:
Product name Version
XDCAM HD Drive (for playback) PDW-U1 XDCAM Drive Software (for Windows PC ) Ver. 3.0
SxS Memory Card Reader SxS Device Driver Ver.1.1.0.0
XDCAM Browser Ver. 1.3
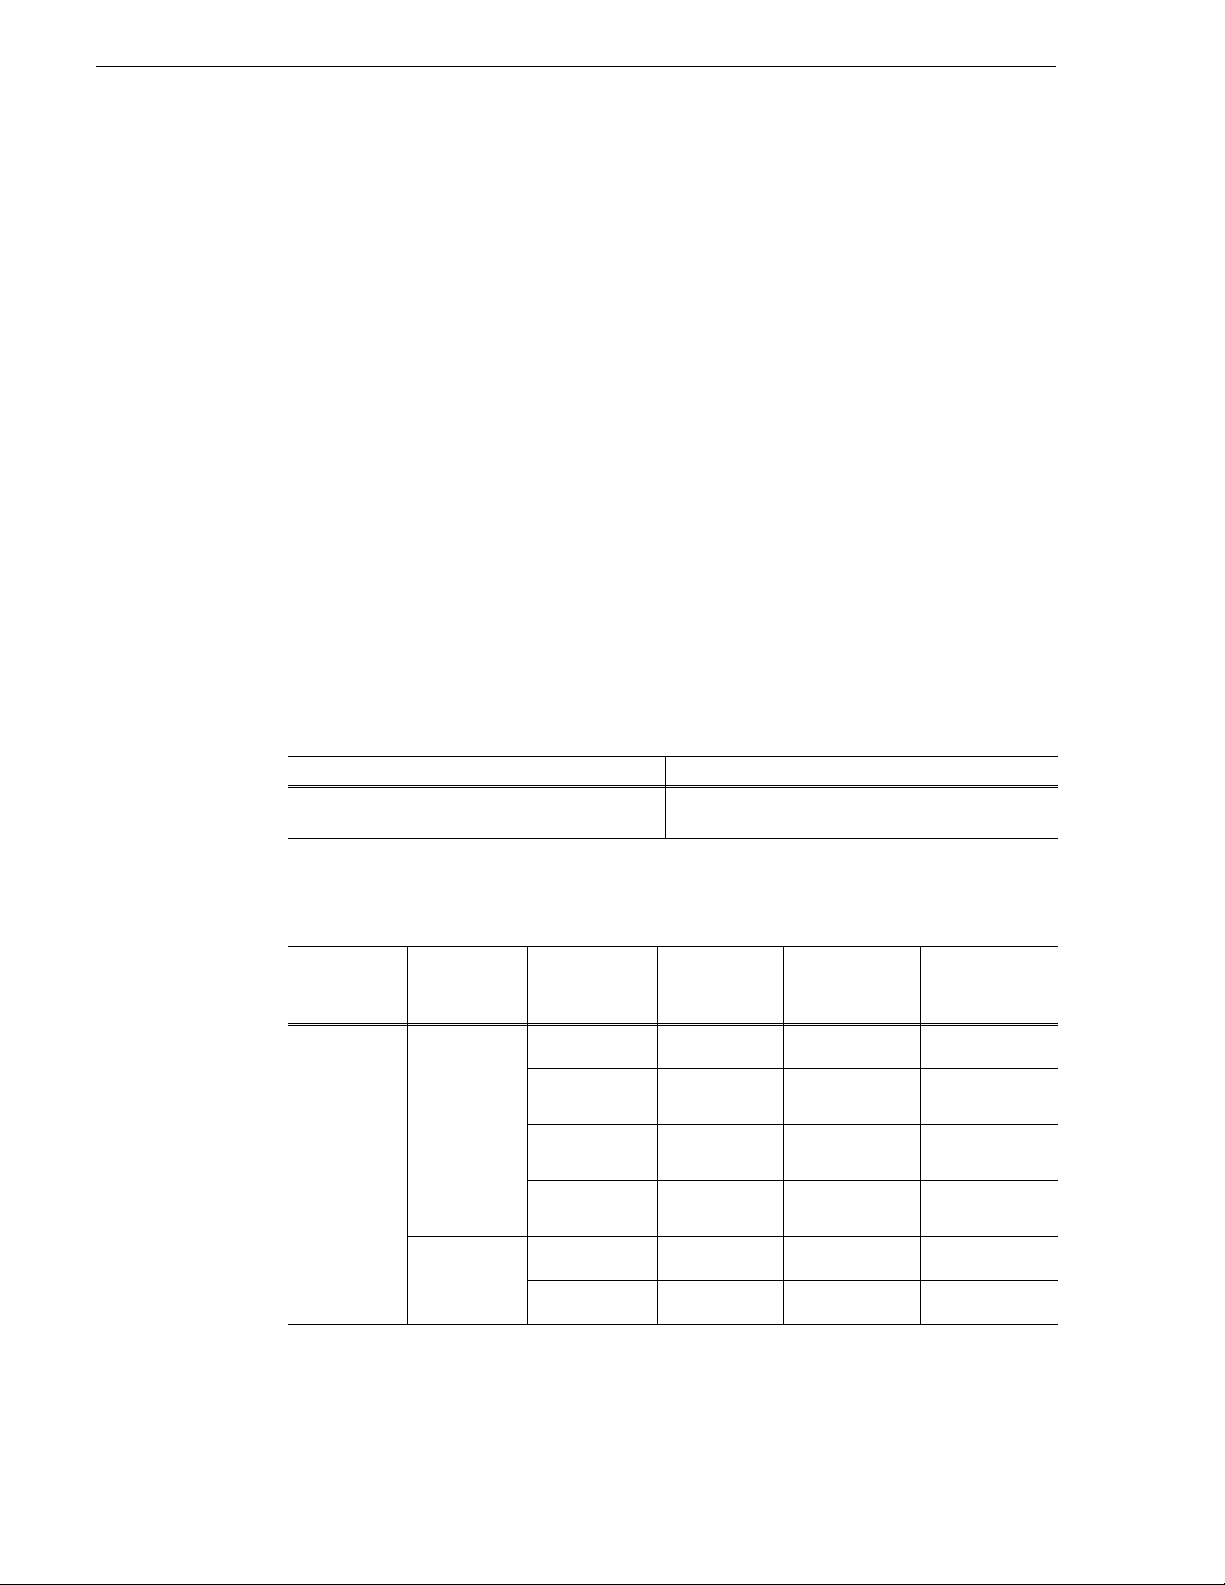
Supported formats
XDCAM
Codec
DV25 720 x 480 59.94i 25 Mbps
Frame
size
Frame rate Bitrate
R1*/P1/P2
1 in 2 out
Supported
○:
×: Not supported
Import
Import
(XDCAM)
(XDCAM=>
Grass Valley
HQ AVI)
○○
720 x 576 50i 25 Mbps
12 T2 Users Manual –SP3/SP4– October 17, 2011
1 in 2 out
○○
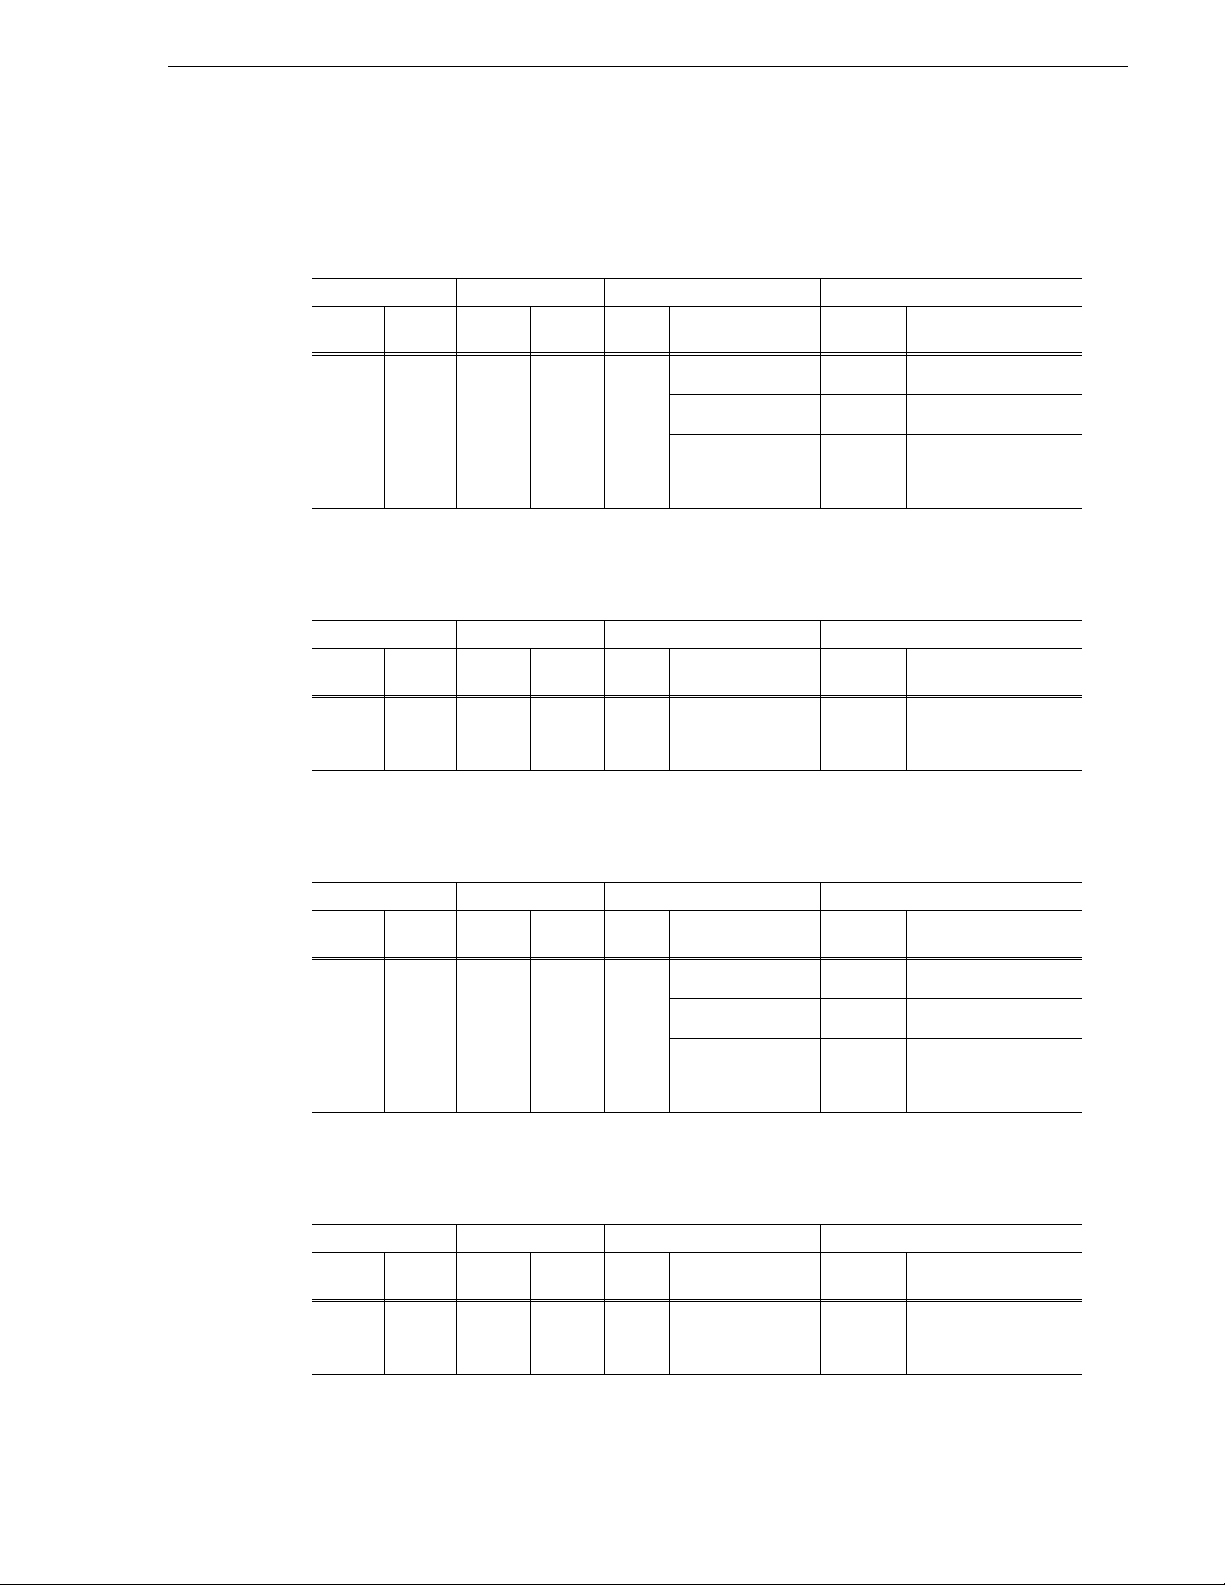
Page 13

Codec
IMX 720 x 486 59.94i 30 Mbps/ 40 Mbps/
MPEG2 1440 x 1080 59.94i 35 Mbps
Frame
size
720 x 576 50i 30 Mbps/ 40 Mbps/
Frame rate Bitrate
50 Mbps
50 Mbps
R1*/P1/P2
1 in 2 out
1 in 2 out
1 in 1 out
Supported formats
Import
Import
(XDCAM)
(XDCAM=>
Grass Valley
HQ AVI)
○○
○○
○○
29.97p 35 Mbps
23.98p 35 Mbps
50i 35 Mbps
25p 35 Mbps
59.94i 18 Mbps/25 Mbps
29.97p 18 Mbps/25 Mbps
23.98p 18 Mbps/25 Mbps
50i 18 Mbps/25 Mbps
25p 18 Mbps/25 Mbps
1440 x 540 59.94i 8.75 Mbps/
12.5 Mbps/ 17.5 Mbps
29.97p 8.75 Mbps/
12.5 Mbps/ 17.5 Mbps
23.98p 8.75 Mbps/
12.5 Mbps/ 17.5 Mbps
50i 8.75 Mbps/
12.5 Mbps/ 17.5 Mbps
25p 8.75 Mbps/
12.5 Mbps/ 17.5 Mbps
1920 x 1080 59.94i 50 Mbps
1 in 1 out
1 in 1 out
1 in 1 out
1 in 1 out
1 in 2 out
1 in 2 out
1 in 2 out
1 in 2 out
1 in 2 out
○○
○○
○○
○○
○○
○○
○○
○○
○○
×××
×××
×××
×××
×××
1 in 1 out
○○
29.97p 50 Mbps
23.98p 50 Mbps
50i 50 Mbps
25p 50 Mbps
1280 x 720 59.94p 25 Mbps
50p 25 Mbps
59.94p 35 Mbps/50 Mbps
50p 35 Mbps/50 Mbps
* Formats for Grass Valley HQ.
October 17, 2011 T2 Users Manual –SP3/SP4– 13
1 in 1 out
1 in 1 out
1 in 1 out
1 in 1 out
1 in 2 out
1 in 2 out
1 in 1 out
1 in 1 out
○○
○○
○○
○○
○○
○○
○○
○○
Page 14
Chapter 2 T2 XDCAM Option
The following tables list the availability of direct playback, FTP transfer, import, and
export operations for each format:
Browse FTP Import Export
List view Direct
playback
○○
* Available only for MXF single files
XDCAM EX
Container/
Codec
MP4/
MPEG2
Upload Download
*
Frame size Frame rate Bitrate
1920 x 1080 59.94i 35 Mbps
50i 35 Mbps
29.97p 35 Mbps
25p 35 Mbps
23.98p 35 Mbps
1440 x 1080 59.94i 35 Mbps
50i 35 Mbps
29.97p 35 Mbps
25p 35 Mbps
23.98p 35 Mbps
59.94i 25 Mbps
50i 25 Mbps
1280 x 720 59.94p 35 Mbps
50p 35 Mbps
29.97p 35 Mbps
25p 35 Mbps
23.98p 35 Mbps
59.94p 18.3 Mbps
50p 18.3 Mbps
29.97p 18.3 Mbps
25p 18.3 Mbps
23.98p 18.3 Mbps
Import
*
○
○: Supported
: Not all formats supported
Post-import format Export Post-export format
XDCAM
Grass Valley HQ AVI
XDCAM
○
Grass Valley HQ AVI
or
○
XDCAM (MXF single)
Supported
○:
×: Not supported
R1*/P1/P2
1 in 1 out
1 in 1 out
1 in 1 out
1 in 1 out
1 in 1 out
1 in 1 out
1 in 1 out
1 in 1 out
1 in 1 out
1 in 1 out
1 in 2 out
1 in 2 out
1 in 1 out
1 in 1 out
1 in 1 out
1 in 1 out
1 in 1 out
Import
(XDCAM
EX)
○○
○○
○○
○○
○○
○○
○○
○○
○○
○○
○○
○○
○○
○○
○○
○○
○○
Import
(XDCAM EX =>
Grass Valley HQ AVI)
×× ×
×× ×
×× ×
×× ×
×× ×
14 T2 Users Manual –SP3/SP4– October 17, 2011
Page 15
Connection between T2 and a device
Container/
Codec
AVI/
DV
* Formats for Grass Valley HQ.
Frame size Frame rate Bitrate
720 x 480 59.94i 25 Mbps
720 x 576 50i 25 Mbps
R1*/P1/P2
1 in 2 out
1 in 2 out
The following tables list the availability of direct playback, FTP transfer, import, and
export operations for each format:
Browse FTP Import Export
List view Direct
playback
○○
* Available only for single files (*.mp4, *.avi)
Upload Download
*
*
Import
○
Post-import format Export Post-export format
XDCAM EX
Grass Valley HQ AVI
Connection between T2 and a device
Import
(XDCAM
EX)
Import
(XDCAM EX =>
Grass Valley HQ AVI)
○○
○○
○: Supported
: Not all formats supported
XDCAM EX
○
Grass Valley HQ AVI
or
○
XDCAM (MXF single)
What are VFAM/FAM and SAM?
FAM (i.Link) and VFAM (USB) connections used for connecting T2 and a device
enable you to access a file that saves video and audio together. FAM (File Access
Mode) and VFAM (Virtual Access Mode) connections are compatible with each
other. SAM (Simple Access Mode) connections provide access to files that save video
and audio in separate files.
The T2 XDCAM Option does not support SAM connections.
Connecting your T2 and XDCAM drive (PDW-U1)
Before performing this procedure, you must prepare the XDCAM FAM Driver
supported by PDW-U1 in the OS (C:) drive. For more information about the software
information or installation procedure of the XDCAM FAM Driver, please refer to the
instruction manual of your PDW-U1 or the Sony Corporation Web site.
CAUTION: You must install the supported XDCAM FAM Driver to your T2 before
connecting it to PDW-U1.
1. Start up your system in the maintenance mode.
• For instructions on how to start up your system in the maintenance mode, refer
to the Maintenance Manual of your T2.
October 17, 2011 T2 Users Manual –SP3/SP4– 15
Page 16
Chapter 2 T2 XDCAM Option
2. Install the XDCAM FAM Driver.
• For more information about the installation procedure of the XDCAM FAM
Driver, please refer to the instruction manual of your PDW-U1 or the Sony
Corporation Web site.
3. Exit the maintenance mode and restart your system in the normal mode.
CAUTION: Depending on your environment, you may be asked to restart your T2
after completing the XDCAM FAM Driver installation. In this case, you must
restart your system leaving it in the maintenance mode and then switch to the
normal mode (CommandCenter) after your T2 is started.
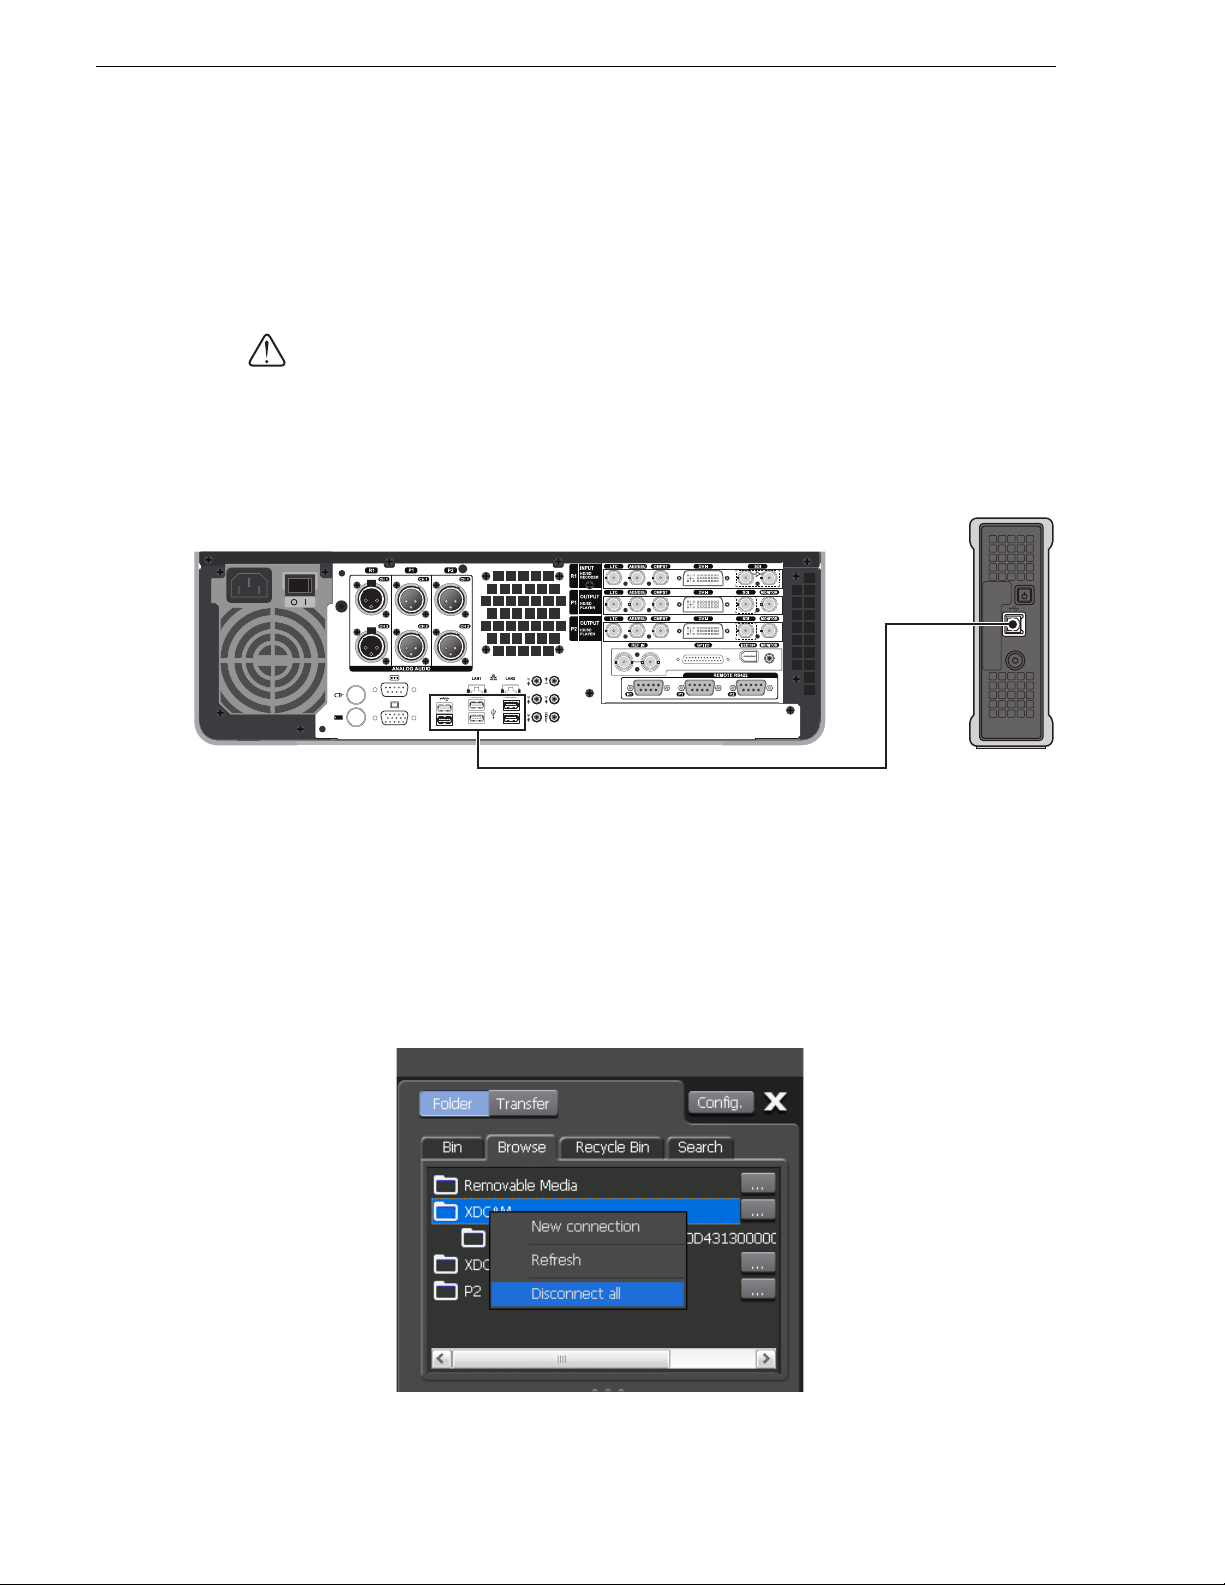
4. Connect your T2 and PDW-U1 with a USB cable.
PDW-U1
T2
• For more information about the connection between PDW-U1 and a power cord,
please refer to the instruction manual of your PDW-U1.
5. Turn on your PDW-U1 and insert a professional disc.
• A message appears indicating that a new removable device has been connected.
Removing a professional disc
1. Right-click XDCAM in the Browse tab, and then click Disconnect all.
USB cable
16 T2 Users Manual –SP3/SP4– October 17, 2011
Page 17
Connection between T2 and a device
2. Click Yes.
3. Press the EJECT button on your PDW-U1.
CAUTION: Disconnecting folders does not cause the device to be disconnected and
the EJECT button operation is disabled.
NOTE: To remove your drive, click
Device...
Option in the menu bar, and then click Remove
Connecting your T2 and SxS memory card USB reader/writer (SBAC-US10)
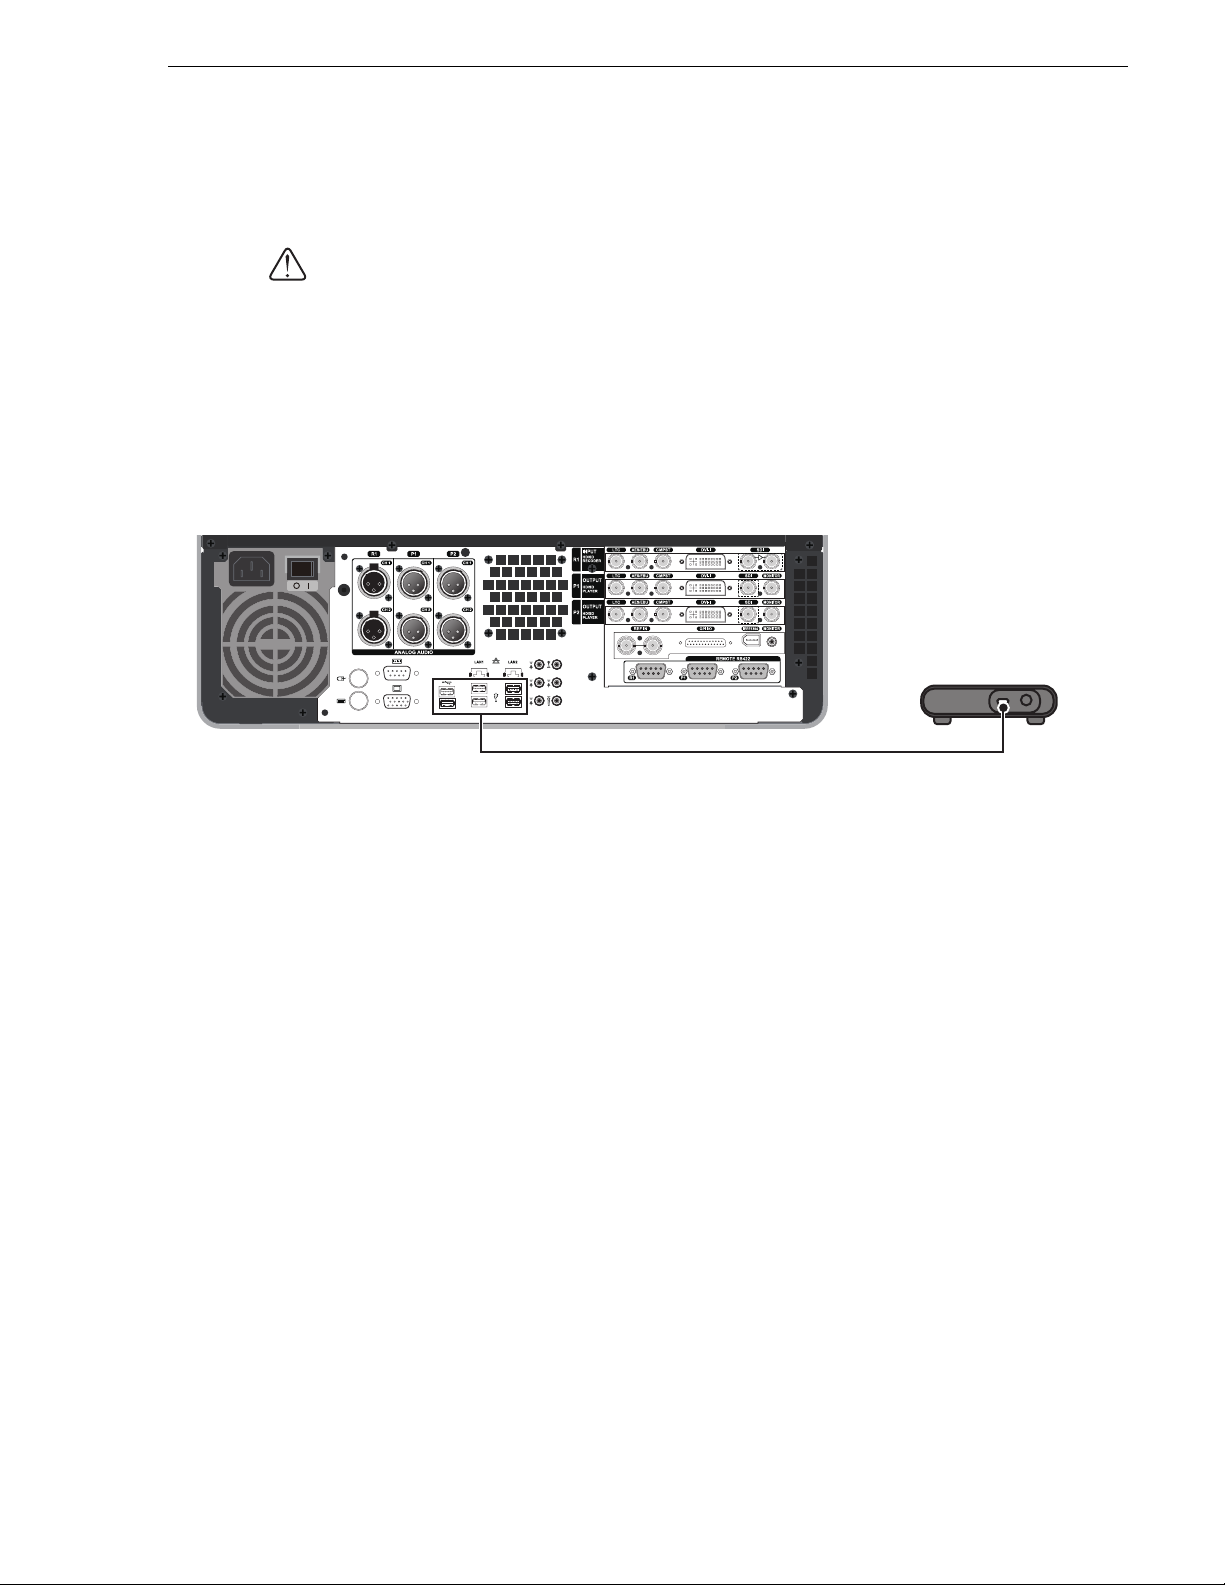
1. Connect your T2 and SBAC-US10 with a USB cable.
T2
SBAC-US10
USB cable
• For more information about the connection between SBAC-US10 and a power
cord, please refer to the instruction manual of your SBAC-US10.
Removing an SxS memory card
1. Right-click XDCAM EX in the Browse tab, and then click Disconnect all.
2. Click
3. Pull out the SxS memory card.
October 17, 2011 T2 Users Manual –SP3/SP4– 17
Yes.
Page 18

Chapter 2 T2 XDCAM Option
Workflow using XDCAM
Playing sources in an XDCAM drive
You can load a file that is saved in a professional disc to your T2 for playback.
1. Insert a professional disc into your PDW-U1.
• The drive name is added to the XDCAM node in the Browse tab, and the clip
list is displayed.
CAUTION: If the XDCAM node is not recognized automatically, click
Browse tab, select the drive on the "Browse For Folder" dialog box, and then click
OK.
2. Select and right-click a clip, and then click
• You can also load a clip by dragging and dropping it onto the P1/P2 channel or
double-clicking it after selecting a channel.
3. Click
CAUTION: Although In and Out points can be configured, importing only the part
between In and Out points is not available.
Play for the channel to which you loaded the clip.
Load to P1 or Load to P2.
... in the
Importing XDCAM sources (Import in the native format/Convert to Grass Valley HQ AVI for import)
You can import a file that is saved in a professional disc to your T2 as the original
XDCAM format, or after converting it to Grass Valley HQ AVI.
CAUTION: Importing an XDCAM source in the native format will copy all of the
files that are located directly under the root folder as well as the General, Clip, Sub,
and Edit folders to your T2. As for files in each folder, only the files that are related
to the selected file for the import will be copied.
NOTE: You can also play a playlist in which XDCAM format sources and
non-XDCAM format ones are mixed.
NOTE: You can also convert a clip to Grass Valley HQ AVI after importing it as
the original XDCAM format.
18 T2 Users Manual –SP3/SP4– October 17, 2011
Page 19

1. Display the XDCAM clips in the Browse tab.
Workflow using XDCAM
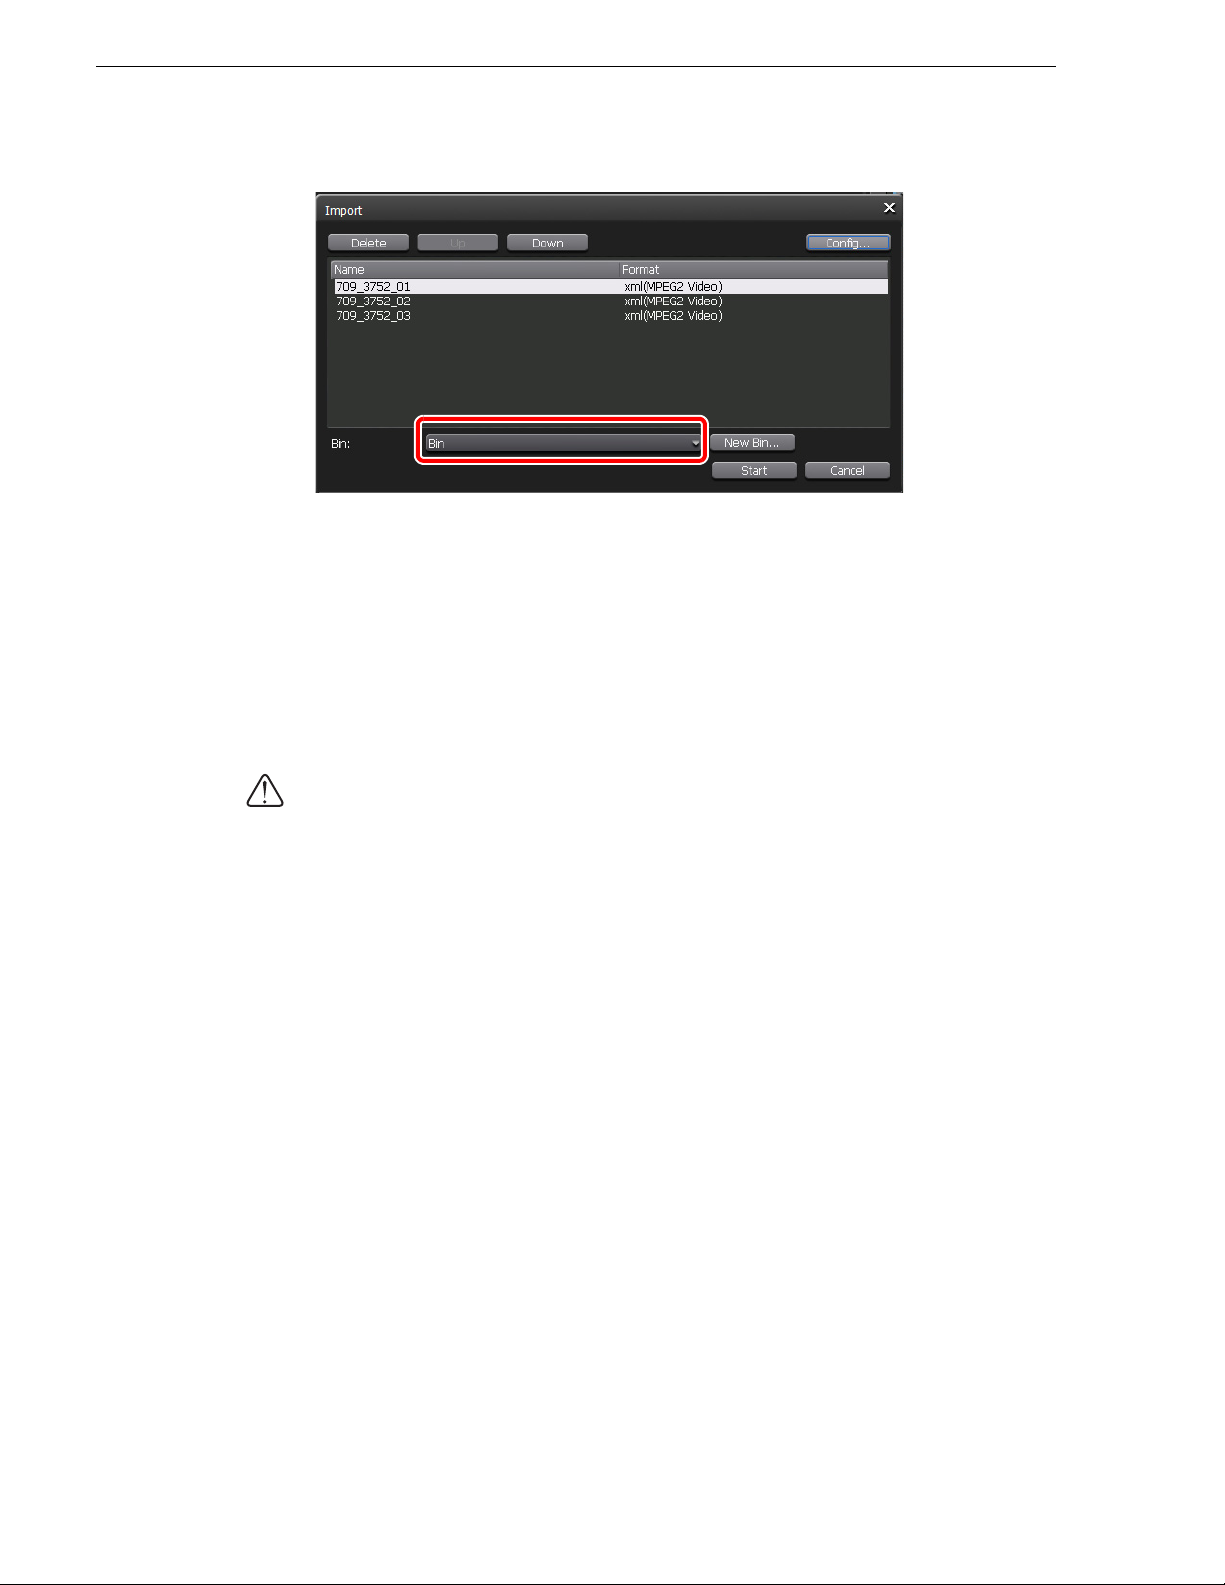
2. Select the clip(s) you want to import, right-click on it, and then click
Import...
• Multiple clips can be selected.
• The "Import" dialog box appears.
3. Click
Config...
• The "Format" column in the list shows the file format to be imported. If no
change is necessary, you do not need to click
Config... to change the setting.
Proceed to step 5.
4. From the "File format after import:" list in the XDCAM Import Settings, select a
format, and then click
OK.
• If you import a clip as the XDCAM format, select
after converting it to Grass Valley HQ AVI, select
NOTE: If you import an MXF single file, click
XDCAM. If you import a clip
HQ.
MXF in the "Transfer" tree, and
then select a format from the "File format after import:" list.
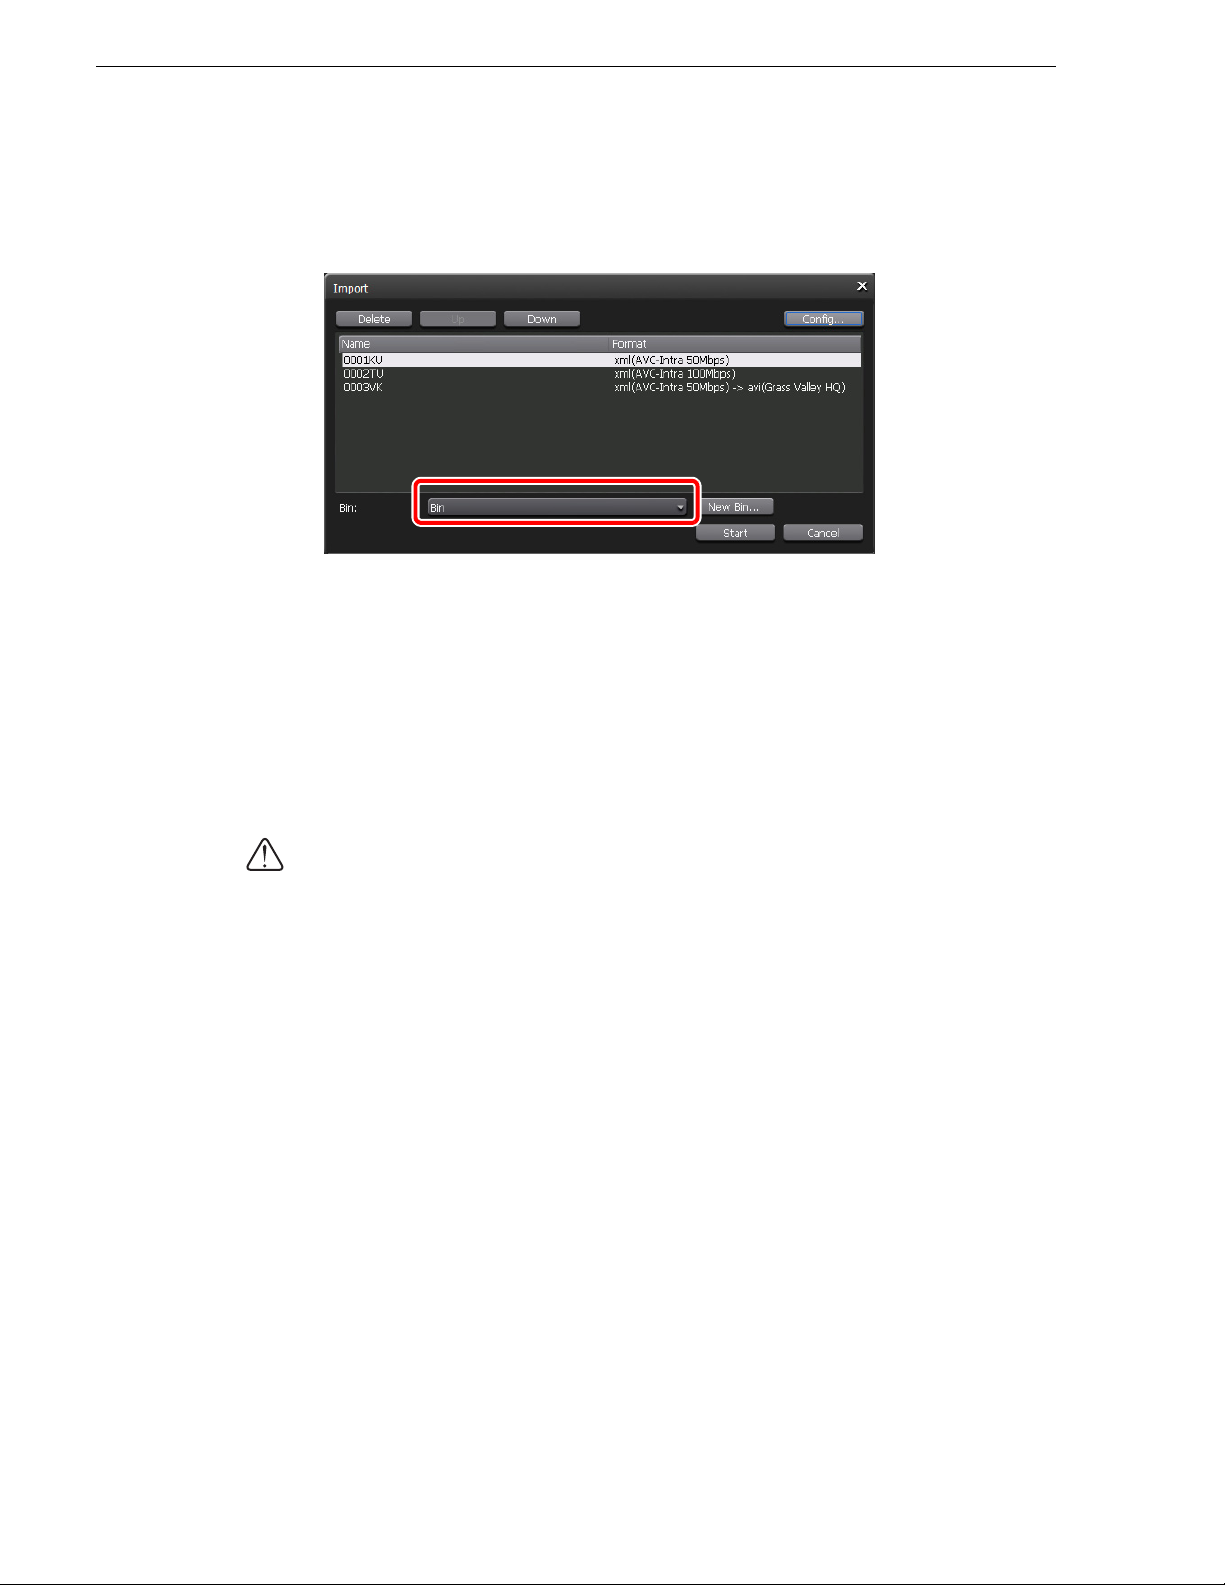
5. Select the import destination bin.
• You can click
New Bin...
to create a new bin and specify it as the import destination.
• You can select a clip in the clip list on the "Import" dialog box and click Up or
Down to change the import order.
• You can select a clip in the clip list on the "Import" dialog box and click
Delete
to delete it from the import list.
October 17, 2011 T2 Users Manual –SP3/SP4– 19
Page 20

Chapter 2 T2 XDCAM Option
6. Click Start.
• The import begins. You can check the progress in the transfer screen.
CAUTION: By default, the system will pause any transfer and conversion during a
recording or playback. If you want to change the setting to allow transfer and
conversion to be performed even during a recording or playback, click
then click
recording or playing out.
Common in the "Transfer" tree. Unchecking Pause file transfers while
or playback. However, if this option is unchecked, the recording/playback
operations may not be performed normally, therefore, we recommend that you use
the system with this option checked.
Converting XDCAM sources stored in a bin to Grass Valley HQ AVI
You can convert an XDCAM format clip that is stored in a bin to a Grass Valley HQ
AVI clip.
NOTE: Your T2 can play a playlist in which XDCAM format sources and
non-XDCAM format ones are mixed.
1. Display the clips in the Bin tab.
Config. and
enables transfer and conversion even during a recording
2. Select the clip(s) you want to convert, right-click on it, and then click
Convert to AVI(Grass Valley HQ).
Convert
• Multiple clips can be selected.
3. Click
Yes.
• The conversion begins. You can check the progress in the transfer screen.
• The new converted clips will be saved in the same bin as their original ones.
CAUTION: By default, the system will pause any transfer and conversion during a
recording or playback. If you want to change the setting to allow transfer and
conversion to be performed even during a recording or playback, click
then click
recording or playing out.
Common in the "Transfer" tree. Unchecking Pause file transfers while
enables transfer and conversion even during a recording
Config. and
or playback. However, if this option is unchecked, the recording/playback
operations may not be performed normally, therefore, we recommend that you use
the system with this option checked.
Sending/receiving XDCAM sources to/from your T2 via FTP
FTP can be used to connect to your T2 from other devices or edit terminals etc. to
upload and download sources. You must first configure the FTP server settings on
your T2.
CAUTION:
only MXF single files in the XDCAM format can be uploaded/downloaded.
When you upload/download XDCAM sources to/from your T2 via FTP,
CAUTION: If the post-import file type is set to "AVI (HQ)" in the MXF import
settings when you upload an XDCAM source to your T2 via FTP, an XDCAM
source is converted to Grass Valley HQ AVI after the upload.
20 T2 Users Manual –SP3/SP4– October 17, 2011
Page 21

Workflow using XDCAM
CAUTION: If you want to use Chinese for file names, you must set the character set
of file names to UTF-8 on the FTP client side beforehand. Correct file names cannot
be displayed if the character sets do not match. The configuration method depends
on your software. Refer to the help etc. of your software.
1. Click Config.
2. Click Network-1 in the "General" tree.
3. Configure the IP address and DNS server address.
4. Click
5. Click
FTP in the "General" tree.
Settings...
• To change the settings, you must first stop FTP and then click Settings...
6. Configure the FTP server settings, and then click OK.
October 17, 2011 T2 Users Manual –SP3/SP4– 21
Page 22

Chapter 2 T2 XDCAM Option
7. Click Start, and then click OK.
• Checking
Limit the FTP transfer rate while recording or playing. will limit
the transfer rate of FTP uploads/downloads during a recording and playback.
8. Access your T2 from a client.
• Enter the IP address you configured in
password you configured in
FTP to connect to your T2 via FTP.
9. Upload or download your data.
CAUTION: By default, the system will pause any transfer and conversion during a
recording or playback. If you want to change the setting to allow transfer and
conversion to be performed even during a recording or playback, click
then click
recording or playing out.
Common in the "Transfer" tree. Unchecking Pause file transfers while
enables transfer and conversion even during a recording
or playback. However, the recording/playback operations may not be performed
normally if both of the
Limit the FTP transfer rate while recording or playing. options in step 7 are
Pause file transfers while recording or playing out. and
unchecked, therefore, we recommend that you use the system with these options
checked.
Exporting a file in the XDCAM format
Clips imported as the original XDCAM format can be exported as the XDCAM
format.
For important notes on exporting, see "Important notes on T2 export" on page 112.
Network-1 and enter the user name and
Config. and
NOTE:
You can also export a Grass Valley HQ AVI clip after converting it to the
XDCAM format. For more information, see "Converting Grass Valley HQ AVI to MXF
(XDCAM format) and exporting the converted file" on page 67.
22 T2 Users Manual –SP3/SP4– October 17, 2011
Page 23

Workflow using XDCAM
CAUTION: Importing an XDCAM source in the native format will copy all of the
files that are located directly under the root folder as well as the General, Clip, Sub,
and Edit folders to your T2. As for files in each folder, only the files that are related
to the selected file for the import will be copied. If a clip imported in the native
format is exported without conversion, the exported clip may not be properly
handled by a device that uses any file or folder that was not copied to your T2 during
the import.
1. Display the clips in the Bin tab.
2. Select the XDCAM format clip(s) you want to export, right-click on it, and then
Export Export Media Files...
click
• Multiple clips can be selected.
• A message related to export appears. Read the message, and then click
• The "Export" dialog box appears.
3. Click
Browse... to configure the export destination.
• You can select a clip in the clip list on the "Export" dialog box and click
Down to change the export order.
• You can select a clip in the clip list on the "Export" dialog box and click
to delete it from the export list.
4. Click
Start.
• The export begins. You can check the progress in the transfer screen.
OK.
Up or
Delete
CAUTION: By default, the system will pause any transfer and conversion during a
recording or playback. If you want to change the setting to allow transfer and
conversion to be performed even during a recording or playback, click
then click
recording or playing out.
Common in the "Transfer" tree. Unchecking Pause file transfers while
enables transfer and conversion even during a recording
Config. and
or playback. However, if this option is unchecked, the recording/playback
operations may not be performed normally, therefore, we recommend that you use
the system with this option checked.
October 17, 2011 T2 Users Manual –SP3/SP4– 23
Page 24

Chapter 2 T2 XDCAM Option
Exporting from EDIUS 6 in the MXF format
A project created on the EDIUS 6 Turnkey system can be exported to your T2 via
FTP.
You need to configure the FTP server settings in both EDIUS 6 and T2 beforehand.
For more information on how to configure the FTP settings, see "Sending/receiving
XDCAM sources to/from your T2 via FTP" on page 20.
In EDIUS 6, you need to open the "Importer/Exporter" tree in the system settings and
configure the FTP server in "MXF". For more information, please refer to the EDIUS
User Reference Guide.
CAUTION: The BC Export Option for EDIUS 6 turnkey workstations is required to
export a project in the MXF format from your EDIUS 6.
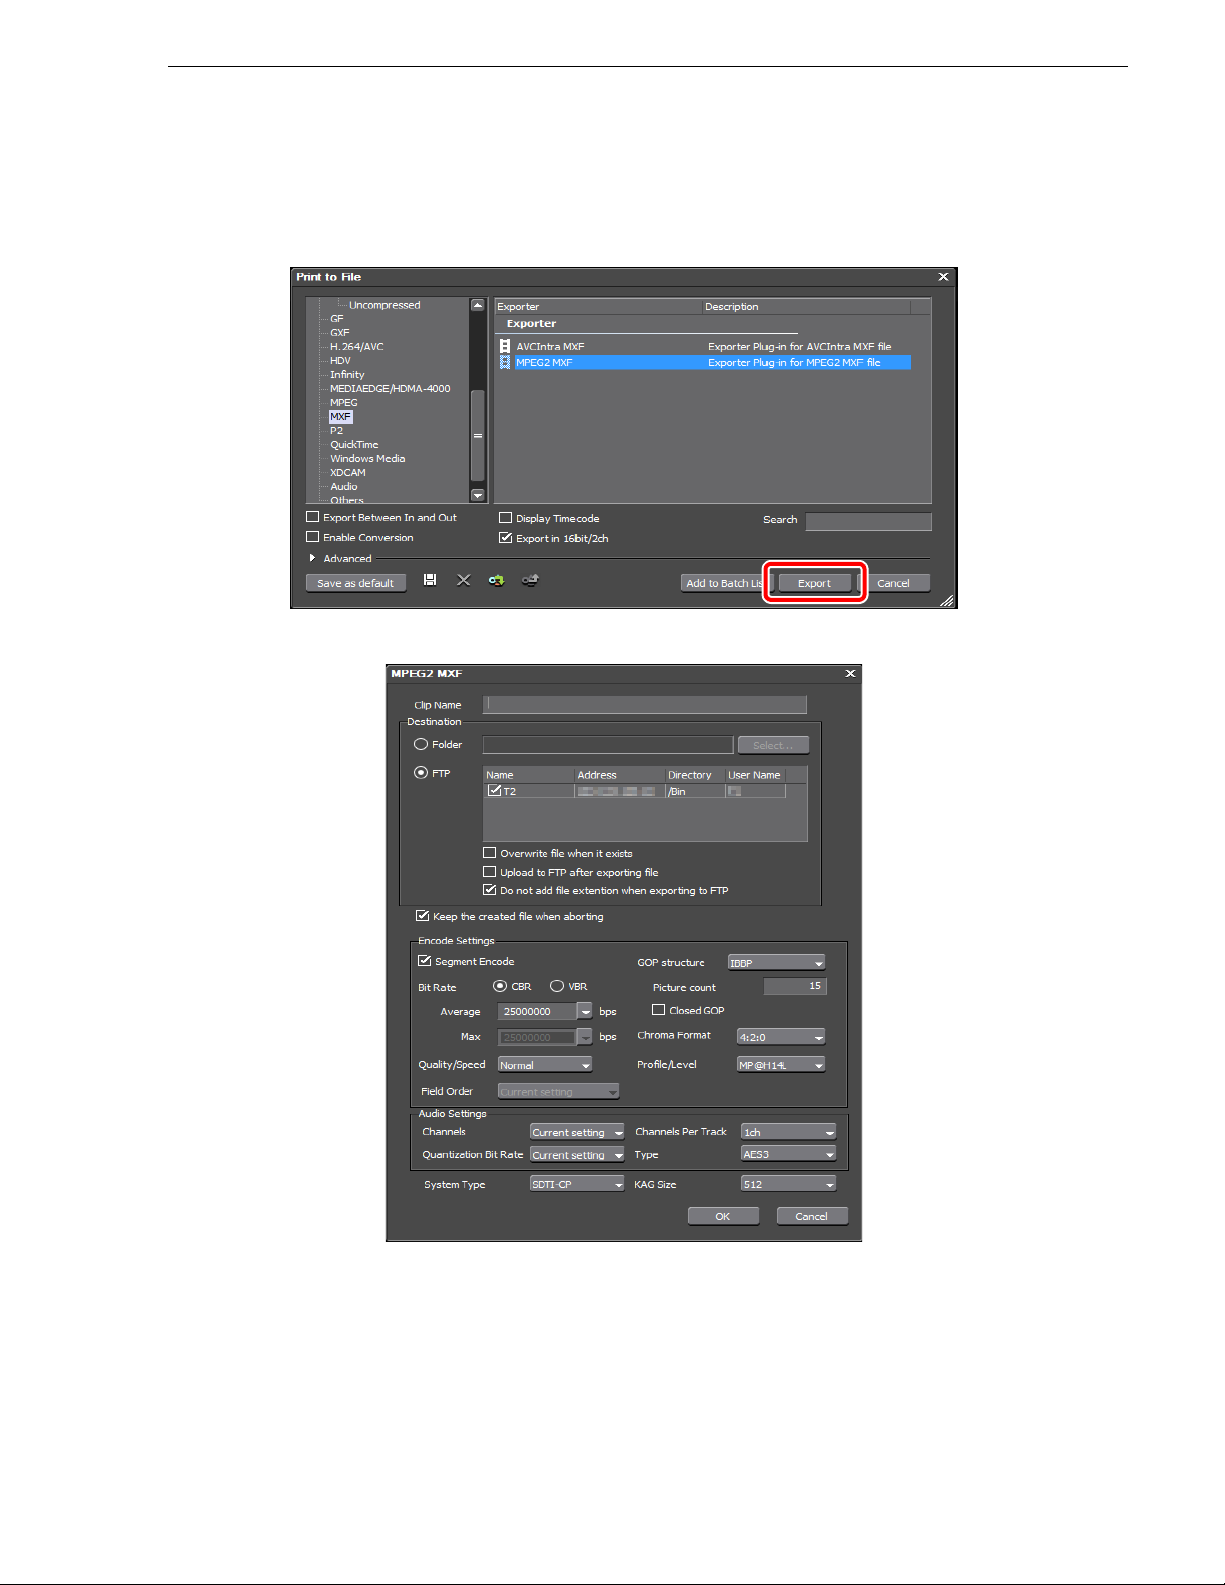
1. Click Export in the Recorder, and then click Print to File.
2. Click
MXF in the category tree on the "Print to File" dialog box.
24 T2 Users Manual –SP3/SP4– October 17, 2011
Page 25
Workflow using XDCAM
3. Select "MPEG2 MXF" from Exporter, and then click Export.
• "MPEG2 MXF" is not displayed if the project setting is different from the export
format. You must check
Enable Conversion and select an exporter.
4. Enter a clip name and select
FTP in Destination.
5. Configure the settings, and then click
OK.
• The rendering begins. You can check the progress in the transfer screen on your
T2.
October 17, 2011 T2 Users Manual –SP3/SP4– 25
Page 26

Chapter 2 T2 XDCAM Option
Workflow using XDCAM EX
Playing sources in an SxS memory card
You can load a file that is saved in an SxS memory card to your T2 for playback.
1. Insert an SxS memory card into your SBAC-US10.
2. In the Browse tab, click
3.
Select the XDCAM drive on the "Browse For Folder" dialog box, and then click OK.
• The drive name is added to the XDCAM EX node in the Browse tab, and the clip
list is displayed.
4. Select and right-click a clip, and then click
• You can also load a clip by dragging and dropping it onto the P1/P2 channel or
double-clicking it after selecting a channel.
5. Click
CAUTION: Although In and Out points can be configured, importing only the part
between In and Out points is not available.
Play for the channel to which you loaded the clip.
... for XDCAM EX.
Load to P1 or Load to P2.
26 T2 Users Manual –SP3/SP4– October 17, 2011
Page 27

Workflow using XDCAM EX
Importing XDCAM EX sources (Import in the native format/Convert to Grass Valley HQ AVI for import)
You can import a file that is saved in an SxS memory card to your T2 as the original
XDCAM EX format, or after converting it to Grass Valley HQ AVI.
CAUTION: Importing an XDCAM EX source will copy all of the files that are
located directly under the root folder as well as the CLPR and TAKR folders to your
T2. As for files in each folder, only the files that are related to the selected file for the
import will be copied.
NOTE: You can also play a playlist in which XDCAM EX format sources and
non-XDCAM format ones are mixed.
NOTE: You can also convert a clip to Grass Valley HQ AVI after importing it as
the original XDCAM EX format.
1. Display the XDCAM EX clips in the Browse tab.
2. Select the clip(s) you want to import, right-click on it, and then click
Import...
• Multiple clips can be selected.
• The "Import" dialog box appears.
3. Click
Config...
• The "Format" column in the list shows the file format to be imported. If no
change is necessary, you do not need to click
Config... to change the setting.
Proceed to step 5.
4. From the "File format after import:" list in the "XDCAM EX Import Settings",
select a format and then click
OK.
• If you import a clip as the XDCAM EX format, select
convert a clip to Grass Valley HQ AVI for import, select
October 17, 2011 T2 Users Manual –SP3/SP4– 27
XDCAM EX. If you
HQ.
Page 28
Chapter 2 T2 XDCAM Option
5. Select the import destination bin.
• You can click
New Bin... to create a new bin and specify it as the import
destination.
• You can select a clip in the clip list on the "Import" dialog box and click
Down to change the import order.
• You can select a clip in the clip list on the "Import" dialog box and click
Up or
Delete
to delete it from the import list.
6. Click
Start.
• The import begins. You can check the progress in the transfer screen.
CAUTION: By default, the system will pause any transfer and conversion during a
recording or playback. If you want to change the setting to allow transfer and
conversion to be performed even during a recording or playback, click
then click
recording or playing out.
Common in the "Transfer" tree. Unchecking Pause file transfers while
enables transfer and conversion even during a recording
Config. and
or playback. However, if this option is unchecked, the recording/playback
operations may not be performed normally, therefore, we recommend that you use
the system with this option checked.
Converting XDCAM EX sources stored in a bin to Grass Valley HQ AVI
You can convert an XDCAM EX format clip that is stored in a bin to a Grass Valley
HQ AVI clip.
NOTE: Your T2 can play a playlist in which XDCAM EX format sources and
non-XDCAM EX format ones are mixed.
1. Display the clips in the Bin tab.
2. Select the clip(s) you want to convert, right-click on it, and then click
Convert to AVI(Grass Valley HQ).
Convert
• Multiple clips can be selected.
28 T2 Users Manual –SP3/SP4– October 17, 2011
Page 29

Workflow using XDCAM EX
3. Click Yes.
• The conversion begins. You can check the progress in the transfer screen.
• The new converted clips will be saved in the same bin as their original ones.
CAUTION: By default, the system will pause any transfer and conversion during a
recording or playback. If you want to change the setting to allow transfer and
conversion to be performed even during a recording or playback, click
then click
recording or playing out.
or playback. However, if this option is unchecked, the recording/playback
operations may not be performed normally, therefore, we recommend that you use
the system with this option checked.
Common in the "Transfer" tree. Unchecking Pause file transfers while
enables transfer and conversion even during a recording
Config. and
Sending/receiving XDCAM EX sources to/from your T2 via FTP
FTP can be used to connect to your T2 from other devices or edit terminals etc. to
upload and download sources. The procedure for sending/receiving XDCAM EX
sources to/from your T2 via FTP is the same as for sending/receiving XDCAM
sources to/from your T2 via FTP. For more information, see "Sending/receiving
XDCAM sources to/from your T2 via FTP" on page 20.
CAUTION: When you upload/download XDCAM EX sources to/from your T2 via
FTP, only single files (*.mp4, *.avi) in the XDCAM EX format can be uploaded/
downloaded.
CAUTION: If the post-import file type is set to "AVI (HQ)" in the MXF import
settings when you upload an XDCAM EX source to your T2 via FTP, an XDCAM
EX source is converted to Grass Valley HQ AVI after the upload.
CAUTION: If you want to use Chinese for file names, you must set the character set
of file names to UTF-8 on the FTP client side beforehand. Correct file names cannot
be displayed if the character sets do not match. The configuration method depends
on your software. Refer to the help etc. of your software.
Exporting a file in the XDCAM EX format
Clips imported as the original XDCAM EX format can be exported as the XDCAM
EX format.
For important notes on exporting, see "Important notes on T2 export" on page 112.
CAUTION:
the files that are located directly under the root folder as well as the CLPR and TAKR
folders to your T2. As for files in each folder, only the files that are related to the
selected file for the import will be copied.
exported without conversion, the exported clip may not be properly handled by a
device that uses any file or folder that was not copied to your T2 during the import.
Importing an XDCAM EX source in the native format will copy all of
If a clip imported in the native format is
1. Display the clips in the Bin tab.
October 17, 2011 T2 Users Manual –SP3/SP4– 29
Page 30

Chapter 2 T2 XDCAM Option
2. Select the XDCAM EX format clip(s) you want to export, right-click on it, and then
Export Export Media Files...
click
• Multiple clips can be selected.
• A message related to export appears. Read the message, and then click
• The "Export" dialog box appears.
3. Click
Browse... to configure the export destination.
• You can select a clip in the clip list on the "Export" dialog box and click
Down to change the export order.
• You can select a clip in the clip list on the "Export" dialog box and click
to delete it from the export list.
4. Click
Start.
OK.
Up or
Delete
• The export begins.
CAUTION: By default, the system will pause any transfer and conversion during a
recording or playback. If you want to change the setting to allow transfer and
conversion to be performed even during a recording or playback, click
then click
recording or playing out.
Common in the "Transfer" tree. Unchecking Pause file transfers while
enables transfer and conversion even during a recording
Config. and
or playback. However, if this option is unchecked, the recording/playback
operations may not be performed normally, therefore, we recommend that you use
the system with this option checked.
30 T2 Users Manual –SP3/SP4– October 17, 2011
Page 31

Chapter 3
T2 P2 Option
This chapter consists of the following:
• "What is P2?" on page 32
• "Validated driver versions" on page 32
• "Supported formats" on page 32
• "Connection between T2 and a device" on page 36
• "Connecting your T2 and P2 drive (AJ-PCD20)" on page 36
• "Removing a P2 card" on page 37
• "Workflow using P2" on page 38
• "Playing sources in a P2 drive" on page 38
• "Importing P2 sources (Import in the native format/Convert to MXF (OP-1a) for
import/Convert to Grass Valley HQ AVI for import)" on page 39
• "Converting P2 sources stored in a bin to MXF (OP-1a)/ Grass Valley HQ AVI"
on page 41
• "Exporting a file in the P2 format" on page 41
• "Exporting an AVC-Intra MXF file from EDIUS 6" on page 43
October 17, 2011 T2 Users Manual –SP3/SP4– 31
Page 32
Chapter 3 T2 P2 Option
What is P2?
P2 is a professional broadcast video system developed by Panasonic Corporation. P2
cards used as recordable media are solid-state memory cards, which allows high speed
transfer to and from an IT infrastructure as well as direct editing of files saved in a
card.
P2 records video in the MXF file format. Compression formats include AVC-Intra
100, AVC-Intra 50, DVCPRO HD, DVCPRO50, DVCPRO/DV (DVCPRO25) and
the T2 P2 Option supports all of these formats. Each file is saved as a single clip with
operations to start and stop a recording. Each file is also linked to thumbnail data. T2
allows you to access a P2 card from the Browse tab to list the saved clips as
thumbnails and manipulate them in the same way as clips in a bin.
P2 content records additional information such as date, time, or comments and proxy
AV data as metadata in addition to high resolution video and audio data. T2 can
import such metadata (XML and proxy data) together as well.
P2 enables video recording across several cards, for example, by utilizing a hot swap
function on a camera recorder equipped with multiple P2 card slots. Your T2 manages
such video as separate clips.
Validated driver versions
This product has been validated on the drivers of the following versions:
Product name Version
Memory Card Drive "P2 drive"
AJ-PCD20
Supported formats
Codec Frame size Frame rate R1*1/P1/P2 Import (P2)
DV
DVCPRO
720 x 480 59.94i
29.97p
(over 59.94i)
23.98p
(over 59.94i)
23.98A
(over 59.94i)
720 x 576 50i
P2 driver installer
Package ver. 2.16
1 in 2 out
1 in 2 out
1 in 2 out
1 in 2 out
1 in 2 out
○: Supported
×: Not supported
Import
(P2=>Grass
Valley HQ AVI)
○○
○○
○○
○○
○○
25p (over 50i)
32 T2 Users Manual –SP3/SP4– October 17, 2011
1 in 2 out
○○
Page 33

Codec Frame size Frame rate R1*1/P1/P2 Import (P2)
DVCPRO50 720 x 480 59.94i
1 in 2 out
○○
Supported formats
Import
(P2=>Grass
Valley HQ AVI)
29.97p
(over 59.94i)
23.98p
(over 59.94i)
23.98A
(over 59.94i)
720 x 576 50i
25p (over 50i)
DVCPROHD 1280 x 1080 59.94i
29.97p
(over 59.94i)
23.98p
(over 59.94i)
23.98pA
(over 59.94i)
1440 x 1080 50i
25p (over 50i)
DVCPROHD 960 x 720 59.94p
1 in 2 out
1 in 2 out
1 in 2 out
1 in 2 out
1 in 2 out
1 in 2 out
1 in 2 out
1 in 2 out
1 in 2 out
1 in 2 out
1 in 2 out
1 in 2 out
○○
○○
○○
○○
○○
○○
○○
○○
○○
○○
○○
○○
29.97p
(over 59.94p)
29.97pN
23.98p
(over 59.94p)
23.98pN
50p
25p (over 50p)
25pN
1 in 2 out
1 in 2 out
1 in 2 out
1 in 2 out
1 in 2 out
1 in 2 out
1 in 2 out
○○
○○
○○
○○
○○
○○
○○
October 17, 2011 T2 Users Manual –SP3/SP4– 33
Page 34

Chapter 3 T2 P2 Option
Codec Frame size Frame rate R1*1/P1/P2 Import (P2)
AVC-Intra50 1440 x 1080 59.94i
0 in 1 out
Import
(P2=>Grass
Valley HQ AVI)
○○
29.97p
23.98p
50i
25p
960 x 720 59.94p
29.97p
23.98p
50p
25p
AVC-Intra100 1920 x 1080 59.94i
29.97p
23.98p
50i
25p
―
0 in 1 out
0 in 1 out
―
0 in 1 out
―
0 in 1 out
0 in 1 out
―
0 in 1 out
―
0 in 1 out
0 in 1 out
―
*2
×
○
○○
○○
*2
×
○
○○
*2
×
○
○○
○○
*2
×
○
○○
*2
×
○
○○
○○
*2
×
○
1280 x 720 59.94p
29.97p
23.98p
50p
25p
*1.Formats for Grass Valley HQ.
*2.AVC-Intra50/100 clips that do not match any of the T2 output profiles will be forced to be converted to
Grass Valley HQ AVI.
0 in 1 out
―
0 in 1 out
0 in 1 out
―
○○
*2
×
○
○○
○○
*2
×
○
34 T2 Users Manual –SP3/SP4– October 17, 2011
Page 35
Supported formats
The following tables list the availability of direct playback, FTP transfer, import, and
export operations for each format:
• AVC-Intra100 (1920 x 1080 59.94i/50i/23.98p, 1280 x 720 59.94p/50p)
○: Supported
Browse FTP Import Export
List view
Direct
playback
Upload
Download
Import
Post-import format
Export Post-export format
P2
○○
Remark: Because this format matches a T2 output format, it can be imported as the P2, MXF (OP-1a),
or Grass Valley HQ AVI format.
No No
MXF (OP-1a)
○
Grass Valley HQ
AVI
P2
○
MXF (OP-1a)
○
Grass Valley HQ AVI
or
○
XDCAM (MXF single)
• AVC-Intra100 (1920 x 1080 29.97p/25p)
○: Supported
Browse FTP Import Export
○
Direct
playback
Upload
No No No
Download
Import
○
Post-import format
Grass Valley HQ
AVI
Export Post-export format
Grass Valley HQ AVI
or
○
XDCAM (MXF single)
List view
Remark: Because this format does not match any of the T2 output formats, it is always converted to the
Grass Valley HQ AVI format.
• AVC-Intra50 (1440 x 1080 59.94i/50i/23.98p, 960 x 720 59.94p/50p)
○: Supported
Browse FTP Import Export
List view
Direct
playback
Upload
Download
Import
Post-import format
Export Post-export format
P2
○○
Remark: Because this format matches a T2 output format, it can be imported as the P2, MXF (OP-1a),
or Grass Valley HQ AVI format.
No No
MXF (OP-1a)
○
Grass Valley HQ
AVI
P2
○
MXF (OP-1a)
○
Grass Valley HQ AVI
or
○
XDCAM (MXF single)
• AVC-Intra50 (1440 x 1080 29.97p/25p)
○: Supported
Browse FTP Import Export
○
Direct
playback
Upload
No No No
Download
Import
○
Post-import format
Grass Valley HQ
AVI
Export Post-export format
Grass Valley HQ AVI
or
○
XDCAM (MXF single)
List view
Remark: Because this format does not match any of the T2 output formats, it is always converted to the
Grass Valley HQ AVI format.
October 17, 2011 T2 Users Manual –SP3/SP4– 35
Page 36
Chapter 3 T2 P2 Option
• DVCPRO
List view
Browse FTP Import Export
Direct
playback
Upload
Download
Import
Post-import format
Export Post-export format
○: Supported
P2
○○
No No
MXF (OP-1a)
○
Grass Valley HQ
AVI
Connection between T2 and a device
Connecting your T2 and P2 drive (AJ-PCD20)
Before performing this procedure, you must prepare the P2 driver for Windows
(32bit) supported by AJ-PCD20 in the OS (C:) drive. For more information about the
software information or installation procedure of the P2 driver, please refer to the
instruction manual of your AJ-PCD20 or the Panasonic Corporation Web site.
1. Start up your system in the maintenance mode.
• For instructions on how to start up your system in the maintenance mode, refer
to the Maintenance Manual of your T2.
2. Connect your AJ-PCD20 and install the P2 driver.
• For more information about the installation procedure of the P2 driver, please
refer to the instruction manual of your AJ-PCD20 or the Panasonic Corporation
Web site.
P2
○
MXF (OP-1a)
○
Grass Valley HQ AVI
or
○
XDCAM (MXF single)
3. Exit the maintenance mode and restart your system in the normal mode.
CAUTION: Depending on your environment, you may be asked to restart your T2
after completing the P2 driver installation. In this case, you must restart your
system leaving it in the maintenance mode and then switch to the normal mode
(CommandCenter) after your T2 is started.
4. Plug the power cord of your AJ-PCD20.
• Your device is turned on once the power plug, AC adapter, and AJ-PCD20 are
connected. For more information, please refer to the instruction manual of your
AJ-PCD20.
36 T2 Users Manual –SP3/SP4– October 17, 2011
Page 37
Connection between T2 and a device
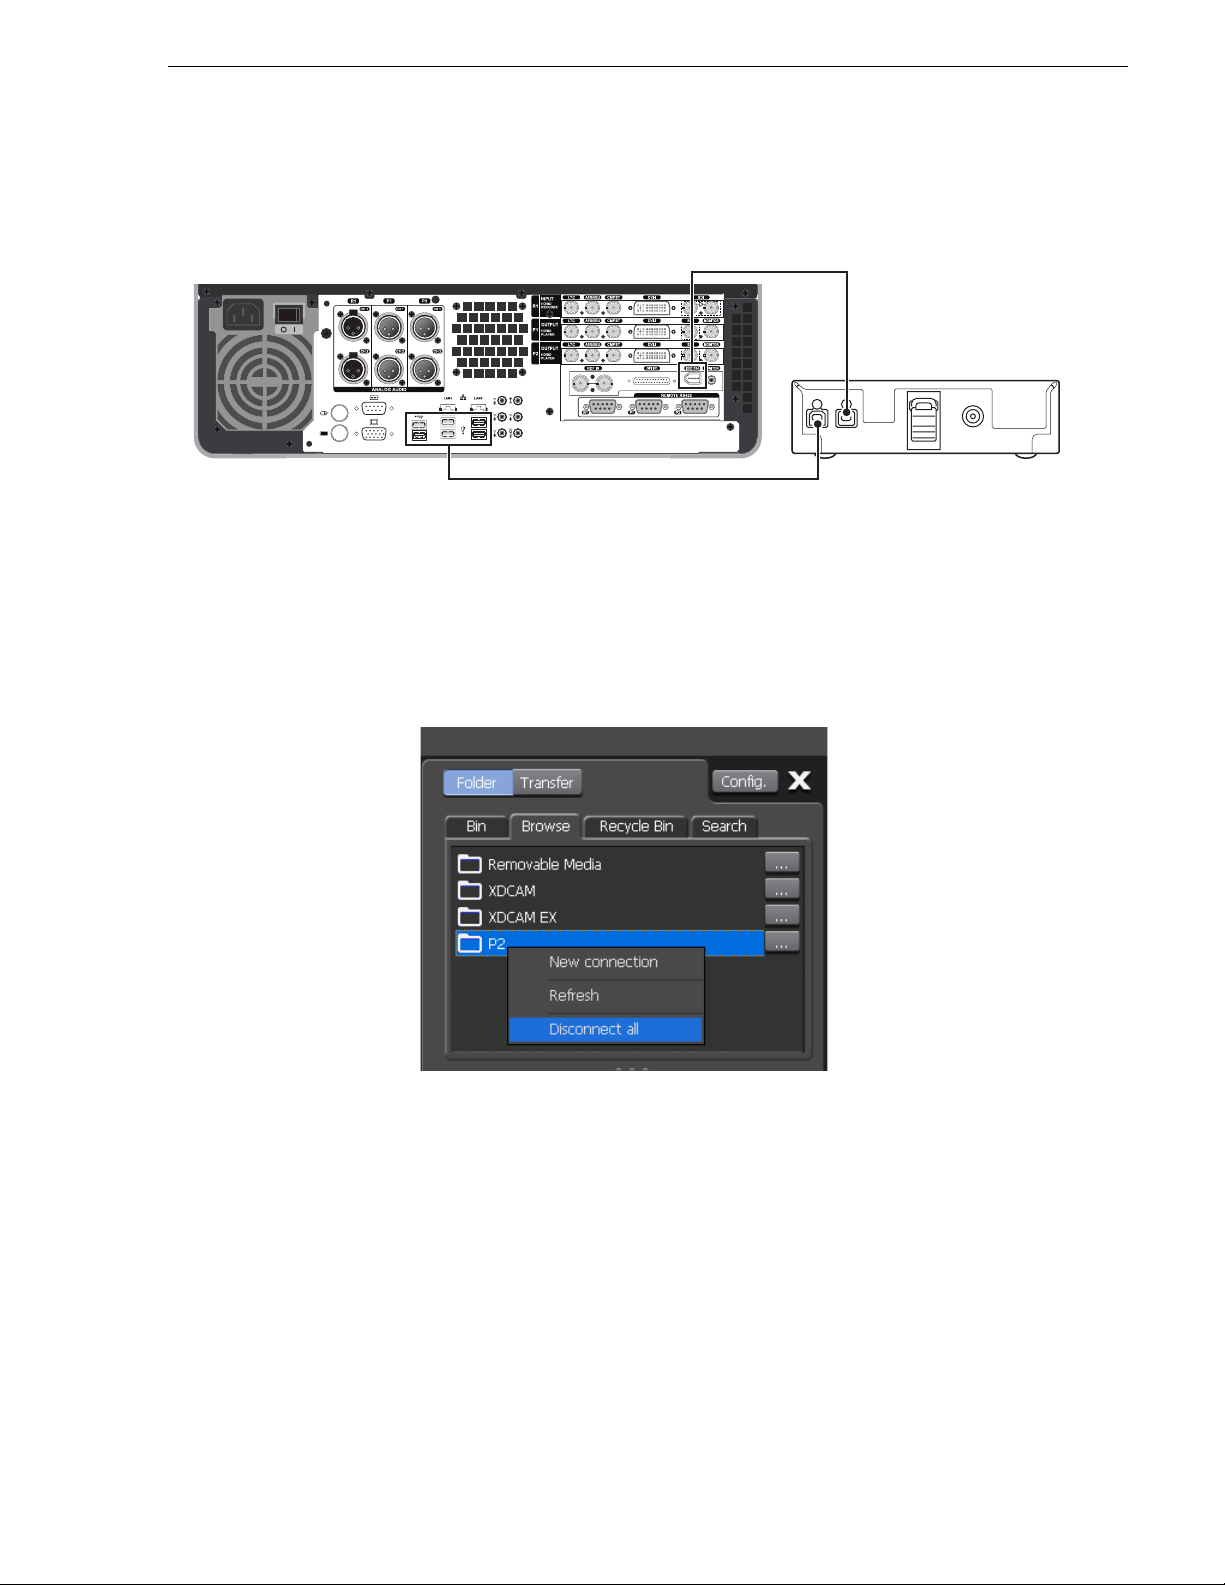
5. Connect your T2 and AJ-PCD20 with a USB or IEEE1394 cable, and then insert a
P2 card.
• For more information about each cable, please refer to the instruction manual of
your AJ-PCD20.
• A message appears indicating that a new removable device has been connected.
Removing a P2 card
1. Right-click P2 in the Browse tab, and then click Disconnect all.
T2
IEEE1394 cable
AJ-PCD20
USB cable
2. Click
Yes.
3. Press the EJECT button on your AJ-PCD20.
NOTE: To remove your drive, click
Device...
October 17, 2011 T2 Users Manual –SP3/SP4– 37
Option in the menu bar, and then click Remove
Page 38
Chapter 3 T2 P2 Option
Workflow using P2
Playing sources in a P2 drive
You can load a file that is saved in a P2 card to your T2 for playback.
CAUTION: P2 clips in AVCIntra 100 or AVCIntra 50 are available only for 1Out.
If you want to play a P2 clip in AVCIntra 100 or AVCIntra 50 while recording in the
R1 channel, playing a clip in the P1/P2 channel, or loading a different clip in P1/P2
channel, you must stop the recording/playback operation or unload the clip.
1. Insert a P2 card into your AJ-PCD20.
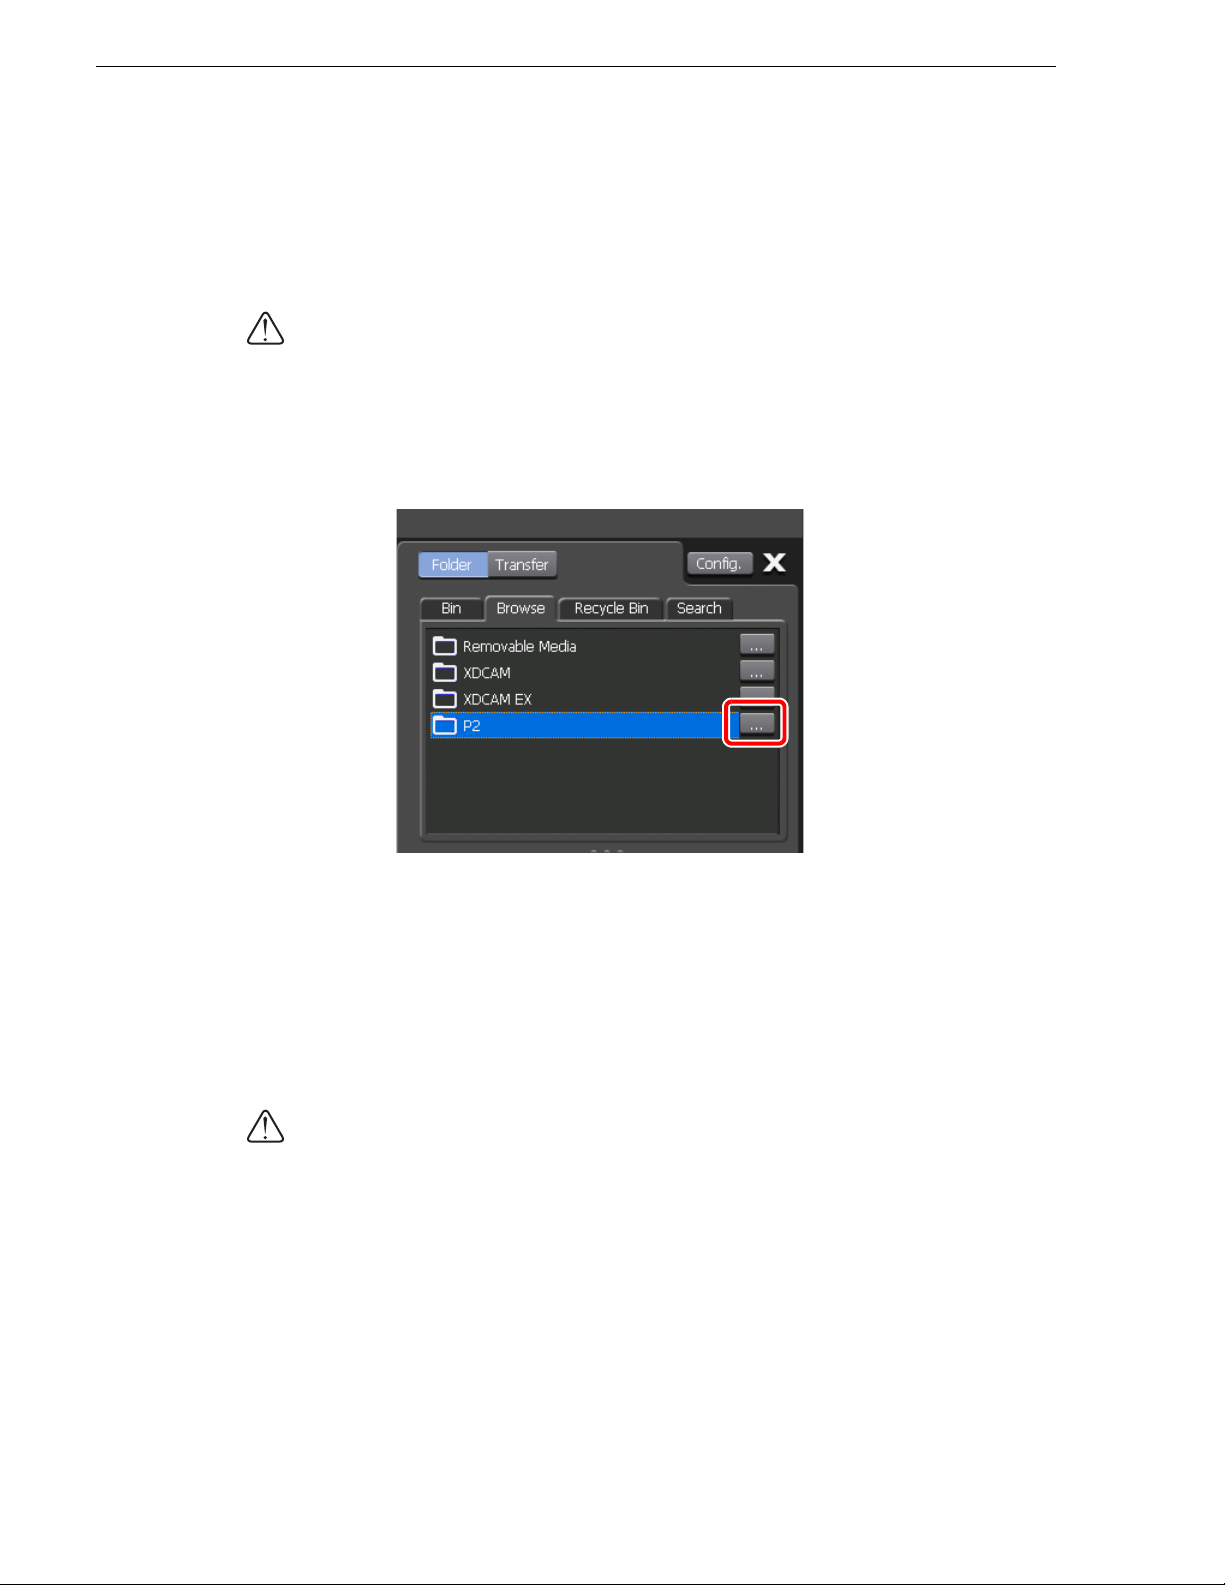
2. In the Browse tab, click
3. Select the P2 drive on the "Browse for Folder" dialog box, and then click
• The drive name is added to the P2 node in the Browse tab, and the clip list is
displayed.
4. Right-click a clip, and then click
• You can also load a clip by dragging and dropping it onto the P1/P2 channel or
double-clicking it after selecting a channel.
... for P2.
OK.
Load to P1 or Load to P2.
5. Click
CAUTION: Although In and Out points can be configured, importing only the part
between In and Out points is not available.
38 T2 Users Manual –SP3/SP4– October 17, 2011
Play for the channel to which you loaded the clip.
Page 39
Workflow using P2
Importing P2 sources (Import in the native format/Convert to MXF (OP-1a) for import/ Convert to Grass Valley HQ AVI for import)
You can import a file that is saved in a P2 card to your T2 as the original P2 format
or after converting it to MXF (OP-1a)/Grass Valley HQ AVI. To import a file after
converting to MXF (OP-1a), it will be imported as the original codec.
CAUTION: Importing a P2 source in the native format will copy all of the files that
are located directly under the root folder as well as the CONTENTS folder and its
sub folders (AUDIO, CLIP, ICON, PROXY, VIDEO, and VOICE folders). As for
files in each folder, only the files that are related to the selected file for the import
will be copied.
CAUTION: The system will import 29.97p and 25p clips in AVCIntra 100 and
AVCIntra 50 after converting them to Grass Valley HQ AVI. These clips cannot be
imported in the original native formats.
NOTE: You can also play a playlist in which P2 format sources and non-P2 format
ones are mixed.
NOTE: In addition, you can convert a clip to Grass Valley HQ AVI after importing
it as the original P2 format.
1. Display the P2 clips in the Browse tab.
2. Select the clip(s) you want to import, right-click on it, and then click
• Multiple clips can be selected.
• The "Import" dialog box appears.
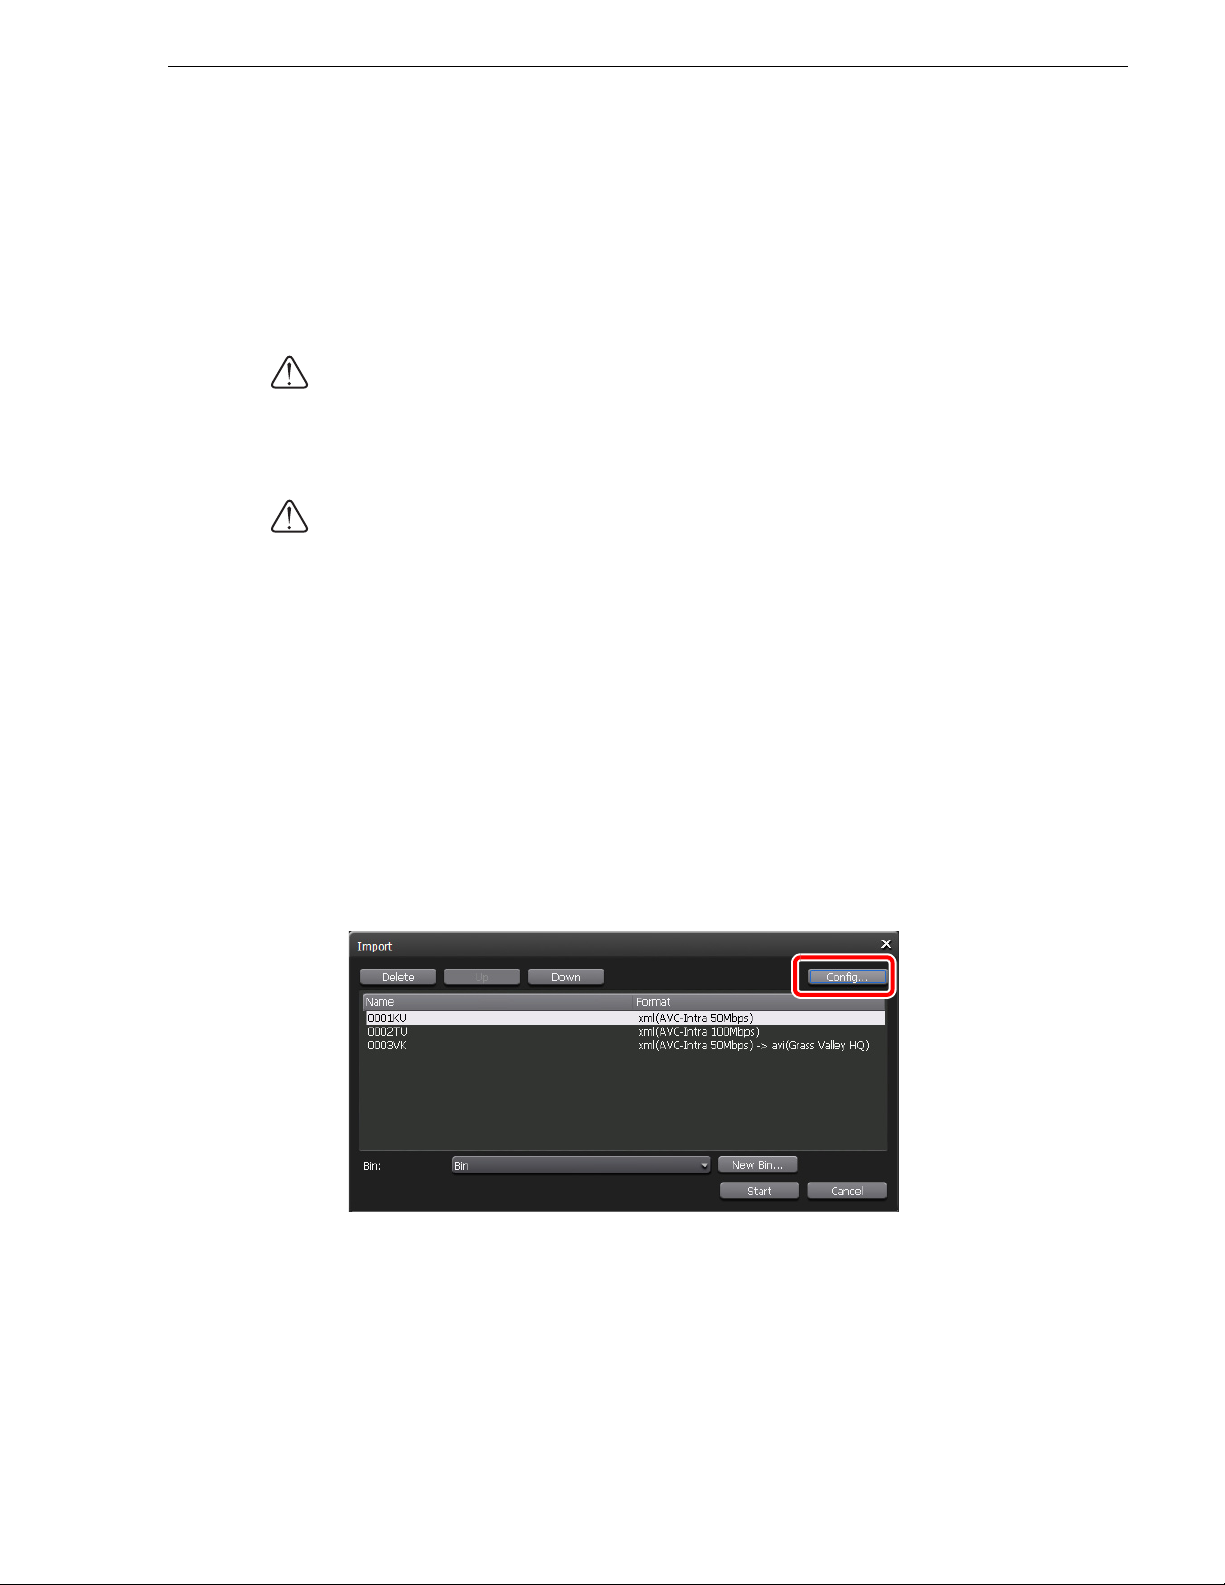
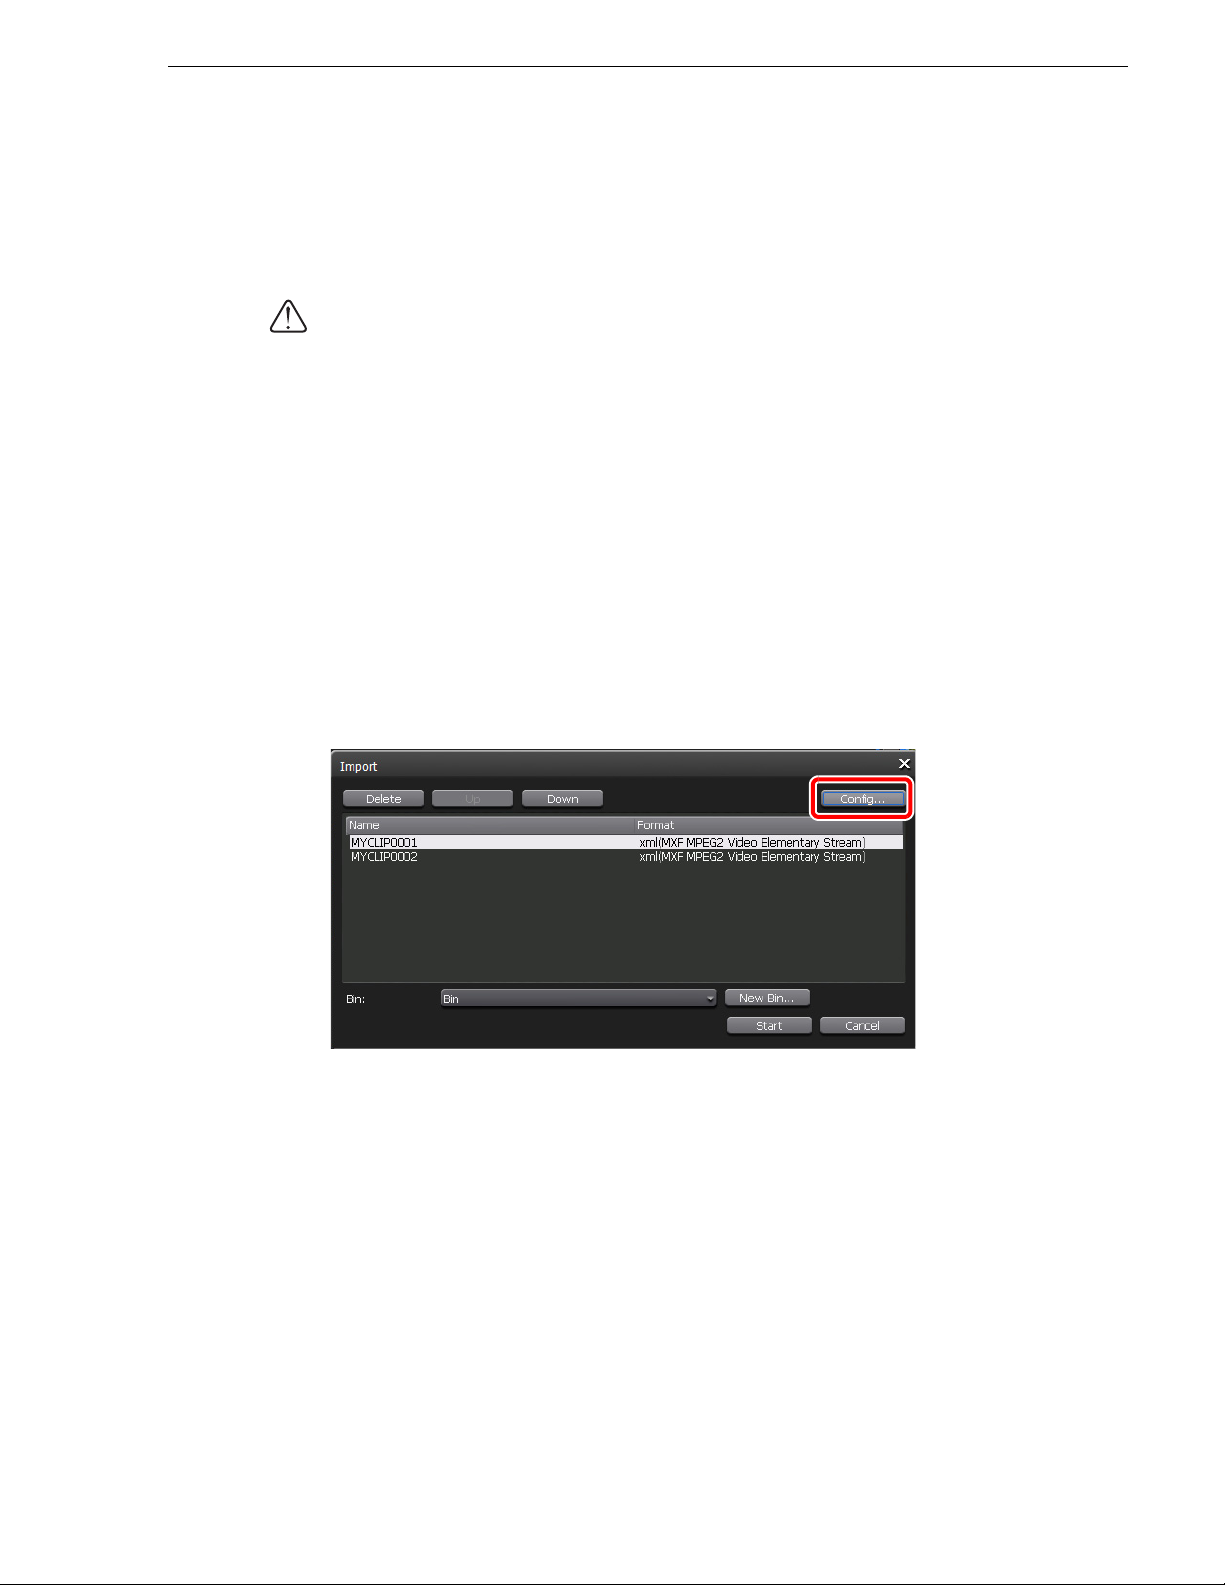
3. Click
Config...
• The "Format" column in the list shows the file format to be imported. If no
change is necessary, you do not need to click
Proceed to step 5.
Config... to change the setting.
Import...
4. From the "File format after import:" list, select a format and then click
• If you import a clip as the P2 format, select
a clip to MXF (OP-1a) for import, select
Grass Valley HQ AVI for import, select
October 17, 2011 T2 Users Manual –SP3/SP4– 39
P2 MXF(OP-Atom). If you convert
MXF(OP-1a). If you convert a clip to
HQ.
OK.
Page 40
Chapter 3 T2 P2 Option
NOTE: If you import an MXF single file, click MXF in the "Transfer" tree, and
then select a format from the "File format after import:" list.
5. Select the import destination bin.
• You can click
New Bin... to create a new bin and specify it as the import
destination.
• You can select a clip in the clip list on the "Import" dialog box and click
Down to change the import order.
• You can select a clip in the clip list on the "Import" dialog box and click
Up or
Delete
to delete it from the import list.
6. Click
Start.
• The import begins. You can check the progress in the transfer screen.
CAUTION: By default, the system will pause any transfer and conversion during a
recording or playback. If you want to change the setting to allow transfer and
conversion to be performed even during a recording or playback, click
then click
recording or playing out.
Common in the "Transfer" tree. Unchecking Pause file transfers while
enables transfer and conversion even during a recording
Config. and
or playback. However, if this option is unchecked, the recording/playback
operations may not be performed normally, therefore, we recommend that you use
the system with this option checked.
40 T2 Users Manual –SP3/SP4– October 17, 2011
Page 41

Converting P2 sources stored in a bin to MXF (OP-1a)/ Grass Valley HQ AVI
You can convert a P2 format clip that is stored in a bin to an MXF (OP-1a) or a Grass
Valley HQ AVI clip.
NOTE: Your T2 can play a playlist in which P2 format sources and non-P2 format
ones are mixed.
1. Display the clips in the Bin tab.
Workflow using P2
2. Select the clip(s) you want to convert, right-click on it, and then click
Convert to MXF(OP-1a) or Convert to AVI(Grass Valley HQ).
• Multiple clips can be selected.
3. Click
Yes.
• The conversion begins. You can check the progress in the transfer screen.
• The new converted clips will be saved in the same bin as their original ones.
CAUTION: By default, the system will pause any transfer and conversion during a
recording or playback. If you want to change the setting to allow transfer and
conversion to be performed even during a recording or playback, click
then click
recording or playing out.
Common in the "Transfer" tree. Unchecking Pause file transfers while
enables transfer and conversion even during a recording
or playback. However, if this option is unchecked, the recording/playback
operations may not be performed normally, therefore, we recommend that you use
the system with this option checked.
Exporting a file in the P2 format
Clips imported as the original P2 format can be exported as the P2 format.
For important notes on exporting, see "Important notes on T2 export" on page 112.
Convert
Config. and
CAUTION: Importing a P2 source in the native format will copy all of the files that
are located directly under the root folder as well as the CONTENTS folder and its
sub folders (AUDIO, CLIP, ICON, PROXY, VIDEO, and VOICE folders). As for
files in each folder, only the files that are related to the selected file for the import
will be copied. If a clip imported in the native format is exported without conversion,
the exported clip may not be properly handled by a device that uses any file or folder
that was not copied to your T2 during the import.
1. Display the clips in the Bin tab.
Select the P2 format clip(s) you want to export, right-click on it, and then click
2.
Export Media Files...
Export
• Multiple clips can be selected.
• A message related to export appears. Read the message, and then click
OK.
• The "Export" dialog box appears.
October 17, 2011 T2 Users Manual –SP3/SP4– 41
Page 42

Chapter 3 T2 P2 Option
3. Click Browse... to configure the export destination.
• You can select a clip in the clip list on the "Export" dialog box and click
Down to change the export order.
• You can select a clip in the clip list on the "Export" dialog box and click
Up or
Delete
to delete it from the export list.
4. Click
Start.
• The export begins. You can check the progress in the transfer screen.
CAUTION: By default, the system will pause any transfer and conversion during a
recording or playback. If you want to change the setting to allow transfer and
conversion to be performed even during a recording or playback, click
then click
recording or playing out.
Common in the "Transfer" tree. Unchecking Pause file transfers while
enables transfer and conversion even during a recording
Config. and
or playback. However, if this option is unchecked, the recording/playback
operations may not be performed normally, therefore, we recommend that you use
the system with this option checked.
42 T2 Users Manual –SP3/SP4– October 17, 2011
Page 43

Exporting an AVC-Intra MXF file from EDIUS 6
A project created on the EDIUS 6 Turnkey system can be exported to your T2 via
FTP.
You need to configure the FTP server settings in both EDIUS 6 and T2 beforehand.
For more information on how to configure the FTP settings, see "Sending/receiving
XDCAM sources to/from your T2 via FTP" on page 20.
In EDIUS 6, you need to open the "Importer/Exporter" tree in the system settings and
configure the FTP server in "MXF". For more information, please refer to the EDIUS
User Reference Guide.
Workflow using P2
CAUTION: The BC Export Option for EDIUS 6 Turnkey Workstations is required
to export a project in the MXF format from your EDIUS 6.
1. Click Export in the Recorder, and then click Print to File.
2. Click
MXF in the category tree on the "Print to File" dialog box.
October 17, 2011 T2 Users Manual –SP3/SP4– 43
Page 44

Chapter 3 T2 P2 Option
3. Select "AVCIntra MXF" from Exporter, and then click Export.
• "AVCIntra MXF" is not displayed if the project setting is different from the
export format. You must check
Enable Conversion and select an exporter.
4. Enter a clip name and select
FTP in Destination.
5. Configure the settings, and then click
OK.
• The rendering begins. You can check the progress in the transfer screen on your
T2.
44 T2 Users Manual –SP3/SP4– October 17, 2011
Page 45

Chapter 4
T2 GF Option
This chapter consists of the following:
• "What is GF?" on page 46
• "Supported formats" on page 46
• "Connection between T2 and a device" on page 47
• "Connecting your T2 and GFPAK" on page 47
• "Removing GFPAK" on page 47
• "Workflow using GF" on page 48
• "Playing sources in GFPAK" on page 48
• "Importing GF sources (Import in the native format/Convert to Grass Valley
HQ AVI for import)" on page 49
• "Converting GF sources stored in a bin to Grass Valley HQ AVI" on page 50
• "Sending/receiving GF sources to/from your T2 via FTP" on page 51
• "Exporting a file in the GF format" on page 51
October 17, 2011 T2 Users Manual –SP3/SP4– 45
Page 46

Chapter 4 T2 GF Option
What is GF?
GF is a professional broadcast video system jointly developed by TOSHIBA
CORPORATION and IKEGAMI TSUSHINKI CO., LTD.
GFPAK used as recordable media adopts a flash memory for recording device, and is
equipped with SATA interface allowing high speed transfer and USB interface for
wide use.
GF records video files in the MXF file format. MPEG2 HD LONG GOP 50 Mbps/I
frame only 100 Mbps codec is used as the compression format.
T2 allows you to access GFPAK from the Browse tab to list the saved clips as
thumbnails and manipulate them in the same way as clips in a bin.
Supported formats
Codec Frame size Frame rate
MPEG2 1920 x 1080 59.94i 1 in 1 out
R1*/P1/P2
○: Supported
Import
Import (GF)
(GF=>Grass
Valley HQ AVI)
○○
50i 1 in 1 out
1280 x 720 59.94p 1 in 1 out
50p 1 in 1 out
D10 720 x 576 50i 1 in 2 out
720 x 486 59.94i 1 in 2 out
DV25 720 x 576 50i 1 in 2 out
720 x 480 59.94i 1 in 2 out
DVCPRO25 720 x 576 50i 1 in 2 out
720 x 480 59.94i 1 in 2 out
DVCPRO50 720 x 576 50i 1 in 2 out
720 x 480 59.94i 1 in 2 out
* Formats for Grass Valley HQ.
○○
○○
○○
○○
○○
○○
○○
○○
○○
○○
○○
46 T2 Users Manual –SP3/SP4– October 17, 2011
Page 47

Connection between T2 and a device
The following table lists the availability of direct playback, FTP transfer, import, and
export operations for each format:
○: Supported
Browse FTP Import Export
List view
Direct
playback
Upload
Download
Import
Post-import format
Export Post-export format
GF
*
○○
* Available only for MXF single files
*
○
Grass Valley HQ
AVI
Connection between T2 and a device
Connecting your T2 and GFPAK
1. Connect your T2 and GFPAK with a USB cable.
T2
USB cable
• A message appears indicating that a new removable device has been connected.
GF
○
Grass Valley HQ AVI
or
○
GF (MXF single)
GFPAK
Removing GFPAK
1. Right-click GF in the Browse tab, and then click Disconnect all.
2. Click
October 17, 2011 T2 Users Manual –SP3/SP4– 47
Yes.
Page 48
Chapter 4 T2 GF Option
3. Click Option in the menu bar, and then click Remove Device...
4. Select a drive, and then click Remove.
5. Click
Yes, and then remove GFPAK.
Workflow using GF
Playing sources in GFPAK
You can load a file that is saved in GFPAK to your T2 and play it back.
1. Connect GFPAK to your T2.
• The drive name is added to the GF node in the Browse tab, and the clip list is
displayed.
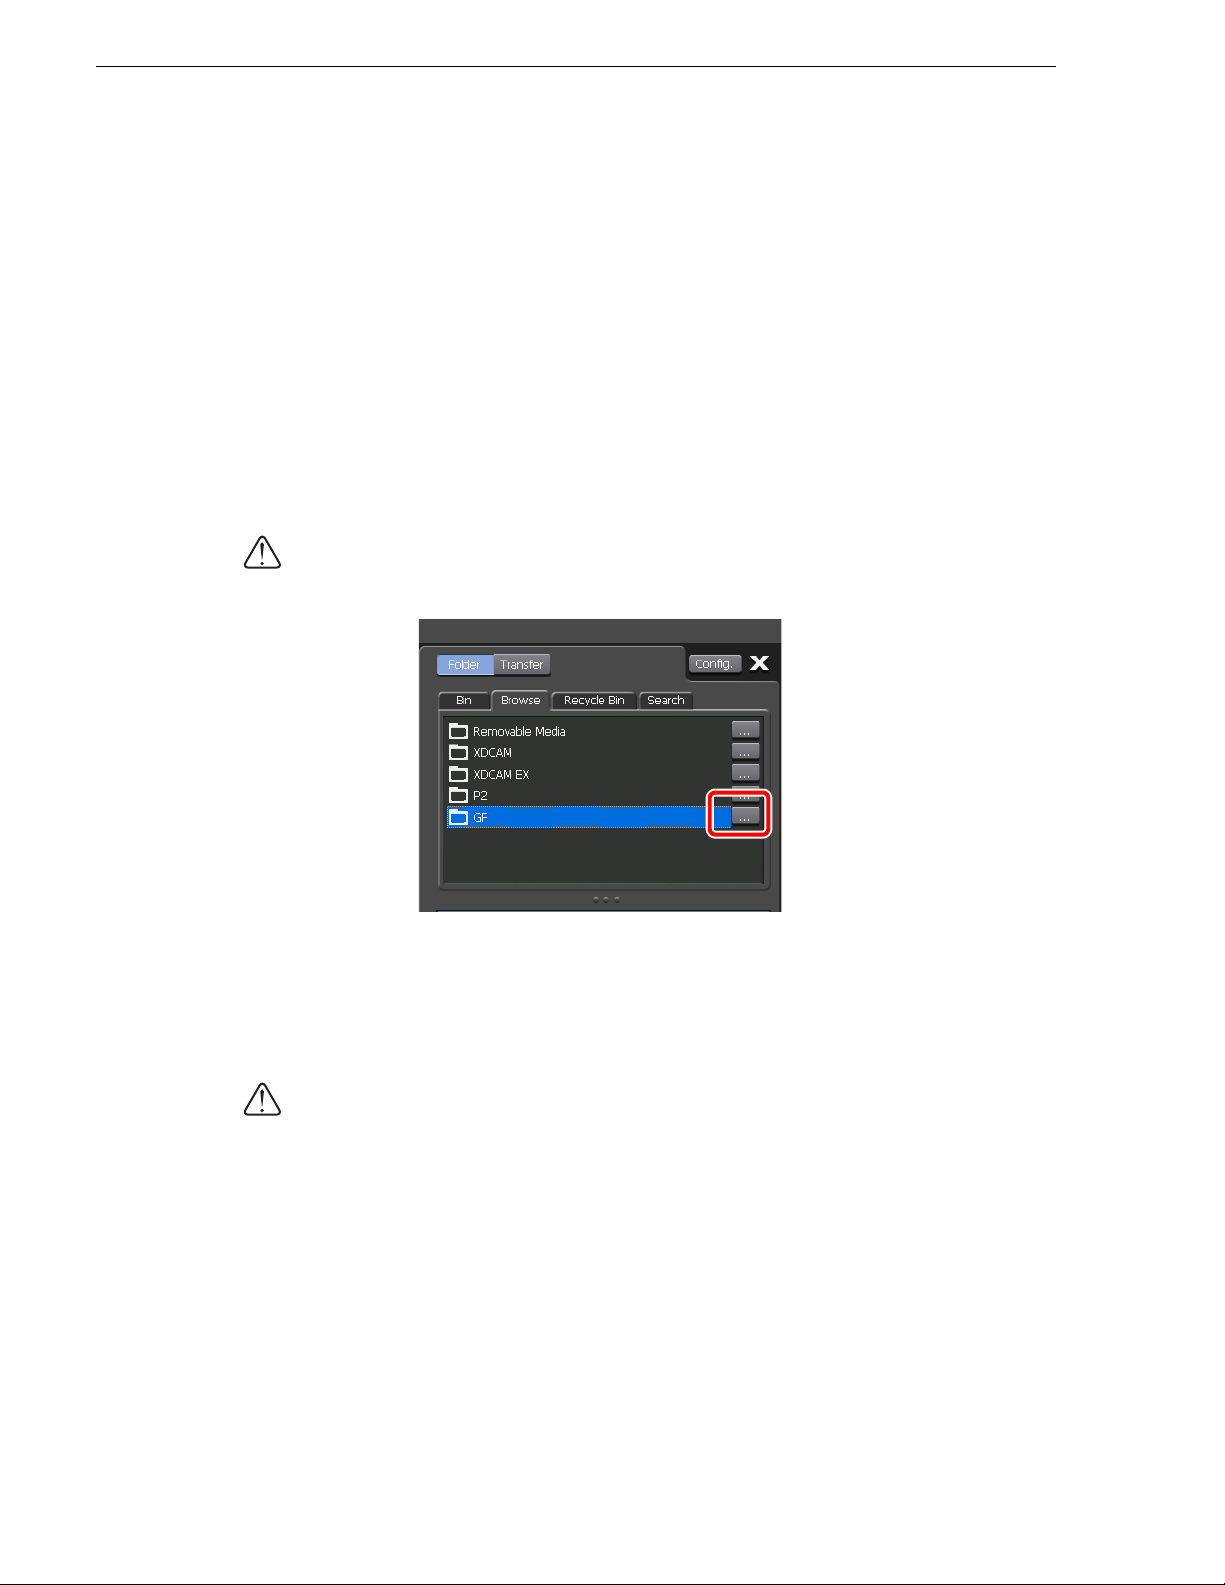
CAUTION: If the GFPAK node is not recognized automatically, click
Browse tab, select the drive on the "Browse For Folder" dialog box, and then click
OK.
... in the
2. Right-click a clip, and then click
• You can also load a clip by dragging and dropping it onto the P1/P2 channel or
double-clicking it after selecting a channel.
3. Click
CAUTION: Although In and Out points can be configured, importing only the part
between In and Out points is not available.
48 T2 Users Manual –SP3/SP4– October 17, 2011
Play for the channel to which you loaded the clip.
Load to P1 or Load to P2.
Page 49
Workflow using GF
Importing GF sources (Import in the native format/Convert to Grass Valley HQ AVI for import)
You can import a file that is saved in GFPAK to your T2 as the original GF format,
or after converting it to Grass Valley HQ AVI.
CAUTION: Importing a GF source in the native format will copy all of the files that
are located directly under the root folder as well as the Bin and PLAYLIST folders
to your T2. As for files in each folder, only the files that are related to the selected
file for the import will be copied.
NOTE: You can also play a playlist in which GF format sources and non-GF
format ones are mixed.
NOTE: You can also convert a clip to Grass Valley HQ AVI after importing it as
the original GF format.
1. Display the GF clips in the Browse tab.
2. Select the clip(s) you want to import, right-click on it, and then click
Import...
• Multiple clips can be selected.
• The "Import" dialog box appears.
3. Click
Config...
• The "Format" column in the list shows the file format to be imported. If no
change is necessary, you do not need to click
Config... to change the setting.
Proceed to step 5.
4. From the "File format after import:" list, select a format and then click
OK.
• If you import a clip as the GF format, select
a clip to Grass Valley HQ AVI for import, select
NOTE: If you import an MXF single file, click
GF MXF(OP-Atom). If you convert
HQ.
MXF in the "Transfer" tree, and
then select a format from the "File format after import:" list.
October 17, 2011 T2 Users Manual –SP3/SP4– 49
Page 50
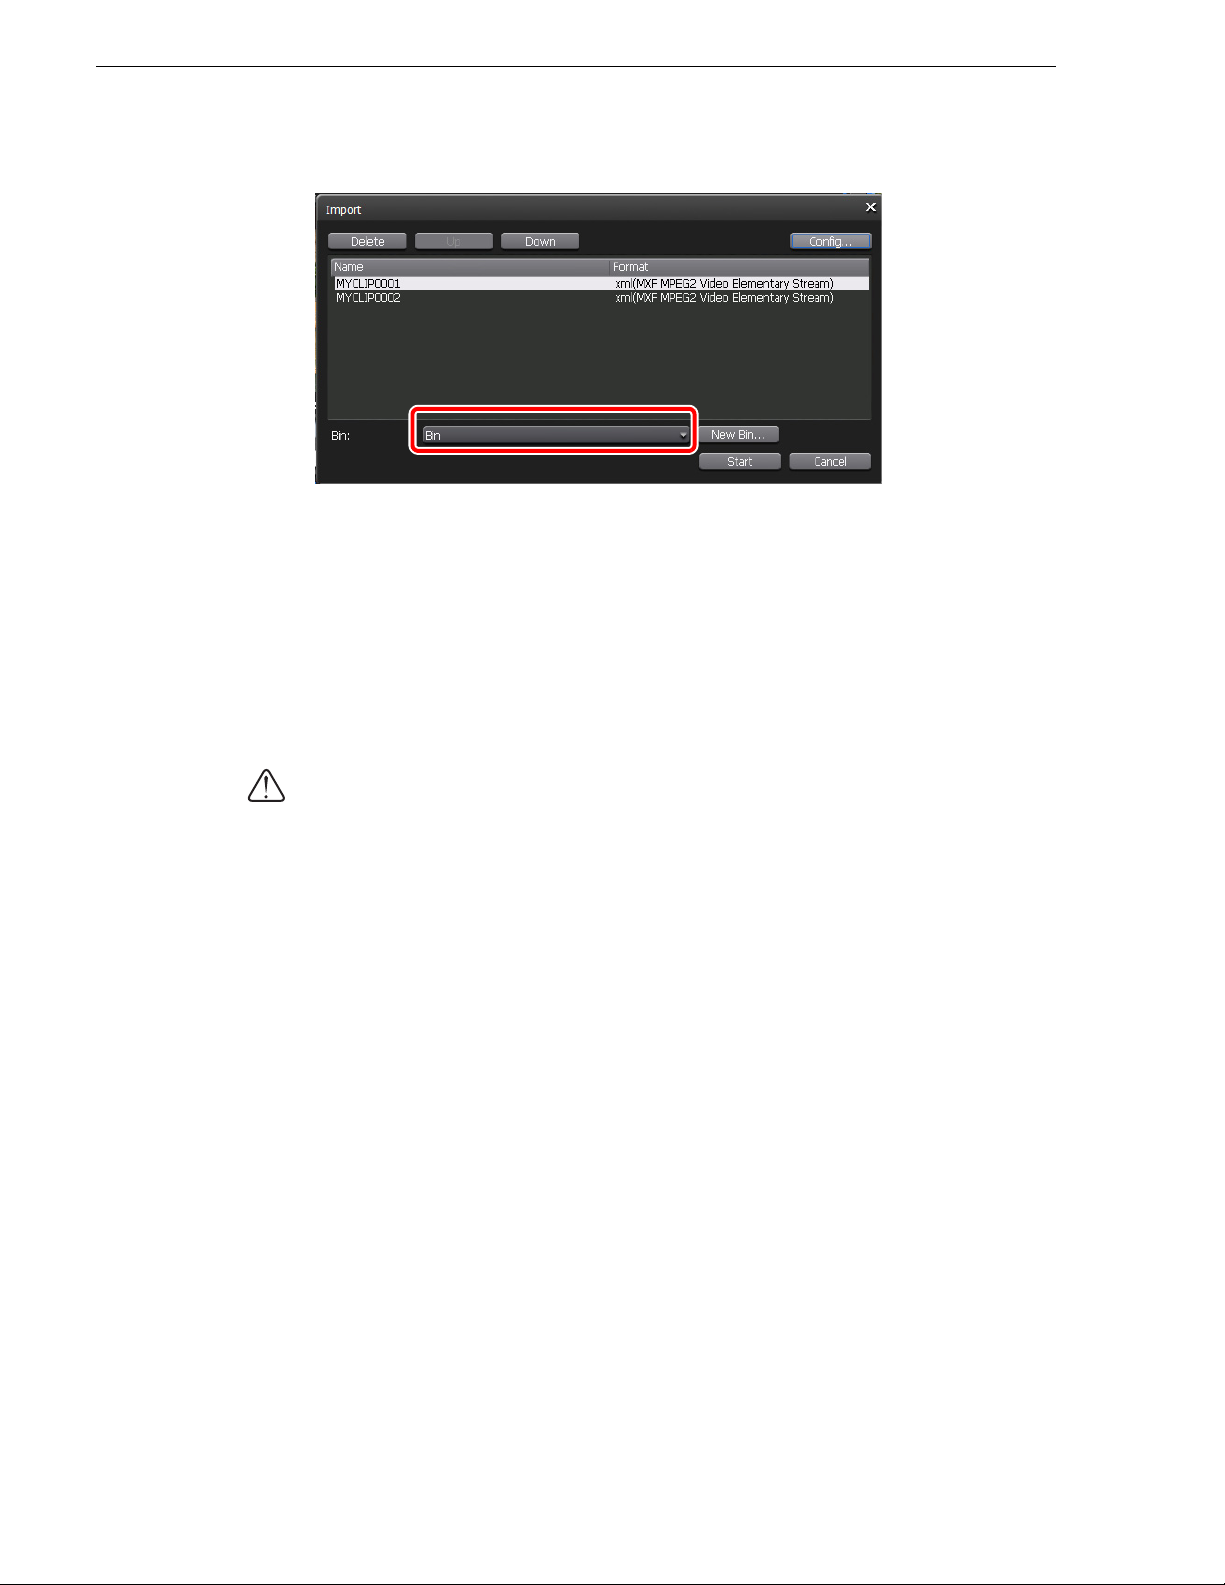
Chapter 4 T2 GF Option
5. Select the import destination bin.
• You can click
New Bin... to create a new bin and specify it as the import
destination.
• You can select a clip in the clip list on the "Import" dialog box and click
Down to change the import order.
• You can select a clip in the clip list on the "Import" dialog box and click
Up or
Delete
to delete it from the import list.
6. Click
Start.
• The import begins. You can check the progress in the transfer screen.
CAUTION: By default, the system will pause any transfer and conversion during a
recording or playback. If you want to change the setting to allow transfer and
conversion to be performed even during a recording or playback, click
then click
recording or playing out.
Common in the "Transfer" tree. Unchecking Pause file transfers while
enables transfer and conversion even during a recording
Config. and
or playback. However, if this option is unchecked, the recording/playback
operations may not be performed normally, therefore, we recommend that you use
the system with this option checked.
Converting GF sources stored in a bin to Grass Valley HQ AVI
You can convert a GF format clip that is stored in a bin to a Grass Valley HQ AVI clip.
NOTE: Your T2 can play a playlist in which GF format sources and non-GF format
ones are mixed.
1. Display the clips in the Bin tab.
2. Select the clip(s) you want to convert, right-click on it, and then click
Convert to AVI(Grass Valley HQ).
Convert
• Multiple clips can be selected.
50 T2 Users Manual –SP3/SP4– October 17, 2011
Page 51
3. Click Yes.
• The conversion begins. You can check the progress in the transfer screen.
• The new converted clips will be saved in the same bin as their original ones.
CAUTION: By default, the system will pause any transfer and conversion during a
recording or playback. If you want to change the setting to allow transfer and
conversion to be performed even during a recording or playback, click
then click
recording or playing out.
or playback. However, if this option is unchecked, the recording/playback
operations may not be performed normally, therefore, we recommend that you use
the system with this option checked.
Common in the "Transfer" tree. Unchecking Pause file transfers while
enables transfer and conversion even during a recording
Sending/receiving GF sources to/from your T2 via FTP
You can use FTP to upload and download sources to/from your T2 connected with
other devices or edit terminals etc. The procedure for sending/receiving GF sources
to/from your T2 via FTP is the same as for sending/receiving XDCAM sources to/
from your T2 via FTP. For more information, see "Sending/receiving XDCAM
sources to/from your T2 via FTP" on page 20.
Workflow using GF
Config. and
CAUTION:
MXF single files in GF format can be uploaded/downloaded.
CAUTION: If the post-import file type is set to "AVI (HQ)" in the MXF import
settings when you upload a GF source to your T2 via FTP, the GF source is
converted to Grass Valley HQ AVI after the upload.
CAUTION: If you want to use Chinese characters for file names, you must set the
character set of file names to UTF-8 on the FTP client side beforehand. Correct file
names cannot be displayed if the character sets do not match. The configuration
method depends on your software. Refer to the help etc. of your software.
When you upload/download GF sources to/from your T2 via FTP, only
Exporting a file in the GF format
Clips imported as the original GF format can be exported as the GF format.
For important notes on exporting, see "Important notes on T2 export" on page 112.
CAUTION: Importing a GF source in the native format will copy all of the files that
are located directly under the root folder as well as the Bin and PLAYLIST folders
to your T2. As for files in each folder, only the files that are related to the selected
file for the import will be copied. If a clip imported in the native format is exported
without conversion, the exported clip may not be properly handled by a device that
uses any file or folder that was not copied to your T2 during the import.
1. Display the clips in the Bin tab.
October 17, 2011 T2 Users Manual –SP3/SP4– 51
Page 52
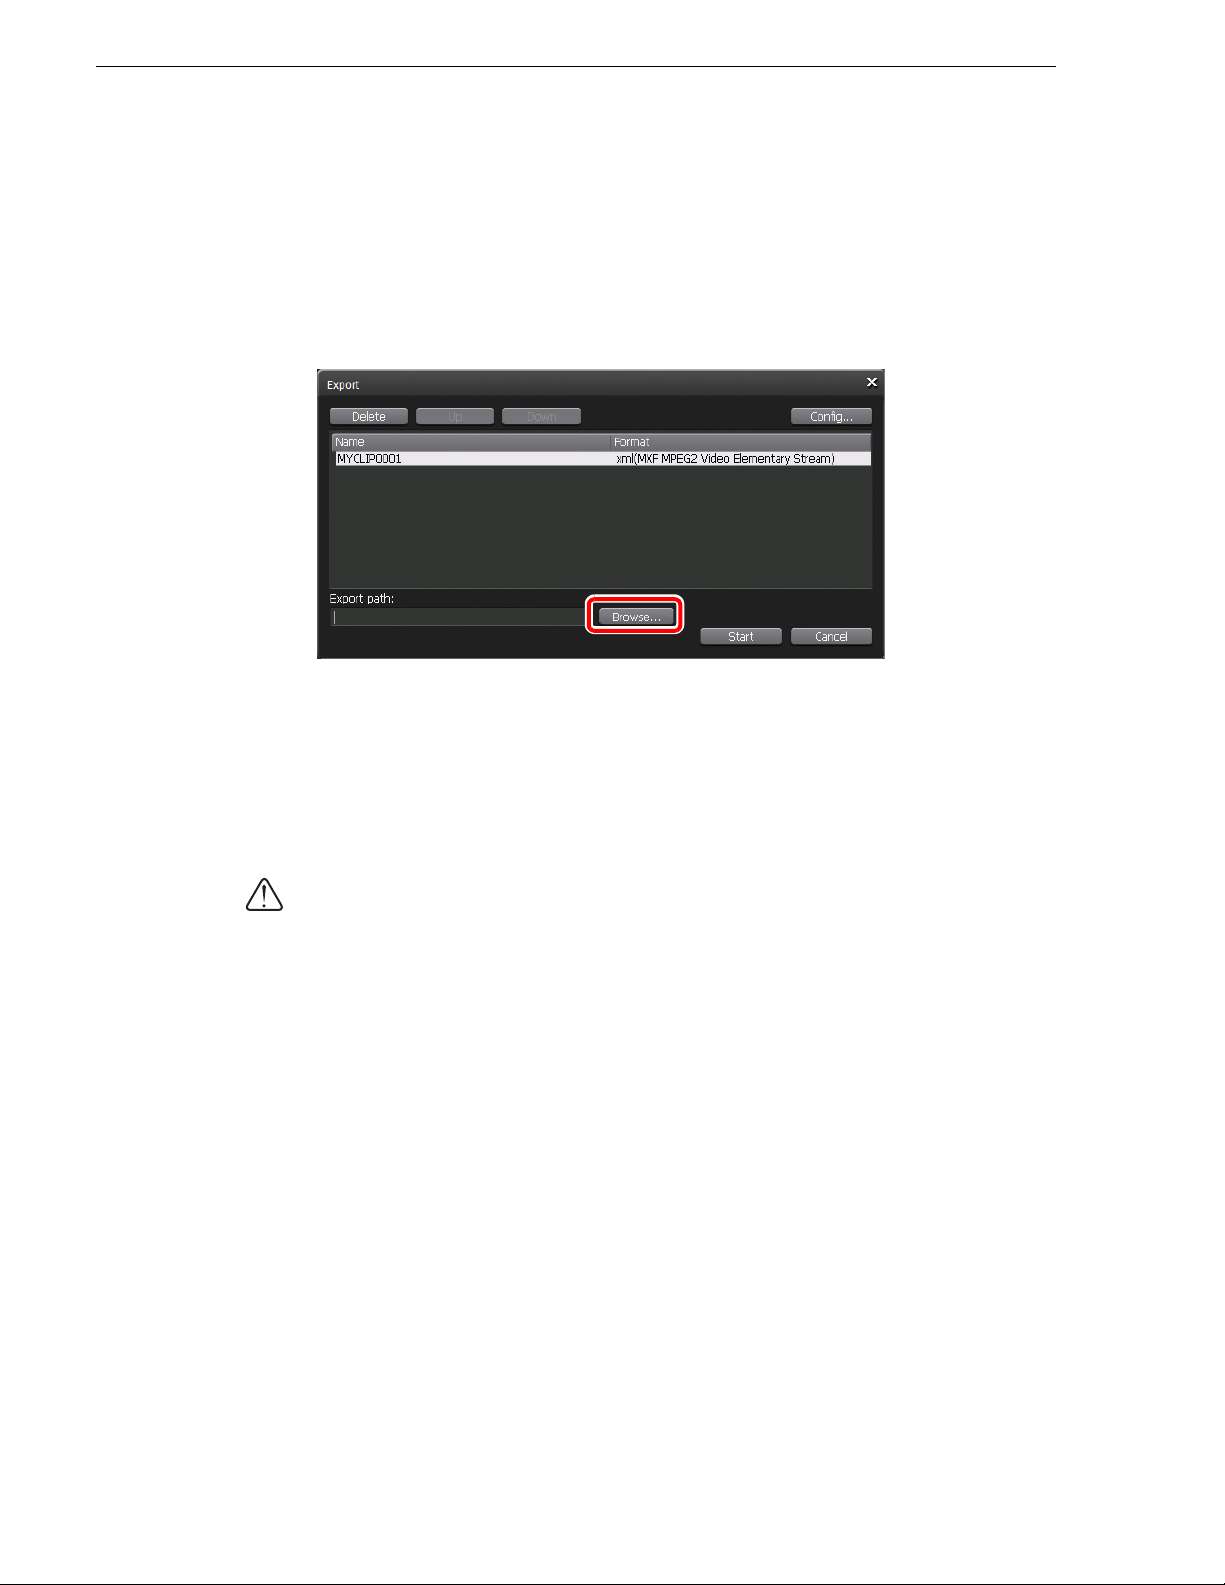
Chapter 4 T2 GF Option
2.
Select the GF format clip(s) you want to export, right-click on it, and then click
• Multiple clips can be selected.
Export Media Files...
Export
• A message related to export appears. Read the message, and then click
• The "Export" dialog box appears.
3. Click
Browse... to configure the export destination.
• You can select a clip in the clip list on the "Export" dialog box and click
Down to change the export order.
• You can select a clip in the clip list on the "Export" dialog box and click
to delete it from the export list.
4. Click
Start.
• The export begins. You can check the progress in the transfer screen.
OK.
Up or
Delete
CAUTION: By default, the system will pause any transfer and conversion during a
recording or playback. If you want to change the setting to allow transfer and
conversion to be performed even during a recording or playback, click
then click
recording or playing out.
Common in the "Transfer" tree. Unchecking Pause file transfers while
enables transfer and conversion even during a recording
Config. and
or playback. However, if this option is unchecked, the recording/playback
operations may not be performed normally, therefore, we recommend that you use
the system with this option checked.
52 T2 Users Manual –SP3/SP4– October 17, 2011
Page 53

Chapter 5
T2 Alpha Option
This chapter consists of the following:
• "Option overview" on page 54
• "Limitations" on page 55
• "Supported formats" on page 56
• "What is Fill and Key data?" on page 56
October 17, 2011 T2 Users Manual –SP3/SP4– 53
Page 54
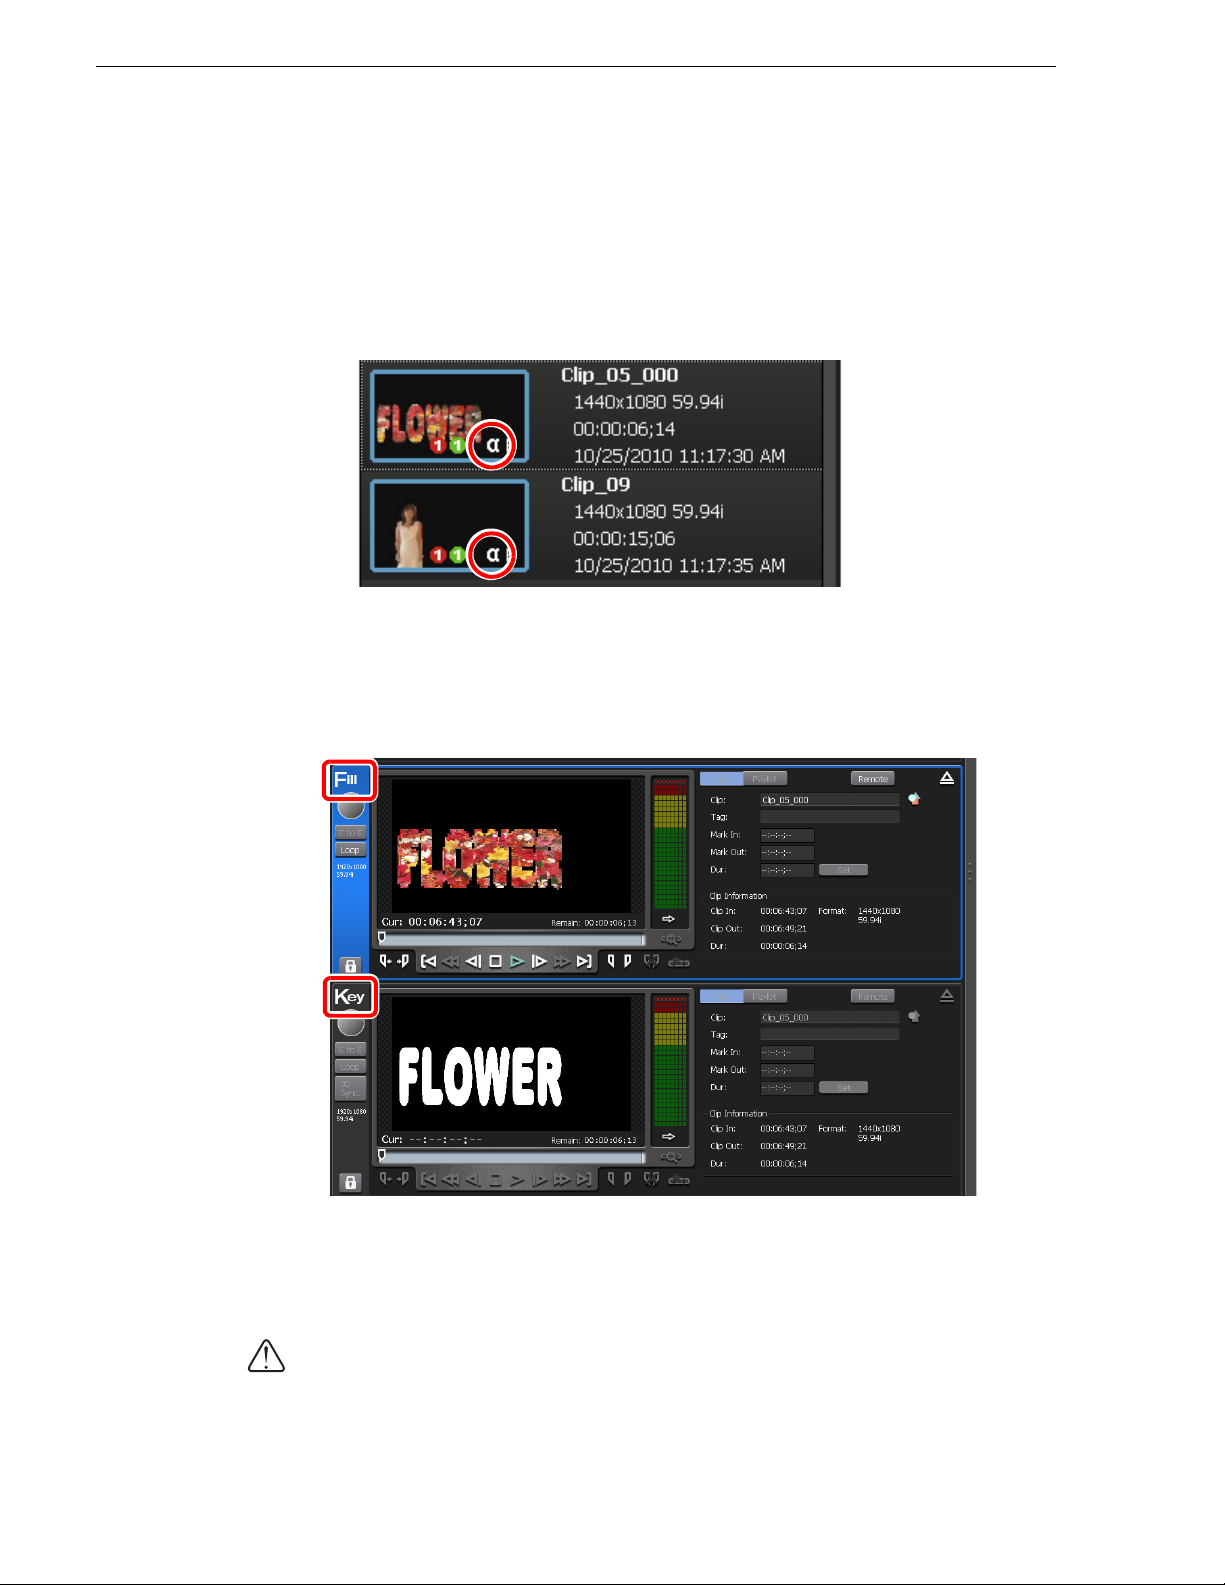
Chapter 5 T2 Alpha Option
Option overview
You can play/import movies and still images containing transparency information
(alpha embedded clips). In addition, you can play a playlist in which alpha embedded
clips and normal clips are mixed.
In the list of the Browse or Bin tab, alpha embedded clips are displayed with icons
indicating that they contain alpha.
If an alpha embedded clip is loaded to the P1 or P2 channel, the Fill data is output to
the channel where the clip is loaded and the Key data is output to the other channel
(Fill/Key output mode). The Fill side channel is shown as "Fill" and the Key side
channel is shown as "Key".
NOTE: Icons corresponding to Fill and Key are shown during the front panel mode.
When you play a playlist that contains any alpha embedded clip, the system enters the
Fill/Key output mode and the Key side will output a black screen while a normal clip
is being played.
For more information about Fill and Key, see "What is Fill and Key data?" on page 56.
CAUTION: The Fill/Key output and normal modes will be switched automatically
while playing a clip. The video may be disrupted due to the output signal loss when
the modes are switched, however, this is not a system failure.
54 T2 Users Manual –SP3/SP4– October 17, 2011
Page 55

Limitations
• The pairing function is not available for alpha embedded clips.
• A loading operation cannot be performed if the 3D Sync mode is turned on or P1/
P2 channel is locked.
• If the E to E mode is turned on, a message appears. The E to E mode is turned off
if you continue.
• If a different clip is already loaded in the other channel when an alpha embedded
clip is loaded, it is unloaded.
• Playback operations of alpha embedded clips can be performed only in the Fill side
channel.
• The following operations are available while an alpha embedded clip is loaded:
Option overview
- Move to an In/Out point
- Set an In/Out point
- Create a sub clip (you cannot create a sub clip of a still image clip with an
alpha channel)
- Move to the first frame, frame reverse, stop, playback, frame forward, and
move to the last frame
- Scrubbing bar operations
- Set a fade in effect (applied to the Key side)/fade out effect (applied to the
Key side)/actions (pause, loop) for an event in a playlist
• The following operations are not available while an alpha embedded clip is loaded:
- Fast forward and fast reverse
- VAR operations
- Switch a clip in a playlist to the trim mode
• The system will import files that contain transparency information after converting
them to Grass Valley HQ AVI files. In this case, the conversion is performed so
that the bitrate will be lower (the Q value = 12).
• Similarly, you can also play an alpha embedded clip using the remote control with
an AMP command.
• You cannot import a sequence file in which still images with alpha channels and
those without alpha channels are mixed.
• While in the Fill/Key output mode, locking the Fill side channel will also cause the
Key side channel to be locked.
October 17, 2011 T2 Users Manual –SP3/SP4– 55
Page 56

Chapter 5 T2 Alpha Option
Supported formats
Movies:
• AVI format (Grass Valley HQ/uncompressed)
• QuickTime format (ProRes4444/Animation/uncompressed)
Still images:
• TARGA
What is Fill and Key data?
Fill data is a base image on which transparency information is overlaid, and Key data
is an image that will be used as transparency information. Key data acts as a mask on
Fill data.
Fill Key Fill Key
A still image containing transparency information has a data area for transparency
information called the alpha channel in addition to the data area for color information
that is represented with RGB color. Your T2 will output color information as Fill data
and the alpha channel as Key data.
56 T2 Users Manual –SP3/SP4– October 17, 2011
Page 57

Chapter 6
Additional/Updated Functions for SP3 and SP4
This chapter consists of the following:
• "MXF import and export functions" on page 59
• "Supported formats" on page 59
• "Importing Grass Valley HQ MXF sources (Import in the native format/
Convert to Grass Valley HQ AVI for import)" on page 60
• "Converting Grass Valley HQ MXF sources stored in a bin to Grass Valley HQ
AVI" on page 62
• "Sending/receiving Grass Valley HQ MXF sources to/from your T2 via FTP" on
page 63
• "Exporting a file in the Grass Valley HQ MXF format" on page 63
• "Exporting a Grass Valley HQ MXF file from EDIUS 6" on page 64
• "Converting Grass Valley HQ AVI to MXF (XDCAM format) and exporting the
converted file" on page 67
• "Loading and editing T2 sources in other editing software" on page 69
• "AVCHD import and export functions" on page 70
• "Supported formats" on page 70
• "Displaying AVCHD sources in removable media" on page 71
• "Importing AVCHD sources (Import in the native format/Convert to Grass
Valley HQ AVI for import)" on page 72
• "Converting AVCHD sources stored in a bin to Grass Valley HQ AVI" on
page 74
• "Sending/receiving AVCHD sources to/from your T2 via FTP" on page 74
• "Exporting a file in the AVCHD format" on page 74
• "Restoring settings at the next startup" on page 75
• "Batch capture" on page 78
• "Batch capture action settings" on page 78
• "Importing the batch capture list and executing the batch capture" on page 79
• "Setting In and Out points" on page 82
• "Additional/updated functions for the playlist view" on page 83
• "Switching event view" on page 83
• "Background color for events" on page 85
October 17, 2011 T2 Users Manual –SP3/SP4– 57
Page 58

Chapter 6 Additional/Updated Functions for SP3 and SP4
• "Changing the event view style and background color" on page 86
• "Selecting and sorting multiple events" on page 86
• "Setting a specific timecode to an event in a playlist" on page 87
• "Setting an event template" on page 88
• "Converting a playlist to a single clip" on page 90
• "Converting a playlist stored in a bin to a single clip" on page 91
• "Converting a playlist to a single media file for export" on page 91
• "Importing/exporting playlists and clips" on page 93
• "Exporting playlists and clips in the T2 format" on page 93
• "Importing playlists and clips" on page 94
• "Transferring media files to other T2" on page 95
• "Configuring the FTP server settings of T2 (destination)" on page 95
• "Exporting media files from T2 to T2" on page 96
• "Backing up all data to other T2 (Sync backup)" on page 98
• "Setting T2 on the sync destination (slave) to the slave mode" on page 98
• "Setting T2 on the sync source (master) to the master mode for data sync" on
page 99
• "Local operations in the remote mode" on page 101
• "Local operations in the R1-Remote mode" on page 101
• "Local operations in the P1-Remote mode/P2-Remote mode" on page 102
• "Other additional/updated functions" on page 103
• "Automatically exporting files while recording" on page 103
• "Automatically loading sources that can be loaded to the P1/P2 channel" on
page 104
• "Automatically adding a sub clip created in R1 to a playlist" on page 105
• "Setting the preview update interval" on page 105
• "Exporting ancillary data during playback at other than single speed" on
page 107
• "Keyboard shortcuts" on page 107
• "Starting up your T2 with the Wake On LAN function" on page 107
• "Tally signal output from GPI" on page 109
58 T2 Users Manual –SP3/SP4– October 17, 2011
Page 59

MXF import and export functions
Supported formats
The following tables list the availability of direct playback, FTP transfer, import, and
export operations for each format:
• MXF single file (XDCAM format)
Browse FTP Import Export
List view
Direct
playback
Upload
Download
Import
Post-import format
MXF import and export functions
○: Supported
Export Post-export format
XDCAM (MXF single)
○
○○○ ○○
Grass Valley HQ AVI
• MXF single file (EDIUS export and P2 video formats)
Browse FTP Import Export
List view
Direct
playback
Upload
Download
Import
Post-import format
MXF single file
(EDIUS export format,
P2 video format)
○
Export Post-export format
○
○○○ ○○
Grass Valley HQ AVI
Remark: The following codecs are supported by the EDIUS export format:
- AVC-Intra MXF
-D10 MXF
- DV MXF
- DVCPRO25 MXF
- DVCPRO50 MXF
- DVCPROHD MXF
-MPEG2 MXF
• MXF single file (P2 audio and unrecognized formats)
○
XDCAM (MXF single)
Grass Valley HQ AVI
or
XDCAM (MXF single)
○: Supported
MXF single file
(EDIUS export format,
P2 video format)
Grass Valley HQ AVI
or
XDCAM (MXF single)
Browse FTP Import Export
List view
(Broken
format)
Remark: An MXF single file (P2 audio format) cannot be imported.
Direct
playback
Upload
No No ― No ―――
Download
Import
Post-import format
Export Post-export format
October 17, 2011 T2 Users Manual –SP3/SP4– 59
Page 60

Chapter 6 Additional/Updated Functions for SP3 and SP4
• MXF single file (GF format)
Browse FTP Import Export
List view
Direct
playback
Upload
Download
Import
Post-import format
○: Supported
Export Post-export format
GF (MXF single)
○○○ ○○
Grass Valley HQ AVI
GF (MXF single)
○
Grass Valley HQ AVI
or
○
GF (MXF single)
• MXF single file (Grass Valley HQ MXF format)
○: Supported
Browse FTP Import Export
List view
Direct
playback
Upload
Download
Import
Post-import format
Grass Valley HQ MXF
○○○ ○○
Grass Valley HQ AVI
Export Post-export format
Grass Valley HQ MXF
○
Grass Valley HQ AVI
or
○
XDCAM (MXF single)
Importing Grass Valley HQ MXF sources (Import in the native format/Convert to Grass Valley HQ AVI for import)
You can import a Grass Valley HQ MXF format file, which is saved in removable
media, to your T2 as the original Grass Valley HQ MXF format or after converting it
to the Grass Valley HQ AVI format.
NOTE: You can also play a playlist in which Grass Valley HQ MXF format sources
and non-Grass Valley HQ MXF format ones are mixed.
NOTE: In addition, you can convert a file to Grass Valley HQ AVI after importing
it as the original Grass Valley HQ MXF format.
1. Display the Grass Valley HQ MXF format clips in the Browse tab.
2. Select the clip(s) you want to import, right-click on it, and then click
Import...
• Multiple clips can be selected.
• The "Import" dialog box appears.
60 T2 Users Manual –SP3/SP4– October 17, 2011
Page 61

MXF import and export functions
3. Click Config...
• The "Format" column in the list shows the file format to be imported. If no
change is necessary, you do not need to click
Proceed to step 6.
Config... to change the setting.
4. Click
MXF in the "Transfer" tree.
5. From the "File format after import:" list, select a format and then click
• If you import a clip as the Grass Valley HQ MXF format, select
convert a clip to Grass Valley HQ AVI for import, select
AVI(HQ).
MXF. If you
OK.
October 17, 2011 T2 Users Manual –SP3/SP4– 61
Page 62

Chapter 6 Additional/Updated Functions for SP3 and SP4
6. Select the import destination bin.
• You can click
New Bin... to create a new bin and specify it as the import
destination.
• You can select a clip in the clip list on the "Import" dialog box and click
Down to change the import order.
• You can select a clip in the clip list on the "Import" dialog box and click
Up or
Delete
to delete it from the import list.
7. Click
Start.
• The import begins. You can check the progress in the transfer screen.
CAUTION: By default, the system will pause any transfer and conversion during a
recording or playback. If you want to change the setting to allow transfer and
conversion to be performed even during a recording or playback, click
then click
recording or playing out.
Common in the "Transfer" tree. Unchecking Pause file transfers while
enables transfer and conversion even during a recording
Config. and
or playback. However, if this option is unchecked, the recording/playback
operations may not be performed normally, therefore, we recommend that you use
the system with this option checked.
Converting Grass Valley HQ MXF sources stored in a bin to Grass Valley HQ AVI
You can convert a Grass Valley HQ MXF format clip that is stored in a bin to a Grass
Valley HQ AVI clip.
NOTE: Your T2 can play a playlist in which Grass Valley HQ MXF format sources
and non-Grass Valley HQ MXF format ones are mixed.
1. Display the clips in the Bin tab.
2. Select the clip(s) you want to convert, right-click on it, and then click
Convert to AVI (Grass Valley HQ).
Convert
• Multiple clips can be selected.
62 T2 Users Manual –SP3/SP4– October 17, 2011
Page 63

MXF import and export functions
3. Click Yes.
• The conversion begins. You can check the progress in the transfer screen.
• The new converted clips will be saved in the same bin as their original ones.
CAUTION: By default, the system will pause any transfer and conversion during a
recording or playback. If you want to change the setting to allow transfer and
conversion to be performed even during a recording or playback, click
then click
recording or playing out.
or playback. However, if this option is unchecked, the recording/playback
operations may not be performed normally, therefore, we recommend that you use
the system with this option checked.
Common in the "Transfer" tree. Unchecking Pause file transfers while
enables transfer and conversion even during a recording
Config. and
Sending/receiving Grass Valley HQ MXF sources to/from your T2 via FTP
FTP can be used to connect to your T2 from other devices or edit terminals etc. to
upload and download sources. The procedure for sending/receiving Grass Valley HQ
MXF sources to/from your T2 via FTP is the same as for sending/receiving XDCAM
sources to/from your T2 via FTP. For more information, see "Sending/receiving
XDCAM sources to/from your T2 via FTP" on page 20.
CAUTION: If the post-import file type is set to "AVI (HQ)" in the MXF import
settings when you upload a Grass Valley HQ MXF source to your T2 via FTP, the
Grass Valley HQ MXF source is converted to Grass Valley HQ AVI after the
upload.
CAUTION: If you want to use Chinese for file names, you must set the character set
of file names to UTF-8 on the FTP client side beforehand. Correct file names cannot
be displayed if the character sets do not match. The configuration method depends
on your software. Refer to the help etc. of your software.
Exporting a file in the Grass Valley HQ MXF format
Clips imported as the original Grass Valley HQ MXF format can be exported as the
Grass Valley HQ MXF format.
For important notes on exporting, see "Important notes on T2 export" on page 112.
1. Display the clips in the Bin tab.
2.
Select the Grass Valley HQ MXF format clip(s) you want to export, right-click on it,
and then click
• Multiple clips can be selected.
• A message related to export appears. Read the message, and then click
• The "Export" dialog box appears.
Export
Export Media Files...
OK.
October 17, 2011 T2 Users Manual –SP3/SP4– 63
Page 64
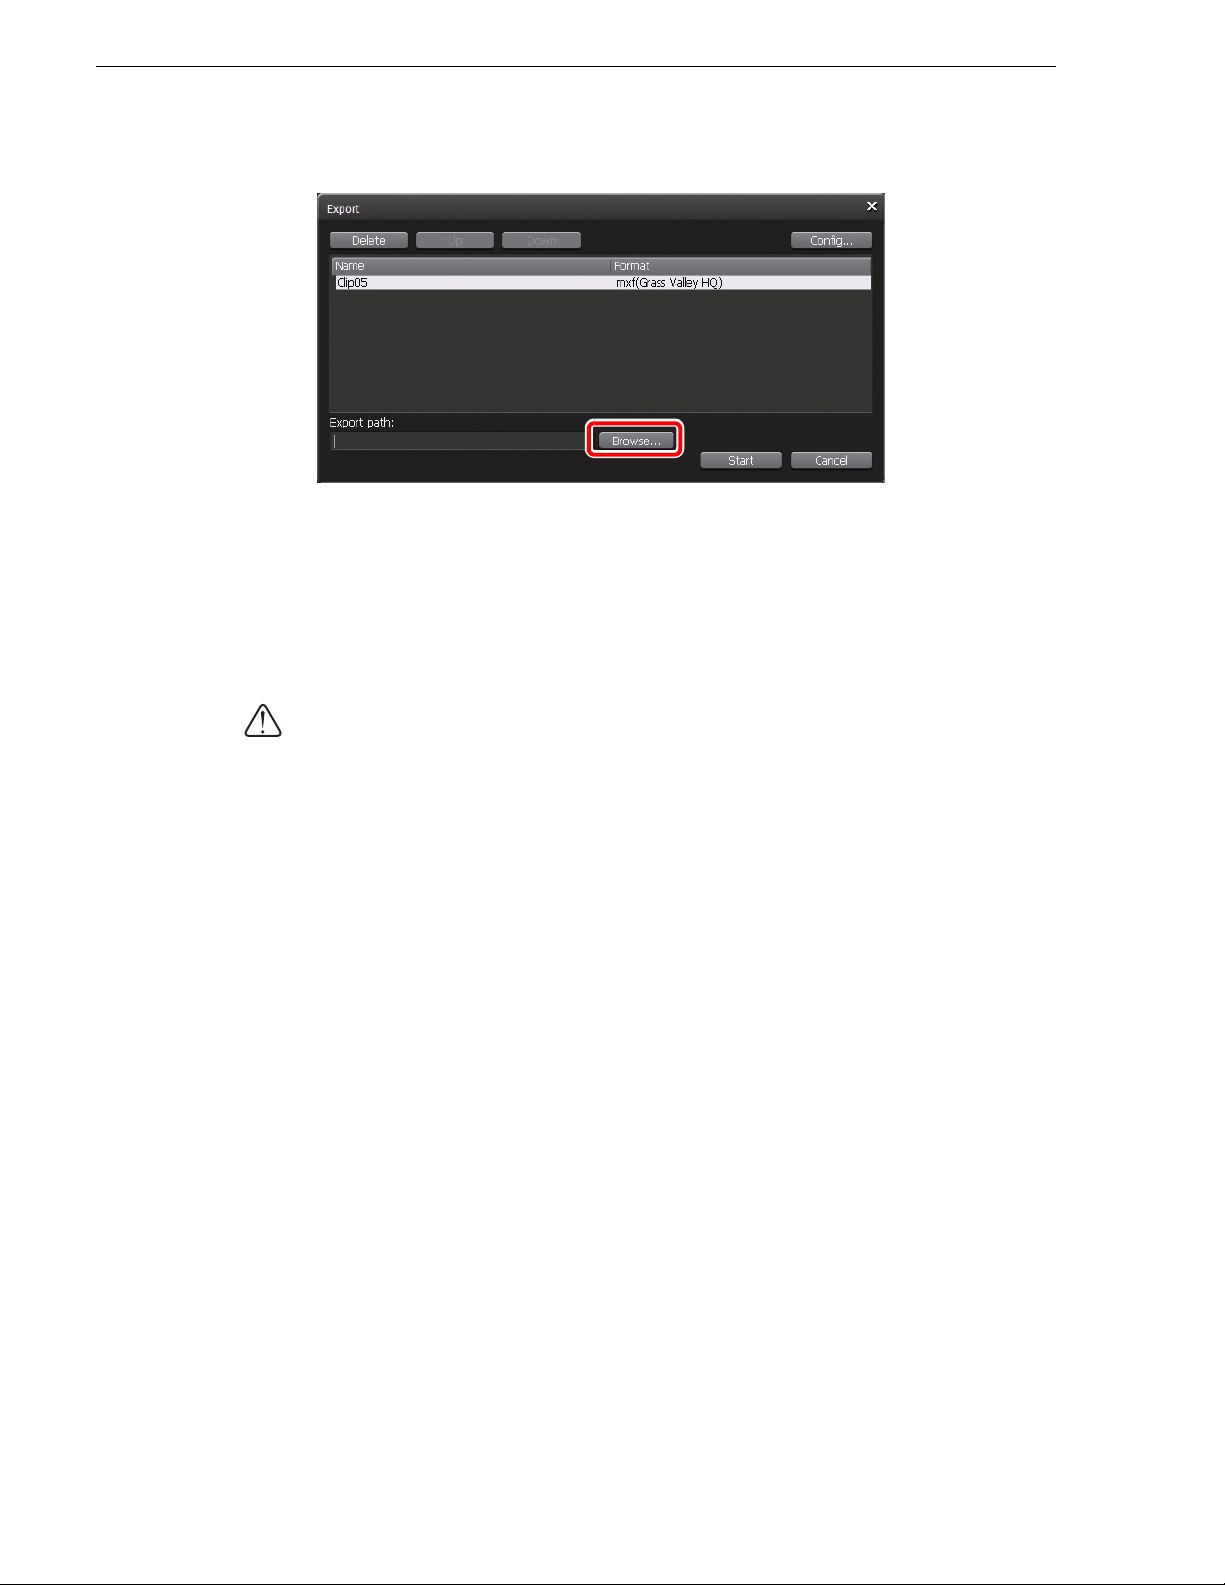
Chapter 6 Additional/Updated Functions for SP3 and SP4
3. Click Browse... to configure the export destination.
• You can select a clip in the clip list on the "Export" dialog box and click
Down to change the export order.
• You can select a clip in the clip list on the "Export" dialog box and click
to delete it from the export list.
4. Click
Start.
• The export begins. You can check the progress in the transfer screen.
CAUTION: By default, the system will pause any transfer and conversion during a
recording or playback. If you want to change the setting to allow transfer and
conversion to be performed even during a recording or playback, click
then click
recording or playing out.
Common in the "Transfer" tree. Unchecking Pause file transfers while
enables transfer and conversion even during a recording
or playback. However, if this option is unchecked, the recording/playback
operations may not be performed normally, therefore, we recommend that you use
the system with this option checked.
Exporting a Grass Valley HQ MXF file from EDIUS 6
A project created on the EDIUS 6 Turnkey system can be exported to your T2 via
FTP.
You need to configure the FTP server settings in both EDIUS 6 and T2 beforehand.
For more information on how to configure the FTP settings, see "Sending/receiving
XDCAM sources to/from your T2 via FTP" on page 20.
Up or
Delete
Config. and
64 T2 Users Manual –SP3/SP4– October 17, 2011
Page 65
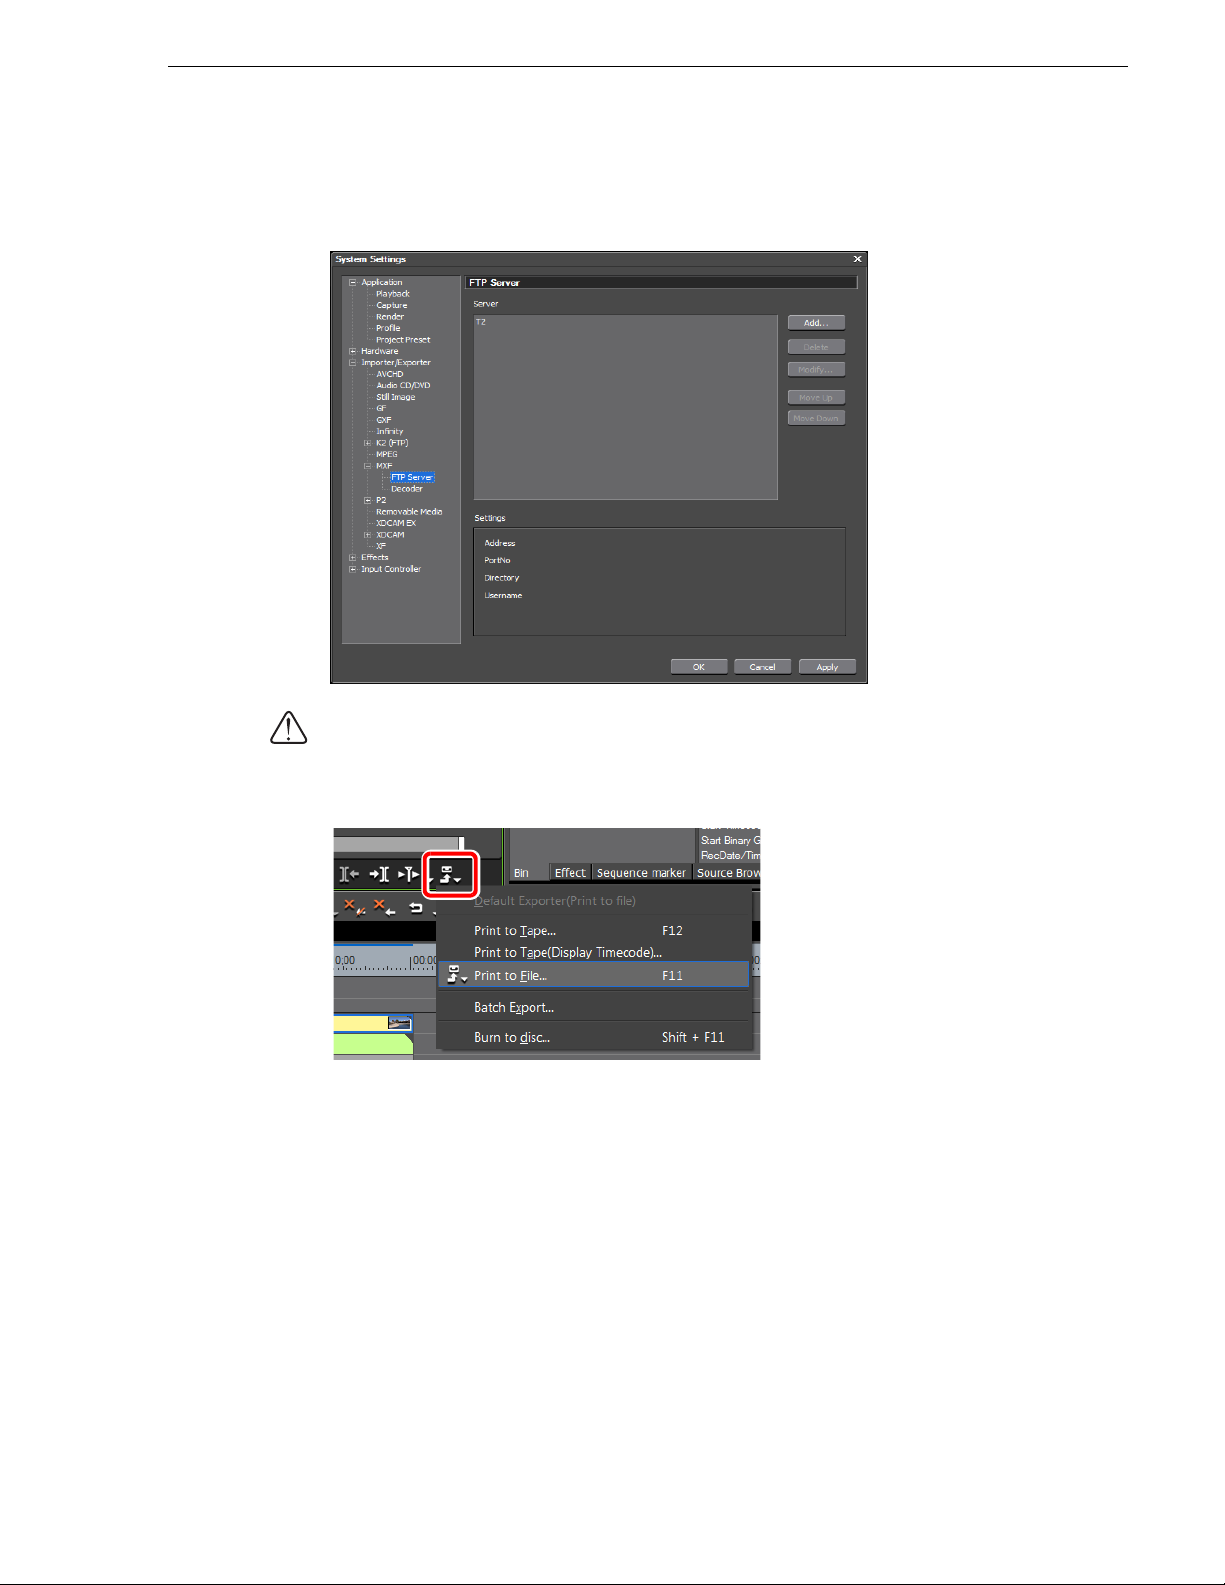
MXF import and export functions
In EDIUS 6, you need to open the "Importer/Exporter" tree in the system settings and
configure the FTP server in "MXF". For more information, please refer to the EDIUS
User Reference Guide.
CAUTION: The BC Export Option for EDIUS 6 turnkey workstations is required to
export a project in the MXF format from your EDIUS 6.
1. Click Export in the Recorder, and then click Print to File.
2. Click
MXF in the category tree on the "Print to File" dialog box.
October 17, 2011 T2 Users Manual –SP3/SP4– 65
Page 66
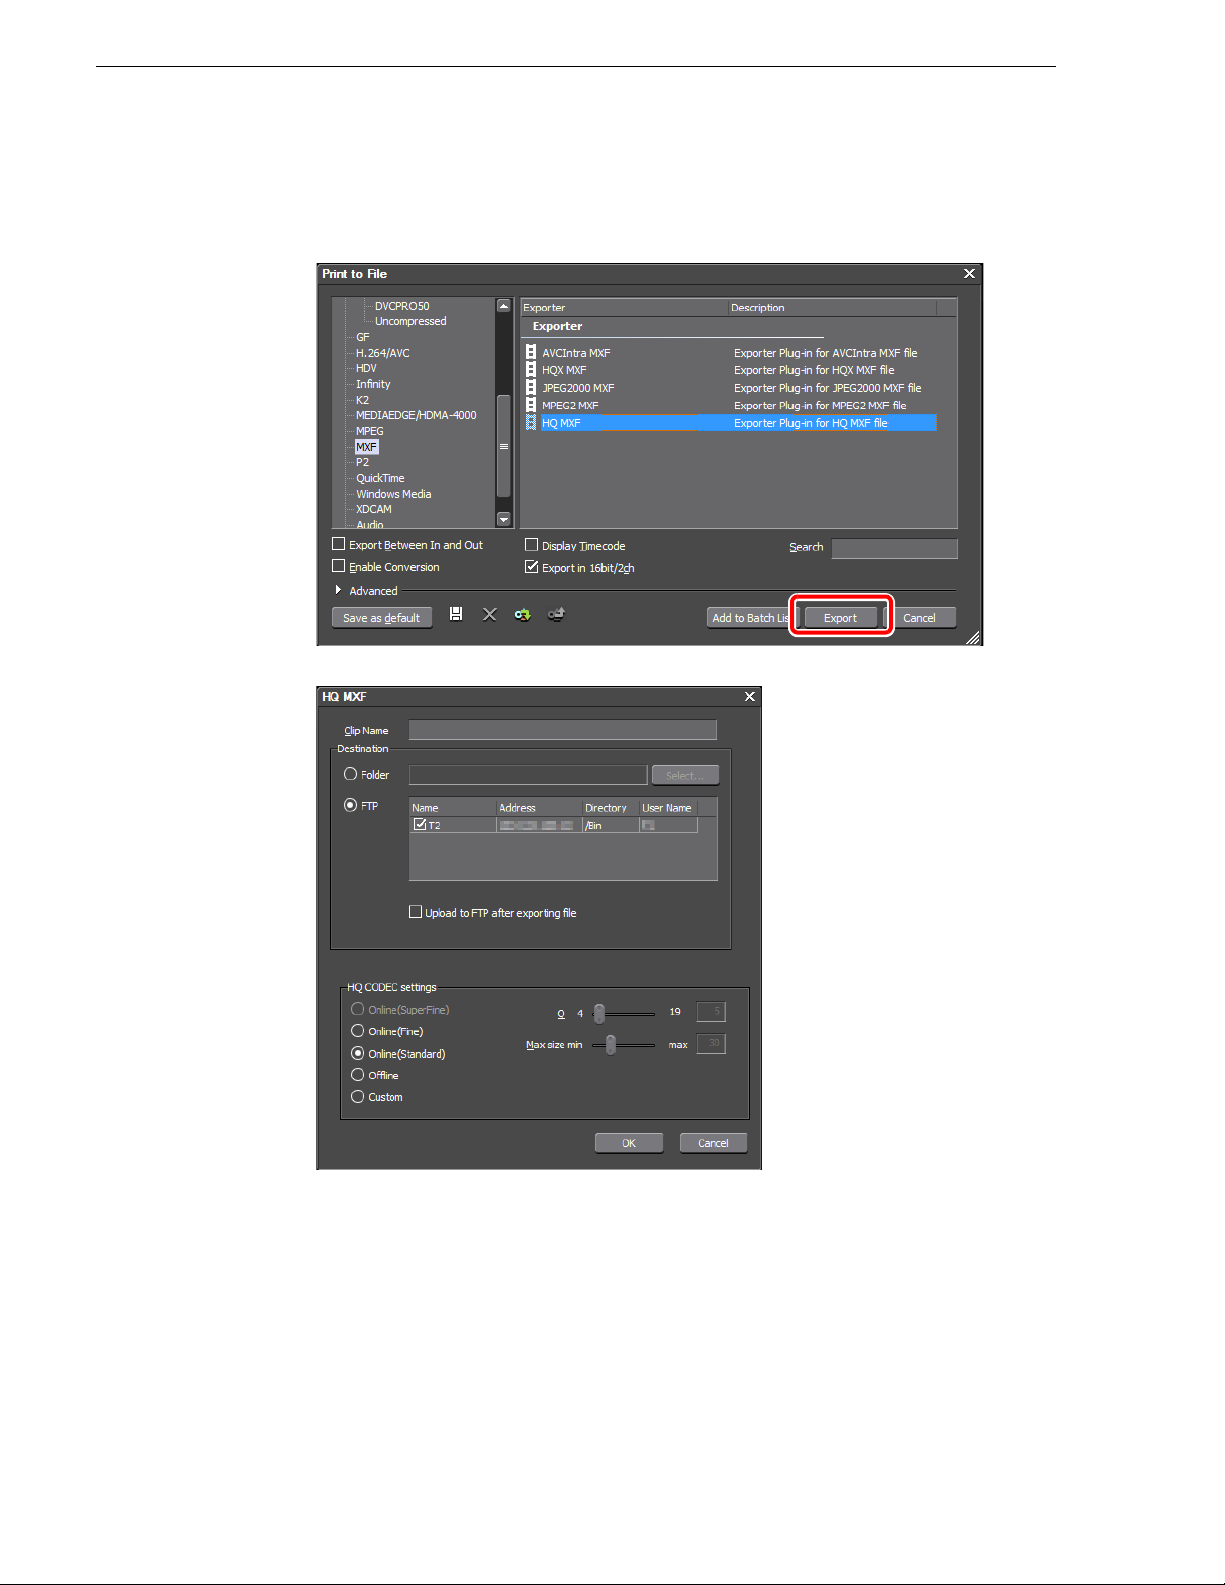
Chapter 6 Additional/Updated Functions for SP3 and SP4
3. Select "HQ MXF" from Exporter, and then click Export.
• "HQ MXF" is not displayed if the project setting is different from the export
format. You must check
Enable Conversion and select an exporter.
4. Enter a clip name and select
5. Configure the settings, and then click
FTP in Destination.
OK.
• The rendering begins. You can check the progress in the transfer screen on your
T2.
66 T2 Users Manual –SP3/SP4– October 17, 2011
Page 67
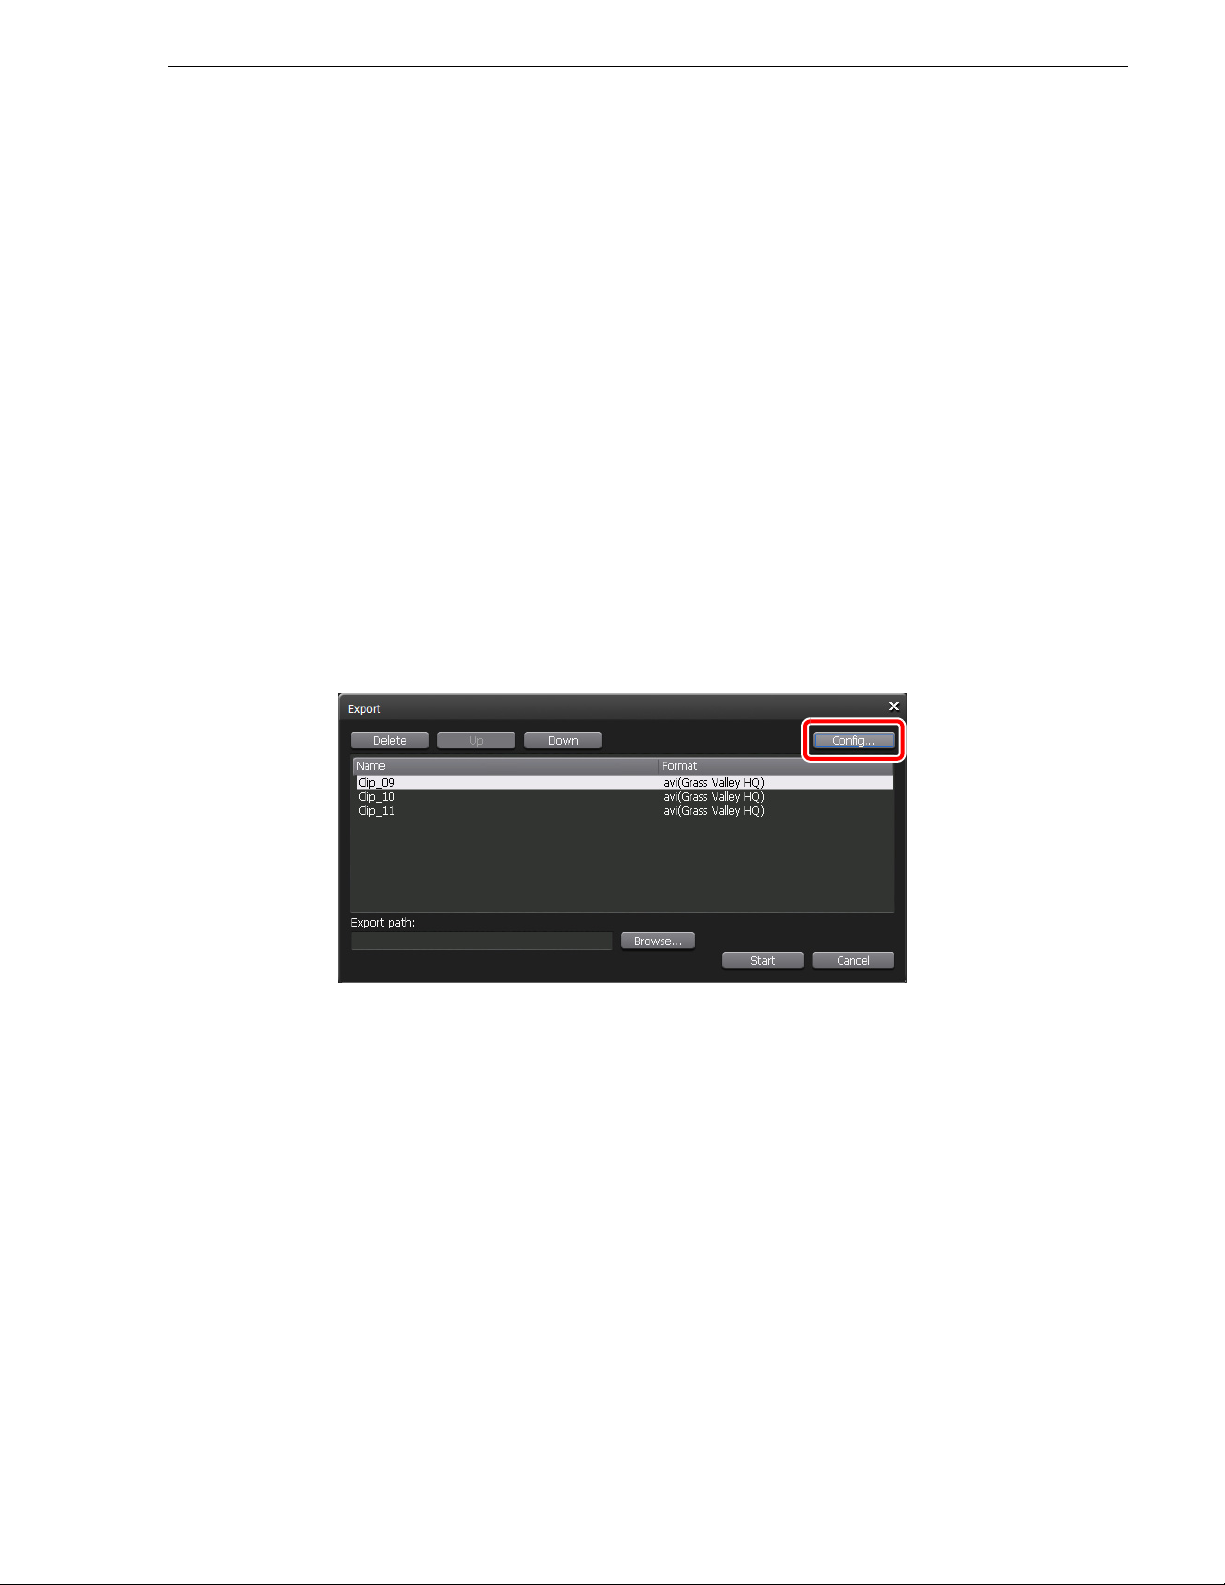
MXF import and export functions
Converting Grass Valley HQ AVI to MXF (XDCAM format) and exporting the converted file
You can export Grass Valley HQ AVI files by converting them to the following
formats:
• MXF format (XDCAM HD422) (1920 x 1080 59.94i/50i/29.97p/25p 50 Mbps)
• MXF format (XDCAM HD) (1440 x 1080 59.94i/50i/29.97p/25p/23.98p 25 Mbps)
• MXF format (XDCAM IMX) (720 x 486 59.94i, 720 x 576 50i)
• MXF format (XDCAM DV) (720 x 486 59.94i, 720 x 576 50i)
For important notes on exporting, see "Important notes on T2 export" on page 112.
1.
Select the clip(s) you want to export,
Export Media Files...
• Multiple clips can be selected.
right-click on it, and then click Export
• A message related to export appears. Read the message, and then click
• The "Export" dialog box appears.
2. Click
Config...
• The "Format" column in the list shows the file format to be exported. If no
change is necessary, you do not need to click
Proceed to step 6.
Config... to change the setting.
OK.
October 17, 2011 T2 Users Manual –SP3/SP4– 67
Page 68
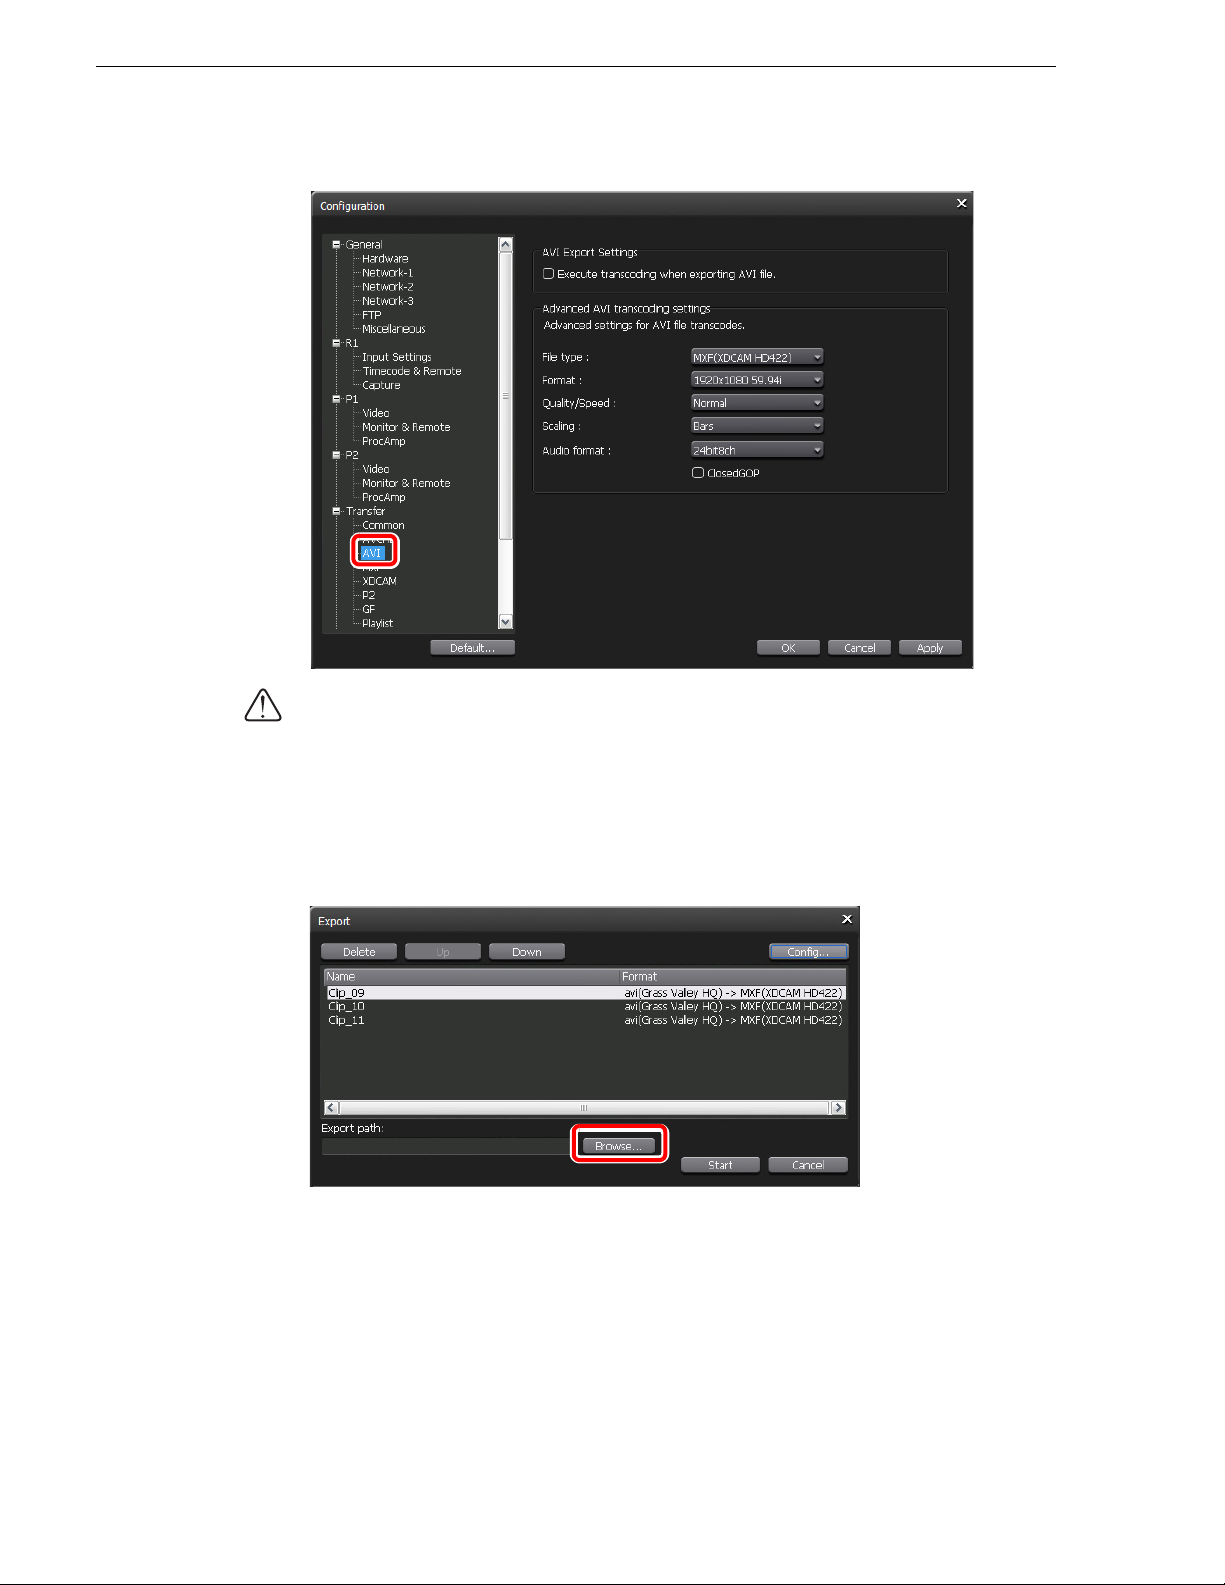
Chapter 6 Additional/Updated Functions for SP3 and SP4
3. Click AVI in the "Transfer" tree.
CAUTION: If an AVI format clip has In and Out points configured, only the part
between these points is converted.
4. Check
Execute transcoding when exporting AVI file.
• Uncheck it to export a file without format conversion.
5. Configure the advanced AVI transcoding settings, and then click
6. Click
Browse... to configure the export destination.
• You can select a clip in the clip list on the "Export" dialog box and click
Down to change the export order.
• You can select a clip in the clip list on the "Export" dialog box and click
OK.
Up or
Delete
to delete it from the export list.
7. Click
Start.
• The conversion and export begin. You can check the progress in the transfer
screen.
68 T2 Users Manual –SP3/SP4– October 17, 2011
Page 69

MXF import and export functions
Loading and editing T2 sources in other editing software
You can load and edit T2 sources in Adobe Premiere Pro and Apple Final Cut Pro.
Convert clips in a bin to the XDCAM format and download the converted clips via
FTP from a client.
For more information on how to configure the FTP settings, see "Sending/receiving
XDCAM sources to/from your T2 via FTP" on page 20.
CAUTION: If you want to use Chinese for file names, you must set the character
set of file names to UTF-8 on the FTP client side beforehand. Correct file names
cannot be displayed if the character sets do not match. The configuration method
depends on your software. Refer to the help etc. of your software.
Example: Convert an AVI file
1. Select the clip(s) you want to convert, right-click on it, and then click Convert
Convert to MXF(XDCAM).
• Multiple clips can be selected.
2. Click
Yes.
• The conversion begins. You can check the progress in the transfer screen.
• The new converted clips will be saved in the same bin as their original ones.
3. Download the converted clip(s) via FTP from a client PC.
4. Load the T2 sources in the editing software on the client PC.
October 17, 2011 T2 Users Manual –SP3/SP4– 69
Page 70

Chapter 6 Additional/Updated Functions for SP3 and SP4
AVCHD import and export functions
Supported formats
Codec Type Frame size Frame rate
H.264/
AVC
AVCHD 1920 x 1080
59.94i 0 in 1 out
50i 0 in 1 out
R1*/P1/P2
Supported
○:
×: Not supported
Import
Import
(AVCHD)
(AVCHD=>
Grass Valley
HQ AVI)
○○
○○
1440 x 1080
1280 x 720
720 x 480
720 x 576
AVCHD-PRO
(PH-mode)
NXCAM 1920 x 1080
1920 x 1080
1280 x 720
23.98p 0 in 1 out
59.94i 0 in 1 out
50i 0 in 1 out
23.98p 0 in 1 out
59.94p 0 in 1 out
50p 0 in 1 out
23.98p 0 in 1 out
59.94i 0 in 1 out
50i 0 in 1 out
30p (over 60i) ―
25p (over 50i) ―
30p (over 60p) ―
25p (over 50p) ―
60i 0 in 1 out
24p 0 in 1 out
○○
○○
○○
○○
○○
○○
○○
○○
○○
× ○
× ○
× ○
× ○
○○
○○
30p ―
50i 0 in 1 out
25p ―
1280 x 720
1440 x 1080
* Formats for Grass Valley HQ.
70 T2 Users Manual –SP3/SP4– October 17, 2011
60p 0 in 1 out
50p 0 in 1 out
60i 0 in 1 out
50i 0 in 1 out
× ○
○○
× ○
○○
○○
○○
○○
Page 71
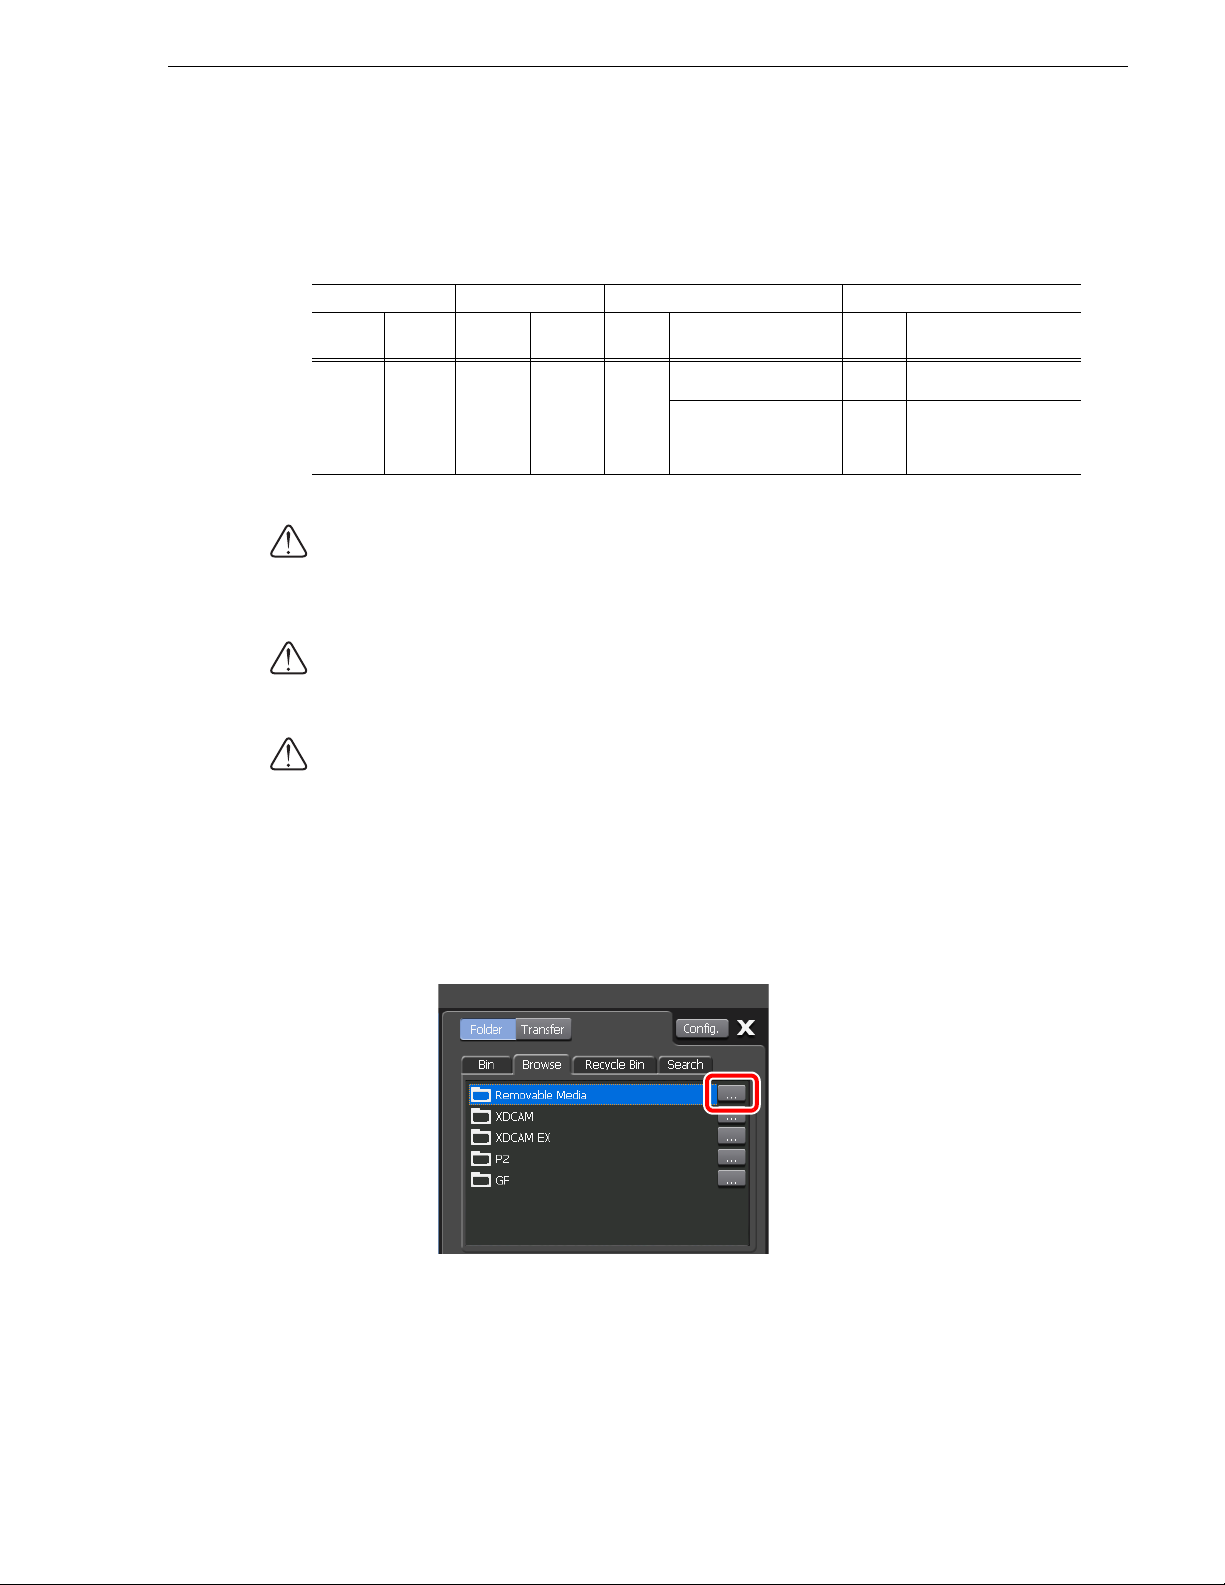
AVCHD import and export functions
The following table lists the availability of direct playback, FTP transfer, import, and
export operations for each format:
• AVCHD single file (*.mts, *.m2ts)
○: Supported
Browse FTP Import Export
List view
Direct
playback
Upload
Download
Import
Post-import format
Export Post-export format
AVCHD
*
○
* After importing, playback in the AVCHD format is available.
No
○○○
Grass Valley HQ AVI
CAUTION: Clips in the AVCHD format are available only for 1Out. If you want to
play a clip in the AVCHD format while recording in the R1 channel, playing a clip
in the P1/P2 channel, or loading a different clip in P1/P2 channel, you must stop
the recording/playback operation or unload the clip.
CAUTION: If you play clips in the AVCHD format at other than single speed, clips
may not be played clearly. If you want to play clips clearly at other than single
speed, we recommend that you convert them to Grass Valley HQ AVI for import.
CAUTION: The system is under heavy load during playback of clips in the AVCHD
format. We recommend that you reduce the load on the system by canceling the R1
preview update setting or pausing the file transfer etc.
Displaying AVCHD sources in removable media
You can check AVCHD format files saved in removable media on your T2.
1. Connect removable media to your T2.
AVCHD
○
Grass Valley HQ AVI
or
○
XDCAM (MXF single)
2. In the Browse tab, click
... for Removable Media.
3. Select a folder in removable media from the "Browse For Folder" dialog box, and
then click
OK.
• Select the BDMV folder or the STREAM folder.
• The folder name is added to the Removable Media node in the Browse tab, and the
clip list is displayed.
October 17, 2011 T2 Users Manual –SP3/SP4– 71
Page 72
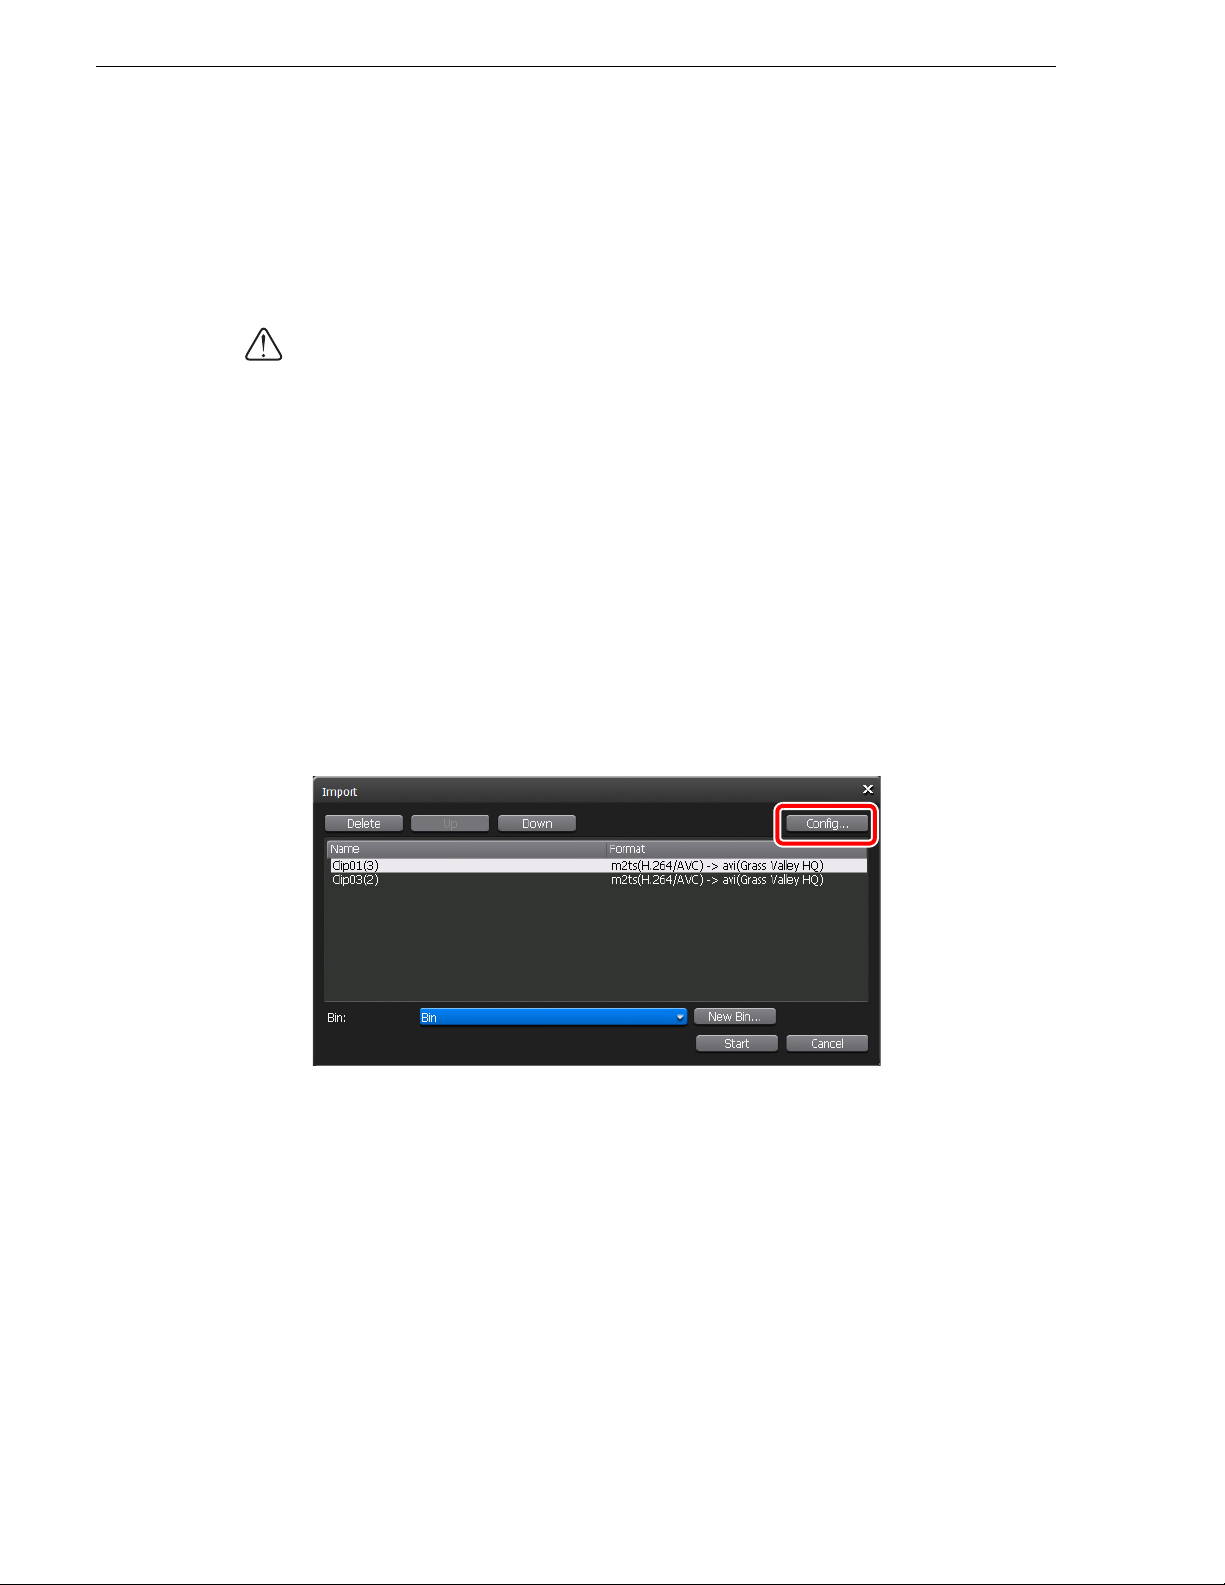
Chapter 6 Additional/Updated Functions for SP3 and SP4
Importing AVCHD sources (Import in the native format/Convert to Grass Valley HQ AVI for import)
You can import an AVCHD format file, which is saved in removable media, to your
T2 as the original AVCHD format or after converting it to the Grass Valley HQ AVI
format.
CAUTION: The system will import 480p, 720p (25p/29.97p/30p), and 1080p (25p/
29.97p/30p/50p/59.94p/60p) clips in the AVCHD format after converting them to
Grass Valley HQ AVI. These clips cannot be imported as their original native
formats.
NOTE: You can play a playlist in which AVCHD format sources and non-AVCHD
format ones are mixed.
NOTE: You can also convert a clip to Grass Valley HQ AVI after importing it as
the original AVCHD format.
1. Display the AVCHD format clips in the Browse tab.
2. Select the clip(s) you want to import, right-click on it, and then click
• Multiple clips can be selected.
• The "Import" dialog box appears.
3. Click
Config...
• The "Format" column in the list shows the file format to be imported. If no
change is necessary, you do not need to click
Proceed to step 6.
Config... to change the setting.
Import...
72 T2 Users Manual –SP3/SP4– October 17, 2011
Page 73

4. Click AVCHD in the "Transfer" tree.
AVCHD import and export functions
5. From the "File format after import:" list, select a format and then click
• If you import a clip as the AVCHD format, select
to Grass Valley HQ AVI for import, select
AVCHD. If you convert a clip
HQ.
6. Select the import destination bin.
• You can click New Bin... to create a new bin and specify it as the import
destination.
• You can select a clip in the clip list on the "Import" dialog box and click
Down to change the import order.
• You can select a clip in the clip list on the "Import" dialog box and click
to delete it from the import list.
OK.
Up or
Delete
7. Click
Start.
• The import begins. You can check the progress in the transfer screen.
October 17, 2011 T2 Users Manual –SP3/SP4– 73
Page 74

Chapter 6 Additional/Updated Functions for SP3 and SP4
CAUTION: By default, the system will pause any transfer and conversion during a
recording or playback. If you want to change the setting to allow transfer and
conversion to be performed even during a recording or playback, click
then click
recording or playing out.
or playback. However, if this option is unchecked, the recording/playback
operations may not be performed normally, therefore, we recommend that you use
the system with this option checked.
Common in the "Transfer" tree. Unchecking Pause file transfers while
enables transfer and conversion even during a recording
Converting AVCHD sources stored in a bin to Grass Valley HQ AVI
You can convert an AVCHD format clip that is stored in a bin to a Grass Valley HQ
AVI clip. The procedure is the same as for converting a Grass Valley HQ MXF format
clip to a Grass Valley HQ AVI clip. For more information, see "Converting Grass
Valley HQ MXF sources stored in a bin to Grass Valley HQ AVI" on page 62.
NOTE: Your T2 can play a playlist in which AVCHD format sources and
non-AVCHD format ones are mixed.
Sending/receiving AVCHD sources to/from your T2 via FTP
Config. and
FTP can be used to connect to your T2 from other devices or edit terminals etc. to
upload and download sources. Procedure for sending/receiving AVCHD sources to/
from your T2 via FTP is the same as for sending/receiving XDCAM sources to/from
your T2 via FTP. For more information, see "Sending/receiving XDCAM sources to/
from your T2 via FTP" on page 20.
CAUTION: If the post-import file type is set to "HQ" in the AVCHD import
settings, an AVCHD format source is converted to Grass Valley HQ AVI after the
upload when being uploaded to your T2 via FTP.
CAUTION: If you want to use Chinese for file names, you must set the character set
of file names to UTF-8 on the FTP client side beforehand. Correct file names cannot
be displayed if the character sets do not match. The configuration method depends
on your software. Refer to the help etc. of your software.
Exporting a file in the AVCHD format
Clips imported as the original AVCHD format can be exported as the AVCHD
format.
For important notes on exporting, see "Important notes on T2 export" on page 112.
1. Display the clips in the Bin tab.
2. Select the AVCHD format clip(s) you want to export, right-click on it, and then
click
Export Export Media Files...
• Multiple clips can be selected.
• A message related to export appears. Read the message, and then click
• The "Export" dialog box appears.
74 T2 Users Manual –SP3/SP4– October 17, 2011
OK.
Page 75

Restoring settings at the next startup
3. Click Browse... to configure the export destination.
• You can select a clip in the clip list on the "Export" dialog box and click
Down to change the export order.
• You can select a clip in the clip list on the "Export" dialog box and click
to delete it from the export list.
4. Click
Start.
• The export begins. You can check the progress in the transfer screen.
CAUTION: By default, the system will pause any transfer and conversion during a
recording or playback. If you want to change the setting to allow transfer and
conversion to be performed even during a recording or playback, click
then click
recording or playing out.
Common in the "Transfer" tree. Unchecking Pause file transfers while
enables transfer and conversion even during a recording
or playback. However, if this option is unchecked, the recording/playback
operations may not be performed normally, therefore, we recommend that you use
the system with this option checked.
Restoring settings at the next startup
You can retain current modes and settings when you exit your T2, and restore them at
the next startup.
The following modes can be restored at the next startup.
Up or
Delete
Config. and
• Workstation mode/Front panel mode
• R1-Live mode/R1-VTR mode/VTR batch mode
• Remote mode (R1-Remote mode/P1-Remote mode/P2-Remote mode)
October 17, 2011 T2 Users Manual –SP3/SP4– 75
Page 76

Chapter 6 Additional/Updated Functions for SP3 and SP4
You can set whether to restore the following items at the next startup.
• Contents of the playlist/clip loaded to the P1/P2 channel
Click
Config.
- Check Keep the contents mounted on P1/P2 to retain the contents of the
playlist/clip loaded to the P1/P2 channel.
, and then click
Miscellaneous
in the "General" tree.
- Check
Keep the playback frame positions on P1/P2 to retain the playback
position on the scrubbing bar.
- Check
Automatically playback the mounted contents on P1/P2 to play
the part between In and Out points of the playlist/clip loaded to the P1/P2
channel at the next startup automatically.
CAUTION: Changes such as the name or In/Out points of the clip loaded directly
from the Browse tab to the P1/P2 channel cannot be retained.
76 T2 Users Manual –SP3/SP4– October 17, 2011
Page 77

Restoring settings at the next startup
• Connections of the external drive displayed in the Browse tab
Click
Config.
Keep the connections on the browse tab
Check
external drive displayed in the Browse tab. The contents of the external drive
displayed in the Browse tab will be updated at the next startup.
, and then click
Miscellaneous
in the "General" tree.
to retain the connections of the
• Mapping state of the network drive
Click
Config.
configuration screen. Check
, and then click
Network-3
Reconnect on next bootup
in the "General" tree. Click
Drive" dialog box to retain the network drive connections.
* Cannot set this option in the front panel mode.
Add...
in the
on the "Map Network
October 17, 2011 T2 Users Manual –SP3/SP4– 77
Page 78

Chapter 6 Additional/Updated Functions for SP3 and SP4
Batch capture
You can import the batch capture list to your T2 and record sources at once.
The batch capture lists that can be imported are the following file formats:
• CSV file (Mode1/Mode2) (*.csv): Batch capture list created with EDIUS
• ALE file (*.ale): File corresponding to Avid Log Exchange batch capture list
• FCL file (*.fcl): File corresponding to Apple Final Cut Pro batch capture list
CAUTION: This function is available only in the workstation mode. This function
is not available in the front panel mode.
CAUTION: After importing the batch capture list to your T2, you cannot change
In/Out points, duration, or reel name or cannot add batch capture items.
Batch capture action settings
1. Click Config., and then click Capture in the "R1" tree.
2. Configure the preroll and margin in "VTR Capture".
• Enter the preroll time in "Preroll:".
• Enter the margin time before and after the recording range in "Margin:".
78 T2 Users Manual –SP3/SP4– October 17, 2011
Page 79

3. Configure the batch capture action in "VTR Batch Capture".
Batch capture
• In "Clip name", enter a prefix of the clip name generated at the batch capture.
The generated clip name is the "prefix of the clip name_Serial number". By
default, the clip name is "Clip_Serial Number".
• Unchecking
When an error occurs, continue to capture the following items.
stops recording if an error occurs.
• Unchecking
Completed items are not captured. performs the completed batch
capture items again at the next batch capturing.
4. Click
OK.
Importing the batch capture list and executing the batch capture
NOTE: Before executing the batch capture, make the input settings of the VTR you
use. Click
settings.
1. Switch to the R1-VTR mode.
Config., and then click Input Settings in the "R1" tree to configure the
October 17, 2011 T2 Users Manual –SP3/SP4– 79
Page 80
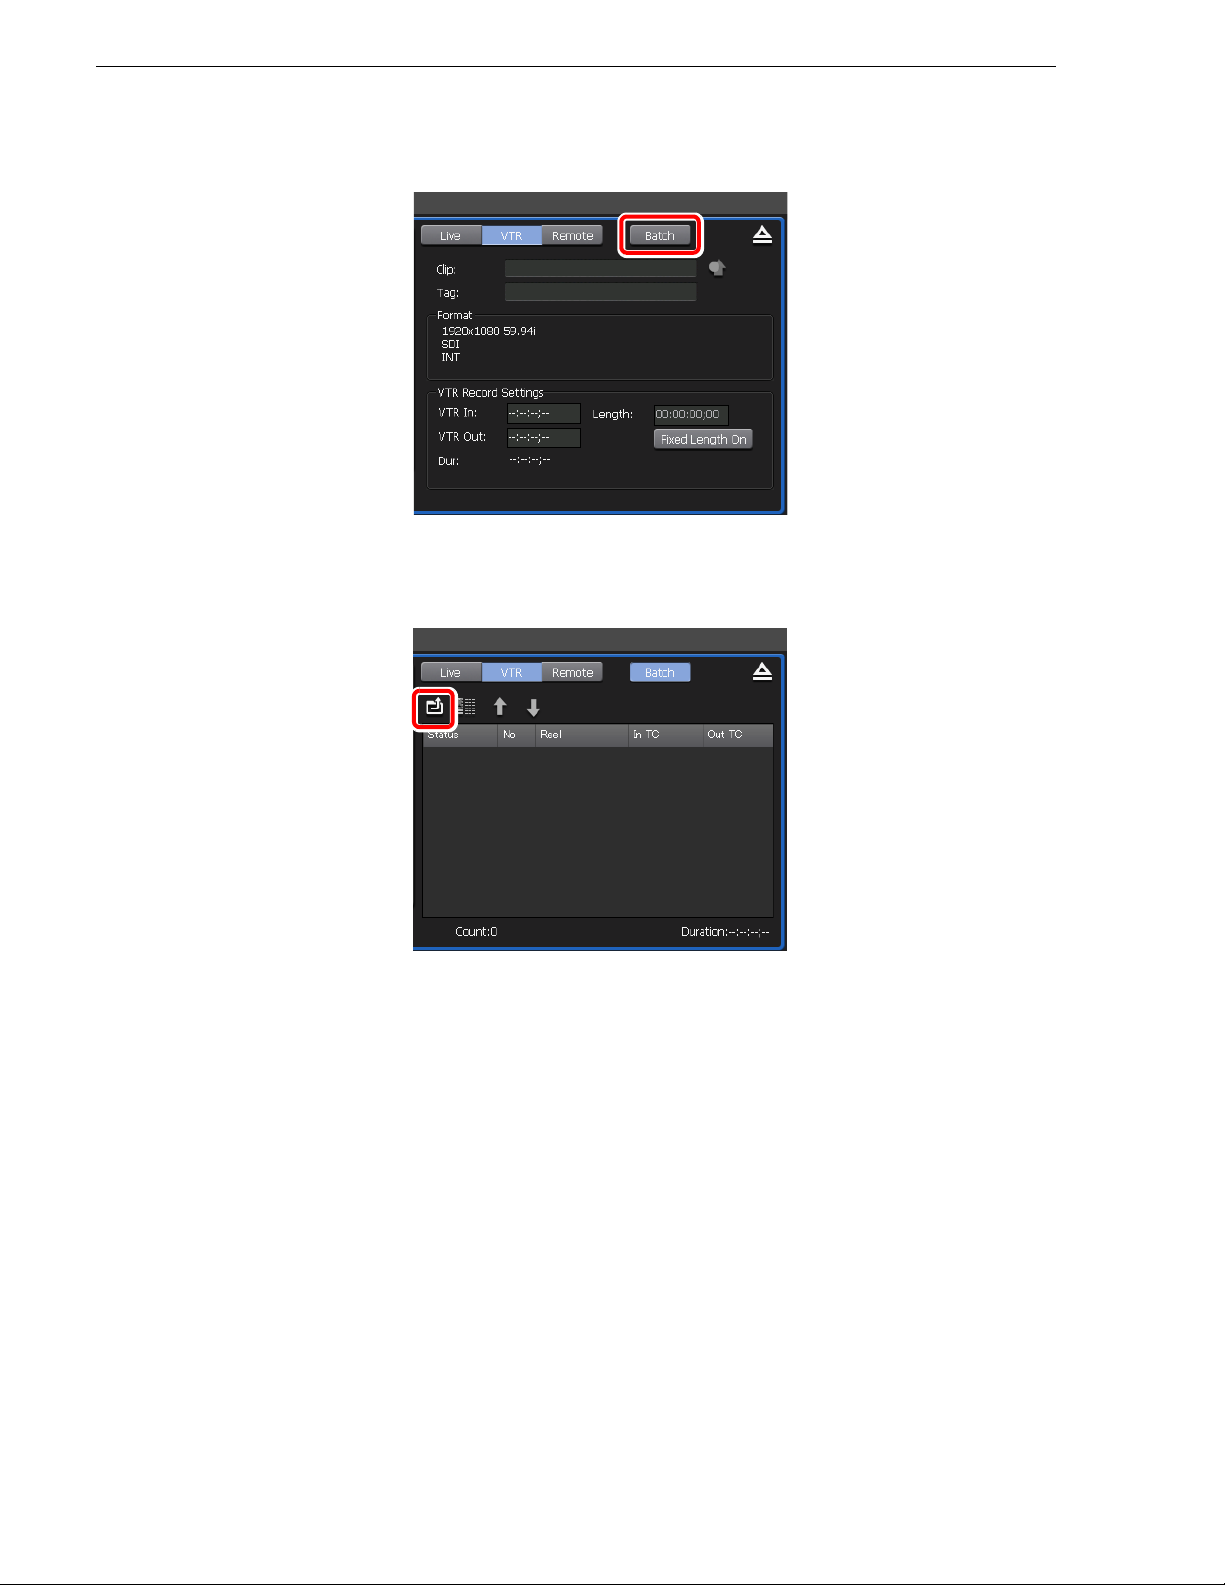
Chapter 6 Additional/Updated Functions for SP3 and SP4
2. Click Batch.
• The mode is switched to the VTR batch mode and the batch capture screen
appears.
3. Click
Import Batch capture list.
4. Select the batch capture list, and then click
OK.
80 T2 Users Manual –SP3/SP4– October 17, 2011
Page 81
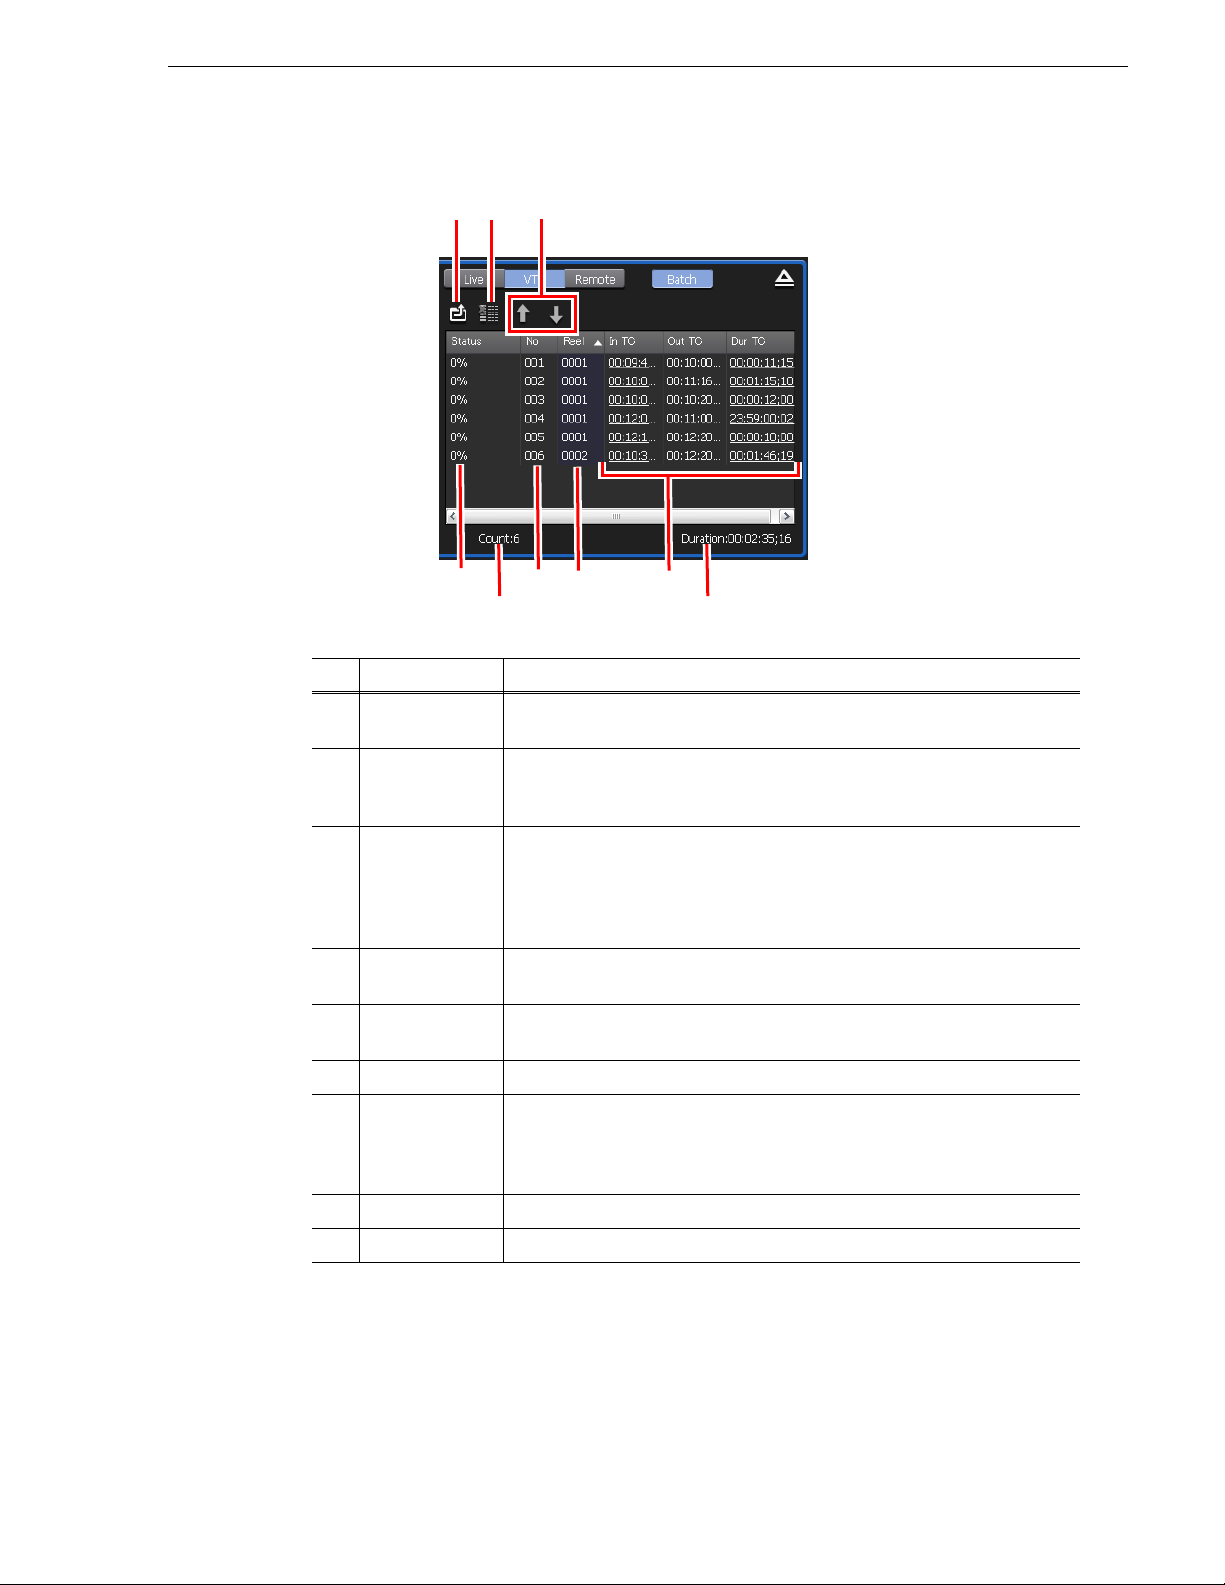
• The batch capture list appears.
(3)
(2)
(1)
Batch capture
(4)
No.
Name Function
Import Batch
(1)
capture list
Delete Delete a batch capture item.
(2)
Move up/
Move down
(3)
Status Display the recording progress. When an error occurs, the error detail is
(4)
No Display the serial number corresponding to the suffix of the clip name
(5)
(6) Reel Display the reel name.
In TC/Out TC/
Dur TC
(7)
(5)
(6) (7)
(8) (9)
Import the batch capture list (CSV, ALE, FCL files).
You can also delete a batch capture item by selecting and right-clicking an item,
and then click
Sort the batch capture items.
Select an item and click
down by one line.
You can also move an item by selecting an item, right-click on it, and then
click Move Up or Move Down
displayed.
generated after the batch capture.
Display the timecode of In/Out points and duration.
The timecode to be prioritized when recording is underlined. To change the
prioritized timecode, select and right-click an item, and then click Change
to "In/Out Capture" or Change to "In/Dur Capture".
Delete.
Move Up
or
Move Down
.
to move an item up or
(8) Count: Display the total number of the batch capture items.
(9) Duration: Display the total duration in the batch capture list.
NOTE: Select and right-click a batch capture item, and then click
Select All to
select all items.
October 17, 2011 T2 Users Manual –SP3/SP4– 81
Page 82
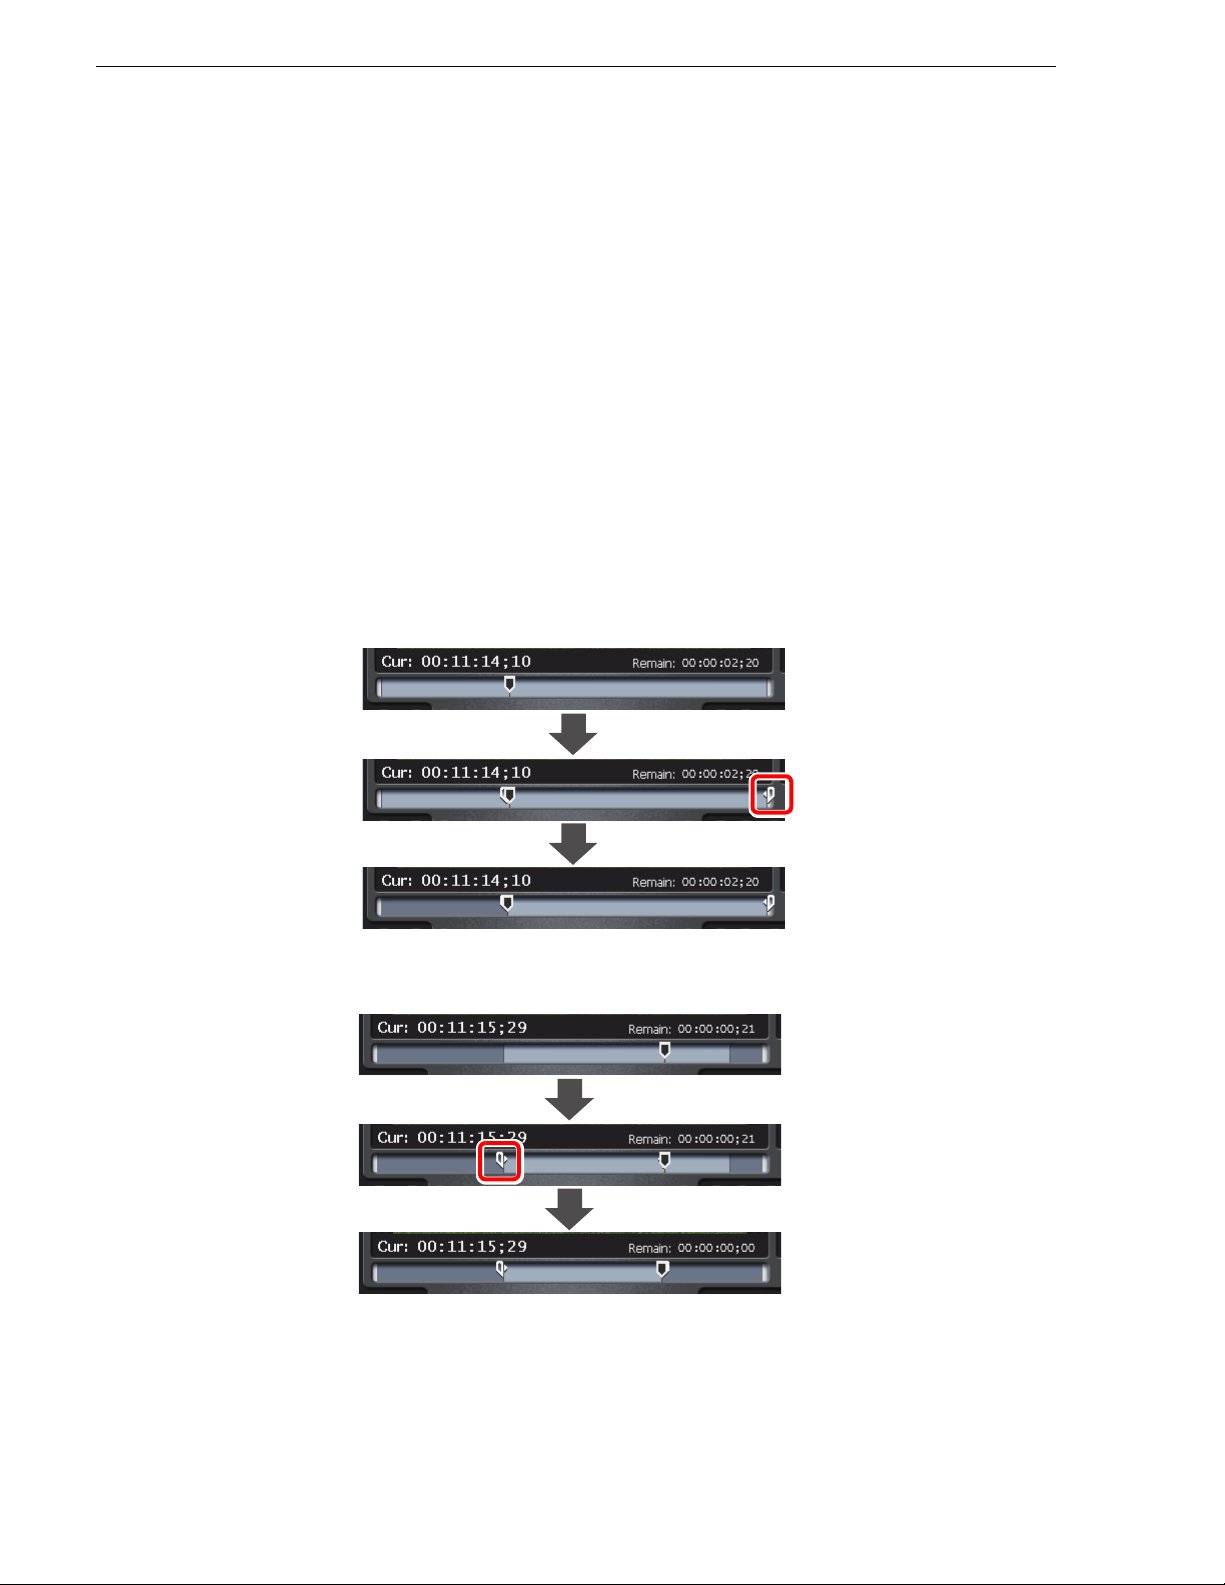
Chapter 6 Additional/Updated Functions for SP3 and SP4
5. Connect the VTR to your T2 and click Rec.
• If the batch capture items to which different reel names are set exist in the batch
capture list, a message appears. Insert a tape corresponding to the reel name into
the VTR and click
or if no reel name is set, a message will not appear and recording starts.)
• Recording starts and the progress is displayed in "Status".
OK. (If the same reel names are set in all batch capture items,
• If you stop the batch capture click
• Clips that have completed recording are stored in the currently selected bin.
Setting In and Out points
The step for setting In and Out points to clips loaded to the P1/P2 channel has
changed. When either an In or Out point is set, the corresponding In or Out point is
set automatically, therefore, In and Out points can be set easily.
For example, if an In point is set to any position of the clip in which In and Out points
have not been set, the Out point is automatically set at the end of the clip. Click
to set the In/Out point.
Stop.
Set
An Out point is set
automatically.
If an Out point is set to any position of the clip in which In and Out points have been
set, the already set In point is automatically set. Click
An In point is set
automatically.
82 T2 Users Manual –SP3/SP4– October 17, 2011
Set to update an In/Out point.
Page 83
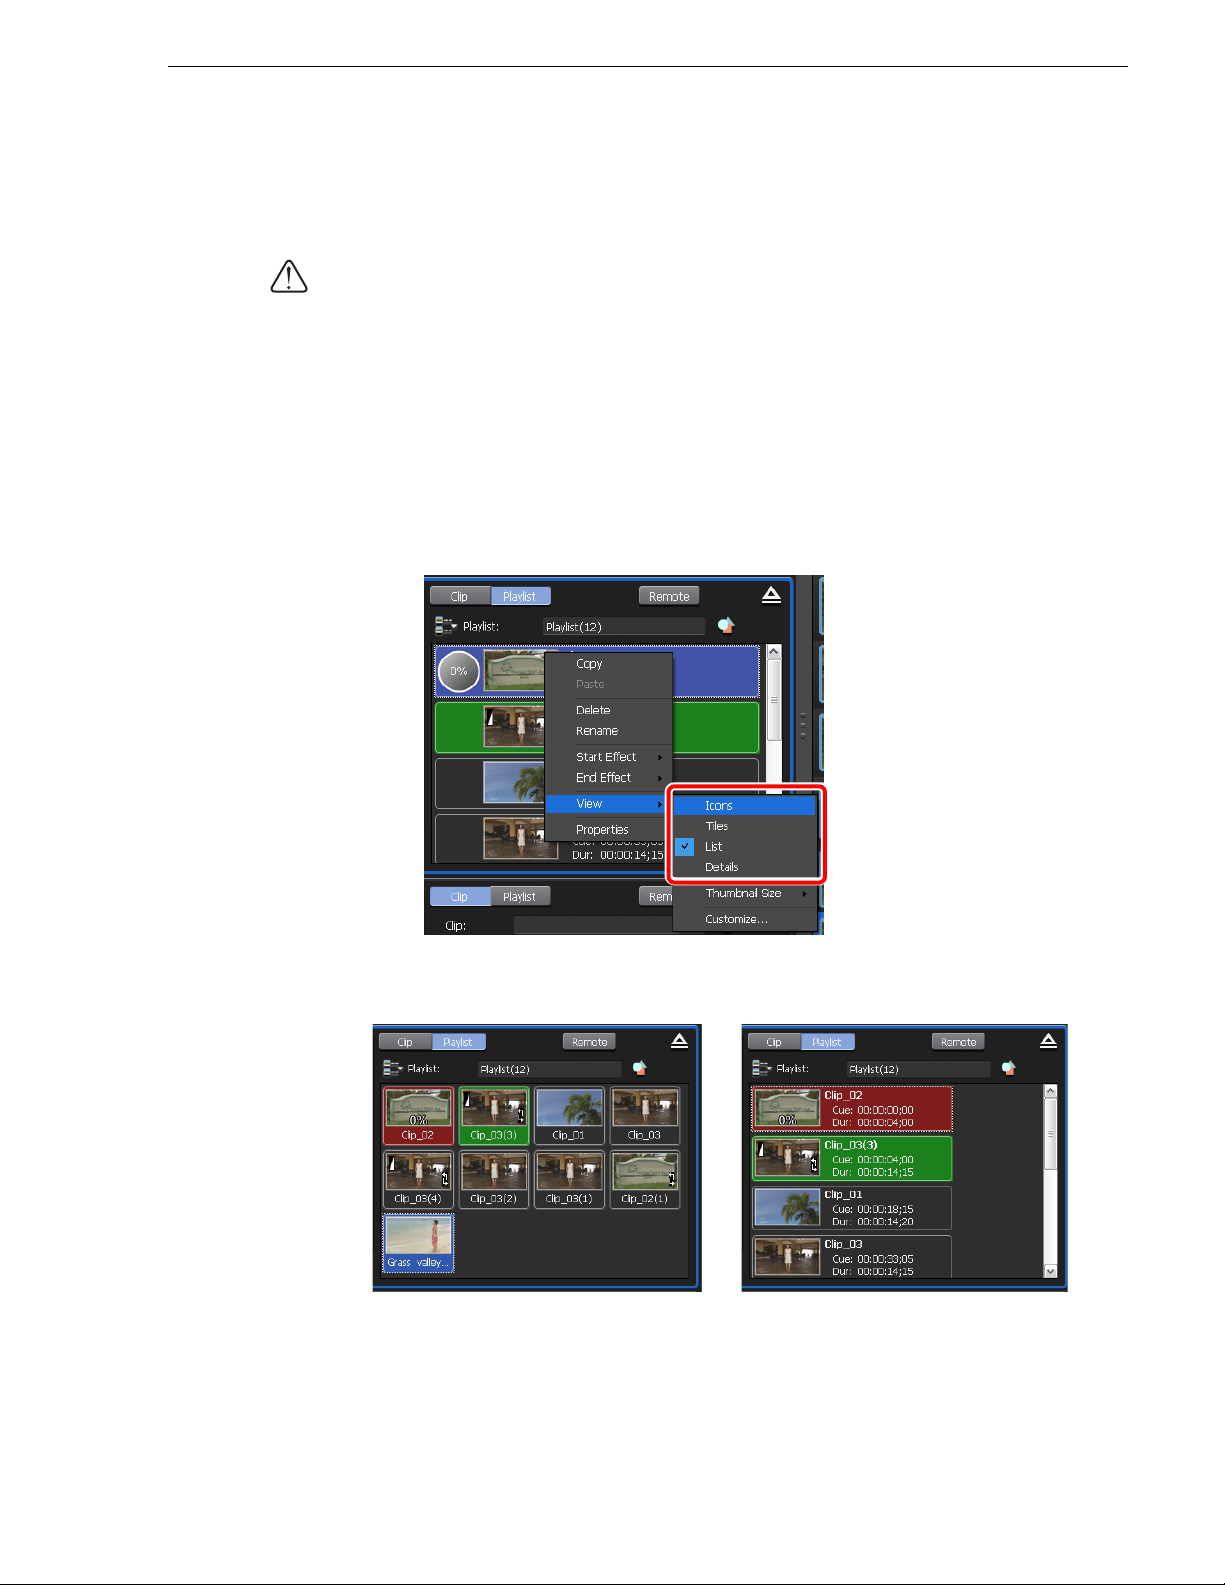
Additional/updated functions for the playlist view
Additional/updated functions for the playlist view
This section describes the additional/updated functions for the playlist view.
CAUTION: This function is available only in the workstation mode. This function
is not available in the front panel mode.
Switching event view
You can switch the display of events to the icon view or list view without thumbnail.
NOTE: You can set to show/hide the progress bar or keyboard shortcut icon
displayed in a thumbnail of events. For more information, see "Changing the event
view style and background color" on page 86.
Right-click on the event display area
1.
Details
• Select from the following four items:
).
- Icons: Icon view (with thumbnail) - Tiles: Tile view (with thumbnail)
and select View
an item (
Icons/Tiles/List
/
October 17, 2011 T2 Users Manual –SP3/SP4– 83
Page 84

Chapter 6 Additional/Updated Functions for SP3 and SP4
- List: List view (with thumbnail) - Details: Details view (without thumbnail)
NOTE: If keyboard shortcuts are assigned to events, an icon is displayed on the
thumbnail in the icon view, tile view, and list view.
- A red icon indicates the shortcut assigned to the event of the selected channel.
- A black icon indicates the shortcut assigned to the event of the specified channel.
NOTE: In the icon view, tile view, and list view, you can set to show/hide the
progress bar or keyboard shortcut icon. For more information, see "Changing the
event view style and background color" on page 86.
NOTE: In the icon view, tile view, and list view, you can change the thumbnail size.
Right-click on the event display area and select
(Large/Middle/Small).
item
NOTE: You can change the event view by clicking
- For 1ch mode - For 3ch mode
View... Thumbnail Size an
Menu in the Playlist.
84 T2 Users Manual –SP3/SP4– October 17, 2011
Page 85
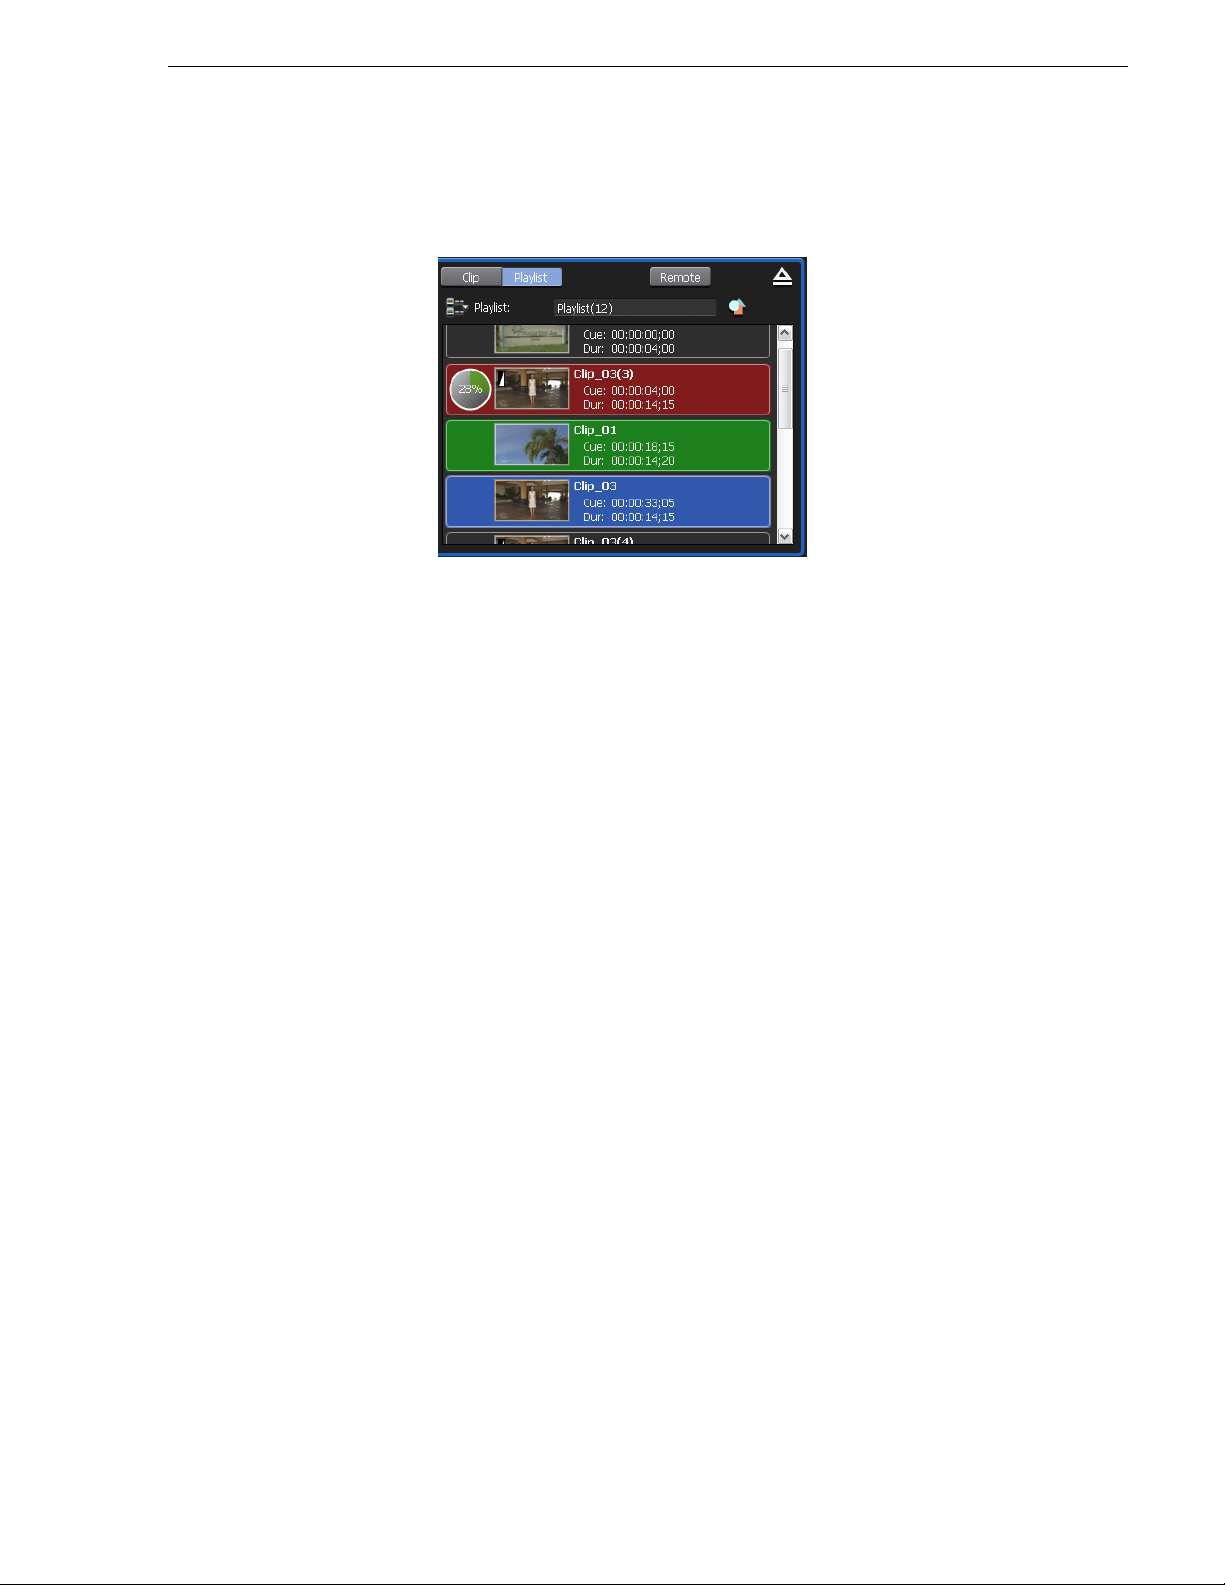
Background color for events
The current status of the event is indicated by the background color. By default, the
meanings of background colors are as follows:
• Red indicates that the event has the playback position on the scrubbing bar.
• Green indicates the next event has the playback position on the scrubbing bar.
• Blue indicates that the event is selected.
Additional/updated functions for the playlist view
NOTE: You can change the background color. For more information, see
"Changing the event view style and background color" on page 86.
October 17, 2011 T2 Users Manual –SP3/SP4– 85
Page 86
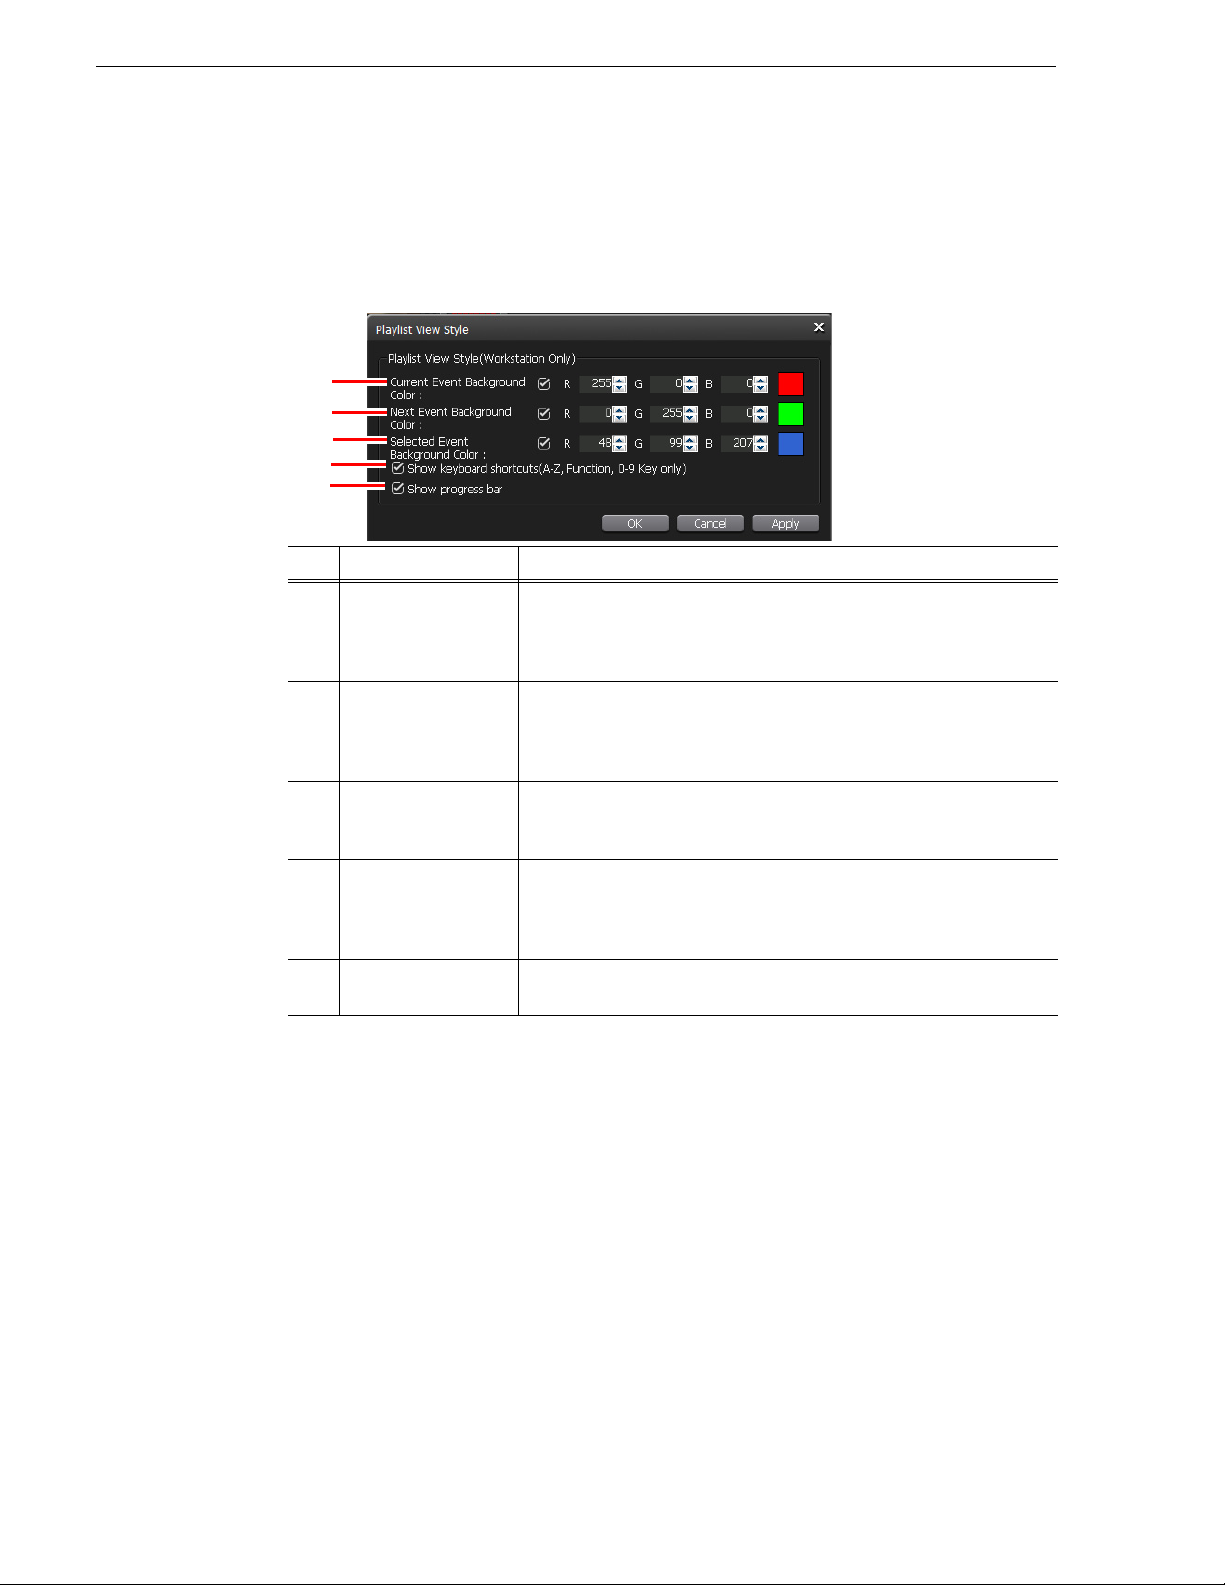
Chapter 6 Additional/Updated Functions for SP3 and SP4
Changing the event view style and background color
You can change the settings of the event view style and background color.
1. Right-click on the event display area and select
• The "Playlist View Style" dialog box appears.
(1)
(2)
(3)
(4)
(5)
No.
Name Function
Current Event
Background Color:
(1)
Next Event
Background Color:
(2)
Selected Event
(3)
Background Color:
Show keyboard
shortcuts (A-Z,
(4)
Function, 0-9 Key
only)
Set to show/hide the background color indicating that the event has the
playback position on the scrubbing bar.
To change the background color, check this item and specify the value
for R, G, and B. The specified color is displayed on the right.
Set to show/hide the background color indicating that the next event has
the playback position on the scrubbing bar.
To change the background color, check this item and specify the value
for R, G, and B. The specified color is displayed on the right.
Set to show/hide the background color indicating the selected event.
To change the background color, check this item and specify the value
for R, G, and B. The specified color is displayed on the right.
Set to show/hide the keyboard shortcut icon assigned to the event.
* Icons can be shown only when the [A] to [Z] keys, function key, and
[0] to [9] keys on the keyboard are assigned.
View Customize...
Show progress
(5)
bar
2. Configure the settings, and then click
NOTE: You can configure the settings on the screen displayed by clicking
then click
Miscellaneous
Set to show/hide the progress bar of the playback.
OK.
in the "General" tree. Click
Settings...
Config.
, and
in "Playlist View
Style:".
Selecting and sorting multiple events
You can select multiple events to copy, delete, change the names, and set the start
effect and end effect.
As with the PC operations, use the [Ctrl] key or [Shift] key on the keyboard or drag
the mouse to select multiple events and perform operations from the right-click menu.
You can change the event order by the drag & drop operation. You can also sort the
multiple events you selected.
86 T2 Users Manual –SP3/SP4– October 17, 2011
Page 87
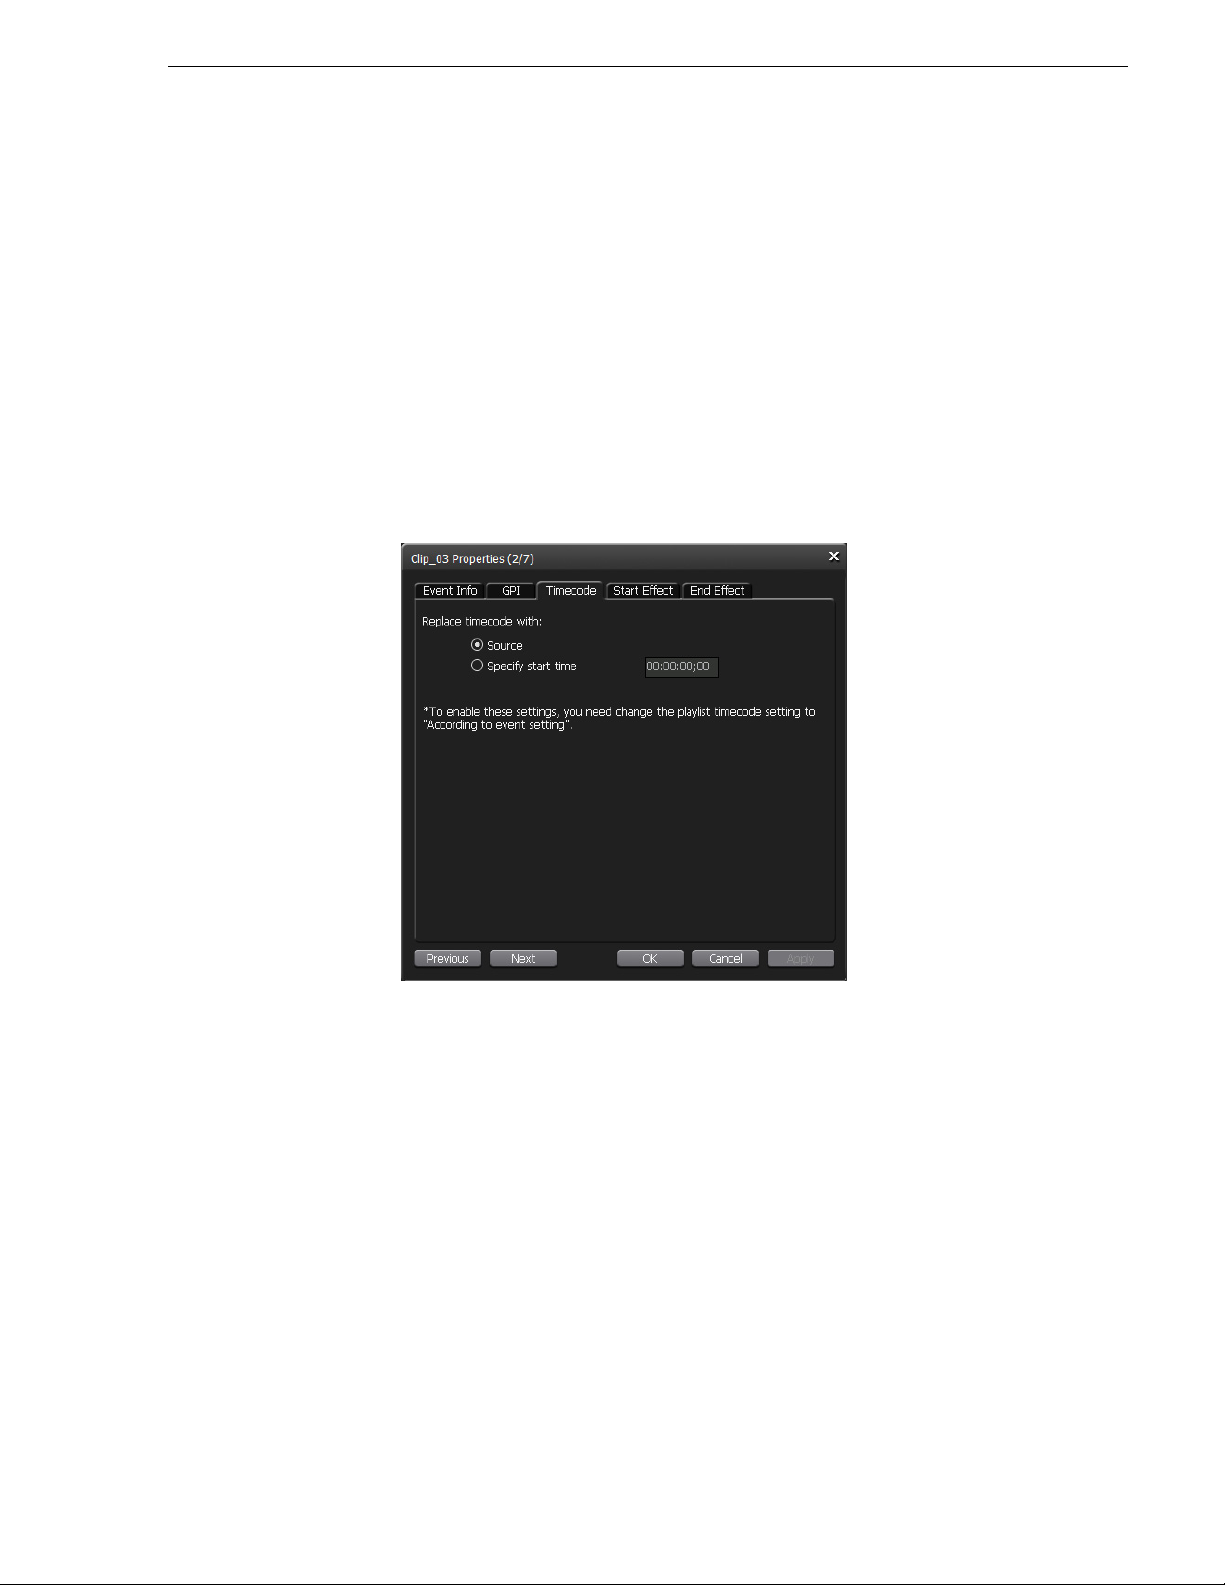
Setting a specific timecode to an event in a playlist
Setting a specific timecode to an event in a playlist
You can set a specific timecode to each event (clip event/playlist event) in a playlist.
In the 1ch mode or trim mode, you can check the timecode set to each event.
The following is the procedure for setting a specific timecode to each event.
NOTE: If you set a specific timecode to a clip, you can retain the timecode setting
at the time when the clip is added to a playlist. After adding a clip to a playlist,
perform the operations of steps 3 and 4. (If you change the timecode setting of the
original clip after adding the clip to a playlist, the setting will not be reflected in the
playlist.
1. Display the event properties.
2. Click the
• To use the timecode of the source in a media file, select
• To use any given timecode, select
timecode.
Timecode tab and set the timecode of the event
Specify start time and enter the start
Source.
• To retain the timecode setting for the event in a playlist event, select
to event setting
3. Display the playlist properties.
October 17, 2011 T2 Users Manual –SP3/SP4– 87
.
According
Page 88
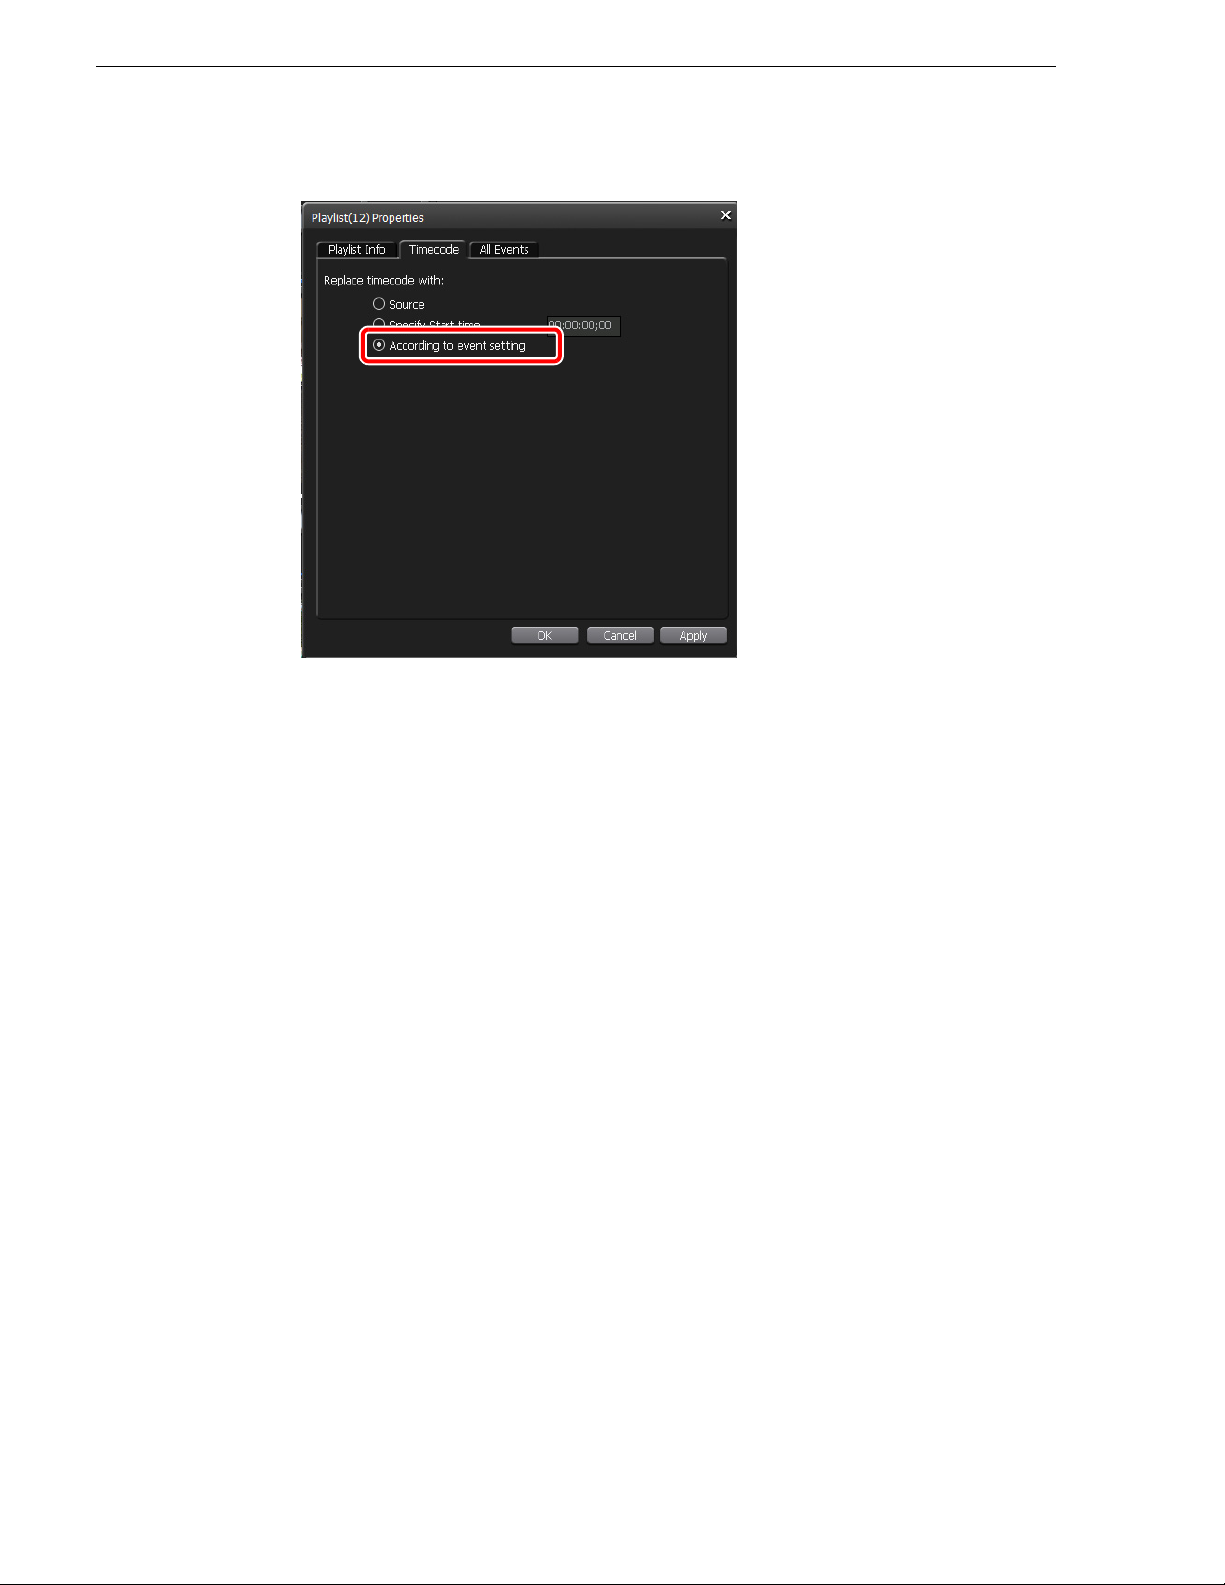
Chapter 6 Additional/Updated Functions for SP3 and SP4
4. Click the Timecode tab, select According to event setting, and then click OK.
Setting an event template
You can set the effect at the event start point (start effect) or the effect at the event end
point (end effect) as an event template. If you set an event template, the template
setting is applied to newly added events.
The following is the procedure for setting an event template.
1. Click
Config., and then click Miscellaneous in the "General" tree.
88 T2 Users Manual –SP3/SP4– October 17, 2011
Page 89
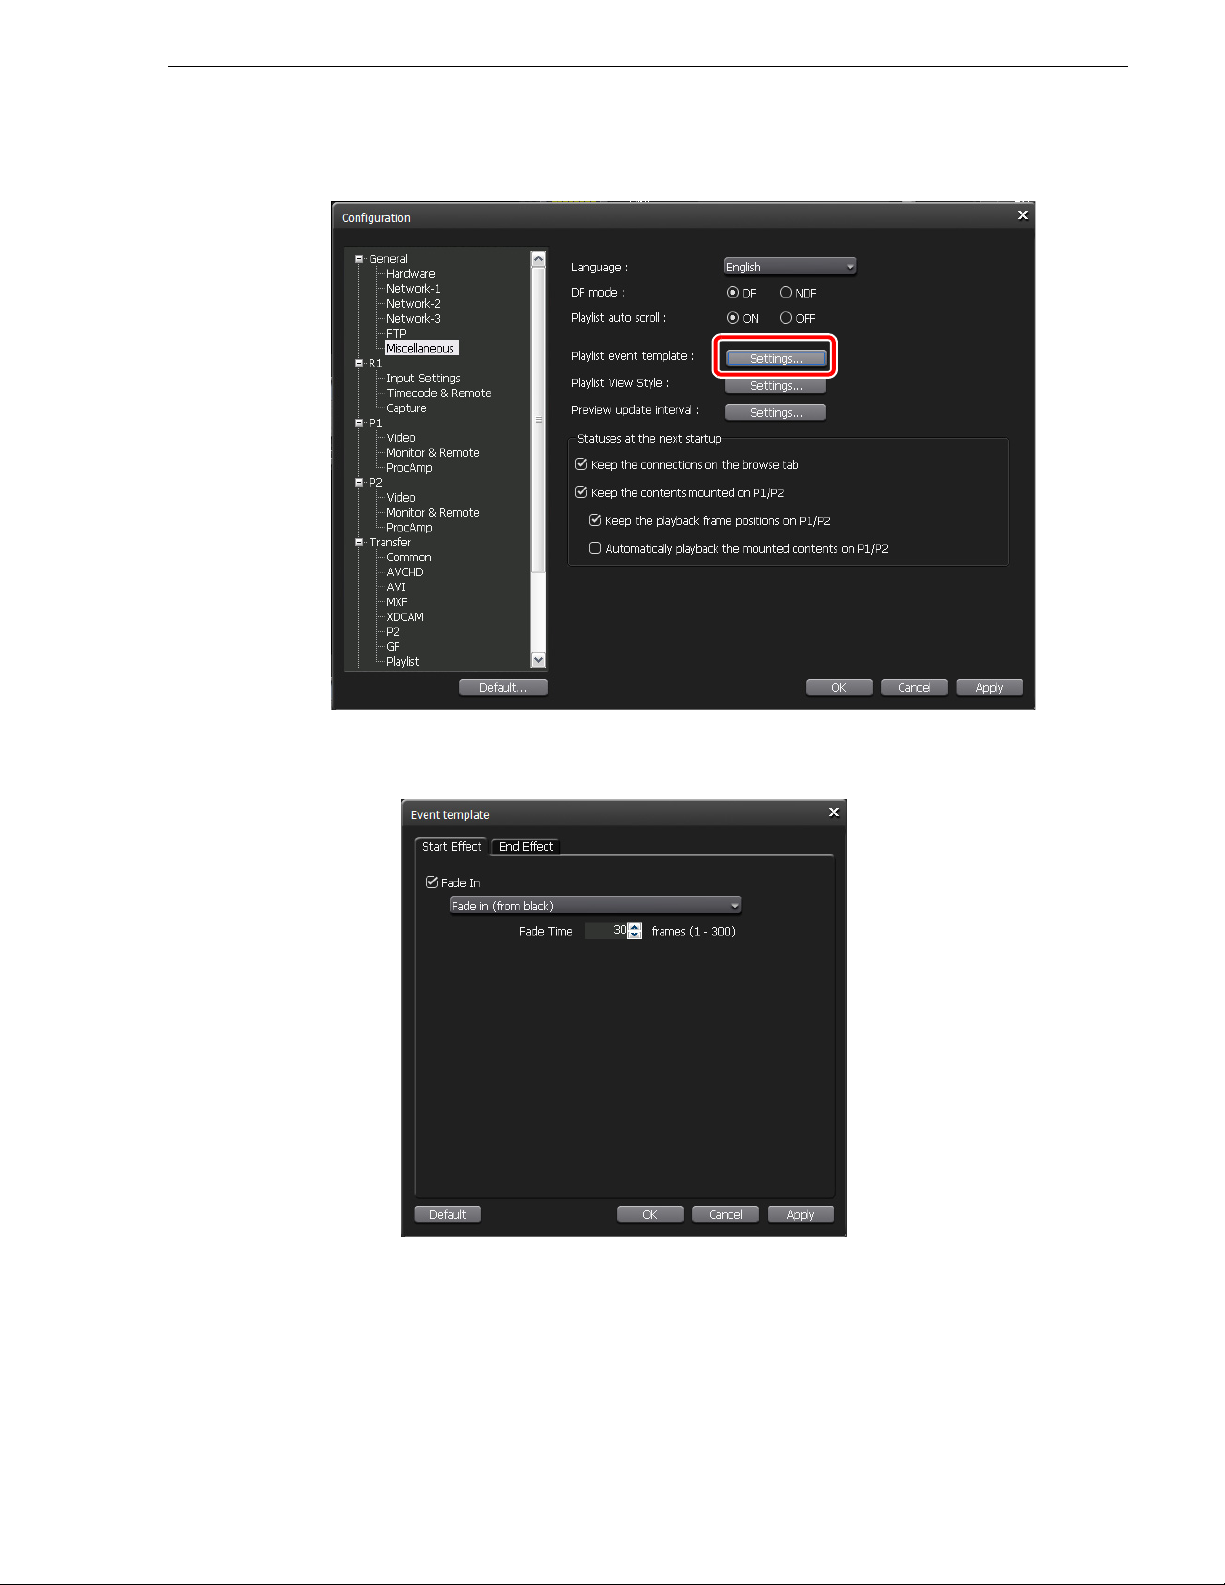
2. Click Settings... in "Playlist event template:".
Setting an event template
• The "Event template" dialog box appears.
3. In the
Start Effect tab, set the start effect.
• To set a fade in effect, check
- Fade in (from black): Set a fade in effect from a black screen.
- Fade in (from white): Set a fade in effect from a white screen.
Fade in. Select an item from the list.
• Enter the duration between the beginning and the end of the fade in effect (the
number of frames) in "Fade Time".
October 17, 2011 T2 Users Manual –SP3/SP4– 89
Page 90

Chapter 6 Additional/Updated Functions for SP3 and SP4
4. In the End Effect tab, set the end effect.
• To set a fade out effect, check
- Fade out (to black): Set a fade out effect to a black screen.
- Fade out (to white): Set a fade out effect to a white screen.
Fade out. Select an item from the list.
• Enter the duration between the beginning and the end of the fade out effect (the
number of frames) in "Fade Time".
• To set an action, check
- Pause (show black): Pause the playback with a black screen displayed.
- Pause (show white): Pause the playback with a white screen displayed.
- Pause (last frame): Pause the playback with the last frame displayed.
- Pause (next event): Pause the playback with the first frame of the next event
displayed.
- Pause (show EtoE): Display the video input to the R1 channel with active through.
- Loop: Play back the event in loop.
Action. Select an item from the list.
5. Click OK.
• If you add new events, the event template setting is applied regardless of the start
effect or end effect setting of the original clip.
Converting a playlist to a single clip
A playlist can be converted to a single clip (media file). A playlist is converted to a
clip in Grass Valley HQ AVI or MXF (XDCAM format).
CAUTION: If a playlist is converted to a single clip, the effect set to the playlist is
disabled.
NOTE: To convert a playlist to an MXF (XDCAM format) clip, click
AVI in the "Transfer" tree, and then configure the format settings on the screen.
Config., click
NOTE: A playlist that contains multiple formats can be converted to a single clip.
90 T2 Users Manual –SP3/SP4– October 17, 2011
Page 91

Converting a playlist to a single clip
NOTE: A timecode set in a playlist or event properties can be retained in each
frame of the converted media file.
NOTE: The profile (size and frame rate) of the converted clip is the same as the
profile of the playlist.
NOTE: The audio gain set for the event in the playlist is maintained in the
converted clip. Audio is converted into PCM 48kHz 24bit 8ch.
Converting a playlist stored in a bin to a single clip
1. In the Bin tab, select the playlist(s) you want to convert, right-click on it, and then
Convert Convert to AVI(Grass Valley HQ) or Convert to MXF(XDCAM).
click
• Multiple playlists can be selected.
2. Click
Yes.
• The conversion begins. You can check the progress in the transfer screen.
• The new converted clips will be saved in the same bin as their original playlists.
CAUTION: By default, the system will pause any transfer and conversion during a
recording or playback. If you want to change the setting to allow transfer and
conversion to be performed even during a recording or playback, click
then click
recording or playing out.
Common in the "Transfer" tree. Unchecking Pause file transfers while
enables transfer and conversion even during a recording
or playback. However, if this option is unchecked, the recording/playback
operations may not be performed normally, therefore, we recommend that you use
the system with this option checked.
Converting a playlist to a single media file for export
For important notes on exporting, see "Important notes on T2 export" on page 112.
1. In the Bin tab, select the playlist(s) you want to export, right-click on it, and then
click
Export Export Media Files...
• Multiple playlists can be selected.
• A message related to export appears. Read the message, and then click
• The "Export" dialog box appears.
Config. and
OK.
October 17, 2011 T2 Users Manual –SP3/SP4– 91
Page 92

Chapter 6 Additional/Updated Functions for SP3 and SP4
2. Click Config...
• The "Format" column in the list shows the file format to be exported. If no
change is necessary, you do not need to click
Proceed to step 5.
Config... to change the setting.
3. Click
Playlist in the "Transfer" tree.
4. From the "File format after export:" list, select
OK.
MXF(XDCAM) or HQ and then click
92 T2 Users Manual –SP3/SP4– October 17, 2011
Page 93

Importing/exporting playlists and clips
5. Click Browse... to configure the export destination.
• You can select a clip in the clip list on the "Export" dialog box and click
Down to change the export order.
• You can select a clip in the clip list on the "Export" dialog box and click
to delete it from the export list.
6. Click
Start.
• The conversion and export begin. You can check the progress in the transfer
screen.
Importing/exporting playlists and clips
If you export playlists or clips in the T2 format (TWF file), you can import them to
other T2 with the information (In/Out points, effect, event list, etc.) retained.
NOTE: TWF file is a file in the ZIP format. If you change the extension of the TWF
file to "*.zip" and extract it with the extraction software for ZIP, you can extract it
as a media file.
NOTE: You can send/receive playlists and clips directly from T2 to other T2 via
FTP. For more information, see "Transferring media files to other T2" on page 95.
Exporting playlists and clips in the T2 format
For important notes on exporting, see "Important notes on T2 export" on page 112.
Up or
Delete
1. In the Bin tab, select the playlist(s) or clip(s) you want to export, right-click on it,
and then click
• Multiple playlists or clips can be selected.
• A message related to export to other T2 appears. Read the message, and then
click
• The "Export" dialog box appears.
October 17, 2011 T2 Users Manual –SP3/SP4– 93
Export Export in T2 Format (TWF Files)...
OK.
Page 94

Chapter 6 Additional/Updated Functions for SP3 and SP4
2. Click Browse... to configure the export destination.
3. Click
Start.
• The export begins. You can check the progress in the transfer screen.
Importing playlists and clips
The procedure for importing the TWF files to T2 depends on the export destination of
the TWF files.
• If the TWF files are in removable media, they can be imported from the Removable
Media node in the Browse tab with the normal procedures.
• If the TWF files are uploaded to FTP of the current T2 from other T2 or devices,
the TWF files can be used from the Bin tab without import operations.
94 T2 Users Manual –SP3/SP4– October 17, 2011
Page 95

Transferring media files to other T2
Transferring media files to other T2
You can transfer media files from T2 to other T2 via FTP. If you export media files
to the FTP server of T2 (destination) from
Bin tab on T2 (destination) without import operations.
First, on T2 (source), configure the FTP connection settings of T2 (destination).
Configuring the FTP server settings of T2 (destination)
1. Click Config., and then click FTP in the "General" tree.
T2 (source), you can use the files from the
2. Click
Add... in "FTP Export List".
• To change the current FTP connection settings, select a server and click
Change...
• To delete the current FTP connection settings, select a server and click Delete.
• The "FTP Connection Setting" dialog box appears.
October 17, 2011 T2 Users Manual –SP3/SP4– 95
Page 96
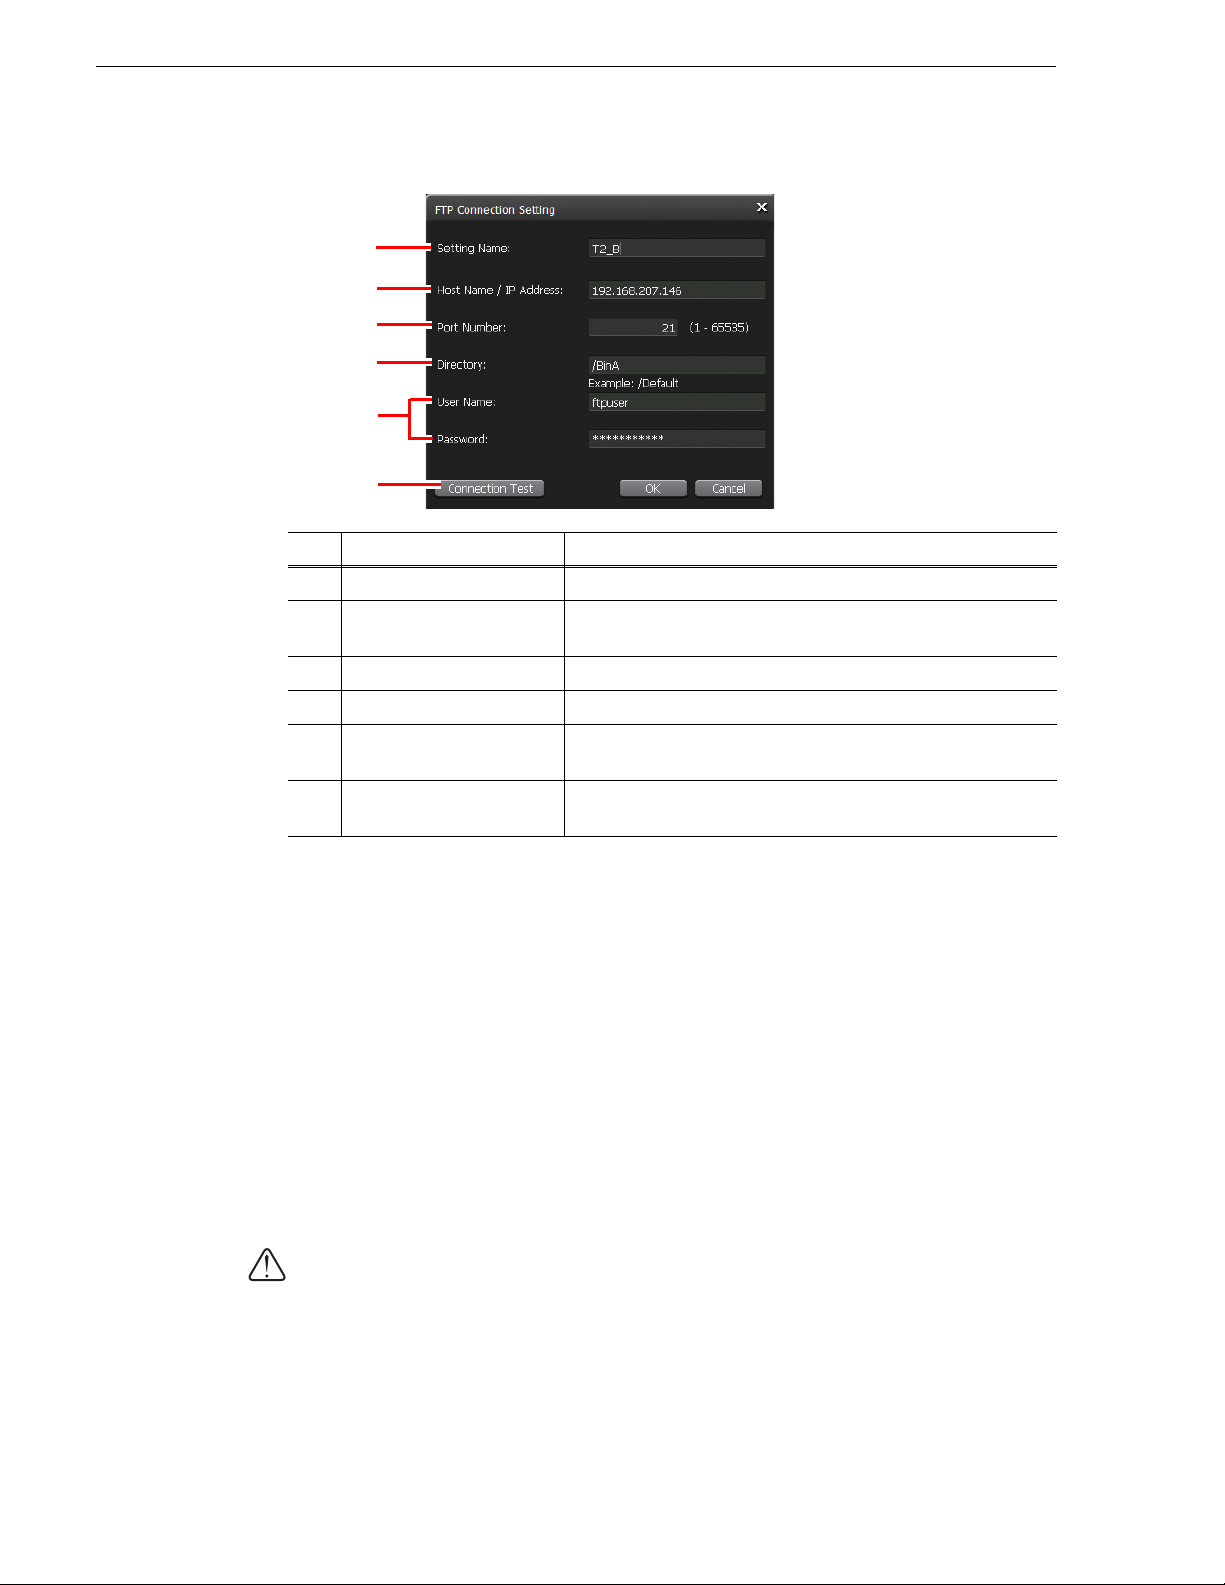
Chapter 6 Additional/Updated Functions for SP3 and SP4
3. Configure the FTP server settings of T2 (destination), and then click OK.
(1)
(2)
(3)
(4)
(5)
(6)
No. Name Function
(1) Setting Name: Enter the server setting name.
Host Name/
(2)
IP Address:
(3) Port Number: Enter a port number (1 to 65535).
(4) Directory: Enter a bin address of the export destination.
User Name:/
(5)
Password:
Connection Test
(6)
Enter the IP address or host name of the FTP server.
Enter a user name and password.
Click this button to test the FTP connection with the entered user
name and password.
Exporting media files from T2 to T2
For important notes on exporting, see "Important notes on T2 export" on page 112.
1. In the Bin tab, select the playlist(s) or clip(s) you want to export, right-click on it,
and then click
Files)...
• Multiple playlists or clips can be selected.
• To export playlists or clips in the T2 format (TWF file), click
Format (TWF Files)...
• A message related to export or a message related to export to other T2 appears.
Read the message, and then click
• The "Export" dialog box appears.
CAUTION: Playlists or clips composed of multiple files cannot be exported as the
original formats. Export them in the T2 format.
NOTE: To convert Grass Valley HQ AVI to MXF (XDCAM format) for export,
perform steps 2 to 5 in "Converting Grass Valley HQ AVI to MXF (XDCAM
format) and exporting the converted file" on page 67 on the "Export" dialog box.
Export Export Media Files... or Export in T2 Format (TWF
OK.
Export in T2
96 T2 Users Manual –SP3/SP4– October 17, 2011
Page 97
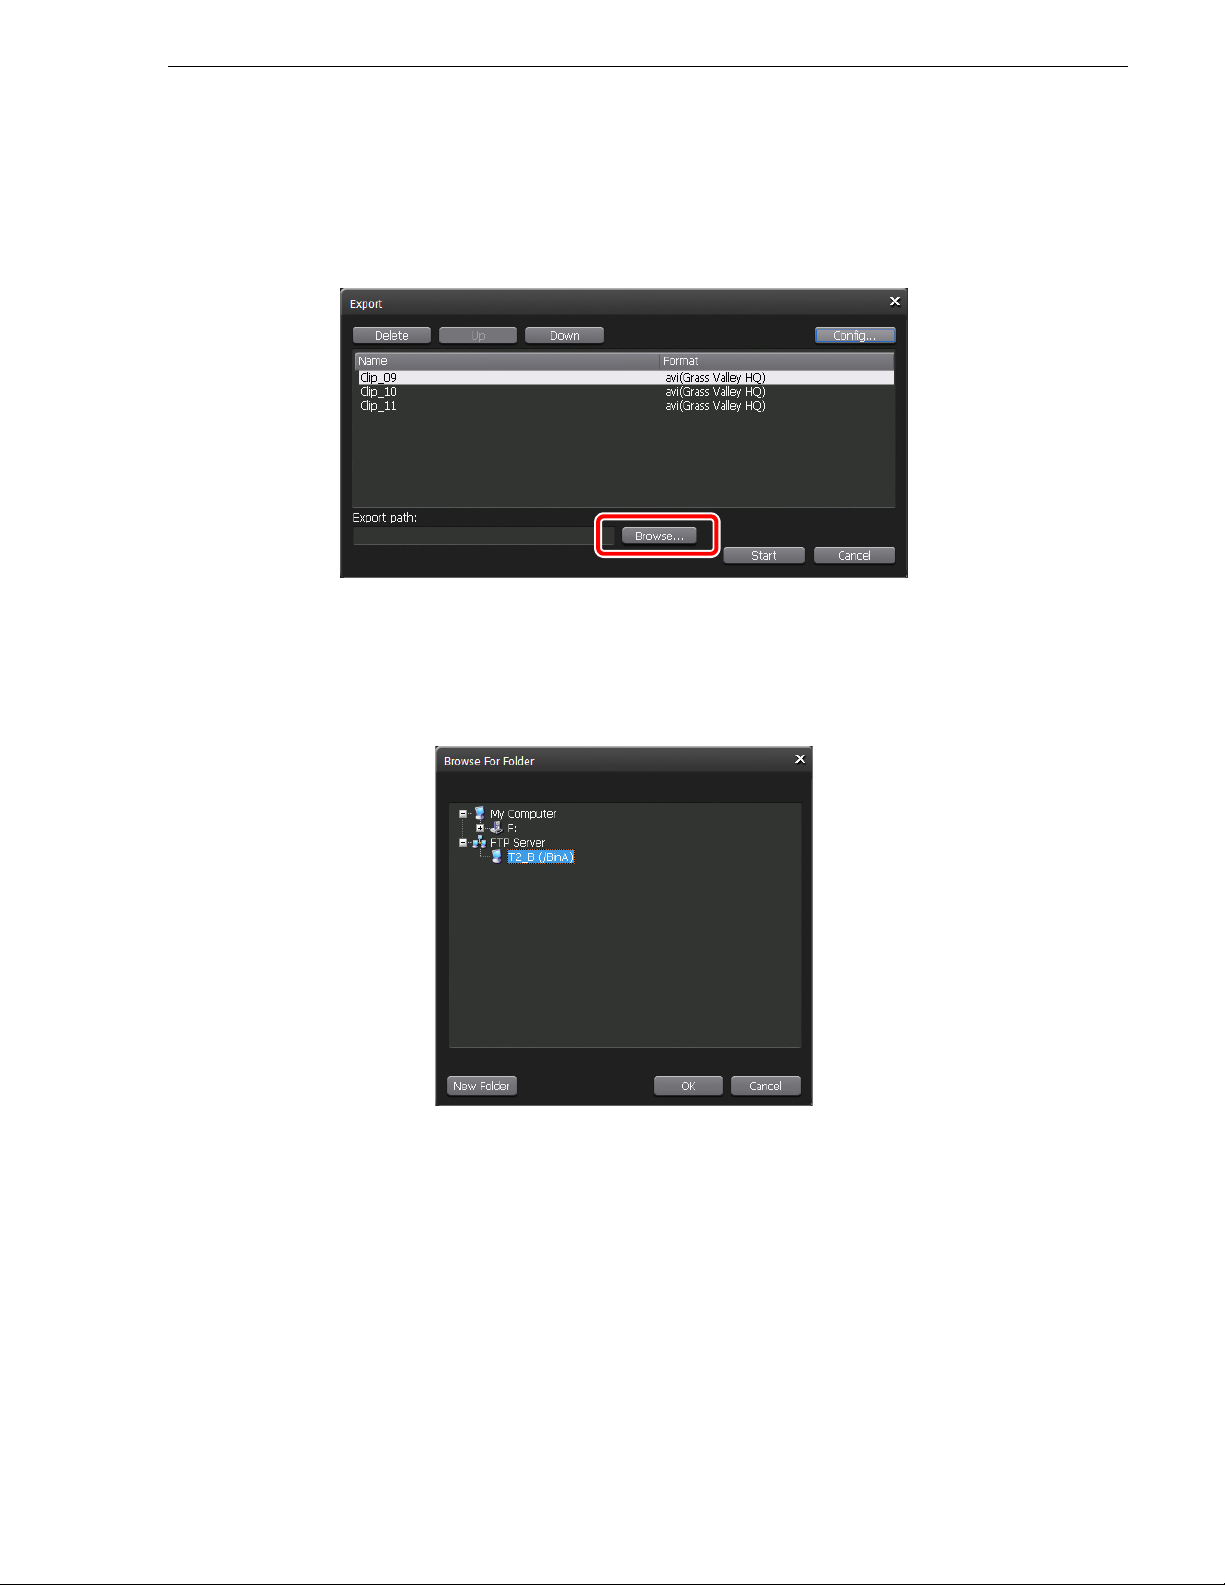
Transferring media files to other T2
NOTE: To convert a playlist to a single media file for export, perform steps 2 to 4
in "Converting a playlist to a single media file for export" on page 91 on the
"Export" dialog box.
2. Click
Browse...
• You can select a clip in the clip list on the "Export" dialog box and click Up or
Down to change the export order.
• You can select a clip in the clip list on the "Export" dialog box and click
Delete
to delete it from the export list.
3. Click the "FTP Server" tree, select the FTP server of T2 (destination), and then
OK.
• The FTP server configured on the "FTP Connection Setting" dialog box appears.
4. Click
Start.
• The export begins. You can check the progress in the transfer screen.
October 17, 2011 T2 Users Manual –SP3/SP4– 97
Page 98
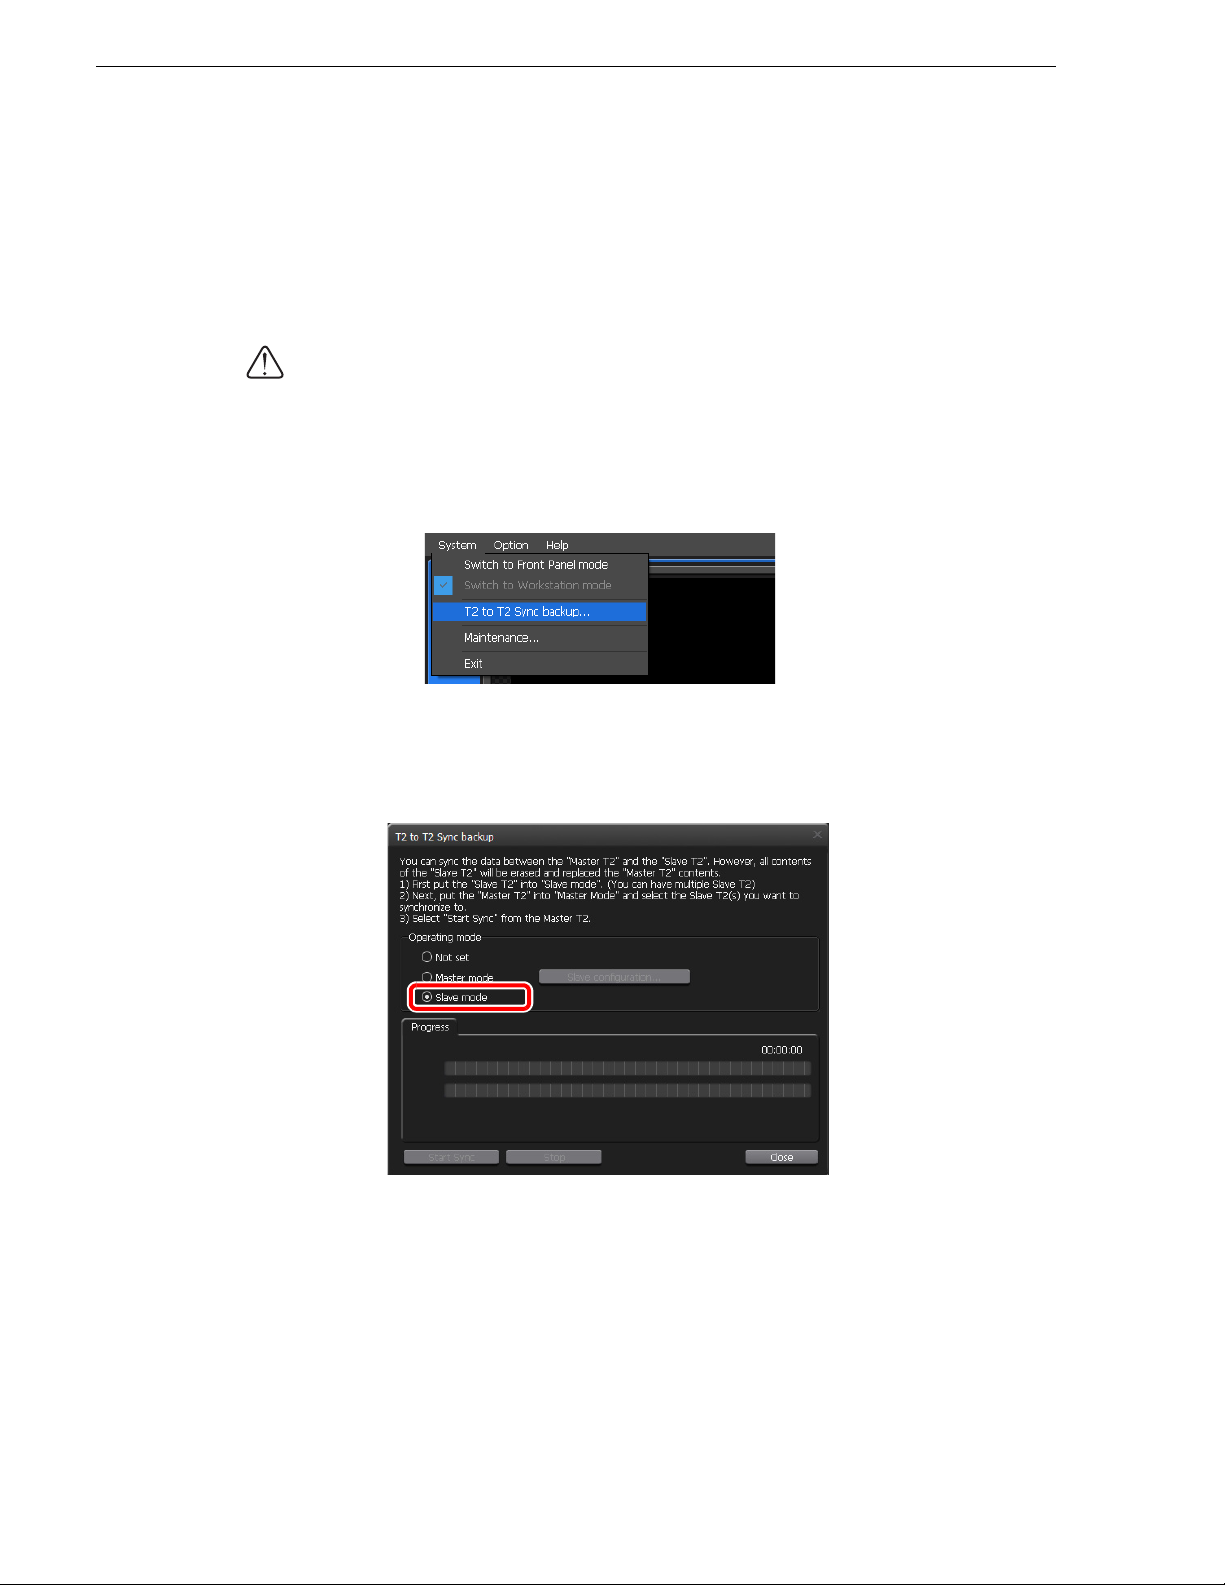
Chapter 6 Additional/Updated Functions for SP3 and SP4
Backing up all data to other T2 (Sync backup)
T2 data (media files and database) can be synchronized to other multiple T2 on the
network. T2 (slave) data on the sync destination is initialized and they are completely
synchronized to T2 (master) data.
The following is the procedure for synchronizing T2 (master) data to T2 (slave).
CAUTION: Set the remote mode (R1-Remote mode/P1-Remote mode/P2-Remote
mode) to off on both T2 (master and slave) beforehand. (You cannot switch between
on and off while transferring files.)
Setting T2 on the sync destination (slave) to the slave mode
1. From the menu bar, click System T2 to T2 Sync backup...
• If you capturing or loading clips in the R1/P1/P2 channel, a message appears
asking whether to unload clips. Click
• The "T2 to T2 Sync backup" dialog box appears.
2. Select
Slave mode, and then click Close.
• T2 on the sync destination (slave) is set to the slave mode.
• To synchronize data to multiple T2 (slave), perform steps 1 and 2 on all T2
(slave).
OK to unload clips.
98 T2 Users Manual –SP3/SP4– October 17, 2011
Page 99
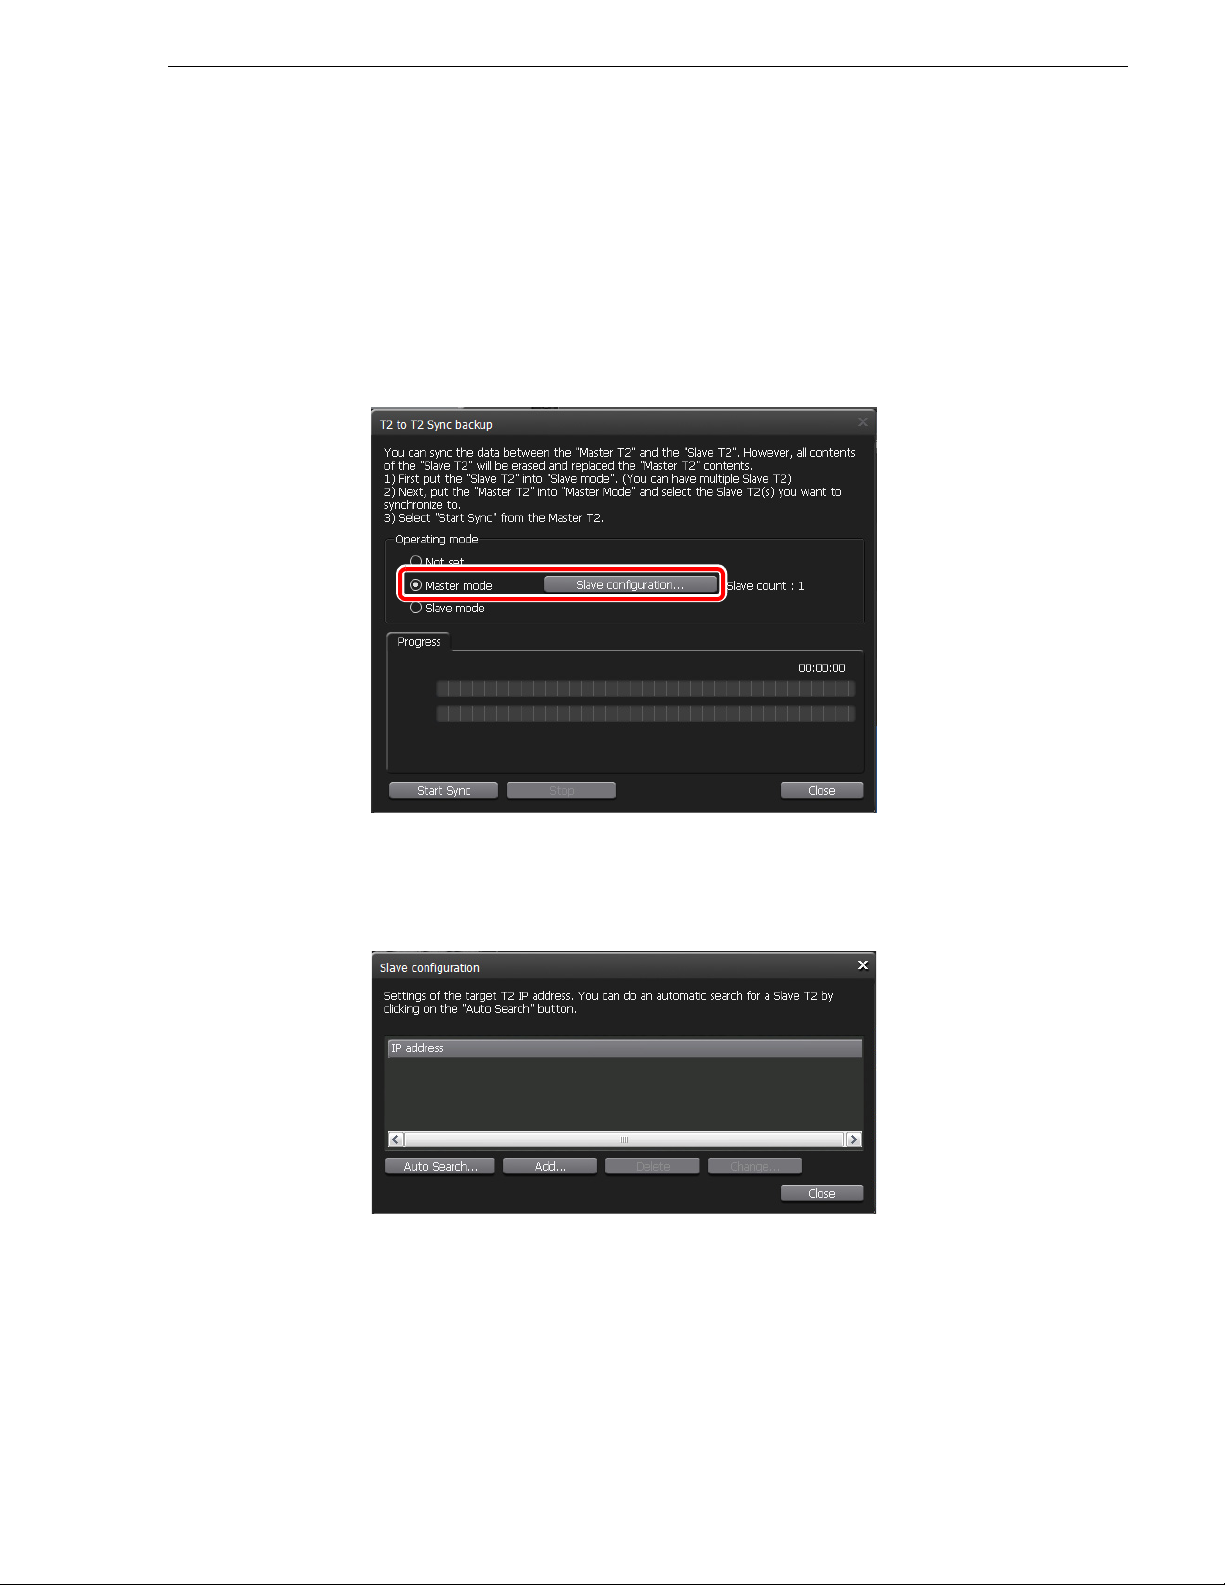
Backing up all data to other T2 (Sync backup)
Setting T2 on the sync source (master) to the master mode for data sync
1. From the menu bar, click System T2 to T2 Sync backup...
• If you capturing or loading clips in the R1/P1/P2 channel, a message appears
asking whether to unload clips. Click
• The "T2 to T2 Sync backup" dialog box appears.
OK to unload clips.
2. Select
Master mode, and then click Slave configuration...
• T2 on the sync source (master) is set to the master mode.
• The number of T2 set to the slave mode is displayed in "Slave count:".
3. Set the IP address of T2 set to the slave mode.
• Click
• To set an IP address manually, click
4. Click
October 17, 2011 T2 Users Manual –SP3/SP4– 99
Auto Search... to search for T2 set to the slave mode on the network.
Select an IP address on the search result dialog box, and then click
Add... and enter an IP address.
Close.
Add ALL.
Page 100
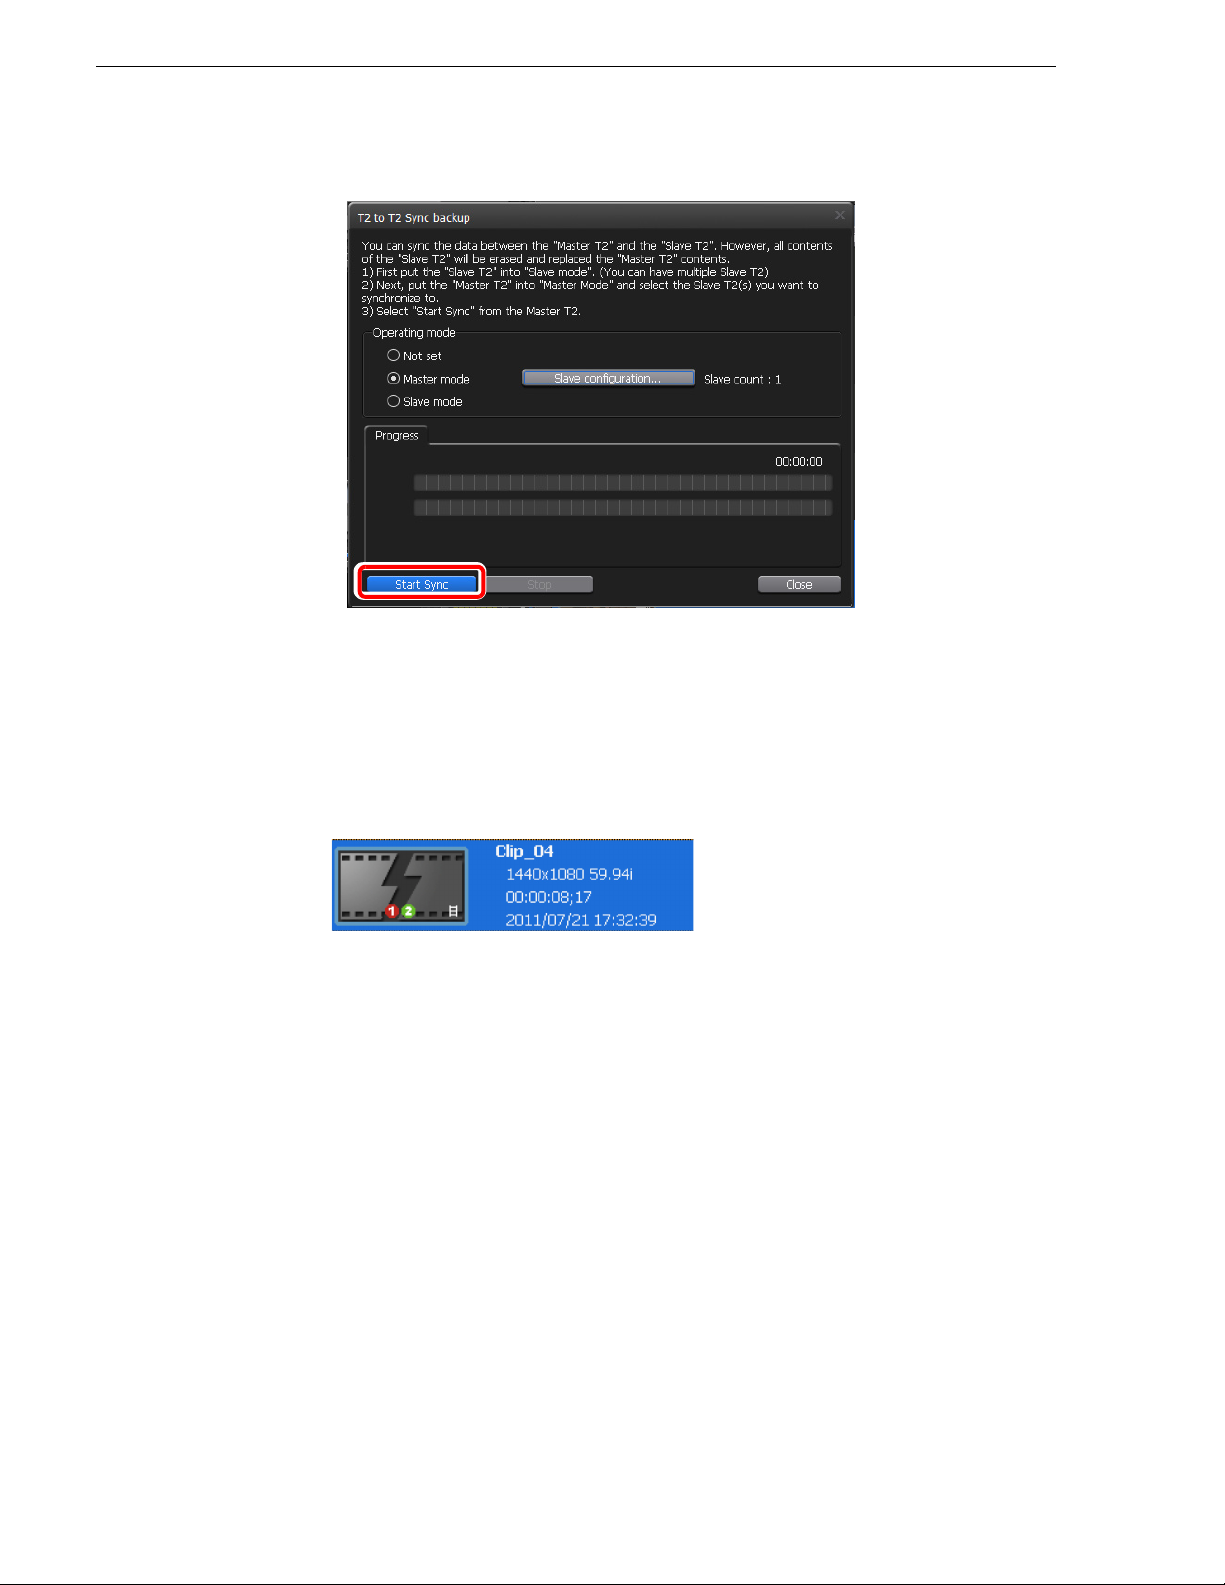
Chapter 6 Additional/Updated Functions for SP3 and SP4
5. Click Start Sync on the "T2 to T2 Sync backup" dialog box.
6. A message appears. Click
OK.
• The synchronization begins. You can check the file transfer status on the upper
progress bar, and the whole status on the lower progress bar.
• If you stop sync, click
Stop. You can stop sync from T2 set to the slave mode.
NOTE: If data sync is stopped forcibly such as when the power of T2 goes off etc.,
clips may be displayed with the following thumbnail. Such a clip cannot be used.
NOTE: If synchronization is stopped and started again, already transferred files
will be skipped.
100 T2 Users Manual –SP3/SP4– October 17, 2011
 Loading...