

Page 1

Soft Panels
Software Routing System Control Panels
Instruction Manual
Software Version 3.1
071833205
AUGUST 2010
Page 2

Affiliate with the N.V. KEMA in The Netherlands
CERTIFICATE
Certificate Number: 510040.001
The Quality System of:
Thomson Inc, and its worLdwide Grass Valley division affiliates DBA
GRASS VALLEY
Headquarters
400 Providence Mine Rd
Nevada City, CA 95959
United States
15655 SW Greystone Ct.
Beaverton, OR 97006
United States
10 Presidential Way
Suite 300
Woburn, MA 01801
United States
Kapittelweg 10
4827 HG Breda
The Nederlands
7140 Baymeadows Way
Ste 101
Jacksonville, FL 32256
United States
2300 So. Decker Lake Blvd.
Salt Lake City, UT 84119
United States
Rue du Clos Courtel
CS 31719
35517 Cesson-Sevigné Cedex
France
1 rue de l’Hautil
Z.I. des Boutries BP 150
78702 Conflans-Sainte
Honorine Cedex
France
Technopole Brest-Iroise
Site de la Pointe du Diable
CS 73808
29238 Brest Cedex 3
France
40 Rue de Bray
2 Rue des Landelles
35510 Cesson Sevigné
France
Spinnereistrasse 5
CH-5300 Turgi
Switzerland
Brunnenweg 9
D-64331 Weiterstadt
Germany
Carl-Benz-Strasse 6-8
67105 Schifferstadt
Germany
Including its implementation, meets the requirements of the standard:
ISO 9001:2008
Scope:
The design, manufacture and support of video and audio hardware and software products and
related systems
.
This Certificate is valid until: June 14, 2012
This Certificate is valid as of: June 14, 2009
Certified for the first time: June 14, 2000
H. Pierre Sallé
President
KEMA-Registered Quality
The method of operation for quality certification is defined in the KEMA General Terms
And Conditions For Quality And Environmental Management Systems Certifications.
Integral publication of this certificate is allowed.
KEMA-Registered Quality, Inc.
4377 County Line Road
Chalfont, PA 18914
Ph: (215)997-4519
Fax: (215)997-3809
CRT 001 073004
Accredited By:
ANAB
Page 3

Soft Panels
Software Routing System Control Panels
Instruction Manual
Software Version 3.1
071833205
AUGUST 2010
Page 4

Contacting Grass Valley
International
Support Centers
Local Support
Centers
(available
during normal
business hours)
France
24 x 7
Australia and New Zealand: +6
Middle East: +9
Europe
+800 8080 2020 or +33 1 48 25 20 20
Hong Kong, Taiwan, Korea, Macau: +852 2531 3058 Indian Subcontinent: +91 22 24933476
Asia
Southeast Asia/Malaysia: +6
China: +8
Belarus, Russia, Tadzikistan, Ukraine,
S. Europe/Italy-Roma: +3
Benelux/Belgium: +3
Germany, Austria, Eastern Europe: +4
61 0660 159 450 Japan: +81 3 5484 6868
71 4 299 64 40 Near East and Africa: +800 8080 2020 or +33 1 48 25 20 20
Copyright © Grass Valley, Inc. All rights reserved.
This product may be covered by one or more U.S. and foreign patents.
Grass Valley Web Site
The www.grassvalley.com web site offers the following:
Online User Documentation — Current versions of product catalogs, brochures,
data sheets, ordering guides, planning guides, manuals, and release notes
in .pdf format can be downloaded.
FAQ Database — Solutions to problems and troubleshooting efforts can be
found by searching our Frequently Asked Questions (FAQ) database.
Software Downloads — Download software updates, drivers, and patches.
United States/Canada
24 x 7
03 7805 3884 Southeast Asia/Singapore: +65 6379 1313
1 1300 721 495 Central/South America: +55 11 5509 3443
Uzbekistan: +7 095 2580924 225 Switzerland: +41 1 487 80 02
9 06 87 20 35 28 -Milan: +39 02 48 41 46 58 S. Europe/Spain: +34 91 512 03 50
2 (0) 2 334 90 30 Benelux/Netherlands: +31 (0) 35 62 38 42 1 N. Europe: +45 45 96 88 70
9 6150 104 444 UK, Ireland, Israel: +44 118 923 0499
+1 800 547 8949 or +1 530 478 4148
4 Soft Panels — Instruction Manual
Page 5

Contents
Section 1 — Introduction. . . . . . . . . . . . . . . . . . . . . . . . . . . . . . . . . . . . . . . . . . . . . . . . . 7
Section 2 — Soft Panels Installation. . . . . . . . . . . . . . . . . . . . . . . . . . . . . . . . . . . . 9
Section 3 — Encore System Soft Panel Configuration . . . . . . . . . . . . . . . . 15
Section 4 — Prelude System Soft Panel Configuration . . . . . . . . . . . . . . . 21
Overview . . . . . . . . . . . . . . . . . . . . . . . . . . . . . . . . . . . . . . . . . . . . . . . . . . . . . . . . . . . . . 7
Soft Panels Requirements. . . . . . . . . . . . . . . . . . . . . . . . . . . . . . . . . . . . . . . . . . . . . . . . 7
Soft Panels Console and GUI. . . . . . . . . . . . . . . . . . . . . . . . . . . . . . . . . . . . . . . . . . . . . 8
Installing with the Soft Panels Installer . . . . . . . . . . . . . . . . . . . . . . . . . . . . . . . . . . . . 9
Installing with Encore/Prelude Software Installer . . . . . . . . . . . . . . . . . . . . . . . . . 12
Soft Panel Licensing for Encore Systems. . . . . . . . . . . . . . . . . . . . . . . . . . . . . . . . . . 15
Encore Soft Panels Configuration Overview . . . . . . . . . . . . . . . . . . . . . . . . . . . . . . 18
Background Information . . . . . . . . . . . . . . . . . . . . . . . . . . . . . . . . . . . . . . . . . . . . . 18
Encore Soft Panel Names . . . . . . . . . . . . . . . . . . . . . . . . . . . . . . . . . . . . . . . . . . . . . 18
First Time Quick Configuration with Encore . . . . . . . . . . . . . . . . . . . . . . . . . . . . . . 19
SMS7000 Soft Panel Configuration. . . . . . . . . . . . . . . . . . . . . . . . . . . . . . . . . . . . . . . 20
Soft Panel Licensing for Prelude Systems . . . . . . . . . . . . . . . . . . . . . . . . . . . . . . . . . 21
Prelude Soft Panels Configuration Overview. . . . . . . . . . . . . . . . . . . . . . . . . . . . . . 22
Background Information . . . . . . . . . . . . . . . . . . . . . . . . . . . . . . . . . . . . . . . . . . . . . 22
Prelude Soft Panel Names . . . . . . . . . . . . . . . . . . . . . . . . . . . . . . . . . . . . . . . . . . . . 22
NetConfig Agent . . . . . . . . . . . . . . . . . . . . . . . . . . . . . . . . . . . . . . . . . . . . . . . . . . . . 23
First Time Quick Configuration with Prelude . . . . . . . . . . . . . . . . . . . . . . . . . . . . . 23
Requirements . . . . . . . . . . . . . . . . . . . . . . . . . . . . . . . . . . . . . . . . . . . . . . . . . . . . . . . 23
Procedure . . . . . . . . . . . . . . . . . . . . . . . . . . . . . . . . . . . . . . . . . . . . . . . . . . . . . . . . . . 24
Soft Panel Only Prelude Systems . . . . . . . . . . . . . . . . . . . . . . . . . . . . . . . . . . . . . . . . 28
Multiple Control Systems on the Same Network. . . . . . . . . . . . . . . . . . . . . . . . . . . 29
Section 5 — Control Panel GUIs. . . . . . . . . . . . . . . . . . . . . . . . . . . . . . . . . . . . . . . . 31
Panel Type Drop Down Menu . . . . . . . . . . . . . . . . . . . . . . . . . . . . . . . . . . . . . . . . . . 31
Soft Panel Types . . . . . . . . . . . . . . . . . . . . . . . . . . . . . . . . . . . . . . . . . . . . . . . . . . . . . . 31
Encore/Prelude . . . . . . . . . . . . . . . . . . . . . . . . . . . . . . . . . . . . . . . . . . . . . . . . . . . . . 31
Kalypso . . . . . . . . . . . . . . . . . . . . . . . . . . . . . . . . . . . . . . . . . . . . . . . . . . . . . . . . . . . . 33
Acappella . . . . . . . . . . . . . . . . . . . . . . . . . . . . . . . . . . . . . . . . . . . . . . . . . . . . . . . . . . 33
SMS7000 (Encore Soft Panels Only) . . . . . . . . . . . . . . . . . . . . . . . . . . . . . . . . . . . . 34
Jupiter (Encore Soft Panels Only) . . . . . . . . . . . . . . . . . . . . . . . . . . . . . . . . . . . . . . 37
Editing Button Labels and the Dynamic Keycap Feature . . . . . . . . . . . . . . . . . . . . 37
Dynamic Keycap Off. . . . . . . . . . . . . . . . . . . . . . . . . . . . . . . . . . . . . . . . . . . . . . . . . 37
Dynamic Keycap On . . . . . . . . . . . . . . . . . . . . . . . . . . . . . . . . . . . . . . . . . . . . . . . . . 38
Line Breaks . . . . . . . . . . . . . . . . . . . . . . . . . . . . . . . . . . . . . . . . . . . . . . . . . . . . . . . . . 38
Soft Panels — Instruction Manual 5
Page 6

Contents
Section 6 — Soft Panels Console . . . . . . . . . . . . . . . . . . . . . . . . . . . . . . . . . . . . . . 39
Soft Panels Console Overview . . . . . . . . . . . . . . . . . . . . . . . . . . . . . . . . . . . . . . . . . . 39
Console Password. . . . . . . . . . . . . . . . . . . . . . . . . . . . . . . . . . . . . . . . . . . . . . . . . . . 39
Connection Lock . . . . . . . . . . . . . . . . . . . . . . . . . . . . . . . . . . . . . . . . . . . . . . . . . . . . 40
Encore Soft Panels Console . . . . . . . . . . . . . . . . . . . . . . . . . . . . . . . . . . . . . . . . . . . . 40
Connect Button . . . . . . . . . . . . . . . . . . . . . . . . . . . . . . . . . . . . . . . . . . . . . . . . . . . 40
Panel Type . . . . . . . . . . . . . . . . . . . . . . . . . . . . . . . . . . . . . . . . . . . . . . . . . . . . . . . 40
Panel Name . . . . . . . . . . . . . . . . . . . . . . . . . . . . . . . . . . . . . . . . . . . . . . . . . . . . . . 40
Recv Port, Send Port . . . . . . . . . . . . . . . . . . . . . . . . . . . . . . . . . . . . . . . . . . . . . . . 40
Local IP Address . . . . . . . . . . . . . . . . . . . . . . . . . . . . . . . . . . . . . . . . . . . . . . . . . . 41
Primary and Redundant IP Address:. . . . . . . . . . . . . . . . . . . . . . . . . . . . . . . . . 41
Apply Config . . . . . . . . . . . . . . . . . . . . . . . . . . . . . . . . . . . . . . . . . . . . . . . . . . . . . 41
Restore Config . . . . . . . . . . . . . . . . . . . . . . . . . . . . . . . . . . . . . . . . . . . . . . . . . . . . 41
Dynamic Keycap . . . . . . . . . . . . . . . . . . . . . . . . . . . . . . . . . . . . . . . . . . . . . . . . . . 41
Always on Top. . . . . . . . . . . . . . . . . . . . . . . . . . . . . . . . . . . . . . . . . . . . . . . . . . . . 41
Poll Timeout. . . . . . . . . . . . . . . . . . . . . . . . . . . . . . . . . . . . . . . . . . . . . . . . . . . . . . 41
Menu . . . . . . . . . . . . . . . . . . . . . . . . . . . . . . . . . . . . . . . . . . . . . . . . . . . . . . . . . . . . 41
Exit. . . . . . . . . . . . . . . . . . . . . . . . . . . . . . . . . . . . . . . . . . . . . . . . . . . . . . . . . . . . . . 43
Prelude System Console . . . . . . . . . . . . . . . . . . . . . . . . . . . . . . . . . . . . . . . . . . . . . . . 44
Prelude Console Control Differences . . . . . . . . . . . . . . . . . . . . . . . . . . . . . . . . . . 44
Connect Button . . . . . . . . . . . . . . . . . . . . . . . . . . . . . . . . . . . . . . . . . . . . . . . . . . . 44
Send Matrix Cfg Button . . . . . . . . . . . . . . . . . . . . . . . . . . . . . . . . . . . . . . . . . . . . 44
Prelude Soft Panel Communications Settings . . . . . . . . . . . . . . . . . . . . . . . . . . . 45
Broadcast/Multicast . . . . . . . . . . . . . . . . . . . . . . . . . . . . . . . . . . . . . . . . . . . . . . . 45
Matrix Port . . . . . . . . . . . . . . . . . . . . . . . . . . . . . . . . . . . . . . . . . . . . . . . . . . . . . . . 45
Multicast IP Fields. . . . . . . . . . . . . . . . . . . . . . . . . . . . . . . . . . . . . . . . . . . . . . . . . 45
Hardware Control Panel Keycap Legend Generation . . . . . . . . . . . . . . . . . . . . . . 45
Keycap Legend Generation. . . . . . . . . . . . . . . . . . . . . . . . . . . . . . . . . . . . . . . . . . . 46
Keycap Legend Preparation . . . . . . . . . . . . . . . . . . . . . . . . . . . . . . . . . . . . . . . . . . 46
Keycap Legend Replacement . . . . . . . . . . . . . . . . . . . . . . . . . . . . . . . . . . . . . . . . . 47
Index. . . . . . . . . . . . . . . . . . . . . . . . . . . . . . . . . . . . . . . . . . . . . . . . . . . . . . . . . . . . . . . . . . . . . . 49
6 Soft Panels — Instruction Manual
Page 7

Introduction
Overview
Soft Panels are virtual versions of physical control panels used with Encore
and Prelude routing systems. Soft Panels operate on PCs connected to that
system’s network.
Soft Panels feature a Graphical User Interface (GUI) that represents the
various specific panel types supported. The button labels on the Soft Panels
GUI can automatically be updated with the current names of Sources, Des
tinations, Salvos, etc. using the Dynamic Keycap feature. The button labels
can also be edited manually.
Section 1
-
Once configured, each Soft Panel type operates the same as the corresponding hardware panel. Soft Panels are treated by the routing control
system the same as their hardware panel equivalents.
Soft Panels are sold separately from the routing system and are individually licensed.
On Encore systems the total number of all hardware panels plus all Soft
Panels cannot exceed 127 per Encore SCB. On Prelude systems the total
number of all panels cannot exceed 32.
Soft Panels Requirements
The Soft Panels application runs on Windows 2000 or Windows XP operating systems. It has also been tested to work with Windows 7, provided
the user logs in with Administrator privileges. Soft Panels have also been
successfully tested for operation on the Macintosh (Intel Duo) platform
running the Parallels application to generate a Windows XP virtual
machine.
Note Soft Panels do not work on Windows NT, ME, or 95/98 PCs.
The Soft Panels application requires a monitor display setting of 1024 horizontal pixels or more.
Soft Panels — Instruction Manual 7
Page 8
Section 1 — Introduction
Note Soft Panels running on a PC with more than one monitor may display an extra
window. Attempting to close the extra window closes the Soft Panel application. Clicking on the frame of the extra window
screen. However, the video driver application may have a configuration
option forcing all windows to display on screen. Disabling this option (if it is
available) can permit hiding the extra window off screen.
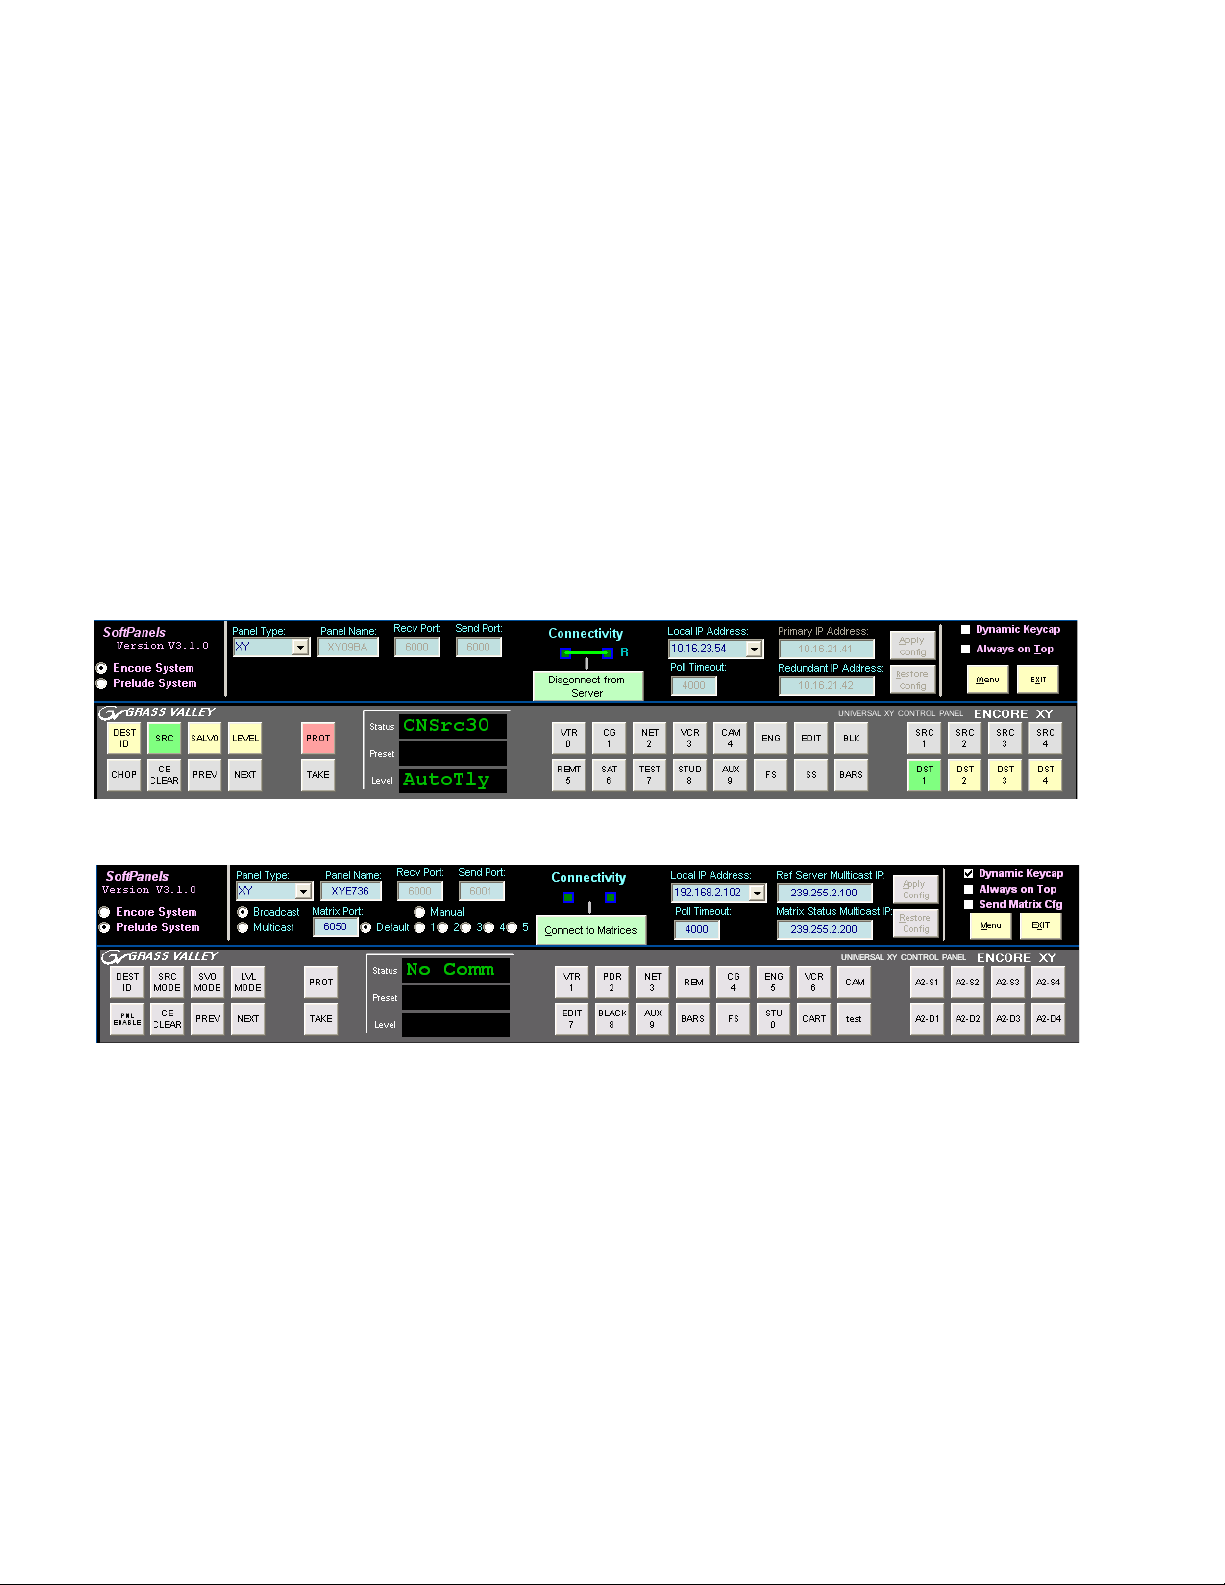
Soft Panels Console and GUI
The Soft Panels application has a Console that controls how the Soft Panel
application connects to the routing system and what type of GUI panel will
be used. Two Consoles are available, one for Encore (Figure 1) and another
for Prelude (Figure 2). The Console type is selected with the labeled radio
buttons on the left.
Figure 1. Encore XY Soft Panel with Console Connected
may allow it to be moved off
Figure 2. Prelude XY Soft Panel with Console Disconnected
On Encore systems running 1.7.4 or newer software, multiple Soft Panel
instances can be launched, allowing the use of multiple Soft Panels types
simultaneously.
On Prelude systems, only one Soft Panel application can run on a PC at a
time, and
each PC. However, any of the available panel types can be dynamically
selected, connected, and used with the associated routing system at any
time.
The Soft Panel application must connect befor
Encore systems the connection is made to an Encore Panel Server. On
Prelude systems the connection is made to the Matrix being controlled.
only one Soft Panel GUI at a time can be displayed and used on
e it becomes operational. On
8 Soft Panels — Instruction Manual
Page 9

Soft Panels Installation
Note Soft Panels operate on a PC that is on the same network as the control
system or matrix to which it will connect. For example, with an Encore system
if the SCB is on network 192.168.0.x then the PC needs to be on network
192.168.0.x.
The Soft Panels application is included on the Encore and Compact Router
Control System software CDs, and is available for download from the
Grass Valley Support web site. Soft Panels can be installed onto any
number of PCs, but must be licensed and configured before they become
operational.
On Encore systems the first Soft Panel instances launched will be operational (up to the number of licenses purchased). Any additional Soft Panels
launched will not be allowed to change router crosspoints. Closing unused
Soft Panels will free up licenses for use elsewhere on the Encore network.
On Prelude systems Soft Panels are individually licensed on each PC.
Section 2
Installing with the Soft Panels Installer
1. Acquire the Soft Panels software. It can be downloaded from the web
onto any convenient media (hard disk, thumb drive, or burned to CD).
2. Access the Soft Panels directory and run Setup.exe. The Soft Panels install
program will launch.
3. Click Next, accept the license agreement, and click Next again (Figure 3).
Soft Panels — Instruction Manual 9
Page 10
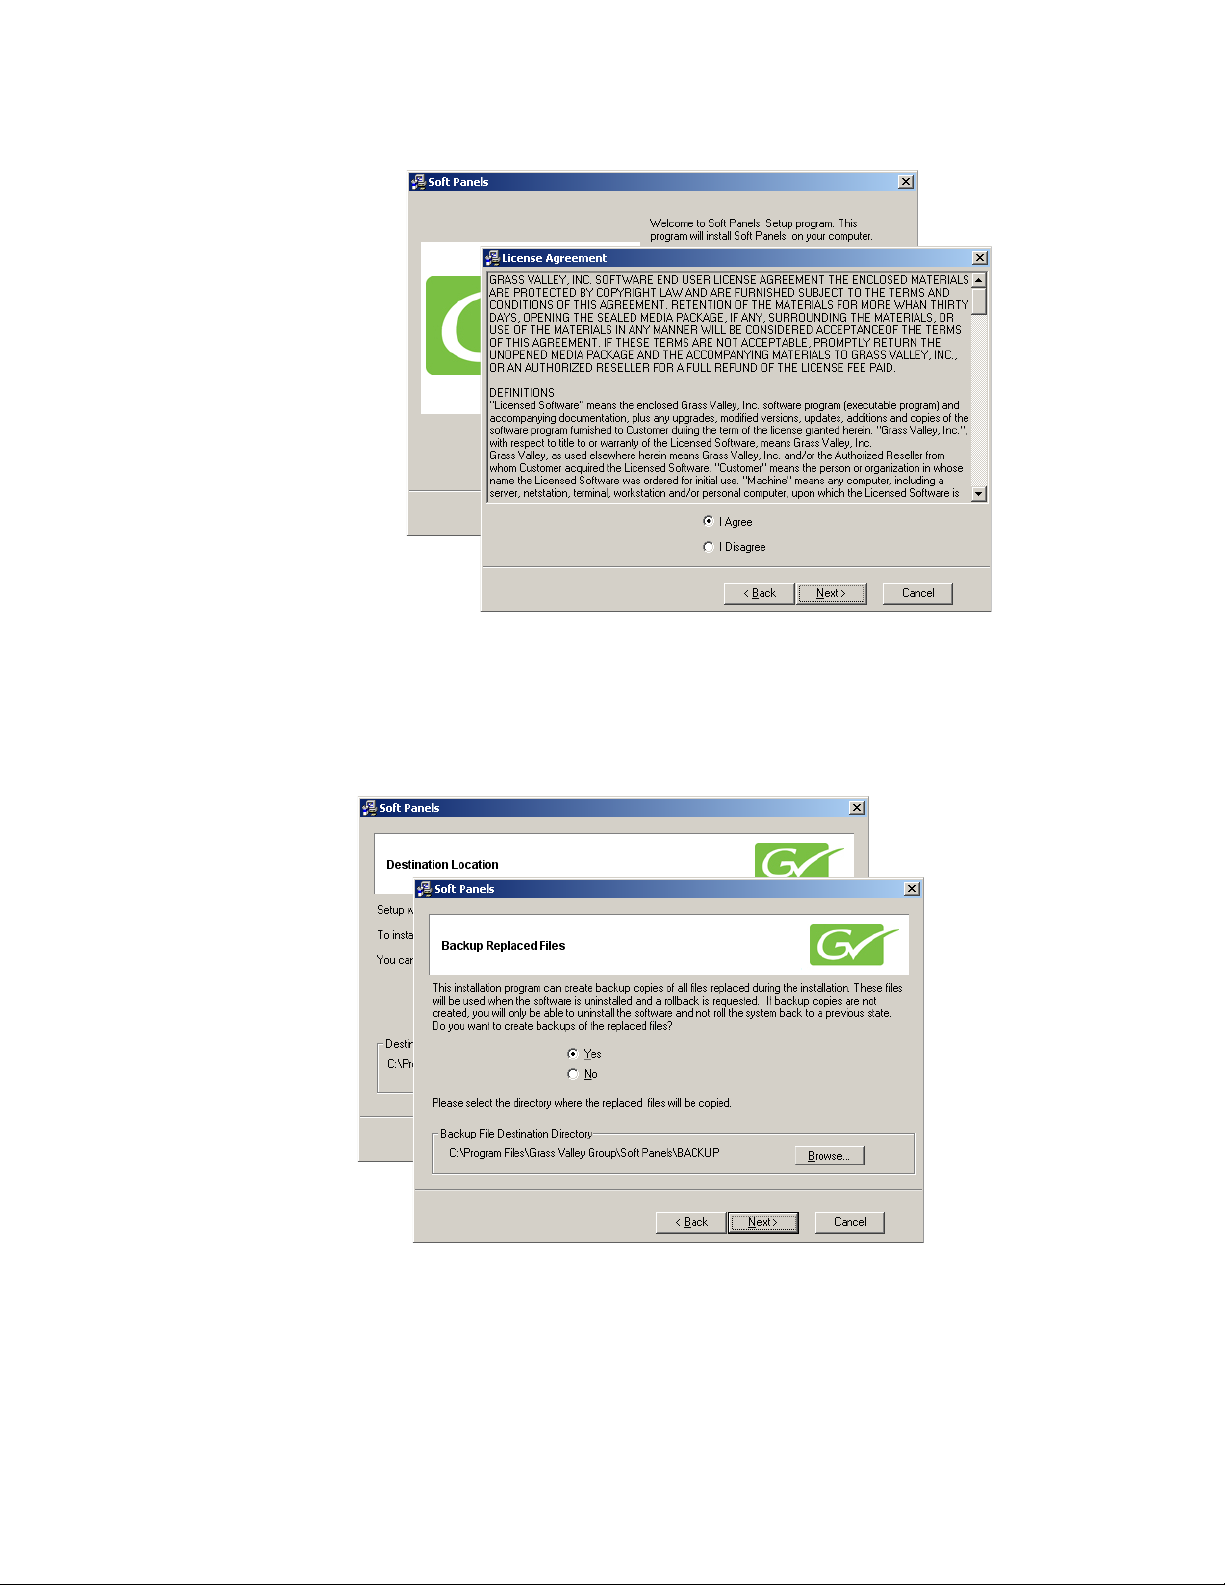
Section 2 — Soft Panels Installation
Figure 3. Initial Soft Panels Installation Screens
4. Screens subsequently appear that allow you to choose the installation
destination and backup existing files (Figure 4). Default settings are
recommended, selected by clicking
Figure 4. Subsequent Soft Panels Installation Screens
Next.
10 Soft Panels — Instruction Manual
Page 11
Installing with the Soft Panels Installer
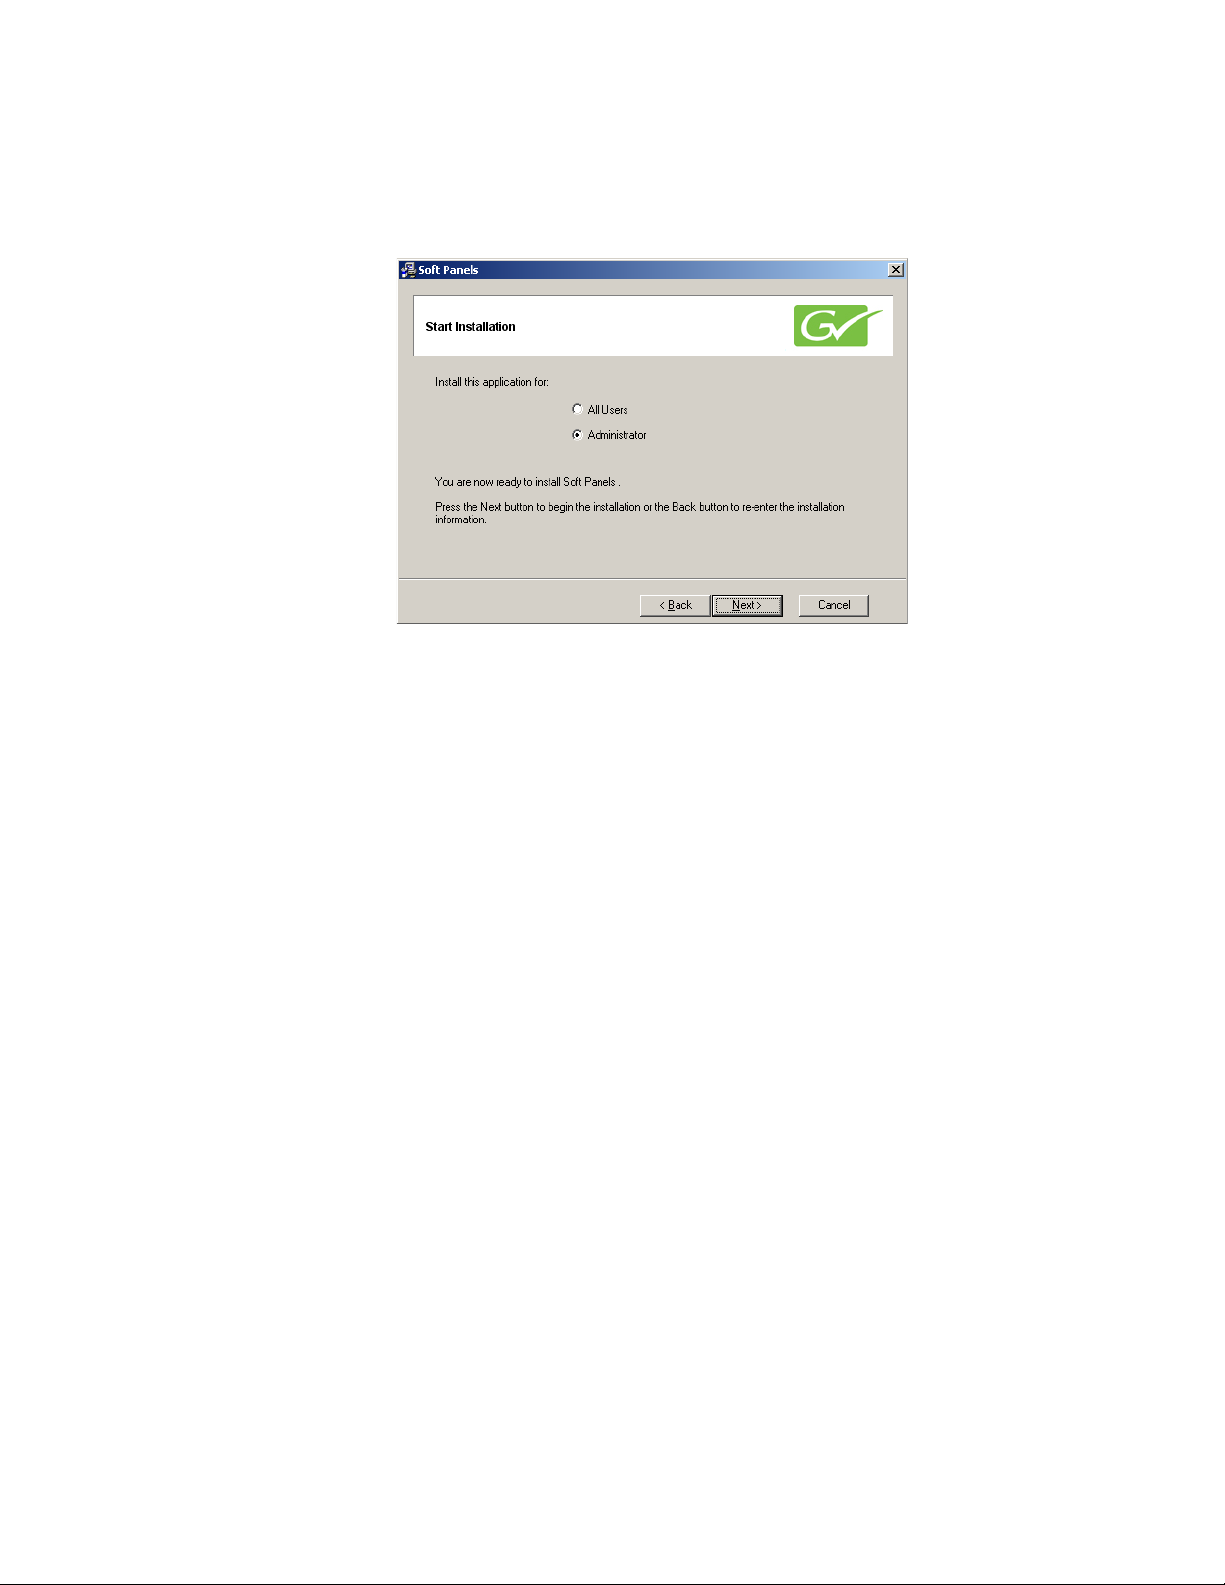
5. A Start Installation screen appears next, which lets you choose the level
All Users and Administrator settings (Figure 5).
with
Figure 5. Subsequent Soft Panels Installation Screens
• Selecting the default Administrator setting will allow anyone logging
in to use the Soft Panels application on that PC, but only users
logged on as administrator will be able to perform advanced functions (creating and updating the .ini file, etc).
• Selecting
Panels application and also permits everyone access to the
advanced functions. This access is removed if Soft Panels is uninstalled.
After making your selection click
All Users will allows anyone logging in to use the Soft
Next.
Soft Panels — Instruction Manual 11
Page 12
Section 2 — Soft Panels Installation
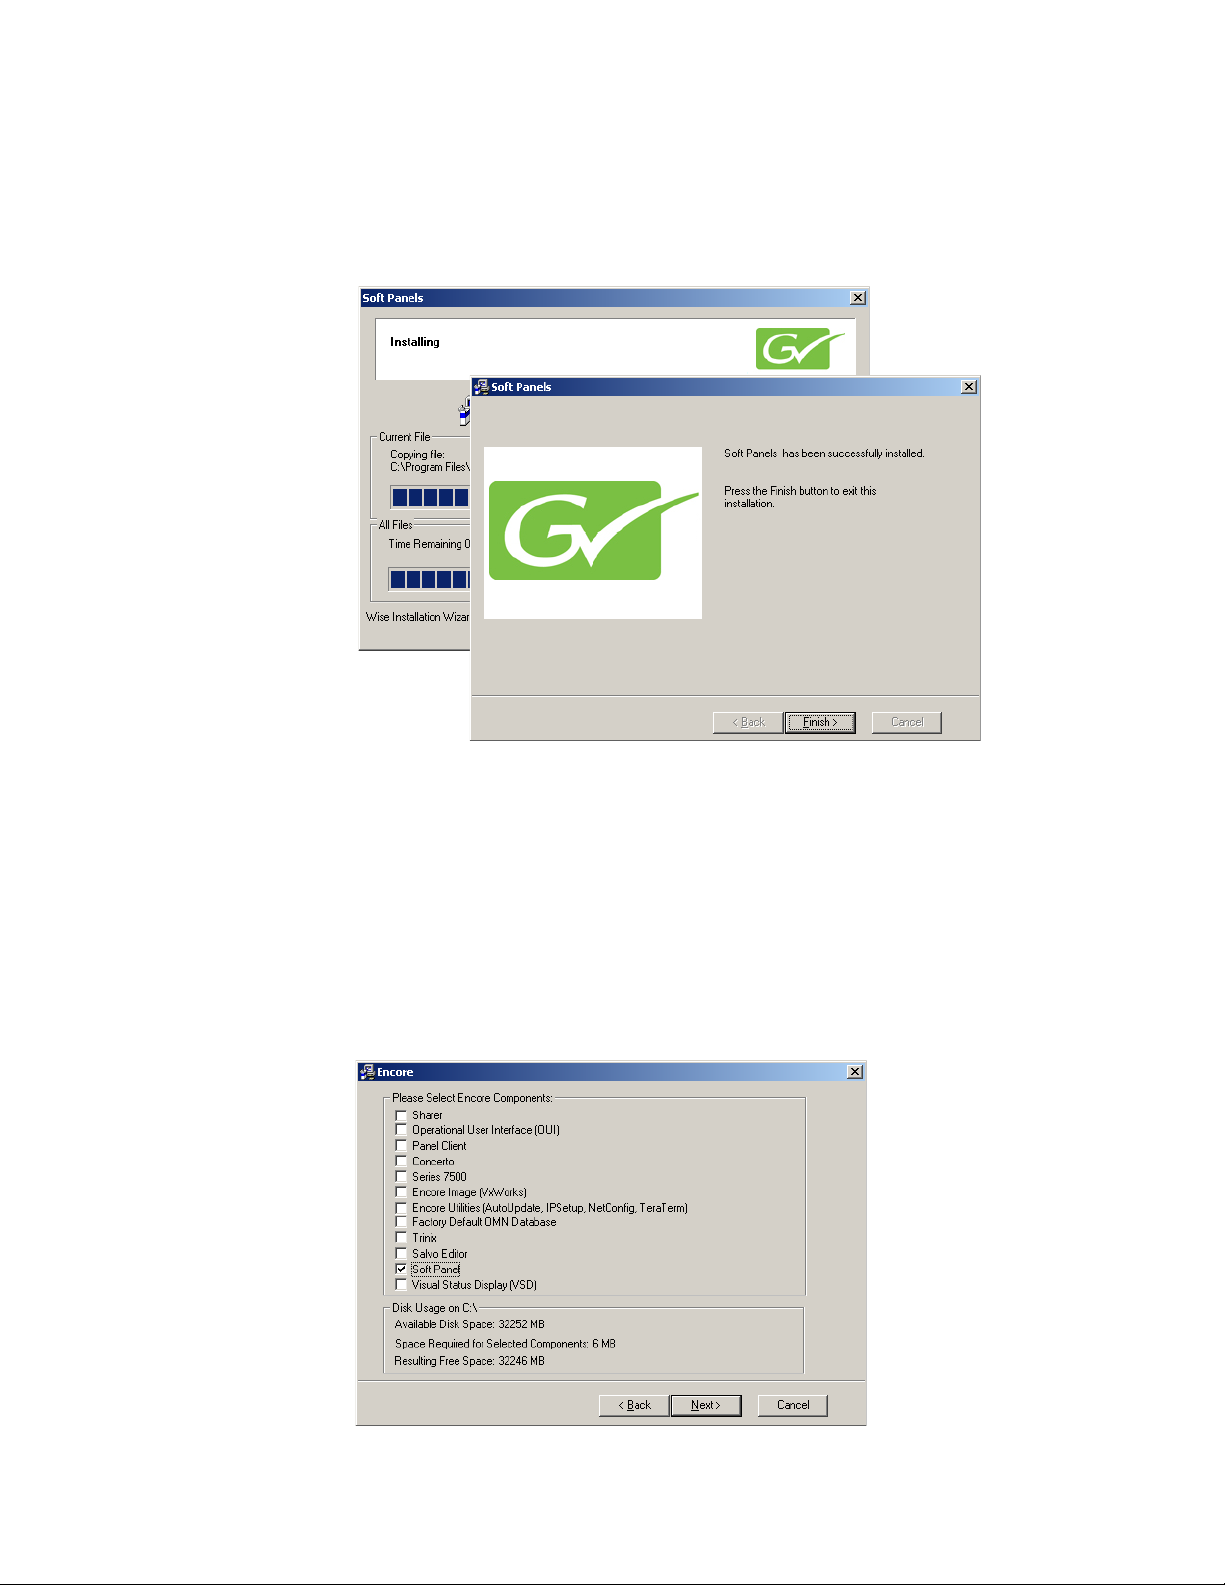
6. A progress bar screen will appear indicating the software is being
loaded, and a success screen displays when complete (Figure 6). Click
Finish to exit the installer application.
Figure 6. Final Installation Screens
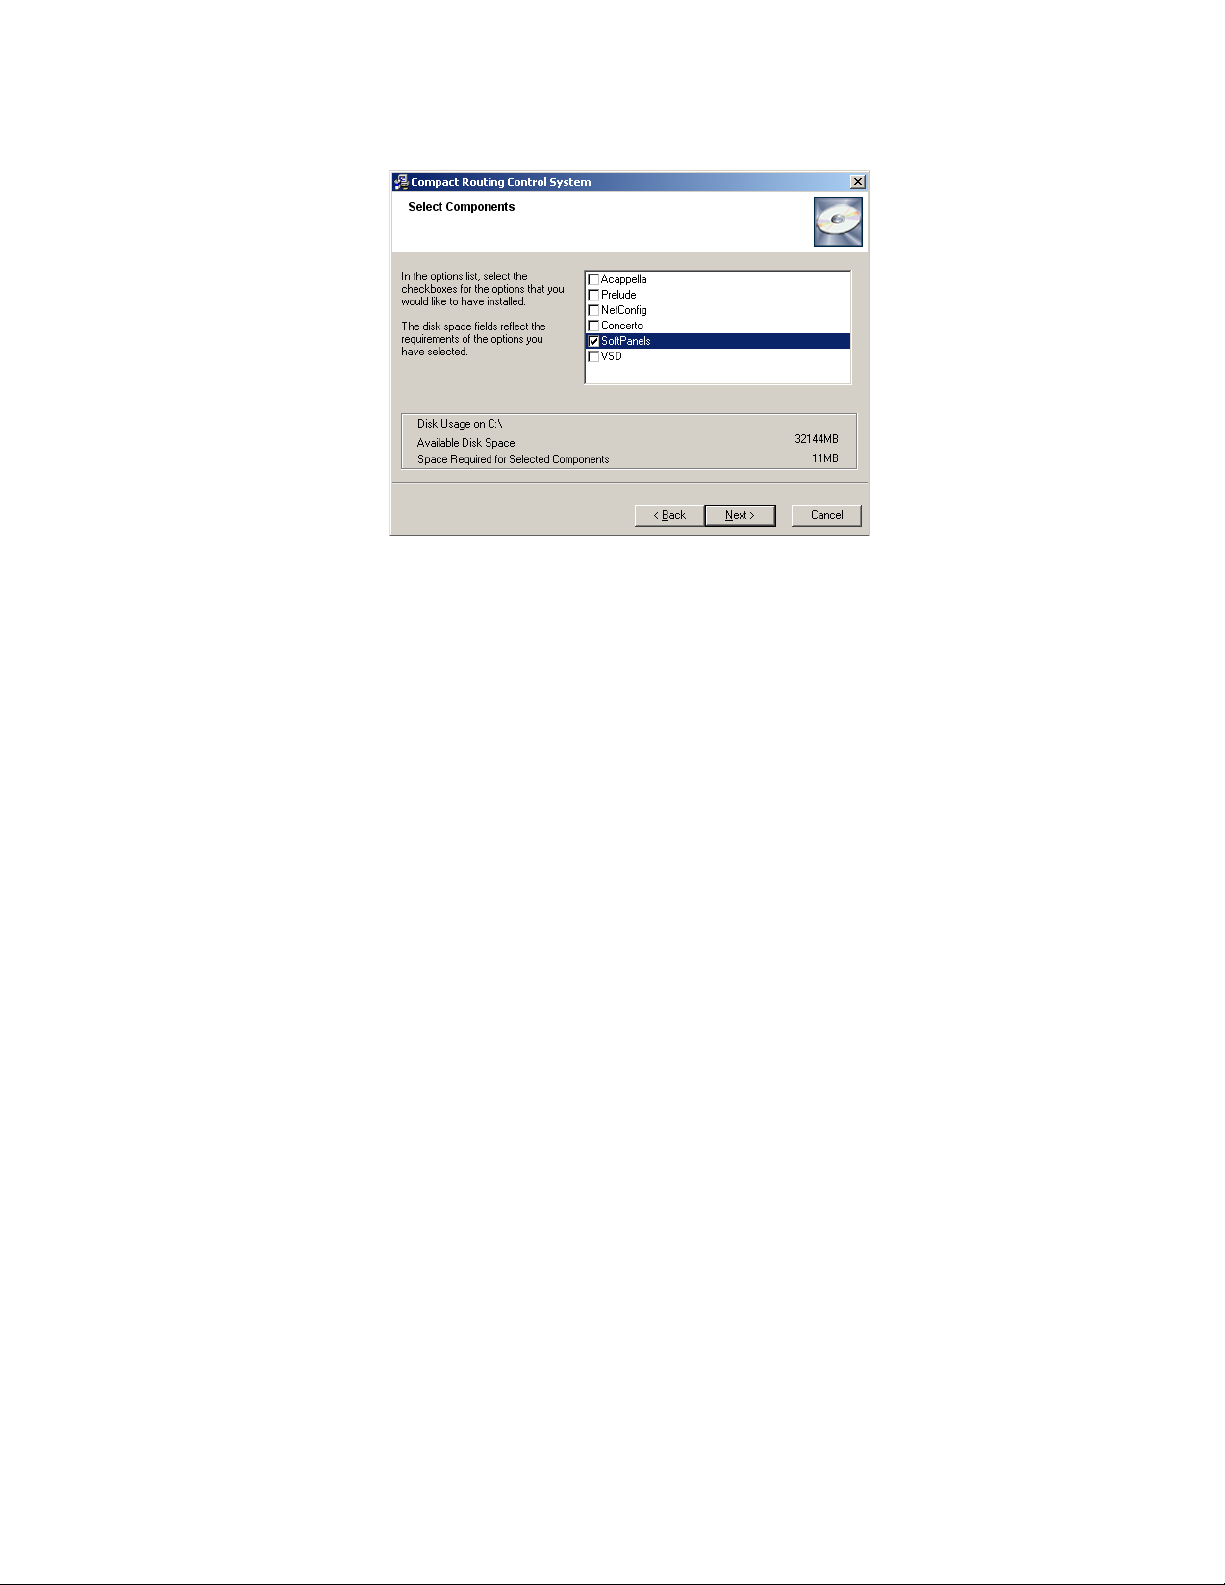
Installing with Encore/Prelude Software Installer
A check box for Soft Panels is available during an Encore or Prelude control
system software installation process. You can choose to install Soft Panels
on the PC along with the control system software if you wish, or you can
select only that checkbox to install just Soft Panels (Figure 7 and Figure 8).
Figure 7. Encore Installer Checkboxes
12 Soft Panels — Instruction Manual
Page 13
Installing with Encore/Prelude Software Installer
Figure 8. Prelude Installer Checkboxes
When selected, the Soft Panels installer (as described earlier) will launch.
Soft Panels — Instruction Manual 13
Page 14

Section 2 — Soft Panels Installation
14 Soft Panels — Instruction Manual
Page 15

Encore System Soft Panel Configuration
Soft Panel Licensing for Encore Systems
Encore system Soft Panels are activated with a license. The license is tied to
Encore System Controllers (SCBs) running the Encore system’s Panel
Servers. For example, if five licenses are purchased, up to five Soft Panels
(of any type) can be can run at a time on five different PCs connected to the
Encore system, provided Soft Panel software has been installed on the PCs.
The total number of all hardware panels plus all Soft Panels cannot exceed
127 per Encore SCB.
Soft Panels licenses are purchased through Grass Valley Sales and the keys
are issued by Grass Valley Customer Support. After purchasing your
licenses, you will need to provide the Device ID(s) of the Encore SCBs
running the Panel Server to Customer Support so they can generate the key.
Section 3
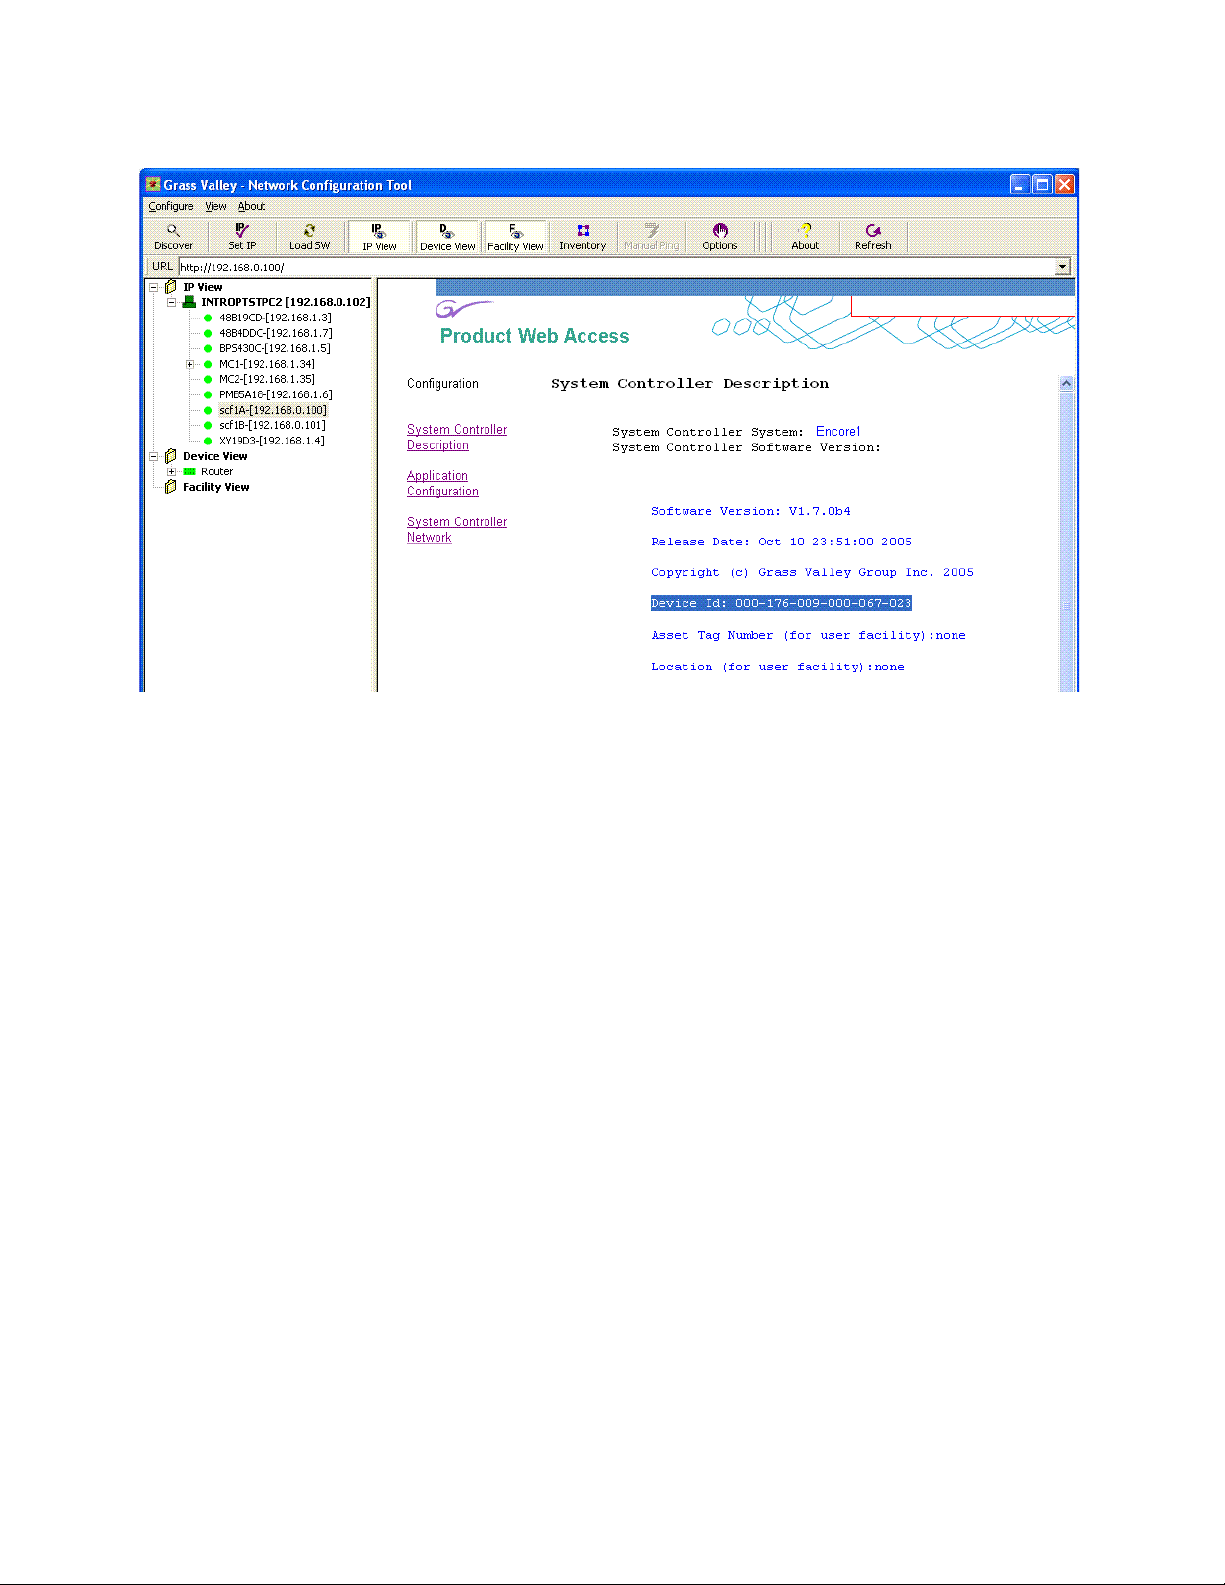
1. Using NetConfig or an internet browser, display the web page of the
SCB and select the
Device Id number displayed on the screen.
Soft Panels — Instruction Manual 15
System Controller Description (Figure 9). Write down the
Page 16
Section 3 — Encore System Soft Panel Configuration
Figure 9. SCB System Controller Description Web Page
2. If you have redundant SCBs, access the web page of the secondary SCB
and write down its
3. Contact Grass Valley Customer Support, confirm the number of
licenses purchased, and give them the SCB Device ID(s). You will be
given a license key number.
4. Go to the SCB web page display and select Application Configuration
(Figure 10)
Device Id number.
16 Soft Panels — Instruction Manual
Page 17

Soft Panel Licensing for Encore Systems
Figure 10. SCB Application Configuration Web Page
The following is displayed in the bottom area of the window:
Soft Panels : N
N is the number of enabled floating Soft
Panel licenses have been enabled.
5. Select Enter License Key to open the following window (Figure 11).
Figure 11. License Key Menu
6. Enter the supplied key, including the dashes, and select Submit.
7. A confirmation prompt reports entry of a valid key. Click OK. The
number of licenses will then be displayed on the web page.
8. Repeat Step 4 through Step 7 on the secondary SCB, if present.
Panel licenses. N = 0 if no Soft
Soft Panels — Instruction Manual 17
Page 18

Section 3 — Encore System Soft Panel Configuration
Encore Soft Panels Configuration Overview
Background Information
Soft Panels used with Encore systems are configured and managed similar
to hardware panels. Soft Panels seen by the Encore Panel Server on the
network are automatically detected by their assigned name. If the Panel
Server database has a configuration with that name, it is sent to the Soft
Panel and that panel acquires that defined functionality. Changing the
name of the Soft Panel to a different existing configuration immediately
changes the Soft Panel’s functionality to those new settings.
CAUTION Every panel (hardware or software) on the Encore network must have a
unique panel name. Do not use an existing hardware panel name for the name
of a Soft Panel. Unpredictable panel behavior may result.
You use the Panel Server OUI to edit panel configurations, which can then
be used by Soft Panels. Soft Panel functional configurations are not defined
by the Soft Panel application itself, except for an initial Soft Panel name, IP
address settings, and some GUI settings. These settings are adjusted using
the Soft Panels Console, and they apply only to the Soft Panels instance
running on that PC.
Encore Soft Panel Names
A Soft Panel instance must be detected on the network before it can receive
a configuration. If a Soft Panel connects to the Panel Server and a configu
ration for that named panel doesn’t exist, a default configuration for that
panel type will be loaded to it. This default configuration name consists of
the panel type and the last four hexidecimal digits of the MAC address of
the PC running Soft Panels. The helps ensure every panel instance is
unique. Once that Soft Panel with the default configuration exists, you can
use the Panel Server to edit that configuration or apply a template to that
configuration.
An alternative Soft Panel naming convention is to use the panel type as a
prefix and the last octet of the PC’s IP address as a suffix. For example, if
the PC has a 192.168.0.133 address and you are using an XY Soft Panel, the
panel name could be XY-133. A PC’s IP address is easier to determine than
the hexidecimal MAC address. You can also edit a Soft Panel configuration
to give it a descriptive name, for example XY-Edit1
CAUTION Do not create duplicate Soft Panel names on different PCs. Each panel must
have a unique name. To create multiple panels that behave the same, use the
Panel Server to create a template with the desired functionality and apply that
template to different panels.
-
18 Soft Panels — Instruction Manual
Page 19

First Time Quick Configuration with Encore
First Time Quick Configuration with Encore
You can use the following procedure to quickly get a GUI panel up and
running after Soft Panels has been installed and licensed. Configuration
details are presented later in this manual.
1. Launch the application by double-clicking on the Soft Panels icon and
OK to the password prompt.
click
This will display the Soft Panels Console
first run, a virtual version of an XY panel. The panel will not be operational and none of the buttons will tally (Figure 12).
Figure 12. Initial Soft Panels Console and XY Panel
2. Select the desired Panel Type (48B, BPS, etc.).
3. Enter a Panel Name.
4. Enter the Primary IP Address of the SCB running the Master Panel Server
application.
5. If you have redundant SCBs, enter the Secondary IP Address of the SCB
running the Mirror Panel Server application.
and, when the application is
6. Click Apply Config to save the configuration.
7. Click on Connect to Server. The Panel and Server lights will flash and a line
will connect them when communications has been established.
8. The Soft Panel will now be operational, such that Sources can be routed
to Destinations and the buttons will tally. The default configuration for
that panel type will be used (Figure 13).
Figure 13. Operational Soft Panel XY Panel
Soft Panels — Instruction Manual 19
Page 20

Section 3 — Encore System Soft Panel Configuration
9. The Dynamic Keycap feature (checkbox on the upper right of the
console) determines what button legends are displayed.
CAUTION Do not enable the Dynamic Keycaps option if using Soft Panels with Encore
V1.7.2.2 or earlier.
a. When the Dynamic Keycap feature is on, all the Soft Panel button
labels will automatically show their functions, Source and
Destination names, etc.
b. When the Dynamic Keycap feature is off, the buttons will be labeled
with generic names that probably will not match their actual
functions. The Soft Panel's button labels will need to be edited to
reflect the function of the button assigned by the Panel Server. Right
click on a Soft Panel GUI button and enter the text for that button.
Use a backslash (\) character to force a new line of text. Remember
that changing the text of the button does not change its function; it
only changes the label for that button.
10. To close the Soft Panel application, click on Exit, or right click on the
panel and choose
Exit application.
If the Soft Panel application was connected to the SCB when Exit is
selected, the connection will be restored automatically when the Soft
Panel is re-launched.
Note Default panel configurations have all Salvos disabled. Panel reconfiguration
is required before it can execute Salvos.
Soft Panel functionality can be changed with the Panel Server. Using the
Encore OUI log onto the primary CP Server that the Soft Panel application
is connected to. From the OUI select Soft Panel category and type being run
on the PC, then select the name of the Soft Panel to edit. Make the changes
you wish for that panel. The changes will be sent immediately to that panel.
SMS7000 Soft Panel Configuration
SMS7000 Soft Panels are modeled on hardware panels controlled via
coaxial cabling connected to Encore SCBs equipped with optional GSC
mezzanines. On Encore systems, a GSC mezzanine must be installed in an
SCB before SMS7000 Soft Panels will operate. This is the case even if no
actual GSC hardware panels exist in the system. While the PC running Soft
Panels uses Ethernet communications, an Encore SCB needs a GSC mezza
nine in order to generate SMS7000 GSC panel commands.
-
20 Soft Panels — Instruction Manual
Page 21

Section 4
Prelude System Soft Panel Configuration
Soft Panel Licensing for Prelude Systems
Prelude system Soft Panels are activated with a license. The license is tied
to a network interface card (NIC) of the PC where the Soft Panel application
will run. Only one Soft Panel instance can run on each PC, but any panel
type can be selected. The total number of all hardware panels plus all Soft
Panels cannot exceed 32 per Prelude system.
Soft Panels licenses are purchased thr
are issued by Grass Valley Customer Support. After purchasing licenses,
you will need to provide Device IDs to Customer Support so they can generate the key. You need to have installed
PC to get the Device ID.
1. If not already present, install the Soft Panels application on the PC (see
Section 2-Soft Panels Installation).
2. Launch the Soft Panels application on the PC.
3. Select the Prelude radio button on the Soft Panels Console.
4. Go to Menu, Options, Help, License Information to display the Device ID of the
PC (Figure 14).
Figure 14. Prelude System Soft Panel License Key Menu
ough Grass Valley Sales and the keys
the Soft Panels application on the
5. Write down the Device Id number displayed on the screen.
Soft Panels — Instruction Manual 21
Page 22

Section 4 — Prelude System Soft Panel Configuration
6. Repeat Step 1 through Step 5 above on all the PCs you will use to run
Soft Panels.
7. Contact Grass Valley Customer Support, confirm the number of
licenses purchased, and give them the Device ID(s). You will be given
license key numbers for each purchased Soft Panel.
8. On each PC, return to the Prelude system Soft Panel License Key Menu
and enter the supplied key, including the dashes, and select
9. A confirmation prompt reports entry of a valid key. Click OK.
Prelude Soft Panels Configuration Overview
Background Information
Soft Panels used with Prelude systems are configured and managed similar
to hardware panels. The Soft Panel application needs to receive a copy of
the Router configuration, to know what Levels, Sources, and Destinations
are present. Each Soft Panel instance must also receive a panel configura
tion to define that panel’s capabilities. These configurations are sent to the
Soft Panel application and individual panel instances with the Prelude user
interface incorporated into the NetConfig application.
Submit.
-
A Soft Panel instance must be detected on the network before it can be sent
configurations. When the PC running Soft Panels is on the same network
as the Prelude system, the NetConfig application within which Prelude
runs will be able to detect the Soft Panel application, provided a Soft Panel
is connected. Clicking the
Panel announces the presence of that Soft Panel on the network, making it
accessible to NetConfig, and so able to receive configurations.
After the Soft Panel receives its configurations, clicking the Connect to
Matrices
connect to the Prelude system matrices that the Soft Panel will control.
button uses the IP information in its loaded router configuration to
Prelude Soft Panel Names
Each Soft Panel instance has a name. A configuration for a Prelude Soft
Panel instance name can be sent to the PC where Soft Panels is running.
This allows different settings for the same type of Soft Panel. Renaming a
Soft Panel’s name draws that named panel configuration from the PC.
The default Soft Panel instance name consists of the panel type and the last
four hexidecimal digits of the MAC address of the PC running Soft Panels.
The helps ensure every panel instance is unique.
Connect to Matrices button of a newly installed Soft
22 Soft Panels — Instruction Manual
Page 23

You can edit a Soft Panel instance to give it a descriptive name, for example
XY-Edit1. If you change the name of an Soft Panel, you will need send the
newly named panel a panel configuration before it will be operational.
Configurations sent to a Soft panel from Prelude will replace the locally
stored configuration for that panel saved on the PC.
NetConfig Agent
The Prelude version of the Soft Panel application has a NetConfig agent,
which NetConfig uses to discover the Soft Panel device just like any other
device. This is designed to work even if the Soft Panel and NetConfig appli
cations are running on the same PC. However, VPN services such as
“Check point securemote” must not be running on the PC for this to work.
1. Go to Control Panel > Administrative Tools > Services.
2. Uncheck the VPN protocol such as Chekpoint Securemote from the
3. Restart the Prelude Soft Panel.
First Time Quick Configuration with Prelude
-
NIC's property page.
Now clicking on the Connect to Matrices button will list the Soft Panel device
in the NetConfig application.
First Time Quick Configuration with Prelude
You can use the following procedure to quickly get a GUI panel up and
running on a Prelude system. Configuration details are presented later in
this manual.
Requirements
This procedure assumes:
• The Prelude system is installed and configured for normal operation,
which includes the creation of a router configuration file. For this
example the Prelude system has one matrix and at least one hardware
control panel.
• Soft Panels has been installed on the PC, and the PC is on the Prelude
network.
• Soft Panels has been licensed for use with Prelude on that PC.
Soft Panels — Instruction Manual 23
Page 24

Section 4 — Prelude System Soft Panel Configuration
Procedure
1. Launch the application by double-clicking on the Soft Panels icon and
OK to the password prompt.
click
This will display the Soft Panels Cons
first run, a virtual version of an XY panel. The panel will not be operational (
2. If not already selected, choose the Prelude System radio button on the
left to bring up the Prelude version of Soft Panels (Figure 15).
Figure 15. Initial Prelude Soft Panels Console and XY Panel
3. If desired, select a different Panel Type (48B, BPS, etc.). The default XY
panel type provides access to all system crosspoints and is a good one
to use for initial Soft Panel operational testing.
4. If desired, enter a Panel Name and then click Apply Config to rename that
panel instance.
No Comm status) and none of the buttons will tally.
ole and, when the application is
Note Every panel (hardware or software) in a Prelude system must have a unique
name.
5. Click Connect to Matrices. The Panel and Server connectivity indicator
lights should flash, but the Soft Panel will not yet be operational.
24 Soft Panels — Instruction Manual
Page 25

First Time Quick Configuration with Prelude
6. Launch NetConfig, select the Prelude button at the top of the screen, and
make sure the
Figure 16. NetConfig Prelude User Interface
Levels tab below is selected (Figure 16).
7. Load the current router configuration into the Prelude user interface.
This can be accomplished in various ways.
• Click
• If you are not sure what router configuration file to use, and your
Note Identical router configurations should be used on all Prelude system hard-
Load Router Config from File and select the copy of the router con-
figuration file currently being used by t
Load. Be sure to select the correct file.
- or -
elude system has an operating hardware control panel, click
Pr
Router Config from Control Panel
router configuration to bring into the Prelude user interface.
ware and software control panels.
button and select a working panel’s
he Prelude system, and click
Get
Soft Panels — Instruction Manual 25
Page 26

Section 4 — Prelude System Soft Panel Configuration
8. With the router configuration loaded (Levels, Sources and Destinations
should be displayed), click on
sure the Soft Panel name is selected on the list, and click
Figure 17. Soft Panel Selected for Router Configuration Send.
Note All panels discovered by NetConfig will be selected by default, and it is gen-
erally OK to send the router configuration to all
reset if the Reboot when complete box is checked.
Send Router Config to Control Panel, make
OK (Figure 17)
panels. However, they will all
26 Soft Panels — Instruction Manual
Page 27

First Time Quick Configuration with Prelude
9. Select the tab of the Soft Panel type you are configuring (XY, for
example), click
(Figure 18).
Figure 18. Default Panel Configuration Selected for Load.
Load Panel Config from File, select Default, and click Load
10. With the default panel configuration loaded (Functions and Selections
will be displayed), click
the Soft Panel name.
11. Make sure the Re-Boot when complete box is checked, and then click OK.
12. After reset, the Soft Panel will now have a router and panel
configuration and become operational. Sources can be routed to
Destinations and the buttons will tally (Figure 19).
Figure 19. Operational Default Prelude Soft Panel
Send Panel Config to Control Panel, and select just
Soft Panels — Instruction Manual 27
Page 28

Section 4 — Prelude System Soft Panel Configuration
13. The Dynamic Keycap feature (checkbox on the upper right of the
console) determines what button legends are displayed.
a. When the Dynamic Keycap feature is on, all the Soft Panel button
labels will automatically show their functions, Source and
Destination names, etc.
b. When the Dynamic Keycap feature is off, the buttons will be labeled
with generic names that probably will not match their actual
functions. The Soft Panel's button labels will need to be edited to
reflect the function of the button assigned by the Panel Server. Right
click on a Soft Panel GUI button and enter the text for that button.
Use a backslash (\) character to force a new line of text. Remember
that changing the text of the button does not change its function; it
only changes the label for that button.
14. To close the Soft Panel application, click on Exit, or right click on the
panel and choose
If the Soft Panel application was connected when Exit is selected, the
connection will be restored automatically when the Soft Panel is relaunched.
Exit application.
Note Default panel configurations have all Salvos disabled. Panel reconfiguration
is required before it can execute Salvos.
You can now use the Prelude user interface to create a new configuration
for that Soft Panel. Sending that configuration to the Soft Panel with the
Boot when complete
box checked will change that panel’s functionality.
Soft Panel Only Prelude Systems
A Prelude system can operate without any hardware panels, using only
Soft Panels. In this situation, matrices will need to get their configuration
sent to them from the Soft Panel application. To accomplish this, the
Matrix Cfg
This panel will then automatically send its copy of the router configuration
to the matrix whenever that Soft Panel resets. This mimics the behavior of
hardware Prelude panels, which automatically send their router configura
tion when they reboot.
The Send Matrix Cfg button is off by default, and should remain off when Soft
Panels run on a Prelude system that has hardware panels. This helps
prevent the loading of an old router configuration file to matrices when the
PC reconnects to the Prelude network.
button needs to be checked on at least one operating Soft Panel.
Re-
Send
-
See the separate Prelude Instruction Manual for additional information.
28 Soft Panels — Instruction Manual
Page 29

Multiple Control Systems on the Same Network
Multiple Control Systems on the Same Network
Multiple Prelude systems can be configured to operate independent of one
another on the same network. Prelude systems can also be configured to
operate on the same network as an Encore routing system. To avoid con
flicts, these systems need to be isolated from one another. This can be
accomplished using Multicast communications, specifying different ports,
and selecting different System IDs on hardware control panel and routing
matrix web pages. Because Soft Panels do not have webpages, these con
trols reside on the Prelude System Console.
See Prelude Soft Panel Communications Settings on page 45 and the separate
Prelude Instruction Manual for more information.
-
-
Soft Panels — Instruction Manual 29
Page 30

Section 4 — Prelude System Soft Panel Configuration
30 Soft Panels — Instruction Manual
Page 31

Control Panel GUIs
Panel Type Drop Down Menu
Clicking on the Panel Type arrow opens a list of the available Control Panels,
sorted by type (Figure 20).
Figure 20. Control Panel Type Drop Down Menu
Section 5
Soft Panel Types
The Graphical User Interfaces of the Encore Control Panels currently available are shown below. These panels ope
counterparts.
Encore/Prelude
Figure 21. 48B Soft Panel
Soft Panels — Instruction Manual 31
rate the same as their hardware
Page 32

Section 5 — Control Panel GUIs
Figure 22. BPS Soft Panel
Figure 23. Encore/Prelude UCP Soft Panel
Figure 24. Encore CLN (Client) Soft Panel
Figure 25. PMB Soft Panel
Figure 26. XY Soft Panel
32 Soft Panels — Instruction Manual
Page 33

Kalypso
Soft Panel Types
Figure 27. KMD Soft Panel
Figure 28. KSD Soft Panel
Acappella
Several different Acappella Soft Panels exist, with different numbers of
Sources and Destinations. Three representative GUIs are shown below.
Figure 29. Acappella 16x16 Soft Panel
Figure 30. Acappella 16x8 Soft Panel
Figure 31. Acappella 8 x1 Soft Panel
Soft Panels — Instruction Manual 33
Page 34

Section 5 — Control Panel GUIs
SMS7000 (Encore Soft Panels Only)
Figure 32. SMS7000 CLN Soft Panel
Figure 33. COS Soft Panel
Figure 34. EDP Soft Panel
Figure 35. MB8 Soft Panel
34 Soft Panels — Instruction Manual
Page 35

Figure 36. MCO Soft Panel
Figure 37. P32 Soft Panel
Note The P32 panel type was formerly identified as BPS32.
Figure 38. P48 Soft Panel
Soft Panel Types
Figure 39. SVR Soft Panel
Figure 40. UCP Soft Panel
Soft Panels — Instruction Manual 35
Page 36

Section 5 — Control Panel GUIs
Figure 41. SCP Soft Panel
Figure 42. PXS Soft Panel
Figure 43. PXD Soft Panel (works only in a group)
Figure 44. PXYE Soft Panel (works only in a group)
Figure 45. UMD 1 (Single Under Monitor Display)!
Figure 46. UMD 2
Figure 47. UMD 3l
36 Soft Panels — Instruction Manual
Page 37

Editing Button Labels and the Dynamic Keycap Feature
Jupiter (Encore Soft Panels Only)
Figure 48. JEP-100l
Editing Button Labels and the Dynamic Keycap Feature
Most button labels can be edited using the Soft Panel application by rightclicking on the virtual button and entering the desired text.
Note Editing the label of a Soft Panel button does not change the actual function of
The following button labels cannot be edited:
• PMB panels:
•EDP panels: Prev, Next, Take/Load, and Protect/Hold
• MB8 panel: Protect and Tak e
•COS panel: Protect and CPW
• MCO panel: RLS
User edited text can have both upper and lower case letters. Dynamic
Keycap text is always all upper case.
Dynamic Keycap Off
When the Dynamic Keycap feature is turned off, edited Soft Panel button
labels are persistent if that panel instance is disconnected and then reconnected to the Server. The edited button text is
Panels. This means that button labels may be different for the same Soft
Panel configuration of a panel type when they are loaded onto different
PCs. This allows customizing each panel’s button labels depending on
where it is being used.
that button, it only changes the text displayed on that button.
Take/Load, and Protect/Hold
saved on the PC running Soft
Soft Panels — Instruction Manual 37
Page 38

Section 5 — Control Panel GUIs
Dynamic Keycap On
Button label editing is still available when the Dynamic Keycap feature is
turned on, but the names will revert to those contained in the Panel Server
configuration for that panel if it is disconnected and reconnected, or if the
Dynamic Keycap feature is turned on.
Line Breaks
A button label text line break can be forced by entering a backslash (\) character, which can increase readability.
38 Soft Panels — Instruction Manual
Page 39

Soft Panels Console
Soft Panels Console Overview
The Console is primarily used to connect that Soft Panel instance to the
Encore Panel Server or Prelude system routing matrix, at which time the
Soft Panel can become operational. It is also used to assign a name to the
Soft Panel, control some aspects of the GUI display (size, placement), and
on Prelude systems specify network communication settings.
Two different Consoles exist, one used with Encore systems and the other
with Pr
both Consoles.
elude systems. Most of the controls and indicators are the same on
Section 6
Console Password
The Console can be password protected to lock the usage of that Soft Panel
instance on that PC. The password window opens when Soft Panels is
launched (Figure 49). By default there is no passw
Figure 49. Console Password Window
Click Change Password to enter a password. Once password protected, the
Soft Panel will launch and operate with its last settings, but the Console
will be hidden and button labels will not be editable.
If a panel is password protected, right clicking on the panel brings up a
nu with
me
will open the Console to permits full Soft Panel control.
ord; just click OK.
Show Console. Clicking on that item and entering the password
Soft Panels — Instruction Manual 39
Page 40

Section 6 — Soft Panels Console
Connection Lock
Some of the Console controls are locked when the Soft Panel application is
connected. When disconnected, these Console fields can be edited. During
the editing process the characters are displayed in red text.
Panel Type, Disconnect from Server, Dynamic Keycap, Always on Top, Menu, and
The
Exit Console Controls remain active when connected.
Encore Soft Panels Console
Figure 50. Encore Console Disconnected (Controls Unlocked)
Figure 51. Encore Console Connected (Contr
Connect Button
In the center left of the Console is a button labeled Connect to Server when the
Soft Panel is not connected to the Encore Panel Server, and labeled
nect from Server
a line when connected, and blinking indicators report an active link.
Panel Type
Opens a drop down menu of the various GUI panels that can be selected.
The panels are grouped by their type (Encore/Prelude, Kalypso, SMS7000.
Acappella).
Panel Name
Allows the entry of a name for the current Soft Panel. The Apply Config button
is used to apply the entered name.
ols Locked)
Discon-
when connected. Above this button is a display that shows
Recv Port, Send Port
The Port fields report the current port and are not editable.
40 Soft Panels — Instruction Manual
Page 41

Local IP Address
Reports the IP address of the PC on which that Soft Panel application is
running. The drop down menu supports PCs running multiple network
interface cards.
Primary and Redundant IP Address:
Allows entry of the IP Addresses of the SCBs running the Master and
Mirror Panel Server.
Apply Config
Saves changes made to the Console fields. Note that this only involves settings for the Console (IP address, Panel Name, etc.). Changing the panel
name can indirectly change its functionality of the Soft Panel, provided a
panel configuration has been created with that name and been sent to the
Soft Panel PC.
Encore Soft Panels Console
Restore Config
Click on this button if, during the editing of Console fields, you wish to
return to the last settings that had been saved for the Console.
Dynamic Keycap
When checked, dynamically updates the panel’s keycap button labels
(Source, Destination, Level, Salvo, Keypad Set, etc.) with the currently
defined names from the Panel Server (see
Dynamic Keycap Feature on page 37 for more information).
Always on Top
When checked, forces the Soft Panel and Console to always be displayed in
front of any other windows on that PC.
Poll Timeout
This setting can be left at the default 4000.
Editing Button Labels and the
Menu
Opens a drop down menu with Create Shortcut, Export Keycap Configuration, and
Options selections.
Soft Panels — Instruction Manual 41
Page 42

Section 6 — Soft Panels Console
Create Shortcut
Creates a shortcut on the Windows desktop, allowing quick access to that
specific SoftPanel type. The shortcut is name is the configuration of that
panel. When selected, the SoftPanel will automatically connect to its configured Panel Server.
Export Keycap Configuration
A keycap file suitable for Encore and Acappella hardware Control Panels
button legends can be created using this control. A navigation window
opens, allowing you to name the file, and choose a location to save the file,
or create a new folder for the file. See Hardware Control Panel Keycap Legend
Generation on
Options
Clicking on Options opens a menu with three tabs. General settings are shown
in Figure 52. The SoftPanel application requires a display setting of 1024
horizontal pixels or more.
page 45.
Figure 52. General Menu
Note Buttons for Panel Width settings not supported by the monitor’s current res-
olution are grayed out. Minor visual artifacts may appe
1600 pixel settings.
The various controls on this menu allow adjustment of the size, placement,
and information display of the SoftPanel to meet personal preferences.
The Half Width Panel
width panel, by dragging the corner of the display.
Custom Size checkbox allows the resizing of a half
ar at 1152, 1280, and
42 Soft Panels — Instruction Manual
Page 43

Encore Soft Panels Console
The Options Buttons settings are shown in Figure 53.
Figure 53. Button Menu
The Button Coloring section of this menu allows the “state color” to be
changed as desired. In the above example, the arrow indicates the button
that would be selected to edit the “on” state color for the Protect button.
With this button selected, the Red, Green, and Blue sliders can be used to
edit the color, which is then Applied.
Help window is shown in Figure 54.
The
Figure 54. Help Menu
The Options Help menu offers access to the Soft Panels Instruction Manual
(.pdf file) and the Soft Panel application version number.
The License Information button is not operational
Encore Soft Panels licensing is tied to the Encore Panel Server.
on Encore systems.
Exit
Exits the Soft Panel Application
Soft Panels — Instruction Manual 43
Page 44

Section 6 — Soft Panels Console
Prelude System Console
Figure 55. Prelude Console Disconnected (Controls Unlocked)
Figure 56. Prelude Console Connected (Controls Locked)
Prelude Console Control Differences
The Prelude system Console controls and indicators are mostly the same as
those on the Encore version. Refer to Encore Soft Panels Console on page 40
for specific information.
The most significant Prelude Console differences are:
• No server IP Address fields, which are not used on Prelude systems
because connection is made dir
Send Matrix Cfg button, used to make the Soft Panel send its router con-
•
figuration to the matrices when the panel connects.
• Additional communications settings, for isolating Prelude network
communi
cations.
Connect Button
In the center left of the Console is a button labeled Connect to Matrices when
the Soft Panel is not connected, and labeled
connected. Above this button is a display that shows a line between the
Panel when connected, and blinking indicators report an active link.
Send Matrix Cfg Button
When this box is checked, the Soft Panel application will always send its
router configuration to the matrices whenever it connects. This mimics the
behavior of Prelude hardware panels. Leave this control in the default Off
state if hardware panels exist on your Prelude system. This control is
required for Soft Panel only Prelude systems (see page 28).
ectly to the matrices.
Disconnect from Matrices when
44 Soft Panels — Instruction Manual
Page 45

Hardware Control Panel Keycap Legend Generation
Prelude Soft Panel Communications Settings
Prelude systems can be configured to use different methods that increase
communications efficiency and allow multiple systems to operate indepen
dent of one another on the same network.
Note All components on an individual Prelude system (hardware control panels,
software control panels, and matrices) must use the same Broadcast/Multi
cast and port number settings.
Broadcast/Multicast
Multicast increases message bandwidth efficiency for larger Prelude sys-
tems, or systems running on busy networks. The default Broadcast setting is
appropriate on Prelude systems with up to three control panels.
Matrix Port
Different Matrix Ports can be used to isolate systems from one another. You
can use the default port number, increment the port number by 1-5, or
select Manual and enter a different port number.
-
-
See the separate Prelude Instruction Manual for more information.
Multicast IP Fields
If the Prelude Soft Panel is being used with a Concerto matrix configured
for Multicast operation, the IP addresses for the
Matrix Status can be entered into this fields.
Note Concerto matrices operating under Prelude control must be set to match.
From the Concerto Network Configuration web page, select Use Multicast,
and then select Manual Select to enter matching IP addresses.
Hardware Control Panel Keycap Legend Generation
Control Panel keycaps suitable for Encore and Acappella hardware panels
can now be printed. A Microsoft Word template file is available that can be
populated with keycap legends using the Soft Panels application. The
resulting keycap file can be printed onto a clear sheet, cut to size, and
inserted into the hardware panel buttons.
The cut lines in the provided template work only for Encore and Acappella
panels. Buttons on other model panels (SMS7000, JEP-100, Kalypso) are
sized differently. Templates for other model panels are not available, but
with careful work you may be able to reformat another model’s generated
keycap file using Microsoft Word to fit into that panel’s button size.
Reference Server and
Soft Panels — Instruction Manual 45
Page 46

Section 6 — Soft Panels Console
Keycap Legend Generation
1. If necessary, use the Encore Panel Server to create a configuration for
2. Rename the Default template for that panel type to create a copy, using
3. Copy the hardware Control Panel configuration from Step 1 above to
4. Launch the Encore Soft Panels application and choose that model of
5. From the Panel Server, copy the legend template you created to that
6. Ensure the Soft Panels Dynamic Keycap box is checked.
7. Right click on the Soft Panel GUI (or click the Menu button on the
the hardware Control Panel that includes the desired dedicated
Sources, Destinations, and button functions.
a descriptive name (e.g., XYLgnd) to create a working legend template.
the legend template.
Soft Panel. Identify the name of that Soft Panel instance (for example,
XY09BA).
Soft Panel instance.
console), and then select
Export Keycap Configuration.
8. A navigation window opens, allowing you to name the file, and choose
a location to save the file, or create a new folder for the file. The default
save location is C:\Program Files\Grass Valley Group\Soft Panels.
9. Enter a name for the keycap legend file, navigate to the save location,
and click
The file (a .doc MS Word document) can now be opened and used to print
keycap legends.
Save.
Keycap Legend Preparation
1. Access the .doc file from the saved location and without changing the
document’s formatting print it without any scaling onto a clear sheet.
2. Using the guide lines, carefully cut the keycap legends from the sheet.
A sharp knife and straight-edge works well for this operation.
46 Soft Panels — Instruction Manual
Page 47

Keycap Legend Replacement
8053_54r0
Base
Legend
CAM
1
Keycap
1. Using your fingers or rubber-mouthed pliers, carefully pull a keycap
out of the Control Panel (Figure 57).
Figure 57. Control Panel Keycap
Hardware Control Panel Keycap Legend Generation
2. If the keycap has an existing legend, remove it from the base or
carefully extract it from the inside of the keycap without scratching it.
3. Insert the new legend into the keycap in the proper orientation.
4. Press the keycap back onto its base in the panel.
5. Repeat the above steps for all the keycaps to be updated with new
legends on that panel.
Soft Panels — Instruction Manual 47
Page 48

Section 6 — Soft Panels Console
48 Soft Panels — Instruction Manual
Page 49

Index
Numerics
48B panel GUI 31
A
Acappella 33
Acappella panel GUI 33
Administrator
Soft Panels permissions 11
All Users
Soft Panels permissions 11
Always on Top button 41
Apply Config button 41
B
BPS panel GUI 32
Broadcast 45
button label
line break 38
button legends 7
Buttons
Options 43
Buttons menu item 43
C
Change Password 39
Check point securemote 23
CLN panel GUI-Encore 32
CLN panel GUI-SMS 34
communications settings
Prelude 45
configuration 18
first time for Encore panel 19
first time for Prelude panel 23
SMS7000 GSC mezzanine 20
using Encore Panel Server 20
connect
to Encore Panel Server 8
to Prelude matrix 8
Connect button 40, 44
Connect to Matrices button 44
use after configuration 22
use before configuration 22
Connect to Server button 40
Console
Encore 8
Encore detailed description 40
general description 8
locked when connected 40
overview 39
password 39
Prelude 8
Prelude detailed description 44
Prelude differences from Encore 44
control panel
maximum with Encore 7, 15
maximum with Prelude 7, 21
COS panel GUI 34
Create Shortcut menu item 42
D
default configuration
of panel 18
default panel configuration
Salvos disabled 20, 28
default panel instance name 18, 22
Device Id number
Encore SCB 15
Prelude PC 21
Disconnect from Matrices button 44
Disconnect from Server button 40
documentation online 4
Dynamic Keycap
off 37
on 38
Dynamic Keycap button 41
Dynamic Keycap feature 37
Soft Panels — Instruction Manual 49
Page 50

Index
E
editing Soft Panel name
Encore 18
Prelude 23
EDP panel GUI 34
Encore
configuration overview 18
maximum number of panels 7, 15
Soft Panel names 18
Encore CLN panel GUI 32
Encore UPC panel GUI 32
Encore/Prelude 31
Exit button 43
Export Keycap Configuration button 42
F
FAQ database 4
frequently asked questions 4
IP address
entry field 41
primary SCB 19
secondary SCB 19
J
JEP-100 GUI-Jupiter 37
Jupiter JEP-100 GUI 37
K
Kalypso 33
keycap legend
generation description 45
generation procedure 46
preparation 46
replacement 47
KMD panel GUI 33
KSD panel GUI 33
G
General Menu
Options 42
General settings 42
Get Router Config from Control Panel 25
Grass Valley web site 4
GUI
Soft Panels 7
H
Help Menu
Options 43
Help window 43
I
Identical router configurations
for Prelude 25
installation 9
Encore installer 12
Prelude installer 12
Soft Panels installer 9
Instruction Manual
Soft Panels 43
L
license key
Encore 17
licensing 7
procedure with Encore 15
procedure with Prelude 21
purchase 15, 21
line break
on button label 38
Load Router Config from File 25
Local IP Address field 41
M
Macintosh (Intel Duo) 7
Matrix Port 45
Matrix Status Multicast IP 45
MB8 panel GUI 34
MCO panel GUI 35
Menu configuration screen 41
monitor
display setting 7
Multicast 45
Multicast IP Fields 45
50 Soft Panels — Instruction Manual
Page 51

Index
multiple control systems 29
multiple Soft Panel instances 8
N
name
of panel 18
unique for each panel 18
naming convention 18
NetConfig 15
NetConfig agent
used with Prelude 23
network requirements 9
O
online documentation 4
Options
Buttons 43
General Menu 42
Help Menu 43
Options menu item 42
P
P32 panel GUI 35
P48 panel GUI 35
panel
default configuration 18
panel configuration
editing with Panel Server 18
quick for Encore 19
quick for Prelude 23
panel instance name
default 18, 22
panel name 18
must be unique 18
Panel Name entry field 40
panel names
Encore 18
Prelude 22
panel naming convention 18
Panel Server
editing panel configuration 18
panel type
Acappella 33
drop down menu 31
Encore/Prelude 31
Kalypso 33
SMS7000 34
Panel Type button 40
Panel Width settings 42
Parallels application 7
password
Console 39
PC
Prelude runs one Soft Panel 21
permissions
Administrator 11
All Users 11
PMB panel GUI 32
Poll Timeout 41
Port field 40
Prelude
communications settings 45
configuration overview 22
detecting panel on network 22
identical router configurations 25
maximum number of panels 7, 21
Soft Panel names 22
using only Soft Panels 28
PXD panel GUI-SMS 36
PXS panel GUI-SMS 36
PXYE panel GUI-SMS 36
Q
quick Encore panel configuration 19
quick Prelude panel configuration 23
R
Reboot when complete box 26
Reference Server Multicast IP 45
Restore Config button 41
S
Salvos disabled
default panel configuration 20, 28
SCB
primary IP address 19
Soft Panels — Instruction Manual 51
Page 52

Index
secondary IP address 19
SCP panel GUI-SMS 36
Send Matrix Cfg button 28, 44
Show Console 39
SMS CLN panel GUI 34
SMS SVR panel GUI 35
SMS UCP panel GUI 34
SMS UMD 1 GUI 36
SMS UMD 2 GUI 36
SMS UMD 3 GUI 36
SMS7000 34
SMS7000 GSC mezzanine 20
Soft Panel
detected on Prelude network 22
Soft Panel name
changing for Encore 18
changing for Prelude 23
Soft Panels
Administrator permissions 11
All Users permissions 11
Encore configuration overview 18
general description 7
GUI 7
installation 9
licensing 7
one instance on Prelude PC 21
Prelude configuration overview 22
Soft Panels Instruction Manual 43
Soft Panels type 31, 33, 34
software download from web 4
SVR panel GUI-SMS 35
VPN services 23
W
web site documentation 4
web site FAQ database 4
web site Grass Valley 4
web site software download 4
Windows 2000 7
Windows 7 7
Windows 95/98 7
Windows ME 7
Windows NT 7
Windows XP 7
X
XY panel GUI 32
U
UCP panel GUI-Encore 32
UCP panel GUI-SMS 34, 35
UMD 1 GUI-SMS 36
UMD 2 GUI-SMS 36
UMD 3 GUI-SMS 36
V
version number
Soft Panel application 43
virtual control panel 7
52 Soft Panels — Instruction Manual
 Loading...