

Page 1

SiteConfig
Systems Management Application
User Manual
Software Version 2.1
071-8693-03
October 2011
Page 2

CERTIFICATE
Certificate Number: 510040.001
The Quality System of:
Grass Valley USA, LLC and its Grass Valley Affiliates
Headquarters:
400 Providence Mine Road
Nevada City, CA 95945
United States
15655 SW Greystone Ct.
Beaverton, OR 97006
United States
Brunnenweg 9
D-64331 Weiterstadt
Germany
Kapittelweg 10
4827 HG Breda
The Nederlands
2300 So. Decker Lake Blvd.
Salt Lake City, UT 84119
United States
Including its implementation, meets the requirements of the standard:
ISO 9001:2008
Scope:
The design, manufacture and support of video and audio hardware and software products and related
systems.
This Certificate is valid until: June 14, 2012
This Certificate is valid as of: December 23, 2010
Certified for the first time: June 14, 2000
H. Pierre Sallé
President
KEMA-Registered Quality
The method of operation for quality certification is defined in the KEMA General Terms And Conditions For
Quality And Environmental Management Systems Certifications. Integral publication of this certificate is allowed.
KEMA-Registered Quality, Inc.
4377 County Line Road
Chalfont, PA 18914
Ph: (215)997-4519
Fax: (215)997-3809
CRT 001 042108
ccredited By:
ANAB
A
Page 3

SiteConfig
Systems Management Application
User Manual
Software Version 2.1
071-8693-03
October 2011
Page 4
Contacting Grass Valley
International
Support Centers
Local Support
Centers
(available
during normal
business hours)
France
24 x 7
Australia and New Zealand: +61 1300 721 495 Central/South America: +55 11 5509 3443
Middle East: +971 4 299 64 40 Near East and Africa: +800 8080 2020 or +33 1 48 25 20 20
Europe
+800 8080 2020 or +33 1 48 25 20 20
Hong Kong, Taiwan, Korea, Macau: +852 2531 3058 Indian Subcontinent: +91 22 24933476
Asia
Southeast Asia/Malaysia: +603 7805 3884 Southeast Asia/Singapore: +65 6379 1313
China: +861 0660 159 450 Japan: +81 3 5484 6868
Belarus, Russia, Tadzikistan, Ukraine, Uzbekistan: +7 095 2580924 225 Switzerland: +41 1 487 80 02
S. Europe/Italy-Roma: +39 06 87 20 35 28 -Milan: +39 02 48 41 46 58 S. Europe/Spain: +34 91 512 03 50
Benelux/Belgium: +32 (0) 2 334 90 30 Benelux/Netherlands: +31 (0) 35 62 38 42 1 N. Europe: +45 45 96 88 70
Germany, Austria, Eastern Europe: +49 6150 104 444 UK, Ireland, Israel: +44 118 923 0499
Copyright © Grass Valley USA, LLC. All rights reserved.
This product may be covered by one or more U.S. and foreign patents.
United States/Canada
24 x 7
+1 800 547 8949 or +1 530 478 4148
Grass Valley Web Site
The www.grassvalley.com web site offers the following:
Online User Documentation — Current versions of product catalogs, brochures,
data sheets, ordering guides, planning guides, manuals, and release notes
in .pdf format can be downloaded.
FAQ Database — Solutions to problems and troubleshooting efforts can be
found by searching our Frequently Asked Questions (FAQ) database.
Software Downloads — Download software updates, drivers, and patches.
4 SiteConfig — User Manual
Page 5

Contents
Chapter 1: Getting started with SiteConfig...............................................................................9
About SiteConfig.....................................................................................................................................10
SiteConfig features.................................................................................................................................10
About installing SiteConfig......................................................................................................................10
System requirements for SiteConfig control point PC.............................................................................11
Installing/upgrading SiteConfig...............................................................................................................11
Install prerequisite files on the SiteConfig PC.........................................................................................13
Opening SiteConfig.................................................................................................................................13
SiteConfig main window.........................................................................................................................13
Icons in SiteConfig..................................................................................................................................14
Terminology used in SiteConfig..............................................................................................................16
Taskflow checklist for using SiteConfig...................................................................................................18
Chapter 2: Working with network configuration....................................................................21
Working with sites and groups................................................................................................................22
About sites..........................................................................................................................................22
About site hierarchy.............................................................................................................................22
Network configuration hierarchy .........................................................................................................24
About system descriptions..................................................................................................................25
About saving system descriptions.......................................................................................................25
Creating a new system description.....................................................................................................26
Location of SiteConfig files..................................................................................................................30
Importing a system description...........................................................................................................30
Importing a K2 System Configuration file............................................................................................30
About SiteConfig and K2Config settings.............................................................................................31
About Control Panel, SiteConfig, and K2Config settings....................................................................32
About the Control Panel Service host and applications......................................................................33
Exporting (Save As) a system description..........................................................................................34
Merging system descriptions...............................................................................................................35
About groups.......................................................................................................................................35
Adding a group....................................................................................................................................35
Removing items from the system description.....................................................................................36
Working with networks............................................................................................................................36
About networks...................................................................................................................................36
Creating or modifying a network.........................................................................................................37
About hosts files and SiteConfig.........................................................................................................39
Viewing the hosts file..........................................................................................................................40
Generating host tables using SiteConfig.............................................................................................41
Working with devices..............................................................................................................................42
About SiteConfig support on managed devices..................................................................................42
About device phases...........................................................................................................................42
Third party devices in SiteConfig........................................................................................................43
Discovering devices with SiteConfig...................................................................................................44
Assigning discovered devices.............................................................................................................45
Adding a discovered device to the system description........................................................................46
Assigning the control point PC............................................................................................................47
Adding a device...................................................................................................................................47
About device and host names.............................................................................................................48
Modifying a device name.....................................................................................................................49
Modifying a host name........................................................................................................................49
Making the host name the same as the device name.........................................................................49
11 October 2011 SiteConfig 2.1 User Manual 5
Page 6

Contents
Pinging devices from the PC that hosts SiteConfig.............................................................................50
Identifying a device.............................................................................................................................50
Moving a device to a different group...................................................................................................50
About planned and current IP configuration........................................................................................51
Viewing device interfaces....................................................................................................................51
About IP configuration of network interfaces on devices.....................................................................52
Managing IP configuration on a newly discovered device...................................................................53
Managing IP configuration on a discovered device.............................................................................53
Modifying a managed network interface.............................................................................................54
Modifying an unassigned (unmanaged) interface...............................................................................58
About adding an interface...................................................................................................................59
Adding an interface.............................................................................................................................60
About locking a device or group..........................................................................................................61
Unlocking a device or group................................................................................................................62
Locking a device or group...................................................................................................................62
About credentials in SiteConfig...........................................................................................................63
Password changes and compatibility..................................................................................................63
Setting global credentials....................................................................................................................64
Setting credentials for a specific device..............................................................................................65
Changing passwords on Windows 7...................................................................................................65
Changing passwords on Windows XP.................................................................................................66
Accessing a device via Remote Desktop from SiteConfig..................................................................66
Power cycling a device........................................................................................................................67
Closing and restarting SiteConfig.......................................................................................................67
Chapter 3: Working with software deployment......................................................................69
Understanding software deployment concepts.......................................................................................70
About deployment groups...................................................................................................................70
About managed software and tasks....................................................................................................70
Requirements for software managed by SiteConfig............................................................................72
About managed and unmanaged software.........................................................................................72
About the package store.....................................................................................................................72
About roles..........................................................................................................................................72
About managing deployment tasks.....................................................................................................73
About software deployment tasks.......................................................................................................73
About the Discovery Agent..................................................................................................................74
About deployment options...................................................................................................................75
Workflow for software deployment......................................................................................................75
Working with devices and software deployment groups.........................................................................76
Configuring deployment groups..........................................................................................................76
About adding a software role to a device............................................................................................77
Adding a software role to a device......................................................................................................77
About removing a software role...........................................................................................................78
Removing a software role from a device.............................................................................................78
Checking all currently installed software on devices...........................................................................78
Comparing files for software deployment............................................................................................79
Working with managed software packages............................................................................................79
Adding a software package to a deployment group............................................................................79
Install prerequisite files on the SiteConfig PC.....................................................................................80
Creating managed packages from installed software.........................................................................80
Managing the package store...............................................................................................................80
Working with software deployment tasks................................................................................................81
Displaying software deployment tasks................................................................................................81
Configuring software deployment tasks..............................................................................................82
Setting deployment options.................................................................................................................82
Uninstalling software...........................................................................................................................84
Upgrading software.............................................................................................................................84
6 SiteConfig 2.1 User Manual 11 October 2011
Page 7

Contents
Retrying a failed task...........................................................................................................................85
Reinstalling software...........................................................................................................................86
Upgrading the Discovery Agent...........................................................................................................86
Chapter 4: SiteConfig application setup.................................................................................89
Location of SiteConfig files.....................................................................................................................90
Setting the SiteConfig package store location........................................................................................90
About system description backups.........................................................................................................90
Backing up the system description.........................................................................................................91
Chapter 5: Troubleshooting.....................................................................................................93
Viewing logs............................................................................................................................................94
Viewing the application log..................................................................................................................94
Viewing the deployment log................................................................................................................94
Viewing failed install logs....................................................................................................................94
Troubleshooting device discovery...........................................................................................................94
If you are unable to discover a device.................................................................................................95
If you have previously discovered and configured a device................................................................95
Troubleshooting software deployment....................................................................................................95
If an executing deployment task fails...................................................................................................95
If a deployment task does not start.....................................................................................................95
Appendix A: Trademarks and Agreements.............................................................................97
Trademarks.............................................................................................................................................98
JPEG acknowledgment...........................................................................................................................98
11 October 2011 SiteConfig 2.1 User Manual 7
Page 8

Contents
8 SiteConfig 2.1 User Manual 11 October 2011
Page 9

Chapter 1
Getting started with SiteConfig
This section contains the following topics:
• About SiteConfig
• SiteConfig features
• About installing SiteConfig
• System requirements for SiteConfig control point PC
• Installing/upgrading SiteConfig
• Install prerequisite files on the SiteConfig PC
• Opening SiteConfig
• SiteConfig main window
• Icons in SiteConfig
• Terminology used in SiteConfig
• Taskflow checklist for using SiteConfig
11 October 2011 SiteConfig 2.1 User Manual 9
Page 10

Getting started with SiteConfig
About SiteConfig
SiteConfig is Grass Valley's tool for network configuration and software deployment. SiteConfig
is a ProductFrame application. ProductFrame is an integrated platform of tools and product
distribution processes for system installation and configuration.
You can use SiteConfig as a stand-alone tool for planning and system design, even before you have
any devices installed or cabled. You can define networks, IP addresses, hostnames, interfaces, and
other network parameters. You can add devices, group devices, and modify device roles in the
system.
As you install and commission systems, SiteConfig runs on a designated PC. It discovers devices,
configures their network settings, and manages host files. SiteConfig also manages software
installations and upgrades and provides a unified software package with compatible versions for
deployment across multi-product systems.
You should use SiteConfig for network configuration and software deployment at installation and
throughout the life of the system in your facility. This enforces consistent policy and allows
SiteConfig to keep a record of changes, which makes the system easier to maintain and aids in
troubleshooting should a problem arise.
SiteConfig displays information from a system description file, which is an XML file.
SiteConfig features
SiteConfig provides features for network configuration and software deployment.
Network Configuration
• Creating a description of a customer facility including the networks and devices that comprise
the system
• Remote hostname and IP address configuration and validation
• Remote device discovery and identification
• Host file generation and distribution
• Remote Desktop access to devices from the SiteConfig UI
• Reboot or shutdown devices remotely
Software Deployment
• Software packaging to ensure compatibility
• Remote detection and verification of installed software
• Remote installation and uninstallation of software
About installing SiteConfig
SiteConfig uses a protocol that involves sending Ethernet broadcast messages to discover and
configure devices. To enable this protocol to work correctly, there must be unrestricted network
access between the PC that hosts SiteConfig and the devices to be discovered.
10 SiteConfig 2.1 User Manual 11 October 2011
Page 11

Getting started with SiteConfig
This is achieved if control network interfaces are all connected to the same switch or to multiple
switches interconnected with ISLs/trunks. If your site requires that other switches and/or routers be
in the network path, you must make sure that no restrictions are in place that block SiteConfig
protocols.
Also, do not install SiteConfig on a PC on which a drive from a managed device is mapped as an
administrative share (C$). For example, if you have a PC set up to run anti-virus software and for
this purpose you have network drives set up on the PC mapped to C$ shares on devices, then do not
use that PC to host SiteConfig and manage those devices.
For a given system, there should be just one instance of SiteConfig managing the system.
System requirements for SiteConfig control point PC
The PC on which SiteConfig is installed must meet the following requirements:
CommentsRequirements
Operating system
Java JRE
Installing/upgrading SiteConfig
Prerequisites:
• The PC on which you are installing SiteConfg meets system requirements.
• The PC is connected to the LAN on which all the devices to be managed are connected.
• There are no routed paths to the devices to be managed.
Microsoft Windows (Must be a U.S. version):
XP Professional Service Pack 2, Server 2003, or
Vista Enterprise Service Pack 1.
Minimum 512 MB, 1 GB recommendedRAM
Must have at least 128 MB memoryGraphics acceleration
Pentium 4 or higher class, 2 GHz or greaterProcessor
400 MBHard disk space
Version 4.0Microsoft .NET Framework
1.3.1_12 and 1.4.2_05 or higher. Required for
the HP Ethernet Switch configuration interface,
which is used for K2 Storage Systems (shared
storage).
Microsoft XML 4 Service Pack 2 is required.XML
1. Procure SiteConfig installation files from the Grass Valley website or via other distribution
mechanisms.
The following directory and files are required to install SiteConfig:
• DotNetFx directory
• ProductFrameUISetup.msi
• setup.exe
11 October 2011 SiteConfig 2.1 User Manual 11
Page 12
Getting started with SiteConfig
2. If you already have a version of SiteConfig installed, go to Windows Add/Remove Programs and
uninstall it.
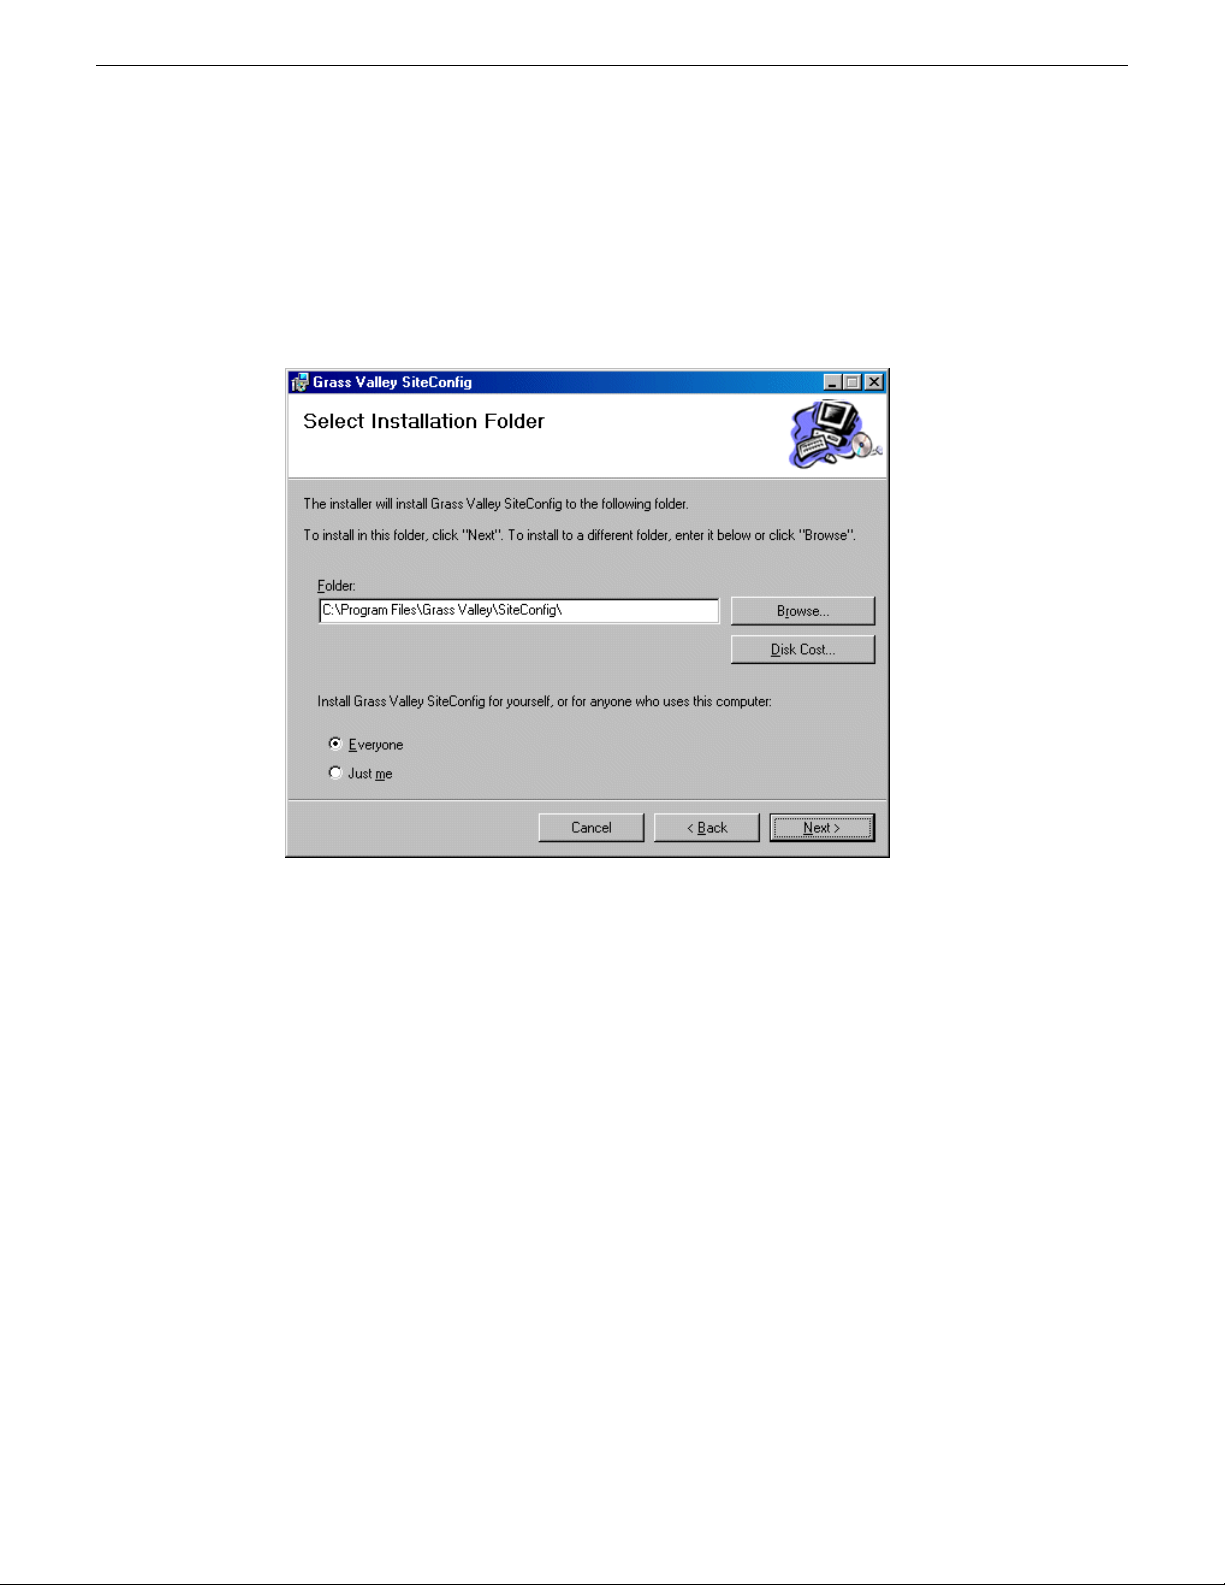
3. Double-click setup.exe.
The installation wizard opens.
4. Work through the wizard pages, clicking Next and Finish.
If the PC does not have the appropriate version of Microsoft .NET, the SiteConfig installation
programs installs it.
5. Open the Windows operating system Services control panel on the PC and look for an entry
called " ProductFrame Discovery Agent".
The Discovery Agent must be installed on the SiteConfig PC so that the PC can be discovered
by SiteConfig and added to the system description as a managed device. This is necessary to
ensure name resolution in SiteConfig's hosts file.
The Discovery Agent is also known as the Network Configuration Connect Kit. For example,
in Windows Add/Remove Programs, it can be displayed as either Network Configuration Connect
Kit or SiteConfig Discovery Agent.
6. Proceed as follows:
• If the Discovery Agent is not installed, navigate to the SiteConfig install location's Discovery
Agent Setup subdirectory and double-click the DiscoveryAgentServiceSetup.msi file. This
launches the setup program and installs the Discovery Agent. Follow the setup wizard to
complete installation. A restart is required after installation. Then continue with the next step
in this procedure.
• If the Discovery Agent is already installed, continue with the next step in this procedure.
12 SiteConfig 2.1 User Manual 11 October 2011
Page 13

7. If not already configured, configure the SiteConfig PC with a valid Ethernet IP address for the
LAN using Windows Network Connections.
8. If you are not going to be using SiteConfig to manage system hosts files, put the system hosts
file on the SiteConfig PC.
Related Links
About installing SiteConfig on page 10
Install prerequisite files on the SiteConfig PC
Some software components share common prerequisite software. You must install a prerequisite
software package on the SiteConfig PC to make the prerequisite software available for software
deployment to devices.
1. Check release notes for the required version of prerequisite files, if any.
2. On the SiteConfig PC, open Windows Add/Remove programs and look for Grass Valley
Prerequisite Files, then proceed as follows:
• If the required version of prerequisite files is installed, do not proceed with this task.
• If prerequisite files are not installed or are not at the required version, proceed with this task.
Getting started with SiteConfig
3. Procure the required prerequisite software installation file. The file name is Prerequisite
Files.msi.
4. On the SiteConfig PC, run the installation file. The installation program copies prerequisite files
to C:\Program Files\Grass Valley\Prerequisite Files.
Opening SiteConfig
1. Use the SiteConfig shortcut on the Windows desktop or in the Start menu to open SiteConfig.
2. SiteConfig opens as follows:
• If you have previously opened SiteConfig, the SiteConfig main window opens with the most
recently used system description loaded.
• If you have not previously used SiteConfig or if SiteConfig does not have access to a system
description file, you are prompted to create a new system description or to import an existing
system description.
3. Respond as appropriate.
SiteConfig main window
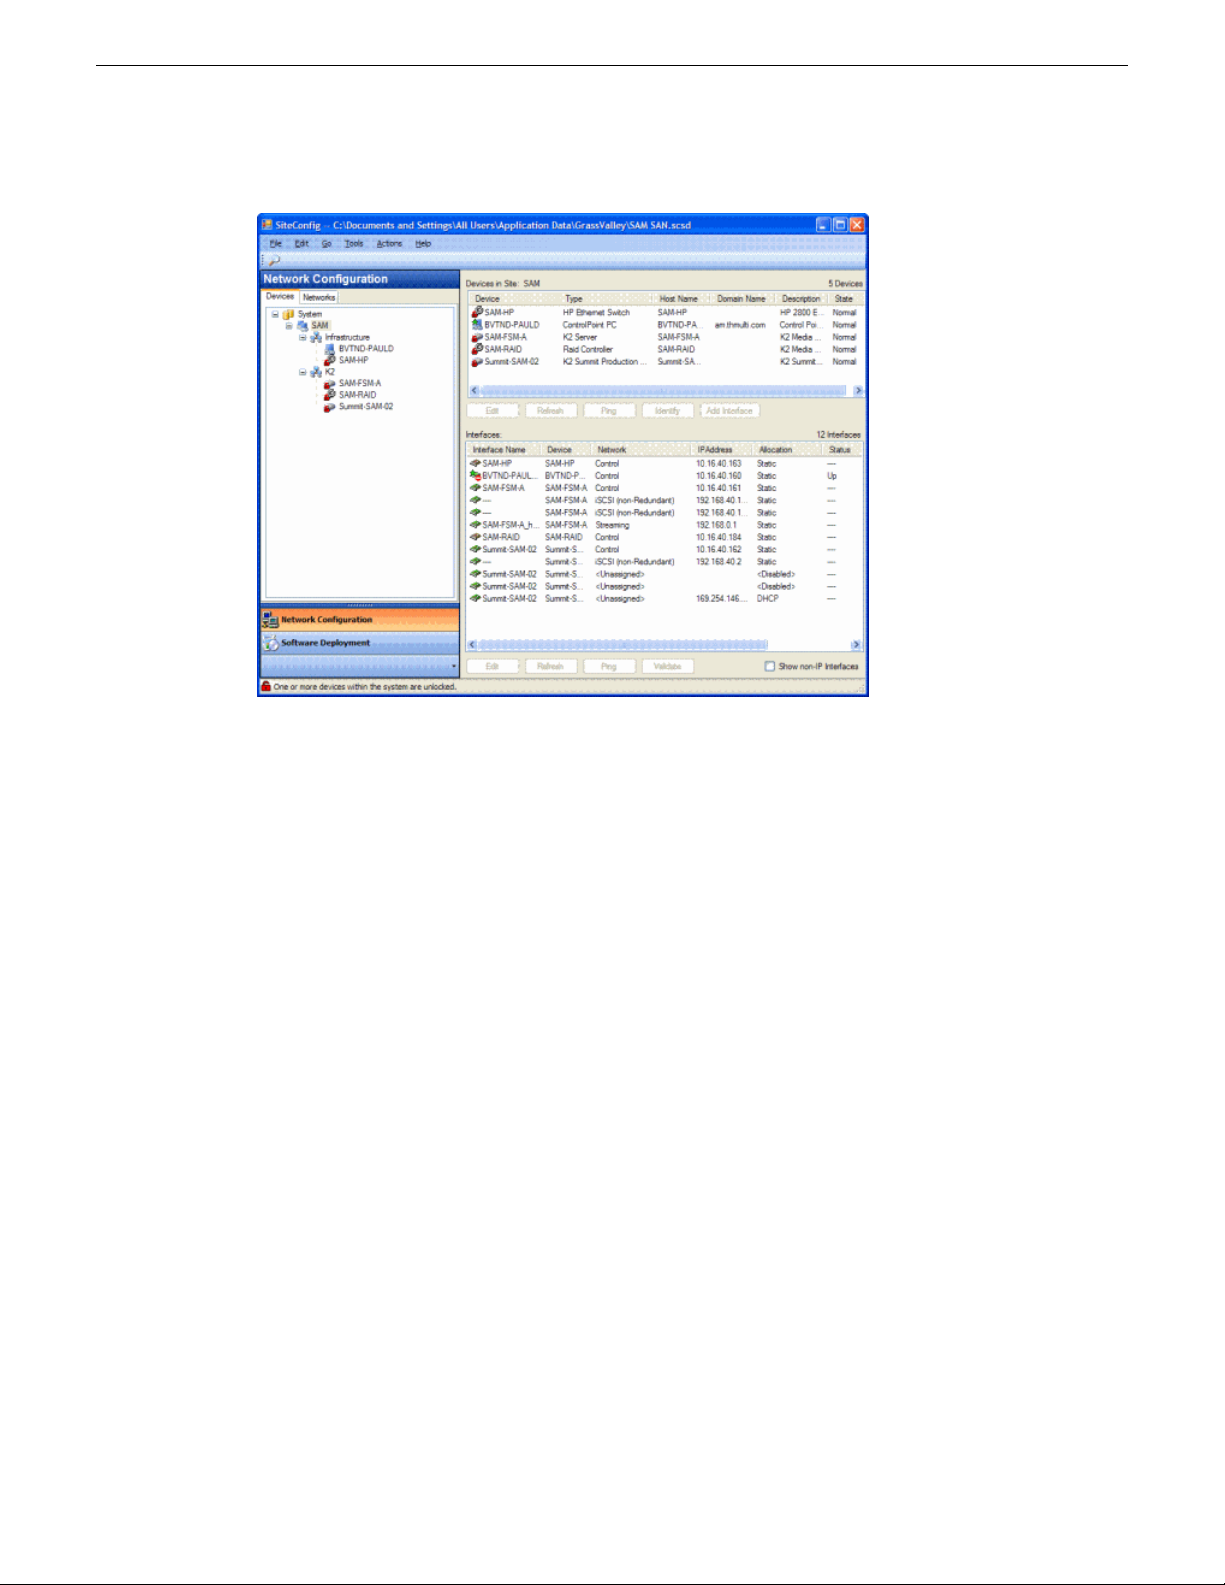
The SiteConfig main window is as follows:
11 October 2011 SiteConfig 2.1 User Manual 13
Page 14
Getting started with SiteConfig
The left side of the screen shows the tree view of the currently loaded system description. The
Network Configuration and Software Deployment buttons at the bottom of the tree view activate
either the network configuration workspace or the software deployment workspace.
The network configuration workspace on the left has two tabs: a Devices tab to display the tree of
devices in the system and a Networks tab to show the hierarchy of networks defined in the system.
The software deployment workspace also has two tabs: a Devices tab that displays the same tree
view of devices but provides information about the software roles assigned to the devices and the
software currently installed on devices. The Deployment Groups tab provides the interface to manage
software deployment tasks.
Select an item in the tree and the view on the right side of the screen shows details about the item
selected. Select a site or group to show information about all the items that fall under the selected
item.
Right-click an item to access a context menu of operations.
Icon overlays on items and tooltips provide status and warning feedback.
Icons in SiteConfig
SiteConfig object icons
The following icons identify a graphical user interface object.
14 SiteConfig 2.1 User Manual 11 October 2011
Page 15
Getting started with SiteConfig
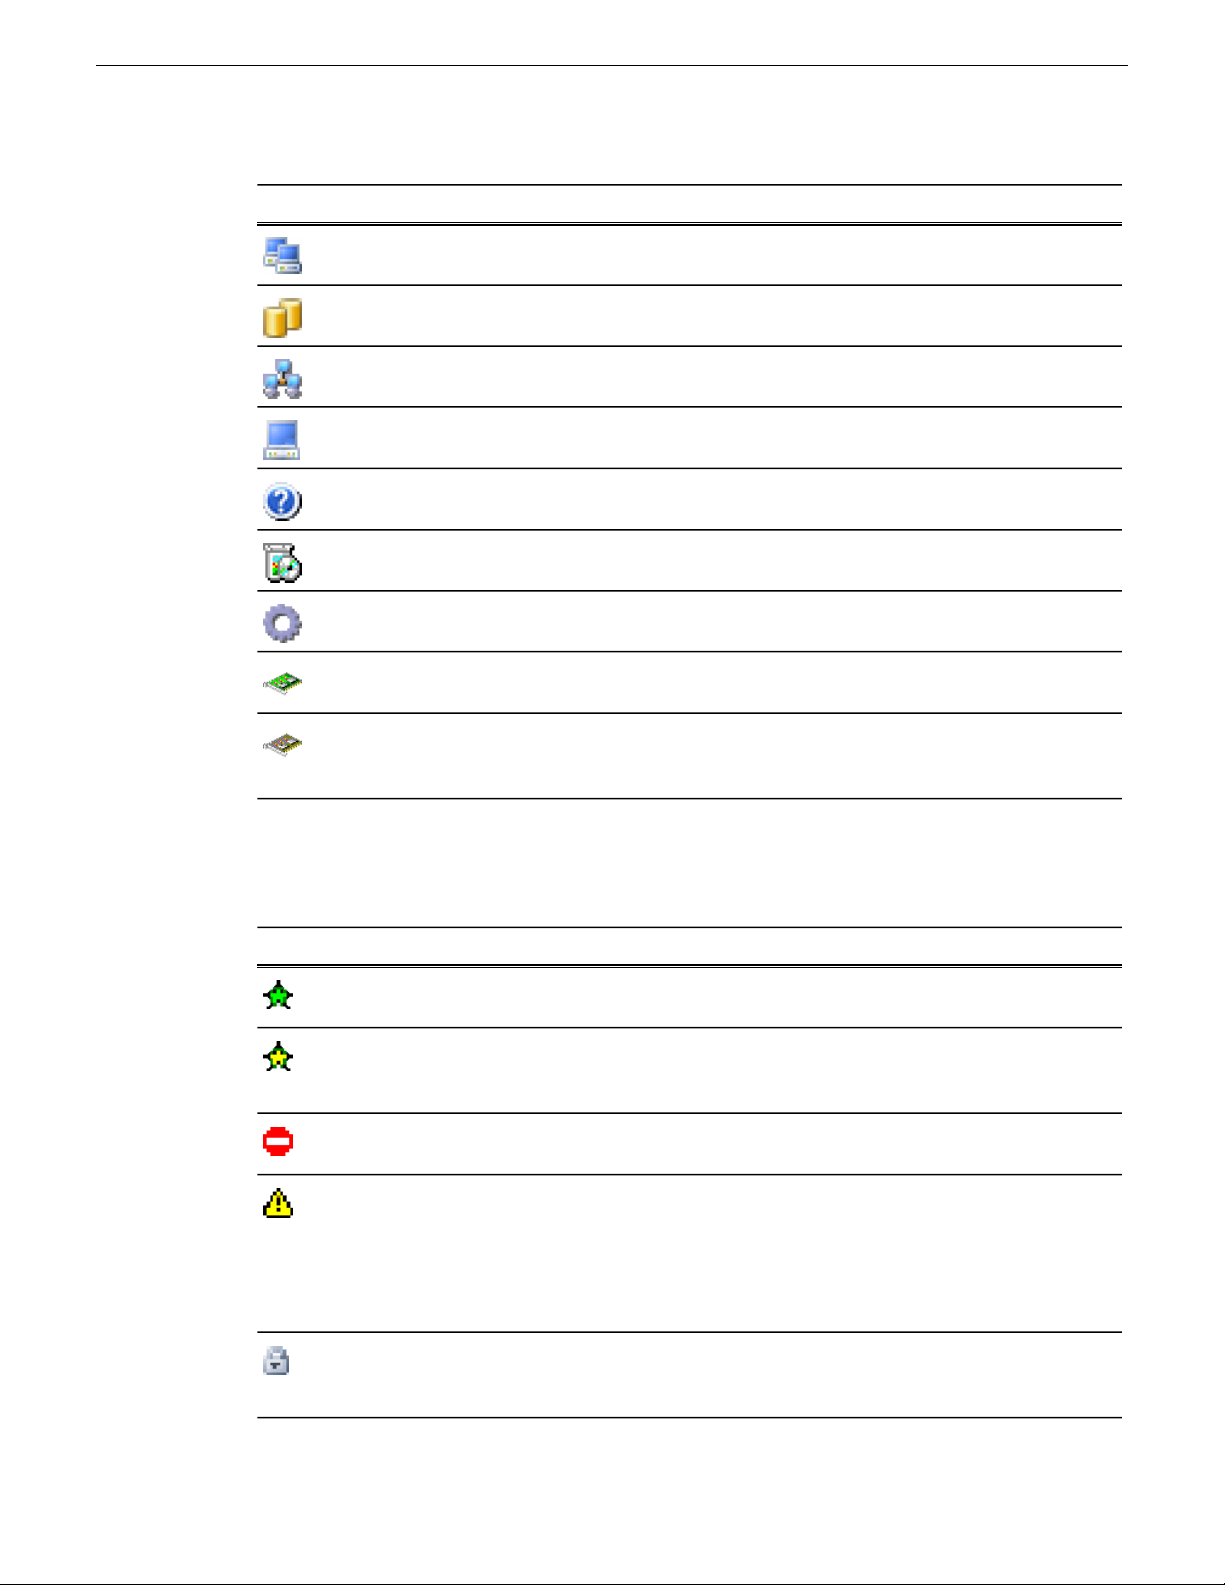
MeaningIcon
Site. A site is a container for networks and groups of devices and may also contain sub
sites
System. A system is also a site but it is the top most site in the hierarchy
Group. An arbitrary collection of devices
Default device icon. Represents a single device. Icons for specific device types look
different
Unknown device. If there is no specific icon provided for a particular device type, this
icon is displayed by default
Software package. Represents a cab file that contains software installer files
Role. A single software component representing a piece of functionality
Managed Network Interface. The green tinge represents a "managed" network interface
that SiteConfig can manage IP assignments
Unmanaged Network Interface. Represents a NIC whose IP assignments are not currently
being managed by SiteConfig either due to lack of connectivity OR that IP assignments
are managed by an external entity such as DHCP
Icon overlay indicators
Configuration and connection status is indicated by overlay graphics on object icons. Unless specified
otherwise, the indicators appear in the Network Configuration | Devices view, as follows:
MeaningOverlay descriptionOverlay graphic
Green star
Connected, configured, and communicating correctly
in SiteConfig.
Yellow star
Discovered and assigned, but SiteConfig is unable to
establish direct IP communication yet is able to detect
it via the NetConfig protocol
Red circle with white bar
User attention required. Hover over the icon to view a
tooltip with more information
Yellow warning triangle
Warning. Hover over icon to see tooltip information
about the warning. In the Network Configuration view,
the warning could be restart required or awaiting restart.
In the Software Deployment view, the warning could
be deployment tasks pending, restart required, or
awaiting restart.
Gray lock
Locked. Network configuration and deployment tasks
are disabled unless you unlock the item. You must
provide administrator credentials to unlock.
11 October 2011 SiteConfig 2.1 User Manual 15
Page 16

Getting started with SiteConfig
MeaningOverlay descriptionOverlay graphic
Red lock
Terminology used in SiteConfig
System Description
The system description is an XML file that describes a complete system. Almost all of the information
displayed in SiteConfig is saved to the system description file. The file has a .scsd extension.
Site
A site is a logical collection of groups of devices and the networks to which those devices connect.
A K2 SAN is an example of a site.
Group
A group is an arbitrary collection of devices that can be defined in SiteConfig to categorize sets of
devices. For example, a group called "Infrastructure" can be created to contain devices like Ethernet
switches, Fibre Channels switches, and Control Point PCs.
Managed Networks
Unlocked. Network configuration and deployment tasks
are fully enabled
Managed IP Networks are Networks on which the allocation of IP Addresses is managed by the
SiteConfig application. The term "managed" is also applied to network interfaces on devices to
imply that their IP addresses can be managed by the SiteConfig application. Prior to a device being
discovered, all network interfaces on a device are unmanaged. When discovered, any interface that
is used to connect to a managed network can be configured and set on the device via SiteConfig.
Unmanaged Networks
Unmanaged Networks are Networks on which allocation of IP Addresses is externally managed by
DNS\host files or DHCP. The term "unmanaged" is also applied to network interfaces on devices
to imply that their IP addresses are not managed by the SiteConfig application. All network interfaces
prior to discovery of devices are unmanaged.
NetConfig protocol
The NetConfig protocol is an Ethernet based protocol that is used by SiteConfig to discover devices
on the network via broadcasts. The protocol is also used to configure networking properties like
hostnames and IP addresses on individual devices.
Discovery Agent
The Discovery Agent is a Windows service that must be installed on all managed devices to allow
for discovery and configuration by SiteConfig. The service is listed in Windows as the "ProductFrame
Discovery Agent". The Discovery Agent is installed by the SiteConfig Network Configuration
Connect Kit.
16 SiteConfig 2.1 User Manual 11 October 2011
Page 17

Getting started with SiteConfig
Software package
A managed software package is a collection of software installation files. The collection can include
software for multiple devices and products. The software package is distributed as a *.cab file.
SiteConfig requires that a valid software package be available in its software package store in order
to deploy software.
Package store
A single instance of SiteConfig as it runs on a control point PC has a single package store. You
must specify the location of the package store as a directory on a local or network connected drive.
A software package must be in the package store in order to be available to SiteConfig software
deployment features.
Deployment group
A deployment group is a group of devices to which SiteConfig can deploy software. You group the
devices together based on your software deployment tasks. For example, devices that all get the
same software can be combined in a deployment group. You define software deployment groups in
the SiteConfig Software Deployment | Deployment Groups tree view.
Credentials
Administrator credentials are required in order to install software on a device. SiteConfig remembers
a username and password and passes those credentials to the device in order to get permission to
install software. If all your devices have the same administrator username and password, you can
enter them in SiteConfig as global credentials and then SiteConfig uses those credentials to install
software on all devices. If some devices have a different username and password than those used
for global credentials, you can specify in SiteConfig the credentials for individual devices. SiteConfig
then uses those credentials to install software on the individual device, rather than using the global
credentials.
Roles
A role is a grouping of software functionality. A device can have one or more software roles. A
software role is typically provided by one or more programs or services running on the device. For
some products, a single device-type can be configured to have several different combinations of
software roles, depending on the functionality that device provides to the system or systems to which
it belongs.
Depending on a device’s family, type, and configuration, SiteConfig automatically assigns the
appropriate software roles to a device when the device is added to the system description. You can
also manually modify a device’s software roles.
SiteConfig knows what software should be installed for each software role, and deploys the software
from a software package accordingly.
Deployment Tasks
A deployment task is a mapping between a particular software package that is part of a deployment
group and a device that is part of the same deployment group.
Managed Package and Managed Software
A managed package, or managed software, consists of software that can be installed and/or uninstalled
and/or reinstalled by SiteConfig.
11 October 2011 SiteConfig 2.1 User Manual 17
Page 18
Getting started with SiteConfig
Taskflow checklist for using SiteConfig
Use the following sequence of tasks as a guideline as you install, configure, and manage your system
with SiteConfig. This checklist outlines a typical commissioning workflow for a new system.
Create a new system description
CommentTask
Create a hierarchy of sites adding networks,
groups and device placeholders
Set the properties of each network specified
for the system
Modify or add device placeholders, edit each
network interface and specify the IP address
to use
Discover devices
Match each discovered device to an existing
placeholder or create a new device from the
discovered device
For each device, edit each network interface
specifying the necessary network information
required and apply to the device
Add your Control Point PC to the system
description
Deploy hosts files
Use the site wizard to add sites based on
models or import a system description (
.scsd) file
Specify IP address ranges and other network
details for managed and unmanaged networks
If you discover a device for which you do
not yet have a placeholder device prepared,
you can add the device directly to the
appropriate site\group without a placeholder.
Set the control interface IP address first, then
the others
Repeat steps for all devicesSet the hostname of the device
Make sure you have completed network
configuration of all network interfaces across
all devices before deploying the host file to
ensure completeness and validity. Deploy to
the control point PC as well as to managed
devices.
Create a deployment group
Perform a software check on every device in
the deployment group
Add one or more software packages
Run deployment tasks on devices
You must control which deployment tasks
run on what devices and in what order. For
example, on a K2 SAN you must deploy to
servers first, then clients. If your system
requires a specific sequence of software
deployment and restarts, you must manage
the sequence yourself. SiteConfig does not
enforce this type of deployment sequence.
18 SiteConfig 2.1 User Manual 11 October 2011
Page 19

If you have one or more K2 SAN sites
defined, import the system description file
into the K2 System Configuration application
and configure every device.
Getting started with SiteConfig
CommentTask
11 October 2011 SiteConfig 2.1 User Manual 19
Page 20

Page 21

Chapter 2
Working with network configuration
This section contains the following topics:
• Working with sites and groups
• Working with networks
• Working with devices
11 October 2011 SiteConfig 2.1 User Manual 21
Page 22

Working with network configuration
Working with sites and groups
About sites
Sites are containers for networks and groups of devices and may also contain subsites. When you
start with a new system description, you add one or more sites in the tree view under the System
node. SiteConfig provides you with a wizard to help create a site based on a model.
A site model is a template to enable simplified creation of sites. Each model specifies a set of
networks that devices under that site connect to, for example, a control network, a streaming network,
a storage network. The model also specifies a set of device models that typically comprise such a
site, including attributes like the specific number of devices of a particular model.
You can choose to start with a site model and then add more sites to the system as appropriate. You
can also choose to create a site which is entirely custom; where you specify networks, groups,
devices without starting with predefined models.
When you create multiple sites, their placement in the tree view tells SiteConfig how the devices
under them connect together.
Related Links
Network configuration hierarchy on page 24
About site hierarchy
Sites are containers for networks and groups of devices and may also contain sub sites. When you
build a tree view of sites and subsites, it is important to understand that you are also defining a
hierarchy of networks.
When you add a network to a particular site, it means that every item that you add under that site
is connected to the network(s) defined at that site and its parent site(s). However, if you have peer
sites in the tree (at the same level) and they each define one or more networks, SiteConfig does not
allow the devices in one peer site to connect to a network in another peer site. SiteConfig interprets
any device you add to a peer site as not being connected to the networks defined at another peer
site. The exception to this are networks defined at a mutual parent site(s). If peer sites have a mutual
parent site, the devices in any peer site can connect to the network in the mutual parent site. This is
illustrated in the following examples:
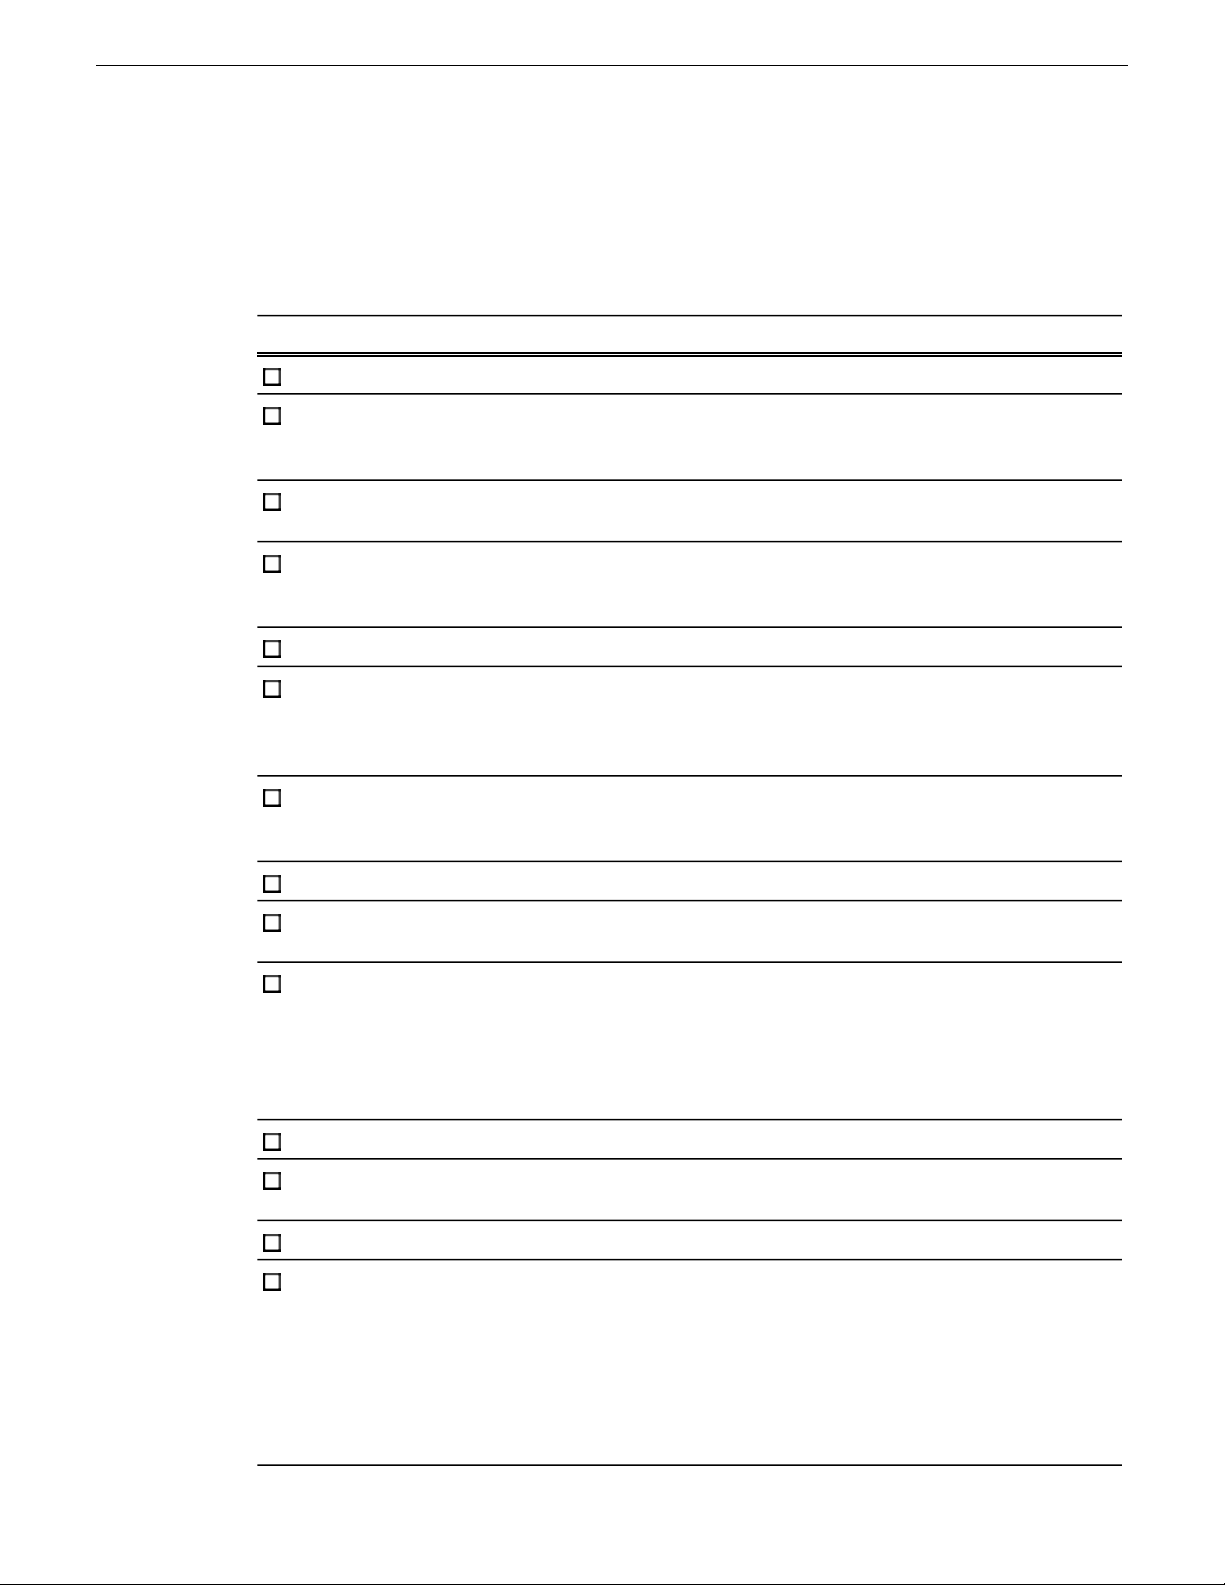
The SiteConfig tree view of sites and devices under the System node (which is also a site) appears
as follows:
22 SiteConfig 2.1 User Manual 11 October 2011
Page 23
Working with network configuration
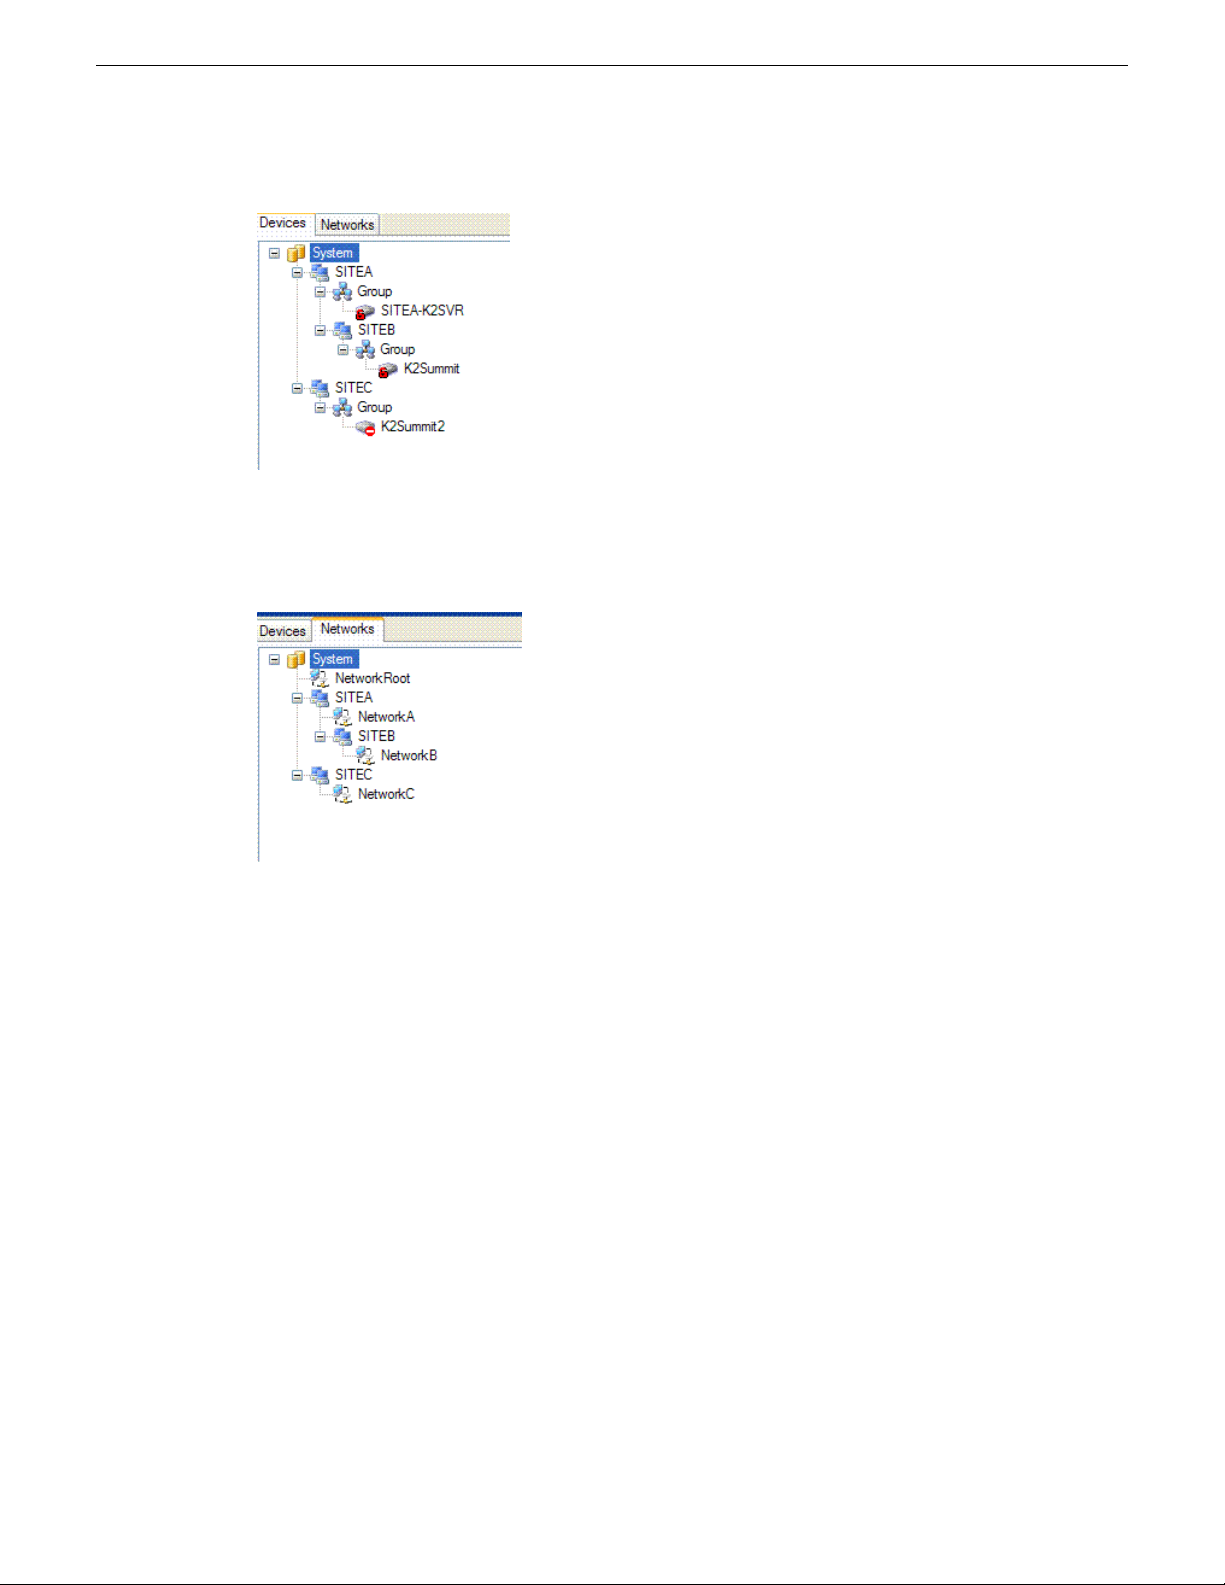
The SiteConfig tree view of some networks defined at different sites within the tree view appears
as follows:
The interpretation of this hierarchy is as follows:
• All devices that are under SITEA or SITEB connect to the networks defined at those sites
(NetworkA and NetworkB respectively) and to the network "NetworkRoot" defined at their
parent - System.
• All devices under SITEC connect to NetworkC and NetworkRoot only - not to networks defined
under SITEA or SITEB.
• When you edit the network interface IP addresses on devices, the network options presented will
be limited to the networks that are "in scope".
When creating sites and networks, consider the following:
• Put your control network in the top level site since there is likely just one control network for
the entire system. Then when you add child sites, only add other networks that are intended for
devices within that site. An example of this is a storage networking network for a K2 SAN.
• Create peer sites to isolate networks from one another. For example, on mirrored storage SANs
the storage networking networks are typically isolated.
Related Links
Network configuration hierarchy on page 24
11 October 2011 SiteConfig 2.1 User Manual 23
Page 24

Working with network configuration
Rules for networks on page 37
Network configuration hierarchy
The following table describes the various items that can be defined in the SiteConfig tree view and
what each can contain
Is contained byContainsDescriptionHierarchy
System
Site
Group
Device
The top level container.
The name is free form.
An association of
networks and devices.
Typically used for
major sub-systems,
such as the K2 SAN.
Can be free form, but
predefined models are
provided.
A category of devices.
Can be free form or can
have specific properties
and constraints relative
to functionality in the
site or system. A site
must have at least one
group in which to
contain devices.
A physical device,
predefined by Family,
Type, and
Configuration.
NoneSites: multiple, free
form
System, SiteSites: multiple, free
form. Nesting is
constrained; Groups:
multiple, free form
SiteDevices: multiple, free
form
GroupSub-device: multiple,
predefined; Interfaces:
multiple, predefined
Sub-device
DeviceNoneA physical component
or group of components
that reside in a device,
such as a LUN or
RANK in a RAID
device, predefined by
Family, Type, and
Configuration
Interface
DeviceNoneA physical connection
point, usually a network
adapter, predefined by
Type.
Related Links
About sites on page 22
24 SiteConfig 2.1 User Manual 11 October 2011
Page 25

About site hierarchy on page 22
About system descriptions
You have several options for starting and developing a SiteConfig system description, as follows:
Start with an existing system description
You can obtain a system description for a system similar to the one you are installing. Some system
descriptions are provided with SiteConfig as templates for specific system types. You can import
the system description into SiteConfig, and then modify it until it matches your specific system.
You can define the entire system including defining sites, groups, networks, devices and even the
planned IP assignments before you arrive at the installation site.
You can save your work as a system description file (.scsd) file and when onsite at the installation
site, you can import the file into SiteConfig as your starting point.
Once you import the system description you can make changes as appropriate and proceed to discover
the connected physical devices.
Working with network configuration
About the mirrored SAN system description template
Mirrored K2 SANs introduce an additional level to the network hierarchy in the SiteConfig system
description. Because of the rules for networks, the placement of networks in a mirrored SAN system
is critical for device connectivity. Therefore it is recommended that you start by importing a
SiteConfig system description template designed specifically for a mirrored K2 SAN system to
achieve the required network hierarchy.
The mirrored SAN system description template provides a Site node for the X SAN and a Site node
for the Y SAN. The K2 clients (K2 Media Clients and/or K2 Summit Production Clients) and K2
Media Servers for each SAN must be under their Site node. For your existing mirrored SANs, you
add groups and devices to the appropriate Site node. As you modify the system description template
to match your specific K2 SAN mirrored system, do not change the position of the SAN Site nodes
or the networks in the tree view hierarchy.
Start with a new system description
You can create new system description using SiteConfig on your PC before you arrive at the
installation site, or as part of the commissioning process at the installation site.
Typically, if you are starting with a new system description, you use the site wizard to add one or
more sites based on appropriate site models, define networks and their IP ranges, and add device
placeholders. Then you discover devices and perform appropriate network configuration, followed
by software deployment.
About saving system descriptions
When you make a change to a system description, SiteConfig saves the change within three seconds
and updates the system description file. There is no need to save changes when you close a system
description or to manually save changes while you are working on a system description.
11 October 2011 SiteConfig 2.1 User Manual 25
Page 26
Working with network configuration
Creating a new system description
1. Open SiteConfig and proceed as follows:
• If a dialog box opens that gives you the choice of creating or importing a system description,
it means SiteConfig does not have access to a system description file. Click Create.
• If the SiteConfig main window opens, click File | New.
The Create New System Description dialog box opens.
2. In the Create New System Description dialog box, enter the name of the file for the system
description you are creating.
It is recommended that you store the system description file in the default location, rather than
browsing to store the file in a different location. SiteConfig always accesses the default location.
3. Click OK.
A blank system description loads, which displays just the top-level System node in the tree view.
4. In the Network Configuration | Devices tree view, right-click the System node or a Site node and
select Add Site.
In this context, "Site" is a distinct system, such as a K2 SAN or an Aurora Browse system.
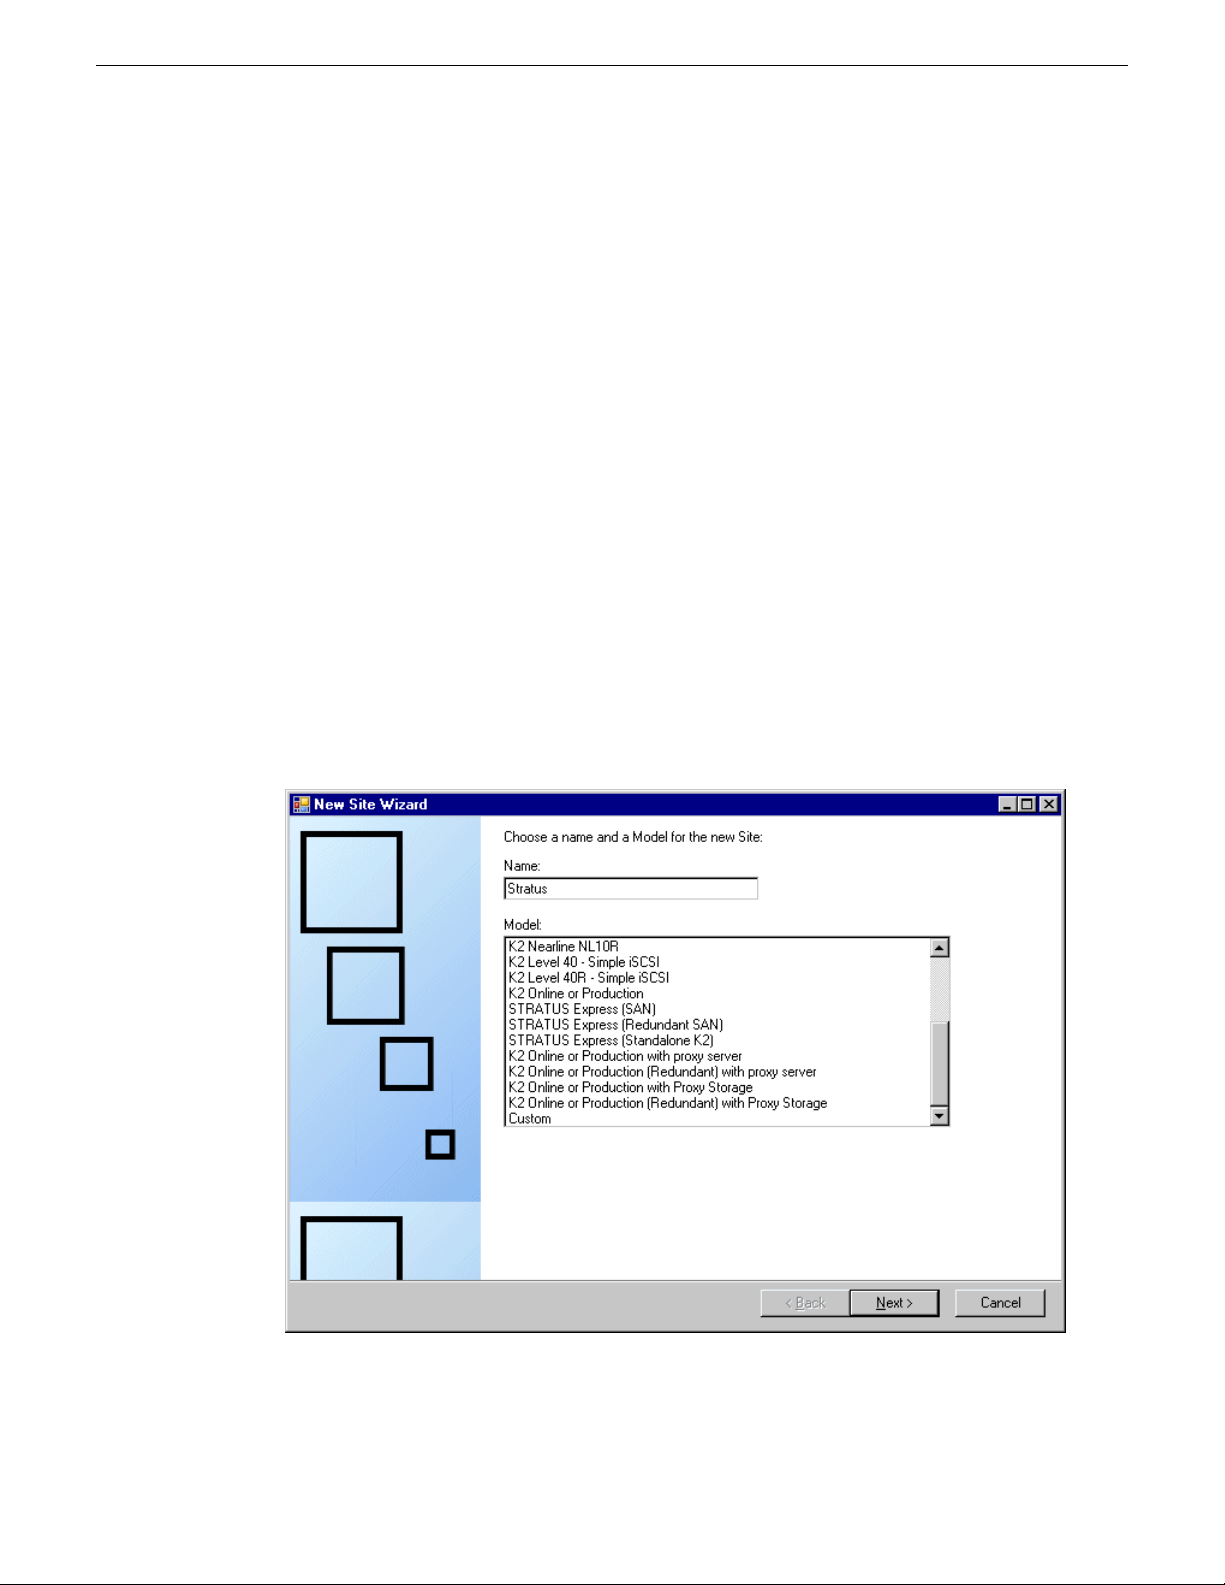
The New Site Wizard opens.
26 SiteConfig 2.1 User Manual 11 October 2011
Page 27
Working with network configuration
5. Enter a name for the site you are creating, considering the following:
• Keep the site name short, as it becomes the root identifier that is the default prefix for device
and network names.
• Sites in the tree view are automatically sorted alphabetically.
6. Select a model on which to base your site.
7. Click Next.
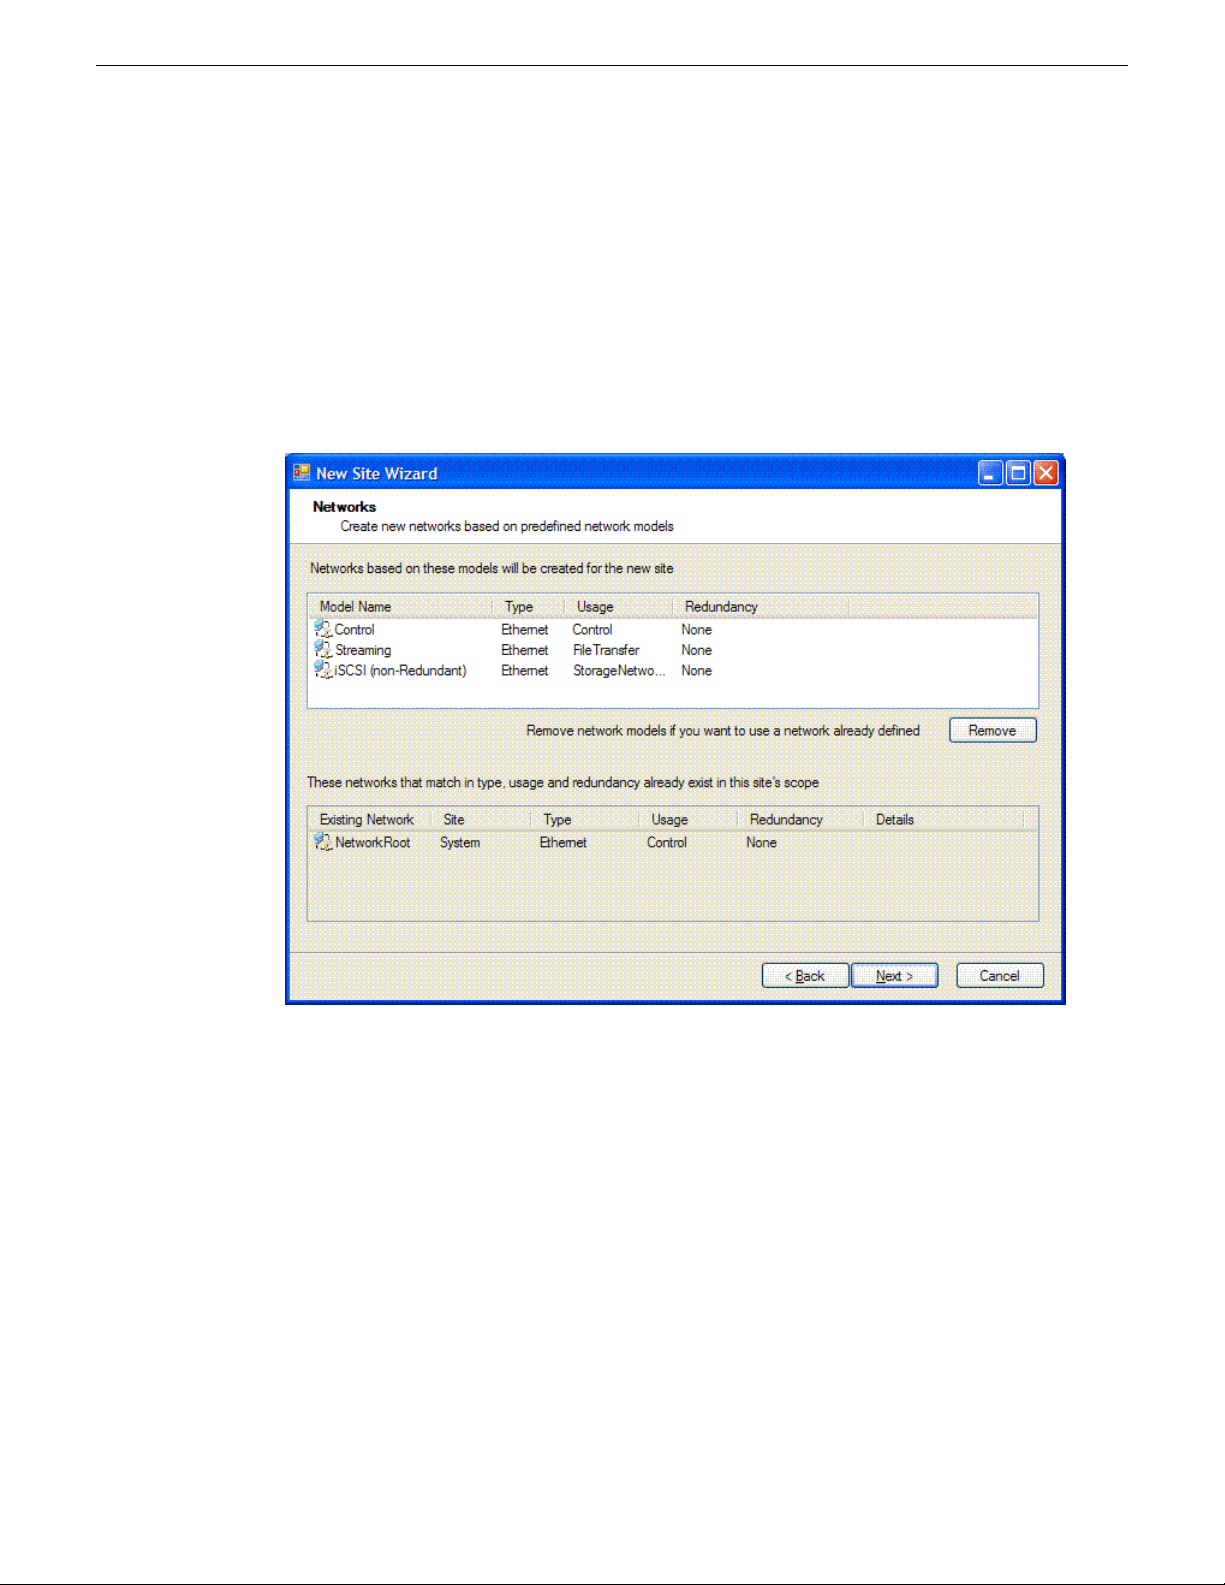
The Networks page opens.
The Networks page displays a list of networks that are defined for the selected site model. Each
of these networks is based on a network model that defines the type, usage and redundancy of
the network. When the New Site Wizard creates a network, it is based on this model.
8. If a network is not necessary for the site you are creating, select the network and click Remove.
Since child sites inherit the networks defined at their parent(s), if the site you are creating has a
parent site that already contains one of the displayed networks, then it is not necessary to include
that network here.
11 October 2011 SiteConfig 2.1 User Manual 27
Page 28
Working with network configuration
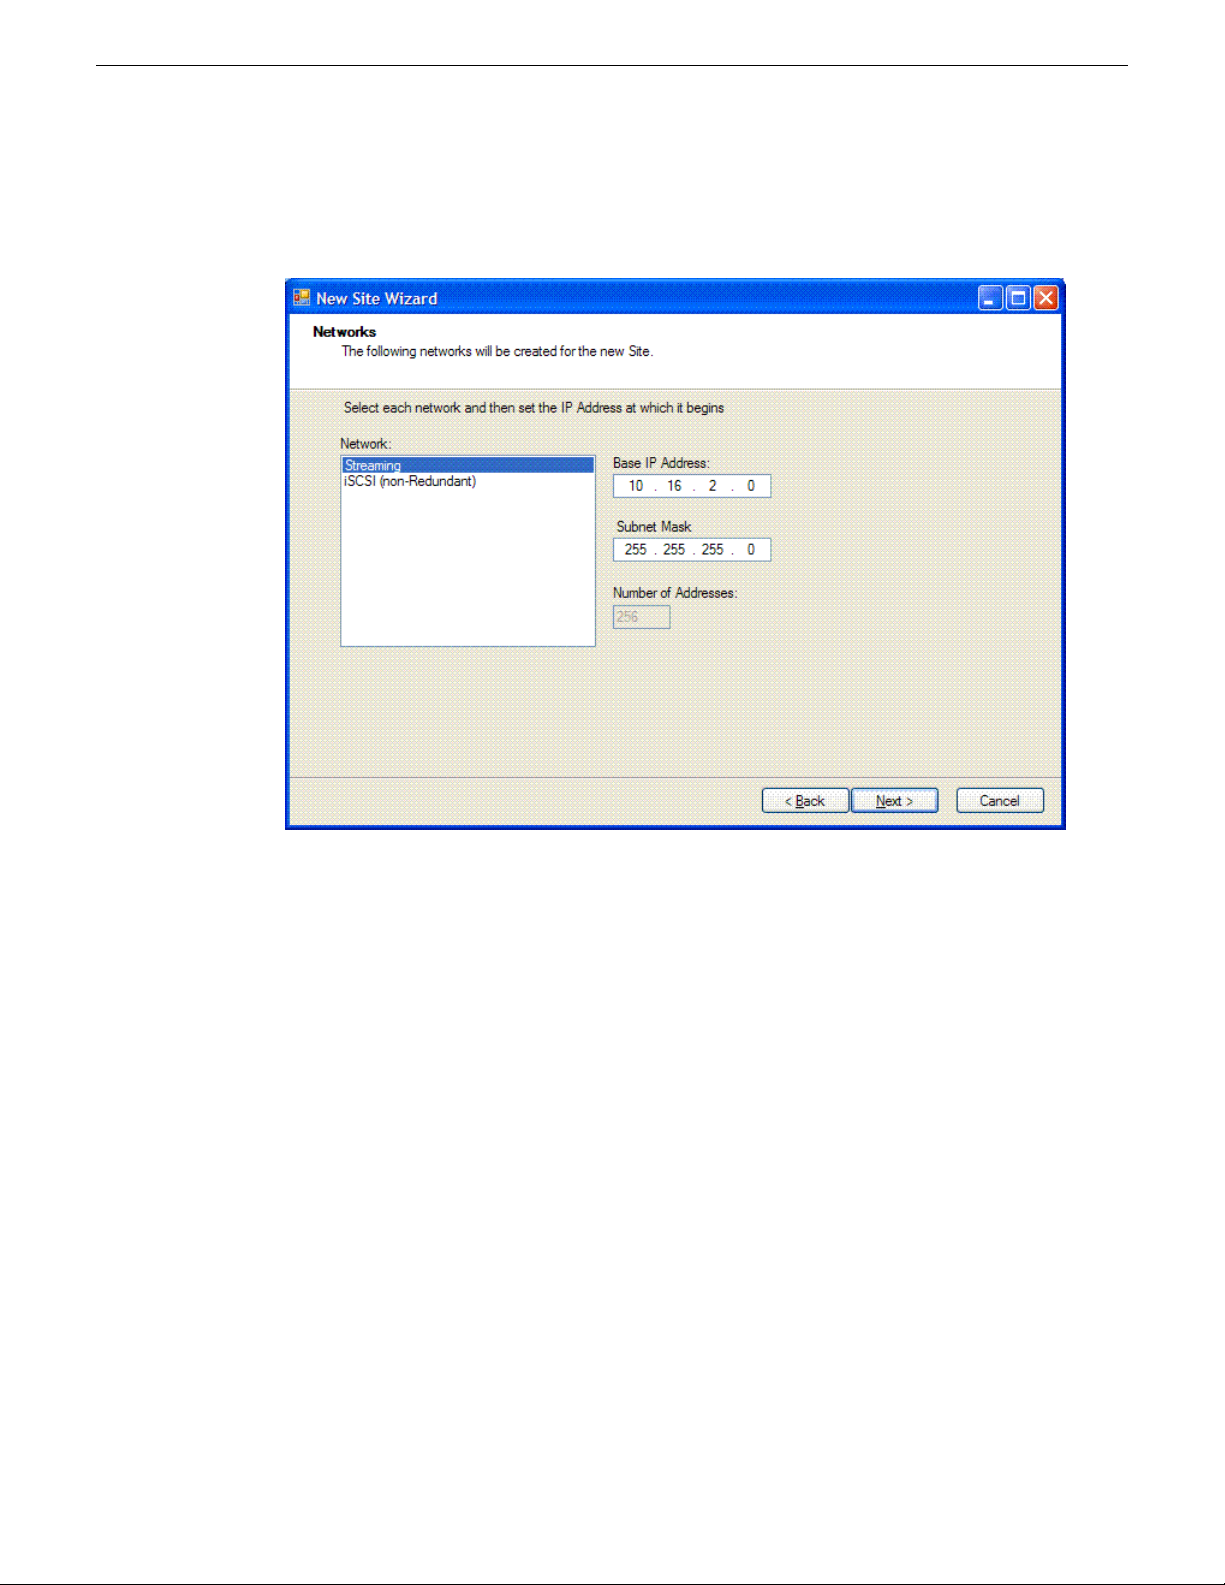
9. Click Next.
The second Networks page opens.
The second Networks page shows the network models you chose to be created for this site.
10. Select each network and specify the base IP address, subnet mask and number of addresses for
the IP address range for the network.
You can assign an IP address from this network for any device you add to this site.
When you complete the wizard, SiteConfig creates new networks based on the values you specify
here.
28 SiteConfig 2.1 User Manual 11 October 2011
Page 29

11. Click Next.
The Devices page opens.
Working with network configuration
The Devices page shows you the device models that typically comprise a site based on the model
you chose in the first page of the New Site Wizard. The New Site Wizard creates these devices
as part of the site. You can then modify, remove, or you add devices, including device models
that are not shown on this page.
12. You can select a device model and do one or more of the following:
• Specify the number of devices of that model for the site. If the control is disabled, it means
that the number of devices is constrained by the site model. For example, a site model might
be constrained to have one Ethernet switch only.
• Specify the starting IP address of a set of devices of that model. SiteConfig automatically
assigns IP addresses from this range. If you require a different sequence of IP addresses, you
can modify them on each device after the New Site Wizard completes.
13. Click Next.
The "...Site will be created..." page opens.
This is the last page and summarizes what the New Site Wizard adds to the tree view.
14. Click Finish to create the site.
The site is displayed in SiteConfig in the tree view with groups and device placeholders displayed
under the site node. New networks are displayed in the tree view of networks in the Networks tab.
11 October 2011 SiteConfig 2.1 User Manual 29
Page 30

Working with network configuration
Location of SiteConfig files
SiteConfig uses the user profile directory, as currently configured in the Windows operating system,
to store and access files. The user profile directory can be different on different control point PCs,
depending on the Windows operating system installation. In the user profile directory you can find
the Application Data\GrassValley directory, which is where SiteConfig stores its files. The
complete path for a typical control point PC is as follows:
C:\Documents and Settings\All Users\Application Data\GrassValley
In this directory you can find system descriptions files, which have the scsd extension. You can
also find other SiteConfig directories and files.
Importing a system description
Prerequisites for this task are as follows:
• The SiteConfig PC has access to the system description file you are importing.
1. Open SiteConfig and proceed as follows:
• If a dialog box opens that gives you the choice of creating or importing a system description,
it means SiteConfig does not have access to a system description file. Click Import.
• If the SiteConfig main window opens, click File | Import.
The Import System Description dialog box opens.
2. Browse to and select a system description file (*.scsd) and click Open.
The current system description is closed and the system description you are importing is displayed
in SiteConfig.
Importing a K2 System Configuration file
If you are using SiteConfig for the first time at a system that has already been commissioned and
if the system has a K2 SAN, you can import the K2 System Configuration application's XML file
into your system description.
1. Open SiteConfig and proceed as follows:
• Click the File | Import menu item.
The Import System Description dialog box opens.
2. From the Files of type drop-down list select K2 SAN Config (.xml), browse to the location of the
XML file, select the file, and click Open.
SiteConfig creates new sites in the system description representing each K2 SAN it finds in the
XML file. SiteConfig adds placeholder devices for each device in the K2 SAN. SiteConfig might
popup windows asking you to resolve devices to equivalent device models in SiteConfig. Choose
the appropriate device model.
30 SiteConfig 2.1 User Manual 11 October 2011
Page 31

About SiteConfig and K2Config settings
Many settings and operations, such as network settings, adding/removing devices, and software
versions, are managed by both the SiteConfig application and the K2Config application. Each
application has its own XML file in which information is stored. You can keep the applications in
synch by using an orderly task flow as you configure the K2 SAN.
When doing initial installation and configuration tasks, you can export/import system information
from one application’s XML file to the other application’s XML file. You can also merge from
K2Config into an existing SiteConfig system description. These export/import/merge features
support a one-time process in which a system as described in the XML file of one application is
imported into the XML file in the other application. The target XML must not already contain the
system being imported.
When you change a setting in one application, it is not automatically updated directly in the other
application. The applications do not communicate dynamically with one another. However, both
applications can read settings as currently configured on the actual physical device and update their
XML file accordingly. This is the method you must use to keep the applications in synch.
When you change a setting that is managed by both applications, you should change it first in
SiteConfig, as a general rule. This application gives you the best context for the system as a whole
and provides features to identify and verify changes. Once the change is implemented on the actual
physical device, you must then open the relevant page in the K2Config application. This causes the
K2Config application to refresh its settings from the device and write the change to its XML file.
It also allows you to verify your change within the context of the K2Config application.
Working with network configuration
The following table summarizes operations that involve interaction between SiteConfig and K2Config.
Import SiteConfig system
description file into
K2Config
Import K2Config XML
into SiteConfig
Use this operation for initial install/commission
(greenfield) sites. First define the site topology
using SiteConfig and complete network
configuration and software deployment. Then
import the SiteConfig system description into
K2Config and complete the K2 SAN
configuration.
Use this operation when you're running
SiteConfig for the first time at a site with
existing K2 SANs that have already been
configured with K2Config. This allows you to
seed the SiteConfig system description with
device information that is already in the
K2Config XML file. After you have done this
operation for the first time, do not do it again.
Additional informationTask flow context and policiesOperation
This operation creates a K2 SAN in
K2Config with SiteConfig defined
devices. Uses the site name to check
if the K2 SAN already exists. The
operation will not import if the K2
SAN exists with the same name. The
operation can import all sites which
are K2 SANs from a single system
description file in a single import step.
This operation creates a SiteConfig
site with K2Config defined devices.
The operation removes all other sites.
11 October 2011 SiteConfig 2.1 User Manual 31
Page 32

Working with network configuration
Additional informationTask flow context and policiesOperation
Merge K2Config XML
into SiteConfig system
description
Rename Site\SAN
Remove Site\SAN
Add device
Create a new site\SAN
Use this operation when you've already defined
some sites using SiteConfig and you later want
to bring in another K2Config defined K2 SAN
that doesn't exist in SiteConfig. Do not merge
a K2Config XML that you've already merged.
If you do so, it is likely that SiteConfig will
create a new site with the same devices.
K2Config. Do not import\merge into SiteConfig
or K2Config.
K2Config. Do not import\merge into SiteConfig
or K2Config.
configuration and software deployment. Then,
add in K2Config and configure using K2Config.
configure network and deploy software, then
import into K2Config and configure each device
This operation creates a SiteConfig
site with K2Config defined devices but
leaves existing sites as is.
—Rename first in SiteConfig. Then rename in
—Remove first in SiteConfig. Then remove in
—Remove from both SiteConfig and K2Config.Remove device
—Add in SiteConfig first, do network
—Use SiteConfig to create site, add devices,
Change hostname
Remove and re-add to K2Config. If changing
the hostname of a media file system/metadata
K2 Media Server, re-configure all clients on the
K2 SAN using K2Config
Change IP address (except
address of TOE on K2
Media Server)
K2Config, click on the changed device's
network configuration node. This refreshes the
K2Config view of IPs from the device.
Change IP address of TOE
on K2 Media Server
use K2Config.
Modify K2 SAN
redundancy - redundant to
non-redundant or vice
versa
appropriate redundancy models and configure
network and deploy software. Remove K2 SAN
from K2Config. Import site into K2Config.
Configure using K2Config.
About Control Panel, SiteConfig, and K2Config settings
When you use SiteConfig and K2Config to set up your system, the STRATUS Control Panel
application can access the SiteConfig/K2Config information and pre-populate many of its settings.
—Perform hostname change using SiteConfig.
—Use SiteConfig for IP address changes. Then in
—For TOE IP changes and/or TOE card removal,
—Use SiteConfig to recreate the site using the
32 SiteConfig 2.1 User Manual 11 October 2011
Page 33

Working with network configuration
When the SiteConfig/K2Config information defines a device name or other value that is valid for
a particular setting, the STRATUS Control Panel application automatically fills in the setting or
populates a pick list from which you can make the appropriate selection.
For this reason Grass Valley requires that before you use the STRATUS Control Panel application,
you first use the SiteConfig and K2Config to set up your system and enter all the information that
is specific to your site and your workflow. Then the exchange of information from
SiteConfig/K2Config to the STRATUS Control Panel application validates your settings as you
configure, thereby reducing errors and providing a more efficient overall process.
The STRATUS Control Panel application also allows you to enter device names and other values
as free-form text. This allows flexibility for knowledgeable system installers. Use free-form entry
with care, as minor typographical differences can cause configuration errors.
The information exchange is uni-directional, going from the SiteConfig/K2Config application to
the STRATUS Control Panel application. If you make a setting in the STRATUS Control Panel
application, it is not reflected in the SiteConfig or K2Config application. However, the STRATUS
Control Panel application does do basic error checking. If you have a valid setting in the STRATUS
Control Panel application, then later you change that value in the SiteConfig/K2Config application,
the STRATUS Control Panel application detects the change. The next time you open the STRATUS
Control Panel application page that contains the setting, the STRATUS Control Panel application
displays an indicator to notify you that the value has changed. This allows you to pick the new value
or otherwise validate your settings.
The SiteConfig application and the K2Config application write their configuration files to the
machine that hosts the Control Panel Service. The SiteConfig application does this automatically
whenever you make a change to the SiteConfig system description. The K2Config application does
this automatically whenever you add a K2 SAN. In addition, you can manually synchronize K2Config
information to the STRATUS Control Panel application.
The configuration information is presented to the rest of the STRATUS system by the Control Panel
Service that runs on the STRATUS Core Services server with role of Common Services. Therefore
the STRATUS Core Services server must be operational and accessible on the network when you
use the STRATUS Control Panel application. If the configuration information becomes unavailable,
the STRATUS Control Panel application displays an indicator to notify you of the problem.
About the Control Panel Service host and applications
The Core Services server with the SiteConfig role of STRATUS Common Services hosts the Control
Panel Service. To communicate configuration information, multiple applications must be configured
to reference this Core Services server.
In the SiteConfig application, click Tools | Options | Network Configuration.
11 October 2011 SiteConfig 2.1 User Manual 33
Page 34

Working with network configuration
In the K2Config application, click STRATUS | Network Configuration.
In the STRATUS Control Panel application, configure the log in dialog box.
In the STRATUS application, configure the log in dialog box.
Exporting (Save As) a system description
The system description export feature allows you to save a system description file in a different
location and/or with a different file name.
1. Click File | Export.
A Export System Description dialog box opens.
2. Browse to your desired export location.
3. Enter the desired name of the system description file.
4. Click Save.
34 SiteConfig 2.1 User Manual 11 October 2011
Page 35

Merging system descriptions
Prerequisites for this task are as follows:
• Two or more system description files are accessible.
• The system description files are not identical.
Before merging system descriptions, compare their networks and plan your network integration.
SiteConfig does not error check for overlapping IP address ranges, network access, or other potential
problems when merging system descriptions. You might find integration easier if you reconfigure
networks before merging system descriptions.
1. If you have not already done so, import one of the system description files that you want to
merge.
2. Click File | Merge.
A Merging Into Existing System Description dialog box opens.
3. Navigate if necessary to the system description file that you want to merge, select the system
description file and then click Open.
• If the selected system description is identical to the existing system description, SiteConfig
displays an informative message and does not allow the merge.
Working with network configuration
• If the selected system description file is not identical, the system description appears as a new
4. Identify the name of the merged system description file, as listed in the title bar of the SiteConfig
main window. It is the name of the system description file last merged.
5. If you want to change the name of the merged system description file, do the following:
a) Export the system description file and give it a different name.
b) Import the system description file.
6. Evaluate the merged system description, including networks, device groups, and software
deployment groups. Reconfigure and integrate as necessary.
7. Repeat this procedure to merge additional system description files.
About groups
Groups are a way to classify sets of devices based on common attributes. For example you can
choose to create a group of devices based on their hardware type, such as Ethernet switches, or
based on their functionality, such as Editor PCs.
Creating groups also allows you to perform some common operations in SiteConfig. In the tree-view
you can select the group node and perform an operation, such as deploying hosts files or restarting,
on all the devices in the group.
site in the SiteConfig tree view.
Adding a group
1. In the Network Configuration | Networks tree view, right-click a site node and select Add Group.
The group appears in the tree view.
11 October 2011 SiteConfig 2.1 User Manual 35
Page 36

Working with network configuration
2. Right-click the group and select Rename.
3. Enter the desired name for the group.
Removing items from the system description
1. In the tree view, right-click any of the following nodes:
• Site
• Network
If you have at least one device in your system that has a network interface that is connected
to this network, you must reassign all network interfaces before you can remove the network.
• Group
• Device
• Sub-device
• Interface
2. Select Remove.
The item is removed from the system description.
Working with networks
About networks
This section describes how to use SiteConfig to define and manage the networks in a system.
When you add a network to a site in the tree view, you are defining a network to which one or more
devices within that site can connect. SiteConfig can then configure networking properties on devices
that you add to the site. For example, SiteConfig can set IP addresses on a device's network interface
based on an IP you select from a range of IPs belonging to a network that you have defined.
You can also choose to define networks in SiteConfig that exist at a given site but are not managed
by SiteConfig, such as DNS\DHCP managed networks. Having these networks defined in SiteConfig
gives you the ability to describe network connectivity between devices without actually managing
the network itself
About managed and unmanaged networks
The term "managed network" in SiteConfig refers to a network for which SiteConfig administers
IP address assignments and other networking properties on devices. When you create a managed
network, you input details such as the range of static IP addresses for the network, gateway, any
DNS servers used by the network.
When you create a managed network, you can then select a device in SiteConfig and set the network's
properties in the interfaces view for the device. When you use SiteConfig to discover the device,
SiteConfig can then configure the network settings on the physical device.
36 SiteConfig 2.1 User Manual 11 October 2011
Page 37

The term "unmanaged network" refers to a network that is administered by an external entity such
as DNS\DHCP or prebuilt hosts files. If a system manages IP addresses using an external entity,
you can create an unmanaged network in SiteConfig to indicate that one or more devices you add
to SiteConfig connects to to the unmanaged network. When configuring network interfaces on
discovered devices, you can specify the interface(s) that connect to an unmanaged network.
SiteConfig can toggle a network connection on a device. SiteConfig can assign the network connection
to use DHCP managed addressing if you specify that the connection/interface connects to a defined
unmanaged network. Or SiteConfig can assign the network connection to use static IP addresses
specified by a managed network you define in SiteConfig.
If there are third party devices that provide name/IP resolution by using a prebuilt hosts file, you
can create an unmanaged network and supply a hosts file to SiteConfig. SiteConfig can then merge
the contents of this hosts file into the hosts file that SiteConfig maintains.
Types of networks
SiteConfig categorizes networks based on the following attributes:
• Data link layer protocol - You can specify whether a network uses Ethernet or Fibre Channel
• Usage - Specify what the network is used for, such as storage networking, control, or streaming
• Redundancy - Specify whether a particular network is the primary or backup path for a network
connection. Some devices might have dual paths in the networking infrastructure to support fault
tolerance by connecting one network interface to the primary path or network and another interface
to the backup network. You can then use SiteConfig to specify which network interface on a
device connects to the primary network and which one connects to the backup network and if it
is a managed network, SiteConfig can configure an appropriate static IP address from the choice
made.
Working with network configuration
Rules for networks
When adding networks to sites, you are indicating that all devices under that site can connect to the
network. If you edit the network interfaces of any device that you add to that site, SiteConfig shows
you only the networks that are within "scope", which are networks defined in each immediate site
parent going up the hierarchy to the System node.
Related Links
About site hierarchy on page 22
Network considerations and constraints
• Do not use any 10.1.0.n IP addresses. These are used by the K2 RAID (NEC Condor) maintenance
port and must be reserved for that purpose. If these addresses are otherwise used, maintenance
port communication errors occur.
Creating or modifying a network
1. In the Network Configuration | Networks tree view, select a System node or a Site node.
The networks under that node are displayed in the list view.
11 October 2011 SiteConfig 2.1 User Manual 37
Page 38

Working with network configuration
2. Proceed as follows:
• To add a network under the currently selected node, in the tree view right-click the node and
select Add Network.
• To modify a network, in the list view right-click a network and select Details.
The Network Settings dialog box opens.
38 SiteConfig 2.1 User Manual 11 October 2011
Page 39

Working with network configuration
3. Configure the settings for the network as follows:
• Type – The link layer of the protocol stack, such as Ethernet or Fibre Channel.
• Usage – The function of the network, related to the type of traffic the network carries, such
as control or file transfer.
• Redundancy – Specifies if the network supports redundancy and if the network is primary or
secondary.
• Name – The name of the network, as it is displayed in SiteConfig and identified in host files.
• Exclude from Host Files – If selected, SiteConfig does not write the network’s hostnames
and IP addresses to the host files that it copies to networked devices.
• Managed – Network settings are managed by SiteConfig.
• Base IP Address – The first (lowest) IP address in the range of IP addresses managed by
SiteConfig.
• Number of Addresses – The number of IP addresses in the range managed by SiteConfig.
• Subnet Mask/Gateway IP Address – Additional network settings managed by SiteConfig.
• Unmanaged – Network settings are managed by mechanisms external to SiteConfig.
• DNS – Name resolution is provided by a DNS server for the unmanaged network.
• IP Address Allocation via DHCP – IP addresses are assigned by DHCP for the unmanaged
network.
• Host File – Name resolution is provided by host files for the unmanaged network. If you want
SiteConfig to copy the contents of the unmanaged network’ s host file into a managed network’ s
host file, enter the location of the unmanaged network’s host file. This allows host names of
devices on the unmanaged network to be resolved on the managed network.
• DNS Servers – Servers providing DNS for name resolution. These DNS server can be for
both managed and unmanaged networks.
• Default Interface Name Suffix – The suffix added to the end of host names to identify interfaces
on this network.
4. Click OK to save settings and close.
5. If you added a network, it appears in the Network Configuration | Networks tree view at the bottom
of the list.
About hosts files and SiteConfig
SiteConfig uses the network information in the system description to define a hosts file and allows
you to view the hosts file. SiteConfig can manage this hosts file on Windows operating system
devices that are in the system description and that are part of a SiteConfig managed network.
When you have successfully assigned devices and applied planned network settings to interfaces,
it is an indication that host table information, as currently captured in the system description, is valid
11 October 2011 SiteConfig 2.1 User Manual 39
Page 40

Working with network configuration
and that you are ready to have SiteConfig assemble the host table information into a hosts file. Your
options for placing this host table information on devices are as follows:
• If you do not want SiteConfig to manage your host table information, you can manage it yourself.
This is typically the case if your facility has an existing hosts file that contains host table
information for devices that are not in the SiteConfig system description. In this case, you can
have SiteConfig generate a single hosts file that contains the host table information for the devices
in the system description. You can then copy the desired host table information out of the
SiteConfig hosts file and copy it into your facility hosts file. You must then distribute your facility
hosts file to devices using your own mechanisms.
• If you want SiteConfig to manage all information in hosts files on devices, you can have
SiteConfig copy its hosts file to devices. In so doing, SiteConfig overwrites the existing hosts
files on devices. Therefore, this requires that all devices that have name resolution through the
hosts file be configured accordingly in the SiteConfig system description.
If you choose to have SiteConfig write hosts files to devices, the process consumes system resource
and network bandwidth. Therefore you should wait until you have verified the information for all
devices/interfaces in the host file, rather than updating hosts files incrementally as you discover/assign
devices.
SiteConfig does not automatically deploy hosts files to managed devices as you add or remove
devices. If you add or remove devices from the system description, you must re-deploy the modified
hosts file to all devices.
Viewing the hosts file
However, do not attempt to use the Save As window to modify hosts files on devices managed by
SiteConfig.
1. In the Network Configuration | Networks tree view, select a network, site, or system node.
2. Click View Hosts file.
A Host File Contents window opens that displays the host file contents.
Do not attempt to use this window to modify host files on devices managed by SiteConfig. Any
changes you make in the Save As window are not saved in the hosts file that is defined in the
system description.
3. Do one of the following to close the Host File Contents window:
• If you want to save the hosts file to a different location, you can edit text if desired and then
click Save As to save the hosts file to the location of your choice.
• Click Close.
40 SiteConfig 2.1 User Manual 11 October 2011
Page 41

Related Links
About hosts files and SiteConfig on page 39
Generating host tables using SiteConfig
Prerequisites for this task are as follows:
• Planned control network settings are applied to control network interfaces and devices are
communicating on the control network as defined in the system description.
• Interfaces for networks that require name resolution via the hosts file, such as the FTP/streaming
network, have settings applied and are communicating.
• You have viewed host names, as currently defined in the system description, and determined
that they are correct.
• The SiteConfig PC is added to the system description so that it is included in the host tables
generated by SiteConfig.
When you add or modify devices or their IP addresses in the SiteConfig system description, you
should update host tables on all devices that use them.
1. In the Network Configuration | Networks tree view, select a network, site, or system node.
2. Click View Hosts file.
A Hosts File Contents window opens that displays the contents of the hosts file as currently
defined in the system description.
Working with network configuration
3. Verify the information in the hosts file.
4. Do one of the following:
• If you are managing host table information yourself, click Save As and save a copy of the
hosts file to a location on the control point PC. Then open the copy of the hosts file, copy the
desired host table information from it, and paste it into your facility hosts file as desired. Then
you can use your own process to distribute the facility hosts file to devices. Remember to
distribute to the control point PC so that SiteConfig and other management applications such
as K2Config can resolve network host names.
• If SiteConfig is managing hosts files, do the following:
NOTE: Writing hosts files to multiple devices consumes system resource and network
bandwidth. Therefore it is recommended that you wait and do this after the system is complete
and fully implemented, rather than updating hosts files incrementally as you discover/assign
devices.
a) In the Network Configuration | Devices | Devices list view, right-click a device to which you
intend to write the hosts file and select View Current Host File.
A Host File Contents window opens that displays the contents of the hosts file that is currently
on that actual device.
b) Verify that there is no information that you want to retain in the device’s current hosts file
that is not also in the hosts file as currently defined in the system description. If you need to
save the device's current hosts file, click Save As and save to a different location.
c) In the Network Configuration | Devices | Devices list view, right-click a device or use Ctrl +
Click to select multiple devices, and select Update Host File.
The current hosts file is overwritten with the hosts file as defined in the system description.
11 October 2011 SiteConfig 2.1 User Manual 41
Page 42

Working with network configuration
Related Links
Third party devices in SiteConfig on page 43
About hosts files and SiteConfig on page 39
Working with devices
About SiteConfig support on managed devices
Before SiteConfig can be used to discover or manage a device, the device must meet the following
requirements:
• The device must be a Microsoft Windows operating system device.
• The device must have Microsoft .NET version 2.0 installed, as reported in the Windows
Add/Remove Programs control panel.
• The SiteConfig Discovery Agent service must be running on the device, as reported in the
Windows Services control panel.
Software that meets these requirements is bundled in various components and installation programs,
some of which are available at your SiteConfig install location as follows:
• The ConnectivityKit folder contains Microsoft .NET. You can copy the contents of this folder
to a device and then run setup.exe to install the software.
• The DiscoveryAgent Setup folder contains the SiteConfig Discovery Agent. You can copy the
contents of this folder to a device and then run setup.exe to install the software.
Related Links
Troubleshooting device discovery on page 94
Comparing files for software deployment on page 79
About device phases
As you work with a SiteConfig system description to move from planning to implementation, a
device moves through several phases, as follows:
• Placeholder device — This is a “virtual” device that is still in the planning phase. It is in a system
description, but it has not yet had an actual, network-connected physical device assigned to it.
• Discovered device — This is a physical device that has been discovered by SiteConfig but that
has not yet been assigned to a device in the system description.
• Assigned device — This is a device that has been discovered as a physical device and that has
been assigned to a device in the system description. The full set of SiteConfig features can be
applied to an assigned device.
Placeholder device
When you first add a device to a system description, it is only a placeholder for a physical device.
Later you discover the physical device and match it to the placeholder.
42 SiteConfig 2.1 User Manual 11 October 2011
Page 43

You can edit network interfaces on placeholders to choose an IP address from available networks.
This is stored in the system description as a "planned" configuration and when you discover and
assign a physical device to the placeholder, you can then set the network settings on the actual
device.
When the device is a placeholder, all interfaces on the device are displayed as "unmanaged". In the
tree view an unmanaged interface is displayed with unmanaged interface icon.
Related Links
Icons in SiteConfig on page 14
Discovered device
Clicking on the discover devices icon on the toolbar or from the Actions | Discover Devices menu
item brings up a window that displays a list of devices that SiteConfig has discovered on the network.
If you have added a placeholder device to the tree view, you can now match the placeholder to one
of the discovered devices to complete the association.
If you have matched a placeholder device to a discovered device, the device is displayed in the tree
view with a green or yellow overlay icon. This indicates that there is network communication with
the device. If the device is powered off or offline, no overlay icon is displayed.
Working with network configuration
Assigned device
An assigned device is a device that has been matched with a discovered device and thus can be
actively managed by SiteConfig.
If an assigned device is online and connected to the control network, when SiteConfig launches it
re-detects the assigned device and allows its network properties to be edited.
Third party devices in SiteConfig
You can use SiteConfig to perform network configuration tasks on third party devices that run non
Grass Valley software but interact with the managed devices you have defined in the system
description.
The following conditions apply in order to manage network configuration on third party devices -
• The SiteConfig prerequisites are installed
• The networks these devices connect to must also be defined in the system description
• The devices must be accessible from the SiteConfig PC via the control network
You can then add a placeholder device using the "Generic Device" model, discover the device and
perform network configuration as you would on any other managed device.
Alternatively, you may not want to perform any network configuration on third party devices but
you may want them added to the system description if -
• Their network interfaces connect to one or more managed networks defined in SiteConfig
• The managed networks are not excluded from the host file
In order to do this, perform the following steps -
11 October 2011 SiteConfig 2.1 User Manual 43
Page 44

Working with network configuration
1. Add a placeholder device using the "Generic Device" type
2. Edit the host name of the placeholder device to match the actual host name of the device
3. Click the "Add Interface" button to specify an unmanaged network interface on the device. Select
the managed network and the actual IP address of the network interface.
4. Add any other network interfaces in the same manner
5. If you now view the host file generated by SiteConfig, you should now see the network interfaces
added providing the network(s) are not excluded from the host file and the connected networks
are not unmanaged networks (DNS\DHCP).
Discovering devices with SiteConfig
Prerequisites for this task are as follows:
• The Ethernet switch or switches that support the control network are configured and operational.
If multiple switches, ISLs are connected and trunks configured.
• The PC that hosts SiteConfig is communicating on the control network.
• There are no routers between the PC that hosts SiteConfig and the devices to be discovered.
• Devices to be discovered are Windows operating system devices, with SiteConfig support
installed.
• Devices are cabled for control network connections.
• If discovering a device with Microsoft Windows Server 2008 operating system, the device must
have an IP address, either static or DHCP supplied.
1. Open SiteConfig.
2. In the toolbar, click the discover devices button.
The Discover Devices dialog box opens.
A list of discovered devices is displayed.
44 SiteConfig 2.1 User Manual 11 October 2011
Page 45

3. Click Rescan to re-run the discovery mechanism. You can do this if a device that you want to
discover has its network connection restored or otherwise becomes available. Additional devices
discovered are added to the list.
Assigning discovered devices
Prerequisites for this task are as follows:
• Devices have been discovered by SiteConfig
• Discovered devices are not yet assigned to a device in the system description
• The system description has placeholder devices to which to assign the discovered devices.
1. If the Discovered Devices Dialog box is not already open, click the discover devices button .
The Discover Devices dialog box opens.
2. Identify discovered devices.
• If a single device is discovered in multiple rows, it means the device has multiple network
interfaces. Choose the interface that represents the device's currently connected control
connection. This is typically Ethernet ... 0.
• If necessary, select a device in the list and click ID Device. This triggers an action on the
device, such as flashing an LED or ejecting a CD drive, to identify the device.
Working with network configuration
3. To also view previously discovered devices that have already been assigned to a device in the
system description, select Show … currently assigned devices.
The currently assigned devices are added to the list. Viewing both assigned and unassigned
devices in this way can be helpful to verify the match between discovered devices and placeholder
devices.
4. In the row for each discovered device, view items on the Device Id drop-down list to determine
the match with placeholder devices, as follows:
• If SiteConfig finds a match between the device-type discovered and the device-type of one
or more placeholder devices, it displays those placeholder devices in the list.
• If SiteConfig does not find a match between the device-type discovered and the device-type
of a placeholder device, no placeholder device is displayed in the list.
5. In the row for a discovered device, click the Device Id drop-down list and select the placeholder
device that corresponds to the discovered device.
If there is no corresponding placeholder device currently in the system description, you can select
Add to create a new placeholder device and then assign the discovered device to it.
6. When discovered devices have been assigned, click OK to save settings and close.
7. In the Network Configuration | Devices tree view, select each of the devices to which you assigned
a discovered device.
Related Links
Discovering devices with SiteConfig on page 44
11 October 2011 SiteConfig 2.1 User Manual 45
Page 46

Working with network configuration
Adding a discovered device to the system description on page 46
Adding a discovered device to the system description
Prerequisites for this task are as follows:
• The device has been discovered by SiteConfig
• The discovered device has not yet been assigned to a device in the system description
• The site to which the device is to be assigned is in the system description.
• The group to which the device is to be assigned is in the system description.
Use this procedure to add a discovered device to the system description without first creating a
placeholder for the device.
1. In the SiteConfig toolbar, click the discover devices button to open the Discover Devices
dialog box.
A list of discovered devices is displayed.
2. In the row for a discovered device, click the Device Id drop-down list and select Add.
The Add Device dialog box opens.
3. Select the site to which you are assigning the device.
4. Select the group to which you are assigning the device.
5. Accept the default device name or modify it. If a hostname has already been set, you can enter
the hostname here.
6. Select the OS platform type : x86 for a 32 bit OS, x64 for a 64 bit OS
7. Select the model of the device.
8. If there is more than one control network in the system description, select the control network.
9. Select the IP address.
10. Click OK to save settings and close.
The discovered device is added to the tree and SiteConfig retrieves and displays current network
interface information in the interfaces view.
46 SiteConfig 2.1 User Manual 11 October 2011
Page 47

Related Links
Discovering devices with SiteConfig on page 44
Assigning discovered devices on page 45
Assigning the control point PC
Prerequisites for this task are as follows:
• The SiteConfig control point PC has the SiteConfig Discovery Agent installed. The Discovery
Agent is also known as the Network Configuration Connect Kit. In Windows Add/Remove
Programs, it can be displayed as either Network Configuration Connect Kit or SiteConfig
Discovery Agent.
• The system description contains a control point PC placeholder device.
• The placeholder's control network interface is configured with the control network IP address
that is currently on the actual control point PC.
• The device name of the control point PC placeholder is same as the host name of the actual
control point PC.
In this procedure you discover the physical control point PC and assign it to the placeholder control
point PC in the system description.
Working with network configuration
1. Open SiteConfig on the control point PC.
2. Discover devices and identify the control point PC discovered device.
3. Assign the discovered device to the control point PC placeholder.
4. In the Network Configuration | Devices tree view, select the control point PC.
5. In the Interfaces list view, right-click the control network interface and select Edit.
The Managed Network Interface Details dialog box opens.
6. Evaluate IP settings as follows:
• If only Current settings are displayed (the Planned tab is not displayed), it means the planned
settings you configured on the placeholder device are identical to those on the actual control
point PC If this is the case, no further configuration is required.
• If both a Current tab and a Planned tab are displayed, it means the planned settings you
configured on the placeholder device are not identical to those on the actual control point PC.
If this is the case, do not apply planned settings. Doing so overwrites IP settings on the actual
control point PC, which stops network communication. Instead, select the Planned tab and
click Remove.
NOTE: Do not click OK if planned settings (red text) are displayed.
7. When you are sure that only Current settings are displayed and that those are the current valid
settings for the control point PC, click Apply, then OK to save settings and close.
Adding a device
Prerequisites for this task are as follows:
• The system description contains a group.
11 October 2011 SiteConfig 2.1 User Manual 47
Page 48

Working with network configuration
1. In the Network Configuration | Devices tree view, right-click a group and select Add Device.
If a device supports sub-devices, you can right-click the device and select Add Sub-Device.
The Add Device dialog box opens.
2. Configure settings for the device you are adding as follows:
• Family, Type, Model – Based on your selection, the device is pre-defined in Product Frame,
with interfaces added and networks assigned. For Model, if you select <Custom>, no interfaces
are added or networks assigned.
• Name – This is the device name, as displayed in the SiteConfig device tree view and device
list view. This name can be different than the host name (network name). You can accept the
default name or enter a name of your choice. Devices in the tree view are sorted alphabetically.
• Amount – You can add multiple devices, as currently defined by your settings in the Add
Device dialog box. An enumerator is added to the name to create a unique name for each
device added.
• Platform type - Select x86 if the device has a 32 bit OS, x64 if it has a 64 bit OS.
• Control Network – If multiple control networks are available in the system description, you
can select the control network for the device you are adding.
• Starting Address – Select from the list of available addresses on the selected control network.
If adding multiple devices, this is the starting address, with addresses assigned sequentially
to each device added.
3. Click OK to save settings and close.
About device and host names
In SiteConfig, a device can have different names, as follows:
• Device name — This is a name for display in SiteConfig only. It is stored in the SiteConfig
system description, but not written to the actual device. It is displayed in the device tree view
and in the device list view. It can be a different name than the device’s host name.
48 SiteConfig 2.1 User Manual 11 October 2011
Page 49

Working with network configuration
• Host name — This is the network name of the device. SiteConfig has a default naming convention
for host names which you can use or override with your own host names.
In most cases it is recommended that the Device name and Host name be the same. This avoids
confusion and aids troubleshooting.
The Device name can serve as a placeholder as a system is planned and implemented. During the
install/commission process, when you reconcile a device's current and planned network interface
settings, the Host name as configured in the system description can be overwritten by the host name
on the actual device. However, the Device name configured in the system description is not affected.
Therefore it is recommended that in the early planned stages, you configure the Device name to be
the desired name for the device, but do not yet configure the Host name. Then, after you have applied
network interface settings, you can change the Host name to be the same as the Device name. This
changes the host name on the actual device so that then all names are in sync.
SiteConfig does not allow duplicate device names or host names.
Items in the tree view are automatically sorted alphabetically, so if you change a name the item
might sort to a different position.
Modifying a device name
1. In the Network Configuration | Devices tree view, right-click a device and select Rename.
2. Type in the new name.
Note that this does not change the hostname on the physical device. If you want the hostname
to match the device name, you must also modify the hostname.
Modifying a host name
1. In the Network Configuration | Devices | Device list view, right-click a device and select Edit.
The Edit Device dialog box opens.
2. In the Host Name field, modify the host name or do one of the following:
• Click the Set to Device Name button to set the hostname to match the device name
• Click Set to Default to allow SiteConfig to choose an auto-generated name
3. Set a domain name for the device if this applies to your system. This does not add the device to
the domain, it only specifies the fully qualified domain name for this device.
4. Click OK.
SiteConfig changes the hostname on the physical device.
Making the host name the same as the device name
1. Verify that the current device name, as displayed in the SiteConfig tree view, is the same as your
desired host name.
2. In the Network Configuration | Devices | Device list view, right-click the device and select Edit.
The Edit Device dialog box opens.
11 October 2011 SiteConfig 2.1 User Manual 49
Page 50

Working with network configuration
3. Identify the state of buttons as follows:
• If the host name is different than the device name, the Set to Device Name button is enabled.
• If the host name is the same as the device name, the Set to Device Name button is disabled.
4. If enabled, click Set to Device Name.
This changes the host name to be the same as the device name.
5. Click OK.
6. When prompted, restart the device.
Pinging devices from the PC that hosts SiteConfig
Prerequisites:
• The devices you are pinging are in the SiteConfig system description.
You can send the ping command to one or more devices in the system description over the network
to which the SiteConfig host PC is connected. Typically this is the control network.
1. In the Network Configuration | Networks tree view, select a network, site, or system node.
2. In the Devices list view, select one or more devices. Use Ctrl + Click or Shift + Click to select
multiple devices.
3. Right-click the selected device or devices and select Ping.
The Ping Devices dialog box opens and lists the selected device or devices.
The Ping Devices dialog box reports the progress and results of the ping command per device.
Identifying a device
SiteConfig can help you identify a physical device in a rack of equipment by having the device
provide a visual cue like flashing the front panel LED or ejecting the CD tray. The visual cue might
not be available on all devices.
If the visual cue for a particular device is to flash the front panel LED, you can modify the duration
that SiteConfig will continuously flash the LED. The default is 10 seconds but may be overridden
in the Tools | Options | Network Configuration window.
1. In the discover devices dialog, after you have discovered devices, select a device from the list
and click the ID Device button and then look for a visual cue on the racks that your equipment is
mounted on. This will help you match a placeholder to a discovered device or help you add a
new device.
2. Select a device from the tree and in the devices view on the right, click the Identify button.
Moving a device to a different group
In the Network Configuration | Devices tree view, select a device and drag it to another group.
After moving a device, make sure it accesses networks correctly. For example, each site typically
has its own networks, so if you move a device between groups in different sites, you will likely need
to reassign networks.
50 SiteConfig 2.1 User Manual 11 October 2011
Page 51

About planned and current IP configuration
If you add a device to the system description before discovering the actual device, you are working
with the placeholder device. If you chose a device model, SiteConfig displays a list of the network
interfaces that the model defines in the interfaces view.
You can edit all the network interfaces for the placeholder. You can select a network from which
to assign an IP address and also a specific IP address from that network, if the interface connects to
a managed network. You can also set a hostname for the device. Since you have not matched the
placeholder to a discovered device, all settings are called "planned" settings and are saved in the
system description only.
When you discover a device and match it to a placeholder, SiteConfig retrieves all the current
network configuration from the device. For each network interface defined in the plan, SiteConfig
matches it to the corresponding network interface retrieved and display. SiteConfig displays a
planned tab that indicates the settings that do not match with the current settings.
You can now either choose to do one of the following:
• Keep the current settings. To do this you remove planned settings, which allows SiteConfig to
accept the current settings.
• Have SiteConfig apply the planned settings to the device. When this occurs, the settings currently
configured on the actual network interface are overwritten, so you should compare planned
settings and current settings and verify that the planned settings are correct.
Working with network configuration
Always set your control interface IP address before your other network interfaces.
SiteConfig also generates a planned tab if settings were modified outside of SiteConfig. A red icon
overlay with tooltip provides contextual information.
Viewing device interfaces
1. In the Network Configuration | Networks tree view, select any node.
The devices under that node are displayed in the device list view and the interfaces on the devices
are displayed in the interface list view.
11 October 2011 SiteConfig 2.1 User Manual 51
Page 52

Working with network configuration
2. To view interfaces that do not use Internet Protocol (IP), such as Fibre Channel interfaces, as
well as interfaces that do use IP, select Show non-IP Interfaces.
3. To view only interfaces that use IP, deselect Show non-IP Interfaces.
4. To view only the interfaces on a single device, select the device in the tree view or in the device
list view.
About IP configuration of network interfaces on devices
You can perform IP configuration of network interfaces when working with a placeholder device
prior to discovery. When you add a device and choose a particular model, the model defines the
number, type and usage characteristics of network interfaces to expect on such a device.
You can view and edit each network interface and set up IP configuration selecting an appropriate
IP from the network to which each interface connects. The process for editing IP configuration
varies, depending on the device's phase.
Placeholder device IP configuration
On a placeholder device, you edit network interfaces using the Unmanaged Network Interfaces
dialog box.
The Unmanaged Network Interfaces dialog box allows you only to save changes to the system
description.
Discovered device IP configuration
On a discovered device, you edit network interfaces using the Managed Network Interfaces dialog
box.
52 SiteConfig 2.1 User Manual 11 October 2011
Page 53

Working with network configuration
The Managed Network Interfaces dialog box allows you to edit and save changes to the device.
Managing IP configuration on a newly discovered device
Use the following process if you have matched a placeholder device to a discovered device for the
first time.
NOTE: Pay close attention to icon overlays on the network interface icons. A red icon with a
white bar indicates a potential problem that you need to resolve. Hover over the icon to see a
tooltip with text that describes the problem.
1. Identify the network interface that displays a yellow or green icon. This is typically the control
network interface. Edit the IP configuration of this interface.
2. Edit and configure the other interfaces.
Related Links
About IP configuration of network interfaces on devices on page 52
Managing IP configuration on a discovered device
Use the following process on a discovered device to which you have already applied planned network
settings.
11 October 2011 SiteConfig 2.1 User Manual 53
Page 54

Working with network configuration
NOTE: Pay close attention to icon overlays on the network interface icons. A red icon with a
white bar indicates a potential problem that you need to resolve. Hover over the icon to see a
tooltip with text that describes the problem.
1. Select an interface and double-click or click on the Edit button.
If SiteConfig cannot communicate with the device, the Unmanaged Interface Details dialog box
opens which allows you only to save changes to the system description.
If you are working with a device that has been discovered and currently communicating with
SiteConfig , the Managed Interface Details dialog box opens which allows you to edit and save
changes to the device.
A green star overlay icon over a network interface indicates that SiteConfig can directly
communicate with that interface over the network. This is typically the control network interface.
A yellow icon overlay indicates limited connectivity to the interface, such as if no IP address
has been assigned to the control network interface.
2. To refresh network settings from the device, click the Refresh button.
SiteConfig retrieves current network configuration from the device and can indicate problem
interfaces by changing the icon overlay to a red icon with a white bar. An example of this type
of problem is if IP addresses do not match values in the system description. Edit the interface to
check if there is now a planned tab indicating a mismatch.
3. To ping an interface on the control network from the SiteConfig PC, select the interface and
click the Ping button.
The ping operation works only for the control interface since that is the network to which the
SiteConfig PC is connected.
4. For other interfaces like iSCSI (storage networking), you can click the Validate button.
The Validate operation causes a proxy device that has a network interface on the network to ping
the interface and report the result.
Related Links
About IP configuration of network interfaces on devices on page 52
Modifying a managed network interface
Prerequisites for this task are as follows:
• The physical device you are configuring has been discovered and is assigned to a device in the
SiteConfig system description.
• SiteConfig has communication with the device.
• The device is defined in the system description with an appropriate network interface.
54 SiteConfig 2.1 User Manual 11 October 2011
Page 55

Working with network configuration
1. In the Interfaces list view determine the interface to configure, as follows:
• Identify the interface with which SiteConfig is currently communicating, indicated by the
green star overlay icon. This should be the control network interface.
• Verify that the interface over which SiteConfig is currently communicating is in fact the
interface defined for the control network in the system description. If this is not the case, you
might have the control network cable connected to the wrong interface port. The control
connection should always be the first port on the motherboard, except when you have a
loopback connection.
• Configure the control network interface first before configuring any of the other interfaces.
• After you have successfully configured the control network interface, return to this step to
configure each remaining interface.
2. In the Interfaces list view, check the icon for the interface you are configuring.
If the icon has a red stop sign overlay, it indicates that current settings and planned settings do
not match or that there is some other problem. Hover over the icon to read a tooltip with
information about the problem.
3. In the Interfaces list view, right-click the interface you are configuring and select Edit.
The Managed Network Interface Details dialog box opens.
11 October 2011 SiteConfig 2.1 User Manual 55
Page 56

Working with network configuration
4. Identify the interface on the discovered device that you are configuring.
• Identify Ethernet LAN adapters by their "Description" name. This is the Windows connection
name. SiteConfig reads this name from the device and displays it at the top of this dialog box.
This is the most accurate way to identify the network adapter on the discovered device that
you are configuring.
• Identify iSCSI adapters by their "Type".
5. Configure naming settings as follows:
DescriptionSetting
Interface Name
Specify the name of the interface as you would like it entered in the hosts
file. The control interface name defaults to the host name. Ensure that
no other interface has the same interface name as the control network
interface name.
Set To Default
Returns the interface name to SiteConfig default convention, based on
the root Site name and device-type.
If applicable, enter a DNS suffix to add to the interface name.DNS Suffix
Aliases
Click if you want one or more alias names for this network interface to
be added to the hosts file. For each alias you specify the hosts file
contains an additional entry.
Use Interface
Name/Aliases in Host
Files
Select if you want to use the specified interface name and one or more
aliases, if specified, in the hosts file. If not selected, the default behavior
occurs, which is to use the device host name in the hosts file.
NOTE: If the network to which this interface is assigned is configured
to "Exclude from Host Files" in the Network Settings dialog box, then
this setting has no affect. The interface is excluded from the hosts file,
regardless of settings here.
6. Evaluate settings on the Planned tab and change if necessary.
• Compare settings on the Planned tab with settings on the Current tab.
• If you want to keep the current settings as reported in the Current tab, click Remove to remove
the planned settings.
• If you need to have multiple IP addresses for the same interface, click the Add button and
specify your IP addresses.
56 SiteConfig 2.1 User Manual 11 October 2011
Page 57

7. To modify planned settings, do the following:
a) Select the network settings and click Edit.
The Edit IP Address dialog box opens.
Working with network configuration
b) Edit IP address settings as follows:
DescriptionSetting
Select the network for the interfaceNetwork
Select DHCP or Static, as appropriate for the network.Address Allocation
Select the IP address for the interfaceIP Address
The networks listed in the Edit IP Address dialog box are those currently defined in the system
description, with available settings restricted according to the network definition. If you
require settings that are not available, you can close dialog boxes and go to the Network
Configuration | Networks tab to modify network settings, then return to the Edit IP Address
dialog box to continue.
8. When you have verified that the planned settings are correct, click OK, then Yes to apply settings
to the device and close.
11 October 2011 SiteConfig 2.1 User Manual 57
Page 58

Working with network configuration
9. After configuring control network settings, do the following
a) If a message informs you of a possible loss of communication, click OK.
This message is normal, since this is the network over which you are currently communicating.
b) In the Device list view, observe the device icon and wait until the icon displays the green star
overlay before proceeding.
The icon might not display the green star overlay for several seconds as settings are
reconfigured and communication is re-established.
c) In the Interface list view, right-click the interface and select Ping.
The Ping Host dialog box opens.
If ping status reports success, the interface is communicating on the control network.
Related Links
About IP configuration of network interfaces on devices on page 52
Modifying an unassigned (unmanaged) interface
Prerequisites for this task are as follows:
• The system description has one or more placeholder devices.
• The placeholder device has a one or more unmanaged network interfaces.
1. In the Network Configuration | Devices tree view, select a placeholder device.
The interfaces for that device are displayed in the interfaces list view.
2. In the interfaces list view, right-click an interface and select Edit.
The Unmanaged Network Interface Details dialog box opens.
58 SiteConfig 2.1 User Manual 11 October 2011
Page 59

Working with network configuration
3. Configure the settings for the interface as follows:
• Network – This list includes the networks in the system description, as well as an
<Unassigned> network. Select the network for the interface. If you select <Unassigned>, the
interface can be on a network that is not included in the system description and therefore not
managed by SiteConfig.
• IP Address – A list of the available IP addresses for the selected network. Select the IP address
for the interface.
• Interface Name – The network name of the interface, as follows:
• On the Control network, the network name of the interface must be the host name of the
device.
• On other networks (not the Control network) the network name of the interface shall not
be the host name of the device. Some networks, such as the iSCSI network, do not allow
interface names, and so naming controls are disabled.
NOTE: In the networks view, you can specify that a particular network be excluded from
the hosts file. This means that any network interfaces you assign to such a network are
automatically excluded from the hosts file even if you checked the Use Interface
Name/Aliases in Host Files checkbox. If you uncheck this box, it will default to using the
host name as the interface name. Be careful that you do not specify two interfaces with the
same host name.
• Set to Default – Sets the name of the interface to SiteConfig’s default convention, based on
the current host name of the device.
• Use Interface Name/Aliases in Host Files – Enables the Aliases button. Tells SiteConfig to
use this interface name in the hosts file. See note above.
• Aliases – Allows you to assign multiple network names to the adapter, such that they are
managed by SiteConfig’s host file management features.
• DNS Suffix – For communication on some networks, a suffix, such as mycorp.com, must be
added to host names.
4. Click OK to save settings and close.
Related Links
About IP configuration of network interfaces on devices on page 52
About managed and unmanaged networks on page 36
About adding an interface
You can add an interface to a placeholder device to describe a network interface not automatically
created when you chose a device model. Another scenario for using this feature is to add devices
that are not managed by SiteConfig but are part of the system. In this case you can add a placeholder
device to the system description and then add one or more interfaces describing its network
connectivity. Once defined, SiteConfig can add this information to the hosts file.
11 October 2011 SiteConfig 2.1 User Manual 59
Page 60

Working with network configuration
Adding an interface
1. In the Network Configuration | Devices | Device list view, right-click a device and select Add
Interface.
The Add Unmanaged Network Interface dialog box opens.
60 SiteConfig 2.1 User Manual 11 October 2011
Page 61

Working with network configuration
2. Configure settings for the interface you are adding as follows:
• Type – Select the type of interface you are adding.
The interface types listed, such as Ethernet or Fibre Channel, are those currently defined in
the system description.
• Model – Select the model for the interface. Select <Generic> if the model of the interface
you are adding is not listed.
The models listed can include specific manufacturer product models for the interface, as
defined in the system description, as well as a <Generic> model.
• Network – Select the network for the interface.
The networks listed include those in the system description, as well as an <Unassigned>
network. If you select <Unassigned>, the interface can be on a network that is not included
in the system description and therefore not managed by SiteConfig.
• IP Address – Select the IP address for the interface.
The list of IP addresses is available only for networks that support IP addresses. It is a list of
the available IP addresses for the selected network.
• Interface Name – Accept the default name or enter a different name.
This is the network name of the interface. For example, on the Control network, the network
name of the interface is the host name of the device. Some networks, such as the iSCSI
network, do not allow interface names, and so naming controls are disabled.
• Set to Default – Click to set the name of the interface to SiteConfig’s default convention.
• Use Interface Name/Aliases in Host Files – Click to enable the Aliases button.
This checkbox is available only for networks that use host files.
• Aliases – Click to assign multiple network names to the adapter.
This button is available only for networks that use host files. Names entered as aliases are
managed by SiteConfig’s host file management features.
• DNS Suffix – Enter a DNS suffix, if required by the selected network.
For communication on some networks, a DNS suffix, such as mycorp.com, must be added to
host names. The DNS Suffix field is available only for networks that can use DNS.
3. Click OK to save settings and close.
About locking a device or group
You can lock a device or all the devices in a group so that they can not be accessed by SiteConfig
for management operations. These management operations are found throughout SiteConfig, including
the Network Configuration view and the Software Deployment view. When a device is locked, some
SiteConfig controls, such as Edit buttons, are disabled.
When you are not actively managing devices with SiteConfig, it is recommended that you lock the
devices.
On some devices, a restart is required for the lock/unlock operation to take effect.
11 October 2011 SiteConfig 2.1 User Manual 61
Page 62

Working with network configuration
For K2 Summit Production Clients, the lock feature enables the write filter, which prevents persistent
changes to the system drive.
Unlocking a device or group
Prerequisites for this task are as follows:
• The device or all the devices in the group are communicating correctly in SiteConfig. This is
indicated by the green star icon overlay.
• The device or all the devices in the group are currently locked. This is indicated by the gray lock
icon overlay.
1. In either the Network Configuration | Devices tree view or the Software Deployment | Deployment
Groups tree view, identify the device or the group of devices that you intend to unlock.
2. Right-click the device or the group and select Unlock.
A “…may require restart…” message appears.
Not all device-types require a restart for the unlock process.
3. Click Yes to allow SiteConfig to restart the device or devices.
The Set Administrative Credentials dialog box opens.
4. Enter a username and password with administrator level privileges on the device or devices and
click OK.
The Unlocking Devices window opens and displays progress.
5. When the Unlocking Devices window reports that the unlock process completed successfully,
click Close.
The device or devices are now unlocked. For K2 Summit Production Clients, this also disables the
write filter, which enforces a restart.
Related Links
About locking a device or group on page 61
Locking a device or group
Prerequisites for this task are as follows:
• The device or all the devices in the group are communicating correctly in SiteConfig. This is
indicated by the green star icon overlay.
• The device or all the devices in the group are currently unlocked. This is indicated by the red
lock icon overlay.
1. In the Network Configuration | Devices tree view or the Software Deployment | Deployment Groups
tree view, identify the device or the group of devices that you intend to lock.
2. Right-click the device or the group and select Lock.
A “…may require restart…” message appears.
Not all device-types require a restart for the lock process.
3. Click Yes to allow SiteConfig to restart the device or devices.
The Locking Devices window opens and displays progress.
62 SiteConfig 2.1 User Manual 11 October 2011
Page 63

4. When the Locking Devices window reports that the lock process completed successfully, click
Close.
The device or devices are now locked. For K2 Summit/Solo, this also enables the write filter, which
enforces the restart.
Related Links
About locking a device or group on page 61
About credentials in SiteConfig
SiteConfig requires administrative privileges on devices in order to perform most of the network
configuration and deployment tasks. For known devices types, SiteConfig has a default administrator
login and password. These default credential depend on the SiteConfig version, so check your
SiteConfig Release Notes for any changes. When you add a device based on a known device type,
SiteConfig references the default administrator login and password. Then, when you use remote
desktop or perform software deployment to the device, SiteConfig automatically uses these
credentials. These credentials are called "global" credentials for the device since the same credentials
are used on all devices of that type in the system.
Working with network configuration
You can choose to override the default credentials for a given device type. For example, if you have
specified a different administrator account or a different password on the devices when commissioning
the system, then you want SiteConfig to use these modified credentials.
It is possible to also override the default credentials for a single device.
Password changes and compatibility
With currently released products, default accounts and passwords are unified across Grass Valley
systems. This includes K2, STRATUS, and Aurora products. However, some previous versions of
Grass Valley products had default accounts and passwords that were not unified with other Grass
Valley products. For example, the Administrator account on previous versions of K2 products had
a password of adminK2, rather than the unified password of adminGV!.
Therefore, when combining newer, currently released Grass Valley products with older, previously
released products, you must manage your passwords for system and operational compatibility. Grass
Valley recommends the following:
• Ensure that a user account that is the same on all systems has the same password.
• Change all passwords to the newer unified passwords. This applies especially to the Administrator
account, where you would change the password on your older systems from adminK2 to
adminGV!.
• If your site policies prohibit changing your passwords, then you may change the passwords on
your newer systems to match your older systems. In the case of the Administrator account, on
your newer systems you would change the password from adminGV! to adminK2.
• Do not change the password for the GVadmin account. This account must retain the default
password of adminGV!. Grass Valley applications and services use this account/password for
program interactions.
11 October 2011 SiteConfig 2.1 User Manual 63
Page 64

Working with network configuration
Consider the following as you change passwords:
• SiteConfig provides default credentials for each device type. If you have not overridden these
default credentials in SiteConfig, whenever your SiteConfig access requires authentication,
SiteConfig uses the default credentials. When you upgrade SiteConfig, it is possible that the
newer version of SiteConfig has newer default credentials. If this is the case, authentication can
fail when SiteConfig uses the new default credentials to access a device still configured for the
old default credentials. Therefore, refer to SiteConfig Release Notes when upgrading and if
default credentials change, reconcile by overriding default credentials in SiteConfig as necessary.
• Transfers between K2 systems require that the same user account and password be on both
systems. The transfer uses the credentials with which you are logged in to the application initiating
the transfer to authenticate the transfer on the other K2 system. If a password has changed and
is no longer the same or an account is not present, the transfer fails. Therefore, when initiating
transfers use accounts and passwords that are the same on all systems.
Setting global credentials
1. Click Tools | Options | Security.
The Global Device Type Logon Credentials dialog box opens.
2. Select a device type from the drop down list a do one of the following:
• Select the Use default global device type credentials option.
• Select the Override default global device type credentials option.
You can specify the credentials to use by clicking the Change Credentials... button and entering
the administrator account name and password to use. SiteConfig then uses these credentials
for all devices of that type in the system.
64 SiteConfig 2.1 User Manual 11 October 2011
Page 65

Setting credentials for a specific device
Use this procedure to tell SiteConfig to use either the global credentials for the device type on a
selected device OR to override global credentials and use a specific account name and password
for the selected device.
1. In the tree view, right-click a device and select Credentials.
The Remote Target Credentials dialog box opens.
2. Proceed as follows:
Working with network configuration
• If you previously applied credentials to the device that were different than the global credentials
and now you want to apply the global device type credentials, select Use Global Credentials.
• If you want to apply credentials to the device that are different than the device-type credentials,
select Override Global Credentials.
The Set Device Logon Credentials dialog box opens.
3. Enter the user name and password for the device and click OK. To test the credentials, right-click
on the device and choose Remote Desktop to start a session to the device.
Changing passwords on Windows 7
Use the proper Windows operating system procedure to change a password as instructed in this
topic. Failure to do so causes subsequent problems in the SiteConfig application and when doing
other configuration tasks. Do not use Computer | Manage and set the password for Local Users and
Groups. Do not attempt to change the password on an account that is not your currently logged in
account.
1. Ensure that you are logged in to the Windows operating system with the account for which you
are changing the password.
2. In the Windows operating system Control Panel, open User Accounts.
3. Select the account (your currently logged in account) for which you are changing the password.
4. Press Ctrl + Alt + Delete.
5. Select Change a Password.
6. When prompted, enter the existing (current) password and the new password.
11 October 2011 SiteConfig 2.1 User Manual 65
Page 66

Working with network configuration
7. If the PC hosts the SiteConfig application, do the following:
a) Close SiteConfig.
b) Log out of the Windows operating system.
c) Log in to the Windows operating system.
If a message regarding loss of data appears, it means you are not using the proper Windows operating
system procedure. Do not proceed with attempting to change the password.
If the PC hosts the SiteConfig application and you change the password using an improper procedure,
you must change the password back to the original password. Failure to do so renders SiteConfig
inoperable.
Changing passwords on Windows XP
Use the proper Windows operating system procedure to change a password as instructed in this
topic. Failure to do so causes subsequent problems in the SiteConfig application and when doing
other configuration tasks. Do not use Computer | Manage and set the password for Local Users and
Groups. Do not attempt to change the password on an account that is not your currently logged in
account.
1. Ensure that you are logged in to the Windows operating system with the account for which you
are changing the password.
2. In the Windows operating system Control Panel, open User Accounts.
3. Select the account (your currently logged in account) for which you are changing the password.
4. Select Change the Password.
5. When prompted, enter the existing (current) password and the new password.
6. If the PC hosts the SiteConfig application, do the following:
a) Close SiteConfig.
b) Log out of the Windows operating system.
c) Log in to the Windows operating system.
If a message regarding loss of data appears, it means you are not using the proper Windows operating
system procedure. Do not proceed with attempting to change the password.
If the PC hosts the SiteConfig application and you change the password using an improper procedure,
you must change the password back to the original password. Failure to do so renders SiteConfig
inoperable.
Accessing a device via Remote Desktop from SiteConfig
You can access a device via Remote Desktop if you have configured its network properties to allow
communication over the control network.
• To initiate a Remote Desktop session, right-click on a device in the tree view and select Remote
Desktop.
SiteConfig opens a Remote Desktop session to the device in a new window and automatically
logs on using either the global credentials or the overridden credentials (if any).
If Remote Desktop does not log on to the device, check the credentials being used and check
network connectivity to the device.
66 SiteConfig 2.1 User Manual 11 October 2011
Page 67

• Click the visible dialog pending user input link next to a deployment task.
This link appears if a deployment task is underway and a dialog box pops up on the device that
requires your input. In this case SiteConfig can automatically launch a Remote Desktop session
to the device.
Power cycling a device
When you must shutdown and then power up (power cycle) a device, rather than restart the device,
you must use a combination of SiteConfig and manual operations.
1. In the SiteConfig tree-view, right-click the device and select Shutdown.
SiteConfig initiates the Windows shutdown operation on the device and the device powers off.
2. At the local device, verify that shutdown operations are complete, then press the standby button
or otherwise manually power up the device.
The device starts up.
3. Verify that startup operations are complete on the device.
4. In SiteConfig, in the tree-view, right-click the device and select Set Restart Complete.
This re-synchronizes SiteConfig regarding the current state of the device. If software deployment
tasks were waiting for the restart to occur, SiteConfig now allows them to proceed.
Working with network configuration
Closing and restarting SiteConfig
SiteConfig automatically saves changes to the system description as you perform tasks. When you
close and reopen SiteConfig, it loads the last system description file you were working with when
you closed the application.
At startup, SiteConfig also rediscovers all devices on the network, essentially performing the same
operation the occurs when you use the Discover Devices dialog. It also refreshes its network
configuration information on all previously discovered devices.
To close SiteConfig, click on the File | Exit menu item or close the main window.
SiteConfig saves the system description and closes.
11 October 2011 SiteConfig 2.1 User Manual 67
Page 68

Page 69

Chapter 3
Working with software deployment
This section contains the following topics:
• Understanding software deployment concepts
• Working with devices and software deployment groups
• Working with managed software packages
• Working with software deployment tasks
11 October 2011 SiteConfig 2.1 User Manual 69
Page 70

Working with software deployment
Understanding software deployment concepts
About deployment groups
Deployment groups contain a set of devices that receive the software contained in a software package.
Each device within the system can only belong to one deployment group. In order to deploy software
to devices using SiteConfig, you must add one or more deployment groups to the "All Deployment
Groups" node. Once you create a deployment group, you must then choose one or more devices to
belong to that group based on criteria you determine. Some examples of different ways you can
create deployment groups are -
• Devices of the same type. For example, a group of all K2 Media Servers in a K2 SAN
• Devices that might need to have the same versions of a package deployed. For example, all K2
Media Clients on a K2 SAN
• Devices that have software deployed from the same product family. For example, all Aurora
devices
• If you have several packages that are compatible with each other, you can create a deployment
group of all devices that must be upgraded together to maintain compatibility
• You can also create a deployment groups based on how you manage the sequence of software
deployment. For example, you can create a group for your servers so that they can be upgraded
first with software packages, then a separate group for clients so that you can add the client
software packages and upgrade separately.
• You can create a deployment group to test a particular version of a software package on a set of
devices.
Once you create a deployment group, you then add software packages to the group. SiteConfig
identifies all devices within that group to which packages are deployed. This identification is based
on the roles specified for the device in SiteConfig and the roles specified in the packages.
The Default deployment group is a special group for devices. This deployment group allows
SiteConfig to automatically carry out software deployment operations on devices that do not belong
to any other deployment group. When you initiate a Check Software operation, SiteConfig matches
software packages in the package store with software on devices. If a device that does not belong
to a deployment group has a match, SiteConfig automatically places the device in the Default
deployment group. In addition, you can add managed packages and deploy software to devices in
the Default group. SiteConfig generates appropriate deployment tasks for devices in this group when
you initiate the Check Software operation and when you add packages to the Default group. However,
SiteConfig does not allow you to add devices to this group. This is because you should set up your
own deployment groups based on your own logical grouping of devices within your system.
About managed software and tasks
Managed software is software that can be installed, uninstalled, and reinstalled by SiteConfig. A
managed package is a *.cab file that contains one or more installers (*.msi files) for managed
software that can be deployed to a device. It also contains a description of the roles deployed by the
installer and types of devices that can have the software deployed to them. In order to see what a
managed package contains, you can select any package listed within the Managed Packages area in
70 SiteConfig 2.1 User Manual 11 October 2011
Page 71

Working with software deployment
Software Deployment | Deployment Groups and click the Details button. The Package Details dialog
box opens:
From this dialog, you can view which software installs are contained within the managed package
and whether or not there are any software dependencies. You can also see the software roles that
this package contains. Deployment tasks are generated if the following two conditions are fulfilled:
1. A match between one or more of the roles in the managed package and one or more roles added
to any device within the deployment group.
2. A match between the type of device that the managed package specifies and the types of devices
contained within the deployment group.
Deployment tasks may also be generated if you perform a Check Software on a device. SiteConfig
attempts to match the device's installed software with software that has been either added to the
package store or to a deployment group. If the software matches, SiteConfig considers the software
to be managed software.
Some software components, such as those for Aurora products, share common prerequisite software.
This common software is contained in a separate installation package. You install this prerequisite
software package on the control point PC so that when SiteConfig deploys any software that needs
the prerequisite software, it uses the software installation files from the common package. This
reduces the size of .cab files overall and makes software download more manageable.
11 October 2011 SiteConfig 2.1 User Manual 71
Page 72

Working with software deployment
Related Links
About roles on page 72
Requirements for software managed by SiteConfig
In order for SiteConfig to be able to deploy software, the software must be authored as an MSI
(Windows Installer Database) file. If the software is installed on a Windows operating system device,
you can determine if the software is an MSI file. Open the Add/Remove Programs control panel
and look for the software. If the software appears in Add/Remove Programs, it is MSI software.
Non-MSI software does not appear in Add/Remove Programs.
About managed and unmanaged software
You can create a managed software package out of installed software on a device. You might want
to do this when you want to uninstall a software product via SiteConfig that currently doesn't have
a matching managed package in your package store. When you do this, SiteConfig takes the software
installation files saved on the device that are not already packaged as a *.cab file, copies them over
to the control point, packages them as *.cab, and adds them to the deployment group. You can then
uninstall and install that managed package. If uninstalling, once the deployment task completes
uninstalling, the task is no longer displayed.
It is recommended that you only create managed software packages for Grass Valley products and
only when release notes or product documentation instruct you to do so for specific products. Creating
managed packages is not guaranteed to work for third party software.
Related Links
Creating managed packages from installed software on page 80
About the package store
The SiteConfig package store is a directory for storing software packages. When you add a software
package to a deployment group, SiteConfig copies the package file to the package store. A software
package must be in the package store in order for it to be installed by SiteConfig. When you remove
a software package from a deployment group, the package file remains in the package store, so that
you can add it to a deployment group later. By default, the location of the package store is as follows:
C:\Documents and Settings\All Users\Application
Data\GrassValley\SiteConfigPackageStore
This directory should not contain anything other than the managed packages that are added here via
SiteConfig. Additionally, you should not modify any of these packages in any way as SiteConfig
expects their structure to be in a specific format. Either of these actions can cause undesired results
from the application.
About roles
A role is a grouping of software functionality. A device can have one or more software roles. A
software role is typically provided by one or more programs or services running on the device. For
some products, a single device type can be configured to have several different combinations of
72 SiteConfig 2.1 User Manual 11 October 2011
Page 73

software roles, depending on the functionality that device provides to the system or systems to which
it belongs.
Depending on a device's family, type, and model, SiteConfig automatically assigns the appropriate
software roles to a device when the device is added to the system description. You can also manually
modify a device's software roles.
SiteConfig knows what software should be installed for each software role, and deploys the software
from a software package accordingly. SiteConfig matches managed package roles with device roles
in order to generate appropriate deployment tasks for the actual software deployment activities.
Related Links
About managed software and tasks on page 70
About managing deployment tasks
Deployment tasks are managed from within the Tasks area within Software Deployment | Deployment
Groups. There are several properties of deployment tasks that you should consider:
• Some deployment tasks may be dependent upon other deployment tasks. Checking or unchecking
a task may check or uncheck other tasks for the same device if they are coupled together due to
a package dependency. For example, for K2 products, if you uncheck SNFS, SiteConfig
automatically unchecks K2 system software also. SiteConfig might need to enforce the installation
of these dependencies before the installation of the main product or you could encounter
deployment failures.
• Upgrades are performed by completely uninstalling a previous version of the software before
installing the next version. So if an upgrade is occurring, you will see one task for uninstalling
the older product and another task for installing the newer product. Uninstall tasks always execute
first. If an uninstall requires a restart, then the install for the same product will not continue until
you have restarted the device from SiteConfig.
• You control the sequencing of device restarts. If an uninstall or an install requires a restart of the
device, then SiteConfig indicates that a restart is required within the Details column in the Tasks
area. You can click on the "restart required" link to restart the device. Automatic restarts do not
occur in response to an install or an uninstall.
• Only one deployment task executes at a time on any one device.
• Multiple devices at the same time can each have a deployment task executing on them during a
deployment session.
• A deployment session occurs while a deployment task is deploying software to a single device
or while a multiple deployment tasks are deploying software to multiple devices.
• Once you start a sequence of deployment tasks, you cannot add more until the deployment session
is complete.
Working with software deployment
About software deployment tasks
A deployment task is a mapping between a particular software package and the roles that one or
more devices contain that are part of the same deployment group. Each deployment task contains
information about the software package, version, the action that it performs and the status of that
action. The status icons and status indicators for a deployment task are as follows:
11 October 2011 SiteConfig 2.1 User Manual 73
Page 74

Working with software deployment
MeaningIcon \ Status
The install or the uninstall task is currently in the planned state.
The install or the uninstall task is currently in the completed state.
Warning indicator. This means that you must do something before the task
can transition to complete. If the install or uninstall requires a restart of the
device, the task remains in this state until you initiate a restart of the device.
The install or the uninstall has either failed or been aborted. Check the
details column within the Tasks area for more information about the failure.
An install error log might be available.
The install or uninstall is currently in the pending state. This means that
the task is either waiting for a connection to the device or it is waiting for
other executing tasks to complete on the device.
The install or uninstall is currently in the executing state.
The install or uninstall is currently in the aborting state. Once the
install/uninstall has completely stopped executing on the device, this task
transitions to the red aborted icon.
Visible dialog
pending. User input
required
Restart required
Failed
About the Discovery Agent
The SiteConfig Network Configuration Connect Kit, also known as the Discovery Agent, is a
SiteConfig prerequisite that must be installed on all managed devices to allow for discovery and
configuration by SiteConfig. Any version of the Discovery Agent supports discovery, so if the
device has the Discovery Agent installed, it is not necessary to upgrade it before discovering the
device with SiteConfig.
The install or uninstall is currently waiting on input from you. Check the
Details column of the Tasks area for more information. This can mean that
a visible dialog is pending on the remote target. To allow the install or
uninstall to continue, you must initiate a remote desktop session from
SiteConfig into the remote device and interact with the dialog box.
Appears as a hyperlink in the Details column. Click on the link to launch
a remote desktop session to the device. Provide user input as required for
any dialogs visible on the screen
Appears as a hyperlink in the Details column. Click on the link to restart
the device
Appears as a hyperlink in the Details column to indicate a failed task. Click
on the link to view descriptive text about the failure.
When you install the SiteConfig application on your control point PC, a subfolder called Discovery
Agent Setup is created under your install folder that contains the Discovery Agent package. You
are required to add and deploy this package to all your deployment groups to keep this software
updated.
74 SiteConfig 2.1 User Manual 11 October 2011
Page 75

When you install a new version of SiteConfig, that version might come with an updated Discovery
Agent package. If you plan to perform deployment operations on any deployment group and add a
package that generates deployment tasks, SiteConfig displays text indicating that you are required
to add the Discovery Agent package to the deployment group.
SiteConfig does this if it detects that there is no Discovery Agent in the deployment group or if there
is a different version of the package in the group.
You must add the package to the group before the Start Deployment button will be enabled to allow
you to run deployment tasks.
Related Links
Upgrading the Discovery Agent on page 86
About deployment options
For some deployment tasks you must configure software deployment options before SiteConfig can
begin a software deployment operation. Look within the Details column in the Tasks area for a
"Deployment options required" message. This indicates a task for which you must configure software
deployment options. To configure the necessary deployment options, highlight the applicable task
and click the Options button or double-click on the task itself. This brings up a wizard similar to
what you use when you manually deploy software. Once you've configured your deployment options,
then you can start a deployment.
Working with software deployment
Related Links
Configuring deployment groups on page 76
Setting deployment options on page 82
Workflow for software deployment
Use the following sequence of tasks as a guideline as you deploy software.
correctly configured in SiteConfig Network
Configuration.
add and configure your deployment groups.
are deploying software.
deploying software and add a software
package to the deployment group.
CommentTask
—Make sure that all of your devices are
—In Software Deployment | Deployment Groups
—Check Software on each device to which you
Deployment tasks are displayed.Select a deployment group to which you are
—Set any necessary deployment options.
—Deploy the software.
11 October 2011 SiteConfig 2.1 User Manual 75
Page 76

Working with software deployment
Related Links
Working with network configuration on page 21
Configuring deployment groups on page 76
Checking all currently installed software on devices on page 78
Adding a software package to a deployment group on page 79
Setting deployment options on page 82
Installing software
About software deployment tasks on page 73
Working with devices and software deployment groups
Configuring deployment groups
Prerequisites for this procedure are as follows:
• The device is assigned in the SiteConfig system description and network connectivity is present.
1. In the Software Deployment | Deployment Groups tree view, right-click the top node and select
Add Deployment Group.
A deployment group appears in the tree view.
2. Right-click the deployment group, select Rename, and enter a name for the deployment group.
3. Right-click the deployment group and select Add Target Device.
The Add Target Device(s) wizard opens.
4. In the Available Target Devices tree view, select the node that displays the devices that you are
combining as a deployment group.
76 SiteConfig 2.1 User Manual 11 October 2011
Page 77

5. In the right-hand pane, select the devices that you are combining as a deployment group.
To select multiple devices, you can drag through the devices, use Ctrl + Click, or use Shift +
Click.
6. Click OK.
The devices appear in the Deployment Groups tree view under the deployment group. Before you
perform a software deployment, you must check software on the devices that will be receiving new
software. If you have already added packages to the group, on the Deployment Groups tab you will
also see deployment tasks generated for every device with roles that match the package contents.
Related Links
About deployment options on page 75
About adding a software role to a device
If you've added a role to a device that is part of a deployment group, you might see new deployment
tasks generated if there is a package that is part of that deployment group that contains that role.
You may only add roles to a device that are allowed for that particular device type.
Working with software deployment
Adding a software role to a device
1. In the Software Deployment | Devices tree view, right-click the device and select Add Role.
The Add Role dialog box opens.
The Add Role dialog box displays only those roles that SiteConfig allows for the selected device
type.
2. Select the role or roles that you want to add to the device. Use Ctrl + Click or Shift + Click to
add multiple roles.
3. Click OK to save settings and close.
The new role or roles appear under the device in the tree view.
Related Links
About managed software and tasks on page 70
11 October 2011 SiteConfig 2.1 User Manual 77
Page 78

Working with software deployment
About roles on page 72
About removing a software role
If you remove a role from a device that is part of a deployment group, SiteConfig can remove
Install/Planned deployment tasks if that device no longer contains any roles that are specified in the
managed package. Removing a role from a device does not uninstall software that no longer fulfills
the set of roles that belong to a device. That means that an Install/Complete task does not transition
to Uninstall/Planned if a role is removed.
Removing a software role from a device
1. In the Software Deployment | Devices tree view, expand a device’s node to expose the roles
currently assigned to the device.
2. Right-click the role you want to remove and select Remove.
The role is removed from the device in the tree view.
Related Links
About managed software and tasks on page 70
About roles on page 72
Checking all currently installed software on devices
Prerequisites for this task are as follows:
• The device is assigned in the SiteConfig system description and network connectivity is present.
• SiteConfig is able to log in to the device using the username/password credentials assigned to
the device.
• The SiteConfig PC does not have a network drive mapped to an administrative share (such as
C$) on a device on which you are checking software.
• If the SiteConfig Network Configuration Kit and/or Discovery Agent at version lower than
1.1.0.185 is currently installed, it must be manually uninstalled and updated. For more information
refer to SiteConfig Migration Instructions.
• If Aurora product software at a version lower than 6.5.2 is currently installed, it must be manually
uninstalled. For more information refer to SiteConfig Migration Instructions.
1. In the Software Deployment | Deployment Groups tree view, right-click the top-most node for the
group or any individual device and select Check Software.
NOTE: If you have access problems, verify that the adminstrator account on the device has
credentials as currently configured in SiteConfig.
The Check Software dialog box appears. SiteConfig searches for software on the selected device
or devices and gathers information. Progress is reported.
2. When the check is complete, close the Check Software dialog box.
An updated list of all currently installed software is displayed in the Software Deployment | Devices
| Installed Software list view. If software is a SiteConfig managed software package, information is
displayed in the Managed Package and Deployment Group columns.
78 SiteConfig 2.1 User Manual 11 October 2011
Page 79

Related Links
About deployment groups on page 70
About managed software and tasks on page 70
About installing SiteConfig on page 10
Requirements for software managed by SiteConfig on page 72
Comparing files for software deployment
Prerequisites for this task are as follows:
• The software meets requirements for a managed software package.
• The device has SiteConfig support installed
• The device is assigned in the SiteConfig system description and network connectivity is present.
• SiteConfig is able to log in to the device using the username/password credentials assigned to
the device.
The purpose of this feature is to allow you to check the integrity of your installed product. You can
verify that every file that was part of the install is the expected version, that there are no missing
files, and that none of the files were changed or modified after they were installed.
Working with software deployment
1. Perform a Check software within Software Deployment | Devices.
A list of software products that are currently on the device is displayed.
2. Select one of the software products in the list.
3. Click the Details button.
The Installed Software Components dialog box opens
4. Select the product within the list and click Check Files.
The File Check Progress dialog box is displayed while SiteConfig scans for the product
information on the remote device.
After the progress dialog closes, the File Comparison Results dialog box opens. Any file errors
are displayed at the top of the list. File errors can include version incompatibility between the
files that are installed and the files that the installer should have installed, missing files, and
modified files.
5. Click OK when finished.
Related Links
Troubleshooting device discovery on page 94
About SiteConfig support on managed devices on page 42
Requirements for software managed by SiteConfig on page 72
Working with managed software packages
Adding a software package to a deployment group
1. In the Software Deployment | Deployment Groups tree view, select a deployment group.
2. Click the Add button.
The Add Package(s) dialog box opens.
11 October 2011 SiteConfig 2.1 User Manual 79
Page 80

Working with software deployment
3. Do one of the following to select the software package:
• Select from the list of packages then click OK.
• Click Browse, browse to and select the package, then click Open.
4. If one or more EULAs are displayed, accept them to proceed. If you do not accept a EULA, the
associated software is not assigned to the deployment group.
SiteConfig adds the package to the deployment group.
The package appears in the Managed Packages list for the selected deployment group. SiteConfig
creates new software deployment tasks for the package and displays them in the Tasks list view.
Install prerequisite files on the SiteConfig PC
Some software components share common prerequisite software. You must install a prerequisite
software package on the SiteConfig PC to make the prerequisite software available for software
deployment to devices.
1. Check release notes for the required version of prerequisite files, if any.
2. On the SiteConfig PC, open Windows Add/Remove programs and look for Grass Valley
Prerequisite Files, then proceed as follows:
• If the required version of prerequisite files is installed, do not proceed with this task.
• If prerequisite files are not installed or are not at the required version, proceed with this task.
3. Procure the required prerequisite software installation file. The file name is Prerequisite
Files.msi.
4. On the SiteConfig PC, run the installation file. The installation program copies prerequisite files
to C:\Program Files\Grass Valley\Prerequisite Files.
Creating managed packages from installed software
1. In the Software Deployment | Devices tree view, right-click the top-most node for a site and select
Check Software.
The Check Software dialog box appears. SiteConfig searches for software on the selected device
or devices and gathers information. Progress is reported.
2. In the Installed Software area, select any product that doesn't already have a corresponding
managed package and click Manage .
Related Links
About managed and unmanaged software on page 72
Requirements for software managed by SiteConfig on page 72
Managing the package store
Use this procedure to view all packages in the package store and delete old packages that are not
needed.
• You have one or more packages added to your package store
80 SiteConfig 2.1 User Manual 11 October 2011
Page 81

Working with software deployment
When you add packages to any deployment group, they are saved to a special folder called the
package store. These packages remain in the package store even after you have installed or uninstalled
the software that they contain. They are also not deleted from the package store when you remove
them from the deployment group.
In order to manage the space occupied by packages, you should periodically remove from the package
store any package(s) that are not necessary anymore. This deletes all package files from folders in
the package store.
You cannot delete any packages that currently have pending deployment tasks in any deployment
group. You must also remove them from all deployment groups that list them as managed packages.
1. Click Tools | Options | Software deployment | Manage package store
The manage package store dialog opens and displays a list of all the packages in the package
store. The dialog displays the name of the package, the size of the package including all the files
that belong to the package and whether or not the package can be deleted.
2. Select a package that is not grayed out and click Delete.
Package files are deleted from the package store. The managed package files are removed from
the manage package store dialog.
Working with software deployment tasks
Displaying software deployment tasks
Deployment tasks are displayed in the Software Deployment Tasks area. Select nodes from the
Deployment Group tree view to change tasks displayed in the Tasks area.
• To display only tasks that have yet to be installed or uninstalled, de-select Show Completed Tasks.
• To display all tasks, including completed tasks, select Show Completed Tasks.
11 October 2011 SiteConfig 2.1 User Manual 81
Page 82

Working with software deployment
• To display more details about a task, click the Details button.
The Deployment Task Details dialog box opens.
Details displayed include the following:
• The roles associated with the task
• Other tasks upon which the task depends
• The current state of the task
Configuring software deployment tasks
Prerequisites for this task are as follows:
• The task or tasks that you intend to deploy must be planned. SiteConfig does not allow you to
deploy a completed task.
• If deployment options are required for a task, the options must be set.
1. For a planned task that you want executed the next time you deploy software, select the Deploy
checkbox.
2. For a planned task that you do not want executed when you next deploy software, de-select the
Deploy checkbox.
Related Links
Setting deployment options on page 82
Setting deployment options
Pre-requisites for this procedure are as follows:
• A software package has been assigned to the deployment group and applicable deployment tasks
are now displayed in the Tasks area.
1. In the Software Deployment | Deployment Groups tree view, select a deployment group.
82 SiteConfig 2.1 User Manual 11 October 2011
Page 83

Working with software deployment
2. In the Tasks list view, view tasks and determine if you must set deployment options.
Tasks that need to have deployment options set display in the Details column a message stating
"Deployment options required."
If you select a task that needs to have its deployment options set, the Start Deployment button
is disabled and the message is displayed next to the button.
3. Do one of the following to set deployment options:
• Double-click the task.
• Select the task and click the Options button.
A wizard opens.
Options are displayed, similar to those in a standard software installation wizard when you install
software manually.
4. Work through the wizard to set options.
5. If you have multiple devices of the same type, you can enter deployment options for one of them
using the wizard. Then, when you bring up the same wizard on every device, you can choose
the Use options from radio button and select the first device for which you set options.
SiteConfig copies the options you set for the first device and fills in the blanks on the wizard.
11 October 2011 SiteConfig 2.1 User Manual 83
Page 84

Working with software deployment
Related Links
About deployment options on page 75
Uninstalling software
Prerequisites for this task are as follows:
• The software that you are uninstalling is a SiteConfig managed software package.
Use this task to uninstall software when you are not upgrading the software. When uninstalling
software as part of an upgrade, SiteConfig provides a taskflow that is different than the steps provided
here.
1. In Software Deployment | Deployment Groups, select a Device node, a Deployment Group node,
or the All Deployment Groups node.
The corresponding software deployment tasks are displayed in the Tasks list view.
2. Right-click one or more deployment tasks that are in the Install/Complete state and select Uninstall.
You can multiple-select tasks using Ctrl + Click, Ctrl + Shift + Home, or Ctrl + Shift + End.
3. Check these tasks in the Deploy column in the Tasks area.
4. Click the Start Deployment button.
SiteConfig runs deployment tasks and uninstalls software on the devices. Progress is reported
in both the Status and Details columns.
5. Perform manual steps if they are indicated by either the Status or Details columns, such as the
following:
a) Dismiss one or more dialog boxes on a device. You can directly click on the link in the Details
column indicating a visible dialog is pending and a Remote Desktop session will be initiated.
b) Restart the device.
6. Monitor progress as indicated by both the Status and Details column. When finished, the Status
column indicates complete.
Related Links
About managed software and tasks on page 70
Upgrading software on page 84
Upgrading software
Prerequisites for this task are as follows:
• The devices that you are upgrading are in a deployment group.
• For the software you are upgrading, you have added a newer version of that managed software
package to the deployment group.
• You have recently done the SiteConfig "Check Software" operation on the devices you are
upgrading.
If you are upgrading multiple software components for which there is a required sequence, you must
check and uncheck tasks and run multiple deployment sessions to control the sequence. For some
software components, SiteConfig aids you by enforcing dependencies. For each individual software
component, SiteConfig enforces an uninstall of the current version of software before installing the
84 SiteConfig 2.1 User Manual 11 October 2011
Page 85

Working with software deployment
upgrade version. SiteConfig provides uninstall deployment tasks and install deployment tasks to
indicate the taskflow. SiteConfig can do the uninstall/install in a single deployment session.
1. In the Software Deployment | Deployment Groups tree view, select the device or the group of
devices to which you are deploying software.
The corresponding software deployment tasks are displayed in the Tasks list view.
2. For the software you are deploying, select the Deploy check box in the row for the uninstall task.
3. Unselect the Deploy check box for all other deployment tasks for all other software.
4. For the software you are installing, select the Deploy check box in the row for the install task.
NOTE: If there are dependencies, SiteConfig can enforce that some tasks be deployed together.
You can deploy packages for both 32 bit and 64 bit systems because when SiteConfig deploys
software it automatically deploys the 32 bit or 64 bit software appropriate for the target device.
You must install SNFS as a separate cab file.
5. Click the Start Deployment button.
Deployment tasks run and software is uninstalled. Progress is reported and next steps are indicated
in both the Status and Details columns. If an error appears regarding prerequisite software, install
the prerequisite files on the control point PC and then repeat this step.
Deployment tasks run and software is installed. Progress is reported and next steps are indicated
in both the Status and Details columns.
6. When the Status or Details columns indicate next steps, identify the software in the row, then
do one of the following:
• Perform manual steps if indicated, such as dismissing a dialog box on the device and/or
restarting the device.
7. Monitor progress as indicated by both the Status and Details column. When finished, the Status
column indicates complete.
Retrying a failed task
Use this procedure to retry a failed deployment task. A failed deployment task is indicated by a red
LED icon in the status column of the deployment task. The details column will display text indicating
the cause of failure.
1. In Software Deployment | Deployment Groups, select a Device node, a Deployment Group node,
or the All Deployment Groups node.
The corresponding software deployment tasks are displayed in the Tasks list view.
2. Select a deployment task with a failed status.
3. If you have started a deployment session and it has not completed, right-click the deployment
task and select the Retry option.
Click Yes in the dialog asking you to confirm the retry operation. The deployment task will
change to a pending state and will start executing the install or uninstall task in the same
deployment session.
11 October 2011 SiteConfig 2.1 User Manual 85
Page 86

Working with software deployment
4. If the deployment session is complete, you can check the failed task in the Deploy column in the
Tasks area. Click the Start Deployment button.
SiteConfig runs the deployment tasks. Progress is reported in both the Status and Details columns.
Reinstalling software
If you have executed a deployment task to uninstall a particular version of software, you can use
this procedure to reinstall the same version again.
1. In Software Deployment | Deployment Groups, select a Device node, a Deployment Group node,
or the All Deployment Groups node.
The corresponding software deployment tasks are displayed in the Tasks list view.
2. Select a task in the uninstall complete state. This is indicated by the green LED in the Status
column and text that reads "Uninstall" in the Action column.
3. Right click on the task and select the Reinstall option from the context menu.
The Action column will change text to read "Planned" and the Status column will indicate a
pending status (gray LED).
4. Click the Start Deployment button.
SiteConfig runs deployment tasks and installs software on the device. Progress is reported in
both the Status and Details columns.
Upgrading the Discovery Agent
Prerequisites for this task are as follows:
• Your devices are in one or more deployment groups
• A check software operation has been performed either on the device or the deployment group
that you are upgrading
1. Select a software deployment group and check the area next to the Start Deployment button for
a message.
Proceed as follows:
• If there is no message instructing you to upgrade the Discovery Agent, the device or devices
already have the compatible version of the Discovery Agent. Skip ahead to the last step of
this procedure.
• If a message instructs you to upgrade the Discovery Agent, make a note of the required
Discovery Agent version number and continue with the next step in this procedure.
2. Click Add Package
86 SiteConfig 2.1 User Manual 11 October 2011
Page 87

Working with software deployment
3. Click Browse in the add package dialog and browse to the Discovery Agent Setup folder under
your SiteConfig install location on the SiteConfig PC.
4. Select the required DiscoveryAgent_<version>.cab file and click Open.
SiteConfig generates deployment tasks to uninstall the existing version and installs the selected
version and enables the Start Deployment button.
5. Check the uninstall and install deploy tasks for the Discovery Agent and click the Start Deployment
button when you are ready to deploy.
SiteConfig runs the deployment tasks.
6. Repeat these steps for any other software deployment groups.
Related Links
About the Discovery Agent on page 74
11 October 2011 SiteConfig 2.1 User Manual 87
Page 88

Page 89

Chapter 4
SiteConfig application setup
This section contains the following topics:
• Location of SiteConfig files
• Setting the SiteConfig package store location
• About system description backups
• Backing up the system description
11 October 2011 SiteConfig 2.1 User Manual 89
Page 90

SiteConfig application setup
Location of SiteConfig files
SiteConfig uses the user profile directory, as currently configured in the Windows operating system,
to store and access files. The user profile directory can be different on different control point PCs,
depending on the Windows operating system installation. In the user profile directory you can find
the Application Data\GrassValley directory, which is where SiteConfig stores its files. The
complete path for a typical control point PC is as follows:
C:\Documents and Settings\All Users\Application Data\GrassValley
In this directory you can find system descriptions files, which have the scsd extension. You can
also find other SiteConfig directories and files.
Setting the SiteConfig package store location
Prerequisites for this procedure are as follows:
• The control point PC has access to the directory that you want to define as the package store
location.
1. Click Tools | Options | Folders.
The Browse For Folder dialog box opens.
2. Browse to the location that you want to set as your package store, and then click OK.
The configured location is now registered with SiteConfig as its package store.
About system description backups
You can configure SiteConfig to automatically write a system description file to a backup location
whenever a system description closes, which occurs as follows:
• When you import a system description
• When you create a new system description
• When you close SiteConfig
The first time that SiteConfig creates a backup file of a system description, it creates a directory for
it. The directory is named the same as the system description file name. Then, whenever SiteConfig
writes the backup file, it writes it to the directory and adds a time/date suffix to the file name, so
that the backup file does not overwrite previous backup files. You can configure the number of
backup files that you want to retain. When SiteConfig detects that the configured number of backup
files are present in the directory, it deletes the oldest backup file when it saves a new backup file.
You should specify a network drive or other remote location as the location to which the backup
files is saved. In the event of a local system fault in which you lose the main system description file,
you can then import a recent backup file from the remote location for recovery purposes.
90 SiteConfig 2.1 User Manual 11 October 2011
Page 91

Related Links
Backing up the system description on page 91
Backing up the system description
1. Open SiteConfig on the control point PC.
2. Click Tools | Options | Backup.
The Backup Options dialog box opens.
SiteConfig application setup
3. Select Perform Automatic Backups.
4. Click Browse and specify the location to which the system description backup files are saved.
5. If you want SiteConfig to ask “Do you want to…backup?” when a system description closes,
select Prompt before creating backup file.
6. Set the number of backup files that you want SiteConfig to save.
Related Links
About system description backups on page 90
11 October 2011 SiteConfig 2.1 User Manual 91
Page 92

Page 93

Chapter 5
Troubleshooting
This section contains the following topics:
• Viewing logs
• Troubleshooting device discovery
• Troubleshooting software deployment
11 October 2011 SiteConfig 2.1 User Manual 93
Page 94

Troubleshooting
Viewing logs
Viewing the application log
Viewing the deployment log
SiteConfig stores information in several logs.
1. From the SiteConfig menu, select Tools | Logs | Application.
2. If desired, save log information as follows:
• To save the entire log to a text file select File | Save Log.
• To save one or more entries in the log right-click entries and select Copy. Log entries are
copied to your clipboard. You can paste the entries into a text editor.
3. To view the xml version of the log file navigate to C:\Documents and Settings\All
Users\Application Data\GrassValley\SiteConfigLogs and open the file
ApplicationLogFile.xml
1. From the SiteConfig menu, select Tools | Logs | Software Deployment.
2. You can save one or more entries in the log by right-clicking selected entries and selecting Copy.
This copies entries to your clipboard and you can paste the text into any editor such as Notepad.
3. To view the xml version of the log file navigate to C:\Documents and Settings\All
Users\Application Data\GrassValley\SiteConfigLogs.and open the file
DeploymentLogFile.xml
4. You can enable verbose logging when troubleshooting a deployment issue. Turn on verbose
logging for software deployment by checking the Tools | Options | Software Deployment | Enable
Verbose Logging menu item.
In the case of a SiteConfig application crash, you can view the FatalException.Log that resides
in the SiteConfig application install directory.
Viewing failed install logs
Click on the blue Failed link that is displayed in the Details column within the Tasks area in
Software Deployment. You can save the logs to a text file.
Troubleshooting device discovery
Use this procedure if you have trouble discovering devices or if SiteConfig does not display a green
or yellow overlay icon over the device icon in the tree view.
Related Links
Comparing files for software deployment on page 79
94 SiteConfig 2.1 User Manual 11 October 2011
Page 95

About SiteConfig support on managed devices on page 42
If you are unable to discover a device
Try the following if you are unable to discover a new device you have just added to your system
description.
• In the discover devices window, click the Rescan button to refresh the list of discovered devices
• Check if the ProductFrame Discovery Agent service is running on the device.
If you have previously discovered and configured a device
Use the following information if you are having problems with a device that you have previously
discovered and for which you have successfully configured network properties.
SiteConfig should re-discover the device at application startup and display a green or yellow overlay
icon over the device icon in the tree or on the control network interface. If SiteConfig does not
display these overlay icons, it indicates a problem.
• Try pinging the device
The ping dialog indicates success or failure. If it fails to ping, check if the device is online and
if network connectivity to the control network is functional.
Troubleshooting
• Open the discover devices window and check the Show currently assigned devices checkbox and
then click the Rescan button.
SiteConfig attempts to rediscover all devices and you should see the missing device appear in
the list if this is successful.
• Check if the ProductFrame Discovery Agent service is running on the device. Restart the service
and try rescanning.
Troubleshooting software deployment
Use the following information if a software deployment task fails.
Related Links
Viewing logs on page 94
If an executing deployment task fails...
Enable verbose logging for the deployment log and retry the deployment task. When it fails,
click on the "failed" link to bring up the detailed install log and look for errors.
If a deployment task does not start...
1. Check connectivity to the device by pinging
2. Check the credentials used to manage the device. Open a remote desktop session from SiteConfig.
If this fails, verify the administrator account credentials used by SiteConfig.
11 October 2011 SiteConfig 2.1 User Manual 95
Page 96

Page 97

Appendix A
Trademarks and Agreements
This section contains the following topics:
• Trademarks
• JPEG acknowledgment
11 October 2011 SiteConfig 2.1 User Manual 97
Page 98

Trademarks and Agreements
Trademarks
Grass Valley, STRATUS, K2, Aurora, Summit, ChannelFlex, Dyno, Solo, ClipStore, Infinity, Turbo,
Profile, Profile XP, NetCentral, NewsBrowse, NewsEdit, NewsQ, NewsShare, NewsQ Pro, and
Media Manager are either registered trademarks or trademarks of Grass Valley USA, LLC. in the
United States and/or other countries. Grass Valley USA, LLC. products are covered by U.S. and
foreign patents, issued and pending. Additional information regarding Grass Valley USA, LLC.
trademarks and other proprietary rights may be found at www.grassvalley.com. Other trademarks
and logos used in this document are either registered trademarks or trademarks of the manufacturers
or vendors of the associated products, such as Microsoft®Windows® operating system, Windows
Media® player, Internet Explorer® internet browser, and SQL Server™. QuickTime and the
QuickTime logo are trademarks or registered trademarks of Apple Computer, Inc., used under license
therefrom.
JPEG acknowledgment
This software is based in part on the work of the Independent JPEG Group.
98 SiteConfig 2.1 User Manual 11 October 2011
Page 99

Index
A
account
security 65
Add Remove Programs 72
administrative share on SiteConfig control point PC 10
alias
multiple network names 60
B
backup
SiteConfig system description 91
C
cab file 72
CD tray
to identify device 50
commissioning
with SiteConfig 18
connect kit
SiteConfig 11
F
family
as device model 47
Fibre Channel interfaces 51
H
hosts files
writing to devices 41
I
icon overlay colors
managing IP configuration 53
icons
software deployment 73
install failure
SiteConfig log 94
installing SiteConfig
system requirements 11
J
D
dependencies
software 70
software deployment 73
deployment groups
adding software 79
configuring 76
device
adding with SiteConfig wizard 26
DiscoveryAgentServiceSetup.msi 11
DNS 60
domain name 49
E
EULA 79
java 11
jpeg
acknowledgment 98
K
K2 Summit Production Client write filter 62
K2Config
and SiteConfig settings 31
L
LED
to identify device 50
legal
jpeg acknowledgment 98
trademarks 98
lock
icon definition 14
logs
SiteConfig 94
11 October 2011 SiteConfig 2.1 User Manual 99
Page 100

Index
M
mapped network drive on SiteConfig control point PC
10
Microsoft Windows
system requirement 11
MSI 72
N
network
creating with SiteConfig wizard 26
requirements for SiteConfig installation 10
new site wizard
SiteConfig 26
non-IP Interfaces 51
P
passwords
changing Windows 7 65
changing Windows XP 66
security 65
ProductFrame
definition 10
ProductFrame Discovery Agent 11
troubleshooting 94
SiteConfig
about 10
and K2Config settings 31
and STRATUS Control Panel, K2Config settings 32
K2Config
and STRATUS Control Panel, SiteConfig settings
32
main window 13
opening 13
SiteConfig Network Configuration Connect Kit 11
software
adding to deployment groups 79
configuring deployment groups 76
software package location 72
star icon
definition 14
STRATUS Control Panel
and SiteConfig, K2Config settings 32
applications configured for host 33
switch Ethernet
and SiteConfig 10
system
creating in SiteConfig 26
system description
merging 35
system description file
location of 30, 90
R
remote desktop 66
restart
during software deployment 73
role
and deployment task 72
router
and SiteConfig 10
S
scan
for software 79
security 64
site
creating in SiteConfig 26
definition in SiteConfig 22
site wizard
SiteConfig 26
T
terminology
SiteConfig 16
trademarks 98
U
uninstalling software 73
user profile directory
SiteConfig 30, 90
W
Windows Installer Database 72
wizard
new site SiteConfig 26
software installation 75, 82
write filter
lock/unlock K2 Summit Production Client 62
100 SiteConfig 2.1 User Manual 11 October 2011
 Loading...