

Page 1

RTic User Manual
Document version: 2.43 - 12/20/12
Page 2

Contents
1 Grass Valley Product Support ................................................................................................................ 6
1 About his document ................................................................................................................................ 6
2 RTic ........................................................................................................................................................ 6
3 Workstation prerequisites ....................................................................................................................... 7
4 The RTic Workflow ................................................................................................................................. 7
4.1 Workflow ........................................................................................................................................ 7
4.2 RTic Objects .................................................................................................................................. 9
5 RTic modes .......................................................................................................................................... 10
5.1 Designer ...................................................................................................................................... 10
5.2 Grabber Active ............................................................................................................................. 10
5.3 Off ................................................................................................................................................ 10
5.4 Show content ............................................................................................................................... 10
6 Multirecord sources .............................................................................................................................. 11
6.1 What is a multirecord source ....................................................................................................... 11
6.2 The Record select object ............................................................................................................. 11
6.3 Multirecord sources and scene parameters ................................................................................ 11
7 Starting RTic ......................................................................................................................................... 13
7.1 Starting RTic ................................................................................................................................ 13
7.2 The RTic workspace .................................................................................................................... 13
7.3 The RTic menu ............................................................................................................................ 14
8 Working with objects ............................................................................................................................ 15
8.1 Adding Objects to the Canvas ..................................................................................................... 15
8.2 Moving Objects on the Canvas .................................................................................................... 15
8.3 To link objects .............................................................................................................................. 15
8.4 To link a second object to an object (two inputs) ........................................................................ 15
8.5 To unlink objects .......................................................................................................................... 15
8.6 Cut, copy, paste, delete ............................................................................................................... 16
8.7 Properties .................................................................................................................................... 16
8.8 Rename ....................................................................................................................................... 16
8.9 Grab, show content ..................................................................................................................... 16
9 The Record Select Object how to ........................................................................................................ 17
10 The Channel Composer Ticker Object how to ..................................................................................... 18
10.1 Workflow ...................................................................................................................................... 18
10.2 Example RTic ticker data flow ..................................................................................................... 19
RTic User Manual- document version: 2.43 - 2
Page 3

How to .......................................................................................................................................... 24
10.3
11 The Channel Composer Template Object how to ................................................................................ 27
12 The K2 Edge Object how to ................................................................................................................. 30
13 The Scenepar Object ........................................................................................................................... 31
14 Events how to ....................................................................................................................................... 33
14.1 Inserting and linking Events and Targets .................................................................................... 33
14.2 Trigger onSocket Event via socket .............................................................................................. 33
14.3 Toggle onTime Event via socket ................................................................................................. 33
15 Decisions how to .................................................................................................................................. 34
15.1 Defining a decision ...................................................................................................................... 34
15.2 Reversing the decision ................................................................................................................ 34
15.3 Comparing sources 1 and 2 ........................................................................................................ 34
16 Text how to ........................................................................................................................................... 35
16.1 Replacing, removing, adding and converting strings................................................................... 35
16.2 Adding two text strings together .................................................................................................. 35
16.3 Word wrap ................................................................................................................................... 35
17 Pictures: How to ................................................................................................................................... 36
18 XML how to .......................................................................................................................................... 38
18.1 Specifying a XML-source ............................................................................................................. 38
18.2 Selecting records from the XML-source ...................................................................................... 38
18.3 Linking the XML-object and Record select object ....................................................................... 38
19 SQL how to ........................................................................................................................................... 39
20 RTic objects Quick Reference .............................................................................................................. 40
20.1 Channel Composer Ticker Object ............................................................................................... 40
20.2 Channel Composer Template Object .......................................................................................... 40
20.3 K2 Edge Object............................................................................................................................ 40
20.4 Scenepar Object .......................................................................................................................... 40
20.5 Record sel Object ........................................................................................................................ 40
20.6 onTime Object ............................................................................................................................. 41
20.7 onFileDate Object ........................................................................................................................ 41
20.8 onSocket Object .......................................................................................................................... 41
20.9 Add TGA Object........................................................................................................................... 42
20.10 Add Object ............................................................................................................................... 42
20.11 Color Object ............................................................................................................................. 42
20.12 Decision Object ........................................................................................................................ 43
20.13 Float Object ............................................................................................................................. 43
RTic User Manual- document version: 2.43 - 3
Page 4

Graph Object ........................................................................................................................... 43
20.14
20.15 Integer Object .......................................................................................................................... 44
20.16 Local TGA Object .................................................................................................................... 45
20.17 PICconv Object ........................................................................................................................ 45
20.18 Tab Object ............................................................................................................................... 46
20.19 Table Object ............................................................................................................................ 46
20.20 TEXTlen Object ....................................................................................................................... 47
20.21 Trim Object .............................................................................................................................. 47
20.22 Wordwrap Object ..................................................................................................................... 48
20.23 wWrap2us Object .................................................................................................................... 48
20.24 CVS Object .............................................................................................................................. 48
20.25 Date Object .............................................................................................................................. 49
20.26 Excel Object ............................................................................................................................. 49
20.27 Manual Text Object.................................................................................................................. 50
20.28 Socket XML Object .................................................................................................................. 50
20.29 Text File Object ........................................................................................................................ 50
20.30 Time Object ............................................................................................................................. 51
20.31 XML Object .............................................................................................................................. 51
20.32 XML Vote Object ...................................................................................................................... 52
20.33 onTickfill Object [Legacy] ......................................................................................................... 53
20.34 ADOSQL Object ...................................................................................................................... 54
20.35 Indigo Object [Legacy] ............................................................................................................. 54
20.36 SMS Gate Object [Legacy] ...................................................................................................... 55
20.37 Template Object [Legacy] ........................................................................................................ 56
20.38 Nexus Template Object [Legacy] ............................................................................................ 57
20.39 Ticker Object [Legacy] ............................................................................................................. 58
20.40 Userstring Object [Legacy] ...................................................................................................... 59
20.41 Nexus Userstr object [Legacy] ................................................................................................. 60
21 Legacy .................................................................................................................................................. 61
21.1 Nexus System Object: How to [Legacy] ...................................................................................... 61
21.2 Tickers: How to [Legacy] ............................................................................................................. 61
21.3 Userstrings: How to [Legacy] ....................................................................................................... 62
21.4 Template Target: How to [Legacy] .............................................................................................. 62
21.5 Toggle onTickfill Event via socket: How to [Legacy] ................................................................... 63
RTic User Manual- document version: 2.43 - 4
Page 5

Copyright © Grass Valley USA, LLC. All rights reserved. This product may be covered by one or more
U.S. and foreign patents.
RTic User Manual- document version: 2.43 - 5
Page 6
1 Grass Valley Product Support
Contact information: http://www.grassvalley.com/support/contact
U.S Technical Support: +1 800-547-4989 or +1 530 478 4148 or E-mail: Please use our online form
All other countries Technical Support: +800 80 80 20 20 or +33 1 48 25 20 20 or E-mail:
callcentre@grassvalley.com
FAQ: http://grassvalley.novosolutions.net/
Training: https://grassvalley.csod.com/LMS/catalog/Main.aspx?tab_page_id=-67&tab_id=6
Documentation can be found on the Grassvalley website:
http://www.grassvalley.com/apps/doc_prodlist?super=broadcast&set=ips and
http://www.grassvalley.com/products/k2_edge.
1 About his document
This document describes RTic version 2.43. Information in this manual may at some points differ from
your RTic application due to differences in version.
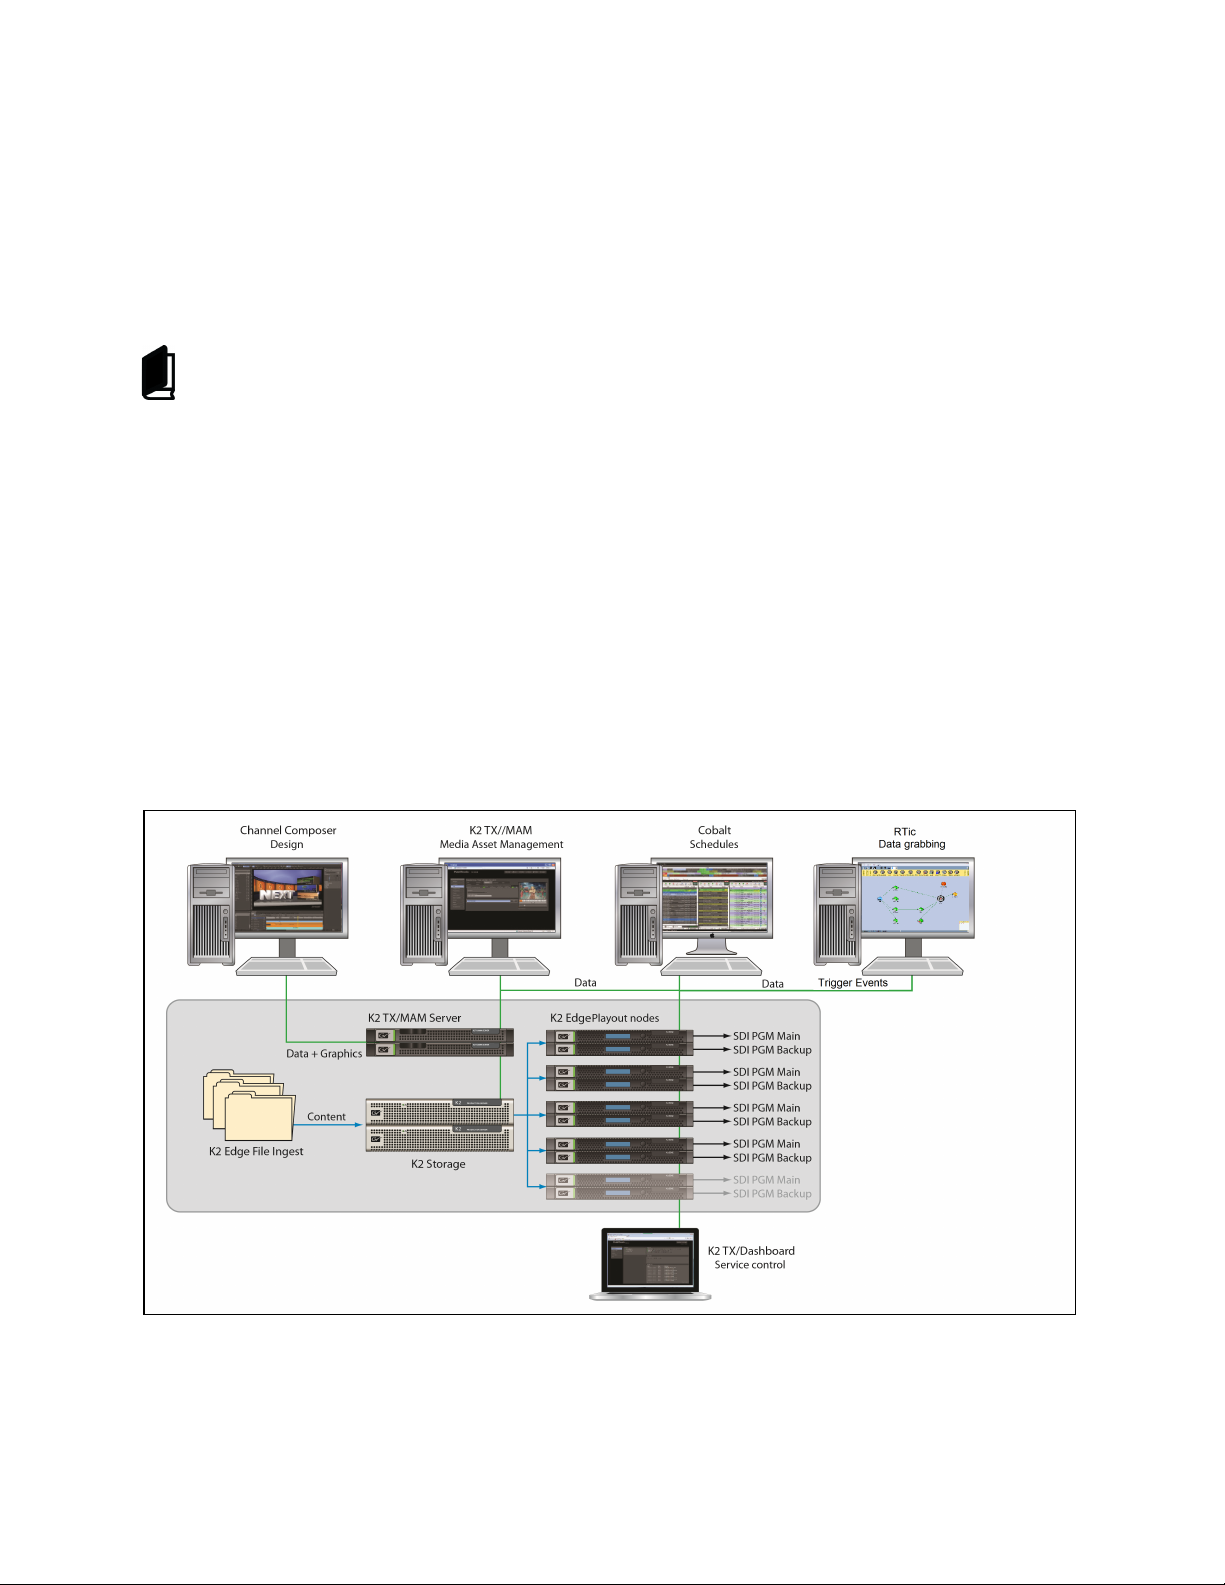
2 RTic
RTic - Real Time information collector - can receive data from a broad variety of sources, then process
and send data directly on air.
RTic is installed on and runs from a workstation. RTic connects to the playout or test system via the RTic
System object [see paragraph 4.2 for an explanation].
RTic User Manual- document version: 2.43 - 6
Page 7

3 Workstation prerequisites
RTic runs on a Windows workstation, Vista/ Windows 7, 32/64-bits, 4Gb @2.4 Ghz.
4 The RTic Workflow
4.1 Workflow
RTic defines data flows: data is grabbed from a source, processed and sent to a target. Events allow you
to further control data grabbing; events are used to trigger data grabbing. The system object specifies the
playout system.
The steps below describe the RTic workflow:
1) Specify the data source.
Data can be grabbed from a variety of sources such as text, XML, Excel, and more. Data can be either
"single record", for example a text fragment, or "multirecord ", for example an Excel source.
2) Process the data.
Options include: trim text, word wrap text, merge graphics, define decisions and conditions for processing
data, select records from a multirecord source, and more.
3) Specify the target.
Define a target: send the data to a scene parameter, a ticker, and etcetera.
4) Link an event to the target.
Events are used to control data grabbing. An event triggers data grabbing, for example according to an
update interval or each time a specified data file is modified.
5) Define the output system.
The system object specifies the playout system.
RTic User Manual- document version: 2.43 - 7
Page 8
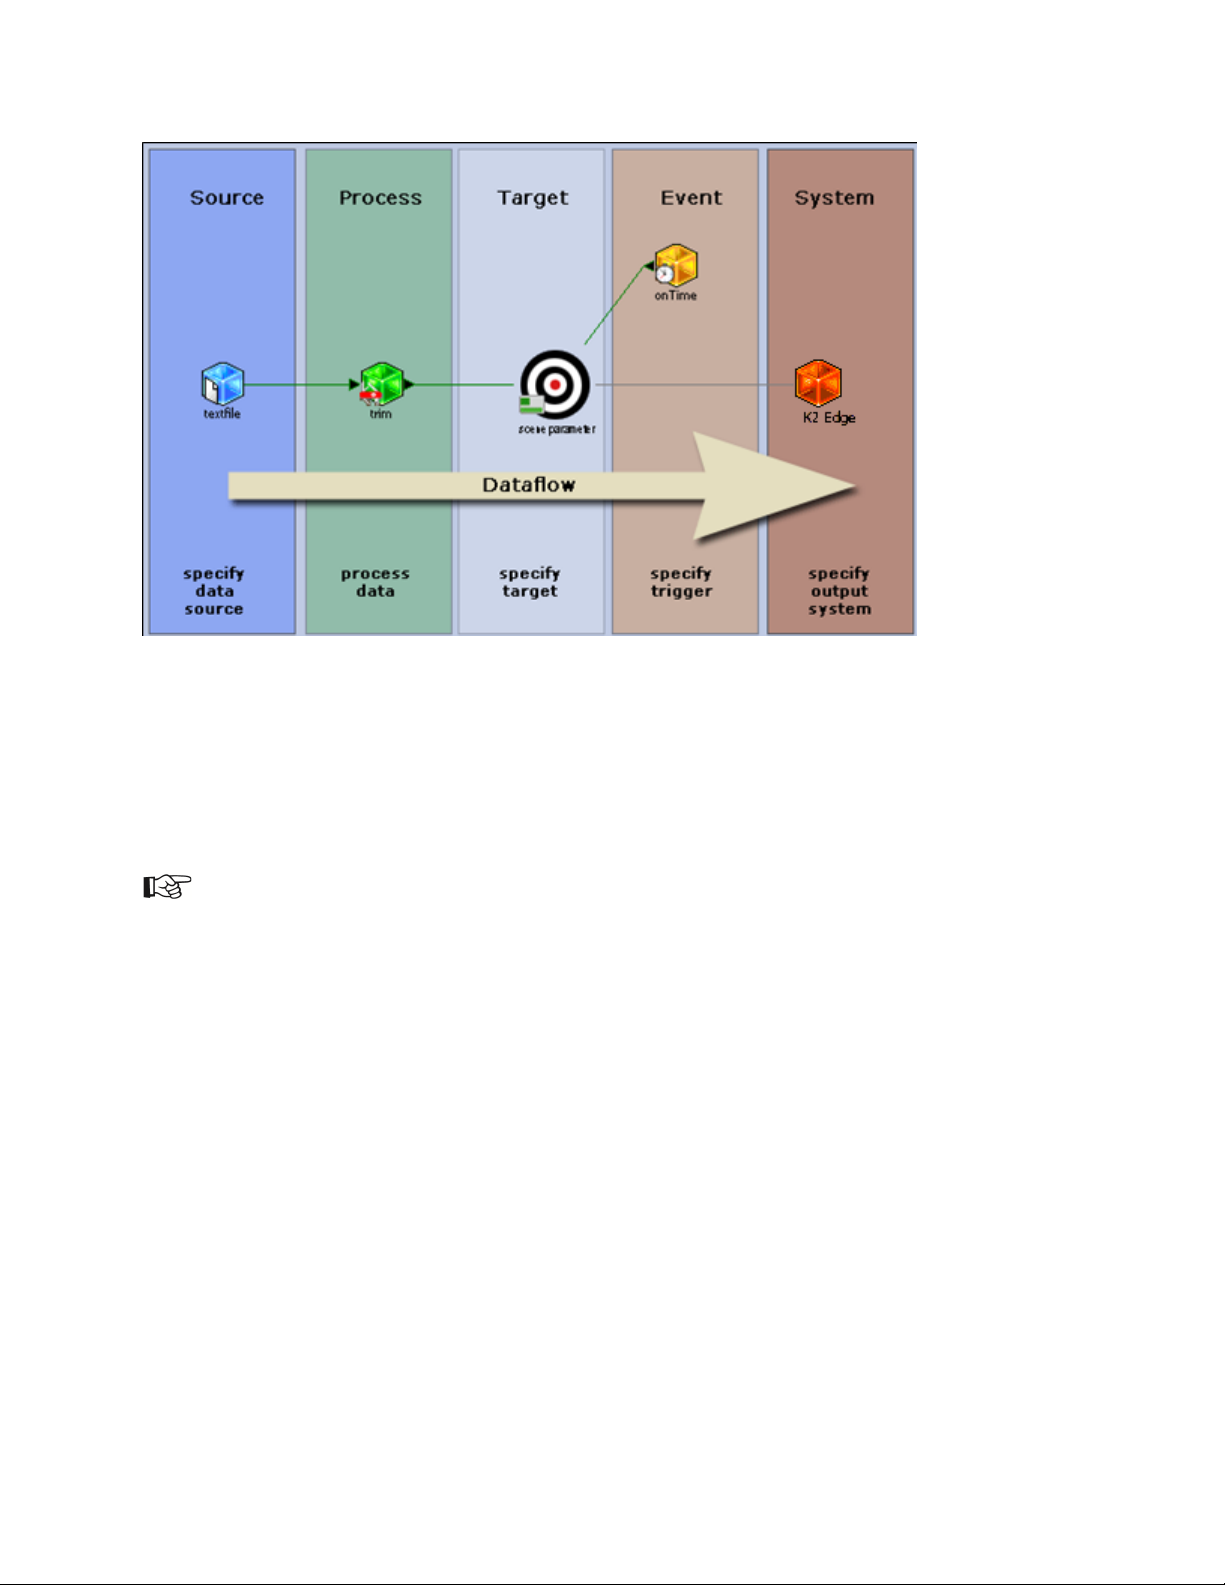
The example above shows a simple dataflow:
1. Text is grabbed from a text file, specified by the Text file object.
2. The text is trimmed as defined by the Trim object.
3. The Target object defines the target; in this example a scene parameter.
4. The onTime Event defines the interval for data grabbing.
5. The system object defines the playout system.
Most RTic objects contain a test grab option. You can use this option to test incoming data at several
stages in the workflow.
RTic User Manual- document version: 2.43 - 8
Page 9

4.2 RTic Objects
Sources
Data can be grabbed from:
• text, file or manual
• XML, file or socket
• database
• Excel files
• and more
Processing
Data processing options include:
• trim text
• merge graphics
• word wrap
• select a record and parameter
• define decisions and conditions for processing data
• and more
Events
Events are used to control data grabbing. For example, define an update interval, or check for changes in
a data file. Events are linked to Targets. In Grabber active mode, the Event updates the related Target
according to the specified trigger.
Targets
Data can be sent to different targets:
• scene parameters
• tickers
• templates
• and more
System
This object specifies the playout system.
RTic User Manual- document version: 2.43 - 9
Page 10

5 RTic modes
5.1 Designer
Designer mode: switch to this mode when building projects.
In this mode, you can manually test grab data. To test grab, verify if the system object is connected. In
Designer mode, you need to connect manually to the playout server. Note that data is actually sent to
system.
5.2 Grabber Active
Playout mode: activates the RTic project.
In this mode, Events – and thus (automatic) data grabbing - are activated. In Grabber Active mode, RTic
automatically connects to the playout server(s) as specified in the System object(s). Projects cannot be
altered.
5.3 Off
Deactivates the RTic project. Events – and thus (automatic) data grabbing - are deactivated. In this mode,
you can manually test grab data. To test grab, verify if the system object is connected. Note that data is
actually sent to system. Projects cannot be altered.
5.4 Show content
Select this option to display the results of the last grab underneath objects.
RTic User Manual- document version: 2.43 - 10
Page 11

6 Multirecord sources
6.1 What is a multirecord source
Excel, CSV, SQL, XML-files, etcetera are multirecord sources. Information is structured and stored in
records. Each record describes an entity, for instance 'Title' or 'Artist'. Records contain parameters, also
referred to as fields, attributes, columns, tags, and so on, depending on the source. Each parameter
contains a value.
• In a Comma Separated Value (CSV) file, each record is terminated by the operating system's line
separator and the parameters within a record are separated by a separation character.
• In an Excel file, each row represents a record, columns represent parameters.
• In a text file, each separate line represents a record.
• In a XML-source, tags are used to define and structure nodes and records. Records or attributes
hold values.
6.2 The Record select object
Use mulitrecord objects in combination with a Record sel object. The Record sel object is used to:
• Select a range of records to grab from the source, for example grab records 10 to 20.
• Select a parameter to grab from the records selected in step 1, for example grab parameter
'Company' (from records 10 to 20).
6.3 Multirecord sources and scene parameters
Each multirecord source parameter is written to a separate scene parameter or story. If 20 parameters are
grabbed from a source, 20 consecutive scene parameters will be updated. A pitch (a step value between
consecutive scene parameters) can be defined.
Example Excel with 3 rows and 3 columns A,B,C:
- A B C
1
row1-columnA row1-columnB
2
row2-columnA row2-columnB
3
row3-columnA row3-columnB
row1-columnC
row2-columnC
row3-columnC
RTic User Manual- document version: 2.43 - 11
Page 12
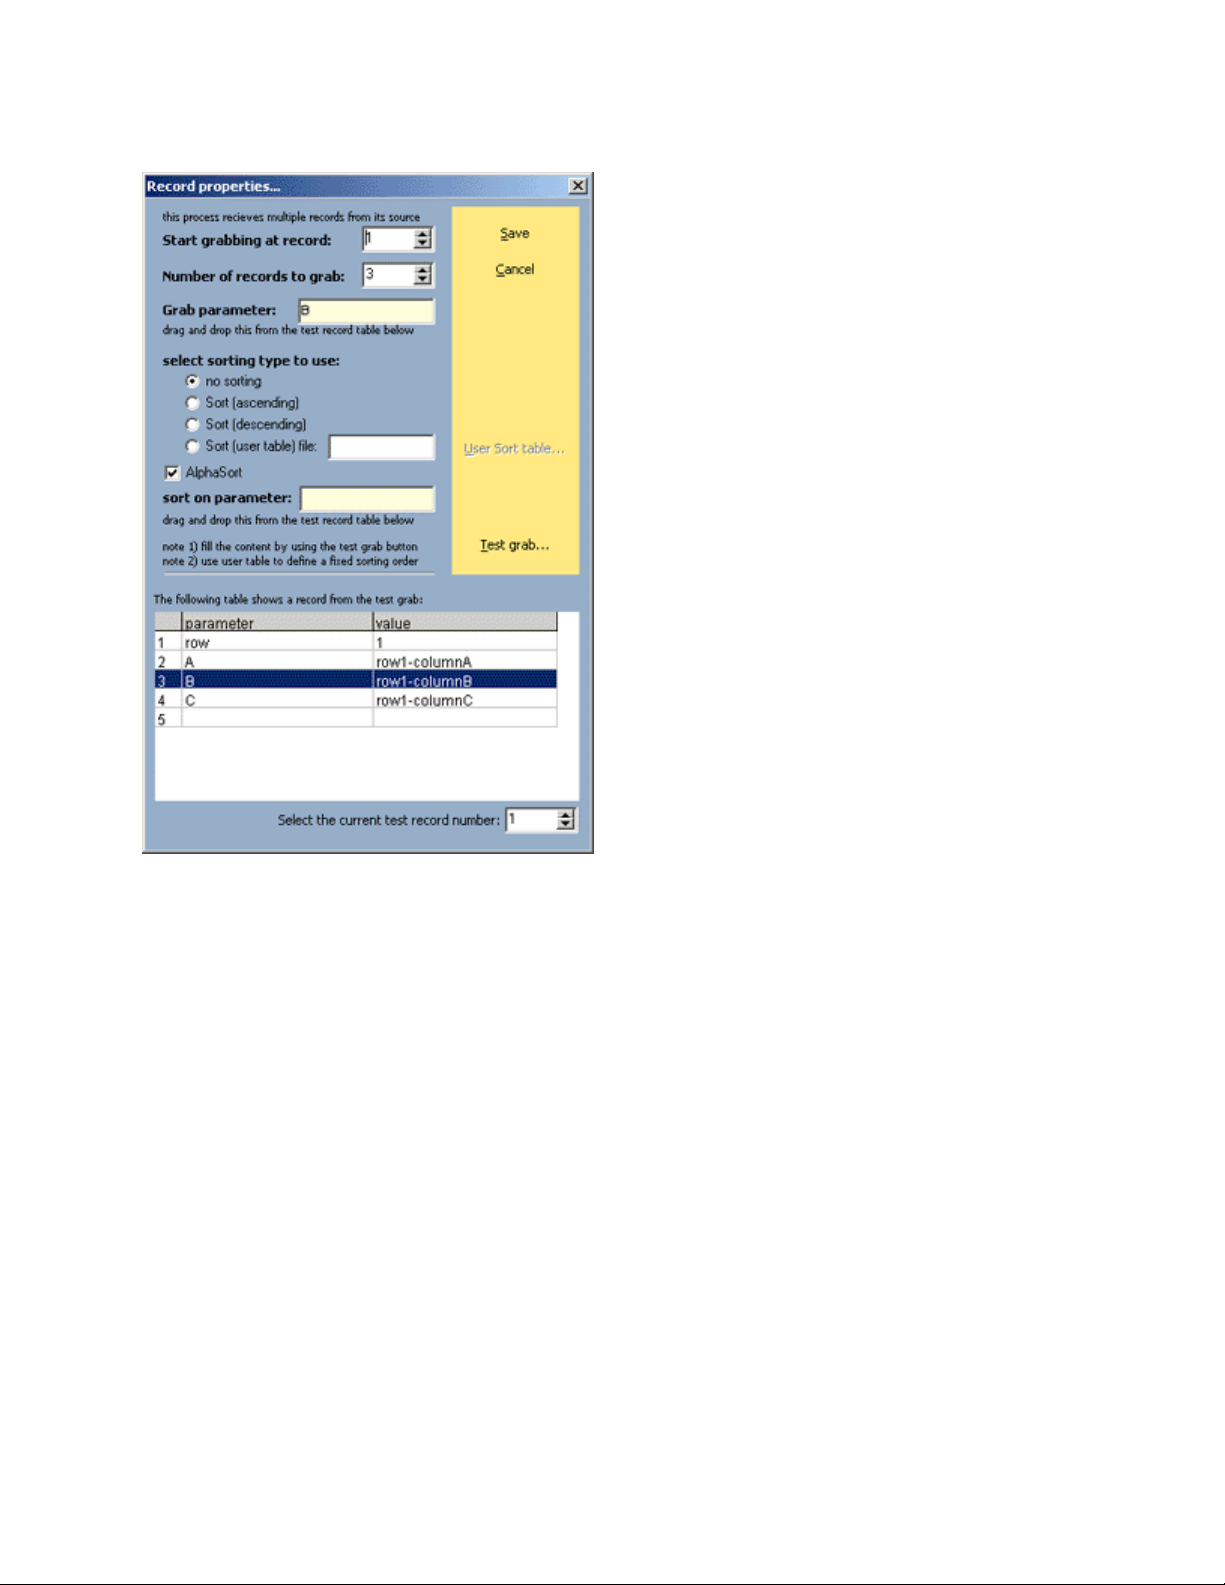
Example Record select object:
The test grab shows record 1, i.e. row 1.
This record contains 3 parameters, i.e. 3 columns.
The Record select object defines:
• records 1-3 will be grabbed; grabbing starts at record 1, the number of records to grab is 3
• from these 3 records, parameter, i.e. column B (the grab parameter), will be grabbed
RTic User Manual- document version: 2.43 - 12
Page 13
7 Starting RTic
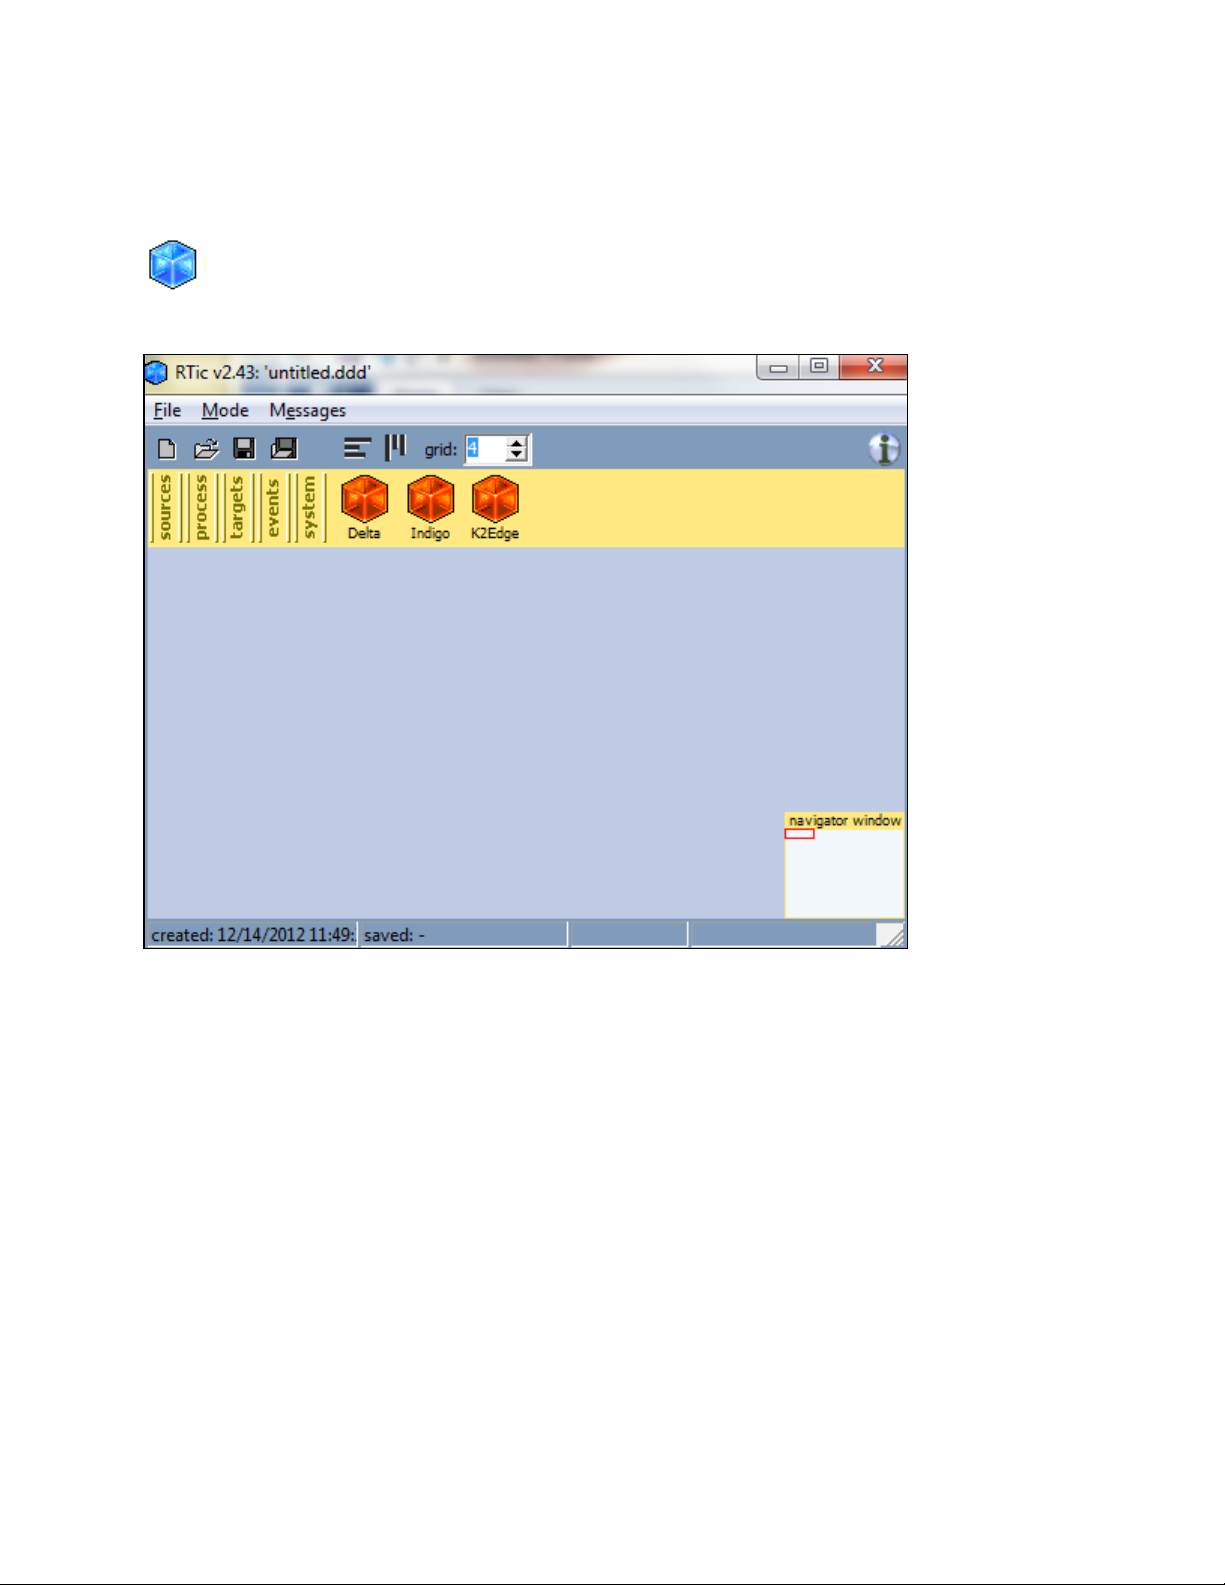
7.1 Starting RTic
To start RTic click the RTic icon on your desktop.
7.2 The RTic workspace
The RTic workspace consists of a menu and the Canvas. The project name is displayed in the upper left
corner. The project’s creation and last save date are shown in the bottom right corner. The navigator
window can be used to select a portion of the Canvas.
RTic User Manual- document version: 2.43 - 13
Page 14
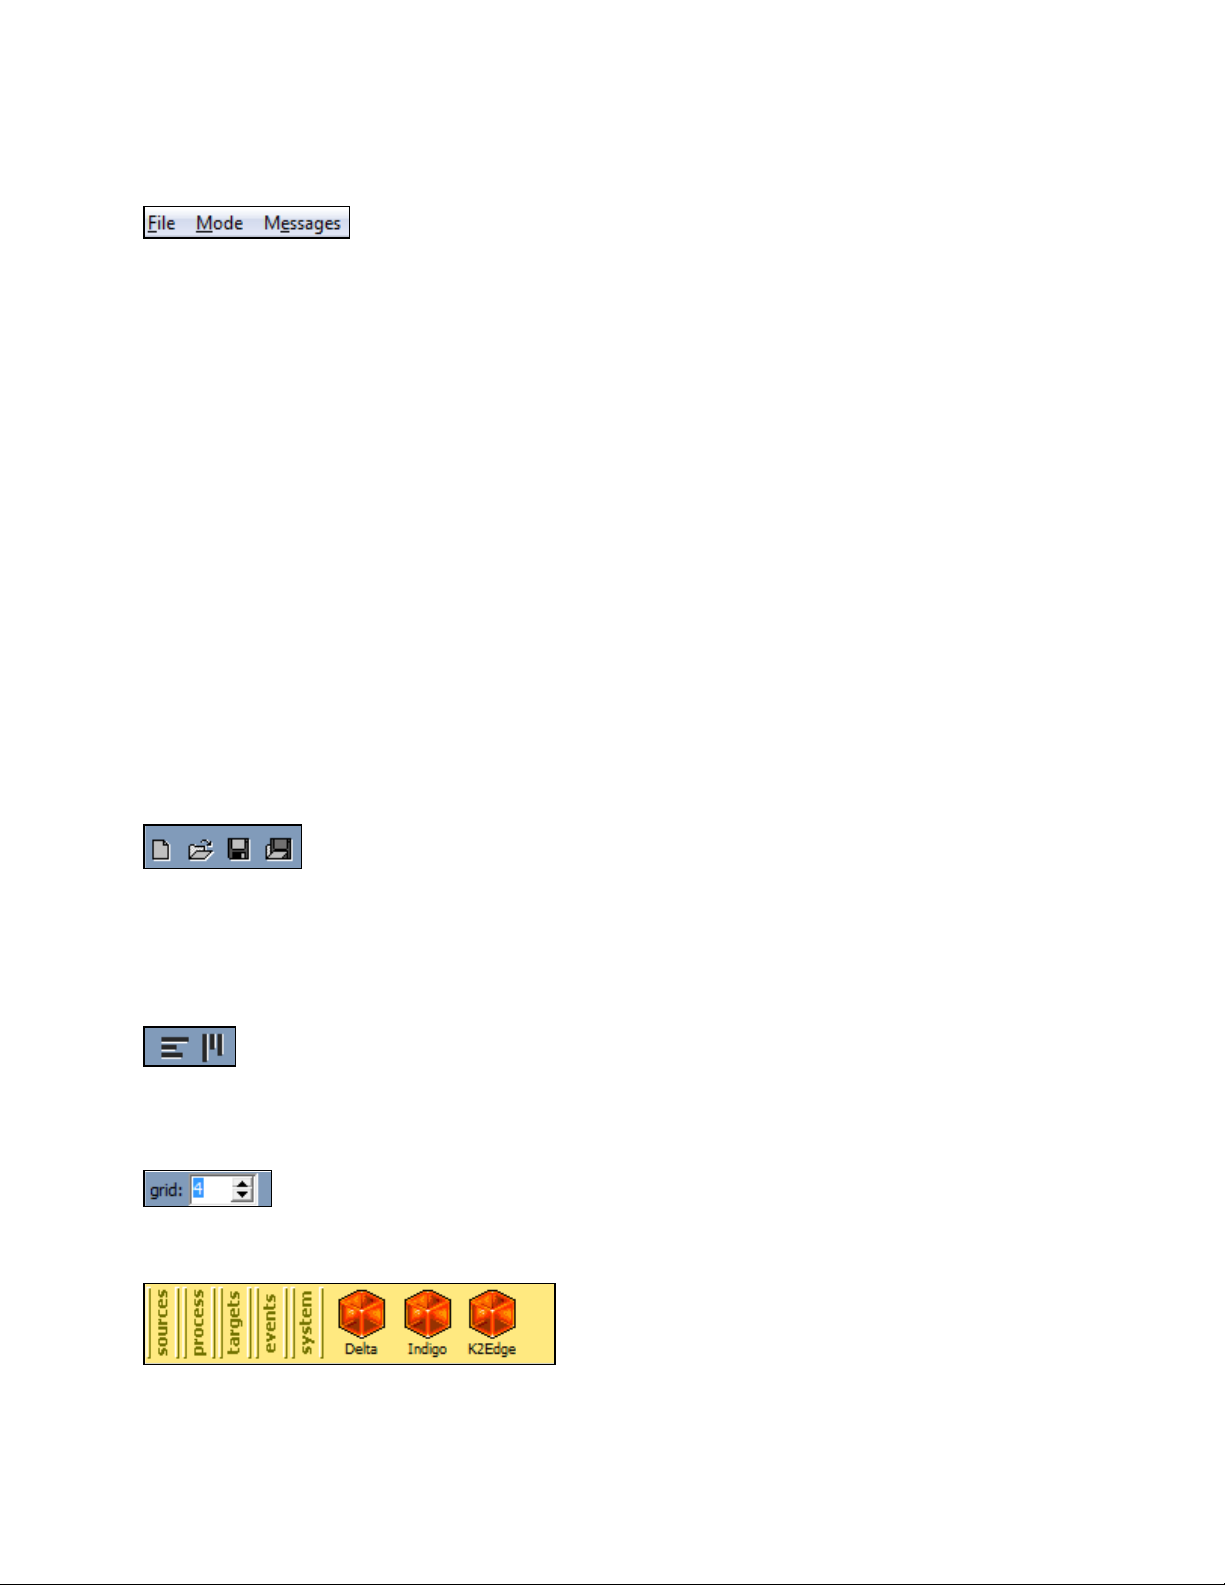
7.3 The RTic menu
File
• New
• Open
• Save
• Save as
• Set project as default Exit
Mode [see chapter 5 for an explanation]
• Off
• Grabber active
• Designer
• Show content
Messages
• Show Error log
• Clear Error log
• Show Message log
• Clear Message log
• New project
• Open project
• Save project
• Save as project
• Align objects horizontally
• Align objects vertically
• Specify a grid in pixels
• Categories and objects
RTic User Manual- document version: 2.43 - 14
Page 15
8 Working with objects
8.1 Adding Objects to the Canvas
To add an object to the Canvas, on the menu, first select the appropriate category, click the object you
want to add, and then click the Canvas.
8.2 Moving Objects on the Canvas
To move an object on the Canvas, select the object, and then move while keeping the mouse
pressed.
8.3 To link objects
Select the object.
Keep mouse pressed while dragging the object on top of target object.
8.4 To link a second object to an object (two inputs)
Select the object.
Keep the mouse and the [Shift]-key pressed while dragging the object on top of target object.
The second link is indicated by a yellow arrow.
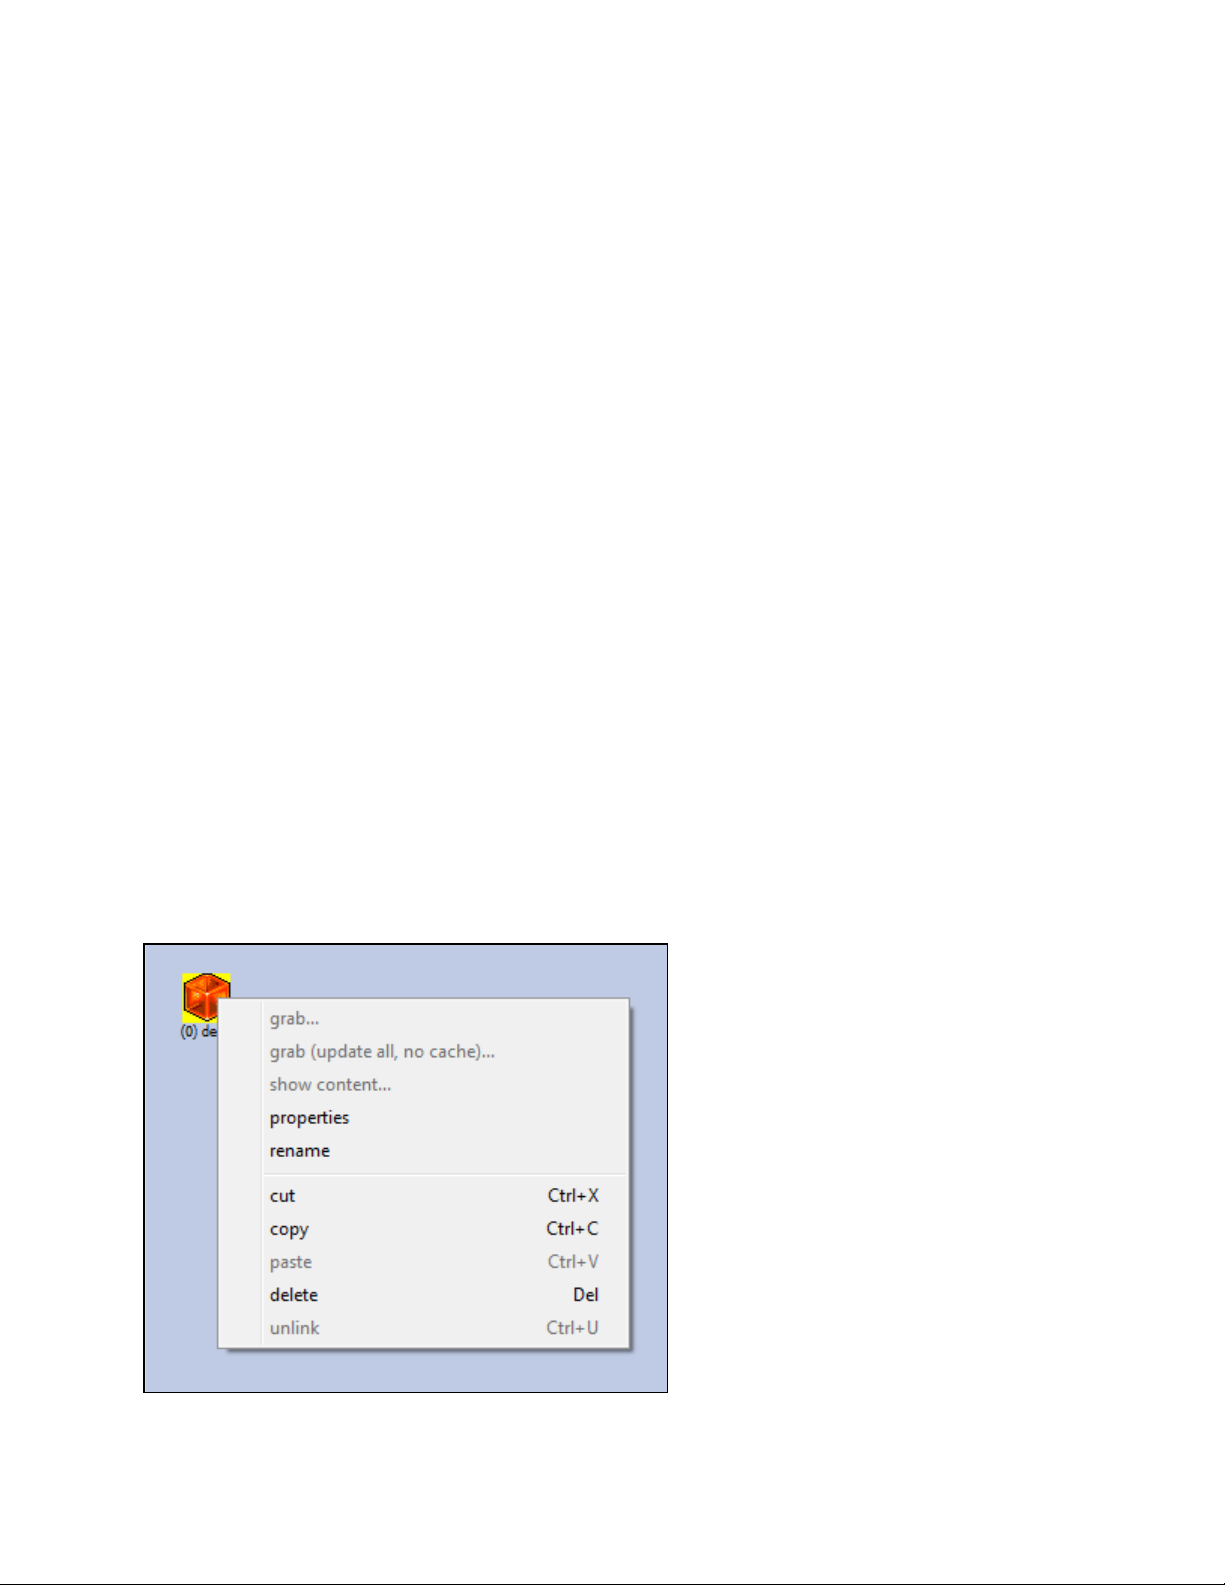
8.5 To unlink objects
Select the object.
Right-click > Unlink.
Example options when right-clicking an object.
RTic User Manual- document version: 2.43 - 15
Page 16

8.6 Cut, copy, paste, delete
To cut, copy, paste or delete an object, right-click the object, then select the appropriate option. You
can also use the Windows shortcuts and the [delete]-key.
8.7 Properties
To view an object’s properties, right-click the object, then select Properties.
8.8 Rename
To rename an object, right-click, then rename.
8.9 Grab, show content
To grab data or show content, right-click the object, then select the appropriate option.
RTic User Manual- document version: 2.43 - 16
Page 17

9 The Record Select Object how to
Use the Record Select object to specify which records and parameters (i.e. which fields, text lines,
columns, and so on) you want to grab from a multirecord source.
See chapter 6 for a brief explanation of multirecord sources.
Insert a Process > Record Sel object.
Drag the multirecord source on top of Record Sel object.
Double-click the Record Sel object to edit:
Specify the first record you want to grab, for example start grabbing at record 5.
Specify the number of records you want to grab.
Click the Test grab button.
The record table shows the first record from the multirecord source.
To scroll through records, change the record number in the bottom right corner.
In the record table, select the parameter you want to grab.
Drag this parameter into the Grab parameter field while keeping the mouse pressed.
If applicable, select a sorting order in which the Record select object’s output will be written to the
scene parameters:
o no sorting
o Sort (ascending)
o Sort (descending)
o Sort (user table) file: click to use a Table object to define the sorting order.
o AlphaSort: click to sort in alphabetical order. If this option is not checked, values are sorted in
numerical order.
You can optionally specify a parameter to sort on by dragging this parameter from the record table
into the sort on parameter box.
Click Save to save the selection.
To test grab output of the Record select object, link the Record select object to a target and use the
target's Test grab option.
Each parameter (value) is written to a separate scene parameter. For example, if 10 record parameters
are grabbed, 10 consecutive scene parameters are updated, also if parameters are empty. A pitch can be
defined.
RTic User Manual- document version: 2.43 - 17
Page 18

10 The Channel Composer Ticker Object how to
Use this object to update a Channel Composer Ticker.
The ticker data flow is defined in RTic: the data source, processing and data grabbing.
Ticker templates (to place the ticker on-screen, set and clear ticker stories) are defined in Channel
Composer.
10.1 Workflow
In RTic, the steps for defining a Ticker are:
• Add a System object.
• Add a Ticker Target object.
This object specifies the ticker’s playout Channel, ticker number and the story mode (for example:
a triple part story ticker with a TGA).
• Link the Ticker to the System object. This object specifies the playout system.
• Add and link a Source object to the Ticker.
Ticker stories will be grabbed from this object.
• If applicable, add Process objects to process the data grabbed from the Source.
• Link an Event to the Ticker to control data grabbing.
The steps for defining a Ticker in Channel Composer are:
• Create a Template to place the Ticker on-screen.
• Create a Template to set ticker stories.
• Create a Template to clear ticker stories.
Example Templates for tickers can be found in Channel Composer under File > Example Projects >
RTic Ticker.
The Channel Composer User Manual explains how to create tickers in Channel Composer.
RTic User Manual- document version: 2.43 - 18
Page 19
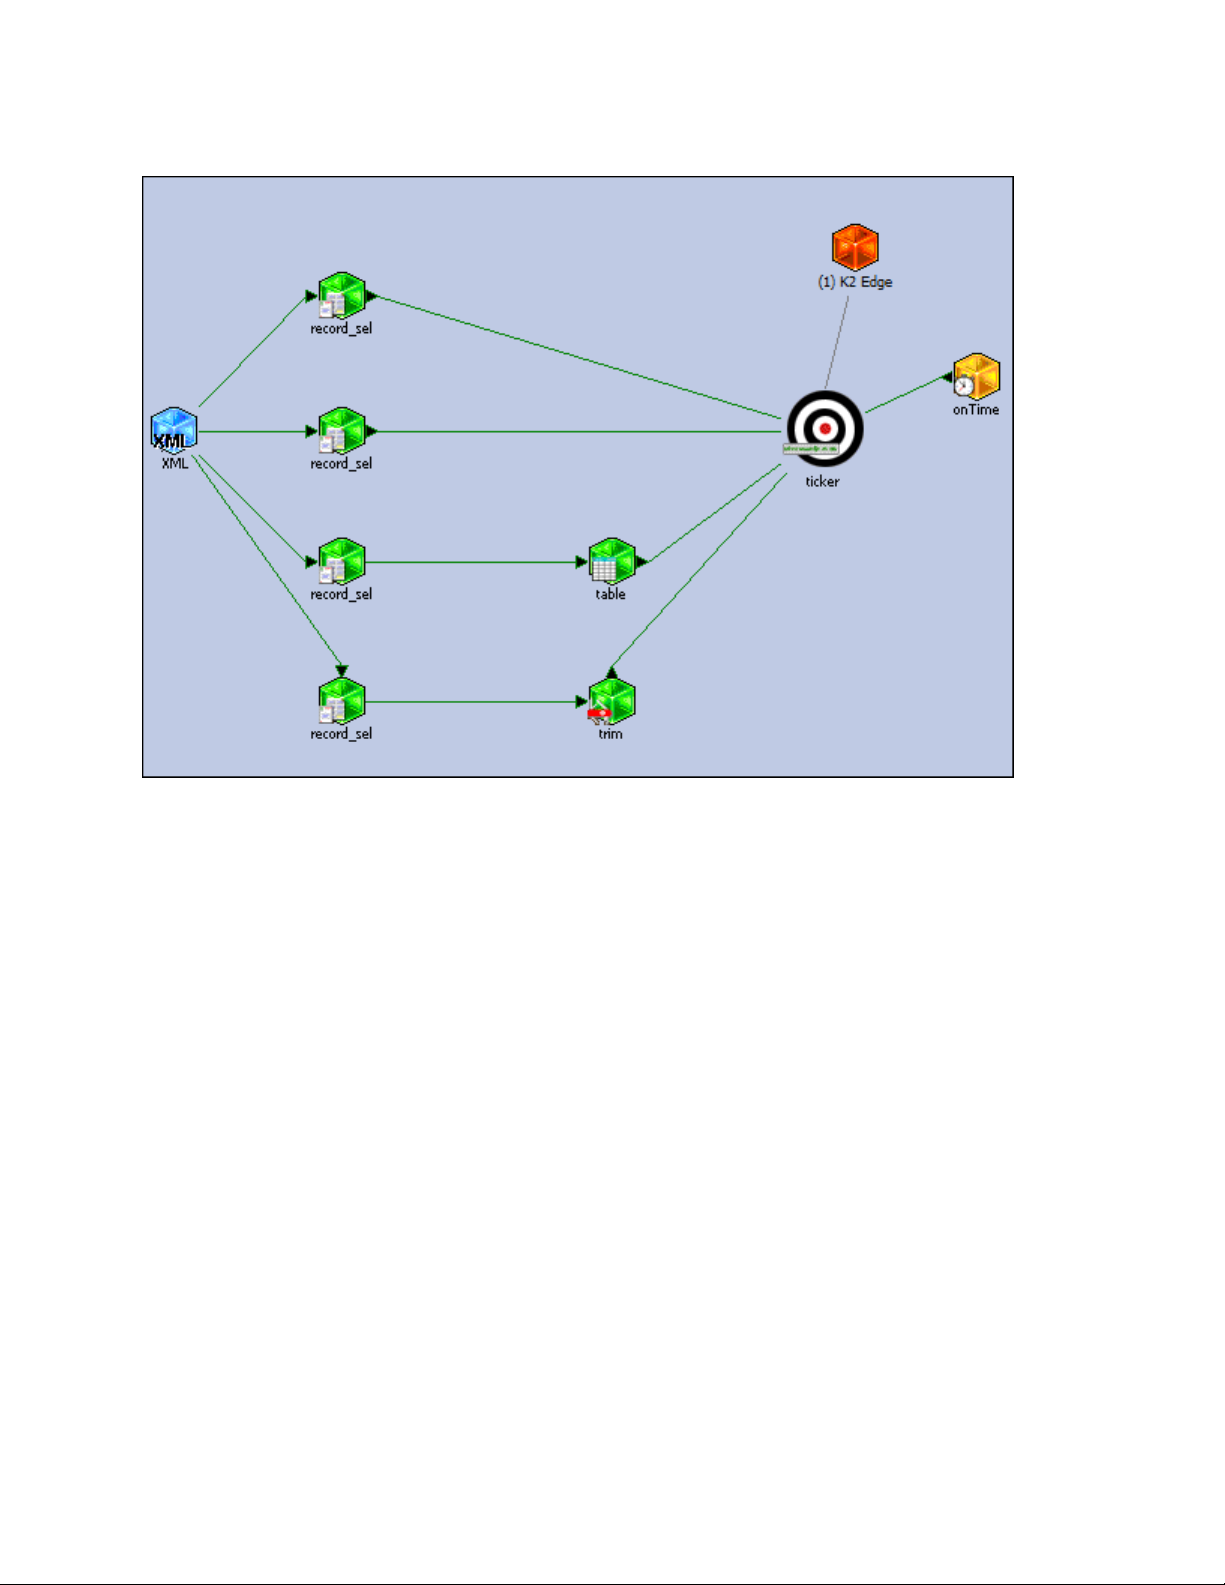
10.2 Example RTic ticker data flow
Explanation:
• The Ticker object specifies the playout Channel, Ticker number and story mode. In this example:
a triple story ticker with a TGA.
• Stories are grabbed from a multirecord XML-source. Record select objects are used to select
fields from this source and update the story parts 1, 2, 3. The ticker_ani scene parameter is
updated with the TGA-filename.
• Trim and Table objects are used to edit and replace text strings.
• The onTime Event updates the Ticker (grabs stories) at a predefined interval.
• The System object links the ticker to the playout system.
RTic User Manual- document version: 2.43 - 19
Page 20

Tickers and multirecord sources
When working with more than one ticker story, you will probably use a multirecord source to feed the
stories [see also the example above]. The Record select object specifies the first and the number of
records to grab from the source, plus the grab parameter (which column).
Each parameter (value) is written to a separate story part. For example, if 10 record parameters are
grabbed, in 10 consecutive stories part 1 is updated, also if parameters are empty. A pitch can be defined.
When linking the Record select and the Ticker objects, you define to which part of the Ticker the
parameters are written: part 1, 2, 3 or the TGA/ANI.
Define a Record select object for each story part, as shown in the example in paragraph 10.2. When
working with a single story mode Ticker, you only need to de fine one Record select object and write
stories to part 1. Example showing two Record select used to update story parts 1 and 2:
RTic User Manual- document version: 2.43 - 20
Page 21

This Record select object grabs column 5 (name) from a CSV-file. 20 records (rows) will be grabbed
starting from record 2. 20 consecutive stories will be updated.
Note that the example shows row 1 from the CSV-file’s grabbed data, which is the file header.
The Ticker Story properties window defines that story part 1 will be updated with the output from the
Record select object.
This means that part 1 from 20 consecutive stories, starting story 0, will be updated with info from the
name column.
RTic User Manual- document version: 2.43 - 21
Page 22

This Recold select object grabs column 10 (title) from a CSV-file. 20 records (rows) will be grabbed,
starting from record 2. This means that 20 consecutive stories will be updated.
RTic User Manual- document version: 2.43 - 22
Page 23

The Ticker Story properties window defines that story part 2 will be updated with the output from the
Record select object.
This means that part 2 from 20 consecutive stories, starting story 0, will be updated with info from the
name column.
This picture shows the Ticker object after a test grab, with input from four Record select objects (IDs 6, 7,
8 and 9) updating story part 1 with the artist name, story part 2 with the track title and story part 3 with the
album name. The TGA-value is updated with the graphic player ID as defined in Channel Composer, here
‘1’.
In this example, all values are grabbed from (different columns in) the same CVS-file.
RTic User Manual- document version: 2.43 - 23
Page 24

10.3 How to
You can include TGAs and ANIs in your tickers. To do so:
In Channel Composer, graphic Players are defined in the Ticker property page. Add the Still or ANI file
as a fixed Asset to the Channel pack.
In RTic select a story mode that includes a TGA (or ANI). Update the TGA (or ANI)-field with the
Player ID, as shown in the example below.
Channels, tickers and stories are numbered starting from 0.
Insert a Targets > Channel Composer Ticker Object.
Link the appropriate System object to the Ticker target.
Link the appropriate Event object to the Ticker target.
Double-click the Ticker object to edit.
In the Ticker on layer box, select the Channel and ticker number.
Select a Ticker story mode (single story mode, triple story with TGA or ANI, etcetera).
If appropriate, check the Cache stories option.
Click Save to save the ticker, click Cancel to discard.
To link Sources (and Process objects) to a Ticker:
Link the appropriate Source (or Process) object(s) to the Ticker Object.
Linking a Source or Process object to the Ticker object will open the Ticker Story properties window.
Here you select:
Story part: the story part you want to update: part-1/part-2/part-3/TGA or ANI.
Note that the Ticker object defines the Ticker story mode. For single stories, select part-1
here.
start story number: the (first) story number you want to update
pitch: if applicable, select a step value between consecutive stories (only applies when
grabbing stories from a multirecord source).
Click Save to save input properties, Cancel to discard.
The number of tickers that can be played out per Channel depends on your K2 Edge license.
RTic User Manual- document version: 2.43 - 24
Page 25

Example.
Stories overview:
• num: index
• story: a story number (256 max)
• type: story part 1/2/3/TGA (depending on ticker mode)
• id: object ID of the data source
• source: name of the data source
• value: data grabbed from the source.
• updated: date and time of the last update.
View grabbed data
Double-click a value field to view grabbed data.
Grab sources
Use the Grab sources option to test incoming data. Note that the System object must be connected and
that data is actually sent to the system.
Clear strings
Use the clear strings option to clear values when testing.
RTic User Manual- document version: 2.43 - 25
Page 26

Example Ticker Story properties window.
The Ticker Story properties window automatically opens when linking an object to the Ticker object. You
can also open and edit this window by double-clicking a story in the Channel Composer Ticker properties
window.
RTic User Manual- document version: 2.43 - 26
Page 27

11 The Channel Composer Template Object how to
Use this object to start a Channel Composer template, and update the scene parameters in this template.
Insert a Targets > Channel Composer Template object.
If not already inserted, insert a System > K2 Edge System object.
Configure and connect the system and Channel on which templates are stored.
Link the appropriate System object to the Template object.
Click the load template icon to list the templates available on the connected playout system and
Channel. RTic will list all the available Templates from the active Channel Pack.
In the templates box, select a template.
Select a start mode for the template:
o start template at every grab
o do not start template automatically
o start template when grab results in changed data
o remote controlled
Click Save to save changes, click Cancel to discard.
To link sources to the scene parameters in a template:
Link the appropriate Source (or if applicable Process) object(s) to the Template object.
A dropdown menu that lists the template’s available scene parameters opens.
Select the scene parameter you want to update.
Leave the layer value at the default. This value is included for backwards compatibility.
Click Save to save settings, Cancel to discard.
Example link to Source.
RTic User Manual- document version: 2.43 - 27
Page 28

Example. Note how the scene parameters window lists the scene parameters included in the selected
Template.
RTic User Manual- document version: 2.43 - 28
Page 29

Scene parameters overview:
• chan: the channel number
• name: the scene parameter name
• type: the type of input field read from the template
• id: object ID of the data source
• source: name of the data source
• value: data grabbed from the source.
• updated: date and time of the last update.
View grabbed data
Double-click a value column field to view grabbed data.
View link data
Double-click a source column field to view the link sources dialog window.
Grab sources
Use the Grab sources option to test incoming data. Note that the System object must be connected and
that grabbed data is actually sent to the system.
Clear strings
Use this option to clear values when testing.
RTic User Manual- document version: 2.43 - 29
Page 30

12 The K2 Edge Object how to
Use this object to specify a K2 Edge playout system.
To define the system and connect:
Insert the System > K2 Edge object.
Double-click to edit.
Enter the playout server’s IP-address.
Enter the IP-socket, the default port is 5000.
Specify the playout Channel number. Channels are numbered starting from 0.
You do not have to specify the number of layers, leave at the default.
Click Connect to connect.
The status bar turns green.
Click Save to save the connection, Cancel to discard.
To link a System object, drag the System object on top of the other object and not vice versa.
Example. The system is connected.
To link a System object, drag the System object on top of the other object and not vice versa.
RTic User Manual- document version: 2.43 - 30
Page 31

13 The Scenepar Object
Use this object to update a scene parameter (whitout starting the template).
Insert a Targets > Scenepar object.
If not already inserted, add a System > K2 Edge System object.
Specify and connect to the system and Channel on which templates are stored.
Link the System object to the Scenepar object.
Click the Get Scenepars icon to load the scene parameters available on the selected system and
Channel. RTic will list the scene parameters from the active Channel Pack.
To link scene parameters and sources:
Link the appropriate Source (or if applicable Process) objects to the Scenepar object.
A dropdown menu that lists available scene parameters opens.
Select a scene parameter.
Leave the layer value at the default. This value is included for backwards compatibility.
Optionally select one of these options:
o update in use scenepars only (and do not clear all scenepars before grab): only used
scene parameters
o force clear all scenepars before grab: all scene parameters are cleared before a grab
Click Save to save settings, Cancel to discard.
RTic User Manual- document version: 2.43 - 31
Page 32

Example.Note how the Template window lists the Template(s) the selected scene parameter is in.
Scene parameters overview:
• chan: the channel number
• name: the scene parameter name
• type: the type of input field read from the template
• id: object ID of the data source
• source: name of the data source
• value: data grabbed from the source.
• updated: date and time of the last update.
View grabbed data
Double-click a value field to view grabbed data.
Grab sources
Use the Grab sources option to test incoming data. Note that the System object must be connected and
that data is actually sent to the system.
Clear strings
Use the clear strings option to clear values when testing.
RTic User Manual- document version: 2.43 - 32
Page 33

14 Events how to
In RTic, switch to Grabber active mode to test.
14.1 Inserting and linking Events and Targets
Open the Events menu.
Insert the appropriate Event object.
Drag the Event on the Target object to link.
14.2 Trigger onSocket Event via socket
In RTic, rename the Event object: right-click the object > rename to <Event_name>.
To trigger the Event, send a trigger via a connected socket on port 5005: EVENT <Event_name>
Example command to trigger event "Event_name": ./ptsockcl 192.168.7.9 5005 "EVENT
Event_name"
• IP: the RTic workstation’s IP-address
• port 5005: the default RTic listen port
Quotes are used to send the EVENT command as a single argument.
14.3 Toggle onTime Event via socket
• In RTic, rename the onTime object: right-click the object > rename to <Timer_name>.
• To trigger the Event, send a trigger via a connected socket on port 5005: TIMER <Timer_name>
[on/off/toggle]
Example command to start event "ontime":
./ptsockcl 192.168.7.9 5005 "TIMER ontime on"
• IP: the RTic workstation’s IP-address
• port 5005: the default RTic listen port
Quotes are used to send the EVENT command as a single argument.
Quotes are used to send the EVENT command as a single argument.
RTic User Manual- document version: 2.43 - 33
Page 34

15 Decisions how to
15.1 Defining a decision
Use the Process > Decision object to specify a decision string: if the string is matched, data is passed.
Insert two Source or Process objects:
1. the first object outputs the data you want to send to the target
2. the second object outputs the decision string
Insert a Process > Decision object.
Link the objects inserted in the first step to the Decision object. Make sure to link the object that sends
the decision parameter second in order (yellow arrow).
Double-click the Decision object to edit.
In the Decision parameter box, enter the decision string.
Click Save, then close object.
15.2 Reversing the decision
To reverse the decision – i.e. only pass data if the decision string is not matched - check the Decision
object's Inverse box.
15.3 Comparing sources 1 and 2
To compare sources 1 and 2 (only pass data if output from sources 1 and 2 is the same) leave the
Decision parameter box empty.
RTic User Manual- document version: 2.43 - 34
Page 35

16 Text how to
16.1 Replacing, removing, adding and converting strings
You can replace, remove, add and convert characters with the Process > Trim and Table objects.
Open the Process menu > insert a Trim or Table object.
Double-click to edit.
Link to the appropriate Sources.
16.2 Adding two text strings together
Insert the Process > Add object.
Link two text Source or Process objects to the Add object.
Output from the object that is linked second in order (yellow arrow) is placed behind output from the
first object. To reverse this order, check the reverse add box.
16.3 Word wrap
Insert a Process wWrap2us object.
Drag a text Source or Process object on the wWrap2us object to link.
The wWrap2us object automatically writes separate text lines to separate scene parameters and can be
used without Record select object.
Multirecord
Text lines are processed as separate records.
To work with multi language/special signs, use unicode encoded sources.
Unicode
To ensure that complex script and right-to-left languages are shown correctly in RTic and later (unicode
version), the following options should be enabled on the PC running the RTic
Start > Settings > Control panel > Regional and language options > Languages > Supplemental
language support.
Enable options:
• Install files for complex script and right to left languages
• Install files for East Asian languages
client:
RTic User Manual- document version: 2.43 - 35
Page 36

17 Pictures: How to
It is advised to use TGA-files as source.
Grab the name of the TGA-file(s) from a single or multirecord object.
Note that the file name must include the file extension (.tga).
If applicable, add a Process object to edit the file name. Link the Source and Process objects.
Add a Local TGA object.
Link the Local TGA object and the object that outputs the file name(s).
Double-click the TGA object.
Specify a directory (local) to grab file(s) from.
Adding TGAs together from 2 sources:
Insert an Add TGA object.
Specify the TGA file(s) as described above and link the two flows to the Add TGA object.
The first flow (green link) is placed at the bottom and determines the maximum width and height.
Notes
• The Local Add object automatically renames the TGA-files.
• The Add TGA object can be preceded by a Local TGA object, Add TGA object or Graph object.
Adding TGAs together from one multisource
Insert the multisource object and specify the TGA-files as described above. Grab multiple records
from the multisource.
Insert an Add TGA object.
Link the flow to the Add TGA object.
The first record is placed at the bottom and determines the maximum width and height.
Note
The Test Add option does not work in combination with multisource objects.
Picture conversion
Converts a BMP to TGA, or vice versa. If applicable, modify alpha and sharpness.
First specify the source file: path and filename.
o Use a (manual) source object to specify the file path and name.
(Note that you can also use the Local TGA object to specify the path, you can use the Add
TGA object to specify the filename.)
o If applicable, process the source using an object such as the Trim object.
Insert and link a PICconv object.
Double-click the PICconv object to edit.
Specify the target format and filename. Make sure to specify the target format file extension.
If appropriate, modify alpha and sharpness.
RTic User Manual- document version: 2.43 - 36
Page 37

Example: Adding TGAs together from 2 sources
• In this example the name of 2 TGAs (without file extension) is grabbed from an XML-source.
• The Record select object is used to select the appropriate record and parameter.
• The Table and Trim objects are used to add the file extension .tga.
• The Add object adds the 2 TGAs together. The yellow link indicates the "second' object. This object
(i.e. file) is placed on top.
• Output is sent to a scene parameter.
RTic User Manual- document version: 2.43 - 37
Page 38

18 XML how to
18.1 Specifying a XML-source
Insert a Sources > XML object.
Double-click the object to edit.
18.2 Selecting records from the XML-source
Double-click the XML-object to edit.
Click Select Records.
The XML-record selector opens. This window shows the structure and content of the XML-source.
Click the + and _ signs to collapse and expand the XML-nodes.
In the left window, select the top node.
In the center window, select a record.
The right window lists the selected record(s).
Click Save to save the selection.
Click Test grab to test grab the selection.
18.3 Linking the XML-object and Record select object
Drag the XML-object on top of a Record select object to link. Then use the Record select object to
select record(s) and parameters.
Note that it is advised not to use special strings in XML-sources to avoid translation to a special character
sequence.
RTic User Manual- document version: 2.43 - 38
Page 39

19 SQL how to
• Insert a Process > ADOSQL object.
• Double-click the object to edit.
• In the ODBC source box, select the ODBC Source.
If not listed in the dropdown menu, first specify a source via Start > Settings Administrative tools >
Data sources (ODBC) or another tool.
• If applicable, specify a user and password for database.
• Specify a query. The query can be:
• Fixed
Define a query in the ADOSQL object.
• Dynamic
The ADOSQL object defines a query with dynamic references ($1, $2, etcetera). Values are
grabbed from a different source that is linked to the ADOSQL object. Specify the separation
sign that separates the values (if more than one) in the Separator string box.
Example:
• The ADOSQL object defines the query: select * from $1 where $2='$3'
• The separator string is: ,
• Input for the query is grabbed from another source.
• Input is: Employee, Department, IT
• Resulting in query: grab all from table Employee where Department=IT
Quotes
Note that for some database types (references to) text strings in queries must be enclosed in (single)
quotes.
Test grab
Always test grab to test the query.
RTic User Manual- document version: 2.43 - 39
Page 40

20 RTic objects Quick Reference
20.1 Channel Composer Ticker Object
See chapter 10 for an explanation.
20.2 Channel Composer Template Object
See chapter 11 for an explanation.
20.3 K2 Edge Object
See chapter 12 for an explanation.
20.4 Scenepar Object
See chapter 13 for an explanation.
20.5 Record sel Object
Type
Process; Record sel Object
Explanation
Use this object to specify the (range of) record(s) and parameters to grab data from.
Properties
• Start grabbing at record: define the first record to start grabbing data from
• Number of records to grab: define the number of records to grab data from
• Grab parameter: select a parameter (attribute/tag) to grab data from: drag and drop from the record
test table
• Select sorting type to use: specify a sorting order for record test table (optional)
o no sorting
o Sort (ascending)
o Sort (descending)
o Sort (user table file)
o Alpha sort: sort in alphabetical order
• Sort on parameter: optional, select a parameter (other than the grab parameter) to sort on
• Record test table: shows an example record, the default is 1. A record number can be selected in
the bottom right corner [Select current test record number]. Fill this table using the Test grab
button.
RTic User Manual- document version: 2.43 - 40
Page 41

20.6 onTime Object
Type
Events; onTime Object
Explanation
Use this object to generate a timed Event.
Properties
• Update every: specify interval in seconds
• Update only in period: check to specify a period
• Toggle: toggle Event on/off
• Reset counter: reset the counter
Toggle
This Event can be toggled on/off via a socket.
20.7 onFileDate Object
Type
Events; onFileDate Object
Explanation
This object generates an Event when a specified file's Save date changes.
Properties
• File to check: specify the file name and location.
20.8 onSocket Object
Type
Events; onSocket Object
Explanation
Use this object to generate Events via a socket (port 5005).
Properties
n/a
Use the Simulate Event button to test or manually trigger functionality.
RTic User Manual- document version: 2.43 - 41
Page 42

20.9 Add TGA Object
Type
Process; Add TGA Object
Explanation
Use this object to merge TGAs and display the graphics on top of each other.
Test Add
Use the Test Add option in the properties window to test the merge.
20.10 Add Object
Type
Process; Add Object
Explanation
Use this object to combine two text strings (sources).
Properties
• reverse add: check this box to reverse the strings’ playout order
Combining Add objects
Multiple Add objects can be linked to combine more than two strings.
Playout order
The yellow link (to the Add object) indicates the string that is second in playout order.
20.11 Color Object
Type
Process; Color Object
Explanation
Use this object to specify a color for text strings.
Properties
• default color: check this box to specify a default color for strings and select a default color
• conditional color: if applicable, specify a string and select the color to apply if this string is matched
• maximum saturation: specify the maximum saturation percentage, the default is 70%
RTic User Manual- document version: 2.43 - 42
Page 43

20.12 Decision Object
Type
Process; Decision Object
Explanation
Use this object to define a decision: if the string is matched, data is passed through.
Properties
• Decision parameter: specify a string or character; if matched, data is passed
• Inverse: check this box to inverse the condition: if the string or character is not matched, data is
passed
20.13 Float Object
Type
Process; Float Object
Explanation
Use this object to perform calculations on data (floats).
Properties
• multiplication object: specify a multiplication factor
• division factor: specify a division factor
• number of leading zeros: specify the number of digits to display
• thousands grouping sign: specify a thousands grouping sign to display
• decimal separation: specify a decimal separation symbol to display
• number of decimals: specify the number of decimals to display
20.14 Graph Object
Type
Process; Graph Object
Explanation
Use this object to translate data to a line or bar graph.
Properties
• Graph name: (optional) specify a name, the name will be displayed in graph
• Graph split mode: select how to render the graph; line and/or background and/or grid and/or labels
• Graph type: select a type; line or bar graph
o total picture width, in pixels
o total picture height, in pixels
o graph width, in pixels
o graph height, in pixels
• Background TGA file: select a TGA-file to be used as background. Note that the background
option should be selected for Graph split mode.
RTic User Manual- document version: 2.43 - 43
Page 44

• Brush TGA file: select a TGA-file to be used as brush for drawing lines. For bar graphs, this should
be a 100% bar.
• Legend font: select a TTF-font and specify the font size for the graph name. The TTF-font file must
be located on the workstation.
o legend x-position: position of the legend within the graph in pixels, relative to the upper
left corner
o legend y-position: position of the legend within the graph in pixels, relative to the upper
left corner
• Label font: select a TTF-font and specify a font size for the label. The TTF-font file must be located
on the RTic workstation.
• Horizontal axis: drag and drop a parameter from the record table
• Advanced settings: click this button for advanced options
• Vertical axis: drag and drop a parameter from the record table
• Advanced settings: click this button for advanced options
• Optional 2nd output file: (optional) specify the location and filename to create a 2nd output file
• Generate Graph: click to generate the graph
Note
The Graph object is not part of the standard RTic-installation.
Test Grab
Use the Test grab option to test incoming data and to fill the record table.
Local files (LAN)
Preferably use a local font and picture files (background and brush) to enhance render times.
20.15 Integer Object
Type
Process; Integer Object
Explanation
Use this object to perform calculations on data (integers).
Properties
• multiplication object: specify a multiplication factor
• division factor: specify a division factor
• number of leading zeros: specify the number of digits
• thousands grouping sign: specify a thousands grouping sign
RTic User Manual- document version: 2.43 - 44
Page 45

20.16 Local TGA Object
Type
Process; Local TGA Object
Explanation
Use this object to specify the local pictures directory (path).
Properties
• Local TGA directory: specify the local pictures (TGA) directory
20.17 PICconv Object
Type
Process; PICconv Object
Explanation
Use this object to scale and/or adjust sharpness and/or convert a picture file to a BMP-file or TGA-file. The
PICconv object can convert a broad variety of formats, including:
• JPG
• TIF
• GIF
• ICO
• PSD
Properties
• target format: select and output format
o BMP (for files without transparency)
o TGA (for files with transparency)
o target filename: specify the target filename, including extension
• target picture width: specify width, in pixels
• target picture height: specify height, in pixels
• fill alpha: check this box to replace transparency with opaque (for TGAs only)
• soft/sharp: check this box and specify softness/sharpness (for TGAs only)
Aspect ratio
The aspect ratio of the source is not automatically constrained.
RTic User Manual- document version: 2.43 - 45
Page 46

20.18 Tab Object
Type
Process; Color Object
Explanation
Use this object to insert a tab in front of a string.
Properties
• horizontal TAB position in pixels: specify the horizontal tab position, in pixels
20.19 Table Object
Type
Process; Table Object
Explanation
Use this object to replace (a) predefined text string(s) with another string.
RTic User Manual- document version: 2.43 - 46
Page 47

Properties
• Table: up to 50 strings (each string can be a number of words) can be defined. The input string is
replaced by the output string.
• Case sensitive: check this box for a case sensitive comparison
• Trim leading/trailing: check this box to remove leading spaces, trailing spaces and control
characters
• Use as value table: if checked, values (floats) in the column 'input string' are handled as a range of
increasing values
• Save to file: save the table to a file (*.tab)
• Open from file: open a table file (*.tab)
• Clear table: click to clear the table
• Clear line: click to clear a selected line
20.20 TEXTlen Object
Type
Process; TEXTlen Object
Explanation
Use this object to apply a string length or number of lines as a condition for passing through text to the
target.
Properties
• line length test: check this box to enable this condition
• text longer or equal to: specify a minimum text length (spaces included)
• and text shorter or equal to: specify a maximum text length (spaces included)
• number of lines test: check this box to enable this condition
• number of lines greater or equal to: specify a minimum number of lines
• and number of lines smaller or equal to: specify a maximum number of lines
20.21 Trim Object
Type
Process; Trim Object
Explanation
Use this object to trim data.
Properties
• replace control characters: check this box to replace control characters with a space
• remove control characters: check this box to remove control characters
• remove double spaces: check this box to remove all double spaces in the data
• chars to replace: specify characters (without a space in between) you want to replace with a space
• chars to remove: specify characters (without a space in between) to be removed
• use trimming values: check this box to enable, parameters below can be combined:
RTic User Manual- document version: 2.43 - 47
Page 48

o chars to remove from end: specify the number of chars to remove from the end of the
string (spaces included)
o chars to remove from start: specify the number of chars to remove from the start of the
string (spaces included)
o maximum number of chars: specify the maximum number of characters in the string (from
start, spaces included). Characters exceeding this limit are removed.
• convert to lower case: check this box to convert a string to lower case
• convert to uppercase: check this box to convert a string to upper case
• capitalize: check this box to convert the first character of a string to upper case, other characters to
lower case
• leading string: specify the characters or text to put in front of the string
• trailing string: specify the characters or text to add to the end of the string
20.22 Wordwrap Object
Type
Process; Wordwrap Object
Explanation
Use this object to wrap text. Specify the maximum number of characters per line (spaces included). When
this limit is exceeded, the text is wrapped.
Properties
• word wrap in characters: specify the maximum number of characters allowed per line.
20.23 wWrap2us Object
Type
Process; wWrap2us Object
Explanation
Use this object to wrap text. Specify a maximum number of characters per line (spaces included). When
this limit is exceeded, the text is wrapped. The Wordwrap object must always be used in combination with
a Record sel object.
Properties
• word wrap in characters: specify the maximum number of chars allowed per line
• split words if necessary: check this box to enable splitting of words
• leave enters: leave [hard returns] from the source in the data
• start grabbing at line: specify a line to start grabbing at (make sure to check the 'leave enters'
option)
• number of lines to grab: specify the number of lines to grab. Text lines are automatically written to
separate scene parameters.
20.24 CVS Object
Type
Sources; CVS
RTic User Manual- document version: 2.43 - 48
Page 49

Explanation
Use this object to grab data from a CVS-file. In a CVS-file, values are separated by a special character,
usually a comma. Other characters such as tabs and semicolons can be used as well.
Properties
• Separation character: specify the separation character used in the file, the default is a comma.
• Select file to use: specify the file to grab data from
Tab
Use character T to specify a tab separator.
Test Grab
Use the Test grab option in the properties window to test incoming data.
20.25 Date Object
Type
Sources; Date
Explanation
Use this object to grab the current date (RTic workstation date).
Properties
• Date formats: select one of the displayed date formats
• DAY/MONTH table: double-click 'use column' to specify a custom name for days or months
Hints & Tips
Multiple Date objects can be combined using the Add object.
20.26 Excel Object
Type
Sources; Excel
Explanation
Use this object to grab data from an Excel-file.
RTic User Manual- document version: 2.43 - 49
Page 50

Properties
• Select Excel input file to use: select the Excel file
• sheet name: specify the name of the sheet to grab data from, case sensitive
• left-top cell: specify a cell range, the left-top cell (start of range, for example A1)
• right-bottom cell: specify a cell range, the right-bottom cell (end of range, for example G28)
Test Grab
Use the Test grab option to test incoming data.
20.27 Manual Text Object
Type
Sources; Manual text
Explanation
Use this object to create a manual text source. This source can only be updated in RTic. Most commonly
used for static texts.
20.28 Socket XML Object
Type
Sources; Socket XML
Explanation
Use this object to grab XML-strings from a socket, using the RTic socket server.
Properties
• IP socket: specify the socket
• Server status: displays the RTic socket server status
• Connect status: displays the number of clients connected to the socket
• Start: start RTic the socket server
• Stop: stop RTic the socket server
• Select (designer mode) XML file to use: select a file: for designing and test purposes only! Note:
select a file with a XML-structure that matches the XML-data that will be grabbed from the socket.
Select records: click this button to open a node and the record selector
• selected node: select the node you want to grab data from (click the Select records button to open
the selector)
• selected record: select the record you want to grab data from (click the Select records button to
open the selector)
Test Grab
Use the Test grab option to test incoming data.
20.29 Text File Object
Type
Sources; Text File
RTic User Manual- document version: 2.43 - 50
Page 51

Explanation
Use this object to grab data from a text file.
Properties
• local textfile: check this box to select local text file
• remote textfile from URL: check this box to select a remote file (URL)
• Fill in URL to use: specify the URL, full address: for example http://www.example.com
• Select local file to post as request: specify a request file, if applicable
• Select local file send after receive: specify a confirmation file, if applicable
• Username: specify a username, if applicable
• Password: specify a password, if applicable
• Proxy server: specify the proxy server IP, if applicable
• Proxy port: specify the proxy server port, if applicable
Test Grab
Use the Test grab option to test incoming data.
20.30 Time Object
Type
Sources; Time
Explanation
Use this object to grab the current time (RTic workstation system time).
Properties
• Time formats: select one of the displayed time formats.
Hints & Tips
Multiple Time objects can be combined using the Add object.
20.31 XML Object
Type
Sources; XML
Explanation
Use this object to grab data from a XML-file.
RTic User Manual- document version: 2.43 - 51
Page 52

Properties
• Local XML: select a local file (LAN)
o selected node: use the Select records option to select a node
o selected record: use the Select records option to select a record
• URL XML: specify the URL, full address: for example http://www.example.com/file.xml
o Select a local file to post as request: specify request file, if applicable
o Select a local file to send after receive: specify confirmation file, if applicable
o Username: specify a username, if applicable
o Password: specify a password, if applicable
o Proxy server: specify the proxy server IP, if applicable
o Proxy port: specify the proxy server port, if applicable
• selected node: use the Select records option to select a node
• selected record: use the Select records option to select the record
SchedIt XML:
Source file designated by SchedIt.
• selected node: use the Select records option to select a node
• selected record: use the Select records option to select the record
Test Grab
Use the Test grab option to test incoming data.
Select Records
Click this option to browse through the XML-structure.
20.32 XML Vote Object
Type
Sources; XML Vote Object
Explanation
Use this object to grab and analyze XML voting results.
Properties
• Fill in incoming XML directory: specify the directory for incoming XML-files (LAN). Note that after
being processed, files are removed from this directory.
• Fill in storage XML directory: specify the directory: files that match the condition " the parameter
grabbed is no longer than 2 chars, if the specified parameter was not found or empty" are written to
this directory
• 'not recognized' filename: specify the path and filename, if " the parameter grabbed is 3 or more
chars long" the file is moved and renamed to the specified path and filename. Note that this file is
overwritten each time results are processed.
Results are presented in the following format:
• index·0·text·A·num·1·perc·33·perc3·033·total·3·
• index·1·text·B·num·2·perc·66·perc3·066·total·3·
o index shows serial number
RTic User Manual- document version: 2.43 - 52
Page 53

o text shows the value grabbed (parameter field)
o num is the times this value was found.
o perc shows occurrence as a percentage
o perc3 is the same value, but is always 3 digits long
o total indicates the number of files used (i.e. files that matched the parameter name and
where the value was less than 3 chars)
• single processing (on/off): if checked, single file processing is enabled. Files are processed one
by one; processing stops after one file has been processed (starting with the oldest file found). If
not checked, all files in the XML input directory are processed in one Event.
• Select Records: click this button to select and browse an XML-file, then select a node, record
and parameter
• selected node: select the node you want to grab
• selected record: select the record you want to grab
• parameter name: select the parameter you want to grab
• Reset Vote: ---
Vote results
To write vote results to a target, link a Record select object to the XML vote object, select a parameter and
specify the target.
Test Grab
Use the Test grab option to test incoming data.
20.33 onTickfill Object [Legacy]
Type
Events; onTickfill Object
Explanation
Use this object to check the number of stories in the ticker buffer. If the number of stories in the buffer is
less than a predefined threshold, new stories are grabbed from a source.
This object can only be used when in the TemplatoR Ticker Initialise (Angle) Object the ticker-mode is
specified as "story once".
Properties
• ticker status file: specify file in format: \\ip\delta\tickfillx.y
o ip: ip
o x: layer
o y: ticker ID
• ticker story threshold: specify number of stories that should be available in ticker buffer
• Toggle on/off: toggle Event on/of
Toggle
This Event can be toggled on/off via a socket.
. This status file is automatically generated.
RTic User Manual- document version: 2.43 - 53
Page 54

20.34 ADOSQL Object
Type
Process; ADOSQL Object
Explanation
Use this object to grab data from a database using a query.
Properties
• ODBC source: select the ODBC source or database
• user name: enter the database username
• password: enter the database password
• separator string: specify the separator string that is used in the database to separate records
• odbc data query string: specify a query
Test Grab
Use the Test grab option to test incoming data.
20.35 Indigo Object [Legacy]
Explanation
• IP address: system IP address
• IP socket: socket for applications, set at default
• Connect status: displays status
o green: connected
o red: disconnected
• Number of layers: select the number of layers for the broadcast set
• Board positioning table
o layer: layer number
o position: board position
• Connect: connect to the system
• Disconnect: disconnect
RTic User Manual- document version: 2.43 - 54
Page 55

20.36 SMS Gate Object [Legacy]
SMS_Gate target
This target can send (simulate sending) sms-messages to the sms_gate (1.2.0.3) application.
This way there is no need to have an actual sms modem installed when demonstrating the sms_gate
application.
XML source
This source reads the XML output (outbox messages) created by the sms_gate application by sending an
http request (http://127.0.0.1
Settings: use the URL XML option and Fill in the URL to use: http://127.0.0.1 (any text behind the IPaddress is ignored) for sending requests and retrieving the outbox messages.
Or use local XML and then c:\smsgate_folder\XMLoutput.xml to read a previous xml output (This is a local
file created by the sms_gate application when an http-request is done. So this can be the output from
previous request).
SMS_gate 1.2.0.3 Application
When using RTic as an input for messages select the Moderator input enabled from and fill in the http
address and the name of the input target (i.e. the RTic sms_gate target name. This should be the exact
same name that is used in RTic, e.g.: http://127.0.0.1/my_RTic_sms_gate_target_name
Otherwise, when using al modem as input, select SMS serial modem connected to.
) and reading the returned XML data.
)
RTic User Manual- document version: 2.43 - 55
Page 56

20.37 Template Object [Legacy]
Type
Targets; Template Object
Explanation
Use this object to start a template script based on incoming data, and, if applicable, update the template's
userstrings.
• Template file: select the template (BTS script)
• Queue: select a queue number
• Trigger template options:
o do not start template automatically
o start template on every grab
o start template when grab results in changed data
o remote controlled
• Template dynamic: this field is automatically filled, using the Grab source option, if the ‘template
dynamic’ option is enabled.
• Use dynamic template name: check this box to enable dynamic template selection
Template overview
Columns:
• layer: layer number
• num: userstring number
• type: media type
• id: object ID
• source: name of data source
• value: data grabbed from source
• updated: date and time last update
Input properties
The Input properties window automatically opens when linking an object (input) to the Template object.
• Available in this template: select a userstring number (lists userstrings available in template) /
dynamic template option
Connect
To be able to edit the Template object, connect to the System object.
Grab sources
Use the Grab sources option to test incoming data.
RTic User Manual- document version: 2.43 - 56
Page 57

20.38 Nexus Template Object [Legacy]
Each userstring 0 to 511 can contain up to 2084 characters.
Type
Targets; Template Object
Explanation
Use this object to start a template script based on incoming data, and, if applicable, update the template's
userstrings.
• Template file: select the template (BTS script)
• Queue: select a queue number
• Trigger template options:
o do not start template automatically
o start template on every grab
o start template when grab results in changed data
o remote controlled
• Template dynamic: this field is automatically filled, using the Grab source option, if the ‘template
dynamic’ option is enabled.
• Use dynamic template name: check box to enable dynamic template selection
Template overview
Columns:
• layer: layer number
• num: userstring number
• type: media type
• id: object ID
• source: name of data source
• value: data grabbed from source
• updated: date and time last update
Input properties
The Input properties window automatically opens when linking an object (input) to the Template object.
• Available in this template: select a userstring number (lists userstrings available in template) /
dynamic template option
Connect
To be able to edit the Template object, connect to the Nexus system object.
Grab sources
Use the Grab sources option to test incoming data.
RTic User Manual- document version: 2.43 - 57
Page 58

20.39 Ticker Object [Legacy]
Type
Targets; Ticker Object
Explanation
Use this object to update tickers.
Properties
• Ticker on Layer: select a layer and ticker ID
• cache stories (don't update when identical): check this box to cache stories
• Ticker story mode: check this box to select a story mode
Story overview
Columns:
• num: -
• story: story number (0-98)
• type: story part 1/2/3/TGA (depending on ticker mode)
• id: object ID
• source: name of the data source
• value: data grabbed from the source
• updated: date and time the last update
Edit userstring properties
Double-click number to edit properties.
• Story part: story part 1/2/3/TGA (depending on ticker mode)
• start number: story number
• pitch: when grabbing data from a multi record source, the step value between consecutive stories
View grabbed data
Double-click the value to view grabbed data.
Input properties
The Input properties window automatically opens when linking an object to the Ticker object.
• Story part: select the part of the story that you want to update: part-1/part-2/part-3/TGA
• start number: select the (first) story number
• pitch: the step value between consecutive stories, only applies when grabbing stories from a multi
record source
Grab sources
Use the Grab sources option to test incoming data.
RTic User Manual- document version: 2.43 - 58
Page 59

20.40 Userstring Object [Legacy]
Type
Targets; Userstrings Object
Explanation
Use this object to update userstrings.
Properties
• Layer tabs: layer tabs represent layers
Columns:
• num: userstring number
• type: -
• id: object ID
• source: name of the data source
• value: data grabbed from the source
• updated: date and time the last update
Edit userstring properties
Double-click the userstring number to edit userstring properties (only for filled userstrings).
• layer/board: layer
• start number: the userstring number
• pitch: when grabbing data from a multi record source, the step value between consecutive
userstring numbers
View grabbed data
Double-click the 'value field' to view grabbed data.
Input properties
The Input properties window automatically opens when linking an object (input) to the Userstrings object.
• layer/board: select a layer
• start number: select the userstring number you want to update
• pitch: when grabbing data from a multi record source, the step value between consecutive
userstring numbers
Template
To update a template's userstrings, use a Template target object and trigger the template script.
Multiple sources
The Userstring object contains all available userstring numbers on a system. Multiple sources can be
related to a single Userstring object.
Grab sources
Use the Grab sources option to test incoming data.
RTic User Manual- document version: 2.43 - 59
Page 60

Clear strings
Use the clear strings option to clear strings when testing.
20.41 Nexus Userstr object [Legacy]
Each userstring 0 to 511 can contain up to 2084 characters.
Type
Targets; Userstrings Object
Explanation
Use this object to update userstrings.
Properties
• Layer tabs: layer tabs represent layers
Columns:
• num: userstring number
• type: -
• id: object id
• source: name of the data source
• value: data grabbed from the source
• updated: date and time of the last update
Input properties
The Input properties window automatically opens when linking an object (input) to the Userstrings object.
• layer/board: select a layer
• start number: select the userstring number you want to update
• pitch: when grabbing data from a multi record source, the step value between consecutive
userstring numbers
Edit userstring properties
Double-click userstring number to edit userstring properties (only for filled userstrings).
• layer/board: the layer
• start number: the userstring number
• pitch: when grabbing data from a multi record source, the step value between consecutive
userstring numbers
View grabbed data
Double-click the value field to view grabbed data.
RTic User Manual- document version: 2.43 - 60
Page 61

21 Legacy
21.1 Nexus System Object: How to [Legacy]
To define the playout system and connect:
Insert a System > Nexus object.
Double-click the object to edit.
Enter the system’s IP-address.
Enter the IP-socket. Default port: 5000.
Specify the number of layers (boards) for the broadcast set.
Fill in the board positioning table for the broadcast set.
Click Connect to connect. The status bar turns green when connected.
Click Save to save the connection, Cancel to discard.
To link a System object, drag the System object on top of the other object (not vice versa).
21.2 Tickers: How to [Legacy]
Before ticker stories can be viewed on-screen, initialize and start the ticker. Initializing clears the ticker
buffer.
Inserting, linking and editing Tickers
Insert a Targets > Ticker Object.
Link the appropriate System > System object to the Ticker target: as a result the layer table lists
available layers.
Double-click the Ticker object to edit.
In the Ticker on layer box, select a layer and ticker ID.
Select a Ticker story mode.
If appropriate, check the Cache stories option.
Click Save to save the Ticker, click Cancel to discard.
Linking sources to a Ticker
Insert the appropriate Source/Process object(s) to grab stories from.
Link objects to Ticker.
The Input properties window opens.
1. Select a story part: part-1/part-2/part-3/TGA.
2. Select a TGA if applicable to specify a TGA-file (include file extension).
Note that the Ticker object defines the Ticker story mode (single story mode, triple story
with TGA, etcetera).
Select the (first) story number.
Select a step value between consecutive stories; only applies when grabbing stories from a
multirecord source.
Click Save to save properties, click Cancel to discard.
RTic User Manual- document version: 2.43 - 61
Page 62

To execute a script after last story, use $L. The script can for instance trigger an Event in RTic. Note that it
is advised not to use special strings in XML-sources, to avoid translation to a special character sequence.
21.3 Userstrings: How to [Legacy]
Output to Userstring(s)
Insert a Target > Nexus Userstr object.
Drag the object (source or process) that outputs userstring(s) on top of the Userstring object.
The userstring properties window opens.
Specify a layer number.
Specify a start number: the number of the userstring you want to update, or first userstring number in
case of a multirecord source.
Specify a pitch: only applicable if more than one userstring is updated (multirecord source).
21.4 Template Target: How to [Legacy]
First define a System object for the system that templates (scripts) are located on and connect.
Inserting and linking System and Template objects
Insert a Target > Nexus Template object.
If not already inserted, insert a System > Nexus System object.
Specify and connect to the system on which templates are stored.
Link the System and Template objects.
Editing Template objects
Fixed template
Double-click the Template object to edit.
In the Template file box, select the template (BTS).
Make sure the Use dynamic template box is not checked.
Leave the Template dynamic field empty.
Select a queue.
Select a start mode for the template.
If applicable, (un)check the Cache option.
Click Save to save changes, Cancel to discard.
Dynamic templates
Double-click the Template object to edit.
To work with dynamic templates, check the Use dynamic template box.
Leave the Template dynamic field empty. This field is automatically updated when working with
dynamic templates.
In the Template file box, select any one of the dynamic templates to fill the userstring table. Note that
the dynamic templates must address the same userstrings (numbers and layers).
To update the dynamic template (grab file name), link the appropriate object to the Template object.
Note that the filename must include the file extension (.bts).
Click Save to save changes, Cancel to discard.
When linking objects to the Template object (inputs), a dropdown menu that lists available userstrings
opens. Select the Dynamic template option.
RTic User Manual- document version: 2.43 - 62
Page 63

Specifying inputs
To link sources and userstrings:
Link the appropriate object(s) to the Template object.
When linking, a dropdown menu that lists available userstrings for the linked template opens:
o select the userstring you want to update, or
o select the dynamic template option
Userstring table
The userstring table automatically lists the userstrings defined in the selected template.
Grab sources
Use the Grab sources button to test incoming data.
Read template
Use the Read template button to view template info.
21.5 Toggle onTickfill Event via socket: How to [Legacy]
In RTic, rename the onTickfill object: right-click object > rename to <Ticker_name>.
To trigger the Event, send a trigger via a connected socket on port 5005: TICKFILL
<Ticker_name> [on/off/toggle]
Example command to start event "Ticker_name":
./ptsockcl 192.168.7.9 5005 "TICKFILL Ticker_name on"
• IP: the RTic workstation’s IP-address
• port 5005: the default RTic listen port
RTic User Manual- document version: 2.43 - 63
 Loading...