

Page 1

LDK 7500 + LDK5490
Digital Cinematographic Camera
Technical Manual
Contents
About This Manual ................................................ ii
Viper
Safety Instructions ........................................... 1-1
Safety Summary ................................................ 1-2
Cautions and Warnings ...................................... 1-2
Installation ......................................................... 2-1
Packing/Unpacking ............................................ 2-2
Hardware Customization .................................... 2-2
Attaching an Adapter ......................................... 2-3
Detaching an Adapter ......................................... 2-3
Connectors ........................................................ 2-4
Cables and breakout box.................................... 2-8
Specifications .................................................. 2-10
Camera head dimensions ................................. 2-11
Adapter dimensions ......................................... 2-12
Replacements ................................................... 3-1
Introduction ........................................................ 3-2
Handgrip ............................................................ 3-2
Printed circuit boards ......................................... 3-3
Front unit ........................................................... 3-4
03.18.5 Technical Manual LDK 7500 + LDK 5490 Adapter i
Adjustments ..................................................... 4-1
Introduction ........................................................ 4-2
Test Equipment ................................................. 4-3
Set-up Instructions ............................................. 4-3
Video ADC Automatic Calibration ....................... 4-4
Pre-processor Calibration ................................... 4-4
3200K Adjustment ............................................. 4-4
Sawtooth Calibration .......................................... 4-4
Flare Adjustment ................................................ 4-5
Software Download ............................................ 4-5
Video Monitoring Adjustment ............................. 4-7
Exploded Views ............................................... 5-1
HD Camera head ................................................ 5-2
Camera head basic ............................................ 5-3
Left cover assembly........................................... 5-4
Right cover assembly ........................................ 5-5
Shoulder pad assembly ...................................... 5-6
Handgrip assembly ............................................ 5-7
Page 2

About This Manual
Service policy
The LDK 7500 + LDK 5490 is a sophisticated camera
containing state-of-the-art electronic components which
are designed to provide long-life operation without the
need for maintenance. With this in mind, the service
policy of Thomson Broadcast Solutions endeavours to
ensure that help will be quickly on hand in the unlikely
event of anything going wrong. The guiding principles
of the Thomson Broadcast Solutions first line
maintenance philosophy are speed and cost
effectiveness. First line maintenance is dedicated to
keeping your camera operational, despite a fault, by
module replacement and the replacement of minor
mechanical parts by the user.
Purpose of this manual
The provision of correct information is the first step in
ensuring the operational integrity of the camera.
Information on the operation of the camera is to be
found in the Operators’s Manual.
This technical manual is an integral part of the service
policy. It ensures that you will be able to install and setup your camera to meet the requirements of your
environment. This information on the installation of the
camera is contained in Section 2 of the manual. The
remaining sections of the manual provide first line
service information so that suitably qualified service
personnel can detect and repair faults, normally by
module replacement.
Structure of this manual
The manual is divided into five different sections:
Section 1: Safety Instructions
Outlines the safety precautions that must be taken
when using the camera.
Section 2: Installation.
Gives instructions on the integration of the camera into
the operating environment and the customization of
certain hardware functions
Section 3: Replacements.
Gives information on the replacement of components
at first line level.
Section 4: Adjustments.
Contains the adjustment procedures to be followed to
obtain the best performance.
Section 5: Exploded Views
Because of the complexity of some of the components,
second line service can only be carried out at the
specially equipped service centres and information
concerning second line maintenance is not supplied
in this manual.
Intended audience
The manual is intended as a guide to those with a
working knowledge of camera systems and installation
techniques. The first line detection and repair of faults
requires a general knowledge of test and measurement
techniques.
ii Technical Manual LDK 7500 + LDK 5490 Adapter 03.18.5
Page 3

Identification and Status
To indicate the status of a drawing, a box with the
numbers 0 to 9 is shown in the bottom-right of the
drawing. The number that is crossed-out is the status
number of the drawing. For example, in the illustration
below, the status is 1.
0 1 2 3 4
5 6 7 8 9
A sticker is used on the units themselves to identify
them and to indicate their status. For example, in the
illustration below, the top line is the 12-digit number
that identifies the unit type.
3922 406 88991
00121107 00 01
The first four digits of the number on the second line
represent a date code (year, week); the next four digits
represent the serial number for that week.
The number in the grey area indicates the status of the
unit. The last two digits represent the number that will
be given to the next status. However, if these two
digits are contained in a box, then this is the current
status. For example, in the illustration above, the
current status of the unit is 01.
Line 3
This is the status of the PCB.
The digit after the first slash is the status. If there is
no number before the slash, it means that the status
is less than 10, a 1 before the slash means the status
is between 10 and 19, a 2 before the slash means
between 20 and 29 etc.
Example:
VR4567891012 means status 4
VR3/78901234 means status 37.
Example of LDK number:
LDK 4501/01 means 8926 450 10101
LDK 4500/00 means 8926 450 00001
Numbers of printed circuit board assembly
- 3922 406 xxxxx or 3922 407 xxxxx
Number (screened in PCB layout) of printed circuit
board assembly: 3922 411xxxxx (not a spare part).
Line 1 3922 407 00000
Line 2 123456AA0101
Line 3 VR/0123456789
Line 1
This is the code number of the printed circuit board
assembly (PCB).
Line 2
This is the serial number of the PCB. The first 6 digits
and the 2 letters are for internal use. The last four digits
reperesent the date of the manufacturing: wwyy.
Example:
123456AA1402 means the PCB is manufactured in
week 14 of the year 2002.
03.18.5 Technical Manual LDK 7500 + LDK 5490 Adapter iii
Page 4

iv Technical Manual LDK 7500 + LDK 5490 Adapter 03.18.5
Page 5

Section 1
Safety Instructions
This section outlines the precautions that must be taken into account when using the adapter.
Contents
Safety Summary ................................................ 1-2 Cautions and Warnings ...................................... 1-2
Safety Instructions Technical Manual LDK 7500 + LDK 5490 Adapter 1-1
Page 6

Safety Summary
Cautions and Warnings
This informaton is intended as a guide for trained and
qualified personnel who are aware of the dangers
involved in handling potentially hazardous electrical/
electronic equipment. It is not intended to contain a
complete list of all safety precautions which should be
observed by personnel in using this or other electronic
equipment.
The installation, maintenance and service of this
equipment involves risks both to personnel and
equipment and must be performed only by qualified
personnel exercising due care.
Personnel engaged in the installation, operation,
maintenance or servicing of this equipment are urged
to become familiar with First Aid theory and practises.
During installation and operation of this equipment,
local building safety and fire protection standards
must be observed.
Before connecting the equipment to the power supply
of the installation, the proper functioning of the protective
earth lead of the installation needs to be verified.
Whenever it is likely that safe operation is impaired,
the apparatus must be made inoperative and secured
against any unintended operation. The appropriate
servicing authority must then be informed. For example,
safety is likely to be impaired if the apparatus fails to
perform the intended function or shows visible damage.
When performing service, be sure to read and comply
with the warning and caution notices appearing in the
manuals. Warnings indicate danger that requires correct
procedures or practices to prevent death or injury to
personnel. Cautions indicate procedures or practices
that should be followed to prevent damage or destruction
to equipment or property.
WARNING
THE CURRENT AND VOLTAGES PRESENT IN THIS
EQUIPMENT ARE DANGEROUS. ALL PERSONNEL
MUST AT ALL TIMES FOLLOW THE SAFETY
REGULATIONS.
ALWAYS DISCONNECT POWER BEFORE REMOVING
COVERS OR PANELS.
ALWAYS DISCHARGE HIGH VOLTAGE POINTS
BEFORE SERVICING.
NEVER MAKE INTERNAL ADJUSTMENTS, PERFORM
MAINTENANCE OR SERVICE WHEN ALONE OR WHEN
FATIGUED.
IN CASE OF AN EMERGENCY ENSURE THAT THE
POWER IS DISCONNECTED.
ANY INTERRUPTION OF THE PROTECTION
CONDUCTOR INSIDE OR OUTSIDE THE APPARATUS,
OR DISCONNECTION OF THE PROTECTIVE EARTH
TERMINAL, IS LIKELY TO MAKE THE APPARATUS
DANGEROUS. INTENTIONAL INTERRUPTION IS
PROHIBITED.
USE ONLY FUSES OF THE TYPE AND RATING
SPECIFIED.
This product has been designed and tested according
to EN60065.
CAUTION
To prevent risk of overheating, ventilate the
product correctly.
Connect the product only to a power source with
the specified voltage rating.
Do not allow system ground currents to exceed
1.5A in the outer shield of the triax cable or 0.2A
in other cable shields.
1-2 Technical Manual LDK 7500 + LDK 5490 Adapter Safety Instructions
Page 7
Symbol Colour Explanation
Red High voltage terminal at which
a voltage, with respect to an
other terminal, exists or may
be adjusted to 1000V or more.
Yellow/Black Live part.
Yellow/Black This marking indicates that the
operator must refer to an
explanation in the Instruction
Manual, or that a specific
component must be replaced
by the component specified in
the documentation for safety
reasons.
White/Black Protective earth (ground)
terminal.
Cathode ray tubes
Components marked on the circuit diagram are
critical for safety and include those specified to comply
with X-ray emission standards for units using cathode
ray tubes and those specified for compliance with
various regulations regarding spurious radiation
emission.
When servicing units that use cathode ray tubes
(CRTs), the cathode ray tubes themselves, the high
voltage circuits and related circuits are specifically
chosen so that they comply with recognized codes
pertaining to X-ray emission.
Consequently, when servicing, replace the cathode
ray tubes and other parts with specified parts only. Do
not attempt to modify these circuits as any unauthorized
modification can increase the high voltage value and
cause X-ray emission from the cathode ray tube.
Handle the cathode ray tube only when wearing
shatterproof goggles and after discharging the high
voltage completely.
Safety Instructions Technical Manual LDK 7500 + LDK 5490 Adapter 1-3
Page 8

1-4 Technical Manual LDK 7500 + LDK 5490 Adapter Safety Instructions
Page 9

Section 2
Installation
This section provides information which is relevant when the camera is to be used for the first time.
Packing and unpacking instructions together with information on the integration of the camera into
your studio system are provided. The procedures for the customization of certain hardware functions
and connector information is also provided.
Contents
Packing/Unpacking ............................................ 2-2
Hardware Customization .................................... 2-2
Attaching an Adapter ......................................... 2-3
Detaching an Adapter ......................................... 2-3
Connectors ........................................................ 2-4
Installation Technical Manual LDK 7500 + LDK 5490 Adapter 2-1
Cables and breakout box.................................... 2-8
Specifications .................................................. 2-10
Camera head dimensions ................................. 2-11
Adapter dimensions ......................................... 2-12
Page 10

Packing/Unpacking
Hardware Customization
Inspect the shipping container for evidence of damage
immediately after receipt. If the shipping container or
cushioning material is damaged, it should be kept until
the contents of the shipment have been checked for
completeness and the units have been checked
mechanically and electrically.
The shipping container should be placed upright and
opened from the top. Remove the cushioning material
and lift out the contents.
The contents of the shipment should be checked
against the packing list. If the contents are incomplete,
if there is mechanical damage or defect, or if the units
do not perform correctly when unpacked, notify your
Thomson Multimedia Broadcast Solutions sales or
service centre within eight days. If the shipping
container shows signs of damage or stress, notify the
carrier as well.
If a unit is being returned to Thomson Multimedia
Broadcast Solutions for servicing, try to use the
containers and materials of the original packaging.
Attach a tag indicating the type of service required,
return address, model number, full serial number and
the return number which will be supplied by your
Thomson Multimedia Broadcast Solutions service
centre.
If the original packing can no longer be used, the
following general instructions should be used for
repacking with commercially available materials:
a. Wrap unit in heavy paper or plastic.
b. Use strong shipping container.
c. Use a layer of shock-absorbing material around all
sides of the unit to provide firm cushioning and
prevent movement inside container.
d. Seal shipping container securely.
e. Mark shipping container FRAGILE to ensure careful
handling.
The camera head is delivered in a ready-to-use state,
however, there are occasions when it might be
necessary to re-adjust some functions after, for
example, fitting a new lens.
A large number of functions can be set-up using the
control facilities of the menu system. In addition to this
software set-up there are some functions which can be
selected or adjusted internally in the camera.
Refer to the next chapters for instructions.
Lens matching
When a camera is supplied with a lens it is not
necessary to perform any of the following adjustments
as the lens is already matched to the camera. However,
if you wish to change to a different type of lens or the
lens is not supplied with your camera, back focus,
white shading and auto iris adjustment procedures
may have to be performed.
• Colour balance.
If required, perform the gain adjustment of the
preprocessor board and/or white shading adjustment
procedures, described in section 4.
• Auto Iris Adjustment
If a different lens either works too slow or overshoots
too much with the auto iris control, adjust the
potentiometer on the lens to obtain acceptable
operation. Refer to the lens documentation.
• Back Focus Adjustment
To adjust the back focus of the lens refer to the
documentation of the lens.
2-2 Technical Manual LDK 7500 + LDK 5490 Adapter Installation
Page 11
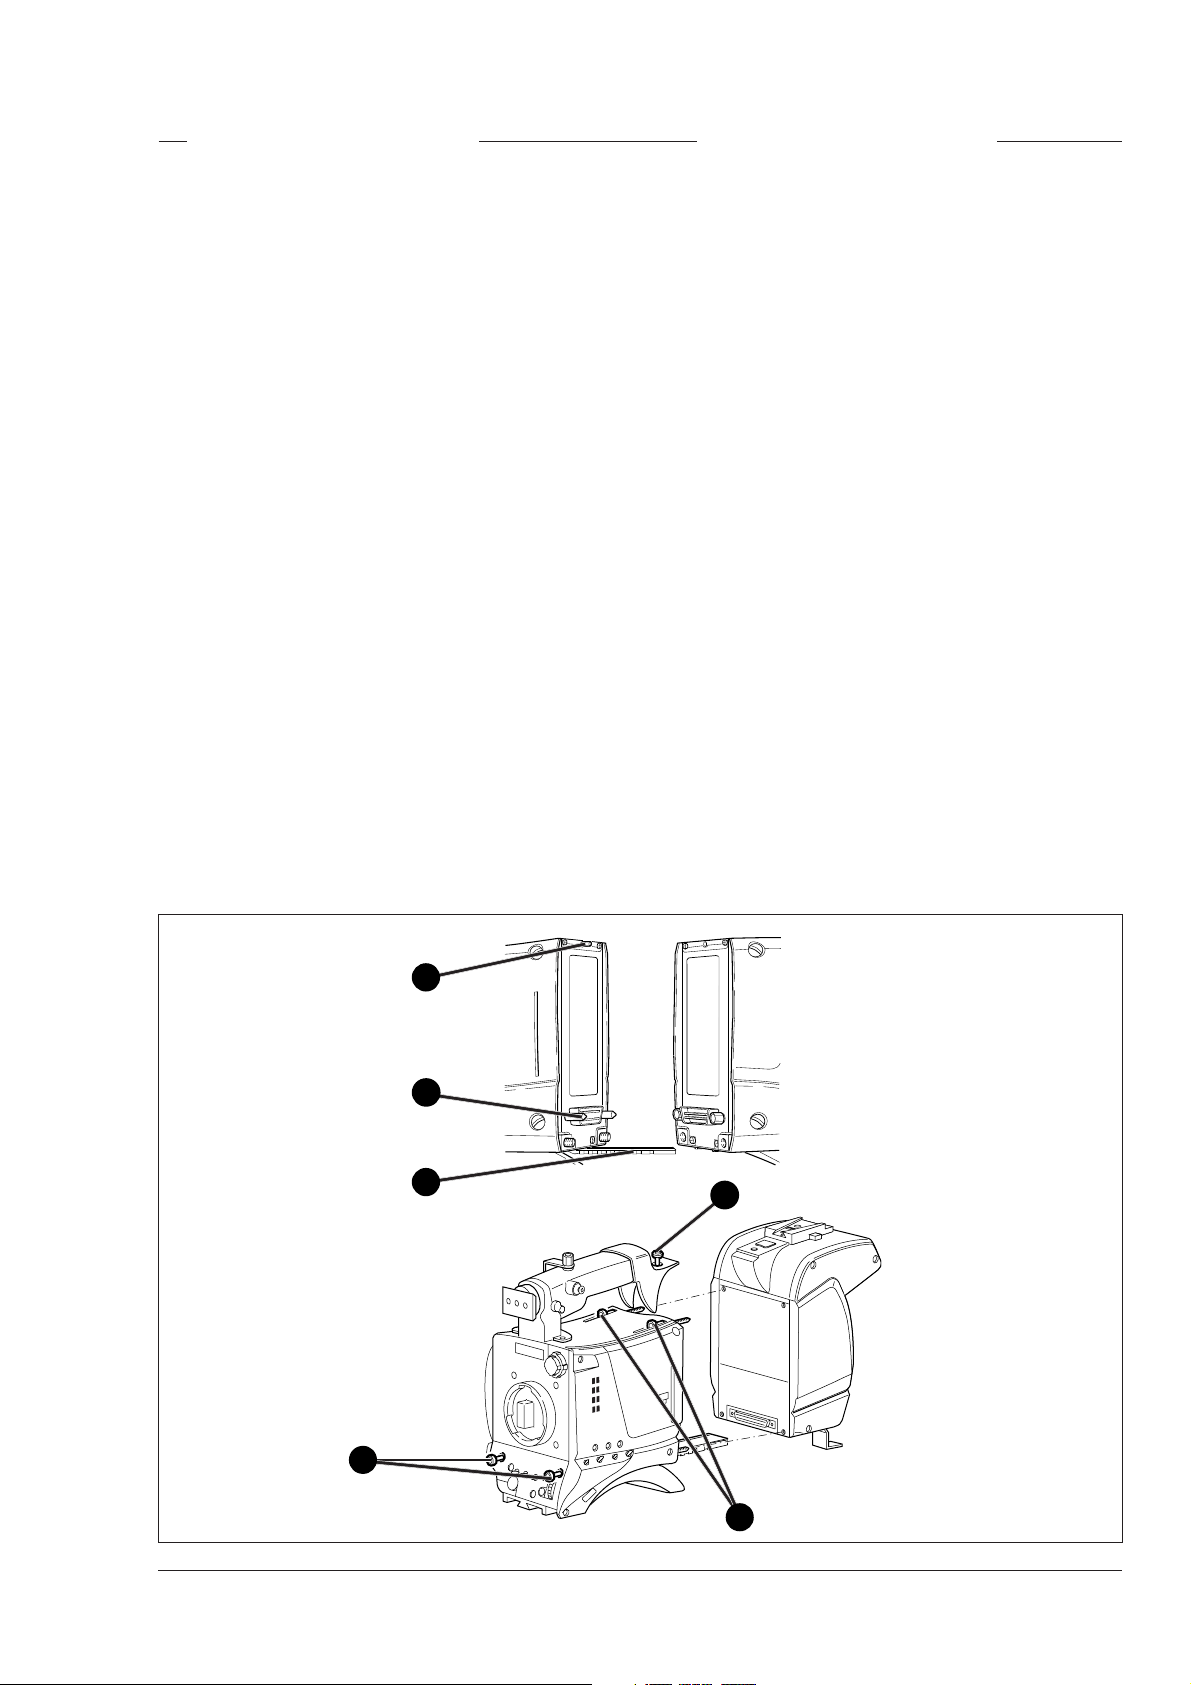
Attaching an Adapter
Detaching an Adapter
The adapter can be used with various HD camera
heads. To attach the adapter to the camera proceed as
follow the steps in the order given:
Caution
Do not connect this HD adapter to an SD camera head
- connectors and guide pins are not compatible.
Caution
Be extremely careful. Do not allow the guide pins to
damage the pins of the connector.
Caution
Tightening the screws in the wrong order could
result in mechanical damage to the camera.
a. Using the rail
(1) on the bottom of the camera head
as a guide, fit the guide pins (2) on either side of the
connector and the guide pin (3) at the top rear of the
camera head into the corresponding slots of the
adapter.
b. First, tighten the two horizontal screws (4) on the
top of camera.
c. Next, tighten the two horizontal screws (5) at the
front of the camera.
d. Lastly, tighten the vertical screw (6) in the handle
of the camera.
To detach the adapter from the camera head follow the
steps for attaching it in the reverse order.
Caution
Loosening the screws in the wrong order could
result in mechanical damage to the camera.
3
2
1
r
Clea
1
A
r
a
le
C
/4
1
D
N
2
B
P
r 4
ta
S
6
/1
1
D
3
C
PN
r 6
ta
S
4
/6
1
D
4
D
sN
u
c
ft fo
o
S
6
5
4
Installation Technical Manual LDK 7500 + LDK 5490 Adapter 2-3
Page 12
Connectors
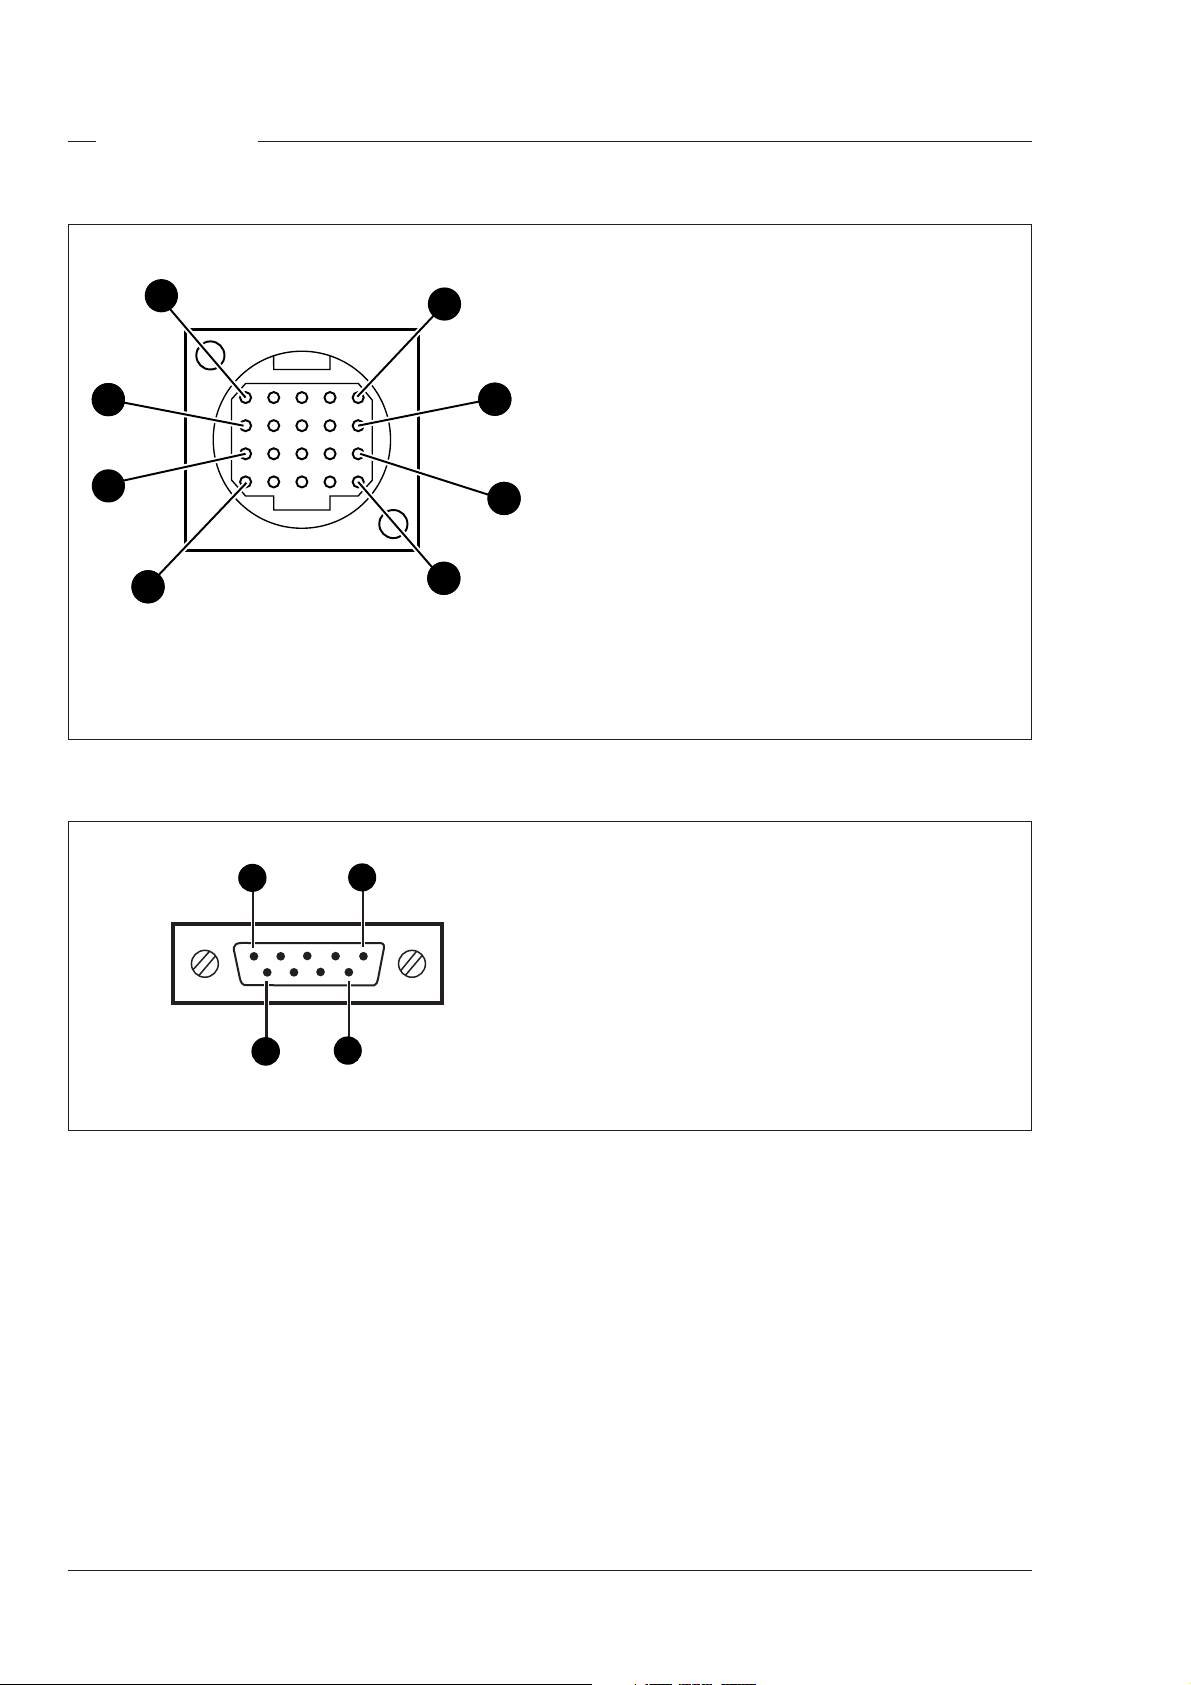
Viewfinder connector
1
6
11
16
Hirose 20-pole female; panel view
5
20
10
15
1. -80V (not used)
2. n.c.
3. GND
4. INTN-D
5. vf ext video (not used)
6. n.c.
7. vf video ret
8. SDA-D
9. SCL-D
10. vf ext video ret (not used)
11. GND
12. vf video
13. Pb vf ret
14. Pr vf ret
15. GND
16. +batt
17. +batt
18. Pb vf
19. Pr vf
20. shield
Cable 20-pin male connector:
Part number 5322 320 12159
RS232 connector
1
6
D-conn 9-pin male; panel view
5
1. SPARE
2. RS-RXD
3. RS-TXD
4. RS-DTR
5. RS-DGND
6. RS-DSR
7. RS-RTS
8. RS-CTS
9. +12V
9
2-4 Technical Manual LDK 7500 + LDK 5490 Adapter Installation
Page 13
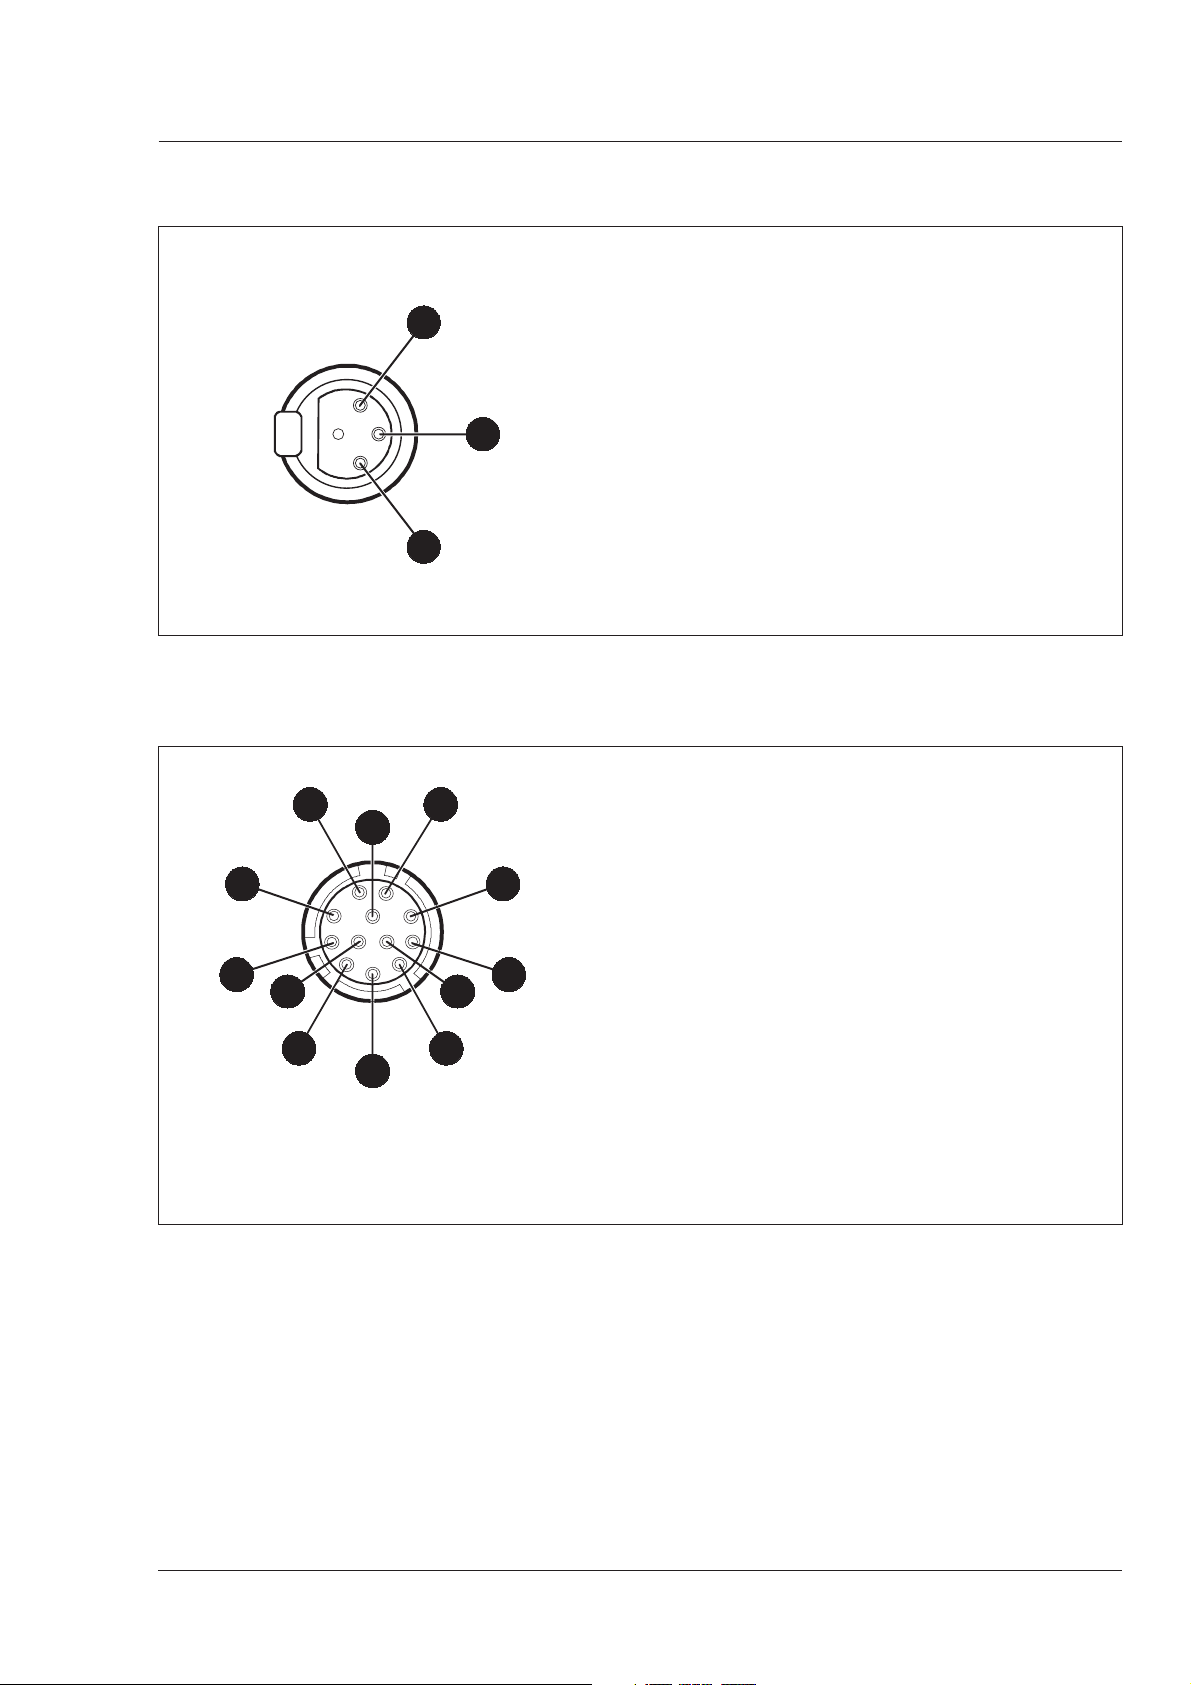
Audio microphone connector
XLR 3-pole female
Lens connector
8
7
12
1
2
9
1
10
6 4
5
11
1. Audio Screen
2. Audio In
3. Audio Return
Microphone impedance >200 ohm
Sensitivity controlled via camera menu: -64 dBu to -22 dBu.
3
2
3
Signal at pin 2 of audio input is in phase with signal at pin 2
of audio output on Breakout box.
1. Ext. Video On/Off
2. VTR Trigger Switch
3. -batt
4. Momentary Iris
5. IrisControl
6. + batt
7. Iris Follow
8. Lens Servo
9. Range Extender
10. Zoom Follow
11. Focus follow*
12. Spare
* not standard on lens
Hirose 12-pole female; panel view
Cable 12-pin male connector:
Installation Technical Manual LDK 7500 + LDK 5490 Adapter 2-5
Part number 5322 265 41208
Page 14

Multicore connector
2
1
5
4
8
9
12
14
B
16
17
18
21
23+3-pin male; panel view
Panel connector part number 3922 040 03231
3
22
A
1 Audio X
2 Audio Shield
3 Audio Y
6
7
4 Tally in (active >3V; imped. 10KOhm)
5 -Batt
6 +Batt
7 Record out (stop < 0.2V; start >4.5V; imped. 1KOhm)
11
10
13
15
8 -Batt sense
9 -Batt
10 +Batt
11 +Batt sense
12 -Batt
13 +Batt
14 TXD
15 RXD
C
20
19
16 TXD ret
17 Playback in
18 CVBS
19 Gen Lock in (HD tri-level sync. 0.6Vpp, 75 Ohm)
23
20 RXD ret
21 Playback ret
22 CVBS ret
23 Gen Lock in ret
A Dual Link A (see table)
B HD SDI (see table)
C Dual Link B (see table)
Viper signal output
Processing modes
BNC connectors Multicore pins FilmStream HD Stream R, G, B Y, Cr, Cb
HDSDI-A A Dual link 4:2:2* HDSDI 4:2:2* Dual link 4:2:2 HDSDI 4:2:2
Viewing B HDSDI 4:2:2** HDSDI 4:2:2** HDSDI 4:2:2 HDSDI 4:2:2
HDSDI-B C Dual link 0:2:2* HDSDI 4:2:2* Dual link 0:2:2 HDSDI 4:2:2
* no video processing
** monitoring quality only
Power input connector
1. - Batt
1
4
2. - Batt sense
3. + Batt sense
4. + Batt (+10.5V.......+17V)
2
3
XLR4-pin male; panel view
2-6 Technical Manual LDK 7500 + LDK 5490 Adapter Installation
Page 15

Power output connector
1
4
Hirose 4-pole female; panel view
Cable 4-pin male connector:
Obtainable from Hirose part number HR10A-7P-4P
2
3
LCP connector
9
1
10
8
7
12
11
6 4
5
1. Gnd
2. On air (TTL level; H= on air)
3. Housing
4. + Batt (max. 2A)
1. -
2. RS-232 RXD
3. RS-232 TXD
2
3
4. -
5. ground
6. -
7. -
8. -
9. +Batt
10. -
11. -
12. Housing
Hirose 12-pin male; panel view
Installation Technical Manual LDK 7500 + LDK 5490 Adapter 2-7
Page 16

Cables and breakout box (options)
Cables
To connect the multicore connector of the camera to
the breakout box the following cables are optionally
available:
HD Cable Assy 10m Full Function LDK8175/01
HD Cable Assy 40m Full Function LDK8175/04
HD Cable Assy 10m Standard LDK8175/11
HD Cable Assy 40m Standard LDK8175/14
In the standard cables the following pins are not
connected: 1, 2, 3, 14, 15, 16, 17, 18, 19, 20, 21, 22,
23 and B (see multicore connector pinning).
AUDIO
Breakout box option (LDK 8275)
The breakout box has the following connectors:
• Multicore in
• HDSDI A out (2x BNC)
• HDSDI B out (2x BNC)
• Viewing HDSDI out (2x BNC)
*
*
*
• CVBS out
• Sync. in
• Playback in
• Control
• Power in 12 Vdc
• Power in 24 Vdc
• Audio out
* terminate (75 Ohm) if not used
POWER
12 VDC
24 VDC
Important: Terminate all unused HDSDI output BNC connectors using the 75-Ohm terminator plugs supplied.
Control connector
9-pin male; panel view
HDSDI VIEWING
BA
1
6
5
9
HDSDI
SELECT
CONTROL
CVBS SYNC PLAYBACK
1. Tally in (active >3V; imped. 10KOhm)
2. RS-RXD
3. RS-TXD
4. -
5. RS-DGND
6. VTR start/stop (stop < 0.2V; start >4.5V imped. 1KOhm)
7. -
8. -
9. + Batt (+10.5V.......+17V)
2-8 Technical Manual LDK 7500 + LDK 5490 Adapter Installation
Page 17

Power input connector 24 Vdc
2
1. - Batt
2. + Batt (+17V.......+30V)
Use the SELECT switch to choose this input.
Fischer 2-pin male; panel view
Cable 2-pin female connector:
Fischer part number WS105Z087/7.2
Power input connector 12 Vdc
1
2
XLR 4-pin male; panel view
1
4
3
Note
If the DC output connector of the camera is drawing 18W or
more and a 50m cable or longer is used, then the power
supplied to this socket will not be sufficient to operate the
system. Power the camera locally to use cables lengths
greater than 50m.
1. - Batt
2. - Batt sense
3. + Batt sense
4. + Batt (+10.5V.......+17V)
Use the SELECT switch to choose this input.
Note
If the DC output connector of the camera is drawing 18W or
more and a 40m cable or longer is used, then the power
supplied to this socket will not be sufficient to operate the
system. Power the camera locally to use cables lengths
greater than 40m.
Audio connector
1. Shield
21
3
XLR 3-pin male; panel view
Installation Technical Manual LDK 7500 + LDK 5490 Adapter 2-9
2. Audio in
3. Audio return
Signal at pin 2 of audio output is in phase with signal at
pin 2 of audio input on camera.
Sensitivity controlled in camera: -64 dBu to -22 dBu.
Page 18

Specifications
General data
Power requirements: 12 Vdc nominal (11.5 to 17 Vdc)
Power consumption: 44 W approx. (incl. 2-inch VF and
Operating temperatures: -20°C to +40°C (-4°F to +113°F)
Storage temperatures: -20°C to +60°C (-4°F to +140°F)
Weight: 4.3 kg (9.7 lbs) approx. (incl. 2-inch
Dimensions: 197 x 117 x 349 mm (H x W x L)
Viewfinder CRT: 2" monochrome
2" Viewfinder resolution: >600 TV lines (centre)
Output Modes: FilmStream mode (RGB 10-bit log)
Camera Head
Pick-up device: 3x2/3" HD-DPM
Picture elements: 9.2 million pixels
Aspect Ratio: 16:9 (1.77:1) in 1080 or 720 lines
Frame rates: - 1080p: 23.98, 24, 25, 29.97 fps
Smear: No vertical smear
Optical system: F1.4 prism system
Optical filters: 1st Wheel Clear, 2-stop, 4-stop, 6-
Electronic colour filters: RGB, YCrCb modes:
Digital quantization: 12-bit A-to-D
Digital signal processing: > 22 bits (not active in FilmStream
FilmStream adapter)
VF and FilmStream adapter)
HDStream (YUV 10-bit log)
RGB (4:4:4)
YUV (4:2:2)
+TM
CCDs
1920 (H) x 4320 (V) effective
or 2.37:1 in 1080p mode
(segmented frame output)
- 1080p: 23.98 fps with 3:2 pull-down
to give 1080i59.94
- 1080i: 50, 59.94 Hz
-720p: 23.98, 25, 29.97 fps with 2:2/
3:2 frame repeat to give 50, 59.94 Hz
-720p: 50, 59.94 Hz
stop ND
2nd Wheel Clear, 4-point star, 6point star, soft-focus
3200K, 4700K, 5600K, 7200K, Auto
white.
HDStream mode:
3200K, 5600K, Thru (no correction).
FilmStream mode (viewing channel
only):
3200K, 4700K, 5600K, 7200K, Thru
mode)
Sensitivity: 2000 lux (186 ft cd) at F9.0 (typical,
1080p24 video mode). Effective
ASA320 in FilmStream mode
Gain: FilmStream mode (viewing channel
only): -6, 0, +6, +12 dB
-3dB to +12dB in 3dB steps (user
definable presets in video modes)
S/N ratio: 54 dB in Y (typical, in video modes)
Modulation depth: 40% at 27 MHz
Exposure control: Down to 1/1000 sec.
Variable shutter: appox. 50 to 310 degrees
Connectors
Front microphone input: 1x XLR-3 female, balanced, +48V
Viewfinder: 20-pin connector
Lens out: 12-pin connector
LDK 5490 FilmStream adapter
Dual link HD SDI out: BNC 2x, SMPTE 372M, 0.8 Vpp;
75 Ohm; 1.5 Gb/s (FilmStream or full
resolution RGB 10-bits)
HD SDI out: BNC 1x, SMPTE 292M, 0.8 Vpp;
75 Ohm; 1.5 Gb/s (viewing output in
FilmStream and HDStream modes)
CVBS out: BNC 1x, 1.0 Vpp; 75 Ohm, standard
definition - viewing quality.
Viewfinder out: BNC 1x, Y-signal of viewfinder or
external video, 1 Vpp; 75 Ohm
DC In: XLR-4, 12 Volts dc
DC Out: 4-pole Fischer, 12 Volts, 1.5A,
(unregulated)
LCP: 12-pole Hirose, LCP-100 local control
panel
Multicore: 23+3 pole, record start, return video
(SD) in, genlock in, DC in, camera
control, tally, CVBS out, audio out,
HD SDI out, Dual link HD SDI out
2-10 Technical Manual LDK 7500 + LDK 5490 Adapter Installation
Page 19

Camera head dimensions
Installation Technical Manual LDK 7500 + LDK 5490 Adapter 2-11
Page 20

Adapter dimensions
2-12 Technical Manual LDK 7500 + LDK 5490 Adapter Installation
Page 21

Section 3
Replacements
This section gives information on the procedures to follow when replacing printed circuit boards and
mechanical components at first line level.
Contents
Introduction ........................................................ 3-2
Handgrip ............................................................ 3-2
Replacements Technical Manual LDK 7500 + LDK 5490 Adapter 3-1
Printed circuit boards ......................................... 3-3
Front unit ........................................................... 3-4
Page 22

Introduction
Handgrip
The instructions given in this section are restricted to
those modules which can be replaced at the first line
service level. These modules include:
• The handgrip
• The printed circuit boards
• The front unit
After a printed circuit board has been replaced it is
sometimes necessary to carry out adjustments to
match the new boards to your camera and so maintain
the performance levels. The relevant adjustment
procedures are given in Section 4.
The procedures for removing the modules should be
followed in reverse order when remounting the units.
To remove the handgrip proceed as follows:
a. Remove the viewfinder from its support bracket on
the handgrip.
1
b. Loosen the screw
securing the handgrip to the
top of the adapter.
c. Loosen the two socket head screws
2
securing the
handgrip to the front of the camera.
1
2
2
lear
C
1
A
r
a
e
Cl
/4
1
D
N
2
B
r 4P
Sta
1/16
D
N
3
C
P
6
r
Sta
1/64
D
N
4
D
s
u
c
o
t f
Sof
3-2 Technical Manual LDK 7500 + LDK 5490 Adapter Replacements
Page 23

Printed circuit boards
Gaining access to camera head boards
To access the printed circuit boards remove the left
side cover of the camera head as follows:
a. Unscrew the four screws on the left side panel.
b. Swing down the cover.
Clear Clear
A 1
Star 4P ND1/4
B 2
Star 6P ND 1/16
C 3
Soft focus ND 1/64
D 4
Location of boards
The boards in the camera head are numbered as
follows:
1
Sync monitoring board
2
Data board
3
Front driver board
Gaining access to adapter boards
To access the printed circuit boards remove the left
side cover of the adapter as follows:
a. Unscrew the three screws on the left side panel.
b. Remove the cover.
Location of adapter boards
The boards in the adapter are numbered as follows:
4
Power board
5
HDSDI output board
6
Miscellaneous HDSDI board
1
2
3
7
4
5
6
8
Removing a board
To remove a printed circuit board proceed as follows:
a. Pull up the top print ejector 7 and pull down the
bottom print ejector 8 to release the printed circuit
board from its connector.
b. Pull horizontally on these ejectors to slide the
board clear of the camera.
Replacements Technical Manual LDK 7500 + LDK 5490 Adapter 3-3
Page 24

Front unit
To remove the front unit the following steps have to be
carried out:
• Loosen the two top screws
• Open the camera left side cover
• Open the camera right side cover
• Remove DVP board
• Remove the front unit
Opening the left side cover
To open the left side cover proceed as follow:
a. Loosen the four screws 1 at the front of the
camera.
b. Swing down the cover
1
Clear Clear
A 1
Star 4P ND1/4
B 2
Star 6P ND 1/16
C 3
Soft focus ND 1/64
D 4
Opening the right side cover
To remove the right front cover proceed as follows:
a. Unscrew the four retaining screws
1 and swing the
right front cover down.
b. Disconnect the B, R and G coax cables from the
DVP board using the correct tool (part no. 5322 395
10802)
c. Unscrew the two top retaining screws
2 of the DVP
board and swing the board downwards.
d. Reach in behind the board and disconnect the flat
cable from the connector at the bottom of the
board.
e. Disconnect the flat cable 3 that comes from the
cover, from the motherboard connector 4.
f. Loosen the screw 5 and remove the retaining tie 6
that restrains the cover.
g. Remove the cover.
2
B G R
6
5
4
1
1
x4
3
3-4 Technical Manual LDK 7500 + LDK 5490 Adapter Replacements
Page 25

Removing the DVP board
To remove the DVP board proceed as follows:
h. Unscrew the two bottom retaining screws
DVP board from the plastic clips and remove the
board.
i. Unscrew and disconnect the connector
8
from the
Front.
B G R
7
7 of the
8
Removing the front unit
To remove the front unit proceed as follows:
a. To ease the removal of the front unit remove the
1
adapter screws
completely.
b. Unscrew the four retaining screws 2 of the front
unit.
c. Move the front unit slightly upwards and forward
and disconnect the flat cable that comes from the
front from the connector on the connector board of
the camera.
d. Remove the front unit.
lear
1
A
2
Clear C
1/4
ND
2
B
Star 4P
ND 1/16
33
C
Star 6P
D 1/64
N
4
D
oft focus
S
2
1
Replacements Technical Manual LDK 7500 + LDK 5490 Adapter 3-5
Page 26

3-6 Technical Manual LDK 7500 + LDK 5490 Adapter Replacements
Page 27

Section 4
Adjustments
This section contains the adjustment procedures to be followed to obtain the best performance from
the camera. These procedures need only be used if, following a module replacement, the camera
does not perform according to specifications.
Contents
Introduction ........................................................ 4-2
Test Equipment ................................................. 4-3
Set-up Instructions ............................................. 4-3
Video ADC Automatic Calibration ....................... 4-4
Pre-processor Calibration ................................... 4-4
Adjustments Technical Manual LDK 7500 + LDK 5490 Adapter 4-1
3200K Adjustment ............................................. 4-4
Sawtooth Calibration .......................................... 4-4
Flare Adjustment ................................................ 4-5
Software Download ............................................ 4-5
Video Monitoring Adjustment ............................. 4-7
Page 28

Introduction
This camera is factory tested and adjusted for operational
use. Under normal circumstances, the internal automatic
calibration procedures do not need to be started and the
internal potentiometers do not need to be adjusted.
There are two situations that might require some
realignment of the camera:
a. When a lens is fitted.
b. When a printed circuit board has been replaced.
When a lens is fitted the following alignment procedures
should be carried out in the order given:
1. Run the internal 3200K calibration procedure.
2. Adjust the white shading via the menu system.
3. Adjust the flare.
4. Adjust the back focus (see lens manual for this
adjustment).
If a printed circuit board is replaced, refer to table 4-1 to
see which adjustments must be carried out to realign
the camera. For a particular board, carry out the
procedures in the order given.
If it is discovered that the camera is misaligned, the
following procedures are given as a guide for competent
service personnel, who have a thorough knowledge of
the camera and have the use of calibrated equipment,
to realign the camera.
If no improvement can be achieved or an adjustment is
out of range, please contact your local supplier or the
nearest Thomson Multimedia Broadcast Solutions
Service Centre.
The camera head adjustment procedures are designed
as separate units. Within a numbered procedure do not
change the position of switches or jumpers unless
instructed to do so in the procedure.
Table 4-1 Adjustment procedures on board replacement
Printed Circuit Board
Digital video board
Pre-processor board
Lens plate assemble
Data Board
Sync. / monitoring board
Adjustment Procedure
1. Video ADC automatic calibration (internal)
2. Sawtooth calibration (internal)
1. Pre-processor calibration (internal)
1. 3200K adjustment
2. White shading adjustment
3. Flare adjustment
1. Software download
1. Video monitoring adjustment
4-2 Technical Manual LDK 7500 + LDK 5490 Adapter Adjustments
Page 29

Test Equipment
Set-up Instructions
The following is a list of equipment required to carry out
the adjustment procedure:
• Set of board extenders LDK 5820/01
• Oscilloscope (with cursor measurement)
• Spotlight 3200K
• Focus test chart
• Black hole test chart
• White PortaPattern test chart
• White 3200K test chart
• Waveform monitor
CAUTION:
Do not attempt to improve camera performance
by adjusting individual potentiometers, jumpers or switches
as this may lead to complete misalignment of the camera.
CAUTION:
Do not realign individual potentiometers, jumpers or switches
not mentioned in this chapter or earlier in this manual.
These adjustment points are for factory use only.
Before carrying out any adjustments the following steps
are recommended:
• Attach an adapter to the camera.
• Install the camera on a tripod.
• Attach the lens and the necessary cables.
• Allow the camera to warm-up.
CAUTION:
Switch off the power supply to the camera
before removing or replacing printed circuit boards.
Adjustments Technical Manual LDK 7500 + LDK 5490 Adapter 4-3
Page 30

Video ADC Automatic Calibration
The following is an automatic internal calibration procedure to adjust the analogue-digital convertors.
(There are not pre-conditions for this calibration.)
a. In the menu system select the Service menu.
b. Select Calibrations.
c. Select Video ADC and run the procedure.
Sawtooth Calibration
The following is an automatic internal calibration procedure to adjust the internal gain of the DVP board.
(There are not pre-conditions for this calibration.)
a. In the menu system select the Service menu.
b. Select Calibrations.
c. Select Sawtooth and run the procedure.
Pre-processor Calibration
The following is an automatic internal calibration procedure to adjust the analogue-digital convertors.
(There are not pre-conditions for this calibration.)
a. In the menu system select the Service menu.
b. Select Calibrations.
c. Select PreProc and run the procedure.
3200K Adjustment
The following is an automatic internal calibration procedure to set the 3200K colour temperature.
a. Recall the standard factory file.
b. Shoot the white test chart illuminated with a 3200k spotlight (nominal video).
c. In the menu system select the Service menu.
d. Select Calibrations.
e. Select 3200K and run the procedure.
4-4 Technical Manual LDK 7500 + LDK 5490 Adapter Adjustments
Page 31

Flare Adjustment
The following is an adjustment procedure to correct the flare introduced by the lens.
a. Recall the standard factory file.
b. Close the lens and set the black level to approximately 10mV.
c. With the menu system select the green signal.
d. Shoot the black hole test chart (100% video).
e. In the menu system select the Video menu.
f. Select Flare.
g. View the waveform monitor and adjust the green flare so that there is no difference in the black level.
h. Repeat this adjustment for blue and red.
Software Download
The following procedure should be carried out to update the software.
a. Connect the PC to the RS232 connector of the camera.
b. Follow the instruction on the PC to download the software.
Adjustments Technical Manual LDK 7500 + LDK 5490 Adapter 4-5
Page 32

Video Monitoring Adjustment
ZR234
A50
B50
Sync. / Monitoring Board
X1B1
A1
4-6 Technical Manual LDK 7500 + LDK 5490 Adapter Adjustments
Page 33

Video Monitoring Adjustment
Set-up
1. Switch off power. Place sync. monitoring board on service extender. Switch on power.
2. Switch on colour bar.
Viewfinder output level
3. Connect oscilloscope to X1-B45.
4. Adjust the potentiometer on the sync. monitoring board to obtain the correct output amplitude VF output signal.
Measure at: Adjust with: Required result: Correct:
X1-B45 ZR234 700mV
0.2V
100
90
10
0%
5. Switch off power. Return sync. monitoring board to its position in the camera.
10µS
VB+700mV
Adjustments Technical Manual LDK 7500 + LDK 5490 Adapter 4-7
Page 34

4-8 Technical Manual LDK 7500 + LDK 5490 Adapter Adjustments
Page 35

Section 5
Exploded Views
Contents
HD Camera head............................................... 5-2
Camera head basic ...........................................5-3
Left cover assembly........................................... 5-4
Exploded Views Technical Manual LDK 7500 + LDK 5490 Adapter 5-1
Right cover assembly ........................................ 5-5
Shoulder pad assembly .....................................5-6
Handgrip assembly ............................................5-7
Page 36

5-2 Technical Manual LDK 7500 + LDK 5490 Adapter Exploded Views
Page 37

Exploded Views Technical Manual LDK 7500 + LDK 5490 Adapter 5-3
Page 38

5-4 Technical Manual LDK 7500 + LDK 5490 Adapter Exploded Views
Page 39

Exploded Views Technical Manual LDK 7500 + LDK 5490 Adapter 5-5
Page 40

5-6 Technical Manual LDK 7500 + LDK 5490 Adapter Exploded Views
Page 41

Exploded Views Technical Manual LDK 7500 + LDK 5490 Adapter 5-7
Page 42

5-8 Technical Manual LDK 7500 + LDK 5490 Adapter Exploded Views
 Loading...