

Page 1

User’s Guide
LDK 7500 + LDK 5490
VIPER - DIGITAL CINEMATOGRAPHIC CAMERA SYSTEM
3922 496 49801
PRINTED: January 2004
Page 2

Declaration of Conformity
We, Thomson Broadcast Solutions B.V., Kapittelweg 10, 4827 HG Breda, The Netherlands, declare under our sole responsibility that this
product is in compliance with the following standards:
EN60065 : Safety
EN55103-1 : EMC (Emission)
EN55103-2 : EMC (Immunity)
following the provisions of:
a. the Safety Directives 73/23//EEC and 93/68/EEC
b. the EMC Directives 89/336/EEC and 93/68/EEC
FCC Class A Statement
This product generates, uses, and can radiate radio frequency energy and if not installed and used in accordance with the instructions,
may cause interference to radio communications.
It has been tested and found to comply with the limits for a class A digital device pursuant to part 15 of the FCC rules, which are
designed to provide reasonable protection against such interference when operated in a commercial environment.
Operation of this product in a residential area is likely to cause interference in which case the user at his own expense will be required to
take whatever measures may be required to correct the interference.
Copyright
Für diese Unterlage behalten wir uns alle
Rechte vor (Gemäß DIN 34). Technische
Änderungen im Zuge der
Weiterentwicklung vorbehalten.
Copying of this document and giving it to
others, and the use or communication of
the contents thereof, are forbidden
without express authority. Offenders are
liable to the payment of damages. All
rights are reserved in the event of the grant
of a patent or the registration of a utility
model or design. Liable to technical
alterations in the course of further
development.
© Copyright Thomson Broadcast and Media Solutions 2004
Toute communication ou reproduction de
ce document, toute exploitation ou
communication de son contenu sont
interdites, sauf autorisation expresse. Tout
man-quement à cette règle est illicite et
expose son auteur au versement de
dommages et intérêts. Tous nos droits sont
réservés pour le cas de la délivrance d'un
modèle d'utilité. Sous réserve de
modification au cours de l'évolution
technique.
Page 3

03.18.5 i
Viper
Digital Cinematographic Camera
Operator's Manual
The Viper FilmStream Camera combines two different application
concepts in a single camera. By selecting the operation mode, the
camera operates either as a HD video camera or as a digital film camera.
The digital film camera mode is known as the FilmStream mode.
Using this manual
This manual is divided into two parts:
Part 1
Describes how to set-up and use the camera as a digital film camera
in the FilmStream mode.
Part 2
Describes how to set-up and use the camera as a HD video camera.
Page 4

ii Viper
Important Precautions .................................................................................. iv
Introduction............................................................................................... 1-1
Selecting operational mode ........................................................................ 1-2
Streaming modes ....................................................................................... 1-3
Technology ................................................................................................. 1-4
Access and Security ................................................................................... 1-6
Assembling the Units............................................................................... 2-1
Lens ............................................................................................................ 2-2
2-inch Viewfinder ........................................................................................ 2-4
Positioning the 2-inch viewfinder ............................................................... 2-6
Tripod Adapter Plate (optional) ..................................................................2-8
Shoulder Pad ............................................................................................2-10
Configurations .......................................................................................... 3-1
Configurations ............................................................................................3-2
Camera Controls ...................................................................................... 4-1
Power Supply ............................................................................................. 4-2
FilmStream Connectors ............................................................................. 4-4
FilmStream Camera Functions .................................................................. 4-6
Viewfinder Indicators ................................................................................4-12
System Menu Control ............................................................................... 4-17
Auxilary Functions .................................................................................... 4-18
Set-up and operation ............................................................................... 5-1
Setting up the camera ................................................................................5-2
Operating the camera ................................................................................. 5-4
Using the Menus ....................................................................................... 6-1
Introduction .................................................................................................6-2
Menu System .............................................................................................. 6-3
Menu Structure ........................................................................................... 6-6
Security Menu ............................................................................................. 6-7
Files Menu .................................................................................................. 6-8
Contents - Part 1 - FilmStream mode
Page 5

03.18.5 iii
Contents - Part 2 - HD Video mode
Introduction............................................................................................... 1-1
Selecting operational mode ........................................................................ 1-2
HD Video mode ..........................................................................................1-3
Technology ................................................................................................. 1-4
Access and Security ................................................................................... 1-6
Assembling the Units............................................................................... 2-1
Transport Case ...........................................................................................2-2
Lens ............................................................................................................ 2-4
2-inch Viewfinder ........................................................................................ 2-6
Positioning the 2-inch viewfinder ............................................................... 2-8
2-inch Viewfinder Accessories ................................................................. 2-10
Microphone ...............................................................................................2-12
Shoulder Pad ............................................................................................2-14
Top Light (option) ..................................................................................... 2-15
Tripod Adapter Plate (option) ................................................................... 2-16
Configurations .......................................................................................... 3-1
Configurations ............................................................................................3-2
Camera Controls ...................................................................................... 4-1
Power Supply ............................................................................................. 4-2
Video Connectors ....................................................................................... 4-4
Video Functions ..........................................................................................4-6
Viewfinder .................................................................................................4-12
Viewfinder Indicators ................................................................................4-14
Audio ......................................................................................................... 4-18
System Menu Control ............................................................................... 4-19
Auxilary Functions .................................................................................... 4-20
Set-up and operation ............................................................................... 5-1
Setting up the camera ................................................................................5-2
Operating the camera ................................................................................. 5-4
Shooting screens ......................................................................................5-10
Using the Menus ....................................................................................... 6-1
Introduction .................................................................................................6-2
Menu System .............................................................................................. 6-3
Menu Structure ........................................................................................... 6-6
Security Menu ............................................................................................. 6-7
Files Menu .................................................................................................. 6-8
Install Menu ..............................................................................................6-10
Appendix
Page 6
iv Viper
To ensure continual high performance from the camcorder take the
following precautions into consideration:
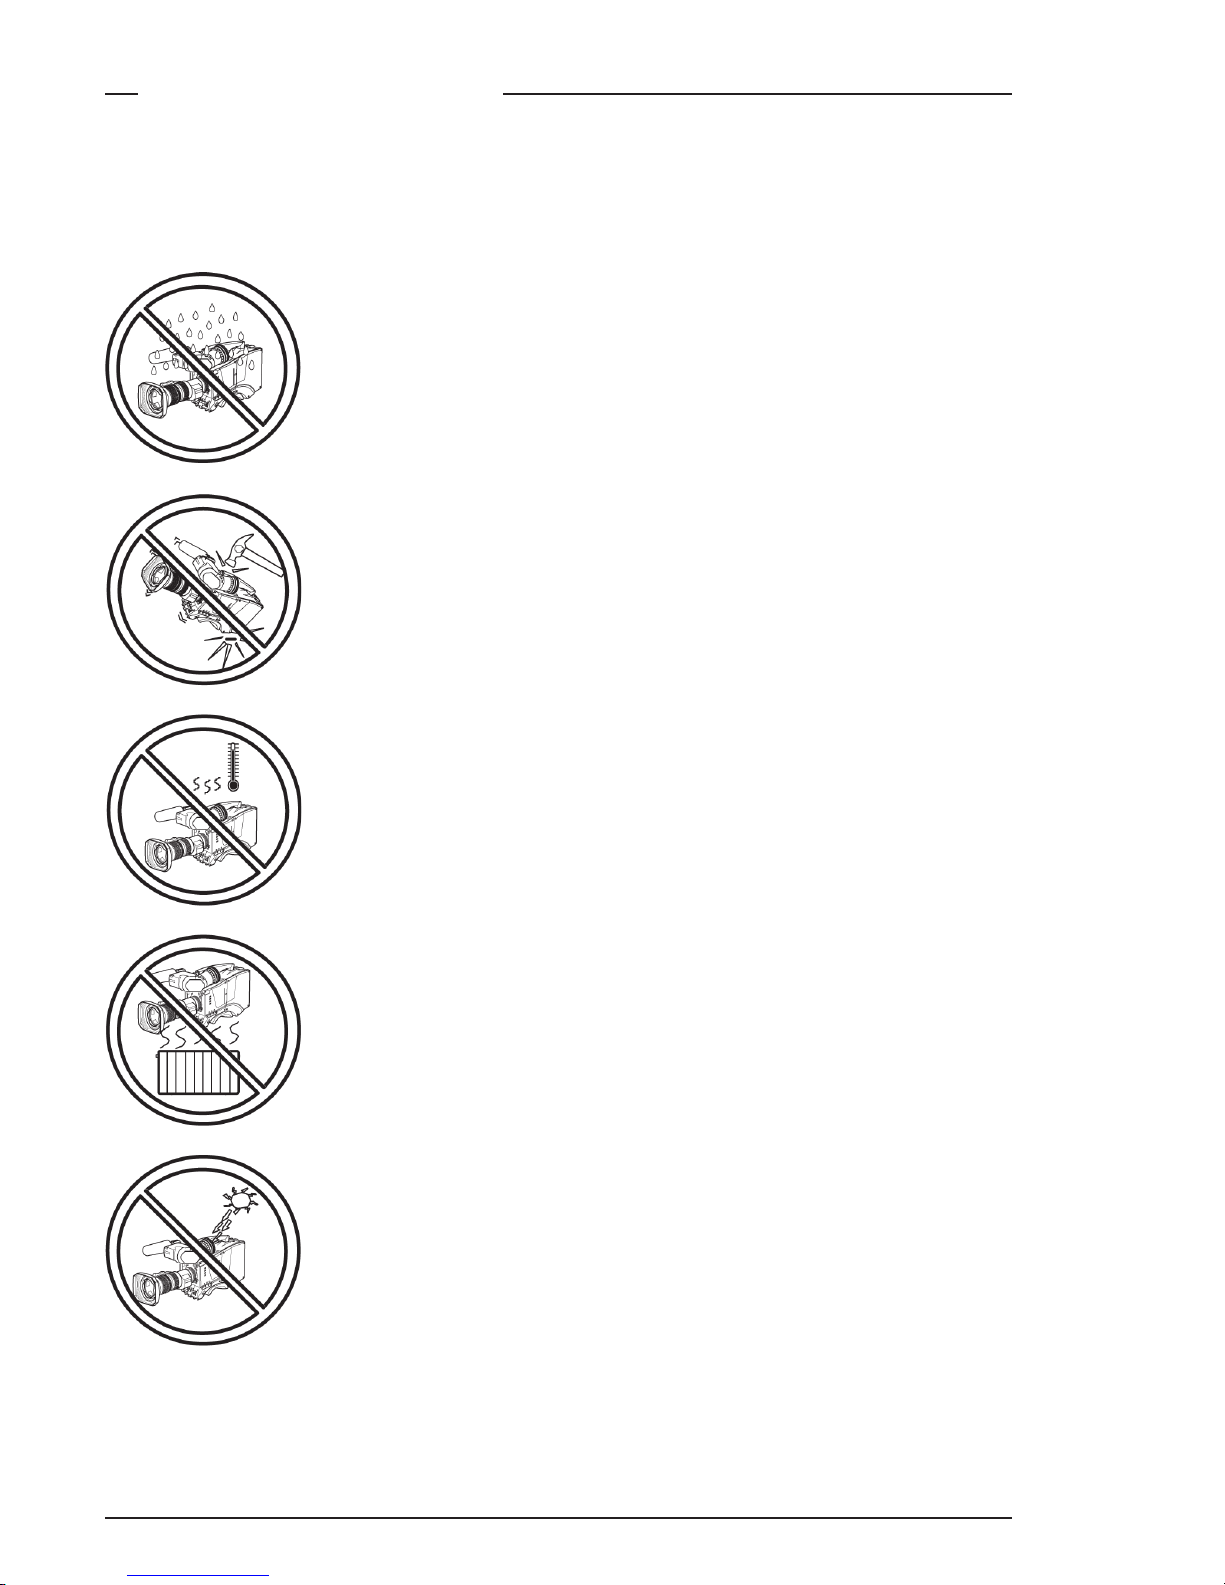
Important Precautions
Avoid very damp places. If the environment is wet
or damp a rain cover must be used to protect the
unit.
Do not subject the unit to severe shocks or vibration.
Do not expose the camera to extremes of
temperature.
Do not leave the unit in direct sunlight or close to
heating appliances for extended periods.
Do not allow sunlight to shine into the viewfinder.
Page 7

03.18.5 v
Warning
If the camera is in a wet or damp environment, a rain cover must be
used to protect it for personal safety reasons (EN60065). The optional
rain cover protects the camera according to safety specification
EN60529 up to level IPX2 (spraying water).
FCC Class A Statement
This equipment generates, uses, and can radiate radio frequency
energy and if not installed and used in accordance with the instructions,
may cause interference to radio communications.
It has been tested and found to comply with the limits for a class A
digital device pursuant to part 15 of FCC rules, which are designed to
provide reasonable protection against such interference when operated in a commercial environment.
Operation of this equipment in a residential area is likely to cause
interference in which case the user at his own expense will be required
to take whatever measures may be required to correct the interference.
Page 8

vi Viper
Page 9

Introduction FilmStream mode 1-1
Section 1
Introduction
This section describes the FilmStream mode of operation and
outlines the technology used in the Viper. The access and
security features of the camera are also explained.
Selecting operational mode ............................................................. 1-2
Streaming modes .............................................................................. 1-3
Technology ....................................................................................... 1-4
Access and Security .......................................................................... 1-6
Contents
Page 10

1-2 FilmStream mode Viper
To operate in the FilmStream mode you must ensure that the camera
is switched to this mode. The output signals and the control functions
that are available depend on the mode you select.
The factory default for the mode setting is the FilmStream mode, so
normally you do not have to switch modes to operate the camera as
a digital film camera.
If a different mode has been set up, then you need to switch to the
FilmStream mode by changing a menu setting (for more details refer
to Section 5).
To change modes:
1. Open the menu system.
2. Go to the Install menu.
3. Select Output mode item.
4. Change the value to FilmStream or HDStream.
The camera remembers the last selected mode, so it remains in the
FilmStream mode even when switched off and on again.
Monitoring
To provide a monitoring signal for viewing, a separate channel is used
which undergoes some video processing to make it acceptable for
viewing on monitors and viewfinders. Although derived from the same
sensor signals, this channel is entirely separate from the main FilmStream
output.
The Viper does not have any adjustable visual parameters for the
FilmStream outputs. Framing, focussing, exposure setting, shutter
angle and optical filtering are the only operations required of the
camera and lens operators.
Selecting operational mode
Page 11

Introduction FilmStream mode 1-3
Streaming modes
FilmStream mode
The FilmStream mode differs from the HD video mode in that it
captures all information in a scene and stores it digitally without
altering any parameters. By avoiding video processing in the raw RGB
data, the output signal is a true and faithful representation of the light
from the scene. Thus the FilmStream digital data signals are full-range
signals suitable for film post-production without any loss of information.
Capturing the light
The Viper uses three high-definition CCD sensors to register the light
from the lens. The signals from these sensors are converted to R, G, and
B data values using 12-bit A/D converters. Using logarithmic calculations
this data is then converted to 10-bit values and transferred to a recorder
using a dual HD-SDI link. Full resolution is maintained: true-progressive
1920 x 1080 pixels for every color. No color sub-sampling, no color
space conversions, no irreversible video manipulations, no further
quantizations, and no compression is carried out.
HDStream mode
The output mode can also be set to HDStream. This mode provides
signals similar to the FilmStream signals but in a 4:2:2 HD-SDI format.
These HDStream signals are subject to white balancing in the camera
but like FilmStream signals, they do not undergo any other video
processing. HDStream mode is ideal when storage capacity is limited
or for applications where lower resolution signals are sufficient, such
as background for keying.
Page 12

1-4 FilmStream mode Viper
Technology
CCD sensor technology
The Viper FilmStream Camera uses three unique 9.2 Megapixel HDDPM+ CCD sensors that allow the camera to work in several formats;
1080 lines at 24/25/30 frames per second or 720 lines at 24/25/30/50/
60 frames per second.
This CCD sensor is based on the Frame-Transfer principle which is best
suited for progressive images. The Viper uses a mechanical shutter
which means that the CCD exposure has a similar ramp to film cameras,
thus providing similar motion characteristics.
Formats
The following formats can be selected in the Install menu:
1080psf at 23.98Hz
1080psf at 24Hz
1080psf at 25Hz
1080psf at 29.97Hz
1080i at 50Hz
1080i at 59.94Hz
1080i at 59.94Hz - 23
720p at 23.98Hz
720p at 25Hz
720p at 29.97Hz
720p at 50Hz
720p at 59.94Hz
The sensor consists of 1920 horizontal pixels and 4320 vertical subpixels. By grouping the vertical sub-pixels, the vertical line count can
be set. Full resolution is preserved and the horizontal viewing angle
stays the same.
• 1080P
When four vertical sub-pixels are combined, the total line count
becomes 1080 lines. So, a 1920 x 1080 image sensor is obtained with
a 16:9 aspect ratio.
Page 13

Introduction FilmStream mode 1-5
• 1080i
When eight vertical sub-pixels are combined, the total line count
becomes 540 lines. The second field is shifted four pixels to give an
interlaced picture.
• 720P
When six vertical sub-pixels are combined, then the total line count
becomes 720 lines. So, a 1920 x 720 image sensor is obtained with a 16:9
aspect ratio. When set to 60 frames per second, slow motion effects can
be achieved during post-production at different playback speeds.
• Cinemascope Aspect Ratio
When three vertical sub-pixels are combined, 1440 vertical lines are
obtained. By using the middle 1080 lines, a 2.37:1 aspect ratio is
achieved without the need for anamorphic lenses while maintaining
full 1920 x 1080 resolution. There is no need to crop the image or lose
resolution to get this aspect ratio.
Page 14
1-6 FilmStream mode Viper
Access and Security
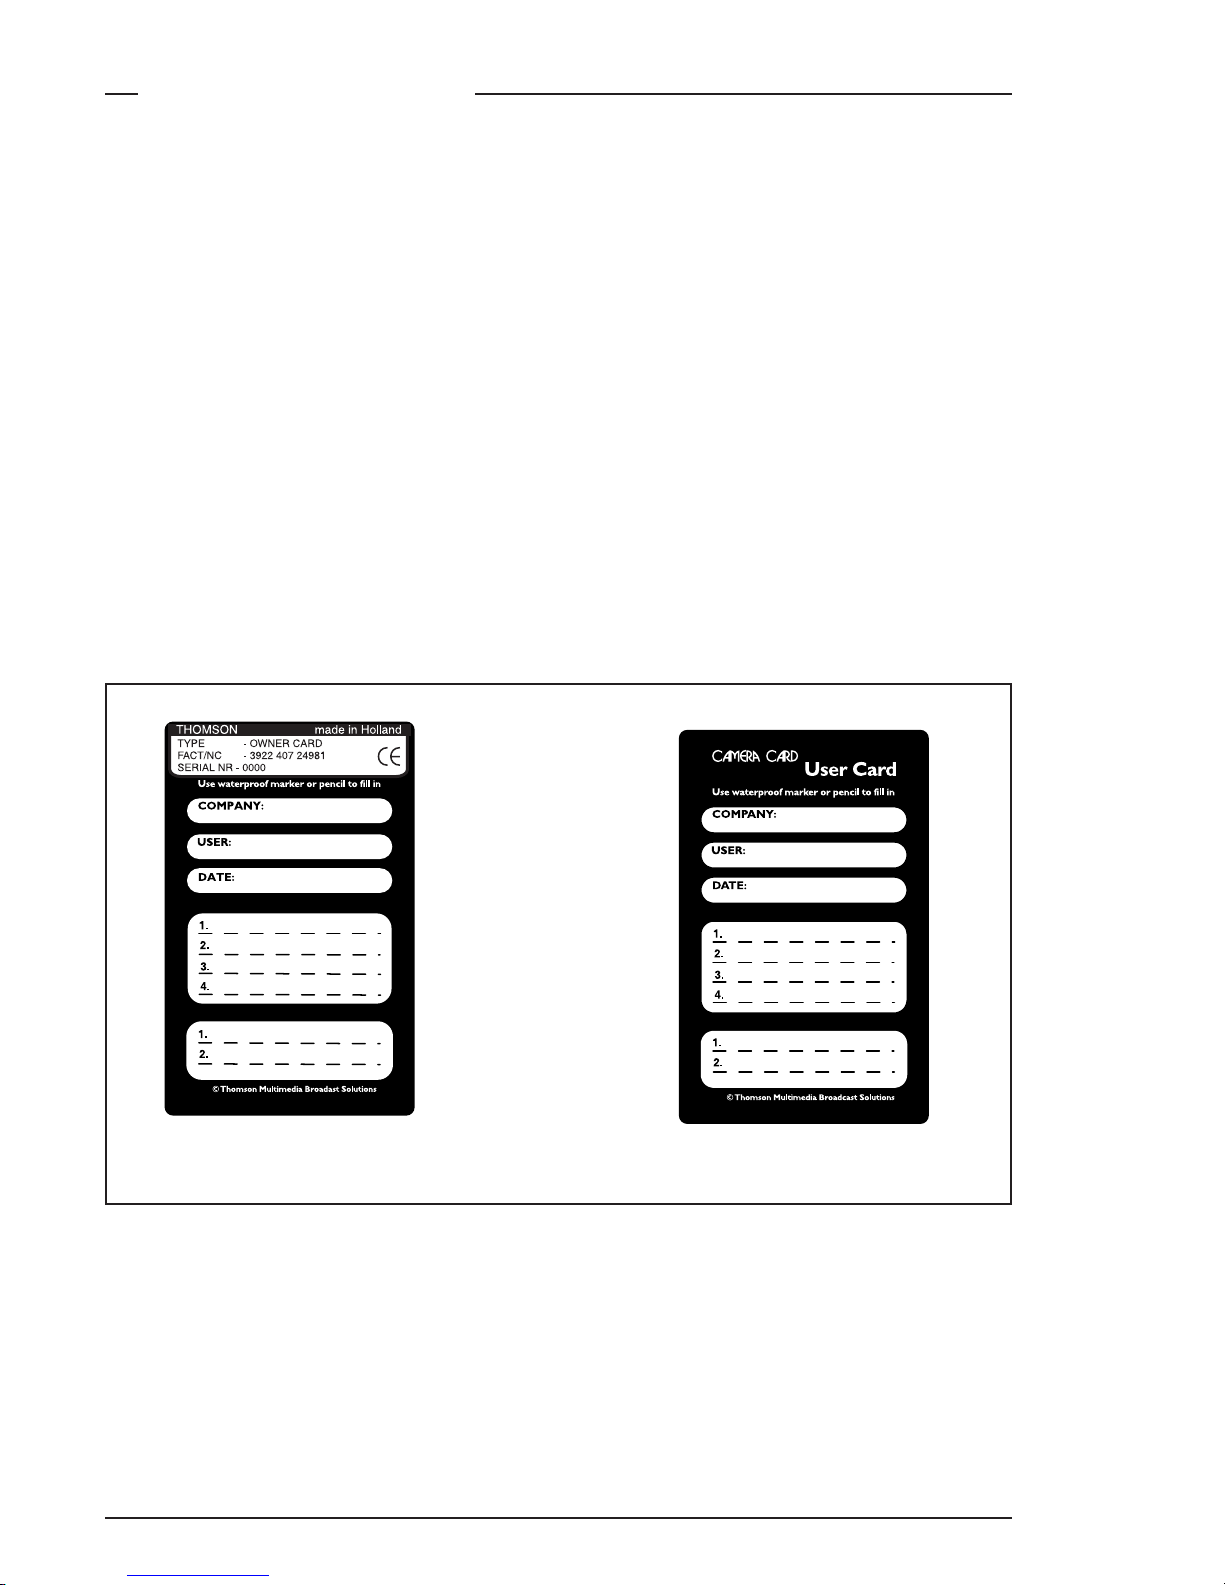
Camera cards
Three camera cards are delivered with each camera; one owner’s card
and two user cards. An owner’s card is linked to the serial number of
the camera and is unique to that camera. It cannot be used as an
owner’s card for another camera.
The owner’s card acts as:
• an access control device to the security settings of the camera.
• a storage card for four scene files and two operator files.
The user card stores four scene files and two operator files.
Operator files contain information relating to the set-up of general
camera preferences. Scene files contain information relating to the
video settings of the camera head.
User card
Owner’s card
Page 15
Introduction FilmStream mode 1-7
C
le
a
r
C
le
a
r
A
1
S
ta
r 4
P
N
D
1
/4
B
2
S
ta
r 6
P
N
D
1
/1
6
C
3
S
o
ft fo
c
u
s
N
D
1
/6
4
D
4
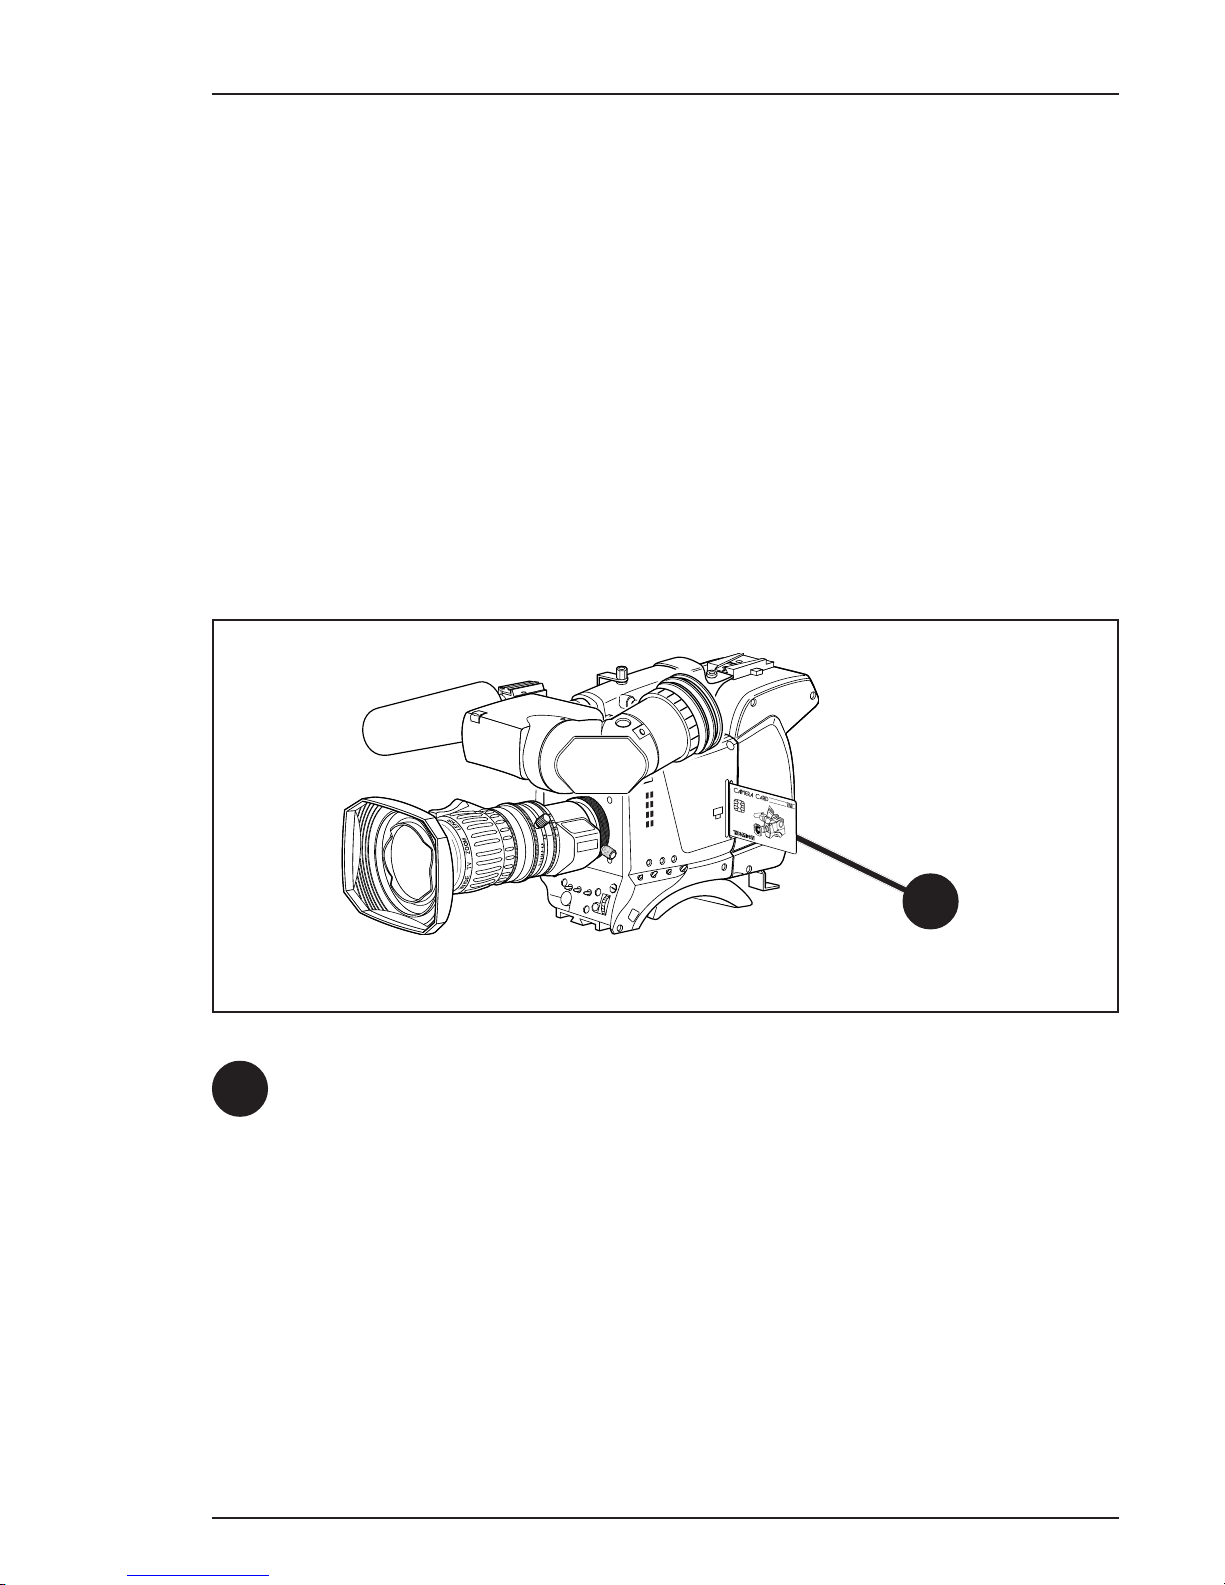
Camera card slot
Insert your camera card into this slot with the chip on the card facing
the front of the camera. Push the card home until it fits snugly.
A camera card is not required for normal operation of the camera.
Note
Only use an original camera card.
Store the owner’s card in a safe place.
1
1
Access control
The owner’s card or the PIN code is used to access special set-up and
security features of the camera. Inserting the owner’s card into the
camera gives direct access to the Security menu. If you select the
Security menu without this card inserted, you must enter the correct
PIN code to gain access to this menu.
User levels
Four user levels can be set in the security menu. These restrict access,
in varying degrees, to the operational controls. The appendix indicates
which functions are available at each user level.
Page 16

1-8 FilmStream mode Viper
Page 17

Assembling the Units FilmStream mode 2-1
This section provides information on the physical assembly
of the camera and on the mounting of accessories.
Section 2
Assembling the Units
Contents
Lens ................................................................................................... 2-2
2-inch Viewfinder ............................................................................. 2-4
Positioning the 2-inch viewfinder .................................................... 2-6
Tripod Adapter Plate (optional) ...................................................... 2-8
Shoulder Pad ................................................................................... 2-10
Page 18
2-2 FilmStream mode Viper
Lens
1
3
4
5
2
Page 19

Assembling the Units FilmStream mode 2-3
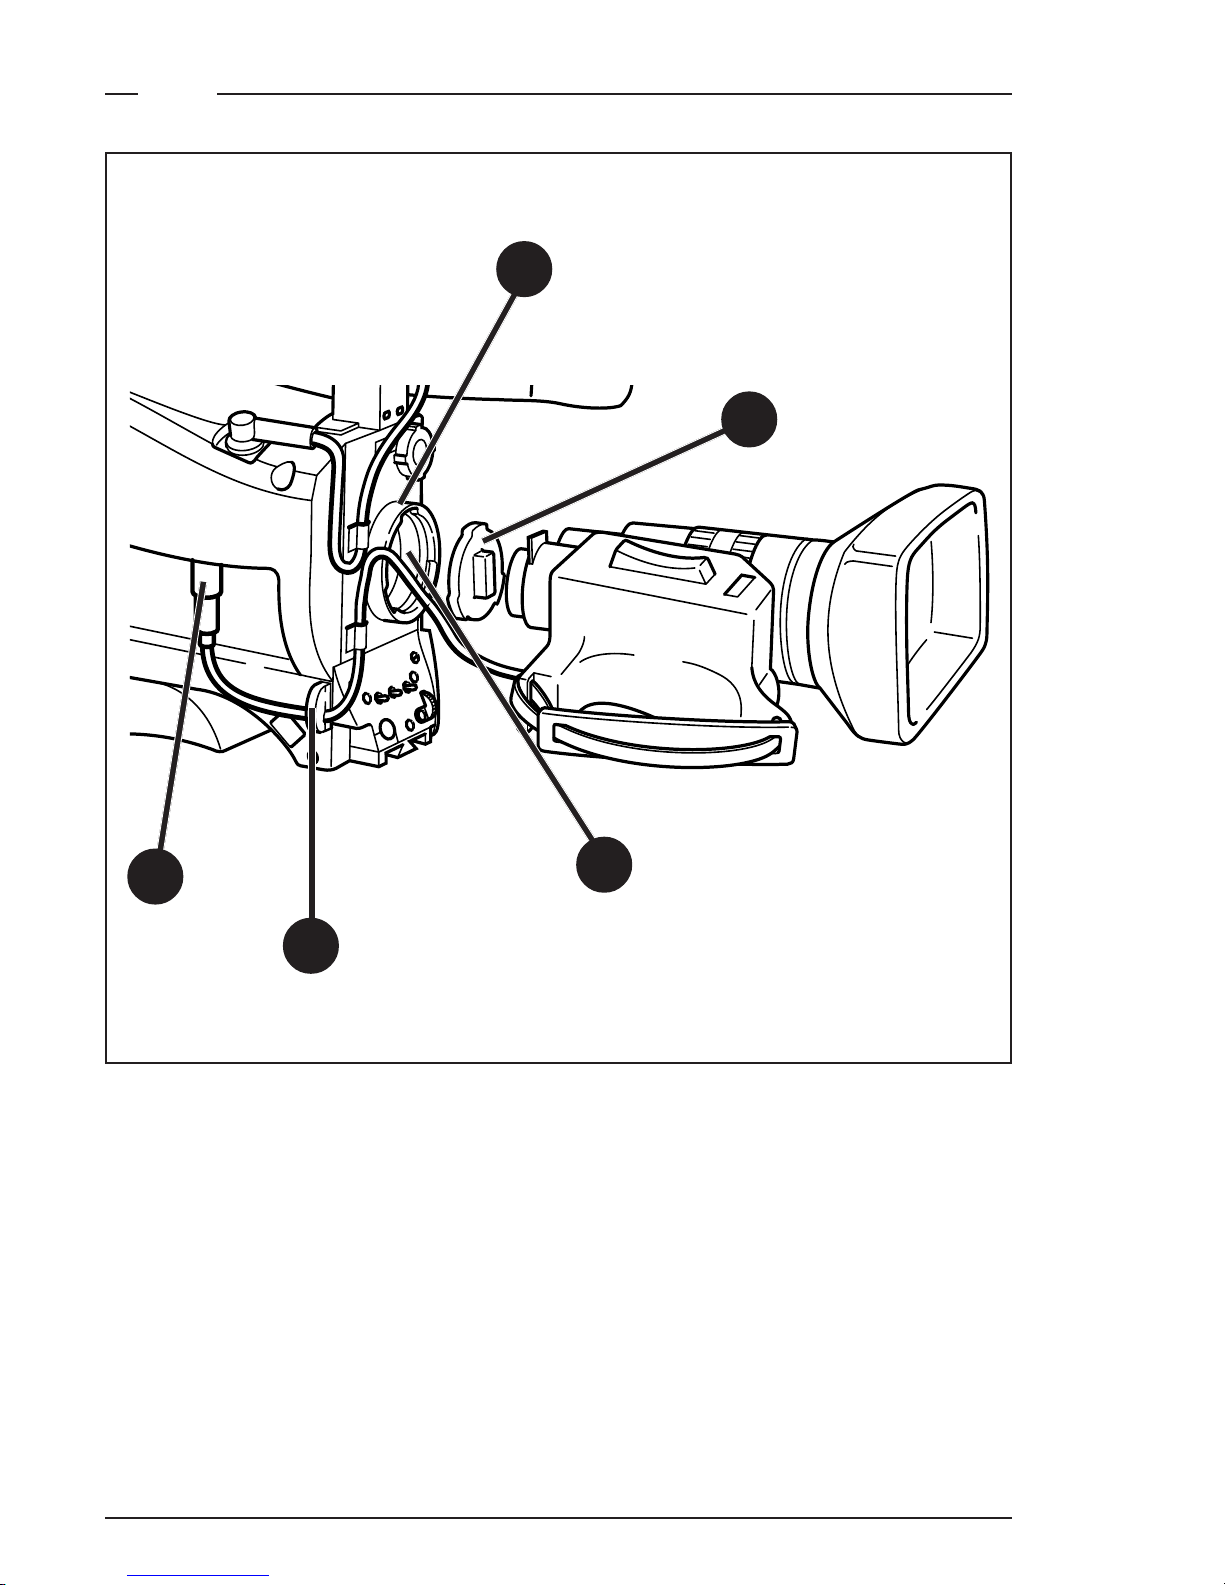
Attach a lens to the camera head as follows:
a. Ensure that the lens locking ring (1) is in the unlocked position -
turned counterclockwise.
b. Remove the dust protection cap (2).
c. Slot the lens into the lens mount (3).
Caution
Do not attach a lens weighing more than 5 kg to the
camera without a support.
d. Turn the lens locking ring (1) clockwise to lock the lens in place.
e. Connect the lens cable, if any, to the lens connector (4) at the right
side of the camera.
f. Place the lens cable into the bottom clip at the front of the camera
and clip (5) located at the side. (Pull and twist clip (5) to open it.)
g. In the Lens menu, set the Lens Type item to Std for a standard lens
or to WA for a wide angle lens.
h. Select the lens manufacturer in the Lens menu. Select Ang for
Angenieux, Can for Canon, Fuj1 or Fuj2 for Fujinon or select Other
for other lens manufacturers.
Note:
Always mount the dust protection cap when the lens is not connected
to the camera.
When a new lens is fitted to the camera it may be necessary to carry
out some adjustments to optimize its use, for example, back focus. For
more information about these adjustments refer to the lens
manufacturer’s documentation.
Page 20
2-4 FilmStream mode Viper
2-inch Viewfinder
1
2
3
4
5
6
Page 21

Assembling the Units FilmStream mode 2-5
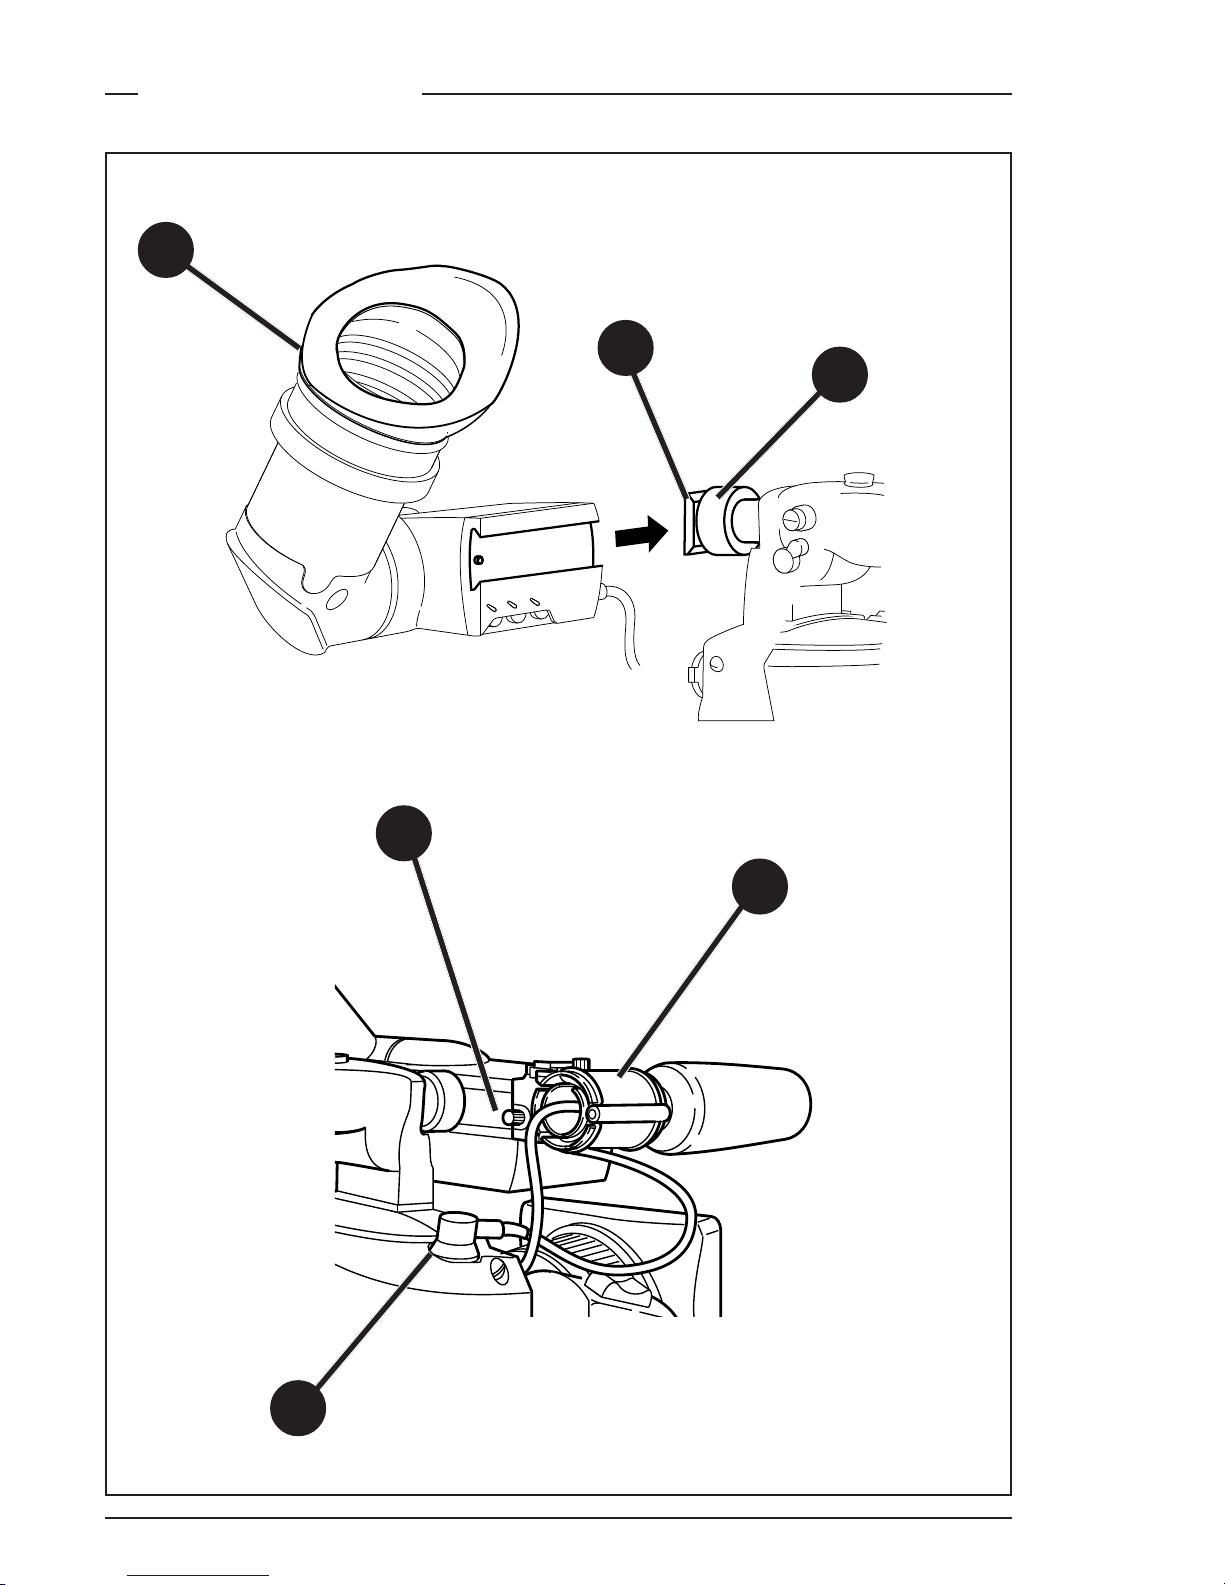
Mounting the 2-inch viewfinder and microphone holder
To mount the 2-inch viewfinder proceed as follows:
a. Loosen locking ring (1) of viewfinder support bracket (2) at the
front of the camera handle. (As seen from the rear of the camera,
turning the locking ring counterclockwise moves it towards the
handle.)
b. Slide the viewfinder onto the viewfinder support bracket.
c. Tighten the locking ring (1) by turning it clockwise (as seen from
rear) so that the viewfinder is mounted securely to the support.
d. Connect the viewfinder cable to the viewfinder connector socket
(4) at the top right of the camera.
e. Slide the microphone holder (5) onto the viewfinder and secure
with the knurled screw (6).
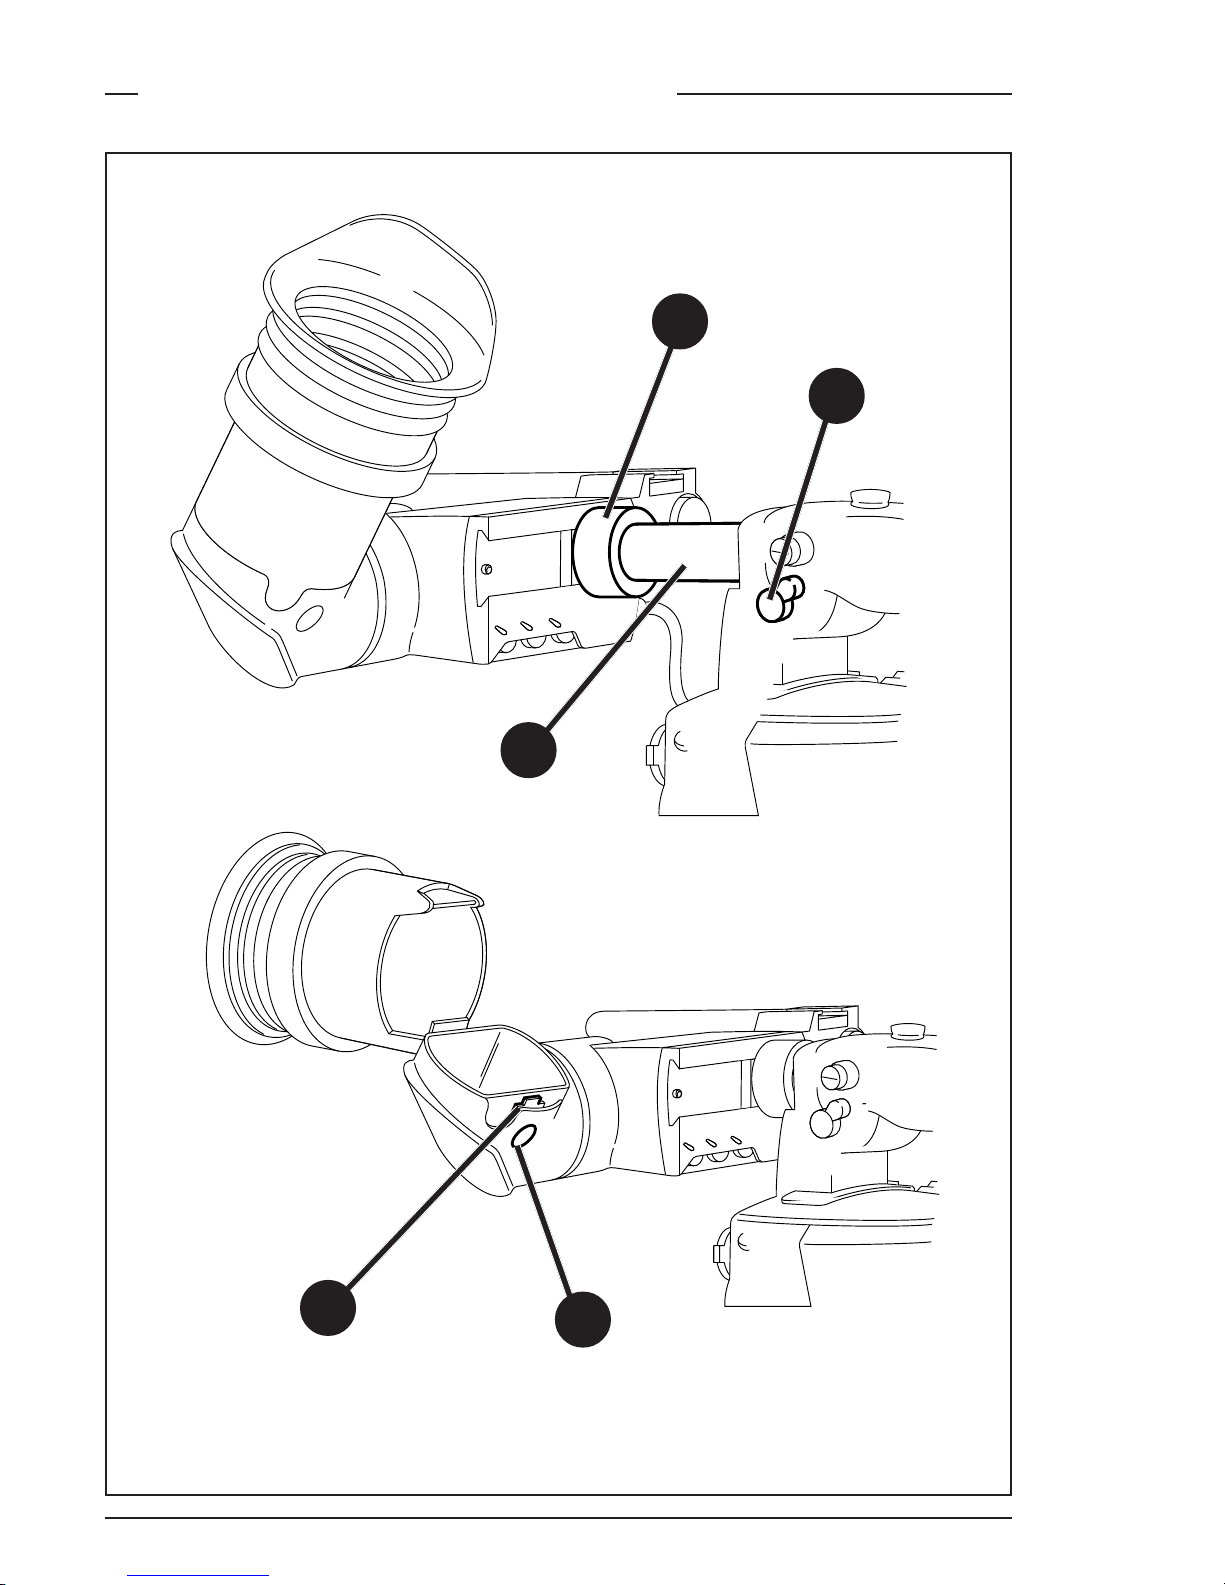
Caution
Always fit the microphone holder (5) even if you don’t use
a microphone as it functions as a safety stop for the
viewfinder.
f. To improve the comfort of the skin contact when using the
viewfinder, fit the eyepiece cover (3) to the rubber eyepiece.
Page 22
2-6 FilmStream mode Viper
Positioning the 2-inch viewfinder
1
2
3
4
5
Page 23

Assembling the Units FilmStream mode 2-7
The horizontal position of the viewfinder can be adjusted as follows to
suit your requirements:
a. Loosen the locking ring (1). (As seen from the rear of the camera,
turning the locking ring counterclockwise moves it towards the
handle.)
b. Slide the viewfinder horizontally along the rail to the desired
position.
c. Tighten the locking ring (1) by turning clockwise.
The dioptre hood and eyepiece of the viewfinder can be rotated
vertically.
The viewfinder can be positioned backwards and forwards along the
camera axis. Loosen the support bracket round bar retaining lever (2)
and slide the round bar (3) forwards or backwards. When the desired
position is reached tighten the support bracket round bar retaining
lever (2) again.
To use the viewfinder at a distance press the button (4) below or above
the eyepiece tube and swing it free of the associated clip (5). The
display can now be seen from further away.
Page 24
2-8 FilmStream mode Viper
C
l
e
ar
C
l
ear
A
1
S
t
ar
4P
N
D
1/
4
B
1
S
t
ar
6P
N
D
1/
16
C
1
Sof
t
f
ocus
N
D
1/
64
D
1
To mount the camera on a tripod, the tripod plate (LDK 5031 is
available as an option) must first be attached to the tripod.
Follow the tripod manufacturer’s instructions to mount the wedge
plate supplied with the tripod and the tripod adapter plate firmly onto
the tripod.
Tripod Adapter Plate (optional)
1
2
3
4
5
Page 25

Assembling the Units FilmStream mode 2-9
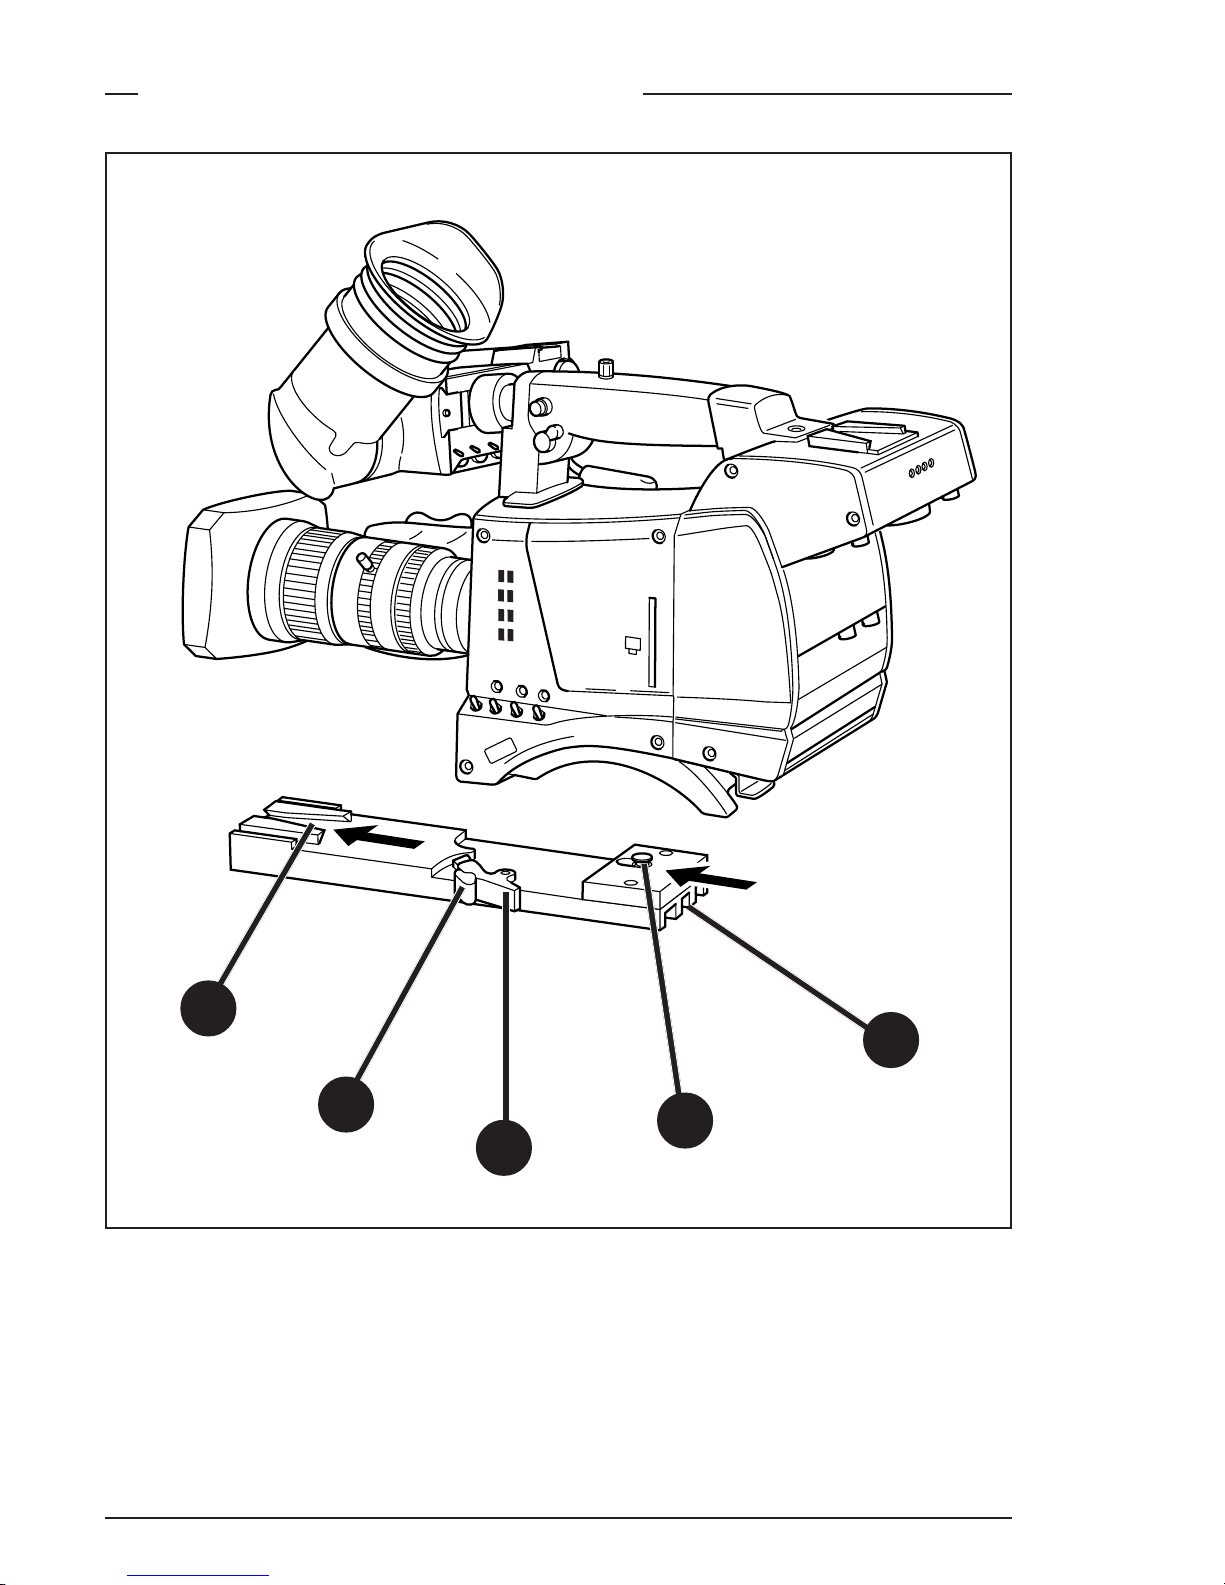
Attach the camera to the tripod adapter plate as follows:
a. Slide the camera horizontally along the tripod adapter plate from
back to front ensuring that the front of the camera engages the Vslot (1) at the front of the tripod adapter plate, and that the slot on
the bottom of the camera engages the stud (2) at the rear of the
tripod adapter plate.
b. Firmly push the camera forward until it clicks into place.
c. When the camera is mounted on the tripod tighten thE locking
lever (5) to ensure that the stud (2) at the rear of the plate is locked
firmly in place.
Caution
Failure to attach the camera to the tripod adapter plate in
the correct manner could result in an unsecured camera.
Ensure that the rear stud (2) is engaged and that the camera
clicks into place.
To remove the camera from the tripod proceed as follows:
a. When removing the camera first open the locking lever (5) to free
the rear stud (2).
b Press the red locking lever (3) against release handle (4) on the
tripod adapter plate and hold.
c. Ensure that you have a firm hold of the camera.
d. Pull the release handle (4) forward.
e. Move the camera backwards and up. The camera is now free from
the tripod adapter plate.
Page 26
2-10 FilmStream mode Viper
Shoulder Pad
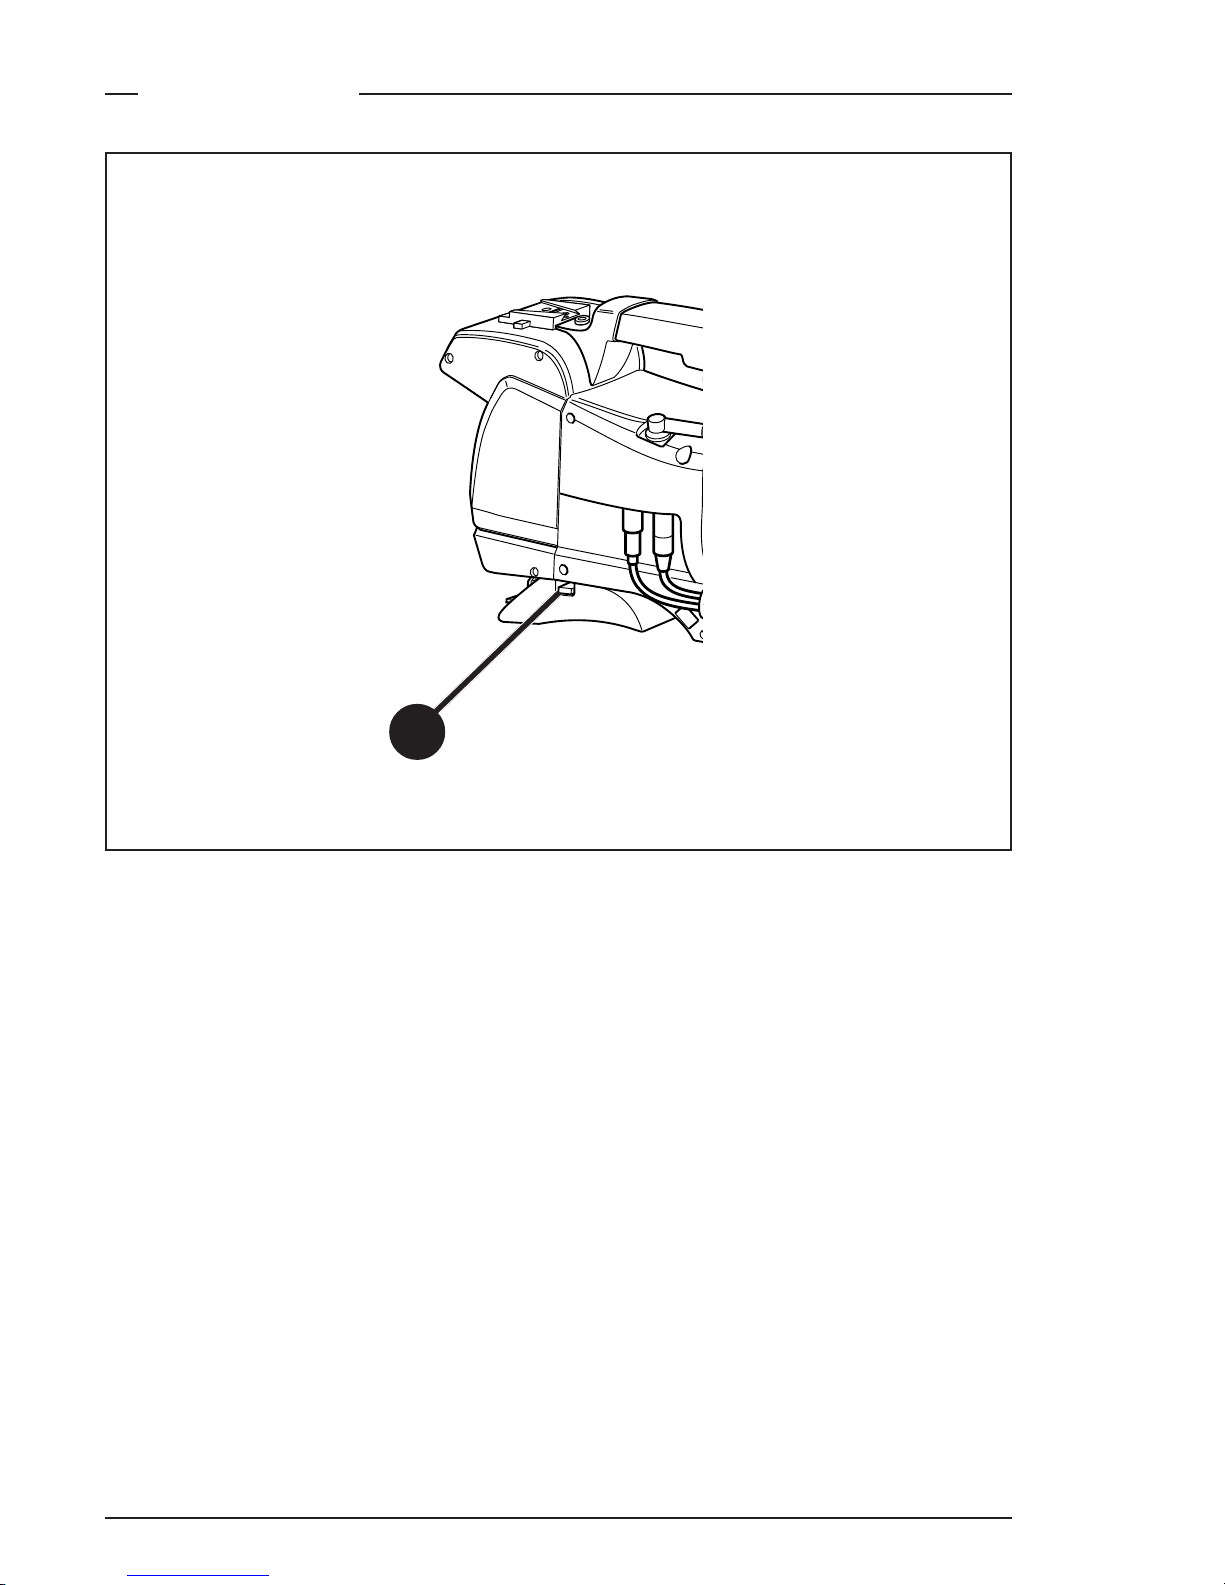
To change the position of the shoulder pad press and hold lever (1).
The shoulder pad can now be moved backwards and forwards along
the axis of the camera. Adjust the shoulder pad when all units have
been mounted so that the best balanced position can be obtained.
1
Page 27

Configurations FilmStream mode 3-1
This section describes how the Viper can be connected to
external equipment and how it can be configured with an
external recorder.
Section 3
Configurations
Contents
Configurations ................................................................................... 3-2
Page 28

3-2 FilmStream mode Viper
Configurations
FilmStream system diagram
HD-SDI viewing
CVBS
Hard disk
capture
system
FilmStream/RGB/YUV
HD-SDI viewing, CVBS
Rec. Start
Tally return
Cam. Audio 1x
Hard disks
to post-production
SD
off-line
recorder
HD-SD
converter
Off-line tape
To off-line editing
More audio
Time code
SDI
(Off-line copy from
SDI or CVBS)
Cl
ea
rC
l
e
ar
A
1
S
t
ar
4
P
ND
1
/
4
B
2
S
t
ar
6
P
ND
1/16
C
3
S
o
f
t
focus
N
D
1/64
D
4
Break-out
box
Page 29

Configurations FilmStream mode 3-3
HDStream system diagram
Break-out
box
12V power
2nd HD-SDI
CVBS
Voodoo
HD-D5
HD-CAM
YUV (HD-SDI)
(Rec. Start)
(Tally return)
Cam. Audio 1x
To post-production
SD
off-line
recorder
HD-SD
converter
or
Off-line tapeTo off-line editing
More audio
Time code
On-line tape
SDI
Cl
ea
rCl
e
ar
A
1
S
t
ar
4
P
ND
1
/
4
B
2
S
t
ar
6
P
ND
1/16
C
3
S
o
f
t
f
oc
us
ND
1/64
D
4
Page 30

3-4 FilmStream mode Viper
Page 31

Controls FilmStream mode 4-1
This section shows the physical location of the controls and
connectors on the camera. These are grouped according to
their function so as to provide a quick reference guide to the
operation of a particular aspect of the camera.
Section 4
Camera Controls
Contents
Power Supply .................................................................................... 4-2
FilmStream Connectors .................................................................... 4-4
FilmStream Camera Functions ......................................................... 4-6
Viewfinder Indicators ..................................................................... 4-12
System Menu Control ..................................................................... 4-17
Auxilary Functions .......................................................................... 4-18
Page 32

4-2 FilmStream mode Viper
DC out LCP CVBS VF
Power Supply
Power switch
The power supply to the camera is switched on and off by the power
at the front-left of the camera. The power switch has two positions:
On : Power to camera is switched on.
Off : Power to camera is switched off.
Note
When you switch off the power, the access rights are reset and the
camera starts at the assigned user level when switched on again.
1
1
4
3
5
2
6
Page 33

Controls FilmStream mode 4-3
Power source switch
Power can be supplied to the camera in either of two ways:
• via the multicore cable and connector, or
• directly, via the DC IN power socket on the rear of the camera.
Set the power source switch at the rear of the camera to the position
that corresponds to you chosen method:
Ext. : Powered via DC IN socket
Multi : Powered via multicore
Power on indicator
The power indicator lights when power is supplied to the camera and
the camera power is switched on.
Circuit breaker button
If excessive current flows the circuit breaker shuts off the power. If this
happens check for faults and if necessary take corrective action before
pressing the circuit breaker button to reset the power.
Power output socket
This socket provides a nominal +12 Vdc supply (20VA max.) for
powering accessories.
Power input socket
This socket accepts a DC supply of 12V Nominal (11V to 17V) to power
the camera. Nominal power consumption is 44W.
Caution
The input voltage must not exceed 17 Vdc.
2
3
4
5
6
Page 34

4-4 FilmStream mode Viper
DC out LCP CVBS VF
Viewing channel output connector (HD-SDI)
This BNC connector supplies a serial digital video output (Y/Cr/Cb
4:2:2) for monitoring purposes.
FilmStream Connectors
2
3
1
1
4
5
Page 35

Controls FilmStream mode 4-5
Multicore connector
This multicore connector provides the FilmStream output, viewing
channel output signals, control signals and the camera microphone
signal. DC power can also be supplied to the camera via this connector.
The connector accepts a playback video signal for display in the
viewfinder. The start/stop control signal for an external recorder is also
passed via this connector.
FilmStream output connectors
These BNC connectors together supply the dual link FilmStream output
for a recording system or for a post-production suite.
Viewfinder output connector
This BNC connector supplies an analog video output signal of the
viewfinder signal. Markers and menus similar to those in the viewfinder
can be superimposed on this signal.
Viewing channel output connector (CVBS)
This BNC connector supplies a CVBS output signal for viewing.
2
3
4
5
Page 36

4-6 FilmStream mode Viper
C
le
a
r
C
lear
A
1
Star 4P
N
D
1/4
B
2
Star 6P
N
D
1/16
C
3
Sof
t f
o
c
u
s
N
D
1/64
D
4
Filter switch
Rotate these switches to move the optical filter wheels:
The outer (bigger) filter switch has four positions:
1 : Clear
2 : ND 1/4 filter ( 2 stops)
3 : ND 1/16 filter ( 4 stops)
4 : ND 1/64 filter ( 6 stops)
The inner (smaller) filter switch has four positions:
1 : Clear
2 : 4-point star*
3 : 6-point star*
4 : Soft focus*
The status of the filterwheel is shown in the viewfinder for a few
seconds. If an ND (Neutral Density) filter is selected, the ND/RE
indicator in the viewfinder lights.
FilmStream Camera Functions
2
3
4
5
1
1
* The type of filters used in this filter wheel may vary from camera to camera.
6
Page 37

Controls FilmStream mode 4-7
Std Scene File button
The standard scene file button is a momentary button which, when
pressed for two seconds, recalls the standard scene file values. These
values only take effect when the camera is not recording.
Colour Bars switch (Bars)
The Bars switch turns the colour bar test signal on and off. The lens iris
closes automatically when the colour bars are switched on.
Clean Scan button (shutter angle)
Press the Clean Scan button for two seconds to directly access the
shutter angle function. Press the Clean Scan button for two seconds to
switch off the shutter angle function. (Default shutter angle is 180°.)
Exposure Time switch
This up/down momentary switch gives a choice of exposure time
settings (see Section 5 for more details). These are:
Nom. - nominal setting
CRT - position for shooting sync-locked monitors
1/200 - for fast moving objects
1/500 - for fast moving objects
50 Hz - shooting with 50Hz lighting (adjustable)
60 Hz - shooting with 60Hz lighting (adjustable)
If an exposure time other than nominal is selected, the non-standard
indicator (!) in the viewfinder lights.
Recorder Start buttons
The recorder start buttons control the recording system. The button,
when pressed initially, starts the recording system. When the button is
pressed again, it stops the recording system. These buttons operate in
parallel with each other. (If set in the Lens menu, this button can also
operate as a momentary button.)
2
3
4
5
6
Page 38

4-8 FilmStream mode Viper
C
le
a
r
C
lear
A
1
Star 4P
N
D
1/4
B
2
Star 6P
N
D
1/16
C
3
Sof
t f
o
c
u
s
N
D
1/64
D
4
Monitoring Video Functions
These buttons and switches only effect the monitoring signal and have
no effect on the FilmStream output.
Viewfinder Zoom button
When this button is pressed and held, the centre of the viewfinder
picture is magnified to assist with focusing. (The VF Zoom Switch item
in theVF menu can be used to set this button so that it operates as a
latched switch.)
Colour Temp. switch (White Bal.)
This up/down scroll selection switch allows a choice between four
preset colour temperatures:
- 3200K (3.2K)
- 4700K (4.7K)
- 5600K (5.6K)
- 7500K (7.5K)
- Thru (for checking optical colour balancing)
Indicators in the 2-inch viewfinder light to show which position is
selected.
2
3
1
1
2
Page 39

Controls FilmStream mode 4-9
Gain selection switch
This up/down scroll selection switch gives a choice between three gain
settings. The indicators in the viewfinder light as follows:
- Gain is -6dB
+ Gain is +6dB
++ Gain is +12dB
3
Page 40

4-10 FilmStream mode Viper
Viewfinder
Tally indicators (red)
The red tally indicators at the front of the viewfinder and at the rear of
the carrying handle light to indicate that the camera is recording.
Tally switch
The tally switch is used to control the tally indicators at the front of the
viewfinder and at the rear of the carrying handle.
When this switch is set to the ON position, the front tally indicator lights
when the camera is recording. The front tally does not light during
recording if the tally switch is set to OFF. The rear tally light does not
depend on the position of the tally switch if the Tally Handgrip setting
in the Install menu is set to ON - it lights during recording. If the Tally
Handgrip setting in the Install menu is set to SWITCH, the rear tally is
controlled by the tally switch.
2
3
4
5
6
1
7
8
2
1
Page 41

Controls FilmStream mode 4-11
Zebra switch
This switch disables (OFF position) or enables the zebra pattern in the
viewfinder which indicates high video levels. Values for the zebra
function are selected in the VF menu. (The zebra pattern is switched
off when the skin view is on.)
Option switch
This switch is included on the viewfinder to allow future features to be
incorporated.
Brightness control
Use this rotary control to adjust the brightness of the viewfinder display
to suit your needs.
Contrast control
Use this rotary control to adjust the contrast of the viewfinder display
to suit your needs.
Crispening control
This rotary control adjusts the sharpness of the picture displayed in the
viewfinder. Reduce the crispening for a better picture when the gain
is set to +++.
Dioptre
The dioptre of the viewfinder can be adjusted to suit your eyesight by
turning the dioptre ring. The range of the dioptre is +1 to -3.
3
4
5
6
7
8
Page 42

4-12 FilmStream mode Viper
ND/RE
BATT
TAPE
REC
++
+
-
AW2AW1
FL
7.55.63.2
FOC+
4.7
!
Viewfinder Indicators
Gain indicators
The gain indicators along the top of the viewfinder light as follows:
- Gain is - (-6dB)
+ Gain is + (+6dB)
++ Gain is ++ (+12dB)
(Only applies to the monitoring signals.)
8
2
3
4
5
6
7
1
9
10
11
1
Page 43

Controls FilmStream mode 4-13
Top indicators
REC lights (red) when the camera is recording. It flashes while the
recording system is preparing to record.
TAPE flashes when only about 5 minutes or less of tape is left. It
lights continuously when the tape is at an end.
BATT flashes when battery voltage is low. It lights continuously
when battery voltage is less than 11V.
ND/RE lights when an ND optical filter or the range extender is
selected.
FOC+ lights when the focus assist funtion in the viewfinder is
switched on. Flashes when viewfinder zoom is on.
Iris indication
Indicates the value of the iris opening (when enabled in the VF menu).
Zebra pattern
This diagonal line pattern warns the operator that the area affected has
risen above a predetermined level of the full scale video exposure
value. Level and contrast are selected in the VF menu.
Safe area marker
The safe area marker indicates an area that represents 80% of the whole
viewfinder picture area.
Non standard indicator
The non-standard video settings indicator (!) lights when exposure is
not set to nominal. It also lights when black stretch, clean scan, AWC
or FL colour temperature, or extended iris is on.
2
3
4
5
6
Page 44

4-14 FilmStream mode Viper
White Balance indicators
The white balance indicators light as follows:
3,2 - preset temperature of 3200K is selected
4,7 - preset temperature of 4700K is selected
5,6 - preset temperature of 5600K is selected
7,5 - preset temperature of 7500K is selected
FL - not used in FilmStream mode
AW1 - not used in FilmStream mode
AW2 - not used in FilmStream mode
! - Thru
These indicators only show the colour temperature setting for the
monitoring signal. There is no white balance in the FilmStream signal.
ND/RE
BATT
TAPE
REC
++
+
-
AW2AW1
FL
7.55.63.2
FOC+
4.7
!
8
2
3
4
5
6
7
1
9
10
11
7
Page 45

Controls FilmStream mode 4-15
Message box
The display time of this information message box is set by the Info time
item of the VF menu.
Centre marker
This cross marks the centre of the picture.
Cadre marker
These dotted white lines show the limits of a 4:3 picture in the 16:9
mode.
Zoom indication
Indicates the degree to which the lens has been zoomed in or out if this
feature is supported by the lens. It shows 50 if not supported.
8
9
10
11
Page 46

4-16 FilmStream mode Viper
Audio microphone connector
Balanced input for high quality condensor microphone. A phantom
power supply is provided for this microphone. The maximum input
level is -12dBu = 0dBFS. Only connect condenser microphones to this
audio connector.
The sensitivity is controlled via the Install menu or LCP.
Audio
1
1
Page 47

Controls FilmStream mode 4-17
C
le
a
r
C
lear
A
1
Star 4P
N
D
1/4
B
2
Star 6P
N
D
1/16
C
3
Sof
t
f
o
c
u
s
N
D
1/64
D
4
The system menus are displayed in the viewfinder. There are two
controls at the front of the camera that allow you to navigate through
these menus. The functions handled by the system menus are divided
into eight different menus. Each of these menus gives you access to a
particular group of functions. More information on using the system
menus is contained in Section 6.
System Menu Rotary control
This rotary control is used to move through the various menus of the
control system. It is also used to vary the value of some functions.
System Menu Select switch
This switch, when pressed, selects the particular menu that is pointed
out by the cursor in the viefinder menu display. It is also used to set
an on/off function or to select a value from a list.
System Menu Control
1
2
1
2
Page 48

4-18 FilmStream mode Viper
DC out LCP CVBS VF
Tally Indicators
The red tally indicators light to indicate that the camera is recording.
LCP connector
The optional Local Control Panel (LCP) connects to this 12-pin
connector.
Auxilary Functions
2
1
1
2
Page 49

Set-up and operation FilmStream mode 5-1
This section contains information on the practical use of the
camera. It tells you how to set up and use the camera in the
FilmStream mode.
Section 5
Set-up and operation
Contents
Setting up the camera ...................................................................... 5-2
Operating the camera ....................................................................... 5-4
Page 50

5-2 FilmStream mode Viper
Physical set-up
The Viper can be tripod-mounted or operated from the shoulder.
Attach all accessories to the camera as described in Section 2 or as
described by the manufacturer. Connect the camera to the recording
system or directly to the post-production facility.
Power
If using an external power source connected to the power input socket
at the back of the camera, switch to the external source.
Set the power switch on the left side of the camera to the On position.
Functional set-up
The camera uses an electronic viewfinder. Text messages giving
information about the camera status are superimposed on the viewfinder
picture. The viewfinder is also used to display a menu-style control
system. This menu give access to the camera functions.
When you first use the camera, you should enter the menu system to
check and, if necessary select, the operational mode that you wish to
work in and to set up your personal preferences. Refer to Section 6 Operating the Menu System which explains how to use the menu
system.
The menu system has 3 user levels. If the level is set too low, you may
not have access to all the available functions. The owner card or the
PIN code is used to set the user level in the Security menu. For full
control, set the level to 3.
Mode selection
The operational mode is selected in the Install menu. Check that the
output mode item is set to FilmStream. Then select the format you want
- 1080p or 720p. If you select 1080p, you can then select the aspect ratio
- 16:9 or SW (cinemascope).
Lens
Setting up the camera
Page 51

Set-up and operation FilmStream mode 5-3
When you fit a lens, check the lens documentation to determine how
to adjust the back focus of the lens. In the menu system, select the lens
type from two predefined settings; standard or wide angle.
Choose and, if necessary, adjust the iris parameters to suit the lens and
your personal preferences.
Viewfinder preferences
Viewfinder markers, and on-screen display preferences can be set in
the VF menu. The zebra overexposure indicators and the focus assist
function are also set up in this menu.
There are also several switches and controls on the viewfinder itself for
adjusting its functioning (refer to Section 4).
Monitoring signal
To make the FilmStream signal suitable for viewing it undergoes video
processing. This is only for the monitoring signal, the FilmStream signal
is not affected. Some video parameters can be changed for the
monitoring signal.
On the camera:
• Gain (-6db, 0dB, +6db or +12db)
• Colour temperature (3.2K, 4.7K, 5.6K, 7.5K or Thru)
In the Video Mon. menu:
• Black level
• Knee compression of highlights
• Skin matrix
Set these preferences to get the best possible picture in the viewfinder
and on the monitors.
When the camera is used in the FilmStream mode the only operational
Page 52

5-4 FilmStream mode Viper
functions to be performed are:
• Framing
• Focussing
• Shutter angle
• Internal optical filters (if required)
• Start recording
Framing
Because the picture displayed in the viewfinder (and on the monitors)
is directly derived from the electronic signal from the sensors, it is a
perfect representation of the captured shot regardless of the position
of the viewfinder. (The viewfinder causes no light loss or reflections
and does not have to be physically aligned.)
Focussing
A tape measure stud on the lens adapter provides a reference for the
optical plane.
To assist with optical focussing through the viewfinder, use the VF
Zoom button on the left-front of the camera to enlarge the centre of the
viewfinder image.
A crawler function (that can be switched on or off in the VF menu) adds
motion in the viewfinder to objects in sharp focus.
Light exposure
The camera has a sensitivity that is equivalent to a film sensitivity of
about 320ASA (400ASA for super wide-angle). Use the zebra function
in the viewfinder picture to identify overexposed areas.
The sensitivity of the camera is also influenced by the shutter angle you
select.
Shutter angle (exposure time)
Operating the camera
Page 53

Set-up and operation FilmStream mode 5-5
The shutter angle is set electronically with the exposure switch on the
front of the camera.
The following table gives the equivalent values of exposure time in
mSec. for a particular shutter angle measured in degrees. This is shown
for the various frame rates.
The following table gives the equivalent values of shutter angle in
degrees for a particular exposure time. This is shown for the various
frame rates.
Fine adjustment of the shutter angle can be achieved by using the clean
scan button.
Internal optical filter
23.98 24 25 29.97 50 59.94
Exposure time
Nom. 312.00312.00312.00312.00312.00312.00
50Hz 172.63 172.80 180.00 215.78 180.00 215.78
60Hz 143.86 144.00 150.00 179.82 150.00 179.82
1/200 43.16 43.20 45.00 53.95 90.00 107.89
1/500 17.26 17.28 18.00 21.58 36.00 43.16
1/1000 17.26 8.64 9.00 10.79 18.00 21.58
Frames/sec
23.98 24 25 29.97 50 59.94
Shutter angle
312 36.15 36.11 34.67 28.92 17.33 14.46
270 31.28 31.25 30.00 25.03 15.00 12.51
225 26.07 26.04 25.00 20.85 12.50 10.43
180 20.85 20.83 20.00 16.68 10.00 8.34
135 15.64 15.63 15.00 12.51 7.50 6.26
90 10.43 10.42 10.00 8.34 5.00 4.17
45 n.a. n.a. n.a. n.a. 2.50 2.09
Frames/sec
Page 54

5-6 FilmStream mode Viper
Neutral density filters can be placed in the path of the optical signal to
restrict the incoming light. The filter is selected via the filter switch at
the top-front of the camera. These filters can be used, for example, to
control depth of field. A second filter wheel in the camera contains
special-effect filters.
Start recording
If your recording system supports this function, you can use the Rec.
start button on the front or left side of the camera to start (and stop)
the recording system. The tally indicators light when recording is in
progress.
Page 55

Using the Menu System FilmStream mode 6-1
This section describes the structure of the menu control
system. It explains how to program the menu system for your
personal preferences. The menu structure and the methods
of function selection are also explained.
Section 6
Using the Menus
Contents
Introduction ...................................................................................... 6-2
Menu System ..................................................................................... 6-3
Menu Structure .................................................................................. 6-6
Security Menu ................................................................................... 6-7
Files Menu ......................................................................................... 6-8
Page 56

6-2 FilmStream mode Viper
C
le
a
r
C
lear
A
1
Star 4P
N
D
1/4
B
2
Star 6P
N
D
1/16
C
3
Sof
t f
o
c
u
s
N
D
1/64
D
4
Introduction
Operationally, the camera is very easy to use. It may require some time
for you to become familiar with all the functions available and the large
number of set-up options. We recommend that you spend time using
the various controls and displays in order to discover the wide range
of possibilities.
Read the instructions in this section carefully but also feel free to
examine the various menus in detail. In this way you will learn quickly
to intuitively operate the camera.
The Systems Menu is viewed in the viewfinder and controlled by the
rotorary control and the Select button at the front of the camera.
System menu on/off
and selection button
Rotary control
Page 57

Using the Menu System FilmStream mode 6-3
Menu off exec
VF
Lens
Video Mon.
Install
Files
Security
Diagnostics
Service
MENU: MAIN
The system functions of the camera are grouped into menus and submenus. The systems menu is viewed in the viewfinder and navigated
by means of the Rotary control and the Select button which are both
located at the front of the camera.
Entering the menu system
Press the Select button after the camera is switched on, the message
Menu off appears in the viewfinder. Press the Select button again
while this text is showing, the Main menu appears in the viewfinder.
The Main menu screen shows five items and the name of the menu.
Four more items are hidden but become visible when you scroll down.
(Some of these items may not appear if the user level is not set to 3.)
A cursor shows your position in the menu. The Rotary control moves
the cursor up and down.
Finding your way
Use the Rotary control to move the cursor through the menu items. If
a double arrow (>>) is visible, then pressing the Select button brings
you one level lower in the menu system. Only five items are visible in
each menu. Scroll up or down to see any additional items.
When you first enter a menu (other than the Main menu) the cursor is
positioned next to the first item.
The TOP and PREVIOUS entries are not immediately visible but are
located above the first item. Use the rotary switch to scroll up to them.
Menu System
Page 58

6-4 FilmStream mode Viper
Format 1080i
Aspect ratio 16:9
Output mode FilmStr.
Disable camera Off
IR receiver Off
OnAir lamp On
Notch On
Exposure
Gain preset
MENU: INSTALL
TOP
PREVIOUS
- Select TOP to bring you back to the Main menu.
- Select PREVIOUS to go back to the menu that you were in before
the current one.
The Install menu above shows the items displayed when you first enter
the menu and the other items that are available by scrolling up or down
with the Rotary control.
Leaving the Systems Menu
If you are deep within the menu structure, follow these steps to leave:
a. If necessary move the cursor to the leftmost column with the Select
button.
b. Scroll upwards with the Rotary control until the cursor points to
TOP (this is the Main menu).
c. Press the Select button. The cursor now points to the Menu off item
of the Main menu.
d. Press the Select button to leave the Systems menu.
This is the recommended way of leaving the System menu.
If you do not use the menu it disappears after a few seconds. (This
delay can be programmed in the VF menu.) However, when you press
the Select button again you enter the System menu at the last position
of the cursor and not at the top of Main menu.
To prevent confusion the next time you enter the System menu, it is
advisable to leave the System menu by returning to the Main menu
(TOP) and selecting Menu off.
Page 59

Using the Menu System FilmStream mode 6-5
Making changes
To find out where you have to go to change a function, consult the
appendix to discover under which menu group or sub-group the
function you want to change is located.
If the cursor points to an item (and there are no double arrows to
indicate a sub-menu) then the item pointed to has a value. The value
can be:
- a toggle value (only two values)
- a list value (more than two values)
- an analogue value (variable from 00 to 99)
or unavailable (---).
If the value is unavailable it cannot be changed. This is indicated by
three dashes (---). This can occur, for example, when a function is
switched off. The analogue values associated with that function are
then unavailable.
If there are only two values associated with the function, then pressing
the Select button toggles between these two values.
If a value is displayed after the function that is part of a list, then
pressing the Select button places the cursor in a list menu indicating
the value currently selected. Use the rotary control to point to a new
value. Press the Select button to return the cursor to the function list.
If an analogue value is displayed after the function name, then pressing
the Select button places the cursor in front of the value and the rotary
control is used to change the analogue value. Press the Select button
to return the cursor to the function list.
Undoing changes
If you make changes to the video settings in the Systems menu and you
decide not to keep them, use the Std. File button at the side of the
camera to recall a standard set of values for the video parameters.
Page 60

6-6 FilmStream mode Viper
Access to the functions on these menus is determined by the user level
that has been set. The menus are as follows:
Main (top) menu
The top menu gives access to the other main menus.
VF menu
This menu contains the functions which determine how items in the
viewfinder are displayed
Lens menu
The functions contained in this menu control various aspects of the
lens.
Video Mon. menu
The video menu contains those functions which affect the picture
quality of the monitoring signal.
Install menu
This menu contains functions which are used to install the camera into
a particular configuration. It also contains controls to customize those
switches which are directly operated on the camera.
Files menu
This menu allows function values to be stored in scene files and
recalled as required.
Security menu
The security menu is used by the camera owner to set user levels and
to control access to the camera, or to store the customer (scene and
operator) default files.
Diagnostic menu
The diagnostic menu is designed to provide information on the current
status of the camera.
Menu Structure
Page 61

Using the Menu System FilmStream mode 6-7
The Security menu provides restricted access to special set-up and
security features of the camera. Access to this menu requires the
owner's unique camera card or the PIN code that has been set for the
camera.
Note:
An owner’s card is linked to the serial number of the camera and is
unique to that camera. It cannot be used as an owner’s card for another
camera.
Inserting the owner card into the camera gives direct access to the
security menu. If you select the Security menu without this card
inserted, you must enter the correct PIN code to gain access to the
Security menu.
User Levels
The installed user level function in the Security menu restricts access,
in varying degrees, to the operational controls of the camera. There are
four user levels: user0, user1, user2 and user3.
The purpose of the user levels is to restrict the set of functions which
can be changed by whoever is using the camera. In this way a more
centralized and uniform control can be achieved and the danger of the
camera operator accidentally changing critical functions while shooting
is reduced.
User level 0 is a special protection level which locks most of the
operational controls of the camera. Use this level to ensure that a
camera that has been set-up is not tampered with. User level 0 is not
normally used for operational purposes. The appendix indicates which
functions are available at each user level.
PIN Code
The PIN code of the camera can be viewed and changed in the Security
menu. The camera's PIN code when it leaves the factory is set to 0000.
It is strongly advised that this code be changed by the owner on receipt
of the camera. This ensures added protection against unauthorised
access to the Security menu.
Security Menu
Page 62

6-8 FilmStream mode Viper
Files Menu Features
A user of the LDK 7500 camera can have access to 15 different files. This
number can be extended by using additional scene file smart cards. The
Files menu is used to recall and store these files.
There are two types of file; scene files and operator files. A scene file
contains values related to the picture performance. The operator file
contains values related to the set-up of the camera (viewfinder, lens
and installation parameters). The appendix indicates the functions that
are stored in the scene file and those functions that are stored in an
operator file.
Scene files
Four scene files are stored in the camera itself (SCAM1, SCAM2, SCAM3
and SCAM4). Another four scene files can be stored on the smart card
(SCARD1, SCARD2, SCARD3 and SCARD4). The default file names can
be changed in the files menu. A STANDARD scene file (preselected as
either factory or customer defined) is stored in the camera.
Note:
The standard customer scene file is stored via the Security menu, not
the Files menu. The decision to use the factory defined file or the
customer defined file as the standard file is also made in this menu.
The Files menu enables the scene files to be stored and recalled using
the store and recall entries of the menu system.
If the message NOK is displayed then the old values are restored. If the
camera is recording when a scene file is recalled then the recalled
values do not become active until the camera stops recording.
Operator files
The Files menu also allows the recall of the opererator file stored in the
camera (OCAM1) or one of the two operator files (OCARD1 and
OCARD2) stored on the smart card. These files contain information for
setting up the non-video configuration of the camera.
Files Menu
Page 63

Using the Menu System FilmStream mode 6-9
The default file names can be changed in the files menu. A STANDARD
operator files (factory or customer defined) is stored in the camera.
Note:
The standard customer operator file is stored via the Security menu, not
the Files menu. The decision to use the factory defined file or the
customer defined file as the standard file is also made in this menu.
Standard customer file
The green button on the side of the camera recalls the standard scene
file. This file contains standard parameters for the picture performance.
A standard operator's file can be recalled via the Files menu. This file
contains parameters for the set-up of the camera. A customer standard
can be defined for the standard scene file and for the standard
operator's file. The contents of the customer files for both these
standard files is stored via the security menu. The selection of a factory
defined or a customer defined file for use as a standard file is also made
in this menu.
Page 64

6-10 FilmStream mode Viper
Page 65

Main Menu
Menu text User Values Default Blocked if File Comments
VF
>>
Lens
>>
Video
>>
Install
>>
Files
>>
Security
>>
0
0
2
0
1
0
Appendix LDK 7500 Menu FilmStream v2_0.xls Page 1
Page 66

VF Menu
Menu text User Values Default Blocked if File Comments
VF mon
Y,R,G,B,-G Y - Op.
VF Contour
>>
VF Contour On, Off On - Op.
Level 0..99 50 VF cont. Off Op.
Focus Assist
On,Off On - Op.
Zebra
>>
Zebra On,Off Off 2" VF used Op.
zebra mode Level, band Level Zebra Off Op.
zebra level (%) 0..99 90 Zebra Off Op.
zebra contrast 0..99 15 Zebra Off Op.
Centre Cross
On,Off Off - Op.
Focus Ind.
On,Off Off No SuperXPander Op.
Zoom Ind.
On,Off Off - Op.
Box downright
Fltr,Off Off - Op.
Safe Area
On,Off Off - Op.
Safe Area Type
16:9, 15:9, 14:9 16:09 - Op.
Mon CentreCross
On, Off Off - Op.
Mon 1.85 Marker
On, Off Off - Op.
Ind. White
0..99 70 - Op.
Ind. Black
0..99 30 - Op.
Display
On, Time Time - Op.
Menu Time
0..10 sec. 10 Display On Op.
Info Time
0..20 sec. 5 - Op.
Rotary Speed
0..10 sec. 5 - Op.
EXT Aspect Ratio 4:3,16:9 4:3 - Op.
VF Zoom Switch Mom., Alt. Mom. - Op.
0
3
0
3
3
3
0
0
0
2
2
2
0
0
0
0
0
0
3
2
2
3
2
3
Appendix LDK 7500 Menu FilmStream v2_0.xls Page 2
Page 67

Lens Menu
Menu text User Values Default Blocked if File Comments
Lens Type Std,WA Std - Op.
Auto Iris On, Off Off SuperXPander
Peak/Average 0..99 65 Auto Iris off Sc.
Auto iris setp. 0..99 35 - Sc.
Mom. iris setp. 0..99 35 - Sc.
Manufacturer Fuj, Ang, Can, Other Fuj - -
Extended iris
>>
Gain speed 0..99 5 - Op.
ExpTimeSpeed 0..99 4 - Op.
Min iris F5.6, 8, 11, 16 F16.0 - Op.
Max iris F1.4, 2, 2.8, 4, 5.6 F2.0 - Op.
Min exp time 1/100, 1/200, 1/500 1/500 - Op.
Max Gain (dB) 0..15 (steps of 3) 15dB - Op.
Autoiris const
>>
Iris gain 5..10 5 - Op.
VTR Switch Alt,Mom Alt -
3
3
0
S
3
3
3
3
0
3
S
3
3
0
0
Appendix LDK 7500 Menu FilmStream v2_0.xls Page 3
Page 68

Video Monitoring Menu
Menu text User Values Default Blocked if File Comments
Contour
>>
Contour Off, On On - Sc.
Contour level 00..99 50 Contour = Off Sc.
Gain
>>
Red 0..99 50 - Sc.
Green 0..99 50 - Sc.
Blu
e
0..99 50 - Sc.
Black
>>
Red 0..99 50 - Sc.
Green 0..99 50 - Sc.
Blu
e
0..99 50 - Sc.
Maste
r
0..99 50 - Sc.
Knee
>>
Knee Off, On Off - Sc.
Point M 0..99 50 knee <> var Sc.
Slope M 0..99 60 knee <> var Sc.
SkinMatrix On, Off On Sc.
S
3
3
3
3
3
3
2
3
3
3
3
3
Appendix LDK 7500 Menu FilmStream v2_0.xls Page 4
Page 69

Install Menu
Menu text User Values Default Blocked if File Comments
Format
1080i50, 1080i59,
1080psf23, 1080psf24,
1080psf25, 1080psf29,
1080i59-23, 720p50,
720p59, 720p59-23,
720p59-25, 720p59-29
---
Output Mode
YCrCb, FilmStream,
RGB, HD Stream
YCrCb - -
Metadata
Off, Full Field, 2L in Vid,
2L bfr Vi
d
Off - -
IR receiver
Off, On Off - Op.
OnAir Lamp
Off, On On VF<> 7" Op.
Audio
>> Off, On Off - Op.
Audio gain
-22, -28, -34, -40, -46, 52, -58, -6
4
-22db - Op.
Shutter
>>
Lighting -10..+10 0 Exp.<> 50,60Hz Sc.
Shutter Adjust >>
Shutter motor On, Off On - Sc.
Shutter angle 144.0..354.0 354.0 - Sc.
Gain preset
>>
Gain - (dB) -3, -6 -6dB - Op.
Gain + (dB) 3,6,9 3dB - Op.
Gain ++ (dB) 6,9,12 6dB - Op.
Autowhite
Coltemp<>AW
Awb speed 0..99 4 - Op.
Awb gain 0..99 10 - Op.
Timing
H. Phase 0..99 50 - Op.
PCI Id 0..8 1 -
1
1
0
2
1
1
2
0
0
1
0
2
2
2
S
S
S
S
S
S
Appendix LDK 7500 Menu FilmStream v2_0.xls A - 5
Page 70

Security Menu
Menu text User Values Default Blocked if File Comments
Installed Level user0..user3 u3 no owner card, no PIN -
Run Hours >> no owner card, no PIN
Days ago 0 ... 30 0 Set Time >>
Hour 0 … 23 - Minute 0 … 59 - Set Date >> - Year 0 … 99 - Month 1 … 12 - Day 1 … 31 0 PIN code >> - no owner card, no PIN
Four digits 0000 … 9999 0000 - Customer files >> - no owner card, no PIN -
Store cust. Scene Exec Store cust. Oper Exec Store cust. VTR Exec no DVCPRO
Green Button >> - no owner card, no PIN Standard Factory/Customer Factory Scene file On,Off On Operator file On,Off On VTR file On,Off Off no DVCPRO
2
2
0
0
0
0
2
2
2
2
2
0
0
0
0
Appendix LDK 7500 Menu FilmStream v2_0.xls Page 6
Page 71

Files Menu
Menu text User Values Default Blocked if File Comments
Store scenefile
>>
File select SCAM1..4, SCARD 1..4 - - -
Store Exec - - -
Recall scenefile
>>
File select STANDARD,
SCAM1..4, SCARD 1..4
---
Recall Exec - - -
Store oper. file
>>
File select OCAM 1, OCARD 1..2 - - -
Store Exec - - -
Recall oper. file
>>
File select STANDARD, OCAM 1,
OCARD 1..2
---
Recall Exec - - -
Attributes
>>
File select available files - - File name - - Attribute R/W, R R/W no card -
Standard files
>> not installed
Standard settings Exec - - -
2
2
1
2
2
1
1
1
2
2
2
2
Appendix LDK 7500 Menu FilmStream v2_0.xls Page 7
Page 72

Diagnostic Menu
Menu text User Values Default Blocked if File Comments
Adaptor Type …--Sensor Type …--Sensor Voltage Ok, NotOk - - Shutter Run Run, Stop - - Front Power Ok, NotOk - - Cam. 12nc ... - - Cam. Version ... - - Cam. Status ... - - -
Cam. Boot ver. ... - - -
Cam. FPGA ver. ... - - -
Adapter Version ... - - PPG Status ... - - DVP Status ...
---
2
2
2
2
2
2
2
2
2
2
2
Appendix LDK 7500 Menu FilmStream v2_0.xls Page 8
Page 73

Service Menu
Menu text User Values Default Blocked if File Comments
Sawtooth Off, On Off - -
Sawt Select PrPr, Asic PrPr - -
ViPr Test Int, Ext Int - -
LPC Off, On On - -
BPC Off, On On - -
Chroma Off, On On - -
Shutter phase -30..+30 0 - -
Scaler
>>
--EPLD Test Off,Sawt,Bars Off Chroma Off, On On - -
3
0
S
S
0
3
3
S
S
Appendix LDK 7500 Menu FilmStream v2_0.xls Page 9
Page 74

Main Menu
Menu text User Values Default Blocked if File Comments
VF
>>
Lens
>>
Video
>>
Install
>>
Files
>>
Security
>>
Diagnostics
>>
Servic
e
>>
1
0
2
3
0
0
2
0
Appendix LDK7500 Menu HDV v2.0.xls Page 1
Page 75

VF Menu
Menu text User Values Default Blocked if File Comments
VF mon
Y,R,G,B,-G Y - Op.
VF Contour
>>
VF Contour On, Off On - Op.
Level 0..99 95 VF cont. Off Op.
Focus Assist
On,Off On - Op.
Zebra
>>
Zebra On,Off Off 2" VF used Op.
zebra mode Level, band Level Zebra Off Op.
zebra level (%) 0..99 90 Zebra Off Op.
zebra contrast 0..99 15 Zebra Off Op.
Centre Cross
On,Off Off - Op.
Audio Bar
On,Off Off - Op.
Focus Ind.
On,Off Off No SuperXPander Op.
Iris Ind.
On,Off Off SuperXPander Op.
Zoom Ind.
On,Off Off - Op.
Box downright
Fltr,Off Off - Op.
Safe Area
On,Off Off - Op.
Safe Area type
16:9, 15:9, 14:9 16:9 - Op.
Marker
Off,16:9,15:9,14:9 Off - Op.
Marker 4:3
On,Off Off - Op.
Marker Type
Dot,Shad, Both Off - Op.
Mon Centre cross
On,Off Off - Op.
Mon 1:85 marker
On,Off Off - Op.
Ind. White
0..99 28 - Op.
Ind. Black
0..99 30 - Op.
Display
On,Time Time - Op.
Menu Time
0..10 sec. 10 Display On Op.
Info Time
0..20 sec. 5 - Op.
Rotary Speed
0..10 5 - Op.
VF Notch
On,Off Off - Op.
EXT Aspect Ratio
4:3,16:9 4:3 - Op.
VF Zoom switch Mom, Alt Mom - Op.
2
0
0
0
0
2
3
3
3
2
0
0
2
3
0
0
0
0
0
0
0
0
3
3
0
2
2
2
3
0
Appendix LDK7500 Menu HDV v2.0.xls Page 2
Page 76

Lens Menu
Menu text User Values Default Blocked if File Comments
Lens Type Std,WA Std - Op.
Auto Iris On, Off Off SuperXPander
Peak/Average 0..99 65 Auto Iris off scene
AutoIris Setpoint 0..99 35 - scene
Mom. Iris Setpoint 0..99 50 - scene
Manufacturer Fuj, Ang, Can, Other Fuj - -
Extended iris
>>
GainSpeed 0..99 5 - Op.
ExpTimeSpeed 0..99 4 - Op.
Min iris F5.6, 8, 11, 16 F16.0 - Op.
Max iris F1.4, 2, 2.8, 4, 5.6 F2.0 - Op.
Min exp time 1/100, 1/200, 1/500 1/500 - Op.
Max Gain (dB) 0..15 (steps of 3) 15dB - Op.
Autoiris const
>>
Iris gain 5..10 - - -
VTR Switch Alt,Mom Alt -
S
3
0
3
S
0
0
3
3
3
3
3
3
3
0
Appendix LDK7500 Menu HDV v2.0.xls Page 3
Page 77

Video Menu
Menu text User Values Default Blocked if File Comments
Colour filter 00 .. 99 50 3k2, 5K6, 7K5, AWC Sc.
Contour >>
Contour Off, On On - Sc.
Level 00..99 50 Contour = Off Sc.
Source Select >> Y,R,G,RG RG - Sc.
<more> >>
vert cont 0..99 25 Contour = Off Sc.
coarse/fine 0..99 50 Contour = Off Sc.
Level 0..99 50 Contour = Off Sc.
level dep. 0..99 40 Contour = Off Sc.
noise slicer 0..99 5 Contour = Off Sc.
Soft Contour >>
Soft Contour Off, On Off - Sc.
Level 0..99 70 Soft Cont = Off Sc.
Knee Contour Off, 1,2,3,4 Off Sc.
Skin >>
Skin 2 Off, 1, 2, 1+2 Off - Sc.
Auto 2 Off, On Off Skin = Off or 1+2 View 2 Off, On Off Skin = Off
Skin Level 2 0..99 50 Skin = Off Sc.
<more> >>
width1 Red 3 0..99 50 Skin <> 1 Sc.
width1 Blue 3 0..99 50 Skin <> 1 Sc.
color1 Red 3 0..99 50 Skin <> 1 Sc.
color1 Blue 3 0..99 50 Skin <> 1 Sc.
width2 Red 3 0..99 50 Skin <> 2 Sc.
width2 Blue 3 0..99 50 Skin <> 2 Sc.
color2 Red 3 0..99 50 Skin <> 2 Sc.
color2 Blue 3 0..99 50 Skin <> 2 Sc.
Flare >>
Flare S Off, On On - Sc.
Red S 0..99 10 Flare = Off Sc.
Green S 0..99 15 Flare = Off Sc.
Blue S 0..99 25 Flare = Off Sc.
S
3
3
3
2
S
3
2
3
S
S
2
Appendix LDK7500 Menu HDV v2.0.xls Page 4
Page 78

Video Menu (continued)
Menu text User Values Default Blocked if File Comments
Black
>>
Dyn. Black 2 Off, On - - Black strech 3 0…99 99 Blk str = Off Sc.
Master 2 0..99 50 - Sc.
<more> >>
Red 3 0..99 50 - Sc.
Green 3 0..99 50 - Sc.
Blue 3 0..99 50 - Sc.
Maste
r
3 0..99 50 - Sc.
Gain
>>
Red 0..99 50 - Sc.
Green 0..99 50 - Sc.
Blue 0..99 50 - Sc.
Knee
>>
Knee Off, Var Off - Sc.
Knee Type Y, NAM Y - Sc.
Slope M 0..99 60 knee <> var Sc.
Point M 0..99 50 knee <> var Sc.
<more> >>
Knee Limit 0..99 99 knee <> var Sc.
Desaturation Off, On On knee=off Sc.
Desat Level 0..99 50 desat = off Sc.
Auto Point 0..99 30 knee <> auto Sc.
Auto Ref 0..99 30 knee <> auto Sc.
Gamma
>>
Gamma Nom,Low,Pre Nom - Sc.
Master 0..99 76 gamma <> Pre Sc.
Red 0..99 76 gamma <> Pre Sc.
Green 0..99 76 gamma <> Pre Sc.
Blue 0..99 76 gamma <> Pre Sc.
<more> >>
Curve
BBC04, BBC05, BBC06,
ARD, 6xARD, CCIR,
RAI
ARD - Sc.
Gamma Gamma,Lin gamma - Sc.
2
3
3
S
3
3
S
2
3
2
2
2
S
3
S
S
S
3
S
Appendix LDK7500 Menu HDV v2.0.xls Page 5
Page 79

Video Menu (continued)
Menu text User Values Default Blocked if File Comments
Matrix
>>
Matrix
EBU, RAI, BBC ,B/W,
SKIN, 1:1,CFL,VAR1,
VAR2
Skin - Sc.
R..G 0..99 -- Matrix <> Var Sc.
G..R 0..99 -- Matrix <> Var Sc.
R..B 0..99 -- Matrix <> Var Sc.
B..R 0..99 -- Matrix <> Var Sc.
G..B 0..99 -- Matrix <> Var Sc.
B..G 0..99 -- Matrix <> Var Sc.
Matrix / Gamma G/M, M/G G/M - Sc.
White Limit
>>
White Limit Off, On On - Sc.
Master 0..99 80 Wh.Limit = Off Sc.
Shading
Shading Off, On On - Sc.
H saw red 0..99 50 Shading = Off H saw green 0..99 50 Shading = Off H saw blue 0..99 50 Shading = Off H par red 0..99 0 Shading = Off H par green 0..99 0 Shading = Off H par blue 0..99 0 Shading = Off V saw red 0..99 50 Shading = Off V saw green 0..99 50 Shading = Off V saw blue 0..99 50 Shading = Off V par red 0..99 0 Shading = Off V par green 0..99 0 Shading = Off V par blue 0..99 0 Shading = Off Saturation 0..99 50 - -
S
S
S
S
S
S
2
S
S
S
S
S
S
S
3
S
S
S
S
S
S
S
S
S
S
Appendix LDK7500 Menu HDV v2.0.xls Page 6
Page 80

Install Menu
Menu text User Values Default Blocked if File Comments
Format
1080i50, 1080i59,
1080psf23, 1080psf24,
1080psf25, 1080psf29,
1080i59-23, 720p50,
720p59, 720p59-23,
720p59-25, 720p59-29
---
AspectRatio
16:9, Wide 16:9 - -
Output Mode
YCrCb, FilmStream,
RGB, HD Stream
YCrCb - -
IR receiver
Off, On Off - Op.
Audio
>>
Audio gain
Off, On Off - Op.
Shutter
>>
Lighting -10..+10 0 Exp.<> 50,60Hz Sc.
Shutter Adjust >>
Shutter motor On, Off On - Sc.
Shutter angle 144.0..354.0 354.0 - Sc.
Gain preset
>>
Gain - (dB) -3, -6 -3dB - Op.
Gain + (dB) 3,6,9 3dB - Op.
Gain ++ (dB) 6,9,12 6dB - Op.
Gain +++ (dB) 12,15,18 12dB - Op.
Timing
>>
H.Phase 0..99 50 - Op.
2
0
2
2
2
1
0
2
0
2
2
1
1
1
Appendix LDK7500 Menu HDV v2.0.xls A - 7
Page 81

Files Menu
Menu text User Values Default Blocked if File Comments
Store scenefile
>>
File select SCAM1..4, SCARD 1..4 - - -
Store Exec - - -
Recall scenefile
>>
File select STANDARD,
SCAM1..4, SCARD 1..4
---
Recall Exec - - -
Store oper. file
>>
File select OCAM 1, OCARD 1..2 - - -
Store Exec - - -
Recall oper. file
>>
File select STANDARD, OCAM 1,
OCARD 1..2
---
Recall Exec - - -
Attributes
>>
File select available files - - File name - - Attribute R/W, R R/W no card Standard files >> not installed
Standard settings
Exec - - Lighting - - Night Exec - - Fluorescent Exec - - Extreme contrast Exec - - Creative - - Sport warm colour Exec - - Sport interview Exec - - HI film Exec - - HI film + skin Exec - - LO Film Exec - - LO film + skin Exec - - Sepia film Exec - - Matching - - LDK9x + LDK10 Exec - - DVW-xxx Exec - - HL-xxx Exec - - Standard settings Exec - - -
2
2
2
1
1
1
2
2
2
2
2
1
2
2
2
2
2
2
2
2
2
2
2
2
2
2
Appendix LDK7500 Menu HDV v2.0.xls Page 8
Page 82

Security Menu
Menu text User Values Default Blocked if File Comments
Installed Level user0..user3 u3 no owner card, no PIN -
Run Hours >> no owner card, no PIN
Da
y
s ago 0 ... 3
0
0-
Set Tim
e
>>
Hou
r
0 … 2
3
--
Minut
e
0 … 59 - Set Dat
e
>> - -
Yea
r
0 … 99 - Mont
h
1 … 12 - Da
y
1 … 31 0 PIN code >> - no owner card, no PIN
Four di
gits
0000 … 999
9
000
0
--
Customer files >> - no owner card, no PIN -
Store cust. Scen
e
Exec Store cust. O
per
Exec Store cust. VT
R
Exec no DVCPRO
Green Button >> - no owner card, no PIN -
Standar
d
Factory/Custome
r
Fact -
Scene fil
e
On,Off On Operator file On,Off On -
0
0
0
2
2
2
2
2
2
2
0
0
0
0
Appendix LDK7500 Menu HDV v2.0.xls Page 9
Page 83

Diagnostic Menu
Menu text User Values Default Blocked if File Comments
Adaptor Type
…---
Sensor Type
…---
Sensor Voltage
Ok, NotOk - - -
Shutter Run
Run, Stop - - -
Front Power
Ok, NotOk - - -
Green carrier
Ok, NotOk - - -
Cam. 12nc
... - - -
Cam. Version
... - - -
Cam. Status
... - - -
Cam. Boot ver.
... - - -
Cam. FPGA ver.
... - - -
Adapter 12nc
... - - -
Adapter Version
... - - Adapter Status ...
---
2
2
2
2
2
2
2
2
2
2
2
2
Appendix LDK7500 Menu HDV v2.0.xls Page 10
Page 84

Service Menu
Menu text User Values Default Blocked if File Comments
Sawtooth Off, On Off - -
Sawt Select PrPr, Asic PrPr - -
ViPr Test Int, Ext Int - -
LPC Off, On On - -
BPC Off, On On - -
Shutter phase -30..+30 0 - -
Scaler
>>
--EPLD Test Off,Sawt,Bars Off Chroma Off, On On - -
S
3
0
3
3
S
S
S
Appendix LDK7500 Menu HDV v2.0.xls Page 11
Page 85

Training Center Breda
Training Center Breda
Training Center Breda
Training Center Breda
Training Center Breda
page 1
Training Center Breda
LDK 200
Series
Block Diagrams
TRAD
Triax Operation
T
r
a
c
ke
r
A
u
x
S
ta
r
t
V
s
h
i
f
t
E
x
p
.
T
i
m
e
W
h
i
t
e
B
a
l
C
l
e
a
n
s
c
a
n
N
o
m
.
l
e
v
e
l
A
B
C
D
C
l
e
a
r
Star 4P
S
ta
r
4
P
S
o
ft fo
c
u
s
C
l
e
a
r
ND 1/4
N
D
1
/
1
6
N
D
1
/6
4
V
T
R
S
a
v
e
E
x
t
.
I
r
i
s
S
t
d
.
F
i
l
e
P
o
w
e
r
o
n
Smart
Card
Power
off
1
2
3
4
812-4
date 26-06-02
Page 86

Training Center BredaTraining Center Breda
Training Center BredaTraining Center Breda
Training Center Breda
page 2
Training Center Breda
Head
I C - G
2
Focus
Zoom
IRIS
R.Ext
I C (G) Contr.
I C (E) Control
I C (E)
I C (E) SPI
I C - D
Switches
Viewfinder
Left switch
panel
Front switch
panel
Micr.
input
Lens.
conn.
Digipot
POWER ON
Connector
board
Right
Cover
Switches
Switches
Focus Follow
Lens Switches
Zoom Follow
IRIS Contr./ Follow
2
2
2
2
I C ( F ) SPI Control
2
2
I C - G
2
I C - G
2
CCD
CC
D
PELTIER
3 phase control
Sensor
board
Pre Processor
R
G
B
R
G
B
Servo
Servo
Puls Pattern
Generator
Sensor
Data
Board
SEAL Glass
LP Filter +
Retardation plate
CCD
Video Processor
Sync Monitoring
DSP 1 DSP 2
Front Driver
Data Board camera
DC/DC
Convertor
SMARTCARD
Reader
Shutter
Control
+12/18/28V
I C (B----G)
2
To Sensor
board
A/D
Conv.
D/A
Conv.
PROM
EEPROM
RAM.
RS 232
Contr.
Micro Contr.
I C
Contr.
2
VF insert
Generator
Linedouble
Generator
Sync pulse
Generator
Ext Video
Detect
+
PIP
Pulses
Pulses
VF BNC
Ext Video
Power
ON/OFF
H / V
Mic.
Ext ( Continuous )
Loc / Ext
Pr / Pb
VF Video
I C( F )
2
Databoard
Databoard
Databoard
Databoard
Black Shading R/G/B
Lens Control and Follow
LON Bus
ID Adaptor
ID Head
F
B
PC
LDK6000 Video path.ai
Head LDK 6000
Test Saw
insert
PRE Filter
Clamp
A/D Conv.
Clock and
REF GEN.
Testsaw GEN.
DIG. Clamp
Bl Shad. Gen.
White Shad.
Black Level
KNEE
MATRIX
GAMMA
SKIN detect
AUTO IRIS
Postfilter
Output
Drivers
DIGITAL
and
ANALOG
Leaking Pixel
Corr.
Contour Corr.
BL. Stretch
COL BAR
insert
AUTO WHITE
VF Selector
VF Zebra
D/A Conv V.F.
IR Filter
D/A Conv
VF output
C
10bit par
Y
10bit par
SMPTE 292M
DC /DC
3,3V 12V
Sub
Board
Sensing
boards
Opto Coupler
Filter-driver
I C (E)
2
I C (E)
2
Page 87

Training Center Breda
Training Center Breda
Training Center Breda
Training Center Breda
Training Center Breda
page 3
Training Center Breda
Overview VIPER
Focus
Zoom
IRIS
R.Ext
I C (E) Control
I C (E) SPI
2
2
CCD
CCD
PELTIER
3 phase control
Sensor
board
Pre Processor
R
G
B
Servo
Servo
Puls Pattern
Generator
Sensor
Data
Board
Sensing board
SEAL Glass
LP Filter +
Retardation plate
CCD
Opto Coupler
I C (E)
2
I C (E)
2
To Sensor
board
IR Filter
Sub
Board
HEAD
Dig. Video proc.
HD SDI Output
LVDS
Input
formatter
R
10bit par
G
10bit par
B
10bit par
LVDS
LVDS
LVDS
LVDS
Framestore
DDR Ram
DUAL Link
Formater
Videoproc
.
Output
mux
Viewing
scaler
10 bit
10 bit
10 bit
20 bit
8 bit
20 bit
20 bit
20 bit
20 bit
20 bit
20 bit
Serializer
GM 1522
Serializer
GM 1522
Serializer
GM 1522
Encoder
SAA 712
LINK 1
LINK 2
HDSDI
CVBS
Cadres
1,5 Gbit/s
1,5 Gbit/s
1,5 Gbit/s
FILMSTREAM OUTPUT
HD Viewing OUTPUT
SD Viewing OUTPUT
Adaptor
A/D
12bit
A/D
12bit
A/D
12bit
Frame rate
convertor
Frame
store
12 bit 12 bit
12 bit
12 bit
12 bit
12 bit
DSP 1 DSP 2
LOG
Misc. Board
Sync Mon. Board
Data. Board
Power Board
10,5-17 V
Breaker
10,5-17V (2A)
1V8
3V3
3V3
+5VDig
+ 5V Dig
+ 5V An
- 5V An
+ 3V3
Power
Module
Head
+ Batt.
+ Batt.
+ Batt.
Main Video Proc
26-06-02
Front Driver Board
Front Unit
auto
fuse
+ Audio
+ Tally
Tally
4pin
Hirose
Page 88

Training Center BredaTraining Center Breda
Training Center BredaTraining Center Breda
Training Center Breda
page 4
Training Center Breda
Head
11
11
11
12
12
12
A/DA
GAIN
CLOCK1
CLOCK3 CLOCK4
CLOCK2
A
A
A
ASICA2
EPLD
EPLD
EPLD
ASICB2
12
A/D
GAIN
CLOCK1
12
A/D
GAIN
CLOCK1
12
CLAMP
CLAMP
CLAMP
1.5V
0V
3.5V
2.5V
3.5V
2.5V
3.5V
2.5V
3.5V
2.5V
3.5V
2.5V
3.5V
2.5V
1.5V
0V
1.5V
0V
A
CLAMP
A
CLAMP
R-in
FSYNC-in
TEST-in
TestoutTestgain VFgain
Syncin
Syncin Syncout
Syncout
Syncout Syncin
Clockin
Clockin Clockin
Clockout
Rin
Rin RoutRout
GoutGout
BoutBout
Rin
Gin
Bin
G
R
B
VFYRGB
VFPrPb
Gin
Gin
Bin
Bin
Rclamp
Rclamp
Gclamp
Gclamp
Bclamp
Bclamp
Wclamp
HBLSH/LPF
Wclamp
ControlControl Control
BScaninBScanin BScanout
BScanout
BScanout
BScanin
CLOCK-in
IIC/SPI
BSCAN
G-in
B-in
CLOCK-out
FSYNC-out
VF-y
VF-Pr/VF-Pb
HBLSH / LPF
TEST-out
TEST-out
WclampA
WclampA
WclampA
WclampA
WclampAWclampA
Wclamp
CONTROL
CLOCK1
CLOCK2
CLOCK3
CLOCK4
Fsync
2
2
4
5
9
2
75E75E75E
75E
75E
75E
Delay&Buffer
Testgain
VFgain
Control
R 10bit par
G 10bit par
B 10bit par
VIPER Vid proc
26-06-02
LVDS
LVDS
DDR RAM
DDR RAM
DDR RAM
DDR RAM
Frame store 4 x 64 Mbit
Log Curve
Front Back
to Sync
Monitoring
board
LVDS out
Page 89

Training Center Breda
Training Center Breda
Training Center Breda
Training Center Breda
Training Center Breda
page 5
Training Center Breda
VIPER adaptorVIPER adaptor
VIPER adaptorVIPER adaptor
VIPER adaptor
LVDS in
Input
formatter
R 10bit par
G 10bit par
B 10bit par
LVDS
LVDS
DDR Ram
Framerate convertor
DUAL Link
Formatter
Videoproc
.
Output
mux
Viewing
scaler
10 bit
10 bit
10 bit
20 bit
8 bit
20 bit
20 bit
20 bit
20 bit
20 bit
20 bit
Delog
Black Control
Gain
Knee
Skin Matrix
Gamma
Contour
Black offset
RGB_YC lowpass
BlackWhiteClip
Output formatter
Serializer
GM 1522
Serializer
GM 1522
Serializer
GM 1522
Encoder
SAA 7121
HD SDI Output
26-06-02
LINK 1
LINK 2
HDSDI
CVBS
EPLD
Cadres
1,5 Gbit/s
1,5 Gbit/s
1,5 Gbit/s
FILMSTREAM OUTPUT
HD Viewing OUTPUT
SD Viewing OUTPUT
VF Mon
Output
HD Viewing OUTPUT
Format
Converter
RGB=> YC FilmStream
Cadres
Page 90

Training Center BredaTraining Center Breda
Training Center BredaTraining Center Breda
Training Center Breda
page 6
Training Center Breda
23456789
0
23456789
0
23456789
0
1234567890123
1
23456789012
3
1
23456789012
3
1
23456789012
3
1234567890123
LVDS
Video Proc
HD SDI Output
EPLD AsicA AsicB
Y
C
RB
Gamma
Knee
Contour
Matrix
VIPER
LDK 6000
mode
Serial out Serial out
Serial out
SD CVBS Output
HD SDI Out 4:2:2
Scaler /
Encoder.
Y
C
RB
2345
6
Y
C
RB
1:1
A/D
A/D
A/D
R
G
B
12bit
12bit
12bit
LVDS
Video Proc
HD SDI Output
EPLD AsicA AsicB
R
G
B
VIPER
FilmStream
mode
Serial out Serial out
Serial out
Scaler /
Encoder.
A/D
A/D
A/D
R
G
B
12bit
12bit
12bit
R
G
B
HD VF Output
Link 2
HD SDI 4:2:2
SD CVBS Output
Link 1 SDI 4:2:2
HD VF Output
LVDS
Video Proc
HD SDI Output
EPLD AsicA AsicB
R
G
B
Gamma
Knee
Contour
Matrix
VIPER
R G B
mode
Serial out Serial out
Serial out
Scaler /
Encoder.
4:4:4
1:1
RGB_YC
lowpass
BW clip
Output
format
A/D
A/D
A/D
R
G
B
12bit
12bit
12bit
R
G
B
Link 2 SDI 0:2:2
HD SDI 4:2:2
SD CVBS Output
HD VF Output
Link 1
LOG
Curve
Not Proc. Data
HD SDI Out 4:2:2
HD SDI Out 4:2:2
VIPER Modes
1080 output 48 PsF 50 PsF 60 Psf 50 I 60 I
input
24 P mode 1 mode 2
25 P mode 1
30 P mode 1
50 I mode 0
60 I mode 0
720 output 24 P 50 Rep 60 Rep 50 P 60 P
input
24 P mode 0 mode 2
25 P mode 1
30 P mode 1
50 P mode 0
60 P mode 0
PsF = Progressive Segmented Frame
I = Interlace
P = Progresive
R
G
B
DELOG
Black/Gain
Gamma
Knee
Contour
Matrix
R
G
B
mode 0 = Transparent
mode 1 = Progr => Interlace
mode 2 = 3:2 PullDown
 Loading...