

Page 1
Page 2
Page 3
Copyright
Copyright © 2003 Grass Valley Inc. All rights reserved. Printed in the United States
of America.
This document may not be copied in whole or in part, or otherwise reproduced
except as specifically permitted under U.S. copyright law, without the prior written
consent of Grass Valley Inc., P.O. Box 59900, Nevada City, California 95959-7900
Trademarks
Disclaimer
U.S. Government
Restricted Rights
Legend
Revision Status
Grass Valley, FeedClip, NewsEdit, NewsQ, NewsShare, and Profile are either
registered trademarks or trademarks of Grass Valley in the United States and/or
other countries. Other trademarks used in this document are either registered
trademarks or trademarks of the manufacturers or vendors of the associated
products. Grass Valley products are covered by U.S. and foreign patents, issued
and pending. Additional information regarding Grass Valley’s trademarks and
other proprietary rights may be found at www.thomsongrassvalley.com.
Product options and specifications subject to change without notice. The
information in this manual is furnished for informational use only, is subject to
change without notice, and should not be construed as a commitment by Grass
Valley. Grass Valley assumes no responsibility or liability for any errors or
inaccuracies that may appear in this publication.
Use, duplication, or disclosure by the United States Government is subject to
restrictions as set forth in subparagraph (c)(1)(ii) of the Rights in Technical Data
and Computer Software clause at DFARS 252.277-7013 or in subparagraph c(1)
and (2) of the Commercial Computer Software Restricted Rights clause at FAR
52.227-19, as applicable. Manufacturer is Grass Valley Inc., P.O. Box 59900,
Nevada City, California 95959-7900 U.S.A.
Rev Date Description
April 2002 Release for Software Version 4.0
April 2003 Preliminary Release for Software Version 4.5
July 2003 Release 071-8142-03 for Software Version 4.5
Page 4

Contents
Preface
Grass Valley Product Support . . . . . . . . . . . . . . . . . . . . . . . . . . . . . . . . 7
Safety Summaries . . . . . . . . . . . . . . . . . . . . . . . . . . . . . . . . . . . . . . . . . 9
Safety Terms and Symbols. . . . . . . . . . . . . . . . . . . . . . . . . . . . . . . . . . 11
Service Safety Summary . . . . . . . . . . . . . . . . . . . . . . . . . . . . . . . . . . . 12
Certifications and Compliances . . . . . . . . . . . . . . . . . . . . . . . . . . . . . . 13
Environmental Criteria . . . . . . . . . . . . . . . . . . . . . . . . . . . . . . . . . . . . . 16
Chapter 1 Introducing FeedClip
What is FeedClip? . . . . . . . . . . . . . . . . . . . . . . . . . . . . . . . . . . . . . . . . 18
Quick Overview of Creating Clips with FeedClip . . . . . . . . . . . . . . . . . 19
Tour of the FeedClip Window . . . . . . . . . . . . . . . . . . . . . . . . . . . . . . . . 20
The Viewer Window. . . . . . . . . . . . . . . . . . . . . . . . . . . . . . . . . . . . . 22
The Record Tab. . . . . . . . . . . . . . . . . . . . . . . . . . . . . . . . . . . . . . . . 23
The Playback Tab . . . . . . . . . . . . . . . . . . . . . . . . . . . . . . . . . . . . . . 24
The Scheduler Tab . . . . . . . . . . . . . . . . . . . . . . . . . . . . . . . . . . . . . 25
Working in Shared or Local Mode . . . . . . . . . . . . . . . . . . . . . . . . . . . . 26
Navigating in FeedClip . . . . . . . . . . . . . . . . . . . . . . . . . . . . . . . . . . . . . 27
Using the Mouse . . . . . . . . . . . . . . . . . . . . . . . . . . . . . . . . . . . . . . . 27
Using the Keyboard . . . . . . . . . . . . . . . . . . . . . . . . . . . . . . . . . . . . . 27
Using the Shortcut Menus . . . . . . . . . . . . . . . . . . . . . . . . . . . . . . . . 27
Tour of the FeedClip Keyboard. . . . . . . . . . . . . . . . . . . . . . . . . . . . . . . 28
The Record Button . . . . . . . . . . . . . . . . . . . . . . . . . . . . . . . . . . . . . 28
Mark Point Buttons . . . . . . . . . . . . . . . . . . . . . . . . . . . . . . . . . . . . . 28
Transport Control Buttons . . . . . . . . . . . . . . . . . . . . . . . . . . . . . . . . 29
Other FeedClip Buttons . . . . . . . . . . . . . . . . . . . . . . . . . . . . . . . . . 29
Chapter 2 Scheduling Feeds For Recording
Tour of the Scheduler Tab . . . . . . . . . . . . . . . . . . . . . . . . . . . . . . . . . . 32
Toolbar. . . . . . . . . . . . . . . . . . . . . . . . . . . . . . . . . . . . . . . . . . . . . . . 33
Understanding the Scheduler List Colors . . . . . . . . . . . . . . . . . . . . 34
Enabling the Scheduler. . . . . . . . . . . . . . . . . . . . . . . . . . . . . . . . . . . . . 35
Adding New Entries . . . . . . . . . . . . . . . . . . . . . . . . . . . . . . . . . . . . . . . 36
Modifying Entries . . . . . . . . . . . . . . . . . . . . . . . . . . . . . . . . . . . . . . . . . 40
Editing Entries . . . . . . . . . . . . . . . . . . . . . . . . . . . . . . . . . . . . . . . . . 40
Disabling Scheduled Events . . . . . . . . . . . . . . . . . . . . . . . . . . . . . . 40
Scheduling Recurring Events . . . . . . . . . . . . . . . . . . . . . . . . . . . . . . . . 41
Adding a New Entry . . . . . . . . . . . . . . . . . . . . . . . . . . . . . . . . . . . . . 41
Editing an Entry . . . . . . . . . . . . . . . . . . . . . . . . . . . . . . . . . . . . . . . . 44
Removing an Entry . . . . . . . . . . . . . . . . . . . . . . . . . . . . . . . . . . . . . 44
Using the Context-Sensitive Scheduler Menu . . . . . . . . . . . . . . . . . . . 45
Digital News Production
3
Page 5

Contents
Chapter 3 Recording Feeds and Creating Clips
Tour of the Record Tab . . . . . . . . . . . . . . . . . . . . . . . . . . . . . . . . . . . . 48
Recording a Feed. . . . . . . . . . . . . . . . . . . . . . . . . . . . . . . . . . . . . . . . . 49
Adjusting Audio Input . . . . . . . . . . . . . . . . . . . . . . . . . . . . . . . . . . . . . . 51
Adjusting the Volume. . . . . . . . . . . . . . . . . . . . . . . . . . . . . . . . . . . . 51
Muting Audio Channels . . . . . . . . . . . . . . . . . . . . . . . . . . . . . . . . . . 51
Creating a Playlist While Recording. . . . . . . . . . . . . . . . . . . . . . . . . . . 52
Using the Auto-Mark Feature . . . . . . . . . . . . . . . . . . . . . . . . . . . . . 53
Rearranging Your Playlist. . . . . . . . . . . . . . . . . . . . . . . . . . . . . . . . . . . 53
Reordering Clips . . . . . . . . . . . . . . . . . . . . . . . . . . . . . . . . . . . . . . . 53
Deleting Clips . . . . . . . . . . . . . . . . . . . . . . . . . . . . . . . . . . . . . . . . . 53
Grouping Clips. . . . . . . . . . . . . . . . . . . . . . . . . . . . . . . . . . . . . . . . . 54
Using the Context-Sensitive Record Menu . . . . . . . . . . . . . . . . . . . . . 55
Chapter 4 Playing Feeds and Clips
Tour of the Playback Tab . . . . . . . . . . . . . . . . . . . . . . . . . . . . . . . . . . . 58
Opening a Feed . . . . . . . . . . . . . . . . . . . . . . . . . . . . . . . . . . . . . . . . . . 59
Closing a Feed . . . . . . . . . . . . . . . . . . . . . . . . . . . . . . . . . . . . . . . . 59
Playing Feeds and Clips. . . . . . . . . . . . . . . . . . . . . . . . . . . . . . . . . . . . 60
Playing a Feed. . . . . . . . . . . . . . . . . . . . . . . . . . . . . . . . . . . . . . . . . 60
Playing Clips in the Playlist . . . . . . . . . . . . . . . . . . . . . . . . . . . . . . . 60
Changing the Playing Speed While Viewing . . . . . . . . . . . . . . . . . . 61
Creating a Playlist . . . . . . . . . . . . . . . . . . . . . . . . . . . . . . . . . . . . . . . . 62
Using the Auto-Mark Feature . . . . . . . . . . . . . . . . . . . . . . . . . . . . . 63
Rearranging Your Playlist. . . . . . . . . . . . . . . . . . . . . . . . . . . . . . . . . . . 63
Reordering Clips . . . . . . . . . . . . . . . . . . . . . . . . . . . . . . . . . . . . . . . 63
Deleting Clips . . . . . . . . . . . . . . . . . . . . . . . . . . . . . . . . . . . . . . . . . 63
Grouping Clips. . . . . . . . . . . . . . . . . . . . . . . . . . . . . . . . . . . . . . . . . 64
Adjusting Audio Output. . . . . . . . . . . . . . . . . . . . . . . . . . . . . . . . . . . . . 65
Adjusting the Volume. . . . . . . . . . . . . . . . . . . . . . . . . . . . . . . . . . . . 65
Muting Audio Channels . . . . . . . . . . . . . . . . . . . . . . . . . . . . . . . . . . 65
Using the Context-Sensitive Playback Menu . . . . . . . . . . . . . . . . . . . . 66
4
Digital News Production
Page 6

Chapter 5 Trimming Clips
Tour of the Trimmer . . . . . . . . . . . . . . . . . . . . . . . . . . . . . . . . . . . . . . . 68
How to Trim a Clip . . . . . . . . . . . . . . . . . . . . . . . . . . . . . . . . . . . . . . . . 68
Navigating Through Clips . . . . . . . . . . . . . . . . . . . . . . . . . . . . . . . . . . . 69
Playing Clips . . . . . . . . . . . . . . . . . . . . . . . . . . . . . . . . . . . . . . . . . . 70
Moving to Specified Frames . . . . . . . . . . . . . . . . . . . . . . . . . . . . . . 70
Changing Mark In and Out Points. . . . . . . . . . . . . . . . . . . . . . . . . . . . . 71
More Ways to Use the Trimmer . . . . . . . . . . . . . . . . . . . . . . . . . . . . . . 71
Using Handles to Add Frames to Your Clips . . . . . . . . . . . . . . . . . . 71
Locking the Duration of a Clip . . . . . . . . . . . . . . . . . . . . . . . . . . . . . 72
Playing Past Out . . . . . . . . . . . . . . . . . . . . . . . . . . . . . . . . . . . . . . . 72
Using Control Track . . . . . . . . . . . . . . . . . . . . . . . . . . . . . . . . . . . . . 73
Looping Playback. . . . . . . . . . . . . . . . . . . . . . . . . . . . . . . . . . . . . . . 73
Resetting the Mark Points on the Clip . . . . . . . . . . . . . . . . . . . . . . . 73
Chapter 6 Sending Clips
Grouping Clips . . . . . . . . . . . . . . . . . . . . . . . . . . . . . . . . . . . . . . . . . . . 76
Sending Clips . . . . . . . . . . . . . . . . . . . . . . . . . . . . . . . . . . . . . . . . . . . . 78
Understanding Clip Status Colors. . . . . . . . . . . . . . . . . . . . . . . . . . . . . 80
Appendix A The FeedClip Keyboard . . . . . . . . . . . . . . . . . . . . . . . . . . . . . .81
Contents
Appendix B Configuring FeedClip . . . . . . . . . . . . . . . . . . . . . . . . . . . . . . . . 85
Appendix C Tips for Using FeedClip . . . . . . . . . . . . . . . . . . . . . . . . . . . . . . 115
Index
Digital News Production
5
Page 7

Contents
6
Digital News Production
Page 8

Grass Valley Product Support
To get technical assistance, check on the status of problems, or report new
problems, contact Grass Valley Product Support via e-mail, the Web, or by
phone or fax.
Web Technical Support
To access support information on the Web, visit the product support Web page
on the Grass Valley Web site. You can download software or find solutions to
problems by searching our Frequently Asked Questions (FAQ) database.
Grass Valley Product Support
World Wide Web:
Technical Support E-mail Address:
http://www.thomsongrassvalley.com/support/
gvgtechsupport@thomsongrassvalley.com
Phone Support
Use the following information to contact product support by phone during
business hours. After-hours phone support is available for warranty and
contract customers.
USA and Americas (includes Latin America and Canada)
Telephone (800) 547-8949 (Toll Free)
(530) 478-4148 (Direct Dial Toll Call)
Fax (530) 478-3181
Europe and UK
UK Regional
Service
Location
France Tel +33 145 297 300
Tel +44 1753 218 777
Fax +44 1753 218 757
Fax +33 145 297 302
Italy Tel +39 72 901 428
Germany Tel +49 221 1791 234
Fax +39 72 905 371
Fax +49 221 1791 235
Digital News Production
7
Page 9

Preface
Asia Pacific
Australia Tel (612) 8877 6800
Fax (612) 8877 6825
China Tel (86) 10 6235 1185
Fax (86)10 6235 1190
Hong Kong Tel (852)-2531-3000
Fax (852)-2802-2996
Authorized Support Representative
A local authorized support representative may be available in your country. To
locate the support representative for your country, visit the product support
Web page on the Grass Valley Web site.
Profile Users Group
You can connect with other Profile XP Media Platform users to ask questions
or share advice, tips, and hints.
Send email to profile-users@thomsongrassvalley.com to join the community
and benefit from the experience of others.
India Tel (91) 11 373 0544
Fax (91) 11 373 0543
Japan Tel (813) 5484 6869
Fax (813) 5484 3775
South East
Asia
Tel (65) 7328 729
Fax (65)7327 649
8
Digital News Production
Page 10

Safety Summaries
General Safety Summary
Review the following safety precautions to avoid injury and prevent damage to
this product or any products connected to it.
Only qualified personnel should perform service procedures.
While using this product, you may need to access other parts of the system.
Read the
cautions related to operating the system.
Review all system operator manuals, including manuals in electronic format on
the system hard drive.
Injury Precautions
General Safety Summary
Safety Summaries
in other system manuals for warnings and
Use Proper Power
Cord
Ground the Product
Do Not Operate
Without Covers
Do Not Operate in
Wet/Damp
Conditions
Do Not Operate in
an Explosive
Atmosphere
Avoid Exposed
Circuitry
To avoid fire hazard, use only the power cord specified for
this product.
This product is grounded through the grounding conductor of
the power cord. To avoid electric shock, the grounding
conductor must be connected to earth ground. Before making
connections to the input or output terminals of the product,
ensure that the product is properly grounded.
To avoid electric shock or fire hazard, do not operate this
product with covers or panels removed.
To avoid electric shock, do not operate this product in wet or
damp conditions.
To avoid injury or fire hazard, do not operate this product in
an explosive atmosphere.
To avoid injury, remove jewelry such as rings, watches, and
other metallic objects. Do not touch exposed connections and
components when power is present.
Digital News Production
9
Page 11

Preface
Product Damage Precautions
Use Proper Power
Source
Provide Proper
Ventilation
Do Not Operate With
Suspected Failures
Battery
Replacement
Do not operate this product from a power source that applies
more than the voltage specified.
To prevent product overheating, provide proper ventilation.
If you suspect there is damage to this product, have it
inspected by qualified service personnel.
To avoid damage, replace only with the same or equivalent
type recommended by the circuit board manufacturer.
Dispose of used battery according to the circuit board
manufacturer’s instructions.
10
Digital News Production
Page 12
Safety Terms and Symbols
Terms in This
Manual
!
These terms may appear in this and other product manuals:
WARNING
: Warning statements identify conditions or
practices that can result in personal injury or loss of life.
Safety Terms and Symbols
Terms on the
Product
Symbols on the
Product
!
practices that can result in damage to the equipment or other
CAUTION
: Caution statements identify conditions or
property.
These terms may appear on the product:
DANGER
indicates a personal injury hazard immediately
accessible as one reads the marking.
WARNING
indicates a personal injury hazard not
immediately accessible as you read the marking.
CAUTION
indicates a hazard to property including the
product.
The following symbols may appear on the product:
DANGER high voltage
Protective ground (earth) terminal
!
ATTENTION – refer to manual
Digital News Production
11
Page 13

Preface
Service Safety Summary
Do Not Service
Alone
Do not perform internal service or adjustment of this product
unless another person capable of rendering first aid and
resuscitation is present.
No Power Switch
Use Care When
Servicing With
Power On
To avoid electric shock, disconnect the main power by means
of the power cord. The power cord is the main power
disconnect. Ensure that the power cord is easily accessible at
the rear of the product or at the power receptacle.
Dangerous voltages or currents may exist in this product.
Disconnect power and remove battery (if applicable) before
removing protective panels, soldering, or replacing
components.
To avoid electric shock, do not touch exposed connections.
12
Digital News Production
Page 14

Certifications and Compliances
Canadian Certified
Power Cords
Canadian approval includes the products and power cords
appropriate for use in the North America power network. All
other power cords supplied are approved for the country of
use.
Certifications and Compliances
FCC Emission
Control
Canadian EMC
Notice of
Compliance
This equipment has been tested and found to comply with the
limits for a Class A digital device, pursuant to Part 15 of the
FCC Rules. These limits are designed to provide reasonable
protection against harmful interference when the equipment
is operated in a commercial environment. This equipment
generates, uses, and can radiate radio frequency energy and,
if not installed and used in accordance with the instruction
manual, may cause harmful interference to radio
communications. Operation of this equipment in a residential
area is likely to cause harmful interference in which case the
user will be required to correct the interference at his own
expense. Changes or modifications not expressly approved
by Grass Valley can affect emission compliance and could
void the user’s authority to operate this equipment.
This digital apparatus does not exceed the Class A limits for
radio noise emissions from digital apparatus set out in the
Radio Interference Regulations of the Canadian Department
of Communications.
Le présent appareil numérique n’émet pas de bruits
radioélectriques dépassant les limites applicables aux
appareils numériques de la classe A préscrites dans le
Règlement sur le brouillage radioélectrique édicté par le
ministère des Communications du Canada.
Canadian Certified
AC Adapter
EN55022 Class A
Warning
Canadian approval includes the AC adapters appropriate for
use in the North America power network. All other AC
adapters supplied are approved for the country of use.
For products that comply with Class A. In a domestic
environment this product may cause radio interference in
which case the user may be required to take adequate
measures.
Digital News Production
13
Page 15

Preface
Laser Compliance
Laser Safety
Requirements
The device used in this product is a Class 1 certified laser
product. Operating this product outside specifications or
altering its original design may result in hazardous radiation
exposure, and may be considered an act of modifying or new
manufacturing of a laser product under U.S. regulations
contained in 21CFR Chapter 1, subchapter J or CENELEC
regulations in HD 482 S1. People performing such an act are
required by law to recertify and reidentify this product in
accordance with provisions of 21CFR subchapter J for
distribution within the U.S.A., and in accordance with
CENELEC HD 482 S1 for distribution within countries using
the IEC 825 standard.
Laser Safety
FCC Emission
Limits
Laser safety in the United States is regulated by the Center for
Devices and Radiological Health (CDRH). The laser safety
regulations are published in the “Laser Product Performance
Standard,” Code of Federal Regulation (CFR), Title 21,
Subchapter J.
The International Electrotechnical Commission (IEC)
Standard 825, “Radiation of Laser Products, Equipment
Classification, Requirements and User’s Guide,” governs
laser products outside the United States. Europe and member
nations of the European Free Trade Association fall under the
jurisdiction of the Comité Européen de Normalization
Electrotechnique (CENELEC).
This device complies with Part 15 of the FCC Rules.
Operation is subject to the following two conditions: (1) This
device may not cause harmful interference, and (2) this
device must accept any interference received, including
interference that may cause undesirable operation.
14
Digital News Production
Page 16

Certification
Category Standard
Certifications and Compliances
Safety
Designed/tested for compliance with:
ANSI/UL60950-2000
IEC 60950
CAN/CSA C22.2, No. 60950-00
EN60950:2000
- Safety of Information Technology Equipment (3rd edition, 1999)
- Safety of Information Technology Equipment
- Safety of Information Technology Equipment
- Safety of Information Technology Equipment (3rd edition)
Digital News Production
15
Page 17
Preface
Environmental Criteria
The following table lists the environmental criteria for the FeedClip system.
Characteristics Description
Operating Temperature
Storage Temperature
Operating Altitude
Storage Altitude
Mechanical Shock
Random Vibration
Transportation
Equipment Type Supplemental Data: Information Technology
Equipment Class Supplemental Data: Class 1
Installation Category Requirement: Category II Local level mains, appliances,
Pollution Degree Requirement: Level 2 operating environment, indoor use
Relative Humidity Requirement: Operating 80% from +30° to +40°C
Requirement:
Requirement:
Requirement:
Supplemental Data:
Requirement:
Supplemental Data:
Requirement:
Requirement:
Requirement:
10° to 40°C
-40° to 65°C
To 10,000 feet
To 40,000 feet
Non-Operational: Class 5 Grass Valley
Grass Valley 001131500
IEC 60950 compliant to 2000 meters
Class 5 (30G) Grass Valley 001131500
Operational: Class 6 Grass Valley
001131500
001131500
portable equipment, etc.
only.
Non-Operating 90% from +30° to +60°C
Do not operate with visible moisture on the
circuit boards
16
Digital News Production
Page 18

Chapter
1
Introducing FeedClip
FeedClip is a digital, interactive feed capture system for news applications that
enables broadcasters to quickly turn around live events faster than is possible in
a tape environment. With FeedClip, you can record video while simultaneously
creating, organizing, and playing back clips—you can save clips and use them
in a broadcast or export them to a NewsEdit workstation for further editing.
This manual shows you how to use FeedClip effectively and efficiently to
record news feeds and create clips for use in a broadcast news show.
This chapter discusses:
• What FeedClip is
• The feed capture process using FeedClip
• The FeedClip window
• Working in Local or Shared mode
• How to navigate around FeedClip
• How to use the FeedClip keyboard
Digital News Production 17
Page 19

Chapter 1 Introducing FeedClip
What is FeedClip?
FeedClip is a feed capture system that allows you to record video and audio to
a disk and create and organize clips. You can mark clips on the fly while
recording a live broadcast or from a previously recorded file, then use clips for
broadcast or export selected clips to NewsEdit for further editing.
With FeedClip, you can undertake multiple tasks such as recording, clip
marking, scrubbing, and editing all at the same time—bringing greater
efficiency to your news and broadcasting operation.
FeedClip also lets you schedule events to record in the future.
Examples of use for FeedClip include:
• The President calls a news conference prior to your evening news broadcast.
You start FeedClip and begin recording the news conference in its entirety.
While the broadcast is recording, you review the incoming video and mark
clips in the recording. You then edit and organize these clips for broadcast
during your nightly news program.
• There is a live breaking news event in the middle of your evening broadcast.
You start FeedClip and begin marking clips. You then edit those clips and
play them back on the air without any transfer between machines.
• You need to create a highlight package of a sports event for your late sports
segment. You play the recording and mark clips of the highlights you want
to include in the broadcast, then organize a highlight package. When you
play back the clips, you can play them normally or in slow motion.
18 Digital News Production
Page 20

Quick Overview of Creating Clips with FeedClip
Quick Overview of Creating Clips with FeedClip
You create clips with FeedClip following these general steps:
1. Record news feeds to disk.
You can record manually or schedule feeds to record at specific times on
specific dates.
2. Create clips from the news feed.
You can create clips while a feed is recording or later during playback.
3. Trim the clips, if necessary.
4. Send the clips to a NewsEdit workstation for additional editing or to a
network server to play to air.
This manual takes you through the process of recording feeds and creating clips
with FeedClip.
Digital News Production 19
Page 21
Chapter 1 Introducing FeedClip
Tour of the FeedClip Window
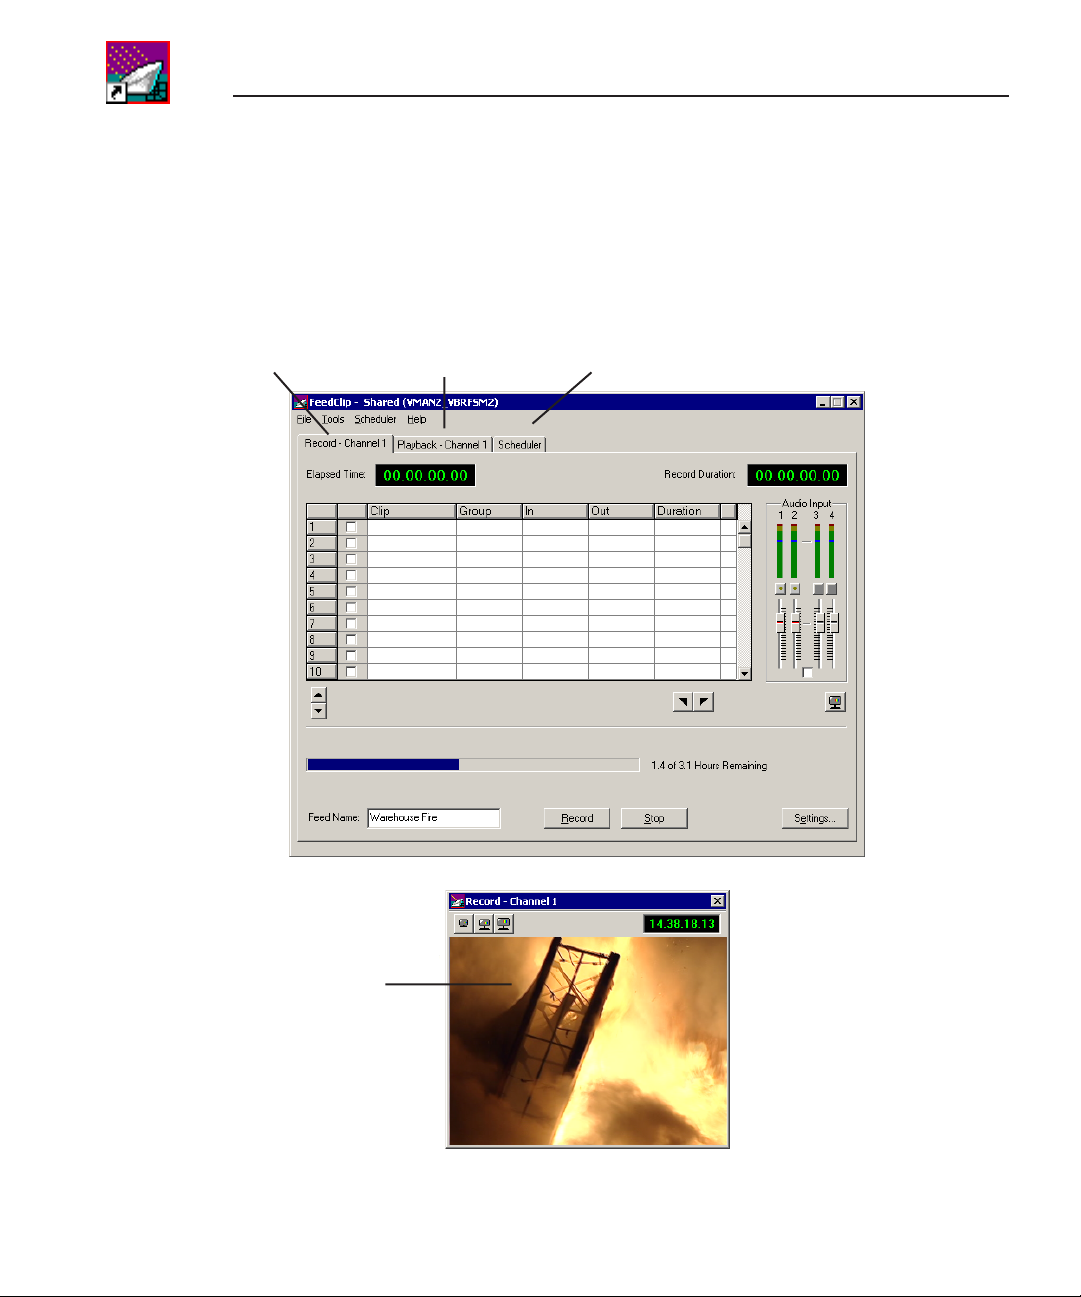
The FeedClip window consists of a viewer window and three tabs — the
Record tab, the Playback tab, and the Scheduler tab.
Record
Tab
Playback
Tab
Scheduler
Tab
Viewer
Window
20 Digital News Production
Page 22
Tour of the FeedClip Window
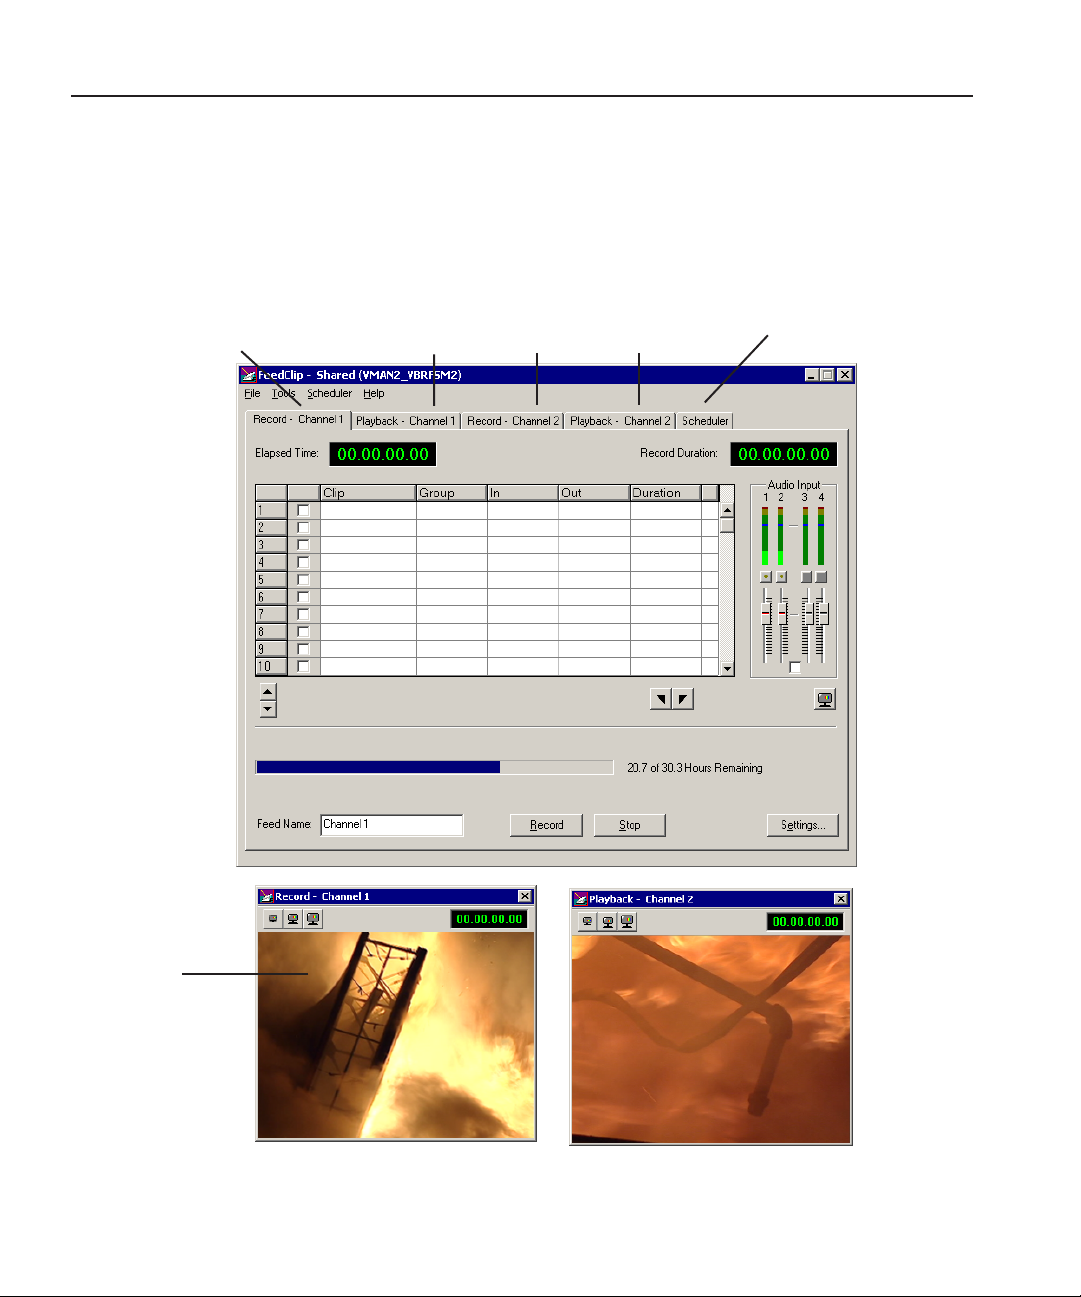
If you are using two channels with FeedClip, you have two Record tabs and two
Playback tabs — one for each channel, and one Scheduler for both channels.
You also have a viewer window for each channel.
Record
Tab for
Channel 1
Playback
Tab for
Channel 1
Tab for
Channel 2
PlaybackRecord
Channel 2
Scheduler
TabTab for
Viewer
Windows
Digital News Production 21
Page 23
Chapter 1 Introducing FeedClip
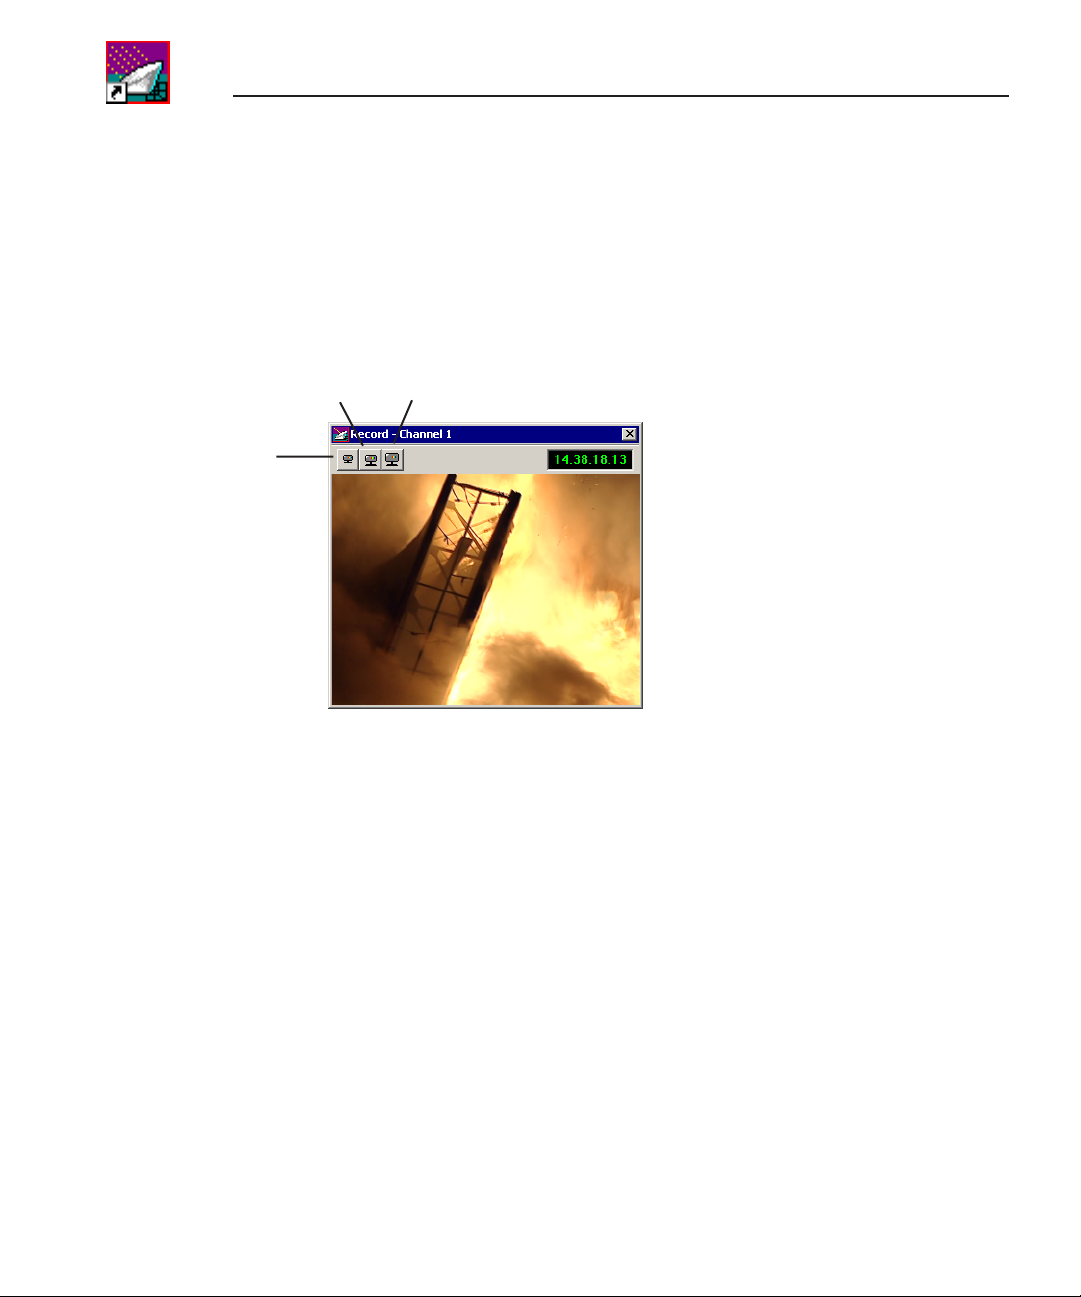
The Viewer Window
The viewer window lets you monitor the video while you are recording,
scrubbing, or playing back. You can view the video at full size, half size, or
quarter size.
View
1/4
Size
View
1/2
Size
View
Full
Size
22 Digital News Production
Page 24
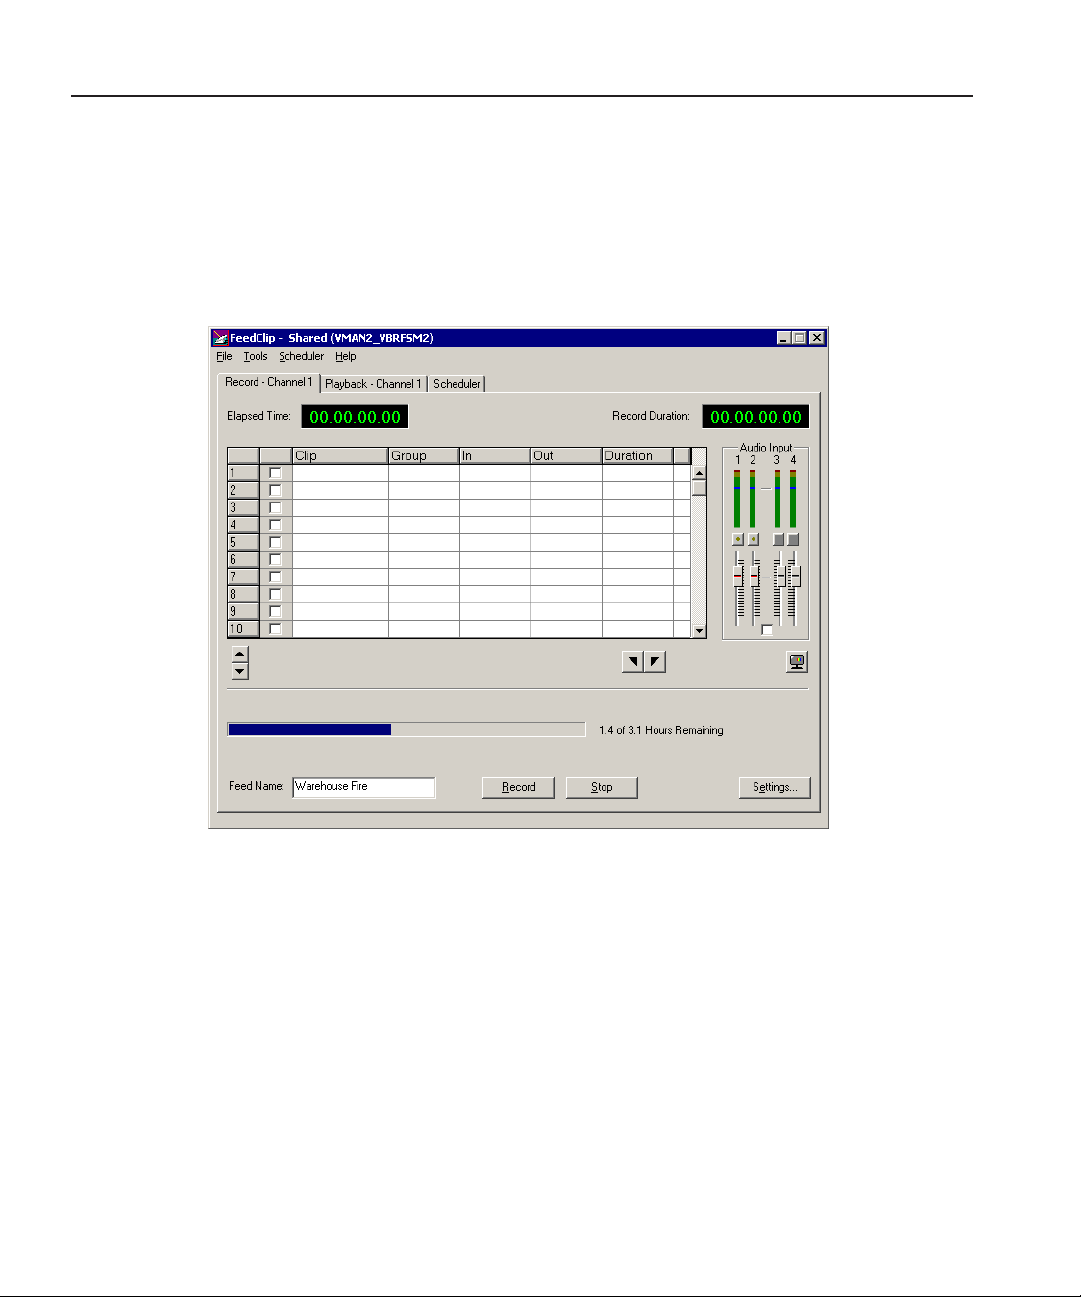
The Record Tab
The Record tab lets you record feeds immediately and create clips on the fly. If
you’ve scheduled a feed, it displays in the Record tab when it records. You can
also adjust the audio input levels.
The Record Tab
See Chapter 3, “Recording Feeds and Creating Clips,” for details on recording
feeds.
Digital News Production 23
Page 25
Chapter 1 Introducing FeedClip
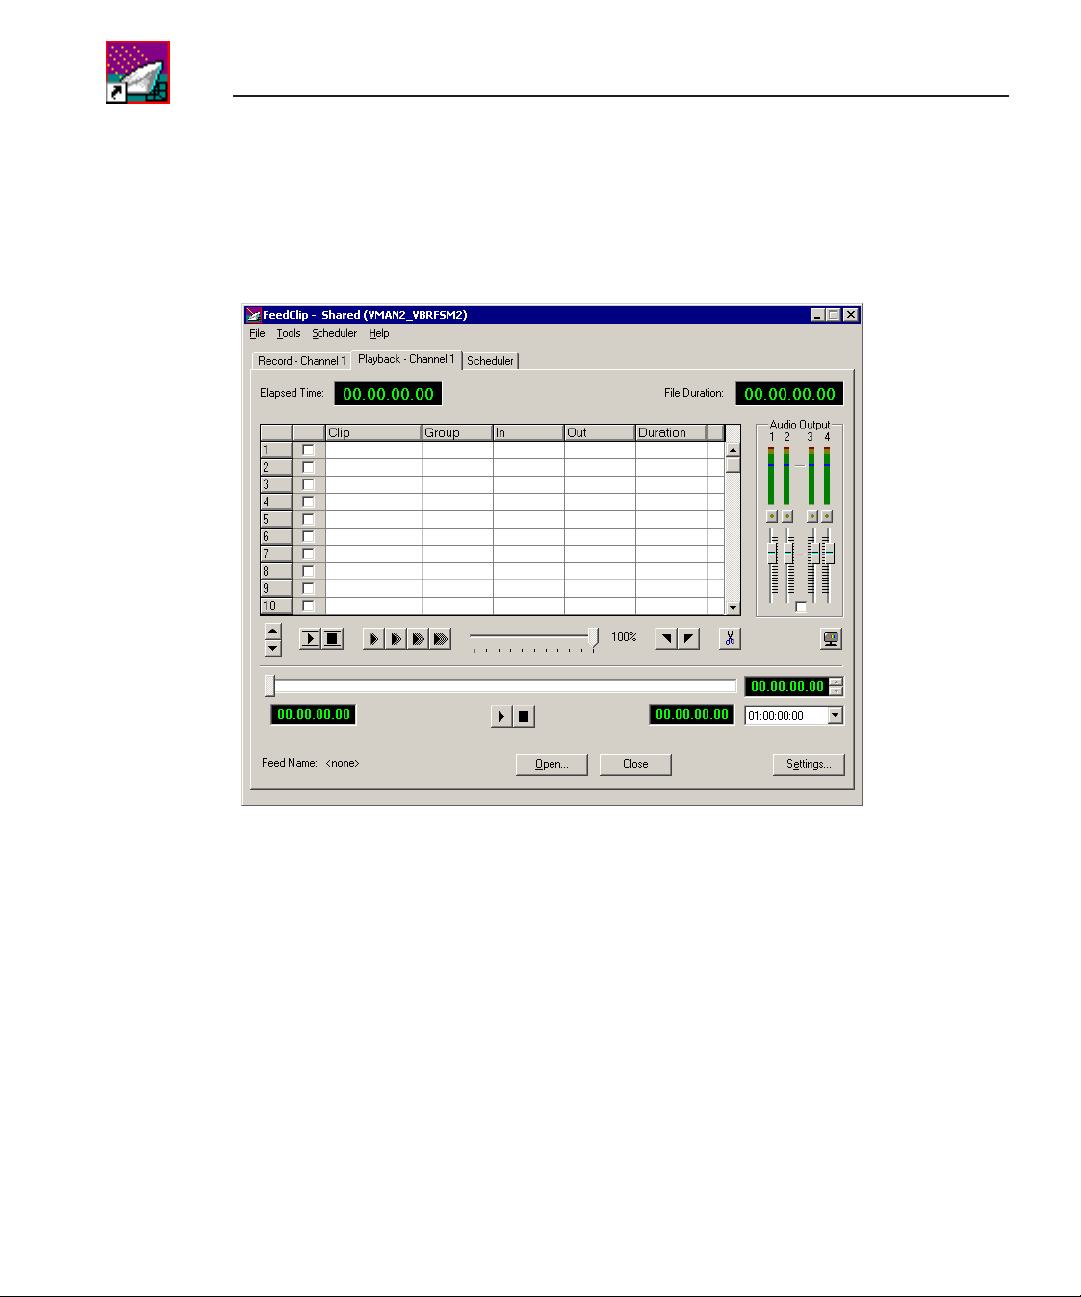
The Playback Tab
The Playback tab lets you open a recorded feed and create clips. You can also
trim a clip, if necessary, and adjust the audio output levels.
See Chapter 4, “Playing Feeds and Clips,” for details on using recorded feeds.
24 Digital News Production
Page 26
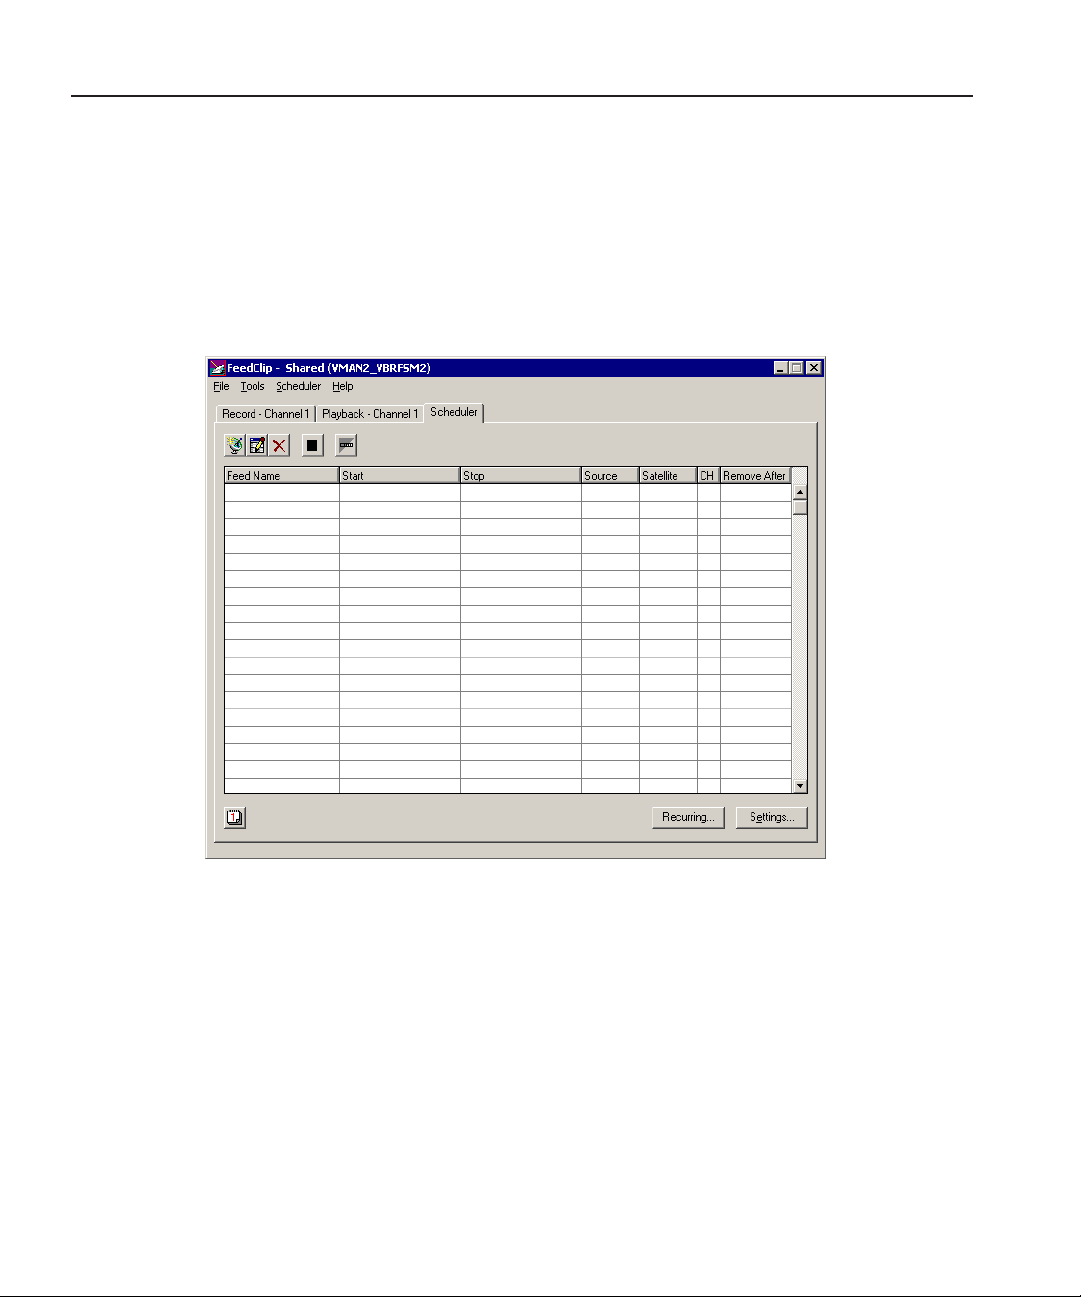
The Scheduler Tab
The Scheduler lets you set up feeds to record automatically at pre-defined times
and dates. You can also schedule recurring events, allowing you to record the
same feed every day of the week or once a week — you define the dates and
times.
The Scheduler Tab
See Chapter 2, “Scheduling Feeds For Recording,” for details on using the
scheduler to automatically record feeds.
Digital News Production 25
Page 27
Chapter 1 Introducing FeedClip
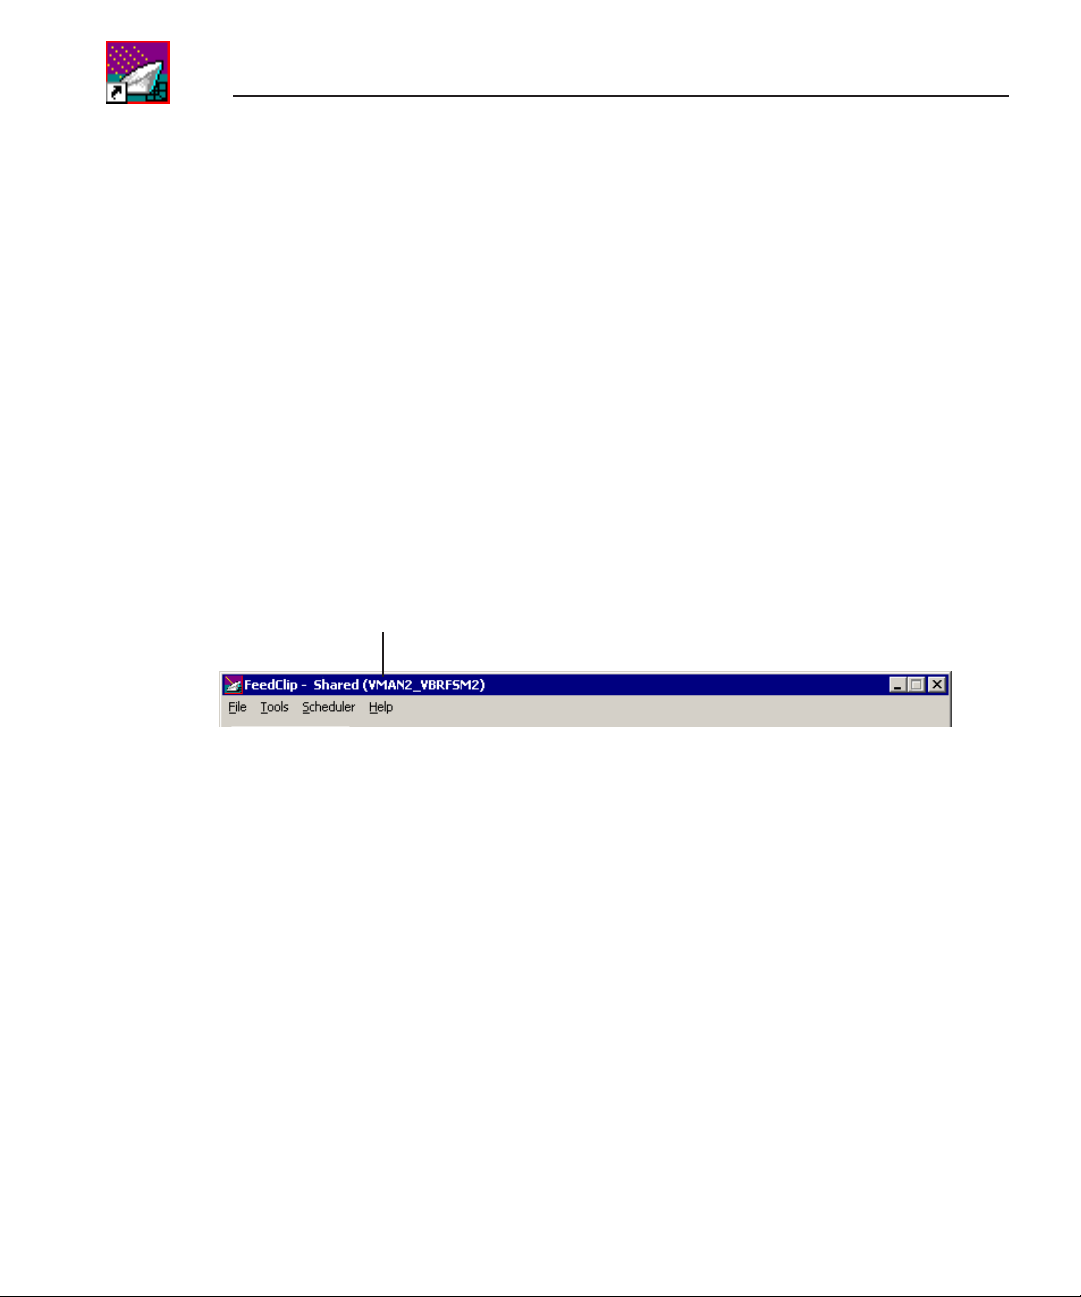
Working in Shared or Local Mode
You can use FeedClip either in shared or local mode:
• Shared mode uses a shared media database. All Digital News Production
workstations access the same bins; the bins are locked so two editors can’t
make changes to the same file at the same time.
• Local mode uses your computer’s local disk storage and a local media
database. Each FeedClip workstation has its own Bin on the FeedClip
machine, and cannot share the Bin. In order to use someone else’s files, you
need to import them.
You can change modes from the General Options menu; see “Setting General
Options” on page 88 for instructions.
FeedClip indicates your current mode at the top of the window.
FeedClip in Shared Mode
You record and play back media in FeedClip the same way regardless of what
mode you are working in. The main difference is that your Bin is shared, and
all editors using a Digital News Production workstation have access to the same
media files you do.
26 Digital News Production
Page 28

Navigating in FeedClip
You work in FeedClip with the mouse, the keyboard, or a combination of both.
This manual includes instructions for both mouse and keyboard commands,
allowing you to use the method you prefer. You may generally find keyboard
operation easier.
Using the Mouse
To execute a mouse command, move the mouse pointer to a given menu or
button, then click the left mouse button. This manual uses the term click when
you press the mouse button once; double-click when you press the mouse
button twice in quick succession; press when you press and hold the mouse
button.
Using the Keyboard
The keyboard is customized with color-coded keys that allow you to see
commands at a glance. Keyboard commands are either a single keystroke or a
key combination. You execute key combinations such as
and holding the first key in the combination, and then pressing the second key.
A complete list of the keyboard keys and functions is in Appendix A.
Navigating in FeedClip
Ctrl+TAB by pressing
Using the Shortcut Menus
FeedClip also makes use of right-click shortcut menus, which provide a quick
way to access relevant commands without having to move the mouse pointer to
the toolbar or menu bar. To access these menus, press the right mouse button
once and a menu appears. The commands that appear depend on the position of
the mouse pointer when you right-click. For example, when you right-click in
the playlist on the Record tab, the shortcut menu provides quick access to
recording commands.
If you are comfortable using a mouse, shortcut menus provide a valuable means
of accessing commands quickly.
Digital News Production 27
Page 29
Chapter 1 Introducing FeedClip
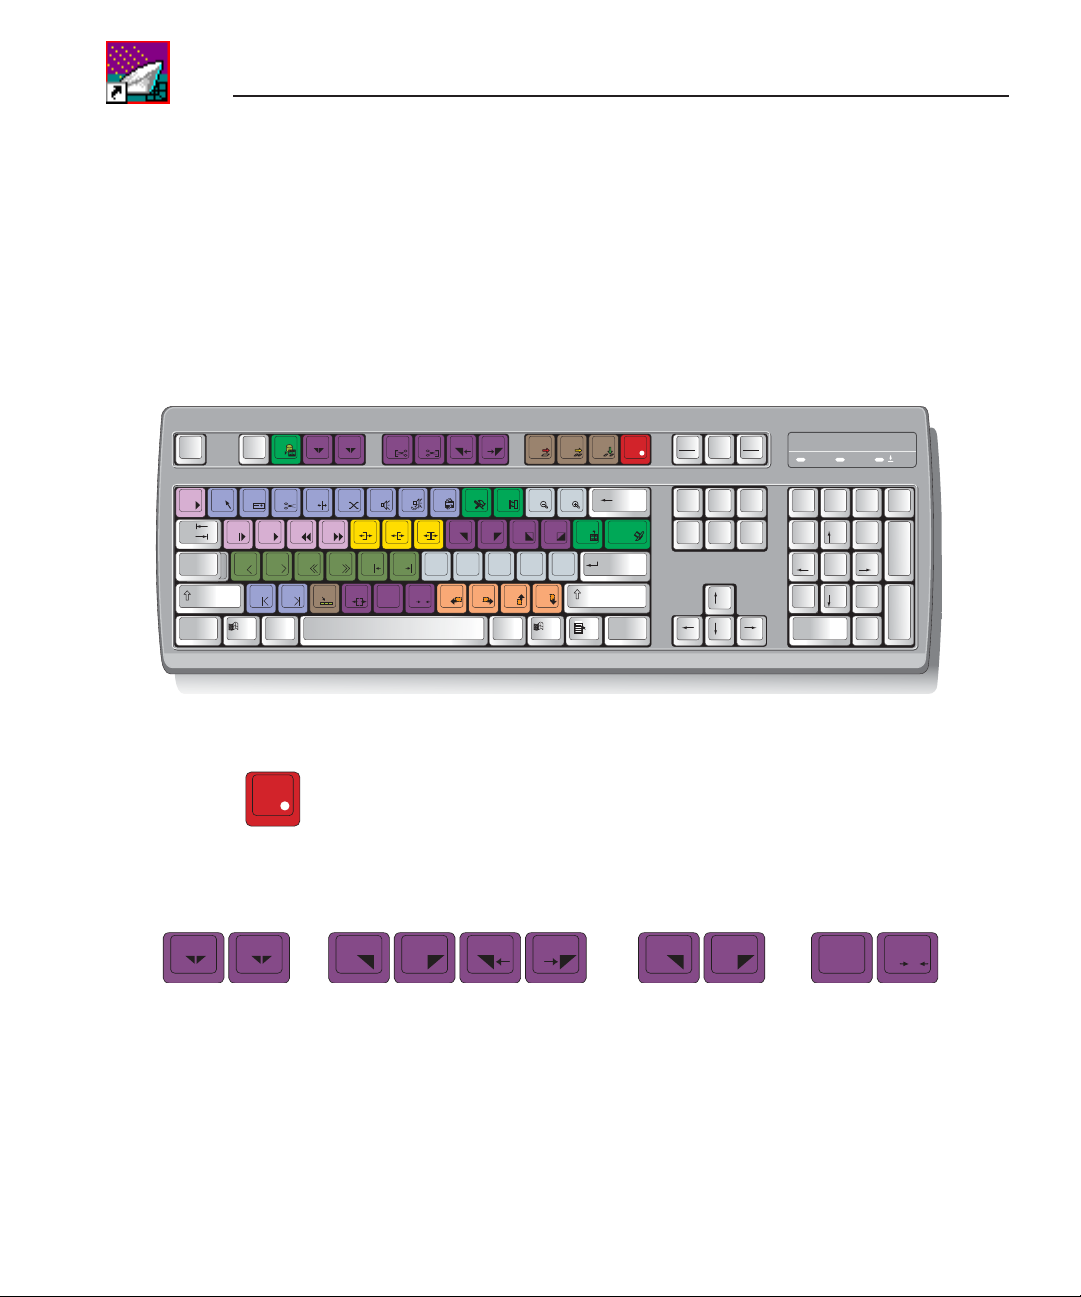
Tour of the FeedClip Keyboard
FeedClip’s keyboard uses color-coded keys that correspond to FeedClip
functions. The keyboard you use with FeedClip is the same keyboard you use
with other Digital News Production products, including NewsEdit. Some of the
keys are used exclusively for NewsEdit and are not used with FeedClip. Keys
listed here apply to FeedClip functions. For a complete key reference, see
Appendix A.
Esc F1
~
!1@2#3$4%5^6&7*8(9)
`
Tab
Caps
Locks
Shift
Ctrl
F2 F31F4
Q W
A G
Z XHC V
RE I O P
D FS
Alt
F5 F6 F7 F8 F9 F10 F11 F12
2
T
Y U
B
CTL
The Record Button
F12
The record button is red, and allows you to start recording with one key press.
Mark Point Buttons
F3
F4
1
2
F5 F6 F7 F8
You use the dark purple buttons to set and control the mark In and Out points.
Print
Scrn
SysRq
_
+
-
0
{[}
J
V
N
M
O
L
A1KA2
<
,
:
;
A3
?/>
.
Backspace
=
|
]
\
"
Enter
'
A4
Shift
CtrlAlt Gr
Insert
Delete End
I O
Scroll
Lock
Home
Pause
Break
PageUpNum
Page
Down
1A
/*-
Lock
8
7
Home
465
2
1
End
0
Ins
B
CTL
9
Pg Up
+
3
Pg Dn
Enter
.
Del
N
O
28 Digital News Production
Page 30
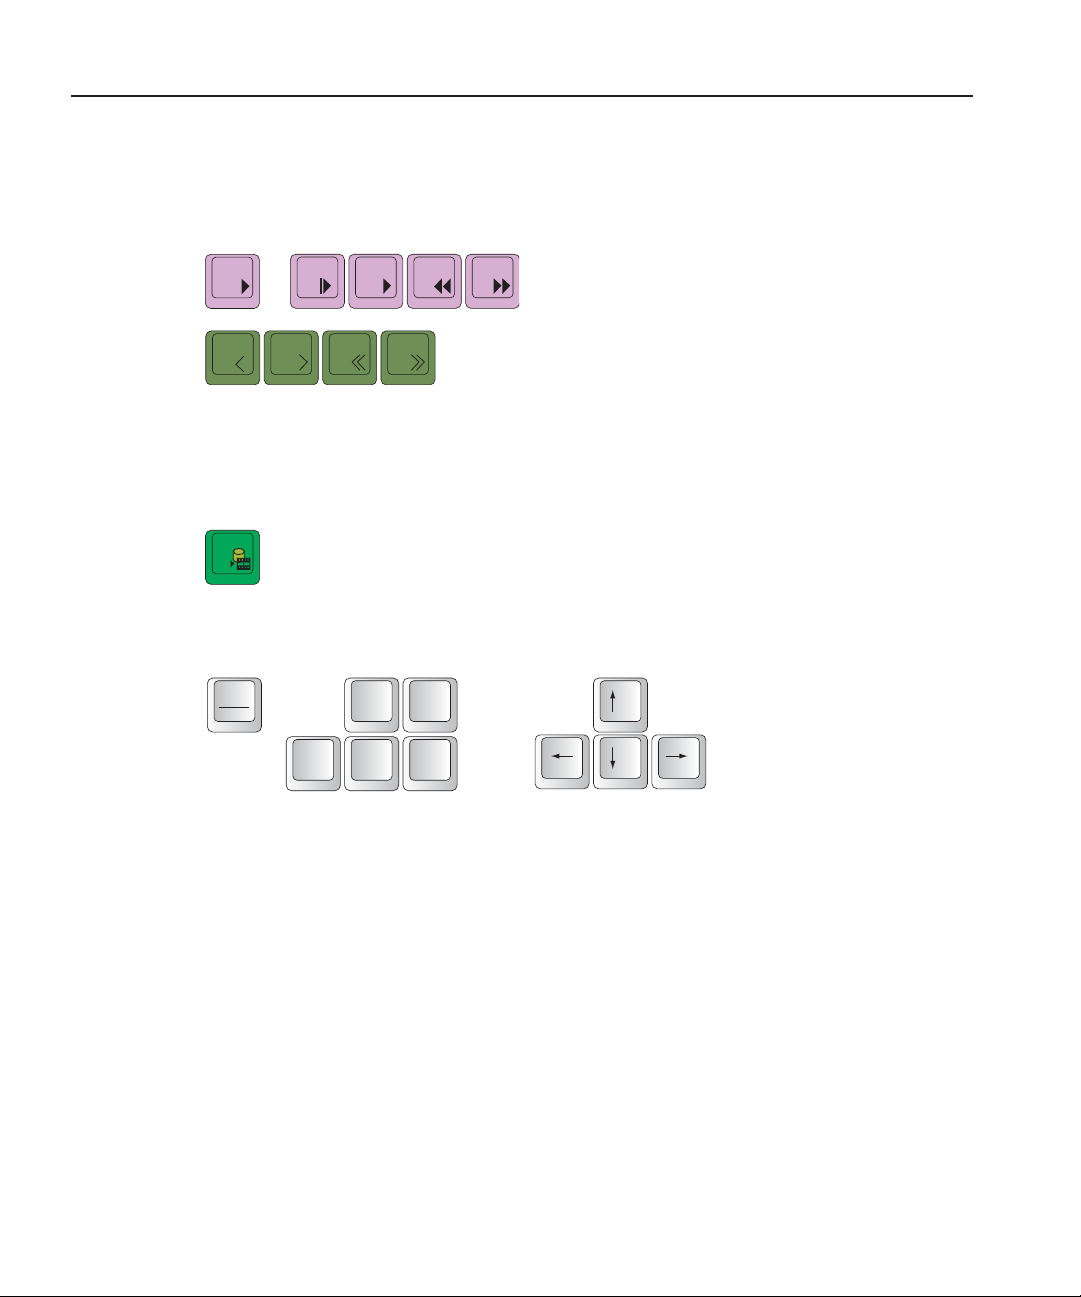
Transport Control Buttons
Transport Control Buttons
~
Q W RE
`
D FSA
You use the light purple buttons for playing clips; you use the avocado green
buttons to control movement within a clip.
Other FeedClip Buttons
F2
You use this green button to send clips to other workstations or video servers.
The black buttons round out the FeedClip application.
Pause
Break
~
`
Home
Delete End
Page
Up
Page
Down
Digital News Production 29
Page 31

Chapter 1 Introducing FeedClip
30 Digital News Production
Page 32

Chapter
2
Scheduling Feeds For Recording
Most news stations have several feeds coming in each day, and managing those
feeds and ensuring on-time and accurate recording can be difficult. With the
FeedClip Scheduler, you can set up feeds to record automatically at pre-defined
times and dates. You can also schedule recurring events, allowing you to record
the same feed every day of the week or once a week—you define the dates and
times.
This chapter discusses how to:
• Use the Scheduler to schedule feeds for recording
• Enable the Scheduler
• Add entries
• Modify or delete entries
• Add and modify recurring entries
Digital News Production 31
Page 33

Chapter 2 Scheduling Feeds For Recording
Tour of the Scheduler Tab
To schedule feeds for recording, you use the FeedClip Scheduler. The
Scheduler is a good way to ensure that feeds are recorded on-time all the time.
You can set up FeedClip to record at any time of the day or night. You can also
set up feeds to record at the same time every day of the week, or whenever you
record feeds. FeedClip controls the recording so you don’t have to.
To use the Scheduler, click the Scheduler tab to bring it to the front of the
window.
Toolbar
List of
Scheduled
Feeds
Enable the
Scheduler
Schedule
Recurring
Feeds
32 Digital News Production
Change
Scheduler
Settings
Page 34

Toolbar
Toolbar
The Scheduler Toolbar lets you access common features:
Icon Function
Creates a new scheduled entry for recording.
Edits a scheduled entry.
Deletes the selected scheduled entry.
Stops a scheduled entry from recording if it is already recording.
Disables an entry so it won’t record at the scheduled time, but
doesn’t delete the entry from the scheduler.
Digital News Production 33
Page 35

Chapter 2 Scheduling Feeds For Recording
Understanding the Scheduler List Colors
Each entry in the Scheduler displays a certain color according to its status in
FeedClip. The colors are:
Row Background Color Description
Red The entry is recording.
Gold The entry is waiting to record and is next to record.
Green The entry has recorded.
Blue The entry is selected.
Gray The entry is disabled and will not record.
Black The scheduled entry overlaps another recording.
34 Digital News Production
Page 36

Enabling the Scheduler
In order for feeds to record at scheduled times and dates, you need to enable the
Scheduler. You can set up feeds to record, but unless you enable the Scheduler,
the feeds will not record at the appropriate time.
To enable the scheduler:
Enabling the Scheduler
• Click the
The Record tab displays an icon indicating that scheduling can occur.
Enable Scheduler button on the Scheduler tab.
Scheduler Enabled
If you disable the scheduler, any scheduled feeds will not record.
NOTE: If you are using two channels with FeedClip, you need to
click the Enable Scheduler buttons for each individual channel in
order to schedule feeds.
Digital News Production 35
Page 37

Chapter 2 Scheduling Feeds For Recording
Adding New Entries
To record feeds, you add a scheduled entry for each feed you want to record.
You provide information about the feed and FeedClip adds the entry to the
Scheduler. The entry also displays on the Record tab while it’s recording.
If you want to schedule a feed to record on more than one occasion, such as
every day of the week, see “Scheduling Recurring Events” on page 41 for
instructions.
NOTE: You must allow at least thirty seconds of time between two
scheduled feeds on the same channel.
To add a new entry:
1. Click the
The Add Entry window opens.
Add Entry button or double-click a row in the scheduling list.
36 Digital News Production
Page 38

Adding New Entries
2. Fill out the information for the feed you are scheduling:
- Name — Enter the name of the scheduled feed.
- Description — Enter a description of the feed (optional).
- Location — Displays the path to the Bin where this feed is stored.
(See “General Settings” on page 100 for instructions on setting the default
bin for recording)
- Do Not Remove — Check this box if you want to keep feeds stored on
your system or server. Otherwise, feeds and clips will delete
automatically after a period of time.
- Remove After — Enter the number of days for a scheduled feed to remain
on the system. After that period of time, the entry and the recorded clip
are deleted from your system.
- Start Record Now— Check this box if you want a recording to start as
soon as you click OK. If you check this box, you need to provide an
ending time for the record. Can be used with Open Ended Record.
- Open Ended Record— Check this box if you want a recording to
continue until you manually stop it. You provide a start time for the
record. Can be used with Start Record Now.
- Start Time— Enter the time you want the recording to start. Enter the
time using the format
hour:minutes:seconds along with AM/PM.
- Stop Time — Enter the time you want the recording to end. Enter the time
using the format
hour:minutes:seconds along with AM/PM.
- Start Date — Select the day you want the recording to start on using the
drop-down calendar. Move to a different month using the arrows at the top
Digital News Production 37
Page 39

Chapter 2 Scheduling Feeds For Recording
of the calendar.
- Stop Date — Select the day you want the recording to end on using the
drop-down calendar. Move to a different month using the arrows at the top
of the calendar.
- Source — Select the source to record from on the drop-down list
(optional).
- Satellite — Select the satellite to record from on the drop-down list
(optional).
- Channel — Select the channel on which to record the scheduled event.
3. Click
38 Digital News Production
OK.
Page 40

The new entry displays in the Scheduler list.
Adding New Entries
New entry
scheduled
for recording
Digital News Production 39
Page 41

Chapter 2 Scheduling Feeds For Recording
Modifying Entries
Once you create an entry and it is listed on the scheduler, you can edit or delete
it. You can also disable scheduled events without deleting a clip.
Editing Entries
If you need to edit an entry for any reason:
1. Select the entry you want to edit and click
You can also double-click the entry.
2. Make your changes in the Edit Entry window.
3. Click
OK.
The entry updates and displays in the Scheduler.
Removing Entries
If you need to delete an entry:
• Select the entry you want to delete and click
You can also click once on an entry to select it and press the Delete key.
The entry is removed from the Scheduler list.
Disabling Scheduled Events
Sometimes you may need to delete a specific recording but you don’t want to
remove it from the Scheduler list. Recurring Events cannot be deleted, so you
must disable them in order to stop the recording.
To disable an event:
• Select the entry you want to edit and click
You can also right-click on the entry and select
The entry background turns gray (indicating it will not record) but remains in
the Scheduler.
When you want to re-enable the entry, click the
Edit Entry.
Delete Entry.
Disable Entry.
Disable Entry.
Disable Entry button again.
40 Digital News Production
Page 42

Scheduling Recurring Events
If you want to schedule a feed to record on more than one occasion, such as
every day of the week, or once a week, you create a recurring entry. Scheduling
a recurring event is similar to scheduling a one-time recording except that you
enter information about how the event recurs throughout time.
Adding a New Entry
Adding a new recurring event involves entering information about the event.
To add a new entry:
Scheduling Recurring Events
1. Click the
The Schedule Recurring Events window opens.
2. Click the
Recurring... button at the bottom right of the Scheduler tab.
Add Entry button or double-click a row in the scheduling list.
Digital News Production 41
Page 43

Chapter 2 Scheduling Feeds For Recording
The Add Recurring Entry window opens.
3. Fill out the information for the recurring feed:
- Name — Enter the name of the scheduled feed.
- Description — Enter a description of the feed (optional).
- Do Not Remove — Check this box if you want to keep feeds stored on
your system or server. Otherwise, feeds and clips will delete
automatically after a period of time.
- Remove After — Enter the number of days for a scheduled feed to remain
on the system. After that period of time, the entry and the recorded clip
are deleted from your system.
- Start Time— Enter the time you want the recording to start. Enter the
time using the format
hour:minutes:seconds along with AM/PM.
- Stop Time — Enter the time you want the recording to end. Enter the time
using the format
hour:minutes:seconds along with AM/PM.
- Days of the Week— Check the boxes for the day or days you want the
entry to record. For example, if you want to record a feed every Monday
at the same time, check the box for Monday.
42 Digital News Production
Page 44

Adding a New Entry
- Source — Select the source to record from on the drop-down list
(optional).
- Satellite — Select the satellite to record from on the drop-down list
(optional).
- Channel — Select the channel on which to record the scheduled event.
4. Click
OK.
The new entry displays in the Recurring Events list.
New recurring
entry scheduled
for recording
5. Click
OK again.
The next instance of the recurring entry appears on the Scheduler tab.
New entry
appears on
the Scheduler
tab
Digital News Production 43
Page 45

Chapter 2 Scheduling Feeds For Recording
Editing an Entry
If you need to edit a recurring entry for any reason:
1. Click the
2. Select the entry you want to edit and click
You can also double-click the entry.
3. Make your changes in the Edit Recurring Entry window.
4. Click
The entry updates and displays in the Recurring Events list and in the
Scheduler.
Recurring... button.
OK.
Removing an Entry
If you need to delete a recurring entry:
1. Click the
2. Select the entry you want to delete and click
The entry deletes and is removed from the Recurring Events list.
To prevent a single instance of a recurring entry from recording, disable it from
the Scheduler tab.
Recurring... button.
Edit Entry.
Delete Entry.
44 Digital News Production
Page 46

Using the Context-Sensitive Scheduler Menu
Using the Context-Sensitive Scheduler Menu
Several FeedClip features are available by right-clicking in the clip list in the
Scheduler window. The menu is context-sensitive; that is, you will see a
different list of available features depending on what is selected.
Menu Item Description
Add Entry Opens the Add Scheduled Entry window allowing you to
Edit Entry Opens the entry in the Edit window allowing you to make
Disable Entry Stops the entry from recording at the scheduled time; does
Delete Removes the scheduled feed from the list; you cannot undo
Stop Recording Use this to stop a feed from recording; use when the feed is
create a new feed to record.
changes to the scheduled feed.
not remove the entry from the list.
this function.
currently recording.
Digital News Production 45
Page 47

Chapter 2 Scheduling Feeds For Recording
46 Digital News Production
Page 48

Chapter
3
Recording Feeds and Creating Clips
One of FeedClip’s most powerful features is the ability to record and mark clips
at the same time. This means that while a feed is recording you can mark, group,
trim and otherwise organize clips without interrupting the recording. This is one
of the advantages of working digitally.
You can record a feed and create clips at the same time, or record a feed and
create the clips at a later time.
This chapter discusses how to:
• Record feeds
• Adjust audio input
• Create a playlist while recording
• Rearrange the playlist
• Use the context-sensitive menu
Digital News Production 47
Page 49

Chapter 3 Recording Feeds and Creating Clips
Tour of the Record Tab
You use the Record tab to record all of your feeds. You can also create clips
while you are recording a feed. If you schedule feeds using the FeedClip
Scheduler, they appear in the playlist when they record.
To record feeds, click the Record tab to bring it to the front of the window.
Playlist
Reorder
items in
the list
Name
of
feed
Starts recording
current feed
Stops
recording
Adjust
the audio
Show or
hide the
Viewer
window
Mark in
and out
points
Change
settings
48 Digital News Production
Page 50

Recording a Feed
You record a feed within the Record tab. The Record Duration box tells you the
amount of time the feed has been recording.
To record a feed:
1. Enter a name for the feed in the Feed Name box.
Recording a Feed
Shows the duration
of your recording
Enter a
name
for the
feed
2. Adjust the audio input if necessary.
See “Adjusting Audio Input” on page 51 for instructions.
3. Click the
Record button or press F12 on your keyboard to start recording.
The Record Duration number becomes red and starts counting your feed.
Digital News Production 49
Page 51

Chapter 3 Recording Feeds and Creating Clips
4. Create clips while recording the feed if you want to.
See “Creating a Playlist While Recording” on page 52 for instructions.
5. When you are done recording, press the
Stop button or press the space bar
on your keyboard.
Make sure you are really done recording before you stop. Once you stop
recording, the feed is saved to your default location and the playlist no longer
appears on the screen. The playlist is saved along with the feed.
50 Digital News Production
Page 52

Adjusting Audio Input
You can adjust the audio input before you record a feed to customize the audio
levels for your particular needs. You can also make adjustments while the feed
is recording.
Adjusting Audio Input
Input meters
Drag the
sliders to
adjust the
volume
Adjusting the Volume
You can use the Master Audio Sliders to adjust the input level for your feeds.
To use the Master Audio Sliders:
• Drag the slider for the appropriate channel up or down to set the input level.
Check the Master Gang box to adjust both channels simultaneously
(unlabeled).
Muting Audio Channels
By default, FeedClip monitors all audio channels. You can mute specific
channels or mute multiple channels at a time.
Click to
mute a
channel
Check to
gang both
channels
To Mute a specific track:
• Click the
Master Mute button for the channel (or channels) you want to
mute.
To turn off muting, click the Master Mute button again.
Digital News Production 51
Page 53

Chapter 3 Recording Feeds and Creating Clips
Creating a Playlist While Recording
As mentioned before, an important feature of FeedClip is the ability to create
clips from a feed as it’s recording. You can then open the playlist in the
Playback tab and trim the clips if necessary. You can also send clips to another
workstation if an editor needs them before the recording is done.
To create a playlist:
1. Make sure the Record tab is selected.
2. Watch the recording in the Viewer window.
If you need to turn on the viewer, press the
Show/Hide Viewer button.
3. To create a clip, select a Mark In point by clicking the Mark In button or
pressing
4. End the clip by clicking the
keyboard.
5. Continue marking In and Out points to create as many clips as you want
while recording.
52 Digital News Production
I or F5 on your keyboard.
Mark Out button or pressing O or F6 on your
Page 54

Using the Auto-Mark Feature
FeedClip provides an easy way to automatically mark Out points while creating
your playlist. Auto-marking lets you set a default duration for the length of
clips.
When you create an In point for a clip, FeedClip automatically marks an Out
point based on the duration you set.
To set up automarking, see “Auto-Marking Settings” on page 102.
Rearranging Your Playlist
While you are recording the feed and creating clips, you may want to create
groups for your clips, or rearrange the clips that are already in the playlist.
Reordering Clips
You can change the position of a clip in the playlist by moving it up or down in
the list.
To reorder a clip:
Using the Auto-Mark Feature
1. Highlight the clip you want to move by clicking its row number in the
leftmost column.
2. Click the Reorder Up or Down button to move the clip to the desired position
in the list.
Deleting Clips
If you need to remove a clip from the playlist at any time, highlight the clip by
clicking its row number and press the
also right-click on the clip and select
Digital News Production 53
Delete button on your keyboard. You can
Delete Selection.
Page 55

Chapter 3 Recording Feeds and Creating Clips
Grouping Clips
Grouping clips is a way to create a sequence comprised of several clips. When
you send a playlist to another workstation or server, each clip is sent as a
separate file. A group of clips, on the other hand, is sent as one file, using the
name of the group as the filename.
To group clips:
1. Select the clips you want to group by clicking on the row number of the clip
in the playlist.
To select a group of consecutive clips, hold down the
Shift key and click on
the clips you want to group; to select a group of non-consecutive clips in the
playlist, hold down the
2. Right-click on one of the clips in the playlist and select
Ctrl key and click on the clips to group.
Group Selection.
The Select Group window opens.
3. Type a name for the group of clips or select one from the list.
4. Click
OK.
The name of the group appears in the Group column for each clip in the group.
54 Digital News Production
Page 56

Using the Context-Sensitive Record Menu
Using the Context-Sensitive Record Menu
Several FeedClip features are available by right-clicking on a clip in the playlist
in the Record window. The menu is context-sensitive; that is, you will see a
different list of available features depending on what is selected.
Menu Item Description
Mark In Marks an In point at the current location in the feed.
Mark Out Marks an Out point at the current location of the feed.
Delete Selection Removes the selected clip(s) from your playlist.
Send Selection Sends the selected clip(s) to your primary send
Send Selection To... Allows you to select the send location for the selected
Group Selection... Adds selected clips to a new or existing group.
Remove Selection From Group Removes the selected clip(s) from the current group.
destination, if you’ve set one. See “Sending Clips” on
page 78.
clip(s).
Digital News Production 55
Page 57

Chapter 3 Recording Feeds and Creating Clips
56 Digital News Production
Page 58

Chapter
4
Playing Feeds and Clips
Once a feed has been recorded, you can use the features of the Playback tab to
play feeds, trim clips, or adjust the audio ouput of a clip. If you didn’t create a
playlist while the feed was recording, you can create one during playback.
This chapter discusses how to:
• Open and play feeds
• Create a playlist
• Rearrange a playlist
• Adjust audio output
• Use the context-sensitive menu
Digital News Production 57
Page 59

Chapter 4 Playing Feeds and Clips
Tour of the Playback Tab
You use the Playback tab to open and play feeds you are currently recording or
already recorded. While playing the feed, you can create a playlist if you didn’t
create one while the feed was recording. Once you create a playlist (or have one
you created while recording), you can trim clips, rearrange them, and adjust the
audio.
To play feeds, click the Playback tab to bring it to the front of the window.
Playlist
Reorder
items in
the list
Play the
selected
clip
Stop playing
the clip
Change the
playback
speed
Play
the feed
Lets you choose
a feed to open
Close
the feed
Adjust
the audio
Show or
hide the
Viewer
window
Open
the
Trimmer
Mark in
and out
points
Change
settings
Stop
playing
the feed
58 Digital News Production
Page 60

Opening a Feed
Once a feed is recorded, you can open it in the Playback tab to play it and create
a playlist. If you have already created a playlist, you can review the clips and
trim them if necessary.
To open a feed:
Opening a Feed
1. Click the
The Open File window opens.
2. Select the feed from the list and click
The feed opens in the Playback tab. If you’ve created a playlist, the clips display
as well; if not, the playlist is empty.
Open ... button on the Playback tab.
Open.
Closing a Feed
When you want to close a feed, click the Close File button on the Playback tab.
The feed and playlist close and the Playback tab is empty.
Digital News Production 59
Page 61

Chapter 4 Playing Feeds and Clips
Playing Feeds and Clips
Once a feed is open, you can play it in order to create a playlist. If a playlist
exists, you can play all of the clips or an individual clip.
Playing a Feed
If a playlist doesn’t exist for the currently open feed, you need to play the feed
before creating a playlist.
To play a feed:
• Click the
To create a playlist, follow the instructions in “Creating a Playlist” on page 62.
Play Feed button or press the ~ or W keys on your keyboard.
Playing Clips in the Playlist
Once you have clips in your playlist, you can play each clip individually or as
a group.
To play a single clip, highlight the clip and click the
To play a group of clips:
1. Check the box next to the clip name for each clip you want to play.
All clips
selected
for playing
Play Clip button.
2. Click the
60 Digital News Production
Play Clip button.
Page 62

Changing the Playing Speed While Viewing
Changing the Playing Speed While Viewing
While playing a feed, you can adjust the speed at which you view the footage
in order to speed it up or slow it down.
Changing the speed does not change the speed of the clips when saved; it is used
only for viewing.
To change the play speed:
• Click one of the playback speed buttons.
The buttons are predefined as follows:
Button Playback Speed
0%
50%
75%
100%
You can define the speed each of the playback speed buttons represents.
See “Slow Motion Settings” on page 108 for instructions.
Digital News Production 61
Page 63

Chapter 4 Playing Feeds and Clips
Creating a Playlist
If you didn’t create a playlist while your feed was recording, you can do it using
the Playback tab. As you play the feed, you can create clips just as you do using
the Record tab. You can also trim clips if you need to.
To create a playlist:
1. Open a feed by clicking the
2. Play the feed by pressing the
pressing
3. Watch the recording in the Viewer window.
If you need to turn on the viewer, press the
4. To create a clip, select a Mark In point by clicking the
pressing
~ or W on your keyboard.
I or F5 on your keyboard.
Open button on the Playback tab.
Play Feed button on the Playback tab or
Show/Hide Viewer button.
Mark In button or
5. End the clip by clicking the
keyboard.
6. Continue marking In and Out points to create as many clips as you want
while the feed is playing.
You can use the slider bar on the Playback tab to quickly jump to different
positions in a clip.
62 Digital News Production
Mark Out button or pressing O or F6 on your
Page 64

Using the Auto-Mark Feature
FeedClip provides an easy way to automatically mark Out points while creating
your playlist. Auto-marking lets you set a default duration for the length of
clips.
When you create an In point for a clip, FeedClip automatically marks an Out
point based on the duration you set.
To set up automarking, see “Auto-Marking Settings” on page 102.
Rearranging Your Playlist
While you are playing the feed and creating clips, you may want to create
groups for your clips, or rearrange the clips that are already in the playlist.
Rearranging the playlist in the Playback tab is the same as rearranging the
playlist in the Record tab. You can group clips to send as a sequence, reorder
the playlist, and delete clips.
Reordering Clips
You can change the position of a clip in the playlist by moving it up or down in
the list.
Using the Auto-Mark Feature
To reorder a clip:
1. Highlight the clip you want to move.
2. Click the Reorder Up or Down buttons to move the clip to the desired
position in the list.
Deleting Clips
If you need to remove a clip from the playlist at any time, highlight the clip and
press the
and select
Digital News Production 63
Delete button on your keyboard. You can also right-click on the clip
Delete Selection.
Page 65

Chapter 4 Playing Feeds and Clips
Grouping Clips
Grouping clips is a way to create a sequence comprised of several clips. When
you send a playlist to another workstation or server, each clip is sent as a
separate file. A group of clips, on the other hand, is sent as one file, using the
name of the group as the filename.
To group clips:
1. Select the clips you want to group by clicking on the row number of the clip
in the playlist.
To select a group of consecutive clips, hold down the
Shift key and click on
the clips you want to group; to select a group of non-consecutive clips in the
playlist, hold down the
2. Right-click in the playlist and select
Ctrl key and click on the clips to group.
Group Selection.
The Select Group window opens.
3. Type a name for the group of clips or select one from the list.
4. Click
OK.
64 Digital News Production
Page 66

Adjusting Audio Output
You can adjust the audio output after you record a feed to customize the audio
lev els for your particular needs. You can also adjust the volume while you are
playing a feed.
Adjusting Audio Output
Output meters
Drag the
sliders to
adjust the
volume
Adjusting the Volume
You can use the Master Audio Sliders to adjust the output level for your feeds.
To use the Master Audio Sliders:
• Drag the slider for the appropriate channel up or down to set the output
volume.
Check the Master Gang box to adjust both channels simultaneously
(unlabeled).
Muting Audio Channels
By default, FeedClip monitors all audio channels. You can mute specific
channels or mute multiple channels at a time.
Click to
mute a
channel
Check to
gang both
channels
To Mute a specific track:
• Click the
Master Mute button for the channel (or channels) you want to
mute.
To turn off muting, click the Master Mute button again.
Digital News Production 65
Page 67

Chapter 4 Playing Feeds and Clips
Using the Context-Sensitive Playback Menu
Several FeedClip features are available by right-clicking in the clip list in the
Playback window. The menu is context-sensitive, that is, you will see a
different list of available features depending on what is selected.
Menu Item Description
Play Selection Begins playing the selected clip.
Stop Playing Stops playing the current clip.
Mark In Marks an In point at the location of the cursor.
Mark Out Marks an Out point at the location of the cursor.
Trim Clip... Opens the Trimmer so you can edit a clip.
Delete Selection Removes the selected clip(s) from your playlist.
Send Selection Sends the selected clip(s) to your primary send
Send Selection To... Allows you to select the send location for the selected
Group Selection... Combines selected clips into one group that you can
Remove Selection From Group Removes the selected clip(s) from the current group.
destination.
clip(s).
name.
66 Digital News Production
Page 68

Chapter
5
Trimming Clips
After you create clips, you may need to trim a clip to fit or edit out bad frames.
FeedClip provides a method for trimming so you can create quality clips.
This chapter discusses how to:
• Use the FeedClip Trimmer
• Navigate through clips
• Change Mark In and Mark Out points
• Use additional features of the Trimmer
Digital News Production 67
Page 69

Chapter 5 Trimming Clips
Tour of the Trimmer
You may often need to shorten your clips or change the starting or ending
frame. With FeedClip, you trim clips by changing the Mark In and Mark Out
points using the FeedClip Trimmer. The Trimmer is available on the Playback
tab.
To open a clip for trimming, select the clip and click the
click the clip. The Trimmer window opens.
Mark
Out
Trim icon, or double-
Mark In
Lock
Duration
Navigation
Buttons
Control
Track
How to Trim a Clip
Trimming a clip involves these general steps:
1. On the Playback tab, select the clip you want to trim and click the
2. Play the clip using any of the navigation methods.
3. Change the Mark In and/or Mark Out Points on the clip.
4. Click
68 Digital News Production
OK when you are done trimming the clip to save your changes.
The rest of this chapter explains each step in detail.
Play
Control
Buttons
Play Past
Out
Reset
Add
Handles
Loop
Playback
Trim icon.
Page 70

Navigating Through Clips
FeedClip provides some quick ways to navigate through your clips to find the
frames you need for trimming. You use the Play Control buttons to play through
the clip and the Navigation buttons to move to a specified frame.
You can either click the icons or press the corresponding keys on the keyboard.
Navigating Through Clips
Name of clip
Navigation
Buttons
Play
Control
Buttons
If you want to change the name of the clip, type the new name in the specified
area.
Digital News Production 69
Page 71

Chapter 5 Trimming Clips
Playing Clips
The Play Control buttons let you play through your clip — these buttons work
like a tape deck.
Icon Keyboard Key Description
Q
E
~ or W
R
space bar
Moving to Specified Frames
The Navigation buttons let you move through your clip by frames.
Icon Keyboard Key Description
A
D
Starts playing the clip from the beginning.
Rewinds the clip.
Starts playing from the position of the cursor.
Fast forwards the clip.
Stops playing the clip.
Move back 1 frame.
Move back 10 frames.
70 Digital News Production
F
S
Move forward 10 frames.
Move forward 1 frame.
Page 72

Changing Mark In and Out Points
Changing Mark In and Out Points
Trimming clips with FeedClip is simple. All you need to do is mark new In and
Out points for each clip you want to trim.
To trim a clip:
1. Select the clip and click the
2. If you need to trim the beginning of the clip, press
and stop at the frame where you want the clip to start.
You can also use the slider to move to the approximate In point and then use
A, S, D, and F keys on the keyboard to find the exact spot.
the
3. Press
4. If you want to trim the end of the same clip, play the clip again and stop at
5. Press
I (Mark In) on the keyboard to mark a new In point.
the frame where you want the clip to end.
O (Mark Out) on the keyboard to mark a new Out point.
Trim icon to open the Trimmer window.
F10 (Play) to play the clip
More Ways to Use the Trimmer
In addition to trimming clips by marking new In and Out points, there are
several other features you can use while trimming.
Using Handles to Add Frames to Your Clips
When you create clips with FeedClip, handles are automatically added on to the
beginning and end of the clip so you have additional frames to choose from
when trimming your clips.
To use handles:
1. Click the
The handles appear as additional frames on the slider in the Trimmer.
2. Mark new In and Out points for your clip using the additional material.
Add Handles icon.
Digital News Production 71
Page 73

Chapter 5 Trimming Clips
Locking the Duration of a Clip
Sometimes you need to maintain the length of the clip, but still need to trim it.
Using the Lock Duration feature, you can keep the exact length of the clip intact
while trimming. FeedClip uses the extra frames in the handles and adjusts the
clip. For instance, if you move the Mark In point 5 frames from the beginning
of the clip, the Mark Out point moves automatically 5 frames to keep the
duration time intact.
To lock the duration of a clip:
• Click the
Lock Duration icon.
Playing Past Out
Playing Past Out allows you to create an Out point on the fly while continuing
to view media after the Mark Out point. This is useful if you’re not sure if the
Out point is in the right place.
To play past the Out point:
1. Click the
2. Play your clip.
The clip continues playing past the Mark Out point, letting you see the rest
of the footage in the clip.
Play Past Out icon.
72 Digital News Production
Page 74

Using Control Track
Control track is a way to see the actual count of a clip or piece of tape instead
of using the timecode.
To use control track:
Using Control Track
• Click the
The timecode field changes and the text becomes yellow.
To switch back to viewing the timecode, click the Control Track icon again.
To reset the control track to zero:
• Click the
Control Track icon.
Reset Control Track icon while in Control Track mode.
Looping Playback
You can play the clip in the Trimmer continuously in a loop if you want.
To loop playback:
• Click the
To stop looping the playback, click the Loop Playback icon again.
Loop Playback icon.
Resetting the Mark Points on the Clip
If you want to remove edits you’ve made to the clip, you can reset the clip to
the mark point positions from the last time you saved the clip or the last time
you used the Trimmer window.
To reset the mark points back to their original positions:
• Click the
Reset icon.
Digital News Production 73
Page 75

Chapter 5 Trimming Clips
74 Digital News Production
Page 76

Chapter
6
Sending Clips
Once you create clips, you export them for use in a news broadcast. You can
send clips to another workstation for further editing, to a network video server
for storing, or to a playout machine to play to air.
This chapter discusses how to:
• Group clips for sending
• Select and send your clips to another workstation or video server
• Understand clip status colors
Digital News Production 75
Page 77

Chapter 6 Sending Clips
Grouping Clips
Usually when you send clips to another FeedClip workstation, a NewsEdit
workstation, or a video server, the clips are sent as individual clips. You can
also create a group of clips that gets sent as a sequence. This is especially useful
if you are sending the clips to play to air.
You can group clips from either the Recording or the Playback tab.
To group clips:
1. Select the clips you want to group by clicking on the number of the clip in
the playlist.
Clip #1
selected
To select a group of consecutive clips, hold down the
the clips you want to group.
To select a group of non-consecutive clips in the playlist, hold down the
key and click on the clips to group.
76 Digital News Production
Shift key and click on
Ctrl
Page 78

2. Right-click in the playlist and select Group Selection.
The Select Group window opens.
3. Type a name for the group of clips or select one from the list.
Grouping Clips
4. Click
OK.
When you send a group of clips, FeedClip sends the group as one file with the
group name as the name of the sequence.
Digital News Production 77
Page 79

Chapter 6 Sending Clips
Sending Clips
Sending your completed clips to a playback server is the most common way to
use FeedClip. You can also send your clips to another workstation or to a
network server.
If you have a Profile Video Server, you can send your clips to the server for
almost instant playback to air. Once you establish a network between a Profile
server and other FeedClip workstations, you can send clips to other
workstations as well as to the Profile Video Server.
You follow the same steps to send clips to any FeedClip or NewsEdit
workstation or compatible video or playback server.
To send clips:
1. Select the clip(s) you want to send.
2. Press
F2 on the keyboard or right-click in the playlist and select Send
Selection.
The Select Destination window opens, showing all available locations:
78 Digital News Production
Page 80

NOTE: If you need to add another destination, see “Setting Up Send
Locations” on page 92.
3. Click to check the box where you want to send the clip(s).
Apply to set this send location as the default.
Click
Sending Clips
4. If you want to change the name of the clip, type it in the
You cannot change the
5. Click
Send to send your clip.
You can also press
Send Type or Send To fields.
Enter on the keyboard to send the clip quickly.
Send As: field.
The color in the status column turns yellow while the clip is sent and turns
green when its done sending.
Digital News Production 79
Page 81

Chapter 6 Sending Clips
Understanding Clip Status Colors
In the Recording and Playback tabs, a status column lets you know what state
each clip is in. As a clip moves through different stages while sending, the
colors in the status column change.
If you need to see what each color means, you can view the status legend:
• Select
Status Color Status Description
Help | Status Legend.
Yellow FeedClip is in the process of sending the selected clip(s) to the file in your
Bin.
Green The clip(s) have been successfully sent to the file.
Red There was an error in the send procedure and the clip was not sent. Try
sending your clip again.
Blue This clip was overwritten by another file. To prevent this from happening,
go to Settings | Loop Record from the Record tab and change the Loop
Duration time or turn the loop record option off. You should also uncheck
the checkbox Delete Expired Clips Automatically in order to prevent
clips being deleted.
80 Digital News Production
Page 82

Appendix
A
The FeedClip Keyboard
This appendix lists all of the keyboard functions that control FeedClip,
including key combinations using the Control and Shift keys.
The keyboard you use with FeedClip is the same keyboard you use with other
Digital News Production products, including NewsEdit. Some of the keys are
used exclusively for NewsEdit and are not used with FeedClip.
Keys listed in this appendix apply to FeedClip functions.
Digital News Production 81
Page 83

Appendix The FeedClip Keyboard
Icon Key Name Function
F2 Send Lets you send a clip or sequence to another
F3 While recording, marks an In and Out point using
1
F4
2
F5 Trim In Cuts the beginning of the clip, the top, off of the
F6 Trim Out Cuts the end of the clip, the tail, off of the selected
F7 Go to Mark In In the Trimmer, moves to the Mark In point.
F8 Go to Mark Out In the Trimmer, moves to the Mark Out point.
F12 Record Starts recording the feed.
~ Play Plays a clip.
Q Play From Start Plays sequence or clip starting at the beginning.
W Play Plays the Timeline, source or clip.
destination.
the Automarking feature. See “Auto-Marking
Settings” on page 102.
If you are not recording, switches between channels
1 and 2.
selected clips on the timeline.
clips on the timeline.
Shift + W Reverse Play Plays sequence in the Timeline in reverse.
E Rewind Rewinds for both Timeline and Source.
R Fast Forward Fast Forwards for both Timeline and Source.
Ctrl + R Record Starts recording from source or source bin.
I Mark In Marks an In point. If you are using the Automark
feature, automatically marks an Out point as well.
Ctrl + I Go to Mark In In the Trimmer, moves to the Mark In point.
82 Digital News Production
Page 84

Icon Key Name Function
p
CTL
O
Home
Page
U
O Mark Out Marks an Out point. If you are using the Automark
Ctrl + O Go to Mark Out In the Trimmer, moves to the Mark Out point.
A Move 1 frame left Moves position one frame to the left.
S Move 1 frame right Moves position one frame to the right.
Ctrl + S Save Saves your sequence.
D Move 10 frames left Moves position 10 frames to the left.
Ctrl + D Move one second left Moves position 1 second to the left.
F Move 10 frames right Moves position 10 frames to the right.
Ctrl + F Move one second
right
B Control Track In the Trimmer, toggles between Timecode and
N Reset Control Track In the Trimmer, resets the Control Track to
Home Go to Start Moves the position to the beginning of a clip.
Page Up Page Up In the playlist on the Record and Playback tabs,
feature, automatically marks an In point as well.
Moves position 1 second to the right.
Control Track.
00:00:00:00.
scrolls up one page at a time.
In the Trimmer, moves the clip forward 1/5 of the
way with each button press.
Delete
End
Page
Down
Delete Delete Deletes the selected clip from the Bin or the
Timeline.
End Go to End Moves the position to the end of a clip or sequence.
Page Down Page Down In the playlist on the Record and Playback tabs,
scrolls down one page at a time.
In the Trimmer, moves the clip backward 1/5 of the
way with each button press.
Digital News Production 83
Page 85

Appendix The FeedClip Keyboard
Icon Key Name Function
Left arrow Shuttle Rewind Shuttles left in increments of -50%, -75%, -1x, -2x,
Right arrow Shuttle Fast Forward Shuttles right in increments of +50%, +75%, -1x, -
Up arrow Up arrow Moves the highlight to the previous clip.
Down arrow Down arrow Moves the highlight to the next clip.
Numberpad 4 Left 1 frame Moves the selected clip to the left one frame.
Ctrl +
Numberpad 4
Numberpad 6 Right 1 frame Moves the selected clip to the right one frame.
Ctrl +
Numberpad 6
Space Bar Play/Stop Toggles between playing and stoping a clip. If you
Left 10 frames Moves the selected clip to the left 10 frames.
Right 10 frames Moves the selected clip to the right 10 frames.
-3x.
2x, -3x.
are recording, also stops recording a feed.
84 Digital News Production
Page 86

Appendix
B
Configuring FeedClip
Before you can successfully record feeds and create clips, you need to configure
FeedClip for the particular equipment in your newsroom. The system may be
configured for you by the engineer installing the system; if not, this appendix
tells you how to do it.
This appendix discusses how to:
• Install the FeedClip software
• Launch the FeedClip application
• Set options for your newsroom
• Define recording settings
• Define playback settings
• Define scheduling settings
Digital News Production 85
Page 87

Appendix Configuring FeedClip
Installing the FeedClip Software
The FeedClip software should already be installed on your computer when your
system arrives. However, if needed, the software can be installed by either a
Grass Valley Service Engineer or by you.
To install the software:
1. Insert the NewsRoomSuite CD into your CD drive.
2. Double-click on
3. Double-click on the CD drive and double-click on the file
SetupFeedClip.exe.
4. Follow the on-screen instructions.
5. When the installation is complete, click
The computer prompts you to reboot so the new settings take effect.
My Computer.
OK to close the installation program.
Launching the FeedClip Application
To launch the application from your local hard drive:
• Double-click the FeedClip icon on the computer desktop or open the
program by clicking
The FeedClip application window opens along with the Viewer window.
NOTE: These instructions assume the application is on your local
hard drive. If the application is stored on a network drive, launch the
Windows Explorer and locate the application. Refer to your Windows
documentation for more information.
Start | Programs | Vibrint | FeedClip.
86 Digital News Production
Page 88

Setting Options for Your Newsroom
You need to configure FeedClip for the specific equipment you are using in
your newsroom.
To configure your FeedClip system:
1. Choose
The Options window opens:
2. Go through each tab on the Options window and configure FeedClip using
the descriptions in the sections below.
Tools | Options.
3. Click
OK when you are done configuring your system.
Digital News Production 87
Page 89

Appendix Configuring FeedClip
Setting General Options
Setting Options Description
Database Connection Mode
Use House Clock
NTSC Timecode
88 Digital News Production
Local
Shared
On
Off
SMPTE - Drop
Frame
SMPTE
Select Local if you are using local disk storage and a locl
FeedClip database. You have access to files on your local
machine only.
Shared if you are using shared disk storage and a
Select
shared database. You share the Bin with all FeedClip
workstations that are part of the NewsShare network.
Check this if you want to have FeedClip use your
newsroom’s house clock to synchronize feeds.
If you turn on this option without having a house clock
connected, FeedClip uses the workstation’s system clock
for the timecode.
Recommended setting to avoid the time slipping problems
associated with non-drop frame.
Standard format used to represent timecode.
Page 90

Setting Options Description
Prompt Before File
Overwrite
Display Time Remaining for
Playback
Abort Time (Hours
Remaining)
On
Off
On
Off
Check this option to receive a confirmation prompt before
overwriting existing files.
Check this opton to have FeedClip show you how much
time is remaining while playing back a clip in the playlist.
N/A Enter the amount of time (in hours) before recording stops;
FeedClip stops recording when this amount of time is
remaining for recording. The default time is 0.1.
Channel
1
2
Select the channel to name.
Record Channel Name N/A Enter a name for the record channel.
Playback Channel Name N/A Enter a name for the playback channel.
Digital News Production 89
Page 91

Appendix Configuring FeedClip
Setting Handles
You use Edit Clips handles when you want additional footage at the beginning
and end of a clip for additional editing. The default duration is 5 seconds.You
use Send to File handles when sending a clip or feed to another workstation or
server. The default duration is 2 seconds.
If you want to change the handle duration, type the new number in the field.
90 Digital News Production
Page 92

Setting Up Your Workgroup
In order for your FeedClip workstation to be able to send media to other
workstations or media servers, you need to set up a workgroup.
To set up a workgroup:
1. Make sure that your Share Name is
2. Click
Update Workgroup List.
VibrintAVFiles.
The system lists the available machines for file export.
3. Click
OK.
In addition to setting up a workgroup, you also need to share your media folder
in order to receive files from other FeedClip workstations. See “Setting Up
Media Files for Sharing” on page 98 for instructions.
Digital News Production 91
Page 93

Appendix Configuring FeedClip
Setting Up Send Locations
Once you create a series of clips, you can send them to another NewsEdit
workstation or to a network video server. In order to send clips, you first need
to configure FeedClip with each of the send locations you will use.
A send location can be a NewsEdit XT workstation, a Profile Media Server, or
a Bin you specify. If you want to store clips on your computer, you can also add
a send location for your PC.
92 Digital News Production
Page 94

To set up a send location:
1. Click
Add.
The Add Named Destination to Send List window appears:
2. Enter the name of the send location.
3. Select the type of location from the drop-down list.
Send Type Description
Vibrint
Select Vibrint when the send location is another NewsEdit, FeedClip, or
NewsQ workstation, or a NewsQ Pro system.
Profile
SeaChange
GXF ftp
4. Check the
Include Graphics box if you want all graphics to remain with the
Select Profile when the send location is a Profile Media Server.
Select SeaChange when the send location is a SeaChange server.
Select GXF ftp to send the completed sequence as a GXF stream which
can be used for a generic FTP site.
sequence.
5. Click
Browse and select the file destination path.
If you are setting up a Profile Media Server as a send location, open Media
Manager, click on the desired destination directory, and drag the folder from
Digital News Production 93
Page 95

Appendix Configuring FeedClip
Media Manager into this field.
6. If you are setting up a Profile, SeaChange, or GXF ftp send location, enter
the following information:
- Host Name — For Profile, automatically fills in with the computer name
for the Profile Video Server; for the others, enter the name of the
computer.
- User Name — For Profile, automatically fills in as
movie; leave as is; for
the others, enter your user name.
- Password — For Profile, leave this field blank; for the others, enter the
password for the send location, if you have one.
7. Check the
NewsQ Pro Destination box if this send location is a NewsQ Pro
server.
8. Click
OK.
94 Digital News Production
Page 96

Setting Colors
In the clip list, different colors indicate the status of clips. If you want to change
any of the colors in the FeedClip interface:
1. Click the
Change... button for the playlist row color you want to change.
The Color window opens.
2. Pick the new color and click
OK.
3. Change other colors, if you wish.
4. Click
OK when you are done.
Digital News Production 95
Page 97

Appendix Configuring FeedClip
Setting Controller Options
If you are using an external controller with FeedClip, select the COM Port you
are using.
96 Digital News Production
Page 98

Setting NewsQ Pro Options
Setting Description
Primary Database Server Enter the server name where the primary NewsQ Pro database resides.
Ports Enter the port numbers used to access the primary NewsQ Pro database.
Backup Database Server Enter the server name where the secondary NewsQ Pro database resides.
Ports Enter the port numbers used to access the secondary NewsQ Pro database.
Thumbnails Server Enter the server name where NewsQ Pro stores video clip thumbnails.
Path Enter the path to the thumbnail directory.
Categories Lists the currently configured NewsQ Pro categories.
Digital News Production 97
Page 99

Appendix Configuring FeedClip
Adding NewsQ Pro Categories
NewsQ Pro lets you create playlists for airing news broadcasts. Categories let
you better organize your clips and separate them for different news shows, for
example.
If you want to add categories for NewsQ Pro:
1. Click
2. Enter a name for the new category and click
Add.
The Add Category window appears:
OK.
Setting Up Media Files for Sharing
In order to transfer media files to another Vibrint workstation, you need to set
up file sharing on your computer. If you are also running NewsEdit on your
workstation, file sharing is already set up.
To set up your files for sharing:
1. In Windows Explorer, open the drive where your media files will be stored
(usually drive E:).
2. Right-click on the VibrintAVFiles folder and choose
Sharing.
3. Choose the
VibrintAVFiles.
4. Click
The folder you shared will now appear with the standard Windows sharing
icon.
98 Digital News Production
Shared As option button and leave the default share name
OK.
Page 100

Defining Record Settings
You need to configure FeedClip for the type of recording you are doing in your
newsroom.
To configure your FeedClip system:
1. Click the
The Settings window opens:
2. Go through each tab on the Settings window and configure FeedClip using
the descriptions in the sections below.
3. Click
Settings... button on the Record tab.
OK when you are done configuring your system.
Digital News Production 99
 Loading...