

Page 1
EDIUS NEO
Editing for the Digital Generation
User Reference Guide
SOFTWARE VERSION 2
April 11, 2009
Page 2

Affiliate with the N.V. KEMA in The Netherlands
CERTIFICATE
Certificate Number: 510040.001
The Quality System of:
Grass Valley, Inc.
400 Providence Mine Road
Nevada City, CA 95945
United States
15655 SW Greystone Ct.
Beaverton, OR 97006
United States
10 Presidential Way
3
rd
Floor, Suite 300
Woburn, MA 01801
United States
Nederland B.V.
4800 RP BREDA
The Netherlands
Weiterstadt, Germany
Brunnenweg 9
D-64331 Weiterstadt
Germany
Rennes, France
Rue du Clos Courtel
Cesson-Sevigne, Cedex
France
Technopole Brest Iroise
CS 73808
29238 Brest Cedex 3
France
17 rue du Petit Albi-BP 8244
95801 Cergy Pontoise
Cergy, France
2300 South Decker Lake Blvd.
Salt Lake City, UT 84119
United States
7140 Baymeadows Way
Suite 101
Jacksonville, FL 32256
United States
Including its implementation, meets the requirements of the standard:
ISO 9001:2000
Scope:
The design, manufacture and support of video hardware and software products and
related systems.
This Certificate is valid until: June 14, 2009
This Certificate is valid as of: August 30, 2006
Certified for the first time: June 14, 2000
H. Pierre Sallé
President
KEMA-Registered Quality
The method of operation for quality certification is defined in the KEMA General Terms
And Conditions For Quality And Environmental Management Systems Certifications.
Integral publication of this certificate is allowed.
KEMA-Registered Quality, Inc.
4377 County Line Road
Chalfont, PA 18914
Ph: (215)997-4519
Fax: (215)997-3809
CRT 001 073004
ccredited By:
ANAB
A
Page 3
EDIUS Neo
Editing for the Digital Generation
User Reference Guide
SOFTWARE VERSION 2
April 11, 2009
Page 4
Contacting Grass Valley
International
Support Centers
Local Support
Centers
(available
during normal
business hours)
France
24 x 7
Australia and New Zealand: +61 1300 721 495 Central/South America: +55 11 5509 3443
Middle East: +971 4 299 64 40 Near East and Africa: +800 8080 2020 or +33 1 48 25 20 20
Europe
+800 8080 2020 or +33 1 48 25 20 20
+800 8080 2020 or +33 1 48 25 20 20
Hong Kong, Taiwan, Korea, Macau: +852 2531 3058 Indian Subcontinent: +91 22 24933476
Asia
Southeast Asia/Malaysia: +603 7805 3884 Southeast Asia/Singapore: +65 6379 1313
China: +861 0660 159 450 Japan: +81 3 5484 6868
Belarus, Russia, Tadzikistan, Ukraine, Uzbekistan: +7 095 2580924 225 Switzerland: +41 1 487 80 02
S. Europe/Italy-Roma: +39 06 87 20 35 28 -Milan: +39 02 48 41 46 58 S. Europe/Spain: +34 91 512 03 50
Benelux/Belgium: +32 (0) 2 334 90 30 Benelux/Netherlands: +31 (0) 35 62 38 42 1 N. Europe: +45 45 96 88 70
Germany, Austria, Eastern Europe: +49 6150 104 444 UK, Ireland, Israel: +44 118 923 0499
Copyright © Thomson. All rights reserved.
This product may be covered by one or more U.S. and foreign patents.
United States/Canada
24 x 7
+1 800 547 8949 or +1 530 478 4148
Grass Valley Web Site
The www.thomsongrassvalley.com web site offers the following:
Online User Documentation — Current versions of product catalogs, brochures,
data sheets, ordering guides, planning guides, manuals, and release notes
in .pdf format can be downloaded.
FAQ Database — Solutions to problems and troubleshooting efforts can be
found by searching our Frequently Asked Questions (FAQ) database.
Software Downloads — Download software updates, drivers, and patches.
4 EDIUS Neo — User Reference Guide
Page 5

Contents
Preface. . . . . . . . . . . . . . . . . . . . . . . . . . . . . . . . . . . . . . . . . . . . . . . . . . . . . . . . . . . . . . . . . . . . 17
About This Manual . . . . . . . . . . . . . . . . . . . . . . . . . . . . . . . . . . . . . . . . . . . . . . . . . . . . 17
Minimum System Requirements . . . . . . . . . . . . . . . . . . . . . . . . . . . . . . . . . . . . . . . . 17
DVD Contents . . . . . . . . . . . . . . . . . . . . . . . . . . . . . . . . . . . . . . . . . . . . . . . . . . . . . . . . 18
Section 1 — Getting Started . . . . . . . . . . . . . . . . . . . . . . . . . . . . . . . . . . . . . . . . . . . . 19
Starting EDIUS Neo . . . . . . . . . . . . . . . . . . . . . . . . . . . . . . . . . . . . . . . . . . . . . . . . . . . 19
Select Project Folder Location . . . . . . . . . . . . . . . . . . . . . . . . . . . . . . . . . . . . . . . . . 20
Entering Numeric Data . . . . . . . . . . . . . . . . . . . . . . . . . . . . . . . . . . . . . . . . . . . . . . . . 22
Direct Input. . . . . . . . . . . . . . . . . . . . . . . . . . . . . . . . . . . . . . . . . . . . . . . . . . . . . . . 23
Offset Input. . . . . . . . . . . . . . . . . . . . . . . . . . . . . . . . . . . . . . . . . . . . . . . . . . . . . . . 23
Arrow Key Input . . . . . . . . . . . . . . . . . . . . . . . . . . . . . . . . . . . . . . . . . . . . . . . . . . 23
Mouse Wheel Input . . . . . . . . . . . . . . . . . . . . . . . . . . . . . . . . . . . . . . . . . . . . . . . . 24
Start-Up Window . . . . . . . . . . . . . . . . . . . . . . . . . . . . . . . . . . . . . . . . . . . . . . . . . . . . . 25
Project Presets . . . . . . . . . . . . . . . . . . . . . . . . . . . . . . . . . . . . . . . . . . . . . . . . . . . . . . 25
Create a Project Preset. . . . . . . . . . . . . . . . . . . . . . . . . . . . . . . . . . . . . . . . . . . . . . 25
Create a New Project. . . . . . . . . . . . . . . . . . . . . . . . . . . . . . . . . . . . . . . . . . . . . . . . . 28
Create a New Project from a Project Preset on Startup . . . . . . . . . . . . . . . . . . 28
Create a New Project From the Current Project . . . . . . . . . . . . . . . . . . . . . . . . 30
Change Current Project Settings . . . . . . . . . . . . . . . . . . . . . . . . . . . . . . . . . . . . . . . 32
Save the Current Settings as a New Project Preset . . . . . . . . . . . . . . . . . . . . . . 34
Change the Settings of an Existing Project Preset. . . . . . . . . . . . . . . . . . . . . . . 34
Other Actions in the Project Settings Dialog . . . . . . . . . . . . . . . . . . . . . . . . . . . 34
Sequences . . . . . . . . . . . . . . . . . . . . . . . . . . . . . . . . . . . . . . . . . . . . . . . . . . . . . . . . . . . . 35
Create a New Sequence . . . . . . . . . . . . . . . . . . . . . . . . . . . . . . . . . . . . . . . . . . . . . . 35
Saving Projects. . . . . . . . . . . . . . . . . . . . . . . . . . . . . . . . . . . . . . . . . . . . . . . . . . . . . . . . 36
Auto Save/Backup . . . . . . . . . . . . . . . . . . . . . . . . . . . . . . . . . . . . . . . . . . . . . . . . . . . . 37
Exiting EDIUS . . . . . . . . . . . . . . . . . . . . . . . . . . . . . . . . . . . . . . . . . . . . . . . . . . . . . . . . 38
Project Operations. . . . . . . . . . . . . . . . . . . . . . . . . . . . . . . . . . . . . . . . . . . . . . . . . . . . . 38
Opening Project Files . . . . . . . . . . . . . . . . . . . . . . . . . . . . . . . . . . . . . . . . . . . . . . . . 38
Open Project on Startup . . . . . . . . . . . . . . . . . . . . . . . . . . . . . . . . . . . . . . . . . . . . 38
Open a Project from the Current Project . . . . . . . . . . . . . . . . . . . . . . . . . . . . . . 39
Restore Offline Clips. . . . . . . . . . . . . . . . . . . . . . . . . . . . . . . . . . . . . . . . . . . . . . . . . . . 40
Relink and Restore. . . . . . . . . . . . . . . . . . . . . . . . . . . . . . . . . . . . . . . . . . . . . . . . . . . 43
Capture and Restore . . . . . . . . . . . . . . . . . . . . . . . . . . . . . . . . . . . . . . . . . . . . . . . . . 45
Window Configuration . . . . . . . . . . . . . . . . . . . . . . . . . . . . . . . . . . . . . . . . . . . . . . . . 47
Multi-Monitor Layout. . . . . . . . . . . . . . . . . . . . . . . . . . . . . . . . . . . . . . . . . . . . . . . . 47
Single-Monitor Layout . . . . . . . . . . . . . . . . . . . . . . . . . . . . . . . . . . . . . . . . . . . . . . . 48
Customizing Screen Layout . . . . . . . . . . . . . . . . . . . . . . . . . . . . . . . . . . . . . . . . . . . 49
Saving Custom Layouts . . . . . . . . . . . . . . . . . . . . . . . . . . . . . . . . . . . . . . . . . . . . . . 51
Applying a Saved Layout. . . . . . . . . . . . . . . . . . . . . . . . . . . . . . . . . . . . . . . . . . . . . 52
Restoring Default Layout . . . . . . . . . . . . . . . . . . . . . . . . . . . . . . . . . . . . . . . . . . . . . 53
Preview Window. . . . . . . . . . . . . . . . . . . . . . . . . . . . . . . . . . . . . . . . . . . . . . . . . . . . . . 53
Dual Mode . . . . . . . . . . . . . . . . . . . . . . . . . . . . . . . . . . . . . . . . . . . . . . . . . . . . . . . 53
EDIUS Neo — User Reference Guide 5
Page 6

Contents
Single Mode . . . . . . . . . . . . . . . . . . . . . . . . . . . . . . . . . . . . . . . . . . . . . . . . . . . . . . 55
Player Operation Buttons . . . . . . . . . . . . . . . . . . . . . . . . . . . . . . . . . . . . . . . . . . . . 56
Recorder Operation Buttons . . . . . . . . . . . . . . . . . . . . . . . . . . . . . . . . . . . . . . . . . . 59
Timeline Window. . . . . . . . . . . . . . . . . . . . . . . . . . . . . . . . . . . . . . . . . . . . . . . . . . . . . 61
Timeline Operation Buttons . . . . . . . . . . . . . . . . . . . . . . . . . . . . . . . . . . . . . . . . 61
Timeline Scale . . . . . . . . . . . . . . . . . . . . . . . . . . . . . . . . . . . . . . . . . . . . . . . . . . . . 62
Timeline Scale Controller. . . . . . . . . . . . . . . . . . . . . . . . . . . . . . . . . . . . . . . . . . . 62
Track Panel. . . . . . . . . . . . . . . . . . . . . . . . . . . . . . . . . . . . . . . . . . . . . . . . . . . . . . . 64
Asset Bin Window . . . . . . . . . . . . . . . . . . . . . . . . . . . . . . . . . . . . . . . . . . . . . . . . . . . . 65
Palette Windows. . . . . . . . . . . . . . . . . . . . . . . . . . . . . . . . . . . . . . . . . . . . . . . . . . . . . . 66
Information Palette. . . . . . . . . . . . . . . . . . . . . . . . . . . . . . . . . . . . . . . . . . . . . . . . . . 66
Effect Palette . . . . . . . . . . . . . . . . . . . . . . . . . . . . . . . . . . . . . . . . . . . . . . . . . . . . . . . 67
Sequence/Clip Marker Palette . . . . . . . . . . . . . . . . . . . . . . . . . . . . . . . . . . . . . . . . 67
Section 2 — Application and Plug-In Settings . . . . . . . . . . . . . . . . . . . . . . . . 69
Application Settings. . . . . . . . . . . . . . . . . . . . . . . . . . . . . . . . . . . . . . . . . . . . . . . . . . . 69
Timeline Settings. . . . . . . . . . . . . . . . . . . . . . . . . . . . . . . . . . . . . . . . . . . . . . . . . . . . 70
Extend Clips When Applying Transition/Cross Fade . . . . . . . . . . . . . . . . . . 70
Insert Default Cross Fade in Transition. . . . . . . . . . . . . . . . . . . . . . . . . . . . . . . 72
Insert Default Transition in Cross Fade. . . . . . . . . . . . . . . . . . . . . . . . . . . . . . . 72
Set the Cutting Point of Transition/Cross Fade to Front . . . . . . . . . . . . . . . . 72
Hold the Next Clip When Trimming a Clip Except Ripple Trim . . . . . . . . . 72
Add Clips to Mapped Track . . . . . . . . . . . . . . . . . . . . . . . . . . . . . . . . . . . . . . . . 72
Snap of Event . . . . . . . . . . . . . . . . . . . . . . . . . . . . . . . . . . . . . . . . . . . . . . . . . . . . . 73
Insert Mode . . . . . . . . . . . . . . . . . . . . . . . . . . . . . . . . . . . . . . . . . . . . . . . . . . . . . . 74
Overwrite Mode . . . . . . . . . . . . . . . . . . . . . . . . . . . . . . . . . . . . . . . . . . . . . . . . . . 74
Sync Mode . . . . . . . . . . . . . . . . . . . . . . . . . . . . . . . . . . . . . . . . . . . . . . . . . . . . . . . 75
Ripple Mode. . . . . . . . . . . . . . . . . . . . . . . . . . . . . . . . . . . . . . . . . . . . . . . . . . . . . . 76
Waveform. . . . . . . . . . . . . . . . . . . . . . . . . . . . . . . . . . . . . . . . . . . . . . . . . . . . . . . . 78
Clip Timecode . . . . . . . . . . . . . . . . . . . . . . . . . . . . . . . . . . . . . . . . . . . . . . . . . . . . 78
Clip Thumbnail . . . . . . . . . . . . . . . . . . . . . . . . . . . . . . . . . . . . . . . . . . . . . . . . . . . 78
Render Settings . . . . . . . . . . . . . . . . . . . . . . . . . . . . . . . . . . . . . . . . . . . . . . . . . . . . . 78
Filters. . . . . . . . . . . . . . . . . . . . . . . . . . . . . . . . . . . . . . . . . . . . . . . . . . . . . . . . . . . . 80
Transition/Cross Fades . . . . . . . . . . . . . . . . . . . . . . . . . . . . . . . . . . . . . . . . . . . . 80
Key/Transparency . . . . . . . . . . . . . . . . . . . . . . . . . . . . . . . . . . . . . . . . . . . . . . . . 80
Speed Change . . . . . . . . . . . . . . . . . . . . . . . . . . . . . . . . . . . . . . . . . . . . . . . . . . . . 80
Contents That Are Not the Same Format as the Project . . . . . . . . . . . . . . . . . 80
Rendering Decisions . . . . . . . . . . . . . . . . . . . . . . . . . . . . . . . . . . . . . . . . . . . . . . . 80
Delete Invalid Rendering Files . . . . . . . . . . . . . . . . . . . . . . . . . . . . . . . . . . . . . . 81
Duration Settings . . . . . . . . . . . . . . . . . . . . . . . . . . . . . . . . . . . . . . . . . . . . . . . . . . . 81
Still Image. . . . . . . . . . . . . . . . . . . . . . . . . . . . . . . . . . . . . . . . . . . . . . . . . . . . . . . . 82
Title . . . . . . . . . . . . . . . . . . . . . . . . . . . . . . . . . . . . . . . . . . . . . . . . . . . . . . . . . . . . . 82
V-Mute . . . . . . . . . . . . . . . . . . . . . . . . . . . . . . . . . . . . . . . . . . . . . . . . . . . . . . . . . . 83
Rubberband Point . . . . . . . . . . . . . . . . . . . . . . . . . . . . . . . . . . . . . . . . . . . . . . . . . 83
Source Settings . . . . . . . . . . . . . . . . . . . . . . . . . . . . . . . . . . . . . . . . . . . . . . . . . . . . . 83
Adjust Frame Rate When Loading Clip. . . . . . . . . . . . . . . . . . . . . . . . . . . . . . . 84
Color Range for RGB Clip . . . . . . . . . . . . . . . . . . . . . . . . . . . . . . . . . . . . . . . . . . 84
Color Range for YCbCr Clip . . . . . . . . . . . . . . . . . . . . . . . . . . . . . . . . . . . . . . . . 85
Capture Settings . . . . . . . . . . . . . . . . . . . . . . . . . . . . . . . . . . . . . . . . . . . . . . . . . . . . 86
Preroll . . . . . . . . . . . . . . . . . . . . . . . . . . . . . . . . . . . . . . . . . . . . . . . . . . . . . . . . . . . 87
Margin. . . . . . . . . . . . . . . . . . . . . . . . . . . . . . . . . . . . . . . . . . . . . . . . . . . . . . . . . . . 87
Confirm Reel Name When Setting Input Device . . . . . . . . . . . . . . . . . . . . . . . 87
Confirm Filename . . . . . . . . . . . . . . . . . . . . . . . . . . . . . . . . . . . . . . . . . . . . . . . . . 87
6 EDIUS Neo — User Reference Guide
Page 7

Load to Player After Capture. . . . . . . . . . . . . . . . . . . . . . . . . . . . . . . . . . . . . . . . 87
Skip Errors and Continue Capture . . . . . . . . . . . . . . . . . . . . . . . . . . . . . . . . . . . 87
Automatically Divide Files. . . . . . . . . . . . . . . . . . . . . . . . . . . . . . . . . . . . . . . . . . 88
Deck Control After Capture . . . . . . . . . . . . . . . . . . . . . . . . . . . . . . . . . . . . . . . . . 88
Restore Offline Clip Settings . . . . . . . . . . . . . . . . . . . . . . . . . . . . . . . . . . . . . . . . . . 88
Docking Margin . . . . . . . . . . . . . . . . . . . . . . . . . . . . . . . . . . . . . . . . . . . . . . . . . . . 89
Restore Default - Load Project File . . . . . . . . . . . . . . . . . . . . . . . . . . . . . . . . . . . 89
Playback Settings . . . . . . . . . . . . . . . . . . . . . . . . . . . . . . . . . . . . . . . . . . . . . . . . . . . . 90
Preroll . . . . . . . . . . . . . . . . . . . . . . . . . . . . . . . . . . . . . . . . . . . . . . . . . . . . . . . . . . . 90
Stop Playback at Frame Drop. . . . . . . . . . . . . . . . . . . . . . . . . . . . . . . . . . . . . . . . 90
Continue Playback When Editing . . . . . . . . . . . . . . . . . . . . . . . . . . . . . . . . . . . . 91
Continue Playback When Trimming Clip . . . . . . . . . . . . . . . . . . . . . . . . . . . . . 91
Show Correct Frame When Scrubbing . . . . . . . . . . . . . . . . . . . . . . . . . . . . . . . . 91
Combine Filter Layers and Track Layers (for Effect Settings). . . . . . . . . . . . . 91
Buffered Frames Before Playback . . . . . . . . . . . . . . . . . . . . . . . . . . . . . . . . . . . . 91
Output Timecode . . . . . . . . . . . . . . . . . . . . . . . . . . . . . . . . . . . . . . . . . . . . . . . . . . 91
Source Timecode Priority . . . . . . . . . . . . . . . . . . . . . . . . . . . . . . . . . . . . . . . . . . . 91
Match Frame Settings . . . . . . . . . . . . . . . . . . . . . . . . . . . . . . . . . . . . . . . . . . . . . . . . 92
Search Direction . . . . . . . . . . . . . . . . . . . . . . . . . . . . . . . . . . . . . . . . . . . . . . . . . . . 92
Target Tracks . . . . . . . . . . . . . . . . . . . . . . . . . . . . . . . . . . . . . . . . . . . . . . . . . . . . . 93
Transition . . . . . . . . . . . . . . . . . . . . . . . . . . . . . . . . . . . . . . . . . . . . . . . . . . . . . . . . 93
Application Settings . . . . . . . . . . . . . . . . . . . . . . . . . . . . . . . . . . . . . . . . . . . . . . . . . 93
Recent Clip - Show the MRU List . . . . . . . . . . . . . . . . . . . . . . . . . . . . . . . . . . . . 94
Recent Clip - Number of Files . . . . . . . . . . . . . . . . . . . . . . . . . . . . . . . . . . . . . . . 95
Recent Clip - Show Thumbnail in the MRU List. . . . . . . . . . . . . . . . . . . . . . . . 95
Recent Project - Show the MRU List . . . . . . . . . . . . . . . . . . . . . . . . . . . . . . . . . . 95
Recent Project - Number of Files . . . . . . . . . . . . . . . . . . . . . . . . . . . . . . . . . . . . . 95
Settings - Save Window Positions . . . . . . . . . . . . . . . . . . . . . . . . . . . . . . . . . . . . 95
Settings - Show Tooltip . . . . . . . . . . . . . . . . . . . . . . . . . . . . . . . . . . . . . . . . . . . . . 95
Settings - Enable Auto Save/Auto Save Interval . . . . . . . . . . . . . . . . . . . . . . . 96
Settings - Player Format . . . . . . . . . . . . . . . . . . . . . . . . . . . . . . . . . . . . . . . . . . . . 96
Settings - Default Titler . . . . . . . . . . . . . . . . . . . . . . . . . . . . . . . . . . . . . . . . . . . . . 96
Project File - Default Folder . . . . . . . . . . . . . . . . . . . . . . . . . . . . . . . . . . . . . . . . . 96
Project File - File Name . . . . . . . . . . . . . . . . . . . . . . . . . . . . . . . . . . . . . . . . . . . . . 96
Customize Settings . . . . . . . . . . . . . . . . . . . . . . . . . . . . . . . . . . . . . . . . . . . . . . . . . . . . 96
Button Settings . . . . . . . . . . . . . . . . . . . . . . . . . . . . . . . . . . . . . . . . . . . . . . . . . . . . . . 96
Add a Space Between Buttons . . . . . . . . . . . . . . . . . . . . . . . . . . . . . . . . . . . . . . 101
Delete Buttons . . . . . . . . . . . . . . . . . . . . . . . . . . . . . . . . . . . . . . . . . . . . . . . . . . . 101
Change Button Position . . . . . . . . . . . . . . . . . . . . . . . . . . . . . . . . . . . . . . . . . . . 101
Reset Current Button List to Defaults. . . . . . . . . . . . . . . . . . . . . . . . . . . . . . . . 101
Control Settings . . . . . . . . . . . . . . . . . . . . . . . . . . . . . . . . . . . . . . . . . . . . . . . . . . . . 101
Show Timecode . . . . . . . . . . . . . . . . . . . . . . . . . . . . . . . . . . . . . . . . . . . . . . . . . . 102
Shuttle/Slider . . . . . . . . . . . . . . . . . . . . . . . . . . . . . . . . . . . . . . . . . . . . . . . . . . . . 105
Show Player and Recorder Buttons. . . . . . . . . . . . . . . . . . . . . . . . . . . . . . . . . . 105
Overlay Settings. . . . . . . . . . . . . . . . . . . . . . . . . . . . . . . . . . . . . . . . . . . . . . . . . . . . 106
Normal Edit Overlays . . . . . . . . . . . . . . . . . . . . . . . . . . . . . . . . . . . . . . . . . . . . . 107
Trim Edit Overlays . . . . . . . . . . . . . . . . . . . . . . . . . . . . . . . . . . . . . . . . . . . . . . . 107
Overlay View Attributes. . . . . . . . . . . . . . . . . . . . . . . . . . . . . . . . . . . . . . . . . . . 107
Export Overlays . . . . . . . . . . . . . . . . . . . . . . . . . . . . . . . . . . . . . . . . . . . . . . . . . . 108
Source Information to Show. . . . . . . . . . . . . . . . . . . . . . . . . . . . . . . . . . . . . . . .
Show Safe Area Overlay Attributes . . . . . . . . . . . . . . . . . . . . . . . . . . . . . . . . . 109
Audio Level Meter Overlays . . . . . . . . . . . . . . . . . . . . . . . . . . . . . . . . . . . . . . . 110
Display Bin Details Settings. . . . . . . . . . . . . . . . . . . . . . . . . . . . . . . . . . . . . . . . . . 110
View . . . . . . . . . . . . . . . . . . . . . . . . . . . . . . . . . . . . . . . . . . . . . . . . . . . . . . . . . . . . 111
108
Contents
EDIUS Neo — User Reference Guide 7
Page 8

Contents
Folder Type . . . . . . . . . . . . . . . . . . . . . . . . . . . . . . . . . . . . . . . . . . . . . . . . . . . . . 112
Columns . . . . . . . . . . . . . . . . . . . . . . . . . . . . . . . . . . . . . . . . . . . . . . . . . . . . . . . . 113
Keyboard Shortcut Settings. . . . . . . . . . . . . . . . . . . . . . . . . . . . . . . . . . . . . . . . . . 114
Category . . . . . . . . . . . . . . . . . . . . . . . . . . . . . . . . . . . . . . . . . . . . . . . . . . . . . . . . 115
Filter . . . . . . . . . . . . . . . . . . . . . . . . . . . . . . . . . . . . . . . . . . . . . . . . . . . . . . . . . . . 116
Shortcut Assignment Buttons . . . . . . . . . . . . . . . . . . . . . . . . . . . . . . . . . . . . . . 116
Making a Keyboard Shortcut Assignment . . . . . . . . . . . . . . . . . . . . . . . . . . . 118
Window Color Settings . . . . . . . . . . . . . . . . . . . . . . . . . . . . . . . . . . . . . . . . . . . . . 118
Plug-In Settings. . . . . . . . . . . . . . . . . . . . . . . . . . . . . . . . . . . . . . . . . . . . . . . . . . . . . . 121
AVCHD Importer . . . . . . . . . . . . . . . . . . . . . . . . . . . . . . . . . . . . . . . . . . . . . . . . . . 121
Still Image . . . . . . . . . . . . . . . . . . . . . . . . . . . . . . . . . . . . . . . . . . . . . . . . . . . . . . . . 122
Capture Field . . . . . . . . . . . . . . . . . . . . . . . . . . . . . . . . . . . . . . . . . . . . . . . . . . . . 122
Filtering. . . . . . . . . . . . . . . . . . . . . . . . . . . . . . . . . . . . . . . . . . . . . . . . . . . . . . . . . 123
Adjust Aspect. . . . . . . . . . . . . . . . . . . . . . . . . . . . . . . . . . . . . . . . . . . . . . . . . . . . 123
File Type . . . . . . . . . . . . . . . . . . . . . . . . . . . . . . . . . . . . . . . . . . . . . . . . . . . . . . . . 123
MPEG Importer. . . . . . . . . . . . . . . . . . . . . . . . . . . . . . . . . . . . . . . . . . . . . . . . . . . . 123
GPUfx Settings . . . . . . . . . . . . . . . . . . . . . . . . . . . . . . . . . . . . . . . . . . . . . . . . . . . . 125
VST Plugin Bridge Settings . . . . . . . . . . . . . . . . . . . . . . . . . . . . . . . . . . . . . . . . . . 126
Adding a Location to the VST Plugin Search List . . . . . . . . . . . . . . . . . . . . . 127
Section 3 — Capturing and Importing Clips and Stills . . . . . . . . . . . . . . 129
Supported File Types. . . . . . . . . . . . . . . . . . . . . . . . . . . . . . . . . . . . . . . . . . . . . . . . . 129
Capturing Basics. . . . . . . . . . . . . . . . . . . . . . . . . . . . . . . . . . . . . . . . . . . . . . . . . . . . . 131
Source Connections . . . . . . . . . . . . . . . . . . . . . . . . . . . . . . . . . . . . . . . . . . . . . . . . 131
Capture Settings . . . . . . . . . . . . . . . . . . . . . . . . . . . . . . . . . . . . . . . . . . . . . . . . . . . 131
Capturing from a DV or HDV Device. . . . . . . . . . . . . . . . . . . . . . . . . . . . . . . . . . . 132
Setting Reel Name . . . . . . . . . . . . . . . . . . . . . . . . . . . . . . . . . . . . . . . . . . . . . . . . . 135
Confirming File Capture Settings. . . . . . . . . . . . . . . . . . . . . . . . . . . . . . . . . . . . . 137
Setting In and Out Points. . . . . . . . . . . . . . . . . . . . . . . . . . . . . . . . . . . . . . . . . . . . 138
Sorting Input Formats . . . . . . . . . . . . . . . . . . . . . . . . . . . . . . . . . . . . . . . . . . . . . . 140
Registering Input Presets. . . . . . . . . . . . . . . . . . . . . . . . . . . . . . . . . . . . . . . . . . . . 141
Capturing from DirectShow Devices (Web Cameras, etc.) . . . . . . . . . . . . . . . . . 142
Capturing from DVD/CD. . . . . . . . . . . . . . . . . . . . . . . . . . . . . . . . . . . . . . . . . . . . . 145
DISCcapture Capture Settings . . . . . . . . . . . . . . . . . . . . . . . . . . . . . . . . . . . . . . . 148
Capturing from Devices Not Controlled by Capture Settings . . . . . . . . . . . . . . 149
Capturing Directly to the Timeline . . . . . . . . . . . . . . . . . . . . . . . . . . . . . . . . . . . . . 150
Batch Capturing . . . . . . . . . . . . . . . . . . . . . . . . . . . . . . . . . . . . . . . . . . . . . . . . . . . . . 151
Batch Capture Functions . . . . . . . . . . . . . . . . . . . . . . . . . . . . . . . . . . . . . . . . . . . . 153
Creating a New Batch Capture List . . . . . . . . . . . . . . . . . . . . . . . . . . . . . . . . . 154
Saving Batch Capture Lists . . . . . . . . . . . . . . . . . . . . . . . . . . . . . . . . . . . . . . . . 154
Loading Batch Capture Lists . . . . . . . . . . . . . . . . . . . . . . . . . . . . . . . . . . . . . . . 155
Importing Existing Clips or Stills into the Asset Bin. . . . . . . . . . . . . . . . . . . . . . . 157
Importing Still Sequences . . . . . . . . . . . . . . . . . . . . . . . . . . . . . . . . . . . . . . . . . . . 158
Importing Folders. . . . . . . . . . . . . . . . . . . . . . . . . . . . . . . . . . . . . . . . . . . . . . . . . . 161
Section 4 — Clip Operations and Management . . . . . . . . . . . . . . . . . . . . . . 163
Clip Storage. . . . . . . . . . . . . . . . . . . . . . . . . . . . . . . . . . . . . . . . . . . . . . . . . . . . . . . . . 163
Clip Display Properties . . . . . . . . . . . . . . . . . . . . . . . . . . . . . . . . . . . . . . . . . . . . . 163
Video Clip. . . . . . . . . . . . . . . . . . . . . . . . . . . . . . . . . . . . . . . . . . . . . . . . . . . . . . . 164
Still Image Clip . . . . . . . . . . . . . . . . . . . . . . . . . . . . . . . . . . . . . . . . . . . . . . . . . . 165
Audio Clip . . . . . . . . . . . . . . . . . . . . . . . . . . . . . . . . . . . . . . . . . . . . . . . . . . . . . . 165
Color Bar Clip . . . . . . . . . . . . . . . . . . . . . . . . . . . . . . . . . . . . . . . . . . . . . . . . . . . 166
8 EDIUS Neo — User Reference Guide
Page 9

Color Matte Clip. . . . . . . . . . . . . . . . . . . . . . . . . . . . . . . . . . . . . . . . . . . . . . . . . . 166
Title Clip . . . . . . . . . . . . . . . . . . . . . . . . . . . . . . . . . . . . . . . . . . . . . . . . . . . . . . . . 167
Timeline Sequence Clip. . . . . . . . . . . . . . . . . . . . . . . . . . . . . . . . . . . . . . . . . . . . 167
Sequence Clip . . . . . . . . . . . . . . . . . . . . . . . . . . . . . . . . . . . . . . . . . . . . . . . . . . . . 168
Renaming Clips . . . . . . . . . . . . . . . . . . . . . . . . . . . . . . . . . . . . . . . . . . . . . . . . . . . . 168
Saving Clips from the Timeline. . . . . . . . . . . . . . . . . . . . . . . . . . . . . . . . . . . . . . . 168
Creating Clips . . . . . . . . . . . . . . . . . . . . . . . . . . . . . . . . . . . . . . . . . . . . . . . . . . . . . . . 170
Create a Color Bar Clip. . . . . . . . . . . . . . . . . . . . . . . . . . . . . . . . . . . . . . . . . . . . . . 170
Modify Color Bar Properties . . . . . . . . . . . . . . . . . . . . . . . . . . . . . . . . . . . . . . . 172
Create a Color Matte Clip. . . . . . . . . . . . . . . . . . . . . . . . . . . . . . . . . . . . . . . . . . . . 173
Modify Color Matte Properties . . . . . . . . . . . . . . . . . . . . . . . . . . . . . . . . . . . . . 176
Create a Title Clip . . . . . . . . . . . . . . . . . . . . . . . . . . . . . . . . . . . . . . . . . . . . . . . . . . 176
Creating a Sequence (Conjoining Multiple Clips) . . . . . . . . . . . . . . . . . . . . . . . 176
Creating Individual Clips from a Sequence (Cancelling a Sequence) . . . . . . . 177
Clip Operations . . . . . . . . . . . . . . . . . . . . . . . . . . . . . . . . . . . . . . . . . . . . . . . . . . . . . . 179
Displaying Clips in the Player. . . . . . . . . . . . . . . . . . . . . . . . . . . . . . . . . . . . . . . . 179
Clip Playback . . . . . . . . . . . . . . . . . . . . . . . . . . . . . . . . . . . . . . . . . . . . . . . . . . . . . . 179
Playback with Player Operation Buttons . . . . . . . . . . . . . . . . . . . . . . . . . . . . . 180
Playback with Shuttle/Slider Controls. . . . . . . . . . . . . . . . . . . . . . . . . . . . . . . 180
Playback with the Mouse . . . . . . . . . . . . . . . . . . . . . . . . . . . . . . . . . . . . . . . . . . 181
Setting In and Out Points . . . . . . . . . . . . . . . . . . . . . . . . . . . . . . . . . . . . . . . . . . . . 182
Setting Separate In/Out Points for Video and Audio . . . . . . . . . . . . . . . . . . . . 183
Adjusting Video and Audio In/Out Points. . . . . . . . . . . . . . . . . . . . . . . . . . . 185
Move to the In or Out Point . . . . . . . . . . . . . . . . . . . . . . . . . . . . . . . . . . . . . . . . . . 186
Removing In and Out Points . . . . . . . . . . . . . . . . . . . . . . . . . . . . . . . . . . . . . . . . . 187
Editing Clip Properties . . . . . . . . . . . . . . . . . . . . . . . . . . . . . . . . . . . . . . . . . . . . . . 188
Editing Clip Settings . . . . . . . . . . . . . . . . . . . . . . . . . . . . . . . . . . . . . . . . . . . . . . . . 191
Color Bar, Color Matte and Title Clips . . . . . . . . . . . . . . . . . . . . . . . . . . . . . . . 191
Editing Clip Settings for Multiple Clips. . . . . . . . . . . . . . . . . . . . . . . . . . . . . . . . 193
Clip Width View . . . . . . . . . . . . . . . . . . . . . . . . . . . . . . . . . . . . . . . . . . . . . . . . . 193
Detail View . . . . . . . . . . . . . . . . . . . . . . . . . . . . . . . . . . . . . . . . . . . . . . . . . . . . . . 194
Checking Clip Storage Location . . . . . . . . . . . . . . . . . . . . . . . . . . . . . . . . . . . . . . 195
Opening a Clip with an External Application. . . . . . . . . . . . . . . . . . . . . . . . . . . 196
Clip Management . . . . . . . . . . . . . . . . . . . . . . . . . . . . . . . . . . . . . . . . . . . . . . . . . . . . 198
Selecting Clips . . . . . . . . . . . . . . . . . . . . . . . . . . . . . . . . . . . . . . . . . . . . . . . . . . . . . 198
Copying Clips . . . . . . . . . . . . . . . . . . . . . . . . . . . . . . . . . . . . . . . . . . . . . . . . . . . . . 198
Cutting Clips . . . . . . . . . . . . . . . . . . . . . . . . . . . . . . . . . . . . . . . . . . . . . . . . . . . . . . 198
Pasting Clips. . . . . . . . . . . . . . . . . . . . . . . . . . . . . . . . . . . . . . . . . . . . . . . . . . . . . . . 199
Deleting (Releasing) Clips . . . . . . . . . . . . . . . . . . . . . . . . . . . . . . . . . . . . . . . . . . . 200
Sorting Clips. . . . . . . . . . . . . . . . . . . . . . . . . . . . . . . . . . . . . . . . . . . . . . . . . . . . . . . 200
Setting Clip Color . . . . . . . . . . . . . . . . . . . . . . . . . . . . . . . . . . . . . . . . . . . . . . . . . . 201
Creating Folders. . . . . . . . . . . . . . . . . . . . . . . . . . . . . . . . . . . . . . . . . . . . . . . . . . . . 203
Moving Folders . . . . . . . . . . . . . . . . . . . . . . . . . . . . . . . . . . . . . . . . . . . . . . . . . . . . 204
Duplicating Folders. . . . . . . . . . . . . . . . . . . . . . . . . . . . . . . . . . . . . . . . . . . . . . . . . 205
Deleting Folders. . . . . . . . . . . . . . . . . . . . . . . . . . . . . . . . . . . . . . . . . . . . . . . . . . . . 205
Selecting the Folder to Display . . . . . . . . . . . . . . . . . . . . . . . . . . . . . . . . . . . . . . . 205
Exporting Bin Information . . . . . . . . . . . . . . . . . . . . . . . . . . . . . . . . . . . . . . . . . . . 206
Importing Bin Information. . . . . . . . . . . . . . . . . . . . . . . . . . . . . . . . . . . . . . . . . . . 207
Exporting Stored Information . . . . . . . . . . . . . . . . . . . . . . . . . . . . . . . . . . . . . . . . 208
Searching for Clips in the Asset Bin . . . . . . . . . . . . . . . . . . . . . . . . . . . . . . . . . . . 210
Searching for Unused Clips . . . . . . . . . . . . . . . . . . . . . . . . . . . . . . . . . . . . . . . . . . 213
Deleting Search Results . . . . . . . . . . . . . . . . . . . . . . . . . . . . . . . . . . . . . . . . . . . . . 215
Contents
EDIUS Neo — User Reference Guide 9
Page 10

Contents
Section 5 — Timeline Operations. . . . . . . . . . . . . . . . . . . . . . . . . . . . . . . . . . . . . 217
Timeline Settings . . . . . . . . . . . . . . . . . . . . . . . . . . . . . . . . . . . . . . . . . . . . . . . . . . . . 217
Edit Settings. . . . . . . . . . . . . . . . . . . . . . . . . . . . . . . . . . . . . . . . . . . . . . . . . . . . . . . 217
Insert Mode . . . . . . . . . . . . . . . . . . . . . . . . . . . . . . . . . . . . . . . . . . . . . . . . . . . . . 217
Overwrite Mode . . . . . . . . . . . . . . . . . . . . . . . . . . . . . . . . . . . . . . . . . . . . . . . . . 218
Sync Mode . . . . . . . . . . . . . . . . . . . . . . . . . . . . . . . . . . . . . . . . . . . . . . . . . . . . . . 219
Ripple Mode. . . . . . . . . . . . . . . . . . . . . . . . . . . . . . . . . . . . . . . . . . . . . . . . . . . . . 220
Extend Mode . . . . . . . . . . . . . . . . . . . . . . . . . . . . . . . . . . . . . . . . . . . . . . . . . . . . 221
Fix Mode. . . . . . . . . . . . . . . . . . . . . . . . . . . . . . . . . . . . . . . . . . . . . . . . . . . . . . . . 223
Track Settings . . . . . . . . . . . . . . . . . . . . . . . . . . . . . . . . . . . . . . . . . . . . . . . . . . . . . 224
Track Panel. . . . . . . . . . . . . . . . . . . . . . . . . . . . . . . . . . . . . . . . . . . . . . . . . . . . . . 224
Adjust Track Panel Width . . . . . . . . . . . . . . . . . . . . . . . . . . . . . . . . . . . . . . . . . 228
Adjust Track Panel Height. . . . . . . . . . . . . . . . . . . . . . . . . . . . . . . . . . . . . . . . . 228
Change Track Name . . . . . . . . . . . . . . . . . . . . . . . . . . . . . . . . . . . . . . . . . . . . . . 230
Copy Tracks . . . . . . . . . . . . . . . . . . . . . . . . . . . . . . . . . . . . . . . . . . . . . . . . . . . . . 232
Move Tracks. . . . . . . . . . . . . . . . . . . . . . . . . . . . . . . . . . . . . . . . . . . . . . . . . . . . . 232
Add Tracks. . . . . . . . . . . . . . . . . . . . . . . . . . . . . . . . . . . . . . . . . . . . . . . . . . . . . . 233
Delete Tracks . . . . . . . . . . . . . . . . . . . . . . . . . . . . . . . . . . . . . . . . . . . . . . . . . . . . 235
Audio Channel Settings . . . . . . . . . . . . . . . . . . . . . . . . . . . . . . . . . . . . . . . . . . . 236
Timeline Scale Settings. . . . . . . . . . . . . . . . . . . . . . . . . . . . . . . . . . . . . . . . . . . . . . 238
Timeline Scale Markings . . . . . . . . . . . . . . . . . . . . . . . . . . . . . . . . . . . . . . . . . . 238
Timeline Scale Settings . . . . . . . . . . . . . . . . . . . . . . . . . . . . . . . . . . . . . . . . . . . . 239
Clip Placement . . . . . . . . . . . . . . . . . . . . . . . . . . . . . . . . . . . . . . . . . . . . . . . . . . . . . . 239
In and Out Points . . . . . . . . . . . . . . . . . . . . . . . . . . . . . . . . . . . . . . . . . . . . . . . . . . 239
Setting In and Out Points on Timeline. . . . . . . . . . . . . . . . . . . . . . . . . . . . . . . 239
Setting In and Out Points on Ends of Clips. . . . . . . . . . . . . . . . . . . . . . . . . . . 240
Adjusting In and Out Points . . . . . . . . . . . . . . . . . . . . . . . . . . . . . . . . . . . . . . . 241
Deleting In and Out Points on the Timeline . . . . . . . . . . . . . . . . . . . . . . . . . . 242
Placing Clips on the Timeline . . . . . . . . . . . . . . . . . . . . . . . . . . . . . . . . . . . . . . . . 242
Using Clips in the Asset Bin . . . . . . . . . . . . . . . . . . . . . . . . . . . . . . . . . . . . . . . 242
Clip Status Indicators . . . . . . . . . . . . . . . . . . . . . . . . . . . . . . . . . . . . . . . . . . . . . 244
Setting In/Out Points and Placing a Clip . . . . . . . . . . . . . . . . . . . . . . . . . . . . 246
Place Video or Audio Only on Timeline . . . . . . . . . . . . . . . . . . . . . . . . . . . . . 247
Placing Clips by Channel. . . . . . . . . . . . . . . . . . . . . . . . . . . . . . . . . . . . . . . . . . 248
Three-Point Editing. . . . . . . . . . . . . . . . . . . . . . . . . . . . . . . . . . . . . . . . . . . . . . . 251
Four-Point Editing . . . . . . . . . . . . . . . . . . . . . . . . . . . . . . . . . . . . . . . . . . . . . . . 252
Placing Special Clips Between In and Out Points of the Timeline. . . . . . . . 253
Moving Clips on the Timeline . . . . . . . . . . . . . . . . . . . . . . . . . . . . . . . . . . . . . . . 254
Selecting Multiple Clips . . . . . . . . . . . . . . . . . . . . . . . . . . . . . . . . . . . . . . . . . . . 254
Moving Selected Clip(s) . . . . . . . . . . . . . . . . . . . . . . . . . . . . . . . . . . . . . . . . . . . 255
Moving Selected Clip(s) and Subsequent Clips . . . . . . . . . . . . . . . . . . . . . . . 256
Changing Clip Order . . . . . . . . . . . . . . . . . . . . . . . . . . . . . . . . . . . . . . . . . . . . . 257
Searching Timeline Clips in the Asset Bin . . . . . . . . . . . . . . . . . . . . . . . . . . . . . 258
Timeline Clip Operations . . . . . . . . . . . . . . . . . . . . . . . . . . . . . . . . . . . . . . . . . . . . . 259
Unlink. . . . . . . . . . . . . . . . . . . . . . . . . . . . . . . . . . . . . . . . . . . . . . . . . . . . . . . . . . . . 259
Link . . . . . . . . . . . . . . . . . . . . . . . . . . . . . . . . . . . . . . . . . . . . . . . . . . . . . . . . . . . . . . 260
Group . . . . . . . . . . . . . . . . . . . . . . . . . . . . . . . . . . . . . . . . . . . . . . . . . . . . . . . . . . . . 261
Ungroup (Remove Group) . . . . . . . . . . . . . . . . . . . . . . . . . . . . . . . . . . . . . . . . . . 261
Copy . . . . . . . . . . . . . . . . . . . . . . . . . . . . . . . . . . . . . . . . . . . . . . . . . . . . . . . . . . . . . 261
Cut. . . . . . . . . . . . . . . . . . . . . . . . . . . . . . . . . . . . . . . . . . . . . . . . . . . . . . . . . . . . . . . 262
Ripple Cut . . . . . . . . . . . . . . . . . . . . . . . . . . . . . . . . . . . . . . . . . . . . . . . . . . . . . . . . 262
Paste . . . . . . . . . . . . . . . . . . . . . . . . . . . . . . . . . . . . . . . . . . . . . . . . . . . . . . . . . . . . . 264
Paste at In/Out Points of Existing Clip. . . . . . . . . . . . . . . . . . . . . . . . . . . . . . . . 265
10 EDIUS Neo — User Reference Guide
Page 11

Replace . . . . . . . . . . . . . . . . . . . . . . . . . . . . . . . . . . . . . . . . . . . . . . . . . . . . . . . . . . . 265
Replace Clip Elements . . . . . . . . . . . . . . . . . . . . . . . . . . . . . . . . . . . . . . . . . . . . . . 266
Set Clip Color on Timeline . . . . . . . . . . . . . . . . . . . . . . . . . . . . . . . . . . . . . . . . . . . 267
Dividing Clips at Cursor Position. . . . . . . . . . . . . . . . . . . . . . . . . . . . . . . . . . . . . 268
Dividing Clips at In/Out Points . . . . . . . . . . . . . . . . . . . . . . . . . . . . . . . . . . . . . . 269
Combining a Divided Clip. . . . . . . . . . . . . . . . . . . . . . . . . . . . . . . . . . . . . . . . . . . 270
Enable/Disable Clips . . . . . . . . . . . . . . . . . . . . . . . . . . . . . . . . . . . . . . . . . . . . . . . 272
Deleting a Clip . . . . . . . . . . . . . . . . . . . . . . . . . . . . . . . . . . . . . . . . . . . . . . . . . . . . . 273
Deleting Between In/Out Points on Timeline. . . . . . . . . . . . . . . . . . . . . . . . . . . 273
Deleting Only the Video or Audio Portion of a Clip . . . . . . . . . . . . . . . . . . . . . 275
Ripple Deleting Clips . . . . . . . . . . . . . . . . . . . . . . . . . . . . . . . . . . . . . . . . . . . . . . . 276
Ripple Deleting Between In/Out Points on Timeline . . . . . . . . . . . . . . . . . . . . 277
Ripple Deleting Only the Video or Audio Portion of a Clip. . . . . . . . . . . . . . . 279
Delete Timeline Gaps . . . . . . . . . . . . . . . . . . . . . . . . . . . . . . . . . . . . . . . . . . . . . . . 280
Changing Clip Playback Speed . . . . . . . . . . . . . . . . . . . . . . . . . . . . . . . . . . . . . . . 282
Changing Speed of Multiple Clips . . . . . . . . . . . . . . . . . . . . . . . . . . . . . . . . . . 284
Video Display Layout/Crop . . . . . . . . . . . . . . . . . . . . . . . . . . . . . . . . . . . . . . . . . 284
Keyframe Settings . . . . . . . . . . . . . . . . . . . . . . . . . . . . . . . . . . . . . . . . . . . . . . . . 292
Trimming Clips . . . . . . . . . . . . . . . . . . . . . . . . . . . . . . . . . . . . . . . . . . . . . . . . . . . . . . 293
Trimming Mode. . . . . . . . . . . . . . . . . . . . . . . . . . . . . . . . . . . . . . . . . . . . . . . . . . . . 293
Trimming Operations . . . . . . . . . . . . . . . . . . . . . . . . . . . . . . . . . . . . . . . . . . . . . . . 297
Trimming at Ends of Clips . . . . . . . . . . . . . . . . . . . . . . . . . . . . . . . . . . . . . . . . . 297
Trimming from the Preview Window . . . . . . . . . . . . . . . . . . . . . . . . . . . . . . . . . 301
In Point, Out Point or Slide Point Trim . . . . . . . . . . . . . . . . . . . . . . . . . . . . . . 302
Slip Trim or Rolling Trim . . . . . . . . . . . . . . . . . . . . . . . . . . . . . . . . . . . . . . . . . . 302
Trimming by Value . . . . . . . . . . . . . . . . . . . . . . . . . . . . . . . . . . . . . . . . . . . . . . . . . 303
Trimming with Shortcuts . . . . . . . . . . . . . . . . . . . . . . . . . . . . . . . . . . . . . . . . . . . . 306
Ripple Trim. . . . . . . . . . . . . . . . . . . . . . . . . . . . . . . . . . . . . . . . . . . . . . . . . . . . . . . . 307
Split Trim . . . . . . . . . . . . . . . . . . . . . . . . . . . . . . . . . . . . . . . . . . . . . . . . . . . . . . . . . 309
Slide Trim . . . . . . . . . . . . . . . . . . . . . . . . . . . . . . . . . . . . . . . . . . . . . . . . . . . . . . . . . 311
Slip Trim . . . . . . . . . . . . . . . . . . . . . . . . . . . . . . . . . . . . . . . . . . . . . . . . . . . . . . . . . . 313
Rolling Trim . . . . . . . . . . . . . . . . . . . . . . . . . . . . . . . . . . . . . . . . . . . . . . . . . . . . . . . 314
Sequence and Clip Markers. . . . . . . . . . . . . . . . . . . . . . . . . . . . . . . . . . . . . . . . . . . . 316
Show/Hide the Marker Palette . . . . . . . . . . . . . . . . . . . . . . . . . . . . . . . . . . . . . . . 316
Sequence Marker Palette . . . . . . . . . . . . . . . . . . . . . . . . . . . . . . . . . . . . . . . . . . . . 317
Clip Marker Palette . . . . . . . . . . . . . . . . . . . . . . . . . . . . . . . . . . . . . . . . . . . . . . . 319
Setting Markers . . . . . . . . . . . . . . . . . . . . . . . . . . . . . . . . . . . . . . . . . . . . . . . . . . . . 322
Set Marker at Specific Location . . . . . . . . . . . . . . . . . . . . . . . . . . . . . . . . . . . . . 322
Set Marker Between In and Out Points . . . . . . . . . . . . . . . . . . . . . . . . . . . . . . 324
Clip Marker and Slider Shortcut Menus . . . . . . . . . . . . . . . . . . . . . . . . . . . . . . . 326
Sequence Marker and Timeline Cursor Shortcut Menu . . . . . . . . . . . . . . . . . . 327
Selecting a Marker Position . . . . . . . . . . . . . . . . . . . . . . . . . . . . . . . . . . . . . . . . . . 328
Moving Markers . . . . . . . . . . . . . . . . . . . . . . . . . . . . . . . . . . . . . . . . . . . . . . . . . . . 330
Delete Markers. . . . . . . . . . . . . . . . . . . . . . . . . . . . . . . . . . . . . . . . . . . . . . . . . . . . . 330
Entering Marker Comments . . . . . . . . . . . . . . . . . . . . . . . . . . . . . . . . . . . . . . . . . 331
Sequence Marker Palette. . . . . . . . . . . . . . . . . . . . . . . . . . . . . . . . . . . . . . . . . . . 331
Clip Marker Palette . . . . . . . . . . . . . . . . . . . . . . . . . . . . . . . . . . . . . . . . . . . . . . . 332
Display of Marker Comments . . . . . . . . . . . . . . . . . . . . . . . . . . . . . . . . . . . . . . . . 333
Recorder Window . . . . . . . . . . . . . . . . . . . . . . . . . . . . . . . . . . . . . . . . . . . . . . . . 333
Player Window. . . . . . . . . . . . . . . . . . . . . . . . . . . . . . . . . . . . . . . . . . . . . . . . . . .
Export Marker List . . . . . . . . . . . . . . . . . . . . . . . . . . . . . . . . . . . . . . . . . . . . . . . . . 335
Import Marker List . . . . . . . . . . . . . . . . . . . . . . . . . . . . . . . . . . . . . . . . . . . . . . . . . 337
Clip Markers on the Timeline . . . . . . . . . . . . . . . . . . . . . . . . . . . . . . . . . . . . . . . . 338
Timeline Playback . . . . . . . . . . . . . . . . . . . . . . . . . . . . . . . . . . . . . . . . . . . . . . . . . . . . 339
334
Contents
EDIUS Neo — User Reference Guide 11
Page 12

Contents
Playback by Scrubbing. . . . . . . . . . . . . . . . . . . . . . . . . . . . . . . . . . . . . . . . . . . . . . 339
Playback with Recorder Operation Buttons . . . . . . . . . . . . . . . . . . . . . . . . . . . . 340
Playback with Shuttle/Slider Controls . . . . . . . . . . . . . . . . . . . . . . . . . . . . . . . . 342
Position Slider Shortcut Menu . . . . . . . . . . . . . . . . . . . . . . . . . . . . . . . . . . . . . 343
Playback with the Mouse. . . . . . . . . . . . . . . . . . . . . . . . . . . . . . . . . . . . . . . . . . . . 344
Playback Between Timeline In/Out Points . . . . . . . . . . . . . . . . . . . . . . . . . . . . 344
Playback Around Timeline Cursor . . . . . . . . . . . . . . . . . . . . . . . . . . . . . . . . . . . 345
Move to Timeline In/Out Points . . . . . . . . . . . . . . . . . . . . . . . . . . . . . . . . . . . . . 346
Move by Timecode . . . . . . . . . . . . . . . . . . . . . . . . . . . . . . . . . . . . . . . . . . . . . . . . . 346
Match Frame Positioning. . . . . . . . . . . . . . . . . . . . . . . . . . . . . . . . . . . . . . . . . . . . 347
Match Frame from Player to Timeline . . . . . . . . . . . . . . . . . . . . . . . . . . . . . . . 347
Match Frame from Timeline to Player . . . . . . . . . . . . . . . . . . . . . . . . . . . . . . . 348
Rendering Operations . . . . . . . . . . . . . . . . . . . . . . . . . . . . . . . . . . . . . . . . . . . . . . . . 349
Time Scale Color Code. . . . . . . . . . . . . . . . . . . . . . . . . . . . . . . . . . . . . . . . . . . . . . 349
Rendering Sequence Overload Areas . . . . . . . . . . . . . . . . . . . . . . . . . . . . . . . . . 351
Rendering Overload Area in Entire Project . . . . . . . . . . . . . . . . . . . . . . . . . . . . 352
Rendering Only a Selected Overload/Loaded Area . . . . . . . . . . . . . . . . . . . . . 353
Rendering Between In an Out Points. . . . . . . . . . . . . . . . . . . . . . . . . . . . . . . . . . 353
Rendering Overload Areas . . . . . . . . . . . . . . . . . . . . . . . . . . . . . . . . . . . . . . . . 354
Render All Areas Needing Rendering . . . . . . . . . . . . . . . . . . . . . . . . . . . . . . . 354
Rendering Overload and Loaded Areas . . . . . . . . . . . . . . . . . . . . . . . . . . . . . 355
Rendering a Clip or Transition . . . . . . . . . . . . . . . . . . . . . . . . . . . . . . . . . . . . . . . 355
Exporting Video Clips from the Timeline. . . . . . . . . . . . . . . . . . . . . . . . . . . . . . 356
Exporting Still Image Clips from the Timeline. . . . . . . . . . . . . . . . . . . . . . . . . . 358
Deleting Temporary Files Manually . . . . . . . . . . . . . . . . . . . . . . . . . . . . . . . . . . 358
Timeline Sequence Operations. . . . . . . . . . . . . . . . . . . . . . . . . . . . . . . . . . . . . . . . . 359
Creating a New Sequence . . . . . . . . . . . . . . . . . . . . . . . . . . . . . . . . . . . . . . . . . . . 361
Creating a Nested Sequence . . . . . . . . . . . . . . . . . . . . . . . . . . . . . . . . . . . . . . . . . 362
Open a Nested Sequence . . . . . . . . . . . . . . . . . . . . . . . . . . . . . . . . . . . . . . . . . . . . 364
Closing a Sequence . . . . . . . . . . . . . . . . . . . . . . . . . . . . . . . . . . . . . . . . . . . . . . . . . 364
Saving Timeline Clips as Asset Bin Sequence . . . . . . . . . . . . . . . . . . . . . . . . . . 365
Creating A Blank Sequence Clip on the Timeline . . . . . . . . . . . . . . . . . . . . . . . 366
Duplicating a Sequence . . . . . . . . . . . . . . . . . . . . . . . . . . . . . . . . . . . . . . . . . . . . . 366
Undo/Redo Operations . . . . . . . . . . . . . . . . . . . . . . . . . . . . . . . . . . . . . . . . . . . . . . 367
Undo an Operation. . . . . . . . . . . . . . . . . . . . . . . . . . . . . . . . . . . . . . . . . . . . . . . . . 367
Redo a Cancelled Operation . . . . . . . . . . . . . . . . . . . . . . . . . . . . . . . . . . . . . . . . . 367
Section 6 — Effects and Titles . . . . . . . . . . . . . . . . . . . . . . . . . . . . . . . . . . . . . . . . 369
Effects . . . . . . . . . . . . . . . . . . . . . . . . . . . . . . . . . . . . . . . . . . . . . . . . . . . . . . . . . . . . . . 369
Show/Hide the Effect Palette . . . . . . . . . . . . . . . . . . . . . . . . . . . . . . . . . . . . . . . . 369
Effect Palette . . . . . . . . . . . . . . . . . . . . . . . . . . . . . . . . . . . . . . . . . . . . . . . . . . . . . . 370
Expand Folder View. . . . . . . . . . . . . . . . . . . . . . . . . . . . . . . . . . . . . . . . . . . . . . . . 370
Effect View Show/Hide. . . . . . . . . . . . . . . . . . . . . . . . . . . . . . . . . . . . . . . . . . . . . 371
Effect Types . . . . . . . . . . . . . . . . . . . . . . . . . . . . . . . . . . . . . . . . . . . . . . . . . . . . . . . 373
Plug-In Base Effects. . . . . . . . . . . . . . . . . . . . . . . . . . . . . . . . . . . . . . . . . . . . . . . 373
System Preset Effects . . . . . . . . . . . . . . . . . . . . . . . . . . . . . . . . . . . . . . . . . . . . . 373
User Preset Effects. . . . . . . . . . . . . . . . . . . . . . . . . . . . . . . . . . . . . . . . . . . . . . . . 373
Default Effects . . . . . . . . . . . . . . . . . . . . . . . . . . . . . . . . . . . . . . . . . . . . . . . . . . . 373
Effect Properties . . . . . . . . . . . . . . . . . . . . . . . . . . . . . . . . . . . . . . . . . . . . . . . . . . . 374
Applying Effects . . . . . . . . . . . . . . . . . . . . . . . . . . . . . . . . . . . . . . . . . . . . . . . . . . . 375
Drag and Drop. . . . . . . . . . . . . . . . . . . . . . . . . . . . . . . . . . . . . . . . . . . . . . . . . . . 375
Right-Click Menu . . . . . . . . . . . . . . . . . . . . . . . . . . . . . . . . . . . . . . . . . . . . . . . . 376
Applying Filters to Clips. . . . . . . . . . . . . . . . . . . . . . . . . . . . . . . . . . . . . . . . . . . . . . 378
12 EDIUS Neo — User Reference Guide
Page 13

Color Correction Filters . . . . . . . . . . . . . . . . . . . . . . . . . . . . . . . . . . . . . . . . . . . . . 378
Applying Color Correction Filters. . . . . . . . . . . . . . . . . . . . . . . . . . . . . . . . . . . 379
Adjusting YUV Curve . . . . . . . . . . . . . . . . . . . . . . . . . . . . . . . . . . . . . . . . . . . . . 380
Preview Settings. . . . . . . . . . . . . . . . . . . . . . . . . . . . . . . . . . . . . . . . . . . . . . . . . . 382
Keyframe Settings . . . . . . . . . . . . . . . . . . . . . . . . . . . . . . . . . . . . . . . . . . . . . . . . 385
Adjusting Color Balance . . . . . . . . . . . . . . . . . . . . . . . . . . . . . . . . . . . . . . . . . . . 386
Color Wheel Adjustments. . . . . . . . . . . . . . . . . . . . . . . . . . . . . . . . . . . . . . . . . . 388
White Balance Adjustments . . . . . . . . . . . . . . . . . . . . . . . . . . . . . . . . . . . . . . . . 390
Correcting Colors with the Color Picker . . . . . . . . . . . . . . . . . . . . . . . . . . . . . 394
Monotone Filter Adjustments . . . . . . . . . . . . . . . . . . . . . . . . . . . . . . . . . . . . . . 396
Apply Video Filters . . . . . . . . . . . . . . . . . . . . . . . . . . . . . . . . . . . . . . . . . . . . . . . . . 398
Apply Audio Filters . . . . . . . . . . . . . . . . . . . . . . . . . . . . . . . . . . . . . . . . . . . . . . . . 399
Adding Effects Between Clips. . . . . . . . . . . . . . . . . . . . . . . . . . . . . . . . . . . . . . . . . . 399
Clip Margin . . . . . . . . . . . . . . . . . . . . . . . . . . . . . . . . . . . . . . . . . . . . . . . . . . . . . . . 400
Clip Transitions . . . . . . . . . . . . . . . . . . . . . . . . . . . . . . . . . . . . . . . . . . . . . . . . . . . . 400
Track Transitions . . . . . . . . . . . . . . . . . . . . . . . . . . . . . . . . . . . . . . . . . . . . . . . . . . . 402
Audio Cross Fades . . . . . . . . . . . . . . . . . . . . . . . . . . . . . . . . . . . . . . . . . . . . . . . . . 403
Apply Default Effects . . . . . . . . . . . . . . . . . . . . . . . . . . . . . . . . . . . . . . . . . . . . . . . 404
Changing Default Effects . . . . . . . . . . . . . . . . . . . . . . . . . . . . . . . . . . . . . . . . . . . . 405
Changing the Length of a Transition or Cross Fade . . . . . . . . . . . . . . . . . . . . . 407
Changing Default Effect Duration . . . . . . . . . . . . . . . . . . . . . . . . . . . . . . . . . . . . 408
Creating Video Composites. . . . . . . . . . . . . . . . . . . . . . . . . . . . . . . . . . . . . . . . . . . . 409
Composition . . . . . . . . . . . . . . . . . . . . . . . . . . . . . . . . . . . . . . . . . . . . . . . . . . . . . . . 410
Picture in Picture . . . . . . . . . . . . . . . . . . . . . . . . . . . . . . . . . . . . . . . . . . . . . . . . . . . 411
Configuring Picture in Picture Effects . . . . . . . . . . . . . . . . . . . . . . . . . . . . . . . 412
Adding Motion to the Overlay Window . . . . . . . . . . . . . . . . . . . . . . . . . . . . . 416
Keyers . . . . . . . . . . . . . . . . . . . . . . . . . . . . . . . . . . . . . . . . . . . . . . . . . . . . . . . . . . . . 419
Chroma Key . . . . . . . . . . . . . . . . . . . . . . . . . . . . . . . . . . . . . . . . . . . . . . . . . . . . . 419
Configuring Chroma Key Effects . . . . . . . . . . . . . . . . . . . . . . . . . . . . . . . . . . . 420
Luminance Key. . . . . . . . . . . . . . . . . . . . . . . . . . . . . . . . . . . . . . . . . . . . . . . . . . . 427
Configuring Luminance Key Effects. . . . . . . . . . . . . . . . . . . . . . . . . . . . . . . . . 428
Transparency Adjustments . . . . . . . . . . . . . . . . . . . . . . . . . . . . . . . . . . . . . . . . . . 433
Fade-In/Fade-Out Effects . . . . . . . . . . . . . . . . . . . . . . . . . . . . . . . . . . . . . . . . . . . 435
Apply Fade-In/Fade-out to Audio or Video Only . . . . . . . . . . . . . . . . . . . . . 437
Alpha Channel . . . . . . . . . . . . . . . . . . . . . . . . . . . . . . . . . . . . . . . . . . . . . . . . . . . . . 437
Title Mixer Effects . . . . . . . . . . . . . . . . . . . . . . . . . . . . . . . . . . . . . . . . . . . . . . . . . . 442
Effect Operations. . . . . . . . . . . . . . . . . . . . . . . . . . . . . . . . . . . . . . . . . . . . . . . . . . . . . 443
Show/Hide the Information Palette. . . . . . . . . . . . . . . . . . . . . . . . . . . . . . . . . . . 443
Information Palette . . . . . . . . . . . . . . . . . . . . . . . . . . . . . . . . . . . . . . . . . . . . . . . . . 443
Verifying and Adjusting Effects . . . . . . . . . . . . . . . . . . . . . . . . . . . . . . . . . . . . . . 445
Enabling/Disabling Effects . . . . . . . . . . . . . . . . . . . . . . . . . . . . . . . . . . . . . . . . . . 446
Deleting Effects . . . . . . . . . . . . . . . . . . . . . . . . . . . . . . . . . . . . . . . . . . . . . . . . . . . . 447
Deleting Effects from the Timeline . . . . . . . . . . . . . . . . . . . . . . . . . . . . . . . . . . 447
Deleting Effects from the Information Palette . . . . . . . . . . . . . . . . . . . . . . . . . 448
Copy Effects . . . . . . . . . . . . . . . . . . . . . . . . . . . . . . . . . . . . . . . . . . . . . . . . . . . . . . . 449
Copy Transitions . . . . . . . . . . . . . . . . . . . . . . . . . . . . . . . . . . . . . . . . . . . . . . . . . . . 449
Replacing Effects . . . . . . . . . . . . . . . . . . . . . . . . . . . . . . . . . . . . . . . . . . . . . . . . . . . 451
Saving Effects . . . . . . . . . . . . . . . . . . . . . . . . . . . . . . . . . . . . . . . . . . . . . . . . . . . . . . 452
Deleting Effects from the Effect Palette . . . . . . . . . . . . . . . . . . . . . . . . . . . . . . . .
Customizing the Effect Palette . . . . . . . . . . . . . . . . . . . . . . . . . . . . . . . . . . . . . . . . . 454
Creating Folders in the Effects Palette . . . . . . . . . . . . . . . . . . . . . . . . . . . . . . . . . 454
Renaming Effects and Folders . . . . . . . . . . . . . . . . . . . . . . . . . . . . . . . . . . . . . . . . 454
Lock/Unlock the Folder Structure . . . . . . . . . . . . . . . . . . . . . . . . . . . . . . . . . . . . 455
Changing the Folder Structure . . . . . . . . . . . . . . . . . . . . . . . . . . . . . . . . . . . . . . . 456
453
Contents
EDIUS Neo — User Reference Guide 13
Page 14

Contents
Folder Shortcuts . . . . . . . . . . . . . . . . . . . . . . . . . . . . . . . . . . . . . . . . . . . . . . . . . . . 457
Shortcut Assignments with Drag and Drop . . . . . . . . . . . . . . . . . . . . . . . . . . 457
Shortcut Assignments in the Effect View . . . . . . . . . . . . . . . . . . . . . . . . . . . . 458
Deleting a Folder Shortcut. . . . . . . . . . . . . . . . . . . . . . . . . . . . . . . . . . . . . . . . . . . 459
Resetting Effect Palette to Defaults . . . . . . . . . . . . . . . . . . . . . . . . . . . . . . . . . . . 459
Export User Preset Effects . . . . . . . . . . . . . . . . . . . . . . . . . . . . . . . . . . . . . . . . . . . 460
Import User Preset Effects. . . . . . . . . . . . . . . . . . . . . . . . . . . . . . . . . . . . . . . . . . . 461
Titles . . . . . . . . . . . . . . . . . . . . . . . . . . . . . . . . . . . . . . . . . . . . . . . . . . . . . . . . . . . . . . . 462
QuickTitler. . . . . . . . . . . . . . . . . . . . . . . . . . . . . . . . . . . . . . . . . . . . . . . . . . . . . . . . 462
QuickTitler Application Details . . . . . . . . . . . . . . . . . . . . . . . . . . . . . . . . . . . . 464
Entering Text . . . . . . . . . . . . . . . . . . . . . . . . . . . . . . . . . . . . . . . . . . . . . . . . . . . . . . 466
Changing Text Settings . . . . . . . . . . . . . . . . . . . . . . . . . . . . . . . . . . . . . . . . . . . . . 468
Changing Text Size . . . . . . . . . . . . . . . . . . . . . . . . . . . . . . . . . . . . . . . . . . . . . . . 469
Moving Text. . . . . . . . . . . . . . . . . . . . . . . . . . . . . . . . . . . . . . . . . . . . . . . . . . . . . 470
Rotating Text . . . . . . . . . . . . . . . . . . . . . . . . . . . . . . . . . . . . . . . . . . . . . . . . . . . . 470
Changing Text Color . . . . . . . . . . . . . . . . . . . . . . . . . . . . . . . . . . . . . . . . . . . . . . . 471
Applying Transparency to Text . . . . . . . . . . . . . . . . . . . . . . . . . . . . . . . . . . . . . . 472
Applying Color Gradations. . . . . . . . . . . . . . . . . . . . . . . . . . . . . . . . . . . . . . . . . . 473
Applying Texture to a Text Object. . . . . . . . . . . . . . . . . . . . . . . . . . . . . . . . . . . . 475
Adding a Text Border (Edge) . . . . . . . . . . . . . . . . . . . . . . . . . . . . . . . . . . . . . . . . 476
Adding Shadows to Text . . . . . . . . . . . . . . . . . . . . . . . . . . . . . . . . . . . . . . . . . . . . 478
Rolling or Crawling Text . . . . . . . . . . . . . . . . . . . . . . . . . . . . . . . . . . . . . . . . . . . . 480
Adjusting Roll or Crawl Speed . . . . . . . . . . . . . . . . . . . . . . . . . . . . . . . . . . . . . 482
Embossing Text. . . . . . . . . . . . . . . . . . . . . . . . . . . . . . . . . . . . . . . . . . . . . . . . . . . . 482
Blur Text. . . . . . . . . . . . . . . . . . . . . . . . . . . . . . . . . . . . . . . . . . . . . . . . . . . . . . . . . . 483
Text Styles . . . . . . . . . . . . . . . . . . . . . . . . . . . . . . . . . . . . . . . . . . . . . . . . . . . . . . . . 484
Applying Text Styles. . . . . . . . . . . . . . . . . . . . . . . . . . . . . . . . . . . . . . . . . . . . . . 484
Saving Text Styles . . . . . . . . . . . . . . . . . . . . . . . . . . . . . . . . . . . . . . . . . . . . . . . . 485
Changing Text Style Names . . . . . . . . . . . . . . . . . . . . . . . . . . . . . . . . . . . . . . . 485
Deleting Text Styles . . . . . . . . . . . . . . . . . . . . . . . . . . . . . . . . . . . . . . . . . . . . . . 486
Image and Graphic Styles . . . . . . . . . . . . . . . . . . . . . . . . . . . . . . . . . . . . . . . . . . . 486
Creating Images and Graphics . . . . . . . . . . . . . . . . . . . . . . . . . . . . . . . . . . . . . 486
Changing Image or Graphic Settings. . . . . . . . . . . . . . . . . . . . . . . . . . . . . . . . . . 488
Changing the Image or Graphic Object Size. . . . . . . . . . . . . . . . . . . . . . . . . . 489
Moving Graphic Objects . . . . . . . . . . . . . . . . . . . . . . . . . . . . . . . . . . . . . . . . . . 489
Rotating Graphic Objects . . . . . . . . . . . . . . . . . . . . . . . . . . . . . . . . . . . . . . . . . . 490
Applying Transparency to Images and Graphics . . . . . . . . . . . . . . . . . . . . . . . 490
Adding a Border to Graphics . . . . . . . . . . . . . . . . . . . . . . . . . . . . . . . . . . . . . . . . 491
Applying Shadows . . . . . . . . . . . . . . . . . . . . . . . . . . . . . . . . . . . . . . . . . . . . . . . . . 493
Blur a Graphic or Image. . . . . . . . . . . . . . . . . . . . . . . . . . . . . . . . . . . . . . . . . . . . . 495
Changing Line Styles . . . . . . . . . . . . . . . . . . . . . . . . . . . . . . . . . . . . . . . . . . . . . . . 496
Embossing Graphics. . . . . . . . . . . . . . . . . . . . . . . . . . . . . . . . . . . . . . . . . . . . . . . . 497
Title Object Layout . . . . . . . . . . . . . . . . . . . . . . . . . . . . . . . . . . . . . . . . . . . . . . . . . 499
Order. . . . . . . . . . . . . . . . . . . . . . . . . . . . . . . . . . . . . . . . . . . . . . . . . . . . . . . . . . . 499
Align . . . . . . . . . . . . . . . . . . . . . . . . . . . . . . . . . . . . . . . . . . . . . . . . . . . . . . . . . . . 500
Same Space. . . . . . . . . . . . . . . . . . . . . . . . . . . . . . . . . . . . . . . . . . . . . . . . . . . . . . 501
Center in Screen. . . . . . . . . . . . . . . . . . . . . . . . . . . . . . . . . . . . . . . . . . . . . . . . . . 503
Title Mixer Effects. . . . . . . . . . . . . . . . . . . . . . . . . . . . . . . . . . . . . . . . . . . . . . . . . . 503
Adjusting Title Position . . . . . . . . . . . . . . . . . . . . . . . . . . . . . . . . . . . . . . . . . . . . . 504
Editing a Linked Title Clip . . . . . . . . . . . . . . . . . . . . . . . . . . . . . . . . . . . . . . . . . .
Importing Background Files . . . . . . . . . . . . . . . . . . . . . . . . . . . . . . . . . . . . . . . . . 508
Exporting Title as a Still Image. . . . . . . . . . . . . . . . . . . . . . . . . . . . . . . . . . . . . . . 510
508
14 EDIUS Neo — User Reference Guide
Page 15

Section 7 — Audio Operations. . . . . . . . . . . . . . . . . . . . . . . . . . . . . . . . . . . . . . . . . 511
Adjusting Volume and Pan . . . . . . . . . . . . . . . . . . . . . . . . . . . . . . . . . . . . . . . . . . . . 511
Additional Rubberband Adjustments . . . . . . . . . . . . . . . . . . . . . . . . . . . . . . . . . 513
To delete a point from the rubber band, right-click on the point and select Add/Delete from
the menu. . . . . . . . . . . . . . . . . . . . . . . . . . . . . . . . . . . . . . . . . . . . . . . . . . . . . . . . . . . . 513
Entering Value Adjustments . . . . . . . . . . . . . . . . . . . . . . . . . . . . . . . . . . . . . . . . . . . 513
Resetting the Pan Rubber Band. . . . . . . . . . . . . . . . . . . . . . . . . . . . . . . . . . . . . . . . . 515
Deleting or Initializing Rubber Band Points . . . . . . . . . . . . . . . . . . . . . . . . . . . . . . 515
Initializing the Rubber Band . . . . . . . . . . . . . . . . . . . . . . . . . . . . . . . . . . . . . . . . . 515
Delete Selected Rubber Band Points. . . . . . . . . . . . . . . . . . . . . . . . . . . . . . . . . . . 516
Applying V-Mute . . . . . . . . . . . . . . . . . . . . . . . . . . . . . . . . . . . . . . . . . . . . . . . . . . 517
Adding Voice Overs and Sound Effects . . . . . . . . . . . . . . . . . . . . . . . . . . . . . . . . . 519
Section 8 — Exporting/Project Output. . . . . . . . . . . . . . . . . . . . . . . . . . . . . . . . . 523
Exporting in Various File Formats . . . . . . . . . . . . . . . . . . . . . . . . . . . . . . . . . . . . . . 523
Export Settings . . . . . . . . . . . . . . . . . . . . . . . . . . . . . . . . . . . . . . . . . . . . . . . . . . . . . 523
Using Exporter . . . . . . . . . . . . . . . . . . . . . . . . . . . . . . . . . . . . . . . . . . . . . . . . . . . . . 523
Advanced Exporter Settings. . . . . . . . . . . . . . . . . . . . . . . . . . . . . . . . . . . . . . . . 528
Other Exporter Functions. . . . . . . . . . . . . . . . . . . . . . . . . . . . . . . . . . . . . . . . . . . . 531
Save Preset As Default . . . . . . . . . . . . . . . . . . . . . . . . . . . . . . . . . . . . . . . . . . . . 532
Save Preset . . . . . . . . . . . . . . . . . . . . . . . . . . . . . . . . . . . . . . . . . . . . . . . . . . . . . . 533
Delete Preset . . . . . . . . . . . . . . . . . . . . . . . . . . . . . . . . . . . . . . . . . . . . . . . . . . . . . 535
Export Preset. . . . . . . . . . . . . . . . . . . . . . . . . . . . . . . . . . . . . . . . . . . . . . . . . . . . . 535
Import Preset . . . . . . . . . . . . . . . . . . . . . . . . . . . . . . . . . . . . . . . . . . . . . . . . . . . . 536
Export to DVD or Blu Ray . . . . . . . . . . . . . . . . . . . . . . . . . . . . . . . . . . . . . . . . . . . 536
Export Still Images . . . . . . . . . . . . . . . . . . . . . . . . . . . . . . . . . . . . . . . . . . . . . . . . . 551
Export to Tape . . . . . . . . . . . . . . . . . . . . . . . . . . . . . . . . . . . . . . . . . . . . . . . . . . . . . 553
Output to HDV (Generic HDV) Device . . . . . . . . . . . . . . . . . . . . . . . . . . . . . . 553
Output to DV (Generic OHCI) Device . . . . . . . . . . . . . . . . . . . . . . . . . . . . . . . 555
Export to Devices Not Controlled by Capture Settings. . . . . . . . . . . . . . . . . . . 558
Contents
Section A — Hardware Settings . . . . . . . . . . . . . . . . . . . . . . . . . . . . . . . . . . . . . . . 559
DirectShow Device Settings. . . . . . . . . . . . . . . . . . . . . . . . . . . . . . . . . . . . . . . . . . . . 559
Canopus HQ Codec Settings . . . . . . . . . . . . . . . . . . . . . . . . . . . . . . . . . . . . . . . . . 559
Device Settings. . . . . . . . . . . . . . . . . . . . . . . . . . . . . . . . . . . . . . . . . . . . . . . . . . . . . 561
Generic HDV Settings. . . . . . . . . . . . . . . . . . . . . . . . . . . . . . . . . . . . . . . . . . . . . . . . . 563
Canopus HQ Codec Settings . . . . . . . . . . . . . . . . . . . . . . . . . . . . . . . . . . . . . . . . . 563
Video Overlay Settings . . . . . . . . . . . . . . . . . . . . . . . . . . . . . . . . . . . . . . . . . . . . . . 563
Generic OHCI Settings . . . . . . . . . . . . . . . . . . . . . . . . . . . . . . . . . . . . . . . . . . . . . . . . 565
System/Output Settings. . . . . . . . . . . . . . . . . . . . . . . . . . . . . . . . . . . . . . . . . . . . . 565
DV Device Settings . . . . . . . . . . . . . . . . . . . . . . . . . . . . . . . . . . . . . . . . . . . . . . . . . 567
Video Overlay Settings . . . . . . . . . . . . . . . . . . . . . . . . . . . . . . . . . . . . . . . . . . . . . . 568
EDIUS Neo HDSPARK (HSX) Settings . . . . . . . . . . . . . . . . . . . . . . . . . . . . . . . . . . 569
System/Output Settings. . . . . . . . . . . . . . . . . . . . . . . . . . . . . . . . . . . . . . . . . . . . . 569
Video Overlay Settings . . . . . . . . . . . . . . . . . . . . . . . . . . . . . . . . . . . . . . . . . . . . . . 570
Appendix B — Special Procedures . . . . . . . . . . . . . . . . . . . . . . . . . . . . . . . . . . . . 571
Keyframeable 2D Picture-in-Picture. . . . . . . . . . . . . . . . . . . . . . . . . . . . . . . . . . . . . 571
EDIUS Neo — User Reference Guide 15
Page 16

Contents
Appendix C — Input/Output Formats. . . . . . . . . . . . . . . . . . . . . . . . . . . . . . . . . . 583
Output Devices . . . . . . . . . . . . . . . . . . . . . . . . . . . . . . . . . . . . . . . . . . . . . . . . . . . . . . 583
Generic OHCI HD 60Hz . . . . . . . . . . . . . . . . . . . . . . . . . . . . . . . . . . . . . . . . . . . . 583
Generic OHCI HD 50Hz . . . . . . . . . . . . . . . . . . . . . . . . . . . . . . . . . . . . . . . . . . . . 583
Generic OHCI HD 24Hz . . . . . . . . . . . . . . . . . . . . . . . . . . . . . . . . . . . . . . . . . . . . 585
Generic OHCI SD NTSC . . . . . . . . . . . . . . . . . . . . . . . . . . . . . . . . . . . . . . . . . . . . 585
Generic OHCI SD PAL. . . . . . . . . . . . . . . . . . . . . . . . . . . . . . . . . . . . . . . . . . . . . . 586
Generic OHCI SD 24Hz . . . . . . . . . . . . . . . . . . . . . . . . . . . . . . . . . . . . . . . . . . . . . 586
Input Devices . . . . . . . . . . . . . . . . . . . . . . . . . . . . . . . . . . . . . . . . . . . . . . . . . . . . . . . 587
Generic OHCI Input . . . . . . . . . . . . . . . . . . . . . . . . . . . . . . . . . . . . . . . . . . . . . . . . 587
Generic HDV Input . . . . . . . . . . . . . . . . . . . . . . . . . . . . . . . . . . . . . . . . . . . . . . . . 587
File Formats Supported In Trimming Operations. . . . . . . . . . . . . . . . . . . . . . . . . 588
Default Keyboard Shortcuts . . . . . . . . . . . . . . . . . . . . . . . . . . . . . . . . . . . . . . . . . . . 590
Asset Bin Shortcuts. . . . . . . . . . . . . . . . . . . . . . . . . . . . . . . . . . . . . . . . . . . . . . . . . 590
Edit Shortcuts . . . . . . . . . . . . . . . . . . . . . . . . . . . . . . . . . . . . . . . . . . . . . . . . . . . . . 591
Edit - Delete Shortcuts . . . . . . . . . . . . . . . . . . . . . . . . . . . . . . . . . . . . . . . . . . . . . . 592
Edit - Select Shortcuts. . . . . . . . . . . . . . . . . . . . . . . . . . . . . . . . . . . . . . . . . . . . . . . 592
Edit - Move Shortcuts. . . . . . . . . . . . . . . . . . . . . . . . . . . . . . . . . . . . . . . . . . . . . . . 593
. . . . . . . . . . . . . . . . . . . . . . . . . . . . . . . . . . . . . . . . . . . . . . . . . . . . . . . . . . . . . . . . . . 593
View Shortcuts . . . . . . . . . . . . . . . . . . . . . . . . . . . . . . . . . . . . . . . . . . . . . . . . . . . . 593
Play Shortcuts . . . . . . . . . . . . . . . . . . . . . . . . . . . . . . . . . . . . . . . . . . . . . . . . . . . . . 594
Marker Shortcuts . . . . . . . . . . . . . . . . . . . . . . . . . . . . . . . . . . . . . . . . . . . . . . . . . . 594
Mode Shortcuts . . . . . . . . . . . . . . . . . . . . . . . . . . . . . . . . . . . . . . . . . . . . . . . . . . . . 595
Index. . . . . . . . . . . . . . . . . . . . . . . . . . . . . . . . . . . . . . . . . . . . . . . . . . . . . . . . . . . . . . . . . . . . . 597
16 EDIUS Neo — User Reference Guide
Page 17

Preface
About This Manual
This User Reference Guide contains detailed information concerning
EDIUS Neo tools, features and functions used in creating and managing
project workflows.
For information about the installation of EDIUS Neo and importing custom
data from prior versions of EDIUS Neo, see the Quick Start Guide.
Minimum System Requirements
• Intel® or AMD® CPU 3.0 GHz or faster (multiple CPUs or multi-core
CPUs are recommended; SSE2 and SSE3 instruction sets supported).
• 1 GB RAM (2 GB or more recommended)
• 800MB or more free disk space for the software installation.
• DVD-ROM Drive for software installation.
• DVD-R/RW or DVD+R/RW drive required when creating DVD video
with Burn to Disc
• Blu-Ray BD-R/BD-RE drive required when creating Blu-Ray disc with
Burn to Disc
• DirectX 9.0 or later
• Graphics card supporting Direct3D 9.0c or later and support for PixelShader Model 3.0 is required.
• For SD editing: 128 MB RAM or larger required; 256 MB or larger
recommended.
• For HD editing: 256 MB RAM or larger required; 512 MB or larger
recommended.
• ATA 100/7200 rpm or faster hard drive is necessary for video storage.
• Available hard drive space should be twice the size of file to be
edited.
• RAID 0 recommended for HD editing.
• Soundcard with WDM driver support is required.
EDIUS Neo — User Reference Guide 17
Page 18

Preface
DVD Contents
• Supported operating systems:
• Windows® XP Home or Windows XP Professional (Service Pack 2
or later, 32-bit)
• Windows® Vista ( SP1 or later, 32-bit or 64-bit) including the following:
• Windows® Vista Home Basic
• Windows® Vista Home Premium
• Windows® Vista Business
• Windows® Vista Ultimate
Note External video deck or camera may require either a free IEEE 1394 FireWire
port or USB 2.0 port for connectivity.
•EDIUS Neo software
• EDIUS Neo Installation Guide (PDF)
• User Reference Guide (PDF)
• AVCHD Converter
• Hardware Drivers
18 EDIUS Neo — User Reference Guide
Page 19

Getting Started
This section contains the basic information needed for working with
EDIUS Neo such as numeric data input, starting EDIUS Neo, creating user
profiles and projects presets, and, screen layout and customization.
Topics dealing with the use of EDIUS Neo tools, features and functions (e.g.
application settings, capturing clips, Timeline editing, titles and effects,
audio operation and exporting projects) used in creating projects are
covered in other sections of this manual.
Note All keyboard shortcut keys referenced in any part of this manual are the
default shortcuts. Keyboard shortcuts may be customized. In this case, some
or all of the shortcuts referenced in this manual may not reflect the shortcuts
defined on your system. For a comprehensive listing of default keyboard
shortcuts, see Appendix C-Input/Output Formats.
Section 1
Starting EDIUS Neo
To start the EDIUS Neo application, do one of the following:
1. Double-click the EDIUS Neo icon (illustrated in Figure 1) on the
desktop.
Figure 1. EDIUS Neo Application Icon
2. Select Start>All Programs>Canopus>EDIUS Neo 2 from the Windows
desktop.
When EDIUS Neo is started the first time after installation, some startup
screens may appear. These startup screens vary depending upon the instal
lation status. If EDIUS Neo was installed for the first time (i.e. the installation was not an upgrade of a prior EDIUS Neo version), more information
is gathered. For an upgrade installation, most settings from the prior
version are retained and fewer startup screens will appear.
-
EDIUS Neo — User Reference Guide 19
Page 20

Section 1 — Getting Started
Select Project Folder Location
When EDIUS Neo is started for the first time after a new installation (not
an upgrade from a prior version), the dialog box in
Figure 2. EDIUS Neo Project Folder Location Dialog
Figure 2 will appear.
To select a folder in which to store EDIUS Neo projects, do the following:
1. Click the Browse button.
2. Navigate to the drive on which the desired folder is located or will be
created (see Figure 3).
Figure 3. Browse to Project Folder Location
3. If the desired folder already exists on the selected drive, select the
desired folder and click the
OK button (see Figure 4).
20 EDIUS Neo — User Reference Guide
Page 21
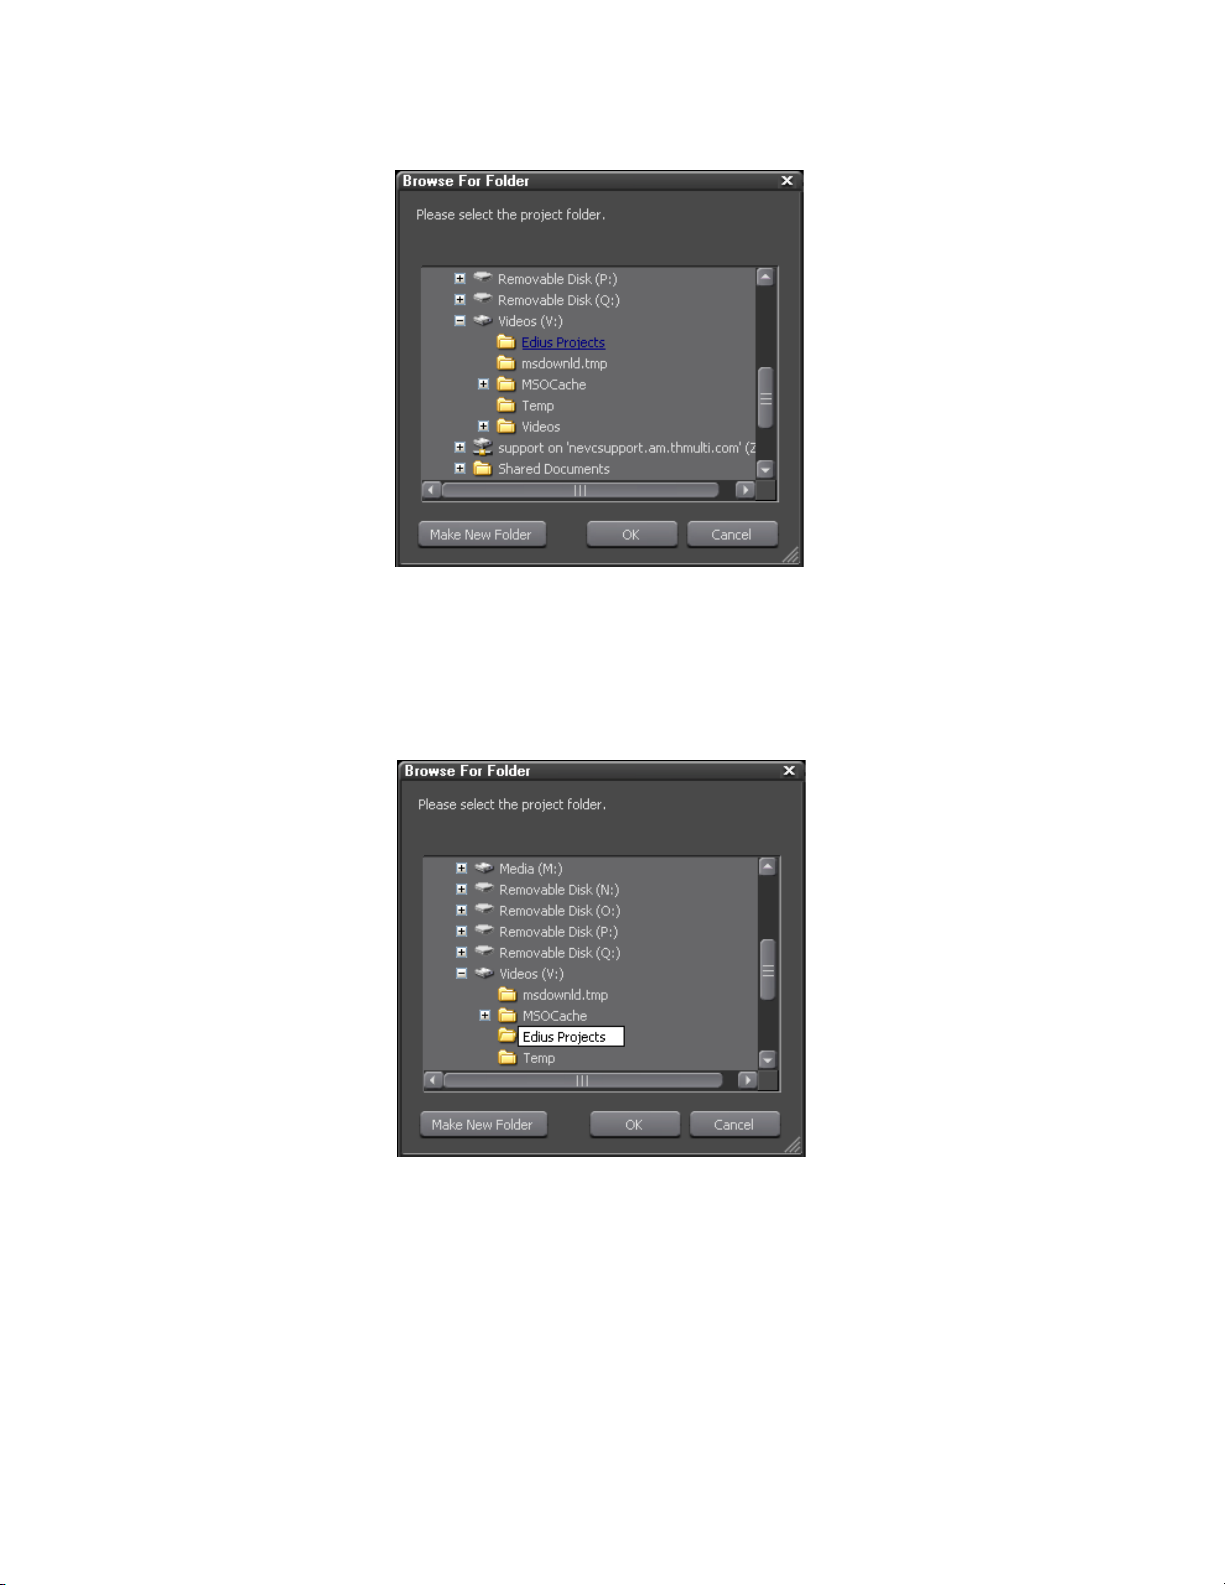
Starting EDIUS Neo
Figure 4. Select Project Folder
4. If the desired folder does not exist on the selected drive, Click the Make
New Folder
button, enter the desired folder name and click on the OK
button (see Figure 5).
Figure 5. Make New Project Folder
The dialog box in Figure 6 appears indicating the selected project folder.
EDIUS Neo — User Reference Guide 21
Page 22
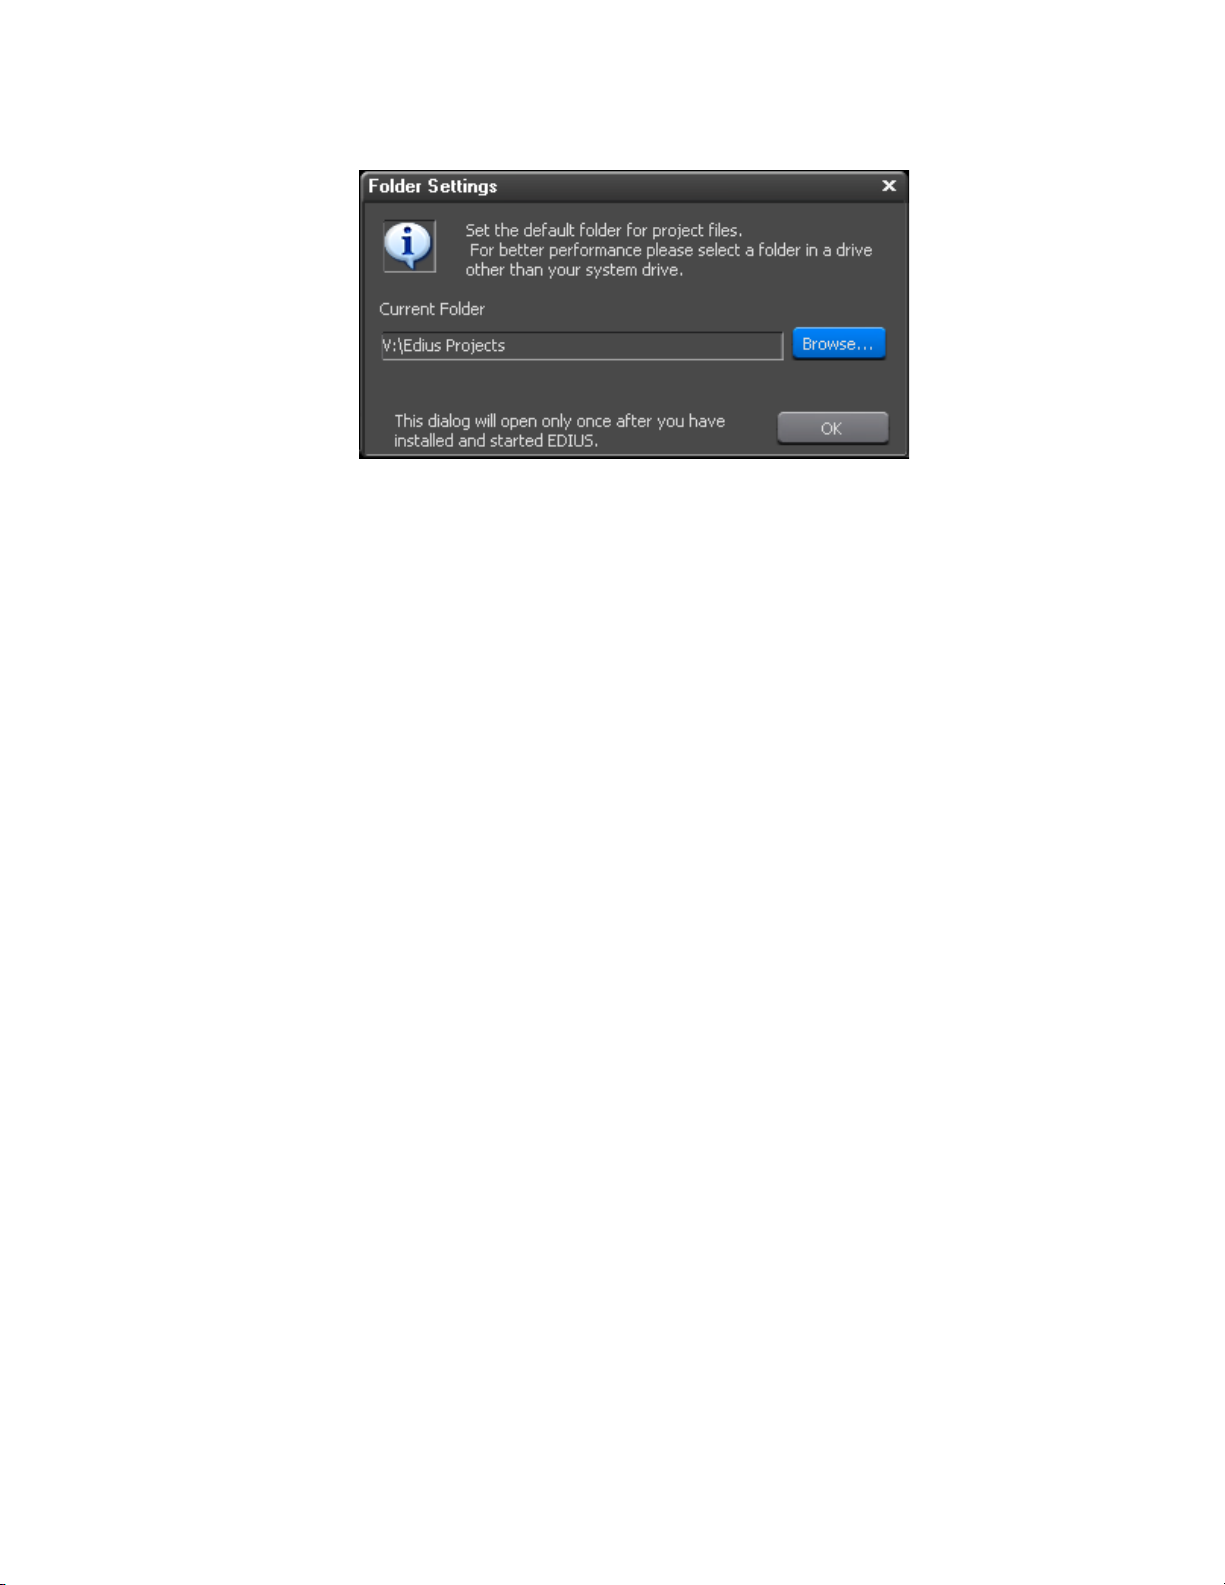
Section 1 — Getting Started
Figure 6. Project Folder Default Location
5. Click OK to set the current folder as the default folder for EDIUS Neo
project files.
Note As indicated in the dialog box, once the default folder selection is made, this
dialog box will not appear again when EDIUS Neo is launched.
Entering Numeric Data
Numeric data entry is possible or required in many application screens and
data input windows throughout EDIUS, including some startup screens.
This section explains the various methods of entering numeric data
There are four methods for entering numeric data into an input field These
methods are:
• Direct Input
•Offset Input
•Arrow Key Input
• Mouse Wheel Input
Some input fields are time codes or duration which may be comprised of
multiple number segments. The format of these fields is HH:MM:SS;FF
(H=hour, M=Minutes, S=Seconds and F=Frames). Other numeric input
field are single-segment numbers such as the number of video and audio
tracks. Except where noted below, these numeric input methods apply to
all numeric fields.
22 EDIUS Neo — User Reference Guide
Page 23

Direct Input
The direct input method requires entering the numeric values from the keyboard. To enter a numeric value with the direct input method do the following:
1. Select the desired input field.
2. To enter, for example, the value 25 minutes, 16 seconds and 15 frames
3. Press the [Enter] key.
Note When entering a number such as 1 hour and 15 minutes with no seconds and
Offset Input
Entering Numeric Data
use one of the following methods:
a. enter 25M16S15F
b. enter 251615
frames, enter either 1H10M or 01150000. 10 minutes is entered as either
10M or 100000. 2 hours is entered as either 2H or 02000000.
The offset input method is used to quickly increment or decrement an
existing timecode by a particular value.
Note Offset input is only available with timecode (multi-segment) values.
To enter a timecode offset, follow these steps:
1. Select the desired input field.
2. Enter the desired offset value.
A “+” before the value increments the timecode by the specified value.
A “-” before the value decrements the timecode by the specified value.
Note If the timecode value in a particular field is 00:05:35;20 (5 minutes, 35 sec-
3. Press the [Enter] key.
Arrow Key Input
With the arrow key input method, the arrow keys (K,L,I,J) are used to
enter or change numeric values.
onds, 20 frames), entering an offset value of +2510 will increment the timecode value to 00:06:01;00 (assuming a 30 frame per second video standard).
Entering an offset value of -2510 will decrement the timecode to 00:05:10;10.
To enter numbers using the arrow key input method, do the following:
1. Select the desired input field.
EDIUS Neo — User Reference Guide 23
Page 24

Section 1 — Getting Started
Mouse Wheel Input
2. Use the [K] key to increment the numeric value; use the [L] key to
decrement the numeric value; use the [I] key to move one number
segment to the left; use the [J] key to move one number segment to the
right.
3. Press the [Enter] key when input is finished.
The mouse wheel input method uses the mouse wheel or buttons to input
numeric data.
To enter numbers using the mouse, follow these steps:
1. Move the mouse cursor near the input field. The mouse cursor shape
changes to indicate that mouse wheel input mode is active.
2. Click the numeric value you wish to change whether it is part of a
multi-segment number or a single-segment value.
3. Rotate the mouse wheel up or down to increment or decrement the
selected value.
4. Press the [Enter] key when input is finished.
An alternate mouse input method uses the mouse buttons as follows:
• Hold down the right mouse button and drag the mouse upwards from
the initial mouse position until the number begins to increase. Once the
number begins to increase, it will continue to increase until the mouse
button is released.
• Hold down the right mouse button and drag the mouse downward to
decrease the data value. Once the number begins to decrease, it will
continue to decrease until the mouse button is released.
Note The number will not decrement below a value of zero (0).
• Hold down the left mouse button and drag the mouse upward to
increase the value. Only continued upward movement of the mouse
will increase the data value.
• Hold down the left mouse button and drag the mouse downward to
decrease the value. Only continued downward movement of the mouse
will decrease the data value.
Note The number will not decrement below a value of zero (0).
24 EDIUS Neo — User Reference Guide
Page 25

Start-Up Window
Each time EDIUS Neo is launched, the window shown in Figure 7 will
appear. When EDIUS Neo is started for the first time after a new installation (not an upgrade from a prior version), the Recent Project section will
be blank.
Figure 7. EDIUS Neo Start-up Window
Start-Up Window
The EDIUS Neo start-up window is composed of two main areas; Recent
Projects list and New Project presets.
Project Presets
Project presets make it possible to start a new project with predetermined
default settings. Settings which can be defined in project presets include the
following:
• Output Device
•Output Format
Multiple project presets may be created from which the appropriate selection is made when a new project is started.
Create a Project Preset
To create a project preset, do the following:
1. From the start-up window, click the New Preset button. The dialog box in
Figure 8 appears.
EDIUS Neo — User Reference Guide 25
Page 26
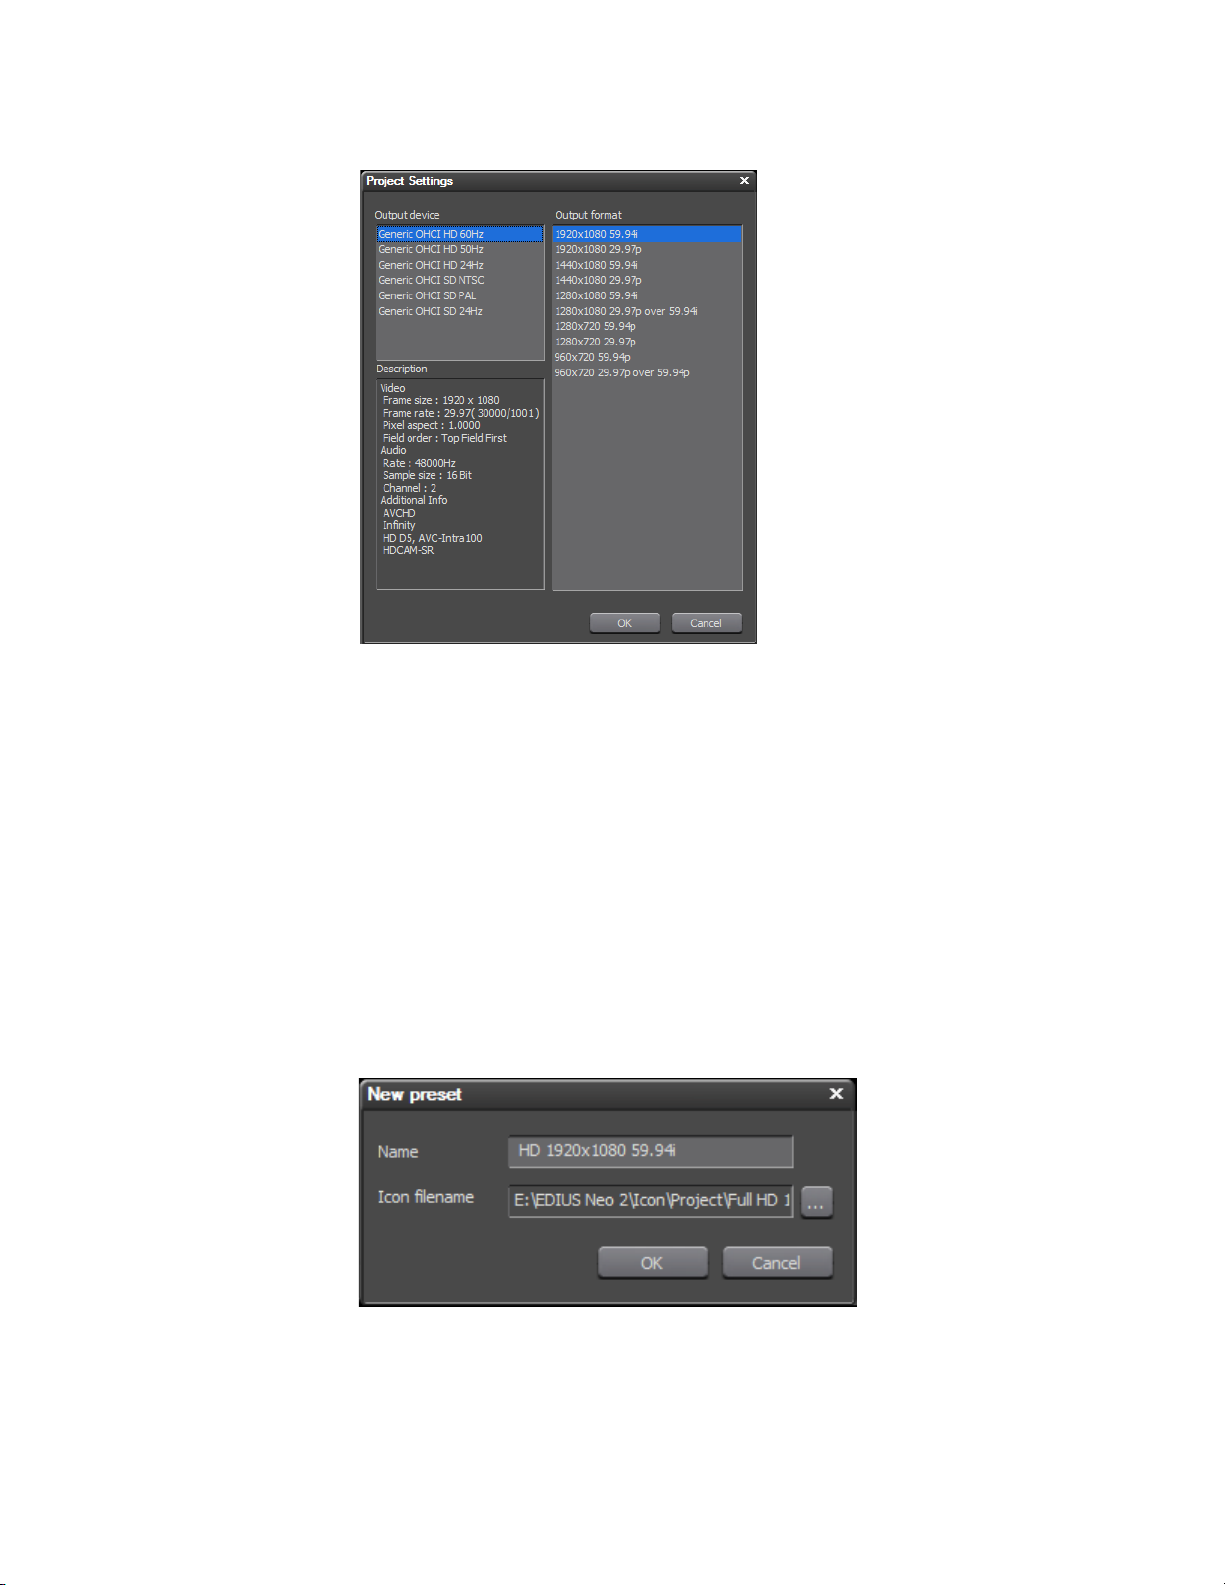
Section 1 — Getting Started
Figure 8. Project Preset Settings
2. From the list of available output devices, select the output device for the
project preset.
3. From the list of output formats, select the default output format for the
project preset
Note The Description section of the Project Settings dialog will contain details such
as frame size, frame rate, audio rate, sample size, channels, etc. based on the
output device and output format selections.
4. Click the OK button to close the Project Settings dialog box.
The project preset name dialog shown in Figure 9 appears.
Figure 9. New Project Preset
5. If you wish to accept the default project preset name and icon, proceed
to Step 9.
26 EDIUS Neo — User Reference Guide
Page 27
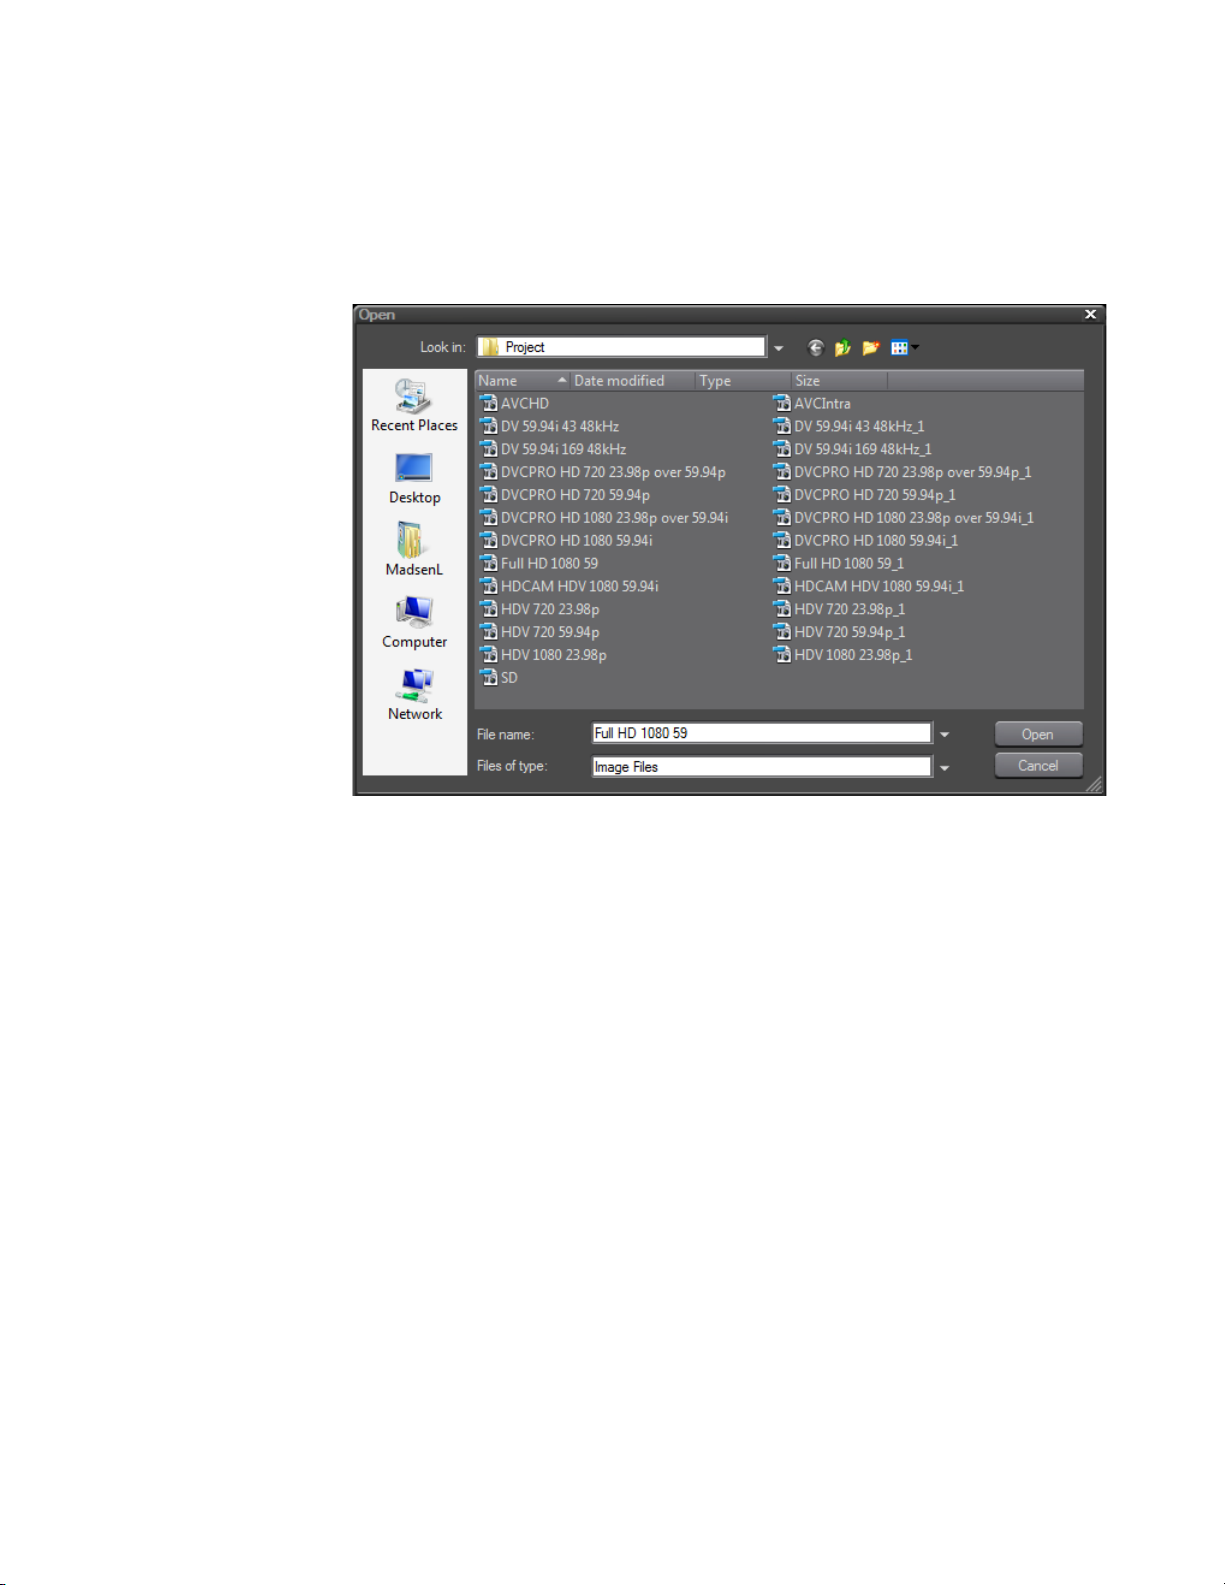
Start-Up Window
6. If you wish to change the name, enter a new name.
7. If you wish to select an icon other than the default icon, click the ...
button. The icon list shown in Figure 10 appears.
Figure 10. Project Preset Icon List
8. Select the desired icon name from the list and click the Open button.
9. Click the OK button to accept the project preset name and icon.
The EDIUS Neo start-up screen re-appears (see Figure 11) with the new
preset definition in the New Project window.
EDIUS Neo — User Reference Guide 27
Page 28
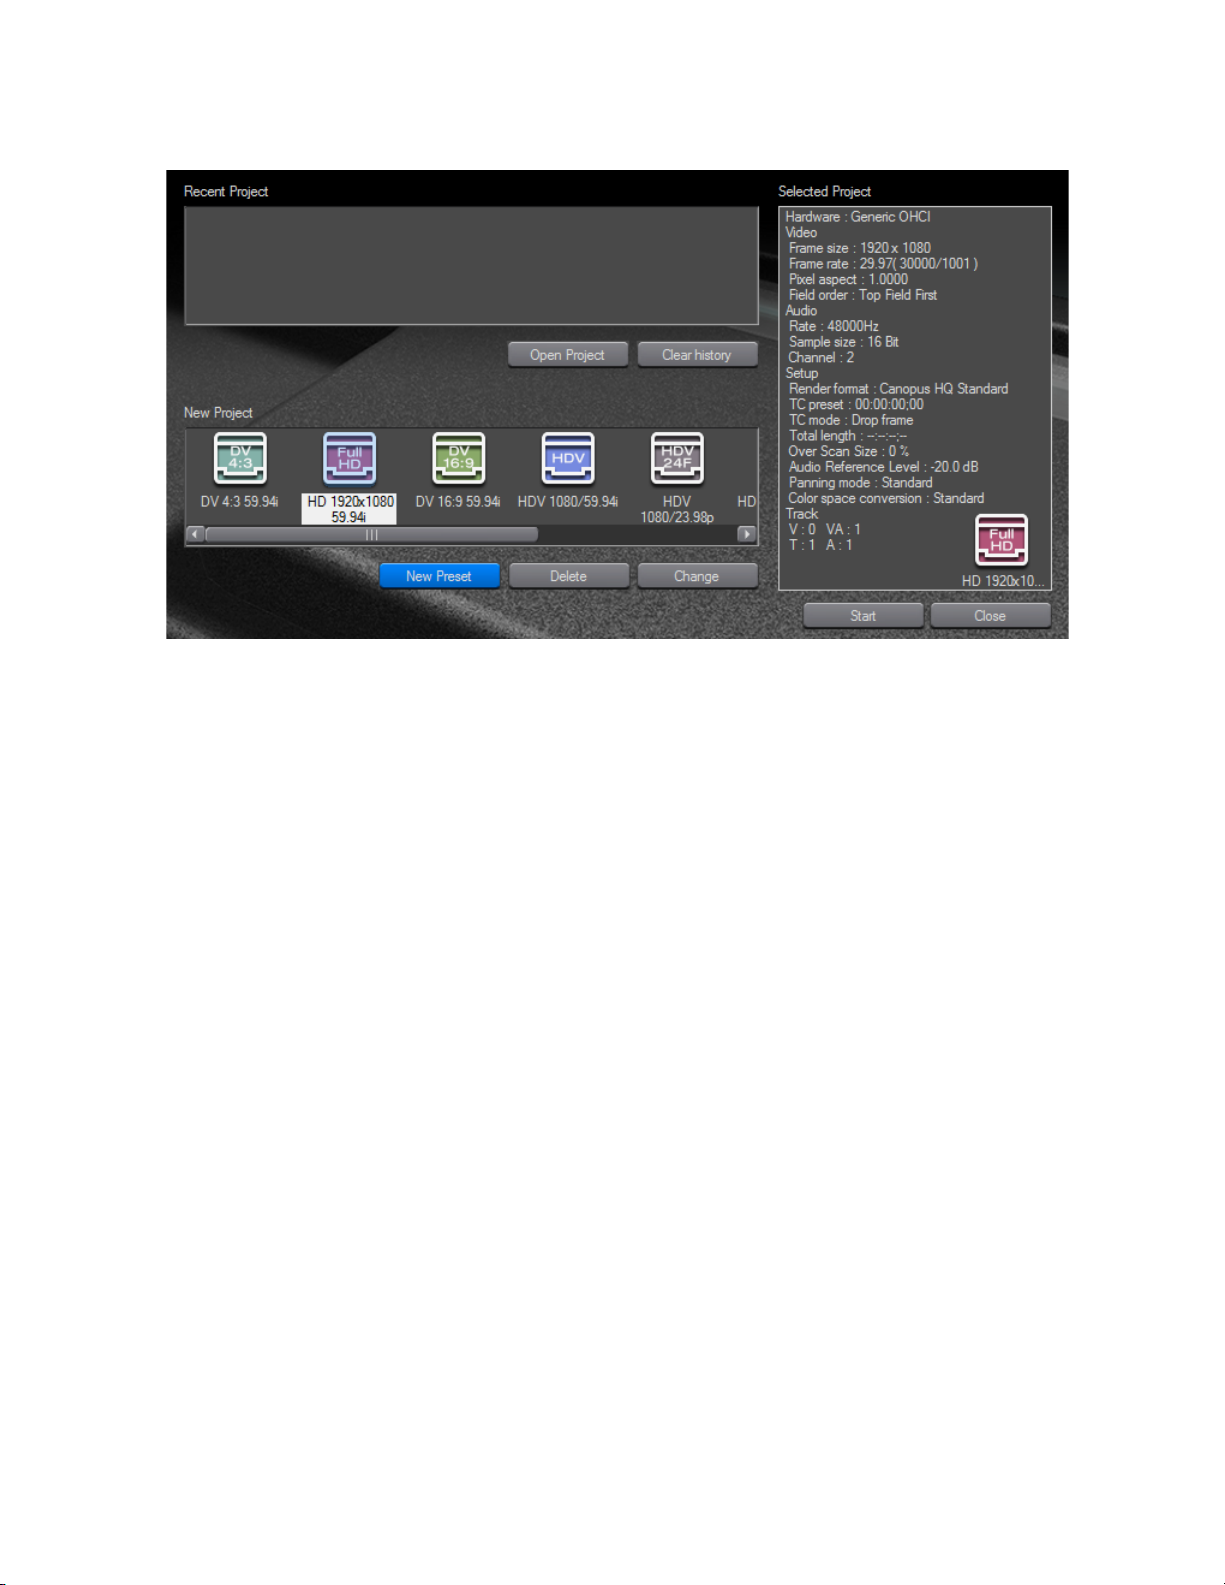
Section 1 — Getting Started
Figure 11. EDIUS Neo Start-up Screen with New Project Preset
10. Create additional project presets as needed by repeating the steps
above.
Create a New Project
EDIUS Neo projects can be created from project presets or from the current
project.
Create a New Project from a Project Preset on Startup
To create a new project using a project preset, do the following:
1. Double-click the desired project preset icon in the New Project area of
the EDIUS Neo start-up screen.
Note You may also single-click to select the desired preset icon and then click the
The Project name setting dialog shown in Figure 12 appears.
2. Enter the project name in the Project name field.
Start button in the lower right corner of the start-up screen.
28 EDIUS Neo — User Reference Guide
Page 29
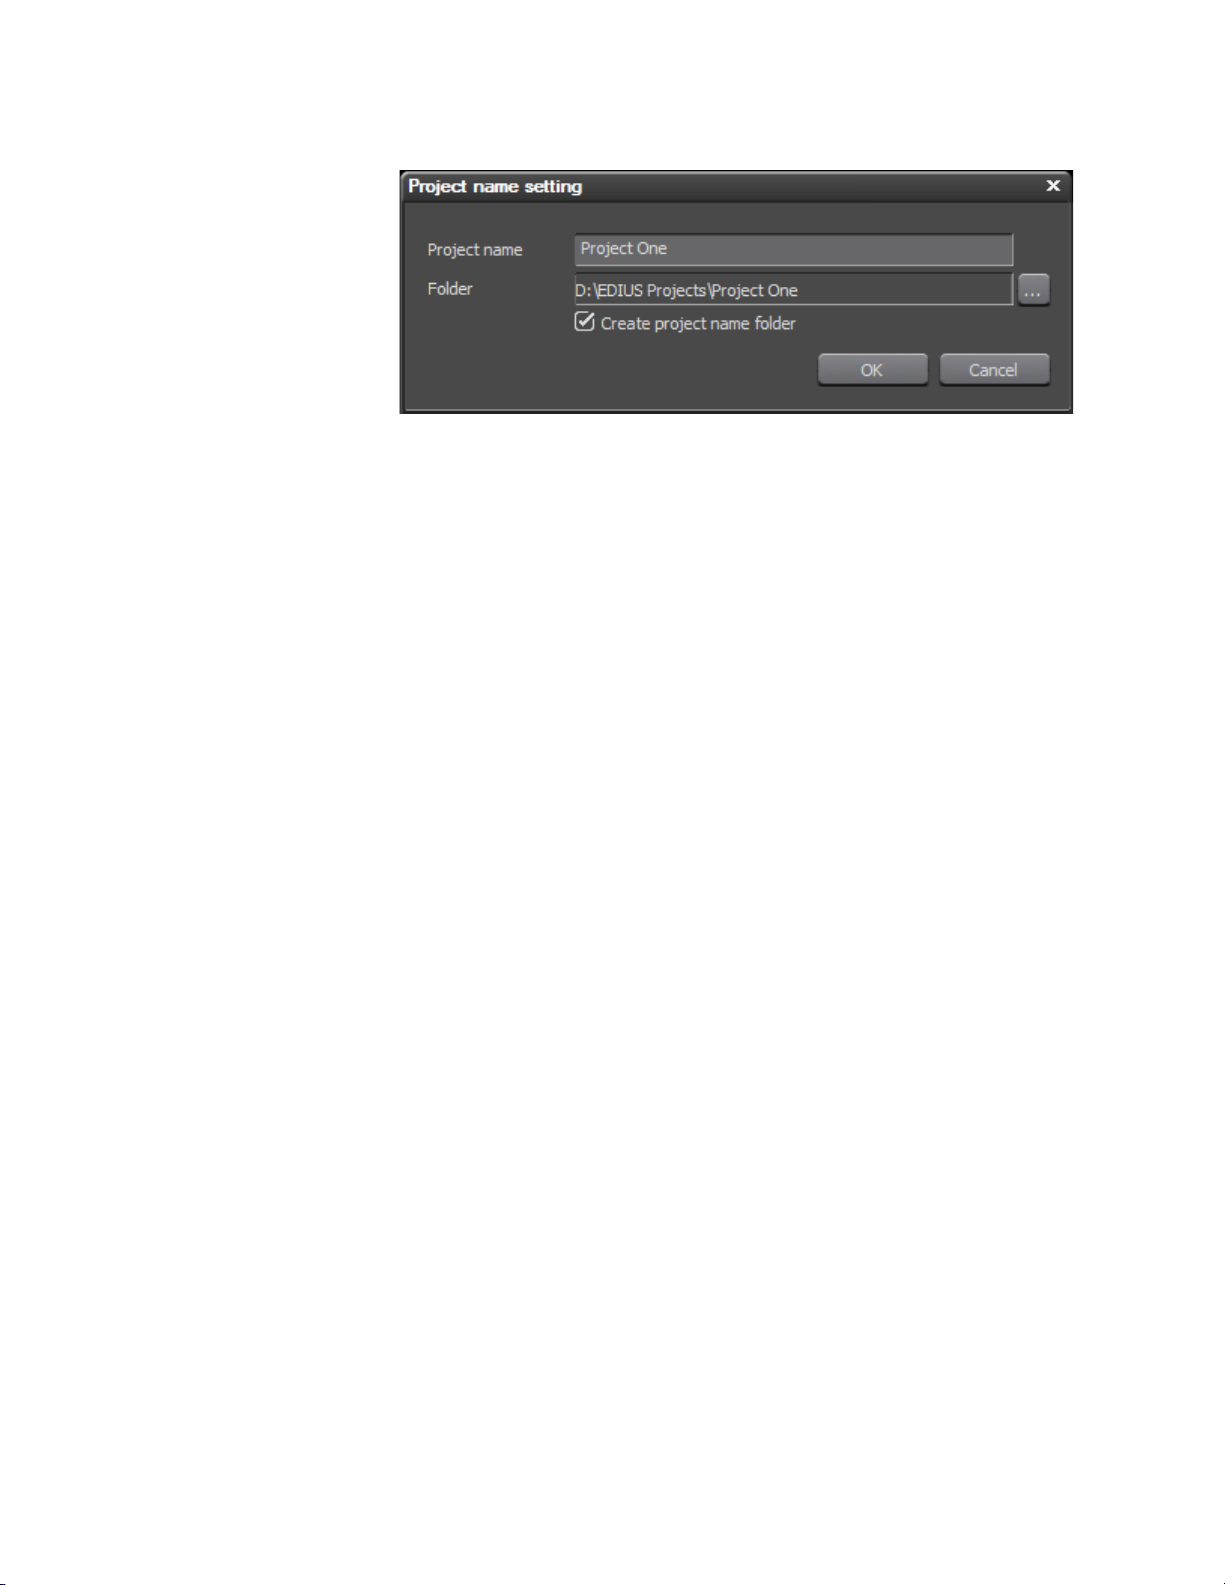
Start-Up Window
Figure 12. New Project Preset Name
Note The default project folder is the folder specified in Select Project Folder Loca-
tion on page 20.
3. Select the “Create project name folder” to create a folder with the same
name as the project in the selected project folder. The project file(s) will
be stored in this folder.
Note If the “Create project name folder” option is not selected, the project file(s)
will be stored in the selected folder location without creating a new folder with
the project name.
If you wish to specify a location for this project other than the default, click
... button and browse to the desired location. Click to OK button to select
the
the new folder.
4. Click OK to create the new project and open EDIUS Neo.
A blank project (no data in the Timeline, Recorder/Player, or Asset Bin
widows) appears as illustrated in Figure 13.
EDIUS Neo — User Reference Guide 29
Page 30
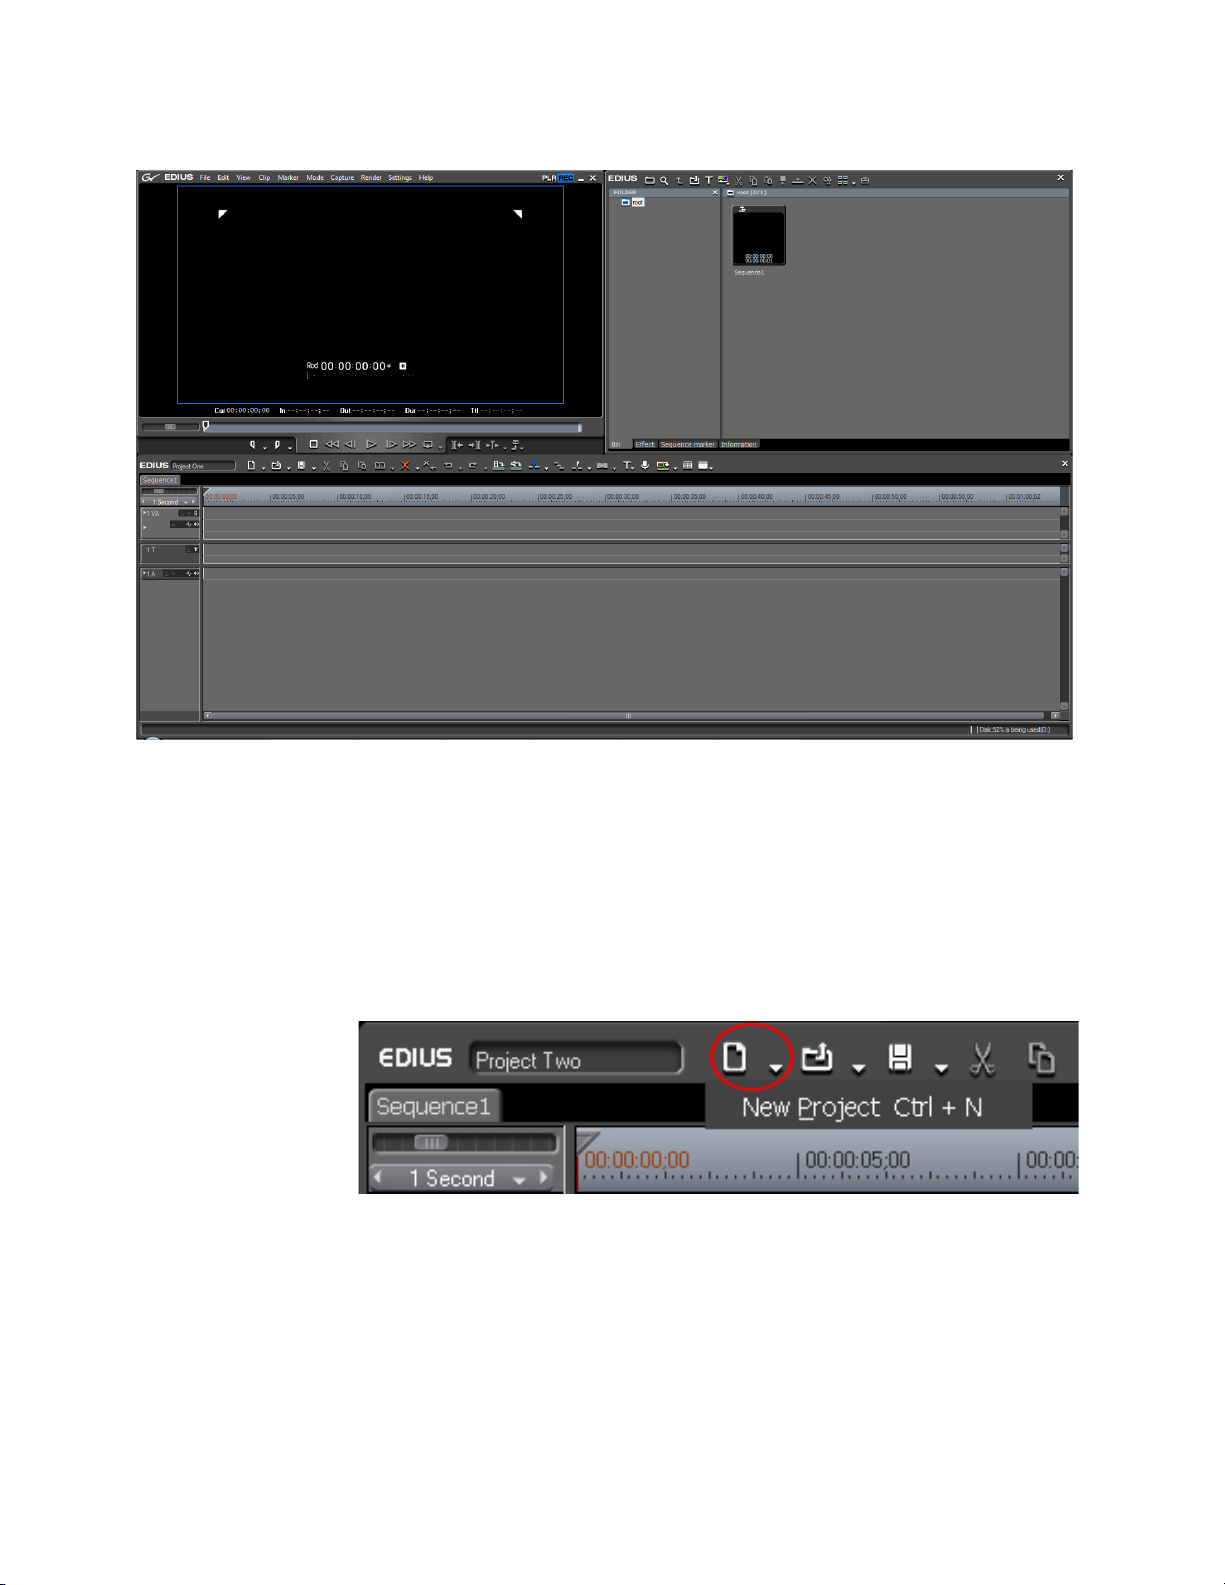
Section 1 — Getting Started
Figure 13. EDIUS Neo New Project
Create a New Project From the Current Project
A new project can be created from the current project in one of three ways.
• Select File>New>Project from the Preview Window
• Click the list button [V]on the
from the menu. See Figure 14.
Figure 14. Create New Project from New Sequence List Button
Note Clicking the New Sequence button, will result in the creation of a new
sequence in the current project. To create a new project, click on the list
button
[V] symbol. See Sequences on page 35 for more information on
sequences.
• Press [CTRL]+[N] on the keyboard
New Sequence Icon and select New Project
30 EDIUS Neo — User Reference Guide
Page 31

Start-Up Window
To create a new project from the current project, do the following:
1. Perform any of the three actions listed above to initiate the creation of a
new project.
After performing any of these actions, a dialog prompting to save the
current project file appears. See Figure 15.
Figure 15. Save Current Project Dialog
2. Click Yes to save the current project.
The Project settings dialog box shown in Figure 16 appears.
Figure 16. Project Settings Dialog
3. Enter a name for the project in the Project name field.
4. Select a project folder and the “Create project name folder” option if
desired.
5. Select the desired project preset and click the OK button.
Note If you wish to create a new project preset, click the New Preset button and
follow the instructions to Create a Project Preset on page 25.
EDIUS Neo — User Reference Guide 31
Page 32
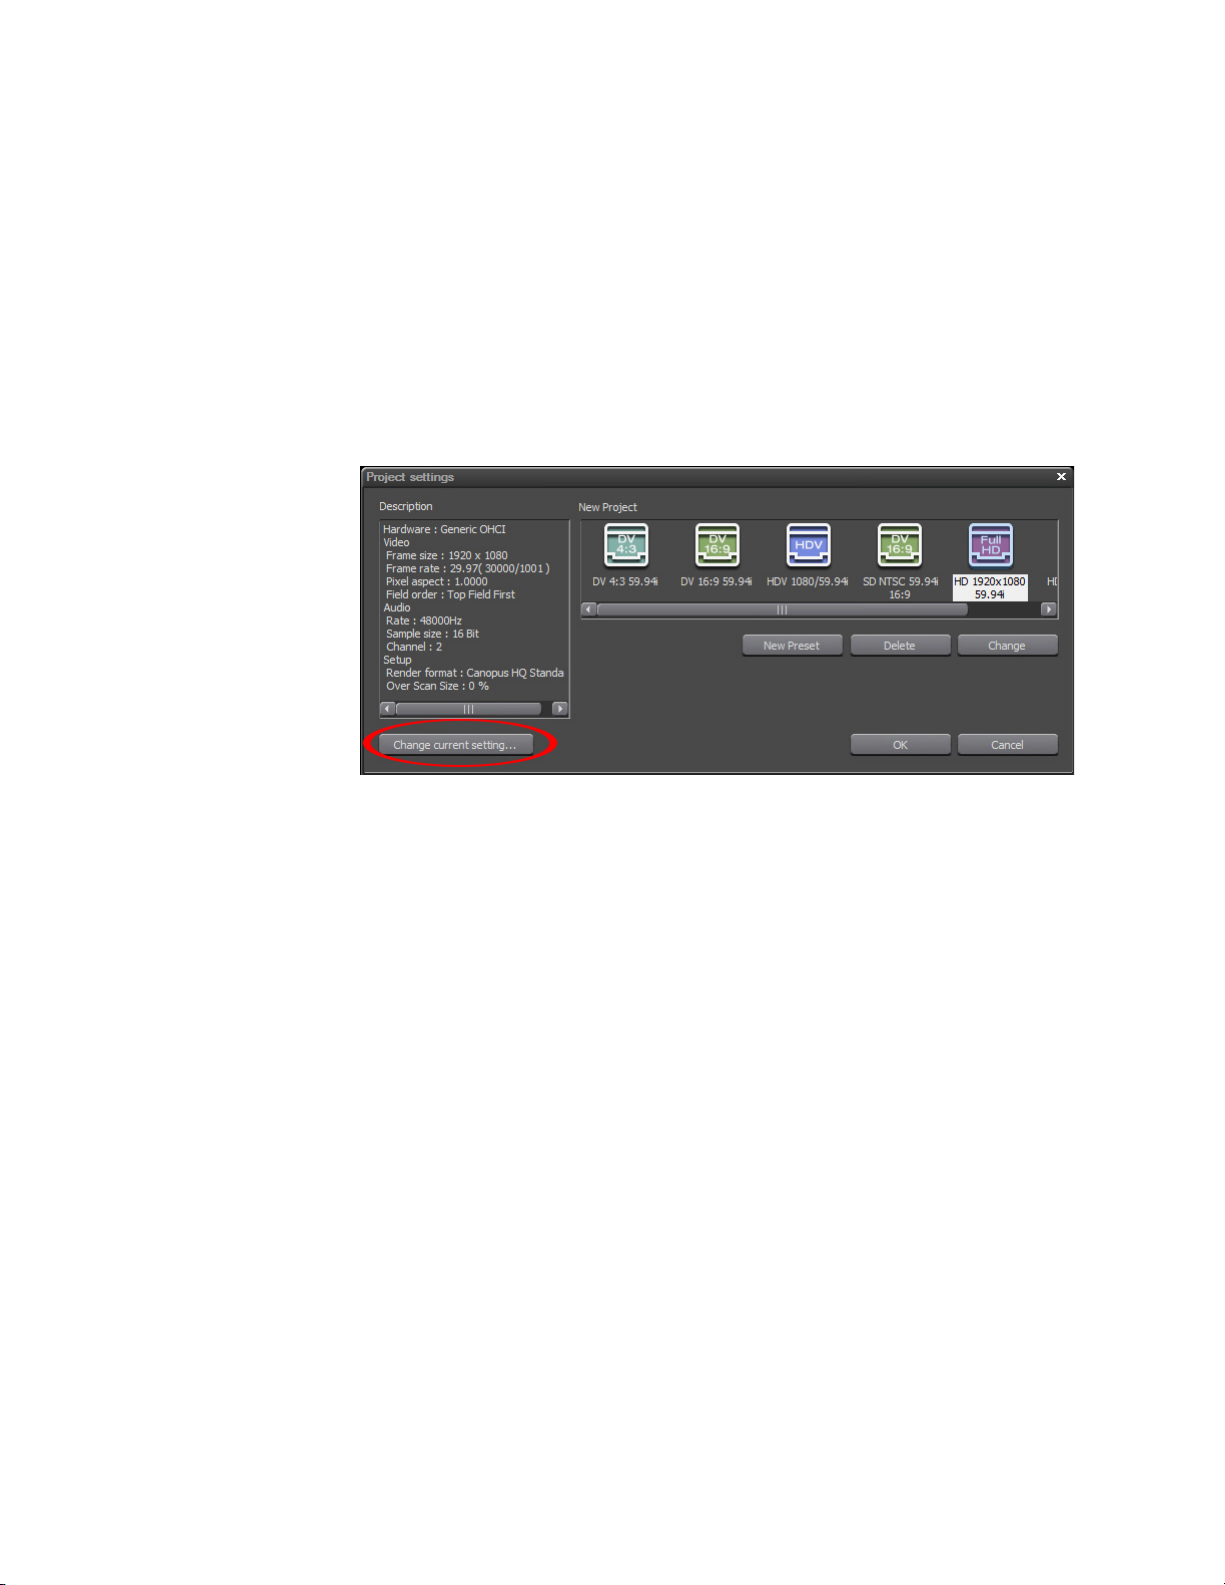
Section 1 — Getting Started
Change Current Project Settings
Although a project is started with a project preset and its associated settings, it is possible to change the settings for a particular project at any time
before project output.
To change project settings, do the following:
1. Select Settings>Project Settings from the Preview window
The Project Settings window shown in Figure 17 appears.
Figure 17. Project Settings - Change Current Settings
2. Click the Change current setting... button.
The Project Settings detail window appears. See Figure 18
32 EDIUS Neo — User Reference Guide
Page 33

Figure 18. Project Settings Detail
Start-Up Window
3. Change the output device or output format project settings as desired.
4. Click the OK button to save the changes to the current project settings.
If you go back into Settings>Project Settings you will notice the addition of
the Current Setting icon (see Figure 19). The current project settings are
associated with this project preset.
Note Changing the current project settings does not change the settings associ-
ated with the original preset from which the project was initiated.
Figure 19. Project Settings - Current Settings
EDIUS Neo — User Reference Guide 33
Page 34

Section 1 — Getting Started
Save the Current Settings as a New Project Preset
If you wish to create a new preset from the current settings, perform the following actions:
1. Click on the Current setting icon.
2. Click the New Preset button.
Note The Current setting preset cannot be deleted or changed (buttons are greyed
out). If you wish to change the current settings use the Change current setting... button.
3. Click the OK button to save the current settings.
Note Do not make any setting changes if you wish to save the current settings as
a new project preset.
4. (Optional) Enter a name and select an icon for the new project preset.
5. Click the OK button to save the project preset.
Change the Settings of an Existing Project Preset
If you wish to make changes to the settings of an existing project preset, do
one of the following:
• Click on the project preset icon from either the EDIUS Neo start-up
window or the Project Settings dialog shown in Figure 17 and click the
Change
button.
• Right-click the preset icon for which you wish to change the settings
and select
Change preset from the menu.
Other Actions in the Project Settings Dialog
The following actions can be performed from the Project Settings dialog
box shown above in
• Specify a folder other than the default for a project location. Click the ...
button to navigate to another folder.
• Delete existing project presets. Click on the project preset icon; click the
Delete button to delete the project preset.
Note An alternative method of deleting project presets is to right-click on the
project preset icon and select the Delete option from the menu.
Figure 16:
34 EDIUS Neo — User Reference Guide
Page 35
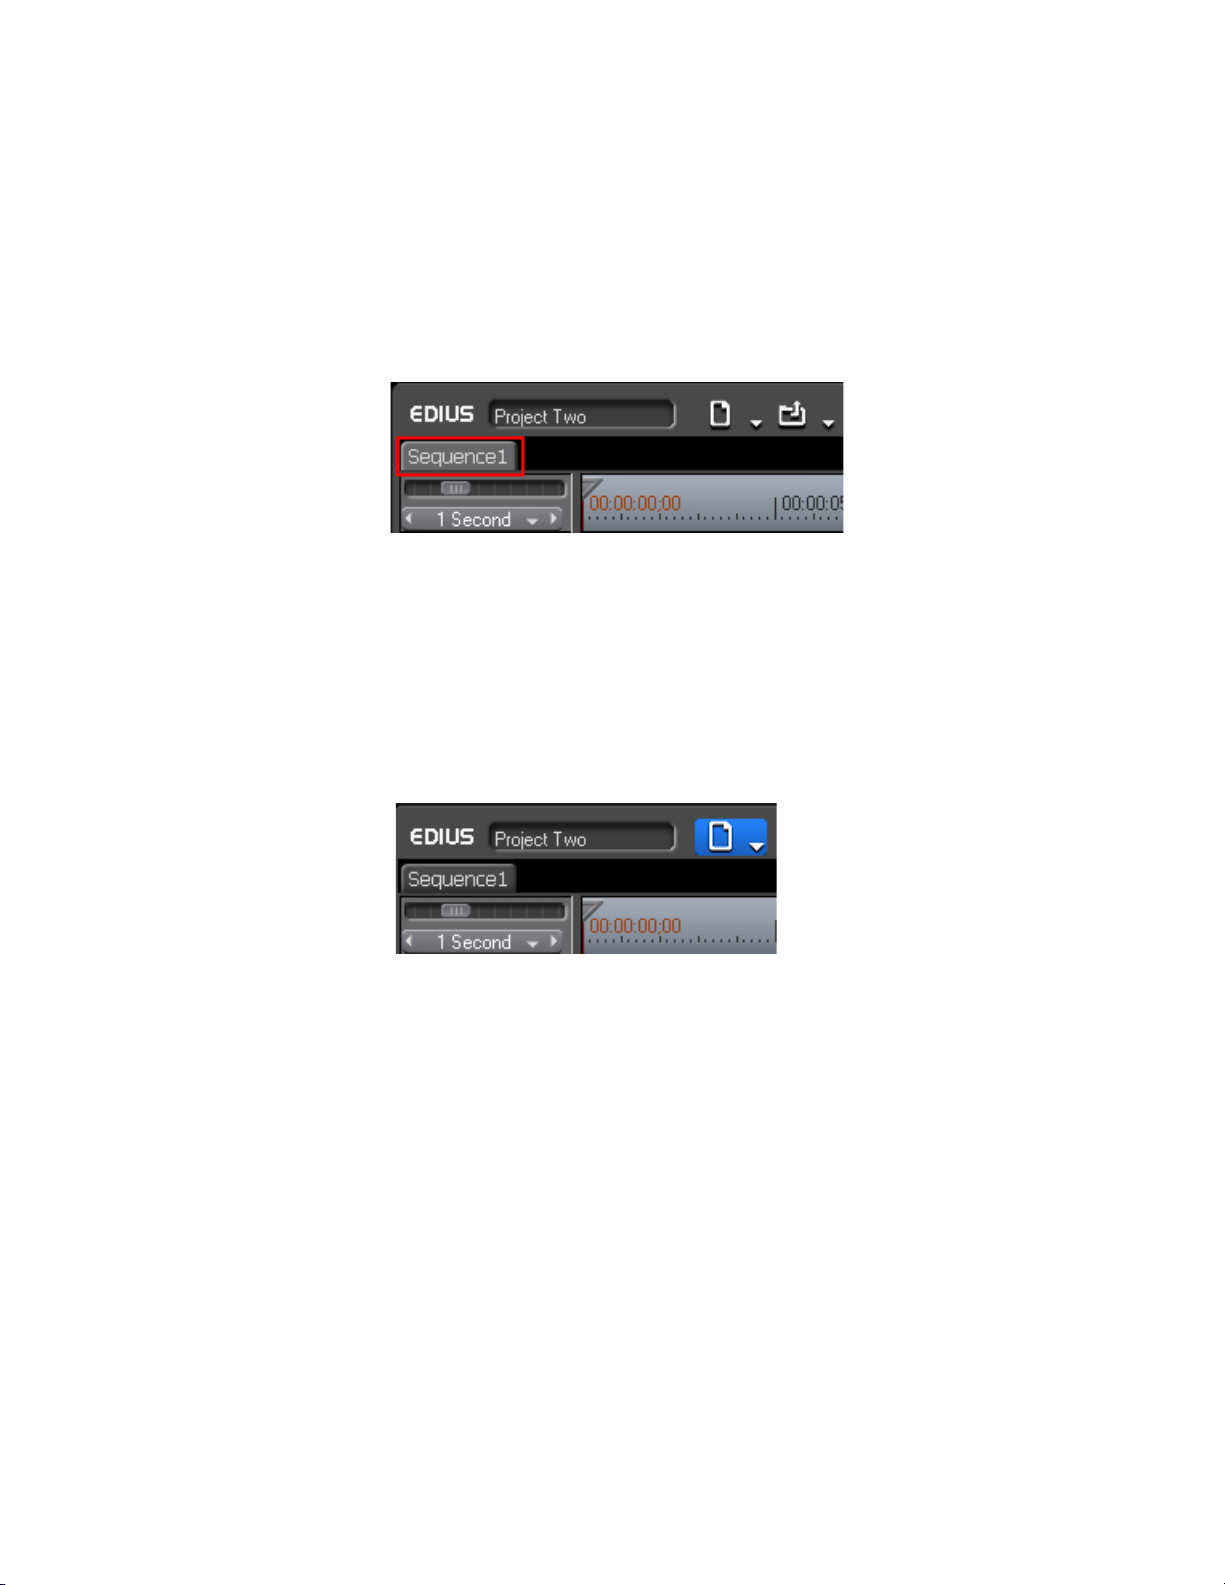
Sequences
Create a New Sequence
Sequences
A sequence is a collection of clips, images, effects, etc. placed on the Timeline. A project may be comprised of one or more sequences.
The sequence tab is located in the upper left corner of the Timeline window
just above the Timeline and just below the project name (see Figure 20).
Figure 20. Sequence Tab
To create a new sequence in the current project, do one of the following:
• Click the New Sequence button in the Timeline window (see Figure 21 -
New Sequence button is highlighted in blue).
the
Figure 21. New Sequence Button
• Select File>New>Sequence from the Preview window menu bar.
• Right-click on a blank area of the clip view in the Asset Bin and select
“New Sequence” from the menu.
Note In this case a blank Timeline sequence clip is created in the Asset bin but a
sequence tab is not displayed in the Timeline window.
• Press [SHIFT]+[CTRL]+[N] on the keyboard.
Any of these methods will result in a new sequence tab appearing in the
Timeline window as shown in Figure 22 as well as the creation of a
sequence clip in the Asset bin as illustrated in Figure 23.
EDIUS Neo — User Reference Guide 35
Page 36

Section 1 — Getting Started
Figure 22. New Sequence Tab
Note Double right-click a sequence tab to change the sequence name.
Figure 23. New Sequence Clip In Asset Bin
Saving Projects
Note The sequence tabs can be dragged and dropped to change their order.
EDIUS Neo projects are saved as .ezp files in the folder specified as the projects folder. See Select Project Folder Location on page 20 for more information.
To save a project with the name entered (or the default name) at project creation, do one of the following:
• Click the
Save project button (highlighted in blue in Figure 24) in the
Timeline window.
Figure 24. Timeline Save Project Button
• Click on the list button [V] of the Save project button and select “Save
Project” from the menu.
• Select File>Save Project from the preview window menu bar.
• Press the [
CTRL]+[S] keys on the keyboard.
36 EDIUS Neo — User Reference Guide
Page 37

Auto Save/Backup
Note As illustrated in Figure 24, the current project name which will be used for
saving the file with the methods listed above is shown in the Timeline
window.
To save a project with a name other than the current name, do one of the
following:
• Click on the list button [V] of the
• While holding down the [
• Select File> Save As from the preview window menu bar.
• Press the {
Note Using any of the methods described above will display a Save As dialog in
Auto Save/Backup
Backup files are only used in unusual circumstances such as project files
becoming corrupted or EDIUS Neo crashing while editing. They are not
used in normal operations.
Backup files are created automatically in the following manner:
Location
Save project button and select “Save
As” from the menu.
SHIFT] key, click the Save project button (high-
lighted in blue in Figure 24) in the Timeline window.
SHIFT]+[CTRL]+[S] keys on the keyboard.
which you can choose a location and file name in which to save the project.
{Project Name}/{Project}/Backup
File Name
{Project name}-year, month, day - hour, minute, second.ezp
If the auto save is enabled, project files are automatically saved at the specified interval. For information on enabling auto save see Settings - Enable
Auto Save/Auto Save Interval on page 96.
When auto save is enabled, auto save files are created in the following
manner:
Location
{Project Name}/{Project}/AutoSave
File Name
{Project name}-year, month, day - hour, minute, second.ezp
EDIUS Neo — User Reference Guide 37
Page 38

Section 1 — Getting Started
Exiting EDIUS
To recover a project from an auto save or backup file, copy the file to the
original project folder and import the file.
Note Auto save and backup files are read only and cannot be overwritten.
To exit EDIUS, do any of the following:
• Select File>Exit from the Preview window menu bar (see Preview
Window on page 53 for more information) and click on the
you wish to exit EDIUS Neo or the
exit operation.
No button if you wish to cancel the
Yes button if
• Press the [
• Click on the “X” in the upper right corner of the preview window.
Project Operations
This section covers project operations such as opening, importing and
exporting project information.
Opening Project Files
Projects may be opened on EDIUS Neo startup or within EDIUS Neo from
the current project.
Open Project on Startup
To open a project on startup, do one of the following when the startup
screen illustrated in Figure 25 appears:
• Double-click the desired project icon in the Recent Project list.
ALT]+[F4] keys on the keyboard.
• Click the desired project icon in the Recent Project list and click the
Project
button.
• Click the desired project icon in the Recent Project list and click the
button.
Note Projects may be removed from the Recent Project list by selecting the project
to be removed and clicking the Clear History button.
38 EDIUS Neo — User Reference Guide
Open
Start
Page 39
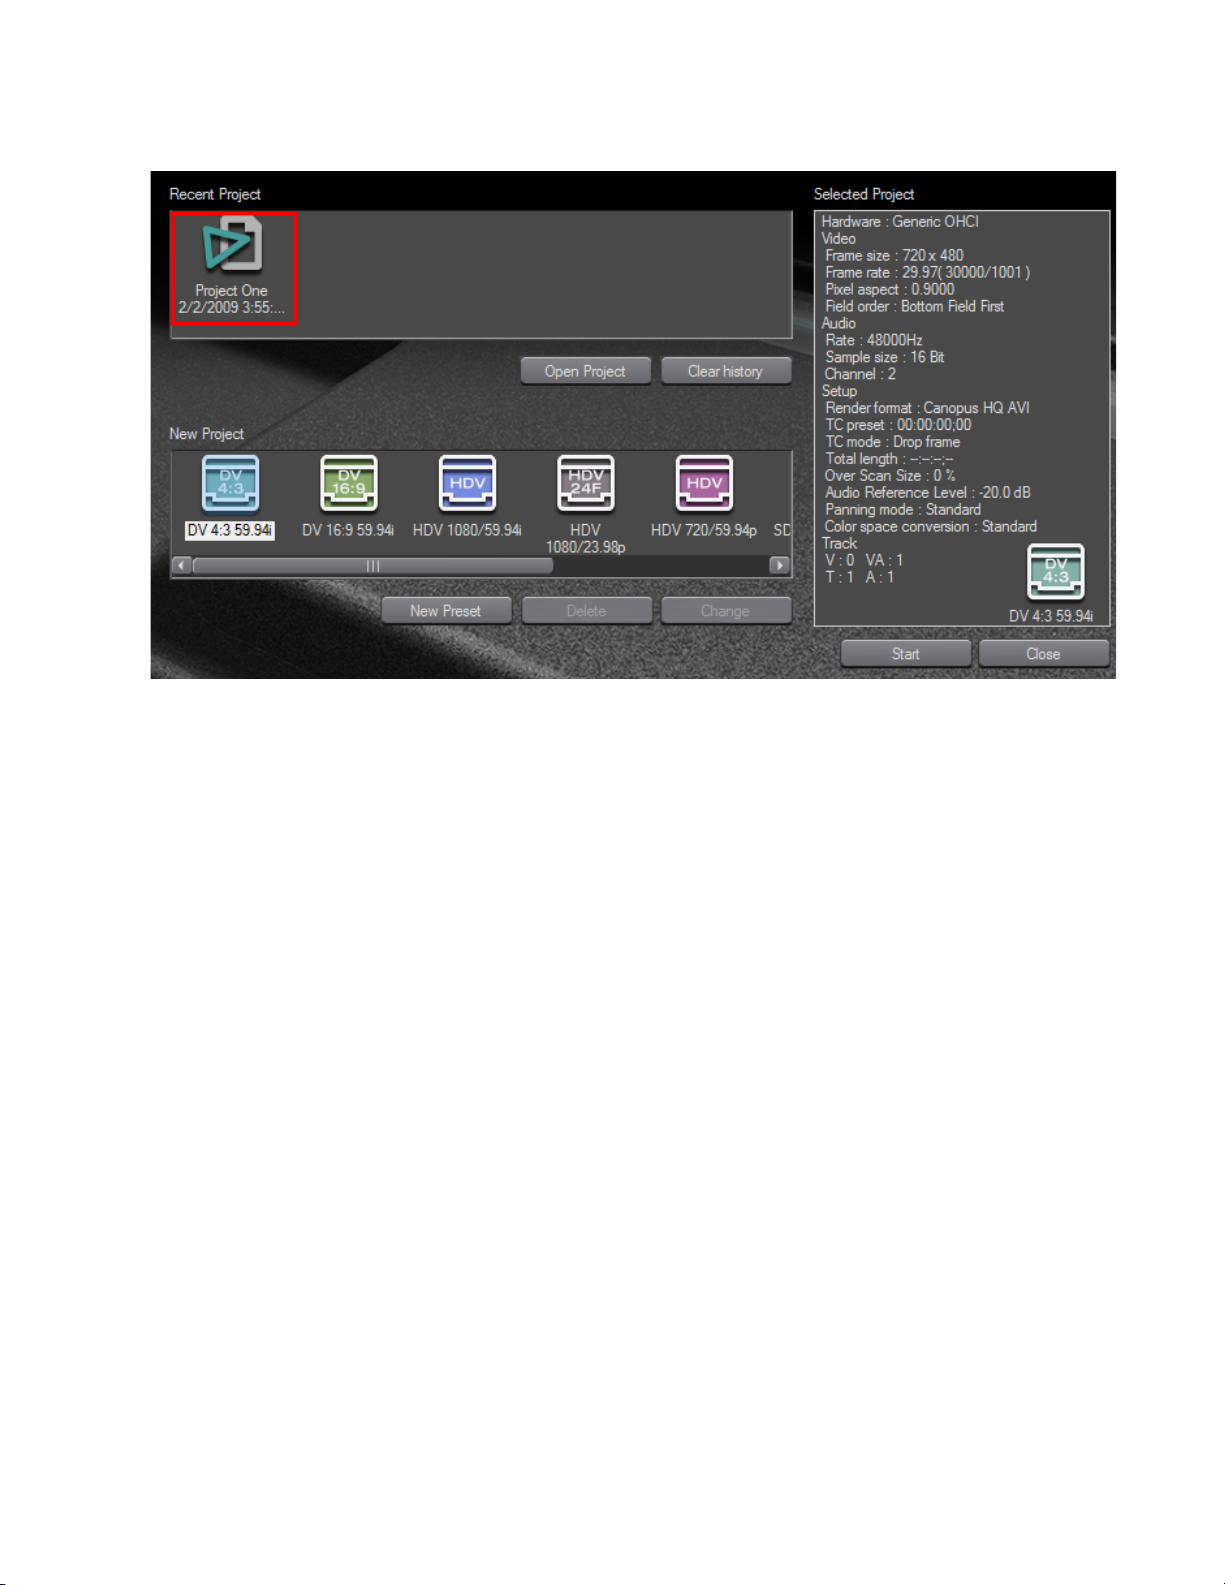
Figure 25. EDIUS Neo Startup Screen Project Icons
Project Operations
Open a Project from the Current Project
To open a different project from within the current project, do any of the following:
Note You will be prompted to save the currently open project before opening
another project.
• Click the Open Project button (highlighted in blue in Figure 26) in the
Timeline window and select the project to open from the Open dialog
EDIUS Neo — User Reference Guide 39
Page 40
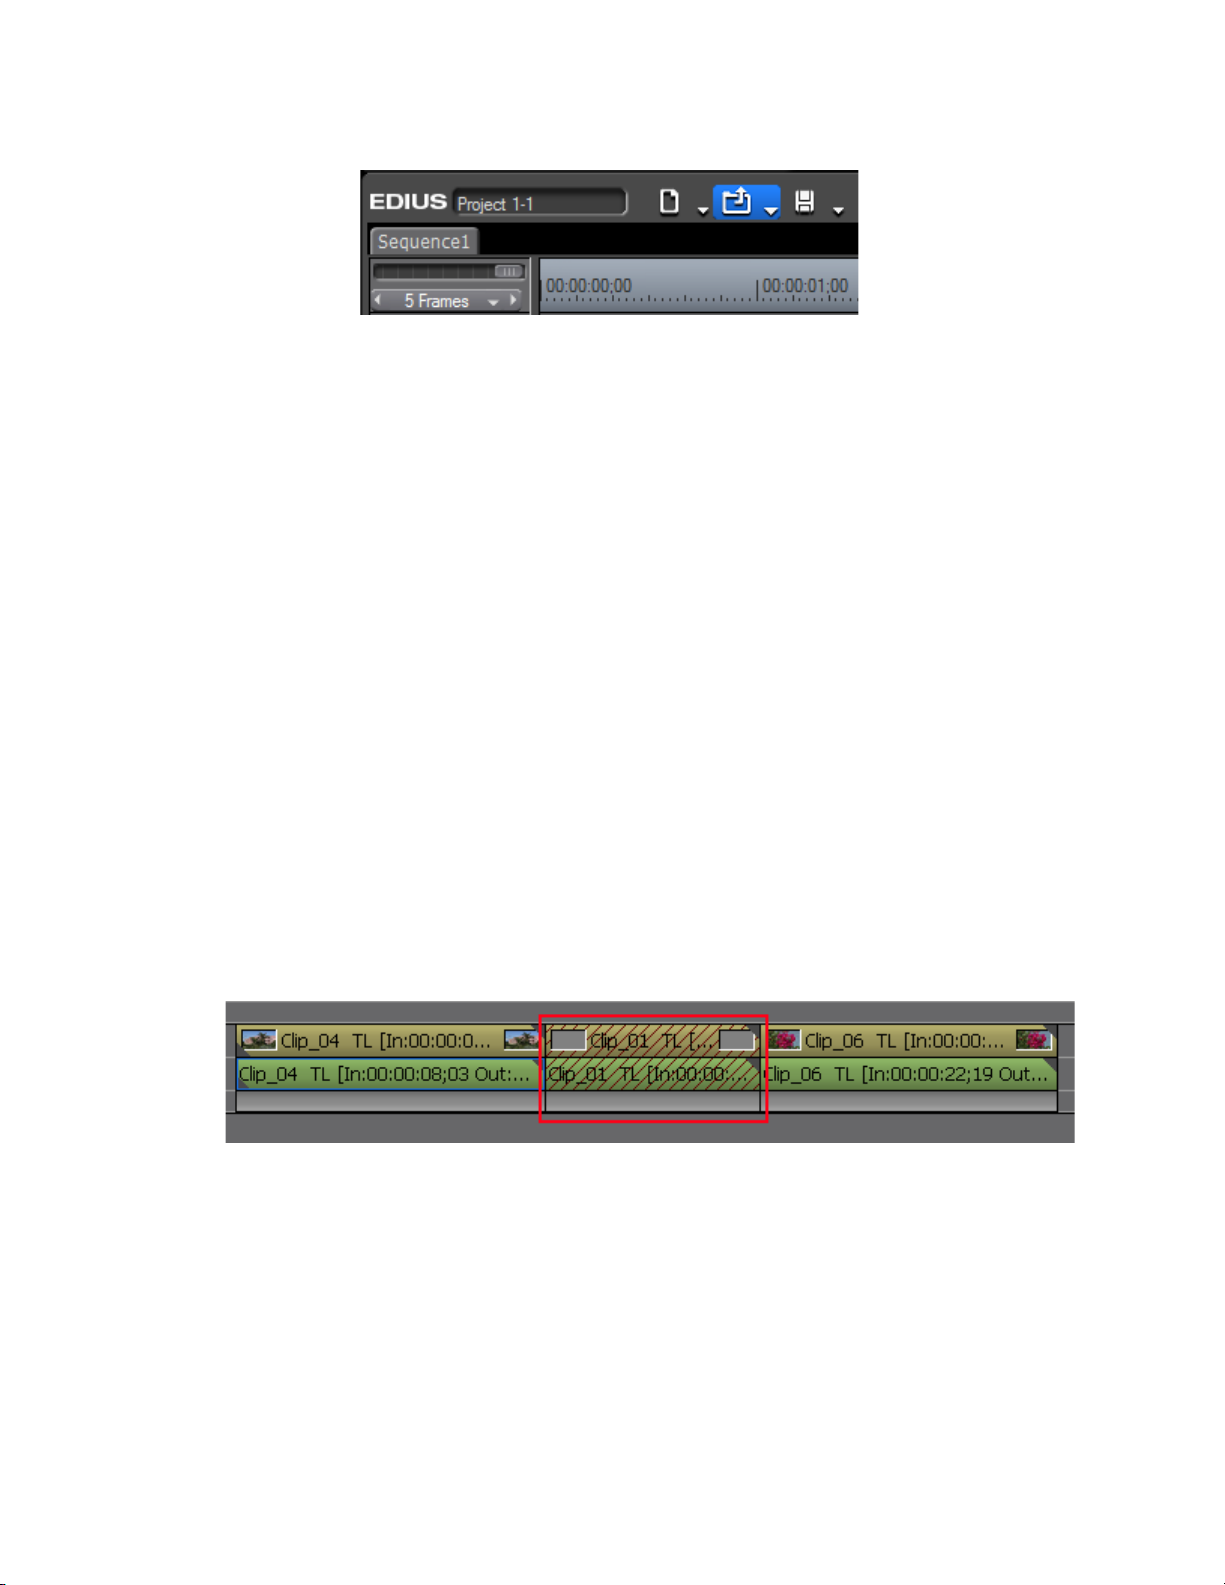
Section 1 — Getting Started
Figure 26. Timeline Open Project Button
• Click the list button [V] of the Open Project button and select the desired
project from the history of recently opened projects at bottom of the
menu.
• Select File>Recent Project>{project name} from the preview window
menu bar.
• Select File>Open Project from the preview window menu bar and select
the desired project from the Open dialog.
• Press the [
Note Clips with speed changes are not split or handled separately as their group is
Restore Offline Clips
Clips saved in the Asset Bin are linked with their source files. If a source file
is moved, renamed or deleted after the project file is saved, clips linked to
the source file become “offline clips.”
Figure 27 shows an offline clip on the Timeline.
Figure 27. Offline Clip on the Timeline
CTRL]+[O] keys on the keyboard.
released.
Figure 28 shows the same offline clip represented in the Asset Bin.
40 EDIUS Neo — User Reference Guide
Page 41

Restore Offline Clips
Figure 28. Offline Clip in the Asset Bin
The Find Offline Clip dialog illustrated in Figure 29 appears when a project
file is opened or imported which contains offline clips
Note Some restoration options may not be available depending on system set-
tings, the availability of capture devices and other factors.
Figure 29. Find Offline Clip Dialog
The following restoration methods are available:
Capture Entire Clip
If this method is selected, the Batch Capture dialog appears and the entire
clip may be re-captured.
For more information on the batch capture procedure see Importing Existing
Clips or Stills into the Asset Bin on page 157.
Capture Only the Areas Used in the Timeline
If this method is selected, the Batch Capture dialog appears and only the
portions of the clip used on the Timeline may be re-captured. If there are
multiple offline clips, replace each offline clip with the recaptured file.
EDIUS Neo — User Reference Guide 41
Page 42

Section 1 — Getting Started
For more information on the batch capture procedure see Batch Capturing
on page 151.
Find From Captured Files
If this method is selected, already captured files are searched by reel
number and timecode. If no matching file is found, click the
Select Folder
button in the Restore Offline Clip dialog to change the search location. To
restore all matching files, click
Restore All in the Restore Offline Clip dialog.
To restore file individually, select the clip name from the list and click the
Restore button.
For more information on the Restore Offline Clip dialog, see Relink and
Restore on page 43.
Open the Clip Restoration Dialog
Select this option to open the Restore Offline Clip dialog. Relink the offline
clip to a file on disk.
For more information on the Restore Offline Clip dialog, see Relink and
Restore on page 43.
Close Button
Click the Close button and then the Yes button on the confirmation dialog to
close the Find Offline Clip dialog without attempting to restore the offline
clip(s). Offline clips will appear on the Timeline and in the Asset Bin as
illustrated in
are muted.
If the Restore Offline Clip dialog appears upon opening or importing a
project file and is closed before restoring the offline clips, it can be opened
at any time by one of the following methods:
• Click the list button [V] of the
Offline Clip” from the menu as illustrated in Figure 30.
Figure 30. Timeline Open Project Button Menu - Restore Offline Clip
Figure 27 and Figure 28. Video and audio for the offline clip
Open Project button and select “Restore
• Select File>Restore Offline Clip from the preview window menu bar.
42 EDIUS Neo — User Reference Guide
Page 43
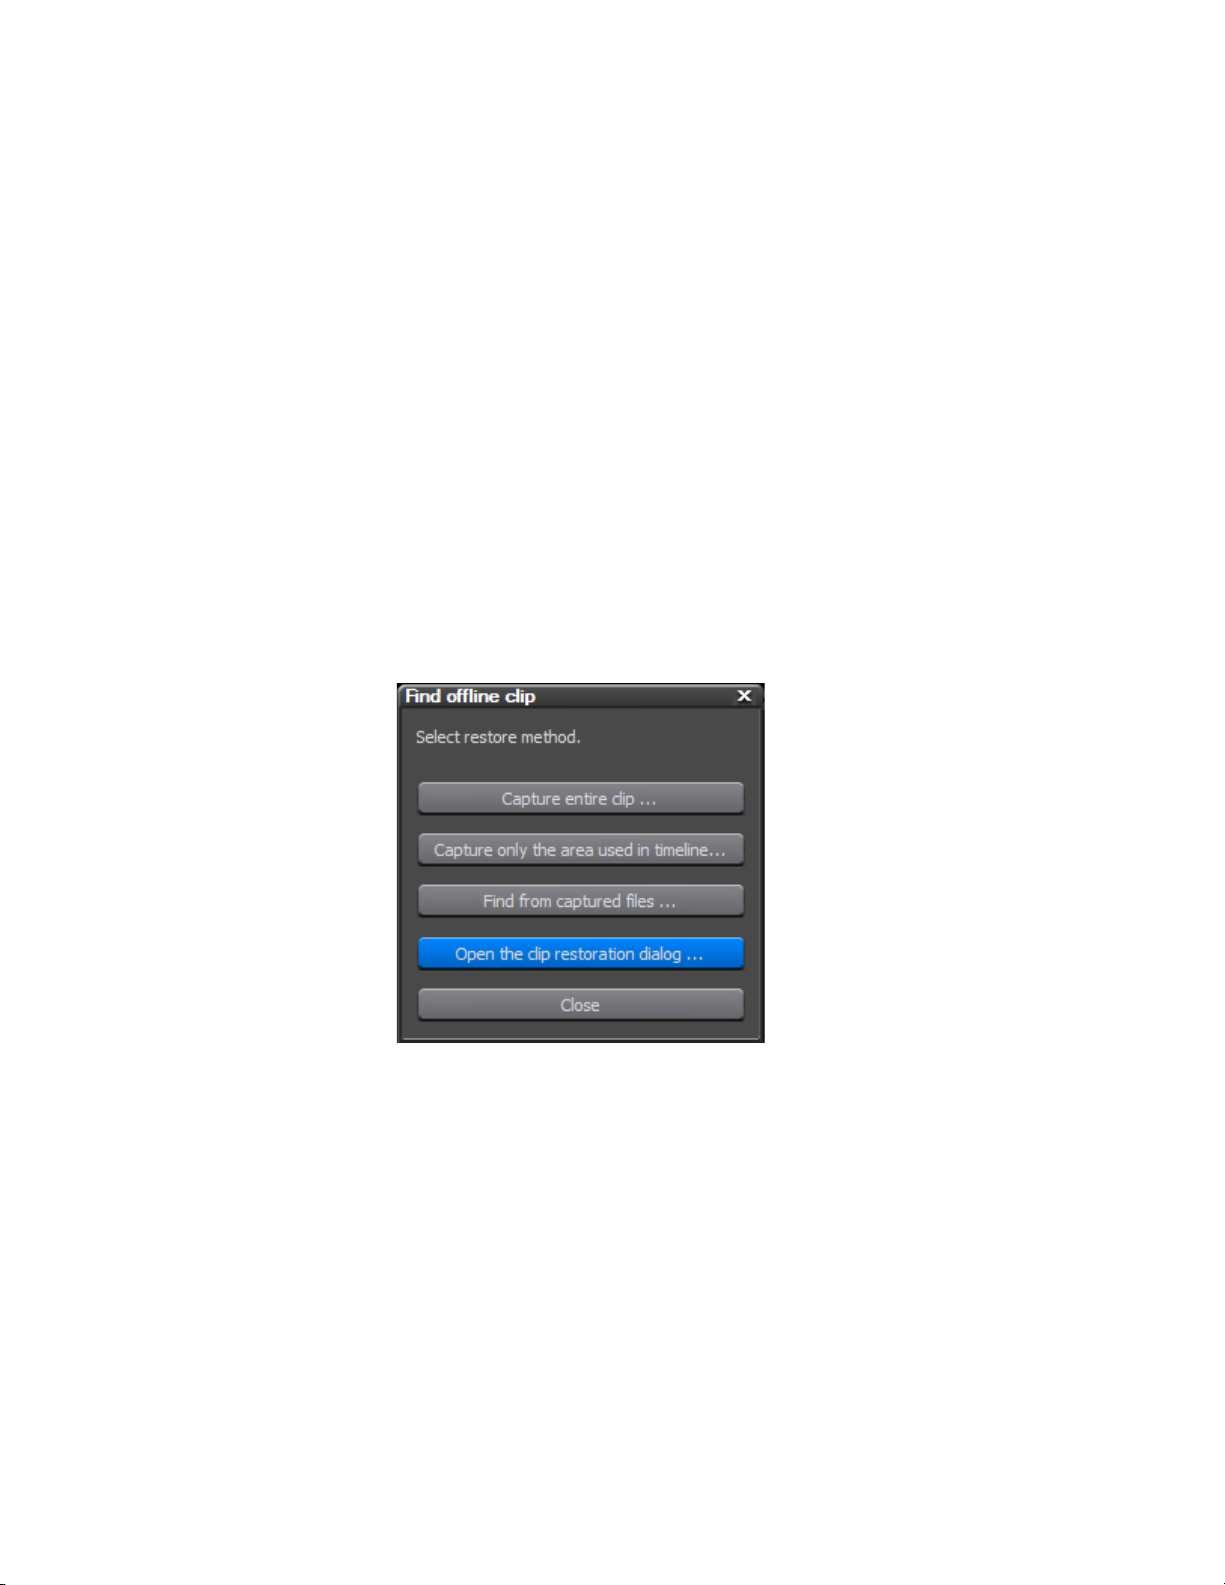
Important Considerations
• When storing reference AVI files as clips, clips linked to the reference
file become offline if the source AVI file is moved. In this case, the
offline clips cannot be restored.
• Files can be captured or restored only if they meet the following criteria:
• Video information for the file exits
• A reel name is assigned to the file
• The file extension is .avi, .m2t or .mov
Relink and Restore
To relink and restore an offline clip, do the following:
1. In the Find Offline Clip dialog, click the Open the clip restoration dialog
button (highlighted in blue in Figure 31).
Restore Offline Clips
Figure 31. Restore Offline Clip Dialog - Open the Clip Restoration Dialog
The Restore Offline Clip dialog is displayed as illustrated in Figure 32.
2. Select the clip(s) to be restored from the Offline Clip List and select
“Relink (select file)” or “Relink (select folder)” from the Restoration
Method column. See below for an explanation of the restoration
methods.
EDIUS Neo — User Reference Guide 43
Page 44

Section 1 — Getting Started
Figure 32. Restore Offline Clip Dialog
Note Select the “Remove clips not used on the Timeline” option on the Restore
Offline Clip dialog to display only the clips used on the Timeline in the Offline
Clip List.
With a clip selected for restoration, the restoration method is selected by
clicking the drop-down list button [V] in the Restoration Method column
and select the desired method from the list. Options are:
Relink (select file)
Displays an Open dialog from which the source file to relink to the offline
clip may be selected.
Relink (select folder)
Displays a Browse for Folder dialog. Search for the source file of the same
name as the offline clip in the specified folder and select the file to relink.
Capture All
Click the Start batch capture button in the lower left corner of the Restore
Offline Clip dialog to display the Batch Capture dialog. Use the batch
capture dialog to recapture the entire clip.
For more information on the batch capture procedure see Batch Capturing
on page 151.
44 EDIUS Neo — User Reference Guide
Page 45

Restore Offline Clips
Capture Only Areas Used in Timeline
Click the Start batch capture button in the lower left corner of the Restore
Offline Clip dialog to display the Batch Capture dialog. Use the batch
capture dialog to recapture the portions of the offline clip(s) used on the
Timeline.
For more information on the batch capture procedure see Batch Capturing
on page 151.
Don’t Capture
If this method is selected, offline clips are not relinked or recaptured.
3. Select the source from the Open or Browse for Folder dialog and click
Open (Open dialog) or OK (Browse for Folder dialog) button to relink
the
the source to the offline clip.
4. Click the Close button in the Restore Offline Clip dialog.
Note When the Restore Offline Clip Close button is clicked, a message will display
if restoration failed on any offline clips.
5. Click the Close button in the Find Offline Clip dialog.
Alternative Method:
Double-click the offline clip on the Timeline or in the Asset Bin and browse
for the file to link to the clip from the Open dialog box.
Capture and Restore
When the source file(s) of offline clip(s) do not exist on the hard drive, you
can recapture them to restore the offline clips.
To capture and restore offline clips, follow these steps:
1. Click the Capture entire clip or Capture only the area used in the Timeline button
in the Find Offline Clip dialog as illustrated in Figure 33.
EDIUS Neo — User Reference Guide 45
Page 46

Section 1 — Getting Started
Figure 33. Restore Offline Clip - Capture Entire Clip
The Batch Capture dialog shown in Figure 34 appears.
Figure 34. Batch Capture Dialog
2. Execute the batch capture following the instructions found in Batch
Capturing on page 151.
Alternative Method:
Select “Capture all” or “Capture only the areas used in timeline” from the
Restoration Method column in the Restore Offline Clip dialog. For more
information on the Restore Offline Clip dialog, see
page 43.
46 EDIUS Neo — User Reference Guide
Relink and Restore on
Page 47

Window Configuration
EDIUS Neo software can be used in multi- or single-monitor configurations. Some layouts will likely be desirable in a single monitor configuration in order to eliminate overlapping windows.
Note All EDIUS Neo screen shots throughout this manual were taken on a single
monitor setup with a 1680x1050 resolution wide screen monitor. Other
monitor resolutions or configurations will result in displays that are similar,
but, not identical, to those depicted in this manual.
Multi-Monitor Layout
In a multi-monitor configuration using, for example, two monitors, the
Preview and Timeline windows will be displayed on one monitor and the
Asset Bin and Palette windows will be displayed on the second monitor.
Sample layouts are shown below in
Figure 35. Dual-Monitor Sample Layout - Monitor One
Window Configuration
Figure 35 and Figure 36.
The Preview window (upper portion of Figure 35) is comprised of the
Player and Recorder and their associated controls. For more information
concerning the operation of the player and recorder, see Player Operation
Buttons on page 56 and Recorder Operation Buttons on page 59.
EDIUS Neo — User Reference Guide 47
Page 48

Section 1 — Getting Started
The Timeline window (lower portion of Figure 35) is the workspace where
video and audio clips are placed for editing. Titles, transitions and effects
are added to clips on the Timeline. For more information on Timeline functions, see Section 5-Timeline Operations.
Figure 36. Dual-Monitor Sample Layout - Monitor Two
The large window on the right side of the screen is the Asset Bin window.
Video and audio clips are placed here for easy access in EDIUS Neo. Clips
in the asset bin can be organized and managed according to user needs.
The three smaller windows on the left of the screen are (from top to bottom)
the Information Palette, the Effects Palette and the Marker Palette.
Single-Monitor Layout
In a single monitor layout, all of the above windows are displayed on a
single monitor. The default layout presents these windows as illustrated in
Figure 37. The Asset Bin, Effects Palette and Sequence Marker Palette
widows are tabbed on the upper right. The Information Palette occupies
the bottom right. It is possible to customize the screen layout and position
the various windows according to your editing needs and preferences. See
Customizing Screen Layout for more information.
48 EDIUS Neo — User Reference Guide
Page 49

Figure 37. Default Single-Monitor Screen Layout
Window Configuration
Customizing Screen Layout
If you wish to use the entire lower section of the monitor display for the
Timeline, the Information Palette can be moved to the upper tabbed section
with the Asset Bin and other palettes as illustrated in
major elements of EDIUS Neo are still readily available with a single mouse
click.
Note Other custom layouts may be created according to user preferences. The
example in Figure 38 is intended to show one way in which all major elements
remain easily accessible although not simultaneously visible on the screen.
Figure 38. All of the
EDIUS Neo — User Reference Guide 49
Page 50

Section 1 — Getting Started
Figure 38. Single-Monitor Customized Layout
To create the custom layout depicted in Figure 38, do the following:
1. Click View on the menu bar and then select Single Mode.
Note Both the Player and Recorder previews are still available. In single mode they
are not simultaneously displayed. See Preview Window on page 53 for more
information.
2. Drag the Information tab and drop it next to the Bin, Effect and
Sequence Marker tabs in the upper right section of the display as
illustrated in Figure 39. The result is the custom layout shown in
Figure 38.
Note The Bin, Information, Effects and Sequence Marker windows are now acces-
sible as tabs. Selecting the desired tab will display the associated window in
the upper right area of the dsiplay.
50 EDIUS Neo — User Reference Guide
Page 51

Figure 39. Single Monitor Drag Information Palette Windows
Window Configuration
Other custom layouts may be created by resizing windows, reordering
tabs, moving palettes to other locations, etc.
Saving Custom Layouts
Custom screen layouts, such as the layout created in the steps above, may
be saved so they can be applied during future EDIUS Neo sessions. To save
a custom layout, do the following:
1. Click View on the menu bar.
2. Select Layout then Save Current Layout then New (See Figure 40).
EDIUS Neo — User Reference Guide 51
Page 52
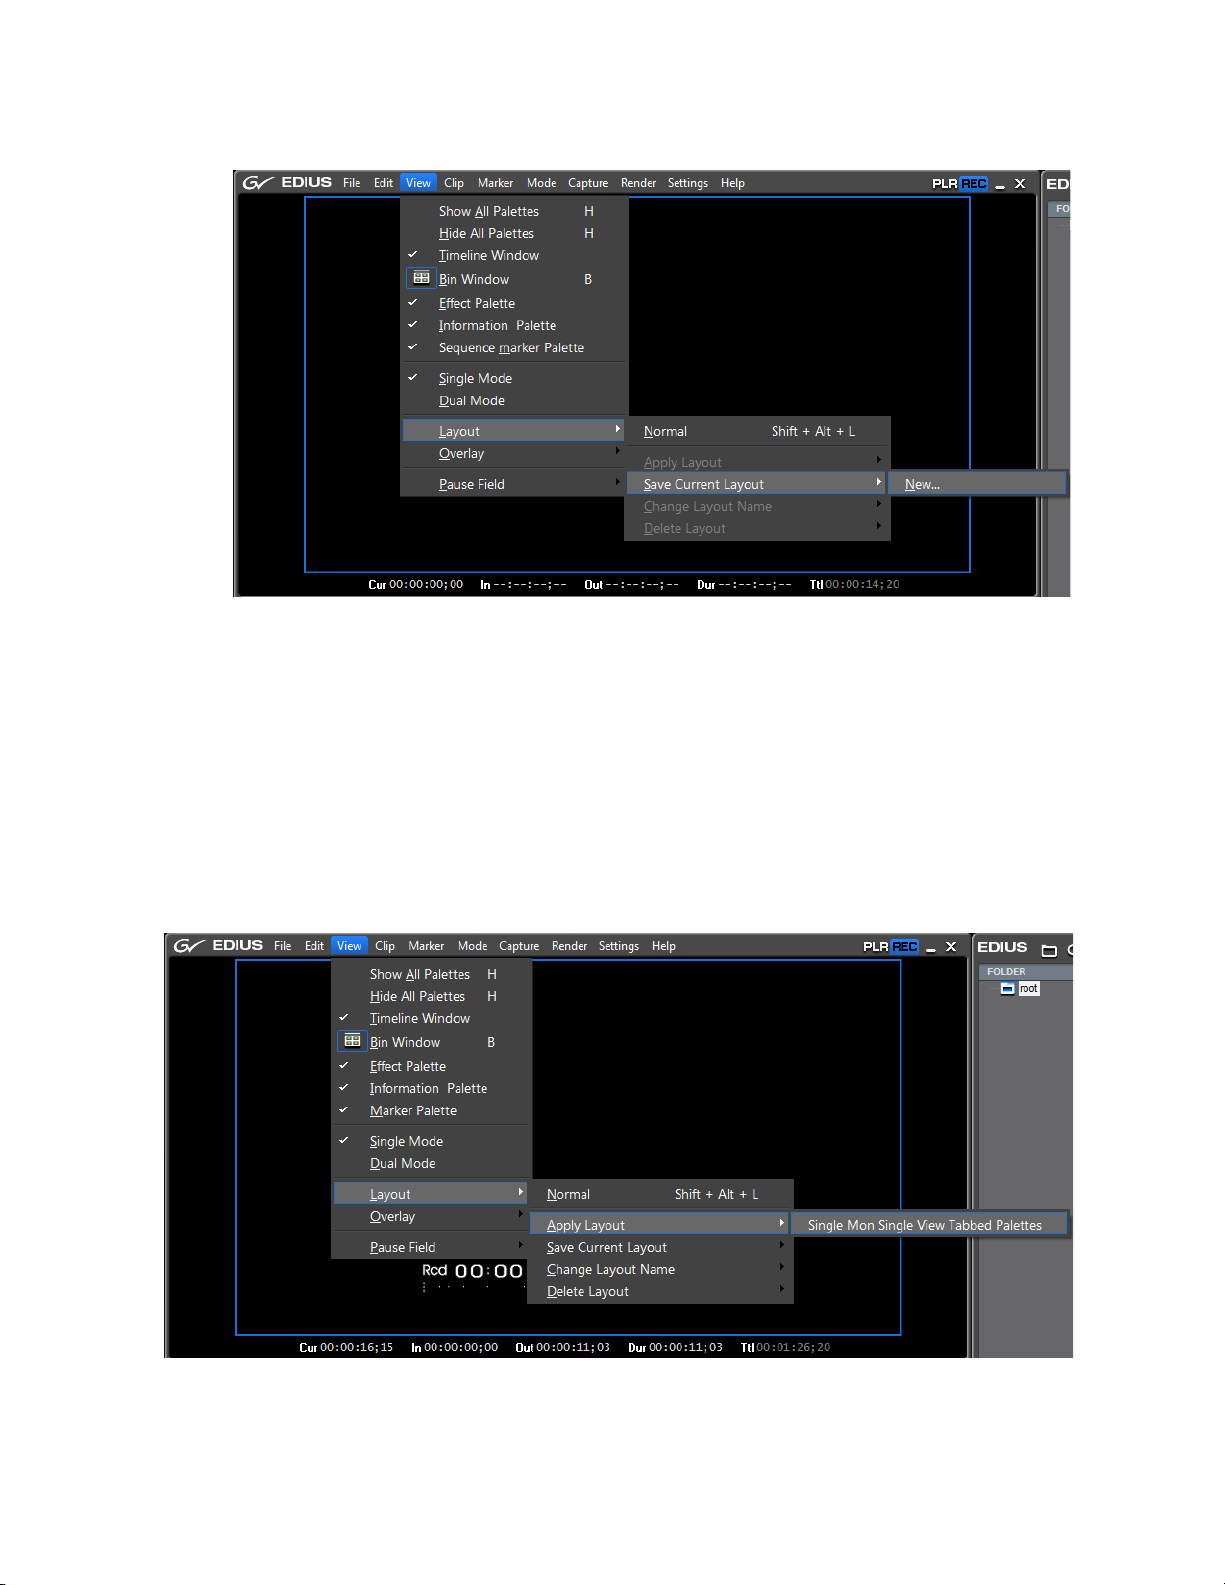
Section 1 — Getting Started
Figure 40. Save Current Layout Menu
3. Enter the desired name for the custom layout and click OK.
Applying a Saved Layout
To apply a saved layout:
Click View on the menu bar, select Layout, then Apply Layout, then the name of
the saved layout you wish to apply (See Figure 41).
Figure 41. Apply Layout Menu
52 EDIUS Neo — User Reference Guide
Page 53

Restoring Default Layout
To return to the default layout:
Click View on the menu bar, select Layout then Normal (See Figure 42)
Figure 42. Normal Layout Menu
Preview Window
Alternative Method
Press the {SHIFT] + [ALT] + [L] keys on the keyboard.
Preview Window
The preview window can be presented in two modes: Dual Mode and
Single Mode. The manner in which the preview window is displayed and
the area it occupies on the screen is also dependent upon the active screen
layout as described in the sections which follow.
Dual Mode
To select Dual Mode, click on View in the menu bar and select Dual Mode.
Note All layout and preview mode functions are also available by clicking on the GV
logo in the upper left corner of the screen. Figure 43 shows the menu that
appears when the GV logo is clicked.
EDIUS Neo — User Reference Guide 53
Page 54

Section 1 — Getting Started
Figure 43. GV Logo Menu
In dual mode, both the Player preview window and the Recorder preview
window are visible at the same time.
Figure 44 depicts dual mode preview
for a dual-monitor configuration or for a single-monitor configuration with
a custom layout. In these layouts, the Player and Recorder preview
windows occupy the entire upper portion of the screen.
Figure 44. Dual Mode Preview - Dual Monitor or Single Monitor Custom Layout
Player
The Player window (on the left) is used to preview material before
importing it into EDIUS Neo and placing it on the Timeline for editing.
Already captured clips can also be placed on and edited to the Timeline
through the player window. The Player can control external devices or play
a clip from the Asset Bin.
Recorder
The Recorder window (on the right) is used to preview edits and effects
applied to clips on the EDIUS Neo Timeline.
Figure 45 shows a dual-mode display using the single-monitor default
layout . In this example, only the left half of the upper portion of the screen
is used for the Player and Recorder preview windows and they are automatically resized.
54 EDIUS Neo — User Reference Guide
Page 55
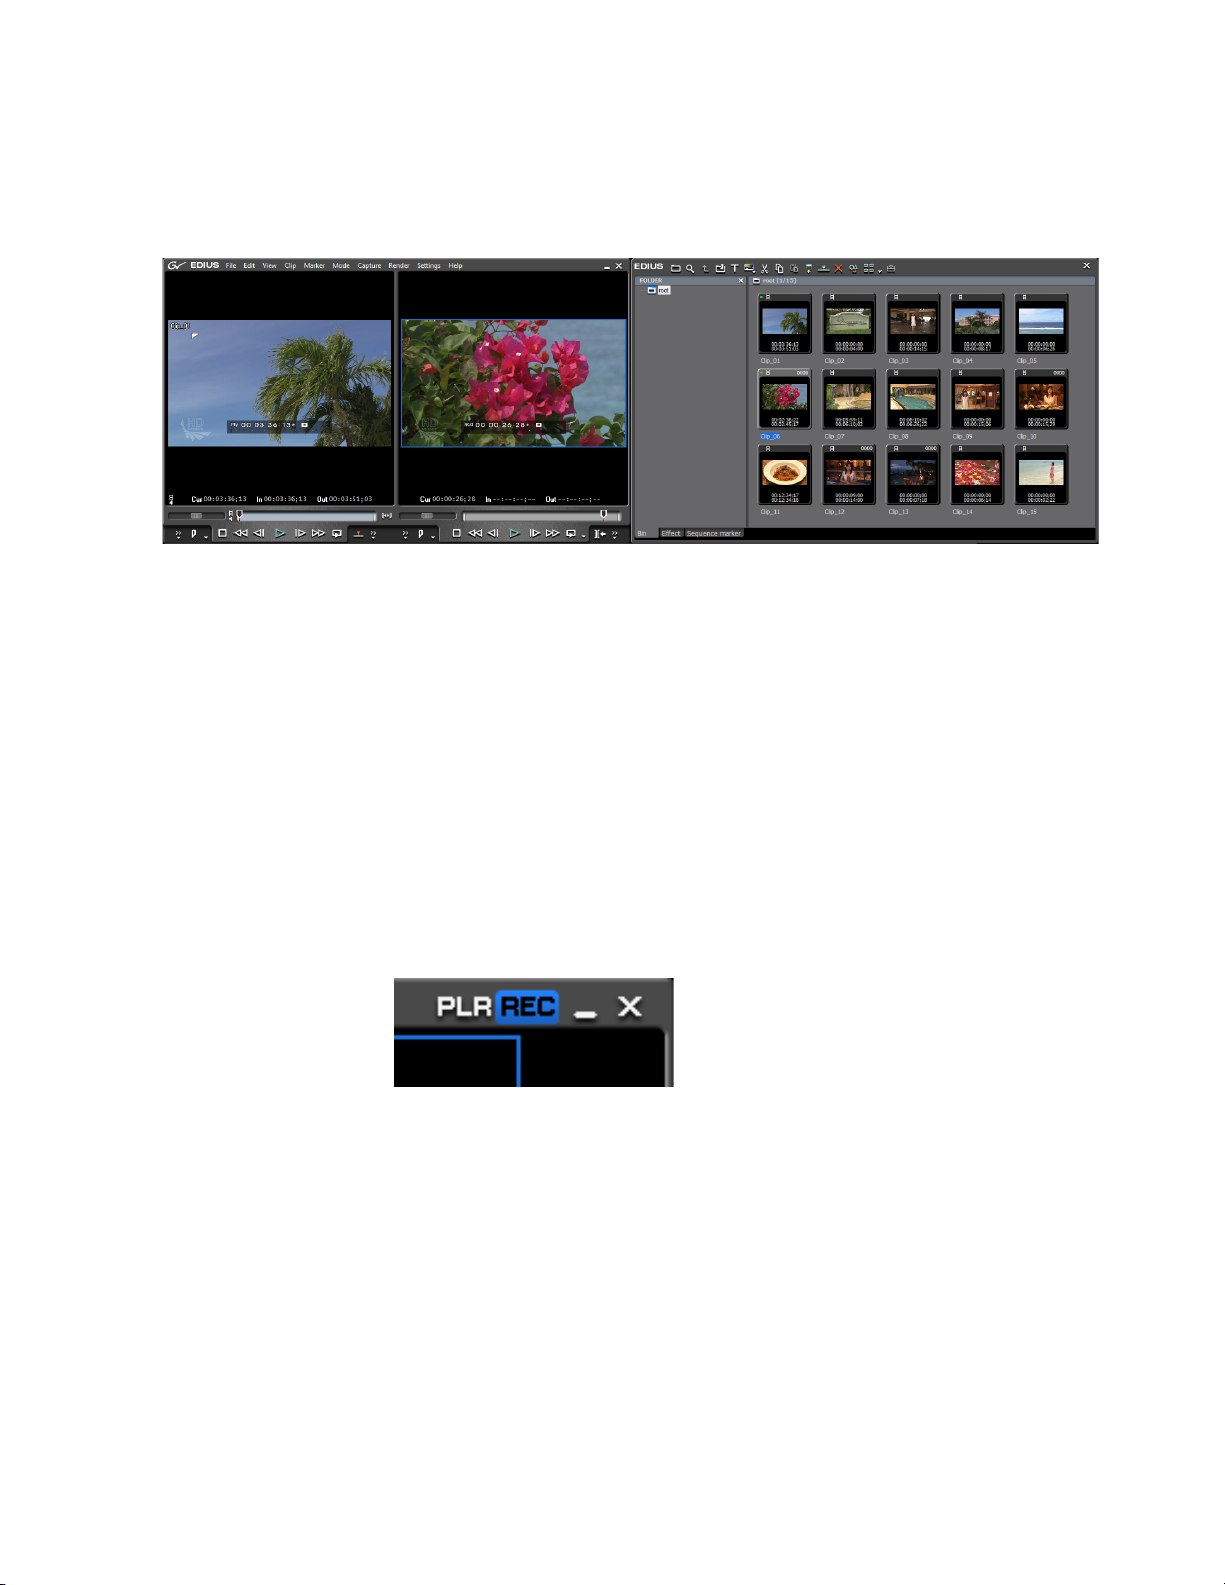
The right half of the screen is occupied by the Asset Bin, Information Palette, Effects Palette and Sequence Marker Palette windows.
Figure 45. Dual Mode Preview - Single Monitor Default Layout
Single Mode
To select Single Mode, click on View in the menu bar and select Single Mode.
Preview Window
Note All layout and preview mode functions are also available by clicking on the GV
logo in the upper left corner of the screen. Figure 43 shows the menu that
appears when the GV logo is clicked.
In single mode, only one preview window is visible. The preview display
is switched between the Player and the Recorder as necessary to manage
the EDIUS Neo workflow. When in single mode, preview toggle buttons
appear in the upper right corner of the Preview window as shown in
Figure 46.
Figure 46. Single Mode Preview Toggle Buttons
The active preview window is highlighted in blue. Click PLR to activate the
Player preview window. Click
REC to activate the Recorder preview
window.
Figure 47 shows the single mode display for a dual-monitor or single
monitor configuration with a custom layout.
EDIUS Neo — User Reference Guide 55
Page 56
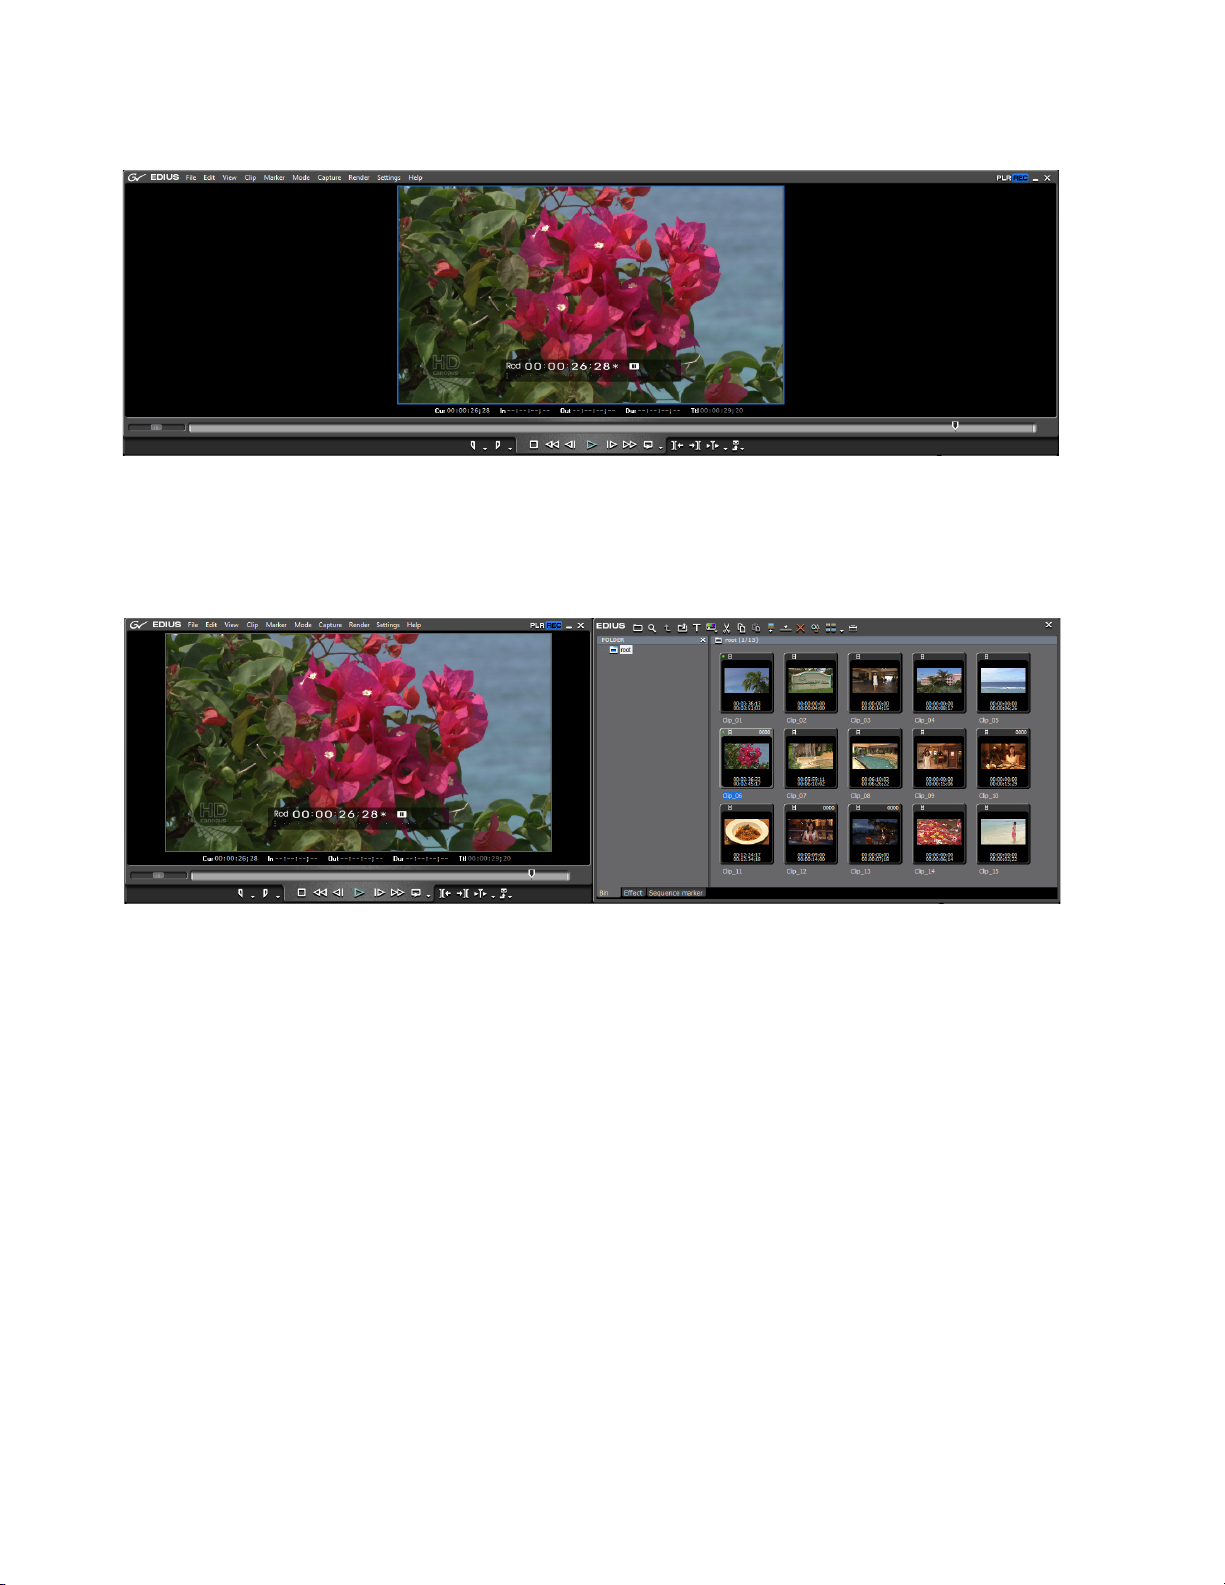
Section 1 — Getting Started
Figure 47. Single Preview Mode Dual Monitor or Single Monitor Custom Layout
Figure 48 shows the single-mode display for the single-monitor default
layout.
Figure 48. Single Mode Preview - Single Monitor Default Layout
Player Operation Buttons
Figure 49 shows the Player operation buttons. The function of each of these
buttons is explained in Tab le 1.
Note All keyboard shortcuts are the default shortcuts. Keyboard shortcuts may be
customized through the Application Settings dialogs (see
Section 2-Application and Plug-In Settings for more information).
56 EDIUS Neo — User Reference Guide
Page 57

Preview Window
Figure 49. Player Operation Buttons
Table 1. Player Operation Button Details
Button Function Description Keyboard Shortcut
Input Preset
Set In
Set Out Specifies the end point of a section of a clip that should be included in the project [O]
Stop Stops playback in the Player window [K]
Review Reviews (rewinds) the clip in the Player [J]
Previous Frame
Play Plays the clip in Player [ENTER]
Next Frame
Fast Forward Fast forwards through the clip in the Player [L]
Loop Repeatedly plays back the clip in the Player until playback is stopped [CTRL]+[SPACE]
Input settings that are preset and saved as buttons can be activated by clicking on
the appropriate Input Preset button.
Specifies the beginning point of a section of a clip that should be included in the
project
Goes to the previous frame in a clip. Each click of the button moves to the previous
frame. Holding down the [<--] key moves frame-by-frame in a faster step rewind
Goes to the next frame in a clip. Each click of the button moves to the next frame.
Holding down the [-->] key moves frame-by-frame in a faster step forward.
[I]
[<--]
[-->]
Overwrite to Timeline
Insert to Timeline
Capture The image displayed in the Player is captured as a still to the Asset Bin [F9]
Add to Batch Capture List
Add Clip to Bin The clip in the Player is added to the Asset Bin. [SHIFT]+[CTRL]+[B]
Overwrites clip(s) on the Timeline at the cursor position with the clip in the Player.
Clip(s) at the cursor position are replaced by the clip in the Player.
Inserts the clip in the Player at the cursor position on the Timeline. Other clips on the
Timeline after the cursor position will be adjusted b backward by the length of the
inserted clip.
The segments in the clip marked with In and Out points are added to the batch capture list for future processing.
[]]
[[]
[CTRL]+[8]
Clicking on the EDIUS logo in the upper left corner also allows access to the
Player functions with their descriptions and keyboard shortcuts. To access
the menu as shown in Figure 50, click on the
Player.
then
EDIUS logo, select Functions and
EDIUS Neo — User Reference Guide 57
Page 58

Section 1 — Getting Started
Note Additional functions not available in the Player preview window are available
from this menu.
Figure 50. EDIUS Logo Player Function Menu
58 EDIUS Neo — User Reference Guide
Page 59

Preview Window
Recorder Operation Buttons
Figure 51 shows the Recorder operation buttons. The function of each of
these buttons is explained in Ta bl e 2.
Note All keyboard shortcuts are the default shortcuts. Keyboard shortcuts may be
customized through the Application Settings dialogs (see
Section 2-Application and Plug-In Settings for more information).
Figure 51. Recorder Operation Buttons
Table 2. Recorder Operation Button Details
Button Function Description Keyboard Shortcut
Set In
Set Out
Stop Stops playback in the Recorder window [K]
Review Reviews (rewinds) the clip in the Recorder [J]
Previous Frame
Play Plays the content in the Recorder [ENTER]
Next Frame
Fast Forward Fast forwards through the content in the Recorder [L]
Loop
Previous Edit Point Moves the cursor to the edit point preceding the current Timeline cursor position. [A}
Specifies the beginning point of a section on the Timeline content hat should be
included in the project output.
Specifies the end point of a section of the Timeline content that should be included
in the project output.
Goes to the previous frame in a clip. Each click of the button moves to the previous
frame. Holding down the [<--] key moves frame-by-frame in a faster step rewind
Goes to the next frame in a clip. Each click of the button moves to the next frame.
Holding down the [-->] key moves frame-by-frame in a faster step forward.
Repeatedly plays back the Timeline contents until playback is stopped. If In and Out
points have been set, the segment between these points is played repeatedly.
[I]
[O]
[<--]
[-->]
[CTRL]+[SPACE]
Next Edit Point Moves the cursor to the edit point following the current Timeline cursor position. [S]
Play Cursor Area
Export Exports content to a tape or file.
Repeatedly plays the content (~3 seconds on each side) in front of and behind the
Timeline cursor.
EDIUS Neo — User Reference Guide 59
Page 60

Section 1 — Getting Started
Clicking on the EDIUS logo in the upper left corner also allows access to the
Recorder functions with their descriptions and keyboard shortcuts. To
access the menu as shown in Figure 50, click on the
tions
and then Recorder.
Note Additional functions not available in the Recorder preview window are avail-
able from this menu.
Figure 52. EDIUS Logo Recorder Function Menu
EDIUS logo, select Func-
60 EDIUS Neo — User Reference Guide
Page 61

Timeline Window
The Timeline shows a chronological progression from beginning to end of
all the elements that comprise a project.
Major editing operations are performed with content on the Timeline.
Video clips, audio clips, still images, titles, transitions, and effects are all
managed on the Timeline. The Timeline is where the finished project takes
shape.
A collection of clips, images, effects, etc. placed on the Timeline is known
as a “sequence.”
Figure 53 depicts the major components of the Timeline window.
Figure 53. EDIUS Neo Timeline
Timeline Window
The Timeline window is comprised of:
• the Timeline Operation Buttons
• the Timeline Scale
• the Timeline Scale Controller
•the Track Panel
Timeline Operation Buttons
The Timeline operation buttons shown in Figure 54 are discussed in detail
in Section 5-Timeline Operations.
EDIUS Neo — User Reference Guide 61
Page 62

Section 1 — Getting Started
Timeline Scale
Figure 54. Timeline Operation Buttons
The Timeline scale provides a very accurate indication of the overall length
of a sequence and allows for frame-accurate editing and clip placement.
Figure 55 shows a portion of the Timeline scale.
Figure 55. Timeline Scale
The numbers at the top of the scale indicate the Timeline position in
hours:minutes:seconds;frames (hh:mm:ss;ff).
The Timeline cursor marks the current preview or editing point.
Timeline Scale Controller
The Timeline scale controller is used to adjust the TimelineTimeline scale
unit in order to see more or less material on screen simultaneously. With a
larger scale unit, more material will be visible on a single screen. With a
smaller scale unit, less material will be visible on a single screen. Or course,
regardless of the scale unit setting, all material placed on the Timeline is
accessible using the scroll bar at the bottom of the Timeline window.
The Timeline scale is adjusted using the Timeline scale controller depicted
in Figure 56. Timeline scale units range from one frame to 60 minutes.
Figure 56. Timeline Scale Controller
Adjusting the scale changes the value of the second-degree (mid-sized) tick
mark. The value of the first-degree (smallest) tick mark is 1/5 of the value
of the second-degree tick mark. The value of the third-degree (largest) tick
mark is five times the value of the second-degree tick mark. Third-degree
tick marks are labeled with the time code.
In the example in Figure 56, the value of the second-degree tick mark is one
(1) second. This makes the value of the first-degree tick mark .20 seconds
and the value of the third-degree tick marks five (5) seconds.
62 EDIUS Neo — User Reference Guide
Page 63

Timeline Window
The Timeline scale can be adjusted in one of three ways:
• Drag the slider to increase or decrease the Timeline scale unit.
• Click on the W(decrement scale unit) or X(increment scale unit)
symbols on the scale control button. The scale unit is indicated by the
text on the button (1 Second in the example above).
• Click on the Tsymbol on the scale control button to display the scale
unit menu (shown in Figure 57) and select the desired scale unit.
Figure 57. Timeline Scale Control Menu
If the scale unit is changed to 10 seconds, the Timeline scale adjusts accordingly with each first-degree tick mark representing two (2) seconds and
each third-degree tick mark 50 seconds. See Figure 58.
Figure 58. Timeline Scale Unit at 10 Seconds
Viewing Entire Sequence on the Timeline
If clips have been added to the Timeline that individually or collectively
exceed the Timeline scale and it is desirable to view the entire sequence on
a single screen, select
Timeline scale unit automatically so that the entire sequence is visible on
screen without scrolling.
Figure 59 shows a sequence with a two (2) minute Timeline scale unit that
causes the sequence to exceed the width of a single screen.
EDIUS Neo — User Reference Guide 63
Fit on the Timeline scale menu. This will adjust the
Page 64
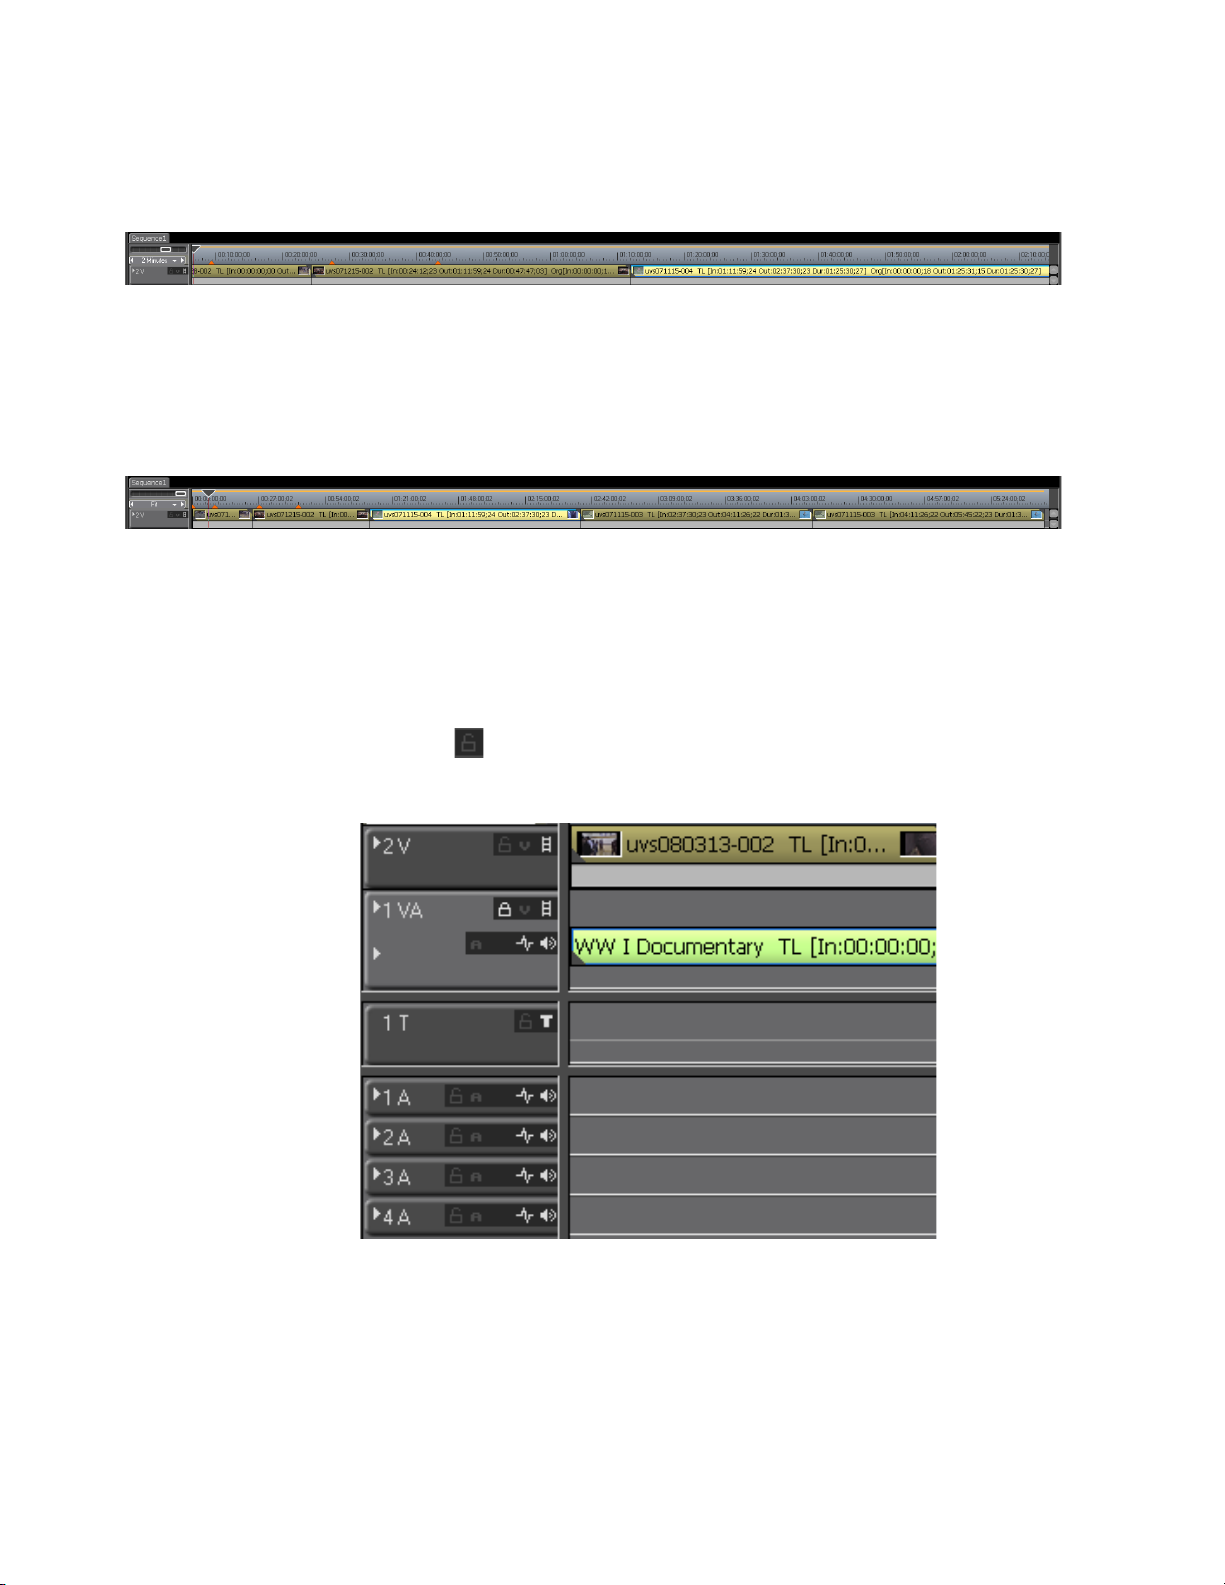
Section 1 — Getting Started
Track Panel
Figure 59. Timeline Sequence Two-Minute Scale Unit
Figure 60 depicts the same sequence with the Timeline scale unit set to “Fit”
which adjusts the Timeline scale to accommodate the entire sequence on a
single screen.
Figure 60. Timeline Sequence “Fit” Scale Unit
The track panel is used for managing video clips and audio clips, generating audio wave forms, managing titles, etc. More details regarding the
track panel are found in
Section 5-Timeline Operations.
Click the icon to lock a track and prevent it from being edited.
Figure 61. Timeline Window Track Panel
64 EDIUS Neo — User Reference Guide
Page 65

Asset Bin Window
The asset bin is where video and audio clips are stored and organized. The
Asset Bin has three main components:
•the Operation Buttons
• the Folder View
• the Clip View.
The Asset Bin is shown in Figure 62.
Figure 62. Asset Bin
Asset Bin Window
The folder view on the left side of the window displays a tree view of asset
folders into which clips can be grouped and organized.
The clip view on the right side of the window shows thumbnails (default
view) of the clips stored in the selected folder.
EDIUS Neo — User Reference Guide 65
Page 66

Section 1 — Getting Started
Palette Windows
The Palette Windows are:
• the Information Palette
• the Effect Palette
• the Marker Palette
Information Palette
Information regarding the clip selected on the Timeline is displayed in the
Information Palette window. Any effects that have been applied to the clip
are also displayed in the Information Palette window. For more informa
tion concerning the Information Palette see Section 4-Clip Operations and
Management.
Figure 63. Information Palette
-
66 EDIUS Neo — User Reference Guide
Page 67
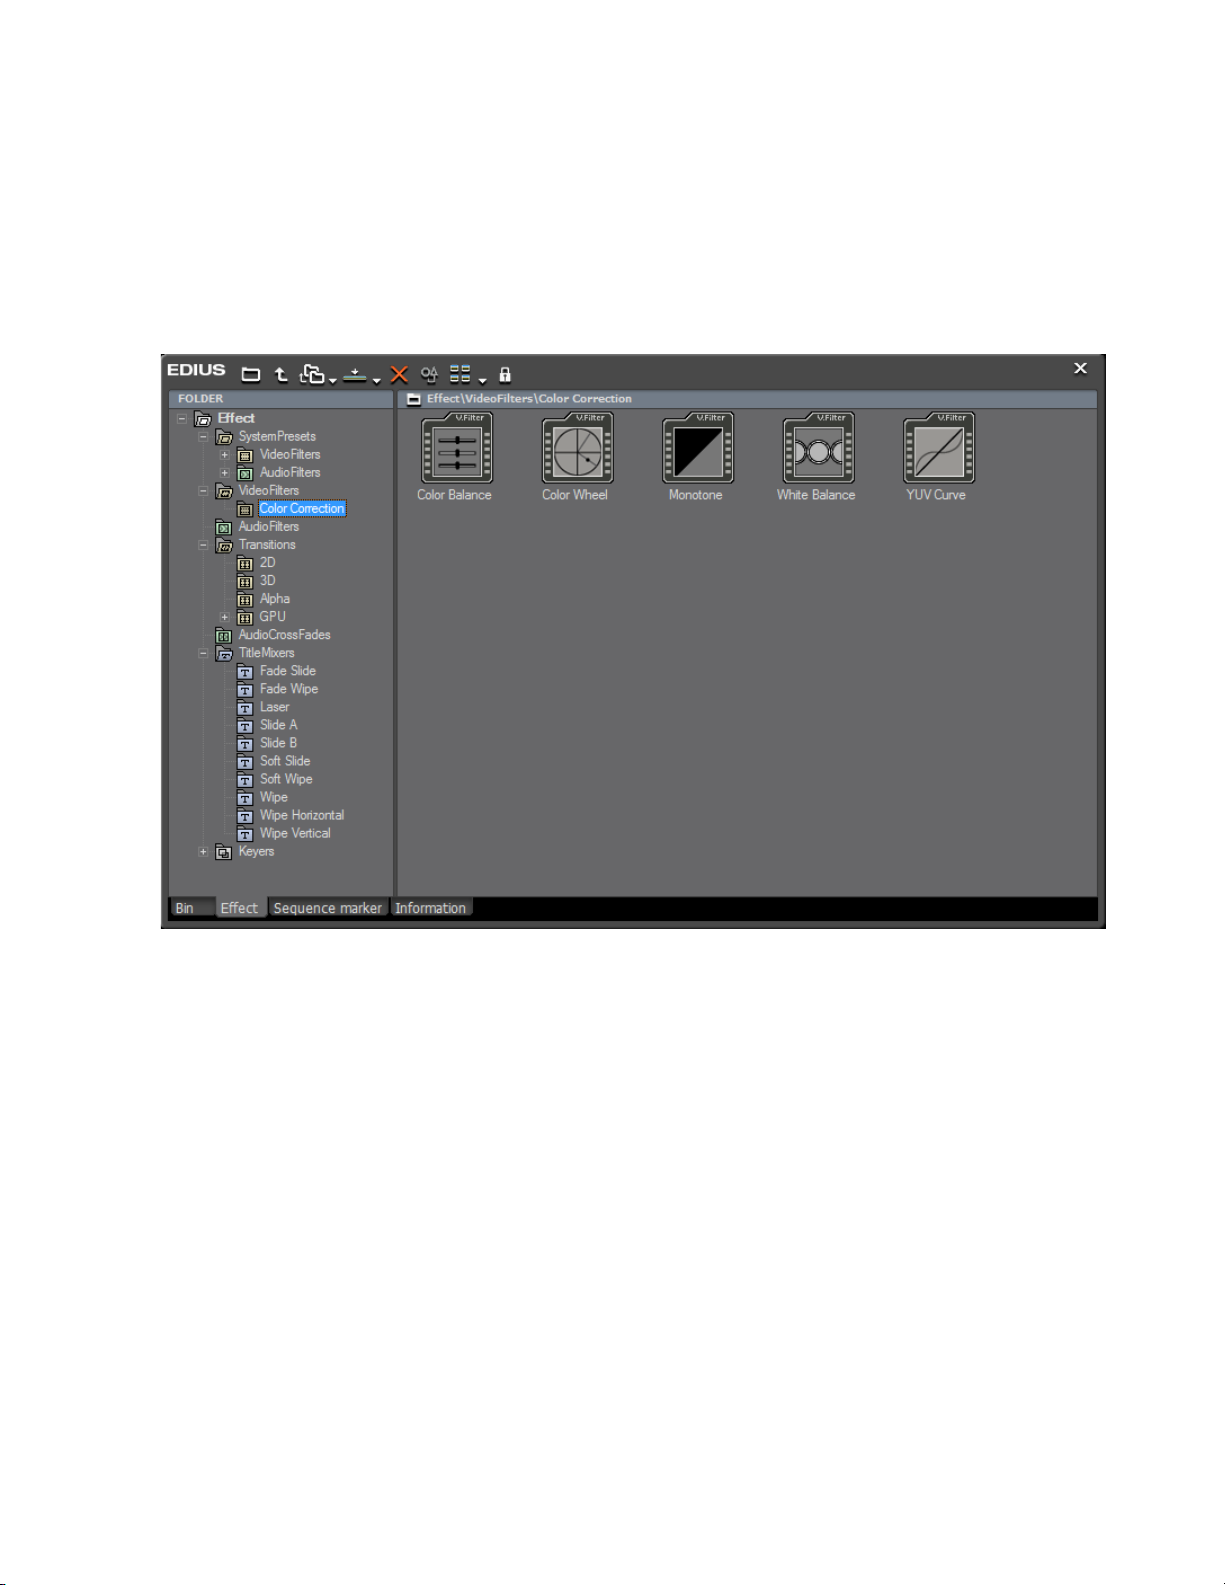
Effect Palette
Palette Windows
The Effect Palette window displays the various color correction, video and
audio filter, transition, title mixer and other effects that may be applied to
clips on the Timeline.
information on the Effect Palette, see Effects on page 369.
Figure 64. Effect Palette
Figure 64 shows the Effect Palette window. For more
Sequence/Clip Marker Palette
The Sequence/Clip Marker Palette window displays the time code position
of all markers applied to assets on the Timeline. Markers are used to
quickly jump to marked positions on the Timeline. The markers become
chapter points in the project output for the Burn to Disc application (see
Export to DVD or Blu Ray on page 536 for more information on Burn to Disc).
Note Outputs other than Burn to Disc do not receive marker information and
markers do not function as chapter points in these outputs.
See Figure 65 for a depiction of the Sequence Marker Palette. For more
information regarding the Sequence/Clip Marker Palette, see Sequence and
Clip Markers on page 316.
EDIUS Neo — User Reference Guide 67
Page 68

Section 1 — Getting Started
Figure 65. Sequence Marker Palette
68 EDIUS Neo — User Reference Guide
Page 69

Section 2
Application and Plug-In Settings
This section covers application and plug-in settings that are used to customized EDIUS Neo and which determine the behavior of certain EDIUS
Neo features. Settings related to specific hardware that may be used with
EDIUS Neo are discussed in
Application Settings
Application settings are organized in the following settings categories:
• Timeline
•Render
Appendix A-Hardware Settings.
•Duration
•Source
•Capture
• Restore Offline Clip
•Playback
• Match Frame
• Application
•Customize
• Button
• Control
•Overlay
• Display Bin Details
• Keyboard Shortcuts
• Window Color
Any or all of these settings can be adjusted according to your preferences
or to meet the specific requirements for a particular project.
EDIUS Neo — User Reference Guide 69
Page 70
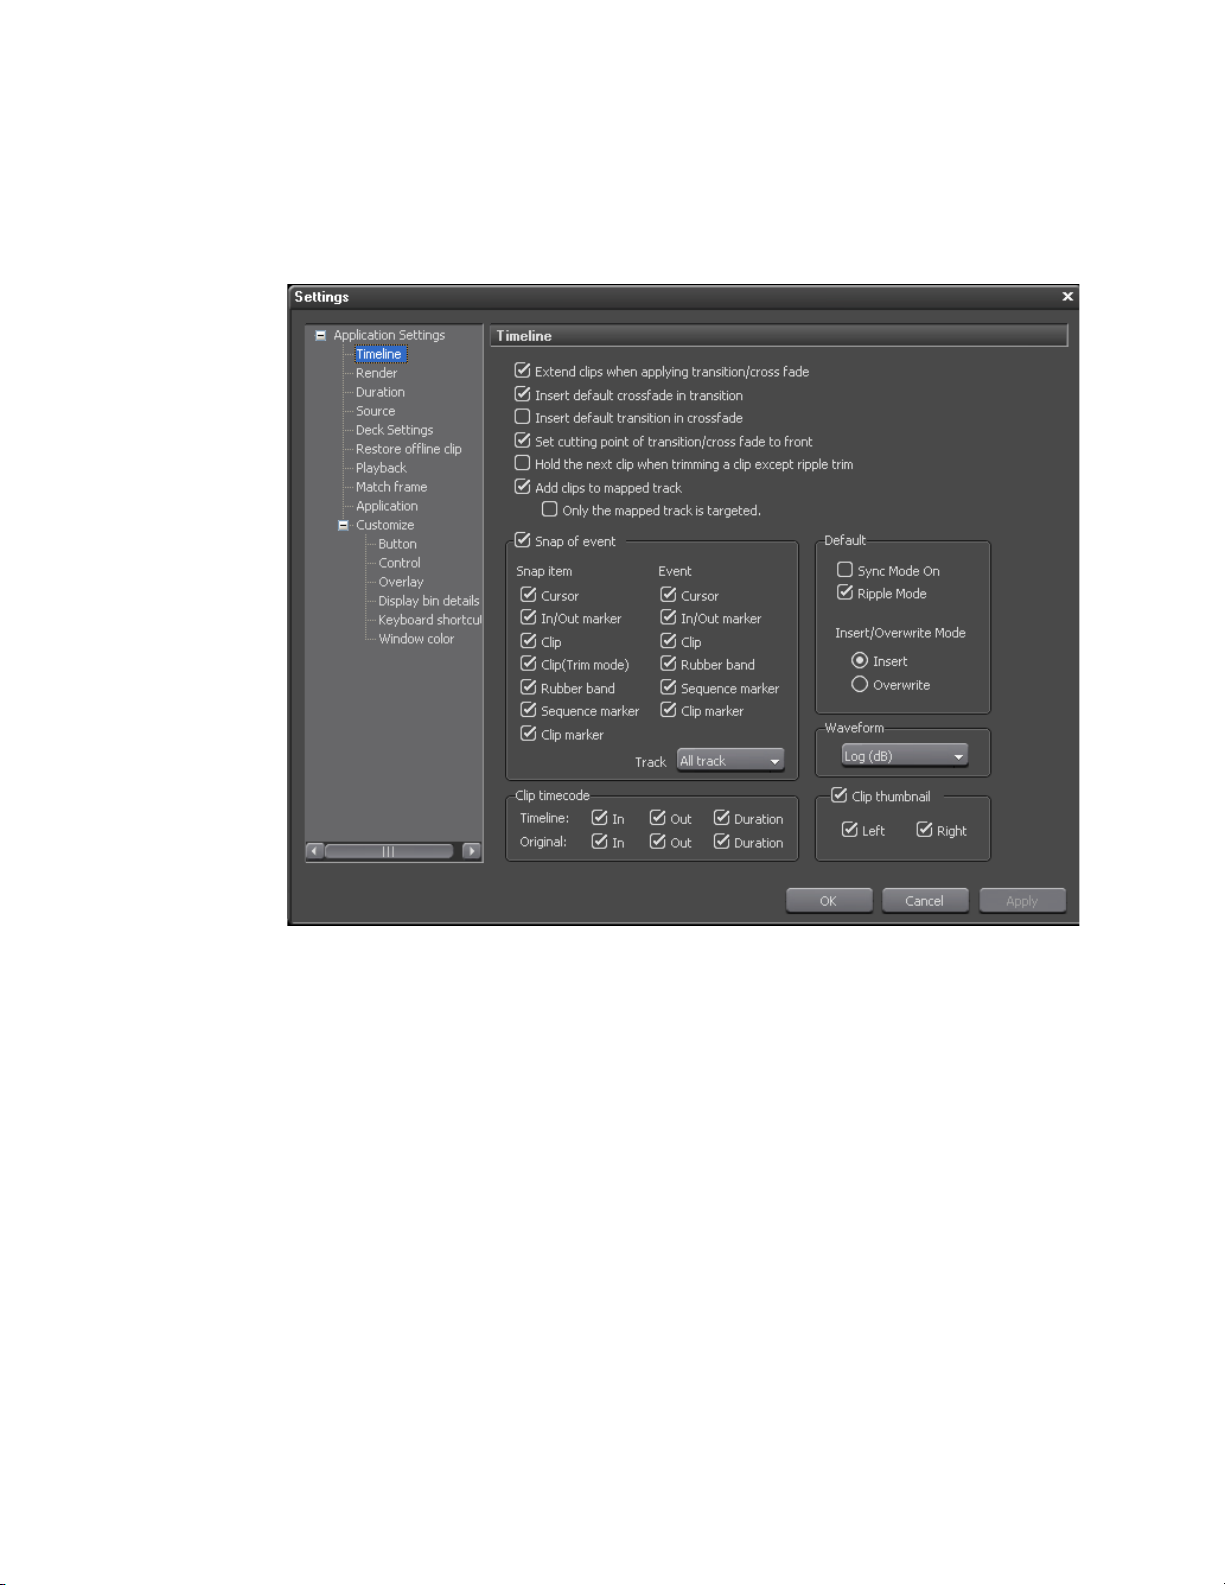
Section 2 — Application and Plug-In Settings
Application settings are accessed by selecting Settings>Application Settings from the Preview window. The Application Settings dialog is shown
in Figure 66 with both Application Settings and Customize trees expanded.
Figure 66. Application Settings Dialog
Timeline Settings
From the Settings dialog shown above, select Timeline from the Application Settings tree (click the “+” to expand the tree if it is collapsed).
The following settings affect clips and effects on the Timeline (see
Figure 66):
Note After making changes to any of the items in the Timeline Settings dialog, click
the Apply button to apply the changes and make them active. Several
changes may be made before clicking the Apply button.
Extend Clips When Applying Transition/Cross Fade
The status of this setting determines whether extend mode is enabled or fix
mode is enabled as explained below.
70 EDIUS Neo — User Reference Guide
Page 71

Application Settings
Extend Mode
• Extend clips when applying transition/cross fade — If this setting is
checked, adding or deleting a transition or audio cross fade between
clips will not change the overall sequence length on the Timeline as
illustrated in Figure 67. Default = Checked (extend mode enabled).
For more information on Extend Mode, see Extend Mode on page 221.
Figure 67. Extend Mode Example
Fix Mode
• Extend clips when applying transition/cross fade — If this setting is
not checked (disabled), adding a transition or an audio cross fade
between clips shortens the overall length of the sequence on the Timeline as illustrated in Figure 68. Deleting a transition or cross fade
lengthens the sequence on the Timeline. Default = Checked (extend
mode enabled).
For more information on Fix Mode, see Fix Mode on page 223.
Figure 68. Fix Mode Example
EDIUS Neo — User Reference Guide 71
Page 72

Section 2 — Application and Plug-In Settings
Insert Default Cross Fade in Transition
If this item is checked, adding a transition to a video clip on the VA track
will automatically add an audio cross fade of the same length as the transi
tion to the audio clip at the same position. Default = Checked.
Insert Default Transition in Cross Fade
If this item is checked, adding a cross fade to an audio clip on the VA track
will automatically add a transition of the same length as the audio cross
fade to the video clip at the same position. Default = Not Checked.
Set the Cutting Point of Transition/Cross Fade to Front
If this item is checked, the cut point of a transition or audio cross fade is set
forward. For example, on a seven-frame transition (no even division point
on either side of the cut line), the transition is set between the 3rd and 4th
frame. This is the first full-frame point forward of the 3.5 frame midpoint
of the transition. Default = Checked.
-
Hold the Next Clip When Trimming a Clip Except Ripple Trim
If this item is checked, clips after the clip that is trimmed will hold their
position on the Timeline unless ripple trim is enabled. Default = Not
Checked.
Add Clips to Mapped Track
With this option enabled, when a clip is added to the Timeline, parts of the
clip that have corresponding mappings in the Timeline are also added.
For example, if a video track is mapped, adding a clip to the audio track
will also add the video portion of the clip to the video track. Insert/Overwrite settings are in effect and govern the manner in which the clip is
added.
If “Add clips to mapped track” is disabled, adding a clip to the audio track
will only add the audio portion of that clip to the selected track. The video
portion will not be added.
Default = Checked.
Only the Mapped Track is Targeted
Note This option has no effect if “Add Clips to Mapped Track” is disabled.
When this option is enabled, only the portions of a clip that have mapped
tracks will appear on the Timeline. Adding clips to an unmapped track is
not allowed.
72 EDIUS Neo — User Reference Guide
Page 73

For example, with this option enabled, if no video track is mapped, but
audio tracks are mapped, dragging a clip with both video and audio onto
the Timeline will result in only the audio portion appearing on the mapped
audio track(s).
When this option is disabled, the portion of the clip that does not have corresponding track mapping will be placed on the Timeline where the user
drops it, if possible, and the mapped portions will appear on the mapped
track(s).
As an example, if a video track is mapped, dragging a clip with both video
and audio to an audio track will result in the audio of the clip appearing in
the selected audio track and the video of the clip appearing in the mapped
video track.
Default = Not Checked.
Snap of Event
Selection in this section determine which items will snap to which destination and the range to which this applies.
Application Settings
Snap Item
Check the items from the following list which should snap to the designated event destinations (Default = all items checked).
•Cursor
• In/Out Marker
• Clip
• Clip (trim mode)
• Rubber Band
• Sequence Marker
• Clip Marker
Event
Check the events from the following list which will be displayed as snap
destinations (Default = all items checked):
•Cursor
• In/Out Marker
• Clip
• Rubber Band
• Sequence Marker
• Clip Marker
EDIUS Neo — User Reference Guide 73
Page 74

Section 2 — Application and Plug-In Settings
Track
Select from the drop-down list the track range for even snapping. The
choices are: All Tracks or Same Track.
Insert Mode
With insert mode enabled, adding a new clip moves any existing clips at
the insertion point forward in time to accommodate the new clip. The
length of the sequence is increased by the length of the inserted clip (see
Figure 69). Default = On.
Figure 69. Insert Mode Example
Overwrite Mode
With overwrite mode enabled, adding a new clip overwrites the existing
clip at the insertion point by the amount of overlap between the two clips.
The length of the sequence does not increase (see Figure 70). Default = Off.
Figure 70. Overwrite Mode Example
Note Insert Mode and Overwrite Mode are mutually exclusive. Only one or the
Insert and Overwrite mode may also be toggled from the tool bar in the
Timeline window. See Figure 71.
other is active. Enabling one mode automatically disables the other.
74 EDIUS Neo — User Reference Guide
Page 75
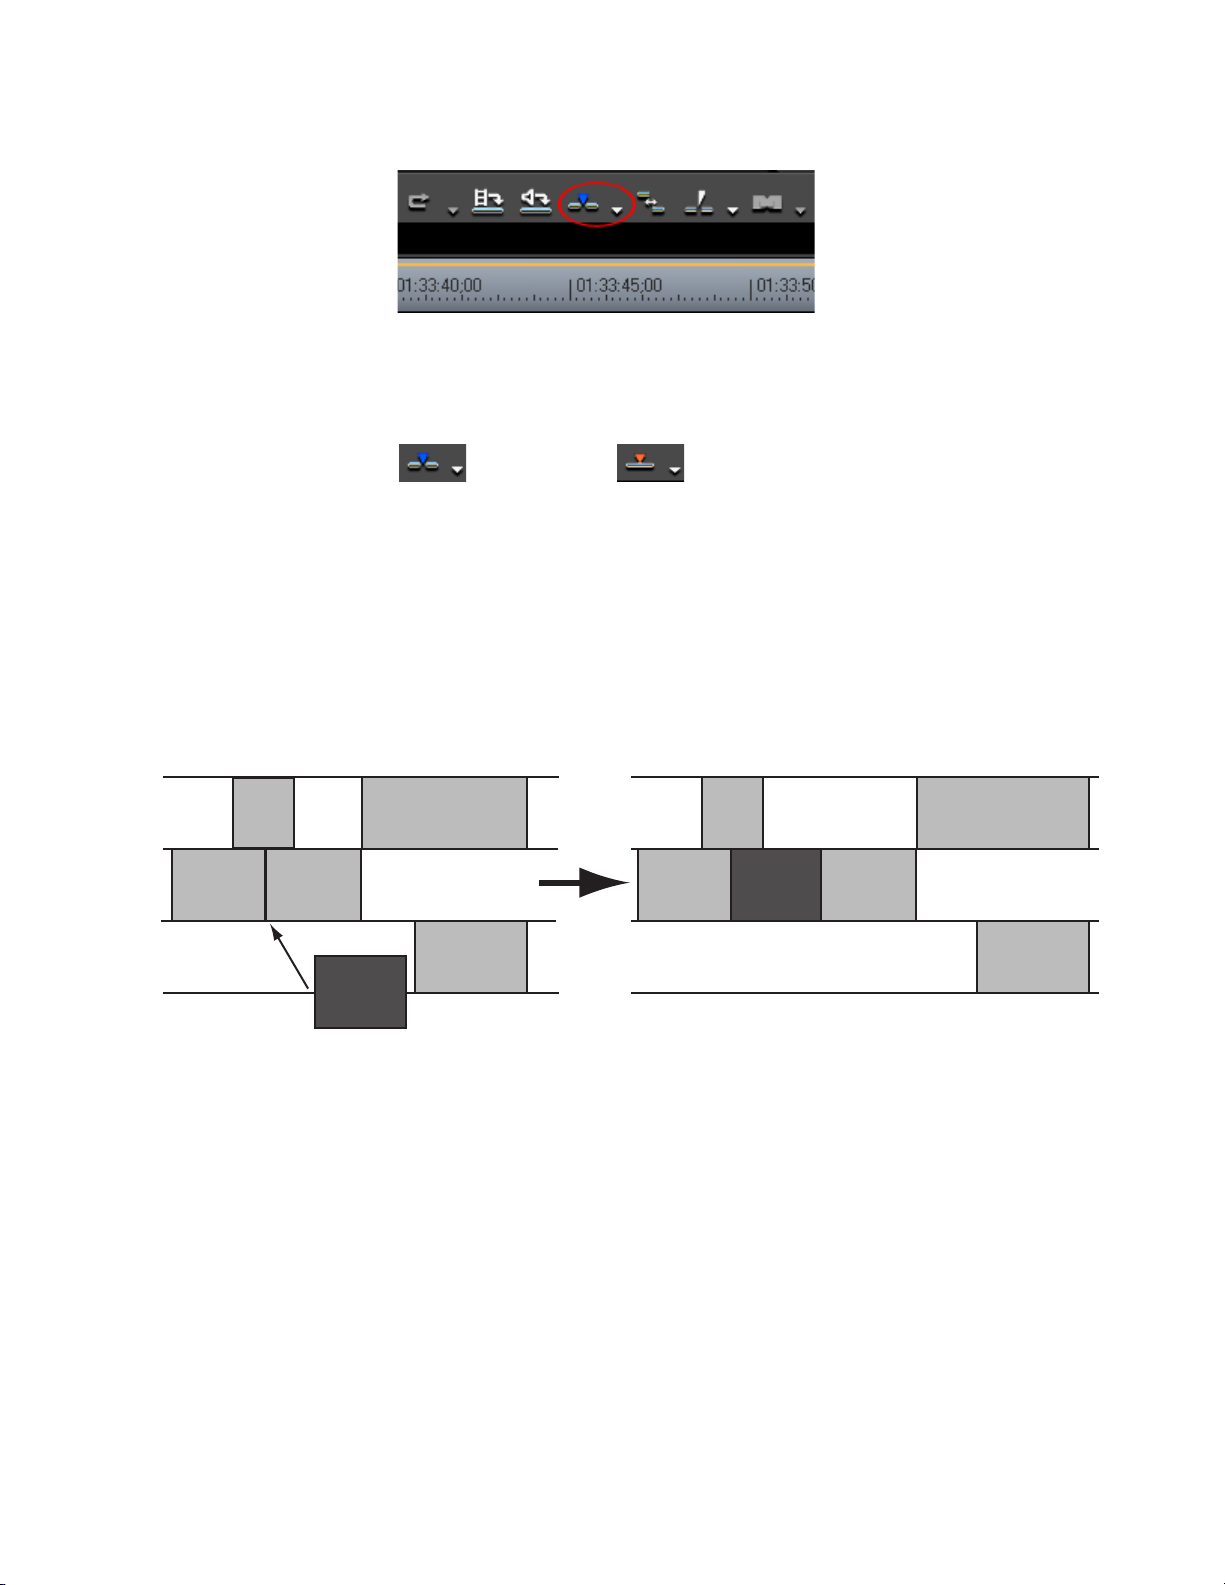
Figure 71. Insert/Overwrite Toggle Button
Each click of the button switches modes.
Sync Mode
If sync mode is enabled, editing a track (inserting or moving clips, for
example) affects other tracks if insert mode is also enabled. All tracks are
kept in sync (maintain their prior positions relative to one another) from the
insertion point on. See
Application Settings
= Insert Mode = Overwrite Mode
Figure 72 for an example. Default = Not Checked.
Figure 72. Sync Mode With Insert Enabled
Sync Mode may also be toggled on and off by either of the following
methods:
• Click the list button [V]on the
Insert Mode or Overwrite Mode icon and
select Sync Mode. A check mark by Sync Mode indicates that Sync
Mode is on. Sync Mode is off when the check mark is not present.
• Select Mode>Sync Mode from the Preview window (see Figure 73). A
check mark by Sync Mode indicates that Sync Mode is on. Sync Mode
is off when the check mark is not present.
EDIUS Neo — User Reference Guide 75
Page 76

Section 2 — Application and Plug-In Settings
Figure 73. Sync Mode Menu Toggle
Note If you do not want Sync Mode to affect a particular track when Sync Mode is
on, click the lock icon on the track panel next to the track you wish to lock
(see Figure 74). When the lock icon is highlighted and locked, the track is
locked. When the icon is dim and unlocked, the track is unlocked. Clicking the
lock icon toggles the lock on and off.
Figure 74. Track Lock Toggle
Ripple Mode
With ripple mode enabled, when a clip is deleted or trimmed, the clips
which follow in the Timeline move to fill in the space formerly occupied by
the trimmed or deleted clip. Default = Checked (On).
Note With ripple mode on, the behavior of clips on all tracks is also affected by the
Figure 75 represents the movement of clips in various tracks on the Time-
line when ripple mode is on, sync mode is off and insert mode is enabled.
status of the Sync Mode setting. The examples below illustrate the effect of
the Sync Mode setting on Ripple Mode editing.
76 EDIUS Neo — User Reference Guide
Page 77

Application Settings
Figure 75. Ripple Mode On/Sync Mode Off/Insert Mode Enabled
Figure 76 represents the movement of clips in various tracks on the Time-
line when both ripple mode and sync mode are turned on with insert mode
also enabled.
Figure 76. Ripple Mode On/Sync Mode On/Insert Mode Enabled
Ripple Mode may also be toggled on and off by one of the following procedures:
• Click the
Ripple Mode button on the Timeline window tool bar. Each click
toggles ripple mode on or off. When ripple mode is off there is a slash
through the ripple mode icon. When ripple mode is on, the slash is
removed. See Figure 77 for details.
Figure 77. Ripple Mode Toggle Button
• Select Mode>Ripple Mode in the Preview window. As in the example
above, the icon next to the Ripple Mode menu selection has a slash
through it when ripple mode is disabled. The slash is not present when
ripple mode is enabled.
EDIUS Neo — User Reference Guide 77
Page 78

Section 2 — Application and Plug-In Settings
Waveform
The Waveform selection sets the display of the waveform on the Timeline.
Choices are Log(dB) or Linear (%). Select the desired waveform display
from the drop-down list by clicking on the V symbol and making the
desired selection. Default = Log (dB).
Clip Timecode
Displays checked timecodes.
In/Out points and duration timecodes on both the Timeline and the original clip may be selected for display.
Clip Thumbnail
If Clip Thumbnail is checked, thumbnails of the In/Out points are displayed at the clip edge of the Timeline. Thumbnails may be displayed on
the left edge, the right edge or both locations. Default = All Checked.
Render Settings
These options control the behavior of the blue/aqua/green/orange/red
lines under the time scale ticks on the Timeline. These colored lines control
what is rendered by forced temporary rendering (the Render In/
Out>Render Overload Area on the Preview window menu bar).
Blue
The area should play back in real-time (no rendering required).
Aqua Blue
Clip will playback in real-time with no rendering (rendering may be
required in certain circumstances).
Green
The area has been rendered to a temporary file.
Orange
The area may not play back in real-time (this area is considered a
"loaded" area).
Red
Real-time playback was attempted for this area but failed (this area is
considered an "overload" area).
78 EDIUS Neo — User Reference Guide
Page 79

Application Settings
The checkboxes determine what factors are considered when labeling an
area as "loaded" (orange).
Regardless of the settings, a Render overload area command will still
render all of the effects to the temporary file.
The render settings are accessed by selecting Settings>Application Settings
from the Preview window and then selecting Render from the Application
Settings tree in the Settings dialog. See Figure 78.
For more information on rendering, see Rendering Operations on page 349.
Note After making changes to any of the items in the Render Settings dialog, click
the Apply button to apply the changes and make them active. Several
changes may be made before clicking the Apply button.
Figure 78. Render Settings
Select or de-select the following to be included in the rendering process:
Default = All Checked (included in rendering target).
EDIUS Neo — User Reference Guide 79
Page 80

Section 2 — Application and Plug-In Settings
Filters
Select to include video filters in the rendering process.
Transition/Cross Fades
Select to include transition and title mixers in the rendering process.
Key/Transparency
Select to include key effect and transparency (when changed from the
default) in the rendering process.
Speed Change
Select to include any clips that feature speed adjustments from the default
of 100% in the rendering process.
Contents That Are Not the Same Format as the Project
Select to include in the rendering target any clips with formats that differ
from project settings. Clips with the following format differences are
included in the rendering process if this parameter is checked:
• Frame size different than project settings
• Aspect ratio different than project settings
• Frame rate different than project settings
• Field order different than project settings
• CODEC compression format different than project settings
• Alpha channel information included in clip
Rendering Decisions
If this parameter is checked, EDIUS Neo will mark areas as requiring rendering if, during playback, the buffer drops below the number of frames
specified in the Buffer Left setting. Default = Checked.
Buffer Left
Specify a number of frames in the buffer which is the threshold for the rendering decision. If the number of frames in the buffer drops below this
threshold during playback, the area will be marked as requiring rendering.
Maximum = 10 frames.
80 EDIUS Neo — User Reference Guide
Page 81

Delete Invalid Rendering Files
This selection determines when invalid rendering files are deleted. The
choices are:
• When the rendered file is invalid
• When the project is closed (default)
These choices are mutually exclusive. Selecting one automatically deselects the other.
Duration Settings
Duration settings determine the default duration on the Timeline of still
images, titles and V-mutes. These settings are defaults and my be changed
on a source-by-source basis on the Timeline.
The format of these duration fields is HH:MM:SS;FF (H=hour, M=Minutes,
S=Seconds; F=Frames). See Entering Numeric Data on page 22 for more information on the various methods for entering numeric data.
Application Settings
The Duration settings are accessed by selecting Settings>Application Settings from the Preview window and then selecting Duration from the
Application Settings tree in the Settings dialog. See Figure 79.
Note After making changes to any of the items in the Duration Settings dialog, click
the Apply button to apply the changes and make them active. Several
changes may be made before clicking the Apply button.
EDIUS Neo — User Reference Guide 81
Page 82

Section 2 — Application and Plug-In Settings
Figure 79. Duration Settings
Still Image
When a still image is placed on the Timeline, its default duration will be the
duration specified in this setting. Default = 00:00:01;00 (1 second).
Add Between In/Out
Check this box if you want to allow still images to be placed between In/
Out points on the Timeline. Default = Checked.
Title
When a title is placed on a title track, its default duration will be the duration specified in this setting. Default = 00:00:01;00 (1 second).
Automatically Add Title Mixer When Importing Titles
If this setting is checked, placing a title on the track automatically applies
the default title mixer as well. Default = Checked.
82 EDIUS Neo — User Reference Guide
Page 83

Add Between In/Out Points
Check this box if you want to allow titles to be placed between In/Out
points on the Timeline. Default = Checked.
V-Mute
The V-mute function eliminates audio by frame units. This is useful for
eliminating small amounts of unwanted audio noise.
Set the desired default duration for V-mute. Default = 00:00:01;00 (1
second).
Rubberband Point
Set the desired auto add point for rubberband points.
Source Settings
Source settings determine how sources imported into EDIUS Neo are
treated.
Application Settings
The Source settings are accessed by selecting Settings>Application Settings
from the Preview window and then selecting Source from the Application
Settings tree in the Settings dialog. See Figure 80.
Note After making changes to any of the items in the Source Settings dialog, click
the Apply button to apply the changes and make them active. Several
changes may be made before clicking the Apply button.
EDIUS Neo — User Reference Guide 83
Page 84

Section 2 — Application and Plug-In Settings
Figure 80. Source Settings
Adjust Frame Rate When Loading Clip
Check this box if you want the frame rate of imported clips to be automatically adjusted to match the project settings frame rate. (Default = Not
Checked).
Color Range for RGB Clip
This setting determines the default way EDIUS Neo should treat RGB colorspace clips.
Note The color range setting can be changed for individual clips in the Bin in the
Clip Properties.
Because there are two different methods for converting RGB color space to
YCbCr color space for broadcast, you may find that RGB clips may have
blown-out whites and crushed blacks or have dull whites and grayish
blacks.
84 EDIUS Neo — User Reference Guide
Page 85

Application Settings
Select the desired color range for RGB clips. Choices are:
• White (default)
• Super White
White
Maps RGB 0,0,0 to YCbCr 16,128,128 (broadcast-safe black) and RGB
255,255,255 to YCbCr 235,128,128 (broadcast-safe white). All values inbetween are interpolated through the range.
Use this setting if your RGB clip is showing crushed blacks and blown-out
whites.
Super White
Maps RGB 0,0,0 to YCbCr 0,128,128 (super-black) and RGB 255,255,255 to
YCbCr 255,128,128 (super-white). All values in-between are interpolated
through the range.
If your RGB clip is showing grayish blacks and dull whites, set the clip's
color range to Super White.
Color Range for YCbCr Clip
This setting determines the default way EDIUS Neo should treat YCbCr
colorspace clips.
Note This option does not have any affect on Canopus DV, Canopus HQ or Canopus
Lossless clips. These formats are always treated as Super White.
Select the color range for YCbCr Clips. Choices are:
•White
• Super White (default)
White
Maps YCbCr 0,128,128 to YCbCr 16,128,128 (broadcast-safe black) and
YCbCr 255,128,128 to YCbCr 235,128,128 (broadcast-safe white). All values
in-between are interpolated through the range.
Use this setting if your YCbCr clip is showing crushed blacks and blownout whites.
Super White
Maps YCbCr 0,128,128 to YCbCr 0,128,128 (super-black) and YCbCr
255,128,128 to YCbCr 255,128,128 (super-white).
EDIUS Neo — User Reference Guide 85
Page 86

Section 2 — Application and Plug-In Settings
If your YCbCr clip is showing grayish blacks and dull whites, set the clip's
color range to Super White.
Capture Settings
Capture settings determine how EDIUS Neo interacts with an external
source device when capturing clips.
The Capture settings are accessed by selecting Settings>Application Settings from the Preview window and then selecting Capture from the Application Settings tree in the Settings dialog. See Figure 81.
Note After making changes to any of the items in the Capture dialog, click the
Apply button to apply the changes and make them active. Several changes
may be made before clicking the Apply button.
Figure 81. Capture Settings
The format of the Preroll and Margin fields is HH:MM:SS;FF (H=hour,
M=Minutes, S=Seconds; F=Frames). See Entering Numeric Data on page 22
for more information on the various methods for entering numeric data.
86 EDIUS Neo — User Reference Guide
Page 87

Preroll
Enter the desired time to preroll the device before capturing begins.
Margin
Enter the desired clip margin added at In and Out points during capture
operations. The margin is the “dead space” before and after clips that can
by used to insert transitions and other effects.
Confirm Reel Name When Setting Input Device
If the option is selected, when an input device is selected for capture operations, the ReelName dialog illustrated in Figure 82 will automatically
appear. See Section 3-Capturing and Importing Clips and Stills for more information. Default = Not Checked.
Figure 82. ReelName Dialog
Application Settings
Confirm Filename
A file name for AVI file(s) generated during capture operations is automatically created. This setting determines when the user is prompted to
confirm/change the filename and location. Choices are:
•Before Capture
• After Capture (default)
Select the desired filename confirmation setting.
Load to Player After Capture
If this setting is checked, the AVI file created during a capture operation
will be automatically loaded into the Player when the capture is complete.
Default = Not Checked.
Skip Errors and Continue Capture
If this setting is checked, errors encountered during batch capture operations will be ignored and capturing will continue. Default = Checked.
EDIUS Neo — User Reference Guide 87
Page 88

Section 2 — Application and Plug-In Settings
Automatically Divide Files
Select the conditions which will cause captured data to be automatically
divided into multiple AVI files during capture operations. Choices are:
• At timecode break
• When aspect ratio changes
• When audio sampling rate changes
• When the recording time data changes
Default = All Checked.
Deck Control After Capture
Select the desired deck state after a manual capture and a batch capture.
Capture
•Nothing
•Pause (default)
•Stop
Batch Capture
•Nothing
•Pause
• Stop (default)
Restore Offline Clip Settings
Clips that have been used in projects may go “offline” if they are accidentally moved or deleted. If offline clips need to be recaptured, the settings in
this section determine the restoration parameters.
The Restore Offline Clip settings are accessed by selecting Settings>Application Settings from the Preview window and then selecting Restore
Offline Clip from the Application Settings tree in the Settings dialog. See
Figure 83.
Note After making changes to any of the items in the Restore Offline Clip Settings
dialog, click the Apply button to apply the changes and make them active.
Several changes may be made before clicking the Apply button.
88 EDIUS Neo — User Reference Guide
Page 89
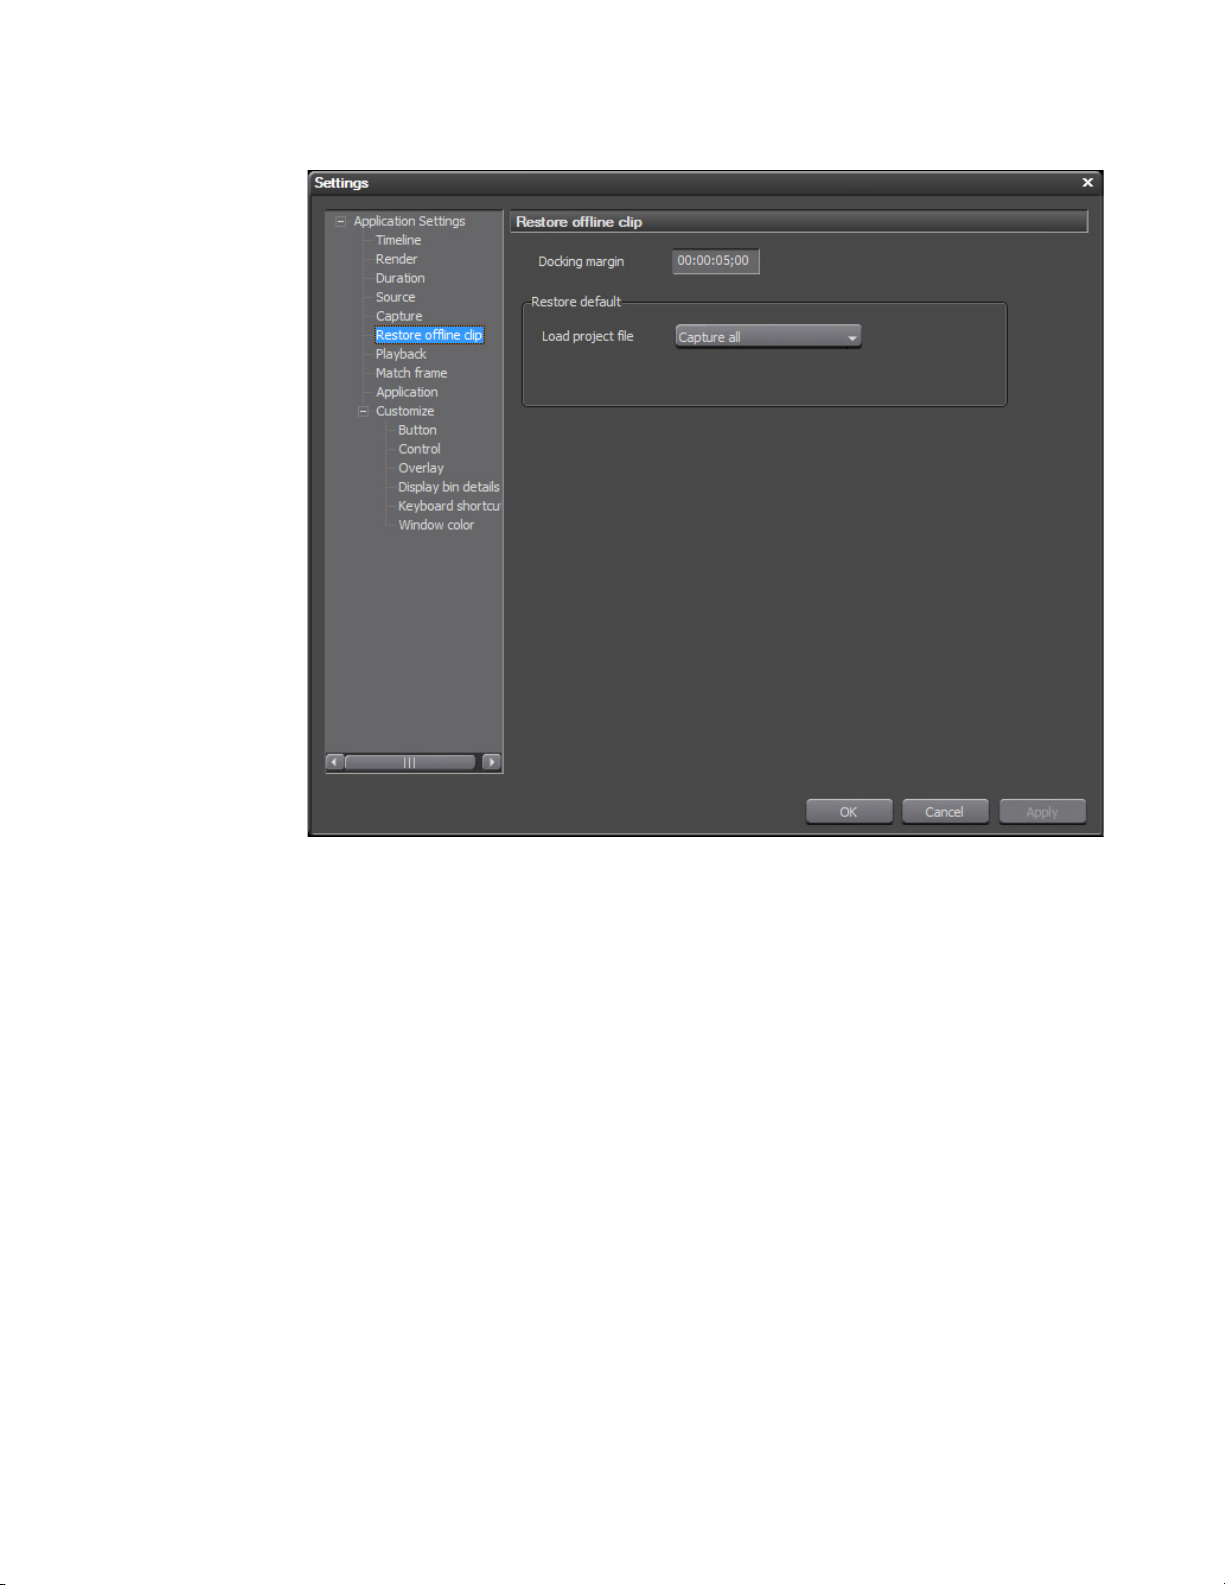
Figure 83. Restore Offline Clip Settings
Application Settings
Docking Margin
When re-capturing the necessary areas of an offline source, set the margin
between recaptured areas. When multiple offline clips are placed on the
Timeline in closer proximity than the docking margin, they are combined
into a single clip.
Set the desired docking margin in a HH:MM:SS;FF (H=hour, M=Minutes,
S=Seconds; F=Frames) format. See Entering Numeric Data on page 22 for
more information on the various methods for entering numeric data.
Restore Default - Load Project File
When restoring clips using a project file select the preferred restoration
method. Choices are:
• Capture all (default)
• Capture used area
•Don’t capture
EDIUS Neo — User Reference Guide 89
Page 90

Section 2 — Application and Plug-In Settings
Playback Settings
Playback settings determine behavior during project playback operations.
The Playback settings are accessed by selecting Settings>Application Settings from the Preview window and then selecting Playback from the
Application Settings tree in the Settings dialog. See
Note After making changes to any of the items in the Playback Settings dialog,
click the Apply button to apply the changes and make them active. Several
changes may be made before clicking the Apply button.
Figure 84. Playback Settings
Figure 84.
Preroll
Set the preroll time for playback with the Play Cursor Area function.
Default = 00:00:03;00 (3 seconds).
Stop Playback at Frame Drop
If this selection is checked, playback stops when processing cannot keep up
with the playback speed which results in dropped frames. Default = Not
Checked.
90 EDIUS Neo — User Reference Guide
Page 91

Application Settings
Continue Playback When Editing
If this option is checked, playback continues even as editing operations are
executed during playback. Default = Checked.
Continue Playback When Trimming Clip
If this option is checked, playback continues even as clip trimming operations are executed during playback. Default = Checked.
Show Correct Frame When Scrubbing
When checked, the correct frame is always displayed while scrubbing
(dragging the Timeline cursor with the mouse). If this option is not
checked, some frames may be skipped while scrubbing. When scrubbing
on MPEG or Windows Media files, it is best to leave this option disabled.
Default = Not Checked.
Combine Filter Layers and Track Layers (for Effect Settings)
When checked, this option displays a composite image when previewing
clips in the effect settings dialog box. For example the composite image of
V1 and V2 track images is displayed when opening the settings dialog for
a video filter applied to the V1 track. If this option is not checked, only the
image on the V1 track is displayed. Default = Not Checked.
Buffered Frames Before Playback
This setting designates the number of frames to be buffered when playback
is initiated. Increasing the number of buffered frames increases the likeli
hood that processing can keep up with the playback speed. Choices are 5,
10 and 15. Default = 5.
Output Timecode
Select the timecode to be exported when exporting to file or tape. Choices
are:
• Sequence timecode (default)
•Source timecode
Source Timecode Priority
-
When exporting or displaying the source timecode, set the track priority to
either lower track (default) or upper track.
Note Even with Lower Track selected, if the upper track transparency is not set to
100%, the lower track timecode is not displayed.
EDIUS Neo — User Reference Guide 91
Page 92

Section 2 — Application and Plug-In Settings
Match Frame Settings
Match Frame settings determine search order and targets.
The Match Frame settings are accessed by selecting Settings>Application
Settings from the Preview window and then selecting Match Frame from
the Application Settings tree in the Settings dialog. See
Note After making changes to any of the items in the Match Frame Settings dialog,
click the Apply button to apply the changes and make them active. Several
changes may be made before clicking the Apply button.
Figure 85. Match Frame Settings
Figure 85.
Search Direction
Select the desired search direction; Previous or Next (default). Previous
searches from right to left across the Timeline. Next searches from left to
right across the Timeline.
92 EDIUS Neo — User Reference Guide
Page 93

Target Tracks
The target tracks selection determines which tracks are searched. All tracks
is the default. If you want to limit the tracks that are searches, select Choose
Tracks and then check the tracks to be included in searches. Choices are:
• VA tracks or V tracks (Video/Audio or Video only)
• A tracks (Audio)
• T tracks (Title)
• Selected track (track currently selected in the Timeline window)
Transition
When searching for transitions, this setting determines if the search should
find the frame before the transition (“from” side clip) or the frame after the
transition (“to” side clip). Default = “from” side clip.
Application Settings
Application Settings
Application settings determine how EDIUS Neo saves files, records
window positions, creates titles and other application-specific operations.
The Application settings are accessed by selecting Settings>Application
Settings from the Preview window and then selecting Application from the
Application Settings tree in the Settings dialog. See
Note After making changes to any of the items in the Application Settings dialog,
click the Apply button to apply the changes and make them active. Several
changes may be made before clicking the Apply button.
Figure 86.
EDIUS Neo — User Reference Guide 93
Page 94

Section 2 — Application and Plug-In Settings
Figure 86. Application Settings
Recent Clip - Show the MRU List
If this option is selected, the names of recently used clips will appear in the
Recent Clip list which is accessed by selecting File>Recent Clip from the
preview window menu bar. See
Figure 87 for an example.
94 EDIUS Neo — User Reference Guide
Page 95

Figure 87. Recent Clip Menu
Application Settings
Recent Clip - Number of Files
The number entered in this field designates how many recently used clips
will be displayed in the Recent Clip list. Default = 5.
Recent Clip - Show Thumbnail in the MRU List
If selected, this setting displays clip thumbnails in the Recent Clip list.
Large or Small (default) clip thumbnails may be selected. See
Recent Project - Show the MRU List
If this option is selected, a list of recently opened projects appears in the
Recent Project area of the EDIUS Neo start up screen.
Recent Project - Number of Files
The number entered in this field designates how many recently opened
projects will be displayed in the recent Project window. Default = 5.
Settings - Save Window Positions
If this setting is checked, window and palette positions at the time EDIUS
Neo is closed are saved and used the next time EDIUS Neo is started.
Figure 87.
Settings - Show Tooltip
If this option is enabled, tooltips are displayed when the mouse cursor is
positioned on effect names. Default = Checked.
EDIUS Neo — User Reference Guide 95
Page 96

Section 2 — Application and Plug-In Settings
Settings - Enable Auto Save/Auto Save Interval
If this setting is checked, open project files are automatically saved at the
interval specified in Auto save interval. The Auto save interval is specified
in minutes. Default = Checked with a 3-minute auto save interval.
Settings - Player Format
Select the desired player format for file playback; Auto detect or Timeline
format (default).
Settings - Default Titler
Select the default application to be used for creating titles. QuickTitler is the
default application included with EDIUS Neo. If other EDIUS-compatible
titling applications (such as TitleMotion Pro) have been installed, they will
be available in the selection list.
Project File - Default Folder
A default project folder may created when EDIUS Neo is first started. The
default location for all projects may be changed here. Regardless of the
default project folder location setting, a different location may be specified
for each project, if desired, as it is created or saved.
Project File - File Name
Enter the default filename when a new project is created. The default name
can be changed when a new project is created or saved.
Customize Settings
Many aspects of the EDIUS Neo interface may be customized including
buttons, keyboard shortcuts, window colors and more.
Button Settings
The Button settings are accessed by selecting Settings>Application Settings
from the Preview window and then selecting Button from the Customize
tree in the Settings dialog. See
Figure 88.
If the Customize tree is collapsed, click the “+” to expand the tree.
Note After making changes to any of the items in the Button dialog, click the Apply
button to apply the changes and make them active. Several changes may be
made before clicking the Apply button.
96 EDIUS Neo — User Reference Guide
Page 97

Figure 88. Button Settings
Customize Settings
Buttons for the Player, Recorder, Asset Bin, Timeline and Effects windows
may be customized according to needs and usage patterns. The Player and
Recorder buttons are divided into the following button groups (see
Figure 89):
•Left
•Center - Left
• Center - Right
•Right
Figure 89. Player Operation Button Groups
EDIUS Neo — User Reference Guide 97
Page 98
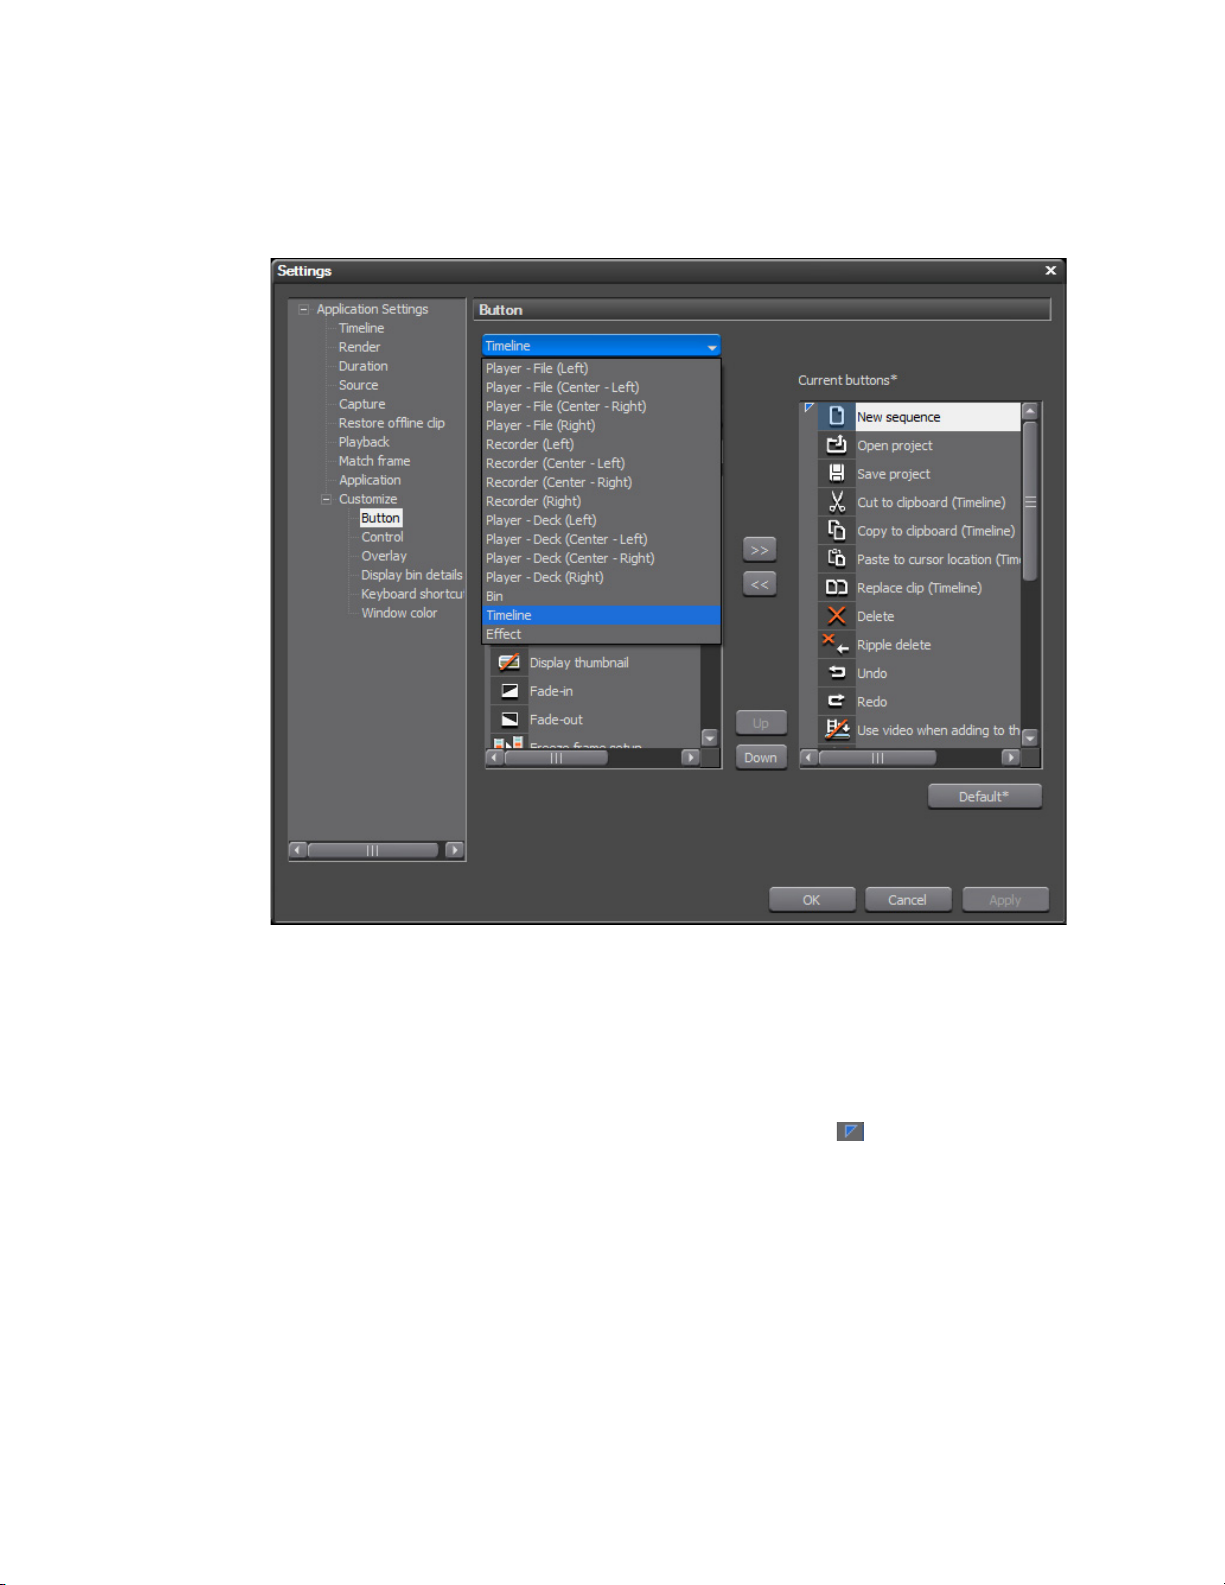
Section 2 — Application and Plug-In Settings
The drop-down list at the top of the Button dialog (see Figure 90) displays
the button groups that may be customized.
Figure 90. Select Button Group
To customize operation buttons, do the following:
1. Select the button group to be customized from the drop-down list box
shown in Figure 90.
2. From the Current Buttons list, select the button before which you want
the new button placed. The insertion marker marks the position at
which the button will be inserted. See Figure 91 for an example.
98 EDIUS Neo — User Reference Guide
Page 99

Customize Settings
Figure 91. Select New Button Position
3. Select a button to add from the Available Buttons list and click the Add
button.
Note The Available Buttons list can be filtered to narrow down the possible selec-
tions. From the Category drop-down list, a specific button category may be
selected (see Figure 92). Alternatively, a key word may be entered in the Filter
field to narrow down the list of available buttons.
Figure 92. Button Category Selection
The selected button is added to the Current Button list at the position of the
insertion marker. See Figure 93.
4. Add other buttons as needed following the steps above.
EDIUS Neo — User Reference Guide 99
Page 100
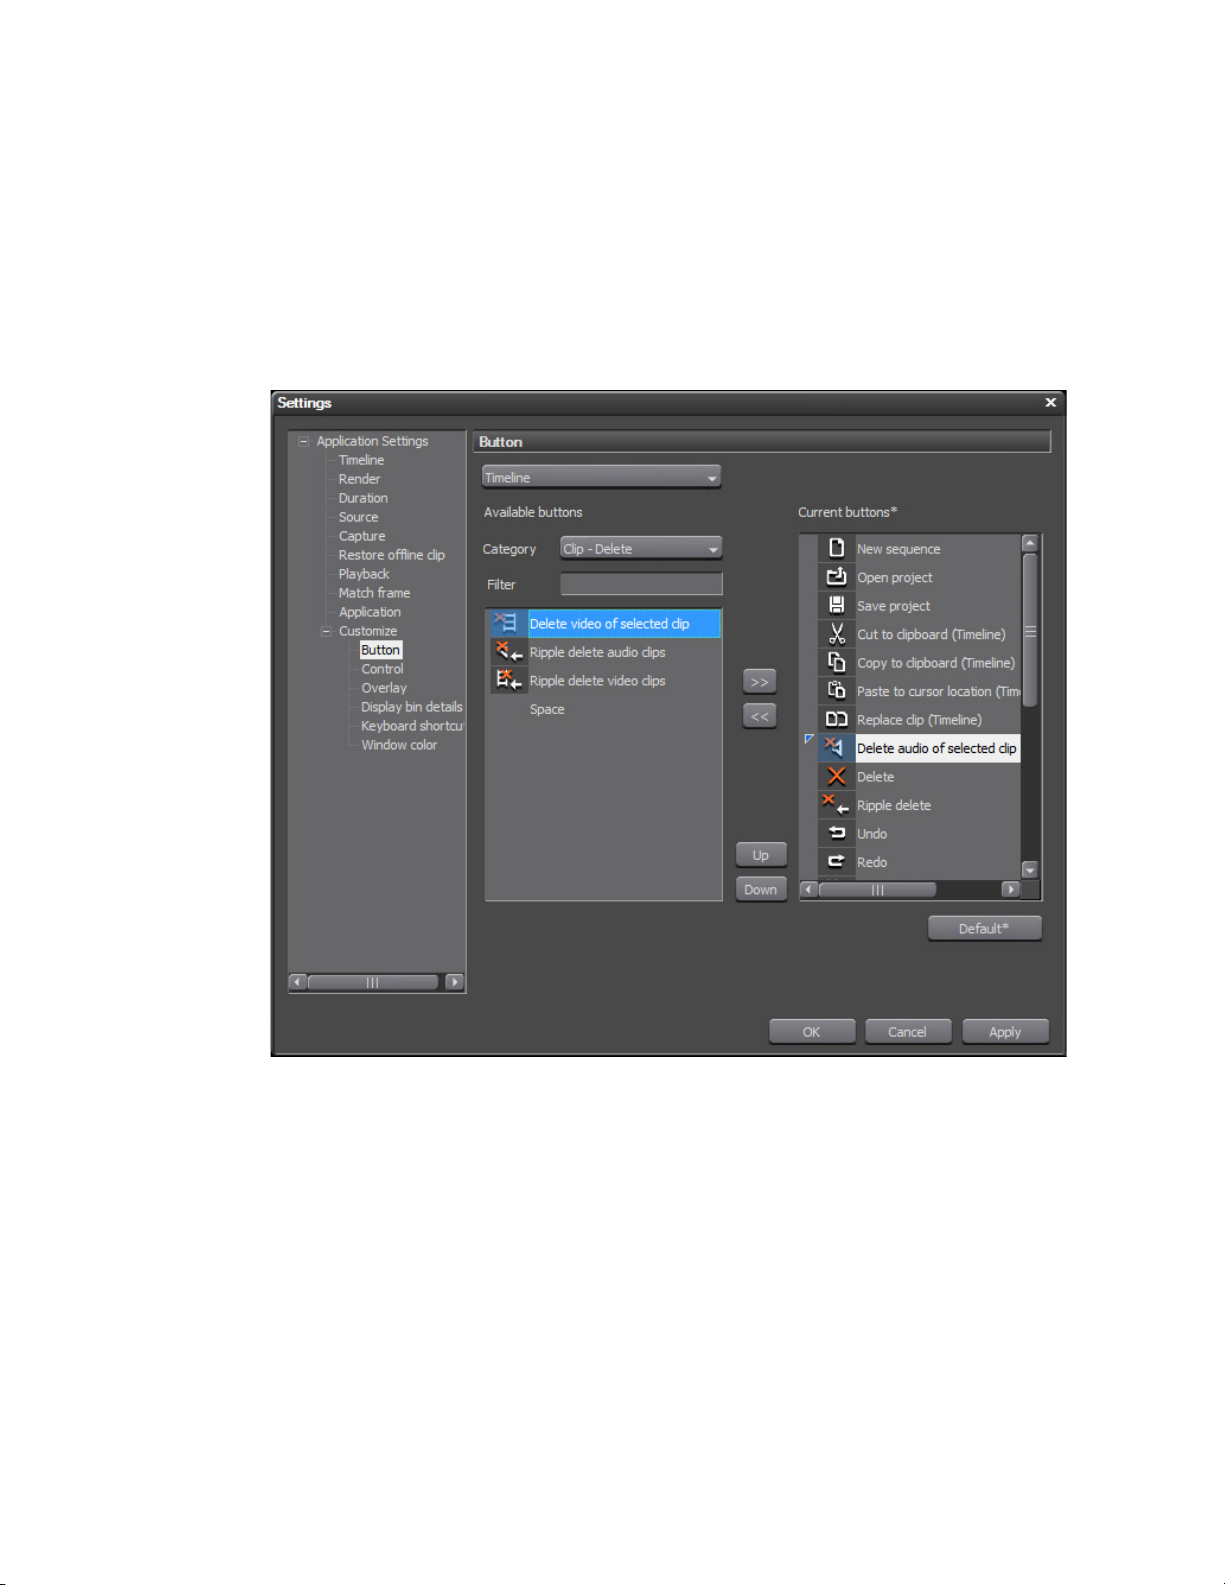
Section 2 — Application and Plug-In Settings
Alternative Methods:
• Double-click the button to be added from the Available buttons list. The
button is inserted in the Current Buttons list above the insertion point.
• Drag and drop the button from the Available Buttons list to the Current
Buttons list. The button may be dropped at any point in the Current
Buttons list and the selected insertion point is ignored.
Figure 93. New Button Added to Current Buttons List
5. Make additional changes to button groups as needed (see page 101 for
additional button actions).
6. Click the Apply button to apply the changes made to button groups and
close the Button Settings dialog.
Note If too many buttons are added to the Player (Center - Left), Player (Center -
Right), Recorder (Center - Left) or Recorder (Center - Right) button groups,
only the buttons that can be displayed within the available area will be shown.
Other button actions may be performed in the Button Setting dialogs as
explained below.
100 EDIUS Neo — User Reference Guide
 Loading...