Page 1

APPLICATION
NOTE
EDIUS for Avid Editors
By Maxim Jago, 123 Training
www.123training.co.uk
November 2010
Based on Grass Valley™ EDIUS® 6 and
Avid Media Composer 5
www.grassvalley.com
Page 2

Contents
Introduction 1
About This Overview 1
Differences and Similarities 2
Overview of the EDIUS Interface 3
Asset Bin 3
Source Browser 3
Player and Record Monitors 4
Timeline 4
Information Palette 5
Effects Palette 5
EDIUS Button Menus 5
Timeline Modes 5
Importing Media 6
Source Browser 6
Working with the Asset Bin 7
Additional Tools 8
Player and Recorder Preview Monitors 9
Preview Monitor Overlays 10
On-Screen Display 10
Page 3

EDIUS FOR AVID EDITORS
Core Editing 11
Adding Clips to a Sequence 11
Removing Clips from a Sequence 11
Moving Clips in a Sequence 11
The Proxy Workflow 11
Working with the Timeline 12
Timeline Modes 12
Track Patching 12
Sync Locks 13
Track Headers 13
About Clip Segments 13
Trimming 14
Titles 14
Transitions 15
Effects 16
Adding Effects 16
Color Correction 16
Combining Effects 16
The Layouter 17
Audio 18
Adding Audio Filters 18
Output 19
Output to Tape 19
Batch Export 19
Output to File 19
Output to DVD/Blue-ray Disc 20
Important Settings 21
Summary 21
Further Information 21
www.grassvalley.com
iii
Page 4
Introduction
EDIUS FOR AVID EDITORS
Grass Valley’s EDIUS is a powerful nonlinear editing system
used by countless editors all over the world to produce broadcast television, film, multimedia, DVDs, and Blu-ray Discs.
Nonetheless, many experienced Avid editors hesitate to jump
in and discover the fast, powerful, and easy-to-use editing tools
which EDIUS offers.
There are good reasons to stick with what you know: no time is
required to learn the tools you already use and it takes effort to
learn new technologies.
About This Overview
These notes give you ever ything you need to translate your
existing Avid editing skills into EDIUS editing skills. You will find
EDIUS quick and easy to learn, with several features that go
beyond the tools Media Composer offers.
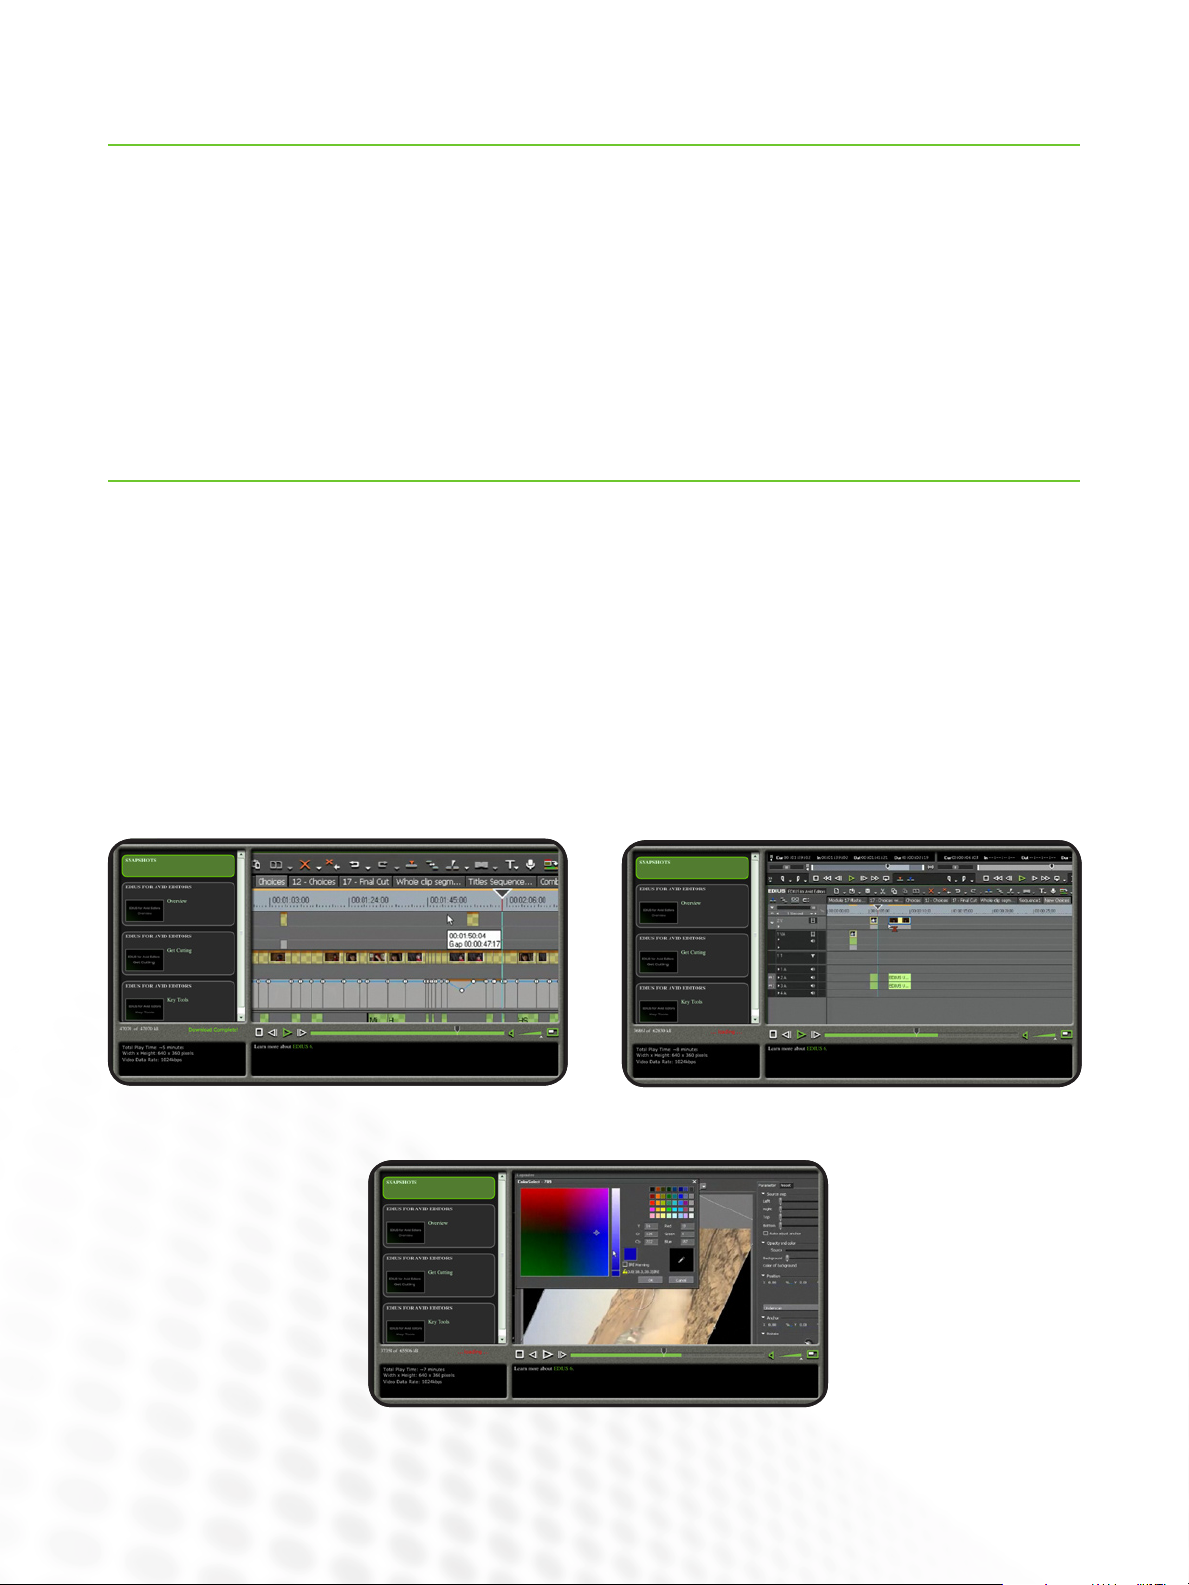
To watch three supporting videos for this application note, visit
The good news is that the core Media Composer and EDIUS
editing experiences are not just similar — they are almost
exactly the same!
In fact, Media Composer 5 has new features that make it more
similar to editing with EDIUS than ever before. Many differences between the systems are only in the colors, button
designs, or names of tools.
This document is intended specifically for Avid Media
Composer 5 editors and is based on EDIUS 6. However, users
of any editing system will find this information valuable as a
quick way of getting to know EDIUS, without long explanations
of technologies you are already familiar with.
http://video.grassvalley.com/video/gvsnapshots/edius_for_avid_editors.
At that site you’ll find videos entitled “Overview,” Get Cutting,” and “Key Tools.”
Overview
Get Cutting
Key Tools
1
www.grassvalley.com
Page 5

Differences and Similarities
EDIUS FOR AVID EDITORS
EDIUS 6 looks very different compared to Media Composer 5
(MC5) but the two systems have a lot in common.
Let’s start with what is the same
Both systems have:
Software-only and software+hardware modes•
Switchable single or dual player/program monitors•
Standard keyboard shortcuts like “I” for Mark-In and “O” for •
Mark-Out
Track patching•
Sync locks•
Effects applied by drag-and-drop•
JKL playback•
Standard 3-point edits•
Mono or stereo audio tracks•
Native support for multiple video formats•
Sequence and clip markers (locators in MC5)•
Timeline-based clip rubber-banding•
The same standard editing workflow•
Now let’s look at some differences
Only EDIUS has:
Combined video+audio tracks—great for fast editing•
Dedicated title tracks for graphic and stills media•
Native, real-time support for almost any media format•
Direct linking between clips and ALL original media (not just •
AMA-supported formats)
Bin subfolders•
A dedicated Source Browser for browsing file-based camera •
media (like P2)
Separate configuration settings for all effects (no Effect •
Editor)
A multi-threaded, batch-encoding file encoder (no need for •
Sorenson)
A powerful, automated Proxy mode (like transcoding but with •
fewer clicks)
Monitor overlays with Zebra for highlights, shadows, and •
audio level
No filler—it just doesn’t exist on the EDIUS Timeline•
Separate settings windows, including Application, User, •
Project, and Sequence
A seamless interface, with no wasted space•
In Summary
The core editing experience is the same, whether you cut
with Media Composer or EDIUS. When editing, you will very
often find the same functionality you would expect in Media
Composer, plus a little bit more in EDIUS.
www.grassvalley.com
2
Page 6
Overview of the EDIUS Interface
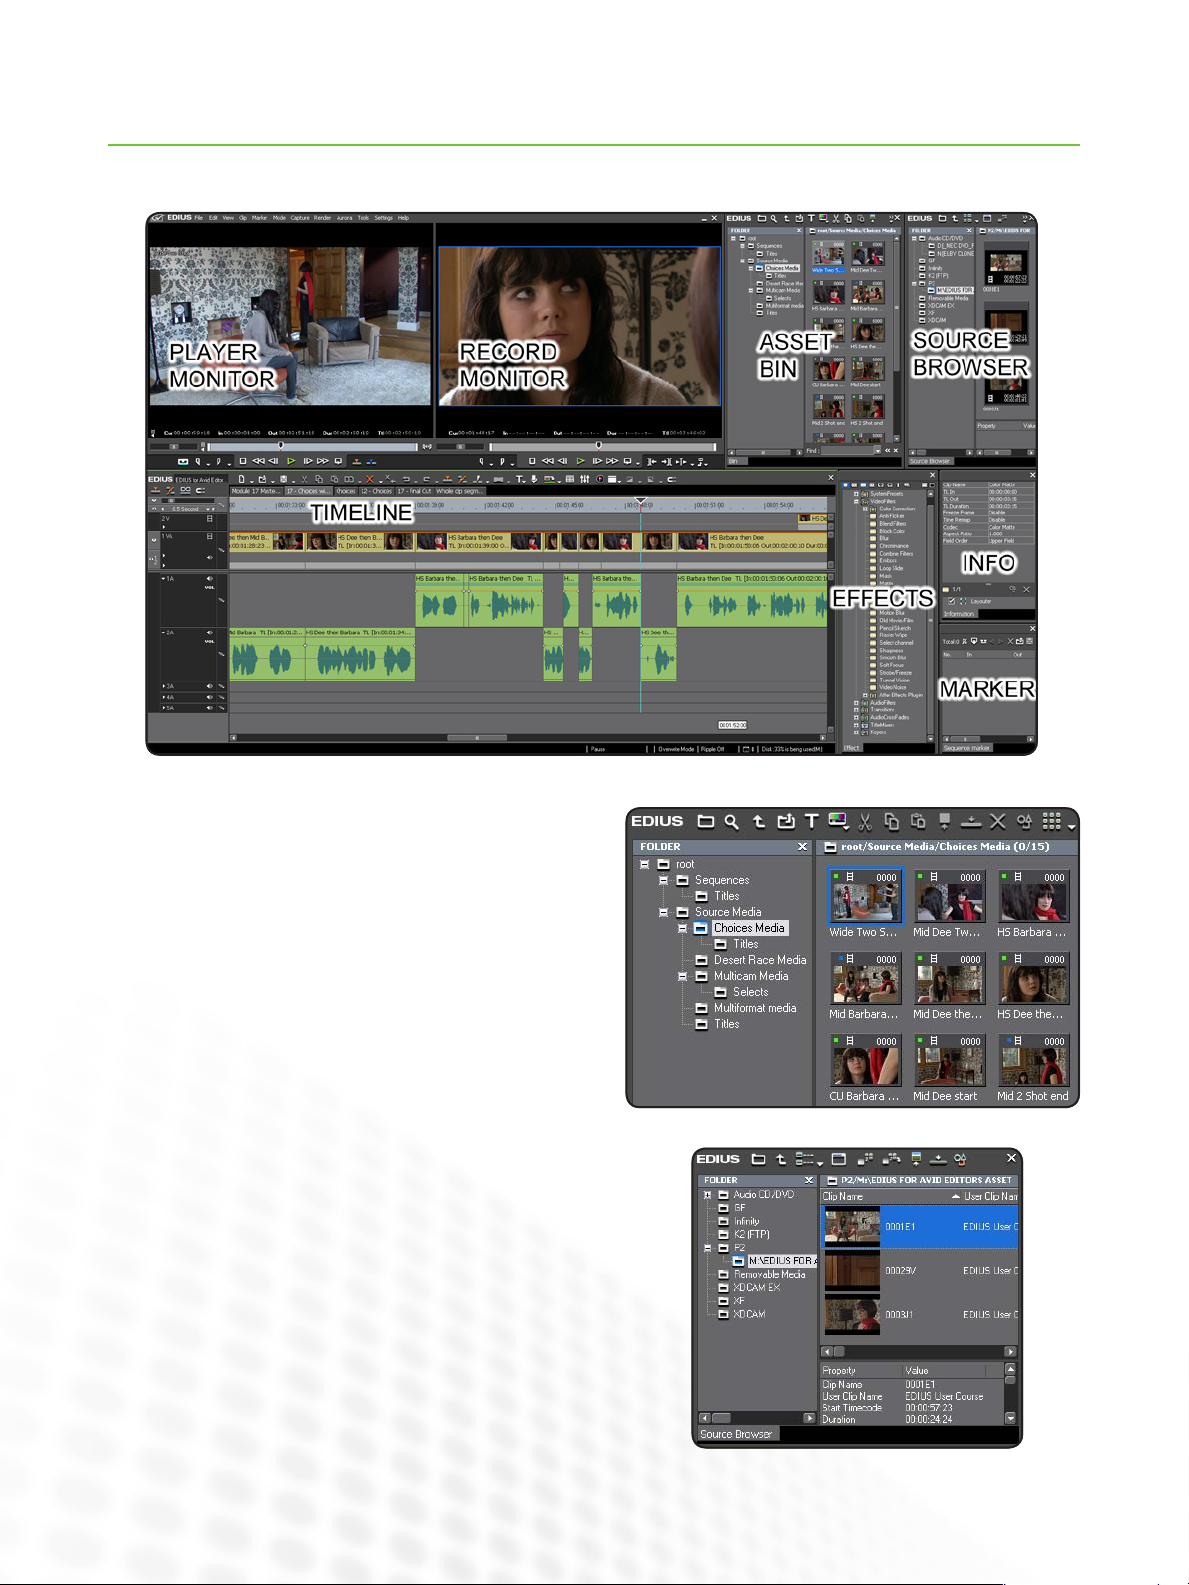
The colors may be different, but the key components of the EDIUS interface should be familiar to you.
EDIUS FOR AVID EDITORS
Asset Bin
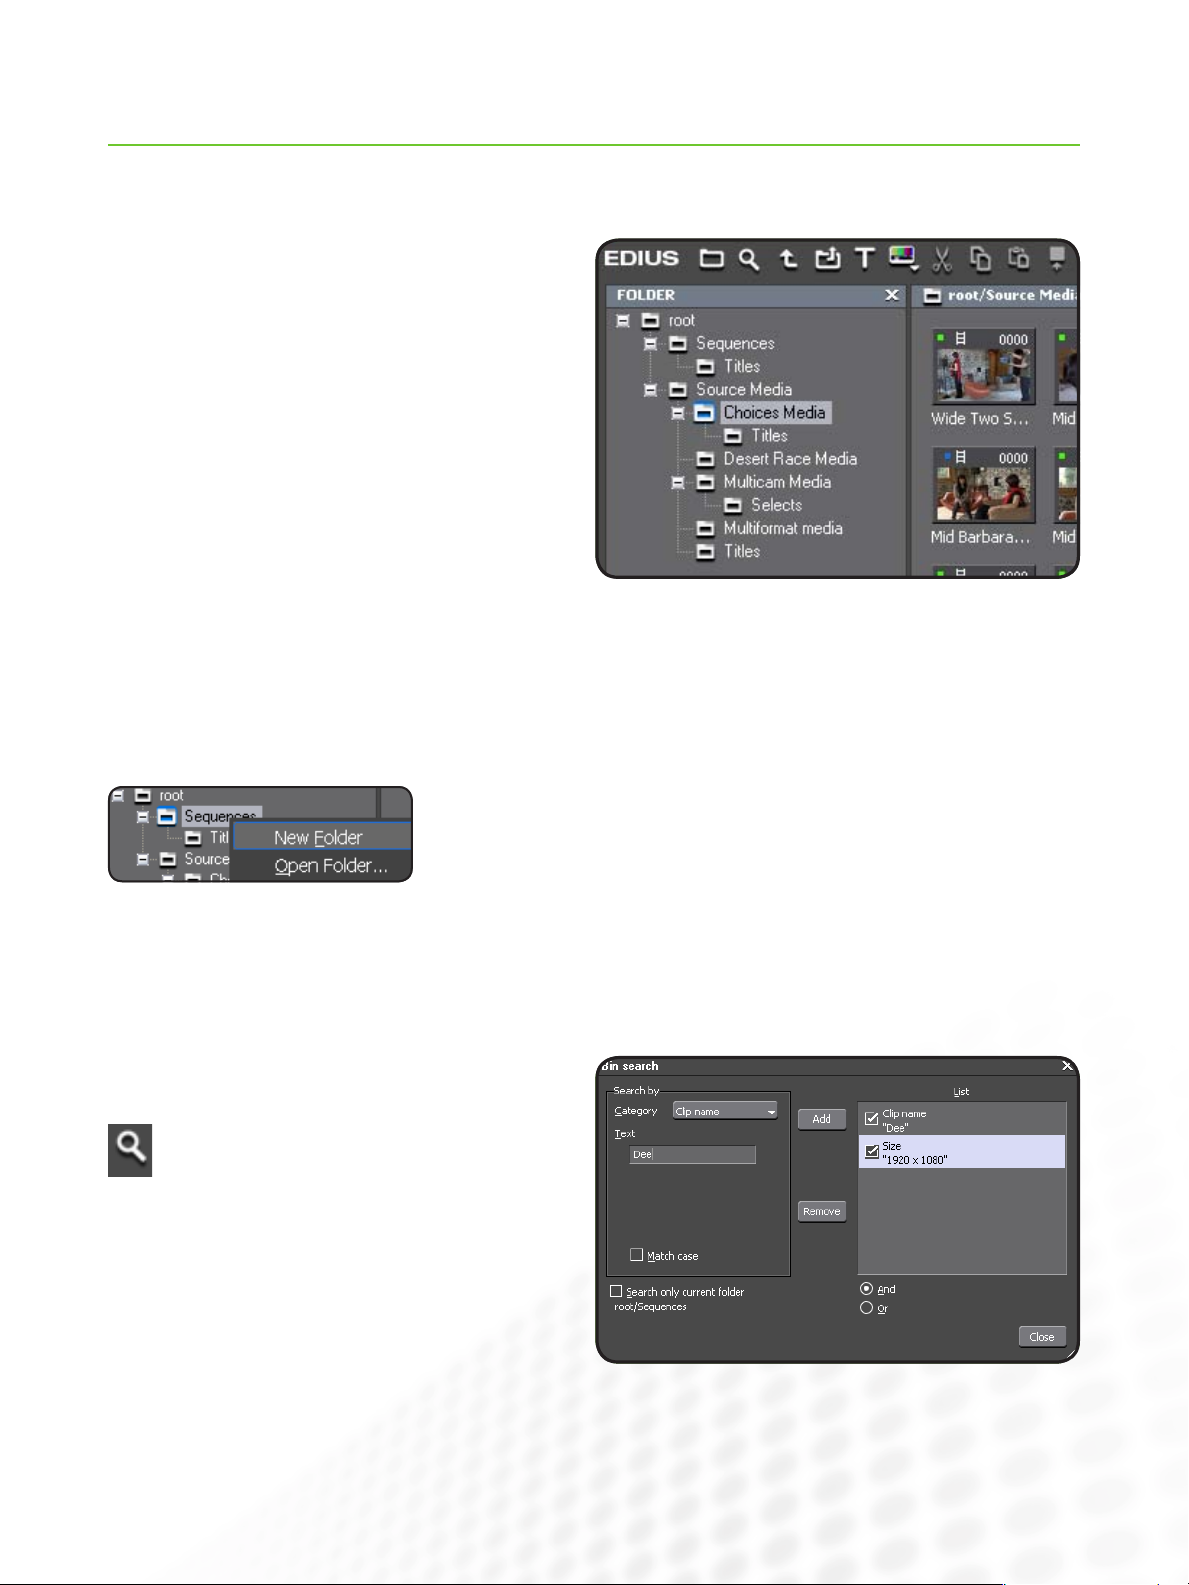
Just like Media Composer bins but designed like a file browser.
Bins are called folders in EDIUS and sub-folders work just as
you would expect—be more organized than ever.
Source Browser
No need for AMA—EDIUS links directly to ALL media as standard. The Source Browser lets you view file-based media from
camera formats like P2 and XDCAM like regular clips. Edit into
a sequence directly or organize them first in a bin.
3
www.grassvalley.com
Page 7
EDIUS FOR AVID EDITORS
Overview of the EDIUS Interface (cont.)
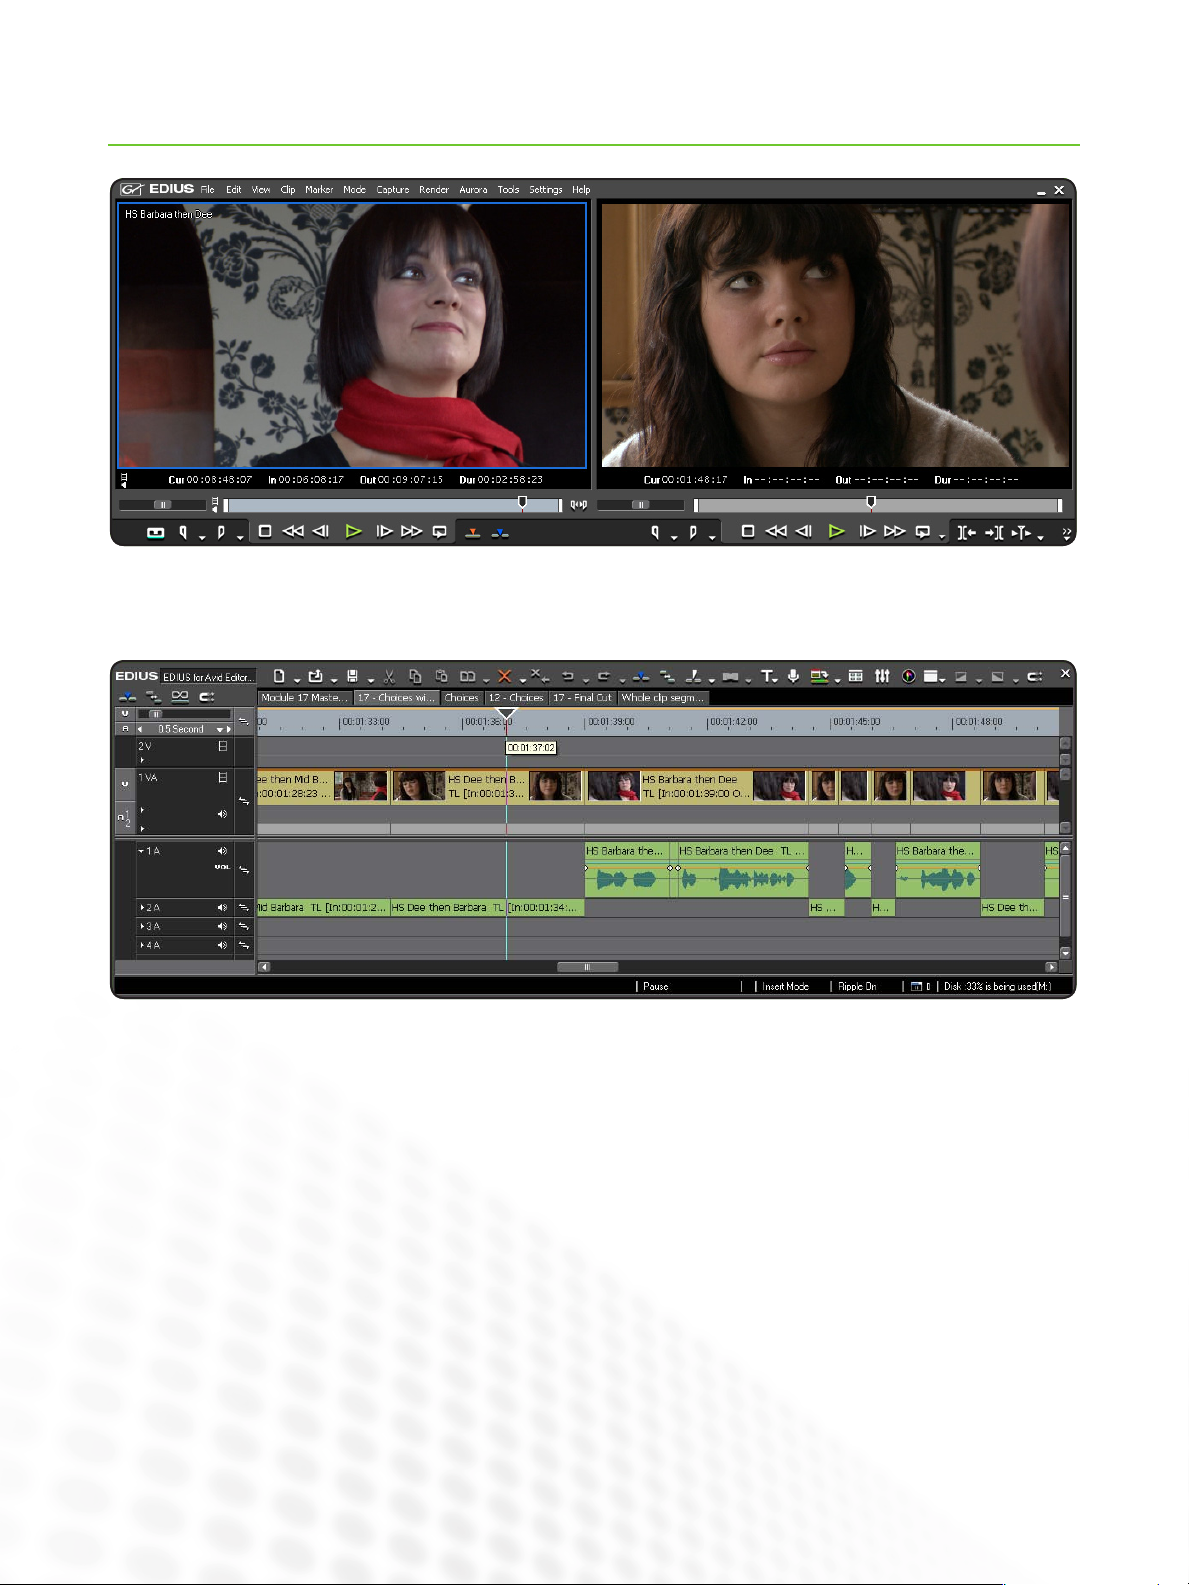
Player and Record Monitors
Just the same as Source/Record Composer monitors in Media Composer. These can be set to single or dual mode in the View
menu.
Timeline
Much more similar to Media Composer than it first appears, plus dedicated Title tracks and combined video/audio tracks. Standard
modifier keys (CTRL and ALT) provide “yellow” and “red” Media Composer editing modes (Insert and Overwrite in EDIUS).
4
www.grassvalley.com
Page 8
EDIUS FOR AVID EDITORS
Overview of the EDIUS Interface (cont.)
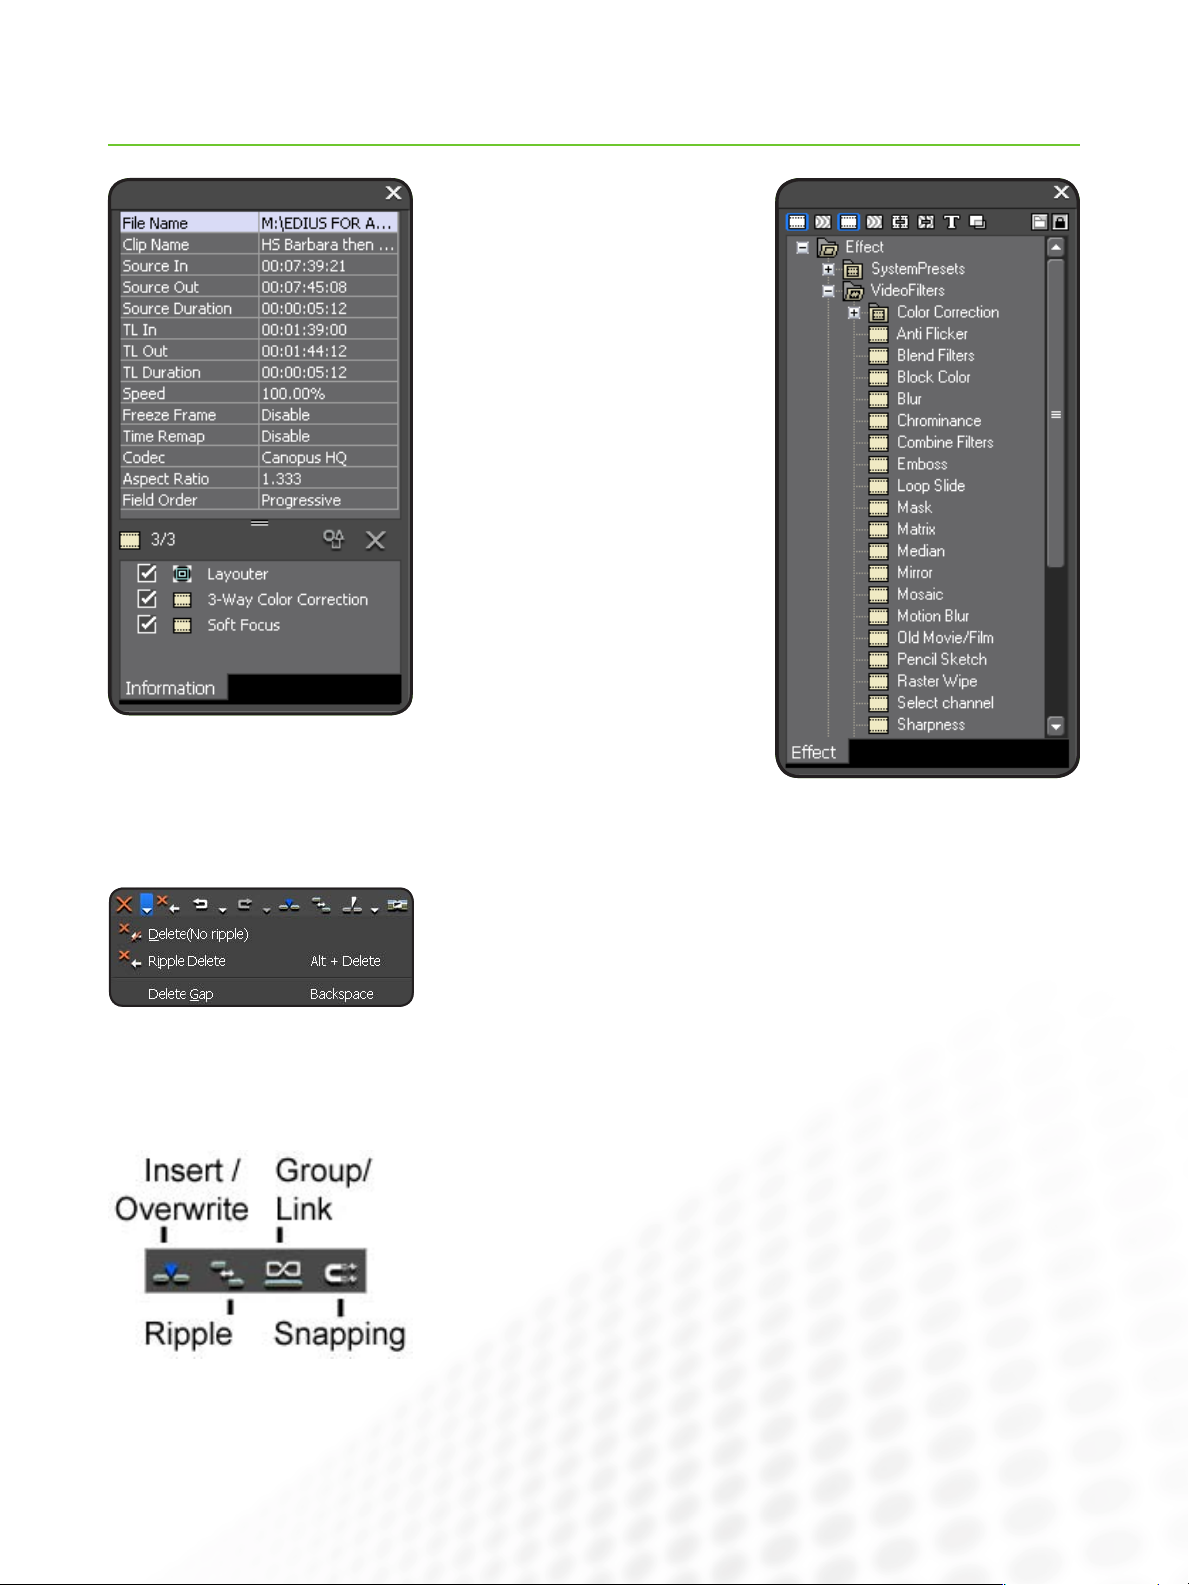
Information Palette
Like an always-on version of the Info
console command in Media Composer,
combined with a list of any effects
applied to a selected clip, plus Layouter
controls for scaling, rotation and animated 3D picture in picture effects.
Effects Palette
Just like the Media Composer Effect
Palette but with audio effects included.
EDIUS Button Menus
Many buttons in EDIUS have sub-menus that extend their functionality, indicated by
a drop-down triangle. The Delete button on the Timeline, for example, is also a menu
containing multiple delete options, including effects and rubber banding.
There’s a small learning curve with these sub-menus but they are well worth the
time as they give you direct access to options you might need to go hunting in the
Command Palette for in Media Composer.
Timeline Modes
Just as Media Composer has the red Lift/Over write and yellow Extract/Splice-in
modes, you set your EDIUS Timeline with:
Insert/Overwrite mode (like Red and Yellow Media Composer modes)•
Ripple mode to leave gaps/not leave gaps when deleting or trimming•
Group/Link mode to maintain or break links between sync source audio and video•
Snapping mode (like the CTRL/Command key in Media Composer)•
www.grassvalley.com
5
Page 9

EDIUS FOR AVID EDITORS
Importing Media
Importing media into EDIUS is like the best combination of AMA (with direct access to the original media) and the regular import process in Media Composer.
To import regular ‘whole’ media files, you can:
Double click on a blank space in the right-hand viewing panel of the Asset Bin•
Right-click on a blank space in the right-hand viewing panel of the Asset Bin •
and choose Add File...
Press CTRL-O•
Click on the Open button at the top of the Asset Bin•
You can even click on the File menu and choose Add Clip... to open media directly in the Player monitor for use in a sequence without importing it to the Asset Bin.
Source Browser
What if you are importing file-based camera media like P2 or XDCAM?
With Media Composer, you would set up your media directories as AMA linked bins
but with EDIUS there is simply no need.
The EDIUS Source browser is a dedicated window for viewing these kinds of files as
whole clips.
Drag clips from the Source Browser to the Asset Bin to organize them or add them
directly to a sequence.
Right-click on your selected media and choose Add and Transfer to Bin, or click the
Add and Transfer to Bin button to make a local copy of the media in your project folder
before importing.
This way you can remove your original media and edit using your selected copies.
Remember, all imported clips behave like AMA clips. If you remove your original
media files, linked clips will go offline unless you copy them onto your local drive first.
6
www.grassvalley.com
Page 10
EDIUS FOR AVID EDITORS
Working with the Asset Bin
Media Composer treats ever y bin as a separate file on your hard drive. All EDIUS bins are incorporated into a single EDIUS Project
file, making organization a little simpler.
The Asset Bin is similar to the Media Composer Project
Window.
It can contain multiple bins and has shortcut buttons for
importing media and generating media like color mattes.
The Asset Bin is designed like an Windows Explorer window.
It has folders, rather than bins, on the left with their contents
displayed on the right.
When you first create a project, you will have just one bin folder, called “root.” This is the start of your media organization. Create a
subfolder by right-clicking on the folder list and choosing New Folder.
You can move folders around just like desktop folders, by dragging and dropping.
Just as with Media Composer, you can create multiple copies of clips that link to the
same media file. In fact, you can use regular copy and paste commands, including
CTRL-C and CTRL-V to make duplicates of clips.
EDIUS has a unique search feature that creates persistent Search results folders. To access this feature:
Press CTRL-F•
Click on the Search button at the top of the Asset •
Bin
Right click on the folder panel and choose Search•
www.grassvalley.com
7
Page 11

EDIUS FOR AVID EDITORS
Working with the Asset Bin (cont.)
The search options are similar to the Media Composer custom sift options in a bin, but the results can be taken from all bin folders
in your project. You can achieve a similar result by custom sifting the Media tool in Media Composer, but with EDIUS this is integrated into the Asset Bin and remains accessible until you remove it, allowing multiple views of the same media.
You can have multiple concurrent Search folders, making it easy to locate new clips as they are added to your project.
You can also press F3 to display a quick search bar that
searches inside the current bin folder. This is very similar to
Media Composer sifting but is quicker to access.
Additional Tools
The Asset Bin has a Tools menu button with the same contents as the regular Tools menu.
These special tools include:
Disc Burner: Burns copies of previously created DVD/Blu-ray Disc image files or •
folders. You can export a sequence directly to DVD/Blu-ray Disc from EDIUS using
the Export menu.
XDCAM EX Clip Browser: If Sony’s clip browser is installed, this links to it.•
EDIUS Watch: Creates special watch folders. Media added to these folders is •
automatically imported to your project.
MPEG TS Writer: Creates .m2t HDV transport streams FAST, for output to HDV.•
8
www.grassvalley.com
Page 12
EDIUS FOR AVID EDITORS
Player and Recorder Preview Monitors
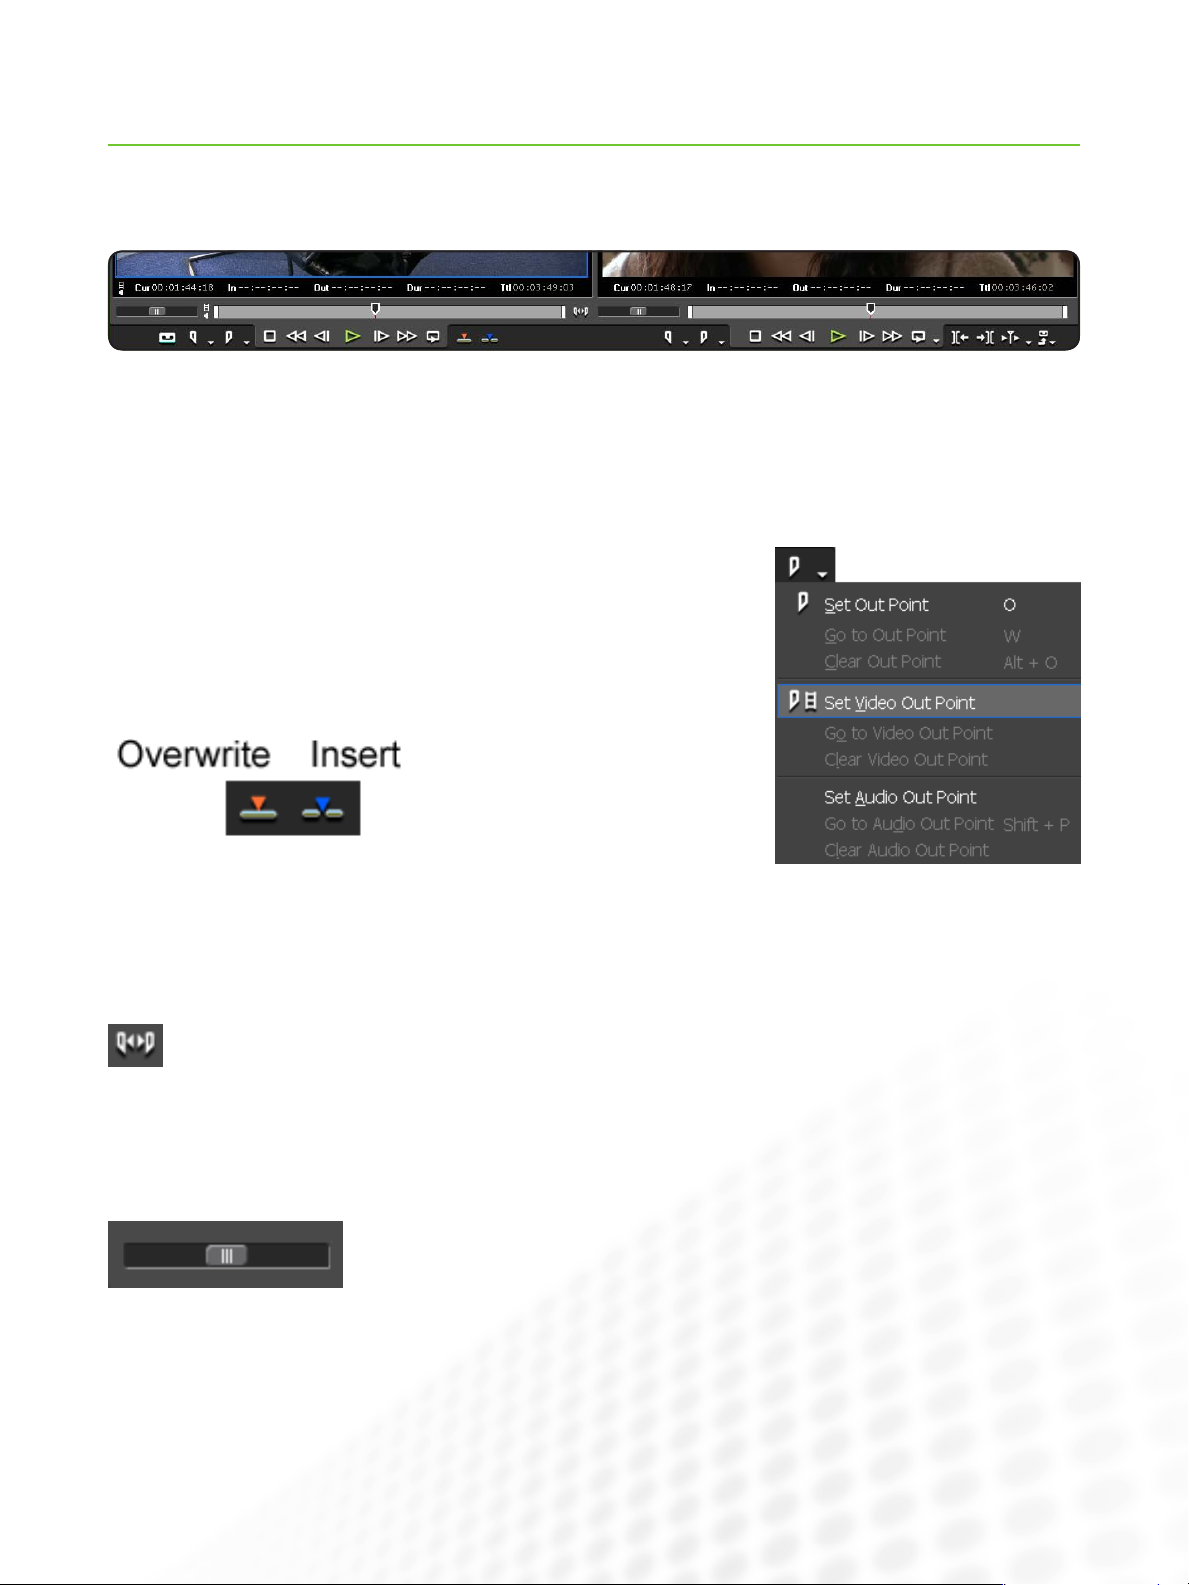
You will recognize most of the st andard buttons on the Player and Recorder Preview Monitor windows. If in doubt, hover your
mouse over the button to get the tooltip, which gives the name and the keyboard shortcut.
To give users a more natural, analog experience, there are real fast-forward and rewind buttons, as well as the familiar play, next
frame, and previous frame buttons.
Like Media Composer, you can set separate video and audio marks on your source
clips for J cuts and L cuts: just use the sub-menu attached to the Set In or Set Out
point buttons.
Standard keyboard shortcuts like “I” for In Point and “O” for Out Point are the same.
The default EDIUS Edit shortcuts are different to Media Composer, though they function the same way:
Overwrite is “]” and the Insert (splice
in) is “[.”
Removing all marks is “X.”
These shortcuts can easily be changed
by visiting the User settings.
If you are viewing long clips in the Player monitor,
mark a section with In and Out marks, then click the
Expand Focus button to zoom the navigation bar to
your selection. This makes scrubbing and locating
clips much easier.
Like Media Composer, you can click and drag In and Out marks
in the monitor navigator, though there is no need to use the ALT
modifier key.
As well as the analog style
Fast For ward and Rewind
buttons, EDIUS has Shuttle
controllers. The further you
drag to the right or left, the
faster the video will play forwards or backwards—just like a
physical shuttle controller.
There is also a powerful mouse-gesture control system.
Click and drag inside the viewing panel of the Player or
Recorder monitors to get the following results:
Drag Left to Right: Mark In•
Drag Right to Left: Mark Out•
Drag Top to Bottom: Edit into Timeline (using track patching •
and Insert/Overwrite mode)
Using the right mouse button, if you drag in circles on the
image, the mouse will behave like a Jog controller, allowing
very precise analog playback of digital media with smooth,
natural-sounding audio.
www.grassvalley.com
9
Page 13
EDIUS FOR AVID EDITORS
Player and Recorder Preview Monitors (cont.)
Preview Monitor Overlays
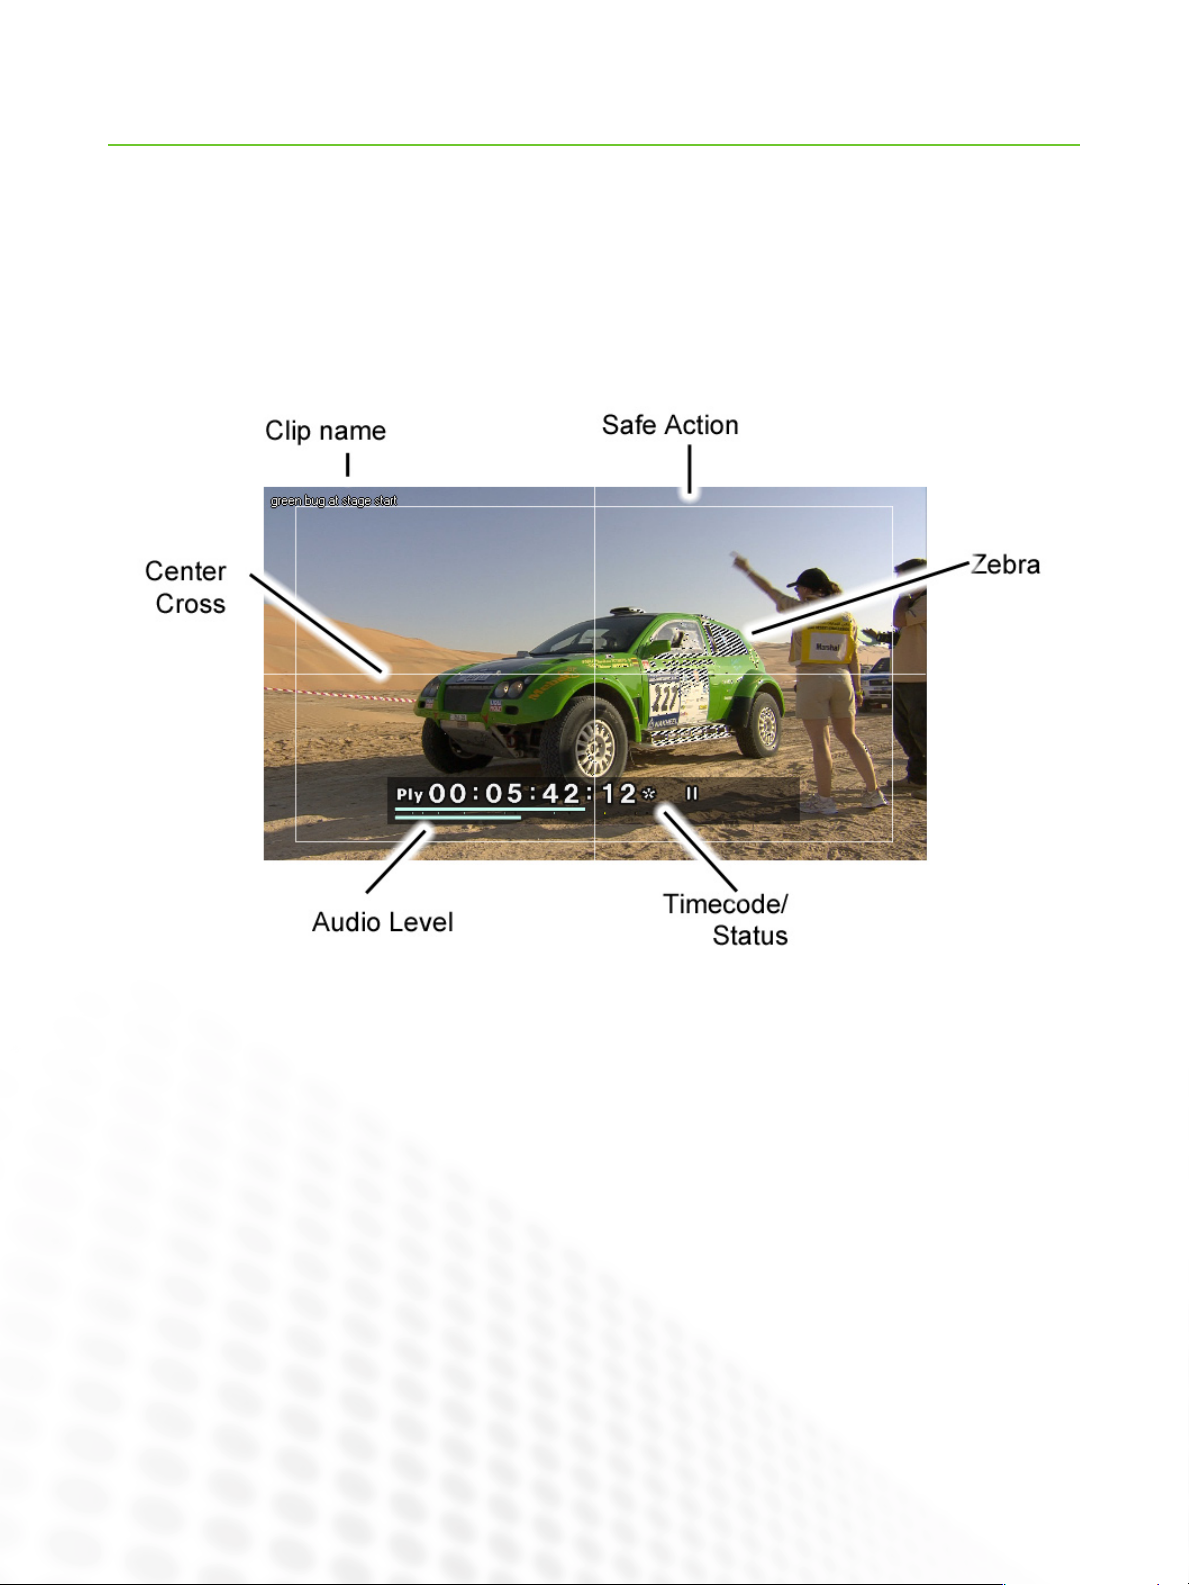
The View menu gives access to several types of overlay information you can display on the Player and Recorder monitors:
Clip/Device:• Displays the current clip name (or video deck preset if when capturing)
Safe Area:• Displays the Safe Action and Safe Title zones
Center Cross:• Splits the screen into four equal sections for layout
Marker:• Displays the text of any markers (these are the same as Media Composer Locators)
Zebra:• Just like in-camera zebra, shows highlights and shadows
On-Screen Display
Under the View menu, there is an option to toggle the display of an On-screen Status—and you can choose to display this just on
your computer monitor or also on your external client monitor.
The Status displays current Timecode, Playback Status, and Audio Level.
10
www.grassvalley.com
Page 14

EDIUS FOR AVID EDITORS
Core Editing
Much of your time as an editor will be spent looking at clips, marking them, and adding them to a sequence.
The good news for Avid editors using EDIUS is that there is almost no difference in functionality, naming, button functions, or
keyboard shortcuts.
Adding Clips to a Sequence
To Perform a Standard Edit:
1. Double click on a clip in the Asset Bin to open it in the Player monitor
2. Add In and Out marks by clicking on the Add In Point or Add Out Point buttons or by pressing the “I” or “O” keys
3. Set up your track patching, just as you would with Media Composer
4. Set your edit position on the Timeline, or use an In mark
5. Click on the Insert or Overwrite button or press the [ or ] key
You can also drag-and-drop directly from the Player Preview monitor or from the Asset Bin.
What happens when you remove a clip from a sequence depends on the Timeline modes—see “Working with the Timeline.”
Removing Clips from a
Sequence
To Remove a Clip Segment from a
Sequence:
Select it
Press the Delete key
or
Click on the Delete shortcut button at the top of
the Timeline
Moving Clips in a Sequence
Moving clips that are already part of a sequence is the same
experience in EDIUS as it is in Media Composer. Like Media
Composer, you will need to choose your mode (Insert or
Overwrite).
Since version 5, Media Composer has provided the option to
automatically select audio clips that are linked with video clips.
This has always been the way the EDIUS timeline functions.
In both edit systems, you prevent this automatic selection by
using the ALT modifier key.
The Proxy Workflow
Media Composer allows you to transcode media to a highly
compressed format and then relink clips to the new files for
increased performance, relinking to the original media later for
output.
or
Right click on it and choose Delete
(Media Composer Lift) or Ripple Delete
(Media Composer Extract)
or
Use one of the Timeline Delete button
submenu options to choose a different
delete type or partial delete
When you turn on Proxy mode, EDIUS automatically creates
highly compressed copies of all your project media and links all
Asset Bin clips and sequence clips to the new files.
The conversion is a background process, so you can continue
editing while it happens and you will know when a clip has
been converted as Proxy clips have a patterned texture on the
Timeline.
Working in Proxy mode dramatically reduces workload for your
CPU, which is useful when editing on a less powerful computer
like a laptop.
Toggle between Proxy mode and regular editing mode at any
time, by clicking on the Mode menu and choosing Proxy Mode.
EDIUS offers the same functionality, including a standarddefinition downconvert for HD media, but there is also a fully
automated Proxy mode.
www.grassvalley.com
11
Page 15

Working with the Timeline
EDIUS FOR AVID EDITORS
The core editing tools and functions you are used to in Media
Composer are available in EDIUS, though sometimes with different names and different button designs.
Let’s look at the key options:
Timeline Modes
You will be familiar with the EDIUS Insert and Overwrite
modes, as Media Composer Extract/Splice-in and Lift/Overwrite
modes.
EDIUS also has a Ripple Mode and Group/Link mode:
Toggle Insert/Overwrite mode: The same
as Media Composer—In Overwrite mode,
clip segments overwrite other clips on the
Timeline; in Insert mode, clip segments
shuffle around each other non-destructively.
Set Ripple Mode: This applies different
Timeline behavior when you are in Insert
mode—the options do not apply if you are
in Overwrite mode.
Track Patching
If Ripple mode is on (when you are in Insert mode), reducing the duration of a clip by trimming will cause other clips to
move. If Ripple mode is off, EDIUS will leave a gap instead.
If you delete or move a clip segment with Ripple mode on,
other clips will move to fill the gap. If you turn Ripple mode off,
EDIUS will leave a gap.
Like Media Composer, the result will also be affected by your
sync locks.
Set Group/Link Mode: Enables or
disables the automatic selection of linked
video and audio segments. This is the
same as the new Link Selection Toggle in
Media Composer 5.
Snap to Event: Media Composer snaps
to clip edges when you use the CTRL key.
EDIUS achieves a similar result with the
Snap mode.
EDIUS and Media Composer both use
track patching to position clips that are
edited into a sequence. There are perhaps two minor differences:
EDIUS will add patched clips to a
sequence even if the track header is
turned off, while Media Composer
requires the track headers to be turned
on. You can disable parts of a source clip
by turning individual source buttons off.
EDIUS allows you to toggle source audio
between stereo and dual mono modes
on the timeline, without needing to
change clips in the Asset Bin.
To toggle the mode, right click on the
source audio button and choose Audio
Source Channel.
12
www.grassvalley.com
Page 16

Working with the Timeline (cont.)
Sync Locks
These behave exactly as you would expect, based on your experiences of Media Composer. You can toggle all sync locks
on and off by clicking on the Sync Lock toggle at the top of the track header buttons.
Track Headers
EDIUS has controls for displaying or hiding audio waveforms on each track.
The options available can vary because EDIUS supports several kinds of tracks:
Audio•
Video•
Title•
Audio/Video•
You can add or delete tracks by right clicking on any of the track header buttons.
EDIUS FOR AVID EDITORS
About Clip Segments
In the same way that Media Composer displays video and audio segments in different
colors, EDIUS keeps video, audio, and mixer (opacity/alpha) parts of sequence clip
segments separate.
Media Composer will not allow you to combine video and audio on a single track, so it
is simple to see what kind of media you have in a sequence.
EDIUS allows you to combine all media types on special Video/Audio tracks. This
makes it ver y clear which audio is associated with which video but can confuse new
users who are not familiar with Video/Audio tracks.
The Video, Audio, and Mixer parts of clips, all have different appearances. The Mixer
part clip always appears where there is video. It allows rubber-banding of clip opacity
(think of the Media Composer Superimpose effect).
The mixer is only visible when you click the expand triangle on the track header to
show it.
www.grassvalley.com
13
Page 17

Trimming
Trimming with Media Composer 5 is more similar to trimming with EDIUS than previous versions.
To apply single or dual roller trims directly, simply click and drag. To trim multiple clips,
lasso to select them and then click and drag.
To apply a complex multi-clip trim, hold down the CTRL key to apply multiple trim
handles.
To use the dedicated Trimming window, with controls similar to the Trimming mode in
Media Composer, double click on a clip handle. You can do this without first selecting
a handle—just double click the clip handle you want to trim.
The Trimming mode window has standard controls as you would expect, including
shortcuts for standard trim types like slip and slide. If in doubt, hover the mouse cursor over a button and the tooltip will tell you the trim type.
EDIUS FOR AVID EDITORS
The Trimming mode window appears in place of the Preview monitors. When in Trimming mode, you will see two “X” close buttons on the window. The top right corner “X” will quit EDIUS.
The larger “X” at the bottom closes the Trimming window and returns you to the Preview monitors.
You can also toggle in and out of Trimming mode by pressing F6.
Titles
The EDIUS title tool is very similar to the Media Composer Title tool but it has a few more options.
Both the Media Composer Title tool and EDIUS Quick Titler use object selection in the same way.
Use the Text tool to create text or a shape tool to create a shape.
Use the Select tool to move what you have typed or created.
When you select an item you have created, the Properties panel displays options for that object.
Along the bottom of the Title tool, there are several standard title styles. Apply a style by double clicking on
it.
To create a new style, set up your text or graphic as you want it and right click inside the Style Bar to
choose Save As New Style.
If you select the background, or no object (no text or graphics), the Properties panel will display the Title
properties. This allows you to set the title as a still, roll or crawl or add a background image.
The EDIUS title tool operates in low resolution to maximize responsiveness. To see a finished quality version of your
title, click the Preview button at the top of the window or press F3.
Unlike Media Composer, where graphic media is treated like still video, with a finite duration, graphic media in EDIUS
has a theoretically infinite duration. The default duration is set in the User settings but you can trim to any length you
like.
14
www.grassvalley.com
Page 18

EDIUS FOR AVID EDITORS
Transitions
Drag-and-drop transition effects in EDIUS function exactly as they would in Media Composer.
To apply a transition effect to multiple clips, lasso to select them and drag-and-drop the effect you want, as usual.
Set the Timeline position slider near an
edit and press CTRL-P to add the default
transition on the selected track.
EDIUS allows you to adjust the duration
of transitions just as you would adjust
the length of a clip segment—by trimming. Simply click and drag one end of
a transition on the Timeline to adjust the
duration.
There are options in the User settings
that tell EDIUS whether or not to automatically add an audio crossfade when
you add a video transition.
Removing a transition is simply a question of selecting it and pressing Delete.
You access individual settings (including
keyframing) for transitions by selecting the transition you want and double
clicking on its entry in the Information
palette.
www.grassvalley.com
15
Page 19

EDIUS FOR AVID EDITORS
Effects
Adding , working with, and removing effects is essentially the same in EDIUS as it is in Media Composer. As with so many of the
differences between the systems, they are most often aesthetic.
Adding Effects
When you add an effect by dragging and dropping it onto a clip segment, be sure to
drop the effect onto the correct part of the clip.
Video effects should be added to the video part of a clip•
Audio effects should be added to the audio•
Keying or blending effects should be added to the Mixer part of the clip•
The separation of the video, audio, and mixer parts of clips also applies when looking for effect settings. The Information palette shows effects that are applied to the
selected part of the clip.
This sometimes confuses new EDIUS editors, particularly when working with combined Video/Audio tracks, where a clip behaves like a complete clip on a single track.
If you select a clip and effects you have applied do not show up in on the Information
palette, double check you have the correct part of the clip selected. A blue outline
appears on the selected part of the clip.
Combining Effects
It is not necessary to nest effects in EDIUS as it is in Media Composer. To combine multiple effects, drag them onto a clip and you will see them as a list on the
Information Palette.
You can enable and disable individual effects by clicking on the effect tick box on the
Information Palette.
You can change the order effects are applied, like Media Composer, by dragging and
dropping to move them up or down the list.
Color Correction
EDIUS does not use a special Color Correction mode in the way that Media Composer
does, though it offers similar tools and functionality.
Color correction effects are applied like any other—by dragging and dropping the
chosen effect from the Effect list.
A Vectorscope and Waveform are available at any time—not just when
color correcting—by clicking on the Vectorscope/Waveform button at the
top of the Timeline or by selecting Vectorscope/Waveform on the View
menu.
16
www.grassvalley.com
Page 20

EDIUS FOR AVID EDITORS
Effects (cont.)
The Layouter
Media Composer uses several kinds of effects to apply adjustments to clips like reframing or picture in picture. EDIUS also has
effects that can be used this way, including a dedicated picture in picture effect.
In addition, EDIUS has advanced Layouter controls for every clip.
The Layouter gives 2D and 3D control over clip appearance that can be fully keyframed. It is a powerful tool, especially when
combined with video filter effects like the Track Matte and Mask, which can selectively mask regions of video or apply effects to
regions.
If you are familiar with cropping, position, rotation and color selection controls, you will enjoy using the Layouter.
There are just a small number of features you may not be familiar with already.
To use keyframing, put a tick in the box
for each setting you wish to keyframe.
You can also tick the “Layouter” box at
the top to turn on keyframing for every
setting.
If you expand an
individual keyframe
setting, you will find
keyframe controls
very similar to those
found in the advanced
keyframe panel of
Media Composer.
The Layouter has a 2D and a 3D mode. You switch between these modes by clicking on the appropriate button at the top of the window.
You can switch the units of measurement between percentages and pixels by clicking on the “%” or “px” button
at the top right of the Layouter window.
You can apply the effects and effect settings from one clip to another clip (or multiple clips). You can do this by dragging the effect
straight from the Information palette to another clip.
www.grassvalley.com
17
Page 21
EDIUS FOR AVID EDITORS
Audio
Media Composer 5 uses a combination of several tools to apply audio level keyframes, display current master volume, and add
audio effects.
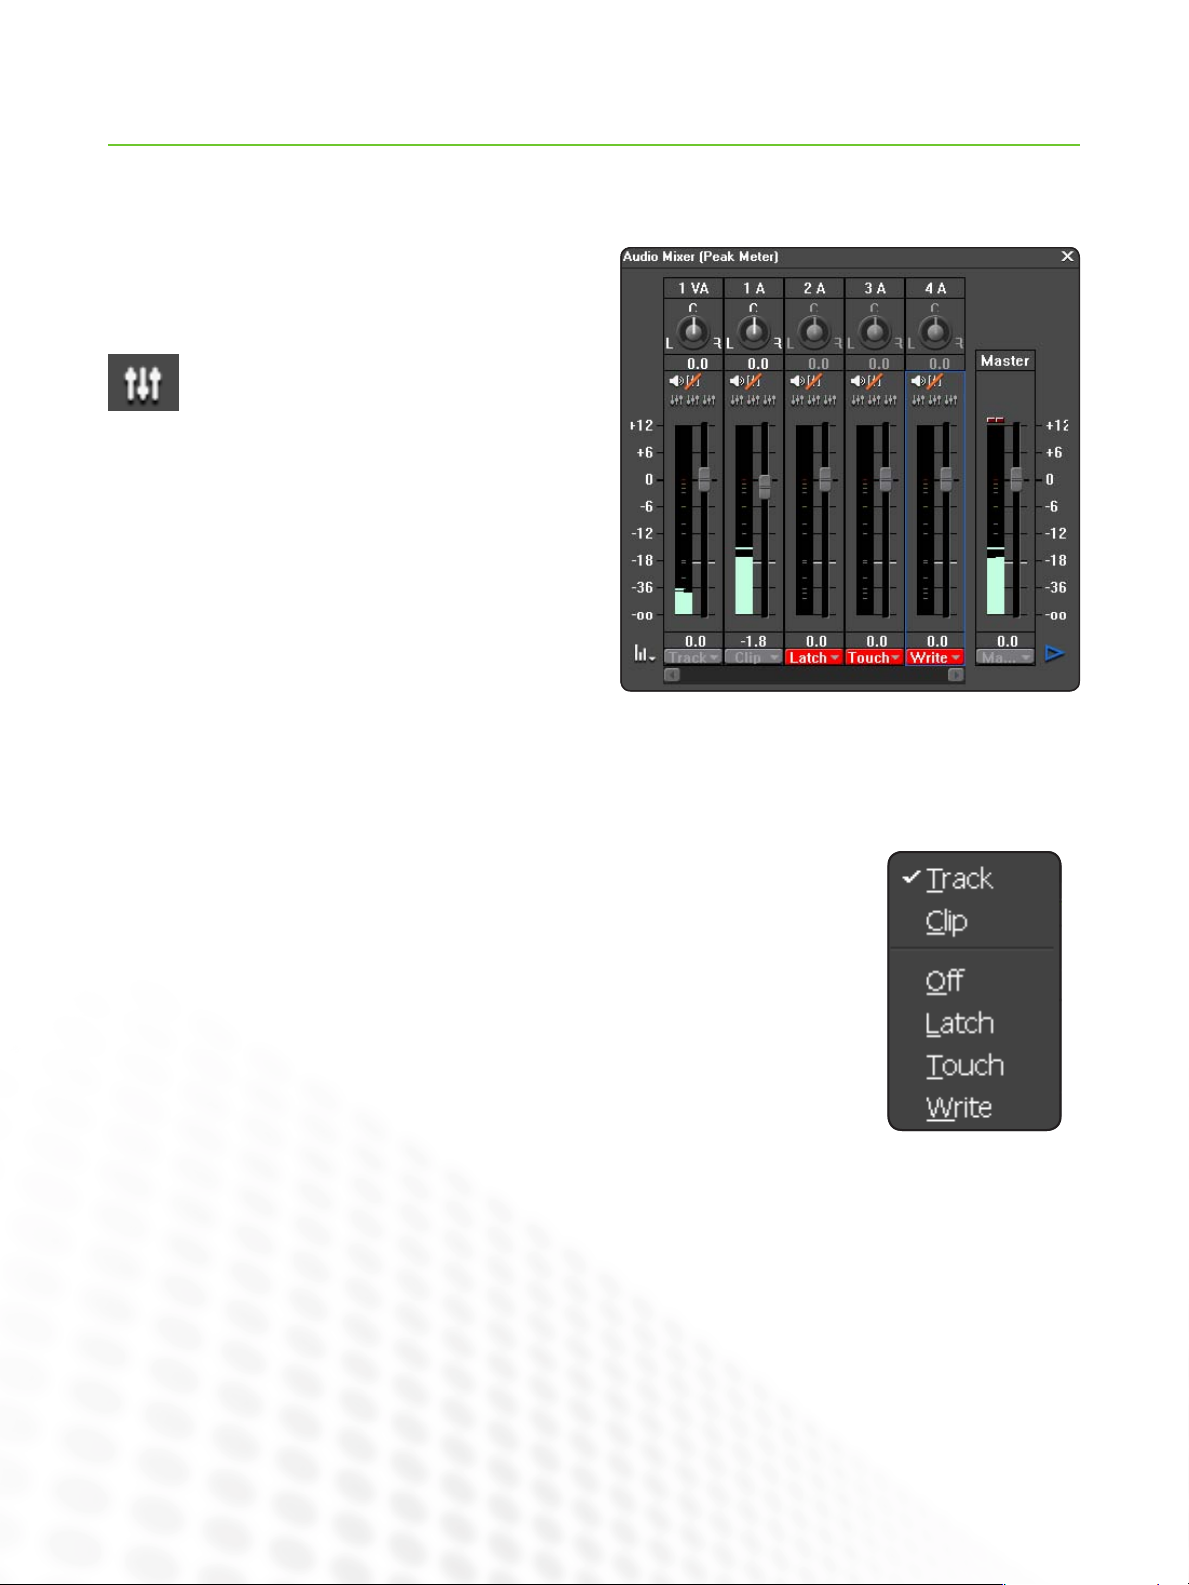
EDIUS 6 has an Audio Mixer that is very similar to
the equivalent in Media Composer, accessed by
clicking on the View menu and choosing Audio Mixer
or by clicking on its button at the top of the Timeline.
While most of the options will be familiar to you, unless you also
use an audio editing system, you may not be familiar with the
Latch/Touch/Write modes the EDIUS audio mixer includes for the
live creation of audio rubber banding—audio keyframes.
Each track shown in the Audio Mixer has the following modes:
Track: Adjusts overall level for the whole track.•
Clip: Adjusts overall level for the current clip.•
Off: Makes no new changes to audio level, though the mixer will still display audio level for the •
track.
Latch: This is the way the Media Composer audio mixer records audio level keyframes. If audio •
level keyframes exist, the fader will animate, following them. When you take control of the fader,
new replacement keyframes are added. When you release the fader, it stays where you leave it,
overwriting existing keyframes with the new level until you stop playback.
Touch: Follows existing audio keyframes just like Latch mode. However, when you release the fader •
after applying an adjustment, it will go back to following existing keyframes, rather than overwriting
them.
Write: Does not follow existing keyframes at all. With this mode you can set the fader before you •
begin and when you press record, existing keyframes will be ignored and overwritten.
EDIUS even allows you to set a new Master output volume to make last minute adjustments to overall output level.
Adding Audio Filters
Audio filters are applied and adjusted like any other effects in EDIUS—find the effect you want in the Effect palette and drag-anddrop to apply it. Always be sure to drop the effect onto the Audio part of the clip segment or it won’t be applied.
18
www.grassvalley.com
Page 22

EDIUS FOR AVID EDITORS
Output
The Export button menu at the bottom right corner of the Recorder Preview monitor has all of the output options you might need
to play out to tape or export your sequence to a file, DVD, or Blu-ray Disc.
The same export options are also under the File menu.
Output to Tape
If you want to crash record, you can usually
simply hit record on your video deck and play
your sequence because EDIUS always plays
sequences and effects at full quality.
If you choose “Print to Tape” or “Print to Tape
(Display Timecode)...” which burns in timecode,
you can use regular deck controls to mark a cut
point on your tape and frame accurately insert
edit.
Batch Export
If you select “Add to Batch List” rather than
“Export,” EDIUS will add the job to the Batch
Export window, which you also access under the
Export menu.
EDIUS will not begin processing the Batch of
encoding jobs until you manually tell it to.
Output to File
“Print to File...” brings up the Print to File window, with a wide range of media formats you
can export to. The settings that apply to each of
the presets should be familiar to you.
The advanced settings, along with many additional presets, are unavailable until you tick the
Enable Conversion box, which allows EDIUS to
change the frame rate and frame size.
If you tick the Display Timecode box, EDIUS will
burn timecode into the output automatically—
very useful for client review. Note: you change
the start timecode for your sequence in the
sequence settings.
The Batch Export window has buttons to add
extra jobs, allowing you to quickly build a list of
output versions.
One major difference between EDIUS and Media
Composer is the lack of Sorenson Squeeze or
any other third-party encoding application. This is
because EDIUS already has advanced encoding
features built in.
www.grassvalley.com
19
Page 23

EDIUS FOR AVID EDITORS
Output (cont.)
Output to DVD/Blue-ray Disc
EDIUS has a comprehensive integrated DVD/Blue-ray Disc authoring application called Disc Burner, accessed by clicking on the
Export menu and choosing “Burn to Disc...”
You can create single-layer and dual-layer DVDs and Blu-ray Discs, straight from the Timeline, without creating any intermediary
files for a separate DVD authoring application.
If you simply want to burn a disc with your current sequence, go to the Write tab and click on
Create Disc. EDIUS will burn the DVD/Blue-ray Disc with an automatically generated menu that
links to your sequence.
Note that the Movie t ab has an “Add File” button, to
browse to a media file and include it on the disc. “Add
Sequence” allows you to choose any combination of
sequences in your current project for inclusion.
Clicking on the “Setting” button for a movie title, under the Movie tab, gives access to the encoding settings.
The St yle tab has a significant number of prebuilt menu designs to choose from. Use the tabs at the bottom of the window to
browse them. Whichever style you choose, EDIUS automatically links buttons and add text based on your project and sequence
names.
The Edit tab allows you to apply detailed adjustments to the menu designs.
Under the Write tab, there is a tick box to “Enable Detailed” settings. These include the option to create a disc image (you can use
the Disc Burner under the EDIUS Tools menu to create multiple copies of an existing image).
20
www.grassvalley.com
Page 24

Important Settings
EDIUS FOR AVID EDITORS
The st andard settings are likely to allow you to jump in and get
to work with EDIUS. It is likely your system has already been
configured, with shortcuts to any connected video decks you
will use and storage drives organized and ready to use.
Under the System Settings, you will find the User Profile
management options. This allows you to create multiple user
profiles, export and import them (export and import by right
clicking on the profile entries). To change the current profile,
choose “Change Profile...” on the Settings menu.
User settings give many detailed options to tweak and tune
EDIUS to operate exactly as you want it to. Note, in particular,
the User Interface categor y, that includes Button and Keyboard
Shortcut options.
EDIUS allows you to switch Project settings at any time, and to
keep multiple user-defined presets ready to hand, so you can
toggle bet ween different resolutions. Use the Project settings
to choose a different Preset or make specific changes to the
current settings.
Project presets are created in the System Settings.
Summary
The core EDIUS editing experience is very similar to editing with Media Composer and the latest version of Media Composer adds
features and functionality that more closely align it to the EDIUS editing experience.
Once you get used to the buttons being different colors and the new naming conventions, you will find everything you know about
editing in Media Composer is still useful in EDIUS.
Many experienced Avid editors fall in love with the speed and ease of use EDIUS gives.
The best way to build your confidence is to start cutting... Happy editing!
Further Information
For further information about EDIUS, Grass Valley hardware and software, and further training, visit www.grassvalley.com.
SALES
Local and regional sales contacts can be found by visiting
www.grassvalley.com/sales
Local and regional support contacts can be found by visiting
SUPPORT
www.grassvalley.com/support
© Copyright 2010 Technicolor USA, Inc. dba Grass Valley. All rights reserved. Grass Valley and EDIUS are trademarks of Technicolor USA, Inc. All other
tradenames referenced are service marks, trademarks, or registered trademarks of their respective companies. Specifications subject to change without
notice. PRV-4104M
 Loading...