

Page 1
Hardware Setup Manual
EDIUS NX PCI-X / EDIUS NX PCI-e /
EDIUS NX Express / HDSTORM
F095807232
Page 2

Cautions
(1) It is prohibited to copy a part or all of this product without prior permission.
(2) The contents or specif ications of this product may be changed without prior notice.
(3) We have prepared the contents of this product to the best of our ability; however if you have any questions
about the contents, or if there are any errors or missing items, please contact Thomson Grass Valley.
(4) However we do not t ake any responsibility for malfunctions arising from use, irrespective of the poi nts
outlined in (3).
(5) Irrespective of whether it was due to a usage er ror, Thomson Grass Valley takes no responsibility for
extraordinary, incidental or derivative claims, including those for lost ear nings generated by the application of
this product.
(6) It is prohibited to analyze, reverse engineer, decompile or disassemble any of the items included with this
product, including the soft ware, hardware and manual.
(7) Microsoft and Windows are registered t rademarks of the Microsoft Corporation, USA.
(8) QuickTime is the registered trademark of the Apple Computer, Inc., USA.
(9) Adobe, Adobe logo, Adobe Photoshop, Premiere and After Effects are registered trademarks of Adobe Systems
Incor porated.
(10) Intel, Pentium and Xeon are the trademarks or registered trademarks of Intel Corporation or its subsidiaries in
the United States of America and other countries.
(11) HDV and HDV logos are the trademarks of Sony Corporation and Victor Company of Japan, Limited (JVC).
(12) Dolby, Dolby and the Double D symbol are registered trademarks of Dolby Laboratories.
They are manufactured based on their own license.
(13) HDMI, the HDMI logo and High-Def inition Multimedia Interface are trademarks or registered trademarks of
HDMI Licensing LLC.
(14) Other product names or related brand names are trademarks or registered trademarks of their respective
companies.
Manual Explanation
■ Information not described in this manual may be displayed in some cases. Make sure to read the text f ile attached
to the disc.
■ If there are any variations between the explanation in this manual and the actual application method, priorit y is
given to the actual application method.
■ The screens used as examples in this manual are those of the development stage, so they may vary from those i n
the final product.
■ This manual is written for people who have a basic knowledge of how to use a computer. If there are no special
instructions, per form the same operation as a normal computer operation.
■ In this manual, EDIUS 5 and EDIUS series are called 'EDIUS'.
■ In this manual, Microsoft® Windows® XP Professional operating system is called Windows X P Professional or
Windows XP. Microsoft® Windows® XP Home Edition operating system is called Windows X P Home Edition or
Windows XP.
■ In this manual, Windows Vista™ Home Basic, Windows Vista™ Home Premium, Windows Vista™ Business,
Windows Vist a™ Ultimate is called Windows Vista Home Basic, Windows Vista Home Premium, Windows
Vista Business, Windows Vista U ltimate or Windows Vista.
■ In this manual, Adobe Photoshop is called Photoshop, and Adobe After Effects is called Af ter Effects.
■ Information in this manual is subject to change without notice, due to the change in product specifications etc.
Hardware Setup Manual
July 23, 2008
Copyright © 2008 Thomson
All rights reserved.
Page 3

Table of Contents
1 Before Using
Notices & Warranties . . . . . . . . . . . . . . . . . . . . . . . . . . . . . . . . . . . . . . . 3
Notices & Warranties . . . . . . . . . . . . . . . . . . . . . . . . . . . . . . . . . . . . . . . . . . . . . . . 3
DANGER . . . . . . . . . . . . . . . . . . . . . . . . . . . . . . . . . . . . . . . . . . . . . . . . . . . . . . . . . 4
CAUTION . . . . . . . . . . . . . . . . . . . . . . . . . . . . . . . . . . . . . . . . . . . . . . . . . . . . . . . . 4
FCC Notice . . . . . . . . . . . . . . . . . . . . . . . . . . . . . . . . . . . . . . . . . . . . . . . . . . . . . . . 5
Declaration of Conformity . . . . . . . . . . . . . . . . . . . . . . . . . . . . . . . . . . . . . . . . . . . . 5
Operation environment . . . . . . . . . . . . . . . . . . . . . . . . . . . . . . . . . . . . . . . . . . . . . . 6
Limitations . . . . . . . . . . . . . . . . . . . . . . . . . . . . . . . . . . . . . . . . . . . . . . . . . . . . . . . . 9
Support . . . . . . . . . . . . . . . . . . . . . . . . . . . . . . . . . . . . . . . . . . . . . . . . . 10
Customer Support . . . . . . . . . . . . . . . . . . . . . . . . . . . . . . . . . . . . . . . . . . . . . . . . .10
Web-site . . . . . . . . . . . . . . . . . . . . . . . . . . . . . . . . . . . . . . . . . . . . . . . . . . . . . . . . 10
Online User Registration . . . . . . . . . . . . . . . . . . . . . . . . . . . . . . . . . . . . . . . . . . . .10
2 Hardware Setting
Setting the Main Board . . . . . . . . . . . . . . . . . . . . . . . . . . . . . . . . . . . . . .11
Setting the Sub Board . . . . . . . . . . . . . . . . . . . . . . . . . . . . . . . . . . . . . . 12
Expansion board (HX-HD1) . . . . . . . . . . . . . . . . . . . . . . . . . . . . . . . . . . . . . . . . . 12
Hardware MPEG Engine board . . . . . . . . . . . . . . . . . . . . . . . . . . . . . . . . . . . . . . 14
Audio output . . . . . . . . . . . . . . . . . . . . . . . . . . . . . . . . . . . . . . . . . . . . . . . . . . . . . 16
Setting the NX Bay (NHX-B10) (Optional) . . . . . . . . . . . . . . . . . . . . . . . 18
Setting the HDSTORM BAY (Optional) . . . . . . . . . . . . . . . . . . . . . . . . . 20
Part names . . . . . . . . . . . . . . . . . . . . . . . . . . . . . . . . . . . . . . . . . . . . . . 22
EDIUS NX PCI-X / PCI-e / Express Main board (NHX-E1 / E2) Rear panel . . . . 22
Expansion board (HX-HD1) Rear panel . . . . . . . . . . . . . . . . . . . . . . . . . . . . . . . . 22
HDSTORM Main board (HQX-E1) Rear panel . . . . . . . . . . . . . . . . . . . . . . . . . . . 23
Hardware MPEG Engine board Rear panel (Optional) . . . . . . . . . . . . . . . . . . . . . 24
NX Bay (NHX-B10) Front panel (Optional) . . . . . . . . . . . . . . . . . . . . . . . . . . . . . . 24
HDSTORM BAY Front panel (Optional) . . . . . . . . . . . . . . . . . . . . . . . . . . . . . . . . 25
3 Software Installation / Uninstallation
Installing EDIUS . . . . . . . . . . . . . . . . . . . . . . . . . . . . . . . . . . . . . . . . . . 26
Installing Attached Application Software . . . . . . . . . . . . . . . . . . . . . . . 31
Installing TitleMotion Pro . . . . . . . . . . . . . . . . . . . . . . . . . . . . . . . . . . . . . . . . . . . 31
Tools Folder contents . . . . . . . . . . . . . . . . . . . . . . . . . . . . . . . . . . . . . . . . . . . . . . 32
HQX-E1 Monitor . . . . . . . . . . . . . . . . . . . . . . . . . . . . . . . . . . . . . . . . . . . . . . . . . . 33
Installing DV Capture . . . . . . . . . . . . . . . . . . . . . . . . . . . . . . . . . . . . . . . . . . . . . .34
Conrmation after installation . . . . . . . . . . . . . . . . . . . . . . . . . . . . . . . . 37
Conrming resource (in Windows Vista) . . . . . . . . . . . . . . . . . . . . . . . . . . . . . . . . 37
Conrming resource (in Windows XP) . . . . . . . . . . . . . . . . . . . . . . . . . . . . . . . . . 38
Uninstallation . . . . . . . . . . . . . . . . . . . . . . . . . . . . . . . . . . . . . . . . . . . . 41
Uninstalling driver and application software from Windows Vista . . . . . . . . . . . . 41
Uninstalling driver and application software from Windows XP . . . . . . . . . . . . . . 42
Page 4

4 License Transfer
Transferring license . . . . . . . . . . . . . . . . . . . . . . . . . . . . . . . . . . . . . . . . 43
Using License Transfer tool . . . . . . . . . . . . . . . . . . . . . . . . . . . . . . . . . . . . . . . . . 43
Transfer between a USB key and a local disk of a PC . . . . . . . . . . . . . . . . . . . . . 44
Transfer between a USB key and another USB key . . . . . . . . . . . . . . . . . . . . . . . 45
5 Hardware Specications
Main Board . . . . . . . . . . . . . . . . . . . . . . . . . . . . . . . . . . . . . . . . . . . . . . 46
EDIUS NX PCI-X (NHX-E1) . . . . . . . . . . . . . . . . . . . . . . . . . . . . . . . . . . . . . . . . .46
EDIUS NX PCI-e / EDIUS NX Express (NHX-E2) . . . . . . . . . . . . . . . . . . . . . . . . 46
HDSTORM (HQX-E1) . . . . . . . . . . . . . . . . . . . . . . . . . . . . . . . . . . . . . . . . . . . . . . 47
Expansion board (HX-HD1) . . . . . . . . . . . . . . . . . . . . . . . . . . . . . . . . . 48
Hardware MPEG Engine board . . . . . . . . . . . . . . . . . . . . . . . . . . . . . . . 48
NX Bay (NHX-B10) (Optional) . . . . . . . . . . . . . . . . . . . . . . . . . . . . . . . . 50
HDSTORM BAY (HQX-B10) (Optional) . . . . . . . . . . . . . . . . . . . . . . . . . 50
Page 5

1
Before Using
Notices & Warranties
Notices & Warranties
Copyright Regulations
It is illegal for anyone to violate any of the rights provided by the copyright laws to
the owner of copyright, except for fair use (mainly private noncommercial use). Also,
in certain cases copying is prohibited with no exceptions. In no event shall Thomson
Grass Valley be liable for any direct or indirect damages whatsoever arising from the
use of captured materials.
Warranty
This product is covered by a limited warranty when you register your Thomson Grass
Valley product. This warranty is for a period of one year (or two years in European
Union countries) from the date of purchase from Thomson Grass Valley or an
authorized Thomson Grass Valley agent. This warranty applies only to the original
purchaser of the Thomson Grass Valley product and is not transferable, Thomson
Grass Valley warrants that for this period the product will be in good working order.
Should our product fail to be in good working order, Thomson Grass Valley will, at its
option, repair or replace it at no additional charge, provided that the product has not
been subjected to misuse, abuse or non-Thomson Grass Valley authorized alternations,
modications and/or repair. Proof of purchase is required to validate your warranty.
Thomson Grass Valley is not responsible for any lost prots, lost savings or other
incidental or consequential damages arising out of the use of, or inability to use, this
product. This includes damage to property and, to the extent permitted by law, damages
for personal injury. This warranty is in lieu of all other warranties of merchantability
and tness for a particular purpose.
Before Using
Page 6

DANGER
The following conditions indicate the potential for serious bodily injury or loss of life.
Health precautions
In rare cases, ashing lights or stimulation from the bright light of a computer display
or TV monitor may trigger temporary epileptic seizures or loss of consciousness. It is
believed that even individuals whom have never experienced such symptoms may be
susceptible. If you or close relatives have experienced any of these symptoms, consult a
doctor before using this product.
Do not use in environments requiring a high degree of reliability
and safety
This product is not to be used in medical devices or life support systems. The
characteristics of this product are not suited for use with such systems.
Protect against static electricity
An electrostatic discharge may damage components of this product. Do not directly
touch any of the connectors or component surfaces.
Static electricity can be generated on clothing and on people. Before handling the
product, discharge static electricity from your body by touching a grounded metal
surface.
Do not disassemble
Do not remove the cover or modify the Product. Fire, electric shock or malfunction
may result. For internal inspection or repair, please contact your system integrator or
Thomson Grass Valley directly.
CAUTION
The following conditions indicate the potential for bodily harm, damage to hardware or
loss of data.
Do not setup in areas subject to heat
Do not setup in an area exposed to direct sunlight or near a heating apparatus. The heat
can accumulate, causing burns, re or damage. Also, the unit may become deformed or
change color.
Only setup using the prescribed method
Do not setup in a manner other than prescribed. Do not use while wrapped in cloth or
plastic. Heat can accumulate, causing burns, re or damage.
Page 7

FCC Notice
This equipment has been tested and found to comply with the limits for the class B
digital device, pursuant to part 15 of the FCC Rules. These limits are designed to
provide reasonable protection against interference in a residential installation. This
equipment generates, uses and can radiate radio frequency energy and if not installed,
and used in accordance with the instructions, may cause harmful interference to radio
communications. However, there is no guarantee that interference will not occur in a
particular installation. If this equipment does cause harmful interference to radio or
television reception, which can be determined by turning the equipment off and on,the
user is encouraged to try and correct the interference by one or more of the following
measures:
Reorient or relocate the receiving antenna.
Increase the separation between the equipment and receiver.
Connect the equipment into an outlet on a circuit different from that to which the
receiver is connected.
Consult the dealer or an experienced radio/TV technician for help.
This equipment has been cer tied to comply with the limits for a class B computing
device, pursuant to FCC Rules. In order to maintain compliance with FCC regulations,
shielded cables must be used with this equipment. Operation with non-approved
equipment or unshielded cables is likely to result in interference to radio and TV
reception. The user is cautioned that changes and modications made to the equipment
without the approval of manufacturer could void the user's authority to operate this
equipment.
This device complies with part 15 of the FCC Rules. Operation is subject to the
following two conditions: (1)This device may not cause harmful interference, and (2)
this device must accept any interference received, including interference that may cause
undesired operation.
Before Using
Declaration of Conformity
According to FCC Part 15
Responsible party Name: Grass Valley, Inc
Address: 400 Providence Mine Road, Nevada City, CA 95959
Telephone: 530-478-3890
Page 8

Operation environment
EDIUS operation is not necessarily guaranteed even in the environments
Notes
EDIUS NX PCI-X / PCI-e
►
CPU:
EDIUS NX PCI-X ............ Intel Pentium 4 2.8GHz or higher
EDIUS NX PCI-e ............. Intel Pentium 4 2.4GHz or higher
* Supports multi-processor and Hyper-threading technology.
►
Empty bus slots satisfying the below performance are required:
Main board:
EDIUS NX PCI-X ............Using 1 PCI (64bit / 66MHz PCI ver2.1)
* You can also use two 32bit / 33MHz PCI (PCI Spec. Revision 2.1) slots, if you are
editing in SD resolutions only.
EDIUS NX PCI-e ............. Using 1 PCI Express x1 (PCI Express Spec. Revision 1.0a)
Expansion board:
HX-HD1 ............................ Using 1 PCI (32bit / 33MHz PCI ver2.1 or later)
•
satisfying all conditions below.
PC
(Intel Xeon 2.8GHz Dual Processor (Hyper-threading)
recommended)
(Intel Pentium D 3.0GHz or higher is recommended for HD
resolution)
PCI bus
Memory
►
EDIUS NX PCI-X ..............1GB or lager
EDIUS NX PCI-e ............... 512MB or lager
(1GB or larger recommended for HD resolution editing.)
Hard disk drive
►
800MB or larger space required for software installation.
Drive with ATA100 / 7200r pm or faster is necessary for video storage.
* Ultra 160 SCSI or faster is necessary to playback two or more streams in SD
uncompressed.
* RAID0 is recommended for HD resolution editing.
Graphics
►
Direct3D 9.0c or later, PixelShader 3.0 or later
SD 128 MB or larger required, 256 MB or larger recommended
HD 256 MB or larger required, 512 MB or larger recommended
Sound system
►
Support for WDM driver is required.
Page 9
DVD-ROM drive
►
Required for software installation.
DVD-R / RW or DVD+R/RW drive is required when creating DVD-Video with
Canopus DVD Creator.
OS
►
Windows XP SP2 or later (32bit)
Windows Vista SP1 or later (32bit)*
Windows Vista SP1 or later (64bit)*
* Windows Vista SP1 includes the following operation systems.
Windows Vista Home Basic
Windows Vista Home Premium
Windows Vista Ultimate
Windows Vista Business
EDIUS NX Express
PC
►
CPU: Intel Pentium 4 2.4GHz or higher
(Intel Pentium D 3.0GHz or higher is recommended for HD resolution)
* Supports multi-processor and Hyper-threading technology.
PCI bus
►
Empty bus slots satisfying the below performance are required:
Main board:
Using 1 PCI Express x1 (PCI Express Spec. Revision 1.0a)
Hardware MPEG Engine board:
Using 1 PCI Express x1 (PCI Express Spec. Revision 1.0a)
Before Using
Memory
►
512MB or lager (1GB or larger recommended for HD resolution editing.)
Hard disk drive
►
800MB or larger space required for software installation.
Drive with ATA100 / 7200r pm or faster is necessary for video storage.
* Ultra 160 SCSI or faster is necessary to playback two or more streams in SD
uncompressed.
* RAID0 is recommended for HD resolution editing.
Graphics
►
Direct3D 9.0c or later, PixelShader 3.0 or later
SD 128 MB or larger required, 256 MB or larger recommended
HD 256 MB or larger required, 512 MB or larger recommended
Sound system
►
Support for WDM driver is required.
Page 10

DVD-ROM drive
►
Required for software installation.
DVD-R / RW or DVD+R/RW drive is required when creating DVD-Video with
Canopus DVD Creator.
OS
►
Windows XP SP2 or later (32bit)
Windows Vista SP1 or later (32bit)*
Windows Vista SP1 or later (64bit)*
* Windows Vista SP1 includes the following operation systems.
Windows Vista Home Basic
Windows Vista Home Premium
Windows Vista Ultimate
Windows Vista Business
HDSTORM
PC
►
CPU: Intel Pentium 4 2.8GHz or higher
(Xeon 2.8GHz Dual Processor (hy per-threading) recommended.)
* EDIUS complies with multi-processor and hyper threading technology.
* CPU supporting SSE2 instructions is necessary in operating EDIUS.
PCI bus
►
The below PCI Express slot is required:
PCI Express x1 (PCI Express Spec. Revision 1.0a)
Memory
►
Memory space with 1GB or larger required, larger than 2GB recommended.
Hard disk drive
►
800MB or larger space required for software installation.
Drive with ATA100 / 7200r pm or faster is necessary for video storage.
* The disc space in HDD requires twice as large as the size of the le to be edited.
* RAID 0 is recommended for HD resolution editing.
Graphics
►
Direct3D 9.0c or later, PixelShader 3.0 or later
SD 128 MB or larger required, 256 MB or larger recommended
HD 256 MB or larger required, 512 MB or larger recommended
Sound system
►
Support for WDM driver is required.
Page 11

DVD-ROM drive
►
Required for installation.
DVD-R / RW or DVD+R / RW drive is required when creating DVD-Video with
Canopus DVD Creator.
OS
►
Windows XP SP2 or later (32bit)
Windows Vista SP1 or later (32bit)*
* Windows Vista SP1 includes the following operation systems.
Windows Vista Home Basic
Windows Vista Home Premium
Windows Vista Ultimate
Windows Vista Business
* Cannot be used in Windows Vista (64bit).
Limitations
Following are limitations to use HDSTORM / EDIUS NX Express / EDIUS NX PCI-X
/ EDIUS NX PCI-e. Please also see the Readme text included in the installation DVDROM for the latest information.
Stand-by mode
Set stand-by mode for screen saver and monitor power supply to "OFF" when using this
product.
Exporting MPEG4 le using Hardware MPEG Engine Board.
Up to 4GB of the le size, or up to 500,000 frames (for NTSC), 425,000 frames (for
•
PAL) can be exported.
The encoding process stops once the exported le surpasses the above limit. As the
•
actual size of the exported le cannot be estimated, the encoding process stops before
the le reaches 4GB.
Before Using
Page 12

Support
Customer Support
For questions regarding hardware setup and usage, please contact your local Thomson
Grass Valley ofce, distributor or the store where you have purchased this product.
Web-site
Including EDIUS, the latest company information is announced at our web-site:
http://desktop.grassvalley.com/
The latest drivers utilities, product manuals, FAQs, etc. are also available at our web-site.
Online User Registration
You can register your EDIUS here.
http://desktop.grassvalley.com/support/
10
Page 13
2
Main board
Hardware Setting
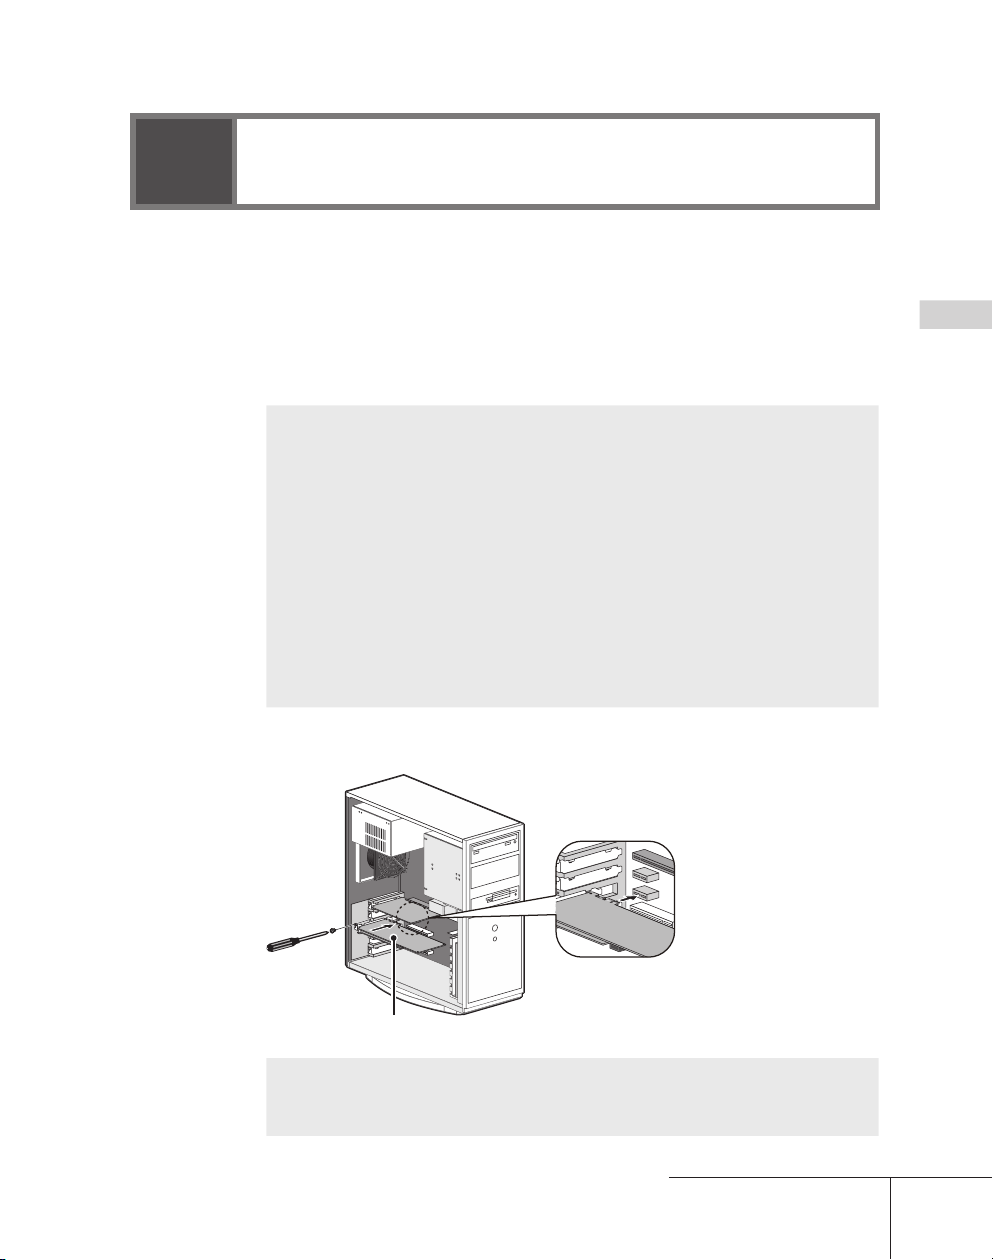
Setting the Main Board
Before board setting, be sure that your work area is dust-free and dr y. Prepare a Phillips
screwdriver and an empty box for removed screws in advance.
Also, be sure that your PC is turned off and that the cables (including power) are
removed from the PC.
* The product components vary depending on the product of your purchase.
POINT
1 Tightly set the main board in PCI (PCI Express) slot.
See the instruction manual for your PC (motherboard) for the PCI slot (PCI
Express slot) type.
<EDIUS NX PCI-X>
Set the main board (NHX-E1) in the normal PCI slot (64bit / 66MHz PCI).
•
32bit / 33MHz PCI can be used when you edit only SD format videos.
•
<EDIUS NX PCI-e / EDIUS NX Express>
Set the main board (NHX-E2) in the PCI Express slot (PCI Express x1).
•
When PCI Express x1 is not available, either PCI Express x4 or x8 can
•
be used.
<HDSTORM>
Set the main board (HQX-E1) in the PCI Express slot (PCI Express x1).
•
When PCI Express x1 is not available, either PCI Express x4 or x8 can
•
be used.
Hardware Setting
POINT
The main board should t in the PCI slot (PCI Express slot) without
•
using any force. If the board cannot be inser ted fully, please do not force
in or bend any parts of the board.
11
Page 14
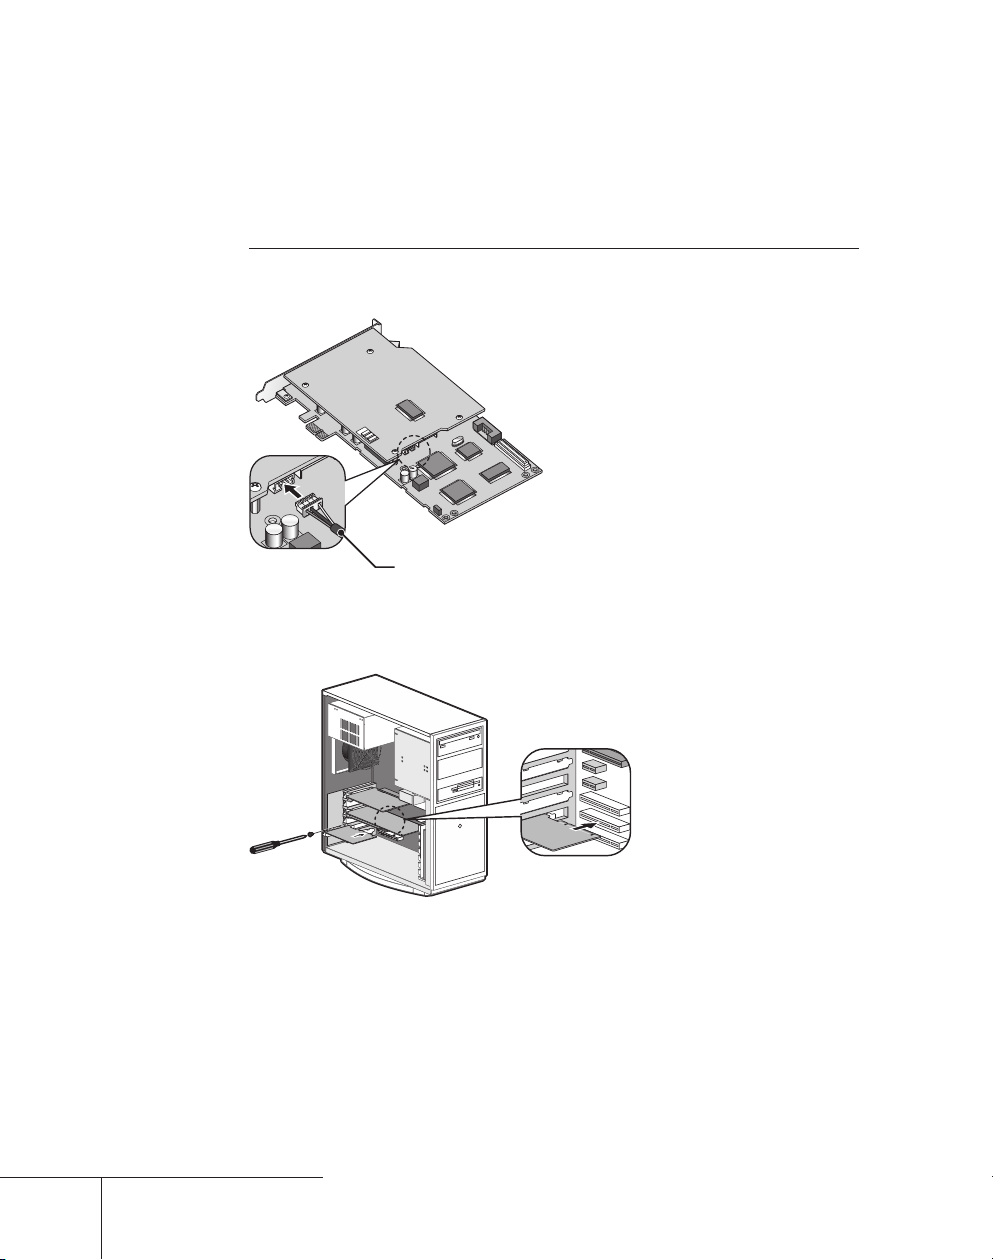
Setting the Sub Board
Audio cable (unbranched end)
EDIUS NX PCI-X / PCI-e / Express
►
Expansion board (HX-HD1)
1 Set the audio cable (4pin-4pin) to the main board.
2 Tightly slide expansion board (HX-HD1) in PCI slot and x
the bracket temporarily.
12
Page 15
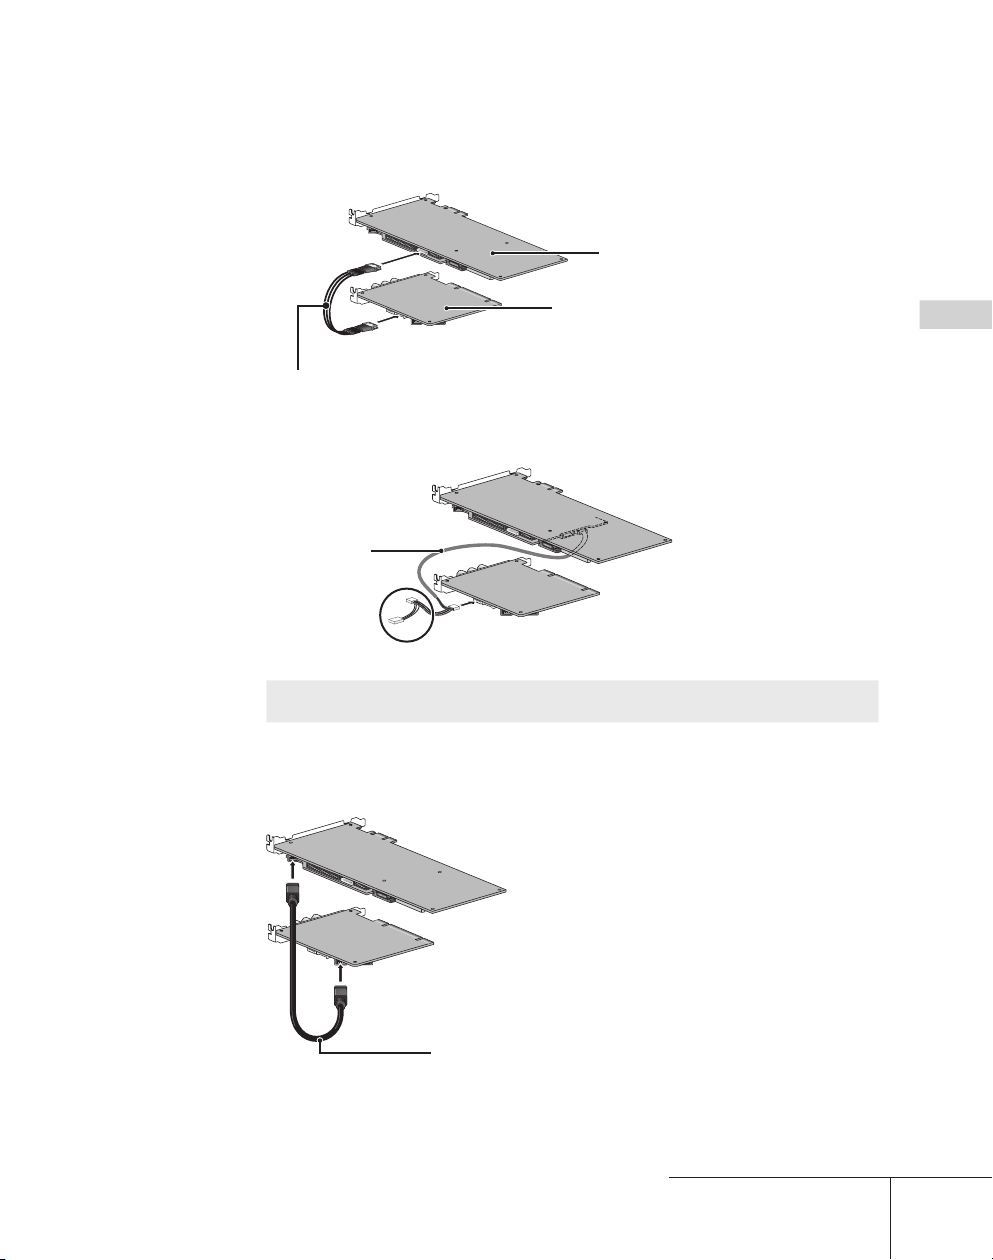
3 Connect main and expansion boards with the board
Main board
Expansion board (HX-HD1)
Audio Cable
(4pin-4pin)
*
DV cable
connection cable (6pin-6pin).
4 Connect main and expansion boards with the audio cable
(4pin-4pin).
* Do not use these two connectors when connecting the expansion board.
POINT
For more details on audio output, see "Audio output" on page 16.•
Hardware Setting
5 Connect main and expansion boards with the DV cable.
* You can use either of the two DV connectors on the expansion board.
1
Page 16
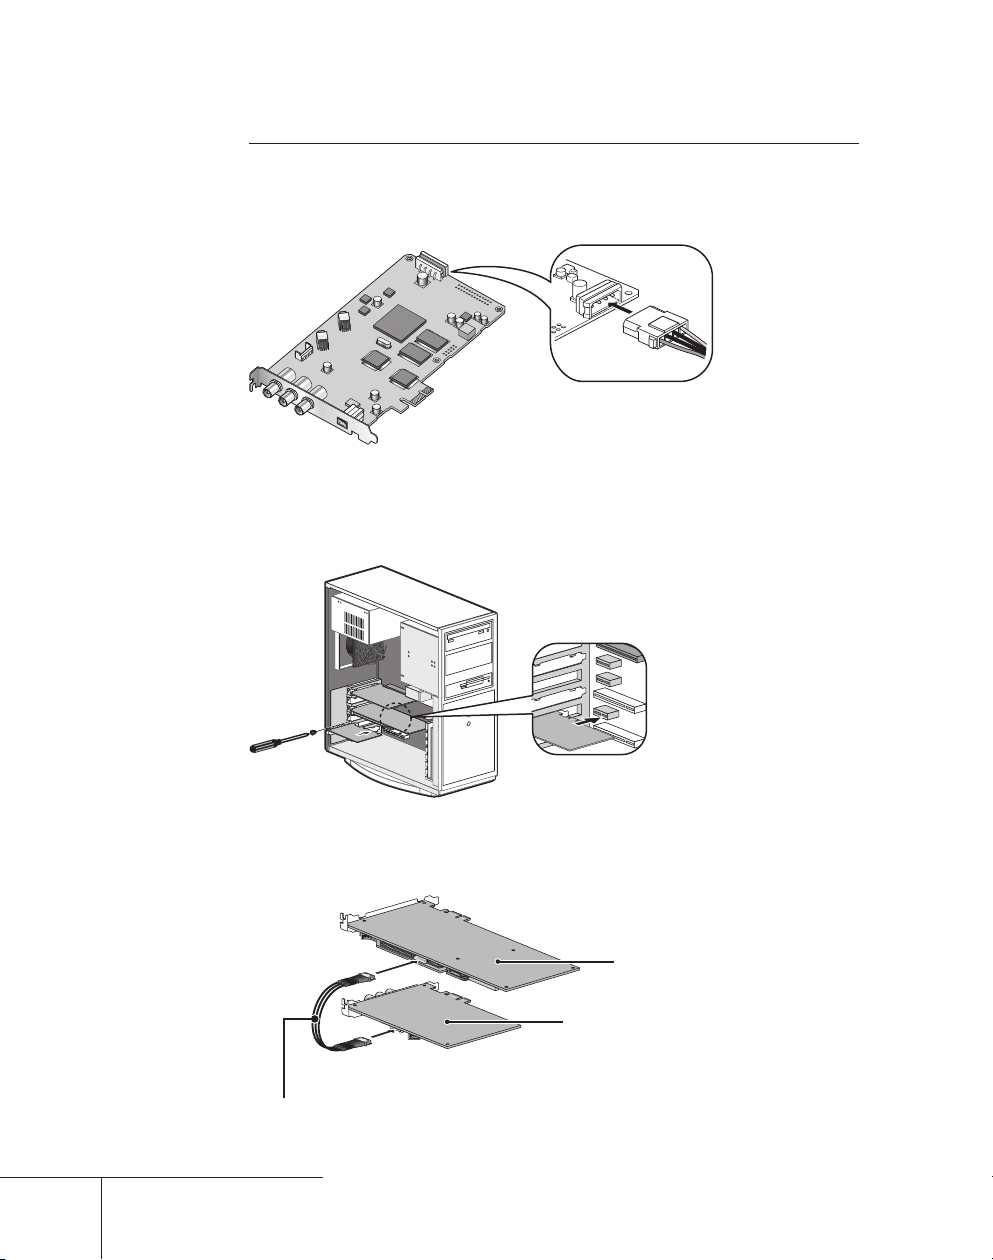
Hardware MPEG Engine board
Board connection cable (6pin-6pin)
Main board
Hardware MPEG Engine board
1 Connect the power cable to the Hardware MPEG Engine
board.
* The component connectors do not exist on some board.
2 Tightly slide Hardware MPEG Engine board in PCI Express
slot and x the bracket temporarily.
3 Connect main and Hardware MPEG Engine boards with the
* The component connectors do not exist on some board.
1
board connection cable (6pin-6pin).
Page 17

4 Connect main and Hardware MPEG Engine boards with the
DV cable
DV cable.
* You can use either of the two DV connectors on the Hardware MPEG Engine board.
* The component connectors do not exist on some board.
Hardware Setting
1
Page 18
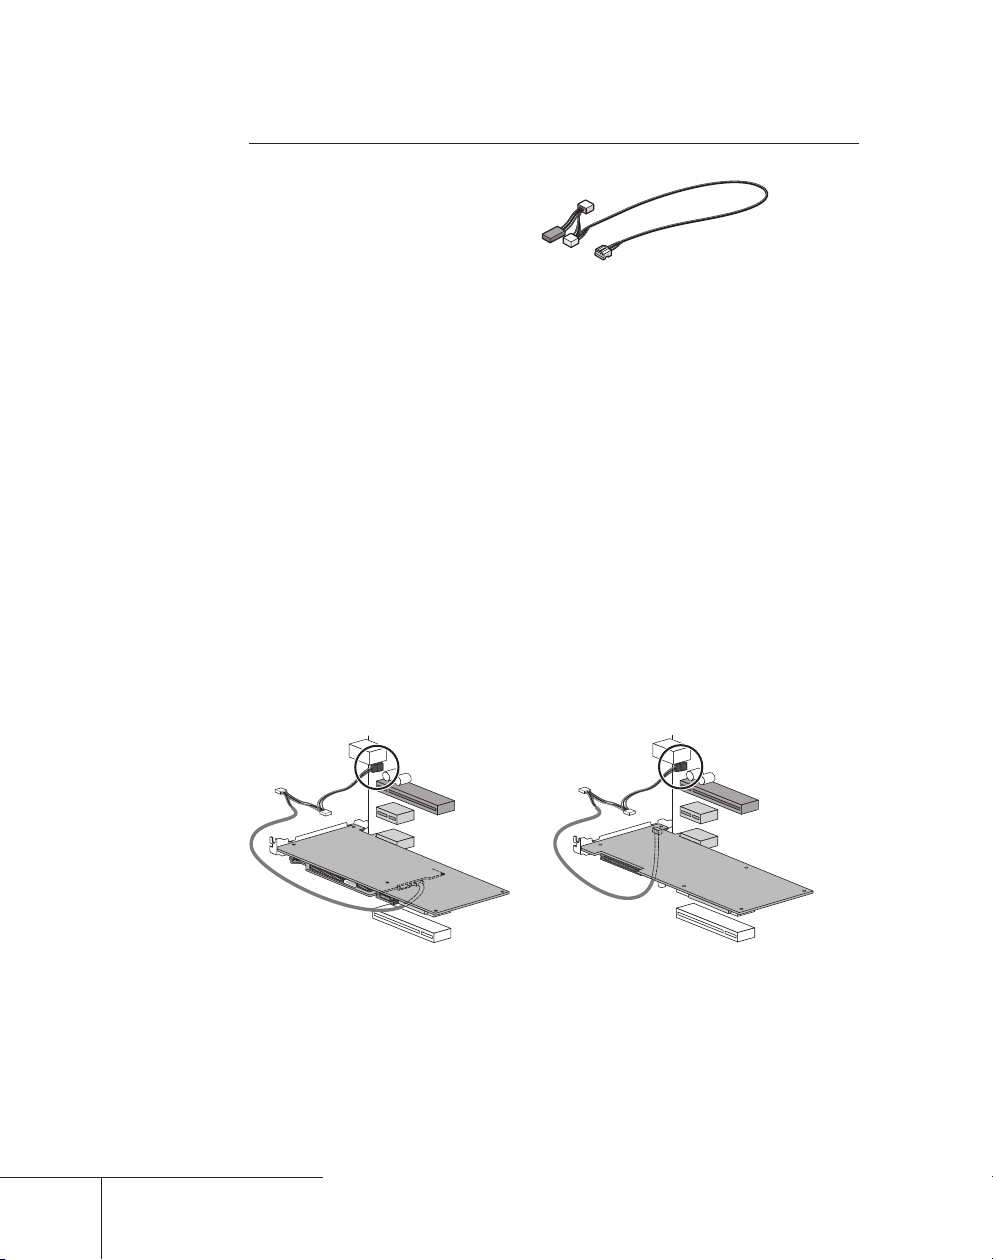
Audio output
Audio cable (4pin-4pin)
Specication of audio cable (4pin-4pin) is:
Red : Right channel (R)
White : Left channel (L)
Black : Ground (G)
For audio output, use the attached audio cable (4pin-4pin) to connect sound device in
output destination and the main board.
* Attached audio cable (4pin-4pin) branches off connectors with different type and
wiring specication. Connect the side without branch to main board, and the side
with branch to sound device in output destination. Use a connector that complies with
the connector type and wiring specication for connecting destination. If you can not
use the attached audio cable (4pin-4pin), prepare another cable separately.
For HDSTORM, in addition to the connection with the audio cable (4pin-4pin)
mentioned above (internal connection), connection to a sound device to be the output
destination with a stereo mini cable (exter nal connection) is available. Internal and
external connection cannot be active at the same time.
Output from sound device on board
Connect the audio cable to the terminal of motherboard.
* Note that onboard sound device (sound device installed in motherboard: for details,
see the instruction manual for your PC or motherboard) might interfere with the
board installed in slot depending on connector position of the device.
16
EDIUS NX PCI-X/PCI-e/Express HDSTORM
Page 19

Output from sound board
Connect the audio cable to the terminal of sound board.
EDIUS NX PCI-X/PCI-e/Express HDSTORM
Hardware Setting
17
Page 20

Setting the NX Bay (NHX-B10) (Optional)
DV cable
Internal connection cable
For EDIUS NX PCI-X / PCI-e / Express
►
Before setting the Bay, be sure that your work area is dust-free and dry. Prepare a
phillips screwdriver, a slotted screwdriver and an empty box for removed screws in
advance.
Also, be sure that your PC is turned off and that the cables (including power) are
removed from the PC.
1 Connect the attached DV cable to the NX Bay. Also check
the connection of internal connection cables.
2 Set the NX Bay in PC.
1
Page 21

3 Connect the internal connection cable to the main board.
Internal connection cable
Sub board
4 Connect the DV cable to the sub board (HX-HD1 / Hardware
MPEG Engine board).
5 Set the NX Bay with screws.
Hardware Setting
1
Page 22

Setting the HDSTORM BAY (HQX- B10)
Internal connection cable
(Optional)*
To mount HDSTORM BAY, the space for 5 inch Bay and 4pin
POINT
* May be included depending on the product package.
►
Before setting the Bay, be sure that your work area is dust-free and dry. Prepare a
Phillips screwdriver, a slotted screwdriver and an empty box for removed screws in
advance.
Also, be sure that your PC is turned off and that the cables (including power) are
removed from the PC.
1 C onnect the attached internal co nnection ca ble to the
•
internal power terminal are required on the PC.
For HDSTORM
HDSTORM BAY.
20
2 Set the HDSTORM BAY in PC.
Page 23

3 Connect the internal connection cable to the main board.
Internal connection cable
4 Set the HDSTORM BAY with screws.
5 Connect the PC internal power cable to the power connecter.
Hardware Setting
21
Page 24

Part names
[1] [2] [3] [4] [5]
[1] [2]
EDIUS NX PCI-X / PCI-e / Express Main board (NHX-E1 / E2) Rear panel
[1] Analog audio input terminal (stereo mini-jack)
[2] Analog audio output terminal (stereo mini-jack)
[3] Analog video input terminal (mini-DIN7pin)
You can directly connect the S-video cable. Use the analog video terminal conversion
cable in the package to con nect the pin-jack (composite).
[4] Analog video output terminal (mini-DIN7pin)
You can directly connect the S-video cable. Use the analog video terminal conversion
cable in the package to con nect the pin-jack (composite).
[5] DV terminal (DV4pin)
In case that the main board and the Hardware MPEG Engine board are connected
inter nally with a DV cable, please do not input DV / HDV signal via the DV terminal
(IEEE1394 6pin) on the Hardware MPEG Engine board. Use the DV terminal (DV
4pin) on the main board.
22
Expansion board (HX-HD1) Rear panel
[1] Unbalanced audio 2ch output terminal (pin-jack)
This can be simultaneously used with analog audio output of main board.
[2] HD / SD component output terminal (BNC)
Page 25

HDSTORM Main board (HQX-E1) Rear panel
[1] [2] [3]
[1][2][3][4]
[1] AUDIO terminal
* The sound are output while editing.
[2] HDMI IN terminal
[3] HDMI OUT terminal
If the board does not work properly, check the LED on the board.
POINT
•
[1] Conguration status indicator
The LED is lit in normal condition.
When it ashes, the memory space normally used has a problem
and the back-up memory space is used. Reinstall the driver.
When the LED is lit off, any data cannot be read. Please contact
your local Grass Valley ofce, distributor or the store where you
have purchased this product.
[2] Board – PC link status indicator
The LED is lit off in normal condition.
When the LED is lit, insert the main board to another PCI Express slot.
When it ashes, see Match / mismatch driver indicator
[3] Match / mismatch driver indicator
The LED ashes when the main board is inserted to another slot,
or when HDSTORM board attached to another PC is inserted to a
slot, after installation. Uninstall and reinstall EDIUS and the driver.
[4] HDSTORM BAY connection indicator
The LED is lit when HDSTORM BAY is connected, and lit off
when not connected.
Hardware Setting
23
Page 26

Hardware MPEG Engine board Rear panel (Optional)
[1]
[2]
[1]
[5]
[2] [3] [4]
[6] [7] [8] [9] [11] [12] [13][10]
[1] DV terminal (IEEE1394 6pin)
In case that the main board and the Hardware MPEG Engine board are connected
inter nally with a DV cable, please do not input DV / HDV signal via the DV terminal
(IEEE1394 6pin) on the Hardware MPEG Engine board. Use the DV terminal (DV
4pin) on the main board.
[2] HD / SD component output terminal (BNC)
* These terminals do not exist on some board.
In EDIUS 5, Hardware MPEG encoding for the output is not
Notes
•
supported.
NX Bay (NHX-B10) Front panel (Optional)
2
[1] DV indicator
Lights in DV input / output.
[2] INPUT S-VIDEO indicator
Lights in S-video input.
[3] INPUT VIDEO indicator
Lights in composite video input.
[4] INPUT AUDIO indicator
Lights in analog audio input.
[5] DV terminal
[6] INPUT S-VIDEO (S-Video input) terminal
[7] INPUT VIDEO (composite video input) terminal
Page 27

[8] INPUT AUDIO L (audio input / left) terminal
[1] [2]
[4] [6]
[3]
[5]
[9] INPUT AUDIO R (audio input / right) terminal
[10] OUTPUT S-VIDEO (S-Video output) terminal
[11] OUTPUT VIDEO (composite video output) terminal
[12] OUTPUT AUDIO L (audio output / left) terminal
[13] OUTPUT AUDIO R (audio output / right) terminal
HDS TO RM BAY (H QX- B10) Fro n t pan el (Optional)*
* May be included depending on the product package.
[1] HDMI IN terminal
[2] HDMI OUT terminal
[3] VIDEO IN terminal
Video component input terminal
You can directly connect the composite video cable to the green terminal.
Use the analog video terminal conversion cable in the package and connect the red and
blue terminals to the BAY, to connect to S terminal.
[4] VIDEO OUT terminal
Video component output terminal
You can directly connect the composite video cable to the green terminal.
Use the analog video terminal conversion cable in the package and connect the red and
blue terminals to the BAY, to connect to S terminal.
[5] AUDIO IN terminal
[6] AUDIO OUT terminal
Hardware Setting
25
Page 28

3
Software Installation / Uninstallation
Installing EDIUS
This section explains how to install EDIUS both on Windows Vista and Windows XP.
When you start up PC after setting up the board, "Found New
Notes
1 Set the product DVD into the DVD-ROM drive.
If the application does not start automatically, open the product DVD, and double-click
"SetupManagerForEDIUS.exe".
2 Click [Install].
"InstallShield Wizard" dialog box appears.
POINT
•
Hardware"("Found New Hardware Wizard" in Windows XP) appears.
Select [Cancel] here.
Before starting installation, close all the other applications that may be
•
running in the task tray.
Installation requires the account authorized for the administrator (such
•
as PC administrator).
In order to install, you must log in as a user with administrator privileges.
•
When you use the Canopus Video Out Plug-in, install the product which
•
you want to use the plug-in for in advance.
Application to be installed may differ depending on model.
•
When the other version of EDIUS has been installed, uninstall it along to
•
the screen instruction and restart PC.
2
3 Click [Next].
Windows Vista Windows XP
Page 29

4 Click [Yes] to agree the license agreement.
Windows Vista Windows XP
If you do not accept the terms, click [No]. If you do not agree to the
POINT
Notes
•
license agreement, you cannot use this product.
Be sure of reading through terms and conditions by scrolling whole
•
description.
5 Specify the user name, company name, and serial number,
and click [Next].
Windows Vista Windows XP
Software Installation / Uninstallation
POINT
Enter the serial number of 6 to 16 digits, which is pasted on the product
•
package of the EDIUS 5 product DVD.
Please note that the serial number cannot be reissued. Keep the number
•
securely.
2
Page 30

6 Specify the folder to install EDIUS, and click [Next].
Click [Browse], and select the folder, to install in another folder.
Windows Vista Windows XP
7 Check on the component to install, and click [Next].
If you have been using EDIUS NX PCI-X / PCI-e / Express, check "HX-E1 / E2" to
install it.
For using HDSTORM, check "HQX-E1" to install.
When AVC-Intra (optional) is mounted, check "AVC-C1".
Windows Vista Windows XP
28
8 Check "Create shortcuts on the desktop." and click [Next].
Windows Vista Windows XP
Page 31

9 Check the settings and click [Next].
Installation of EDIUS starts up.
Windows Vista Windows XP
To use GPUfx transition, the following conditions are required.
POINT
10
Windows Vista Windows XP
•
- Direct3D 9.0c or later, PixelShader 3.0 or later
- SD 128 MB or larger required, 256 MB or larger recommended
- HD 256 MB or larger required, 512 MB or larger recommended
Click [Install]. (Click [Continue Anyway] in Windows XP.)
Software Installation / Uninstallation
This screenshot is of EDIUS NX PCI-X/
PCI-e/Express.
Instead of [HX-E1], [HQX-E1] is displayed
for HDSTORM.
[AVC-C1] is displayed for AVC-Intra.
29
Page 32

11
Select "Yes, I want to restart my computer now." and click
[Finish].
The screen differs when you have installed the driver for HDSTORM, "HQX-E1" or the
driver for AVC-Intra, "AVC-C1". Shut down and restart your PC.
Windows Vista Windows XP
PC restarts. Installation of EDIUS is completed.
USB key in the package stores the license for using EDIUS.
POINT
•
Attach the USB key to the USB port of PC for using EDIUS. If the
•
detection is completed properly, the message appears to notify that new
hardware is found.
30
Page 33

Installing Attached Application Software
Install attached application software if necessary.
This section explains how to install EDIUS both on Windows Vista and Windows XP.
TitleMotion Pro may not be included in the package depending on the
Notes
Installing TitleMotion Pro
TitleMotion Pro is the application software specic for the title creation. A variety of
expression is available such as 3D text or animation. It implements 3 functions to create
a title by switching each function according to the operation purpose.
1 Set TitleMotion Pro Installation CD into the CD-ROM drive.
"InstallShield Wizard" dialog box appears.
2 Click [Next].
Windows Vista Windows XP
•
product of your purchase.
Software Installation / Uninstallation
Installation of TitleMotion Pro starts up.
1
Page 34

3 Select "Yes, I want to restart my computer now." and click
[Finish].
Windows Vista Windows XP
PC restarts. Installation of TitleMotion Pro is completed.
Tools Folder contents
The following contents are provided in Tools Folder in the product DVD.
Adobe Reader is included. Use it to view the PDF manuals
provided.
Adobe Reader
AVCHD
converter
DVCapture
EdiusLM
If Adobe Reader has not been installed on your PC, execute
the setup le and install it by following the on-screen
instruction.
This tool converts AVCHD video les (such as m2ts)
into AVI les for Canopus HQ Codec. By using AVCHD
converter, you can convert data into AVI les for Canopus
HQ Codec, and the response in edit operation improves.
To install the tool, double-click "setup.exe" and follow the
on-screen instructions.
For details on the installation and operation, see the PDF
manual in Tools Folder.
DV capture tool that supports simultaneous capturing
with 3 cameras, with maximum 2 cameras connecting to
IEEE1394 ports (OHCI), and one connecting to EDIUS NX
series. The function is also available to detect the border of
the DV timecode and divide the le automatically.
Double-click "CDVCap.exe" and follow the screen
instruction to install.
License Transfer Tool is included. Without attaching
the USB key, you can use the license of EDIUS or other
optional products.
License Transfer ►P43
2
Page 35

Included les are the default shortcut key le, "Avid
Keyboard
Shortcut
VideoOut Plug-ins
shortcut for EDIUS.dat", "EDIUS Pro3 shor tcut.dat",
"FinalCutPro shortcut for EDIUS.dat", and "FinalCutPro
shortcut for EDIUS (104 keys - English) .dat". Refer to
Reference Manual for details to read the le.
Canopus VideoOut Plug-ins is included. It is plug-in
software for 'NewTek LightWave 3D', 'Autodesk Maya',
'Autodesk 3ds Max', 'Autodesk Combustion', 'TVPaint
Mirage', 'Adobe Photoshop' and 'Adobe After Effects'. This
outputs videos or images displayed in each applications
from video output on appropriate product to TV monitor.
For details on the installation and operation, see the
PDF manual in "Manual" → "ENG" folder in EDIUS 5
Installation DVD.
HQX-E1 Monitor
HQX-E1 Monitor is software to be used for capturing when HQX-E1 and a device are
connected via a HDMI cable. You can check in advance the resolution or the number
of audio channels of the video to be captured, and the image display ability or the
number of receivable audio channels of the monitor device. The installation is executed
automatically when installing the HQX-E1 driver.
Software Installation / Uninstallation
33
Page 36

Installing DV Capture
This section explains how to install EDIUS both on Windows Vista and Windows XP.
1 Set the product DVD into the DVD-ROM drive.
2 Open "Tools" folder, "DV Capture" folder, and double-click
"CDVCap.exe".
"InstallShield Wizard" dialog box appears.
3 Click [Next].
Windows Vista Windows XP
4 If you agree the license agreement, select "I accept the
terms of the license agreement" and click [Next].
34
Windows Vista Windows XP
Be sure to read through terms and conditions by scrolling whole
Notes
•
description.
Page 37

5 Specify le user name and company name and click [Next].
Windows Vista Windows XP
6 Specify the folder to install DV Capture, and click [Next].
Click [Change...] and select the folder, to install in another folder.
Windows Vista Windows XP
7 Click [Install].
Windows Vista Windows XP
Software Installation / Uninstallation
Page 38

8 Click [Finish].
Windows Vista Windows XP
Page 39

Conrmation after installation
Conrming resource (in Windows Vista)
Conrm whether driver has been nor mally installed after restar ting when driver and
application software installation is nished.
1 Proceed to [System and Maintenance] from [Control Panel]
of [Start] menu.
Or right click [Computer] of [Start] menu and select
[Properties].
2 Click [Device Manager].
3 Double click [Sound, video and game controllers].
Software Installation / Uninstallation
*This screenshot is for EDIUS NX Express / EDIUS NX PCI-e.
4 Conrmthedevicenames.
[HX-E1] (EDIUS NX PCI-X)
•
[HX-E2] (EDIUS NX PCI-e / EDIUS NX Express)
•
[HQX-E1] (HDSTORM)
•
[Canopus Hardware MPEG Engine] (EDIUS NX Express)
•
[AVC-C1] (AVC-Intra)
•
If you nd ! or X mark at the top of device name, that means you failed installing HXE1 / HX-E2 / HQX-E1 / AVC-C1 driver.
Try installation again, check rival resource, or change board insertion position.
5 Close [Device Manager].
Checking the driver for the main board now nishes.
6 Start up EDIUS or ADVC Mode Controller and exit once.
37
Page 40

POINT
For more information on how to start up EDIUS, see "Starting EDIUS"
•
"EDIUS User Guide / Reference Manual".
POINT
For EDIUS PCI-X/PCI-e, follow the procedures below and check the
driver for the Expansion board.
Referring to steps 1 and 2, open [Device Manager].
1
Double click the following items to check that the driver is installed.
2
- [IEEE 1394 Bus host controllers]
Device-[NEC OHCI Compliant IEEE 1394 Host Controller]
Close [Device Manager].
3
When resources compete
EDIUS will not operate normally if your and other devices compete or share PC
resources. Try following solution.
Remove other device that share interrupting or change IRQ of other device.
•
Change resource setting with BIOS of PC or motherboard. See instruction manual of
•
PC or motherboard since BIOS setting method varies by manufacturer.
IRQ set method varies depending on PC or motherboard manufacturer.
POINT
•
Some types assign arbitrary IRQ to each PCI Express slot with BIOS,
other types program special IRQ in advance.
Conrming resource (in Windows XP)
Conrm whether driver has been nor mally installed after restar ting when driver and
application software installation is nished.
1 Proceed to [Performance and maintenance] from [Control
panel] of [start] menu and select [See basic information
about your computer].
Or right click [My Computer] of [start] menu and select
[Properties].
38
Page 41

2 Select [Hardware] tab and click [Device Manager].
3 Double click [Sound, video and game controllers].
Software Installation / Uninstallation
*This screenshot is for EDIUS NX Express / EDIUS NX PCI-e.
4 Conrmthedevicenames.
[HX-E1] (EDIUS NX PCI-X)
•
[HX-E2] (EDIUS NX PCI-e / EDIUS NX Express)
•
[HQX-E1] (HDSTORM)
•
[Canopus Hardware MPEG Engine] (EDIUS NX Express)
•
[AVC-C1] (AVC-Intra)
•
If you nd ! or X mark at the top of device name, that means you failed installing HXE1 / HX-E2 / HQX-E1 /AVC-C1 driver.
Try installation again, check rival resource, or change board insertion position.
5 Close [Device Manager].
Checking the driver for the main board now nishes.
6 Start up EDIUS or ADVC Mode Controller and exit once.
39
Page 42

POINT
For more information on how to start up EDIUS, see "Starting EDIUS"
•
"EDIUS User Guide / Reference Manual".
POINT
For EDIUS PCI-X/PCI-e, follow the procedures below and check the
driver for the Expansion board.
Referring to steps 1 and 2, open [Device Manager].
1
Double click the following items to check that the driver is installed.
2
- [IEEE 1394 Bus host controllers]
Device-[NEC OHCI Compliant IEEE 1394 Host Controller]
- [Network adapters]
Driver-[1394 Net Adapter]
* #2 of [1394 Net Adapter #2] may appear when connecting and
disconnecting boards several time. Display description varies
depending on your environment.
Close [Device Manager].
3
When resources compete
EDIUS will not operate normally if your and other devices compete or share PC
resources. Try following solution.
Remove other device that share interrupting or change IRQ of other device.
•
Change resource setting with BIOS of PC or motherboard. See instruction manual of
•
PC or motherboard since BIOS setting method varies by manufacturer.
IRQ set method varies depending on PC or motherboard manufacturer.
POINT
•
Some types assign arbitrary IRQ to each PCI Express slot with BIOS,
other types program special IRQ in advance.
40
Page 43

Uninstallation
Uninstalling driver and application software from Windows Vista
Before starting uninstallation, close all the other applications that may be
Notes
•
running in the task tray.
In order to uninstall, you must log in as a user with administrator
•
privileges.
1 Click "Start" menu and click "Control Panel".
2 Click "Uninstall a program".
3 Select "EDIUS 5 (SetupManager)" and click [Uninstall].
4 Click [Continue] to continue uninstallation.
5 Check on the component to uninstall and click [Next].
Software Installation / Uninstallation
Uninstallation starts.
6 Click [Finish].
PC will be rebooted. Uninstallation is now completed.
1
Page 44

Alternative
Click "Start" menu and click "All Programs". Click and open "Canopus" folder,
•
and click "Uninstall" in "EDIUS 5" folder. Then follow the procedure in Step4 to 6.
Uninstalling driver and application software from Windows XP
Before starting uninstallation, close all the other applications that may be
Notes
•
running in the task tray.
In order to uninstall, you must log in as a user with administrator
•
privileges.
1 Click "Start" menu, and click "Control Panel".
2 Double-click "Add or Remove Programs".
3 Select "EDIUS 5 (SetupManager)", and click [Remove].
4 Check on the component to uninstall, and click [Next].
2
Uninstallation starts.
5 Click [Finish].
The computer will reboot. Uninstallation is completed.
Alternative
Click "Start" menu, then click "All programs" → "Canopus" → "EDIUS 5" →
•
"Uninstall". Check the items to uninstall and click [Next].
Page 45

4
License Transfer
Transferring license
When you are using EDIUS on a desktop PC where the numbers of USB ports are
limited, or when you do not want to carry USB key, consider transfer ring EDIUS
licenses. Make sure to read and understand the following notes before transferring
licenses.
The procedure in Windows Vista is described here. The operation is same in Windows
XP.
The license transfer tool must be executed on a PC where EDIUS has
Notes
•
been installed.
When you close the license t ransfer tool, make sure that the transferring
•
procedures of license have been completed. If you close the tool while
processing, your EDIUS license may be lost.
Please note that the USB key cannot be reissued no matter what the
•
circumstances (even when the license information exists on a PC). Keep
the USB key securely.
License can only be transferred between PC and USB key, or between
•
USB and USB. It cannot be transferred f rom a PC to another PC.
If you have several licenses of the same product, they cannot be
•
integrated in one USB key.
If you have transferred the license to a PC, there is a possibility that
•
the license may be lost because of the malfunction of a hard disk drive
or any other reasons. We recommend that you should not transfer the
license to a PC unless there is a compelling reason.
Note that when you have transferred the license to a PC, the registered
•
license data may become invalid if you change the hardware (CPU,
Memory, Motherboard, HDD, NIC, etc) congurations.
License Transfer
Using License Transfer tool
1 Set the USB key that contains the licenses you want to
transfer to a USB port of a PC.
2 Set the product DVD into the DVD-ROM drive.
Page 46

3 Open "Tools", "EdiusLM" and double-click "EdiusLM.exe".
[EDIUSLM] dialog appears.
Transfer between a USB key and a local disk of a PC
1 Click "USB to PC" on the "EDIUS LM" dialog.
2 Select the license to transfer and click [->].
To transfer from a PC to a USB key, click [<-].
3 Wait until the license is transferred, and click [Close].
Page 47

Transfer between a USB key and another USB key
1 Click the "USB to USB" tab on the "EDIUSLM" dialog.
2 Select the license to transfer and click [->].
3 Remove the USB key, set the USB key to transfer the license
to, and then click [Refresh].
Make sure to remove the USB key where the license had been stored,
Notes
•
before setting the destination USB key.
When you change the USB keys, do not fail to click [Refresh] in order to
•
update the License list.
License Transfer
4 Select the license and click [<-] to transfer it to the new USB
key.
5 Wait until the license is transferred, and click [Close].
Do not remove the USB key when the licenses are being transferred.
Notes
•
To transfer licenses, make sure to replace USB keys step by step.
•
Page 48

5
Hardware Specications
Main Board
EDIUS NX PCI-X (NHX-E1)
PCI standard
Digital video
Analog video
Analog audio
Board size
Max
consumption
current
Weight
PCI Spec. Revision 2.1 For HD / SD edit: 64bit / 66MHz PCI
For SD edit: 32bit / 33MHz PCI
DV terminal (DV 4pin) x 1
* OHCI board or Expansion board is required for HDV I/O.
S terminal (Mini DIN7pin) x 1
Input
Output
Input
Output
212mm (Width 107mm)
32bit PCI (for SD edit) +5V: 2.2A, +12V: 440mA, -12V: 160mA
64bit PCI (for HD edit) +5V: 2.4A, +12V: 440mA, -12V: 160mA
About 250g
* S cable can be directly connected.
* Use analog video connector conversion cable to
connect RCA (composite) connector.
S terminal (Mini DIN7pin) x 1
* S cable can be directly connected.
* Use analog video connector conversion cable to
connect RCA (composite) connector.
Stereo mini-jack x 1
* Use audio conversion cable to connect RCA
connector.
Stereo mini-jack x 1
* Use audio conversion cable to connect RCA
connector.
EDIUS NX PCI-e / EDIUS NX Express (NHX-E2)
PCI Express
standard
Digital video
PCI Express x 1 (PCI Express Spec. Revision 1.0a)
DV terminal (DV 4pin) x 1
* OHCI board or Expansion board is required for HDV I/O.
Page 49

S terminal (Mini DIN7pin) x 1
* S cable can be directly connected.
* Use analog video connector conversion cable to
connect RCA (composite) connector.
S terminal (Mini DIN7pin) x 1
* S cable can be directly connected.
* Use analog video connector conversion cable to
connect RCA (composite) connector.
Stereo mini-jack x 1
* Use audio conversion cable to connect RCA
connector.
Stereo mini-jack x 1
* Use audio conversion cable to connect RCA
connector.
Analog video
Analog audio
Board size
Input
Output
Input
Output
212mm (Width 111mm)
Max
consumption
+12V: 2.3A, +3.3V: 1.3A
current
Weight
About 240g
HDSTORM (HQX-E1)
Hardware Specications
PCI Express standard
Video
Audio
Max consumption
current
Operating temperature
Operating humidity
PCI Express x 1 (PCI Express Spec. Revision
1.1)
Input HDMI terminal x 1
Output HDMI terminal x 1
Input HDMI (LPCM 8ch)
Output
HDMI (LPCM 8ch)
Stereo mini-jack x 1
+12V : 250mA, +3.3V : 3A
0°C to 45°C
40 ~ 80% (No Condensation)
47
Page 50

Expansion board (HX-HD1)
PCI standard
Analog video
Analog audio
Board size
PCI Spec. Revision 2.1 (32bit / 33MHz)
Output HD / SD component output (BNC) x 3
Unbalanced audio (RCA pin-jack) x 2
Output
120mm (Width 93mm)
* Can simultaneously be used with audio output
of main board.
Max
consumption
+5V: 200mA, +12V: 100mA, -12V: 100mA
current
Weight
About 110g
Hardware MPEG Engine board
PCI
Express
standard
Analog
video
I/O terminal
MPEG
Encoding
part
PCI Express x 1 (PCI Express Spec. Revision 1.0a)
Output
HDV / DV Input
(IEEE1394)
MPEG2
HD / SD component output (BNC) x 3
* These connectors do not exist on some board.
6pin x 1*
4pin x 2 (for internal connection)
NTSC
Resolution
PAL
Video Bit Rate
Number of
Pictures
Cycle 1 to 4
Frame Rate
Audio Bit Rate 96 to 384kbps
Sampling
Frequency
Audio
Compression
Multiplex MPEG2 program stream
MPEG2 128kbps ~ 15Mbps(VBR/CBR)
0 to 5
NTSC 29.97fps / 14.985fps
PAL 25fps
48kHz 44.1kHz 32kHz
MPEG1 Layer2
720x480, 704x480, 640x480,
480x480, 352x480, 352x240,
320x240, 176x120
720x576, 704x576, 640x576,
480x576, 352x576, 352x288,
320x288, 176x144
Page 51

Resolution
Video Bit Rate
MPEG
Encoding
part
MPEG4
Frame Rate
Audio Bit Rate 64 to 160kbps
Sampling
Frequency
Audio
Compression
Multiplex
Consumption Current (Max)
Available Temperature Range
Available
Resources
Size /
Weight
Inter rupt 3
Memory Space Area for 2M byte
Approx. 163(W) x 112(H)mm x 16mm(D)
* Excluding projecting parts
Approx. 140g
720x480, 704x480, 640x480,
NTSC
PAL
MPEG4 32kbps to 8Mbps (VBR / CBR)
NTSC 29.97fps / 14.985fps
PAL 25fps
48kHz, 24kHz
AAC
MPEG4 File Format ISO/IEC 14496-14
MEMORY STICK Standard Video
File Format
+3.3V 1.8A, +12V 150mA
5 to 45 degrees C
480x480, 352x240, 320x240,
176x120
720x576, 704x576, 640x576,
480x576, 352x576, 352x288,
320x288, 176x144
Hardware Specications
* In case that the main board and the Hardware MPEG Engine Component Out board
are connected internally with a DV cable, please do not input DV / HDV signal via
the DV terminal (IEEE1394 6pin) on the Hardware MPEG Engine board. Use the DV
terminal (DV 4pin) on the main board.
Page 52

NX Bay (NHX-B10) (Optional)
Digital video
Analog video
Analog audio
DV terminal (DV 4pin) x 1
Input
Output
Input RCA pin jack x 2 (stereo 1 system)
Output RCA pin jack x 2 (stereo 1 system)
RCA pin jack x 1
S terminal x 1
RCA pin jack x 1
S terminal x 1
HDSTORM BAY (HQX-B10) (Optional)*
* May be included depending on the product package.
Digital video
Digital audio
Analog video
Analog audio
Power supply
Max
consumption
current
Product size
Input HDMI terminal x 1
Output HDMI terminal x 1
Input HDMI (LPCM 8ch)
Output HDMI (LPCM 8ch)
Component terminal x 1
* Composite video cable can be directly
Input
Output
Input RCA pin jack x 2 (stereo 1 system)
Output RCA pin jack x 2 (stereo 1 system)
DC 5V (supplied from internal PC to 4pin power terminal)
DC 12V
+12V : 370mA, +5V : 1.1A
143mm(W)x165mm(D)x42mm(H)
connected.
* Use analog video connector conversion cable
to connect S terminal.
Component terminal x 1
* Composite video cable can be directly
connected.
* Use analog video connector conversion cable
to connect S terminal.
50
 Loading...