

Page 1

Channel Composer User Manual
Document version: 1.6.2 - 3/25/13
Page 2

1 Support ..................................................................................................................................................... 5
2 About this document ................................................................................................................................. 6
3 Channel Composer Concepts .................................................................................................................. 8
3.1 Objects ........................................................................................................................................... 9
3.2 Templates ..................................................................................................................................... 10
3.3 Formats ........................................................................................................................................ 10
3.4 Assets, Metadata, Scene Parameters and Test Media ............................................................... 11
3.5 Main Event ................................................................................................................................... 12
3.6 Projects and Channel Packs ........................................................................................................ 13
3.7 Channel Pack Activation and Scheduling .................................................................................... 14
3.8 Workflow ....................................................................................................................................... 16
4 Channel Composer: getting started ....................................................................................................... 17
4.1 System Requirements (Mac) ........................................................................................................ 17
4.2 Installation Mac ............................................................................................................................ 17
4.3 Requirements (Windows) ............................................................................................................. 18
4.4 Installation Windows .................................................................................................................... 18
4.5 Starting Channel Composer ......................................................................................................... 19
4.6 Setting preferences and customizing Channel Composer ........................................................... 19
5 Working with Projects ............................................................................................................................. 22
5.1 Creating or opening an existing project ....................................................................................... 22
5.2 Importing a Project ....................................................................................................................... 23
5.3 Merging Projects .......................................................................................................................... 24
5.4 Restoring a Backup ...................................................................................................................... 25
5.5 Exporting a Project ....................................................................................................................... 25
5.6 Exporting a Project to disk ........................................................................................................... 26
5.7 Managing Exports ........................................................................................................................ 29
6 Working with Templates ......................................................................................................................... 31
6.1 Opening a Template ..................................................................................................................... 31
6.2 Creating a new Template ............................................................................................................. 31
6.3 Renaming a Template .................................................................................................................. 31
6.4 Deleting a Template ..................................................................................................................... 31
6.5 Copying a Template ..................................................................................................................... 32
6.6 Displaying Object properties on the Timeline .............................................................................. 32
Channel Composer User Manual - Channel Composer User Manual- document version: 1.6.2 - 1
Page 3

6.7 In Points and Out Points .............................................................................................................. 33
6.8 Keyframing ................................................................................................................................... 34
6.9 Template settings ......................................................................................................................... 36
6.10 Commands .............................................................................................................................. 37
6.11 Template Rules ....................................................................................................................... 38
6.12 Try-out mode ........................................................................................................................... 39
6.13 Pixel Perfect ............................................................................................................................ 40
6.14 Creating an Operator Panel .................................................................................................... 41
6.15 Adding Objects ........................................................................................................................ 42
6.16 Modifying an Object's properties ............................................................................................. 43
6.17 Transform gizmo ..................................................................................................................... 43
6.18 Layering Objects ..................................................................................................................... 44
6.19 Grouping Objects .................................................................................................................... 44
6.20 Locking Objects ....................................................................................................................... 44
6.21 2D and 3D-mode ..................................................................................................................... 45
6.22 Prefabs .................................................................................................................................... 45
6.23 Copying Objects ...................................................................................................................... 45
6.24 Deleting Objects ...................................................................................................................... 45
7 Object Types .......................................................................................................................................... 46
7.1 Introduction ................................................................................................................................... 46
7.2 Live ............................................................................................................................................... 51
7.3 RTic-compatible Tickers ............................................................................................................... 52
7.4 Subtitles ........................................................................................................................................ 56
7.5 Controllers .................................................................................................................................... 65
7.6 GPIO Command ........................................................................................................................... 70
8 Working with Assets, Metadata and Scene Parameters ........................................................................ 72
8.1 Adding Assets .............................................................................................................................. 72
8.2 Metadata ...................................................................................................................................... 72
8.3 Scene Parameters ....................................................................................................................... 73
9 Working with Applets .............................................................................................................................. 76
9.1 Creating a new Applet .................................................................................................................. 76
9.2 Renaming an Applet ..................................................................................................................... 76
9.3 Deleting an Applet ........................................................................................................................ 76
Channel Composer User Manual - Channel Composer User Manual- document version: 1.6.2 - 2
Page 4

10 Working with Formats ............................................................................................................................. 77
10.1 Opening the Format Timeline ................................................................................................. 77
10.2 Creating a new Format ........................................................................................................... 77
10.3 Renaming a Format ................................................................................................................ 77
10.4 Deleting a Format .................................................................................................................... 78
10.5 Adding Templates to a Format ................................................................................................ 78
10.6 Timing Templates .................................................................................................................... 78
10.7 Opt-out .................................................................................................................................... 78
10.8 Adding applets to a Format ..................................................................................................... 79
10.9 Timing applets ......................................................................................................................... 79
10.10 Simulcast ................................................................................................................................. 80
11 Channel Pack Validation ........................................................................................................................ 81
11.1 Basic testing and further analysis ........................................................................................... 82
11.2 Basic testing ............................................................................................................................ 82
11.3 Further analysis ....................................................................................................................... 82
11.4 Starting playback statistics ...................................................................................................... 82
11.5 Interpreting playback statistics ................................................................................................ 83
12 Quick Reference ..................................................................................................................................... 87
12.1 The Channel Composer workspace ........................................................................................ 87
12.2 The main menu ....................................................................................................................... 88
12.3 Main toolbar ............................................................................................................................ 94
12.4 View mode icons .................................................................................................................... 96
12.5 The Stage ................................................................................................................................ 96
12.6 The Template Timeline ........................................................................................................... 97
12.7 The Format Timeline ............................................................................................................. 100
12.8 Project window ...................................................................................................................... 102
12.9 Objects window ..................................................................................................................... 103
12.10 Object window ....................................................................................................................... 104
12.11 Project Assets window .......................................................................................................... 106
12.12 Scene Parameters window ................................................................................................... 107
12.13 History window ...................................................................................................................... 107
12.14 Library window ...................................................................................................................... 108
12.15 Text styles window ................................................................................................................ 108
Channel Composer User Manual - Channel Composer User Manual- document version: 1.6.2 - 3
Page 5

13 Hotkeys................................................................................................................................................. 109
13.1 Global .................................................................................................................................... 109
13.2 Stage ..................................................................................................................................... 111
13.3 Template Timeline ................................................................................................................. 111
Copyright © Grass Valley USA, LLC. All rights reserved. This product may be covered by one or more
U.S. and foreign patents.
Channel Composer User Manual - Channel Composer User Manual- document version: 1.6.2 - 4
Page 6
1 Support
Contact information: http://www.grassvalley.com/support/contact
U.S Technical Support: +1 800-547-4989 or +1 530 478 4148 or E-mail: Please use our online form
All other countries Technical Support: +800 80 80 20 20 or +33 1 48 25 20 20 or E-mail:
callcentre@grassvalley.com
FAQ: http://grassvalley.novosolutions.net/
Training: https://grassvalley.csod.com/LMS/catalog/Main.aspx?tab_page_id=-67&tab_id=6
Answers to frequently asked questions can be found on our forum on the Grass Valley website:
http://forum.grassvalley.com/forum/
If applicable, register yourself on the forum page:
> Smart Playout Center > Channel Composer.
Channel Composer User Manual - Channel Composer User Manual- document version: 1.6.2 - 5
Page 7

2 About this document
This manual is written for users with a basic understanding of broadcasting and Channel design. We
recommend that users who are new to these concepts take the Channel Composer training.
This document describes Channel Composer version 1.6.2. Information in this manual may at some points
differ from your Channel Composer application due to differences in version. Screenshots show the
Channel Composer Mac interface.
A number of Example Projects are included in Channel Composer and can be found under File >
Example Projects. Following topics are explained:
• Play Video: demonstration of basic video playback.
• Tickers: various examples of Tickers.
• Clocks and Counters: various examples of Clocks and Counters.
• Squeeze back: an example of a squeeze back of the main video.
• Keying: demonstrates the two main ways of keying, by Player and by Object.
• Soft cuts: explains Template soft cutting.
• Scaling: various methods for upscaling, for example from SD to HD, and downscaling.
• Quality Assurance: various techniques that can be used to counter graphics artifacts commonly seen
in broadcasting.
• Optimization: various techniques for playback optimization.
• Controllers: examples of Controllers; Controllers are an alternative to keyframing for animating
Objects.
• Ground Reflection: demonstrates the Group Object’s ability to generate reflections of its members on
the ground plane.
• Sports: an example of the usage of Channel Composer for a sports info Channel.
• Music: an example of a typical music Channel.
• Simulcast: an example of a basic HD-SD simulcast project.
• Tickers: shows how to set up RTic compatible tickers.
Channel Composer User Manual - Channel Composer User Manual- document version: 1.6.2 - 6
Page 8

Channel Composer video tutorials are available on the Grass Valley website:
http://www.grassvalley.com/apps/doc_show?&set=ips&c=^channel%20composer$|Channel%20Compose
r&super=broadcast&skin=gvcmsnew&sort=rev > Videos.
Following tutorials are available:
• Creating a Play Clip Template and Format.
• Creating a Logo Bug Template and Format.
• Creating a 3D Picture-in-Picture Template and Format.
• Creating a Ticker Template and Format.
• Creating a Clip title Template and Format.
• Creating a Clip title Wipe Template and Format.
• Creating a 3D picture-in-picture Template and Format.
• Working with Controllers.
• Creating a Dynamic Textbox Template.
Channel Composer User Manual - Channel Composer User Manual- document version: 1.6.2 - 7
Page 9
3 Channel Composer Concepts
Channel Composer is used to create 2D and 3D-scenes. Look-and-feel, presentation and content
metadata is assembled to a complete Channel design, ready for on-air presentation. This chapter
describes the basic Channel Composer concepts.
Channel Composer User Manual - Channel Composer User Manual- document version: 1.6.2 - 8
Page 10
3.1 Objects
The Objects window lists all the Objects added to a
Channel Composer works with Objects such as Clip,
Box, Still, Animation, Plane and so on. Objects have
properties, such as opacity, position and scale that
can be modified and animated.
The example shows the Object properties window for
a Clip Object.
Project (or all Objects included in the selected
Template when the Filter icon is active as shown in the
example on the left.)
Each Object is placed on its own layer. Objects on
higher layers overlap Objects on lower layers.
In Channel Composer, one and the same Object can
be used in different Templates while its properties can
have different values per Template.
Channel Composer User Manual - Channel Composer User Manual- document version: 1.6.2 - 9
Page 11

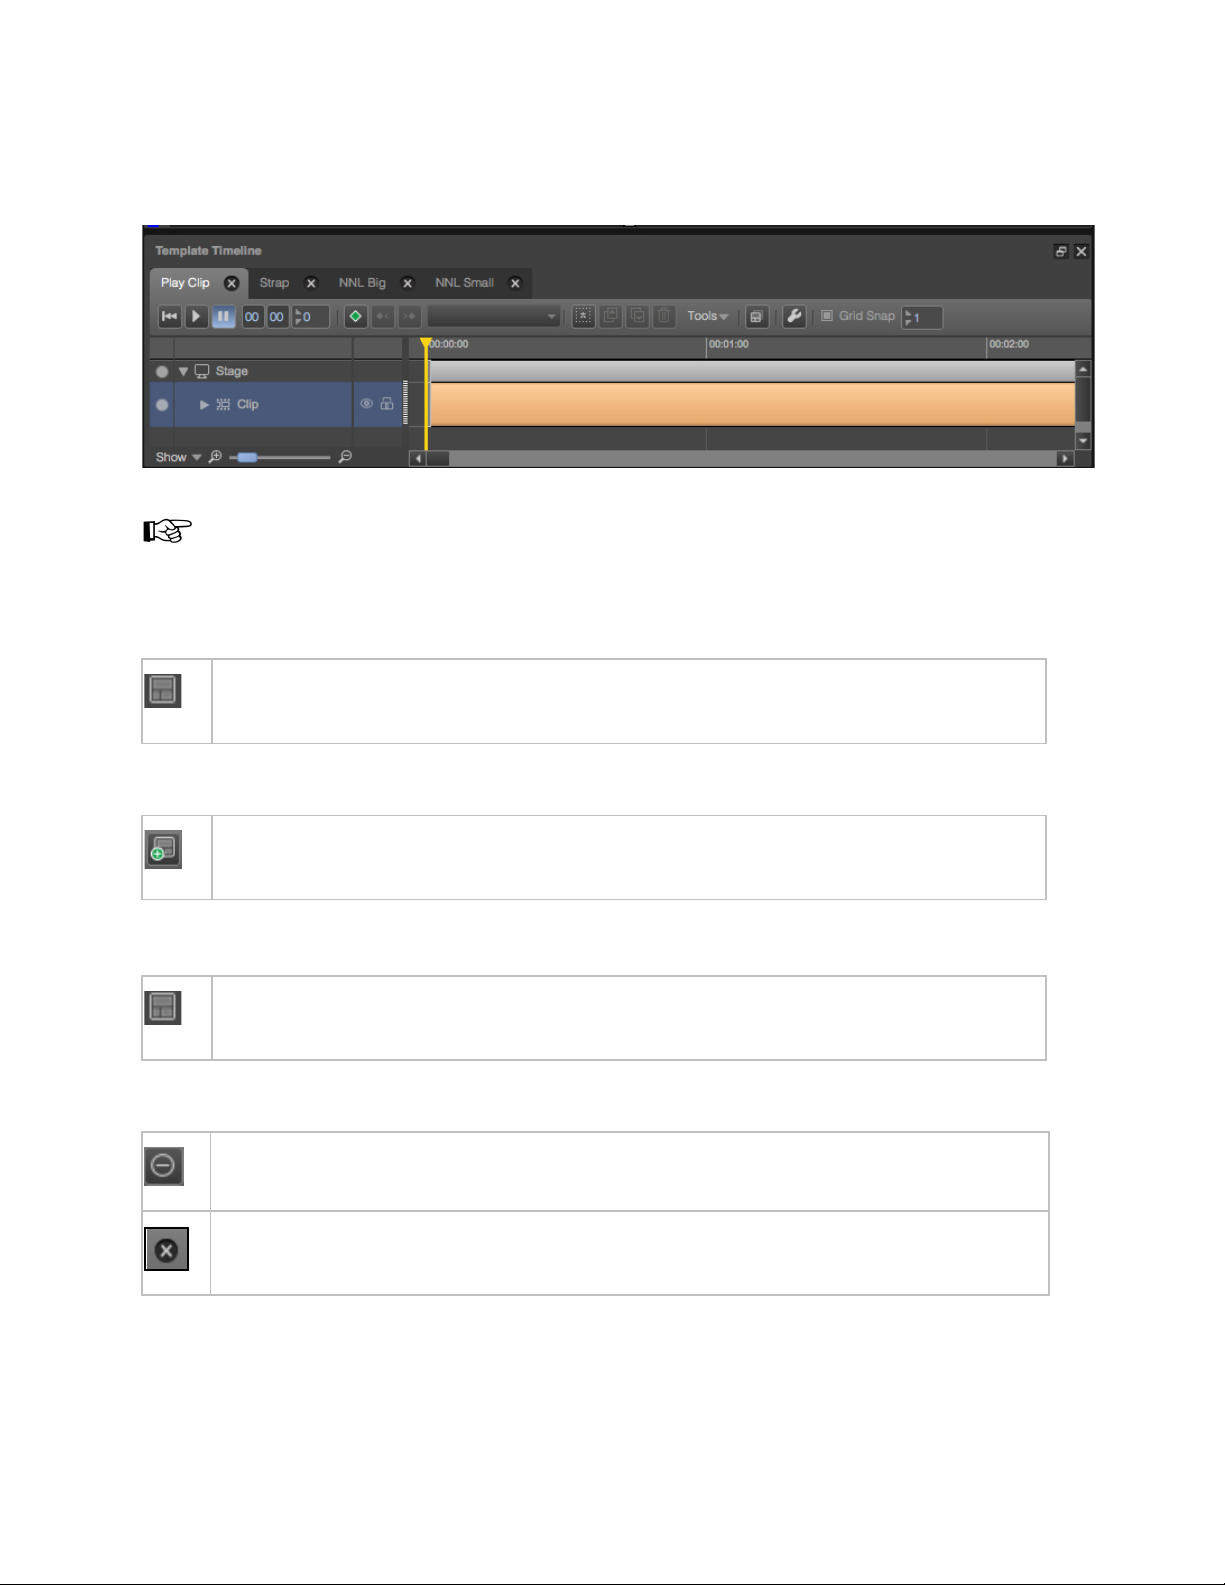
3.2 Templates
Templates are used to transform Objects’ properties such as opacity, position and scale in time. The
example above shows a Template used to play a Clip. The column on the left lists the Objects included in
the Template. Each Object has its own track on the Timeline. The player head (the yellow vertical line) can
be moved, paused and rewinded to preview animations on the Stage.
Define a Template for on-screen transitions that you want to able to control and time independently from
each other.
3.3 Formats
A format is a list of secondary Events (Templates and Applets) that together provide a certain on-air look
and behavior when executed.
The example above shows the Format Play Clip. The column on the left lists the Templates and Applets
included in this Format. Templates and Applets are timed on the Format Timeline using offsets relative to
the main Asset.
Channel Composer User Manual - Channel Composer User Manual- document version: 1.6.2 - 10
Page 12
3.4 Assets, Metadata, Scene Parameters and Test Media
p or Still, can refer to
An Object, for example a Cli
fixed content or to dynamic content.
• Example fixed content: a logo.
• Example dynamic content: video clips;
the Template plays out a different video
clip each time it is activated.
All the fixed files that belong to a Channel design are added to the Channel Composer Project as Assets.
These Assets are included in the Channel Pack when the Project is exported to the TX/MAM database.
Thus, all the fixed design elements needed for playout - logos, straps, and so on - are available in the
Channel Pack.
To refer to dynamic content, Scene Parameters are defined. These parameters are dynamically updated
with the assets’ filename when Events are scheduled. Dynamic content is fetched from Storage for
playout.
Example:
Scene Parameter Event ID Scene Parameter Value when
scheduled
clip 12345 a0000548.avf
clip 12346 a0000978.avf
clip 12347 a0000564.avf
An Object can also refer to a file's metadata fields. This metadata information can be played out, or is
used to schedule Events. For examples, clip title and artist information is derived for playout from the clips'
<title> and <artist> metadata fields.
For testing purposes, test media (images, videos) can be added to the Test Media library. Note that test
media will not be included in the Channel Pack when the Project is exported.
Channel Composer User Manual - Channel Composer User Manual- document version: 1.6.2 - 11
Page 13
3.5 Main Event
In this paragraph we will briefly explain the concepts ´main Asset´ and ‘main Event’ that this manual at
some points refers to.
A Playlist lists main Events. Each main Event consists of secondary Events (Templates and Applets).
Example: in a music show Format, Events are built of the following secondary Events:
• Playout the clip.
The clip is the main Asset. The dynamic reference to the music clip file (scene parameter usually
linked to the File property of the Clip Player object) is updated with the clip asset’s filename when
the Events are scheduled. Dynamic content is fetched from Storage for playout.
• Fade in the logo 5 seconds after the start of the main Event.
The logo is a fixed Asset that is included in the Channel Pack
• Fade out the logo 3 seconds before the end of the main Event.
The secondary Events are timed relative to the main Asset’s duration.
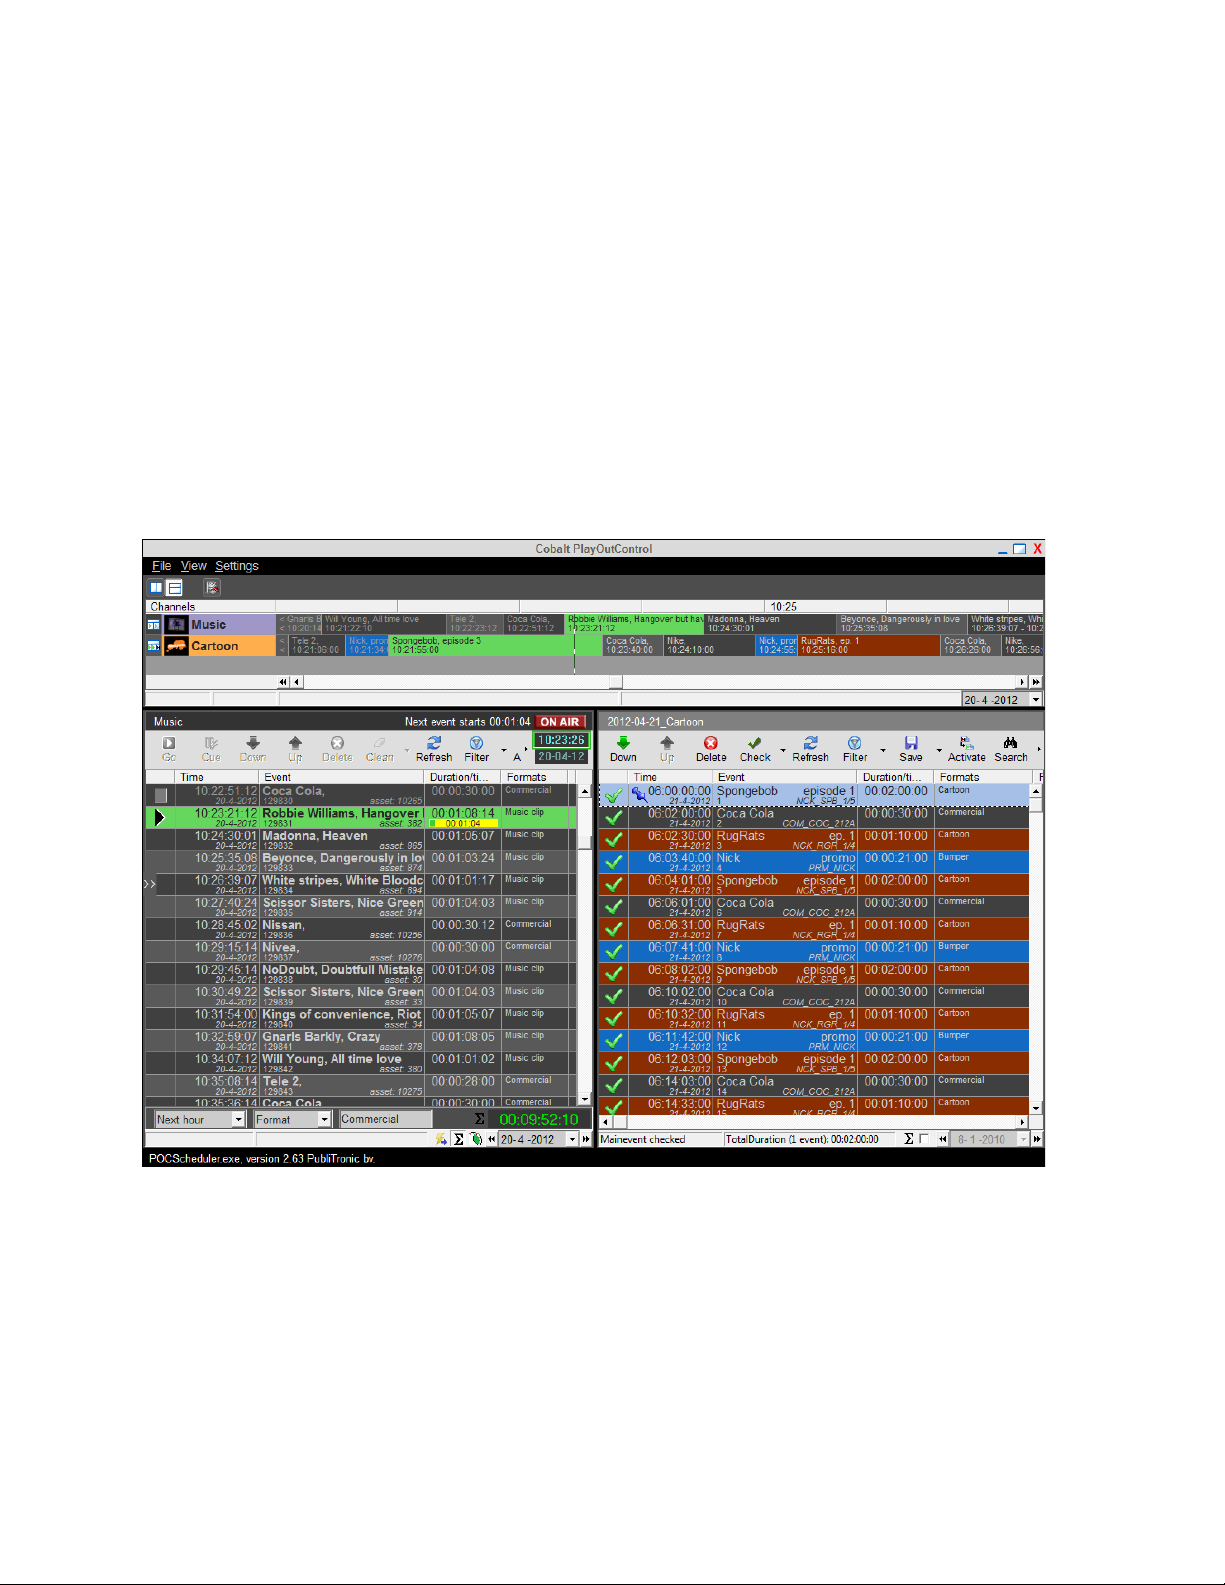
Example playlist in Playout Control, listing main Events.
Channel Composer User Manual - Channel Composer User Manual- document version: 1.6.2 - 12
Page 14
3.6 Projects and Channel Packs
Project
Channel Pack
A Project contains all the elements that together compose a Channel’s on-air design: fixed Assets,
Objects, Templates, Applets and Formats. Projects are designed in Channel Composer and are then
exported to the TX/MAM-database as a Channel Pack. Formats are now available for scheduling.
Before playout, the Channel Pack is transferred from the TX/MAM database to the playout nodes.
Dynamic content is fetched from Storage and is also transferred to the playout nodes.
Formats
Objects
Assets
Templates
Applets
Channel Composer User Manual - Channel Composer User Manual- document version: 1.6.2 - 13
Page 15
Schedule
Channel Pack
Events are scheduled with
the Assets, Templates, Applets and Formats from:
Event
Channel Pack ID: 2400
Event
Event
Channel Pack ID: 2312
Event
3.7 Channel Pack Activation and Scheduling
When creating a Schedule, the Cobalt scheduling process will apply the Channel Pack that is active at the
Events’ planned start time. This means that Events are scheduled with the Formats from this Pack. Events
in a Playlist play out the Formats they were scheduled with.
Example:
Start time: 13/02/12 12:00:00
Event
Start time: 13/02/12 12:03:00
Start time: 13/02/12 and so on
Start time: 14/02/12 12:00:00
Start time: 14/02/12 12:03:00
Event
Start time: 14/02/12 and so on
Activation starts: 13/02/12 12:00:00
Activation starts: 14/02/12 12:00:00
Example Activation date and time set for a Channel Pack.
Channel Composer User Manual - Channel Composer User Manual- document version: 1.6.2 - 14
Page 16
The Channel Pack's activation period can be specified:
• in Channel Composer when exporting the Project to the TX/MAM database
• via the ‘Manage Exports’ option
• using the Channel Pack Manager.
Channel Composer ‘Export’ and ‘Manage Export’ options are described in Chapter 5. Note that you can
also view (not modify) Channel Packs in POC.
When scheduling Events in an active Playlist that uses a different Channel Pack than the currently
loaded Pack, leave at least one minute for this Pack to load. In other words, schedule Events at
least one minute in advance of start of playout.
Example Channel Packs overview in POC. The currently active Pack is highlighted. Note that Channel
Packs have an asset ID. When a Channel Pack is changed and exported, a new pack with a new asset ID
is created.
If a Channel Pack is changed after it has been used in a Schedule, you need to regenerate the
Schedule (with the new Pack ID) to apply these changes.
Channel Composer User Manual - Channel Composer User Manual- document version: 1.6.2 - 15
Page 17
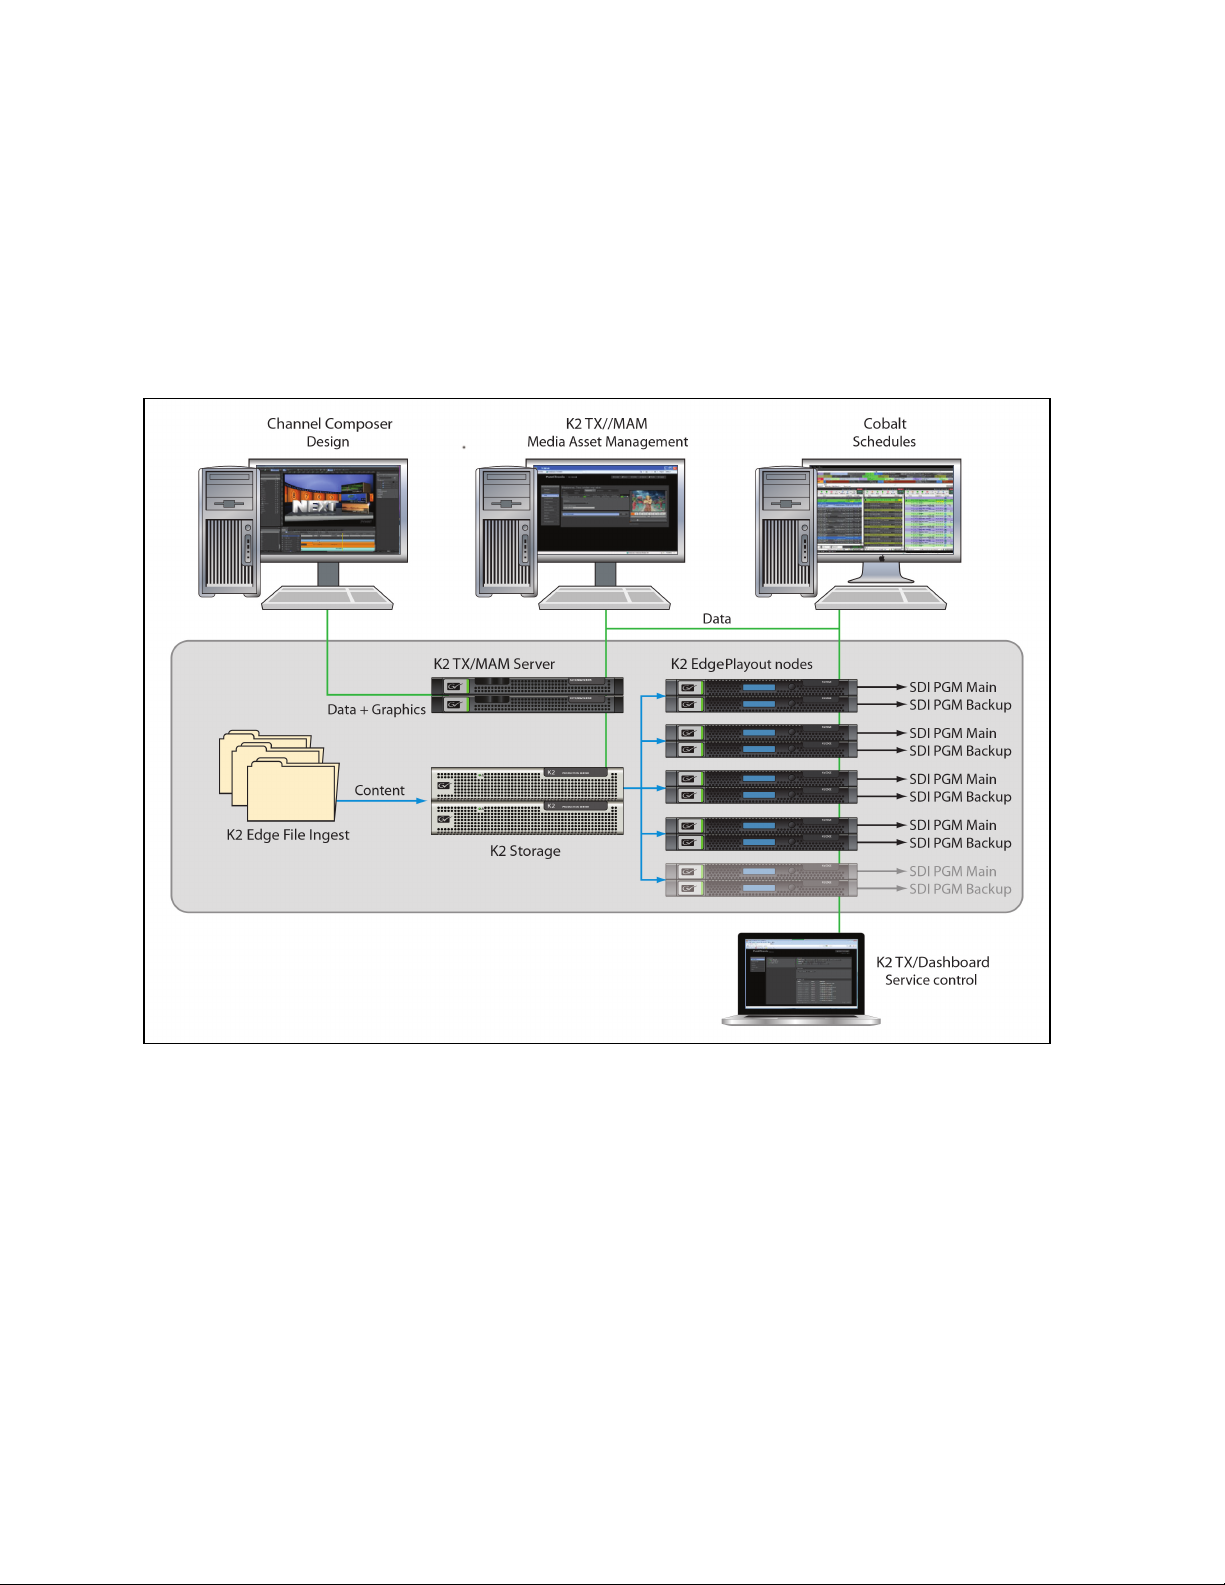
3.8 Workflow
Channels are designed in Channel Composer.
The Project is then exported to the Cobalt (TX/MAM) database and includes all the design
elements needed for playout.
Formats are now ready for scheduling.
Before playout, the Channel Pack is transferred from the TX/MAM database to the playout nodes.
Dynamic content is fetched from Storage and also transferred to the playout nodes.
Channel Composer User Manual - Channel Composer User Manual- document version: 1.6.2 - 16
Page 18

4 Channel Composer: getting started
4.1 System Requirements (Mac)
• A Mac computer with a multi-core Intel processor (64-bit).
• Mac OS X v10.6 (Snow Leopard) or later.
• Memory: 4GB of RAM.
• Video card:
o 512MB of VRAM or more.
o OpenGL 2.1 and the following OpenGL extensions:
EXT_framebuffer_multisample
EXT_framebuffer_blit
ARB_texture_rectangle
APPLE_flush_buffer_range
o NOT recommended: Nvidia Quadro cards.
o Recommended: ATI Radeon HD5670 or better, Nvidia Geforce GT320 or better.
• A USB-dongle with a Channel Composer license.
[See the following link for an overview of the OpenGL support on Mac OS X for your system and video
card: http://developer.apple.com/graphicsimaging/opengl/capabilities/]
[See the readme included with the installation image for most recent requirements.]
4.2 Installation Mac
Double-click the Channel Composer image (.dmg file) to mount the disk image.
The disk image icon appears on the desktop and the next window opens.
Install the dongle driver (SentinelSystemDriver).
Drag the Channel Composer icon on the Applications folder, to copy Channel Composer to your
Applications folder.
You can now start Channel Composer from the Applications folder.
Channel Composer User Manual - Channel Composer User Manual- document version: 1.6.2 - 17
Page 19

4.3 Requirements (Windows)
• An Intel/AMD 64-bit multiprocessor PC.
• A 64bit edition of Windows Vista or Windows 7.
• Memory: 4GB of RAM.
• Video card:
o 512MB of VRAM or more.
o OpenGL 2.1 and the following OpenGL extensions:
EXT_framebuffer_multisample
EXT_framebuffer_blit
ARB_texture_rectangle
ARB_map_buffer_range
o NOT recommended: Nvidia Quadro cards.
o Recommended: Nvidia Geforce GTS250 or better.
• A USB dongle with a Channel Composer license.
[See the readme included with the installation image for most recent requirements.]
We strongly recommend installing the Sentinel System Driver (dongle driver) that is distributed as part of
the Channel Composer disk image.
It is not possible to run Channel Composer via Windows Remote Desktop.
4.4 Installation Windows
Double-click the installer exe file and follow the instructions.
It is recommended to run Channel Composer as an Administrators group user. The easiest way to achieve
this is to mark the application to run as Administrator: in Windows Explorer, access 'Channel
Composer.exe' properties, navigate to 'Compatibility' tab and tick 'Run as Administrator' checkbox.
Channel Composer does not really require elevated privileges to run, but in doing so a wider range of
thread scheduling priorities become available thus allowing for faster response times. Note that Channel
Composer does not create or modify any files unless instructed by the user, i.e. to save a project on disk.
To that effect it is perfectly safe to run Channel Composer as Administrators group user.
Channel Composer User Manual - Channel Composer User Manual- document version: 1.6.2 - 18
Page 20
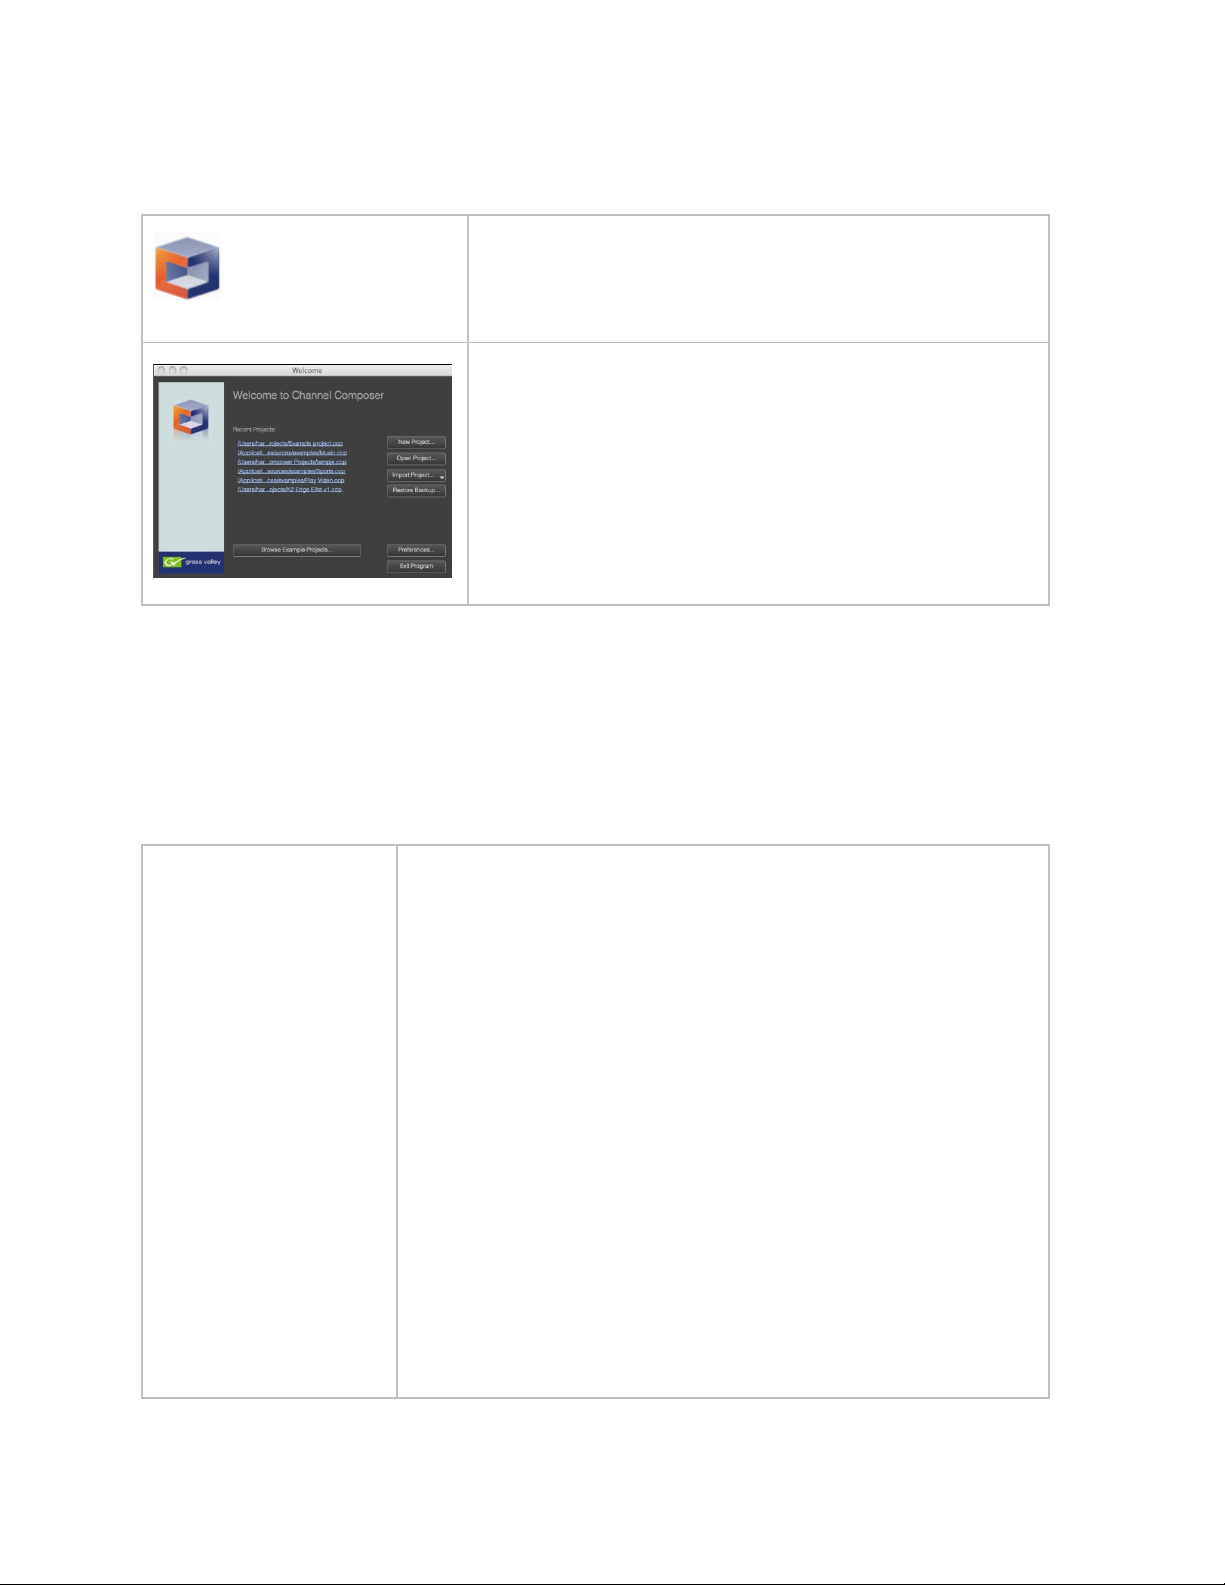
4.5 Starting Channel Composer
To start Channel Composer, double-click the Channel
Composer icon.
Channel Composer opens. You can now start working with
Projects. Chapter 5 explains the options in this window.
4.6 Setting preferences and customizing Channel Composer
The Channel Composer workspace can easily be customized. One way to do this is by adding or
removing (View > Windows) windows, or by scaling and repositioning windows (drag and drop). Windows
can also be added together by dragging a window on top of another. Double-click the window's title to
dock and undock windows. Other options to customize Channel Composer include:
Channel Composer >
Preferences
On the toolbar > Channel Composer > Preferences, you can define
preferences, for:
• Nexos:
◦ Broadcast Format
◦ Multi-Sampling Anti Aliasing: use to improve the design's
visual quality on your workstation (remove edge line
roughness and jagged edges). Note that higher sample
rates impact performance of your workstation.
◦ Players: set the big buffer pool size in MB.
• File:
◦ Specify the default Project folder.
◦ Autosave: disable (default) or enable autosave every x
minutes
• History: the number of actions tracked in history.
• Guides: the color of the guides and snap distance.
Channel Composer User Manual - Channel Composer User Manual- document version: 1.6.2 - 19
Page 21

•
Grid: the color of the grid, spacing and snap distance.
• Backup System: number of backups to keep.
• Networking: specify the FTP transfer mode.
View > Windows On the toolbar View > Windows, you can define which windows you
want to display or hide. Options are:
• Project Navigator
• History
• Library
• Project Assets
• Objects
• Object Properties
• Template Timeline
• Text Styles
• Scene Parameters
• Format Timeline
Main menu > View
• Template Rules
On the main menu > View , you can set a number of options for the
Stage:
• Zoom In: zoom in on the Stage.
• Zoom Out: zoom out from the Stage.
• Zoom to 100%: scale the Stage to 100%.
• Fit in Window: fit the Stage in the available workspace.
• Rulers: show or hide rulers.
• Grid: show or hide the grid.
• Guides: show or hide guides.
• Snap to Guides: enable or disable ‘snap to guides’.
• Snap to Grid: enable or disable ‘snap to grid’.
• Pixel Perfect Information: show or hide pixel perfect
information.
• Windows: select the windows you want to display.
• Clean View Mode: activate to hide all windows and display the
Stage only, deactivate to show windows and the Stage.
Channel Composer User Manual - Channel Composer User Manual- document version: 1.6.2 - 20
Page 22

Main toolbar
On the toolbar, you can set a number of options for the Stage:
• Zoom In: zoom in on the Stage.
• Zoom Out: zoom out of the Stage.
• Percentage: zoom the stage to the selected percentage.
• Fit: fit the Stage in the available workspace.
• Curtains: Objects may be placed outside of the active Stage
area to allow animation on to and off of the Stage. The curtains
button covers this outside area for a clear view of what the
final Channel output will be.
Channel Composer User Manual - Channel Composer User Manual- document version: 1.6.2 - 21
Page 23
5 Working with Projects
Channel Composer works with Projects. When exported to disk or the TX/MAM database, the Project is
bundled into a Channel Pack [see also paragraph 3.6]. Options are:
Create a new Project.
Open an existing Project.
Import a Project from a Channel Pack on disk or from the TX/MAM database.
Restore a backup.
Merge Projects.
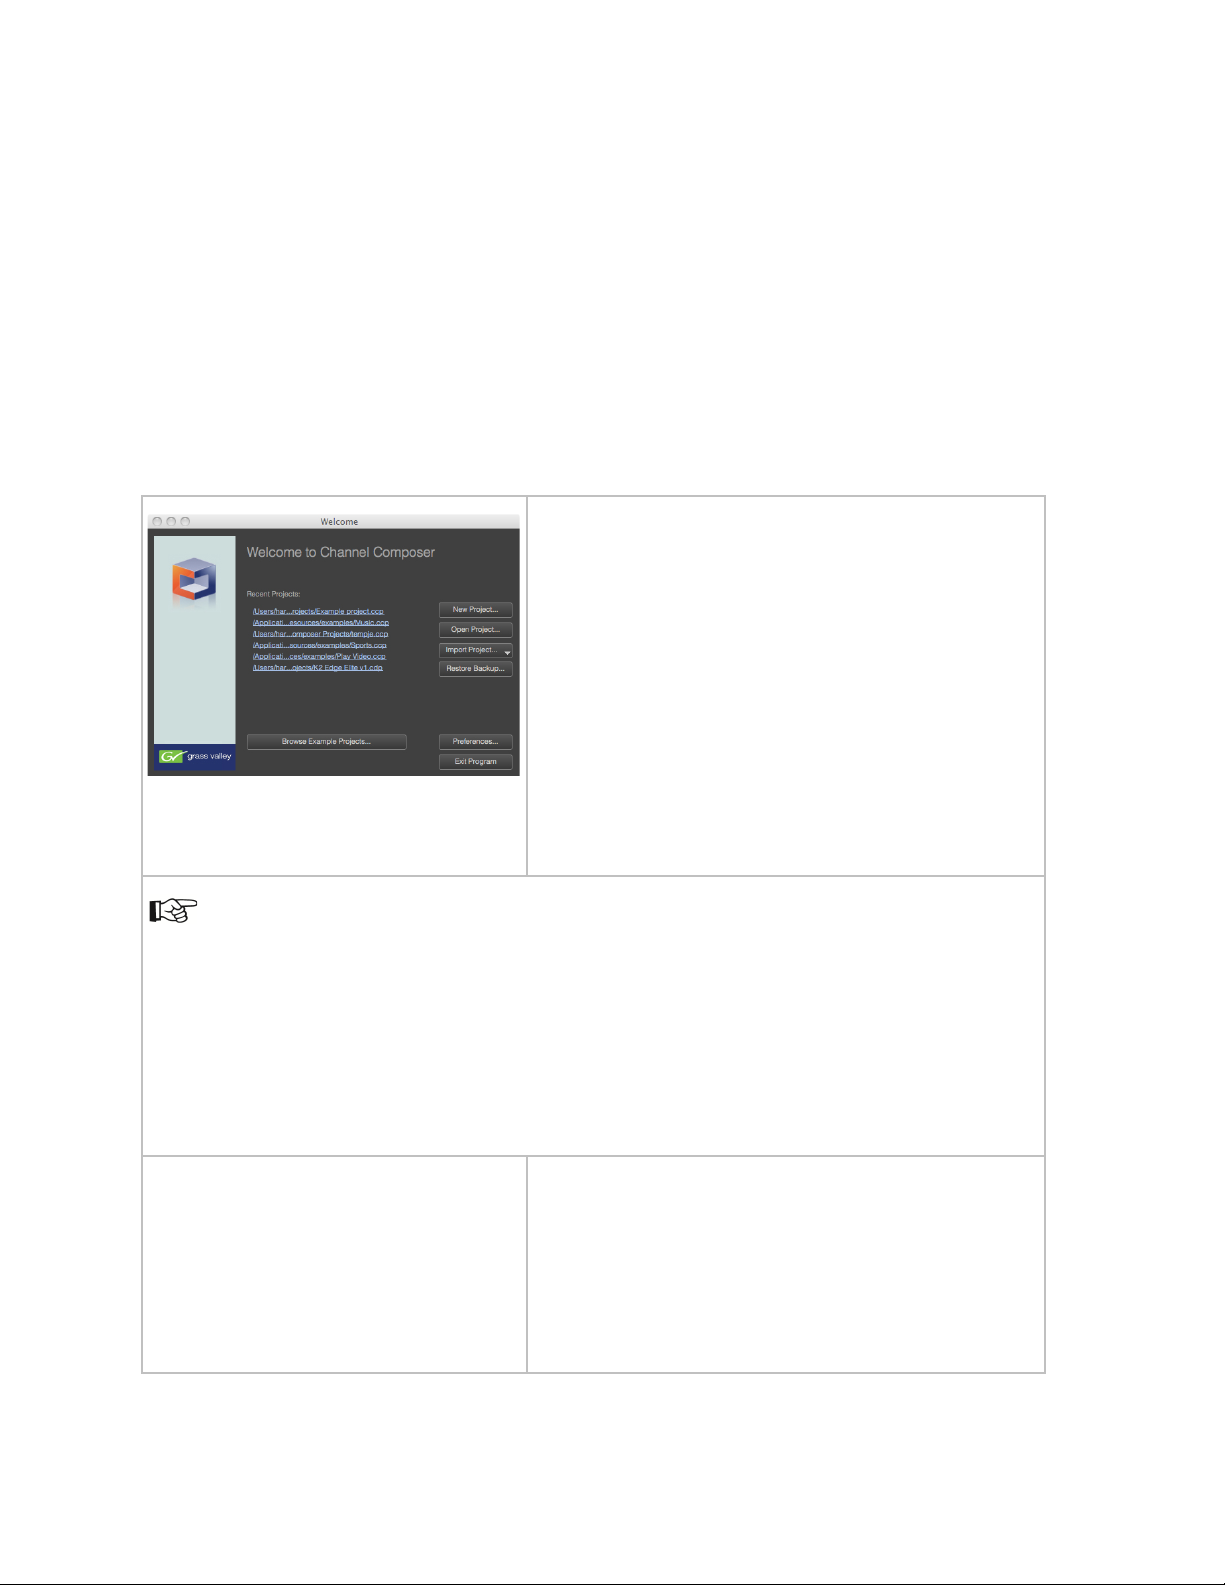
5.1 Creating or opening an existing project
Following options are available from the Channel
Composer Welcome screen, and from the File option on
the main menu:
• Create a new Project.
• Open an existing Project.
• Open an existing Project from a list of recent
Projects.
• Import a Project.
In the Welcome window, Channel Composer preferences can be set. This can be necessary when
the Project you want to open uses a different broadcast format than Channel Composer’s current
format (Channel Composer opens with the broadcast format last used). After changing the broadcast
format, you have to restart Channel Composer.
Instead of changing Channel Composer’s broadcast format, you can load the Project with the
currently active format and thus change the Project’s broadcast format. Note that this can result in an
incorrect output resolution and playback speed.
New Project
• Restore a Backup.
For a new Project, specify:
• Name
• Location
• Author
• Description
Channel Composer User Manual - Channel Composer User Manual- document version: 1.6.2 - 22
Page 24

New Projects contain three default Templates:
• nexosInit: this Template is automatically started after a nexos restart and places the Color
Bar Object on-screen (default). This template can be further customized at will.
• packInit: this Template is automatically started when a new Channel Pack is started, before
the first Template in this Pack. This Template can be further customized at will, for example
to start a Live Player.
• Template: an empty Template that contains an Out Point for the Color Bar Object (default).
We advise to remove the Color Bars to save resources [see also the Example Project
Optimization].
File > Project Settings
File > Merge Project
File > Preferences Preferences can be viewed and modified under File >
Project properties can be viewed under File > Project
Settings.
Note that Export and Channel Pack Asset Type options
can be reset here.
The Merge option can be found under the File option.
Preferences.
5.2 Importing a Project
Projects can be imported from a Channel Pack on disk or from the TX/MAM database.
5.2.1 Importing a Project from a Channel Pack on disk
Click File > Import Project > from Disk.
Browse to the folder the Channel pack is located in and select the applicable Channel Pack (.cpk
file).
Channel Composer User Manual - Channel Composer User Manual- document version: 1.6.2 - 23
Page 25
5.2.2 Importing a Project from the TX/MAM database
File > Import Project > from TX/MAM
Database
Select Project
Select destination folder
Click File > Import Project > from TX/MAM
Database.
Specify the (virtual) IP-address of the TX/MAM
server.
Fill in the login credentials for the TX/MAM
server. Note that this user must be defined in
Cobalt Asset Manager and should have read
rights for the Channel Pack Asset Type.
Click Next to continue, or Cancel to discard.
Select the Channel Pack you want to import.
Click Next to continue or Cancel to discard.
Select a destination folder for the Project.
Click Next to start the import, Back to go to the
previous screen or Cancel to discard.
You can use the Channel Pack Manager to list the Channel Packs that have been exported to a TX/MAM
database.
5.3 Merging Projects
Merging Projects is an easy means to reuse parts of a Project (Templates, Formats, and Applets). For
example, to reuse a set of ‘ticker’ and ‘play video’ Templates and Formats, place these items in a separate
Project, then merge this Project with other Projects to reuse. Merging Projects can also be useful when
working with several people on a Project.
The Merge Project functionality has been enhanced with the option to do a replacement merge. Using this
type of merge, objects and assets in the merged-in project replace objects and assets of the same name
in the original project.
Channel Composer User Manual - Channel Composer User Manual- document version: 1.6.2 - 24
Page 26
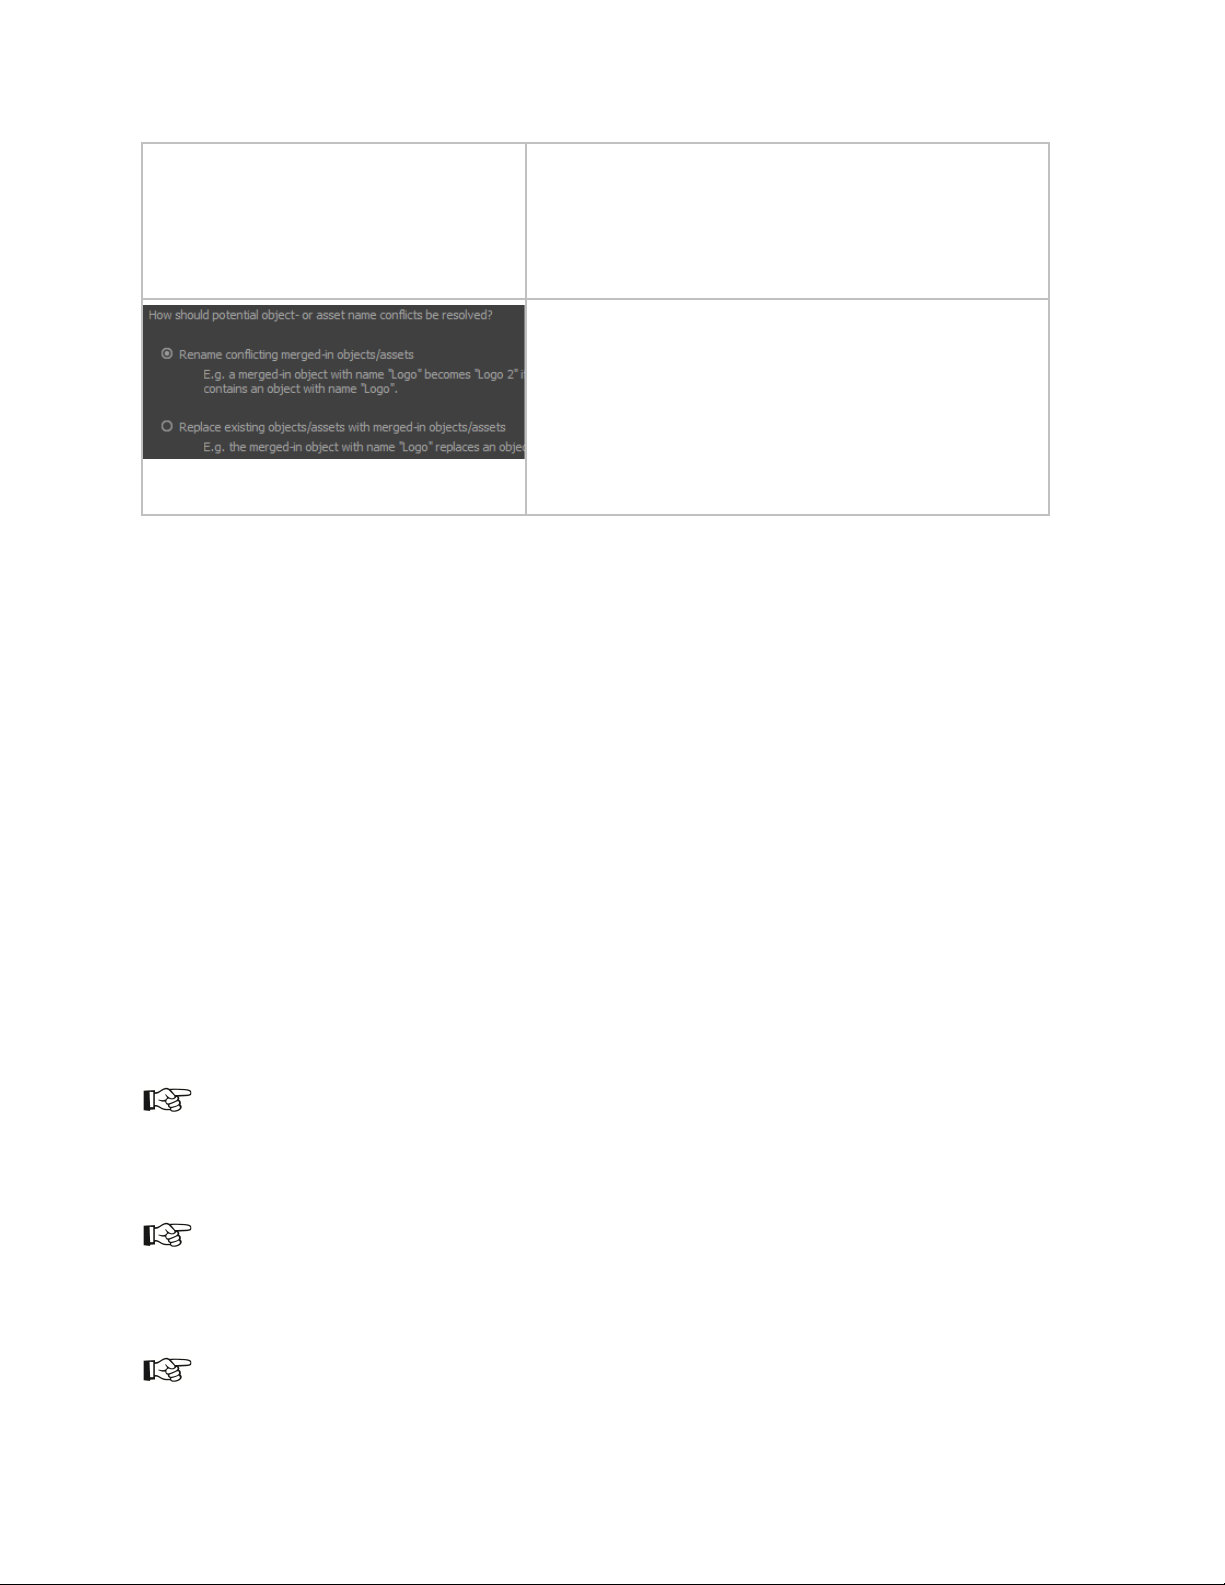
File > Merge Click File > Merge.
Select the type of merge and Project you want to
merge with the current projects.
Select the appropriate option if performing a
replacement merge.
Click Open to merge, Cancel to discard.
5.4 Restoring a Backup
Each time a Channel Composer Project is saved, a backup is automatically created. This backup contains
all project data, except for Project Assets.
To restore a backup:
Click File >Restore Backup.
Select the backup you want to restore and click Restore.
5.5 Exporting a Project
When a Project is exported, a Channel Pack is created. Options are:
• Export to disk, for example to create a backup: create a Channel Pack and export to the specified
destination folder.
• Export to the TX/MAM database: create a Channel Pack and export to the TX/MAM database
when the design is ready, or to share with other people working on different workstations or
locations. Once exported to the TX/MAM database, the Channel Pack can be used for scheduling.
You can specify the Project’s activation period during export, or at a later stage.
rd
• Export to Playout: create a Channel Pack and export to a playout server for 3
testing purposes.
Before you can export Projects, at least one CPK (Channel Pack) Asset Type and Format Asset Type
must be available in Cobalt/TX/MAM.
To be able to work with Exports, you also need read/write rights for the appropriate Channels and CPK
(Channel Pack) Asset Types. These user rights are set in Cobalt Asset Manager.
party scheduling or
Channel Packs can be validated against a test schedule. For more information see chapter 12.
Channel Composer User Manual - Channel Composer User Manual- document version: 1.6.2 - 25
Page 27

5.6 Exporting a Project to disk
Click File > Export Project > to Disk.
Specify the destination folder and Channel Pack name.
5.6.1 Exporting a Project to the TX/MAM database
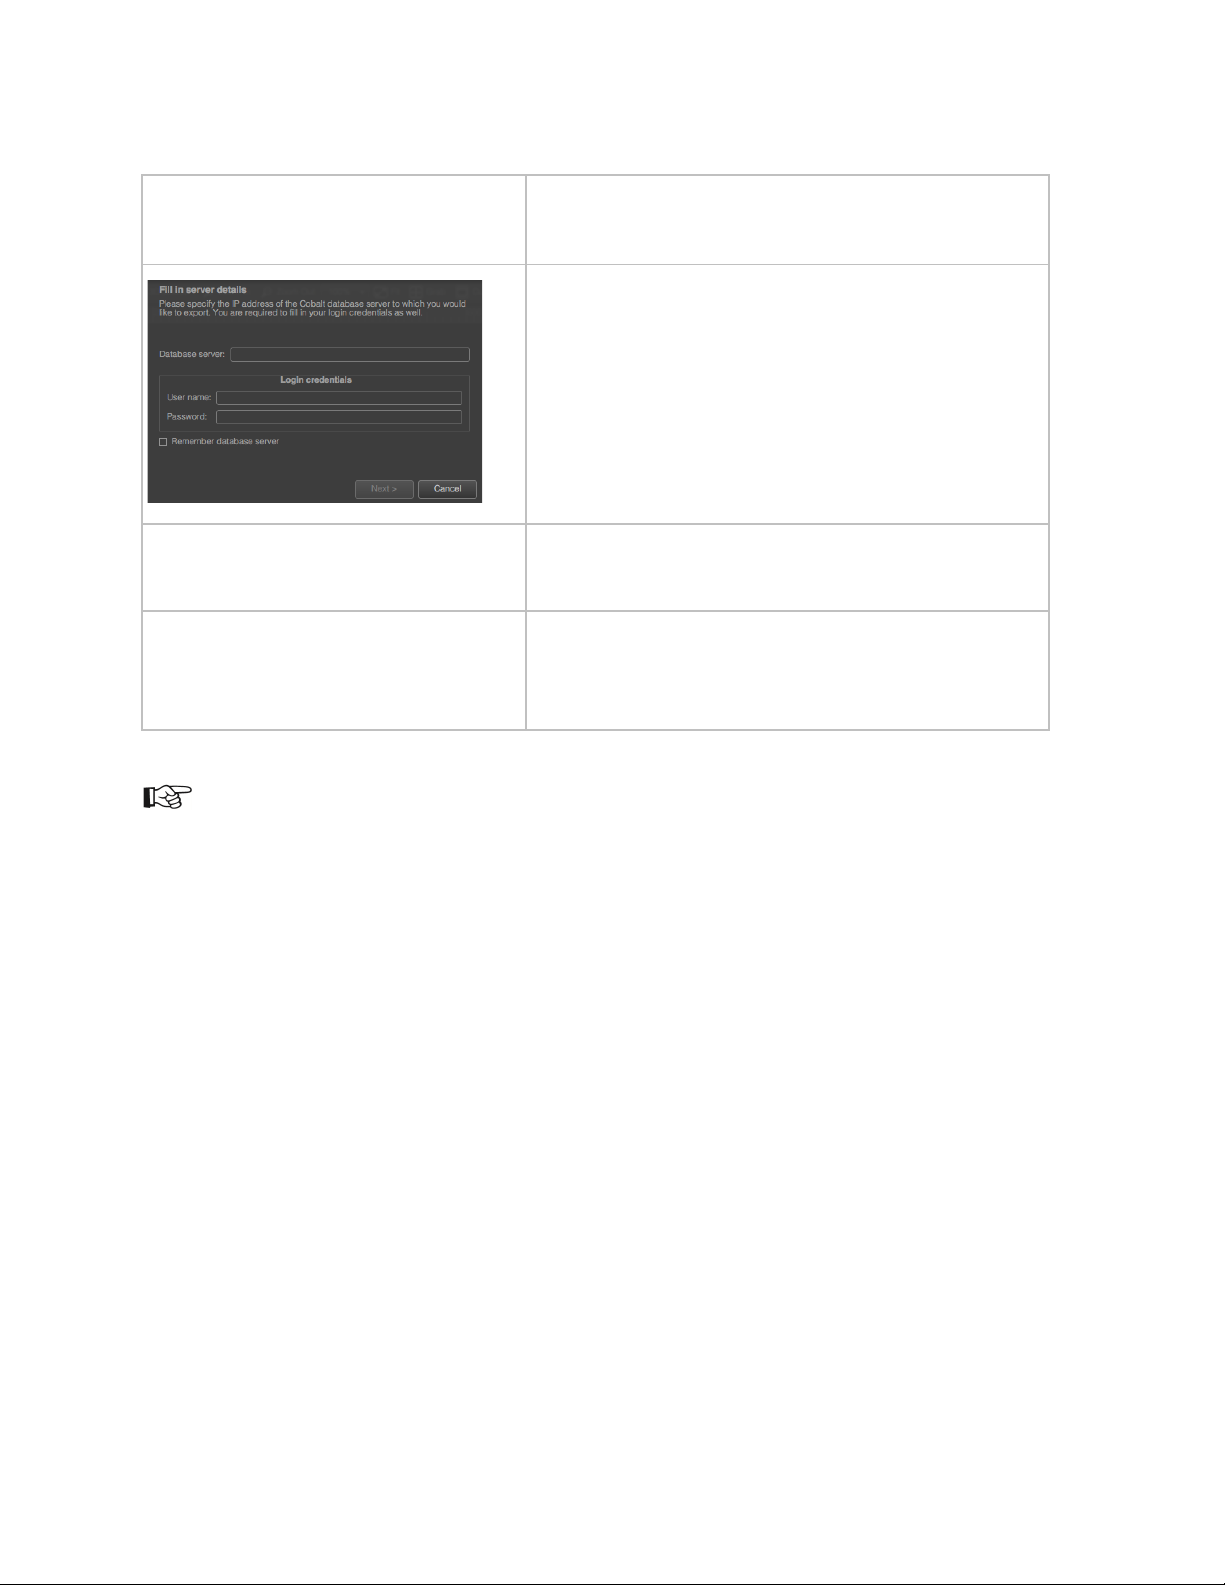
File
Specify the IP-address of the TX/MAM database server.
Specify the user name and password for the TX/MAM database.
If you select the Remember database server option, the database server specified will be saved as
a property of the Project.
Click File > Export Project > to TX/MAM Database.
(To reset, click Project > Project Settings > Export TX/MAM database server > Reset.)
Click Next to continue, Cancel to discard.
Channel Composer User Manual - Channel Composer User Manual- document version: 1.6.2 - 26
Page 28
Select a Channel Pack Asset type from the Asset types listed. The Project will be exported
as an Asset of this type.
If you select the Remember Asset type option, the Asset type specified will be saved as a property
of the Project.
(To reset, click Project > Project Settings > Export > Channel Pack asset type > Reset.)
Click Next to continue, Back to go to the previous screen or Cancel to discard.
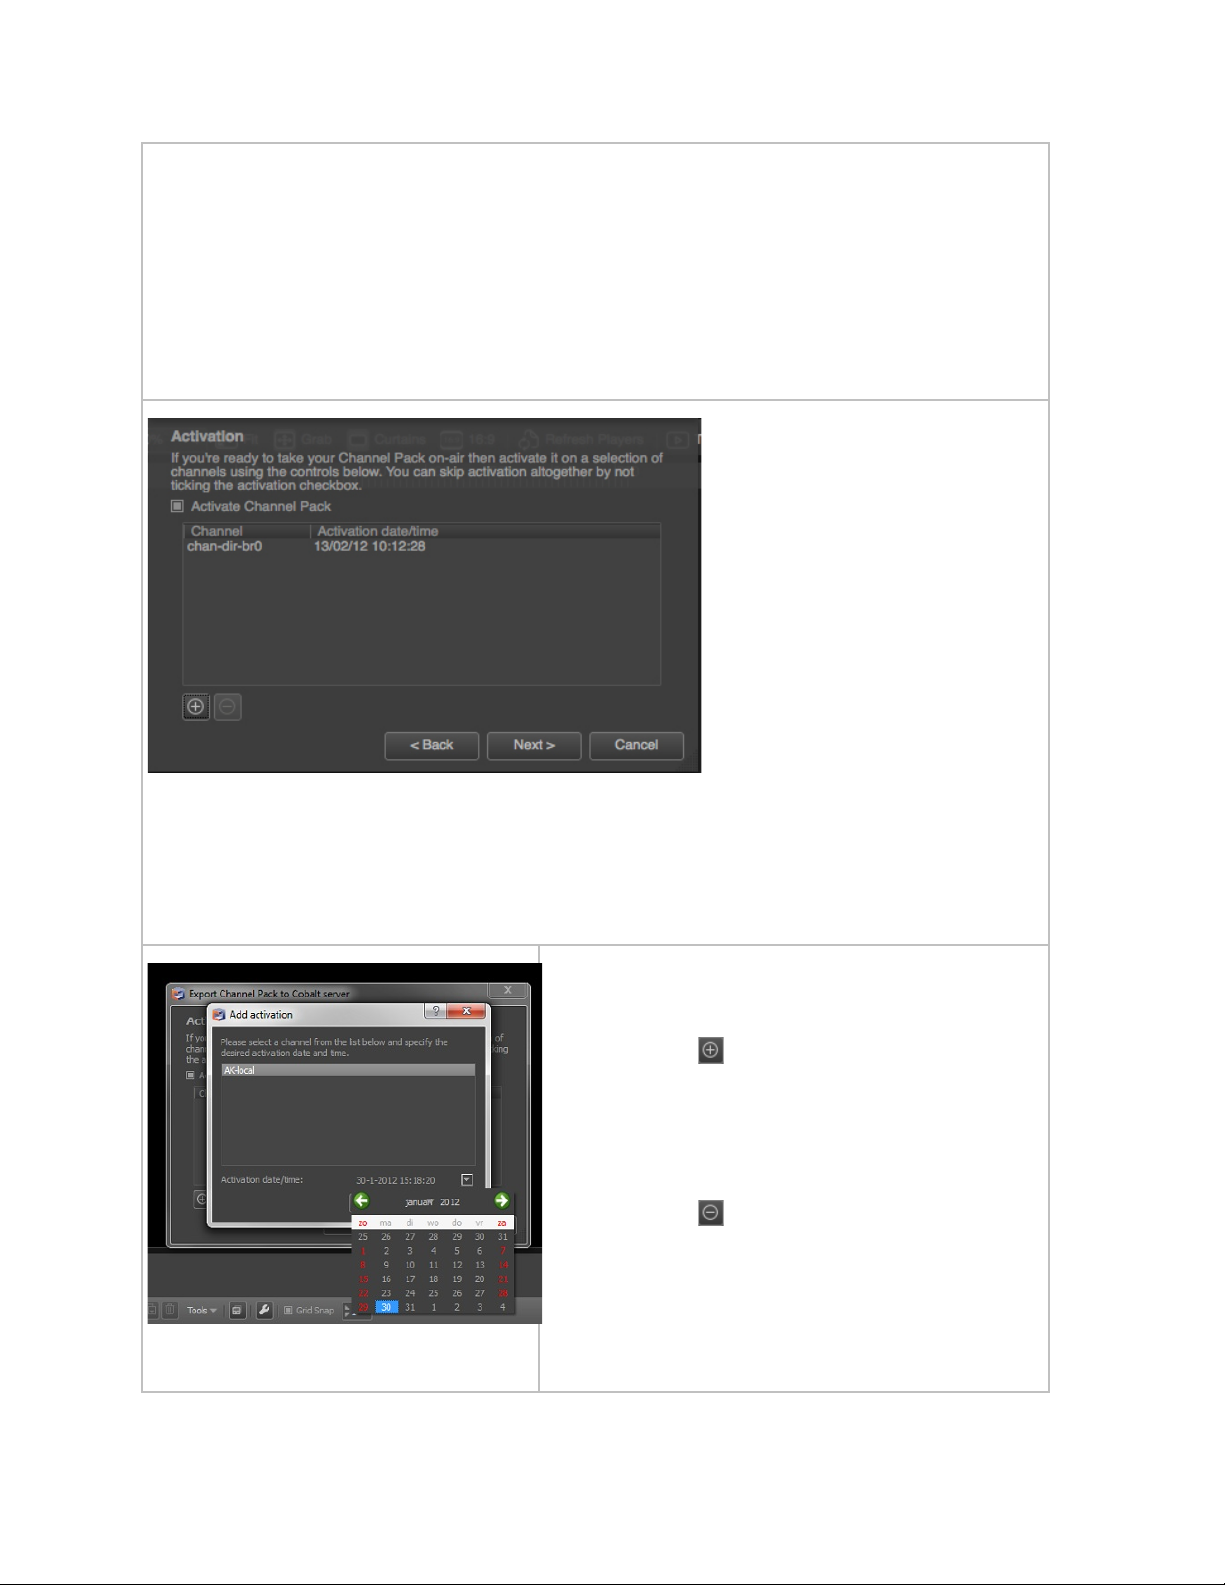
To export the Project to the playout server without activation, leave the Activate Channel Pack
option unchecked and click Next. You can activate the pack at a later Stage via File > Manage
Exports.
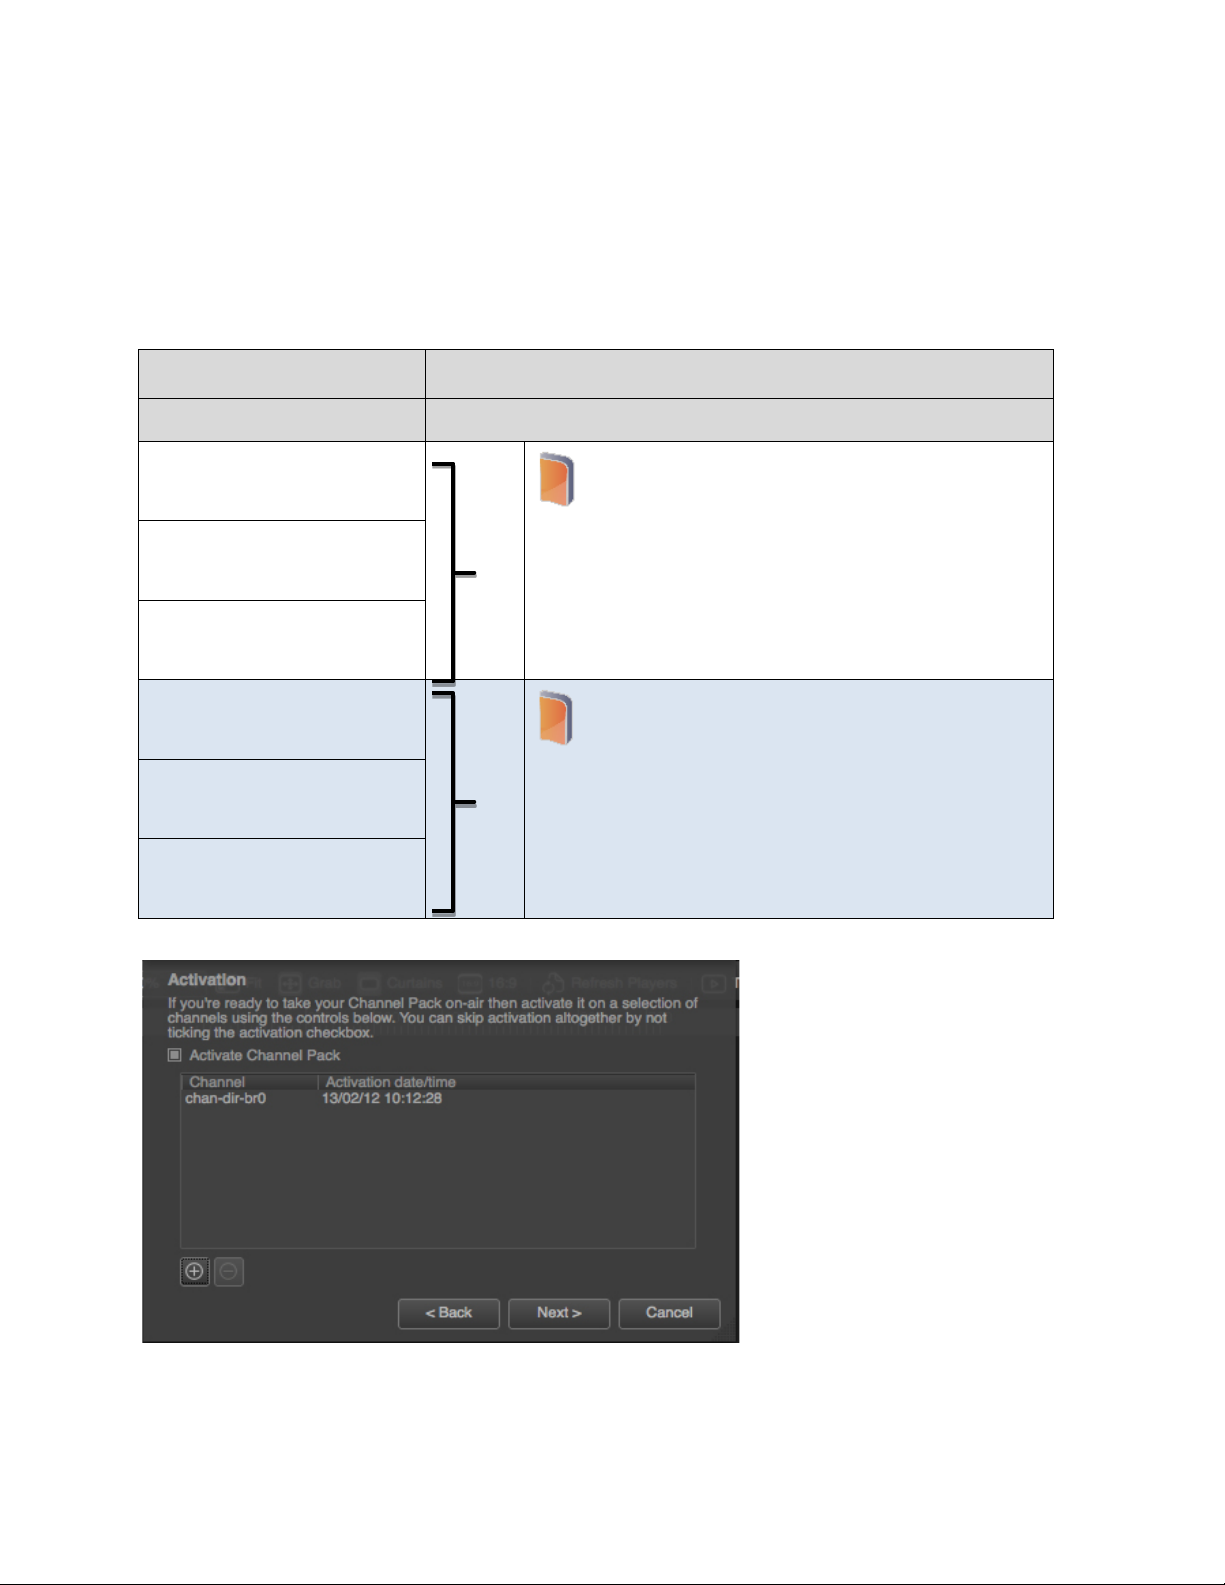
To activate the Project on one or more
Channels, click the Activate Channel Pack
option.
Click the icon to add a Channel to the
activation list. To specify an activation date and
time, click the arrow icon.
Click OK to save, Cancel to discard.
Click the icon to delete a Channel from the
activation list.
Click Next to export and activate the Project,
Channel Composer User Manual - Channel Composer User Manual- document version: 1.6.2 - 27
Back to go to the previous screen or Cancel to
discard.
Page 29
Note that only one Channel Pack can be active simultaneously per Channel.
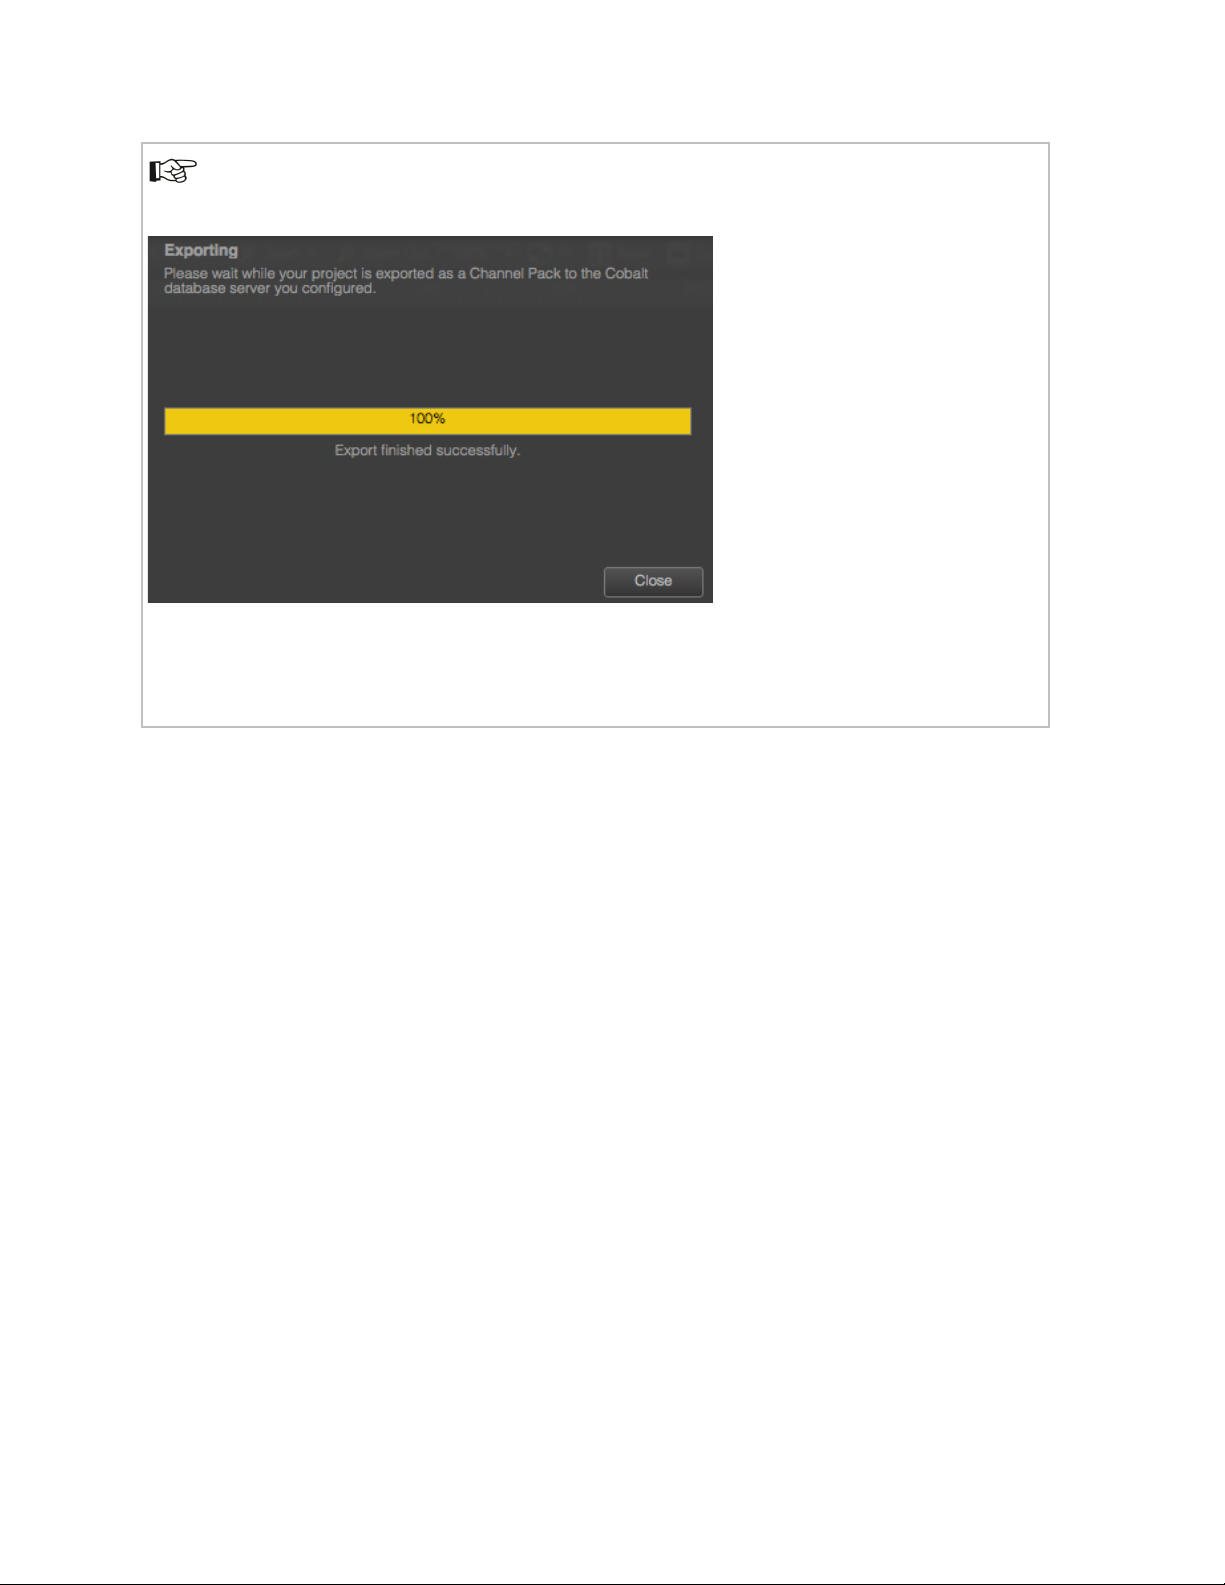
The Project is exported. All elements needed for playout – Assets, Objects, Templates, Applets and
Formats – are included in the Channel Pack.
Dynamic content will be fetched from Storage, using the Scene Parameters defined in the Project.
5.6.2 Exporting a Project to Playout
Click File > Export Project > to Playout…
Specify the playout server(s) you want to export the Project to:
o Server IP
o Channel number
o Activation time
Channel Composer User Manual - Channel Composer User Manual- document version: 1.6.2 - 28
Page 30

5.7 Managing Exports
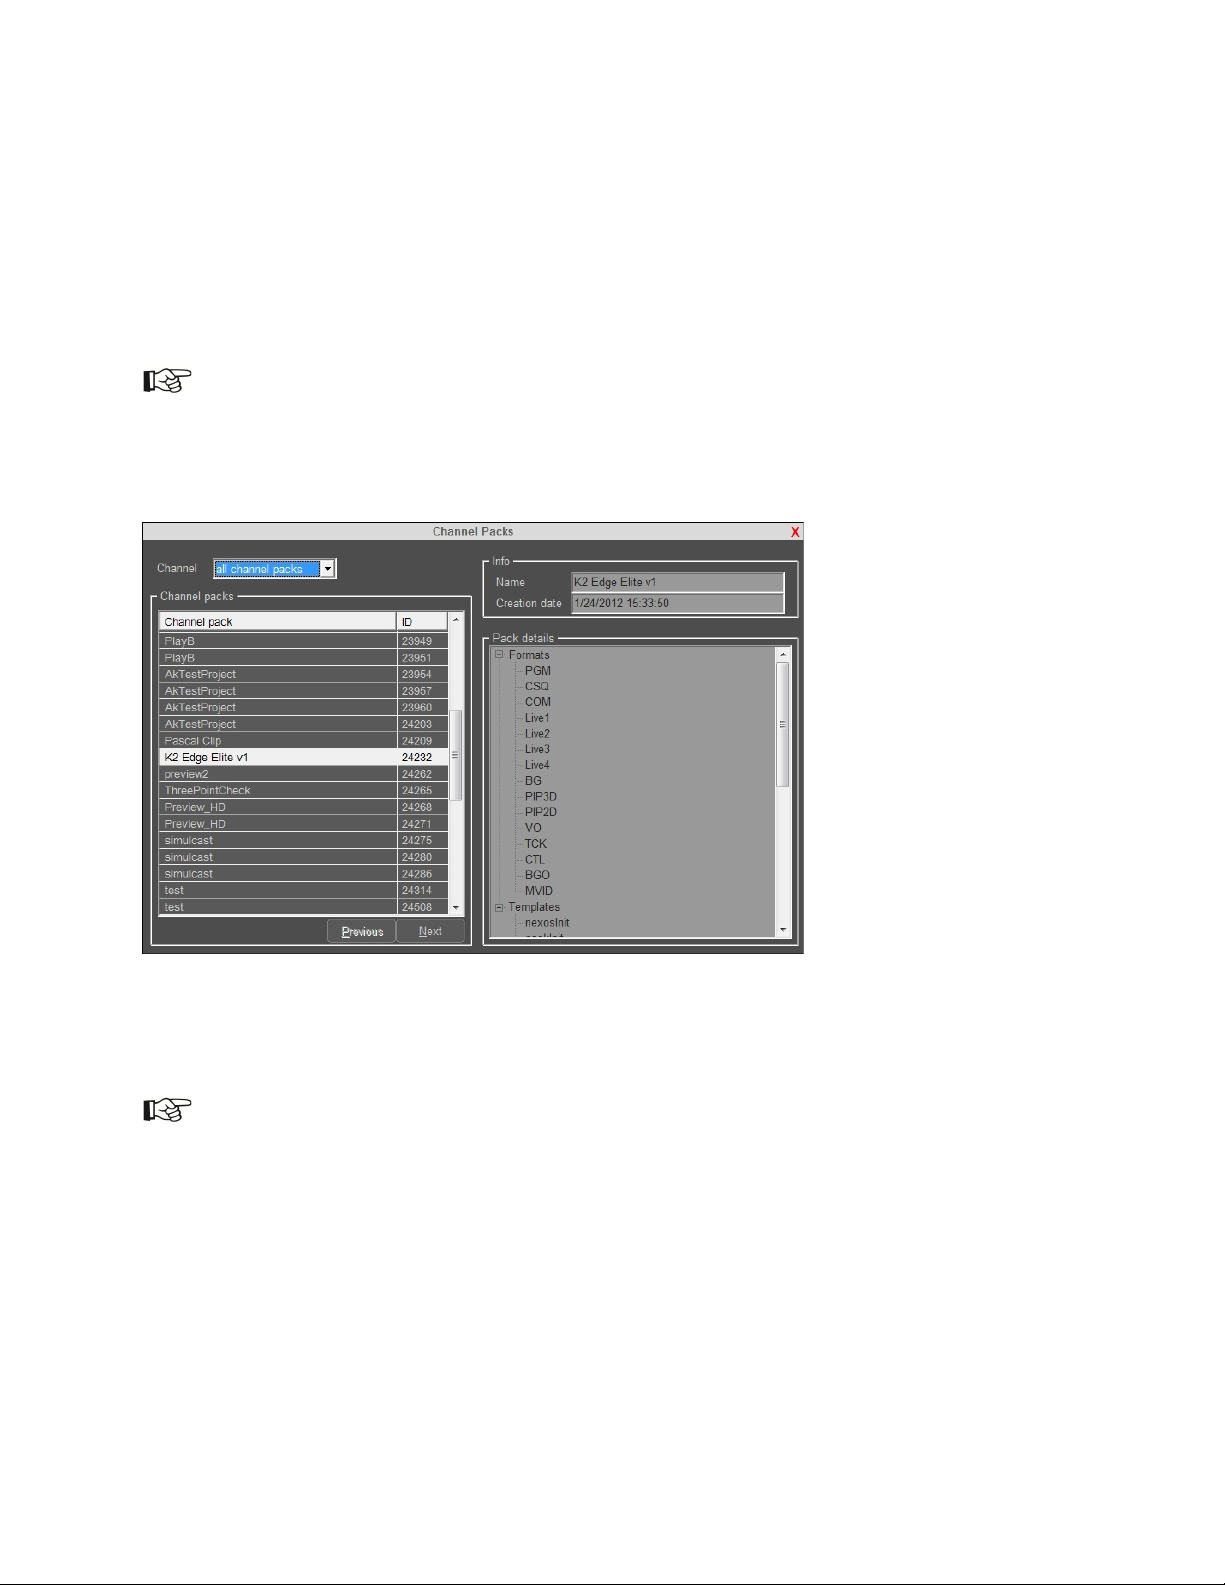
This option lets you manage Channel Packs. Options:
• View Project Packs, per Channel or Project in chronological order (Grouped).
• Remove a Pack from the database.
• Modify the activation properties of a Channel Pack (Channel, activation date/time).
• View Channel Pack contents.
To open, go to File > Manage Exports. The Manage Exports window opens.
Specify the IP-address of the TX/MAM database server.
Specify the user name and password used for the export. This is a Cobalt user.
Note that this user should have read and/or write rights for the applicable Channel Pack Asset
Type and Channel. These user rights are set in Cobalt Asset Manager.
The example below shows Channel Packs per Project (Grouped). The icon indicates that a Pack is
currently active in Cobalt. The Info window shows properties of the selected Pack. The Contents window
shows Templates, Formats, Applets and Scene Parameters included in the selected Pack.
Channel Composer User Manual - Channel Composer User Manual- document version: 1.6.2 - 29
Page 31
View:
Grouped
Channel
: View Channel Packs Grouped per Project (in chronological order) or by Channel.
Indicates that the Channel Pack is currently active in Cobalt.
To remove a Pack from the database, select the Pack and click the Remove icon.
To list Channels and activation date/time for a Pack, select the Pack in the list.
Note that only one Channel Pack can be active simultaneously per Channel.
To activate a Channel Pack for a Channel:
Select the Pack.
In the Activation panel, click the Add icon. Specify the Channel and
activation date/time.
Click OK to confirm, Cancel to discard.
To de-activate a Channel Pack:
Select the Pack, the applicable Channel and activation date/time definition.
In the Activation panel, click the Delete icon.
Contents
Channel Composer User Manual - Channel Composer User Manual- document version: 1.6.2 - 30
The Contents window lists the Templates, Formats, Applets and Scene
Parameters included in the Channel Pack.
Page 32
6 Working with Templates
Templates are used to animate Objects' properties in time.
Example Template Timeline.
Move the player head or use the player buttons or time code fields to preview animations on the Stage.
6.1 Opening a Template
In the Project window, double-click the Template you want to edit, or select the appropriate
Template tab in the Template Timeline.
6.2 Creating a new Template
In the Project window, click the Add Template icon, or in the toolbar click Project > Add
Template.
6.3 Renaming a Template
In the Project window, select the Template > right-click > Rename, or on the Template
Timeline double-click the Template name on the tab header.
6.4 Deleting a Template
: In the Project window, select the Template > click the Delete icon to delete.
: To delete a template tab from the Template Timeline (the Template itself will still be available
in the Project), click the Delete icon on the tab header.
Channel Composer User Manual - Channel Composer User Manual- document version: 1.6.2 - 31
Page 33

6.5 Copying a Template
: In the Project window, select the Template > right-click > Duplicate Template.
You can also select the Template on the Template Timeline > click the Duplicate Template icon
to copy.
Note that Objects in the source Template are not duplicated; in other words, both Templates - the
original and the source will use one - and the same Object. If this Object is modified in Template
A, it will also be modified in Template B.
6.6 Displaying Object properties on the Timeline
To display not only Objects, but also Object properties on the Timeline, select the Show > Object
Properties option in the Timeline’s left bottom corner.
Note how the distinction between Changing and Unchanging properties is made.
A green segment between keyframes indicates that the property value changes in between the keyframes.
When this segment is grey, property values do not change.
Channel Composer User Manual - Channel Composer User Manual- document version: 1.6.2 - 32
Page 34

6.7 In Points and Out Points
In and Out Points specify when an Object is active, i.e. audible, visible, and so on. As a default, the In
Point is set at 00:00:0 and no Out Point is defined.
To add an In Point, drag the Object’s In Point (the Object’s activity segment’s start on the
Timeline) to the appropriate position, or right-click the Timeline on the appropriate position > Set
In Point.
To add an Out Point, right-click the Object > Enable Out Point, or right-click the Timeline on the
appropriate position > Set Out Point.
Then drag the Object’s Out Point (the activity segment’s end) to the appropriate position, or
right-click the Timeline on the appropriate position > Set Out Point.
When the Player > Auto-stop at Out Point option is activated (under Object properties), a Stop Playback
action is automatically inserted when an Out Point is added to a Player on the Template Timeline. This will
stop the Player. Note that this option only applies for Player Objects.
The Example Project Optimization explains how to work with In and Out Points.
Example Audio Object with In and Out Point. Because the Auto-stop at Out Point is enabled for this
Object (Object properties), the Stop Player action is added to the Out Point, as indicated by the Stop
Player icon .
Channel Composer User Manual - Channel Composer User Manual- document version: 1.6.2 - 33
Page 35

6.8 Keyframing
Keyframes are used to animate Object properties such as position, size and effects over time. A keyframe
is a snapshot of the properties of one or more Objects at a specific point in time. Keyframes are used to
define start, intermediate and end points of an animation. The frames in between these keyframes are
then automatically filled in by Channel Composer.
You can also use Controllers to animate Objects. For an explanation, see File > Example Projects:
Controllers.
6.8.1 Keyframing
To add a keyframe, on the Template Timeline, select the Object(s) you want to
animate.
On the Timeline, specify the point in time where you want to start the animation. To
do this, specify mm:ss:ff or move the player head to the appropriate position on the
Timeline.
Define the Object's properties at his point in time.
Now click the Add keyframe icon to keyframe the Objects’ properties at this point in
time.
On the Timeline, specify the point the time where want to end the animation. Define
the Object's properties at that point in time and insert a second keyframe.
Channel Composer will automatically fill in the Object's animation between the
keyframes. Any number of keyframes can be defined.
Move the player head on the Timeline to preview animations.
The icon on the Timeline indicates that a keyframe is added.
The icon indicates that a keyframe is added to an Object or sub-property on a lower level.
: Click to go to the selected Object’s previous keyframe.
: Click to go to the selected Object’s next keyframe.
: Reverse or timescale selected keyframes.
: Define the type of interpolation for the selected keyframes. Options are:
• Constant Speed
• Ease In
• Ease Out
• Step
Channel Composer User Manual - Channel Composer User Manual- document version: 1.6.2 - 34
Page 36

6.8.2 Updating keyframes
All
All + Ripple
From Selected
click the Object
Keyframes can be updated on the property level in the Object's properties window.
: This icon indicates that keyframes have been defined for a property group.
Click the icon to display and edit settings. Note that properties’ values are displayed for the
point in time selected in the Template Timeline.
: This icon indicates that keyframes have been defined for a property.
Click the icon to edit. Click the icon to display and edit settings. Note that properties’ values
are displayed for the point in time selected in the Template Timeline.
Keyframes can be updated on the Template Timeline:
: Click the update icon to update the selected keyframe with the properties defined for the
Object.
To update all properties’ values of a keyframe for all selected Objects, select the Object(s) > right-click >
Object Keyframes > Update Keyframe.
6.8.3 Deleting keyframes
On the Template Timeline, open the Template you want to edit.
: To delete keyframes: on the Timeline, select the keyframes you want to delete.
Then click the Delete icon.
: To delete all keyframes for a selected Object: right-click the Object > Object
Keyframes > Delete > From All.
: To delete all keyframes for a selected Object including its sub-Objects: right-
click the Object > Object Keyframes > Delete > All + Ripple.
: To delete the selected keyframes from the selected Object: right-
> Object Keyframes > Delete > From Selected.
Channel Composer User Manual - Channel Composer User Manual- document version: 1.6.2 - 35
Page 37

6.8.4 Copying keyframes
Copy All
Detach
6.8.5 Detaching keyframes
: To copy keyframes, on the Timeline select the keyframes you want to copy. Then
click the copy icon.
: To copy all keyframes for a selected Object: right-click the Object > Object
Keyframes > Copy All.
: Click the Paste icon to paste keyframe(s).
: To detach an Object’s keyframes from other keyframes in an animation, right-click
the Object > Object Keyframes > Detach. Options are:
• From All: detach the Object from all keyframes
• From All + Ripple: detach an Object including its underlying Objects from all
keyframes
• From Selection: detach the Object from the selected keyframes only
6.9 Template settings
: Click the Define Template settings icon to specify Template settings:
• hard or soft cuts
• priority mode (used for JIP (Join In Progress))
Channel Composer User Manual - Channel Composer User Manual- document version: 1.6.2 - 36
Page 38

6.10 Commands
To add a Command to a Template, drag the Command from the Prefabs library on the Timeline.
To display or hide command tracks on the Timeline, click
the Show > Command Tracks option. This option can be
found in the bottom left corner of the Template Timeline
The example on the left shows the Timeline with two
Commands inserted, on two command tracks:
• a Clear all Command on track 0
• a Ticker Command on track 1
: To delete a command track, click the icon.
: A command track is automatically inserted when a
Command is dragged on the Timeline.
To add additional tracks, click the icon.
: Copy the selected Commands to the clipboard.
: Paste clipboard items on the Timeline.
Channel Composer User Manual - Channel Composer User Manual- document version: 1.6.2 - 37
Page 39
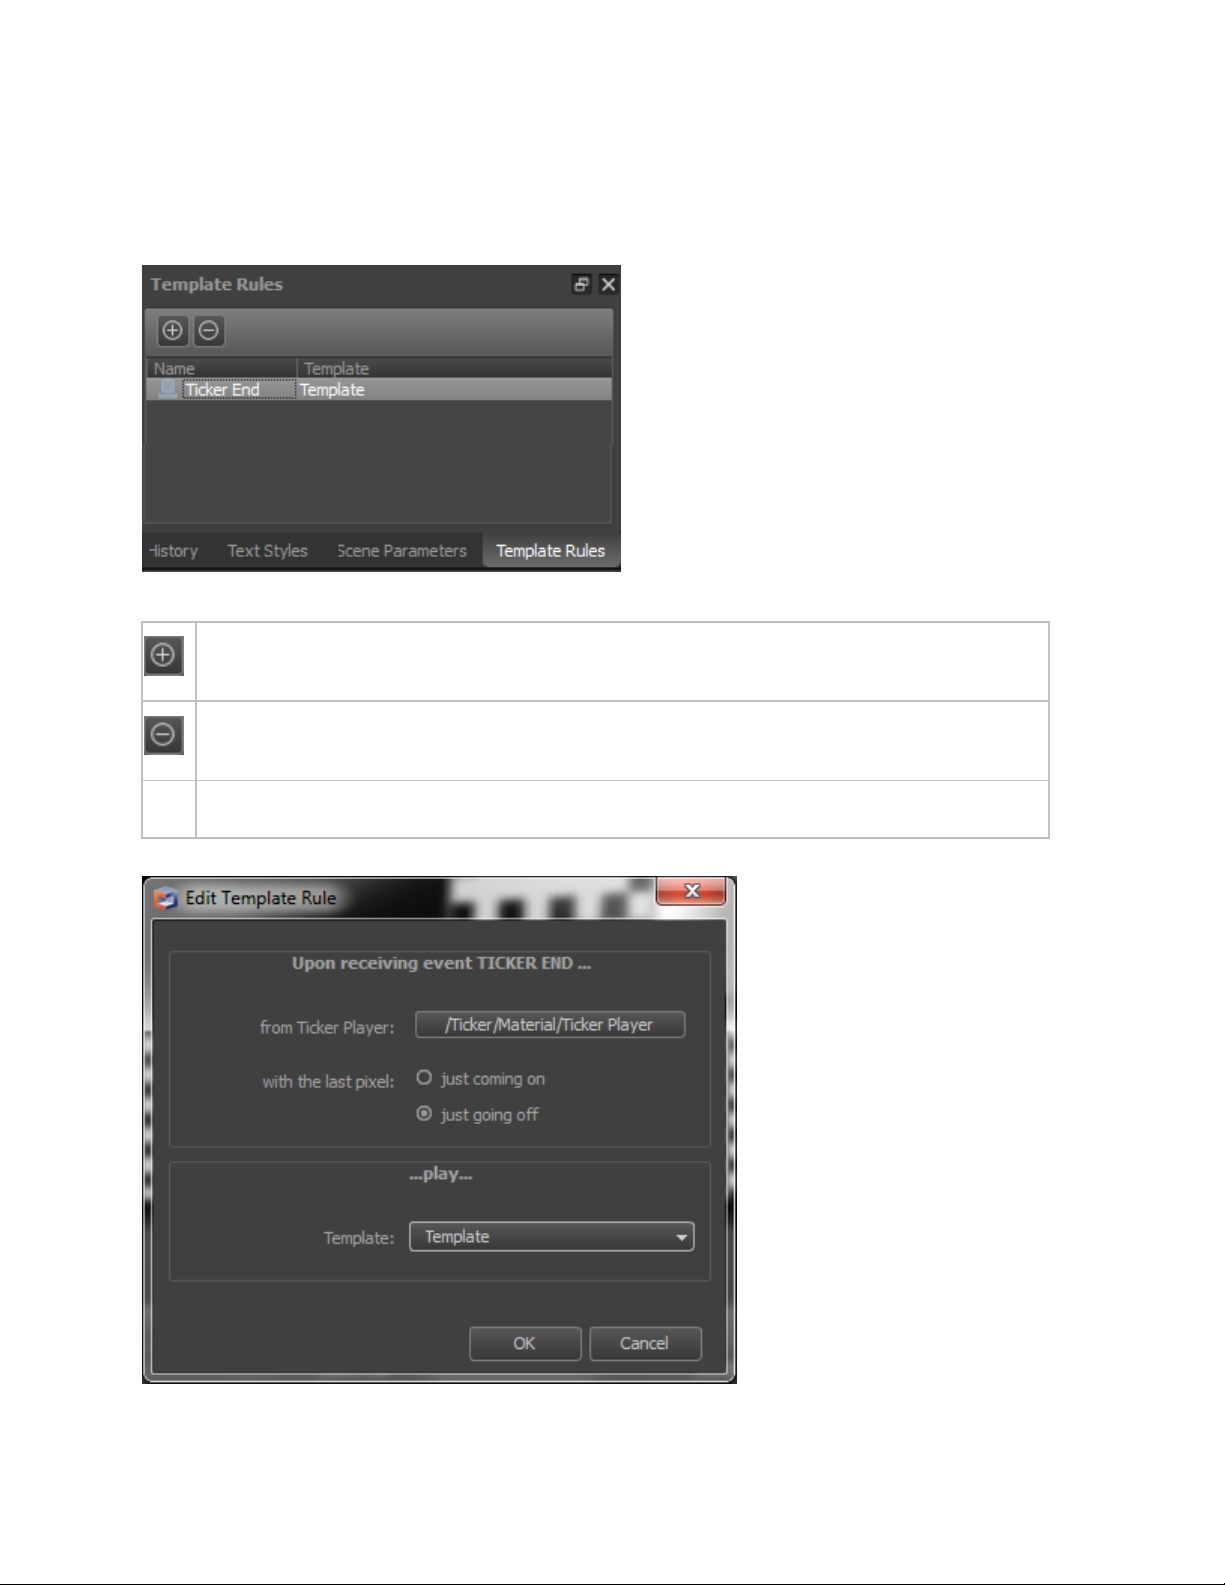
6.11 Template Rules
Template Rules can be used to start a Template based on a predefined Event, for example start a
Template at Ticker End (Event). A Ticker End Event is generated by the Ticker Player when the last pixel
of the last ticker story has been played out.
The Template Rules window.
: Click to add a Rule.
: Click to delete the selected Rule.
Rule : Click a Rule to edit.
Example Template Rule.
Channel Composer User Manual - Channel Composer User Manual- document version: 1.6.2 - 38
Page 40

6.12 Try-out mode
To preview Templates in try-out mode:
In try-out mode, the Stage shows a preview of
your Templates. Note that the output will be
exactly the same as on the K2 Edge, but will not
be guaranteed real-time.
Using the Opt-out filter makes it possible to
preview each Channel separately.
Restart
Stats
Exit
Colors
On the main toolbar, click the Try out mode icon to switch to try-out mode.
Note that when in Tryout mode, you cannot edit.
In the Try-out mode window, double-click Templates to cue.
In the cue, drag Templates to change order.
Click Restart to empty the cue.
Click Stats to display statistics.
Use the nexos playback statistics tool to generate playout statistics [see also chapter
12].
Click Exit to exit Tryout mode.
Orange indicates that Templates are loading.
Blue indicates that Templates are playing.
Grey indicates that Templates have been played.
Channel Composer User Manual - Channel Composer User Manual- document version: 1.6.2 - 39
Page 41

6.13 Pixel Perfect
An Object is pixel perfect if it maps its content straight to playout and does not transform the content's
pixels during the rendering process. Distortions can occur for many reasons. For example: the Object is
rotated, scaled, positioned in front or behind the 2D plane or on sub pixel coordinates, the content is
stretched over the surface of a 3D object, texture filtering and/or effects are applied, etcetera. These
distortions are often unwanted, especially for 2D-elements such as text and main clips.
To display Objects' pixel perfect information, on the toolbar select the View > Pixel Perfect option.
An exact match is displayed in green: Pixel perfect. Discrepancies are displayed in red:
• Material distortion: the material applied transforms pixels.
• Not on 2D plane: the plane on which content is displayed is not on the 2D plane (not on the z-
coordinate 0).
• Shape/size mismatch: the plane on which content is displayed is bigger or smaller than the
content's dimensions.
• Rotated: the plane on which content is displayed is rotated.
• Sub-pixel coordinates: one or more edges of an Object are on sub-pixel coordinates.
• Texture filtering on: texture filtering is enabled.
• Effect on: the Object has an effect.
• Height is not an even value: the interlaced content is displayed on a plane that does not have a
height that is an even number (in pixels).
The Example Project Quality Assurance explains various Channel Composer techniques that can be used
to counter graphics artifacts commonly seen in broadcasting. Examples demonstrate how to deal with the
most common causes of distortions for 2D elements: sub pixel positioning and texture filtering of
interlaced content.
Channel Composer User Manual - Channel Composer User Manual- document version: 1.6.2 - 40
Page 42

6.14 Creating an Operator Panel
Operator Panels are created in Channel Composer for use in Cobalt Playout Control (POC). Each Project
can have one Operator Panel. An Operator Panel consists of buttons representing Templates, Applets
and Scene Parameters. When a button is clicked in POC, the Template, Applets and Scene Parameters
associated with the button are triggered on the playout server.
When a Project is exported to the TX/MAM database and the Project Pack is activated, the Operator
Panel will be available for the related Channel in Cobalt Playout Control (POC).
To create an Operator Panel:
Decide which Templates you want to be able to operate via the Panel in POC.
On the main menu, go to Project > Operator Panel Settings.
A dialogue opens listing the Templates, Applets and Scene Parameters in the current Project.
Select the check boxes in front of the items that you want to use on your Operator Panel.
When finished, click Save.
Example Operator Panel Settings in Channel Composer.
Channel Composer User Manual - Channel Composer User Manual- document version: 1.6.2 - 41
Page 43
Working with Objects
Channel Composer works with Objects. Objects are placed on the Stage
and are animated in time on the Template Timeline.
A number of Example Projects that explain how to work with Objects is included in Channel Composer.
You can find these projects under File > Example Projects.
6.15 Adding Objects
To add an Object to a Template:
Template Timeline On the Template Timeline, first select the Template you want to
add the Object to. Now there are different options for adding
Objects:
Assets window
Test Media window
Prefabs window
Objects window
On the toolbar, click the Add Object icon, then select the type of
Object you want to add and double-click.
You can select an Asset form the Assets or Test Media or Prefabs
Library window and drag this Asset on the Stage. An Object which
refers to this Asset is automatically created.
You can also select an existing Object in the Objects window. Then
right-click > Add to Template, or drag the Object on the Template.
Channel Composer User Manual - Channel Composer User Manual- document version: 1.6.2 - 42
Page 44

Note that in Channel Composer, one and the same Object can be used in different Templates and its
properties can have different values per Template.
6.16 Modifying an Object's properties
There are several ways to edit an Object's properties:
Object window
Stage
To open an Object's properties window: click the Object on the Stage, in
the Objects window or on the Template Timeline.
(If the Object window is not visible, enable the window: toolbar > View >
Windows > Object).
Or double-click the Object in the Objects window, on the Template
Timeline or Stage.
Objects can also be transformed on the Stage. Select the Object and
drag the handles to modify the Object.
6.17 Transform gizmo
You can transform Objects (position, scale, rotation) either in the Object window, or on the Stage using the
transform gizmo. Note that how the handles work depends on if the gizmo is in 2D or 3D mode.
Scale: move the cursor over the inside of the Object handlers until this cursor appears.
Then drag to scale the object.
Rotate: move the cursor over the Object handlers until this cursor appears. Then drag to
rotate the Object around the Z-axis.
Free rotate or arc ball rotate (3D only): move the cursor over the center of the Object’s
movement axes to activate this cursor and rotate the Object around its X, Y and Z-axes.
Move the Object on the Z-axis (3D): move the cursor over the movement axes’ arrow head
to activate.
Grab the Object to move on the Stage.
Channel Composer User Manual - Channel Composer User Manual- document version: 1.6.2 - 43
Page 45

The movement axes can be customized in the main toolbar:
• View: the axes are aligned with the current view.
• Group: the axes are aligned with the group the Object is in.
• Object: the axes are aligned with the Object. When the Object rotates, the axes will rotate as well.
Example 3D Box with the X, Y and Z-movement axes aligned with the Object.
6.18 Layering Objects
The Objects window lists all Objects in a Project or Template. Each Object is placed on its own layer.
Objects on higher layers overlap Objects on lower layers. To change, drag Objects into the appropriate
order, or use the Arrow icons.
6.19 Grouping Objects
Objects can be grouped, so they can be modified and animated as a group. To group objects:
Select the Object you want to group, either by [CTRL/CMD]+clicking them in the Objects window,
or by drawing a selection with the cursor around the relevant Objects on the Stage.
On the main menu select Objects > Group, or on the Stage right-click the selection > Group.
You can open the group to edit individual Objects within the group: Objects > Open Group, or on
the Stage right-click the group > Open Group. When finished, close the group.
To ungroup Objects: Objects > Ungroup, or on the Stage right-click the group > Ungroup.
6.20 Locking Objects
Lock Objects to prevent unwanted selection, or to protect the Object from being selected and modified
accidently.
To lock or unlock Objects, in the Objects window or on the Template Timeline, select
the Object. Then click the Lock icon.
Channel Composer User Manual - Channel Composer User Manual- document version: 1.6.2 - 44
Page 46

6.21 2D and 3D-mode
In the Library > Prefabs, the star icon (as shown in the example on the left) indicates that
Use this option to toggle the 2D and 3D handles of the transform gizmo:
Click the 2D-icon to enable the 2D-handles.
Click the 3D-icon to switch to 3D-handles.
Show or hide 3D editing guides when editing a Group.
6.22 Prefabs
Objects and all the properties you defined for them can be exported to the Prefabs library for later reuse.
To export an Object to the Prefabs library: select the Object, then in the Object window click
the Export icon.
the prefab is a custom made Object.
6.23 Copying Objects
To copy an Object (duplicate):
In the Objects window or on the Stage, select the Object > right-click > Copy.
To paste > right-click the Objects window or the Stage > Paste.
Note that the Object is also added to the active Template.
6.24 Deleting Objects
Objects can be removed from a Template (and still be available in the Project), or deleted from the
Project.
To remove an Object from a Template, select the Object on the Template Timeline or Stage >
right-click > Remove from Template. Or Objects > Remove from Template.
To delete an Object from a Project, select the Object in the Objects window > Delete. Note that
the Object will be removed from any Templates it was used in.
Channel Composer User Manual - Channel Composer User Manual- document version: 1.6.2 - 45
Page 47

7 Object Types
7.1 Introduction
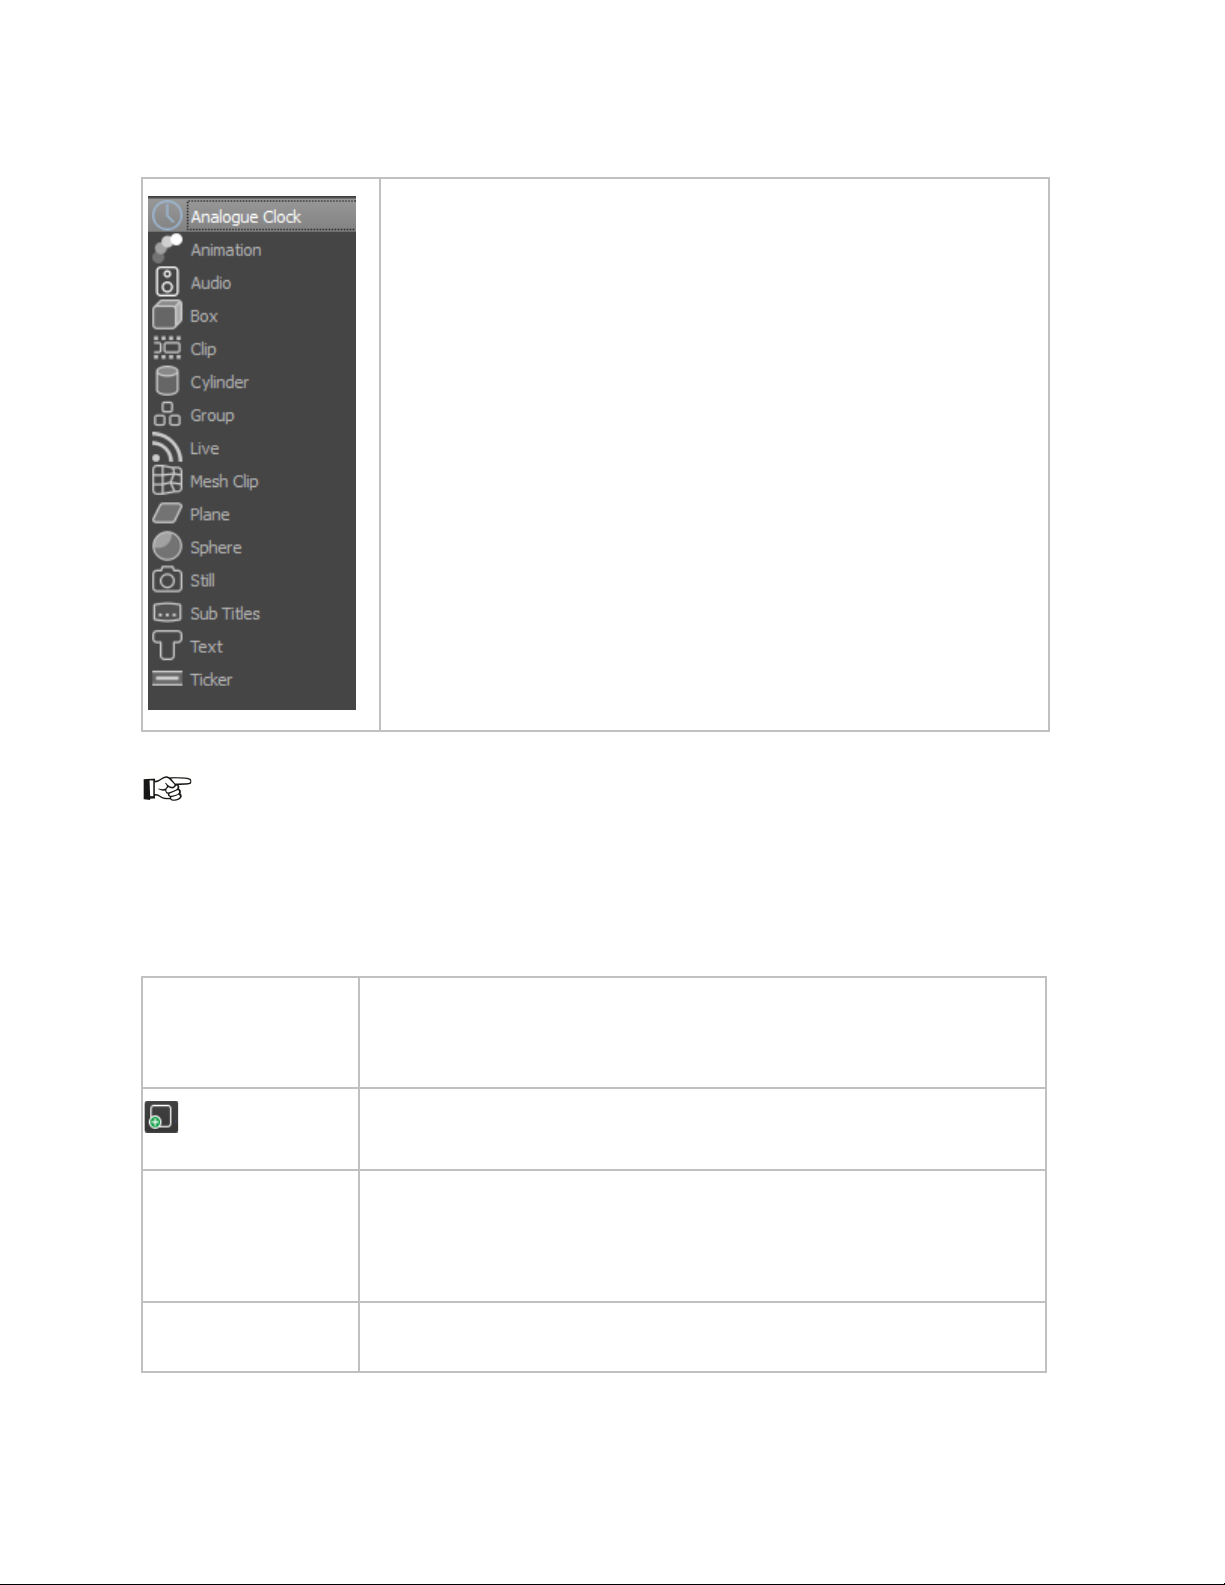
7.1.1 Stage Objects
The Channel Composer Stage objects are:
: Analogue Clock Object
: Animation Object
: Audio Object
: Box Object
: Clip Object
: Cylinder Object
: Group Object
: Live Object
: Mesh clip Object
: Plane Object
: Sphere Object
: Still Object
: Text Object
: Ticker Object
: Subtitles Object
Channel Composer User Manual - Channel Composer User Manual- document version: 1.6.2 - 46
Page 48
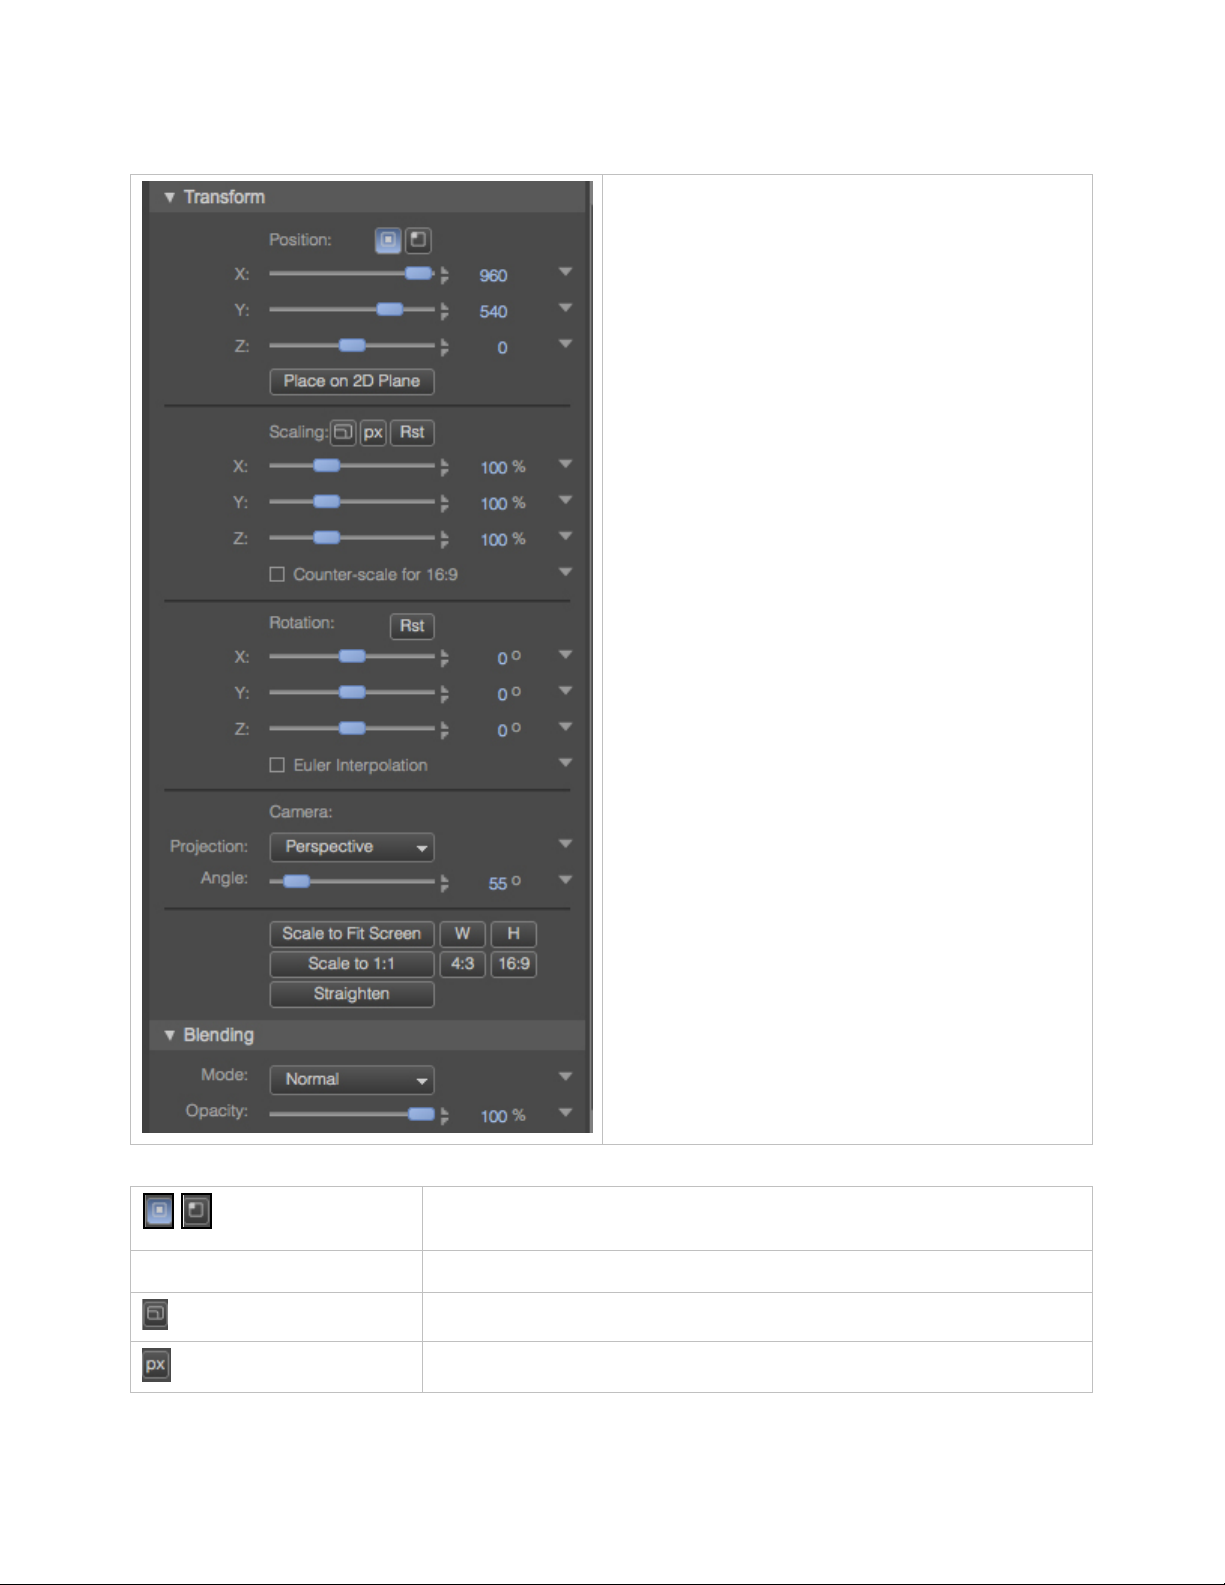
7.1.2 Transform and Blending properties
The Transform and Blending options allow you to:
• position an Object
• scale an Object
• rotate an Object
• specify projection
• blend an Object
The Transform and Blending options are available:
• in the Object window
• or transform Objects on the Stage, using the
transform gizmo
This paragraph explains a number of tools for the
Transform and Blending options.
Use these options to position Objects from center (default), or from the
Place on 2D Plane Place the front of the object on the 2D plane (i.e. on z-coordinate 0).
Channel Composer User Manual - Channel Composer User Manual- document version: 1.6.2 - 47
upper left corner.
Lock aspect ratio when scaling.
Scale in pixels instead of in %.
Page 49

Reset the Object (scaling/rotation) to 100%.
Counter scale for 16:9.
Rotation
Euler interpolation
Camera
Select to scale back the Object in screen horizontal direction to counter
the horizontal stretching that occurs when the object is viewed in 16:9
anamorphic widescreen mode.
The angles are with respect to the axes of the Group the Object resides
in. For example, if the Object is on the Stage, the Stage is the Group.
The Object is rotated in the following order: x, y, z.
Generate the Object's rotation by combining the individually animated
rotation angles.
You can either use a perspective (depth) and specify its angle (default
55%), or use an orthographic view (no perspective).
Scaling Tools:
• Scale to fit screen: scale object to fit screen (no aspect ratio).
• W: scale object to fit screen width (keeping aspect ratio).
• H: scale object to fit screen height (keeping aspect ratio).
• Scale 1:1: scale object to 1:1 aspect ratio, based on height.
• Scale 4:3: scale object to 4:3 aspect ratio, based on height.
• Scale 16:9: scale object to 16:9 aspect ratio, based on height.
• Straighten: remove skewing. An Object is skewed if its axes are
not perpendicular to each other. This sometimes happens to
Objects within a Group when the Group is scaled and then
ungrouped.
Blending
Channel Composer User Manual - Channel Composer User Manual- document version: 1.6.2 - 48
Following blending modes can be selected:
• Normal
• Lighten
• Multiply
• Darken
• Maximum
• Mask
Page 50

7.1.3 Players
Objects such as ‘Clip’, ‘Audio’ and ’Still’ use a Player to play out content. Players can be used to control
playout. Different actions can be defined. The default is: Play. Players can be modified in the Object and
Objects window. Example Players:
• Still Player
• Ani Player
• Plasma Player
• Clip Player
• Audio Player
• Gradient Player
• Live Player
• Text Player
• Ticker Player
• Subtitle Player
• No Action: The Player's current action is continued.
• Play: Start the Player.
• Stop: Stop the Player.
• Link to: Link this Player to another Player. The Object will now play out
the content from the Player you linked to. This option can be used to
save resources (only one stream will be used).
For clips, animations and tickers additional options are:
• Pause: Pause the Player.
• Resume: Resume the Player after a Pause.
Auto-stop at Out
Point
If this option is selected, a Stop Playback action is automatically inserted when
an Out Point is added to a Player on the Template Timeline. This will stop the
Player.
For some Objects, a test feed (procedurally generated video) can be used
during editing.
As a default, Player actions are defined from 00:00:00. To define an action at another point in time, work
with keyframes or move the Object’s In Point.
Example Pause player icon on the Timeline.
Channel Composer User Manual - Channel Composer User Manual- document version: 1.6.2 - 49
Page 51

To stop a Player, three options are available:
For each Channel, one main Player can be defined.
• Set an Out Point and leave the Player’s Auto-Stop at Out Point option activated (default).
• Create a separate Template with a Player Stop Action.
• Keyframe a Player Stop Action.
7.1.4 The Main Player
The main Player role has following properties:
• The main Player has priority over other Players when resources are assigned.
• If the main Player contains an embedded Closed Caption subtitle stream, this stream will be
played out. If other Clips contain subtitle streams, these streams will not be played out. In other
words, only the main Player’s subtitle stream will be played out.
• The main Player is the source for the ATC (HD) or VITC (SD) timecode signal in the SDI-output.
Only one signal can be sent out, i.e. from the main Player.
• If the main Player is a Live Player and this Player transfers VBI-data from the SDI-input, this VBI-
data will be transferred to SDI-out instead of any VBI-data generated by the K2 Edge server. This
means that VBI-data from the input such as subtitles and teletext is passed to the output 'as is'.
• The main Player role can be assigned at any point in time, but is only active if between an In and
out Point.
The main Player command is automatically added for the first Clip or Live Object that is added to a
Template.
For Join In Progress (JIP)-mode, a main Player role can be assigned for both normal and high priority
mode. Still, only one main Player will be active, depending on the JIP-mode (normal or high priority).
Channel Composer User Manual - Channel Composer User Manual- document version: 1.6.2 - 50
Page 52

7.2 Live
AVS ports
IO1i
IO1o
IO1o'
IO2
IO3
IO4
IO5
IO6
IO7
IO8
CC SDIs
SDI 0
SDI 8
SDI 8
SDI 1
SDI 2
SDI 3
SDI 4
SDI 5
SDI 6
SDI 7
AVS-K2 Edge ports
CC SDIs
SDI 0
SDI 1
SDI 2
SDI 3
SDI 4
SDI 5
SDI 6
SDI 7
Use the Live Object to play out a live feed from a K2 Edge input port.
The table below describes the mapping between the system’s ports and the SDI ports as defined in
Channel Composer.
Up to AVS1.5 (NexusPci board):
From AVS 2.0 and K2 Edge (TRX board):
IO1
Keep in mind to stop the Live Object when switching to a non-live Event, to save resources. This can be
done by adding the Live Object with an out point at 00:00:00:00 to, for example, the Play Clip Template.
The Auto-Stop at Out Point option for the Live Player should be enabled.
IO2
IO3
IO4
IO5
IO6
IO7
IO8
Channel Composer User Manual - Channel Composer User Manual- document version: 1.6.2 - 51
Page 53

This paragraph explains how to create RTic-compatible Tickers.
Note that Template names for RTic-compatible Tickers must exactly match the syntax
This Template sets ticker stories for the Ticker with <ticker_number> and contains
7.3 RTic-compatible Tickers
Example Templates for RTic-compatible Tickers can be found under File > Example Projects > RTic
Ticker.
To create RTic-compatible Tickers:
Create a Template to place the Ticker on-screen. For an example see the Ticker In Template in the
example Project RTic Ticker. This Template can have any name.
For each Ticker, create the following Templates:
o set_ticker_story<ticker_number>: set ticker stories for <ticker_number>.
o clear_ticker_stories<ticker_number>: clear ticker stories for <ticker_number>.
described above.
7.3.1 The set_ticker_story<ticker_number> Template
Tickers and ticker stories are numbered starting from 0.
For more information on Commands, see paragraph 6.10.
Add the Add Ticker Story command to the set_ticker-story<ticker_number> Template and edit the
the Add Ticker Story Command.
Command (double-click on the Timeline to edit).
Channel Composer User Manual - Channel Composer User Manual- document version: 1.6.2 - 52
Page 54

Example Add Ticker Story Command.
• Player: select the Ticker > <ticker_number> you want to update.
Example.
Channel Composer User Manual - Channel Composer User Manual- document version: 1.6.2 - 53
Page 55
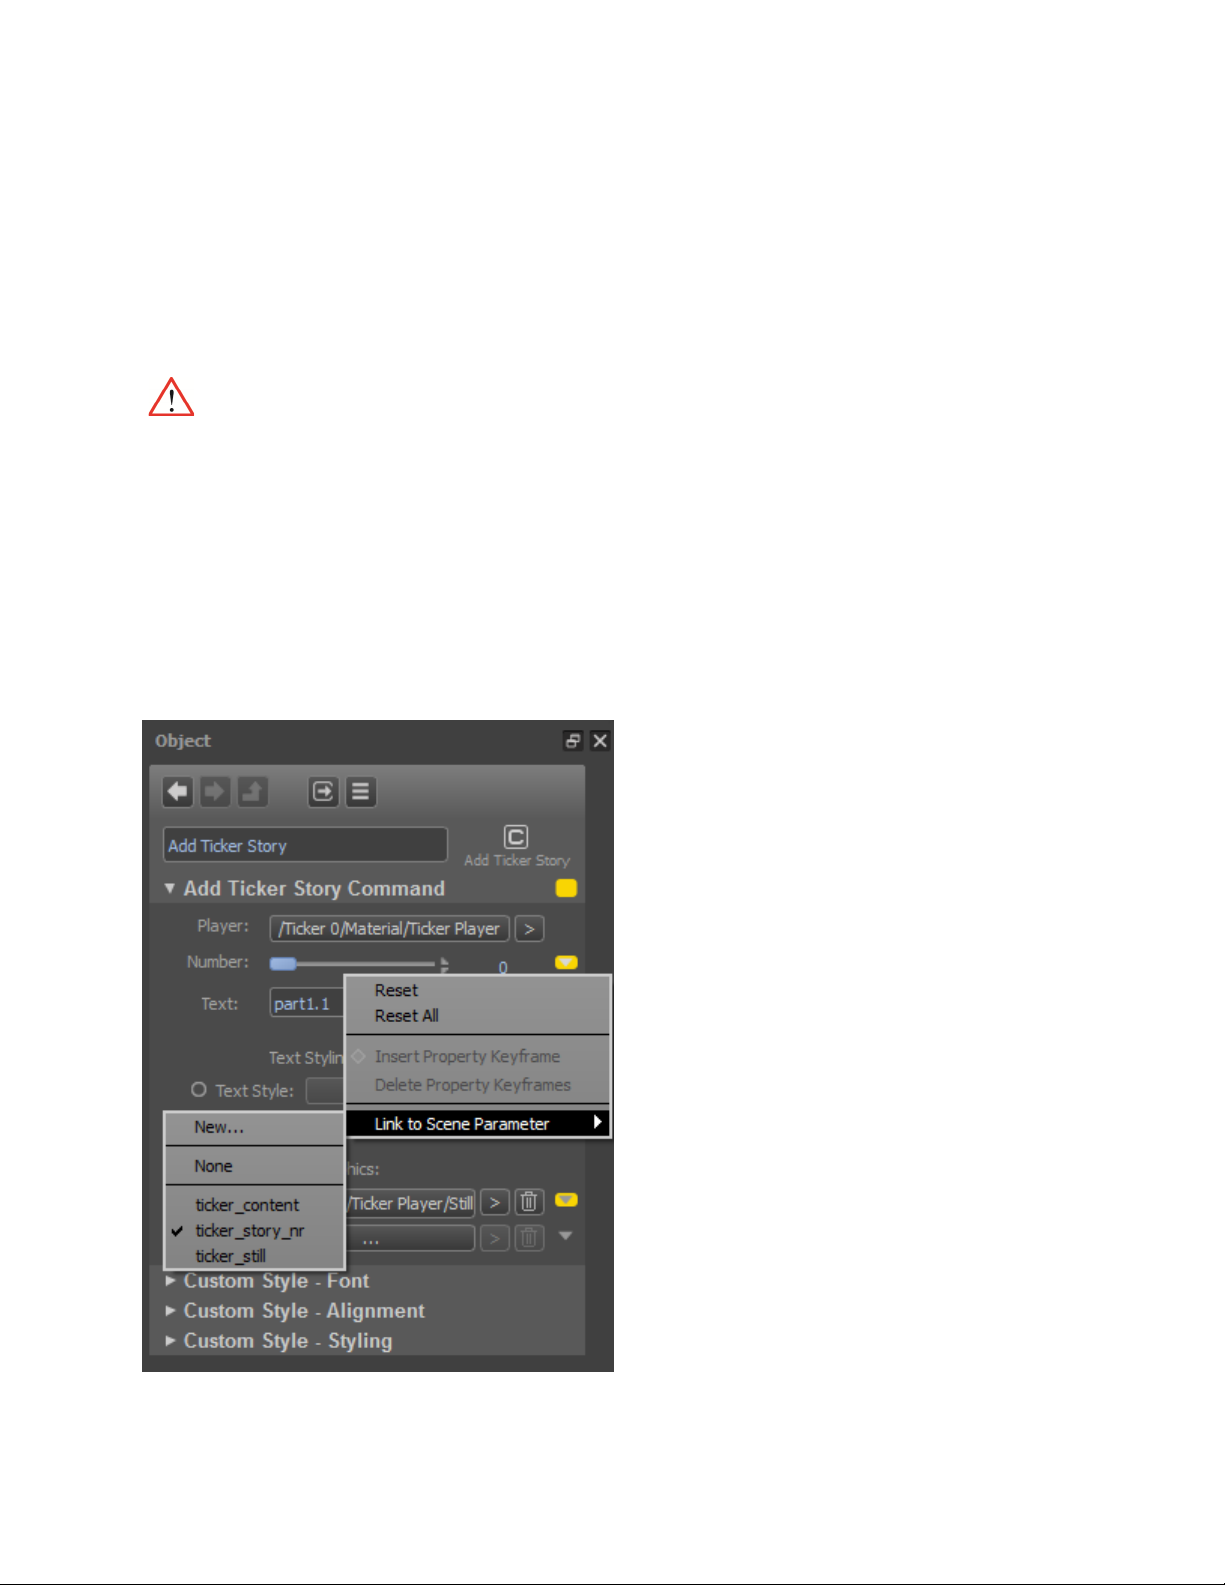
• Number: select the story number you want to update, or link a scene parameter.
• Text: fill in a story, or link a scene parameter.
• Story Graphics: if you want to include stills or animations in your stories, select a Still or ANI-
Player. You can either select a TGA-graphic or ANI-animation to include in your stories, or link a
scene parameter.
Scene parameter names for RTic-compatible Tickers must exactly match the following syntax:
• ticker_content
• ticker_story_nr
• ticker_still
• ticker_ani
• Text Styling: you can either select a predefined Text Style or define a Custom Style (Font,
Alignment, Styling) for your stories. Add font files to your Project Assets.
Example Scene Parameters used for a Ticker.
Channel Composer User Manual - Channel Composer User Manual- document version: 1.6.2 - 54
Page 56

This Template clears ticker stories for the Ticker with <ticker_number> and
7.3.2 The clear_ticker_stories<ticker_number> Template
contains the Ticker Command.
Tickers and ticker stories are numbered starting from 0.
Example Ticker Command.
Player: select the Ticker > <ticker_number> you want to clear.
Select the Clear Command.
The Story Pause and Unpause Commands are not available for RTic Tickers.
Channel Composer User Manual - Channel Composer User Manual- document version: 1.6.2 - 55
Page 57

7.4 Subtitles
Channel Composer supports the following subtitle output formats:
• In-Vision subtitling
• DVB subtitling
• Teletext subtitling
• Closed Captioning subtitling
7.4.1 Introduction
Channel Composer supports the following subtitle output formats:
• In-Vision subtitling
The open In-Vision format produces subtitles as graphical images that are made permanently
visible on screen. They cannot be switched off. Due to the graphical nature of this format, a large
set of unicode characters are supported. Using the grid (described below), placement of subtitles on
screen can be controlled. Using the Object Properties tab in Channel Composer, the font style can
be controlled.
• DVB subtitling
The closed DVB-subtitling format produces graphical images that are encoded and inserted into
an MPEG-transport stream and identified with given PID. These subtitles can be displayed
(optionally) on set top boxes or TV-sets that support the DVB-format. This format too supports a
wide array of unicode characters due to its graphical nature. The grid and font style options
available for the In-Vision format apply here as well.
• Teletext subtitling
Closed Teletext subtitling is a character based protocol originally developed for the PAL
broadcast format. Subtitles are added to the broadcast signal. Subtitles can be shown (optionally)
on screen on TV-sets that support the Teletext protocol. The grid and font style editing features
do not apply.
• Closed Captioning subtitling
Closed Caption subtitles are similar in nature to Teletext subtitles. It is a character based protocol
originally developed for the NTSC broadcast format. Subtitles are added to the broadcast signal.
Subtitles can be shown (optionally) on suitable TV-sets. The character set is relatively limited.
The grid and font style editing features do not apply.
Channel Composer User Manual - Channel Composer User Manual- document version: 1.6.2 - 56
Page 58

7.4.2 Properties
Properties of the Subtitle Object are described in more detail below:
Action:
Actions for the subtitle Player can be set here. The default is ‘Play’.
Auto-Stop at Out Point:
Automatically stops the Player when an Out Point is reached.
File:
The following subtitle file formats are supported:
• EBU STL files. Other STL file formats are not supported.
• SRT files with UTF-8 encoding. Other encoding formats are not supported.
Mode:
Select one of the options below:
• In-Vision subtitling (open)
• DVB subtitling (closed)
• Teletext subtitling (closed)
• Closed Captioning (closed)
Language:
The language selected here is used to optimize subtitle output, depending on the output format selected.
When the language needed is not found in the menu, select the nearest match.
The EBU STL file format covers five different language groups (character sets), but at the moment only
the Latin (for western languages) and Cyrillic (for Russian languages) groups are supported.
The SRT file format with UTF-8 encoding covers the full Unicode character set, but at the moment only the
left-to-right going languages are supported.
Channel Composer User Manual - Channel Composer User Manual- document version: 1.6.2 - 57
Page 59

The table below shows which output formats are supported for the different input file formats and
File format
In-Vision
DVB
Teletext
Closed
EBU STL
Latin
yes
yes
yes
yes
EBU STL
Cyrillic
yes
yes
yes
no
SRT
Left-to-right
yes
yes
no
no
language group combinations:
Language
group
Captioning
In Point:
The In Point defines the time (as defined in the input file) of the first subtitle that must be shown when
playback of the subtitle file is started. This option makes it possible to skip a number of initial subtitles
entries, or restart subtitling in the middle of a clip, for example after a commercial break.
Grid:
For output formats In-Vision and DVB, a grid - built of a number of slots - must be defined. The number of
grid slots, the slot dimensions and the position of the grid on screen can be fully customized. For example
it is possible to cover the full screen with the grid, or to define a grid of just a couple of slots (for example
6) and place it near the bottom of the screen.
The grid has two important characteristics:
1. It takes two adjacent slots to place a single line of subtitle text. In other words, the
maximum font height is the height of two slots added together.
2. A subtitle line can start at any slot, except the last (bottom) slot in the grid.
For example, a grid comprised of 6 slots will allow for a maximum of 3 subtitle lines to be shown. When
placing a single line of subtitle text on a six-slot grid, that line can start at any of the slots except for the
last one (since it takes two slots to render a single line).
The vertical position field as defined in the STL input file format will be used to place a subtitle on a given
pair of adjacent slots. If the range of vertical positions described in the STL file exceeds the number of
available slots, the range will be scaled down to the number of slots available in the grid.
Styling:
For output modes In-Vision and DVB a Text Style must be defined. Remember that the font height cannot
be more than the height of two slots. If the subtitles appear clipped on screen, try to reduce the font
height, or increase the grid slot height (and if needed reduce the number of slots).
Select Text Styles for Normal, Bold and Italic text. Note that Text Styles are defined in Channel Composer,
in the Text Styles window.
Channel Composer User Manual - Channel Composer User Manual- document version: 1.6.2 - 58
Page 60

7.4.3 Mode Specific
Filename (essence)
Asset (external reference)
abc123.mpg
abc123
abc123_eng.stl
English subtitle belonging to the Asset with ext.
Fade Dur:
For In-Vision mode, use the Fade Duration menu to define the number of fields or frames (depending on
broadcast mode) used to fade-in the subtitle text on screen.
Teletext Page:
For Teletext subtitling format, the subtitles will be made available on the Teletext page defined here.
DVB PID:
For the DVB subtitling format, the subtitles will be made available in the transport stream under given PID
value.
7.4.4 Workflow subtitles
1. Link the subtitle essence to the appropriate Asset Type.
2. Ingest subtitle files.
3. Create Formats in Channel Composer for subtitle playout.
7.4.5 Subtitles in TX/MAM
• Link the subtitles essences to the appropriate Asset Type. Create a Subtitle Asset Type, then
Link as essence to type.
• Subtitles are ingested via the Subtitle Inbox. Subtitle files and programs are linked based on the
file name.
Example:
reference abc123
When you want to add subtitle files to an Asset that was created before the subtitle essence link was
added to the Asset Type, you have to re-create the Asset. Otherwise the link with the subtitle essence will
not be recognized.
Channel Composer User Manual - Channel Composer User Manual- document version: 1.6.2 - 59
Page 61

7.4.6 Subtitle workflow in Channel Composer
For subtitle playout, create a Format that contains:
• a Play Clip template
• a Subtitle applet that updates the parameters used for subtitle playout (pre-event)
• a Subtitle template to place the subtitle grid online and play out subtitles using the parameters set
by the applet
To stop subtitle playout for Events without subtitles, create a template to stop the subtitle player and add
this template to the relevant Formats.
The subtitle applet and templates are described in more detail below.
Example Format Program with subtitles:
Channel Composer User Manual - Channel Composer User Manual- document version: 1.6.2 - 60
Page 62
7.4.7 The Subtitle Applet
Parameter
Value
Explanation
1. essence name
manual text: Subtitle
Specifies the subtitle Essence name as
2. scenepar file
manual text: subtitle
The applet updates this scene
3. scenepar player
manual text: subtitle_player_action
The applet updates this scene
The get-sub-essences applet [included in the Commissioning Quick Start Channel Pack] is executed preevent and updates the scene parameters listed in the table below. Scene parameters are used to:
• check if a subtitle essence is available, if not, the subtitle player is stopped
• start the subtitle player if a subtitle essence is available
• synchronize subtitle playout with the time in code in from the video
defined in TX/MAM, in this example
‘Subtitle’.
name
action
4. scenepar subtitle
inpoint
5. template name manual text: Subtitle
Note that the parameters and values can be renamed, but the order in which parameters are added to the
applet should match the table above.
Note that naming of the parameter values in the applet and the scene parameters in the template must
match.
manual text: subtitle_inpoint
parameter with the subtitle file name.
parameter with the subtitle player action:
2: start (subtitle file present)
3: stop (no subtitle file present)
The applet updates this scene
parameter with the video’s tc-in.
Specifies the name of the subtitle
template, in this example ‘Subtitle’.
Channel Composer User Manual - Channel Composer User Manual- document version: 1.6.2 - 61
Page 63
7.4.8 The Subtitle Template
Scene parameter
Value
subtitle
manual text: Empty
subtitle_inpoint
manual text: Empty
subtitle_player_action
manual text: Empty
After the applet has updated the scene parameters (pre-event), the subtitle template:
• starts the subtitle player if a subtitle file is available, if not, the subtitle player is stopped [scene
parameter subtitle player action]
• synchronizes playout of the subtitle file [scene parameter subtitle] with the timecode in from the
video [scene parameter subtitle inpoint]
The subtitle template is also used to place the subtitle grid on-screen.
In Channel Composer, add following scene parameters to this template:
Note that naming of these scene parameters can be changed but that parameter values in the applet and
the scene parameters in the template must match.
Channel Composer User Manual - Channel Composer User Manual- document version: 1.6.2 - 62
Page 64
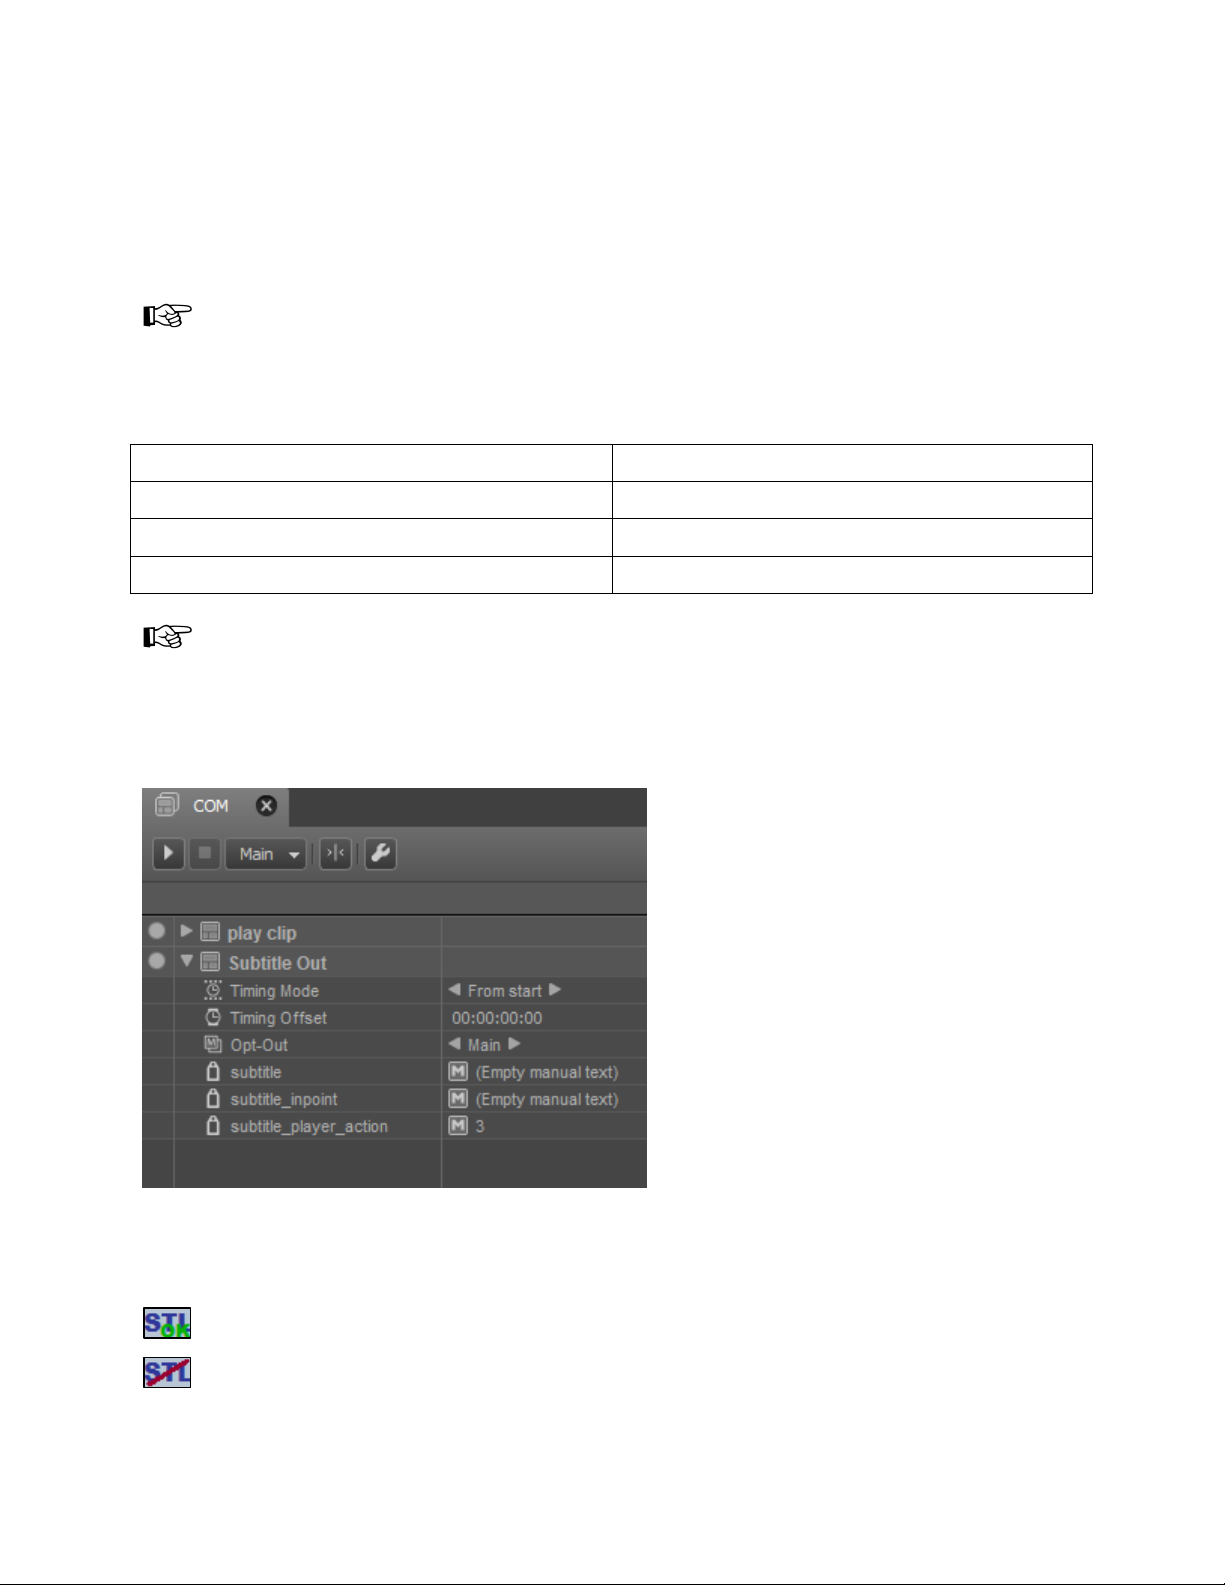
7.4.9 The Subtitle Out Template
Scene parameter
Value
subtitle_inpoint
manual text: Empty
subtitle_player_action
manual text: 3
: Subtitles Error
The Subtitle Out template is used to stop the subtitle player when switching to an Event without subtitles,
for example a Commercial. Add this Template to Formats that do not play out subtitles. The Template sets
the subtitle player action scene parameter to value 3 (stop player).
Note that in an alternative workflow the subtitle applet and template can be added to all Events in a
Playlist, for example Programs and Commercials. In that case, no Subtitle Out template is needed to stop
the subtitle player. The applet and template will stop the subtitle player if no subtitle file is present.
In Channel Composer, add following scene parameters to this template:
subtitle manual text: Empty
Note that naming of these scene parameters can be changed but that parameter values in the applet and
the scene parameters in the template must match.
Example Format Commercial:
7.4.10 Flags
POC will display following flags for subtitle Events:
: Subtitles OK
Channel Composer User Manual - Channel Composer User Manual- document version: 1.6.2 - 63
Page 65

Exp: 6 Mask: 64
Flag configuration:
Exp: 7 Mask: 128 Subtitles OK
Exp: 8 Mask: 256 Subtitles Error
7.4.11 Example
Example Event in POC with updated subtitle scene parameters. Note how the subtitle inpoint matches the
main Event’s tc in:
7.4.12 Applet command line arguments
The applet’s command line arguments are:
1. Optout
2. Queue
3. Main Event Id
4. Subtitle Essence Name
5. Subtitle File Sp Name
6. Subtitle Player Action Sp Name
7. Subtitle In Point Sp Name
8. Subtitle Tpl Name
Channel Composer User Manual - Channel Composer User Manual- document version: 1.6.2 - 64
Page 66

7.5 Controllers
A Controller automatically animates properties of an Object. Controllers can be an
alternative to keyframing. Controllers are ideal for animations that are endlessly repeating,
or animations that depend on real-time data.
Controllers are also described in an Example Project.
Available Controllers are:
• Anchor
• FromTo
• Link
• Oscillate
• Stack
All Objects’ properties can be animated.
Per frame, the Object property values for rendering are determined as follows:
Value0 = a value from keyframes or the default Template value.
Value(N, for the Nth Controller for the property, with N > 0 and Wet-dry in [0…1] =
(1 – Wet-dry) * Value(N - 1) + Wet-dry * Controller-value.
Example: property Opacity has a constant value 50 and a Controller Link with Wet-dry 25% and
Oscillate with Wet-dry 75%. The value for the Opacity property will be:
( 0.75 * 50 + 0.25 * Link-value ) * 0.25 + Oscillate-value * 0.75
Channel Composer User Manual - Channel Composer User Manual- document version: 1.6.2 - 65
Page 67

7.5.1 Anchor
Use an Anchor to keep (one or more sides of) an Object in a specific position: align the Object’s Left,
Right, Bottom, Top, Back or Front to an Anchor Point X, Y or Z.
Example Anchor.
7.5.2 Stack
The Stack Controller is used to tightly stack grouped Objects on the X, Y or Z-axis and avoid overlap, for
example to align a number of Text Groups. Note that this Controller can only be used for Groups.
Example Stack Controller for a Group.
Channel Composer User Manual - Channel Composer User Manual- document version: 1.6.2 - 66
Page 68

7.5.3 FromTo
Use a FromTo Controller to animate a property from one to another value, for example move from Position
Z 5000 to Position Z 0 using a FromTo controller with a Duration taken from the Scene Parameter Move
Duration. This Controller is similar to a keyframed animation with two keyframes. However, the ‘From’ and
‘To’-values can be linked to a Scene Parameter. This cannot be done with keyframes.
Example FromTo Controller.
7.5.4 Oscillate
Use an Oscillate Controller to oscillate (Sinus, Sawtooth, Square or Triangle) an Object’s properties (note
that only one property can be oscillated).
Example Oscillate Controller (Spin Z prefab).
Channel Composer User Manual - Channel Composer User Manual- document version: 1.6.2 - 67
Page 69

7.5.5 Link
The Link Controller is used to link a property of a source Object to a property of a target Object. In the
example below, the target’s color amount is linked to the height of a Cylinder using a Link Controller. The
target property is calculated as Offset + Scale x Source.
Example Link Controller.
Channel Composer User Manual - Channel Composer User Manual- document version: 1.6.2 - 68
Page 70

7.5.6 Controllers How to
To add a Controller to an Object, right-click the Object in the Objects window or on the Stage >
Add Controller > select the Controller you want to add > OK.
Controllers are edited in the Object window.
To work with real-time data to control properties, use Scene Parameters.
Example Controller using a Scene Parameter to dynamically set the Max Value for the oscillation of a
Height property.
When animating individual Rotation properties, Euler Interpolation should be enabled for the target Object.
To rotate around separate axes (for example, only the y-axis), we advise to use Controllers. Also, you
need to enable Euler interpolation.
The example Project Controllers shows a number of examples of Controllers.
Channel Composer User Manual - Channel Composer User Manual- document version: 1.6.2 - 69
Page 71

7.6 GPIO Command
The Channel Composer GPIO Command can be used to manipulate an output pin of one of the
configured GPIO devices.
To add a command to a Template, drag the command from the Library > Command on the Timeline.
The example on the left shows the Timeline with a GPIO
command inserted on a command track.
A command track is automatically inserted when a
command is dragged on the Timeline.
To add additional tracks, click this icon.
: To delete a command track, click this icon.
: Copy selected keyframes or commands to the clipboard.
: Paste clipboard items on the Timeline.
Channel Composer User Manual - Channel Composer User Manual- document version: 1.6.2 - 70
Page 72

Double-click the GPIO Command on the Template Timeline to edit its properties in the Object window:
Device
Supported device names are:
VBI1, etcetera should be defined.
Output pin
The number of the GPIO output pin to be manipulated. The first pin is 1.
Value
Supported values are:
1 – Enables the pin, a logical 'on' or 'high'.
DB9M – Represents the internal GPIO device, available through the DB9
socket on the back of the machine.
410E – Represents the optional Sealevel 410E device that allows GPIO control
over Ethernet.
VBI – Represents the virtual GPIO device that does GPIO-over-VBI on the
video output(s) of the associated nexos channel. Alternatively, real device
names VBI0, VBI1, VBI2, etc. can be used to explicitly address the GPIO
devices dedicated to channels 0, 1, 2, etc.
Note that GPIO devices must be defined in the nexos-gpio-params.txt file in
order to use them here. In case of VBI devices, only the real devices VBI0,
0 – Disables the pin, a logical 'off' or 'low'.
Example GPIO Command properties.
Channel Composer User Manual - Channel Composer User Manual- document version: 1.6.2 - 71
Page 73

8 Working with Assets, Metadata and Scene Parameters
See also paragraph 3.4 for an explanation of Assets, Metadata and Scene Parameters.
8.1 Adding Assets
To add Assets to a Project, go to the Projects Assets window > Assets.
: Click to add an Asset.
: Click to delete the selected Asset.
Assets are included in the Channel Pack. For testing purposes, you can add test media to the Test Media
library. These files will not be included in the Channel Pack.
8.2 Metadata
Metadata can be used for on-air presentation or to trigger Events. To work with metadata, import the
relevant metadata definitions from Cobalt Asset Manager or TX/MAM first.
In Asset Manager/TX/MAM, copy the Asset Type's metadata definition to a .xml file and save this
file on your workstation:
In Cobalt, open the Asset Manager.
On the main menu, click Settings > Manage Assets.
The Manage Asset Type Window opens.
Select the relevant Asset type in the list and click Properties.
The Edit Asset Type Window opens.
You can now copy the xml-definition to a simple text editor or xml-editor on your workstation.
Save the file with the extension .xml on your workstation.
Example XML-definition.
Channel Composer User Manual - Channel Composer User Manual- document version: 1.6.2 - 72
Page 74
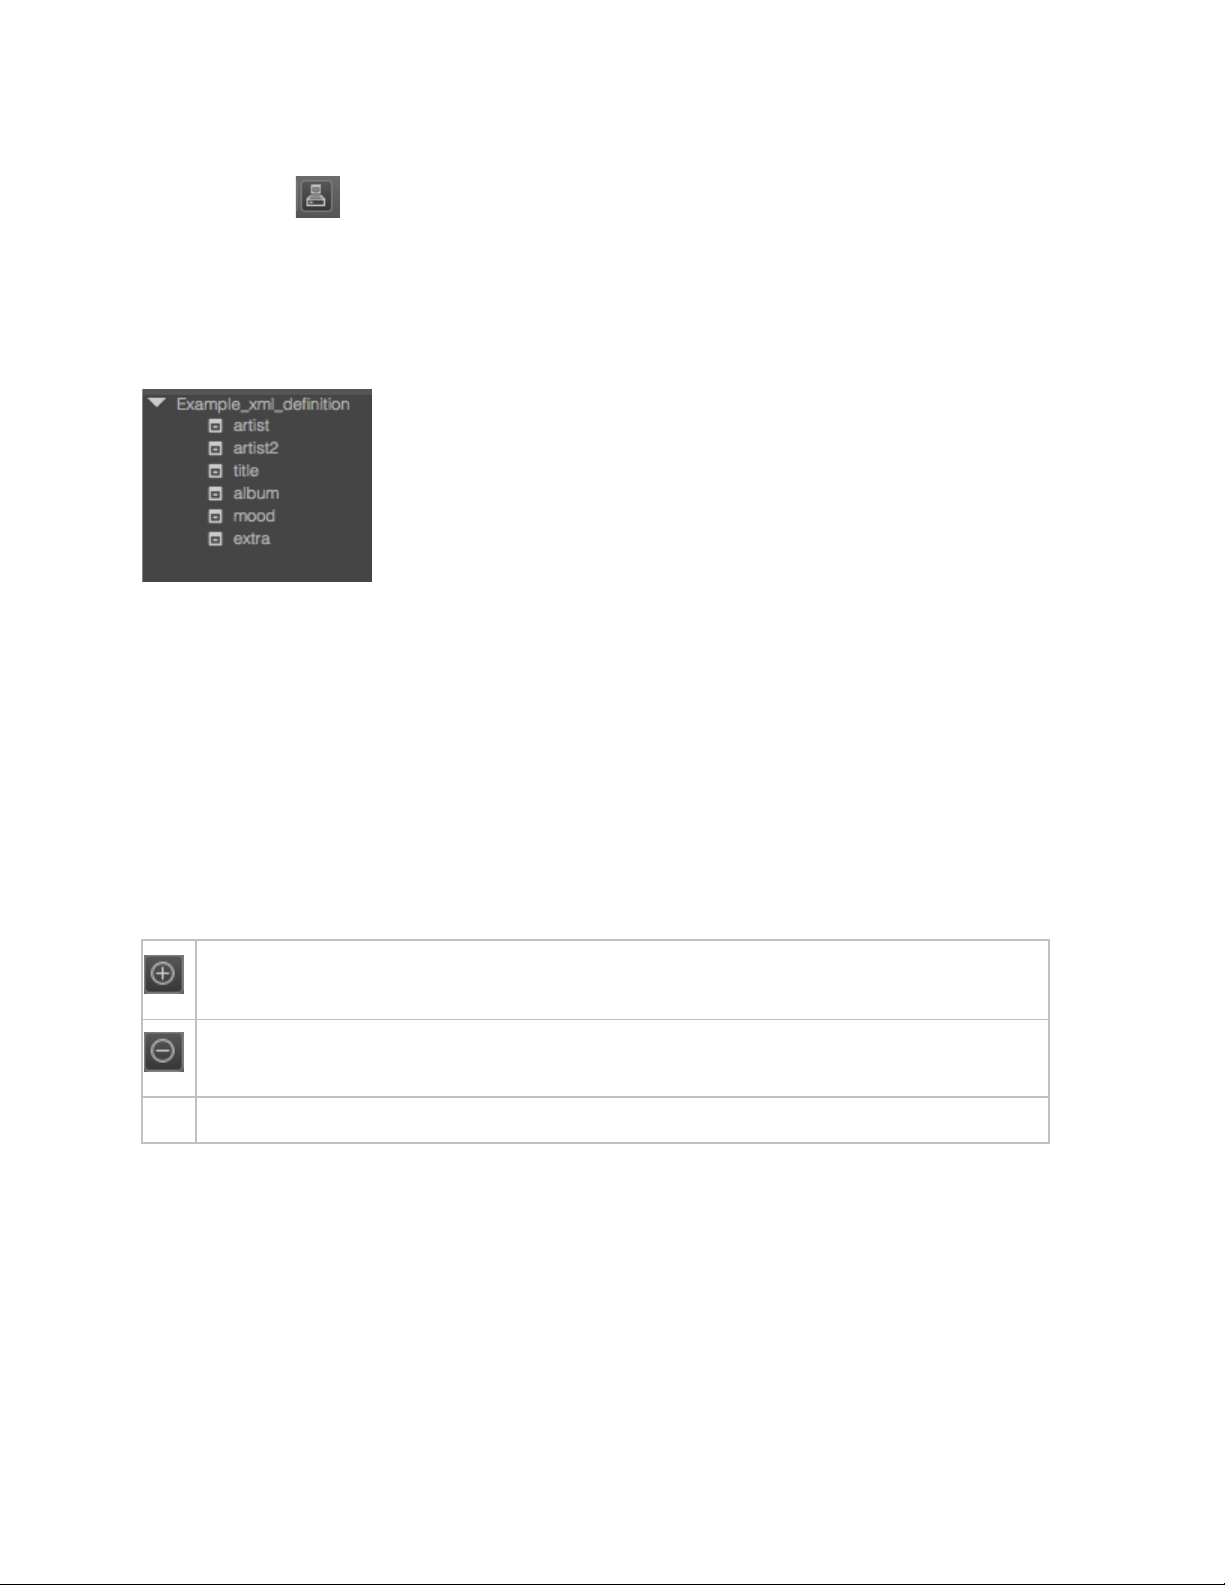
In Channel Composer go to the Project Assets > Metadata window.
Click the icon to import the .xml file.
The metadata definition (.xml file name) and metadata fields will be listed in the Metadata
window.
Metadata fields can now be linked to Scene Parameters [see the next paragraph for more
information on this topic].
Example XML-definition in Channel Composer.
8.3 Scene Parameters
To work with Scene Parameters:
Create Scene Parameters.
Link parameters to Object properties in the Object window.
Link parameters to content (specify a parameter type) on the Format Timeline.
8.3.1 Creating Scene Parameters
To define a Scene Parameter, go to the Scene Parameters window.
: Click to add a Scene Parameter, then specify a name (characters and/or numbers).
: Click to delete the selected Scene Parameter.
New : You can create Scene Parameters directly in the Object window [see the next paragraph].
Channel Composer User Manual - Channel Composer User Manual- document version: 1.6.2 - 73
Page 75

8.3.2 Linking Scene Parameters to properties
To link a Scene Parameter to an Object property:
Open the Object's properties window.
Click the arrow behind the property you want to define a Scene Parameter for.
Click Link to Scene Parameter. You can now select an existing Scene Parameter, or create a
new parameter.
8.3.3 Linking Scene Parameters to content
Scene Parameters are linked to content in the Format Timeline. A Scene Parameter can be linked to:
• A dynamic reference: the main Asset in an Event.
• An external reference: an Asset’s external reference.
• A fixed Asset reference: a reference to an Asset in the TX/MAM database (Cobalt Asset ID).
• Manual Text: manual text.
• Import Field: custom Event data.
• An Asset from the Channel Composer Assets pool.
• A metadata field.
To link, in the Format Timeline:
Open the Format (double click in the Project window) and expand the appropriate Object's
properties.
Right-click the Scene Parameter's value field.
Select Change Parameter Type.
Select the appropriate parameter type.
Channel Composer User Manual - Channel Composer User Manual- document version: 1.6.2 - 74
Page 76

Example Play Template on the Format Timeline, with
parameter clip linked to a dynamic reference.
To link a Scene Parameter to a metadata field or Asset from the Channel Composer pool:
Open the Format and expand the appropriate Object's properties.
Right-click the Scene Parameter's value field.
Drag and drop the metadata field or Asset from the Project Assets window on the Scene
Parameter's value field.
Click Clear Parameter to clear a Scene Parameter value.
The yellow icons in the example on the left indicate that a
Scene Parameter has been defined for an Object or
property.
8.3.4 Adding a test clip for a Format
To specify a test clip for the Format's main Event, click upon the Test clip button in the upper
right corner of the Format Timeline, then select a file from the Test Media folder.
Channel Composer User Manual - Channel Composer User Manual- document version: 1.6.2 - 75
Page 77
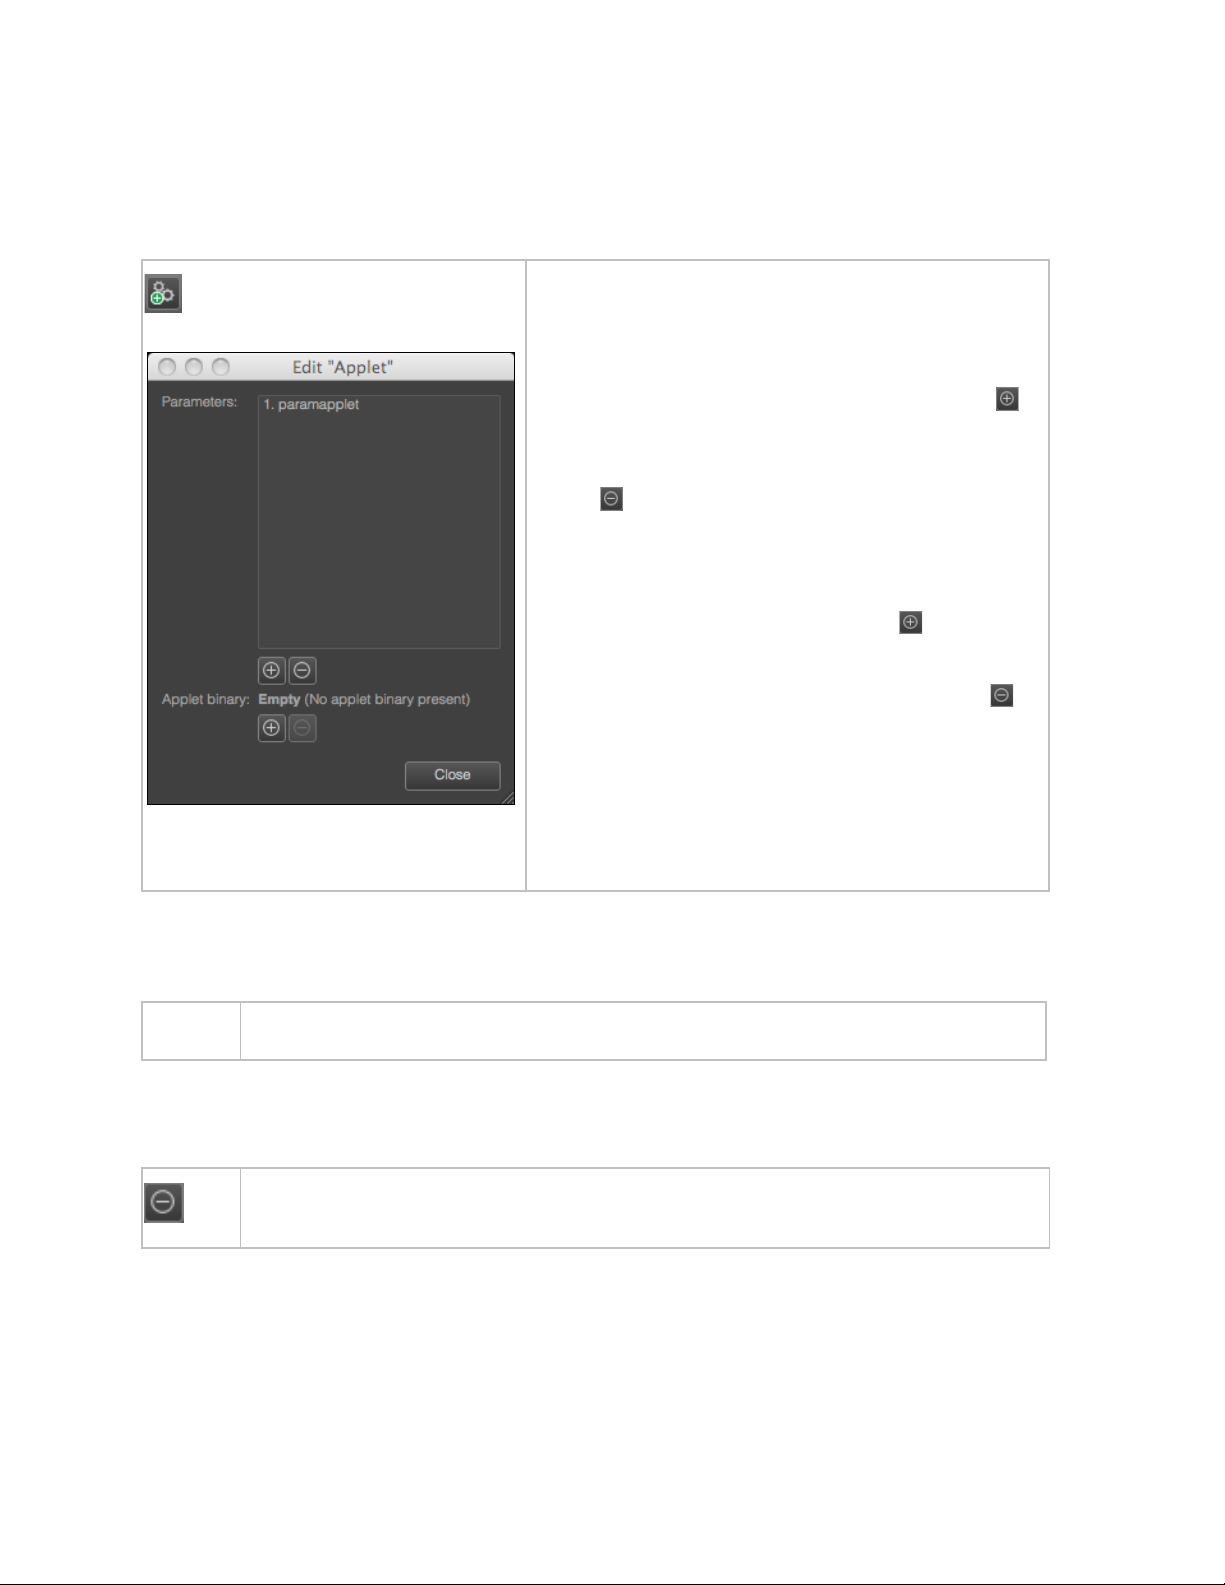
9 Working with Applets
9.1 Creating a new Applet
In the Project window click the add applet icon.
Parameters
To define parameters for an applet, click the
icon and specify a name.
To delete a parameter, select and then click the
icon.
Applet binary
To add an applet binary, click the icon, then
select the binary file.
To delete a binary, select and then click the
icon.
Note that applets (and the parameters included in them)
can be added to Formats, while the binary file is added at
a later Stage.
9.2 Renaming an Applet
Rename
: In the Project window, select the applet > right-click > Rename.
9.3 Deleting an Applet
: In the Project window, select the applet > click the delete icon to delete.
Chapter 11 describes how to add applets to a Format, and how to time applets.
Channel Composer User Manual - Channel Composer User Manual- document version: 1.6.2 - 76
Page 78
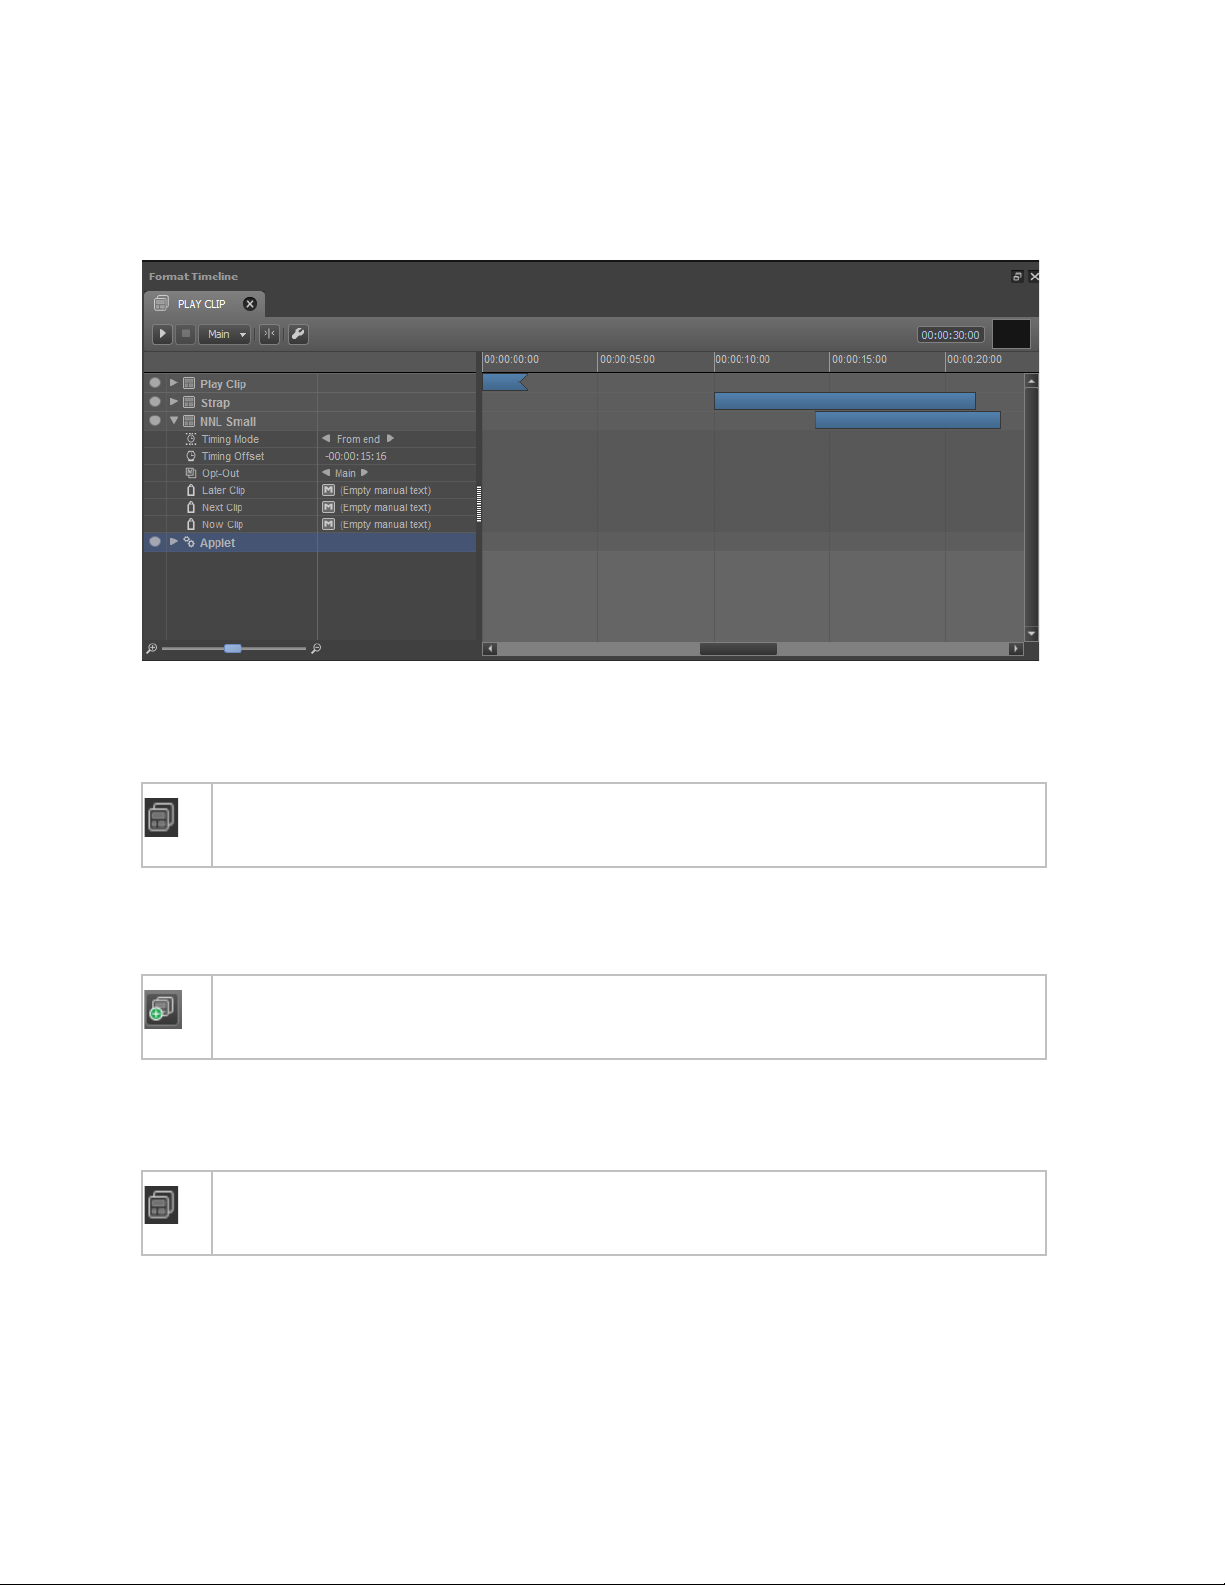
10 Working with Formats
Formats time sub events (Templates and Applets) relative to the main Event.
Example Format Timeline with Template NNL Small expanded.
10.1 Opening the Format Timeline
To open the Format Timeline, in the Project window double-click the Format you
want to edit.
10.2 Creating a new Format
In the Project window click the Add Format icon, or in the toolbar click Project >
New Format.
10.3 Renaming a Format
Formats can be renamed in the Project window. Select the Format > right-click >
Rename.
Channel Composer User Manual - Channel Composer User Manual- document version: 1.6.2 - 77
Page 79

10.4 Deleting a Format
In the Project window, select the Format > click the delete icon to delete.
10.5 Adding Templates to a Format
To add Templates to a Format, open the relevant Format on the Format Timeline.
Then drag Templates from the Projects window upon the Format Timeline.
10.6 Timing Templates
In the Format Timeline expand the Template's properties first, if applicable; click the icon
behind the Template.
Select Timing Mode; click the arrow icons. Following options can be set:
From start: absolute timing offset in hh:mm:ss:ff from start
From end: absolute timing offset in hh:mm:ss:ff from end
Relative: timing offset in percentage from start
Not active: not active
Specify Timing Offset: enter values manually or move the Template on the Timeline to specify
the timing offset.
Example timing setting for Template Play.
10.7 Opt-out
To define an optional output Channel for a Template or Applet, click the icon > Opt-Out >
select main (0) or another Channel number. The default is main.
For an example of how to use this option, see paragraph 11.10, Simulcast.
Channel Composer User Manual - Channel Composer User Manual- document version: 1.6.2 - 78
Page 80

10.8 Adding applets to a Format
To add an applet to a Format, open the relevant Format on the Format Timeline.
Then drag the applet from the Projects window upon the Format Timeline.
10.9 Timing applets
On the Format Timeline expand the applet's properties first, if applicable; click the icon behind
the applet.
Select Timing Mode; click the arrow icons. Following options can be set:
From start: absolute timing offset in hh:mm:ss:ff from start
From end: absolute timing offset in hh:mm:ss:ff from end
Relative: timing offset in percentage from start
Not active: not active
Pre Event: the applet is executed before the Event is checked by playout distri (the applet is used
to write Event information back to the database).
Subtitle: almost the same as pre Event; the applet is executed before the Event is checked by
playout distri, the first parameter is executed by sequencer at Event start, the start time in the
parameter is replaced by the start time of the Event.
Post Asset: the applet is executed after the Asset has been checked by playout distri (note for
applet developers: this applet can use shared memory*).
Pre Asset: the applet is executed before the Asset has been checked by playout distri (note for
applet developers: this applet can use shared memory*).
(*Note for applet developers: for extra information concerning the Asset, shared memory can be used,
also to supply playout distri with information.)
Specify Timing Offset: enter values manually or move the applet on the Timeline to specify the
timing offset.
Example timing setting for an applet.
Channel Composer User Manual - Channel Composer User Manual- document version: 1.6.2 - 79
Page 81

10.10 Simulcast
For simulcast broadcasts, two instances of each Template are created: one is played out on the HDchannel, the other one is played out on the SD-channel. The playout Channel is defined in the Format,
using the Template’s Opt-Out option setting.
The example below shows a Play Clip Format. The Clip and Logo Templates have been created for SD
and HD. The HD-Templates are played out on Channel main, HD in this example. The SD-Templates are
played out on Channel 1, SD in this example. The playout Channel is specified in the Format, with the
Opt-Out option. Note that you do not create separate Formats for HD and SD, but only add both the HD
and SD Templates per Format.
For an example of a Simulcast project, see File > Example Projects: Simulcast.
Example Format that plays out two instances of a Template; to Channel Main (HD) and Channel 1 (SD),
as defined with the Opt-Out option.
In Cobalt, you only have to schedule one Channel. Formats will be played out on the 2 Channels defined
in the Templates (in the example above main and 1). HD and SD-settings are defined on the K2 Edge, via
the IP Manager.
Channel Composer User Manual - Channel Composer User Manual- document version: 1.6.2 - 80
Page 82

11 Channel Pack Validation
Testing on a representative K2Edge system, against a representative schedule, with representative
content, is the only way to determine if a channel pack is ready for on-air usage. Only go on air with a
validated channel pack!
Channel Packs should be validated against a test schedule. The playback statistics tool can be helpful
with this. While the test schedule is played out on a test server - using hardware, content and a schedule
closely similar to the ones used for actual playout - the statistics tool is displayed as an on-screen overlay
and shows real-time playback information:
• the current and peak amount of active players per type
• the amount of active templates and objects
• the amount of upload bandwidth from system RAM to the graphics card RAM, which is
“expensive”
• the durations of the update and render phases in milliseconds and the sum of both durations
(total)
Example nexos playback statistics tool overlay.
Please note that these statistics can also be viewed using the statistics option in Channel Composer Tryout Mode. However, Channel Composer cannot measure the durations of the update and render phases.
This can only be done on a test playout server. Monitoring playback statistics during playout of a test
schedule gives a good sense of the actual system load templates generate when run.
Channel Composer User Manual - Channel Composer User Manual- document version: 1.6.2 - 81
Page 83

11.1 Basic testing and further analysis
./nexcommand <channel number> 0 complex '{cmd=nre;subcmd=control;stats-
This paragraph describes how you can test your Channel Packs. You can run the test schedule and
statistics tool, without continuously monitoring (basic testing). If unacceptable peak values have occurred,
further analysis is required.
11.2 Basic testing
Create and start the test schedule on the test server. Make sure the test schedule uses the Channel
Pack you want to validate [see also paragraph 3.7].
Start the playback statistics tool [see paragraph 12.4].
Run the test schedule. You do not have to monitor statistics continuously. Check peak values at the
end of the test: if the statistics tool’s outline is red [see also paragraph 12.5.4], unacceptable peak
values have occurred and further testing is required.
If peak values are instantly red from the start, run the command again to reset.
11.3 Further analysis
Start the test schedule on the test server.
Start the playback statistics tool as described in paragraph 12.4.
Monitor the statistics tool to identify overloads. Paragraph 12.5.4 describes how to interpret measures.
11.4 Starting playback statistics
Login on the test playout server, for example via PuTTy.
Within the /system/objects/code folder, type:
sw=true;perfstats-sw=true;}'
Replace <channel number> with the number of the Channel you are running the test schedule on.
Re-enter this command to reset peak values if applicable.
Channel Composer User Manual - Channel Composer User Manual- document version: 1.6.2 - 82
Page 84

11.5 Interpreting playback statistics
11.5.1 Current and peak player amounts (cur | peak)
Use these numbers to determine if started players - especially players that create a lot of load such as
‘clip’, ‘ani’ and ‘live‘ - are stopped later on. Values should stabilize and then decrease at some point in
time.
Example: if a template running a fixed length animation is started, the current ani-value will first increase
by one. If the template is well designed (i.e. the player is stopped on the timeline at some point) the value
should decrease by one sometime later.
Note that the number next to ‘clip’ will probably always be one, since usually a full screen clip is always
running.
• When to act: if the player amounts keep increasing over a longer period of time, or if amounts are
high for important player types:
o clip > 2
o big ani > 2
o live > 2
o text > 20
o fullscreen clip + fullscreen ani + fullscreen live > 3
o fullscreen still > 2
• How to act: check your templates for the existence of Out Points. Ideally, every player should have
an Out Point, except for probably the main Clip and Live players that run continuously.
11.5.2 Update time (update tm)
Shows the duration in milliseconds of the update phase. Within the update phase, the states of all active
objects are updated.
All durations listed below are based on NTSC. For PAL, add 25% to values.
• When to act: when this value exceeds ~5ms.
• How to act:
o If this value peaks above 5ms but then immediately falls back to an acceptable value:
This probably means that nexos is overloaded due to too many simultaneously occurring
object In Points.
Spread In Points of objects across multiple frames, where possible.
o If this value stays above 5ms:
This probably means that too many objects and/or templates are active at the same time.
Reduce the amount of running objects and/or templates. Use Out Points to deactivate objects.
Channel Composer User Manual - Channel Composer User Manual- document version: 1.6.2 - 83
Page 85

11.5.3 Render time (render tm)
Shows the duration in milliseconds of the render phase. During this phase, all active (visible) objects are
rendered on screen.
When to act: when this value exceeds ~9ms.
How to act:
• If this value peaks above 9ms but then immediately falls back to an acceptable value:
This probably means that too much content is being uploaded from system RAM to GPU RAM at the
same time.
Spread In Points of visible objects (Clips, Stills, Lives, Text etc.) across multiple frames, where
possible.
• If the value stays above 9ms:
Multiple potential reasons, in order of decreasing likelihood:
1. Too many running Clip/Ani/Live objects.
Reduce the amount of running players.
2. Dimensions of Clip/Ani/Live/Still/Text content are too big.
Reduce dimensions (e.g. crop dimensions, do not use HD content when only SD content is
needed, do not use full screen images for a small logo in the corner, disable Progressive Image
on large Still and Text objects).
• If the pixel-sum of all static graphics running simultaneously is greater than the pixel-sum of 2 HD
Stills, the nexos texture cache is probably full. By default, the texture cache can handle 2 HD Stills. All
extra content needs to be uploaded to the GPU, which increases rendering time. This can be solved
by increasing the size of the texture cache. Please contact Grass Valley for Support.
1. Too many graphical effects.
Reduce the number of effects. Please be aware of the Quality Scaler effect which can be quite
“expensive” in terms of rendering. Generally only one Quality Scaler should be active at any time.
2. Too many graphical layers.
Layering is too complex. Reduce the amount of groups containing layered groups (in other words
nested groups). For example by disabling Layer Objects on Groups. This flattens a group to a
single layer.
Channel Composer User Manual - Channel Composer User Manual- document version: 1.6.2 - 84
Page 86

11.5.4 Interpreting the measure bars
The vertical yellow line shows peak values that have been measured:
Example.
The green or red horizontal bar shows current values. Red indicates that high values are measured, green
indicates that values are within safe margins:
Example.
Channel Composer User Manual - Channel Composer User Manual- document version: 1.6.2 - 85
Page 87

If the overlay’s outline turns red, this indicates that very high values for the total of update and render
times have occurred at some point during the test:
Example.
Channel Composer User Manual - Channel Composer User Manual- document version: 1.6.2 - 86
Page 88

12 Quick Reference
A
The main menu.
B
The main toolbar.
D
E
F
Objects are animated in time on the Template Timeline. Each Template is displayed on its own
G
The Stage represents the Channel´s output.
12.1 The Channel Composer workspace
The Channel Composer workspace consists of the Stage and a number of windows that can be arranged
and customized [see chapter 0 for more information]. The example below shows a default empty Channel
Composer workspace (Mac) in Template editing mode. In Format Editing a number of windows are not
visible.
C
The Projects window lists the Formats, Templates and Applets that have been defined for a
Channel. Three windows are docked on this window: the Object window (view and edit an
Object's properties), the Library (the prefabs and test media libraries) and the Project Assets
window (view and edit the Project's Assets and metadata).
The Objects window lists the Objects available in the Project and shows their layering.
Actions can be viewed and redone or undone in the History window. Two windows are docked on
this window: the Scene Parameters window (view and edit Scene Parameters) and the Text
Styles window (view and edit text styles).
tab. Formats are edited in the Format Timeline (not activated in the example above). Each
Format is displayed on its own tab. Note that in Format editing mode, some windows are hidden.
Channel Composer User Manual - Channel Composer User Manual- document version: 1.6.2 - 87
Page 89

12.2 The main menu
12.2.1 Channel Composer
About Channel
Composer
Preferences
: Displays the Channel Composer version.
: Set Channel Composer preferences:
• Nexos:
o Broadcast Format
o Multi-Sampling Anti Aliasing: use to improve the design's
visual quality on your workstation (remove edge line
roughness and jagged edges). Note that higher sample rates
impact performance of your workstation.
o Players: set the big buffer pool size in MB.
• File:
o Specify the default Project folder.
o Autosave: disable (default) or enable autosave every x
minutes.
• History: the number of actions tracked.
• Guides: the color of the guides and snap distance.
Services
Hide Channel
Composer
Hide Others
Show all
Quit Channel
Composer
• Grid: the color of the grid, spacing and snap distance.
• Backup System: number of backups to keep.
• Networking: specify the FTP transfer mode.
Note that changes require a restart of Channel Composer to take effect.
: Set service preferences:
• No Services Apply
• Services Preferences
: Hide Channel Composer.
: Hide other applications.
: Show all applications on your desktop.
: Quit Channel Composer.
Channel Composer User Manual - Channel Composer User Manual- document version: 1.6.2 - 88
Page 90

12.2.2 File
New Project
Open Project
Recent Projects
Save Project
Save Project As
Export Project
Import Project
Manage Exports
Merge Project
Example Projects
: Create a new Project.
: Open an existing Project.
: Lists recent Projects, select to open.
: Save the Project under its current name.
: Save the Project with a different name, or at a different location.
: Export the Project as a Channel Pack to disk, or to a TX/MAM Database,
Playout.
: Import a Channel Pack from disk or the TX/MAM Database.
: See chapter 5.7 for more information.
: Merge or replacement merge the current Project with the selected Project.
: List and open an example Project.
Restore Backup
Exit
: Restore a Project backup.
: Exit Channel Composer.
Channel Composer User Manual - Channel Composer User Manual- document version: 1.6.2 - 89
Page 91

12.2.3 Edit
Undo
Redo
Copy
Paste
Delete
Select All
Select None
: Undo the previous action.
: Redo the previous action.
: Copy the selected Object(s).
: Paste the copied Object(s).
: Delete the selected Object(s).
: Select all Objects on the Stage or within the opened Group. Hidden
Objects are selected as well.
: Deselect all Objects.
Channel Composer User Manual - Channel Composer User Manual- document version: 1.6.2 - 90
Page 92

12.2.4 View
Zoom In
Zoom Out
Zoom to 100%
Fit in Window
Rulers
Grid
Guides
Snap to Grid
Snap to Guides
Pixel Perfect
Information
: Scale the Stage.
: Scale the Stage.
: Scale the Stage to 100%.
: Fit the Stage in the workspace available.
: Show or hide rulers.
: Show or hide the grid.
: Show or hide guides.
: Snap Objects to the grid.
: Snap Objects to the guides.
: Show pixel perfect Information.
Windows
Clean View Mode
: Show or hide windows:
Project Navigator
History
Library
Project Assets
Objects
Object Properties
Template Timeline
Text Styles
Scene Parameters
Format Timeline
Template Rules
: Select to show the Stage only, deselect to show the Stage plus active
windows.
Channel Composer User Manual - Channel Composer User Manual- document version: 1.6.2 - 91
Page 93

12.2.5 Project
New Template
New Format
Project Settings
Add a Template to the Project.
Add a Format to the Project.
Format
Displays:
Frame Size
Aspect Ratio
FPS
Interlaced
Name
Location
To edit, go to Channel Composer > Preferences.
Info
Edit:
Author
Description
Export
Specify or reset export settings:
TX/MAM Database server: IP address
Channel Pack Asset type
Channel Composer User Manual - Channel Composer User Manual- document version: 1.6.2 - 92
Page 94

12.2.6 Objects
Align
Group
Ungroup
Open Group
: Align the selected Object. Options are:
Left
Right
Top
Bottom
Front
Back
Vertical Center
Horizontal Center
Rotation
: Group selected Objects.
: Ungroup selected group of Objects.
: Temporarily open a group of Objects to edit Objects, then close group.
Close Group
Arrange
Tools
Add Controller
: Close an open group (regroup Objects).
: Move the selected Object:
Move to Front
Move Up
Move Down
Move to Back
: Lists the tools that have been applied for the selected Object.
: Add a controller:
Anchor
FromTo
Link
Oscillate
Stack for Groups
Channel Composer User Manual - Channel Composer User Manual- document version: 1.6.2 - 93
Page 95
Refresh Players
12.3 Main toolbar
: Add an Object to the canvas:
: Click to refresh all Players.
: Add an Analogue Clock Object to the Stage.
: Add an Animation Object to the Stage.
: Add an Audio Object to the Stage.
: Add a Box Object to the Stage.
: Add a Clip Object to the Stage.
: Add a Cylinder Object to the Stage.
: Add a Group Object to the Stage.
: Add a Mesh clip Object to the Stage.
: Add a Plane Object to the Stage.
: Import a 3D-Object.
: Lock aspect ratio.
Channel Composer User Manual - Channel Composer User Manual- document version: 1.6.2 - 94
: Add a Sphere Object to the Stage.
: Add a Still Object to the Stage.
: Add a Text Object to the Stage.
: Add a Ticker Object to the Stage.
Page 96

: Switch to 2D-mode.
: Switch to 3D-mode.
Group
View
Object
: Customize the movement axes:
• View: axes are aligned with the current view.
• Group: axes are aligned with the group the Object is in.
• Object: axes are aligned with the Object. When the Object rotates, the axes will rotate as
well.
: Show or hide 3D editing guides when editing a Group.
: Click to zoom in, or select a zoom percentage.
: Click to zoom out, or select a zoom percentage.
: Fit the Stage on the workspace available.
: Grab the canvas.
: Add curtains to the Stage.
: Toggle 16:9 view mode.
: Refresh Players.
: Switch to try-out mode.
Channel Composer User Manual - Channel Composer User Manual- document version: 1.6.2 - 95
Page 97

12.4 View mode icons
: Show small icons.
: Show medium icons.
: Show large icons.
: Icon view mode.
: List view mode.
12.5 The Stage
The Stage represents the Channel's output.
The Stage allows editing and previewing of the Objects (clip, logo, ticker, etcetera) that
together compose a Channel's output.
The Stage can be customized as described in chapter 0.
Channel Composer User Manual - Channel Composer User Manual- document version: 1.6.2 - 96
Page 98

12.6 The Template Timeline
Double-click a Template in the Project window to open the Template Timeline. Each Template is
displayed on its own tab.
: Rewind (the player head on the Timeline).
: Play (the player head on the Timeline).
: Pause (the player head on the Timeline).
: Shows the position of the player head on the Timeline in mm:ss:ff, or enter
values to place the player head on the Timeline.
: Click to add a keyframe.
The icon on the Timeline indicates the keyframe is added to an Object or
property.
The icon indicates that the keyframe is added to an Object or sub-property on
a lower level.
: Click to update the selected keyframe.
: Go to the previous keyframe.
: Go to the next keyframe.
Channel Composer User Manual - Channel Composer User Manual- document version: 1.6.2 - 97
Page 99

: Define interpolation for the selected keyframes. Options are:
• Constant Speed
• Ease In
• Ease Out
• Ease In & Out
• Step
: Select all items on the Timeline.
: Copy the selected keyframes or commands to the clipboard.
: Paste clipboard items on the Timeline.
: Delete the selected keyframes or commands.
(in frames).
: Copy a Template to a new Template.
Note that Objects in the source Template are not duplicated; in other words, both
templates, the original and the source will use one and the same Object. If this
Object is modified in Template A, it will also be modified in Template B.
: Define settings for hard (default) or soft cuts. When soft cuts are used, the
: Reverse the selected keyframes / timescale the selected keyframes’ duration
property values of this Template are slowly blended in.
: Enable or disable grid snap and set snap distance.
: This option can be found in the bottom left corner of the Template Timeline.
Click the arrow to define what information is displayed on the Template
Timeline:
• Command Tracks: Display or hide command tracks.
• Object Properties: Display or hide Object properties.
Channel Composer User Manual - Channel Composer User Manual- document version: 1.6.2 - 98
Page 100
: When the pickup button is deactivated [as shown in the example on the left],
the Object, sub object or property will not be modified by the Template.
As a default, this option is activated:
: Click the hide and lock icons to hide/unhide and lock/unlock Objects on the
Stage.
: This option can be found in the bottom left corner of the Template Timeline.
Use the slider to zoom the Timeline in or out.
.
Channel Composer User Manual - Channel Composer User Manual- document version: 1.6.2 - 99
 Loading...