

Page 1
Aurora Transfer
MEDIA ASSET MANAGEMENT APPLICATION
Instruction Manual
SOFTWARE VERSION 6.0b
071-8486-01
SEPTEMBER 2006
Page 2

Copyright Copyright © 2006 Grass Valley, Inc. All rights reserved. Printed in the United States of America.
Portions of software © 2000 – 2006, Microsoft Corporation. All rights reserved.
This document may not be copied in whole or in part, or otherwise r eproduced except as
specifically permitted under U.S. copyright law, without the prior written consent of Grass
Valley, Inc., P.O. Box 59900, Nevada City, California 95959-7900
This product may be covered by one or more U.S. and foreign patents.
Trademarks Grass Valley, K2, Aurora, Turbo, M-Series, Profile, Profile XP, NewsBrowse, NewsEdit,
NewsQ, NewsShare, NewsQ Pro, Aurora, and Media Manager are either registered
trademarks or trademarks of Grass Valley, Inc. in the United States and/or other countries.
Other trademarks used in this document are either registered trademarks or trademarks of the
manufacturers or vendors of the associated products. Grass Valley, Inc. products are covered
by U.S. and foreign patents, issued and pending. Additional information regarding Grass
Valley, Inc. trademarks and other proprietary rights may be found at
www.thomsongrassvalley.com.
Disclaimer Product options and specifications subject to change without notice. The information in this
manual is furnished for informational use only, is subject to change without notice, and should
not be construed as a commitment by Grass Valley, Inc. Grass Valley, Inc. assumes no
responsibility or liability for any errors or inacc uracies that may appear in this publication.
U.S. Government
Restricted Rights
Legend
Use, duplication, or disclosure by the United States Government is subject to restrictions as set
forth in subparagraph (c)(1)(ii) of the Rights in Technical Data and Computer Software clause
at DFARS 252.277-7013 or in subparagraph c(1) and (2) of the Commercial Computer
Software Restricted Rights clause at FAR 52.227-19, as applicable. Manufacturer is Grass
Valley, Inc., P.O. Box 59900, Nevada City, California 95959-7900 U.S.A.
Revision Status
Rev Date Description
April 27, 2006 Initial release of Transfer Instruction Manual. Part number
071-8486-00.
September 11,
2006
Updates for version 6.
0b software. Part number 071-8486-01.
2 Aurora Trans fer Instruction Manual September 11, 2006
Page 3

Contents
Preface..................................................................................................................5
Chapter 1 System Overview
Functional description .............................................................................................9
Product Features.....................................................................................................9
System diagram ...................................................... ...... .................................. ..... ...11
Chapter 2 Installing the Aurora Transfer system
Rack-mount the Transfer Server.............................................................................14
About the Transfer Server.......................................................................................14
Cable the Transfer Server.......................................................................................14
Install Aurora Transfer Server software...................................................................15
Other software installation considerations..........................................................16
Chapter 3 Configuring the Aurora Transfer System
Establish conventions........................ .................................. ..... ...... .........................18
MDI logical names convention............................................................................18
Ports and services mapping...............................................................................20
Configure network...................................................................................................21
Set up IP addresses and name resolution..........................................................21
Configure network settings.................................................................................21
Host table files....................................................................................................21
Prepare for core configuration stages.....................................................................23
Accessing services.............................................................................................23
Accessing system configuration pages ..............................................................23
Configure MediaFrame components.......................................................................25
Configure Media Frame ASK: Register components..........................................26
Prepare MDI server............................................................................................27
Configure ASK Location: MDI server..................................................................28
Configure Profile MDIs .......................................................................................29
Configure News MDIs.........................................................................................30
Configure K2 MDIs.............................................................................................31
Configure M-Series MDIs...................................................................................32
Test: MediaFrame stage.....................................................................................33
Configure Archive....................................................................................................35
Add archive MDI.................................................................................................36
Verify archive preparations.................................................................................37
Avalon archive preparations..........................................................................37
FlashNet preparations...................................................................................37
DIVA preparations .......................................................... ...... ..... ...... ...... ..... ...38
Network connectivity - all archive types.........................................................39
Configure ASK Location: Archive MDI host........................................................40
Configure Media Frame Core ASK: Archive.......................................................40
Configure Avalon Archive MDI ...........................................................................41
Configure FlashNet MDI.....................................................................................42
Configure DIVA MDI...........................................................................................43
Configure Archive Services................................................................................44
Add Aurora Transfer clients.....................................................................................44
Chapter 4 Using the Transfer application
Opening the Transfer application............................................................................48
Browse user restrictions................................................ ...... ....................................48
Connecting to ASK.............................................................. ..... ...... ..... ...... ...... ........49
About the MediaFrame network.............................. ...... ...... ..... ...... ..... ....................49
Browsing media assets ...........................................................................................50
September 11, 2006 Aurora Transfer Instruction Manual 3
Page 4

Contents
Navigating the MediaFrame network....................... ...... .................................. ...50
Saving and using locations as Favorites............................................................51
Viewing properties.............................................................................................. 52
Changing the display of the MediaFrame network............................................. 52
Transferring media assets........................................................ ..... ...... .................... 53
Initiating a transfer..............................................................................................53
Initiating multiple transfers.................................................................................. 55
Using the Transfer Information window..............................................................55
Managing transfers.............................................................................................56
Viewing completed transfers..............................................................................56
Modifying media assets and folders........................................................................ 58
Renaming an asset or a folder........................................................................... 58
Deleting an asset or a folder ..............................................................................59
Creating a new folder.........................................................................................59
Searching media assets.......................................................................................... 59
Searching file names.....................................................................................59
Searching with filters..................................................................................... 60
Modifying a search filter................................................................................. 61
Configuring the Transfer application....................................................................... 62
Viewing the application log...................................................................................... 63
Chapter 5 Recovery Planning
Server failure considerations................................................................................... 65
Database maintenance and administration............................................................. 65
Repairing a database that is unusable due to transaction log size .................... 65
How to determine the size of the transaction log ............................................... 66
Manually controlling transaction log growth .......................................................66
Back up the transaction log........................................................................... 66
Shrink the transaction log.............................................................................. 67
Setting up a database maintenance plan...........................................................67
Database Restoration......................................................................................... 69
Index...................................................................................................................... 71
4 Aurora Trans fer Instruction Manual September 11, 2006
Page 5

Preface
This Aurora Transfer Instruc tion Manual is part of a full set of support document ation
for the Aurora Transfer product, described as follows:
•
•
•
Aurora Transfer Instruction Manual — Provides explanations and procedures for
installing, configuring, and using the Aurora Transfer Server and the Aurora
Transfer application at a customer site. This document is available in printed form
as part of the product bundle when you receive your new system. It is also available
in electronic form (PDF fi le) on the Aurora Transfer Application CD-ROM.
Aurora Transfer Online Help — Provides i nstruct ions fo r using the Aurora Trans fer
application. This documen t is available f rom the Aurora Tran sfer applicati on Help
menu.
Aurora Transfer Release Notes — Contains the latest information about the
product’s hardware and the software. The information in this document includes
upgrade instructions, feature changes from the previous releases, helpful system
administrative information, and any known problems.
September 11, 2006 Aurora Transfer Instruction Manual 5
Page 6
Preface
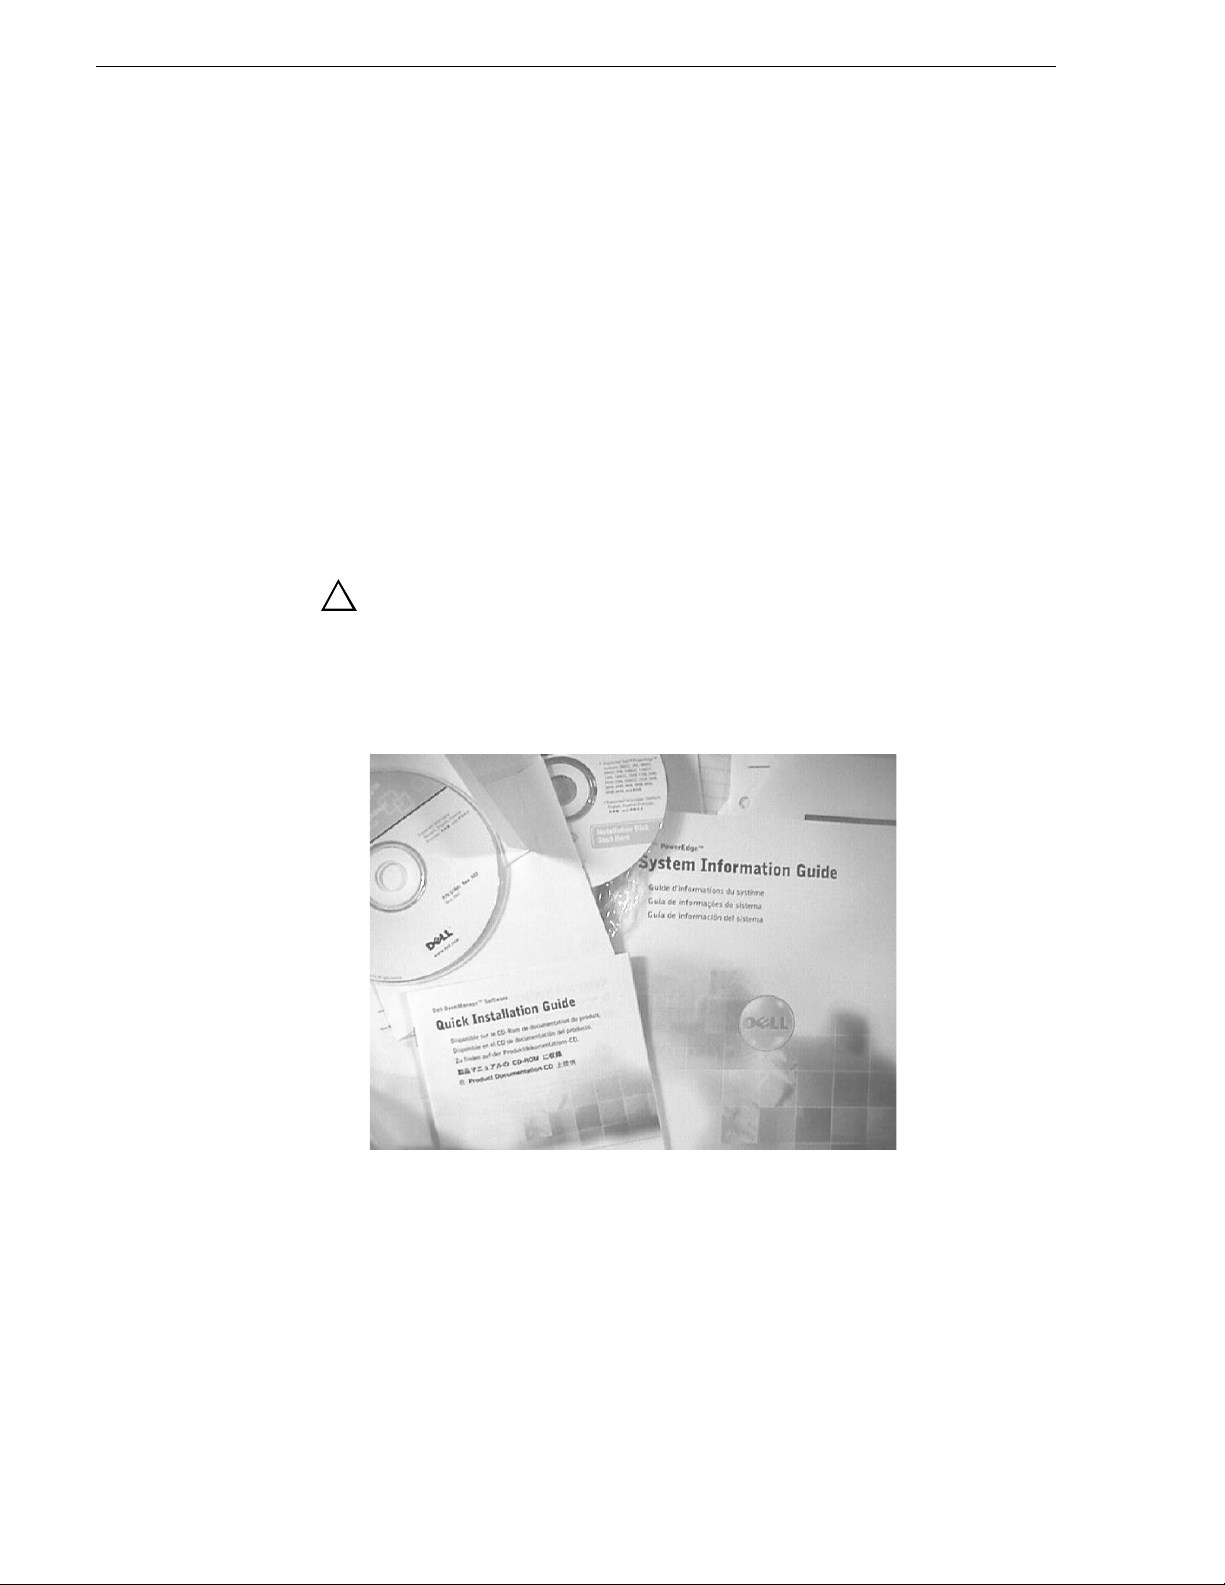
Using the Dell Server documentation
This manual contains all of the information you need to in stall the Tr ansfer syst em,
however, a full set of Dell server documentation has been provided on the Dell
Product Documentation CD-ROM. The Dell server documentation applies to the
Transfer Server. Refer to the documents on this CD-ROM only as required by
procedures in this manual.
Information referenced on the Dell Product Documentation CD-ROM includes, but
is not limited to:
• Unpacking and rack-mounting the Transfer Server
• Important safety and regulatory information
• Transfer Server stat us indicators, messages, and error codes
• Troubleshooting help for the Transfer Server hardware.
!
CAUTION: Do not use the Dell Quick Instal lation Guide provided with
the Dell CD-ROM package. Thi s g u id e i ncl ude s i n st ruc ti ons fo r using
the OpenManage software CD-ROM to install an operating system.
The Transfer Server comes fully configured and is ready for
installation. To begin installation, refer to one of the installation
chapters in this manual.
6 Aurora Trans fer Instruction Manual September 11, 2006
Page 7

Grass Valley Product Support
To get technical as sista nce, ch eck on the stat us of proble ms, or r eport new prob lems,
contact Grass Valley Product Support via e-mail, the Web, phone, or fax. Contact
Grass Valley first regarding problems with third party software on Grass Valley
®
products, such as the Microsoft
Web Technical Support
To access support infor mation on the Web, v isit the pro duct support Web p age on the
Grass Valley Web site. Yo u ca n down loa d software or find solut ions to problems by
searching our Frequently Asked Questions (FAQ) database.
World Wide Web: http://www.thomsongrassvalley.com/support/
Technical Support E-mail Address: gvgtechsupport@thomson.net.
Phone Support
Use the following information to contact product support by phone during business
hours. Afterhours phone support is available for warranty and contract customers.
United States (800) 547-8949 (Toll Free) France +33 (1) 34 20 77 77
Latin America (800) 547-8949 (Toll Free) Germany +49 6155 870 606
Eastern Europe +49 6155 870 606 Greece +33 (1) 34 20 77 77
Southern Europe +33 (1) 34 20 77 77 Hong Kong +852 2531 3058
Windows® operating system and SQL Server™.
Middle East +33 (1) 34 20 77 77 Italy +39 06 8720351
Australia +61 3 9721 3737 Netherlands +31 35 6238421
Belgium +32 2 3349031 Poland +49 6155 870 606
Brazil +55 11 5509 3440 Russia +49 6155 870 606
Canada (800) 547-8949 (Toll Free) Singapore +656379 1390
China +8 6 106615 9450 Spain + 34 91 512 03 50
Denmark +45 45968800 Sweden +46 87680705
Dubai + 971 4 299 64 40 Switzerland +41 (1) 487 80 02
Finland +35 9 6828460 0 UK +44 870 903 2022
Authorized Support Representative
A local authorize d support re presentati ve may be avail able in your country. To loc ate
the support repr esentative for your country, vi sit the pro duct support Web pag e on the
Grass Valley Web site.
September 11, 2006 Aurora Transfer Instruction Manual 7
Page 8
Preface
8 Aurora Trans fer Instruction Manual September 11, 2006
Page 9

Chapter 1
System Overview
This chapter includes the following topics:
• “Functional description” on page 9
• “System diagram” on page 11
Functional description
The Transfer product provides the ability to navigate, find, organize, move, and
manage high-resolution media asset s, regar dless of the ir physi cal lo catio n or type. A
wide range of devices is supported, includ ing storage devices, archive devices, serv ers
and news editing stations.
The Transfer product is made up of two components:
• The Transfer Server — This is a d edicated ser ver that pr ovides the co re processi ng
mechanism for Transfer functionality. It come from the factory with software
pre-installed. For a description of the Aurora Transfer Server, refer to “About the
Transfer Server” on page 14.
• The Transfer application — This software component provides the user interface
for controlling the movement of media from source to destination. The software
can be installed on a network-connected Windows PC. For a description of the
Transfer application, refer to Chapter 4, Using the Transfer application.
Transfer functions are built on the Grass Valley MediaFrame platform. This allows
the Transfer product to share MediaFrame components with other Gr ass Valley
products, such as Aurora Browse. The underlying protocol for file transfers is FTP.
Product Features
The Transfer product includes the following features:
• Explore and selec t a sse ts on source and destina ti on d evi ces by browsing or with a
simple search.
• Dynamic discovery of new assets.
• Manual Transfer — Select desired asset(s), drag and drop single file or in
highlighted blocks from source to desired destination.
• Batch Transfer — Drag and drop selected assets (designated folder, designated
EDL, playlist) to create a transfer list.
• Abort or cancel a transfer in progress.
• Displays transfer status from each device, including progress, estimated to
complete, and errors.
• Displays asset proper ties, including size , creation date, timecode, dur ation, original
file format, current file format, data rate, and l ocation of co pies of the sam e asset.
• Supports asset management on K2 Medi a Clients , K2 Storage Sys tem, NewShare,
September 11, 2006 Aurora Transfer Instruction Manual 9
Page 10

Chapter 1 System Overview
M-Series iVDR, Profile XP Media Platform (with and without UI M), Grass Valley
Open SAN, EMC (Avalon) Archive, SGL FlashNet Archive, and Front Porch
Digital DIVArchive.
10 Aurora Transfe r Instruction Manual September 11, 2006
Page 11
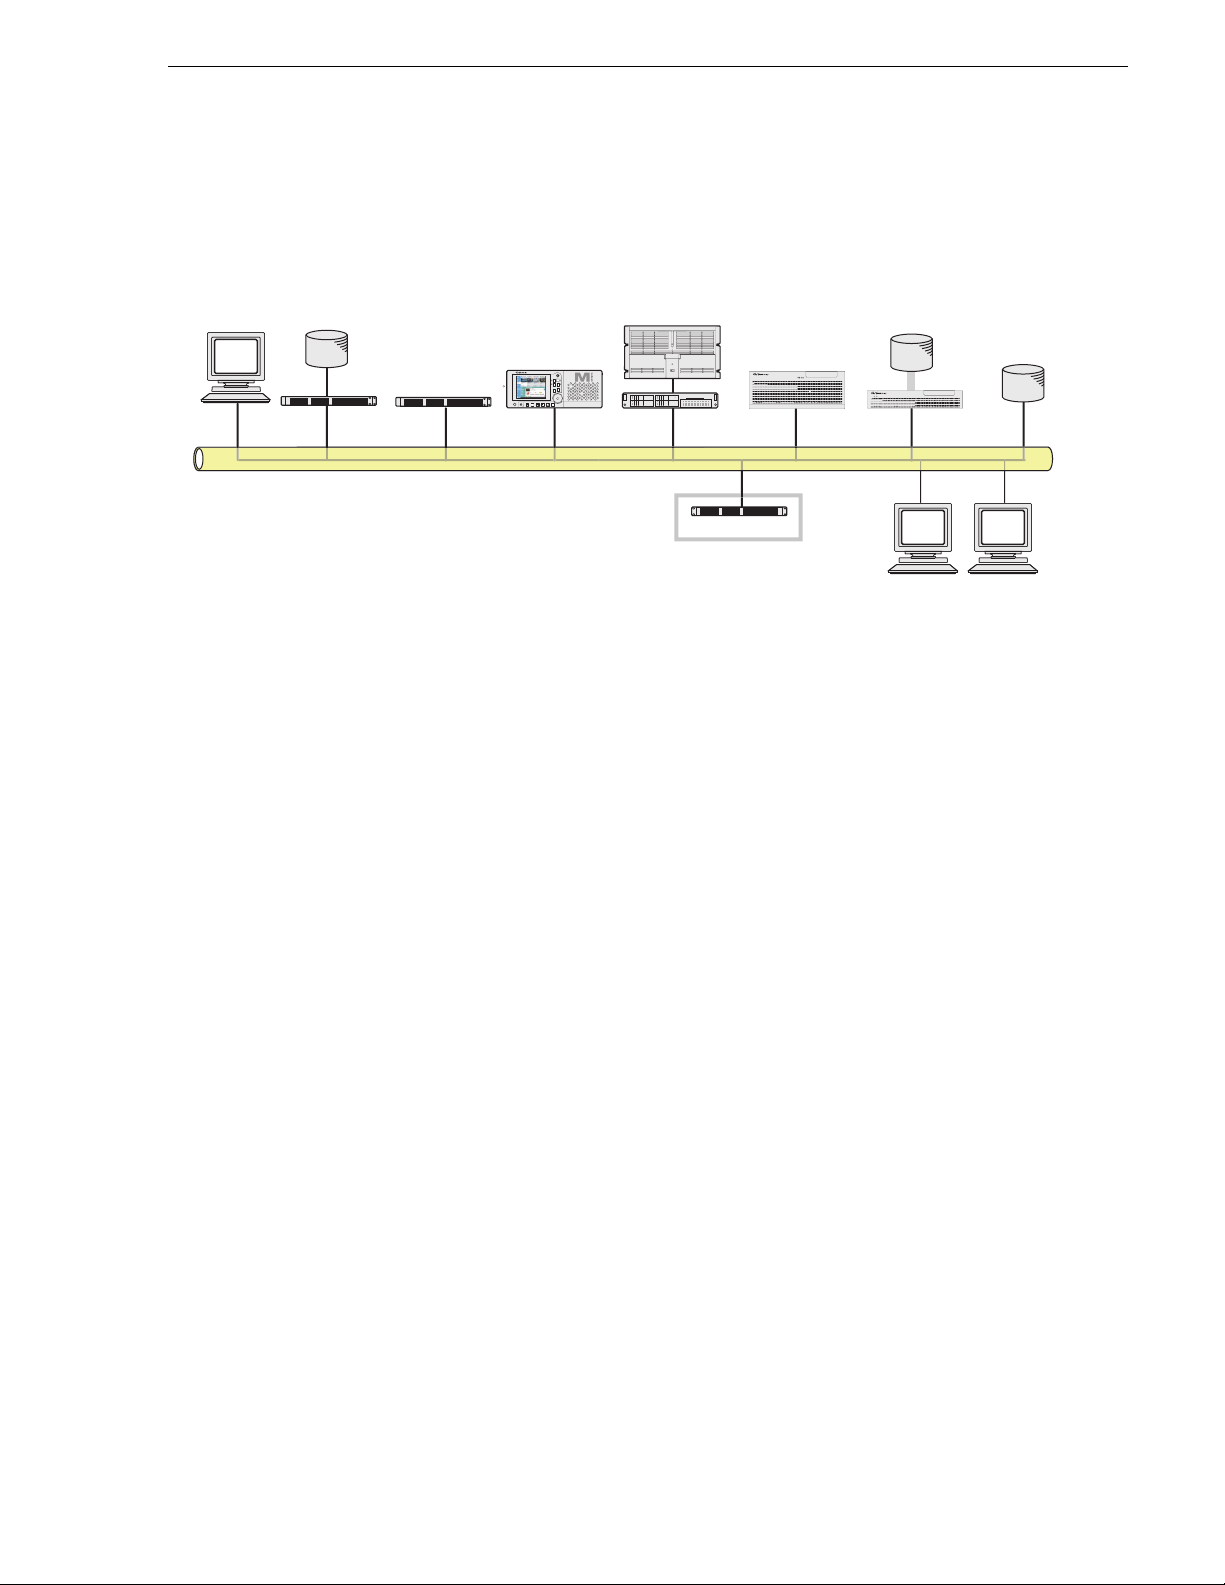
System diagram
This diagram illustrates an example network architecture for a Transfe r system.
System diagram
Aurora Edit
NewShare
storage
DSM
Aurora FTP server
M-Series iVDR
R1
P2P1R2
SHTL
JOG
VAR
Profile XP Media Platform
UIM
Transfer Server
K2 Media Client
(internal storage)
!
K2
Storage
K2 Media
Server
Transfer Clients
Archive
The Transfer system can also be integrated as part of the Aurora Browse system, in
which case Aurora Browse platforms, such as the Aurora Browse Server and the MDI
Server, provide the functionality of a Transfer Server. If you have a Aurora Browse
system, you need only install the Trans fer application on a network connec ted PC and
connect to the machine t hat hosts the ASK software comp onent. Refer to “Add Aurora
Transfer clients” on page 44.
September 11, 2006 Aurora Transfer Instruction Manual 11
Page 12

Chapter 1 System Overview
12 Aurora Transfe r Instruction Manual September 11, 2006
Page 13

Chapter 2
Installing the Aurora Transfer system
This chapter provides instructions for installing the hardware and software
components that support the Aurora Transfer system.
The instructions in this chapter are as follows:
• “Rack-mount the Transfer Server” on page 14
• “About the Transfer Server” on page 14
• “Cable the Transfer Server” on page 14
• “Install Aurora Transfer Serv er software” on page 15
When you are done installing the hardware and software, continue with Chapter 3,
Configuring the Aurora Transfer System and Chapter 5, Recovery Planning to
complete the installation of your Aurora Transfer system.
September 11, 2006 Aurora Transfer Instruction Manual 13
Page 14
Chapter 2 Installing the Aurora Transfer system
Rack-mount the Transfer Server
Follow the instructions you received with the rack-mount hardware to install the
Transfer Server. One rack-unit spacing is recommended between components for
ventilation.
About the Transfer Server
The central hardware c omponent of the Aurora Transf er system is the Aurora Trans fer
server. It hosts the following software components:
• A web server, which delivers the Transfer system configuration pages
• The MediaFrame datab ase and Manage d Device Int erface se rvices for ho lding and
relating assets in the sys tem.
The server connects via the network to source devices, destination devices, and PCs
running the Transfer application. Refer to the system diagrams in Chapter 1, System
Overview.
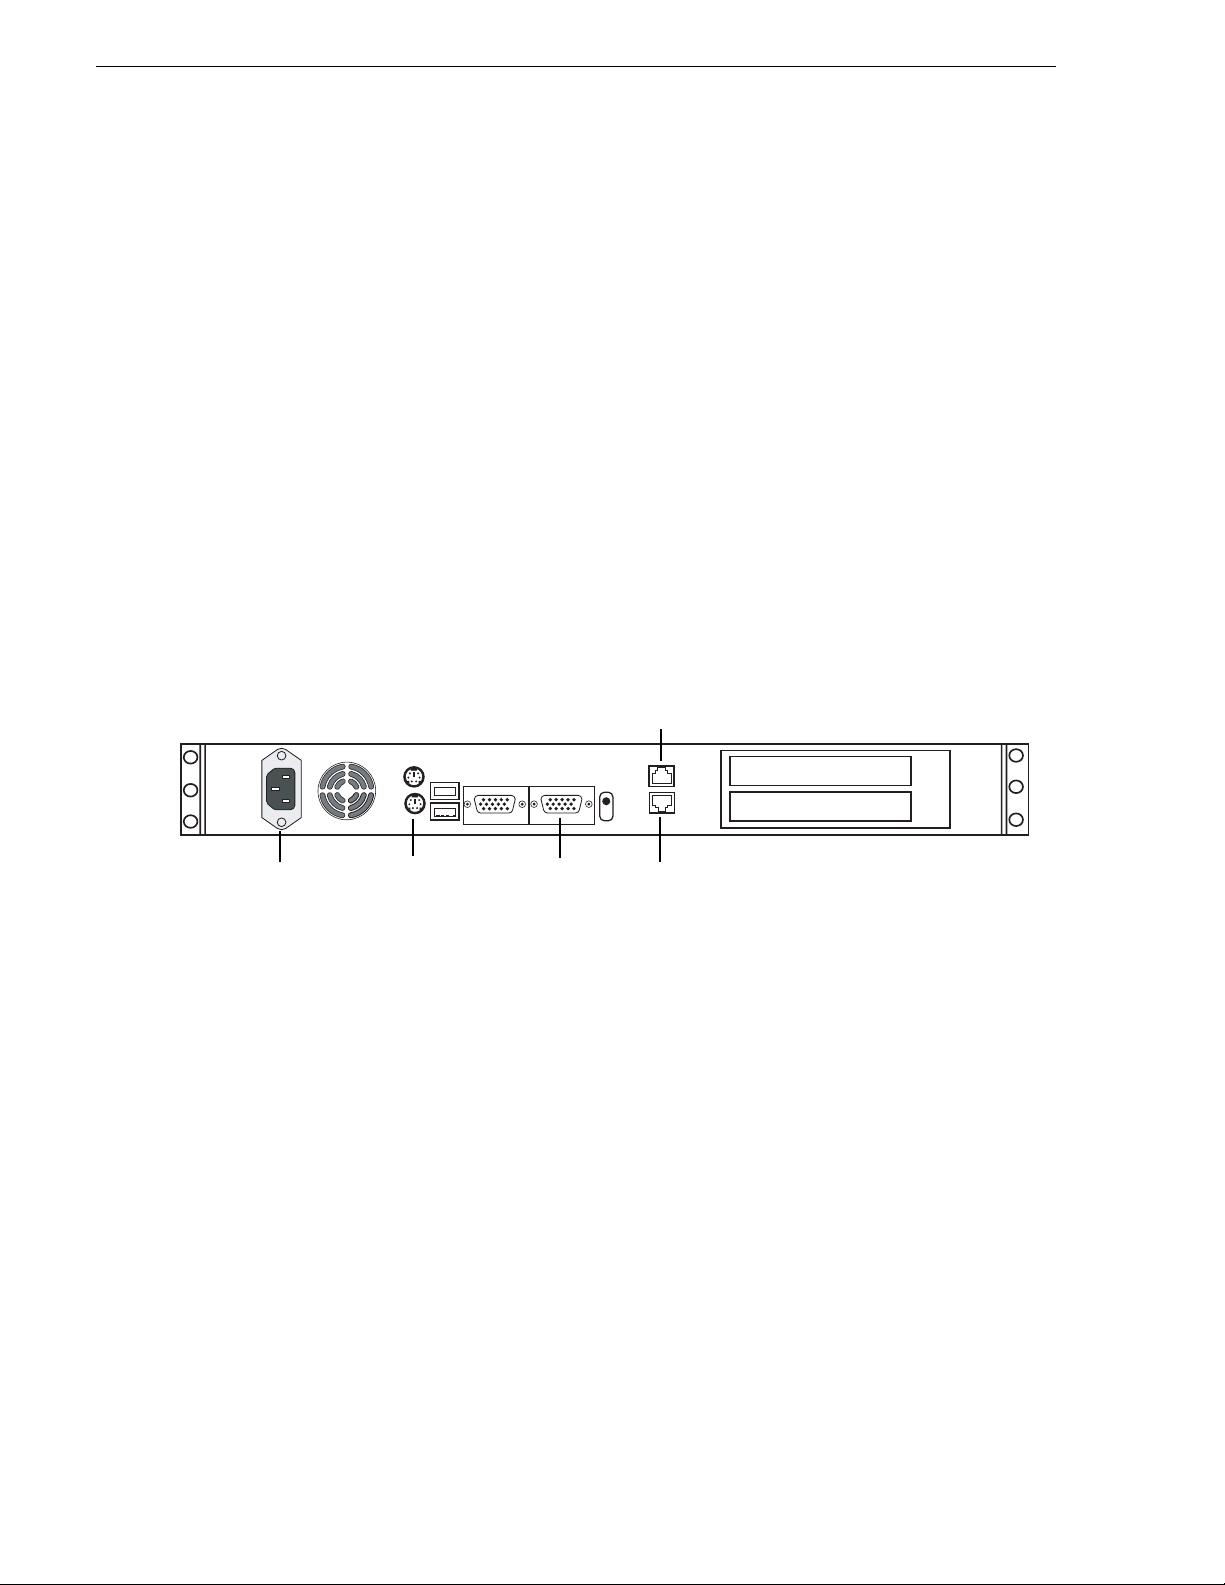
Cable the Transfer Server
Power
Cable as illustrated and as follows:
• Connect Gigabit port 1 to the network.
Keyboard/mouse
port to pigtail
to KVM
VGA cable
to KVM
Gigabit port 1
Gigabit port 2
14 Aurora Transfe r Instruction Manual September 11, 2006
Page 15

Install Aurora Transfer Server software
Install Aurora Transfer Server software
This sectio n is for inst alling software on the Transfer Server. To install Transfer
application software on client PCs, refer t o “Add Aurora Transfer cli ents” on page 44.
Do not inst all software on new a Transfer Server. In a new Aurora Transfer system,
the Transfer Server co mes from the factory wit h software pre-inst alled, so you shoul d
not need to install the software.
If you need to install Transfer Server software, refer to the instructions listed below.
For version-specific instructions, check Aurora Transfer Release Notes. Also refer
“Other software installation considerations” on page 16.
To install Transfer Server software, use the following installation program on the
Aurora Transfer Application CD:
• …\Server\Setup.exe — Use this setup file to install Aurora Transfer software on the
Aurora Transfer server. This is the same installation file as that used for Aurora
Browse systems. The following table indicates the software components installed
for a Transfer Server.
Install Components Transfer Server
Core Services
!
Managed Devic e s :
FlashNet Archive
Profile
Proxy
NTFS
Avalon Network Archive
DIVArchive
a
News
M-Series
Ingest
Router Gateway
a.
The News MDI must be installed on the DSM.
!
!
!
!
!
!
!
September 11, 2006 Aurora Transfer Instruction Manual 15
Page 16
Chapter 2 Installing the Aurora Transfer system
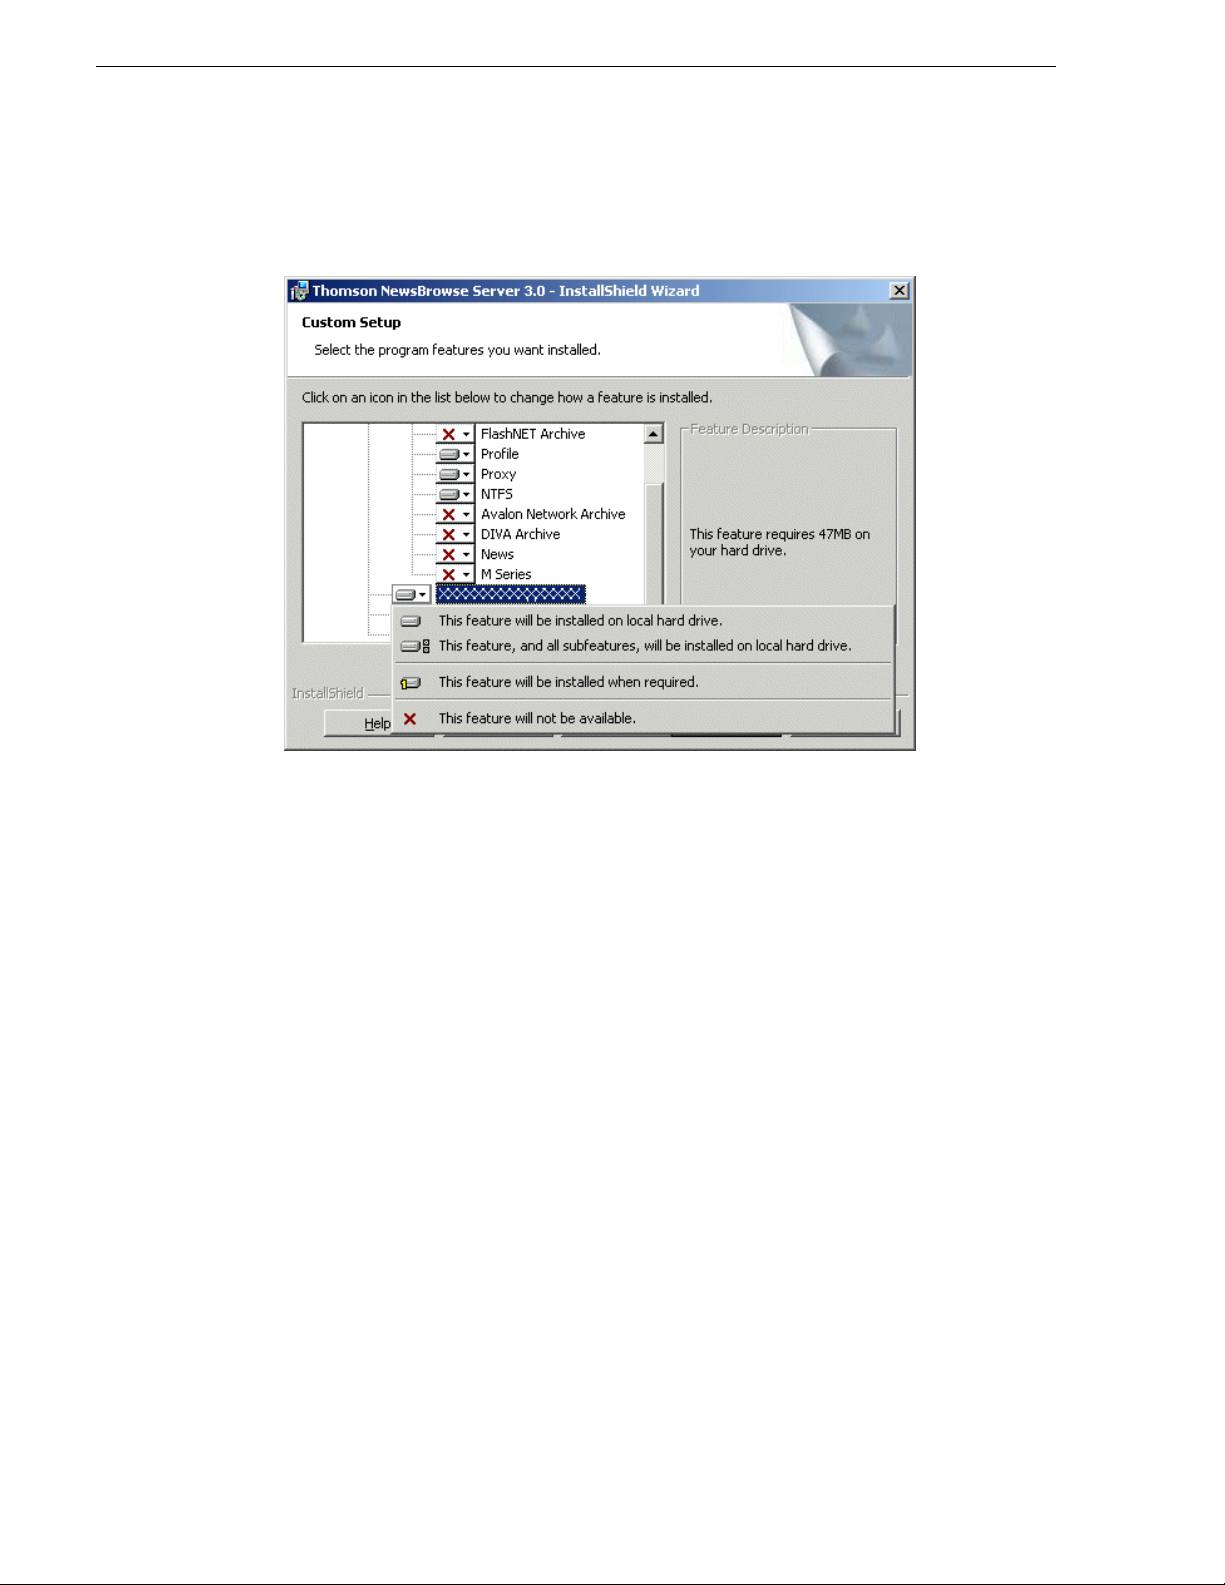
To install the software components listed in the preceding table, run the installation
program and when you arrive at the Custom Setup screen, do the following:
If a component that you want to install displays a red X, click the component and
select
This feature will be installed on local hard drive.
If a component that you do not want to install does not display a red X, click the
component and select
This feature will not be available.
To upgrade software from a previ ous version, ref er to Auro ra Transfe r Release Note s
for version-specif ic inst ructions.
NOTE: When upgrading Aurora Transfer Server software, read messages and
respond carefully. Do not accept the default “Yes” when prompted to delete
databases.
Other software installation considerations
• Before installing the Profile MDI, i nstall Profile client software.
• To support archive functionality for Aurora Transfer on a AuroraShare NAS
system, you must install a unique Aurora FTP on a platform somewhere in the
system.
16 Aurora Transfe r Instruction Manual September 11, 2006
Page 17

Chapter 3
Configuring the Aurora Transfer System
The topics in this chapter include the following:
• “Establish conventions” on page 18
• “Configure network” on page 21
• “Prepare for core configuration stages” on page 23
• “Configure MediaFrame components” on page 25
• “Configure Archive” on page 35
• “Add Aurora Transfer clients” on page 44
September 11, 2006 Aurora Transfer Instruction Manual 17
Page 18

Chapter 3 Configuring the Aurora Transfer System
Establish conventions
The following conventions are recommended to make your Aurora Transfer system
easier to work on and understand. Refer to these sections as necessary as you
configure your system.
MDI logical names convention
The Aurora Transfer system uses a Managed Device Interface (MDI) to manage a
device that stores media as sets. Typically the se are the source and dest ination devices
on which media resides, such as Media Servers and archive devices. Each type of
device has its own MDI. The MDI software component is hosted on a MDI server,
rather than being hosted on the same machine that it manages. In the case of the
Transfer system, t he Transf er serve r takes the r ole of MDI s erver for all MDIs ex cept
the News MDI. For the News MDI, the DSM must be the MDI serv er.
As you configure your Aurora Transfer system you must create and enter logical
names for the MDIs that pro vid e Aurora Trans fe r funct ionalit y. Thes e logic al names
provide a mapping of the func tionality of the standard Aurora Transf er services to the
specific machines in your particular system. For this reason you should take care to
create logical names that are easy to identify and interpret as they appear in the
various configuration pages.
It is especiall y importa nt that you dist inguish between t he logic al name o f a MDI an d
the hostname of the machine to which the software component relates. In the
conventions suggested in this manual, machine names are lower case and logical
names are upper case to make this distinction.
Also refer to “Ports and services mapping” on page 20.
The following table demonstrates how logical names for MDIs are mapped to the
machines of your Aurora Transfer system and provides a suggested naming
convention.
Machine type Service that manages
the machine
Avalon Archive Thomson Avalon
Archive MDI
DIVA Archive Thomson DIVA MDI
FlashNet Archive Thomson FlashNet MDI
M-Series Thomson MSeries MDI M-SERIES1,
MDI/logical name(s) Comments
ARCHIVE1 Most Aurora Transfer systems have but one
M-SERIES2,
M-SERIES3,…
archive MDI—of the appropriate type for the
archive product—that manages their entire
archive system.
One logical name is required for each
M-Series iVDR that integrates with the
Aurora Transfer system.
18 Aurora Transfe r Instruction Manual September 11, 2006
Page 19

Establish conventions
Machine type Service that manages
the machine
K2 Thomson K2 MDI K2-Storage1 When this MDI accesses a K2 Storag e
News Thomson News MDI NEWS1 There is but on News MDI in the system. It
NTFS Thomson NTFS MDI NTFS1 There is but one NTFS MDI in the system. It
Profile Thomson Profile MDI SAN1 When this MDI manages an Open SAN
MDI/logical name(s) Comments
System, it manages one of the connected K2
Media Clients. The MDI should be named for
the K2 Storage System.
K2-1, K2-2, K2-3,… When this MDI manages a stand-alone K2
Media Client, there is one MDI for each K2
Media Client. One logical name is required
for each stand-alone K2 Media Client system
that integrates with the Aurora Transfer
system.
manages the AuroraShare NAS. The News
MDI must reside on the DSM.
manages NTFS storage on one or more
machines—typically the server and the NAS
machines.
system, it manages one designated Profile on
an Open SAN. One logical name per Open
SAN system is required.
PROFILE1,
PROFILE2,
PROFILE3,…
When this MDI ma nages a stand- alone
Profile XP system, there is one MDI for each
Profile XP. One logical name is required for
each stand-alone Profile XP system that
integrates with the Aurora Transfer system.
September 11, 2006 Aurora Transfer Instruction Manual 19
Page 20

Chapter 3 Configuring the Aurora Transfer System
Ports and services mapping
Aurora Transfer soft ware components run as Windows ser vices, which c ommunicate
over designated ports. As you configure the Aurora Transfer system, you must
correctly designate port numbers. Topics later in this manual provide specific
instructions for entering port numbers on each configuration page. These are the
default port numbers. Do not modify or create your own convention for port usage
without consulting Grass Valley. Designate ports as specified in the following table:
Services Port Comments
Thomson Ask 9010 —
Thomson Asset Manager 9022 and 9023 —
Thomson Avalon Archive
MDI
Thomson DIVA MD I 9122 —
Thomson FlashNet MDI 9124 —
Thomson Metadata 9014 Not visible on a configuration pa ge
Thomson MSeries MDI 9140 The service manages a number of host processes, one for each M-Series
Thomson K2 MDI 9160 The service manages a n umber of host processes, one f or each K2
Thomson News MDI 9150 —
Thomson NTFS MDI 9115 —
Thomson Profile MDI 9130 The service manages a number of host processes, one for each Profile
Thomson Proxy MDI 9110 —
Thomson Resolver 9016 Not visible on a configuration page
9120 —
iVDR that is being managed. These host processes require ports 9140 -
9149. Stopping/starting the service stops/starts all of the host processes.
system that is bein g m anage d. Th es e ho st proce sse s requ ire po rts 9 160
- 9169. Stopping/starting the service stops/starts all of the host
processes.
that is being managed. These host processes require ports 9130 - 9139.
Stopping/starting the service stops/starts all of the host processes. The
version 1.5 defau lt p or t number for thes e p r oc e s ses wa s 80 22, with no
range
The Aurora Transfer system also depends upon Microsoft Internet Information
Services (IIS) and SQL services, which are installed on the Transfer Server.
20 Aurora Transfe r Instruction Manual September 11, 2006
Page 21

Configure network
Recommended networking strategies are explained in the following sections.
Strategies that use host table files are also com patible with the Tran sfer system. Refer
to “Host table files” on page 21.
Set up IP addresses and name resolution
It is recommended that Aurora Transfer systems use Micr osoft DNS for name
resolution and hav e a DNS server. The do main contro ller should p rovide this s ervice.
If the Aurora Transfer system does not have a domain controller, another machine
may be configured to provi de this service. Pr operly configuring all network interface s
is extremely important to make DNS name resolution work correctly.
The network should be set to use dynamic host configuration protocol (DHCP) to
assign network IP addresses. All interfaces on this network should be configured to
register connections with DNS automatically.
If necessary, the Transfer system will work with a network set up with host tables.
Refer to “Host table files” later in this sect ion. Howe ver , you must use c are t o ensure
that all host tables are identical and names are resolved correctly for all devices.
Configure network
Configure network settings
Use the instructions in this s ectio n to confi gure networ k machines, whi ch includ e the
following types:
• Aurora Transfer Server
• Transfer client PCs
You will need the following information from the customer's IT department:
• Verify that the subnet mask for the Aurora Transfer machines should be
255.255.255.0.
• Extra IP ad dresses for fu ture growth
• The IP address for the DNS server and alternate
• The name of the Domain connected (i.e. mycorp.com) if used
• The IP address for the WINS server if applicable
The Transfer system is similar to ContentShare, on the Production network only.
Host table files
If you can not use Microsoft DNS for name resolution, you can use host table files.
These files must be on all network machines. Find host table files at
C:\Windows\system32\drivers\etc
The following is an example of host table entries. Not sho wn are entries for Profile
systems, UIMs, and other machines on the network. Refer to the documentation for
these other m achines for h ost table req uirements.
#--------------------------------------------------------
September 11, 2006 Aurora Transfer Instruction Manual 21
Page 22

Chapter 3 Configuring the Aurora Transfer System
#General Host Table
#--------------------------------------------------------
#
Aurora Tran sfer Server
192.168.30.21 iron-transfer-svr
Aurora Tran sfer Ethernet Switch
#
192.168.30.200 iron-transfer-2950-prod-1
Host table tips:
• The Transfer Server IP address need to be reso lved using the Cli ent side IP address
via DNS lookup, not the host table.
• If the server has a canonical name, the host table for any machine that runs MDIs
that are subscrib ed to by the se rver must mat ch case for t he enti re canoni cal name.
E.g., if the server ’s canonical n ame is “TRANSFER-SERVER1.myco rp.net”, the n
the host table entry in the MDI server(s ) must match; if the entry is
“TRANSFER-SERVER1.MYCORP.NET”, then it will not work. Pinging will not
show the problem. The probl em doe sn’ t s how up until the MDIs attempt to notify
the server.
22 Aurora Transfe r Instruction Manual September 11, 2006
Page 23
Prepare for core configuration stages
***** Contact Grass Valley
Support for password.
Prepare for core configuration stages
Do the following tasks in preparation for the configuration of core system
functionality.
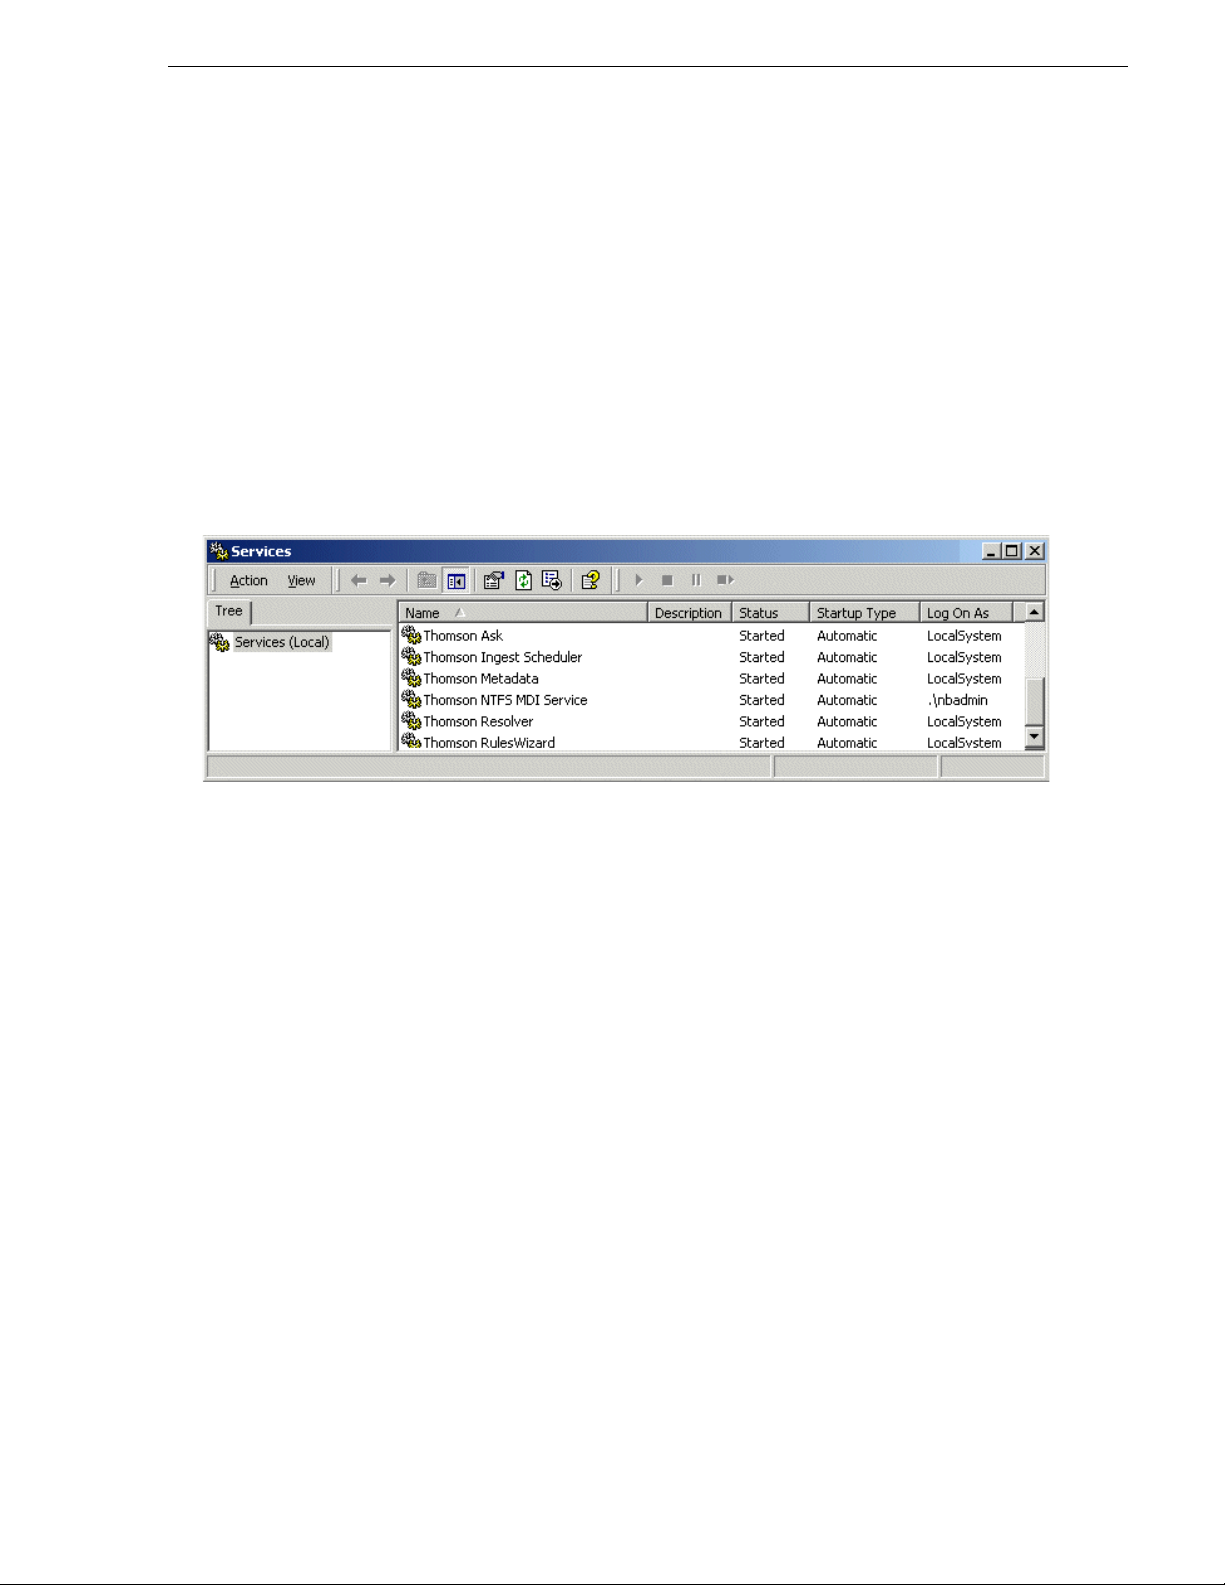
Accessing services
The Transfer Server software components run as Windows services. When you
change the configuration for a particular software component through the
configuration pages, you must restart that software component’s service to put the
changes into effect. Click
Services
group together in the services list.
to access the services. All service names start with “Thomson…”, so they
Start | Settings | Control Panel | Administrative Tools |
Refer to “Ports and services mapping” on page 20 for a list of services.
Accessing system configuration pages
Use Internet Explorer to browse to port 280 of a machine to access its configuration
pages.
You must have administrator permissions on the machine. For example, to log on to
the configuratio n pages on the Aurora Transfer se rver with administrator permissions,
use the following:
Username: root-transfer-svr\nbadmin
Password:
You can access the Transfer Server configuration pages as follows:
• From the local computer, use the following URL:
• From a network-connected computer, in the URL replace “localhost” with the
network name of the computer hosting the configuration pages. For example, to
access the configuration pages on a server named iron-transfer-svr, use the
following URLs:
You must have network access to open configuration pages.
*****
http://localhost:280
http://iron-transfer-svr:280
September 11, 2006 Aurora Transfer Instruction Manual 23
Page 24

Chapter 3 Configuring the Aurora Transfer System
To access configuration pages, do the following:
Enter the URL to the configu ration page at port 280 and press Enter.
Verify the machine name and IP address, to confirm that you are configuring
the correct mach ine.
Click links to open configuration page s.
Some pages use Active X controls that require special browser settings. To make
these settings, do the following:
1. Open Internet Explorer 6 or higher and click
Tools | Internet Options. The Inte rne t
Options dialog box opens.
2. Click
Security | Local intranet | Custom Level. The Security Settings dialog box
opens.
3. Under “Download signed ActiveX contro ls ”, cli ck
Enable.
24 Aurora Transfe r Instruction Manual September 11, 2006
Page 25

Configure MediaFrame components
Configure MediaFrame components
MediaFrame components make up the co re platfor m on whi ch Aurora Tr ansfe r runs .
The primary MediaFrame components that you need to configure are as follows:
• ASK — The ASK software component runs on the Aurora Transfer se rver. It is the
central registr y for all the sof tware compon ents of the Auror a Transfer system. As
software components carry out tas ks in a functioni ng system they regularly refe r to
the ASK component to establish communication and exchange commands and
data. The configuration pages also refer to the ASK component to populate fields
and lists and to validate the values you enter as you configure the system.
• MDIs — Devices have Managed Device Interfaces (MDIs) which represents the
device’s assets in a way that is understandable by the other components of the
Aurora Tran sfer system. This allows the Aurora Transfer server to coordina te the
activity of the Aurora Transfer system.
In this configuration stage set up logical names for software components (MDIs) that
manage devices. This brings the source and destination devices on-line as managed
devices.
To configure MediaFrame components, do the following:
• “Configure Media Frame ASK: Register components” on page 26
• “Prepare MDI server” on page 27
• “Configure ASK Location: MDI server” on page 28
• “Configure Profile MDIs” on page 29
• “Configure News MDIs” on page 30
• “Configure K2 MDIs” on page 31
• “Configure M-Series MDIs” on page 32
• “Test: MediaFrame stage” on page 33
September 11, 2006 Aurora Transfer Instruction Manual 25
Page 26

Chapter 3 Configuring the Aurora Transfer System
Configure Media Frame ASK: Register components
http://localhost:280 MediaFrameCore ASK
Open this config uration page locally on the Aurora Trans f er server machine .
All Domain names in the Aurora Transfer system must be identical.
Port 9010 is required. See “Ports and serv ic es m apping” on page 20.
Saves changes. Changes are lost if you leave the configuration page without
updating.
For the following settings, use the table below. Add each MDI an d/ or Encoder
required by your system
Click to add an MDI.
Lists currently added MDIs.
Checks MDIs.
Deletes the curren tly selected MDI.
Always click
To put changes in to eff ect, st art or res tart the ASK se rvice o n the Aur ora Tr ansfer
server.
Update… buttons after making changes
For the conventions mentioned in the following table, refer to “MDI logical names
convention” on page 18
When you add an MDI
logical name for this
type of machin e/
device…
A K2 Storage Systema K2 As per
K2 Media Client -
Internal storage
(stand-alone)
Open SAN Profile
Stand-alone Profile Profile
M-Series MSeries
Select “MDI/
Encoder Type”…
K2
b
Profile As per
Enter “MDI/
Encoder
Name”…
convention.
convention.
As per
convention.
Enter “Host Name or IP”… Enter “Port”… Comments
Hostname of the machine hosting the
K2 MDIs. Typically the MDI Server.
Hostname of the machine hosting the
Profile MDIs. Typically the Transfer
Server
Hostname of the machine hosting the
M-Series MDIs. Typ ically the
Transfer Server
9160 - 9169 These are process ports, as
9130 - 9139 These are process ports, as
9140 - 9149 These are process ports, as
explained in “Ports and services
mapping” on page 20. Assign
numbers in an intentional
sequence, so they are easy to match
in “Configure K2 MDIs ” on
page 31.
explained in “Ports and services
mapping” on page 20. Assign
numbers in an intentional
sequence, so they are easy to match
in “Configure Profil e M D Is” on
page 29.
explained in “Ports and services
mapping” on page 20. Assign
numbers in an intentional
sequence, so they are easy to match
in “Configure M-Series MDIs” on
page 32.
26 Aurora Transfe r Instruction Manual September 11, 2006
Page 27

Configure MediaFrame components
When you add an MDI
logical name for this
type of machin e/
device…
Aurora Edit News As per
Archive device … Archive ARCHIVE1, as
a.
For a K2 Storage System, enter one of its connected K2 Media Clients. As per convention, name the MDI for the K2 Storage System.
b.
Enter only one Profile per Ope n SA N . As per convention, name the MDI for the Open SAN, rather than for t he Profile.
Select “MDI/
Encoder Type”…
Enter “MDI/
Encoder
Name”…
convention.
per convention.
Enter “Host Name or IP”… Enter “Port”… Comments
Hostname of the machine hosting the
News MDI.This must be the DSM.
Hostname of the machine hosting the
archive MDI. Typically this is the
Transfer Server
Leave field
blank. Correct
port number is
automatically
entered on
“Add MDI”.
Refer to “Ports
and services
mapping” on
page 20 to
verify.
The ASK settings page registers the logical names for the MDIs required by your
Aurora Transfer system with the ASK software component, which runs on the Aurora
Transfer server.
Prepare MDI server
A machine that hosts a MDI service takes the ro le of a MDI server. In the Aurora
Transfer system, the Transfer Server takes the role of MD I server, so no additional
preparation is nec essary. The exception is that the MDI se rver for the News MDI must
be the DSM. In this case, ensure that the News MDI is installed on the DSM and that
the DSM is communicating on the network with na me resolutio n.
September 11, 2006 Aurora Transfer Instruction Manual 27
Page 28

Chapter 3 Configuring the Aurora Transfer System
Configure ASK Location: MDI server
http://localhost:280 ASK Location
This page tells the MDI server (which is the Transfer server) where to look for the
ASK service, which runs on the Aurora Transfer server. The function of the ASK is
to store the location of the software component s in the system, so the components can
find one another.
Access this p age locally on the Transfer Server.
Enter the name of the Auror a Transfer Ser ver
Port 9010 is required. See “Ports and serv ic es m apping” on page 20.
Saves changes. Changes are lost if you leave the configuration page without
updating.
Always click
It is not neces s ary to restart a service to p ut these settin g s into effect.
Update… buttons after making changes
28 Aurora Transfe r Instruction Manual September 11, 2006
Page 29

Configure Profile MDIs
Configure MediaFrame components
http://localhost:280 Managed Devices Profile MDI
Access this page locally on the Transfer server.
Port 9100 is required.
All Domain names in the Aurora Transfer system must be identical.
Saves changes. Changes are lost if you leave the configurat io n page without
updating.
Select a Profile MDI.
Enter the hostname of the Profile for the MDI selected above.
For Open SAN systems, enter here the names of the other Profile XP systems
on the Open SAN that are mana ged by this MDI. Separate hostnames w ith
commas.
The time that the Profile MDI waits befor e it inf orm s the Aurora Transfer
system that a clip has finished recording. Leave at 2.
Increment 9130-9139 so each Profile MDI has a unique process port.
Click to add as an existing mana ged device. For stand-alone Profile Media
Servers, add a MDI for each one. For Open SAN Profile Media Servers, add
only one MDI per Open SAN.
Verify the MDIs currently on-l in e.
Click to remove the selec ted m an age d device.
For a Transfer system, do no t configure the fields below t his point.
a
a.
Do not change this port number. It is fo r a s ervice that
manages the port 9130-9139 proce sses.
Always click
To put changes into effect, start or restart Profile MDI Service on the MDI
server.
Update… buttons after making changes
This page configures the Managed Device Interfaces (MDI) for the Profile Media
Servers. As you add Profile MDIs make sure that you associate Profile MDIs and
Profile host names correctly.
Multiple Profile MDIs run on a single machine (the Transfer Server), but they each
need their own process port number. For this purpose, enter incrementing numbers
9130 - 9139 in the “Port” field. The MDI s and their port numbers must match settings
as in “Configure Media Frame ASK: Register componen ts” on page 26. To make the
configurations eas ier t o read for t rouble shooti ng pu rposes , add MDIs seq uentiall y so
there is a correlat ion between the po rt number and any numb er in the MDI name. The
field increments auto matically, o r you can manually enter port numb ers.
For configuring a basic Transfer system, do not configure transfer targets.
September 11, 2006 Aurora Transfer Instruction Manual 29
Page 30

Chapter 3 Configuring the Aurora Transfer System
Configure News MDIs
http://localhost:280 Managed Devices News MIDI
This page configures the Managed Device Interface (MDI) for the AuroraShare
system. Med iaFrame depends on the News MDI to make News assets visible across
the system.
Access this page locally on the DSM.
Select a News MDI.
Port 9150 is required. See “Ports and services mapping” on page 20.
The time that the News MDI waits before it informs the Aurora Transfer system
that a clip has finished recording. Leave at 2.
Enter the machine that hosts the AuroraEdit database (the DSM).
Enter the machine that hosts the co n for m ser vice.
Leave blank or enter UNC path to shared storage. See below.
Saves changes. Changes are lost if you leave the configurat io n page without
updating.
Always click
To put change s into effect , start or re start Ne ws MDI S ervice on the MDI ser ver
(DSM).
Update… buttons after making changes
The V: drive must be mapped on the machine that hosts the News MDI. By
convention, the DSM hosts the News MDI.
The NAS Shared Location can be left blank for most systems. An example of a system
for which the path must be entered is a AuroraShare NAS system whose DSM (the
News MDI host) has been upgraded to Windows 2003 Server. The path is required
because of enhanced security in the Windows 2003 Server operating system.
As you configure the News MDI make sure that you associate the News MDI and
News host names correctly.
30 Aurora Transfe r Instruction Manual September 11, 2006
Page 31

Configure K2 MDIs
Configure MediaFrame components
http://localhost:280 Managed Devices K2 MDI
Access this page locally on the MDI Server.
Select a K2 MDI.
Increment 9160-9169 so each K2 MDI has a unique process port.
Enter a stand-alone K2 Media Client or the one K2 Media Client on a K2
Storage System.
Click to add as an existing managed device.
Verify the MDIs currently on-l in e.
Click to remove the selec ted m an age d device.
The following settings specify K2 systems to which assets can be transferred.
Select the MDI for a K2 system to which assets can be transferred.
Hostname of the K2 system specified above.
Click to add as a transfer target. This makes the K2 system available for
selection from th e Aurora Browse applic ation as a transfer de s ti nation.
K2 systems capabl e of receiving a transf er.
Click to remove the selected transfer target.
To put changes into ef fect, start or restart K2 MDI Service on t he MDI Se r ver.
This page configures the Managed Device Interface (MDI) for a stand-alone K2
Media Client or one of the K2 Media Servers on a K2 Storage System. MediaFrame
depends on the K2 MDI to make K2 assets visible across the system.
As you configure th e K2 MDI make s ure t hat you assoc iate t he K2 MDI a nd K2 host
names correctly.
Multiple K2 MDIs run on a singl e machine (the Tr ansfe r Serve r), but they eac h need
their own process por t number. For this purp ose , ent er i ncr ement i ng numbers 9160 9169 in the “Port” field. The MDIs and their port numbers must match settings as in
“Configure Media Frame ASK: Register components” on page 26. To make t h e
configurations eas ier t o read for t rouble shooti ng pu rposes , add MDIs seq uentiall y so
there is a correlation between the port number and any number in the MDI name.
For K2 systems, add transfer targets as follows:
• For a K2 Storage System (SAN), the hostname of a K2 Media Server that has the
role of FTP server.
• For a stand-alone K2 Media Client, the hostname of the K2 Media Client
• Hostname of a Aurora FTP server. This is required for the Aurora Transfer
application to support Aurora/News transfers.
September 11, 2006 Aurora Transfer Instruction Manual 31
Page 32

Chapter 3 Configuring the Aurora Transfer System
Configure M-Series MDIs
http://localhost:280 Managed Devices MSeries MIDI
Access this page locally on the Transfer server.
Select a M-Series MDI.
Increment 9140-914 9 so ea ch M-Seri es MDI has a unique process port.
Enter the M-Series managed by the MDI.
Click to add as an existing managed device.
Verify the MDIs currently on-l in e.
Click to remove the selec ted m an age d device.
For a Transfer system, do no t configure the fields below t his point.
Always click
To put changes into effect, start or restart M-Series MDI Service on the
Transfer Server.
Update… buttons after making changes
This page configures the Managed Device Interface (MDI) for the M-Series iVDR.
MediaFrame depends on the M-Series MDI to make M-Series assets visible across the
system.
As you configure the M-Series MDI make su re that you assoc iate the M-Series MDI
and M-Series host names correctly.
Multiple M-Serie s MDIs run on a single mac hine (the Tra nsfer Server ), but they each
need their own process port number. For this purpose, enter incrementing numbers
9140 - 9149 in the “Port” field. The MDI s and their port numbers must match settings
as in “Configure Media Frame ASK: Register componen ts” on page 26. To make the
configurations eas ier t o read for t rouble shooti ng purp oses, a dd MDIs se quenti ally s o
there is a correlation between the port number and any number in the MDI name.
32 Aurora Transfe r Instruction Manual September 11, 2006
Page 33

Test: MediaFrame stage
The following test exercises sys t em functionality exclusive to the MediaFrame core
platform. A successful test verifies that the basic confi gurations are correct.
Run the test as follows:
Configure MediaFrame components
Under MediaFrame Core | ASK, on the Ask Settings configuration page click
MDIs/Encoders
. The MediaFrame core s ystem chec ks MDI mappi ngs and dev ices for
inconsistencies. This can take several minutes. A report is displayed.
Validate
Make sure there are no e rr or s di spl ay ed. To troubleshoot erro rs , che ck t he fol lo w ing :
• Make sure services are running and report as online.
• Make sure you have configured the correct host name for the MDI service.
• Ping machines to verify network communication.
September 11, 2006 Aurora Transfer Instruction Manual 33
Page 34

Chapter 3 Configuring the Aurora Transfer System
34 Aurora Transfe r Instruction Manual September 11, 2006
Page 35

Configure Archive
To support archive Transfer functionality on a AuroraShare NAS system, you must
install a unique Aurora FTP on a platform somewhere in the system.
To configure and test the Archive stage, do the following:
1. “Add archive MDI” on page 36
2. “Verify archive preparations” on page 37
3. “Configure ASK Location: Archive MDI host” on page 40
4. “Configure Media Frame Core ASK: Archive” on page 40
5. “Configure Avalon Archive MDI” on page 41
6. “Configure FlashNet MDI” on page 42
7. “Configure DIVA MDI” on page 43
8. “Configure Archive Services.” on page 44
Configure Archive
September 11, 2006 Aurora Transfer Instruction Manual 35
Page 36

Chapter 3 Configuring the Aurora Transfer System
Add archive MDI
The archive MDI software component runs as a service. The archive MDIs that are
available for the different types of archive devices are as follows:
• Avalon Archive MDI — runs as the Thomson Avalon Archive MDI service
• FlashNet MDI — runs as the Thomson FlashNet MDI service
• DIVA MDI — runs as the Thomson DIVA MDI service
The archive MDI software component must be installed on a network connected
computer. Similar to the other MDIs in th e Aurora Transf er system, the ar chive MDI
should be installed on the Aurora Transfer server.
You can install the arc hive MDI software component fr om the Aurora Transfer Server
installation program. Select the component for your archive from the Custom setup
page.
36 Aurora Transfe r Instruction Manual September 11, 2006
Page 37

Verify archive preparations
If archiving via Fibr e Channel from a Pr ofile XP or Op en SAN system, be awa re that
a single Profile XP system provides a maximum of four streams for concurrent
transfers. Keep this mind when configuring the archive device for concurrent
transfers. If the archive i s conf igured such that it can request more than four streams
simultaneously from a ny si ngl e Pr ofile XP system, th e a ddi ti ona l transfers will err or
out.
For the type of a rchive d evice you use , check th e following to verify prope r operat ion
with the Aurora Transfer system.
Avalon archive preparations
Check the fo llowing on th e machine which runs Avalon IDM Softw are (Archive ):
1. Login to the machine and go to /avalon/aam/utils
2. Run stataam and verify all services running properly.
3. Make sure host tables are set correctly. Verify for the machine name/IP which IDM
will talk to.
4. If archiving from a Profile XP or Open SAN system, make sure the Fiber channe l
interfaces are configured so that Avalon IDM can talk to the Profiles.
Configure Archive
Consider the following when preparing to integrate Avalon archive with Aurora
Transfer:
• Avalon archive has no fixed limit for concurre nt transfers.
FlashNet preparations
Check the following on the machin e which runs the FlashNet software:
1. Login to the machine.
2. If archiving from a Profile XP or Open SAN system, verify that you can telnet to
the Profile XP Ethernet IP address on port 8192 (telnet keystone2_le0
8192).
3. Verify that you can FTP from the Fl ashNet server to the h igh-r es storage machi ne:
• If archiving from a Profile XP or Open SAN, verify tha t you can FTP from the
FlashNet server to the Profile on the Fibre Channel address and login as user
movie.
• If archiving from a AuroraShare NAS, verify that you can FTP from the
FlashNet server to the AuroraShare NAS on Gigabit Ethe rne t a nd l ogi n as use r
vmfmovie.
4. Make sure the “FlashNet Socke t Listener” and “FlashNet Automat ion” services are
up and running.
5. Use the FlashNet “Jukebox” application to test that a drive can be successfully
accessed from FlashNet. Refer to “User Guide for FlashNet running on Windows
NT and Windows 2000 platforms”.
Consider the following when preparing to integrate FlashNet with Aurora Transfer:
September 11, 2006 Aurora Transfer Instruction Manual 37
Page 38

Chapter 3 Configuring the Aurora Transfer System
• The FlashNet MDI does not take any user specified name for a full restore. The
clips are restored using the original clip name (from archive). The FlashNet MDI
does, however, allow a user specified name for a partial restore.
• If archiving from a Profile XP or Open SAN system, take the concurrent transfer
limit into consideration. FlashNet’s setting fo r concurrent transfers applies
globally to all source/destination pairs. There is no setting on a server-by-server
basis. To make the setti ng for “maximum number of concurrent transf ers”, you use
a file named C:\.dtool_env where you can specify “API_MAX_BACKUPS” and
“API_MAX_RESTORES”. The following is an exampl e for an e ight drive system:
API_MAX_BACKUPS 2
API_MAX_RESTORES 4
This example specifies that two concurrent jobs could be used for automation
ingest into the archive, four concurrent jobs could be allowed for automation
restore of archive s, leaving two dr ives spare for emergency use or another function.
• The FlashNet MDI uses a file ca che to su pport asset functional ity. As the FlashNet
device does not have any support for file system updates, the FlashNet MDI
assumes that the MDI is the only gateway to the entire FlashNet file system. Any
changes made outside the scope of the MDI will not be reflected in MDI
immediately.
• Renaming of an asset is not supported in FlashNet.
• The FlashNet server installation must have the GENERATE UNIQUE NAME
entry set to FALSE. Use Configurator.exe for FlashNet server configuration.
• A restore operation always defaults to highest “Time Critica l” priority and archive
operation defaults to “normal” priority.
DIVA preparations
Check the following on the machin e which runs DIVA software:
1. Login to the machine.
2. Verify that you can FTP from the DIVA server to the machine with the high-res
online material:
• If archiving from a Profile XP or Open SAN, verify that you can FTP from the
DIVA server to the Profile on the Ethernet IP address and login as user movie.
• If archiving from a AuroraShare NAS, verify tha t you can FTP from the DIVA
server to the AuroraS hare NAS on Giga bit Ethe rnet and lo gin as user vmfmovie.
Consider the following when preparing to integrate DIVA with Aurora Transfer:
• The DIVA MDI does not take an y user sp ecifi ed name fo r a f ull re store . The c lips
are restored using the original name (from archive). The DIVA MDI does,
however, allow a user specified name for a partial restore.
• DIVA has no fixed limit for concurrent transfers.
• If archiving from a Profile XP or Open SAN system, take the concurrent transfer
limit into considerat ion. DIVA’s setting for concurrent transfe rs applies to spec ific
source/destination pairs. With the configuration utility/tool you can specify the
concurrency limit on a server-by-server basis.
38 Aurora Transfe r Instruction Manual September 11, 2006
Page 39

• The DIVA MDI makes an the assump ti on t hat t he MDI i s t he only gateway to the
entire DIVA file system. Any c hanges made out side the sc ope of the MDI will no t
be reflected in MDI immediately.
• Renaming of an asset is not supported in DIVA.
• A restore operation always defaults to highest “Time Critical” priority and an
archive operation defaults to “normal” priority.
• The source name specified in the DIVA configuration utility must be the same as
the host table name of the machine with high-res online material.
Network connectivity - all archive types
To test network connectivity, ping all machines from all machines.
If archiving to/from a AuroraShare NAS, ping th ese machines on the GigaBit
network:
• Aurora Transfer Server
• The machine hosting the News FTP service
• Archive machine
Configure Archive
• The AuroraShare NAS system
If archiving to/from Profile XP/Open SAN systems, ping these machines on the
GigaBit network:
• Aurora Transfer Server
• Archive machine
• All Profile XP or Open SAN systems from/to which media is archived/restored
If archiving to/from P rofile XP/O pen SAN systems, also u se Fibre Channel IP
addresses and ping these machines:
• Archive server
• All Profi le systems from/to whi ch media is archived/restored
September 11, 2006 Aurora Transfer Instruction Manual 39
Page 40

Chapter 3 Configuring the Aurora Transfer System
Configure ASK Location: Archive MDI host
http://localhost:280 ASK Location
This page tells the Ar chi ve MDI h ost where to look for the ASK ser vi ce, which runs
on the Aurora Transfer server. If the Archive MDI host is the Aurora Transfer Server,
this configuration has likely already been done.
Configure Media Frame Core ASK: Archive
Make sure the A rchive MDI is registered with the ASK software com ponent, as
explained in “Configure Media Frame ASK: Register components” on page 26.
Open this page locally on the machine that hosts the Archive MDI.
Enter the name of the Auror a Transfer ser ver
Port 9010 is required. See “Ports and serv ic es m apping” on page 20.
Saves changes. Changes are lost if you leave the configuration page without
updating.
Always click
It is not neces s ary to restart a service to p ut these settin g s into effect.
Update… buttons after making changes
40 Aurora Transfe r Instruction Manual September 11, 2006
Page 41

Configure Avalon Archive MDI
Configure Archive
http://localhost:280 Managed Devices Avalon MDI
Open this page locally from the Avalon Archive MDI host.
Name of the Avalon Archive machine. Append -idm to the end of the name.
This name (with -idm appended) must also be in the host table.
9120. See “Ports and services mapping” on page 20.
Enter
Adds media to the clip to ensure correct long GOP structure. Leave at 2.
The number of archive device s controlled by the MDI.
Select if using partial res tore feature .
Saves changes. Changes are lost if you leave the configuration page without
updating.
The following settings define FT P for a rchive sources/destinations.
Select
Provided by Mana ged Device. Requires netsem configuration on
Avalon. The remainder of this page is di sabled.
-ORSelect
Round-robin. Requires configuration in the following fields
Select the News MDI name.
Enter the hostname of the machine host ing the News F TP service. I f multiple
hostnames, enter with comma s sepa ra ting.
Adds a FTP server as a source/destination for archive operations.
Currently added FT P s ervers.
a
b
:
c
a.
With Avalon configuration , you def ine FTP Servers and
load balance when you c onfigure netsem, so it is not
necessary to enter any inform a ti on on this page.
b.
If you do not use Avalon configuration, you must define
FTP servers and load balance on this page.
c.
This defines the load balancing. The order of serv ers
entered here is the order in which the MDI seeks an open
channel for an archi ve job.
Open this page local ly on the Tran sfer Ser ver. In t his ex ample sett ings ar e shown fo r
archiving to/from a Auro raShare NAS. This page tells the Avalo n Archive MDI
where to look for FTP transfer of high-res material.
Typically load balancing is configured using Round Robin on this page. If load
balancing is provided by the managed device, when configuring netsem, make sure
the netsem FTP server logical name matches the same FTP server MDI name.
Deletes the curren tly selected device.
Always click
To put changes into effect, start or restart the Thomson Avalon Managed
Device service.
Update… buttons after making changes
September 11, 2006 Aurora Transfer Instruction Manual 41
Page 42

Chapter 3 Configuring the Aurora Transfer System
Configure FlashNet MDI
http://localhost:280 Managed Devices FlashNet MDI
Open this page locally from the FlashNet MDI host.
The name of the Flas hNet MDI.
9124. See “Ports and services mapping” on page 20.
Enter
Name or IP address of the FlashNet machine.
Saves changes. Changes are lost if you leave the configuration page without
updating.
The following settings define FT P for a rchive sources/destinations.
Load balancing settings are disabled as only Round Robin is supported.
Select the MDI name for the News MDI.
Enter the hostname of the machine hosting the News FTP service.
Adds a FTP server as a source/destinati on for archive operations.
Currently added FT P s ervers.
Deletes the curren tly selected device.
Always click
Update… buttons after making changes
Open this page locally on the mach ine that hos ts the FlashNet MDI software
component.
This page tells the Fla shNet MDI where to look for FTP transfer of hi gh-res materi al.
In this example settings are shown for archiving to/from a AuroraShare NAS. For
AuroraShar e NAS system s, archive transfers are handled by a single FTP serv er.
42 Aurora Transfe r Instruction Manual September 11, 2006
Page 43

Configure DIVA MDI
Configure Archive
http://localhost:280 Managed Devices DIVA MDI
Open this page locally from the DIVA MDI host.
Name of the DIVA MDI.
9122. See “Ports and services mapping” on page 20.
Enter
Name of IP address of the DIVArchive machine.
The port at which DIVA Manager listens for any active connection. By default
this port is set to 9000.
Specify the name of the disk arrays that are currently c onfigured with the
DIVA system.
The timeout value that contro ls any commu nica tion with the DIVA man ager.
Default value is set to 180 seconds.
Saves changes. Changes are lost if you leave the configuration page without
updating.
The following settings define FT P for a rchive sources/destinations.
Load balancing settings are disabled as only Round Robin is supported.
Select the News MDI name.
Enter the hostname of the machine hosting the News FTP service.
Adds a FTP server as a source/destination for archive operations.
Currently added FT P s ervers.
a
a.
An array designates a collection of disks designated by
their name as th ey are declared in t he D I V Archive
configuration.
Open this page locally on the machine that hosts the DIVA MDI software component.
This page tells the DIVA MDI where to look for FTP transfer of high-res media
assets. In this e xample se ttin gs a re shown for ar chivi ng to/f rom a Auro raS hare NAS.
For AuroraShare NAS syst ems, archive tr ansfe rs are han dled by a si ngle FTP serv er.
Deletes the curren tly selected device.
Always click
Update… buttons after making changes
September 11, 2006 Aurora Transfer Instruction Manual 43
Page 44

Chapter 3 Configuring the Aurora Transfer System
Configure Archive Services.
http://root-nb-svr-n:280 Aurora Tran sfer Application Archive Services
Enter name for restore locati on, for display in the Aurora Transfer
application.
Select the MDI for the high-res system that gets the r es tored clips.
Select a location on the high-res system that gets the restored clips.
Select if restoring to mirrored high-res systems. This opens the following fields
for mirrored restore operations.
Select the MDI for the mirrored system that gets the restored clips.
Select a location on the mirrored system that gets the restored clips.
Click to add as a restore location.
Lists currently added restore lo cations.
Click to remove the currently selected restore location.
a
Restart the
a.
Profile location lists are automatically populated by
reading bins and volumes, as in Media Manager, from the
Profile whose MDI is selected from the field above.
This page tells the Archive MDI where to place high-res assets as they are restored
from the archive device.
When you select “Enable Mirrored Destination…”, you can then enter the MDI and
location for the mirrored high-res system. This allows you to define the pair of
mirrored systems as a single restore location. When this single location is selected in
the Aurora Transfer a pplication, clips are re stored or deleted on bot h high-res systems
simultaneously.
Add Aurora Transfer clients
Select one or more PCs on which to inst all the Transf er application. Th e requirements
for a Transfer client PC are as follows:
• Windows XP
• Pentium 4 processor
• Microsoft .NET Framework 1.1
• Network access to the Aurora Transfer server
Aurora Transfer application to put changes into effect.
To install the Transfer application, do the following:
1. Insert the Aurora Transfer Application CD.
2. Open setup.exe.
3. Follow on-screen instructions, clicking
44 Aurora Transfe r Instruction Manual September 11, 2006
Next and Yes.
Page 45

Add Aurora Transfer clients
4. When you arrive at the Configuration Information page, enter the IP address or
name of the Transfer Serve r. In the Transfer s ystem, the ASK softwar e component
is hosted by the Transfer Server. If you have not yet installed and configured the
Transfer Server, you can enter any text fo r now to enable th e Next button. You c an
configure the ASK host name in the Transfer application later.
5. Select the user credentials as follows:
• Administrator — With this option, all operations are available in the Transfer
application.
• Browse User Only — With this option, the following operations are not
available in the Transfer application:
-Delete
- Rename
- Create (bin)
-Cut/Paste.
6. Click
7. Find the Transfer application shortcut on the Windows desktop.
Next and Finish to complete the installation wizard.
Transfer
Refer to the next chapter “Using the Transfer application” for operational p rocedures.
September 11, 2006 Aurora Transfer Instruction Manual 45
Page 46

Chapter 3 Configuring the Aurora Transfer System
46 Aurora Transfe r Instruction Manual September 11, 2006
Page 47

Chapter 4
Using the Transfer application
The following topics provide instructions for using the Transfer application to
manage media assets on source and destination devices:
• “Opening the Transfer applic at ion ”
• “Browse user restrictions”
• “Connecting to ASK”
• “About the MediaFrame network”
• “Browsing media assets”
• “Modifying media assets and folders”
• “Transferring media assets”
• “Searching media assets”
• “Viewing the application log”
September 11, 2006 Aurora Transfer Instruction Manual 47
Page 48

Chapter 4 Using the Transfer application
Opening the Transfer application
To open the Transfer application, double-click the Transfer shortcut on the
Windows desktop. The Transfer application opens.
The following ill ustration identi fies the primary i nformation displ ayed in the Transfe r
application:
Views of the
MediaFrame
network
List of
transfers
Transfer
This tab shows
the list of
current and
pending
transfers
This tab shows
the list of
completed
transfers
Make sure that you allow ad equate screen spac e so the Trans fer applicat ion can op en
with its full width displayed. Sizing the application smaller causes controls to be
hidden.
Browse user restrictions
If the Transfer application was installed as “Browse User Only”, the following
operations are not available:
•Delete
• Rename
• Create (bin)
•Cut/Paste.
48 Aurora Transfe r Instruction Manual September 11, 2006
Page 49

Connecting to ASK
When the Transfer application opens, if it cannot communicate with the ASK
software component, a “…ASK is not reachable…” message is displayed. ASK
provides to the Transfe r ap pli ca ti on al l the i nf ormat i on it needs about each managed
device. In the T ransfer system, the ASK software component is hos ted by the Transf er
Server. To connect the Transfer application to ASK on the Transf er Server, do one of
the following:
• When you install the Tra nsfer application, on the Conf iguration Informatio n page
enter the IP ad dress or hostname of the Transfe r Server or other computer that hos ts
the ASK software component.
Connecting to ASK
• In the Transfer application click
box opens.
For the ASK location, enter the name of the Transfer Server or other computer that
hosts the ASK component . You can also remove the cur r ent ASK location and add a
different ASK locat ion fr om t hi s dialog box. Click
close.
Tools | Configuration. The Configuration dialog
Add, then OK to save settings and
Refer to “Configuring the Transfer application” on page 62 to make other selections
in the Configuration dialog box.
About the MediaFrame network
While the MediaFrame network uses a sta nda rd Wind ows Ethernet network for data
transport, the MediaFrame network is not a Windows network. The MediaFrame
network is a functional extension of the MediaFrame platform. This platform is a
group of software compon ents that interact to pr ovide the ability to manage media that
resides on devices of diff erent t ypes. These devices are ter med “managed devices” in
the context of the MediaFrame platform. The MediaFrame network is made up of
these managed devices.
September 11, 2006 Aurora Transfer Instruction Manual 49
Page 50

Chapter 4 Using the Transfer application
Browsing media assets
Use the following procedures to navigate among the devices of the MediaFrame
network and view media asset information.
• “Navigating the MediaFrame network”
• “Saving and using locations as Favorites”
• “Viewing properties”
• “Changing the display of the MediaFrame network”
Navigating the MediaFrame network
The right and left panes of the Transfer application allow identical access to the
MediaFrame network. Double-click icons to open networks, domains, and managed
devices, which gives yo u access to the f olders th at contain the media assets. Cli ck the
Up button to move up the hierarchy.
Managed devices are displayed as a detailed list as follows:
This list represents the MediaFrame Managed Device Interfaces (MDIs) currently
configured. The names displ ayed a re th e MDI names, not t he host name of the device
itself. Typically there i s one MDI for each physical device, but in some cases one MDI
manages multiple physical devices. Keep this in mind as you open MDIs.
When you open MDIs, folde rs ar e di sp layed. These folders r epr es ent t he b ins and/or
directories on the managed devic e or de vices . You can ope n folde rs t o displ ay medi a
assets. Media assets are displayed as a detailed list as follows:
50 Aurora Transfe r Instruction Manual September 11, 2006
Page 51

Saving and using locations as Favorites
In the detailed list view, you can click column heads to re-sort the list of folders or
media assets.
You can arrange columns and otherwise modify the view of assets, as explained in
“Changing the display of the MediaFrame network” on page 52.
To browse a hierarchical tree view, click the
box opens.
Select a node and click
OK. The pane in the main application window opens to the
selected location.
Browse button. The Browse dialog
Saving and using locations as Favorites
1. Navigate to a frequently used location.
2. Click
3. When next you want to go to that location, cl ick the
September 11, 2006 Aurora Transfer Instruction Manual 51
Favorites | Add To Favorites. The location is added to the Favorites list for
both the left and right side views of the MediaFrame network.
Favorites button and select the
Page 52

Chapter 4 Using the Transfer application
location fr om the list.
4. To clea r the list of F avorites, click
removed from the list for both the left and right side views of the MediaFrame
network.
Viewing properties
To view properties, select a media asset or a folder and do one of the following:
• Right-click and select
•Click the
•Click
•Press
The Properties dialog box opens.
Properties button.
File | Properties.
F4.
Favorites | Clear Favorites. All Favorites are
Properties.
You can click column heads to re-sort the list of properties.
Changing the display of the MediaFrame network
In the toolbar click Views and select the way y ou want t he networ k entit ies displa yed.
You can choose to display as follows:
• Icons
•List
•Details
In a list view, right-click one of the column heads and select
Column Manager dialog box opens.
52 Aurora Transfe r Instruction Manual September 11, 2006
Column Manager. The
Page 53

Select or de-select columns and move them up or down the list to create the
arrangement of columns you desire.
Transferring media assets
Transferring media assets
Use the following procedures to control the movement of media between managed
devices.
• “Initiating a transfer”
• “Initiating multiple transfers”
• “Using the Transfer Information window”
• “Managing transfers”
• “Viewing completed transfers”
Initiating a transfer
To transfer media assets from one location to another, do the following:
1. Verify or change th e currentl y configured transfer o ptions as follows:
a. Click
b. In the Transfer Options area, configure the Transfer Initiator field if desired.
c. In the Transfer Options area, configure the Au to Rename fiel d if desire d. When
Tools | Configuration. The Configuration dialog box opens.
This sets the user name at tributed as the initiator of transfers.
set to True it enables the Transfer application to automatically rename a
transferred asset if necessary.
Also refer to “Configuring the Transfer application” on page 62.
2. Select the sourc e media asset or ass ets you intend to t ransfer in one of the following
ways:
• In either the left side or the right side view of the MediaFrame network, select
the source media asset or assets.
September 11, 2006 Aurora Transfer Instruction Manual 53
Page 54

Chapter 4 Using the Transfer application
• Do a search and select the source media asset or assets in the Search dialog box.
Refer to “Searching media assets” on page 59.
3. Use Ctrl + Click or Shift + Click to select mu ltiple assets. If you se lect multiple
assets, you will initiate multiple transfers. Refer to the next section “Initiating
multiple transfers”.
4. In the tree view, navigate to the fo lder that is the destination for the transfer as
follows:
• If you selected the source assets in the MediaFrame network view, find your
destination in the opposite pane.
• If you selected the source assets in the Search dialog box, your destination can
be in either the right pane or the left pane of the MediaFrame network view.
5. To initiate the transf er, use one of th e following methods:
• Drag and drop from source to destination. This initiates the transfer as a copy
operation. This is the only method that works if you selected the source assets
in the Search dialog box.
• Click the arrow that points from the source to the destination. This
initiates the transfer as a copy operation.
• Use the Windows clipboard, with Copy/Paste initiating a copy operation and
Cut/Paste initiating a move operation. Your options for Windows clipboard
functions are as follows:
- Use the right-click pop-up menu
-Use Edit menu
- Use keyboard shortcuts: Ctrl + C = Copy; Ctrl + X = Cut; Ctrl + V = Paste.
• You can also drag and drop from the Transfer application window to the
application window of other Aurora applications. Refer to release notes for
supported applications.
6. As the transfer initiates, the Transfer Options dialog opens.
If desired you can change the settings for the transfer as follows:
• Change the priority. This affect the w ay the trans fer is sorted in the transfer
54 Aurora Transfe r Instruction Manual September 11, 2006
Page 55

Initiating multiple transfers
queue if there are multiple simultaneous transfers.
• If the transfer source is a archive device that supports partial restore, you can
select and configure the part ial tr ansfe r setti ngs. Do so accordi ng to the por tion
of the media asset you are restoring.
• Select
Save Transfer Options if you want these same settings to apply to future
transfers with the same source and destination.
Click
OK to save settings (if modified) and close the dialog box.
7. Click the
Transfer Monitor tab and monitor transfer progress. When the Status
column reports Done, the transfer is successful.
8. To move a completed transfer item to the Transfer History tab, right-click the row
and select
Move Items to History.
Initiating multiple transfers
With the Transfer application you can have multiple transfers occurring
simultaneously. However , most devic e-types have a li mit as to how many concu rrent
transfers the devi ce can suppor t. Generally the limit is four transf ers per ser ver. Some
devices, such as archive devices, have a limit that is lower. Be aware of these limits
as you initiate transfers. Once the limit of concurr ent transfers is reached on a device,
one of the following occur s, depend ing on the type of transf er and the type of devi ce:
• Additional transfers are added to a queue of transfers and become pending
transfers.
• FTP transfer requests that are not queued can fail. A “System out of resources”
message is displayed.
Refer to “Managing transfers” on page 56 for more information on pendin g tra nsfer s.
You can initiate multiple transfers in the following ways:
• Select multiple asset s on one dev ic e as the s ource f or a tra nsfer . Each sour ce asse t
selected becomes an individual transfer.
• Initiate a transfer as in the preceding procedure “Initiating a transfer”, and then
while that tr ansfer is underway, initiate one or more additional transfers.
Using the Transfer Information window
The Transfer Information window is at the bottom of the Transfer application
interface. This window allows you to manage current transfers, to manage pending
transfers, and to view a li st of completed transfers.
September 11, 2006 Aurora Transfer Instruction Manual 55
Page 56

Chapter 4 Using the Transfer application
The following controls are available for the Transfer Information window:
• To close the Transfer Information window, click the
the title bar.
• If the Transfer Information window is not currently displayed, click
Information Window
• Double-click the t itl e bar of t he Tra nsfer Inf ormatio n Window to ope n it as a new,
separate window. Double-click the title bar again to re-dock the Transfer
Information Window at the bottom of the Transfer application interface window.
To disable this separate window feature, click the pin icon on the right end of the
title bar.
• Click column heads to resort rows.
• Select the Transfer Monito r tab t o manage curr ent and pendi ng tran sfers , or se lect
the Transfer History ta b to view a list of co mpleted tr ansfers. If one of these tabs is
not available, close the Transfer Information window and then re-open it.
• To move a completed transfer item from the Transfer Mo nitor tab to the Transfer
History tab, right-click the row and select
Managing transfers
Use the Transfer Monitor tab to manage current and pending transfers.
X control on the right end of
View |
to open it.
Move Items to History.
You can perform the following operations:
• To delete a transfer currently underway, right-click the transfer and select
Transfer
.
Cancel
Viewing completed transfers
Use the Tra nsfer History tab to vi ew a list of co mpleted transfers.
To move a completed transfer item from the Tr ansfer Monitor tab to the Transfer
History tab, right-click the row and select
56 Aurora Transfe r Instruction Manual September 11, 2006
Move Items to History.
Page 57

Viewing completed transfers
You can perform the following operations:
• To resort the list, click column hea ds.
• Double-click a transf er to o pen t he Tr ansfer Log Property dialog box. This dialog
box displays transfer information. If there was a transfer error, the err or
information is displayed.
• Right-cl i ck a transf er and selec t
dialog box.
Show Statistics to open the Transfer Statistics
September 11, 2006 Aurora Transfer Instruction Manual 57
Page 58

Chapter 4 Using the Transfer application
To remove completed trans fers f rom the li st, ri ght- click a ro w and sel ect Clear Items.
All completed transfers are removed from the Transfer History tab.
Modifying media assets and folders
Use the following procedures to modify media assets and folder. The Transfer
application must be installed with administrator credentials for these tasks to be
available.
• “Renaming an asset or a folder”
• “Deleting an asset or a folder”
• “Creating a new folder”
Renaming an asset or a folder
To rename an asset or a folder, do one of the following:
• Right-click a media asset or a folder and select
• Select a media asset or a folder an d click the
• Select a media asset or a folder and click
• Select a media asset or a folder and press the
The name of the media asset or folder becomes editable. Modify the name and then
press
Enter or click off the name to put the change into effect.
Rename.
Rename button.
File | Rename.
F2 key.
58 Aurora Transfe r Instruction Manual September 11, 2006
Page 59

Deleting an asset or a folder
If deleting a folder, you must first delete all the assets in that folder, as the Transfe r
application allows only empty folders to be deleted.
To delete an a sset or a folder, do one of the following:
Deleting an asset or a folder
• Right-click a media asset or a folder and select
• Select a media asset or a folder an d click the
• Select a media asset or a folder an d click
• Select a media asset or a folder and press the
The media as set or folder is deleted.
Creating a new folder
You can create new folders at the root of the managed device. Some devices also
allow you to create new folders in other locations in the folder hierarchy of the
managed device. This fe ature is enable d in the Transf er application according to what
the device allows.
To create a n ew folder, do the follow ing:
1. Navigate to a location in which creating a new folder is allowed.
2. Do one of the following:
• Right-click in the location and select
•Click the
•Click
The folder appears.
New button.
File | New.
Delete.
Delete button.
File | Delete.
Delete key.
New.
3. Modify the folder name and then pres s
into effect.
Searching media assets
The following procedures describe Transfer application search features.
• “Searching file names”
• “Searching with filters”
• “Modifying a search filter”
Searching file names
To find media asse ts with a fil e name that c ontains some or all of the text you specify,
do the following:
1. Click the
Search button or click File | Search. The Search dialog box opens.
Enter or click off the name to put the change
September 11, 2006 Aurora Transfer Instruction Manual 59
Page 60

Chapter 4 Using the Transfer application
2. In the Device drop-down list, select the device you want to search. Devices are
identified by their MDI names.
3. In the Name field, enter the full or partial file na me for which you are searching.
4. Click
Search Now. A list of media assets that match your search criteria are
displayed.
You can drag and drop from the search dialog box to the right or left panes of the
MediaFrame network view to initiate a transfer copy operation.
Searching with filters
If you desire to use advanced sear ch criteria, us e the following pr ocedure to create and
add one or more search filters. Filters thus created are available only as long as the
Search dialog box remains open. When you cl ose the Search dialog box, the filt ers are
not saved for reuse at a later time.
1. Click the
2. Click the
Search button or click File | Search. The Search dialog box opens.
Add Filters link. The Add/Update Search Filter dialog box opens.
60 Aurora Transfe r Instruction Manual September 11, 2006
Page 61

Searching media assets
3. In the Field to filte r drop-down list, sel ect the field th at contains the i nformation on
which you are basing your search.
4. In the Comparison drop-down list, se le ct t he type of search you want to do on the
information in the selected field. You can select the following types of searches:
•Contains
•Ends with
•Equal to
• Starts with
5. In the Value field, enter the text on which you are basing your search.
6. If you want to display a list of all assets that do NOT match the search criteria
currently configured, select the “Invert this logic…” option.
7. Click
Add Filter. The Add/Update Search Fil ter dialog box close s and filter app ears
in the list of filter on the Search dialog box.
8. In the Search dialog box, click
search criteria are di splayed.
9. You can repeat this procedure to create and add one or more additional filters.
When you do so, the search exe cut ed is based on the combined sea rch par amet er s
of all filters currently added.
You can drag and drop from the search dialog box to the right or left panes of the
MediaFrame network view to initiate a transfer copy operation.
Modifying a search filter
To change or remove an existing filter, do the following:
1. Click the
Search button or click File | Search. The Search dialog box opens.
2. In the list of filters, click the filter that you w ant to chang e or remove. The Add/
Update Search Filter dialog box opens.
Search Now. A list of media assets that match the
September 11, 2006 Aurora Transfer Instruction Manual 61
Page 62

Chapter 4 Using the Transfer application
3. Change the search criter ia and click Update Filter, or if you want to delete the filt er,
Remove this filter. The Add/Upd ate Search Filter dialog box closes and the list
click
of filters on the Search dialog box displays your changes.
Configuring the Transfer application
• To configure the Transfer application, click Tools | Configuration. The
Configuration dialog box opens.
You can make the following settings to change the way the Transfer application
operates.
•For the
ASK location, enter the name of the Tran sfer Se rver or other computer that
hosts the ASK component. You c an also remove t he current ASK locat ion and add
a different ASK location fr om th is dia log box. Cl ick
Add, then OK to save sett ings
and close.
•
Search Settings: Search Chunk Size sets the number of search results generated
when you click the Search button.
•
Search Settings: Auto Response I nterva l s et s t he interval between t wo consecutive
clicks of the Search button.
62 Aurora Transfe r Instruction Manual September 11, 2006
Page 63

• Explore Settings: Explore Chunk Size sets the number of items displayed in the
Transfer application main window when a MediaFrame network node is opened.
•
Explore Settings: Auto Response Interval se ts the interva l betwee n two consecuti ve
operations when a MediaFrame network node is opened.
•
Transfer Options: Transfer Initiator sets the user name attributed as the initiator of
transfers.
•
Transfer Options: Auto Rename if set to True enables the Transfer application to
automatically rename a transferred asset if necessary.
Viewing the application log
You can view a list of actions executed by the Transfer application. You might be
asked to provide information from this list to Grass Valley Support to help
troubleshoot a problem.
Viewing the application log
To view the application log, click
View | Log File. The Log window opens.
September 11, 2006 Aurora Transfer Instruction Manual 63
Page 64

Chapter 4 Using the Transfer application
64 Aurora Transfe r Instruction Manual September 11, 2006
Page 65

Chapter 5
Recovery Planning
Establish a recove ry plan in the event a Auror a Transfer mach ine fails, s o that Auror a
Transfer services can be re-configured rapidly to minimize impact.
Server failure considerations
The SQL database s hould be backed up on a regular bas is and stored i n a safe location.
In the case of server failure the database can then be restored to minimize data loss. If
an off-line backup server is purchased it should be pre-configured to operate in the
system so in case of primary server failure, minimal time will be spent bringing up the
backup system. The backed up database could be restored to this backup server on a
regular basis.
Database maintenance and administration
Aurora Transfer utilizes the SQL full recovery model and a maintenance plan is
essential to keeping the database in working order. Not only does the database need
to be backed up but the acc ompan ying tr ansact ion l og needs to be bac ked up as well.
Failure to back up the transaction log can caus e the database to become inope rable due
to the transaction log file growing too large.
The transaction log is responsible for keeping track of all the edits to data until it
reaches what is known as a checkpoint. Once the checkpoint is reached, the data
should be permanently committed to the database. Problems arise when this
checkpoint is reached, data is not committed to the database, and the transaction log
continues to grow. If the tran sac ti on lo g rea che s the capac it y of gr owth it ca n rend er
the database inoper abl e. In the event that th e dat aba se has been rendered inoperable,
a manual truncation of t he t ra nsa cti on log will need to be perf orme d, as e xpl ai ned i n
“Repairing a database that is unusable due to transaction log size” on page 65.
Adopt the f ollowing practices to keep the database heal thy:
• Daily monitor the growth of the transaction log daily, as explained in “How to
determine the size of the transaction log” on page 66.
• When necessary, manually back up the database and the transaction log, then
shrink the transaction log file to release disk resources to the operating system, as
explained in “Manually controlling transaction log growth” on page 66.
• Set up a database maintenance plan. This automatically backs up the transaction
log and the database. Refer to “Setting up a database maintenance plan” on
page 67.
Repairing a database that is unusable due to transaction log size
If the database is rendered inoperable due to the transaction log becoming too large,
it is highly likely that the transaction log has never been backed up, a database
maintenance plan has not been en abled on the sys tem, or the SQL Server age nt is not
running to implement your maintenanc e plan. The f ollowing s teps shoul d resolve th e
problem:
September 11, 2006 Aurora Transfer Instruction Manual 65
Page 66

Chapter 5 Recovery Planning
1. Open SQL Query Analyzer
2. Make sure the database in ques tion is selected in t he top tool bar. (For t his example
the MediaFrame database will be used.)
3. First try to backup the transaction log without truncating it by running the
following command:
BACKUP LOG MediaFrame TO Disk = 'filePath\fileName.trn'
Where filePath and fileName is user specified, (e.g. D:\Em ergency
Backups\MediaFrame_tran_12052003.trn) if the file does not already exist, you
will need to create it . If the transa ction log is ful l it is likel y that this comm and will
fail but it is important to try it to maintain database integrity.
4. Regardless if the previous command passes or fails, execute the following
command to clear the transaction log:
BACKUP LOG MediaFrame WITH TRUNCATE_ONLY
5. To free unused resources t o the oper atin g sys tem execu te the f ollowi ng command:
DBCC SHRINKFILE(MediaFrame_log, 2)
How to determine the size of the transaction log
When SQL is installed the spac e that it is allotted on the ope rat i ng sys tem is divided
into two parts: 50% is give n to store transa ction logs and 50 % is reserved for data. To
identify the amount of space the transaction logs is taking up, open SQL Query
Analyzer and execute the following command.
DBCC sqlperf(logspace)
This comma nd will return the amou nt of space e ach database’s transa ction log is
taking up and the percentage of space the transaction log is using. The column that
lists the percent of space the transaction log is taking up is misleading. Aurora
Transfer databases set the transaction log growth limit to 500MB. If one of the
databases transaction l ogs is larger than 350MB, t hen follow the steps in the next
procedure “Manually controlling transaction log growth”.
Manually controlling transaction log growth
Use this procedure when the transaction log is approaching its size limit. First back
up the database and the trans action log to keep a record of its current state. Then flush
and shrink the transaction log file to reduce its size. To do this open SQL Enterprise
Manager and manually backup the database and transaction log of the database in
question. The steps to do this are as follows:
Back up the transaction log
The following procedure uses the default location of the transaction log backup,
which is as follows:
C:\Program Files\Microsoft SQL Server\MSSQL\BACKUP\<database name>\
If your transacti on log backups are in a di fferent locat ion, substitute the different pat h.
1. Open
2. Connect to the SQL Server which is hos ting the MediaFr ame databases. An empty
66 Aurora Transfe r Instruction Manual September 11, 2006
Start | Programs| Microsoft SQL Server | Query Analyzer.
Page 67

query automatically opens.
3. To back up the transaction logs, type the following commands. I n the se ex amples
the number string at the end of the command indicates May 31, 2005 at 12:00.
Enter the actual year, month, date, hour, and minute in the indicated
YYYYMMDDHHMM format.
• To back up the MediaFrame transaction log, type:
BACKUP LOG MediaFrame
TO DISK=’C:\Program Files\Microsoft SQL
Server\MSSQL\BACKUP\MediaFrame\_tlog_200505311200’
4. Continue with the next procedure “Shrink the transaction log”.
Shrink the transaction log
This must be done very soon after backi ng up the transactio n log. This will reduce the
transaction log to the size specified; the log will then grow as needed.
Use Query Analyzer, as in the previous procedure.
The command to shrink the MediaFrame transaction log file is:
DBCC SHRINKFILE(MediaFrameLog, 10)
Setting up a database maintenance plan
Setting up a database maintenance plan
The best way to con trol the growt h of transaction logs is to simply back the m up, once
a day at the very least . SQL 2000 makes it ver y easy to set up a database mainte nance
schedule. Before you begin implemen ting a database maintenance plan using the SQL
2000 Database Maintenance Planner wizard make sure that the
SQLSERVERAGENT service is started and its properties are set to auto start for a
local system account. If the SQLSERVERAGENT is not running, the database
maintenance plan will not run. The following steps describe how to launch and
configure the SQL 2000 Database Maintenance Planner:
1. Open SQL 2000 Enterprise Manager.
2. Expand Microsoft SQL Servers, expand th e SQL Server Group and select the SQL
server.
3. On the
4. After the wizard launches click the Next> button.
5. Select
databases.
6. Click the
7. Select the
10% of the database.
Tools menu, click Database Maintenance Planner…
These databases radio button and select the MediaFrame and NBIngest
Next> button to navig ate to the Update Data Optimiz ation Information page.
Update statistics used by query optimizer. Sample check box and set it to
8. Check the schedule to verify that the time scheduled will not conflict with peak
usage of the system. If a schedule t ime change is neede d, click the
Change… button
to modify the time. This option can be run daily but once a week is good.
9. Click the
September 11, 2006 Aurora Transfer Instruction Manual 67
Next> button to navigate to the Database Integrity Check page.
Page 68

Chapter 5 Recovery Planning
10.Select the Check database integrity check box.
11.Select the
12.Select the
Include indexes radio button.
Perform these checks before doing backups check box.
13.Check the schedule to verify that the time scheduled will not conflict with peak
usage of the system. If a schedule time change is n eeded, click th e
Change… button
to modify the time. This option can be run daily but once a week is good.
14.Click the
15.Select
Next> button to navigate to the Specify the Database Back up plan page.
Back up the database as part of the maintenance plan check box.
NOTE: Do not select “Attempt to repair any minor problems”.
16.Select
17.Select the
18.Change the schedule from once a week to daily by clicking the
19.Select the
20.Select the
Verify the integrity of the backup when complete check box.
Disk radio button
Change… button.
Daily radio button and set the interval to Every 1 day(s).
Occurs once at radio button. If the default time of 2:00:00 AM is not
good, change it to a more suitable time.
21.Make sure that the
Start Date is today's date and that the No end date radio buttons
are selected.
22.Click the
OK button and verify the schedule.
23.Click the
24.Select the
specific folder for database backup files. If that is the case, then select the
directory
Next> button to navigate to the Specify Backup Disk Directory page.
Use the default backup directory radio button, except if the site has a
Use this
radio button and enter in the specified pa th. (Note: SQL can only see l ocal
drives and cannot see sh ared directorie s or disks that are not native to the mach ine.)
25.Select the
26.Select the
27.The backup extension should be set to
28.Click the
Create a subdirectory for each database check box.
Remove files older than check box and set the value to 1 week(s).
BAK.
Next> button to navigate to the Specify Transaction Log Back up Plan
page.
29.Select
30.Select
31.Select the
32.Click the
33.Select the
34.Select the
35.Make sure that the
Back up the transaction log as part of the maintenance plan check box.
Verify the integrity of the backup when complete check box.
Disk radio button.
Change… button to set the transaction log schedule.
Daily radio button and set the interval to Every 1 day(s).
Occurs every radio button and set the interval to every 6 hours.
Start Date is today's date and that the No end date radio button
is selected.
68 Aurora Transfe r Instruction Manual September 11, 2006
Page 69

36.Click the OK button and verify the schedule.
Database Restoration
37.Click the
Directory
38.Select the
specific folder for database backup files. If that is the case, then select the
directory
Next> button to navigate to the Specify Transaction Log Backup Disk
page.
Use the default backup directory radio button, except if the site has a
Use this
radio button and enter in the specified pat h. (Note: SQL can only see l ocal
drives and cannot see sha red directorie s or disks that are not native to the machi ne.)
39.Select the
40.Select the
41.The backup extension should be set to
42.Click the
43.Click the
44.Click the
Wizard
Create a subdirectory for each database check box.
Remove files older than check box and set the value to 1 week(s).
TRN.
Next> button to navigate to the Reports to Generate page.
Next> button to navigate to the Maintenance Plan History page.
Next> button to navigate to the Completing the Database Maintenance Plan
page.
45.Enter Aurora Transfer for the name of the schedule.
46.Click the
Finish button. (Note: If an error occurs, it is most likely that your
SQLSERVERAGENT was not started. Start the service and start over.)
If the SQLSERVERAGENT is ever stopped, so is your mai ntenance plan. Make su re
that the service is set to auto start in case of a reboot.
Database Restoration
When Aurora Transfer is installed, a maintenance plan should be implemented to
schedule backups of the MediaFrame database and transaction logs. The rule of
thumb in restoring the database is to restore the last successful database backup and
transaction log backups preceding system failure. Below is a given scenario of a
system failure and the steps necessary to recover.
• 2:00:00 AM database back up performed by the maintenance plan
• 8:00:00 AM transaction log is backed up by the maintenance plan
• 2:00:00 PM transaction log is backed up by the maintenance plan
• 2:30:00 PM system failure occurs
The basic s t eps to recover are as fo llows:
1. Restore the database backup done at 2:00:00 AM
2. Restore the transaction backup done at 8:00:00 AM
3. Restore the transaction backup done at 2:00:00 PM
With a database maintenance schedule in place, SQL already recognizes the most
recent database backup as well as the sequenc e of transacti on log backups. To resto re
the database to the most current state before failure occurre d, open SQL Enterprise
Manager, expand the SQL Server s, expand the SQL Server Gro up, expand the server
node, expand the databases directory and do the following:
September 11, 2006 Aurora Transfer Instruction Manual 69
Page 70

Chapter 5 Recovery Planning
1. Right mouse click the MediaFrame database
2. Select
3. Select
All Tasks.
Restore Database…
4. Select the Database radio button.
SQL automatically selects most recent database backup file and sequence of
transaction logs.
5. Verify the date and time stamp.
6. Click the
OK button.
SQL will first restor e t he database, then restore the first transaction log backup, then
restore the proceeding transaction logs up until the point of failure. After restore has
completed the database will be restored to the point in time of the last backed up
transaction log.
70 Aurora Transfe r Instruction Manual September 11, 2006
Page 71

Index
Symbols
.NET Framework 44
A
Active X 24
application log 63
archive
configuring MDI 41
configuring services 44
enter MDI name 27
MDI installed on platforms 36
MDI service 20
preparing 37
ASK
configure Avalon archive 40
configuring 25
service 20
Aurora Browse 9
Aurora Transfer clients
adding 44
Avalon Archive
configuring MDI 41
MDI service 20
, 11
B
bins
browsing 50
browse user
restrictions 48
transfer application 45
browsing, media assets 50
K2 MDI 31
M-Series MDI 32
News MDI 30
Profile MDI 29
connecting to ASK 49
conventions
MDI naming 18
D
database 14
administration 65
recovery plan 65
SQL 14
delete, media asset or folder 59
Dell server
documentation 6
description, product 9
DHCP 21
diagram, system 11
directories
browsing 50
display
number of items 63
DIVArchive
configuring MDI 43
MDI port number 20
DNS 21
dock windows 56
domains
DSM
, 22
in MediaFrame network 50
as MDI server 18
C
cabling
Transfer server 14
canonical names 22
columns, select to display 53
concurrent transfers 55
configuration pages
accessing 23
archive MDI 41
archive services 44
ASK settings 26
DIVA MDI 43
FlashNet MDI 42
September 11, 2006 Aurora Transfer Instruction Manual 71
E
error
display properties 57
error codes 6
F
favorites, on MediaFrame network 51
features, product 9
filter, for search 60
FlashNet archive, configuring MDI 42
folder 58
new, modify 59
Page 72

Index
FTP 9
functional description 9
H
host table, example 21
I
icon view, of MediaFrame network 52
IIS 20
initiator
configure name 63
installation
rack-mounting 14
software 15
K
K2
configure MDI 31
L
limit of concurrent transfers 55
list view, of MediaFrame network 52
log
application 63
logons
Transfer server 23
M
machine naming convention 18
managed devices
list of 9
MDI
description 25
installed on platforms 27
test 33
media assets
modifying 58
search 59
MediaFrame 9
configure ASK 26
network 49
MediaFrame network
navigating 50
views 52
Metadata service 20
M-Series
configure MDI 32
multiple transfers 55
N
name resolution 22
naming conventions
MDI 18
network 11
canonical names 22
DHCP 21
diagram 11
DNS lookup 21
subnet mask 21
WINS 21
News MDI
configure 30
installing 27
NewsFTP 16
NewsShare NAS system 16
NTFS MDI
service 20
, 22
P
partial restore 55
passwords
Transfer server 23
ports
for configuration page access 23
numbers with services 20
Profile MDI 29
priority, for transfer 54
product description and features 9
Profile
configure MDI 29
MDI service 20
software install 16
properties
of media asset or folder 52
Proxy MDI
service 20
, 31, 32
R
rack-mounting 6, 14
recovery plan 65
rename
automatic 63
media assets or folders 58
Resolver service 20
72 Aurora Transfe r Instruction Manual September 11, 2006
Page 73

restore
partial 55
S
safety 6
search
configure 62
filter 60
media assets 59
number of results 62
services
accessing 23
with ports 20
software installation 15
SQL
administration 65
Query Analyzer 66
recovery plan 65
transaction log 65
statistics for transfers 57
status indicators 6
subnet mask 21
system overview
functional description 9
network 11
network diagram 11
system requirements
transfer client PC 44
transfer server
about 14
connecting to with application 49
service documentation 6
transfer targets 29
tree view, of MediaFrame network 51
troubleshooting, transfer server hardware 6
U
user credentials, tra nsf er application 45
W
web server 14
WINS 21
T
Thomson services, see services
transaction log 65
transfer
error 57
manage 56
media assets 53
multiple 55
priority 54
statistics 57
transfer application
configure 62
overview 48
transfer client PC
system requirements 44
transfer history tab
moving items to 55
Transfer Information window 56
Transfer Options dialog 54
September 11, 2006 Aurora Transfer Instruction Manual 73
Page 74

Index
74 Aurora Transfe r Instruction Manual September 11, 2006
 Loading...