

Page 1
Aurora Playout
PLAYBACK CONTROL SYSTEM
User Guide
SOFTWARE VERSION 6.3
071-8516-03
SEPTEMBER 2007
Page 2

Copyright Copyright © 2007 Grass Valley, Inc. All rights reserved. Printed in the United States of America.
Portions of software © 2000 – 2007, Microsoft Corporation. All rights reserved.
This document may not be copied in whole or in part, or otherwise r eproduced except as
specifically permitted under U.S. copyright law, without the prior written consent of Grass
Valley, Inc., P.O. Box 59900, Nevada City, California 95959-7900
This product may be covered by one or more U.S. and foreign patents.
Trademarks Grass Valley, K2, Aurora, Turbo, M-Series, Profile, Profile XP, NewsBrowse, NewsEdit,
NewsQ, NewsShare, NewsQ Pro, Aurora, and Media Manager are either registered
trademarks or trademarks of Grass Valley, Inc. in the United States and/or other countries.
Other trademarks used in this document are either registered trademarks or trademarks of the
manufacturers or vendors of the associated products. QuickTime and the QuickTime logo are
trademarks or registered trademarks of Apple Computer, Inc., used under license therefrom.
Grass Valley, Inc. products are covered by U.S. and foreign patents, issued and pending.
Additional information regarding Grass Valley, Inc. trademarks and other proprietary rights may
be found at www.thomsongrassvalley.com.
Disclaimer Product options and specifications subject to change without notice. The information in this
manual is furnished for informational use only, is subject to change without notice, and should
not be construed as a commitment by Grass Valley, Inc. Grass Valley, Inc. assumes no
responsibility or liability for any errors or inacc uracies that may appear in this publication.
U.S. Government
Restricted Rights
Legend
Use, duplication, or disclosure by the United States Government is subject to restrictions as set
forth in subparagraph (c)(1)(ii) of the Rights in Technical Data and Computer Software clause
at DFARS 252.277-7013 or in subparagraph c(1) and (2) of the Commercial Computer
Software Restricted Rights clause at FAR 52.227-19, as applicable. Manufacturer is Grass
Valley, Inc., P.O. Box 59900, Nevada City, California 95959-7900 U.S.A.
Revision Status
Rev Date Description
September 21,
2006
January 18, 2007 Release 071-8516-01 for Software Version 6.0b.
May 23, 2007 Release 071-8516-02 for Software Version 6.1.
September 19,
2007
Release 071-8516-00 for Software Version 6.0. Initial release of
Aurora Playout User Guide.
Release 071-8516-03 for Software Version 6.3.
2 Aurora Playout User Guide September 19, 2007
Page 3

Contents
Grass Valley Product Support. . . . . . . . . . . . . . . . . . . . . . . . . . . . . . . . . 7
Safety Summaries. . . . . . . . . . . . . . . . . . . . . . . . . . . . . . . . . . . . . . . . . . 8
Safety Terms and Symbols. . . . . . . . . . . . . . . . . . . . . . . . . . . . . . . . . . . 9
Service Safety Summary. . . . . . . . . . . . . . . . . . . . . . . . . . . . . . . . . . . . 10
Certifications and Compliances. . . . . . . . . . . . . . . . . . . . . . . . . . . . . . . 10
Environmental Criteria. . . . . . . . . . . . . . . . . . . . . . . . . . . . . . . . . . . . . . 12
Chapter 1 Introducing Aurora Playout
What is Aurora Playout? . . . . . . . . . . . . . . . . . . . . . . . . . . . . . . . . . . . . 13
Terms You Should Know. . . . . . . . . . . . . . . . . . . . . . . . . . . . . . . . . . . . 14
Using Aurora Playout . . . . . . . . . . . . . . . . . . . . . . . . . . . . . . . . . . . . . . 14
Linking to a Newsroom Computer System (NCS) . . . . . . . . . . . . . . 15
Creating a Playlist Manually . . . . . . . . . . . . . . . . . . . . . . . . . . . . . . 15
Tour of Aurora Playout and Plug-ins. . . . . . . . . . . . . . . . . . . . . . . . . . . 16
The Aurora Playout Application . . . . . . . . . . . . . . . . . . . . . . . . . . . . 17
The Assignment List Plug-in. . . . . . . . . . . . . . . . . . . . . . . . . . . . . . . 17
The Assignment List . . . . . . . . . . . . . . . . . . . . . . . . . . . . . . . . . . . . 18
Housekeeper . . . . . . . . . . . . . . . . . . . . . . . . . . . . . . . . . . . . . . . . . . 19
Simple Database (SDB) Server . . . . . . . . . . . . . . . . . . . . . . . . . . . . 21
Thumbnail Server. . . . . . . . . . . . . . . . . . . . . . . . . . . . . . . . . . . . . . . 21
XMOS Server . . . . . . . . . . . . . . . . . . . . . . . . . . . . . . . . . . . . . . . . . . 22
Chapter 2 Setting Up Your NCS for Aurora Playout
Setting Up ENPS . . . . . . . . . . . . . . . . . . . . . . . . . . . . . . . . . . . . . . . . . 23
Sending scripts . . . . . . . . . . . . . . . . . . . . . . . . . . . . . . . . . . . . . . . . 24
MOS Ready to Air . . . . . . . . . . . . . . . . . . . . . . . . . . . . . . . . . . . . . . 25
Setting Up iNEWS . . . . . . . . . . . . . . . . . . . . . . . . . . . . . . . . . . . . . . . . 25
Configuring status translations. . . . . . . . . . . . . . . . . . . . . . . . . . . . . 25
Setting Up Octopus . . . . . . . . . . . . . . . . . . . . . . . . . . . . . . . . . . . . . . . 26
Registering the MOSWrapper File . . . . . . . . . . . . . . . . . . . . . . . . . . 26
Creating an ActiveX Device . . . . . . . . . . . . . . . . . . . . . . . . . . . . . . . 27
Configuring the MOS Device . . . . . . . . . . . . . . . . . . . . . . . . . . . . . . 27
Adding Breaks in Your Rundown . . . . . . . . . . . . . . . . . . . . . . . . . . . . . 30
Chapter 3 Installing Aurora Playou t
Cabling the Aurora Playout Computer . . . . . . . . . . . . . . . . . . . . . . . . . 32
Installing Aurora Playout Software . . . . . . . . . . . . . . . . . . . . . . . . . . . . 33
Installing the Assignment List Plug-in. . . . . . . . . . . . . . . . . . . . . . . . 34
Using the Installer . . . . . . . . . . . . . . . . . . . . . . . . . . . . . . . . . . . . 34
Using a Configuration File . . . . . . . . . . . . . . . . . . . . . . . . . . . . . . 36
Using a Batch File . . . . . . . . . . . . . . . . . . . . . . . . . . . . . . . . . . . . 38
Connecting the RDU 1510 Under Monitor Display . . . . . . . . . . . . . . . . 38
Connecting the X-keys Jog/Shuttle Controller . . . . . . . . . . . . . . . . . . . 38
Chapter 4 Configuring Aurora Playout
Configuring the Aurora Playout Application. . . . . . . . . . . . . . . . . . . . . . 41
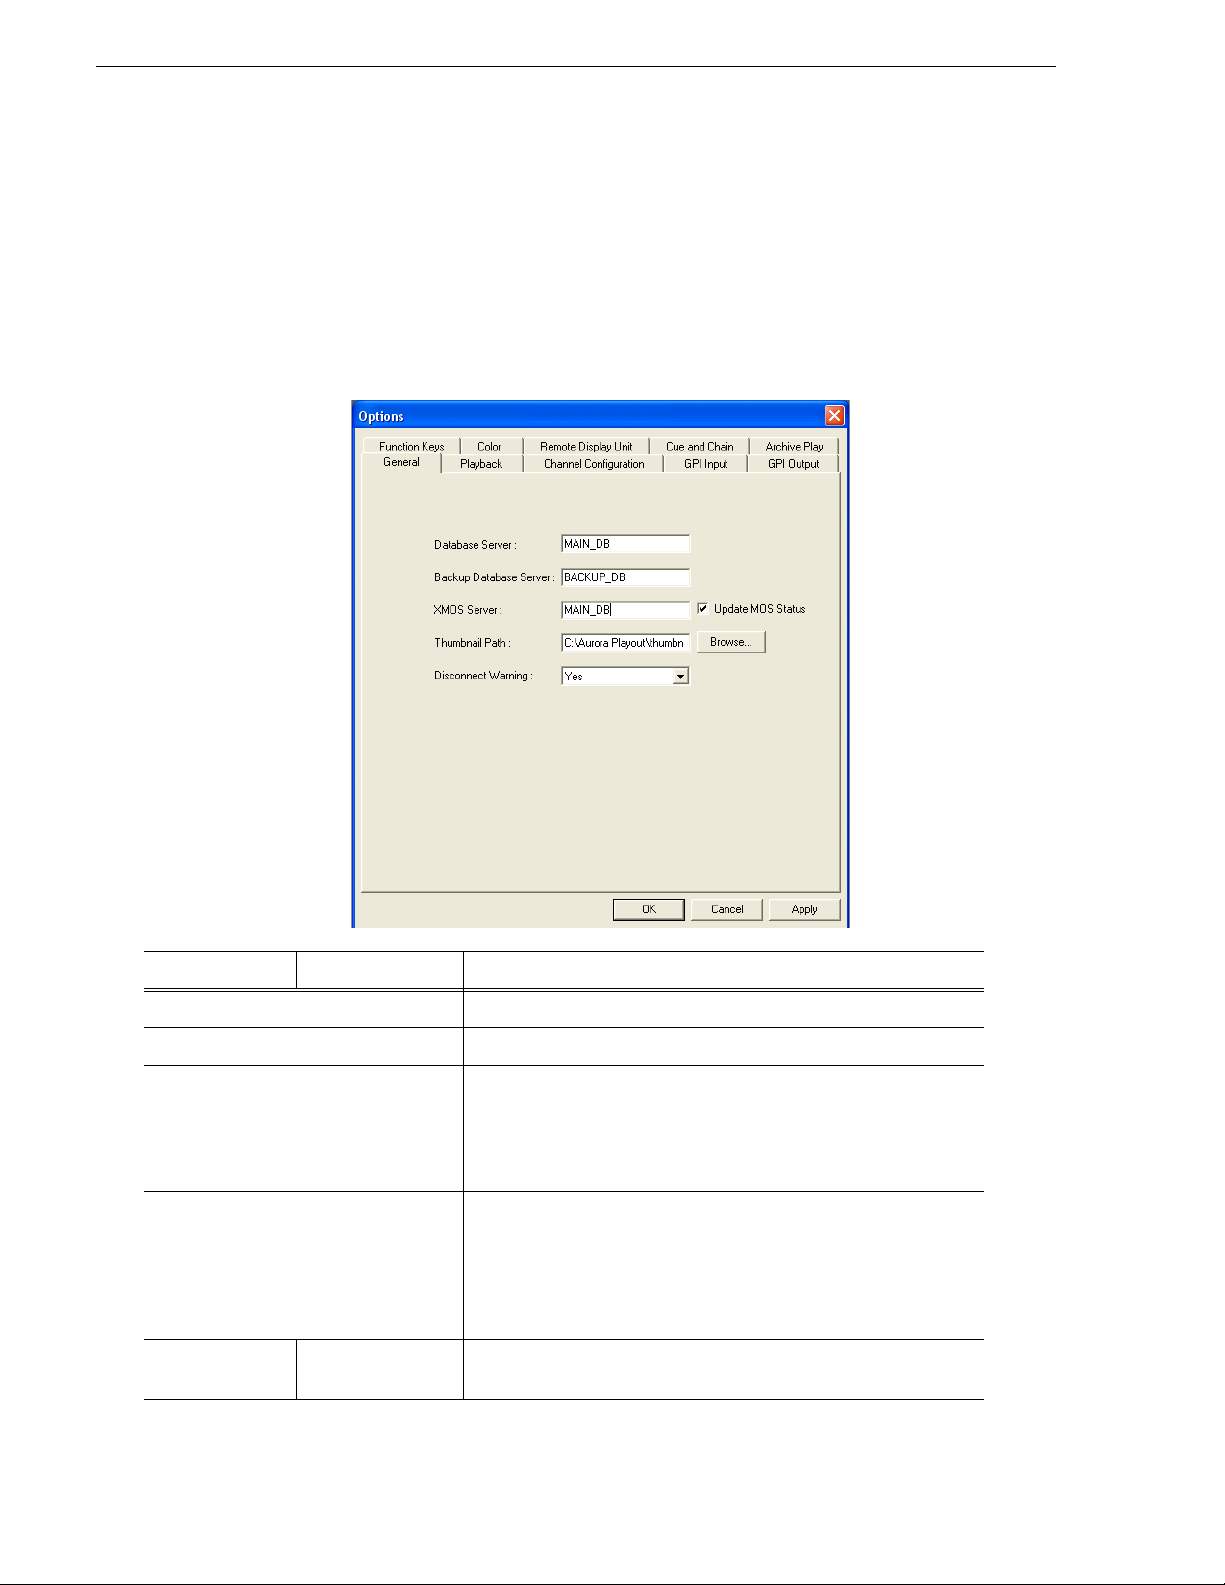
Setting General Options. . . . . . . . . . . . . . . . . . . . . . . . . . . . . . . . . . 42
Setting Playback Options . . . . . . . . . . . . . . . . . . . . . . . . . . . . . . . . . 43
Setting Channel Configuration . . . . . . . . . . . . . . . . . . . . . . . . . . . . . 45
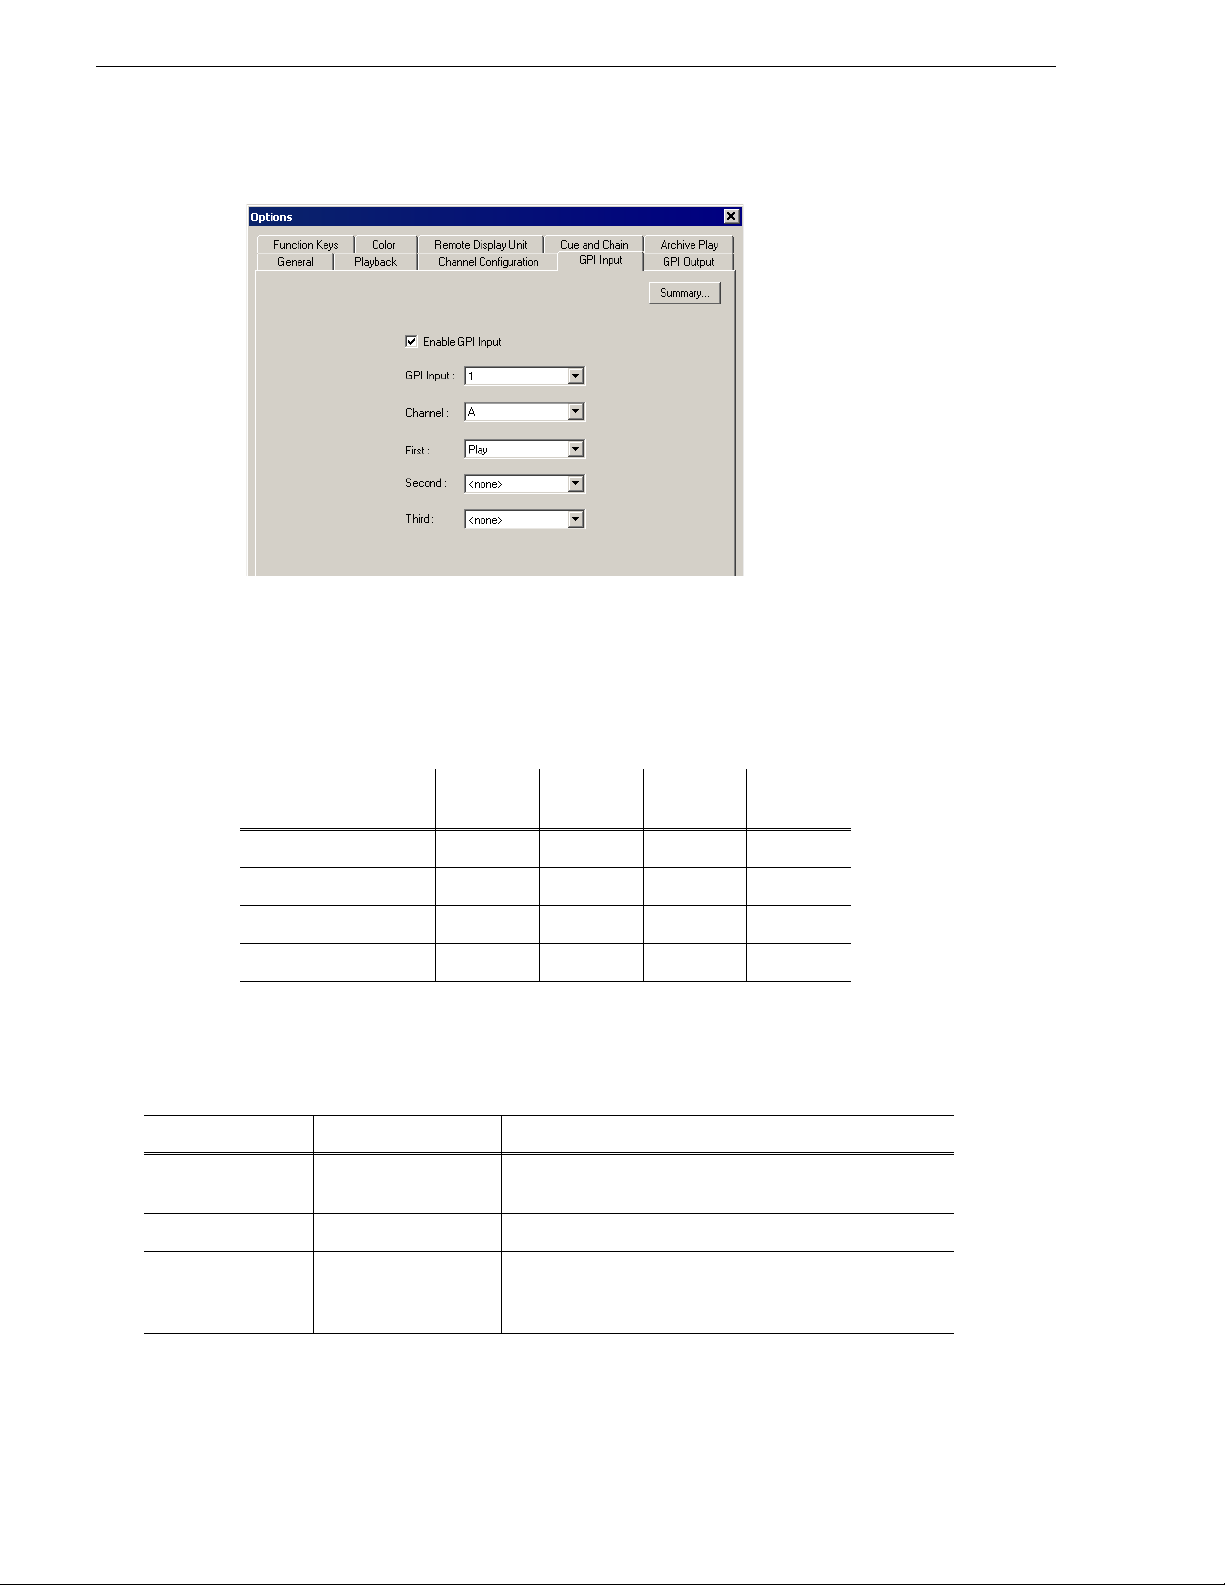
Configuring GPI Input. . . . . . . . . . . . . . . . . . . . . . . . . . . . . . . . . . . . 46
Configuring GPI Output . . . . . . . . . . . . . . . . . . . . . . . . . . . . . . . . . . 48
Defining Function Keys. . . . . . . . . . . . . . . . . . . . . . . . . . . . . . . . . . . 49
Configuring the X-Keys Controller . . . . . . . . . . . . . . . . . . . . . . . 50
Using the X-keys Jog/Shuttle Controller . . . . . . . . . . . . . . . . . . . 51
September 2007 Aurora Playout User Guide 3
Page 4

Contents
Defining Status Colors. . . . . . . . . . . . . . . . . . . . . . . . . . . . . . . . . . . .53
Configuring the Remote Display Unit (RDU). . . . . . . . . . . . . . . . . . .54
Setting Cue and Chain Options. . . . . . . . . . . . . . . . . . . . . . . . . . . . .56
Configuring Archive Play. . . . . . . . . . . . . . . . . . . . . . . . . . . . . . . . . .56
Configuring the Simple Database (SDB) Server . . . . . . . . . . . . . . . . . .57
Setting General Options . . . . . . . . . . . . . . . . . . . . . . . . . . . . . . . . . .58
Setting Media Options. . . . . . . . . . . . . . . . . . . . . . . . . . . . . . . . . . . .60
Reinitializing Media Monitor . . . . . . . . . . . . . . . . . . . . . . . . . . . . . . .61
Repopulating Rundown Items . . . . . . . . . . . . . . . . . . . . . . . . . . . . . .61
Restoring Backup Database . . . . . . . . . . . . . . . . . . . . . . . . . . . . . . .61
Configuring the Thumbnail Server . . . . . . . . . . . . . . . . . . . . . . . . . . . . .62
Creating a Thumbnail Folder. . . . . . . . . . . . . . . . . . . . . . . . . . . . . . .62
Setting Up the Thumbnail Server . . . . . . . . . . . . . . . . . . . . . . . . . . .62
Configuring the XMOS Server . . . . . . . . . . . . . . . . . . . . . . . . . . . . . . . .62
Refreshing Rundowns. . . . . . . . . . . . . . . . . . . . . . . . . . . . . . . . . . . .64
Configuring Housekeeper . . . . . . . . . . . . . . . . . . . . . . . . . . . . . . . . . . .64
Setting General Options . . . . . . . . . . . . . . . . . . . . . . . . . . . . . . . . . .65
Setting Media Options. . . . . . . . . . . . . . . . . . . . . . . . . . . . . . . . . . . .65
Configuring the Standalone Assignment List Manager . . . . . . . . . . . . .67
Chapter 5 NCS Rundowns and Aurora Playout
Using the Assignment List Plug-in . . . . . . . . . . . . . . . . . . . . . . . . . . . .70
Creating Placeholders. . . . . . . . . . . . . . . . . . . . . . . . . . . . . . . . . . . .70
Sorting Placeholders by Category. . . . . . . . . . . . . . . . . . . . . . . . . . .72
Viewing Placeholder Categories . . . . . . . . . . . . . . . . . . . . . . . . . . . .72
Searching Placeholders . . . . . . . . . . . . . . . . . . . . . . . . . . . . . . . . . .72
Viewing a Video Thumbnail for a Placeholder. . . . . . . . . . . . . . . . . .73
Using ENPS . . . . . . . . . . . . . . . . . . . . . . . . . . . . . . . . . . . . . . . . . . . . .74
Creating Placeholders Automatically. . . . . . . . . . . . . . . . . . . . . . . . .74
Inserting Clips to ENPS Manually . . . . . . . . . . . . . . . . . . . . . . . . . . .75
Assigning Playout Channels to Clips. . . . . . . . . . . . . . . . . . . . . . . . .76
Using iNEWS . . . . . . . . . . . . . . . . . . . . . . . . . . . . . . . . . . . . . . . . . . . . .76
Creating Placeholders . . . . . . . . . . . . . . . . . . . . . . . . . . . . . . . . . . .77
Assigning Playout Channels to Clips . . . . . . . . . . . . . . . . . . . . . . . .77
Using Octopus . . . . . . . . . . . . . . . . . . . . . . . . . . . . . . . . . . . . . . . . . . . .78
Creating Placeholders Automatically . . . . . . . . . . . . . . . . . . . . . . . .78
Linking Clips to Octopus Manually . . . . . . . . . . . . . . . . . . . . . . . . . .78
Inserting Clips with the Assignment List Plug-in . . . . . . . . . . . . . . . .79
Assigning Playout Channels to Clips. . . . . . . . . . . . . . . . . . . . . . . . .80
Chapter 6 Editing and Aurora Playout
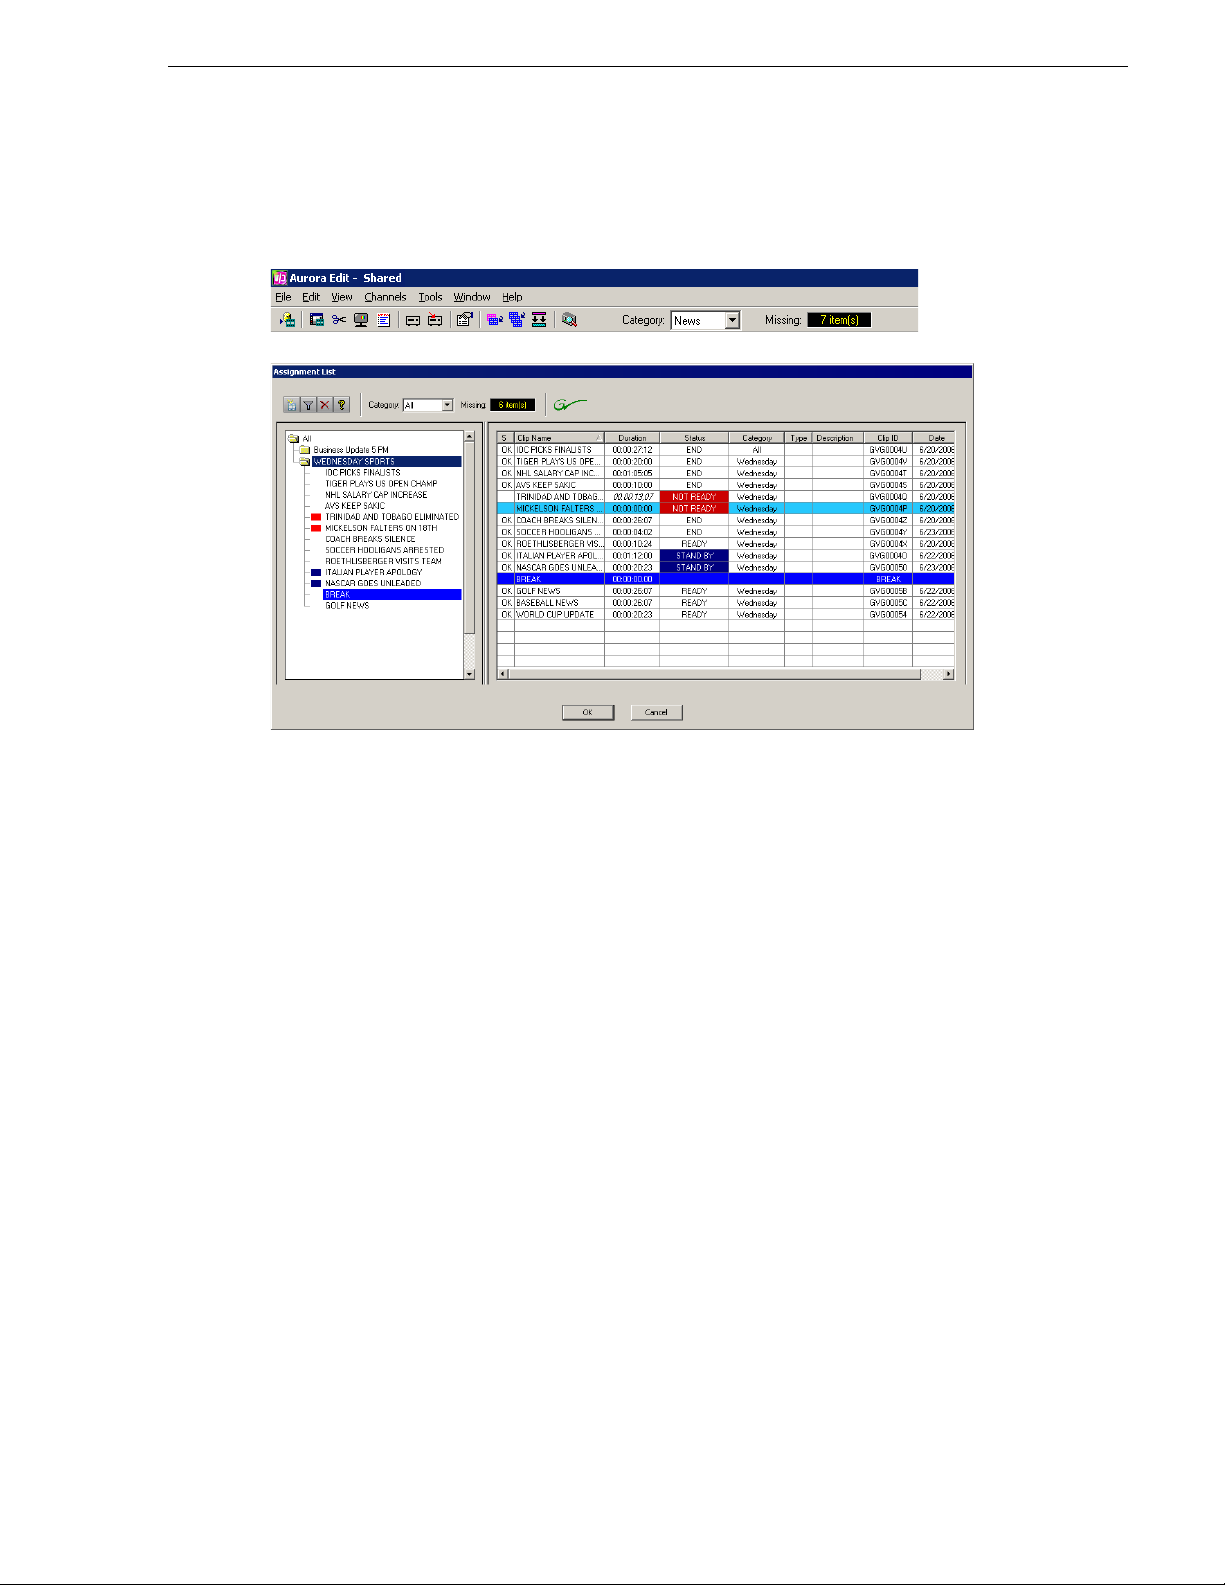
Tour of the Assignment List . . . . . . . . . . . . . . . . . . . . . . . . . . . . . . . . . .81
Receiving Editing Assignments . . . . . . . . . . . . . . . . . . . . . . . . . . . . . . .83
Linking Sequences to Aurora Playout Placeholders . . . . . . . . . . . . . . .83
Sending Completed Clips. . . . . . . . . . . . . . . . . . . . . . . . . . . . . . . . . . . .87
Additional Assignment List Features . . . . . . . . . . . . . . . . . . . . . . . . . . .88
Creating New Placeholders. . . . . . . . . . . . . . . . . . . . . . . . . . . . . . . .89
Deleting Placeholders . . . . . . . . . . . . . . . . . . . . . . . . . . . . . . . . . . .90
Changing a Clip Category. . . . . . . . . . . . . . . . . . . . . . . . . . . . . . . . .90
Viewing the Assignment List . . . . . . . . . . . . . . . . . . . . . . . . . . . . . . .90
Identifying Missing Clips . . . . . . . . . . . . . . . . . . . . . . . . . . . . . . . . . .90
Chapter 7 Playing Clips to Air
Tour of the Aurora Playout Application . . . . . . . . . . . . . . . . . . . . . . . . .92
Toolbar . . . . . . . . . . . . . . . . . . . . . . . . . . . . . . . . . . . . . . . . . . . . . . .93
4 Aurora Playou t User Guide September 2007
Page 5

Playlist . . . . . . . . . . . . . . . . . . . . . . . . . . . . . . . . . . . . . . . . . . . . . . . 94
Understanding Playlist Colors . . . . . . . . . . . . . . . . . . . . . . . . . . . 95
Channels . . . . . . . . . . . . . . . . . . . . . . . . . . . . . . . . . . . . . . . . . . . . . 95
Rundowns. . . . . . . . . . . . . . . . . . . . . . . . . . . . . . . . . . . . . . . . . . . . . 96
Clip Browser. . . . . . . . . . . . . . . . . . . . . . . . . . . . . . . . . . . . . . . . . . . 97
Playlist Overview . . . . . . . . . . . . . . . . . . . . . . . . . . . . . . . . . . . . . . . 99
Creating a Playlist . . . . . . . . . . . . . . . . . . . . . . . . . . . . . . . . . . . . . . . . . 99
Opening an NCS Rundown . . . . . . . . . . . . . . . . . . . . . . . . . . . . . . . 99
Appending Rundowns to a Playlist . . . . . . . . . . . . . . . . . . . . . . 100
Previewing Other Rundowns. . . . . . . . . . . . . . . . . . . . . . . . . . . 101
Manually Creating a New Playlist. . . . . . . . . . . . . . . . . . . . . . . . . . 102
Saving Local Playlists . . . . . . . . . . . . . . . . . . . . . . . . . . . . . . . . 102
Opening Saved Playlists . . . . . . . . . . . . . . . . . . . . . . . . . . . . . . 103
Appending a Playlist . . . . . . . . . . . . . . . . . . . . . . . . . . . . . . . . . 103
Exporting a Playlist . . . . . . . . . . . . . . . . . . . . . . . . . . . . . . . . . . 104
Chaining Clips in a Playlist . . . . . . . . . . . . . . . . . . . . . . . . . . . . 104
Cueing and Playing Clips . . . . . . . . . . . . . . . . . . . . . . . . . . . . . . . . . . 105
Cueing Clips. . . . . . . . . . . . . . . . . . . . . . . . . . . . . . . . . . . . . . . . . . 105
Using the Jog Feature. . . . . . . . . . . . . . . . . . . . . . . . . . . . . . . . 105
Playing Clips. . . . . . . . . . . . . . . . . . . . . . . . . . . . . . . . . . . . . . . . . . 106
Archiving Clips. . . . . . . . . . . . . . . . . . . . . . . . . . . . . . . . . . . . . . . . . . . 106
Recording a Black Clip for Archive Play. . . . . . . . . . . . . . . . . . . . . 107
Using Aurora Edit. . . . . . . . . . . . . . . . . . . . . . . . . . . . . . . . . . . . 107
Using a Media Server . . . . . . . . . . . . . . . . . . . . . . . . . . . . . . . . 108
Additional Playlist Features. . . . . . . . . . . . . . . . . . . . . . . . . . . . . . . . . 108
Rearranging the Layout of a Playlist. . . . . . . . . . . . . . . . . . . . . . . . 108
Viewing Clip Properties . . . . . . . . . . . . . . . . . . . . . . . . . . . . . . . . . 108
Assigning Clips to Channels. . . . . . . . . . . . . . . . . . . . . . . . . . . . . . 108
Rearranging a Playlist . . . . . . . . . . . . . . . . . . . . . . . . . . . . . . . . . . 109
Adding New Clips to a Playlist . . . . . . . . . . . . . . . . . . . . . . . . . . . . 109
Using the Context-Sensitive Playlist Menu . . . . . . . . . . . . . . . . . . . . . 110
Chapter 8 Managing Clips
Tour of Housekeeper. . . . . . . . . . . . . . . . . . . . . . . . . . . . . . . . . . . . . . 111
The Housekeeping Tab . . . . . . . . . . . . . . . . . . . . . . . . . . . . . . . . . 111
The Clip Import Tab . . . . . . . . . . . . . . . . . . . . . . . . . . . . . . . . . . . . 112
The Archive Tab. . . . . . . . . . . . . . . . . . . . . . . . . . . . . . . . . . . . . . . 113
Toolbar . . . . . . . . . . . . . . . . . . . . . . . . . . . . . . . . . . . . . . . . . . . . . 114
Deleting Clips From the Clip Database. . . . . . . . . . . . . . . . . . . . . . . . 115
Deleting Placeholders/Clips . . . . . . . . . . . . . . . . . . . . . . . . . . . . . . 115
Moving Files to the Recycle Bin . . . . . . . . . . . . . . . . . . . . . . . . . . . 115
Emptying the Recycle Bin. . . . . . . . . . . . . . . . . . . . . . . . . . . . . . . . 116
Unprotecting a Clip. . . . . . . . . . . . . . . . . . . . . . . . . . . . . . . . . . . . . 116
Refreshing the Clip List . . . . . . . . . . . . . . . . . . . . . . . . . . . . . . . . . 116
Deleting Clips from a media server only. . . . . . . . . . . . . . . . . . . . . 116
Importing Clips . . . . . . . . . . . . . . . . . . . . . . . . . . . . . . . . . . . . . . . . . . 117
Importing Clips from a media server. . . . . . . . . . . . . . . . . . . . . . . . 117
Changing Clip Properties . . . . . . . . . . . . . . . . . . . . . . . . . . . . . . . . 118
Creating New Placeholders . . . . . . . . . . . . . . . . . . . . . . . . . . . . . . 118
Archiving Clips. . . . . . . . . . . . . . . . . . . . . . . . . . . . . . . . . . . . . . . . . . . 120
Resynchronizing Clips. . . . . . . . . . . . . . . . . . . . . . . . . . . . . . . . . . . . . 120
Appendix A Sample of iNEWS configuration file
Sample of MOS Gateway configuration file. . . . . . . . . . . . . . . . . . . . . 123
Index....................................................................................................127
September 2007 Aurora Playout User Guide 5
Page 6

Contents
6 Aurora Playou t User Guide September 2007
Page 7

Grass Valley Product Support
T o get technica l assistance, che ck on the status of a question, or to repo rt new issue, contac t
Grass Valley Product Support via e-mail, the Web, or by phone or fax. Contact Grass Valley
first regarding problems with third party software on Grass Valley products, such as the
®
Microsoft
internet browser, SQL Server™ and QuickTime™.
Web Technical Support
Phone Support
Windows® operating system, Windows Media® player, Internet Explorer
To access support infor mation on the Web, v isit the pro duct support Web p age on the
Grass Valley Web site. Yo u ca n down loa d software or find solutions to problems by
searching our Frequently Asked Questions (FAQ) database.
World Wide Web: http://www.thomsongrassvalley.com/support/
Technical Support E-mail Address: gvgtechsupport@thomson.net .
Use the following information to contact product support by phone during business
hours. Afterhours phone support is available for warranty and contract customers.
Grass Valley Product Support
®
International
(France)
International
(United States,
Canada)
Hong Kong,
Taiwan, Korea,
Macau
Australia, New
Zealand
Central, South
America
China +861 066 0159 450 Netherlands +31 (0) 35 62 38 421
Belgium +32 (0) 2 334 90 30 Northern Europe +45 45 96 88 70
Japan +81 3 5484 6868 Singapore +65 6379 1313
Malaysia +603 7805 3884 Spain +41 487 80 02
Middle East +971 4 299 64 40 UK, Ireland, Israel +44 118 923 0499
+800 80 80 20 20
+33 1 48 25 20 20
+1 800 547 8949
+1 530 478 4148
+852 2531 3058 Indian
+61 1300 721 495 Germany, Austria,
+55 11 5509 3440 Near East, Africa +33 1 48 25 20 20
Italy +39 02 24 13 16 01
+39 06 87 20 35 42
Belarus, Russia,
Tadzikistan,
Ukraine,
Uzbekistan
Subcontinent
Eastern Europe
+7 095 258 09 20
+33 (0) 2 334 90 30
+91 11 515 282 502
+91 11 515 282 504
+49 6150 104 444
September 2007 Aurora Playout User Guide 7
Page 8

Authorized Support Representative
A local authoriz ed support repres entative may be av ailable in you r country. To locat e the
support represent ative for your c ountry, visit the product support Web p age on the Grass
Valley Web site.
Safety Summaries
General Safety Summary
Review the following safety precautions to avoid injury and prevent damage to this
product or any products connected to it.
Only qualified personnel should perform service procedures.
While using this product , you may need t o acces s other parts of the sy stem. Read t he
General Safety Summary in other system manuals for warn ings a nd cau ti ons re late d
to operating the system.
Review all system operator manuals, including manuals in electronic format on the
system hard drive.
Injury Precautions
Use Proper Power
Cord
Ground the Product This product is grounded t hrou gh the grounding conductor of the power
Do Not Operate
Without Covers
Do Not Operate in
Wet/Damp
Conditions
Do Not Operate in
an Explosive
Atmosphere
Avoid Expo sed
Circuitry
To avoid fire hazard, use only the power cord specified for this product.
cord. To avoid electric shock, the grounding conductor must be
connected to earth ground. Before making connections to the input or
output terminals of the product, ensure that the product is properly
grounded.
To avoid electric shock or fire hazard, do not operate this product with
covers or panels removed.
To avoid electric shock, do not operate this product in wet or damp
conditions.
To avoid injury or fire ha zard, do not operate this pr oduct in an explosive
atmosphere.
To avoid injury, remove jewelry such as rings, watches, and other
metallic objects. Do not touch exposed connections and components
when power is present.
Product Damage Precautions
Use Proper Power
Source
8 Aurora Playout User Guide September 2007
Do not operate this product from a power source that applies more than
the voltage specified.
Page 9

Safety Terms and Symbols
!
!
Provide Proper
Ventilation
Do Not Operate With
Suspected Failures
Battery
Replacement
To prevent product overheating, provide proper ventilation.
If you suspect there is damage to this product, have it inspected by
qualified service personnel.
To avoid damage, replace only with the same or equivalent type
recommended by the circu it board manufactu rer. Dispose of used bat tery
according to the circuit board manufacturer’s instructions.
Safety Terms and Symbols
Terms in This
Manual
Terms on the
Product
These terms may appear in this and other product manuals:
WARNING: Warning stat ements ide ntify con ditio ns or prac tices t hat ca n
result in personal injury or loss of life.
CAUTION: Caution statements identify conditions or practices that can
result in damage to the equipment or other property.
These terms may appear on the product:
DANGER indicates a personal injury hazard immediately accessible as
one reads the marking.
WARNING indicates a persona l injury hazard no t immediately acces sible as
you read the marking.
CAUTION indicates a hazard to property including the product.
September 2007 Aurora Playout User Guide 9
Page 10

!
Symbols on the
Product
The following symbols may appear on the product:
DANGER high voltage
Protective ground (earth) terminal
ATTENTION – refer to manual
Service Safety Summary
Do Not Service
Alone
No Power Switch To avoid electric shock, disconnect the main power by means of the
Use Care When
Servicing With
Power On
Do not perform internal service or adjustment of this product unless
another person capab le of rendering first a id a nd re sus citation is present.
power cord. The power cord is the main power disconnect. Ensure that
the power cord is easily accessible at the rear of the product or at the
power receptacle.
Dangerous voltages or currents may exist in this product. Disco nnect power
and remove battery (if applicable) before removing protective panels,
soldering, or replacing components.
To avoid electric shock, do not touch exposed connections.
Certifications and Compliances
Canadian Certified
Power Cords
Canadian approval includes the products and power cords appropriate for
use in the North America power network. All other power co rds supplied are
approved for the country of use.
FCC Emission
Control
Canadian EMC
Notice of
Compliance
This equipment has been te sted and fou nd to comply with the limits for a
Class A digital d evice, pursuant to Part 15 of the FCC Rules. These limits
are designed to provide reasonable protection against harmful
interference when the equipment is operated in a commercial
environment. This equipment generates, uses, and can radiate radio
frequency energy and, if not installed and used in accordance with the
instruction manual, may cause harmful interference to radio
communications. Operation of this equipment in a residential area is
likely to cause harmful interference in which case the user will be
required to correct the interference at his own expense. Changes or
modifications not expressly approved by Grass Valley can affect
emission compliance and could void the user’s authority to operate this
equipment.
This digital apparatus does not exceed the Class A limits for radi o noi se
emissions from digital apparatus set out in the Radio Interference
Regulations of the Canadian Department of Communications.
Le présent appareil numérique n’émet pas de bruits radioélectriques
dépassant les l imites appl icables a ux apparei ls numérique s de la cl asse A
préscrites dans le Règlement sur le brouillage radioélectrique édicté par
le ministère des Communications du Canada.
10 Aurora Playout User Guide September 2007
Page 11

Certifications and Compliances
Canadian Certified
AC Adapter
EN55022 Class A
Warning
Laser Compliance
Laser Safety
Requirements
Laser Safety Laser safety in the United States is regulated by the Center for Devices
Canadian approval includes the AC adapters appropriate for use in the
North America power network. All other AC adapters supplied are
approved for the country of use.
For products that comply with Class A. In a domestic environment this
product may cause r adio interference i n which case the use r may be required
to take adequate measures.
The device used in this product is a Class 1 certified laser product.
Operating this product outside specifications or altering its original
design may result in hazardous radiation exposure, and may be
considered an act of modifying or new manufa ctu ri ng of a la ser product
under U.S. regulations contained in 21CFR Chapter 1, subchapter J or
CENELEC regulations in HD 482 S1. People performing such an ac t are
required by law to recertify and reidentify this product in accordance with
provisions of 21CFR subchapter J for distribut ion wit hin the U.S.A., and
in accordance with CENELEC HD 482 S1 for distribution within
countries using the IEC 825 standard.
and Radiological Health (CDRH). The laser safety regulations are
published in the “Laser Product Performance Sta ndard,” Code of Federa l
Regulation (CFR), Title 21, Subchapter J.
FCC Emission
Limits
The International Electrotechnical Commission (IEC) Standard 825,
“Radiation of Laser Products, Equipment Classification, Requirements
and User’s Guide,” governs laser products outside the United States.
Europe and member nations of the Europe an Free Tra de Associat ion fall
under the jurisdiction of the Comité Européen de Normalization
Electrotechnique (CENELEC).
This device complies with Pa rt 15 of the FCC Rules. Opera tion is subject
to the following two conditions: (1) This device may not cause harmful
interference, and (2) this device must accep t any interf erence rece ived,
including interference that may cause undesirable operation.
September 2007 Aurora Playout User Guide 11
Page 12

Certification
Environmental Criteria
Category Standard
Safety Designed/tested for compliance with:
ANSI/UL60950-2000 - Safety of Information Technology Equipment
IEC 60950 - Safety of Information Technology Equipment (3rd edition, 1999)
CAN/CSA C22.2, No. 60950-00 - Safety of Information Technology Equipment
EN60950:2000 - Safety of Information Technology Equipment (3rd edition)
The following table lists the environmental criteria for Aurora Playout.
Characteristics Description
Operating Temperature Requirement: 10° to 40°C
Storage Temperature Requirement: -40° to 65°C
Operating Altitude Requirement: To 10,000 feet
Supplemental Data: IEC 60950 compli ant to
2000 meters
Storage Altitude Requirement: To 40,000 feet
Mechanical Shock Supplemental Data: Class 5 (30G) Grass Valley
001131500
Random Vibration Requirement: Operational: Class 6 Grass
Valley 001131500
Requirement: Non-Operational: Class 5
Grass Valley 001131500
Transportation Requirement: Grass Valley 001131500
Equipment Type Supplemental Data: Information Technology
Equipment Class Supplemental Data: Class 1
Installation Category Requirement: Category II Local level
mains, appliances,
portable equipment, etc.
Pollution Degree Requirement: Level 2 operating
environment, indoor use only.
Relative Humidity Requirement: Operating 80% from +30° to
+40°C
Non-Operating 90% from
+30° to +60°C
Do not operate with visible
moisture on the circuit boards.
12 Aurora Playout User Guide September 2007
Page 13

Chapter 1
Introducing Aurora Playout
Aurora Playout is a playout contro l syste m that li nks a nonl inear editi ng syste m with
an electronic news production system and a media server for a complete digital
solution that works with Grass Valley’s media servers, Aurora Edit, and a
MOS-compatible newsroom computer system.
This manual shows yo u how t o ins tall, confi gure, and us e Auror a Play out ef fect ively
and efficientl y to play o ut clips to air us ing el ectronic news clip s create d with Auro ra
Edit.
This chapter discusses:
• What Aurora Playout is
• Terms you should know
• How to use Aurora Playout in your newsroom, and the roles of newsroom staff
• The Aurora Playout software components
What is Aurora Playout?
Aurora Playout is a playback control system that controls media servers for live
playback. It includes tools to integrate the program production workflow between a
media server, Aurora Edit, and optionally a newsroom computer system.
Aurora Play out is compatible with these systems:
Media Server Profile Video S erver
K2
M-Series iVDR
Editing Application Aurora Edit
Newsroom Computer
System
See the Aurora Playout Release No tes for supported versions of media servers and
Newsroom Computer Systems.
By using Aurora Pl ayout with a media serve r for ser ver pl ayou t in live progr ams you
can effectively replace four to six tape machines, depending on your media server.
Aurora Playout displays each channel simultaneously and you can control playout
with a keyboard and mouse, or with GPI buttons.
Associated Press Electronic News Production System (ENPS)
Avid Technology iNEWS
Octopus Newsroom
Aurora Playout consists of seven software components:
• Main Aurora Playout application
September 2007 Aurora Playout User Guide 13
Page 14

Chapter 1 Introducing Aurora Playout
• Assignment List Plug-in
• Assignment List Manager
• Housekeeper utility
• SDB Server
• XMOS Server
• Thumbnail Server
Each component plays a different role in the newsroom workflow and is introduced
later in this chapter.
Terms You Should Know
To use Aurora Playout effectively and efficiently, you should become familiar with
these terms:
Term Definition
Clip A piece of media you can edit, containing video, audio , or both.
Once a sequence is sent from a Aurora Edit workstati on to a media server it
becomes a clip again. All clip s and subclips merge into one clip.
Placeholde r An item (in the Aurora Pl ayout Assign ment List Plug -in or the Assi gnment Lis t
Manager) reserved for a clip that doesn’t yet exist or is not c omplete. Clips are
linked in the playlist and played to air.
Script The textual information for a news story in the newsroom computer system
(NCS) rundown. Scripts can also reference electronic media, such as clips from
a media server.
Sequence Edited med ia, consisting of different clips and sub clips edited u sing the Auro ra
Edit editing system.
Story The story — a collection of clips, sequences, an d scripts — is the complete
news segment that plays to air.
Using Aurora Playout
You can use Aurora Playout in two ways:
• To create playlists by linking to a newsroom computer system (NCS)
• To create playlists manually in Aurora Playout
14 Aurora Playout User Guide September 2007
Page 15
Linking to a Newsroom Computer System (NCS)
On-Air
Transmission
Video/Audio Routing System
Gigabit Ethernet Switch
Ethernet LAN
Playout K2
ENPS Client with
Aurora Playout Plug-in
ENPS Server and
MOS Gateway
RS422
Incoming
Feeds
!
Ingest K2
Aurora Edit with
Assignment List
!
Aurora Playout
Linking to a Newsroom Computer System (NCS)
The most efficient way to use Aurora Playout is with a MOS-compatible newsroom
computer system. The producer uses the newsroom computer system to create
rundowns for news shows, and links clips creat ed in Auro ra Edit to rundown scr ipts .
After the clips are complete, control room personnel use Aurora Playout to play out
the clips to air.
A typical newsroom workflow using a newsroom computer system (NCS) is:
• The news producer creates a rundown using NCS
• The news producer uses the Aurora Playout Assignment List Plug-in to:
• Create placeholders for scripts that require clips
• Assign placeholders to editors
• Link placeholders to scripts in the rundown
• The news producer assigns playback channels within the NCS rundown
• The news editor creates sequences for assignments using Aurora Edit
• The news editor uses the Aurora Playout Assignment List Manager to:
• Receive assignments from the producer
• Create additional clip placeholders
• Reassign placeholders to other editors
• Control room personnel use the main Aurora Playout application to:
• Open the producer’s rundown playlist
• Assign clips to specific channels for playback
• Rearran ge, insert, or delete clips prior to broadcast if necessary
• Play back clips during the news broadcast
Creating a Playlist Manually
When a MOS-compatible NCS is not available, you can manually create rundowns
and playlists.
September 2007 Aurora Playout User Guide 15
Page 16
Chapter 1 Introducing Aurora Playout
on
After creating playli sts, using placeholde rs to link to clips creat ed in Aurora Edit, you
can cue and play the clips for broadcast.
Incoming
Feeds
Gigabit Ethernet Switch
Video/Audio Routing System
Aurora Playout
Playout K2
RS422
!
On-Air
Transmissi
Ethernet LAN
Ingest K2
!
Aurora Edit with
Assignment List
A typical newsroom workflow using Aurora Playout to create playlists is:
• The news producer creates a rundown
• The news editor creates sequences for assignments using Aurora Edit
• The news producer uses the Aurora Playout Assignment List Manager to:
• Create placeholders for clips
• Assign placeholders to editors
• The news editor uses the Aurora Playout Assignment List Manager to:
• Create placeholders for clips
• Reassign placeholders to other editors
• Control room personnel use the main Aurora Playout application to:
• Create a new playlist and rundown using the scripts from the producer and the
clip database
• Assign clips to specific channels for playback
• Rearran ge, insert, or delete clips prior to broadcast if necessary
• Play back clips during the news broadcast
Tour of Aurora Playout and Plug-ins
Aurora Playout consists of several components to allow newsrooms to coordinate
news playback with a media server and an Aurora Edit workstation.
16 Aurora Playout User Guide September 2007
Page 17
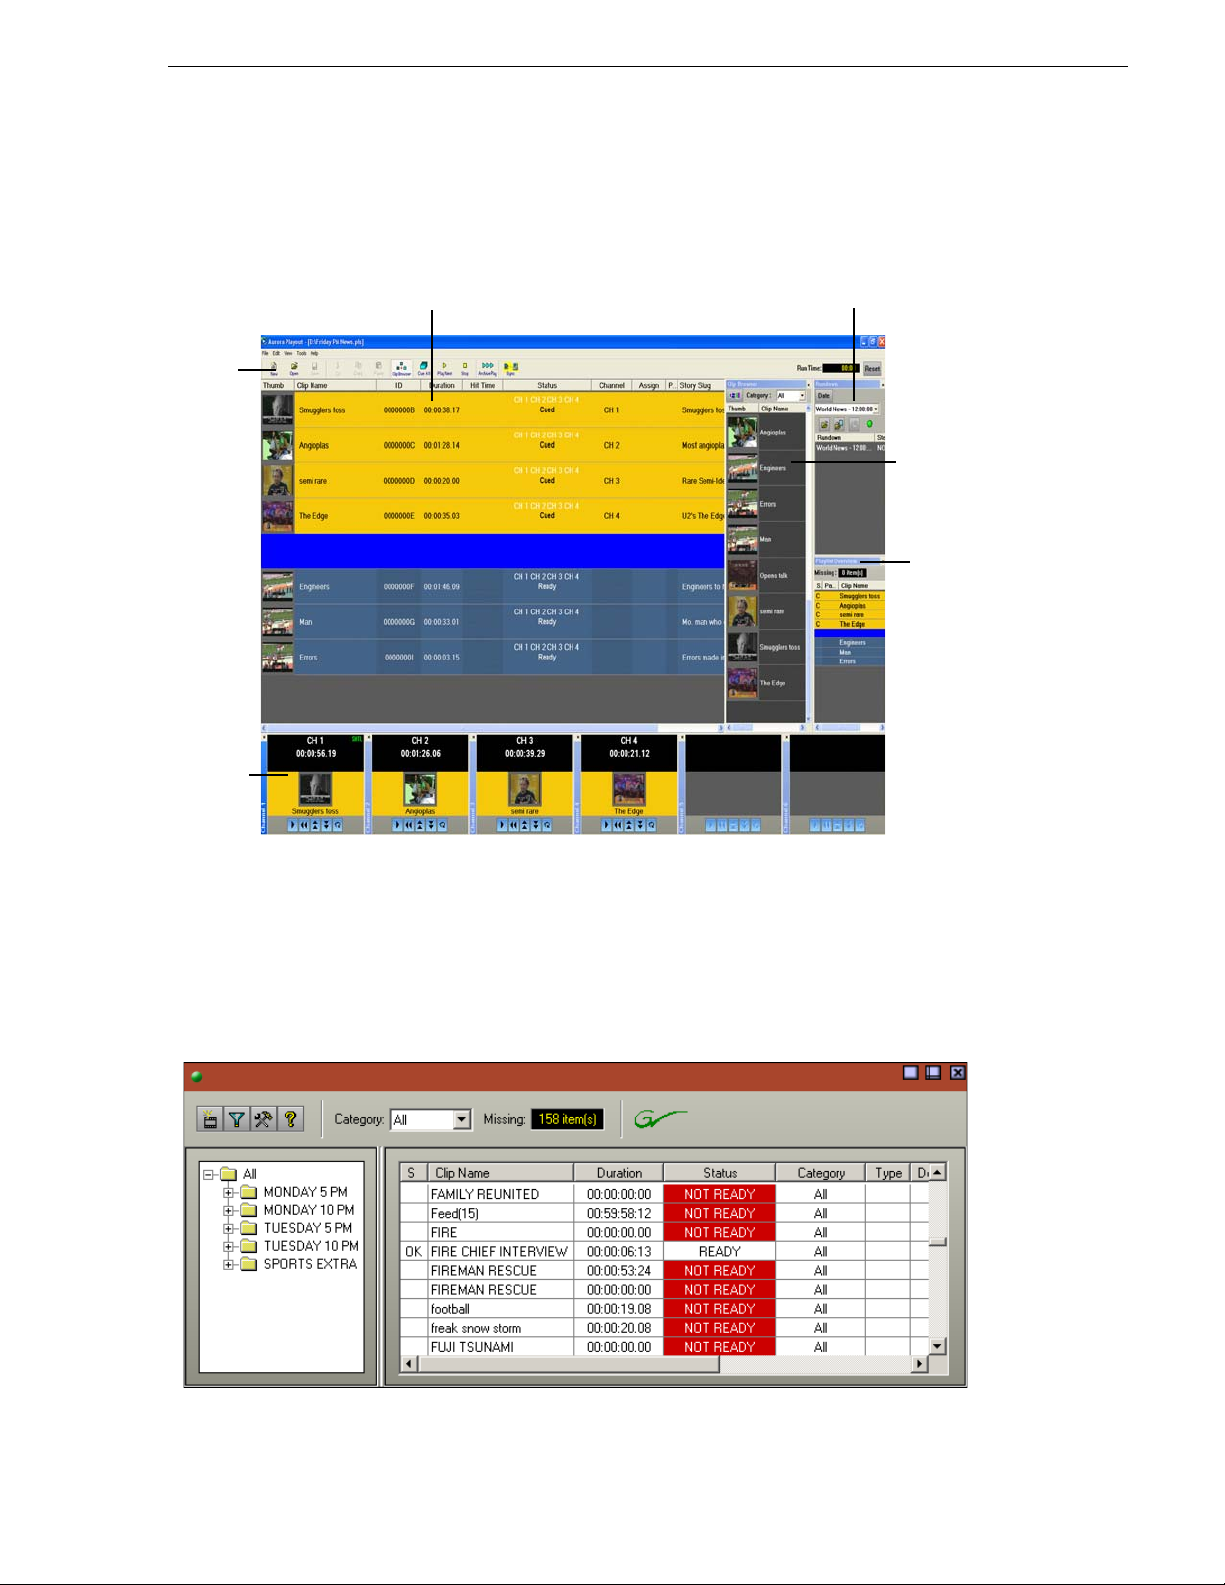
The Aurora Playout Application
Toolbar
Playlist
Channels
Clip
Browser
Rundowns
Playlist
Overview
Playback operators use the main Aurora Playout application to control playlists before
and during news broadcasts and to create new playlists.
The Aurora Playout Application
Chapter 4, “Playing Clips to Air,” describes the Aurora Playout application.
The Assignment List Plug-in
Producers use the Aurora Pla yout Ass ignment List Pl ug-in t o crea te pla ceh olders for
clips and to coordina te electronic news st ories with rundown scrip ts. The Assignment
List Plug-in integrates with the ENPS, iNEWS, and Octopus newsroom computer
systems.
September 2007 Aurora Playout User Guide 17
Page 18

Chapter 1 Introducing Aurora Playout
Chapter 2, “NCS Rundowns and Aurora Playout,” describes the Assignment List
Plug-in.
The Assignment List
The Assignment List comes i n two forms: standalone an d embedded into the Aurora
Edit application.
Producers (or other station personnel) use the standalone Assignment List to
determine how many clips are missing for a given news show. Editors use the
embedded Assignment List to re ceive assign ments from the produ cer. Bot h forms of
the Assignment List are used to create additional placeholders for clips and to reassign
placeholders to other categories.
The standalone Assignment List runs on any comput er on the network—an ic on in the
task bar flashes red when items in the selected category or rundown are missing.
18 Aurora Playout User Guide September 2007
Page 19
Housekeeper
The embedded Assignment List runs on the Aurora Edit workstation and integrates
with Aurora Edit — the Aurora Edit toolbar displays part of th e Assignment List so
editors can see at a g lance how many stories ne ed video. Opening the Ass ignment List
provides more detail on specific stories.
Chapter 3, “Editing and Aurora Playout,” describes the Assignment List Manager.
Housekeeper
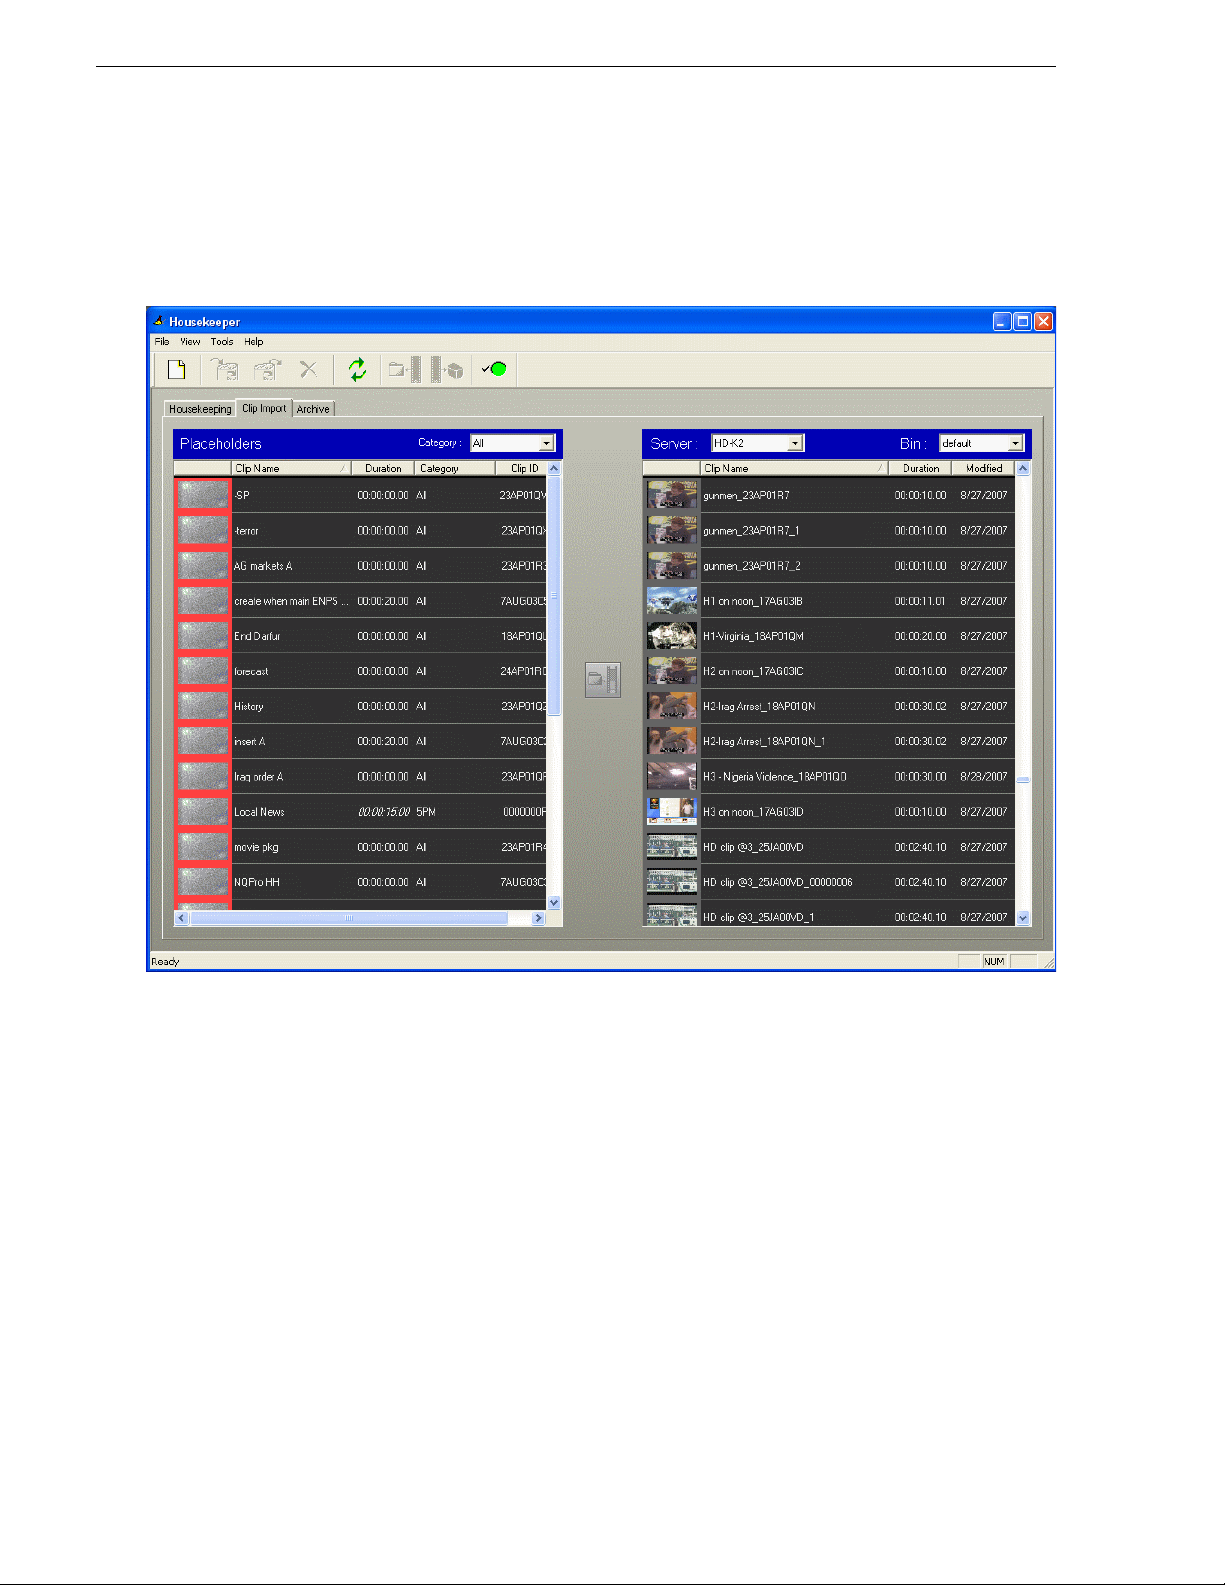
Playback operators use Housekeeper to remove files from the clip database, import
files from media servers, and to archive clips. Housekeeper typically runs on the
computer with the Main Aurora Playout application, though it can be installed on
multiple computers if necessary.
September 2007 Aurora Playout User Guide 19
Page 20
Chapter 1 Introducing Aurora Playout
Due to differences in media server channeless connection limit, not all computers
within your broadcas t operat ion can run Hous ekeeper application at th e same t ime. If
your media server is K2 version 3.2, you can run up to seven Housekeeper
applications simultaneously. While for M-Series, Profile and K2 version 3.1 and
lower; only three Housekeeper applications can be run at the same time.
Chapter 5, “Managing Clips,” describes Housekeeper.
20 Aurora Playout User Guide September 2007
Page 21
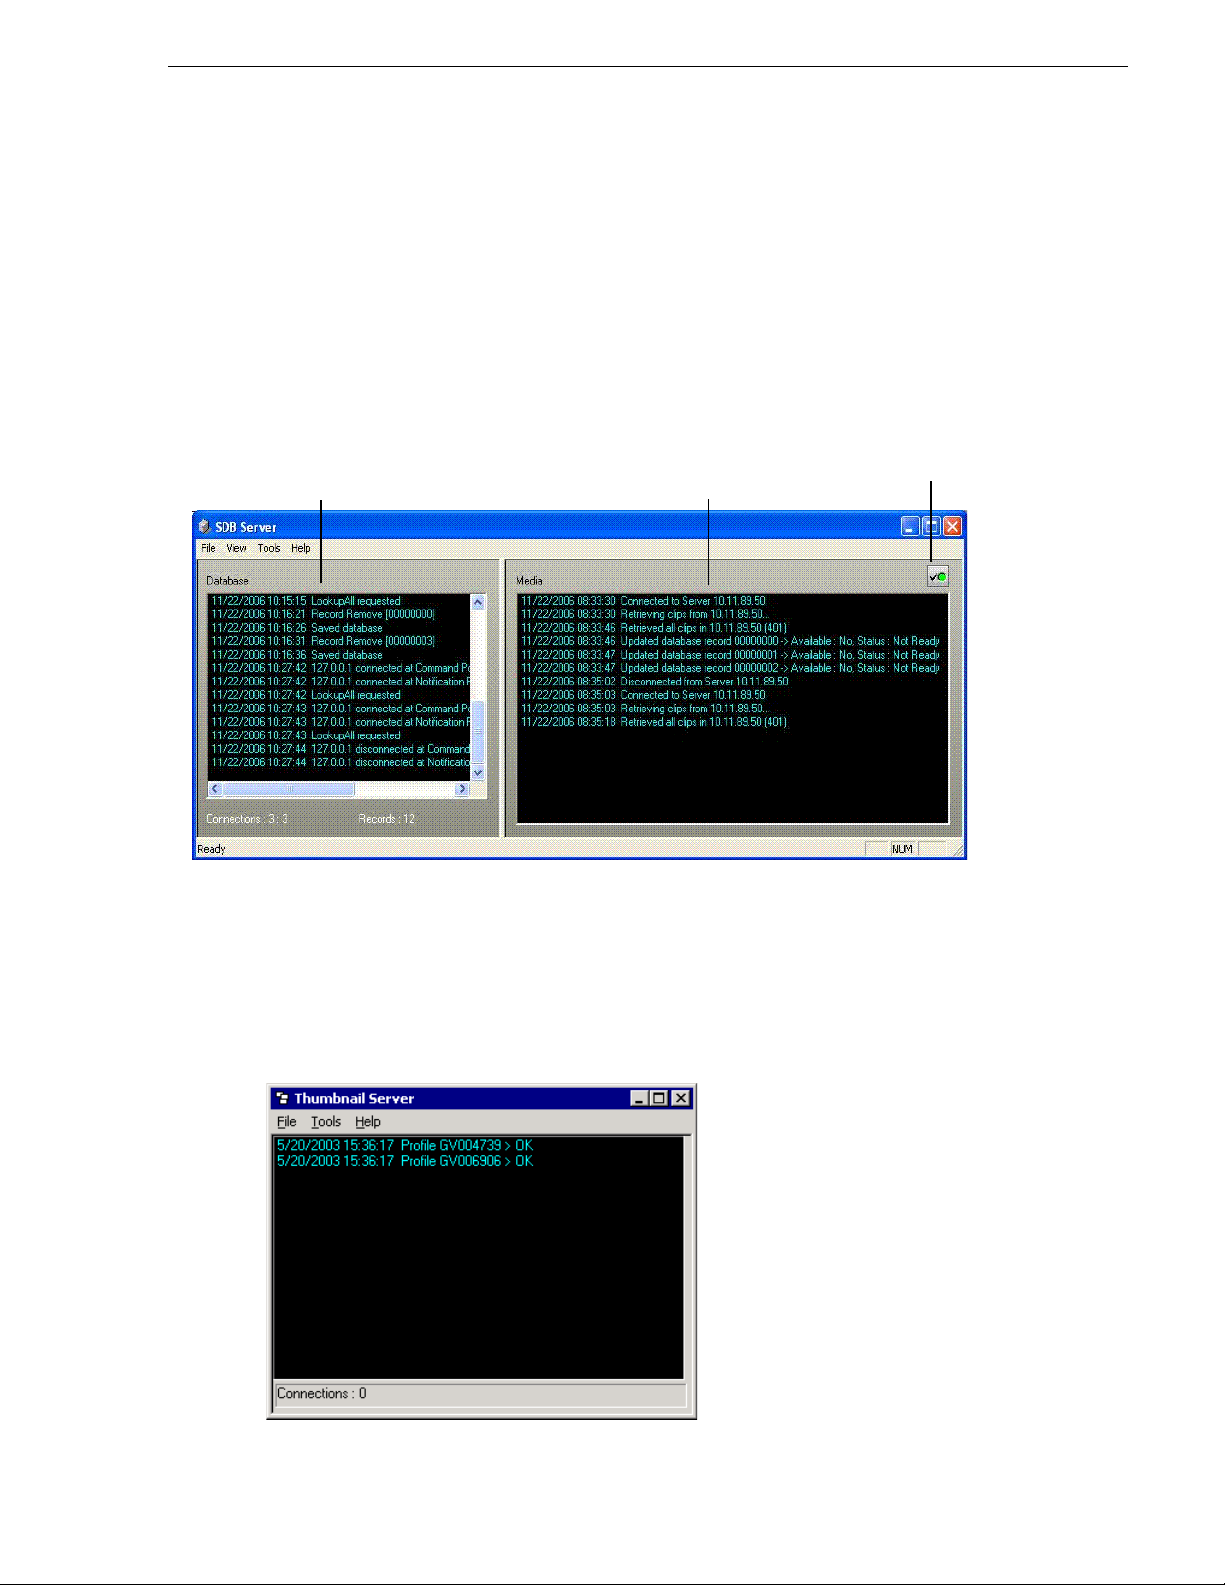
Simple Database (SDB) Server
Activity within rundowns
Activity within the
Aurora Playout database
Media
Server
status
The SDB Server runs in the background to keep clip status current. When the status
of a clip changes, the SDB Server updates available status and clip duration in the
Aurora Playout database, which in turn updates the Aurora Playout application. In
addition, when a clip sent from Aurora Edit is associated with a Aurora Playout
placeholder, the SDB Ser ver up dates the nu mber of miss ing i tems in the As sig nment
List Manager and Assignment List Plug-in.
The SDB Server runs on the same computer as th e XMOS Ser ver , and opt io nal ly on
a second system as a hot standby backup database.
Simple Database (SDB) Server
Thumbnail Server
The Thumbnail Server displays connection status to the Profile media server(s) and
creates thumbnails for MPEG clips. The K2 system or the M-Seri es iVDR does not
use the Thumbnail Server.
The Thumbnail Server typically runs on the Aurora Playout machine for flexibility,
but it can run on the same computer as the other Aurora Playout Ser ver Compone nts.
September 2007 Aurora Playout User Guide 21
Page 22
Chapter 1 Introducing Aurora Playout
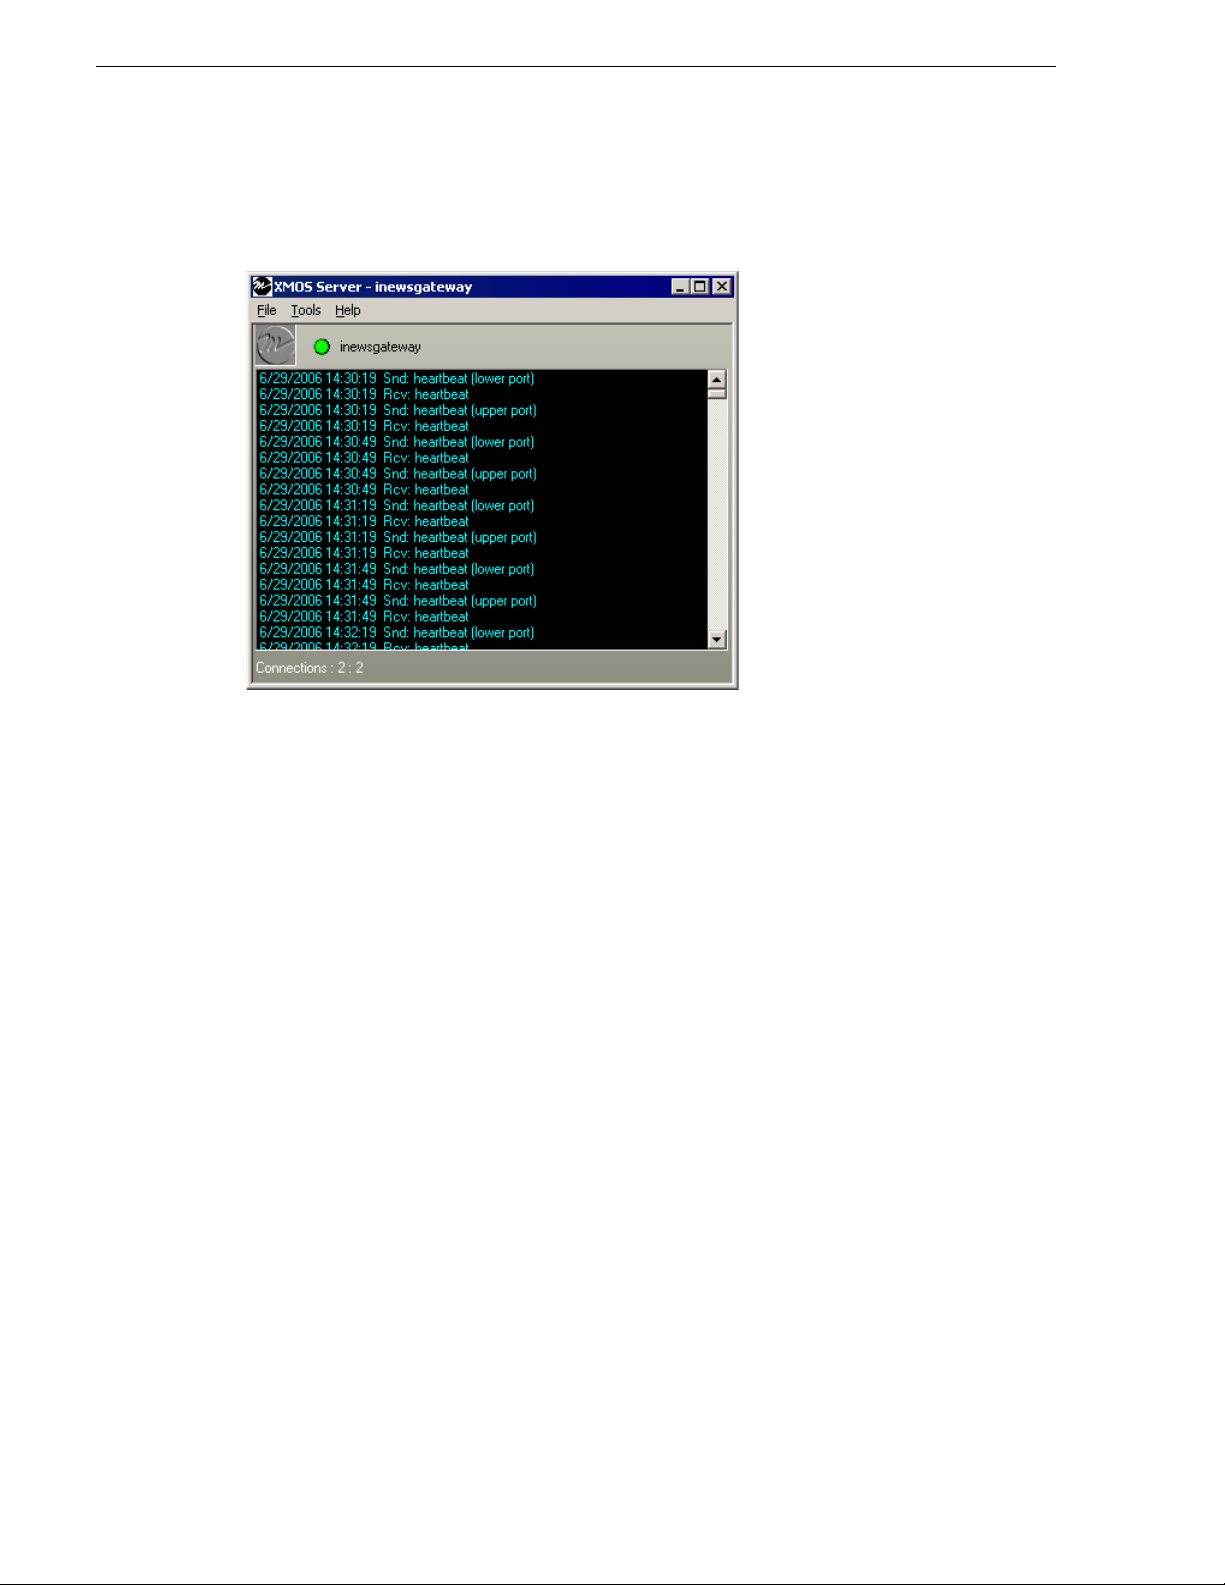
XMOS Server
The XMOS Server displays the communication between the Newsroom Computer
System and Aurora Playout. I t runs on the same computer as the pri mary SDB Server.
22 Aurora Playout User Guide September 2007
Page 23

Chapter 2
Setting Up Your NCS for Aurora Playout
With Aurora Playout, you can use your Newsroom Computer System (NCS) to create
rundowns and link clips to rundown scripts. The MOS-compatible NCS needs to be
configured for use with Aurora Playout.
This chapter discusses how to configure the following newsroom computer systems:
• ENPS
•iNEWS
• Octopus
This chapter also describes how to add breaks to your rundown.
Setting Up ENPS
To set up ENPS for use with Aurora Playout, you need to modify your ENPS
configuration:
1. On the ENPS servers, find the nom.ini file and add the following section:
[MOS]
Inport=10540
Outport=10541
LogIn=1
LogOut=1
Version=2.6
NumberROConstruction=0
2. Close the News Object Manager (NOM); it should restart automatically.
3. On an ENPS client, log in as the administrator and start up ENPS.
4. From the NEWS folder (e.g. KXYZ NEWS), select
Groups | New
ID KXYZGVG
Description GV Clips
Server Select the name of your ENPS server from the dropdown list
5. Click
6. At both ENPS Servers, choose
7. Close the News Object Manager and it should restart automatically. After the
8. From the NEWS folder (e.g. KXYZ NEWS), select
September 2007 Aurora Playout User Guide 23
Save and close ENPS on the workstation.
NOM has started, restart the ENPS client.
and create a new group with these parameters:
Resync (if using an ENPS Buddy Server).
System Maintenance |
System Maintenance | MOS
Page 24

Chapter 2 Setting Up Your NCS for Aurora Playout
Configuration | New and create a ne w MOS entry with these pa rameters:
ID The MOS ID; this value is case sensitive and must match the MOS ID
configured in the XMOS Server Options.
The recommended format is
<family>.<machine>.<location>.<enterprise>.mos. Standard practice is
to use station call letters for location and station group abbreviation for
enterprise.
Description GV Assignment List
IP The IP address or host name of the machine hosting the SDB Server and
the XMOS Server.
ActiveX GVG.XMOSCtrl.1
Default Settings Leave blank. These settings are configured when you install the
Assignment List Plug-in.
Program The group ID you configured in step 4.
MOS Versio n 2.6
Local DragDrop Off
Auto Create On
Story Send On
9. From the NEWS folder (e.g. KXYZ NEWS), sel ect
Configuration Options
its value to
10. On the ENPS server, close the NOM one last time and let it restart automatically.
11.Restart the ENPS client application.
12.Refer to “Installing the Assignment List Plug-in” on page 34 and install the
Assignment List Plug-in on all ENPS clients where this functionality is needed.
Sending scripts
The ENPS MOS Story Send feature allows Aurora Edit systems to view scripts.
To configure your system to send scripts:
1. For an existing rundown or template in ENPS, go to
2. Temporarily toggle the
3. Click in the
for Aurora Playout.
System Ma intenance | G lobal
, add a new property named AddMOSObjDuration and set
1.
Properties.
MOS Control Active field to OFF.
MOS Story Send field and turn on the c heckbox for the MOS ID used
4. Toggle the
MOS Control Active to ON to make the rundown available to Aurora
Playout.
5. Refer to “Configuring the XMOS Server” on page 62 and configure the XMOS
Server to write scripts.
24 Aurora Playout User Guide September 2007
Page 25

Aurora Edit systems will then be able to use the "Link to Story" and "Story View"
features described in Chapter 6, “Editing and Aurora Playout”.
MOS Ready to Air
If you want producers to have the ability to indicate to the Aurora Playout operation
when a rundown is rea dy, use the ENPS MOS Ready to Air fe ature. When you set this
ENPS rundown property to ON, a corresponding READY flag is set to ON in the
Aurora Playout Rundown window Status column.
Setting Up iNEWS
To set up iNEWS for us e with Aur ora Play out, you n eed to a dd a new MOS d evice to
the iNEWS configuration file:
1. On the MOS gateway machine, open the file C:\Program
Files\Avid\MOSGateway\mosconfig.xml.
2. Modify the following lines of the file, adding values for your location:
Value Description
MOS Ready to Air
ncs id Your Newsroom Compu ter System name; this value is case sensitive and
must match the NCS ID configuration in the XMOS Server options (see
“Configuring the XMOS Server” on page 62).
host The hostname of the iNEWS serve r.
mos Your MOS ID; this value is case sensitive and must match the MOS ID
configuration in the XMOS Server options (see “Configuring the XMOS
Server” on page 62).
amcp T he tag displayed in iNEWS scripts for placeholders embedded in scripts.
This value should match th e device name that appears in the iNEWS
SYSTEM.MAP file.
network The hostname of the machine running the XMOS Server.
NOTE: With iNEWS,
<handlesRoItemLevelCommands> default setting could cause
stories to drop to the bottom of the playlist when they are newly inserted, or when
their channel assignment is changed. Therefore,
value should be set to
NO in the mosconfig.xml file.
Configuring status translations
To ensure correct status reporting between Aurora Playout and iNEWS server, you
need to edit the status translation table in the iNEWS configuration file.
The status translation table within the mosconfig.xml file should appear as below:
<statusTranslations>
<statusUnavailable>NOT READY</statusUnavailable>
<statusCueing>CUEING</statusCueing>
<statusAvailable>READY</statusAvailable>
<statusCued>STAND BY</statusCued>
<statusPlaying>PLAY</statusPlaying>
<statusPaused>STOPPED</statusPaused>
<handlesRoItemLevelCommands>
September 2007 Aurora Playout User Guide 25
Page 26

Chapter 2 Setting Up Your NCS for Aurora Playout
<statusStopped>END</statusStopped>
</statusTranslations>
On the iNEWS server, your MCS dictionary (located at /site/dict/mcs) would
typically contain these lines:
A_EVERR /5ERROR
A_CAFRZ /END
A_CATREL /2STANDBY
A_CATHRD /THREAD
A_CACUING /2CUEING
A_CACUED /2CUED
A_CANOTAPE /4NOT READY
A_CABIN /READY
A_CAPLAY /3PLAY
A_CAPAUSE /3STOPPED
A_CAREW /REWIND
A_CAEJECT /EJECT
A_CAINCMPLT /TRANSFER
NOTE: Since the statuses tha t appear in this dictionary can be cust omized, the values
shown in the right column of your MCS dictionary may vary slightly from the ones
shown here.
To ensure correct configuration with iNEWS, a sample of the mosconfig.xml file is
provided in the appendix section. See Appendix A, Sample of iNEWS configuration
file on page 123.
Setting Up Octopus
To configure Octopus for Aurora Playout, you need to register a file on the Octopus
server, create an ActiveX device, and modify the MOS Devices configuration.
Registering the MOSWrapper File
1. Find the file MOSWrapper.ocx on the Octopus server machine.
2. Put the file on the Octopus server in the following location:
• On a Windows 2000 machine, put the file in C:/WINNT
• On a Windows XP machine, put the file in C:/WINDOWS
3. Double-click on the file to register it.
4. If necessary, specify the program to register it as REGSVR32.exe.
26 Aurora Playout User Guide September 2007
Page 27
Creating an ActiveX Device
1. In the Octopus application, go to Admin | MOS | Devices.
2. Highlig ht the MOS ID for Aurora Playout.
Creating an ActiveX Device
3. Click the
4. Click
Option Setting
Name User preference (e.g., ALP)
Long Name User preference (e.g., Assignment List)
Size
Type browser
Version 1.0 iNews
Insert ActiveX using GUID
Enter GUID of ActiveX control 4A7EA76A-62A5-11D4-BAE8-005 0048C80CA
5. Click
ActiveX button in the toolbar.
New and configure the device as follows:
800 width x 600 height
OK.
Configuring the MOS Device
1. In the Octopus appli cati on, go t o Admin | MOS | Devices and double-c lick on the
device you want to use with Aurora Playout.
2. Configure the Basic tab as follows:
mosID These values must match those set for the XMOS Server. See
ncsID
Disabled Unchecked
MOS protocol version 2.6
Media server host Name of machine hosting the SDB Server
Media server port SDB Server port (normally won’t change from default setting)
Rundown server host Name of machine hosting the XMOS Server
Rundown server port XMOS Server port (normally won’t change from default setting)
“Configuring the XMOS Server” on page 62.
3. Configure the Advanced tab as follows:
Option Setting
Send all objects
Send empty elements
Send empty stories ✔
September 2007 Aurora Playout User Guide 27
Page 28

Chapter 2 Setting Up Your NCS for Aurora Playout
Option Setting
Editable times
Supports more than one show ✔
Replace rundowns after connect ion roReplace
Content synchronisation allowed ✔
Send rundown metadata ✔
Send story texts ✔
Send story text elements User Preference
Prompt story element labels
Keep sending roStoryReplace ✔
Log heartbeats
Send roEl em e n tAction
Uses UTC time ✔
Receive feedback for all shows ✔
Allow mosListAll ✔
Use name instead of JobID
Delete lowres files
4. Configure the Object creation tab as follows:
Default MOS object creation device ✔
Allow automatic MOS object creation ✔
Default MOS object duration 00:00:00:00
MOS object naming pat tern
%n (where n = the name of the slug)
5. Configure the Statuses tab as follows:
Controls story status ✔ (needed to provide status information on Aurora Playout)
28 Aurora Playout User Guide September 2007
Page 29
Configuring the MOS Device
Create thes e status categories (these are the suggested names and order):
6. Configure the Extra tab as follows:
Send channel info: ✔
Other settings based on user preference
7. On the Times tab, use the default settings.
8. Click
OK.
September 2007 Aurora Playout User Guide 29
Page 30
Chapter 2 Setting Up Your NCS for Aurora Playout
Break
Adding Breaks in Your Rundown
With Aurora Playout, you can add breaks to your rundown. The Aurora Playout
Assignment List Plug-in has a placeholder call ed BREAK that you use to link to a line
in your rundown.
To add a break:
1. In the newsroom computer syst em (NCS) appli cation, i nsert a new line which will
be used as the break.
2. Open this story of the rundown.
3. From the Aurora Playout Assignment List Plug-in, drag the BREAK placeholder
into the story.
4. Save the story.
The break appears in the Aurora Playout playlist as a blue break line.
NOTE: With the current version of iNEWS and Octopus newsr oom computer systems,
setting BREAK as the stor y property or story type in t he rundown of bot h systems wil l
not show the break in Aurora Playout. To avoid this problem, iNEWS and Octopus
users should not mark the story as a break item. Please refer to your NCS
documentation on ways to create customized rundown templates that could readily
include BREAK placeholder from the Assignment List Plug-in.
30 Aurora Playout User Guide September 2007
Page 31

Chapter 3
Installing Aurora Playout
Aurora Playout uses a central computer with RS-422 boards and GPI boards.
Software for Aurora Play out nee ds to be i nstal led on t he c entra l comput er, as well a s
other components on various computers in your network.
This chapter discusses how to:
• Cable the Aurora Playout computer
• Install Aurora Playout software, including components and plug-ins
• Connect the RDU 1510 Under Monitor Display
• Connect the X-keys controller
September 2007 Aurora Playout User Guide 31
Page 32

Chapter 3 Installing Aurora Playout
Cabling the Aurora Playout Computer
Connect the GPI inputs and outputs using the separate cables and connection blocks
as instructed in the Sealevel manuals included with your system.
The following illustr ation provides an example of a typical computer . Your particular
computer might be different.
COM2
(Not used)
COM1
Ethernet
Windows
SVGA
Monitor
KeyboardMouse
To 8-connector "octopus" cable that is supplied
by Comtrol along with their RS-422 cards
Network
RS-422
Controlled
Devices
(1 - 8)
Controlled
GPI
I/Os
(1 - 16)
RS-422
Devices
(9 - 16)
GPI
I/Os
(17 - 32)
32 Aurora Playout User Guide September 2007
Page 33

Installing Aurora Playout Software
The various Aurora Playout components reside on mult iple computers. The followi ng
table indicates where each component is typically installed:
Component Machine wher e yo u ins ta l l it.. .
Aurora Playout application Aurora Playout computer
NOTE: It is recommended that Aurora Playout is run at a
display resolution of 1280 x 1024.
Thumbnail Server Separate PC for the Server Components.
NOTE: If you are using an M-Series iV DR or K2 as your
media server, you don’t need to install the Thumbnail
Server.
Installing Aurora Playout Software
Aurora Playout Server
Components:
XMOS Server
SDB Server
Housekeeper Aurora Playout computer or another PC on the same network
Assignment List Mana ge r
(standalone version)
Assignment List Plug-in All NCS client computers. See “Installing the Assignment
Hot Standby Database Server Optional; install on a PC on the same ne twork as th e Aurora
Recommend installi ng on a separate computer even though
they are allowed to be on Aurora Playout computer.
NOTE: When the XMOS Server applicatio n is ru n nin g o n a
Windows XP system, it is recommended th at the “Windows
Firewall” feature be turned off, as it can adversely affect the
speed of MOS c om m u nic a tion with the newsroom comput e r
system.
Non-NCS comp ute rs , us u ally used by Newsroom Producers
List Plug-in” on page 34 for installation instructions.
Playout computer.
Because you must configure some components with the locations of other
components, you should plan your overall installation before you begin.
To install the Aurora Playout application and its components:
1. Insert the Aurora Playout CD into the CD-ROM drive.
2. Navigate to the CD and double-click
SetupAuroraPlayout.exe.
September 2007 Aurora Playout User Guide 33
Page 34
Chapter 3 Installing Aurora Playout
3. Click Next until you reach the Select Components screen.
4. At the Select Components scre en, check t he boxes f or the compo nent( s) you want
to install.
5. Click
6. Click
Next to start the installation.
Finish at the Inst allation Complete scre en.
7. Configure each component:
Aurora Playout
application
Thumbnail Server See “Configuring the Thu mbnail Server” on page 62.
Housekeeper See “Configuring Housekeeper” on page 64.
XMOS Server See “Configuring the XMOS Server” on page 62.
SDB Server See “Configuring the Simple Database (SDB) Server” on page 57.
Assignment List
Manager
X-keys Jog/Shuttle
controller
See “Configuri ng the Aurora Playout A pplication” on page 41.
See “Configuring the Standalone Assignment List Manager” on
page 67.
See “Configuring the X-Keys Controller” on page 50.
Installing the Assignment List Plug-in
The Assignment List Plug-i n should be inst alled on each NCS computer that ne eds to
access it. You can install this plug-in on each computer using the installation CD, or
you can create a network installation from which you can install the plug-in on
multiple computers using the same configuration file.
Using the Installer
If you are installi ng the Assignment Li st Plug-in on a small number of c omputers, the
easiest way to install i t is to use the installation CD.
To install the Assignment List P lug-in:
34 Aurora Playout User Guide September 2007
Page 35

Installing the Assignment List Plug-in
1. Insert the Aurora Playout CD into the CD-ROM drive.
2. Navigate to the CD and double-click
3. Click
Next until you reach the Select Components screen.
4. At the Select Components screen, check the
and click
Next.
SetupAuroraPlayout.exe.
Assignment List Plugin checkbox
The Assignment List Plugin Configuration Selection screen appears:
5. Select
September 2007 Aurora Playout User Guide 35
Configure Assignment List Plugin using installer and click Next.
Page 36

Chapter 3 Installing Aurora Playout
The Assignment List Plugin Configuration Dialog screen appears:
6. Enter the following information for your system and click
Name Description
Database Server Enter the name of the server hosting the Aurora Playout
database (the primary SDB Server).
Backup Database Server If you are using a backup server, check the box and enter the
name of the server hosting the Hot Standby Database Server.
XMOS Server Enter the name of the computer hosting the XMOS Server.
MOS ID Enter your MOS ID; in ENPS, the MOS ID appears under
ENPS | System Maintenance | MOS Configuration in the ID
column.
Thumbnail Path Enter the full path to the shared thumbnail directory on the
computer where thumbna ils are stored, in the format
\\server\foldername; e.g., if you have a shared folder named
“thumbnails” on your playout system named “Playout1”, the
path would be \\Playout1\thumbnails.
This path needs to match the path set in Aurora Edit—To ols |
Options | Aurora Playout | Thumbnail Path.
Please choose Newsroom
computer system:
Select the type of Newsroom Computer System yo u are
using—
ENPS/Octopus or iNEWS.
Next:
7. Click
8. Click
Next.
Finish to comple te the installation.
NOTE: After installi ng, you can view or change configur ation settings by cli cking the
Options button in the Assignment List Plug-in.
Using a Configuration File
If you want to install the Assignment List Plug-in on multiple computers with the
same configuration, you can create a network installer:
36 Aurora Playout User Guide September 2007
Page 37

Installing the Assignment List Plug-in
1. Copy the Aurora Playout software installation file, SetupAuroraPlayout.exe,
from the CD onto your network.
2. Using a text editor such as Notepad, create a file called setup.ini similar to this
example:
[AssignmentListPlugin]
DatabaseServer=SERVER1
BackupDatabaseServer=SERVER2
MosID=thom.wxyz.mos
ThumbnailPath=\\PLAYOUT1\thumbnails
VideoStandard=1
XMOSServer=SERVER1
RundownView=1
UnicodeDragDrop=1
Name Description
DatabaseServer The name of the server host ing the Aurora Playout database (primar y SDB
Server).
BackupDatabaseServer The name of the server hosting the hot standby Aurora Playout database (backup
SDB Server).
MOSID Your MOS ID.
Thumbnail Path The full path to the sha red thumbnail directory on the computer where thum bnails
are stored, in the format
named “thumbnails” on your playout system named “Playout1”, the path would
be \\Playout1\thumbnails.
This path needs to match the path set in Aurora Edit—Tools | Options | Aurora
Playout | Thumbnails Path.
VideoStand ard Your video standa r d :
Non-drop Frame
XMOS Server The name of the computer hosting the XMOS Server.
Rundown View Determines whether to show the list of rundowns in the left pane of the
Assignment List Plug-in:
UnicodeDragDrop Your Newsroom Computer System:
\\server\foldername; e.g., if you have a shared folder
0 for PAL, 1 for NTSC - Drop Frame, or 2 for NTSC -
.
0 for off, 1 for on.
0 for iNEWS or 1 for ENPS/Octopus.
3. Save the file in the directory with the SetupAuroraPlayout.exe file.
From each computer on which you are installing the plug-in:
1. Navigate to the networ k direc tory whe re you sa ved the i nstal ler an d config ura tion
file and double-click
2. Click
Next until you reach the Select Components screen.
3. At the Select Components screen, check the
and click
Next.
SetupAuroraPlayout.exe.
Assignment List Plugin checkbox
4. Select
5. Click
6. Click
Configure Assignment List Plugin using setup.ini and click Next.
Next.
Finish to comple te the installation.
September 2007 Aurora Playout User Guide 37
Page 38

Chapter 3 Installing Aurora Playout
The installer uses the setup.ini file to configure the Assignment List Plug -in.
Using a Batch File
You can als o create a ba tch file to a utomatically install the Assignm ent List Plug-in
using the setup.ini file.
To create th e batch file :
1. Create a text file named
setupALP.bat.
2. In the file, put this text:
setupauroraplayout.exe /ALP
3. Save the file into the same directory as the Aurora Playout installer and your
setup.ini file.
From each computer on which you are installing the plug-in:
• Double-click
setupALP.bat.
The batch file runs and installs the plug-in.
Connecting the RDU 1510 Under Monitor Display
Use a cable that has a DB9 s erial connector on o ne end and an RJ11 conne ction on the
other. The DB9 end connects to the COM1 serial port on the back of the Aurora
Playout, and the RJ11 end connects to the port labeled "Control" on the back of the
RDU-1510. This is an RS-422/RS-232 serial communication port.
The RJ11 connector’s pinout is shown belo w. Pin 1 is at the bottom of the connector.
Aurora Playout can be connected to either pins 3 and 4 for RS-422 or pin 4 for
RS-232. When using RS-232, pi n 3 must be conne cted to groun d. The remote dis play
unit does not transmit data to this serial port connector.
Pin Function
1 No connection
2 Ground
3 RS-422 non-inverted data or grounded for RS-232
4 RS-422 inverted data or RS-232 da ta
5 No connection
6 No connection
Connecting the X-keys Jog/Shuttle Contro ller
Once you have install ed Aurora Playout and the other component s, you can insta ll the
optional X-keys Jog/Shuttle controller. Aurora Playout has been designed to work
with the X-keys Jog/Shuttle controller (model XPS-08-US) only.
1. Plug the X-keys Jog/Shutt le controller into a USB conn ector on the Aurora Playout
machine.
2. On the Aurora Playou t machine, insert the X-keys Macro Works installation CD
38 Aurora Playout User Guide September 2007
Page 39

Connecting the X-keys Jog/Shuttle Controller
and follow instructions. Do not check the box to put shortcuts on the desktop.
NOTE: If AutoRu n is not enabl ed on your CD-ROM dri ve, find th e file "ai nstall. exe"
on the installation CD and run it.
3. Reboot the computer when prompted.
4. When the installation has completed, the X-keys Macro Maker and Macro
Manager windows automatically pop up. Close these windows. Aurora Playout
comes with a pre-configured X-keys layout.
5. Start Aurora Playout.
6. In the Au rora Playout Tools menu, select
7. Select the
X-keys tab.
8. Verify the “Enable X-keys” box is checked and click
Options.
OK.
Now you can use the X-keys Jog/Shuttle controller. A default layout ha s been
provided with pre-configured X-keys. You can customize the X-keys to suit your
needs. For more information on the X-keys configuration, see “Configuring the
X-Keys Controller” on page 50.
September 2007 Aurora Playout User Guide 39
Page 40

Chapter 3 Installing Aurora Playout
40 Aurora Playout User Guide September 2007
Page 41

Chapter 4
Configuring Aurora Playout
Aurora Playout has many opti ons that let you def ine how your system is set up. While
your system was pre-con figured at the fa ctory, you might want to adjust some options
based on how you use Aurora Playout.
This chapter discusses how to configure the following components:
• Aurora Playout application
• SDB Server
• Thumbnail Server
• XMOS Server
• Housekeeper Utility
• Assignment List Manager
• Assignment List Plug-in
Configuring the Aurora Playout Application
Aurora Playout has sever al options that you can tail or to your newsroom environment.
This section describes each setting in case you need to reconfigure your system.
To configure your Aurora Playout system:
1. Choose
The Options window appears:
Tools | Options.
September 2007 Aurora Playout User Guide 41
Page 42
Chapter 4 Configuring Aurora Playout
2. Go through each tab in the Options window and configure Aurora Playout using
the descriptions in the following sections.
3. Click
4. Click
Apply to apply your settings to each tab.
OK when you are done setting options.
Setting General Options
Setting Options Description
Database Server Enter the name of the computer hosting the primary SDB Server.
Backup Database Server Enter the name of the computer hosting the hot-s tandby SDB Server.
XMOS Server Enter the name of the computer hosting the XMOS Server. By default,
Update MOS Status checkbox is selected. When you have two or
the
more Playout systems running, uncheck the box on the backup system
to avoid MOS status conflicts when the same rundown is loaded by
more than one Playout system.
Thumbnail Path Enter the full path to the sha re d thu m bnai l d ire ct ory o n the c o mpu ter
where thum bnai ls ar e stor ed, in the f orma t \\server\foldername; e.g.,
if you have a shared folder named “thumbnails” on your playout
system named “Playout1”, the path would be \\Playout1\thumbnails.
This path needs to match the path set in Aurora Edit—Tools | Optio ns
| Aurora Playout | Thumbnails Path.
Disconnect
Warning
42 Aurora Playout User Guide September 2007
Yes
No
Yes to be alerted before Aurora Playout disconnects the
Select
synchronization with the NCS.
Page 43

Setting Playback Options
Setting Playback Options
Setting Options Description
Channel
Assignment
Space Bar Play Enabled
Counter Mode Count Down
Counter Display HH:MM:SS:FF
Stop Cue Delay Determines the amount of time to freeze a clip on its last frame
Post Roll Stop When a channel is playing and
Out Cue Preview Previews the last few seconds of the clip and immediately recues.
Soft When a rundown is loaded, does not assign channels to stories;
clips will be cued to the first available channel.
Hard When a rundown is loaded, assigns channels to all stories without
a current channel assignment and maintains that assignm ent
regardless of the available channels.
Enables or disables use of the space bar to play the next cued clip.
Disabled
Sets the clip duration counter to count time down from the clip
Count Up
MM:SS
duration to zero, or from zero up to the clip duration.
Determines how the counter is displayed.
before cueing the next clip on t hat channel.
Play Next is pressed, determines the
amount of time tha t the clip c ontinues t o post roll before cueing t he
next clip to that channel.
(The number of seconds that previews is determined by your
studio’s needs.)
September 2007 Aurora Playout User Guide 43
Page 44

Chapter 4 Configuring Aurora Playout
Setting Options Description
Minimum On-Air Determines the minimum time that the On-Air GPI trigger m ust be
on before releasing it will send the clip into post-roll and cue the
next clip.
End Blip 1 and 2 Determines the amount of time prior to the end of a clip to display
an audio/visual w arn in g.
End Blip Stay On Determines whether the End Blip visual signal remains on once
triggered or just flashes momentarily.
Prevent Pause within X Seconds of Pl ay Determines whether stop comman ds (through GPI input or mouse
click) can occur within a determined period of time after the
playing of a clip begins.
44 Aurora Playout User Guide September 2007
Page 45
Setting Channel Configuration
Click for a
summary of
the current
channel
configuration
Setting Channel Configuration
Setting Options Description
Select Channel 1-6 Select the channel to configure.
Channel Channel Name Enter a label name for the channel .
Include in Rotation to include this channel
Check
when automatically assigning channels.
Use Backup if you are using a second
Check
media server for mirrored playback.
Select the type of cha nnel connection.
Select the primary port for this chann el.
system.
playback channel. Use the naming convention
Vtr1, Vtr2, etc., for the channel name.
Main Playback
Channel/Backup
Playback Channel
Include in Rotation On
Off
Use Backup On
Off
Control Type RS 422
Ethernet
Playback Control
Port
Media Server Enter the name of the K2, M-Series or Profile
Server Channel Name Enter the name of the channel you are using for this
September 2007 Aurora Playout User Guide 45
Page 46
Chapter 4 Configuring Aurora Playout
Configuring GPI Input
General Purpose Interface (GPI) inputs allow you to connect a switcher or other
control device to the Aurora Pla yout syst em and use it to con tr ol th e Auror a Playout
software. Aurora Playout supports either 16 or 32 GPI inputs depending on your
hardware configuration. Sixteen GPI inputs are pre-configured by default to control
the following functions for channels A through D:
GPI Inputs
Aurora Playout
function
Play/Stop Cued Clip15913
Recue Current Clip 2 6 10 14
Cue Previous Clip 3 7 11 15
Cue Next Clip 4 8 12 16
Channel A Channel B Channel C Channel D
Click the Summary button to see an overview of the current GPI settings.
To reassign the functi on of a GPI inp ut, select the GPI number , the ch annel it aff ects,
and the function you want the GPI to perform.
Setting Options Description
Enable GPI Input
GPI Input
Channel <none>
On (checked)
Off (unchecked)
1 through 16 or 32 Select the GPI input you are conf iguring.
Channel A-F
Not Channel Specific
Check
Enable GPI Input to control the Aurora Playout
software via GPI input.
Select the channel that this GPI trigger will affect.
46 Aurora Playout User Guide September 2007
Page 47

Setting Options Description
Configuring GPI Input
GPI Function for
Channel A-F labels:
First
Second
Third
GPI Function for
Not Channel
:
Specific
Select a function f or each GPI in put. Eac h input usua lly has only one f unction , though
it can perform up to three functions.
<none> The GPI has no assigned function.
Play/Stop Plays or stops the current clip.
Play Plays the cu rr e nt clip.
Stop Stops playing the cur rent clip.
Recue Recues the cu r r e nt clip.
Cue Previous Cues the previous clip in the playlist.
Cue Next Cues the next clip in the playlist.
On-Air Only used with the First GPI function. Sends the specified
channel an On-Air signal. When Aurora Playout detects a
signal, the channel window becomes red to indicate the
channel is playing to air. When the On-Air GPI trigger is
held longer than the Minimum On-Air duration specified
under Options and then released, the channel goes into
post-roll and then cues the next clip.
<none> The GPI has no assigned function.
Cue All Cues a clip into each available ch annel, starting with the
selected clip.
Play Next Plays the next clip in the playlist.
Stop All Stops all playing channels in the playlist.
Cursor Up Selects the previous item in the playlist.
Cursor Down Selects the next item in the playlist.
September 2007 Aurora Playout User Guide 47
Page 48

Chapter 4 Configuring Aurora Playout
Configuring GPI Output
To assign the function of a GPI output, select the channel it affects, the command in
Aurora Playout that triggers GPI output and the GPI output number.
Setting Options Description
Enable GPI Output
Channel <none>
Command Cued The output is set when the channel is cued; reset when the
GPI Output
On (checked)
Off (unchecked)
Channel A - F
Playing The output is set when the channel is playing; reset when
Loop Play The output is set when the channel is in loop play mode;
Jog Forward The output is set when the Jog Forward or Jog Backward
Jog Backward
End Blip 1 (Hold till End
of Clip)
End Blip 2 (Hold till End
of Clip)
<none>
or 1-32 (depending
1-16
on your configu r a tion )
Check
Enable GPI Output to allow Aurora Playout to
trigger GPI outputs.
Select the channel that will trigger the GPI output.
channel is playing or if the clip is ejected.
the channel is stopped or the clip is ejected.
reset if not in loop play mode.
buttons are pressed; reset when the Play, Stop, or Eject
buttons are pressed, or when the channel is re-cued.
The output is set when the playing channel reaches End
Blip 1; reset when the channel is stopped or the clip is
ejected.
The output is set when the playing channel reaches End
Blip 2; reset when the channel is stopped or the clip is
ejected.
Select the GPI output you want to activate.
Click the Summary button to see an overview of the current GPI settings.
48 Aurora Playout User Guide September 2007
Page 49
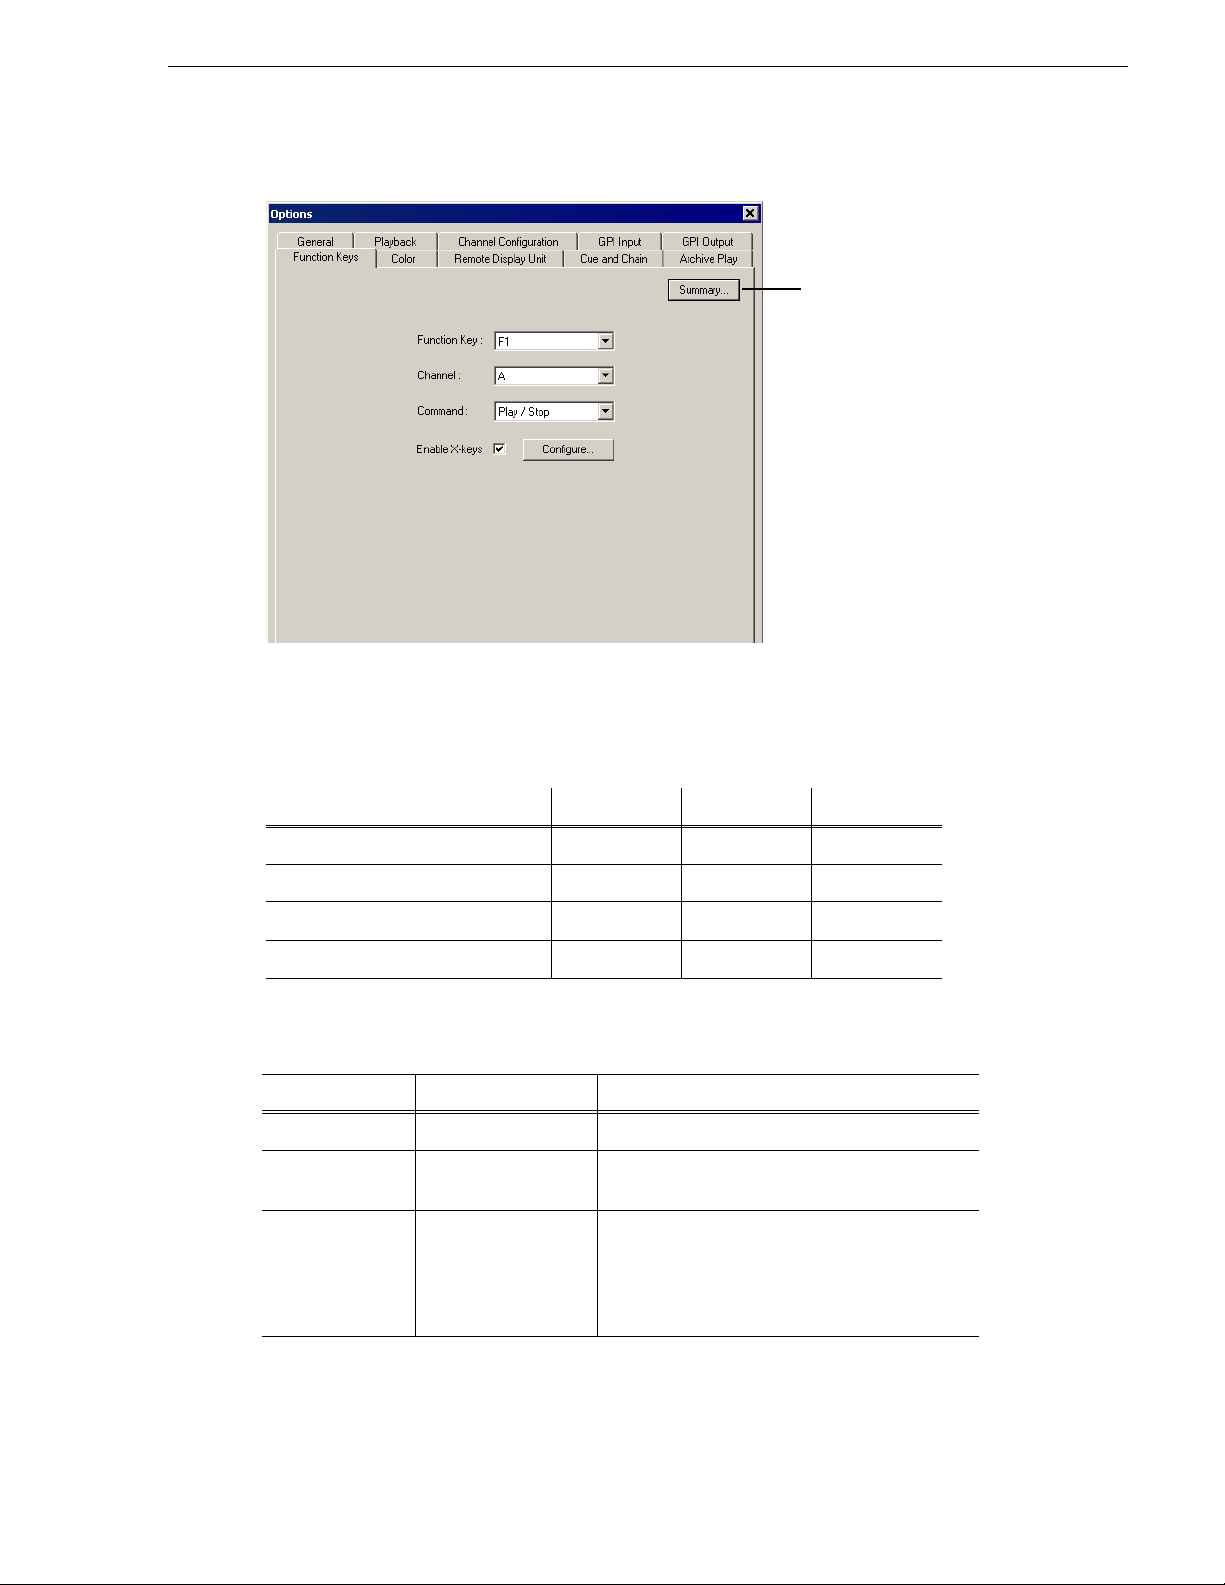
Defining Function Keys
Click for a
summary of
the current
function key
assignments
The computer function keys (F1 - F12) provide shortcuts to some Aurora Playout
commands, and are pre-configured by default to control the following functions for
channels A through C:
Defining Function Keys
Function Key
Aurora Playout function Channel A Channel B Channel C
Play/Stop Cued Clip F1 F5 F9
Recue Current Clip F2 F6 F10
Cue Previous Clip F3 F7 F11
Cue Next Clip F4 F8 F12
To reassign a function , select the Functio n Key number, the channel it affects, a nd the
command you want the function key to perform.
Setting Options Description
Function Ke y
Channel <none>
Command <none>
F1 through F12 Select the function key you want to set.
Select the channel on whic h the func tion key will
Channel A-F
Play/Stop
Recue
Cue Previous
Cue Next
operate.
Select the command the function key will perform
on the specified channel.
September 2007 Aurora Playout User Guide 49
Page 50

Chapter 4 Configuring Aurora Playout
Setting Options Description
Enable X-keys On (checked )
Off (unchecked)
Configuring the X-Keys Controller
You can use Aurora Playout with the X-keys Jog/Shuttle controller. For installation
information, see “Connecting the X-keys Jog/Shuttle Controller” on page 38. Many
of the X-keys have been pre-c onf igured on the Green layer; only th e Toggl e key has
been pre-configured on the Red layer. You can change the default l ayout or add new
commands on the unused keys.
Check
Enable X-keys to allow Aurora Playout to
use an X-keys Jog/Shuttle controller
Configure to define the function of each
Click
X-key.
NOTE: Before you can use the X-keys Jog/Shuttle controller, you need to install the
X-keys Macro Works software. However, do not use the X-keys Macro Maker
application to modify the keys.
To configure or modify a key:
1. Check
Enable X-keys on the Function Keys tab and click Configure.
2. Click on the key that you want to configure or modify. A drop-down list displays
the available commands.
3. Select a command to apply to this key.
4. Repeat steps 1 and 2 to configure additional keys.
5. Once you have finished configuring keys, click
OK.
In addition to the keys, the controller comes with jog/shuttle knob. The jog control,
the center disk of the knob, al lows you to make prec ise frame by fr ame selecti ons for
editing. The outer rim can be used in Shuttle or Varispeed mode. The SH/VS key
toggles between the two modes.
50 Aurora Playout User Guide September 2007
Page 51

Shuttle and Varispeed modes both allow you to play clips at various preset fast
forward, rewind, and slow-motion speeds. In Shuttle mode, when you release the
knob the clip stops. In Varispeed mode, when you release the knob the clip keeps
playing until you press the Stop key.
Using the X-keys Jog/Shuttle Controller
The X-keys controller allows you to simplify your workflow. For example, you can
use the default layout to easily navigate between different channels or between the
Playlist and Clip Browser windows.
Any commands you send using the X-keys controller apply to the currently active
channel or window, which is considered to have
you can perform tasks such as navigating through a clip or trimming a clip. When a
window has focus, you can scroll through the clips or the playlist. Always bear in
mind that you need to give focus to a channel or window before you can apply the
X-keys controller comm ands to it.
The following table describes the pre-configured keys on the X-keys Jog/Shuttle
controller.
Setting Description
Defining Function Keys
focus. When a channel has focus,
Enable X-keys Enables or disables the X-keys Jog/ Shuttle controller.
Layer Indicates whether you are configuring the Red or Gr een layer.
Reset All Keys Resets all the keys on the particular layer that you are configuring. Reset All
Keys does not affect keys that shift between the layers, i.e. the Toggle, Red,
and Green keys.
Toggle While you are using the X-keys controlle r, Toggle switches between the Red
and Green layers.
Focus PL Gives focus to the main Aurora Playout Playlist window, t hat is, makes the
Playlist window active. X-keys commands such as scrolling will apply to the
window that has focus.
Focus CB Gives focus to the Clip Browser window, if open. X-keys commands such as
scrolling will apply to the window that has focus.
Scr Up
Scr Down
Focus 1-6 Gives focus to the specified channel. X-keys commands such as those related
Focus Next Gives focus to the next channel. All X-keys commands will apply to the
When the focus is on the Clip Browser window, you can press the Scroll Up
or the Scroll Down button to select a clip in the Clip Browser.
When the focus is on the main Playli s t window, you can press the Scroll Up
or the Scroll Down button to select a clip in the Rundown.
to playing, shuttling, or trim ming a clip i n a channe l will a pply to the c hannel
that currently has focus.
channel that currently has focus.
10 Back Jogs the clip b ackward 10 frames.
10 Fwd Jogs the clip forward 10 frames.
1 Back Jogs the clip backw ard 1 frame.
September 2007 Aurora Playout User Guide 51
Page 52

Chapter 4 Configuring Aurora Playout
Setting Description
1 Fwd Jogs the clip forward 1 fra me.
Rew When the focus is on a channel, you can press the Rew button to rewind the
clip in that channel.
FF When the focus is on a channel , you can press the FF button to fast forwa r d
through the clip in that channel.
Tab Key In message dialog boxes, functions in the same manne r as the Tab key on a
computer keyboa r d .
Enter Key In message dialog boxes, functions in the same manner as the Enter key on the
computer keyboa r d .
SH/VS Toggles between Shuttle an d Varispeed modes.
Mark In Marks a new In point for a clip. After trimming, the clip must be recued to
apply the new Mark In.
Mark Out Marks a new Out point for a clip. After trimming, the clip must be recued to
apply the new Mark Out.
Clear Clears the trim marks of a cli p.
Out Cue When a channel has focus, you can use the Out Cue key to activate Out Cue
Preview for that channel. This allows you to preview the end of a clip by
playing the last few seconds, followed by a recue to the beginning. The
duration of the preview can be configured by going to the Tools menu and
selecting Options, then ch anging the Out Cue Preview field on t he Playback
tab.
VAR -1
VAR 1
VAR -3
VAR 3
VAR -5
VAR 5
VAR -7
VAR 7
Recue Recues the clip.
Play/Stop Plays or stops the clip.
Variable speed
presets
These seven speeds correspond to whatever values are typed into the fields in
the Variable Speed Presets secti on of the X-keys Configuration dial og box.
When you press a VAR key, the clip plays at the preset speed for that key until
you press the Stop key.
You can move the wheel to the left to access the negative (backward) speeds,
move the wheel to the right to access the positive (forward) speeds.
Preset speeds that you can access by using the shuttle/varispeed wheel of the
controller or by using the VAR keys. You can modify these to your own
settings.
52 Aurora Playout User Guide September 2007
Page 53

Defining Status Colors
Defining Status Colors
Aurora Playout uses color to show clip st atus. To change a color, open the drop-down
menu for the color you want to change and select a new color.
Setting Description
Cued The color indicating that a clip is cued.
Roll The color indicating that a clip is playing.
Stopped The color indicating that a clip is stopped during play.
Post Roll The color indicating that a clip is in post roll.
End Blip 1 The color indicating the first audio/visual warnin g.
End Blip 2 The color indicating the second audio/visual warning.
Default Resets the colors to the default system colors.
September 2007 Aurora Playout User Guide 53
Page 54

Chapter 4 Configuring Aurora Playout
Configuring the Remote Display Unit (RDU)
A Remote Display Unit (RDU) lets you see the clips playing on each channel and the
status of each clip. The RDU usually res ides in the control r oom so that operator s can
monitor playback stat us during a broadcast. Ther e are two different RDUs you c an use
with Aurora Playout: RDU 1510 or TSI 1000.
Setting Options Description
Type of Display Unit RDU-151
0
TSI-1000
Select Unit 1
2
3
Control - Com Port
- Machine Name
Select your type of Remote Display Unit.
For the TSI, sele ct the unit that you wa nt to use. You can
connect the Aurora Playout system to up to three TSI Remote
Display Units. The default values of th ese units are 1 ,2, and 3.
You can configure these to more appropriate names for your
needs.
For the RDU 1510, select the Co m Port on the Aur ora Playou t
that the RDU is connected to (usual ly COM1).
For the TSI 1000, enter the IP address or the host name of the
TSI 1000 machine.
54 Aurora Playout User Guide September 2007
Page 55

Setting Options Description
Configuring the Remote Display Unit (RDU)
Color and
Font
Resource Display ID (1-6) Enter the Display ID number for each channel on the RDU.
Text Font No rmal
Spaced
Thin
Small
Normal Color Red
Green
Amber
On-Air Color Red
Green
Amber
External
Color
On-Air and
External Color
Tally Input (1-2)/Input ID Th e
Red
Green
Amber
Red
Green
Amber
Select the text format to display on the RDU.
Select the color to display on the RDU during normal
operation.
Select the color to display on the RDU to indicate a GPI
On-Air trigger.
Select the color to display on an external tally dev ice to
indicate an input trigger.
Select the color to display on the RDU to indicate that both the
GPI On-Air and Tal ly Input are triggered.
The Display ID determines the position o f the clip information
on the RDU.
color display associated with the current channel state on the
RDU. Typically, these settings should be left at their default
values. For more information abou t tally states , please see th e
user manual for your RDU-1510.
Tally Input determines the state of the channel, and the
Display Size Check the Size checkb ox to display the clip na me with the full
number of characters allowed. If Full is checked, 19 cha racters
can be displayed. If Full is not checked, 1 3 characters can be
displayed. (TSI-1000 only.)
Duration Check the Duration box to display the minute and seconds.
September 2007 Aurora Playout User Guide 55
Page 56
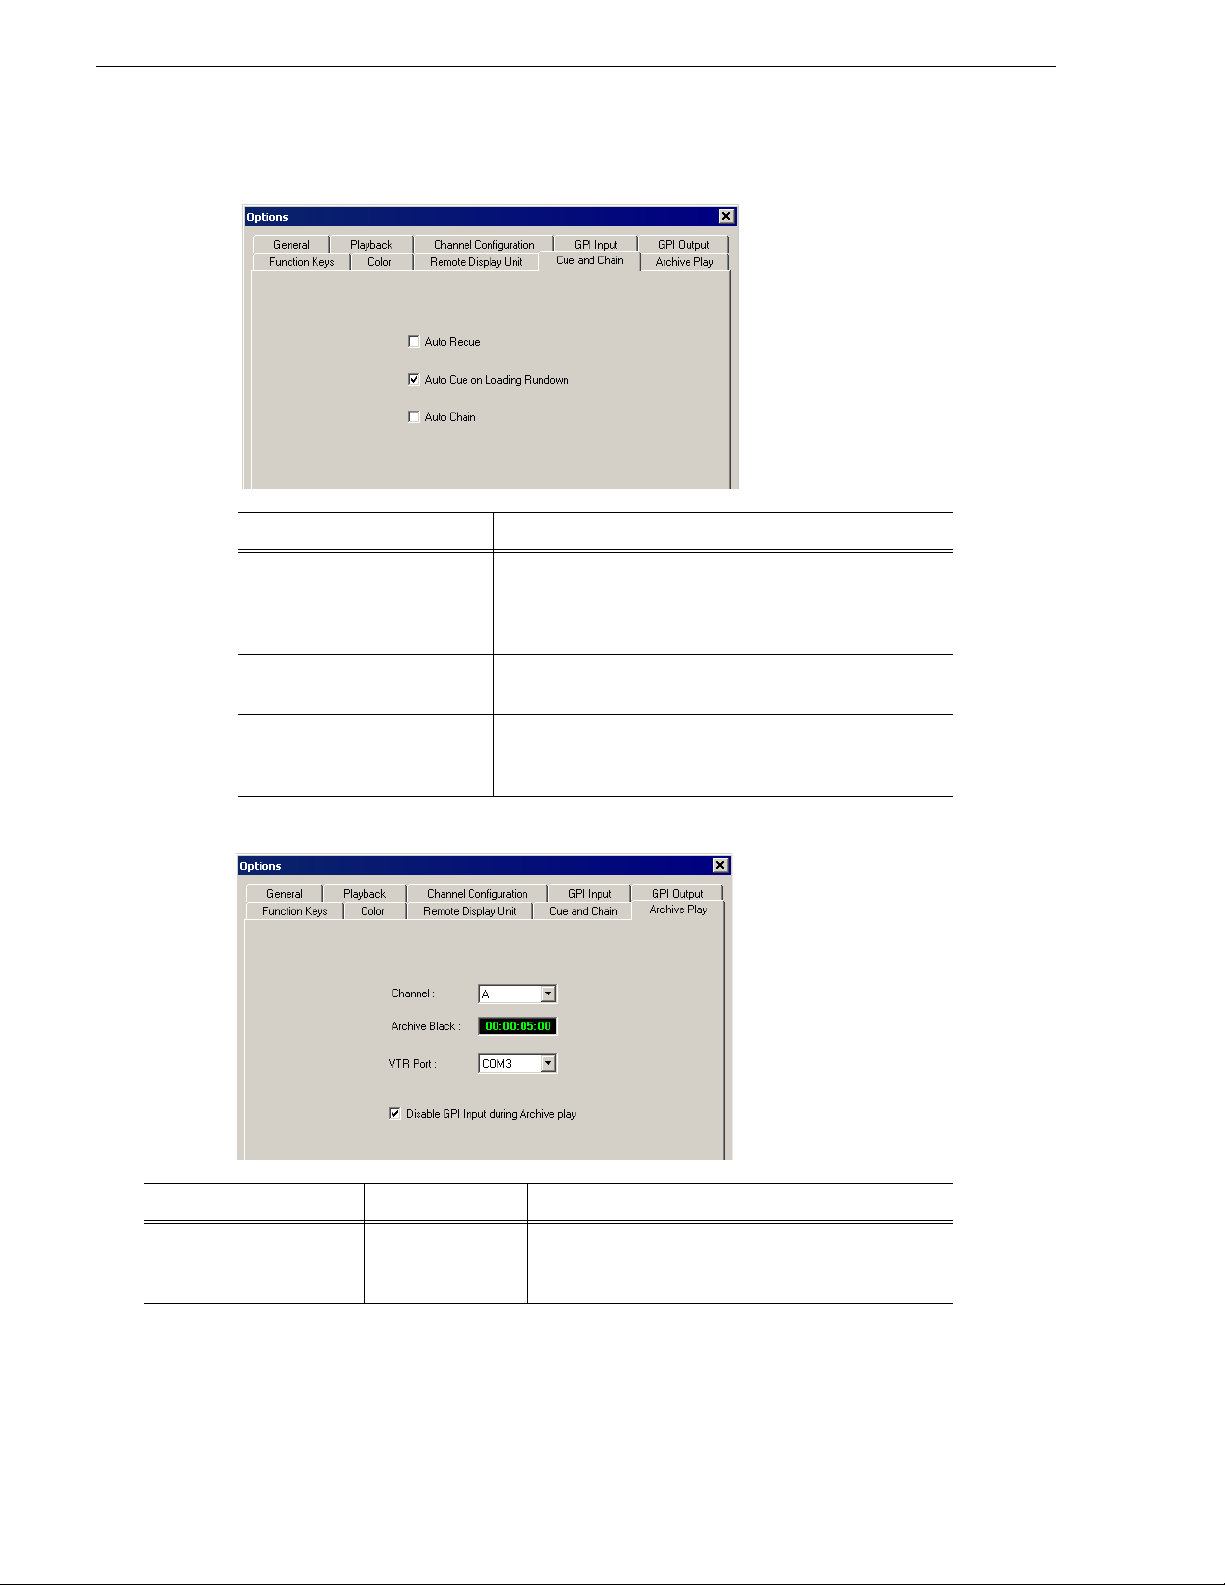
Chapter 4 Configuring Aurora Playout
Setting Cue and Chain Options
Setting Description
Auto Recue Check
when a clip is moved to a new position within the Aurora
Playout playlis t or the NCS rundown, or when clips change
to Ready status.
Auto Cue on Loading Rundown Check
clips into all available channels when you open a rundown.
Auto Chain Check
chain two or more consecutive clips in a playlist that are
assigned to the same channel.
Configuring Archive Play
Auto Recue to automatically recue clips in the play list
Auto Cue on Loading Rundown to automatically cue
Auto Chain to have Aurora Playout automatically
Setting Options Description
Channel Channel A-F Select the channel to use for Archive Play. When in
Archive Play mode, clips can be cued only to this
channel.
56 Aurora Playout User Guide September 2007
Page 57

Configuring the Simple Database (SDB) Server
Setting Options Description
Archive Black Specify the Archive Black duration. Archive Black is
the black video that separates each archived clip from
the next. The default time is
If it does not already exist on your media server, you
must record a black clip and place it in the default media
bin. The clip should be about 10 seconds long and must
be named “BLACK.” See “Recording a Black Clip for
Archive Play” on page 107 for instructions.
VTR Port Select the COM port you are using to connect the VTR.
5 seconds.
Disable GPI Input during
Archive Play
On (checked)
Off (unchecked)
Determines whether to allow GPI In put while archivin g
clips.
Configuring the Simple Database (SDB) Server
The SDB Server provides you with status on all Aurora Playout playlists associated
with NCS rundowns. To configure the SDB Server:
1. Double-click
Programs | Aurora 6.3 | SDB Server.
2. Choose
The Options window appears.
3. Go through each tab on the Options window and configure Aurora Playout using
the descriptions in the following sections.
4. Click
OK.
SDB Server on the desktop or click the Start menu and choose
Tools | Options.
September 2007 Aurora Playout User Guide 57
Page 58

Chapter 4 Configuring Aurora Playout
Setting General Options
Setting Description
Database Identifier Enter an ID for the database, up to 4 characters, such as your station call letters. All clip
IDs will begin with this identifier. This is an optional field.
Mirror Server Enter the name of the computer hosting the backup database server.
For the primary SDB Server, this is the syste m hosting th e hot standby d atabase server;
for the hot standby database server, this is the system hosting the primary SDB Server.
XMOS Server Enter the name of the computer hosting the XMOS Server.
Video Standard: Select your newsroom video standard:
NTSC - Non-drop Frame.
Database Backup
Path
Database Backup
Interval
Thumbnail Server Specifies the name of the computer running the Thumbnail Server application (if used).
Thumbnail Path Sets the path where the thumbnails will be stored.
Being Edited Select the color that displays in the Assignme nt List to alert editors that a sequenc e is
Enter the path for the database backups.
Enter how often you wa nt the database to back up automaticall y.
being edited.
PAL, NTSC - Drop Frame, or
58 Aurora Playout User Guide September 2007
Page 59

Setting General Options
Setting Description
Categories L et s you define categories for sorting and assigning placeholders.
To add a category, click
Categories appear in these locations:
Assignment List Plug-in
Assignment List Manager
Housekeeper
Aurora Playout Clip Browser
Aurora Edit
Durations Lets you set default estimated durations for new placeholde rs.
To add a duration, click
hours:minutes:seconds:frames, and click
Types Lets you define story types for placeholders. Two story types, SOT (Story on Tape) and
VO (Voice Over) are default types.
To add a story type, click
Add, enter the name of the category, and click OK.
Add, enter the duration in the format
OK.
Add, enter the type, and click OK.
September 2007 Aurora Playout User Guide 59
Page 60
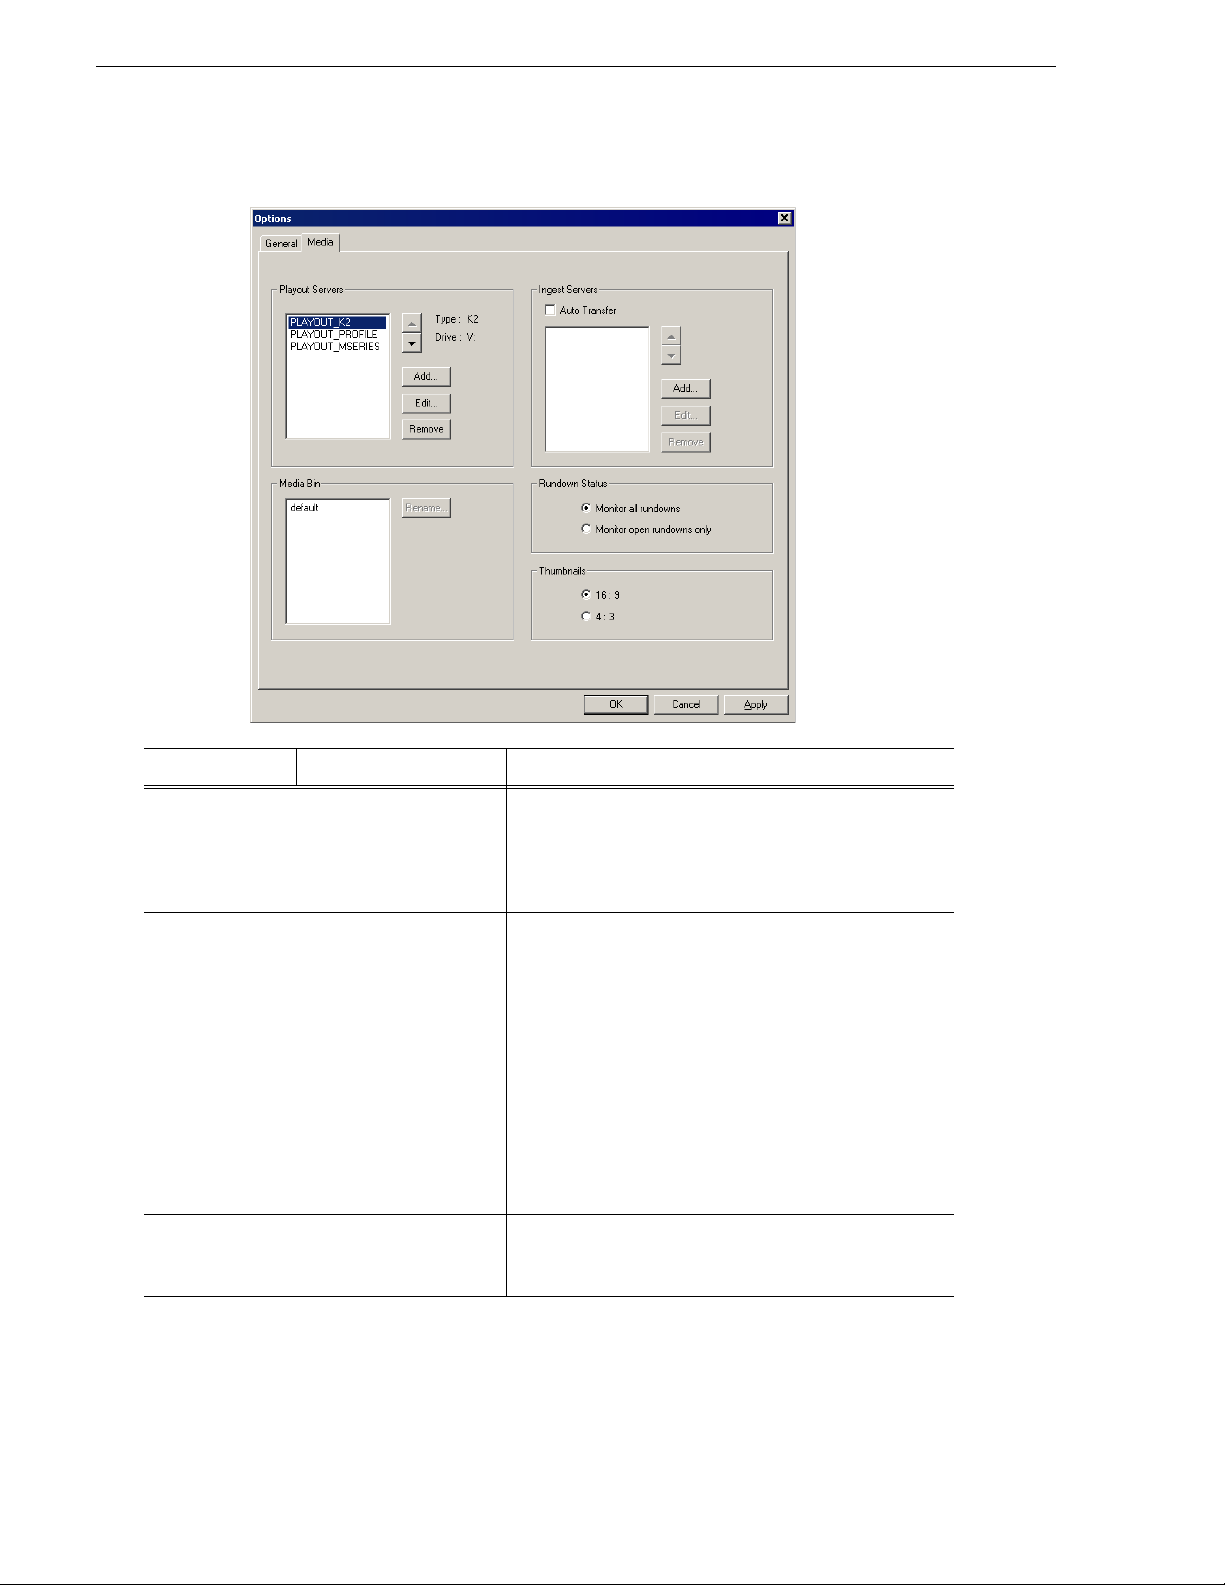
Chapter 4 Configuring Aurora Playout
Setting Media Options
Setting Options Description
Playout Servers Lets you define the media servers you are using for playout.
To add a playout server, clic k
Drive where the media is stored on the playout server, and
OK.
click
If you are using mirrored playback, add both servers here.
Ingest Servers Use the Auto Transfer feature to automatically transfer
media from a source (ingest) server to a destination
(playout) server. The Auto Transfer takes place only when
media that is sent to or recorded on the ingest server is
associated with a Playout placeholder that is part of a
MOS-Active rundown.
To add an ingest server, check
enter the name, and click
to a different server, select the server and click
A media server can only be either a source or desti nation
server for Auto Transfer, so the same media server should
never be added to both the Playout and Inge st sections. If
you are not using Auto Tr ansfer, leave this sect ion blank.
Media Bin Aurora Playout creates a default Media Bin where playout
media is sent; also used for monitoring ready status and clip
duration.
Add, enter the Name and
Auto Transfer, click Add,
OK. To change the ingest server
Rename.
60 Aurora Playout User Guide September 2007
Page 61

Reinitializing Media Monitor
Setting Options Description
Rundown Status Monitor all rundowns Select Monitor all rundowns to update sta tuses for stories
in all active rundowns in your newsroom computer system,
regardless of whether they are currently open in Aurora
Playout; this is the default.
Monitor open rund owns
only
Thumbnails 16:9
4:3
Reinitializing Media Monitor
To refresh rundowns, reinitialize media server connections and update database
records, you can sele ct the opti on to Reinitia lize Media Monito r. This is an opti on for
you to manually execute the refresh function, even though SDB Server would be
automatically updated each time there is a new change to your rundown.
To reinitialize media monitor:
1. Click
2. Select
SDB Server on the taskbar of your desktop to display the window.
Tools | Reinitialize Media Monitor or press F5 for the shortcut button.
Repopulating Rundown Items
The option to repopulate rundown items is useful if you were to accidentally delete
placeholders in Housekeeper for an active rundown. You can repopulate those
placeholders by selecting this option within SDB Server. However, this option only
repopulate empty placeholders and you still need to associate clips to those
placeholders before the rundown is ready for playback.
Monitor open rundowns only to update statuses for
Select
only the rundowns that are open in Aurora Playout; when
set, only updates the status column in your newsroom
computer syste m f or open rundowns.
Select the video aspect ratio for t humbnails displayed in
Aurora Playout components.
To repopulate rundown items:
1. Click
2. Select
SDB Server on the taskbar of your desktop to display the window.
Tools | Repopulate Rundown Items.
3. You could see the change from “Unknown Placeholder” to the previous name of
the placeholder in the rundown list.
4. Open the
Housekeeper application and associate the clip to the repopulat ed
placeholder.
Restoring Backup Database
You also have the option to rest ore your backup databa se in case the curre nt database
is corrupted or your syst em crash ed. For extra precaut ion, it is als o advisa ble to ha ve
a backup database server on another machine on your network.
To restore the backup database:
1. Click
2. Select
September 2007 Aurora Playout User Guide 61
SDB Server on the taskbar of your desktop to display the window.
Tools | Restore Backup Database.
Page 62

Chapter 4 Configuring Aurora Playout
Configuring the Thumbnail Server
The Thumbnail Server displays connection status to the Profile media server(s) and
creates thumbnails for MPEG cli ps. If yo u are usi ng an M-Seri es iVDR, K2 c lient, or
Profile with DV media for playout, you don’t need to use the Thumbnail Server.
Creating a Thumbnail Folder
Regardless of which media server you’re using, you need to create a directory in
which to store video thumbnails.
To create the Thumbnail folder:
1. Navigate to
2. Create a folder and name it
3. Right-click on the folder, select
4. Click
C:\Aurora 6.3.
Thumbnails.
Sharing, and click Share this folder.
OK.
Setting Up the Thumbnail Server
To set up the Thumbnail Server:
1. Double-click
Programs | Aurora 6.3 | Thumbnail Server.
2. Choose
3. Enter the name of the Profile media server (playout server) where the media resides
that will be used for th umbnails. If using mul tiple servers, sepa rate each name with
a comma.
Thumbnail Server on the desktop or click the Start menu and c hoose
Tools | Options.
4. Click
OK.
Configuring the XMOS Server
The XMOS Server provides communication between the Newsroom Computer
System and Aurora Playout. To configure the XMOS Server:
1. From the
62 Aurora Playout User Guide September 2007
Start menu, choose Programs | Aurora 6.3 | XMOS Server.
Page 63

2. Choose Tools | Options; the Options window appears:
3. Enter the following system inform ation:
Setting Description
Configuring the XMOS Server
MOS ID Enter your MOS ID:
In ENPS, see
In iNEWS, this value matches the <mos> value within the configuration file on the
iNEWS MOS Gateway at
your iNEWS administrator for assistance.
In Octopus, see Admin | MOS | Devices.
NCS ID Enter the name of the server hosting your newsroom computer system:
For ENPS, the name of the ENPS Se rver. If you have
ENPS | System Maintenance | MOS Configuration in the ID column.
C:/Progr a m Fi les/Avid/MOS Gateway /mosconf ig.xml. See
an ENPS Buddy server, you
need to enter both the main and buddy server names in both the NCS ID and
NCS MOS Server fields, in the format "MAIN,BUDDY".
For iNEWS, the name of the iNEWS Server.
For Octopus, see
NCS MOS Server Enter the name of the server hosting the NCS MOS Server component:
For ENPS, the same value you entered for the NCS ID.
For iNEWS, the name of the iNEWS MOS Gatew a y ma chine.
For Octopus, the name of the Octopus Server machine.
MOS Version Select the version of MOS you are using from the pull-down menu;
Octopus,
Database Server Enter the name of the server hosting the Aurora Playout database (primary SDB server).
Backup Database
Server
Script Path Enter the full path (or browse) to the directory where scripts are stored.
Enter the name of the server hosting the backup Aurora Playout database (hot standby
SDB server).
If you are not using a hot standby SDB server, leave thi s field blank.
Admin | MOS | Devices.
2.6 for ENPS and
2.7 for iNEWS. If your version is un kn ow n , lea v e se t at the default value, 2.6 .
4. Click
OK.
September 2007 Aurora Playout User Guide 63
Page 64

Chapter 4 Configuring Aurora Playout
Refreshing Rundowns
To reflect new changes on your rundown, you can select the option to refresh
rundowns within XMOS Server. This is an option for users to manually execute the
refresh function, even though XMOS Server would be automatically updated each
time there is a new change to your rundown.
To refresh rundowns:
1. Double-click
Programs | Aurora 6.3 | XMOS Server.
2. Click
Tools | Refresh Rundowns.
XMOS Server on the desktop or click the Start menu and choose
Configuring Housekeeper
Housekeeper has several options that can be tailored to the requirements and
equipment in your newsroom.
To configure Housekeeper:
1. Double-click
Programs | Aurora 6.3 | Housekeeper.
2. Choose
3. Go through each tab on the Opti ons window and conf igure Housek eeper usin g the
descriptions in the following sections.
4. Click
OK.
Housekeeper on the desktop or click the Start menu and choose
Tools | Options.
64 Aurora Playout User Guide September 2007
Page 65

Setting General Options
Setting General Options
Setting Options Description
Database Server Enter the name of the computer hosting the Aurora Playout database
(primary SDB server).
Backup Database Server Enter the name of the computer hosting t he backup Aurora Playout
database (hot standby SDB server).
Editorial Duration Prompt Check this box to prompt the user for an Editorial Duration when
associating clips with placeholders through the Clip Import tab.
Thumbnail Server Enter the name of the system running the Thumb nail Server applic ation (if
used).
Thumbnail Path Enter the full path to the thumbnail directory.
Setting Media Options
In order for Houseke eper to connect t o media servers where clips are s tored, you must
first add the server names to the Media tab.
September 2007 Aurora Playout User Guide 65
Page 66

Chapter 4 Configuring Aurora Playout
To add a media server:
1. Click
Add.
The Add Server window appears:
2. Enter the name of the server and select its type from the pull-down menu.
3. Enter the drive where media is located on the server.
The default drive for a Prof ile Ser ver is EXT: and fo r an M- Serie s or K2 Server is
V:.
4. Select the type of server—
•
Playout Server—A server where you will be sending clips to be played to air.
•
Import Server—Any server wher e you want to i mport clip s from; t his serv er is
Playout, Import, and/or Archive:
listed on the Clip Impor t tab.
•
Archive Server— Any server where you want to archive files; this server is
listed on the Archive tab. You can only have one Archive Server.
5. Click
66 Aurora Playout User Guide September 2007
OK.
Page 67
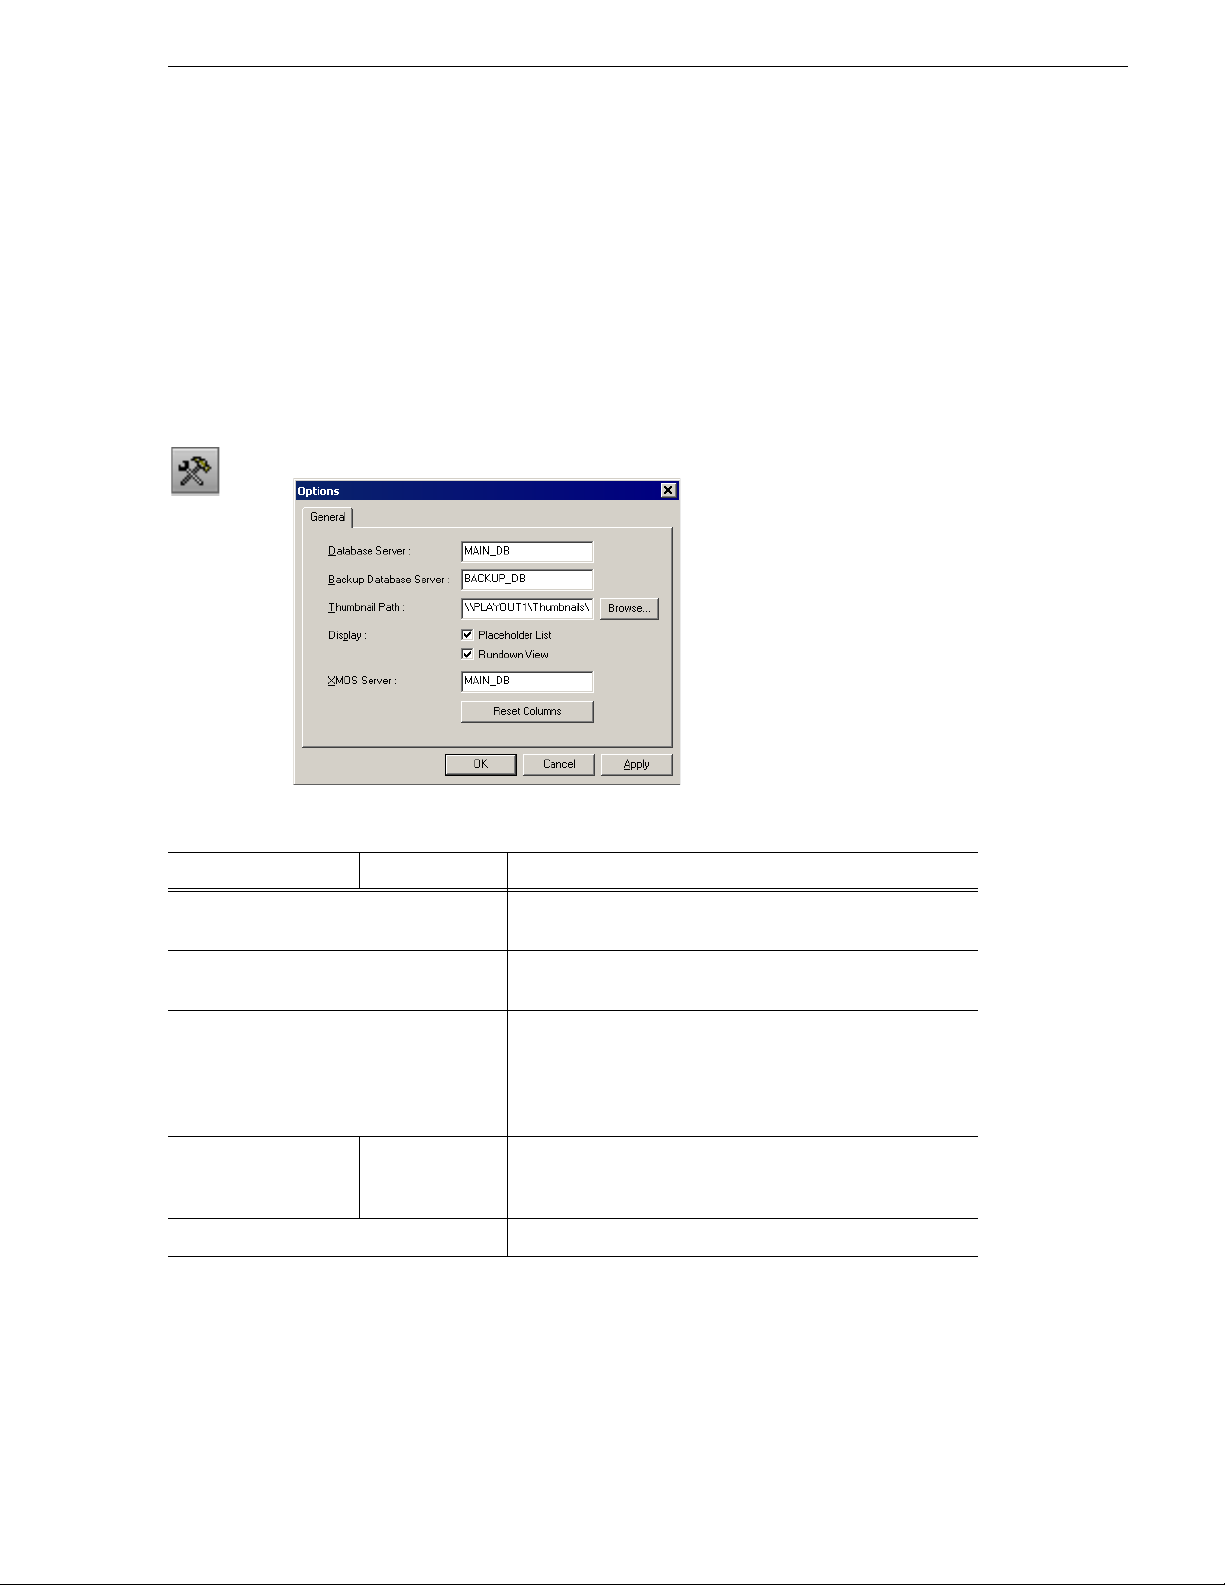
Configuring the Standalone Assignment List Manager
Configuring the Standalone Assignment List
Manager
The Assignment List Manager lets producers create placeholders for clips, assign or
reassign placeholders to editors, and monitor clip status.
To configure the Assignment List Manager:
1. Click the
Manager
Start menu and select Programs | Aurora 6.3 | Assignment List
.
The Assignment List Manager appears.
2. Click
Options; the Options window appears:
3. Enter the following system inform ation:
Setting Options Description
Database Server Enter the name of the server where the Aurora Playout
database resides (primary SDB server).
Backup Database Server Enter the name of the server for the backup Aurora Playout
database (hot standby SDB server).
Thumbnail Path Enter the full path to the shared thumbnail directory on the
computer where thumbnails are stored, in the format
\\server\foldername; e.g., if you have a shared folder named
“thumbnails” on your playout system named “Playout1”, the
path would be \\Playo ut1\thumbnails.
Display Placeholder List
Rundown View
XMOS Server Enter the na me of the computer hosting the XMOS Server.
4. Click
OK.
Select Pl aceholder List to di splay placeholde r s in the
Assignment List Manager and select
display the list of rundowns.
Rundown View to
To configure the Assignment List Manager integrated in Aurora Edit, see “Setting
Aurora Playout Options” in the Aurora Edit User Guide.
September 2007 Aurora Playout User Guide 67
Page 68

Chapter 4 Configuring Aurora Playout
68 Aurora Playout User Guide September 2007
Page 69
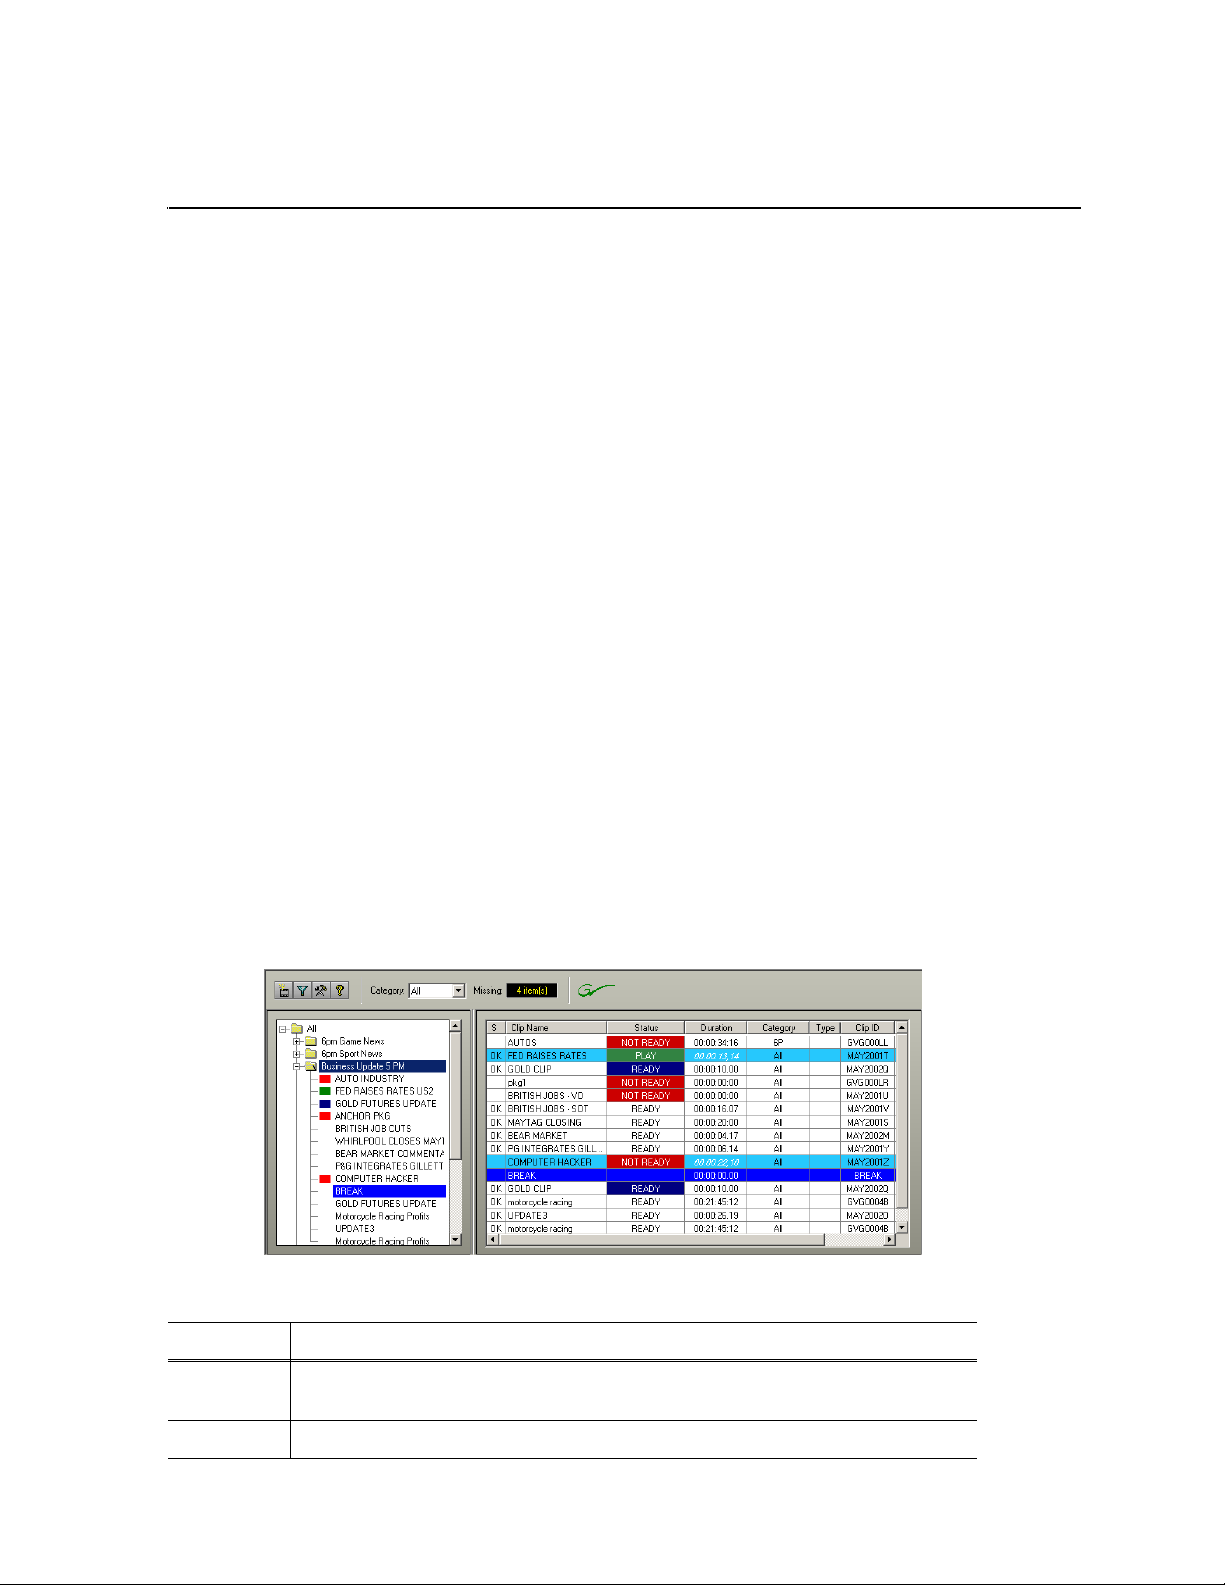
Chapter 5
NCS Rundowns and Aurora Playout
Producers can use Aurora Playout with a MOS-compatible newsroom computer
system (NCS) to create rundowns, create placeholders for editor assignments, and
link clips to the rundown. Producers can also use the NCS to assign clips to specific
playback channels , eliminating th e need for a playback operator to assign chann els for
the rundown.
In sites without an NCS, an editor can follow the producer’s script and create
placeholders using another component of Aurora Playout, such as the Assignment
List Manager, and have a playback operator manually create playlists.
This chapter is written for producers and discusses how to use the Assignment List
Plug-in to:
• Create placeholders for news clips
• Sort placeholders by category
• View placeholder categories and video thumbnails
• Link clips to an ENPS, iNEWS, or an Octopus rundown
• Assign a playout channel to clips
Tour of the Assignment List Plug-In
You use your NCS to cr eate rund owns for ne ws shows and add scrip ts for e ach story .
The Aurora Playout Assignment List Plug-in integrates with your NCS and allows
you to create placeholders for clips, assign those placeholders to newsroom editors,
and link the resulting clips back to your NCS rundown.
The Assignment List Plug-in displays the following information for each clip:
Column Description
S The clip status: displays OK if a clip has been completed, se nt to the media server, and is
ready for playback. Status is blank if a clip is incomplete and not ready for playback.
Clip Name The name of the clip.
September 2007 Aurora Playout User Guide 69
Page 70

Chapter 5 NCS Rundowns and Aurora Playout
Column Description
Duration The duration of the clip set when the placehold er was created. Once media is sent to the
placeholder, thi s field updates to the actual duratio n of the media.
Status MOS status: matches the NCS status. Includes READY/NOT READY, PLAYED, etc.
Category The category assigned to the clip; you can assign categories based on the editor to receive the
assignment, for instance.
Type The type of c lip a n editor needs to create: Voice O v e r ( VO ) , So un d on Tape (SOT), or other
types set in the SDB Server Options. See “Setting General Options ” on page 58 for details.
Description Brief description of the clip an editor needs to create.
Clip ID The clip ID, which is automati cally defined when the placehold er is created.
Date The date the placeholder was created.
P (Protected) Protected status; displays
deleted from the database. Column is blank if the clip is unprotected.
P if the clip is protected, whic h prevents it from being erased or
Using the Assignment List Plug-in
With the Assignment Lis t Plug-in, you can create pl aceholders, assign an d s ort them
by category, monitor rundown or clip status, and view or change placeholder
properties.
Creating Placeholders
You need to create a placeholder for each news clip you are linking to a rundown.
Placeholders genera te assignments fo r editors, who can then cre ate news clips for the
story and send them to a media server for playback. Placeholders also let you see if
clips are complete and ready for air or not.
If you are not usin g a news room computer syst em, use t he Assi gnment List Man ager
or Housekeeper instead of the Assignment List Plug-in to create placeholders. Both
components have the same purpose — to create placeholders and assign them to
editors. Chapter 3, “Editing and Aurora Playout,” describes the Assignment List
Manager.
To create a new placeholder:
1. In the Assignment List Plug-In window, click
New.
70 Aurora Playout User Guide September 2007
Page 71
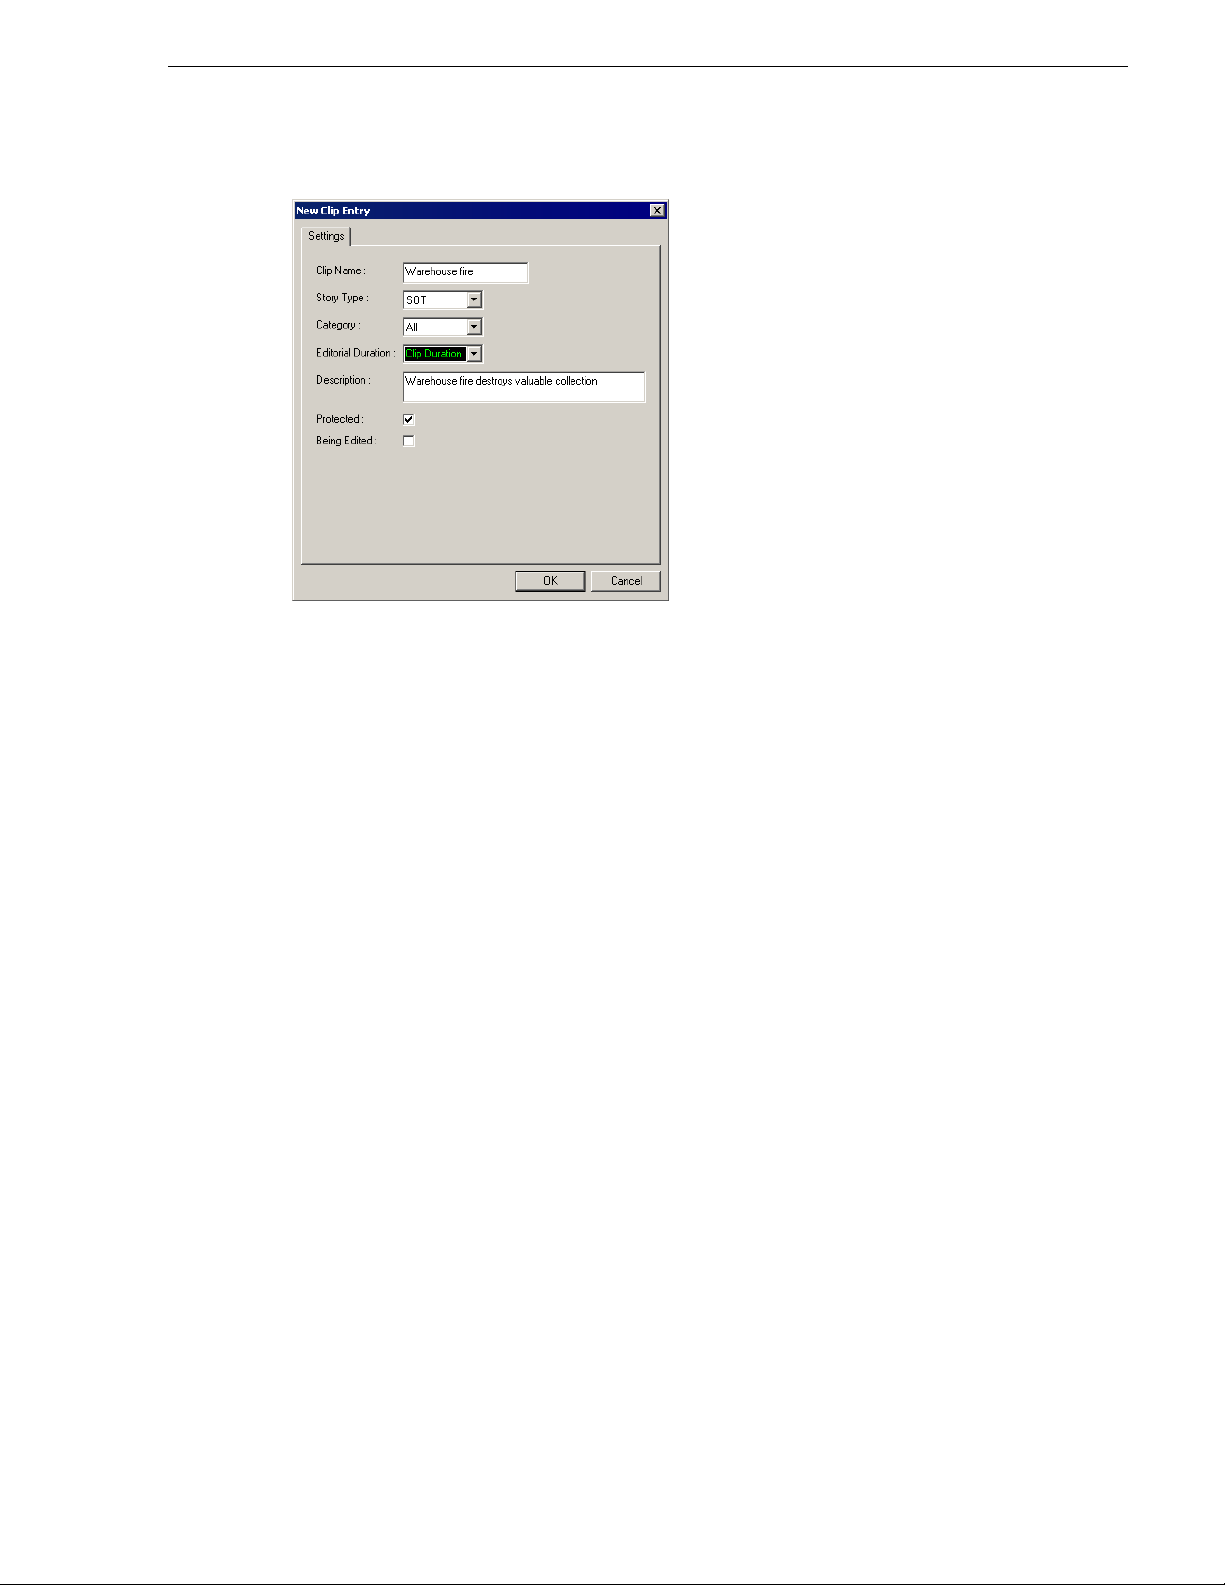
Creating Placeholders
The New Clip Entry window appears:
2. Enter a clip name.
The name identifies the placehol der in the Assignment Li st Plug-in (in the NCS) ,
the Assignment List Manager (in the Aurora Edi t system or sta ndalone), and i n the
Aurora Play out playlis t.
3. Optionally, you can provide additional information about the placeholder:
•
Story Type — Select a Story Type from the drop-down menu. Story types are
set in the SDB Server Op tions; see “Setting General Options” on page 58 for
details. Default sto ry types are
SOT (Sound On Tape) or VO (Voice Over). You
can also leave this field blank.
•
Category — Select a category from the drop-down menu. The category
determines how stories are grouped and sorted.
•
Editorial Duration — Enter a duration for th e placeholder or se lect one from the
drop-down list. The Editorial Duration is an optional value you can set for an
estimated on-air duration of the cl ip that is changed to a more precise value later.
Editorial Duration has the priority over media duration. Once an Editorial
Duration is set; it will not be adjusted to clip duration, even afte r media is
associated with the placeholder. The editor ne eds to set the final Editorial
Duration be fore the clip is sent for playback.
Description — Enter a description for the placeholder. The description helps
•
news editors identify the clip they need to create.
•
Protected — Check this box to prevent the clip from being erased or deleted
from the data base.
•
Being Edited — Check this box to i ndicate when the seque nce for a placeholde r
is currentl y being edited. This field allows user s to easily determine tha t a clip
is already being worked on. When checked, these areas designate that t he clip is
Being Edited: the clip in the Aurora Playout playlist and in the Assignment List
Manager changes color, and the text for the clip in the standalone Assignment
List Manager changes color.
September 2007 Aurora Playout User Guide 71
Page 72
Chapter 5 NCS Rundowns and Aurora Playout
4. Click OK.
The new placeholder appears in the Assignment List.
NOTE: The Clip ID and the Date are set automatically when you create a new
placeholder.
Sorting Placeholders by Category
When you create a new placeholder, you have the option of putting the placeholder
into a category. Cate gories al low you to filter it ems you view in the Assi gnment List .
You can filter items by selecting a rundown in the left pane of the Assignment List
and further filter using the Category bo x at the top of the Ass ignment List. Only it ems
in the selected category appear in the list.
You can add placeholders to a category at any time by doing the following:
1. Right-click on the clip and select
The Clip Properties window appears.
2. Select a news editor, workstation name, or other category from the
3. Click
NOTE: You can change a cat egory for multi ple placeholders at once by cli cking Shift
+ selecting a group of clips, then right-clicking and selecting
OK.
The placeholder automatically appears on the edit workstation.
Viewing Placeholder Categories
In the Assignment List Plug-in, you can view the placeholders and clips based on
Category.
To change the Category of clips to view:
1. Select a category from the
2. The list displays only the placeholders and clips in that category.
3. Select
All to view all assignment placeholders again.
Category list.
Properties.
Category list.
Properties.
Searching Placeholders
You have several ways to search f or placeholders in the Assign ment List Plug- In. The
most common way is to scroll down through the window to find t he placeholder that
you need. You could also get to a specific placeholder by entering the first few
characters of the pl aceholder name.
To navigate and search for placeholders:
• Click on one of the placeholders in the list and scroll down to search for other
placeholders.
• Use the up and down arrow keys on your keyboard to navigate through the list.
Right and left arrow keys could also be used to see all column details.
72 Aurora Playout User Guide September 2007
Page 73

Viewing a Video Thumbnail for a Placeholder
• To search for a specific pl aceholder , type the firs t characte r and the act ive bar will
automatically go to a placeholder that starts with that character. If you type a
second character within 1 second of the first character, the active bar will go to a
placeholder that starts with those 2 characters. If you enter the same character
repeatedly, the ac tive bar wil l navigat e through a ll placeh olders that star t with tha t
character.
Viewing a Video Thumbnail for a Placeholder
The Assignment List Plug-in, in addition to showing a clip’s properties, displays the
first frame of the clip as a thumbnail.
You can only see thumbnails for completed clips, which are identified with an
the Status column; the thumbnail is blank for incomplete clips.
To view a thumbnail:
• Double-click a placeholder.
The Clip Properties window appears, displaying the video thumbnail if the clip is
complete.
OK in
September 2007 Aurora Playout User Guide 73
Page 74

Chapter 5 NCS Rundowns and Aurora Playout
Aurora Playout Assignment List Plug-in
Rundown
Editing
Window
Using ENPS
The Aurora Playout Assignment List Plug-in lets you create a placeholder for a clip
and insert it into the ac companyi ng stor y slu g in th e NCS rundo wn. Wit h ENPS, you
can create the placeholders and insert them manually to your rundown or use the
auto-creat e feature an d create and insert the placeholder automatically.
Creating Placeholders Automatically
With ENPS, you can au tomatically create a placeholder l inked to a story slu g. To link
placeholders automatically, you need to enable the Auto Create feature in the ENPS
MOS Configuration and add the Auto Create column to your ENPS rundown
template.
To create and link a placeholder automatically:
1. Create a new rundown.
Create a rundown as you normall y would. See the ENPS docu mentation for deta ils.
2. Create a new story slug in ENPS.
3. Create a new placeholder using one of these methods:
• Click the
Object AutoCreate field, select the MOS ID from the dr op-down list,
74 Aurora Playout User Guide September 2007
Page 75

and press Enter.
Aurora Playout
clip infor mation
Inserting Clips to ENPS Manually
• To assign a category when you create the placeholder, click the
Placeholder Create
field, select the MOS ID from the drop-down list, enter a
Group name and a Story Type, if desired, and press
A new placeholder is cr eated in the Aurora Playout Assignment List Plug-in and i s
automatically linked and embedded into the script for this story.
You can then use the Assignment List Plug-in to edit properties for the new
placeholder, such as category or type.
Inserting Clips to ENPS Manually
As an alternative to using the ENPS Auto Create feature, you can manually create
placeholders and add them to your story scripts. For example, you would use this
method to add an existing placeholder to your script.
To insert a clip to an ENPS rundown:
1. Create a new rundown.
Create a rundown as you normall y would. See the ENPS documenta tion for details.
Object
Enter.
2. Create a new story in ENPS and open it.
3. Create a new placeholder using the Aurora Playout Assignment List Plug-in,
Assignment List Ma nager, or Housekeep er.
See “Creating Placeholders” on page 70 for instructions.
4. Drag the new placeholder from the Assignment List Plug-in to the ENPS Editing
Window.
September 2007 Aurora Playout User Guide 75
Page 76
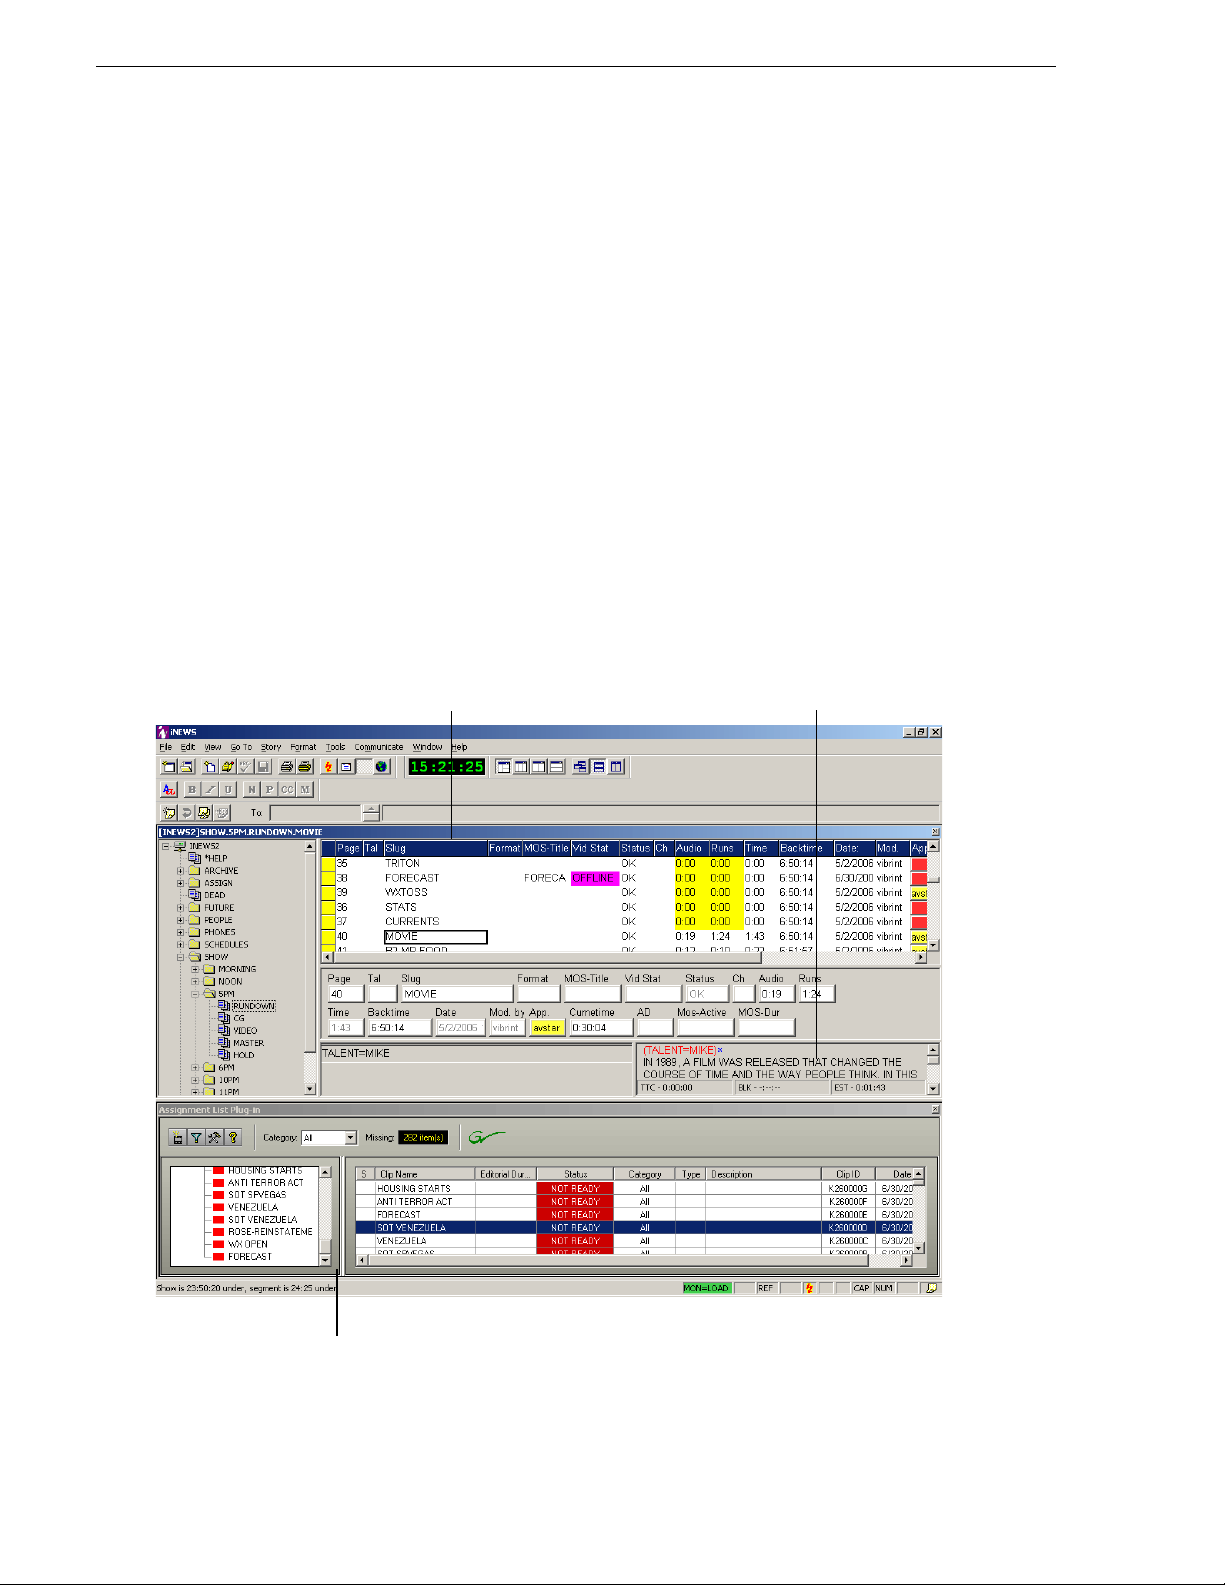
Chapter 5 NCS Rundowns and Aurora Playout
Aurora Playout Assignment List Plug-in
Queue Panel Story Panel
When you save the script, the clip is added to the ENPS rundown.
Assigning Playout Channels to Clips
With ENPS and Aurora Playout you can assign playout channels to stories in a
rundown. When a playba ck oper ator opens the r undown, s tori es ar e alread y a ssigne d
to playout channels.
To assign a playout channel in an ENPS rundown:
1. Click the
2. Enter the channel name in the MOS Channels box and cl ick
You must enter the channel label exactly as it was set up in Aurora Playout.
The story is assi gned to that channel and ap pears in the Aurora Pla yout applica tion
in the “Assign” column.
MOS Channel column for the story you want to assign.
Using iNEWS
To use an Aurora Edit sequence in a news stor y when it play s out to air , you need to
create a placeholder and insert it to your NCS rundown.
OK.
76 Aurora Playout User Guide September 2007
Page 77

Creating Placeholders
To insert an Aurora Playout placeholder into your story:
1. Create a new rundown.
Create a rundown as you normally would. See the iNEWS documentation for
details.
2. Create a new story in iNEWS.
3. Create a new placeholder in the Aurora Playout Assignment List Plug-in,
Assignment List Ma nager, or Housekeep er.
See “Creating Placeholders” on page 70 for instructions.
4. Verify that the new story slug is hi ghl ighted in the Queue Panel and then drag the
new placeholder from the Assignment List Plug-in to the Story Form window.
5. Click on a different line in the Queue Panel to save your changes.
The placeholder links with the story and the clip name displays in the Clip Slug
column in the iNEWS Queue Panel.
Assigning Playout Channels to Clips
Creating Placeholders
With iNEWS you can assign playout channels to stories in a rundown. When a
playback operator opens the rundown, stories are already assigned to playout
channels.
To assign a playout channel in an iNEWS rundown:
1. Select the slug you want to assign and right-click the
2. Choose
3. Enter the channel name and click
You must enter the channel label exactly as it was set up in Aurora Playout.
4. Save the slug.
The story is assi gned to that channel and app ears in th e Aurora Play out applicat ion
in the “Assign” column.
Assign Channel.
OK.
Ch box.
September 2007 Aurora Playout User Guide 77
Page 78

Chapter 5 NCS Rundowns and Aurora Playout
Click this button
for auto-create
Using Octopus
The Aurora Playout Assign ment List Plug-in lets you create placeholders fo r clips and
insert them to the accompanying sto ry slug in th e NCS rundown. With Octopus , you
can create the placeholders and insert them manually to your rundown or use the
auto-creat e feature an d create and insert the placeholder automatically.
Creating Placeholders Automatically
With Octopus, you can create placeholders automatically using the Auto-create
feature.
To create a p laceholde r and insert it automatically:
1. Create a new story in Octopus.
2. Open the story.
3. If an element doesn’t ex ist, right -click and selec t
OK.
4. Click the button next to the JOBID field and select
The MOS ID and Name of the placeholder fill in automatically.
5. Click
OK to save.
Linking Clips to Octopus Manually
If your system doesn’t have the auto-create feature enabled, you can create
placeholders and insert them to your rundown manually:
New | type of element and click
Auto-create - MOS ID.
78 Aurora Playout User Guide September 2007
Page 79

1. Create a new story in Octopus.
Drag the
placeholder
onto this button
2. Open the story.
Inserting Clips with the Assignment List Plug-in
3. If an element doesn’t ex ist, right -click an d selec t
OK.
4. Click the button next to the JOBID field and select
New | type of element and click
Create.
5. In the Create MOS objec t on remote devi ce window, ente r the des ired placeho lder
name in the Name field and click
6. Click
Save or OK to save the placeholder.
OK.
Inserting Clips with the Assignment List Plug-in
You can also insert clips usi ng the Aurora Playout Assignment Lis t Plug-in integrated
with Octopus:
1. Split the Octopus window so you can see the Rundown View and the Aurora
Playout Assignment List Plug-in.
2. Insert a new element if one doesn’t exist.
3. In the Assignment List Plug-in, create a new placeholder or use an existing one.
See “Creating Placeholders” on page 70 for instructions.
4. Drag the placeholder from the Assignment List Plug-in to the button next to the
Name field on the Octopus element.
5. Click
September 2007 Aurora Playout User Guide 79
OK.
Page 80

Chapter 5 NCS Rundowns and Aurora Playout
Assigning Playout Channels to Clips
For Octopus newsroom computer system (NCS), playout channel assignment to
stories in a rundown i s not s upport ed. When a pl aybac k operat or ope ns the run down,
he or she needs to manually assign respective channels in Aurora Playout.
“Assigning Clips to Channels” on page 108 for instructions .
See
80 Aurora Playout User Guide September 2007
Page 81

Chapter 6
Aurora Playout Assignment List Manager
in Aurora Edit toolbar
Standalone
Assignment List
Manager
Editing and Aurora Playout
News editors use the Assignment List component of Aurora Playout to receive
assignments from the producer and return completed assignments.
The Assignment List runs on the comp uter with the Aurora Edit editing system.
Editors create clips and sequences in Aurora Edit as usual and send them to a media
server. A playlist is re ceived from the NCS or a playback operator uses the clips in
Aurora Playout to create a playlist, and then controls the playback of clips to air.
This chapter is writte n for news editors a nd discusses how t o use the Assignment Lis t
to:
• Receive assignments from your producer
• Link a sequence with a Aurora Playout placeholder
• Create new clip placeholders
• Delete empty placeholders
• Change clip assignments
• Update clips
Tour of the Assignment List
You use the Assignment List to receive assignments from the producer, to create
additional placeholders for clips, and to reassign placeholders to other editors.
The embedded Assignment List runs on the Aurora Edit workstation and integrates
with Aurora Edit; the Aurora Edi t toolbar dis plays part of the Assignment List so you
can see the number of ass ignment s you’ve re ceived. The s tandalon e Assignment L ist
runs on any computer in the network.
September 2007 Aurora Playout User Guide 81
Page 82

Chapter 6 Editing and Aurora Playout
Creates
a new
placeholder
Displays the total
number of placeholders
for the selected category
Shows only
list of
missing
clips
Permanently
deletes the
selected
placeholder(s)
or rundown
To see more d etail for each story:
• In the standalone Assignment List, maximize the window:
• In Aurora Edit, double-clic k the
The list of assignments shows each clip/placeholder and its properties:
Column Description
S The clip status: displays
server, and is ready for playback. Status is blank if a clip is incomplete and not
ready for playback.
Clip Name The name of the clip/placeholder.
Missing box to open the Assignment List window:
OK if a clip has been completed, sent to th e media
Duration The duration of the clip set when the placeholder was created. This estimated
value will be changed later when media is associated with the placeholder.
82 Aurora Playout User Guide September 2007
Page 83
Receiving Editing Assignments
Column Description
Status MOS status: matches the NCS status. Includes READY/NOT READY,
PLAYED, etc.
Category The category assigned to the clip; you can assign categories based on the editor
to receive the assignment, for instance.
Type The type of story or sequence an editor needs to create: Voice Over (VO),
Sound on Tape (SOT), or other types set in SDB Server Options.
Description Brief description of the clip an editor needs to create.
Clip ID The clip ID, which is automaticall y defined when the placeholder is created.
Date The date the placeholder was created.
P (Protected) Protected status; displays
erased or deleted from the database. Column is blank if the clip is unprotected.
P if the clip is protec ted, which prev ents it from being
Receiving Editing Assignments
Assignments automatically appear in your Assignment List when they are sent from
the producer or assigned from another editor.
Producers create the assignments as clip placeholders for use in an upcoming news
broadcast. You create clips in Aurora Edit and link them to the placeholders in the
Assignment List.
Linking Sequences to Aurora Pl ayout Placeholders
Aurora Edit can link to scripts on iNEWS, Octopus, and AP/ENPS Newsroom
computer systems, which you can use as an aid for creating your sequence.
You can link to a news or sports story when you crea te a new sequence, as de scri bed
below, by opening Sequence Properties and clicking the Link to Stor y icon.
To link to a Aurora Playout placeholder:
1. In Auror a Edit, click the
New Sequence button in the Bin toolbar.
September 2007 Aurora Playout User Guide 83
Page 84

Chapter 6 Editing and Aurora Playout
Rundown
View
The Sequence Properties window appears:
You can also use an existing sequence—open the sequence in Aurora Edit, and
click the
Story View button in the main toolbar.
2. Click
Link to Story.
The Assignment List window appears, displaying available stories:
NOTE: Once an Aurora Playout story is linked, the row color for the selected story
changes to reflect that the story is being edited. The various row colors represent:
green = play, blue = stand by, yellow = stopped, red = not ready.
3. In the Rundown View in the left portion of the Assignment List window, expand
the desired rundown by cl icking the + icon.
4. In the Rundown View, click on the name of the story you want to work on.
The list of available placeholders displays in the right portion of the Assignment
List window.
5. If more th an one place holder displa ys, scroll down the list to search for the
placeholder.
84 Aurora Playout User Guide September 2007
Page 85

Linking Sequences to Aurora Playout Placeholders
6. If you know the name of the placeholder to which you want to link, you can type
the first character and the active bar will autom atically go to the placeho lder that
starts with that character. Type few characters from the placeholder name to get to
the specific placeholder and click
The Sequence Properties window appears with the name and ID filled in:
OK.
7. Click
OK.
The Timeline opens.
NOTE: When the timeline position cursor moves (e.g., when playing the sequence),
the blue highlight in the Story View window moves in concert to match the current
timeline position.
8. Click the
Story View button in the Main Toolbar.
September 2007 Aurora Playout User Guide 85
Page 86
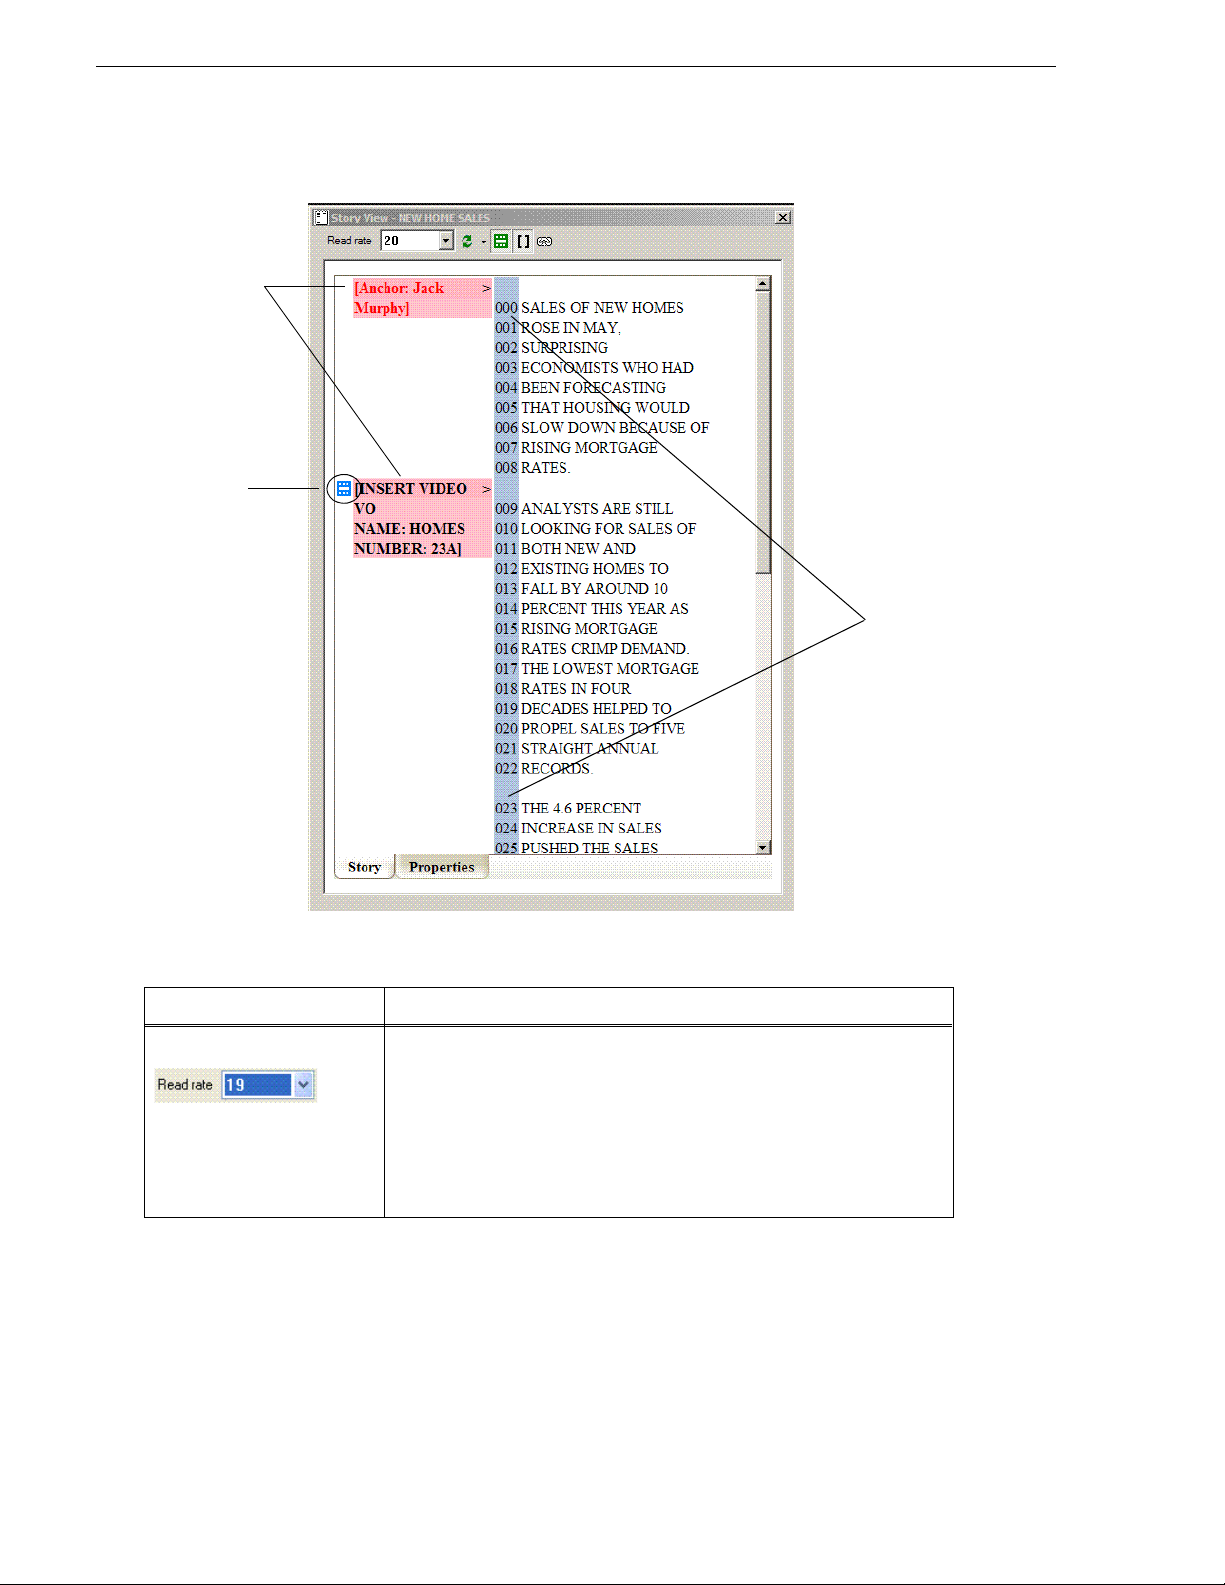
Chapter 6 Editing and Aurora Playout
Production
Placeholder
(also known as
MOS object)
Time
Commands
Indicator
(Read
Rate)
The Story View window opens:
86 Aurora Playout User Guide September 2007
See the following instructions for using the Stor y View toolbar functions.
Item Function
Read Rate Displays the current Read Rate in characters per second.
Click the arrow to select a specific script reader’s (newscaster’s) reading
speed.
Reset to return to the default reading rate.
Click
Click
Off to turn off the Read Rate function.
NOTE: When the timeline position cursor moves (e.g., when playing the
sequence). the blue highlight in the Story View window moves in concert to
match the current timeline position.
Page 87

Sending Completed Clips
Item Function
Refresh Mode Selects one of two script refresh modes:
Automatic: Any script change on the NCS side automatically updates the
script in the Story View window. This is the default setting.
Manual: Script changes on the NCS side are not reflected in the Story View
window. You must click Refresh Script to update the window with the most
recent script changes.
The Refresh Script icon flashes yellow for 30 seconds, and then remains
yellow to indicate that an updat ed script is available . Click Refresh Script to
load the latest script and revert the icon to green.
Refresh Script Refreshes the Story View with any script changes made on the NCS side.
If the script is updated on the NCS while in Manual mode, the Refresh Scrip t
icon flashes yellow for 30 seconds and then remains yellow to ind icate tha t
an updated script is availabl e. Click Refre sh Script to loa d the update d script
and revert the Refresh Script icon to green.
Media Object Server (MOS)
Object Display Toggle
Production Command Toggle Toggles the production command (e.g., wipe, package, out cue, anchor, etc.)
Link Sequence to Story Links a sequence to a particular story.
Toggles the MOS Object Display function on and off.
When on, an icon marks where placehol ders have been put in the script.
When off, the placeholder icons disappear from the screen.
display column on and off.
Sending Completed Clips
Once you create a clip or sequence on Aurora Edit fo r a specific pl aceholder, you need
to send it to a media server so it can be played to air by Aurora Playout. Your Aurora
Edit workstation should be configur ed with the medi a server a nd its defa ult direc tory
as the default Send Destination. See your Aurora Edit documentation for more
information.
If you didn’t previously l ink your sequence t o a Aurora Playout placehold er, you can
do it before sending the clip.
To send a completed sequence:
1. Select the complete d sequence in the Aurora E dit Bin.
If you have the completed sequence open in Aurora Edit, it is already selected;
Save before sending to make sure you send the latest version.
click
2. Press
F2 on the keyboard or click the Send to File button in the toolbar.
The Send To Selected Destinations window appears, displaying the list of open
Aurora Playout placeholders. If you linked the sequence to a Aurora Playout
placeholder, that placeholder is highlighted.
September 2007 Aurora Playout User Guide 87
Page 88

Chapter 6 Editing and Aurora Playout
If not already selected, click the checkbox for your media server’s location.
NOTE: Toggling the Missing Clips Only button to off displays previously sent
placeholders with media. You can also link a sequence to one of these placeholders,
which overwrites the media with th e new content.
3. If you haven’t linked the sequence to a placeholder, select one to assign to your
completed sequence.
4. Enter an
NOTE: Editori al Duratio n only affect s the Dura tion Column in the ENPS newsroom
computer system.
When sending a linked story to a Aurora Playout destination, you have the
opportunity to change the Editorial Duration. To enter a duration, type it into the
green timecode Editorial Duration field at the bottom of the window, not by
changing the Editorial Duration property of the placeholder.
The duration is sent back to the Newsroom Computer System as the actual on-air
duration of the sequence for more accurate rundown timing.
5. Click
The clip is sent to the media ser ver. Once the c lip is sent , the placeho lder no longe r
appears in your Assignme nt List and th e number o f missi ng ite ms at t he top of the
screen decreases by one.
Editorial Duration for the sequence, if desired.
Send.
Additional Assignment List Features
In addition to cr eati ng clip s fo r ass igned p laceho lde rs and sending th em to the se rver
for playback, there are other features of the Assignment List that you can use.
88 Aurora Playout User Guide September 2007
Page 89
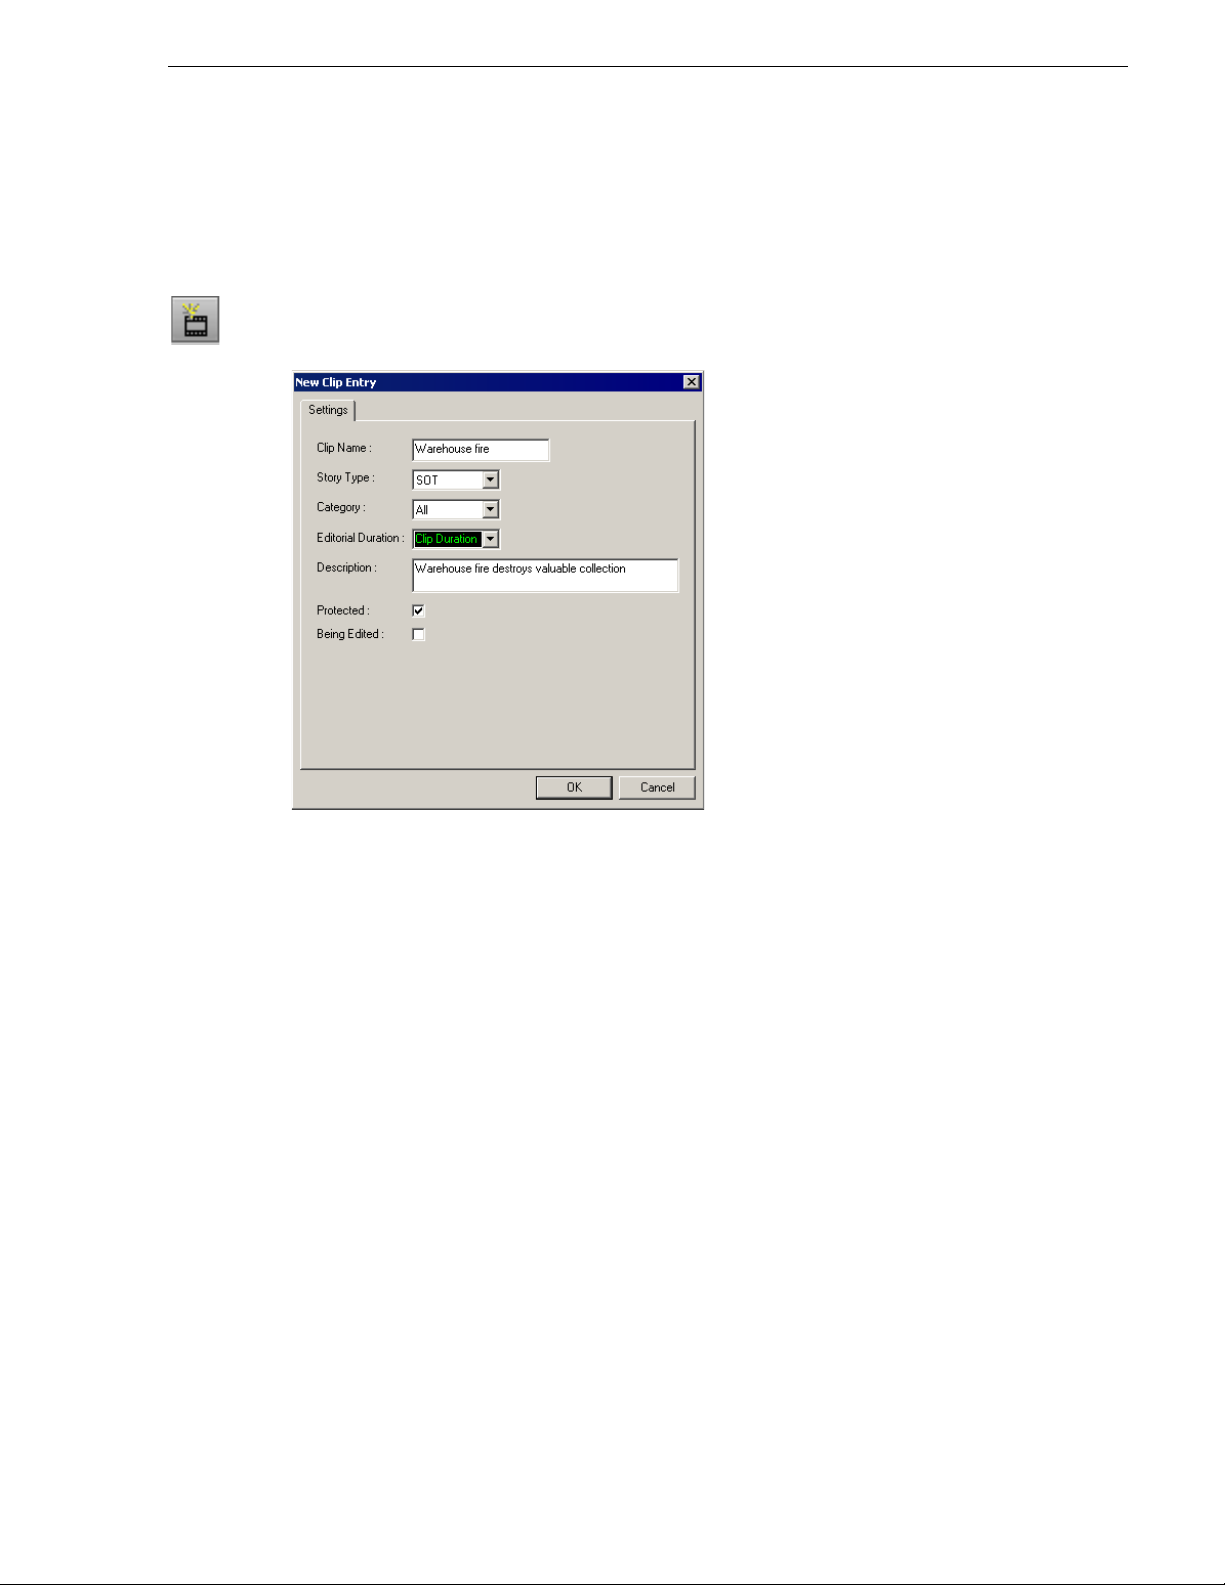
Creating New Placeholders
In addition to the assignments you receive from your producer, you ca n create
additional placeholders for clips you want to include in a broa dcast.
To create a new placeholder for a clip:
Creating New Placeholders
1. Click
New Placeholder.
The New Clip Entry window appears:
2. Enter a clip name.
The placeholder name id entifies the pla ceholder in your Assi gnment List Manager,
the Assignment List Plug-i n on the ENPS syste m, and the Aurora Pl ayout pla yli st.
3. Optionally, enter additional information about the placeholder:
•
Story Type— If desired, specify whether this is a SOT (story on tape), VO
(voice over), etc.
•
Description — Enter a description for the placeholder to help identify the clip
you need to create.
•
Category — Select a category from the drop-down menu. The category
determines who receives the placeholder as an assignment. Selecting
makes the placeholder accessible to all editors who select
ALL in their
Assignme nt List Ma nager.
•
Editorial Duration — If desired, enter an estimated duration for the story or
select one from the drop-down list. The editor can also enter an editorial
duration that is less tha n the cl ip lengt h, which i s sent ba ck to the NCS for sh ow
timing.
Protected — Check this box to prevent the clip from being deleted from the
•
database.
•
Being Edited — Check this box to show that the cl ip for a placeho lder is being
edited. This field allows editors to easily see that a clip is already being worked
ALL
September 2007 Aurora Playout User Guide 89
Page 90

Chapter 6 Editing and Aurora Playout
on in another edit room.
4. Click
OK.
The Clip ID and Date are automatically set when you create the placeholder.
Deleting Placeholders
If you need to, you can delete placeholders from the Assignment List. However,
deleting items using the Assignment List only deletes the placeholder, not the
corresponding media. For this reason, you should only delete empty placeholders
from the Assignment List and use House keeper for deleting clips (see “Deleting Clips
From the Clip Database” on page 115).
To delete an empty placeholder:
• Select the clip(s) you want to delete and click
Changing a Clip Category
If you need to change a clip category:
1. In the Clips window, double-click on the placeholder you want to assign.
2. Select a new editor, workstation name, or other category from the
3. Click
OK.
Delete.
Category list.
The placeholder appears on the edit workstation.
Viewing the Assignment List
In the Assignment List, you can choose to view assignments within a selected
category or all of the assignments in the list.
To change the category of assignments to view:
• Select a category from the
The list displays only the placeholders and clips in that category.
Select
All to view all assignment placeholders again.
Category drop-down list.
Identifying Miss ing Clips
In the Assignment List, you can filter the list of clips to show only missing clips.
To show missing clips:
•Click the
Click the button again to show the entire clip list.
NOTE: If yo u are usi ng the Rund own View, you can furth er filt er the l ist by sel ecting
only the rundown you want to view.
Missing Clips Only button.
90 Aurora Playout User Guide September 2007
Page 91

Chapter 7
Playing Clips to Air
Playback operators us e the Aurora Playout appl ication to control t he playback of news
clips to air. Using a playlist linked to an NCS rundown or local Aurora Playout
playlist, playback operators cue and play clips as required during a broadcast.
This chapter is written for playback operators and discusses how to use the Aurora
Playout application to:
• Open a newsroom computer system rundown
• Create a playlist manually
• Cue clips and play them to air
• Archive clips to tape
• Add clips to a playlis t, rearrange clips, and view clip properties
• Use the context-sensitive Playlist menu
September 2007 Aurora Playout User Guide 91
Page 92
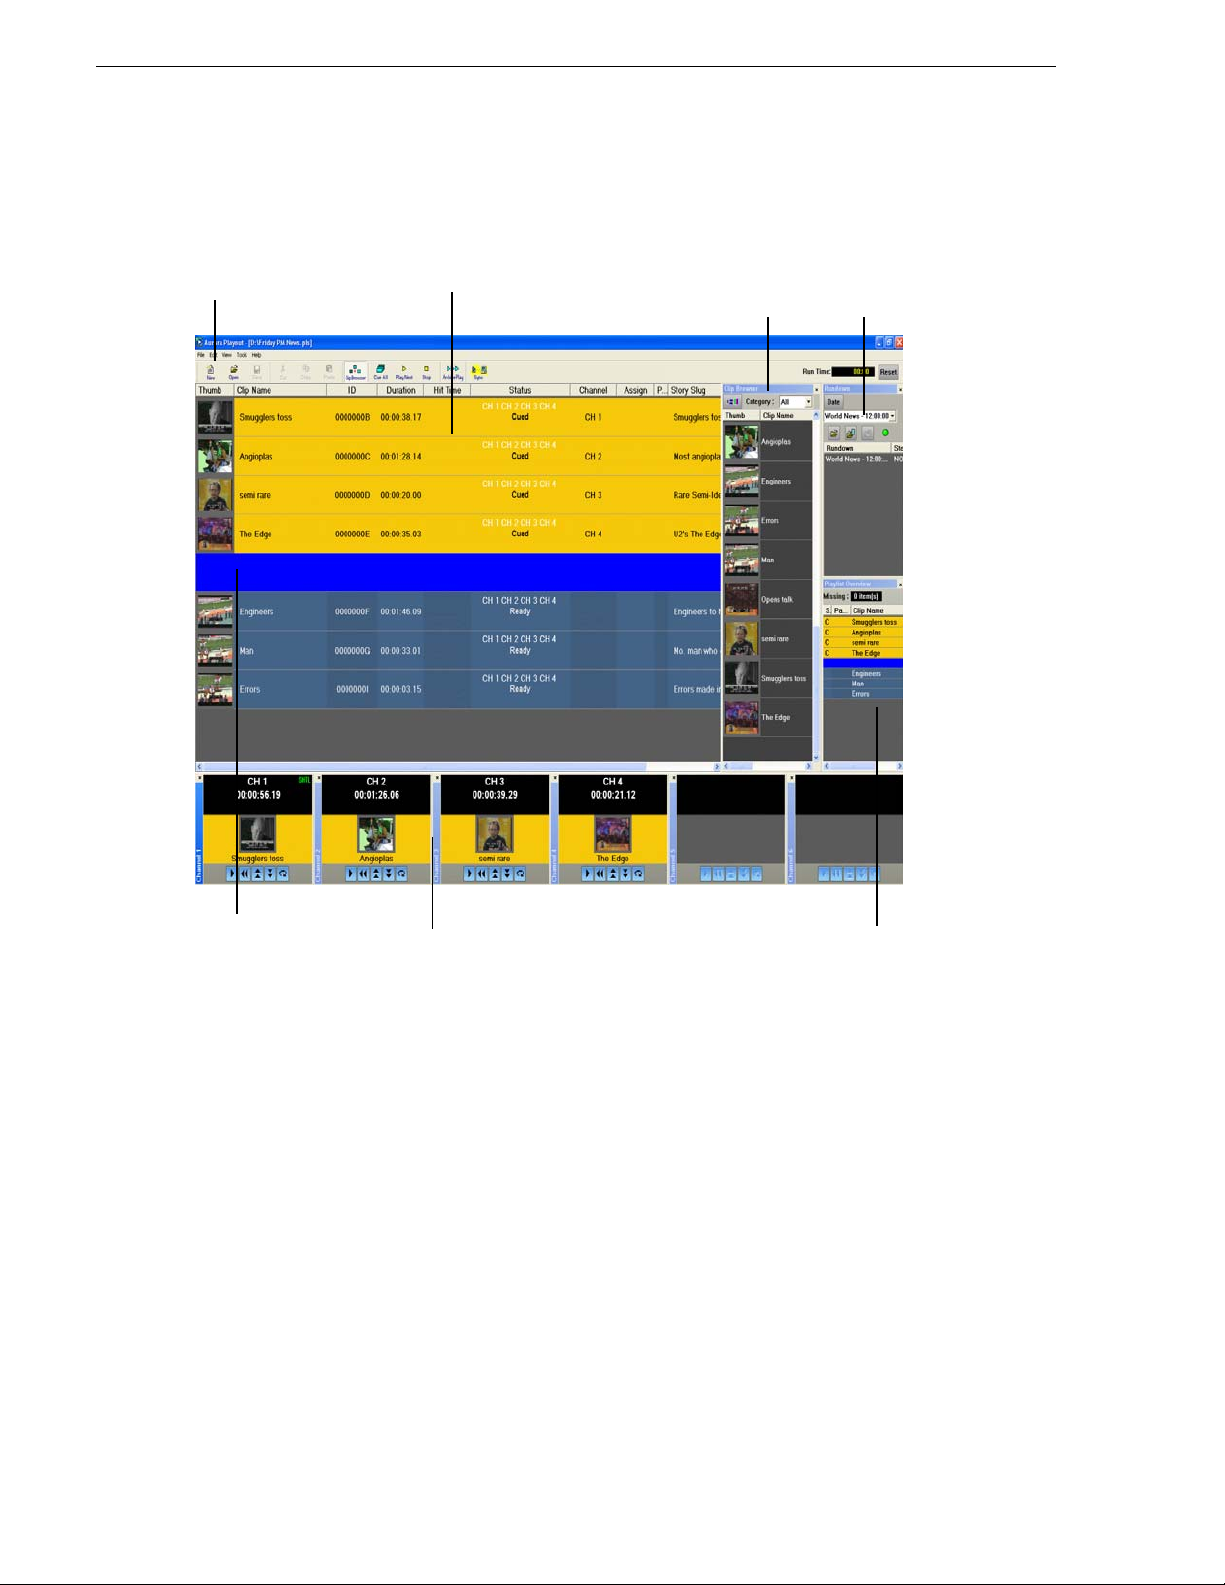
Chapter 7 Playing Clips to Air
Toolbar
Playlist
Channels
Playlist OverviewBreak
RundownsClip Browser
Tour of the Aurora Playout Application
You use the Aurora Playout appl ication to c ontrol a playl ist before and dur ing a news
broadcast. You can also use it to manually cr eate a new playlist.
The Clip Browser, Rundowns list, and Playlist Overview are all dockable; you can
rearrange windows or close windows you ar en’t using (such as unused channels) . The
channel windows are not dockable, but each can be opened or closed.
To restore a window you have closed, cho ose the name of the window from the Vie w
menu.To restore all windows to their default locations, choose
Tools | Reset Windows.
92 Aurora Playout User Guide September 2007
Page 93

Toolbar
The Aurora Playout Toolbar lets you access common features:
Icon Function Other Ways to Access...
Creates a blank playlist. File | New Playlist or
Ctrl + N
Opens a saved local (.pls) playlist. File | Open Playlist or
Ctrl + O
Saves the current playlist as a local (.pls) playlist. File | Save Playlist or
Ctrl + S
Cuts selected clips from the playlist to the clipboard. Edit | Cut or Ctrl + X
Toolbar
Copies selected clips from the playlist to the clipboard. Edit | Copy or Ctrl + C
Pastes clips from the clipboard into the playlist. Edit | Paste or Ctrl + V
Opens the Clip Browser, so you can add clips to the playlist. Ctrl + I
Cues all channels specified in t he automatic channel assignm ent
starting with the currently selected story.
Plays the next clip in the playlist. Spacebar (if enabled)
Stops playing all clips. ---------------
Puts the Aurora Playout applicatio n into Archive Play mode, which
lets you archive stories to tape.
---------------
and external GPI
---------------
When sync has been broken with t he NCS rundown, such as by
reordering stories, re-syncs the Aurora Playout playlist with the
NCS.
---------------
September 2007 Aurora Playout User Guide 93
Page 94

Chapter 7 Playing Clips to Air
Playlist
The playlist lists each clip and its properties:
Column Description
Thumb Displays a video thumbnail of the clip, if available. To change the thumbnail size, click the
Thumb column heading or select View | (Small) or (Large) Thumbnail.
A red border appears around a blank thumbnail if the clip is not ready for playback.
Clip Name Displays the name of the clip. A scissors icon appears next to a clip that has been trimmed.
Duration Displays the full duration of the media, not the editorial duration.
Hit Time Counts up the relativ e time that the clip plays from when the Reset button wa s pressed, whic h
is usually when a show starts.
Status D isp lays the available channel s and the status of the clip:
Not Ready — The clip is not ready to play.
Ready — The clip is ready to play.
[Blank] — Clip has not yet been cued.
Cued — The clip is cued to a specific channel and is ready to play.
Roll — The clip is playing to air.
Stopped — The clip has been manually stop ped during play.
Played — The clip has finished playing.
Channel Displays the channel in which a clip is currently cued or playing.
Assign Displays the channel assigned through the NCS or Aurora Playout. Allows you to assign a clip
to a channel, over riding automatic channel assignment.
Page Corresponds to the page of the NCS rundown. This column is blank if you are not using ENPS
or Octopus with Aurora Playout or if the producer did not select Freeze Page Numbers for the
rundown properties in ENPS.
Story Slug Displays the name of the story from the NCS rundown .
ID Displays th e clip ID, which is automatically set when you create the placeholder.
Description Displays any descriptive text entered in placeholder properties.
You can rearrange t he ord er of the columns in the pl ayli st by d rag ging t he tit le of the
column to a new location. To restore all columns to their default position, choose
Tools | Reset Playlist Columns.
94 Aurora Playout User Guide September 2007
Page 95

You can also resize the columns by dragging to expand or shrink the column name.
Understanding Playlist Colors
Each playlist entry appears in a color that identifies its status in Aurora Playout:
Row Background Color Description
Yellow The clip is cued for playback.
Green The clip is playing.
Orange The clip is stopped during play.
Gray The clip is in post roll.
Channels
You can modify row col ors by choosi ng
Click the row color box you want to change and select a new color.
Channels
The channels area displays the channels available on your system. You can perform
the following functions for each channel:
Icon Function
Tools | Options and clicking t he Color tab .
Plays the current clip in the channel. If a clip is playing, clicking this button
pauses the clip; click it again to resume playback.
Recues the current clip.
Cues the previous clip in the channel.
Cues the next available clip.
Loops playback for the current clip.
Sets a Mark In point to begin trim ming the c lip. A Scissors ic on appea rs next to
the clip name in the playlist to indicate a trimmed clip.
September 2007 Aurora Playout User Guide 95
Page 96

Chapter 7 Playing Clips to Air
Icon Function
Sets a Mark Out point to end trimming the clip.
Clears both the Mark In and Mark Out points from the clip.
Previews the last few seconds of the clip and immediately recues. (The number
of seconds that previews is set under Options and determined by your studio’s
needs.)
This symbol indicates that an Aurora Playout channel is no longer connected to its
corresponding channel on the media server. Check the following possible problems;
you cannot remotely control the media server while this symbol is present:
• If you are using RS-422, there is no physical serial/network cable connection
between Aurora Playout and the media server used for playout.
• If you are using Ethernet channel connections, the entries for media server or
Server Channel Name are not set correctly in the Aurora Playout Channel
Configuration; see “Setting Channel Configuration” on page 45.
• COM ports are set incorrectly in the Aurora Playout Channel Configuration; see
“Setting Channel Configuration” on page 45.
• Playout channels on the media server are not set to use remote AMP protocol.
Rundowns
The rundown area displays the open rundowns and their status, a list of available
rundowns, server status, and the following controls:
Icon Function
Opens the selected rundown and creates a playlist.
Appends the selected rundown to the end of the current playlis t.
96 Aurora Playout User Guide September 2007
Page 97
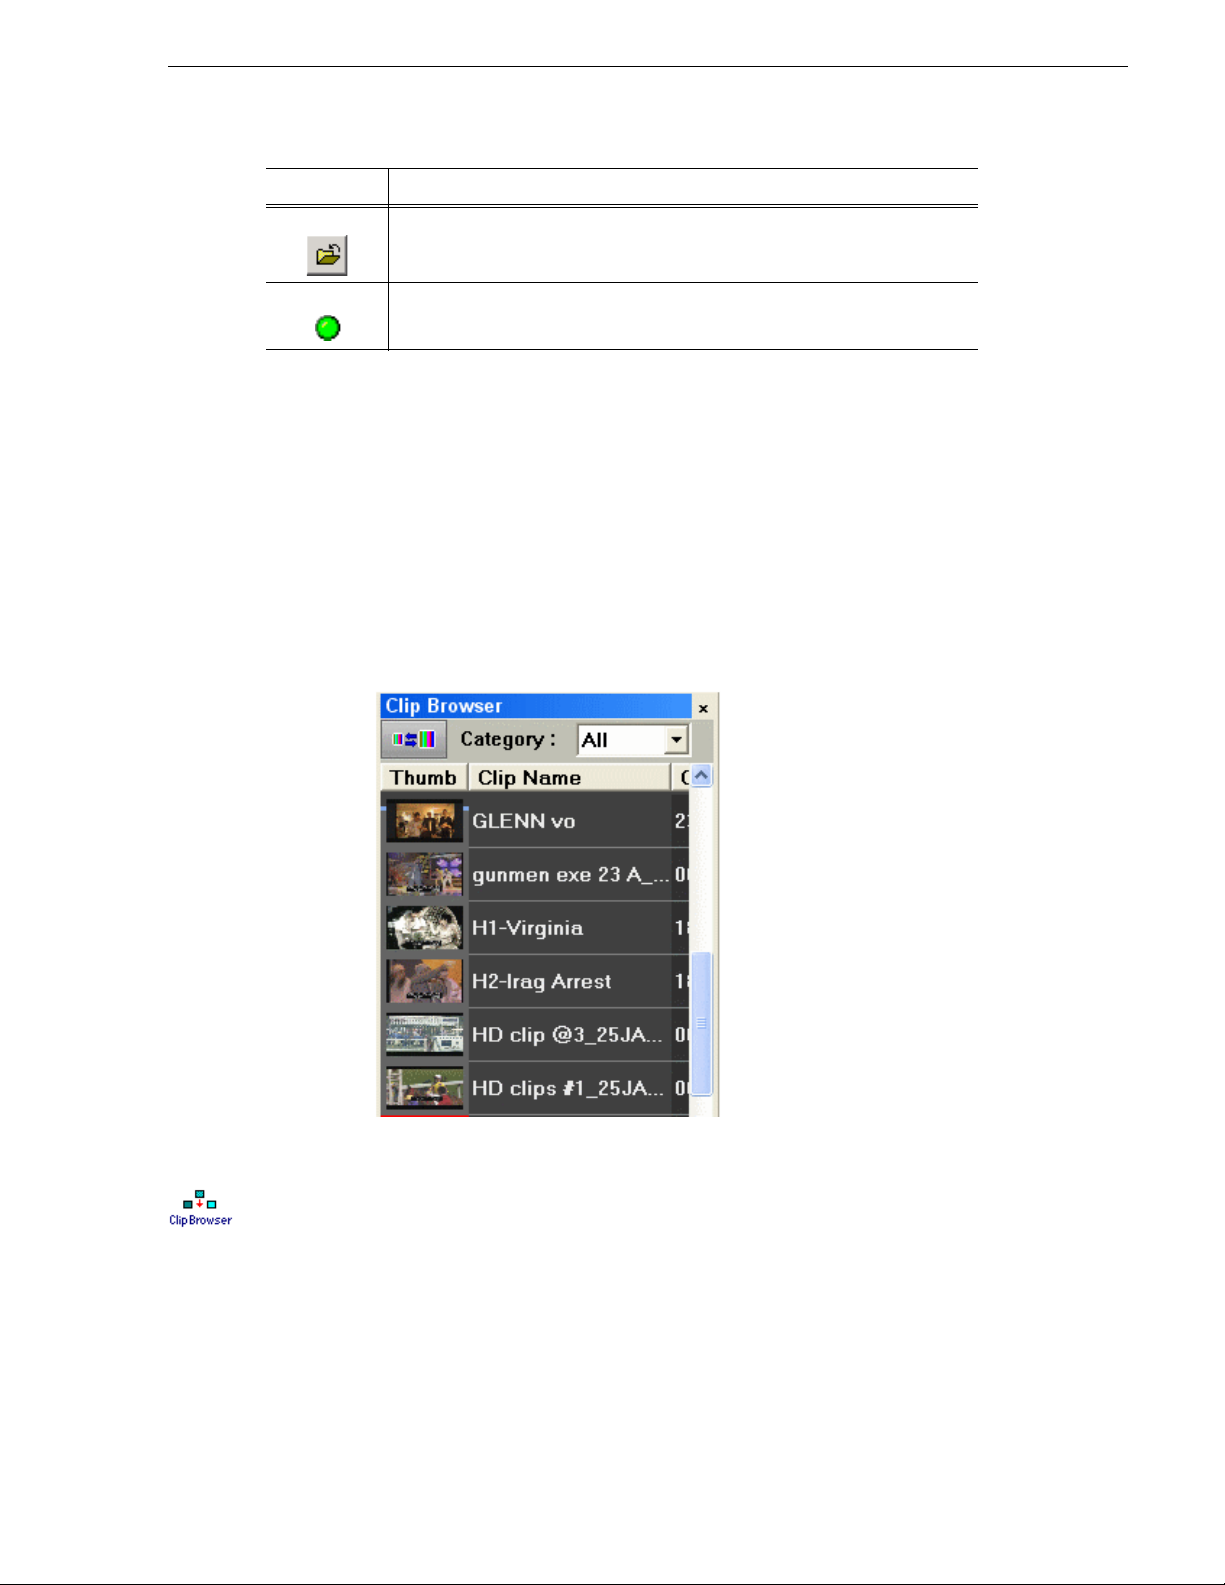
Icon Function
Removes the selected rundown from the playlist.
Indicates the connection status between Aurora Playout and the XMOS Server;
green indicates a successful connection.
The status displays READY whe n the “ MOS Ready to Air” proper ty is ena bled f or a
rundown through ENPS or Octopus . The St atus column i s not used wi th iNEWS; the
column can be resized off of the screen if desired.
You can open up to five rund owns at once; all o pen rundowns merge int o a composite
playlist, allowing seamless control of back-to-back rundowns.
Selecting a rundown from the rundowns list selects all clips in that rundown in the
playlist area.
Clip Browser
Clicking
specific date.
Clip Browser
Clip Browser displays thumbnails and information of clips and placeholders from
Aurora Playout database, allowing you to easily add them to your playlist.
Date toggles a calendar which lets you filter the display of rundowns to a
If the Clip Browser window is not op en, c li ck
Clip Browser button from the toolbar.
The Clip Browser opens, displaying clips and placeholders from Aurora Playout
database. Dragging a clip from the Clip Browser window and dropping it on the
Playlist window appends the clip to the playlist.
You can add clips that are ready or empty placeholders to which media will be sent
later.
To filter display i tems on the Clip Browser window, y ou can select a speci fic category
from the category dropdown list. Select
September 2007 Aurora Playout User Guide 97
All to view all clips and placeholders again.
Page 98

Chapter 7 Playing Clips to Air
To toggle the thumbnail size on Clip Browser window, you can click on the Toggle
Thumbnail View
The Clip Browser also consist s of clip and placehol der in form ation a s descri bed bel ow:
Column Description
Thumb Displays a video thumbnail of the clip, if availa ble. A red border ap pears around a blank
thumbnail if the clip is not ready for playback.
To change the thumbnail size, click the Toggle Thumbnail View button.
Clip Name Displays the name of the clip.
Clip ID Displays the clip ID, which is automatically set when you create the placeholder.
Duration Displays the full duration of the media, not the editorial duration.
In Use Displays a check sign if the clip is appended manually to the playlist.
Category Displays the category assigned to the placeholder.
Type Displays the story type of placeholder that had been created: Soun d on Tape (SOT), Voice
Over (VO), or other types set in in the SDB Server options.
Date Displays the date the placeholder was created.
button.
Description Displays any descriptive text entered in placeholder properties.
You have several ways to search for clips and placeholders in Clip Browser. The most
common way is to scroll down through the window to find the placeholder that you
need. You can also ge t to a speci fic placeho lder by en tering the first few c haracters o f
the placeholder name.
To navigate and search for placeholders:
• Click on one of the placeholders in the Clip Browser window and scroll down to
search for other placeholders.
• Use the up and down arrow keys on your keyboard to na vigate through the list.
• To search for a specific pl aceholder , type the firs t chara cter and the ac tive bar will
automatically go to a placeholder that starts with that character. If you type a
second character within 1 second of the first character, the active bar will go to a
placeholder that starts with those 2 characters. If you enter the same character
repeatedly, the ac tive bar wi ll navigat e through a ll placeh olders th at sta rt with tha t
character.
98 Aurora Playout User Guide September 2007
Page 99
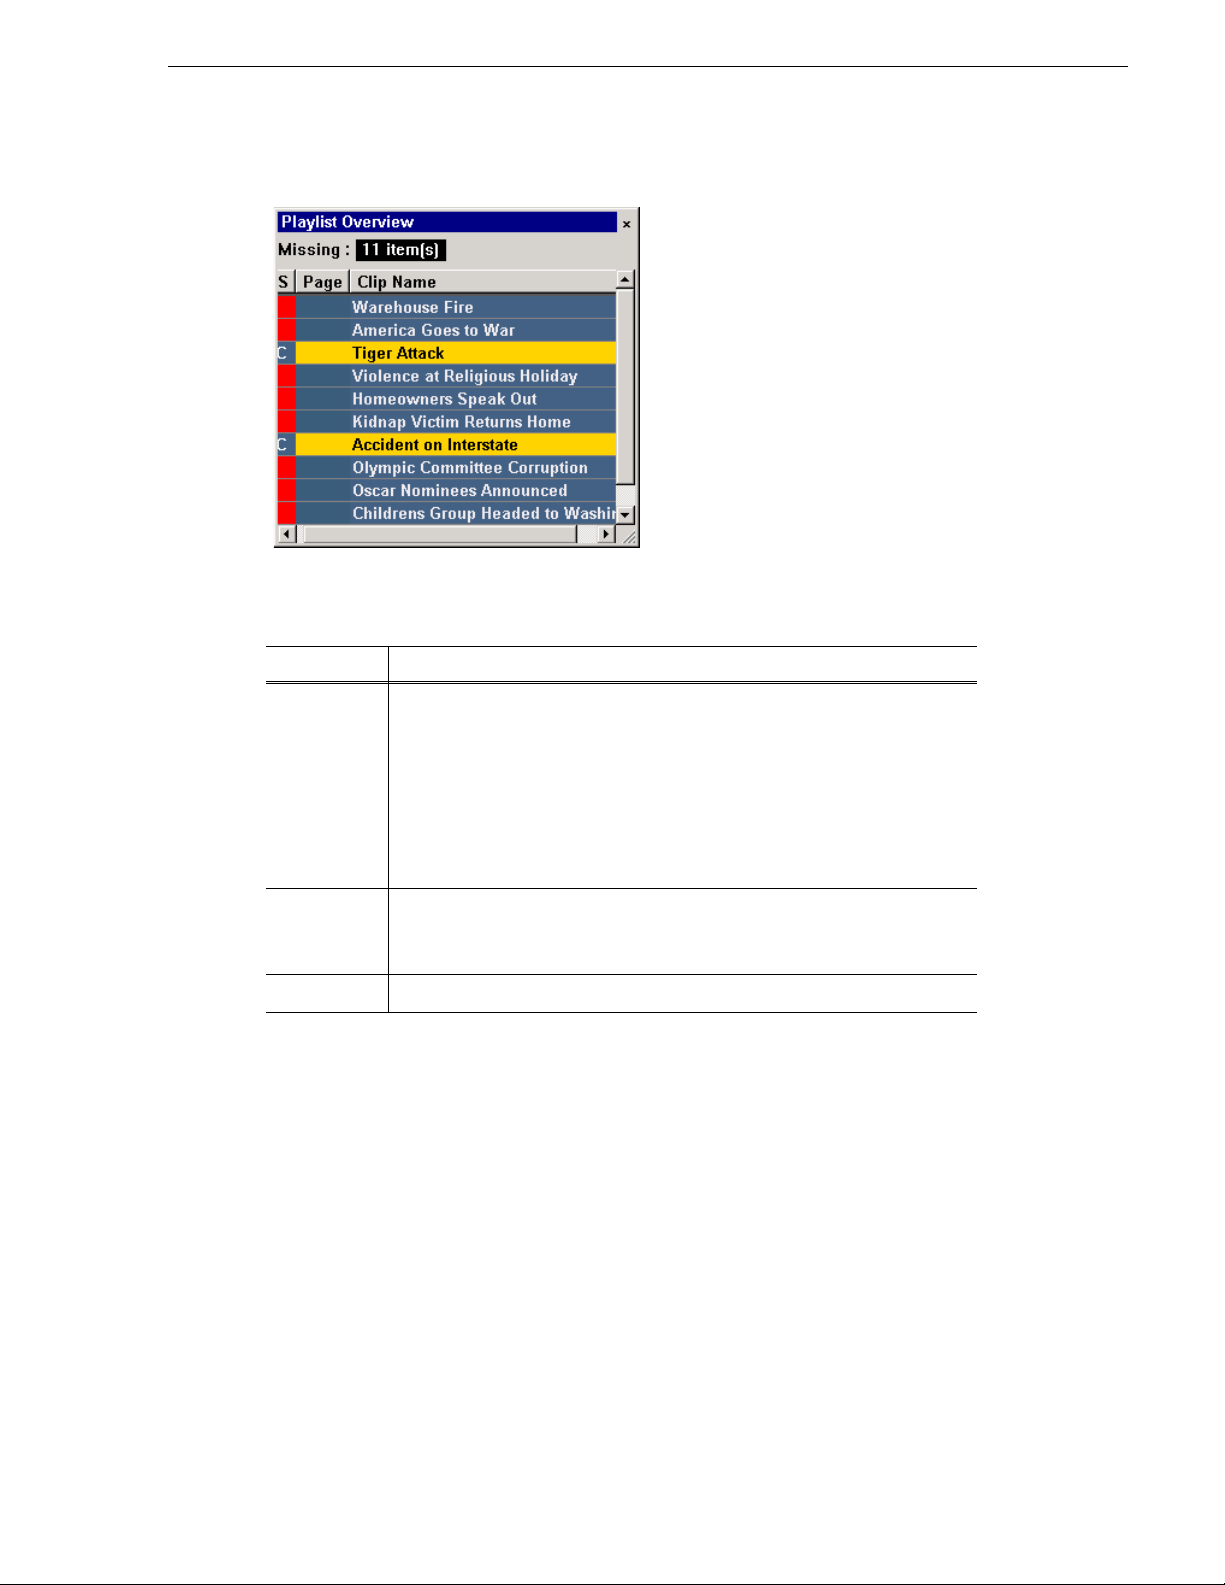
Playlist Overview
The playlist overview di splays a subset of the playlist columns, all owing you to scroll
to other parts of the pl ayl is t wi tho ut di sr upt ing the view in the main playl is t win dow.
Column Description
Playlist Overview
Status Displays clip the status:
- Blank — The clip has not yet been cu ed.
- C (Cued) — Clip is cued to a specific channel and is ready to play.
- P (Played) — The clip has finished playing.
- R (Roll) — The clip is playing to air.
- S (Stopped) — The cl ip has bee n manua lly sto pped during play.
- Red Square — Clip not ready for p layback.
Page Co rresponds to the page of the ENPS or Octopus rundown.
This column is blank if you are not us ing ENPS or Octo pus with Aurora Playou t
or if your Producer didn’t choose the
Clip Name Displays the clip name.
Creating a Playlist
You need to create a playlist before you can play clips to air. There are two ways to
create a playlist: by opening a rundown that you created in a newsroom computer
system or by manually creating a playlist in Aurora Playout.
Opening an NCS Rundown
If you use a newsroom computer sys tem such as ENPS, iNEWS, or Octo pus to create
news rundowns, you can open a rundown that you created there.
Freeze Page Numbers option in ENPS.
To open an NCS rundown:
September 2007 Aurora Playout User Guide 99
Page 100

Chapter 7 Playing Clips to Air
Rundowns
Clips cued
to channels
Name of
open
rundown
• Select a rundown from the drop-down list and click Open Rundown.
The rundown opens in the Aurora Playout application, displays all clips in the
rundown, and cues clip s to channels if
(see “Setting Cue and Chain Options” on page 56). The playlist displays a
headframe for each c lip; a re d border an d blank t humbnail ap pear for c lips tha t are
not yet ready for playback.
Auto Cue on Loading Rundown is en abled
Appending Rundowns to a Playlist
With Aurora Playout and your NCS, you can add rundowns to create a playlist that
includes all of the cl ip s and oth er inf ormati on from ea ch of the run downs. Appen ded
rundowns are added to the end of the current playlist.
To append a rundown:
1. Select the rundown from the drop-down list.
2. Click
Append Rundown.
The rundown is added to the end of the current Playlist, displays in the Playlist
Overview, and the rundown name is added to the Rundown list. You can open up
100 Aurora Playout User Guide September 2007
 Loading...