

GRASS VALLEY AURORA EDIT - INSTALLATION V7.1, Aurora Edit, Aurora LD Installation Manual
Aurora Edit and LD
FAST-TURN PRODUCTION TOOLS
Installation Manual
Software Version 7.1
071-8501-05
Oct. 2010

Affiliate with the N.V. KEMA in The Netherlands
CERTIFICATE
Certificate Number: 510040.001
The Quality System of:
Thomson Inc, and its worLdwide Grass Valley division affiliates DBA
GRASS VALLEY
Headquarters
400 Providence Mine Rd
Nevada City, CA 95959
United States
15655 SW Greystone Ct.
Beaverton, OR 97006
United States
10 Presidential Way
Suite 300
Woburn, MA 01801
United States
Kapittelweg 10
4827 HG Breda
The Nederlands
7140 Baymeadows Way
Ste 101
Jacksonville, FL 32256
United States
2300 So. Decker Lake Blvd.
Salt Lake City, UT 84119
United States
Rue du Clos Courtel
CS 31719
35517 Cesson-Sevigné Cedex
France
1 rue de l’Hautil
Z.I. des Boutries BP 150
78702 Conflans-Sainte
Honorine Cedex
France
Technopole Brest-Iroise
Site de la Pointe du Diable
CS 73808
29238 Brest Cedex 3
France
40 Rue de Bray
2 Rue des Landelles
35510 Cesson Sevigné
France
Spinnereistrasse 5
CH-5300 Turgi
Switzerland
Brunnenweg 9
D-64331 Weiterstadt
Germany
Carl-Benz-Strasse 6-8
67105 Schifferstadt
Germany
Including its implementation, meets the requirements of the standard:
ISO 9001:2008
Scope:
The design, manufacture and support of video and audio hardware and software products and
related systems
.
This Certificate is valid until: June 14, 2012
This Certificate is valid as of: June 14, 2009
Certified for the first time: June 14, 2000
H. Pierre Sallé
President
KEMA-Registered Quality
The method of operation for quality certification is defined in the KEMA General Terms
And Conditions For Quality And Environmental Management Systems Certifications.
Integral publication of this certificate is allowed.
KEMA-Registered Quality, Inc.
4377 County Line Road
Chalfont, PA 18914
Ph: (215)997-4519
Fax: (215)997-3809
CRT 001 073004
Accredited By:
ANAB

Aurora Edit and LD
FAST-TURN PRODUCTION TOOLS
Installation Manual
Software Version 7.1
071-8501-05
Oct. 2010

Copyright Copyright © Grass Valley, Inc. All rights reserved. Printed in the United States of America.
Portions of software © 2000 – 2010, Microsoft Corporation. All rights reserved. This document
may not be copied in whole or in part, or otherwise reproduced except as specifically permitted
under U.S. copyright law, without the prior written consent of Grass Valley, Inc., P.O. Box
59900, Nevada City, California 95959-7900. This product may be covered by one or more U.S.
and foreign patents.
Disclaimer Product options and specifications subject to change without notice. The information in this
manual is furnished for informational use only, is subject to change without notice, and should
not be construed as a commitment by Grass Valley, Inc. Grass Valley, Inc. assumes no
responsibility or liability for any errors or inaccuracies that may appear in this publication.
U.S. Government
Restricted Rights
Legend
Trademarks and
Logos
Revision Status
Use, duplication, or disclosure by the United States Government is subject to restrictions as set
forth in subparagraph (c)(1)(ii) of the Rights in Technical Data and Computer Software clause
at DFARS 252.277-7013 or in subparagraph c(1) and (2) of the Commercial Computer
Software Restricted Rights clause at FAR 52.227-19, as applicable. Manufacturer is Grass
Valley, Inc., P.O. Box 59900, Nevada City, California 95959-7900 U.S.A.
Grass Valley, K2, Aurora, Summit, Dyno, Solo, Infinity, Turbo, Profile, Profile XP, NetCentral,
NewsBrowse, NewsEdit, NewsQ, NewsShare, NewsQ Pro, and Media Manager are either
registered trademarks or trademarks of Grass Valley, Inc. in the United States and/or other
countries. Grass Valley, Inc. products are covered by U.S. and foreign patents, issued and
pending. Additional information regarding Grass Valley, Inc. trademarks and other proprietary
rights may be found at www.grassvalley.com. Other trademarks and logos used in this
document are either registered trademarks or trademarks of the manufacturers or vendors of
the associated products, such as Microsoft® Windows® operating system, Windows Media®
player, Internet Explorer® internet browser, and SQL Server™. QuickTime and the QuickTime
logo are trademarks or registered trademarks of Apple Computer, Inc., used under license
therefrom.
Rev Date Description
March 28, 2005 Initial release, part number 071-8294-00
Nov. 21, 2005 Release 071-8294-01 for Software Version 5.5
June 30, 2006 Release 071-8501-00 for Software Version 6.0
October 26, 2006 Release 071-8501-01 for Software Version 6.0a
Sept. 20, 2007 Release 071-8501-02 for Software Version 6.3
Nov. 25, 2008 Release 071-8501-03 for Software Version 6.5
April 15, 2010 Release 071-8501-04 for Software Version 7.0
October 4, 2010 Release 071-8501-05 for Software Version 7.1
4 Aurora Edit and LD Installation Manual 4 October 2010

Contents
Grass Valley Product Support..................................................................................................9
Chapter 1: Preparing for installation.......................................................................11
Aurora Edit installation checklists..........................................................................................12
Optional equipment checklist.............................................................................................12
Network setup and implementation checklist.....................................................................12
Software update checklist..................................................................................................14
Configuration checklist.......................................................................................................15
Chapter 2: Installing Aurora Edit Hardware............................................................17
Aurora Edit Components.......................................................................................................18
Workstation Components..................................................................................................18
Storage Options.................................................................................................................19
Installing Optional Equipment................................................................................................19
Optional Breakout Box and Video I/O Board......................................................................20
Controlling a Video Tape Recorder....................................................................................22
Connecting External Controllers to Aurora Edit.................................................................22
Connecting a Jog/Shuttle Controller .................................................................................23
Connecting a Motorized Fader or Effects Controller..........................................................23
Contents
Chapter 3: Configuring the network........................................................................27
Network setup and implementation checklist........................................................................28
About NewsShare.................................................................................................................29
About K2 networks................................................................................................................29
About SiteConfig...................................................................................................................30
About developing a system description.................................................................................30
Adding NAS to system description........................................................................................31
About the corporate LAN.......................................................................................................34
About software deployment on the corporate LAN................................................................35
Configuring the corporate LAN..............................................................................................35
Adding a group......................................................................................................................36
Adding a device to the system description............................................................................36
About device and host names...............................................................................................38
Modifying a device name.......................................................................................................38
About IP configuration of network interfaces on devices.......................................................38
Placeholder device IP configuration...................................................................................39
Discovered device IP configuration....................................................................................39
Modifying unassigned (unmanaged) network interfaces on Edit devices..............................40
About SiteConfig support on Aurora Edit devices.................................................................42
Installing SiteConfig support.................................................................................................43
Installing and configuring SiteConfig support for Aurora Edit LD..........................................45
Set credentials.......................................................................................................................46
Discovering devices with SiteConfig......................................................................................47
Assigning discovered devices...............................................................................................48
Modifying Edit device managed network interfaces..............................................................49
4 October 2010 Aurora Edit Installation Guide 5

Contents
Adding Aurora Edit LD workstations for software deployment...............................................53
Setting credentials for a specific device................................................................................54
Making the host name the same as the device name...........................................................55
Pinging devices from the control point PC.............................................................................55
About hosts files and SiteConfig...........................................................................................56
Generating host tables for devices with SiteConfig...............................................................57
Setting Up the Host Table......................................................................................................58
Chapter 4: Managing Software.................................................................................61
Create record of software installed on devices......................................................................62
Adding a software role to a device........................................................................................63
Removing a software role from a device...............................................................................63
Configuring deployment groups.............................................................................................63
Distribute devices into deployment groups............................................................................65
Install prerequisite files on the control point PC....................................................................65
Prepare for installation...........................................................................................................66
Prepare SiteConfig for software deployment.........................................................................66
Upgrade K2 systems.............................................................................................................67
Set up K2 Aurora FTP...........................................................................................................67
Adding K2-Aurora FTP software role to K2 Media Server.................................................67
Install and configure K2-Aurora FTP..................................................................................68
Distribute devices into deployment groups............................................................................69
Manually install software.......................................................................................................70
Check all currently installed software....................................................................................71
Add software package to deployment group.........................................................................72
Setting deployment options...................................................................................................73
Install and configure software on a NewsShare System.......................................................76
Install storage software on shared storage devices...........................................................76
Configuring devices for NAS..............................................................................................78
Configuring devices for K2 SAN storage...........................................................................78
Install Aurora software on shared storage devices............................................................79
Configuring the Disk Volume..............................................................................................80
Install software on other Aurora Edit devices........................................................................81
Chapter 5: Manually Installing Aurora Edit and LD Software................................85
Manually Installing Aurora Edit/Aurora Edit LD Software......................................................86
Third Party Software Installation...........................................................................................87
Chapter 6: Aurora Edit Application Configuration.................................................89
Setting Up Media Files for Sharing........................................................................................90
About Aurora Edit video sources...........................................................................................90
Add Source—General settings..........................................................................................90
Add Source—Connections settings...................................................................................91
Add Source—Record Channels settings...........................................................................92
Add Source—Record Handles settings.............................................................................92
Add Source—Preroll settings.............................................................................................92
Option Configurations............................................................................................................93
Options—General (Aurora Edit).........................................................................................93
Options—General (Aurora Edit LD)...................................................................................95
6 Aurora Edit Installation Guide 4 October 2010

Contents
Options—Media Locations (Aurora Edit LD)......................................................................96
Options—Audio/Video Settings..........................................................................................97
Options—Output................................................................................................................99
Options—Send................................................................................................................100
Options—Handles............................................................................................................104
Options—Timeline...........................................................................................................105
Options—Graphics..........................................................................................................108
Options—Controller.........................................................................................................108
Options—Aurora Playout.................................................................................................109
Understanding the System Self-Test...................................................................................110
Troubleshooting the System Self-Test..............................................................................111
Chapter 7: SmartBins..............................................................................................113
Understanding SmartBins...................................................................................................114
Transfer SmartBins..........................................................................................................114
Shared SmartBin.............................................................................................................114
Database Monitoring and Updating.................................................................................115
Running the SmartBins Setup Tool.....................................................................................116
Verifying the DCOM Configuration......................................................................................118
Chapter 8: Conform Server.....................................................................................119
The Conform Server............................................................................................................120
Hardware Requirements.....................................................................................................120
Software Requirements.......................................................................................................120
Conform Server Configuration.............................................................................................120
Disabling IE Enhanced Security Configuration................................................................120
Disabling Power Management.........................................................................................120
Configuring IIS.................................................................................................................121
Configuring DEP..............................................................................................................121
Testing the Conform Server Installation..............................................................................122
Testing IIS installation......................................................................................................122
Testing Conform Service Installation...............................................................................122
Web.Config......................................................................................................................122
Chapter 9: Aurora Edit Security.............................................................................125
Aurora Edit Security Overview.............................................................................................126
Designing a security schema..............................................................................................126
Sample security schema..................................................................................................126
NewsShare system users and groups.............................................................................127
Configuring the Domain Controller......................................................................................128
Guidelines........................................................................................................................128
Creating Groups..............................................................................................................129
Creating Users.................................................................................................................129
Adding Users to the New Groups....................................................................................129
Configuring SNFS for SAN Security....................................................................................130
Setting Security Permissions...............................................................................................130
Setting Initial Shared Volume Permissions .....................................................................131
Setting high-level shared volume permissions ................................................................131
Setting Aurora Edit Level Root Permissions....................................................................132
4 October 2010 Aurora Edit Installation Guide 7

Contents
Setting Aurora Edit Bin Permissions ...............................................................................134
Testing.................................................................................................................................135
Appendix A: Workstation Slot Map........................................................................137
HP z800 Workstation Board Assignment............................................................................138
Appendix B: Database Maintenance.....................................................................139
Database Maintenance.......................................................................................................140
Database Overview.............................................................................................................140
newsBackUpDb...............................................................................................................141
newsRestoreDb...............................................................................................................141
newsDropDb....................................................................................................................142
newsInstallDb..................................................................................................................143
newsShrinkDb..................................................................................................................143
newsInitAutoBack............................................................................................................144
Glossary.................................................................................................................................147
8 Aurora Edit Installation Guide 4 October 2010

Grass Valley Product Support
To get technical assistance, check on the status of a question, or to report a new issue,
contact Grass Valley Product Support via e-mail, the Web, or by phone or fax.
Web Technical Support
To access support information on the Web, visit the product support Web page on the
Grass Valley Web site. You can download software or find solutions to problems.
World Wide Web: http://www.grassvalley.com/support/
Technical Support E-mail Address: gvgtechsupport@grassvalley.com
Telephone Support
Use the following information to contact Product Support by phone.
International Support Centers
Our international support centers are available 24 hours a day, 7 days a week.
Authorized Local Support Representative
A local support representative may be available in your country. To locate a support
center during normal local business hours, refer to the following list. This list is
regularly updated on the website for Grass Valley Product Support
(http://www.grassvalley.com/support/contact/phone/)
After–hours local phone support is also available for warranty and contract customers.
Macau
In countryToll freeSupport Center
+33 1 48 25 20 20+800 80 80 20 20France
+1 530 478 4148+1 800 547 8949United States
TelephoneCountryRegion
+86 10 5883 7575ChinaAsia
+852 2531 3058Hong Kong, Taiwan, Korea,
+81 3 6848 5561Japan
4 October 2010 Aurora Edit Installation Guide 9
+603 7492 3303Southeast Asia - Malaysia
+65 6379 1313Southeast Asia - Singapore

Grass Valley Product Support
South America
TelephoneCountryRegion
+91 22 676 10324India
1 300 721 495AustraliaPacific
0800 846 676New Zealand
+61 3 8540 3650For callers outside Australia
or New Zealand
+55 11 5509 3440AllCentral America,
North America
Africa
North America, Mexico,
Caribbean
France
Eastern Europe
Tadzhikistan, Ukraine,
Uzbekistan
Near East and Africa
+1 800 547 8949;
+1 530 478 4148
+44 1189 230 499UK, Ireland, IsraelEurope
+31 (0) 35 62 38 421Benelux – Netherlands
+32 (0) 2 334 90 30Benelux – Belgium
+800 80 80 20 20;
+33 1 48 25 20 20
+49 6150 104 444Germany, Austria,
+7 495 258 09 20Belarus, Russia,
+45 404 72 237Northern Europe
+39 06 87 20 35 28Southern Europe – Italy
+34 91 512 03 50Southern Europe – Spain
+971 4 299 64 40Middle EastMiddle East, Near East,
+800 80 80 20 20;
+33 1 48 25 20 20
10 Aurora Edit Installation Guide 4 October 2010

Chapter 1
Preparing for installation
This section contains the following topics:
• Aurora Edit installation checklists
4 October 2010 Aurora Edit Installation Guide 11

Preparing for installation
Aurora Edit installation checklists
Use the following sequence of checklists to guide the overall task flow of installing
and commissioning an Aurora Edit system.
Optional equipment checklist
Use items in this checklist as appropriate for the optional equipment you are installing
in your Aurora Edit workstation.
CommentInstructionsTask
Install video board and
breakout box
Connect audio/video cables
to breakout box
Connect audio mixer
Connect video tape
recorder
Connect jog/shuttle
controller
Connect motorized fader
or effects controller
Assign Com Port
(Windows)
Assign Com Port (Aurora
Edit)
Next: Network setup and implementation checklist
Network setup and implementation checklist
If you have not already
done so, add your storage,
either K2 SAN or NAS, to
the system description
If you have not already
done so, configure your
NAS, and verify that it is
operational.
Installation and Service
Manual. For NAS, followstorage, either K2 SAN or
procedures for K2 Nearline
SAN.
CommentInstructionsTask
Modify your existing
system description.
—Refer to the K2 SAN
12 Aurora Edit Installation Guide 4 October 2010
Preparing for installation
CommentInstructionsTask
If you have Aurora Edit
LD systems on the
corporate LAN, add the
corporate LAN to system
description
devices to the system
description
to the system description
for each of your actual Edit
devices
placeholder devices
Configure the network
interfaces of the
placeholder devices
Install SiteConfig support
on devices if necessary.
Set credentials on devices
if necessary.
Modify your existing
system description.
—Add a group for your Edit
—Add a placeholder device
—Configure the names of the
Specify IP address ranges
and other network details
—Discover your Edit devices
—Assign each discovered
device to its placeholder
device
For each discovered and
assigned device, edit each
If a device connects to
multiple networks, set the
control network interfacenetwork interface. Specify
network settings and apply
them to the device.
IP address first. Also set
the hostname.
If you have Aurora Edit
LD systems on the
corporate LAN, add them
to the system description
and set credentials.
If not already set correctly,
set the hostname of
Make sure the device name
is correct, then make the
discovered devices hostname the same as the
device name.
—Ping each Edit device to
test network
communication
4 October 2010 Aurora Edit Installation Guide 13
Preparing for installation
CommentInstructionsTask
Generate host table
information and distribute
point PC all devices to ensure
Next: Software update checklist
Software update checklist
Make sure you have
completed network
configuration of allto hosts files on each
network interfaces acrossdevice and on the control
complete and valid host
table information. You can
use SiteConfig to copy
hosts files to devices, or
you can manage hosts files
yourself.
CommentInstructionsTask
—Add/remove software roles
Make sure software roles
match the software that
should be installed on each
device, according to your
system design.
—Add Edit devices to the
deployment group
—Place software on control
point PC
Create a deployment group
Procure the correct version
of software installation
files and prerequisite files.
Check software on devices
Refer to the release notes
for your product.
Add software to
deployment group
Set deployment options
Upgrade/install software to
devices from control point
PC
If using Final Cut Pro with
Aurora Edit, install and
K2 FCP Connect
Installation Manual
These tasks are not
supported by SiteConfig.
license K2-FCP-Connect. Do them manually, at each
local device.
Next: Configuration checklist
14 Aurora Edit Installation Guide 4 October 2010
Configuration checklist
Set up media files for
sharing
Add video sources to
Aurora Edit
Set Options
(Tools/Options)
Configure Smartbins
Configure Conform Server
Design Aurora Security
Schema
Preparing for installation
CommentInstructionsTask
If K2 FCP Connect is
installed and licensed,
configure Macintosh
systems on K2 storage.
If using K2 FCP Connect,
configure Aurora Edit for
using Final Cut Pro.
Next:
K2 FCP Connect
Installation Manual
4 October 2010 Aurora Edit Installation Guide 15


Chapter 2
Installing Aurora Edit Hardware
This section contains the following topics:
• Aurora Edit Components
• Installing Optional Equipment
4 October 2010 Aurora Edit Installation Guide 17

Installing Aurora Edit Hardware
Aurora Edit Components
The Aurora Edit application is part of the Aurora Suite of products that consists of
several components that comprise a total digital news production system. All Aurora
Edit applications run on the Aurora Edit platform. For a list of system specifications
for customer-supplied hardware qualified for use with Aurora Edit, refer to the Version
Compatibility section. This information is also included in the Aurora Edit Release
Notes on the CD-ROM where the most recent information is always included.
Refer to the Aurora Edit Release Notes for the most updated information for the
following:
• System Specifications for qualified laptops, desktop computers, and workstations
• HP Workstation Board Assignments
• Compatible DSM Components
• Compatible Grass Valley Products
• Compatible Third Party Products
Workstation Components
The Aurora Edit application is provided on a CD-ROM and installed on a
customer-supplied laptop, desktop computer, or workstation depending on the editing
application needed. When you order your system, you will choose the components
needed for your facility based on your system design.
NOTE: For a list of supported hardware configurations, see the latest Aurora Edit
Release Notes included on the CD and online for the most up-to-date information
on system specifications and software updates.
System components can include:
• Keyboard and Mouse
A keyboard and mouse can be used to control the Aurora Edit and Aurora Edit LD
functions. The keyboard and mouse are customer-supplied. Included with each
Aurora Edit application CD-ROM is a set of keyboard stickers that are applied to
the standard keyboard to make the key strokes compatible with the current Aurora
Edit software version. A customer-supplied laptop computer can also use the
keyboard stickers in the same manner to control Aurora Edit or Aurora Edit LD.
• Monitor
Aurora Edit workstations support either one or two monitors. In a dual-monitor
configuration, one monitor is typically used to display bins while the other displays
other Aurora Edit application components.
• Breakout Box (BOB)
18 Aurora Edit Installation Guide 4 October 2010

Aurora Edit supports an option that includes an I/O board that connects to a
rackmountable Breakout Box (BOB) to provide multiple analog and SDI video
and audio inputs and outputs.
• External Control Devices
Standard USB jog/shuttle controllers are acceptable. For an officially qualified list
of devices used on Aurora Edit check with your sales representative when you plan
your system design or contact customer support.
Storage Options
The Aurora Edit system provides three options for storing files:
Local (standalone) on a workstation, computer, or laptop not tied to a shared strorage
solution.
NOTE: In Local mode, no DSM or Smartbins are possible, as well as other
network-required functionality.
Installing Aurora Edit Hardware
NAS (Network Attached Storage) network, a shared storage network consisting of:
• A NAS Server to manage the network file systems
• RAID arrays to provide media storage
• Database System Manager (DSM) to host the News database and (optionally) the
SmartBins Service
NAS networks support Gigabit Ethernet networking.
K2, a shared storage network, consisting of these components:
• A K2 Media Server to manage network file systems
• RAID arrays to provide media storage
• Gigabit Ethernet Switches to connect the K2 Media Server to Aurora Edit clients
• A Control Point PC to K2 Configuration application
• A Database System Manager (DSM) to host the News database and (optionally)
the SmartBins Service
K2 networks use Gigabit Ethernet networking.
Installing Optional Equipment
Aurora Edit allows you to connect a variety of specialized optional equipment to
enhance your editing capabilities. This includes an optional AJA Video Breakout Box
(BOB) and video board. Other interfaces include customer-supplied external controllers
such as a jog shuttle, motorized fader, and effects controllers.
4 October 2010 Aurora Edit Installation Guide 19

Installing Aurora Edit Hardware
Optional Breakout Box and Video I/O Board
Qualified Aurora Edit workstations can be equipped with an optional rack-mountable
AJA Video Breakout Box (BOB) with an I/O video board that installs in a slot in the
Aurora workstation.
This option provides additional high-quality analog and digital audio and analog,
component, and SDI video sources, in addition to one HDMI (High Definition
Multimedia Interface) input and one HDMI output. It allows interfacing to various
external devices such as tape decks and cameras as well as HDMI sources. When the
I/O Video board is installed in the workstation during initial installation, the necessary
software components for this option will be installed when the Aurora Edit software
is deployed using the SiteConfig application.
Installing the Video I/O Board and Connecting to the Breakout Box (BOB)
Install the video I/O board in the workstation, then connect it to the rear of the Breakout
Box (BOB) as described below.
NOTE: The previous version Breakout Box (BOB) and video I/O board had three SDI BNC
connectors and no HDMI connectors and had a differenct breakout cable. Cable it in the
same manner by following the labeled cables.
1. Install the video I/O board in the correct workstation slot.
2. Connect the video board to the rear of the breakout box (BOB) using the two cables
provided. One end of the cables attaches to the video board and the other to the
back of the BOB. The cables included are listed below and labeled clearly for
installation:
a) Connect the 60-pin to 60-pin cable to the 60-pin connector on the video board
installed in the workstation and J1 on the rear of the Breakout Box (BOB).
b) Connect the breakout cable with two BNCs labeled SDI OUT to J5 and SDI IN
to J4 on the BOB and in the same order (OUT, IN) to the video card, installed
in the workstation, then connect the two HDMI connectors Iabeled HDMI OUT
to J3 and HDMI IN to J2 on the BOB and in the same order (OUT, IN) to the
video board in the workstation.
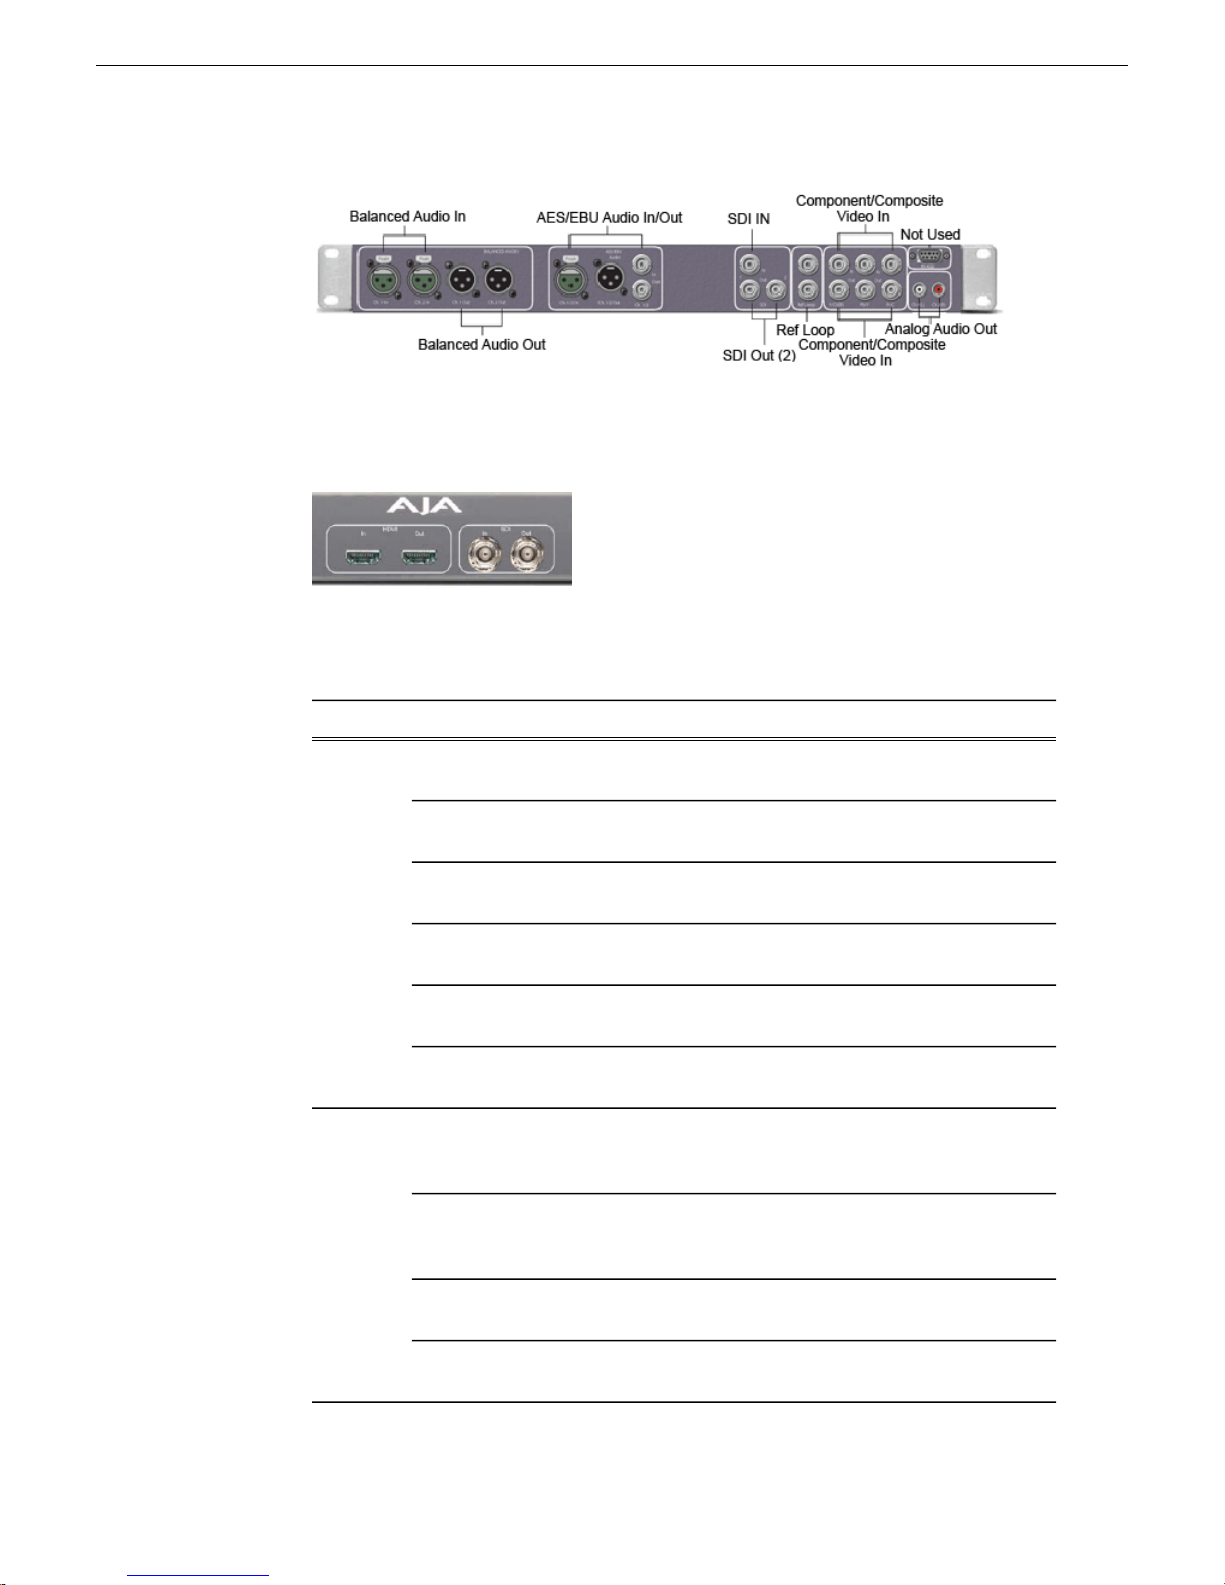
Connecting Cables to the Breakout Box
The following illustrations and table detail how to connect video and audio cables to
the breakout box to interface external equipment to your Aurora Edit system.
The image below illustrates the previous version of the HDR Breakout Box (BOB)
with three SDI connectors (one IN and two OUT) and no HDMI connectors. This
BOB requires a specific video board and cable set as specified in the option model.
20 Aurora Edit Installation Guide 4 October 2010
Installing Aurora Edit Hardware
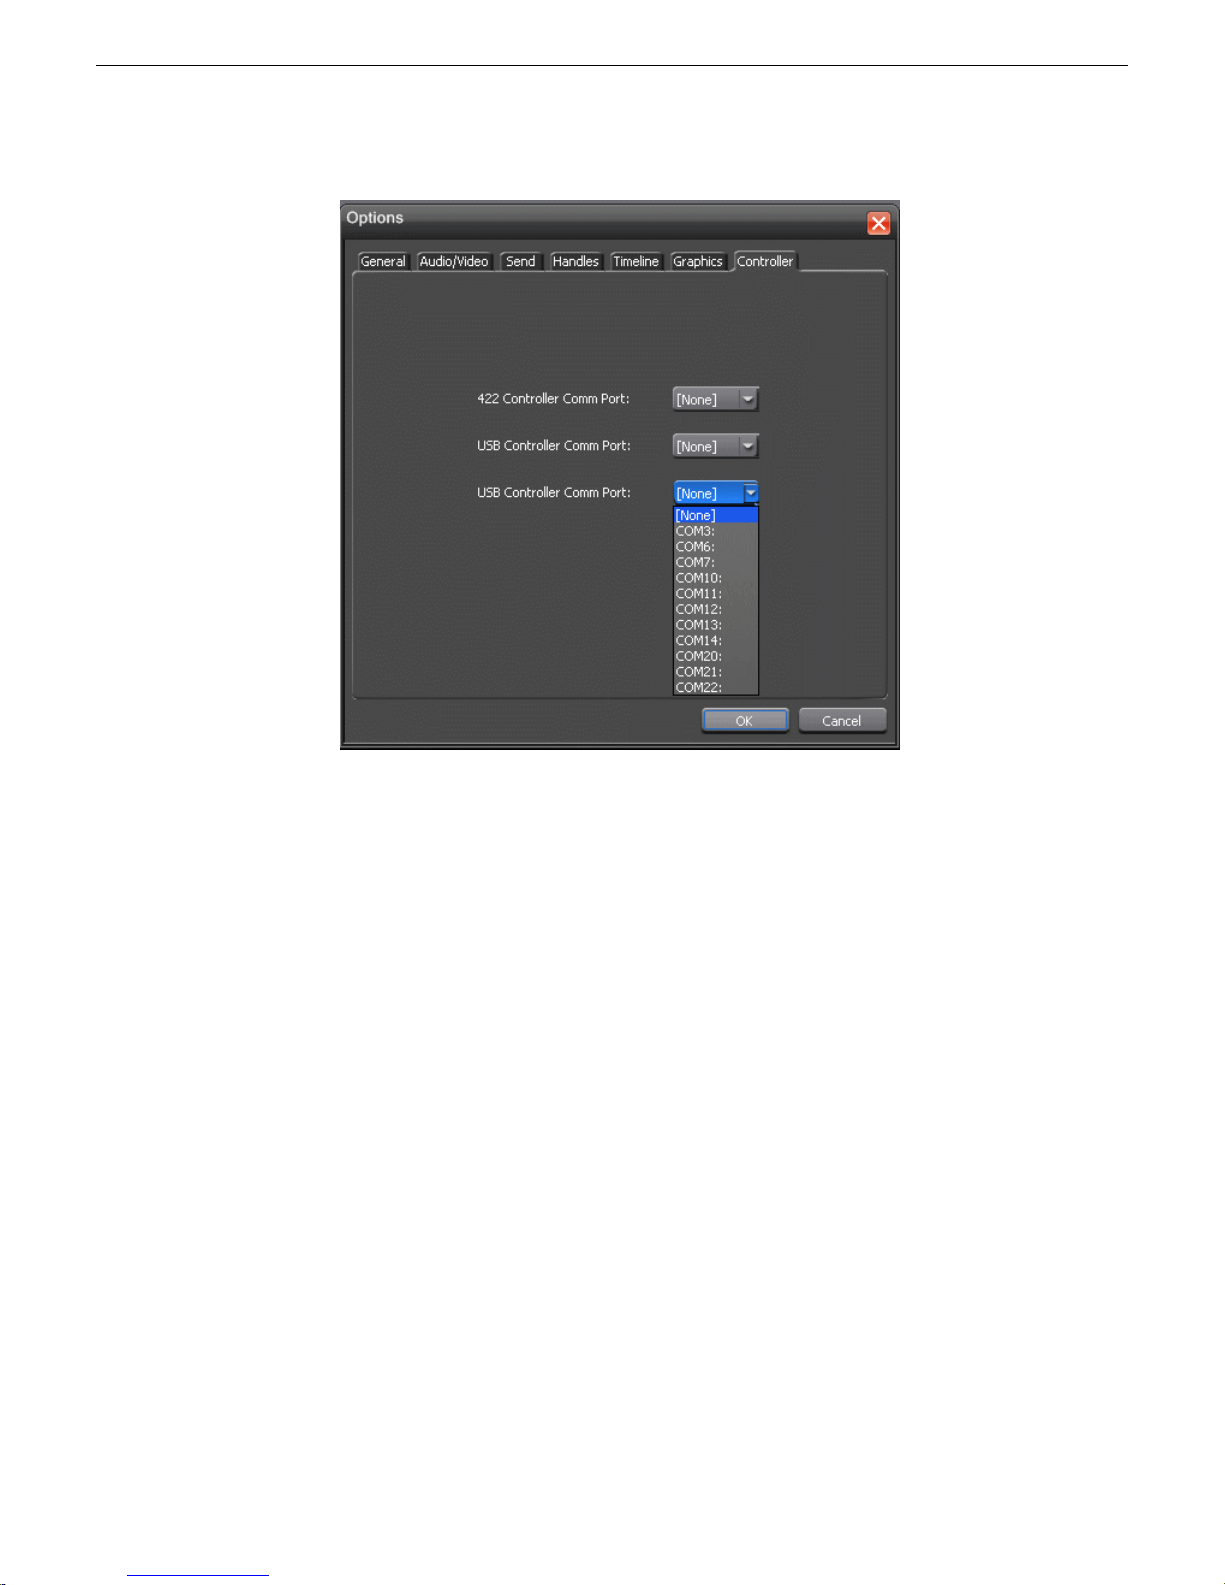
The image below shows the latest version AJA Breakout Box (BOB) that is identical
to the older version except it now has two SDI connectors and two HDMI connectors.
This BOB requires a specific video board and cable set as specified in the option
model.
The table below gives cabling information from the AJA Breakout Box (BOB) to
external devices.
NOTE: This table assumes VTRs are operating in playout to tape mode.
Analog
Audio
(without
mixer)
Digtial
Audio
VTR Channel 1
output
VTR Channel 2
output
BOB Balanced Left
Out
BOB Balanced Right
Out
BOB Unbalanced
Left Out
BOB Unbalanced
Right Out
VTR AES/EBU
Channels 1&2 Output
BOB AES/EBU
Channels !&2 Output
BOB Unbalanced
Left Out
Cable TypeToFromInput
XLR-female to XLR-maleBOB Balanced IN
left channel
XLR-female to XLR-maleBOB Balanced IN
right channel
XLR-male to XLR-femaleVTR Channel 1
input
XLR-male to XLR-femaleVTR Channel 2
input
RCA-male to XLR or 1/4" maleLeft desktop
speaker
RCA-male to XLR or 1/4" maleRight desktop
speaker
XLR-male to XLR-maleBOB AES/EBU
Channels 1&2
Input
XLR-male to XLR-femaleVTR AES/EBU
Channels 1&2
Input
RCA-male to XLR or 1/4" maleLeft desktop
speaker
4 October 2010 Aurora Edit Installation Guide 21
BOB Unbalanced
Right Out
RCA-male to XLR or 1/4" maleRight desktop
speaker

Installing Aurora Edit Hardware
Cable TypeToFromInput
Single BNC-BNCBOB SDI InputVTR SDI OutputVideo
Single BNC-BNCVTR SDI InputBOB SDI Output
VTR Composite
Output
BOB Composite
Output
VTR Component
Output
BOB Component
Output
1.3a
Controlling a Video Tape Recorder
Machine control of external devices such as VTRs/camcorders and other control
devices is done through an RS-422 remote serial interface or a USB port. Check the
specifications for your specific workstation for RS-422 connector requirements. In
some cases, the workstation must have an optional RS-422 PCI card installed. You
may also use the local RS-232 port on the workstation with an RS-422 adapter for
tape deck serial control applications.
Single BNC-BNCBOB Composite
Input
Single BNC-BNCVTR Composite
Input
Tri BNC-BNC harnessBOB Component
Input
Tri BNC-BNC harnessVTR Component
Input
HDMI Audio/Video cableBOB HDMI InputHDMI Device OutputHDMI
HDMI Audio/Video CableHDMI MonitorBOB HDMI Output
Once cabling is complete, the workstation port must be configured in the Aurora Edit
application to control the external device. Also configure the port on the Controller
card for DCE (controller).
NOTE: The serial interface to the Aurora system is made to a connection on the
rear of the workstation. Do not use the Breakout Box (BOB) Machine Control
connection.
Connecting External Controllers to Aurora Edit
Aurora Edit supports three types of external controllers: the Motorized Fader Controller,
the Jog/Shuttle Controller, and the Effects Controller as described in the table below.
Control connections for these devices are USB or RS-422 depending on the device.
An optional PCI board with an RS-422 machine control port must be installed in the
workstation for correct RS-422 control. Check the specifications for your workstation
type in Appendix B, Workstation Slot Map, for slot installation location of the optional
PCI RS-422 board.
22 Aurora Edit Installation Guide 4 October 2010

Installing Aurora Edit Hardware
DescriptionController
Jog Shuttle
Motorized Fader
Effects
Assists editing with a jog/shuttle wheel for convenient searching, buttons
to minimize keyboard strokes, and a backlit LCD timecode display.
Assists audio mixing with four touch-sensitive, motorized faders, 16
channel switches, 4 function keys, and bank shift buttons.
Assists effects editing with a 3–axis joystick mechanism, five rotary
encoders, and 10 switches.
Connecting a Jog/Shuttle Controller
Your workstation should be powered down for this task.
1. Plug the controller’s 9-pin connector into the RS-422 port on the optional PCI
board on the back of the Aurora Edit workstation (COM4). The port should be set
for DTE (Device).
2. Plug the controller’s power connector into a DC power adapter connection.
3. Verify that the following information appears on the controller’s display when it
powers up:
Grass Valley
Aurora Edit
Rev x.xx
4. Turn on your Aurora Edit workstation.
Connecting a Motorized Fader or Effects Controller
Your workstation should be powered down for this task.
1. Plug the controller’s USB connector into one of the two available USB ports on
the back of your Aurora Edit workstation (usually COM5 for the Motorized Fader
Controller and COM6 for the Effects Controller).
2. If you are connecting the Motorized Fader Controller, plug the controller’s power
connector into a DC power adapter connection.
The Effects Controller is powered via the USB cable.
3. Turn on your Aurora Edit workstation.
4. When the New Hardware Wizard appears, follow the directions on the screen.
5. When asked for the controller’s driver, insert the Aurora Edit CD and navigate to
\Drivers\JLC USB Drivers.
6. Finish the new hardware installation.
4 October 2010 Aurora Edit Installation Guide 23

Installing Aurora Edit Hardware
Assigning a COM Port (Windows)
To verify that the COM port is set correctly in the Windows Device Manager:
1. Right-click on My Computer and select Properties.
2. Click the Hardware tab on the System Properties window and then click Device
Manager.
3. Click the * symbol next to the Ports item.
4. Click on JLCooper USB to Serial (COM#) and select Properties.
5. Click the Port Settings tab on the Properties tab and click Advanced.
6. Select the correct COM Port Number.
7. Click OK to close the Advanced window, and again to close the Properties window.
Assigning a COM Port (Aurora Edit)
To use any of the controllers, you need to assign a specific Aurora Edit COM port for
the controller. Aurora Edit has pre-configured COM ports as follows:
COM
Port
Aurora Playout GPIOGPIO1
2
Video Tape Recorder (VTR)RS-4223
Jog/Shuttle ControllerRS-4224
Motorized Fader ControllerUSB5
Effects ControllerUSB6
To assign a COM port:
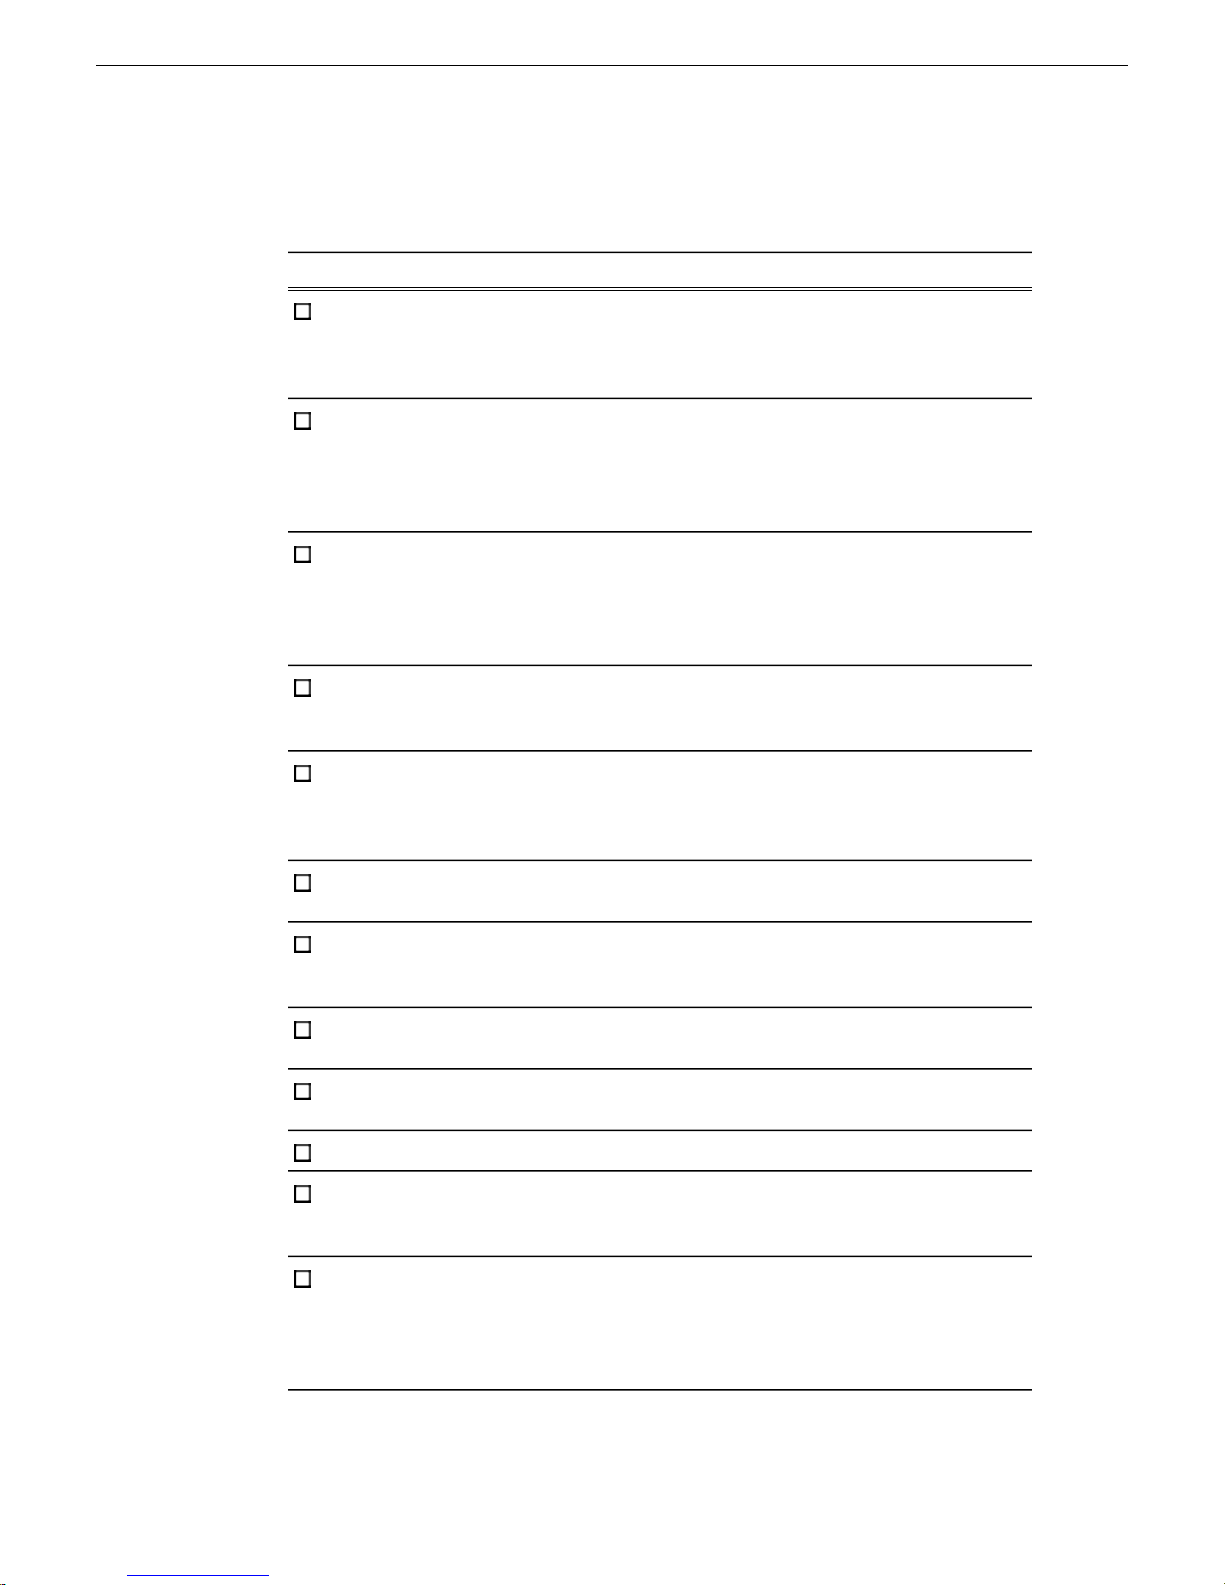
1. In the Aurora Edit application, choose the Tools | Options | Controller pulldown to
bring up the Controller window.
24 Aurora Edit Installation Guide 4 October 2010
Installing Aurora Edit Hardware
2. For the Jog/Shuttle Controller, select the correct COM port from the 422 Controller
Comm Port drop-down list; for the other controllers, select the correct COM port
from the USB Controller Comm Port drop-down lists.
The COM port needs to match the number of the USB port where you connected
the controller.
3. Click OK.
You can now use the controller to control features on Aurora Edit.
4 October 2010 Aurora Edit Installation Guide 25


Chapter 3
Configuring the network
This section contains the following topics:
• Network setup and implementation checklist
• About NewsShare
• About K2 networks
• About SiteConfig
• About developing a system description
• Adding NAS to system description
• About the corporate LAN
• About software deployment on the corporate LAN
• Configuring the corporate LAN
• Adding a group
• Adding a device to the system description
• About device and host names
• Modifying a device name
• About IP configuration of network interfaces on devices
• Modifying unassigned (unmanaged) network interfaces on Edit devices
• About SiteConfig support on Aurora Edit devices
• Installing SiteConfig support
• Installing and configuring SiteConfig support for Aurora Edit LD
• Set credentials
• Discovering devices with SiteConfig
• Assigning discovered devices
• Modifying Edit device managed network interfaces
• Adding Aurora Edit LD workstations for software deployment
• Setting credentials for a specific device
• Making the host name the same as the device name
• Pinging devices from the control point PC
• About hosts files and SiteConfig
• Generating host tables for devices with SiteConfig
• Setting Up the Host Table
4 October 2010 Aurora Edit Installation Guide 27
Configuring the network
Network setup and implementation checklist
CommentInstructionsTask
If you have not already
done so, add your storage,
either K2 SAN or NAS, to
the system description
If you have not already
done so, configure your
NAS, and verify that it is
operational.
If you have Aurora Edit
LD systems on the
corporate LAN, add the
corporate LAN to system
description
devices to the system
description
to the system description
for each of your actual Edit
devices
placeholder devices
Modify your existing
system description.
—Refer to the K2 SAN
Installation and Service
Manual. For NAS, followstorage, either K2 SAN or
procedures for K2 Nearline
SAN.
Modify your existing
system description.
—Add a group for your Edit
—Add a placeholder device
—Configure the names of the
Configure the network
interfaces of the
placeholder devices
Install SiteConfig support
on devices if necessary.
Set credentials on devices
if necessary.
device to its placeholder
device
For each discovered and
assigned device, edit each
network settings and apply
them to the device.
28 Aurora Edit Installation Guide 4 October 2010
Specify IP address ranges
and other network details
—Discover your Edit devices
—Assign each discovered
If a device connects to
multiple networks, set the
control network interfacenetwork interface. Specify
IP address first. Also set
the hostname.
If you have Aurora Edit
LD systems on the
corporate LAN, add them
to the system description
and set credentials.
Configuring the network
CommentInstructionsTask
If not already set correctly,
set the hostname of
discovered devices hostname the same as the
test network
communication
Generate host table
information and distribute
point PC all devices to ensure
Next: Software update checklist
About NewsShare
Make sure the device name
is correct, then make the
device name.
—Ping each Edit device to
Make sure you have
completed network
configuration of allto hosts files on each
network interfaces acrossdevice and on the control
complete and valid host
table information. You can
use SiteConfig to copy
hosts files to devices, or
you can manage hosts files
yourself.
NewsShare allows Aurora Edit to share a common news database and media volume,
making the editing workflow easier to create and maintain.
NewsShare allows Aurora Edit to share a common news database and media volume,
making the editing workflow easier to create and maintain. You can configure
NewsShare for NAS storage or K2 storage.
About K2 networks
NewsShare allows Aurora Edit to share a common news database and media volume,
making the editing workflow easier to create and maintain. You can configure
NewsShare for NAS storage or K2 storage.
Before creating a NewsShare environment, you first need to install and configure a
K2 Media Server. Refer to the K2 SAN Installation and Service Manual.
4 October 2010 Aurora Edit Installation Guide 29

Configuring the network
Many K2 network components, particularly the StorNext File System (SNFS), require
all clients and servers to use fixed IP addresses. If your network uses a DHCP server,
you must create address reservations or a fixed address subnet.
Complete IP connectivity must exist between all DSMs, K2 Media Servers, and Aurora
Edit workstations for a particular K2 network. You might find it convenient to assign
all machines on a K2 network to the same Workgroup.
About SiteConfig
SiteConfig is the recommended tool for network configuration and software
deployment. SiteConfig is a ProductFrame application. ProductFrame is an integrated
platform of tools and product distribution processes for system installation and
configuration.
You can use SiteConfig as a stand-alone tool for planning and system design, even
before you have any devices installed or cabled. You can define networks, IP addresses,
hostnames, interfaces, and other network parameters. You can add devices, group
devices, and modify device roles in the system.
As you install and commission systems, SiteConfig runs on the control point PC. It
discovers devices, configures their network settings, and manages host files. SiteConfig
also manages software installations and upgrades and provides a unified software
package with verified compatible versions for deployment across multi-product systems.
You should use SiteConfig for network configuration and software deployment at
installation and throughout the life of the system in your facility. This enforces
consistent policy and allows SiteConfig to keep a record of changes, which makes the
system easier to maintain and aids in troubleshooting should a problem arise.
SiteConfig displays information from a system description file, which is an XML file.
SiteConfig operates in different modes that correspond to a system’ s life-cycle phases:
network configuration, software deployment, and software configuration. You can
expand nodes and select elements in the tree view and the list view to view and modify
networks, systems, individual devices, software deployment, and configuration settings.
About developing a system description
The topics in this manual assume that you are modifying an existing system description.
Your system description is typically developed using one of the following taskflows:
• For a system in which all devices are new from Grass Valley with one or more K2
SANs, you first create a system description for your K2 SAN or SANs, then add
Browse/MediaFrame, Edit, Ingest, and Playout devices as appropriate. Refer to
the K2 SAN installation and Service Manual for instructions on creating the system
description.
30 Aurora Edit Installation Guide 4 October 2010
 Loading...