

Page 1
Aurora Ingest
INGEST MANAGEMENT SYSTEM
System Guide
SOFTWARE VERSION 6.1
071-8514-02
MAY 2007
Page 2

Copyright Copyright © 2007 Grass Valley, Inc. All rights reserved. Printed in the United States of America.
Portions of software © 2000 – 2007, Microsoft Corporation. All rights reserved.
This document may not be copied in whole or in part, or otherwise r eproduced except as
specifically permitted under U.S. copyright law, without the prior written consent of Grass
Valley, Inc., P.O. Box 59900, Nevada City, California 95959-7900
This product may be covered by one or more U.S. and foreign patents.
Trademarks Grass Valley, K2, Aurora, Turbo, M-Series, Profile, Profile XP, NewsBrowse, NewsEdit,
NewsQ, NewsShare, NewsQ Pro, Aurora, and Media Manager are either registered
trademarks or trademarks of Grass Valley, Inc. in the United States and/or other countries.
Other trademarks used in this document are either registered trademarks or trademarks of the
manufacturers or vendors of the associated products. Grass Valley, Inc. products are covered
by U.S. and foreign patents, issued and pending. Additional information regarding Grass
Valley, Inc. trademarks and other proprietary rights may be found at
www.thomsongrassvalley.com.
Disclaimer Product options and specifications subject to change without notice. The information in this
manual is furnished for informational use only, is subject to change without notice, and should
not be construed as a commitment by Grass Valley, Inc. Grass Valley, Inc. assumes no
responsibility or liability for any errors or inacc uracies that may appear in this publication.
U.S. Government
Restricted Rights
Legend
Use, duplication, or disclosure by the United States Government is subject to restrictions as set
forth in subparagraph (c)(1)(ii) of the Rights in Technical Data and Computer Software clause
at DFARS 252.277-7013 or in subparagraph c(1) and (2) of the Commercial Computer
Software Restricted Rights clause at FAR 52.227-19, as applicable. Manufacturer is Grass
Valley, Inc., P.O. Box 59900, Nevada City, California 95959-7900 U.S.A.
Revision Status
Rev Date Description
September 14,
2006
January 18, 2007 Release 071-8514-01 for Software Version 6.0b
May 23, 2007 Release 071-8514-02 for Software Version 6.1
Initial release of the Aurora Ingest System Guide, 071-8514-00 for
Software Version 6.0. Updated from 071-8342-02, IngestStation
System Guide
ii Aurora Ingest System Guide May 23, 2007
Page 3

Contents
Grass Valley Product Support. . . . . . . . . . . . . . . . . . . . . . . . . . . . . . . . . v
Safety Summaries. . . . . . . . . . . . . . . . . . . . . . . . . . . . . . . . . . . . . . . . . .vi
Safety Terms and Symbols . . . . . . . . . . . . . . . . . . . . . . . . . . . . . . . . . . .vii
Service Safety Summary. . . . . . . . . . . . . . . . . . . . . . . . . . . . . . . . . . . . viii
Certifications and Compliances. . . . . . . . . . . . . . . . . . . . . . . . . . . . . . . viii
Environmental Criteria. . . . . . . . . . . . . . . . . . . . . . . . . . . . . . . . . . . . . . . x
Chapter 1 Introducing Aurora Ingest
What is Aurora Ingest? . . . . . . . . . . . . . . . . . . . . . . . . . . . . . . . . . . . . . . 1
Aurora Ingest applications. . . . . . . . . . . . . . . . . . . . . . . . . . . . . . . . . . . . 2
Aurora Ingest workstations . . . . . . . . . . . . . . . . . . . . . . . . . . . . . . . . . . . 2
Aurora Ingest - Server . . . . . . . . . . . . . . . . . . . . . . . . . . . . . . . . . . . . 3
Aurora Ingest - VTR Controller. . . . . . . . . . . . . . . . . . . . . . . . . . . . . . 3
Aurora Ingest - VTR Ingest. . . . . . . . . . . . . . . . . . . . . . . . . . . . . . . . . 3
Aurora Ingest - Scheduler Client . . . . . . . . . . . . . . . . . . . . . . . . . . . . 3
Aurora Ingest - RMI Client . . . . . . . . . . . . . . . . . . . . . . . . . . . . . . . . . 3
Integration with Aurora Suite and third-party products . . . . . . . . . . . . . . 4
Understanding Status Colors . . . . . . . . . . . . . . . . . . . . . . . . . . . . . . . . . 4
Chapter 2 Installing and Configuring Aurora Ingest
System Requirements . . . . . . . . . . . . . . . . . . . . . . . . . . . . . . . . . . . . . . 5
Aurora Ingest - Server . . . . . . . . . . . . . . . . . . . . . . . . . . . . . . . . . . . . 6
Aurora Ingest - VTR Ingest/VTR Controller . . . . . . . . . . . . . . . . . . . . 6
Aurora Ingest - Scheduler. . . . . . . . . . . . . . . . . . . . . . . . . . . . . . . . . . 7
Aurora Ingest - RMI . . . . . . . . . . . . . . . . . . . . . . . . . . . . . . . . . . . . . . 7
Installing Aurora Ingest . . . . . . . . . . . . . . . . . . . . . . . . . . . . . . . . . . . . . . 8
Installing Hardware (VTR Controller) . . . . . . . . . . . . . . . . . . . . . . . . . 8
Installing Software . . . . . . . . . . . . . . . . . . . . . . . . . . . . . . . . . . . . . . . 8
Obtaining a Software License Number . . . . . . . . . . . . . . . . . . . . . . . 9
Migrating Aurora Ingest - Server . . . . . . . . . . . . . . . . . . . . . . . . . . . . 9
Setting Up Your Media Server . . . . . . . . . . . . . . . . . . . . . . . . . . . . . . . 10
K2 Media Server. . . . . . . . . . . . . . . . . . . . . . . . . . . . . . . . . . . . . . . . 10
M-Series iVDR . . . . . . . . . . . . . . . . . . . . . . . . . . . . . . . . . . . . . . . . . 11
Configuring Aurora Ingest. . . . . . . . . . . . . . . . . . . . . . . . . . . . . . . . . . . 11
Aurora Ingest - Server . . . . . . . . . . . . . . . . . . . . . . . . . . . . . . . . . . . 12
Configuration Overview . . . . . . . . . . . . . . . . . . . . . . . . . . . . . . . . . . 12
Configuring System Settings . . . . . . . . . . . . . . . . . . . . . . . . . . . . . . 13
Configuring Media Servers . . . . . . . . . . . . . . . . . . . . . . . . . . . . . . . 14
Configuring Routers . . . . . . . . . . . . . . . . . . . . . . . . . . . . . . . . . . . . . 16
Configuring Channels . . . . . . . . . . . . . . . . . . . . . . . . . . . . . . . . . . . 22
Configuring Aurora Ingest - Scheduler (Feed) . . . . . . . . . . . . . . . . . 24
Configuring VTR Controller . . . . . . . . . . . . . . . . . . . . . . . . . . . . . . . 26
Configuring VTR Ingest (VTR) . . . . . . . . . . . . . . . . . . . . . . . . . . . . . 28
Configuring RMI . . . . . . . . . . . . . . . . . . . . . . . . . . . . . . . . . . . . . . . . 31
User Administration for Aurora Ingest. . . . . . . . . . . . . . . . . . . . . . . . . . 32
Chapter 3 Using Aurora Ingest - Scheduler
Tour of the Aurora Ingest - Scheduler Window. . . . . . . . . . . . . . . . . . . 34
Channel Window Toolbar. . . . . . . . . . . . . . . . . . . . . . . . . . . . . . . . . 35
Tour of Schedule Viewer. . . . . . . . . . . . . . . . . . . . . . . . . . . . . . . . . . . . 35
Channel Columns. . . . . . . . . . . . . . . . . . . . . . . . . . . . . . . . . . . . . . . 36
Crash Recording . . . . . . . . . . . . . . . . . . . . . . . . . . . . . . . . . . . . . . . . . 36
Scheduling Recordings . . . . . . . . . . . . . . . . . . . . . . . . . . . . . . . . . . . . 37
Scheduling events with ENPS . . . . . . . . . . . . . . . . . . . . . . . . . . . . . 38
May 2007 Aurora Ingest Syste m Guide iii
Page 4

Contents
Setting up ENPS Assignment Grid . . . . . . . . . . . . . . . . . . . . . . . . . .38
Adding New Events. . . . . . . . . . . . . . . . . . . . . . . . . . . . . . . . . . . . . .40
Adding New Events from CompuSat. . . . . . . . . . . . . . . . . . . . . . . . .42
Adding Recurring Events . . . . . . . . . . . . . . . . . . . . . . . . . . . . . . . . .44
Modifying Events. . . . . . . . . . . . . . . . . . . . . . . . . . . . . . . . . . . . . . . .46
Deleting Events. . . . . . . . . . . . . . . . . . . . . . . . . . . . . . . . . . . . . . . . .46
Creating a Template . . . . . . . . . . . . . . . . . . . . . . . . . . . . . . . . . . . . .46
Using VTR Ingest Reservation . . . . . . . . . . . . . . . . . . . . . . . . . . . . .47
Using filters . . . . . . . . . . . . . . . . . . . . . . . . . . . . . . . . . . . . . . . . . . . .48
Chapter 4 Using VTR Controller
Tour of the VTR Controller Window . . . . . . . . . . . . . . . . . . . . . . . . . . .50
Accessing VTR Controller . . . . . . . . . . . . . . . . . . . . . . . . . . . . . . . . . . .51
Chapter 5 Using VTR Ingest
Tour of the VTR Ingest Window . . . . . . . . . . . . . . . . . . . . . . . . . . . . . .54
Channel Window Toolbar . . . . . . . . . . . . . . . . . . . . . . . . . . . . . . . . .56
Channel Columns . . . . . . . . . . . . . . . . . . . . . . . . . . . . . . . . . . . . . . .56
VTR Ingest Overview. . . . . . . . . . . . . . . . . . . . . . . . . . . . . . . . . . . . . . .56
Using VTR Ingest. . . . . . . . . . . . . . . . . . . . . . . . . . . . . . . . . . . . . . . . . .56
Adding Handles . . . . . . . . . . . . . . . . . . . . . . . . . . . . . . . . . . . . . . . .57
Creating a Segment List . . . . . . . . . . . . . . . . . . . . . . . . . . . . . . . . . .57
Deleting the Segment List . . . . . . . . . . . . . . . . . . . . . . . . . . . . . . . . .58
Controlling the VTR with VTR Ingest. . . . . . . . . . . . . . . . . . . . . . . . .58
Marking In and Out Points. . . . . . . . . . . . . . . . . . . . . . . . . . . . . . . . .59
Recording Clips to the Media Server . . . . . . . . . . . . . . . . . . . . . . . .59
Importing an EDL. . . . . . . . . . . . . . . . . . . . . . . . . . . . . . . . . . . . . . . . . .60
Exporting an EDL . . . . . . . . . . . . . . . . . . . . . . . . . . . . . . . . . . . . . . . . .61
Chapter 6 Using Aurora Ingest - RMI
What is Aurora Ingest- RMI?. . . . . . . . . . . . . . . . . . . . . . . . . . . . . . . . .63
Using Aurora Ingest - RMI . . . . . . . . . . . . . . . . . . . . . . . . . . . . . . . . . . .63
Chapter 7 Linking Clips to Aurora Playout Placeholders
Tour of the Assignment List Manager . . . . . . . . . . . . . . . . . . . . . . . . . .66
Linking Clips . . . . . . . . . . . . . . . . . . . . . . . . . . . . . . . . . . . . . . . . . . . . .67
Creating New Placeholders . . . . . . . . . . . . . . . . . . . . . . . . . . . . . . . . . .67
Appendix A The Aurora Ingest Keyboard
Appendix B Aurora Ingest Error Messages
...................................................................................................................... 73
Index
iv Aurora Ingest System Guide May 2007
Page 5

Grass Valley Product Support
To get technical assistance, check on the status of a question, or to report new issue,
contact Grass Valley Product Support via e-mail, the Web, or by phone or fax.
Contact Grass Valley first regarding problems with third party s oftware on Grass
Valley products, such as the Microsoft
®
Media
player, Internet Explorer® internet browser, and SQL Server™.
Web Technical Support
To access support infor mation on the Web, v isit the pro duct support Web p age on the
Grass Valley Web site. Yo u ca n down loa d software or find solut ion s t o pr obl ems by
searching our Frequently Asked Questions (FAQ) database.
World Wide Web: http://www.thomsongrassvalley.com/support/
Technical Support E-mail Address: gvgtechsupport@thomson.net.
Phone Support
Use the following information to contact product support by phone during business
hours. Afterhours phone support is available for warranty and contract customers.
®
Grass Valley Product Support
Windows® operating system, Windows
International
(France)
International
(United States,
Canada)
Hong Kong,
Taiwan, Korea,
Macau
Australia, New
Zealand
Central, South
America
China +861 066 0159 450 Netherlands +31 (0) 35 62 38 421
Belgium +32 (0) 2 334 90 30 Northern Europe +45 45 96 88 70
Japan +81 3 5484 6868 Singapore +65 6379 1313
Malaysia +603 7805 3884 Spain +41 487 80 02
Middle East +971 4 299 64 40 UK, Ireland, Israel +44 118 923 0499
+800 80 80 20 20
+33 1 48 25 20 20
+1 800 547 8949
+1 530 478 4148
+852 2531 3058 Indian
+61 1300 721 495 Germany, Austria,
+55 11 5509 3440 Near East, Africa +33 1 48 25 20 20
Authorized Support Representative
Italy +39 02 24 13 16 01
+39 06 87 20 35 42
Belarus, Russia,
Tadzikistan,
Ukraine,
Uzbekistan
Subcontinent
Eastern Europe
+7 095 258 09 20
+33 (0) 2 334 90 30
+91 11 515 282 502
+91 11 515 282 504
+49 6150 104 444
A local authorized support represent ative may be availabl e in your countr y. To locate the
support representat ive for your count ry, visit the pro duct support Web page on the Grass
Valley Web site.
May 2007 Aurora Ingest Syste m Guide v
Page 6

Safety Summaries
General Safety Summary
Review the following safety precautions to avoid injury and prevent damage to this
product or any products connected to it.
Only qualified personnel should perform service procedures.
While using this product , you may need t o acces s other parts of the sy stem. Read t he
General Safety Summary in other system manua ls fo r warn ing s and cauti ons re la ted
to operating the system.
Review all system operator manuals, including manuals in electronic format on the
system hard drive.
Injury Precautions
Use Proper Power
Cord
Ground the Product This product is grounded t hrou gh the grounding conductor of the power
To avoid fire hazard, use only the power cord specified for this product.
cord. To avoid electric shock, the grounding conductor must be
connected to earth ground. Before making connections to the input or
output terminals of the p roduct, ensure that the product is properly
grounded.
Do Not Operate
Without Covers
Do Not Operate in
Wet/Damp
Conditions
Do Not Operate in
an Explosive
Atmosphere
Avoid Expo sed
Circuitry
To avoid electric shock or fire hazard, do not operate this product with
covers or panels removed.
To avoid electric shock, do not operate this product in wet or damp
conditions.
To avoid injury or fire ha zard, do not operate this pr oduct in an explosive
atmosphere.
To avoid injury, remove jewelry such as rings, watches, and other
metallic objects. Do not touch exposed connections and components
when power is present.
Product Damage Precautions
Use Proper Power
Source
Provide Proper
Ventilation
Do Not Operate With
Suspected Failures
vi Aurora Ingest System Guide May 2007
Do not operate this product from a power source that applies more than
the voltage specified.
To prevent product overheating, provide proper ventilation.
If you suspect there is damage to this product, have it inspected by
qualified service personnel.
Page 7

Safety Terms and Symbols
!
!
Battery
Replacement
To avoid damage, replace only with the same or equivalent type
recommended by the circu it board manufactu rer. Dispose of used bat tery
according to the circuit board manufacturer’s instructions.
Safety Terms and Symbols
Terms in This
Manual
Terms on the
Product
These terms may appear in this and other product manuals:
WARNING: Warning stat ements ide ntify con ditio ns or prac tices t hat ca n
result in personal injury or loss of life.
CAUTION: Caution statements identify conditions or practices that can
result in damage to the equipment or other property.
These terms may appear on the product:
DANGER indicates a personal injury hazard immediately accessible as
one reads the marking.
WARNING indicates a persona l injury hazard no t immediately acces sible as
you read the marking.
CAUTION indicates a hazard to property including the product.
May 2007 Aurora Ingest Syste m Guide vii
Page 8

!
Symbols on the
Product
The following symbols may appear on the product:
DANGER high voltage
Protective ground (earth) terminal
ATTENTION – refer to manual
Service Safety Summary
Do Not Service
Alone
No Power Switch To avoid electric shock, disconnect the main power by means of the
Use Care When
Servicing With
Power On
Do not perform internal service or adjustment of this product unless
another person capab le of rendering first aid a nd re sus citation is present.
power cord. The power cord is the main power disconnect. Ensure that
the power cord is easily accessible at the rear of the product or at the
power receptacle.
Dangerous voltages or currents may exist in this product. Disco nnect power
and remove battery (if applicable) before removing protective panels,
soldering, or replacing components.
To avoid electric shock, do not touch exposed connections.
Certifications and Compliances
Canadian Certified
Power Cords
Canadian approval includes the products and power cords appropriate for
use in the North America power network. All other power co rds supplied are
approved for the country of use.
FCC Emission
Control
Canadian EMC
Notice of
Compliance
This equipment has been te sted and fou nd to comply with the limits for a
Class A digital d evice, pursuant to Part 15 of the FCC Rules. These limits
are designed to provide reasonable protection against harmful
interference when the equipment is operated in a commercial
environment. This equipment generates, uses, and can radiate radio
frequency energy and, if not installed and used in accordance with the
instruction manual, may cause harmful interference to radio
communications. Operation of this equipment in a residential area is
likely to cause harmful interference in which case the user will be
required to correct the interference at his own expense. Changes or
modifications not expressly approved by Grass Valley can affect
emission compliance and could void the user’s authority to operate this
equipment.
This digital apparatus does not exceed the Class A limits for radi o noi se
emissions from digital ap paratus set out in the Radio Interferenc e
Regulations of the Canadian Department of Communications.
Le présent appareil numérique n’émet pas de bruits radioélectriques
dépassant les l imites appl icables a ux apparei ls numérique s de la cl asse A
préscrites dans le Règlement sur le brouillage radioélectrique édicté par
le ministère des Communications du Canada.
viii Aurora Ingest System Guide May 2007
Page 9

Certifications and Compliances
Canadian Certified
AC Adapter
EN55022 Class A
Warning
Laser Compliance
Laser Safety
Requirements
Laser Safety Laser safety in the United States is regulated by the Center for Devices
Canadian approval includes the AC adapters appropriate for use in the
North America power network. All other AC adapters supplied are
approved for the country of use.
For products that comply with Class A. In a domestic environment this
product may cause r adio interference i n which case the use r may be required
to take adequate measures.
The device used in this product is a Class 1 certified laser product.
Operating this product outside specifications or altering its original
design may result in hazardous radiation exposure, and may be
considered an act of modifying or new manufa ctu ri ng of a la ser product
under U.S. regulations contained in 21CFR Chapter 1, subchapter J or
CENELEC regulations in HD 482 S1. People performing such an ac t are
required by law to recertify and reidentify this product in accordance with
provisions of 21CFR subchapter J for distribut ion wit hin the U.S.A., and
in accordance with CENELEC HD 482 S1 for distribution within
countries using the IEC 825 standard.
and Radiological Health (CDRH). The laser safety regulations are
published in the “Laser Product Performance Sta ndard,” Code of Federa l
Regulation (CFR), Title 21, Subchapter J.
FCC Emission
Limits
The International Electrotechnical Commission (IEC) Standard 825,
“Radiation of Laser Products, Equipment Classification, Requirements
and User’s Guide,” governs laser products outside the United States.
Europe and member nations of the Europe an Free Tra de Associat ion fall
under the jurisdiction of the Comité Européen de Normalization
Electrotechnique (CENELEC).
This device complies with Pa rt 15 of the FCC Rules. Opera tion is subject
to the following two conditions: (1) This device may not cause harmful
interference, and (2) this device must accept any interference received,
including interference that may cause undesirable operation.
May 2007 Aurora Ingest Syste m Guide ix
Page 10

Certification
Environmental Criteria
Category Standard
Safety Designed/tested for compliance with:
ANSI/UL60950-2000 - Safety of Information Technology Equipment
IEC 60950 - Safety of Information Technology Equipment (3rd edition, 1999)
CAN/CSA C22.2, No. 60950-00 - Safety of Information Technology Equipment
EN60950:2000 - Safety of Information Technology Equipment (3rd edition)
The following table lists the environmental criteria for Aurora Ingest.
Characteristics Description
Operating Temperature Requirement: 10° to 40°C
Storage Temperature Requirement: -40° to 65°C
Operating Altitude Requirement: To 10,000 feet
Supplemental Data: IEC 60950 compli ant to
2000 meters
Storage Altitude Requirement: To 40,000 feet
Mechanical Shock Supplemental Data: Class 5 (30G) Grass Valley
001131500
Random Vibration Requirement: Operational: Class 6 Grass
Valley 001131500
Requirement: Non-Operational: Class 5
Grass Valley 001131500
Transportation Requirement: Grass Valley 001131500
Equipment Type Supplemental Data: Information Technology
Equipment Class Supplemental Data: Class 1
Installation Category Requirement: Category II Local level
mains, appliances,
portable equipment, etc.
Pollution Degree Requirement: Level 2 operating
environment, indoor use only.
Relative Humidity Requirement: Operating 80% from +30° to
+40°C
Non-Operating 90% from
+30° to +60°C
Do not operate with visible
moisture on the circuit boards.
x Aurora Ingest System Gui de May 2007
Page 11

Chapter 1
Introducing Aurora Ingest
Aurora Ingest is an automated media digitization system, made up of several
integrated applications, that allows you to ingest footage from VTRs, feeds from a
router, or files from multi ple Digital Media Cameras and Digital Media Recorders, all
directly to a Media Server in your operation.
This manual shows you how to install and con figure the Aurora Ing est applications in
your newsroom, and how to use Aurora Ingest to capture and record clips for l ater use
in a newscast.
This chapter is divided into the following sections:
• “What is Aurora Ingest ?”
• “Aurora Ingest applications”
• “Aurora Ingest workstations”
• “Integration with Aurora Suite and third-party products”
• “Understanding Status Colors”
What is Aurora Ingest?
Aurora Ingest lets you get footage from VTRs and from router feeds and ingest it
directly to your Media Server. With the Aurora Ingest applications you can select
clips from multiple VTR tapes, create a batch (also known as a segment) list, and
record it to the server. You can also ingest feeds from a router source directly to the
same server. Up to eight VTRs are supported at any time. You can select the
supported VTRs from an unlimited number of VTRs or RS-422-connected routers.
Batch jobs can be saved as Edit Decision Lists (EDLs).
The Aurora Ingest system supports the K2 Media Server and M-Series iVDR media
server or servers. You can configure your system to record clips into two servers in
parallel. If one server fails or has inadequat e storage, only the recording on that server
will be stopped. When the system continues to the next clip, the storage capacity on
both servers is che cked again, allowing parallel recordin g to resume if storage is made
adequate.
Raw footage comes from a VTR connected directly to the Aurora Ingest workstation,
a CompuSat satellite dish control system, or a router sou r ce. While you connect the
media servers to the Aurora Ingest workstation using AMP Sockets, you need RS-422
connection from the VTR t o the Aurora Ingest workstation to have co ntrol of the VTR
in the Aurora Ingest windows. For router sources, Aurora Ingest supports the Grass
Valley SMS 7000, Encore control and Jupiter systems, and allows source selection
and renaming.
May 2007 Aurora Ingest Syste m Guide 1
Page 12

Chapter 1 Introducing Aurora Ingest
Aurora Ingest applications
Aurora Ingest consists of the following applications:
• Aurora Ingest - Server, which lets you configure the other Aurora Ingest
applications for batch or feed events, as well as monitor the status of the media
servers, database servers, routers, CompuSat-controlled satellite dish, and
channels. You can also access the logs . For mo re i nfor mat ion, see “Aurora Ingest
- Server” on page 12.
• VTR Controller, which lets you monit or and manage the VT Rs you use with VTR
Ingest. For more information, see Chapter 4, Using VTR Controller on page 49.
• VTR Ingest, which lets you ingest footage from VTRs and import or export Edit
Decision Lists (EDLs). Supporting up to eight channels, VTR Ingest can record
footage and confi gur abl e handle durations. It l ets you set mark points u si ng e it her
the VTR, the PC keyboard, or the mouse. You can ingest a single item or build a
batch list o f items to capture from multiple tapes. You can also create a batch list
offline and then import the list into VTR Ingest as a common EDL. For more
information, see Chapter 5, Using VTR Ingest on page 53.
• Aurora Ingest - Scheduler, which lets you schedule i ngest feed events from a medi a
server, CompuSat satellite dish control system, or router source. Y ou can also
schedule events to r ecord, up to one ye ar in advance, on eac h server port, incl uding
recurring events . Schedule Vie wer provides an e asily readable way to s ee all port s
and more specifically the task assigned to each port. For more information, see
Chapter 3, Using Aurora Ingest - Scheduler on page 33.
• Removable Media Interfa ce (RMI), which lets you ingest files from multiple
Infinity Digital Media Cameras and Digital Media Recorders, as well as Sony
XDCam and Panasonic P2 removable media devices. For more information, see
Chapter 6, Using Aurora Ingest - RMI on page 63.
For information on installing and configuring the Aurora Ingest applications, see
Chapter 2, Installing and Configuring Aurora Ingest on page 5.
If you use Aurora Playout as a playback system in your ope ration, you can ingest clips
directly to a Aurora Playout rundown by linki ng clips to a Aurora Playout placeholder
at the point of record. For more information, see Chapter 7, Linking Clips to Aurora
Playout Placeholders on page 65.
Aurora Ingest workstations
Aurora Inge st has a client/server architecture th at allows for multiple simultaneous
users. It supports simultaneous event creation, event modification, event deletion,
event monitoring, and resource viewing from multiple workstations.
Each workstation can control up to ei ght VTRs for batch li st creation and b atch ingest.
You can work with either directly attached VTRs and dedicated server ports or
through a router.
You can trigger multipl e c hannel records from dispa ra te sour ce s si mult aneously and
schedule record events without reference to physical server port. Aurora Ingest
automatically allocates any available port as determined at the o ptimum time b efore
the record event is scheduled to begin. RS-422 router level control allows any
router-connected VTR to be controlled by any Aurora Ingest channel.
2 Aurora Ingest System Gui de May 2007
Page 13

Aurora Ingest - Server
This application has the following functionality:
• control of all Media Servers for all types of ingest
• stores the ingest schedule
• switches the Encore/SMS7000/Jupiter router
• interfaces to ENPS
• interfaces to CompuSat satellite dish control system
• user account administration
Aurora Ingest - VTR Controller
This application has the following functionality:
• controls up to eight VTRs for VTR Ingest (AI server controls media server ports)
Aurora Ingest - VTR Ingest
This application has the following functionality:
Aurora Ingest - Server
• provides a user interface for playing tapes and marking in and out points
• creates batch (segment) lists
• provides a user interface for ingested clips to be recorded to Media Servers
Aurora Ingest - Scheduler Client
This application has the following functionality:
• ingest scheduling
• schedule status display
Aurora Ingest - RMI Client
This application has the following functionality:
• Ingests material from P2/XDCAM/Infinity removable media devices
May 2007 Aurora Ingest Syste m Guide 3
Page 14

Chapter 1 Introducing Aurora Ingest
Integration with Aurora Suite and third-party products
Aurora Inge st is integrated with the other applications in the Au rora Suite and
third-party removable media devices. In addition to serving as a metadata entry and
transfer application fo r metadata cr eated in the newsroom computer system (NRCS),
it supports:
• Simultaneous file transfer ingest, including MOS-ID matching, status updating,
and metadata import and transfer to Au rora Browse from multiple Rev Pro and
Professional Compact Flash removable media devices.
Understanding Status Colors
Each entry in the batch list displays a certain color according to its status. The colors
are:
Row Background Color Description
Red The entry is recording.
Gold The entry is cued and is next to record.
Green The entry has finished recording.
Blue The Scheduler entry is ready to record.
Black VTR Ingest has reserved this channe l at t hi s t ime.
Purple The entry failed to record. See the Error Message field for
more information.
Grey The entry time has elapsed, probably due to a conflict with
another recording.
4 Aurora Ingest System Gui de May 2007
Page 15
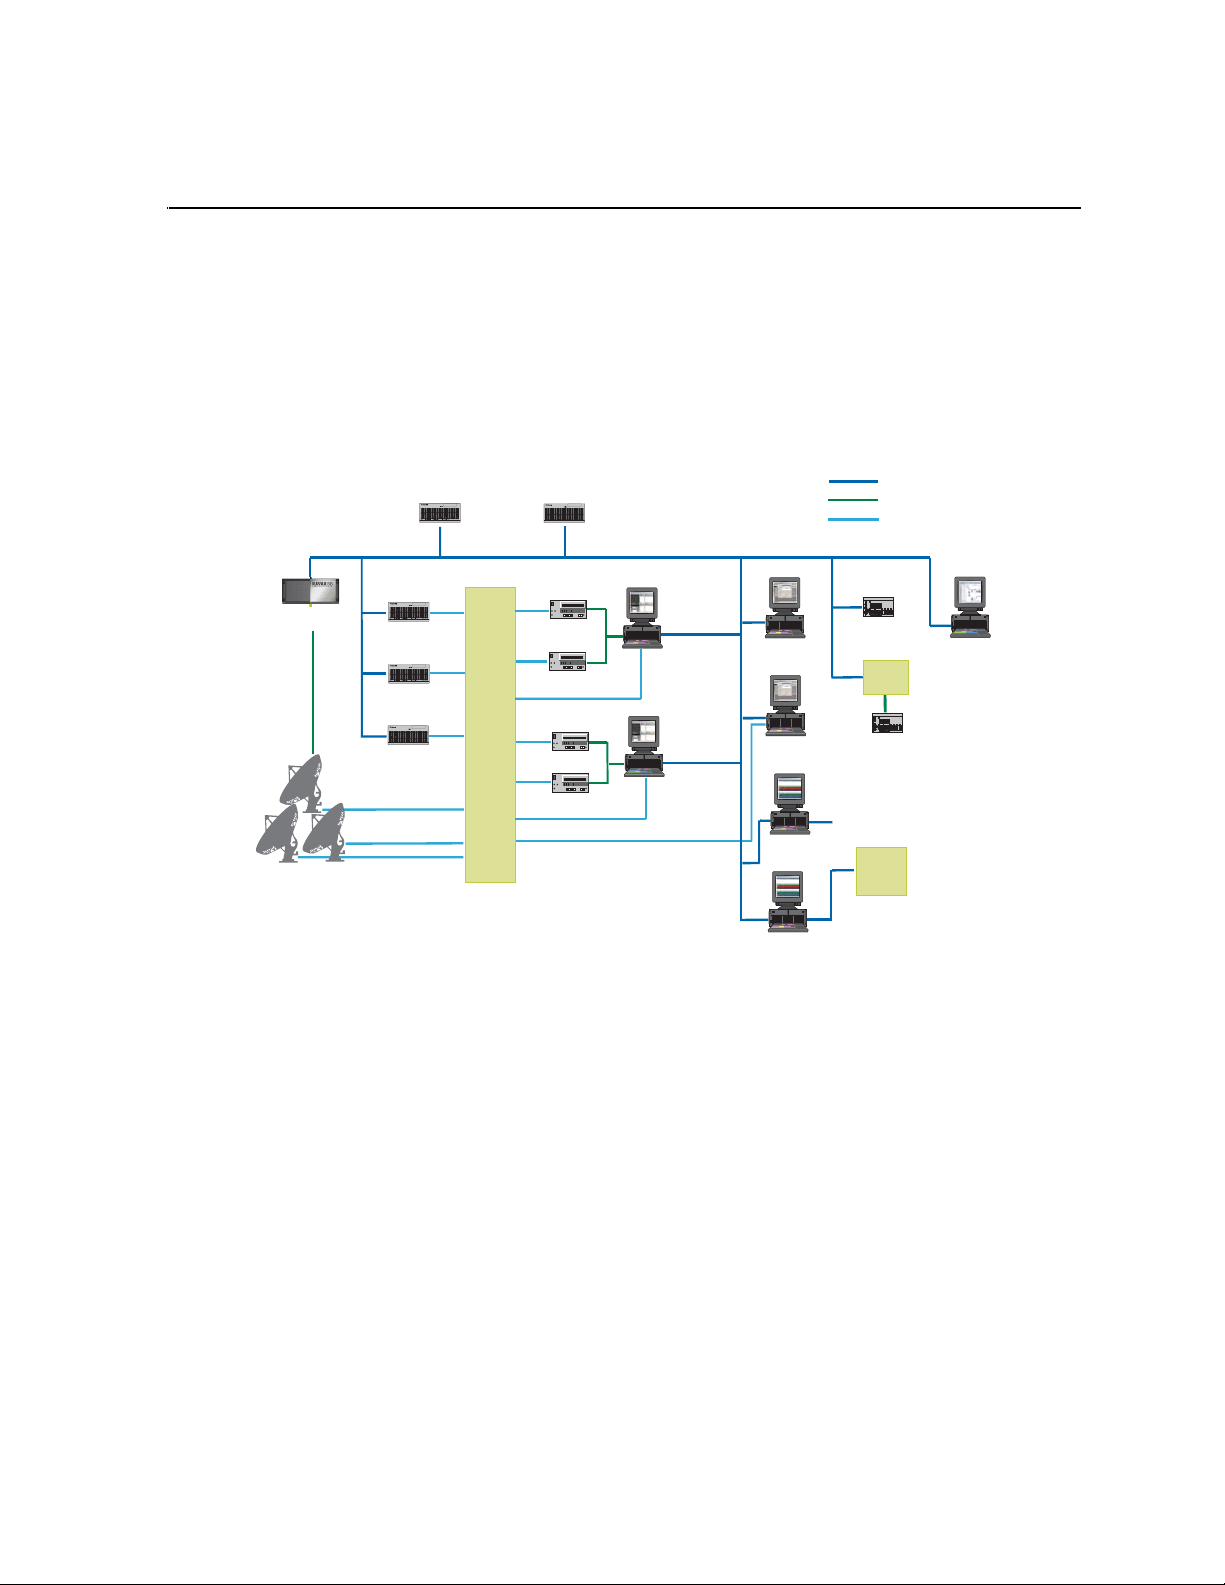
Chapter 2
SMS
7000
NAS
Serial hub
Router
Matrix
VTR Ingest /
Ethernet LAN
NetCentral
Encore/
RS422
Satellite
Receivers
!
Aurora Ingest Server
VTR
Logging Workstation
SDI / HD-SDI
CompuSat satellite
dish control system
!
Aurora Ingest Server
(Marathon)
!
!
Media Server
Media Server
!
Media Server
VTR Ingest /
Logging Workstation
VTR
VTR
VTR
AI Client
Workstation
AI Client
Workstation
Innity Client
P
2
/XDCAM/
Innity Client
P
2
/XDCAM/
Jupiter
Installing and Configuring Aurora Ingest
The Aurora Ingest system consists of an Aurora Ingest Server, one or more Aurora
Ingest Scheduling Clients, VTRs, the Aurora Ingest software, K2 Media Client or
M-Series iVDR media server or servers, and optional router or CompuSat satellite
dish control system sources.
This chapter is divided into the following sections:
• “System Requirements”
• “Installing Aurora Ingest”
• “Setting Up Your Media Server”
• “Configuring Aurora Ingest”
System Requirements
May 2007 Aurora Ingest Syste m Guide 5
• “User Administration for Aurora Ingest”
Grass Valley supplies a CD containing the Aurora Ingest software and
documentation. For some of the Aurora Ingest components, Grass Valley also
supplies hardware. The following section details the software and hardware
requirements for each Aurora Ingest component.
Page 16

Chapter 2 Installing and Configuring Aurora Ingest
Aurora Ingest - Server
The Aurora Ingest - Server ap plication coul d be installed on the Aurora Inges t Server
or Aurora Ingest Base Workstation on any regular office machine. The application
must be running for an Aurora Inges t client to conne ct to it. All Aurora Inge st Clients
should have their system time synced to the Aurora Ingest Server.
NOTE: Grass Valley recommends that the Scheduler, VTR Ingest and Aurora
Ingest - Server applications are not installed in the same machine as K2 AppCenter
application or its remote Control Point software.
Grass Valley supplies the Aurora Ingest - Server software/hardware configuration:
• Dell Server with Windows 2003 Server (two units if redundant option selected)
• Additional Windows 2003 license and Marathon Ftvirtual Server license (if
redundant option selected)
• DIGI One SP 1 Port RS 422 Serial to Ethernet Device Server (RoHS Compliant)
• .NET Framework 2. 0
• MSXML 6.0
• SQL Express 2005
• SQL Server Management Studio Express
Aurora Ingest - VTR Ingest/VTR Controller
VTR Ingest and VTR Controll er can be i nstalled on th e same machine. I f VTR Ingest
and VTR Controller are on two separate machines, the two machines need to be
connected via Ethernet. For your VTR Controller client, Grass Valley supplies an
RS-422 card. (See “Installing Hardware (V TR Controller)” on page 8.)
NOTE: Grass Valley recommends that the Scheduler, VTR Ingest and Aurora
Ingest - Server applications are not installed in the same machine as K2 AppCenter
application or its remote Control Point software.
The PC you use to run VTR Ingest/VTR Controller should conform to these
requirements:
• Windows XP Pro, with the Intel P4 CPU and a minimum of 512 MB RAM
• 10 GB HDD
• Minimum 1024x768 SVGA display adapter (Preferred: 1280 x 1024)
• CD-ROM drive for installation
• Two available PCI slots for the video capture and RS-422 boards (for VTR
Controller)
• 100BaseTX Ethernet interface
• Hauppage WinTVGo Video Capture Card (optional)
6 Aurora Ingest System Gui de May 2007
Page 17

Aurora Ingest - Scheduler
NOTE: Grass Valley recommends that the Scheduler, VTR Ingest and Aurora
Ingest - Server applications are not installed in the same machine as K2 AppCenter
application or its remote Control Point software.
The PC you use to run Aurora Ingest - Scheduler should conform to these
requirements:
• Windows XP Pro, with the Intel P4 CPU and a minimum of 512 MB RAM
• 10 GB HDD
• Minimum 1024x768 SVGA display adapter (Preferred: 1280 x 1024)
• CD-ROM drive for installation
• 100BaseTX Ethernet interface
• Hauppage WinTVGo Video Capture Card (optional)
Aurora Ingest - RMI
Do not install the Aurora Ingest - RMI client on a machine that already has Aurora
Edit installed. You need to install the Aurora Core software instead.
(SetupAuroraCore.exe on the Aurora Ingest software CD.)
Aurora Ingest - Scheduler
The PC you use to run RMI Client should con form to these require ments (minim um):
• Windows XP Pro, with the Intel P4 CPU and a minimum of 512 MB RAM
• 10 GB HDD
• Minimum 1024x768 SVGA display adapter
• CD-ROM drive for installation
• USB Port
• Aurora Core software
For HD ingests, Grass Valley recommends the following configuration:
• Windows XP Pro
• HP Workstation xw9300, with Opteron 285/2.6GHZ 1MB/1000 dual core
processor and 2GB (4x512) DDR400 RAM
• 80GB SATA 3Gb/s 7200 HDD
• NVIDIA Quadro FX3450 256MB PCI-Express
• 1280 x 1024 SVGA display adapter
• 48X DVD-ROM/CDRW Combo
• Opteron 285/2.6GHz 1MB/1000 dual core processor
• Intel Pro/1000 GT Gigabit PCI NIC desktop adapter
• USB Port
May 2007 Aurora Ingest Syste m Guide 7
Page 18
Chapter 2 Installing and Configuring Aurora Ingest
O
N
12
• Aurora Core software
Installing Aurora Ingest
To install Aurora In gest, you need to install the ha rdware in your computer, ins tall the
Aurora Ingest software, and obtain a software license number.
This section is divided into the following topics:
“Installing Hardware (VTR Controller)”
“Installing Software”
“Obtaining a Software License Number”
“Migrating Aurora Ingest - Server”
Installing Hardware (VTR Controller)
Grass Valley supplies the Aurora Ingest Server with all the necessary hardware and
software installed. The software for the other Aurora Ingest components can be
installed on any PC with that meets the “System Requirements” for that com ponent.
In addition, for VTR Controller Grass Valley supplies a RocketPort Plus Universal
PCI 422 SMPTE 8 Port RoHS RS-422 card that must be installed.
NOTE: Th e video capture card is for SD (standard definit ion) video only. If you want
to ingest HD video and then view it on the Inges t monitor, f irst downconve rt from HD
to SD, and then from digital to analog. The video capture card accepts composite
analog video only (NTSC or PAL).
1. Install the video capture card in your computer and install the card’s driver.
2. If you are connecting one or more VTRs to VTR Controller, instal l the RS-422 card
in your computer, making sure the dip switches are set to the down position
shown, and install the card’s driver.
3. Connect the video capture board’s S-Video Input connector to the device you’re
using for on-screen video display (VTR, router, or switch box).
4. Connect the VTR(s) to the VTR Controller machine via RS-422.
5. If you are using LTC for timecode, connect a timecode cable from the timecode
source (VTR for VTR Inge st , Ti mecode Generator for Auro ra Ingest - Scheduler)
to the Media Server.
Installing Software
If you’re migrating Aurora Ingest - Server from an existing installation to a new one ,
refer to “Migrating Aurora Ingest - Server” on page9.
To install the Aurora Ingest software on your computer, insert the Aurora Ingest
CD-ROM into the machine’s CD-ROM drive and follow these instructions:
, as
On this screen... Do this...
Welcome Click Next.
8 Aurora Ingest System Gui de May 2007
Page 19

On this screen... Do this...
Choose Destination Location Click Next.
Select Components Specify the Aurora Ingest applicat ions to install: Server,
Scheduler, VTR Controller, VTR Ingest, or RMI.
With Server component, Microsoft .NET Framework 2.0 and
Microsoft SQL Server 2005 will also be installed by default.
[Note: RMI cannot be installed on a machine that already has
Aurora Edit installed. You nee d to install the Aurora Core software
(SetupAuroraCore.exe is on the Aurora Ingest software
instead.
CD.)]
Specify Server Name Enter the Aurora Ingest Server that the Aurora Ingest applications
will use.
Start Installation Click Next.
Installation Complete Click Finish.
Obtaining a Software License Number
Once you’ve installed the Aurora Ingest software, you need to get a license number
from Grass Valley.
Obtaining a Software License Number
When you install the Aurora Ingest - Server application, the SabreTooth License
Manager is installe d as wel l. You c annot l aunch channel s or c onfigu re Auro ra Ing est
until you have obtained the SabreTooth license.
To get a license number, follow these steps:
1. Click on the Aurora License Request icon on the desktop. The Sabr eTooth License
Manager opens.
2. Follow the directions and License Manager will generate a unique ID (a unique
string of characters).
3. Email this unique ID to BVTN-Auroralicenses@thomson.net and you will be
provided with the SabreTooth license number.
Migrati ng Aurora In gest - Server
1. Run the latest Aurora Ingest 6.1 installer on the existing machine to update the
Aurora Ingest database. With Server component selection, Microsoft .NET
Framework 2.0 and Microsoft SQL Server 2005 will also be installed by default.
2. Export the Aurora Ingest Server registry key under “My
Computer\HKEY_LOCAL_MACHINE\SOFTWARE\Grass Valley\Aurora
Ingest\Se rver” from existing machine.
CAUTION: DO NOT launch the Microsoft SQL Server Management
Studio Express CTP on both existing machine and n ew machine. If you
do this, you cannot back up the database.
3. Shut down the Aurora Ingest - Server appl ication on the existing machine and copy
two files (IS_Data.MDF a nd IS_Log.LDF) from C:\Pr ogram Files\ Microsoft SQL
Server\90\Tools\Binn from existing machine to same directory path in new
May 2007 Aurora Ingest Syste m Guide 9
Page 20
Chapter 2 Installing and Configuring Aurora Ingest
machine. Make sure these two files are NON-READONLY.
4. Make sure the “SQLServer (SQLEXPRESS)” service is running on new machine .
You can check the state of the service in the “Services” application.
5. Launch the Microsoft SQL Server Management Studio Express CTP on new
machine.
6. Log on, using Window Authentication Mode, to attach the Aurora Inge st databas e.
7. Attach the Aurora Ingest database as shown in the following screenshot.
8. Select the IS_Data.MDF from the same directory (C:\Program Files\Microsoft
SQL Server\90\Tools\Binn).
9. After the Aurora Ingest database had been attached successfully, you should be
able view the Aurora Inges t database fold er shown under the Database s root folder.
10.Import the server registry key to new machine
11.Run the latest Aurora Ingest installer on new machine.
12.License the Aurora Ingest software (Number of Channels , Schedule r, VTR Ingest
and RMI). For more information on licensing, see “Obtaining a Software License
Number” on page 9.
13.Remove the licenses from the existing machine.
14.Launch the Aurora Ingest - Server application on the new machine. Select
Options
15.Change the “SabreTooth Server” s etting to the compute r name of the new machi ne.
and click on the System tab.
Setting Up Your Media Server
Once you’ve cabled Aurora Ing est and installe d software, you nee d to configure your
Media Server to work with Aurora Ingest.
K2 Media Server
Tools |
To configure the K2 system for Aurora Ingest:
10 Aurora Ingest System Guide May 2007
Page 21

• See your K2 documentation; set up the record channels to use Advanced Media
Protocol (AMP).
• Configure channels to use LTC or VITC input.
M-Series iVDR
The configuration of M-Series iVDR for Aurora Ingest depends on the type of
communication you’re using for the server—DCOM or RS-422.
DCOM
If you are using DCOM, see your M-Series iVDR documentation and set up the
record channels to use Advanced Media Protocol (AMP).
RS-422
If you are using RS-422, see your M-Se ries iVDR documentation and set up the server
as follows:
• Make sure you configure the record channels to the correct RS-422 port.
• Set up record channels to use Advanced Media Protocol (AMP).
M-Series iVDR
• Configure channels to use LTC or VITC input.
Configuring Aurora Ingest
Once you have installed any ha rdware (if necess ary) and th e software c omponents of
Aurora Ingest, you need to configure the Aurora Ingest options for your particular
newsroom equipment and workflow.
You can add and configure VTRs with the VTR Controller and VTR Ingest
applications. The Aurora Ingest - RMI client is configured through the Aurora
Ingest - RMI application. All other configuring can be performed in the Aurora
Ingest - Server application.
This section is divided into the following topics:
“Aurora Ingest - Server”
“Configuration Overview”
“Configuring System Settings”
“Configuring Media Servers”
“Configuring Routers”
“Configuring Channels”
“Configuring Aurora Ingest - Scheduler (Feed)”
“Configuring VTR Ingest (VTR)”
“Configuring RMI”
May 2007 Aurora Ingest Syste m Guide 11
Page 22
Chapter 2 Installing and Configuring Aurora Ingest
Aurora Ingest - Server
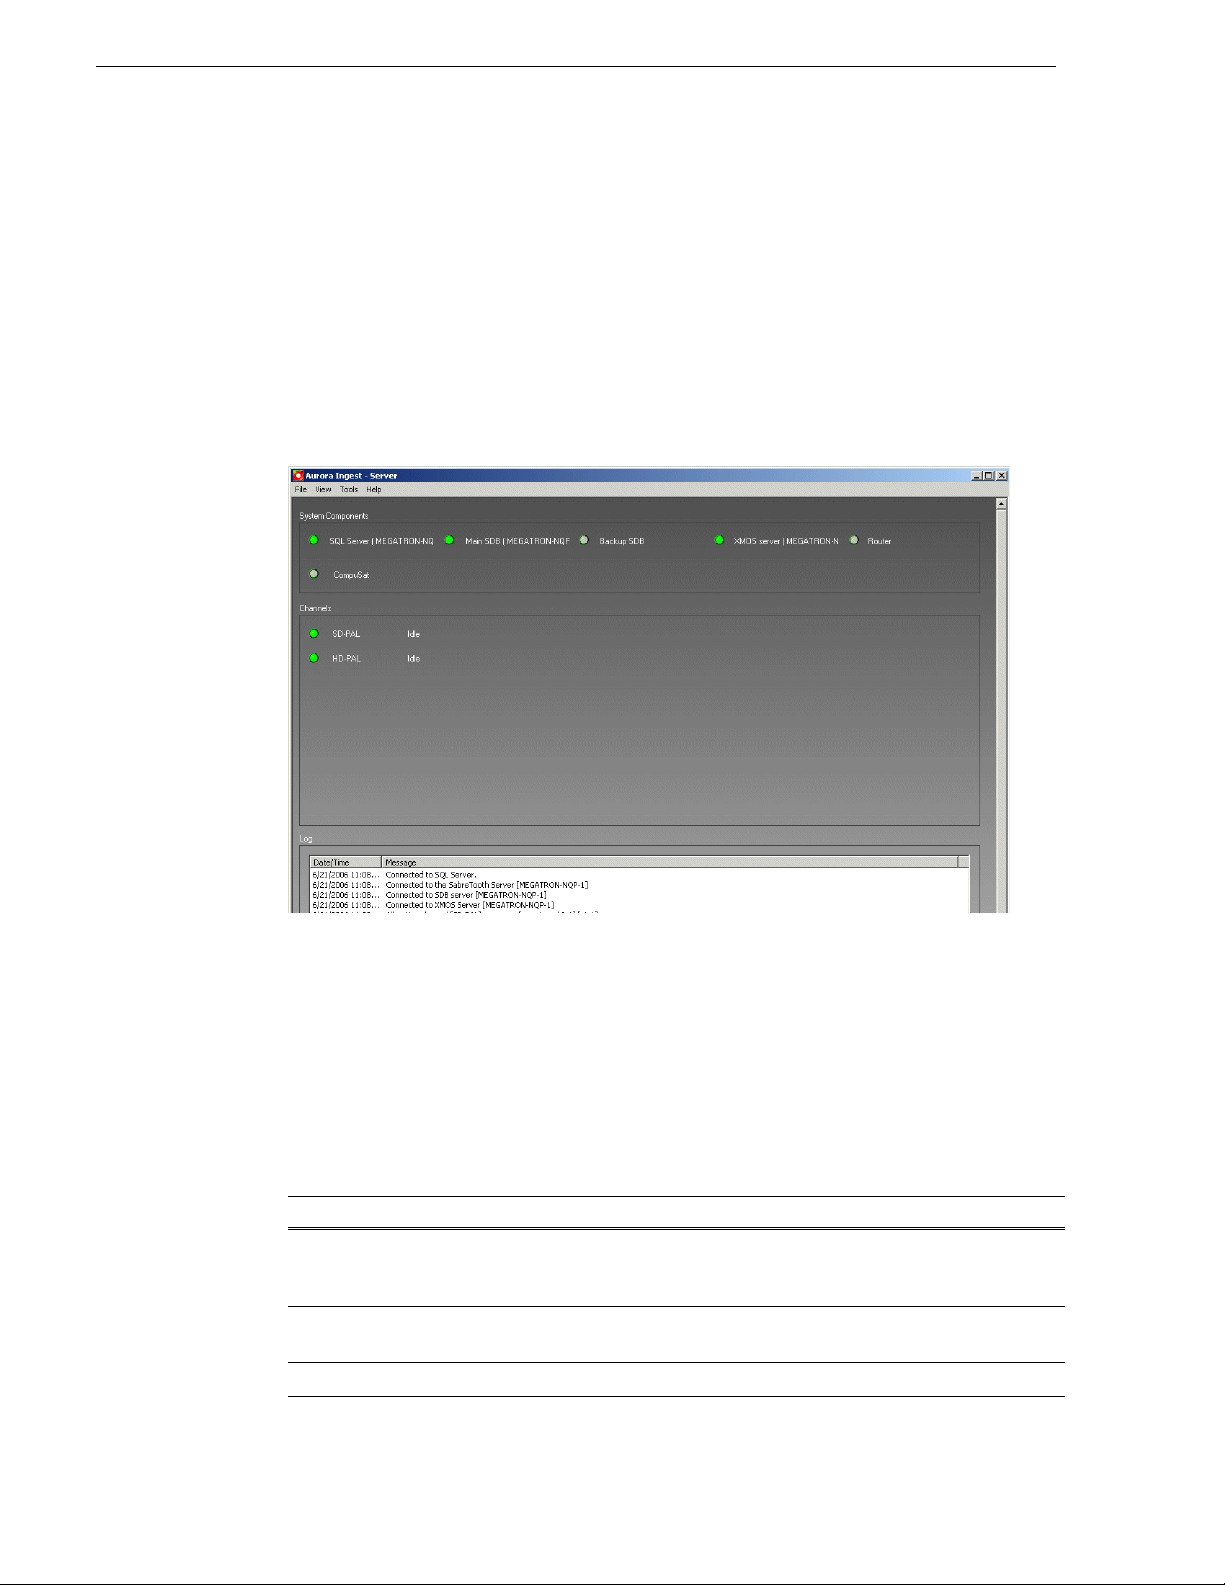
The Aurora Ingest - Server applicatio n shows the status of the system co mponents and
channels, as well as the System logs. The server machine name might be truncated,
however the full name is visible if you hover over the area. Additional information
regarding a channel can also be obtained if you hover on the channel name. These
information include channel name, server name, recording port, remaining storage
and status of the channel.
• A green indicator—the component or channel is connected.
• A red indicator—the component or channel is not connected.
• A grayed-out indicator—the component is not configured.
To configure Aurora Ingest, select
overview of the process of configuring Aurora Ingest.
Configuration Overview
In Aurora Ingest - Server application, you can configure most of the Aurora Ingest
settings. (Configur e VTR controller settings in VTR Controller and VTR Ingest.) The
following table details the configurable options in the Aurora Ingest - Server
application. The fol lowing s ecti ons desc ribe the Aurora Ingest confi gurat ion pro ces s
in detail.
Options Description
System Allows you to specify servers, such as the SDB server, XMOS Server, SabreTooth server,
etc. You can also specify the Video s tandard and CompuSat location, and any information
about the log level and when to warn the user that the storage is close to the threshold level.
Media
Server
Router Specify the type of router (Encore/SMS7000 or Jupiter) and its IP address or COM port.
Allows you to add, edit, or delete information about the media servers, including the drive
and record locations. Note: the record location is not machine dependent.
Tools | Options. The following section gives an
12 Aurora Ingest System Guide May 2007
Page 23
Options Description
Channel Specify the various channel s and the media server they are associated with, as well as the
record location. (The record location is the router destinat ion, which is physica lly connected
to the media server using the AV cable.)
Feed For feed ingests performed using Aurora Ingest - Scheduler, this tab allows you to specify
default information ab out the clips, such as name, r ecord durat ion, cra sh record lo cation a nd
duration, and tim ecode source (System ti me, LTC or VITC).
VTR For segment (batch) ingests performed using VTR Ingest, this tab allows you to specify
default information about th e cl ips, su c h as na m e, re cord loc a tio n, ha ndle a nd pre ro ll tim e s,
and timecode source (Control track, LTC or VITC).
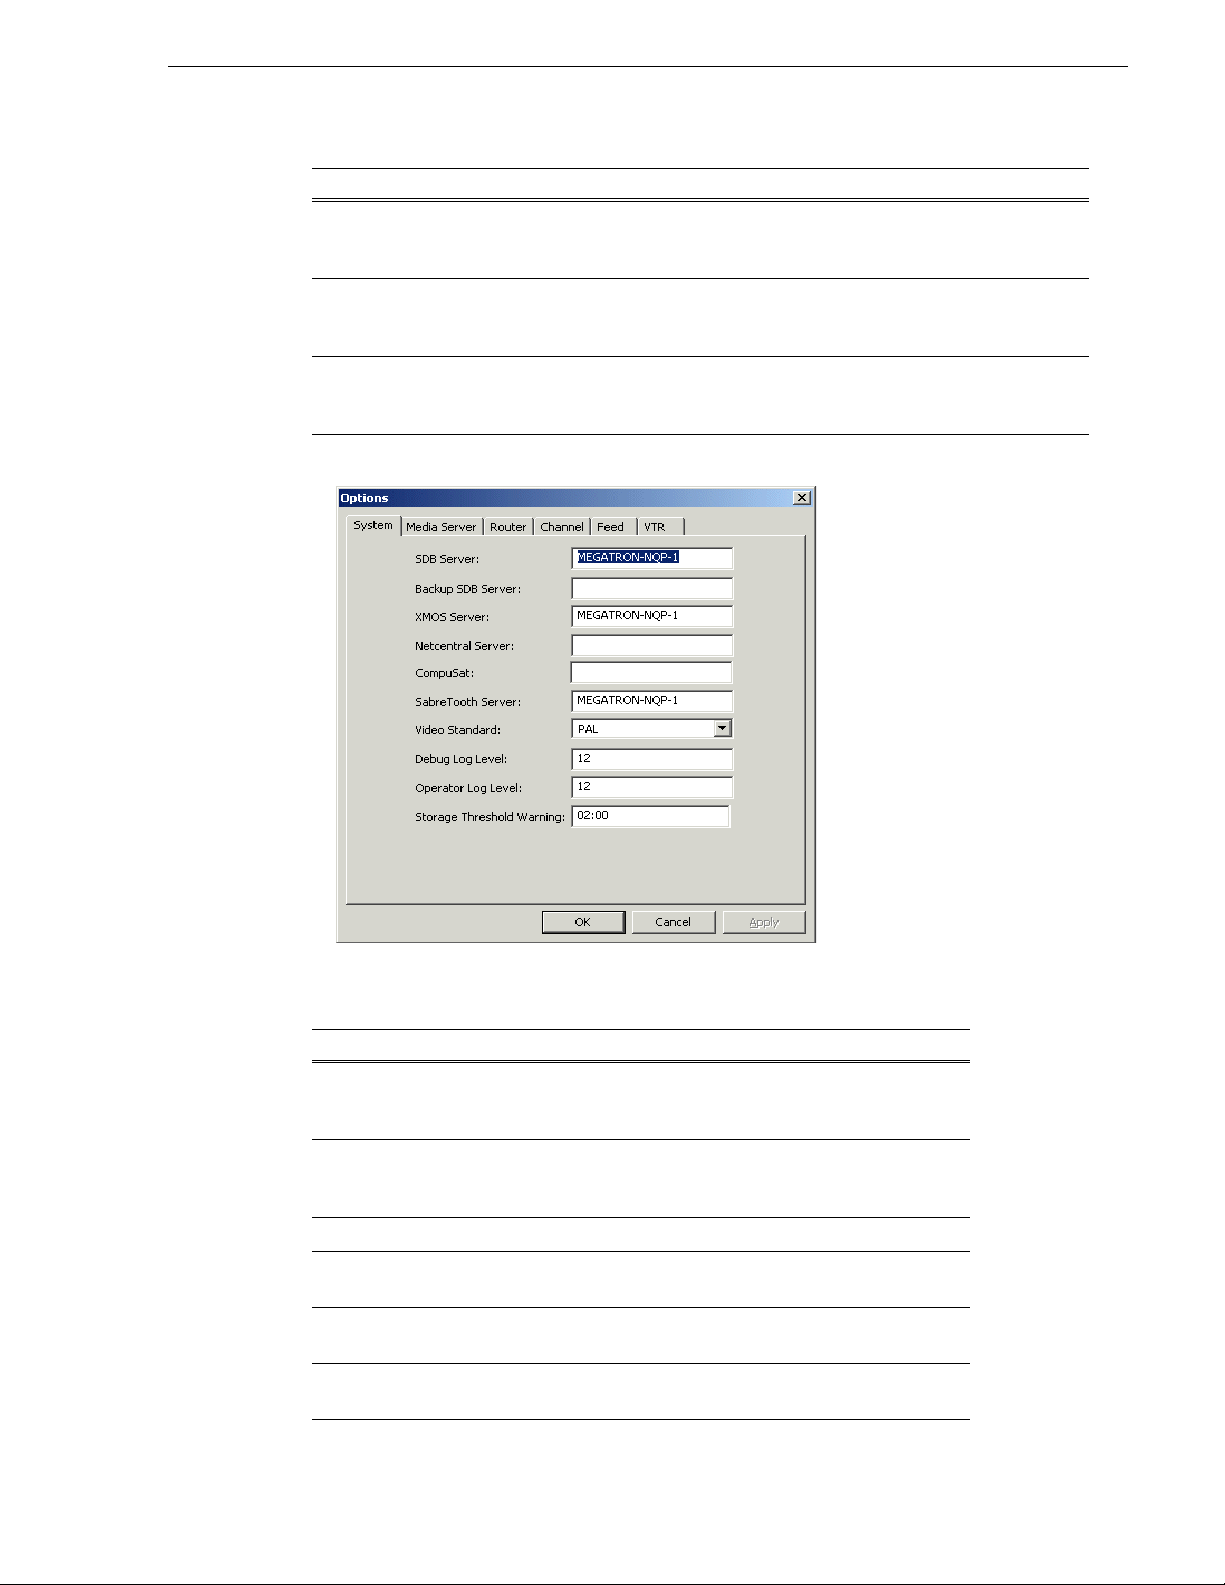
Configuring System Settings
Configuring System Settings
Setting Description
SDB Server Enter the IP address or computer name of the server where t he
Aurora Playout database resides (primary SDB Server is
running).
Backup SDB
Server
XMOS Server Enter t he name of the computer hosting the XMOS server.
NetCentral Server If your system uses NetCentral to monitor equipment, enter its
CompuSat If you are using CompuSat satellit e dish control syste m, enter the
SabreTooth Server Enter the name of the server where the SabreTooth license is
If you are using a backup database server, enter the IP address or
computer name of the server where the backup Aurora Playout
database resides (hot -standby SDB Server is running).
name or IP address.
location where the CompuSat application is running.
located.
May 2007 Aurora Ingest Syste m Guide 13
Page 24
Chapter 2 Installing and Configuring Aurora Ingest
Setting Description
Video Standard NTSC drop frame
NTSC non-drop
PAL
Debug Log Level Specify the level of detail in the Debug and Operator logs. The
Operator Log Lev e l
minimum level that coul d be set is 0, which means that n o log will
be generated for that setting. The default level is set to 12.
Select the video standard used in your
operation.
Storage Threshold
Warning
Specify when the Aurora Ingest system warns that the storage
threshold level is being reached. The format of the setting is
hh:mm and the default is set to 2 hours.
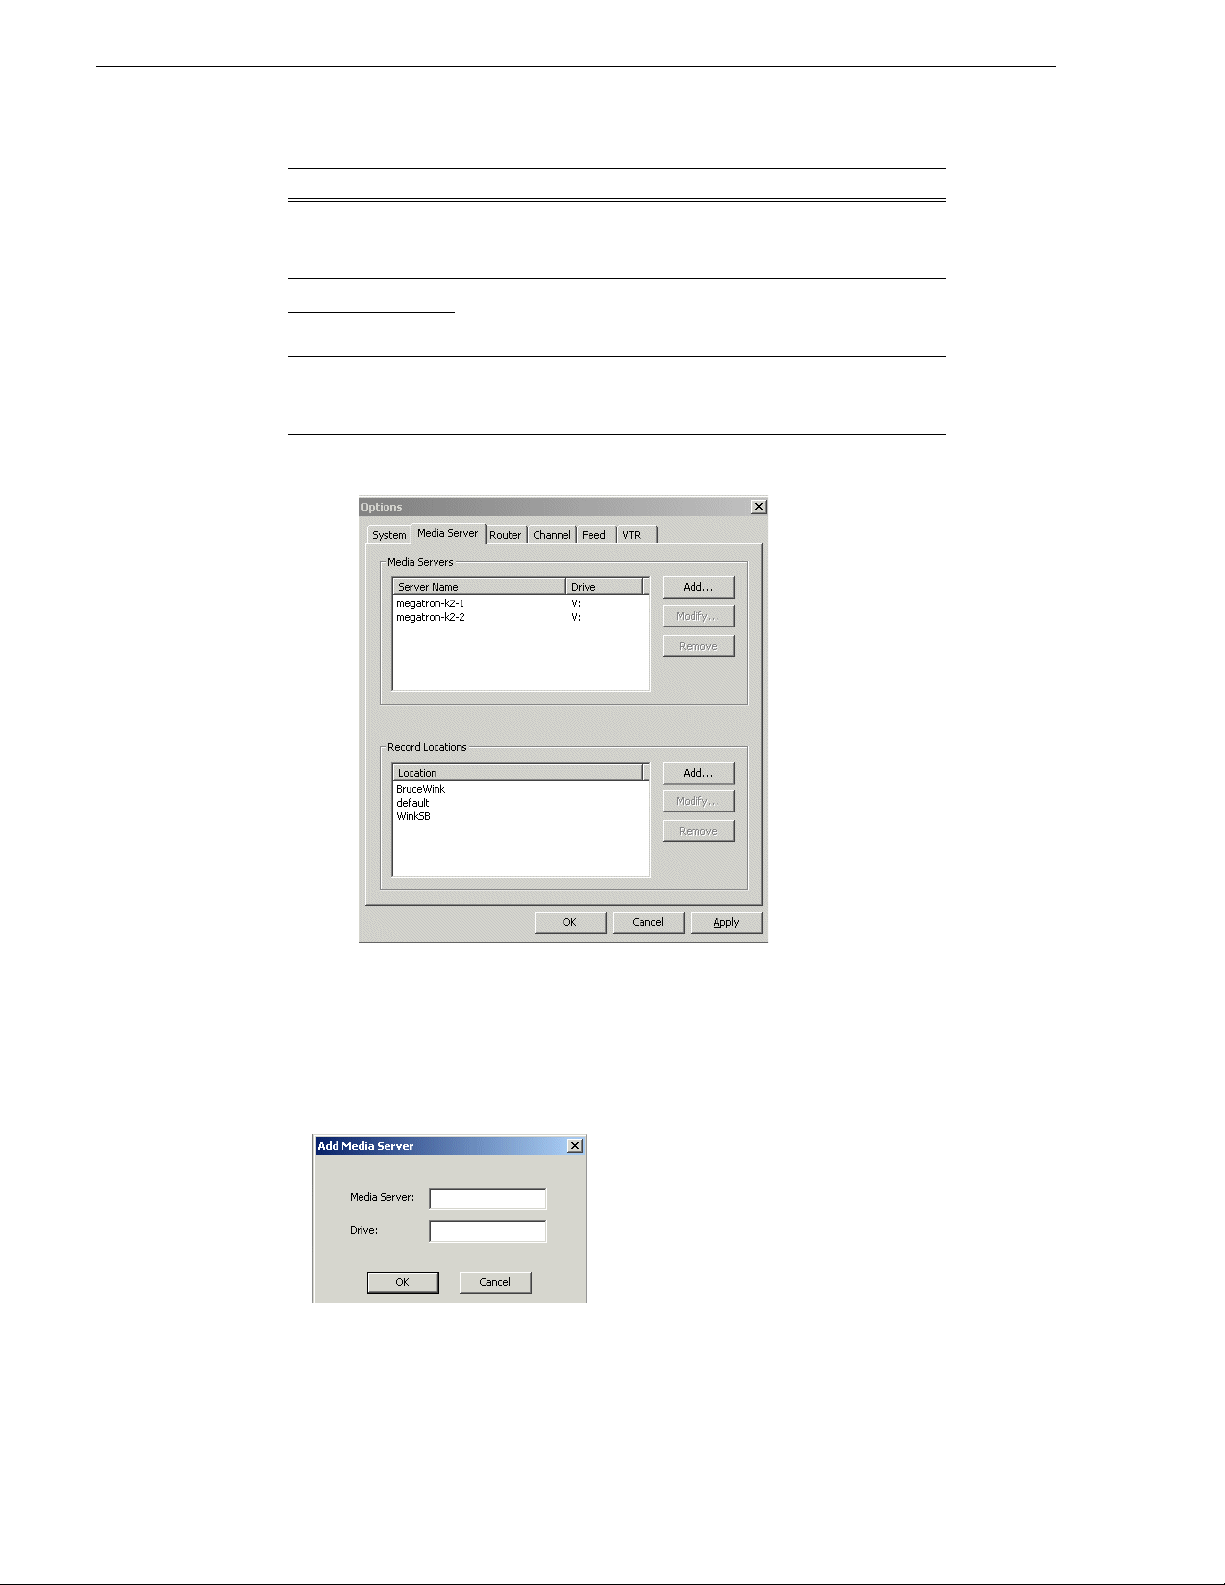
Configuring Media Servers
Setting Recording Locations
You can also specify where schedu led recordings will resid e on each server. Once you
configure them, select which folder to record to when recording clips and feeds.
To set a reco rd location:
1. In the Media Servers box, click
2. E nter the media server name and its dr ive letter (e.g. V:), and click
14 Aurora Ingest System Guide May 2007
Add.
OK.
Page 25
3. In the Record Locations box, click Add.
Configuring Media Servers
4. Type the name of the location and click
If you entered a folder na me that do es not exis t on the media s erver, Auror a Ingest
creates the folder as soon as the first record is started in the new folder.
5. Repeat step 3 and step 4 to create additional locations.
Modifying Recording Locations
To modify a record location:
1. In the Media Servers box, select the media server name that you want to change
and click
Modify.
2. Enter the new media server name and its drive letter (e.g. V:), and click
3. If you need to change the folder name as well, select the folder name in the Record
Locations box and click
OK.
OK.
Modify.
4. Enter the new folder name and click
OK.
5. Repeat step 1 to step 4 to modify more recording locations.
Removing Recording Locations
To remove a record location:
May 2007 Aurora Ingest Syste m Guide 15
Page 26
Chapter 2 Installing and Configuring Aurora Ingest
Jupiter Router
Encore/SMS7000 Router
1. In the Media Servers box, select the media server name and click Remove.
2. Click
Yes to confirm the removal of the media server from the Aur ora Ingest -
Server sett ing.
3. If you need to remove a folder as well, select the folder name in the Record
Locations box and click
4. Click
OK to close the options window or click Apply to continue with other
configuration settings.
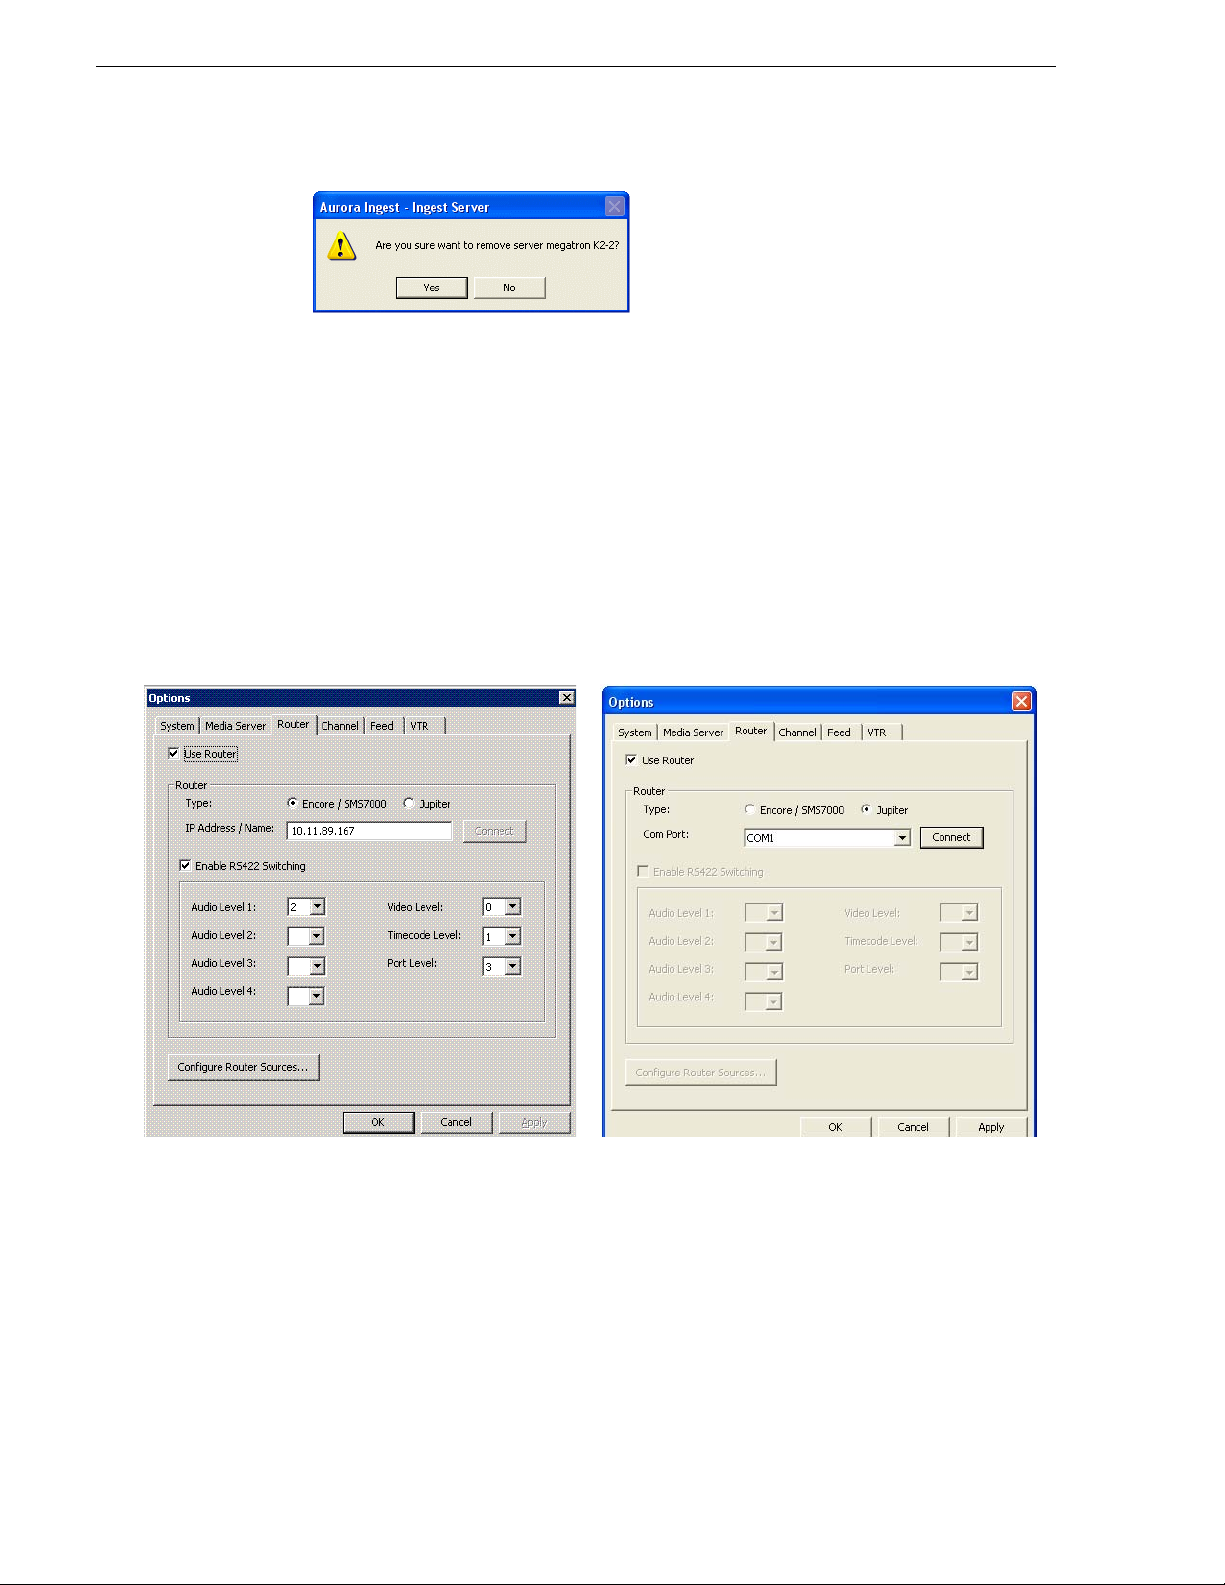
Configuring Routers
If you are using a Jupi ter or an Encore/SMS7000 rout er as part of your news stati on,
you can configure Aurora Ingest to use sources from the router to record clips.
Remove.
16 Aurora Ingest System Guide May 2007
To configure a router for use with Aurora Ingest:
1. Check the
Use Router checkbox.
2. For router type, select either the Encore/SMS7000 or Jupiter.
3. For Encore/SMS7000, enter the IP address or name of the router that you want to
connect to. Then, go to step 5.
4. For Jupiter with direct route r connection via RS422, select e ither COM1 or COM2
(depending on your setup) fr om the drop-down list. For Jupite r with connection via
serial hub, select the appropriate COM port that had been configured. For more
information, see “Configuring Virtual COM port” on page 18.
Page 27

Configuring Routers
5. Click Connect.
6. You can also enable RS-422 switching, which enables you to switch between
VTRs for each channel without having to swap the RS-422 cables manually, as
Aurora Ingest will swit ch the RS-422 port. Auro ra Ingest switches v ideo from the
VTR to the video capture card whether RS-422 switching is enabled or not. For
more information on RS-422 switching, see “About RS-422 switching” on
page 21.
7. Select 0 (zero) for the video level if video is the first level in your router control
system, 1 if it is the second level and so on. Select the level from the drop- down list.
8. Click
9. Click the
Apply to save changes.
Configure Router Sources button. Aurora I ngest connects to the ro uter and
queries the list of sources. The Configure Router Sources dialog box displays,
showing the available sources.
10.In the Feed window, you can enable the router sources that are connected to the
CompuSat satellite feed. You can also rename the router source in the “Source
Name” column and choose a default location in the Media Server for the feed to
record to.
NOTE: Onc e you have enabled the Feed router sources, a li st of enabled Feed rout er
sources is available in the router source list of the Add Feed dialog box in the
Scheduler application.
11.Click
May 2007 Aurora Ingest Syste m Guide 17
OK to exit the Configure Router Sources dialog box. The settings will take
effect once you click
Apply in the Options dialog box.
Page 28

Chapter 2 Installing and Configuring Aurora Ingest
12.In the VTR window, you can enable t he router sources t hat the VTRs are connecte d
to. You can also rename the router source in the “Source Name” column.
NOTE: Once you have en abled t he VTR rout er sour ces, a l ist of enable d VTR rout er
sources is available in the VTR Ingest application.
13.Click
OK to accept the changes and exit the dialog box.
Configuring Virtual COM port
In order to co nnec t to Jupiter router via ethernet, a serial hub needs to be configured.
This serial hub will ac t as a virtual COM port, which enables serial-to-ethernet
connectivity as though Jupiter is communicating with Aurora Ingest via the local
COM port.
When you purchase Aurora Ingest, DIGI One SP RS422 Serial to Ethernet Device
Server is also provided in the same package. Before starting to configure the device
server, write down the MAC address located at the bottom of the hardware.
To setup the h ardware:
1. A serial crossover cable (also known as null-modem cable) is needed to allow
proper communications between Jupiter router and DIGI One SP Device Server.
The appropriate pinouts can be referred from the table below:
DIGI One SP Device Server Jupiter Router
Pin Name Pin Numb er Pin Number Pin Name
Rx +23Tx +
Tx +37Rx +
Rx -68Tx Tx -92Rx -
2. Connect one end of the crossover cable to the device server and the other end to
18 Aurora Ingest System Guide May 2007
Page 29

RS422 serial cable to connect to Jupiter.
DIGI One SP Device Server
Crossover Cable
Ethernet Cable
Power Supply
(DB9 female-to-female)
Serial Cable to connect to Jupiter
(DB9 male-to-male)
Configuring Routers
3. Connect an ethernet cable from the devi ce serve r to a net work poin t on yo ur LAN.
4. C onnect the power suppl y to the device server.
To install the software:
1. Insert the DIGI CD in your CD ROM drive.
2. The setup wizard will automatically be displayed on your screen. If not, clic k
> My Computer > CD ROM drive: > setup.exe
Start
May 2007 Aurora Ingest Syste m Guide 19
Page 30

Chapter 2 Installing and Configuring Aurora Ingest
3. Click Next and the setup wizard will search your network to locate the DIGI One
SP device server.
4. Select the device server according to its specific MAC address.
5. Take note of the device IP address and click
Next.
6. In the Network Settings section, select IP and enter the IP address that had been
retrieved by the setup wizard.
7. In the COM Port Settings section, set the number of ports to 1 and select the
appropriate COM port from the Starting COM drop down list. This will be your
virtual COM port.
20 Aurora Ingest System Guide May 2007
Page 31

8. Click Finish and the setup wizard will install the software.
Configuring Routers
9. Click
Finish after the installation is done.
NOTE: Once you have configured the virtual COM port, it will be available in the
COM Port drop down list on the router configuration window of Aurora Ingest Server.
About RS-422 switching
If RS-422 switching is not enabled, you do not have to select the levels because
Aurora Inge st switches all levels wh en switching the router for server port
switching and VTR Ingest monitoring s witching. Conve rsely, if RS- 422 switchin g
is enabled, Aurora Ingest switches the router differently.
• Each VTR source has four levels.
• Feed sources have two (if they use VITC) or three (if they use LTC) levels.
• K2 destinations have the HD-SDI, AES and LTC levels (we know for cert ain VTRs
use LTC).
• VTR Ingest video capture destinations have the HD-SDI level (and AES if
speakers are connected).
• VTR Ingest com ports destinations have the RS-422 level.
May 2007 Aurora Ingest Syste m Guide 21
Page 32

Chapter 2 Installing and Configuring Aurora Ingest
FEED
VTR
Level 1
HD-SDI
Level 3
LTC
Level 4
RS-422
K2
VTR Ingest
Vid Cap
Level 2
AESI
VTR Ingest
Com 1
Aurora Inge st switches:
• level 1, 2 and 3 for source-to-server port switching.
• level 1 (and 2) for VTR Ingest monitoring switching.
• level 4 for VTR to VTR Ingest Com Port switching.
Configuring Channels
The number of channel s is limited only by your med ia server hardware. You need to
configure each channel in order to record clips.
NOTE: Aurora Ingest has only been tested to a maximum of 24 ingest channels.
22 Aurora Ingest System Guide May 2007
Page 33

Configuring Channels
To add, modify or remove a channel, select the channel and click the Add, Modify or
Remove button.
the
Setting Description
Name Enter a name for the channel. This name identifies the Aurora Ingest Channel
Window.
Media
Server
Channel In the drop-down list, select or enter the n ame o f th e me di a serv er cha nne l yo u are
Recording
Destination
Specify the media server for the channel. (Media servers are configured in the
Media Server tab.)
using to record, such as
Select the recording location from the drop -do wn list. (Re cor di ng desti natio ns are
specified in the VTR and Feed tabs respectively for VTR Ingest and Aurora
Ingest - Scheduler ingests.)
vtr1.
May 2007 Aurora Ingest Syste m Guide 23
Page 34

Chapter 2 Installing and Configuring Aurora Ingest
Configuring Aurora Ingest - Scheduler (Feed)
Setting Description
Default Clip Name Specify the default clip name.
Default Record Location Enter the default location for any schedule d record
event.
Default Duration Enter the default duration for any new feed event
you schedule. (00:59:50 by default).
To easily schedule back-to-ba ck records, adjust
the default duration by 10 seconds in order to avoid
a recording conflict. For example, for a 1 hour feed
duration, set the default duration to 00: 59 :50 .
Default Crash Loca tio n Enter the de fa ult location for any un-sc he du le d,
i.e. crash record event. Once specif ie d, all crash
records will go to the same folder name on all
media servers.
Default Crash Duration Enter the default duration for any un-scheduled
record event.
Timecode Source
Select the timecode source from the drop-down
list: System Time, LTC, or VITC
Configuring Scheduler in the Aurora Ingest - Scheduler application
After you have configured Scheduler in the Aurora Ingest - Server application, you
need to configure the options in the Aurora Ingest - Scheduler application.
If you have the optional Hauppage WinTVGo video capture card installed in your
scheduler machine and a r outer configured i n your system, you will need to define the
destination of th e router connected (v ia digital to analo g converters, if needed) to your
video capture card.
24 Aurora Ingest System Guide May 2007
Page 35

Configuring Aurora Ingest - Scheduler (Feed)
1. In Aurora Ingest - Scheduler, select Tools | Options.
2. If you want to use an Aurora Ingest Server that differs from one listed in
Tools | Options in the Aurora Ingest - Server application, you need to specify the
server here. In the System tab, specify the Aurora Ingest Server.
3. Click
Apply.
4. Select the Video Viewer tab.
5. Check the Enable video viewer box.
6. If desired, check the 16:9 box.
7. If using a router, select the router destin ati on from th e drop-do wn list. If no rout er
has been configured, this field will be grayed out. To configure a router, see
“Configuring Routers” on page 16.
8. If you have installed the video captur e card, sele ct the devi ce in the ca pture devi ce
drop-down list.
9. Click
May 2007 Aurora Ingest Syste m Guide 25
OK.
Page 36

Chapter 2 Installing and Configuring Aurora Ingest
The Aurora Ingest - Scheduler application is now configured. For more information,
see “Using Aurora Ingest - Scheduler” on page 33.
Configuring VTR Controller
Before you can use VTR Ingest wit h a VTR or VTRs, you need to config ure the VTR
Controlle r application. VTR Cont roller can be installed on the same machine as the
VTR Ingest application, but this is not required.
To configure VTR Controller, follow these steps:
1. From the Windows Start menu, select
Controller
2. Select
. The VTR Controller application opens.
Tools | Options. The VTR Controller Options dialog box displays.
Program | Aurora 6.1 | Aurora Ingest - VTR
3. Click the
Add button. A dialog box displays that allows you to enter a name and
select a control port and timecode mode. The listening port is automatically
populated. (Knowing the listening port can be useful if, for example, you are
having difficulties with firewall and nee d t o kn ow what port should be allo wed a s
an exception.)
26 Aurora Ingest System Guide May 2007
Page 37

Configuring VTR Controller
After you have added the VTR, you sho uld see it displayed in the VTR Status window
with a green indicator next to its name.
Once you have added VTRs, you can modify or delete them. However, if you only
have one VTR displa yed in the stat us window, you can not delete it and have an e mpty
status window.
Troubleshooting VTR Controller configuratio n
If you see a red indicator next to the VTR’s name, try restarting VTR Controller. If
the VTR status still displays a red indicator, verify the following:
• The correct COM port has been specified for the VTR.
• The COM port is not being used by another application controlling the VTR.
• The VTR is turned on.
• The hardware has been correctly inst alled. For more information, see “Installing
Aurora Ingest” on page 8 .
• The IP address or computer name where VTR Controller is installed matches the
address or name in the VTR Ingest application.
May 2007 Aurora Ingest Syste m Guide 27
Page 38

Chapter 2 Installing and Configuring Aurora Ingest
The VTR Controller application is now configured. For more information, see “Using
VTR Controller” on page 49. Before you can use a VTR with Aurora Inges t, you need
to configure th e VTR Ingest a pplication and make s ure the VT R informat ion matches
the information you entered when configuring VTR Controller. For more info rmation
on VTR Ingest, see “Configuring VTR Ingest (VTR)” on page 28.
Configuring VTR Ingest (VTR)
Configuri ng VTR Inge st is a two-step process.
1. Populate the fields in the VTR tab under
Tools | Options in the Aurora
Ingest - Server application.
2. Populate the VTR information unde r
and verify that it matches the VTR information under
Tools | Options in the VTR Inges t application
Tools | Options in the VTR
Controller application.
Configuring VTR Ingest in the Aurora Ingest - Server application
Setting Description
Default Clip Name Specify the default clip name.
Default Record Location Enter the default location for any vtr ingest record
event.
In Handle Handles allow you to have additional frames to use
Out Handle
Preroll Enter the number of seconds of preroll you want to
28 Aurora Ingest System Guide May 2007
while editing. Enter the duration you want for the
In and Out Handles (0 secon ds by def ault).
use when recording clips (5 seconds by default).
Page 39

Configuring VTR Ingest (VTR)
Configuring VTR Ingest in the VTR Ingest application: VTR tab
Make sure you have already configured the VTR Controller application before
completing this section. The VTR information in these two applications needs to
match. For more information, see “Configuring VTR Controller” on page 26.
1. In the VTR Ingest application, select
Tools | Options.
2. In the VTR tab, enter the IP address or name of the Aurora Ingest Server.
3. If desired, check the prompt for Tape ID box. This feature allows you to custo mize
the identification of your tape.
4. Select the channel from the drop-down list and enter the name of the channel.
5. Enter the IP address or name of the computer where VTR Controller is installed.
(If VTR Controller is installed on the same machine, enter
localhost.)
6. Select the com port from the drop-down list.
7. From the list of available VTRs, select the VTR router source. Once selected, the
router source is displayed in the Selected VTR box.
8. You can check the Enable RS-422 Switching box and select the RS-422
destination.
9. To make the changes but keep the Options dialog box open, click
May 2007 Aurora Ingest Syste m Guide 29
Apply.
Page 40

Chapter 2 Installing and Configuring Aurora Ingest
10.Proceed to “Configuring VTR Ingest in the VTR In gest applicat ion: Video Vi ewer
tab” on page 30.
Configuring VTR Ingest in the VTR Ingest application: Video Viewer tab
Make sure you have already configured the router in the Aurora Ingest - Server
applicatio n before completing this section. The router information in the se two
applications needs to match. For mo re information, see “Configuring Routers” on
page 16.
If you have the optional Hauppage WinTVGo video capture card installed in your
VTR Ingest machine, you will need to define the des ti nat ion of the router connected
(via digital to analog converters, if needed) to your video capture card.
1. In VTR Ingest, click the Video Viewer tab. The Video Viewer tab displays.
2. Select the router destination from the drop-down list.
The VTR Ingest application is now ready to use. For more information, see “Using
VTR Ingest” on page 53.
30 Aurora Ingest System Guide May 2007
Page 41

Configuring RMI
The Aurora Ingest - RMI application is configu red in the RMI application.
Configuring RMI
Once the “System Requirements” have been met, you can use this dialog box to
configure Aurora Ingest - RMI.
1. Enter the IP address or computer name of the Aurora Ingest Server.
2. Specify the removable media device or devices.
3. Specify the import and conversion settings.
4. Select local or shared storage, and browse to the VibrintAVFiles location.
• Prompt for tape ID - this feature lets you give the disk and all of the clips useful
names right up front.
• Use Global Tape ID for P2 - select this if you want to use global tape ID when
ingesting from Panasonic P2.
• Automatically select clips upon disk discovery - use this feature if it’s better for
your workflow to ingest the clips then select or de-select individual clips.
5. If you are configuring for HD Infi nity file s or HD XDCAM file s, you al so nee d to
specify the conversion settings.
• Chroma Format - select the chroma format from the drop-down list
• Bit Rate - set the appropriate bit rate needed
6. Click
OK.
May 2007 Aurora Ingest Syste m Guide 31
Page 42

Chapter 2 Installing and Configuring Aurora Ingest
User Administration for Aurora Ingest
By specifying permissions, an administrator can control who can access the Aurora
Ingest applications and what actions can be performed. There are no default
permissions. All actions are disallowed unless specifically permitted.
Users belong to groups. Groups have permission granted or denied to access the
following tasks:
Permission Description
Crash record Allows a user to record an unscheduled Aurora Ingest - Scheduler event.
Feed event Allows a user so assigned to record a single Aurora Ingest - Scheduler event .
Recurring
event
Allows a user so assigned to create a recurring Aurora Ingest - Scheduler record
event.
Open-ended
event
Logging Allows a user to log a tape, create an EDL and sa ve it. (Does not give the user
VTR Ingest Allows a user so assigned to create Aurora Ingest - VTR batch events.
RMI Allows a user to access Aurora Ingest - RMI to ingest events from playout devi ces
Allows a user so assigned to record a Aurora Ingest - Scheduler event with no end
time specified.
permission to record.)
such as the Infinity Digital Media Cameras and Digital Media Recorders or from
Panasonic P2 or Sony XDCam removable media devices
32 Aurora Ingest System Guide May 2007
Page 43

Chapter 3
Using Aurora Ingest - Scheduler
With Aurora Ingest - Scheduler, you can r ec ord an event from a VTR, rou te r sour ce ,
or CompuSat. You can crash record, allowi ng for the immedi at e re cor ding from any
router source, or schedule events to record up to one year in advance, including
recurring events.
Before you c an record an event, you need to have the Aurora Ingest system
configured. For more information, see “Configur ati on Overview”.
This chapter describes the Scheduler layout and details how to use Scheduler to
capture and record clips for later use in a newscast. For information on configuring
the Scheduler application, see “Confi gur ing Aurora Ingest - Scheduler (Feed)” on
page 24.
This chapter is divided into the following sections:
• “Tour of the Aurora Ingest - Scheduler Window”
• “Tour of Schedule Viewer”
• “Crash Recording”
• “Scheduling Recordings”
May 2007 Aurora Ingest Syste m Guide 33
Page 44

Chapter 3 Using Aurora Ingest - Scheduler
Available
channels
Schedule
Viewer
Previous
Day
Next
Day
Today
Toggle
Timelock
Zoom
tools
Current
time
Record
date
Filter used,
(if any)
Status bar
Scheduled
record
Event
buttons
Current
time
Hide/Show viewer
VTR Ingest
reservation
Alert icon
depend
on your
channel
setup in
Aurora
Ingest Server
Tour of the Aurora Ingest - Scheduler Window
The Scheduler window allows you to quickly view the channels and record or
schedule events. The Hide/Show viewer is grayed-out if the
is not checked in
Tools | Options.
Enable video viewer box
If you hover on the channel name, an informational tooltip will appear to show the
channel name, server, recording port, remaining storage and status of the channel.
34 Aurora Ingest System Guide May 2007
Page 45

Channel Window Toolbar
The Event buttons let you perform common Scheduler functions:
Icon Function
Add a scheduled event.
Modify a selected event.
Delete the selected event.
View the selected event
Tour of Schedule Viewer
To see the detai l s o f the events scheduled for a particular day , yo u mi ght want to use
Schedule Viewer. Schedule Viewer provides an easy way to select dates for
scheduling and to view scheduled events.
Channel Window Toolbar
To access Schedule Viewer, clic k the
Viewer
. Schedule Viewer opens, and displays all scheduled events for the selected
Calendar icon or select Schedule | Sch edule
day.
In Schedule Viewer, you add, modify, and delete events just as you would from the
Aurora Ingest - Scheduler application.
May 2007 Aurora Ingest Syste m Guide 35
Page 46

Chapter 3 Using Aurora Ingest - Scheduler
Channel Columns
Each channel window displays information about the event:
Column Description
Clip title The name of the event placeholder.
Router source The router source selected for this event.
Status The current status of the event:
Ready = The event is ready to record.
Cueing = The event is preparing to record.
Recording = The event is currently recording to the serve r.
Done = The event has finished recording.
Failed = The event could not record. Check the Error Message field for more
information.
Elapsed = The time for the event to record has p assed. The status c olor is gray
as the elapsed time is passing, and turns to black when the time has passed.
Start time The beginning and ending time for the event.
End time
Location The name of the folder where the clip resides in the database.
Channel The channel that had been selected for the event
Owner The user who created the clip.
Error Message Any error message describing why the event was not recorded to the server.
Crash Recording
You can crash record when you want to record an event immediately.
To crash record:
1. Select the channel where you want to record the event. If you do not select a
channel, Scheduler will automatically assign a channel.
2. Select the router source f or the recording by s electing from the route r source combo
box.
3. If desired, enter a name for the clip. If not, Aurora Ingest application will
automatically name each clip using the prefix you set when you configured each
channel. Refer to “Configuring Channels” on page 22.
4. Click
Record.
The clip cues, and after a short time the clip begins recording.
36 Aurora Ingest System Guide May 2007
Page 47

Scheduling Recordings
While the clip is recording, the record button flashes red and the clip is displayed
as red. A scheduled clip is displayed as blue.
5. When you are done recording, click
Recording stops and t he clip status changes to Done. Yo u can view t he status by
selecting a clip and clicking on the View Event button or you can view the
status of all the clips recorded that day by using Schedule Viewer.
Scheduling Recordings
With Scheduler, you can set up events to record automatically at pre-defined times
and dates. You can also schedule recurring events, allowing you to record the same
event every day of the week or once a week.
Stop Record.
This section is divided into the following topics:
“Scheduling events with ENPS”
“Setting up ENPS Assignment Grid”
May 2007 Aurora Ingest Syste m Guide 37
Page 48

Chapter 3 Using Aurora Ingest - Scheduler
“Adding New Events”
“Adding New Events from CompuSat”
“Adding Recurring Events”
“Modifying Events”
“Deletin g Events”
“Creating a Template”
“Using VTR Ingest Reservation”
“Using filters”
Scheduling events with ENPS
When scheduling events with ENPS, keep the following in mind:
• If there aren't any channel s availa ble in the schedu ler, ENPS doesn 't have an y way
of alerting the user.
• The channels are auto-assigned only.
• Make sure there is at least 10 seconds of space between feeds.
• All recordings will be stored on the default folder on the media client server.
Setting up ENPS Assignment Grid
ENPS provides a standard layout for assignment grid of Newsgathering that can be
customized accord ing t o your ne eds. Each line of t he gr id represents a s eparate story
item. When you click on a line of the Newsgathering, you will see linked grids into
which information about the story can be entered.
To set up the assignment grid:
1. On an ENPS client, log in as the administrator and start up ENPS.
2. From the NEWS folder (fourth folder rover), select
Configuration Options
3. If it needs to be added or changed, News Object Manager (NOM) should be
re-configured and re-started.
4. From the NEWS folder (fourth folder rover), select
and make sure that DEFAULTMOSVERSION is set to 2.6.
System Maintenance | Global
System Maintenance |
38 Aurora Ingest System Guide May 2007
Page 49

Setting up ENPS Assignment Grid
[Enterprise Name] Fields and add the following parameters:
ID Default
Caption
GVFeedS
ource
GVStart Start
GVEnd End Time Left T ime 1000 Event
GVFeed
Notes
GVFeeds Feeds Left Form Feed Source,C\[See
Feed
Source
Time
Feed
Notes
Just Valida
tion
Left Comb
oBox
Left Time 1000 Event
Left Text 1000 Event
List Width Type Word
List of router
sources. [Available
choices to appear in
a pull-down list,
delimited by pipes]
Eg.
Source1|Source2|So
urce3
note*],,GVFeedSou
rce|Start Time,
Time,,GVStart|End
Time,Time,,GVEn
d|FeedNotes,,GVFe
edNotes
1000 Event
Sheet
Sheet
Sheet
Sheet
1000 Event
Sheet
Wrap
MOS
Send
Note* Available
choices to appear in
a pull-down list,
delimited by
back-slashes and
should be similar to
the ones in
GVFeedSource
Eg.
Source1\Source2\S
ource3
5. Restart ENPS client.
6. Create a new Newsgathering by naming it GV Assignments.
7. Enable
MOS Control Active and MOS Story Send (to Aurora Playout’s MOS ID).
8. Delete all existing column s except Story Slug.
9. Select
Layout | Add Columns and name them with the following:
• Break
• Feed Source
May 2007 Aurora Ingest Syste m Guide 39
Page 50

Chapter 3 Using Aurora Ingest - Scheduler
• Start Time
•End Time
•MOS Status
•Feed Notes
10.Insert two new rows, change the Story Slugs to AM Assignments and PM
Assignments and select Break for both.
11.Delete the Break column.
12. Select
Layout | Save as template and click Yes to save template.
Below is the sample template:
Adding New Events
To record events, you add a schedule d event for each event you want to record. You
provide information about the event and Scheduler adds the event to the record
schedule.
To add a new event:
1. Select the channel where you want to record the event. If you do not select a
channel, Scheduler automatically assigns a channel.
2. Click
40 Aurora Ingest System Guide May 2007
Add Event.
The Add Event dialog box appears:
Page 51

Adding New Events
3. Fill out the information for the event you are scheduling:
• Template—Select a template from the drop- down list.
Templates save inf o r mati on such as clip locat ion and recording cha nnel so that
you can save time on repeated ingests. See “Creating a Template” on page 46.
• Clip Title—Enter a name for the scheduled event, if you want to.
If not, Aurora Ingest automatically names each clip using the prefix you set
when you configured each channel. See “Configuring Channels” on page 22.
• Assignment List M anager—Cl ick
Assignment List Manager to link this event to
a Aurora Playout rundown. S ee “Linking Cli ps to Aurora Playo ut Placeholders”
on page 65 for details.
• Location—If desired, select a different record location for the event.
• Router So urce—Select the source to record from in the drop-down list.
• Gang Roll—Click
Gang Roll to select several router sources to start recording
simultaneously as can be seen in the window below:
• Start Record Now—Check this box to star t a re cording a s soon as you cli ck
OK.
If you check this box, you need t o provide an endin g time for the rec ord. Can be
used with Open Ended Record.
• Open Ended Record—Check this box if you want a recording to continue until
you manually stop it. You provide a start time for the record . Can be used with
Start Record Now.
• Start Date—Select the date you want the recording to start on using the
May 2007 Aurora Ingest Syste m Guide 41
Page 52

Chapter 3 Using Aurora Ingest - Scheduler
drop-down calendar. Move to a different month using the arrows at the top of
the calendar.
• Start Time—E nter the time you want the recording to start, using th e format
hour:minutes:seconds.
NOTE: When schedul in g two ev ents b ack-t o-back , a s pace of 10 se conds i s requ ired
from the stop of the first record to the start of the second record. In order to
compensate for this, it is recommended that the default record duration reflect a stop
time 10 seconds prior to the rounded duration (e.g., 00:59:50 for a 1 hour record).
• Stop Date—Select the date you want the recording to end on using the
drop-down calendar.
• Stop Time—Enter the time you want the recording to end, using the format
hour:minutes:seconds.
• Recurring—Check thi s box if you want this scheduled event to occur more th an
once. See “Adding Recurring Events” on page 44 for instructions.
4. Click
Add.
The scheduled event is added to Scheduler with a
Adding New Events from CompuSat
To record events from a CompuSat-con trolled satellite dish, you have to ensure that
the CompuSat system component is connected to Aurora Ingest Server. See
“Configuring System Settings” on page 13 for configuration instructions.
Make sure that the CompuSat syst em indicator is gree n to si gnify th at the co mponent
is connected on the System Components display of Aurora Ingest Server.
Ready status.
To add a new event:
1. Select the channel where you want to record the event. If you do not select a
channel, Scheduler automatically assigns a channel.
2. Click
Add Event.
The Add Event dialog box appears. Note that there i s a n add it ion al CompuSat tab
in the dialog box.
42 Aurora Ingest System Guide May 2007
Page 53

Adding New Events from CompuSat
3. Fill out the information for the event you are scheduling in the General tab:
• Template—Select a template from the drop- down list.
Templates save inf o r mati on such as clip locat ion and recording cha nnel so that
you can save time on repeated ingests. See “Creating a Template” on page 46.
• Clip Title—Enter a name for the scheduled event, if you want to.
If not, Aurora Ingest automatically names each clip using the prefix you set
when you configured each channel. See “Configuring Channels” on page 22.
• Assignment List M anager—Cl ick
Assignment List Manager to link this event to
a Aurora Playout rundown. S ee “Linking Cli ps to Aurora Playo ut Placeholders”
on page 65 for details.
• Location—If desired, select a different record location for the event.
• Router Source—Select the source to record from on the drop-down list.
• Start Date—Select the date you want the recording to start on using the
drop-down calendar. Move to a different month using the arrows at the top of
the calendar.
• Start Time—E nter the time you want the recording to start, using th e format
hour:minutes:seconds.
NOTE: When schedul in g two ev ents b ack-t o-back, a s pace of 10 sec onds i s requi red
from the stop of the first record to the start of the second record. In order to
compensate for this, it is recommended that the default record duration reflect a stop
time 10 seconds prior to the rounded duration (e.g., 00:59:50 for a 1 hour record).
• Stop Date—Select the date you want the recording to end on using the
drop-down calendar.
• Stop Time—Enter the time you want the recording to end, using the format
hour:minutes:seconds.
• Recurring—Check this box i f you want this sche duled event to oc cur more than
May 2007 Aurora Ingest Syste m Guide 43
Page 54

Chapter 3 Using Aurora Ingest - Scheduler
once. See “Adding Recurring Events” on page 44 for instructions.
4. Then, fill out the informa tion needed for CompuSat setting.
• Event Name—Enter a name for the scheduled event. If you had entered Clip
Title in the General tab, the same name will appear in this box.
• Satellite—S elect the sat ellite that you want to record the event from in the
drop-down list.
• Transponder—Selec t the correspond ing transponder to r ecord the event fr om on
the drop-down list.
• Receiver—Select the corresponding receiver to record the event from on the
drop-down list.
• Audio Frequency—Sele ct the corre spondin g aud io freque ncy th at yo u need f or
this event on the drop-down list.
• Audio Level/Video le vel—Set the cor responding perce ntage of audio and video
levels that you need for this eve nt. If not, you can alwa ys check th e defaul t box
for default settings.
5. Click
Add.
The scheduled event is added to Scheduler with a
Adding Recurring Events
If you want to schedule an event to rec or d on more tha n one occ asi on, such as every
day of the week, or once a week, you creat e a recur ring eve nt. Schedul ing a rec urring
event is the same as scheduling a one-time recording except that you enter
information about how the event recurs throughout time.
Ready status.
NOTE: If using CompuSat, you can only schedule weekly recurring events.
44 Aurora Ingest System Guide May 2007
Page 55

To add a recurring event:
1. Follow steps 1-4 from “Adding New Events” on page 40.
Adding Recurring Events
2. Check the
Recurring checkbox.
The Add Event dialog box expands:
3. Select information about how you want the event to recur:
• For daily occurr ence, select eit her Every Weekday or en ter a number of day s for
the event to recur.
• For Weekly occurrence , che ck the boxes f or the d ay or da ys y ou want th e entr y
to record.
• For Monthly occurren ce, sel ect a specific day each month to record, or select a
May 2007 Aurora Ingest Syste m Guide 45
Page 56

Chapter 3 Using Aurora Ingest - Scheduler
specific day of the week, such as the second Friday, to record.
4. Select the range of occurrence , by sele cting a Star t date , and eithe r an End b y date
or an End after a certain number of occurrences.
5. Click
Add.
The scheduled events are added to Aurora Ingest - Scheduler with a
Modifying Events
If you need to modify a scheduled event for any reason:
1. Select the entry you want to modify and click
The Modify Event window opens.
2. If the event is part of a serie s, you see a messa ge ask ing if yo u want t o mo dify t his
occurrence or the entire series. Select which you want to modify and click
3. Make your changes in the Modify Event window.
4. Click
OK.
The event updates in Scheduler.
Deleting Events
If you need to delete an entry:
1. Select the entry you want to modify and click
2. Select
Yes in answer to the message asking if you want to delete the selected event
or events.
Ready status.
Modify Event.
OK.
Delete.
The event is removed from Scheduler.
Creating a Template
A template saves time by storing information that will be used for multiple events. A
template is created from an event. You cannot create a template unless an event has
been created. You can creat e a template that enab le gang roll s, that is, a te mplate t hat
lets you trigger multiple channel records from disparate sources simultaneously.
1. Select the entry you want to use as a template. If there is no event in Aurora
Ingest - Scheduler, add an event now . See “Adding New Events” on page 40.
46 Aurora Ingest System Guide May 2007
Page 57

2. Select Event | Save as Template.
3. Fill in the information that you want included in the template. To select sources to
create a gang roll, click on the Gang Roll icon.
NOTE: You cannot create a template from a VTR Ingest Reservation, only from an
event.
Using VTR Ingest Reservation
Using VTR Ingest Reservation
Using VTR Ingest Reservation allows you to r eserve a channel for a record event by
VTR Ingest. This ensures that the channel and the specified record time are reserved
for VTR Ingest and cannot be used to schedule events.
To schedule a VTR Ingest Reservation, follow these steps:
1. Select
2. Specify the name of the reservation and the time/date info. If desired, add a
Event | Add VTR Inges t Reservation. The Add VTR Ingest Reservat ion dialog
box displays.
description of the clip.
You can make the reserva tion a recurring event. I f you do not specify a cha nnel, Ingest
with automatically assign one based on availability.
NOTE: Do not use t he Stop but ton in Sche duler to stop a VTR Ingest re cordin g. Stop
the recording through the VTR Ingest application instead.
May 2007 Aurora Ingest Syste m Guide 47
Page 58

Chapter 3 Using Aurora Ingest - Scheduler
Using filters
If you have a large number of feeds, it can sometimes be tedious trying to locate the
particular type of event, or channel, and so on, that you want to view. You can use
filters to view the chan nels that you are partic ularly interested in.
To set up a filter, follow these steps:
1. In Scheduler, select
Tools | Schedule Manager | Filter. The Add Filter dialog box
displays.
2. Name the filter and select the criteria you want to use to filter.
• Event Type—Select the event type from the drop-down list. You can select all
or select a particular event type such as ENPS, Feed, VTR or VTR Ingest
Reservation.
• Source Type—Select the source type that you need to filter. You can select all
or select a particular source such as CompuSat or a router.
• Router Source—Select the particular source if it’s applicable for your filter.
• Channel—Select th e channel tha t you recorded th e feeds into. You can select al l
or select the specific channel that you need to filter.
• Owner—Select all or a particular user of Aurora Ingest that had recorded the
feeds. Names that appear on the drop-down list are according to user
administration setup in Aurora Ingest - Server. For more inform ation on user
administration setup, see “User Administration for Aurora Ingest” on page 32.
3. Click
Add to add the filter to Scheduler.
Once the filter has been added, you can select it from the drop-down list on the
Scheduler menu.
48 Aurora Ingest System Guide May 2007
Page 59

Chapter 4
Using VTR Controller
VTR Controller allows you to control up to eight VTRs for VTR Ingest application.
Furthermore, VTR Control ler all ows you to add, modif y, or edi t VTRs and configure
them to work with other Aurora Ingest applications. This chapter shows you how to
use VTR Controller once it has been ins talled and configured. For infor mation on how
to install and configure the application, see “Installing Aurora Ingest” on page 8.
You can have VTR Controller and VTR Ingest on the same machines or on two
connected via Ethernet. If you modify a VTR in VTR Controller, verify the change
doesn’t conflict with the VTR settings in the VTR Ingest application.
• “Tour of the VTR Controller Window”
• “Accessing VTR Controller”
May 2007 Aurora Ingest Syste m Guide 49
Page 60

Chapter 4 Using VTR Controller
Connected
VTRs
Disconnected
VTR
Status bar
Tour of the VTR Controller Window
The VTR Controller window shows the status of one to eight VTRs. The status of
each VTR is indicated by the colors: a green indicator shows that the VTR is
connected, while a red indi cator shows that th e VTR is no t connec ted. The s tatus bar
at the bottom of the window show the status of the VTR Controller application.
To see the properties of a VTR, click on the red or green icon next to the VTR. The
Properties window displays.
50 Aurora Ingest System Guide May 2007
Page 61

Accessing VTR Controller
VTR Controller icon
To start the VTR Controller application, click on the VTR Controller icon on the
desktop or from the Start button follow this path:
Controller
in the right-hand corner of t he Windows taskb ar. Double- click on t he icon to br ing up
the main VTR Contoller window.
NOTE: If you click the X in the upp er-ri ght corne r of the VTR Contr oller window or
select
Controller icon appears in the Windows taskbar.
To exit the VTR Controller application, right click on the icon and select Exit.
. When VTR Controller is first start ed, it automatical ly minimizes to an icon
File | Exit, the application does not exit. Instead, it is minimized, and the VTR
Accessing VTR Controller
Start | Program | Aurora 6.1 | VTR
May 2007 Aurora Ingest Syste m Guide 51
Page 62

Chapter 4 Using VTR Controller
52 Aurora Ingest System Guide May 2007
Page 63

Chapter 5
Using VTR Ingest
Aurora Ingest - VTR Ingest allows you to record footage f rom VTRs or feeds from a
router directly to a Media Se rver in your newsr oom. With VTR Ingest, you can sel ect
clips from multiple VTR tapes, create a batch (also known as a segment) list, and
record it to the server.
You can also export the segment list as an EDL and import it into Aurora Edit.The
following sections describe each step in detail.
This chapter is divided into the following sections:
• “Tour of the VTR Ingest Window”
• “VTR Ingest Overview”
• “Importing an EDL”
• “Exporting an EDL”
May 2007 Aurora Ingest Syste m Guide 53
Page 64

Chapter 5 Using VTR Ingest
Channel Windows
Viewing Window
Dynamic
Clip
Recording
Tour of the VTR Ingest Window
The VTR Ingest window consists of one to eight channel windows, a viewing
window, and a dynamic clip record area.
54 Aurora Ingest System Guide May 2007
Page 65

Clip Record Area
Record Handles
Add to
Segment List
Mark point area
Clip
Location
Clip title
VTR controls
Channel
Status
Tape ID
Server
Recording
Status
Segment list buttons
List of clips
Channel List
Tour of the VTR Ingest Window
Channel Window
May 2007 Aurora Ingest Syste m Guide 55
Page 66

Chapter 5 Using VTR Ingest
Channel Window Toolbar
The Toolbar lets you perform common functions for recording clips:
Icon Function
Channel Columns
Each channel window displ ays informat ion about the cl ips in the seg ment (batch) li st:
Column Description
Title The name of the clip.
Clip Location The name of the fold er where the clip resides in the media server.
Duration The duration of the clip.
Displays channel status—A green icon indicates status is OK; a red
icon indicates a problem. Click o n this icon to see status for th e VTR,
Primary Server, and Backup Server.
Deletes the selected clip(s).
Clears the segment (batch) capture list.
Mark In The mark points for the clip.
Mark Out
Time Source Control track (CTLTRACK), LTC, or VITC. Note: if using CTL, clip will not
be frame accurate, instead it will be +/- 10 frames.
Owner The name of t he person who marked the clip
Tape ID The identification of the particular tape
Error Message Any error messages describing why the clip was not recorded to the server.
Use Handles Indicate whether handles have been added to the clip.
VTR Ingest Overview
To record c lips from a VTR, follow these basic steps:
1. Decide if you want to add handles to your clips.
2. Create a segment list or import an EDL.
3. Record the segment list to your Media Server.
Using VTR Ingest
You can use VTR Ingest to create a segment (batch) list of clips from videotape
recordings, which you t hen record to your Media Se rver. For instructions o n recording
VTR clips, see “Creating a Segment List” on page 57. (You can schedule recordings
using Scheduler. For more information, see “Using Aurora Ingest - Scheduler” on
page 33.)
56 Aurora Ingest System Guide May 2007
Page 67

To view video, make sure you have configuring VTR Ingest for video viewing. For
more information, see “Configuring VTR Ingest (VTR)” on page 28.
This section is divided into the following topics:
“Adding Handles”
“Creatin g a Segment List”
“Controlling the VTR with VTR Ingest”
“Marking In and Out Points”
“Deleting the Segment List”
“Recording Clips to the Media Server”
Adding Handles
If you add handles to your clips, you wi ll have additional frames to choos e from when
trimming your clips. Grass Valley recommends handles be used.
Adding Handles
To use handles:, click the
To set the duration of the handles, see “Configuring System Settings” on page 13.
Creating a Segment List
To create a segment (or batch) list :
1. Insert a tape into the VTR.
2. Click
3. Play through the videotape to get the fo otage you need (s ee “Control ling th e VTR
4. If desired, name the clip.
5. Select a different record location for the clip, if you want to.
6. Mark an In and Out point for the clip (see “Marking In and Out Points” on
7. Click
Tape ID and name this videotape.
If you don’t enter a Tape ID, Aurora Ingest prompts you before you add the first
clip.
with VTR Ingest” on page 58).
If not, Aurora Ingest will automatically name each clip using the prefix you set
when you configured each channel. Refer to “Configuring Channels” on page 22.
page 59).
Add Segment to List or press C on your keyboard.
Record Handle button.
The clip is added to the list in the Channel Window.
8. Repeat steps 3-7 for additional clips.
9. To use additional tapes, insert a new tape into the VTR and repe at the st eps above.
When you eject a tape, Auror a Ingest clears the tape ID field. You can add the new
videotape name anytime after you insert a new tape; if you haven’t entered a new
Tape ID before you add the first clip from that tape to the segment (batch) list,
Aurora Ingest prompts you to add one.
May 2007 Aurora Ingest Syste m Guide 57
Page 68

Chapter 5 Using VTR Ingest
Deleting the Segment List
You can dele te a clip or the entire segment list:
Button Function Other Ways to Access
Deletes the selected clip. Right-click in segment list and select
Delete.
Clears the segment list. Right-click in segment list and select
Controlling the VTR with VTR Ingest
To get the footage you need to crea te cl ips, you need to play through the videotape in
the VTR. Aurora Ingest provides transport control buttons like those on a tape deck.
Use these controls to locate the material you want to record as a clip.
The deck controls are described in the following table:
Button Function
Jogs one frame back.
Jogs 10 frames back.
Jogs one frame forward.
Jogs 10 frames forward.
Ejects the tape.
Rewinds the tape.
Plays the tape.
Fast forwards the tape.
All
Clear
.
Stops the tape.
58 Aurora Ingest System Guide May 2007
Page 69

Marking In and Out Points
Sets a
Mark In
Point
Sets a
Mark Out
Point
Clears
Mark In
Point
Clears
Mark Out
Point
Shows
Duration
Moves to
Mark In
Point
Moves to
Mark Out
Point
of Clip
Shows
Remaining
Time of Clip
Adds Handles
to the Clip
Adds the Clip to
the Segment List
Mark points are used to determine the length of a clip.
To set Mark In and Out Points:
Marking In and Out Points
1. Find the spot on the videotape where you want your clip to begin.
2. Mark an In Point using any of the following methods:
•Press
•Click the
I on your keyboard.
Mark In button on the Aurora Ingest window.
• Type the timecode in the In field.
• Create a Mark In on the VTR.
3. Play through the tape until you reach the point where you want the clip to end.
4. Mark an Out Point using any of these methods:
•Press
•Click the
O on your keyboard.
Mark Out button on the Aurora Ingest window.
• Use the up or down arrows to find the correct timecode.
• Type the ending timecode in the Out field.
• Create a Mark Out on the VTR.
Recording Clips to the Media Server
After you’ve created a segment (batch) list, you can record the clips to your Media
Server.
To record:
1. Make sure the Channel Window is selected.
2. Click
Record.
Aurora Inge st records the clips from t he VTR tape to the server f or later use in a
May 2007 Aurora Ingest Syste m Guide 59
Page 70

Chapter 5 Using VTR Ingest
news story. Clip status changes from Ready -> Cueing -> Recording -> Done. If
the clip didn’t record for some reason, status shows as Failed.
While the clip is recording, the record button flashes to indicate an active record.
NOTE: If you want to reserve a channel to record a clip using VTR Ingest, you can
ensure this in Aurora Ingest - Scheduler by using Add VTR Ingest Reservation. For
more information, see “Using VTR Ingest Reservation” on page 47.
Importing an EDL
You can also import an Edit Decisi on List (EDL) to use as your segme nt (batch) list.
Supported EDL formats are .ale , .edl , .vl g, and .xml. Clip names in the importe d fi le
cannot be longer than 32 characters.
To export an EDL, see “Exporting an EDL” on page 61.
NOTE: Importing an EDL will clear any existing segments in a VTR’s segment list.
To import an EDL:
1. Choose
File | Import EDL.
2. In the Open window, navigate to the correct folder, select the EDL to import, and
click
Open. The Import Details dialog box opens
3. Enter the Tape ID and select where to record the clips and click
OK.
The EDL appears in the segment (batch) list for the selected channel and is ready
to record:
4. Record your clips to the media server, as described on page 59.
NOTE: If you have a clip that failed to record for some reason, you can change its
status back to Ready by highli ghting the c lip, right- clicking an d selecting
60 Aurora Ingest System Guide May 2007
Mark Ready.
Page 71

Exporting an EDL
Instead of recordi ng your clip s to a media ser ver, you can e xport them as an EDL file ,
which can be used by other programs. By default, EDLs are saved in a .vlg format.
To export an EDL:
1. Highlight the file or group of files you want to export.
Exporting an EDL
2. Choose
The Save As window appears:
3. Navigate to the folder where you want to export the EDL.
4. Enter a name for the file and click
The EDLs can also be opened using Aurora Edit’s batch (segment) capture feature.
File | Export EDL.
Save.
May 2007 Aurora Ingest Syste m Guide 61
Page 72

Chapter 5 Using VTR Ingest
62 Aurora Ingest System Guide May 2007
Page 73

Chapter 6
Using Aurora Ingest - RMI
Aurora Inge st - RMI is an automated media digitization system that allows you to
record footage from VTRs or feeds from a router directly to a Media Server in your
newsroom.
This chapter shows you how to use RMI to capture and record clips for later use in a
newscast. For information on configuring RMI, see “Configuring RMI” on page 31.
This chapter is divided into the following sections:
• “What is Aur ora Ingest - RMI?”
• “Using Aurora Ingest - RMI”
What is Aurora Ingest - RMI?
Aurora Ingest - RMI is an application that lets you simultaneously ingest files from
multiple removable media device s such a s Infi nity, Panasoni c P2 and So ny XDCam.
Using Aurora Ingest - RMI
After you have configured Aurora Ingest - RMI and attached the removable media
device, RMI is ready to use.
May 2007 Aurora Ingest Syste m Guide 63
Page 74

Chapter 6 Using Aurora Ingest - RMI
To use RMI, follow these steps:
1. Verify that the removable media device is plugged in and media is attached or
inserted.
2. Select
Programs | Aurora 6.1 | Aurora Ingest - RMI.
The detach able media option (Rev, P2, XD) is se en automatically.
3. To select the clips you want to ingest, check the box next to each of the clips.
4. Click the Transfer icon.
While the transf er is proceeding, the clip informat ion has a red back ground, and the
percentage of the transferred media is displayed. Once the clip has been
transferred, the clip information has a green background.
RMI recognizes good-shot marks. Sel ect “Marked” from the Stat us drop-down list to
see only those good s hots. The screenshot below shows the Status drop-down list f rom
the Panasonic P2 removable media device:
For XDCAM, RMI recognizes good-shot and bad-shot marks. Select from the
drop-down list as shown below to choose a particular status for your view.
64 Aurora Ingest System Guide May 2007
Page 75

Chapter 7
Linking Clips to Aurora Playout Placeholders
If you are using Aurora Play out for playout, you can link cli ps you record with Aurora
Ingest to placeholde rs in Aurora Playout. You c an link clips for both VTR I ngest and
Aurora Ingest - Scheduler using Aurora Ingest’s Assignment List Manager. In VTR
Ingest, you can link a placeholder to any of the individual clips in the batch list. In
Aurora Ingest - Schedul er, you link the pl aceholder to the ent ire feed, and for pla yout,
you’ll need to jog/shut tle using Aurora Pl ayout to cue the piece accurately to the start
point.
You can link to a Aurora Playout placeholder for scheduled feeds, but not for
recursive feed recordings.
May 2007 Aurora Ingest Syste m Guide 65
Page 76

Chapter 7 Linking Clips to Aurora Playout Placeholders
Tour of the Assignment List Manager
The list of assignments shows each clip placeholder and its properties:
Column Description
Clip Name The name of the clip placeholder.
Duration The length of the clip.
Editorial
Duration
The duration of the clip set when the placeholder was created. This estimated
value will be changed later when media is associated with the placeholder.
Category The category assigned to the clip; you can assign categories based on the editor
to receive the assignment, for instance.
Type The type of story or sequence an editor needs to create: Voice Over (VO),
Sound on Tape (SOT ), o r othe r type s se t in News Q P ro’s S DB Se rver Op tions .
Description Brief description of the clip an editor needs to create.
Clip ID The clip ID, which is automatically defined when the placeholder is created.
Date The date the placeholder was created.
66 Aurora Ingest System Guide May 2007
Page 77

Linking Clips
To link an ingested clip to a Aurora Playout placeholder:
1. In VTR Ingest, mark an In and Out point to create a clip; in Aurora
Ingest - Scheduler, select your feed source.
Linking Clips
2. In the left pane of Aurora Ingest, click
The Assignment List Manager opens.
3. Select a placeholder to link to and click
The placeholder name and description fill in on Aurora Ingest.
4. In VTR Ingest, click
Record.
Add Clip to Batch List; in Aurora Ingest - Scheduler, click
The ingested clip or feed is now associated with the Aurora Playout placeholder.
Creating New Placeholders
If you need to, you can create additional placeholders for clips you want to link to
Aurora Play out.
To create a new placeholder for a clip:
1. In the Assignment List Manager, click
The New Clip Properties window appears:
Assignment List Manager.
OK.
New.
2. Enter the clip information:
Name — Enter a name for the placeholder. The name identifies the placeholder
•
in your Assignment List Manager, the Assignment List
Plug-in on the ENPS system, and the Aurora Playout playlist.
•
Description — Enter a description for the placeholder to help identify the clip
you need to create.
•
Category — Select a category from the drop-down menu. The category
May 2007 Aurora Ingest Syste m Guide 67
Page 78

Chapter 7 Linking Clips to Aurora Playout Placeholders
determines who rec eives the placehol der as an assignmen t. Selecting ALL makes
the placeholder a ccessible t o all editor s who select
Manager.
•
Editorial Duration — If desired, enter an estimate d duration for the stor y or select
one from the drop-down list. Once the clip is created the duration is
automatically adjuste d to the clip length. The ed itor can also enter an edit orial
duration that is less tha n the cl ip lengt h, which is sent ba ck to th e NCS for show
timing.
Protected — Check this box to prevent the clip from being deleted from the
•
database.
•
Being Edited — Check this box to show that the clip for a placeholder is being
edited. This field allows editors to easily see that a clip is already being worked
on in another edit room.
ALL in their Assignment List
3. Click
OK.
The Clip ID and Date are automatically set when you create the placeholder.
68 Aurora Ingest System Guide May 2007
Page 79

Appendix A
The Aurora Ingest Keyboard
This appendix lis ts all of t he keyboard f unctions tha t control Aur ora Ingest, includin g
key combinations using the Control keys.
Icon Key Name Function
F12 Record Starts recording the clips i n the segment list or
the feed from the router source.
Ctrl + Q Eject Ejects tape from tape deck.
W Play Plays the tape or feed.
E Rewind Rewinds the tape or feed.
R Fast Forward Fast Forwards the tape or feed.
I Mark In Marks an In point.
Ctrl + I Go to Mark In Moves to the Mark In point.
O Mark Out Marks an Out point.
Ctrl + O Go to Mark Out Moves to the Mark Out point.
P Clear Mark In Clears the In point.
[ Clear Mark Out Clears the Out point.
A Back 1 Frame Moves cursor one frame back on the Timeline.
S Forward 1 Frame Moves cursor one frame forward on the
Timeline.
D Back 10 Frames Moves cursor 10 frames back on the Timeline.
May 2007 Aurora Ingest Syste m Guide 69
Page 80

Appendix A The Aurora Ingest Keyboard
Icon Key Name Function
F Forward 10 Frames Moves cursor 10 frames for ward on the
Timeline.
C A dd Clip to Segment
List
Space Bar Stop Tog gles between recor din g an d s topping
Adds marked clip to segment list.
recording.
70 Aurora Ingest System Guide May 2007
Page 81

Appendix B
Aurora Ingest Error Messages
The following table describes the Aurora Ingest error messages.
Error Message Description
No available channel at the time of record Could not allocate channel for recording. Please make
sure that AppCenter is running and channel is set to
AMPRecorder.
Could not switch ro uter Could not switch router. Please make sure that the
destination is not locked and router is running.
Could not switch timecode mode Could not switch timecode mode.
Could not cue the clip Could not cue the clip. Please make sure that channel
is set to AMPRecorder, not AMPPlayer.
Clip already exists at this location Clip already exists at this location. Please use a
different name.
Could not start record Could not start record. Please make sure your Media
Server is running and responding.
Could not stop record Could not stop record. Please make sure your Media
Server is running and responding.
The server storage is full The server storage is full. Please clean up the server
storage.
Could not eject clip Could not eject clip. Please make sure your Media
Server is running and responding.
Event may not start record as it conflicts
with another allocated event
Could not control CompuSat for recording Could not control CompuSat for recording. Please
Aurora Ingest Server could not complete
record due to system shutdown
A user has canceled this Ingest event A user has cancelled the Ingest event.
This event was prematurely stopped by the
media server
This event may not have started and/or
stopped at correct timecode
Event did not/may not start record as it conflicts with
another allocated event.
ensure that you have the correct CompuSat
configuration.
Aurora Ingest Server could not complete record due to
system shutdown. Please restart the system in order to
resume.
The event was prematurely st opped by the Media
Server. Please check your storage status.
The event may not have started and/or stopped at
correct timecode.
May 2007 Aurora Ingest Syste m Guide 71
Page 82

Appendix B Aurora Ingest Error Messages
72 Aurora Ingest System Guide May 2007
Page 83

Index
A
Assignment List Manager 66
Aurora Inge st
configuring 12
controlling a VTR 58
description of 63
exporting an EDL 61
importing an EDL 60
installing
hardware 8
software 8
recording clips 59
software license 9
system requirements 5
windows 2
Aurora Play out
Assignment List Manager 66
creating new placeholders 67
linking clips 67
, 10
, 12, 50, 54
B
batch list
creating 57
exporting EDL 61
creating
batch list 57
new placeholders 67
D
description of Aurora Ingest 63
E
EDL
exporting from Aurora Ingest 61
importing into Aurora Ingest 60
supported formats 60
F
filters, using 48
G
gang roll 47
guidelines, safety vi
H
handles, adding 57
hardware, installing 8
C
channel
columns 55
configuration 22
channel window
Scheduler 34
clip record area 55
clips
linking in Aurora Playout 67
recording to server 59
colors, status 4
configuration
Aurora Inge st 12
channels 22
Media Server 10
M-Series iVDR 11
recording settings 13
servers 14
controlling a VTR with A urora Ingest 58
crash recording 36
I
installation
hardware 8
software 8
, 10
K
keyboard, description of keys 69
L
linking clips in Aurora Playout 67
M
Mark Points
description 59
setting 59
Media Server
configuring 10
recording clips 59
M-Series iVDR, configuring for Aurora Ingest 11
May 2007 Aurora Ingest System Guide 73
Page 84

Index
P
PC requirements for Aurora Ingest 5
placeholders, creating 67
precautions vi
R
recording
clips 59
crash 36
scheduling 37
recording settings, configuring 13
recurring recording events 44
RMI
configuring 31
S
safety guidelines vi
Scheduler
channel window 34
scheduling recordings 37
servers, configuring for Aurora Ingest 14
service safety viii
setting Mark Points 59
setting up Media Server 10
software
installation 8
license number 9
status colors 4
system requirements 5
, 10
W
windows in Aurora Ingest 2, 12, 50, 54
T
template, creating 46
timecode source
selecting for Scheduler 24
V
VTR Controller
about 49
troubleshooting the confi gur ati on 27
using 51
VTR Ingest
adding handles 57
clip record area 55
controlling VTR 58
creating batch list 57
Reservation 47
74 Aurora Ingest System Guide May 2007
 Loading...