

Page 1
Aurora Ingest
INGEST MANAGEMENT SYSTEM
System Guide
SOFTWARE VERSION 6.3
071-8514-03
SEPTEMBER 2007
Page 2

Copyright Copyright © 2007 Grass Valley, Inc. All rights reserved. Printed in the United States of America.
Portions of software © 2000 – 2007, Microsoft Corporation. All rights reserved.
This document may not be copied in whole or in part, or otherwise r eproduced except as
specifically permitted under U.S. copyright law, without the prior written consent of Grass
Valley, Inc., P.O. Box 59900, Nevada City, California 95959-7900
This product may be covered by one or more U.S. and foreign patents.
Trademarks Grass Valley, K2, Aurora, Turbo, M-Series, Profile, Profile XP, NewsBrowse, NewsEdit,
NewsQ, NewsShare, NewsQ Pro, Aurora, and Media Manager are either registered
trademarks or trademarks of Grass Valley, Inc. in the United States and/or other countries.
Other trademarks used in this document are either registered trademarks or trademarks of the
manufacturers or vendors of the associated products. QuickTime and the QuickTime logo are
trademarks or registered trademarks of Apple Computer, Inc., used under license therefrom.
Grass Valley, Inc. products are covered by U.S. and foreign patents, issued and pending.
Additional information regarding Grass Valley, Inc. trademarks and other proprietary rights may
be found at www.thomsongrassvalley.com.
Disclaimer Product options and specifications subject to change without notice. The information in this
manual is furnished for informational use only, is subject to change without notice, and should
not be construed as a commitment by Grass Valley, Inc. Grass Valley, Inc. assumes no
responsibility or liability for any errors or inacc uracies that may appear in this publication.
U.S. Government
Restricted Rights
Legend
Use, duplication, or disclosure by the United States Government is subject to restrictions as set
forth in subparagraph (c)(1)(ii) of the Rights in Technical Data and Computer Software clause
at DFARS 252.277-7013 or in subparagraph c(1) and (2) of the Commercial Computer
Software Restricted Rights clause at FAR 52.227-19, as applicable. Manufacturer is Grass
Valley, Inc., P.O. Box 59900, Nevada City, California 95959-7900 U.S.A.
Revision Status
Rev Date Description
September 14,
2006
January 18, 2007 Release 071-8514-01 for Software Version 6.0b
May 23, 2007 Release 071-8514-02 for Software Version 6.1
September 18,
2007
Initial release of the Aurora Ingest System Guide, 071-8514-00 for
Software Version 6.0. Updated from 071-8342-02, IngestStation
System Guide
Release 071-8514-03 for Software Version 6.3
2 Aurora Ingest System Guide September 18, 2007
Page 3

Contents
Grass Valley Product Support. . . . . . . . . . . . . . . . . . . . . . . . . . . . . . . . . 5
Safety Summaries. . . . . . . . . . . . . . . . . . . . . . . . . . . . . . . . . . . . . . . . . . 6
Safety Terms and Symbols . . . . . . . . . . . . . . . . . . . . . . . . . . . . . . . . . . . 7
Service Safety Summary. . . . . . . . . . . . . . . . . . . . . . . . . . . . . . . . . . . . . 8
Certifications and Compliances. . . . . . . . . . . . . . . . . . . . . . . . . . . . . . . . 8
Environmental Criteria. . . . . . . . . . . . . . . . . . . . . . . . . . . . . . . . . . . . . . 10
Chapter 1 Introducing Aurora Ingest
What is Aurora Ingest? . . . . . . . . . . . . . . . . . . . . . . . . . . . . . . . . . . . . . 11
Aurora Ingest applications. . . . . . . . . . . . . . . . . . . . . . . . . . . . . . . . . . . 12
Aurora Ingest workstations . . . . . . . . . . . . . . . . . . . . . . . . . . . . . . . . . . 12
Aurora Ingest - Server . . . . . . . . . . . . . . . . . . . . . . . . . . . . . . . . . . . 13
Aurora Ingest - VTR Controller. . . . . . . . . . . . . . . . . . . . . . . . . . . . . 13
Aurora Ingest - VTR Ingest. . . . . . . . . . . . . . . . . . . . . . . . . . . . . . . . 13
Aurora Ingest - Scheduler Client . . . . . . . . . . . . . . . . . . . . . . . . . . . 13
Aurora Ingest - RMI Client . . . . . . . . . . . . . . . . . . . . . . . . . . . . . . . . 13
Integration with Aurora Suite and third-party products . . . . . . . . . . . . . 14
Understanding Status Colors . . . . . . . . . . . . . . . . . . . . . . . . . . . . . . . . 14
Chapter 2 Installing and Configuring Aurora Ingest
System Requirements . . . . . . . . . . . . . . . . . . . . . . . . . . . . . . . . . . . . . 15
Aurora Ingest - Server . . . . . . . . . . . . . . . . . . . . . . . . . . . . . . . . . . . 16
Aurora Ingest - VTR Ingest/VTR Controller . . . . . . . . . . . . . . . . . . . 16
Aurora Ingest - Scheduler. . . . . . . . . . . . . . . . . . . . . . . . . . . . . . . . . 17
Aurora Ingest - RMI . . . . . . . . . . . . . . . . . . . . . . . . . . . . . . . . . . . . . 17
Installing Aurora Ingest . . . . . . . . . . . . . . . . . . . . . . . . . . . . . . . . . . . . . 18
Installing Hardware. . . . . . . . . . . . . . . . . . . . . . . . . . . . . . . . . . . . . . 18
Installing Software . . . . . . . . . . . . . . . . . . . . . . . . . . . . . . . . . . . . . . 19
Obtaining a Software License Number . . . . . . . . . . . . . . . . . . . . . . 20
Backing up Aurora Ingest Database. . . . . . . . . . . . . . . . . . . . . . . . . 20
Upgrading Aurora Ingest Software. . . . . . . . . . . . . . . . . . . . . . . . . . 21
Migrating Aurora Ingest - Server . . . . . . . . . . . . . . . . . . . . . . . . . . . 22
Restoring Aurora Ingest Database. . . . . . . . . . . . . . . . . . . . . . . . . . 23
Setting Up Your Media Server . . . . . . . . . . . . . . . . . . . . . . . . . . . . . . . 26
K2 Media Server. . . . . . . . . . . . . . . . . . . . . . . . . . . . . . . . . . . . . . . . 26
M-Series iVDR . . . . . . . . . . . . . . . . . . . . . . . . . . . . . . . . . . . . . . . . . 26
Configuring Aurora Ingest. . . . . . . . . . . . . . . . . . . . . . . . . . . . . . . . . . . 27
Aurora Ingest - Server . . . . . . . . . . . . . . . . . . . . . . . . . . . . . . . . . . . 27
Configuration Overview . . . . . . . . . . . . . . . . . . . . . . . . . . . . . . . . . . 28
Configuring System Settings . . . . . . . . . . . . . . . . . . . . . . . . . . . . . . 29
Configuring Media Servers . . . . . . . . . . . . . . . . . . . . . . . . . . . . . . . 30
Configuring Routers . . . . . . . . . . . . . . . . . . . . . . . . . . . . . . . . . . . . . 32
Configuring Channels . . . . . . . . . . . . . . . . . . . . . . . . . . . . . . . . . . . 40
Configuring Channel Groups . . . . . . . . . . . . . . . . . . . . . . . . . . . . . . 42
Configuring Aurora Ingest - Scheduler (Feed) . . . . . . . . . . . . . . . . . 44
Configuring VTR Controller . . . . . . . . . . . . . . . . . . . . . . . . . . . . . . . 51
Configuring VTR Ingest (VTR) . . . . . . . . . . . . . . . . . . . . . . . . . . . . . 53
Configuring Preview Channels. . . . . . . . . . . . . . . . . . . . . . . . . . . . . 57
Configuring RMI . . . . . . . . . . . . . . . . . . . . . . . . . . . . . . . . . . . . . . . . 58
User Administration for Aurora Ingest. . . . . . . . . . . . . . . . . . . . . . . . . . 59
Chapter 3 Using Aurora Ingest - Scheduler
Tour of the Aurora Ingest - Scheduler Window. . . . . . . . . . . . . . . . . . . 66
Toolbar . . . . . . . . . . . . . . . . . . . . . . . . . . . . . . . . . . . . . . . . . . . . . . . 67
September 2007 Aurora Ingest System Guide 3
Page 4

Contents
Clock and Timeline Display. . . . . . . . . . . . . . . . . . . . . . . . . . . . . . . .67
Channel Window. . . . . . . . . . . . . . . . . . . . . . . . . . . . . . . . . . . . . . . .68
Status Colors. . . . . . . . . . . . . . . . . . . . . . . . . . . . . . . . . . . . . . . . . . .69
Tour of Schedule Viewer . . . . . . . . . . . . . . . . . . . . . . . . . . . . . . . . . . . .70
Event Columns . . . . . . . . . . . . . . . . . . . . . . . . . . . . . . . . . . . . . . . . .70
Crash Recording . . . . . . . . . . . . . . . . . . . . . . . . . . . . . . . . . . . . . . . . . .71
Scheduling Recordings . . . . . . . . . . . . . . . . . . . . . . . . . . . . . . . . . . . . .72
Adding New Events. . . . . . . . . . . . . . . . . . . . . . . . . . . . . . . . . . . . . .73
Adding New Events from CompuSat. . . . . . . . . . . . . . . . . . . . . . . . .75
Adding Recurring Events . . . . . . . . . . . . . . . . . . . . . . . . . . . . . . . . .77
Setting up ENPS Assignment Grid . . . . . . . . . . . . . . . . . . . . . . . . . .79
Scheduling events with ENPS. . . . . . . . . . . . . . . . . . . . . . . . . . . . . .82
Modifying Events. . . . . . . . . . . . . . . . . . . . . . . . . . . . . . . . . . . . . . . .85
Extending Events . . . . . . . . . . . . . . . . . . . . . . . . . . . . . . . . . . . . . . .85
Deleting Events. . . . . . . . . . . . . . . . . . . . . . . . . . . . . . . . . . . . . . . . .86
Creating a Template . . . . . . . . . . . . . . . . . . . . . . . . . . . . . . . . . . . . .86
Using VTR Ingest Reservation . . . . . . . . . . . . . . . . . . . . . . . . . . . . .88
Using filters . . . . . . . . . . . . . . . . . . . . . . . . . . . . . . . . . . . . . . . . . . . .89
Viewing Recordings . . . . . . . . . . . . . . . . . . . . . . . . . . . . . . . . . . . . . . . .91
Using Video Viewer. . . . . . . . . . . . . . . . . . . . . . . . . . . . . . . . . . . . . .91
Using Asset Viewer. . . . . . . . . . . . . . . . . . . . . . . . . . . . . . . . . . . . . .92
Chapter 4 Using VTR Controller
Tour of the VTR Controller Window . . . . . . . . . . . . . . . . . . . . . . . . . . .98
Accessing VTR Controller . . . . . . . . . . . . . . . . . . . . . . . . . . . . . . . . . . .99
Chapter 5 Using VTR Ingest
Tour of the VTR Ingest Window . . . . . . . . . . . . . . . . . . . . . . . . . . . . .102
Channel Window Toolbar . . . . . . . . . . . . . . . . . . . . . . . . . . . . . . . .104
Channel Columns . . . . . . . . . . . . . . . . . . . . . . . . . . . . . . . . . . . . . .104
VTR Ingest Overview. . . . . . . . . . . . . . . . . . . . . . . . . . . . . . . . . . . . . .104
Using VTR Ingest. . . . . . . . . . . . . . . . . . . . . . . . . . . . . . . . . . . . . . . . .105
Adding Handles . . . . . . . . . . . . . . . . . . . . . . . . . . . . . . . . . . . . . . .105
Creating a Segment List . . . . . . . . . . . . . . . . . . . . . . . . . . . . . . . . .105
Deleting the Segment List . . . . . . . . . . . . . . . . . . . . . . . . . . . . . . . .106
Controlling the VTR with VTR Ingest. . . . . . . . . . . . . . . . . . . . . . . .106
Marking In and Out Points. . . . . . . . . . . . . . . . . . . . . . . . . . . . . . . .107
Recording Clips to the Media Server . . . . . . . . . . . . . . . . . . . . . . .107
Scanning Tape with Broken Timecodes . . . . . . . . . . . . . . . . . . . . .108
Importing an EDL. . . . . . . . . . . . . . . . . . . . . . . . . . . . . . . . . . . . . . . . .109
Exporting an EDL . . . . . . . . . . . . . . . . . . . . . . . . . . . . . . . . . . . . . . . .110
Chapter 6 Using Aurora Ingest - RMI
What is Aurora Ingest- RMI?. . . . . . . . . . . . . . . . . . . . . . . . . . . . . . . .111
Using Aurora Ingest - RMI . . . . . . . . . . . . . . . . . . . . . . . . . . . . . . . . . .111
Chapter 7 Linking Clips to Aurora Playout Placeholders
Tour of the Assignment List Manager . . . . . . . . . . . . . . . . . . . . . . . . .114
Linking Clips . . . . . . . . . . . . . . . . . . . . . . . . . . . . . . . . . . . . . . . . . . . .115
Creating New Placeholders . . . . . . . . . . . . . . . . . . . . . . . . . . . . . . . . .115
Appendix A The Aurora Ingest Keyboard
Appendix B Aurora Ingest Error Messages
......................................................................................................121
Index
4 Aurora Ingest System Guide September 2007
Page 5

Grass Valley Product Support
T o get technica l assistance, che ck on the status of a question, or to repo rt new issue, contac t
Grass Valley Product Support via e-mail, the Web, or by phone or fax. Contact Grass Valley
first regarding problems with third party software on Grass Valley products, such as the
®
Microsoft
internet browser, SQL Server™ and QuickTime™.
Web Technical Support
Phone Support
Windows® operating system, Windows Media® player, Internet Explorer
To access support infor mation on the Web, v isit the pro duct support Web p age on the
Grass Valley Web site. Yo u ca n down loa d software or find solutions to problems by
searching our Frequently Asked Questions (FAQ) database.
World Wide Web: http://www.thomsongrassvalley.com/support/
Technical Support E-mail Address: gvgtechsupport@thomson.net.
Use the following information to contact product support by phone during business
hours. Afterhours phone support is available for warranty and contract customers.
Grass Valley Product Support
®
International
(France)
International
(United States,
Canada)
Hong Kong,
Taiwan, Korea,
Macau
Australia, New
Zealand
Central, South
America
China +861 066 0159 450 Netherlands +31 (0) 35 62 38 421
Belgium +32 (0) 2 334 90 30 Northern Europe +45 45 96 88 70
Japan +81 3 5484 6868 Singapore +65 6379 1313
Malaysia +603 7805 3884 Spain +41 487 80 02
Middle East +971 4 299 64 40 UK, Ireland, Israel +44 118 923 0499
+800 80 80 20 20
+33 1 48 25 20 20
+1 800 547 8949
+1 530 478 4148
+852 2531 3058 Indian
+61 1300 721 495 Germany, Austria,
+55 11 5509 3440 Near East, Africa +33 1 48 25 20 20
Italy +39 02 24 13 16 01
+39 06 87 20 35 42
Belarus, Russia,
Tadzikistan,
Ukraine,
Uzbekistan
Subcontinent
Eastern Europe
+7 095 258 09 20
+33 (0) 2 334 90 30
+91 11 515 282 502
+91 11 515 282 504
+49 6150 104 444
September 2007 Aurora Ingest System Guide 5
Page 6

Authorized Support Representative
A local authoriz ed support repres entative may be av ailable in you r country. To locat e the
support represent ative for your c ountry, visit the product support Web p age on the Grass
Valley Web site.
Safety Summaries
General Safety Summary
Review the following safety precautions to avoid injury and prevent damage to this
product or any products connected to it.
Only qualified personnel should perform service procedures.
While using this product , you may need t o acces s other parts of the sy stem. Read t he
General Safety Summary in other system manua ls fo r warn ing s and cauti ons re la ted
to operating the system.
Review all system operator manuals, including manuals in electronic format on the
system hard drive.
Injury Precautions
Use Proper Power
Cord
Ground the Product This product is ground ed t hrough the grounding conductor of the power
Do Not Operate
Without Covers
Do Not Operate in
Wet/Damp
Conditions
Do Not Operate in
an Explosive
Atmosphere
Avoid Expo sed
Circuitry
To avoid fire hazard, use only the power cord specified for this product.
cord. To avoid electric shock, the grounding conductor must be
connected to earth ground. Before making connections to the input or
output terminals of the p roduct, ensure that the product is properly
grounded.
To avoid electric shock or fire hazard, do not operate this product with
covers or panels removed.
To avoid electric shock, do not operate this product in wet or damp
conditions.
To avoid injury or fire ha zard, do not operate this pr oduct in an explosive
atmosphere.
To avoid injury, remove jewelry such as rings, watches, and other
metallic objects. Do not touch exposed connections and components
when power is present.
Product Damage Precautions
Use Proper Power
Source
6 Aurora Ingest System Guide September 2007
Do not operate this product from a power source that applies more than
the voltage specified.
Page 7
Safety Terms and Symbols
!
!
Provide Proper
Ventilation
Do Not Operate With
Suspected Failures
Battery
Replacement
To prevent product overheating, provide proper ventilation.
If you suspect there is damage to this product, have it inspected by
qualified service personnel.
To avoid damage, replace only with the same or equivalent type
recommended by the circu it board manufactu rer. Dispose of used bat tery
according to the circuit board manufacturer’s instructions.
Safety Terms and Symbols
Terms in This
Manual
Terms on the
Product
These terms may appear in this and other product manuals:
WARNING: Warning stat ements ide ntify con ditio ns or prac tices t hat ca n
result in personal injury or loss of life.
CAUTION: Caution statements identify conditions or practices that can
result in damage to the equipment or other property.
These terms may appear on the product:
DANGER indicates a personal injury hazard immediately accessible as
one reads the marking.
WARNING indicates a persona l injury hazard no t immediately acces sible as
you read the marking.
CAUTION indicates a hazard to property including the product.
September 2007 Aurora Ingest System Guide 7
Page 8

!
Symbols on the
Product
The following symbols may appear on the product:
DANGER high voltage
Protective ground (earth) terminal
ATTENTION – refer to manual
Service Safety Summary
Do Not Service
Alone
No Power Switch To avoid electric shock, disconnect the main power by means of the
Use Care When
Servicing With
Power On
Do not perform internal service or adjustment of this product unless
another person capab le of rendering first aid a nd re sus citation is present.
power cord. The power cord is the main power disconnect. Ensure that
the power cord is easily accessible at the rear of the product or at the
power receptacle.
Dangerous voltages or currents may exist in this product. Disco nnect power
and remove battery (if applicable) before removing protective panels,
soldering, or replacing components.
To avoid electric shock, do not touch exposed connections.
Certifications and Compliances
Canadian Certified
Power Cords
Canadian approval includes the products and power cords appropriate for
use in the North America power network. All other power co rds supplied are
approved for the country of use.
FCC Emission
Control
Canadian EMC
Notice of
Compliance
This equipment has been te sted and fou nd to comply with the limits for a
Class A digital d evice, pursuant to Part 15 of the FCC Rules. These limits
are designed to provide reasonable protection against harmful
interference when the equipment is operated in a commercial
environment. This equipment generates, uses, and can radiate radio
frequency energy and, if not installed and used in accordance with the
instruction manual, may cause harmful interference to radio
communications. Operation of this equipment in a residential area is
likely to cause harmful interference in which case the user will be
required to correct the interference at his own expense. Changes or
modifications not expressly approved by Grass Valley can affect
emission compliance and could void the user’s authority to operate this
equipment.
This digital apparatus does not exceed the Class A limi ts for radi o noi se
emissions from digital ap paratus set out in the Radio Interferenc e
Regulations of the Canadian Department of Communications.
Le présent appareil numérique n’émet pas de bruits radioélectriques
dépassant les l imites appl icables a ux apparei ls numérique s de la cl asse A
préscrites dans le Règlement sur le brouillage radioélectrique édicté par
le ministère des Communications du Canada.
8 Aurora Ingest System Guide September 2007
Page 9

Certifications and Compliances
Canadian Certified
AC Adapter
EN55022 Class A
Warning
Laser Compliance
Laser Safety
Requirements
Laser Safety Laser safety in the United States is regulated by the Center for Devices
Canadian approval includes the AC adapters appropriate for use in the
North America power network. All other AC adapters supplied are
approved for the country of use.
For products that comply with Class A. In a domestic environment this
product may cause r adio interference i n which case the use r may be required
to take adequate measures.
The device used in this product is a Class 1 certified laser product.
Operating this product outside specifications or altering its original
design may result in hazardous radiation exposure, and may be
considered an act of modifying or new manufa ctu ri ng of a la ser product
under U.S. regulations contained in 21CFR Chapter 1, subchapter J or
CENELEC regulations in HD 482 S1. People performing such an ac t are
required by law to recertify and reidentify this product in accordance with
provisions of 21CFR subchapter J for distribut ion wit hin the U.S.A., and
in accordance with CENELEC HD 482 S1 for distribution within
countries using the IEC 825 standard.
and Radiological Health (CDRH). The laser safety regulations are
published in the “Laser Product Performance Sta ndard,” Code of Federa l
Regulation (CFR), Title 21, Subchapter J.
FCC Emission
Limits
The International Electrotechnical Commission (IEC) Standard 825,
“Radiation of Laser Products, Equipment Classification, Requirements
and User’s Guide,” governs laser products outside the United States.
Europe and member nations of the Europe an Free Tra de Associat ion fall
under the jurisdiction of the Comité Européen de Normalization
Electrotechnique (CENELEC).
This device complies with Pa rt 15 of the FCC Rules. Opera tion is subject
to the following two conditions: (1) This device may not cause harmful
interference, and (2) this device must accept any interference received,
including interference that may cause undesirable operation.
September 2007 Aurora Ingest System Guide 9
Page 10

Certification
Environmental Criteria
Category Standard
Safety Designed/tested for compliance with:
ANSI/UL60950-2000 - Safety of Information Technology Equipment
IEC 60950 - Safety of Information Technology Equipment (3rd edition, 1999)
CAN/CSA C22.2, No. 60950-00 - Safety of Information Technology Equipment
EN60950:2000 - Safety of Information Technology Equipment (3rd edition)
The following table lists the environmental criteria for Aurora Ingest.
Characteristics Description
Operating Temperature Requirement: 10° to 40°C
Storage Temperature Requirement: -40° to 65°C
Operating Altitude Requirement: To 10,000 feet
Supplemental Data: IEC 60950 compli ant to
2000 meters
Storage Altitude Requirement: To 40,000 feet
Mechanical Shock Supplemental Data: Class 5 (30G) Grass Valley
001131500
Random Vibration Requirement: Operational: Class 6 Grass
Valley 001131500
Requirement: Non-Operational: Class 5
Grass Valley 001131500
Transportation Requirement: Grass Valley 001131500
Equipment Type Supplemental Data: Information Technology
Equipment Class Supplemental Data: Class 1
Installation Category Requirement: Category II Local level
mains, appliances,
portable equipment, etc.
Pollution Degree Requirement: Level 2 operating
environment, indoor use only.
Relative Humidity Requirement: Operating 80% from +30° to
+40°C
Non-Operating 90% from
+30° to +60°C
Do not operate with visible
moisture on the circuit boards.
10 Aurora Ingest System Guide September 2007
Page 11

Chapter 1
Introducing Aurora Ingest
Aurora Ingest is an automated media digitization system, made up of several
integrated applications, that allows you to ingest footage from VTRs, feeds from a
router, or files from multi ple Digital Media Cameras and Digital Media Recorders, all
directly to a Media Server in your operation.
This manual shows you how to install and con figure the Aurora Ing est applications in
your newsroom, and how to use Aurora Ingest to capture and record clips for l ater use
in a newscast.
This chapter is divided into the following sections:
• “What is Aurora Ingest ?”
• “Aurora Ingest applications”
• “Aurora Ingest workstations”
• “Integration with Aurora Suite and third-party products”
• “Understanding Status Colors”
What is Aurora Ingest?
Aurora Ingest lets you get footage from VTRs and from router feeds and ingest it
directly to your Media Server. With Aurora Ingest applications, you can select clips
from multiple VTR tapes, create a batch (also known as a segment) list, and record it
to the serve r . You can also ingest feeds from a router source directly to the same
server. Up to eight VTRs are supported at any time. You can select the supported
VTRs from an unlimited number of VTRs or RS-422-connected routers. Batch jobs
can be saved as Edit Decision Lists (EDLs).
The Aurora Ingest system supports the K2 Media Server and M-Series iVDR media
server or servers. You can configure your system to record clips into two servers in
parallel. If one server fails or has inadequat e storage, only the recording on that server
will be stopped. When the system continues to the next clip, the storage capacity on
both servers is che cked again, allowing parallel recordin g to resume if storage is made
adequate.
Raw footage comes from a VTR connected directly to the Aurora Ingest workstation,
a CompuSat satellite dish control system, or a router sou r ce. While you connect the
media servers to the Aurora Ingest workstation using AMP Sockets, you need RS-422
connection from the VTR t o the Aurora Ingest workstation to have co ntrol of the VTR
in the Aurora Ingest windows. For router sources, Aurora Ingest supports the Grass
Valley SMS 7000, Grass Valley Acapella, Encore control and Jupiter systems, and
allows source selection and renaming.
September 2007 Aurora Ingest System Guide 11
Page 12

Chapter 1 Introducing Aurora Ingest
Aurora Ingest applications
Aurora Ingest consists of the following applications:
• Aurora Ingest - Server, which lets you configure the other Aurora Ingest
applications for batch or feed events, as well as monitor the status of the media
servers, d atabase servers, routers, CompuS at satellite d ish control system, and
channels. You can also access the logs . For mo re i nfor mat ion, see “Aurora Ingest
- Server” on page 27.
• VTR Controller, which lets you monit or and manage the VT Rs you use with VTR
Ingest. For more information, see Chapter 4, Using VTR Controller on page 97.
• VTR Ingest, which lets you ingest footage from VTRs and import or export Edit
Decision Lists (EDLs). Supporting up to eight channels, VTR Ingest can record
footage and confi gur abl e handle durations. It lets you set mark poi nt s using either
the VTR, the PC keyboard, or the mouse. You can ingest a single item or build a
batch list o f items to capture from multiple tapes. You can also create a batch list
offline and then import th e list into VTR Ingest as a common EDL. Once you create
a batch list, you can o ptimiz e the l ist by timeco de, which allows the mate rial to be
ingested in the shortest time possible, or manually arrange the batch list items in
order to prioritize immediately needed clips. For more information, see Chapter 5,
Using VTR Ingest on page 101.
• Aurora Ingest - Scheduler, which lets you schedule i ngest feed events from a medi a
server, CompuSat satellite dish control system, router source and VTRs. You c an
also schedule events to record, up to one year in advance, on each server port,
including recurr ing events. Schedule Vie wer provides an easi ly readable way to see
all ports and more specifically the task assigned to each port. For more information,
see Chapter 3, Using Aurora Ingest - Scheduler on page 65.
• Removable Media Interfa ce (RMI), which lets you ingest files from multiple
Infinity Digital Media Cameras and Digital Media Recorders, as well as Sony
XDCam and Panasonic P2 removable media devices. For more information, see
Chapter 6, Using Aurora Ingest - RMI on page 111.
For information on installing and configuring the Aurora Ingest applications, see
Chapter 2, Installing and Configuring Aurora Ingest on page 15.
If you use Aurora Playout as a playback system in your ope ration, you can ingest clips
directly to a Aurora Playout rundown by linki ng clips to a Aurora Playout placeholder
at the point of record. For more information, se e Chapter 7, Linking Clips to Aurora
Playout Placeholders on page 113.
Aurora Ingest workstations
Aurora Inge st has a client/server architecture th at allows for multiple simultaneous
users. It supports simultaneous event creation, event modification, event deletion,
event monitoring, and resource viewing from multiple workstations.
Each workstation can control up to ei ght VTRs for batch li st creation and b atch ingest.
You can work with either directly attached VTRs and dedicated server ports or
through a router.
12 Aurora Ingest System Guide September 2007
Page 13

You can trigger multipl e ch annel records from disparate sources simult ane ous ly and
schedule record events without reference to physical server port. Aurora Ingest
automatically allocates any available port as determined at the o ptimum time b efore
the record event is scheduled to begin. RS-422 router level control allows any
router-connected VTR to be controlled by any Aurora Ingest channel.
Aurora Ingest - Server
This application has the following functionality:
• control of all Media Servers for all types of ingest
• stores the ingest schedule
• switches the Encore/SMS7000/Acapella/Jupiter router
• interfaces to ENPS
• interfaces to CompuSat satellite dish control system
• user account administration
Aurora Ingest - VTR Controller
Aurora Ingest - Server
This application has the following functionality:
• controls up to eight VTRs for VTR Ingest (AI server controls media server ports)
Aurora Ingest - VTR Ingest
This application has the following functionality:
• provides a user interface for playing tapes and marking in and out points
• creates batch (segment) lists
• provides a user interface for ingested clips to be recorded to Media Servers
Aurora Ingest - Scheduler Client
This application has the following functionality:
• schedules ingests f rom router sources, CompuSat sat ellite dish control system, and
VTRs.
• displays schedule status
• asset viewer if optional video card installed on the system
Aurora Ingest - RMI Client
This application has the following functionality:
• Ingests material from P2/XDCAM/Infinity removable media devices
September 2007 Aurora Ingest System Guide 13
Page 14

Chapter 1 Introducing Aurora Ingest
Integration with Aurora Suite and third-party products
Aurora Inge st is integrated with the other applications in the Au rora Suite and
third-party removable media devices. In addition to serving as a metadata entry and
transfer application fo r metadata cr eated in the newsroom computer system (NRCS),
it supports:
• Mark In/Out of inco ming feed mate rial, allowi ng direct assignment of field -edited
material to Aurora Playout placehol ders.
• Simultaneous file transfer ingest, including MOS-ID matching, status updating,
and metadata import and transfer to Au rora Browse from multiple Rev Pro and
Professional Compact Flash removable media devices.
Understanding Status Colors
Each entry in th e batch l ist, sc hedule vi ewer and s cheduler window di splays a certai n
color according to its status. The defau lt colors are:
Event Background Color Description
Red The entry is recording.
Gold The entry is cued and is next to record.
Green The entry has finished recording.
Blue The Scheduler entry is ready to record.
Black VTR Ingest has reserved this channe l at t hi s t ime.
Purple The entry failed to record. See the Error Message field for
more information.
Grey The entry time has elapsed, probably due to a conflict with
another recording.
Users can change status colors in Aurora Ingest - Scheduler by changing the
configuration as shown in “Configuring Scheduler in the Aurora Ingest - Scheduler
application” on page 19.
14 Aurora Ingest System Guide September 2007
Page 15
Chapter 2
SMS
7000
NAS
Serial hub
Router
Matrix
VTR Ingest /
Ethernet LAN
NetCentral
Encore/Acapella/
RS422
Satellite
Receivers
!
Aurora Ingest Server
VTR
Logging Workstation
SDI / HD-SDI
CompuSat satellite
dish control system
!
Aurora Ingest Server
(Marathon)
!
!
Media Server
Media Server
!
Media Server
VTR Ingest /
Logging Workstation
VTR
VTR
VTR
AI Client
Workstation
AI Client
Workstation
Innity Client
P
2
/XDCAM/
Innity Client
P
2
/XDCAM/
Jupiter
Installing and Configuring Aurora Ingest
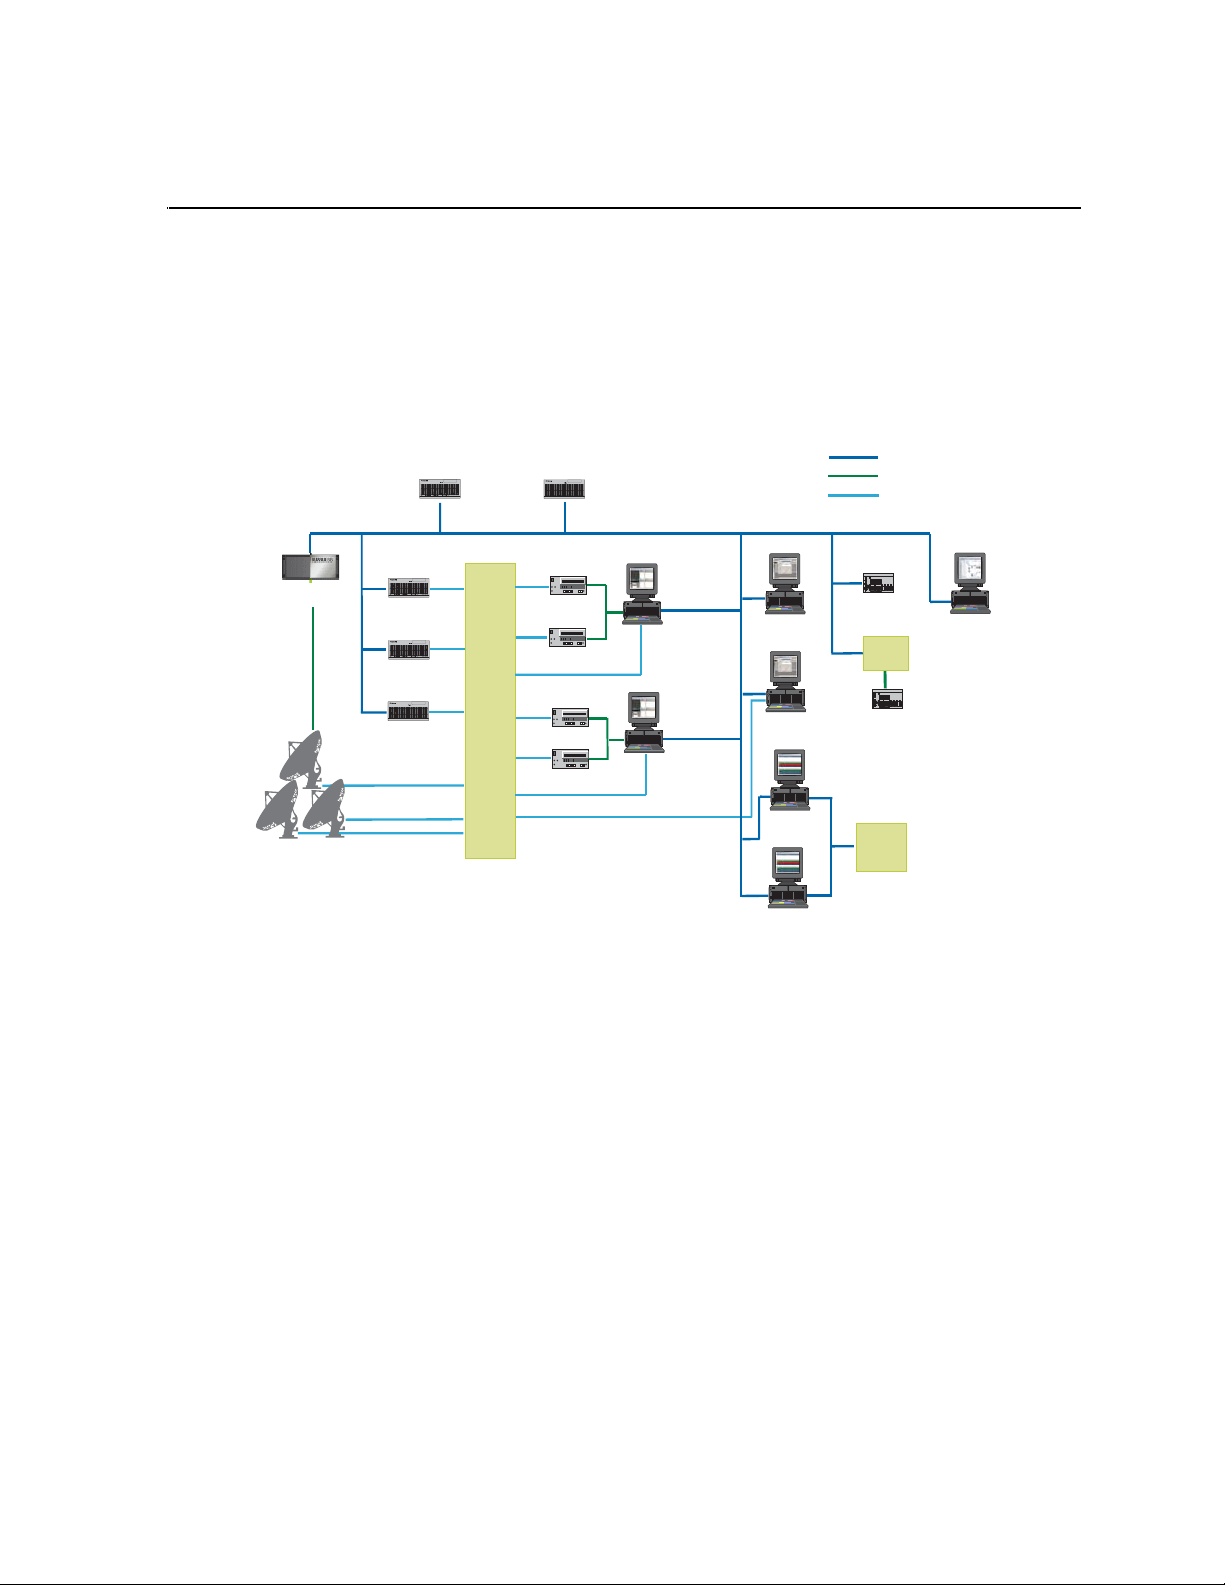
The Aurora Ingest system consists of an Aurora Ingest Server, one or more Aurora
Ingest Scheduling Clients, K2 Media Server or M-Series iVDR media server or
servers, VTRs, router or CompuSat satellite dish control system sources.
This chapter is divided into the following sections:
• “System Requirements”
• “Installing Aurora Ingest”
• “Setting Up Your Media Server”
• “Configuring Aurora Ingest”
• “User Administration for Aurora Ingest”
System Requirements
Grass Valley supplies a CD containing the Aurora Ingest software and
documentation. For some of the Aurora Ingest components, Grass Valley also
supplies hardware. The following section details the software and hardware
requirements for each Aurora Ingest component.
September 2007 Aurora Ingest System Guide 15
Page 16

Chapter 2 Installing and Configuring Aurora Ingest
Aurora Ingest - Server
The Aurora Ingest - Server ap plication coul d be installed on the Aurora Inges t Server
or Aurora Ingest Base Workstation on any regular office machine. The application
must be running for an Aurora Inges t client to conne ct to it. All Aurora Inge st Clients
should have their system time synced to the Aurora Ingest Server.
NOTE: Grass Valley recommends that the Scheduler, VTR Ingest and Aurora
Ingest - Server applications are not installed in the same machine as K2 AppCenter
application or its remote Control Point software.
Grass Valley supplies the Aurora Ingest - Server software/hardware configuration:
• Dell Server with Windows 2003 Server (two units if redundant option selected)
• Additional Windows 2003 license and Marathon Ftvirtual Server license (if
redundant option selected)
• DIGI One SP 1 Port RS 422 Serial to Ethernet Device Server (RoHS Compliant)
• Microsoft .NET Framework 2.0
• Microsoft Visual C++ 2005
• Microsoft SQL Express 2005
• Microsoft SQL Server Management Studio Express
Aurora Ingest - VTR Ingest/VTR Controller
VTR Ingest and VTR Controll er can be i nstalled on th e same machine. I f VTR Ingest
and VTR Controller are on two separate machines, the two machines need to be
connected via Ethernet. For your VTR Controller client, Grass Valley supplies an
RS-422 card. (See “Installing Hardware” on page 18.)
NOTE: Grass Valley recommends that the Scheduler, VTR Ingest and Aurora
Ingest - Server applications are not installed in the same machine as K2 AppCenter
application or its remote Control Point software.
The PC you use to run VTR Ingest/VTR Controller should conform to these
requirements:
• Windows XP Pro, with the Intel P4 CPU and a minimum of 512 MB RAM
• 10 GB HDD
• Minimum 1024x768 SVGA display adapter (Preferred: 1280 x 1024)
• CD-ROM drive for installation
• Two available PCI slots for the video capture and RS-422 boards (for VTR
Controller)
• 100BaseTX Ethernet interface
• Hauppage WinTVGo Video Capture Card (optional)
• Blackmagic Design DeckLi nk Video Capture Card (optional)
16 Aurora Ingest System Guide September 2007
Page 17

Aurora Ingest - Scheduler
NOTE: Grass Valley recommends that the Scheduler, VTR Ingest and Aurora
Ingest - Server applications are not installed in the same machine as K2 AppCenter
application or its remote Control Point software.
The PC you use to run Aurora Ingest - Scheduler should conform to these
requirements:
• Windows XP Pro, with the Intel P4 CPU and a minimum of 512 MB RAM
• 10 GB HDD
• Minimum 1024x768 SVGA display adapter (Preferred: 1280 x 1024)
• CD-ROM drive for installation
• 100BaseTX Ethernet interface
• Hauppage WinTVGo Video Capture Card (optional)
• Blackmagic Design DeckLi nk Video Capture Card (optional)
Aurora Ingest - RMI
Aurora Ingest - Scheduler
Do not install the Aurora Ingest - RMI client on a machine that already has Aurora
Edit installed. You need to install the Aurora Core software instead.
(SetupAuroraCore.exe on the Aurora Ingest software CD.)
The PC you use to run RMI Client should con form to these require ments (minim um):
• Windows XP Pro, with the Intel P4 CPU and a minimum of 512 MB RAM
• 10 GB HDD
• Minimum 1024x768 SVGA display adapter
• CD-ROM drive for installation
• USB Port
• Aurora Core software
For HD ingests, Grass Valley recommends the following configuration:
• Windows XP Pro
• HP Workstation xw8400, with Xeon 51 60/3.0GHz 4MB/1333 dual co re processor
and 2GB (2x1GB) 667MHz DDR2 RAM
• 80GB SATA 3Gb/s 7200 HDD
• NVIDIA Quadro FX3450 256MB PCI-Express
• 1280 x 1024 SVGA display adapter
• 16X DVD-ROM/CDRW Combo
• Xeon 5160/3.0GHz 4MB/1333 dual core processor
• Intel Pro/1000 GT Gigabit PCI NIC desktop adapter
September 2007 Aurora Ingest System Guide 17
Page 18

Chapter 2 Installing and Configuring Aurora Ingest
O
N
12
• USB Port
• Aurora Core software
Installing Aurora Ingest
To install Aurora In gest, you need to install the ha rdware in your computer, ins tall the
Aurora Ingest software, and obtain a software license number.
This section is divided into the following topics:
“Installing Hardware”
“Installing Software”
“Obtaining a Software License Number”
“Backing up Aurora Ingest Database”
“Upgrading Aurora Ingest Software”
“Migrating Aurora Ingest - Server”
“Restoring Aurora Ingest Database”
Installing Hardware
Grass Valley supplies the Aurora Ingest Server with all the necessary hardware and
software installed. The software for the other Aurora Ingest components can be
installed on any PC which meets the “System Requi re me nt s” for that component.
Installing RS-422 card (VTR Controller)
For VTR Controller, Grass Valley supplies a RocketPort Plus Universal PCI 422
SMPTE 8 Port RoHS RS-422 card that must be installed.
1. If you are connecting one or more VTRs to VTR Controller, instal l the RS-422 card
in your computer, making sure the dip switches are set to the down position
shown, and install the card’s driver.
2. Connect the VTR(s) to the VTR Controller machine via RS-422.
3. If you are using LTC for timecode, connect a timecode cable from the timecode
source (VTR for VTR Inge st , Ti mecode Generator for Aurora Ingest - Schedul er )
to the Media Server.
4. Without the LTC physical connection, timecodes could stil l be polled via RS-422.
Check the option to enable RS-422 timecode mode within
Controlle r application as described in “Configuring VTR Controller” on page 51.
Installing Video Capture card (optional)
You can install either Hauppage WinTVGo Video Capture Card or Blackmagic
Design DeckLink Video Capt ure Car d to v iew cl ips on Aurora Ing est Clien ts. Check
for minimum system require ments needed before choosi ng and purchasing your video
capture card.
, as
Tools|Options of VTR
Both video capture cards are for SD (standard definition) video only. If you want to
ingest HD video and then view it, first downconvert from HD to SD.
18 Aurora Ingest System Guide September 2007
Page 19

Installing Software
For Hauppage WinTVGo video capture card, you have to then convert from digital to
analog. The video capt ure card accepts c omposite a nalog vide o only (NTSC o r PAL).
For Blackmagic Design DeckLink Video Capture Card, SDI input and output with
embedded audio are support ed. For audio moni toring, yo u could also connect SPDIF
output to your audio peripheral.
Follow the steps below to install your video capture card:
1. Install the video capture card in your machine and install the card’s driver. Refer
to the manufacturer’s m anual for installation in structions.
2. For Hauppage WinTVGo video capture card, connect the video capture board’s
S-Video Input connector to the device you’re using for on-screen video di splay
(VTR, router, or switch box).
3. For Blackmagic Design DeckLink Video Captu re Card , connect SDI Outpu t from
your media server or router to SDI Input connector of the video capture card.
4. If you have a video capture c ard i nstal led i n y our machi ne and a rou ter c onfigu red
in your system, select the router destination from the dropdown list within
Tools|Options|Video Viewer of Aurora Ingest Scheduler or VTR Ingest.
5. After the video capture ca rd has b een su cce ssful ly co nfigur ed, it coul d be select ed
from the Capture Device dropdown list within
Aurora Ingest Scheduler or VTR Ingest.
Tools|Options|Video Viewer of
Installing Software
If you are upgrading Aurora Ingest from an existing installation to a new software
release, refer to “Backing up Aurora Ingest Database” on page 20 and “Upgrading
Aurora Ingest Software” on page 21.
If you are migrating Aurora Ingest - Server from an existing installation to a new
machine, refer to “ Migr at ing Aurora Ingest - Server” on page 22.
To install the Aurora Ingest software on your computer, insert the Aurora Ingest
CD-ROM into the machine’s CD-ROM drive and follow these instructions:
On this screen... Do this...
Welcome Click Next.
License Agreement Select I Agree and click Next.
Choose Destination Location Click Next.
Select Components Specify the Aurora Ingest applications to install: Server,
Scheduler, VTR Controller, VTR Ingest, or RMI.
With Server component, Microsoft .NET Framework 2.0 and
Microsoft SQL Express 2005 will also be installed by defaul t.
[Note: RMI cannot be installed on a machine that already has
Aurora Edit installed. You nee d to install the Aurora Core software
(SetupAuroraCore.exe is on the Aurora Ingest software
instead.
CD.)]
September 2007 Aurora Ingest System Guide 19
Page 20

Chapter 2 Installing and Configuring Aurora Ingest
On this screen... Do this...
Specify Server Name Enter host name of Aurora Ingest Server.
Select the SQL Server configuration th at will be used by Aurora
Ingest Server.
If you choose SQL Server 2005, select the server instance from the
dropdown list.
Then, click the Test Connection button to ensure that the SQL
Server is accessible.
Start Installation Click Next.
Installation Complete Click Finish.
Obtaining a Software License Number
Once the Aurora Ingest software is installed, you are provided with a 3 0-day demo
license. You need to get a license nu mber from Grass Valley in order to install the
permanent license. Obtaining the software license number is important because you
cannot launch channel s or configure Aurora Ingest aft er your 30-day demo license has
expired.
When you install the Aurora Ingest - Server application, the SabreTooth License
Manager is installed as well. To get a license number, follow these steps:
1. Click on the License Manager icon on the desktop. The SabreTooth License
Manager opens.
2. Select
File|Generate Unique ID and License Manager will generate a unique ID (a
unique string of characters).
3. Email this unique ID to BVTN-Auroralicenses@thomson.net and you will be
provided with the software license number.
Backing up Aurora Ingest Database
It is advisable for use rs to back-up the Aurora Ing est database before upgrading to the
latest version of t he software. With a dat abase back-up, you can av oid any lost of fe ed
schedules and the need to key-in everything again in case of a system crash. The
back-up could also be placed on another machine or an external drive for extra
precaution.
The database back-up coul d be done easily us ing Microsoft SQL Serv er Management
Studio Express. Listed below are the steps to back-up your Aurora Ingest database:
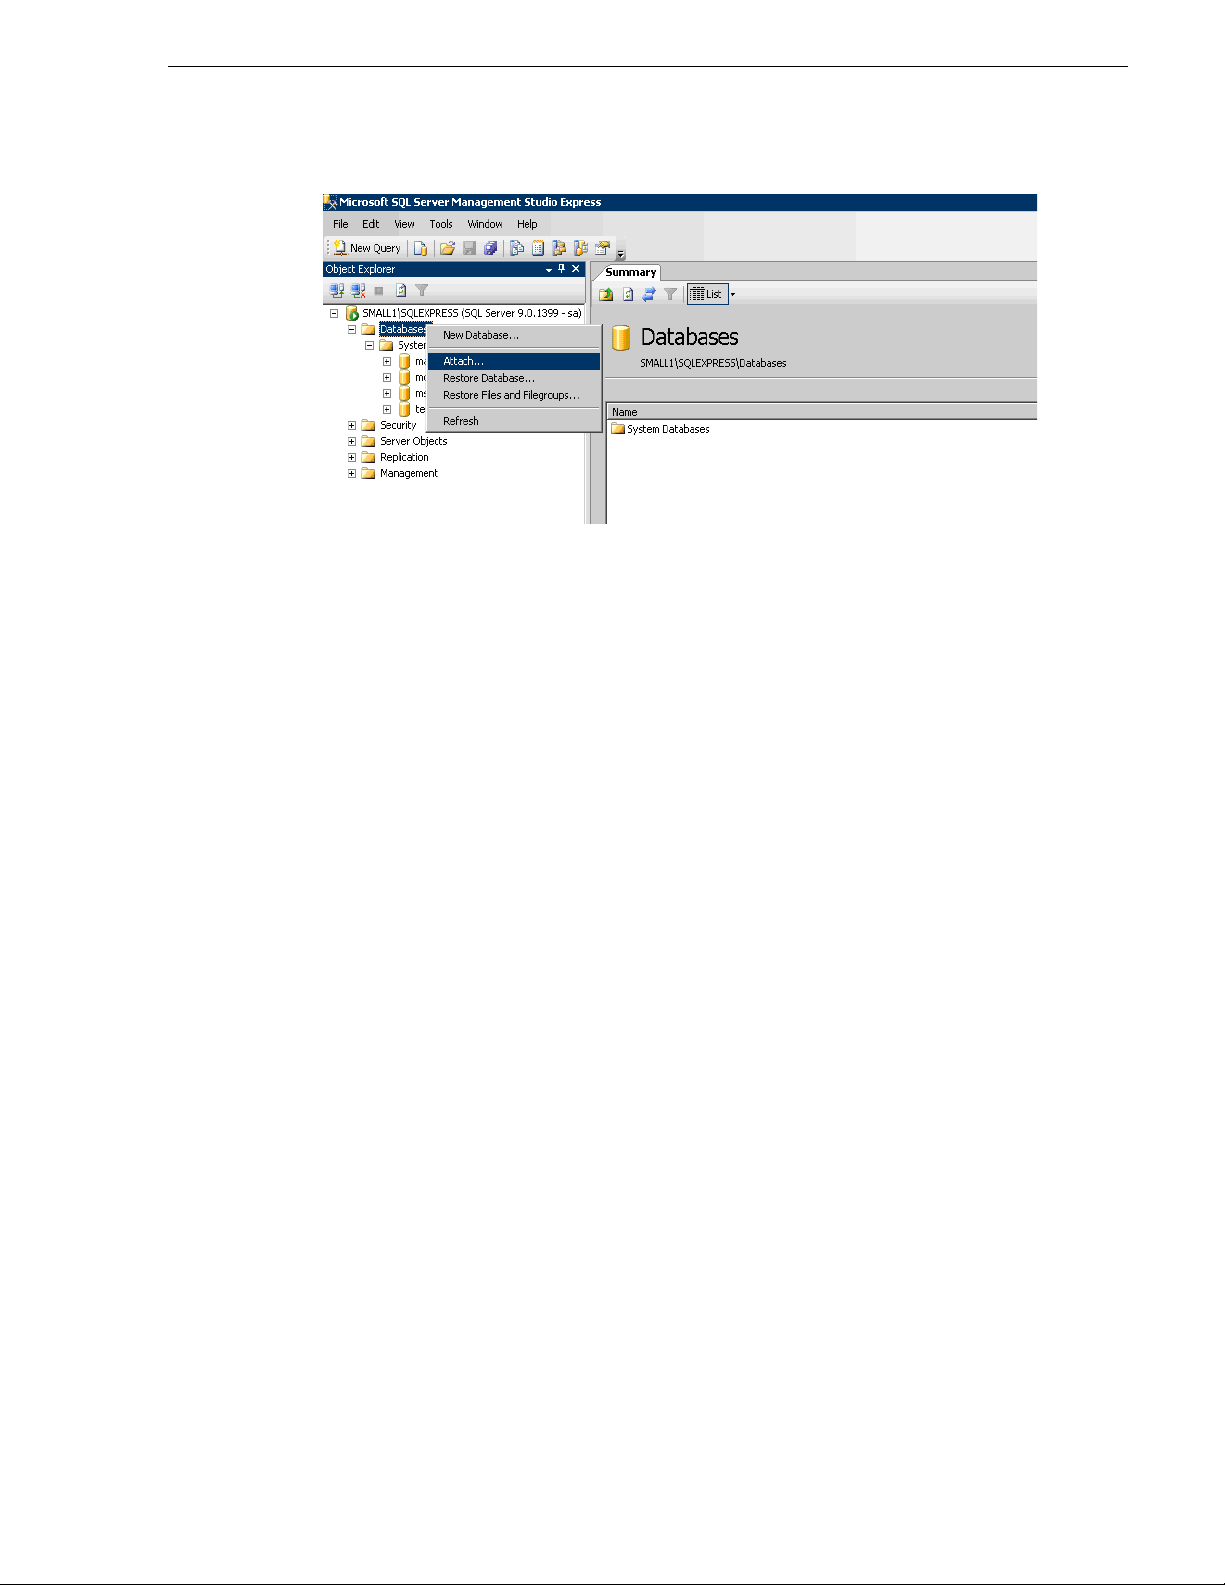
1. Login to Windows XP as an administrator or as a user with administrative rights.
2. Go to Start>All Programs> Microsoft SQL Server 2005 and select SQL Server
Management Studio Express to launch the application.
3. Connect to your SQL Server by Windows Authentication.
4. Double-click on Databases and you could see the folder expands to show System
Databases and IS.
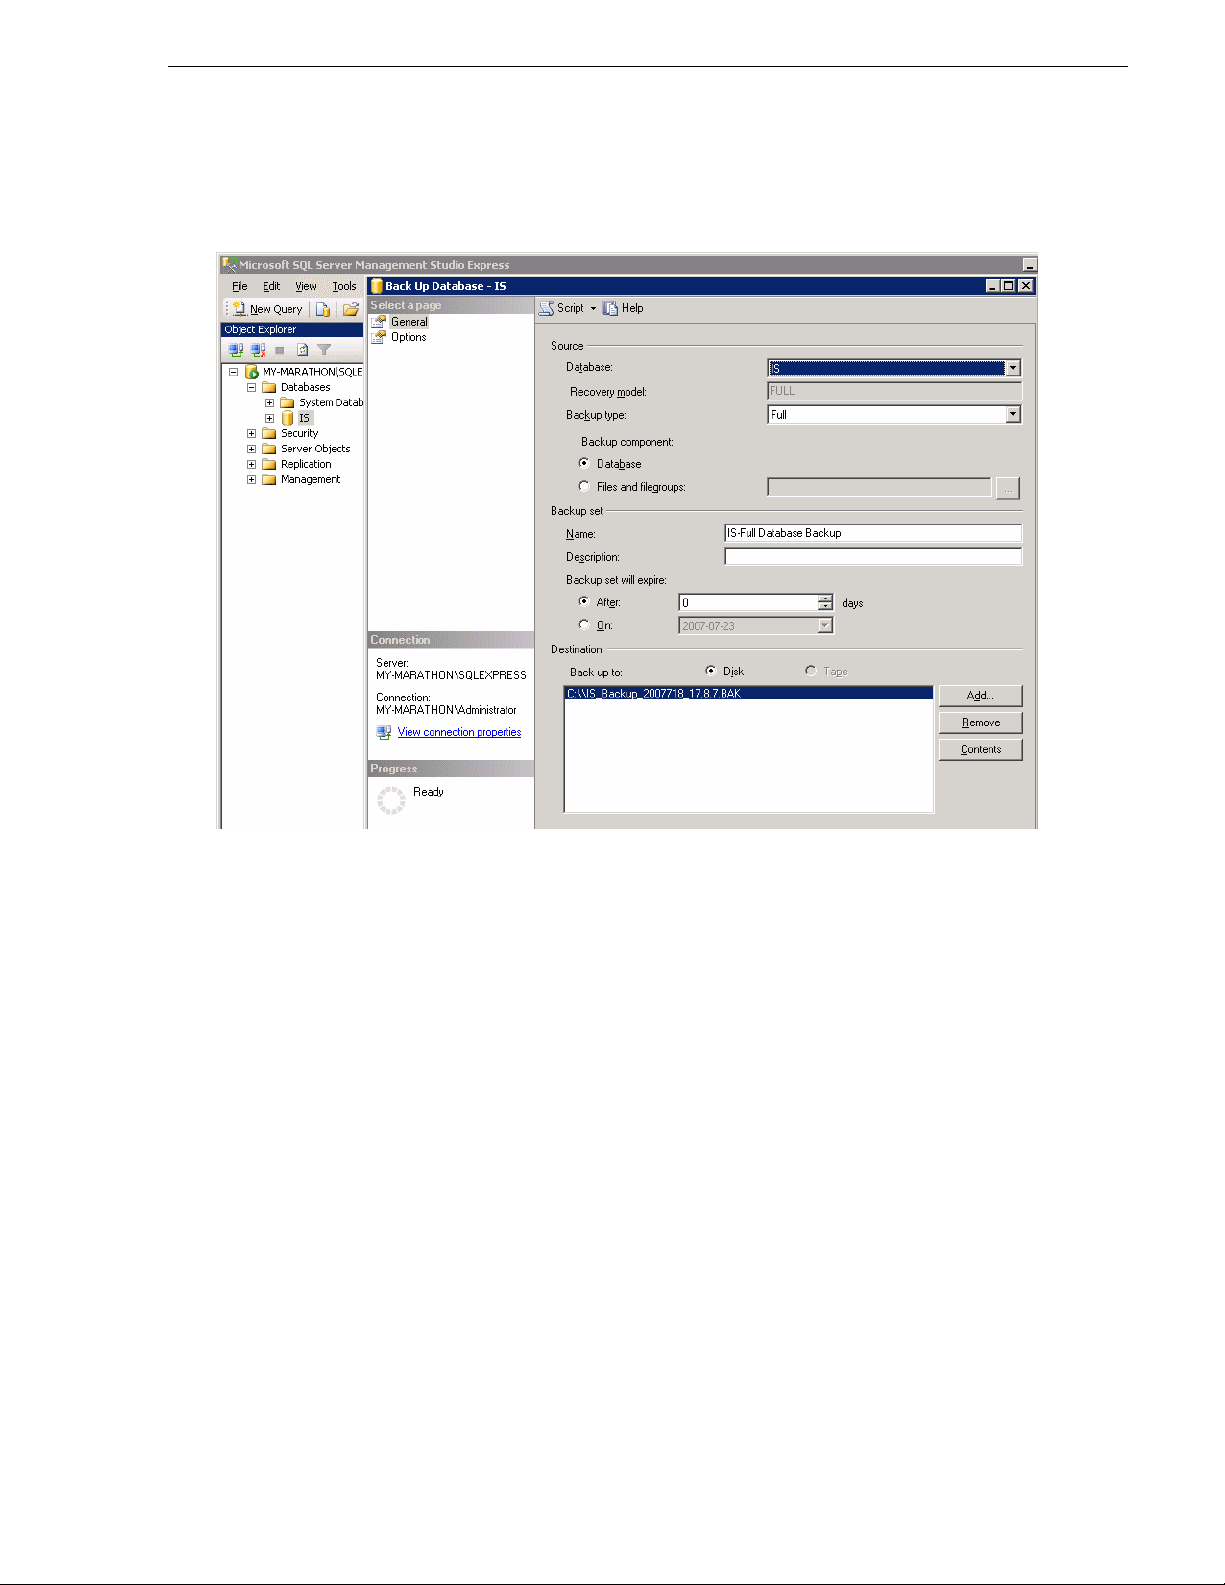
5. Right-click on IS and select Tasks>Back Up.
20 Aurora Ingest System Guide September 2007
Page 21
Upgrading Aurora Ingest Software
6. In the General page, select IS from the Data bas e dro pdown l ist or t ype “I S” if it ’s
not listed in the drop down list , and select Full f rom the Ba ckup type dropdown li st.
7. Key in the backup name and select the backup destination.
8. In the Options page, select Back up to the existing media set and Overwrite all
existing backup sets.
9. Click OK.
NOTE: DO NOT dele te Aurora In gest folder in the registr y key and 2 files
(IS_Data.mdf and IS_Log.ldf ) in C:\Program Files\Microsoft SQL
Server\90\Tools\Binn if you don't have a backup on another machine or an external
drive. All data in the curren t databas e could n ot be retr ieved if those fi les were to be
deleted and the system crashed.
Upgrading Aurora Ingest Software
Before upgrading from one ver si on of Aurora Ingest to another, you shou ld c los e al l
components in the current Aurora Ingest application.
Aurora Ingest 6.3 installer provid es an option to insta ll Microsoft SQL Express 2005
or attaching your Auro ra Inge st dat abase to the full versi on of Micr osoft SQL Server
2005. The full version of SQL Server 2005 al lows customers to r un the Aurora In gest
- Server database component on the same server as the NewsShare DSM.
This means that both news database and ingest database will share the same SQL
processes. If you want to move your cu rrent Aurora Ingest database that runs on SQL
Express 2005 to your NewsShar e DSM machine that runs the full version of SQL
Server 2005, refer to “Migrating Aurora Ingest - Server” on page 22.
September 2007 Aurora Ingest System Guide 21
Page 22

Chapter 2 Installing and Configuring Aurora Ingest
To upgrade Aurora Ingest, follow the steps below:
1. Uninstall all components in the current version of Aurora Ingest by selecting
Start>Control Panel> Add or Remove Programs.
2. Run the Aurora Ingest 6.3 installer and follow the steps described in “Installing
Software” on page 19.
3. Reboot your machine after the installation is complete.
NOTE: When installing onto a clean system, Aurora Ingest will embed the SQL
Express 2005 ins tal l into its installer. The full version of Microsoft SQL Server 2005
is available as an optional item.
Migrating Aurora Ingest - Server
Database migration shoul d be done if you need to move Aurora In gest datab ase from
the current machi ne to a b rand new mach ine, or t o move yo ur Aurora Ingest da tabase
to the machine that runs yo ur NewsShare DSM.
Follow the steps below for migration process of the Aurora Ingest database:
1. Run the latest Aurora Ingest 6.3 installer on the existing machine to update the
Aurora Ingest database.
2. Export the Aurora Ingest Server regi stry key under “My
Computer\HKEY_LOCAL_MACHINE\SOFTWARE\Grass Valley\Aurora
Ingest\Server” from exis ting machine.
CAUTION: DO NOT launch the Microsoft SQL Server Management
Studio Express on both existing machine and new machine. If you do
this, you cannot back up the database.
3. Shut down the Aurora Ingest - Server application on the existing machine and cop y
two files (IS_Data.mdf and IS_Log.ldf) from C:\Program Files\Microsoft SQL
Server\90\Tools\Binn from existing machine to same directory path in new
machine. Make sure these two files are NON-READ ONLY.
4. Make sure the “SQLServer (or SQLEXPRESS)” service is running on new
machine. You can chec k the state of the service in the “Services” application.
5. Launch the Microsoft SQL Server Management Studio Express on new machine.
6. Log on, using Window Authentication Mode, to attach the Aurora Inge st databas e.
7. Attach the Aurora Ingest database as shown in the following screenshot.
22 Aurora Ingest System Guide September 2007
Page 23
Restoring Aurora Ingest Database
8. Select the IS_Data.mdf from the same di rectory (C:\ Program Files\Mic rosoft SQL
Server\90\Tools\Binn).
9. After the Aurora Ingest database had been attached successfully, you should be
able to view Aurora Ingest database folder shown under the Dat abases root folder.
10.Import the server registry key to new machine.
11.Run the Aurora Ingest 6.3 installer on new machine.
12.Reboot the machine after installation is complete.
13.License the Aurora Ingest sof twa re (Number of Channels, Scheduler, VTR Ingest
and RMI). For more information on lice nsi ng, se e “Obtaining a Software License
Number” on page 20.
14.Remove the licenses from the existing machine.
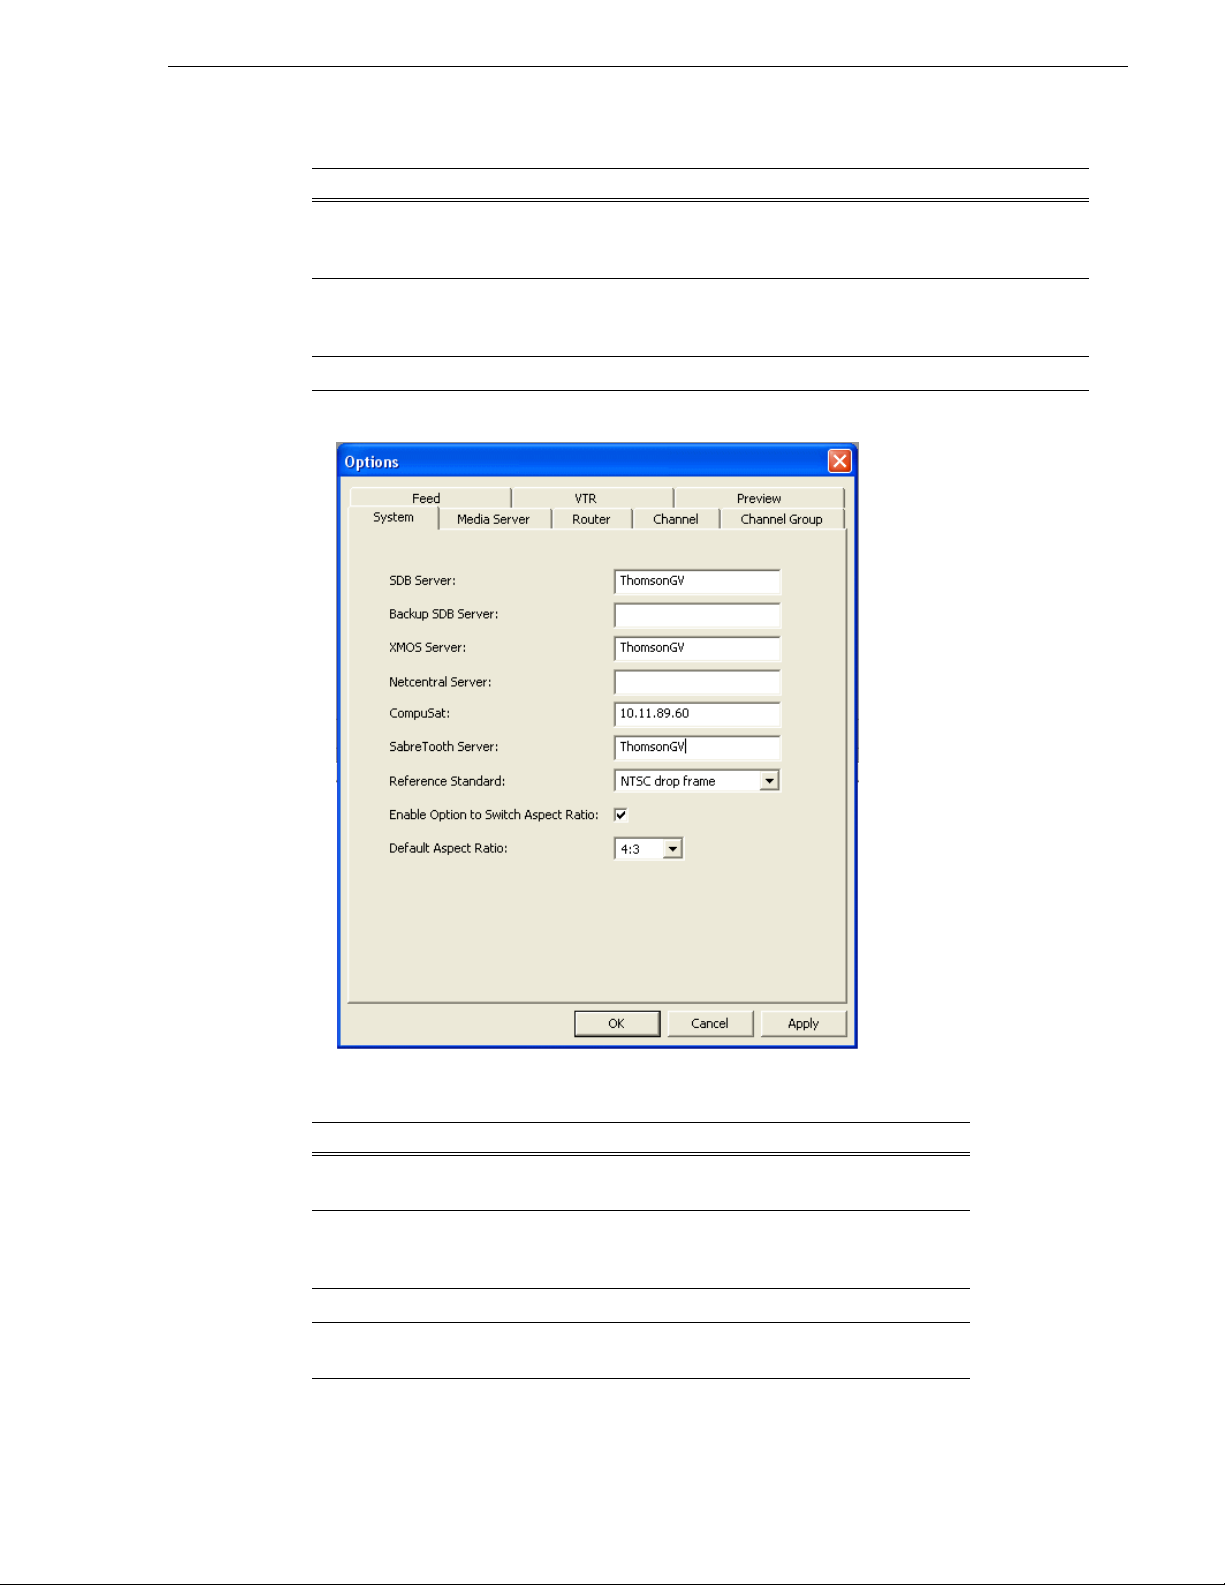
15.Launch the Aurora Ingest - Server application on the new machine. Select
Options
and click on the System tab.
16. Edit settings of SDB Server, XMOS Serve r and SabreTooth Server according to
the new machine.
Restoring Aurora Ingest Database
In case of a system crash or a corrupted database, database restore could easily be
done using Microsof t SQL Server Manag ement Studio Expre ss. Before proceed ing to
restore, make sure that database back-up had been done and the back-up location
identified. Follow the steps below to restore your Aurora Ingest database:
1. Login to Windows XP as an administrator or as a user with administrative rights.
2. Shut down Aurora Ingest - Server if it’s currently running on your machine.
Tools |
3. Go to Start>All Programs> Microsoft SQL Server 2005 and select SQL Server
Management Studio Express to launch the application.
4. Connect to your SQL Server by Windows Authentication.
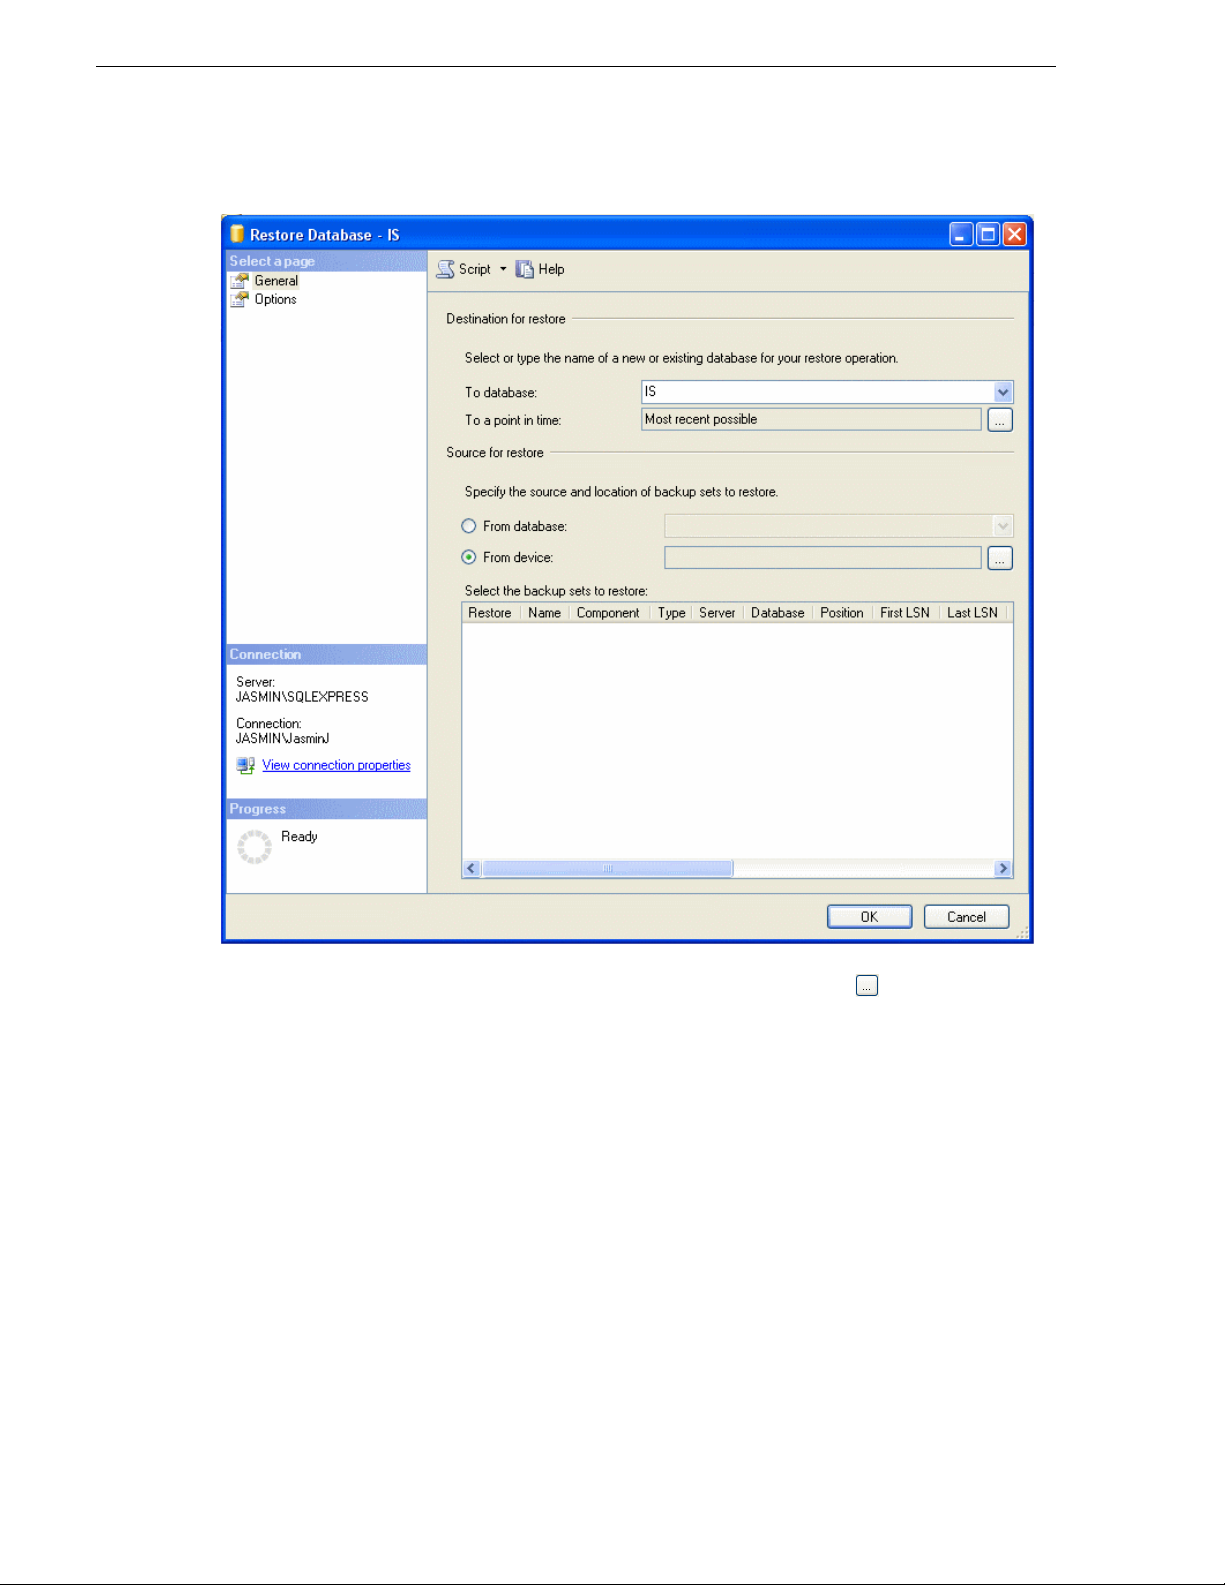
5. Right-click on Databases and select Restore Database.
September 2007 Aurora Ingest System Guide 23
Page 24
Chapter 2 Installing and Configuring Aurora Ingest
6. In the Destination for restore section, select IS from the database dropdown list.
Key in “IS” if it’s not in the dropdown list.
7. In the Source for restor e section, select Fr om device and c lick to browse to the
folder that you had stored your backup.
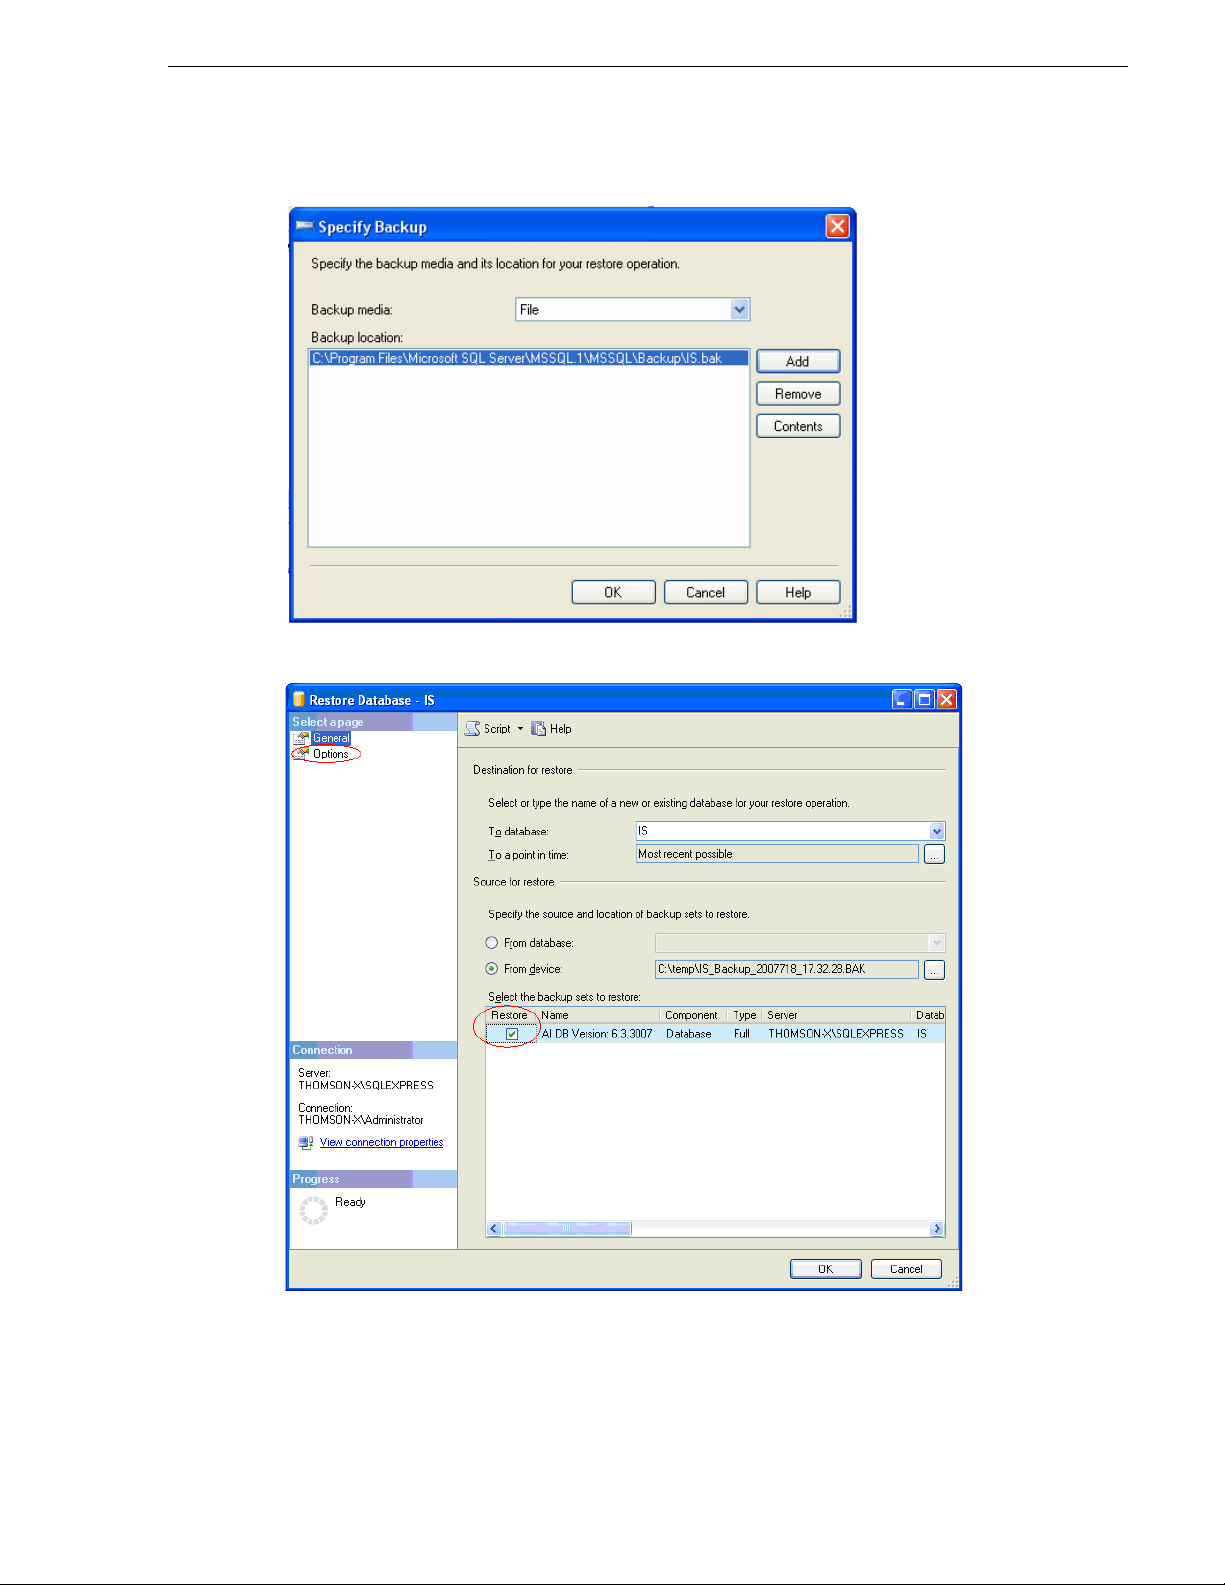
8. Click Add to get to the folder where you had saved the backup, select the backup
24 Aurora Ingest System Guide September 2007
Page 25
Restoring Aurora Ingest Database
file and click OK twice.
9. Check the box under Restore column to select the backup database to be restored.
10.In Options page, check Overwrite the existing database.
11.Click OK.
September 2007 Aurora Ingest System Guide 25
Page 26

Chapter 2 Installing and Configuring Aurora Ingest
Setting Up Your Media Server
Once you’ve cabled Aurora Ing est and installe d software, you nee d to configure your
Media Server to work with Aurora Ingest.
K2 Media Server
To configure the K2 system for Aurora Ingest:
• See your K2 documentation; set up the record channels to use Advanced Media
Protocol (AMP).
• Configure channels to use LTC or VITC input.
M-Series iVDR
The configuration of M-Series iVDR for Aurora Ingest depends on the type of
communication you’re using for the server—DCOM or RS-422.
DCOM
If you are using DCOM, see your M-Series iVDR documentation and set up the
record channels to use Advanced Media Protocol (AMP).
RS-422
If you are usin g RS-422, see y our M-Series iVDR documen tation and set up the server
as follows:
• Make sure you configure the record channels to the correct RS-422 port.
• Set up record channels to use Advanced Media Protocol (AMP).
• Configure channels to use LTC or VITC input.
26 Aurora Ingest System Guide September 2007
Page 27

Configuring Aurora Ingest
Once you have installed any ha rdware (if necess ary) and th e software c omponents of
Aurora Ingest, you need to configure the Aurora Ingest options for your particular
newsroom equipment and workflow.
You can add and configure VTRs with the VTR Controller and VTR Ingest
applications. The Aurora Ingest - RMI client is configured through the Aurora
Ingest - RMI application and Aurora Ingest - Sch eduler is c onfigured th rough Aurora
Ingest - Scheduler application. All other configurations can be performed in the
Aurora Ingest - Server application.
This section is divided into the following topics:
“Aurora Ingest - Server”
“Configuration Overview”
“Configuring System Settings”
“Configuring Media Servers”
“Configuring Routers”
Configuring Aurora Ingest
“Configuring Channels”
“Configuring Channel Groups”
“Configuring Aurora Ingest - Scheduler (Feed)”
“Configuring VTR Controller”
“Configuring VTR Ingest (VTR)”
“Configuring Preview Channels”
“Configuring RMI”
Aurora Ingest - Server
The Aurora Ingest - Server application shows the status of the system components and
channels, as well as the system logs. The server machine name might be truncated,
however the full name is visible if you hover your mouse over the area.
Additional information regarding a channel can also be obtained if you hover on the
channel name. These informa tion include channel na me, server name, recordi ng port,
September 2007 Aurora Ingest System Guide 27
Page 28

Chapter 2 Installing and Configuring Aurora Ingest
remaining storage and status of the channel.
• A green indicator—the component or channel is connected.
• A red indicator—the component or channel is not connected.
• A grayed-out indicator—the component is not configured.
To configure Aurora Ingest, select
overview of the process of configuring Aurora Ingest.
Configuration Overview
In Aurora Ingest - Server application, you can configure most of the Aurora Ingest
settings. (Configur e VTR controller settings in VTR Controller and VTR Ingest.) The
following table details the configurable options in the Aurora Ingest - Server
application. The fol lowing s ecti ons desc ribe the Aurora Ingest confi gurat ion pro ces s
in detail.
Options Description
System Allows you to specify servers, such as the SDB server, XMOS Server, SabreTooth server,
CompuSat satellite dish control system , etc. You can also specify the Video standard , enable
the option to switch aspect ratio and set the default aspect ratio of feeds and VTR ingests.
Media
Server
Router All ows you to specify the type of r outer (Encore/SMS7000, Acapella or Jupiter) and its IP
Channel Allows you to specify the various channels and the media server they are associated with, as
Channel
Group
Allows you to add, edit, or delete information about th e media servers, including the drive
and record locations. Note: the record location is not machine dependent.
address or COM port.
well as the record loca tion. (The r ecord loc ation is th e router desti nation, whi ch is physica lly
connected to the media server using the AV cable.)
Allows you to specify channel groups and channels to be included in those groups. Channel
groups are assigned to users in the User Administration setup. Auto-assign would only be
limited to channels that are av ailable to the particular user.
Tools | Options. The following section gives an
28 Aurora Ingest System Guide September 2007
Page 29
Options Description
Feed For feed ingests performed using Aurora Ingest - Scheduler, this tab allows you to specify
default information ab out the clips, such as name, r ecord durat ion, cra sh record lo cation a nd
duration, and tim ecode source (System ti me, LTC or VITC).
VTR For segment (batch) ingests performed using VTR Ingest, this tab allows you to specify
default information about th e cl ips, su c h as na m e, re cord loc a tio n, ha ndle a nd pre ro ll tim e s,
and timecode source (Control track, LTC or VITC).
Preview Allows you to specify the preview channel for Asset Viewer in Aurora Ingest - Scheduler.
Configuring System Settings
Configuring System Settings
Setting Description
SDB Server Enter the IP address or computer name of the server where t he
Aurora Playout database resides (primary SDB Server is running).
Backup SDB Server If you are using a backup database server, enter the IP address or
computer name of the server where the backup Aurora Playout
database resides (hot -standby SDB Server is running).
XMOS Server Enter t he name of the computer hosting the XMOS server.
NetCentral Server If your system uses NetCentral to monitor equipment, enter its
name or IP address.
September 2007 Aurora Ingest System Guide 29
Page 30
Chapter 2 Installing and Configuring Aurora Ingest
Setting Description
CompuSat If you are using CompuSat satellite dish control system, enter the
location where the CompuSat application is running.
SabreTooth Server Enter the name of the server where the SabreTooth license is
located.
Reference Standard
Enable option to
switch aspect ratio
Default aspect ratio
PAL
NTSC drop frame
NTSC non-drop
Click the check box if you want to enable the option to switch
video aspect ratio of feeds and VTR ingest s. This feature is
currently supported for SD K2 media clie nt version 3.2 only.
16:9
4:3
Configuring Media Servers
Select the video reference standard used in
your operation.
Select the default aspect ratio for your ingest
operation.
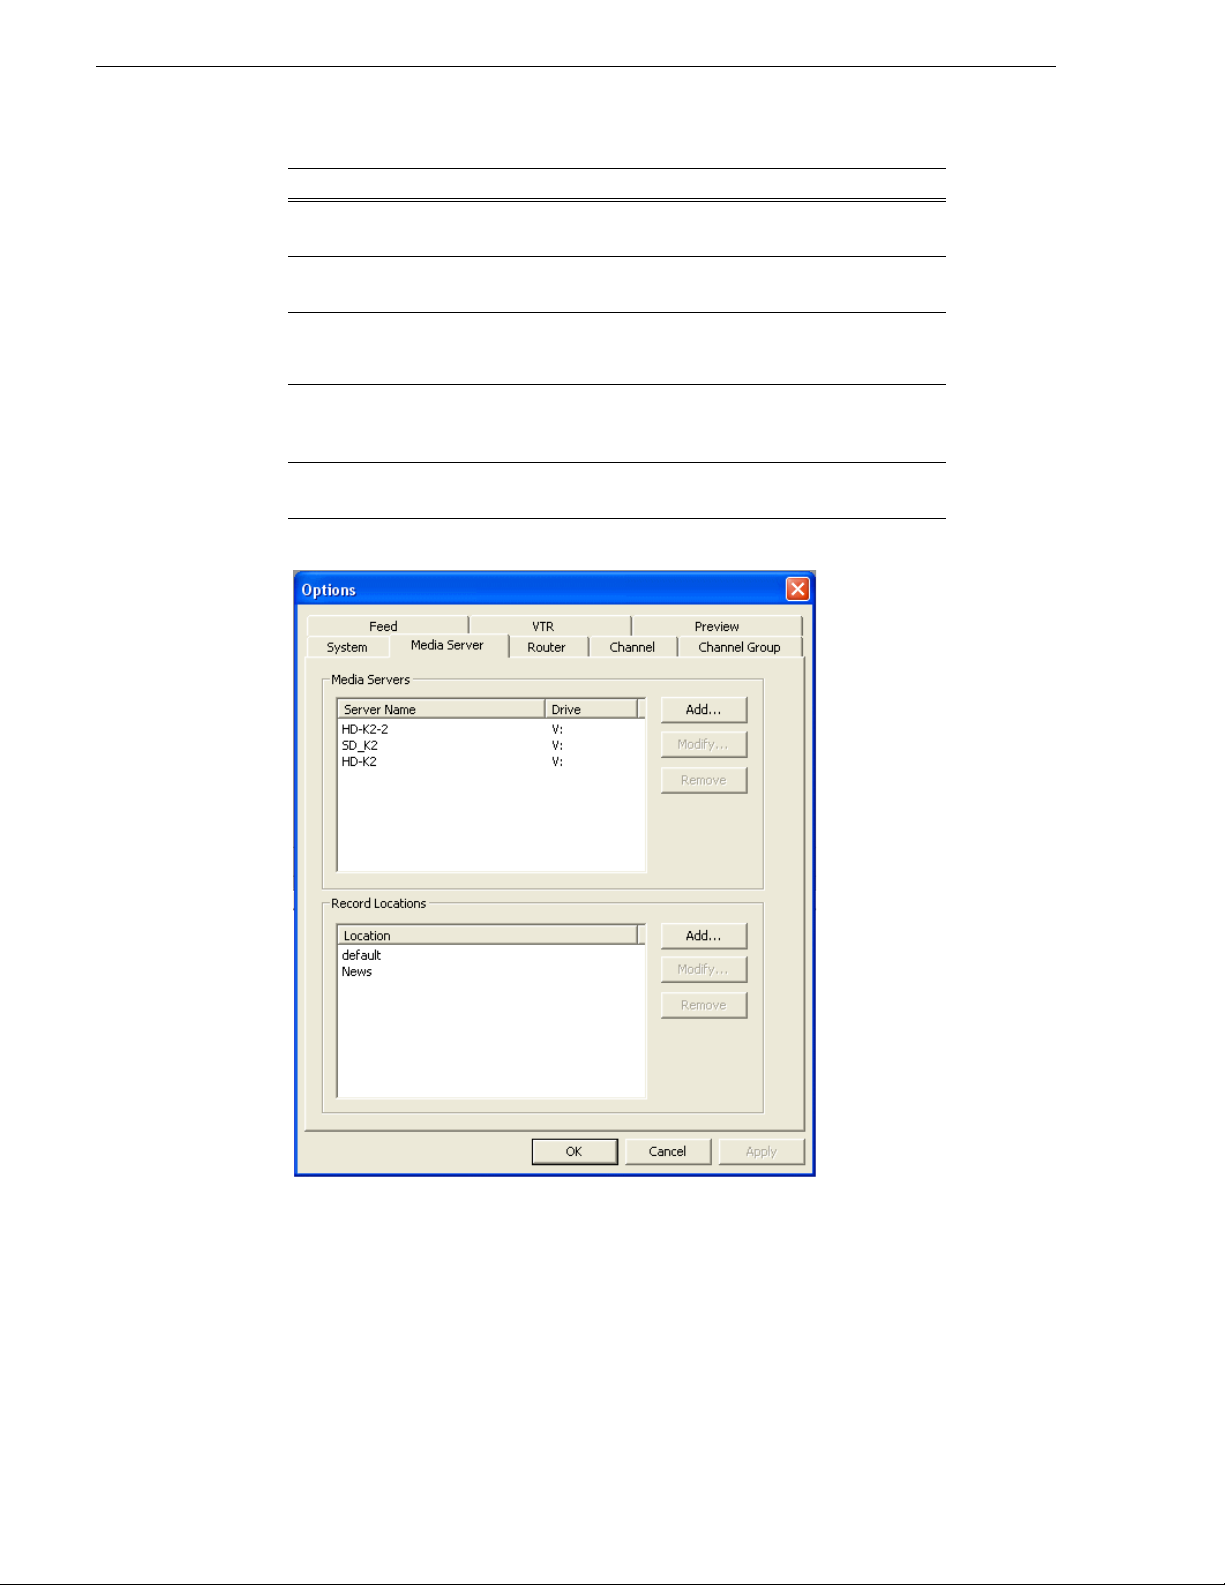
Setting Recording Locations in Media Servers
You can also specify where schedu led recordings will resid e on each server. Once you
configure them, select which folder to record to when recording clips and feeds.
To set a reco rd location:
30 Aurora Ingest System Guide September 2007
Page 31

1. In the Media Servers box, click Add.
Configuring Media Servers
2. E nter the media server name and its dr ive letter (e.g. V:), and click
3. In the Record Locations box, click
4. Type the name of the location and click
5. Repeat step 3 and step 4 to create additional locations.
Modifying Recording Locations
To modify a record location:
1. In the Media Servers box, select the media server name that you want to change
and click
Modify.
OK.
Add.
OK.
2. Enter the new media server name and its drive letter (e.g. V:), and click
OK.
3. If you need to change the folder name as well, select the folder name in the Record
Locations box and click
4. Enter the new folder name and click
Modify.
OK.
5. Repeat step 1 to step 4 to modify more recording locations.
September 2007 Aurora Ingest System Guide 31
Page 32

Chapter 2 Installing and Configuring Aurora Ingest
Acappella Router
Encore/SMS7000 Router
Removing Recording Locations
To remove a record location:
1. In the Media Servers box, select the media server name and click
2. Click
Yes to confirm the removal of the media server from the Aur ora Ingest -
Server sett ing.
3. If you need to remove a folder as well, select the folder name in the Record
Locations box and click
4. Click
OK to close the options window or click Apply to continue with ot her
configuration settings.
Configuring Routers
If you are using Encore, SMS7000, Acappella or Jupiter router as part of your news
station, you can config ure Aurora Ingest to us e sources from the route r to record clips.
Remove.
Remove.
32 Aurora Ingest System Guide September 2007
To configure a router for use with Aurora Ingest:
1. Check the
Use Router checkbox.
2. For router type, select between Encore/SMS7000, Acappella or Jupiter from the
dropdown list.
3. For SMS7000 or Acappella router, enter the IP address or name of the router that
you want to connect to. Then, go to step 11.
Page 33

Configuring Routers
4. For Encore router, enter the IP address or name of the router that you want to
connect to. Then, you also nee d to ensure that the IP addr ess of your Aurora Ingest
Server is entered in the RCL Server configuration of the Encore router control
system.
5. Login to Encore OUI, select
App_CPServer and RCL Servers.
6. On the Ethernet Client Names and IP Addresses section of the RCL Server
Configuration window, enter the machine name and IP address of your Aurora
Ingest Server.
7. Logout from Encore OUI and proceed to step 11.
8. When connecting to a Jupiter router, use the ESswitch interface protocol.
9. For Jupiter with direct connection via RS422, select either COM1 or COM2
(depending on your setup) from the COM Port dropdown list.
10.For Jupiter with connect ion via the se rial hub, sel ect the approp riate COM port t hat
had been configured. For more inf or ma tion, see “Configuring Virtual COM port ”
September 2007 Aurora Ingest System Guide 33
Page 34

Chapter 2 Installing and Configuring Aurora Ingest
Jupiter Router
on page 35.
11.Click
Connect.
12.If you are using Encore, SMS7000 or Jupiter, you can also enable RS-422
switching. This feature enables you to switch between VTRs for each channel
without having to swap the RS-422 cables manually, as Aurora Ingest will switch
the RS-422 port. Aurora I nges t s wit ches video from the VTR to th e vi deo capture
card whether RS-422 swi tching is enabl ed or not. For more i nformation on RS-4 22
switching, see “About RS-422 switching” on page 39.
13.Select 0 (zero) for the video level if video is the first level in your router control
system, 1 if it is the second level and so on. Select the level from th e dropdown list.
14.Click
15.Click the
Apply to save changes.
Configure Router Sources button. Aurora I ngest connects to the r outer and
queries the list of sources. The Configure Router Sources dialog box displays,
showing the available sources.
34 Aurora Ingest System Guide September 2007
Page 35

Configuring Routers
16.In the Feed window, you can enable the router sources that are connected to the
CompuSat satellite feed. You can also rename the router source in the “Source
Name” column and choose a defa ult location in the Media Server for the feed to
record to.
NOTE: Onc e you have enabled the Feed router sources, a li st of enabled Feed rout er
sources is available in the router source list of the Add Feed dialog box in the
Scheduler application.
17.In the VTR window, you can enable the router sources th at the VTRs are connec ted
to. You can also rename the router source in the “Source Name” column.
NOTE: Once you have en abled t he VTR rout er sour ces, a l ist of ena ble d VTR route r
sources is available in the VTR Ingest application.
18.Click
OK to exit the Configure Router Sources dialog box. The settings will take
effect once you click
19.Click
OK to accept the changes and exit the dialog box.
Configuring Virtual COM port
In order to co nnect to Jupiter router via ether net , a serial hub needs to be configured.
This serial hub will ac t as a virtual COM port, which enables serial-to-ethernet
connectivity as though Jupiter is communicating with Aurora Ingest via the local
COM port.
Apply in the Options dialog box.
September 2007 Aurora Ingest System Guide 35
Page 36

Chapter 2 Installing and Configuring Aurora Ingest
DIGI One SP Device Server
Crossover Cable
Ethernet Cable
Power Supply
(DB9 female-to-female)
Serial Cable to connect to Jupiter
(DB9 male-to-male)
When you purchase Aurora Ingest, DIGI One SP RS422 Serial to Ethernet Device
Server is also provided in the same package. Before starting to configur e the device
server, write down the MAC address located at the bottom of the hardware.
To setup the h ardware:
1. A serial crossover cable (also known as null-modem cable) is needed to allow
proper communications between Jupiter router and DIGI One SP Device Server.
The appropriate pinouts can be referred from the table below:
DIGI One SP Device Server Jupiter Router
Pin Name Pin Numb er Pin Number Pin Name
Rx +23Tx +
Tx +37Rx +
Rx -68Tx Tx -92Rx -
2. Connect one end of the crossover cable to the device server and the other end to
RS422 serial cable to connect to Jupiter.
36 Aurora Ingest System Guide September 2007
3. Connect an ethernet cable from the device se rver t o a netw ork point on your LAN.
4. C onnect the power supply to the device server.
To install the software:
1. Insert the DIGI CD in your CD ROM drive.
2. The setup wizard will automatically be display ed on your screen. If not, cli ck
Start
Page 37

Configuring Routers
> My Computer > CD ROM drive: > setup.exe
3. Click Next and the setup wizard will search your network to locate the DIGI One
SP device server.
4. Select the device server according to its specific MAC address.
5. Take note of the device IP address and click
September 2007 Aurora Ingest System Guide 37
Next.
Page 38

Chapter 2 Installing and Configuring Aurora Ingest
6. In the Network Settings section, select IP and enter the IP address that had been
retrieved by the setup wizard.
7. In the COM Port Settings section, set the number of ports to 1 and select the
appropriate COM port from the Starting COM drop down list. This will be your
virtual COM port.
8. Click
9. Click
Finish and the setup wizard will install the software.
Finish after the installation is done.
NOTE: Once you have configured the virtual COM port, it will be available in the
COM Port dropdown list on the router configuration window of Aurora Ingest Server.
38 Aurora Ingest System Guide September 2007
Page 39

About RS-422 switching
FEED
VTR
Level 1
HD-SDI
Level 3
LTC
Level 4
RS-422
K2
VTR Ingest
Vid Cap
Level 2
AESI
VTR Ingest
Com 1
If RS-422 switching is not enabled, you do not have to select the levels because
Aurora Inge st switches all levels wh en switching the router for server port
switching and VTR Ingest monitoring s witching. Conve rsely, if RS- 422 switchin g
is enabled, Aurora Ingest switches the router differently.
• Each VTR source has four levels.
• Feed sources have two (if they use VITC) or three (if they use LTC) levels.
• K2 destinations have the HD-SDI, AES and LTC levels (we know for cert ain VTRs
use LTC).
• VTR Ingest video capture destinations have the HD-SDI level (and AES if
speakers are connected).
• VTR Ingest com ports destinations have the RS-422 level.
Configuring Routers
Aurora Inge st switches:
• level 1, 2 and 3 for source-to-server port switching.
• level 1 (and 2) for VTR Ingest monitoring switching.
• level 4 for VTR to VTR Ingest Com Port switching.
September 2007 Aurora Ingest System Guide 39
Page 40

Chapter 2 Installing and Configuring Aurora Ingest
Configuring Channels
The number of channel s is limited only by your med ia server hardware. You need to
configure each channel in order to record clips.
To add a channel, click the
Add button.
Configure the channel by entering details as below:
Setting Description
Name Enter a name for the channel. This name identifies the channel in Aurora Ingest -
Server and its clients.
Media
Server
Channel In the dropdown list, select or enter the name of the media server chan nel you are
Select media server for the channel from the dropdown list. (Media servers are
configured in the Media Server tab.)
using to record, such as
VTR1, VTR2, VTR3, etc.
40 Aurora Ingest System Guide September 2007
Page 41

Configuring Channels
Setting Description
Record
Destination
If channel groups ha d bee n configured prior to cha nnel se tup, you have to assign the
channel to a channel group first. The Assign Channel Groups window will be
displayed when you click the Add button.
Select the recording locatio n from the dr opdo wn list. (Re co rdi ng destina tio ns are
specified in the VTR and Feed tabs respectively for VTR Ingest and Aurora
Ingest - Scheduler ingests.)
Select the particular channel group for the new channel to be assigned to, and click
OK to continue configuring the channel. For more information on Channel Group
setting, refer to “Configuring Channel Groups” on page 42.
NOTE: Channels could belong to more than one group.
To modify a channel, select the channel and click the
Modify button.
Change any details on the channel configurati on and cli ck OK.
September 2007 Aurora Ingest System Guide 41
Page 42

Chapter 2 Installing and Configuring Aurora Ingest
To delete a channel, se lect the channel a nd click the Remove button. The confir mation
window will be displayed as below:
Yes to confirm the removal of the channel.
Click
Configuring Channel Groups
Channel group setting is for users to organize channels into several categories
according to broadcasti ng needs.The featur e lets you specify group name s and assign
channels to be included in those groups.
For example, “News” channe l group could con tain several channels that in gest assets
related to local news, national news, world news and breaking news. While other
channel groups contain channels that ingest assets related to their own group.
Setting Description
Group Enter a name for the channel group. This name identifies the channe l group for
Aurora Ingest - Server and its clients.
Channels Select channels to be assigned to the channel group. If desired, a channel could also
be assigned to several channel groups. If a channel is assigned to all groups, the
particular channel is available for all users of Aurora Ingest clients.
42 Aurora Ingest System Guide September 2007
Page 43

Configuring Channel Groups
By this feature, channel availability are assigned according to user logon setup.
Channel groups are assigned to users in the Aurora Ingest - Server by your system
administrator. With this setup, auto-assign of channels would only be limited to
channels that ar e available to the particular user . For more informati on regarding User
Administration setup, refer to “User Administration for Aurora Ingest” on page 59.
To add a channel group, click the
Add button.
By default, all channels are selected when you create a new channel group. You can
deselect channels by unchecking boxes that are not to be assigned to your channel
group.
Enter the name of the channel group, assign channels to the group by deselecting
unwanted channels and click OK.
To modify a channel group, select the channel group and click
Modify button.
Edit the name of the cha nnel group, check or un check channels for the group and click
OK.
September 2007 Aurora Ingest System Guide 43
Page 44

Chapter 2 Installing and Configuring Aurora Ingest
To delete, select the particular channel group and click Remove button.
Yes to confirm the removal of the channel group.
Click
Configuring Aurora Ingest - Scheduler (Feed)
Setting Description
Default Clip Name Specify the default clip name.
Default Record Location Enter the default location for any schedule d record
event.
Default Duration Enter the default duration for any new feed event
you schedule. (00:59:50 by default).
To easily schedule back-to-ba ck records, adjust
the default duration by 10 seconds in order to avoid
a recording conflict. For example, for a 1 hour feed
duration, set the default duration to 00: 59 :50 .
Default Crash Loca tio n Enter the de fa ult location for any un-s c hedu l e d,
i.e. crash record event. Once specif ie d, all crash
records will go to the same folder name on all
media servers.
44 Aurora Ingest System Guide September 2007
Page 45

Configuring Aurora Ingest - Scheduler (Feed)
Setting Description
Default Crash Duration Enter the default duration for any un-scheduled
record event.
Timecode Source
Configuring Scheduler in the Aurora Ingest - Scheduler application
After you have configured Scheduler in the Aurora Ingest - Server application, you
need to configure the options in the Aurora Ingest - Scheduler application.
If you have the optional Hauppage WinTVGo video capture card or Blackmagic
Design DeckLink video c apture card installed i n your schedu ler machine a nd a router
configured in your system, you will need to define the destination of the router
connected (via digital to analog converters, if needed) to your video capture card.
Select the timecode source from the dropdo wn list:
System Time, LTC, or VITC
1. In Aurora Ingest - Scheduler, select
Tools | Options and the below win dow displays:
2. If you want to use an Aurora Ingest Server that is hosted on another mach ine , you
need to specify the serve r name here. In the Server section of System tab, specify
the Aurora Ingest - Server for your operation.
3. In the Options section, you can select to show a secondary timeline on Aurora
Ingest - Scheduler main window. This feature allows you to display dual time
zones on Scheduler application, which is of great use for global operations.
4. Select the time zone that you need from the dropdown list for your secondary
timeline. Once configured, Scheduler will display both primary and secondary
clock and timelines on the main window.
September 2007 Aurora Ingest System Guide 45
Page 46

Chapter 2 Installing and Configuring Aurora Ingest
5. You can also set a default start time for a newl y added event. Th e default st art time
ranges from 5 minutes to the next hour on the dropdown list. For example, if you
set the default star t time to 10 minutes a nd click the Add Ev ent button at 11.10 am,
the default start time on the Add Event window will be set to 11.21 am after
allowing 10 minutes default between adding and recording the event.
6. Click
Apply to save changes without exiting the Options window.
7. Select the Color tab to customize status colors in the Aurora Ingest - Scheduler
application.
8. You can change the color of text, state and border of events if desired.
9. To change the text color, click t ext on the dr opdown list a nd click th e color palet te
button.
10.Select the text color that you want from the color palette display. You can choose
46 Aurora Ingest System Guide September 2007
Page 47

Configuring Aurora Ingest - Scheduler (Feed)
either to use basic colors as provided or define your own custom colors.
11. To create custom colors, click
Define Custom Colors button and the color palette
window will be expanded as shown below:
12.To change the luminance value of your color, move the right arrow up and down
with the minimum value at the bottom and maximum value at the top of the scale.
13.To change the hue, move the crosshair marker left and right with the minimum
value on the most left and maximum value on the most right.
14.To change the saturation value of your color, move the crosshair marker up and
down with the minimum value at the bottom and maximum value on top.
15.Click
Add to Custom Colors button to add the color that you chose to the Custom
colors section on the color palette.
16.Select the text color that you want for Scheduler application and click OK.
17.To change the status color for 7 states of events in the Scheduler, select the state
September 2007 Aurora Ingest System Guide 47
Page 48

Chapter 2 Installing and Configuring Aurora Ingest
from the dropdown list.
18.Follow steps 11-15 if you want to customize your own state colors.
19.Select the color for each state from the color palette and click OK.
20.To change the color of an event border, select the border from 6 types of borders
in the dropdown list.
21.Follow steps 11-15 if you want to customize your own border colors.
22.Select the color for each border from the color palette and click OK.
23.Click
24. To reset back to default colors, click the
Apply to implement your color changes.
Reset button and a pop- up window will be
displayed.
25.Click
Yes to confirm the reset of your color scheme an d click Apply to implement
your color changes.
48 Aurora Ingest System Guide September 2007
Page 49

26.Then, select the Video Viewer tab.
Configuring Aurora Ingest - Scheduler (Feed)
27.Check the Enable video viewer box to have a video viewer in your Scheduler
application. This feature enables user to view the asset as it is ingested into the
media server.
28.If desired, check the 16:9 video format.
29.If using a router, select the router destination from the dropdown list. If no router
has been configured, this field will be grayed out. To configure a router, see
“Configuring Routers” on page 32.
30.If you have installed a video capture card, select the device in the capture device
September 2007 Aurora Ingest System Guide 49
Page 50

Chapter 2 Installing and Configuring Aurora Ingest
dropdown list.
31.Select No Capture Device if you want to view the asset via a separate video
monitor.
32.Once Hauppauge WinTV video capture card or Blackmagic Design DeckLink
video capture card is configured for the video viewer, it could also be utilized for
high resolution asset vie wer.
33.The High Resolution Asset Viewer enables users to view ingested asset in the
media server and edit as set wit h Mark I n/Out points via the asset viewer controls.
To enable the feature, check the Enable video viewer box in that section.
34.Select the player channel of the asset vie wer fro m t he dro pdown lis t. The chann el
setting is done in the Preview tab within
Tools | Options of Aurora Inge st - Se rver.
For more inf ormation on th e setup, refer to “Configuring Preview Channels” on
page 57.
35.Click
OK.
36.The Aurora Ingest - Scheduler application is now configured. For more
information, see “Using Aurora Ingest - Scheduler” on page 65.
50 Aurora Ingest System Guide September 2007
Page 51

Configuring VTR Controller
Before you can use VTR Ingest wit h a VTR or VTRs, you need to conf igure the VTR
Controlle r application. VTR Cont roller can be installed on the same machine as the
VTR Ingest application, but this is not required.
To configure VTR Controller, follow these steps:
Configuring VTR Controller
1. From the Windows Start menu, select
Controller
2. Select
. The VTR Controller application opens.
Tools | Options. The VTR Controller Options dialog box displays.
All Programs | Aurora 6.3 | Aurora Ingest - VTR
3. Click the
Add button. A dialog box displays that allows you to enter a name and
select a control port and timecode mode. The listening port is automatically
populated. (Knowing the listening port can be useful if, for example, you ar e
having difficulties with f irewall and need to know which port sho uld be allowed as
an exception.)
4. Without the LTC physical connection, timecodes could stil l be polled vi a RS-422.
Check the option to enable RS-422 timeco de mode in the Add VTR window if you
want to poll the timeco de. Once configure d, timecode is no lo nger a require d input
September 2007 Aurora Ingest System Guide 51
Page 52

Chapter 2 Installing and Configuring Aurora Ingest
and records on VTR Ingest will be triggered with timecode detection via RS-422.
NOTE: Records with RS-422 timecode mode have a frame accuracy recording
window of +/- 10 frames. Due t o this, in and out handle settings are provided wi thin
the setup.
5. You can set In and Out Handles for record ings with VTR using the RS-422
timecode mode. Both handles are set to 10 frames by default.
6. If you are using an XDCAM VTR, you can select the checkbox to enable auto scan
for the XDCAM VTR. The XDCAM VTR does not adhere to typical RS-422
shuttle commands. By ena bling the auto scan f eat ur e for XDCAM VTR, previous
and next commands will be us ed instead of the usual shuttle forward and back.
7. You can also change the shuttle speed for the auto scan feature. The default is set
to 32, but you can change to any value depend ing on the type of VTR that you use.
When XDCAM mode is selected, t he field to set the shut tle speed of aut o scan will
be disabled and grayed out.
8. Click OK to add the VTR.
52 Aurora Ingest System Guide September 2007
Page 53

Configuring VTR Ingest (VTR)
After you have successfully added the VTR, you should see it displayed in the VTR
Status window with a green indicator next to its name.
Once you have added VTRs, you can modify or delete them. However, if you only
have one VTR displa yed in the stat us window, you can not delete it and have an e mpty
status window.
Troubleshooting VTR Controller configuratio n
If you see a red indicator next to the VTR’s name, try restarting VTR Controller. If
the VTR status still displays a red indicator, verify the following:
• The correct COM port has been specified for the VTR.
• The COM port is not being used by another application controlling the VTR.
• The VTR is turned on.
• The hardware has been correctly inst alled. For more information, see “Installing
Aurora Ingest” on page 18 .
• The IP address or computer name where VTR Controller is installed matches the
address or name in the VTR Ingest application.
The VTR Controller applicatio n is now configured. For more i nformation, see “Using
VTR Controller” on p age 97. Before you can use a VTR with Aurora Ingest, you need
to configure the VTR Ingest a pplication and make sure the VTR infor mation matches
the information you entered when con figuring VTR Controller. For more info rmation
on VTR Ingest, see “Configuring VTR Ingest (VTR)” on page 53.
Configuring VTR Ingest (VTR)
Configuri ng VTR Inge st is a two-step process.
1. Populate the fields in the VTR tab under
Ingest - Server application.
Tools | Options in the Aurora
2. Populate the VTR information unde r
and verify that it matches the VTR information under
September 2007 Aurora Ingest System Guide 53
Tools | Options in the VTR Ingest application
Tools | Options in the VTR
Page 54

Chapter 2 Installing and Configuring Aurora Ingest
Controller application.
Configuring VTR Ingest in the Aurora Ingest - Server application
Setting Description
Default Clip Name Specify the default clip name.
Default Record Location Enter the default location for any vtr ingest record
event.
In Handle Handles allow you to have additional frames to use
Out Handle
Preroll Duration Enter the number of seconds of preroll you want to
while editing. Enter the duration you want for the
In and Out Handles (0 secon ds by def ault).
use when recording clips (5 seconds by default).
Configuring VTR Ingest in the VTR Ingest application
Make sure you have already configured the VTR Controller application before
completing this section. The VTR information in these two applications needs to
match. For more information, see “Configuring VTR Controller” on page 51.
1. In the VTR Ingest application, select
Tools | Options.
2. In the VTR tab, enter the IP address or host name of the A urora Ingest Server.
3. If desired, check the prompt for Tape ID box. This feature allows you to cust omize
the identification of your tape. If you don’t enter a tape ID, VTR Ingest prompts
you to enter the ID before y ou ingest the first clip.
4. If needed, you can also enable the Auto Scan feature. It allows you to scan and
capture media from a tape according to timecode breaks.
54 Aurora Ingest System Guide September 2007
Page 55

Configuring VTR Ingest (VTR)
5. Select a channel from the dropdown list and enter the name of the channel.
6. Enter the IP address or name of the computer where VTR Controller is installed.
(If VTR Controller is installed on the same machine, enter
localhost.)
7. Select the COM Port from the dropdown list.
8. When using channel groups, the Defaul t Ing est Ch annel dro pdown li st r eflect s the
configuration that had b een se t for the use r. You c an select one o r more gro ups, or
select individual channels depending on your setup.
9. Once a channel group is checked and selected, individual channels within that
group become red in the dropdown list and they can no longer be individually
selected.
10.If a user or user group is configur ed to belong to no channel groups, then those
September 2007 Aurora Ingest System Guide 55
Page 56

Chapter 2 Installing and Configuring Aurora Ingest
users could see and select all available channels within the dropdown list.
11.From the list of available VTRs, select the VTR router source. Once selected, the
router source is displayed in the Selected VTR box.
12.You can also check the Enable RS-422 Switching box and select the RS-422
destination.
13.To make the changes but keep the Options dialog box open, click
Apply.
14.Proceed to configure video viewer in the Video Viewer tab.
NOTE: If you have the optional Hauppage WinTVGo video capture card or
Blackmagic Design DeckLink video capture card installed in your VTR Ingest
machine, you will need to def ine the destinat ion of the router conne cted (via digi tal to
analog converters, if needed) to your video capture card.
15.Click the Video Viewer tab.
16.Check the 16:9 format video if desired.
17.Select the router destination from the dropdown list. If no router has been
configured, this field will be grayed out. To configure a router, see “Configuring
Routers” on page 32.
18.For the Capture Device dropdown list, select No Capture Device if you want to
view the asset via a separate video monitor.
19.If you have installed a video capture card, select the device in the capture device
dropdown list.
20.Click OK after you are done with the configuration.
The VTR Ingest application is now ready for use. For more information, see “Using
VTR Ingest” on page 101.
56 Aurora Ingest System Guide September 2007
Page 57

Configuring Preview Channels
With the high resolution asset viewer in Aurora Ingest - Scheduler, users can view
assets that had been ingested into the media server. The configuration of playback
channel for this asset viewer is done in the Preview tab within
Aurora Inge st - Server.
Configuring Preview Channels
Tools | Options of
1. To configure the channel, click the
Add button.
2. Enter the name of the channel and select the media server from the dropdown list.
3. Then, select the channel and router source from the dropdown list.
4. Click OK. After the preview channel had been configured, you can select it from
the Player channel dropdown list within Tools | O ptions of Aurora Ingest -
Scheduler.
5. To modify the channel configuration, select the preview channel and click the
Modify button.
6. Edit the channel configuration and click OK.
September 2007 Aurora Ingest System Guide 57
Page 58

Chapter 2 Installing and Configuring Aurora Ingest
7. To remove, select the preview channel and click the Remove button.
8. Click
Yes to confirm the removal of the preview channel.
Configuring RMI
The Aurora Ingest - RMI application is configured in the RMI application.
Once the “System Requirements” have been met, you can use this dialog box to
configure Aurora Ingest - RMI.
1. Enter the IP address or computer name of the Aurora Ingest Server.
2. Specify the removable media device or devices.
3. Specify the import and conversion settings.
4. Select local or shared storage, and browse to the VibrintAVFiles location.
• Prompt for tape ID - this feature lets you give the disk and all of the clips useful
names right up front.
• Use Global Tape ID for P2 - select this if you want to use global tape ID when
ingesting from Panasoni c P2. Wi th th e globa l tape ID, you ca n have a singl e ID to
represent multiple Panasonic P2 cartridges.
• Automatically select clips upon disk discovery - use this feature if it’s better for
your workflow to ingest all clips, then select or de-select individual clips.
5. If you are configuring for HD Infi nity file s or HD XDCAM file s, you a lso ne ed to
58 Aurora Ingest System Guide September 2007
Page 59

User Administration for Aurora Ingest
specify the conversion settings.
• Chroma Format - select the chroma format from the dropdown list.
• Bit Rate - set the appropriate bit rate needed.
6. Click
OK.
User Administration for Aurora Ingest
User administration for Aurora Ingest clients is done within Tools | Us er
Administration
administrator can c reate user accounts, user groups and spec ify permissions accordin g
to user groups or user accounts.
By specifying permissions, an administrator can control who can access Aurora
Ingest applications and wha t ac tions can be performed. By defaul t, users are granted
permissions for all tasks and access to all Aurora Ingest components when you
initially create use r accounts. You can deselect pe rmissions that are not to be assi gned
to the particular user or the particular group.
For a smooth operation, it is best to create user groups with specific permissions to
each group and configure channel grou ps bef ore assigning them to users. Therefore;
once you select group and channel group for the user, pre-configured permissions
would be automatically set up as well.
It is mandatory for users to belong to groups. Groups have permission granted or
denied to access the following tasks and components:
Permission Description
Crash Event Allows a user to record an unscheduled Aurora Ingest - Scheduler event.
Feed Event Allows a user so assigned to record Aurora Ingest - Scheduler event.
in Aurora Ingest - Server. With this administrative feature, a system
Recurring
Event
Open-ended
Event
Logging Allows a user to log a tape, create an EDL and sa ve it. (Does not give the user
VTR Ingest Allows a user so assigned to create Aurora Ingest - VTR batch events.
RMI Allows a user to access Aurora Ingest - RMI to ingest events from playout devi ces
Switch Aspect
Ratio
Make Public
Templates/
Filters
Allows a user so assigned to create a recurring Aurora Ingest - Scheduler record
event.
Allows a user so assigned to record a Aurora Ingest - Scheduler event with no end
time specified.
permission to record.)
such as the Infinity Digital Media Cameras and Digital Media Recorders or from
Panasonic P2 or Sony XDCam removable media devices
Allows a user to switch video aspect ratio of Aurora Ingest - Scheduler record event
and Aurora Ingest - VTR Ingest record event.
Allows a user to create public templates and public filters. Without this permission,
the make public check box for templates and filters will be grayed-out.
September 2007 Aurora Ingest System Guide 59
Page 60

Chapter 2 Installing and Configuring Aurora Ingest
To create a user, select Tools | User Administr ation and the foll owing windo w will be
displayed.
Super Group is the default group that has permissions to all tasks and components.
To create a group, click
Add in the Groups section.
Enter the name of th e group and select channel group from t he dropdown list. Cha nnel
Groups are configured wi t hin Channel Group tab of
Tools | Options in Aurora Ingest
- Server. For more i nformation on how to c reate channel gr oups, refer to “Configuring
Channel Groups” on page 42.
60 Aurora Ingest System Guide September 2007
Page 61

User Administration for Aurora Ingest
Set permissions for the group by checking the Allow box or Deny box for each item.
Click OK after you fini sh configuri ng the group and p roceed to cr eate more group s to
suit your broadcasting needs.
To create a u ser, click
Add in the Users section.
Enter the Username and select a gr oup for the user fro m the dropdown list. If specific
permissions had been set for the group, the use r will automaticall y will be set with t he
same appropriate permissions. If needed, you can still edit permissions to the
particular user in this window.
If channel groups had also been configured for the particular group, they will be
automatically shown under Channel Groups. If not, you can also select channel
groups from the dropd own list. You can select more tha n one channel gr oup if needed.
Click OK after you finish configuring the user setting and proceed to create more
users to suit your broadcasting operation.
September 2007 Aurora Ingest System Guide 61
Page 62

Chapter 2 Installing and Configuring Aurora Ingest
To modify user settings, select the user name and click Modify.
The user name could not be changed, but you can change the group, channel group
and edit permissions for the user in this window.
Click OK to apply the changes.
To delete a user, select the user name and click
Click
Yes to confirm the removal of the user.
Delete.
62 Aurora Ingest System Guide September 2007
Page 63

User Administration for Aurora Ingest
To modify group settings, select the group name and click Modify.
The group name could not be changed, but you could change the channel group and
edit permissions for the group in this window.
Click OK to apply the changes.
To delete a group, select the group name and click
Delete.
Click Yes to confirm the removal of the group.
September 2007 Aurora Ingest System Guide 63
Page 64

Chapter 2 Installing and Configuring Aurora Ingest
64 Aurora Ingest System Guide September 2007
Page 65

Chapter 3
Using Aurora Ingest - Scheduler
With Aurora Ingest - Scheduler, you can r ec ord an event from a VTR, router source,
CompuSat satellite dish control system and ENPS. You can crash record, allowing for
the immediate recording from any router source, or schedule events to record up to
one year in advance, including recurring events. You can also gang roll, allowing
several router sources to start recording simultaneously. In addition, you can view a
recording item or a previo usly recorded item, and tri m the clip if it is already link ed
to an Aurora Playout placeholder.
Before you c an record an event, you need to have the Aurora Ingest system
configured. For more information, see “Configur ati on Overview”.
This chapter describes the Scheduler layout and details how to use Scheduler to
capture and record clips for later use in a newscast. For information on configuring
the Scheduler application, see “Confi gur ing Aurora Ingest - Scheduler (Feed)” on
page 44.
This chapter is divided into the following sections:
• “Tour of the Aurora Ingest - Scheduler Window”
• “Tour of Schedule Viewer”
• “Crash Recording”
• “Scheduling Recordings”
• “Viewing Recordings”
September 2007 Aurora Ingest System Guide 65
Page 66

Chapter 3 Using Aurora Ingest - Scheduler
Available
channels
Schedule
Viewer
Previous
Day
Next
Day
Today
Toggle
Timelock
Zoom
tools
Event
buttons
Hide/Show Asset Viewer
according
to your
channel
setup in
Aurora
Ingest Server
Filter used,
(if any)
Current
time
Scheduled
record
VTR Ingest
reservation
Current time
and
secondary
timeline
Status bar
Hide/Show Video
Viewer
Record date
Tour of the Aurora Ingest - Scheduler Window
The Scheduler user interface allows you to quickly view channels configured via
Aurora Ingest - Server, and schedule or record events for your broadcast operation.
By default, Scheduler window opens to the current day, date and time according to
your system time.
If you hover on a channel name o n the left pane of the applic ation, a toolti p will appear
to show the channel name, server, r ecording por t, remainin g storage and stat us of the
channel.
If you hover on an event on the main Scheduler win dow, a tooltip will appear to show
the title, router source, start time, end time, duration of the event, recording location,
channel group (if applicable), aspect ratio setting of the channel, description of the
event and error (if applicable).
66 Aurora Ingest System Guide September 2007
Page 67

Toolbar
Toolbar
These buttons let you perform common Scheduler functions:
Icon Function
Add a scheduled event.
Modify a selected event.
Delete the selected event.
View the selected event
Hide or show the high resolution Asset Viewer.
Hide or show the Vi de o V i e wer .
Launch the Schedule Viewer window.
Go to previous da y on the main Schedu ler window. The day and date
on the toolbar will show the previous day and date as well.
Go to next day on the main Scheduler window. The day and date on
the toolbar will show the next day and date as well.
Go to today’s date on the main Scheduler window. The day and date
on the toolbar will sh ow the current day and date.
Toggle timelock on the main Scheduler window.
Zoom in to the main Scheduler win dow. The maxim um displa y that
could be zoomed in shows 5 minutes difference on the timeline.
Zoom out of the main Scheduler window. The display could be
zoomed out to show 2 hours difference on the timeline at most.
Clock and Timeline Display
Clock and timeline display are two essential features to schedule recordings.
You also have the option to di splay a secondary cloc k and timeline on your Scheduler
window. If you have mul tiple sites a cross many time zon es, seei ng anothe r time z one
and timeline could make the s cheduling process easier. For more i nformation on how
to setup the second ary clock and timeline, see “Configuring Sched u le r i n t he Aur o r a
Ingest - Scheduler application” on page 45.
September 2007 Aurora Ingest System Guide 67
Page 68

Chapter 3 Using Aurora Ingest - Scheduler
Channel name
Record button
Stop button
Expand button
Dropdown
of router sources
(if configured)
Dropdown to
select aspect ratio
(if applicable)
Arrow buttons to minimize/maximize channel item
Once configured, Scheduler will display both times on the main window..
However, the secondary time is only shown on the clock and timeline display. You
will not see the secondary time within add feed dialogs or tooltips within the
Scheduler.
Channel Window
The channel window shows channels that had been configured within your Aurora
Ingest - Server. For more information on channel configuration, see “Configuring
Channels” on page 40.
Each channel window contains buttons and dropdowns that you need if you want to
record an event immediately or also known as a crash record. For more information
on crash recording, see “Crash Recording” on page 71.
Icon Function
Start recording an event.
Stop recording the event.
Expand channel window to show channel items. The arrow on the
expand button shows downward if the channel window is already
expanded.
Arrow button to minimize channel display by row.
Arrow button to expa nd channel display by row.
The router sources dropdown will show available router sources if you already
configured your router and router sources for feeds. For information on how to
configure your router and router sources, see “Configuring Routers” on page 32.
68 Aurora Ingest System Guide September 2007
Page 69

The aspect ratio dropdown will be available if the Enable Option to Switch Aspect
Ratio is sel ected in System tab within
availability of the dropdown al so depends on user’s permissio n to swit ch aspect r atio
within the logon setup. This is done through the User Administration tool within
Aurora Inge st - Server.
The feature to change aspect ratio is currently supported for K2 version 3.2 when
controlling SD channel s only. The feature wi ll not work with previou s versions of K2,
HD channels, or other media servers, such as Profile and M-Series.
Status Colors
Each event entry appears in a color tha t identifies its status in Scheduler:
Event Background Color Description
Red The entry is recording.
Gold The entry is cued and is next to record.
Green The entry has finished recording.
Blue The entry is ready to r ecord.
Status Colors
Tools|Options of Aurora Ingest - Server. The
Black VTR Ingest has reserved this channel at this time.
Purple The entry failed to record. See the Error Message field for
more information.
Grey The entry time has elapsed, probably due to a conflict with
another recording.
You can change those default colors if you want to. For more information on how to
modify color setting within the Schedule r grid, refer to “Configuri ng Scheduler in the
Aurora Ingest - Scheduler application” on page 45.
September 2007 Aurora Ingest System Guide 69
Page 70

Chapter 3 Using Aurora Ingest - Scheduler
A preview window is provi ded in the color tab within Tools|Options of Aurora In gest
- Scheduler. You could see the change in appearance when different colors are
selected from dropdown li sts of events
Tour of Schedule Viewer
To see the detail s of the events schedul ed for a particular day, you might want to use
Schedule Viewer. Schedule Viewer provides an easy way to select dates for
scheduling and to view scheduled events .
To access Schedule Viewer, click the
Schedule Viewer
. Schedule Viewer opens, and displays all scheduled events for the
Schedule Viewer icon or select View |
selected day.
In Schedule Viewer, you could add, modify, and delete events using appropriate
buttons just as you would from the toolbar on Aurora Ingest - Scheduler main
window.
Event Columns
Each column displays information about the event:
Column Description
Clip title The name of the event placeholder.
Router source The router source selected for this event.
70 Aurora Ingest System Guide September 2007
Page 71

Column Description
Status The current status of the event:
Ready = The event is ready to record.
Cueing = The event is preparing to record.
Recording = The event is currently recording to the serve r.
Done = The event has finished recording.
Failed = The event could not record. Check the Error Message field for more
information.
Elapsed = The time for the event to record has p assed. The status c olor is gray
as the elapsed time is passing, and turns to black when the time has passed.
Start time The beginning and ending time for the event .
End time
Location The name of the folder where the clip resides in the database.
Channel The channel that had been selected for the event
Owner The user who created the clip.
Error Message Any error message describing why the event was not recorded to the server.
Crash Recording
Crash Recording
You can crash record when you want to record an event immediately.
To crash record:
1. Select the channel where you want to record the event. If you do not select a
channel, Scheduler will automatically assign a channel.
2. Select the router source for the recording by selecting from the router source
dropdown list.
3. If the feature to switch aspect ratio is enabled within your Aurora Ingest - Server
and the feature is supported on your media server, select the aspect ratio that you
need from the dropdown list.
4. Click
Record. The clip cues, and after a short time the clip begins recording.
5. Aurora Ingest application will automatically name each clip using the prefix you
set when you configured each channel. Refer to “Configuring Channels” on
page 40.
6. You can rename the clip by right-click on the event and select
press the
F2 key to bring up the Rename window.
Rename Event or
7. While the clip is recording, the record button flashes and the clip is displayed as
September 2007 Aurora Ingest System Guide 71
Page 72

Chapter 3 Using Aurora Ingest - Scheduler
red. A scheduled clip is displayed as blue.
8. When you are done recording, click
Recording stops and the cl ip status cha nges to Done. You can vi ew the event setup
by selecting a c lip a nd cli cking on the View Even t b utton or you can view the
status of all the clips recorded that day by using Schedule Viewer.
Scheduling Recordings
With Scheduler, you can set up events to record automatically at pre-defined times
and dates. You can also schedule recurring events, allowing you to record the same
event every day of the week or once a week.
Stop Record.
This section is divided into the following topics:
“Adding New Events”
72 Aurora Ingest System Guide September 2007
Page 73

“Adding New Events from CompuSat”
“Adding Recurring Events”
“Setting up ENPS Assignment Grid”
“Scheduling events with ENPS”
“Extending Events”
“Deletin g Events”
“Creating a Template”
“Using VTR Ingest Reservation”
“Using filters”
Adding New Events
To record events, you add a scheduled event for each event you want to record. You
provide information about the event and Scheduler adds the event to the record
schedule.
To add a new event:
Adding New Events
1. Select the channel where you want to record the event. If you do not select a
channel, Scheduler automatically assigns a channel.
2. Click
3. Fill out the information for the event you are scheduling:
Add Event.
The Add Event dialog box appe ars:
• Template—Select a template from the dropdown list.
Templates save inf o r mati on such as clip location and recording channel so that
you can save time on repeated ingests. See “Creating a Template” on page 86.
• Clip Title—Enter a name for the scheduled event, if you want to.
September 2007 Aurora Ingest System Guide 73
Page 74

Chapter 3 Using Aurora Ingest - Scheduler
If not, Aurora Ingest automatically names each clip using the prefix you set
when you configured each channel. See “Configuring Channels” on page 40.
• Assignment List Man ager—Clic k
Assignment List Manage r to link this event to
an Aurora Playout rundown. See “Linking Clips to Aurora Playout
Placeholders” on page 113 for details.
• Router Source—Select the source to record from in the dropdown list. If no
router had been configured to your system, None will be displayed in the
dropdown.
• Gang Roll—Click
Gang Roll to select several router sources to start recording
simultaneously as can be seen in the window below:
• Aspect ratio—Select the aspect ratio that you want for the recording of the feed.
This feature is enabled if the optio n is selected in System ta b within
Tools|Options of Aurora Ingest - Server, the user is given permission to switch
aspect ratio and the feed is going to be recorded into K2 version 3.2 when
controlling SD channels only. This aspect ratio setting applies to both primary
and backup event, if the option to record backup is selected.
• Recording Channel— Channel availabilit y f or a us er depends on channel group
and user administration setup within Aurora Ingest - Server. If a user or user
group is not configured to any channel groups, then those users will see all
channels that had been configured on Aurora Ingest - Serv er. When us ing
channel groups, the user can only see channels and channel groups that they
have access to. Initially, users can select individual channels and one or more
channel groups from the dropdown list. However, once a channel group is
selected; channels within that group will be displayed in red and they can no
longer be individually selected. Other channels from other channel groups are
grayed out and can no longer be selected as well. If needed, more than one
channel group could be selected from the dropdown list.
• Clip Location—Select a record location for the ev ent from the dropdown list.
Record locations are configured in the Media Server tab within Tools|Options
of Aurora Ing est - Server.
• Record Backup—Check this box if you want to record a backup of the feed.
After the option is sele cte d, you need to set the backup channel and location of
the clip.
74 Aurora Ingest System Guide September 2007
Page 75

Adding New Events from CompuSat
• Start Record Now—Check this box to star t a re cording a s soon as you cli ck OK.
If you check this box, you need t o provide an ending time for the record. It can
also be used with Open Ended Record.
• Open Ended Record—Check this box if you want a recording to continue until
you manually stop it. You only provi de a start t ime for the recor d as the end t ime
section is grayed out when this option is selected.
• Start Date—Select the date you want the recording to start on using the
dropdown calendar. Mo ve to a dif ferent month us ing the ar rows at the top of the
calendar.
• Start Time—E nter the time you want the recording to start, using th e format
hour:minutes:seconds.
NOTE: When schedul in g two ev ents b ack-t o-back, a s pace of 10 sec onds i s requi red
from the stop of the first record to the start of the second record. In order to
compensate for this, it is recommended that the default record duration reflect a stop
time 10 seconds prior to the rounded duration (e.g., 00:59:50 for a 1 hour record).
• Stop Date—Select th e date you want the recordi ng to end on using the dropdown
calendar.
• Stop Time—Enter the time you want the recording to end, using the format
hour:minutes:seconds.
• Recurring—Check this box i f you want this sche duled event to oc cur more than
once. See “Adding Recurring Events” on page 77 for instructions.
4. Click
Add and the scheduled event is added to Scheduler with a Ready status.
Adding New Events from CompuSat
To record events from a CompuSat-con trolled satellite dish, you have to ensure that
the CompuSat system component is connected to Aurora Ingest Server. See
“Configuring System Settings” on page 29 for configuration instructions.
Make sure that the CompuSa t system i ndicator is green to signify that the component
is connected on the Syst em Components display of Aurora Ingest Server.
September 2007 Aurora Ingest System Guide 75
Page 76

Chapter 3 Using Aurora Ingest - Scheduler
To add a new event:
1. Select the channel where you want to reco rd the event. If channel gro up is selecte d,
channels from other groups will be grayed out and can no longer be individually
selected. Your event will be auto-assigned to channels within the selected channel
group(s).
2. Click
Add Event.
The Add Event dialog box appears. Note that there is an additional CompuSat t ab
in the dialog box.
3. Fill out the information for the event you are scheduling in the General tab. For
details on each item in this tab, refer to “Adding New Events” on page 73.
4. Then, fill out the informa tion needed for CompuSat setting.
• Event Name—Enter a name for the scheduled event. If you had entered Clip
76 Aurora Ingest System Guide September 2007
Page 77

Adding Recurring Events
Title in the General tab, the same name will appear in this box.
• Satellite—S elect the sat ellite that you want to record the event from in the
dropdown list.
• Transponder—Selec t the correspond ing transponder to r ecord the event fr om on
the dropdown list.
• Receiver—Select the corresponding receiver to record the event from on the
dropdown list.
• Audio Frequency—Sele ct the corre spondin g aud io freque ncy that you nee d fo r
this event on the dropdown list.
• Audio Level/Video le vel—Set the corr esponding percen tage of audio and v ideo
levels that you need for this eve nt. If not , you can alway s check the defaul t box
for default settings.
5. Click
Add.
The scheduled event is added to Scheduler with a
Adding Recurring Events
If you want to schedule an event to record on more tha n one occasion, such as every
day of the week, or once a week, you cre ate a recur ring even t. Schedul ing a rec urrin g
event is the same as scheduling a one-time recording except that you enter
information about how the event recurs throughout time.
NOTE: If using CompuSat, you can only schedule weekly recurring events.
To add a recurring event:
1. Follow steps 1-4 from “Adding New Events” on page 73.
2. Check the
Recurring Event checkbox.
Ready status.
September 2007 Aurora Ingest System Guide 77
Page 78

Chapter 3 Using Aurora Ingest - Scheduler
The Add Event dialog box expa nds:
3. Select information about how you want the event to recur:
• For daily occurr ence, select eit her Every Weekday or en ter a number of da ys for
the event to recur.
• For Weekly occurr ence, ch eck the boxes f or the day o r days y ou want t he entr y
to record.
• For Monthly occurrence , sel ect a specific day each month to record , or se le ct a
specific day of the week, such as the second Friday, to record.
78 Aurora Ingest System Guide September 2007
Page 79

Setting up ENPS Assignment Grid
4. Select the range of occurrence, by se lect ing a St art da te, and e ither an End by date
or an End after a certain number of occurrences.
5. Click
Add.
The recurring events are added to Aurora Ingest - Scheduler with a
Setting up ENPS Assignment Grid
ENPS provides a standard layout for assignment gr id of Newsgathering that can be
customized accord ing to your needs. Each line of the grid represents a separate st ory
item. When you click on a line of the Newsgathering, you will see linked grids into
which information about the story can be entered. In order to schedule events via
ENPS, you need to set up specific assignment fields and assignment template.
Setting up assignment fields:
1. On an ENPS client, log in as the administrator and start up ENPS.
2. From the NEWS folder (fourth folder rover), select
Configuration Options
3. Add a new field,
ENPS version 5.00.0077 or higher.)
4. If no setting has been changed or added, go directly to step 5. If yes, res ta rt News
Object Manager (NOM) to ensure that the new field is added.
5. From the NEWS folder (fourth folder rover), select
[Enterprise Name] Fields
and make sure that DEFAULTMOSVERSION is set to 2.6.
FormatSubFieldValues and set i ts va lue to 1. ( Only app licab le for
and add the following parameters:
Ready status.
System Maintenance | Global
System Maintenance |
ID Default
GVFeedS
ource
Caption
Feed
Source
Just Validation List Width Type Word
Left ComboBox List of router
sources. [Available
choices to appear in
a pull-down list,
delimited by pipes]
Eg.
Source1|Source2|So
urce3
1000 Event
Sheet
Wrap
MOS
Send
September 2007 Aurora Ingest System Guide 79
Page 80

Chapter 3 Using Aurora Ingest - Scheduler
ID Default
Caption
GVStart Start
Time
Just Validation List Width Type Word
Left Time
(For ENPS
versions
lower than
5.00.0077)
MOSDateT
ime
(For ENPS
5.00.0077
or higher)
GVEnd End Time Left Time
(For ENPS
versions
lower than
5.00.0077)
MOSDateT
ime
(For ENPS
5.00.0077
or higher)
GVFeed
Notes
Feed
Notes
Left Text 1000 Event
1000 Event
Sheet
1000 Event
Sheet
Sheet
Wrap
MOS
Send
GVFeeds Feeds Left Form Feed Source,C\[See
note*],,GVFeedSou
rce|Start Time,
Time,,GVStart|End
Time,Time,,GVEn
d|FeedNotes,,GVFe
edNotes
(For ENPS versions
lower than
5.00.0077)
1000 Event
Sheet
80 Aurora Ingest System Guide September 2007
Page 81

Setting up ENPS Assignment Grid
ID Default
Caption
GVFeeds Feeds Left Form Feed Source,C\[See
Just Validation List Width Type Word
note*],,GVFeedSou
rce|Start
Time,,,GVStart|End
Time,,,GVEnd|Fee
dNotes,,GVFeedNo
tes
(For ENPS
5.00.0077 or
higher)
Note* Available
choices to appear in
a pull-down list,
delimited by
back-slashes and
should be similar to
the ones in
GVFeedSource
Eg.
Source1\Source2\S
ource3
1000 Event
Sheet
Wrap
MOS
Send
6. Restart ENPS client.
Sample assignment fields for ENPS versions lower than 5.00.0077:
Sample assignment fields for ENPS version 5.00.0077 or higher:
Setting up assignment template
1. Create a new Newsgathering by naming it GV Assignments.
2. Enable
MOS Control Active and MOS Story Send (to Aurora Playout’s MOS ID).
3. Delete all existing column s except Story Slug.
4. Select
Layout | Add Columns and name them with the following:
• Break
September 2007 Aurora Ingest System Guide 81
Page 82

Chapter 3 Using Aurora Ingest - Scheduler
• Feed Source
• Start Time
•End Time
•MOS Status
•Feed Notes
5. Insert two new rows, change the Story Slugs to AM Assignments and PM
Assignments and select Break for both.
6. Delete th e Break column.
7. Select
Layout | Save as template and click Yes to save the template.
Scheduling events with ENPS
When scheduling events with ENPS, keep the following in mind:
• If there aren't any channel s availa ble in the schedu ler, ENPS doesn 't have an y way
of alerting the user.
• Channel availabil ity depends on c hannel group and use r logon setup wi thin Aurora
Ingest - Server.
• Make sure there is at least 10 seconds of space between feeds.
• Scheduling recurring feeds is not available via ENPS.
Prior to creating a newsga theri ng on ENPS, take no te of the MOS ID in your XMOS
Server and ensure that the NCS ID is configured to ENPS.
1. From the NEWS folder (fourth folder rover), select
82 Aurora Ingest System Guide September 2007
New | Newsgathering and this
Page 83

window will be displayed on screen.
Scheduling events with ENPS
2. Select
GV Assignments template and the program name will also be GV
Assignments by default . You can c hange t he progr am name to suit your br oadcast
operation.
3. Enable
MOS Control Active field by clicking on it and a check sign will be
displayed.
4. Click on
5. Click
MOS Story Send and select your MOS ID from the list.
Go and the below window will be displayed.
6. To create a story or newsgathering item, right-click on AM Assignments or PM
Assignments and select
Insert row or press CTRL-I for the hotkey.
7. Enter the name of the story and click on each column on the selected line of the
assignment grid to fill out other information of the event you are scheduling:
• Feed Source—Select the feed source from the dropdown list. If a router is
configured withi n Aurora Ingest - Server, ro uter sources a re available wi thin the
dropdown.
• Location—Select the record loc ation of the e vent. Record loca tions listed on the
dropdown are according to record location setup within Aurora Ingest - Server.
• Channel—Enter the name of the channel for the recording. Available channels
depend on channel group and user logon setup wi thin Aurora Ingest - Ser ver. A
channel will be auto-assigned, if no ch annel is entered for this setting.
• Start Time—Enter the start time of the event. The tim e format is HH:MM.
• End Time—Enter the end time of the event. The time format is HH:MM.
• Feed Notes—Enter the d escription or any extra info rmation of the event.
8. Create more stories if you want to schedule more events via ENPS. Details of the
September 2007 Aurora Ingest System Guide 83
Page 84

Chapter 3 Using Aurora Ingest - Scheduler
scheduling can easily be changed and viewed on the assignment grid.
NOTE: Do not cr eate sto ry or newsga thering ite m below the b lack lin e as the XMOS
Server will not be able to update the MOS Status of that story.
9. Double-click on Script icon if you want to write scripts for the story.
10.You can also click within the script window to edit details of the scheduling.
11.The following window will be displayed and select
GVFeeds page to change any
details of the event.
12.Open your Scheduler main window to see events scheduled via ENPS. Those
events are distinguished from other events by green borders.
13.You can also change the border color of ENPS events in color tab within
Tools|Options of the Scheduler.
14. Status colors of ENPS events are the same with other event setup on the Scheduler.
84 Aurora Ingest System Guide September 2007
Page 85

Modifying Events
As can be seen below, the ENPS event displays in yellow as the event is cueing.
15.MOS Status change is updated on the as signment g rid of ENPS as displaye d in the
following window.
16.However, you cannot delete an ENPS event via Schedu ler. The fo llowin g window
will be displayed if you try to delete an ENPS event.
17.An ENPS event on the Scheduler can only be deleted from the assignment grid of
ENPS.
Modifying Events
If you need to modify a scheduled event for any reason:
1. Select the entry you want to modify and click
The Modify Event window opens.
2. If the event is part of a ser ies, you see a messa ge aski ng if yo u want t o modify t his
occurrence or the entire series. Select which you want to modify and click
3. Make your changes in the Modify Event window.
4. Click
The event updates in Sche duler.
OK.
Extending Events
You can also modify the st art and end time of an event on the Scheduler window,
without opening the Modify Event window. After an event has been scheduled or
while recording, you can drag and drop the start or end time.
1. Select the event that you want to extend within the Scheduler. Once selected, an
Modify Event.
OK.
September 2007 Aurora Ingest System Guide 85
Page 86

Chapter 3 Using Aurora Ingest - Scheduler
extend icon will appear if you hover over the start or end time of the event.
2. Click and drag to extend or retr act the start or end time accord ing to your broadcas t
needs.
3. A time tooltip and a shadow will be displayed to indicate the time change. You can
also extend your feed while recording, as shown below:
4. Release your mouse after th e n ew t ime f or the event has been selected. A wind ow
will be displayed for you to confirm the time change.
5. Click
Yes to confirm the time change of your event.
Deleting Events
If you need to delete an event:
1. Select the event you want to modify and click
2. Select
Yes in answer to the message asking if you want to delete the selected event
or events.
The event is removed from Scheduler.
Creating a Template
A template saves time by storing information that will be used for multiple events. A
template is created from an event. Without details from prior event, you can also
create a template wit hin Schedule Manager wi ndow of the Scheduler. I n addition, you
can create a template that enable gang rolls, that is, a template that lets you trigger
multiple channel records from disparate sources simultaneou sly.
1. Select the event you want to us e as a template . For more informatio n on how to add
an event, see “Adding New Events” on page 73.
Delete.
86 Aurora Ingest System Guide September 2007
Page 87

Creating a Template
2. Select Event | Save as Template.
3. Fill in the information that you want included in the template.
• Template Name—Enter the name of the event template.
• Make Public—This option is available if your logon configuration had been
setup to allow you making publi c templates and fi lters. The permis sion to allow
this option for a user is within User Administration setup of Aurora Ingest Server. Check the box if you want to set the template as a public template.
• Clip Title—Enter a different clip title if needed. By d efault, the clip title of the
selected event is automatically entered in this fiel d.
• Router Source—Selec t a different router source to r ecord from in the dropdown
list if needed. By defa ult, the router source of the selec ted event is automat ically
entered in this field.
• Gang Roll—Click
Gang Roll button to select several router sources to start
recording simultaneously as can be seen in the window below:
• Aspect ratio—Select the aspect ratio that you want for the recording of the feed.
This feature is enabled if the option is selected in System tab within
Options
of Aurora Ingest - Server , the use r is gi ven per mission to swit ch aspec t
Tools |
ratio and the feed is going to be recorded into K2 version 3.2 controlling SD
channels only.
• Recording Channel—Select a different channel than the one automatically
entered from the selected event if you want. Channel availability depends on
channel group and user logon setup within the Aurora Ingest - Server.
• Clip Location—Select a different record location than the one automatically
entered from the selected event if you want. Availability of record locations
depend on your setup within the Aurora Ingest - Server.
September 2007 Aurora Ingest System Guide 87
Page 88

Chapter 3 Using Aurora Ingest - Scheduler
• Record Backup—Check the box if you want to record backup of an even t as part
of the event template . Select the reco rding channel and rec ording location of the
backup from the dropdown lists.
4. Click
OK to save the template .
NOTE: You cannot create a template from a VTR Ingest Reservati on, only from a feed
event in the Scheduler.
5. The template will be available for you, or other users within your broadcast
operation if you set it as a public template. You can select it within the Template
dropdown list in the Add Event or Modify Event window.
6. You can also add a new template, modify or remove existing template wi thin
| Schedule Manager
of the Scheduler.
View
Using VTR Ingest Reservation
Using VTR Ingest Res erv at ion allows you to reserve a channel for a re cor d event by
VTR Ingest. This ensur es that the channel a nd t he specified record time are reserv ed
for VTR Ingest and cannot be used to schedule events.
To schedule a VTR Ingest Rese rvation, follow these steps:
1. Select
88 Aurora Ingest System Guide September 2007
Event | Add VTR Ingest Reservatio n. The Add VTR Ingest Res ervation dialog
box displays.
Page 89

Using filters
2. Specify the name of the reservation and the time/date info. If desired, add a
description of the clip.
You can make the reserva tion a recurring event. I f you do not specify a cha nnel, Ingest
with automatically assign one based on availability.
NOTE: Do not use t he Stop but ton in Sche duler to stop a VTR Ingest re cordin g. Stop
the recording through the VTR Ingest application instead.
Using filters
If you have a large number of feeds, it can sometimes be tedious trying to locate the
particular type of event, or channel, and so on, that you want to view. You can use
filters to view the chan nels that you are partic ularly interested in.
To set up a filter, follow these steps:
1. In Scheduler, select the Filter tab within
the below window
View | Schedule Manager , as c an be seen in
September 2007 Aurora Ingest System Guide 89
Page 90

Chapter 3 Using Aurora Ingest - Scheduler
2. Click Add to add a new filter. The Add Filter dialog box displays.
3. Name the filter and select the criteria you want to use to filter.
• Make Public—This option is available if your logon configuration had been
setup to allow you making pu blic templates and filters. The permission to allow
this option for a user is within User Administration setup of Aurora Ingest Server. Check the box if you want to set the filter as a public filter.
• Event Type—Select t he event t ype from the dropdown li st. You can select all or
select a particular event type such as ENPS, Feed, VTR or VTR Ingest
Reservation.
• Source Type—Select the source type that you need to filter. You can select all
or select a particular source such as CompuSat or a router.
• Router Source—Select the particular source if it’s applicable for your filter or
select all if needed.
• Channel—Select the channe l that you will be rec ording the fee ds i nto. You c an
select all or select the specific channel that you need to filter.
• Owner—Select all or a particular user of Aurora Ingest that had recorded the
feeds. Names that appear on the dropdown list are according to user
administration setup in Aurora Ingest - Server. For more inform ation on user
administration setup, see “User Administration for Aurora Ingest” on page 59.
4. Click
Add to add the filter to Sche dule Mana ger. The fi lter is add ed as ca n be se en
90 Aurora Ingest System Guide September 2007
Page 91

Viewing Recordings
Select a filter from the dropdown list
in the window below:
Once a filter has been added, you can select it from the dropdown list on the
Scheduler toolbar and only filtered events can be seen on the main Scheduler
window.
Viewing Recordings
Using Vide o Viewer
September 2007 Aurora Ingest System Guide 91
With Aurora Ingest - Schedu ler, you c an view s cheduled r ecording s via two diff erent
viewers known as Video Viewer and Asset Viewer. Wi th the Ass et Vie wer , you can
also trim the top and tail of a clip if it is already linked to an Aurora Playout
placeholder. Both viewer buttons are easily accessible on the toolbar of Scheduler.
The Video Viewer or also known as Live Feed Viewer can be used to monitor the
recording of an event. You need to enable the feature in the video viewer tab within
Tools | Options of the Scheduler. For mor e information on how to co nfigure the vi deo
viewer, refer to “Conf iguring Scheduler in the Aurora Ingest - Sched uler applicati on”
on page 45.
If you have a router configured in your system, you can setup the router source for
your video viewer in the video viewer tab within
Tools | Options of the Scheduler.
Page 92

Chapter 3 Using Aurora Ingest - Scheduler
You do not need to have a video ca pture card instal led in order to use this feature. You
can set the
router source to an external monitor to preview the feed.
To launch Video Viewer:
1. Select an event on the Scheduler and click the Video Viewer icon or select View |
Live Feed Viewer
2. The Live Feed Viewer window opens and disp lays the clip f rom the select ed event.
Video Display Device dropdown to No Capture Device and configure your
.
3. You can click on the Video Viewer icon again to hide the Live Feed Viewer
window.
4. If you click the Asset Viewer button while the Live Feed Viewer window is on
display, the Live Feed Viewer will close its window and the View Asset window
will launch; and vice versa.
Using Asset Viewer
With the Asset Viewer, you can view a previously recorded item or a currently
recording item, and trim the top and tail of the clip if it is already linked to an Aurora
Playout placeholder. This feature is currently supported for playbacks on K2 media
clients only.
A video capture card is not mandatory because the Asset Viewer window will still
launch and you can trim the clip by previ ewing it using an external monitor. The Asset
Viewer uses the same video capture device and router destination as the Video
Viewer. For more information on configuring the high resolution asset viewer, refer
to “Configuring Scheduler in the Aurora Ingest - Scheduler application” on page 45.
92 Aurora Ingest System Guide September 2007
Page 93

Using Asset Viewer
Playback of clips on Ass et Viewe r re qui re s the configuration of preview channels in
the preview tab within
If you have a router con figured in your s ystem, you need to set up the router sou rce for
the playback channel. Aurora Ingest - Server will switch the router source of the
playback channel to the router destination of video capture card or video monitor
defined in the video viewer tab within
Tools|Options of Aurora Ingest - Server.
Tools|Options of the Scheduler.
Once configured, preview channels will be available for individual clients of
Scheduler. Although multiple clients can be configured to use the same preview
channel, it is advisable to configure multiple preview channels and assign different
channels to differ ent clients. To configure a pa rticular playback ch annel, select it from
the Player Channel dropdown l ist in the vid eo viewe r tab within
Tools|Options of the
Scheduler.
To launch Asset Viewer:
1. Select an event on the Scheduler.
2. Click the Asset Viewer icon or select
View | Asset Viewer. Yo u c an al so ri ght-c lick
September 2007 Aurora Ingest System Guide 93
Page 94

Chapter 3 Using Aurora Ingest - Scheduler
on the selected event and select View Asset.
3. The clip loads to the playback channel and the View Asset window launches the
clip.
4. You can use control buttons on the Vi ew Asset window to view the clip. However,
only clips that are linked to Aurora Playout placeholders can be trimmed. The
control buttons are described below:
Button Function
Jogs one frame back.
Jogs 10 frames back.
Jogs one frame forward.
Jogs 10 frames forward.
Rewinds the clip.
Fast forwards the clip.
94 Aurora Ingest System Guide September 2007
Page 95

Button Function
Trimming the clip
You can trim the top and tail of a clip if it is already linked to an Aurora Playout
placeholder. For information on how to link an event to Aurora Pl ayout placeholder,
refer to Chapter 7, Linking Clips to Aurora Playout Placeholders on page 113.
Using Asset Viewer
Ejects the clip.
Plays the clip.
Stops the clip.
Sets mark in point on the clip.
Sets mark out point on the clip.
Moves to the mark in point.
Moves to mark out point.
Clears the mark in point.
Clears the mark out point.
Activates the trim to placeholder.
To trim the clip in View Asset window:
1. Select an event on the Scheduler and click the Asset Viewer icon to lau nch the clip
on the View Asset window.
September 2007 Aurora Ingest System Guide 95
Page 96

Chapter 3 Using Aurora Ingest - Scheduler
2. Drag the slider to get to a point on the clip.
3. Click the Mark In button to set the mark in point on the clip.You can see that the
color of the trim button changes to yellow to indicate that trimming is in progress.
4. Drag the slider to get to an other point and click the Mar k Out button to s et the mark
out point on the clip.You can use othe r control but tons on the View Asse t window
to clear mark in/out points or to get to mark in/out points.
5. After you are satisfied with yo ur mark in and mark out point s, click the Trim button
to trim the cl ip.
6. The trim button reverts back to green color to indicate that the trimming is done.
7. You could now select the trimmed clip and placeholder via Housekeeper or Clip
Browser within Aurora Playout, and drag it into your playlist for playback.
96 Aurora Ingest System Guide September 2007
Page 97

Chapter 4
Using VTR Controller
VTR Controller allows you to control up to eight VTRs for VTR Ingest application.
Furthermore, VTR Control ler all ows you to add, modif y, or edi t VTRs and configure
them to work with other Aurora Ingest applications. This chapter shows you how to
use VTR Controller once it has been ins talled and configured. For infor mation on how
to install and configure the application, see “Installing Aurora Ingest” on page 18.
You can have VTR Controller and VTR Ingest on the same machines or on two
connected via Ethernet. If you modify a VTR in VTR Controller, verify the change
doesn’t conflict with the VTR settings in the VTR Ingest application.
• “Tour of the VTR Controller Window”
• “Accessing VTR Controller”
September 2007 Aurora Ingest System Guide 97
Page 98

Chapter 4 Using VTR Controller
Connected
VTRs
Disconnected
VTR
Status bar
Tour of the VTR Controller Window
The VTR Controller window shows the status of one to eight VTRs. The status of
each VTR is indicated by the colors: a green indicator shows that the VTR is
connected, while a red indi cator shows that th e VTR is no t connec ted. The s tatus bar
at the bottom of the window show the status of the VTR Controller application.
To see the properties of a VTR, click on the red or green icon next to the VTR. The
Properties window displays.
98 Aurora Ingest System Guide September 2007
Page 99

Accessing VTR Controller
VTR Controller icon
To start the VTR Controller application, click on the VTR Controller icon on the
desktop or from the Start button follow this path:
Controller
in the right-hand corner of t he Windows taskb ar. Double- click on t he icon to br ing up
the main VTR Contoller window.
NOTE: If you click the X in the upp er-ri ght corne r of the VTR Contr oller window or
select
Controller icon appears in the Windows taskbar.
To exit the VTR Controller application, right click on the icon and select Exit.
. When VTR Controller is first start ed, it automatical ly minimizes to an icon
File | Exit, the application does not exit. Instead, it is minimized, and the VTR
Accessing VTR Controller
Start | Program | Aurora 6.3 | VTR
September 2007 Aurora Ingest System Guide 99
Page 100

Chapter 4 Using VTR Controller
100 Aurora Ingest System Guide September 2007
 Loading...